System User Guide - SHL Central | Home
49
SHL Central User Guide, version 6.0 (March 2012) 1 System User Guide Contents New SHL Central Account Registration Process 2 Forgotten Password Process 8 Incorrect Password Entry 12 Changing SHL Central Account Details 16 Application Access Request 18 Basket and Order History 21 The Library 23 Applications on SHL Central 26 SHL JobMatch 34 SHL Bureau 41 SHL Central | User Guide March 2012
Transcript of System User Guide - SHL Central | Home
SHL Central User Guide, version 6.0 (March 2012) 1
System User Guide
Contents
New SHL Central Account Registration Process 2
Forgotten Password Process 8
Incorrect Password Entry 12
Changing SHL Central Account Details 16
Application Access Request 18
Basket and Order History 21
The Library 23
Applications on SHL Central 26
SHL JobMatch 34
SHL Bureau 41
SHL Central | User Guide
March 2012

SHL Central User Guide, version 6.0 (March 2012) 2
New SHL Central Account Registration Process
Anyone visiting SHL Central will arrive on a pre signed-in home page:
If you click on the SIGN IN or REGISTER, you are taken to the Sign In page:
At this point, an existing registered user will sign in on the left hand side. If you select ‘Remember me’, Central will pre-populate your email address into the ‘Email’ field each time you sign in.

SHL Central User Guide, version 6.0 (March 2012) 3
If you click on the ‘Register now’ button on the right hand side, or if you click on ‘register’ on the home page, you are taken straight to the account registration request page:
The Registration page contains clearly marked mandatory fields (there are also non-mandatory fields), and also useful help sections that appear when you hover over a blue ‘i’ icon. These help sections remain on screen until you click elsewhere on the page (example help section for ‘Password’ below):
We recommend that if you already have an account number, you should enter this into the appropriate field as it will accelerate the process of granting you access to certain content (for example, you must be associated with a valid SHL account number to have access to and place an ‘SHL Bureau’ order).

SHL Central User Guide, version 6.0 (March 2012) 4
There is an ‘i’ icon and help section for the account field:
Please note, if the system recognises the D number, it will auto populate the account name into the ‘Company’ field – however, this field can still be overwritten if necessary.
Below is an example of the message that appears when the system has not recognised the entered account number:
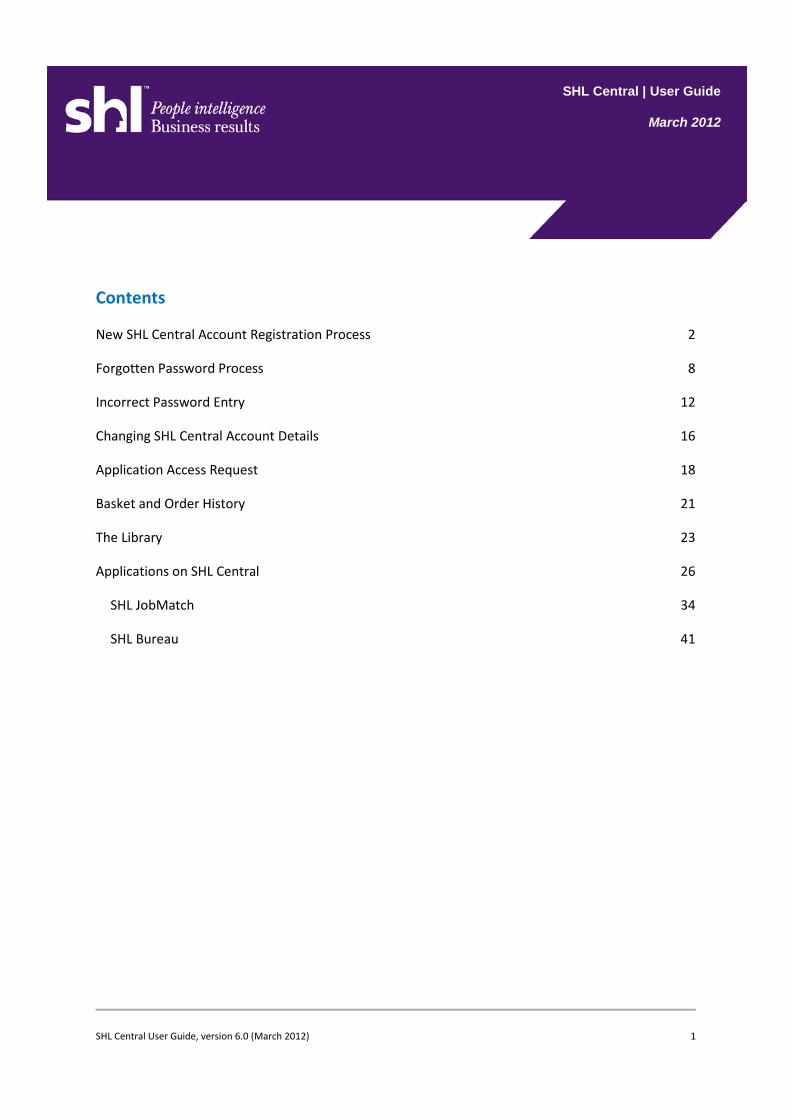
You also have the option to sign up to your local SHL newsletter and to opt out of receiving any promotional emails from SHL.
At the bottom, there is a ‘capcha’ field (the ‘PCY8Y’ section below) that checks that the registration is being completed by a person not a computer - this field can be changed if you are struggling to read what is displayed in the field, and there is also a sound option that reads out the characters displayed:
SHL Central User Guide, version 6.0 (March 2012) 5
You can view your registered details at any time by accessing ‘my account’, which appears as a post sign-in link in the top right of the Central screen. You should then click the ‘Register’ button to submit the form:
If there are any errors, such as inconsistent field entries, or uncompleted mandatory fields, the page will return to the top and clearly mark the fields where there appears to be an error (these error messages will also appear at the point when you are entering the fields initially, if you create an inconsistency – with email address for example):

SHL Central User Guide, version 6.0 (March 2012) 6
If you have entered a number in the ‘Account’ field that is not recognised, and you click ‘Register’, the following error message will be displayed at the top of the page – you will not be able to submit the registration while an unrecognised account number is left in the ‘Account’ field.
If the registration form has been completed successfully, the following message is displayed:
You then receive a confirmation email with a link, which you must click to verify your email address before your account can be fully validated:

SHL Central User Guide, version 6.0 (March 2012) 7
The link takes you to the Sign In page, which confirms your email address has been verified – it also pre-populates your email address. You just then have to enter your password and you will then enter the site. You are then taken to the Central home page and an email is sent to you confirming your registration is complete:
Central recognises you on the home page, and a ‘My Account’ option is now displayed on the main navigation bar, which if clicked takes you into your profile, where you can makes changes to your registered details, and also to your order history.
In your profile, if you want to change your email address, there is an approval process that must be followed before the new email address is stored against your profile (see ‘Changing SHL Central Account Details’ section for this process):
SHL Central User Guide, version 6.0 (March 2012) 8
Forgotten Password Process
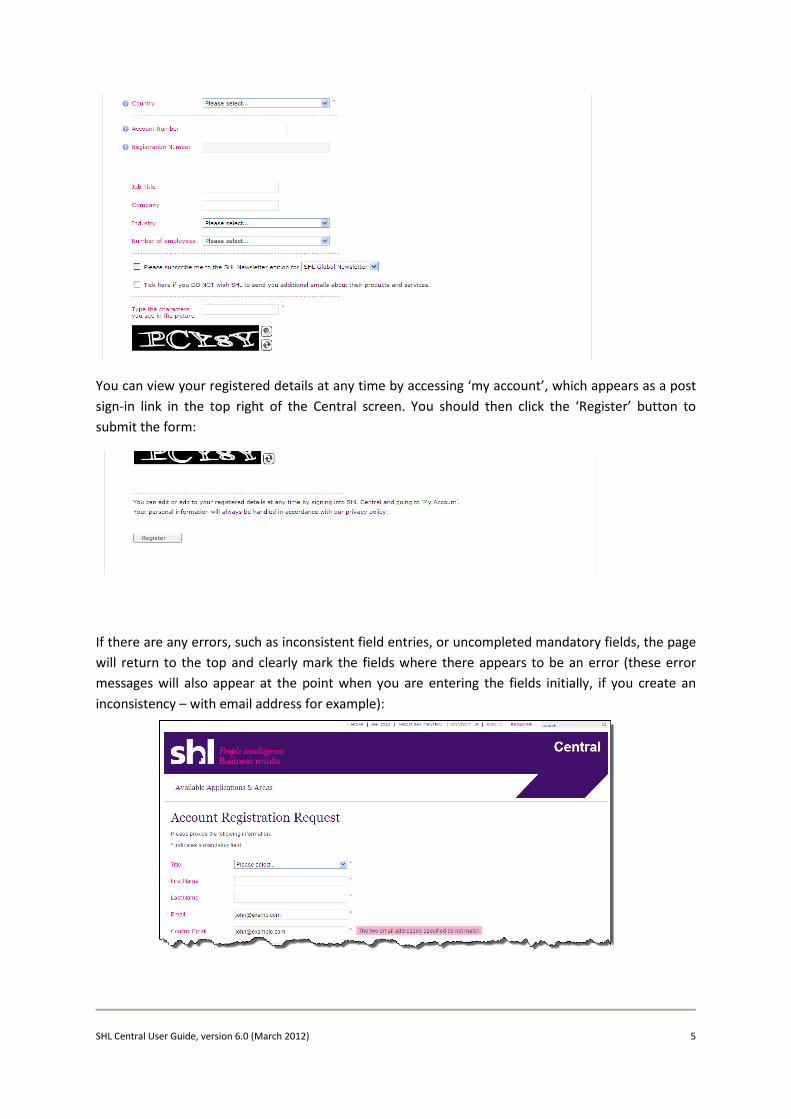
On the Sign In page, there is a ‘forgotten password?’ option for existing users:
If you click on the ‘Forgotten password?’ link, either before or after entering your email address, you will see the following:
Once you have entered your email address and clicked the ‘New password request’ button, you see the following message:
SHL Central User Guide, version 6.0 (March 2012) 9
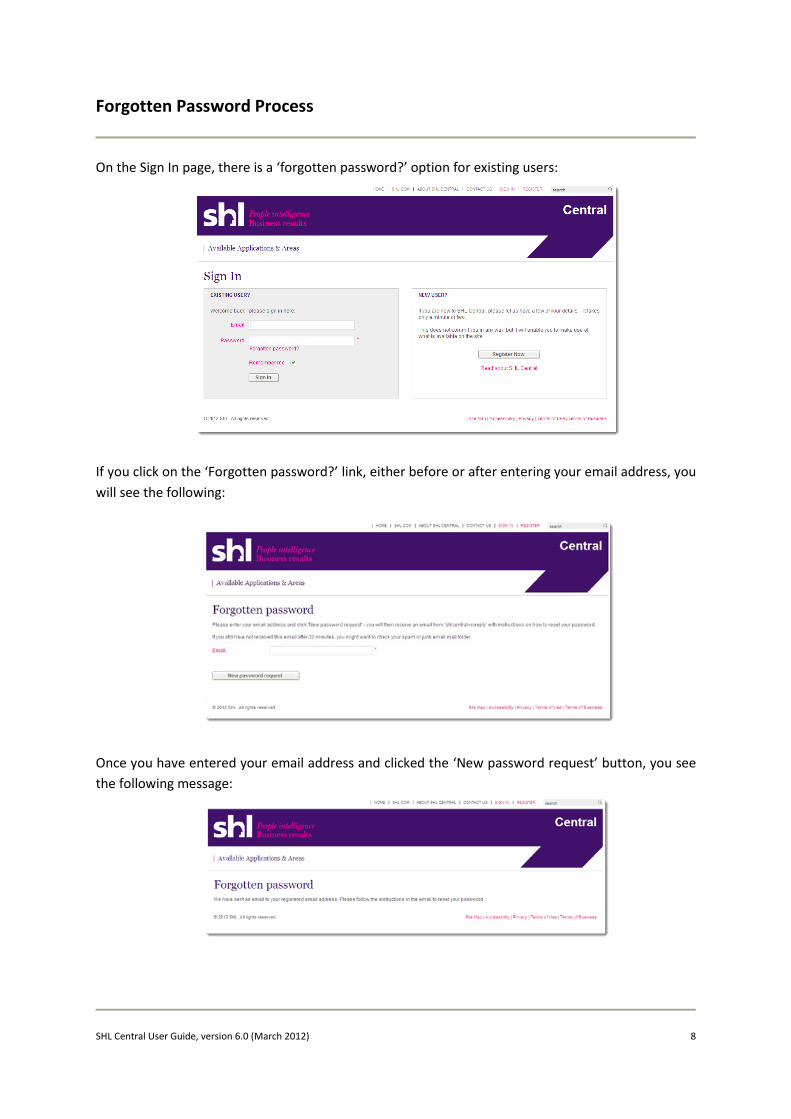
The email you receive is as follows:
When you click on the link, you are taken to the following screen:
If you answer the question incorrectly, you see the following message and can try again (you have four attempts in total:

SHL Central User Guide, version 6.0 (March 2012) 10
If you fail to answer the question correctly on four occasions, you will see the following message:
If you then try to sign in using your email address and previous password (that you may have now remembered), you will be completely locked out and see the following message:
If the security question is answered correctly, you are taken to a screen on which you can enter and confirm a new password – the ‘i’ icon clearly states the password strength required (one upper case, one numeric and one character):
SHL Central User Guide, version 6.0 (March 2012) 11
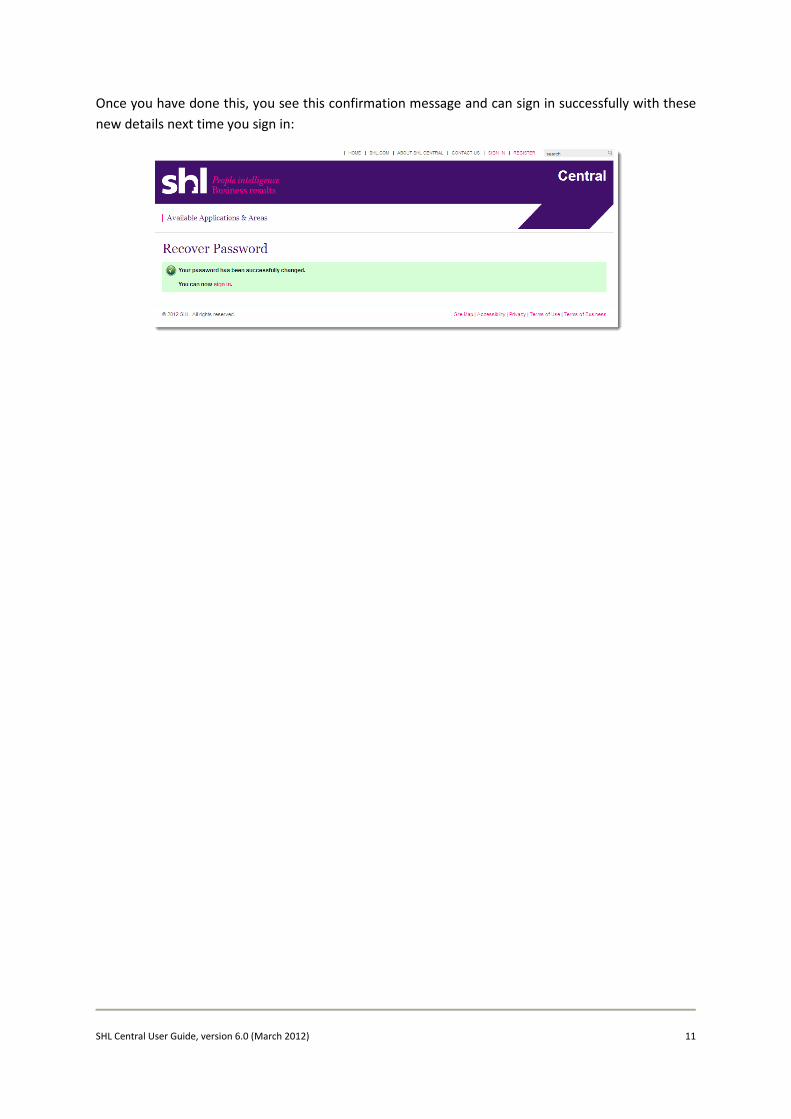
Once you have done this, you see this confirmation message and can sign in successfully with these new details next time you sign in:

SHL Central User Guide, version 6.0 (March 2012) 12
Incorrect Password Entry
You have three chances to enter your password on the Sign In page. After each of the first two incorrect attempts, the following message is shown:
After the 3rd unsuccessful attempt, you are semi-locked out of Central and you receive the following screen message:

SHL Central User Guide, version 6.0 (March 2012) 13
At this point, you can still click on the ‘Forgotten password’ link and you will see the following screen:
If you enter your email address here and click ‘New password request’, you will receive an email with a link with which you can go through and reset your password – the email clearly states that the link expires after 24 hours:
It is important to note that in this scenario, only the link in the latest email received relating to resetting your password will be valid – if you try to click on a link in a previous ‘reset password’ triggered email, you will see an error message on screen.

SHL Central User Guide, version 6.0 (March 2012) 14
The email a semi-locked out user receives is as follows:
The link takes you to this page which asks you the security question that is saved in your Central profile (set up by you):
If answered successfully, you can then enter a new password:

SHL Central User Guide, version 6.0 (March 2012) 15
This is then confirmed to you:
SHL Central User Guide, version 6.0 (March 2012) 16
Changing SHL Central Account Details
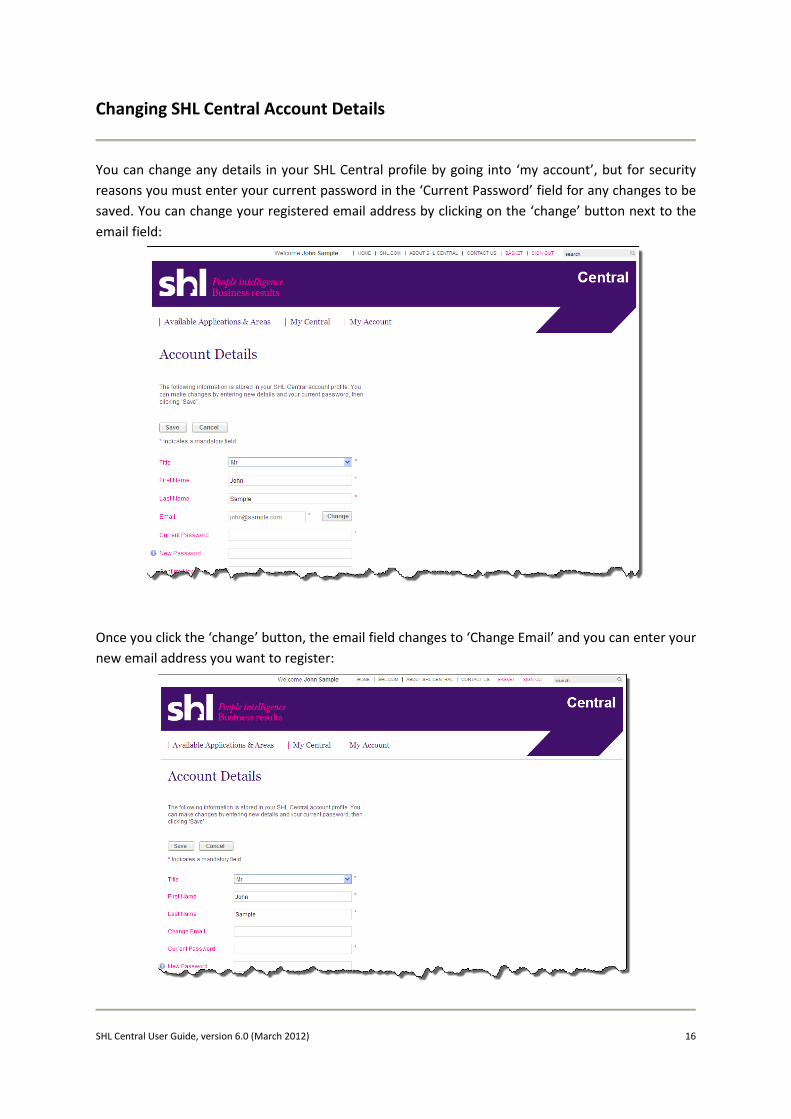
You can change any details in your SHL Central profile by going into ‘my account’, but for security reasons you must enter your current password in the ‘Current Password’ field for any changes to be saved. You can change your registered email address by clicking on the ‘change’ button next to the email field:
Once you click the ‘change’ button, the email field changes to ‘Change Email’ and you can enter your new email address you want to register:

SHL Central User Guide, version 6.0 (March 2012) 17
Once you have entered the new address, you need to click ‘Save changes’ at the bottom of your Account Details page, after which you will see this message:
An email is automatically sent to SHL customer support, to action the request. If approved, you then receive email confirmation of this change in your old email address inbox, and you must click on the link to verify this new email address:
The link takes you to the Sign In page that confirms the email address has been verified – you can then enter your password and sign in as normal.

SHL Central User Guide, version 6.0 (March 2012) 18
Application Access Request
Many applications will be made available to all users registered in Central – ie. open access.
However, there are some applications, for example ‘SHL Bureau’, which require you to have a valid account number (D number) in your profile to be able to have access to the application.
Using the ‘SHL Bureau’ application as an example...
If you are a brand new user, not registered yet on Central, and you click any link requesting access to ‘SHL Bureau’, you will be taken straight to the Sign In page (as the system does not know if you are an existing user or not). You would then click the ‘Register Now’ button:
You are then taken to the registration page, and at the bottom of the page, an area has been preset, confirming you are requesting access to ‘SHL Bureau’ as well as registering for the first time:

SHL Central User Guide, version 6.0 (March 2012) 19
Once you have registered successfully and clicked ‘Register’ at the bottom of the registration page, you will see the following message – note the additional paragraph referring to your request for access to SHL Bureau:
You then receive a confirmation email with a link which you must click to verify your email address before your account can be fully validated:
The link takes you to the Sign In page, which confirms your email address has been verified – it also pre-populates your email address. You just then have to enter your password and you will then enter the site.
You are then taken to the Central home page and an email is sent to you confirming your registration is complete:

SHL Central User Guide, version 6.0 (March 2012) 20
Central recognises you on the home page, and a ‘My Account’ option is now displayed on the main navigation bar, which if clicked, takes you into your profile, where you can make changes to your registered details, and to your order history.
In your profile, if you want to change your email address, there is an approval process that must be followed before the new email address is stored against your profile (see ‘Changing SHL Central Account Details’ section for this process):
Once you have verified your email address, an email is automatically sent to SHL Client Support with the request to grant you access to SHL Bureau. To have access to SHL Bureau, you must have a valid SHL account number (’D’ number). This is what SHL Client Support will check – if they cannot identify an existing account number for you, they will contact you.

SHL Central User Guide, version 6.0 (March 2012) 21
Basket and Order History
A ‘BASKET’ option will appear in the top right of your Central screen when you are signed in, and an ‘Order History’ option appears under ‘My Account’:
Basket
This area contains a list of any orders that are un-submitted. For example, if you were interrupted while in the process of placing an order, and did not complete the order, the un-submitted order will be retained in your basket for 30 days from the last save point, and will then be deleted.
The uncompleted order will be saved up to the last save point – ie. the last ‘next’ or equivalent click at the bottom of an order process page.
In the example below, there is an un-submitted order, and you could click on the ‘Continue Order’ link to open the order up at the last save point and continue:
SHL Central User Guide, version 6.0 (March 2012) 22
Order History
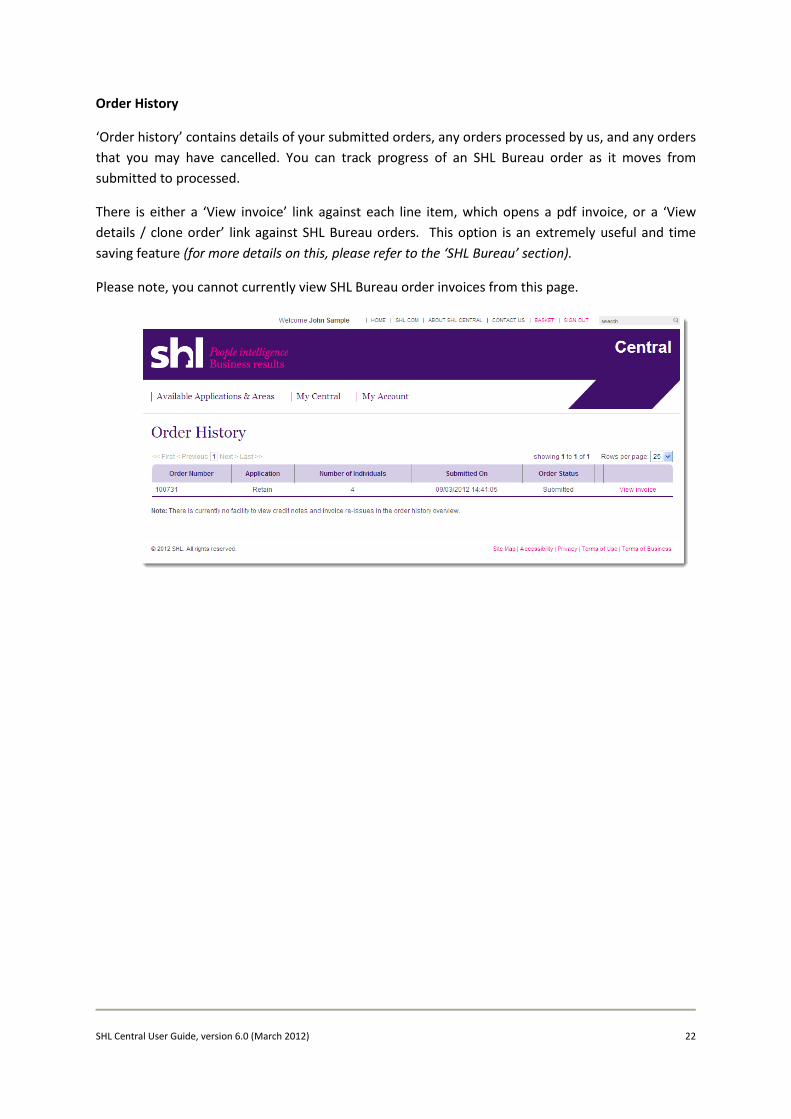
‘Order history’ contains details of your submitted orders, any orders processed by us, and any orders that you may have cancelled. You can track progress of an SHL Bureau order as it moves from submitted to processed.
There is either a ‘View invoice’ link against each line item, which opens a pdf invoice, or a ‘View details / clone order’ link against SHL Bureau orders. This option is an extremely useful and time saving feature (for more details on this, please refer to the ‘SHL Bureau’ section).
Please note, you cannot currently view SHL Bureau order invoices from this page.

SHL Central User Guide, version 6.0 (March 2012) 23
The Library
The Library is an area where you can browse and download brochures, flyers and samples relating to SHL products. You can also access information such as white papers, best practice guides, case studies, user manuals and product comparison group information. ‘The Library’ appears as an option in the main navigation bar, whether or not you are signed into the site. Clicking on this takes you to the Library home page:
If you know the product for which you are looking for supporting material, or the document name you are looking for, you can use the ‘search’ option or click on one of the six category folders to open and search a section in more detail. The Library categories Four of The Library categories are open for anyone to access at any time, whether signed into SHL Central or not.

SHL Central User Guide, version 6.0 (March 2012) 24
Manuals & User Guides and Comparison Groups are only accessible if you are signed-in, and if we have given you access to these additional areas. The instructions below the category folders explain this, and how you can request access to these additional areas. It is very straightforward, and in most instances, access will be confirmed by email from the SHL Client Support team well within 24 hours.
Clicking on any of the category folders on this Library home page takes you to the specific page focused on that category (eg. ‘Brochures and Flyers’ - see below), where you can use the table tab options and tick boxes to search for a specific document.
The ‘Your Selection’ results area indicates how many items there are available in total in that category (in this example ‘5’), and this area updates as you tick item(s) in the table, and under any of the tabs available in that category (in this case ‘Product’ and ‘Language’). Clicking ‘Reset search’ clears your selection results within that category, and clicking ‘The Library Home’ on the main navigation bar takes you back to The Library front page.
SHL Central User Guide, version 6.0 (March 2012) 25
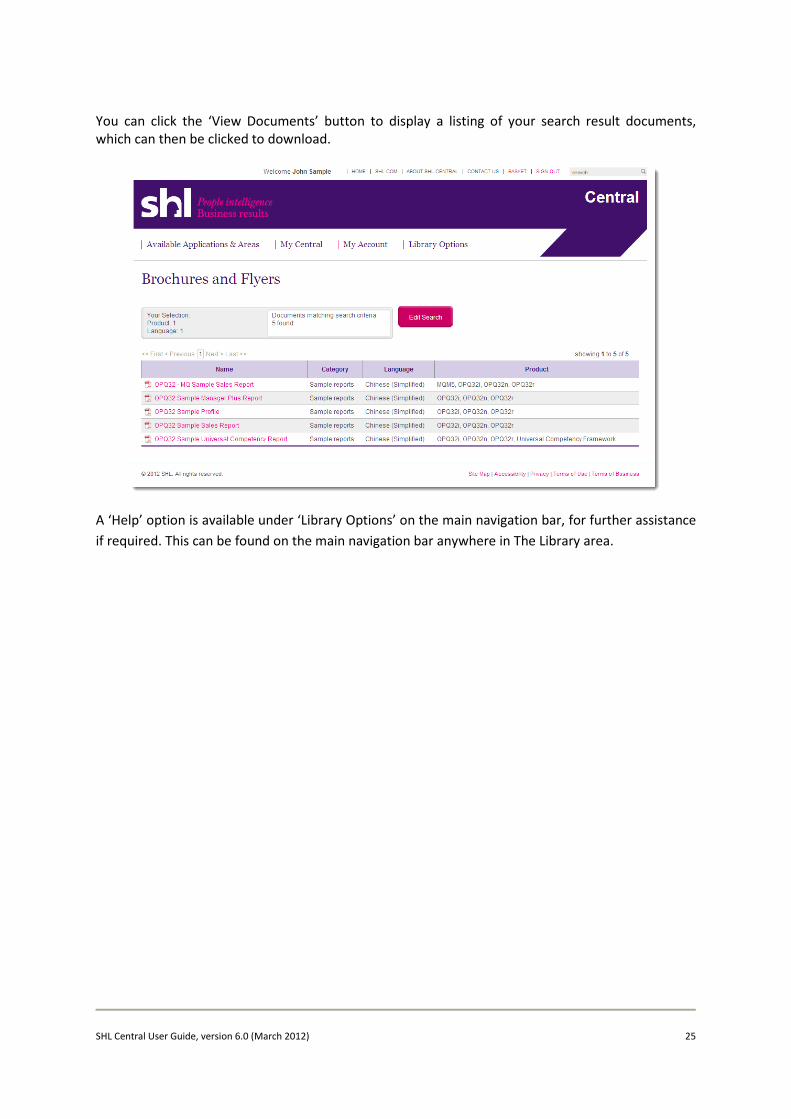
You can click the ‘View Documents’ button to display a listing of your search result documents, which can then be clicked to download.
A ‘Help’ option is available under ‘Library Options’ on the main navigation bar, for further assistance if required. This can be found on the main navigation bar anywhere in The Library area.

SHL Central User Guide, version 6.0 (March 2012) 26
Applications on SHL Central
The online SHL Bureau service was the first application made available on SHL Central in October 2010. We have since added a range of business solution ‘applications’ called Retain, On-Board, Safe@Work, Sales Excel and SHL JobMatch with more to follow as the site continues to evolve.
These applications are designed to respond to specific common business scenarios and needs. We give you automatic access to most of these applications (ie. ‘open access’) - however, some may require you to be SHL trained to use them, in which case you may need to request access. Any such applications are clearly identified, and access request turnaround is extremely quick and efficient.
You can buy any of the applications straight away, apart from SHL Bureau, which you will need to request access to before using it. Applications to which you have requested access and have been granted access to, will appear in the ‘My Applications’ dropdown that appears on the main navigation bar.
For more information on what is available, go to the Available Applications & Areas page, accessible from the main navigation bar – this is visible pre and post sign-in. You can also seldct an individual application from the dropdown if you prefer, to go straight to information about it:
You can click on any of these (for example ‘Retain’) to find out what it will do for you. You can read about the benefits the application provides, and check the price – you can also look at an example report:

SHL Central User Guide, version 6.0 (March 2012) 27
When you have decided that you would like to use the application, click on one of the ‘Use it now’ links, and you are taken straight to a page on which you can buy the number of reports you need – in this example, the user has already purchased 3 Retain reports as shown on the right:
SHL Central User Guide, version 6.0 (March 2012) 28
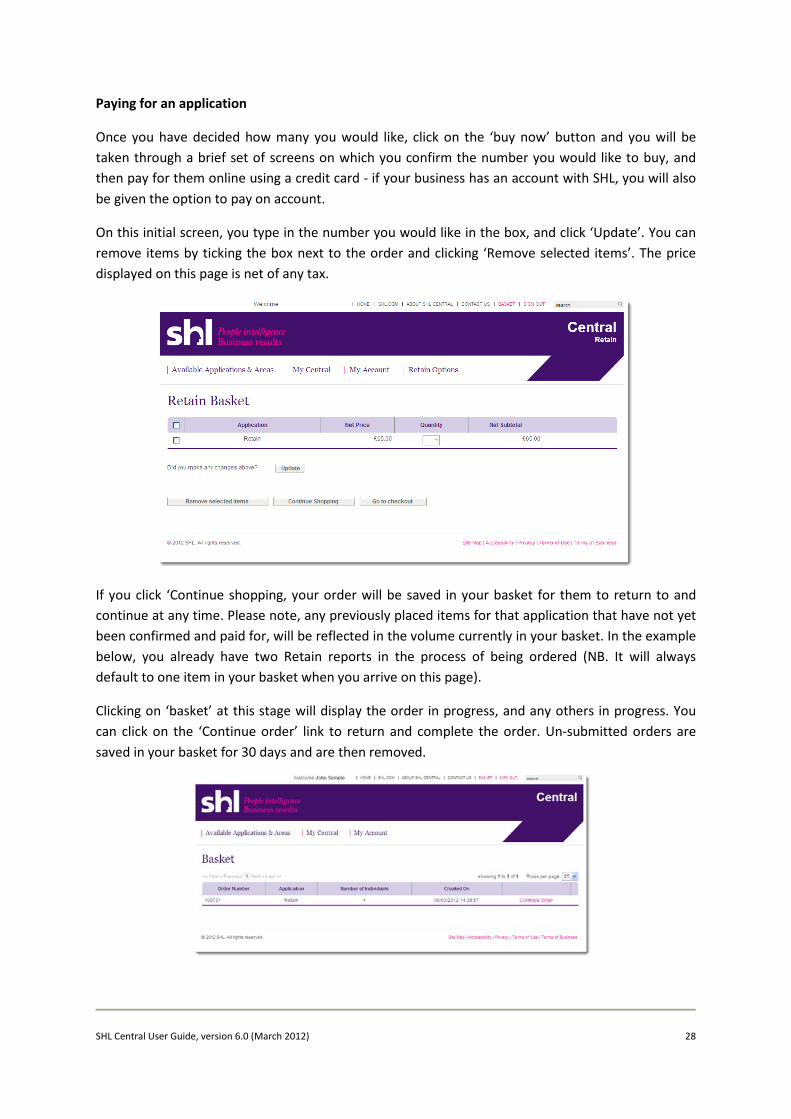
Paying for an application
Once you have decided how many you would like, click on the ‘buy now’ button and you will be taken through a brief set of screens on which you confirm the number you would like to buy, and then pay for them online using a credit card - if your business has an account with SHL, you will also be given the option to pay on account.
On this initial screen, you type in the number you would like in the box, and click ‘Update’. You can remove items by ticking the box next to the order and clicking ‘Remove selected items’. The price displayed on this page is net of any tax.
If you click ‘Continue shopping, your order will be saved in your basket for them to return to and continue at any time. Please note, any previously placed items for that application that have not yet been confirmed and paid for, will be reflected in the volume currently in your basket. In the example below, you already have two Retain reports in the process of being ordered (NB. It will always default to one item in your basket when you arrive on this page).
Clicking on ‘basket’ at this stage will display the order in progress, and any others in progress. You can click on the ‘Continue order’ link to return and complete the order. Un-submitted orders are saved in your basket for 30 days and are then removed.

SHL Central User Guide, version 6.0 (March 2012) 29
If you are happy with the order, you progress by clicking ‘Go to checkout’ which takes you to this page. This confirms your order value and displays any applicable tax, and you can add in a VAT number if you would like this to appear on your invoice.
You have the option to pay by credit card, and if you have an approved account with us, an additional button will be displayed with a ‘pay on account’ option (as below). ‘Amend order’ takes you back to the previous page:
There is a promotion code field on this screen into which you can enter any code you have been given to use. Once you have done this and clicked ‘Add’, if the system recognises the code as valid, you will see confirmation of this and the promotion code with the impact it has on the order value, will be clearly displayed on the page.
If an invalid or expired promotion code is entered, the system will send back an appropriate message at the top of the screen explaining why the code cannot be used.
If paying by credit card, the card payment process then goes via our payment service provider partner Cybersource. This works in the same way as many consumer ecommerce sites – there is a short delay while the card details are verified and authorised, and if there is any problem with the card payment, this will be communicated on screen to you and the order will not progress. If all goes through successfully, you will be taken to your Completion Status page (or back to the application welcome page if using SHL JobMatch).
Please go to the separate section on the ‘SHL JobMatch’ application now, if you would like guidance on how to use
SHL JobMatch

SHL Central User Guide, version 6.0 (March 2012) 30
Setting up the assessment
Once your payment has been confirmed, you are then taken to the Completion Status page. It will confirm your order has been successful. There are a number of useful things you can do on this page:
The main function here is to enter the contact details of people you want to assess, and send them your assessment invitations. You can add more people by clicking ‘Add’ (you must click ‘save’ for each individual for each record to be stored correctly). Each time you click ‘save’, you will see one less available report to use for that application indicated in the ‘You currently have...’ box at the top of the page:
You can remove an individual from the table by using the tick box to the left of that person’s record, and clicking ‘Cancel’. Please note, cancelled records will remain visible in the table with a ‘Cancelled’ flag in the status column.

SHL Central User Guide, version 6.0 (March 2012) 31
We have created a standard invitation email, which you can review by clicking on ‘Customise Email’ - you can edit the subject line and place your own customised text on this email if you like:
The invitation contains information the individual needs to know in order to take the assessment - for example, the login details to the site on which they can take the online assessment.
You will be copied on each invitation email that is sent, so you have a delivery record. This is useful as it gives you the flexibility of resending the email (by forwarding from your mailbox) to an individual if necessary. Any email delivery failure notices will be sent to your mailbox.
When you are ready to send the assessment invitations, you select the individuals you wish to include by ticking the box against those individuals and click ‘Invite’. The invitation email will then be automatically sent to those people. A user will see a confirmation at the top of your screen, and the status for an invited individual will change to ‘Invited’:

SHL Central User Guide, version 6.0 (March 2012) 32
You can track assessment completion status for each individual. Once their report is available to view, you will receive an email notification containing a link to your completion status page (via sign in), and you can view it by clicking the ‘View Report’ link that will appear on each individual’s line as they complete your assessment (the PDF report will open in a separate window):
The individuals’ details and reports will remain on this page to provide you with a record of whom you have assessed with the application - they will remain there for a period of 12 months and then be archived.
There is a useful search facility that enables you to find individual records in the table.
You can come back to this Completion Status page to check on progress at any time by going to ‘My Applications’, then clicking on the application for which you want to check progress or review assessment records. You then just open the Completion Status page.
If you have previously purchased reports for an application, and have some left over, the number of unused reports you have available will be shown on the application welcome page - Clicking on the ‘Use them now’ button will take you to the Completion Status page:

SHL Central User Guide, version 6.0 (March 2012) 33
For more information on using an application, there is a handy ‘Help’ page which a user can find in the Application ‘Options’ (in this example ‘Retain Options’) in the main navigation bar on any of the application pages. This contains a set of the most frequently asked questions and answers.

SHL Central User Guide, version 6.0 (March 2012) 34
SHL JobMatch
The SHL JobMatch application provides a unique, easy and highly reliable means of measuring the fit of an individual’s competencies and potential, with the specific competency set required for a particular job. It is intended to be used when matching individuals to graduate, managerial or professional level roles.
JobMatch home page
Under JobMatch options, ‘Home’ always takes you back to this home page, and ‘Help’ goes to some questions & answers about JobMatch that you might find useful:
‘My Jobs’ is where you can find details of all the Job Definitions you have created using the JobMatch application. The ‘Rater Status’ area is where you can invite colleagues to review your Job Definitions, and where you can check if they have finished their reviews. ‘Completion Status’ is where you can enter details of candidates you want to assess, review the match scores of those who have completed their assessments, and also download optional JobMatch Plus Reports for individual candidates. ‘Shared Jobs’ is where you can share job definitions you have created with other people, and ‘Jobs to Rate’ is where you can access draft job definitions that other users are asking you to review for them.
Clicking the ‘buy now’ button takes you to where you can buy ‘credits’ for whichever components of JobMatch you need. If you already have an SHL account, you will be given the option to pay on this

SHL Central User Guide, version 6.0 (March 2012) 35
account – otherwise, you can pay by credit card, through the secure, automated online card payment process.
You can purchase as many of each of the three components of JobMatch as you like at any time, and you will always be brought back to the home page once you have completed a purchase. The area on the right hand side of the home page indicates how many Job Definitions, Match Scores or JobMatch Plus report ‘credits’ you have previously purchased, and still have available to use.
To create a new job profile, or ‘define’ a job, click on the green ‘define new job’ button.
Define New Job Page
There are a few key steps to go through in this process. On each of the following screens, mandatory questions are indicated with an asterisk.
This first screen is where you enter general information about the job such as the job title and summary description. You also select from a series of dropdown menus, the closest description to the job you are defining. There are also some additional, non-mandatory information fields.

SHL Central User Guide, version 6.0 (March 2012) 36
All information you provide is stored, and will appear in the Job Definition report created when you finalise the job definition.
Once you are happy with what you have entered on this page, click next to move on to the next screen. At this point you are alerted that one of your available job definition credits has now been used. Information you have entered this far is now saved, so that you can come back and continue defining this job later if you wish. You can do this by reopening it from your job list on the ‘My Jobs’ page.
The next screen contains a number of additional questions about the job you are defining. These questions will vary depending on the information provided on the previous page. These questions are all optional, but the more information you provide, the more accurate the recommended competency profile will be! Once you have finished with this screen, click next to move on. At this point you are alerted that after this step, you will not be able to make further changes to the job details.
Competency Importance Levels Page
You are now taken to the competency importance levels screen, which is where you will see displayed the SHL recommended competency profile for the job you have defined. You can see the SHL recommended level of importance on each of the 20 competency scales.
The blue markers can be moved along the sliders using your mouse if you feel you would like to tweak one or two of them, but you will be informed on screen if you place too many of these into

SHL Central User Guide, version 6.0 (March 2012) 37
one column. Hovering over the small blue ‘i’ icons will display a graphical explanation of how SHL have come to their recommendation on that scale. Once you are happy with this profile, click next, which takes you to a summary page.
Summary Page
At this point, you have the option to invite colleagues to review the job you have defined, or to finalise it and move straight on to where you can invite individuals to be assessed for that job. If you decide you would like other people to review the job definition, click on the ‘Invite Raters’ button at the bottom of the screen, which takes you to the Rater Status page.
Rater Status Page
You can add email addresses for as many raters as you like by clicking ‘Add Rater’. For each one, you can select the relationship this individual has with the job being defined, and the job you would like them to review in the Job Title dropdown - then click invite, and a message is automatically sent with a link to the job profile you have defined.
An invited rater will see the competency profile screen and can move the markers if they feel they are not in the appropriate importance level column. As each rater completes their review, you are
SHL Central User Guide, version 6.0 (March 2012) 38
sent an email confirmation, with a link that takes you to the competency profile screen displaying their review markers. You can also view all rater reviews for a job on the ‘My Jobs’ page.
My Jobs Page
This page displays the status of any job definitions you are creating or have already finalised. There are a number of actions you can take for any of the jobs listed here.
These include reviewing job details, inviting raters to review a job if it has not yet been finalised, and if a job has been finalised, inviting candidates to be assessed for the job, and downloading a PDF report of the Job Definition.
Clicking on ‘View/Edit Job’ link next to a job that has not yet been finalised, opens the job details for editing. You can then use the workflow bar along the top to click on the ‘Set Competency Importance Levels’ step – this will open the competency profile page displaying the raters’ review markers.
The reviews are indicated by triangular icons above each scale – you can choose to view any or all of the rater reviews for this job at the same time using the select function in the top left just above the table, and hovering over the markers indicates which rater the marker relates to. You have the option to move the markers if you wish, but you are not obliged to make any changes. Once you are ready to finalise the job competency profile, click here, which takes you to the summary page.
After clicking ‘finalise job’ at the bottom of the summary page, you will see an alert asking for confirmation that you wish to finalise the job, and the job definition is then locked down and immediately made available for candidates to be assessed against and matched to. Whenever you finalise a job, you are taken to the Completion Status page and a message is displayed with a link that enables you to download a PDF Report of the Job Definition you have just finalised.
Shared Jobs Page
You can share a finalised Job Definition with someone else, so they can use it to assess people against with JobMatch.
To share a Job Definition, go to JobMatch Options in the main navigation and select 'Shared Jobs'. This page lists the people with whom you have already shared a job, and which job you shared with them. If you want to share a job with someone new, or another job with someone you have shared one with previously, click on 'Share Job' and enter their details - then choose the job you want to share with them from the 'Job Title' dropdown, and click 'Share Job' to the right.

SHL Central User Guide, version 6.0 (March 2012) 39
A confirmation email is sent to them and copied to you. If the person you are sharing with is not yet registered on SHL Central, they will be prompted to register before being able to view the shared job.
Jobs that other people have shared with you are included on your 'My Jobs' page with the job creator name, to distinguish them from ones you have made yourself. You can also share jobs you have finalised from the 'My Jobs' page.
Please note: Only finalised Job Definitions can be shared, you can only share Job Definitions you have created and you cannot un-share a job with someone once you have shared it with them.
Completion Status Page
The Completion Status page is where you can enter the email contact details of individuals you would like to match against a particular job you have created, and from where you send their assessment invitations. There will always be an open set of candidate detail fields for you to use. This ‘Job’ dropdown will display all the job definitions you have created – here you choose which job you want to match this candidate to.
If you want to add another candidate, just click ‘Add’. Clicking ‘Save’ ensures the individual’s details are stored. Each time you click on ‘Save’, you will see confirmation of this, and you will also see one less Match Score available to use. You can ‘Edit’ an individual’s details at any point up to inviting them to take the assessment. You can remove an individual by selecting them and clicking ‘Remove’ – doing this will add back one available Match Score.
There is a standard assessment invitation email, which you can review by clicking on the Customise Email Link, but you can edit the subject line and include your own message if you wish, then save it.
When you are ready to send your assessment invitations, select the individuals you wish to include, and click on ‘invite’. The invitation email is then sent automatically to those people. You are copied on each invitation email, so you have a delivery record, and your email address is shown as the ‘sent from’ mailbox on the invitation email. Any email delivery failure notices will be sent to your mailbox.
You can edit the invitation email text for each individual, or a group of individuals, by editing the email text in ‘Customise Email’, then ticking the box against each individual you want that email text to be sent to - then repeating the process as required.
You will receive email confirmation whenever a candidate has completed the assessment, and their match score is available to view – which is displayed in the results column.

SHL Central User Guide, version 6.0 (March 2012) 40
If you would like to have the JobMatch Plus Report for an individual - for example, for the most strongly matched candidate you would like to bring in for interview - click ‘Get JobMatch Plus Report’ for that candidate. You will be alerted that you are about to use one of your available JobMatch Plus Reports, and then you will see confirmation of your request. You will be sent email confirmation when a requested report is available to download, which you can do by clicking on the link that appears in the Results column. The report will open in a separate window.
The individuals’ details, their scores and links to the JobMatch Plus Reports you have requested will remain on this page to provide you with a record - they will remain there for 12 months and will then be archived.
There is a useful search facility that enables you to find details of individuals you have assessed. This area appears once you have entered details for at least one individual.
SHL Central User Guide, version 6.0 (March 2012) 41
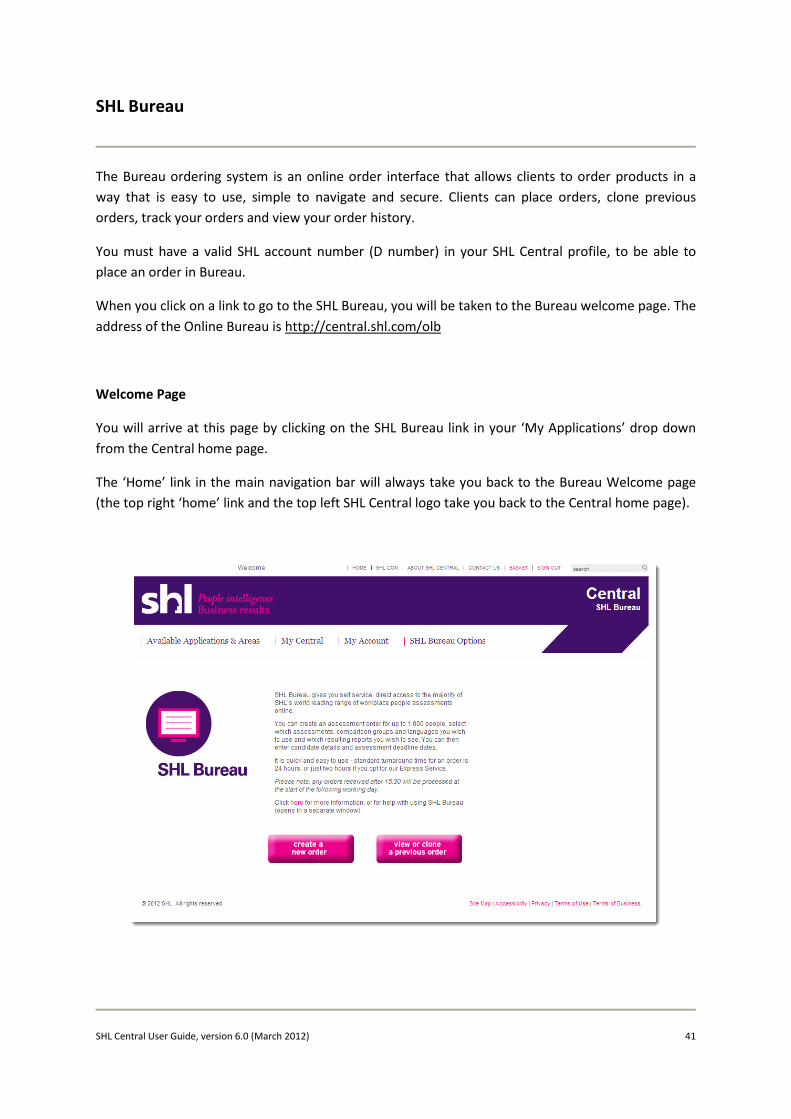
SHL Bureau
The Bureau ordering system is an online order interface that allows clients to order products in a way that is easy to use, simple to navigate and secure. Clients can place orders, clone previous orders, track your orders and view your order history.
You must have a valid SHL account number (D number) in your SHL Central profile, to be able to place an order in Bureau.
When you click on a link to go to the SHL Bureau, you will be taken to the Bureau welcome page. The address of the Online Bureau is http://central.shl.com/olb
Welcome Page
You will arrive at this page by clicking on the SHL Bureau link in your ‘My Applications’ drop down from the Central home page.
The ‘Home’ link in the main navigation bar will always take you back to the Bureau Welcome page (the top right ‘home’ link and the top left SHL Central logo take you back to the Central home page).

SHL Central User Guide, version 6.0 (March 2012) 42
There is an extremely useful ‘Help’ option under ‘SHL Bureau Options’ on the main navigation bar, which contains a set of FAQs and Bureau team contact details – this is also referenced in the introductory section on this welcome page.
This help section contains the vast majority of main questions a user might have about the Bureau service, but there will always be some we haven’t thought of, and this page can be added to if necessary!
There are two clear options for you: ‘create a new order’ or ‘view or clone a previous order’, which takes you to your order history page.
Creating a New Order
There are four screens you have to complete:
1. Enter type of order (named or generic) and the assessment details 2. Enter assessment individuals’ details 3. Enter registered user’s details and report recipients 4. Request express service and select payment option
NB. If you select the generic option, you are taken straight from step 1 to step 3, as the entry fields on Step 2 will be entered by you outside of the Bureau ordering process If a user clicks the ‘create a new order’ button, the system will recognise if you have more than one account (D number) associated with your profile and will ask you which account you wish to place this order against.
Credit checking When you click on the ‘create a new order’ button on the welcome page, the system runs a credit check to ensure that the account is within the specified credit limits. If you do not pass this check, you will receive a message informing you that you cannot place an order due to your credit limit being exceeded, and to contact us asap to resolve this.
Step 1
The system recognises which country your account number is associated with, and opens up the first page, Step 1 (which contains the product catalogue), pre-populated with your relevant country’s product catalogue and prices.
In this example, you have an Australian account, and therefore the products displayed are as agreed by the SHL Australia team, and the prices displayed are the standard list prices in Australian $:

SHL Central User Guide, version 6.0 (March 2012) 43
You can select a combination of assessments listed, and then select the assessment language, comparison group and report options available for each assessment selected. The language and comparison group options displayed are related – eg. only available comparison groups will be listed for the language selected for that assessment product.
In this example, you have selected the Motivation Questionnaire, which then opens up the MQ options to the right. This section is collapsed again if you un-check the MQ box on the left hand side, and likewise for any of the options in the catalogue:
SHL Central User Guide, version 6.0 (March 2012) 44
Please note the mandatory fields in the product catalogue section – if you select an assessment, you must then select language, comparison group and report option(s) to continue to the next step. An error message will be displayed against any mandatory field left empty.
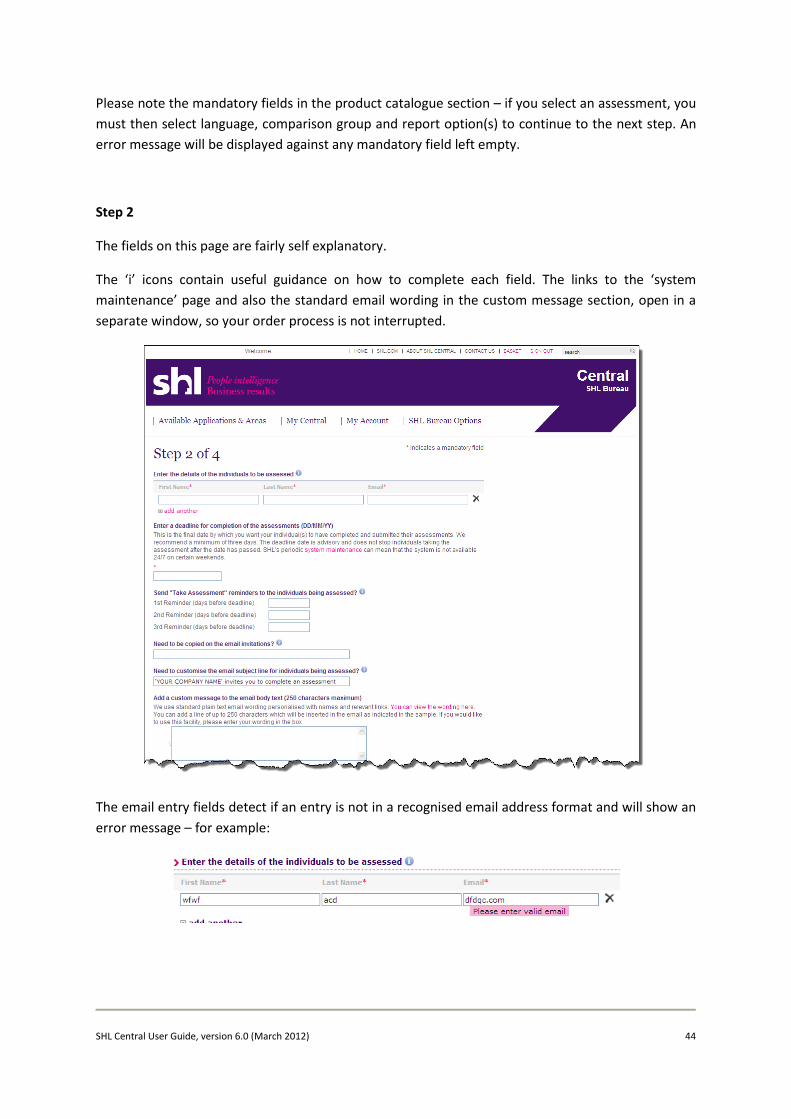
Step 2
The fields on this page are fairly self explanatory.
The ‘i’ icons contain useful guidance on how to complete each field. The links to the ‘system maintenance’ page and also the standard email wording in the custom message section, open in a separate window, so your order process is not interrupted.
The email entry fields detect if an entry is not in a recognised email address format and will show an error message – for example:

SHL Central User Guide, version 6.0 (March 2012) 45
Step 3
You must enter details of an SHL registered user in this section – the invoice is then sent to this contact (this is made clear to you in the ‘i’ help section). You cannot progress beyond this point unless you enter valid details here.
You also enter contact details of those who will receive email notification of when reports are available to view (this notification will contain a link into SHL On Demand to view the report(s)).
If you have selected any Verify assessments, an additional section will be shown on this page, as below – the ‘i’ text makes it clear that it this area is left blank, we assume that the first person entered in the section below (report access) will be noted as the verification test supervisor.

SHL Central User Guide, version 6.0 (March 2012) 46
Step 4
This page covers payment options, as well as the option to select the express service, and also to enter a promotional code if you have an appropriate one to use.
The express service price is displayed in the appropriate currency applicable to you (in this case, your account is Australian, therefore the Australian $ price is shown).
The system will automatically recognise whether you require a PO number (if paying on account), and will display an error if this field is left blank when records in our accounting system suggest that a PO number is required.
At the bottom, it clearly states to whom the invoice will be sent (this is the registered user whose details were entered in Step 3).
If you select to pay by credit card, a different field is displayed into which you should enter a telephone number for us to call you back and take the CC details over the telephone – this process is made clear in the ‘i’ text;

SHL Central User Guide, version 6.0 (March 2012) 47
Order Summary page
You are then shown a summary of your order, clearly indicating the order number at the top, also stating the total value of the order and reconfirming to whom the invoice will be sent. You can click ‘previous’ to go back to any of the previous pages and make edits if required. You must click the tick box to accept the SHL terms of business before you can submit your order.
A confirmation message is then displayed, and the order is immediately logged into your ‘submitted orders’ list in your ‘order history’ page, and is removed from your ‘basket’.

SHL Central User Guide, version 6.0 (March 2012) 48
An email is immediately sent automatically to you confirming the order – this email contains links, which enable you to go straight to his order history where you can track the progress of your order, and also to go straight into the order summary (in this case OLB4000123):

SHL Central User Guide, version 6.0 (March 2012) 49
Managing Orders
An order can have the following status: Un-submitted, Submitted or Processed.
Un-submitted Orders
You can partially complete an order and to return to it at any time provided you have saved the data by clicking on the ‘Next’ button on the bottom of the page – the data will be saved up to that point, and the un-submitted order can be retrieved in your ‘my basket’ page. Un-submitted orders are then deleted after 30 days from the last save date.
Submitted Orders
Once orders are submitted, they cannot be amended or re-submitted. However you can use a submitted order to clone the details for a new order. This can save you a lot of time if you are submitting an order that is largely the same as a previous order. The same applies for processed orders.
Cloning Orders
In recognition of the fact that many customers always use the same set of assessments and norms, there is a feature to clone an order. You can clone orders from both previously submitted and processed orders.
Once presented with the list of submitted or processed orders in the order history page, you can click on ‘view/clone against any item. This will open to the relevant order summary page, at the bottom of which is a ‘clone this order’ button.
You are then presented with the first page of a new order pre-populated with the previous order details but requiring new Purchase Order details and new candidate names if a named order. However, any details can be edited by you.