Central User Administration - Community Archive€¦ · · 2017-02-23SAP Online Help 04.10.2005...
56
Central User Administration HELP.BCCCMUSR
Transcript of Central User Administration - Community Archive€¦ · · 2017-02-23SAP Online Help 04.10.2005...

Central User Administration
HE
LP
.BC
CC
MU
SR

SAP Online Help 04.10.2005
Central User Administration 2
Copyright © Copyright 2004 SAP AG. All rights reserved. No part of this publication may be reproduced or transmitted in any form or for any purpose without the express permission of SAP AG. The information contained herein may be changed without prior notice. Some software products marketed by SAP AG and its distributors contain proprietary software components of other software vendors. Microsoft, Windows, Outlook, and PowerPoint are registered trademarks of Microsoft Corporation. IBM, DB2, DB2 Universal Database, OS/2, Parallel Sysplex, MVS/ESA, AIX, S/390, AS/400, OS/390, OS/400, iSeries, pSeries, xSeries, zSeries, z/OS, AFP, Intelligent Miner, WebSphere, Netfinity, Tivoli, and Informix are trademarks or registered trademarks of IBM Corporation in the United States and/or other countries. Oracle is a registered trademark of Oracle Corporation. UNIX, X/Open, OSF/1, and Motif are registered trademarks of the Open Group. Citrix, ICA, Program Neighborhood, MetaFrame, WinFrame, VideoFrame, and MultiWin are trademarks or registered trademarks of Citrix Systems, Inc. HTML, XML, XHTML and W3C are trademarks or registered trademarks of W3C®, World Wide Web Consortium, Massachusetts Institute of Technology. Java is a registered trademark of Sun Microsystems, Inc. JavaScript is a registered trademark of Sun Microsystems, Inc., used under license for technology invented and implemented by Netscape. MaxDB is a trademark of MySQL AB, Sweden. SAP, R/3, mySAP, mySAP.com, xApps, xApp, SAP NetWeaver, and other SAP products and services mentioned herein as well as their respective logos are trademarks or registered trademarks of SAP AG in Germany and in several other countries all over the world. All other product and service names mentioned are the trademarks of their respective companies. Data contained in this document serves informational purposes only. National product specifications may vary. These materials are subject to change without notice. These materials are provided by SAP AG and its affiliated companies ("SAP Group") for informational purposes only, without representation or warranty of any kind, and SAP Group shall not be liable for errors or omissions with respect to the materials. The only warranties for SAP Group products and services are those that are set forth in the express warranty statements accompanying such products and services, if any. Nothing herein should be construed as constituting an additional warranty.
SAP Online Help 04.10.2005
Central User Administration 3
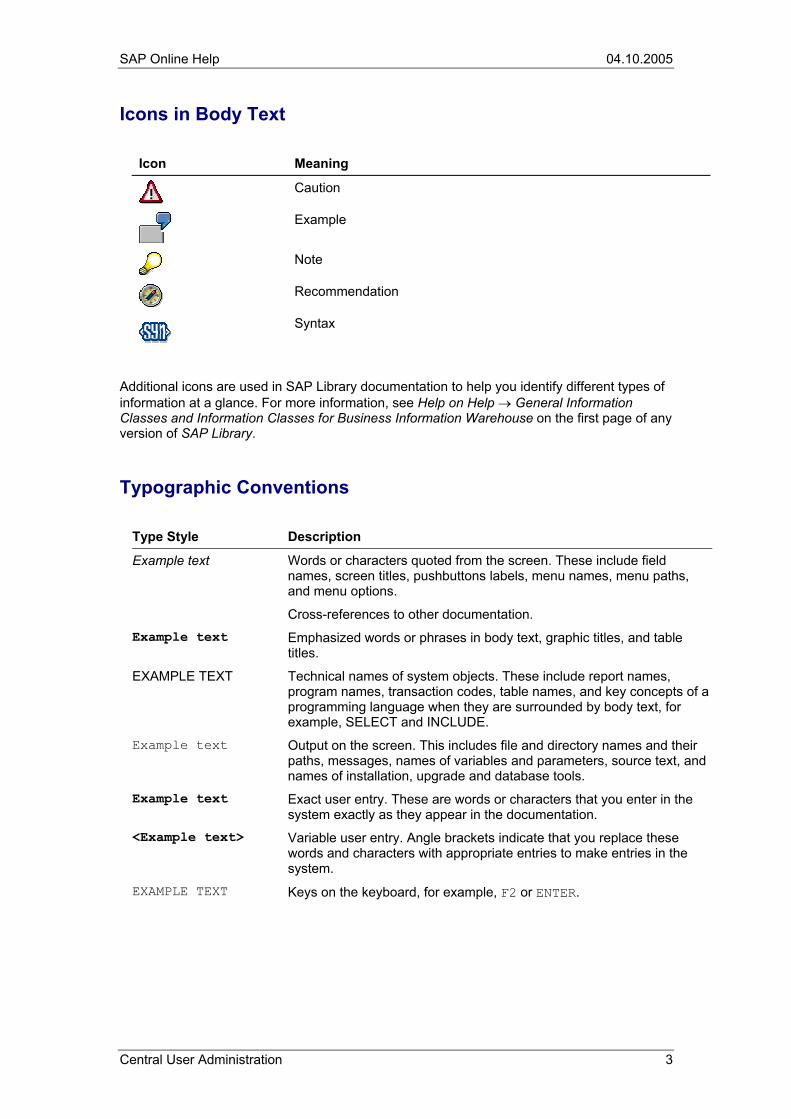
Icons in Body Text
Icon Meaning
Caution
Example
Note
Recommendation
Syntax
Additional icons are used in SAP Library documentation to help you identify different types of information at a glance. For more information, see Help on Help → General Information Classes and Information Classes for Business Information Warehouse on the first page of any version of SAP Library.
Typographic Conventions
Type Style Description
Example text Words or characters quoted from the screen. These include field names, screen titles, pushbuttons labels, menu names, menu paths, and menu options.
Cross-references to other documentation. Example text Emphasized words or phrases in body text, graphic titles, and table
titles.
EXAMPLE TEXT Technical names of system objects. These include report names, program names, transaction codes, table names, and key concepts of a programming language when they are surrounded by body text, for example, SELECT and INCLUDE.
Example text Output on the screen. This includes file and directory names and their paths, messages, names of variables and parameters, source text, and names of installation, upgrade and database tools.
Example text Exact user entry. These are words or characters that you enter in the system exactly as they appear in the documentation.
<Example text> Variable user entry. Angle brackets indicate that you replace these words and characters with appropriate entries to make entries in the system.
EXAMPLE TEXT Keys on the keyboard, for example, F2 or ENTER.

SAP Online Help 04.10.2005
Central User Administration 4
Central User Administration....................................................................................................... 3 Setting Up Central User Administration ................................................................................. 3
Creating an Administration User ........................................................................................ 3
Setting Up Logical Systems ............................................................................................... 3
Defining/Setting Up a Logical System ............................................................................ 3
Assigning a Logical System to a Client .......................................................................... 3
System Users and RFC Destinations................................................................................. 3
Defining Authorizations for System Users ...................................................................... 3
Determining Existing RFC Destinations and System Users........................................... 3
Creating System Users................................................................................................... 3
Creating an RFC Destination for the Target System...................................................... 3
System Users and RFC Destinations with Trusted Systems ......................................... 3
Creating RFC Destinations for the Target System with a Trusted System .................... 3
Creating the Central User Administration........................................................................... 3
Setting Up Field Distribution Parameters ........................................................................... 3
Synchronizing and Distributing Company Addresses ........................................................ 3
Synchronizing User Groups ............................................................................................... 3
Transferring Users from New Systems .............................................................................. 3
Displaying and Processing Distribution Logs..................................................................... 3
Operating Central User Administration .................................................................................. 3 User Maintenance with Active Central User Administration............................................... 3
Assigning Passwords with Active Central User Administration.......................................... 3
Sending User Master Data to a Child System.................................................................... 3
Performing a Text Comparison with Target System Specification..................................... 3
Error Analysis......................................................................................................................... 3 Checking the Setup of Central User Administration........................................................... 3
Creating an ALE Model Including Partner Profiles Manually ............................................. 3
Creating the ALE Distribution Model .............................................................................. 3
Generating Partner Profiles ............................................................................................ 3
Checking Partner Profiles ............................................................................................... 3
Correcting Errors in Partner Profiles............................................................................... 3
Distributing the Model View ............................................................................................ 3
Other Error Sources........................................................................................................ 3
Activated Background Processing ......................................................................................... 3 Changing Partner Profiles with Active Background Processing......................................... 3
Creating a Background User .............................................................................................. 3
Removing Central User Administration.................................................................................. 3 Removing a Child System from Central User Administration ............................................ 3
Removing Central User Administration Completely........................................................... 3

SAP Online Help 04.10.2005
Central User Administration 5
Glossary ................................................................................................................................. 3 Application Link Enabling (ALE)......................................................................................... 3
ALE Landscape .................................................................................................................. 3
ALE Integrated System ...................................................................................................... 3
User Master Record ........................................................................................................... 3
Authorization....................................................................................................................... 3
Authorization Profile ........................................................................................................... 3
Background Processing ..................................................................................................... 3
IDoc .................................................................................................................................... 3
System User ....................................................................................................................... 3
Logical System ................................................................................................................... 3
Partner Profile .................................................................................................................... 3
Profile ................................................................................................................................. 3
Profile Generator ................................................................................................................ 3
Remote Function Call (RFC) .............................................................................................. 3
Role .................................................................................................................................... 3
Child System ...................................................................................................................... 3
Distribution Model............................................................................................................... 3
Central User Administration (CUA) .................................................................................... 3
Central System................................................................................................................... 3

SAP Online Help 04.10.2005
Central User Administration 6
Central User Administration Using Central User Administration, you can maintain user mater records centrally in one system. Changes to the information are then automatically distributed to the child systems [Seite 3]. This means that you have an overview in the central system [Seite 3] of all user data in the entire system landscape.
Distribution of the data is based on a functioning Application Link Enabling [Seite 3] landscape (ALE Landscape [Seite 3]). In this way, data can be exchanged in a controlled manner and is kept consistent. An ALE System Group [Seite 3] is used by the Central User Administration to distribute user data between a central system and child systems linked by ALE. You should therefore familiarize yourself with basic information about the ALE Integration Technology [Extern].
Central User Administration data is distributed asynchronously between the application systems in an ALE environment. This ensures that it still reaches the target system even if it was unreachable when the data was sent.
One system in the Central User Administration ALE environment is defined as the central system. The central system is linked with every child system in both directions. The child systems are not linked to each other , with the exception of the central system, which is itself a child system, from the point of view of Central User Administration.
Use the most up-to-date system in your system landscape as your central system (if possible with a release status of 4.6C or higher). In this way, the newest functions in CUA are available to you.
Validity of this Document
This document is valid for SAP systems with one of the following specified releases or higher:
• Release 4.6B, Support Package Level 49
• Release 4.6C, Support Package Level 40
• Release 4.6D, Support Package Level 29
• SAP Web Application Server 6.10, Support Package Level 28
• SAP Web Application Server 6.20, Support Package Level 16
Some functions are implemented differently depending on the release, meaning that some variance from the description may occur.
See also:
If you have this document as an excerpt in the form of a .pdf file, you can obtain the complete documentation in the SAP Library under the path SAP NetWeaver → Security → Identity Management → Users and Roles → Central User Administration.
• SAP Tutor Central User Administration under service.sap.com/security → Education and Workshops
• Authorization Made Easy Guide Book – Chapters 10 and 11 (www.saplabs.com/simple, www.amazon.com, or www.fatbrain.com/sap)
• Integration Technology ALE [Extern]
• ALE: Implementation and Administration [Extern]

SAP Online Help 04.10.2005
Central User Administration 7
Setting Up Central User Administration To set up Central User Administration (CUA), perform the procedures described below.
Steps to Set Up the CUA
Create Administrator
Specify Logical Systems
Assign Logical Systems to a Client
Create System Users
Create RFC Destinations
Set Distribution Parameters for Fields
SynchronizeCompany Addresses
Create CUA
Transfer Users
The examples used in the procedures refer to the following system landscape:
• Administration system ADM with client 070 and client 075
• Production system PRD with client 324 and client 800
• Production system CRM with client 800
The central system of the CUA is the logical system [Seite 3] ADMCLNT070 in system ADM, client 070. All other clients are logical systems that are linked into the CUA as child systems.

SAP Online Help 04.10.2005
Central User Administration 8
Logical System PRDCLNT324Child System
System PRD
Logical System PRDCLNT800Child System
Logical System CRMCLNT800Child System
System CRM
Logical System ADMCLNT070CUA Central System
System ADM
Logical System ADMCLNT075Child System
Creating an Administration User Use In a completely new system that is to be set up, you must first create an administration user with which you can perform all other steps.
Procedure ...
1. Log on in all logical systems of the future CUA as user SAP* with the default password PASS.
2. Choose Tools → Administration → User Maintenance → Users (Transaction SU01) and create a user, and assign a relevant administration role to it.
3. Apply the security measures described under Securing SAP* Against Misuse [Extern].
Setting Up Logical Systems Systems of the Central User Administration (CUA) are referred to using logical system IDs. In the SAP sense, a logical system is a client. Therefore you must first set up logical system names that you then assign to the clients in the SAP systems.
It is possible that the logical system name already exists because you have already included the system in an ALE distribution. You can then ignore the procedures Define/Set Up Logical System and Assign Logical System to a Client.
This maintenance is cross-client; that is, you only perform it once for each SAP system. If your logical systems are clients of the same SAP system, you only need to perform this step once.

SAP Online Help 04.10.2005
Central User Administration 9
Process Flow 1. Set up the logical system [Seite 3].
2. Assign the logical system to a client [Seite 3].
Defining/Setting Up a Logical System You perform this cross-client procedure only in one SAP System and transport this table to all other SAP Systems connected to the CUA. Alternatively, you can define the logical systems for each SAP System by performing the following procedure in every SAP System for the logical systems there.
Procedure ...
1. Log on to the central system with the administration user (in this example, ADM, client 070).
2. In the Implementation Guide (IMG, transaction SALE), choose Sending and Receiving Systems → Logical Systems → Define Logical System (transaction BD54). You can alternatively maintain the table view V_TBDLS using transaction SM30.
3. Choose Edit → New Entries.
4. In the LogSystem column, create a new logical name in capital letters for every CUA system (that is, for the central and all child systems including those from other SAP Systems).
So that you can easily identify the systems by their names, use the following naming convention for the logical system names: <System ID>CLNT<Client>.
If your central system is ADM, client 070, the name would be: ADMCLNT070.
5. Enter a useful description for the logical system.
If you want to change this short text for a logical system, proceed as follows:
Select the corresponding line.
Choose Edit → Change field contents.
Enter the desired new short text.
Choose Replace.
6. Save your entries, which are included in a transport request.
7. Create the logical system name for the central system in all child systems. You have the following options to do this:
Your transport administration imports the transport request that was created with point 6, which contains the names of all logical systems, into all other SAP Systems in the CUA.
Perform this procedure in all child systems of the CUA. Create the logical system name of the central system and the respective child system there.

SAP Online Help 04.10.2005
Central User Administration 10
Assigning a Logical System to a Client You perform this cross-client procedure only once for each SAP system.
You can only assign a client to one logical system.
Procedure ...
1. Log on to one of the SAP systems (such as ADM, client 070) as the administration user.
2. In the Implementation Guide (IMG, transaction SALE), choose Sending and Receiving Systems → Logical Systems → Assign Client to Logical System (transaction SCC4).
3. Switch to change mode.
4. Call the detail display of the client that you want to assign a logical system by double clicking on the line of the client (for example, client 070).
5. In the Logical System field, specify the name of the logical system to which the selected client is to be assigned (such as ADMCLNT070).
6. In the current SAP System, perform steps 3 and 4 for all clients in this SAP System that are to be included in the CUA.
7. Save your entries.
Perform steps 1-7 in all other SAP systems in the CUA.
System Users and RFC Destinations
Due to the changed password requirements for the user types (see SAP Note 622464) in combination with the profile parameters (see SAP Note 450452), we recommend that you use technical users of the type System in the future, instead of system users.
Use This section provides you with an overview of the interaction of system users, RFC destinations, and authorization roles of the system users and the administration tasks that are connected with this. The exact procedure is described in the following sections.
System users [Seite 3] (called CPIC users in older releases) are required for the internal communication of the systems in an ALE group (the distribution of user data). These system users, defined in the target systems, are entered in RFC destinations in the calling systems. To increase the security of your system landscape, when you are creating system users, assign only greatly restricted authorizations, combined in special roles to the system users (as described in the section Creating System Users [Seite 3] ).
In principle, one user ID (such as SAPCPIC) would be sufficient, and you could use it for all system users. However, with this situation, it would be practically impossible to change the password of the system users, or simply to keep it secret, as there can be multiple utilizing RFC destinations. So that you must only change the password of the relevant system user in one place when you are changing the password later, use a separate system user for each RFC destination. This means that there are as many system users in your system landscape as there are RFC destinations.

SAP Online Help 04.10.2005
Central User Administration 11
No license fees apply to these system users.
To simplify the maintenance of system users, use the following naming conventions:
• In the central system, the naming convention CUA_<system ID>. These system users are used in the child systems in the RFC destinations for child to central system.
For all logical systems in the SAP system ADM, the name for the system user would therefore be CUA_ADM.
• In the child systems, the naming convention CUA_<system ID>_<Client>. These system users are used in the central systems in the RFC destinations for central to child system.
In the child system, specify the client in the name of the system user so that there are still different system users for the different child systems in the central system even after the user transfer.
Create a system user in each child system for the RFC connection from the central system to the child system (for example, in child system CRM, client 800, the system user CUA_CRM_800 that is used by the RFC destination CRMCLNT800 defined in the central system ADM). If there are multiple child systems in a SAP system (such as PRDCLNT324 and PRDCLNT800), create a cross-client RFC destination for the connection in one of these child systems (such as ADMCLNT070). For more information about the procedure for creating system users and RFC destinations, see Creating System Users [Seite 3] and Creating an RFC Destination for the Target System [Seite 3].
In the central system, create a common system user for all child systems within an SAP system for the connection from child to central system (such as in the central system ADM, client 070, the system user CUA_CRM that is used by the RFC destination CRMCLNT070 defined in the child system CRM.) When you are making these definitions, the system that you define as the central system when setting up the CUA also counts as a child system whose data must also be transferred to the central system.
SAP Online Help 04.10.2005
Central User Administration 12
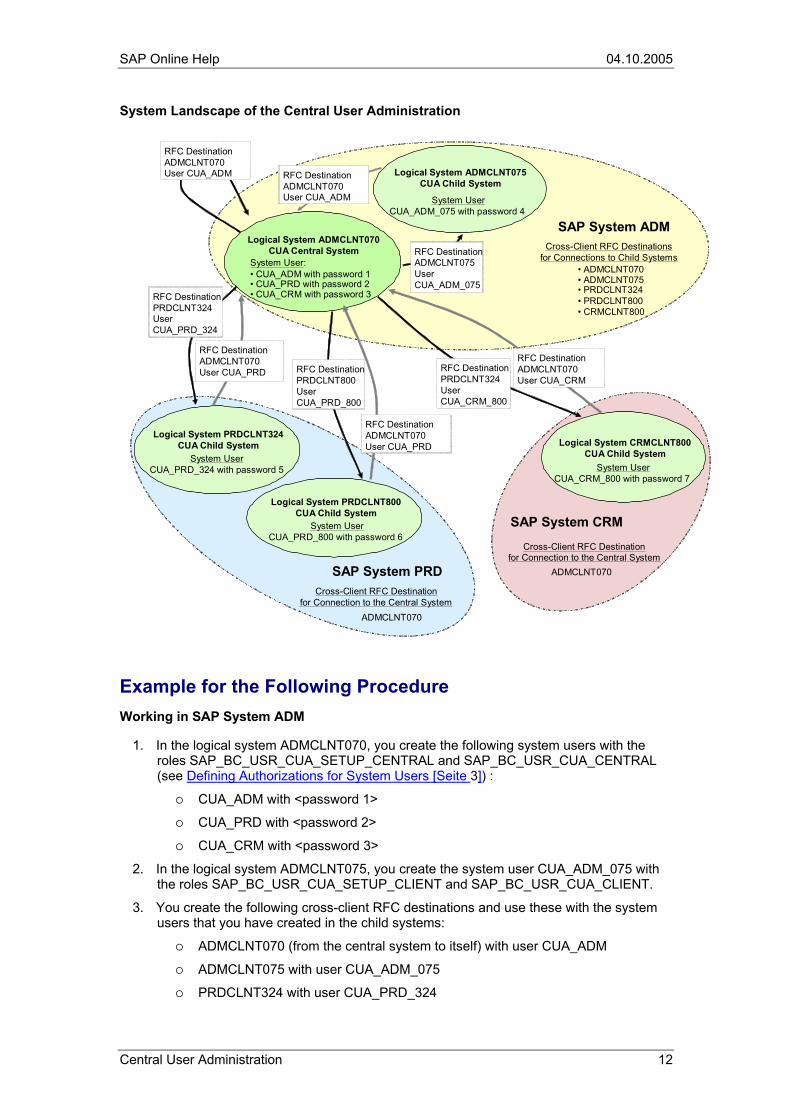
System Landscape of the Central User Administration
Logical System ADMCLNT070CUA Central System
System User:• CUA_ADM with password 1 • CUA_PRD with password 2• CUA_CRM with password 3
SAP System ADM
System UserCUA_ADM_075 with password 4
Logical System ADMCLNT075CUA Child System
Cross-Client RFC Destinationsfor Connections to Child Systems
• ADMCLNT070• ADMCLNT075• PRDCLNT324 • PRDCLNT800• CRMCLNT800
SAP System PRDCross-Client RFC Destination
for Connection to the Central SystemADMCLNT070
System UserCUA_PRD_800 with password 6
Logical System PRDCLNT800CUA Child System
System UserCUA_PRD_324 with password 5
Logical System PRDCLNT324CUA Child System
SAP System CRM
Cross-Client RFC Destination for Connection to the Central System
ADMCLNT070
System UserCUA_CRM_800 with password 7
Logical System CRMCLNT800CUA Child System
RFC Destination PRDCLNT324User CUA_PRD_324
RFC Destination PRDCLNT800User CUA_PRD_800
RFC Destination PRDCLNT324User CUA_CRM_800
RFC DestinationADMCLNT075User CUA_ADM_075
RFC DestinationADMCLNT070User CUA_ADM
RFC Destination ADMCLNT070User CUA_CRM
RFC DestinationADMCLNT070User CUA_PRD
RFC DestinationADMCLNT070User CUA_PRD
RFC DestinationADMCLNT070User CUA_ADM
Example for the Following Procedure Working in SAP System ADM ...
1. In the logical system ADMCLNT070, you create the following system users with the roles SAP_BC_USR_CUA_SETUP_CENTRAL and SAP_BC_USR_CUA_CENTRAL (see Defining Authorizations for System Users [Seite 3]) :
CUA_ADM with <password 1>
CUA_PRD with <password 2>
CUA_CRM with <password 3>
2. In the logical system ADMCLNT075, you create the system user CUA_ADM_075 with the roles SAP_BC_USR_CUA_SETUP_CLIENT and SAP_BC_USR_CUA_CLIENT.
3. You create the following cross-client RFC destinations and use these with the system users that you have created in the child systems:
ADMCLNT070 (from the central system to itself) with user CUA_ADM
ADMCLNT075 with user CUA_ADM_075
PRDCLNT324 with user CUA_PRD_324

SAP Online Help 04.10.2005
Central User Administration 13
PRDCLNT800 with user CUA_PRD_800
CRMCLNT800 with user CUA_CRM_800
Working in SAP System PRD ...
1. In the logical system PRDCLNT324, you create the system user CUA_PRD_324 with the roles SAP_BC_USR_CUA_SETUP_CLIENT and SAP_BC_USR_CUA_CLIENT.
2. In the logical system PRDCLNT800, you create the system user CUA_PRD_800 with the roles SAP_BC_USR_CUA_SETUP_CLIENT and SAP_BC_USR_CUA_CLIENT.
3. You create one cross-client RFC destination ADMCLNT070. Use the system user CUA_PRD created in the central system in this RFC destination.
Working in SAP System CRM ...
1. In the logical system CRMCLNT800, you create the system user CUA_CRM_800 with the roles SAP_BC_USR_CUA_SETUP_CLIENT and SAP_BC_USR_CUA_CLIENT.
2. You create one cross-client RFC destination ADMCLNT070. Use the system user CUA_CRM created in the central system in this RFC destination.
Defining Authorizations for System Users To further increase the security of your system landscape, we deliver strongly restricted authorizations contained in SAP standard roles for the system users. To issue the system users with the required authorizations [Seite 3] to set up and operate the CUA, assign the roles [Seite 3] described below.
The roles contain no menu entries, only authorization data, as the system users cannot log on in dialog mode. Some fields of the authorization data contain the value Asterisk (*), as the system requires complete authorization, for example, for user groups.
Creating Roles in the Central System ...
1. In the Profile Generator [Seite 3] (transaction PFCG), copy the following standard role delivered by SAP into the customer namespace:
SAP_BC_USR_CUA_SETUP_CENTRAL
The system users in the central system require the copied role Z_SAP_BC_USR_CUA_SETUP_CENTRAL only during the set up of the Central User Administration.
SAP_BC_USR_CUA_CENTRAL
SAP_BC_USR_CUA_CENTRAL_BDIST
All system users in the central system require this role if CUA field attributes are set to redistribution [Seite 3].
2. Generate the profiles [Seite 3] for these roles.
Creating Roles in the Child Systems ...
1. In the Profile Generator (transaction PFCG), copy the following standard role delivered by SAP into the customer namespace:
SAP_BC_USR_CUA_SETUP_CLIENT

SAP Online Help 04.10.2005
Central User Administration 14
The system users in the child system require the copied role Z_SAP_BC_USR_CUA_SETUP_CLIENT only during the set up of the Central User Administration.
SAP_BC_USR_CUA_CLIENT
This role contains very extensive authorizations for user administration in the child systems. To protect the change authorizations in this role against misuse, and therefore to increase the security significantly, it was split into two roles. This subdivision is only useful for background processing [Seite 3], as one of the roles is assigned to the background user [Seite 3] that schedules the inbound IDoc processing in the background.
The system user only receives the role SAP_BC_USR_CUA_CLIENT_RFC and receives only the inbound IDocs. The change authorizations for the update of IDocs [Seite 3] are contained in the role SAP_BC_USR_CUA_CLIENT_BATCH that is assigned to the background users.
2. Generate the profiles for these roles.
See also:
• Changing Standard Roles [Extern]
• SAP Note 492589: CUA: Minimum authorizations for system users
Determining Existing RFC Destinations and System Users If your systems are already configured for ALE distribution, you do not need to create a new system user, but should use the existing system user and extend its authorizations by assigning it the roles specified under Creating System Users [Seite 3].
Procedure ...
1. Log on to the central system (in this example, ADMCLNT070).
2. In the Implementation Guide (IMG; transaction SALE), choose Sending and Receiving Systems → Systems in Network → Define Target Systems for RFC Calls (transaction SM59).
The system displays the screen Display and Maintain RFC Destinations.
3. Expand the ABAP connections node and search for the RFC [Seite 3] destination with the name of the child system (such as PRDCLNT324).
If the child system is not in the list, you must create [Seite 3] this RFC destination.
Give the RFC destination the same name as the logical system and enter the name in capital letters.
If the child system is in the list, you must determine the name of the existing system user.
SAP Online Help 04.10.2005
Central User Administration 15
4. To determine the name of the system user, select the child system and choose Edit → Change.
The system displays the RFC Destination <logical system name>.
5. The system user of the child system is in the Logon group box.
To determine the system user of the central system, perform this procedure in a child system.
Creating System Users Use You can use a user of the type Communication to perform dialog-free communication between systems; that is, communication by Remote Function Call [Seite 3].
Prerequisites You have performed the preparations in the section Defining Authorizations for System Users [Seite 3].
If your systems are already configured for ALE distribution, you do not need to create a new system user, but should use the existing system user [Seite 3]. Extend the authorizations of the existing user by assigning the roles specified below to it.
Procedure in the Central System ...
1. Log on to the central system (such as ADM, client 070) with the administration user and choose Tools → Administration → User Maintenance → User (transaction SU01).
2. Create the following system users:
System user CUA_ADM that is used by the central system for the user transfer (transaction SCUG) to call the central system.
System users for the RFC destinations that you created in the child systems (such as CUA_PRD_324 and CUA_CRM_800)
3. Assign all system users an initial password and the user type Communication (CPIC in older releases).
4. Assign the system users for the child systems and the system user CUA_ADM the roles Z_SAP_BC_USR_CUA_SETUP_CENTRAL and Z_SAP_BC_USR_CUA_CENTRAL.
5. Save your entries.
Procedure in the Child Systems ...
1. Log on to each child system and choose Tools → Administration → User Maintenance → User (transaction SU01).
2. Create a system user for the RFC destination that you create in the central system that is used in the central to call the child system (such as CUA_PRD_800).
3. Assign these system users an initial password and the user type Communication (CPIC in older releases).
4. Assign the roles Z_SAP_BC_USR_CUA_SETUP_CLIENT and Z_SAP_BC_USR_CUA_CLIENT to these system users.
5. Save your entries.

SAP Online Help 04.10.2005
Central User Administration 16
Creating an RFC Destination for the Target System Use Application Link Enabling [Extern] (ALE) is based on the use of Remote Function Calls (RFC) between systems. To define the communication in a system landscape, you must define the RFC calls between the central system and the child systems bidirectionally.
Give the RFC destination the same name as the logical system and enter the name in capital letters.
Prerequisites You have defined the logical systems for ALE distribution.
Procedure ...
1. Log on to the central system (in this example, ADM, client 070).
2. In the Implementation Guide (IMG; transaction SALE), choose Sending and Receiving Systems → Systems in Network → Define Target Systems for RFC Calls (transaction SM59).
3. Choose Create.
The system displays the RFC Destination screen.
4. Enter the following data:
Group Box/Field Entry
RFC Destination field Logical system name of the child system in capital letters (such as PRDCLNT324)
Connection Type field 3 (that is, a connection to another SAP system)
Description group box Short text for RFC connection
Logon group box System user of the child system (such as CUA_PRD_324) and its data.
You must create the name of the RFC destination in capital letters.
5. Confirm your entries with ENTER.
6. Choose the option Host Name for Save as.
7. Confirm your entries with ENTER.
8. Specify the name of the SAP system of the child system (such as PRD) in the target system ID field. To do this, overwrite the automatic entry.
9. Specify the message server of the target system in the MessageServer field. To do this, overwrite the automatic entry.
To determine the message server of the child system:
a. Log on to the child system.
b. Choose Tools → CCMS → Control/Monitoring → Control Panel (Transaction RZ03).

SAP Online Help 04.10.2005
Central User Administration 17
c. The message server is displayed in the Services column and contains the letter M (such as DVEBMGS). The server name is in the Server Name column (such as us0033_PRD_60).
d. Enter the first part of the server name (such as us0033) as the message server under MessageServer.
10. If the performance of the normal dialog usage of the end user must not be influenced, choose a logon group in the Group field that is intended for parallel RFC and background processing [Seite 3] and in which no dialog users work.
11. Save your entries.
12. To define the return connection, repeat the procedure in the child system for the central system.
13. When doing so, enter the following data for the RFC connection:
Group Box/Field Entry
RFC Destination field Logical system name of the central system in capital letters (such as ADMCLNT070)
Connection Type field 3 (that is, a connection to another SAP system)
Description group box Short text for RFC connection
Logon group box System user of the central system (such as CUA_PRD) and its data.
Check • To determine whether the network connection between the two systems is functioning
correctly, choose Test Connection.
• To test the authorization of the system user, choose Test → Authorization.
This tests only the system user, the password and a basic authorization. It does not check whether all authorizations required for the CUA exist.
System Users and RFC Destinations with Trusted Systems Use You can increase the security of your system landscape with the Trusted System concept (Trusted Systems: Maintain Trust Relationships Between SAP Systems [Extern]).
You no longer need to enter system users with the associated authorizations in the RFC destination for the RFC [Seite 3] connection from the central [Seite 3] to the child system [Seite 3]. Instead, when creating the RFC destination, specify that the current user is used. The user of the user administrator is therefore used directly for the RFC connection. This means that there is no longer any danger that the authorizations of an explicitly created system user can be misused.
So that the CUA user administration user can access the user data of the child system by RFC, you must also create administration users in all of the child systems, to which you assign at least the roles SAP_BC_USR_CUA_SETUP_CLIENT and

SAP Online Help 04.10.2005
Central User Administration 18
SAP_BC_USR_CUA_CLIENT. If the administrators are to be able to log on to the system directly and should be able work with transactions, you must also assign additional authorizations.
For Trusted Systems, the authorization object S_RFCACL is also checked in child systems (this is not yet contained in the above roles). This ensures that only particular applications (such as SU01) can access the child system by RFC.
You cannot use Trusted Systems with the “current user” for data distribution from the child to the central system (redistribution with distribution parameters) as the end users could change their own user data with transaction SU3 and distribute it to the central system by redistribution. This would also mean that all end users would require change authorization for the user administration in the central system and could also change all other user data.
Although you could use Trusted Systems with an explicitly created system user for redistribution of data from the child to the central system, this brings little advantage. You would have to recreate the authorizations and the system users and expose these to misuse. You would also restrict the usage possibilities of the RFC destination to redistribution, meaning that no other application can use this destination.
We therefore recommend that you use “normal” RFC destinations for the RFC connection from the child to the central system.
Prerequisite • You have set up Trusted System trust relationships [Extern] for the RFC connection
from the central to the child system.
• The administrators have the same user ID in all systems.

SAP Online Help 04.10.2005
Central User Administration 19
System Landscape of the Central User Administration
Logical System ADMCLNT070CUA Central System
System User:• CUA_ADM with password 1 • CUA_PRD with password 2• CUA_CRM with password 3
SAP System ADM
Logical System ADMCLNT075CUA Child System
Cross-client RFC destinationsfor RFC connections to child systems
Normal RFC Destination:Trusted RFC Destination:
SAP System PRDNormal, cross-client
RFC destinationfor connection to the central system
ADMCLNT070
Logical System PRDCLNT800CUA Child System
Logical System PRDCLNT324CUA Child System
SAP System CRMNormal, cross-client
RFC destinationfor connection to the central system
ADMCLNT070
Logical System CRMCLNT800CUA Child System
RFC Destination PRDCLNT324
TrustedRFC Destination PRDCLNT800
TrustedRFC-DestinationPRDCLNT324
TrustedRFC DestinationADMCLNT075
NormalRFC DestinationADMCLNT070
Normal RFC Destination ADMCLNT070User CUA_CRM
Normal RFC DestinationADMCLNT070User CUA_PRD
Normal RFC DestinationADMCLNT070User CUA_PRD
Normal RFC DestinationADMCLNT070User CUA_ADM
•ADMCLNT070•ADMCLNT075•PRDCLNT324 •PRDCLNT800•CRMCLNT800
Example Tasks in SAP System ADM ...
1. In the logical system ADMCLNT070, you create the following system users with the roles SAP_BC_USR_CUA_SETUP_CENTRAL and SAP_BC_USR_CUA_CENTRAL:
CUA_ADM with <password 1>
CUA_PRD with <password 2>
CUA_CRM with <password 3>
2. In the logical system ADMCLNT070, you create the users for the CUA user administrators with the authorizations for user administration; assign these users at least the roles SAP_BC_USR_CUA_SETUP_CENTRAL and SAP_BC_USR_CUA_CENTRAL.
3. You also create users for CUA user administrators in the logical system ADMCLNT075 to which you assign at least the roles SAP_BC_USR_CUA_SETUP_CLIENT and SAP_BC_USR_CUA_CLIENT.
4. Create the following cross-client RFC destinations:
Normal RFC destination without Trusted Systems:

SAP Online Help 04.10.2005
Central User Administration 20
ADMCLNT070 (from the central system to itself) with user CUA_ADM
RFC destinations with Trusted Systems:
ADMCLNT075 with the indicators Current User and Trusted System
PRDCLNT324 with the indicators Current User and Trusted System
PRDCLNT800 with the indicators Current User and Trusted System
CRMCLNT800 with the indicators Current User and Trusted System
Tasks in SAP System PRD ...
1. You also create users for CUA user administrators in the logical system PRDCLNT324 to which you assign at least the roles SAP_BC_USR_CUA_SETUP_CLIENT and SAP_BC_USR_CUA_CLIENT.
2. You also create users for CUA user administrators in the logical system PRDCLNT800 to which you assign at least the roles SAP_BC_USR_CUA_SETUP_CLIENT and SAP_BC_USR_CUA_CLIENT.
3. You create one cross-client RFC destination ADMCLNT070 without Trusted Systems. Use the system user CUA_PRD created in the central system in this RFC destination.
Tasks in SAP System CRM ...
1. You also create users for CUA user administrators in the logical system CRMCLNT800 to which you assign at least the roles SAP_BC_USR_CUA_SETUP_CLIENT and SAP_BC_USR_CUA_CLIENT.
2. You create one cross-client RFC destination ADMCLNT070 without Trusted Systems. Use the system user CUA_CRM created in the central system in this RFC destination.
Creating RFC Destinations for the Target System with a Trusted System Prerequisites You have defined the logical systems for ALE distribution.
Procedure ...
1. Log on to the central system (in this example, ADM, client 070).
2. In the Implementation Guide (IMG; transaction SALE), choose Sending and Receiving Systems → Systems in Network → Define Target Systems for RFC Calls (transaction SM59).
3. Choose Create.
The system displays the RFC Destination screen.
4. Enter the following data:
Group Box/Field Entry
RFC Destination field Logical system name of the child system in capital letters (such as PRDCLNT324)
Connection Type field 3 (that is, a connection to another SAP system)

SAP Online Help 04.10.2005
Central User Administration 21
Description group box Short text for RFC connection
Logon group box Set the Current User indicator.
Security Options group box Set the Trusted System indicator to YES.
Give the RFC destination the same name as the logical system and enter the name in capital letters.
5. Confirm your entries with ENTER.
6. Choose the option Yes for Load Distribution.
7. Choose the option Host Name for Save as.
8. Confirm your entries with ENTER.
9. Specify the name of the SAP system of the child system (such as PRD) in the target system ID field. To do this, overwrite the automatic entry.
10. Specify the message server of the target system in the MessageServer field. To do this, overwrite the automatic entry.
To determine the message server of the child system:
i. Log on to the child system.
ii. Choose Tools → CCMS → Control/Monitoring → Control Panel (Transaction RZ03).
The message server is displayed in the Services column and contains the letter M (such as DVEBMGS). The server name is in the Server Name column (such as us0033_PRD_60).
iii. Enter the first part of the server name (such as us0033) as the message server under MessageServer.
11. If the performance of the normal dialog usage of the end user must not be influenced, choose a logon group in the Group field that is intended for parallel RFC and background processing and in which no dialog users work.
12. Save your entries.
13. To define the return connection, repeat the procedure in the child system for the central system.
14. When doing so, enter the following data for the RFC connection:
Group Box/Field Entry
RFC Destination field Logical system name of the central system in capital letters (such as ADMCLNT070)
Connection Type field 3 (that is, a connection to another SAP system)
Description group box Short text for RFC connection
Logon group box System user of the central system (such as CUA_PRD) and its data.
Check • To determine whether the network connection between the two systems is functioning
correctly, choose Test Connection.
• To test the authorization of the system user, choose Test → Authorization.

SAP Online Help 04.10.2005
Central User Administration 22
This tests only the system user, the password and a basic authorization. It does not check whether all authorizations required for the CUA exist.
Creating the Central User Administration Use You create the Central User Administration (CUA) with this procedure. The following steps are performed automatically in the background:
• The partner profiles are created.
• The corresponding ALE model is created or, in the case of changes, adjusted to the new CUA model.
• The text comparison for roles is performed with the child systems.
Prerequisites You have created the logical systems and RFC destinations.
If you have already created the CUA, and now want to reinclude the child systems in it, execute report RSDELCUA with the Reorganize CUA Tables option in the central system and in the relevant child systems. By doing this, you delete all data that was in the previous CUA about the child systems, ensuring that you avoid inconsistencies when you reconnect the child systems.
Procedure ...
1. Log on to the central system (in this example, ADM, client 070).
2. In the Implementation Guide (IMG, transaction SALE), choose Modeling and Implementing Business Processes → Predefined ALE Business Processes → Cross-Application Business Processes → Central User Administration → Select Model View for Central Administration (transaction SCUA).
3. Enter the name of your distribution model, such as CUA.
4. Choose Create.
5. Enter the name of the child system(s), such as PRDCLNT324.
6. Save your entries.
The Display Logs screen appears.
If you expand the nodes for the individual systems, you will usually see the following messages for each system:
ALE Distribution Model saved
Central User Administration was activated
Text comparison started
If errors occurred, for example, when distributing the ALE model to the child system, the corresponding node is colored red in the system overview. Expand this node to display the error message, such as Error when saving the ALE distribution model in child system &. To display the long text for the message, place the cursor on the message and choose the icon under LTxt in the lower half of the screen (see Analyzing Errors [Seite 3]).

SAP Online Help 04.10.2005
Central User Administration 23
Check ...
1. Log on to the child system (such as PRDCLNT324).
2. In the Implementation Guide (IMG, transaction SALE), choose Modeling and Implementing Business Processes → Predefined ALE Business Processes → Cross-Application Business Processes → Central User Administration → Select Model View for Central Administration (transaction SCUA).
3. To check that the distribution model was distributed, choose Distribution Model → Display Structure.
You can now no longer create user master records in the child systems. However, you can maintain or delete users that already exist in the child system that have not yet been transferred to the central system.
If problems occur, see Checking the Setup of the Central User Administration [Seite 3] and the sections following it for more information.
Setting Up Field Distribution Parameters Use If you are using Central User Administration, you can use the distribution parameters in transaction SCUM to determine where individual parts of a user master record [Seite 3] are maintained.
• In the central system
• Locally in the child system
• In the child system with automatic redistribution to the central system and the other CUA child systems
Every input field of the user maintenance transaction SU01 has a field attribute that you set once in the central system with transaction SCUM during Customizing. As far as possible, you should then not change the field maintenance indicator at all.
If you later change the distribution from Local or Proposal to Global or Redistribution, data inconsistencies can occur.
You must be particularly careful when removing inconsistencies, since data is lost when you switch system-dependent parameters from local to global maintenance and then distribute the users again. The distribution creates the central system status in all child systems. If you have previously maintained system-dependent data, such as the user assignment of roles, this data is unknown to the central system. This means that when you distribute the central system entries, you overwrite the role assignments of the child system. This system-specific data is therefore permanently lost.
To recreate data consistency after changing the field distribution parameters, proceed as follows:
• To maintain cross-system parameter (such as printers) globally rather than locally, set the parameter appropriately and then redistribute the users from the central system to the child systems. This means that the central system status is adopted in all child systems.
• Caution: To maintain system-dependent parameters (such as role or profile assignments) globally rather than locally, you must not redistribute the

SAP Online Help 04.10.2005
Central User Administration 24
users. Instead, you must remove the CUA and set it up again, so that you can copy the users and their system-specific data from the child systems into the central system again. After completely removing the CUA and setting it up again, the field distribution parameters are set to "global" by default. Check these settings before you transfer the users again with transaction SCUG.
The only exception to this is the Locks tab page. You can change the indicators on this tab page at any time without any risk.
Procedure ... ... ...
1. Log on to the central system (in this example, ADM, client 070).
2. In the Implementation Guide (IMG, transaction SALE), choose Modeling and Implementing Business Processes → Predefined ALE Business Processes → Cross-Application Business Processes → Central User Administration → Set Distribution Parameters for Fields (transaction SCUM).
The system displays the User Distribution Field Selection screen, with tab pages of the fields whose distribution parameters you can set. To display additional fields, choose page down.
You can select the following options on the tab pages:
Global You can only maintain the data in the central system. The data is then automatically distributed to the child systems. These fields do not accept input in the child systems, but can only be displayed.
All other fields that are not set to “global” accept input both in the central and in the child systems and are differentiated only by a different distribution after you have saved.
Proposal You maintain a default value in the central system that is automatically distributed to the child systems when a user is created. After the distribution, the data is only maintained locally, and is not distributed again, if you change it in the central or child system.
RetVal You can maintain data both centrally and locally. After every local change to the data, the change is redistributed to the central system and distributed from there to the other child systems.
Local You can only maintain the data in the child system. Changes are not distributed to other systems.
Everywhere You can maintain data both centrally and locally. However, only changes made in the central system are distributed to other systems, local changes in the child systems are not distributed.
3. To maintain the other parameters, too, switch to the other tab pages. The tab pages correspond to those of user maintenance.
4. Save your entries.
The distribution parameters are automatically transferred to the child systems.
Locks Tab Page You can control the distribution of lock data on this tab page, and therefore determine which locks can be set and/or reset in which systems. When you reset locks, you must pay close attention to the lock indicators in the user master record that can be combined in any way you choose, and the functions available in this system, so that you can set the indicators on the Locks tab page appropriately.

SAP Online Help 04.10.2005
Central User Administration 25
A user cannot log on to a child system of a CUA. The local administration removes the lock. However, this removal refers only to a local lock that may exist in the user master record. Global locks, or, if the indicator for Locked due to incorrect logons is set to global, locks due to incorrect logon attempts, are not removed by this. Therefore, if the local administration should be able to remove locks due to incorrect logon attempts, you must not set the indicator for Locked due to incorrect logons to global in transaction SCUM.
To be able to unlock a user from the central system after an incorrect logon attempt or for local locks in a child system, set the indicator everywhere for the lines Unlock incorr. logon and Unlock locally.
The following functions are available in the respective systems:
• Lock globally: This function is only available in the central system. The request to lock or unlock is sent to all child systems and performed there.
• Unlock globally: This function is only available in the central system. The request to lock or unlock is sent to all child systems and performed there.
• Unlock incorrect logon globally: This function is only available in the central system. The request to lock or unlock is sent to all child systems and performed there.
• Lock locally
• unlock locally: This function attempts to remove all three possible lock indicators: Locked due to incorrect logons, global lock, and local lock.
• Unlock incorrect logon locally
Selection on the Locks Tab Page
Field Explanation Global Local Everywhere
Unlock Incorr. Logon
Controls the removal of the indicator Locked due to incorrect logons
Removal of the indicator Locked due to incorrect logon using the unlock globally function is allowed
Removal of the indicator Locked due to incorrect logon using the unlock locally function is allowed
Removal of the indicator Locked due to incorrect logon using the unlock locally function is allowed
Removal of the indicator Locked due to incorrect logon using the unlock globally function is also allowed
Lock Locally
Controls the setting of the locked locally indicator
Setting the indicator locked locally using the lock locally function is allowed
Unlock Locally
Controls the removal of the locked locally indicator
Removing the indicator locked locally using the unlock locally function is allowed
Removing the indicator locked locally using the unlock locally function is allowed
Removal of the

SAP Online Help 04.10.2005
Central User Administration 26
indicator locked locally using the unlock globally function is also allowed
Lock Globally
Controls the setting of the locked globally indicator
Setting the indicator locked globally using the lock globally function is allowed
Unlock globally
Controls the removal of the locked globally indicator
Removal of the locked globally indicator using the unlock globally function is allowed
Removal of the locked globally indicator using the unlock globally function is allowed
Removal of the indicator locked globally using the unlock globally function is also allowed
Recommendations for Other Fields Field Setting
Printer Proposal
Parameters Proposal
Group (Gen.) Proposal
Fields for data that the users maintain themselves
Redistribution
See also:
SAP Note 313945: CUA: Incorrect logon locks not globally reversible
Synchronizing and Distributing Company Addresses Use As company address data has until now been maintained in many systems of the future CUA, you must ensure that at least the central system contains complete information about all valid company addresses. You then distribute this complete company address set to all child systems, meaning that there is a consistent status of company addresses in the entire CUA.
With this procedure, you ensure that every cross-system company address key is unique and that company addresses with the same name contain the same data in all systems of the CUA.
Prerequisites • The CUA is installed and functioning.

SAP Online Help 04.10.2005
Central User Administration 27
• All company addresses have already been created with transaction SUCOMP in the CUA system landscape.
• The company addresses are synchronized from the central system.
Procedure ... ...
1. Clean up the company addresses in all systems with the report RSADRCK2 (in connection with SAP Note 439122). If data inconsistencies are discovered during this process, clean these up manually.
If you set the indicator Test Run (Without Updates), the errors are only displayed. If you actually run the report, the errors are detected and corrected; that is, instead of an incorrect address, the system creates a technically correct address with no content.
2. Log on to the central system: in this example, ADMCLNT070.
3. In the Implementation Guide (IMG, transaction SALE), choose Modeling and Implementing → Predefined ALE Business Processes → Central User Administration → Transfer Users from New Systems (transaction SCUG).
The Central User Administration Structure Display screen appears.
4. Select the first child system for which you want to synchronize the company addresses with the central system, and choose Synchronize Company Addresses in the Central System.
The CUA: Synchronization of the Company Addresses appears, on which the system displays a list comparing the company addresses of the child system that you have selected with those of the central system. All company addresses held either in the central or child system are displayed in the list. The possible address categories are displayed under Overview. By clicking a category, you can jump to the relevant sublist.
5. Process all sublists for the address categories in succession:
Address Categories
In Central System Only These company addresses exist only in the central system. You can distribute them immediately by choosing Distribute to Child System or allow them to be distributed automatically later, during the synchronization.
In Child System Only These company addresses exist only in the child system, but not in the central system. You have the following options:
• If the address concerned is correct and required, add it to the central system by selecting the child system company and choosing Copy from Child System.
• If the address concerned is incorrect or is not required, delete it in the child system with transaction SUCOMP.

SAP Online Help 04.10.2005
Central User Administration 28
Different Company Addresses These company addresses exist in both the central and the child system and have the same company address key, but are differ in the first two fields of the company name. You must therefore check the cross-system address key for consistency. To do this, compare the detail displays for the central and child systems for all of the company addresses listed here, either by double clicking the address or using transaction SUCOMP in the relevant system. The following results are possible:
• The address data is inconsistent, but the company address key relates to the same company in both systems.
Synchronize the company address data as usual, either by selecting the company from the central system and choosing Distribute to Child System or automatically during the distribution of the central system address data to the child systems.
• The company address keys are inconsistent: two different companies are using the same company address key.
Remove the inconsistency in the child system using transaction SUCOMP.
Identical Company Addresses These company addresses exist both in the central and in the child system, and the first two fields of the company name match. You must compare the company address data (for example, you can display the data for an address by double clicking the address, and then display the data for the second address), and choose one of the following options:
• If the data in the child system is more current, select the child system company and choose Copy from Child System.
• If the data in the central system is more current, either select the central system company and choose Distribute to Child System or wait until the data in the child system is automatically overwritten with the data from the central system during the synchronization.
• If there is different, correct, and required data both in the central and in the child system for the same company address, synchronize this data manually in the central system with transaction SUCOMP.

SAP Online Help 04.10.2005
Central User Administration 29
Company Addresses Already Synchronized This is the result display that is only filled during the synchronization. All of the company addresses are originally contained in one of the above categories.
6. Select each of the other child systems of the CUA in turn and perform the comparison with the central system by choosing Synchronize Company Addresses in the Central System.
7. After you have included all correct and required company addresses from the child systems in the central system, choose Back to start the address distribution from the central system.
8. In the central system, choose Distribute Synchronized Company Addresses to Target Systems.
The CUA: Synchronization of the Company Addresses screen appears.
9. Choose Distribute to All Child Systems.
A log appears that displays whether the distribution has been started for each company address.
10. To check the result of the distribution, choose Back and then Synchronize Company Addresses in the Central System.
All company addresses are listed under Company Addresses Already Synchronized with information about the distribution result, which is explained using the Legend.
Result You can now Transfer the Users of a Child System to the Central System [Seite 3].
Synchronizing User Groups Use For you to be able to copy users from a child system and from the central system or to distribute users from the central system to a child system, the user group to which the user is assigned must exist in all system in which the user exists.
Procedure You can create user groups in the following ways:
• Use transaction SUGR to compare the user groups that exist in the relevant system and determine in this way which user groups are missing. Then create these missing groups manually in the system.
• User groups are stored in tables USGRP and USGRPT. As these tables are not Customizing but application tables (master and transaction data), they are not automatically included in a transport request if you make changes. You have the following options:
You enter the missing user groups manually in the central system.
In the system in which the user group data is as complete as possible, set the objects of tables USGRP and USGRPT for a copy transport in transaction SE01. Before you store the objects in the copy transport, manually insert all missing entries in these tables from other systems. Then perform the transport.

SAP Online Help 04.10.2005
Central User Administration 30
• Import SAP Note 395841. In this way, you the user groups can be automatically created at runtime, for example, the user group is created when you copy a user to the central system, if it did not already exist there. If you are distributing a user to a child system in which the relevant user group does not yet exist, the system also displays this.
Transferring Users from New Systems Use If you include a new system in the distribution model selected, you must make sure that the user master records in the new system are transferred to the central system.
Prerequisites You have synchronized the company addresses.
Procedure ... ...
1. Log on to the central system (in this example, ADMCLNT070).
2. In the Implementation Guide (IMG, transaction SALE), choose Modeling and Implementing Business Processes → Predefined ALE Business Processes → Central User Administration → Transfer Users from New Systems (transaction SCUG).
The system displays the Central User Administration Structure Display screen with a tree structure of the systems of the distribution model. The systems with New indicators contain user master records that are not contained in the Central User Administration.
3. If you are setting up a completely new Central User Administration, place the cursor on the central system and choose Transfer Users.
The system displays the following tab pages:
New users These users are not yet contained in Central User Administration. By choosing Transfer Users, you can transfer the selected users into the central system. This transfers all user parameters such as address and logon data, as well as profiles and roles. In the future, the user will be maintained centrally.
Identical users These are users with identical user IDs (that is, their name and user name is the same). The roles and profile data for this user can be transferred to the central system. The user is then distributed and therefore appears as it is stored in the central system. Local data is overwritten.
Different users These user IDs are contained in both the central and the child systems, but with different data.
If in a single case, the users are actually the same user, you can transfer the roles and profile data for the user to the central system. The user is then distributed as it exists in the central system.
If these are two different users, create a new user ID for one user in the central

SAP Online Help 04.10.2005
Central User Administration 31
system, and delete this user in the child system.
Already central users These users are already in the Central User Administration under the same name and are maintained centrally.
4. Select all new and changed users and choose Transfer Users.
5. Perform steps 3 and 4 successively for all child systems from which you want to transfer users.
6. After you have completed the user transfer, remove the roles Z_SAP_BC_CUA_SETUP_CENTRAL and Z_SAP_BC_USR_CUA_SETUP_CLIENT from the system users.
These roles are only required to set up the CUA, but not for its operation. By restricting the authorizations of the system users to the minimum level, you increase the security of your system landscape.
7. Use transaction SCUL to check the distribution of the users after the transfer.
Users that you have not copied to the central system can still be maintained in the child system. This means that the functions Create and Delete are still displayed in the user maintenance. These functions are no longer available only after the complete transfer of all users.
Displaying and Processing Distribution Logs Use You can use the log display (transaction SCUL) primarily to check the status of the IDoc distribution when you change company addresses or users. If you change a company address in the central system of a central user administration (CUA), the address is replicated and a CCLONE IDoc is sent to every child system of the CUA. If you change a user in the CUA central system, its data is also distributed to the child systems assigned to it. Up to three USERCLONExx IDocs are sent for each user:
• User attributes USER
• Profile assignment PROFILE
• Role assignment ACTGRP
You can then see in the result list of the log display whether a user or a company address has been successfully replicated to the child systems.
Displaying Logs ...
1. In the user maintenance (transaction SU01), start the log display by choosing Environment → Distribution Log (transaction SCUL).
The system displays the Central User Administration Log Display screen.
2. Restrict your selection on the Users and Company Address tab pages using characteristics such as receiving system, date and time of last change, and last changed by.
You can choose to take into account only those IDocs that have the status Error, Warning, Unconfirmed, or Successful in one or more IDoc types.

SAP Online Help 04.10.2005
Central User Administration 32
By default, the deleted system assignments are not displayed. To display users that have been deleted in the child system, you must activate this option using the checkbox Display Deleted System Assignments.
3. Choose Execute.
The result list appears, and is structured as follows: the IDoc type is displayed as the first subentry below the user and child system node. The status of the distribution of this IDoc type is then displayed:
Unconfirmed IDocs (gray)
O: Creation/change started
A: Deletion started
Processed IDocs
S: Successfully created/changed (green)
D: System assignment for the user deleted (green)
W: Created/changed with warnings (yellow)
W: Created/changed with errors (red)
The number of the IDoc with which the relevant data was sent is displayed in the third position, followed by the short text for the status message, the date and time of the last change and the user name of the last user to change it.
Processing the Result List You can display the result list by user or by system and then later switch this setting with the button System View/User View. You can also display the list sorted alphabetically or by distribution status, and then change this setting later with the button Alphabetical Sequence/Sequence by Distribution Status.
You can select any users or company addresses from the result list and redistribute them by choosing Distribute. If you redistribute users, a dialog box appears, in which you determine which IDocs are to be sent.
Process the entries in the result list depending on the distribution status displayed: ...
• Distribution with Errors (red)
The IDoc could not be updated. The error messages are listed. You must correct the errors and redistribute the user or the company address.
• Distribution Unconfirmed (gray)
The IDoc was not processed by the child system. This can be due to the fact that
The IDoc was not distributed to the child system (depending on the ALE settings of the central system in transaction WE20)
The IDoc has not yet been processed in the child system (depending on the ALE settings of the child system in transaction WE20)
There is an error in the distribution itself. Check whether central user administration is correctly installed and whether the RFC connections, including the system user, its password, and authorizations (see Defining Authorizations for System Users [Seite 3]) from the central system to the child system and from the child system to the central system are correctly set up.
In the first two cases, you can use the Status Monitor for ALE Messages (transaction BD87) to check the distribution status of the IDoc in the central system and in the child system.
• Distribution with Warnings (yellow)

SAP Online Help 04.10.2005
Central User Administration 33
It was possible to update the IDoc. However, there are warnings. Check the messages, and remove the cause of the warnings. Then redistribute the user or the company address.
• Distributed Error-Free (green)
The IDoc was successfully updated.

SAP Online Help 04.10.2005
Central User Administration 34
Operating Central User Administration This section combines information that affect functions that have special features when you are using Central User Administration (CUA) compared to their operation without CUA.
User Maintenance with Active Central User Administration With active Central User Administration, you still use transaction SU01 to maintain users, however user maintenance is somewhat different:
• Whether fields are ready for input or not depends on the distribution attributes that you assigned to the field in transaction SCUM. For more information, see the Setting Distribution Parameters for Fields [Seite 3].
Only the fields that may be maintained in the system are ready for input.
You can only change a field that is to be maintained globally in the central system. This field does not accept input in the child systems.
• In the central system, the user maintenance transaction also displays the tab page Systems. Here you enter the systems to which users are to be distributed. To display the systems for the corresponding distribution model, use the possible entries help. Each time you save, the system distributes the user data to these listed systems.
• The Roles and Profiles tab pages each contain an additional column for each entry, specifying the system for which the user is assigned the role and/or profile.
With the Text comparison from child sys. Pushbutton on the Roles and Profiles tab pages, you can update the texts for roles/profiles that you have changed, for example, in the child systems. The texts in the child systems are stored temporarily so that they are available in the central system. As the comparison requires some time, it is performed asynchronously and the current texts may not be available immediately.
You can only assign profiles to users for the systems in which they are distributed. If you enter a new system when you assign profiles to users, the system displays a warning that the user was assigned a new system. The entry is automatically transferred into the tab page Systems. After this, the user master record is also distributed in the new system.
During text comparisons from child systems, the names of the generated profiles for the role are not copied to the central system, that is, only assigned profiles are displayed on the Profiles tab page (such as SAP_ALL or SAP_NEW), but no generated profiles of the roles.
All user master records are created in the user master records. Users can then only log onto the central system if the central system itself is entered in Systems tab page of the corresponding user master record.
You can display the global user data from a child system in the User Information System [Extern].

SAP Online Help 04.10.2005
Central User Administration 35
Further Information As well as the authorizations already mentioned, you also need another authorization in the central system for object S_USER_SYS. You can only assign new systems to a new user with this authorization.
When a user is deleted in the central system, the system entry for the user is retained until the deletion is confirmed. If an error occurs, you can repeat the deletion by canceling the system (in the child system).
In the child systems, the RFC user is output as the last person to make changes. Choose an appropriate name when you set up the RFC user.
Assigning Passwords with Active Central User Administration Use With active Central User Administration, you can, as the administrator, system-specifically (that is, client-specifically) change passwords using the Change Password button on the initial screen of user maintenance (transaction SU01).
Assigning a New Initial Password ...
1. Select the systems in which you want to assign the password.
2. Either enter a new password in the fields New Password and Repeat Password or choose the Generate Password button.
3. Choose Enter.
Deactivating a Password ...
1. Select the systems in which you want to deactivate the password.
2. Choose the Deactivate Password button.
If you have also selected the central system, the system automatically removes this selection. To deactivate the password in the central system, you need to select the central system again.
3. Choose Enter.
Sending User Master Data to a Child System Use You can use the report RSCCUSND from the central system of Central User Administration (CUA) to synchronize the master data of selected users with a child system of the CUA. The report sends the master data (including role and profile assignments) to a child system of the CUA.
If master data exists in the child system for the user sent, it is overwritten.

SAP Online Help 04.10.2005
Central User Administration 36
Procedure ...
1. Start report RSCCUSND (for example, using transaction SA38).
2. In the Receiving System field, specify the child system to which you want to send the user data.
3. You can use the fields User and User Group to restrict the number of users.
4. Specify the data that you want to distribute under Distribution Options.
5. Choose Execute.
Performing a Text Comparison with Target System Specification If you have created, deleted or imported roles and/or profiles in a child system of the Central User Administration (CUA), there is initially a different data status in the central and child systems. You do not need to perform a text comparison for all child systems, but can clean up the data specifically for the affected child system as follows:
• In the central system, you use transaction SU01 to execute the Text Comparison from Child System function and specify the changed child system as the target system.
• You send the changed role data from the child system in which you have made the role maintenance (transaction PFCG) changes, to the central system. To do this, choose Environment → Text Comparison for CUA Central System in transaction PFCG of the child system.
• You execute the report SUSR_ZBV_GET_RECEIVER_PROFILES in the central system using transaction SA38, or schedule it regularly as a background job to collect the changed roles and profiles from the child system. You can specify the receiving system using the input help. If you have only made changes in one child system, you only need to specify this system.
• You execute the report SUSR_ZBV_GET_RECEIVER_PROFILES in the child system using transaction SA38, or schedule it regularly as a background job to send the changed roles and profiles to the central system. You can leave the input fields empty, as the data of the child system is always sent to the central system, regardless of the entries.
Error Analysis This section introduces various error sources in the CUA and provides solutions to concrete errors.
See also:
SAP Note 159885 CUA: Collective note for Central User Administration

SAP Online Help 04.10.2005
Central User Administration 37
Checking the Setup of Central User Administration You can use the following checks to determine whether your Central User Administration (CUA) is correctly set up:
Checking the Distribution Model ... ...
• In the Implementation Guide (IMG, transaction SALE) in the central and child systems, choose Modeling and Implementing Business Processes → Maintain Distribution Model and Distribution Views (transaction BD64).
• Check whether the entire model is displayed.
• If the entire model is not displayed the model is incorrectly installed. Check the target systems in the RFC destinations and perform the steps in transaction BD64 [Seite 3].
Checking the CUA Model
• In the Implementation Guide (IMG, transaction SALE) in the central and child systems, choose Modeling and Implementing Business Processes → Predefined ALE Business Processes → Cross-Application Business Processes → Central User Administration → Select Model View for Central Administration (transaction SCUA).
• Check if the name of the model is displayed and, if appropriate, if all child systems are displayed.
If the name of the model is not displayed, it is not installed correctly.
If not all child systems are displayed, the model is incorrectly installed.
• Delete the CUA with report RSDELCUA and install the CUA again.
Creating a Test User in the Child System
• In the child system, call user maintenance transaction SU01.
• Check whether the Create New User function still works.
If you can still create users, the CUA distribution model is incorrectly set.
Creating a Test User with Roles
• Create a test user in the central system with transaction SU01. ...
Enter the logical name of the central system and all child systems on the Systems tab page.
On the Roles tab page, choose the Text comparison from child systems pushbutton.
The text comparison is necessary to tell the central system the names of the roles and profiles in the child systems. You can only display and select roles from child systems in the central system from the possible entries help after this step. You cannot assign roles from child systems manually without a text comparison.
• Assign a role to the test user in each logical system in the system group. To do this, enter all logical systems in the System column and the role that you want to assign to the test user in the corresponding system in the Role column.
• When you save, the distribution process is automatically triggered and the user is created in the specified systems with the appropriate role assignments.
• Check the result in transaction SCUL.

SAP Online Help 04.10.2005
Central User Administration 38
Creating a Test User with Profiles Assign a role to the test user in each logical system in the system group. To do this, enter all
logical systems in the System column and the role that you want to assign to the test user in the corresponding system in the Role column.
When you save, the distribution process is automatically triggered and the user is created in the specified systems with the appropriate role assignments.
• Create a test user in the central system with transaction SU01. ...
Enter the logical name of the central system and all child systems on the Systems tab page.
On the Profiles tab page, choose the Text comparison from child systems pushbutton.
The text comparison is necessary to tell the central system the names of the roles and profiles in the child systems. You can only display and select roles from child systems in the central system from the possible entries help after this step. You cannot assign roles from child systems manually without a text comparison.
• Assign a manually created profile to the test user in each logical system in the system group. To do this, enter all logical systems in the System column and the profile that you want to assign to the test user in the corresponding system in the Profile column.
• When you save, the distribution process is automatically triggered and the user is created in the specified systems with the appropriate profile assignments.
• Check the result in transaction SCUL.
Assign a manually created profile to the test user in each logical system in the system group.
To do this, enter all logical systems in the System column and the profile that you want to assign to the test user in the corresponding system in the Profile column.
When you save, the distribution process is automatically triggered and the user is created in the specified systems with the appropriate profile assignments.
Check the result in transaction SCUL.
See also:
• SAP Note 333441: CUA: Tips for Problem Analysis
• Composite SAP Note 159885 CUA: Collective note for Central User Administration
Creating an ALE Model Including Partner Profiles Manually Use The new transaction SCUA automatically creates the appropriate ALE model with the partner profiles for the CUA model. If you want to change the ALE model independently of the CUA model or errors occurred during the creation of the ALE model with transaction SCUA, you can also perform the following steps manually.
Procedure ...
1. Creating the ALE Distribution Model [Seite 3]
2. Generating Partner Profiles [Seite 3]
3. Distributing the Model View [Seite 3]

SAP Online Help 04.10.2005
Central User Administration 39
Creating the ALE Distribution Model Use The ALE distribution model [Extern] defines which applications in your distributed systems communicate with each other and which types of data are distributed. You require a separate ALE distribution model for a Central User Administration (CUA).
In the central system, you define the structure of your Central User Administration in the model view, which you then distribute to the child systems.
Two types of data are distributed in the ALE distribution model of the CUA to be defined:
• User master data (including assigned roles and profiles)
• Company addresses
You require two methods in the distribution model to distribute user data and company addresses. These methods are realized using BAPIs of the business objects USER and UserCompany with the method clone.
Prerequisites You have defined the logical systems and RFC connections for ALE distribution.
Procedure ...
1. Log on to the central system (in this example, ADM, client 070).
2. In the Implementation Guide (IMG, transaction SALE), choose Modeling and Implementing Business Processes → Maintain Distribution Model and Distribute Views (transaction BD64).
3. Switch to change mode.
4. Choose Create Model View.
5. Enter the following data in the Create Model View dialog box:
A description of the model view (such as Central User Administration) in the short text field.
A technical name in the Technical Name field (such as CUA).
6. Choose Continue and create both methods.
7. To create the distribution method Clone for the business objects USER and UserCompany, choose Add BAPI in each case.
Note that your entries are case-sensitive.
Enter the following data for the distribution method Clone of the business object USER:
Field Entry
Model view CUA (technical name of the view)
Sender/Client (Sending system) ADMCLNT070
Receiver/Server (Receiving system)
PRDCLNT324
Object name/Interface USER (in capital letters)
Method Clone
Enter the following data for the distribution method Clone of the business object UserCompany:
SAP Online Help 04.10.2005
Central User Administration 40
Field Entry
Model view CUA (technical name of the view)
Sender/Client (Sending system) ADMCLNT070
Receiver/Server (Receiving system)
PRDCLNT324
Object name/Interface UserCompany (Note: case-sensitive)
Method Clone
8. Save your entries.
The following message is displayed: Distribution model has been saved.
Generating Partner Profiles Use The partner profiles define the conditions for the interchange of data in an ALE environment with a trading partner using the IDoc interface. To communicate with a partner using the IDoc interface, you must have a partner profile.
You first generate the partner profiles in the central system for all child systems. In a second step, you can change a partner profile in the child system (for example, if you change the output mode from immediate output to background program, or from background program to immediate output).
Procedure ...
1. Log on to the central system.
2. In the Implementation Guide (IMG, transaction SALE), choose Modeling and Implementing Business Processes → Maintain Distribution Model and Distribution Views (transaction BD64).
3. Select your distribution model.
4. Choose Environment → Generate Partner Profile (transaction BD82).
5. Enter the required data:
Field Entry
Model view Name of the model view in capital letters (such as ZBV)
Partner system If you include a new child system in the CUA, specify the logical system name (such as PRDCLNT324) Otherwise, leave this field empty so that the CUA is distributed to all systems.
Version 3
Package size 1 (With immediate output, every individual IDoc is processed immediately. The package size is therefore automatically set to 1.
Output mode Immediate output (For information about output using a background program, see Generating Partner Profiles for Active Background Processing [Seite 3]).

SAP Online Help 04.10.2005
Central User Administration 41
You can use the Package Size attribute to determine how many IDocs are sent with a background program for each RFC operation.
6. Choose Execute.
The system displays the Log for the Generation of the Partner Profile.
7. Check whether the partner profiles were correctly created in the Checking Partner Profiles [Seite 3] section.
See also:
• SAP Note 399271: CUA: Tips for Optimizing Performance of ALE Distrib.
• Correcting Errors in Partner Profiles [Seite 3]
Checking Partner Profiles You have generated the partner profiles without an error being displayed in the log. We nevertheless recommend that you check the partner profiles with the following procedures, especially when the SAP systems in your Central User Administration (CUA) have different release statuses.
Check Technical Consistency of Partner Profile ...
1. After you have generated the partner profiles, choose Environment → Change Partner Profile (transaction WE20) in both the central and the child system.
The Partner Profiles screen appears.
2. Expand the Partner Type LS node.
3. Select the system to be checked (such as PRDCLNT324) and choose Check ( ).
The system displays the Select Partner dialog box, in which the name of the system and partner type are automatically entered.
4. Choose Execute.
The system displays the Display Log screen, on which the result of the check is displayed in the appropriate colors (see color legend).
5. To display a detailed list of the check results, choose Edit → Display Long Text.
If an error occurs, you can start the corresponding Customizing transaction directly by double clicking the error message, and can correct the error there.
Check the Message Type USERCLONE in the Central System ...
1. Log on to the central system (in this example, ADMCLNT070).
2. Call transaction WE20.
The Partner Profiles screen appears.
3. Choose the Partner Type LS (Logical System) folder, and choose the child system (such as PRDCLNT324).
4. In the group box, call USERCLONE in the Message Type column in the Outbound Parameters group box by double clicking it.
5. Check whether the basis type of the message type USERCLONE corresponds to the release status of your central and child system (See SAP Note 389426). The following message types exist:

SAP Online Help 04.10.2005
Central User Administration 42
Basis Type Release
USERCLONE01 4.5
USERCLONE02 4.6B
USERCLONE03 4.6C
USERCLONE04 610 and higher
For example, if your central system has a release status of SAP R/3 4.6C and a child system SAP R/3 4.6B, define USERCLONE02 for this partner profile.
To provide the greatest possible number of functions, the highest possible Basis type, that is supported by both the child and central systems, is entered. Therefore, if you enter Basis type USERCLONE03 and this entry is automatically changed to USERCLONE04, this means that both the central and the child system already support USERCLONE04.
6. If an incorrect Basis type is used, correct the error as described in the Procedure for an Error in the Central System section of Correcting Errors for Partner Profiles [Seite 3].
Check the Process Code of Inbound Processing in the Child Systems ...
1. Log on to the child system (in this example, PRDCLNT324).
2. Call transaction WE20.
The Partner Profiles screen appears.
3. Expand the Partner Type LS (Logical System) folder, and choose the central system (such as ADMCLNT070).
4. In the Inbound Parameters group box, choose the USERCLONE option in the Message Type column.
5. If the value of the process code is BAPP, change it to BAPI.
As of SAP R/3 4.6C you can use BAPP, while BAPI is valid for all releases as of SAP R/3 4.5.
Correcting Errors in Partner Profiles Procedure for an Error in the Central System ...
1. Log on to the central system (in this example, ADMCLNT070).
2. Call transaction WE20.
The Partner Profiles screen appears.
3. Choose the Partner Type LS (Logical System) folder, and choose the child system (such as PRDCLNT324).
4. Check if USERCLONE appears in the Message type column in the Outbound Parameters group box.

SAP Online Help 04.10.2005
Central User Administration 43
If not, this is the problem, and you must enter a Basis type.
If yes, the Basis type is incorrect, and you must change it.
In both cases, switch to change mode, and choose Add ( ).
i. The Partner Profiles: Outbound Parameters screen appears.
ii. Enter the following data:
Field Entry
Message Type USERCLONE
Receiver Port Select from input help.
Output mode Select Pass IDocs immediately
Basis Type for example: USERCLONE02 (See note)
USERCLONE01: For SAP R/3 4.5 USERCLONE02: For SAP R/3 4.6B USERCLONE03: For SAP R/3 4.6C, Support Package in accordance with SAP Note 389426. USERCLONE04: For SAP Web Application Server 6.10 and higher
Use the USERCLONEXX that is understood by the involved systems in the landscape (by this central and this child system). For example, if your central system has a release status of SAP R/3 4.6C and a child system SAP R/3 4.6B, define USERCLONE02 for this partner profile.
iii. On the Postprocessing: Authorized Agent tab page, enter the user ID of the ALE administrator in the Agent field:
Type: US (User)
Agent: ID of the administration user
Language: EN
Distributing the Model View Prerequisites You have created the ALE distribution model and generated and checked the partner profiles.
Procedure ...
1. In the Implementation Guide (IMG, transaction SALE), choose Modeling and Implementing Business Processes → Maintain Distribution Model and Distribution Views (transaction BD64).
2. Place the cursor on the model view.
3. Create the distribution model for every child system by choosing Edit → Model View → Distribute in the central system.
The system displays a dialog box in which the relevant child systems are selected.
4. Choose Continue.

SAP Online Help 04.10.2005
Central User Administration 44
The system displays a log, for example with the entry Target system PRDCLNT324 – Model view CUA has been created.
Other Error Sources Company Addresses of the Active CUA Are Inconsistent ...
1. Run the report RSADRCK2 in the central system.
2. Use transaction SUCOMP to create the new company addresses, which are automatically distributed to the child systems.
3. Assign the new company addresses to the users with transaction SU10, with which the users are automatically distributed to the child systems.
Users and Assignments Are Not Distributed to the Child Systems ...
1. Check whether the correct outbound or inbound mode is selected: Immediate sending of the outbound IDocs in the central system and immediate update of the inbound IDocs in the child system.
...
a. Call transaction WE20 in the central system.
b. Select the partner type LS (logical system), and select the partner system or child system in which the problem occurred.
c. To check whether the output mode is selected as expected, call the option USERCLONE by double clicking it in the Outbound Parameters group box.
2. Check whether and why the IDocs were not executed. ...
a. An error is displayed in transaction WE05.
b. Call transactions SCUL and SM58 and check the tRFC calls that have not been executed.
c. You can see there why the tRFC calls were not executed.
Users and Company Addresses Are Not Distributed to the Child Systems In an active CUA landscape, you want to maintain users or company addresses in a child system or redistribute users and company addresses from the central system to the child systems. However, the corresponding users or company addresses in the child system remain unchanged. The entries in the log of transaction SCUL have the status Distribution unconfrimed. In the central system, although transaction BD87 shows that all USERCLONE or CCLONE IDocs were sucessfully sent to the child system, transaction BD87 in the child system shows that none of the send IDocs was received. This can occur if the child system is configured as a central Integration Server.
As of SAP Web AS 6.20, a system can be configured as a central Integration Server (IS). This IS does not recognize incoming IDocs. This leads to problems, if the IS is attached to an active CUA as a child system, since all changes to users or company addresses are distributed from the central to the child sytems using USERCLONE or CCLONE IDocs. ...
1. Determine whether the child system is an Integration Server.
a. Start transaction SXMB_ADMIN.
b. Execute the node Integration Engine Configuration.
If the entry Integration Server is displayed in the Role of the Business System field, the system is configured as a central Integration Server.

SAP Online Help 04.10.2005
Central User Administration 45
To change this configuration, choose Edit → Change Global Configuration Data, and set a different value in the Role of Business System field. Then save your entries.
2. Include the USERCLONE and CCLONE IDocs in table IDXIDOCINB in the child system. You can do this in the following ways:
Import the Support Package from SAP Note 845644 into the relevant child system. Start transaction SCUA in the central system, switch to change mode, and choose Save. The child system in question is automatically configured at every save so that it recognizes all of the versions of USERCLONE and CCLONE IDocs in the child system. We recommend this procedure for customer systems.
Execute the report IDX_SELECT_IDOCTYP_WITHOUT_IS in the child system that is configured as the central Integration Server and successively add all versions of the USERCLONE and CCLONE IDocs manually.
User Assignments to Roles and Profiles Are Retained in the Central System You have deleted these assignments in a child system, for example by transport, but the central system is not informed of the deletions. Use report SUSR_CUA_CONSISTENCY_CHECK to remove these inconsistencies. The report first performs a Text Comparison from the Child System (see Performing a Text Comparison with Target System Specification [Seite 3]). It then corrects all erroneous assignments of roles or profiles to users, in which the user or a role or profile no longer exists in some child systems. ...
1. Start the report SUSR_CUA_CONSISTENCY_CHECK in the central system using transaction SA38.
2. Enter the child system(s) affected in the Receiving system field.
3. Enter the RFC user for the child system(s) in the User field.
4. Choose one of the following options:
Display Only: This is a test mode that displays a list of the proposed corrections.
Checklist for Correction: You can check the proposed corrections, and delete if appropriate.
Correction (for background processing): The report performs all corrections directly.
Cleaning Up Data for a Child System Removed from the CUA You have removed a child system from your CUA and now want to delete all data for this system in the CUA landscape. ...
1. Start the report RSDELCUA in the central system using transaction SA38.
2. Choose Reorganize CUA Tables, and then set the Test indicator.
3. Choose Execute.
The system then displays a list of the entries to be deleted.

SAP Online Help 04.10.2005
Central User Administration 46
Activated Background Processing To optimize the ALE distribution of the Central User Administration, you can perform the outbound and inbound processing of IDocs in the background (see Background Processing: Concepts and Functions [Extern]).
Optimizing IDoc Outbound Processing During the tests, it may be useful to temporarily set Transfer IDOCs immediately. However, if you have a large number of parallel dialog processes for IDocs in the central and child systems for mass processing in transactions SU10, PFCG, and PFUD, use the following settings for outbound processing in transaction WE20:
• Transactional RFC (tRFC)
• Package size 60
Select the package size so that as many as possible, but not more than 4000, segments build a package (total size under 4 MB).
• Collect IDocs
Collect IDocs means that a regular background job to be scheduled for report RSEOUT00 packs the IDocs into tRFC calls with the maximum package sizes. The last package is usually not full, but is sent anyway.
The tRFC status messages are updated by a job for report RBDMOIND. Transaction SCUL also displays the open tRFC calls of the CUA (see also transaction SM58).
You can delete unsent, obsolete tRFC calls with report RSARFC01 (see SAP Note 371068).
Optimizing IDoc Inbound Processing As every sent IDoc requires at least one work process in the receiving system, performing the inbound processing in the background is advantageous if:
• You send a very large number of IDocs at the same time and want to optimize the performance
• Want to perform the processing serially
• Want to restrict to a particular application server
Proceed as follows: ...
1. In the receiving system, set inbound processing to Processing in background in the partner profiles with transaction WE20.
2. Schedule Report RBDAPP01 as a Background Job [Extern] to process the IDocs (see also SAP Note 399271).
The report passes all inbound IDocs to the application for processing, if they meet the selection criteria, and have the following status:
Status 64, IDoc is ready for transfer to the application
Status 66, IDoc is waiting for preceding IDoc (Serialization)
Serial IDoc Inbound Processing in the Background Schedule the report RBDAPP01 for IDoc inbound processing for normal CUA operation with dialog users as a periodic job with a high repetition frequency (such as every 5 minutes) and the following selection:

SAP Online Help 04.10.2005
Central User Administration 47
• Message types USERCLONE and CCLONE
• Process in parallel: No
The IDoc packages are transferred to the application in sequence. This means that the background job occupies only one work process on the application server.
Parallel IDoc Inbound Processing in the Background If you want to process a very large amount of user data by mass processing (for example, for the user transfer with transaction SCUG or when comparing the role assignments of HR org with transaction PFUD), it may be useful to schedule the job with the following selection:
• Message types USERCLONE and CCLONE
• Package size 3
• Process in parallel: Yes
A free dialog work process is occupied for the inbound processing of the application on the application servers of the specified server group for each IDoc package (asynchronous RFC); that is, the packages are processed in parallel. If you have selected a large number of IDoc packages, almost all dialog work processes of the application server are occupied by the IDoc processing (two processes remain free; see SAP Note 84716). The server group should therefore only contain servers that are not used by dialog users.
As the report RBDAPP01 does not display a message in the case of termination, we recommend that you schedule a job step for report RBDAPP01 without parallel mode after a job step for report RBDAPP01 with parallel mode. This means that the IDocs that were not processed by the first job step have a logged termination (dialog message or message in job log).
Changing Partner Profiles with Active Background Processing Use If you perform the IDoc processing in the background [Seite 3], you must change the partner profiles in the child systems as the distribution model that you created in the central system with the generated partner profiles is not distributed immediately.
Prerequisites You have created the ALE distribution model in the central system and have generated the partner profiles.
Procedure ...
1. Log on to the child system.
2. In the Implementation Guide (IMG, transaction SALE), choose Modeling and Implementing Business Processes → Maintain Distribution Model and Distribution Views (transaction BD64).
3. Select your distribution model.
4. Choose Environment → Generate Partner Profile (transaction BD82).
5. Enter the required data:

SAP Online Help 04.10.2005
Central User Administration 48
Field Entry
Model view Name of the model view in capital letters (such as ZBV)
Partner system Logical system name of the central system (ADMCLNT070)
Version 3
Package size 60
Inbound parameters/Processing
Triggered by background program (Update by background program for large transfers)
You can use the Package Size attribute to determine how many IDocs are sent for each RFC operation.
6. Choose Execute.
Creating a Background User Use If you want to perform IDoc inbound processing in the background, you require a background user in every child system that you can use instead of your own user name to schedule the background jobs in transaction SM37.
Procedure ...
1. In the child system, choose Tools → Administration → User Maintenance → User (transaction SU01).
2. Create a background user in accordance with the naming convention for system users (such as CUA_PRD_BACK).
3. Assign the user type System to the user, and deactivate the password (see Logon Data Tab Page [Extern]).
4. Assign the role Z_SAP_BC_USR_CUA_CLIENT_BATCH to the user.
5. Save your entries.

SAP Online Help 04.10.2005
Central User Administration 49
Removing Central User Administration You have the following options for removing Central User Administration:
• Removing a Child System from Central User Administration [Seite 3]
Restrict Authorizations of System User
Delete Child System from ALE Distribution Model
Delete Message Types of Partner Profiles
Report RSDELCUA
• Removing Central User Administration Completely [Seite 3]
Restrict Authorizations of System User
Delete ALE Distribution Model
Delete Partner Profiles
Report RSDELCUA
Removing a Child System from Central User Administration Use If a system is no longer required in the system landscape, or the central system is inactive and a user must be maintained, remove the child system from Central User Administration (CUA).
Procedure in the Central System ...
1. Log on to the central system.
2. Run report RSDELCUA (for example, using transaction SA38).
The system displays the screen Delete Entire Central User Administration. The name of the distribution model is displayed under Central User Administration.

SAP Online Help 04.10.2005
Central User Administration 50
3. In the Delete group box, choose the Child system option, and enter the child system to be removed from the CUA (for example, using input help).
4. Set the Test indicator, and choose Execute.
The system displays an overview of the data to be deleted. You can jump to transaction SE16 by double clicking.
5. If you are happy with the test result, choose Back and deselect the test indicator. Then choose Execute.
The system displays an overview of the deleted data.
6. In transaction WE20, under Partner profiles for Partner Type LS, delete the message types CCLONE and USERCLONE for the receiving system (child system).
If there are no longer any other message types, you can completely delete this partner profile. However, you can then no longer distribute the distribution model to the child system deleted from CUA. This means that you must also perform steps 3 and 4 in the Procedure in Child System.
7. In the Implementation Guide (IMG, transaction SALE), choose Modeling and Implementing Business Processes → Maintain Distribution Model and Distribution Views (transaction BD64).
8. In change mode, delete the methods for the child system.
9. Save your entries.
10. Distribute the distribution model by choosing Edit → Model View → Distribute and select the child system that you have just deleted in the selection on the dialog window.
11. Check whether the child system was deleted from CUA using the transaction SCUA.
12. If there are no other CUA child systems in the SAP system that contains the child system that is to be removed from the CUA, change the system user in transaction (such as CUA_PRD), by removing the role Z_SAP_BC_USR_CUA_CLIENT on the Roles tab page. If this means that the user is no longer assigned any roles or any profiles, you can assume that it is not used for any other purpose, and can delete it.
As the RFC destinations that you created along with CUA may be used for other ALE connections, you should not delete the RFC destinations, but rather only remove the roles with CUA authorizations from the system user used for CUA.
Procedure in Child System ...
1. Delete the data for the sending system (central system) in transaction WE20. ...
If only the automatically created message type SYNCH remains, you can completely delete the partner profile. However, “empty” partner profiles of this type do not cause any disruption. If other message types are still entered, the partner profile is still being used in other ways, and may not be deleted.
If you have distributed the changed distribution model in the central system to the child system, you no longer need to perform steps 3 and 4.
2. In the Implementation Guide (IMG, transaction SALE), choose Modeling and Implementing Business Processes → Maintain Distribution Model and Distribution Views (transaction BD64).

SAP Online Help 04.10.2005
Central User Administration 51
3. In change mode, select the model (such as CUA), and choose Delete.
If the system does not now display a dialog box asking: Model view CUA may not be changed in this system. Delete CUA?, perform the following steps:
i. Call the Edit model view dialog screen by double clicking the model.
ii. Change the Maintenance system to the local system name (such as PRDCLNT324).
iii. Choose Continue.
iv. Choose Delete again.
Confirm the system query Model view CUA may not be changed in this system. Delete CUA? with Yes.
4. In the child system, change the system user (such as CUA_PRD_324) in transaction SU01 by removing the role Z_SAP_BC_USR_CUA_CLIENT on the Roles tab page. If this means that the user is no longer assigned any roles or any profiles, you can assume that it is not used for any other purpose, and can delete it.
As the RFC destinations that you created along with CUA may be used for other ALE connections, you should not delete the RFC destinations, but rather only remove the roles with CUA authorizations from the system user used for CUA.
Result You have removed the child system from Central User Administration. If you want to include it in CUA again, you must perform a user transfer again.
Removing Central User Administration Completely Use You can remove Central User Administration (CUA) again, simply by performing the reverse of the set up first in the central system and then in all child systems. The first three steps (transactions SCUG, SCUM, and SCUA) are combined in the report RSDELCUA. You then cancel settings in transactions WE20 and BD64, and if necessary also in transaction SM59.
Procedure in the Central System ...
1. Log on to the central system.
2. Run report RSDELCUA (for example, using transaction SA38).
The system displays the screen Delete Entire Central User Administration. The name of the distribution model is displayed under Central User Administration.
3. In the Delete section, choose the Complete CUA, and set the Test indicator. Then choose Execute.
The system displays an overview of the data to be deleted. You can jump to transaction SE16 by double clicking.
4. If you are happy with the test result, choose Back and deselect the test indicator. Then choose Execute.
The system displays an overview of the deleted data.
5. In transaction WE20, delete the data about the sending system (central system) and the receiving systems (child systems); that is, under Partner profile for Partner type LS,

SAP Online Help 04.10.2005
Central User Administration 52
delete the message types CCLONE and USERCLONE (such as ADMCLNT324 and PRDCLNT324) for the central and child systems.
If this means that only the default message type SYNCH remains, you can also delete the partner profiles completely.
6. In the Implementation Guide (IMG, transaction SALE), choose Modeling and Implementing Business Processes → Maintain Distribution Model and Distribution Views (transaction BD64).
...
a. In change mode, select the model (in this example, CUA), and choose Delete.
b. Choose Save.
7. Change the system user (such as CUA_PRD) in transaction SU01 by removing the role Z_SAP_BC_USR_CUA_CENTRAL on the Roles tab page. If this means that the user is now assigned absolutely no authorizations, you can assume that it is not used for any other purpose, and can delete it.
...
As the RFC destinations that you created along with CUA may be used for other ALE connections, you should not delete the RFC destinations, but rather only remove the roles with CUA authorizations from the system user used for CUA.
Procedure in Child System ...
1. Delete the data for the sending system (central system) in transaction WE20.
If only the automatically created message type SYNCH remains, you can completely delete the partner profile. However, “empty” partner profiles of this type do not cause any disruption. If other message types are still entered, the partner profile is still being used in other ways, and may not be deleted.
2. In the Implementation Guide (IMG, transaction SALE), choose Modeling and Implementing Business Processes → Maintain Distribution Model and Distribution Views (transaction BD64).
3. In change mode, select the model (in this example, CUA), and choose Delete.
If the system does not now display a dialog box asking: Model view CUA may not be changed in this system. Delete CUA?, perform the following steps:
a. Call the Edit model view dialog screen by double clicking the model.
b. Change the Maintenance system to the local system name (in this example, PRDCLNT324).
c. Choose Continue.
d. Choose Delete again.
e. Confirm the system query Model view CUA may not be changed in this system. Delete CUA? with Yes.
4. In the child system, change the system user (such as CUA_PRD_324) in transaction SU01 by removing the role Z_SAP_BC_USR_CUA_CLIENT on the Roles tab page. If this means that the user is no longer assigned any roles or any profiles, you can assume that it is not used for any other purpose, and can delete it.
As the RFC destinations that you created along with CUA may be used for other ALE connections, you should not delete the RFC destinations, but rather only remove the roles with CUA authorizations from the system user used for CUA.

SAP Online Help 04.10.2005
Central User Administration 53
Result You have deleted the CUA.
The users of the child system remain as users in the CUA and are globally locked there. This means that these users can never be completely deleted.
If you recreate CUA and want to include the child system in CUA again, you must perform a user transfer again.

SAP Online Help 04.10.2005
Central User Administration 54
Glossary
Application Link Enabling (ALE) Integration technology (middleware) that integrates business processes between SAP Systems and between SAP Systems and external systems. Data is exchanged between application systems in a controlled manner and consistency is maintained.
See also:
ALE: Implementation and Administration [Extern]
ALE Landscape One system in the Central User Administration ALE environment is defined as the central system. The links to the child systems emanate from the central system. The child systems are not linked to each other This means that the central system is also the child system.
ALE Integrated System Systems that are connected using ALE. The application systems of an ALE integrated system are loosely linked. The data is exchanged asynchronously, ensuring that the data arrives in the recipient system, even if this is not available when the data is sent. Synchronous connections are only used by ALE to read data.
User Master Record Record that contains important master data for a user in the SAP system. The user master record contains the assignment of one or more roles to the user. In this way, a user menu and the corresponding authorizations for the activities contained in the user menu are assigned to the user. Only users who have a user master record can log on to the system.
Authorization Authority to execute a particular action in the SAP system. Each authorization references an authorization object. It defines one or more values for each authorization field contained in the authorization object. Authorizations are combined in profiles, which are entered in a user’s master record.
The user can work in the SAP System after a successful authorization check.
Authorization Profile Element of the authorization concept. Authorization profiles give users access to the system. They contain authorizations, which are identified using the name of an authorization object and the name of an authorization. If a profile is specified in a user master record, the user is assigned all of the authorizations defined in this profile.

SAP Online Help 04.10.2005
Central User Administration 55
Background Processing Processing that does not take place on the screen. Background processing enables you to process data in the background while executing other functions in parallel on the screen. Although background processes are not visible to the user, they have the same priority as online processes.
IDoc Standard SAP format for electronic data interchange between systems (Intermediate Document). Different message types (such as delivery confirmations or purchase orders) normally represent different specific formats, the IDoc types. However, multiple message types with related content can be assigned to one IDoc type: For example, the IDoc type ORDERS01 transfers the “logical” message types ORDERS (purchase order) and ORDRSP (order confirmation).
System User User type for dialog-free communication between systems. System users are used, for example, for setting up RFC destinations.
Logical System System in which applications sharing a common data basis run. In SAP terms, a logical system is a client in a database. Messages are exchanged between logical systems.
Partner Profile Definition of parameters for the electronic interchange of data with a trading partner using the IDoc interface. To communicate with a partner using the IDoc interface, you must have a partner profile.
Profile See authorization profile.
Profile Generator Tool for generating roles. The authorization administration generates a role in the profile generator based on transactions, reports, or Internet links that contains the activities for the work area of an employee.
Remote Function Call (RFC) RFC is an SAP interface protocol based on CPI-C. It is used to simplify the programming of communication processes between systems. RFCs enable you to call and execute predefined functions in a remote system - or in the same system. They manage the communication process, parameter transfer, and error handling.

SAP Online Help 04.10.2005
Central User Administration 56
Role Describes the activities of a user and allows the display of user-specific menus in the SAP system. Predefined or self-created roles can be assigned to any number of users. Roles also contain the authorizations with which users can access the reports, Web-based applications, and so on that are contained in the menu.
Child System Central User Administration (CUA) system. With active Central User Administration, you can only delete or create child system users in the central system. You can change users that already exist in the child system, if the settings that you choose for the distribution of the data (transaction SCUM) allow this.
Distribution Model Model that describes the ALE message flow between logical systems. The relationships between logical systems, message types, BAPIs, and filters are defined in the distribution model. Applications and the ALE layer user the distribution model to determine receivers and to control the data distribution.
Central User Administration (CUA) Maintenance of users in a central system. A system group includes several SAP systems with several clients. The same users are often created and the same roles assigned in each client. Central User Administration is designed to perform these tasks in a central system and distribute the data to the systems in the system group.
Central System Central User Administration (CUA) system. You administer users for all systems of the Central User Administration and their authorizations in the central system. With active Central User Administration, you can only create and delete users in the central system and not in the connected child systems. You can also lock and unlock users, assign roles to users, and so onfrom the central system, in accordance with the settings that you have chosen in transaction SCUM for the distribution of the data.