Susannah - Websin back, slip this stitch back to right hand needle. If you are using beads, slip one...
8
Susannah
Transcript of Susannah - Websin back, slip this stitch back to right hand needle. If you are using beads, slip one...
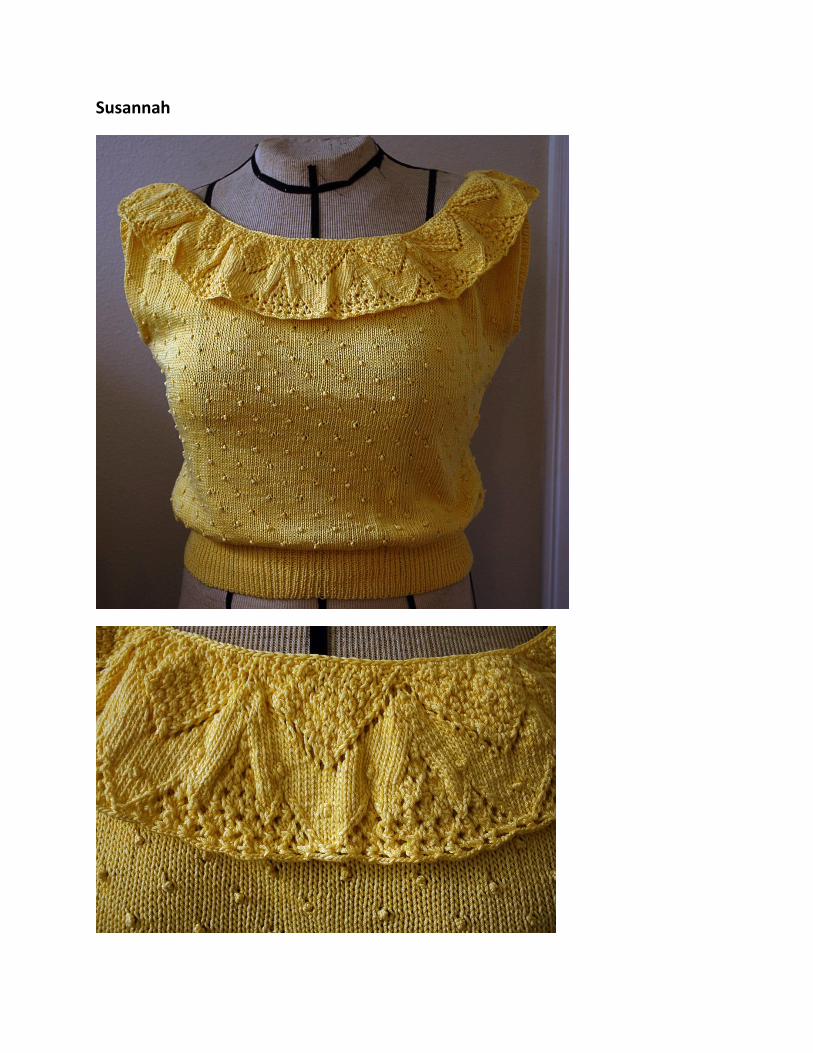
Susannah
Materials:
Approximately 1125 yds (1030 m) mercerized cotton fingering yarn
Shirring elastic (this is to snug up the ribbing. If you’re using a bouncy yarn like wool, you may not need
this). FrayCheck™ or similar product to keep the ends of the elastic from raveling.
Needles: US 2 and 3 (3.75 and 3.25 mm) circular. You’ll probably want two lengths, about 24” (60 cm)
and a longer pair for the ruffle, about 40” (100cm).
Steel crochet hook: size 1 (3.00 mm)
Stitch markers
Optional: Size “E” beads (to substitute for bobbles if you prefer a little fancier look or you just hate
making bobbles). If you are using beads, you will need to thread one bead for each ruffle pattern repeat
onto your yarn before starting to knit the ruffle. See bobble instructions below for more information.
You may also want to add tear-drop, spear or dagger beads to the edging of the ruffle for a really dressy
look.
Optional: 1 ½ yards (1.4 m) very narrow ribbon. Use this if you want an adjustable neckline.
Gauge:
29 sts x 40 rows per 4 inches (10cm)
Pattern instructions will make finished bust size of 37 1/2” (95 cm) to fit 36” (91.5 cm) bust This will
provide a small amount of positive ease—just enough to keep the bobbles from appearing farther
apart at the bustline than in the rest of the sweater.
Abbreviations:
PM: place marker
SM: slip marker
SORM: start of row marker
MB: make bobble (see below)
k: knit
k2 tog: knit next two stitches together
k3 tog: knit next three stitches together
psso: pass slipped stitch over the left-most st on the right-hand needle.
ssk: slip two sts separately as if to knit, insert left needle into two slipped stitches from left to right, knit
these two stitches together. Or; slip one st as if to knit, k1, psso
M1R: Make 1 right (see http://www.knittinghelp.com/videos/increases for instructions)
Bobble Instructions:
For the bobble shown as  in the pattern charts or as MB in the written instructions, k1, p1, k1 in same st, turn, knit these 3 stitches together. Turn and with yarn in back, slip this stitch back to right hand needle. If you are using beads, slip a bead onto the stitch before knitting.
For the bobble shown in the ruffle chart as Ã, you will make a bobble between two sts. To do this, lift the horizontal bar between the stitches onto the left needle from back to front. K1, p1, k1 in this “stitch”. Turn, knit 4 together (the three stitches just made plus the next one on the needle. Turn and with yarn
in back, slip this stitch back to right hand needle. If you are using beads, slip one bead up to the needles before making the next stitch. This will place the bead on the horizontal bar between stitches.
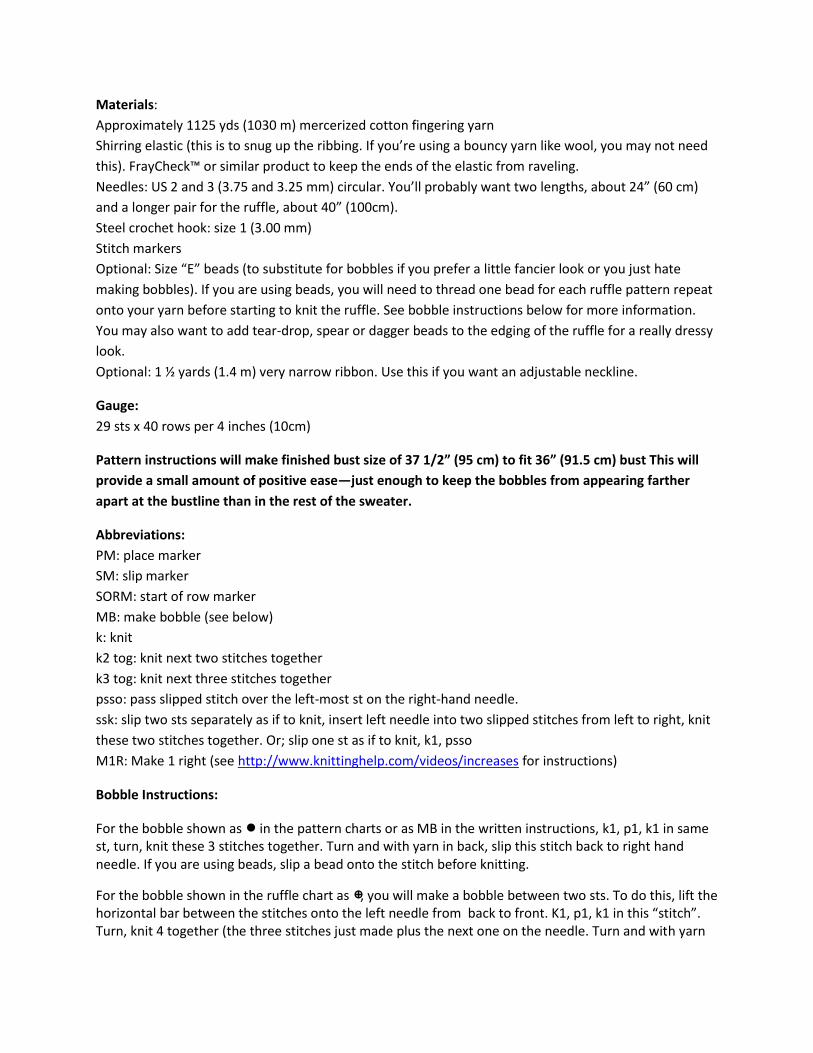
Body Pattern Chart:
(Hint: If you’re having trouble keeping your bobbles lined up while shaping, you can add a stitch marker
just before the bobble stitch. Because the bobbles are offset on every other bobble row, it can be
helpful to use one color of stitch marker for bobbles on one row, and another color for the bobbles on
the offset rows)
Ribbing:
On smaller needles, c.o. 130 sts, PM then c.o. 130 more sts, PM. (260 sts) The markers indicate where
the sides of the top are. It’s helpful to use two different colors of marker so you can easily distinguish
the start of row marker (SORM0.
Note: Any cast on will work, but I used Barbara Walker’s “picot” cast on from p. of the Second Treasury
of Knitting Patterns.This is the same as the “Picot Ribbing” cast on from Cap Sease’s Cast On, Bind Off.
Join to work in the round.
Work 2 ¼ inches (5.7 cm) of 1 x 1 ribbing.
Switch to larger needles.
Body:
Note: Work throughout in pattern stitch from “Body Pattern Chart.”
Rows 1- 4: knit even.
NOTE: Rows 5 and 6 together make the first decrease “row.” The first decrease is at the end of row 5;
the remaining decreases are in row 6. This method makes the decreases line up when knitting in the
15
10
5
1
Key
Bobble (or place bead)
K

round better than they would if you made all the decreases on row 6. After these initial instructions, the
pattern will be written as if all decreases or increases were on the same row, but you should continue to
make the first decrease or increase on the preceding row.
Row 5: k4, MB, continue across to last two sts before SORM, making a bobble on every 8th st. ssk, SM,
Row 6: k1 k2 tog, k to last two sts before next marker, ssk, SM, k1, k2 tog, k to end. (256 sts)
Rows 7-24 Continue working pattern chart, being sure your bobbles are lining up correctly. Do decrease
row on rows 12, 18, and 24. (244 sts)
Work even until piece measures 3” (7.6cm) from top of ribbing.
Next row: k to SORM, M1R, SM.
Next row: k1, M1L, k to next marker, M1R, SM, k1, M1L, continue to end. (248 sts)
Continue working pattern chart , knitting an increase row every 6th row, 7 more times. (272 sts)
Work even until piece measures 9 ½” (24 cm) from top of ribbing. If you are short- or long-waisted, you
can knit fewer or more rows for a custom fit.
Armhole Shaping:
Note: the armholes are minimally shaped, being more of a slit than a true armhole. This creates a slight
cap-sleeve effect. Front and back are identical. From this point on, you will be working flat. Continue
working body pattern chart as you work the top of the sweater.
Row 1: k1, k2 tog, k to within 3 sts of next marker, ssk, k1. Join new yarn. Remove marker. With the new
yarn, k1, k2 tog, k to within 3 sts of SORM, ssk, k1, remove marker. At this point, you’ll be working front
and back simultaneously, with a separate strand of working yarn for front and for back. Repeat the row
instructions for each half. If you prefer, you can work front and back separately, by placing the stitches
for the unworked half on a piece of waste yarn and working that half later. At this point, you should
have 134 sts for each half.
Work 4 rows even.
Decrease row : k1, k2 tog, k to within 3 sts of the end of the row, ssk, k1. (132 sts for each half)
Work 4 rows even, repeat decrease row. (130 sts for each half)
Work even until piece measures 5” (12.7 cm) from start of armholes. (From this point on, there is no
further shaping for the armholes.
Neck Shaping:
Work 35 sts, b.o. 60 sts, join new yarn, work 35 sts.

Working both sides simultaneously, decrease 1 st at each neck edge 24 times on each row. (11 sts
remaining for each shoulder). Knit 3 rows even.
Join shoulders using 3-needle bindoff (See http://www.knittinghelp.com/video/play/three-needle-bind-
off-continental for instructions).
Armhole bands:
Working from right side of work and starting at the under arm, pick up 102 sts around armhole edge.
Work in k1, p1 ribbing for ¾” (2 cm).
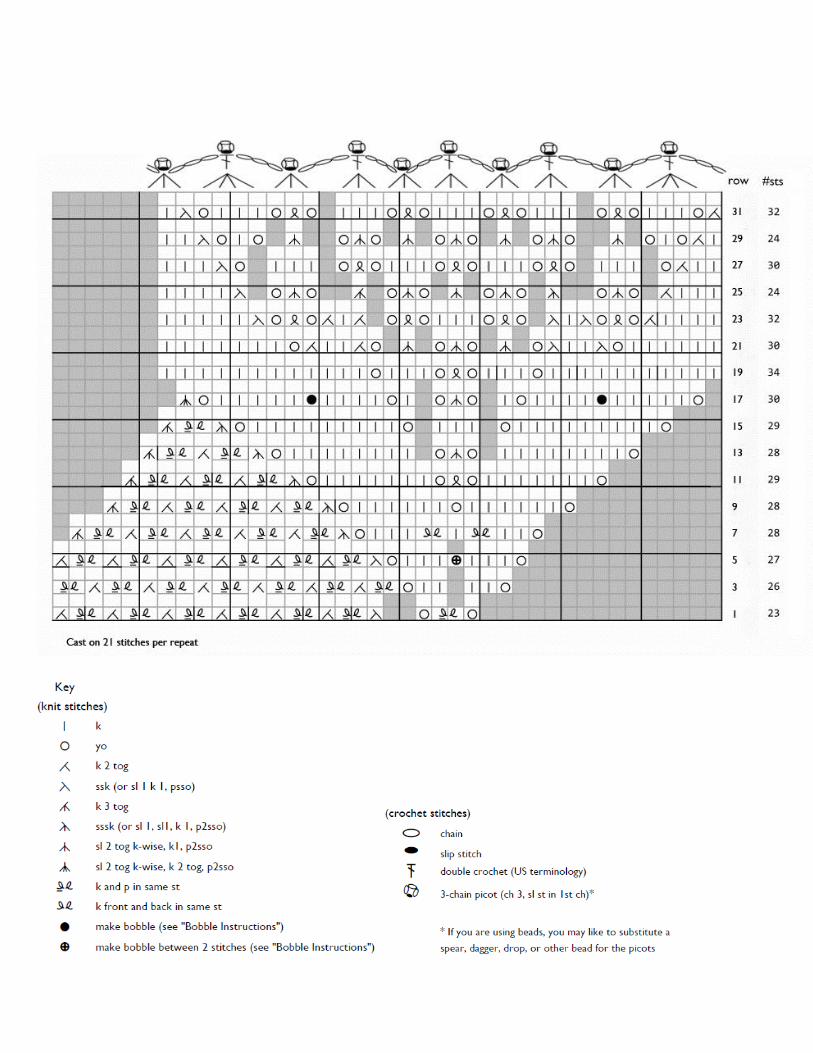
Neck Ruffle:
Cast on 315 stitches (15 repeats), place marker and join to knit in the round, being careful not to twist
stitches. Knit one row in stockinette. Check again to be sure your stitches are not twisted; this is your
last chance to fix it if they are. Follow ruffle chart (on the next page)through row 32, ending when there
are two more stitches left to finish the round. Note: gray boxes in the chart are “no-stitch” boxes.
Pretend they aren’t there. They are inserted to align the rows so you can see the design more clearly.
The number of stitches per repeat are shown in the column at the far right. Note that the number of
stitches varies from row to row. To help you keep track and find mistakes more easily, place a marker
between each repeat.
How to interpret the crochet bind-off chart:
Insert the crochet hook through the next 3 sts on the left-hand needle. Draw a loop through with the
working yarn. Add a bead or work the picot. Ch 3, dc into the next 4 sts on the left-hand needle. Add
bead or work picot. Continue following the chart, picking up 3 or 4 sts from the left-hand needle, as
shown on the chart. Fasten off and weave in the end.

Join ruffle to neckline of the sweater:
The ruffle and neckline may not be exactly the same length. This is unimportant; you just want to
distribute any extra fabric as evenly as you can. Lay the ruffle right-side up along the neckline of the
sweater (right-side out). Pin, clip, or baste the cast-on edge of the ruffle to the sweater, distributing the
fabric evenly.
Cut a length of yarn approximately 1 ½ yards (1.4 m) if you are not using ribbon. Lay the ribbon or length
of yarn along the neckline. This will be your drawstring to allow you to adjust the neckline. Fasten on
and work a row of single crochet (US terminology) through both sweater and ruffle, working over the
length of yarn or ribbon and leaving a length of yarn or ribbon free at the beginning of the row. If you’re
using ribbon and you want the bow in front, start at the center front and leave the tail toward the
outside of the sweater. If you are using yarn as your drawstring, you’ll want the end toward the inside of
the sweater. In this case, start at center back or at the shoulder. Try on the sweater and pull on the ends
of the drawstring to adjust the neckline to your taste. For a yarn drawstring, tie a secure knot on the
inside of the sweater and using a tapestry needle, pass the ends of the yarn back through the row of
single crochet. For a ribbon drawstring, tie a nice bow.
Elasticize the Ribbing
Cotton, linen, silk, rayon, bamboo and other non-stretchy yarns will make for a very loose and non-
stretchy ribbing. If you are using such a yarn (recommended for a summer sweater!), you’ll need to give
the ribbing some help. You can use shirring elastic to keep your ribbing snug and stretchy. Shirring
elastic tends to ravel badly when cut, so put a dot of FrayCheck™ on the ends before beginning and let it
dry. You can clip this end off later to avoid a hard bead if it bothers you.
Thread a tapestry needle with the shirring elastic. I don’t cut the elastic from the spool until I’ve finished
a row, but you can if you like. Just cut a length that’s enough longer than your desired finished ribbing
circumference to allow you to tie a knot. Working from the inside and starting at the first row of ribbing,
insert the needle through just one leg of each of the stitches that present as knit stitches (see photo
below). This will ensure your elastic won’t show on the right side. Keep your elastic fairly slack—it’s easy
to draw up the ribbing too much. Work all the way around. Tie a secure knot and, leaving ends
approximately 5/8” (1.6cm) long, cut the elastic. Put a bead of FrayCheck™ on the cut ends and let it
dry.
Repeat every 4 or five rows making sure that the tension is the same and reversing direction for each
row. End with the last row of ribbing.
With ordinary sewing thread and needle, tack through each knot for extra security and tack down the
ends of the elastic, first snipping off the bead of FrayCheck™ if desired.

Elasticized Ribbing
Schematic