
SurgiNet Table of Contents Documentation/Viewing · SurgiNet Table of Contents...
20
1 SurgiNet Table of Contents Documentation/Viewing Instructions-SurgiNet Detailed Instructions accessed from within PowerChart. Page Number How to access SurgiNet 2 Checking in a Patient 3 Intraoperative Documentation 4 Perioperative document layout 5 Documenting a Case 8 2 nd Circle RN Charting Requirements in PCM/IView 13 Adding Additional Segments 14 Medication Administration 15 Discontinuing a Segment 16 Pick List Completion 16 Finalizing the case 17 Unfinalizing the case 18 Display Case Summary/Clinical Notes 19 Perioperative Doc Toolbar 20
Transcript of SurgiNet Table of Contents Documentation/Viewing · SurgiNet Table of Contents...

1
SurgiNet Table of Contents
Documentation/Viewing
Instructions-SurgiNet Detailed Instructions accessed from within PowerChart.
Page Number
How to access SurgiNet 2
Checking in a Patient 3
Intraoperative Documentation 4
Perioperative document layout 5
Documenting a Case 8
2nd Circle RN Charting Requirements in PCM/IView 13
Adding Additional Segments 14
Medication Administration 15
Discontinuing a Segment 16
Pick List Completion 16
Finalizing the case 17
Unfinalizing the case 18
Display Case Summary/Clinical Notes 19
Perioperative Doc Toolbar 20

2
How to access SurgiNet
Log into PowerChart
1. Log into PowerChart.
2. From the OB Beds Tracking Shell, select your patient.
3. To open SurgiNet, either
a. Click the Perioperative link icon located on the toolbar or
b. Double click the patient indicator column to open the patient’s chart.
4. The Case Selection window opens.
5. Click Retrieve

3
Checking in a Patient
Appointment Check-In
If a patient has been Checked-in, the check in box in front of their name will have a check in it.
(Click to refresh for most up-to-date information button on Case Selection screen.)
Note:
o If you open the patient chart before checking the patient in, the Perioperative Doc components cannot
be viewed. The patient must be checked in to view the Perioperative Doc.
To Check-in a patient:
1. Highlight patient name on case selection screen
Compare Patient Information you have with Patient info in Check In window.
Review the FIN NBR to be sure the Case is attached to the correct Encounter prior to checking the
pt. in.
The Person Name, MRN, Arrive Date, DOB, Enc Type, Nurse Unit should agree with the info you
have.
There should be no Discharge Date.
Do Not check the patient in with only a temporary account number.
If the FIN NBR and related info is not Good, the FIN NBR must be corrected
and the case rescheduled before checking the patient in.
2. Click Check-in button or click checkbox in front of patient’s last name.
3. The Check In window will open.
If the correct encounter has not
yet been selected, the Set ENC
button will be available. Click
SET ENC and select the correct
encounter.
4. Click OK
4
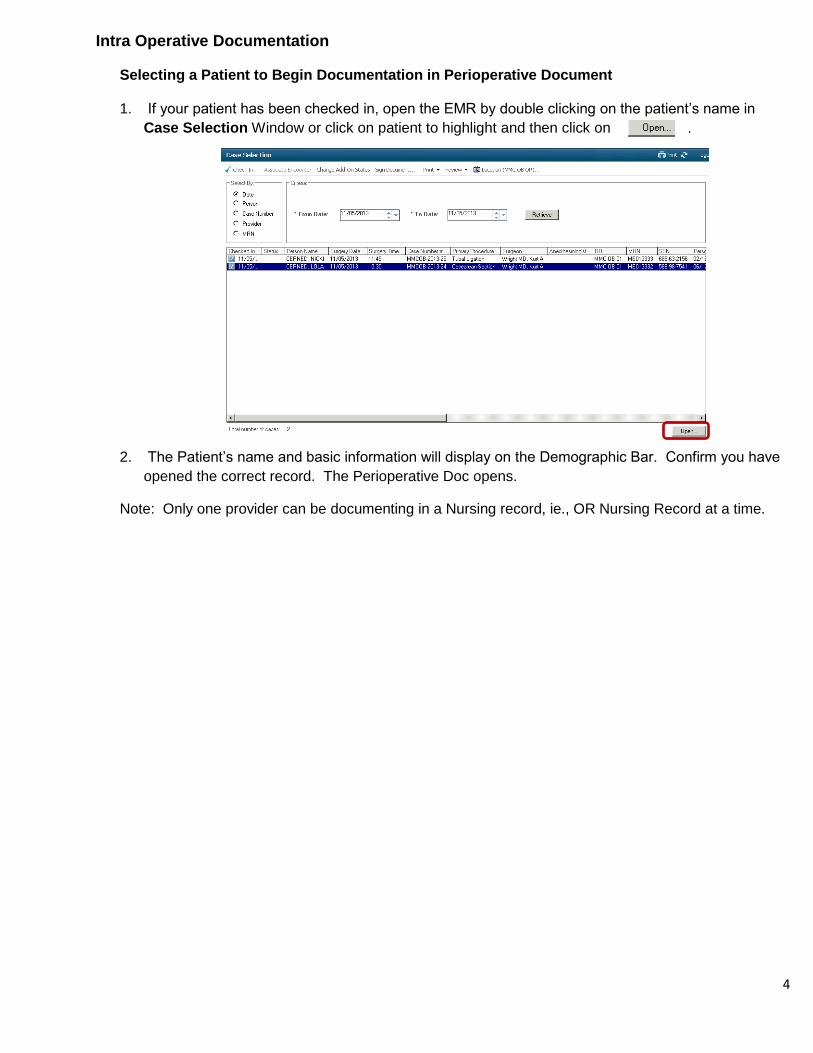
Intra Operative Documentation
Selecting a Patient to Begin Documentation in Perioperative Document
1. If your patient has been checked in, open the EMR by double clicking on the patient’s name in
Case Selection Window or click on patient to highlight and then click on .
2. The Patient’s name and basic information will display on the Demographic Bar. Confirm you have
opened the correct record. The Perioperative Doc opens.
Note: Only one provider can be documenting in a Nursing record, ie., OR Nursing Record at a time.

5
Perioperative Document Layout
Navigator Details
Red exclamation
indicates required
segment.
Segments with a green
checkmark indicate
charting has been done
and required fields have
been completed.
Round circle (bubble) in
front of the segment
section indicates it
contains default
information. Click that
segment section to add
the default information.
The record
automatically opens to
the first segment,
which has one page.
Segment
Segment Section
Unopened segments
will be in bold print.
Pick list is used at the end of the case to
indicate materials used and needing refill
indicated on the Pref. Cards.
Add Segment icon
List box Case Attendance page
Segment Page Numbers Comment Field
Click Next to move to
next segment.
Add Segment

6
Document Layout Details
1. The record automatically opens to the first segment.
The red exclamation mark indicates a required segment
o These segments cannot be discontinued
o The segments that have a green checkmark have already been opened and
charted and the required fields have been completed.
o The round circle (bubble) in front of the segment section indicates it contains default
information. Click that segment section to add the default.
o Grey boxes are required fields.
The unopened segments will be in bold print.
Some segments have multiple pages.
Completing the List Box
1. List box documentation is present throughout segments.
2. The data that appears in the box is entered onto the Nursing Record.
3. Information defaults in from the scheduled appointment.
4. Complete Fields. Required fields have a grey box to the left of the field.
To move from one page to the next page, click button, click in the desired field.
The TAB key will also advance the cursor to the next field for you within the current page
selected.
In fields with a down arrow to the right of the field, click on the arrow and click o highlight
the correct entry.
Click Next when all fields of a segment list box are complete.
The Add Entry box will appear.
Click Yes to add the entry. This will transfer your entries to the list box and will take you
to the next segment.
Modifying a List Box Entry
1. Use modify to change or add documentation to an existing line in the list box.
2. Click to highlight the line you wish to modify in the top list box.
3. Change the appropriate field(s).
4. Click Modify.

7
Deleting a List Box Entry
1. Click to highlight the unwanted line
in the list box on the top of the screen.
2. Click Remove.
3. Click Yes when asked if you want to delete the highlighted entry.
Using Clear
Clear deletes entries in the fields used to fill the list box before they have been added or modified.
Use Clear when what you started to enter is not correct.

8
Documenting the Case
Case Attendance
This is a multiple page segment using a list box to document everyone present in the OR for the procedure. The surgeon is defaulted in as the first entry from scheduling. The Provider’s name will appear in the List Box.
1. Enter/search for the name in the Case Attendee field.
2. Enter Circulator-Primary from the Role Performed dropdown box.
3. Click ADD
4. Continue to add everyone present in the OR for the procedure (except observers such as the father)
You will see the names in the list box.
Note:
To add observers such as the father, click Case Documentation Comments at the bottom of
the window. Then type the names in the free text field.
5. Leave Time In and Time Out fields blank.
Times will default in for each attendee as the patient in room and out of room times are
documented in the Case Times Segment. If left blank the Patient In room and Out room times
will default in and be documented as case attendees In room and Out room times.
6. The Procedure such as Cesarean Section will come from data entered in the Scheduling.
7. Click Next
8. Click Yes to the Add Entry window
Comment/free text
Field

9
Counts Verification-2 page section
1. Click the Initial Count segment component on the navigator to auto populate the document.
2. Click Next to go to the 2nd page.
3. Click Yes to the Add Entry window. The information will be
Added to the list box for that segment.
Note: if additional sponges, etc. are added during the case, Keep track of those as usual on your paper count sheet.
Case Times
1. Click in the Patient in Room field and the current time and date will default in.
Adjust as necessary using the arrows to the right of the time/date fields.
2. Case Times has only one page.
3. Click Next. You will move to the next segment.
Allergy Information-2 pages
1. Click Allergies Reviewed segment to default information.
2. Click Next
Case Times
1. Click in Anesthesia Start time field. Adjust time as needed. Click Next.

10
Patient Positioning-2 Pages
1. Click Left Tilt default.
2. Click Next.
3. Click Yes to Add Entry window.
Note: The Pre Care and Post Care Activity sections describe the OR Plan of Care Outcomes being
addressed. Click Pre or Post Care Activity to view the details.
Patient Care Devices
1. Click SCD’s Cesarean default
2. Click Next
3. Click Yes to Add Entry window.
Skin Assessment
1. Click Normal Cesarean default
2. Click Next.
3. Click Yes to Add Entry window.
Skin Prep-2 page
1. Click Skin Prep Betadine gel default
Note: If patent is allergic to betadine gel change prep agent to chlorhexidine
2. Click Next
3. Click Yes to Add Entry window.

11
Cautery
1. Click OBOR #1 or OBOR #2 default
2. Click Preference Card Comments (bottom on window)
3. Scroll down to locate Bovie: cut: and coag with are unique settings for each provider.
4. Enter the Bovie coag and cut settings in the appropriate fields. 5. Click Next 6. Click Yes to Add Entry window
Protocol (Sign In) 1. Click Sign In Complete default
2. Click Next
Protocol (Time Out) 1. Click Sign Out Complete default 2. Click Next
Case Times 1. Enter Surgery Start Time 2. Click Next.
Birth Times
1. Click Baby A 2. Enter Delivery Time 3. Enter Sex of Infant 4. Click Next. 5. Click YES to Add Entry window
Counts Verification
1. Click 2nd Count default 2. Click Next. 3. Click Yes to Add Entry window

12
General Case Data
1. Ask provider/anesthesia the following details and enter these into the document.
ASA Class
Case Level
Wound Class
2. Enter Specialty
3. Inquire if Post op diagnosis is the same as the pre op diagnosis. Click Same as Pre op. If post op diagnosis is different enter per provider’s statement.
4. Click Next
Counts Verification
1. Click 3rd Count default
2. Click Next
3. Click YES to Add Entry window.
Surgical Procedures
1. Click procedure in List Box
2. Information will default into fields below.
3. Enter any Additional Procedure Details.
4. Enter Surgical Services for
Obstetrics and Gyn.
5. Click Next
6. Takes you to page 2, verify
Wound class is correct.
7. Click Next
8. Click YES to Add Entry window
Case Times
1. Enter Surgery Stop Time
Page 2

13
2. Click Next
Final Counts Verification
1. Click Final Count Completed default
2. Click Next
Dressing/Packing
1. Click appropriate dressing/packing default
2. Click Next.
3. Click YES to Add Entry window.
Protocol (Sign Out)
1. Click Sign Out Complete default
2. Click Next
Case Times
1. Enter Anesthesia and Patient Out of Room date/time
2. Click Next
3. Patient Out of Room date/time will auto populate the attendees also leaving the OR.
Departure from OR
1. Click PACU Cesarean Section default
2. Click Next
2nd Circle RN Charting Responsibilities
It is the responsibility of the 2nd circulating RN to chart in IView in Mom’s chart on the following data:
1. OB Delivery Band-Labor and Delivery Section
Delivery Type
Date/time of birth
Maternal Complications
Chart Delivery Dr. and RN, 2nd Circle RN, Anesthesiologist
Newborn Delivery Data Section-Required for Birth Record
Apgar Score
Gender
Complete Newborn details

14
Adding Additional Segments
1. Click the on the tool bar.
2. Add Segment window will open.
The list on the left contains all the segments Available that have not been used for this patient. The list
on the right contains the Selected segments for this patient’s record.
3. On the Available list, click and highlight to choose the appropriate segments that are needed.
o Surgical Irrigation would be most commonly used for OB
4. Click the button and the segment will move to the Selected list.
5. Click OK.
6. The Surgical PowerChart Segment list on the OR Nursing Record on the far-left side of the screen will show
the new segment in bold print.
There will be no default.
It will Not have a checkmark in front of it.
Click on the new segment to complete the documentation.

15
Medication Administration
This is a segment using a list box to enter documentation.
1. Click Time Med Administered and the current time/date will auto fill.
2. Click on the drop down arrow to the right of the Medication field to display medication options
built into the preference cared for this procedure. Only one medication can be added per entry.
3. Complete remaining fields including the Outcome Met.
Fields with a grey box are required fields.
4. Click Add.

16
Discontinuing a Segment
1. If you have nothing to document in a segment, discontinue it.
2. All unused segments must be discontinued before finalizing the document.
3. Highlight segment on the display list, right click, and click Discontinue.
4. The discontinued segment will be dithered out and look like this when discontinued.
Pick List Completion
Before finalizing the document you must indicate the materials used and needing to be filled on the
Pick List. If you try to finalize the record without completing the Pick List documentation the following
error will occur. The Pick List will open once you click OK to the alert.
1. Right click on bolded encounter number.
2. Click Fill
3. Click Use
4. Click Save
5. Click Documentation tab

17
Finalizing Documentation
1. Click green flag on toolbar.
If all segments/fields have not been completed, a Documentation Deficits screen will appear
listing the missing entries.
To access each segment, double click
on the entry in bold, complete the
appropriate fields, and click OK in the
window. Repeat for each segment
requiring documentation.
Discontinue segments not needed to
document care for this patient, the
document cannot be finalized with
segments empty of documentation.
When all segments are completed and/or
discontinued, click the green flag
again.
The system will do another deficit check and then display a message that there are no deficits.
Click Yes..
2. The finalized document will display. If the finalization needs to be
reversed, click the red flag icon.
3. Enter the appropriate reason and click OK.

18
4. Complete your documentation and finalize the record.
Unfinalizing the Surgical Documentation
1. Select and open the case from the Case Selection window. Click the Perioperative Doc will
display in a read-only state.
2. Click the unfinalize icon.
3. Select a reason for unfinalizing the document.
4. Click OK. The document can now be modified and the refinalized later.

19
Display Case Overview
The Case Overview provides a summary of key case information. To view this:
1. Open the Case Documentation tab while in the Perioperative Doc.
2. Click the Case Overview button or select Case Overview from the Document Menu. 3. Click the Case Documentation icon to return to the Perioperative Doc.
Clinical Notes
Once a Perioperative document has been finalized, the related OR record will be available for viewing
within the Clinical
Notes tab.

20
SurgiNet Perioperative Document Toolbar
Case Overview Finalize Case
Add a Segment
Link to Case Times
Case Overview provides a summary of key
case information.