Studuino Programming Environment...Starting the Studuino Programming Environment ① Open the folder...
20
Studuino Programming Environment Installing Studuino Software Published 2014/11/01 Revised 2018/03/30
Transcript of Studuino Programming Environment...Starting the Studuino Programming Environment ① Open the folder...

Studuino Programming Environment
Installing Studuino Software
Published 2014/11/01
Revised 2018/03/30

Version History
Date Content
2014/11/01 First version
2017/01/16 Updated for new Studuino website
2017/04/14 Updated for new Studuino website
2018/01/22 Revised to include software and OS updates
2018/01/31 Updated for the release of the Mac version of the Icon Programming
Environment
2018/03/30 Updated for the release of the Mac version of the Characters
Programming Environment

Index
1. Getting Started ......................................................................................................... 1
2. Windows .................................................................................................................. 2
2.1. Downloads ............................................................................................................. 2
2.2. Installation .............................................................................................................. 3
2.3. Starting the Software ............................................................................................. 5
2.4. Uninstalling ............................................................................................................ 6
2.5. Updating the Software ......................................................................................... 10
3. Mac OS X .............................................................................................................. 11
3.1. Downloads ........................................................................................................... 11
3.2. Installation ............................................................................................................ 11
3.3. Starting the Software ........................................................................................... 12
3.3.1. [Block Programming Environment] ............................................................... 12
3.3.2. [Icon Programming Environment] ................................................................. 13
4. Raspberry Pi .......................................................................................................... 14
4.1. Downloads ........................................................................................................... 14
4.2. Installation ............................................................................................................ 14
4.2.1. Installing Arduino IDE ................................................................................... 14
4.2.2. Installing the Studuino Programming Environment....................................... 16
4.3. Starting the Studuino Programming Environment ................................................ 16
5. Language Settings ................................................................................................. 17

1
1. Getting Started
This manual explains how to install and start your Studuino software.
It’s divided into sections for Windows, Mac OS X, and Raspberry Pi. Be sure to turn to the
page for your operating system.
The information in this manual is subject to revision at any time.

2
2. Windows
You’ll need to download the installation file before installing the software. If you’re on a PC
without an active Internet connection, download the file using a PC with an active
connection and transfer it using a USB stick or other external memory device.
Make sure to install the software only for the account that will use it.
2.1. Downloads
① Go to the Studuino website at http://www.artec-kk.co.jp/studuino/en/.
② Click Software Downloads under Studuino.
③ Click the button for your operating system on the page that appears.
④ Click the Windows button under Software to download the software.
3
2.2. Installation
① Double click setup.exe to open it.
② The installation of .NET Framework 4.5 will begin automatically if it isn’t already present
on your system. Be sure to click the box next to I have read and accept the license
terms. before clicking the Install button.
The wizard will ask if you wish to install the two files below. Click Yes.
1) dotNetFx45_Full_x86_x64.exe
2) dotNetFx45LP_Full_x86_x64ja.exe
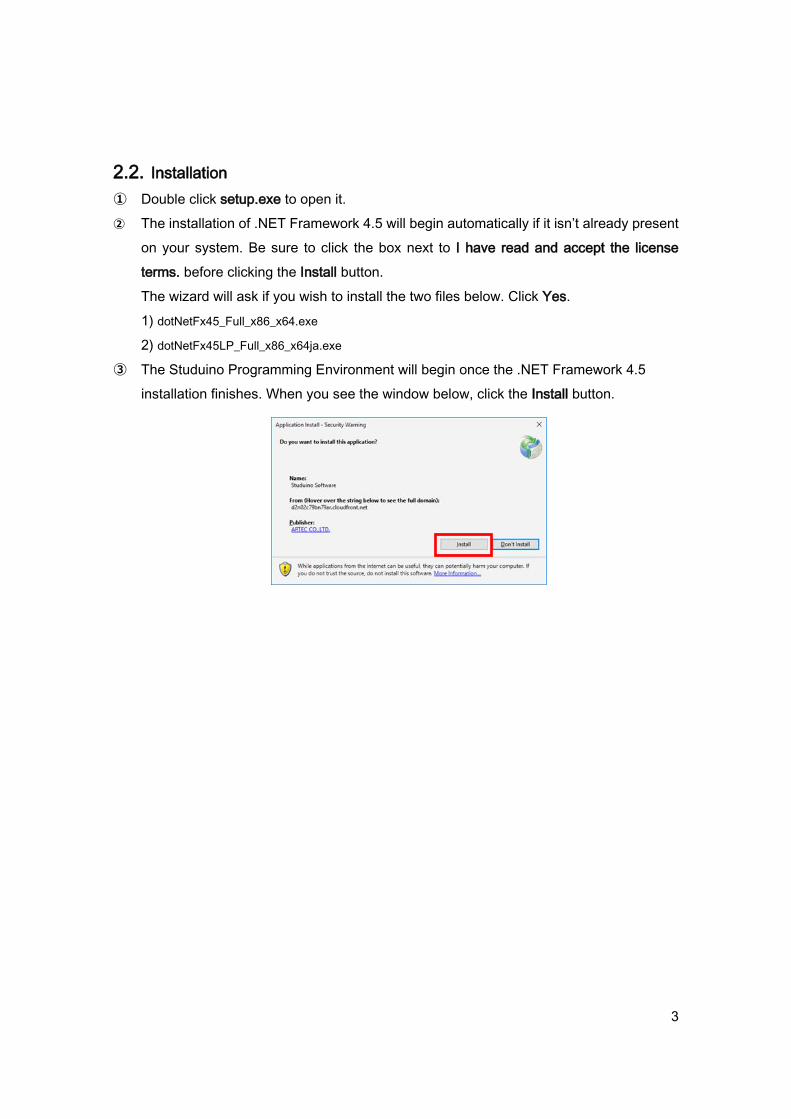
③ The Studuino Programming Environment will begin once the .NET Framework 4.5
installation finishes. When you see the window below, click the Install button.

4
The Startup Screen will appear once the installation has finished.
★ Software will be installed in the following location. The user name will be in the red [username] area, and in [***] a
unique alphanumeric string will appear.
Windows XP
C:\Documents and Settings\[username]\Local Settings\Apps\2.0\[***]\[***]\[***]
Windows Vista / 7 / 8 / 10
C:\Users\[username]\AppData\Local\Apps\2.0\[***]\[***]\[***]
★ Both pieces of software can only be used by the account they were installed on. Choose the Install for all
users option if you wish to use this software on multiple accounts.

5
2.3. Starting the Software
① You’ll have to use a different method depending on your version of Windows. Make
sure to follow the appropriate steps for your version.
Windows XP/Vista/7
Start the software by choosing Studuino Software from the Start menu. If you can’t find the
Studuino Software icon in the Start menu, click All Programs and choose Studuino Software
from the Artec folder to open the software.
Windows 8.1
Start the software by choosing the Studuino Software tile on the Metro screen.
Windows 10
Start the software by choosing Studuino Software on the Start screen.
6
2.4. Uninstalling
You’ll have to use a different method depending on your version of Windows. Make sure to
follow the appropriate steps for your version.
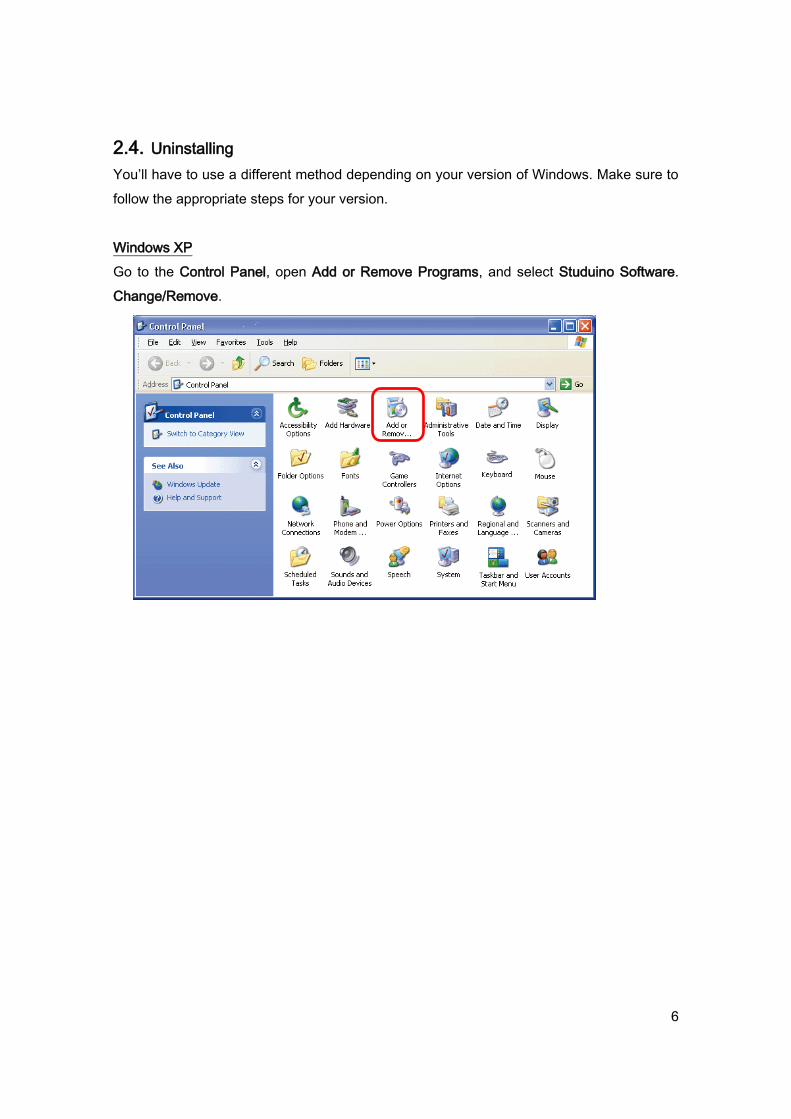
Windows XP
Go to the Control Panel, open Add or Remove Programs, and select Studuino Software.
Change/Remove.
7
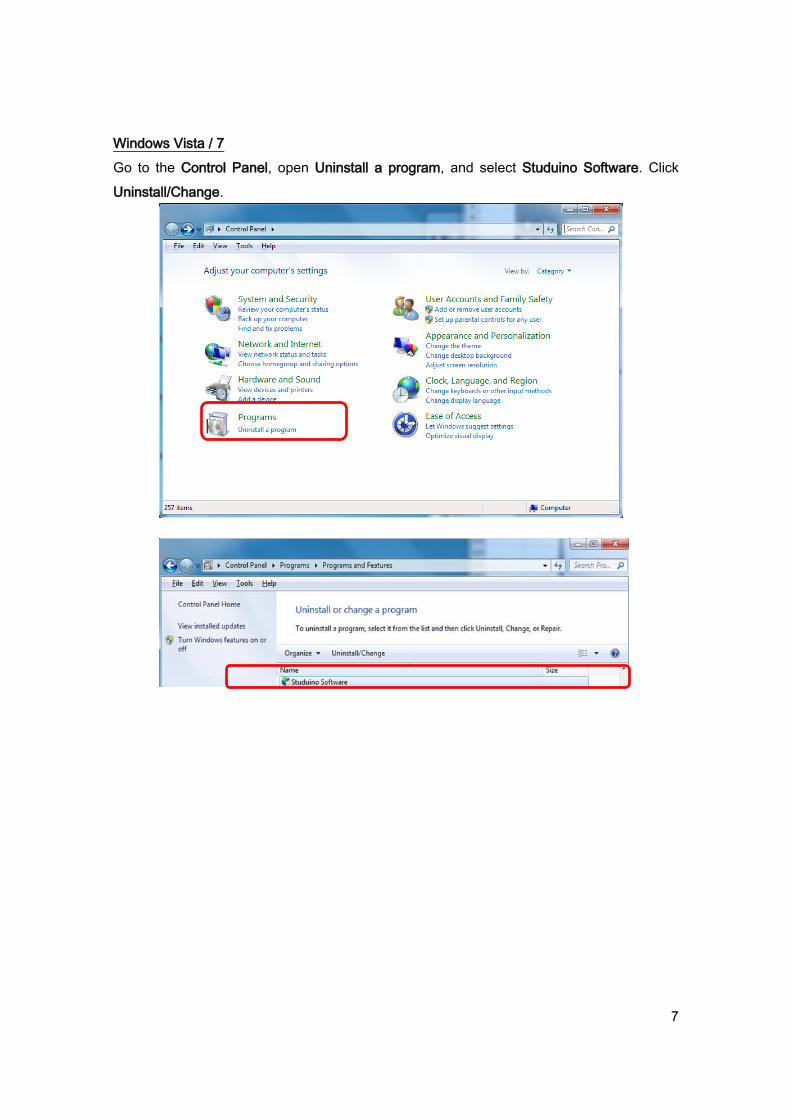
Windows Vista / 7
Go to the Control Panel, open Uninstall a program, and select Studuino Software. Click
Uninstall/Change.

8
Windows 8.1
Right click the bottom left corner to show the system management menu and select
Programs and Features.
On the Programs and Features screen, select Studuino Software and click
Uninstall/Change.
② Select “Programs and Features”
in the context menu that appears
① Right click at the bottom
left of your Desktop
9
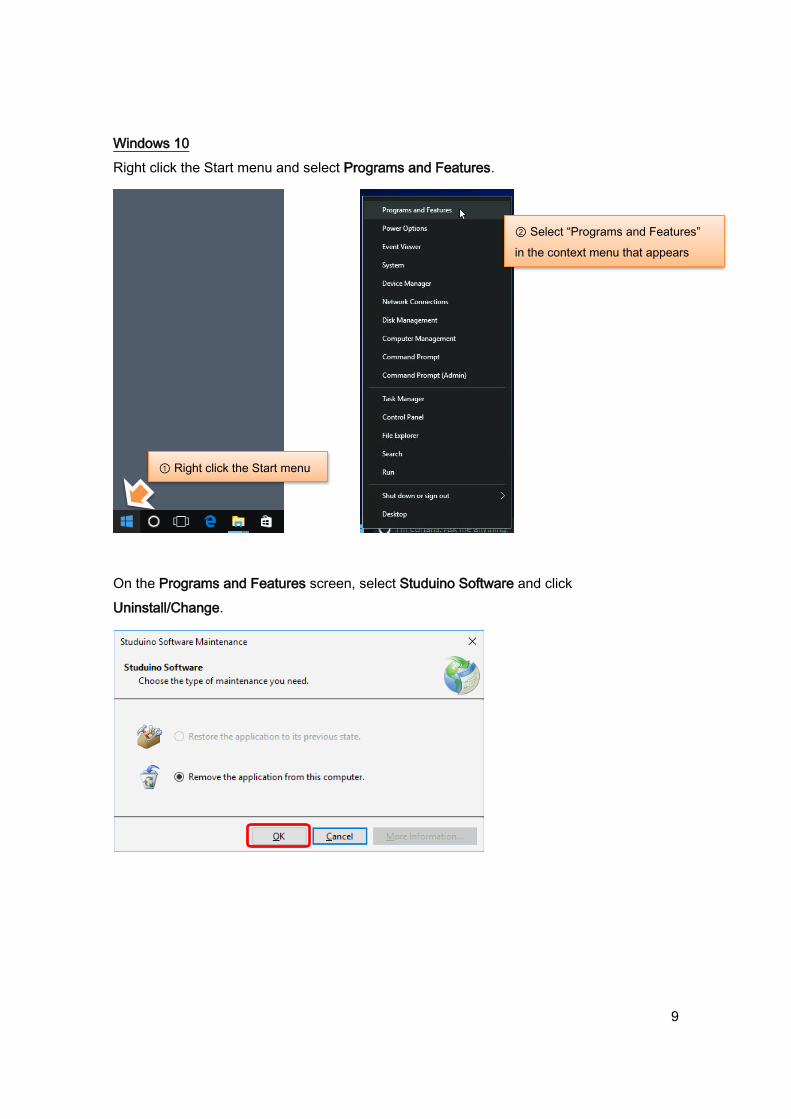
Windows 10
Right click the Start menu and select Programs and Features.
On the Programs and Features screen, select Studuino Software and click
Uninstall/Change.
① Right click the Start menu
② Select “Programs and Features”
in the context menu that appears

10
2.5. Updating the Software
Users with version 0.9.8.3 or later can use the update button on the Startup Screen. Click
the button and click Yes in the dialog box to begin updating.
Users who have version 0.9.8.2 or earlier will need to uninstall their software before
updating to the latest version. See 2.4. Uninstalling for details on how to do this.

11
3. Mac OS X
You’ll need to download the installation file before installing the software. If you’re on a PC
without an active Internet connection, download the file using a PC with an active
connection and transfer it using a USB stick or other external memory device.
3.1. Downloads
① Go to the Studuino website at http://www.artec-kk.co.jp/studuino/en/.
② Click Software Downloads under Studuino.
③ Click the button for your operating system on the page that appears.
④ Click the Mac OS X button under Software to download the software.
3.2. Installation
① Double-click the downloaded file to open it.
② Move the file corresponding to the Programming Environment you intend to use into
your application folder.
③ Select the StuduinoIPE.app file for the Icon Programming Environment, the
StuduinoBPE-R.app file for the Robots Version of the Block Programming Environment,
and the StuduinoBPE-C.app file for the Characters Version of the Block Programming
Environment.
[Icon Programming Environment]
[Block Programming Environment]
Robots Version
[Block Programming Environment]
Characters Version

12
3.3. Starting the Software
3.3.1. [Block Programming Environment]
① Follow these steps the first time you run the software.
After you’ve run it once, simply double-click StuduinoBPE-R.app or
StuduinoBPE-C.app to open the software. The following instructions refer to
StuduinoBPE-R.app, but the same process applies to StuduinoBPE-C.app as well.
1)Hold down the Control key and click StuduinoBPE-R.app.
2)Click Open in the context menu that appears.
3)Click Install in the window that appears.
② This will open the Block Programming Environment.
13
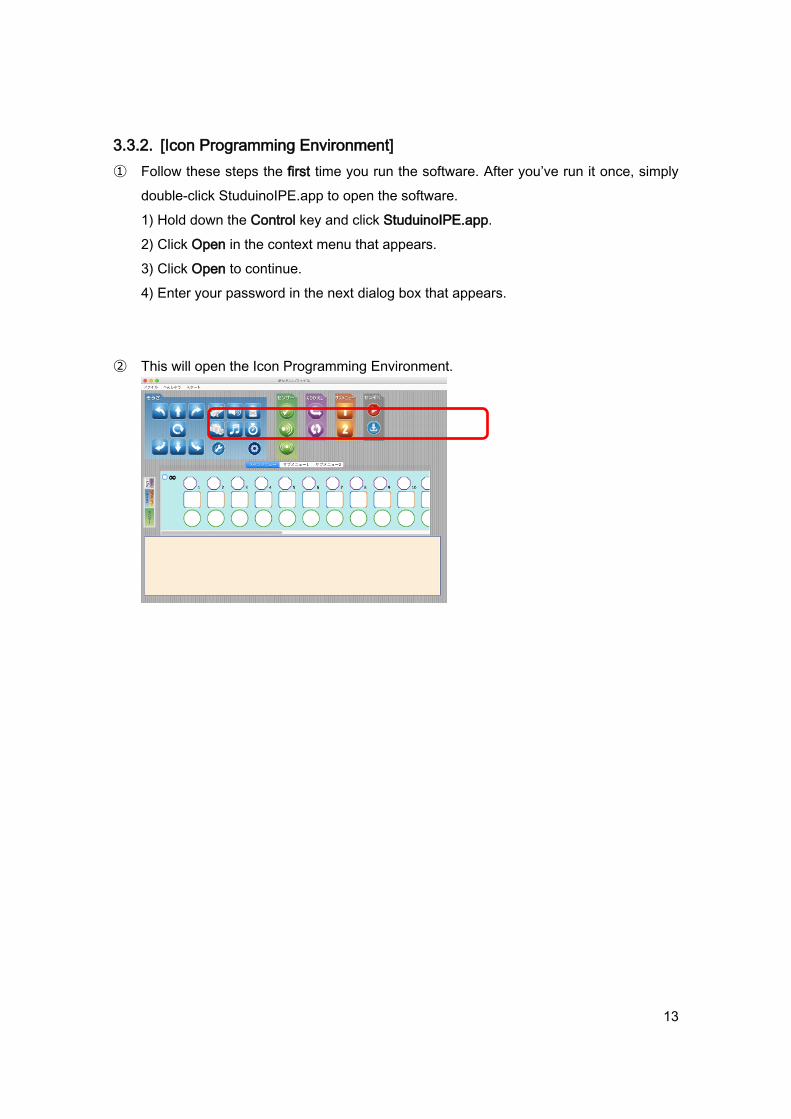
3.3.2. [Icon Programming Environment]
① Follow these steps the first time you run the software. After you’ve run it once, simply
double-click StuduinoIPE.app to open the software.
1) Hold down the Control key and click StuduinoIPE.app.
2) Click Open in the context menu that appears.
3) Click Open to continue.
4) Enter your password in the next dialog box that appears.
② This will open the Icon Programming Environment.

14
4. Raspberry Pi
Only the Block Programming Environment is available for Raspbian.
You’ll need an active Internet connection in order to install the software.
4.1. Downloads
⑤ Go to the Studuino website at http://www.artec-kk.co.jp/studuino/en/.
⑥ Click Software Downloads under Studuino.
⑦ Click the button for your operating system on the page that appears.
⑧ Click the Raspberry Pi button under Software to download the software.
4.2. Installation
4.2.1. Installing Arduino IDE
You’ll need to install Arduino IDE in order to use the Arduino IDE features of the Block
Programming Environment. Follow the steps below to open the terminal and run the
commands shown.
1)Click the menu at the top left. Go to Accessories and click Terminal.
15
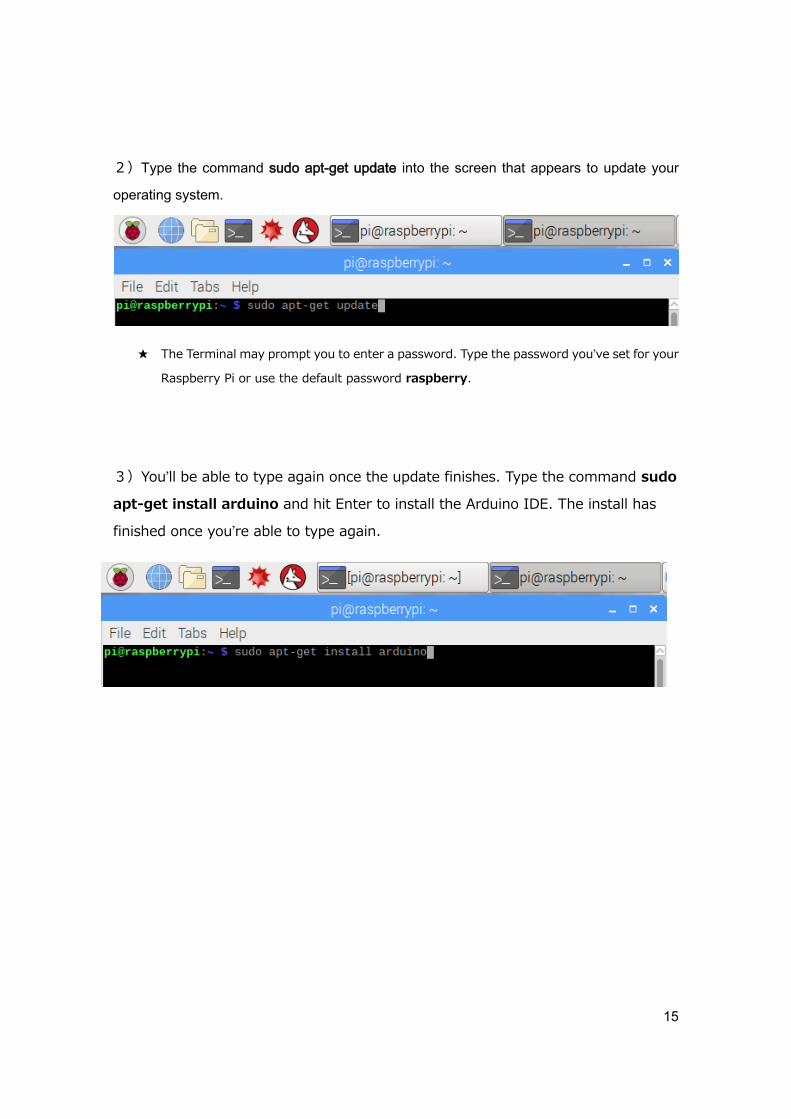
2)Type the command sudo apt-get update into the screen that appears to update your
operating system.
★ The Terminal may prompt you to enter a password. Type the password you’ve set for your
Raspberry Pi or use the default password raspberry.
3)You’ll be able to type again once the update finishes. Type the command sudo
apt-get install arduino and hit Enter to install the Arduino IDE. The install has
finished once you’re able to type again.

16
4.2.2. Installing the Studuino Programming Environment
① Unzip the downloaded file.
② Now move the extracted folder to a location of your choice.
4.3. Starting the Studuino Programming Environment
① Open the folder and double-click the file bpe.sh.
② You’ll see the dialog box shown below. Click the Execute button.
③ This will open the Block Programming Environment.

17
5. Language Settings
The Block Programming Environment supports several languages. Click the globe icon to
open the Language Menu.