
Student User Guide - media.glnsrv.commedia.glnsrv.com/pdf/odw_guides/ow-student-ug.pdf · Student...
19
Student User Guide
Transcript of Student User Guide - media.glnsrv.commedia.glnsrv.com/pdf/odw_guides/ow-student-ug.pdf · Student...

Student User Guide
Student User Guide
©2011 ODYSSEYWARE. All Rights Reserved
0BTable of Contents Home Page and Tools ....................................................................................................... 3 Student Home Page ................................................................................................... 4 Preferences ................................................................................................................. 4 My Courses ........................................................................................................................ 6 Planner ....................................................................................................................... 7 Courses ...................................................................................................................... 8 Working an Assignment .................................................................................................... 9 Problem Section ................................................................................................................. 11 Question Types ......................................................................................................... 12 Teacher Graded Questions ....................................................................................... 16 Messages ........................................................................................................................... 17 Inbox........................................................................................................................... 18 Archived ..................................................................................................................... 19 Sent ............................................................................................................................ 19 Note: For technical support, please contact Technical Support at 1-877-251-6662 or go to
HUwww.odysseyware.com/supportUH.

Student User Guide
9/14/2012 3
1BWelcome to ODYSSEYWARE! Enter the Login ID and Password your school provided you to go directly to your Home page.
Below the Login box, you see three links, About, Help, Terms of Use. These links are on every page in the application. Let’s quickly walk through each of those links, starting with the About link.
• About - The About page is where you find the active ODYSSEYWARE Version number.
• Help – is where you find a copy of this document. • Terms of Use - Clicking this link allows you to access a copy of the
“ODYSSEYWARE End User License”.

Student User Guide
9/14/2012 4
2BHome After you login, the first page you see is your Home page.
The banner at the top of your Home page remains in place unless you have an assignment open. The Header (or banner) shows you the school name, your name, the My Preferences and Logout links.
My Preferences – depending on how your administrator set up your application, you may be able to change the background and color scheme you see when you login. In the Theme box, click [Change] to display the Select a theme drop-down menu. Select from the available list. In the Background box, click the dropdown menu to change the Background. Again, select from the choices offered. Click Save when you are done.
Click Logout when you are done working or leave your computer.

Student User Guide
9/14/2012 5
Another area that remains across all of the pages, except while you are in an assignment, is the row of tabs across the top of the page, enabling easy access to everything you need in the application. This guide walks you through each tab and the corresponding functions and features available when you click each one, staying with the far left tab, the Home tab.
Your Home page is divided into four sections:
1. Messages of the Day – announcements from your school administrator 2. Calendar – displays the current month. Shows you which days are school and non-
school days. Use the arrows at the top to scroll to previous or future months. The today button always brings you back to the current month.
3. Assignments Due – shows you any assignments you have due. Again, you can use the arrows below the list to scroll through the complete list if you have more unread messages than the ones displayed. Click any of the assignment titles to go directly to that assignment.
4. New Messages – displays any new messages you have received from the administrator or your teachers since you last displayed your Home page. Use the arrows below the list to scroll through the complete list if you have more than what appear in the box. Click a message to open that message in your Message Center. Once you open the message, it drops off this part of your Home tab.
1
2 4
3

Student User Guide
9/14/2012 6
3BMy Courses The page you see when you click the My Courses tab depends on how your administrator set up your login account. If your login account is linked to course calendars, you will see two tabs, Planner and Courses. The Planner tab displays when you click My Courses. If your login account is not linked to a course calendar, only the Courses tab displays when you click the My Courses tab. If you do not have the Planner tab, skip to the section on the Courses Tab on page 8 of this document to continue.
My Courses with Planner/Calendar
My Courses without Planner

Student User Guide
9/14/2012 7
My Courses / Planner Tab When you click My Courses, your Planner page automatically displays. This page is divided into four squares that give you a complete snapshot of your schoolwork at the moment. You can access your assignments from the Overdue block and the Schoolwork block of this page. See ‘Working an Assignment’ on page 9 for instructions on how to complete your assignments.
1. Overdue – This box lets you know which, if any, assignments are past due. You see the Course Name, Unit, Title of the assignment, and date it was Due. Click any Uunderlined assignment title U in this box to go directly to that assignment.
2. Schoolwork – This block displays your next assignment due in each course along with all of the projects in the current unit for each course. Click any Uunderlined assignment titleU in this block to open the assignment.
3. Upcoming – shows you the title of the next assignments including any projects, essays, or experiments you have assigned for the next five school days in each course.
4. Overall Progress – lists each Course you are assigned, the date you Started working on it, your current Score and a Progress bar to show you a picture of how much of the course is complete as well as the actual percentage number. You can see the bar fill in as you complete your assignments.
1
2
3
4

Student User Guide
9/14/2012 8
My Courses / Courses Tab The Courses tab is a list of each course you are enrolled in. This list shows you the date you started working on it, your Progress in the course (percent complete), and your current Score in the course. To see a list of the units in the course, click the arrow to the left of the course name. Next, click the arrow to the left of the unit name to display a list of all of the assignments in the unit. At this point, you can also see the Type of assignment (course, unit, lesson, quiz, project, etc.), and the Status of the assignment. The assignments that are in bolded blue text are either assignments you have already completed or ones available for you to work on. Click the blue title to open the assignment.

Student User Guide
9/14/2012 9
4BWorking an Assignment When you open an assignment, there are several things you will always see:
Your name should display on the right side of this banner (like in the red box above).
You also see a row of buttons and dropdown menus. You can use these while working in your assignments.
Return to My Courses button - Use this button to go back to your My Courses page without submitting your assignment as finished.
Hide Lesson / Show Lesson button - / This button is a toggle. If you are in the presentation part of the lesson you see the Hide Lesson button. Once you click that button, it becomes the Show Lesson button. You never see both of them at the same time. Once you finish reading the presentation part of the assignment and are ready to start working on the problems, you can click the Hide Lesson button and display only the questions. This way you do not have to scroll to the bottom of the lesson to see the questions. If you want to return to the presentation to reread a portion or check an answer, click the Show Lesson button and it again displays.
Reference button - This button lets you access an online encyclopedia to look up additional information about a subject or item. Highlight the word, name, phrase, etc. you want to look up and click the Reference button. A small window opens with additional information. Simply click the X in the upper right corner of the small window to close it when you are finished.
Teacher Notes button - Sometimes your teacher may leave you notes about the assignment. When you open a lesson with notes from your teacher, the note opens automatically. Use the X in the upper right corner of the Teacher Notes window to close it when you have read them. Click this Teacher Notes button to refer to it again if you need.
Translate menu - Sometimes you want to see text in another language. Highlight the text you want translated and click the dropdown arrow on the Translate menu to select the language you want. A small Translation window appears with the text displayed in the language you selected.

Student User Guide
9/14/2012 10
Speak menu - If you want (or need) to hear all or part of a lesson read out loud, Highlight the text you want read aloud and click the dropdown arrow on the Speak menu to select the voice you want to use. The Audio Player appears at the top of your screen. Use the controls to pause ( ), rewind ( ), or fast forward ( ). You can also adjust the sound
( ) using the controls on the player. To replay, simply click the play button ( ).
Print button - Click this button to print the lesson and all of the problems. You cannot print answers even in completed lessons.
Submit Lesson button - When you have completed all of the problems associated with the lesson (ALL sections), click the Submit Lesson button to let your teacher know the assignment is done. If you do not click this button, OW does not know you are finished and you cannot open your next assignment in the course and you do not receive a grade for this assignment.
Below this row of buttons and menus you see Section tabs. There may be only one or there may be four or five, depending on how the lesson is presented. They look something like this:
. The best way to approach your lesson is to read the material and do the activities (like slide shows, videos, exercises), practice the vocabulary words, then answer the questions at the end of the section. You are prompted to move onto the next section. Do the same things for each section, read the material, watch and listen to the media, do any activities and answer the questions. When you have completed the last question in the last section of the assignment, a pop-up box alerts you that you have finished the lesson and not to forget to click the Submit Lesson button. In each lesson you have some vocabulary words. Click the green speaker to the left of each word to hear the word. Read the definition to the right of the word. Below the Vocabulary word list are some activities you can use to practice spelling these words as well as learning the words and definitions. Just click the name of the activity (Spelling Bee, Vocabulocity, Flash Cards) you want to do.

Student User Guide
9/14/2012 11
5BProblem Section Each assignment has at least one problem (or question) you must answer to complete the assignment. If you have difficulty answering a problem, there is a Help button at the top of each question. Click the button and leave your teacher a note about the problem. A message is sent to your teacher’s inbox letting them know you need some help. Be aware, though, this problem is graded as a zero until it is answered; and it is included in your overall score!
Once you have submitted a lesson as complete and it has been graded, you can click the Courses tab then click the plus sign beside a course name, and then the plus sign beside the unit title. You should now see the titles of all of the assignments in that unit. The ones in blue are either completed or available to you to open. If you click a completed assignment title, you can open the lesson and see how you did on each question in the problem section. Your completed questions are color-coded, so you can easily see which questions you answered correctly, which were incorrect, and any questions you got partially correct. For example:
• Green means the answer to this question is correct. • Red tells you the answer is incorrect or your teacher has not graded it yet. • Yellow tells you the answer was partially correct. • Gray means the question was skipped. You do not need to answer it.

Student User Guide
9/14/2012 12
Question Types
ODYSSEYWARE uses a variety of question types in your lessons, quizzes, and tests. Many of them are graded automatically, but some require your teacher to grade them. Let’s take a look at some examples, starting with the ones graded automatically by the application.
Matching In matching questions, you are given two columns of related information; for example, words in one column and definitions in the other. One column has empty boxes in front of each item, the other column has numbers. You place the number of an item in the box next to the corresponding item in the other column.
Multiple Choice Multiple choice questions offer three to five choices per question. You just need to click in the bubble next to your answer choice. Make sure you have read the question or instructions carefully.
Multiple Select Multiple select questions offer a number of choices per question. You click in the box next to each answer you believe to be correct. The question will often tell you how many correct choices there are.

Student User Guide
9/14/2012 13
Fill in the Blank / Unordered You are given a sentence with one or more words missing. You must select the correct word or words and type them into the field provided. All of the answers can be found in the text. Make sure you pay attention to capitalization, punctuation and spacing in your answers.
Text Multiple Choice In all text multiple choice questions, the answer box is highlighted in blue. Click the arrow beside the blue box and select the answer you believe is correct. Make sure it displays in the answer field.
True and False True and False questions are one way of verifying that you have grasped the factual concepts present in the material. You just need to click the bubble next to your choice.

Student User Guide
9/14/2012 14
Graphic Multiple Choice Graphic Multiple Choice questions work like Text Multiple Choice questions except you see a series of images instead of words. Click through each one until you find the correct image. You may cycle through them multiple times. The one you display when you submit the assignment is the one that is graded.
Layered Text Boxes Layered Text questions are much like Fill-in-the-Blank questions. Simply enter your answer in the green text box and tab to the next green text box. You most often see them in math problems, where tabbing to the next text box you should fill in, is helpful.

Student User Guide
9/14/2012 15
Drag And Drop This type of question is used to label graphics or set up math equations. You click the item in the menu/list below the graphic to select it; then holding your mouse button down, drag the item to the location where it is to be placed, and release your mouse button. If you put one item on top of another, the second item replaces the first. You can also click Start Over to clear all items already placed. To clear only one item, drag the new item over the one you want to replace. You can also drag an item you already placed in one location to another location.
Student User Guide
9/14/2012 16
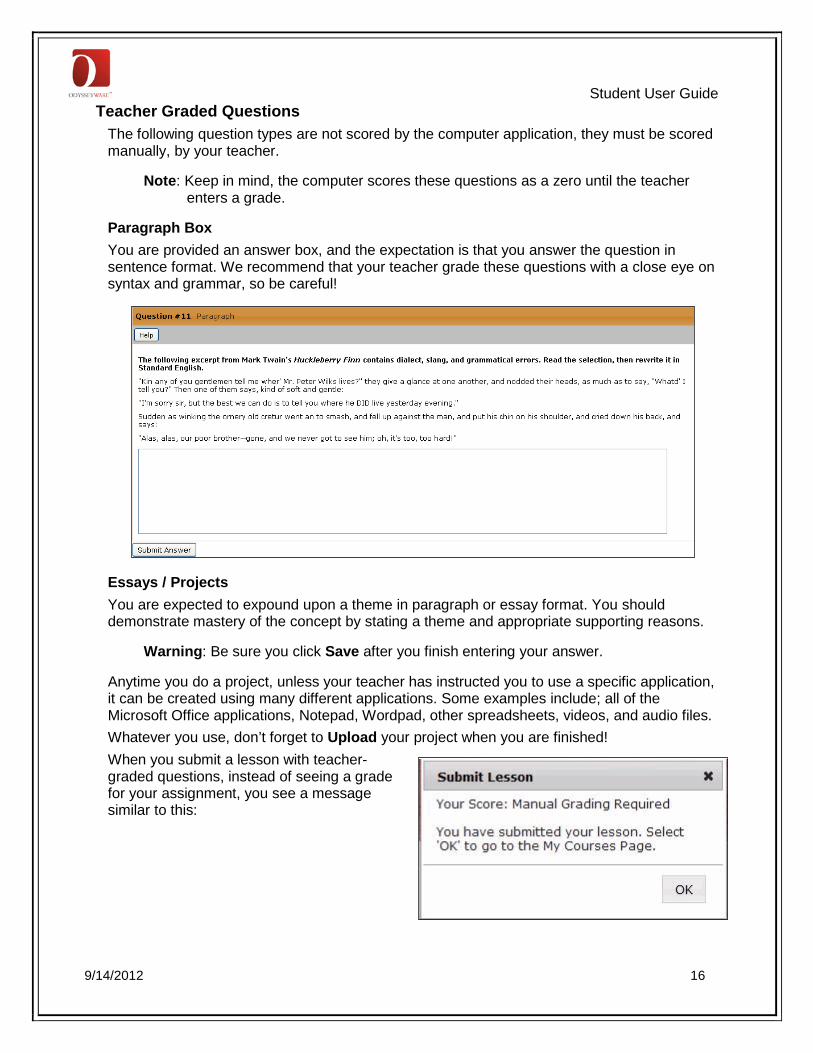
Teacher Graded Questions The following question types are not scored by the computer application, they must be scored manually, by your teacher.
Note: Keep in mind, the computer scores these questions as a zero until the teacher enters a grade.
Paragraph Box You are provided an answer box, and the expectation is that you answer the question in sentence format. We recommend that your teacher grade these questions with a close eye on syntax and grammar, so be careful!
Essays / Projects You are expected to expound upon a theme in paragraph or essay format. You should demonstrate mastery of the concept by stating a theme and appropriate supporting reasons.
Warning: Be sure you click Save after you finish entering your answer.
Anytime you do a project, unless your teacher has instructed you to use a specific application, it can be created using many different applications. Some examples include; all of the Microsoft Office applications, Notepad, Wordpad, other spreadsheets, videos, and audio files. Whatever you use, don’t forget to Upload your project when you are finished! When you submit a lesson with teacher-graded questions, instead of seeing a grade for your assignment, you see a message similar to this:

Student User Guide
9/14/2012 17
6BMessages Your administrator may have established a messaging system for use within ODYSSEYWARE. If so, you see a Messages tab to the right of the My Courses tab. If you do not see this tab, your administrator has chosen not to use messaging within the application. When you click the Messages tab, your Inbox automatically displays. Notice across the top row there are several drop-down menus and buttons. Let’s briefly walk through each.
• Inbox – click this drop-down menu to display your Sent items or Archived items.
• All Messages – clicking this drop-down menu allows you to filter your Inbox to display only messages you have already read or ones you have not read yet.
• New Message – click this button to open a new message screen
• Mark as Read – click the box in the far right column of a row with an unread message and click this button to mark it as read.
• Mark as Unread – click the box in the far right column of a row with a message you have read and click this button to mark it as unread.
• Archive – click the box in the far right column of a row with a message and click this button to move the message out of your inbox and into the archive folder.

Student User Guide
9/14/2012 18
Inbox Each message appears in a row of your Inbox. To simply read the message, double-click the row containing the above information. Each row offers information about the message:
• Selection column – click the checkbox ( ) in the first column to select the message. Use this column to quickly perform the same action to multiple messages, for example, move several messages to the archive folder.
• New Message Indicator – displays a dot as a new message indicator ( ). If the column is blank, this is message has already been viewed.
• Date: the date the message was received (Notice the arrowheads to the right of Date? This indicates you can sort your inbox in ascending or descending order based on the date the message was received.)
• From: Tells you who sent the message. • Subject: Title of the message sent • Preview: Gives you the first few words of the message. • Actions: Click one of the three links, Reply, Forward, or Archive to handle the
message.

Student User Guide
9/14/2012 19
Archived Since you cannot delete messages from your Inbox, one way to manage the number of messages in your Inbox is to move them to your Archive Messages page. It looks much like your Inbox and just as with the Inbox, each message is on a separate row. The columns are all the same, the two differences are:
1. The last link in the Actions column allows you to move the message back to the Inbox 2. The Move to Archive button is now Move to Inbox.
Sent
The Sent Messages page contains a list of each message you have sent. Again, as with the Inbox, each message appears on a separate row. The columns are the same. There are a few differences:
1. The only link in the Actions column allows you to forward the message to someone else within the system.
2. New Message is the only button available.
To access the Archive or Sent mail boxes, use the drop-down menu on the far left-hand side of the top row of the Inbox.


![Student User Guide Edition 4[1]](https://static.fdocuments.in/doc/165x107/55256051550346f36e8b4807/student-user-guide-edition-41.jpg)