Student Quick Start Guide - CourseSites by Blackboard is a free learning · PDF...
112
Student Quick Start Guide Copyright 2012, Blackboard Inc.
Transcript of Student Quick Start Guide - CourseSites by Blackboard is a free learning · PDF...

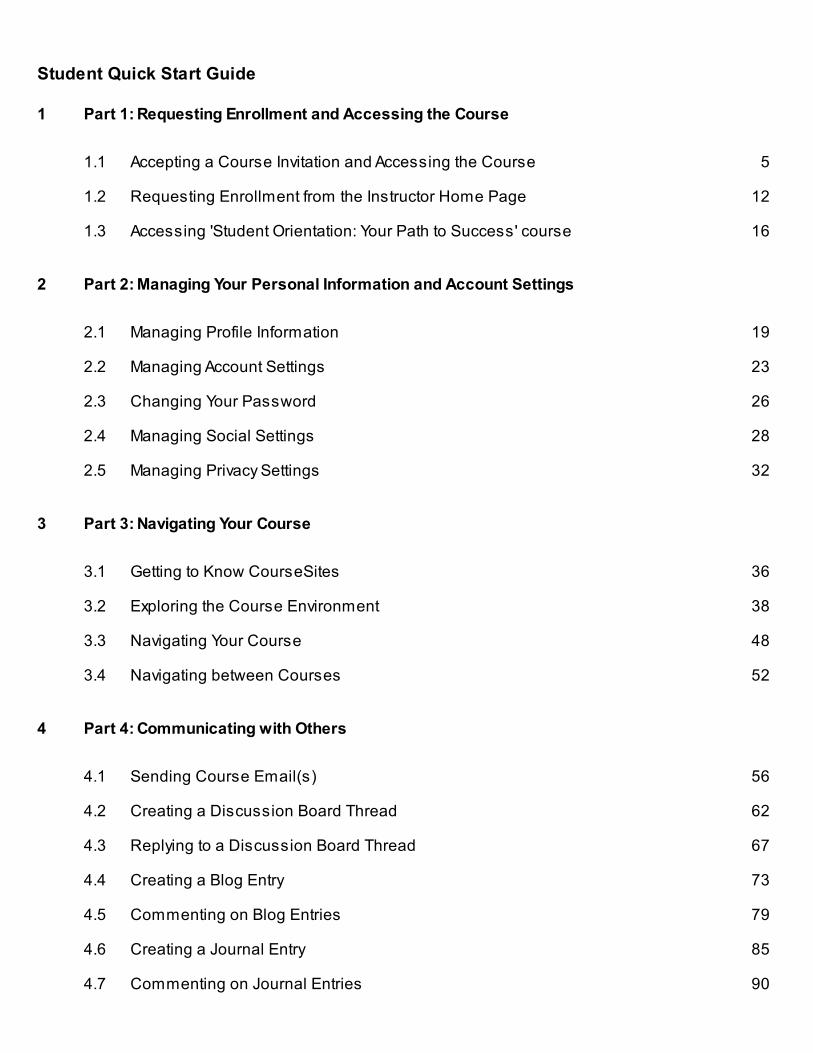
Student Quick Start Guide
Copyright 2012, Blackboard Inc.
Student Quick Start Guide
Part 1: Requesting Enrollment and Accessing the Course1
Accepting a Course Invitation and Accessing the Course 51.1
Requesting Enrollment from the Instructor Home Page 121.2
Accessing 'Student Orientation: Your Path to Success' course 161.3
Part 2: Managing Your Personal Information and Account Settings2
Managing Profile Information 192.1
Managing Account Settings 232.2
Changing Your Password 262.3
Managing Social Settings 282.4
Managing Privacy Settings 322.5
Part 3: Navigating Your Course3
Getting to Know CourseSites 363.1
Exploring the Course Environment 383.2
Navigating Your Course 483.3
Navigating between Courses 523.4
Part 4: Communicating with Others4
Sending Course Email(s) 564.1
Creating a Discussion Board Thread 624.2
Replying to a Discussion Board Thread 674.3
Creating a Blog Entry 734.4
Commenting on Blog Entries 794.5
Creating a Journal Entry 854.6
Commenting on Journal Entries 904.7

Part 5: Assignments and Grades5
Submitting Assignments 965.1
Taking Test and Quizzes 1025.2
Accessing My Grades 1075.3
Part 6: Getting Support6
Getting Support 1116.1

CourseSites by BlackboardStudent Quick Start Guide - 4
Part 1: Requesting Enrollment and Accessing the Course

CourseSites by BlackboardStudent Quick Start Guide - 5
Accepting a Course Invitation and Accessing the Course
1. When you receive an email from the instructor(s), click the link to confirm and register.
Note: Invitation links can only be used once. Please be sure to write down your username and password once you create your account in the remaining steps.

CourseSites by BlackboardStudent Quick Start Guide - 6
2. Click 'I Need an Account' if you DO NOT already have an account on CourseSites (see 3a below.) Click 'I Have an Account' to enroll with an account you already have with CourseSites (see 3b below.)

CourseSites by BlackboardStudent Quick Start Guide - 7
3a. If you have already registered for CourseSites, enter your credentials and click Login.
Note: The home page of the course will appear and you can begin learning.

CourseSites by BlackboardStudent Quick Start Guide - 8
3b. If you have not registered, register with credentials from Facebook, Twitter, Microsoft Live, Yahoo or Gmail or enter your new account information.
Note: You can enable login with a social media or web service after creating a regular account within your Personal Information.

CourseSites by BlackboardStudent Quick Start Guide - 9
4. Review and agree to the Terms of Use, complete the CAPTCHA field, and then click Save and Continue.
5. A welcome message that will allow you to share the news on social media sites or click the Go to Course button to be taken into your course.

CourseSites by BlackboardStudent Quick Start Guide - 10
6. You will receive an confirmation email which will include your username, along with a link to retrieve your Forgotten Password.

CourseSites by BlackboardStudent Quick Start Guide - 11
7. Training and Usage Resources provides you with a link to the Quick Start Student Guide and instructions on how to access the self paced Student Orientation course.
Note: The confirmation email also includes important Support information and links.

CourseSites by BlackboardStudent Quick Start Guide - 12
Requesting Enrollment from the Instructor Home Page
Follow the steps below to request enrollment.
1. Open a compatible browser, enter the URL (web address) of your instructor's home page in the address bar, and select the corresponding "go" arrow or button.
Note: If you are not aware of your instructor's home page address, you can try to find them by using the Students link at the bottom of https://www.coursesites.com.

CourseSites by BlackboardStudent Quick Start Guide - 13
2. Locate and click the desired course you want to enroll in.

CourseSites by BlackboardStudent Quick Start Guide - 14
3. Click Request enrollment to send an enrollment request.

CourseSites by BlackboardStudent Quick Start Guide - 15
4. Write your email address and full name and then click Submit.
5. The enrollment request will be sent to the instructor(s).

CourseSites by BlackboardStudent Quick Start Guide - 16
Accessing 'Student Orientation: Your Path to Success' course
CourseSites by Blackboard provides students a chance to orient themselves to the CourseSites learning environment as well as gain the necessary skills to learn well in an online. The 'Student Orientation' course will introduce you to the essentials tools required to communicate with classmates and instructor(s); access course materials; take test; submit assignments; and check your grades.
1. From the My CourseSites tab, click Student Orientation: Your Path to Success link to access the self-paced course.

CourseSites by BlackboardStudent Quick Start Guide - 17
2. On the course landing page (Introduction), review the course introduction and objectives.
Note: We recommend completing the course in order that it is listed, but feel free to jump from area to area.

CourseSites by BlackboardStudent Quick Start Guide - 18
Part 2: Managing Your Personal Information and
Account Settings
CourseSites by BlackboardStudent Quick Start Guide - 19
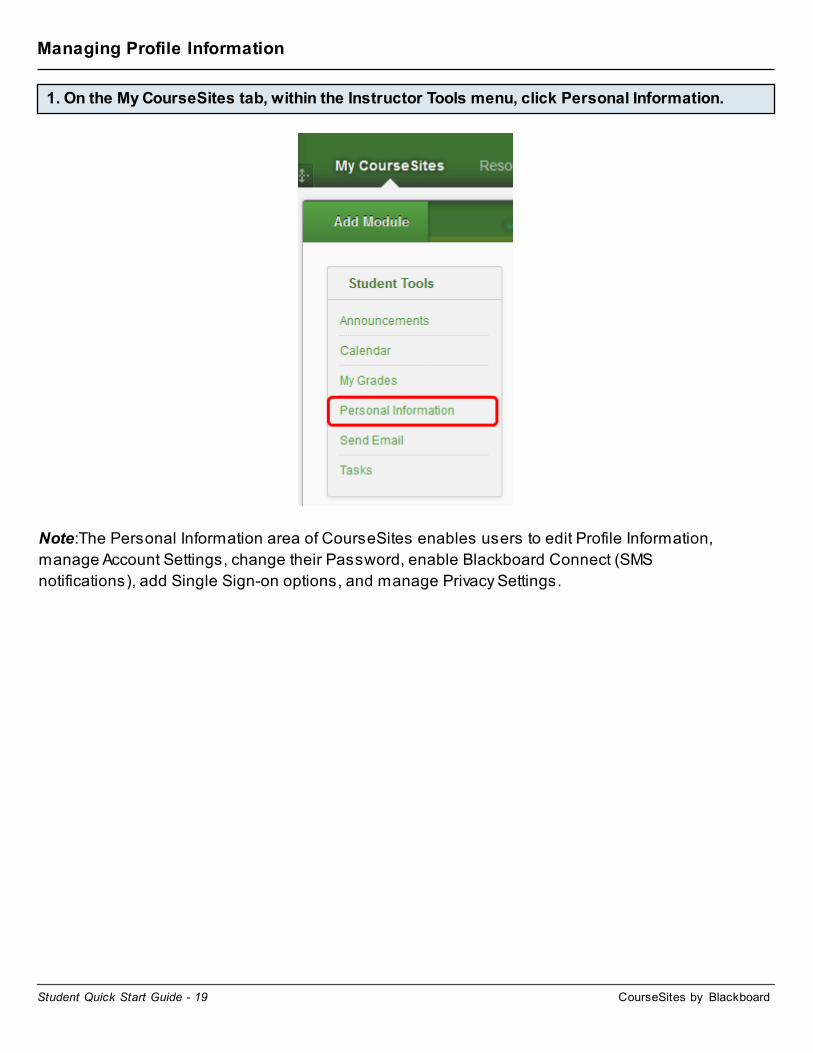
Managing Profile Information
1. On the My CourseSites tab, within the Instructor Tools menu, click Personal Information.
Note:The Personal Information area of CourseSites enables users to edit Profile Information, manage Account Settings, change their Password, enable Blackboard Connect (SMS notifications), add Single Sign-on options, and manage Privacy Settings.
CourseSites by BlackboardStudent Quick Start Guide - 20
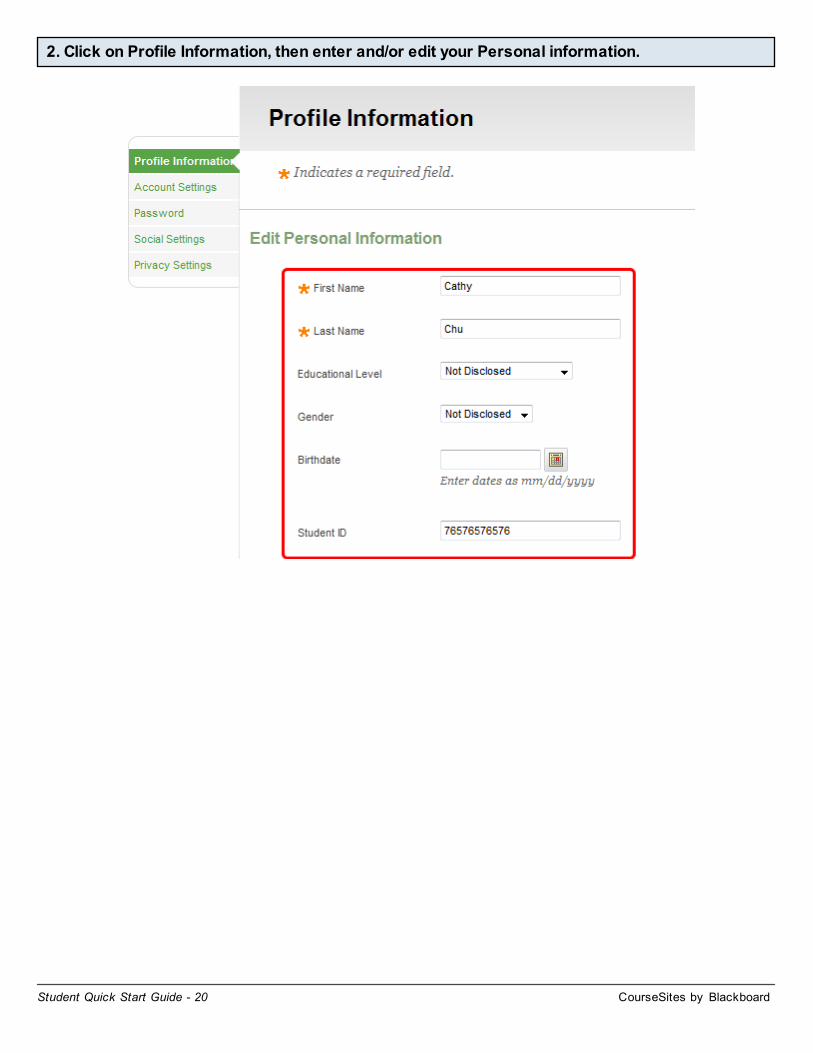
2. Click on Profile Information, then enter and/or edit your Personal information.
CourseSites by BlackboardStudent Quick Start Guide - 21
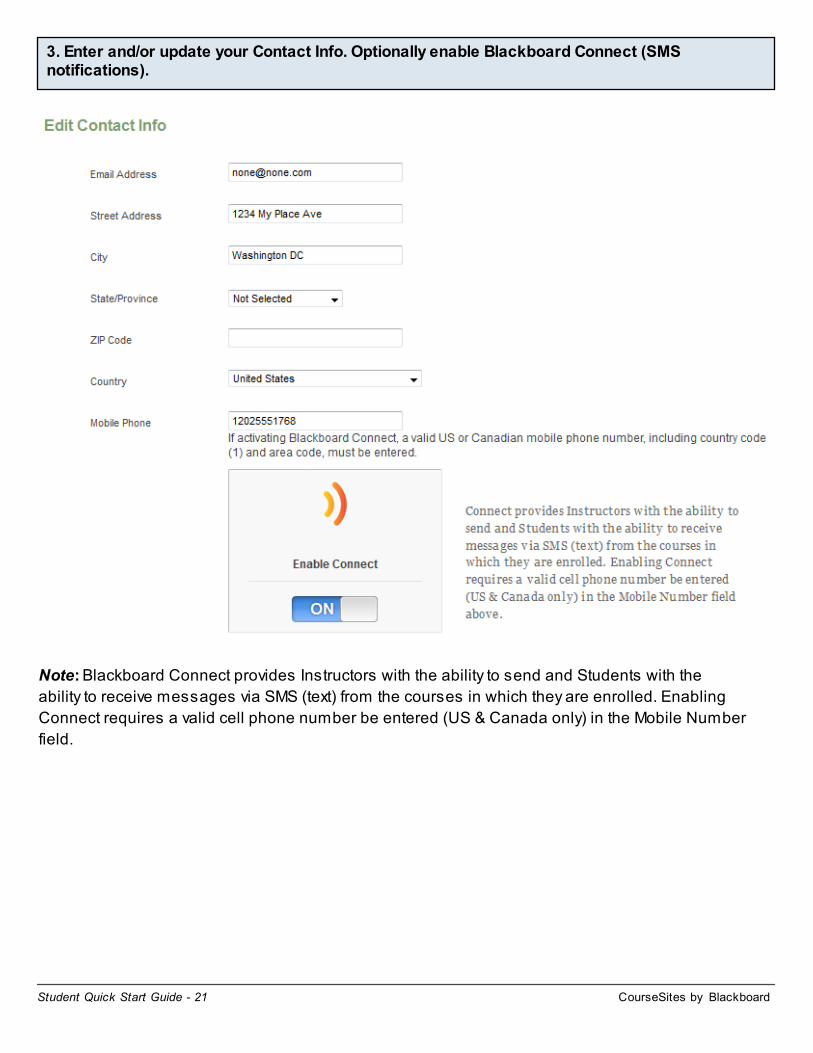
3. Enter and/or update your Contact Info. Optionally enable Blackboard Connect (SMS notifications).
Note: Blackboard Connect provides Instructors with the ability to send and Students with the ability to receive messages via SMS (text) from the courses in which they are enrolled. Enabling Connect requires a valid cell phone number be entered (US & Canada only) in the Mobile Number field.

CourseSites by BlackboardStudent Quick Start Guide - 22
4. Enter and/or update your Institution Information, then click Submit to save any changes.
Note: As you begin typing the name of your Institution or K-12 District, a drop-down list will appear from which you should select the institution or district to which you are affiliated. If your institution or district does not appear on the list, you can type it in. Please use full names and not acronyms.

CourseSites by BlackboardStudent Quick Start Guide - 23
Managing Account Settings
1. On the My CourseSites tab, within the Instructor Tools menu, click Personal Information.
Note: The Personal Information area of CourseSites enables users to edit Profile Information, manage Account Settings, change their Password, enable Blackboard Connect (SMS notifications), add Single Sign-on options, and manage Privacy Settings.
2. Click on Account Settings to access its area.

CourseSites by BlackboardStudent Quick Start Guide - 24
3. Using the ON/OFF button enable or disable the Text Editor.
Note: If the Text Editor is OFF, basic options for entering text will appear. When using Safari 2.0, the Text Editor will only include actions that the browser supports.
4. Using the ON/OFF button enable or disable Page Instructions.
Note: This will show or hide instructions on pages within the course environment for you only.

CourseSites by BlackboardStudent Quick Start Guide - 25
5. Select preferred Language Pack from the menu and click Submit to save any changes.
Note: Once the Language Pack choice is submitted, the system and course environments will display in the language of choice, with the exception of courses where Instructors may be enforcing another Language Pack at the course level.

CourseSites by BlackboardStudent Quick Start Guide - 26
Changing Your Password
1. On the My CourseSites tab, within the Instructor Tools menu, click Personal Information.
Note: The Personal Information area of CourseSites enables users to edit Profile Information, manage Account Settings, change their Password, enable Blackboard Connect (SMS notifications), add Single Sign-on options, and manage Privacy Settings.
2. Click Password to access its area.

CourseSites by BlackboardStudent Quick Start Guide - 27
3. Enter your existing password.
Note: If you are signing in using the one of the Social Sign-on services, such as Facebook, Twitter, Windows Live, Yahoo or Gmail, this will not change the password associated with any of those accounts. Please contact Support (888-383-7003) to provide you with a CourseSites password if you signed up using credentials from these web services.
4. Enter your new password and once again to verify. Next, click Submit to save your changes.
Note: A strong password includes more than 6 characters, and should include one numerical character (0-9) and one capital letter (A-Z). Passwords are case sensitive.

CourseSites by BlackboardStudent Quick Start Guide - 28
Managing Social Settings
Control personal social settings within your CourseSites account.
1. On the My CourseSites tab, within the Instructor Tools menu, click Personal Information.
2. Click Social Settings to access its area.

CourseSites by BlackboardStudent Quick Start Guide - 29
3. Using the ON/OFF button enable or disable your Instructor Home Page.
4. Click on the picture icon to upload, update, hide or delete your Avatar.
Note: Your personal avatar is displayed to users in the Blogs, Journals, and within Notifications Modules (including What's New and To Do). The image file needs to be web compatible (.jpg, .gif, or .png) and the recommended size is 50 x 50 pixels. If uploading or updating your picture, there is no need to click Submit on this page again once you see the updated picture.

CourseSites by BlackboardStudent Quick Start Guide - 30
5. Optionally, add a Social Single Sign-on option.
Note: Enabling a Social Single Sign-on option will allow you to login to CourseSites using the corresponding icon of the service (s) which you've associated with your account (see Step 5a below). No information is shared between CourseSites and the web service. When selecting a Social Single Sign-on option, a new window will open. Enter your credentials for the selected web service and submit. You DO NOT need to click Submit on the CourseSites page.
5a. Upon your next login, use the associated Social Single Sign-on options on the login screen.
CourseSites by BlackboardStudent Quick Start Guide - 31
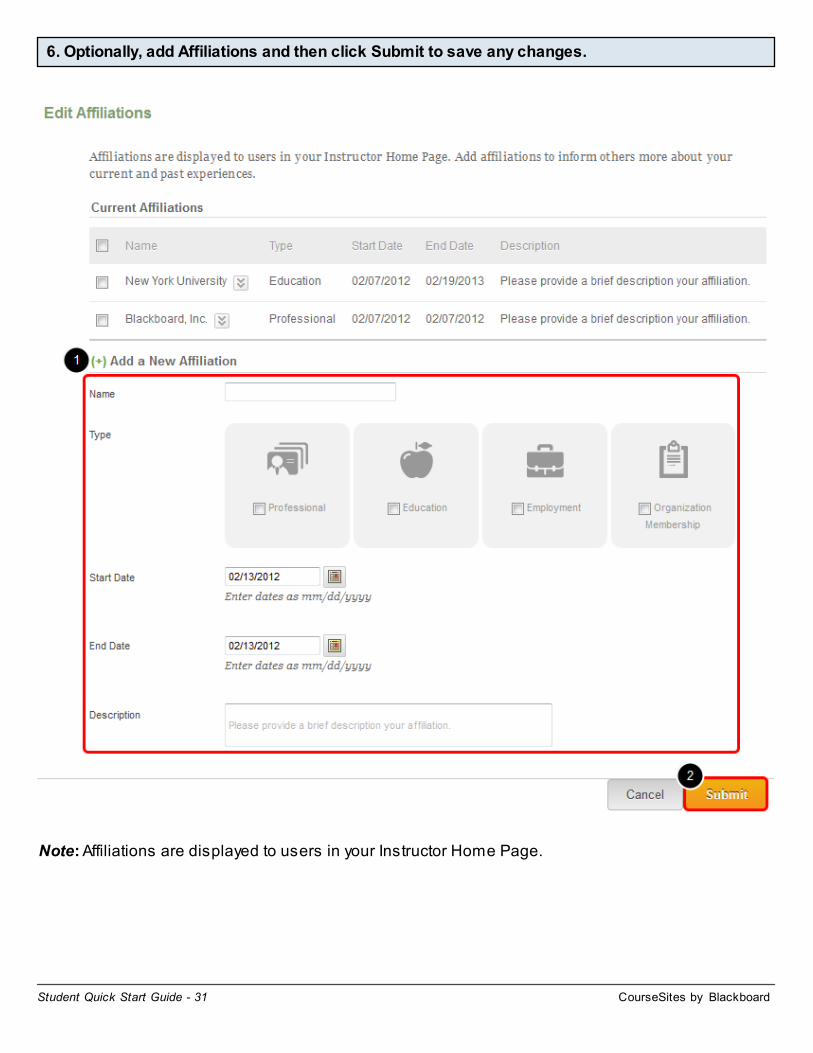
6. Optionally, add Affiliations and then click Submit to save any changes.
Note: Affiliations are displayed to users in your Instructor Home Page.

CourseSites by BlackboardStudent Quick Start Guide - 32
Managing Privacy Settings
Privacy Settings are mainly for students to manage their own preferences. No matter what students select on these settings, Instructors will always have access to student information. It is good to familiarize yourself with these options and make students aware depending on the needs of your educational environment.
1. On the My CourseSites tab, within the Instructor Tools menu, click Personal Information.
2. Click Privacy Settings to access its area.
CourseSites by BlackboardStudent Quick Start Guide - 33
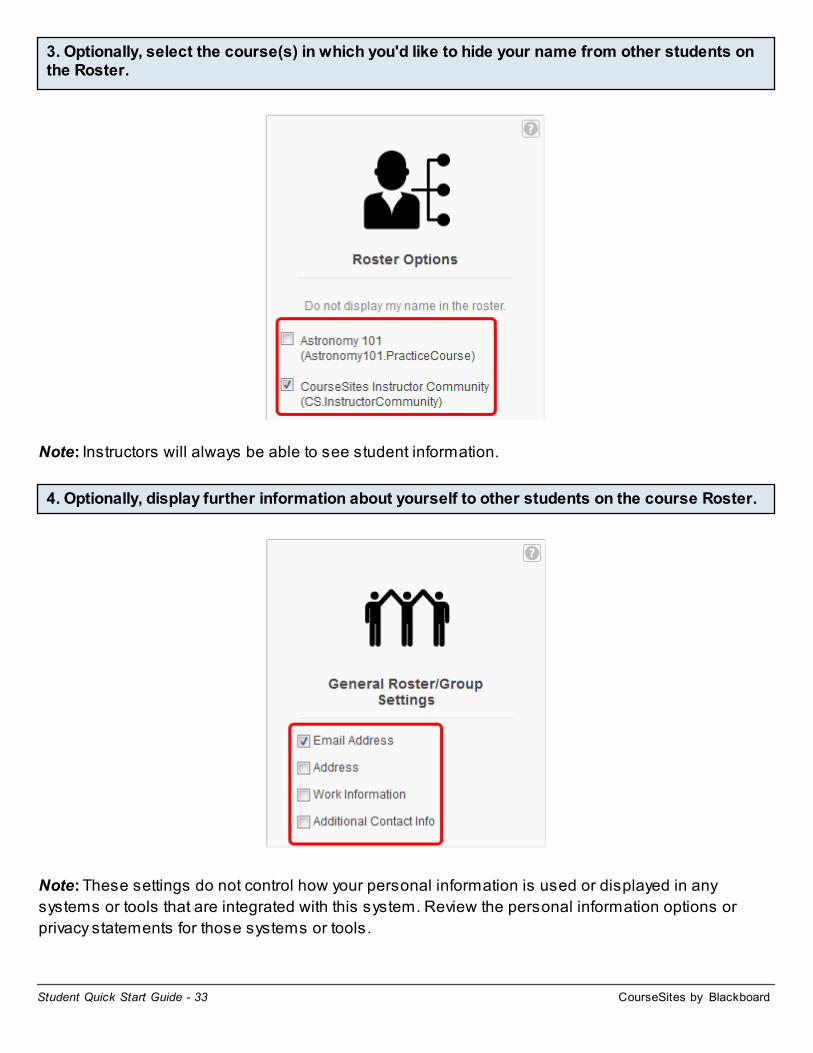
3. Optionally, select the course(s) in which you'd like to hide your name from other students on the Roster.
Note: Instructors will always be able to see student information.
4. Optionally, display further information about yourself to other students on the course Roster.
Note: These settings do not control how your personal information is used or displayed in any systems or tools that are integrated with this system. Review the personal information options or privacy statements for those systems or tools.

CourseSites by BlackboardStudent Quick Start Guide - 34
5. Optionally, select the course(s) in which you'd like to block other students from sending you email.
Note: Instructors will always have the option to send email to student users.
6. Click Submit to save changes before navigating away from this area.

CourseSites by BlackboardStudent Quick Start Guide - 35
Part 3: Navigating Your Course

CourseSites by BlackboardStudent Quick Start Guide - 36
Getting to Know CourseSites
My CourseSites Tab
After logging into CourseSites, you will "land" on the My CourseSites tab. On that tab, as well as on the Resources tab, you can access tools and information contained within modules, as shown in the image above. Some modules can be personalized, such as the My Courses module, to help put the most important information at your fingertips. The icons within the title bar of the modules, when displayed, allow you to modify the modules themselves.

CourseSites by BlackboardStudent Quick Start Guide - 37
Edit Module Icons
In the title bar of some modules, there are one or more icons that can be used to change the appearance of the module. Clicking an icon will allow you to edit the module as indicated in the table above. There will be times when no icons are displayed which mean that module cannot be modified.

CourseSites by BlackboardStudent Quick Start Guide - 38
Exploring the Course Environment
Once you have entered a CourseSites course, you will always see a list of buttons or links down the left hand side of the screen. This is known as the Course Menu. Use these buttons or text links to access and view various areas of the course. Each Course Menu may vary slightly depending on how it was set up by your instructors. As such, your courses may look a bit different from each other and have different sets of tools available.
Instructors customarily will group related items together under a particular navigation link. For example, the syllabus, course policies and schedule might be found in a section called Course Overview. Handouts, assignments, and lecture notes might be found under a link titled Lesson One, Chapter Materials, or Course Documents. Within these areas, students will typically find the assigned learning materials in the form of text, graphics, and files.
Content pictured in following Topic 4 through Topic 8 provided courtesy of Prentice Hall/Pearson Education - Introductory Oceanography - Edition 9 (2001)
Course Environment
Upon entering a course, you will see something similar to the screenshot above. Notice that even within a course, the top tab area will remain. We refer to the tabs in that area as the universal navigation since they stay with you no matter where you are in CourseSites. To the left will always be your Course Menu and to the right will always be where the course content and tool areas will be displayed. When you click on a menu item on the left, the area to right changes. We will explore the Course Menu and content window in the next few topics.

CourseSites by BlackboardStudent Quick Start Guide - 39
Course Menu Icons
The table above displays a set of icons that can be used to change the Course Menu. You can find this set of icons on top of the Course Menu.

CourseSites by BlackboardStudent Quick Start Guide - 40
Sample Course Menus
The table above displays different types of Course Menu designs and organization. Remember, the Course Menu may vary between your courses, but they will function similarly. The differences in the Course Menu are similar to the differences you might see in the set-up of the classrooms within your school's building or campus.

CourseSites by BlackboardStudent Quick Start Guide - 41
Types of Content
This picture above shows the student view of a course within CourseSites. When any user clicks on a link or button found in the Course Menu, such as Course Information or Chapter Materials as pictured above, a variety of content types may be displayed in the content frame, depending on what has been provided by the instructor. For example, there can be text and graphics, links to files, links to web sites, and even folders, which contain more content. The next few topics provide detailed explanations and pictures of the types of content you may encounter in your course.
CourseSites by BlackboardStudent Quick Start Guide - 42
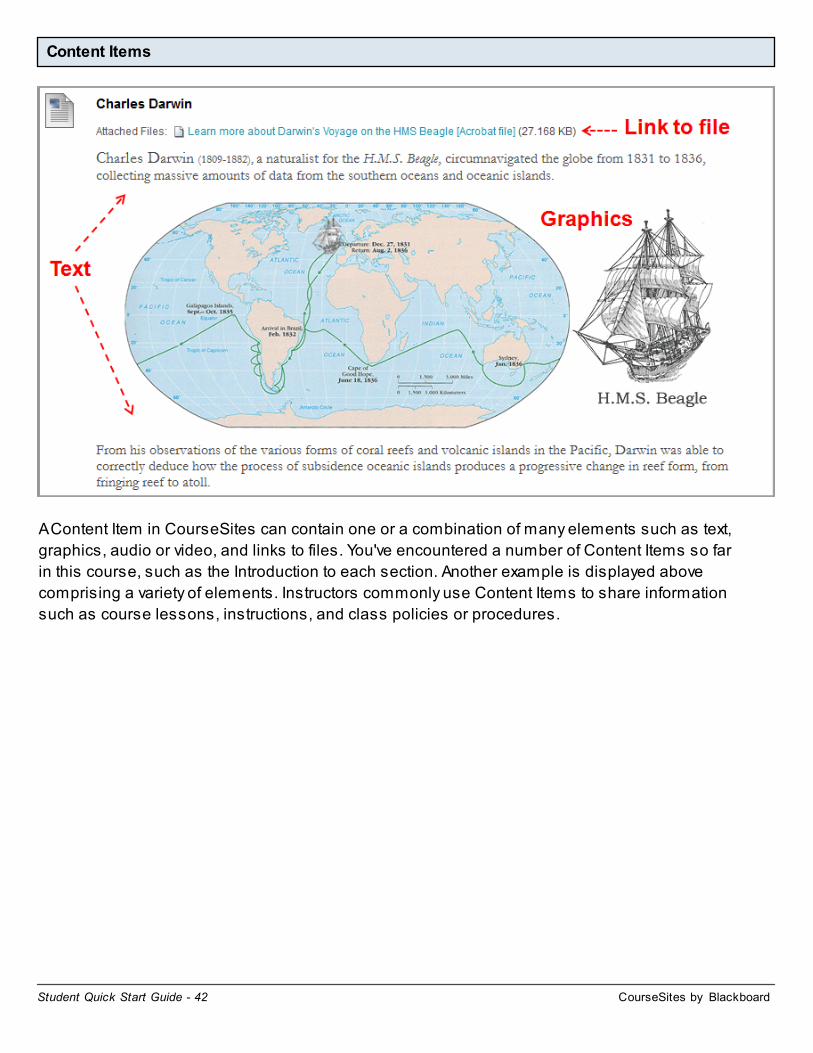
Content Items
A Content Item in CourseSites can contain one or a combination of many elements such as text, graphics, audio or video, and links to files. You've encountered a number of Content Items so far in this course, such as the Introduction to each section. Another example is displayed above comprising a variety of elements. Instructors commonly use Content Items to share information such as course lessons, instructions, and class policies or procedures.

CourseSites by BlackboardStudent Quick Start Guide - 43
Folders
Folders in CourseSites work in much the same way they do in other computer applications and even like paper file folders. CourseSites folders are containers that hold information or more folders. Just like a physical file folder, you must open the folder first to view the items within. You open a folder in CourseSites by clicking on its title. You will see the breadcrumb trail lengthen with the folder name once inside. This trail of links can be used to step back as necessary. An example of folders is displayed in the image above.
Links to Other Web Sites
Within your course, you may encounter links to web sites that are external to CourseSites. There are two ways in which links can be established: (1) as an Item itself where the title becomes an active link and (2) as text linked within a Content Item.
In general, web links are typically displayed in blue, underlined text. Links can open inside the content frame or they can open in a new window. Your instructor will set this function when the link is added to the course. Examples of both types are displayed below.

CourseSites by BlackboardStudent Quick Start Guide - 44
a. Web Link as an Item Itself
b. Web Link Embedded in Text Within a Content Item

CourseSites by BlackboardStudent Quick Start Guide - 45
Course Links
CourseSites can also have shortcuts added by the instructor which lead to other areas of the course. These are referred to as Course Links. As opposed to the web links we just reviewed, Course Links are internal links that provide shortcuts to different areas within a course. For example, a common use for Course Links is to take students from one area of the course to the Discussion Board to participate in a discussion.

CourseSites by BlackboardStudent Quick Start Guide - 46
Learning Modules
There may be times when the topics you are teaching require review in a more sequential order. For instance, when you are teaching a process such as the steps to solve an equation, the scientific method, or the elements of fiction. To reinforce this, instructors may make use of a Learning Module, which automatically sets a structured path for progressing through the content. As opposed to scrolling down to see the information, users would proceed through a sequence of screens using the Table of Contents or the forward and back arrows to move from one page to the next.

CourseSites by BlackboardStudent Quick Start Guide - 47
Task-based Navigation
Tasked-based navigation helps instructors to streamline their workflows. This feature allows you to jump from destination to destination, between courses you are enrolled in. This tool will make teaching and learning simpler and easier. This tool requires that the same destination is located in each course (i.e Discussion board in course one and a discussion board in course two). If the destination doesn't exist, the user will land on the other course Homepage. You can only jump between courses you are enrolled in.

CourseSites by BlackboardStudent Quick Start Guide - 48
Navigating Your Course
Content pictured in following Topic 1 through Topic 5 provided courtesy of Prentice Hall/Pearson Education - Introductory Oceanography - Edition 9 (2001)
Navigate between Course Areas
To navigate between course areas, click on the desired link in the Course Menu. As pictured here, to get to the Chapter Materials area, you would click on the Chapter Materials link on the Course Menu.

CourseSites by BlackboardStudent Quick Start Guide - 49
Navigate Using the Course Map
Another way to move between course areas is by using the Course Map. To view a Course Map:
- Click the double rectangle icon in the tool bar of the Course Menu to open it in a separate window. - Click the folder icon to display all the content in a tree. - Use the plus and minus icons next to each folder to expand and collapse the tree. - Click the desired folder or item to view and the page will display within the browser window below the Course Map window.
Navigate within a Content Area -- Breadcrumb Trail
Use the internal navigation to move between documents and folders. This path of links is often referred to as a "breadcrumb trail, or just "breadcrumbs". Due to the dynamic nature of many of the pages within the course, we strongly recommend that you use the breadcrumb links instead of the browser's Back and Forward buttons.
Breadcrumbs, like these shown here, will appear at the top of each content area within a course.

CourseSites by BlackboardStudent Quick Start Guide - 50
Clicking on a link will take you to that area of the course. For example, the home icon will take you to the entry page of the course. Selecting the name of a content area (Chapter 3) will take you to the top level of that content area. Ellipses ( .... ) indicate additional levels and they will fully display when you click them.
Navigate within a Content Area -- Opening Files
Your instructors may upload files to CourseSites for you to view or download. These files appear within the content higlighted in a blue text. For example, the link to open a chapter presentation may appear as "Chapter Slide Presentation." As pictured above, you would click on the link to open, print or save the file.
After clicking on the link, users may be prompted to either open or save the file. You can choose to open the file if the item is to be reviewed right away. Users can choose to save the file to your computer desktop or another local drive should they need to refer to the item at a later point. If you are unable to view a file, remember that they may need to download the plug-in to your computer first so the file will open and can be viewed in your Internet browser.
Navigate within a Content Area -- Accessing Folders
Course materials and information can be organized using folders. Just as you can organize files on your computer in folders or put documents in folders within a file cabinet, your instructor can organize content using folders in certain areas. Instructors may even create folders within folders should the course contain quite a lot of material.

CourseSites by BlackboardStudent Quick Start Guide - 51
To access information contained within folders, users should click on the folder title, such as the one pictured above. Don't forget to use the breadcrumb trail to keep track of where you are in the course!

CourseSites by BlackboardStudent Quick Start Guide - 52
Navigating between Courses
1. Enter a desired course.
2. Using the Course Menu click on a Content Area. For the purposes of this tutorial the Discussions content area will be selected.

CourseSites by BlackboardStudent Quick Start Guide - 53
3. Let's say you have finished viewing the Discussion Board for the Introductory Astronomy course and would like to view the Discussion Board in another one of your course.
4. Click on the contextual menu beside the Home icon and select the course you now want to view the discussion board of.

CourseSites by BlackboardStudent Quick Start Guide - 54
5. The Discussion Board of the course you selected (Introductory Oceanography) will appear.
Note: When navigating between courses within Content Areas (i.e Chapter Materials above), you may land on the home page of the course if the Content Area names do not match.

CourseSites by BlackboardStudent Quick Start Guide - 55
Part 4: Communicating with Others

CourseSites by BlackboardStudent Quick Start Guide - 56
Sending Course Email(s)
The Send Email tool allows you to send email messages to your classmates and instructor(s) with valid email addresses from within CourseSites.
1. On the My CourseSites tab, within the Student Tools menu, click Send Email.

CourseSites by BlackboardStudent Quick Start Guide - 57
2. Select the course from which you want to send the email.
Note: For the purposes of this tutorial I will be selecting the Introductory Astronomy course.
CourseSites by BlackboardStudent Quick Start Guide - 58
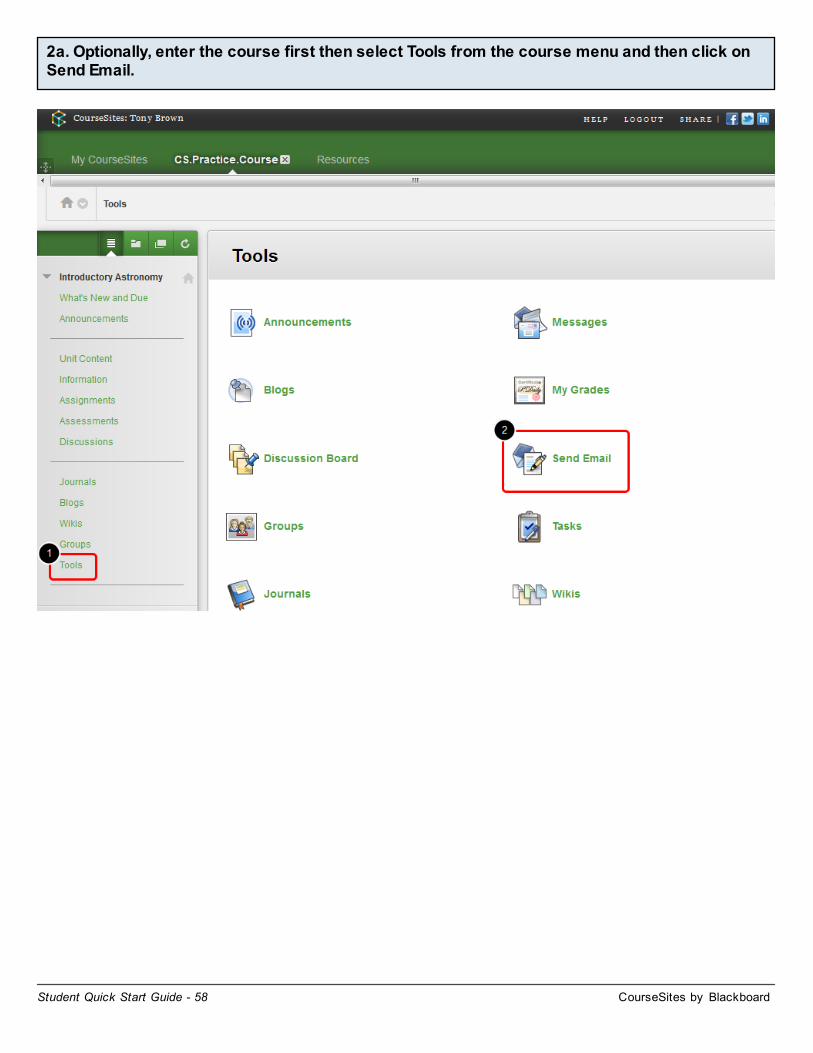
2a. Optionally, enter the course first then select Tools from the course menu and then click on Send Email.

CourseSites by BlackboardStudent Quick Start Guide - 59
3. Select the type of recipients of your email.
Note: For the purposes of this tutorial I have selected Select Users. See the table below on the multiple email options.

CourseSites by BlackboardStudent Quick Start Guide - 60
4. On the Select Users page, select the desired recipient(s) in the Available to Select area and then click the right arrow to move their names into the Selected area.
5. Enter a Subject and Message.
Note: A copy of the email message will be sent to you automatically.

CourseSites by BlackboardStudent Quick Start Guide - 61
6. Click Submit to send.

CourseSites by BlackboardStudent Quick Start Guide - 62
Creating a Discussion Board Thread
Online discussions provide you with the opportunity to "think before you speak, or click in this case! You have time to reflect on what you want to say before you enter your response in the system. You also are ab le to view the responses and perspectives of all your classmates, which sometimes cannot happen face-to-face due to time contraints.
1. On the Course Menu select Tools, and then click Discussion Board.
Note: Your instructor may have set up a direct Discussion link on your course menu, as seen on the course menu above.

CourseSites by BlackboardStudent Quick Start Guide - 63
2. On the Discussion Board page, click the name of the Forum in which you expect to participate.
Note: Typically, instructors will place the questions for you to answer in the Description area to the right of the Forum title. Review this first prior to entering the Forum.

CourseSites by BlackboardStudent Quick Start Guide - 64
3. On the Forum page, click Create Thread.

CourseSites by BlackboardStudent Quick Start Guide - 65
4. On the Create Thread page, enter a Subject and your reply in the Message area.
5. Optionally, attach a files to your thread.

CourseSites by BlackboardStudent Quick Start Guide - 66
6. Click Submit to create the thread.
Note: Double check that your reply has been posted!
CourseSites by BlackboardStudent Quick Start Guide - 67
Replying to a Discussion Board Thread
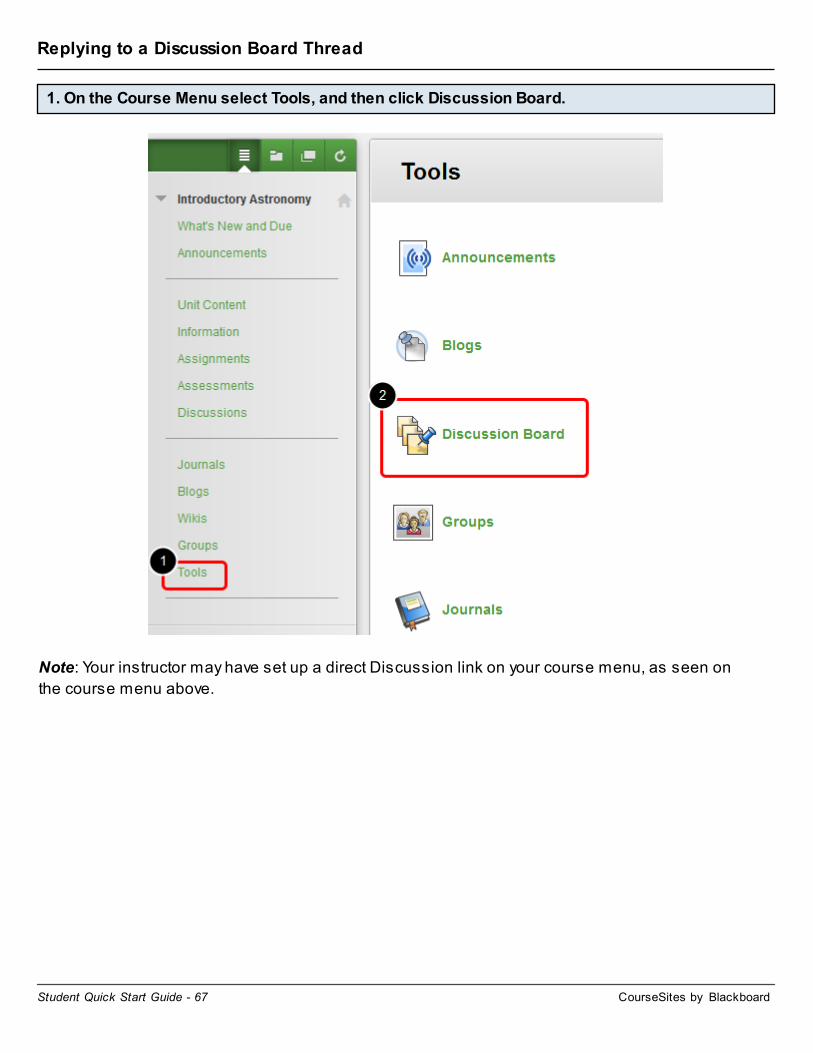
1. On the Course Menu select Tools, and then click Discussion Board.
Note: Your instructor may have set up a direct Discussion link on your course menu, as seen on the course menu above.
CourseSites by BlackboardStudent Quick Start Guide - 68
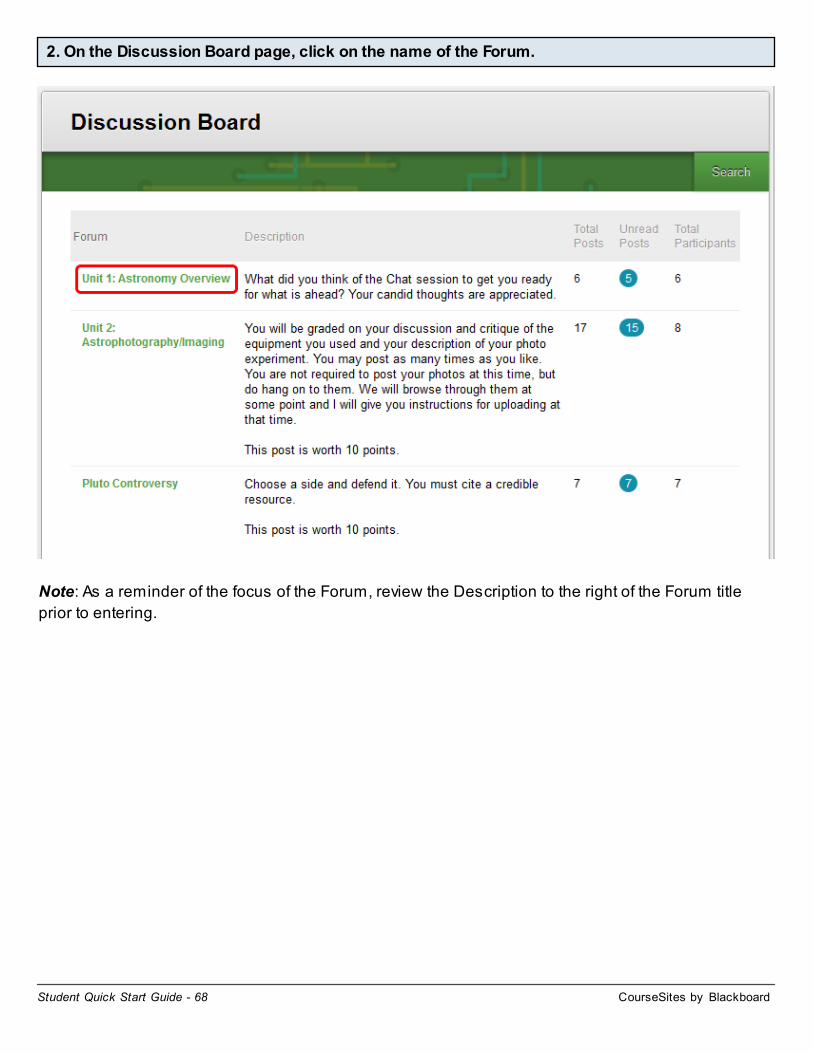
2. On the Discussion Board page, click on the name of the Forum.
Note: As a reminder of the focus of the Forum, review the Description to the right of the Forum title prior to entering.

CourseSites by BlackboardStudent Quick Start Guide - 69
3. On the Forum page, click the name of the Thread to which you'd like to respond and/or review.
CourseSites by BlackboardStudent Quick Start Guide - 70
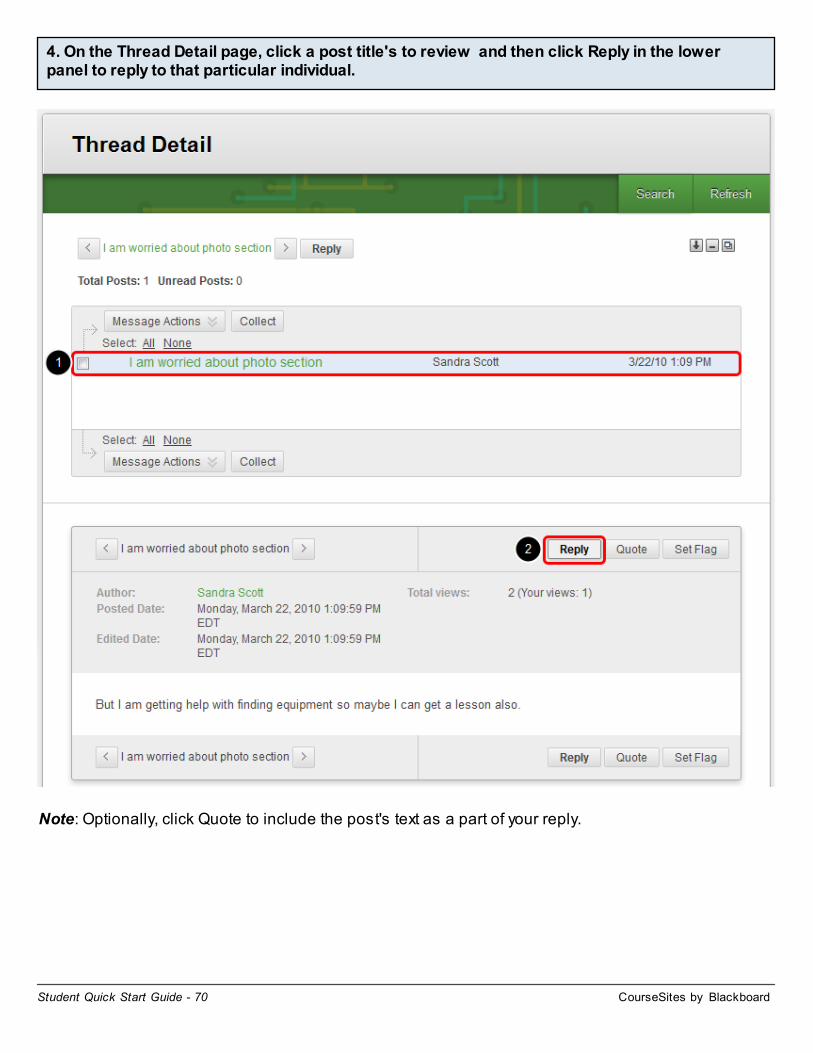
4. On the Thread Detail page, click a post title's to review and then click Reply in the lower panel to reply to that particular individual.
Note: Optionally, click Quote to include the post's text as a part of your reply.

CourseSites by BlackboardStudent Quick Start Guide - 71
5. On the Reply to Post page, edit the Subject, if needed and then enter your reply in the Message area.
6. Optionally, attach a file to your thread.

CourseSites by BlackboardStudent Quick Start Guide - 72
7. Click Submit to post the reply.
8. The response link will appear underneath the orginal post to which you replied.

CourseSites by BlackboardStudent Quick Start Guide - 73
Creating a Blog Entry
A Blog is your personal online journal. Each b log entry you make can include any combination of text, images, links, and multimedia.
1. On the Course Menu select Tools, and then click on Blogs.
Note: Your instructor may have set up a direct Blogs link on your course menu, as seen on the course menu above. This is an alternate access point for the Blogs tool.

CourseSites by BlackboardStudent Quick Start Guide - 74
2. On the Blogs listing page, select the name of the Blog to open.

CourseSites by BlackboardStudent Quick Start Guide - 75
3. On the Blog topic page, click Create Blog Entry.

CourseSites by BlackboardStudent Quick Start Guide - 76
4. On the Create Blog Entry page, enter a Title and Entry Message.
Note: Use spell check before submitting your Blog post.
5. Optionally, attach files to your entry.

CourseSites by BlackboardStudent Quick Start Guide - 77
6. Click Post Entry to submit for the class to view.
CourseSites by BlackboardStudent Quick Start Guide - 78
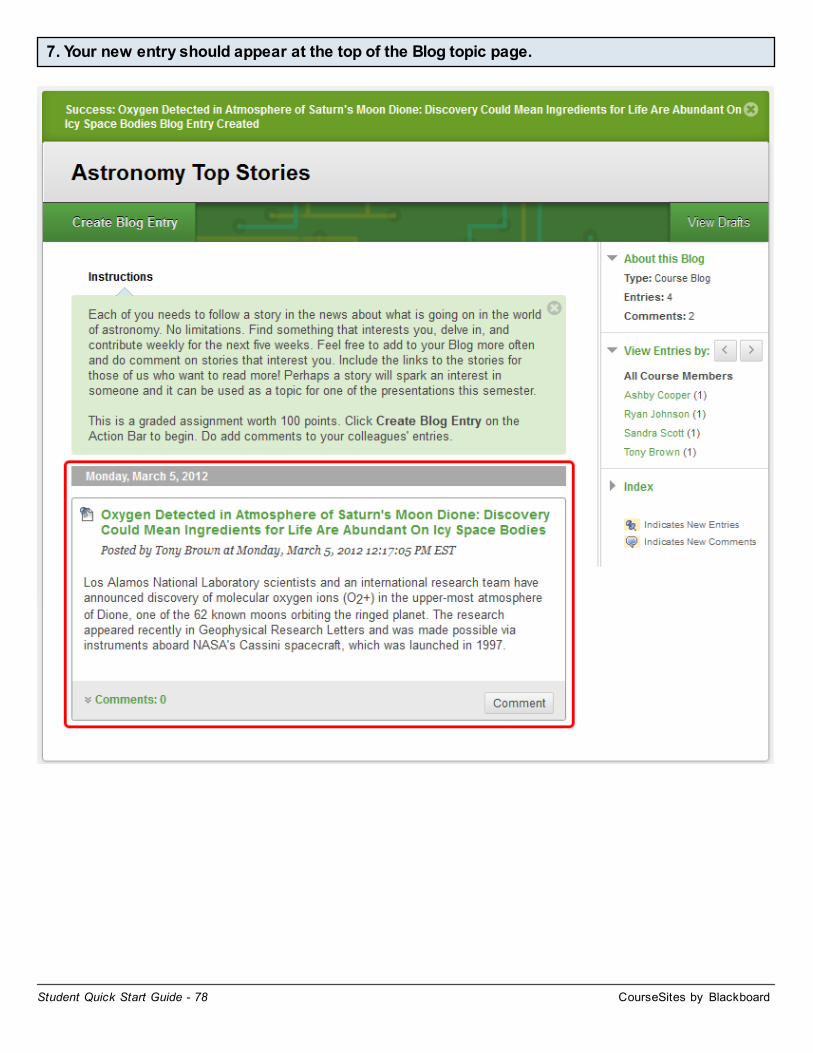
7. Your new entry should appear at the top of the Blog topic page.
CourseSites by BlackboardStudent Quick Start Guide - 79
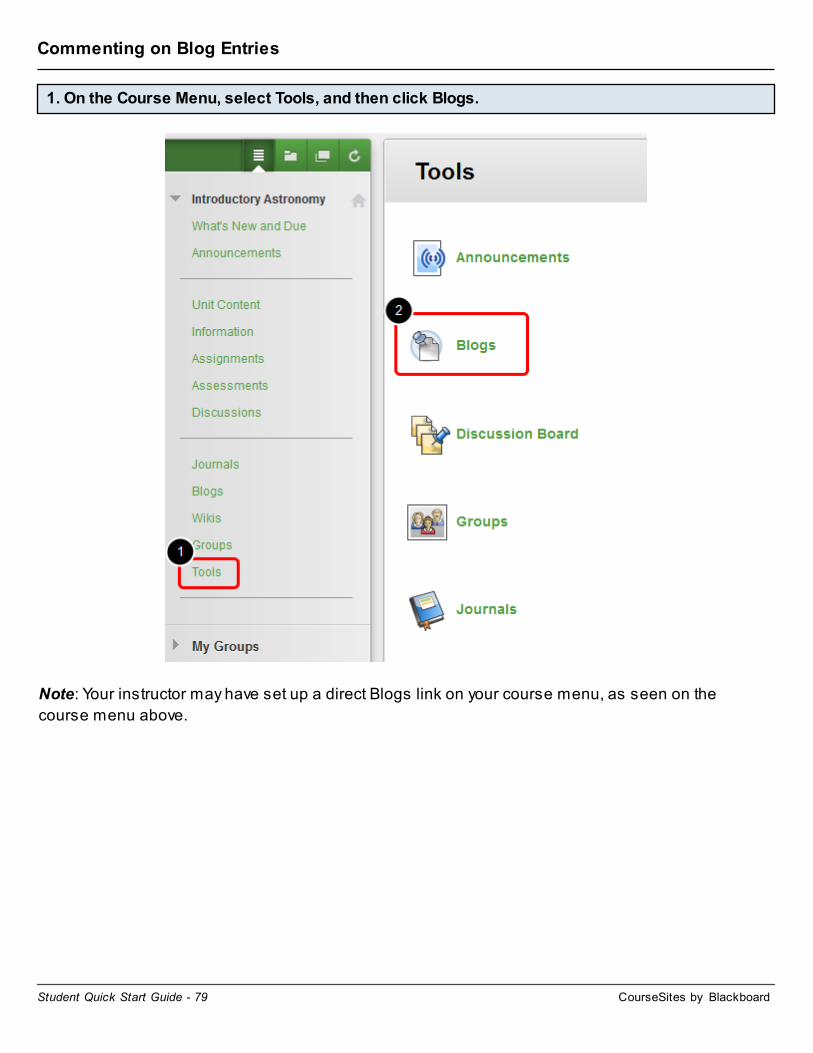
Commenting on Blog Entries
1. On the Course Menu, select Tools, and then click Blogs.
Note: Your instructor may have set up a direct Blogs link on your course menu, as seen on the course menu above.

CourseSites by BlackboardStudent Quick Start Guide - 80
2. On the Blogs page, click the name of the Blog to open.

CourseSites by BlackboardStudent Quick Start Guide - 81
3. On the Blog topic page, select a classmate's Blog to view in the side panel under View Entries by.
CourseSites by BlackboardStudent Quick Start Guide - 82
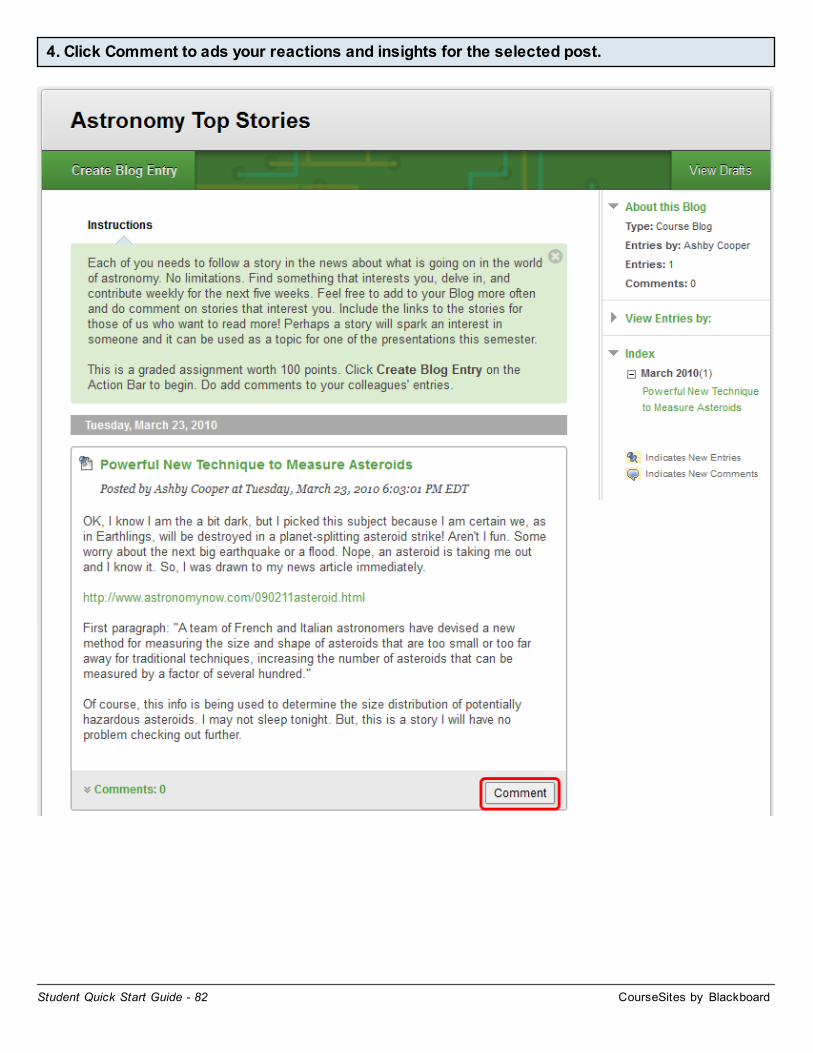
4. Click Comment to ads your reactions and insights for the selected post.

CourseSites by BlackboardStudent Quick Start Guide - 83
5. Enter your comment in the Comment field, and then click Add.

CourseSites by BlackboardStudent Quick Start Guide - 84
6. The comment will appear underneath the selected entry and other comments if desired.

CourseSites by BlackboardStudent Quick Start Guide - 85
Creating a Journal Entry
Journals are a personal space for you to communicate privately with your instructor. It also can be used as a self-reflective tool to post your opinions, ideas and concerns about your course, or discuss and analyze course related materials.
1. On your Course Menu select Tools, and then click on Journals.
Note: Your instructor may have set up a direct Journals link on your course menu, as seen on the course menu above.

CourseSites by BlackboardStudent Quick Start Guide - 86
2. On the Journal listing page, select the name of the Journal to open.
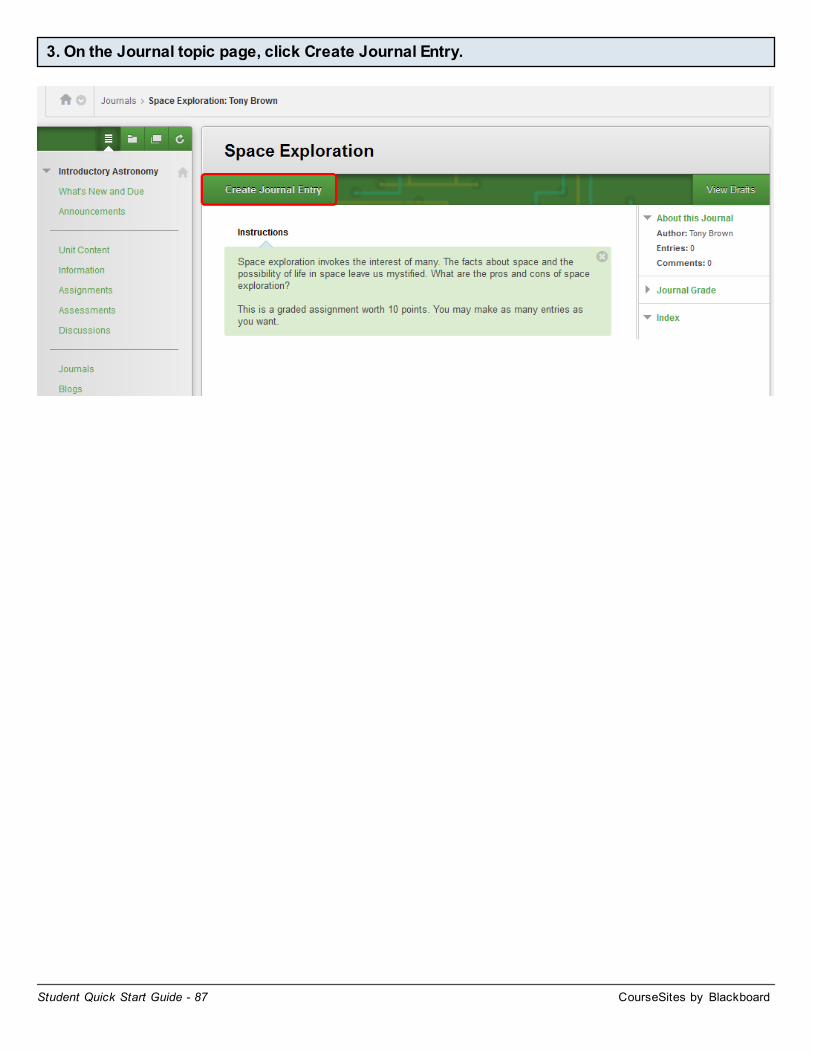
CourseSites by BlackboardStudent Quick Start Guide - 87
3. On the Journal topic page, click Create Journal Entry.

CourseSites by BlackboardStudent Quick Start Guide - 88
4. Enter the Title and Entry Message.
Note: Use spell check your journal entry before posting your entry.
5. Optionally, attach files to your entry.
CourseSites by BlackboardStudent Quick Start Guide - 89
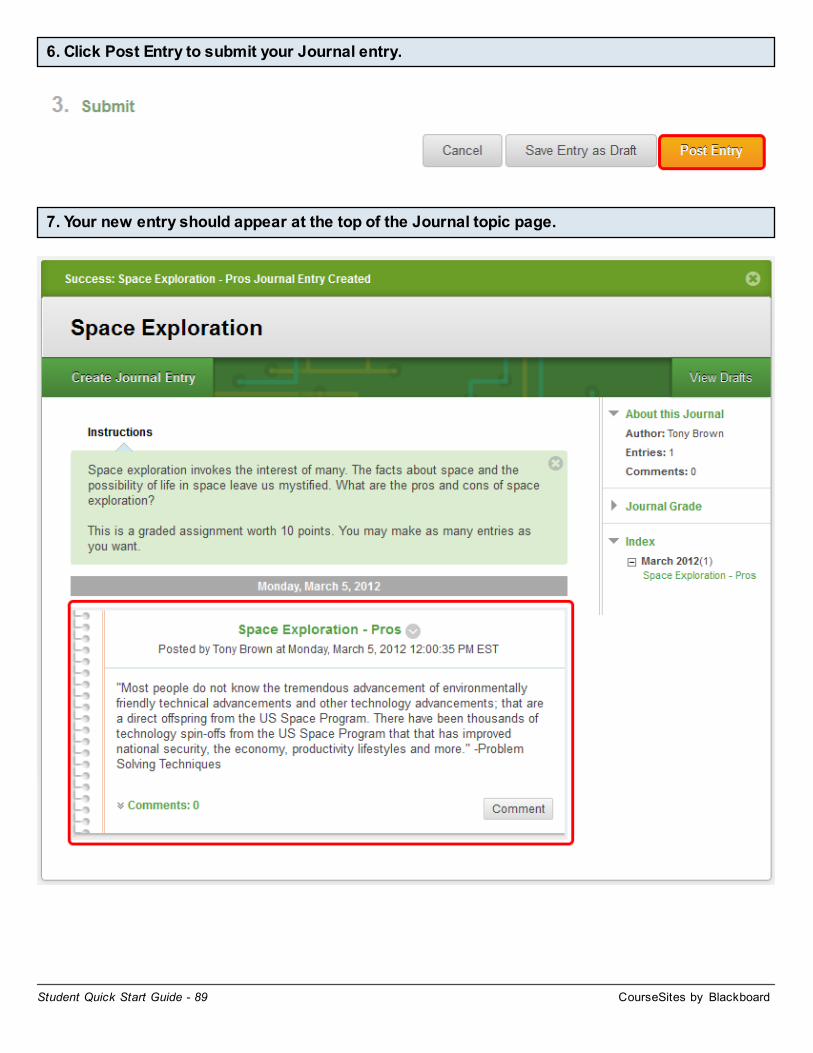
6. Click Post Entry to submit your Journal entry.
7. Your new entry should appear at the top of the Journal topic page.

CourseSites by BlackboardStudent Quick Start Guide - 90
Commenting on Journal Entries
Journals customarily allow one-to-one communication between you and the instructor, but your instructor can enable a course Journal for group reflection. Below are instructions on how to comment on others’ course Journal entries.
1. On the Course Menu select Tools, and then click Journals.
Note: Your instructor may have set up a direct Journals link on your course menu, as seen on the course menu above.

CourseSites by BlackboardStudent Quick Start Guide - 91
2. On the Journals listing page, select a Journal to open.

CourseSites by BlackboardStudent Quick Start Guide - 92
3. On the Journal topic page, click Comment for the selected entry.

CourseSites by BlackboardStudent Quick Start Guide - 93
4. Enter a comment into the Comment field, and then click Add.

CourseSites by BlackboardStudent Quick Start Guide - 94
5. The Comment will appear underneath the selected journal entry.

CourseSites by BlackboardStudent Quick Start Guide - 95
Part 5: Assignments and Grades
CourseSites by BlackboardStudent Quick Start Guide - 96
Submitting Assignments
Assignments enable you to submit work directly to your instructor. Submissions can contain files of any type, or could just be text you enter in the screen. Be sure to review all of the assignment instructions and information before you complete and submit the assignment.
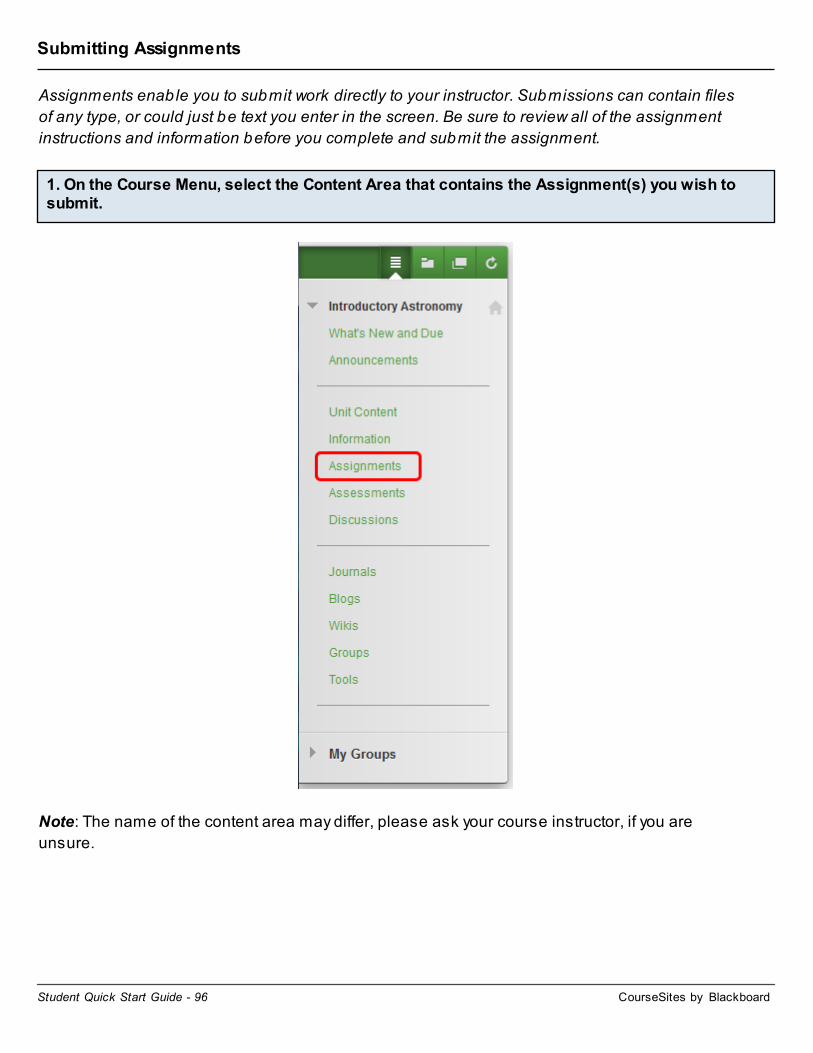
1. On the Course Menu, select the Content Area that contains the Assignment(s) you wish to submit.
Note: The name of the content area may differ, please ask your course instructor, if you are unsure.
CourseSites by BlackboardStudent Quick Start Guide - 97
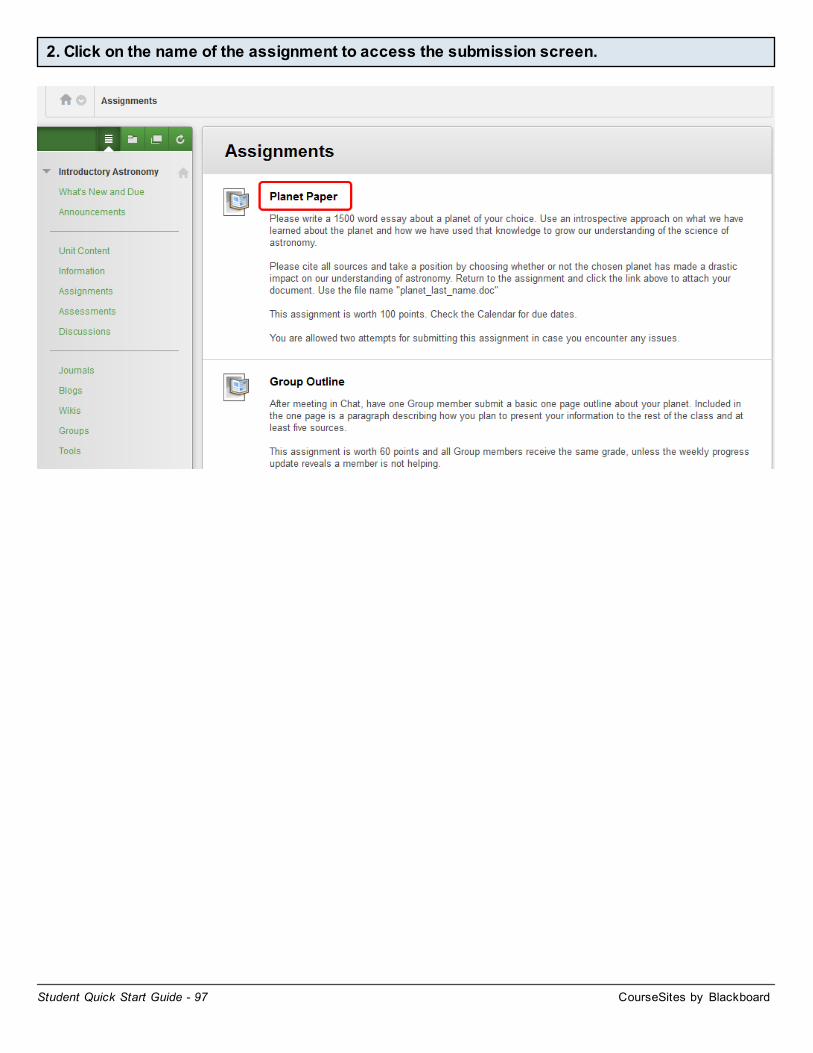
2. Click on the name of the assignment to access the submission screen.

CourseSites by BlackboardStudent Quick Start Guide - 98
3. Review the assignment instruction and/or download any files provided by your instructor, if not already.

CourseSites by BlackboardStudent Quick Start Guide - 99
4. If allowed by your instructor, use the Text Editor in the Assignment Materials area to enter your submission. Otherwise upload your assignment file using the Browse My Computer option.
Note: Multiple files can be attached should that be required. Type any comments you may have for your instructor into the Comments text box.

CourseSites by BlackboardStudent Quick Start Guide - 100
5. Click Submit.
Note: If you do not click Submit, it will not be received by your instructor. Use the Save as Draft button if you expect to return and submit your Assignment at a later date - hopefully before it’s due!
6. A success message will appear, confirming your assignment submission.

CourseSites by BlackboardStudent Quick Start Guide - 101
7. Review your Submission History.
Note: You can follow the same steps noted above to check your grade once your instructor has reviewed and graded the assignment. Check the Instructor Feedback area as pictured above.

CourseSites by BlackboardStudent Quick Start Guide - 102
Taking Test and Quizzes
Instructors may expect you to complete quizzes, tests or surveys as part of your learning experience. You might find these in any Content Area, Learning Module, Lesson Plan and/or folder within your course. Be on the lookout and ask your instructor if you are unable to find any required assessments. Review the steps below to become familiar with how to access and complete a quiz, test or survey.
1. Select the Content Area where the assessment(s) you’d like to take is located, and then click on the title to begin.
Note: The name of Content Area(s) where your instructor has placed course assessments may differ than our picture. Please contact your instructor for the specific location of your course assessments.

CourseSites by BlackboardStudent Quick Start Guide - 103
2. Click Begin to take the assessment.
CourseSites by BlackboardStudent Quick Start Guide - 104
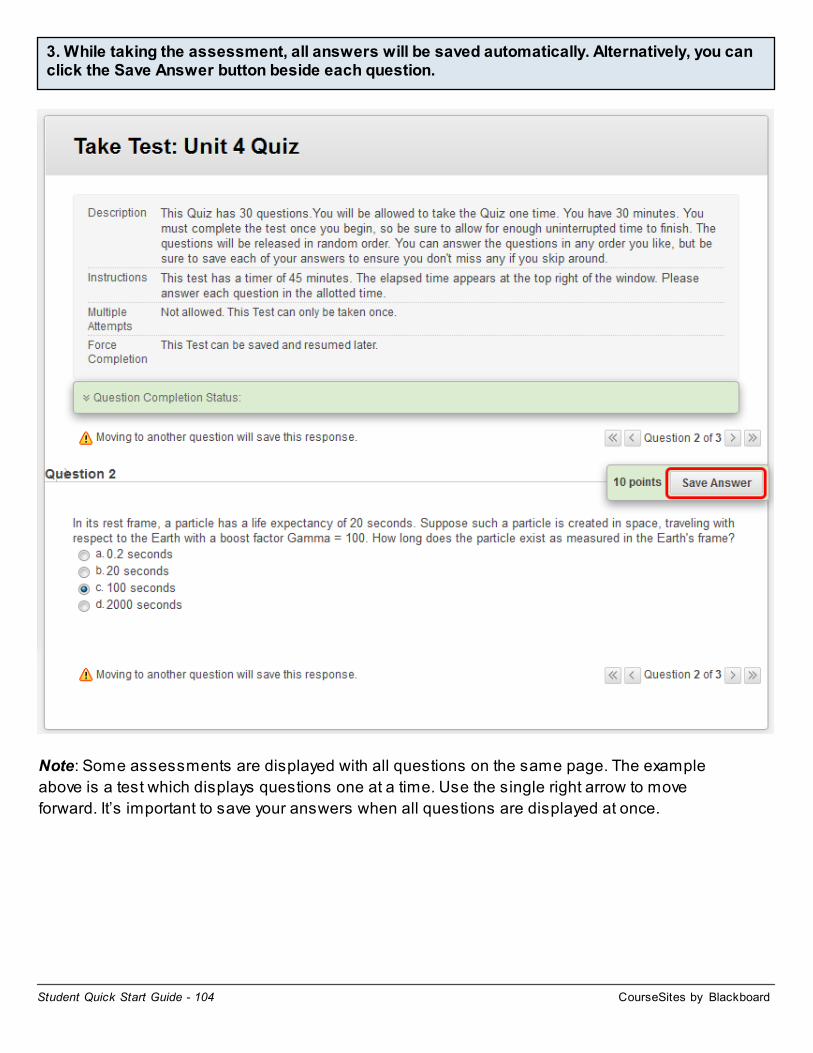
3. While taking the assessment, all answers will be saved automatically. Alternatively, you can click the Save Answer button beside each question.
Note: Some assessments are displayed with all questions on the same page. The example above is a test which displays questions one at a time. Use the single right arrow to move forward. It’s important to save your answers when all questions are displayed at once.

CourseSites by BlackboardStudent Quick Start Guide - 105
4. Click Save and Submit once you have completed all questions within the assessment.

CourseSites by BlackboardStudent Quick Start Guide - 106
5. After successfully submitting your assessment a receipt page will appear.
Note: You can print this receipt using your browser's print command to keep a copy of the page. If your instructor has allowed, you might also see your results and feedback. If not, please check with him or her on expected timing for results and feedback.

CourseSites by BlackboardStudent Quick Start Guide - 107
Accessing My Grades
There are two ways to access My Grades (1) from outside your course, and (2) from within your course.
1. On the My CourseSites tab, within the Student Tools menu, click My Grades.
2. On the My Courses/Organizations page, click the name of your course.

CourseSites by BlackboardStudent Quick Start Guide - 108
2a. On the Course Menu select Tools and then click on My Grades.

CourseSites by BlackboardStudent Quick Start Guide - 109
3. View My Grades.

CourseSites by BlackboardStudent Quick Start Guide - 110
Part 6: Getting Support
CourseSites by BlackboardStudent Quick Start Guide - 111
Getting Support
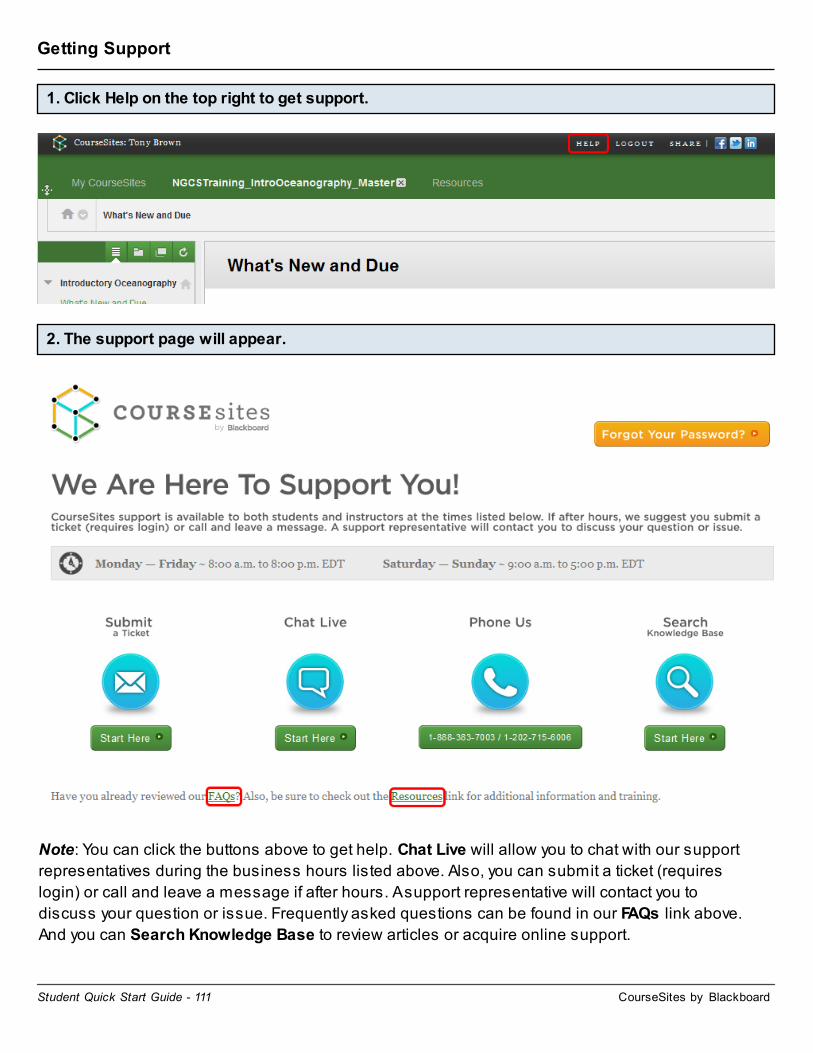
1. Click Help on the top right to get support.
2. The support page will appear.
Note: You can click the buttons above to get help. Chat Live will allow you to chat with our support representatives during the business hours listed above. Also, you can submit a ticket (requires login) or call and leave a message if after hours. A support representative will contact you to discuss your question or issue. Frequently asked questions can be found in our FAQs link above. And you can Search Knowledge Base to review articles or acquire online support.

CourseSites by BlackboardStudent Quick Start Guide - 112
You can also access the Resources tab by clicking the Resources link above.