Standard operating procedures for the welfare of sheep in ... · towards the ship. 4 Module 1....
61
Standard operating procedures for the welfare of sheep in overseas markets
Transcript of Standard operating procedures for the welfare of sheep in ... · towards the ship. 4 Module 1....

Standard operating procedures for the welfare of sheep in overseas markets
1. Animal handlingKey objectives
• Usingthenaturalbehaviouroflivestocktomovethem
• Low-stressanimalhandling
• Appropriateuseofalivestocktalkertomovestock
• Inspectingandimprovinghandlingfacilities

Module 1. Animal handling 1
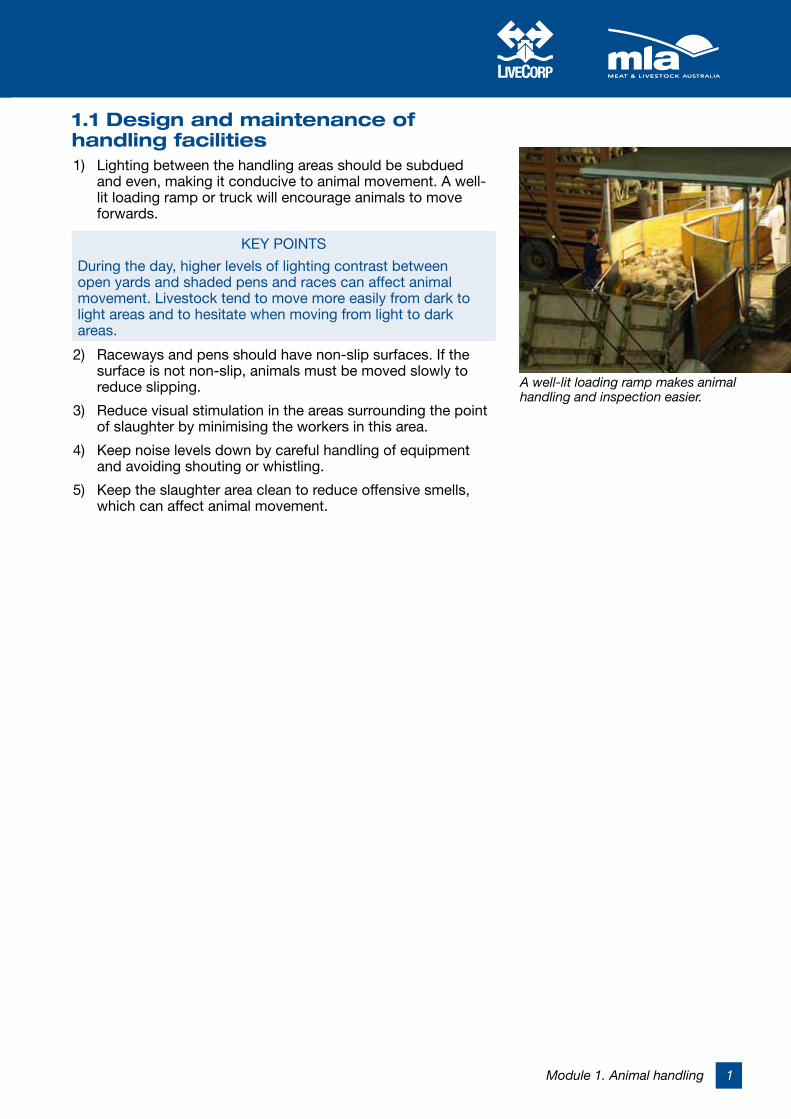
1.1 Design and maintenance of handling facilities1) Lighting between the handling areas should be subdued
and even, making it conducive to animal movement. A well-lit loading ramp or truck will encourage animals to move forwards.
KEY POINTS
During the day, higher levels of lighting contrast between open yards and shaded pens and races can affect animal movement. Livestock tend to move more easily from dark to light areas and to hesitate when moving from light to dark areas.
2) Raceways and pens should have non-slip surfaces. If the surface is not non-slip, animals must be moved slowly to reduce slipping.
3) Reduce visual stimulation in the areas surrounding the point of slaughter by minimising the workers in this area.
4) Keep noise levels down by careful handling of equipment and avoiding shouting or whistling.
5) Keep the slaughter area clean to reduce offensive smells, which can affect animal movement.
A well-lit loading ramp makes animal handling and inspection easier.
2 Module 1. Animal handling
KEY POINTS
Environmental factors that have an effect on livestock movement include:
• reflections on puddles or shiny metal surfaces
• chains and loose ropes
• clothing hung on the race
• metal banging
• high-pitched noise eg pneumatics
• air blowing in the animal’s face
• people moving into the path of the animal
• changes in flooring and texture
• trying to move animals from light to dark
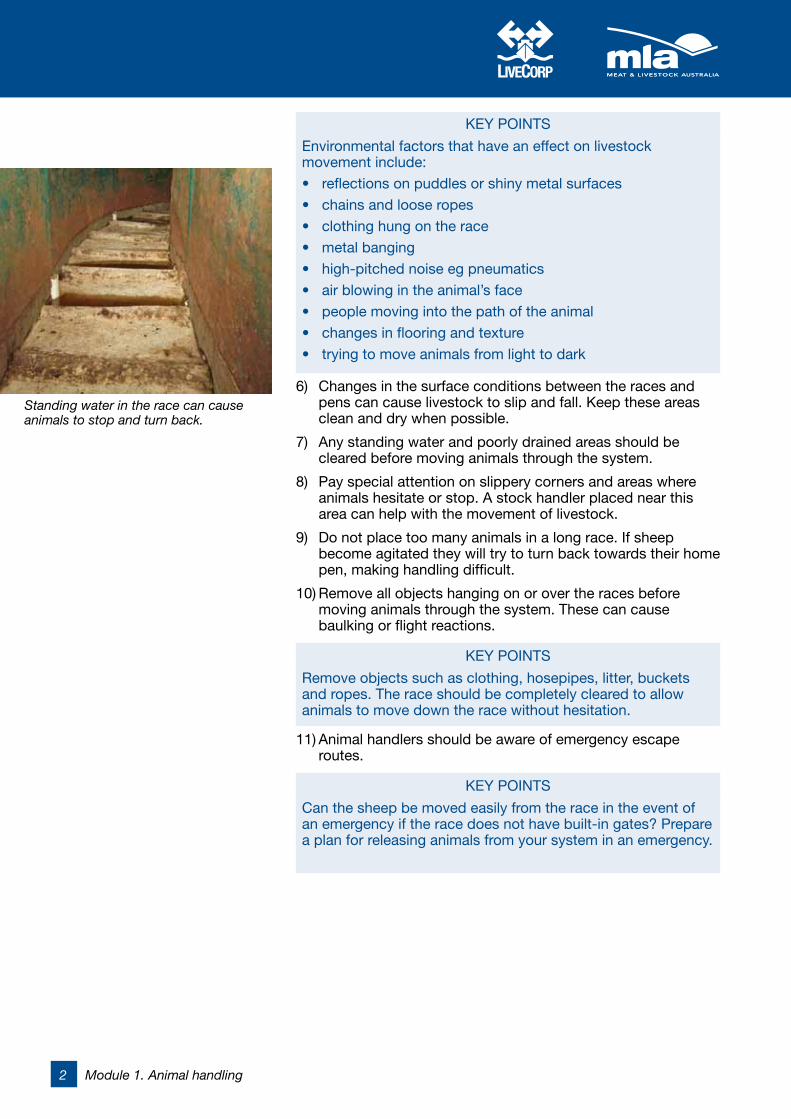
6) Changes in the surface conditions between the races and pens can cause livestock to slip and fall. Keep these areas clean and dry when possible.
7) Any standing water and poorly drained areas should be cleared before moving animals through the system.
8) Pay special attention on slippery corners and areas where animals hesitate or stop. A stock handler placed near this area can help with the movement of livestock.
9) Do not place too many animals in a long race. If sheep become agitated they will try to turn back towards their home pen, making handling difficult.
10) Remove all objects hanging on or over the races before moving animals through the system. These can cause baulking or flight reactions.
KEY POINTS
Remove objects such as clothing, hosepipes, litter, buckets and ropes. The race should be completely cleared to allow animals to move down the race without hesitation.
11) Animal handlers should be aware of emergency escape routes.
KEY POINTS
Can the sheep be moved easily from the race in the event of an emergency if the race does not have built-in gates? Prepare a plan for releasing animals from your system in an emergency.
Standing water in the race can cause animals to stop and turn back.
Module 1. Animal handling 3
1.2 Moving and drafting livestock1) Work as a team to move and draft livestock. Make sure that
all in the team are aware of their responsibilities.
2) Handlers should have an understanding of animal behaviour and be able to use this knowledge to move livestock calmly and effectively.
KEY POINTS
Understanding animal behavior is important when handling them. The main behavioral characteristics when moving livestock are:
• Vision and reaction to movement
• Reaction to noise
• Flight zone and fear reaction
• Size and strength
3) When using movement and position to move livestock, always work on the side of the animal. Do not stand directly behind it in its blind spot.
4) When moving animals from pens into a gateway or race, work around the edge of the flight zone so that the animals move away but do not run.
KEY POINTS
Sheep try to maintain other animals within their vision. They have a wide field of view and can see threats from almost all directions.
5) Apply pressure to the group by moving across the back of the group in a cross style (left to right) pattern.
6) To encourage an animal to stop, move out of the flight zone.
7) Do not try to make animals move (by moving into the flight zone) if they have nowhere to go.
8) Always be aware of your surroundings and remember to close gates behind you.
9) Avoid getting animals too excited. All handling should be performed calmly and quietly.
10) Never hit or put pressure on an animal that is already moving in the right direction.
11) Never move livestock by pulling or carrying by a single limb, horns, ears, wool or hair.
KEY POINTS
Do not drag sheep by the horns or fleece. However, when removing the first (lead) animal from an approved airfreight container, guide the animal by holding the base of the horn and direct it into the open race. This encourages the rest of the group to follow.
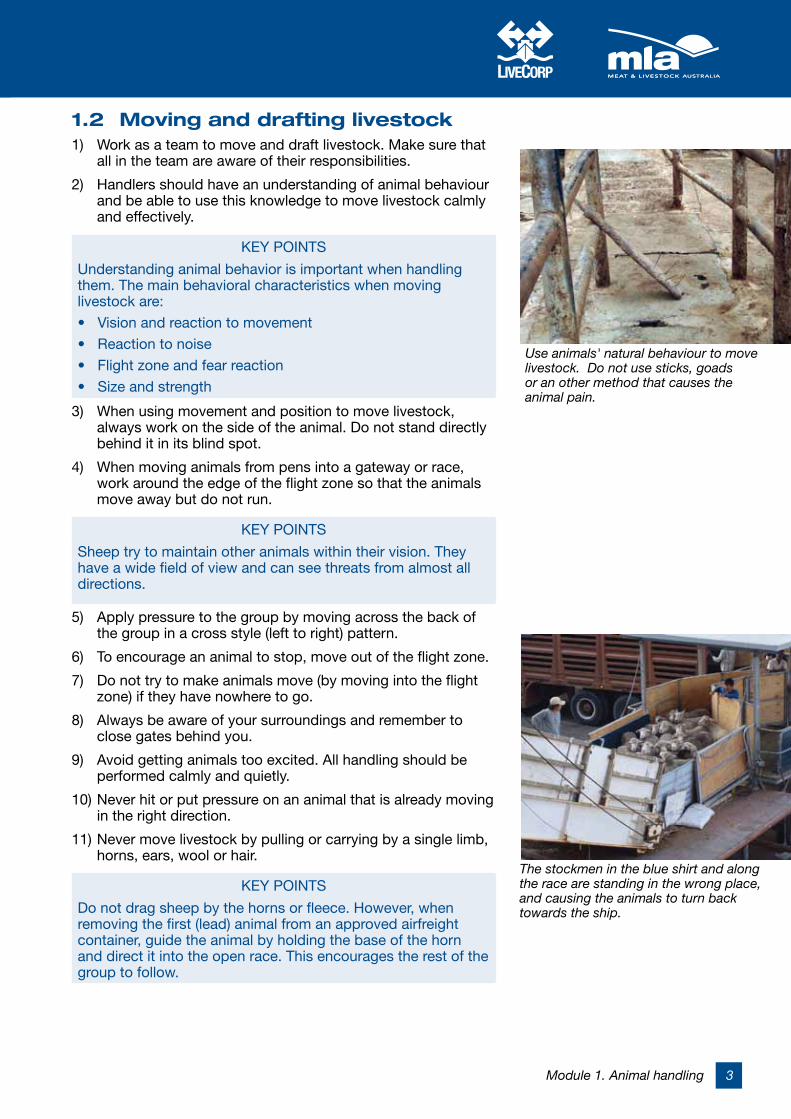
Use animals' natural behaviour to move livestock. Do not use sticks, goads or an other method that causes the animal pain.
The stockmen in the blue shirt and along the race are standing in the wrong place, and causing the animals to turn back towards the ship.

4 Module 1. Animal handling
OIE GUIDELINES
Small animals, such as sheep, can be lifted manually.
KEY POINTS
Pulling the wool or hair of an animal can cause pain, and result in severe carcase damage and poor meat quality.
12) Minimise stress by limiting human interaction with the livestock. Keep unnecessary people away.
13) Do not chase lone animals or cause an animal to become isolated from the group. Always move the last two animals in a pen together; do not leave a single animal alone.
KEY POINTS
Sheep have a herding instinct, and naturally like to follow each other and stay in a group. Use this behavior as much as possible when handling animals in races and pens. An isolated animal will become distressed and difficult to handle.
14) Keep sudden movements and loud noises to a minimum. Do not whistle loudly, shout or bang gates.
15) Know your obligations with respect to the OIE standards. If a worker is found to be mishandling livestock, the supervisor must be informed or the worker instructed on the correct procedures.
16) Do not leave animals in the races during break times or delays.
OIE GUIDELINES
Do not use painful procedures to move animals. These include: whipping, tail twisting, use of nose twitches, pressure on the eyes, ears or external genitalia, or the use of goads or other aids that cause pain and suffering (including large sticks, sticks with sharp ends, lengths of metal piping, fencing wire or heavy leather belts).
Sheep try to stay in a close group, and do not like to be isolated.
Animals must not be left in races during break times or delays, but must be returned to pens.

Module 1. Animal handling 5
1.3 Use of livestock talkers1) Only use livestock talkers when animals are refusing to move
forwards when they have space in which to move.
2) Only lightly touch the hindquarters of the animal with the livestock talker.
KEY POINTS
Electric prodders reduce productivity and upset the animals. Good stockmen should never need to use electric prodders to move sheep.
3) Do not use the livestock talker directly on the face of an animal when trying to make it stop or turn.
4) Do not use the livestock talkers to push sheep too quickly. Too much pressure on the group can cause some individuals to panic and try to escape.
5) Stockmen must not carry or routinely use electric prodders on sheep. They must only be used in an emergency to protect the safety of the stockman.
KEY POINTS
Livestock talkers can be used to move livestock. These must not be used to hit or poke livestock, but as an extension of the body (to make the stockman appear bigger). The noise produced by the plastic strips on the livestock talker can make the animals move forwards.
6) Livestock talkers and other aids should not be used repeatedly if the animal fails to respond or move. Investigate what is preventing the animal from moving.
KEY POINTS
Position of the animal handler is the most effective and least stressful tool for moving livestock. When used with a good understanding of the animal’s flight zone, stress and noise can be minimized. Movement of the body, such as waving hands, makes the handler appear bigger to the animal.
A livestock talker is an effective tool to move sheep and goats.
Moving large groups of sheep too quickly can cause panic and lead to injuries caused by trampling.

2. Land transportKey objectives
•Journeyplanning
•Useandmaintenanceoffacilitiesandequipmentatthefeedlotandabattoir
•Placinglivestockinappropriategroupsfortransportation
•Loadingandunloadingwithminimumstress
• Identifyingandmanaginginjuredanimals

2 Module 2. Land transport

Module 2. Land transport 1
2.1 Transport equipment and facilities1) Before loading and/or unloading livestock, check the
facilities to ensure that they will not cause injury to the animals.
KEY POINTS
Check for damage to flooring, such as potholes, that can cause animals to fall or break a leg. Damage to metal rails and panels can cause injury to the livestock.
2) If the facilities are likely to cause injury, the damage must be fixed immediately or animals must be loaded/unloaded elsewhere.
3) Remove any distractions from the loading/unloading facilities that may cause animals to stop, baulk or turn back.
KEY POINTS
Common distractions include:
• reflections on shiny or wet floors
• dark entrances
• people moving or equipment ahead
• dead ends
• uneven floors or a sudden drop in floor level
• noisy equipment
4) Check livestock trucks for any signs of damage and wear that could injure animals, and report obvious damage to the truck driver or supervisor.
KEY POINTS
Damage to trucks may include:
• holes in the floor
• sharp metal protrusions
• damage to the partitions/ramps or tail-gate.
• bald or perished tyres
• Flimsy or unstable stock crates
Create a checklist for inspecting the trucks.
5) Instructions must be given for any repairs to damaged trucks to be completed before it is used again to transport livestock.
6) All livestock must be loaded/unloaded by an experienced stockman, stevedore or livestock truck driver.
7) Sufficient pens and races must be available before starting to unload.
Check unloading and handling facilities for signs of damage such as sharp metal edges, holes and gaps between panels.
A truck checklist should include an inspection for damage – including bald and perished tyres.
2 Module 2. Land transport
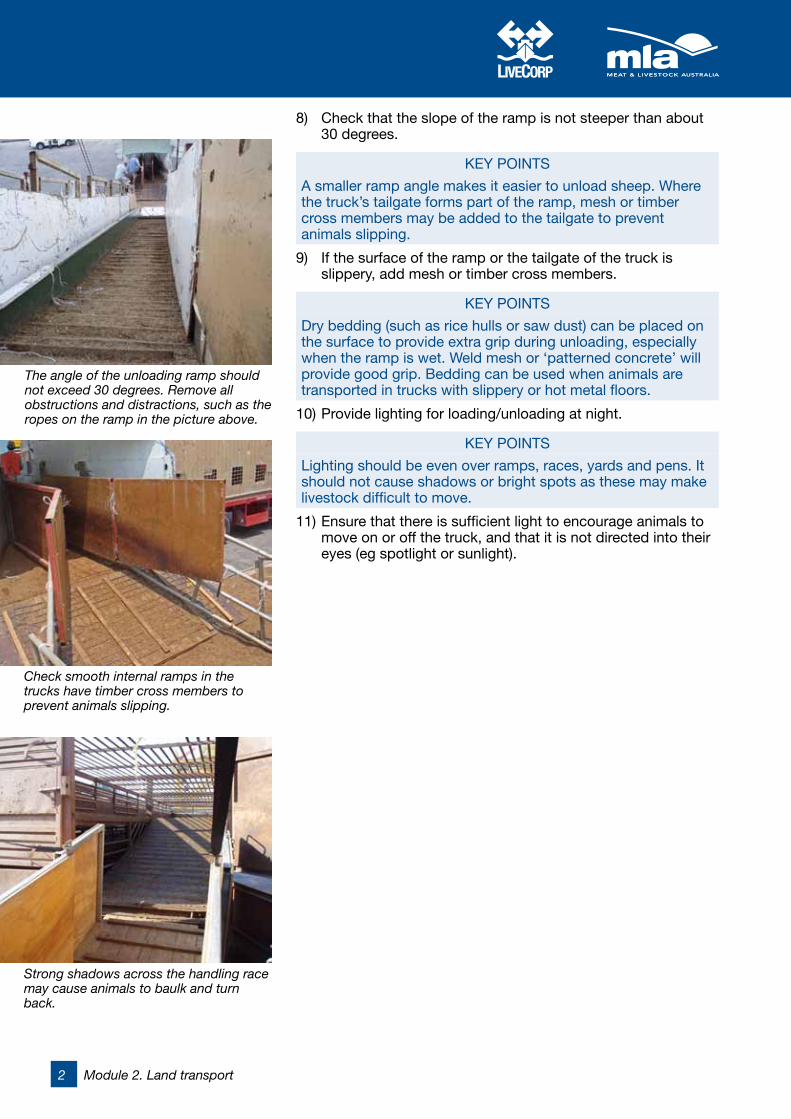
8) Check that the slope of the ramp is not steeper than about 30 degrees.
KEY POINTS
A smaller ramp angle makes it easier to unload sheep. Where the truck’s tailgate forms part of the ramp, mesh or timber cross members may be added to the tailgate to prevent animals slipping.
9) If the surface of the ramp or the tailgate of the truck is slippery, add mesh or timber cross members.
KEY POINTS
Dry bedding (such as rice hulls or saw dust) can be placed on the surface to provide extra grip during unloading, especially when the ramp is wet. Weld mesh or ‘patterned concrete’ will provide good grip. Bedding can be used when animals are transported in trucks with slippery or hot metal floors.
10) Provide lighting for loading/unloading at night.
KEY POINTS
Lighting should be even over ramps, races, yards and pens. It should not cause shadows or bright spots as these may make livestock difficult to move.
11) Ensure that there is sufficient light to encourage animals to move on or off the truck, and that it is not directed into their eyes (eg spotlight or sunlight).
The angle of the unloading ramp should not exceed 30 degrees. Remove all obstructions and distractions, such as the ropes on the ramp in the picture above.
Check smooth internal ramps in the trucks have timber cross members to prevent animals slipping.
Strong shadows across the handling race may cause animals to baulk and turn back.

Module 2. Land transport 3
2.2 Unloading from the vessel at the port of disembarkation1) Unloading must not begin until the unloading platforms/
gateways are secure and suitable trucks are available to deliver livestock to the feedlot or abattoir.
2) Accurately plan when trucks are to arrive to allow the smooth flow of livestock from the vessel.
3) Employ only experienced, skilled personnel for discharging livestock from the vessel and moving to the trucks.
4) Stevedores should be ready to load livestock onto the waiting trucks as soon as discharge of the vessel begins.
5) Animals should not be held on the ramp of the vessel or in handling races for extended periods before loading onto trucks.
OIE GUIDELINES
Assembly/holding areas should be designed to protect animals from exposure to severe weather conditions.
6) Use SOP 1. Animal handling for an understanding of the correct procedures that must be used during the vessel discharge process.
7) Do not use dogs. Use electric prodders only in an emergency.
The arrival of trucks should be planned to reduce the time that sheep are waiting in races during discharge.
Livestock must not be left for prolonged periods on the discharge ramp – particularly during hot weather conditions.
The animal handling facilities should be covered to protect livestock during inspection and movement onto the trucks.
4 Module 2. Land transport
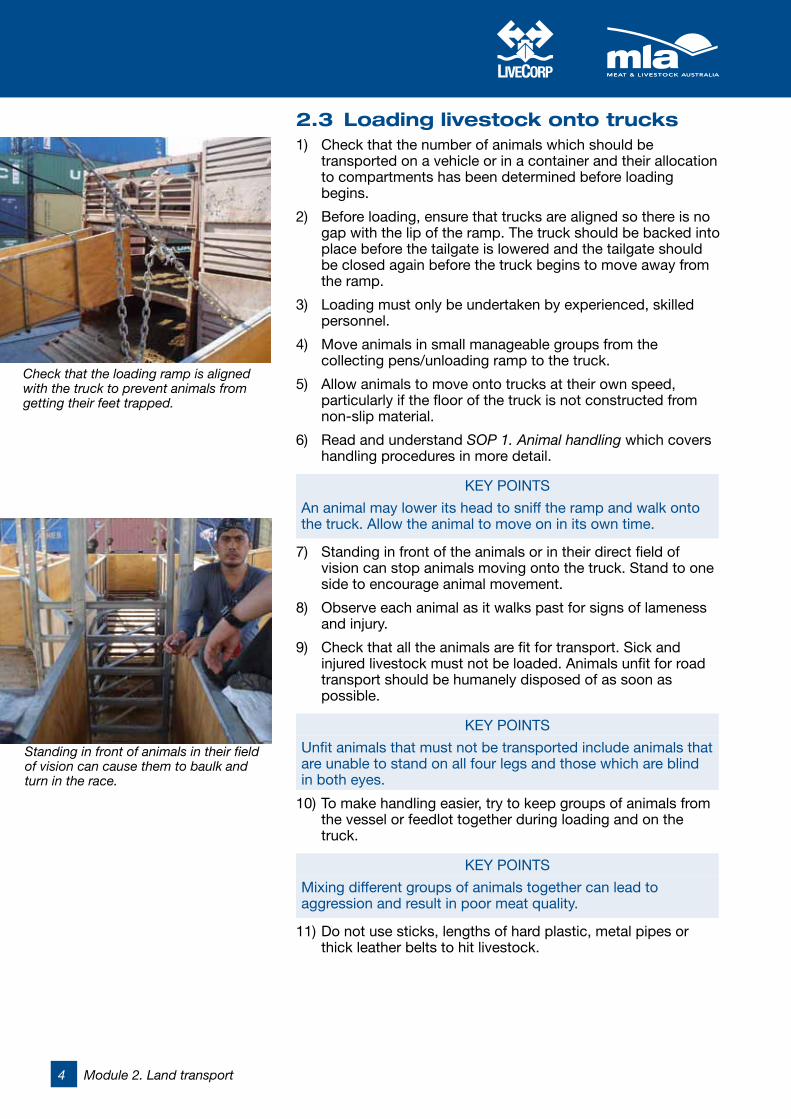
2.3 Loading livestock onto trucks1) Check that the number of animals which should be
transported on a vehicle or in a container and their allocation to compartments has been determined before loading begins.
2) Before loading, ensure that trucks are aligned so there is no gap with the lip of the ramp. The truck should be backed into place before the tailgate is lowered and the tailgate should be closed again before the truck begins to move away from the ramp.
3) Loading must only be undertaken by experienced, skilled personnel.
4) Move animals in small manageable groups from the collecting pens/unloading ramp to the truck.
5) Allow animals to move onto trucks at their own speed, particularly if the floor of the truck is not constructed from non-slip material.
6) Read and understand SOP 1. Animal handling which covers handling procedures in more detail.
KEY POINTS
An animal may lower its head to sniff the ramp and walk onto the truck. Allow the animal to move on in its own time.
7) Standing in front of the animals or in their direct field of vision can stop animals moving onto the truck. Stand to one side to encourage animal movement.
8) Observe each animal as it walks past for signs of lameness and injury.
9) Check that all the animals are fit for transport. Sick and injured livestock must not be loaded. Animals unfit for road transport should be humanely disposed of as soon as possible.
KEY POINTS
Unfit animals that must not be transported include animals that are unable to stand on all four legs and those which are blind in both eyes.
10) To make handling easier, try to keep groups of animals from the vessel or feedlot together during loading and on the truck.
KEY POINTS
Mixing different groups of animals together can lead to aggression and result in poor meat quality.
11) Do not use sticks, lengths of hard plastic, metal pipes or thick leather belts to hit livestock.
Check that the loading ramp is aligned with the truck to prevent animals from getting their feet trapped.
Standing in front of animals in their field of vision can cause them to baulk and turn in the race.

Module 2. Land transport 5
12) Sticks can be used as an extension of the arms to make the handler appear bigger, for example, to fill the space in a gateway—but not to hit animals.
13) Livestock talkers (poles with canvas or plastic strips attached) can be used to encourage movement, but not to hit the animal.
14) Electric goads must not be used during loading—except in an emergency to protect the safety of the stockman.
KEY POINTS
Injuries and stress are most likely to occur during loading and unloading, so take extra care at these times.
15) Check that the animals on board the truck have sufficient space to stand comfortably.
KEY POINTS
Higher stocking densities than that seen in the feedlot may be required to prevent injury during land transport.
OIE GUIDELINES
When animals are standing, they should have sufficient space to adopt a balanced position as appropriate. When animals lie down, they should all be able to adopt a normal lying posture without being on top of one another.
16) Try to maintain animals in their social groups. Only mix horned and unhorned animals if they are compatible (for example, they have previously been transported together with no identified issues).
17) Do not transport pregnant animals to slaughter.
18) Once loading has been completed, the journey must begin without delay to prevent animals being held on a stationary truck.
KEY POINTS
Shade cloth may be needed to protect animals on the top deck of the truck from the direct sun. Bedding can be used to cover the hot metal surface of the truck deck.
Sheep must be able to stand comfortably. However, too low a stocking density can increase injuries.
Horned and unhorned animals should only be transported in the same groups if they have previously been transported successfully together.

6 Module 2. Land transport
2.4 Unloading livestock from trucks1) Animals should be unloaded at the feedlot/abattoir
immediately upon arrival. At the abattoir, slaughter animals in order of arrival to make movement through the yards more straightforward and limit lairage time.
2) If animals are to be held overnight, check the requirements for food and water in SOP 4. Lairage (for abattoirs) or SOP 3. Feedlot operation.
KEY POINTS
When preparing facilities and equipment for unloading animals remember that animals may be fatigued.
3) Trucks must be reversed slowly and in a controlled manner up to the unloading ramp.
4) Ensure that trucks are aligned with the lip of the ramp so that no gap exists. The truck should be backed into place before the tailgate is lowered and the tailgate should be closed again before the truck begins to move away from the ramp.
5) Unloading must only be undertaken by experienced, skilled personnel.
6) Allow animals to move off the trucks at their own speed, particularly if the floor of the truck is not constructed from non-slip material.
7) Read and understand SOP 1. Animal handling, which covers handling procedures in more detail.
8) Do not stand in front of the animals or in their direct field of vision as this can stop animals moving onto the truck. Stand to one side as this will encourage animal movement.
9) Observe each animal as they walk past for signs of lameness and injury. See SOP 3. Feedlot operation or SOP 4. Lairage for management of sick and injured animals.
10) To make handling easier, try to keep transport groups of animals together when moving them into the feedlot or lairage.
11) Do not use sticks, lengths of hard plastic, metal pipes or thick leather belts to hit livestock.
12) Livestock talkers can be used as an extension of the body or arms, for example to fill the space in a gateway.
13) Do not use livestock talkers to hit the animal.
14) Electric goads should be used during unloading only in an emergency to protect the safety of the stockman.
KEY POINTS
Injuries and stress are most likely to occur during loading and unloading.
Allow animals to unload at their own speed – without pressure from stockmen.
Keeping transport groups of animals together makes the handling process more manageable.
Module 2. Land transport 7
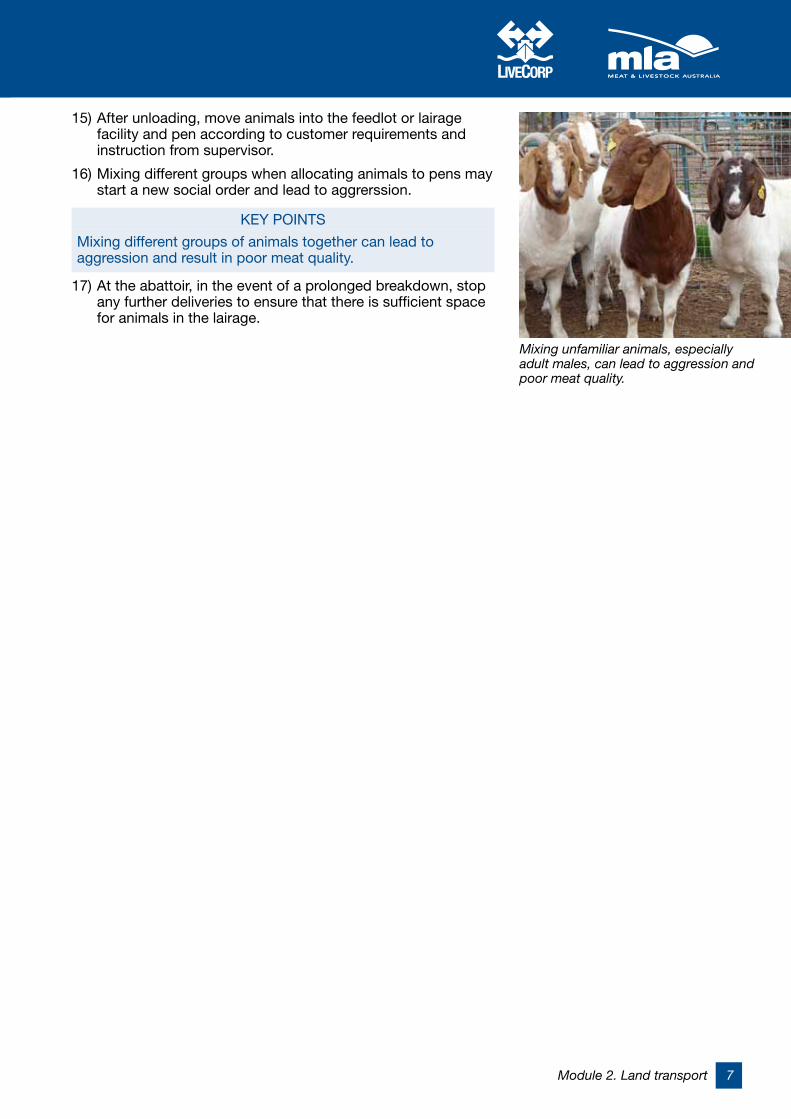
15) After unloading, move animals into the feedlot or lairage facility and pen according to customer requirements and instruction from supervisor.
16) Mixing different groups when allocating animals to pens may start a new social order and lead to aggrerssion.
KEY POINTS
Mixing different groups of animals together can lead to aggression and result in poor meat quality.
17) At the abattoir, in the event of a prolonged breakdown, stop any further deliveries to ensure that there is sufficient space for animals in the lairage.
Mixing unfamiliar animals, especially adult males, can lead to aggression and poor meat quality.

8 Module 2. Land transport
2.5 Inspection of animals and management of downer livestock1) Be aware that downer animals (animals that cannot walk or
stand) have specific requirements with regard to handling, transport and management.
2) Closely observe animals at loading and unloading to check for injuries. Injured animals must not be transported. If fitness to travel is in doubt, consult a veterinarian.
KEY POINTS
Poor transport conditions, for example uneven road surfaces, may increase the likelihood of injuries on the journey. Check animals for injuries to the legs particularly.
3) If animals have been injured during transport and cannot be unloaded without causing further pain and distress, unload sound livestock first, as calmly as possible.
KEY POINTS
Downer animals must be moved, for example with a sheep trolley, only if it can be performed without causing suffering. It is better to slaughter them where they lie.
4) Severely injured stock need to be slaughtered immediately. This must be performed on the truck if safe to do so.
KEY POINTS
Injuries and conditions that require the animal to be killed immediately include:
• fractures of the legs, hips or spine
• emaciation and debilitation
• paralysis from traumatic injuries
• disease resulting in immobility
• blindness in both eyes
• profuse bleeding or serious injury
5) Slaughter downer livestock using a sharp knife or a stunning device (followed by a sharp knife). Follow the appropriate work instructions. Seek assistance from a veterinarian or competent person.
6) Livestock must not be lifted by a single limb, horns or tail, and they must not be dragged. Tying the injured animal to a fixed point and driving the truck away is also forbidden.
OIE GUIDELINES
Downed (downer) animals (that is animals that cannot stand or walk unaided) must never be dragged.
Check animals for signs of injury or lameness as they are unloaded. Transport can cause leg injuries.

Module 2. Land transport 9
7) If moving a sick or injured animal will not cause further pain or distress, move to a separate pen as soon as possible for slaughter or treatment. See SOP. 4 Feedlot operation for the treatment of sick and injured livestock.
KEY POINTS
Injured animals should not be held for long periods of time. For example, a severely injured animal that arrives during the day must not be held until the slaughter floor is operating later in the evening.
10 Module 2. Land transport
2.6 Handling escaped animals 1) Work as a team to move the animal back to the pen, but
keep unnecessary people out of the way.
2) Do not try to isolate an escaped animal, but instead try to herd it back towards the group.
3) Do not make sudden movements or loud noises.
4) Attempt to humanely return escaped animals promptly to the yards. It may be necessary to release the rest of the pen of animals and allow the animal to return to the group before returning to the pen.
5) If possible, lock exit gates to prevent animals from leaving the premises.

3. Feedlot operationKey objectives
• Preparationoffacilitiesforthearrivaloflivestock
• Identifyingandmanaginginjuredanimals
• Managinglivestockinappropriategroups
• Provisionoffood,waterandasafeenvironment
• Preparationoflivestockfortransporttotheabattoir
KEY POINTS
Good feedlot management is critical to the success of a feedlot as it will determine:
• liveweight gain
• sale weight
• carcase quality
• selling price


Module 3. Feedlot operation 1
3.1 Before receival of livestock1) Thoroughly clean and check feedlot and quarantine facilities
before livestock arrive.
2) Clean and fill water troughs with fresh water at a temperature <37ºC.
3) Ensure that there are a sufficient number of pens to accommodate the planned number of livestock.
4) Make sure that the number of animals per pen will allow all animals to stand up, lie down, turn around and access feed/water points.
KEY POINTS
In periods of high temperature, stocking densities should be reduced further. Sheep should be allocated a minimum of 1m2 per animal.
5) Before unloading livestock, check the unloading facilities to ensure that they will not cause injury to the animals.
KEY POINTS
Check for damage to flooring, such as potholes that can cause animals to fall. Damage to metal rails and panels can cause injury to the livestock.
6) If the unloading facilities are likely to cause injury, the damage must be fixed first or the animals must be offloaded elsewhere.
7) The slope of the unloading ramp should not exceed about 30 degrees.
8) Check that the surface of the unloading ramp is not slippery.
KEY POINTS
Dry bedding (for example rice hulls or saw dust) will help the animal to grip during unloading, especially when the ramp is wet. Welded mesh, ‘patterned concrete’ or timber rails can be fitted to provide the animals with a good grip.
9) The time that trucks arrive should be planned as accurately as possible.
10) Ensure that stockmen are ready to receive animals when the trucks arrive. This will reduce waiting time on the trucks before unloading.
KEY POINTS
Prepare a contingency plan for protecting welfare of the animals in the event of exceptional event such as natural disaster, disease outbreak or prolonged delay.
Water troughs must contain clean, cool water and be accessible to all livestock – including those with horns.
The recommended stocking densities allow all animals to lie down, turn around and access feed and water.
Unloading ramps must be well maintained, have a slope of less than 30 degrees and present a non-slip surface.
2 Module 3. Feedlot operation
3.2 Feedlot design and maintenance1) The feedlot as a whole must present an acceptable and tidy
appearance. Keep external areas around buildings clear of rubbish, excess vegetation and non-essential equipment.
2) Before animals arrive at the feedlot or quarantine facility, inspect the facilities for signs of damage that could injure the incoming livestock.
KEY POINTS
The feedlot inspection should include a check for faulty gates and fences; broken gates or drain covers; slippery floors or surfaces; pointed or sharp objects; leaking or broken water devices. Check racks used for forage as damage can cause eye injuries to livestock. Electric wiring should not be in reach of livestock.
3) Any facilities that may cause injury or have an adverse effect on animal welfare must be repaired or not used.
KEY POINTS
The surface of the feedlot pens should provide a dry surface. Bedding materials can be used to absorb urine and faeces.
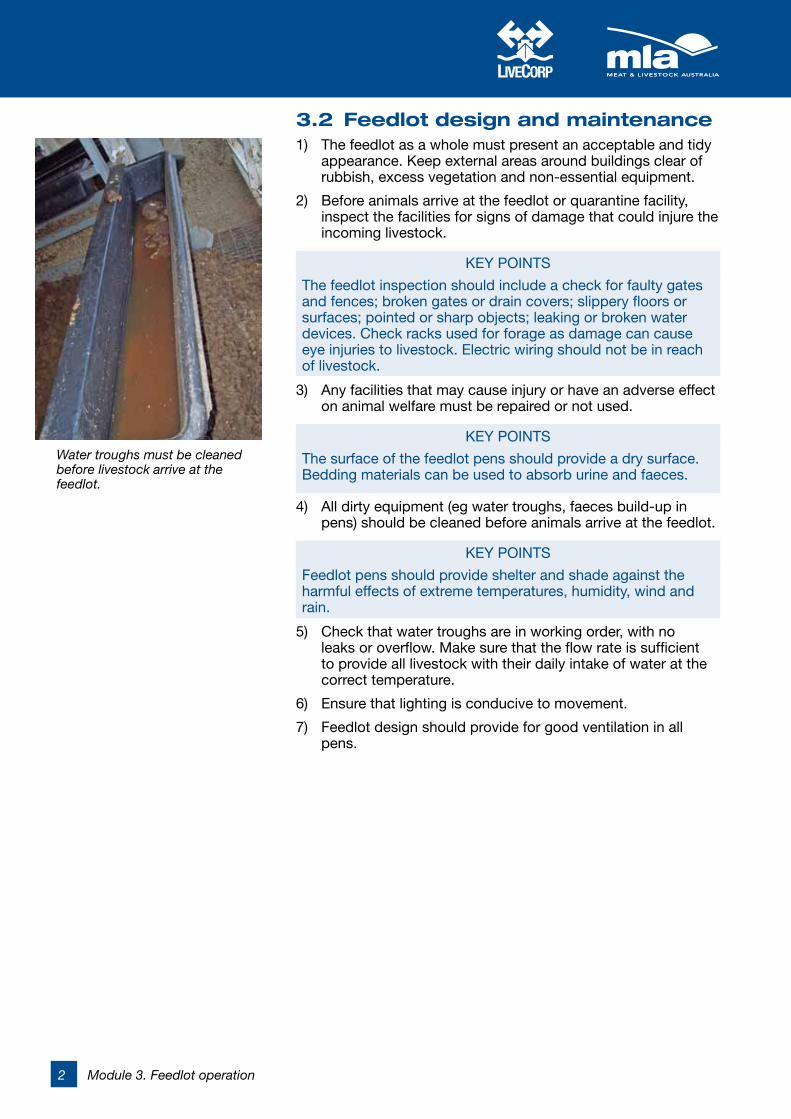
4) All dirty equipment (eg water troughs, faeces build-up in pens) should be cleaned before animals arrive at the feedlot.
KEY POINTS
Feedlot pens should provide shelter and shade against the harmful effects of extreme temperatures, humidity, wind and rain.
5) Check that water troughs are in working order, with no leaks or overflow. Make sure that the flow rate is sufficient to provide all livestock with their daily intake of water at the correct temperature.
6) Ensure that lighting is conducive to movement.
7) Feedlot design should provide for good ventilation in all pens.
Water troughs must be cleaned before livestock arrive at the feedlot.
Module 3. Feedlot operation 3
3.3 Unloading livestock1) All livestock must be unloaded by an experienced stockman
or livestock truck driver.
2) Read and understand SOP 2. Land transport for appropriate unloading procedures.
3) Read and understand SOP 1. Animal handling, which covers animal handling in more detail.
4) Where possible, social groupings should be retained by penning livestock from the same pen on the ship together in the quarantine facility. This is particularly important for rams.
5) If sick and injured animals are identified during unloading, follow the steps described in SOP 2. Land transport.
6) If moving a sick or injured animal will not cause further pain or distress, move it to a separate hospital pen for treatment.
OIE GUIDELINES
Feed (if appropriate) and water should be available for each sick or injured animal.
7) Allow any segregated sick or injured animals to still see and hear other livestock.
KEY POINTS
Do not hold injured animals for long periods of time without veterinary treatment.
8) Once the animals have been unloaded, inspect them again for any injuries or illness that may have been missed.
KEY POINTS
During inspection, observe the animal’s flight zone (See SOP 1. Animal handling). If the flight zone is approached quickly, the animal may act aggressively or move away. Move slowly and calmly during inspection.
3.4 Handling escaped animals 1) Read and understand SOP 2. Land transport.

4 Module 3. Feedlot operation
3.5 Animal husbandry practices1) Separate stock according to sex, age, weight and/or
customer requirements.
KEY POINTS
Locating stock using a system of pen numbers and a blackboard enables good record keeping. It can assist with the movement of stock through the feedlot, calculation of feed requirements and monitoring veterinary treatment.
2) If possible, keep groups that arrive together in the same pen throughout their time in quarantine and while at the feedlot.
3) Do not isolate individual animals.
4) Sheep must not be tethered.
KEY POINTS
Horned animals may injure other stock if penned too tightly. Sheep are stressed by isolation. Any livestock held individually in pens (for example, for treatment) should be able to see and hear other animals of the same species.
5) Inspect the feedlot facilities/equipment and animals twice daily.
KEY POINTS
Early detection of problems relies almost exclusively on using skilled observers. Record any observations to allow for effective management of the feedlot and optimum efficiency.
6) Perform additional inspections on new animals, on the hospital pens and the pens from which any sick livestock have come.
KEY POINTS
Inspections should involve observations of animal behaviour and general appearance, the feedlot environment and other indicators of animal health such as appearance of fresh dung and feed/water intake. All livestock should be seen standing and moving during daily inspections.
7) Inspections should include a check for animals that are not eating, look 'hollow', or have runny dung. Remove any animals with these symptoms, and place in a separate pen for closer management.
8) When sorting animals or administrating treatments follow the steps outlined in SOP 1. Animal handling.
9) Make sure that the pens provide a dry surface for the livestock.
KEY POINTS
Providing a dry standing surface and minimising dung build-up will help to prevent the infection of feet and legs.

Module 3. Feedlot operation 5
3.6 Provision of feed and water1) Provide animals that have recently been transported with
roughage (and water) as soon as possible (before feeding concentrate).
KEY POINTS
Healthy livestock will lie down and ruminate after a good feed of effective fibre, enabling them to start to eat concentrate feed.
2) Check that all livestock can access a constant supply of clean water (at a temperature <37ºC) at all times.
3) Ensure that feed of sufficient quality and quantity is available to all animals.
4) Feed roughage before concentrate in systems where they cannot be mixed together.
5) Any changes to the diet should be introduced gradually over 1–2 weeks if possible.
KEY POINTS
Irregular feeding or long periods without feed and water can severely affect ruminant animal health and even lead to death.
6) Remove any mouldy feed from troughs at least once a day.
7) Make sure that the water troughs have not been contaminated with faeces or spilt feed, and clean any dirty troughs.
8) Check the watering points more frequently for the first 24–36 hours after animals arrive.
All livestock must have access to a diet of sufficient quality and quantity to maintain health and vigour.
Mouldy feed should be removed from troughs at least once a day. Mouldy feed will reduce feed intake.
6 Module 3. Feedlot operation
3.7 Management and treatment of sick and injured animals
KEY POINTS
A veterinary health plan for the feedlot should be maintained. This plan should outline the strategy used to help prevent and treat health disorders in the feedlot.
1) Consider the requirements of the Feedlot veterinary health plan in addition to the steps described in this SOP.
KEY POINTS
Hospital pens should be established for the segregation and treatment of sick and/or injured animals.
2) Check the hospital pen faciltities to ensure that they fulfil the following criteria:
– bedded to allow animals to rest comfortably
– shaded and offering protection against extreme environmental conditions
– feed and water readily available
– visual/audible contact with other livestock of the same species
The hospital pen should be regularly inspected by a veterinarian, and this should occur at least twice a day.
KEY POINTS
Disease in the feedlot can largely be prevented through good management by emphasising husbandry, nutrition, biosecurity and preventive health programs.
3) Animals must be treated in accordance with the feedlot’s veterinary health plan.
4) The administration of veterinary treatment should be performed by a competent person using the appropriate work instructions.
KEY POINTS
Special attention should be given to shy feeders. Management strategies include:
• reducing pen densities
• improving access to feed troughs
• removing the affected animals from the pen and housing in smaller groups.
5) Treatment of animals should continue only when there is a reasonable expectation that the animal will make a full recovery.
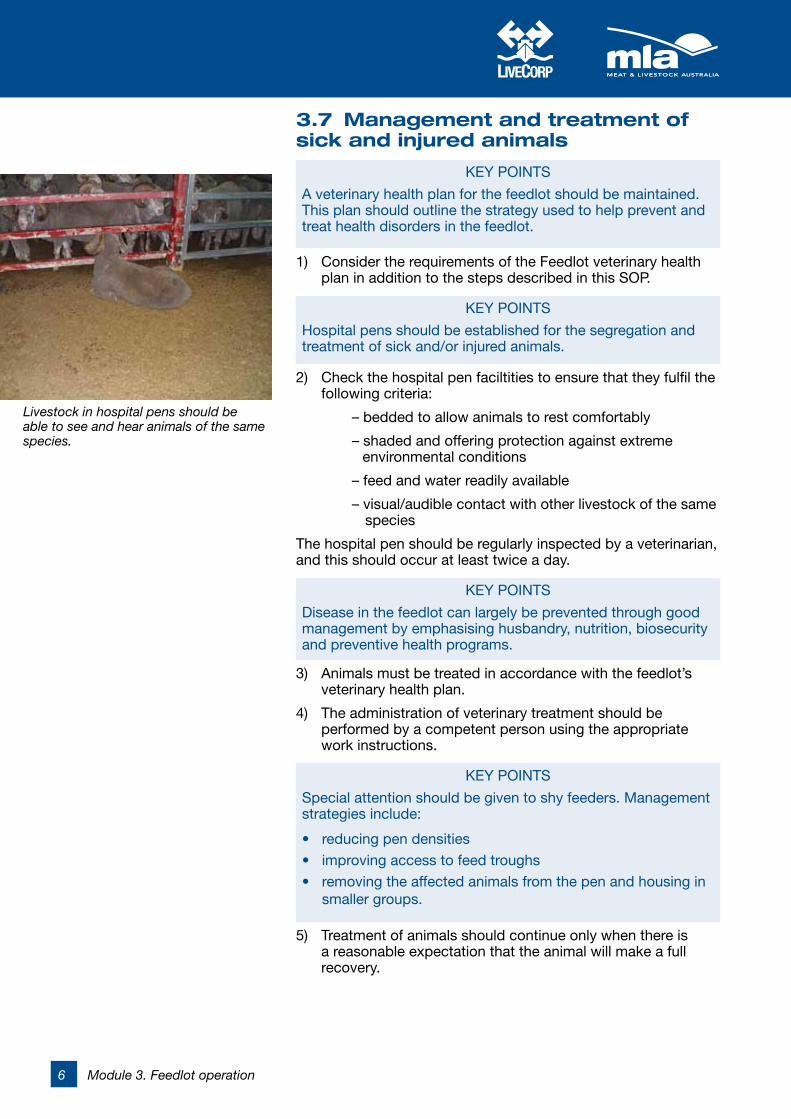
Livestock in hospital pens should be able to see and hear animals of the same species.

Module 3. Feedlot operation 7
KEY POINTS
Sick animals can deteriorate quickly. Treatment should be prompt.
6) Read and understand SOP 2. Land transport for the appropriate treatment of downer livestock.
7) Animals that are not responding to treatment should be slaughtered humanely. SOP 5 and SOP 6 deal with the slaughter of livestock, and these procedures must also be followed when disposing of downer livestock.
8) Lambs born in the feedlot should be segregated with their mothers or humanely slaughtered by a competent person.
9) Lambs (under 3 weeks of age) can be disposed of by a blow to the head. Check for a negative corneal reflex (see SOP 6) to ensure that the method has been effective.
KEY POINTS
Signs that slaughter has been effective include:
• no rhythmic breathing
• no blinking reflexes
• no rotation of eyeball
• fixed glazed expression to eye
• no vocalisation

8 Module 3. Feedlot operation
3.8 Management during extreme environmental conditions
KEY POINTS
Weather can be an important consideration when managing livestock in a feedlot. Extremes of weather may impact animal welfare by causing heat or cold stress. Low temperatures with wind and rain may cause the animals to become chilled, while a heatwave may result in severe heat stress. The impact of extreme weather can be severe on animals that have arrived from Australia.
1) Shade should be available to all livestock during hot environmental conditions.
KEY POINTS
Some types of livestock are more likely to show signs of heat stress during extreme temperature. These include heavy Merino rams and wethers. Provide adequate shade to alleviate heat stress.
2) Check animals for signs of heat stress by looking for rapid breathing.
KEY POINTS
Normal breathing rate is around 40–60 breaths per minute. Sheep that are becoming heat stressed may have a breathing rate around 200 breaths per minute, usually accompanied by open-mouthed panting. A sheep that shows slowed and very deep breathing (movement of the thorax), usually after the initial signs of panting have been observed, indicates severe heat stress and the animal is in danger of collapse and death.
3) Check water troughs more frequently, to ensure that livestock have an unlimited supply of fresh water at the correct temperature (<37ºC).
4) Consider spreading stock out in the feedlot to decrease the density in the pens and increase air circulation.
KEY POINTS
Heat-stressed livestock should be handled calmly and quietly. Move them only if it is absolutely necessary.
5) In cold weather, hold stock in pens that are protected from the prevailing winds and move susceptible animals to the warmer areas of the feedlot.
KEY POINTS
Animals that are susceptible to the cold include shorn sheep, young stock and wet animals.
Rapid panting indicates that livestock are heat stressed.

Module 3. Feedlot operation 9
3.9 Loading facility design and maintenance1) Before loading livestock, check the loading facilities to
ensure that they will not cause injury to the animals.
KEY POINTS
Check for damage to flooring, such as potholes that can cause animals to fall. Damage to metal rails and panels can cause injury to the livestock.
2) If the loading facilities are likely to cause injury, the damage must be fixed first or the animals must be loaded elsewhere.
3) Check that the surface of the loading ramp is not slippery.
KEY POINTS
Dry bedding (for example rice hulls or saw dust) placed on the surface will help the animal to grip during loading, especially when the ramp is wet. Welded mesh, ‘patterned concrete’ or timber rails can be fitted to provide the animals with a good grip.

10 Module 3. Feedlot operation
3.10 Preparation of livestock for loading1) Inspect livestock for fitness to travel. Follow the steps
described in SOP 2. Land transport.
2) Only livestock that are suitable for slaughter should be transported. These must be selected before starting loading to minimise the length of time spent on the truck.
3) Pregnant animals must not be loaded for transport to slaughter.
4) All livestock must be loaded by an experienced stockman or livestock truck driver.
5) Read and understand SOP 1. Animal handling which covers animal handling in more detail and SOP 2. Land transport which covers the loading process.

4. LairageKey objectives
• Inspectionofholdingfacilities
• Appropriatestockingdensity
• Provisionoffeedandwater
• Managinganimalsduringheatstressconditions


Module 4. Lairage 1
4.1. Holding facility design and maintenance1) The lairage as a whole must present an acceptable and tidy
appearance. Keep raceways and pens clear of rubbish, non-essential equipment and other debris.
2) Before animals arrive at the abattoir, inspect the holding facility for signs of damage that could injure the incoming livestock.
KEY POINTS
Holding facilities include all pens, fences, gateways, floor surfaces, roofs and watering facilities. Inspection should include a check for faulty gates and fences; broken gates or drain covers; slippery floors or surfaces; pointed or sharp objects; leaking or broken water devices.
3) Any facilities that may cause injury or have an adverse effect on animal welfare or carcase quality must be repaired or not used.
4) All dirty equipment (eg water troughs, faeces build-up in pens) should be cleaned before animals arrive at the lairage.
5) Check that the holding pens provide enough space for the animals arriving. They must be able to stand-up, lie down and turn around.
KEY POINTS
Lairage facilities should provide shelter and shade to protect livestock from the harmful effects of extreme temperatures, humidity, wind and rain. If possible, the lairage should be located away from the more active areas of the abattoir.
6) Check that water is available in all the pens until the animals are slaughtered.
7) Check that there is a well-lit area to enable the animals to be inspected.
Water troughs must contain clean, cool water and be accessible to all livestock – including those with horns.
2 Module 4. Lairage
4.2 Animal management in the lairage1) Stock may need to be separated according to sex, age,
weight or customer requirements.
KEY POINTS
Locating stock using a system of pen numbers and a blackboard enables good record keeping, and can assist with the movement of stock through the abattoir.
2) Consider animals with special requirements in the lairage.
3) If possible, keep groups that arrive together in the same pen.
4) Do not isolate individual animals.
5) Do not tether or tie animals.
KEY POINTS
Horned animals may injure other stock if penned too tightly. Horned sheep that have not been penned together on the feedlot should not be mixed in the lairage. Heavy wethers and rams are more prone to heat stress so should be penned in the cooler parts of the lairage.
6) Ensure that all the animals in the lairage (even those being slaughtered the same day) have access to clean, cool (<37ºC) drinking water.
KEY POINTS
Optimising hydration by providing animals with continuous access to fresh water improves carcase weight and meat yield.
7) Animals held for prolonged periods (more than 12 hours) must be provided with feed and inspected twice daily.
KEY POINTS
For optimum meat quality, animals should be provided with feed on arrival and up to the point of slaughter. Feeding animals in the lairage can also make them easier to handle.
8) Check that water troughs have not been contaminated with faeces or spilt feed. Clean any dirty troughs.
9) Animals returned to the lairage during breakdowns must have access to water.
10) If sick or injured animals are identified during the inspection of the lairage, follow the requirements for in SOP 2. Land transport.
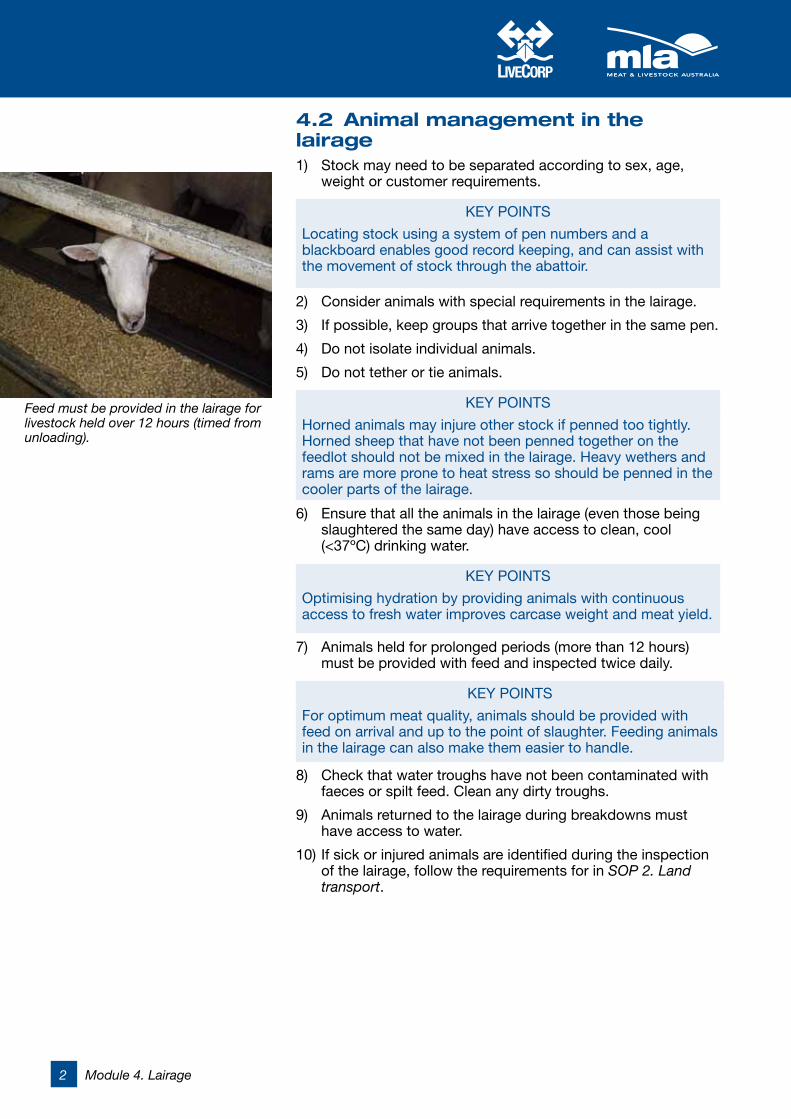
Feed must be provided in the lairage for livestock held over 12 hours (timed from unloading).
Module 4. Lairage 3
4.3 Management during extreme environmental conditions
KEY POINTS
Weather can be an important consideration when managing livestock in a feedlot. Extremes of weather may impact animal welfare by causing heat or cold stress. Low temperatures with wind and rain may cause the animals to become chilled, while a heatwave may result in severe heat stress. The impact of extreme weather can be severe on animals that have arrived from Australia.
1) Shade should be available to all livestock during hot environmental conditions.
KEY POINTS
Types of livestock that are more likely to show signs of heat stress during extreme temperature include heavy Merino rams and wethers. Provide adequate shade to alleviate heat stress.
2) Check animals for signs of heat stress by looking for rapid breathing, open-mouth panting or gasping.
KEY POINTS
Normal breathing rate is around 40–60 breaths per minute. Sheep that are becoming heat stressed may have a breathing rate around 200 breaths per minute, usually accompanied by open-mouthed panting. A sheep that shows slowed and very deep breathing (movement of the thorax), usually after the initial signs of panting have been observed, indicates severe heat stress and the animal is in danger of collapse and death. These animals should be slaughtered as soon as possible.
3) Check water troughs more frequently to ensure that livestock have an unlimited supply of fresh water at the correct temperature (<37ºC).
4) Consider spreading stock out in the feedlot to decrease the density in the pens and increase air circulation.
KEY POINTS
Heat-stressed livestock should be handled calmly and quietly. Move them only if absolutely necessary.
5) In cold weather, hold stock in pens that are protected from the prevailing winds and move susceptible animals to the warmer areas of the feedlot.
KEY POINTS
Animals that are susceptible to the cold include shorn sheep, young stock and wet animals.
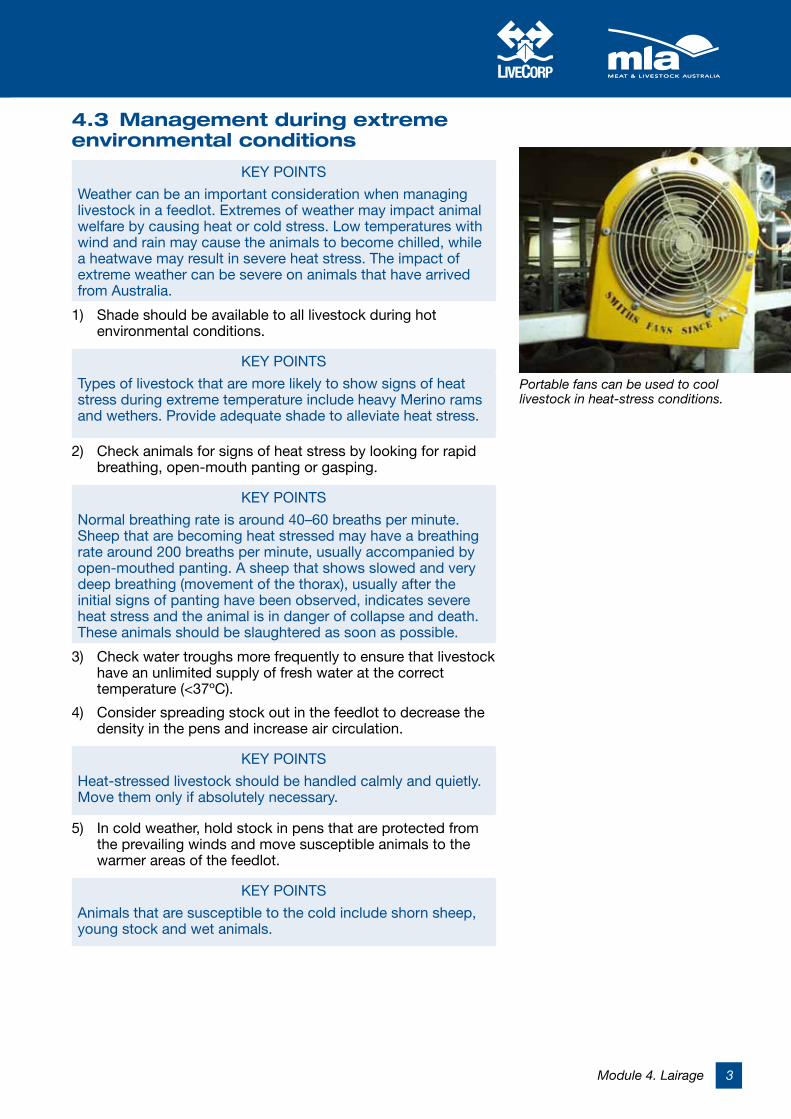
Portable fans can be used to cool livestock in heat-stress conditions.

4 Module 4. Lairage

Module 4. Lairage 5


5. Slaughter – with stunningKey objectives
• Reducinganimalhandling
• Restraintoftheanimalforstunningandslaughter
• Operationandmaintenanceofelectricalstunningequipment
• Identificationofeffectivestunning
• Determiningthecauseofineffectivestunning
• Performingeffectiveslaughterafterstunning
KEY POINTS
Electrical stunning is a method of humanely stunning the animal ready for slaughter. It does not kill the animal and is completely reversible. Using electrical stunning before slaughter prevents the animal from feeling pain and makes the slaughter process easier.


Module 5. Slaughter – with stunning 1
5.1 The restraint process
KEY POINTS
The easiest and preferred way to restrain sheep is by the use of a V-restrainer (with hand-held stunning equipment).
In the absence of a V-restrainer, use manual stunning with a small pen holding small groups of animals (around 4 or 5).
1) Move a small group of animals into the stunning area using the handling methods described in SOP 1. Animal handling.
2) Do not isolate an individual animal. Lone animals must never be left in the V-restrainer, pen or raceway, but must be stunned quickly and effectively to limit the stress caused by isolation.
3) The stunning operator must wait until the animal is presented in a suitable position before attempting to apply the electrodes. Electrodes should not be used to immobilise or restrain the animal.
4) Check that the restraint supplies sufficient pressure to hold the animal effectively, but not excessive pressure.
OIE GUIDELINES
Small animals can be lifted manually.
5) The stunning operative and slaughterman must work together to ensure that the animal is stunned and slaughtered as soon as it has been effectively restrained.
OIE GUIDELINES
Avoid excessive pressure being applied by restraining equipment that causes struggling.
6) Methods which involve tying the animal to restrain it for stunning or slaughter must not be used.
OIE GUIDELINES
Animals must never be restrained by immobilisation by injury such as breaking legs, cutting leg tendons or severing the spinal cord (eg using a puntilla or dagger) as this causes severe pain and stress.
7) Make sure that the group size is manageable. Attempting to place large numbers of livestock into a race or onto a V-restrainer can increase activity and stress leading to carcase damage.
A V-restrainer can be used to position livestock for the application of fixed electrical stunning tongs.
Fixed electrical stunning tongs cannot be used on free-standing animals.

2 Module 5. Slaughter – with stunning
5.2 Operation of electrical stunning equipment 1) Check the stunning equipment before the slaughter
operation begins. The electrodes should be clean with no carbon build-up.
2) Check that the safety switch is operational, and it has not been taped down (making the electrodes permanently live).
KEY POINTS
The effectiveness of an electrical stunning device is largely dependent on the condition of the electrodes. Sufficient current to stun is more likely if the electrodes are clean and well maintained.
3) For maintenance and testing of the stunning equipment, refer to the appropriate work instruction.
KEY POINTS
A person touching one or both of the electrodes may receive a potentially lethal electric shock. Safety procedures and associated work instructions must be followed.
4) Check that the stunning equipment is set to the correct voltage to deliver a stunning current of at least 1.0 amp (refer to work instruction to complete this process)
5) For correct operation, refer to the appropriate work instruction.
KEY POINTS
Only workers who are trained and competent in performing the stunning process correctly should perform the stunning operation. The stunning operative should understand the requirements of the relevant work instructions.Head-only electrical stunning tongs
prevent the animal from feeling the pain of slaughter, but do not kill the animal. There are many different types of stunning tongs.
Sheep can be presented for stunning using a V-restrainer.
Module 5. Slaughter – with stunning 3
5.3 Stunning procedure1) Move the animal into the correct position for stunning.
2) The stunning operative must be ready to stun the animal as soon as it has been moved into position.
3) Do not attempt to restrain or immobilise the animal with the stunning equipment.
4) Apply the stunning equipment to the correct position on the animal’s head. The electrodes must always span the brain.
5) Electrodes must never be placed on the neck of the animal.
OIE GUIDELINES
The use of the electrical stunning method with a single application leg to leg is ineffective and unacceptable in any species.
6) The stunning current should be applied for approximately three seconds, maintaining good contact with the animal’s head.
KEY POINTS
Maintaining good electrical contact may be difficult if the animals have a thick fleece or are very hairy. In these cases, the applied voltage may need to be increased to ensure that there is sufficient current to stun.
OIE GUIDELINES
Appropriate measures, such as removing excess wool or wetting the skin only at the point of contact, can be taken to minimise impedance of the skin, and facilitate effective stunning.
7) Monitor the current during application to ensure that there is a minimum of one amp. If the meter reads less than one amp, increase the voltage setting for subsequent animals.
8) When the electrodes are removed, check that the animal is not breathing rhythmically and there are no other signs of an ineffective stun (see signs of effective stunning).
9) Only assess effective stunning when the electrodes have been removed.
KEY POINTS
Signs of an effective stun (on removal of the electrodes):
• animal displays tonic (rigid)/clonic (kicking) reaction
• no rhythmic breathing (do not confuse with gasping)
• eyes fixed and staring (there may be some eye flicker, but no conscious blinking)
The absence of rhythmic breathing is the best indicator of effective stunning. If breathing is absent, the animal has been stunned effectively.
4 Module 5. Slaughter – with stunning
10) Check that the animal remains effectively stunned and unconscious before bleeding.
11) Animals must not be shackled or hoisted until they are stunned effectively.
OIE GUIDELINES
Animals which are stunned with a reversible method should be bled without delay. The slaughterhouse operator should set up a maximum stun-stick interval that ensures that no animals recover consciousness during bleeding.
KEY POINTS
Slaughtering the animal within 20 seconds of the stun also makes it easier for the slaughterman to handle the animal as it is usually in the tonic (rigid) phase.
12) Once an effective stun has been determined, sticking must be performed quickly (a maximum of 20 seconds timed from the start of the stun).
13) If one person is performing both the stunning and slaughter, he must complete both processes in succession on one individual animal before stunning the next animal.

Module 5. Slaughter – with stunning 5
5.4 Management of ineffective stunning1) If the initial stun is not effective, the stunning operative needs
to take immediate action to re-stun the animal.
KEY POINTS
Signs of ineffective stunning:
• animal shows escape behaviour and/or vocalises upon removal of the electrodes
• rhythmic breathing
• blinking eyes (as seen in conscious animals)One or more of these signs indicates an ineffective stun and the animal must be re-stunned.
2) If stunning is ineffective, determine the cause before stunning the next animal. For example, check the equipment and clean the electrodes.
KEY POINTS
Causes of ineffective electrical stunning:
• incorrect positioning
• poorly maintained or dirty electrodes
• poor restraint
• insufficient voltage to achieve required current
• thick hair or fleece
3) If the cause of ineffective stunning is a fault with the stunning equipment, this must be fixed before stunning the next animal.
4) If the stunning equipment is inoperable, the remaining livestock in the lairage may be slaughtered without prior stunning, until such time that the equipment is fixed. Follow SOP 6. Slaughter – without stunning.

6 Module 5. Slaughter – with stunning
5.5 Slaughter following effective stunning1) Use only a knife that can sever both carotid arteries. The
length of the blade should be approximately twice the width of the animal’s neck.
2) Knives must be prepared and sharpened before beginning the slaughter operation, and then kept sharp between animals (see appropriate work instruction).
KEY POINTS
A sharp knife makes slaughter easier, particularly with woolly Merino sheep.
3) Always take care when handling knives. Hold the knife by the handle and not the blade.
4) Do not throw knives, and keep them away from other workers.
5) The knife used for sticking sheep should be long enough so that the end of the blade remains outside of the sticking wound during slaughter.
6) The stunned animal must be slaughtered as soon as possible after effective stunning has been confirmed. The maximum time between stunning and slaughter is 20 seconds (from stun start).
7) Cut the throat using a single, uninterrupted fast stroke of the blade across the throat from ear to ear (at vertebral position C1).
KEY POINTS
A slow knife stroke can increase the chance of a poor bleed-out.
8) The cut must sever both carotid arteries.
9) The slaughterman must check for effective bleeding, indicated by rapid and profuse bleeding from the cut.
10) Take immediate action if bleeding from the neck wound is not profuse.
11) Immediate action must involve re-sticking the animal, preferably with a second knife.
KEY POINTS
Using a second knife is important as initial problems with bleeding may have been caused by using a blunt knife. A ready-sharpened back-up knife should be held near the slaughter point to be used if the first knife requires resharpening.
12) Leave slaughtered sheep for 30 seconds after sticking (and ensure brain stem reflexes are absent) before performing any further dressing procedures.
The slaughter knife must be sharp and long enough to sever both carotid arteries in one clean cut.
Module 5. Slaughter – with stunning 7
KEY POINTS
Leaving livestock to bleed before starting the dressing procedure improves meat quality with a longer shelf life.
13) After this period, check the corneal reflex before commencing with further dressing.
KEY POINTS
Test the corneal reflex by running a finger across the animal’s eyelashes and gently touching the eye with your fingertips, but do not poke with a finger or other instrument. There should be no eye movement or blinking when touched. If the animal is dead, the eye will remain open and the lid does not move (negative corneal reflex).
14) Further dressing procedures must not be performed until a negative corneal reflex has been observed.
15) Pregnant animals must not be slaughtered. However, if the animal is found to be pregnant during the dressing procedure, the foetus should be prevented from inflating its lungs and breathing air (eg by clamping the trachea). If there is any doubt about consciousness, the foetus should be slaughtered.

8 Module 5. Slaughter – with stunning

Module 5. Slaughter – with stunning 9

6. Slaughter – without stunningKey objectives
• Reducinganimalhandling
• Restraintoftheanimalforslaughter
• Performingeffectiveslaughter
• Recognisingandrectifyingproblemswithbleeding
• Recognisingbraindeath
KEY POINTS
Slaughter without stunning may be carried out in either upright restraint equipment or with the animal manually restrained. The steps detailed in this SOP apply to both methods unless otherwise indicated.

Module 6. Slaughter – without stunning 1
6.1 Manual restraint of livestock for slaughter
KEY POINTS
Prolonging the period of restraint before slaughter will not result in a more relaxed animal but will increase the level of agitation and stress. This will make the slaughter process more difficult, and increase the likelihood of producing very dark meat.
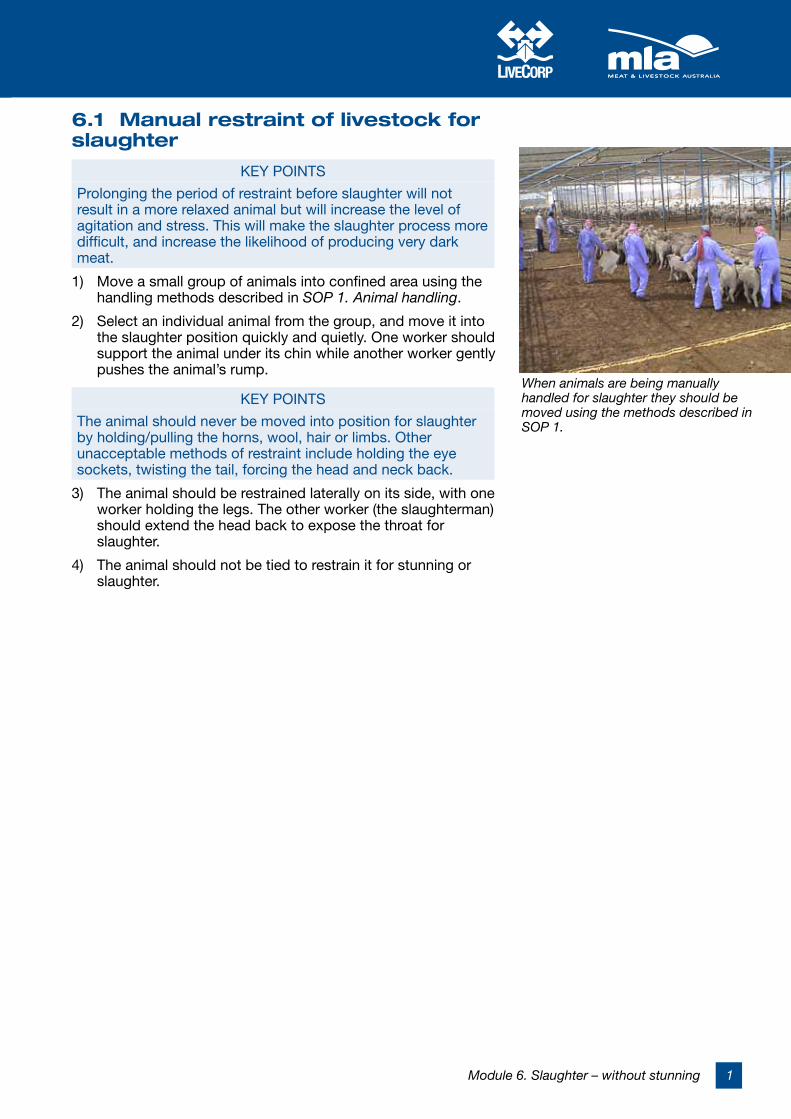
1) Move a small group of animals into confined area using the handling methods described in SOP 1. Animal handling.
2) Select an individual animal from the group, and move it into the slaughter position quickly and quietly. One worker should support the animal under its chin while another worker gently pushes the animal’s rump.
KEY POINTS
The animal should never be moved into position for slaughter by holding/pulling the horns, wool, hair or limbs. Other unacceptable methods of restraint include holding the eye sockets, twisting the tail, forcing the head and neck back.
3) The animal should be restrained laterally on its side, with one worker holding the legs. The other worker (the slaughterman) should extend the head back to expose the throat for slaughter.
4) The animal should not be tied to restrain it for stunning or slaughter.
When animals are being manually handled for slaughter they should be moved using the methods described in SOP 1.
2 Module 6. Slaughter – without stunning
6.2 Restraining equipment for slaughter
KEY POINTS
A double rail restraining device or a V-restrainer may also be used as an alternative to manual restraint. Follow the work instructions for the operation of these restraining devices.
1) Move a small group of animals into confined area using the handling methods described in SOP 1. Animal handling.
2) Select an individual animal from the group, and move it towards the restraining equipment quickly and quietly. One worker should support the animal under its chin while another worker gently pushes the animal’s rump.
3) Carefully lift the animal onto the double rail restraining device (or move into the V-restrainer).
4) Ensure that the restraint supplies sufficient pressure to hold the animal effectively, but not excessive pressure.
OIE GUIDELINES
Avoid animals struggling because of excessive pressure being applied by restraining equipment.
5) Methods which involve tying the animal to restrain it for stunning or slaughter must not be used.
KEY POINTS
Unacceptable methods of restraint include holding the eye sockets, twisting the tail, forcing the head and neck back.
6) Extend the head back to expose the throat for slaughter.

Module 6. Slaughter – without stunning 3
6.3 Slaughter 1) Use only a knife that can sever both carotid arteries. The
blade should be approximately twice the width of the animal’s neck.
2) Knives must be prepared and sharpened before the beginning of the slaughter operation and then kept sharp between animals (see appropriate work instruction).
KEY POINTS
A sharp knife makes slaughter easier, particularly with woolly Merino sheep.
3) Always take care when handling knives and always hold the knife by the handle and not the blade.
4) Do not throw knives, and keep them away from other workers.
5) The blade used for sticking sheep should be long enough so that the end remains outside of the sticking wound during slaughter.
6) Cut the throat using a single, uninterrupted fast stroke of the knife across the throat from ear to ear.
KEY POINTS
A slow knife stroke can increase the chance of a poor bleed-out.
7) The cut must sever both carotid arteries.
8) The slaughterman must check for effective bleeding, indicated by rapid and profuse bleeding from the cut.
9) Take immediate action if bleeding from the neck wound is not profuse.
10) Immediate action must involve re-sticking the animal, preferably with a second knife.
KEY POINTS
Using a second knife is important as initial problems with bleeding may have been caused by using a blunt knife. A ready-sharpened back-up knife should be held near the slaughter point to be used if the first knife requires resharpening.
11) Do not stab the animal in the thorax or brachial joint after making the initial cut across the neck.
12) Do not attempt to remove clots from the wound with your fingers as this may increase animal suffering.
13) The wound should not be allowed to close over the knife. But do not attempt to hold the wound open or aid bleeding with your hands.

4 Module 6. Slaughter – without stunning
14) Leave slaughtered sheep for a minimum of 30 seconds after sticking, or in any case until there is a negative corneal reflex before performing further dressing procedures.
OIE GUIDELINES
After incision of the blood vessels, no scalding carcase treatment or dressing procedures should be performed on the animals for at least 30 seconds, or in any case until all brain-stem reflexes have ceased.
KEY POINTS
Leaving livestock to bleed before starting the dressing procedure improves meat quality with a longer shelf life.
15) After this period, check the corneal reflex before commencing with further dressing.
KEY POINTS
Test the corneal reflex by running a finger across the animal’s eyelashes and gently touching the eye with your fingertips, but do not poke with a finger or other instrument. There should be no eye movement or blinking when touched. If the animal is dead, the eye will remain open and the lid does not move (negative corneal reflex).
16) Further dressing procedures must not be performed until a negative corneal reflex has been observed.
17) Pregnant animals must not be slaughtered. However, if the animal is found to be pregnant during the dressing procedure, the foetus should be prevented from inflating its lungs and breathing air (e.g. by clamping the trachea). If there is any doubt about consciousness, the foetus should be slaughtered.
Check for a corneal reflex by lightly touching the corner of the eye.

Module 6. Slaughter – without stunning 5