Standard Operating Procedure – Macrophytes · PDF file13.01.2017 · Standard...
18
Standard Operating Procedure revised January 12, 2017 Macrophytes Page 1 of 18 Standard Operating Procedure – Macrophytes Table of Contents 1 POINT OF CONTACT ............................................................................................................................ 1 2 OBJECTIVE ........................................................................................................................................... 2 3 DEFINITIONS AND ABBREVIATIONS..................................................................................................... 2 4 OVERVIEW .......................................................................................................................................... 3 5 SOURCES ............................................................................................................................................. 3 6 MATERIALS AND EQUIPMENT ............................................................................................................. 4 7 METHODS............................................................................................................................................ 4 7.1 Site Selection ............................................................................................................................... 4 7.1.1 Considerations for Choosing a Site ...................................................................................... 4 7.1.2 Site Selection Guidance for Soft Shoreline Sites (Beaches) ................................................. 5 7.1.3 Guidance for Submerged Areas (Sampling from Boats, Docks, Jetties, etc.) ....................... 5 7.1.4 Examples of Sample Locations ............................................................................................ 6 7.2 Preparation ................................................................................................................................. 7 7.3 Field Collection and Processing ................................................................................................... 7 7.3.1 Option 1: Soft Shoreline Site (Beaches) ............................................................................... 8 7.3.2 Option 2: Submerged Site ................................................................................................. 10 7.4 Sample Storage ......................................................................................................................... 14 7.5 Laboratory Analysis ................................................................................................................... 14 8 TROUBLESHOOTING / HINTS ............................................................................................................. 14 9 DATA PROCESSING AND STORAGE .................................................................................................... 14 10 REFERENCES .................................................................................................................................. 16 11 Quick Sheet – Macrophytes .......................................................................................................... 17 1 POINT OF CONTACT NAME: Peter Linderoth, Save the Sound / CFE, Water Quality Program Manager ADDRESS: 545 Tompkins Ave, 3rd Floor, Mamaroneck, NY 10543 EMAIL: [email protected] PHONE: 914-263-6233
Transcript of Standard Operating Procedure – Macrophytes · PDF file13.01.2017 · Standard...
Standard Operating Procedure revised January 12, 2017 Macrophytes Page 1 of 18
Standard Operating Procedure – Macrophytes
Table of Contents 1 POINT OF CONTACT ............................................................................................................................ 1
2 OBJECTIVE ........................................................................................................................................... 2
3 DEFINITIONS AND ABBREVIATIONS..................................................................................................... 2
4 OVERVIEW .......................................................................................................................................... 3
5 SOURCES ............................................................................................................................................. 3
6 MATERIALS AND EQUIPMENT ............................................................................................................. 4
7 METHODS............................................................................................................................................ 4
7.1 Site Selection ............................................................................................................................... 4
7.1.1 Considerations for Choosing a Site ...................................................................................... 4
7.1.2 Site Selection Guidance for Soft Shoreline Sites (Beaches) ................................................. 5
7.1.3 Guidance for Submerged Areas (Sampling from Boats, Docks, Jetties, etc.) ....................... 5
7.1.4 Examples of Sample Locations ............................................................................................ 6
7.2 Preparation ................................................................................................................................. 7
7.3 Field Collection and Processing ................................................................................................... 7
7.3.1 Option 1: Soft Shoreline Site (Beaches) ............................................................................... 8
7.3.2 Option 2: Submerged Site ................................................................................................. 10
7.4 Sample Storage ......................................................................................................................... 14
7.5 Laboratory Analysis ................................................................................................................... 14
8 TROUBLESHOOTING / HINTS ............................................................................................................. 14
9 DATA PROCESSING AND STORAGE .................................................................................................... 14
10 REFERENCES .................................................................................................................................. 16
11 Quick Sheet – Macrophytes .......................................................................................................... 17
1 POINT OF CONTACT
NAME: Peter Linderoth, Save the Sound / CFE, Water Quality Program Manager ADDRESS: 545 Tompkins Ave, 3rd Floor, Mamaroneck, NY 10543 EMAIL: [email protected] PHONE: 914-263-6233
Standard Operating Procedure revised January 12, 2017 Macrophytes Page 2 of 18
2 OBJECTIVE
Identify problematic macroalgae blooms and the presence of eelgrass in neighboring waters by examining the wrack line on a beach or sampling submerged areas with a rake.
3 DEFINITIONS AND ABBREVIATIONS
Embayment: A recess in a coastline or an indentation off a shoreline which forms a bay. In Long Island Sound, the names of embayments often include the words Harbor (27%), River (23%), Cove (19%), Bay (10%), Creek (10%), and Pond (7%); with a few including the names Brook, Gut, Inlet, or Lake.
Field Team: Person or group of people working together to sample a station.
Macroalgae (macroalga, singular.): Commonly referred to as seaweed. This is a group of plant-like organisms. They do not have the vascular system and roots of a true plant. The “macro” prefix indicates these organisms are visible with the naked eye, no magnification is required to view the whole organism; although, magnification with a hand lens or loupe may be necessary to view the structure of the organism. In comparison, microalgae are the phytoplankton in the water which are too small to see with the naked eye.
Macrophyte: Plants and macroalgae that are viewable with the naked eye. This term includes macroalgae, seagrass (eelgrass, Zostera marina; widgeon grass, Ruppia maritima), and marsh grass.
Monitoring Group: The group conducting the field work.
Seagrass: A true plant, not an alga; they have the vascular system and roots of a land plant. These plants are fully submerged at all times (though there are a few species not found in Long Island Sound which are intertidal). Long Island Sound has two species of seagrass: Zostera marina (eelgrass), which is the most commonly seen seagrass in our area; and Ruppia maritima (widgeon grass).
Section: The reporting regions for the embayment report card. Each section must include a minimum of three stations. Sections will be assigned a unique name by the UWS; examples are included below.
Number of Sections 1 2 3
Name of Sections whole inner outer inner middle outer
Abbreviations for Sections W I O I M O
Site: The whole embayment, as defined by the UWS list. Each site has a unique three letter code assigned by the UWS; for example, Little neck Bay, NY is “LNE”.
Sonde: An instrument probe that automatically transmits information about its surroundings underground, under water, in the atmosphere, etc.
SOP: Standard operating procedure; this document is a SOP.
Station: The location where samples are collected, identified by a GPS location.
UWS: Unified Water Study
UWS Coordinator: The person designated as the point of contact for the UWS.
UWS Scientific Advisor: Estuarine or water quality scientists designated as advisors to the UWS.
Standard Operating Procedure revised January 12, 2017 Macrophytes Page 3 of 18
4 OVERVIEW
The goal is to identify areas with problematic amounts of macroalgae and areas with eelgrass (a beneficial condition). This is not intended to be a quantitative assessment. Macrophyte surveys will complement chlorophyll a concentrations to better understand the dominant primary producer in the system. Methods for conducting an assessment vary by the location to be assessed. If a soft shoreline is available, photos of the beach area are used to characterize the amount of macroalgae in the neighboring water. Alternatively, a rake is used to assess what is on the bottom when submerged areas are sampled.
METHOD OVERVIEW (please see text below for a full explanation)
Sample 3 days during the 3-week period starting July 15 and ending August 7. Try to sample once per week. If this is not possible, please sample such that you maximize the days between sampling. All three days cannot be sampled in the same 7-day window.
For soft shorelines, take an overview photo of the area, focused on the beach (not the water). Take a close-up photo of each of the dominant macroalgae types on the beach. Complete the datasheet.
For sampling submerged areas, toss the rake 6 times, 2 tosses in each of 3 directions (if limited by access to a single point) or 3 areas (if you have room to move to another location at the station). Photograph each rake, even empty rakes. Complete the datasheet.
Enter the data into the online portal. Upload your photos to the online portal.
BACKGROUND
Later on in this SOP, you will see that you are characterizing macroalgae by morphology (hair-like, twig/leaf-like, sheets) and color (green, other). Macroalgae can be hard to identify, thus we are not attempting to identify the genus or species of algae present. The morphology will allow us to identify algae that are nutrient-loving, and thus may represent a water quality problem. Hair-like algae of all colors tend to be nutrient-lovers. Some branching algae in the twig/leaf-like category are also nutrient-lovers, especially if they fall into the red algae category. Sheets of green or red are problematic, while sheets of brown (e.g. kelp) are indicative of good water quality. Based on these assessments, you may notice that color of the algae is important. Macroalgae fall into three taxonomic divisions denoted by the color of the algae: red (Rhodophyta), green (Chlorophyta), and brown (Phaeophyta). These colors refer to the types of photosynthetic pigments present in the organisms of each division. While a Rhodophyta often looks reddish, it can appear gold, green, brown, or black. The same is true of the other divisions. Green macroalgae typically appear green. Almost all green algae found in our area is indicative of high nutrient availability. Thus, we ask that you distinguish between green algae and those of other colors. Good photos of the algae you are seeing will aid in follow-up analysis of these data.
5 SOURCES
These procedures are under development by the Unified Water Study (UWS).
Standard Operating Procedure revised January 12, 2017 Macrophytes Page 4 of 18
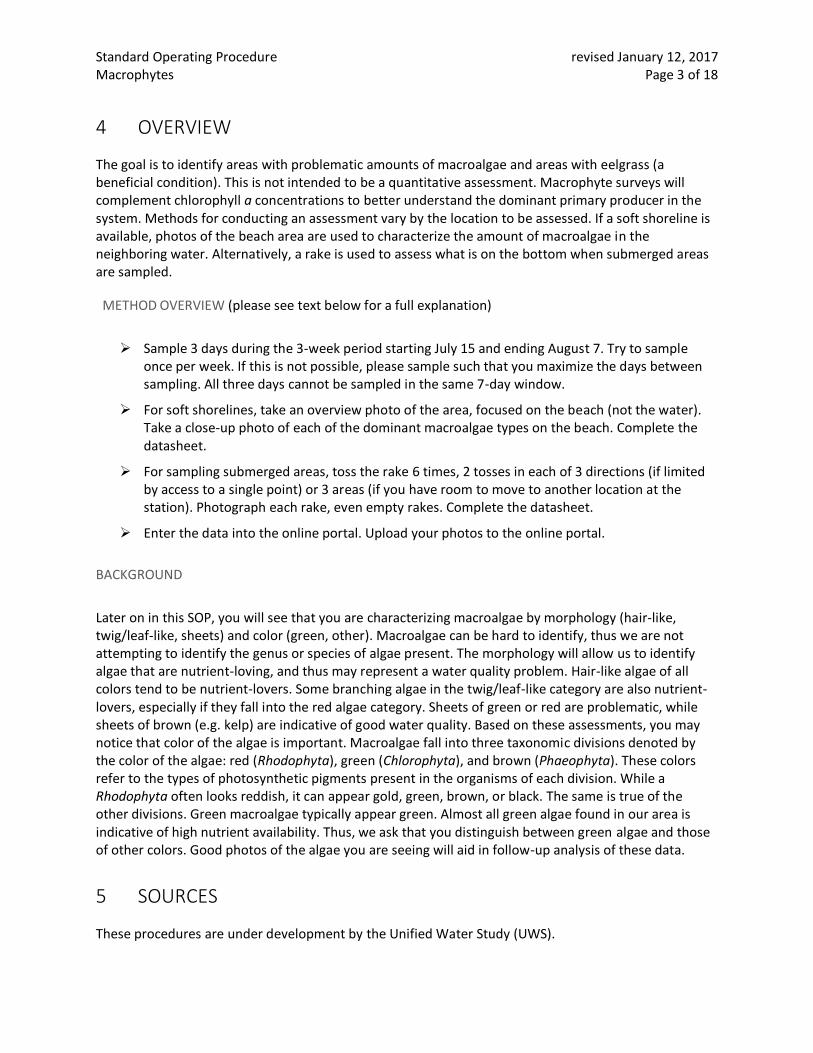
6 MATERIALS AND EQUIPMENT
GPS unit
o GPS unit or GPS app for a smart phone
Digital camera with resolution >5 megapixels (most smartphone cameras meet this criteria)
Bucket or plastic bin, for putting macroalgae in if it is very muddy or falling off rake
Bow rake with ~7 m (~20 feet) of rope attached to the tine-end of the rake and attached to the handle (cable tie, duct tape, etc.).
o The rake should be a heavy duty bow rake with forged steel rakehead, 16 inches wide, with 15 or 16 tines. The total length (handle to tines) should be around 60 inches. A rake with an ash wood handle is appropriate; however, fiberglass or another handle material is also acceptable.
Weight that can be attached to the rake, to help it sink to the bottom. For example, a dive weight or large fishing weights.
Local tidal information for survey sites (for soft shoreline surveys).
7 METHODS
7.1 Site Selection
The number of sites sampled per embayment depends upon the size of the embayment, expected variability in macroalgae coverage, and access to sampling sites. An initial site visit of many locations can aid with determining the viability of sampling sites. A minimum of 3 sample sites is recommended for all embayments. More may be needed for larger embayments. Consultation with the science advisors on sites will aid with the determination of how many to include. We cannot assess how much macroalgae is in an embayment using this method. Instead, the goal is to identify embayments which have widespread macroalgae problems and those which have problem areas for macroalgae but not throughout the whole system. Additionally, eelgrass will be noted when present in the survey, recognizing that it is likely transferred into the embayment from Long Island Sound.
7.1.1 Considerations for Choosing a Site
Must be legally accessible. This includes areas with public access and private areas where permission has been granted by the owner or manager of the area. Roadways closed to pedestrian traffic and all train tracks ARE NOT considered areas with public access, prior permission and official escort are typically required for these areas.
Must be safe to access. The site should not endanger personnel. For example, areas to avoid include: steep inclines, roadways with insufficient buffers from passing cars, areas overrun with poison ivy, areas with excessive debris, etc.
Standard Operating Procedure revised January 12, 2017 Macrophytes Page 5 of 18
Look for areas where macroalgae is likely to collect. The goal is to assess what is out in the system. If you choose an area that is too deep or where the current is sweeping away all of the macroalgae, you may miss an issue that is occurring in shallower, calmer waters. However, if the overall system is deep and scoured by the current or wind driven waves, then sample these areas, as they do indeed represent the system. To assess how representative an area is, try sampling in a few spots in a general area of the embayment. If macroalgae is widespread, make a note of this. If the macroalgae you are sampling is at a spot where macroalgae tends to collect, also make a note of this.
7.1.2 Site Selection Guidance for Soft Shoreline Sites (Beaches)
For soft shoreline assessments, the method calls for taking a photo of the beach and close-ups of the dominant macroalgae types. This is the quicker assessment when compared to a rake survey. You are looking for an area with the following characteristics:
A beach composed of sand or gravel.
Avoid marshes (though you may use a rake from a marsh).
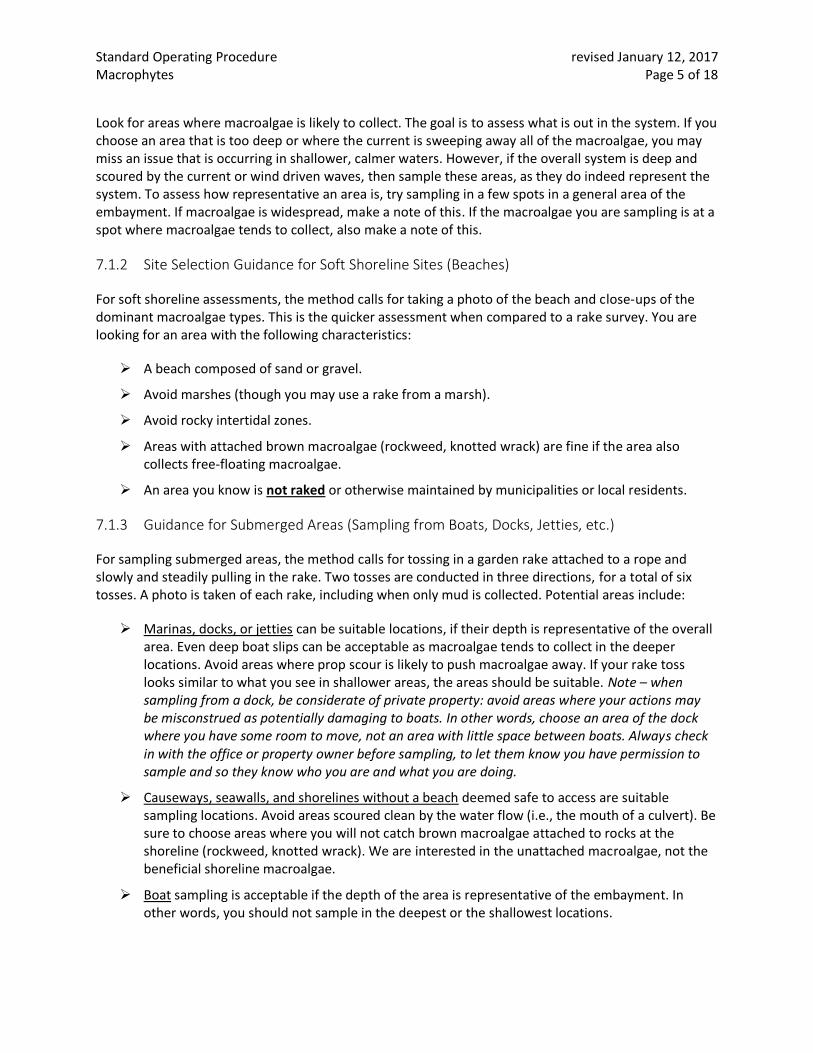
Avoid rocky intertidal zones.
Areas with attached brown macroalgae (rockweed, knotted wrack) are fine if the area also collects free-floating macroalgae.
An area you know is not raked or otherwise maintained by municipalities or local residents.
7.1.3 Guidance for Submerged Areas (Sampling from Boats, Docks, Jetties, etc.)
For sampling submerged areas, the method calls for tossing in a garden rake attached to a rope and slowly and steadily pulling in the rake. Two tosses are conducted in three directions, for a total of six tosses. A photo is taken of each rake, including when only mud is collected. Potential areas include:
Marinas, docks, or jetties can be suitable locations, if their depth is representative of the overall area. Even deep boat slips can be acceptable as macroalgae tends to collect in the deeper locations. Avoid areas where prop scour is likely to push macroalgae away. If your rake toss looks similar to what you see in shallower areas, the areas should be suitable. Note – when sampling from a dock, be considerate of private property: avoid areas where your actions may be misconstrued as potentially damaging to boats. In other words, choose an area of the dock where you have some room to move, not an area with little space between boats. Always check in with the office or property owner before sampling, to let them know you have permission to sample and so they know who you are and what you are doing.
Causeways, seawalls, and shorelines without a beach deemed safe to access are suitable sampling locations. Avoid areas scoured clean by the water flow (i.e., the mouth of a culvert). Be sure to choose areas where you will not catch brown macroalgae attached to rocks at the shoreline (rockweed, knotted wrack). We are interested in the unattached macroalgae, not the beneficial shoreline macroalgae.
Boat sampling is acceptable if the depth of the area is representative of the embayment. In other words, you should not sample in the deepest or the shallowest locations.
Standard Operating Procedure revised January 12, 2017 Macrophytes Page 6 of 18
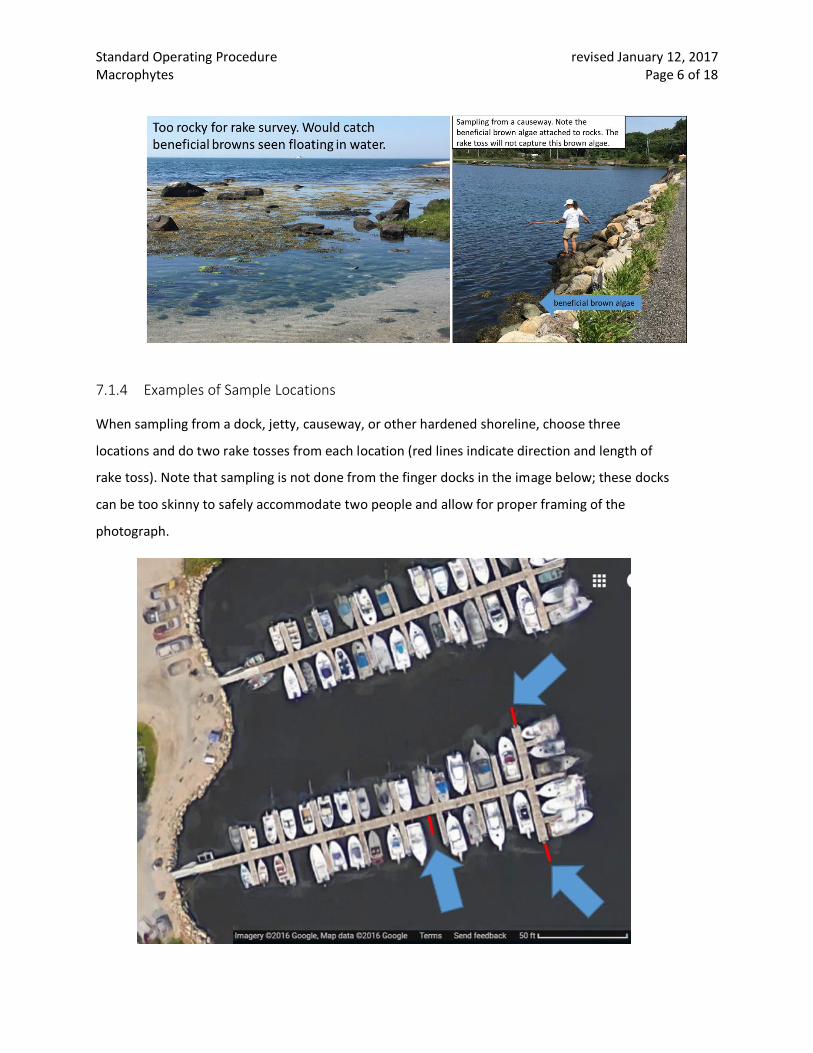
7.1.4 Examples of Sample Locations
When sampling from a dock, jetty, causeway, or other hardened shoreline, choose three
locations and do two rake tosses from each location (red lines indicate direction and length of
rake toss). Note that sampling is not done from the finger docks in the image below; these docks
can be too skinny to safely accommodate two people and allow for proper framing of the
photograph.
Standard Operating Procedure revised January 12, 2017 Macrophytes Page 7 of 18
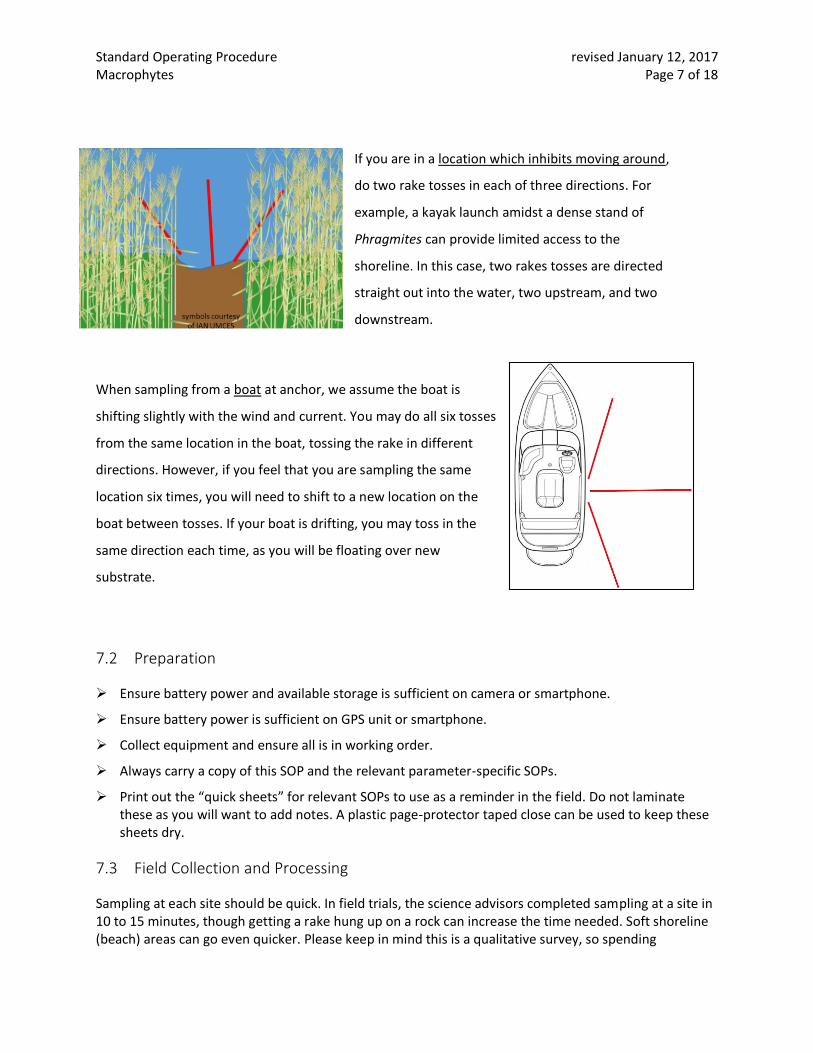
If you are in a location which inhibits moving around,
do two rake tosses in each of three directions. For
example, a kayak launch amidst a dense stand of
Phragmites can provide limited access to the
shoreline. In this case, two rakes tosses are directed
straight out into the water, two upstream, and two
downstream.
When sampling from a boat at anchor, we assume the boat is
shifting slightly with the wind and current. You may do all six tosses
from the same location in the boat, tossing the rake in different
directions. However, if you feel that you are sampling the same
location six times, you will need to shift to a new location on the
boat between tosses. If your boat is drifting, you may toss in the
same direction each time, as you will be floating over new
substrate.
7.2 Preparation
Ensure battery power and available storage is sufficient on camera or smartphone.
Ensure battery power is sufficient on GPS unit or smartphone.
Collect equipment and ensure all is in working order.
Always carry a copy of this SOP and the relevant parameter-specific SOPs.
Print out the “quick sheets” for relevant SOPs to use as a reminder in the field. Do not laminate these as you will want to add notes. A plastic page-protector taped close can be used to keep these sheets dry.
7.3 Field Collection and Processing
Sampling at each site should be quick. In field trials, the science advisors completed sampling at a site in 10 to 15 minutes, though getting a rake hung up on a rock can increase the time needed. Soft shoreline (beach) areas can go even quicker. Please keep in mind this is a qualitative survey, so spending

Standard Operating Procedure revised January 12, 2017 Macrophytes Page 8 of 18
additional time to quantify the macroalgae is not necessary. You are making a call of “not much here”, “wow, that’s a lot of macroalgae”, or “this could be a problem, but I’m not sure.” The first site may take a bit longer, as you get acquainted with the datasheet.
7.3.1 Option 1: Soft Shoreline Site (Beaches)
Conduct the assessment within 3 hours of low tide (this gives you a 6-hour window).
Complete the station information on the datasheet. An example of a completed datasheet is included in this SOP.
o IMPORTANT: Record GPS points as decimal degrees (e.g. 41.56437 N, -71.87634 W). Please do not report GPS in hours and minutes. For example, a location with decimal degrees of 41.56437 N, -71.87634 W can also be reported in hours and minutes as 41° 33' 51.7314", -71° 52' 34.8234". Note that the numbers are different, decimal degrees are not just leaving out the symbols for hours (') and minutes ("). We ask for decimal degrees because hours and minutes do not translate well in a spreadsheet. If you do not understand this distinction, please ask an advisor to explain.
Record the amount of macroalgae on the beach as “none”, “some”, or “lots”.
o None – essentially nothing on the beach, only attached macroalgae is present.
o Some – ranges from a small bit of macroalgae on the beach to large wracklines of macroalgae present on the beach. This is qualitative, the science advisors will review when comparing sites, so do not worry too much about what truly constitutes some versus lots.
o Lots – covers > 50% of the beach. May be a thin covering, in thick wracklines, or a thick layer covering the whole beach.
Examine the macroalgae and use the guide to identify macroalgae morphology (hair-like, twig/leaf like, sheets) and color (green, other). You only need to record macroalgae that constitutes more than 10% of the macroalgae present on the beach.
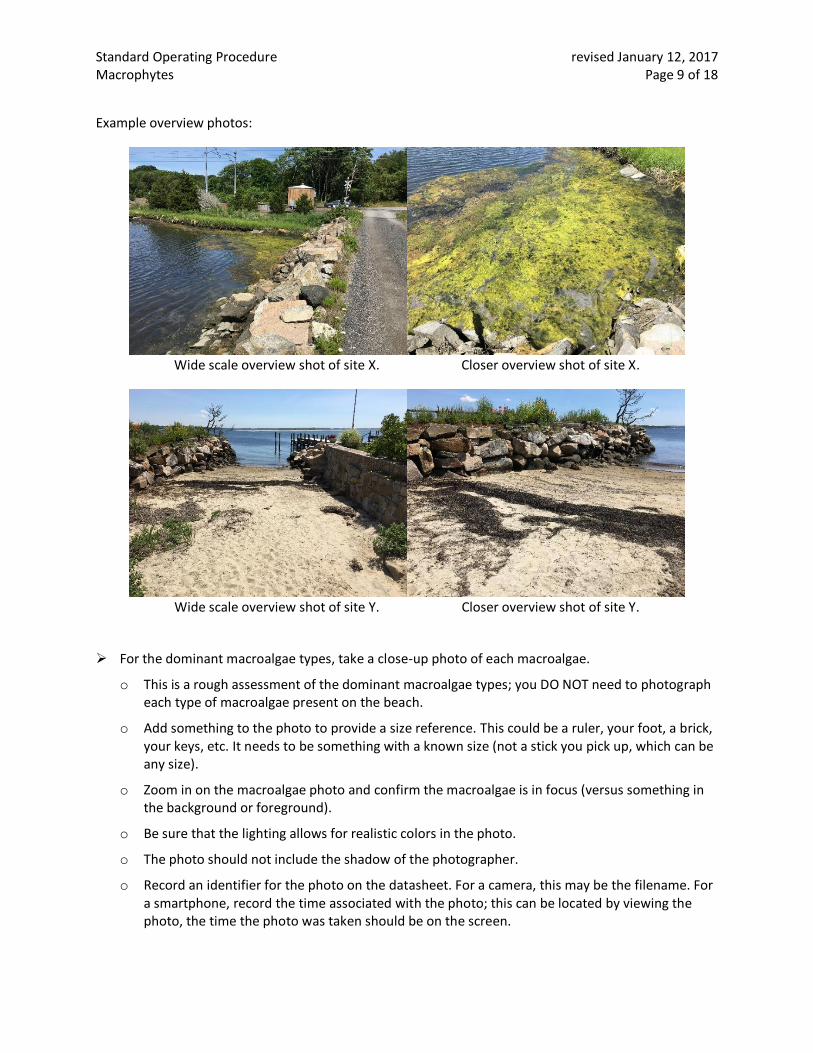
Take two overview photos, showing the overall appearance of the shoreline. One should include upland areas for context, the next should be slightly closer, showing macroalgae (or lack of macroalgae) on the beach (examples below).
o Zoom in on the overview photo and confirm the beach is in focus (versus something in the background or foreground).
o Do not submit any overview photos deemed unacceptable.
o The two overview photos should be sufficient. However, if lighting or size of the site requires, you may take multiple photos.
o Record an identifier for the photo on the datasheet. For a camera, this may be the filename. For a smartphone, record the time associated with the photo; this can be located by viewing the photo, the time the photo was taken should be on the screen.
Standard Operating Procedure revised January 12, 2017 Macrophytes Page 9 of 18
Example overview photos:
Wide scale overview shot of site X. Closer overview shot of site X.
Wide scale overview shot of site Y. Closer overview shot of site Y.
For the dominant macroalgae types, take a close-up photo of each macroalgae.
o This is a rough assessment of the dominant macroalgae types; you DO NOT need to photograph each type of macroalgae present on the beach.
o Add something to the photo to provide a size reference. This could be a ruler, your foot, a brick, your keys, etc. It needs to be something with a known size (not a stick you pick up, which can be any size).
o Zoom in on the macroalgae photo and confirm the macroalgae is in focus (versus something in the background or foreground).
o Be sure that the lighting allows for realistic colors in the photo.
o The photo should not include the shadow of the photographer.
o Record an identifier for the photo on the datasheet. For a camera, this may be the filename. For a smartphone, record the time associated with the photo; this can be located by viewing the photo, the time the photo was taken should be on the screen.
Standard Operating Procedure revised January 12, 2017 Macrophytes Page 10 of 18
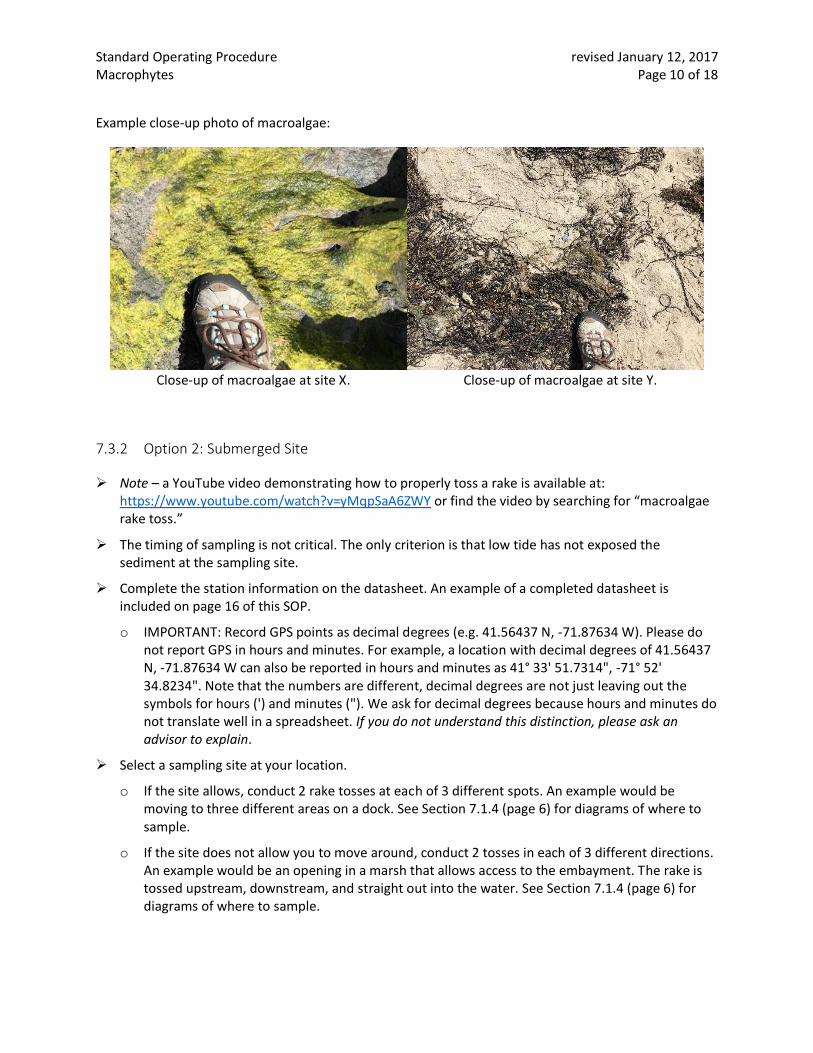
Example close-up photo of macroalgae:
Close-up of macroalgae at site X. Close-up of macroalgae at site Y.
7.3.2 Option 2: Submerged Site
Note – a YouTube video demonstrating how to properly toss a rake is available at: https://www.youtube.com/watch?v=yMqpSaA6ZWY or find the video by searching for “macroalgae rake toss.”
The timing of sampling is not critical. The only criterion is that low tide has not exposed the sediment at the sampling site.
Complete the station information on the datasheet. An example of a completed datasheet is included on page 16 of this SOP.
o IMPORTANT: Record GPS points as decimal degrees (e.g. 41.56437 N, -71.87634 W). Please do not report GPS in hours and minutes. For example, a location with decimal degrees of 41.56437 N, -71.87634 W can also be reported in hours and minutes as 41° 33' 51.7314", -71° 52' 34.8234". Note that the numbers are different, decimal degrees are not just leaving out the symbols for hours (') and minutes ("). We ask for decimal degrees because hours and minutes do not translate well in a spreadsheet. If you do not understand this distinction, please ask an advisor to explain.
Select a sampling site at your location.
o If the site allows, conduct 2 rake tosses at each of 3 different spots. An example would be moving to three different areas on a dock. See Section 7.1.4 (page 6) for diagrams of where to sample.
o If the site does not allow you to move around, conduct 2 tosses in each of 3 different directions. An example would be an opening in a marsh that allows access to the embayment. The rake is tossed upstream, downstream, and straight out into the water. See Section 7.1.4 (page 6) for diagrams of where to sample.
Standard Operating Procedure revised January 12, 2017 Macrophytes Page 11 of 18
Confirm that the line is securely attached to the rake. Place your foot on the end of the rope, to keep it from going into the water.
Face the embayment and hold the rake such that your dominant hand is at the end of the rake (ready to push the rake).
Push the rake out into the water a distance of ~2 rake lengths. The motion is similar to an underhand slow pitch, rather than a javelin throw.
If the toss is too short or too long, bring back and try again.
The tines of the rake should be downward. If the rake lands with tines up, bring back and try again.
After a successful toss, allow rake to settle on the floor then slowly and steadily pull the line so the teeth of the rake drag on the embayment bottom.
o If the rake gets hooked on a rock or other object, try taking up the slack in the rope and pulling up on the rake, or moving to the left and to the right. If you feel that macroalgae was likely dislodged, try tossing again. For some rocks, freeing the rake is easy enough that macroalgae is mostly intact on the rake. For these cases, you do not need to toss again.
o When removing the rake from the water, do so such that macroalgae does not fall off of the rake.
o Make certain that you DO NOT pick up macroalgae removed from the rake on a previous toss. Be aware of where you discard macroalgae from the rake so that you are not capturing the same macroalgae with each toss.
Record the amount of macroalgae on the rake as “none”, “some”, or “lots” (using sample photos shown below to assist).
o None – no macroalgae on the rake.
o Some – some tines are still bare.
o Lots – all tines hold macroalgae. This includes anything from a thin coat of a slimy macroalgae to thick clumps of a wiry or leafy macroalgae.
o If you get a lot of mud, put into a bucket or bin and rinse; mud that clumps on the rake is often being held together by fine macroalgae
Take a photo of the rake (and macroalgae) after each toss.
o Include all of the rake tines and macroalgae in the photo. If a portion of the rake tines is not included, take another photograph. You will want to be about 4 feet from the rake. Do not get too close – some cameras do not focus at shorter distances. With the resolution required, zooming in to look at macroalgae can be done on the computer. You do not need to get super close to get a good shot of the macroalgae, further back is better.
o Frame the shot such that the light is behind the photographer (or at a slight angle), so that the light is good and the photographer’s shadow is not cast on the macroalgae.
o Be aware of the background and change your location for the photo as needed. Light colors in the background make the macroalgae look darker; avoid light backgrounds (e.g. a white boat).
o Zoom in on the photo and confirm the macroalgae is in focus (versus something in the background or foreground).
Standard Operating Procedure revised January 12, 2017 Macrophytes Page 12 of 18
o Be sure that the lighting allows for realistic colors in the photo.
o Record an identifier for the photo on the datasheet. For a camera, this may be the filename. For a smartphone, record the time associated with the photo; this can be located by viewing the photo, the time the photo was taken should be on the screen.
Sort through the macroalgae and use the guide to identify macroalgae morphology (hair-like, twig/leaf like, sheets) and color (green, other). You only need to record macroalgae that constitutes more than 10% of the macroalgae present on the rake.
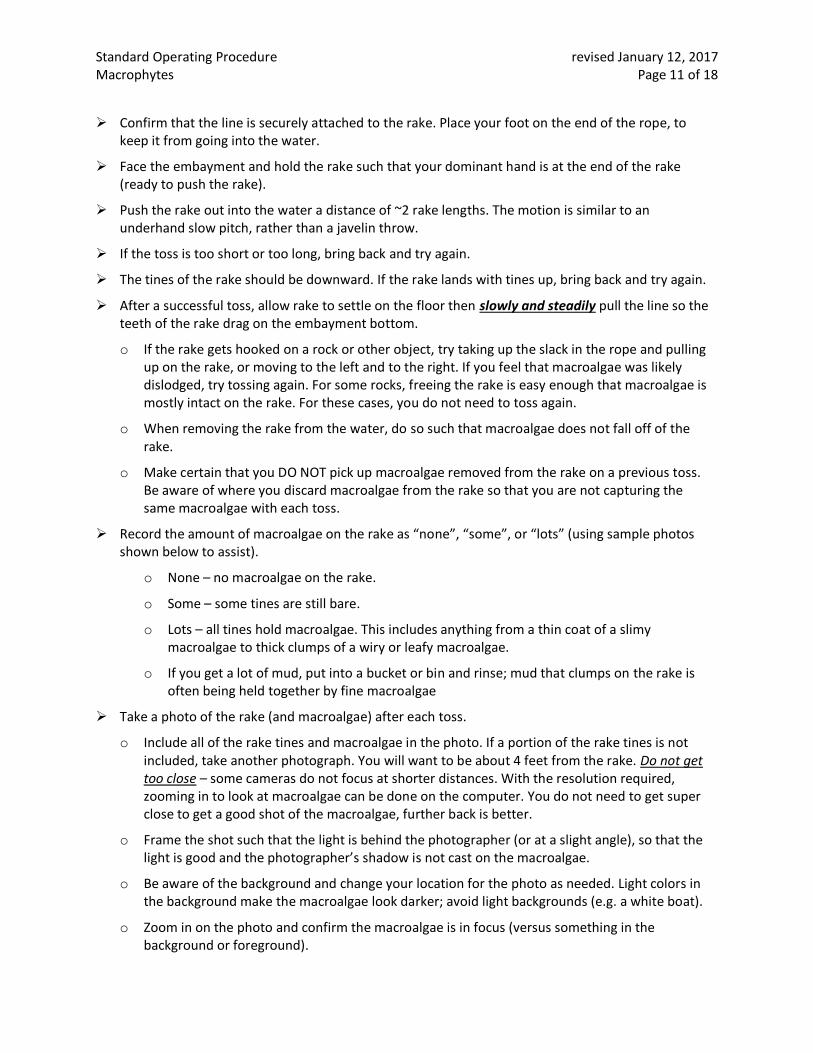
Example photos of rakes:
SITE 1: Wequetequock Cove, Stonington Marina, 7/13/2016
Lots Some Lots
Some Some Some
Standard Operating Procedure revised January 12, 2017 Macrophytes Page 13 of 18
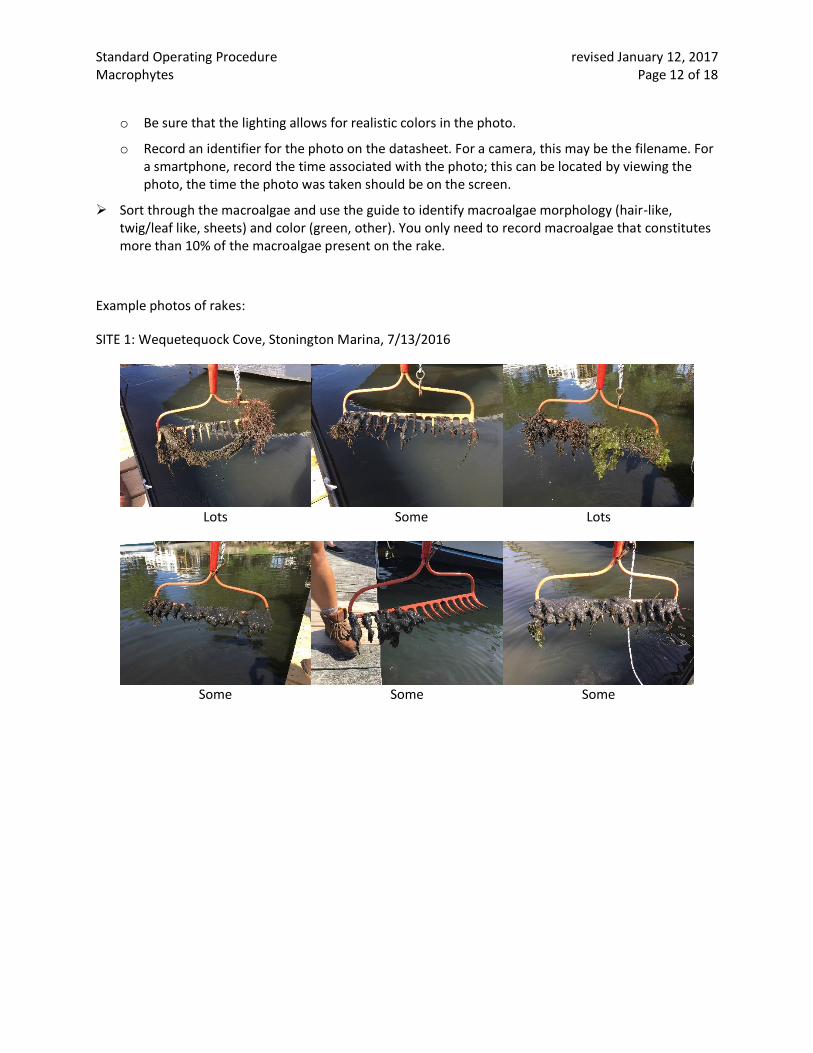
SITE 2: Wequetequock Cove, kayak launch near Saltwater Farm Vineyard, 7/13/2016
Some Some Some
Some Some Lots
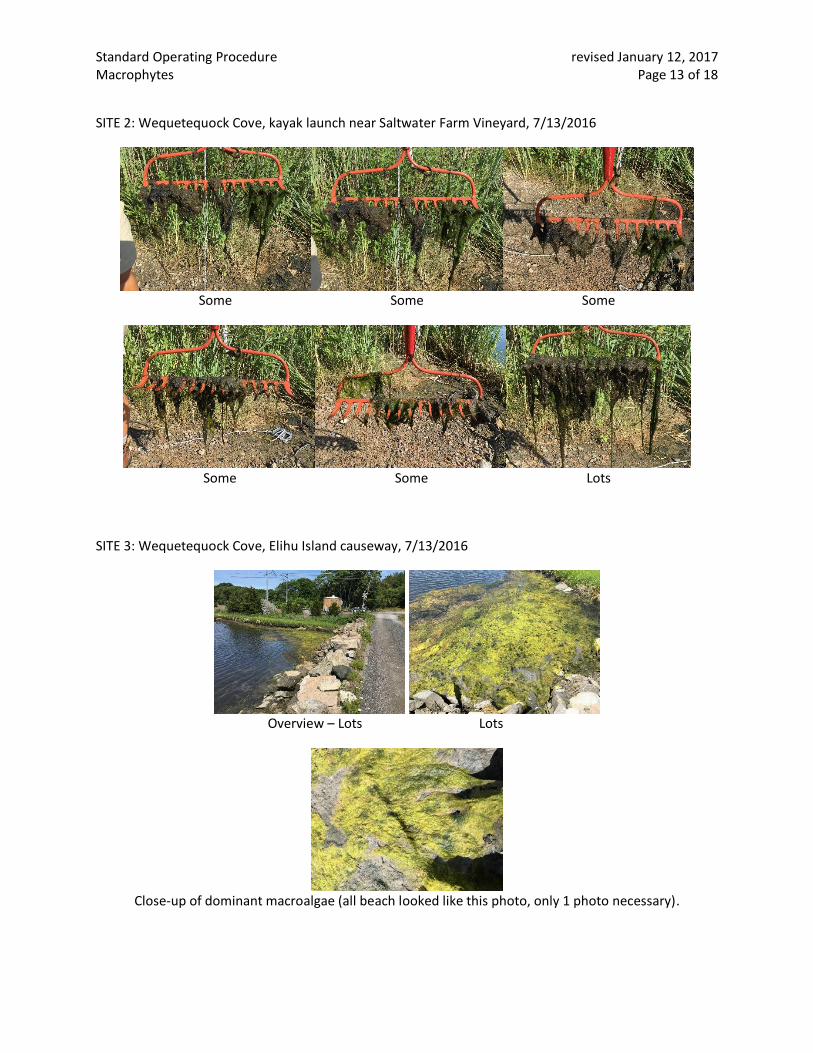
SITE 3: Wequetequock Cove, Elihu Island causeway, 7/13/2016
Overview – Lots Lots
Close-up of dominant macroalgae (all beach looked like this photo, only 1 photo necessary).
Standard Operating Procedure revised January 12, 2017 Macrophytes Page 14 of 18
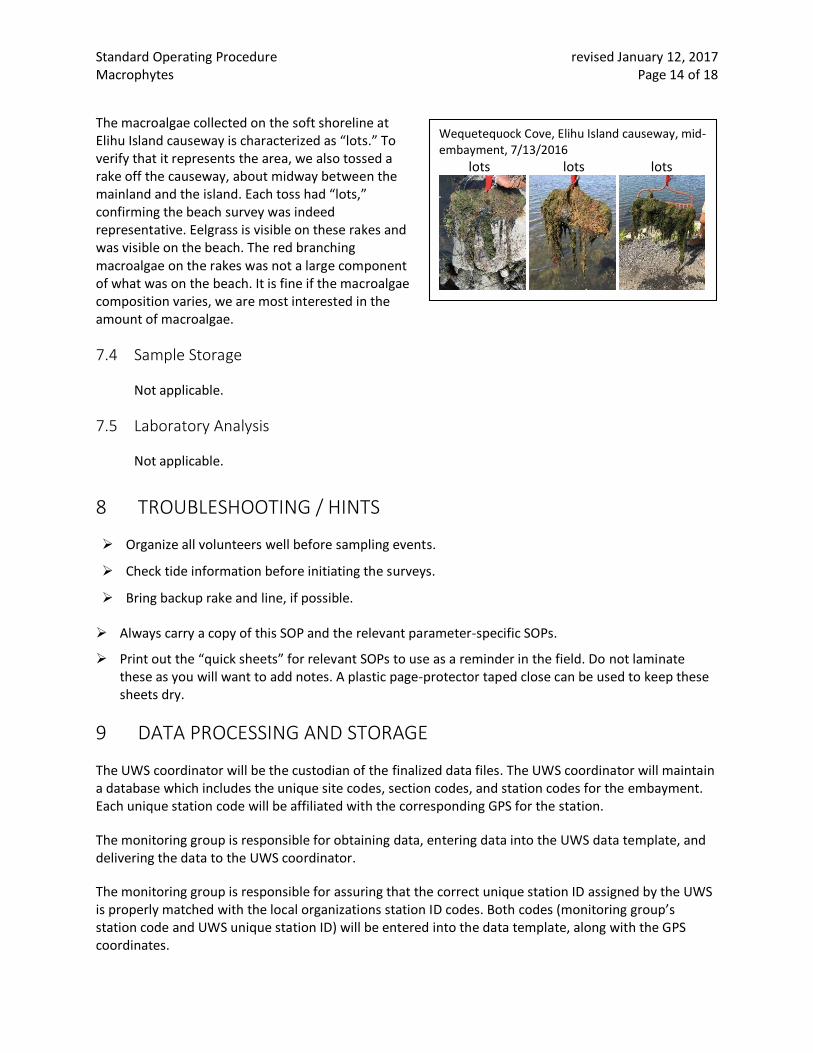
The macroalgae collected on the soft shoreline at Elihu Island causeway is characterized as “lots.” To verify that it represents the area, we also tossed a rake off the causeway, about midway between the mainland and the island. Each toss had “lots,” confirming the beach survey was indeed representative. Eelgrass is visible on these rakes and was visible on the beach. The red branching macroalgae on the rakes was not a large component of what was on the beach. It is fine if the macroalgae composition varies, we are most interested in the amount of macroalgae.
7.4 Sample Storage
Not applicable.
7.5 Laboratory Analysis
Not applicable.
8 TROUBLESHOOTING / HINTS
Organize all volunteers well before sampling events.
Check tide information before initiating the surveys.
Bring backup rake and line, if possible.
Always carry a copy of this SOP and the relevant parameter-specific SOPs.
Print out the “quick sheets” for relevant SOPs to use as a reminder in the field. Do not laminate these as you will want to add notes. A plastic page-protector taped close can be used to keep these sheets dry.
9 DATA PROCESSING AND STORAGE
The UWS coordinator will be the custodian of the finalized data files. The UWS coordinator will maintain a database which includes the unique site codes, section codes, and station codes for the embayment. Each unique station code will be affiliated with the corresponding GPS for the station.
The monitoring group is responsible for obtaining data, entering data into the UWS data template, and delivering the data to the UWS coordinator.
The monitoring group is responsible for assuring that the correct unique station ID assigned by the UWS is properly matched with the local organizations station ID codes. Both codes (monitoring group’s station code and UWS unique station ID) will be entered into the data template, along with the GPS coordinates.
Wequetequock Cove, Elihu Island causeway, mid-embayment, 7/13/2016 lots lots lots
Standard Operating Procedure revised January 12, 2017 Macrophytes Page 15 of 18
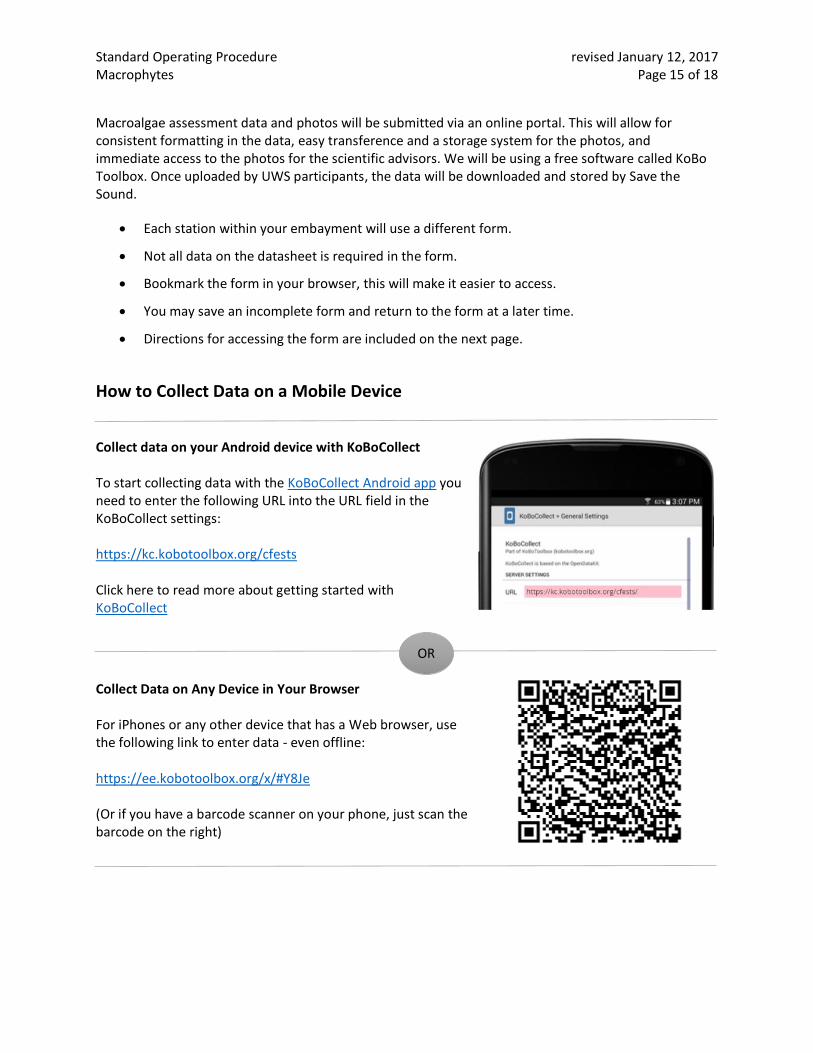
Macroalgae assessment data and photos will be submitted via an online portal. This will allow for consistent formatting in the data, easy transference and a storage system for the photos, and immediate access to the photos for the scientific advisors. We will be using a free software called KoBo Toolbox. Once uploaded by UWS participants, the data will be downloaded and stored by Save the Sound.
Each station within your embayment will use a different form.
Not all data on the datasheet is required in the form.
Bookmark the form in your browser, this will make it easier to access.
You may save an incomplete form and return to the form at a later time.
Directions for accessing the form are included on the next page.
How to Collect Data on a Mobile Device Collect data on your Android device with KoBoCollect To start collecting data with the KoBoCollect Android app you need to enter the following URL into the URL field in the KoBoCollect settings: https://kc.kobotoolbox.org/cfests Click here to read more about getting started with KoBoCollect
Collect Data on Any Device in Your Browser For iPhones or any other device that has a Web browser, use the following link to enter data - even offline: https://ee.kobotoolbox.org/x/#Y8Je (Or if you have a barcode scanner on your phone, just scan the barcode on the right)
OR
Standard Operating Procedure revised January 12, 2017 Macrophytes Page 16 of 18
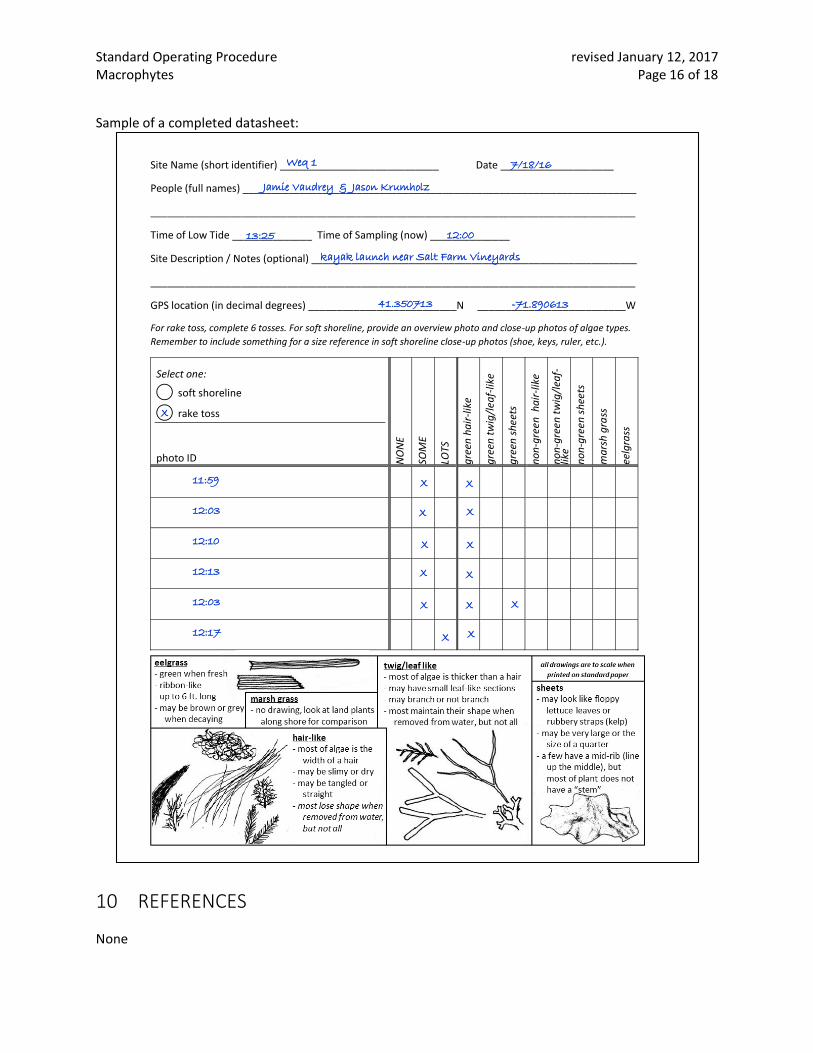
Sample of a completed datasheet:
10 REFERENCES
None
Site Name (short identifier) ____________________________ Date ____________________
People (full names) _____________________________________________________________________
_____________________________________________________________________________________
Time of Low Tide ______________ Time of Sampling (now) ______________
Site Description / Notes (optional) _________________________________________________________
_____________________________________________________________________________________
GPS location (in decimal degrees) __________________________N __________________________W
For rake toss, complete 6 tosses. For soft shoreline, provide an overview photo and close-up photos of algae types.
Remember to include something for a size reference in soft shoreline close-up photos (shoe, keys, ruler, etc.).
Select one:
⃝ soft shoreline
⃝ rake toss
photo ID N
ON
E
SOM
E
LOTS
gre
en h
air
-lik
e
gre
en t
wig
/lea
f-lik
e
gre
en s
hee
ts
no
n-g
reen
ha
ir-l
ike
no
n-g
reen
tw
ig/l
eaf-
like
no
n-g
reen
sh
eets
ma
rsh
gra
ss
eelg
rass
11:59
12:03
12:10
12:13
12:03
12:17
Jamie Vaudrey & Jason Krumholz
Weq 1 7/18/16
13:25 12:00
kayak launch near Salt Farm Vineyards
41.350713 -71.890613
X
X
X
X
X
X
X
X
X
X
X
X
X
X

Standard Operating Procedure revised January 12, 2017 Macrophytes Page 17 of 18
11 Quick Sheet – Macrophytes
Method Overview Sample 3 days during the 3-week period starting July 15 and ending August 7. Try to sample once
per week. If this is not possible, please sample such that you maximize the days between sampling. All three days cannot be sampled in the same 7-day window.
For soft shorelines, take an overview photo of the area, focused on the beach (not the water). Take a close-up photo of each of the dominant macroalgae types on the beach. Complete the datasheet.
For sampling submerged areas, toss the rake 6 times, 2 tosses in each of 3 directions (if limited by access to a single point) or 3 areas (if you have room to move to another location at the station). Photograph each rake, even empty rakes. Complete the datasheet.
Enter the data into the online portal. Upload your photos to the online portal. Preparation Gather field equipment. Ensure battery power and available storage is sufficient on camera or smartphone. Ensure battery power is sufficient on GPS unit or smartphone. Always carry a copy of this SOP and the relevant parameter-specific SOPs. Print out the “quick sheets” for relevant SOPs to use as a reminder in the field. Do not laminate
these as you will want to add notes. A plastic page-protector taped close can be used to keep these sheets dry.
Field Collection and Processing Option 1: Soft Shoreline Site (Beaches) Conduct the assessment within 3 hours of low tide (this gives you a 6-hour window). Complete the station information on the datasheet. IMPORTANT: Record GPS points as decimal
degrees (e.g. 41.56437 N, -71.87634 W). Take two overview photos, showing the overall appearance of the shoreline. One should include
upland areas for context, the next should be slightly closer, showing macroalgae (or lack of macroalgae) on the beach (examples below).
For the dominant macroalgae types, take a close-up photo of each macroalgae. Record the amount of macroalgae on the beach as “none”, “some”, or “lots”.
o None – essentially nothing on the beach, only attached macroalgae is present. o Some – ranges from a small bit of macroalgae on the beach to large wracklines of macroalgae
present on the beach. This is qualitative, the science advisors will review when comparing sites, so do not worry too much about what truly constitutes some versus lots.
o Lots – covers > 50% of the beach. May be a thin covering, in thick wracklines, or a thick layer covering the whole beach.
Examine the macroalgae and use the guide to identify macroalgae morphology (hair-like, twig/leaf like, sheets) and color (green, other). You only need to record macroalgae that constitutes more than 10% of the macroalgae present on the beach.
Remember – we are looking for large amounts of seaweed. If there is nothing on the beach, but you see lots of seaweed (that are not the beneficial brown seaweed) in the water, then try a rake toss in the water.
Standard Operating Procedure revised January 12, 2017 Macrophytes Page 18 of 18
Option 2: Submerged Site The timing of sampling is not critical. The only criterion is that low tide has not exposed the
sediment at the sampling site. Note – a YouTube video demonstrating how to properly toss a rake is available at:
https://www.youtube.com/watch?v=yMqpSaA6ZWY. Complete the station information on the datasheet. IMPORTANT: Record GPS points as decimal
degrees (e.g. 41.56437 N, -71.87634 W). Confirm that the line is securely attached to the rake. Place your foot on the end of the rope, to
keep it from going into the water. Face the embayment and hold the rake such that your dominant hand is at the end of the rake (ready to push the rake). Push the rake out into the water a distance of ~2 rake lengths. The motion is similar to an underhand slow pitch, rather than a javelin throw. o If the toss is too short or too long, bring back and try again. o The tines of the rake should be downward. If the rake lands with tines up, try again.
After a successful toss, allow rake to settle on the floor then slowly and steadily pull the line so the teeth of the rake drag on the embayment bottom. o If the rake gets hooked on a rock or other object, try taking up the slack in the rope and pulling
up on the rake, or moving to the left and to the right. If you feel that macroalgae was likely dislodged, try tossing again.
o When removing the rake from the water, do not let macroalgae fall off of the rake. o Make certain that you DO NOT pick up macroalgae removed from the rake on a previous toss. o If you get a lot of mud, put into a bucket or bin and rinse; mud that clumps on the rake is often
being held together by fine macroalgae. Take a photo of the rake (and macroalgae) after each toss.
o Include all of the rake tines and macroalgae in the photo. If a portion of the rake tines is not included, take another photograph. You will want to be about 4 feet from the rake. Do not get too close – some cameras do not focus at shorter distances. With the resolution required, zooming in to look at macroalgae can be done on the computer. You do not need to get super close to get a good shot of the macroalgae, further back is better.
o Frame the shot such that the light is behind the photographer. o Be aware of the background and change your location for the photo as needed. Light colors in
the background make the macroalgae look darker; avoid light backgrounds (e.g. a white boat). o Zoom in on the photo and confirm the macroalgae is in focus (versus something in the
background or foreground). o Be sure that the lighting allows for realistic colors in the photo. o Record an identifier for the photo on the datasheet. For a camera, this may be the filename. For
a smartphone, record the time associated with the photo; this can be located by viewing the photo, the time the photo was taken should be on the screen.
Record the amount of macroalgae on the rake as “none”, “some”, or “lots”. o None – no macroalgae on the rake. o Some – some tines are still bare. o Lots – all tines hold macroalgae. This includes anything from a thin coat of a slimy macroalgae to
thick clumps of a wiry or leafy macroalgae. o If you get a lot of mud, put into a bucket or bin and rinse; mud that clumps on the rake is often
being held together by fine macroalgae
Examine the macroalgae and use the guide to identify macroalgae morphology (hair-like, twig/leaf like, sheets) and color (green, other). You only need to record macroalgae that constitutes more than 10% of the macroalgae present on the rake.
![Standard Operating Procedure (SOP) FINAL Operating Procedure...Microsoft PowerPoint - Standard Operating Procedure (SOP) FINAL [Compatibility Mode] Author hp Created Date 4/23/2020](https://static.fdocuments.in/doc/165x107/60d7200d311d04701278f223/standard-operating-procedure-sop-operating-procedure-microsoft-powerpoint-.jpg)