Sponsor Portal User Guide for Cisco Identity Services ... · Sponsor Portal User Guide for Cisco...
30
Sponsor Portal User Guide for Cisco Identity Services Engine, Release 1.2 First Published: 2012-08-02 Last Modified: 2013-11-11 Americas Headquarters Cisco Systems, Inc. 170 West Tasman Drive San Jose, CA 95134-1706 USA http://www.cisco.com Tel: 408 526-4000 800 553-NETS (6387) Fax: 408 527-0883
Transcript of Sponsor Portal User Guide for Cisco Identity Services ... · Sponsor Portal User Guide for Cisco...

Sponsor Portal User Guide for Cisco Identity Services Engine, Release1.2First Published: 2012-08-02
Last Modified: 2013-11-11
Americas HeadquartersCisco Systems, Inc.170 West Tasman DriveSan Jose, CA 95134-1706USAhttp://www.cisco.comTel: 408 526-4000 800 553-NETS (6387)Fax: 408 527-0883
THE SPECIFICATIONS AND INFORMATION REGARDING THE PRODUCTS IN THIS MANUAL ARE SUBJECT TO CHANGE WITHOUT NOTICE. ALL STATEMENTS,INFORMATION, AND RECOMMENDATIONS IN THIS MANUAL ARE BELIEVED TO BE ACCURATE BUT ARE PRESENTED WITHOUT WARRANTY OF ANY KIND,EXPRESS OR IMPLIED. USERS MUST TAKE FULL RESPONSIBILITY FOR THEIR APPLICATION OF ANY PRODUCTS.
THE SOFTWARE LICENSE AND LIMITEDWARRANTY FOR THE ACCOMPANYING PRODUCT ARE SET FORTH IN THE INFORMATION PACKET THAT SHIPPED WITHTHE PRODUCT AND ARE INCORPORATED HEREIN BY THIS REFERENCE. IF YOU ARE UNABLE TO LOCATE THE SOFTWARE LICENSE OR LIMITED WARRANTY,CONTACT YOUR CISCO REPRESENTATIVE FOR A COPY.
The Cisco implementation of TCP header compression is an adaptation of a program developed by the University of California, Berkeley (UCB) as part of UCB's public domain versionof the UNIX operating system. All rights reserved. Copyright © 1981, Regents of the University of California.
NOTWITHSTANDINGANYOTHERWARRANTYHEREIN, ALL DOCUMENT FILES AND SOFTWARE OF THESE SUPPLIERS ARE PROVIDED “AS IS"WITH ALL FAULTS.CISCO AND THE ABOVE-NAMED SUPPLIERS DISCLAIM ALL WARRANTIES, EXPRESSED OR IMPLIED, INCLUDING, WITHOUT LIMITATION, THOSE OFMERCHANTABILITY, FITNESS FORA PARTICULAR PURPOSEANDNONINFRINGEMENTORARISING FROMACOURSEOFDEALING, USAGE, OR TRADE PRACTICE.
IN NO EVENT SHALL CISCO OR ITS SUPPLIERS BE LIABLE FOR ANY INDIRECT, SPECIAL, CONSEQUENTIAL, OR INCIDENTAL DAMAGES, INCLUDING, WITHOUTLIMITATION, LOST PROFITS OR LOSS OR DAMAGE TO DATA ARISING OUT OF THE USE OR INABILITY TO USE THIS MANUAL, EVEN IF CISCO OR ITS SUPPLIERSHAVE BEEN ADVISED OF THE POSSIBILITY OF SUCH DAMAGES.
Any Internet Protocol (IP) addresses and phone numbers used in this document are not intended to be actual addresses and phone numbers. Any examples, command display output, networktopology diagrams, and other figures included in the document are shown for illustrative purposes only. Any use of actual IP addresses or phone numbers in illustrative content is unintentionaland coincidental.
Cisco and the Cisco logo are trademarks or registered trademarks of Cisco and/or its affiliates in the U.S. and other countries. To view a list of Cisco trademarks, go to this URL: http://www.cisco.com/go/trademarks. Third-party trademarks mentioned are the property of their respective owners. The use of the word partner does not imply a partnershiprelationship between Cisco and any other company. (1110R)
© 2012-2013 Cisco Systems, Inc. All rights reserved.

C O N T E N T S
C H A P T E R 1 Sponsor Portal Users Guide 1
Importance of Network Security 1
Network Access for Guests 1
Sponsor Portal 2
Guest Portals 2
Your Role as Sponsor 2
Sign on to the Sponsor Portal 3
Unable to Sign On Because Account is Locked 3
C H A P T E R 2 Create Guest Accounts 5
Sponsor Portal Create Accounts Page 5
Create a Known Guest Account 5
Create Random Guest Accounts 6
Import Guest Accounts 7
Privacy of Guest Passwords 8
Create Account Settings 9
C H A P T E R 3 Manage Guest Accounts 13
Sponsor Portal Manage Accounts Page 13
Edit Guest Accounts 13
Resend Guest Passwords 14
Extend Guest Account Durations 15
Suspended and Expired Guest Accounts 16
Suspend Guest Accounts 16
Delete Guest Accounts 16
Reset Guest Passwords 17
Reinstate Guest Accounts 18
Manage Accounts Page Details 18
Sponsor Portal User Guide for Cisco Identity Services Engine, Release 1.2 iii

Manage Account States 19
C H A P T E R 4 Customize the Sponsor Portal 23
Choose the Languages for Guest Notifications 23
Setting Up Email Confirmations 23
Change Your Password 24
Assigning Default Values to Guest Accounts 24
My Settings 25
Sponsor Portal User Guide for Cisco Identity Services Engine, Release 1.2iv
Contents

C H A P T E R 1Sponsor Portal Users Guide
• Importance of Network Security, page 1
• Network Access for Guests, page 1
• Sponsor Portal, page 2
• Guest Portals, page 2
• Your Role as Sponsor, page 2
• Sign on to the Sponsor Portal, page 3
• Unable to Sign On Because Account is Locked , page 3
Importance of Network SecurityAs you connect to your company's network or access the Internet, many processes work in the backgroundto securely protect your computer and the network from harm. Network security is critical to maintainingyour company's confidentiality and data integrity. Unauthorized users could negatively impact your company'snetwork directly by causing it to fail or indirectly by using it to cause harm to others.
Network Access for GuestsWith the increased use of and dependency on mobile devices, such as laptops, tablets, and mobile phones,people have become accustomed to being able to access the Internet from anywhere. However, access tocorporate networks requires more security than free Wi-Fi at a local coffee shop. Network security is criticalto maintaining your company’s confidentiality and data integrity. Network security prevents unauthorizedusers from hacking your company’s network.To protect your company’s network and to ensure that only authorized guests can access it, your companyuses Cisco Identity Service Engine (ISE) guest services. Cisco ISE ensures that only authorized guests, suchas visitors, contractors, consultants, and customers can access your network.
Your Role as a Sponsor
As a sponsor, you are responsible for using the Sponsor portal to create and manage guest accounts forauthorized visitors to your organization. These accounts enable visitors to access your company’s network or
Sponsor Portal User Guide for Cisco Identity Services Engine, Release 1.2 1

provide access to the Internet. When creating these accounts, follow your company guidelines for providingnetwork access to visitors. Cisco ISE saves the entire guest process for auditing and reporting purposes, whichyour company can use to verify that only authorized visitors have been granted network access.
Sponsor PortalUse the Sponsor portal to create temporary accounts for authorized visitors to securely access your corporatenetwork or the Internet. After creating the account, you can use the Sponsor portal to provide account detailsto the guest by printing, e-mailing, or texting. You can also use the Sponsor portal to suspend, extend, anddelete accounts as well as approve or deny guests access to your network using the tabs at the top of the page.
• Create Accounts - Create guest accounts individually, by generating a group of accounts, or by importingaccounts from a spreadsheet (CSV) using a Cisco-supplied template.
• Manage Accounts - Edit, delete, suspend, reinstate and extend guest accounts. Resend account detailsto guests.
• Pending Accounts - Approve or deny selected guest accounts.
• Notices - Check the status of background operations when creating or managing a large number of guestaccounts.
Your system administrator configures the features of your sponsor account, so you might not have access toall the features available on the Sponsor portal.
Guest PortalsWhen people outside your company attempt to use your company's network to access the Internet, they areautomatically routed to a Guest portal, which is a set of special web pages that provide Cisco ISE guest servicesto your visitors. These Guest portals protect your company's network from unauthorized users.
Temporary visitors, who connect to your company's Wi-Fi network, can be directed to a Hotspot Guest portalwhich provides network access without requiring them to log in using usernames and passwords. However,if authorized visitors need access for an extended period of time or need greater access to your company'sinternal resources; as a sponsor, you can create temporary usernames and passwords that they can use to loginto the Credentialed Guest portals.
Your Role as SponsorAs a sponsor, you are responsible for using the Sponsor portal provided by Cisco ISE to create and manageguest accounts for authorized visitors to your organization. These accounts enable visitors to access yourcompany’s network or provide access to the Internet. When creating these accounts, you should adhere toyour company guidelines for providing network access to visitors. Cisco ISE records and stores the entireprocess for auditing and reporting purposes, which your company can use to verify that only authorized visitorshave been granted network access.
Sponsor Portal User Guide for Cisco Identity Services Engine, Release 1.22
Sponsor Portal Users GuideSponsor Portal
Sign on to the Sponsor PortalThe Sponsor portal is a web-based portal that you use to create guest accounts for authorized visitors. Onceyou are signed into the Sponsor portal, you will be automatically logged out after a period of inactivity, whichis configured by your system administrator.
Before You Begin
Obtain the Sponsor portal URL and your username and password from your system administrator.
Procedure
Step 1 Open a web browser and enter the Sponsor portal URL provided to you by your system administrator.Your administrator customizes this URL, but it typically has a format such as:https://ipaddress:portnumber/sponsorportal/PortalSetup.action?portal=portalID orhttps://sponsorportal.yourcompany.com
Step 2 Enter your username and password and click Sign On.Step 3 ClickAccept if you are asked to agree to your company’s network usage terms and conditions before logging
into the Sponsor portal.
If you log in successfully on your desktop, theCreate Accounts page, which is the home page for the Sponsorportal displays. If signing on from your mobile device, a welcome page displays. If not, contact your systemadministrator for assistance.
Unable to Sign On Because Account is LockedBy default, if you incorrectly enter your password for your sponsor account five times in a row, the Sponsorportal temporarily locks you out of the system for two minutes. You can make additional attempts after that,but only one attempt at a time is possible before you are locked out again for the configured amount of time.Your system administrator can change this default setting to require fewer or more failed attempts beforetemporarily locking your account; as well as the amount of time you are locked out.
Sponsor Portal User Guide for Cisco Identity Services Engine, Release 1.2 3
Sponsor Portal Users GuideSign on to the Sponsor Portal

Sponsor Portal User Guide for Cisco Identity Services Engine, Release 1.24
Sponsor Portal Users GuideUnable to Sign On Because Account is Locked

C H A P T E R 2Create Guest Accounts
• Sponsor Portal Create Accounts Page, page 5
• Create a Known Guest Account, page 5
• Create Random Guest Accounts, page 6
• Import Guest Accounts, page 7
• Privacy of Guest Passwords, page 8
• Create Account Settings, page 9
Sponsor Portal Create Accounts PageYou can use the Create Accounts page to create accounts for the following authorized visitors:
• Guests whose personal information, such as last name, email address, or phone number, is available toyou.
• Guests whose personal information is not available or when you need to create multiple accounts quickly.
• Guests whose information is available in an external database in the form of a file that you can import.
Create a Known Guest AccountYou can create individual accounts for guests whose personal information is available, one account at a time.
Procedure
Step 1 Click Known on the Create Accounts page.Your system administrator configures which fields display on this page and are required for creating guestaccounts. Some fields are mandatory (marked with *) and display with default information that you can change.
Step 2 Retain or update the Guest Type you want to assign to the guest.The various types of guests and their access privileges are defined by your system administrator.
Sponsor Portal User Guide for Cisco Identity Services Engine, Release 1.2 5

The maximum number of devices that guests can simultaneously connect to the network and the maximumduration time for network access are displayed for the guest type you select.
Step 3 If displayed and required, enter the guest’s personal information, such as First name andLast name orEmailaddress to create the username.The personal information you enter will be used to generate a username. If not entered, a username is generatedrandomly, depending on the username policies set by your system administrator.
Step 4 Retain or update the defaults for the mandatory settings and enter information in the other fields, as desired.The system administrator can configure multiple selections for Language, SMS Provider, Location, andSSID. However, if only one selection is specified, it will not display, but is automatically assigned when youcreate the guest account. You can view this selection in the guest account details after the account is created.
When setting time durations for accounts, the start and end times you define are applicable in thetime zone for the location you pick.
Note
Step 5 Click Create to create the guest account.An Account Information dialog box displays with the account details, including the guest username andpassword.
What to Do Next
You can email or print the account details for guests, if these facilities are available to you. You can also textthe account details to guests, if your system administrator has enabled this functionality.
Related Topics
Create Account Settings, on page 9Privacy of Guest Passwords, on page 8Create Account Settings, on page 9
Create Random Guest AccountsYou can create a set of multiple random guest accounts in advance, record the details separately, and storethem in the system for future use. For example, if you are a lobby ambassador who needs to distribute guestaccounts on a regular basis, you can save time by using these generic, randomly created accounts.
Procedure
Step 1 Click Random on the Create Accounts page.Your system administrator configures which fields display on this page and are required for creating guestaccounts. Some fields are mandatory (marked with *) and display with default information that you can change.
Step 2 Retain or update the Guest Type you want to assign to the guest.The various types of guests and their access privileges are defined by your system administrator.
The maximum number of devices that guests can simultaneously connect to the network and the maximumduration time for network access are displayed for the guest type you select.
Step 3 Enter the Number of Accounts to create.The maximum number of random guest accounts displayed that you can create at a time is configured by yoursystem administrator.
Sponsor Portal User Guide for Cisco Identity Services Engine, Release 1.26
Create Guest AccountsCreate Random Guest Accounts

Step 4 Based on how your system administrator configured this setting, you can either enter, edit or use the predefinedUsername Prefix to add to each account name.The remainder of the username is generated randomly adhering to the username policies set by your systemadministrator.
Step 5 Retain or update the defaults for the mandatory settings and enter information in the other fields, as desired.The system administrator can configure multiple selections for Language, Location, and SSID. However, ifonly one selection is specified, it will not display, but is automatically assigned when you create the guestaccounts. You can view this selection in the guest account details after the accounts are created.
When setting time durations for accounts, the start and end times you define are applicable in thetime zone for the location you pick.
Note
Step 6 Click Create to create the specified number of random guest accounts.If you created:
• 50 or less random accounts—AnAccount Information dialog box displays with the randomly generatedusernames and passwords for the multiple accounts you created.
• More than 50 random accounts—A message informs you that the accounts are being created in thebackground and to check the Notices page for a status on the operation.
What to Do Next
When you generate random guest accounts, you probably do not have guest information such as email addressesor phone numbers. You can print the account details and manually distribute the login credentials to the guests.If you created more than 50 accounts, open the specific notice on the Notices page to view account detailsfor up to 50 accounts. To view all the accounts created, go to theManage Accounts page.
Related Topics
Create Account Settings, on page 9Privacy of Guest Passwords, on page 8Create Account Settings, on page 9
Import Guest AccountsIf your company maintains account information for authorized visitors in an external database or file, you cancreate guest accounts for these users by importing their information into the Sponsor portal. The file containingthe account information must be a .csv file, which the Sponsor portal then parses and creates new guest useraccounts for each entry in the file.
Before You Begin
• Make sure that you have the necessary permissions to import guest account information.
• You cannot import guest account information from a mobile device (running Apple iOS, Android, andso on), so ensure that you are importing account information using a desktop device (running AppleOSX, Windows, and so on).
Sponsor Portal User Guide for Cisco Identity Services Engine, Release 1.2 7
Create Guest AccountsImport Guest Accounts
Procedure
Step 1 Click Import on the Create Accounts page.Your system administrator configures which fields display on this page and are required for creating guestaccounts. Some fields are mandatory (marked with *) and display with default information that you can change.
Step 2 Retain or update the Guest Type you want to assign to the guest.Your system administrator defines the various types of guests and their access privileges.
The maximum number of devices that guests can simultaneously connect to the network and the maximumduration time for network access are displayed for the guest type you select.
Step 3 Click Download Template to get a template to use for the import file. Ensure that the file you are importingconforms to the required structure before importing it.
Step 4 Click Browse to locate and select the .csv file that contains the guest information is required to create theguest accounts.
If the .csv file includes non-English characters, then enable UTF-8 character encoding, beforeimporting the file. If UTF-8 character encoding is not enabled, the non-English characters are notparsed properly.
Note
Step 5 Retain or update the defaults for the mandatory settings and enter information in the other fields, as desired.The system administrator can configure multiple selections for Language, Location, and SSID. However, ifonly one selection is specified, it does not display, but is automatically assigned when you create the guestaccounts. You can view this selection in the guest account details after the accounts are created.
When setting time durations for accounts, the start and end times you define are applicable in thetime zone for the location you pick.
Note
Step 6 Click Import to import the account information from the external database or file.A message informs you that the accounts are being created in the background and to check the Notices pagefor a status on the operation.
What to Do Next
You can email or print the account details for guests, if these facilities are available to you. You can also textthe account details to guests, if your system administrator has enabled this functionality.
On the Notices page, open the specific notice to view account details for up to 50 accounts. If you importedmore than 50 accounts, go to theManage Accounts page, to view all the accounts created.
Related Topics
Create Account Settings, on page 9Privacy of Guest Passwords, on page 8Create Account Settings, on page 9
Privacy of Guest PasswordsYou can create guest accounts for authorized visitors requiring access to your company’s network and internalresources. When you create accounts, whether it is for a known guest, or randomly for a multiple set of guests,or when importing a batch of guest accounts from an external database, Cisco ISE generates passwords forthese accounts.
Sponsor Portal User Guide for Cisco Identity Services Engine, Release 1.28
Create Guest AccountsPrivacy of Guest Passwords
If your system administrator set you up with the required privileges, you can view these system generatedpasswords:
•When managing guest accounts in the account details for each account.
• If you choose to be notified of the account details at the same time you notify your guests.
However, if your guests are permitted to change their passwords and do so after they log into the Guest portals,you can no longer view these passwords, as they are considered private.
If guests lose or forget their passwords after they change them, you cannot simply resend their passwords tothem. You have to reset their passwords to random passwords and notify them of the new passwords.
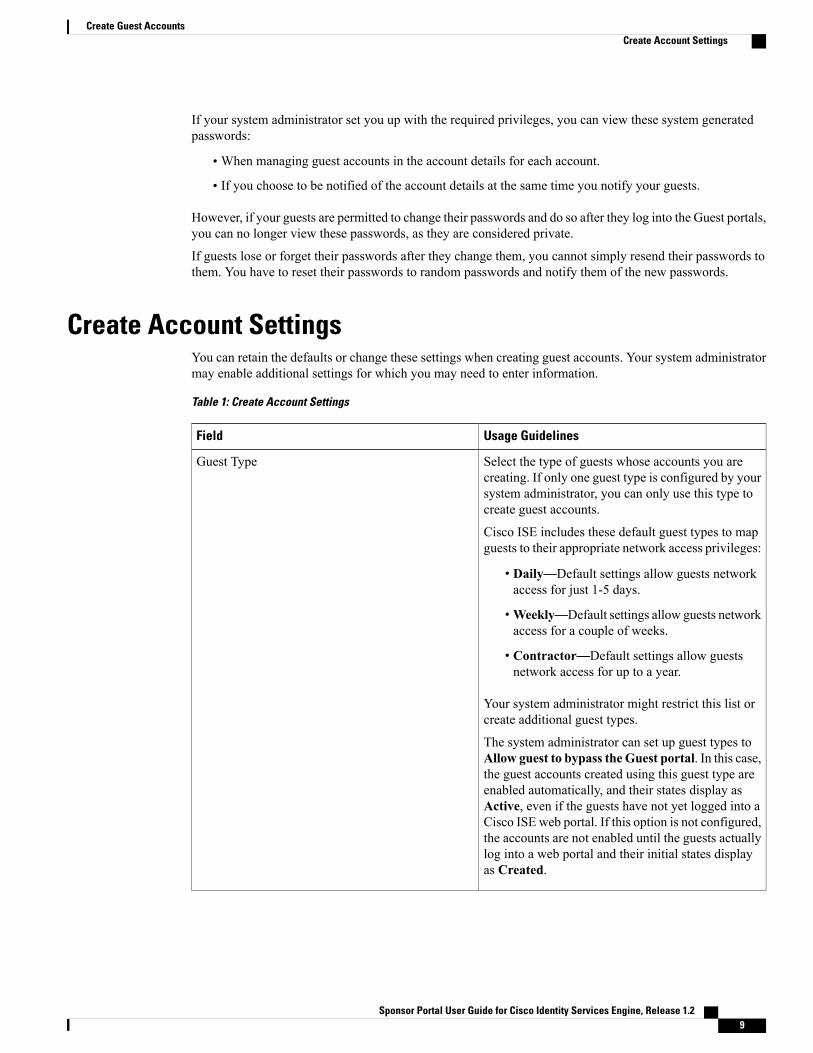
Create Account SettingsYou can retain the defaults or change these settings when creating guest accounts. Your system administratormay enable additional settings for which you may need to enter information.
Table 1: Create Account Settings
Usage GuidelinesField
Select the type of guests whose accounts you arecreating. If only one guest type is configured by yoursystem administrator, you can only use this type tocreate guest accounts.
Cisco ISE includes these default guest types to mapguests to their appropriate network access privileges:
• Daily—Default settings allow guests networkaccess for just 1-5 days.
•Weekly—Default settings allow guests networkaccess for a couple of weeks.
• Contractor—Default settings allow guestsnetwork access for up to a year.
Your system administrator might restrict this list orcreate additional guest types.
The system administrator can set up guest types toAllow guest to bypass the Guest portal. In this case,the guest accounts created using this guest type areenabled automatically, and their states display asActive, even if the guests have not yet logged into aCisco ISE web portal. If this option is not configured,the accounts are not enabled until the guests actuallylog into a web portal and their initial states displayas Created.
Guest Type
Sponsor Portal User Guide for Cisco Identity Services Engine, Release 1.2 9
Create Guest AccountsCreate Account Settings
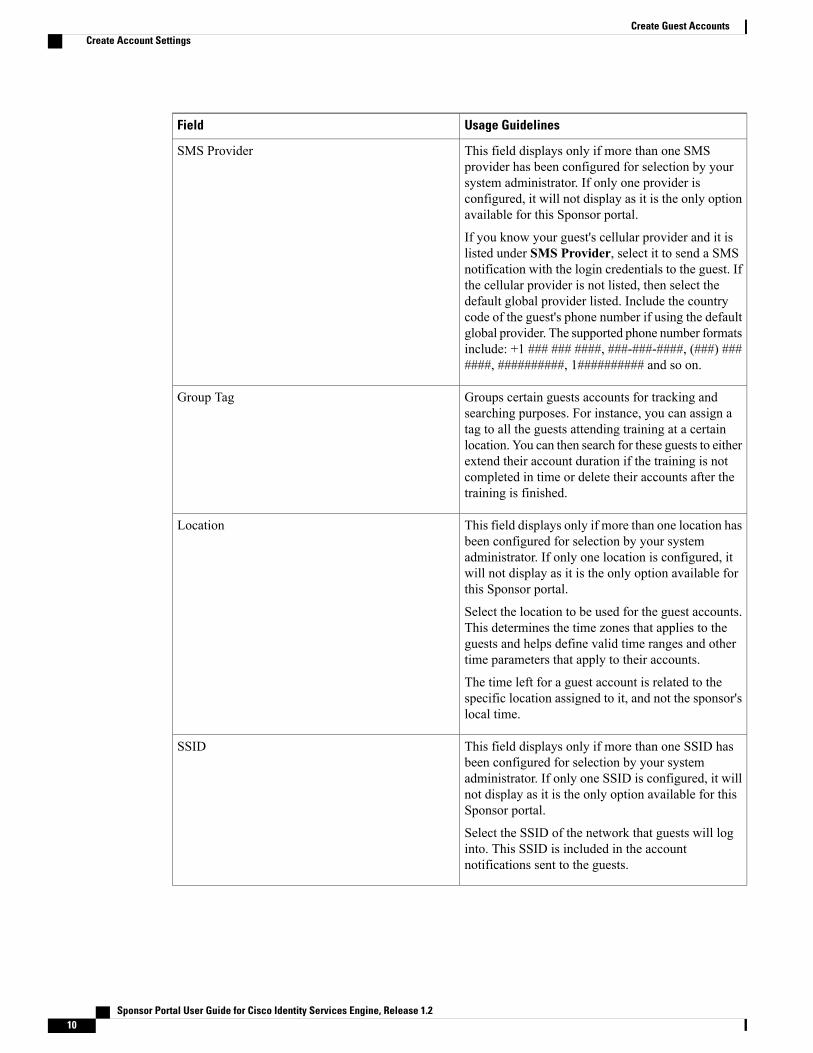
Usage GuidelinesField
This field displays only if more than one SMSprovider has been configured for selection by yoursystem administrator. If only one provider isconfigured, it will not display as it is the only optionavailable for this Sponsor portal.
If you know your guest's cellular provider and it islisted under SMS Provider, select it to send a SMSnotification with the login credentials to the guest. Ifthe cellular provider is not listed, then select thedefault global provider listed. Include the countrycode of the guest's phone number if using the defaultglobal provider. The supported phone number formatsinclude: +1 ### ### ####, ###-###-####, (###) #######, ##########, 1########## and so on.
SMS Provider
Groups certain guests accounts for tracking andsearching purposes. For instance, you can assign atag to all the guests attending training at a certainlocation. You can then search for these guests to eitherextend their account duration if the training is notcompleted in time or delete their accounts after thetraining is finished.
Group Tag
This field displays only if more than one location hasbeen configured for selection by your systemadministrator. If only one location is configured, itwill not display as it is the only option available forthis Sponsor portal.
Select the location to be used for the guest accounts.This determines the time zones that applies to theguests and helps define valid time ranges and othertime parameters that apply to their accounts.
The time left for a guest account is related to thespecific location assigned to it, and not the sponsor'slocal time.
Location
This field displays only if more than one SSID hasbeen configured for selection by your systemadministrator. If only one SSID is configured, it willnot display as it is the only option available for thisSponsor portal.
Select the SSID of the network that guests will loginto. This SSID is included in the accountnotifications sent to the guests.
SSID
Sponsor Portal User Guide for Cisco Identity Services Engine, Release 1.210
Create Guest AccountsCreate Account Settings
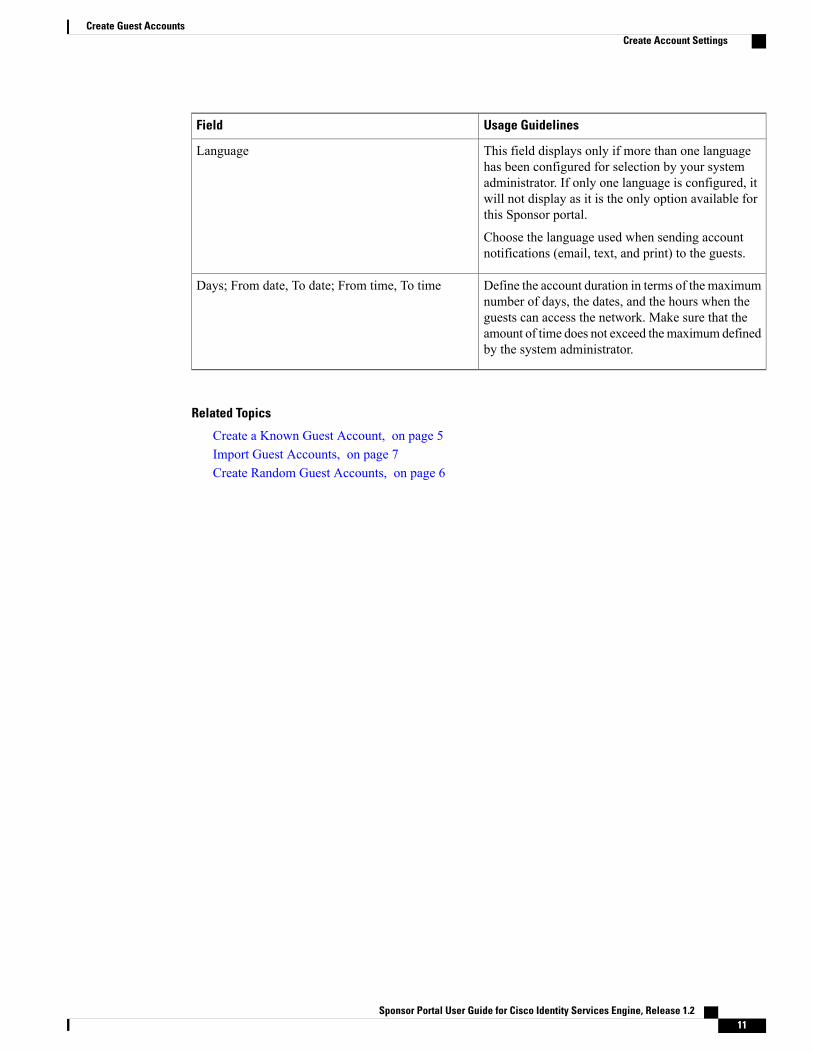
Usage GuidelinesField
This field displays only if more than one languagehas been configured for selection by your systemadministrator. If only one language is configured, itwill not display as it is the only option available forthis Sponsor portal.
Choose the language used when sending accountnotifications (email, text, and print) to the guests.
Language
Define the account duration in terms of the maximumnumber of days, the dates, and the hours when theguests can access the network. Make sure that theamount of time does not exceed themaximum definedby the system administrator.
Days; From date, To date; From time, To time
Related Topics
Create a Known Guest Account, on page 5Import Guest Accounts, on page 7Create Random Guest Accounts, on page 6
Sponsor Portal User Guide for Cisco Identity Services Engine, Release 1.2 11
Create Guest AccountsCreate Account Settings

Sponsor Portal User Guide for Cisco Identity Services Engine, Release 1.212
Create Guest AccountsCreate Account Settings

C H A P T E R 3Manage Guest Accounts
• Sponsor Portal Manage Accounts Page, page 13
• Edit Guest Accounts, page 13
• Resend Guest Passwords, page 14
• Extend Guest Account Durations, page 15
• Suspended and Expired Guest Accounts, page 16
• Suspend Guest Accounts, page 16
• Delete Guest Accounts, page 16
• Reset Guest Passwords, page 17
• Reinstate Guest Accounts, page 18
• Manage Accounts Page Details, page 18
• Manage Account States, page 19
Sponsor Portal Manage Accounts PageOn theManage Accounts page you can manage the guest accounts you created and any other accounts thatyou have the authority to manage.
• Edit and delete guest accounts
• Extend guest account duration
• Suspend guest accounts
• Reinstate expired guest accounts
• Resend and reset passwords for guests
Edit Guest AccountsYou can edit any guest account, regardless of the state it is in.
Sponsor Portal User Guide for Cisco Identity Services Engine, Release 1.2 13

Procedure
Step 1 On theManage Accounts page, select the guest account that you want to edit.Step 2 Click Edit.Step 3 Edit any of the fields that display.
For instance, you may want to change the defaults for Language and Location that you retained when youfirst created the guest accounts. You may want to add information such as names, email addresses, and phonenumbers that was not available when you first created random guest accounts. If you change (reduce or extend)the time duration for an account, the time left is changed based on the specific location assigned to it, and notthe sponsor's local time.
Step 4 Click Save.Step 5 View the changes you made to their account information.
Related Topics
Manage Accounts Page Details, on page 18Manage Account States, on page 19
Resend Guest PasswordsGuests may sometimes be unable to log into the network because they have lost or forgotten their passwords.You can help these guests regain access to the network by resending their original passwords.
Before You Begin
• You cannot resend passwords to guests who have changed them. If these guests have lost or forgottentheir new passwords, you must reset them and notify the guests.
• You can resend passwords for accounts that are either Created or Active.
• You cannot resend passwords for accounts that are either Pending Approval, Suspended, Expired, orDenied.
Procedure
Step 1 On theManage Accounts page, select the guest accounts whose passwords you want to resend.Step 2 Click Resend to send the guests their account details again.Step 3 In theResend pop-up window, select the various notification options (for both guests and sponsors) and click
OK.When sending notification to guests, there are options for sending account information to yourself, as well.
• Send me a summary—Lists the guest name and password. The password will not show if it is blockedby your administrator.
• Copy me—Sends you an email that is the same as the one sent to the guest. The password will not showif it is blocked by your administrator.
Sponsor Portal User Guide for Cisco Identity Services Engine, Release 1.214
Manage Guest AccountsResend Guest Passwords

Related Topics
Manage Accounts Page Details, on page 18Manage Account States, on page 19
Extend Guest Account DurationsYou can extend the account durations for guests before or after their accounts expire, so that they can accessthe network for longer than originally permitted. You can also extend the account durations when editingguest accounts.
If guest accounts have expired, they are no longer able to connect to the network. An automated process runsperiodically (based on criteria set by your system administrator) that removes (purges) all expired accountsfrom the system. If that happens before you can extend the account duration for an expired account, you willneed to create new accounts for these guests.
Before You Begin
• You can extend accounts that are either Created, Active, or Expired.
• You cannot extend accounts that are either Suspended or Denied. You can reinstate them.
Procedure
Step 1 On theManage Accounts page, select the guest account that you want to extend.Step 2 Click Extend.Step 3 Enter the extension information and click OK.
The Expiration Date and Time Left are automatically updated with the new time duration. The time left isrelated to the specific location assigned to the guest account, and not the sponsor's local time.
Step 4 Verify that the Expired accounts' duration times have been extended and their states are reset as follows:
• For accounts awaiting approval, to Pending Approval.
• For accounts that are configured to bypass the credentialed Guest portal, to Active.
• For accounts that are not configured to bypass the credentialed Guest portal, to Created.
Related Topics
Manage Account States, on page 19Manage Accounts Page Details, on page 18Manage Account States, on page 19
Sponsor Portal User Guide for Cisco Identity Services Engine, Release 1.2 15
Manage Guest AccountsExtend Guest Account Durations

Suspended and Expired Guest AccountsWhen guest accounts are suspended manually by you or expire, the affected guests are disconnected from thenetwork and can no longer access it.
Regardless of their state, active, pending and so on, guest accounts expire when they reach the end of theiraccount duration, which you defined when you created the accounts.
Suspended and expired accounts are automatically purged based on a schedule defined by your systemadministrator, but the default is every 15 days. After an account is purged, you must create a new account forthat guest. However, you can reinstate suspended accounts and extend expired accounts before they are purged.
Suspend Guest AccountsYou can suspend the accounts of guests, which disconnects them from the network and prevents them fromaccessing it. However, their accounts are retained in the Cisco ISE database.
Before You Begin
• You can suspend accounts that are either Created or Active.
• You cannot suspend accounts that are either Pending Approval, Expired, or Denied.
Procedure
Step 1 On theManage Accounts page, select the guest accounts that you want to suspend.Step 2 Click Suspend. If configured by your system administrator, you may be asked to provide a reason for the
suspension.Step 3 Click OK to confirm.Step 4 Verify that the accounts are now listed as Suspended.
Related Topics
Manage Accounts Page Details, on page 18Manage Account States, on page 19
Delete Guest AccountsYou can delete any guest account, regardless of the state it is in.
Sponsor Portal User Guide for Cisco Identity Services Engine, Release 1.216
Manage Guest AccountsSuspended and Expired Guest Accounts

Procedure
Step 1 On theManage Accounts page, select the guest accounts that you want to delete.Step 2 Click Delete.Step 3 Click OK to confirm.Step 4 Ensure that the accounts no longer appear in the account list.
Related Topics
Manage Accounts Page Details, on page 18Manage Account States, on page 19
Reset Guest PasswordsGuests may sometimes be unable to log into the network because they have lost or forgotten their passwords.You can help these guests regain access to the network by resetting their passwords.
Before You Begin
• You can reset passwords regardless of whether guests have changed their passwords or not.
• You can reset passwords for accounts that are either Created or Active.
• You cannot reset passwords for accounts that are either Pending Approval, Suspended, Expired, orDenied.
Procedure
Step 1 On theManage Accounts page, select the guest accounts whose passwords you want to reset.Step 2 Click Reset Password to generate random system passwords.
You are asked to confirm the reset and select how you want to notify the guests of their new account details,either by email, text, or print.
Step 3 In the Reset Password pop-up window, select the various notification options (for both guests and sponsors)and click OK.When sending notification to guests, there are options for sending account information to yourself, as well.
• Send me a summary—Lists the guest name and password. The password will not show if it is blockedby your administrator.
• Copy me—Sends you an email that is the same as the one sent to the guest. The password will not showif it is blocked by your administrator.
Sponsor Portal User Guide for Cisco Identity Services Engine, Release 1.2 17
Manage Guest AccountsReset Guest Passwords

Related Topics
Manage Accounts Page Details, on page 18Manage Account States, on page 19
Reinstate Guest AccountsYou can reinstate guest accounts that you suspended previously or denied approval.
Before You Begin
• You can reinstate accounts that are either Suspended or Denied.
• You cannot reinstate accounts that are either Created, Active, Pending Approval, or Expired.
Procedure
Step 1 On theManage Accounts page, select the guest accounts that you want to reinstate.Step 2 Click Reinstate.Step 3 Click OK to confirm.Step 4 Verify that the accounts are reinstated and their states are reset as follows:
• For Suspended accounts—To either Created or Active. Accounts change to Expired, if they expiredwhile suspended.
• For Denied accounts—To either Created or Active. Accounts change to Expired, if they expired whiledenied.
Related Topics
Manage Account States, on page 19Manage Accounts Page Details, on page 18Manage Account States, on page 19
Manage Accounts Page DetailsTheManage Accounts page allows you to manage the guest accounts you have created and other accountsbased on your privileges set by your system administrator.
Use these settings to manage guest accounts.
Table 2: Manage Accounts Page Details
Eligible Account StatesUsage GuidelinesAction
All, except Suspended, Denied.Make changes to a selected account.Edit
Sponsor Portal User Guide for Cisco Identity Services Engine, Release 1.218
Manage Guest AccountsReinstate Guest Accounts

Eligible Account StatesUsage GuidelinesAction
Active, CreatedEmail, text, or print account details for theselected guests.
Resend
Active, Created, ExpiredAdjust the access time period or reactivatethe selected expired guest accounts.
Extend
Active, CreatedDisable the selected guest accounts withoutdeleting them from the system.
You may be prompted to provide reasons forsuspending an account.
Suspend
AllRemove the selected guest accounts from theCisco ISE database.
Delete
Active, CreatedReset the selected guest passwords to randompasswords and notify the guests of the accountdetails.
Reset Password
Suspended, DeniedEnable the selected suspended guest accountsand approve previously denied accounts.
Reinstate
Not applicableView any changes to the displayed accounts.Refresh
Manage Account StatesThe account state displays details about guest accounts.
When you delete an account, it no longer displays on this page and it is removed from the Cisco ISE database.
Table 3: Manage Account States
New StateDescriptionCurrent State
Account states change based on theaction taken on them.
Guests with these accounts havesuccessfully signed in through acredentialed Guest portal, or bypassedthe credentialed Guest captive portal.
In the latter case, the accounts belongto guest types that are configured tobypass the credentialed Guest captiveportal. These guests can access thenetwork by providing their logincredentials to the native supplicant ontheir device.
Active
Sponsor Portal User Guide for Cisco Identity Services Engine, Release 1.2 19
Manage Guest AccountsManage Account States

New StateDescriptionCurrent State
Account states change based on theaction taken on them.
The accounts have been created, but theguests have not yet logged into acredentialed Guest portal.
In this case, the accounts are assignedto guest types that are not configured tobypass the credentialed Guest captiveportal. Guests must first sign in throughthe credentialed Guest captive portalbefore they are able to access other partsof the network.
Created
If you reinstate denied accounts,their states change to:
• Active or Created based on theassigned guest typeconfiguration.
• Expired, if they expired whiledenied, and are purged in thenext purge cycle.
All denied accounts that are notreinstated are purged in the nextpurge cycle. Denied accounts thatexpired cannot be extended(reactivated); you must create newaccounts.
The accounts are denied access to thenetwork.
Denied
Accounts that expired whilein a denied state remain asDenied.
If you extend unexpired accounts,their states remain unchanged.
If you extend (reactivate) expiredaccounts, their states change to:
• Active, if the guests areconfigured to bypass thecredentialed Guest captiveportal.
• Previous states, if the guestsare not configured for bypass.
The time period for the account hasended.
Expired
If approved, based on the guest typeconfiguration, the account can beActive or Created. If denied, itappears on theManage Accountspage as Denied.
The accounts are awaiting approval toaccess the network.
Pending Approval
Sponsor Portal User Guide for Cisco Identity Services Engine, Release 1.220
Manage Guest AccountsManage Account States
New StateDescriptionCurrent State
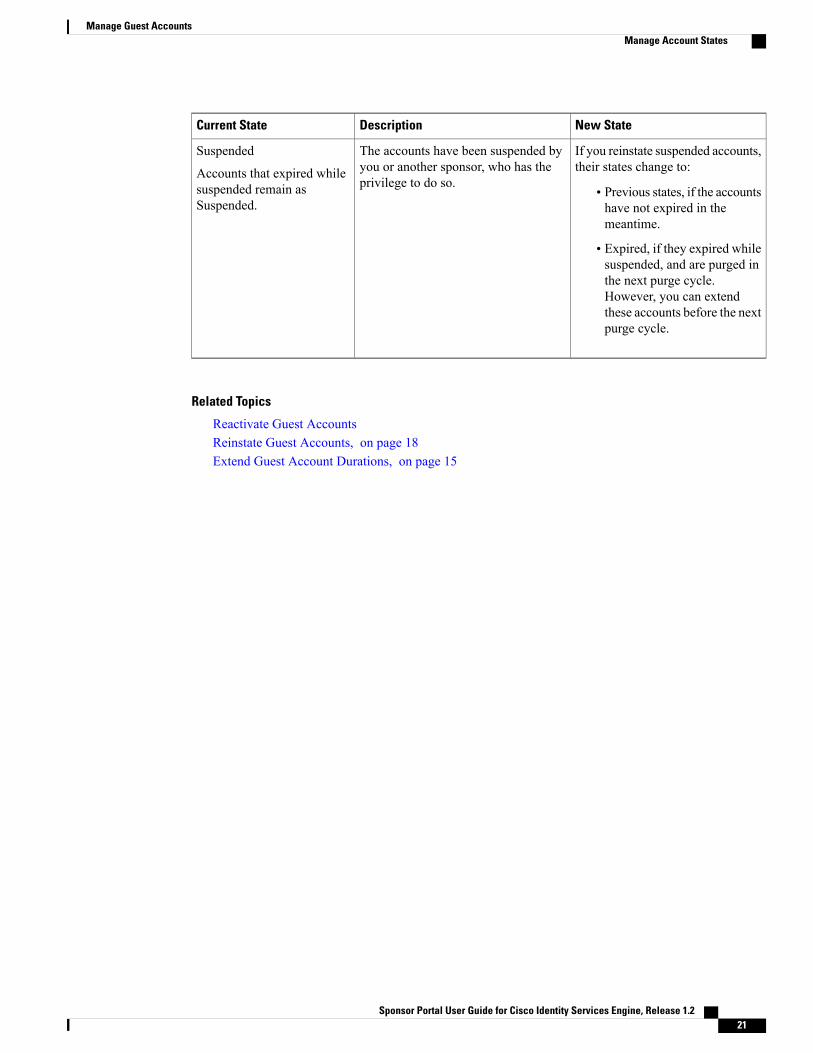
If you reinstate suspended accounts,their states change to:
• Previous states, if the accountshave not expired in themeantime.
• Expired, if they expired whilesuspended, and are purged inthe next purge cycle.However, you can extendthese accounts before the nextpurge cycle.
The accounts have been suspended byyou or another sponsor, who has theprivilege to do so.
Suspended
Accounts that expired whilesuspended remain asSuspended.
Related Topics
Reactivate Guest AccountsReinstate Guest Accounts, on page 18Extend Guest Account Durations, on page 15
Sponsor Portal User Guide for Cisco Identity Services Engine, Release 1.2 21
Manage Guest AccountsManage Account States

Sponsor Portal User Guide for Cisco Identity Services Engine, Release 1.222
Manage Guest AccountsManage Account States
C H A P T E R 4Customize the Sponsor Portal
These topics provide details about how you can customize your Sponsor portal settings and change yourpassword:
• Choose the Languages for Guest Notifications, page 23
• Setting Up Email Confirmations, page 23
• Change Your Password, page 24
• Assigning Default Values to Guest Accounts, page 24
• My Settings, page 25
Choose the Languages for Guest NotificationsYou can change the default languages configured by your system administrator to notify guests of their accountdetails. You can select any of the languages provided by your system administrator.
Procedure
Step 1 On theManage Accounts page, select the guest account for which you want to change the notificationlanguage.
Step 2 Click Edit.Step 3 Select the language you want from the Language drop-down list.Step 4 Click Save.
Setting Up Email ConfirmationsWhen you create a guest account, you can have a copy of the account details automatically emailed to you.Contact your system administrator if this feature is not available to you.
Sponsor Portal User Guide for Cisco Identity Services Engine, Release 1.2 23

Procedure
Step 1 On theManage Guest Accounts page, clickMy SettingsStep 2 Enter your email address in the Your email address field.Step 3 Check the Receive email confirmation check box.Step 4 Click Save.
Change Your PasswordYour system administrator might require you to change your password when signing on to the Sponsor portal,or allow you to change it at any time after you log in. Your password must adhere to the password policy setby your system administrator.
If you are required to change your password when signing on to the Sponsor portal, the Change Passwordscreen displays automatically. If you are not required to change it, but are allowed to change it after you login, the change password option is available in the Welcome Sponsor pull down menu.
Procedure
Step 1 If you want to change your password, selectChange Password on theWelcome Sponsor menu. TheChangePassword screen displays.
Step 2 Enter your old password in the Old password field.Step 3 Enter your new password in the New password field.Step 4 Confirm your new password in the Confirm password field.Step 5 Click Save.
Change Password option is enabled only for internal users. This option is not applicable for usersauthenticated using external identity stores (such as, Active Directory, LDAP, and so on).
Note
Assigning Default Values to Guest AccountsIf you typically create guest accounts that use the same guest role, account duration, time zone, and notificationlanguage, you can set these defaults so you do not have to change them each time you create a guest account.
Sponsor Portal User Guide for Cisco Identity Services Engine, Release 1.224
Customize the Sponsor PortalChange Your Password

Procedure
Step 1 On theManage Guest Accounts page, clickMy SettingsStep 2 Choose the appropriate options in theGuest role, Account duration Time zone, and Notification language
fields.Step 3 Click Save.
My SettingsYou can customize your Sponsor portal settings and set default values for guest accounts that you create.
Usage GuidelinesField
Change the language used by the Sponsor portal orcheck Use browser locale to use the same languageas your web browser.
Language template
Enter your location.Location
Enter your email address and check Receive emailconfirmations to receive copies of account detailssent to guests.
Your email address
Choose a default guest role to use to map guest usersto their appropriate network access privileges.
Guest role
Specify how long the guest user can access thenetwork.
Account duration
Set a time zone to be used by all guest accounts.Time zone
Choose a default language usedwhen sending accountnotifications.
Notification language
Enter your current password in the Old passwordfield and enter your new password in the Newpassword and Confirm password fields.
Password settings
Sponsor Portal User Guide for Cisco Identity Services Engine, Release 1.2 25
Customize the Sponsor PortalMy Settings

Sponsor Portal User Guide for Cisco Identity Services Engine, Release 1.226
Customize the Sponsor PortalMy Settings