Spirit Anleitung 0108 e - Bicycle Man
72
Operating Manual and Service Instructions NEW recumbent- technology 2008 HP Velotechnik January 2008
Transcript of Spirit Anleitung 0108 e - Bicycle Man
Operating Manual andService Instructions
NEWrecumbent-technology
2008HPVelotechnik
January 2008

HPVelotechnik
General safety instructionsIntended use – 3The first miles – 3Legal requirements – 3Load capacity – 4Carrying luggage – 4Transport in the car – 5Do not take kids with you – 5 Trailers – 5Added parts and accessories – 5Fairings – 5Replacement of parts – 6No alteration of parts – 6Final assembly – 6Screws and bolts – 6Quick Releases – 7
Adjusting your new bikeAdjusting the leg length – 9Adjusting the seat angle – 10Adjusting the handlebars – 13Adjusting the suspension – 16
Handling instructionsLearning the new riding technique – 24Wear protective clothing – 25Use clipless pedals – 25Slowly increase the strain – 26Do not ride freehand – 26Do not pull on the handlebars – 27How to ride correctly and safely – 26Brakes – 28Gear system – 30Light system – 31Prop stand – 32
Table of Contents
-
Maintenance and careWear and Tear – 33Brakes – 33Gear system – 35Chain – 36Chain tubes – 38Chain roller – 40Headset – 43Rear suspension element – 45Swing arm pivot – 47Seat – 48Water bottle cage – 49Mudguards – 50Wheels – 51Cleaning and conservation – 52Storing the bicycle – 54Screws and bolts – 54Tightening torques for screws – 55Warranty – 56
Warranty PassWarranty Pass – 57Service Plan – 58Proofs of service – 62
Revision January 2008. For latest product in-formation, please check out our website atwww.hpvelotechnik.com.All trademarks be-long to their respective owners.
HP VELOTECHNIK
Elisabethenstrasse 165830 Kriftel / GermanyTel. ++49 (0) 61 92 - 97 99 2-0Fax ++49 (0) 61 92 - 91 02 18
HPVelotechnik
thank you for buying a recumbent by HP VELOTECHNIK and con-gratulations on the purchase of your new Spirit! With the Spirit,a high-quality luxury bike, you will enjoy many years of exhilara-ting riding pleasure.
Your security and your satisfaction are our main concern. Onthe following pages, this manual will inform you about importantsafety issues as well as maintenance and care instructions.
Even if you have many years of experience with bicycles pleasedo take your time to read this manual carefully.Your recumbentis designed with the latest bicycle technology by HP VELOTECHNIK
that partly needs special treatment and care.
In this manual you will find detailed instructions on how to op-timize your Sprit to meet your demands and riding style as wellas your size and weight.
In addition to this, we have put together a collection of infor-mation on care and maintenance as well as special technical ad-vice from our engineers.
This guide helps you to keep your Spirit in perfect condition sothat you will always have maximum fun, comfort and safety.
Enjoy yourselves and have a great ride!
Paul J.W. Hollants, Dipl.-Ing. Daniel Pulvermüllerand the HP VELOTECHNIK team
1
Introduction
Dear customer,

HPVelotechnik
To this user manual also belong the originalmanuals of component manufacturers such asthe brake manufacturer, the gear system manu-facturer and the pedal manufacturer.These ma-nuals tell you in detail how to operate andmaintain those specific parts. Please do readthe manuals of the part manufacturers as care-fully as the manual on hand. Please have otherusers of your recumbent also read the manu-als before using the bike.
The maintenance and adjustment of this re-cumbent partly require special tools and skills.Do only work within your limits and, in theinterests of your own safety, do not go be-yond. Should you be uncertain at any point, getin contact with your local dealer.
The instructions in this manual apply only to acompletely assembled Spirit with standardparts from the series production of HPVELOTECHNIK.
On special demand HP VELOTECHNIK deliversframe kits with which a specialist dealer canassemble a bicycle individually. In this case themanuals on the operation and maintenance ofthe parts only represent a guideline, please doread every manual of every part manufacturer.The specialist dealer is responsible for the ex-pert assembly, please contact him for detailedadvice! A bicycle that has been assembled froma frame kit must always be tested and appro-ved by a bicycle mechanic before your first ri-de.
Introduction
2
Caution! The texts in the grey boxes areparticularly important for your safety.Textsthat begin with „Danger!“ mark an immedi-ate danger for your life and your health.Please do read them carefully.

Gen
eral
saf
ety
inst
ruct
ions
HPVelotechnik 3
Legal RequirementsWhen you ride your bike on the public road itmust comply with national legislation and gui-delines.These will vary from country to coun-try. In general, there are minimum standardsfor brakes, reflectors and lighting systems, aswell as usually a general duty to ensure thatyour vehicle is in roadworthy safe condition.There will also be a duty to ride in a safe andresponsible manner. If you ride your HPVELOTECHNIK bike in traffic you should be sureto observe all the applicable laws and regula-tions.
In most countries, including Germany and theUK, two independent braking systems are re-quired. Do not ride with only one brake wor-king!
Please contact your local dealer to find out ab-out your legal obligations.
As an addition, we recommend to mount a flagon a pole for better visibility in traffic.
The safety equipment on your bike must bechecked before every ride and maintained inproper condition.
General Safety InstructionsIntended UseYour Spirit is a bicycle for the use on streetsand surfaced roads.
This bicycle is not designed for the use in ra-cing and off-road riding, for jumping or acroba-tics, and you must not ride across curbs, stairs,etc.
Damage through inappropriate use, assemblyerrors, accidents or similar activities and wilfuldamage results in the loss of any warranty.
The intended use also includes the precise ob-servation of the prescribed usage and mainte-nance regulations and instructions.
The First MilesThe first 300 km (186 miles) are an importantphase in which you break in the bicycle.During the first use of a new bicycle thescrews may bed in and come loose. Cables andspokes may stretch. Bearings may show play.Please be very attentive during that period.
After 300 km or after two months at the la-test you will have to take your bicycle to a bi-cycle mechanic for the first service. Please re-cord this first service and the tasks performedin the warranty pass on page 57.The first ser-vice is the prerequisite for further use of thebicycle and for your warranty claims.

HPVelotechnik4
Load CapacityThe maximum load (rider + luggage) is 130 kgs(286 lbs.).The maximum total weight (bicycle+ rider + luggage) is 150 kgs (330 lbs.).The lo-wer limit is valid. It is important to adjust thespring stiffness of the suspension according tothe load, see the chapter about adjusting thesuspension in this manual, 16.With an attached trailer, the maximum totalweight must not be higher than 150 kg (330 lbs)
Carrying LuggageLuggage transport is only allowed with the in-tegrated seat rack, with a bicycle bag at theupper seat stay and with bags at the optionallowrider rack.You can put smaller items like arepair kit, your mobile phone or your wallet inthe integrated bags at the lower end of theback rest.
Maximum load:
● rear rack 25 kgs (57 lbs.)● bicycle bag at the back rest 15 kgs (34 lbs.)● zipped bag in back rest 1 kgs (2.3 lbs)● lowrider rack under the seat 25 kgs (57 lbs.)
Additional loading can influence the road per-formance of your bike considerably. If you planon riding with heavy luggage we advise you tomake a test ride on a street with no traffic toadjust to the new situation.
The load should be packed as close to the bo-dy of the rider as possible, since this leads to amore stable performance.You can also impro-ve the handling of the bike by positioning thecenter of gravity of the luggage as low as pos-sible, so pack heavy items in the bottom ofyour panniers.
Be careful that your luggage on the rack is sa-fely stored. Bags must be tightly fastened tothe rack or to the lowrider carrier that is avai-
lable as accessory. In no case may loose partslike straps and belts touch the wheels, the de-railleur or the suspension.We recommend bicycle bags by ORTLIEB.Youcan buy them with extra large hooks matchingthe oversized tubes of the rack.You can alsorefit those large hooks later.
Take care that your luggage does not coverthe lighting system and the reflectors of yourbicycle and that they stay fully functional.
In case you want to park your bicycle take ca-re to lean it on a wall or any other solid ob-ject.With the kickstand alone it is not possibleto safely park a bicycle loaded with luggage, itcould fall down and be damaged.
General Safety Instructions
Gen
eral
saf
ety
inst
ruct
ions
HPVelotechnik 5
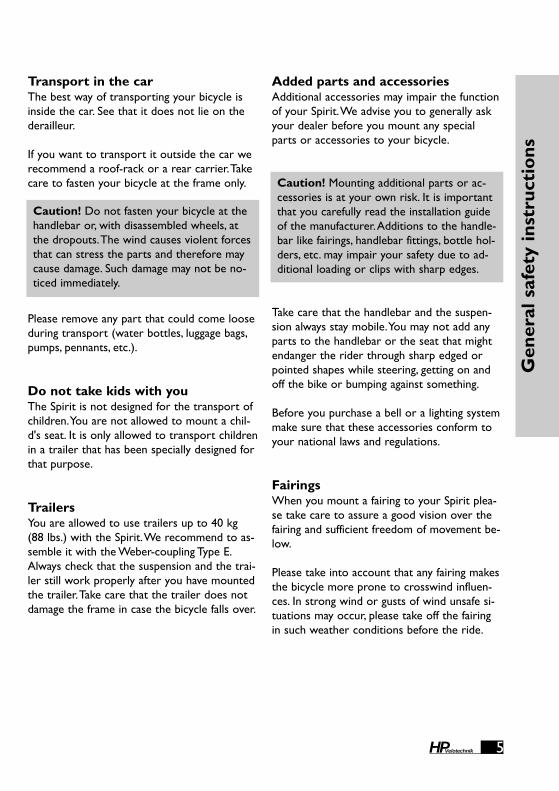
Transport in the carThe best way of transporting your bicycle isinside the car. See that it does not lie on thederailleur.
If you want to transport it outside the car werecommend a roof-rack or a rear carrier.Takecare to fasten your bicycle at the frame only.
Please remove any part that could come looseduring transport (water bottles, luggage bags,pumps, pennants, etc.).
Do not take kids with youThe Spirit is not designed for the transport ofchildren.You are not allowed to mount a chil-d's seat. It is only allowed to transport childrenin a trailer that has been specially designed forthat purpose.
TrailersYou are allowed to use trailers up to 40 kg(88 lbs.) with the Spirit.We recommend to as-semble it with the Weber-coupling Type E.Always check that the suspension and the trai-ler still work properly after you have mountedthe trailer.Take care that the trailer does notdamage the frame in case the bicycle falls over.
Added parts and accessoriesAdditional accessories may impair the functionof your Spirit.We advise you to generally askyour dealer before you mount any specialparts or accessories to your bicycle.
Take care that the handlebar and the suspen-sion always stay mobile.You may not add anyparts to the handlebar or the seat that mightendanger the rider through sharp edged orpointed shapes while steering, getting on andoff the bike or bumping against something.
Before you purchase a bell or a lighting systemmake sure that these accessories conform toyour national laws and regulations.
FairingsWhen you mount a fairing to your Spirit plea-se take care to assure a good vision over thefairing and sufficient freedom of movement be-low.
Please take into account that any fairing makesthe bicycle more prone to crosswind influen-ces. In strong wind or gusts of wind unsafe si-tuations may occur, please take off the fairingin such weather conditions before the ride.
Caution! Do not fasten your bicycle at thehandlebar or, with disassembled wheels, atthe dropouts.The wind causes violent forcesthat can stress the parts and therefore maycause damage. Such damage may not be no-ticed immediately.
Caution! Mounting additional parts or ac-cessories is at your own risk. It is importantthat you carefully read the installation guideof the manufacturer.Additions to the handle-bar like fairings, handlebar fittings, bottle hol-ders, etc. may impair your safety due to ad-ditional loading or clips with sharp edges.

HPVelotechnik6
Replacement of PartsThe replacement of parts relevant for safety(especially brakes, lighting, handlebar, fork, drivetrain, suspension elements) should only be do-ne with original parts by a bicycle mechanic,since it requires a certain degree of skill, suita-ble tools and mechanical aptitude.
Any technical change you perform on yourown is at your own risk!
No alteration of parts
Final AssemblyYour bike has been delivered to your specialistdealer only partly assembled.
Your dealer has carefully finished the assembly,perhaps altered the specification of your biketo meet your special requirements and perfor-med a test ride. Please take care that this pre-delivery service is recorded in the warrantydocument at the end of this manual.
All screws must be checked and tightened,especially at handlebar, stem, fork, swing armpivot and wheels. Please follow the tighteningsettings in the table on page 55.
Rear derailleur and brakes must be checkedand adjusted. Please follow the instructions inthe manuals of the parts manufacturers thatcome with this manual.
Screws and Bolts
General Safety Instructions
Danger! If any part is deformed (e.g. due toan accident or overload), especially frame,fork, handlebar, seat mounts, pedal, cranksand brakes, it is not allowed to use it anyfurther or repair it. Do not try to straightenbent parts.You must replace them for yourown safety. If you do not replace a damagedpart it can result in a total failure of the partand you may be seriously injured!
Caution! You are not allowed to performany work on the parts of the bicycle, especi-ally frame, fork, handlebar and seat, whichmight endanger their solidity.These works include drilling holes, welding,brazing, painting methods that add heat orany other chemical treatment. If any of theseworks is done improperly it may result in aloss of strength through direct damage orincreased susceptibility to corrosion.
Caution! Screws must be tightened withprescribed tightening torque. In this hand-book tightening torques are given in Nm(Newtonmeter).Always use a torquewrench wherever a torque setting is given inthis manual. Never rely on "feel". Screwstightened too much or not enough canbreak, which can lead to dangerous acci-dents. In case you don't own a torquewrench have your bicycle mechanic do therespective work.You will find a table withthe prescribed torque settings on page 55 inthis manual.

HPVelotechnik
Gen
eral
saf
ety
inst
ruct
ions
7
Quick release leversQuick release levers hold the seat of yourSpirit in position.
The wheels come with screws and nuts at theaxle as standard equipment. In case you havechosen wheels with quick release the followinginstructions are also valid for the wheels.Please read the instructions of the quickrelease manufacturer.
A quick release lever consists of two basicparts: the lever on one side provides the clam-ping force.With the adjusting nut on the otherside you adjust the clamping tension on thescrew thread.
To open the quick release move the lever awayfrom the frame. In doing so the inscription"open" should be visible on the lever.
To close the quick release move the lever withpower in the other direction so that the word"close" is visible on the outward side of the le-ver.At the start of the lever's motion, for, say,half of its movement, the lever should movevery easily, without any clamping action. In thesecond half of the lever's movement the forceon the leer should increase considerably, cor-responding in the end to 15–20 kg (46 lbs.).
In its final position the lever should lie parallelwith the bicycle and should not stick out toone side.
Check the security of the lever by attemptingto twist the lever. If the lever can be made topivot around in a circle the clamping is tooloose.You must re-open the quick release,hold the lever and increase the clamping ten-sion. Do this by screwing the adjustment nuton the other side by half a turn. Close the le-ver and check the clamping anew.
Finally, check the that the part being secured isfirmly fixed: Lift each wheel several inch off theground and give it a slap onto the tire fromabove.A properly fixed wheel will remain se-cure in the frame's dropouts.
The dropouts of the fork of your Spirit are de-signed as safety dropouts.Therefore you al-ways have to loosen the clamping nut of thequick release when you take off the frontwheel.When you reassemble it do not forgetto tighten the nut again!
Parts that are fastened with a quick releaseopen easily.Thus, they are more susceptible totheft.Therefore, always secure the wheels witha lock when you park your bicycle. It is alsopossible to exchange the quick releases withspecial security screws (e.g. from PITLOCK) thatcan only be opened with a special tool. Forthis please consult your local specialist dealer.
Danger! An incompletely or improperlyclosed quick release can result in parts co-ming loose, and hence in a crash, possibly re-sulting in serious injury.
The quick release levers must be closed firmly. Hold the seat fra-me with your fingers to enhance your thumb’s power.

HPVelotechnik8
Before the first ride: adjusting yournew SpiritThe seating position is essential for your ridingcomfort, well-being and efficient cycling on theSpirit.Therefore adjust seat, handlebar and su-spension to your individual requirements.
In order to adapt the Spirit as closely as possi-ble to your body dimensions you can adjustthe distance from seat to pedals, the seat an-gle, the angle and the position of the seat cus-hion individually.
The stem of the handlebar is vertically adjusta-ble like a telescope.The handlebars are adju-stable in their angle.
All adjustments together affect the distancebetween your knees and the handlebars aswell as your minimum turning circle.
Remove your luggage prior to all adjustments.That way you have easy access to all operatingelements and you don't make the adjustmentmore difficult through additional weight.
Adjusting the leg length: moving theseatThe Spirit is designed for people from150–200 cm (5'–6'7") height. In order to adjustthe distance between the pedals and the backof the seat move the seat on the rails.
Open the two quick release levers under theseat by turning away the silver levers from theframe.
Hold the frame with one hand.With the otherhand you take hold of the seat unit at the inte-grated rear rack. Now move the seat to thecorrect position.
Close the two quick release levers by movingthe levers towards the frame.The front leverin particular has to be closed tightly so thatthe angle of the back of the seat does notchange during a ride.
In order to check the adjustments have anot-her person hold the bicycle while you are sit-ting on the recumbent.
Adjust the front boom in such a way that yourleg is fully extended when your heel (wearingflat shoes) is in the foremost position on thepedal. Experience shows that the pedal-to-seatdistance on a recumbent can be slightly longerthan on a conventional bike.While you are pe-daling the ball of your foot should be positio-ned over the center of the pedal axle. It is im-portant that your leg is not fully straightenedwhen the crank is in the foremost position.
If the distance is too great it is difficult toovercome this dead point, pedaling becomesuncomfortable and there is too much strain onthe sinews of your feet.
Adjusting the seat
Danger! All procedures described here re-quire a certain degree of skill, suitable toolsand mechanical aptitude.After any assemblyoperation perform a static check and take ashort test-ride on a quiet street, away fromtraffic. If you have any doubts please contactyour local dealer.

Adj
usti
ng y
our
new
bik
e
HPVelotechnik
If the distance is too short you may sufferfrom knee pain or your legs bump on thehandlebar.
A wrong adjustment may lead to pain in yourknees and inefficient pedaling. In addition werecommend to ride with a high pedaling ca-dence, which means to pedal fast and with litt-le pressure. Pedalling with too much pressuremay also lead to pain in the knees.You will findmore information about this on page 26.
9
The area wherein you move the seat is limitedto the front by a screw at the and of the rail.The screw head keeps the seat from glidingdown off the rail and thus damages the surfaceof the frame tube.Always take care that thisscrew is placed in its drilling hole at the rightfront of the rail.
The seat rail has marks for easy length adjust-ment.The maximum rear position is clearlymarked with a „max“ mark. Do not move theseat further back once the front edge of thefront slider is aligned with the „,max“ mark.
Since the rail is open at the rear end you cantake off the seat for transportation.
To reconnect the seat onto the rail adjust thetwo sliders on the quick lever axle parallel toeach other and to the rail and move the seatslowly onto the rail.
The easiest way to do it is when you parkyour bicycle with the kickstand. Kneel downbehind the bicycle so that you have a goodview on the rail and the sliders.
Take care that your fingers do not get caughtbetween the rear rack and the frame and thusget hurt while you move the seat.
Adjust the seat so that your knee will not be fully straightenedwhen pedaling.
Caution! The two quick releases have to beclosed firmly (tightening force 15–20 kgs /45 lbs.) to safely hold the seat.You are notallowed to open them while riding.Afterthey have been closed the imprint "close"must be visible. If the quick releases are nottightened appropriately the seat can movewhile riding and you may no more be ableto handle your bicycle.
Caution! The seat rail does not have a limi-tation at the rear end. If you move the seattoo far back the rear sliders glide off the railso that you can't position the seat properlyanymore.When you move the seat alwaystake care not to move the seat too far tothe back.
HPVelotechnik
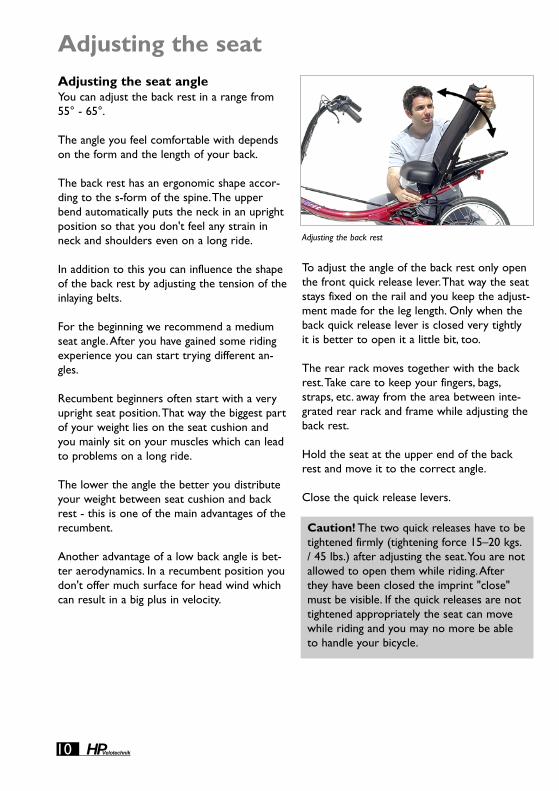
To adjust the angle of the back rest only openthe front quick release lever.That way the seatstays fixed on the rail and you keep the adjust-ment made for the leg length. Only when theback quick release lever is closed very tightlyit is better to open it a little bit, too.
The rear rack moves together with the backrest.Take care to keep your fingers, bags,straps, etc. away from the area between inte-grated rear rack and frame while adjusting theback rest.
Hold the seat at the upper end of the backrest and move it to the correct angle.
Close the quick release levers.
10
Adjusting the seat angleYou can adjust the back rest in a range from55° - 65°.
The angle you feel comfortable with dependson the form and the length of your back.
The back rest has an ergonomic shape accor-ding to the s-form of the spine.The upperbend automatically puts the neck in an uprightposition so that you don't feel any strain inneck and shoulders even on a long ride.
In addition to this you can influence the shapeof the back rest by adjusting the tension of theinlaying belts.
For the beginning we recommend a mediumseat angle.After you have gained some ridingexperience you can start trying different an-gles.
Recumbent beginners often start with a veryupright seat position.That way the biggest partof your weight lies on the seat cushion andyou mainly sit on your muscles which can leadto problems on a long ride.
The lower the angle the better you distributeyour weight between seat cushion and backrest - this is one of the main advantages of therecumbent.
Another advantage of a low back angle is bet-ter aerodynamics. In a recumbent position youdon't offer much surface for head wind whichcan result in a big plus in velocity.
Adjusting the seat
Caution! The two quick releases have to betightened firmly (tightening force 15–20 kgs./ 45 lbs.) after adjusting the seat.You are notallowed to open them while riding.Afterthey have been closed the imprint "close"must be visible. If the quick releases are nottightened appropriately the seat can movewhile riding and you may no more be ableto handle your bicycle.
Adjusting the back rest

Adj
usti
ng y
our
new
bik
e
HPVelotechnik 11
Adjusting the seat cushionThe angle of the seat cushion has an immedia-te effect on your riding comfort.
The steeper you adjust the cushion, i.e. thehigher the position of the front part, the morecontact the cushion has with your thighs.Thatway you distribute your weight onto a biggersurface.The feeling of being "in the seat inste-ad of on the seat" is something which mostpeople find very comfortable.
However, if the angle of the cushion is toosteep it may pinch a little bit while pedaling.When you lower the front part a little bit it isalso more comfortable for smaller riders torest their feet on the ground during a stop.
In case the angle of the cushion is too flat youmay have sometimes the impression that youglide off the seat to the front.
You will find the most comfortable seating po-sition when you try different combinations ofthe angle of the cushion with its horizontal po-sition, as described in the following.
To adjust the angle of the back rest only openthe front quick release lever.That way the seatstays fix on the rail and you keep the adjust-ment made for the leg length. Only when theback quick release lever is closed very tightlyis it better to open it a little bit, too.
Hold the seat at the upper end of the backrest with one hand.That way you keep thecorrect seat back angle.
With the other hand you hold the front partof the seat cushion and move it up or down tothe correct angle.
Take care not to get caught in the movingparts with your fingers or your clothing.
Close the quick release levers.
The angle of both seat cushion and back restis fixed by friction between quick release leverand seat fitting.
Always take care that the two grooved was-hers at the front quick release lever are loca-ted between quick release and seat fitting.
Schwenken des Sitzlkissens
Caution! The two quick releases have to betightened firmly (tightening force 15–20 kgs./ 45 lbs.) after adjusting the seat.You are notallowed to open them while riding.Afterthey have been closed the imprint "close"must be visible. If the quick releases are nottightened appropriately the seat can movewhile riding and you may no more be ableto handle your bicycle.

HPVelotechnik12
Adjusting the horizontal seat cus-hion positionThe seat is bolted to the fittings in long holes.That way you can adjust the horizontal seatposition individually.
The more you move the cushion to the frontthe bigger the seating area, which distributesyour weight evenly.
However, if the cushion is too far towards thefront you may feel a gap between seat andback rest.
Also, the further the cushion is at the frontthe bigger is the feeling of being pinched at thefront part of the cushion, also see page 11 forreference.
We recommend to start with a middle posi-tion and to change it only when necessary.
At the bottom of the seat there are four hex-headed screws. Undo the screws with an Allenkey SW 4 by several turns.
Tighten the screws with 4-6 Nm.
Adjusting the seat
You can move the seat cushion back or forth after you have un-done the four allen key screws.

Adj
usti
ng y
our
new
bik
e
HPVelotechnik 13
Adjusting the heightThe handlebars of the Spirit are held by a tele-scopic stem that is vertically adjustable.
The height of the handlebars determines thedistance to your knees and the maximum pos-sible cramping of the front wheel.
Before you adjust the height and the angle ofthe handlebars please make sure that the seatof your Spirit is well adjusted to your leglength, see page 8.
When you have little experience with recum-bents, we recommend you to choose a highposition for the handlebars, so that you havethe biggest possible moving range for yourlegs.
After you have gained some riding experienceyou can lower the handlebars.The lower thehandlebars the sooner your knees touch themwhile riding in a curve.
A low position of the handlebars permits a re-laxed position for your arms and a good viewto the front.
The handlebar stem consists of two parts.Theupper part is connected with the handlebarsand you slide it telescopically into the lowerpart.
The lower part has two clamping connectionswhere the tube is slotted, and they are con-nected with a clamping screw.Those connec-tions are in particular the connection to theupper part of the stem and the connectionstem/fork at the lower end of the tube.
You adjust the height of the handlebars at theclamping at the upper end of the lower part ofthe stem.
Adjusting the handlebars
You can adjust the height of the handlebars by undoing theclamping screw.
Danger! Every time you undo one of theclamping connections you have to check theclamping screw.You also have to check thewelded-on thread nut.The thread must notbe damaged and the screw must turn easily.Once a year you have to dismount thescrew completely and check it. In case of da-mage or deformation you have to changethe clamping screw immediately.When yourefit the screw, it has to be lubricated care-fully and tightened with the required tighte-ning torque (see table on page 55).
In case you tighten the screws too much theclamping may deform and break.When youbend the screws while tightening they maybreak and the clamping can loosen.Whenyou tighten the screws with an insufficienttightening torque, the clamping does not re-ach the necessary strength and this can re-sult in a twisting of the handlebars or thestem while riding.All these assembly errorscan lead to dangerous falls!

HPVelotechnik
The cables are secured in their guides withplastic clips.Alternatively, you can fasten thecables with cable ties that you put through thecut in the guide.
Adjusting the angle of the foldablestemAs an option, the Spirit can be equipped withthe foldable Glideflex stem from Terracycle.
Angle adjustment of the folding stemThe Glideflex unit is equipped with a backstopadjustment screw close to the pivot axle.Toadjust the backstop, fold the stem forward andturn the backstop screw in or out with a 4mm allen wrench.Turning the bolt in (clock-wise) allows the handlebars to fold furtherback; turning the bolt out stops the handlebarsfrom going as far back.
Adjusting the folding frictionTo adjust the folding friction, tighten or loosenthe pivot bolt with a 5 mm allen wrench.Tightening the bolt will increase friction; loos-ening will decrease friction.
The friction adjustment should not need fre-quent readjustment in normal use. Sometimes,rain will cause the friction to drop slightly, butthings should go back to normal when driedout.
14
Loosen the hex-headed screw with an Allenkey SW6 by several turns. Now you can slidethe upper part of the stem up or down.
Secure the front wheel with your legs and turnthe handlebars right-angled to the front wheel.
Tighten the clamping screw with 17-19 Nm.Check the safe clamping by trying to twist thehandlebars against the front wheel.
Take special care that the cable of the frontdisc brakes is not bent or stretched when youcramp the handlebars strongly.
You can make smaller adjustments by movingthe cables in their guides at the frame and thehandlebar, so that there is enough room at allmobile parts.If this proves not to be sufficient you will haveto have your specialist dealer shorten the ca-bles or replace them by longer cables.
Adjusting the handlebars
Danger! Only pull the stem out so far asnot to fall below the minimum insertiondepth of 7 cm (2 3/4"). In no case may thelower end of the inserted tube be visible inthe clamping slot or the mark on the upperstem half be visible above the lower half!When the stem sticks out too far the clam-ping may be damaged or the stem may comeloose while riding, which can result in a dan-gerous fall.
Caution! After you have adjusted the hand-lebar position you also have to adjust thelength of the brake cables and shifter cables.The cables have to run smoothly withoutany sharp turns and they may not be bent orstretched beyond their elastic limit when thehandlebar is at maximum cramping.Also avo-id large arches that could be caught up inother parts.
Caution! Do not turn the screw so far outthat it contacts the top of the stem when itis folded back.The bolt must contact thesloping surface.
Danger! Do not loosen the bolt past theminimum friction point. If you do, retightenthe bolt until you can feel the friction in-crease.The bolt must be secured with Loctite.
Adj
usti
ng y
our
new
bik
e
HPVelotechnik
While riding you should allow your arms torest in a relaxed position on the handlebars.Do not pull on the handlebars. If the handle-bars turn in the stem clamping during the ride,stop immediately and tighten the clampingscrew of the handlebars again.
If the handlebars turn in a stem that is not suf-ficiently clamped, the handlebars or the stemmight be damaged or deformed. In that case asecure clamping can no longer be guaranteed,even with the correct tightening torque, andhandlebars and stem have to be exchanged.
Handlebar gripsThe grips on the handlebar are susceptible towear and tear. Have your grips replaced byyour bike shop once they don't feel comforta-ble anymore.The grips always need to be atta-ched firmly to the handlebar.
15
Adjusting the angle of the handle-barsBy changing the angle of the handlebars youcan adjust the position of the grips to thelength of your upper body and arms.
Most riders are comfortable with a 45° angle,so that the grips are in a lower/inner position.The more you turn the grips down the lessyou can cramp the front wheel, since thehandlebars touch your knees earlier.
In order to change the angle loosen the clam-ping screw of the handlebars at the upper partof the stem a little bit.Turn the handlebars intoyour favorite position. Check that the stemclamps the handlebars precisely in their midd-le.
Tighten the clamping screw with approx. 10-12Nm. Check the correct clamping of the hand-lebars by pulling and turning them. In doing so,they must not move.
Please take care that the clamping area at thestem is free from burrs, so that it does not ha-ve any sharp edges.A sharp edge can cause thehandlebars to break.
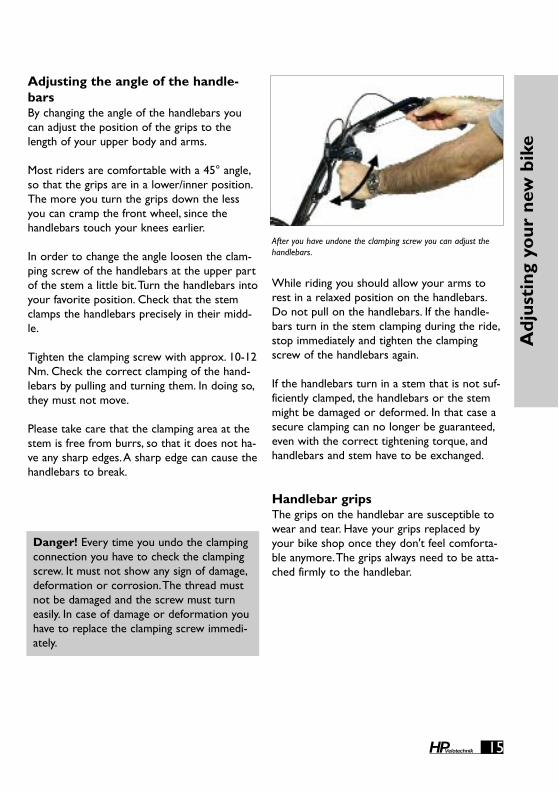
Danger! Every time you undo the clampingconnection you have to check the clampingscrew. It must not show any sign of damage,deformation or corrosion.The thread mustnot be damaged and the screw must turneasily. In case of damage or deformation youhave to replace the clamping screw immedi-ately.
After you have undone the clamping screw you can adjust thehandlebars.

HPVelotechnik16
Purpose of the adjustment of the su-spensionYour Spirit is fitted with a suspension fork forthe front wheel and a rear swing arm for thesuspension of the rear wheel.This systemcompensates slight bumps on the road so thatriding is comfortable and the strain on your bi-cycle is reduced.
A well-adjusted suspension improves the trac-tion of your bicycle on uneven roads.Especially when riding in a bend this allows ahigher speed and also improves the safety.
In order to achieve maximum riding comfort,the suspension settings have to match yourweight as well as the road condition.
The goals of the adjustment are:
● maximum use of the available suspension travel without the suspension frequently bottoming out
● quick reaction of the suspension without obvious oscillation after having passed a bump
● avoiding self enforcing oscillations, that meansincreasing oscillations of the suspension system due to pedaling influence, rhythmic body movements or permanent wavy under-ground
Suspension and dampingThe suspension systems of the suspension forkand the rear swing arm are fitted with the ac-tual springs and dampers which are mountedseparately. Often, the terms suspension anddamping are used inappropriately in everydaylanguage.
The spring is the elastic element that com-presses and decompresses through the loadwhich occurs on bumpy roads.While decom-pressing the spring releases the same energy ithas saved during compression.
The Spirit is fitted with coil springs of steel atthe suspension fork and the rear fork swingingarm.
The damper slows down the process of com-pression and decompression.That means thatthe bicycle after having passed a bump doesnot immediately "spring" back to the initial po-sition or even further than that.The damperconverts spring energy into friction and finallyinto heat, and thus takes away energy from thesuspension system.That way the damper pre-vents that the spring swings uncontrolled afteran initial stimulation. In addition, the damperhelps to avoid self inforcing oscillations of thesuspension that may be caused by reoccurringstimulations like pedaling forces within a crankrevolution or the rhythmic up and down mo-vement of the legs.
The suspension fork of the Spirit works with amechanical friction damping.The rear suspen-sion element has a hydraulic damping cartridgewith a specific damping rate.
Adjusting the suspension

Adj
usti
ng y
our
new
bik
e
HPVelotechnik
Adjusting to loadThe luggage carriers of the Spirit are mountedto the suspended part of the frame.That wayyour luggage is also fully suspended and it spa-res the material. Most notably, even under hea-vy load the suspension will compensate an un-even road much better and quicker comparedto a design where the luggage carrier wouldbe mounted to the unsuspended parts, e.g. therear swing arm.
Additional luggage changes the load of thewheels and their suspension.The suspensionsare more compressed through the load.Thatway, there is less suspension travel for bumpswhile riding.Your suspension could seize upmore often.
The suspension of the front wheel is less affec-ted since luggage at the rear rack almost onlyputs weight on the rear wheel.
The distribution of the load also differs with achange of the seat position.The more you mo-ve the seat to tha back the more you have toincrease the spring stiffness.
In order to compensate the variations in theload you can change the pre-load.
This can compensate for a load of approx. 10kg (23 lbs.) at the rear wheel. In case of highervariations in the load you would have to ex-change the spring for another spring with an-other spring stiffness.
17
You can ride the Spirit with a considerably lo-wer damping than for example a MTB: due tothe relaxed and steady position of the body,the recumbent does not experience extremevariations in the load as it is known from thedancing on the pedals while riding uphill on amountain bike.
In addition to this, varying pedaling forces havevery little influence on the suspension of thebicycle due to the No Squat design of the su-spension system of the Spirit.
It is necessary to choose the correct springstiffness to have a well operating suspensionsystem.The spring stiffness is a measure forthe compression of a spring at a certain load.It is either given in "N/mm" (Newton perMillimeters) or "lbs/inch" (Pounds per Inch).Sometimes you only find "lbs." printed on thesprings.
The suspension is designed in a way that thespring compresses considerably when youmount your bicycle.This is called negative su-spension travel and it enables the bicycle todecompress on bumpy roads.You should choo-se a spring stiffness with which this negativesuspension travel takes up around 20-30% ofthe overall suspension travel.This value usuallyprovides a very comfortable ride on your fullysuspended recumbent bike designed by HPVELOTECHNIK.
HPVelotechnik
You will get this value by adjusting the pre-lo-ad, provided you have roughly chosen the cor-rect spring stiffness (see page 19).
It is not important to exactly follow the re-commended values for the negative travel, rat-her follow your feeling how the bicycle beha-ves during a ride, depending on the road situa-tion and your speed.While riding you shouldonly seldom feel the suspension bottomingout. However, in case this never occurs, thespring might be too hard, which means youdon't use the total suspension travel.
18
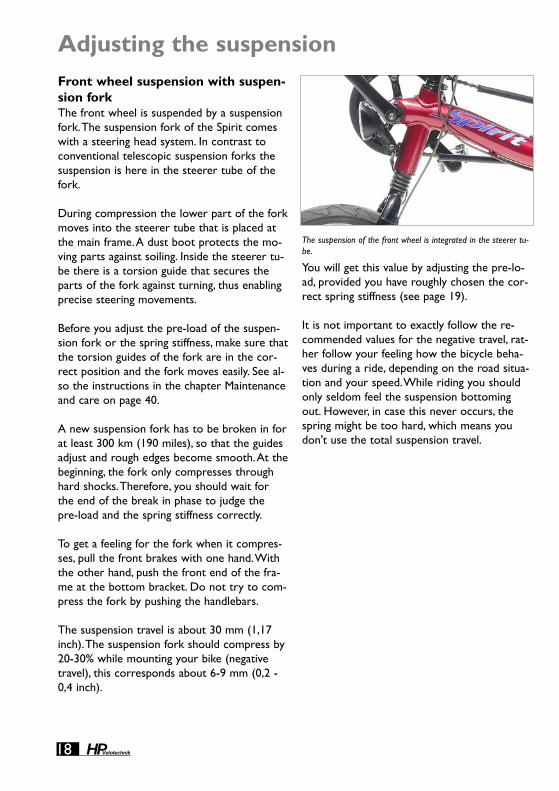
Adjusting the suspensionFront wheel suspension with suspen-sion forkThe front wheel is suspended by a suspensionfork.The suspension fork of the Spirit comeswith a steering head system. In contrast toconventional telescopic suspension forks thesuspension is here in the steerer tube of thefork.
During compression the lower part of the forkmoves into the steerer tube that is placed atthe main frame.A dust boot protects the mo-ving parts against soiling. Inside the steerer tu-be there is a torsion guide that secures theparts of the fork against turning, thus enablingprecise steering movements.
Before you adjust the pre-load of the suspen-sion fork or the spring stiffness, make sure thatthe torsion guides of the fork are in the cor-rect position and the fork moves easily. See al-so the instructions in the chapter Maintenanceand care on page 40.
A new suspension fork has to be broken in forat least 300 km (190 miles), so that the guidesadjust and rough edges become smooth.At thebeginning, the fork only compresses throughhard shocks.Therefore, you should wait forthe end of the break in phase to judge thepre-load and the spring stiffness correctly.
To get a feeling for the fork when it compres-ses, pull the front brakes with one hand.Withthe other hand, push the front end of the fra-me at the bottom bracket. Do not try to com-press the fork by pushing the handlebars.
The suspension travel is about 30 mm (1,17inch).The suspension fork should compress by20-30% while mounting your bike (negativetravel), this corresponds about 6-9 mm (0,2 -0,4 inch).
The suspension of the front wheel is integrated in the steerer tu-be.
Adj
usti
ng y
our
new
bik
e
HPVelotechnik 19
You reduce the pre-load by loosening thescrew anti-clockwise.
The spring must always have a low pre-load.The adjustment screw must at least be tighte-ned by 12 turns in the steerer tube.Accordingly, there has to be a minimum distan-ce of 7 mm (inch?) between the end of thesteerer tube and the upper side of the adjust-ment screw.When you suddenly feel a strong resistancewhile turning the screw into the tube, you ha-ve reached the maximum depth. In that case,undo the screw by one turn.
If the screw does not turn easily undo it ent-irely. Clean the threads, grease the screw light-ly and turn it again into the tube as describedabove.
Remount the handlebar stem on the steerertube. Secure the front wheel with your legsand adjust the handlebar right-angled to thefront wheel. Check the safe clamping by tryingto twist the handlebars against the frontwheel.
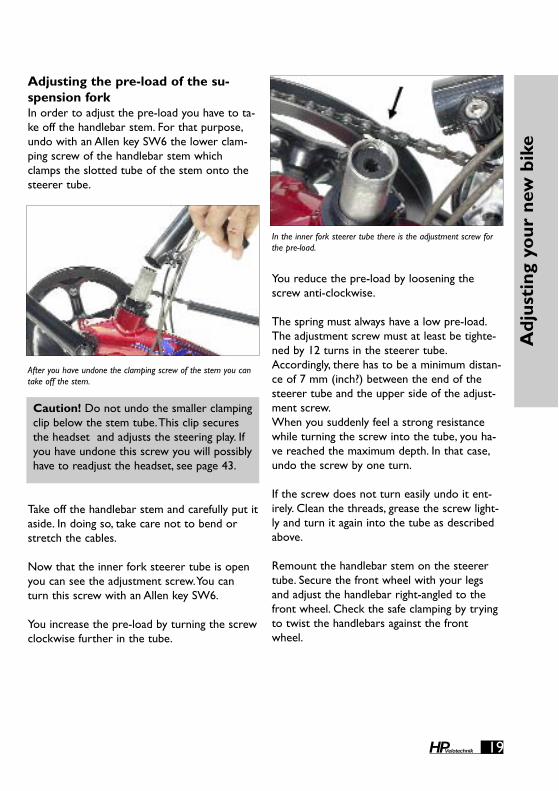
Adjusting the pre-load of the su-spension forkIn order to adjust the pre-load you have to ta-ke off the handlebar stem. For that purpose,undo with an Allen key SW6 the lower clam-ping screw of the handlebar stem whichclamps the slotted tube of the stem onto thesteerer tube.
Take off the handlebar stem and carefully put itaside. In doing so, take care not to bend orstretch the cables.
Now that the inner fork steerer tube is openyou can see the adjustment screw.You canturn this screw with an Allen key SW6.
You increase the pre-load by turning the screwclockwise further in the tube.
Caution! Do not undo the smaller clampingclip below the stem tube.This clip securesthe headset and adjusts the steering play. Ifyou have undone this screw you will possiblyhave to readjust the headset, see page 43.
After you have undone the clamping screw of the stem you cantake off the stem.
In the inner fork steerer tube there is the adjustment screw forthe pre-load.
HPVelotechnik20
Exchanging springs of the suspensionforkYour suspension fork comes by default withtwo standard (green) springs that cover a widerange of load and riding styles.
If the spring stiffness should not meet your re-quirements by adjusting the pre-load or if thesuspension bottoms out too much, you can or-der one or two springs with another springstiffness through your dealer and have themmounted there.
There are two spring stiffnesses for the Spiritsuspension fork:
green = standardyellow = hard
The length is approx. 46 +/- 2 mm (1,8 +/- 0,1inch) per spring.
You can also mount a combination of differentsprings. If, for example, the standard middlesprings are too hard for you, exchange at firstonly one middle spring for a soft spring.
Adjust the pre-load as described above and sofind step by step the spring tuning of your forkthat you are the most comfortable with.
In order to exchange the springs, remove thehandlebar stem as described above under"Adjusting the pre-load of the suspension fork"on page 19.
Undo the adjustment screw completely withan Allen key SW6.
Push the front end of the frame down to pushthe fork completely together.
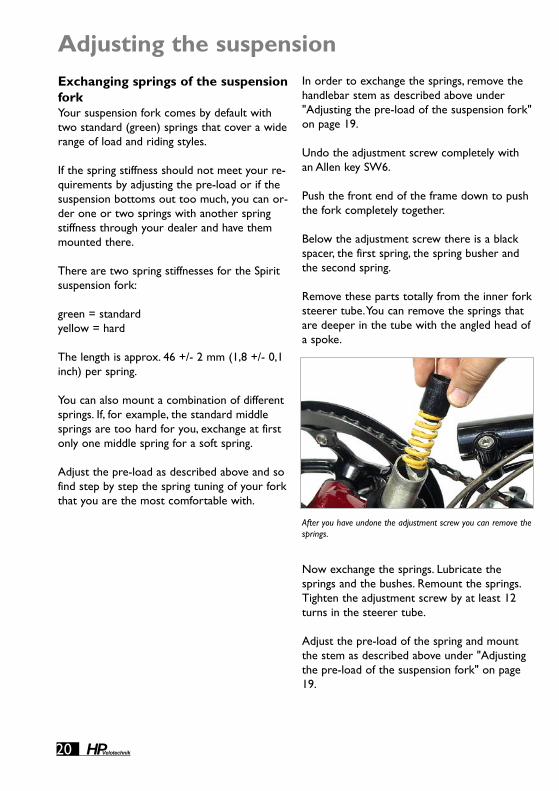
Below the adjustment screw there is a blackspacer, the first spring, the spring busher andthe second spring.
Remove these parts totally from the inner forksteerer tube.You can remove the springs thatare deeper in the tube with the angled head ofa spoke.
Now exchange the springs. Lubricate thesprings and the bushes. Remount the springs.Tighten the adjustment screw by at least 12turns in the steerer tube.
Adjust the pre-load of the spring and mountthe stem as described above under "Adjustingthe pre-load of the suspension fork" on page19.
Adjusting the suspension
After you have undone the adjustment screw you can remove thesprings.

Adj
usti
ng y
our
new
bik
e
HPVelotechnik 21
Adjusting the rear suspension ele-mentFor the rear suspension of the Spirit a steelspring is combined with a hydraulic dampingunit in a spring element.
The damping results from fluid friction of anoil flow through thin holes of a throttle valvein between two chambers inside the damper.Aslightly noticeable sound that may occur fromthis oil flow is normal.
Due to the fluid friction the spring elementmay heat up, therefore touch the spring ele-ment after a ride only when it has cooled off.
Your Spirit comes standard with a steel springrear shock.As an Option, the air shock DT-SWISS XM-180 can be installed. Please read themanual of the rear shock manufacturer for de-tals.
For the rear wheel the same guidelines as forthe suspension fork are valid: for maximum ri-ding comfort the suspension should compressby about 30% of the total suspension travel(100 mm) while you mount the bicycle in dri-ving position.This corresponds to about 30mm (1 1/5 inch).
For that purpose measure for example the di-stance between the end of the main frame andthe rear wheel while the bike is unloaded aswell as while sitting on the bicycle in riding po-sition.Also take into account possible luggage.
You can affect this negative suspension traveldepending on how much you weigh and howmuch you load your bike either by adjustingthe suspension pre-load for fine tuning or byreplacing the spring with a spring with a diffe-rent stiffness in the rough tuning.
Rear suspension element of the Spirit
Danger! Take care that the rear wheel orthe mudguard or the suspension elementnever hit the frame or the rear rack whilethe suspension is fully compressed.Therefore, relax the spring completely byturning the spring retention disc on thethread of the spring element as far as it willgo. Have a second person mount the bicycleand make the suspension bottom out by lea-ning on the seat or the rear rack.
Danger! While adjusting the rear suspen-sion element never load the bicycle, e.g.through resting on the seat or loading therear rack, when your hands or tools are clo-se to the suspension element. Otherwiseyour hands may get caught and squeezedwhen the suspension compresses.
Danger! The suspension elements are filledwith gas under high pressure. Never try toopen the damper or to remove the screw atthe gas tank. Inside the damper there are nouser serviceable parts. In case of damageyou will have to take the complete suspen-sion element to your dealer.

HPVelotechnik22
Adjusting the pre-load of the rearsuspension element (steel spring)The pre-load determines how far the suspen-sion compresses when you are sitting on thebicycle while standing still.
In order to adjust the suspension pre-loadturn the knobby adjustment ring on the threa-ded part of the suspension element by hand.
Turning the adjustment ring clockwise (lookingat it from behind) reduces the pre-load, tur-ning it anti-clockwise, you screw the adjust-ment ring towards the spring and increase thesuspension pre-load. It is helpful to turn thespring together with the adjustment ring.
The adjustment ring should be turned no mo-re than five turns (measured from the relaxedposition) towards the spring. If the suspensioncompresses still too far even after six turns,the spring is too soft and has to be replacedby a harder spring.A too big pre-load of a toosoft spring does not take advantage of the fullcomfort potential. For instructions on changingthe spring see page 45.
Adjusting the suspension
Turning the adjustment ring for the pre-load..
Danger! The adjustment ring has always tobe screwed so far towards the spring thatthe spring has no play when unloaded.Otherwise the adjustment ring could comeloose through shocks while riding, so thatthe slotted rear spring retention disc comesoff. In that case the suspension element maybe damaged or the rear wheel could hit theframe or rear rack, which may lead to se-rious falls.Always have an initial pre-load by at leasthalf a turn on the spring.
Adj
usti
ng y
our
new
bik
e
HPVelotechnik
Air shock DT.SWISS XM-180This rear shock contains pressurized air in amain („positive“) air chamber as suspensionmedium.Air shocks are lighter than steelspring rear shocks.Another advantage is thatthe spring stiffness can be easily adjusted withan air pump: By increasing the pressure thespring becomes harder.
The valve for the air chamber is located at theback end of the air shock.The valve is protect-ed by a metal valve cap.
To pump up the air shock you need a specialair pump designed for bicycle air shocks. Itmust have a fitting schrader valve adaptor anda pressure indicator.
When attaching or removing the pumpto/from the valve, you will loose some air(about 0,5-1 bar).Take off the pump quickly.
Recommended pressure settings
load pressure – 80 kg (183 lbs) 10,5 bar –100 kg (230 lbs) 11,5 bar –130 kg (286 lbs) 13,0 bar
Maximum allowed pressure is 18 bar.
23
Danger! Take care that the rear wheel ormudguard or suspension element never hitthe frame, seat or rear rack box while thesuspension is fully compressed.
Therefore fully deflate the air shock. Have asecond person mount the bicycle and makethe suspension bottom out by pushing onthe seat or the rear rack.
Adjusting the dampingBy adjusting the damping you can adjust theperformance of the suspension precisely toyour individual riding situation.A rough streetwith many harsh bumps that occur in a row oreven cobblestones needs a low damping ratewhile a road with long stretched bumps thatoccur more regularly needs a stronger damp-ing to achieve a smooth road holding.
Please note that you can seriously spoil theriding comfort through a bad damper setting,especially through unsystematic playing withthe knobs that may result in much to highdamper values. In the worst case the suspen-sion element will neither compress nor de-compress. If you are in doubt please consultyour local dealer.
A good setting for maximum comfort isachieved when the rear wheel decompressescompletely after a shock and then oscillatesonly once. In order to check the adjustmentyou will need a second person that compress-es the suspension by pushing the bicycle downwhile you are sitting on the bicycle in the rid-ing position.The other person can then ob-serve the suspension movements.
In order to adjust the damping during decom-pression, turn the adjustment knob on top ofthe rear end of the suspension element.
If you turn the knob in direction of the „-“ youwill get less damping and thus faster decom-pression.Turning the knob in direction of the„+“ will give you more damping and thus slow-er decompression.
HPVelotechnik24
Learning the new riding techniqueYour new bicycle has been assembled by yourspecialist dealer and adjusted together withyou as described on the previous pages under"Adjusting your new bicycle". Before youmount your bike and take your first ride plea-se make yourself familiar with the instructionson the riding technique and the handling.
To ride this recumbent you will have to makeyourself acquainted with the different ridingposition. Make sure that you and all other fu-ture users of this bicycle will have read thismanual carefully prior to the first ride. If youare in doubt please consult your local dealer.
Before the first ride, the users of this recum-bent have to practice and make themselves fa-miliar with the different handling.We recom-mend to practice riding your Spirit on a quietroad away from traffic. Before you ride the bi-cycle in traffic you must master the handlingcompletely.
Go to a road where you can ride straight ahe-ad without being hindered. Hold your bike atthe handlebar and pull a break.Then mountyour bicycle and lean back. Leave one foot onthe ground and put one on the pedal.Therefore, rotate the crank in the top positionso that you can later pedal with power.
Try to keep your balance in that position.Assure yourself that you can stop wheneveryou want to and hold the bicycle with onefoot on the ground.When you feel safe putpressure on the pedal, loosen the brake, pedalwith a lot of force and immediately put yoursecond foot on the other pedal.
Do not care on which side of pedal you arecurrently pedaling in the beginning. Hold thehandlebar loose but steady. Do not pull at it.Accelerate with a few pedal strokes.Your bicy-cle needs speed to stabilize.
Look ahead in the direction where you wantto ride, not at the handlebar, at your feet orthe front wheel.
In order to stop, brake carefully with both bra-kes until the bicycle has come to a completestop. Only then do you put a foot on theground and keep the balance.
Learning the new riding technique
Danger! Never touch the ground with yourfeet while the bicycle is still moving.The feetcould be caught on the ground and be pulledbackwards which could lead to a serious in-jury.
Danger! With a compact recumbent likethe Spirit it is possible that a foot of the ri-der contacts the front wheel when ridingsharp corners with a pedal in the front posi-tion.You will have to avoid this situation atall times since in extreme situations it maylead to a fall and injuries.
To control the bicycle you will therefore ha-ve to apply the following cornering techni-que: when you ride a curve stretch the legon the outside of the curve, stop pedaling,only then start steering into the curve. Onlywhen you ride straight ahead again may youresume pedaling.

Han
dlin
g in
stru
ctio
ns
HPVelotechnik 25
Wear protective clothingRiding a bicycle is a potentially dangeroussport where accidents can happen even whenyou take care of every safety instruction pres-cribed.
We recommend you to wear an approved bi-cycle helmet. Protect yourself by wearing spe-cial sports clothing that fits tight and is reflec-tive.
When you fall with a recumbent you usuallyland on the side of your hips and your hands.Wearing reinforced cycling shorts and glovesreduces the danger of skin injuries considerab-ly.
Use cleatless pedalsOn request, your Spirit comes with pedals thathave a binding system on one side.
As soon as you are comfortable with ridingyour Spirit you should use those cleatless pe-dals. Due to the rigid connection betweenshoe and pedal you don't have to keep yourfoot on the pedals with pressure anymore.Thisenables a more relaxed and round pedalingmovement where you may even pull a little onthe pedals.Without this connection to the pe-dals your feet may come off suddenly, whichmay result in a fall. Modern system pedals withbinding therefore contribute to safe riding.
A first you will have to practice with these pe-dals to make sure that you can get off quicklyin a dangerous situation. Please note the manu-al of the pedal manufacturer that comes withthe binding system and have your dealer ex-plain the use of the pedals to you. In the begin-ning set the release force of the binding on alow value to make sure you can get off safely.
Please use exclusively the enclosed shoe platesof the binding system manufacturer, do not usepedals from other manufacturers. If you usenon-authorized shoe plates the binding systemcan not operate safely.
Protective clothing, cleatless pedals
Danger! Please note that you may be notbe very late or not at all by other roadusers due to the low seat height and rideanticipatory according to this.This is especi-ally important while riding in darkness.Youyourself have a much better view thanothers perceive you. Ride defensively.We re-commend you to mount a well visible andreflecting flag to the bicycle while using it intraffic. Please ask your dealer for more in-formation.

HPVelotechnik26
Slowly increase the strain We recommend you to perform only short ri-des without much power during the firstweeks.
Always use a low gear and ride with a high pe-daling frequency. Only after having acquired so-me training do increase the strain slowly.
When you ride on a recumbent you use othermuscles than on a conventional bicycle, andthey have to be trained first.
In case of an overload, the blood circulation inyour legs may be affected, which shows in lossof power, a prickling in the toes, falling asleepof the legs or cramps.When you have a sportyway of riding, it can take up to 6 months untilyou have become accustomed to your recum-bent.
Should you have pain in your knees while ri-ding this is usually the result of too much po-wer put into pedaling.The good support of theback sometimes misleads to putting the fullpower of the legs in the pedal, similar to theleg training machines in the fitness center.When you repeat it regularly it is harmful forthe knees. Pain in the knees often results froman overuse of the muscles in the knee that canalso be strengthened through exercise.
Also, a wrong adjustment to the leg length (inmost cases too short) can lead to pain in theknees.You will find many tips on proper trai-ning for cyclists in miscellaneous books andmagazines for cyclists.
Your pedaling cadence should stay between80-100 revolutions per minute and not fall be-low 60 revolutions when going uphill. If neces-sary have your specialist dealer adjust the gearrange to your riding style and the terrain youusually ride.When you have the impression that ridingyour Spirit stresses your stomach musclesconsiderably, please lean consciously back andtake care not to pull on the handlebars.
In case of persistent problems please consultyour doctor.
Do not ride freehand
Strain, Do not ride freehand
Danger! In order to ride safely you have tokeep both hands at the handlebar. Evenwhen signaling keep at least one hand at thehandlebar. Otherwise, unforeseen bumps inthe road or oscillations of the steering maylead to a serious fall.

Han
dlin
g in
stru
ctio
ns
HPVelotechnik 27
Do not pull at the handlebars How to ride correctly and safelyAlways adjust your speed to the traffic, the ro-ad and the weather conditions. Ride slowly incurves and on unknown roads.Always ride at asafe distance from other road users, and whenyou ride in a group never ride side by side.
When you approach a traffic light never ridepast the line of waiting cars, since even themost attentive car driver may not see you dueto your low seating position.
Handlebars, Ride correctly and safely
Caution! Always carry your bicycle overstairs and curbstones. Do not ride throughbig road holes. Especially when road holesare filled with water it is very difficult toguess how deep they really are. In case youhit such an obstacle, frame and fork may bedamaged which can result in a serious fall.Atfirst, the damage may be unnoticed. Pleasecheck your bicycle immediately for deforma-tions and cracks. If you are in doubt pleaseconsult your local dealer.
Caution! Do not pull at the handlebarswith power.They have to be held in a re-laxed position.The handlebars do not havethe task to absorb the pedaling forces, thishappens at the seat. Because of the longstem you exert a big leverage on the stemclamping of the fork when you pull at thehandlebars, and you might damage the fork.A failure of the stem clamping can lead toserious falls.
Prior to each ride, check the stem clampingfor any deformation or damage. In case ofdamage you must not use your bicycle anylonger. Have your dealer exchange the dama-ged stem.
HPVelotechnik28
BrakesThe Spirit is equipped with a powerful high-quality brake system. Please do read the sepa-rate manual from the brake manufacturer thatcomes with your bike for details.
Make yourself familiar with the braking system.Remember which lever pulls the front brakeand which the rear brake.
If the arrangement of the levers does not cor-respond to what you are used to, please have abicycle mechanic change it. Please contact yourbike dealer to find out if there exists any legalrequirement for the arrangement of the brakelevers in your country.
For optimum handling you can adjust the di-stance between the brake grip and the handle-bar with a small hex-headed screw at the grip,please see the respective manual for details.
Note that the rear brake is the most effectivebrake on the Spirit.With the rear brake, youachieve a much higher braking effect than withthe front brake.The front wheel has a tenden-cy to lock up and slip on the pavement evenunder low braking forces.
The braking effect of modern brake systemscan be more powerful than what you havebeen used to until now. Do brake carefully.
Do not brake in a bend, always brake before abend. Braking increases the risk of slipping.
If you should hear any unusual sounds whilebraking or the braking effect is reduced, thebraking pads might be worn. Do not use yourbike any further until you have checked thebraking pads according to the manual of thebrake manufacturer or ask your local dealer.
Brakes
Danger! Please note that the braking di-stance is much longer when it is wet orwhen the bike is heavily loaded.When ridingon wet, sandy, icy or slippery roads you haveto use the front brake very carefully to avoidthat your front wheel slips. If it does so, youwill no longer be able to handle your bike,which might lead to a serious fall.
Danger! In case you get into a situation likethat during an emergency stop you have tolet go of the brakes immediately, balanceyour bicycle and brake again. If you are notfamiliar with the brakes, we recommend youto train at first at low speed and with littlebraking effect until you find the correct dosefor an emergency stop.

Han
dlin
g in
stru
ctio
ns
HPVelotechnik
New brake systems, new brake pads and newbrake discs need a break-in period to achievemaximum brake power.This period lasts forabout 30-40 stops from about 30 km/h(20mph), which should be done in a safe areawithout traffic.
29
Check before every ride:
● that the brake system does not have any damages or leaks by activating the lever, holdingit and checking the hose connections for possible leaks.
● that the brake lever pressure is ok by pullingthe lever and ensuring that full braking performance is achieved before the lever touches the handlebar. If this is not the case, adjust the cable or change the brake pads, for hydraulic disc brakes pull the lever several times (pump) until it feels firm.
● check the hydraulic brake system for the correct pressure by pulling the lever, holdingthe pressure and checking the hose connections, bleeding screw and compensating tankfor possible leaks.
Caution! Disc brakes can overheat on longdownhill rides, fade and fail! Do not pull thebrake levers constantly but brake powerfullyfrom time to time. If you notice that thebraking power starts to fade, do stop imme-diately and let your brakes cool off!
Danger! Never touch neither the brakedisc nor the brake caliper after long brakingas this may cause serious injury (risk ofburns).
Danger! Always make sure that the disc andbrake pads are free of oil and grease. If theseparts are dirty please do not use your bicy-cle any more.You can clean oily brake discswith alcohol or a special spray. Oily brakepads have to be replaced. If you are indoubt, please have your specialist dealermaintain your brake system.
HPVelotechnik30
Gear SystemWith the gear system you can adjust the peda-ling frequency, that means the number of revo-lutions of the crank per minute, to the terrainand the desired speed.
Your pedaling frequency should stay between80-100 revolutions per minute and not fall be-low 60 while going uphill. If necessary consultyour local dealer and have him retrofit the ge-ar range to your style of riding.
Your Spirit comes with DualDrive gear systemby SRAM that combines a 3-gear internal hubgear system with an 8-gear derailleur gear to24 gears in total, which are easy to handle.Asan option, you can order the Spirit with a 14-gear internal hub gear system made byROHLOFF or only a derailleur gear system..Thefollowing section refers to the DualDrive gearsystem only. Please refer to the manual of thegear manufacturer.
With the left-hand twist grip you operate thehub gear system.You can turn the grip in astanding position, and while riding during peda-ling or without.The most comfortable and ea-siest way to shift gears is to shift while peda-ling with reduced power.
According to the terrain choose between theuphill mode "I", standard mode "2" and racingmode "3".We recommend you to ride mostlyin the standard mode since the transmissionoperates then with the least loss.
With the right-hand twist grip you operate thederailleur gear.You may only change the gearswhile you keep pedaling, smoothly and withoutapplying great force, all the time that the chainis moving between the sprockets.
Choose between the easiest gear "I" and theheaviest gear "8".
Due to the long cables that expand underpressure and the housing that compresses un-der pressure, it may be helpful for changing ge-ars quickly to turn the twist grip a little bitfarther than necessary to select a gear andturn it back to the indexed position once thechain has properly shifted ("overshift").
Riding a recumbent requires foresighted gearshifting. Before stopping you should timelychange in a low gear to make it easy to startoff again, without having to pedal heavily strug-gling with your balance.Also while standingyou can still operate the left-hand twist grip tothe uphill mode "I".
In case your gear system does not operatesmoothly anymore or causes noise while peda-ling, please have your gear system adjusted on-ce more according to the instructions on page35.
Gear System
Danger! Do practice shifting gears on atraffic-free street. In the course of this, makeyourself familiar with the functioning of thetwist grip shifters. Doing this in traffic coulddistract your attention from possible dan-gers.

Han
dlin
g in
stru
ctio
ns
HPVelotechnik 31
Light systemIf you want to ride your bike on public streets,it must be equipped with a legal light system.Do not only use your lights in the dark but al-so in the twilight of dusk and dawn. Due tolaws and regulations the brightness of bicyclelights may be considerably lower than that ofother vehicles.Therefore always keep in mindthat other road-users may only see you verylate or not at all.
For the Spirit, HP VELOTECHNIK offers two dif-ferent dynamo light systems: one with a tiredynamo and the other with a hub generator.
Both light systems come with strong LEDs forheadlamp and rear light.The LEDs last consi-derably longer (approx. 100.000 workinghours) than a light bulb. For your safety thelight system has a standlight system at thefront and at the rear light, which makes theLEDs shine a few minutes after you have stop-ped riding.The electronic system is maintenan-ce free. Because of the capacitors used youdon't have to worry about batteries.
The cables and the contacts can be affected bycorrosion or mechanical damage.Therefore,check the light system before every ride.
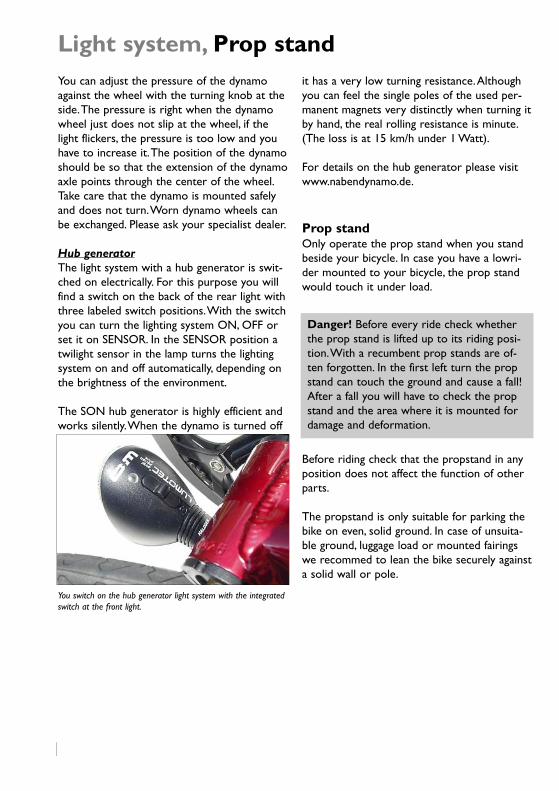
Tire dynamoYou turn on the light system with the tire dy-namo at the rear wheel by unlocking the swi-veling dynamo. For this purpose, you press thered button at the dynamo until it moves to-wards the rear wheel.To turn the light off, youturn the dynamo by hand back to its initial po-sition.
Light system
You switch on the tire dynamo by pressing the red button.Toswitch off the dynamo move it away from the wheel.
Danger! Do not try to operate the dynamolever while riding, your hands could becaught in the wheel and be injured! To turnthe light system on or off stop riding, dis-mount your bicycle and only then do turnthe dynamo lever.Turn the lever carefully wi-thout applying force else you might bend thelever and damage the plastic parts of the dy-namo.
Danger! The dynamo must always be safelyfastened to the bracket at the frame, so thatit can not turn. If the screws comes loosethe dynamo can get caught in the spokesand block the rear wheel - danger of a se-rious fall! Always check the position and se-cure attachment of the dynamo before a ride.
red knob:Push for ON
Turn knob toadjust frictionforce
You can adjust the pressure of the dynamoagainst the wheel with the turning knob at theside.The pressure is right when the dynamowheel just does not slip at the wheel, if thelight flickers, the pressure is too low and youhave to increase it.The position of the dynamoshould be so that the extension of the dynamoaxle points through the center of the wheel.Take care that the dynamo is mounted safelyand does not turn.Worn dynamo wheels canbe exchanged. Please ask your specialist dealer.
Hub generatorThe light system with a hub generator is swit-ched on electrically. For this purpose you willfind a switch on the back of the rear light withthree labeled switch positions.With the switchyou can turn the lighting system ON, OFF orset it on SENSOR. In the SENSOR position atwilight sensor in the lamp turns the lightingsystem on and off automatically, depending onthe brightness of the environment.
The SON hub generator is highly efficient andworks silently.When the dynamo is turned off
it has a very low turning resistance.Althoughyou can feel the single poles of the used per-manent magnets very distinctly when turning itby hand, the real rolling resistance is minute.(The loss is at 15 km/h under 1 Watt).
For details on the hub generator please visitwww.nabendynamo.de.
Prop standOnly operate the prop stand when you standbeside your bicycle. In case you have a lowri-der mounted to your bicycle, the prop standwould touch it under load.
Before riding check that the propstand in anyposition does not affect the function of otherparts.
The propstand is only suitable for parking thebike on even, solid ground. In case of unsuita-ble ground, luggage load or mounted fairingswe recommed to lean the bike securely againsta solid wall or pole.
Light system, Prop stand
You switch on the hub generator light system with the integratedswitch at the front light.
Danger! Before every ride check whetherthe prop stand is lifted up to its riding posi-tion.With a recumbent prop stands are of-ten forgotten. In the first left turn the propstand can touch the ground and cause a fall!After a fall you will have to check the propstand and the area where it is mounted fordamage and deformation.
Mai
nten
ance
and
car
e
HPVelotechnik 33
Maintenance and careYour Spirit is fitted with the latest bicycletechnology that does not require much main-tenance.
However, you will have to maintain your bicy-cle regularly, as it is with other vehicles too.Atleast once a year the bicycle has to be takento a bicycle mechanic for an overall service.Only this way a long lasting and safe functionof all parts of your bicycle can be guaranteed.It maintains the value of your bicycle as well asthe fun and the safety while riding for manyyears.
Read in this chapter how you can carry outsmaller maintenance and care works betweenthe services.
For a quick overview of the works to be donetake a look at the warranty pass on page 58.
Wearing parts
Like every other vehicle the bicycle has partsthat suffer from wear and tear.The life span ofthese parts depends on how often and howthey are used, as well as how they are caredfor. Please note that the wear and tear of cer-tain parts of the bicycle is perfectly normaland not a reason for complaint.This manualcontains information about the most frequentwearing parts.
Maintenance and care, Brakes
Caution! The maintenance works of this re-cumbent partly require special tools andskills. Do only work within your limits and,in the interests of your own safety, do notgo beyond. Should you be uncertain at anypoint, get in contact with your local dealer.
BrakesThe brake pads suffer from wear due to fric-tion and have to be exchanged then. Dependingon riding conditions, they can last bewteen afew hundred up to several thousand kilome-ters. Please read the manual of the brake man-ufacturer carefully.
With rim brakes the rim walls suffer fromwear.When the rims are too worn the tirepressure can tear up the rim and damage thewheel. Please have your bicycle mechanic checkyour rims at the latest after the second brakepad change and exchange them if necessary.
cable operated (mechanical) brakesThe brake pads of your brakes are worn whenyou can pull the lever further and further tothe handlebar before the pads touch the rim.Rim brakes:When the pads are so worn thatyou can't see the cross grooves of the padanymore you will have your bicycle mechanicexchange the brake pads.
To balance the wear of the brake pads you cantighten the cable with the adjuster barrelwhere the cable goes into the brake lever. Firstloosen the locknut, then undo the screw so farthat the wheel turns, barely not touching thepads, hold the screw and tighten the locknutagain towards the brake lever.Take care thatthe slot of the adjuster points down so thatno moisture enters from above or the front.
Caution! Damaged cables where singlewires stick out have to be exchanged imme-diately. Otherwise your brake system mayfail - danger! Please take care that the cableends are always protected with a cap.Always keep the cables shortly trimmed.Leaving too much cable extending past thecable anchor can result in the cable catchingin the rotor or wheel, which could then bepulled in the calliper, causing the wheel tolock up.
HPVelotechnik34
Brakesmechanical disc brakesIf the brake pads are worn so far that tighten-ing the cable tension is not sufficient, you canre-align the brake calliper in the slotted holesand adjust the inner brake pad with the hexbolt at the hub side of the brake calliper. Havethis adjustment work done by a qualified bikemechanic.
CHeck your brake pads frequently as ex-plained in the manual supplied by the brakemanufacturer.Worn brake pads, oily od dam-aged pads must be exchanged immediately bya qualified bike mechanic.
Hydraulic brakesMAGURA hydraulic brakes use low viscositymineral oil that, contrary to DOT brake liquidused in cars, does not absorb water.Thus, youdon't have to change the oil. Please read theMAGURA manual that comes with the bike.Youwill find more detailed maintenance instruc-tions in the manual "Workshop" that is avail-able for download from MAGURA atwww.magura.com. In case of a damaged hoseor any leakage of oil always consult a qualifiedtechnician in a bike shop.
hydraulic rim brakesTo balance the wear of the brake pads there isa turning knob at the brake lever.Turn thisknob anti clockwise to move the pads closerto the rim.As soon as the knob doesn't turnanymore the brake pads have to be exchanged.Before you change the pads turn the knobclockwise as far as it will go, back to the initialposition.
hydraulic disc brakesMAGURA disc brakes feature a fully automaticpad wear adjustment. Brake pads are subjectto wear, therefore regularly check the thick-ness of your brake pads and replace them, ifnecessary. The minimum thickness of thebrake pad incl. metal backing is 2.5 mm.
Caution! Never activate the lever bladewithout the brake pads in place and with thewheel dismounted.When you transport thebicycle without wheels always use the trans-port clips delivered with your bike or put apiece of cardboard in the brake calliper toreplace the disc. Carefully separate brakepads that have moved together with ascrewdriver.
Danger! All maintenance work on the hy-draulic system of your brakes may only becarried out by a qualified technician. In casethese works are carried out without the re-quired knowledge and skills the brake sys-tem might fail which can lead to a seriouscrash.

Mai
nten
ance
and
car
e
HPVelotechnik
Adjusting the gear indexing for theDualDrive hub gearTurn the left twist grip for the hub gear to thestandard mode "2".
At the right side at the rear axle there is theclick box for the hub gear. In the transparentwindow you see a yellow indicator.Adjust thisindicator in line with the mark at the click boxby turning the adjustment screw where the ca-ble goes into the box.
All moving parts of the gear system are affec-ted by wear. Cleaning and lubricating theseparts frequently can prolong the life of theseparts, however they will have to be replacedonce worn out.
The cables have to be checked, cleaned andserviced regularly. Expect more wear and cor-rosion when the bike is often parked outsidein bad weather conditions.
35
Gear systemPlease read the manual of the gear system ma-nufacturer carefully when you want to workon it.
Your dealer will have carefully adjusted yourderailleur gearing system before handing overthe bike. But during the first 300 kilometers(186 miles) of riding, the gear cables canstretch, making the gear indexing imprecise.The chain then climbs only hesitantly onto thenext sprocket.
Adjusting the gear indexing for the derail-leur gearAdjust the barrel adjuster where the gear ca-ble goes into right twist grip or the derailleur.Do it in small steps of half a turn.
Check after each adjustment whether thechain moves smoothly up to the next largersprocket.To do this, either turn the cranks byhand or ride the bike.
When the chain climbs up easily, you need tocheck that it still goes down easily onto thesmallest sprocket. If necessary turn the barreladjuster a little more and then try shifting ge-ars again.
Gear system
Danger! If the chain shifts over the smallestor the biggest sprocket you have to readjustthe end-limit adjusters of the rear or thefront derailleur. Incorrect adjustment can le-ad to the chain coming off, getting stuck ordamaging the spokes, which may result in se-rious falls.The adjustment of the end-limitadjusters is a job for the professional cyclemechanic.
Danger! If the bike falls over, the derailleuror its mounting can be bent so that the mo-vement of the derailleur changes. Check themovement and have it readjusted by your bi-cycle mechanic, if necessary.
Caution! Damaged cables that show forexample single wires have to be changedimmediately. Otherwise they may damageyour gear system.Take care that the endsof the cables are protected with fittingcaps.

HPVelotechnik36
ChainThe chain is a wearing part that has to be lu-bricated regularly and to be changed at signsof excessive wear and tear.
Lubricating the chainDiligent lubrication is important.The chain ofyour Spirit is approximately 2.5 times longerthan a standard bicycle chain (approx. 2.9 m,119 inch). But it also lasts longer since a chainonly wears while bending at the sprockets andthe chain rings.
Use a good chain oil that won't leave a stickyfilm on the chain.The chain oil must not con-tain any aggressive chemical substances thatmight affect the surface of the chain tube.
Specialist stores sell biodegradable lubricants.HP VELOTECHNIK solely recommendsProfiDryLube.This lubricant is purely based onPTFE (Teflon) that keeps the chain clean anddry.This way dirt simply falls off and the tubesalways stay clean.Your dealer can obtain itfrom HP VELOTECHNIK.
It is important that you clean the chain with anoily cloth before lubricating. Otherwise thefresh oil washes the dirt that clings to thechain into the gaps and the bushings where thedirt causes heavy wear.
Do not use any solvents to clean the chain!The solvent washes the oil off the bearingparts, stays there and dilutes the fresh oil sothat a sufficient lubrication is not guaranteed. Ifyou have treated the chain with a solvent youwill have to heat it up with a hot air torch orboil it in chain grease.
An effective protection against corrosion iscritical for a long chain life. Some minutes afteryou have oiled the chain rub it with a cloth toremove superfluous oil from the outer surface.Wax the chain thoroughly with a wax spray.The wax keeps off water, protects from corro-sion and makes dirt fall off easily.
If the chain has become wet after riding in therain you should put your bicycle in a dry andheated room, and every day you should turnthe crank and so move the chain until it is dryagain. Otherwise it is difficult for the moisturein the tubes to evaporate which may lead tocorrosion at the chain.
Chain
Danger! Take care not to pour any oil onthe brake discs or the tires.The brake sy-stem could fail or the tires could slip awaysuddenly.The oil affects the rubber of yourtires and could damage them.While lubrica-ting cover the surrounding area with an oldnewspaper.

Mai
nten
ance
and
car
e
HPVelotechnik 37
Changing the chainThe chain is one of the parts of the bike thatwill wear out.This shows in a stretching of thechain.Worn out chains do not fit the sprocketsand the chain ring anymore and wear themaway very quickly.
Check the chain regularly for lengthening. Forthis purpose try to remove the chain from thechain ring.The chain may come off to a maxi-mum of 5 mm (0,2 inch). For a more precisereading you can buy a chain measurement gau-ge in your bike shop that you simply put intothe chain.
Only use chains that are suitable for the gearsystem of your bike. Otherwise a precise gearshifting is not guaranteed any more. Pleaseconsult your dealer on this topic. He will alsoassist you in checking your sprockets and chainrings.A new chain does not fit a worn sprok-ket or chain ring.We recommend chains fromSRAM (formerSACHS/SEDIS) with rounded edges.They alsoshift gears very well.
HP VELOTECHNIK delivers spare chains by themeter via your dealer. For this purpose pleaseindicate the exact length of your chain or or-der it a little bit longer if you want to be sureit fits.You will need approx. 1,9 m (119 inch) ofchain.
The chain length has to be fitted so that thearm of the derailleur is not fully stretchedwhen you shift onto the the big rear sprocket.The derailleur must be able to compensate atightening of the chain by 4 cm. Please see alsothe manual of the derailleur manufacturer onthe choice of the correct chain length.
See that the joining link is not bigger in sizethan the other chain links to avoid irregularchain sounds.We recommend the joining linksby SRAM (power links). Every time you changethe chain you also have to mount a new po-wer link.
Caution! When you change the chain takecare that the new chain does not show anysharp edges or burrs.Very thin racing chainsare also not suitable since they wear thechain tubes and the chain roller much faster.
Caution! The chain has to be closed with aspecial joining link or a chain riveting toolthat expands the ends of the rivet while ri-veting (ROHLOFF revolver).A poorly joinedchain may break, you can come off the pe-dals and fall. If you are in doubt please haveadjustments of the chain length or the chan-ging of the chain be done by your bicyclemechanic.

HPVelotechnik38
Chain tubesThe chain protection tubes are made of a longlasting plastic that features very low friction,slow wear and good noise damping.The tubesprotect your clothes against the chain oil aswell as the chain against dirt from the road.
The tubes are attached to the frame with aflexible belt an zip-ties.
The tubes are worn by the chain and have tobe cut at the ends and expanded again (or ex-changed) after 3.000-5.000 km (1600-2700 mi-les) approximately, depending on how many ki-lometers have been ridden, on the chain typeand the overall riding condition.You can ex-tend this maintenance interval by turning thetubes by a quarter turn from time to time sothat they do not keep wearing out in the sameplace.
The intensity of the wear depends mainly onthe chain type. Please see also the instructionson "Chain" on page 36.
In order to perform any work at the chain tu-be you'll have to open the chain and finally clo-se it again. Please see the instructions on"Chain" on page 36.
Expanding the tube endsThe ends of the tubes are expanded like atrumpet so that the chain can enter smoothlywithout friction and without making noises.
When the ends are worn out you can renewthem through expansion. Remove the chain byopening the power link or open it with a spe-cial chain riveting tool. Cut the worn part ofthe tube exactly perpendicular with a sharpknife.
Heat the last 5-10 mm (0,2-0,4 inch) at theend of the tube with a gas burner or a candleand turn it permanently until the color of theutmost edge turns from a dull black to a shinyblack. Now you expand the end with a propertool, e.g. the grip of a screwdriver. Quench theexpanded end immediately with cold water.
Take care that the tubes don't catch fire.At any rate, work in a place with sufficientventilation.
If the tube is too short after you have cut it sothat there is not enough protection anymore ithas to be replaced.You can buy spare tubeseither as uncut tubes or already cut into thecorrect length, complete with retention springfrom your specialist dealer.
Chain tubes
Caution! Take care that the chain tubeskeep at least a 5 cm (2 inch) distance to therear and front derailleur when the chain isstretched to the maximum, and that the tu-bes are well fastened. If necessary you willhave to shorten the tubes. If the end of achain tube gets into the rotating drive trainit can be blocked and the chain tubes maybe destroyed.

Mai
nten
ance
and
car
e
HPVelotechnik 39
Changing single tubesOpen the chain as described above and remo-ve it entirely from the tube you want to chan-ge.
Use a side cutter or sharp knife to cut the ca-ble tie that holds the tube in the belt. Removethe old tube from the belt loop.
Put the new tube through the belt loop. Put acable tie through the ring in the belt andaround the tube so that the lock of the cabletie lies hidden in the belt. Move the cable tieso that there are at least 5 cm to both the big-gest rear sprocket and the chain blade coverat the front.Tighten the cable tie firmly andcut off the spare end.
Thread the chain again through the tube.Takecare not to twist the chain. Close the chainagain as described above.

HPVelotechnik40
Suspension ForkPlease clean the dust boot and the tube belowevery four weeks. Lubricate the free part ofthe slider tube after cleaning.Take care thatthe dust boot fits well. Otherwise, dirt and wa-ter can lead to corrosion.
Always check the correct position of brakesand wheels after you have worked on the su-spension fork as described in the respectivechapters.
The inner fork steerer tube is tightly fitted andglued in the fork crown, never try to tear thisconnection apart or to change the tube.
Never add threads to the steerer tube - dan-ger of breaking! You can only use the fork withA-Head type headsets.
A new suspension fork needs a break-in phaseof at least 300 km (160 miles) for theslidingsurfaces to smoothen. At the beginning, thesuspension compresses only under heavyshocks. In order to judge the response or theplay properly you should first wait for the endof the break-in phase.
After 1000 km (550 miles), at the latest after ayear, depending on what occurs first, you haveto lubricate the suspension fork.
In case the fork shows play, it can be adjusted.
Please ask your local dealer for assistance.
lubricating the suspension fork FedergabelDismount the stem, remove the adjustmentscrew and the springs as described under"Exchanging the spring of the suspension fork"on page 20.You don't have to dismount theheadset.
Compress the fork entirely.
Now undo the screw with a long Allen keySW4.
Pull the lower part of the fork out of the fra-me. Remove the screw with the two washersand the O-ring below upwards.
Suspension Fork
Undoing the screw in the steerer tube.
Remove the lower part of the fork downwards.

Mai
nten
ance
and
car
e
HPVelotechnik 41
Clean the slide tube, the safety bolt againsttwisting and the inner part of the steerer tubewith a soft cloth.
Lubricate the slide tube, the safety bolt againsttwisting and the inner part of the steerer tubewith a good, acid-free grease.We recommenda lubricant with added solid particles likeTeflon.
Carefully reinsert the lower part of the fork inthe steerer tube.Take care not to cant thefork and to insert the safety bolt against twi-sting carefully in its guide.
Put the O-ring from above on the upperround part of the safety bolt.Then insert thescrew with the two washers in the steerer tu-be and tighten it with 5.5 Nm.
Clean the springs, the spring bush and the spa-cer. Slightly grease the springs and the bushes.
Mount the adjustment screw with at least 12turns.Adjust the pre-load and mount the stemas described under "Adjusting the pre-load ofthe suspension fork" on page 19.
Adjusting the steering playAt the suspension fork of the Spirit the stee-ring movement is transmitted via the safetybolt against twisting at the steerer tube to thelower part of the fork and so to the frontwheel.
The transmission should happen without noti-ceable play, at the same time the fork shouldcompress slightly under shocks.
You can check this steering play by holding thefront wheel. If the handlebars move without re-sistance the play has to be reduced by adjustingthe torsion guides.
In order to adjust the play you have to dis-mount the fork from the frame.
For that purpose, you have to dismount thestem. Remove the clamping clip above the he-adset and then remove the headset.That way,you can pull the entire fork together with thesteerer tube out of the frame.Take care not tobend any cables.
Undo the two safety screws and the adjust-ment screw by 1.5 turns.
In the middle of the steerer tube there is a bigger safety screwand a smaller adjustment screw, facing each other.

HPVelotechnik42
Play in direction of travelIf you notice at your bicycle that the handle-bar-fork-unity has play in the direction of tra-vel, this may have several causes.
First please check if the headset is mountedcorrectly and adjusted without play. Please alsosee the instructions on page 43 for that.
When you pull the front brake and rock thebicycle a little bit back and forth while sittingon it you may notice a play in the disc brakesystem.
The brake pads have a small play in their gui-des that gives a jolt while rocking. In any casecheck whether the caliper is tightly and cor-rectly screwed to the frame and whether thebrake disk is tightly connected to the hub.
The suspension fork itself also has a slight nor-mal play in the direction of travel that you'llnotice while rocking back and forth with thefront brake pulled. Similar to conventional tele-scopic forks this is immanent in the construc-tion and does not cause problems while riding.
The bushing (as well as the springs) suffersfrom wear which depends on the frequency ofuse, dirt and lubrication.
If the bushing is so worn that the play makesthe steering movements unprecise or produ-ces unusual noise, the fork or maybe only theplain bushing has to be exchanged. Please con-tact your dealer for this service.
Suspension ForkPress the fork together and try whether itcompresses easily. If this is not the case, youhave to clean the fork and lubricate as descri-bed on page 40.
Tighten both adjustment screws with 1 Nm. Itis important that you tighten both screwsevenly.
Tighten the two safety screws with 2 Nm.Werecommend to fasten the screws in additionwith LOCTITE.
Check whether the fork compresses easily. Ifnot the adjustment screws have been fastenedtoo tight or unevenly.
Wrap a cloth around the steerer tube and ca-refully clamp it in a workbench. Check the playby turning the lower part of the fork back andforth.
If the fork has still play adjust the screws againand tighten them evenly a little more.
If the fork shows no play you can remount itto the frame. Clean, lubricate and mount theheadset. Put the clamping clip on the steerertube above the headset.Adjust the headset asdescribed on page 43.
Remount the stem to the steerer tube. Keepthe front wheel with your legs in place and ad-just the handlebars right-angled to the frontwheel.Adjust the clamping screw with 18-20Nm. Check the clamping by trying to twist thehandlebars against the front wheel.

Mai
nten
ance
and
car
e
HPVelotechnik 43
Headset
Undo the screw of the clamping clip by one ortwo turns.
Carefully turn the end cap with an Allen keySW8 a little bit.
In order to check whether everything workssmoothly lift the bicycle at the frame so thatthe front wheel moves freely above theground. Lean the frame a little sideways. Nowthe handlebar should immediately crampsmoothly.When you hold the frame steady andtouch the handlebar lightly it should turnsmoothly, without jolts, from its middle posi-tion.
If the bearing is adjusted too tightly undo theend cap a little bit. If necessary, you can loosenit with a light blow of a rubber hammer.Repeat the adjustment.
Adjusting the headset with mounted adjustment bushing.
HeadsetThe front fork is pivoted in the frame throughthe steering head bearing, also called headset.
The headset can become loose through heavyshocks on the road.
Adjusting the playThe steering head bearing has to be adjusted
so that the fork turns easily with the frontwheel without having play.
To check the bearing play pull the front brakeand grasp with the other hand the upper stee-ring head bearing.Then rock your bicycle hardback and forth. If the steering head bearing hasplay the upper housing distinctly shifts with re-spect to the lower.
To adjust the bearing you need the adjustmentbushing and the end cap that have come withyour bicycle. (With the optional folding stem,there are no adjustment bushing clamping clip.)
Put the adjustment bushing on the steererfork tube over the clamping clip. Screw theend cap tightly into the steerer tube. For thatpurpose, the adjustment screw for the pre-lo-ad has to be turned into the steerer tube byat least 12 mm (5 inch).
Caution! Do not ride with a loose headset.This increases the strain on the fork and theheadset bearing.The headset may be dama-ged or the fork may break.
Caution! Do not tighten the end cap veryhard. It is only used to adjust the play. If theheadset is adjusted too tight the surface ofthe bearings can be damaged.The conse-quence is a turning with jolts and rest posi-tions.Then, the headset has to be exchan-ged.

HPVelotechnik44
After the headset has been adjusted withoutplay tighten the screw of the clamping clipwith 4-6 Nm.
Remove the end cap and take the adjustmentbushing off the steerer tube. Safely depositthese two adjustment tools, best together withthis manual.
Remount the stem to the steerer tube. Keepthe front wheel with your legs in place and ad-just the handlebars right-angled to the frontwheel.Adjust the clamping screw with 18-20Nm. Check the clamping by trying to twist thehandlebars against the front wheel.
Lubricating the steering head bearingOnce a year the steering head bearing has tobe dismounted, cleaned and lubricated.
Take care of the exact order and position ofthe different parts of the bearing.After you ha-ve undone the clamping clip you have to read-just the headset as described above. If you arein doubt have your bicycle mechanic lubricatethe steering head bearing.
Headset adjustemnt with folding stemWith the optionally available folding stem, thestem is clamped directly to the fork’s steerertube; no clamping clip or adjustement bushingare installed.There is a cap above the foldingstem in the end of the steerer tube.
After you have adjusted the bearing play as de-scribed above check if the stem is adjusted ina parallel position to the front wheel and tight-en the two clamping screws alternately with8–10 Nm. Check the clamping by trying toturn the stem against the front wheel.
Headset
Danger! The hex-headed screw in the capadjusts the play of the steering head bearing.This screw does not help to clamp the stemtightly to the steerer tube. It does not se-cure it against turning.Take care that bothclamping screws on the side are tightened asprescribed after you have finished yourworks at the stem. Otherwise the stem mayturn while riding and cause an accident.

Mai
nten
ance
and
car
e
HPVelotechnik 45
Rear suspension elementChanging the springs of the rear su-spension elementYou can buy the spring for the rear suspensionelement in different spring stiffnesses fromyour dealer.
We recommend the following spring stiffnes-ses, depending on the overall weight:
up to 80 kg (183 lbs): 650 lbs./inchup to 100 kg (230 lbs): 850 lbs./inchup to 130 kg (286 lbs): 1100 lbs./inch
Spring lengths:DV22: 70–90 mm (2 3/4 – 3,5 inch)(Length of the spring element: 150 mm)
In order to change the spring you will have toremove the upper screw and swing away therear frame.
Hold the main frame of your bicycle in a workstand.
Push the safety ring at the thread of the su-spension element to the front, so that you canundo the adjustment ring completely and thenturn it to the utmost position at the front.Remove the slotted spring retention disc atthe rear end.
Undo the screws of the rear suspension ele-ment with two Allen keys and push the screwout of the suspension element eye.
Remove the spring from the suspension ele-ment and put in the exchange spring. Make su-re that the new spring has the same diameterand length as the old spring and that it lies sa-fely on the adjustment ring.
Put back the slotted upper spring retentiondisc on the piston rod. If necessary, compressthe spring a little bit with a screw driver.Thespring retention disc has to match its seatingat the rear end of the suspension element.
Secure the spring by tightening the adjustmentring until the spring doesn't have any play any-more. Push the safety ring back into the sloton the thread.
Move the rear swing arm back up and connectthe rear end of the suspension element withthe rear swing arm with the bolt. Lubricate thebolt thoroughly. Secure the screws of the su-spension element with LOCTITE and tighten thescrew with 6-8 Nm.
Readjust the spring pre-load as described onpage 19.
Danger! If the bicycle does not stand onthe ground while undoing the screws of thesuspension element, the rear swing arm maycome down uncontrolled afterwards andhurt you seriously. In addition to this, the ca-bles of the gear system and the brakes mayoverstretch or bend and you would have toreplace them. Ensure that the rear swingarm comes down in a controlled and gentlefashion by putting up a solid string or cabletie between the main frame and the rearswing arm.
Danger! When the bicycle is standing onthe ground, the frame and the swing arm co-me up against each other. Please make surethat this happens in a controlled and gentlefashion. Put a cloth between the contact po-ints.Take care not to squash your fingers.
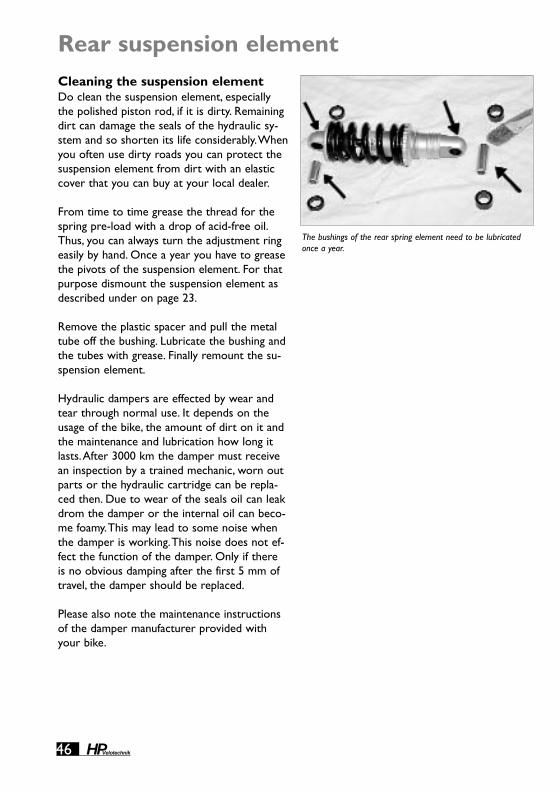
HPVelotechnik46
Rear suspension elementCleaning the suspension elementDo clean the suspension element, especiallythe polished piston rod, if it is dirty. Remainingdirt can damage the seals of the hydraulic sy-stem and so shorten its life considerably.Whenyou often use dirty roads you can protect thesuspension element from dirt with an elasticcover that you can buy at your local dealer.
From time to time grease the thread for thespring pre-load with a drop of acid-free oil.Thus, you can always turn the adjustment ringeasily by hand. Once a year you have to greasethe pivots of the suspension element. For thatpurpose dismount the suspension element asdescribed under on page 23.
Remove the plastic spacer and pull the metaltube off the bushing. Lubricate the bushing andthe tubes with grease. Finally remount the su-spension element.
Hydraulic dampers are effected by wear andtear through normal use. It depends on theusage of the bike, the amount of dirt on it andthe maintenance and lubrication how long itlasts.After 3000 km the damper must receivean inspection by a trained mechanic, worn outparts or the hydraulic cartridge can be repla-ced then. Due to wear of the seals oil can leakdrom the damper or the internal oil can beco-me foamy.This may lead to some noise whenthe damper is working.This noise does not ef-fect the function of the damper. Only if thereis no obvious damping after the first 5 mm oftravel, the damper should be replaced.
Please also note the maintenance instructionsof the damper manufacturer provided withyour bike.
The bushings of the rear spring element need to be lubricatedonce a year.

Mai
nten
ance
and
car
e
HPVelotechnik 47
The bushings are exchangeable. For that pur-pose you will have to dismount the rear swingarm and send it together with the axle viayour specialist dealer to HP VELOTECHNIK.Afterhaving been mounted the bushings are machi-ned to adjust them.
Undoing the axle screwsIn order to mount the rear rack or the lowri-der the axle screws have to be undone.We re-commend you to leave one screw in place toprevent the axle from turning.
In case the rear swing arm is to be dismoun-ted completely you can prevent the axle fromturning by inserting a thin metal rod in thedrilling of the axle through the drilling of therear swing arm under the axle.
Swing arm pivotSwing arm pivotThe rear swing arm pivot comes with mainte-nance-free bushings.They have a self lubrica-ting system with Teflon particles.The bushingssustain a very high load and they show almostno wear.
In case you notice play or a creaking noise atthe rear swing arm please check the twoscrews that keep the axle in the frame.Theywill have to be secured with Loctite.
Tightening torques:Mushroom head screw M8x25: 14-16 Nm
Danger! If the screws of the axle are nottight enough this leads to play and noiseswhen the spring compresses. In extremecases the swing arm may come loose whichleads to a serious fall. If the screws are tootight the thread of the axle may tear out orthe screw may be damaged.
Caution! There has to be a big washer between the main frame and the end of thebushing, else the busing is not able to func-tion without play and the frame will be da-maged.
You can prevent the axle from turning by inserting a thin metalrod in the hole of the axle.

HPVelotechnik48
The seatThe seat cover of the back rest stretches un-der load. On the back, there are four belts totighten the back rest again.Try different ten-sions; often, a somewhat lower tension appearsto be more comfortable.
Clean the back rest with lukewarm water anda sponge. Do not put it in the washing machi-ne, since the net material with the reflectivestrip will be damaged.
The seat cushion suffers from wear and tear. Itcan be damaged by sharp items or by chemicalcleansing agents.When the surface is worn ordamaged you will have to exchange the cus-hion. Otherwise, dampness could get into theseat and affect the wooden underside, whichwould endanger its solidity.
If you dismount the quick releases of the seatfastening, take care to remount the black pla-stic bushings between the sliders when youput them back.These bushings work as com-pression springs that push the sliders awayfrom the clamping rail after you have openedthe quick releases. Only that way can the seatbe smoothly moved on the rail.
At the front quick release there are on bothsides knurled washers between the quickrelease and the aluminum fittings.These was-hers provide the clamping force necessary forthe adjustment of the angle of the back rest.The knurling might affect the coating in theclamping area slightly but it does not interferewith the functionality.
The seat
Clean the back rest and the zipper with lukewarm water.

Mai
nten
ance
and
car
e
HPVelotechnik 49
Water bottle cageYou can mount a water bottle cage at themain frame. For that purpose, there are threa-ding inserts M5 at the top of the frame.
You can mount another water bottle cage atthe stem, using the respective clips.Take carethat the clips don't have sharp edges in ordernot to damage the surface of the stem.
Before buying a water bottle cage please trywhether it fits your Spirit and accesses easily.
Another useful alternative to water bottles aresystems with a "water bag" and a drinking ho-se, e.g. from Source or Camelbag.You can sim-ply strap them behind the seat, onto the rearrack or to your pannier.
Water bottle cage

HPVelotechnik
Check whether the wheels still fully compresswith the mounted mudguards.The mudguards,stays and screws must not touch other partsunder maximum compression.
50
MudguardsMudguardsAt bicycles with suspension, mudguards areexposed to very strong vibrations and maybreak through wear. Please check the stays ofthe mudguard regularly for their position andcheck the mudguards for cracks or deforma-tions. Immediately replace damaged mud-guards.
In order to prevent falls you have to fasten thestays of the front mudguard with a securityclip that opens under pressure.When the cliphas opened once please replace it with a newone.
After you have performed service work or re-placed mudguards check if the wheels turnfreely. Between mudguard and wheel there hasto be a distance of at least 7 mm (0,2 inch).
Caution! You must not mount additionalparts like rear lights or reflectors to themudguards since those may break then.
Danger! If branches or other obstacles getcaught in the wheels while riding and aremoved around they may drag the mudguardsalong.The mudguard can possibly fold upbetween frame and tire and hence block thewheel, which may lead to a serious fall. If youhear any unfamiliar noises while riding stopimmediately and remove anything that mightcling to the mudguards or the wheels.

Mai
nten
ance
and
car
e
HPVelotechnik 51
WheelsThe correct air pressure is decisive forsmooth running and a good protection againstpunctures.The maximum pressure is printedon the side of your tire. Since your Spirit is ful-ly suspended you can always go for the maxi-mum pressure.You might find an indication ofthe minimum required pressure on the side ofthe tire as well.
Since the tubes in the tires gradually loose airyou should check the air pressure before eve-ry ride.
The tubes come with Presta valves (also calledfrench valves).They are very airtight and easyto pump up. For that purpose first undo thevalve cap.
Now you see a small threaded rod with aknurled nut that comes out of the valve. Undothe knurled nut by loosening it as far as itgoes.
To pump up the tire and check the pressureyou need a pump with a gauge, preferably a so-lid standing air pump. Put the knob of thepump on the valve, push it completely on thevalve and then retract it a little bit. Now youcan pump up your tire easily.
After you have pumped up the tire to the ma-ximum pressure pull off the pump knob.Secure the valve through turning the knurlednut on the threaded rod as far as it will go to-wards the valve. Finally put on the valve capagain.
When you exchange tires please note the ma-ximum width limit of 54 mm (approx. 2").Werecommend tires that are 40-54 mm (1,6 - 2inch) wide.At the front wheel you have to usetires of ISO size 305 (16"), at the rear wheelISO size 406 (20").The tire width possible atyour bicycle depends on the size of your rims.Please ask your local dealer.
Wheels
Before pumping up the tire, you have to undo the little knurlednut on the valve.
Danger! Never pump up your tires beyondthe maximum pressure.The tire may burstwhile riding or come off the rim, which mayresult in a serious fall.
Danger! Check your tires for damage on aregular basis.You should exchange tires withworn threads or damaged sidewalls.Damaged rim tapes have to be exchangedimmediately. Damages at the tires may leadto a sudden burst of the tire and thus resultin a serious fall.

HPVelotechnik52
After you have exchanged the tires pleasecheck if the wheels turn freely and check theminimum distance between mudguards andframe.
Due to the small wheel diameter even smalltolerances in rim or tire diameter can causevisible misalignement of the tire on the rim.Pump up the tire to only 1 bar first, then alignthe tire by twisting it with your hands. Do notorientate yourself at the attached reflex strip,this strip can be slightly misaligned due to thepriduction process.
To remove the rear wheel shift the rear derail-leur to the fastest gear "8".Turn the twist gripof the hub gear to the uphill mode "1". Pressthe locking mechanism of the click box.Remove the click box. Now you can undo theaxle nuts and dismount the rear wheel (seethe DualDrive manual).
Cleaning and conservationThe frame of the Spirit has a high quality andenvironmentally friendly powder coating.Thesurfaces of the aluminum parts are either po-lished or anodized.
To keep the surfaces brilliant over many yearsand to protect them effectively against corro-sion the bicycle has to be cleaned from dirtand then conserved.
Dried sweat but also environmental influencessuch as air pollution, dirt on the roads andespecially grit affect the parts, and not onlymay this cause flaws but also serious structuraldamage of the parts through corrosion.
In contrast to a widespread belief particularlythe "non-rusting" aluminum is dramatically af-fected by grit! This kind of damage may not bevisible in the beginning but it leads to a seriousdanger when the part breaks.
Do clean and conserve your bicycle diligently!
The best things to clean your bicycle with arewarm water and a soft cloth. If your bicycle isvery dirty first take a wet sponge to soften thedirt and then remove it. In case of bad greaseor oil stains you should use a special cleansingagent for bicycles in addition.
Wheels, Cleaning
Danger! Take care that your spokes are al-ways in perfect condition and the spoke ten-sion is balanced. Do not ride with wheelsthat run untrue or wheels with loose ormissing spokes.These faults may lead to atotal failure of the wheel while braking andresult in a serious fall!
Caution! To true up the wheels you needspecial skills, please have this work done byan experienced bicycle mechanic. Caution! Do not use any cleansing agents
that scrub or are chemically aggressive sincethey affect the paintwork. Before using anycleansing agent please test it at a part ofyour bicycle that is not immediately visible.

Mai
nten
ance
and
car
e
HPVelotechnik 53
While cleaning your bicycle check it for anycracks, scratches, deformations, damaged parts,loose spokes etc. If you are in doubt pleaseconsult your local bike shop.
In case of small scratches at the surface of thepowder coating of the frame or the surface ofthe seat you can simply polish them away.Youcan buy a special polishing agent for epoxy re-sins at a specialist dealer for boat building. Donot use a polish for metal!
After you have cleaned the bicycle, dry it andtreat the paintwork and the metal surfaceswith wax.You can purchase this wax from yourlocal bike dealer as a convenient spray.
The wax passes moisture and flows into tinygaps and pores.After some minutes the sol-vent evaporates and leaves a dull and glutinousfilm. Now polish the waxed parts of your bicy-cle with a soft cloth to make it real shiny.
Do not only wax the frame but also the spo-kes, hubs, screws and nuts etc.You can alsoconserve the chain with a wax spray after lu-bricating it, see also the chapter on "Chain",page 36.
The frame has small holes for ventilation thatprevent condensation in the frame.These dril-ling holes must not be sealed. However, moi-sture may enter the frame through the drillingholes.Therefore protect the inside of your fra-me by applying wax spray through the holes.
Protect the parts where cables or chain tubesmay scratch the frame with a layer of tape.Youcan buy extra strong transparent tape at yourdo-it-yourself-store.That way you avoid scrat-ches in the powder coating and coating co-ming off.
Caution! Do not use any high-pressure cle-aner.The strong jet of water goes throughthe seals of the bearings, blows away the lu-be and causes corrosion of the bearing partsand the chain. In addition to this it may da-mage stickers.
Caution! Schadhafte Lackstellen müssenumgehend von Rostansatz befreit und ausge-bessert werden.Wird durch Lackschäden ei-ne Stelle Ihres Rahmens freigelegt, kann dieumgebende Lackschicht unterwandert undder Rahmen durch Korrosion zerstört wer-den.
HPVelotechnik54
Storing the bicycleBefore storing your bicycle over a longer peri-od of time, e.g. over winter, please take care ofthe following steps:
● Clean your bicycle and protect it fromcorrosion as described in the chapter on "Cleaning".
● Store your bicycle in a dry and warm place.● Avoid direct sun and storage close to the
heating since it affects the rubber of yourtires.
● Choose the uphill mode "1" at the hub gearand the smallest sprocket at the rear derailleur.That way the cables are in the most relaxed position.
● The tubes of your tires loose air whenstanding over a longer period of time. If the bicycle then rests on flat tires the tires may be damaged.Therefore hang up your bicycle or check the air pressure regularly.
The winter months are a convenient period oftime for the annual service since then you wo-n't have to wait long for an appointment. Manydealers offer special prices for the wintercheck.
Screws and BoltsScrews gradually settle in and through thisthey can come loose.Therefore check thescrews and bolts regularly if they are tightenedappropriately.
In the following table you will find the prescri-bed tightening torques, they refer to greasedscrews!
The grease also prevents your screws fromseizing in their threads so that they won't un-screw anymore. In particular, screws made ofstainless steel are susceptible to this and the-refore have always to be put in with grease.
Do use high quality acid free grease, if possiblea lubricant based on PTFE like Teflon or MoS2.Their ingredients still work properly after thethinner grease has been removed from thecontact points.Alternatively you can useLoctite that you apply to the screw before youput it into the thread.
Always check the screws very diligently forsigns of corrosion. Rust at the screw headsmay also lead to the screw seizing in the thre-ad.When the metallic and shiny coating of gal-vanized screws comes off and discloses dull,gray-brown steel you have to exchange thescrew.
When you exchange screws please do onlyuse screws of the same type. Screws come indifferent strength classes. Please do only usegalvanized screws of the same type andstrength, corresponding to the Germanstrength classes 8.8 or stainless steel screwsgrade A2-70, when not given any other recom-mendation. If you are in doubt please ask yourspecialist dealer.
Storing the bike, Screws and bolts

Mai
nten
ance
and
car
e
HPVelotechnik 55
Tightening torques for screws
The values indicated are meant for a friction value μ=0,125 (greased threads and screw heads).They only refer to the in-dicated parts. Please do always follow the values given in the manuals of the parts manufacturers, since the following va-lues may not be the latest due to changes in the product line!
Part connection screw tightening torque
brakes: mechanical- brake lever handlebar/lever clamping M6 SW5 4 Nm- brake caliper - caliper/frame M6 8–9 Nm
- cable clamping 8–9 Nm- brake disc - disc/hub T20 4,5–6 Nmbrakes: hydraulic- brake lever handlebar/lever clamping M6 SW5 4 Nm- brake caliper - caliper/frame M6 SW5 6 Nm- brake disc - disc/hub M4 Torx T25 4 Nmgear click box cable clamping 4–5 Nmdynamo dynamo/frame M6 SW5 6–8 Nmsuspension element element/frame M6 6–8 Nmrear swing arm axle Linsenk. M8x25 14–16 Nmb.b. set cartridge/frame 50–60 Nmcrank crank/axle 14’er Nuß 35 Nm
chain ring screws 8–11 Nmwheel axle nut 30–40 Nmlowrider rack lowrider/main frame M5 SW4 4–6 Nm
axle Linsenk. M8x25 14–16 Nmhub cassette/ lock ring 38–42 Nmpedal pedal/crank SW15 35–40 Nmshifter lever lever/handlebar 2 Nmderailleur derailleur/frame SW6 8–10 Nm
cable clamping 4–6 Nmmudguard stay/frame M5 SW4 4–6 Nmseat seat cushion/seat mounts M5 SW4 4–6 Nm
quick release 9–12 Nmstem fork/stem M8 SW6 17–19 Nm
telescopic stem M8 SW6 17–19 Nmstem/handlebar M7 SW5 10–12 Nm
pull rod DualDrive pull rod/hube 0,3 Nm
HPVelotechnik56
WarrantyYour dealer has to fully set up and adjust yourSpirit, so that safe function is guaranteed.Thedealer has to make a final safety check andcarry out a test ride.
Your cycle dealer is obliged by law to ensure,among other things, that your bicycle is not af-fected by defects which materially diminish itsvalue of suitability for the described purpose.The exact details will vary according to yourcountry. In Germany, this liability ends twoyears after purchase.
In addition to this, HP VELOTECHNIK offers a 10year warranty on the frame and the swing armpivot of the Spirit against damage through ori-ginal material or manufacturing defects.Thiswarranty applies only to the original purchaser.
Damage trough wear and tear, corrosion ordamage at the surface coating is excluded.
Damage through inappropriate use, inadequatecare and maintenance, falls, crashes, overloa-ding through excess weight, incorrect assemblyor modifications to the bike is also not cove-red.The onus rests with the purchaser.Thewarranty is void if any of the instructions inthis manual are neglected.
The warranty starts with the date of purchase(receipt of the bike dealer) of a new bicycle.The warranty is processed via the bike dealerwho ordered the bicycle from us.
We process our services preferably throughyour nearest HP VELOTECHNIK dealer but alsothrough your local bike dealer.
In case of damage the specialist dealer has tosend the damaged frame to us so that we cancheck it, if asked to do so by us.We do not ta-ke over any secondary costs.
In case of warranty we will cover the costs forthe transportation within the usual limits(postal service). In case of warranty we will re-place the damaged part with a part of ourchoice or a new part equal to the old one(warranty obligation).
In the event of any work that falls under war-ranty the usual warranty period will not beprolonged and no new warranty will be given.If HP VELOTECHNIK refuses to count a repair aswarranty case we will only carry out a repairwith costs after having talked to the customeror his representative, the respective dealer.
It is necessary for the purchaser to fill in theenclosed warranty registration form to benefitfrom the extended warranty.This filled in formhas to be sent to HP VELOTECHNIK within 4weeks after the purchase.
The warranty is only valid when the warrantypass at the end of this manual has been filledin when you received your bike, and when eve-ry inspection listed has been done and recor-ded by your bicycle mechanic within the des-cribed time schedule.
In the event of any warranty the warranty passtogether with a copy of the proof of purchasehas to be sent to HP VELOTECHNIK throughyour dealer.
This warranty does not have any influence onthe rights of the purchaser according to hisstatutory rights.
Warranty

HPVelotechnik
War
rant
y Pa
ss
57
Warranty PassWith the HP VELOTECHNIK Warranty Pass youcan assure the safety and proper function ofyour Spirit for many years.
Like any other vehicle your bicycle has to bechecked for safe operation before riding.Yourbicycle has to be maintained at regular inter-vals, at least once a year you will have to takeyour bicyle to a qualified bicycle mechanic fora thorough check.
The service plan on the next page shows youour mandatory maintenance and serviceworks.
If you wish you can set an upper price limit forthe service with your bicycle mechanic. If thenecessary works exceed this limit you will beinformed in advance.
Our tip:You can avoid seasonal waiting periods inspring and summer when you have your annualinspection done in the quiet months fromOctober to January. Many bike shops then ha-ve special winter check offers.At any rate domake an appointment. Clean your bicycle priorto the inspection since then many of thechecks by sight can be done quickly and at lowcost.
Please have your specialist dealer record everyinspection work in the Warranty Pass.This is arequirement for the validity of our expandedwarranty that exceeds the legal warranty.
Warranty Pass

Warranty Pass
58 HPVelotechnik
Service Plan
part work
light system check functionality
adjust headlamp and rear light, check cable contacts
clean reflectors, replace missing reflectors
tires check air pressure
check tread and sidewalls
brakes check for damages / brake test whilst standing still
check cables / hydraulic system for leaking oil
check rigid feel brake lever blades when pads reach rotor
check brake pads for wear
suspension element clean and oil thread
lubricate bushes
replace worn out parts / hydraulic cartridge
suspension fork check dust boot and correct position
lubricate
check fork play, adjust if necessary
rear swing arm check function and bearing play, tighten axle screws
bottom bracket bearings check bearing play
rims check allignment, check for cracks, dents, wear
chain grease and check for wear
chain tube check for wear
expand ends or exchange tubes
crank check, tighten
paintwork conserve and repair
wheels check alignement and spoke tension
handlebar check for damage / bends
headset check bearings, grease

HPVelotechnik
War
rant
y Pa
ss
59
see page before every ride monthly annually note
31 ●
●
●
51 ●
●
28 / 33 ●
●
●
●
45 ●
●
▲
40 ●
▲ every 1000 km
●
47 ▲
▲
51 ▲
36 ●
38 ●
●
▲
52 ●
51 ●
13 ▲
44 ▲

HPVelotechnik60
Warranty Pass
This service plan is intended to give you arough overview over the required mainte-nance and service works. In no case it can re-place the detailed instructions in this manual!
You can perform service works marked with a“●” when you have the required skills andtools as for example a torque wrench.
When you discover any defects while checkingyour bicycle they have to be repaired immedi-ately. If you are in doubt please consult yourlocal bike shop.
Works marked with a "▲" should only be car-ried out by a trained bicycle mechanic.
At the annual service the bicycle mechanic hasto carry out all works listed as well as all serv-ices and maintenance works necessary accord-ing to the momentary technical standard andprofessional knowledge.
Please follow at any rate the manuals of theparts manufacturers.
Service plan (continued)
parts work
hubs check bearing play and brake discs mount
pedal check bearing play, check binding mechanism
frame check clamping of the front boom
clean and conserve
check for damage, damage to paintwork
quick release check correct closing
derailleur check for movement and function
clean and lubricate
screws and nuts check and tighten
mudguards check for damage and correct position
valves check for correct position and air tightness
stem check clamping
check clamping screws
cables dismount, lubricate, replace if necessary

HPVelotechnik
War
rant
y Pa
ss
61
see page before every ride monthly annually note
▲
▲
52 ●
●
7 ●
35 ●
●
54 ●
50 ●
51 ●
13 ●
▲
35 ▲
The service intervals given in this WarrantyPass refer to an average use and a riding per-formance of 3.000 km per year.
When you ride more kilometers per year oroften ride under bad conditions like rain, gritor other dirty factors it is necessary to haveshorter maintenance intervals.
In order to measure your riding performancewe recommend you to use a bicycle computer.
The regular service maintains the safe opera-tion and the value of your bicycle. Not onlydoes the completed Warranty Pass record themaintenance works for the validation of yourwarranty but also does it proove the care andthe value of your bicycle - a good thing tohave when you are going to sell your Spiritone day.
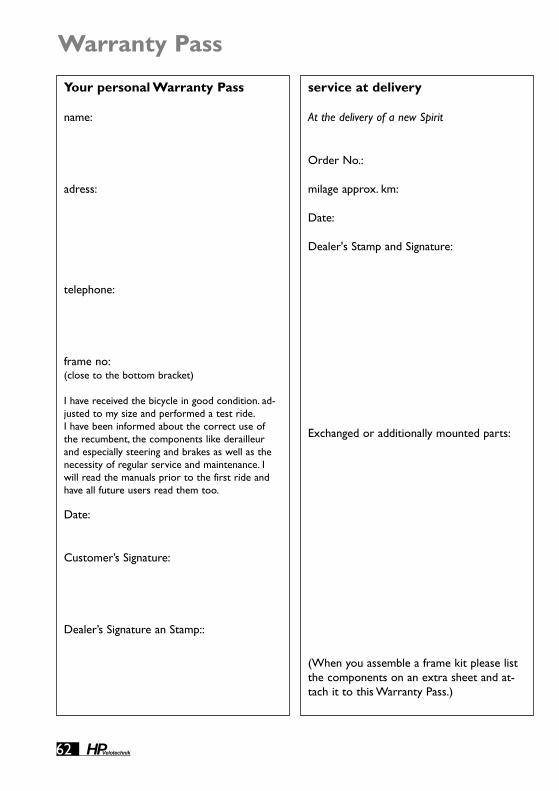
HPVelotechnik62
Warranty Pass
service at delivery
At the delivery of a new Spirit
Order No.:
milage approx. km:
Date:
Dealer's Stamp and Signature:
Exchanged or additionally mounted parts:
(When you assemble a frame kit please listthe components on an extra sheet and at-tach it to this Warranty Pass.)
Your personal Warranty Pass
name:
adress:
telephone:
frame no:(close to the bottom bracket)
I have received the bicycle in good condition. ad-justed to my size and performed a test ride.I have been informed about the correct use ofthe recumbent, the components like derailleurand especially steering and brakes as well as thenecessity of regular service and maintenance. Iwill read the manuals prior to the first ride andhave all future users read them too.
Date:
Customer’s Signature:
Dealer’s Signature an Stamp::

HPVelotechnik
War
rant
y Pa
ss
63
2nd service
No later than 3000 kilometers or one year af-ter the purchase.
Order No.:
milage approx. km:
Date:
Dealer's Stamp and Signature:
Exchanged or additionally mounted parts:
1st service
No later than 300 kilometers or 2 months afterthe purchase.
Order No.:
milage approx. km:
Date:
Dealer's Stamp and Signature:
Exchanged or additionally mounted parts:

HPVelotechnik64
Warranty Pass
4th service
No later than 9000 kilometers or three yearsafter the purchase.
Order No.:
milage approx. km:
Date:
Dealer's Stamp and Signature:
Exchanged or additionally mounted parts:
3rd service
No later than 6000 kilometers or two years af-ter the purchase.
Order No.:
milage approx. km:
Date:
Dealer's Stamp and Signature:
Exchanged or additionally mounted parts:

HPVelotechnik
War
rant
y Pa
ss
65
6th service
No later than 15000 kilometers or five yearsafter the purchase.
Order No.:
milage approx. km:
Date:
Dealer's Stamp and Signature:
Exchanged or additionally mounted parts:
5th service
No later than 12000 kilometers or four yearsafter the purchase.
Order No.:
milage approx. km:
Date:
Dealer's Stamp and Signature:
Exchanged or additionally mounted parts:

Warranty Pass
66 HPVelotechnik
7th service
No later than 18000 kilometers or six years af-ter the purchase.
Order No.:
milage approx. km:
Date:
Dealer's Stamp and Signature:
Exchanged or additionally mounted parts:
8th service
No later than 21000 kilometers or seven yearsafter the purchase.
Order No.:
milage approx. km:
Date:
Dealer's Stamp and Signature:
Exchanged or additionally mounted parts:
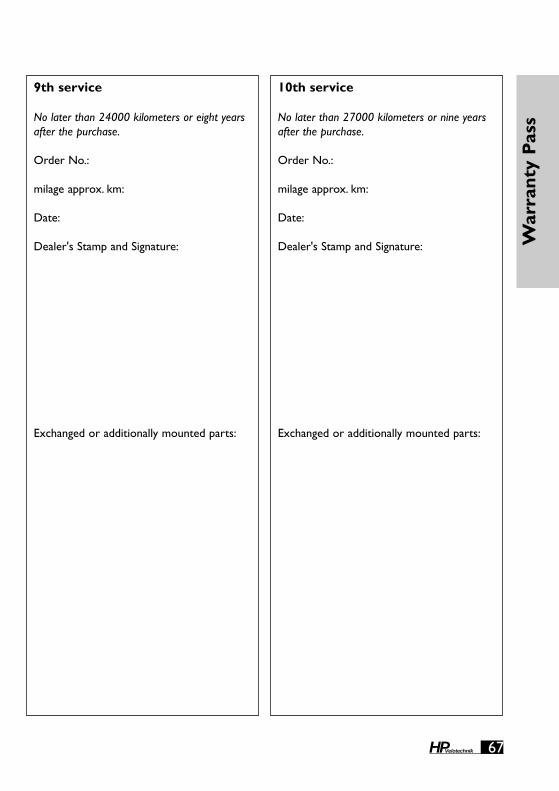
67HPVelotechnik
War
rant
y Pa
ss
9th service
No later than 24000 kilometers or eight yearsafter the purchase.
Order No.:
milage approx. km:
Date:
Dealer's Stamp and Signature:
Exchanged or additionally mounted parts:
10th service
No later than 27000 kilometers or nine yearsafter the purchase.
Order No.:
milage approx. km:
Date:
Dealer's Stamp and Signature:
Exchanged or additionally mounted parts:

Warranty Pass
68 HPVelotechnik
11th service
No later than 30000 kilometers or ten yearsafter the purchase.
Order No.:
milage approx. km:
Date:
Dealer's Stamp and Signature:
Exchanged or additionally mounted parts:
12th service
No later than 33000 kilometers or eleven yearsafter the purchase.
Order No.:
milage approx. km:
Date:
Dealer's Stamp and Signature:
Exchanged or additionally mounted parts:

69HPVelotechnik
War
rant
y Pa
ss
13th service
No later than 36000 kilometers or twelve yearsafter the purchase.
Order No.:
milage approx. km:
Date:
Dealer's Stamp and Signature:
Exchanged or additionally mounted parts:
14th service
No later than 39000 kilometers or thirteenyears after the purchase.
Order No.:
milage approx. km:
Date:
Dealer's Stamp and Signature:
Exchanged or additionally mounted parts:

HP Velotechnik ● Paul J. W. Hollants und Dipl.-Ing. Daniel Pulvermüller GbRElisabethenstr. 1 ● D-65830 Kriftel ●Tel.++49 - 61 92 - 97 99 2-0 ● Fax 91 02 18 ● www.hpvelotechnik.com
2008HPVelotechnik
NEWrecumbent-technology