SmartPay HPP Integration Guide - Barclaycard
60
Barclaycard SmartPay Hosted Payment Page Integration Guide Version 3.0 released April 2012
Transcript of SmartPay HPP Integration Guide - Barclaycard

Barclaycard SmartPay
Hosted Payment Page Integration Guide
Version 3.0 released April 2012

DOC Version Control Version No. Date Issued Reason for Change 1.0 July 2010 Initial Document 2.0 February 2012 Update 3.0 May 2012 Update COPYRIGHT NOTICE No part of this publication may be reproduced, stored in a retrieval system or transmitted in any form or by any means electronic or mechanical, including photocopying and recording, for any purpose, without the prior written permission of Product Development, Barclaycard Global Payment Acceptance, Barclays Bank PLC

Contents Purpose of this Document ...................................................................................... 5 Intended Audience ................................................................................................... 5 Contacting us .......................................................................................................... 5 Documentation & Code Examples ........................................................................... 5 Glossary .................................................................................................................. 6 How to use this Document ...................................................................................... 7 Payment Process ................................................................................................... 8
Introduction ....................................................................................................................................8 Payment Process ..........................................................................................................................8
Payment Process Steps 1 to 8 .............................................................................. 10
Step 1 – Order Ready.................................................................................................................. 10 Step 2 – String Encryption ......................................................................................................... 10 What is the HMAC Key? ............................................................................................................. 10 Step 3 – Passing the customer to the Payment Pages ......................................................... 10 Explanation of the Session Fields ............................................................................................. 12 GET (redirect) vs POST .............................................................................................................. 16 Using an iFrame .......................................................................................................................... 16 Step 4 - The Payment Pages ..................................................................................................... 17 Step 5 - Process Payment ......................................................................................................... 18 Step 6 - Notification .................................................................................................................... 18 Step 7. Payment Completion ..................................................................................................... 19 Step 8 - Return to Merchant Website ...................................................................................... 21
Address Verification Service (AVS) ....................................................................... 22 Collect Address and Pre-populate the Address on the HPP ................................. 24 Modifications ......................................................................................................... 26 Notifications .......................................................................................................... 27 Skins ..................................................................................................................... 28
What is a Skin? ........................................................................................................................... 28 HPP - Oneclick Payments ...................................................................................... 29
Setting up the Payment ............................................................................................................. 29 HPP - Recurring Payments ................................................................................... 30
Creating a Recurring Contract .................................................................................................. 30 Setting up the Payment ............................................................................................................ 30 Submitting Recurring Payments ............................................................................................... 31 Recurring paymentRequest Payments .................................................................................... 32 Recurring paymentRequest response ..................................................................................... 33 Disable a Recurring Contract ..................................................................................................... 35 Disable Response ........................................................................................................................ 36 Supported Payment Methods .................................................................................................. 37
HPP - Tokenisation ............................................................................................... 38
Tokenising a Payment using the SmartPay Hosted Payment Pages ................................ 38 Downloading Reports ........................................................................................... 40

Payment Methods ................................................................................................. 41
Passing Payment Methods with Shopper ............................................................................... 41 Adding Payment Methods ......................................................................................................... 42 Set Order of Payment Methods ............................................................................................... 42 Activate/Disable Payment Method ........................................................................................... 42 Set Payment Method Options .................................................................................................. 43 Minimum Quantity ...................................................................................................................... 43 Maximum Quantity ..................................................................................................................... 43 Adding Costs or discounts ........................................................................................................ 43
Payment Methods - PayPal ...................................................................................44 Moving from Test to Live ...................................................................................... 45 Appendix A – Test and Live URL’s ......................................................................... 46
URL’s for test .............................................................................................................................. 46 URL’s for Live ............................................................................................................................... 47
Appendix B – Computing the HMAC ..................................................................... 48
Payment Set-up ......................................................................................................................... 48 Payment Result .......................................................................................................................... 48 Example HTML Post Form ........................................................................................................ 49
Appendix C – Format Standards ........................................................................... 50 Appendix D – Currency Codes ............................................................................... 51 Appendix E – Payment Methods ........................................................................... 53 Appendix F – Trouble Shooting ............................................................................. 54
Merchant signature was not valid ................................................................................. 54 Merchant account NULL or not configured in Skin ........................................................ 54 Merchant account [merchant account name] not configured in Skin: ............................. 55 Billing address incomplete: ............................................................................................ 55 Session validity is in the past: ........................................................................................ 55 CurrencyCode value missing ......................................................................................... 55 Merchant Reference is missing ...................................................................................... 55 107 - Recurring is not enabled ...................................................................................... 56 The server sent HTTP status code 401: Unauthorized .................................................. 56 Problem Displaying Page ............................................................................................. 56
Appendix G – Payment Page HTML Skeleton ........................................................ 57 Appendix H – HTML Structure ............................................................................... 59 Appendix I – Reset.css .......................................................................................... 60
Purpose of this Document This document is designed to provide internet merchants with the relevant instructions and HTML code to integrate Barclaycard SmartPay into their storefront. It also provides details on how Barclaycard SmartPay handles transactions that can be authenticated using Internet Authentication.
Intended Audience This document is intended for use by: Merchants performing their own integrations Web developers working on behalf of merchants Merchant Development Partners It is recommended that the merchant responsible for the merchant account reviews this document to ensure appropriate configuration of the account. A thorough knowledge of HTML and web-based scripting language is required for successful integration of Barclaycard SmartPay. You must ensure that you have the necessary experience and required skill sets in order to avoid problems with integration. If you do have any queries or questions whilst reading this document then please feel free to contact us, our contact details can be found below.
Contacting us Contact the support team via email at:
[email protected] Alternatively you can call the support team on the following:
From the UK - 01604 269518* Outside the UK - +441604269518*
Support hours: Monday to Friday: 8.00 to 18:00 GMT
* Calls may be monitored and/or recorded to maintain high levels of security and quality of service
Documentation & Code Examples This document and others which can help you with you integration and store setup can be found at the support website. Please refer to your set up email.

Glossary
Term Definition
AVS Address Verification Service
CSC Card Security Code – also known as CV2, CVV2, CID and CVN
GBP Great British Pound (Sterling)
HMAC Hash Message Authentication Code – a method of encrypting data
HPP Hosted Payment Page – Barclaycard SmartPay’s payment pages which take the payment for you
HTML Hypertext Mark up Language – language used to construct web pages
HTTP HyperText Transfer Protocol – the protocol used most often to transfer information from World Wide Web servers to browsers. Also called HyperText Transport Protocol
HTTPS HyperText Transfer Protocol, Secure – a version of http for secure transactions
ISO International Standards Organisation – a recognised protocol for transaction transmission
RSS Really Simple Syndication or Rich Site Summary
MasterCard SecureCode
MasterCard’s process to authenticate the customer as the cardholder during online purchases
Barclaycard SmartPay
Barclaycards secure payment service
SOAP Simple Object Access Protocol – a generic message structure used by programming languages to communicate data in a standard format.
SSL Secure Sockets Layer – a protocol designed to provide secure communications on the internet
URL Uniform Resource Locator – an internet address
VbV Verified by Visa. A Visa initiative to authenticate the customer as the cardholder during online purchases

How to use this Document This document combines essential integration and user information, plus tips on how to get the most from Barclaycard SmartPay. For ease of use, it is indexed by section, topic and product as shown below:
Section Topic
A
Recurring Payments
This type of header will appear at the start of each new subject. There are 9 Sections to this document. The Topic provides information on what can be performed by Barclaycard SmartPay within the section. You can “mix and match” the topics within the sections to tailor this user guide to your specific needs.
Section Content Description A Payment Process How the payment pages can fit into the
purchase process. B Address Verification
Service (AVS) How to pass and pre-populate customer address details on the hosted payment pages.
C Modifications How to perform actions on a transaction via SOAP.
D Notifications The format and values returned in response to the transaction.
E Skins Changing the look and feel of the Hosted Payment Pages.
F Remember Shopper Details
Introduces CSC-only functionality, for the use of repeat shoppers.
G Recurring Payments How to perform and manage recurring transactions.
H Downloading Reports Explaining how to download reports which have been run by the Backoffice.
I Payment Methods Managing the payment methods available.
J Appendix Test and Live URL’s, Computing the HMAC, Format Standards, Currency Codes, Payment Methods, Payment Page HTML Skeleton, HTML Structure and Reset.css.

Section Topic
A Payment Process
Introduction
The Barclaycard SmartPay Hosted Payment Pages (HPP) provides a flexible, secure and easy way to allow customers to pay for goods or services on a merchant’s website. When a customer needs to complete an order they will be transferred from the merchant website to the HPP where the customer will perform the payment. The customer is then directed back to the merchant website with the result of the payment. In order to integrate seamlessly into a merchant website, the HPP is customisable in “look and feel”. We refer to a set of look-and-feel customisations as a “Skin” which consists of a set of custom HTML fragments, images and CSS style sheets, which form the template to displaying the hosted payment pages. Please see the Skin section for more detail on how to create and manage your skin.
Payment Process
The following diagram’s illustrate how the website could be integrated with Barclaycard SmartPay HPP’s and the steps involved, in the following sections we will explain each of these steps. There are 2 versions of the Barclaycard SmartPay Hosted Payment Page (HPP): Single Page HPP - which attempts to host the payment process on a single page. Multi Page HPP - which attempts to host the payment process on 2 or 3 pages
depending on the payment method. Please see Step 4 of Payment Process Steps 1 to 8 for an explanation of how to integrate your preferred option. Note: Please see following page for flow diagram of the process.

One Page Payment Process Diagram:
Mulit Page Payment Process Diagram:

Section Topic
A Payment Process Steps 1 to 8
Step 1 – Order Ready The customer visits your website/shopping cart and adds to the basket the items or services they wish to purchase, typically you website will then store this information in an orders database associated with a unique order reference number which your system creates that can be passed over with the customer to the hosted payment page. This will help to identify the customer when returning to your website at the end of the process.
Step 2 – String Encryption The hand-off between your website and the HPP hosted payment page is achieved by setting up a payment session for the customer and adding this data to the HTML form parameters before you transfer the customer with this data to the HPP. To avoid the possibility of a customer tampering with the payment session data, you will cryptographically sign the data using a “HMAC key”. Note - We provide code examples in common programming languages (please see the Documentation and Code Examples link at the start of this document).
What is the HMAC Key? The HMAC key is the merchant’s shared secret between your integration and Barclaycard SmartPay, the HMAC key is an alphanumeric value that the merchant sets and it is used by your integration to encrypt the string of details for the payment which you then pass the Barclaycard SmartPay, we then use the same HMAC key to compare the string passed with the values contained to check they have not been tampered with.
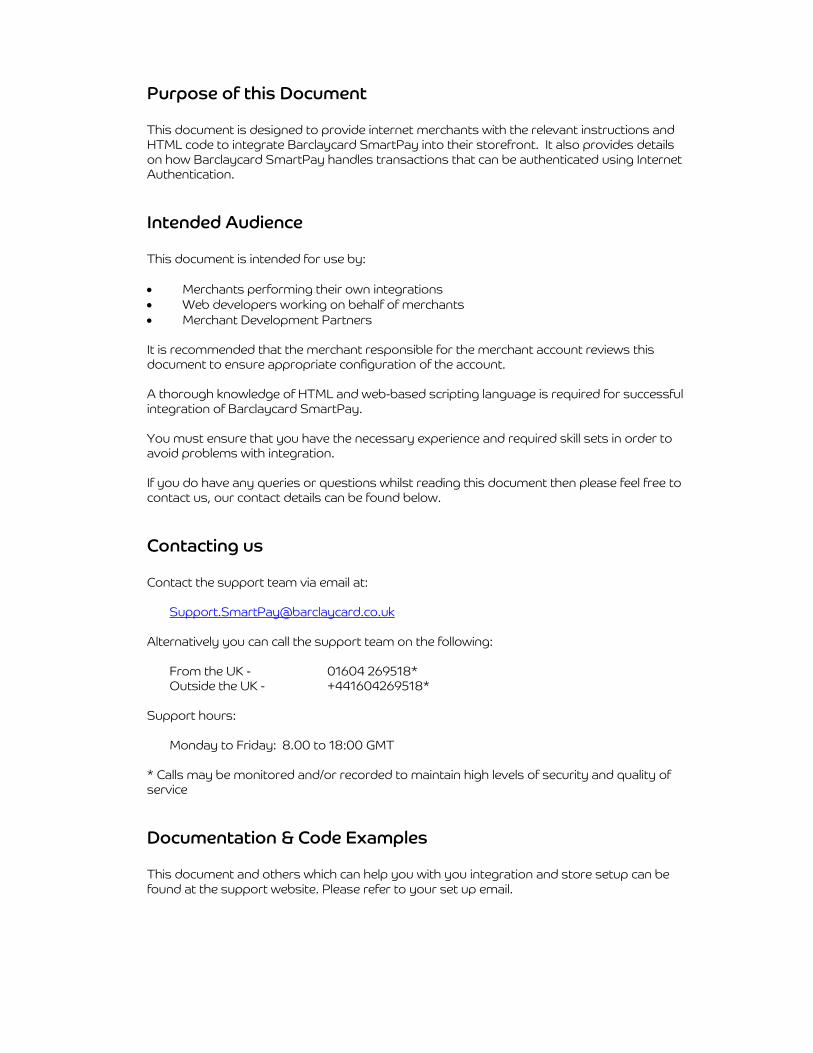
Step 3 – Passing the customer to the Payment Pages Once you have created your encrypted string containing the payment session data using the HMAC this becomes your merchantSig (see Appendix B for more detail on the computing the HMAC). Your website will pass this over to the HPP using a standard HTML form. The following is an example of how the payment session may look if you have a customer who has to pay a total of 100.00 GBP for an order which is known to you in your Backoffice systems as “Internet Order 12345”. The goods will be shipped to the customer before or on October 20th, 2007 and you want to present the text “1 Digital Camera” as an order summary on the payment review page. The customer is using (British) English as their language. The Skin name you will be using is “4aD37dJA” and the (financial) account you have with us is “TestMerchant”. Furthermore, you want this payment offer to expire today at 11 am. (assuming it is October 11th, 2007 10:30 am. In the UTC time zone). Test Hosted Payment Pages (Multiple): - https://test.barclaycardsmartpay.com/hpp/select.shtml Hosted Payment Pages (Single) - https://test.barclaycardsmartpay.com/hpp/pay.shtml
<input type="hidden" name="merchantReference" value="Internet Order 12345" /> <input type="hidden" name="paymentAmount" value="10000" /> <input type="hidden" name="currencyCode" value="GBP" /> <input type="hidden" name="shipBeforeDate" value="2010-10-20" /> <input type="hidden" name="skinCode" value="4aD37dJA" /> <input type="hidden" name="merchantAccount" value="TestMerchant" /> <input type="hidden" name="shopperLocale" value="en_GB" /> <input type="hidden" name="orderData" value="H4sIAAAAAAAAALMpsOPlCkssyswvLVZIz89PKVZIzEtRKE4tKstMTi3W4+Wy0S+wAwDOGUCXJgAAAA==" /> <input type="hidden" name="sessionValidity" value="2010-10-11T11:00:00Z" /> <input type="hidden" name="merchantSig" value="33syARtfsxD47jeXzOlEyZ0j3pg=" />

Explanation of the Session Fields There are a number of mandatory field values which must be passed with the customer to the payment pages. Please find in the following an explanation about the contents of these fields. Mandatory Field Names
Description
merchantReference
This reference will be used in all communication to you about the status of the payment. Although it is a good idea to make sure it is unique, this is not a requirement.
paymentAmount
The payment amount is specified in minor units (without decimal separator). Thus 100.00 (GBP) is specified as 10000 and 199.95 EUR is specified as 19995. Most currencies are like this and have 100 minor units to a major unit (e.g. pennies to the Pound, cents to the Euro). However the Japanese YEN is an exception and doesn't have any minor units; thus 1001 YEN is specified as 1001.
currencyCode
The three-letter capitalised ISO currency code to pay in. For the full list of currency codes supported by Barclaycard SmartPay, please refer to the appendix.
shipBeforeDate
The date by which the goods or services specified in the order must be shipped or rendered. (YYYY-MM-DD format, see the appendix for more detail)
skinCode
The Skin to be used. You can have more than one Skin associated with the account if you require a different branding.
merchantAccount
The merchant account you want to process this payment with (This will be provided to you in your SmartPay set up documentation).
merchantSig
The signature in Base64 encoded format. The signature is generated by encrypting the values of a number of the payment session fields and computing the HMAC over this using the shared secret (configured in the Skin). (See the Appendix for details on computing the signature). We provide code examples in common programming languages for this (please see the Documentation and Code Examples link at the start of this document).
sessionValidity
The final time by which a payment needs to have been made. This is especially useful for tickets/reservations, where you want to “lock” the item for sale for only a short time and payments made after this time would lead to extra costs and administrative hassle. (YYYY-MM-DDThh:mm:ssTZD format, see the appendix for more detail. Note: TZD is the Time Zone Designator which can either be the letter 'Z' or +hh:mm or -hh:mm.)

Mandatory for ONECLICK or RECURRING transactions Only shopperEmail
The email address of the shopper. This is an optional field, but if available it is useful to specify it as there is used in a velocity fraud check. This is not optional if you are creating an ONECLICK of RECURRING contract.
shopperReference
An id that refers uniquely to the shopper (e.g. a customer id in a shopping cart system). This is an optional field, but useful as we can do velocity fraud checking on it.
Note - that any transaction scoring 100 or more will automatically be declined, therefore it is not advised to have this value set to 100 or more as this will mean all your transactions will be blocked.
This is not optional if you are creating an ONECLICK of RECURRING contract.
recurringContract
The value of the recurringContract parameter above must be inserted into the signature string over which the HMAC is computed between the shopperReference and allowedMethods. e.g.: ‘…+ sessionValidity + shopperEmail + shopperReference + recurringContract + allowedMethods + ...’. The payment will proceed as usual and if the result is a successful authorisation, a recurring contract will automatically be created. We show you how to get the contract reference in the following section. If you are also using the CSC-only functionality, then the value of the recurringContract field should be “RECURRING,ONECLICK”. Note - Shoppers are uniquely identified using the shopperReference parameter; it is most important that shoppers are securely logged in on your website and that the shopperReference parameter cannot be modified by the shopper.
There are a number of optional field values which can be passed with the customer to the payment pages. Please find in the following an explanation about the contents of these fields. Optional Field Names
Description
shopperLocale
A combination of language code and country code to specify the language used in the session (e.g. “en_GB” for (British) English). Use just the language code when the country distinction is not required (i.e. “fr”, not “fr_FR”). Default locale is “en_GB”.

orderData
OrderData is a fragment of HTML which will be displayed to the customer on a “review payment” page just before final confirmation of the payment. In order to guarantee correct transmission of this data, including the sending of non-western characters (e.g. the Japanese or Cyrillic character sets), the data is compressed and encoded in the session (GZIP compressed and Base64 encoded). Note: We provide code examples in common programming languages for this (please see the Documentation and Code Examples link at the start of this document). PLEASE NOTE: orderData cannot be displayed on the HPP if the merchantAccount is set up for MOTO payments.
merchantReturnData
(maximum length 128 characters) – This field will be passed back on the return URL when the shopper completes the payment and returns to your shop. This can be used to pass through a session id if needed.
Note – Due to how some payment methods work the merchantReturnData may not be returned. This can especially effect iDEAL payments where the parameter can make the string to the issuer to long causing the payment to fail. To help avoid this try to reduce the length of the merchantReturnData to make it as concise as possible.
countryCode
By default, the payment methods offered to the shopper are filtered based on the country which the IP address of the shopper is mapped to. This prevents a UK shopper from being presented with a German payment method like ELV. This IP-to-country mapping is not 100% accurate, so if you have already established the country of the shopper you may set it explicitly using the countryCode parameter.
Note that this parameter is optional and is not used as part of the signing data. (ISO 3166-1 alpha-2 format, see the Appendix for more detail)
allowedMethods
A comma-separated list of allowed payment methods. This acts as a filter on the payment methods which would normally be available in the Skin. Only the ones in this list will be shown (if available); all others will be ignored. No spaces are allowed. Please refer to section H – Payment Methods in this document for more detail.
Note that this parameter is optional. If the parameter is not used, the value for this field for the merchantSignature computing is an empty String.
offset
This numeric value will be added to the fraud score of the transaction, this enables you to use positive or negative values to either make the transaction less or more likely to be stopped by the fraud scoring.

blockedMethods
A comma-separated list of payment methods which should not be made available. This acts as a filter on the payment methods which would normally be available in the Skin. The methods listed will be removed from the list of available payment methods. No spaces are allowed. Please refer to section H – Payment Methods in this document for more detail
Note that this parameter is optional. If the parameter is not used, the value for this field for the merchantSignature computing is an empty String.
shopperStatement
Some acquirers support a variable shopper statement. To submit a variable shopper statement you can set the shopperStatement field in the payment request. The shopperStatement field may not exceeds 135 characters and can only contain the characters: a-zA-Z0-9.,-?|
Note that if the shopperStatement field is set, it is also included in the HMAC computation.
resURL
To override the Skin's result URL, specify the URL in the parameter resURL in the payment session. The resURL parameter does not need to be included in the signature. Note – Due to how some payment methods work the resURL may not work as desired. This can especially effect iDEAL payments where the parameter can make the string to the issuer too long causing the payment to fail, to help avoid this use the shortest resURL needed.
skipSelection
If you only intend to accept one payment method (e.g Visa), this allows you to automatically load the page that collects the customers payment information. If you supply this value you must ensure that your skin has only one payment method enabled. The value you must supply for this parameter is “true”.

GET (redirect) vs POST When passing the customer and their details to the HPP you can use a HTML form action of GET (redirect) or POST. If you use the GET (redirect) method please keep in mind the following:
Not all browsers are capable of handling large URLs. Some browsers have a limited URL length which should not exceed 2083 characters. It is your own responsibility to make sure this limit is not exceeded.
All parameters and their values should be URL-encoded using UTF-8 character encoding.
The following is an example of the string which could be used in the redirect using the example values previously mentioned. https://test.barclaycardsmartpay.com/hpp/select.shtml?merchantReference=Internet Order 12345&paymentAmount=10000¤cyCode=GBP&shipBeforeDate=20071020& skinCode=4aD37dJA&merchantAccount=TestMerchant&shopperLocale=en_GB& sessionValidity=2007-10-11T11%3A00%3A00%2B01%3A00& shopperReference=SR20100601&merchantSig=33syARtfsxD47jeXzOlEyZ0j3pg=
Using an iFrame We do not support displaying the Hosted Payment Pages in an iFrame. The use of iFrames brings along known usability, security and cross-browser issues. However if you do choose to put the Hosted Payment Pages in an iFrame, please consider the following:
Some (redirect) payment methods like iDEAL do not permit their pages to be viewed in an iFrame and will break out of the iFrame. Other redirect payment methods will assume more available screen space than your iFrame permits.
Using an iFrame could affect the Internet Authentication (MasterCard SecureCode/
Verified by Visa) window supplied by the card issuer, affecting how the page is displayed or possibly stopping the payment.
You should also prepare to handle the difference in behaviour for the payment result
URL, since when the payment completes the customer may not be in an iFrame any more.
Using an iFrame may affect the shopper’s cookie policy on their web browser, these
are used by the Hosted Payment Page. Using an iFrame means that the browser may impose restrictions under which conditions cookies are allowed to be set within the iFrame. While there are workarounds for getting cookies accepted in the default configuration for most browsers, the shopper may have configured a more restrictive policy. The most common problem is with the Safari (Apple) and Chrome (Google) browsers which require (by default) that the loading of the page in the iFrame must “user initiated”. This means that first the iFrame needs to be loaded with a page hosted at the parent domain. Secondly, on this page the user needs to actively click on a button submitting the redirect to the Hosted Payment Pages.
Note - The use of an iFrame with the Hosted Payment Page is not recommended and as so we cannot guarantee that all payment methods will work when using an iFrame, nor that the behaviour of a payment method will stay the same. Furthermore, the exact operation of a (redirect) payment method can differ between the Test environment and the Live environment.
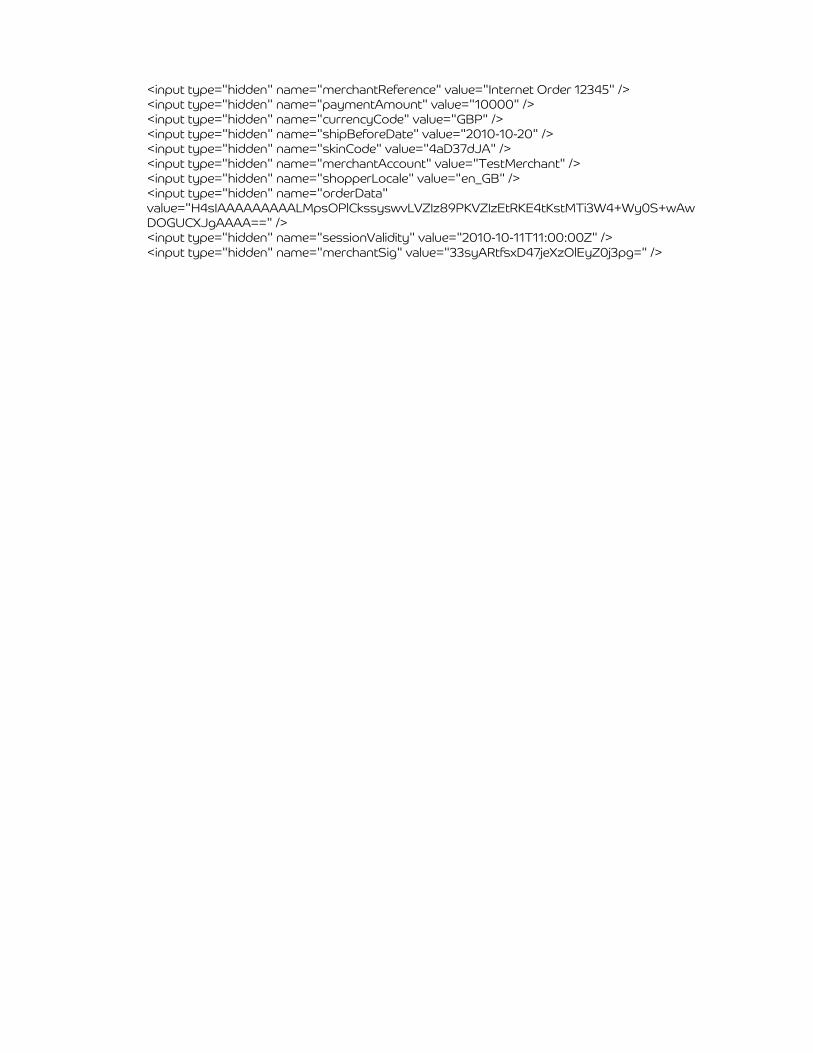
Step 4 - The Payment Pages Single or Multi page Merchants can choose between two different payment flows; You control which method you wish to use by modifying the URL where you direct the cardholder to. The multi-page flow splits the payment process into two or three steps (depending on the payment method) and the single page flow (One Page Payment) which attempts to host the payment process on a single page. The multi-page flow does not require JavaScript. This makes it ideally suited for maximum compatibility with a wide range of browsers and devices; including mobile phones and PDAs. The single page (One Page Payment) flow on the other hand uses JavaScript to manipulate the page content and is suited for use on modern browsers or when page complexity is not an issue and there is enough screen estate.
HPP Test URL’s
Hosted Payment Pages (Multiple) https://test.barclaycardsmartpay.com/hpp/select.shtml
Hosted Payment Pages (Single) https://test.barclaycardsmartpay.com/hpp/pay.shtml
HPP Live URL’s
Hosted Payment Pages (Multiple) https://live.barclaycardsmartpay.com/hpp/select.shtml
Hosted Payment Pages (Single) https://live.barclaycardsmartpay.com/hpp/pay.shtml

Step 5 - Process Payment Once the customer has selected their payment method and entered their details they are processed by Barclaycard SmartPay engine and checked against the active fraud rules in the Fraud Control section in the merchant’s Backoffice settings.
Step 6 - Notification Once the transaction has been approved or declined, a response is returned to a notification handling script on the merchant’s website. This script would normally read in the response returned and then use the Merchant Reference which was passed over with the customer to the payment page, enabling the merchant website to update the Order Databases with the result of the transaction, triggering the merchant order fulfilment process. In the Notification the following fields are returned:- Field Name Description live
Notifying if the transaction was put through the Live or Test system.
eventCode
The event type of the notification. For example “AUTHORISATION” for a standard transaction via the HPP.
pspReference
The unique reference created by Barclaycard SmartPay to identify the transaction.
originalReference
This is empty unless you are using a modification request to change a previous transaction, where this will contain the reference of the original transaction you have sent the request for.
merchantReference
This reference is assigned by you or your website and passed over with the customer to the payment page and is used to identify the customer and help match the transaction to your order database.
merchantAccountCode
The merchant account the payment was processed with.
eventDate
The time the event was generated.
success
Whether or not the event succeeded (true/false).
paymentMethod
How the transaction was paid for, e.g. Visa.
operations
The operations which can be performed on this transaction

reason
Text field which can contain an informational message. Please see below for possible values.
- Refused. - FRAUD. - Referral. - 3d-secure: Authentication failed. - REFUSED. - Issuer Unavailable. - Invalid Card Number. - Acquirer Error. - Expired Card. - Transaction not found. - Insufficient balance on payment. - Invalid Amount. - Recurring transaction failed. - Recurring contract already exists. - Blocked Card. - ERROR. - Original transaction no longer open. - Recurring initial payment not available.
The format of which is as follows:
Reason appears: “97150:1111:12/2012" which is: "AUTH CODE:LAST 4 DIGITS:EXPIRY DATE"
amount
The amount (if relevant) associated with the payment or modification. This consists of a currency and a value which is the amount in minor. In case of HTTP POST notifications you will instead receive currency and value
More details around the notification and how to handle this response can be found in the Notification section of this document.
Step 7. Payment Completion When a customer has completed the payment, they are directed to a default result page. You can specify your own result page in the Skin which will be used instead of the default. We will append parameters to the resultURL that you have specified in your skin configuration to inform you of the status of the payment. Just as you cryptographically signed the payment session when sending the customer to us, we will use the same shared secret to sign the data we return to you. Therefore you can check that the data has not been tampered with. An example of such a result request for the example above is (assumes you set your resultURL to http://yourSite.com/pRes.jsp): http://yourSite.com/pRes.jsp?merchantReference=Internet%20Order%2012345&skinCode=4aD37dJA&shopperLocale=en_GB&authResult=AUTHORISED&pspReference=1211992213193029&merchantSig=CPb2cObMxmIIE0khO8WhEYyKDJs%3D

The parameters passed back are contained in the table below: Field Name Description authResult
AUTHORISED – Authorisation was successfully completed REFUSED – Authorisation was unsuccessful, Declined by
issuer CANCELLED – Shopper cancelled payment or used back
button on initial page to return to merchants website PENDING – Final status of the payment could not be
established at the time, this can be due to the payment method (e.g PayPal) or requiring the shopper to take further action.
ERROR – An error occurred during the payment process
pspReference
The reference Barclaycard SmartPay assigned to the payment. This is globally unique and must be used when communicating about this payment to us. (For “PENDING”, “ERROR” or “CANCELLED” results the pspReference is not yet be known and is therefore empty)
merchantReference
This is the reference your shopping cart/integration assigned to the original payment skinCode - The Skin used
merchantSig
The signature computed over the above values in Base64 encoded format. (See the Appendix for details on computing the signature)
paymentMethod
The payment method used, may be empty if authResult is “CANCELLED”
shopperLocale
Useful if you don't have the customer's language in-session
merchantReturnData
If set in the payment session setup, the value will be passed back
This information is useful in constructing a custom result page, and can integrate smoothly with the customer's session on your server. Although it is best practice to use a fixed result URL, specified in the Skin, there are situations where it is desirable to set the result URL on a per-payment basis. To override the Skin's result URL, specify the URL in the parameter resURL in the payment session. Please see Step 3 for further details. The resURL parameter does not need to be included in the signature. Note – Due to how some payment methods work the resURL may not work as desired. This can especially effect iDEAL payments where the parameter can make the string to the issuer too long causing the payment to fail. To help avoid this use the shortest resURL needed.

Step 8 - Return to Merchant Website If you have used the result page hosted by Barclaycard SmartPay the customer will still be on the hosted payment pages, to return them to your website in you Skin configuration you can specify a continue to URL value this will then place a continue button on the Result URL page, which when selected will direct the customer to your specified continue to URL. Please Note: If you do not specify a ResultURL the order information detailed in step in step 7 will not be sent to your Continue-toURL.

Section Topic
B Address Verification Service (AVS) Address Verification System (AVS) is a security feature that verifies the billing address of the customer. It does so by comparing the numeric portions of the customer's registered billing address to those entered by the shopper. AVS is only supported on a limited set of acquiring connections and only for a limited set of countries (United States, Great Britain and Canada for MasterCard and Visa) and card types. Please check with support what AVS options are supported for your account. You can choose to have the payment pages collect the billing address and/or pre-populate these values from your own system. If you wish to pre-populate these fields you can add them to the payment session as follows. Field Name Description billingAddress.street
The street name
billingAddress.houseNumberOrName
The house number (or name)
billingAddress.city
The city
billingAddress.postalCode
The postal/zip code
billingAddress.stateOrProvince
The state or province
billingAddress.country
The country. (ISO 3166-1 alpha-2 format, see the appendix for more details)
billingAddressSig
A separate merchant signature is required over these fields. The protocol and shared secret is the same as the normal merchant signature, but over the following fields: billingAddress.street + billingAddress.houseNumberOrName + billingAddress.city + billingAddress.postalCode + billingAddress.stateOrProvince + billingAddress.country
You can specify whether the shopper is allowed to view and/or modify these personal details. For this the billingAddressType can be specified. (Please see Collect Address and Pre-populate the Address on the HPP for more information)

Please note that the billingAddressType field is part of the merchant Signature (see the Appendix for Computing the HMAC).
billingAddressType Value Description Not supplied modifiable / visible
1 fixed / visible 2 fixed / invisible
If you want to have the shopper enter the billing address on the payment pages, you can add the billing address data entry fields on the Skin “edit” page. In this case you should not supply a billingAddressType so that the fields are modifiable.

Section Topic
B Collect Address and Pre-populate the Address on the HPP
Allow the cardholder to input their address on the HPP To add address fields to the hosted payment pages simply select Billing Address Fields (AVS) within the configuration page of your chosen “Skin”. (See below).
Pre-populating the HPP with the cardholder address If you wish to pre-populate the payment screen with the cardholders address information you have collected on your own website, you will need ensure that you supply the appropriate HTML form parameters in the form you use to re-direct to the Barclaycard SmartPay Hosted Payment Page. You will also need to ensure that supply an additional addresshmacData string and also a separate billingAddressSig. For example your PHP script would be modified to include the following:
//GZIP and base64 encode the orderData $orderData = base64_encode(gzencode($orderDataRaw)); $houseNumberOrName = $housenum; $city = $town; $postalCode = $pcode; $stateOrProvince = $state; $billingAddressType = $addtype; // concatenate all the data needed to calculate the HMAC-string in the correct order $hmacData = $paymentAmount . $currencyCode . $shipBeforeDate . $merchantReference . $skinCode . $merchantAccount . $sessionValidity . $shopperEmail . $shopperReference . $billingAddressType; $addresshmacData = $street . $houseNumberOrName . $city . $postalCode . $stateOrProvince . $country; // base64 encode the binary result of the HMAC computation. If you use a PHP version < 5.0.12 you // you may need to use a different HMAC implementation. Please refer to "Computing the HMAC in PHP"

$merchantSig = base64_encode(hash_hmac('sha1',$hmacData,$sharedSecret,true)); $billingAddressSig = base64_encode(hash_hmac('sha1',$addresshmacData,$sharedSecret,true)); // Include in the HTML form with mandatory form parameters: <input type="hidden" name="billingAddressSig" value="<?php print $billingAddressSig?>" /> <input type="hidden" name="billingAddressType" value="1" /> <input type="hidden" name="billingAddress.street" value="<?php print $street?>" /> <input type="hidden" name="billingAddress.houseNumberOrName" value="<?php print $housenum?>" /> <input type="hidden" name="billingAddress.city" value="<?php print $town?>" /> <input type="hidden" name="billingAddress.postalCode" value="<?php print $pcode?>" /> <input type="hidden" name="billingAddress.stateOrProvince" value="<?php print $state?>" /> <input type="hidden" name="billingAddress.country" value="<?php print $country?>" />

Section Topic
C Modifications It is possible to perform modifications using your account on the Barclaycard SmartPay Backoffice. It is generally a good idea to automate this if you are processing more than a handful of payments daily. For this we offer a SOAP web service which accepts the modification requests from your Backoffice systems. The modification types include:
capture refund cancel cancelOrRefund
To submit modification messages, you must supply HTTP basic authentication credentials (username/password). The username you should use is “[email protected]”, you can set the password for this user in the Merchant Backoffice (under “settings”->”users”). For more information please refer to the SmartPay Modifications Guide.

Section Topic
D Notifications Whenever a payment is made or a modification is processed, we will notify you of the event and whether or not it was performed successfully. Within your SmartPay back-office you can configure a URL that you wish to receive these messages. Notifications should be used to keep your own back-office systems up to date with the status of each payment or modification to a payment is made. Notifications allow you to receive updates on a payments status, for example you will receive a notification when a payment is processed and authorised. If the payment is then refunded using the back-office or a modification request you will receive a further a notification confirming the payment status has changed. If you choose to use the SmartPay subscription reports you will also receive a notification to confirm the report is available. The notification message also includes additional authorisation information that is not included at other points in the payment process. You must to ensure you have configured a Notification URL before you move your account from Test to Live. You can configure the Notification settings in the Barclaycard SmartPay Backoffice. For more information please refer to the SmartPay Notifications Guide.

Section Topic
E Skins
What is a Skin? A Skin is a set of look-and-feel customisations which consist of a set of custom HTML fragments, images and CSS style sheets, which define the look and feel of the Barclaycard SmartPay Hosted Payment Pages. This allows you to integrate the payment pages in the same style as your website. You can even create multiple skins if you have more than one web shop, or if you want to target a different type of device or application such as a mobile phone browser or point-of -sale terminal. HTML fragments which are included in the payment can also be supplied in different languages and many of the default strings and their translations can be changed by overriding them in resource files (which can also be supplied as part of the Skin). The Skin also allows you to manipulate which payment methods are offered by default and the order in which they are displayed. Also minimum and maximum transaction amounts per payment method can be specified. Please Note: The default skins that are created in your back-office are examples and can be used to process payments, if you make any modifications to the Skins it is your responsibility to test them and ensure they work before you go live. For more information please refer to the SmartPay Skins Guide.

Section Topic
F HPP - Oneclick Payments If a significant portion of your business consists of returning shoppers you can use the CSC-only (oneclick) functionality of Barclaycard SmartPay to store the card details used by a shopper. Returning shoppers will have the option to pay using a card they have previously used by simply filling in the Card Security Code (CSC/CVC) and confirming the purchase.
Setting up the Payment The payment session is set up just like a regular payment. There are two normally optional fields which now become mandatory and one new field which needs to be provided in the payment session form. Field Name Description shopperEmail
The email address of the shopper, no longer optional.
shopperReference
An id that refers uniquely to the shopper, no longer optional.
recurringContract
This parameter defines what type of recurring contract is used. For the CSC-only payments the value “ONECLICK” should be used.
For example: <input type="hidden" name="shopperEmail" value="[email protected]" /> <input type="hidden" name="shopperReference" value="grasshopper52" /> <input type="hidden" name="recurringContract" value="ONECLICK" /> The initial purchase will proceed just like a normal payment with a single exception: a checkbox will allow the shopper to opt-out of having their details stored. For a subsequent payment (provided the shopper didn't opt-out during the initial purchase) the shopper will see a graphic representation of their credit card with a blank field underneath in which to enter their card security code. Note - Shoppers are uniquely identified using the shopperReference parameter; it is most important that shoppers are securely logged in on your website and that the shopperReference parameter cannot be modified by the shopper.

Section Topic
G HPP - Recurring Payments A similar process to Oneclick is followed to create a recurring contract. Creating a recurring contract is done by having the shopper perform a regular payment and storing the card details. We refer to this as the “initial payment”. Recurring payments reuse payment details submitted earlier in the “initial payment” by the shopper to perform the payment. This section explains how to submit recurring payments to the Barclaycard SmartPay Payment System. Recurring payments reuse payment details submitted earlier by the shopper to perform the payment. Note - Recurring payments are not enabled by default. If you would like to start processing recurring payments, you can request this through the support team.
Creating a Recurring Contract Creating a recurring contract is done by having the shopper perform a regular payment. We refer to this as the “initial payment”, details from this will be used to perform later, recurring payments. Please Note: It is not possible to use the HPP to store card details without an authorisation attempt being made.
Setting up the Payment The payment session is set up just like a regular payment. There are two normally optional fields which now become mandatory and one new field which needs to be provided in the payment session form. These additional fields are included in the standard HTML form used to direct the cardholder to the single or multi-page HPP. Field Name Description shopperEmail
The email address of the shopper, no longer optional.
shopperReference
An id that refers uniquely to the (recurring) shopper, no longer optional.
recurringContract
This parameter defines what type of recurring contract is used. The value of this parameter must be "RECURRING" currently.

For example:
<input type="hidden" name="shopperEmail" value="[email protected]" /> <input type="hidden" name="shopperReference" value="grasshopper52" /> <input type="hidden" name="recurringContract" value="RECURRING" />
The value of the recurringContract parameter above must also be inserted into the signature string over which the HMAC is computed between the shopperReference and allowedMethods. e.g.: ‘…+ sessionValidity + shopperEmail + shopperReference + recurringContract + allowedMethods + ...’. The payment will proceed as usual and if the result is a successful authorisation, a recurring contract will automatically be created. We show you how to get the contract reference in the following section. Note - Shoppers are uniquely identified using the shopperReference parameter; it is most important that shoppers are securely logged in on your website and that the shopperReference parameter cannot be modified by the shopper.
Submitting Recurring Payments Submitting recurring payments is implemented as a SOAP service similar to the way modifications are submitted. The URL (and WSDL) for submitting the recurring transaction listed in the Appendix. To submit recurring payments, you must supply HTTP basic authentication credentials (username/password). For the username you should use “[email protected]”, you can set the password for this user in the Barclaycard SmartPay Backoffice (under “Settings”->”Users”). Please Note: It is typically possible to submit a subsequent recurring transaction after 5 minutes from the contract being created. To submit a recurring transaction you will need to call the authorise action in the payment service. Within this action there are two different requests according to the payment type used for the transaction:
paymentRequest directDebitRequest
For card, ELV and direct ebanking you will use the “paymentRequest”, Please see the following pages for a break down on the recurringPayment request and the response listing the possible values.

Recurring paymentRequest Payments The “paymentRequest“ has the following fields: Field Name Description selectedRecurringDetailReference
This is the recurringDetailReference you want to use for this payment. You can use the value “LATEST” to select the most recently used recurring detail.
recurring
The contract value of the recurring object should be present and contain value “RECURRING” for the contract field.
merchantAccount
The merchant account you want to process this payment with.
amount
The amount to authorise. This consists of a currencyCode and a value which is the amount in minor units (see explanation for the paymentAmount session).
reference
Your reference for this payment. This (merchant) reference will be used in all communication to you about the status of the payment. Although it is not a requirement it is a good idea to make this unique.
shopperEmail
The email address of the shopper. This does not have to match the email address supplied with the initial payment, since it may have changed in the mean time.
shopperReference
The reference to the shopper. This shopperReference must be the same as the shopperReference used in the initial payment.
shopperInteraction
The shopperInteraction of the recurring payment must be set to “ContAuth”,
fraudOffset (optional)
A integer that is added to normal fraud score. The value can be either positive or negative.
shopperIP (optional)
The IP address of the shopper. Used in various risk checks (number of payment attempts, location, etc.)

An example of a SOAP request is below showing how the above can be used to submit a recurring payment. <?xml version="1.0"?> <soap:Envelope xmlns:soap="http://schemas.xmlsoap.org/soap/envelope/" xmlns:xsd="http://www.w3.org/2001/XMLSchema" xmlns:xsi="http://www.w3.org/2001/XMLSchema-instance"> <soap:Body> <ns1:authorise xmlns:ns1="http://payment.services.adyen.com"> <ns1:paymentRequest> <amount xmlns="http://payment.services.adyen.com"> <currency xmlns="http://common.services.adyen.com">EUR</currency> <value xmlns="http://common.services.adyen.com">100</value> </amount> <ns1:merchantAccount>YourMerchantAccount</ns1:merchantAccount> <ns1:reference>RecurringPayment-0001</ns1:reference> <ns1:shopperIP>1.1.1.1</ns1:shopperIP> <ns1:shopperEmail>[email protected]</ns1:shopperEmail> <ns1:shopperReference>TheShopperReference</ns1:shopperReference> <ns1:selectedRecurringDetailReference>LATEST</ns1:selectedRecurringDetailReference> <ns1:recurring> <ns1:contract>RECURRING</ns1:contract> </ns1:recurring> <ns1:shopperInteraction>ContAuth</ns1:shopperInteraction> </ns1:paymentRequest> </ns1:authorise> </soap:Body> </soap:Envelope>
Example of a Recurring Payment SOAP request
Recurring paymentRequest response If the message passes validation a risk analysis will be done and, depending on the outcome, authorisation will be attempted. You will receive a payment response with the following fields: Field Name Description pspReference
The reference we assigned to the payment. This is guaranteed to be globally unique and must be used when communicating about this payment to us.
resultCode
The result of the payment. One of Authorised, Refused or Error
authCode
If the payment was successful the authCode (authorisation code) field will contain a value. In all other cases it will be blank.
refusalReason
If the payment was refused, the refusal reason will be specified here.
Please see the following page for an example of the soap recurring payment response.

<?xml version="1.0"?> <soap:Envelope xmlns:soap="http://schemas.xmlsoap.org/soap/envelope/" xmlns:xsd="http://www.w3.org/2001/XMLSchema" xmlns:xsi="http://www.w3.org/2001/XMLSchema-instance"> <soap:Body> <ns1:authoriseResponse xmlns:ns1="http://payment.services.adyen.com"> <ns1:paymentResult> <additionalData xmlns="http://payment.services.adyen.com" xsi:nil="true"/> <authCode xmlns="http://payment.services.adyen.com">50472</authCode> <dccAmount xmlns="http://payment.services.adyen.com" xsi:nil="true"/> <dccSignature xmlns="http://payment.services.adyen.com" xsi:nil="true"/> <fraudResult xmlns="http://payment.services.adyen.com" xsi:nil="true"/> <issuerUrl xmlns="http://payment.services.adyen.com" xsi:nil="true"/> <md xmlns="http://payment.services.adyen.com" xsi:nil="true"/> <paRequest xmlns="http://payment.services.adyen.com" xsi:nil="true"/> <pspReference xmlns="http://payment.services.adyen.com"> AnewPspReference </pspReference> <refusalReason xmlns="http://payment.services.adyen.com" xsi:nil="true"/> <resultCode xmlns="http://payment.services.adyen.com">Authorised</resultCode> </ns1:paymentResult> </ns1:authoriseResponse> </soap:Body> </soap:Envelope>
Example of a Recurring Payment SOAP response You will be informed of the authorisation result via a notification sent to your Notification URL.

Disable a Recurring Contract When a recurring contract is no longer relevant for whatever reason (e.g. a cancelled or expired subscription) it can be disabled to prevent accidentally charging the account holder. Deactivating/disabling a recurring contract is achieved by calling the Recurring service and using the method “disableRequest”. The “disableRequest“ has the following fields: Field Name Description merchantAccount
Your merchant account
shopperReference
The reference to the shopper. This shopperReference must be the same as the shopperReference used in the initial payment.
recurringDetailReference (optional)
The recurringDetailReference of the details you wish to disable. If you do not supply this field, all details for the shopper will be disabled, including the contract.
<?xml version="1.0"?> <soap:Envelope xmlns:soap="http://schemas.xmlsoap.org/soap/envelope/" xmlns:xsd="http://www.w3.org/2001/XMLSchema" xmlns:xsi="http://www.w3.org/2001/XMLSchema-instance"> <soap:Body> <ns1:disable xmlns:ns1="http://recurring.services.adyen.com"> <ns1:disableRequest> <ns1:merchantAccount>YourMerchantAccount</ns1:merchantAccount> <ns1:shopperReference>TheShopperReference</ns1:shopperReference> <ns1:recurringDetailReference> </ns1:recurringDetailReference> </ns1:disableRequest> </ns1:disable> </soap:Body> </soap:Envelope>
Example of a Recurring Disable SOAP Request Details of the Disable Response can be found on the following page.

Disable Response The response will be a “disableResponse“ object with a single field “response“. If a single detail was disabled, the value of this field will be "[detail-successfully-disabled]", if all details are disabled, the value is "[all-detailssuccessfully-disabled]". <?xml version="1.0"?> <soap:Envelope xmlns:soap="http://schemas.xmlsoap.org/soap/envelope/" xmlns:xsd="http://www.w3.org/2001/XMLSchema" xmlns:xsi="http://www.w3.org/2001/XMLSchema-instance"> <soap:Body> <ns1:disableResponse xmlns:ns1="http://recurring.services.adyen.com"> <ns1:result> <response xmlns="http://recurring.services.adyen.com"> [detail-successfully-disabled] </response> </ns1:result> </ns1:disableResponse> </soap:Body> </soap:Envelope>
Example of a Recurring Disable SOAP Response

Supported Payment Methods If the initial payment is performed with one of the following payment methods, it is possible to use the details for recurring payments: Card – All credit and debit cards, with the exception of Maestro: these cards can not be
used for recurring payments. iDEAL - Recurring via iDEAL is not enabled by default. Please contact support if you
would like to support this as well. directdebit_NL ELV direct ebanking - Only when the shopper has used a German bank account. Giropay iDEAL and directEbanking are both payment methods which need shopper interaction which is not possible for recurring payments. Therefore recurring payments via these two payment methods are processed via a different payment method. When the initial payment is iDEAL, the recurring payments are processed as directdebit_NL. Also when the initial payment is direct ebanking, the recurring payments are processed as ELV. Note - that this payment method must also be enabled for your Merchant Account for processing these recurring payments. If you do not want to enable the payment method itself on your Hosted Payment Page, like directdebit_NL, than you will have to deactivate it in your Skin. For all other supported payment methods the recurring payment method is the same as the initial payment method. Please note that it must be clear to the shopper that their details are used for recurring payments. Therefore you should add a message to your website like:
‘I understand that my subscription will be prolonged automatically at the end of each subscription period. The recurring subscription fee will be charged from my credit card, or in case of iDEAL via direct debit from my bank account. I can cancel the subscription at any time
from my game club menu and will then not be charged again.’
Section Topic
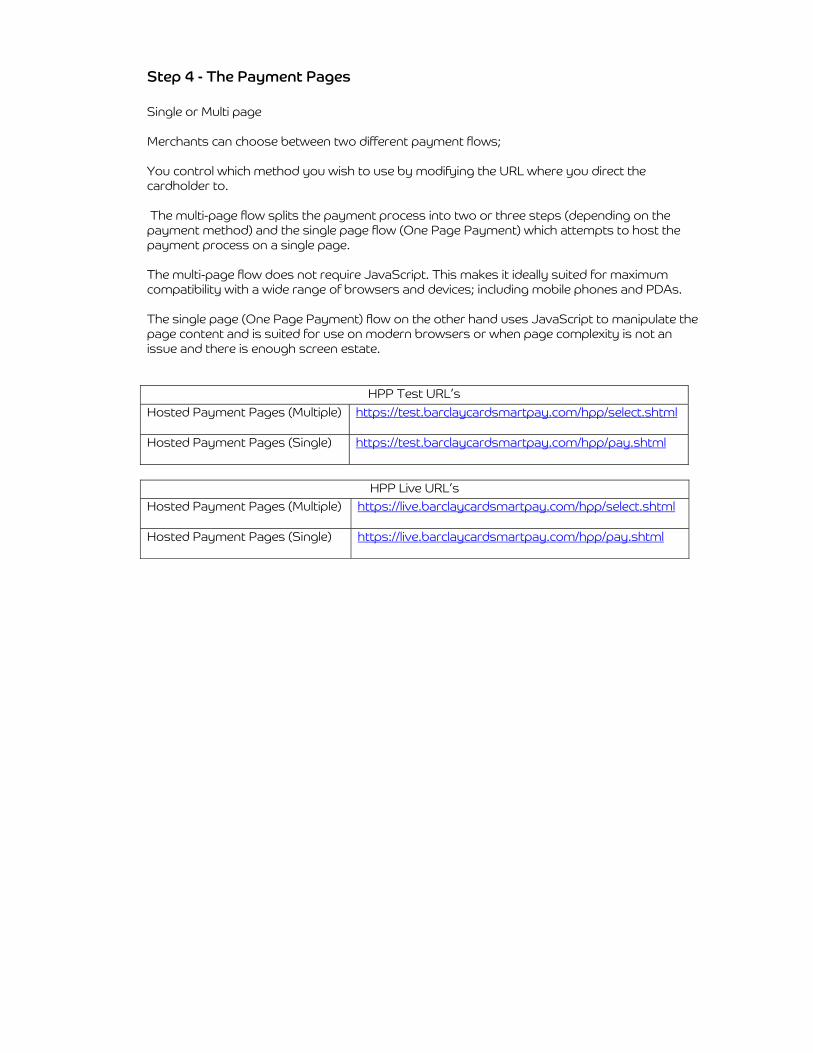
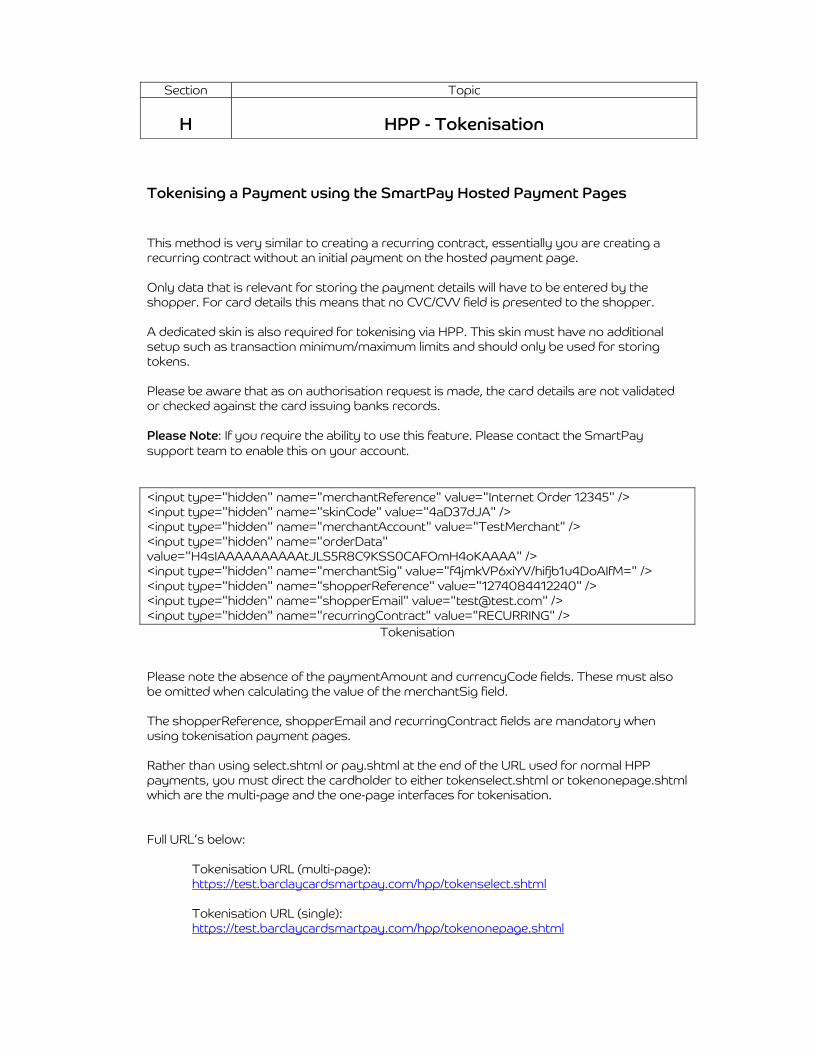
H HPP - Tokenisation
Tokenising a Payment using the SmartPay Hosted Payment Pages This method is very similar to creating a recurring contract, essentially you are creating a recurring contract without an initial payment on the hosted payment page. Only data that is relevant for storing the payment details will have to be entered by the shopper. For card details this means that no CVC/CVV field is presented to the shopper. A dedicated skin is also required for tokenising via HPP. This skin must have no additional setup such as transaction minimum/maximum limits and should only be used for storing tokens. Please be aware that as on authorisation request is made, the card details are not validated or checked against the card issuing banks records. Please Note: If you require the ability to use this feature. Please contact the SmartPay support team to enable this on your account. <input type="hidden" name="merchantReference" value="Internet Order 12345" /> <input type="hidden" name="skinCode" value="4aD37dJA" /> <input type="hidden" name="merchantAccount" value="TestMerchant" /> <input type="hidden" name="orderData" value="H4sIAAAAAAAAAAtJLS5R8C9KSS0CAFOmH4oKAAAA" /> <input type="hidden" name="merchantSig" value="f4jmkVP6xiYV/hifjb1u4DoAIfM=" /> <input type="hidden" name="shopperReference" value="1274084412240" /> <input type="hidden" name="shopperEmail" value="[email protected]" /> <input type="hidden" name="recurringContract" value="RECURRING" />
Tokenisation Please note the absence of the paymentAmount and currencyCode fields. These must also be omitted when calculating the value of the merchantSig field. The shopperReference, shopperEmail and recurringContract fields are mandatory when using tokenisation payment pages. Rather than using select.shtml or pay.shtml at the end of the URL used for normal HPP payments, you must direct the cardholder to either tokenselect.shtml or tokenonepage.shtml which are the multi-page and the one-page interfaces for tokenisation. Full URL’s below:
Tokenisation URL (multi-page): https://test.barclaycardsmartpay.com/hpp/tokenselect.shtml Tokenisation URL (single): https://test.barclaycardsmartpay.com/hpp/tokenonepage.shtml

Upon completion of the tokenisation the shopper is redirected to a result URL. The fields that are passed as part of that redirection are exactly the same as described in the “Payment Completion” section of the HPP Integration Guide. The differences are two-fold:
1. The pspReference field will contain the recurringDetailReference value. This is a 16-digit number that uniquely identifies the stored details.
2. The authResult field will contain the word TOKENSTORED if the payment details have been successfully stored, or ERROR otherwise.
Currently only card type payment methods are supported when using the HPP for tokenising payment details.

Section Topic
I Downloading Reports Once subscribed to a report and the report has been produced they can be downloaded from the report URL’s in the Appendix. Substitute your merchant or company account names in the underlined parts. As the URLs use plain HTTP authentication, you can therefore automate downloading these reports. The username is always [email protected] and the password can be set by selecting Settings and then Users in the Smartpay Backoffice. If you cannot use the @ in the user name, you can also use the % character instead. An easy way to accomplish this from the command-line is to use wget (YCA means your company account and YMA your merchant account, PWD is the password, REP is the report name (e.g. payment_report_batch_18.csv)): $ wget --http-user=report%Company.YCA --http-password=PWD --quiet
--no-check-certificate https://ca-live.barclaycardsmartpay.com/reports/download/MerchantAccount/YMA/REP
However, when new reports are made available, you will receive the regular notification by an HTTPS post or SOAP message to your server, just as you receive payment notifications. The status code is “REPORT_AVAILABLE” and the full download URL will be included in the notification.

Section Topic
J Payment Methods
Passing Payment Methods with Shopper
For some payment request fields you may use require payment method values to indicate certain payment methods, an example of this are the allowedMethods and blockedMethods fields. Below a list of the most common used payment methods names with their value. Please note that the value is case sensitive.
Payment Method name value Visa visa MasterCard mc Solo solo Amex amex iDeal ideal Dutch Banktransfer bankTransfer_NL German Banktransfer bankTransfer_DE Elv elv Dutch Direct Debit directdebit_NL SofortUberweisung directEbanking PayPal paypal Giropay giropay
Also, for the allowedMethods and the blockedMethods fields you can use group payment method value, an example of this is the use of ‘card’ this denotes all cards (visa, mc, amex, etc.) the table below contains the other groups available.
Payment Method name value Cards (includes all debit and credit cards) card Bank Transfers (includes all banktransfers from all countries)
bankTransfer
Some payment methods are not available in all countries. For example iDEAL is only offered if the shopper is from The Netherlands. If the payment methods selection is done on your website, and the allowedMethods parameter contains a value for a payment method that is not available in all countries, we advise to set the countryCode parameter as well. If you don’t, when the shopper originates from a country that won’t prompt the display of that payment method, no payment methods are displayed. For example: if you set the allowedMethods="ideal", you will have to set the countryCode="NL" to make sure that the iDeal payment methods is displayed. Note - The list of payment methods on the Test environment can be different than the list of payment methods on the Live environment. This means that a payment method which is configured on Test is not automatically also available on Live.

Adding Payment Methods
With your account you can choose from a wide range of payment methods. To see what payment methods you currently offer you’ll need to login to the Barclaycard SmartPay Backoffice and then follow these steps.
1. Select Skins from the left hand menu. 2. Then click the Skin code you wish to check the payment methods of. 3. Select Payment Methods from the Extra options at the bottom of the page to see the
manage Payment Methods screen.
Here you can control which payment methods are available, the payment method configuration options and the order they appear on the payment page. If there is a payment method which is not on this list which you would like to accept then please contact our support team.
Set Order of Payment Methods
To change the order or priority of the payment methods available, you can use the Order icons in the right hand column (highlighted in Red below) allowing you to promote your preferred a method to the top of the list. As long as it is active and valid for the country then this payment method will appear first on the payment page.
Activate/Disable Payment Method
The Enabled column shows if a payment method is active or not, if it is not enabled then it will not appear on the payment page. To enable or disable the payment method select the Name or click on the tick/cross or select options this will then open the following screen.

To enable or disable the payment method just select the deactivate/activate button and then select Save Changes.
Set Payment Method Options
Similar to the previous method you will need to select the Name or click on the tick/cross or select options this will then open the previously mentioned screen where you can set the following in addition to enabling or disabling the method.
Minimum Quantity
On each payment type you can specify a lower threshold for a payment method, so that it will not appear as an option unless the total is higher than the value specified here.
Maximum Quantity
Similar to the Minimum Quantity the field allows you to set a maximum value on a payment method, so if the total is higher then the value specified the payment method will not be available.
Adding Costs or discounts
At some point you may decide you wish to discount or charge an administration fee for certain payment types - this can be done within the payment options, this can be a fixed or percentage amount which will be automatically be added to or subtracted from the total when using the hosted payment pages.

Section Topic
J Payment Methods - PayPal If you wish to accept PayPal as a payment method, then please contact our support team, we will advise you what the steps are to getting this setup. Once you have your account you will need to allow payments via Barclaycard SmartPay to do this you will have to do the following: Log in on your PayPal account at http://www.paypal.com Go to your Profile page by selecting "Profile" in the menu on top of the PayPal Backoffice
screen Select "API Access" which is listed under Account Information Select "Grant API Permission" Please fill in the following information:
API account username: TBC API Access Level: Direct Payment
Express Checkout Reporting and Backoffice APIs Authorization and Settlement APIs
Send us your PayPal account email address

Section Topic
K Moving from Test to Live Once you have finished testing your integration and are in a suitable position to begin processing live payments there are some steps you should take to ensure you are ready to begin trading.
1. Make sure you have downloaded all appropriate documentation form the smartpay documentation site http://www.barclaycard.com/smartpay/documentation/.
2. Complete an end to end test of your website making sure no integration errors occur.
It is important to understand, that the detail contained in error messages on the TEST platform will not appear in LIVE.
3. Ensure that you have requested a Live account to be set up through your account
manager and that it is ready to be used.
4. Ensure that 3D secure has been implemented on your ECOM merchant account and that it is ready to be used.
5. In your Test back-office (https://ca-test.barclaycardsmartpay.com/ca/ca/login.shtml)
ensure you have published your SKINS to Live.
6. Once you have your Live account details confirmed to you, then ensure that you have appropriately configured your Live backoffice (https://ca-live.barclaycardsmartpay.com/ca/ca/login.shtml) to match the settings of your Test account.
7. Modify any Test URL’s to Live URL’s for any/all methods of connection to SmartPay
you are using (Please refer to Appendix A – Test and Live URL’s for more information).

Section Topic
A Appendix A – Test and Live URL’s Please find below a list of the URL’s used by Barclaycard SmartPay, please note these have been divided between test and live, to access the corresponding account.
URL’s for test Backoffice URL – https://ca-test.barclaycardsmartpay.com/ca/ca/login.shtml Hosted Payment Pages (Multiple): - https://test.barclaycardsmartpay.com/hpp/select.shtml
Hosted Payment Pages (Single) - https://test.barclaycardsmartpay.com/hpp/pay.shtml RSS Feed URL – https://ca-test.barclaycardsmartpay.com/reports/rss/lasttxrss/MerchantAccount/** https://ca-test.barclaycardsmartpay.com/reports/rss/lasttxrss/Company/*** Reports URL - https://ca-test.barclaycardsmartpay.com/reports/download/MerchantAccount/**/ https://ca-test.barclaycardsmartpay.com/reports/download/Company/***/ Modification SOAP Service – https://pal-test.barclaycardsmartpay.com/pal/servlet/soap/Payment Modification SOAP Service WSDL – https://pal-test.barclaycardsmartpay.com/pal/Payment.wsdl Notification SOAP Service WSDL – https://ca-test.barclaycardsmartpay.com/ca/services/Notification?wsdl Open Invoice SOAP Service WSDL – https://ca-test.barclaycardsmartpay.com/ca/services/OpenInvoiceDetail?wsdl Recurring SOAP Service URL – https://pal-test.barclaycardsmartpay.com/pal/servlet/soap/Recurring Recurring SOAP Service WSDL – https://pal-test.barclaycardsmartpay.com/pal/Recurring.wsdl Payment SOAP Service – https://pal-test.barclaycardsmartpay.com/pal/servlet/soap/Payment Payment SOAP Service WSDL – https://pal-test.barclaycardsmartpay.com/pal/Payment.wsdl Tokenisation URL (multi-page): https://test.barclaycardsmartpay.com/hpp/tokenselect.shtml Tokenisation URL (single): https://test.barclaycardsmartpay.com/hpp/tokenonepage.shtml

URL’s for Live Backoffice URL – https://ca-live.barclaycardsmartpay.com/ca/ca/login.shtml Hosted Payment Pages (Multiple): - https://live.barclaycardsmartpay.com/hpp/select.shtml
Hosted Payment Pages (Single) - https://live.barclaycardsmartpay.com/hpp/pay.shtml RSS Feed URL – https://ca-live.barclaycardsmartpay.com/reports/rss/lasttxrss/MerchantAccount/** https://ca-live.barclaycardsmartpay.com/reports/rss/lasttxrss/Company/*** Reports URL - https://ca-live.barclaycardsmartpay.com/reports/download/MerchantAccount/**/ https://ca-live.barclaycardsmartpay.com/reports/download/Company/***/ Modification SOAP Service – https://pal-live.barclaycardsmartpay.com/pal/servlet/soap/Payment Modification SOAP Service WSDL – https://pal-live.barclaycardsmartpay.com/pal/Payment.wsdl Notification SOAP Service WSDL – https://ca-live.barclaycardsmartpay.com/ca/services/Notification?wsdl Open Invoice SOAP Service WSDL – https://ca-live.barclaycardsmartpay.com/ca/services/OpenInvoiceDetail?wsdl Recurring SOAP Service URL – https://pal-live.barclaycardsmartpay.com/pal/servlet/soap/Recurring Recurring SOAP Service WSDL – https://pal-live.barclaycardsmartpay.com/pal/Recurring.wsdl Payment SOAP Service – https://pal-live.barclaycardsmartpay.com/pal/servlet/soap/Payment Payment SOAP Service WSDL – https://pal-live.barclaycardsmartpay.com/pal/Payment.wsdl Tokenisation URL (multi-page): https://live.barclaycardsmartpay.com/hpp/tokenselect.shtml Tokenisation URL (single): https://live.barclaycardsmartpay.com/hpp/tokenonepage.shtml ** - enter your Merchant Account name in place of this marker. *** - enter your Company Account name in place of this marker.

Section Topic
B Appendix B – Computing the HMAC The signature is computed using the HMAC algorithm with the SHA-1 hashing function3. The data passed in the form fields is concatenated into a string (the “signing string”). The HMAC signature is then computed over this string using a key (which is set for the merchant's Skin). The signature is passed along with the form data and checked at the other end to verify that the data has not been tampered with in transit. The HMAC signature is binary data, so we base64 encode it for transmission. We use HMAC signing for setting up the payment in our systems, and you should use it to verify the payment result when the shopper returns.
Payment Set-up
When setting up a payment the signing string is as follows: paymentAmount + currencyCode + shipBeforeDate + merchantReference + skinCode + merchantAccount + sessionValidity + shopperEmail + shopperReference + allowedMethods + blockedMethods + shopperStatement + billingAddressType The order of the fields must be exactly the same as described above. If you are not using one of the fields, for example 'allowedMethods', the value for this field in the signing string is an empty string. Note – According to the programming language you use you may need to replace the ‘+’ used to join the strings together with a ‘.’ Instead this would mean that the above would become the following. paymentAmount . currencyCode . shipBeforeDate . merchantReference . skinCode . merchantAccount . sessionValidity . shopperEmail . shopperReference . allowedMethods . blockedMethods . shopperStatement . billingAddressType In the example in introduction, this would provide us with the signing string: 10000GBP2007-10-20Internet Order 123454aD37dJATestMerchant2007-10-11T11:00:00Z If the shared secret is Kah942*$7sdp0), the resulting signature is (base64 encoded): x58ZcRVL1H6y+XSeBGrySJ9ACVo=
Payment Result
The payment result uses the following signature string:
authResult + pspReference + merchantReference + skinCode + merchantReturnData In the example in chapter 1, this would provide us with the signing string (parameter values are URL decoded, which your framework should do for you):
AUTHORISED1211992213193029Internet Order 123454aD37dJA If the shared secret is Kah942*$7sdp0), the resulting signature is (base64 encoded):
ytt3QxWoEhAskUzUne0P5VA9lPw= Note - The shopperLocale is passed as parameter, but not used in the signing string.

Example HTML Post Form
This is an example of a form which could be created by your website to submit the customer and the order details to the HPP, this also includes the possible address fields which may be included. <form name="smartForm" action="https://test.barclaycardsmartpay.com/hpp/pay.shtml" method="post" id='tosub'>
<input type="hidden" name="merchantReference" value="MR20091012" /> <input type="hidden" name="billingAddress.street" value="Churchhill Place" /> <input type="hidden" name="billingAddress.houseNumberOrName" value="1" /> <input type="hidden" name="billingAddress.city" value="London" /> <input type="hidden" name="billingAddress.postalCode" value="E14 5HP" /> <input type="hidden" name="billingAddress.stateOrProvince" value="London" /> <input type="hidden" name="billingAddress.country" value="GB" /> <input type="hidden" name="billingAddressSig" value="FHv3XSg…5fa6Ga8=" /> <input type="hidden" name="paymentAmount" value="2500" /> <input type="hidden" name="currencyCode" value="GBP" /> <input type="hidden" name="shipBeforeDate" value="20091017" /> <input type="hidden" name="skinCode" value="WQ12WQ12" /> <input type="hidden" name="merchantAccount" value="AccountName" /> <input type="hidden" name="shopperLocale" value="en_GB" /> <input type="hidden" name="orderData" value="H4sIAWWAAA…..PALrqTATTA" /> <input type="hidden" name="sessionValidity" value="2009-10-12T14:52:55+01:00"
/> <input type="hidden" name="merchantSig" value="ZP4p9o4b…7D0Th8B4=" /> <input type="hidden" name="countryCode” value="GB" /> <input type="hidden" name="shopperEmail" value="[email protected]" /> <input type="hidden" name="shopperReference" value="SR20091012" /> <input type="hidden" name="billingAddressType" value="1" /> <input type="submit" name="submit" value="Buy Now" />
</form>

Section Topic
C Appendix C – Format Standards As part of the data which is used in the payment process you will need to ensure that details like the date are formatted correctly please use the following links to find out more about the standards used and how to format the data. For the Shipbeforedate and sessionValidity please refer to the following like which explains how to format the date a time fields.
http://www.w3.org/TR/NOTE-datetime To pass the countryCode for the billing address, please see the following link which explains the ISO 3166-1 alpha-2 format.
http://www.iso.org/iso/country_codes/iso_3166_code_lists/english_country_names_and_code_elements.htm When passing the currencyCode you can use the format from the following URL - http://www.iso.org/iso/support/faqs/faqs_widely_used_standards/widely_used_standards_other/currency_codes/currency_codes_list-1.htm - Please see the follow section for a list of supported currency codes. With the option of being able to set your own Address bar icon if you don't have tools to create a custom favicon.ico file, you can generate one online at http://www.favicon.cc/

Section Topic
D Appendix D – Currency Codes
Currency Currency Code United Arab Emirates Dirham AED
Argentinean Peso ARS Australian Dollar AUD Bolivia Boliviano BOB
Brazilian Real BRL Bulgarian Lev BGN
Canadian Dollar CAD Swiss Franc CHF Chilean Peso CLP Chinese Yuan CNY
Colombian Peso COP Croatian Kuna HRK
Czech Republic Koruna CZK Danish Krone DKK Estonia Kroon EEK
Euro EUR British Pound GBP
Hong Kong Dollar HKD Hungarian Forint HUF
Israeli Shekel ILS Indian Rupee INR
Icelandic Krona ISK Japan Yen JPY
South Korea Won KRW Lithuania Litas LTL
Latvia Lats LVL Malaysian Ringgits MYR Morocco Dirham MAD Nepalese Rupee NPR
(New) Mexican Peso MXN (New) Taiwan Dollar TWD
Norwegian Krone NOK New Zealand Dollar NZD
Pakistan Rupee PKR Paraguayan Guarani PYG
Peruvian Sol PEN Poland Zloty PLN
Romanian Leu RON Russian Ruble RUB
Saudi Arabia Riyal SAR Sweden Krona SEK
Singapore Dollar SGD Slovakia EUR SKK
Sri Lanka Rupee LKR Thailand Baht THB

Turkey Lira TRY
If the country or currency you require does not appear in the above then please contact our support team.

Section Topic
E Appendix E – Payment Methods The Payment methods are case sensitive and include the following:-
visa mc amex maestrouk solo ideal elv directdebit_NL bankTransfer_NL bankTransfer_DE paypal sms ivr ivrLandline ivrMobile giropay
The shorthand ‘card’ may be used to denote all cards (i.e. visa,mc,amex,etc...) and ‘bankTransfer’ to denote all bank transfers (i.e. bankTransfer_NL, bankTransfer_DE, etc...

Section Topic
F Appendix F – Trouble Shooting The following contains some of the common errors you may receive when integrating to the Barclaycard SmartPay Hosted Payment Pages. If you receive an error or experience any difficulties which are not covered by the following then please do not hesitate to contact the support team.
Merchant signature was not valid
Error Message
Description This error message can be caused by one of the following reasons:-
1. One of the following mandatory fields is missing or has no
value from the HMAC data (encrypted string):
a. Merchant reference b. Payment amount c. Currency code d. Ship before date e. Skin code f. Merchant account g. Session validity h. Merchant signature
All of the above need to match the data within the merchantSig.
2. This can also be caused if the HMAC key passed does not
match the HMAC key specified for the Skin key.
Merchant account NULL or not configured in Skin
Error Message
Description This error message can be caused by one of the following reasons:-
1. The merchantAccount is not being passed in the HMAC. 2. The merchant needs to add the merchant account to the
encrypted string (HMAC).

Merchant account [merchant account name] not configured in Skin:
Error Message
Description The merchant account is not linked to the Skin. The Skin
configuration needs to have the merchant account name amended.
Billing address incomplete:
Error Message
Description This can be caused if the billing address data is missing or incomplete. If you are planning to allowing passing of empty address fields to the payment page please revisit the billingAddressType value. If it is set to un-modifiable then all fields will need to be specified, however if you leave this in a modifiable state the details that are passed will be displayed and changeable by the customer.
Session validity is in the past:
Error Message
Description The session validity needs to be set in the future within the string and posted data. The date specifed as the session vadility needs to be set iat present or in the future.
CurrencyCode value missing
Error Message
Description The currencyCode value is missing or empty, please verify the currencyCode is being passed and has a valid value.
Merchant Reference is missing
Error Message
Description The merchant Reference is missing or empty, please check that you are passing a merchantReference and that it has a valid value. The merchant reference is the order reference number on your system.

107 - Recurring is not enabled
Error Message When using Recurring Payments:- 107 - Recurring is not enabled
Description Recurring is not enabled by default. Please contact support and request to activate Recurring for your account. Make sure you specify what your Company Account is.
The server sent HTTP status code 401: Unauthorized
Error Message When using Recurring Payments:- The server sent HTTP status code 401: Unauthorized'.
Description Your webservice was not able to login properly. Double check if: You have used the correct Service URL (Payment or
Recurring) You have used the correct username you used the configured
password with
Problem Displaying Page
Error Message
Description You have supplied the paymentAmount in an invalid format e.g included a decimal point. Please ensure you remove any decimal points from the paymentAmount.

Section Topic
G Appendix G – Payment Page HTML Skeleton <!DOCTYPE html PUBLIC "-//W3C//DTD XHTML 1.0 Strict//EN"
"http://www.w3.org/TR/xhtml1/DTD/xhtml1-strict.dtd"> <html xmlns="http://www.w3.org/1999/xhtml" xml:lang="en"> <head>
<meta http-equiv="Content-Type" content="text/html; charset=utf-8" /> <title>Page Title</title> <link rel="stylesheet" media="screen" type="text/css" href="/hpp/css/reset.css" /> <link rel="stylesheet" media="screen" type="text/css"
href="/sf/$skinCode/css/screen.css" /> <link rel="stylesheet" media="print" type="text/css"
href="/sf/$skinCode/css/print.css" /> <script type="text/javascript" src="/hpp/js/default.js"></script> <script type="text/javascript" src="/sf/$skinCode/js/custom.js"></script> <!--[if lt IE 7]>
<link rel="stylesheet" type="text/css" href="/sf/$skinCode/css/screen_ie6.css" /> <![endif]-->
</head> <body>
<!-- ### inc/cheader_[locale]5.txt or inc/cheader.txt (fallback) ### --> <form id="pageform" action="" method="post" onsubmit="return formValidate(this);"> <script type="text/javascript"> //<![CDATA[ if (notNull(document.getElementById('pageform'))) { document.getElementById('pageform').setAttribute("autocomplete","off"); } //]]> </script> <div id="content">
<div id="pmcontent"> <!-- ### inc/pmheader_[locale].txt or in/pmheader.txt (fallback) ### --> <div class="padDiv1"></div> <!-- ==================== --> <!—Barclaycard SmartPay Main Content --> <!-- ==================== --> <div class="padDiv2"></div> <!-- ### inc/pmfooter_[locale].txt or inc/pmfooter.txt (fallback) ### --> <!-- ### inc/customfields_[locale].txt or inc/customfields.txt (fallback) ### --> </div>
</div> <div id="foot">
<div id="footc"> <div id="nextstep">
<div id="nextstepc">Next Step Text</div> </div> <div id="footerb1div">
<input onclick="" type="submit" id="mainSubmit" value="continue" class="footerB nextB" />
</div> <div id="footerb2div">
<input onclick="" type="button" id="mainBack" value="previous" class="footerB backB" />
</div>

</div>
</div> </form> <!-- ### inc/cfooter_[locale].txt or inc/cfooter.txt (fallback) ### --> </body> </html>

Section Topic
H Appendix H – HTML Structure

Barclaycard is a trading name of Barclays Bank PLC. Barclays Bank PLC is authorised by the Prudential Regulation Authority and regulated by the Financial Conduct Authority and the Prudential Regulation Authority (Financial Services Register number: 122702). Barclays Bank PLC subscribes to the Lending Code which is monitored and enforced by the Lending Standards Board. Registered in England No. 1026167. Registered Office: 1 Churchill Place, London E14 5HP.
Section Topic
I Appendix I – Reset.css @media screen {
/* Don't forget to set a foreground and background colour */ /* on the 'html' or 'body' element! */
html,body,div,span,applet,object,iframe,h1,h2,h3,h4,h5,h6,p,blockquote,pre,a,abbr,acrony m,address,big,cite,code,del,dfn,em,font,img,ins,kbd,q,s,samp,small,strike,strong,sub,sup ,tt,var,dd,dl,dt,li,ol,ul,fieldset,form,label,legend,table,caption,tbody,tfoot,thead,tr, th,td
{ margin: 0; padding: 0; border: 0; font-weight: inherit; font-style: inherit; font-size: 100%; line-height: 1; font-family: inherit; text-align: left; vertical-align: baseline;
} a img,:link img,:visited img {
border: 0; } table {
border-collapse: collapse; border-spacing: 0;
} ol,ul {
list-style: none; } q:before,q:after,blockquote:before,blockquote:after {
content: ""; }
} @media print {
.hideforprint { display: none;} } /* Some Layout Shortcuts */ .r { text-align: right; } .l { text-align: left; } .fr { float: right; } .fl { float: left; } .b { font-weight: bold; } .mid { vertical-align: middle; } .red { color: #c00; }