SMART ARM-based Microcontrollers Introduction...
29
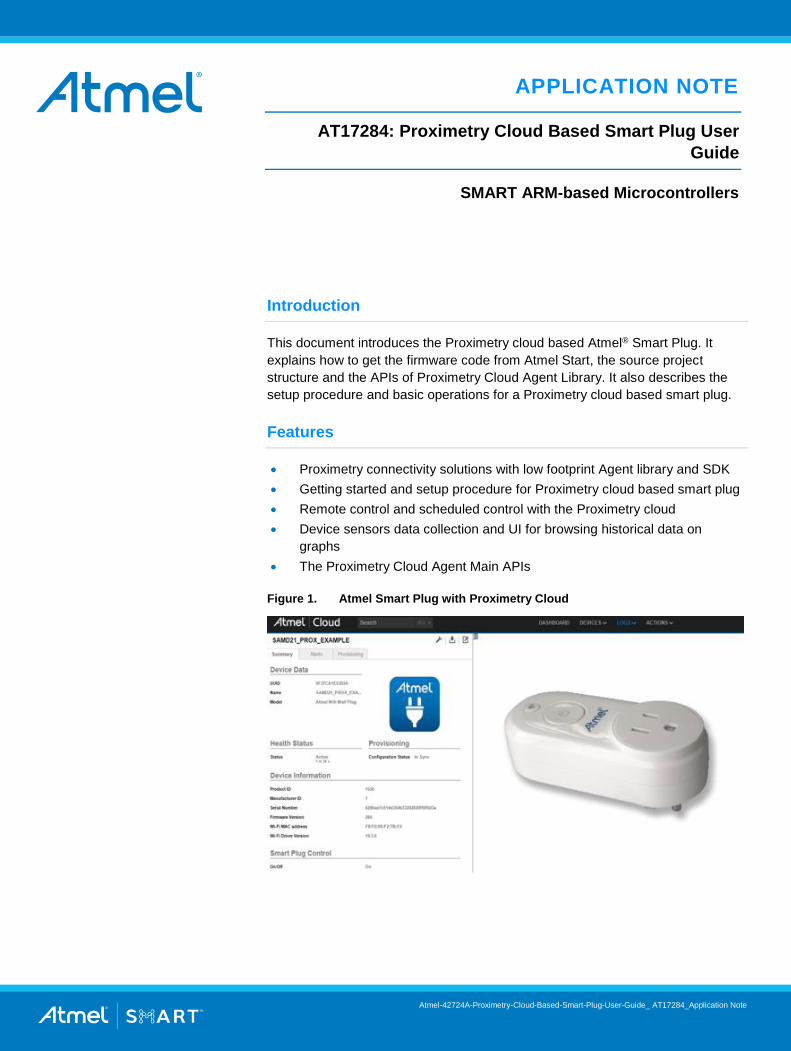
APPLICATION NOTE AT17284: Proximetry Cloud Based Smart Plug User Guide SMART ARM-based Microcontrollers Introduction This document introduces the Proximetry cloud based Atmel ® Smart Plug. It explains how to get the firmware code from Atmel Start, the source project structure and the APIs of Proximetry Cloud Agent Library. It also describes the setup procedure and basic operations for a Proximetry cloud based smart plug. Features Proximetry connectivity solutions with low footprint Agent library and SDK Getting started and setup procedure for Proximetry cloud based smart plug Remote control and scheduled control with the Proximetry cloud Device sensors data collection and UI for browsing historical data on graphs The Proximetry Cloud Agent Main APIs Figure 1. Atmel Smart Plug with Proximetry Cloud Atmel-42724A-Proximetry-Cloud-Based-Smart-Plug-User-Guide_ AT17284_Application Note
Transcript of SMART ARM-based Microcontrollers Introduction...
APPLICATION NOTE
AT17284: Proximetry Cloud Based Smart Plug User
Guide
SMART ARM-based Microcontrollers
Introduction
This document introduces the Proximetry cloud based Atmel® Smart Plug. It
explains how to get the firmware code from Atmel Start, the source project
structure and the APIs of Proximetry Cloud Agent Library. It also describes the
setup procedure and basic operations for a Proximetry cloud based smart plug.
Features
Proximetry connectivity solutions with low footprint Agent library and SDK
Getting started and setup procedure for Proximetry cloud based smart plug
Remote control and scheduled control with the Proximetry cloud
Device sensors data collection and UI for browsing historical data on
graphs
The Proximetry Cloud Agent Main APIs
Figure 1. Atmel Smart Plug with Proximetry Cloud
Atmel-42724A-Proximetry-Cloud-Based-Smart-Plug-User-Guide_ AT17284_Application Note
AT17284: Proximetry Cloud Based Smart Plug User Guide [APPLICATION NOTE] Atmel-42724A-Proximetry-Cloud-Based-Smart-Plug-User-Guide_ AT17284_Application Note 2
2
Table of Contents
Introduction .................................................................................... 1
Features .......................................................................................... 1
1 Overview .................................................................................... 3
1.1 Smart Plug Block Diagram ............................................................................ 3
2 Proximetry Cloud Account Registration and Activation ........ 4
2.1 Proximetry Cloud Account Registration ........................................................ 5
2.2 Active Proximetry Cloud Account .................................................................. 6
3 Development Tools ................................................................... 8
4 Getting Started with Proximetry Cloud Project ...................... 9
4.1 Download Proximetry Cloud Project from Atmel Start ................................... 9
4.2 Import Proximetry Cloud Project into Atmel Studio 7.0 ............................... 10
5 Firmware Architecture ............................................................ 12
5.1 Wi-Fi Connectivity ....................................................................................... 13
5.2 Security ....................................................................................................... 13
5.2.1 Hardware Crypto Engine .................................................................... 13
5.2.2 Software Crypto Library ...................................................................... 14
5.3 Sensor Control ............................................................................................ 14
5.4 QTouch PTC Library ................................................................................... 14
5.5 Proximetry Cloud Agent .............................................................................. 14
6 Source Code Structure ........................................................... 15
7 Proximity Cloud Connectivity Based on Smart Plug ............ 16
7.1 Register Smart Plug Device in Proximetry Cloud ........................................ 16
7.2 View Smart Plug Device Information through Proximetry Cloud Account ... 17
8 Proximetry Cloud Usage and Operations ............................. 18
8.1 Device Activation Code Operations ............................................................ 18
8.2 Proximetry Cloud Device List Operations ................................................... 20
8.3 Proximetry Could Device Group Operations ............................................... 22
8.4 Smart Plug ON/OFF Control ....................................................................... 24
8.5 Smart Plug Scheduled Control .................................................................... 25
9 Proximetry Cloud APIs introduction ..................................... 26
10 Memory Footprint ................................................................... 27
11 Revision History ..................................................................... 28

AT15735: Atmel Smart Plug Firmware User Guide [APPLICATION NOTE] Atmel-42724A-Proximetry-Cloud-Based-Smart-Plug-User-Guide_ AT17284_Application Note
3
3
1 Overview
The Atmel smart plug is an IoT edge node from an IoT system level of view. It acts as a Wi-Fi® Access Point
(AP) during initial setup and can be accessed and configured by the Android app, and will afterwards act as a
connected node on the home Wi-Fi network.
In order to manage smart plug devices through Proximetry, the users should first register a Proximetry cloud
account on the official Proximetry website and then register the smart plug devices in the Proximetry cloud.
After the smart plug has been assigned with a correct device activation code provided by Proximetry and
successfully connected to a Wi-Fi network, the smart plug device node can be found on the Proximetry cloud
account.
The smart plug work flow is shown in the figure below. This is a quite common setup for any IoT system
design.
Figure 1-1. Smart Plug Work Flow
As shown in Figure 1-1, there are two working stages. The first one is adding new plug stage, which is also
known as provisioning stage. The second one is data exchange stage, in which the plug has been added into
an existing Wi-Fi network and can be operated via the Android App and Proximetry cloud. The Android App is
mandatory in the Wi-Fi Provision stage. In the second stage, the users can either use the Android App or the
Proximetry cloud to communicate with the smart plug device. In this application note we will only focus on the
operation through Proximetry cloud.
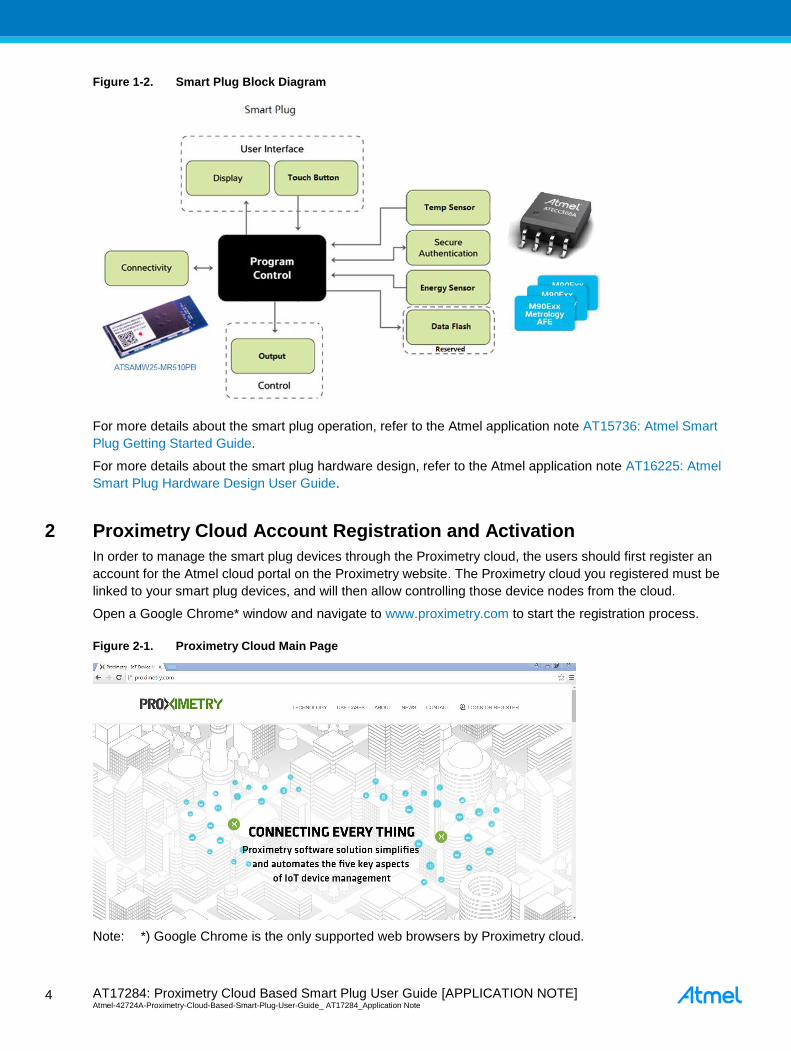
1.1 Smart Plug Block Diagram
The smart plug usually works as an edge node in a typical IoT scenario. The block diagram of the smart plug is
shown in Figure 1-2.
AT17284: Proximetry Cloud Based Smart Plug User Guide [APPLICATION NOTE] Atmel-42724A-Proximetry-Cloud-Based-Smart-Plug-User-Guide_ AT17284_Application Note 4
4
Figure 1-2. Smart Plug Block Diagram
For more details about the smart plug operation, refer to the Atmel application note AT15736: Atmel Smart
Plug Getting Started Guide.
For more details about the smart plug hardware design, refer to the Atmel application note AT16225: Atmel
Smart Plug Hardware Design User Guide.
2 Proximetry Cloud Account Registration and Activation
In order to manage the smart plug devices through the Proximetry cloud, the users should first register an
account for the Atmel cloud portal on the Proximetry website. The Proximetry cloud you registered must be
linked to your smart plug devices, and will then allow controlling those device nodes from the cloud.
Open a Google Chrome* window and navigate to www.proximetry.com to start the registration process.
Figure 2-1. Proximetry Cloud Main Page
Note: *) Google Chrome is the only supported web browsers by Proximetry cloud.

AT15735: Atmel Smart Plug Firmware User Guide [APPLICATION NOTE] Atmel-42724A-Proximetry-Cloud-Based-Smart-Plug-User-Guide_ AT17284_Application Note
5
5
2.1 Proximetry Cloud Account Registration
It just need to take a few steps to register a Proximetry cloud account. First of all, users should get a valid e-
mail address which it will be used to receive e-mail information sent from Proximetry and validate the
Proximetry cloud account.
On the Proximetry website, go to Proximetry Atmel Cloud login entrance to enter the account registration
page
Figure 2-2. Proximetry Atmel Cloud Login Entrance
Click on “Create an Account” to create a new Proximetry cloud account
Figure 2-3. Proximetry Cloud Login Page
Fill in the blanks with all the necessary information especially a valid e-mail address

AT17284: Proximetry Cloud Based Smart Plug User Guide [APPLICATION NOTE] Atmel-42724A-Proximetry-Cloud-Based-Smart-Plug-User-Guide_ AT17284_Application Note 6
6
Figure 2-4. Proximetry Cloud Account Registration Page
Click on “Sign Up” button to finish the account registration process
You should receive an e-mail from Proximetry shortly after and in the next section we will describe how to
activate the registered Proximetry cloud account.
2.2 Activate the Proximetry Cloud Account
After you have created an account through Proximetry website, you should receive a confirmation e-mail.
Open your e-mail to check the Proximetry cloud account status. You should receive a confirmation e-mail
as shown in Figure 2-5.

AT15735: Atmel Smart Plug Firmware User Guide [APPLICATION NOTE] Atmel-42724A-Proximetry-Cloud-Based-Smart-Plug-User-Guide_ AT17284_Application Note
7
7
Figure 2-5. Confirmation E-mail from Proximetry
You should receive another e-mail some hours later with a Device Activation Code provided by
Proximetry
Figure 2-6. Authorization Pass E-mail from Proximetry
Note: The Device Activation Code is used to connect Atmel Smart Plug device to your Proximetry cloud
account. Users should program the device activation code in the smart plug firmware. Each smart plug
device should also contain a unique device activation code. For other device activation codes, you
should create them through your Proximetry cloud account.
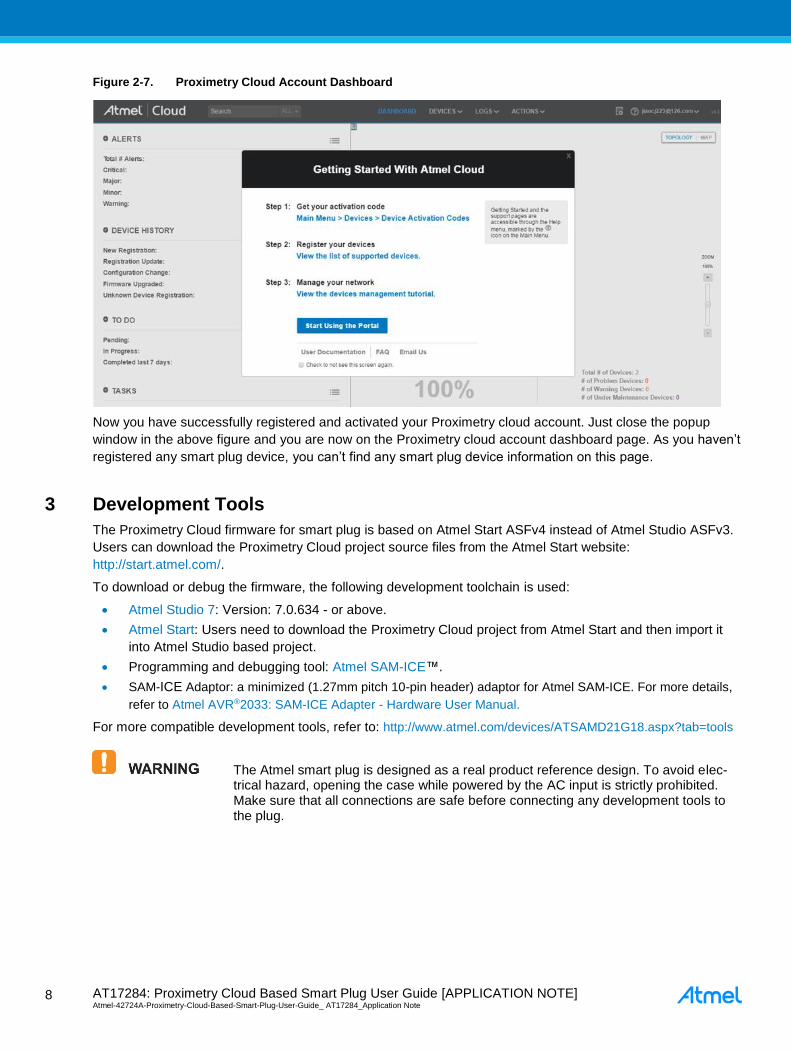
Login in to the Proximetry cloud with your Proximetry cloud account
AT17284: Proximetry Cloud Based Smart Plug User Guide [APPLICATION NOTE] Atmel-42724A-Proximetry-Cloud-Based-Smart-Plug-User-Guide_ AT17284_Application Note 8
8
Figure 2-7. Proximetry Cloud Account Dashboard
Now you have successfully registered and activated your Proximetry cloud account. Just close the popup
window in the above figure and you are now on the Proximetry cloud account dashboard page. As you haven’t
registered any smart plug device, you can’t find any smart plug device information on this page.
3 Development Tools
The Proximetry Cloud firmware for smart plug is based on Atmel Start ASFv4 instead of Atmel Studio ASFv3.
Users can download the Proximetry Cloud project source files from the Atmel Start website:
http://start.atmel.com/.
To download or debug the firmware, the following development toolchain is used:
Atmel Studio 7: Version: 7.0.634 - or above.
Atmel Start: Users need to download the Proximetry Cloud project from Atmel Start and then import it
into Atmel Studio based project.
Programming and debugging tool: Atmel SAM-ICE™.
SAM-ICE Adaptor: a minimized (1.27mm pitch 10-pin header) adaptor for Atmel SAM-ICE. For more details,
refer to Atmel AVR®2033: SAM-ICE Adapter - Hardware User Manual.
For more compatible development tools, refer to: http://www.atmel.com/devices/ATSAMD21G18.aspx?tab=tools
The Atmel smart plug is designed as a real product reference design. To avoid elec-trical hazard, opening the case while powered by the AC input is strictly prohibited. Make sure that all connections are safe before connecting any development tools to the plug.
AT15735: Atmel Smart Plug Firmware User Guide [APPLICATION NOTE] Atmel-42724A-Proximetry-Cloud-Based-Smart-Plug-User-Guide_ AT17284_Application Note
9
9
4 Getting Started with Proximetry Cloud Project
The Proximetry cloud project for smart plug is already integrated in Atmel Start. Users just need to follow a few
steps to download the Proximetry cloud project from Atmel Start website. The Proximetry cloud project is
an .atzip file and can be imported into Atmel Studio 7.0. An Atmel Studio project will be created after the
importing process finishes.
4.1 Download Proximetry Cloud Project from Atmel Start
The Proximetry cloud project for Atmel Smart Plug can be downloaded from the Atmel Start website. Follow the
steps below to get the Proximetry Cloud project source code.
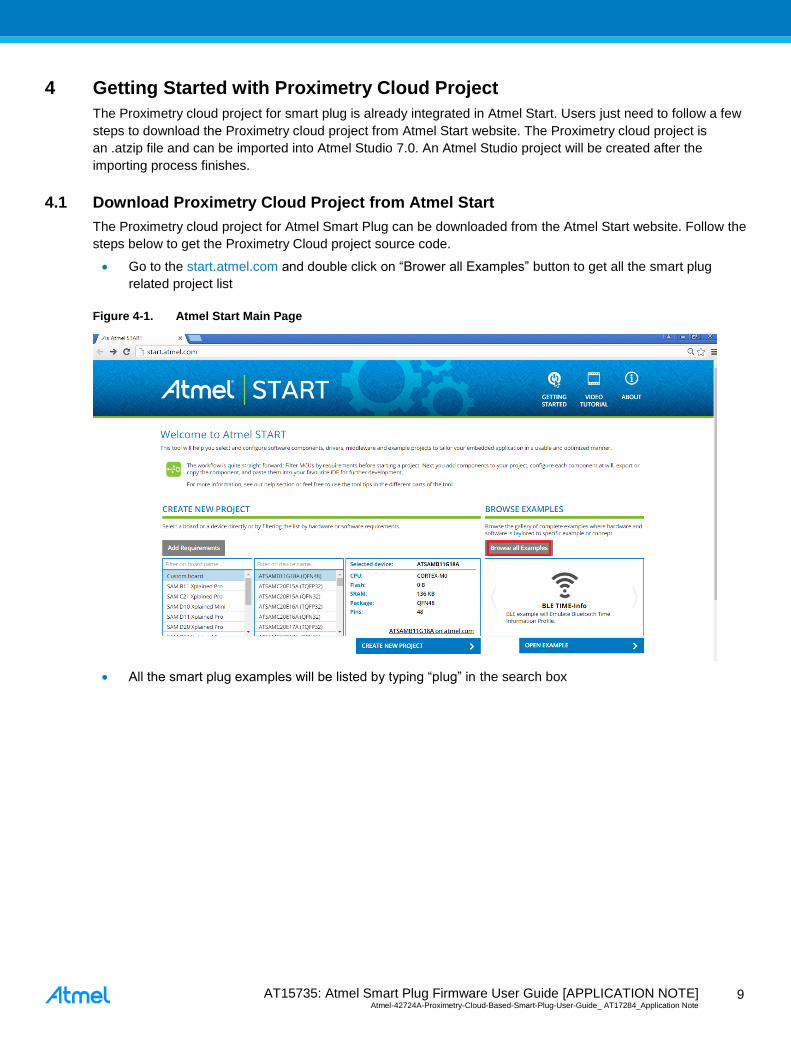
Go to the start.atmel.com and double click on “Brower all Examples” button to get all the smart plug
related project list
Figure 4-1. Atmel Start Main Page
All the smart plug examples will be listed by typing “plug” in the search box
AT17284: Proximetry Cloud Based Smart Plug User Guide [APPLICATION NOTE] Atmel-42724A-Proximetry-Cloud-Based-Smart-Plug-User-Guide_ AT17284_Application Note 1
0
10
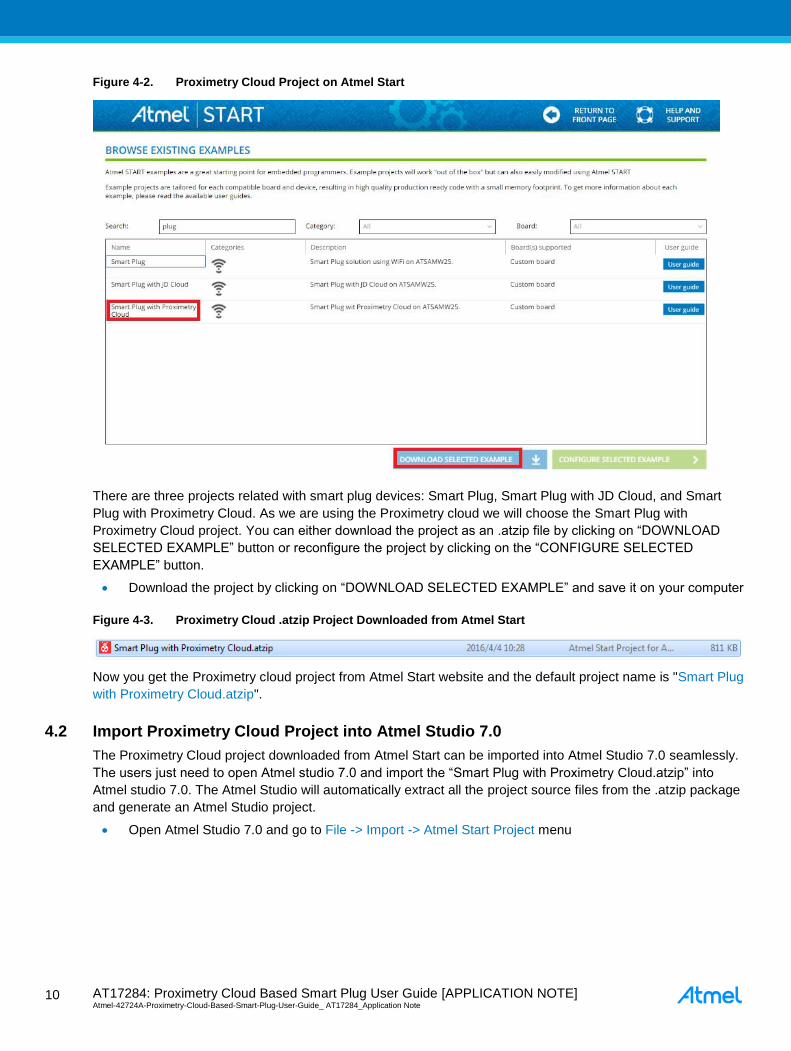
Figure 4-2. Proximetry Cloud Project on Atmel Start
There are three projects related with smart plug devices: Smart Plug, Smart Plug with JD Cloud, and Smart
Plug with Proximetry Cloud. As we are using the Proximetry cloud we will choose the Smart Plug with
Proximetry Cloud project. You can either download the project as an .atzip file by clicking on “DOWNLOAD
SELECTED EXAMPLE” button or reconfigure the project by clicking on the “CONFIGURE SELECTED
EXAMPLE” button.
Download the project by clicking on “DOWNLOAD SELECTED EXAMPLE” and save it on your computer
Figure 4-3. Proximetry Cloud .atzip Project Downloaded from Atmel Start
Now you get the Proximetry cloud project from Atmel Start website and the default project name is "Smart Plug
with Proximetry Cloud.atzip".
4.2 Import Proximetry Cloud Project into Atmel Studio 7.0
The Proximetry Cloud project downloaded from Atmel Start can be imported into Atmel Studio 7.0 seamlessly.
The users just need to open Atmel studio 7.0 and import the “Smart Plug with Proximetry Cloud.atzip” into
Atmel studio 7.0. The Atmel Studio will automatically extract all the project source files from the .atzip package
and generate an Atmel Studio project.
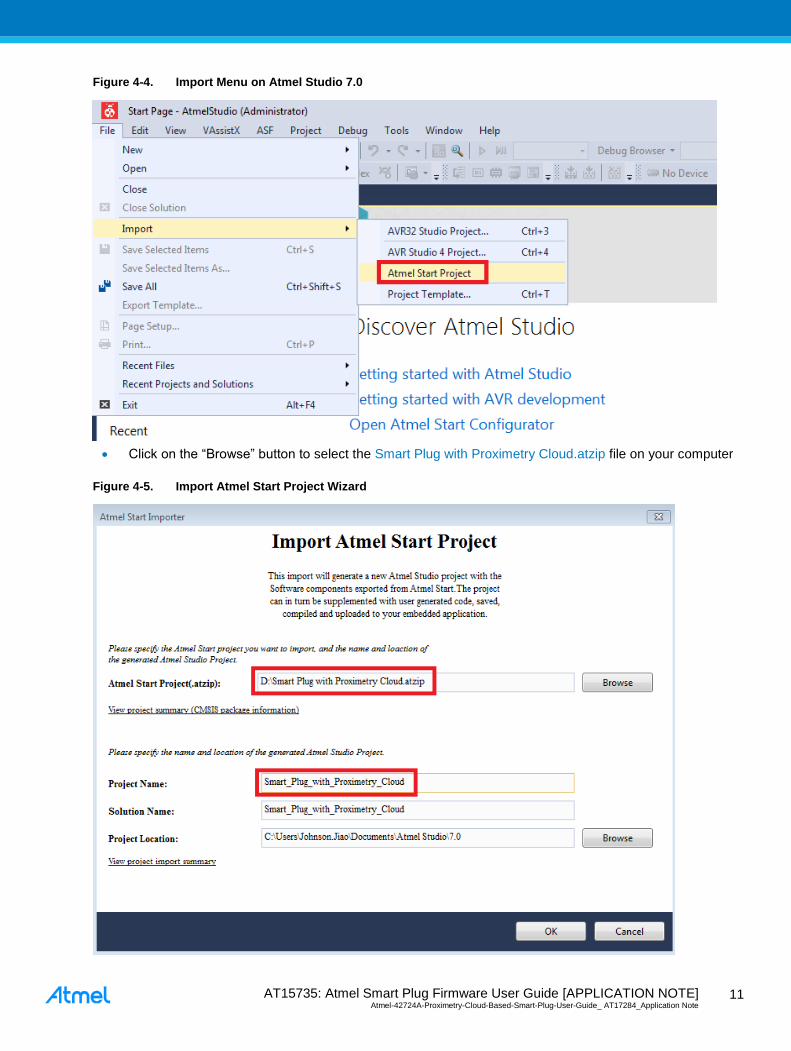
Open Atmel Studio 7.0 and go to File -> Import -> Atmel Start Project menu
AT15735: Atmel Smart Plug Firmware User Guide [APPLICATION NOTE] Atmel-42724A-Proximetry-Cloud-Based-Smart-Plug-User-Guide_ AT17284_Application Note
11
11
Figure 4-4. Import Menu on Atmel Studio 7.0
Click on the “Browse” button to select the Smart Plug with Proximetry Cloud.atzip file on your computer
Figure 4-5. Import Atmel Start Project Wizard
AT17284: Proximetry Cloud Based Smart Plug User Guide [APPLICATION NOTE] Atmel-42724A-Proximetry-Cloud-Based-Smart-Plug-User-Guide_ AT17284_Application Note 1
2
12
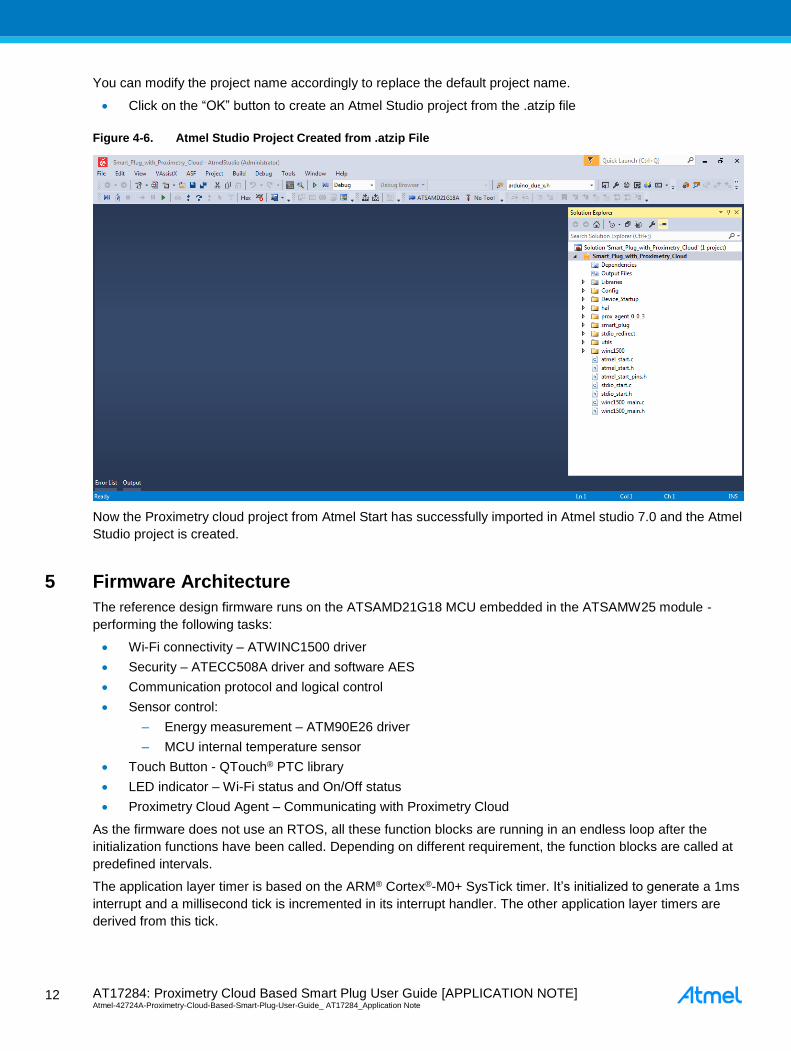
You can modify the project name accordingly to replace the default project name.
Click on the “OK” button to create an Atmel Studio project from the .atzip file
Figure 4-6. Atmel Studio Project Created from .atzip File
Now the Proximetry cloud project from Atmel Start has successfully imported in Atmel studio 7.0 and the Atmel
Studio project is created.
5 Firmware Architecture
The reference design firmware runs on the ATSAMD21G18 MCU embedded in the ATSAMW25 module -
performing the following tasks:
Wi-Fi connectivity – ATWINC1500 driver
Security – ATECC508A driver and software AES
Communication protocol and logical control
Sensor control:
– Energy measurement – ATM90E26 driver
– MCU internal temperature sensor
Touch Button - QTouch® PTC library
LED indicator – Wi-Fi status and On/Off status
Proximetry Cloud Agent – Communicating with Proximetry Cloud
As the firmware does not use an RTOS, all these function blocks are running in an endless loop after the
initialization functions have been called. Depending on different requirement, the function blocks are called at
predefined intervals.
The application layer timer is based on the ARM® Cortex®-M0+ SysTick timer. It’s initialized to generate a 1ms
interrupt and a millisecond tick is incremented in its interrupt handler. The other application layer timers are
derived from this tick.

AT15735: Atmel Smart Plug Firmware User Guide [APPLICATION NOTE] Atmel-42724A-Proximetry-Cloud-Based-Smart-Plug-User-Guide_ AT17284_Application Note
13
13
The low level drivers are based on Atmel Start and users need to be familiar with Atmel Start code styles. A
quick understanding of Atmel Start can be found on this Link:
http://start.atmel.com/static/help/index.html?GUID-0E128A71-D76F-4FFC-8049-6D31238B672D.
Figure 5-1. Smart Plug Firmware Structure
5.1 Wi-Fi Connectivity
The smart plug Wi-Fi function is based on the Atmel industry-leading low-power 2.4GHz IEEE® 802.11 b/g/n
Wi-Fi ATWINC1500 SoC (embedded inside the ATSAMW25 module). It provides an integrated software
solution with application and network services (integrated TCP/IP stack).
For more details about the Wi-Fi firmware development, refer to Software Programming Guide for SAM W25
Xplained Pro and ATWINC1500 Wi-Fi Network Controller - Software Design Guide.
5.2 Security
Security is an integrated part of the smart plug reference design, as it is a key design factor for any IoT
application. Both a hardware crypto device and software crypto library are used to achieve the desired security
features. The same security functions are also implemented on the Android app side (provisioning stage) to
allow them to communicate with each other.
5.2.1 Hardware Crypto Engine
Atmel CryptoAuthentication™ device ATECC508A is used to perform high-speed public key (PKI) algorithms:
ECDH (Elliptic Curve Diffie-Hellman) key agreement and ECDSA (Elliptic Curve Digital Signature Algorithm).
This offloads many heavy operations from the MCU, leaving more cycles for the application. The ATECC508A
crypto device also has a secure hardware-based cryptographic key storage and cryptographic
countermeasures, which are more secure than software-based key storage. For more information about
ATECC508A driver support, refer to http://www.atmel.com/tools/CryptoAuthLib.aspx.
AT17284: Proximetry Cloud Based Smart Plug User Guide [APPLICATION NOTE] Atmel-42724A-Proximetry-Cloud-Based-Smart-Plug-User-Guide_ AT17284_Application Note 1
4
14
Also note that the ATECC508A should be provisioned and/or personalized in production before it’s used in a
final product. For more detail, refer to the application notes below:
ATECC Production Provisioning Guide
ATSHA204A and ATECC508A Personalization Guide
Note: The SN of the ATECC508A included in the SAMW25 module is different with normal commercial
devices. Contact Atmel technical support channel for more information.
5.2.2 Software Crypto Library
Besides the hardware crypto engine, a software crypto library is also included to perform the AES algorithm. In
the smart plug reference design, the AES-128 CBC mode is used to encrypt and decrypt the data. A third-party
library LibTomCrypt from http://www.libtom.net/ is used for this purpose.
5.3 Sensor Control
The smart plug includes two sensors; one is an energy measurement sensor (ATME90E26), while the other is
the internal temperature sensor of the SAM D21 MCU.
The ATM90E26 is a high-performance energy metering device that is accessed by the MCU via a UART
interface. It is used to measure real-time output current, voltage, power, and accumulated electrical energy
output by the smart plug. Check more about ATM90E26 usage in application note:
http://www.atmel.com/Images/Atmel-46102-SE-M90E26-ApplicationNote.pdf.
The temperature sensor is integrated with the MCU ADC peripheral. It is easy to read the ADC result and
calculate the temperature. Read more about this temperature sensor in the ATSAMD21G18 datasheet.
5.4 QTouch PTC Library
The MCU (ATSAMD21G18) embedded in the ATSAMW25 module is equipped with a PTC (peripheral touch
controller) module. Due to the autonomous operation, the PTC uses very little CPU resources and provides
high quality touch performance. Atmel provides the QTouch PTC library to support code development, making
it easy to add a touch button to the smart plug design.
For more about touch application based on the PTC, refer to:
http://www.atmel.com/tools/QTOUCHLIBRARYPTC.aspx
5.5 Proximetry Cloud Agent
Proximetry provides a library named libampagent.a to access Proximetry Cloud. The library implements a lot of
interfaces that can be used to initialize and set up communication with the Proximetry cloud. The users can use
the related interfaces to register the smart plug device with a valid device activation code in Proximetry cloud.
After the communication channel is successfully set up, the smart plug device can write to or read from
Proximetry cloud through the Proximetry Could Agent.
AT15735: Atmel Smart Plug Firmware User Guide [APPLICATION NOTE] Atmel-42724A-Proximetry-Cloud-Based-Smart-Plug-User-Guide_ AT17284_Application Note
15
15
6 Source Code Structure
From Section 0 of this user guide, the .atzip Proximetry Cloud project downloaded from Atmel Start can be
imported in Atmel Studio 7.0 and finally an Atmel Studio project will be created as shown in Figure 6-1.
Figure 6-1. Proximetry Cloud Project on Atmel Studio
The source code structure of Proximetry cloud project is as below:
Libraries: The Proximetry Could Project Library. There are three libraries in the Proximetry cloud Project:
libm, libsamd21_touch_gcc.a, and libampagent.a.
– libm: default math library for each Atmel Start project
– libsamd21_qtouch_gcc.a: library for QTouch operation, provided by Atmel
– libampagent.a: library for communicating with Proximetry Cloud, provided by Proximetry
Config: Configuration files for different peripherals and components. Users can find all the MCU
peripheral configuration files under the “Config” directory. Take the hpl_adc1_v120_config.h as an
example, it represents the configuration file for ADC peripheral.
Device Startup: The samd21g18a_flash.ld is the default device link file for the samd21g18a chip. By
default, the firmware will be downloaded into the flash address with offset at 0x0.
hal: Hardware Abstraction Layer for Different Peripherals. The hal directories contain four sub-
directories; hpl, hri, include, and src. The directories and files are auto generated if the users try to create
an Atmel Start based project. Once a peripheral is selected and configured properly through Atmel Start
webpage, the corresponding hpl and hri files and directories will also be created automatically.
– hpl: hal proxy layer
– hri: hal register interface
– include: include files for hal
– src: source files for hal
AT17284: Proximetry Cloud Based Smart Plug User Guide [APPLICATION NOTE] Atmel-42724A-Proximetry-Cloud-Based-Smart-Plug-User-Guide_ AT17284_Application Note 1
6
16
prox_agent_0_0_3: Proximetry Cloud Agent Library and Interfaces.
– libampagent.a: Proximetry Cloud Agent Library
– amp_agent.h: This file exposes all the interfaces to communicate with the Proximetry cloud
– prox_agent_config.h: This file mainly defines the cloud server address and port information and
pre-defined activation code
smart plug: The smart plug main directory contains main source files needed for UI, crypto, energy
sensor, QTouch, Proximetry Agent, etc. The main function is contained in file main_samd21_prox.c.
winc1500: ATWINC1500 Wi-Fi BSP. The ATWINC1500 Wi-Fi BSP is located in the directory winc1500. It
contains all interfaces/drivers to communicate with the ATWINC1500 from the SAM D21.
7 Proximity Cloud Connectivity Based on Smart Plug
There are several steps to register a smart plug device in Proximetry cloud. After the smart plug firmware has
been programmed with a valid device activation code and configured by Android App to connect with a Wi-Fi
router, the users can view the registered smart plug device information through the Proximetry cloud.
Follow the steps below to register a smart plug device in Proximetry cloud.
7.1 Register Smart Plug Device in Proximetry Cloud
On the Smart_Plug_with_Proximetry_Cloud project, open the prox_agent_config.h file and replace the
device activation code received in your e-mail
Figure 7-1. Programming Device Activation Code in Smart Plug Firmware
Save the file, recompile the project, and program the firmware into the smart plug device
Power on the smart plug and configure the smart plug device to connect to a Wi-Fi router through the
android smart plug app
AT15735: Atmel Smart Plug Firmware User Guide [APPLICATION NOTE] Atmel-42724A-Proximetry-Cloud-Based-Smart-Plug-User-Guide_ AT17284_Application Note
17
17
Now the smart plug device has registered into the Proximetry cloud.
Note: Users should refer to AT15736: Atmel Smart Plug Getting Started Guide to setup the smart plug to
connect to a Wi-Fi router.
7.2 View Smart Plug Device Information through Proximetry Cloud Account
Wait until the smart plug connects to a Wi-Fi router, log in to the Proximetry cloud with your account
through: www.proximetry.com.
Figure 7-2. Proximetry Cloud Account Dashboard
Select DEVICES->DEVICE LIST to view the registered smart plug device
Figure 7-3. Smart Plug Device List
Double click “SAMD21 PROX EXAMPLE” to get more detailed information about this device node
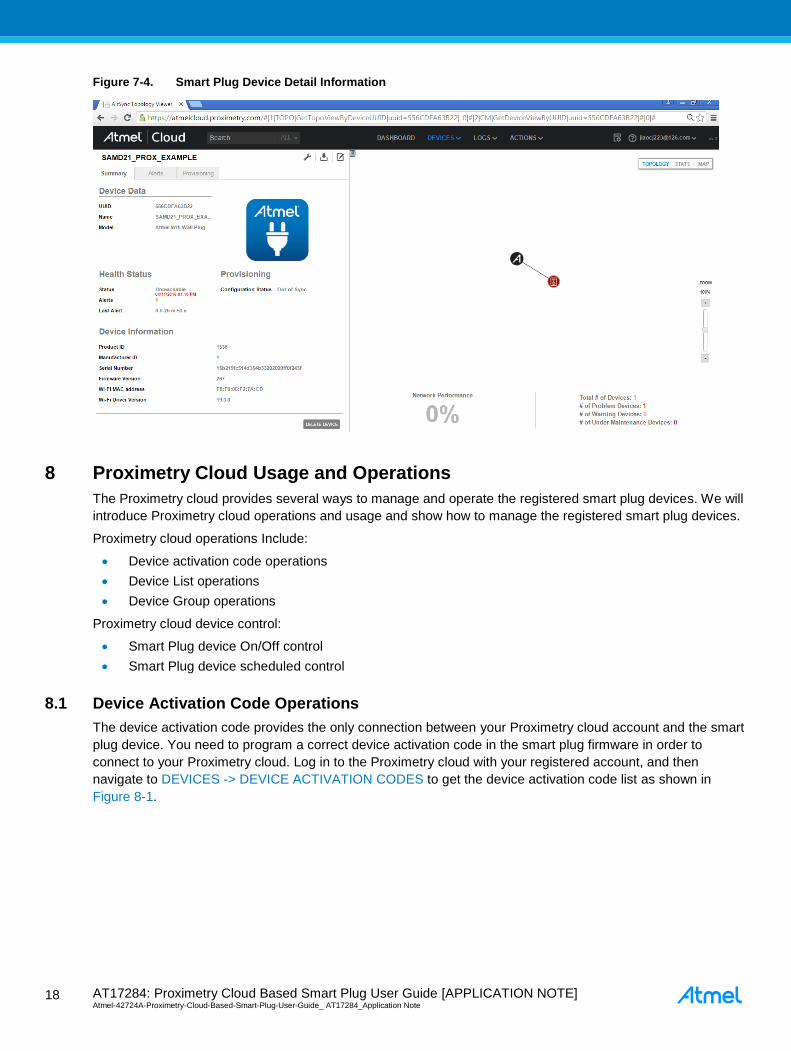
AT17284: Proximetry Cloud Based Smart Plug User Guide [APPLICATION NOTE] Atmel-42724A-Proximetry-Cloud-Based-Smart-Plug-User-Guide_ AT17284_Application Note 1
8
18
Figure 7-4. Smart Plug Device Detail Information
8 Proximetry Cloud Usage and Operations
The Proximetry cloud provides several ways to manage and operate the registered smart plug devices. We will
introduce Proximetry cloud operations and usage and show how to manage the registered smart plug devices.
Proximetry cloud operations Include:
Device activation code operations
Device List operations
Device Group operations
Proximetry cloud device control:
Smart Plug device On/Off control
Smart Plug device scheduled control
8.1 Device Activation Code Operations
The device activation code provides the only connection between your Proximetry cloud account and the smart
plug device. You need to program a correct device activation code in the smart plug firmware in order to
connect to your Proximetry cloud. Log in to the Proximetry cloud with your registered account, and then
navigate to DEVICES -> DEVICE ACTIVATION CODES to get the device activation code list as shown in
Figure 8-1.
AT15735: Atmel Smart Plug Firmware User Guide [APPLICATION NOTE] Atmel-42724A-Proximetry-Cloud-Based-Smart-Plug-User-Guide_ AT17284_Application Note
19
19
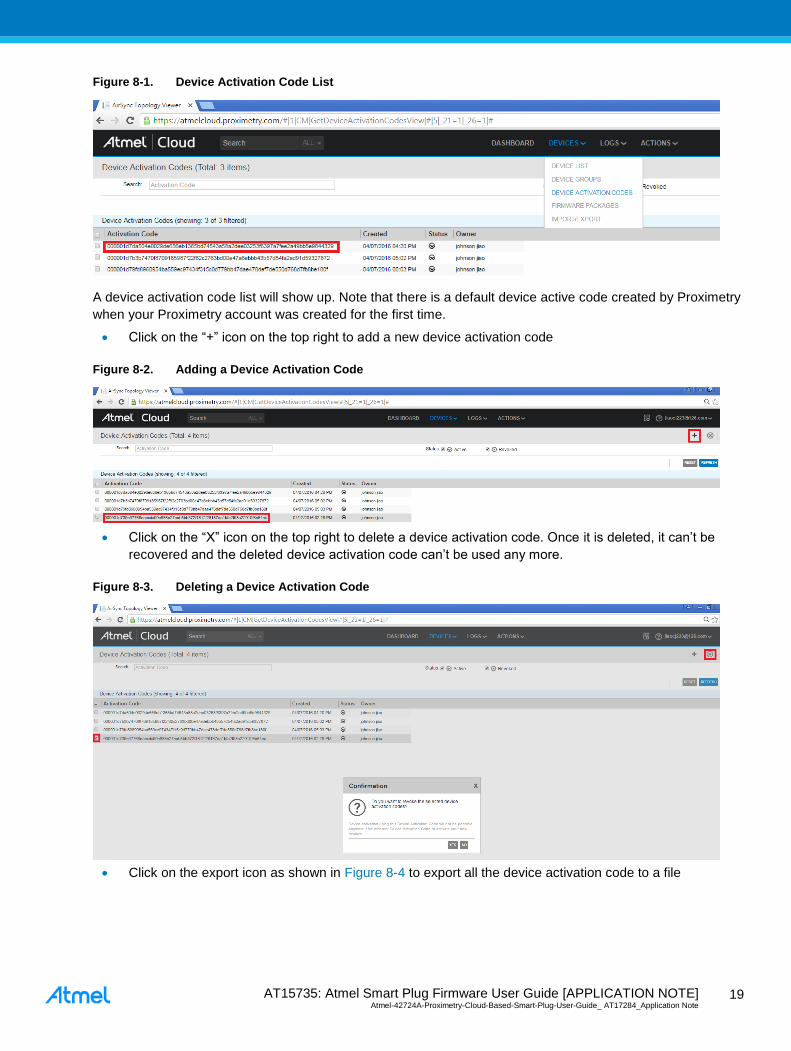
Figure 8-1. Device Activation Code List
A device activation code list will show up. Note that there is a default device active code created by Proximetry
when your Proximetry account was created for the first time.
Click on the “+” icon on the top right to add a new device activation code
Figure 8-2. Adding a Device Activation Code
Click on the “X” icon on the top right to delete a device activation code. Once it is deleted, it can’t be
recovered and the deleted device activation code can’t be used any more.
Figure 8-3. Deleting a Device Activation Code
Click on the export icon as shown in Figure 8-4 to export all the device activation code to a file
AT17284: Proximetry Cloud Based Smart Plug User Guide [APPLICATION NOTE] Atmel-42724A-Proximetry-Cloud-Based-Smart-Plug-User-Guide_ AT17284_Application Note 2
0
20
Figure 8-4. Exporting Device Activation Code in Batch
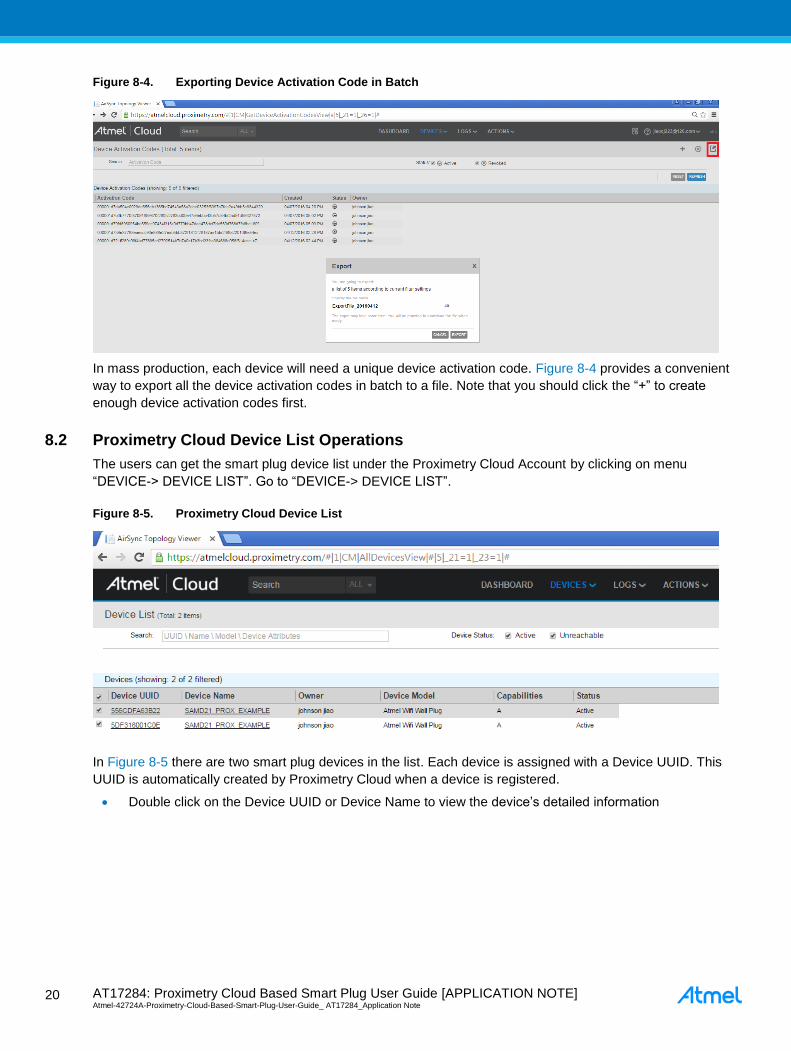
In mass production, each device will need a unique device activation code. Figure 8-4 provides a convenient
way to export all the device activation codes in batch to a file. Note that you should click the “+” to create
enough device activation codes first.
8.2 Proximetry Cloud Device List Operations
The users can get the smart plug device list under the Proximetry Cloud Account by clicking on menu
“DEVICE-> DEVICE LIST”. Go to “DEVICE-> DEVICE LIST”.
Figure 8-5. Proximetry Cloud Device List
In Figure 8-5 there are two smart plug devices in the list. Each device is assigned with a Device UUID. This
UUID is automatically created by Proximetry Cloud when a device is registered.
Double click on the Device UUID or Device Name to view the device’s detailed information
AT15735: Atmel Smart Plug Firmware User Guide [APPLICATION NOTE] Atmel-42724A-Proximetry-Cloud-Based-Smart-Plug-User-Guide_ AT17284_Application Note
21
21
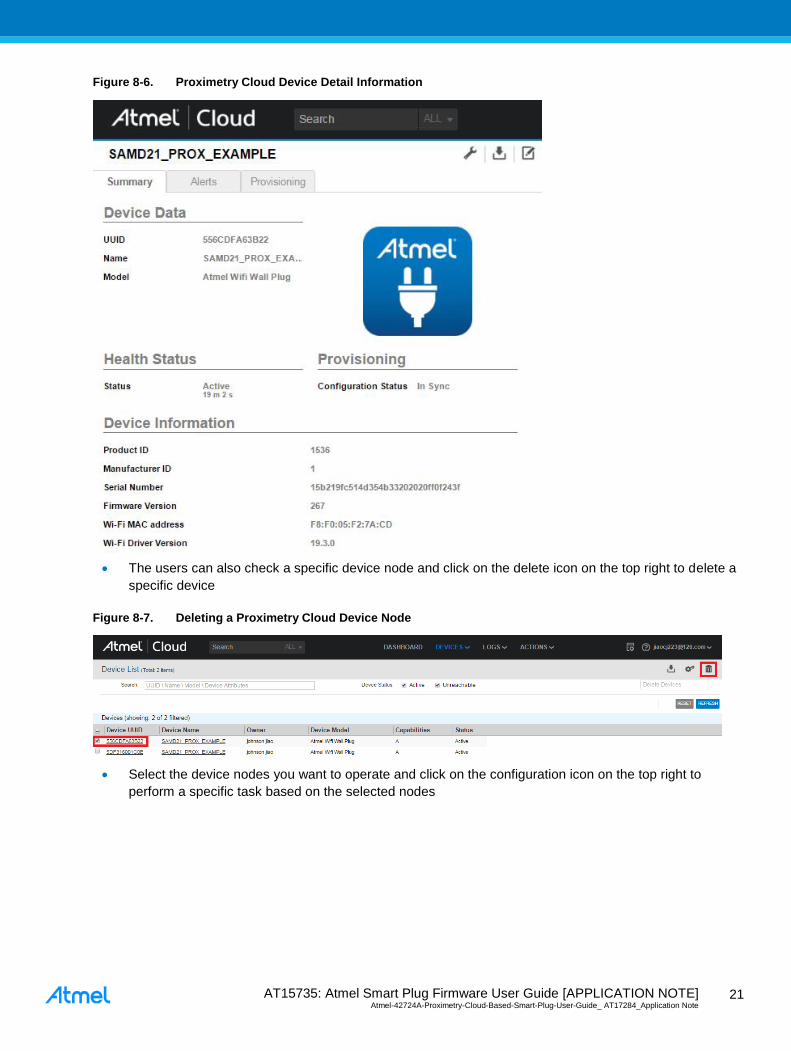
Figure 8-6. Proximetry Cloud Device Detail Information
The users can also check a specific device node and click on the delete icon on the top right to delete a
specific device
Figure 8-7. Deleting a Proximetry Cloud Device Node
Select the device nodes you want to operate and click on the configuration icon on the top right to
perform a specific task based on the selected nodes
AT17284: Proximetry Cloud Based Smart Plug User Guide [APPLICATION NOTE] Atmel-42724A-Proximetry-Cloud-Based-Smart-Plug-User-Guide_ AT17284_Application Note 2
2
22
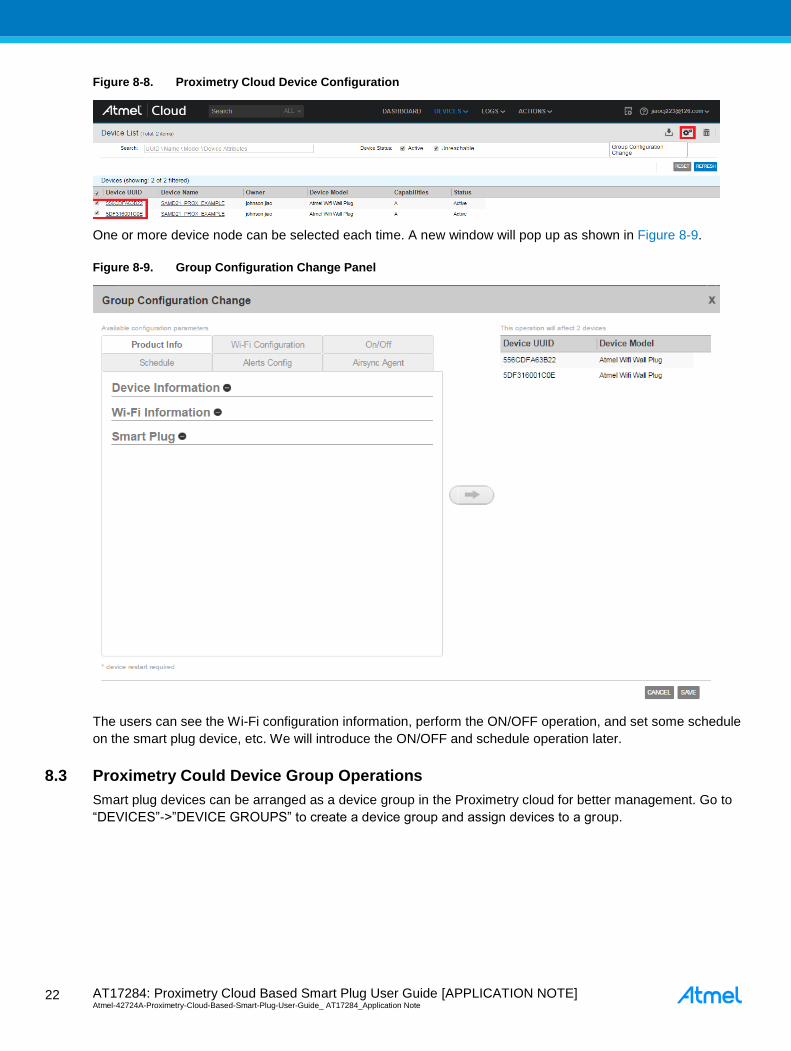
Figure 8-8. Proximetry Cloud Device Configuration
One or more device node can be selected each time. A new window will pop up as shown in Figure 8-9.
Figure 8-9. Group Configuration Change Panel
The users can see the Wi-Fi configuration information, perform the ON/OFF operation, and set some schedule
on the smart plug device, etc. We will introduce the ON/OFF and schedule operation later.
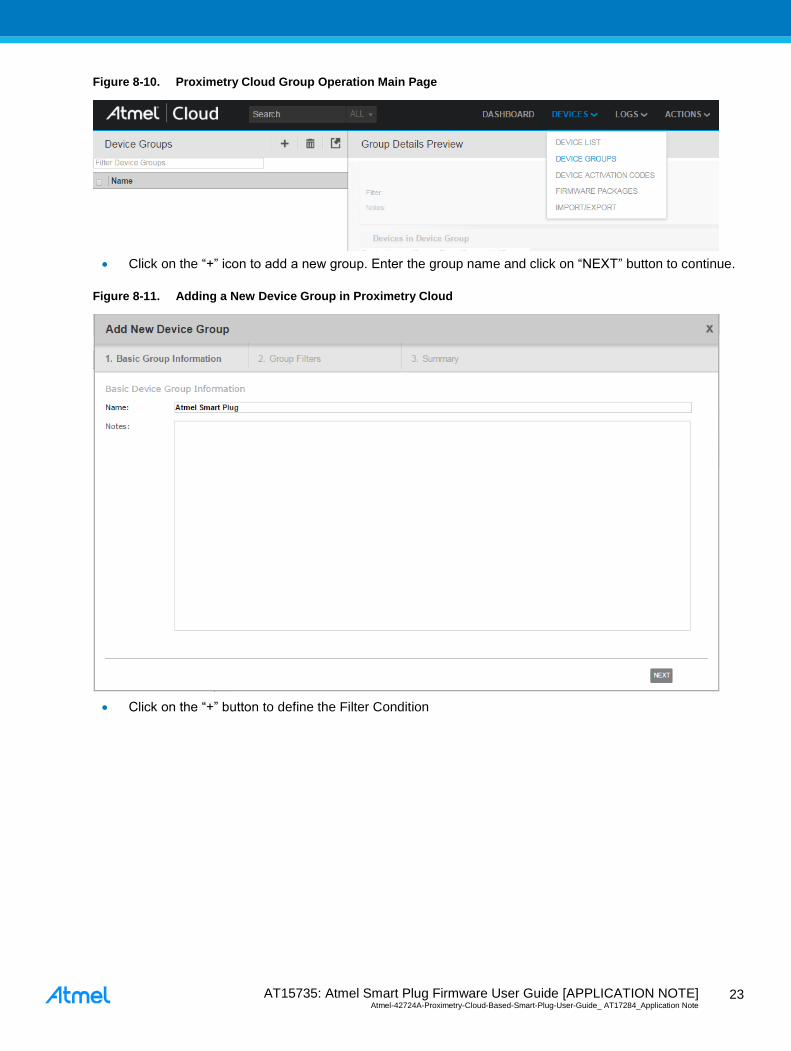
8.3 Proximetry Could Device Group Operations
Smart plug devices can be arranged as a device group in the Proximetry cloud for better management. Go to
“DEVICES”->”DEVICE GROUPS” to create a device group and assign devices to a group.
AT15735: Atmel Smart Plug Firmware User Guide [APPLICATION NOTE] Atmel-42724A-Proximetry-Cloud-Based-Smart-Plug-User-Guide_ AT17284_Application Note
23
23
Figure 8-10. Proximetry Cloud Group Operation Main Page
Click on the “+” icon to add a new group. Enter the group name and click on “NEXT” button to continue.
Figure 8-11. Adding a New Device Group in Proximetry Cloud
Click on the “+” button to define the Filter Condition

AT17284: Proximetry Cloud Based Smart Plug User Guide [APPLICATION NOTE] Atmel-42724A-Proximetry-Cloud-Based-Smart-Plug-User-Guide_ AT17284_Application Note 2
4
24
Figure 8-12. Add New Device Group Wizard
There are a lot of Atmel device models listed in the Proximetry cloud. The smart plug device model name is
“Atmel Wifi Wall Plug”.
Follow the wizard and click on the “NEXT” button and a new group will be created
Figure 8-13. New Device Group with Two Smart Plug Device Nodes
Now you have created a group containing two smart device nodes.
8.4 Smart Plug ON/OFF Control
Smart Plug devices can be controlled to be ON/OFF status through the Proximetry cloud. The following steps
show how to control the ON/OFF action on smart plug devices.
Go to the device list table and double click on the name (SAMD21 PRO EXAMPLE) of the first smart
plug device. A new window will pop up as shown in Figure 8-14.

AT15735: Atmel Smart Plug Firmware User Guide [APPLICATION NOTE] Atmel-42724A-Proximetry-Cloud-Based-Smart-Plug-User-Guide_ AT17284_Application Note
25
25
Figure 8-14. Smart Plug Detail Information
Click on Provisioning panel, then focus on “On/Off” sub-panel, click “EDIT” button to change the ON/OFF
status, and click on “SAVE” button to make the ON/OFF action active.
Figure 8-15. Smart Plug ON/OFF Control through Proximetry Cloud
The smart plug device will be in ON/OFF status immediately according to the selection.
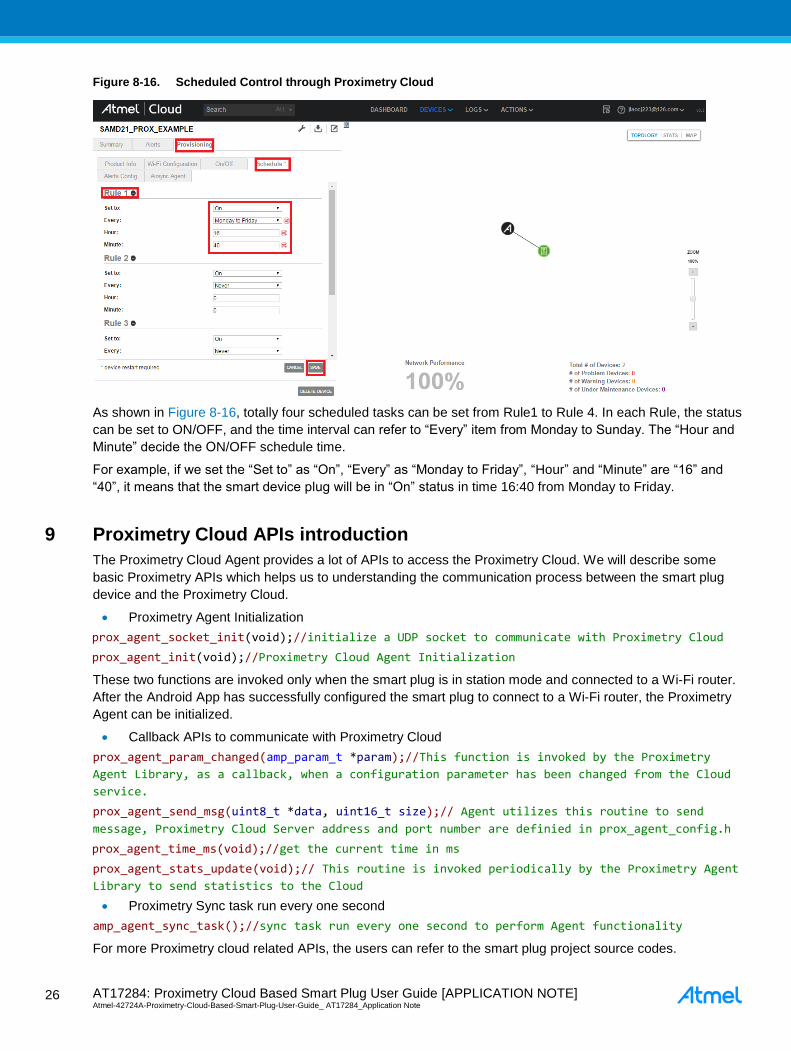
8.5 Smart Plug Scheduled Control
The scheduled control through the Proximetry cloud is similar with the ON/OFF control.
Go to the device list table, double click on the name (SAMD21 PRO EXAMPLE) of the first smart plug
device. A new window will pop up as shown in Figure 8-14.
Click on Provisioning panel, then focus on “Schedule” sub-panel, click “EDIT” button to set the
scheduling task, and click on “SAVE” button to make the schedule active
AT17284: Proximetry Cloud Based Smart Plug User Guide [APPLICATION NOTE] Atmel-42724A-Proximetry-Cloud-Based-Smart-Plug-User-Guide_ AT17284_Application Note 2
6
26
Figure 8-16. Scheduled Control through Proximetry Cloud
As shown in Figure 8-16, totally four scheduled tasks can be set from Rule1 to Rule 4. In each Rule, the status
can be set to ON/OFF, and the time interval can refer to “Every” item from Monday to Sunday. The “Hour and
Minute” decide the ON/OFF schedule time.
For example, if we set the “Set to” as “On”, “Every” as “Monday to Friday”, “Hour” and “Minute” are “16” and
“40”, it means that the smart device plug will be in “On” status in time 16:40 from Monday to Friday.
9 Proximetry Cloud APIs introduction
The Proximetry Cloud Agent provides a lot of APIs to access the Proximetry Cloud. We will describe some
basic Proximetry APIs which helps us to understanding the communication process between the smart plug
device and the Proximetry Cloud.
Proximetry Agent Initialization
prox_agent_socket_init(void);//initialize a UDP socket to communicate with Proximetry Cloud
prox_agent_init(void);//Proximetry Cloud Agent Initialization
These two functions are invoked only when the smart plug is in station mode and connected to a Wi-Fi router.
After the Android App has successfully configured the smart plug to connect to a Wi-Fi router, the Proximetry
Agent can be initialized.
Callback APIs to communicate with Proximetry Cloud
prox_agent_param_changed(amp_param_t *param);//This function is invoked by the Proximetry
Agent Library, as a callback, when a configuration parameter has been changed from the Cloud
service.
prox_agent_send_msg(uint8_t *data, uint16_t size);// Agent utilizes this routine to send
message, Proximetry Cloud Server address and port number are definied in prox_agent_config.h
prox_agent_time_ms(void);//get the current time in ms
prox_agent_stats_update(void);// This routine is invoked periodically by the Proximetry Agent
Library to send statistics to the Cloud
Proximetry Sync task run every one second
amp_agent_sync_task();//sync task run every one second to perform Agent functionality
For more Proximetry cloud related APIs, the users can refer to the smart plug project source codes.
AT15735: Atmel Smart Plug Firmware User Guide [APPLICATION NOTE] Atmel-42724A-Proximetry-Cloud-Based-Smart-Plug-User-Guide_ AT17284_Application Note
27
27
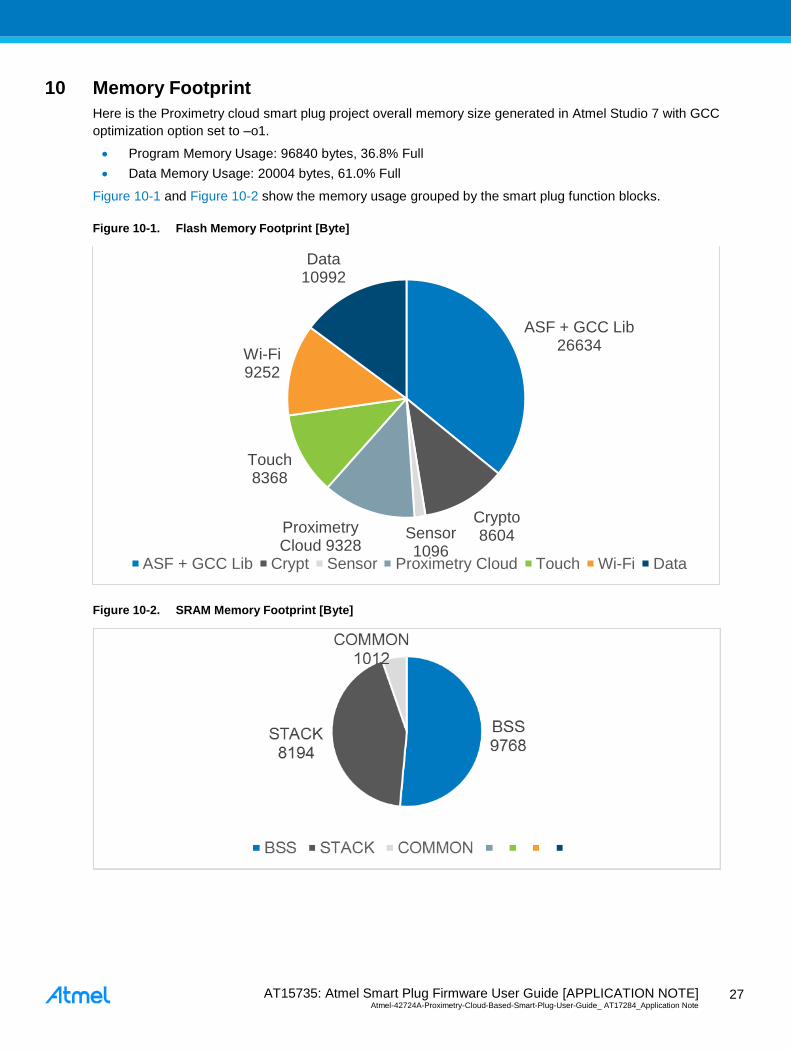
10 Memory Footprint
Here is the Proximetry cloud smart plug project overall memory size generated in Atmel Studio 7 with GCC
optimization option set to –o1.
Program Memory Usage: 96840 bytes, 36.8% Full
Data Memory Usage: 20004 bytes, 61.0% Full
Figure 10-1 and Figure 10-2 show the memory usage grouped by the smart plug function blocks.
Figure 10-1. Flash Memory Footprint [Byte]
Figure 10-2. SRAM Memory Footprint [Byte]
ASF + GCC Lib26634
Crypto8604Sensor
1096
Proximetry Cloud 9328
Touch8368
Wi-Fi9252
Data10992
ASF + GCC Lib Crypt Sensor Proximetry Cloud Touch Wi-Fi Data
AT17284: Proximetry Cloud Based Smart Plug User Guide [APPLICATION NOTE] Atmel-42724A-Proximetry-Cloud-Based-Smart-Plug-User-Guide_ AT17284_Application Note 2
8
28
11 Revision History
Doc Rev. Date Comments
42724A 4/2016 Initial document release.
AT15735: Atmel Smart Plug Firmware User Guide [APPLICATION NOTE] Atmel-42724A-Proximetry-Cloud-Based-Smart-Plug-User-Guide_ AT17284_Application Note
29
29
Atmel Corporation 1600 Technology Drive, San Jose, CA 95110 USA T: (+1)(408) 441.0311 F: (+1)(408) 436.4200 │ www.atmel.com
© 2016 Atmel Corporation. / Rev.: Atmel-42724A-Proximetry-Cloud-Based-Smart-Plug-User-Guide_ AT17284_Application Note. Atmel®, Atmel logo and combinations thereof, AVR®, Enabling Unlimited Possibilities®, QTouch®, and others are registered trademarks or trademarks of Atmel Corporation in U.S. and other countries. ARM®, ARM Connected® logo, Cortex®, and others are the registered trademarks or trademarks of ARM Ltd. Other terms and product names may be trademarks of others. DISCLAIMER: The information in this document is provided in connection with Atmel products. No license, express or implied, b y estoppel or otherwise, to any intellectual property right is granted by this document or in connection with the sale of Atmel products. EXCEPT AS SET FORTH IN THE ATMEL TERMS AND CONDITIONS OF SALES LOC ATED ON THE ATMEL WEBSITE, ATMEL ASSUMES NO LIABILITY WHATSOEVER AND DISCLAIMS ANY EXPRESS, IMPLIED OR STATUTORY WARRANTY RELATING TO ITS PRODUCTS
INCLUDING, BUT NOT LIMITED TO, THE IMPLIED WARRANTY OF MERCHANTABILITY, FITNESS FOR A PARTICULAR PURPOSE, OR NON -INFRINGEMENT. IN NO EVENT SHALL ATMEL BE LIABLE FOR ANY DIRECT, INDIRECT, CONSEQUENTIAL, PUNITIVE, SPECIAL OR INCIDENTAL DAMAG ES (INCLUDING, WITHOUT LIMITATION, DAMAGES FOR LOSS AND PROFITS, BUSINESS INTERRUPTION, OR LOSS OF INFORMATION) ARISING OUT OF THE USE OR INABILITY TO USE THIS DOCUMENT , EVEN IF ATMEL
HAS BEEN ADVISED OF THE POSSIBILITY OF SUCH DAMAGES. Atmel makes no representations or warranties with respect to the accuracy or completeness of the contents of this document and reserves the right to make changes to specifications and products descriptions at any time without notice. Atmel does not make any commitment to update the information contained herein. Unless specifically provided otherwise, Atmel products are not suitable for, and shall not be used in, auto motive applications. Atmel products are not intended,
authorized, or warranted for use as components in applications intended to support or sustain life.
SAFETY-CRITICAL, MILITARY, AND AUTOMOTIVE APPLICATIONS DISCLAIMER: Atmel products are not designed for and will not be used in conne ction with any applications where the failure of such products would reasonably be expected to result in significant personal injury or death (“Safety-Critical Applications”) without an Atmel officer's specific written consent. Safety-Critical Applications include, without limitation, life support devices and systems, equipment or sys tems for the operation of nuclear facilities and weapons systems. Atmel
products are not designed nor intended for use in military or aerospace applications or environments unless specifically desi gnated by Atmel as military-grade. Atmel products are not
designed nor intended for use in automotive applications unless specifically designated by Atmel as automotive -grade.