GSA’s 2011 Transportation Forum Washington, DC, April 20, 2011 Jeffrey Tucker
date post
20-Dec-2015Category
view
215download
0
Slide 1 of 39
Welcome to GSA’s Vendor and Customer Self Service (VCSS) courseSection 5: Statement and Dispute NavigationThis presentation is compliant with section 508 standards.This version was last updated on January 12, 2012.

Slide 2 of 39
Statements Menu
View and Print Statements
Select View and Print Statements to view and print statements for your accounts.
View Details
Select View Details to view details for statements on your accounts.
Dispute Statement Details
Select Dispute Statement Details to dispute a statement that you think might be in error, for non-IPAC statements only.
Disputes of IPAC bills should be performed via Treasury IPAC guidelines using the chargeback process.
Slide 3 of 39
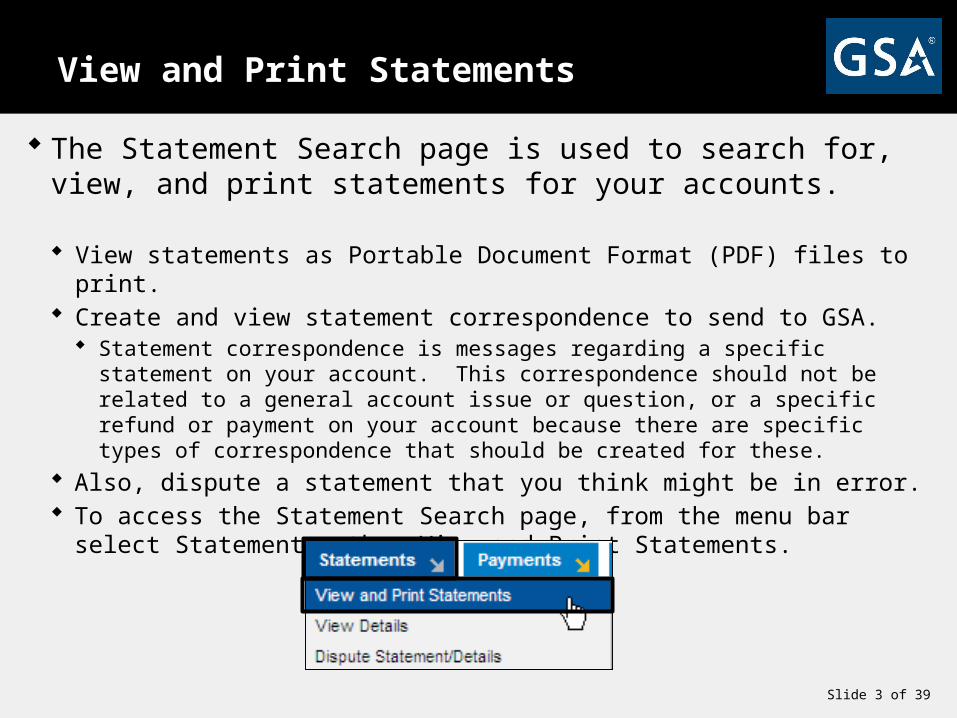
View and Print Statements
The Statement Search page is used to search for, view, and print statements for your accounts.
View statements as Portable Document Format (PDF) files to print. Create and view statement correspondence to send to GSA.
Statement correspondence is messages regarding a specific statement on your account. This correspondence should not be related to a general account issue or question, or a specific refund or payment on your account because there are specific types of correspondence that should be created for these.
Also, dispute a statement that you think might be in error. To access the Statement Search page, from the menu bar select Statements,
then View and Print Statements.
Slide 4 of 39
View and Print Statements (Continued)
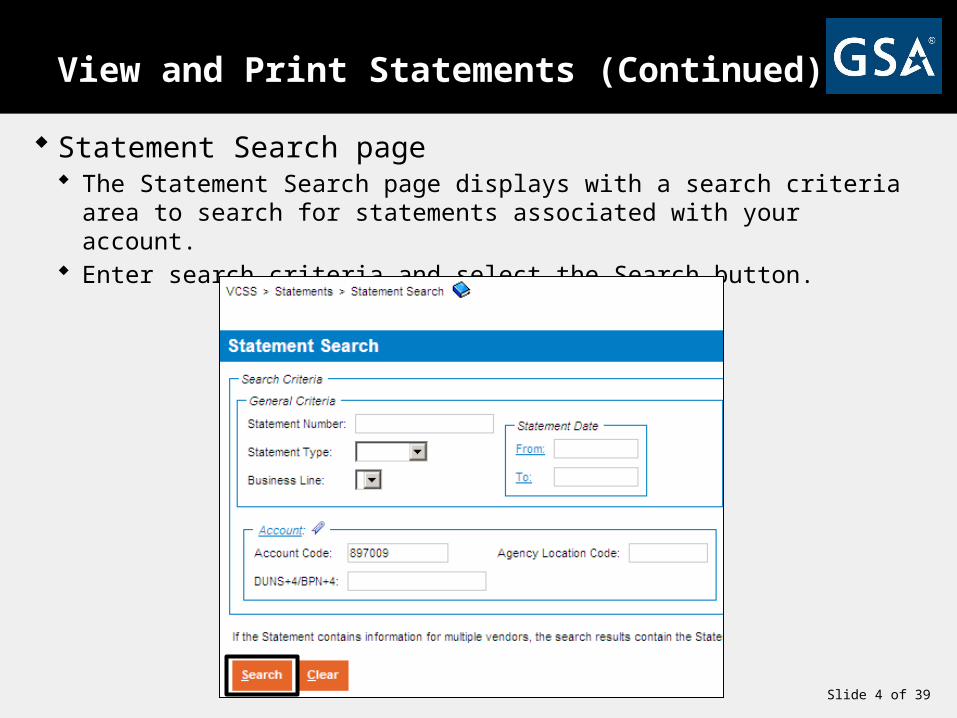
Statement Search page The Statement Search page displays with a search criteria area to search for
statements associated with your account. Enter search criteria and select the Search button.
Slide 5 of 39
View and Print Statements (Continued)
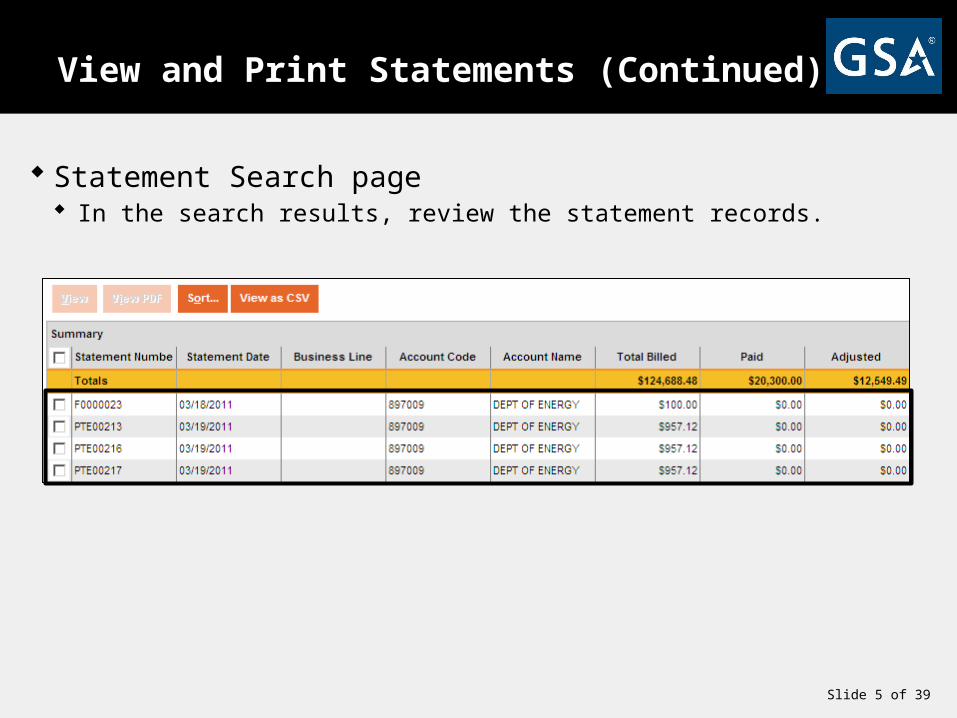
Statement Search page In the search results, review the statement records.

Slide 6 of 39
View and Print Statements (Continued)
Statement Search page To view a PDF version of a statement, select a statement record and then select
the View PDF button.
In the file download pop-up window, select the Open button to open the PDF version of the statement.

Slide 7 of 39
View and Print Statements (Continued)
Statement Search page To view detailed information associated with a statement, select a statement
record and then select the View button.

Slide 8 of 39
View and Print Statements (Continued)
Statement Record The statement record opens and displays in a tab-like format. The first tab is the Statement
Information tab and contains detailed information about the statement, including amounts.

Slide 9 of 39
View and Print Statements (Continued)
Statement Record Within the statement record, select the Details tab to review the details associated with the
statement in the search results. If you have access to a large number of detail records, you may want to enter search criteria
and select the Search button to limit the search results to a manageable number.
Slide 10 of 39
View and Print Statements (Continued)
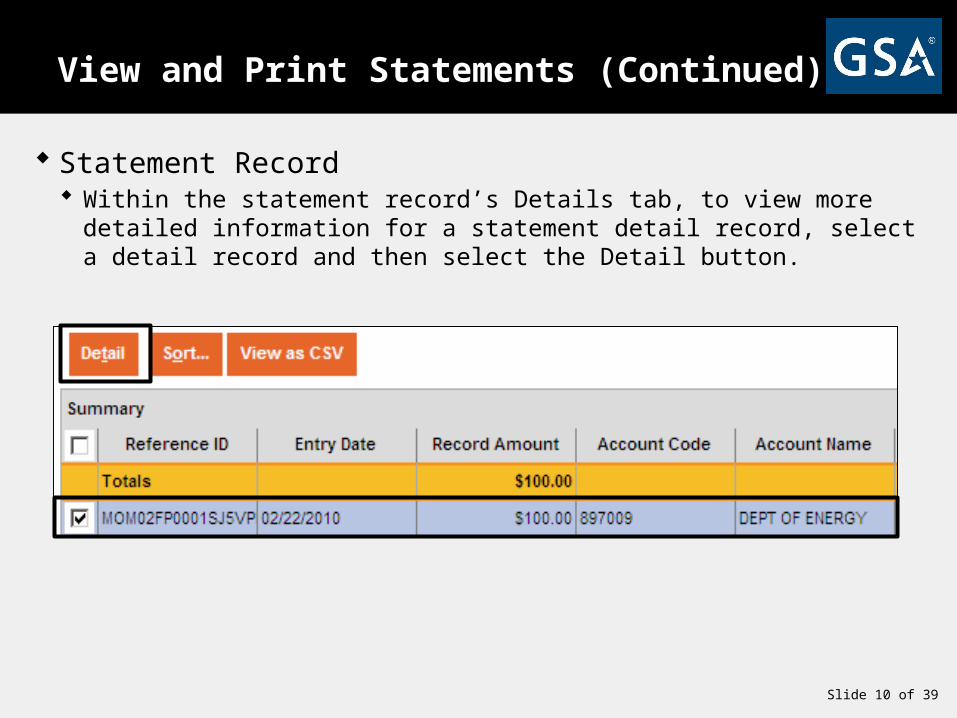
Statement Record Within the statement record’s Details tab, to view more detailed information for
a statement detail record, select a detail record and then select the Detail button.

Slide 11 of 39
View and Print Statements (Continued)
Detail Record The detail record opens and displays with detail record information.
Slide 12 of 39
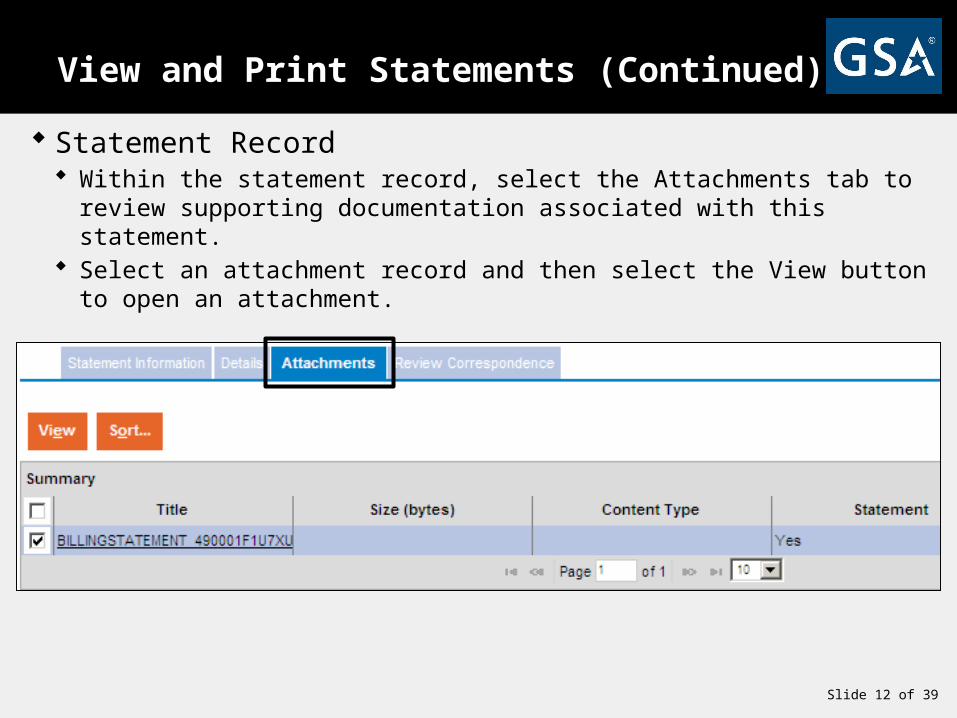
View and Print Statements (Continued)
Statement Record Within the statement record, select the Attachments tab to review supporting
documentation associated with this statement. Select an attachment record and then select the View button to open an
attachment.

Slide 13 of 39
View and Print Statements (Continued)
Statement Record Within the statement record, select the Review Correspondence tab to review
correspondence associated with this statement in the search results.

Slide 14 of 39
View and Print Statements (Continued)
Statement Record To review the details of a statement correspondence record, select the correspondence
record and then review the details that display below the search results.

Slide 15 of 39
View and Print Statements (Continued)
Statement Record The statement record has the following action buttons at the top of the record:
Select the View Referencing Payments button to view payments made on this statement. Select the Send Correspondence button to send correspondence to GSA regarding this
statement. Select the Dispute Statement button to dispute this statement. Select the View PDF button to view a PDF version of this statement.

Slide 16 of 39
View Details
The Detail Record Search page is used search for and view details for statements associated with your accounts.
View details for a statement that display as separate records referred to as “detail records”.
Detail records identify the goods or services billed, the statement they are associated with, the business line, and statement dates.
View more detailed information for each statement detail record.
Also, export the detail records to a CSV file to view and sort through the records.
To access the Detail Record Search page, from the menu bar select Statements, then View Details.

Slide 17 of 39
View Details (Continued)
Detail Record Search page The Detail Record Search page displays with a search criteria area to search for
details on statements. Enter search criteria and select the Search button.
You can search by business line and can additionally search by specific fields related to the GSA business lines.

Slide 18 of 39
View Details (Continued)
Detail Record Search page In the search results, review the statement detail records.

Slide 19 of 39
View Details (Continued)
Detail Record Search
When searching for statement detail records, the search results display up to 1,000 records at a time. Even if your search returns more than 1,000 detail records, up to 1,000 detail records display at once.
If your search returns more than 1,000 detail records, the system will display an informational message stating that your search has returned more than 1,000 records. In order to review all of the records, you have two options:
1. Select the [View as CSV] button to export all of the detail records to a CSV file.
2. Select the [Sort] button to re-sort the order of the detail records that display based on sort criteria that you specify. When you sort the detail records, the system sorts through all of the records, even if there are more than 1,000 records.
Detail records can be sorted by columns such as, Statement Number, Statement Date, Account Name, and Business Line.
Slide 20 of 39
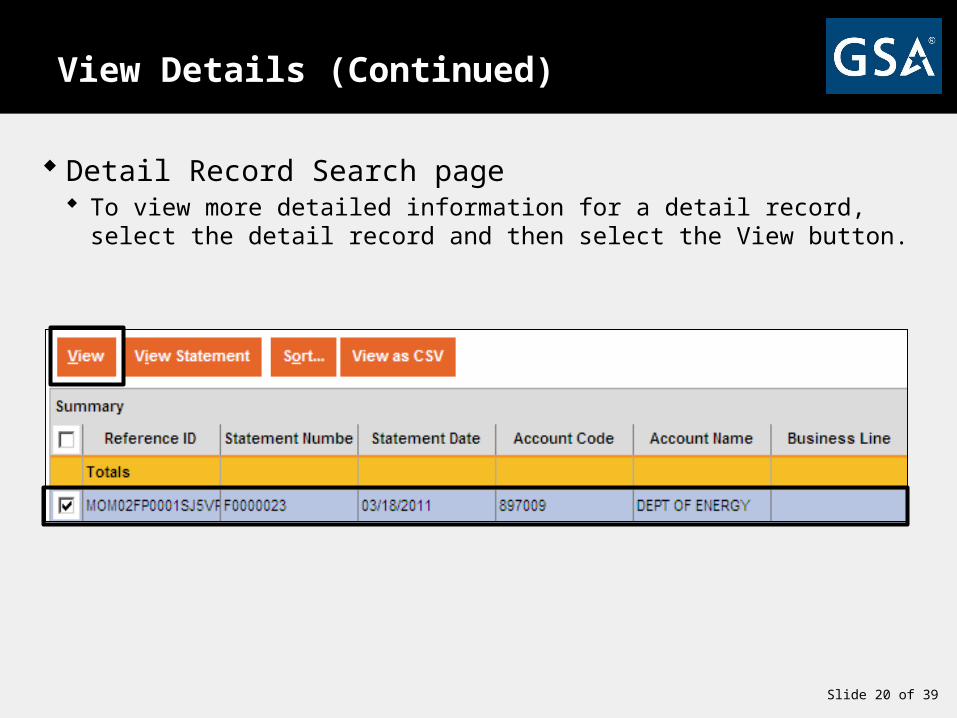
View Details (Continued)
Detail Record Search page To view more detailed information for a detail record, select the detail record
and then select the View button.

Slide 21 of 39
View Details (Continued)
Detail Record The statement detail record opens and displays with detailed information. From this page you can also do the following:
Select the Previous or Next buttons to go to the previous or next detail record that appears on the statement.
Select the View Statement button to view the statement associated with this detail record.

Slide 22 of 39
View Details (Continued)
Detail Record Search page To view the statement associated with a detail record, select a detail
record and then select the View Statement button.

Slide 23 of 39
View Details (Continued)
Statement Record The statement record opens and displays in a tab-like format. The first tab that displays is
the Statement Information tab which contains detailed statement information. Review the detail records associated with this statement, and related attachments and correspondence.

Slide 24 of 39
Dispute Statement Details
The Dispute Statement Details process is used to dispute an entire statement or specific details of a statement, called detail records.
Submit a dispute request if you find the statement might be in error or contain inaccurate information.
To dispute a statement or details associated with a statement, VCSS has a dispute wizard that walks you step-by-step through the dispute submission process. If you would like to dispute details of a statement, there is an additional step to search for
and select the specific detail records you would like to dispute.
To access the dispute wizard, from the menu bar select Statements, then Dispute Statement Details.

Slide 25 of 39
Dispute a Statement
Enter Statement Number to Dispute page The first page of the dispute wizard displays where you identify the statement
you would like to dispute. Enter the Statement Number and select the Next button.
If the statement is associated with more than one account, you must also enter the Account Code.
Slide 26 of 39
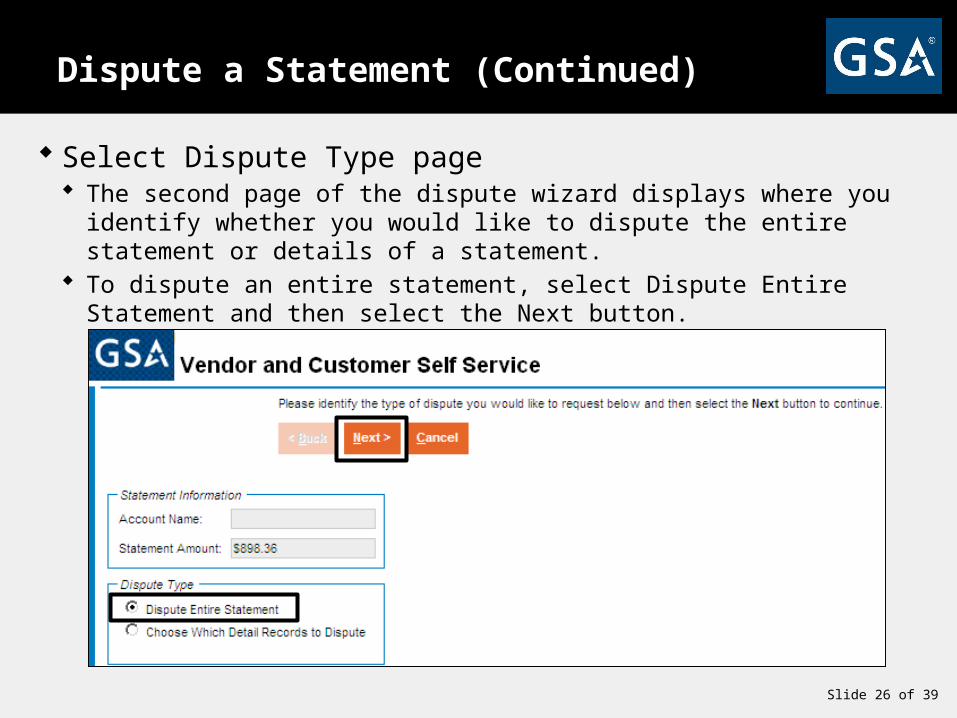
Dispute a Statement (Continued)
Select Dispute Type page The second page of the dispute wizard displays where you identify whether you
would like to dispute the entire statement or details of a statement. To dispute an entire statement, select Dispute Entire Statement and then select
the Next button.

Slide 27 of 39
Dispute a Statement (Continued)
Select Dispute Type page To dispute details of a statement, select Choose Which Detail Records to
Dispute and then select the Next button. When selecting this option, there is an additional step to search for and select the
specific detail billing records to dispute.

Slide 28 of 39
Dispute a Statement (Continued)
Select Detail Records to Dispute page If you selected the option to choose which detail records to dispute, the third
page of the dispute wizard displays to identify detail records for the dispute. Select the Search button without entering search criteria.
If you have access to a large number of detail records, you may want to enter search criteria and select the Search button to limit the search results to a manageable number.

Slide 29 of 39
Dispute a Statement (Continued)
Select Detail Records to Dispute page In the search results, select the detail record and then select the Mark for
Dispute button to include the record in the dispute. You have the option to select more than one detail record for the dispute.

Slide 30 of 39
Dispute a Statement (Continued)
Select Detail Records to Dispute page After you have successfully marked the detail records for dispute, review the
system confirmation message and then select the Next button.

Slide 31 of 39
Dispute a Statement (Continued)
Enter Dispute Information page This is the next page of the dispute wizard that displays after you do either of the
following: Select Dispute Entire Statement. Or select Choose Which Detail Records to Dispute, search for and successfully mark the
detail records for dispute. On this page, enter your contact information.

Slide 32 of 39
Dispute a Statement (Continued)
Enter Dispute Information page Select a Dispute Reason Code and enter a detailed Dispute Explanation.

Slide 33 of 39
Dispute a Statement (Continued)
Enter Dispute Information page If you would like to add supporting documentation to the dispute, select
the Attachments button. The attachment file types supported are text, PDF, Microsoft Excel and Word documents.

Slide 34 of 39
Dispute a Statement (Continued)
Add an Attachment to the Dispute Select the Browse button search for a file on your computer.
In the choose file pop-up window, locate the file on your computer, select the file, and then select the Open button.

Slide 35 of 39
Dispute a Statement (Continued)
Add an Attachment to the Dispute Confirm that the Uploaded file path displays, and then select the Add button to
add this attachment.
C:\Documents and Settings\etjames\Desktop\Services Dispute\Se
If the attachment is successfully added, the attachment record displays in the attachments summary below. Select the Back button to return to the Dispute Information page.
If you would like to view the attachment, select the attachment record and then select the View button.

Slide 36 of 39
Dispute a Statement (Continued)
Dispute Information page Once you have entered the dispute information, and optionally added
attachments if needed, select the Next button.
Slide 37 of 39
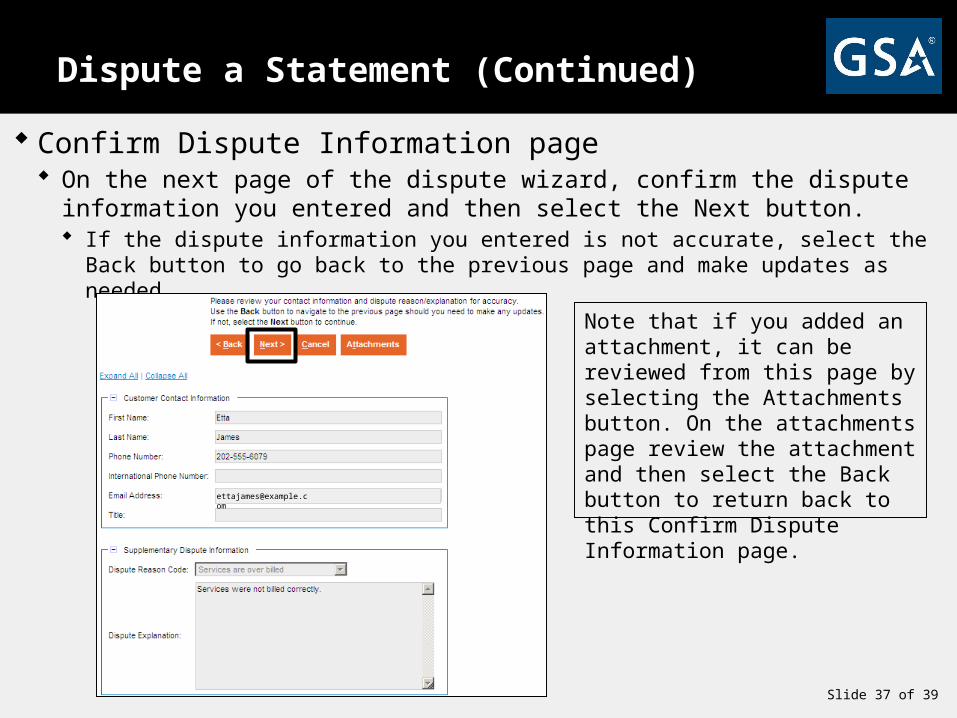
Dispute a Statement (Continued)
Confirm Dispute Information page On the next page of the dispute wizard, confirm the dispute information you
entered and then select the Next button. If the dispute information you entered is not accurate, select the Back button to go back to
the previous page and make updates as needed.
Note that if you added an attachment, it can be reviewed from this page by selecting the Attachments button. On the attachments page review the attachment and then select the Back button to return back to this Confirm Dispute Information [email protected]

Slide 38 of 39
Dispute a Statement (Continued)
Submit Dispute page The last page of the dispute wizard displays where you review the dispute and
then select the Submit Dispute Request button. If you would like to remove the dispute records, select the dispute record and then select the Remove
Details button. If the dispute is not correct, select the Back button to make updates to a previous page in the dispute
wizard.

Slide 39 of 39
Dispute a Statement (Continued)
Dispute Submitted
If the dispute request is submitted successfully, the VCSS home page displays with a confirmation message.
Once the dispute request has been submitted in VCSS, a workflow notification task is created in Pegasys and routed to GSA Finance to be researched.
Return to VCSS to view updates on the dispute processing.