
SketchUp interference
125
Transcript of SketchUp interference

1
1. A letter to the desk of editor
A letter direct from the editor desk highlighting on April edition
2. Interview
Interview with Irmin Verstappen
3. Cover Story
SketchUp interference
4. Article
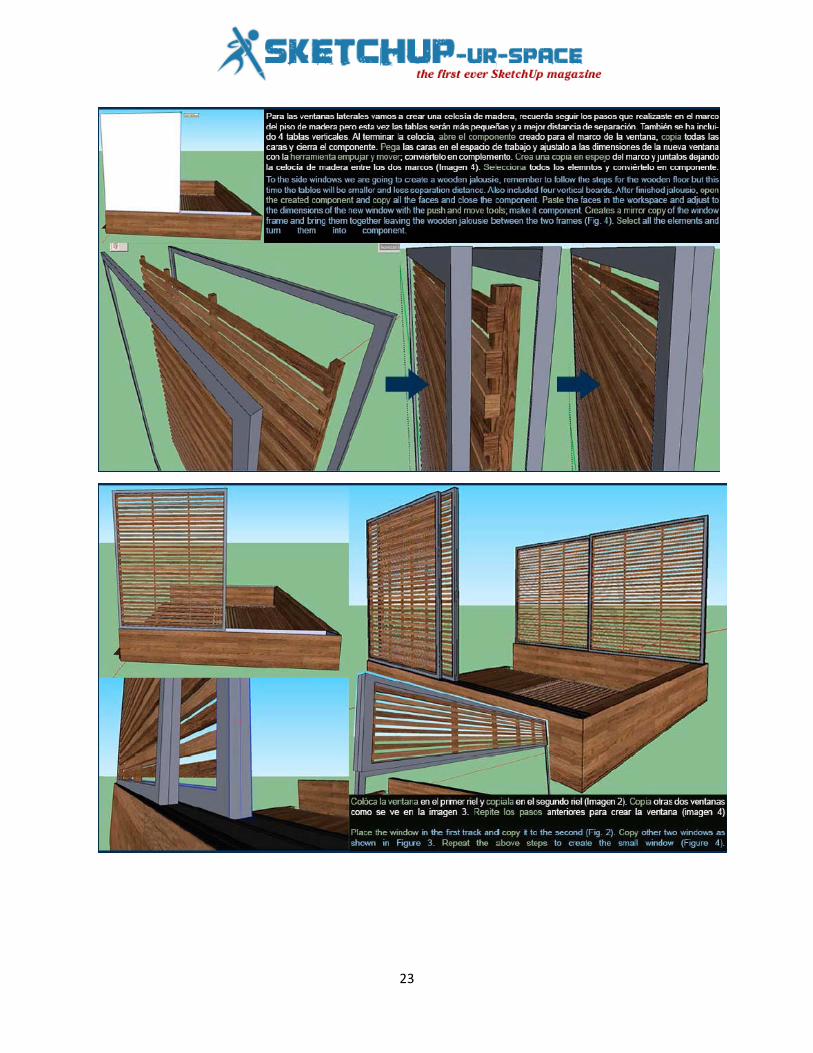
How to apply SketchUp in education Cottage Bathtub - Architectural Visualization
5. Blog
SketchUcation Plugin Store is live! Intersects to Create Mortises in SketchUp
6. Tutorial
How to make grass with Photoshop The Making of the Kitchen How to 1 NPR with SketchUp V-ray tutorial Exterior Night Scene How to import a portion of land in 3D quickly and easily with SketchUp Large chambre en suite wall with SketchUp
8. News Room
9. Magazine Details – The Creative team of SketchUp ur Space
List of Contents

2
A letter to the Desk of Editor Hello friends!
We are going to publish another spectacular issue of SketchUp ur space magazine. We are overwhelmed with gratitude by the cooperation which we receive from the worldwide SketchUp enthusiasts to continue our magazine successfully.
The present theme of the magazine focuses on “The utility of SketchUp inference”. SketchUp inference plays a vital role to make the drawing accurate and produce realistic models. The team of SketchUp ur space has presented an useful cover story highlighting every aspects of inference.
In article section, Mr. John Parker, the most experienced teacher, architect and cad modeler, shared an informative article focusing on ‘how SketchUp provides opportunities to engage with students across a broad spectrum of subject areas and a range of age groupings.’
In tutorial section, Irmin Verstappen, the well known independent Interior Designer from Belgium, has provided a tutorial on “how to create a 3d model of a kitchen efficiently”. There will be also other useful tutorials like ‘Render night scene with SketchUp v-ray’, ‘Import a position of land in 3d quickly with SketchUp etc.
In interview section, the SketchUp ur space team has interviewed Irmin Verstappen. In the interview, Mr. Irmin has shared his experience on how he utilized SketchUp for interior designing.
In news section will get latest updates and news on SketchUp.
Hope our readers will like this publication of SketchUp ur Space. We will welcome some helpful feedback from our readers. Please send me your suggestions at [email protected].
Best Wishes Rajib Dey
Editor Happy Reading!

3
Interview Irmin Verstappen, the independent Interior Designer and 3D visualizer from Belgium
Tell us something about yourself.
I am an Interior Designer working in Belgium. I graduated in 1994 and have been working for several companies since then. Until in 2010, when I started working as an independent designer and 3D visualiser. Today I also work as a teacher in SketchUp, trying to inspire people to use the program for their line of work...
How do you get hooked with SketchUp?
It must have been in 2007, working an a project for a client who couldn't picture the hand drawn sketches I made of a design, when I searched for a tool or program, to do this visualisation proces. There where a few programs available, but SketchUp was free, so I tried it. After while I stopped making hand drawn sketches, but used the different styles in the program, bought the book 'SketchUp for dummies', and the rest is history...
You perform as an Interior Designer. How do you utilize SketchUp for interior design? Which version of SketchUp is most suitable for interior design?
I use SketchUp not only to visualise my ideas, but also to actually design. Most of my concepts start when I'm driving or when I can't sleep at night, and then, the day after, I transform them into SketchUp. I hardly ever start on a piece of paper anymore, or maybe when there is no computer around...
4
Besides a successful Interior Designer, you also work as 3D visualizer. What are the benefits of applying SketchUp for visualization? Focus on some new ideas which will act as the next generation of visual communication.
When my collegues started to notice my 3D work, I got the question whether I would like to do this for them as well, and currently this is almost 50% of my activity. The reason for using SketchUp is very simple: you can start of for free, even with free render programs, it is easy to use, and you get quick results (even for a newbie). When you like it, you can buy it at a very competitive price, compared to other software...
Which project gave you complete satisfaction in which you applied SketchUp successfully?
I get satisfaction out of every project in wich I use my visualisations in a way that I can convince a client to go ahead with my concept. I know for a fact that in some cases if I wouldn't have used SketchUp, I couldn't have sold the project. There are very few people that can understand a '2D plan', and most of the times a customer insists on a 3D picture...
What are the pros and cons of SketchUp?
There are a lot of pros, very few cons. The pros I already mentioned... And in the pro version you get all the extras, import and export features... Also the fact that you can easily modify and extend the software with numerous plugins.
Another very important pro is that it's no problem to interact between other 2D and 3D software.
Come to think of it, it's hard to find any cons...
What new features should be upgraded with SketchUp in near future?
I can't think of any, the plugins make it so easy to adjust the program to your own specific needs. Or maybe something so that it is usable on a tablet... not just a viewer.
Who are your inspirations in Interior Designing/3D visualization?
The classics I guess, Le Corbusier and Ludwig Mies van de Rohe. Also I am a fan of Arne Jacobsen.
You are a professional teacher and take classes on SketchUp. Please tell something about that.
About 2 years ago I was asked to become a teacher to give classes on SketchUp for adults. These lessons are split into 2 groups, the beginners (people who basicly have no knowledge of SketchUp) and the advanced class. Throughout these classes, we start with the very basics, to eventually evolve into the more specifics of SketchUp (such as landscaping, animations, ...)
5
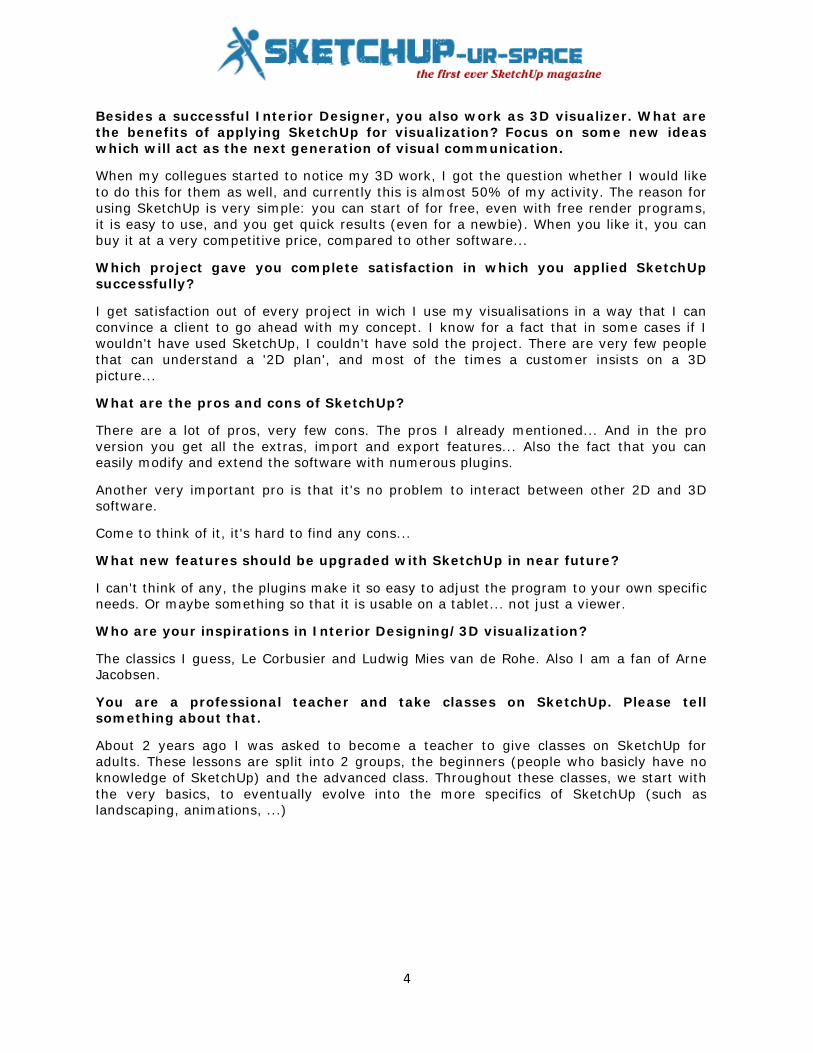
What are your hobbies?
As an independant, I work long hours, so there is not much time for hobbies, but I do own a classic Citroen DS, and whenever there is something to do in the neighborhood with oldtimers, you will probably find me and my son there!
What suggestion do you want to provide to the budding interior designer?
It's not going to be an easy ride, lots of competition, but try to remain faithfull to your ideas and goals...
Provide your feedback for SketchUp-ur-space magazine and how to make it more appealing to SketchUp lovers?
I would like it if I could download each issue as a pdf, sort of a magazine such as 'Catch up' from Sketchucation. That way it would be more than a website.
6
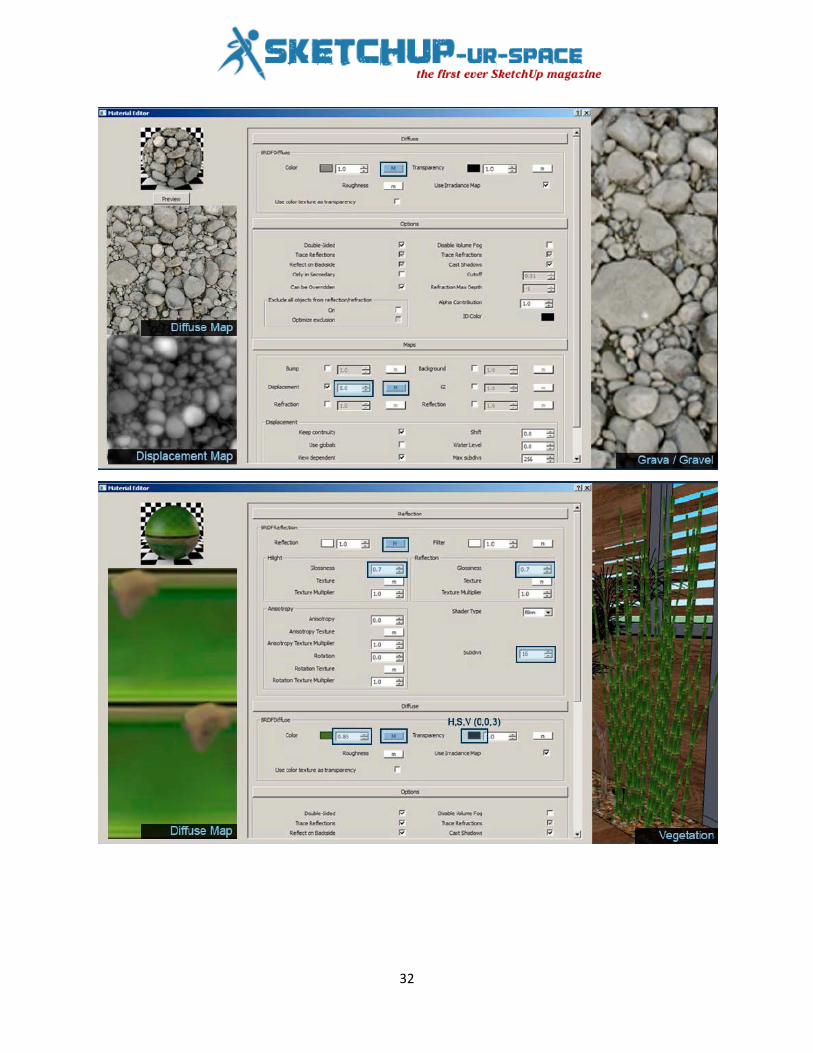
SketchUp interference SketchUp contains an imperceptible inference engine which is based on the foundation of SketchUp functionality. It simplifies the application of SketchUp to draw accurately & quickly and generate realistic models.
An inference is considered as a dynamic action with which SketchUp can find out (infer: derive by reasoning) what the users prefer to perform based upon how they go from the reference.
It is primarily a system that fastens your cursor compliant with any point, edge, axis, face, guide or imaginary line.
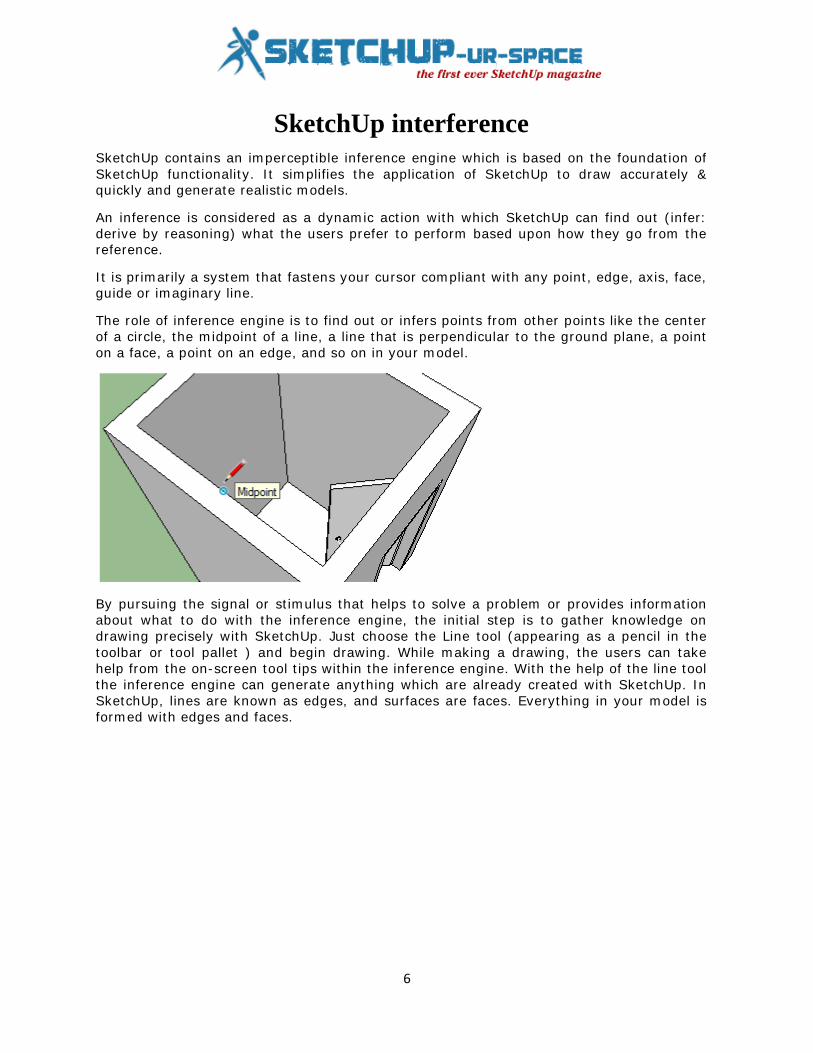
The role of inference engine is to find out or infers points from other points like the center of a circle, the midpoint of a line, a line that is perpendicular to the ground plane, a point on a face, a point on an edge, and so on in your model.
By pursuing the signal or stimulus that helps to solve a problem or provides information about what to do with the inference engine, the initial step is to gather knowledge on drawing precisely with SketchUp. Just choose the Line tool (appearing as a pencil in the toolbar or tool pallet ) and begin drawing. While making a drawing, the users can take help from the on-screen tool tips within the inference engine. With the help of the line tool the inference engine can generate anything which are already created with SketchUp. In SketchUp, lines are known as edges, and surfaces are faces. Everything in your model is formed with edges and faces.

7
While making a drawing with SketchUp, if a SketchUp user wish to include a line from an obtainable point belonging to the model, just hover its mouse over that point. And at the time of being nearer to that point, SketchUp can predict that the user is attempting to reference that point and it will lock to it. The user will view a little green circle pop up over that point to ensure the user that it has been referenced.
Without the inference system, the SketchUp user will find it difficult to make proper connection to that point just by preparing to land on that point with the mouse.
8
Not only the Inference System can be applied for creating a line with SketchUp but it can also be applied for various other things like moving an object, making construction guides, completing a line, rectangle, circle, etc., altering your axes, creating dimension, and more.
There exist various types of SketchUp inferences and these can be divided into three main categories ranging from Point Inferences, Linear Inferences, and Shape Inferences. By going through the following online vide the SketchUp lovers can acquire brief knowledge on the SketchUp Inference System.
http://www.youtube.com/watch?feature=player_embedded&v=qsvfs-dUjsk
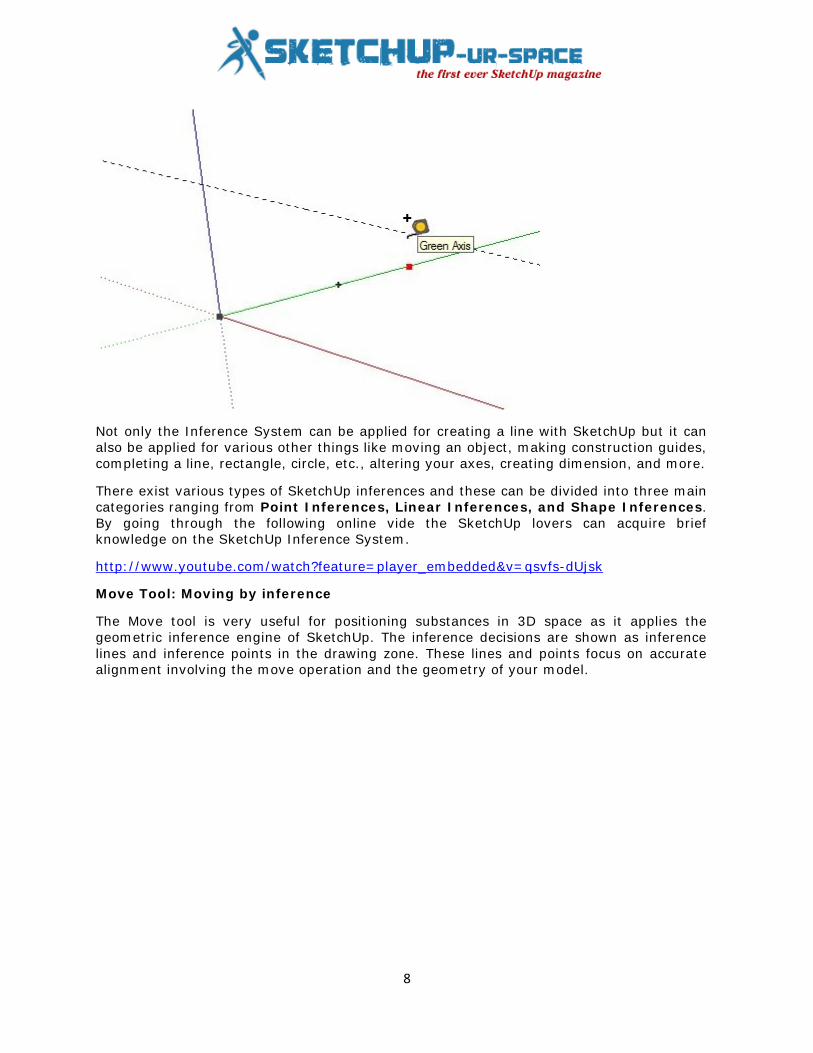
Move Tool: Moving by inference
The Move tool is very useful for positioning substances in 3D space as it applies the geometric inference engine of SketchUp. The inference decisions are shown as inference lines and inference points in the drawing zone. These lines and points focus on accurate alignment involving the move operation and the geometry of your model.
9
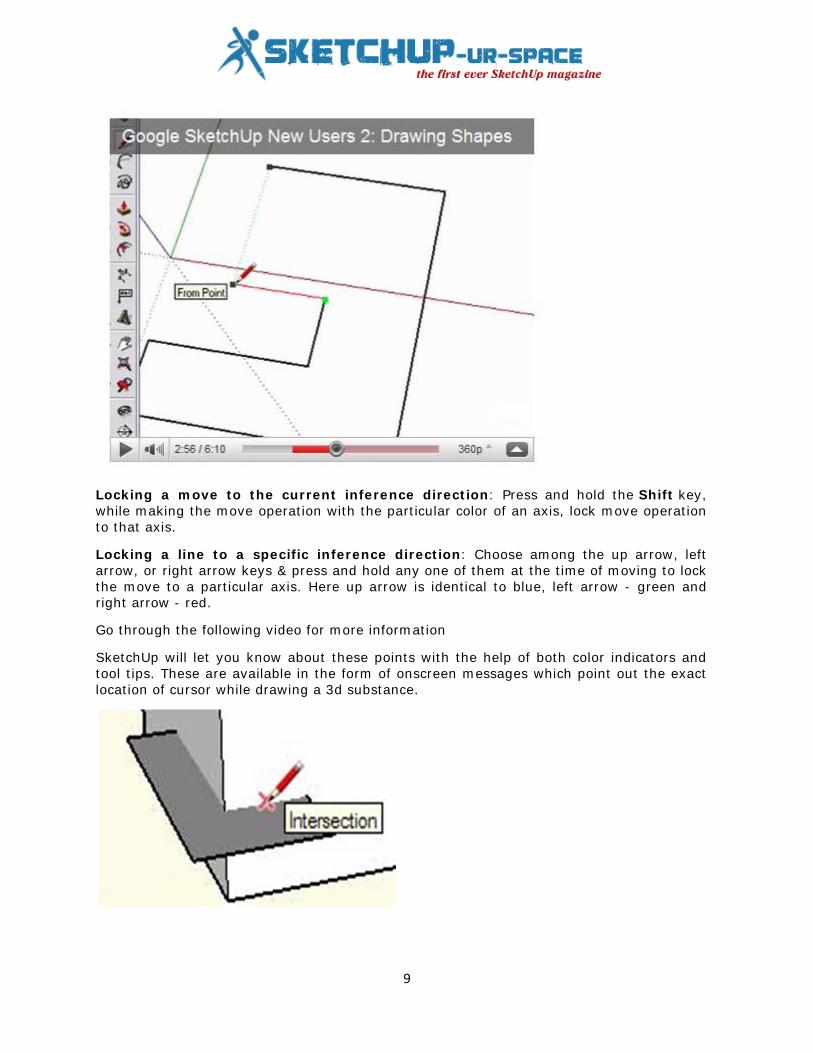
Locking a move to the current inference direction: Press and hold the Shift key, while making the move operation with the particular color of an axis, lock move operation to that axis.
Locking a line to a specific inference direction
: Choose among the up arrow, left arrow, or right arrow keys & press and hold any one of them at the time of moving to lock the move to a particular axis. Here up arrow is identical to blue, left arrow - green and right arrow - red.
Go through the following video for more information
SketchUp will let you know about these points with the help of both color indicators and tool tips. These are available in the form of onscreen messages which point out the exact location of cursor while drawing a 3d substance.

10
How to lock an inference
Sometimes it becomes very complicated to make drawing preciously as geometry may create obstruction to infer points from other points. The inference lock can easily make a solution to this problem. It notifies SketchUp not to be irresolute from the direction while inferring from at present. In order to apply the inference lock, press & hold the Shift key as soon as SketchUp infers the preferred alignment (the inference line is shown as bold). The alignment will be kept locked with the movement of the mouse and/or if the user chooses a secondary inference point.
Any of the inference conditions may be locked; alongside an axis direction, alongside an edge direction, on a face, from a point, parallel or perpendicular to an edge, and so on.
Forcing an Inference Direction
• Right arrow key = red axis
: The users can apply SketchUp forcefully to infer parallel to a particular axis by combining the use of the following keys with the Line tool, Move tool, or Tape Measure tool:
• Left arrow key = green axis
• Up or down arrow keys = blue axis
Reference: http://www.masterSketchUp.com/SketchUp-inference/
11
How to apply SketchUp in education Designed to allow “… everybody to experience the power and fun of building their ideas in CAD” (Schell, n.d.), Google SketchUp is a 3D modelling program that allows the users to model almost any object that they wish. The depth of the program provides users with the ability to create realistic virtual models and a range of 'plugins' extend this to 'augmented reality' models, 3D printing and pattern development and cardboard modelling.
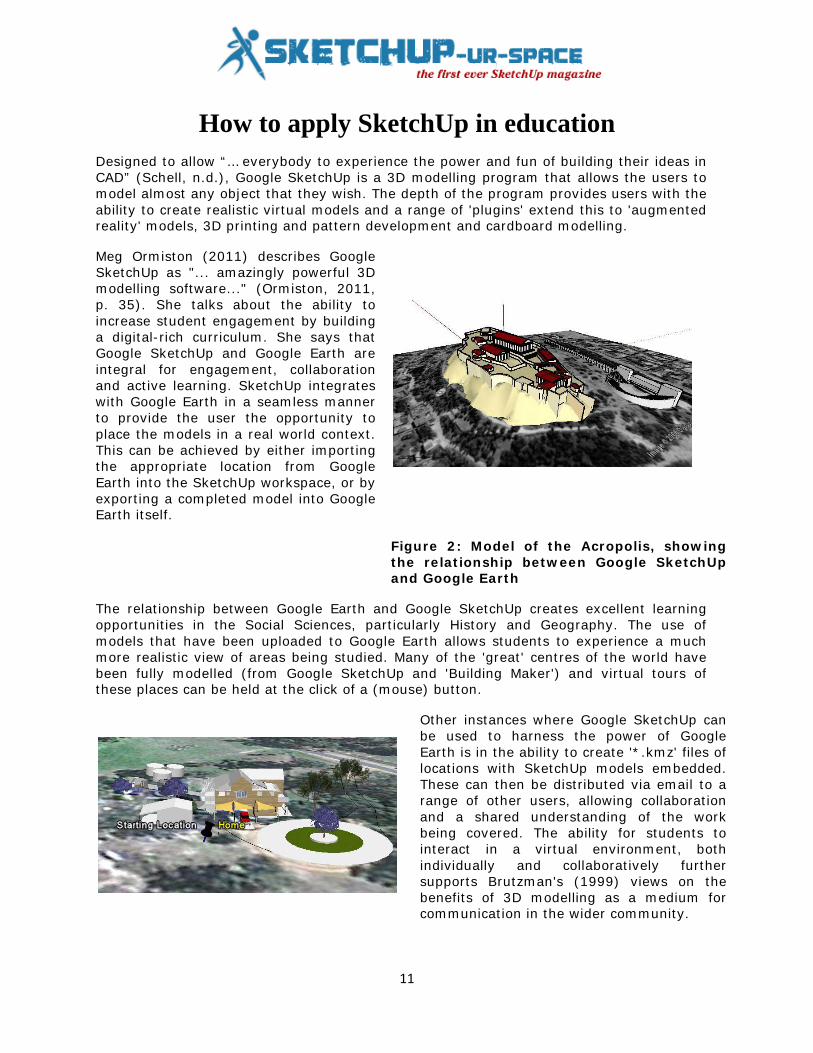
Meg Ormiston (2011) describes Google SketchUp as "... amazingly powerful 3D modelling software..." (Ormiston, 2011, p. 35). She talks about the ability to increase student engagement by building a digital-rich curriculum. She says that Google SketchUp and Google Earth are integral for engagement, collaboration and active learning. SketchUp integrates with Google Earth in a seamless manner to provide the user the opportunity to place the models in a real world context. This can be achieved by either importing the appropriate location from Google Earth into the SketchUp workspace, or by exporting a completed model into Google Earth itself.
The relationship between Google Earth and Google SketchUp creates excellent learning opportunities in the Social Sciences, particularly History and Geography. The use of models that have been uploaded to Google Earth allows students to experience a much more realistic view of areas being studied. Many of the 'great' centres of the world have been fully modelled (from Google SketchUp and 'Building Maker') and virtual tours of these places can be held at the click of a (mouse) button.
Figure 2: Model of the Acropolis, showing the relationship between Google SketchUp and Google Earth
Other instances where Google SketchUp can be used to harness the power of Google Earth is in the ability to create '*.kmz' files of locations with SketchUp models embedded. These can then be distributed via email to a range of other users, allowing collaboration and a shared understanding of the work being covered. The ability for students to interact in a virtual environment, both individually and collaboratively further supports Brutzman's (1999) views on the benefits of 3D modelling as a medium for communication in the wider community.

12
Figure 3: Model of the author’s house uploaded to Google Earth
3D Warehouse: The 3D modelling process allow users to generate models that can be integrated into a range of learning experiences or to access objects from the '3D warehouse' (a repository of models created and uploaded by their makers for use by the SketchUp community) (visithttp://sketchup.google.com/3dwarehouse
).
These objects can be used to engage students by setting the scene for an oral presentation, as seen in the image of the student delivering a piece from Shakespeare, appearing to be on the stage of the Globe Theatre. It can also be used to position an audience in an Ancient History class with models of Ancient Greece or Rome. There are even realist 3D models of people from these times that can help engage the students, especially when presented in a life size view in the classroom (see AR image of Legionnaire).
Figure 4: Sample of the Google Warehouse homepage
TPACK
The design of the Information booth at the Parthenon is an example of TCK, whilst the use of the Globe theatre as a backdrop, or the augmented reality modelling of the furniture reflects a TPCK activity, considering the level of engagement that the students exhibited (Warschauer, 2007). It is in the ability to provide learning experiences that cover the three areas of the TPACK model, regardless of the subject area, that the power of Google SketchUp as a cross-curricular application really comes to the fore.
: The use of Google SketchUp to enhance the learning experiences of students fits well with the TPACK model (Koehler, 2011). In most cases, using SketchUp would be classed as a 'TCK' experience, where the knowledge covered during the activity would be technological knowledge and content knowledge (TCK). If used in a more deliberate manner, with a focus on the engagement and learning, the activity becomes technological, pedagogical and content (TPCK).
In Brutzman's study, he concluded that "… Developing cross-disciplinary virtual worlds with an emphasis on reality provides students with excellent insight, enthusiastic motivation and useful learning exemplars." (Brutzman, 1999, p. 11)
Figure 5: TPACK Model

13
Whilst the use of Google SketchUp does not go as far as creating a virtual world, it does allow the creator and the user to engage more fully with the object in its environment. Breuleux (2001) further supports this in the discussion on the use of ICT in schools when describing how ICT can support more complete experiences (of collaborative knowledge building) by integrating "… well-designed technologies in the context of meaningful, mindful inquiry projects, non-presentational pedagogies, access to resources and tools, and adequate support for technological maintenance and pedagogical renewal." (Breuleux, 2001, p. 3) As this document shows, Google SketchUp provides teachers the opportunity to enable this to happen for their students.
Plugins: The range of 'plugins' available for Google SketchUp is extensive and further enhances the programs value as an environment for all aspects of learning. The list of plugins is extensive, and few people would need or even wish to access all of those that are available (seehttp://sketchup.google.com/intl/en/download/plugins.html for example). There are a number of plugins that teachers can use to enhance the learning experience and a number of these will be discussed here. As teachers (and students) made use of Google SketchUp, they would continue to find more applications for the program and the plugins available.
SketchyPhysics is one plug in that enhances SketchUp's usefulness in a range of areas, notably in the sciences (http://code.google.com/p/sketchyphysics). This plugin allows the user to ably characteristics to the elements created, which allows them to interact with each other in the work space. This is important in the animation of the models produced. The models need to reflect natural elements as closely as possible in order to deliver the most real experience.
Another plugin that continues to inspire users is the AR- Media plugin from Inglobe Technologies
Figure 6: Screenshot of the Sketchyphysics website
(
Figure 7: Sketchyphysics Toolbars
http://www.inglobetechnologies.com/en/new_products/arplugin_su/info.php, 2011). Augmented reality is an area of growth in the education and this plugin allows students and teachers to integrate this technology into the learning experiences. The diagrams included show a number of different applications for the AR-Media plugin, modelling of a robot, furniture and a house in a graphics course, the Osaka Castle modelling demonstration in a Japanese unit and projections of a Roman soldier as part of history. The ability of users to take models created in Google SketchUp and interact with lifelike

14
(and life size) augmented reality models further enhances the level of engagement and the value of the learning activity.
Waybe is another plugin that enhances the value of Google SketchUp (
Figure 9: Selection of Images using Google SketchUp and AR Media
http://waybe.weebly.com/learn-waybe.html). The Waybe plugin (and other similar ones like it) provides the user with the ability to create 'developments' or 'nets' of the objects created. Understanding the volume of the objects created is an important tool for many mathematical concepts. It is also inspiring for students to be able to produce a cardboard model of their object that they can share with others.
Figure 10: Selection of images using Waybe. a) Waybe Toolbars, b) SketchUp Image and c) Waybe pattern developmen
Lipson (1999) discusses the motivation for the use of physical models in education and their importance for active learning. Spatial concepts can be difficult for some students to grasp and these can be addressed through the use of Google SketchUp. Another set of plugins that further enhances these concepts are 3D printing plugins that allow the production of physical models, based on Google SketchUp files. Although requiring additional 3D printing capabilities, this is another area that further demonstrates the cross-curricular application of SketchUp.
t
Figure 81: The relationship between the conceptual organisers of ICT
15
A review of the NET-S standards shows the value of using Google SketchUp across the curriculum. Successful integration of Google SketchUp in the learning experiences addresses elements of all 6 of the standards for students (ISTE, 2007) as well many of the standards for teachers (ISTE, 2008)
Using Google SketchUp also fits well with the organisers from the Statement of Learning for Information Communication Technologies (Curriculum Corporation, 2006) and the elements of the Essential Learnings Information Communication Technologies (ICTs) Cross Curricular Priority (Quuensland Studies Authority, 2007)
The SketchUp4Architects site (http://www.sketchup4architect.com/benefits-of-communication-and-Visualization-sectors-by-sketchup.htm) describes the benefits of using Google SketchUp for communication and visualisation. As is stated in the conclusion, "… the detailed, colourful and realistic models give a more profound understanding of any design" (Narth, 2011). This is one of the key benefits of the use of Google SketchUp as a learning tool.
As this paper has shown, Google SketchUp offers opportunities to engage with students across a broad spectrum of subject areas and a range of age groupings. The program provides users opportunities to interact digitally in a range of environments at almost any level of technical ability. Google SketchUp should be a key part of a teacher's digital toolbox.
Bibliography
Breuleux, A. (2001). Imagining the present, interpreting the possible, cultivating the future:Technology and the renewal of teaching and learning. Education Canada, 41(3). Retrieved August 15, 2011
Brutzman, D. (1999, December 1). Teaching 3D Modeling and Simulation: Virtual Kelp Forest Case Study. Retrieved from citeseerx.ist.psu.edu/viewdoc/download?doi=10.1.1.107.2421.pdf
Curriculum Corporation. (2006). Statements of Learning for Information and Communication Technologies (ICT). Retrieved August 21, 2011, from http://www.iste.org/Libraries/PDFs/NETS_for_Student_2007_EN.sflb.ashx
ISTE. (2007). The ISTE NETS and Performance Indicators for Students (NETS•S). Retrieved August 21, 2011, from International Society for technololgy in Education: Standards: http://www.iste.org/Libraries/PDFs/NETS_for_Student_2007_EN.sflb.ashx
ISTE. (2008). The ISTE NETS and Performance Indicators for Teachers (NETS•T). Retrieved August 21, 2011, from International Society for Technology in Education: http://www.iste.org/Libraries/PDFs/NETS_for_Teachers_2008_EN.sflb.ashx
Koehler, M. J. (2011, May 13). What is TPACK? Retrieved from TPACK- Technollogy Pedagogical and Content Knowledge: http://mkoehler.educ.msu.edu/tpack/what-is-tpack/
Lipson, H. (1999). Printable 3D Models for Customized Hands-on Education. Ithaca NY: Sibley School of Mechanical and Aerospace Engineering, Cornell University.
Narth, D. (2011, March). SketchUp4Architects: Beneifts of Communication and Visulalisation Sectors by SketchUp. Retrieved August 14, 2011, from SketchUp4Architects: http://www.sketchup4architect.com/media/2011/march/sketchup-ur-space-march11.pdf
16
Ormiston, M. (2011). Creating a Digital Rich Classroom. Bloomington IN: Solution Tree Press.
Quuensland Studies Authority. (2007). Retrieved August 21, 2011, from http://www.qsa.qld.edu.au/downloads/early_middle/qcar_ccp_ict_yr9.pdf
Warschauer, M. (2007). The Paradoxical Future of Digital Learning. Learn Inq(1), pp. 41-49.
Figure 1: Google SketchUp Home page:
List of Figures
http://sketchup.google.comm/
Figure 2: Model of the Acropolis, showing the relationship between Google SketchUp and Google Earth Retrieved 7 September 2011.from
http://sketchup.google.com/3dwarehouse/details?mid=6c7cbd5ba83e2edf5bc6c31ea6ff5c5d&prevstart=0
Figure 9: Model of the author’s house uploaded to Google Earth
Screen clipping taken: 7/09/2011
Figure 10: Sample of the Google Warehouse homepage
Figure 5: Augmented Reality Model of a Roman Legionaire created in Google SketchUp and visualised through AR Media
Figure 11: TPACK Model : http://mkoehler.educ.msu.edu/tpack/what-is-tpack/
Figure 12: Screenshot of the Sketchyphysics website
Figure 13: Sketchyphysics Toolbars
Figure 9: Selection of Images using Google SketchUp and AR Media
Figure 10: Selection of images using Waybe. a) Waybe Toolbars, b) SketchUp Image and c) Waybe pattern development.
Fgure 11: The relationship between the conceptual organisers of ICT (Curriculum Corporation, 2006)
17
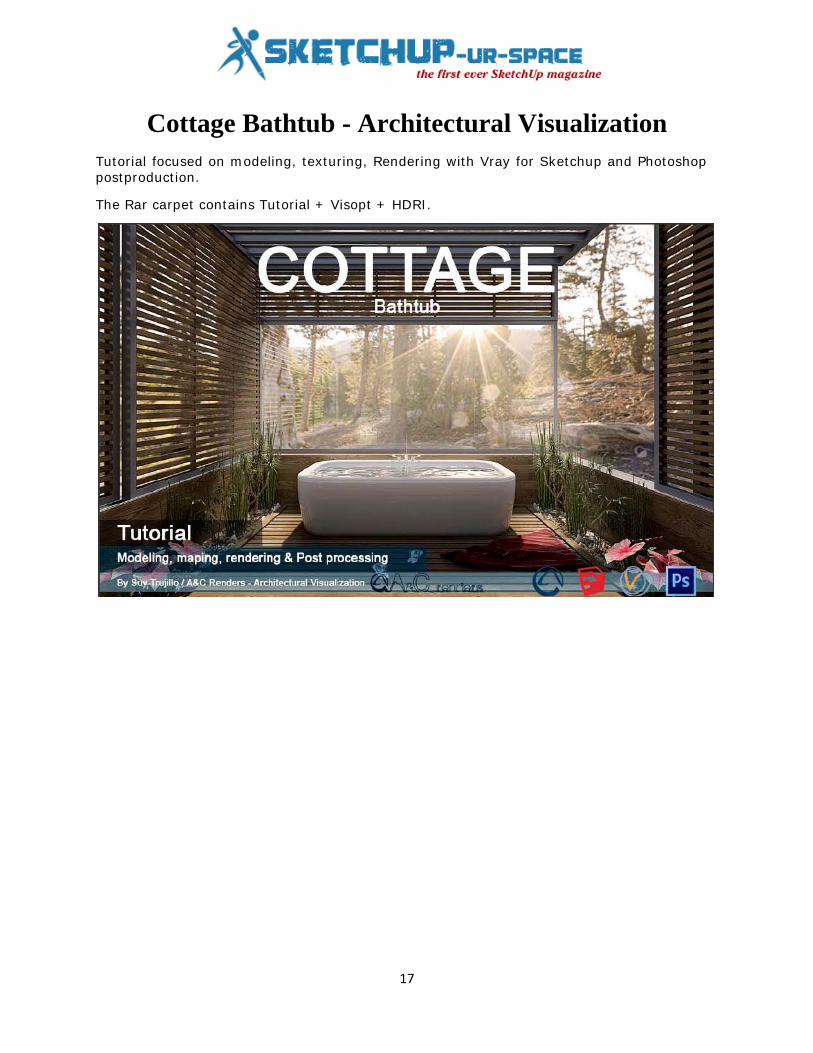
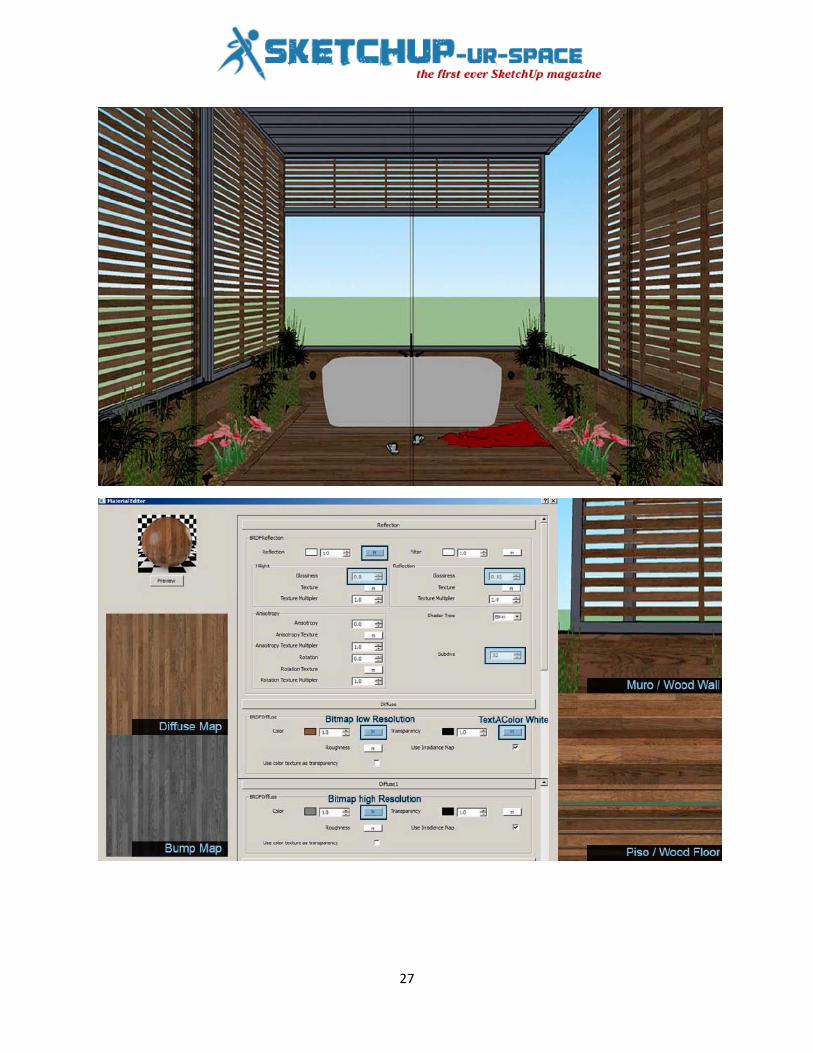
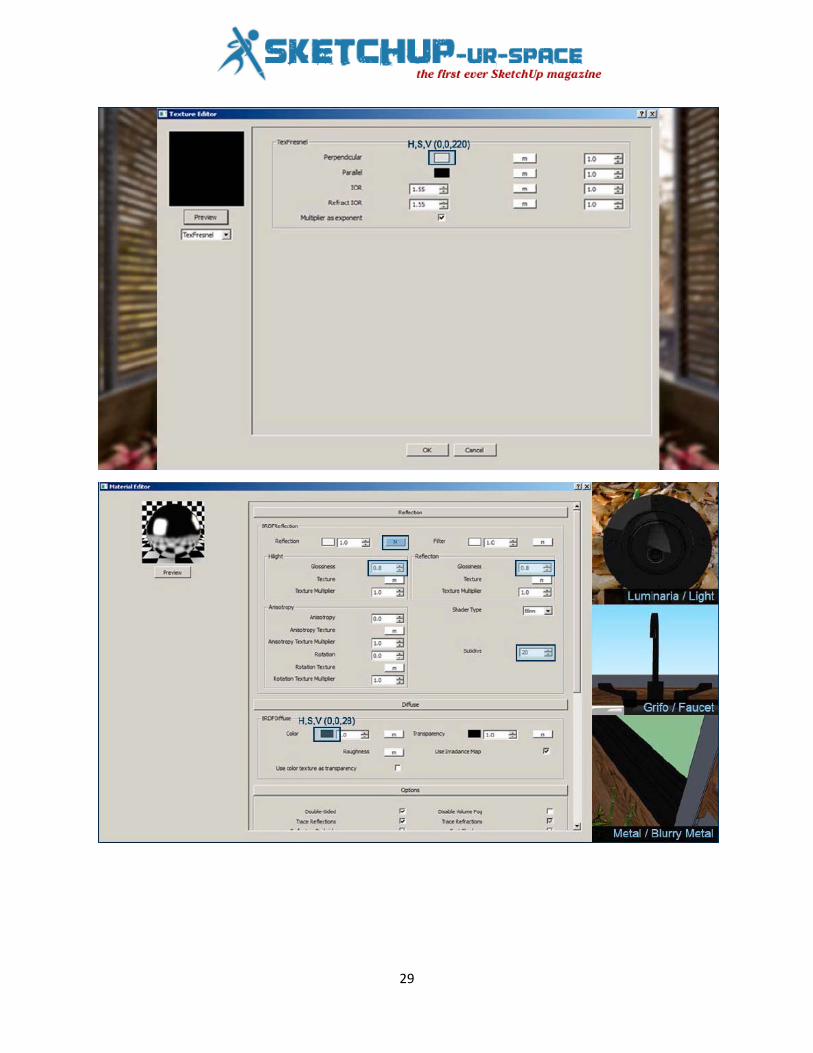
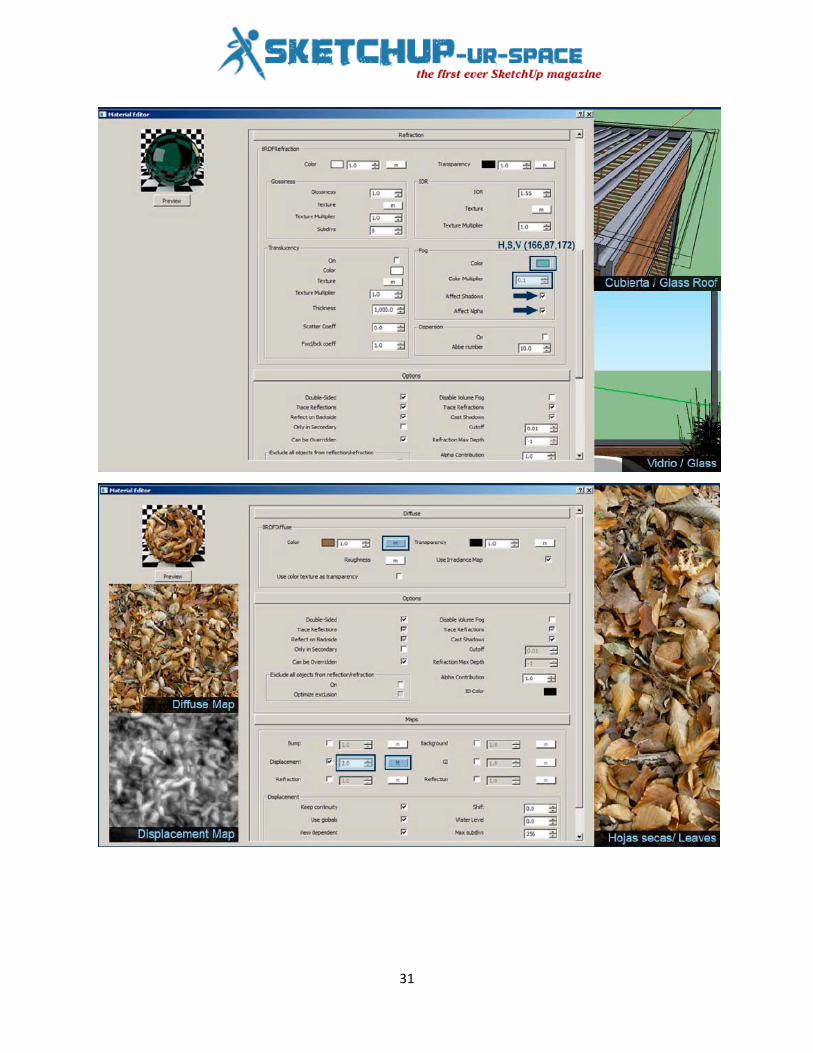
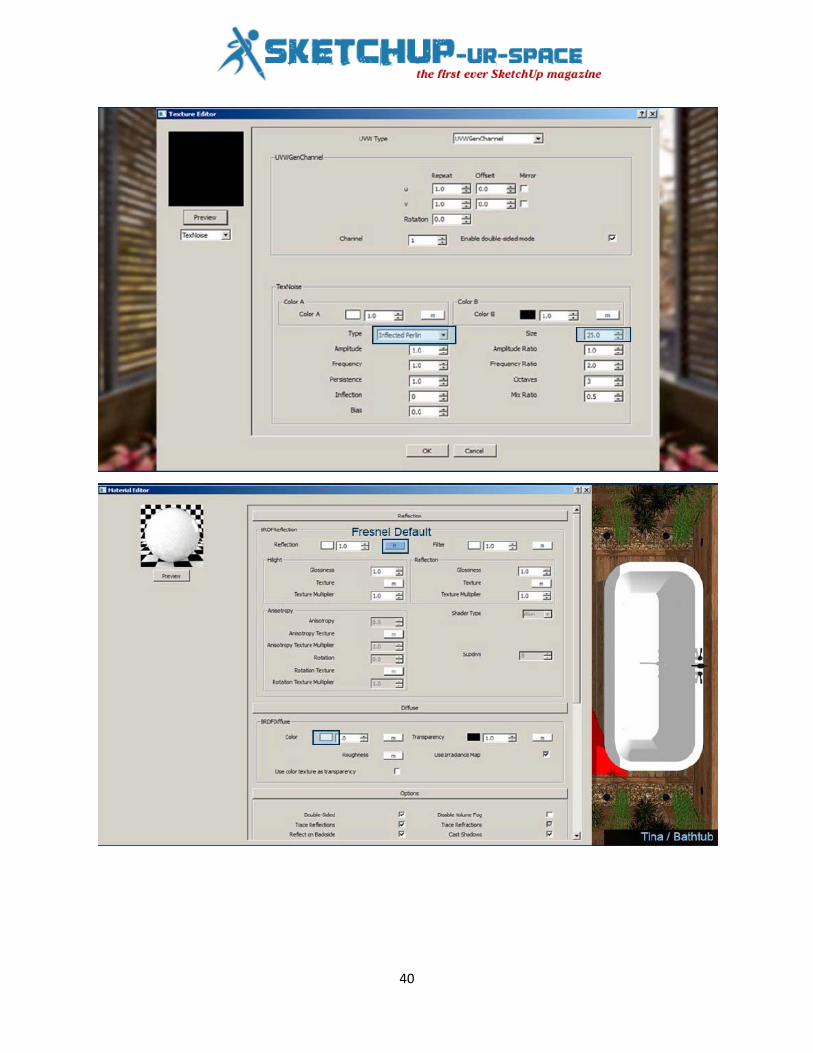
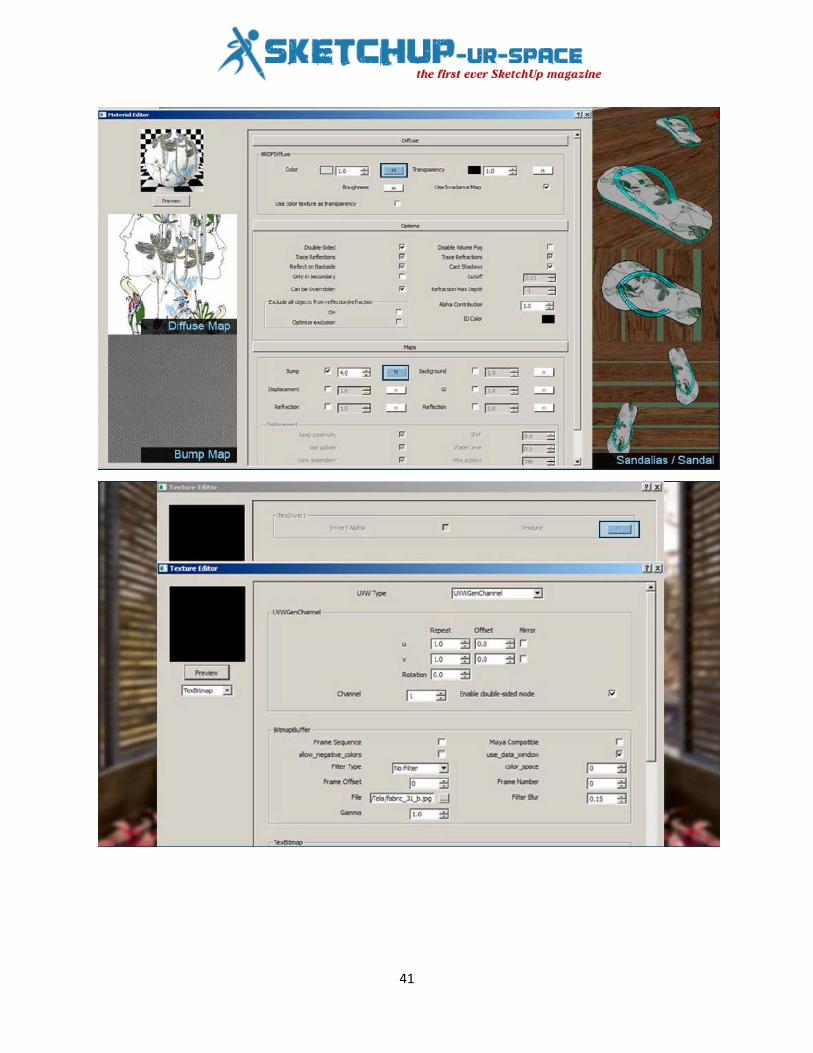
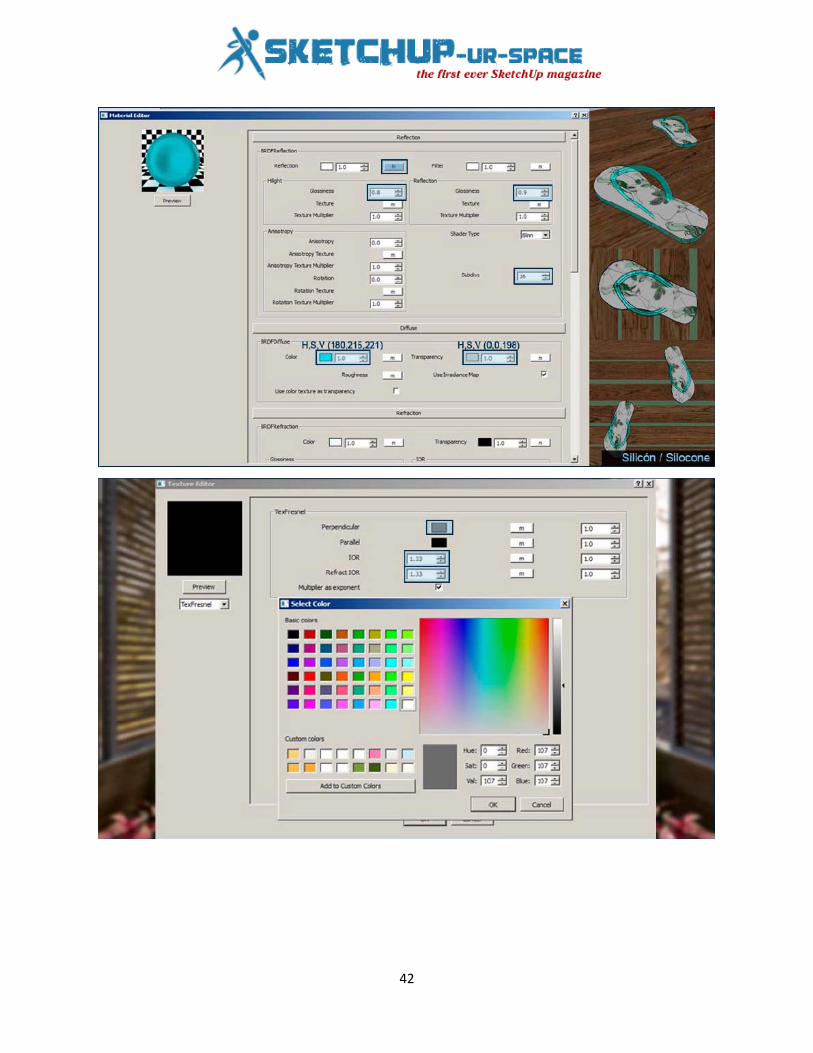
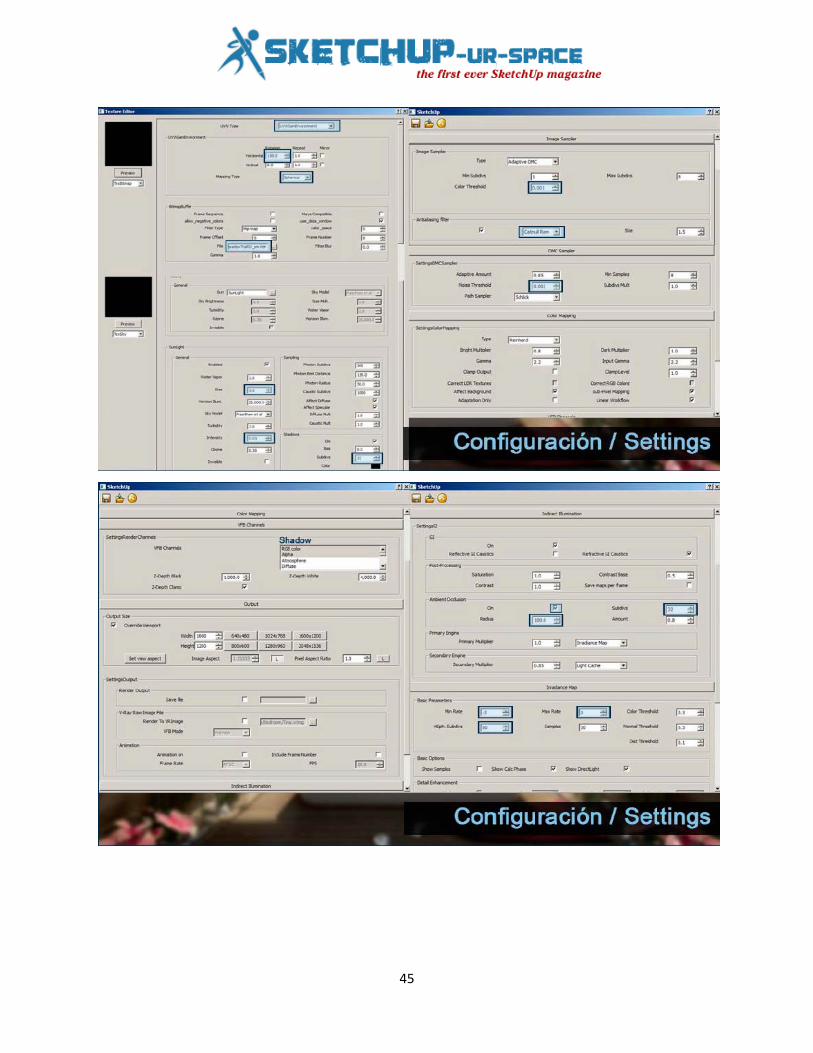
Cottage Bathtub - Architectural Visualization Tutorial focused on modeling, texturing, Rendering with Vray for Sketchup and Photoshop postproduction.
The Rar carpet contains Tutorial + Visopt + HDRI.
18

19

20

21

22
23

24

25

26
27

28
29

30
31
32
33

34

35
36

37
38

39
40
41
42

43

44
45

46

47
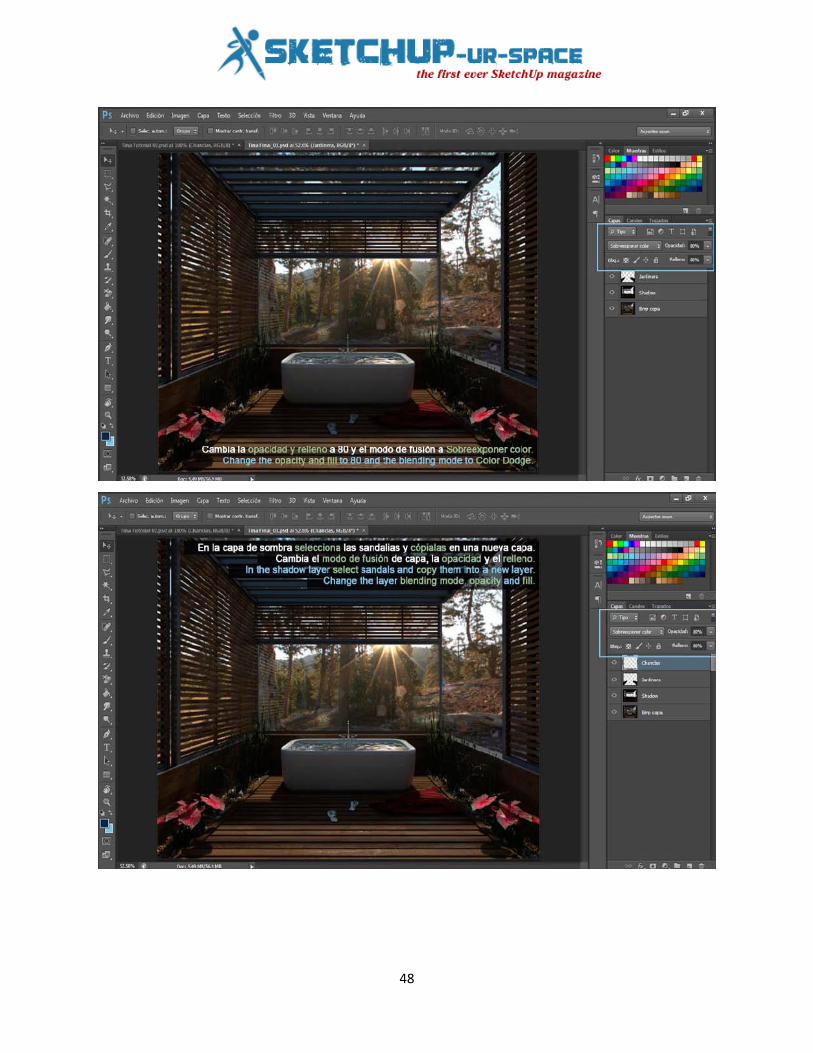
48

49
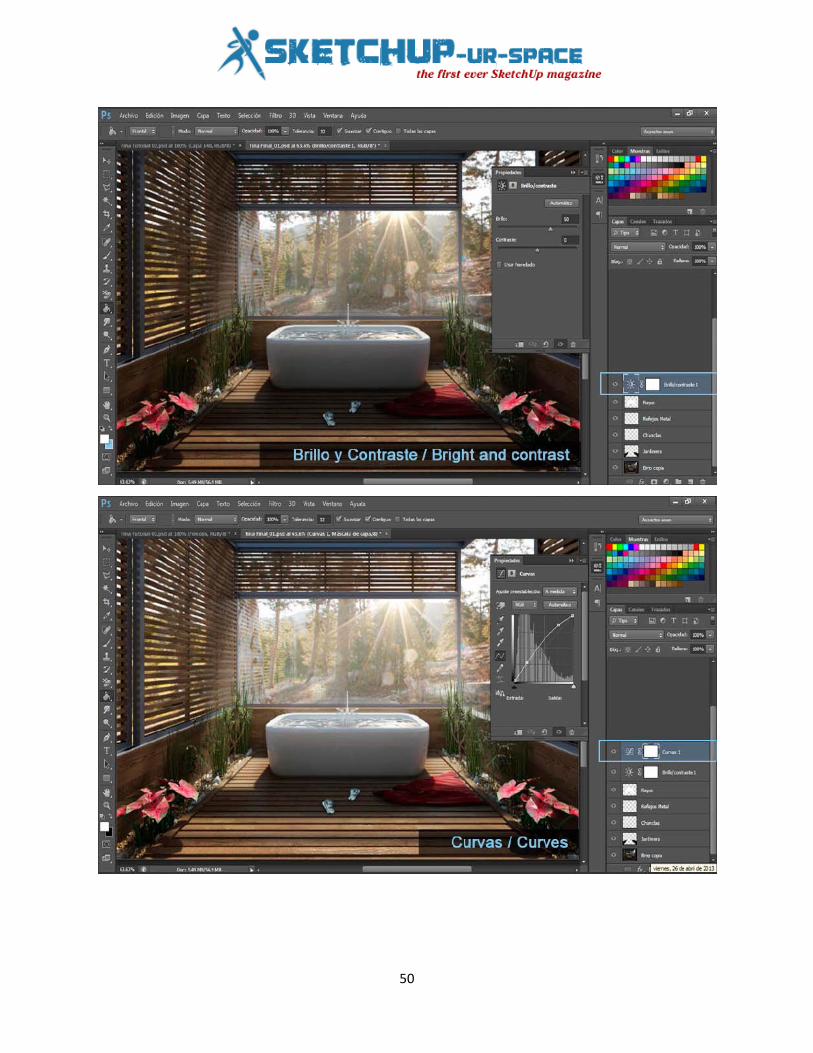
50

51
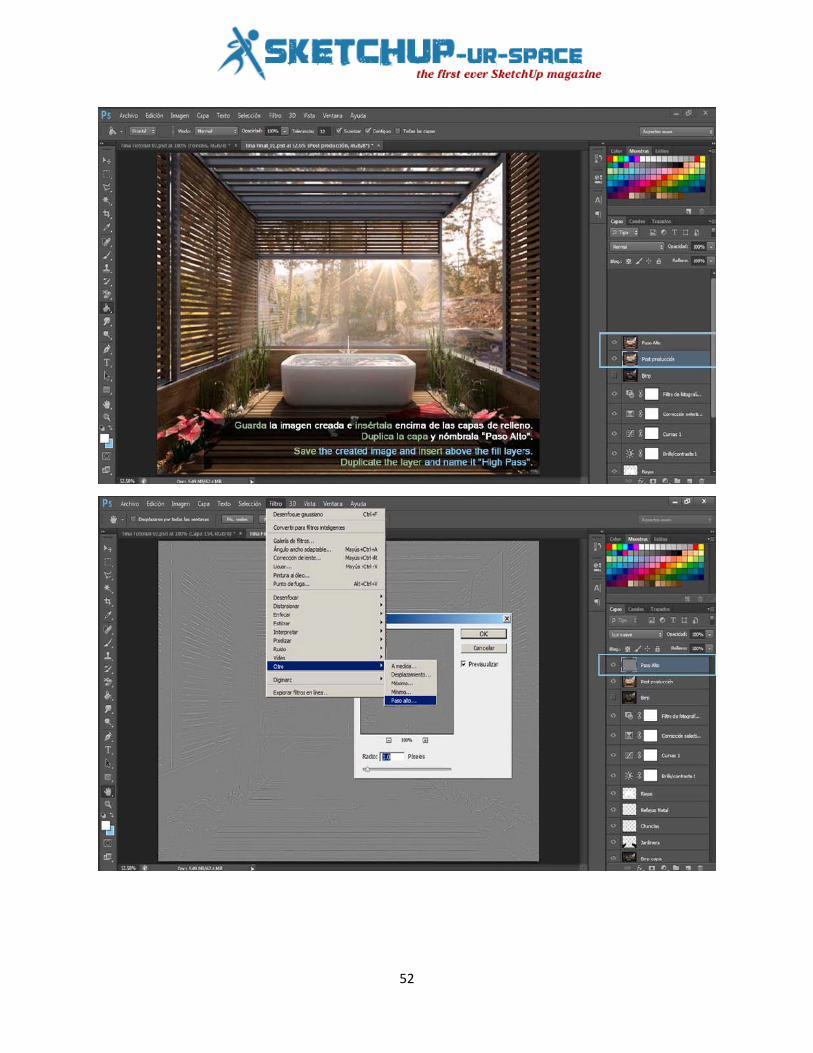
52
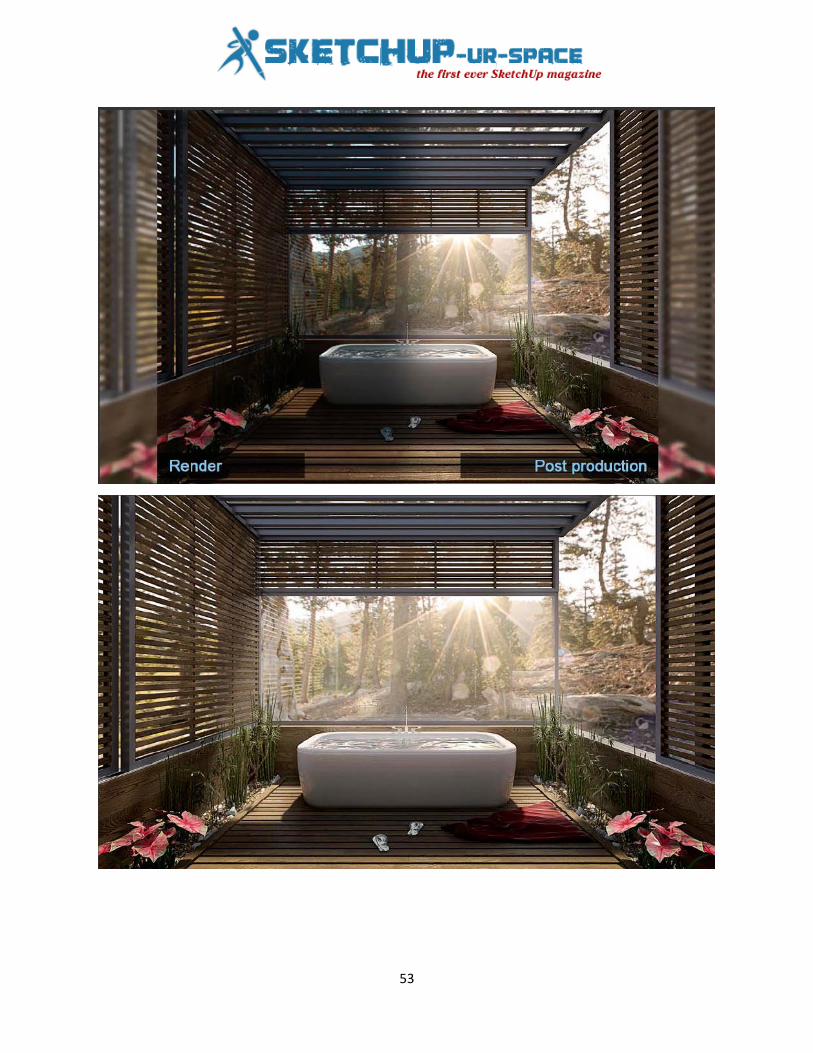
53
55
SketchUcation Plugin Store is live! We teased you for the last few weeks showing you how we were installing plugins directly into SketchUp. Now we are pleased to announce that the SketchUcation Plugin Store is now available for the community!
There's lots of cool features we added over the last few months to help SketchUp users search for and install plugins that are part of SketchUcation folklore. Not only that, but installing is just a simple click, no more dragging and dropping files and folders.
To find out all the details about this new tool just follow the read more link below. You'll see why we are so excited about what make this tool awesome!
If you are new to the big bad world of plugins then I recomment you take a look at our tutorial on installing plugins
Below the search box are 2 filter menus to really help you to dial into the tool you need. There's over 150 plugin authors to choose from and we've already catalogued nearly 600 plugins. The category list is currently very focussed with the aim that community members will help to grow the category tags overtime.
for beginners. Seasoned veterans can scroll down to the end of this article to see to grab the download link.
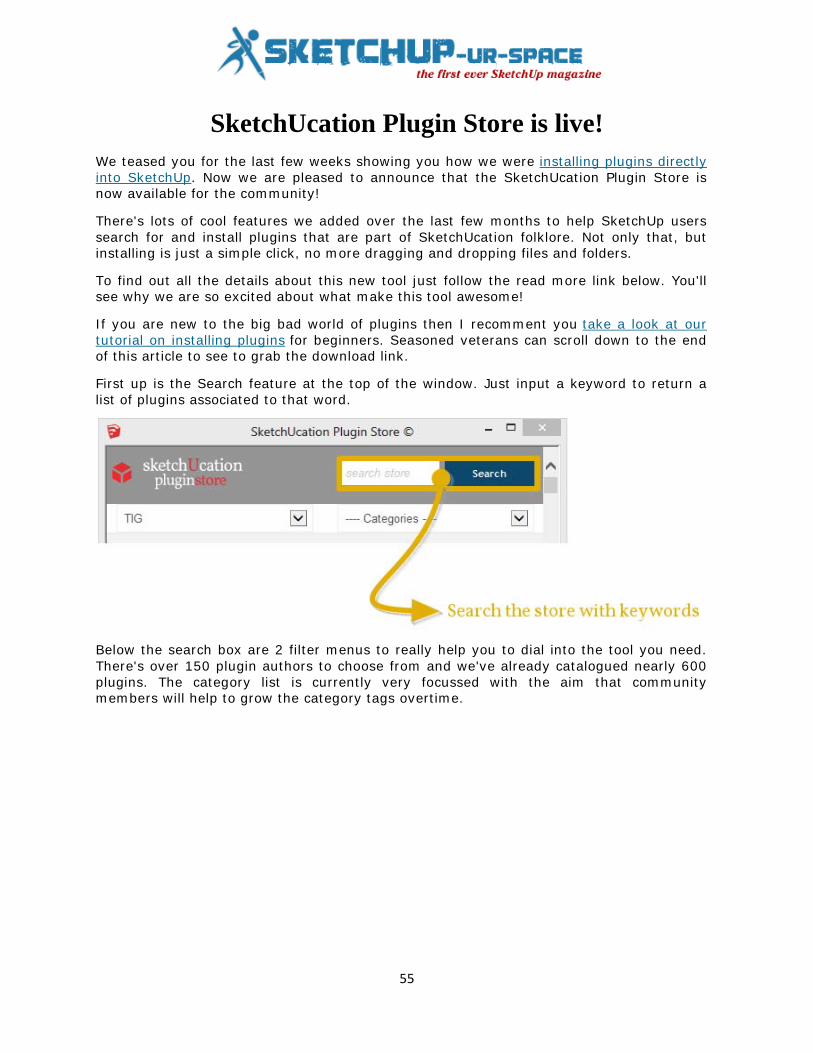
First up is the Search feature at the top of the window. Just input a keyword to return a list of plugins associated to that word.

56
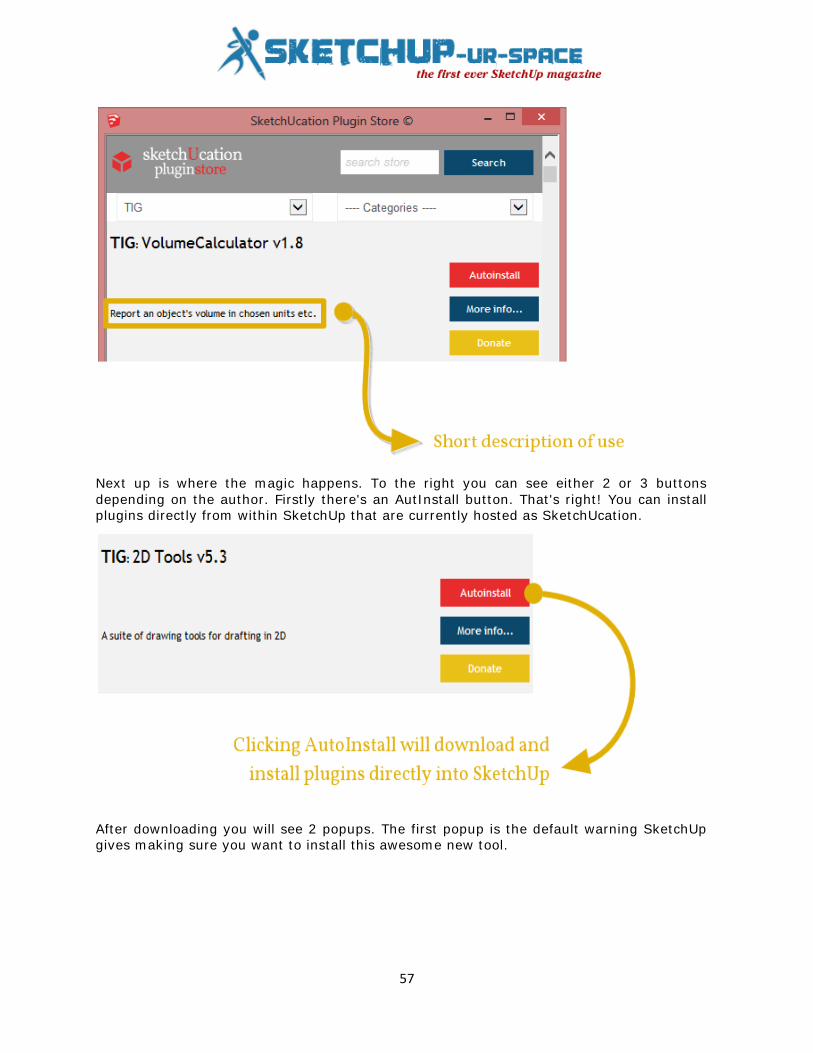
Each plugin has been laid to be as clear and concise as possible. You have the author's name followed by the plugin's name and below that a short description of the tools use.
57
Next up is where the magic happens. To the right you can see either 2 or 3 buttons depending on the author. Firstly there's an AutInstall button. That's right! You can install plugins directly from within SketchUp that are currently hosted as SketchUcation.
After downloading you will see 2 popups. The first popup is the default warning SketchUp gives making sure you want to install this awesome new tool.
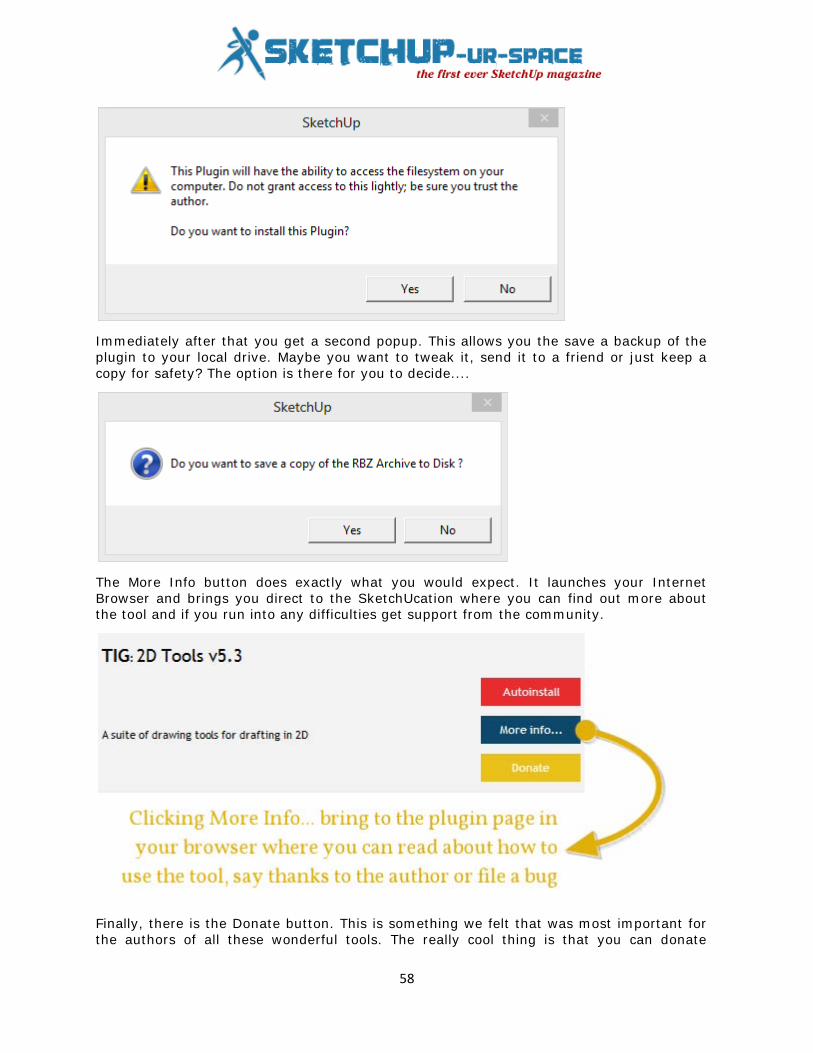
58
Immediately after that you get a second popup. This allows you the save a backup of the plugin to your local drive. Maybe you want to tweak it, send it to a friend or just keep a copy for safety? The option is there for you to decide....
The More Info button does exactly what you would expect. It launches your Internet Browser and brings you direct to the SketchUcation where you can find out more about the tool and if you run into any difficulties get support from the community.
Finally, there is the Donate button. This is something we felt that was most important for the authors of all these wonderful tools. The really cool thing is that you can donate

59
directly to the authors PayPal account from with the Plugin Store tool. SketchUcation does not receive a single penny it is 100% in favour of the author of the tool. Some tools you'll notice have no donate buttons as it is entirely up to the author if the button appears or not. But if you want to grab some good karma once in a while make it worthwhile for authors by sending a token of thanks now and again.
There's also some added features to the Plugin Store that aren't immediately obvious. Some users don't, by defaullt, use the plugins folder that SketchUp uses as the place to host plugins. Our tool recognizes these settings and will install plugins where YOU want not where SketchUp wants. This is really useful in big offices or Universities where SketchUp folder access is restricted and the users must have their own folders for their own scripts. Or if users keep a central plugins folder accessed from several networked PCs.
Overall, we are super excited about our Plugin Store and so should you. You can download it
Written by
for free and started browsing, installing and donating straight away. Enjoy!
Rich O'Brien - Rich is SketchUcation's Managing Director and Certified SketchUp Trainer. He has a background in aviation technical training and is also the editor of CatchUp WebMag.

60
Intersects to Create Mortises in SketchUp
There are several different Intersect Faces options in SketchUp. The one most folks seem to use is Intersect Faces>With Model. I find in most cases that Intersect Faces>With Selection is more useful and often results in less clean up. Here's a case demonstrating this.
Earlier in the week a fellow sent me a model for a project he is working on. He was trying to get mortises cut in the curved pieces to take the crossing sticks. Fortunately in his set up of the model, he had copies of the curved component so mortises only need to be cut in one to make all of them.
I made a short video that hopefully shows the steps clearly. The key thing is that I copied the faces of the sticks and used them to create the faces inside the mortise by using >With Selected.
61
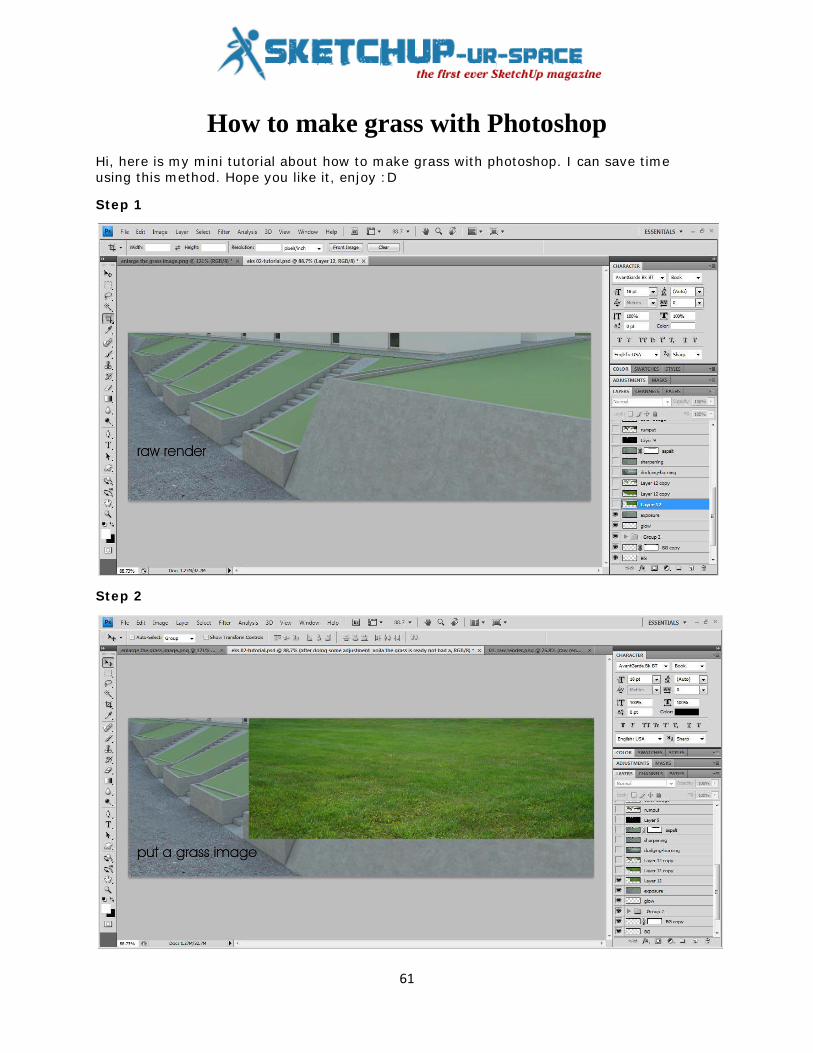
How to make grass with Photoshop Hi, here is my mini tutorial about how to make grass with photoshop. I can save time using this method. Hope you like it, enjoy :D
Step 1
Step 2

62
Step 3
Step 4
63
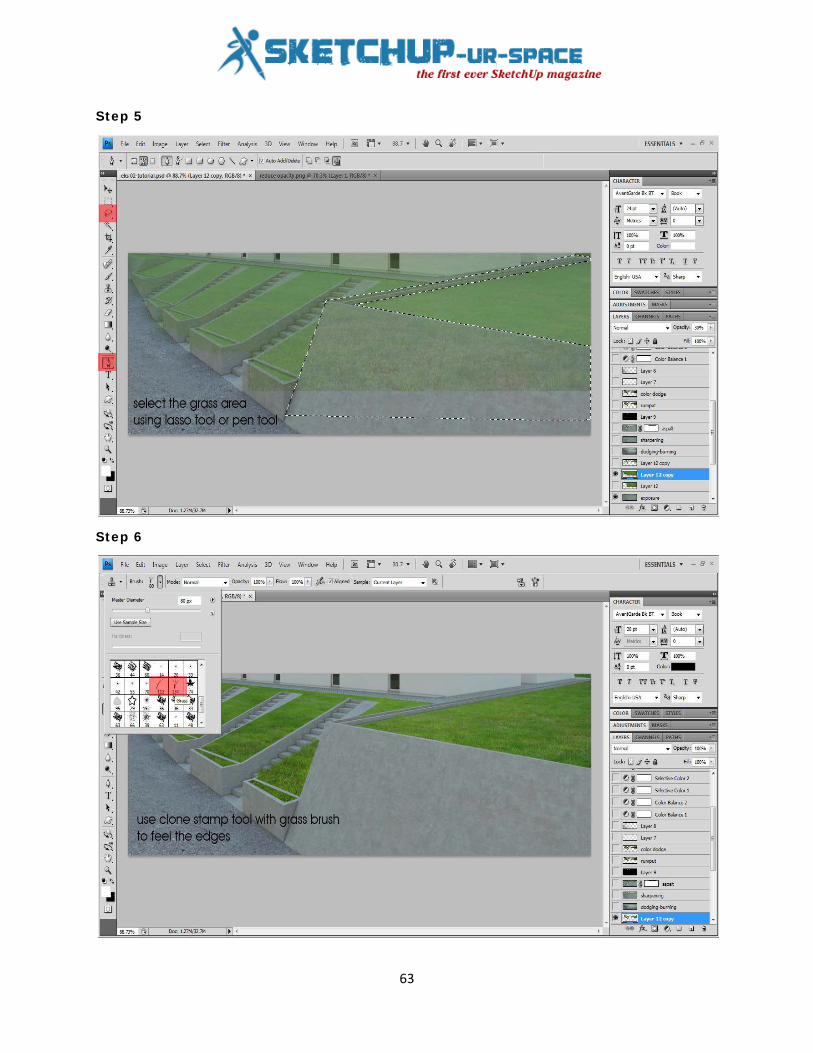
Step 5
Step 6

64
Step 7
Step 8
65
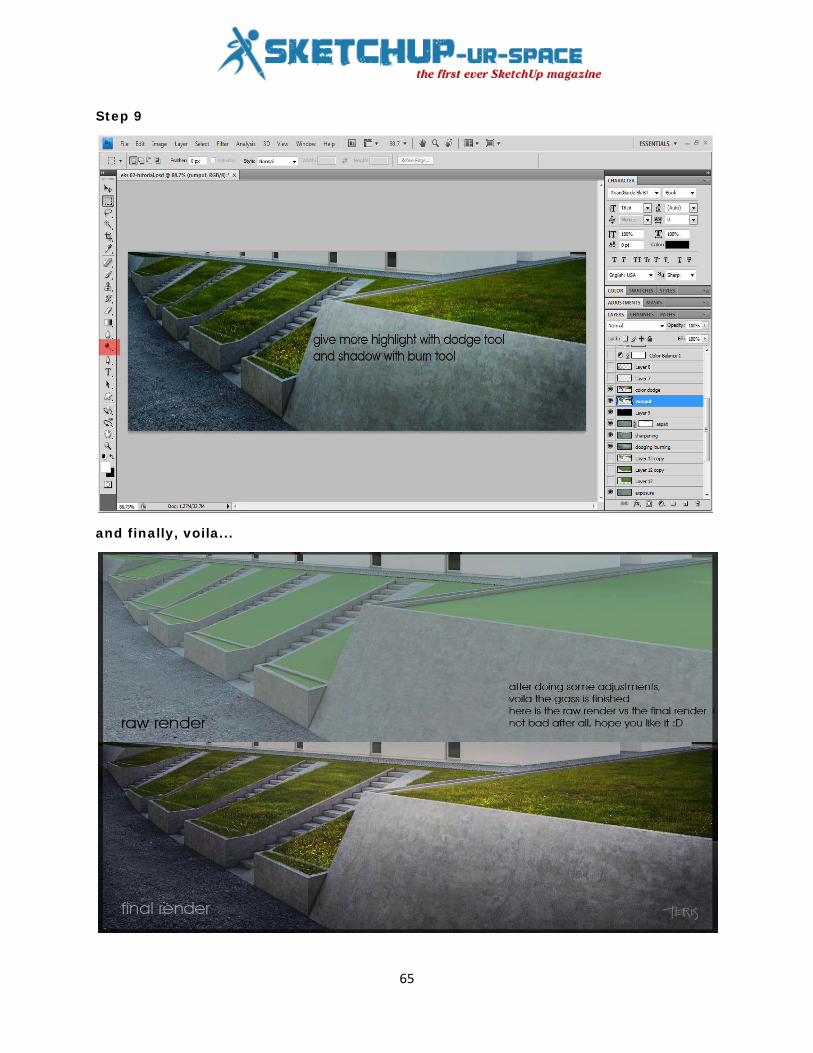
Step 9
and finally, voila...
66
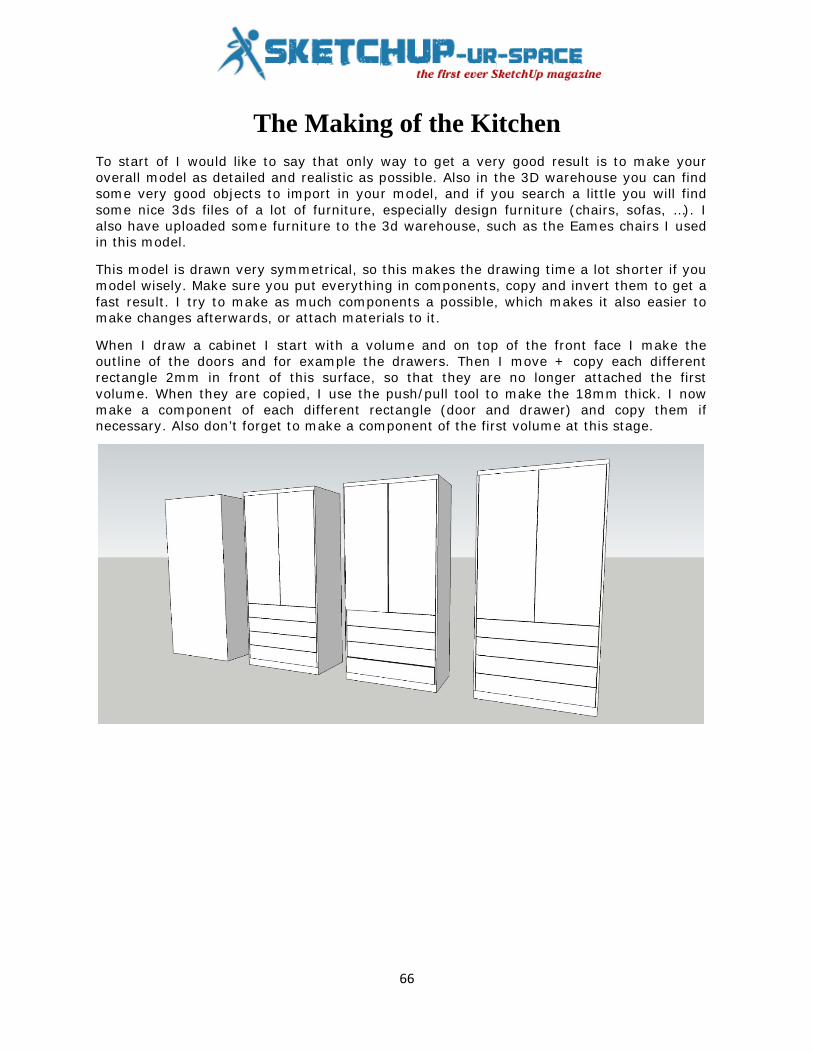
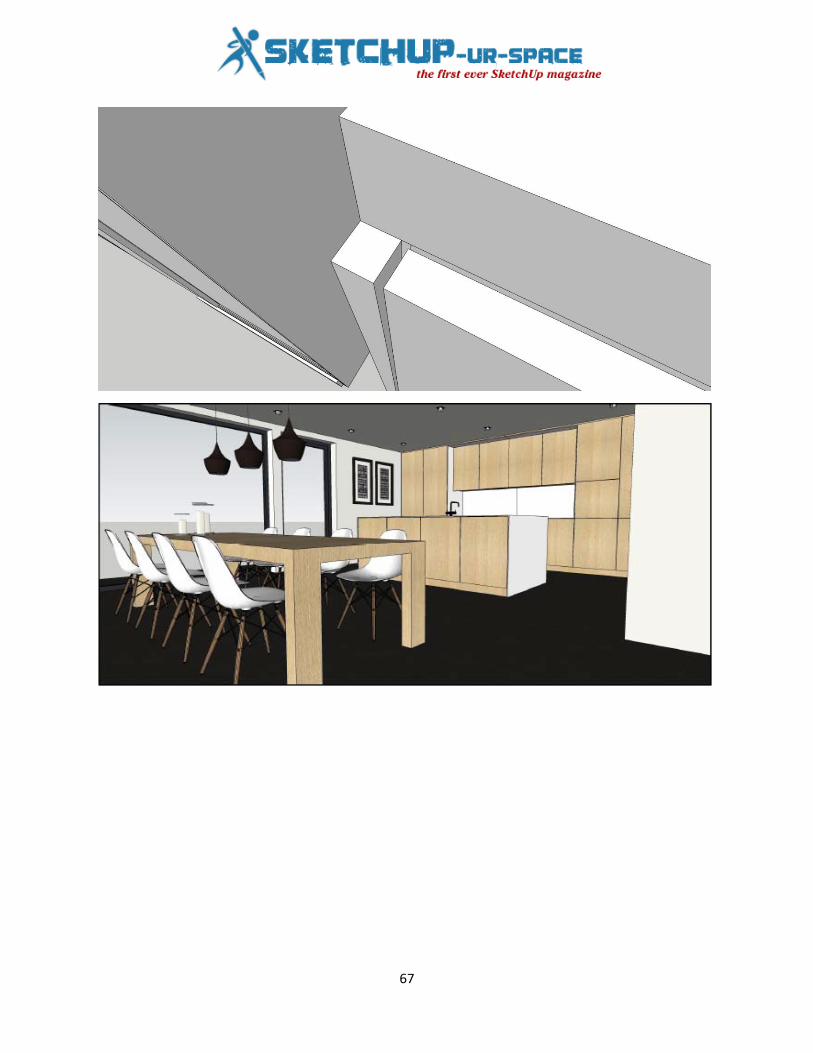
The Making of the Kitchen To start of I would like to say that only way to get a very good result is to make your overall model as detailed and realistic as possible. Also in the 3D warehouse you can find some very good objects to import in your model, and if you search a little you will find some nice 3ds files of a lot of furniture, especially design furniture (chairs, sofas, …). I also have uploaded some furniture to the 3d warehouse, such as the Eames chairs I used in this model.
This model is drawn very symmetrical, so this makes the drawing time a lot shorter if you model wisely. Make sure you put everything in components, copy and invert them to get a fast result. I try to make as much components a possible, which makes it also easier to make changes afterwards, or attach materials to it.
When I draw a cabinet I start with a volume and on top of the front face I make the outline of the doors and for example the drawers. Then I move + copy each different rectangle 2mm in front of this surface, so that they are no longer attached the first volume. When they are copied, I use the push/pull tool to make the 18mm thick. I now make a component of each different rectangle (door and drawer) and copy them if necessary. Also don’t forget to make a component of the first volume at this stage.
67
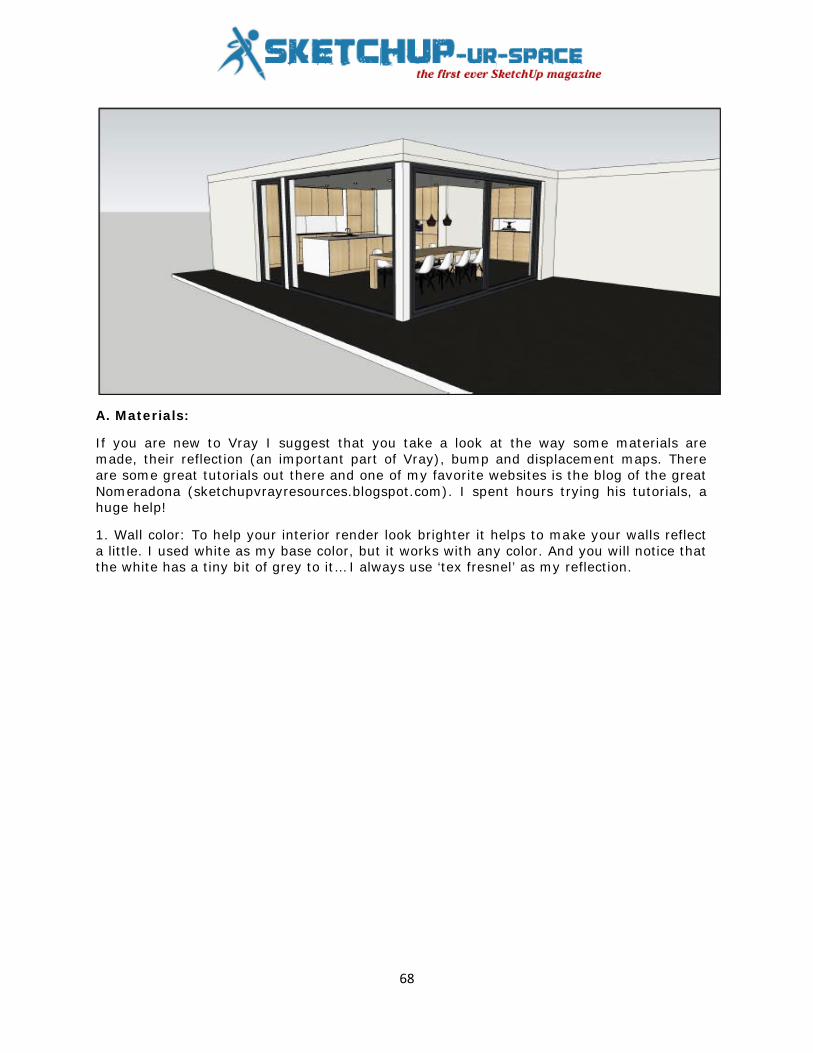
68
A. Materials:
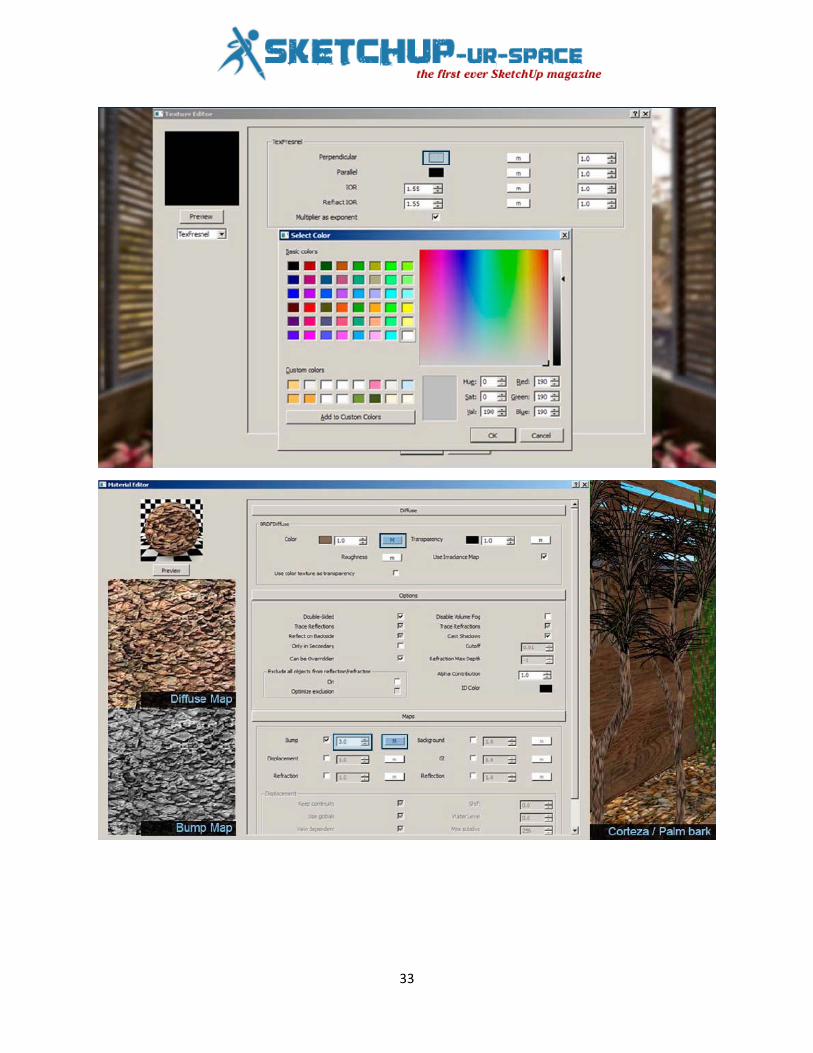
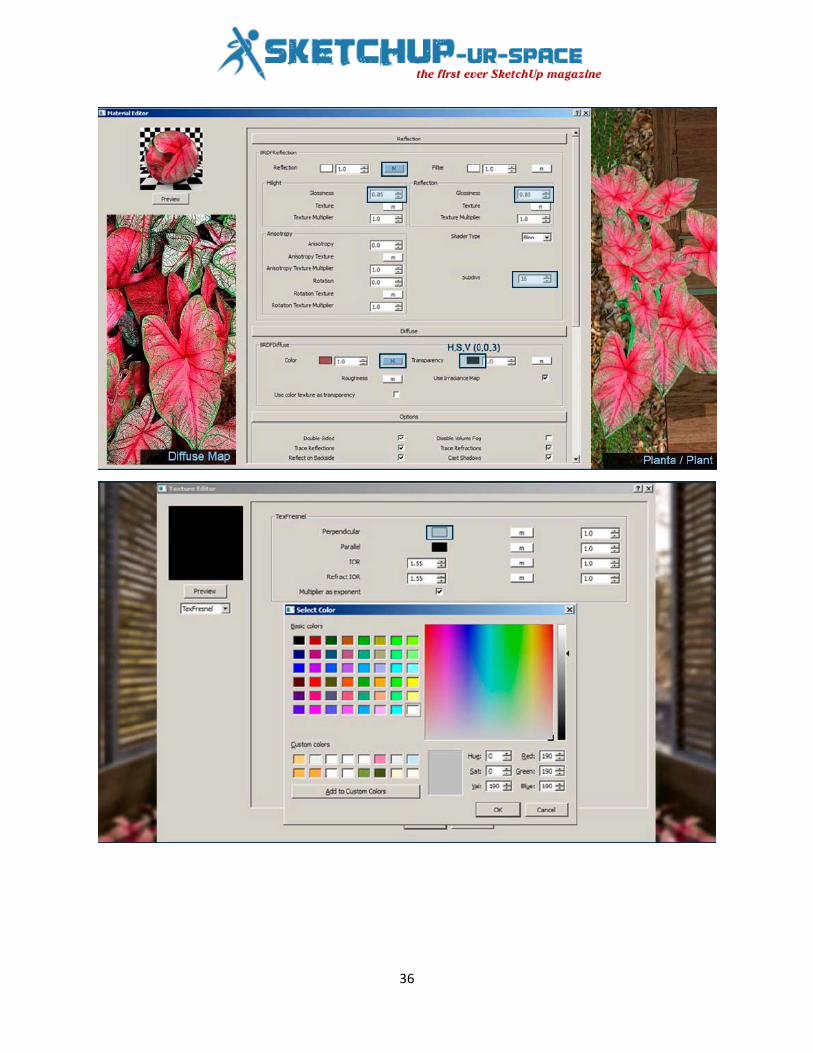
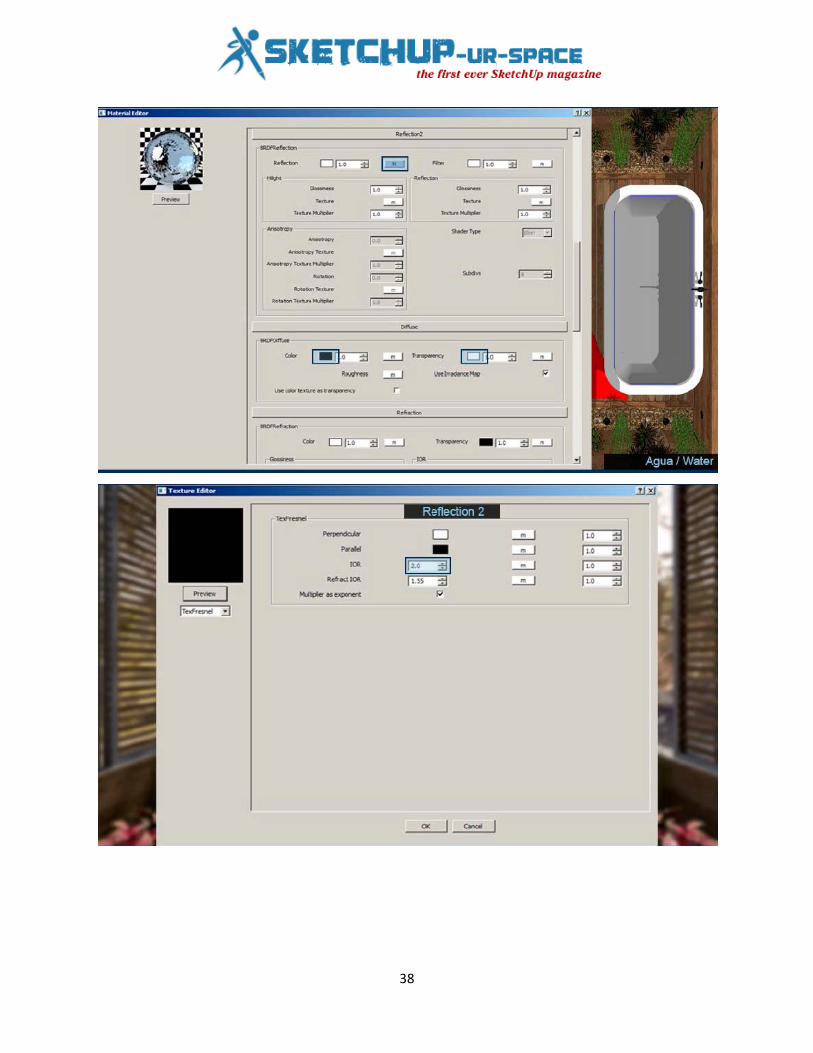
If you are new to Vray I suggest that you take a look at the way some materials are made, their reflection (an important part of Vray), bump and displacement maps. There are some great tutorials out there and one of my favorite websites is the blog of the great Nomeradona (sketchupvrayresources.blogspot.com). I spent hours trying his tutorials, a huge help!
1. Wall color: To help your interior render look brighter it helps to make your walls reflect a little. I used white as my base color, but it works with any color. And you will notice that the white has a tiny bit of grey to it… I always use ‘tex fresnel’ as my reflection.

69
2. Glass: I start off with a basic glass, which you can find on the net, but I add a little fog color to it. To make it look more realistic. (btw there is a great glass tutorial on Nomeradona’s blog)
70
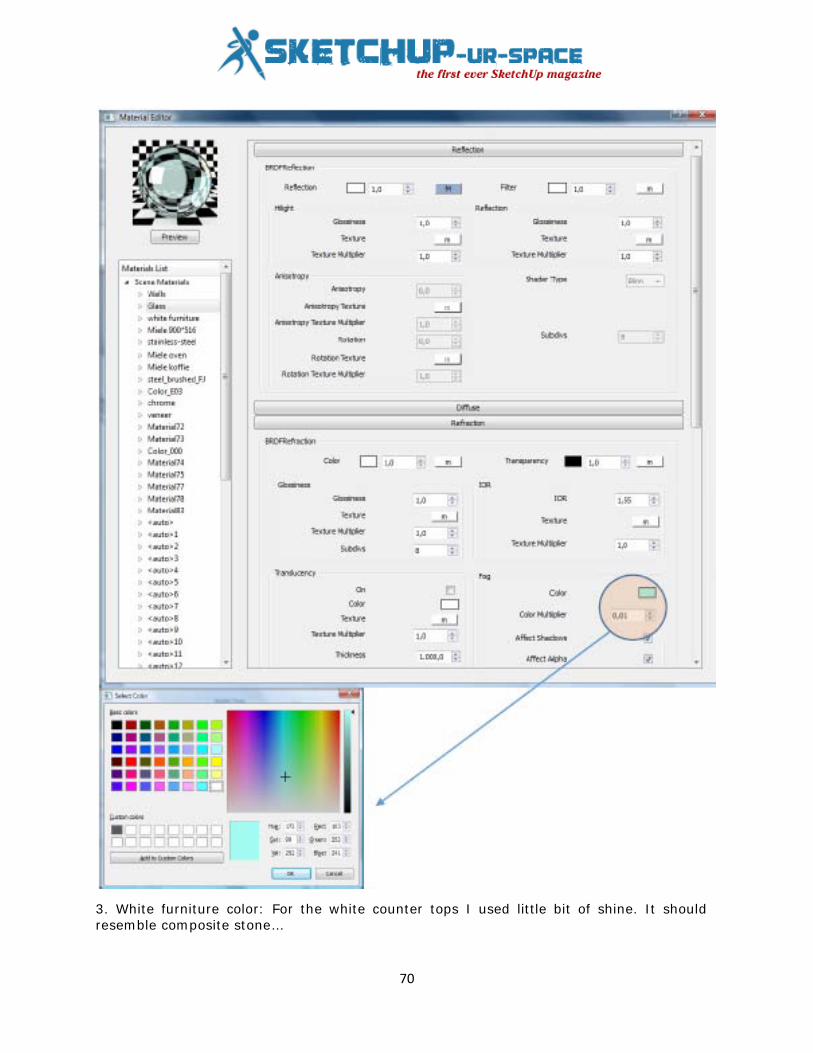
3. White furniture color: For the white counter tops I used little bit of shine. It should resemble composite stone…

71
4. Chrome: Chrome is a material that I often use, and until recently I experimented a little bit with the reflection filter and the diffuse color, made it a little bit more grey. Otherwise it would look like a mirror. You have to add the texfresnel to the reflection layer.
72
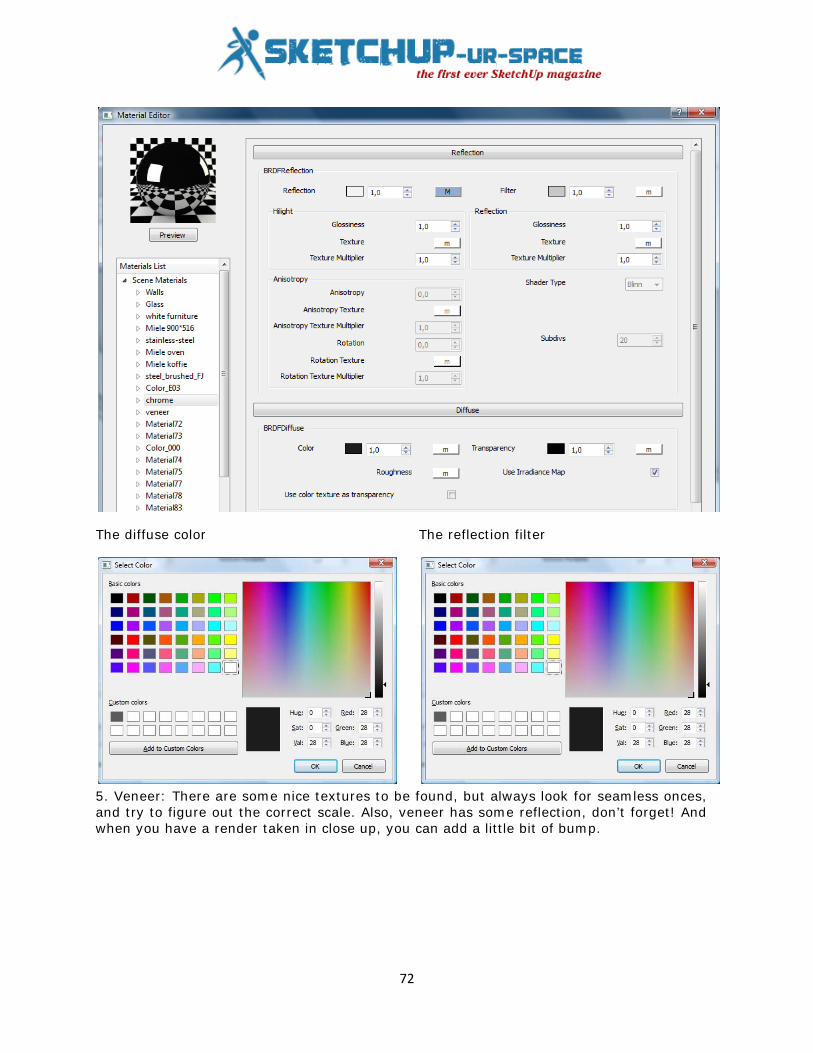
The diffuse color The reflection filter
5. Veneer: There are some nice textures to be found, but always look for seamless onces, and try to figure out the correct scale. Also, veneer has some reflection, don’t forget! And when you have a render taken in close up, you can add a little bit of bump.

73
6. Lamp color (black aluminium, gold on the inside): I used a dark grey for this, relection filter also a little bit of grey, and bit of glossiness

74
All the other materials were found on the internet, and I didn’t change a thing to them!
B. The settings
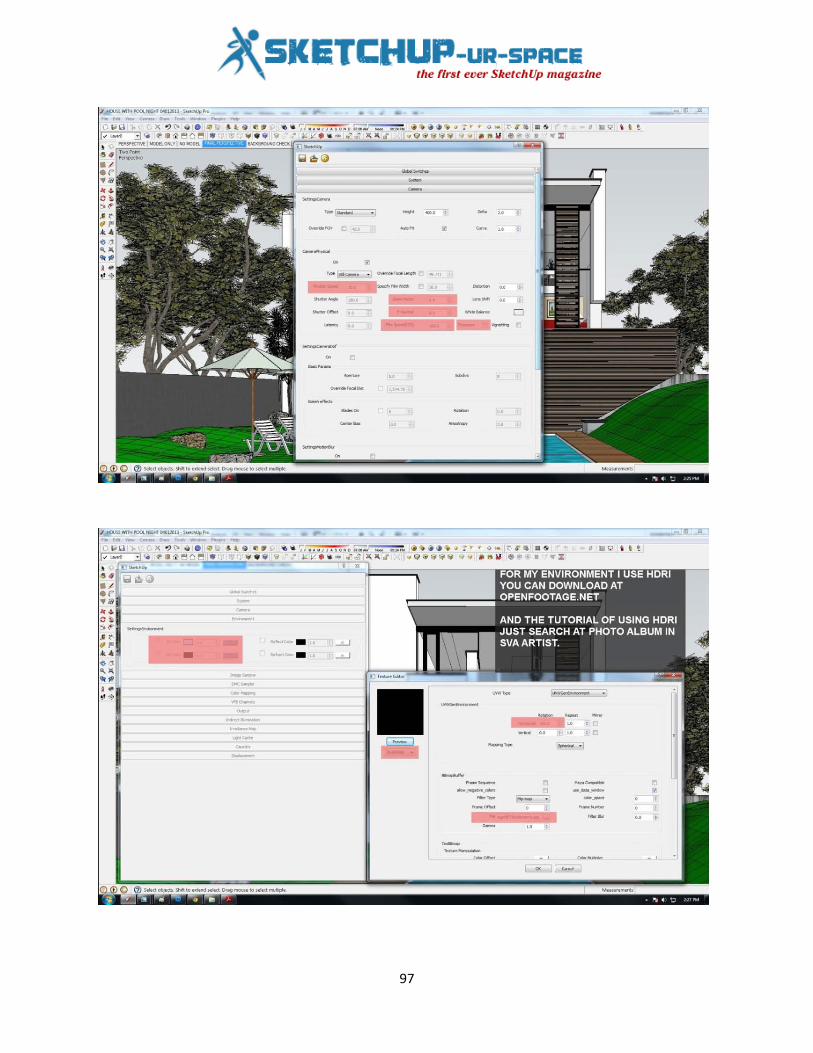
As you know, there are many good settings for interior renders to be found on the net, but for me I find the best results are when I render my models with an HDRI as lightsource. So I start of with the camera settings, I lower the shutter speed to a value between 30 and 50 to brighten up the picture, and also increase the film speed to somewhere between 175 and 225. In this scene, there are a lot of windows, so there a lot of daylight in the scene.

75
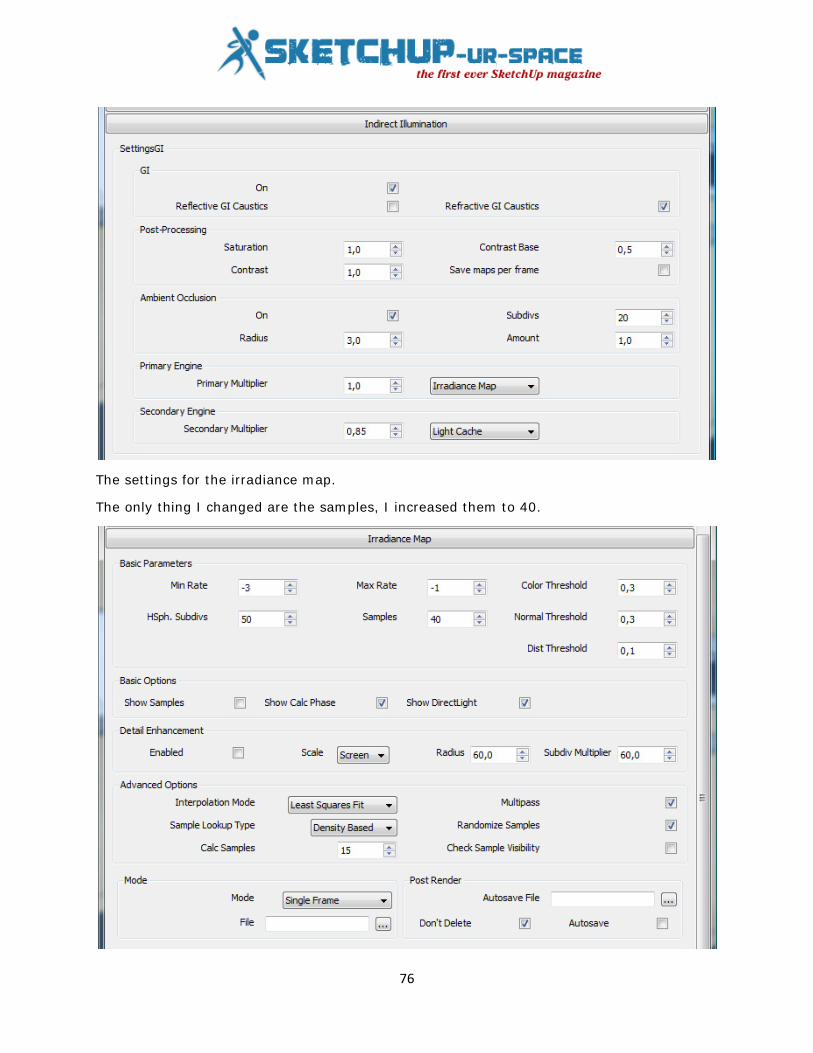
As I mentioned, I try to create a more realistic render with the help of an HDRI picture. You will have to experiment a little with the multiplier. In this scene I increased it to 10, that way I wouldn’t have to bring in extra lights into the model. Also use the same HDRI as a background. Make sure to set the HDRI as an environment
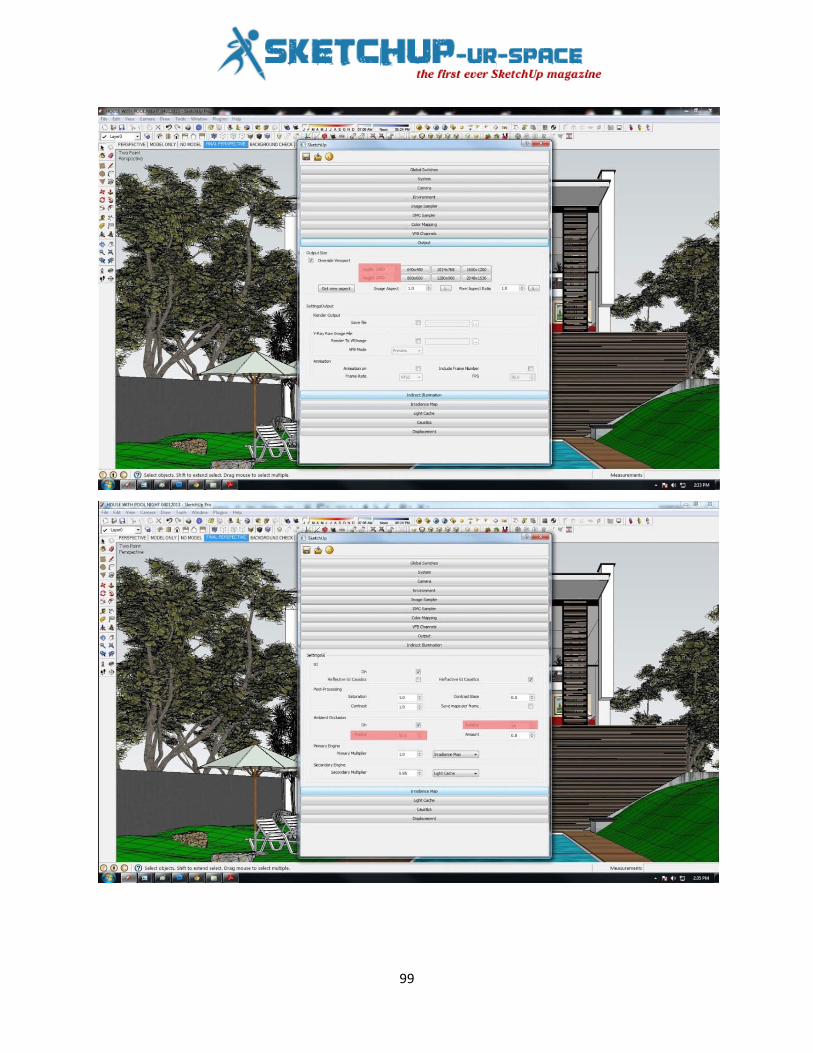
Make sure to activate the ambient occlusion, that way you will get nice clean corners. The more subdivs, the better the result. My primary engine remains the ‘Irradiance map’, the second is the ‘Light cache’…
76
The settings for the irradiance map.
The only thing I changed are the samples, I increased them to 40.
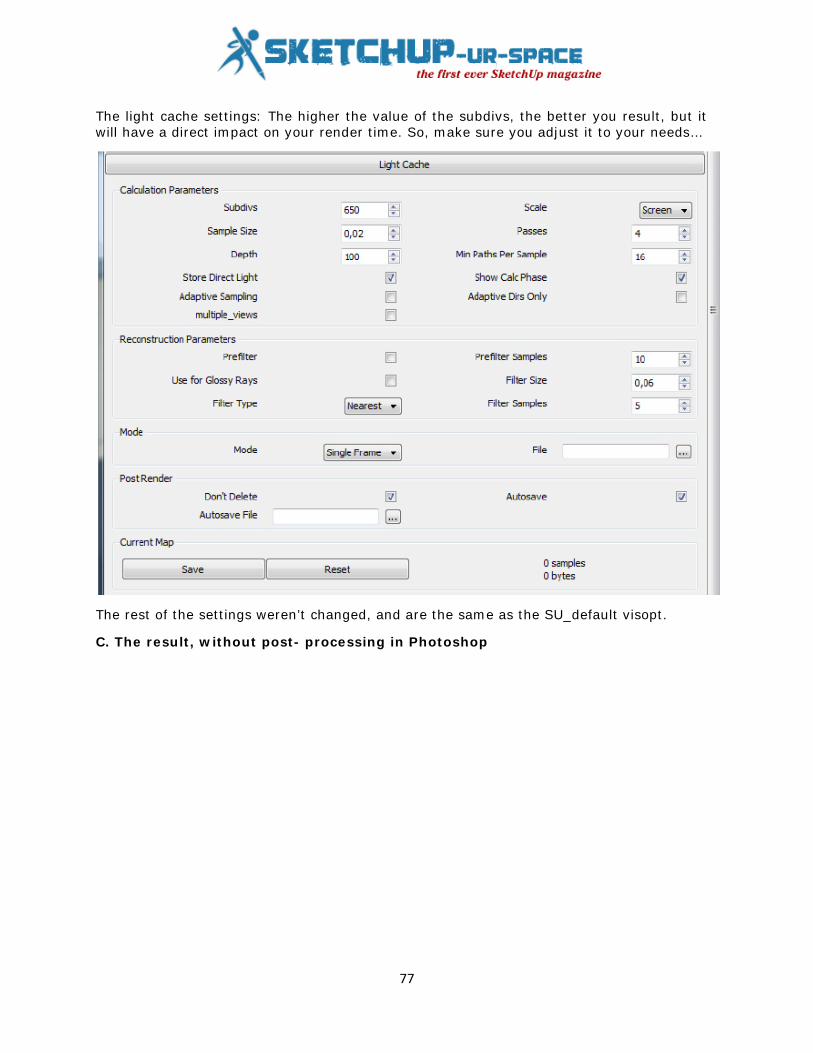
77
The light cache settings: The higher the value of the subdivs, the better you result, but it will have a direct impact on your render time. So, make sure you adjust it to your needs…
The rest of the settings weren’t changed, and are the same as the SU_default visopt.
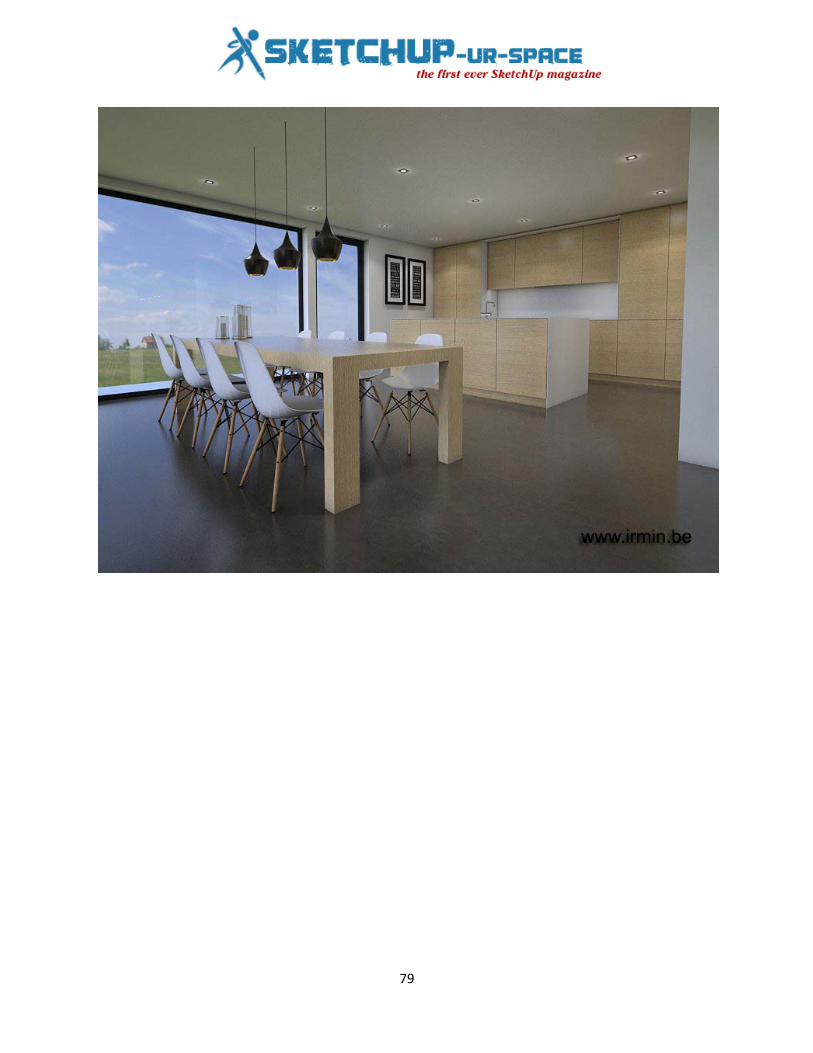
C. The result, without post- processing in Photoshop

78
79

80
How to 1 NPR with SketchUp To make 1 NPR is not hard work, today I'll show you how I made 1 files NPR. First you open your SketchUp file and select your favorite scene corner and saw the most beautiful. Go to File => Export => 2D Graphic ... => Export and save JPEG images.
Then select the style and features of :)
81
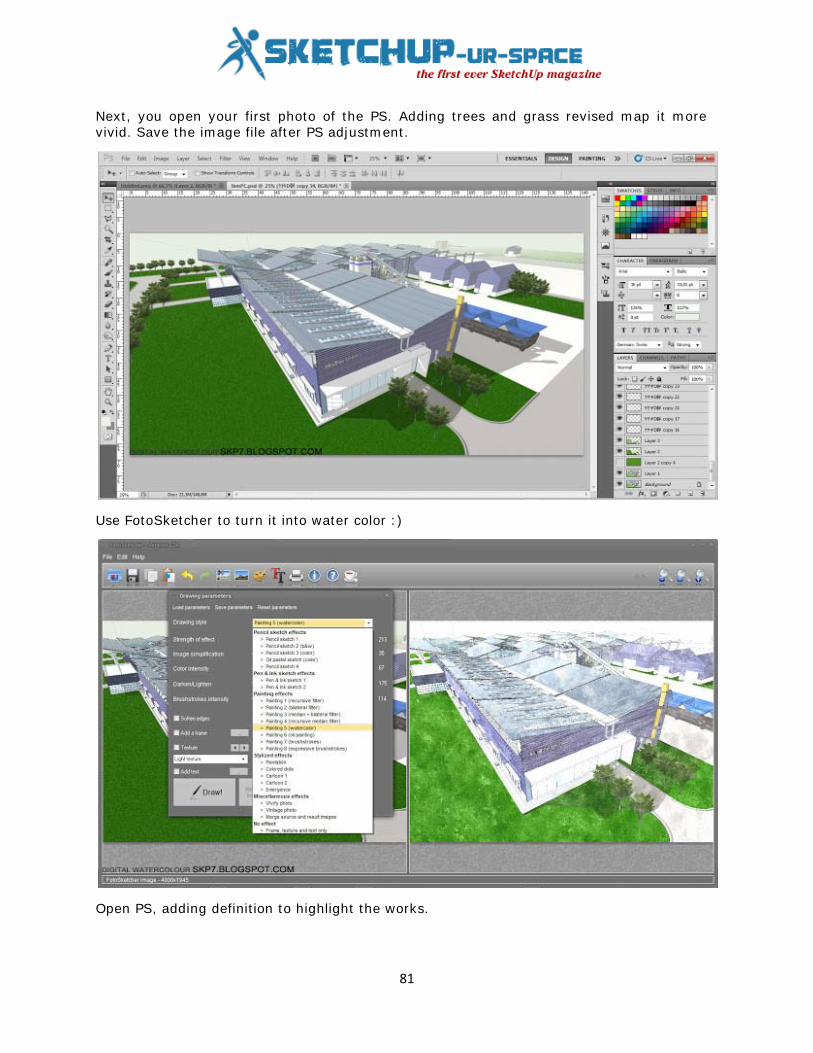
Next, you open your first photo of the PS. Adding trees and grass revised map it more vivid. Save the image file after PS adjustment.
Use FotoSketcher to turn it into water color :)
Open PS, adding definition to highlight the works.
82
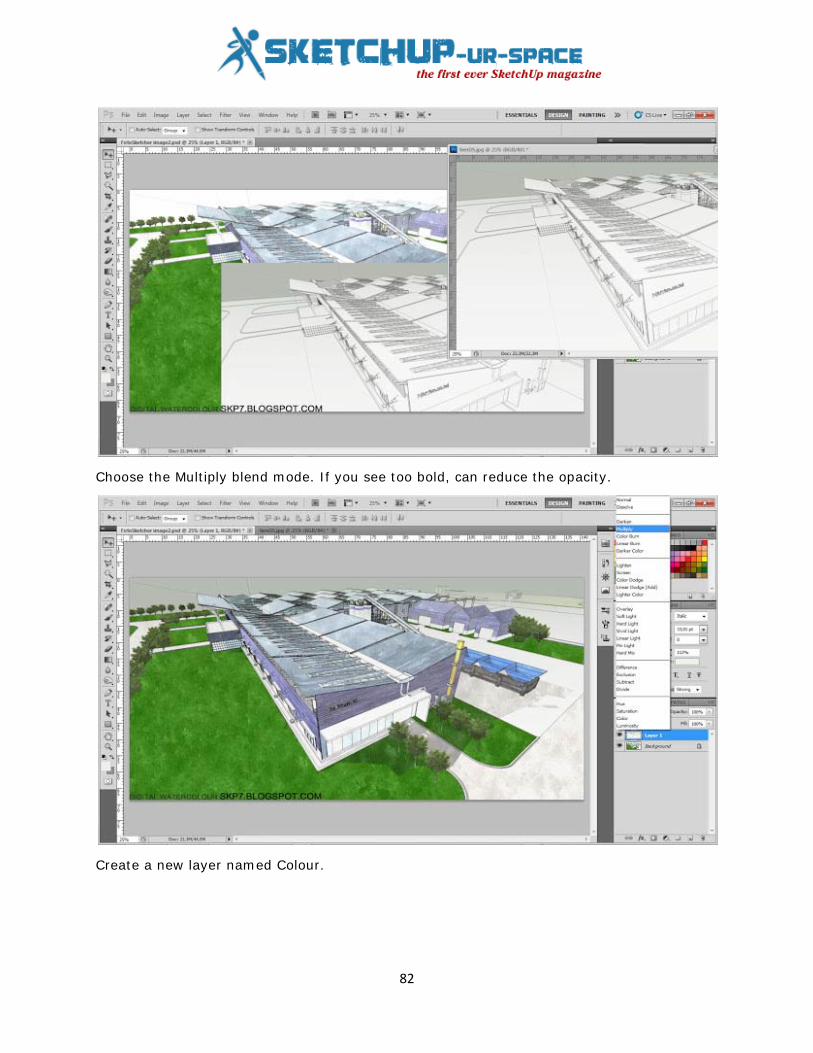
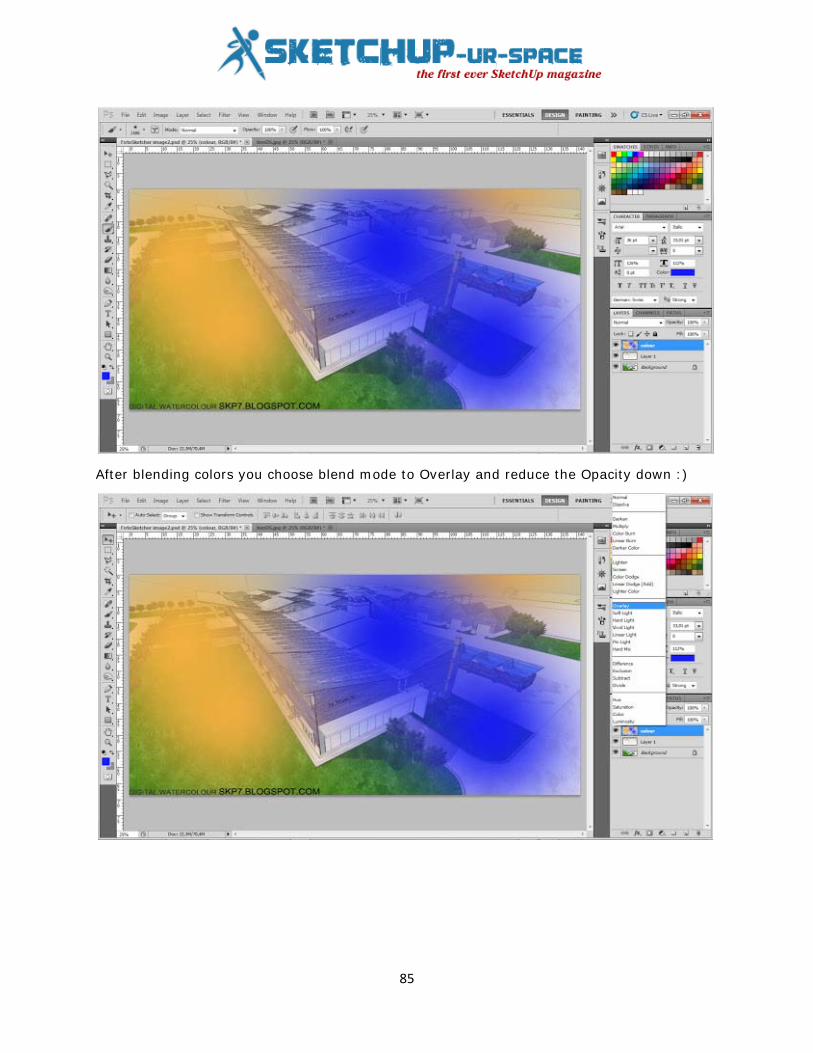
Choose the Multiply blend mode. If you see too bold, can reduce the opacity.
Create a new layer named Colour.

83
Select a color to blend colors and brushes used.
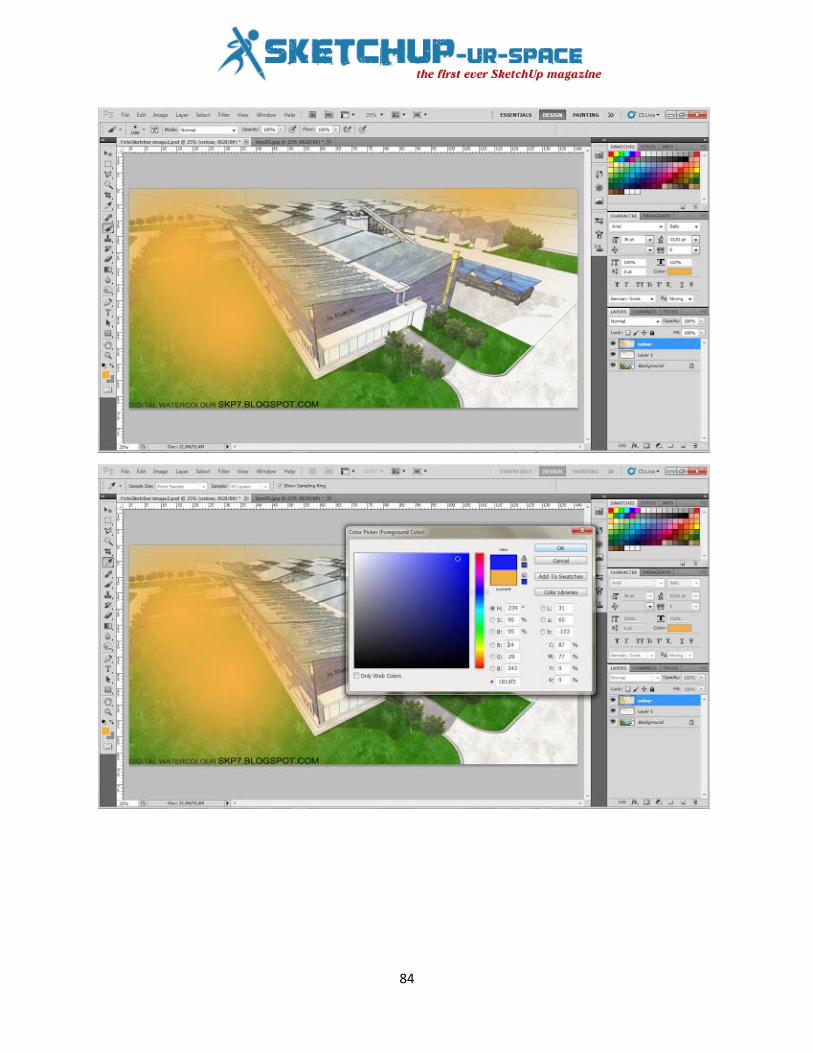
84
85
After blending colors you choose blend mode to Overlay and reduce the Opacity down :)

86
Continue to create new Layer 2 Colour name.
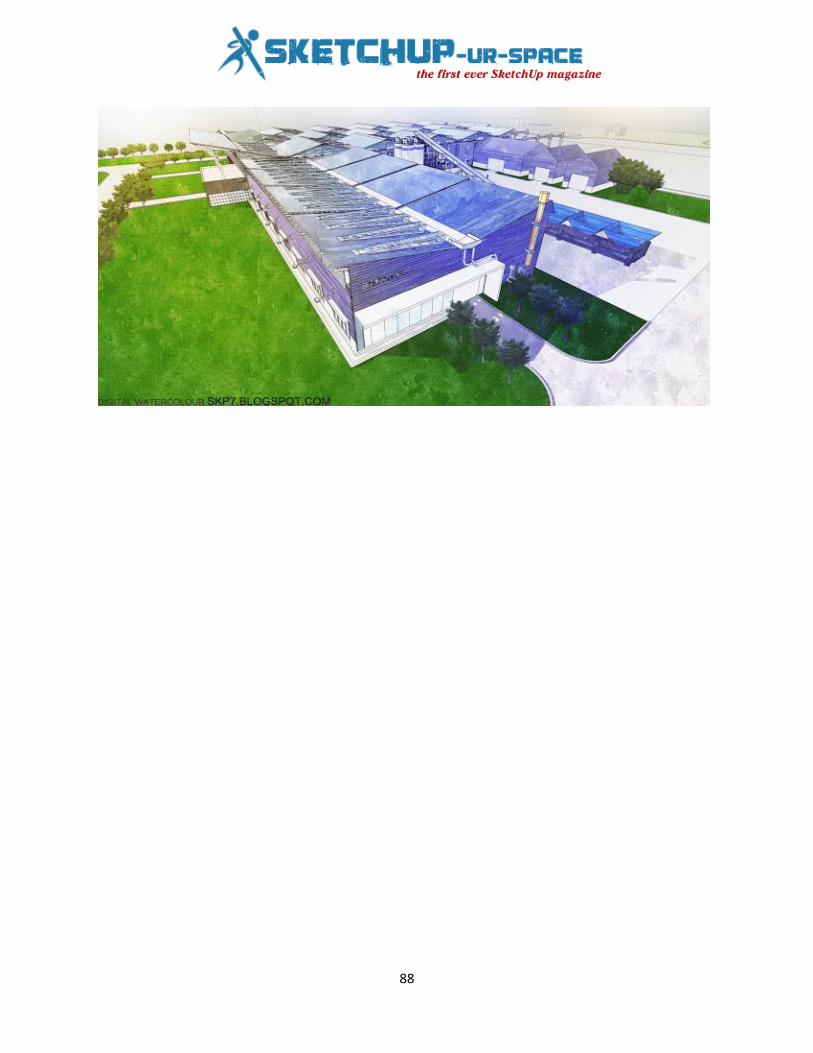
Choose white to create fog.

87
Using paint brush, select Overlay to blend.
And here is my work: D
88
89
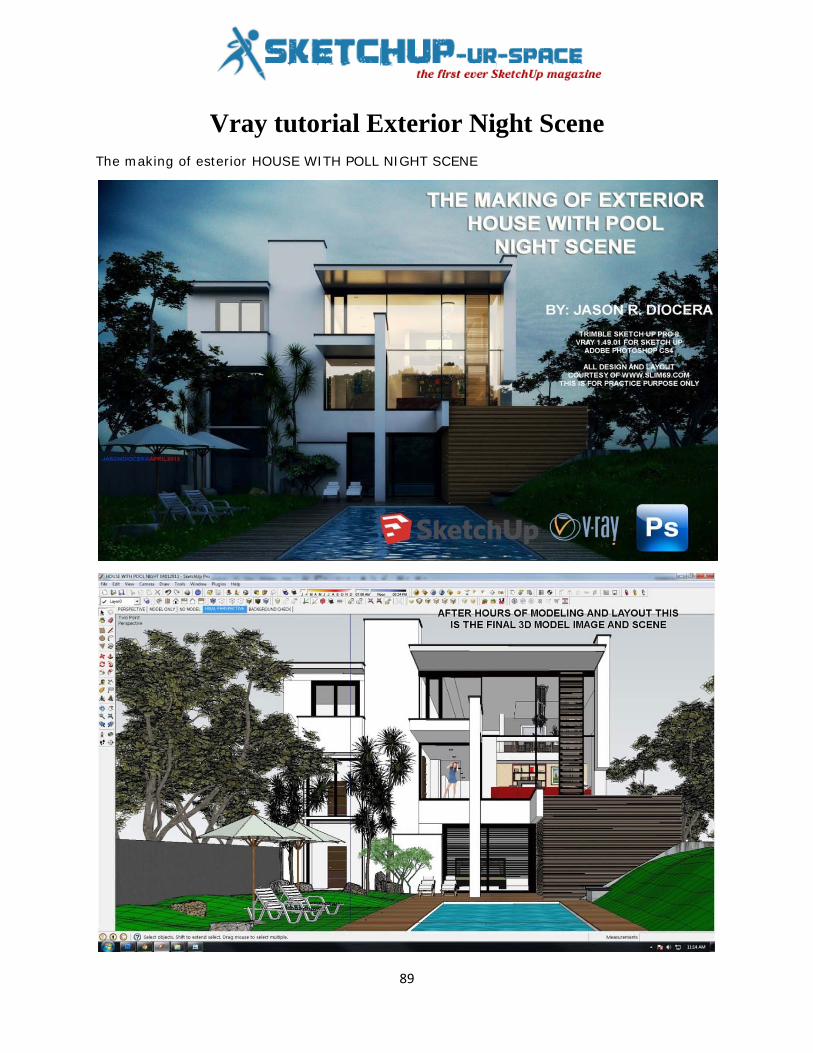
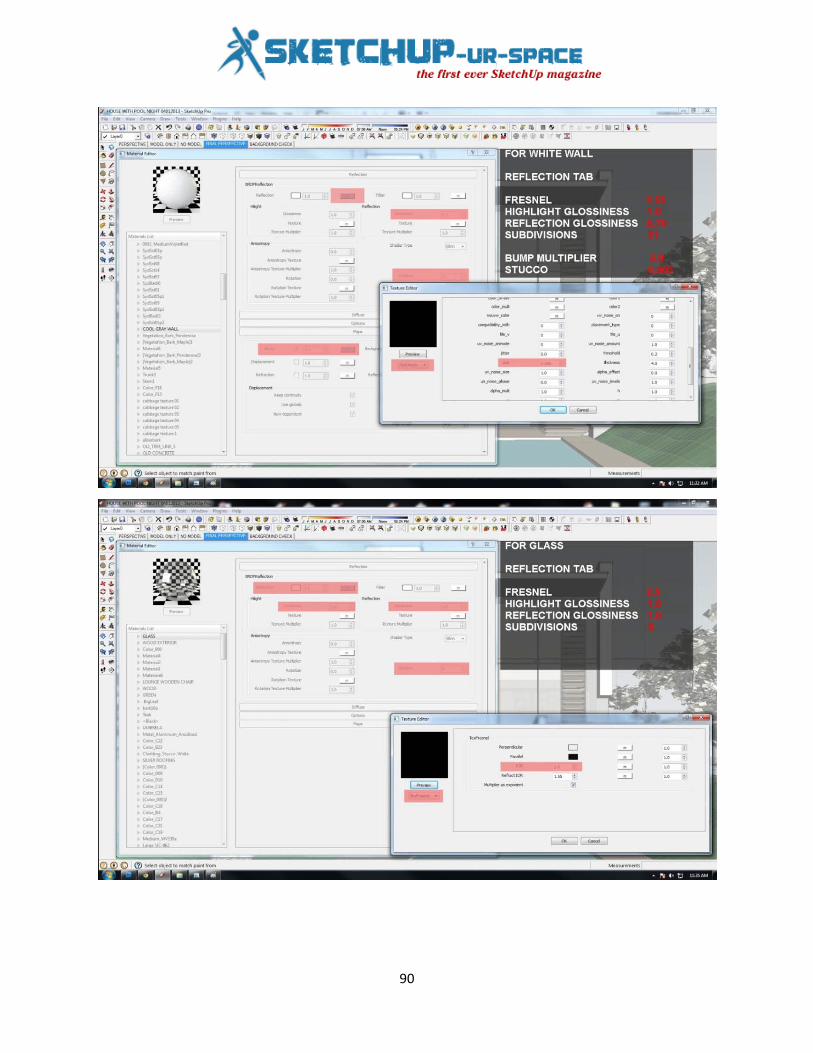
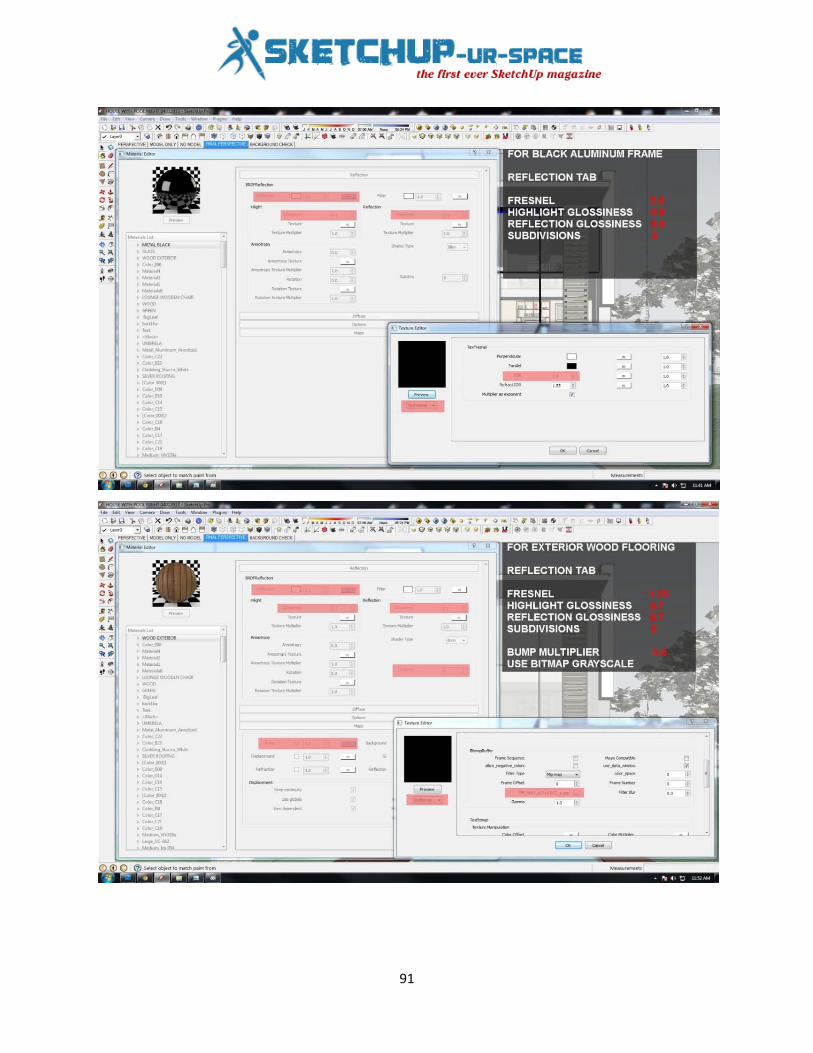
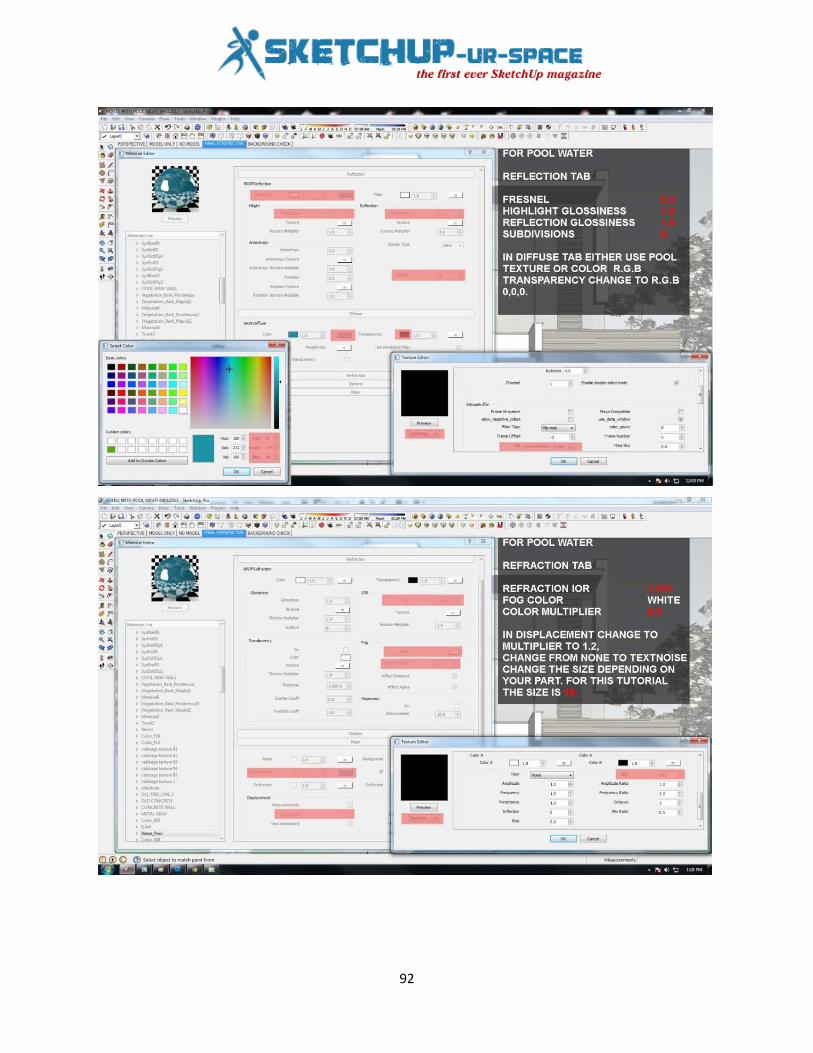
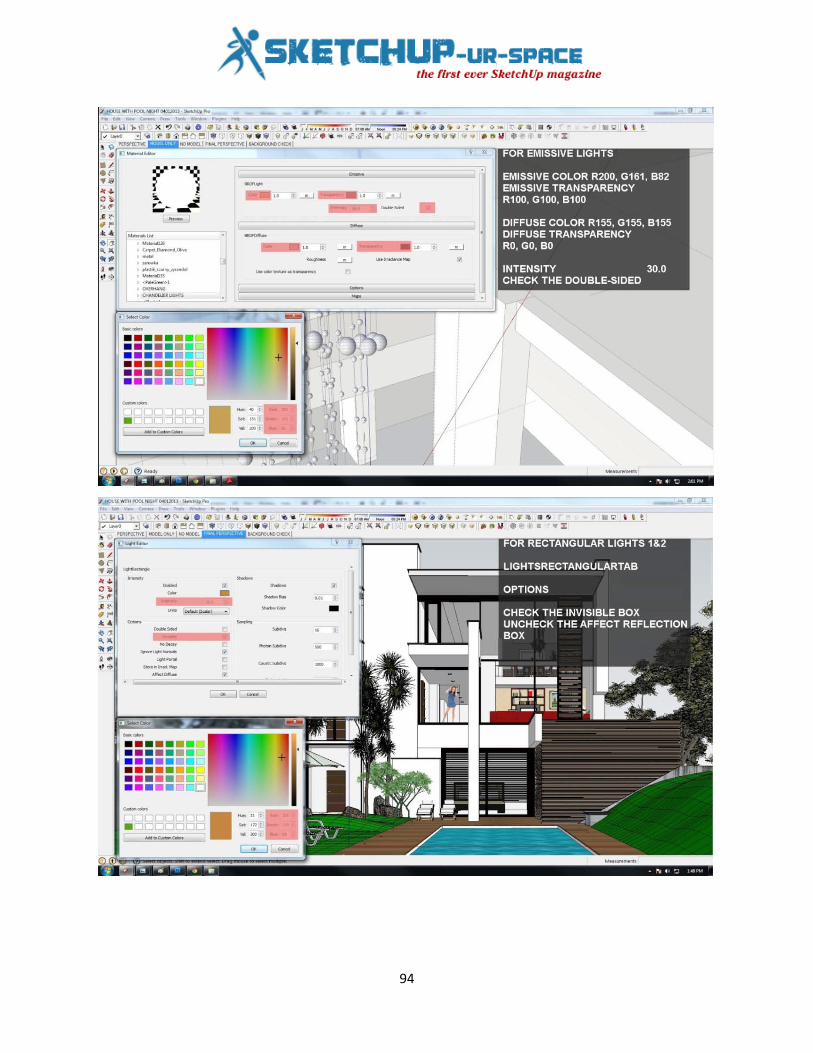
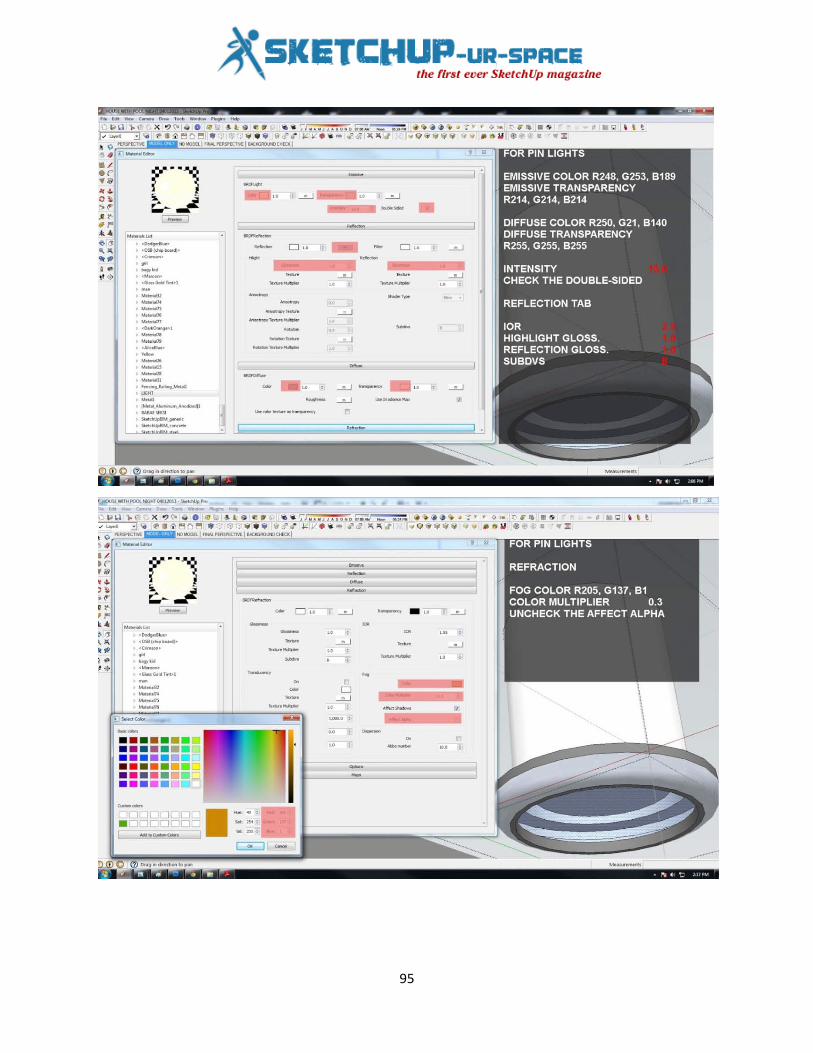
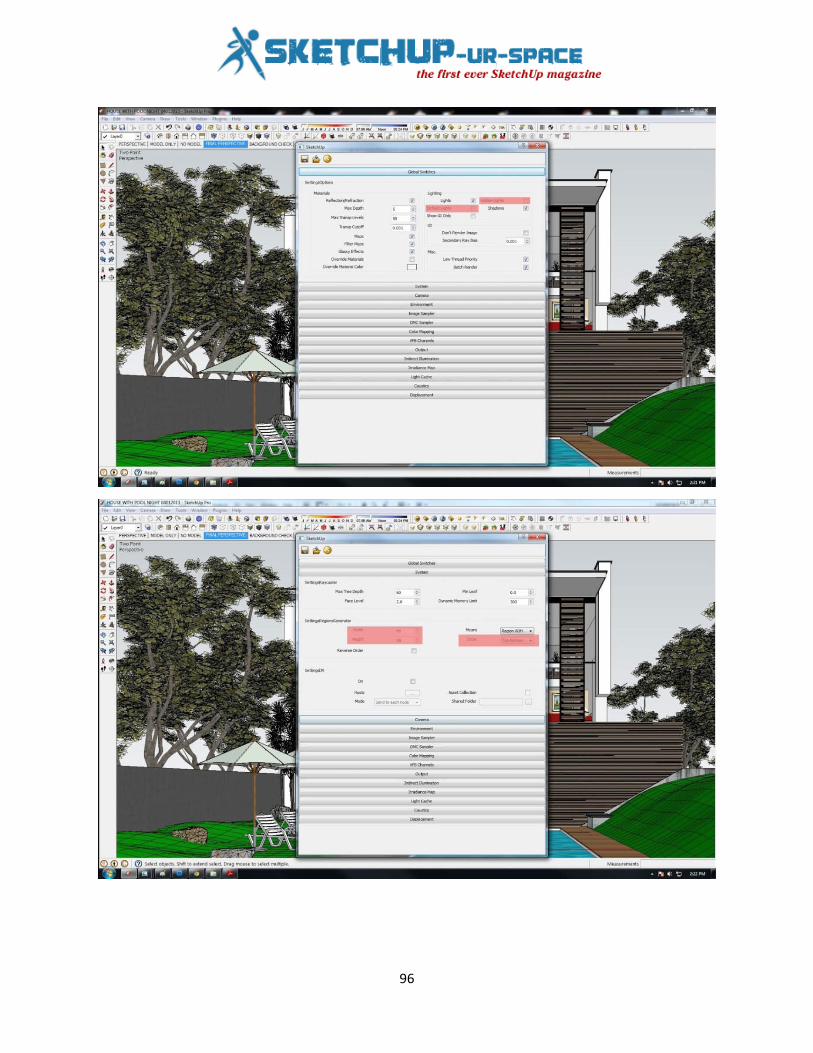
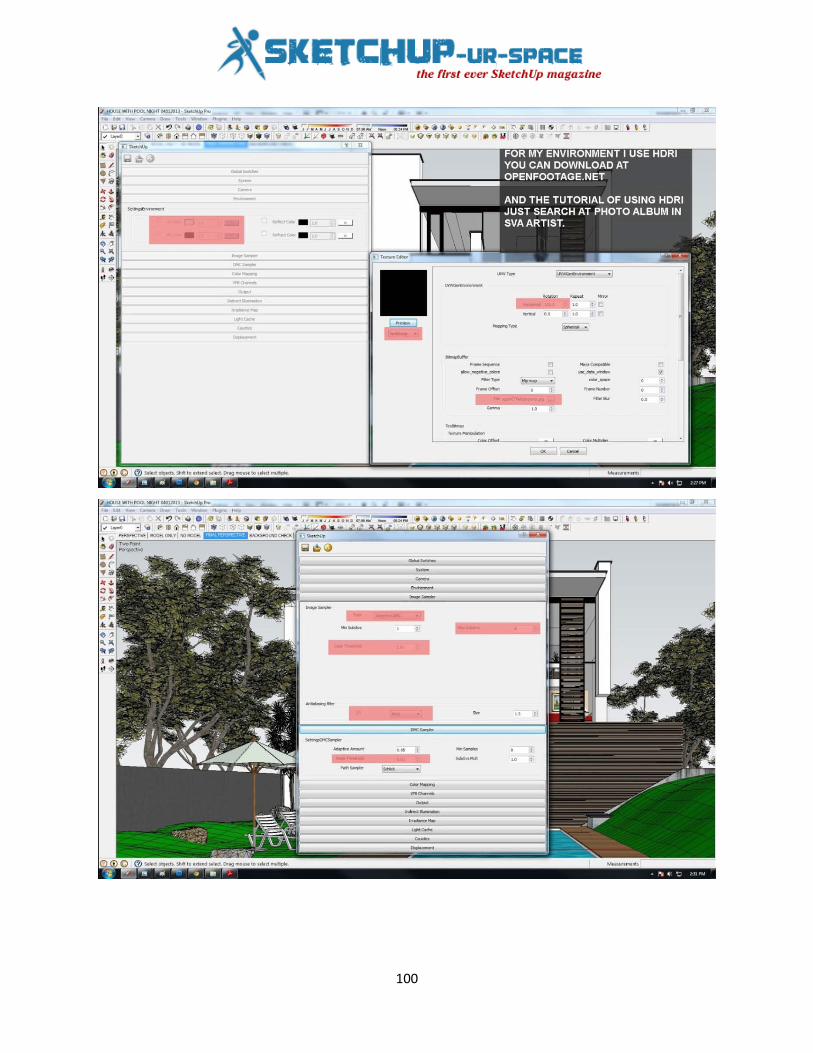
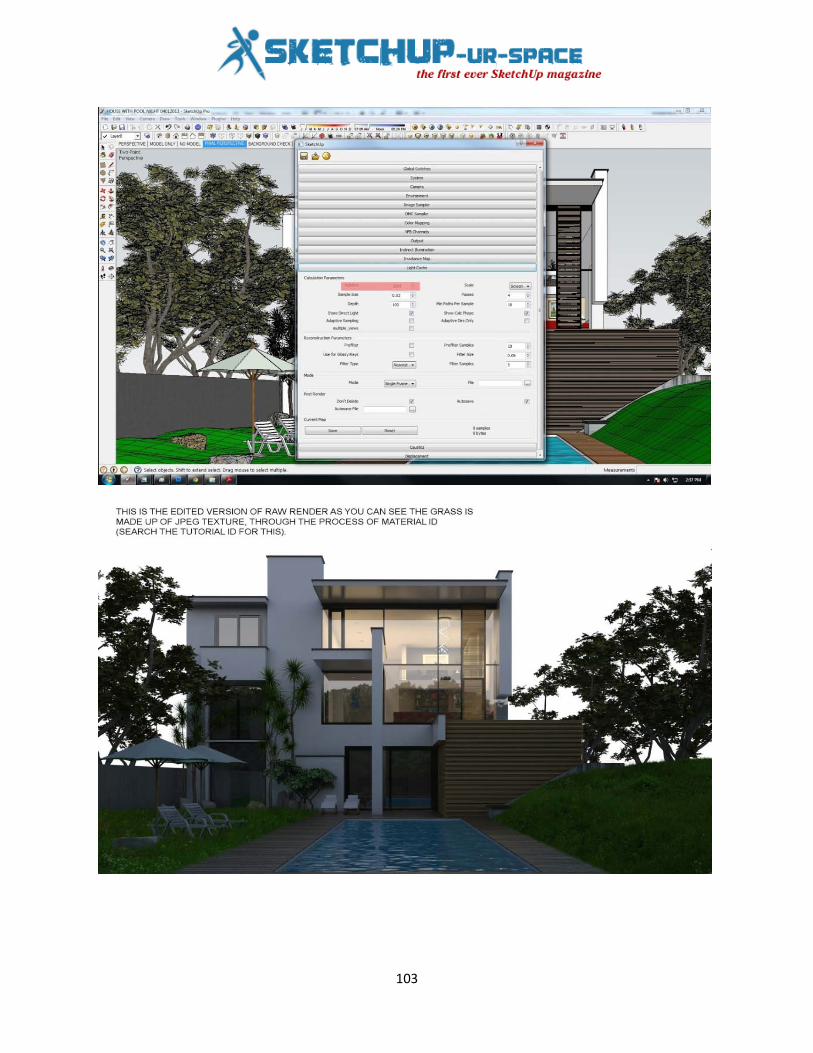
Vray tutorial Exterior Night Scene The making of esterior HOUSE WITH POLL NIGHT SCENE
90
91
92

93
94
95
96
97

98
99
100

101

102
103

104

105

106

107
108
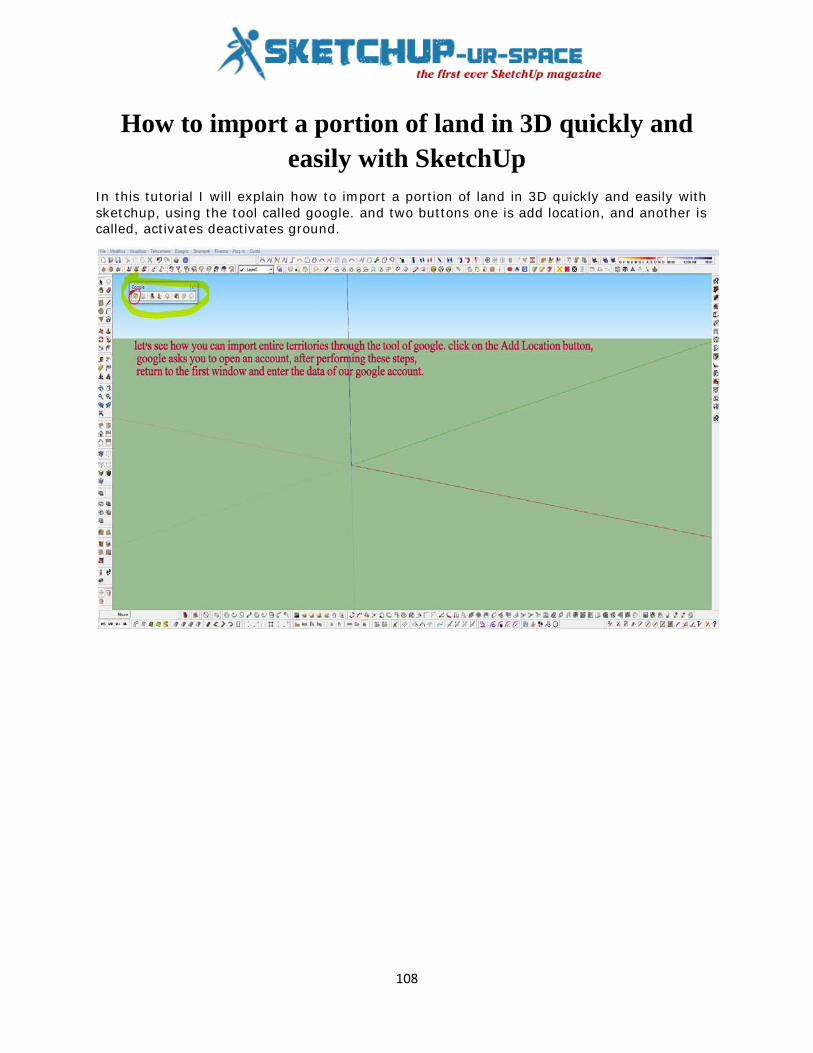
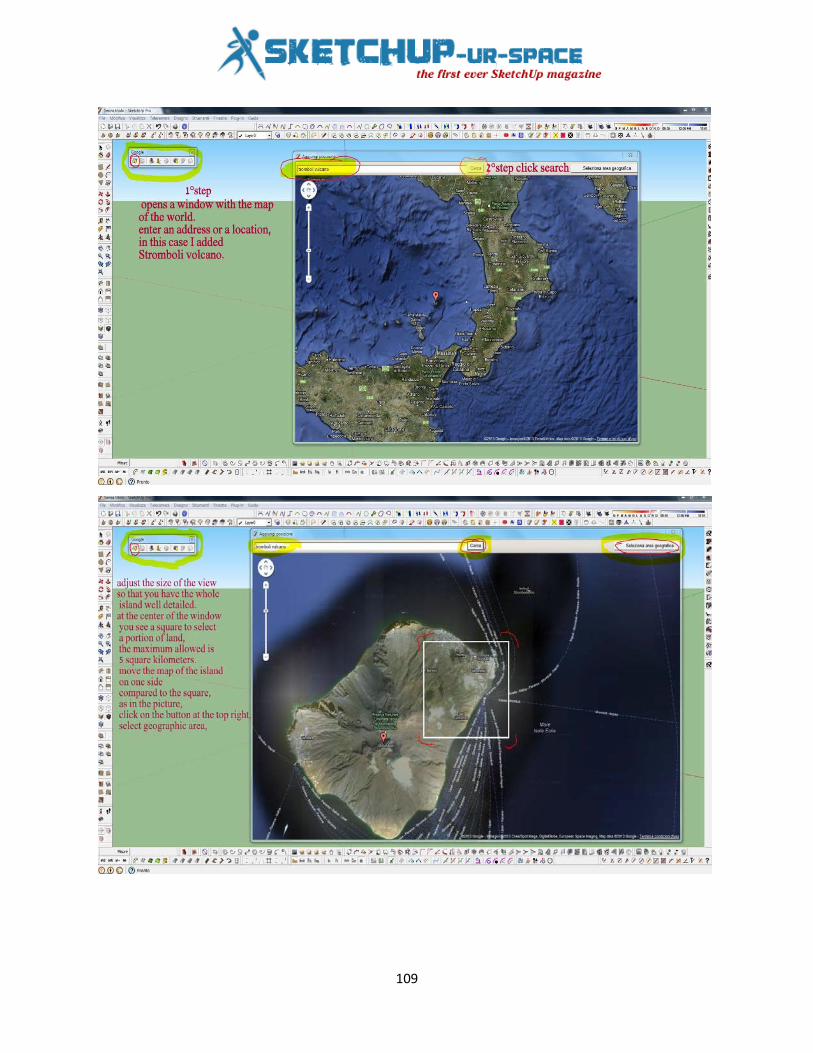
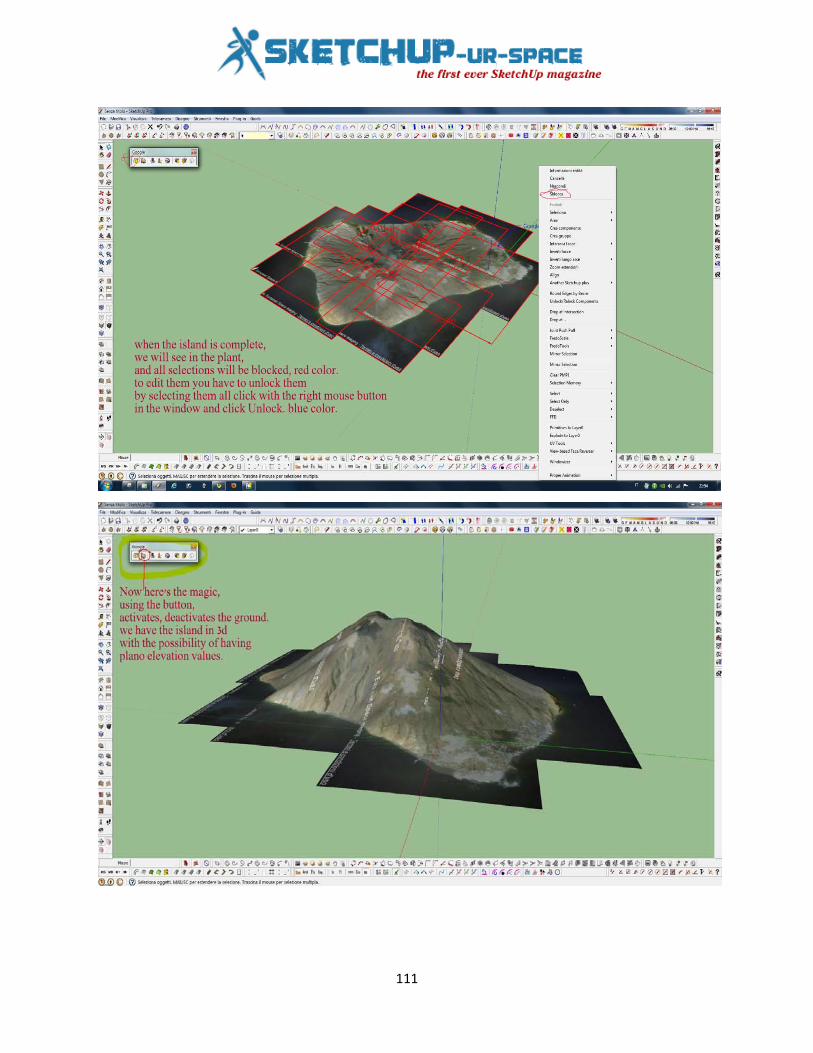
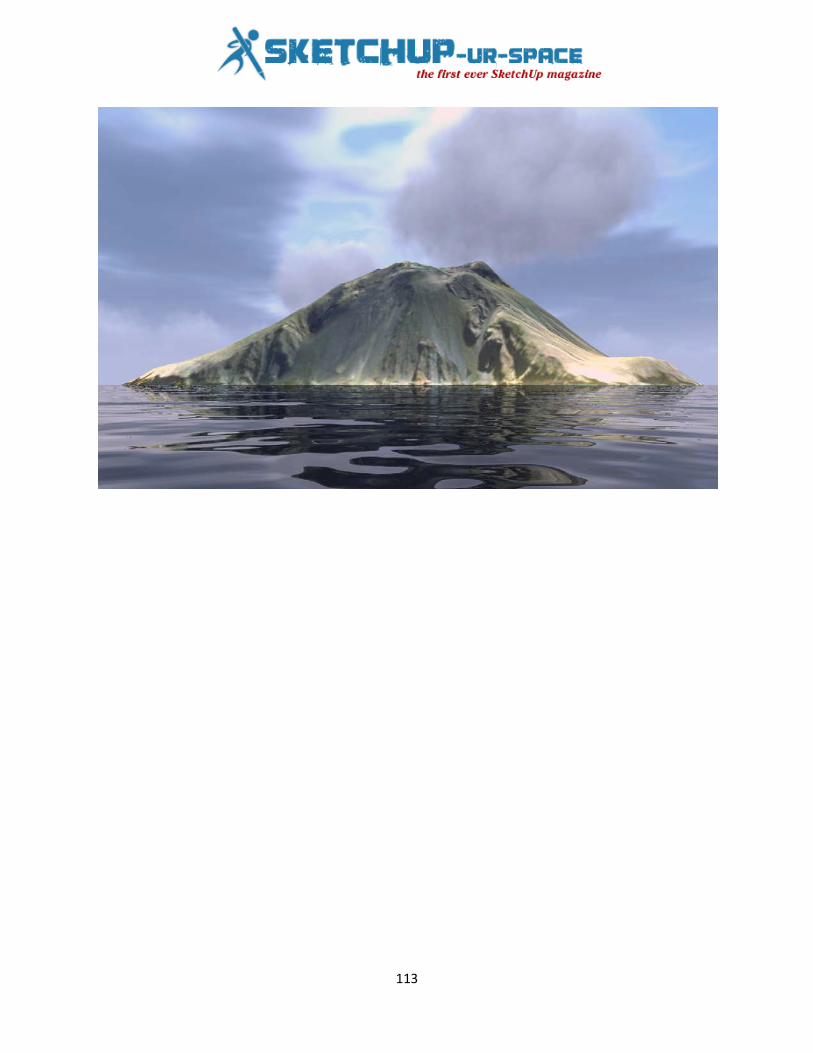
How to import a portion of land in 3D quickly and easily with SketchUp
In this tutorial I will explain how to import a portion of land in 3D quickly and easily with sketchup, using the tool called google. and two buttons one is add location, and another is called, activates deactivates ground.
109

110
111

112
113

114
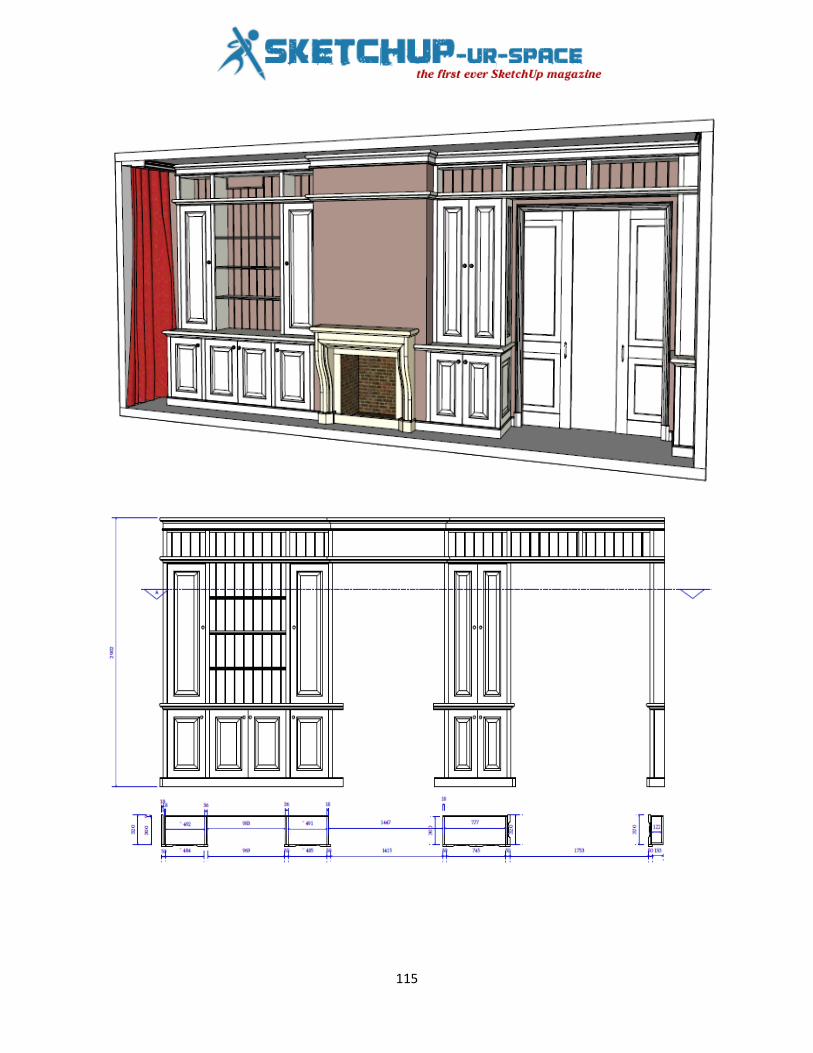
Large chambre en suite wall with SketchUp As a dutch interior designer, SketchUp is the most important software that i use.
Here,s a fine example of a large chambre en suite wall that I not only designed in sketchup ( very detailed) but also produced the woodshop drawings for cabinet maker. At last i also show you a picture of the cabinet in real life.
115
116
Learning SketchUp Training Video A Practical SketchUp Training Course That Teaches Real World Skills
•
In this project-based Learning SketchUp video tutorial series, you'll quickly have relevant skills for real-world applications.
Follow along with our expert instructor in this training course to get:
Concise, informative and broadcast-quality SketchUp training videos
•
delivered to your desktop
The ability to learn at your own pace
•
with our intuitive, easy-to-use interface
A quick grasp of even the most complex SketchUp subjects
Practical working files further enhance the learning process and provide a degree of retention that is
because they're broken into simple, easy to follow tutorial videos
unmatched by any other form of SketchUp tutorial, online or offline...
LINK:
so you'll know the exact steps for your own projects.
http://www.infiniteskills.com/training/learning-sketchup.html
117
AW online workshops SketchUp Beginner’s SketchUp Webinar: This is a beginner’s webinar in Trimble SketchUp. No prior experience with SketchUp is needed, but the student must be able to download and install SketchUp and be familiar with a computer.
Trimble SketchUp 8 is a free and powerful tool. The Pro version is used by professional to model and design everything from bottles to skyscrapers. We will use the free version to model a Bedside Table complete with tapered legs, mortise and tenon joinery, beveled top, and a dovetailed drawer trimmed with bull nose cock beading and a Shaker style drawer pull. We will begin by learning how to install SketchUp, setup application preferences, choose model defaults and customize a template. Next we will tour the work area and become familiar with its tools. The heart of this course is modeling the Bedside Table and producing dimensioned shop drawings and photorealistic textured images.
Click here to view the table of contents for the Beginner’s SketchUp tutorial
Intermediate SketchUp Webinar:Intermediate SketchUp builds on the Beginner’s SketchUp Webinar. This webinar will use the free version of Trimble SketchUp primarily, but the students will be exposed to the Pro version also. The focus of this intermediate level webinar is modeling non-linear components; components with circular and complex shapes.
Each part will deal with modeling a single component of a furniture piece, though the students will have access to the complete model. Part 1 will begin with an arched rail for a clock door, the arch being a simple circular curve. Part 5 will focus on modeling cabriole legs using Bezier Spline curves. Each part will include an introduction to new tools – including a few Ruby script extensions to SketchUp – that are necessary to create ever increasing complex shapes.
Some Parts of this webinar are broken into two videos called Part #A and Part #B to keep the video length reasonable. In addition, in Part 3 the student will be asked to view a video called Non-Circular Curve Tools prior to viewing Part 3. This is to demonstrate the use of the Bezier Spline Ruby script plugin that is used from Part 3 on. Each Part is also accompanied with one or more PDF files explaining the webinar in text form to aid those who may be less visual learners. Some Parts also include SketchUp model files for the students use in following along and practicing on his/her own.
Click here to view the table of contents for the Intermediate SketchUp tutorial

118
Super Modeler Weekend for SketchUp users On Friday the 24th and Saturday the 25th of May, the SketchUp Pro Super Modelers will organize a special modeling party in Eindhoven. This event is sponsored by Design8. On Friday the 24th there will be a crash course SketchUp for beginners and on Saturday the 25th there will be a special modeling event for the more experienced user.
Friday May 24: Crash Course SketchUp On Friday, May 24 there is a crash course SketchUp scheduled for beginners. During this three hour course, highly experienced SketchUp users will give you a detailed explanation of the various tools of SketchUp and they will give you tips & tricks to speed up your modeling process. Design8 will be present with 3D Printer to show how you can make a tangible plastic object from a 3D SketchUp model.
Details: Date and Time: Friday, May 24 at 09:00, Location: de Zwarte Doos, Den Dolech 2, Eindhoven (NL), Maximum number of contestants: 20, Costs: € 45,- per person. E-mail your subscription to Lennart AKA Milo Minderbinder
Saturday, May 25: Modeling PartyFor the more experienced SketchUp user and for those who want to use their knowledge of the crash course, there will be a Modeling Party on Saturday, May 25. During this workshop 3D building modeling for Google Earth will be discussed. Of course it is also an excellent opportunity for you to meet other users and exchange knowledge together.
Details:Date and Time: Staurday, May 25 at 10:00, Location: Kerkstraat 36a, Eindhoven (NL), Maximum number of contestants: 40, Costs: € 5,- per person (incl. free Wi-Fi and a cup of coffee). Please fill in this web form for subscription

119
Architectural 3D Awards 2013 The CGarchitect Architectural 3D Awards are the largest awards event for the architectural visualization industry. Now in its 10th year, the awards attract entries from top studios, freelancers and students from around the world in 4 separate categories: Image, Film/Animation, Interactive and Student, within the Film/Animation and Image. With over $98,000 (yes, ninety-eight thousand US Dollars) worth of prizes in different categories, this is indeed a tempting challenge for any 3D artist with skills and talent.

120
Trimble Acquires Vico Assets to Extend its Design-Build-Operate Capabilities for Building Construction
Trimble announced today that it has acquired assets of privately-held Vico Software, Inc. (Vico) of Boulder, Colorado, a recognized leader in 5D virtual construction software and consulting services. The asset acquisition extends Trimble's solutions for building construction and provides a platform to connect the information flow across the design-build-operate (DBO) lifecycle to improve cost management and optimize scheduling on complex building construction projects. Financial terms were not disclosed.
"Vico's 5D Virtual Construction software solutions pioneered the category of 5D BIM for construction. With Vico's capabilities Trimble is uniquely positioned to participate in the industry's evolution from 2D to 5D management," said Bryn Fosburgh, Trimble vice president. "Vico provides an important contribution in that evolution by connecting data from the virtual aspects to the physical aspects of a building construction project. It becomes the connection point that binds Trimble's hardware and software suite of products together across the DBO lifecycle."
5D is a progressive step of the Building Information Modeling (BIM) process that provides a richer data context to 3D BIM. 5D intelligently links individual 3D model components with time and cost-related information, enabling project owners and Architecture, Engineering and Construction (AEC) service providers to visualize the progression of construction activities and the related costs over time. This BIM-centric project management methodology connects cost, scope and schedule within a visual environment to provide contractors with the ability to proactively resolve issues and streamline project delivery.
"5D Management solutions help create a highly responsive, transparent and efficient construction supply chain," said Mark Sawyer, president and CEO of Vico. "Vico's acquisition by Trimble, the leader in delivering advanced technology to complex construction projects, will extend the value of our solutions inside a much broader product portfolio. Trimble has moved aggressively into this rapidly evolving technology segment, and together we are looking forward to driving the future of BIM for construction."
The Vico Software business will be reported in Trimble's Engineering and Construction Segment.
Read More: http://www.trimble.com/news/release.aspx?id=110212a

121
SketchUp 3D Challenge 174 - Water Slide We're gearing up for Summer (at least in the Northern Hemisphere) and now it's time to start thinking about your summer activities. This challenge is all about water slides: The popular attraction at water parks everywhere. As usual, they come in all shapes and sizes from the common backyard pool slide to the not so common 164 foot tall certified Guinness World Record largest water slide, Kilimanjaro, in Brazil.
There are many kinds of slides for you to model and you are free to create something entirely unique. (Note: Log rides or log flume rides are not considered water slides for the purposes of the challenge.) For a list and a description of the different kinds of water slides, be sure to read the WikiPedia article on water slides.
Read More: http://sketchup3dchallenge.blogspot.in
122
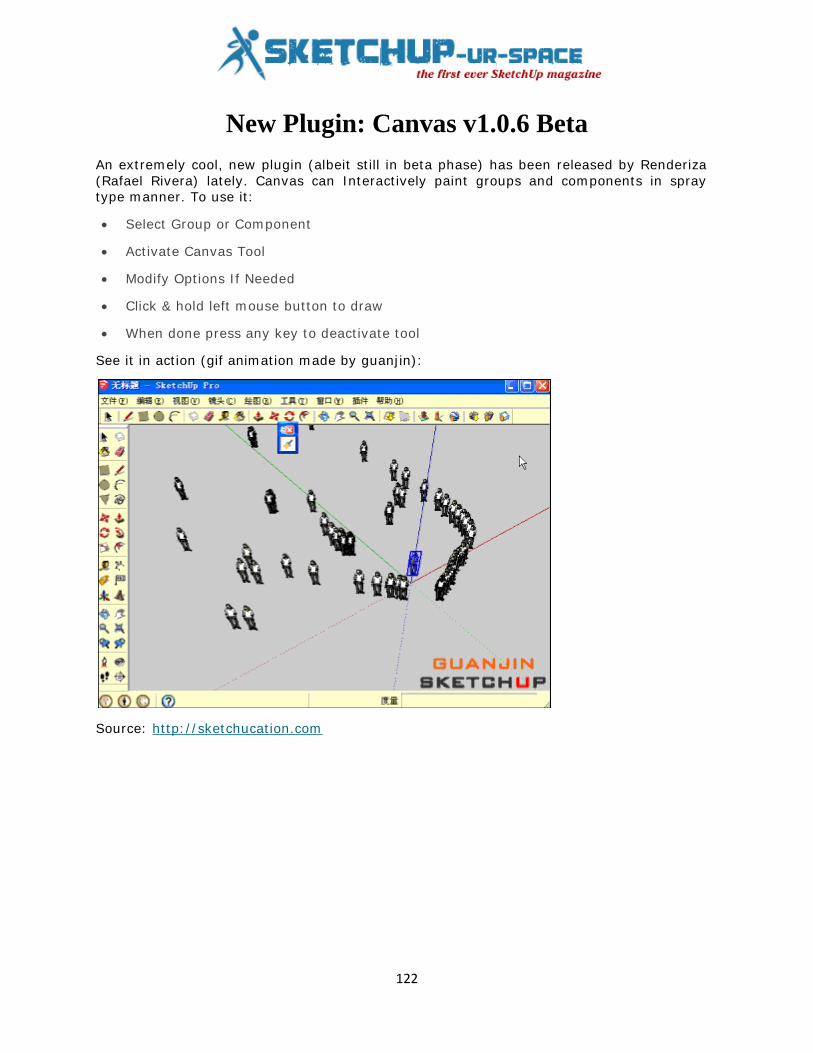
New Plugin: Canvas v1.0.6 Beta An extremely cool, new plugin (albeit still in beta phase) has been released by Renderiza (Rafael Rivera) lately. Canvas can Interactively paint groups and components in spray type manner. To use it:
• Select Group or Component
• Activate Canvas Tool
• Modify Options If Needed
• Click & hold left mouse button to draw
• When done press any key to deactivate tool
See it in action (gif animation made by guanjin):
Source: http://sketchucation.com
123
TopoShaper, a powerful terrain maker for SketchUp Fredo6 on the Sketchucation Forum has created a new terrain maker called TopoShaper. It will take your grouped contours and create a terrain surface from them. This is not duplicate of the Sandbox tools, but rather a significant upgrade in power tools for landscape architects, landscape designers, and site designers.
Here are some of the ways it is different from Sandbox tools: It will fix breaks in your contours (say from elevation labels) and allow you to manually make changes too. It let’s you view the terrain and contours in multiple views so you can see and edit as needed. The terrain surface sits close to the contours but does not use the contour vertices. So it doesn’t pull to a point, but rather fits the best concave shape it can for the whole length of the contour. It also allows you to set the size of the terrain grid so you can choose the level of detail that you want. The terrain that it makes is a grid or quads rather than a network of triangles (a TIN). This will let you edit the surface with Artisan or other plugins much easier. It also creates a skirt around the edge of the topo for a clean look.
He has a manual to show how to use the series of tools/buttons. And the plugin can be downloaded here: http://sketchucation.com/forums/viewtopic.php
Note that you need to have the latest version of the Fredo Library, LibFredo6 v4.8a, in your plugin library for this plugin to work. PLEASE consider donating to him via PayPal if you think this or all of the other plugins he has made are valuable to your SketchUp process.
http://www.youtube.com/watch?feature=player_embedded&v=2ru5MnE-D_Q
Source: http://sketchup4sitedesign.wordpress.com

124
SketchUp ur Space - The Creative Team
Rajib Dey [email protected]
Rajib, the editor-in-chief of SketchUp ur Space magazine is the main writer. He is responsible to write the cover story, blog and many other columns. Along with it, he is creating a liaison between the writers and the readers.
Manoj Kumar Singh [email protected]
Manoj is enthusiastic helps to put the content of the SketchUp up Space magazine in the html version. Manoj is the html developer who beautifully creates each and every edition with care along with the PDF version.


![[Sketchup] Creating Vray Water Material in Sketchup _ Artvisualizer Blog.pdf](https://static.fdocuments.in/doc/165x107/577c78081a28abe0548e6fab/sketchup-creating-vray-water-material-in-sketchup-artvisualizer-blogpdf.jpg)