SILVER KING MAJESTIC MILK DISPENSERS MODELS...
16
S6163-CU-MMC-010 0910-LP-109-2287 TECHNICAL MANUAL FOR SILVER KING MAJESTIC MILK DISPENSERS MODELS SKMAJ1/2/3 DISTRIBUTION STATEMENT C: DISTRIBUTION AUTHORIZED TO U.S. GOVERNMENT AGENCIES AND THEIR CONTRACTORS; ADMINISTRATIVE/OPERATIONAL USE; 1 JUNE 2006. OTHR REQUESTS FOR THIS DOCUMENT MUST BE REFERRED TO NSWC, PHILADELPHIA CODE 944. WARNING: THIS DOCUMENT CONTAINS TECHNICAL DATA WHOSE EXPORT IS RESTRICTED BY THE ARMS EXPORT CONTROL ACT (TITLE 22, U.S.C. SEC. 2751 ET.SEQ.) OR EXECUTIVE ORDER 12470. VIOLATIONS OF THESE EXPORT LAWS ARE SUBJECT TO SEVERE CRIMINAL PENALTIES. DESTRUCTION NOTE: DESTROY BY ANY METHOD THAT WILL PREVENT DISCLOSURE OF CONTENTS OR RECONSTRUCTION OF THE DOCUMENT. PUBLISHED BY DIRECTION OF COMMANDER, NAVAL SEA SYSTEMS COMMAND 15 JULY 2009
Transcript of SILVER KING MAJESTIC MILK DISPENSERS MODELS...

S6163-CU-MMC-010 0910-LP-109-2287
TECHNICAL MANUAL
FOR
SILVER KING MAJESTIC MILK DISPENSERS
MODELS SKMAJ1/2/3 DISTRIBUTION STATEMENT C: DISTRIBUTION AUTHORIZED TO U.S. GOVERNMENT AGENCIES AND THEIR CONTRACTORS; ADMINISTRATIVE/OPERATIONAL USE; 1 JUNE 2006. OTHR REQUESTS FOR THIS DOCUMENT MUST BE REFERRED TO NSWC, PHILADELPHIA CODE 944. WARNING: THIS DOCUMENT CONTAINS TECHNICAL DATA WHOSE EXPORT IS RESTRICTED BY THE ARMS EXPORT CONTROL ACT (TITLE 22, U.S.C. SEC. 2751 ET.SEQ.) OR EXECUTIVE ORDER 12470. VIOLATIONS OF THESE EXPORT LAWS ARE SUBJECT TO SEVERE CRIMINAL PENALTIES. DESTRUCTION NOTE: DESTROY BY ANY METHOD THAT WILL PREVENT DISCLOSURE OF CONTENTS OR RECONSTRUCTION OF THE DOCUMENT.
PUBLISHED BY DIRECTION OF COMMANDER, NAVAL SEA SYSTEMS COMMAND
15 JULY 2009

1
Specifications Subject to Change Without Notice.
1600 Xenium Lane North, Minneapolis, MN 55441-3787
Phone (763) 923-2441
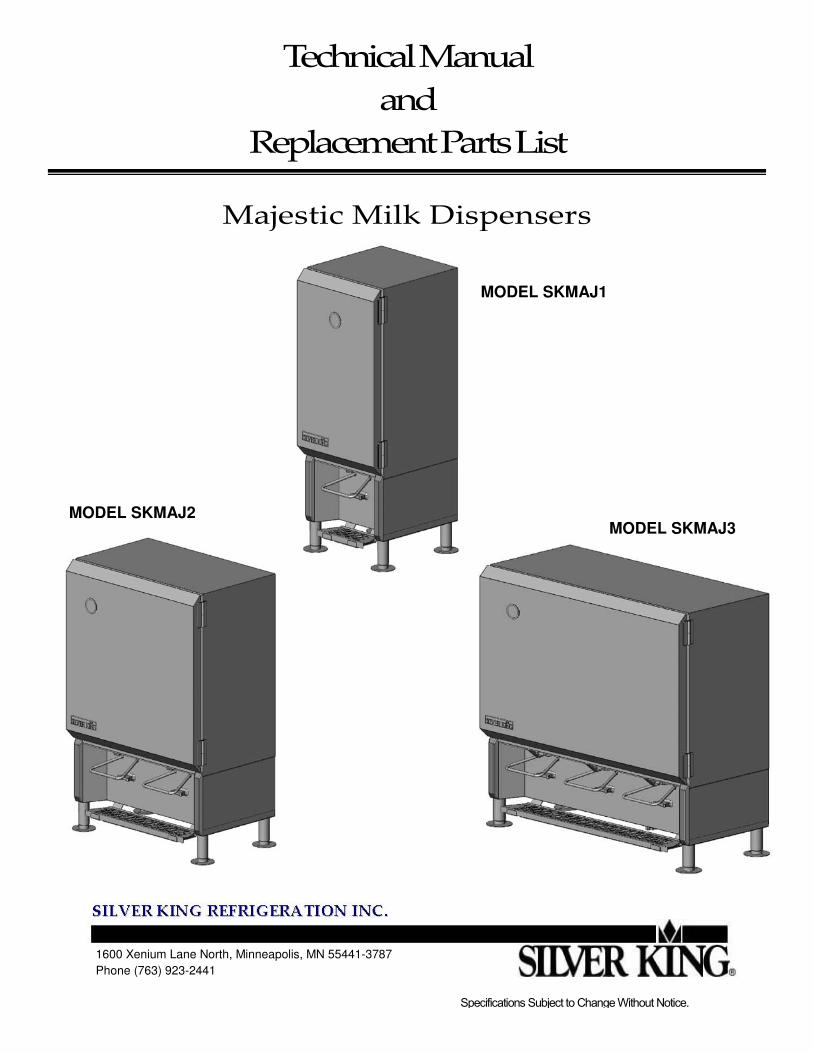
Technical Manual
and
Replacement Parts List
Majestic Milk Dispensers
MODEL SKMAJ1
MODEL SKMAJ2 MODEL SKMAJ3

1
TECHNICAL MANUAL
MAJESTIC SERIES BULK MILK DISPENSERS
Thank you for purchasing Silver King food service equipment. Our goal is to provide our customers with the most reliable equipment in the industry today. Please read this manual and the accompanying warranty information before operating your new Silver King unit. Be sure to complete and mail the warranty card within 10 days of purchase to validate your warranty. Upon delivery of your new Silver King unit, inspect the carton and unit for shipping damages. Report any damage immediately to the transportation carrier and file a written freight damage claim to protect your investment. If a claim is to be filed, save all packaging materials. INSTALLATION The stainless steel exterior of the cabinet has been protected by a plastic covering during manufacturing and shipping. This covering can be readily peeled before installation. After removing this covering, wash the interior and exterior surfaces using a warm mild soapy water solution and a sponge or cloth, rinse with clean water and wipe dry. Drip Tray: Follow the instructions supplied with the drip tray for mounting it to the unit. Location: When locating your new milk dispenser, convenience and accessibility are important considerations, but the following factors must be observed:
• When placing the unit on a counter, the counter must be able to support a minimum of 300 pounds.
• When wall mounting the unit, follow the instructions supplied with the wall mounting kit.
• When placed on a counter, the unit must be on the legs supplied and secured to the counter with the Hold Down Brackets supplied. If the legs are not installed the unit will not operate properly and the warranty will be void.
• There must be at least four (4) inches of clear space above the unit, two (2) inches on each side and back and open in front.
• At no time should anything be stored or placed on top of the unit.
• Correct serving height is important so that those using the dispenser can operate the dispenser properly.
• The unit must be level. The feet on the front legs are adjustable to aid in leveling the unit.
• Avoid placing the unit next to an oven, heating element or hot air source which would adversely affect the performance of the unit.
Electrical Connections: Be sure to check the data plate, located on the liner of the cabinet, for required voltage prior to connecting the unit to power. The specifications on the data plate supersede any future discussion. The standard dispenser is equipped with a seven (7) foot power cord that requires a 115 Volt, 60 Cycle, 1 Phase properly grounded electrical receptacle. The power cord comes with a 3 prong plug for grounding purposes. Any attempt to cut off the grounding spike or to connect to an ungrounded adapter plug will void the warranty, terminate the manufacturers responsibility and could result in serious injury. The circuit must be protected with a 15 or 20 ampere fuse or breaker. Refrigerant: Use HFC-134A.
2
OPERATION Initial startup: After satisfying the installation requirements, the milk dispenser is ready to start. The unit will start when the power cord is connected to a live electrical receptacle. If the compressor is not running when the unit is initially plugged in, check to make sure that the Temperature Control is not set to the ‘off’ position. Allow the unit to run a minimum of two hours before loading it with product. Preparation For Use: Once the unit has achieved proper operating temperature, observe the procedures noted in the label on the door liner for loading milk into the milk dispenser. When removing an empty milk krate, be sure to raise the valve arm fully before pulling the milk tube out of the valve. The last half inch of upward valve travel will lock the valve jaw in place and prevent it from coming out of the valve. Temperature Control: The Temperature Control, located on the front of the unit behind the valve splash guard (see label on door liner), is factory set at the midpoint position, which will maintain an average product temperature of around 36 - 38 Deg F. To access the temperature control, follow the instructions on the door liner. To obtain cooler temperatures turn the Temperature Control stem clockwise and vise versa with a flat blade screwdriver. Allow the unit a minimum of six (6) hours to respond to a control setting adjustment if the product is in the cabinet. Temperature Indicator: The Temperature Indicator, mounted on the door, is factory set to indicate the temperature of the product within two (2) degrees. Should the Temperature Indicator read inaccurately there are instructions for recalibrating it located on the door liner. Defrost: The Silver King Majestic milk dispenser is a manual defrost unit. The unit should be defrosted whenever the walls accumulate a frost bank that is 1/2 inch thick. To defrost the unit, either turn the Temperature Control knob to the ‘off’ position or disconnect the power cord from the electrical receptacle, and open the door. After the frost has melted or come loose from the cabinet walls, wipe out the cabinet interior. Do not attempt to scrape or chisel off the frost as you could do irreparable damage to the unit. MAINTENANCE Preventative maintenance is minimal although these few steps are very important to continued operation and maximizing the life of the appliance. Cabinet Surfaces: The cabinet interior and exterior are stainless steel and should be cleaned periodically with a solution of warm water and a mild soap, rinsed and wiped dry with a clean soft cloth. A stainless steel cleaner can also be used. Should a surface become stained or discolored, do not attempt to clean with an abrasive cleaner or scouring pad. Use a soft cleaner and rub with the grain of the metal to avoid scratching the surface. Do not use chlorinated cleaners. Valves: To clean the valve start by removing the bottom valve body cap (item 32) by prying it down and off. Remove the valve jaw (item 33) by pushing up through the bottom of the valve and pulling it out the top of the valve. Clean all loose parts and the valve (in place) with a solution of warm water and mild soap or a sanitizing solution and rinsing afterwards. Replace the valve jaw by sliding it into the valve from above and pressing down on the valve jaw until it ‘snaps’ firmly onto the valve push rod. Replace the bottom valve body cap. Leaking Valves: To stop a valve from dripping milk start by removing the splash guard (item 10) by hand and the apron (item 12) with a Phillips screwdriver. Locate and loosen the adjustment nut and bolt shown in the valve cross section on page 3. Remove the milk tube from the valve. Raise and drop the valve arm (item 34) several times until the valve jaw (item 33) is tight to the front of the valve opening when the valve arm is fully lowered. Re tighten the adjustment nut and bolt and replace the apron and splash guard. Also make sure that the milk tube is cut as close as possible to the valve.
MODEL SERIAL NO. DATE INSTALLED
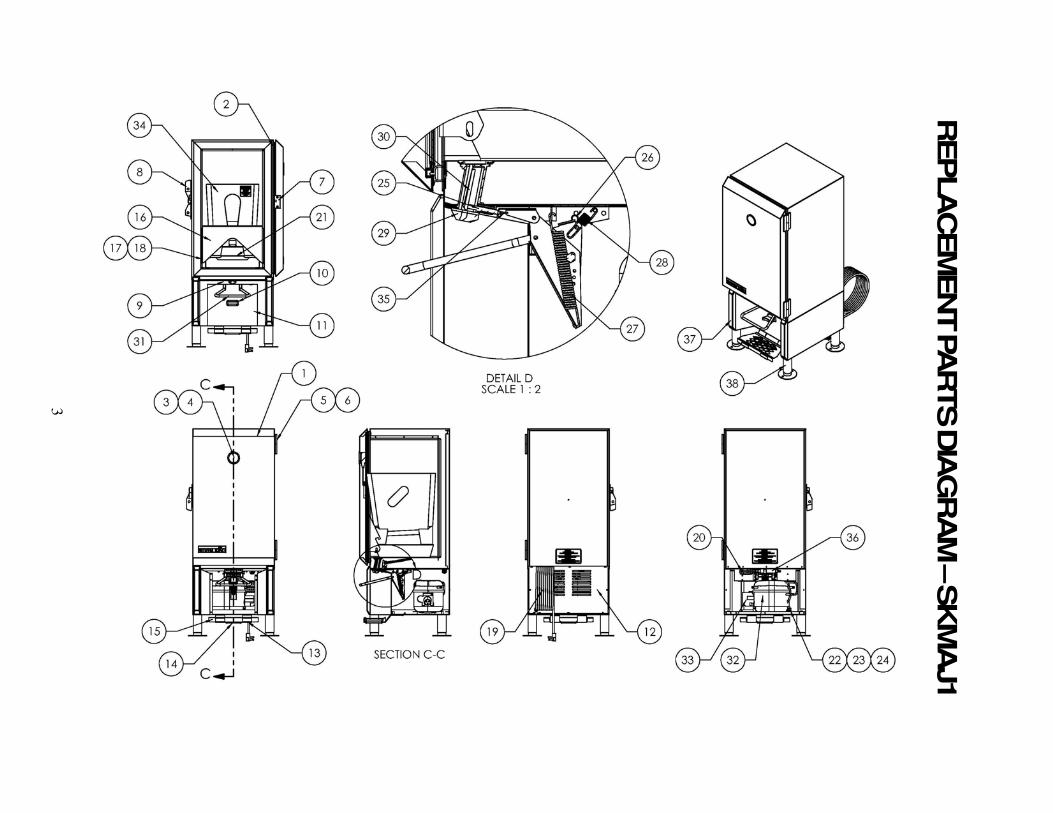
3
R
EPLA
CEM
EN
T P
AR
TS D
IAG
RA
M –
SK
MA
J1
4
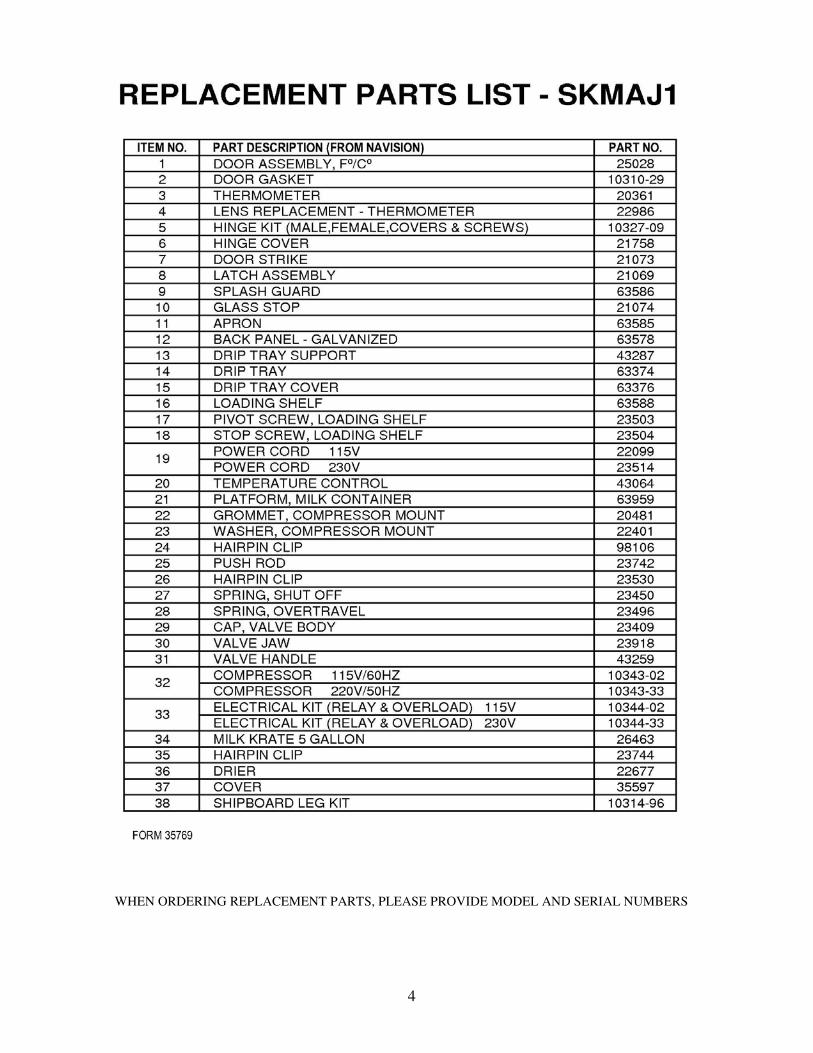
WHEN ORDERING REPLACEMENT PARTS, PLEASE PROVIDE MODEL AND SERIAL NUMBERS
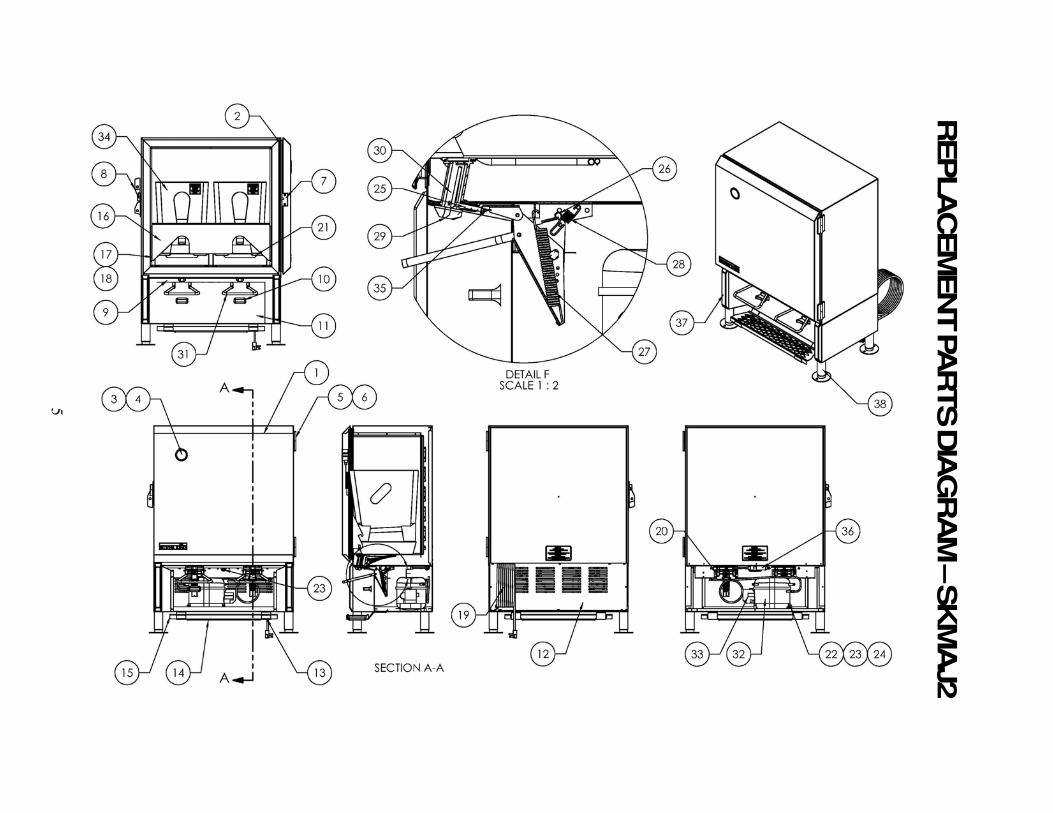
5
R
EPLA
CEM
EN
T P
AR
TS D
IAG
RA
M –
SK
MA
J2

6
WHEN ORDERING REPLACEMENT PARTS, PLEASE PROVIDE MODEL AND SERIAL NUMBERS
7
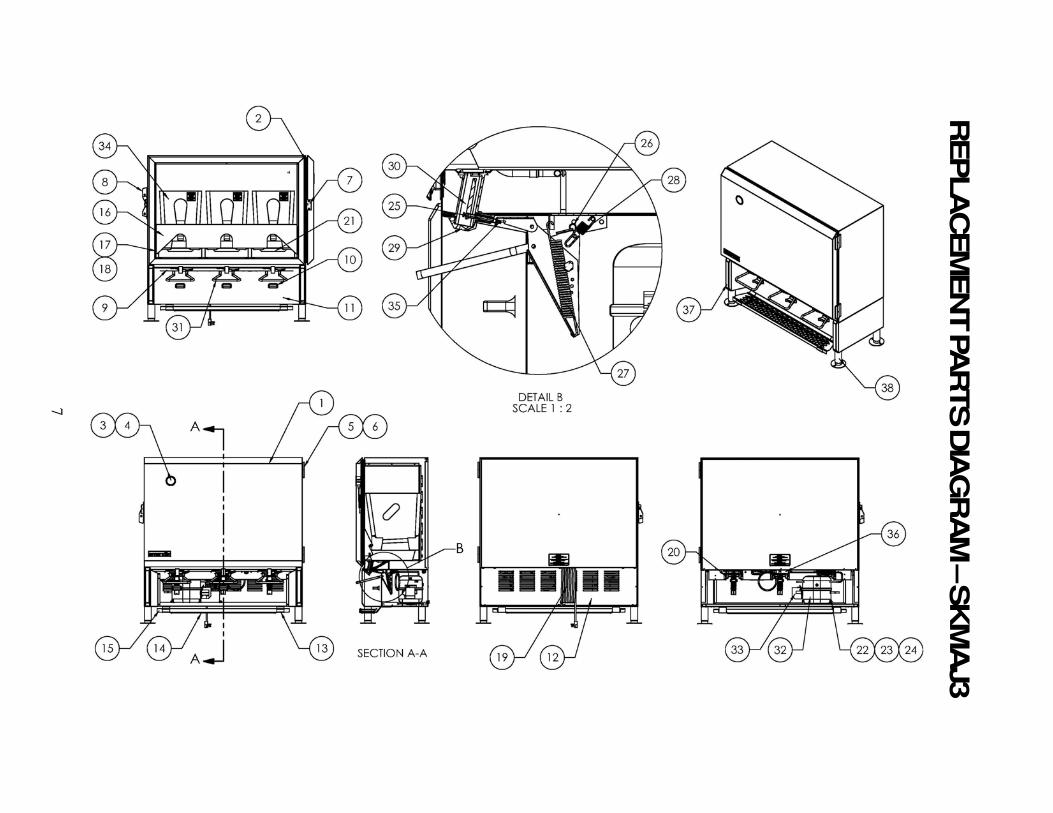
R
EPLA
CEM
EN
T P
AR
TS D
IAG
RA
M –
SK
MA
J3
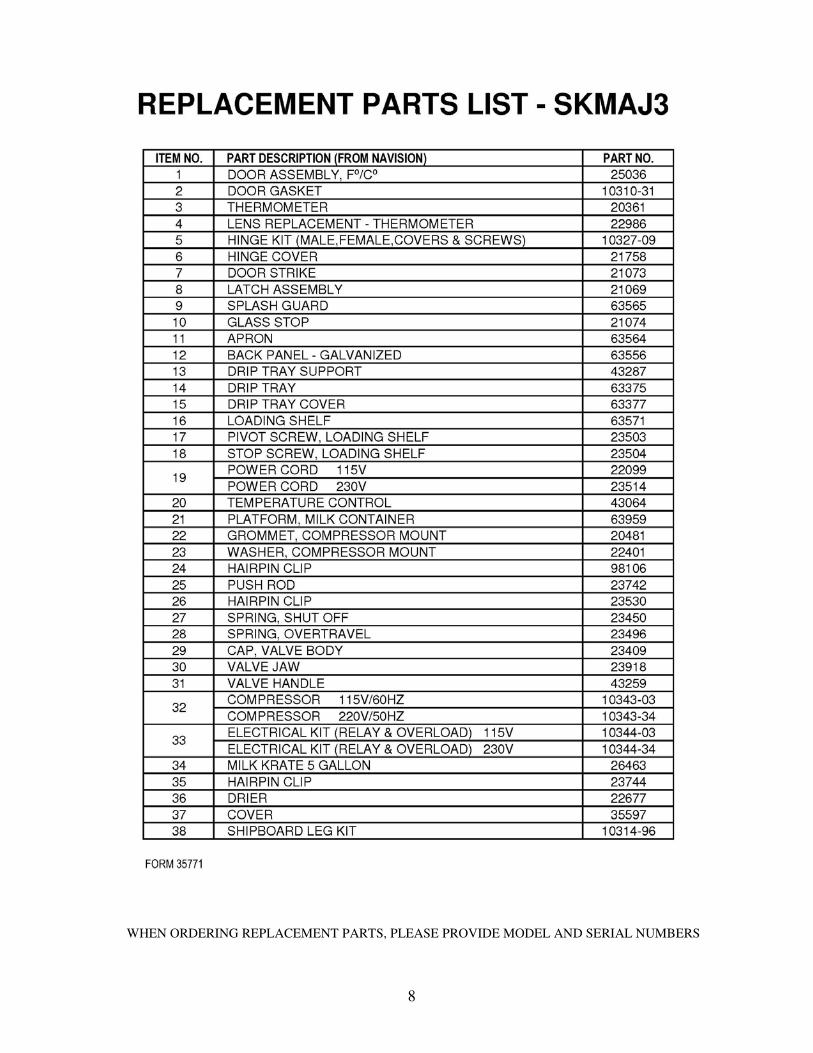
8
WHEN ORDERING REPLACEMENT PARTS, PLEASE PROVIDE MODEL AND SERIAL NUMBERS

9
FO
RM
NO
. 35768 R
EV
A


Ref: NAVSEAINST 4160.3A NAVSEA S0005-AA-GYD-030/TMMP
NAVSEA/SPAWAR TECHNICAL MANUAL DEFICIENCY/EVALUATION REPORT (TMDER) INSTRUCTIONS: Continue on 8 ½” x 11” page if additional space is needed. 1. Use this report to indicate deficiencies, problems and recommendations relating to publications. 2. For CLASSIFIED TMDERs see OPNAVINST 5510H for mailing requirements. 3. For TMDERs that affect more than one publication, submit a separate TMDER for each. 4. Submit TMDERs at web site https://nsdsa2.phdnswc.navy.mil or mail to: COMMANDER, CODE 310 TMDER BLDG 1389, NAVSURFWARCENDIV NSDSA, 4363 MISSILE WAY, PORT HUENEME CA 93043-4307
1. PUBLICATION NUMBER 2. VOL/PART 3. REV/DATE OR CHG/DATE 4. SYSTEM/EQUIPMENT ID
5. TITLE OF PUBLICATION 6. REPORT CONTROL NUMBER (6 digit UIC-YY-any four: xxxxxx-03-xxxx)
7. RECOMMEND CHANGES TO PUBLICATION
7a. Page # 7b. Para # 7c. RECOMMENDED CHANGES AND REASONS
8. ORIGINATOR’S NAME AND WORK CENTER 9. DATE 10. ORIGINATOR’S E-MAIL ADDRESS 11. TMMA of Manual (NSDSA will complete)
12. SHIP OR ACTIVITY Name and Address (Include UIC/CAGE/HULL) 13. Phone Numbers: Commercial ( ) -
DSN - FAX ( ) -
NAVSEA 4160/1 (Rev. 7-2003) S/N 0116-lf-985-4100
FOLD HERE AND TAPE SECURELY PLEASE DO NOT STAPLE
INCLUDE COMPLETE ADDRESS USE PROPER POSTAGE FOR OFFICE USE ONLY
COMMANDER CODE 310 BLDG 1389 NAVSURFWARCENDIV NSDSA
4363 MISSILE WAY PORT HUENEME, CA 93043-4307
FOLD HERE AND TAPE SECURELY PLEASE DO NOT STAPLE