SHOWER TRAYS INSTALLATION GUIDELINES · anclarla de manera manual. 4.3. Colocar el sifón y/o...
30
Bathroom Collection SHOWER TRAYS INSTALLATION GUIDELINES
Transcript of SHOWER TRAYS INSTALLATION GUIDELINES · anclarla de manera manual. 4.3. Colocar el sifón y/o...
BathroomCollectionSHOWER TRAYS INSTALLATION GUIDELINES

Índice/IndexGUÍA DE INSTALACIÓN
Указания за инсталиране
INSTALLATION GUIDELINES
EINBAUANLEITUNG
INSTALLAZIONE
GUIA DE INSTALAÇO
MONTERINGSANVISNINGAR
GUIDE D´INSTALLATION
RICHTLIJNEN VOOR DE INSTALLATIE
3
6
9
12
15
18
21
24
2 7

3
Instalación del plato de ducha
0. Comprobación.Antes de la instalación del plato de ducha, comprobar que las dimensiones son correctas y que el pack incluye la válvula de desagüe.
1. Replanteo del plato en obra.Limpiar la zona donde se va a instalar el plato de ducha.Comprobar las cotas de conexión del desagüe y tuberías. Se debe tener en cuenta las juntas perimetrales (ver punto 3).
2. Conexiónde la válvula.Pegar un tubo flexible en la salida de la válvula del plato que conecte a las tuberías de desagüe. Es imprescindible que coincidan las cotas de conexión del plato y el diámetro de los tubos a conectar.Comprobar el desagüe con el plato de ducha.
pendiente
min. 2%
4
junta
juntaDetalle zona rebajada
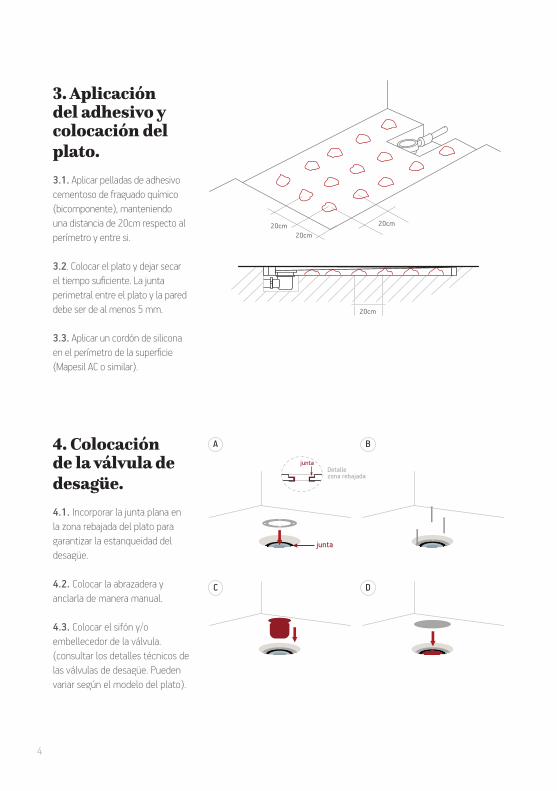
3. Aplicación del adhesivo y colocación del plato. 3.1. Aplicar pelladas de adhesivo cementoso de fraguado químico (bicomponente), manteniendo una distancia de 20cm respecto al perímetro y entre si.
3.2. Colocar el plato y dejar secar el tiempo suficiente. La junta perimetral entre el plato y la pared debe ser de al menos 5 mm.
3.3. Aplicar un cordón de silicona en el perímetro de la superficie (Mapesil AC o similar).
4. Colocación de la válvula de desagüe. 4.1. Incorporar la junta plana en la zona rebajada del plato para garantizar la estanqueidad del desagüe.
4.2. Colocar la abrazadera y anclarla de manera manual.
4.3. Colocar el sifón y/o embellecedor de la válvula. (consultar los detalles técnicos de las válvulas de desagüe. Pueden variar según el modelo del plato).
20cm
20cm
20cm20cm
A B
C D
5
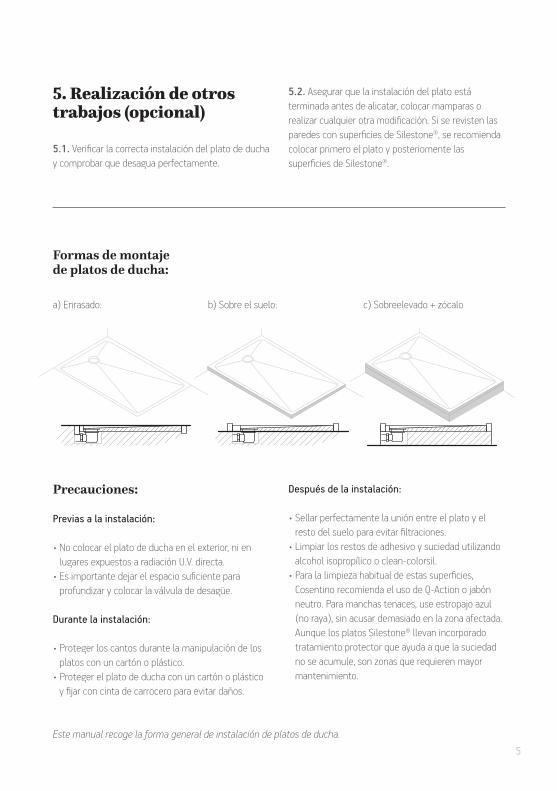
Formas de montaje de platos de ducha:
a) Enrasado:
Este manual recoge la forma general de instalación de platos de ducha.
b) Sobre el suelo: c) Sobreelevado + zócalo
5. Realización de otros trabajos (opcional)
5.1. Verificar la correcta instalación del plato de ducha y comprobar que desagua perfectamente.
5.2. Asegurar que la instalación del plato está terminada antes de alicatar, colocar mamparas o realizar cualquier otra modificación. Si se revisten las paredes con superficies de Silestone®, se recomienda colocar primero el plato y posteriomente las superficies de Silestone®.
Precauciones:
Previas a la instalación:
• No colocar el plato de ducha en el exterior, ni en lugares expuestos a radiación U.V. directa.
• Es importante dejar el espacio suficiente para profundizar y colocar la válvula de desagüe.
Durante la instalación:
• Proteger los cantos durante la manipulación de los platos con un cartón o plástico.
• Proteger el plato de ducha con un cartón o plástico y fijar con cinta de carrocero para evitar daños.
Después de la instalación:
• Sellar perfectamente la unión entre el plato y el resto del suelo para evitar filtraciones.
• Limpiar los restos de adhesivo y suciedad utilizando alcohol isopropílico o clean-colorsil.
• Para la limpieza habitual de estas superficies, Cosentino recomienda el uso de Q-Action o jabón neutro. Para manchas tenaces, use estropajo azul (no raya), sin acusar demasiado en la zona afectada.Aunque los platos Silestone® llevan incorporado tratamiento protector que ayuda a que la suciedad no se acumule, son zonas que requieren mayor mantenimiento.

6
Инсталиране на поддушови корита
0. Проверка. Преди инсталиране на поддушовото корито, проверете дали размерите са коректни и дали пакетът включва сифон.
1. Проверка на поддушовото корито на място. Почистете мястото, където ще инсталирате поддушовото корито. Проверете размерите на каналната тръба и на сифона. Вземете в предвид и поставянето на уплътнение по целия периметър на свръзката на канала и сифона. (вижте Секция 3).
2. Свързване на сифона. Свържете с гъвкава връзка изхода на сифона на поддушовото корито с изхода на каналната тръба. Задължително условие е да съвпадат размерите на двете части, които ще свързватe. Проверете отново сифона на поддушовото корито.
min.
slope 2%
7
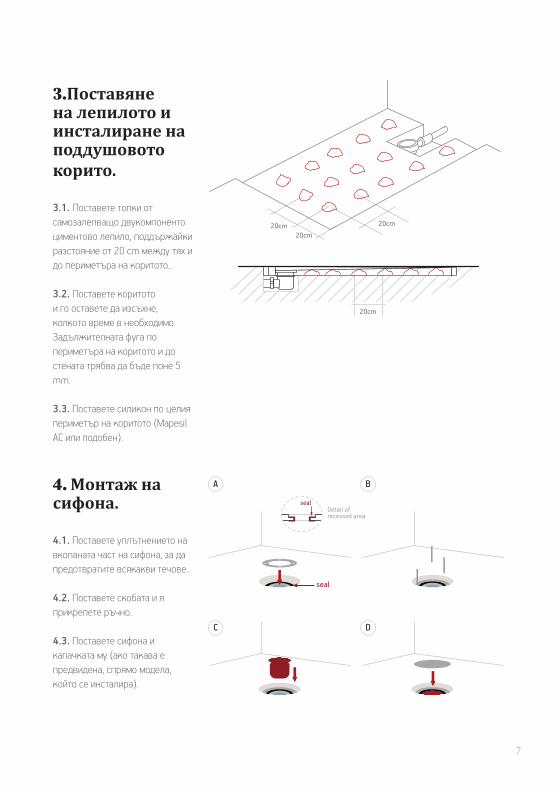
3.Поставяне на лепилото и инсталиране на поддушовото корито. 3.1. Поставете топки от самозалепващо двукомпоненто циментово лепило, поддържайки разстояние от 20 cm между тях и до периметъра на коритото..
3.2. Поставете коритото и го оставете да изсъхне, колкото време в необходимо. Задължителната фуга по периметъра на коритото и до стената трябва да бъде поне 5 mm.
3.3. Поставете силикон по целия периметър на коритото (Mapesil AC или подобен).
4. Монтаж на сифона. 4.1. Поставете уплътнението на вкопаната част на сифона, за да предотвратите всякакви течове..
4.2. Поставете скобата и я прикрепете ръчно.
4.3. Поставете сифона и капачката му (ако такава е предвидена, спрямо модела, който се инсталира).
20cm
20cm
20cm20cm
seal
sealDetail of recessed area
A B
C D

8
Възможни начини на монтаж на поддушово корито:
a) Вградено (на нивото на пода):
Това ръководство съдържа общи указания за монтаж на поддушово корито.
b) Върху пода: c) Повдигнато с облицовка:
5. Допълнителни работи (опционални)
5.1. Проверете дали всичко е инсталирано правилно – поддушовото корито, сифона и дали водата се оттича правилно.
5.2. Подсигурете монтажът на поддушовото корито да бъде направен преди поставянето на плочки и облицовки, паравани и други. Ако стените са покрити със Silestone® облицовки, ние препоръчваме да се монтира първо коритото, след това Silestone® облицовките.
Внимавайте за следното:
Преди монтажа:
• Не инсталирайте поддушовото корито на открито или на места с директна UV светлина.
• Важно е да се остави достатъчно място за потъването на сифона и свърването му с канала.
По време на монтажа:
• Предпазвайте ръбовете на поддушовото корито, използвайте картон, фолио или други подходящи материали.
• Предпазвайте самото поддушово корито с фолио, картон или предпазно тиксо, за да няма драскотини или други щети по него.
След монтажа:
• Запечатайте фугата между поддушовото корито и пода, за да няма никакви течове.
• Почистете остатъците от лепило или силикон, изполвайки изопропил спирт (isopropyl alcohol) или clean-colorsil.
• За регулярно почистване на тези повърхности, Cosentino препоръчва да се използва Q-Action или неутрален сапун. За упорити петна, използвайте синя (не драскаща) гъба (за керамични котлони), без да натискате твърде много. Въпреки че Silestone® поддушовото корито има предпазна обработка, която помага да не се задържа мръсотия, то все пак изисква почистване и поддръжка.

9
Shower tray installation
0. Check.
Before installing the shower tray, ensure that the dimensions are correct and that the pack includes the drain valve.
1. Setting out the tray at the site.
Clean the area where you are installing the shower tray. Check the pipe and drain connection dimensions. The all-round seals must be taken into account (see Section 3).
2. Connection of the valve. Connect a flexible hose to the outlet of the drain valve of the tray to connect to the drain pipe. It is imperative that the connection dimensions of the tray match the diameter of the pipes to be connected. Check the drain on the shower tray.
min.
slope 2%
10
seal
sealDetail of recessed area
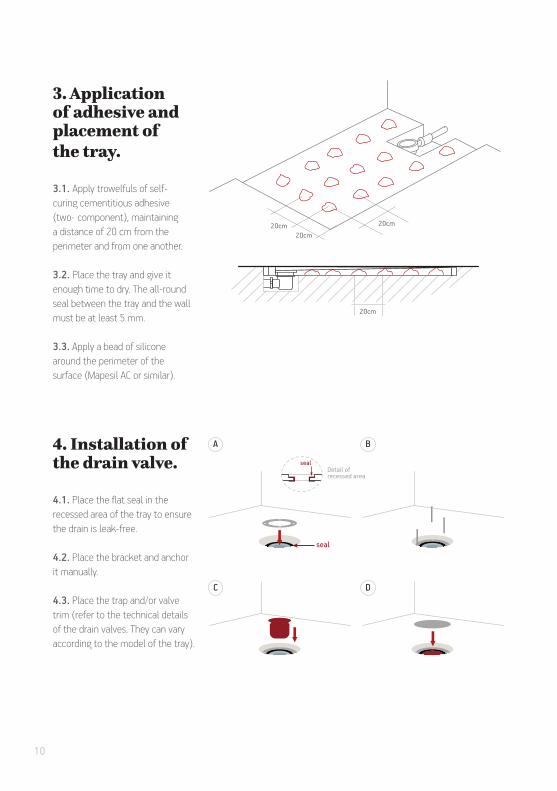
3. Application of adhesive and placement of the tray. 3.1. Apply trowelfuls of self-curing cementitious adhesive (two- component), maintaining a distance of 20 cm from the perimeter and from one another.
3.2. Place the tray and give it enough time to dry. The all-round seal between the tray and the wall must be at least 5 mm.
3.3. Apply a bead of silicone around the perimeter of the surface (Mapesil AC or similar).
4. Installation of the drain valve. 4.1. Place the flat seal in the recessed area of the tray to ensure the drain is leak-free.
4.2. Place the bracket and anchor it manually.
4.3. Place the trap and/or valve trim (refer to the technical details of the drain valves. They can vary according to the model of the tray).
20cm
20cm
20cm20cm
A B
C D
11
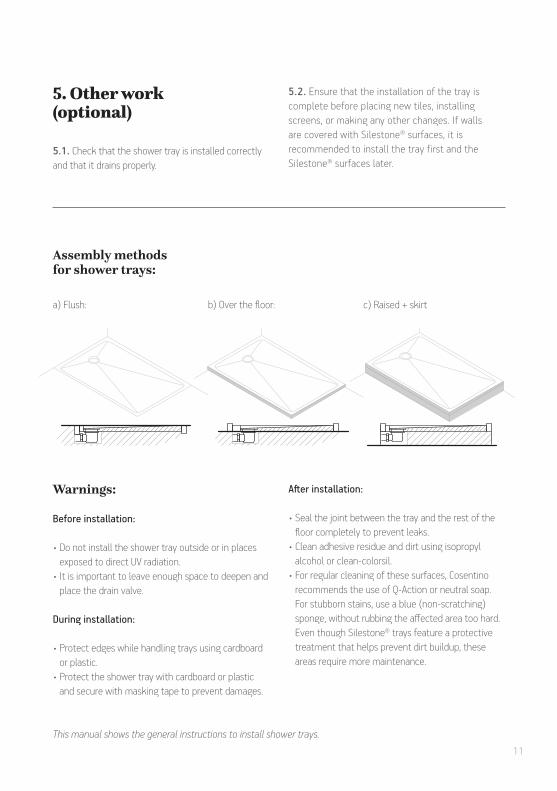
Assembly methodsfor shower trays:
a) Flush:
This manual shows the general instructions to install shower trays.
b) Over the floor: c) Raised + skirt
5. Other work (optional)
5.1. Check that the shower tray is installed correctly and that it drains properly.
5.2. Ensure that the installation of the tray is complete before placing new tiles, installing screens, or making any other changes. If walls are covered with Silestone® surfaces, it is recommended to install the tray first and the Silestone® surfaces later.
Warnings:
Before installation:
• Do not install the shower tray outside or in places exposed to direct UV radiation.
• It is important to leave enough space to deepen and place the drain valve.
During installation:
• Protect edges while handling trays using cardboard or plastic.
• Protect the shower tray with cardboard or plastic and secure with masking tape to prevent damages.
After installation:
• Seal the joint between the tray and the rest of the floor completely to prevent leaks.
• Clean adhesive residue and dirt using isopropyl alcohol or clean-colorsil.
• For regular cleaning of these surfaces, Cosentino recommends the use of Q-Action or neutral soap. For stubborn stains, use a blue (non-scratching) sponge, without rubbing the affected area too hard. Even though Silestone® trays feature a protective treatment that helps prevent dirt buildup, these areas require more maintenance.

12
Duschtasseninstallation
0. Prüfung.
Bevor Sie die Duschtasse installieren, vergewissern Sie sich, dass die Maße korrekt sind und dass das Paket das Ablassventil enthält.
1. Aufstellung der Duschtasse am Ort.
Reinigen Sie den Bereich, an dem Sie die Duschtasse installieren. Prüfen Sie die Maße des Rohrs und des Abwasseranschlusses. Die universalen Dichtungen müssen berücksichtigt werden (siehe Abschnitt 3).
2. Verbindung des Ventils. Verbinden Sie einen flexiblen Schlauch mit dem Auslass des Ablassventils der Duschtasse, um mit der Ablaufleitung zu verbinden. Es ist unbedingt erforderlich, dass die Verbindungsmaße der Wanne zum Durchmesser der Rohre passen, die verbunden werden sollen. Prüfen Sie den Abfluss in der Duschtasse.
Minimale
Neigung 2%

13
Dichtung
DichtungDetail desvertie�en Bereichs
3. Auftragen von Kleber und Platzierung der Duschtasse. 3.1. Tragen Sie Spachtel von selbst-härtendem Klebemörtel (zwei Komponenten) auf, wobei Sie einen Abstand von 20 cm vom Rand und voneinander einhalten.
3.2 Platzieren Sie die Duschtasse und geben Sie genügend Zeit zum Trocknen. Die universale Dichtung zwischen der Duschtasse und der Wand muss mindestens 5 mm lang sein.
3.3 Tragen Sie Silikon um den Rand der Oberfläche auf (MapesilAC oder ähnliches).
4. Installation des Ablassventils. 4.1. Platzieren Sie die flache Dichtung in dem vertieften Bereich der Duschtasse, um sicherzustellen, dass der Abfluss leckagefrei ist.
4.2. Platzieren Sie die Halterung und verankern Sie sie manuell.
4.3. Platzieren Sie den Siphon und/oder die Garnitur (beziehen Sie sich auf die technischen Details der Ablassventile. Sie können je nach Duschtassenmodell variieren).
20cm
20cm
20cm20cm
A B
C D
14
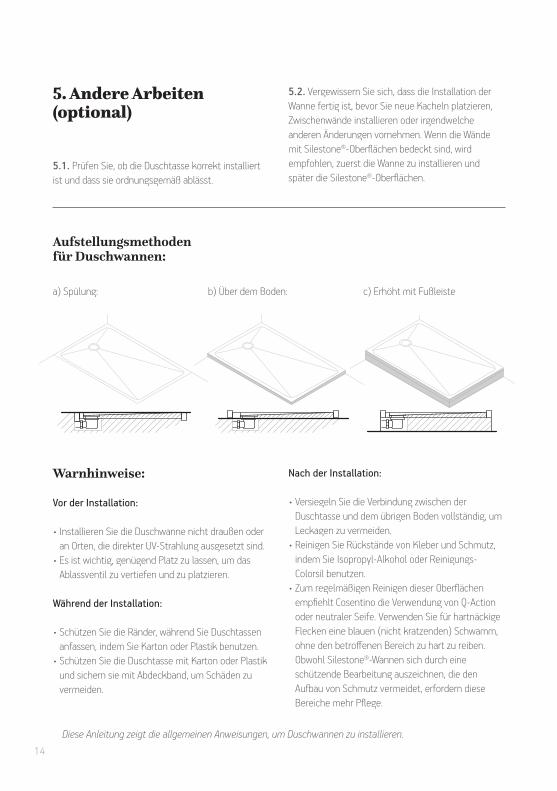
Aufstellungsmethodenfür Duschwannen:
a) Spülung:
Diese Anleitung zeigt die allgemeinen Anweisungen, um Duschwannen zu installieren.
b) Über dem Boden: c) Erhöht mit Fußleiste
5. Andere Arbeiten (optional)
5.1. Prüfen Sie, ob die Duschtasse korrekt installiert ist und dass sie ordnungsgemäß ablässt.
5.2. Vergewissern Sie sich, dass die Installation der Wanne fertig ist, bevor Sie neue Kacheln platzieren, Zwischenwände installieren oder irgendwelche anderen Änderungen vornehmen. Wenn die Wände mit Silestone®-Oberflächen bedeckt sind, wird empfohlen, zuerst die Wanne zu installieren und später die Silestone®-Oberflächen.
Warnhinweise:
Vor der Installation:
• Installieren Sie die Duschwanne nicht draußen oder an Orten, die direkter UV-Strahlung ausgesetzt sind.
• Es ist wichtig, genügend Platz zu lassen, um das Ablassventil zu vertiefen und zu platzieren.
Während der Installation:
• Schützen Sie die Ränder, während Sie Duschtassen anfassen, indem Sie Karton oder Plastik benutzen.
• Schützen Sie die Duschtasse mit Karton oder Plastik und sichern sie mit Abdeckband, um Schäden zu vermeiden.
Nach der Installation:
• Versiegeln Sie die Verbindung zwischen der Duschtasse und dem übrigen Boden vollständig, um Leckagen zu vermeiden.
• Reinigen Sie Rückstände von Kleber und Schmutz, indem Sie Isopropyl-Alkohol oder Reinigungs-Colorsil benutzen.
• Zum regelmäßigen Reinigen dieser Oberflächen empfiehlt Cosentino die Verwendung von Q-Action oder neutraler Seife. Verwenden Sie für hartnäckige Flecken eine blauen (nicht kratzenden) Schwamm, ohne den betroffenen Bereich zu hart zu reiben. Obwohl Silestone®-Wannen sich durch eine schützende Bearbeitung auszeichnen, die den Aufbau von Schmutz vermeidet, erfordern diese Bereiche mehr Pflege.

15
Installazionepiatto doccia
0. Controllo.
Prima di installare il piatto doccia,assicurarsi che le dimensioni sianocorrette e che la confezione includa la valvola di scarico.
1. Posizionamentodel piatto doccia.
Pulire l’area in cui si intendeinstallare il piatto doccia. Controllare le dimensioni dei collegamenti di tubi e scarico. Controllare anche i sigilli perimetrali (vedere Sezione 3 ).
2. Collegamentodella valvola. Collegare un tubo flessibile dall’uscita della valvola di scarico del piatto doccia per connetterlo al tubo di scarico. È necessario che la dimensione del raccordo del piatto doccia corrisponda al diametro dei tubi da collegare. Controllare lo scarico del piatto doccia.
pendenza
min. 2%

16
giunto
giuntoDettaglio zona ribassata
3. Applicazionedell’adesivo e posizionamento del piatto doccia. 3.1. Applicare adesivo cementizio autoasciugante (bi-componente) facendo piccoli mucchi di quantità sufficiente disposti a una distanza di 20 cm dal perimetro e l’una dall’altra.
3.2. Posizionare il piatto doccia e lasciare asciugare. Il sigillo perimetrale tra piatto doccia e muro deve essere di ameno 5 mm.
3.3. Applicare una striscia di silicone lungo il perimetro della superficie (Mapesil AC o simile) .
4. Installazionedella valvola discarico. 4.1. Posizionare la guarnizione piatta nell’incasso del piatto doccia per accertarsi che lo scarico non perda.
4.2. Posizionare la staffa e fissarla manualmente.
4.3. Posizionare il chiusino e/o il corpo valvola (fare riferimento ai dettagli tecnici della valvola di scarico. Questi possono variare a seconda del modello di piatto doccia).
20cm
20cm
20cm20cm
A B
C D
17
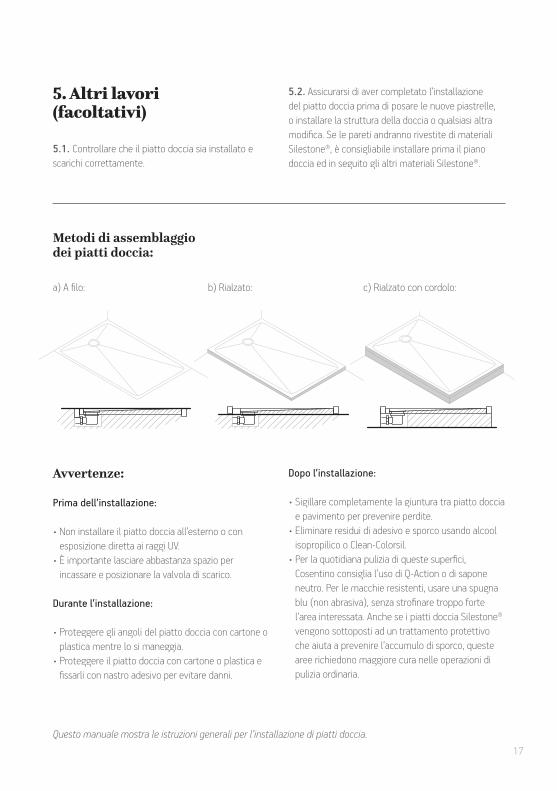
Metodi di assemblaggiodei piatti doccia:
a) A filo:
Questo manuale mostra le istruzioni generali per l’installazione di piatti doccia.
b) Rialzato: c) Rialzato con cordolo:
5. Altri lavori(facoltativi)
5.1. Controllare che il piatto doccia sia installato e scarichi correttamente.
5.2. Assicurarsi di aver completato l’installazione del piatto doccia prima di posare le nuove piastrelle, o installare la struttura della doccia o qualsiasi altra modifica. Se le pareti andranno rivestite di materiali Silestone®, è consigliabile installare prima il piano doccia ed in seguito gli altri materiali Silestone®.
Avvertenze:
Prima dell’installazione:
• Non installare il piatto doccia all’esterno o con esposizione diretta ai raggi UV.
• È importante lasciare abbastanza spazio per incassare e posizionare la valvola di scarico.
Durante l’installazione:
• Proteggere gli angoli del piatto doccia con cartone o plastica mentre lo si maneggia.
• Proteggere il piatto doccia con cartone o plastica e fissarli con nastro adesivo per evitare danni.
Dopo l’installazione:
• Sigillare completamente la giuntura tra piatto doccia e pavimento per prevenire perdite.
• Eliminare residui di adesivo e sporco usando alcool isopropilico o Clean-Colorsil.
• Per la quotidiana pulizia di queste superfici, Cosentino consiglia l’uso di Q-Action o di sapone neutro. Per le macchie resistenti, usare una spugna blu (non abrasiva), senza strofinare troppo forte l’area interessata. Anche se i piatti doccia Silestone® vengono sottoposti ad un trattamento protettivo che aiuta a prevenire l’accumulo di sporco, queste aree richiedono maggiore cura nelle operazioni di pulizia ordinaria.

18
Instalação dabase do duche
0. Verificar.
Antes de instalar a base do duche,assegure-se de que as dimensõesestão corretas e que a embalagem inclui a válvula de drenagem.
1. Definir o espaço para a colocação da base no local.
Limpe a área onde vai instalar a base do duche. Verifique as dimensões das ligações da tubagem e drenagem. Deve ter em conta as vedações totais (ver a Secção 3).
2. Ligação da válvula. Ligue uma mangueira flexível ao orifício da válvula de drenagem da base para ligar a tubagem de drenagem. É indispensável que as dimensões da base correspondam ao diâmetro dos tubos que irão ser ligados. Verifique a drenagem da base do duche.
pendente
min. 2%
19
junta
juntadetalhezona rebaixada
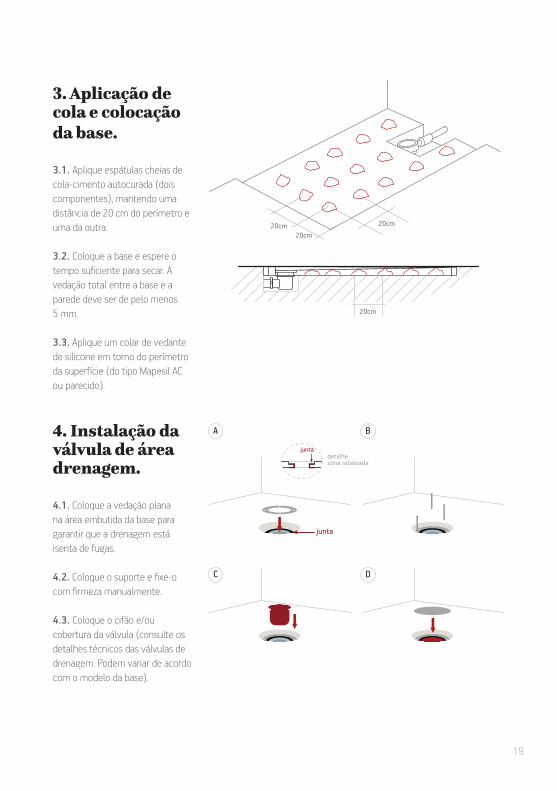
3. Aplicação de cola e colocação da base. 3.1. Aplique espátulas cheias de cola-cimento autocurada (dois componentes), mantendo uma distância de 20 cm do perímetro e uma da outra.
3.2. Coloque a base e espere o tempo suficiente para secar. A vedação total entre a base e a parede deve ser de pelo menos 5 mm.
3.3. Aplique um colar de vedante de silicone em torno do perímetro da superfície (do tipo Mapesil AC ou parecido).
4. Instalação da válvula de áreadrenagem. 4.1. Coloque a vedação plana na área embutida da base para garantir que a drenagem está isenta de fugas.
4.2. Coloque o suporte e fixe-o com firmeza manualmente.
4.3. Coloque o cifão e/ou cobertura da válvula (consulte os detalhes técnicos das válvulas de drenagem. Podem variar de acordo com o modelo da base).
20cm
20cm
20cm20cm
A B
C D

20
Métodos de montagem para bases de duche:
a) Embutida:
Este manual disponibiliza instruções genéricas para instalar bases de duche.
b) Sobre o pavimento: c) Superfície elevada + circunscrita:
5. Outros trabalhos (opcional)
5.1. Verifique se a base do duche está instalada corretamente e efetua adequadamente a drenagem.
5.2. Certifique-se de que a instalação da base está concluída antes da colocação de novos azulejos, instalação de cabines, ou a realização de quaisquer outras mudanças. Se as paredes estiverem cobertas com superfícies de Silestone®, recomenda-se que instale primeiro a base e mais tarde as superfícies de Silestone®.
Avisos:
Antes da instalação:
• Não instale a base do duche no exterior ou em locais expostos diretamente à radiação UV.
• É importante deixar espaço suficiente para colocar e inserir com suficiente profundidade a válvula de drenagem.
Durante a instalação:
• Ao manusear as bases proteja as arestas utilizando cartão ou plástico.
• Proteja a base do duche com cartão ou plástico e segure com fita adesiva para evitar danos.
Após a instalação:
• Feche hermeticamente o espaço entre a base e o resto do pavimento para evitar fugas.
• Limpe os resíduos de cola e sujidade utilizando álcool isopropílico ou clean-colorsil.
• Para limpezas frequentes dessas superfícies, a Cosentino recomenda o use do Q-Action ou de sabão neutro. Para nódas resistentes, use uma esponja azul (não abrasiva), evitando esfregar a área afetada de modo muito agressivo. Embora as bases de Silestone® disponham de um tratamento protetor que ajuda a evitar a acumulação de sujidade, estas áreas exigem mais manutenção

21
Installation av duschkar
0. Kontrollera.
Se till att måtten är korrekta och att paketet inkluderar avloppsventilen före installation.
1. Utplacering av karet på platsen.
Rengör det område där du installerar duschkaret. Kontrollera måtten på rör- och avloppsanslutningarna. Tätningarna hela vägen runt måste beaktas (se Avsnitt 3).
2. Anslutning av ventilen. Anslut en flexibel slang till avloppsventilens utlopp på karet för att ansluta till avloppsröret. Det är absolut nödvändigt att anslutningsmåtten för karet matchar diametern på de rör som ska anslutas. Kontrollera avloppet på duschkaret.
sluttning
minst 2%

22
sammanfogning
detalj i nedsänkt zon
sammanfogning
3. Appliceringav lim och placering av karet. 3.1. Applicera murslevar med självhärdande cementlim (tvåkomponent) och håll ett avstånd på 20 cm från omkretsen och från varandra.
3.2. Placera karet och ge det tillräcklig tid att torka. Tätningen hela vägen runt mellan karet och väggen måste vara minst 5 mm.
3.3. Applicera silikonpärlor runt omkretsen av ytan (MapesilAC eller liknande).
4. Installation av avloppsventilen. 4.1. Placera den plana tätningen i det fördjupade området i karet för att se till att avloppet är fritt från läckage.
4.2. Placera fästet och förankra det för hand.
4.3. Placera silen och/eller ventilfodret (se de tekniskauppgifterna för avloppsventilerna. De kan variera beroende på karets modell).
20cm
20cm
20cm20cm
A B
C D

23
Monteringsmetoderför duschkar:
a) Jäms med golvet:
Denna manual visar de allmänna anvisningarna för att installera duschkar.
b) Över golvet: c) Upphöjt + kjol:
5. Annat arbete(valfritt)
5.1. Kontrollera att duschkaret är korrekt installerat och att det dränerar ordentligt.
5.2. Se till att installationen av karet är klar innan nytt kakel placeras, skärmar installeras eller några andra ändringar görs. Om väggarna är täckta med Silestone®-ytor, rekommenderas att först installera karet och Silestone®-ytorna senare.
Varningar:
Före installation:
• Installera inte duschkaret utomhus eller på platser utsatta för direkt UV-strålning.
• Det är viktigt att lämna tillräckligt utrymme för att försänka och placera avloppsventilen.
Under installation:
• Skydda kanterna vid hantering av karen med hjälp av kartong eller plast.
• Skydda duschkaret med kartong eller plast och säkra med maskeringstejp för att förhindra skador.
Efter installation:
• Försegla fullständigt fogen mellan karet och resten av golvet för att förhindra läckage.
• Rengör limrester och smuts med isopropylalkohol eller clean-colorsil.
• Cosentino rekommenderar användning av Q-Action eller neutral tvål för regelbunden rengöring av dessa ytor. Använd en blå svamp (som inte repar) för envisa fläckar, utan att skrubba det berörda området alltför hårt. Även om Silestone®-kar har en skyddsbehandling som hjälper till att förhindra uppbyggnad av smuts kräver dessa områden mer underhåll.

24
InstallationBac de Douche
0. Vérifiez.
Avant d’installer le bac de douche, assurez-vous que les dimensions sont correctes et que le carton d'emballage comprend le robinet de vidange.
1. Mettre le bac sur l’emplacement.
Nettoyez la zone où vous installez le bac de douche. Vérifiez les dimensions du tuyau d’évacuation et de la canalisation. Les joints d’étanchéité doivent être pris en compte. (voir la section 3).
2. Raccordement de la valve. Connectez un tuyau souple à la sortie du robinet de vidange du bac pour le relier au tuyau de vidange. Il est impératif que les dimensions de connexion du bac correspondent au diamètre des tuyaux à connecter. Vérifiez le tuyau d’évacuation sur le bac de douche.
Pente
minimum de 2%
25
joint plat
joint platDétail de lazone d'évacuation
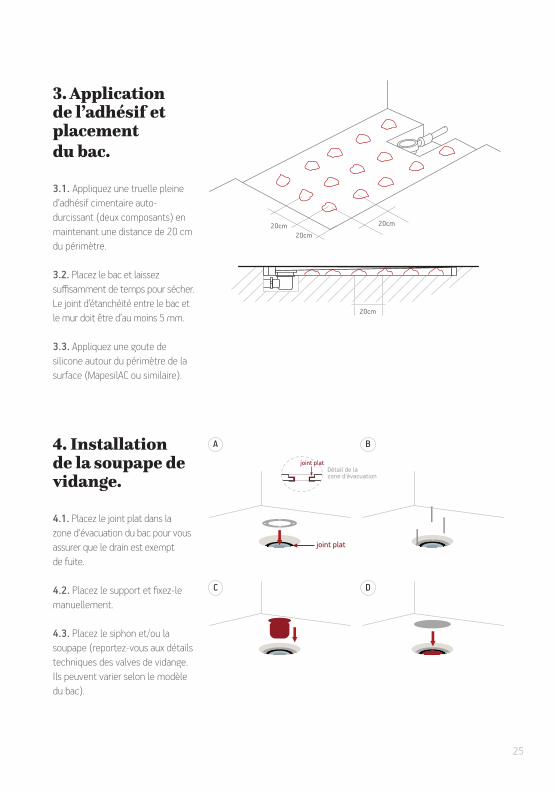
3. Application de l’adhésif et placement du bac. 3.1. Appliquez une truelle pleine d’adhésif cimentaire auto-durcissant (deux composants) en maintenant une distance de 20 cm du périmètre.
3.2. Placez le bac et laissez suffisamment de temps pour sécher. Le joint d’étanchéité entre le bac et le mur doit être d’au moins 5 mm.
3.3. Appliquez une goute de silicone autour du périmètre de la surface (MapesilAC ou similaire).
4. Installation de la soupape de vidange. 4.1. Placez le joint plat dans la zone d'évacuation du bac pour vous assurer que le drain est exempt de fuite.
4.2. Placez le support et fixez-le manuellement.
4.3. Placez le siphon et/ou la soupape (reportez-vous aux détails techniques des valves de vidange. Ils peuvent varier selon le modèle du bac).
20cm
20cm
20cm20cm
A B
C D

26
Méthodes d’assemblagepour les bacs de douche:
a) A fleur:
Ce manuel montre les instructions générales pour installer des bacs de douche.
b) Sur le sol: c) Élevé + bordure
5. Autres travaux (optionnel)
5.1. Vérifiez que le bac à douche est correctement installé et qu’il se vide normalement.
5.2. Assurez-vous que l’installation du bac est terminée avant de mettre des nouvelles parois, d’installer de nouvelles vitres ou d’effectuer d’autres modifications. Si les murs sont recouverts de surfaces Silestone®, il est recommandé d’installer le bac d’abord et les surfaces Silestone® ensuite.
Avertissements:
Avant l’installation:
• N’installez pas le bac à douche à l’extérieur ou dans des endroits exposés à un rayonnement UV direct.
• Il est important de laisser suffisamment d’espace pour placer et raccorder la valve d'évacuation.
Pendant l’installation:
• Protégez les bords tout en manipulant le bac à l’aide de carton ou de plastique.
• Protégez le bac à douche avec du carton ou du plastique et sécurisez avec du ruban adhésif pour éviter tout dommage.
Après l’installation:
• Fixez le joint entre le bac et le reste du sol pour éviter les fuites.
• Nettoyez les résidus d’adhésif et la saleté en utilisant de l’alcool ou un colorsil propre.
• Pour un nettoyage régulier de ces surfaces, Cosentino recommande l’utilisation de Q-Action ou d’un savon neutre. Pour les taches tenaces, utilisez une éponge bleue (sans grattage), sans frotter trop fort la zone concernée. Bien que les bacs Silestone® possèdent un traitement protecteur aidant à prévenir l’accumulation de saleté, ces zones nécessitent plus d’entretien.
27
InstallatieDouchegoot
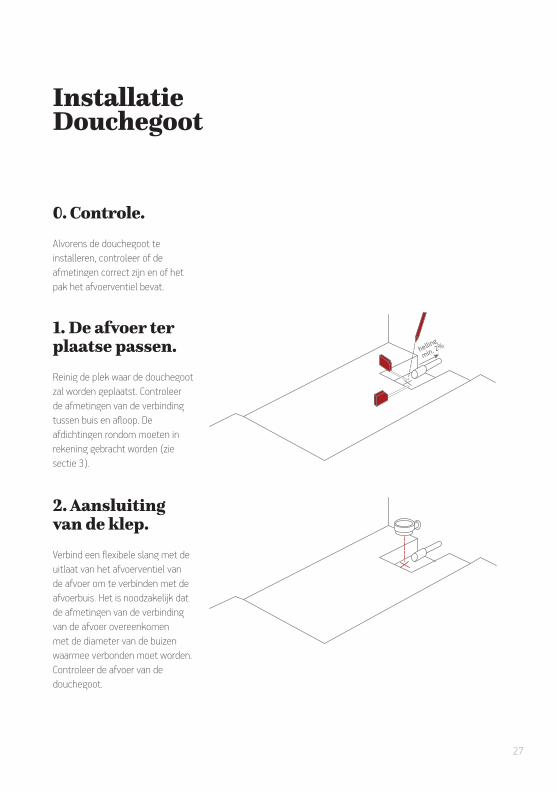
0. Controle.
Alvorens de douchegoot te installeren, controleer of de afmetingen correct zijn en of het pak het afvoerventiel bevat.
1. De afvoer ter plaatse passen.
Reinig de plek waar de douchegoot zal worden geplaatst. Controleer de afmetingen van de verbinding tussen buis en afloop. De afdichtingen rondom moeten in rekening gebracht worden (zie sectie 3).
2. Aansluiting van de klep. Verbind een flexibele slang met de uitlaat van het afvoerventiel van de afvoer om te verbinden met de afvoerbuis. Het is noodzakelijk dat de afmetingen van de verbinding van de afvoer overeenkomen met de diameter van de buizen waarmee verbonden moet worden. Controleer de afvoer van de douchegoot.
helling
min. 2%
28
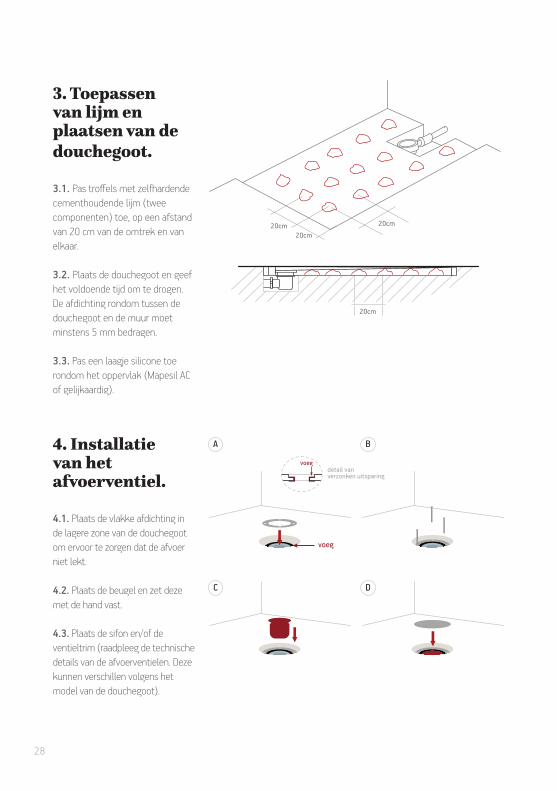
voeg
voegdetail vanverzonken uitsparing
3. Toepassen van lijm en plaatsen van de douchegoot. 3.1. Pas troffels met zelfhardende cementhoudende lijm (twee componenten) toe, op een afstand van 20 cm van de omtrek en van elkaar.
3.2. Plaats de douchegoot en geef het voldoende tijd om te drogen. De afdichting rondom tussen de douchegoot en de muur moet minstens 5 mm bedragen.
3.3. Pas een laagje silicone toe rondom het oppervlak (Mapesil AC of gelijkaardig).
4. Installatie van het afvoerventiel. 4.1. Plaats de vlakke afdichting in de lagere zone van de douchegoot om ervoor te zorgen dat de afvoer niet lekt.
4.2. Plaats de beugel en zet deze met de hand vast.
4.3. Plaats de sifon en/of de ventieltrim (raadpleeg de technische details van de afvoerventielen. Deze kunnen verschillen volgens het model van de douchegoot).
20cm
20cm
20cm20cm
A B
C D
29
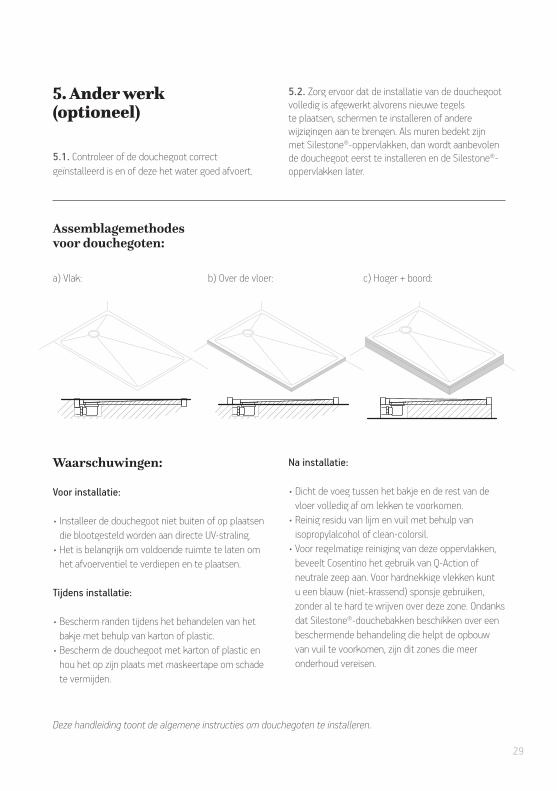
Assemblagemethodes voor douchegoten:
a) Vlak:
Deze handleiding toont de algemene instructies om douchegoten te installeren.
b) Over de vloer: c) Hoger + boord:
5. Ander werk(optioneel)
5.1. Controleer of de douchegoot correct geïnstalleerd is en of deze het water goed afvoert.
5.2. Zorg ervoor dat de installatie van de douchegoot volledig is afgewerkt alvorens nieuwe tegels te plaatsen, schermen te installeren of andere wijzigingen aan te brengen. Als muren bedekt zijn met Silestone®-oppervlakken, dan wordt aanbevolen de douchegoot eerst te installeren en de Silestone®-oppervlakken later.
Waarschuwingen:
Voor installatie:
• Installeer de douchegoot niet buiten of op plaatsen die blootgesteld worden aan directe UV-straling.
• Het is belangrijk om voldoende ruimte te laten om het afvoerventiel te verdiepen en te plaatsen.
Tijdens installatie:
• Bescherm randen tijdens het behandelen van het bakje met behulp van karton of plastic.
• Bescherm de douchegoot met karton of plastic en hou het op zijn plaats met maskeertape om schade te vermijden.
Na installatie:
• Dicht de voeg tussen het bakje en de rest van de vloer volledig af om lekken te voorkomen.
• Reinig residu van lijm en vuil met behulp van isopropylalcohol of clean-colorsil.
• Voor regelmatige reiniging van deze oppervlakken, beveelt Cosentino het gebruik van Q-Action of neutrale zeep aan. Voor hardnekkige vlekken kunt u een blauw (niet-krassend) sponsje gebruiken, zonder al te hard te wrijven over deze zone. Ondanks dat Silestone®-douchebakken beschikken over een beschermende behandeling die helpt de opbouw van vuil te voorkomen, zijn dit zones die meer onderhoud vereisen.
COSENTINO HEADQUARTERSCarretera Baza-Huercal Overa km 59 / 04850 Cantoria (Almería)
Tel. : +34 950 444 175 / [email protected] www.cosentino.com / www.silestone.com / www.dekton.com
*Obtenga información sobre colores con certificación NSF a través de www.nsf.org
*
VA 0
9-20
17