ShopBot Headquarters, Durham, NC. ShopBot’s reason for being.

ShopBot Link Manual

iii
Table Of Contents ShopBot Link ................................................................................................................................................. 1
Introduction ................................................................................................................................................ 1
Specifications ............................................................................................................................................. 2
Operation .................................................................................................................................................... 2
Export ......................................................................................................................................................... 3
Loading ........................................................................................................................................................... 5
Loading Files .............................................................................................................................................. 5
eCabinet Systems Files (*.twd) .................................................................................................................. 5
Clear All ..................................................................................................................................................... 6
Scrap Part Recovery ................................................................................................................................... 6
Selection Filter ........................................................................................................................................... 6
Settings ........................................................................................................................................................... 9
Settings ....................................................................................................................................................... 9
Dimension Format ...................................................................................................................................... 9
Table Parameters .......................................................................................................................................10
Machine Settings .......................................................................................................................................10
Machine Settings ...................................................................................................................................10
Sheet Selection ......................................................................................................................................11
Router Off Every Sheet .........................................................................................................................11
Ck Waste Board Every Sheet ................................................................................................................11
Placement Pins Setup ............................................................................................................................11
Header & Footer ....................................................................................................................................11
Pocket Settings ..........................................................................................................................................13
Pocket Settings ......................................................................................................................................13
Pocket Step & Clean Up ........................................................................................................................14
Pocket Area (Through Cuts) ..................................................................................................................14
Run Pockets made of 1 arc and 1 line as a drill when the line is on the edge of the part ......................14
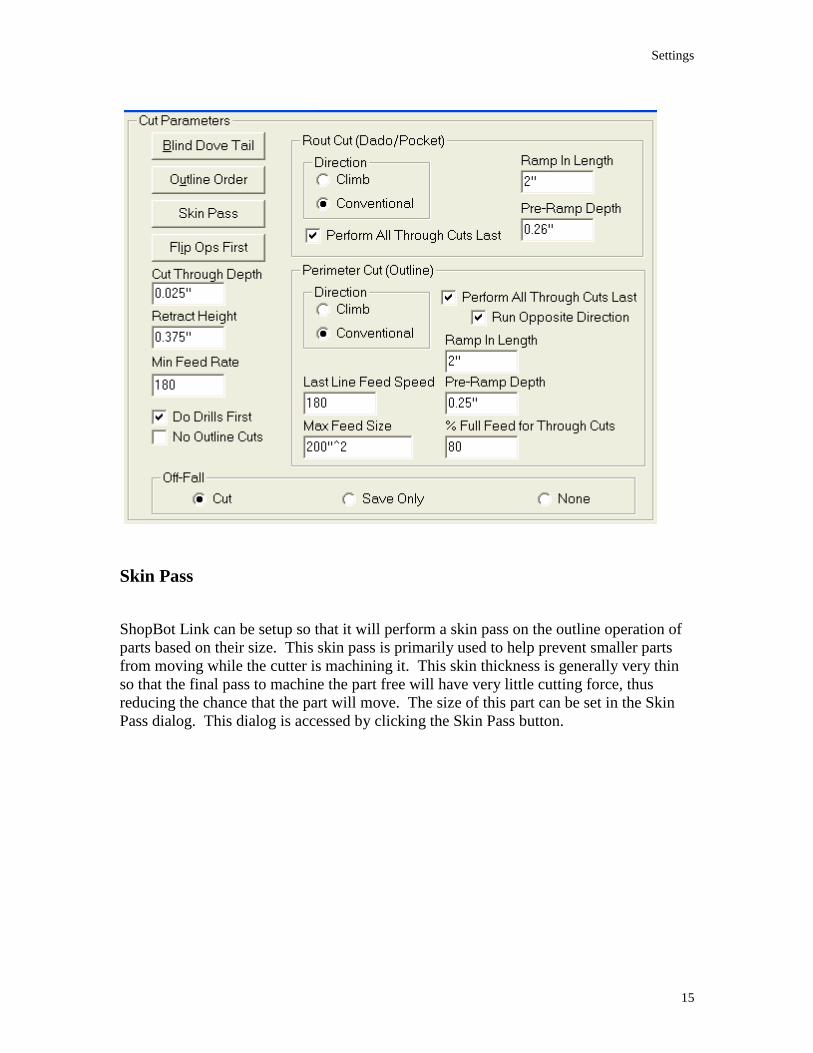
Cut Parameters...........................................................................................................................................14
Cut Parameters.......................................................................................................................................14
Skin Pass................................................................................................................................................15
Skin Thickness ......................................................................................................................................17
Ramp In Length .....................................................................................................................................17
Cut Through Depth ................................................................................................................................17
Retract Height ........................................................................................................................................17
Outline Order .........................................................................................................................................18
Pre-Ramp Depths...................................................................................................................................18
% Full Feed for Through Cuts ...............................................................................................................18
Last Line Feed Speed ............................................................................................................................18
Max Feed Size .......................................................................................................................................18
Min Feed Rate .......................................................................................................................................18
Do Drills First ........................................................................................................................................18
Perform All Through Cuts Last (outline cuts) .......................................................................................19
Perform All Through Cuts Last (rout cuts) ............................................................................................19
Run Opposite Direction .........................................................................................................................19
No Outline Cuts .....................................................................................................................................19
Off-Fall ..................................................................................................................................................19
Tabbing Parts .............................................................................................................................................20
Tabbing Parts .........................................................................................................................................20
Tab Parameters ......................................................................................................................................20
Nesting Parameters ....................................................................................................................................20
Nesting Parameters ................................................................................................................................20
Min. Square for Off Fall ........................................................................................................................21
Add Part Clearance ................................................................................................................................21

ShopBot Link Manual
iv
Collar .....................................................................................................................................................21
Part Rotation Step Angle .......................................................................................................................22
Nest to the Edge of the Sheet .................................................................................................................22
Starting Corner ......................................................................................................................................22
Tooling ..........................................................................................................................................................25
Tooling ......................................................................................................................................................25
Select Tool Tolerance ................................................................................................................................25
Tooling Group ...........................................................................................................................................26
Copy/Paste .................................................................................................................................................26
Group Materials .........................................................................................................................................26
Ignore Groups ............................................................................................................................................26
Outline Tool Setup ....................................................................................................................................26
Operation Tool(s) Setup ............................................................................................................................27
Confirmation Screen ..................................................................................................................................28
Adding Sheets and/or Off-fall .......................................................................................................................31
Adding Sheets and/or Off-fall ...................................................................................................................31
Off-Fall Library .........................................................................................................................................31
Off-fall Library ......................................................................................................................................31
Load Operations ....................................................................................................................................33
Delete Operations ..................................................................................................................................33
Search Option ........................................................................................................................................33
Bring Selections to Top .........................................................................................................................33
Sheet Entry ................................................................................................................................................33
Void Entry .................................................................................................................................................34
Grain Setting ..............................................................................................................................................34
Rotate Off-fall Input ..................................................................................................................................34
Sheet(s) List ...............................................................................................................................................35
Accept Sheet ..............................................................................................................................................35
Delete Sheet ...............................................................................................................................................35
Return ........................................................................................................................................................35
Nesting ..........................................................................................................................................................37
Printing ..........................................................................................................................................................41
Writing to ShopBot........................................................................................................................................47
Rotate Flip Operation ....................................................................................................................................49
Dovetail Drawer Boxes .................................................................................................................................51
eCabinet Systems Drawer Box Designer Setup .........................................................................................51
Set up at the Machine ................................................................................................................................52
ShopBot Link Settings Dialog ...................................................................................................................53
ShopBot Link Tooling Dialog ...................................................................................................................57
Carvings ........................................................................................................................................................59
Inset Carvings with eCabinet Systems ......................................................................................................59
Run a Single Carving .................................................................................................................................59
Glossary .........................................................................................................................................................63
Index ..............................................................................................................................................................65
1
ShopBot Link
User Manual Last Updated: L.E. 12-7-2016 Version 1.x
Introduction
ShopBot Link is a nesting package integrated into the ShopBot Control.
This package allows the user to nest various parts into sheet stock, thus creating a user-
friendly program. Some benefits of this particular package include better yield, mixing
of different parts, label printing for the parts as well as off-fall, ability to re-use off-fall,
etc. It will also display a graphical view of the nest to insure it will suit the user’s needs
along with a yield percentage per sheet stock.
ShopBot Link Manual
2
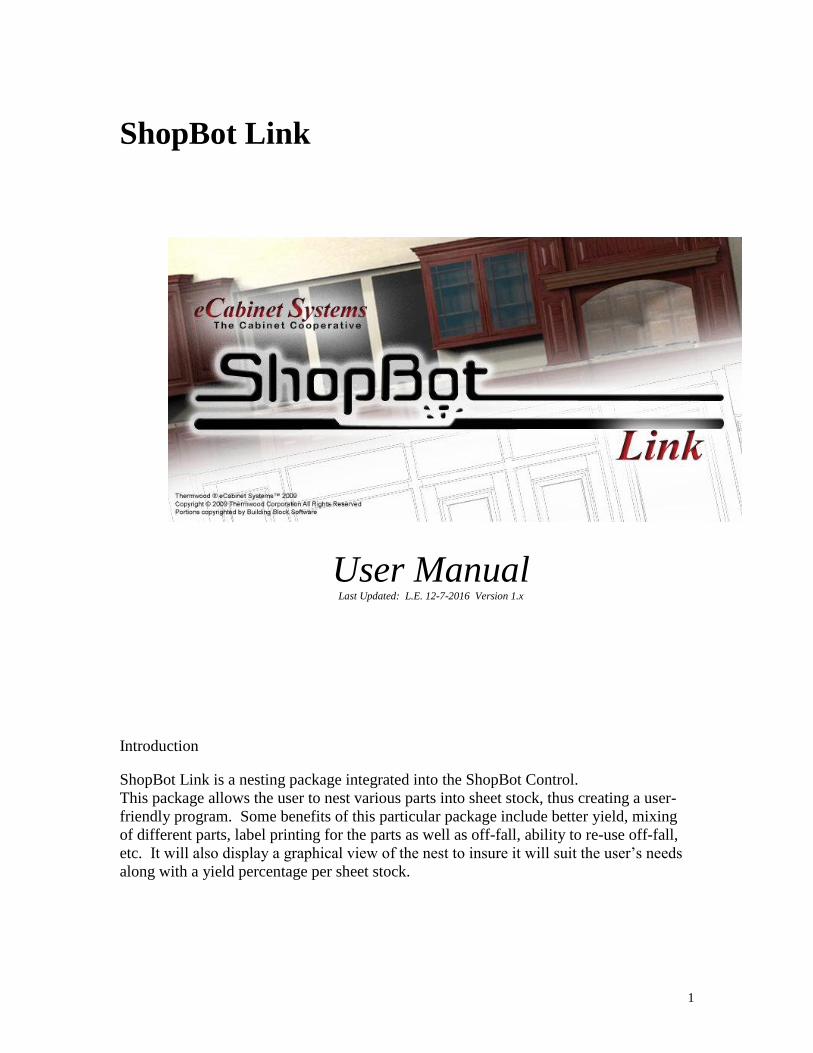
Specifications
ShopBot Link can be used in conjunction with eCabinet systems software to quickly nest
and generate CNC programs from the provided TWD files.
Definition: Off-fall = Usable scrap leftover from an operation.
Operation
The user may activate ShopBot Link from the Start menu or an icon on the desktop. A
dialog box will appear resembling the following picture:

ShopBot Link
3
Export
The Export option will create a file containing all the current setting in ShopBot Link.
This helps Thermwood debug any cases that are causing problems. Simply click on the
button and designate where to save the file. Then send this file to Thermwood with a
description of your problem.


5
Loading
Loading Files
Clicking on the “Load” button will bring up the Load dialog which is the interface used
to load all compatible files into the ShopBot Link Software. The large, white window on
the left contains the current parts ready to be nested. The column to the right contains
load and add buttons for each compatible file.
eCabinet Systems Files (*.twd)
To load a new file, press Load which is located under the heading “TWD Files”
(eCabinets icon listed below). Once the window’s browser appears, the operator will

ShopBot Link Manual
6
need to select the correct file or files that he/she wants to load (To select multiple files,
hold down Ctrl. Key when selecting). Once the selection has been made a list of parts
will then appear in the window on the left. If the user looks closely, they will notice
check marks aside of the cabinet(s) name and individual parts. If the check marks are
removed, that part will not be included in the nest. Then operator also has the option to
change the quantity of the parts that are going to be cut. To do this, they must select the
specific line containing the parts that they want to change the quantity of. Then, by
pressing the “Enter” key, this will enable them to type in a new quantity. Once a file has
been loaded, more files can be added by pressing the “Add” button, located under the
“TWD Files” heading. To clear all parts listed in the Load Screen; press the “Clear All”
button. Otherwise, when loading a TWD the load screen will automatically be cleared.
Clear All
To clear all parts listed in the Load Screen; press the “Clear All” button. Otherwise,
when loading a TWD or DXF file the load screen will automatically be cleared.
Scrap Part Recovery
There may be times that a particular part moves during machining, resulting in a
defective part. This means a single part will have to be re-machined. To do this, the
operator needs to go into the Load screen and make sure that only the parts that need cut
again are selected. Then, they will need to place a check mark aside of the Scrap Part
Recovery option which will cause the machine to run only one part per sheet. Each part
will be cut at the flip operation fence and follow the X & Y Shift settings.
The option for no outline cuts in Settings will be obeyed. If it is selected the part to be
machined will need to be cut to size and can be placed in the fence location for the
operations to be performed.
If the no outline cuts selection is not selected then the machine will run the outline pass.
Material will need to be a size greater than the part by the diameter in width and length
when the option Nest to Edge of Sheet is NOT selected. If Nest to Edge of Sheet is
selected then the material does NOT need to be oversized.
The Part Rotation Step Angle option in Settings is also obeyed. For example, if the
setting is 90 degrees then the part(s) will be rotated 90 degrees.
Selection Filter
The Selection Filter allows for nesting only certain materials in the currently loaded
items. By selecting a material(s) in the drop down list the appropriate parts will be
selected in the tree for nesting. By choosing "All Materials" all parts will be selected in
the tree for nesting. Settings are applied when the Apply button is pressed.

Loading
7


9
Settings
Settings
The Settings option must be addressed prior to running the ShopBot Link software, in
order for the nesting feature to operate correctly. When selecting the Settings button at
the main ShopBot Link screen, the following dialog box will appear:
Dimension Format
The section named “Format” is the dimensional mode in which the CNC code will be
written when the operator chooses too write the CNC code. The Format can be set to any
of the dimensional modes when nesting TWD files.

ShopBot Link Manual
10
Table Parameters
The section named “Table Parameters” defines the size of the machine table, ability to
swap X with Y, and the thickness of wasteboard being used. If a wasteboard is not being
used, then this value should be set to zero.
The "Length Axis" value setting is used to set which axis on the machine is longer. Most
cabinet machines have X as the long axis. Some Model 67 configurations have the Y
axis as the longer axis so this value should be set to Y for those configurations.
Machine Settings
Machine Settings
The section named “Machine Settings” is used to activate the different options that the CNC machine
being operated may have.

Settings
11
Sheet Selection
“Sheet Selection” enables the operator to select a specific sheet that they want to start
machining on, when starting a particular CNC program.
Router Off Every Sheet
“Router Off Every Sheet” insures that the router will be shut off after completing cut
operations on each sheet of material.
Ck Waste Board Every Sheet
“Ck Waste Board Every Sheet” prompts the operator to check wasteboard thickness
every time a new sheet is started.
Placement Pins Setup
“Placement Pins Setup” allows the operator to choose settings (which pins to use and
I/O’s that operate) for use of automatic popup pins. The operator has the ability with the
dialog below to control which output is used to turn the pins on/off as well as which input
must be met forcing the pins to “wait”. The pins can be used for Sheet Operations and
Flip Operations if required by checking the appropriate boxes.
Header & Footer

ShopBot Link Manual
12
Custom code can be entered at various places as headers and/or footers in the program
generated. The feature is merely inserting whatever text, which is put in the edit boxes
on the dialog displayed below, into the CNC program..
Program
A header and/or Footer can be added for the entire program. The code will be placed at
the beginning for Header and at the end for Footer.
Sheet
Code can be inserted before and after each sheet run. This allows you to set how you
wish the machine to behave before and/or after each sheet is completely cutt. It also
allows for any unique load/unload operations to be inserted at the appropriate points in
the CNC program.
Flip Operations
If your job contains flip operations the header and/or footer code will be enter before
and/or after each part's flip operations are performed.

Settings
13
Pocket Settings
Pocket Settings
The “Pocket Settings” enable the operator to setup parameters for cutting pockets. The
operator has the option to choose a “Spiral” or “Zigzag” cutting method when cutting
pockets.

ShopBot Link Manual
14
Pocket Step & Clean Up
“Step Percentage” is the amount the tool will step over each cut pass based on a
percentage of the tool diameter. The “Clean Up Amount” is the amount of material that
is left around the outer perimeter of the pocket, for a finish pass. When nesting parts that
will have pockets cut in them that go through the material, the operator has the option to
choose whether or not a plug is left.
Pocket Area (Through Cuts)
“Pocket Area (Through Cuts)” enables the user to control the tool deciding whether to
leave a plug or too completely remove all material in the center of a pocket boundary. If
the through pocket has an area less than the area specified, the tool will cut away all
material within the pocket’s boundary. All through pockets, with an area larger than the
specified amount, will be cut leaving a plug.
Run Pockets made of 1 arc and 1 line as a drill when the line is on the edge
of the part
“Run Pockets made of 1 arc and 1 line as a drill when the line is on the edge of the part,”
is used to cut KD fastener pockets as a drill operation, rather than using the pocketing
method.
Cut Parameters
Cut Parameters
The “Cut Parameters” section allows the operator to control the cutting methods used
when machining parts. For instance, Direction allows the operator to choose a cut path
direction of Climb or Conventional. The direction can be set separately for Outline cuts
and Dado/Rout/Pocket cuts.
Settings
15
Skin Pass
ShopBot Link can be setup so that it will perform a skin pass on the outline operation of
parts based on their size. This skin pass is primarily used to help prevent smaller parts
from moving while the cutter is machining it. This skin thickness is generally very thin
so that the final pass to machine the part free will have very little cutting force, thus
reducing the chance that the part will move. The size of this part can be set in the Skin
Pass dialog. This dialog is accessed by clicking the Skin Pass button.

ShopBot Link Manual
16
The thickness for this skin is defined in the Skin Thickness field. The Skin Pass dialog
also allows the operator to set a maximum square inch or millimeter setting as well as a
maximum width/length value for skinny parts. Any part that falls below either setting will
get a skin Pass operation on the outline. The outline tool will cut the part down to the
Skin Thickness before cutting completely through the part.
NOTE: The Cut Parameter option “Perform All Through Cuts Last” on the main Settings
dialog will control whether or not this skin pass is removed before moving on to other
parts or machined after all other parts in the nest are machined.
On some parts, it may be desirable/beneficial not to remove this skin (leave it on and
removed it with some secondary operation or, if thin enough, break/flake off by hand).
The "Size to Leave Skin on Skin Pass Part" option is provided to control what size parts
should leave the skin. Any part that falls below either the Size or Width/Length setting
will have the skin left on.

Settings
17
Skin Thickness
If 2 passes are to be used, ShopBot Link will leave a “Skin Thickness” which is removed
on the second pass.
Ramp In Length
ShopBot Link ramps into a part rather than plunging directly into it. The benefits of this
include, no burning of the material, longer cutter life, and longer spindle life. The length
of this ramp is set within the “Ramp In Length”. If we set this value to 6 inches, then it
will take 6” to ramp to the proper depth of cut. The value can be set separately for
Outline cuts and Dado/Rout/Pocket cuts.
Cut Through Depth
The “Cut Through Depth” simply cuts through the part by the specified amount.
Retract Height

ShopBot Link Manual
18
“Retract Height” is the distance the machine retracts above the part before indexing to the
next part.
Outline Order
The “Outline Order” button gives the operator the option to choose what order he or she
would like the parts too cut.
Pre-Ramp Depths
“Dado/Rout Pre-Ramp Depth” and “Outline Pre-Ramp Depth” allow the machine to
plunge into the material by the specified amount, before continuing with the ramp in.
This is useful when machining laminated sheets with an up spiral or compression cutter.
It helps prevent chipping of the laminate.
% Full Feed for Through Cuts
The “% Full Feed for Through Cuts” field adjusts the feed rate set for the Outline tool.
Example: If the outline tool is set to run at 500 IPM, and the “% Full Feed for Through
Cuts” field is set to 50%, ShopBot Link will run the outline tool at 250 IPM.
Last Line Feed Speed
The “Last Line Feed Speed” is used to control the rate of speed at which the machine
performs the cleanup cut for the “Ramp In Length” of the part. This is used to prevent
part movement when cutting the part free from the sheet.
Max Feed Size
The value entered in the “Max Feed Size” field is set to square inches. If a part has an
area less than the “Max Feed Size”, then ShopBot Link will adjust the feed rate for this
part only. This will also help prevent part movement for the small parts that qualify.
Min Feed Rate
“Min Feed Rate” specifies the slowest feed rate at which the machine will cut.
Do Drills First
Settings
19
By checking the “Do Drills First” check box, all of the drill operations in the program
will be executed first.
Perform All Through Cuts Last (outline cuts)
The operator has the option to machine all “skins” last if a part requires 2 passes. To do
this, “Perform All Through Cuts Last” can be selected. If left un-checked, the machine
will perform the second pass immediately after the first pass.
Perform All Through Cuts Last (rout cuts)
This option is available for all pockets and dado cuts. If there are cuts that do not cut through the part they
will be machined first leaving the through cuts last before the outline cuts. NOTE: All operations for a
tool are kept in order. If a program requires multiple tools then it is possible to have a through cut occur
before a non-through cut if a tool change is required.
Run Opposite Direction
When deflection becomes a problem with parts not getting cut to correct size, it may be
helpful to have the machine cut a final pass in the opposite direction. The option "Run
Opposite Direction" allows this to occur. It will ONLY be available when "Perform All
Through Cuts Last" is selected.
With the option selected ShopBot Link will cut the through cut pass on a part in the
opposite direction of the previous pass(es). For example, if the Direction setting is set to
Conventional cutting, then the through cut pass on the part will cut in the Climb
direction.
To get multiple passes to occur you can either use the Skin Pass feature OR Max
Penetration value in Tooling.
No Outline Cuts
When this check box is selected the CNC code generated will not cut the outline pass on all parts in the
nest.
Off-Fall
There are 3 options for how Control Nesting generates Off-Fall. Off-Fall is the portion of
the sheet that is considered good for re-nesting. This portion of the sheet is stored for use
by Control Nesting when needed. The 3 options are:
Cut
ShopBot Link Manual
20
Control Nesting will cut the perimeter of the Off-Fall once all the other parts in the sheet
have been machined.
Save Only Control Nesting will not cut the Off-Fall shape, but will still hold the Off-Fall for use.
None Off-Fall is not calculated on the sheet and is not saved.
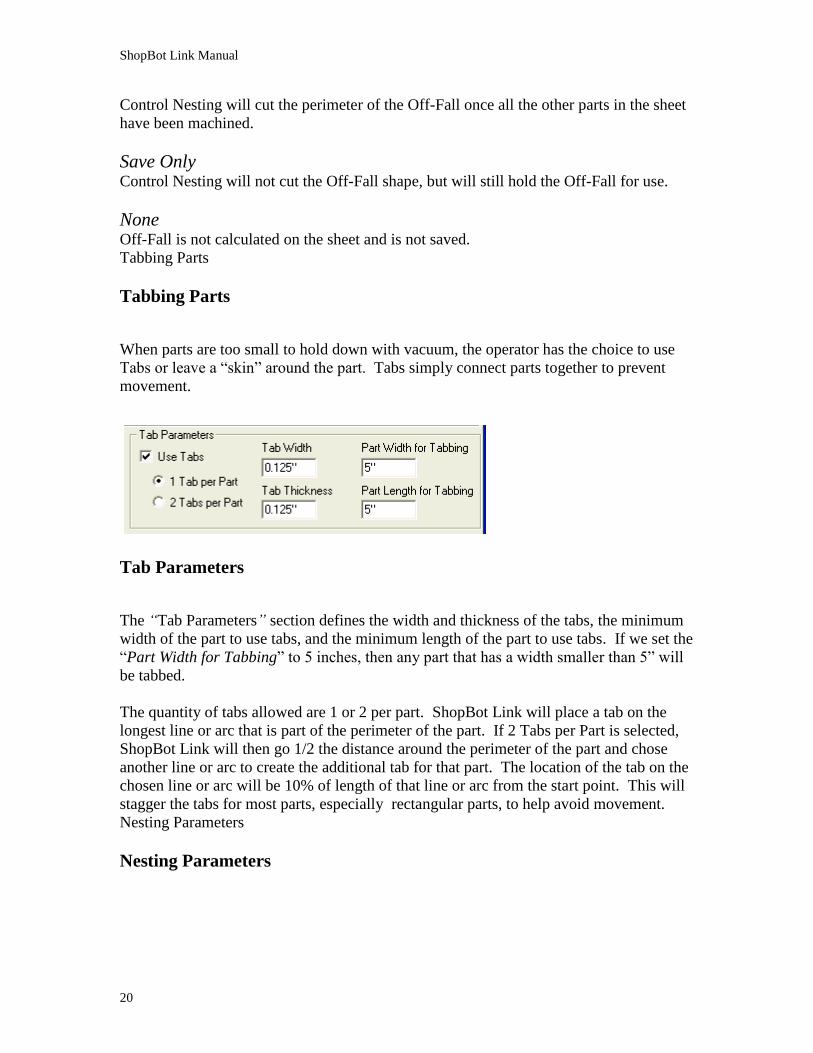
Tabbing Parts
Tabbing Parts
When parts are too small to hold down with vacuum, the operator has the choice to use
Tabs or leave a “skin” around the part. Tabs simply connect parts together to prevent
movement.
Tab Parameters
The “Tab Parameters” section defines the width and thickness of the tabs, the minimum
width of the part to use tabs, and the minimum length of the part to use tabs. If we set the
“Part Width for Tabbing” to 5 inches, then any part that has a width smaller than 5” will
be tabbed.
The quantity of tabs allowed are 1 or 2 per part. ShopBot Link will place a tab on the
longest line or arc that is part of the perimeter of the part. If 2 Tabs per Part is selected,
ShopBot Link will then go 1/2 the distance around the perimeter of the part and chose
another line or arc to create the additional tab for that part. The location of the tab on the
chosen line or arc will be 10% of length of that line or arc from the start point. This will
stagger the tabs for most parts, especially rectangular parts, to help avoid movement.
Nesting Parameters
Nesting Parameters

Settings
21
The button named “Nesting Parameters” opens a dialog which allows the user to
determine size of off-fall, additional part clearance, nest direction, collar, step angle, nest
to edge, and starting corner..
Min. Square for Off Fall
The “Min. Square for Off Fall” field determines the area in which ShopBot Link searches
for off-fall (Scrap material that can be used). For instance, if the operator has a value of
12 inches set, ShopBot Link will search every 12 inches square for off-fall. The smallest
off-fall in this case, will be 12 inches square. ShopBot Link will store the dimensions for
the off-fall in a database, which may be found under the “Add Sheet(s)” button from the
main menu. If the user does not wish to use off-fall, setting this value larger than the
maximum sheet area will prevent ShopBot Link from using it.
Add Part Clearance
The “Add Part Clearance” option is the value that increases the distance between parts.
This is mainly used to prevent accidental gouging once a part has been machined, in case
it moves during other operations. Part movement may be caused by insufficient hold
down methods, parts being too small, etc.
Collar

ShopBot Link Manual
22
“Collar” is the distance around the outside edge of the sheet stock that parts are to be
nested within. Normally, an additional amount is added when the outside edges of the
sheet are damaged.
Part Rotation Step Angle
“Part Rotation Step Angle” is a feature added to the Settings dialog to give the operator
the ability to control the increments in which each part is rotated and tried when the nest
is created. Example: If the step angle provided is 90 degrees, then the parts will be tried
in 0, 90, 180, and 270 degrees. This value is what is used for non-grain material nests to
rotate parts for optimal nesting.
Nest to the Edge of the Sheet
The “Nest to the Edge of the Sheet” check box will allow the operator to nest parts
directly along the edge of the sheet of material. By default ShopBot Link will leave the
radius of the outline tool around the edge of the sheet when creating a nest and then any
Collar amount will be added to that number. If the collar is set to zero and the Nest to the
Edge of the Sheet is checked, parts will be nested to the edge of the material when
creating the CNC code.
Starting Corner
One of 4 corners can be designated as the starting point for parts to be nested on a sheet.
This is NOT related to where your fixture is located. The starting corner represents the
corner of the sheet that parts are placed as the nesting calculations are performed.
The Starting Corner can be designated for New Sheets. It can also be designated for
Added Sheets & Off-Fall. The designation for Added Sheets and Off-Fall is the same.

Settings
23


25
Tooling
Tooling
This is where all ShopBot Link tools are defined. Parameters such as diameter, feed and
spindle speeds, operation type(s), etc. are set on this dialog.
Select Tool Tolerance
This value will tell ShopBot Link what tolerance to use when selecting the proper tool for
an operation. The tolerance value is applied to the diameter of the tool. For example, if

ShopBot Link Manual
26
an operation calls for a tool with a diameter of 0.25" and the tool at the control that will
work for this operation is actually 0.245 a tolerance of 0.006" will allow this tool to be
selected for the operation.
Tooling Group
The purpose of tooling groups is to allow a group of tools to be used for specific
materials. Currently, ShopBot Link allows 50 different tooling groups to be defined. To
set up a tooling group, the operator must first define which group by using the pull-down
menu. Once this has been selected, the operator must set the materials that they wish to
use for this tool group.
An entire Group setting can be erased by clicking the Erase button next to the Group
name.
Copy/Paste
Copy and Paste options are available. To Copy/Paste a group setting select the desired
group in the drop down. Then click the Copy button or use the hot key Ctrl-C. Then
select the group you wish to Paste the settings into. Once that group is selected click the
Paste button or use the hot key Ctrl-V.
Group Materials
The materials that each tool group is used on is specified in the “Group Materials”
section. Notice the “Add” and “Delete” buttons. By pressing the “Add” button, a dialog
box will appear in which the operator may add materials from the database or create their
own. After doing this, the material name(s) will appear in the white window. To delete a
material, highlight the name and press the “Delete” button.
Ignore Groups
If it is not necessary to have separate setting for tooling based on the type of material
being machined, then the option “Ignore Groups” can be checked on. When checked on,
the ShopBot Link will only use the tools and their settings defined within the Default
group regardless of the material being machined.
Outline Tool Setup
The first tool is defined in the “Outline Tool Setup” section. This section defines the tool
to be used for all perimeter (outline) cuts. You must enter a tool number representing the
tool number to be used at the ShopBot along with the diameter of that tool. Note that
ShopBot Link also uses the tool’s diameter to determine the distance between parts when
nesting. Once the tool has been specified, the operator must set the “Feed Speed”,
“Plunge Speed”, "Max Penetration", and “Spindle Speed”. If the machine is configured
for it, the operator has the option to choose the “Reverse Spindle” option.
The "Max Penetration" setting keeps a tool from being used at a depth greater than this
amount in 1 pass. If a depth of cut is greater than this amount ShopBot Link will perform

Tooling
27
the operation in incremental passes at the "Max Penetration" amount until the operation
is complete.
Operation Tool(s) Setup
All other tooling will be defined in the “Operation Tool(s) Setup” section. ShopBot Link
has the option to setup 50 different operations. To start, choose an operation number
from the pull-down menu. Then specify the tool number and diameter. Now we need to
define the operation(s) that we would like to use this tool for. This can be done by
selecting the appropriate operation(s) under the “Type” section. Only now can we set the
“Feed Speed”, “Plunge Speed”, “Spindle Speed”, "Max Penetration", and “Reverse
Spindle”. These fields are grayed out until the operator chooses an operation type.
Tools specified as Rout/Dado will be used in Pocketing operations. The pocketing
feature will search through the list of Operation Tools starting at Operation 1. The
FIRST tool found which successfully performs the pocketing operation will be selected.
It is good practice to set your tools from larger diameter to smaller diameter in the
Operation Tools list.
The "Max Penetration" setting keeps a tool from being used at a depth greater than this
amount in 1 pass. If a depth of cut is greater than this amount ShopBot Link will perform
the operation in incremental passes at the "Max Penetration" amount until the operation
is complete.
Notice the “Interpolate” selection. With this selected, we are allowing that tool to be
used for any circle interpolation that may be needed. Also, with this selected we are now
able to set the “Max Interpolate Diameter” field. The “Max Interpolate Diameter” field
allows the user to limit the size of hole to machine with that tool. Normally, when
drilling a hole with a high RPM, there is a risk of burning the material or damaging the
tool. Interpolating a hole will prevent this from happening.
Blind Dove Tail tool specifications can as be set with Dove Tail Tool and Use for Male
Routs with Dove Tail check boxes. The Dove Tail Tool check box is to designate the tool
is a Dove Tail Tool. The Use for Male Routs with Dove Tail check box is to designate
this tool is to be used to cut the male ends of the dove tail joint if and only if the tool
diameter is small enough to perform the radius cuts that are present in a particular joint.
ShopBot Link Manual
28
Pocket Screw Rout check box is to designate which tool will perform the ramp-in rout for
the pocket screw operation. This tool must be a 3/8" cutter capable of cutting a ramp in
pocket. Designating the operation tool as Pocket Screw Rout means that it will NOT be
used for any other type of rout or dado operation.
Pocket Screw Drilling options provide a means to designate a 5mm (or smaller) tool that
can perform drilling that creates a shelf for positioning the pocket screw during assembly.
Designating the operation tool as Pocket Screw Drill means that it will NOT be used for
any other type of drilling operation.
- Position Shelf Only will only perform the shelf drill hole operation for aiding in
positioning the pocket screw
- Shelf & Clean Up will perform the shelf drill hole as well as 2 drill holes for
cleaning the corner radius' created by the pocket screw rout
Confirmation Screen
The “Confirmation Screen” button allows the user to review all settings that have been
made in the “Tooling” section of Rolling Nest.

Tooling
29

31
Adding Sheets and/or Off-fall
Adding Sheets and/or Off-fall
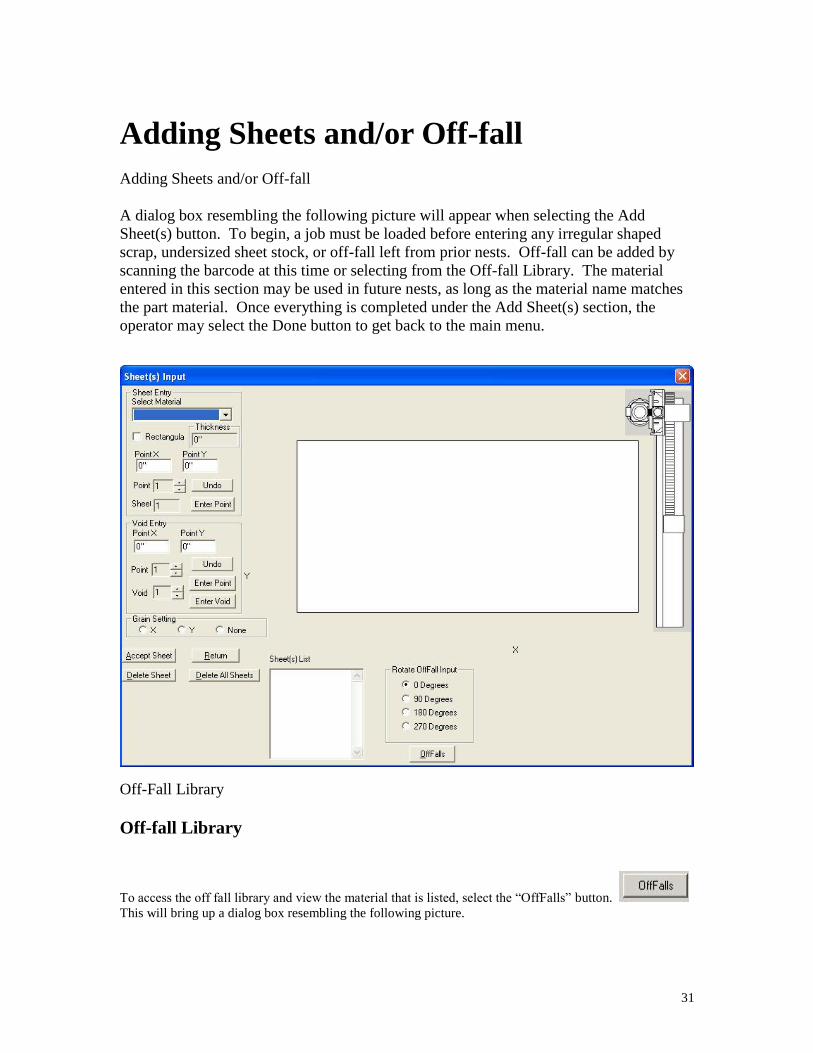
A dialog box resembling the following picture will appear when selecting the Add
Sheet(s) button. To begin, a job must be loaded before entering any irregular shaped
scrap, undersized sheet stock, or off-fall left from prior nests. Off-fall can be added by
scanning the barcode at this time or selecting from the Off-fall Library. The material
entered in this section may be used in future nests, as long as the material name matches
the part material. Once everything is completed under the Add Sheet(s) section, the
operator may select the Done button to get back to the main menu.
Off-Fall Library
Off-fall Library
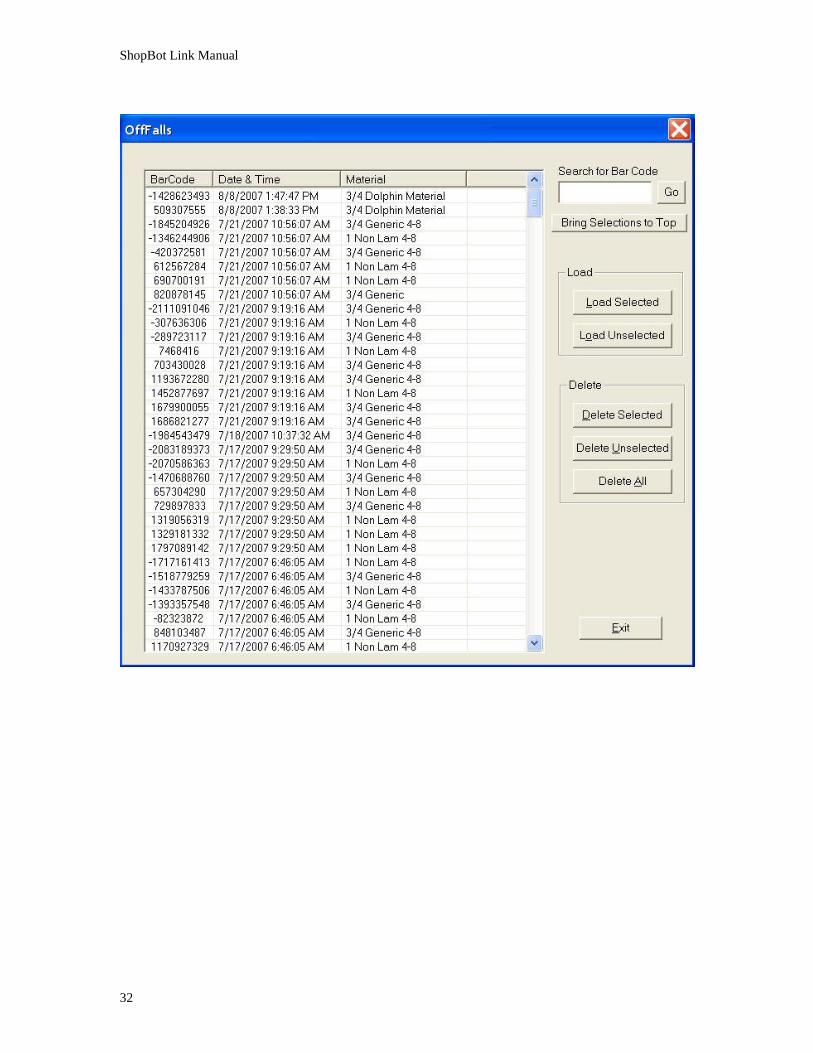
To access the off fall library and view the material that is listed, select the “OffFalls” button.
This will bring up a dialog box resembling the following picture.
ShopBot Link Manual
32
Adding Sheets and/or Off-fall
33
Load Operations
The options within the “Load Operations” section allows the operator to load either the
selected or the unselected OffFalls from the box to the left.
Delete Operations
The options within the “Delete Operations” section allows the operator to delete either
the selected or unselected OffFalls from the box to the left.
Search Option
The Search Option allows the ability to enter a bar code from the label on the off-fall.
Enter the number with out the $ symbol then hit enter or click Go. The item will be
selected in the list if it exists. Then you can load or delete that off-fall.
Note: Previous selections will remain when using this option.
Bring Selections to Top
This button will bring all selections in the list to the top for viewing them together.
Sheet Entry
The first section is called “Sheet Entry.” “Select Material” is where the operator will
enter a material name, or choose from the pull-down menu. If the material name doesn’t
match the part material, then ShopBot Link will not use it. If it is rectangular, check the
field next to “Rectangular” and enter the dimensions for “Length” and “Width.” To the
right, ShopBot Link will draw the rectangular scrap. If the material is not rectangular,
un-check the “Rectangular” field and enter points into the “Point X” and “Point Y”
fields. This requires that the material be drawn in a point-to-point fashion. Selecting
“Enter Point” will place the point in the large window. If any of the points have been
entered incorrectly, “Undo” may be selected to start over. The points entered must
create a closed contour.

ShopBot Link Manual
34
Void Entry
The next section is called “Void Entry.” It allows the user to specify a bad section within
the scrap material; ShopBot Link will not nest any parts into this section. The void is
also drawn in a point-to-point fashion. Once finished entering the points, selecting
“Enter Void” will add it to the material in the large window.
Grain Setting
The “Grain Setting” section allows the user to specify the direction of grain for the scrap
material. Check the appropriate field that applies.
Rotate Off-fall Input
“Rotate Off Fall input” allows the operator to select the orientation of the off fall
material that is selected from the off fall library. The operator must select the orientation
before loading the off fall material.

Adding Sheets and/or Off-fall
35
Sheet(s) List
This list contains the sheets created that will be used when nesting.
Accept Sheet
Once all sections are completed, selecting the Accept Sheet button will place the material
into the Sheet(s) List window.
Delete Sheet
Too remove sheets from the Sheet(s) List window, the operator must highlight the sheet
and then select the Delete Sheet button. Any material in the Sheet(s) List window will be
used in the next nest, if possible. Remember, the scrap material name must match the
part material name in order to use it.
Return
The Return button will return operator to the main ShopBot Link screen if selected.

37
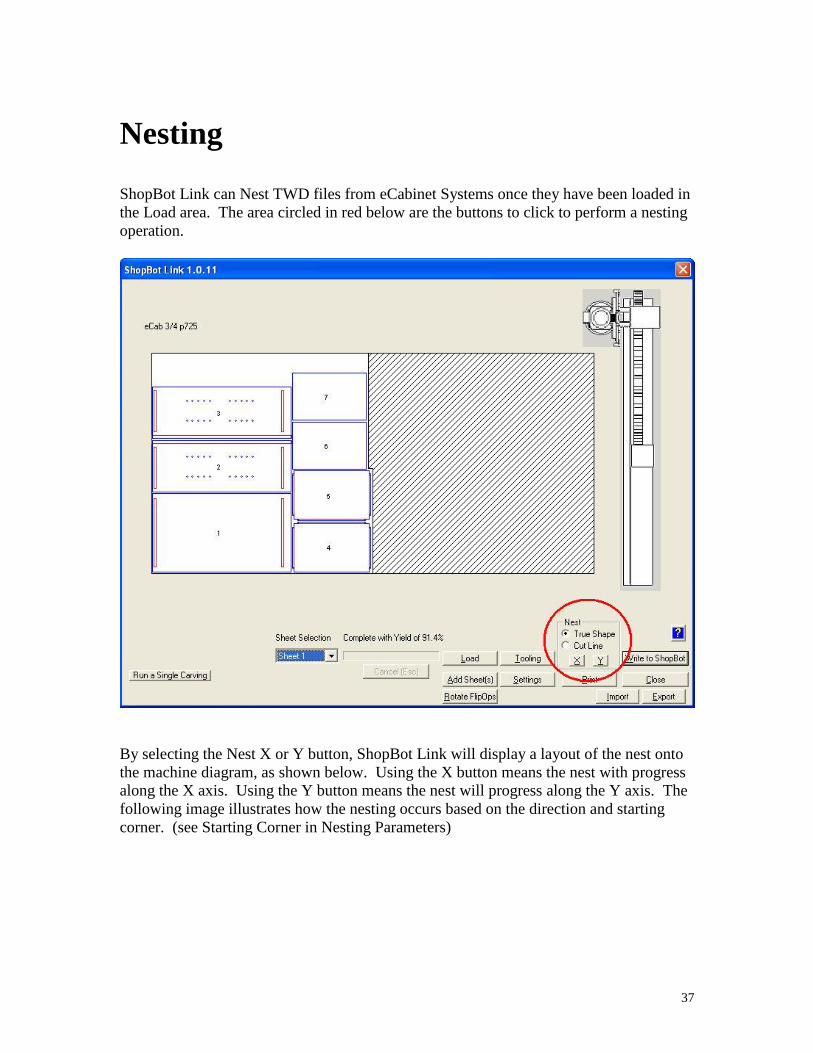
Nesting
ShopBot Link can Nest TWD files from eCabinet Systems once they have been loaded in
the Load area. The area circled in red below are the buttons to click to perform a nesting
operation.
By selecting the Nest X or Y button, ShopBot Link will display a layout of the nest onto
the machine diagram, as shown below. Using the X button means the nest with progress
along the X axis. Using the Y button means the nest will progress along the Y axis. The
following image illustrates how the nesting occurs based on the direction and starting
corner. (see Starting Corner in Nesting Parameters)

ShopBot Link Manual
38
There are 2 Nesting methods that can be selected. True Shape and Cut Line. True Shape
method will try to fit the parts tightly to the starting corner allowing them to interlock
among each other if possible. Cut Line nesting will fit the parts while trying to leave a
common edge between them.
The nest will be based off of the previous inputs. Along with the nest, a yield percentage,
material type, and number of sheets used will be displayed. To scroll through the sheets
in the nest to view, simply click on the drop down arrow and select the sheet you want to
view.

Nesting
39

41
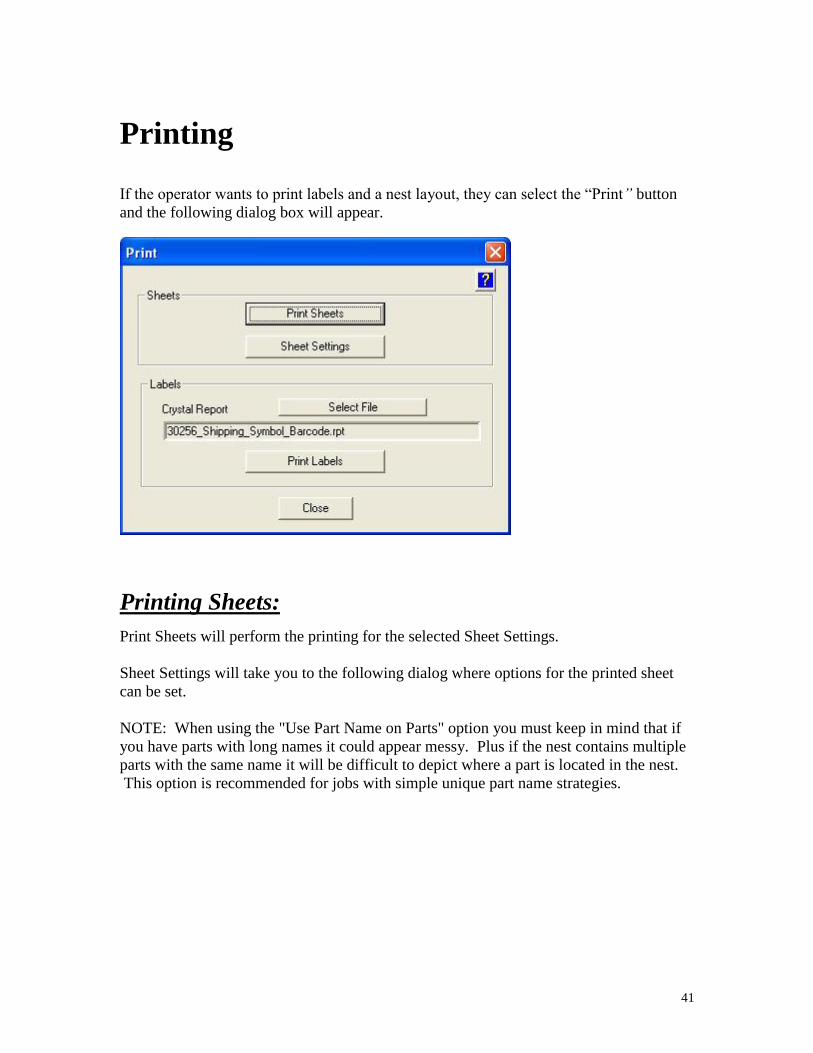
Printing
If the operator wants to print labels and a nest layout, they can select the “Print” button
and the following dialog box will appear.
Printing Sheets:
Print Sheets will perform the printing for the selected Sheet Settings.
Sheet Settings will take you to the following dialog where options for the printed sheet
can be set.
NOTE: When using the "Use Part Name on Parts" option you must keep in mind that if
you have parts with long names it could appear messy. Plus if the nest contains multiple
parts with the same name it will be difficult to depict where a part is located in the nest.
This option is recommended for jobs with simple unique part name strategies.

ShopBot Link Manual
42
Printing Labels:
Print Labels will bring up a dialog box to perform label printing. The labels will be
printed based on the Crystal Report file selected. Click the Select File button to select a
Crystal Report file. The files provided with ShopBot Link are located in the
C:\Documents and Settings\All Users\Application Data\Thermwood\ShopBot
Link\Labels directory on XP and C:\ProgramData\Application
Data\Thermwood\ShopBot Link\Labels on Vista.
The following is a list of the available Crystal Report files with a label type and an
example of the data they display per label.
NOTE: Files with the word "Barcode" in the title will only print labels with barcodes.
30252_Address.rpt & 30252_Address_Barcode.rpt
Label Type: Dymo label printer with 30252 Address labels

Printing
43
30256_Shipping.rpt & 30256_Shipping_Barcode.rpt
Label Type: Dymo label printer with 30256 Shipping labels
30252_Address_Symbol.rpt & 30252_Address_Symbol_Barcode.rpt
Label Type: Dymo label printer with 30252 Address labels
30256_Shipping_Symbol.rpt & 30256_Shipping_Symbol_Barcode.rpt
Label Type: Dymo label printer with 30256 Shipping labels

ShopBot Link Manual
44
1p33x4_Address_Sheet.rpt & 1p33x4_Address_Sheet_Barcode.rpt
Label Type: Sheet Inkjet or Laser printer with 1.33" x 4" labels
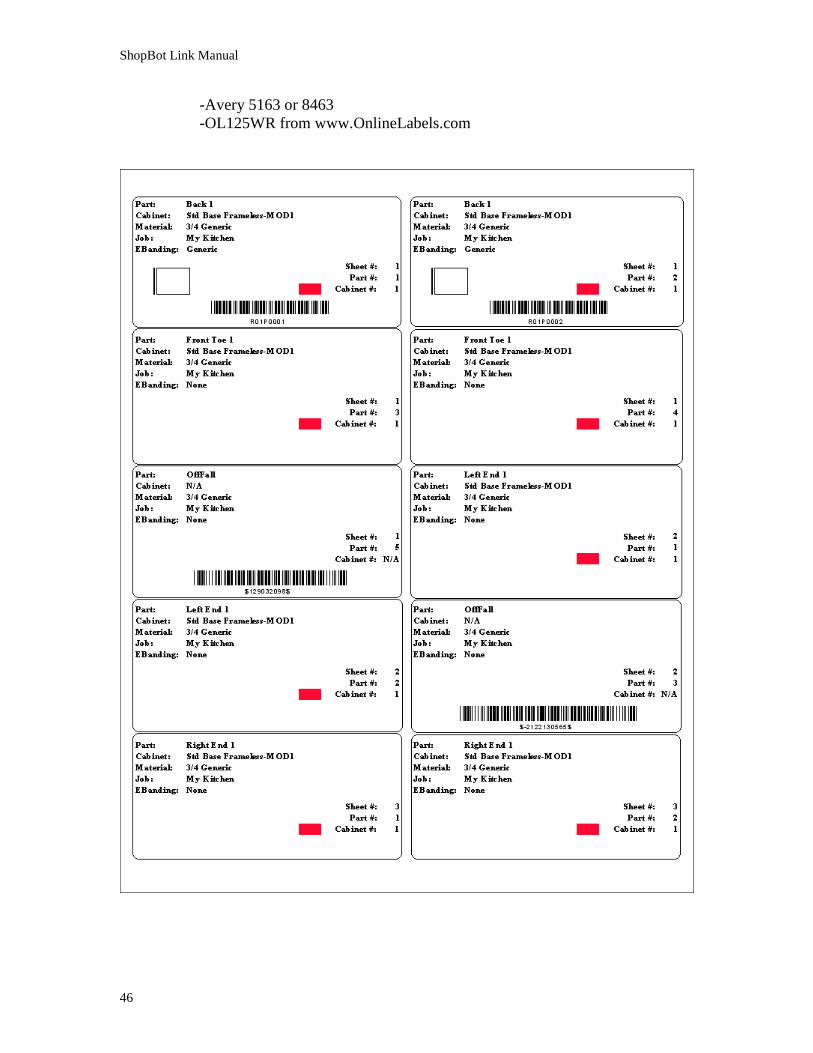
- Avery 5162 or 8462
- OL100WR from www.OnlineLabels.com
Printing
45
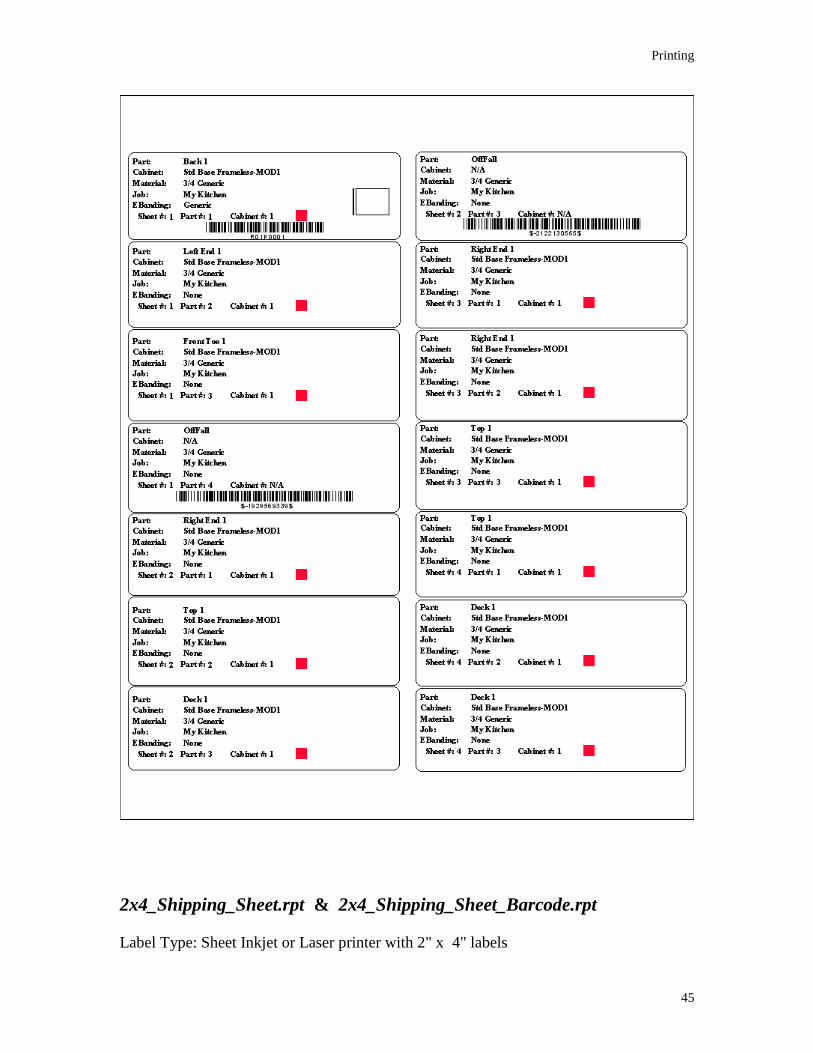
2x4_Shipping_Sheet.rpt & 2x4_Shipping_Sheet_Barcode.rpt
Label Type: Sheet Inkjet or Laser printer with 2" x 4" labels
ShopBot Link Manual
46
-Avery 5163 or 8463
-OL125WR from www.OnlineLabels.com

47
Writing to ShopBot
The “Write to ShopBot” button is the final step for creating a nested program. When this
button is clicked, ShopBot Link will output the necessary code to cut parts, to the
ShopBot Control Software screen.
If the option to "View Code Before Writing to ShopBot" is selected in Settings, then a
viewer will pop up showing you the code that will be written to ShopBot. You can either
click Continue to have the code written to ShopBot or click Cancel to return to ShopBot
Link.
NOTE: There is no file that can be opened to look at the code. This viewer is the only
mean of seeing the code written by ShopBot Link.

49
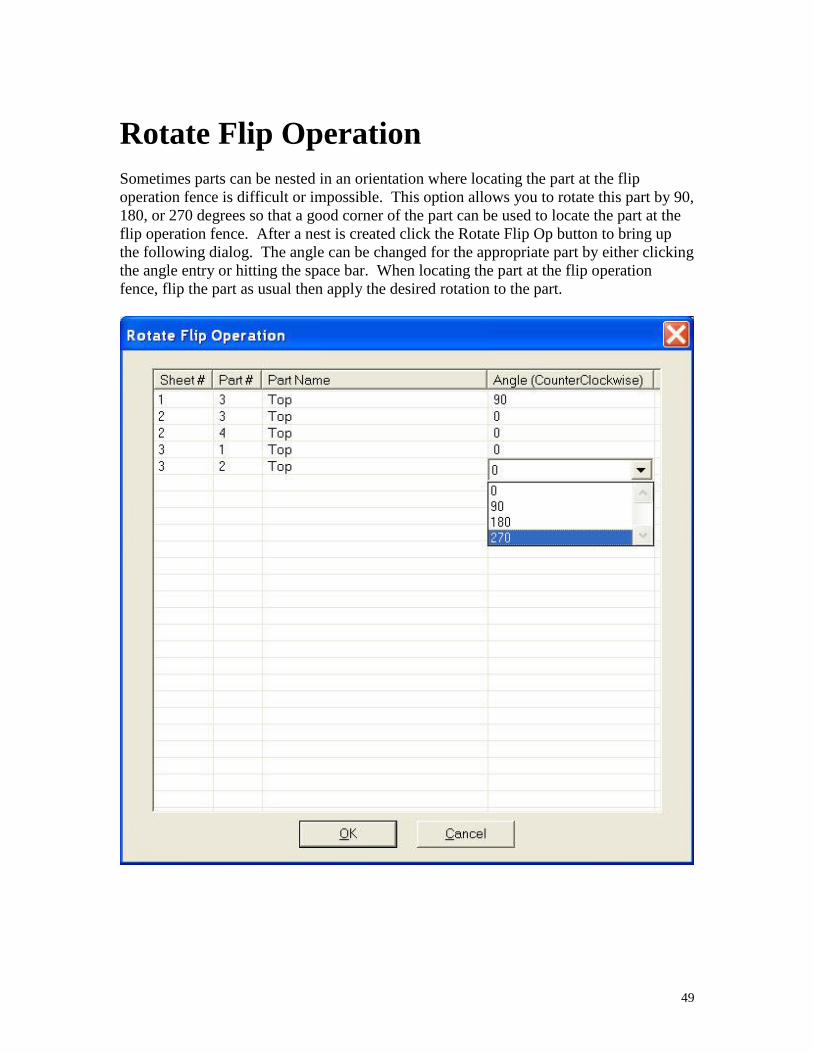
Rotate Flip Operation
Sometimes parts can be nested in an orientation where locating the part at the flip
operation fence is difficult or impossible. This option allows you to rotate this part by 90,
180, or 270 degrees so that a good corner of the part can be used to locate the part at the
flip operation fence. After a nest is created click the Rotate Flip Op button to bring up
the following dialog. The angle can be changed for the appropriate part by either clicking
the angle entry or hitting the space bar. When locating the part at the flip operation
fence, flip the part as usual then apply the desired rotation to the part.

51
Dovetail Drawer Boxes
eCabinet Systems Drawer Box Designer Setup
To properly create a drawer box for CNC machining, there are a few parameters that need
to be set. Several of these setting revolve around the geometry of the female dovetail
router tool that will be used.
Load a drawer box into the drawer box designer. Go to construction setting, then
construction parameters of the part that will have the male dovetails. You will see the
Dovetail Settings in the upper right corner of this dialog. These values (excluding inset
fields) can also be changed globally on the global settings tab of the construction setting
dialog.
Placement Inset Values: Distance from the edge of the part to the center of the first
tail.
Max. Dist. Between: Maximum allowed distance between (center to center) before
adding an additional tail.

ShopBot Link Manual
52
Dovetail Depth: This value is dependant on the female dovetail tool ‘s geometry.
(see dimension A in illustration 1) When using the Thermwood supplied dovetail tool
FSH1065 this value is .35”
Fit Clearance: This value will apply side clearance for the dovetails. This may be
desired for gluing purposes. The amount entered is the sum of the total clearance (a .01”
fit clearance will apply .005” of clearance on each side of the dovetail)
Thickness (% of Material): This value defines the thickness of the dovetails. When
using the Thermwood supplied dovetail tool FSH1065, it will be necessary to machine
down approximately .21” of material to hide the dovetail radius when parts are
assembled. The Thickness % can be calculated by taking the material thickness being
used minus .21” divided by material thickness being used.
Thickness % = ((Material Thickness - .21”) / Material Thickness)
Dovetail Width: This is the dovetail width from tip to tip. Typically this value should
not exceed 2 times the dovetail bit diameter (see dimension B in illustration 1)
Corner Radius: This value is dependant on the female dovetail tool ‘s geometry.
(see dimension R in illustration 1) When using the Thermwood supplied dovetail tool
FSH1065 this value is .125”
Corner Angle: This value is dependant on the female dovetail tool ‘s geometry.
(see angular dimension C in illustration 1) When using the Thermwood supplied dovetail
tool
FS
H1
065
this
val
ue
ran
ges
7-10 Degrees.
Set up at the Machine

Dovetail Drawer Boxes
53
Table flatness is very important to the success of a quality dovetail joint. If the
machining surface is not flat, it may result in the dovetail tool’s top radiuses gouging in
some areas and being too shallow in others. This may result in an unsatisfactory fit.
With that said, surfacing of the spoil-board and possibly the waste board/handling sheet
will most likely be required.
The tool for the female dovetail routes has two critical values that be set up properly.
These values are Diameter and the Z axis zero reference on the machine itself.
Z axis zero reference: This value is set at the ShopBot machine and is as important as the
machining surface flatness. If this number is not accurate, again it may result in the
dovetail tool’s top radiuses gouging or being too shallow. This may result in an
unsatisfactory fit. It MUST be understood that this value can be altered for the dove tail
tool to help with the fit of the joint. If the tool is not cutting deep enough the joint will
show a gap. If the tool is cutting too deep the joint will be too tight. This value will need
to be altered based on fluctuations in material thickness. Keep in mind that the value for
depth that is set in eCabinet Systems MUST be an accurate value relative to the tool's
geometry. (Please refer to eCabinet Systems Drawer Box Designer Setup)
Diameter: This value is taken from the tip of the tails (see dimension B in illustration 1)
If this value is not defined correctly, unsatisfactory fit may result. This diameter is set in
the ShopBot Link’s Tooling dialog with the operation tool that is checked to be the
“Dove Tail Tool”.
Note: Although it may be best to locate the underlying issue, this value can be used to
tighten loose side to side fit by increasing the value enter.
ShopBot Link Settings Dialog
In ShopBot Link, there are 2 parameters in the settings dialog that pertain to dovetail
machining. They are Dovetail Radius Crunch and Male Dovetail Feed.
Dovetail Radius Crunch: Due to the nature of the blind dovetail joint, there are certain
crushing factors that take place when assembling the parts. When machined to the
perfect dimension, the sharp corners of the male tails will crush against the radius created
by the female dovetail tool causing the tails to seat potentially too deep. This
phenomenon is controlled by the Dovetail Radius Crunch value. The value entered in
this field will pull the female tool geometry back causing a shallower fit. This amount
should be adjusted until desired fit is achieved. Keep in mind that different materials may
require different values. (A value of 0” will have no crunch applied. The larger the value,
the shallower the female cut will be. See illustration 2 for more detail)
Male Dovetail Feedrate: This is the federate that will be used when machining around
the male dovetail joints. It is not uncommon for the same tool cutting dado operations
(which typically can be cut at much higher feedrate) to be used for cutting around the
male dovetail cuts.
ShopBot Link Manual
54
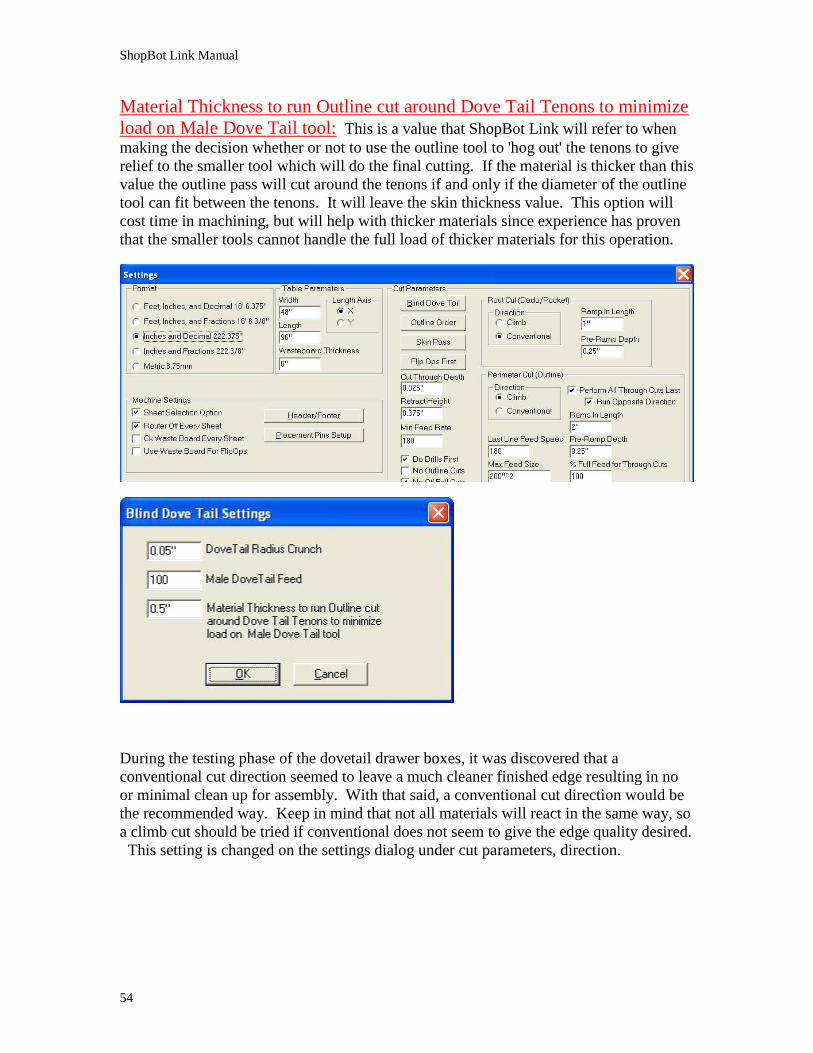
Material Thickness to run Outline cut around Dove Tail Tenons to minimize
load on Male Dove Tail tool: This is a value that ShopBot Link will refer to when
making the decision whether or not to use the outline tool to 'hog out' the tenons to give
relief to the smaller tool which will do the final cutting. If the material is thicker than this
value the outline pass will cut around the tenons if and only if the diameter of the outline
tool can fit between the tenons. It will leave the skin thickness value. This option will
cost time in machining, but will help with thicker materials since experience has proven
that the smaller tools cannot handle the full load of thicker materials for this operation.
During the testing phase of the dovetail drawer boxes, it was discovered that a
conventional cut direction seemed to leave a much cleaner finished edge resulting in no
or minimal clean up for assembly. With that said, a conventional cut direction would be
the recommended way. Keep in mind that not all materials will react in the same way, so
a climb cut should be tried if conventional does not seem to give the edge quality desired.
This setting is changed on the settings dialog under cut parameters, direction.

Dovetail Drawer Boxes
55

ShopBot Link Manual
56

Dovetail Drawer Boxes
57
ShopBot Link Tooling Dialog
When setting up tooling for the dovetail joints, there are a few tooling settings that need
to be discussed. To get to the tooling dialog, select the Tooling button on the main
ShopBot Link dialog. First, it is required to designate an operation tool as being the
female dovetail tool. This is accomplished by the following steps:
Select the operation # desired
Select a tool number for that operation
Check on the Dovetail Tool option for that operation
Next, the operation tool for the male dovetail routs may be specifically designated by
checking the Use for Male Routs with Dovetail option. Having this option checked will
force it to use this tool if the diameter is acceptable for the rout. If the diameter is too
large, it will search the operation tools for the largest acceptable diameter that will work.
If this option is not checked for any operation tools, it will automatically do a search for
the largest acceptable tool diameter available.
Note: If using tooling groups, ensure that the material being used exists in the group and
that the operation tools needed are specifically set for that group.

ShopBot Link Manual
58

59
Carvings
Inset Carvings with eCabinet Systems
Inset Carvings which are available at www.ecabinetsystems.com can be applied to parts
in eCabinet Systems. ShopBot Link will perform these carvings as long as the particular
carving is installed. This allows you to perform carvings in a nest of parts.
The screen for ShopBot Link will not display the carving. It will only display an arrow in
the location the carving is to occur.
Run a Single Carving
A carving can be cut at any location on the machine with any rotation and scale. To
accomplish this you must have the carving installed on your computer that you wish to
cut. Carving installations can be found at www.ecabinetsystems.com. Then click the
Run a Single Carving button.

ShopBot Link Manual
60
To select your carving click on the drop down box labeled Select Carving File.
A picture of the carving should appear in the window.
The user defined variables text for the file will appear in the large edit box. This is where
you can set user variables for tool numbers, ZSafe, ZClearance, PERPASS (for perimeter
cuts), Wasteboard thickness, and ZShift (material thickness based on your needs.
Documentation is available at www.ecabinetsystems.com for how to use these settings.
Carvings
61
A carving can be rotated using the slider control or edit box under Rotate Carving.
NOTE: The image will not rotate with this setting. Only the resulting carving will be
rotated.
The location you wish to perform the cut can be entered in the Location area for X and Y.
Z values are handled with the user variables.
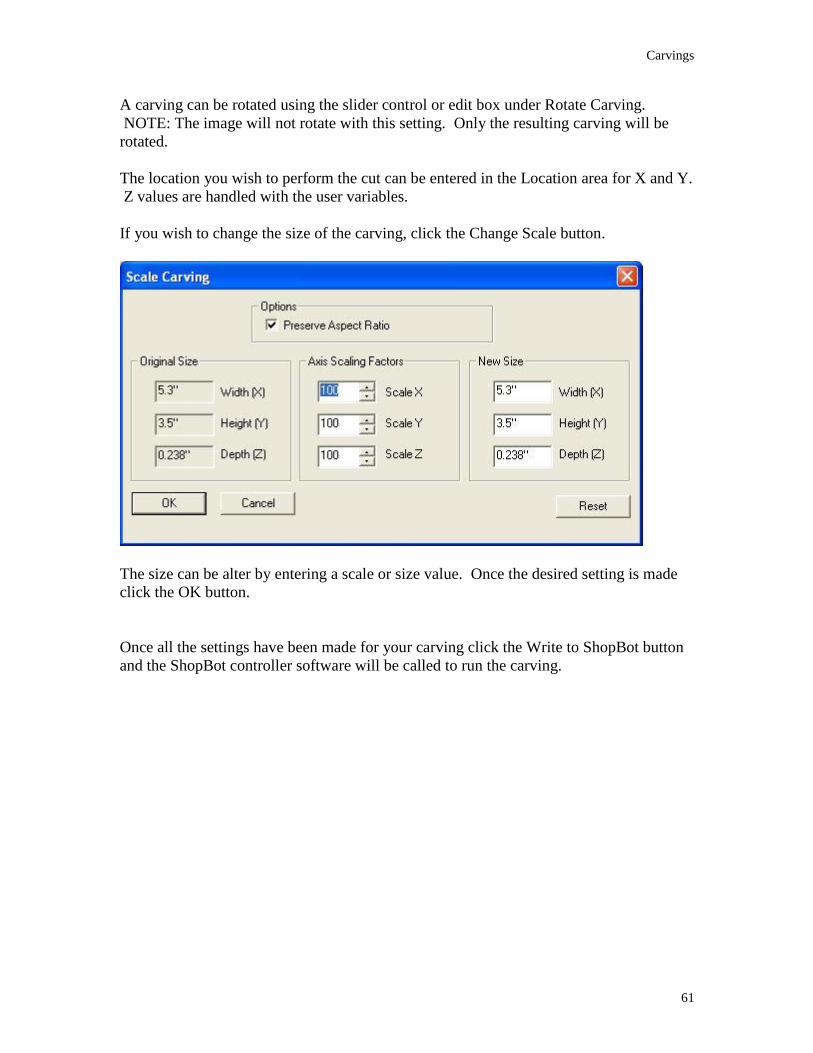
If you wish to change the size of the carving, click the Change Scale button.
The size can be alter by entering a scale or size value. Once the desired setting is made
click the OK button.
Once all the settings have been made for your carving click the Write to ShopBot button
and the ShopBot controller software will be called to run the carving.


63
Glossary
O
Off-fall: Usable scrap leftover from an operation.

65
Index
0
0 55
1
12
value ............................................................. 21
1p33x4_Address_Sheet.rpt ............................... 41
1p33x4_Address_Sheet_Barcode.rpt ............... 41
2
2x4_Shipping_Sheet.rpt ................................... 41
2x4_Shipping_Sheet_Barcode.rpt .................... 41
3 30252_Address.rpt ........................................... 41
30252_Address_Barcode.rpt ............................ 41
30252_Address_Symbol.rpt ............................. 41
30252_Address_Symbol_Barcode.rpt .............. 41
30256_Shipping.rpt .......................................... 41
30256_Shipping_Barcode.rpt ........................... 41
30256_Shipping_Symbol.rpt ............................ 41
30256_Shipping_Symbol_Barcode.rpt ............. 41
5
50
set ................................................................. 18
A
Accept Sheet ..................................................... 36
Accept Sheet button
selecting ........................................................ 36
Accept Sheet button .......................................... 36
Add ............................................................... 5, 26
Add Part Clearance ........................................... 21
Add Part Clearance ........................................... 21
Added Sheets
selecting ........................................................ 31
Added Sheets .............................................. 21, 22
Added Sheets .................................................... 31
Adding
Sheets and/or Off-fall ................................... 31
Adding .............................................................. 31
Address ............................................................. 41
All Materials ....................................................... 7
And/or ............................................................... 12
Apply button ....................................................... 7
Arc .................................................................... 14
Avery 5162 ....................................................... 41
Avery 5163 ....................................................... 41
B Barcode
scanning ........................................................ 31
Barcode ............................................................. 31
Barcode ............................................................. 41
Barcodes ........................................................... 41
Blind Dove Tail tool ......................................... 27
Board/handling .................................................54
Bring Selections
Top ................................................................34
Bring Selections ................................................34
C Change Scale button .........................................63
Checking
Use ................................................................60
Checking ...........................................................60
Ck Waste Board Every Sheet ...........................11
Ck Waste Board Every Sheet ...........................11
Clean Up ...........................................................14
Clean Up Amount .............................................14
Clear All .........................................................5, 6
Clear All ............................................................ 6
Clicking
Double Pass button .......................................15
Erase button ..................................................26
Clicking ............................................................15
Clicking ............................................................26
Climb .......................................................... 14, 19
CNC
creating .........................................................22
selected .........................................................19
write ..............................................................10
CNC ................................................................... 2
CNC ..................................................................10
CNC ..................................................................10
CNC ..................................................................11
CNC ..................................................................12
CNC ..................................................................19
CNC ..................................................................19
CNC ..................................................................22
CNC ..................................................................53
Collar ................................................................21
Collar ................................................................21
Collar ................................................................22
Confirmation Screen .........................................28
Confirmation Screen .........................................28
Conventional
set ..................................................................19
Conventional .....................................................14
Conventional .....................................................19
Copy button ......................................................26
Copy/Paste ........................................................26
Corner
Starting .........................................................22
Corner ...............................................................22
Corner Angle ....................................................53
Corner Radius ...................................................53
Creating

ShopBot Link Manual
66
CNC .............................................................. 22
Creating ............................................................ 22
Crystal Report ................................................... 41
Crystal Report file ............................................ 41
Ctrl ...................................................................... 5
Ctrl-C ................................................................ 26
Ctrl-V ............................................................... 26
Currently, Rolling Nest .................................... 26
Cut
Off Fall ......................................................... 19
Cut .................................................................... 19
Cut Parameters ................................................. 14
Cut Parameters ................................................. 14
Cut Through Depth ........................................... 17
Cut Through Depth ........................................... 17
D
Dado/Rout Pre-Ramp Depth ............................. 18
Daylight ............................................................ 54
Default .............................................................. 26
Degrees ............................................................. 53
Delete ............................................................... 26
Delete Operations ............................................. 34
Delete Operations ............................................. 34
Delete Sheet ...................................................... 36
Delete Sheet button
select ............................................................. 36
Delete Sheet button........................................... 36
Diameter ........................................................... 54
Dimension Format ............................................ 10
Direction ..................................................... 14, 19
Dist ................................................................... 53
Do Drills First ................................................... 18
Doesn’t ............................................................. 34
Done button
select ............................................................. 31
Done button ...................................................... 31
Double Pass
get ................................................................. 15
use ................................................................. 19
Double Pass ...................................................... 15
Double Pass ...................................................... 19
Double Pass button
clicking ......................................................... 15
Double Pass button ........................................... 15
Double Pass dialog ........................................... 15
Double Pass Part ............................................... 15
Dove Tail .......................................................... 27
Dove Tail Tenons ............................................. 55
Dove Tail Tool ................................................. 27
Dovetail ............................................................ 60
Dovetail Depth ................................................. 53
Dovetail Radius Crunch ................................... 55
Dovetail Settings
see ................................................................. 53
Dovetail Settings .............................................. 53
Dovetail Tool .................................................... 60
Dovetail Width .................................................53
Drill ..................................................................14
Drills First .........................................................18
DXF file ........................................................6, 37
Dymo ................................................................41
E
ECabinet ............................................................ 2
ECabinet Systems .............................................63
ECabinet Systems Drawer Box Designer Setup
refer...............................................................54
ECabinet Systems Drawer Box Designer Setup
......................................................................53
ECabinet Systems Drawer Box Designer Setup
......................................................................54
ECabinet Systems Files ..................................... 5
ECabinet Systems MUST .................................54
ECabinets icon ................................................... 5
Edge
Nest ...........................................................6, 22
part ................................................................14
part, ...............................................................14
Edge ................................................................... 6
Edge ..................................................................14
Edge ..................................................................22
Enter .................................................................. 5
Enter Point ........................................................34
Enter Void ........................................................35
Erase button
clicking .........................................................26
Erase button ......................................................26
Es ......................................................................19
Exiting
ShopBot Link ................................................26
Exiting ..............................................................26
Export ................................................................ 3
F
F2 ......................................................................26
F9
pressing .........................................................26
F9 ......................................................................26
Feed Speed.................................................. 26, 27
Feedrate ............................................................55
Files
Loading .......................................................... 5
Files ................................................................... 5
FIRST tool ........................................................27
Fit Clearance .....................................................53
Flip Operations .................................................11
Footer ................................................................12
Format ..............................................................10
Format ..............................................................10
FSH1065 ...........................................................53
Full Feed
Through Cuts ................................................18
Through Cuts ................................................18
Full Feed ...........................................................18

Index
67
G
Get
Double Pass .................................................. 15
Get .................................................................... 15
Grain Setting..................................................... 35
Grain Setting..................................................... 35
Group
Tooling ......................................................... 26
Group ................................................................ 26
Group Materials ................................................ 26
Group Materials ................................................ 26
H
He/she ................................................................. 5
Header .............................................................. 12
I I/O’s .................................................................. 11
Ignore Groups ................................................... 26
Ignore Groups ................................................... 26
Inset Carvings ................................................... 63
Interpolate ......................................................... 27
Introduction ........................................................ 1
IPM ................................................................... 18
K
KD .................................................................... 14
L
L.E. ..................................................................... 1
Label Type ........................................................ 41
Labels
Printing ......................................................... 41
Labels ............................................................... 41
Laser ................................................................. 41
Last Line Feed Speed ....................................... 18
Last Line Feed Speed ....................................... 18
Last Updated....................................................... 1
Leave Skin
Size ............................................................... 15
Leave Skin ........................................................ 15
Length ............................................................... 34
Length Axis ...................................................... 10
Line................................................................... 14
Load .................................................................... 5
Load dialog ......................................................... 5
Load Operations ............................................... 34
Load Operations ............................................... 34
Load Screen .................................................... 5, 6
Load/unload ...................................................... 12
Loading
Files ................................................................ 5
TWD ........................................................... 5, 6
Loading ............................................................... 5
Loading ............................................................... 5
Loading ............................................................... 6
Loading ............................................................... 6
Location ............................................................ 63
M Machine ............................................................ 54
Machine Settings ..............................................10
Machine Settings ..............................................10
Male Dove Tail tool ..........................................55
Male Dovetail Feed ..........................................55
Male Dovetail Feedrate ....................................55
Male Routs
Use ................................................................27
Male Routs........................................................27
Male Routs........................................................60
Management .....................................................26
Material.............................................................53
Material Thickness ..................................... 53, 55
Max Feed Size ..................................................18
Max Feed Size ..................................................18
Max Interpolate Diameter .................................27
Max Penetration .......................................... 26, 27
MDB .................................................................37
Min ...................................................................21
Min Feed Rate ..................................................18
Min Feed Rate ..................................................18
Model 53 ...........................................................20
Model 67 ...........................................................10
MUST ...............................................................54
N
Nest/Labels
Rolling ..........................................................41
Nest/Labels .......................................................41
Nesting
Edge ..........................................................6, 22
Parameters ....................................................20
selecting ........................................................37
TWD ....................................................... 10, 37
Nesting ............................................................... 6
Nesting ..............................................................10
Nesting ..............................................................20
Nesting ..............................................................22
Nesting ..............................................................37
Nesting Parameters ...........................................20
New Sheets .......................................................22
NOT ..............................................................6, 22
NOTE ......................................................... 41, 63
O
Off Fall .............................................................21
cut .................................................................19
Square ...........................................................21
Off Fall .............................................................19
Off Fall .............................................................21
Off Fall Cuts .....................................................19
Off-Fall .............................................................22
Off-fall Library ........................................... 31, 32
OffFalls .............................................................32
OffFalls .............................................................34
OffFalls .............................................................34
OK button .........................................................63
OL100WR ........................................................41
OL125WR ........................................................41
ShopBot Link Manual
68
On/off ............................................................... 11
ONLY ............................................................... 19
Operation ................................................ 2, 25, 27
Operation Tool ................................................. 27
Operation Tools list .......................................... 27
OR Max Penetration ......................................... 19
Outline .............................................................. 55
Outline Cuts ...................................................... 19
Outline Order .................................................... 18
Outline Order .................................................... 18
Outline Pre-Ramp Depth .................................. 18
Outline tool
set ................................................................. 18
Outline tool ....................................................... 18
Outline Tool Setup ........................................... 26
Outline Tool Setup ........................................... 26
P
Parameters
Nesting.......................................................... 20
Parameters ........................................................ 20
Part Rotation Step Angle .................................. 22
Part Rotation Step Angle .................................... 6
Part Rotation Step Angle .................................. 22
Part Width
Tabbing ......................................................... 20
Part Width......................................................... 20
Part, .................................................................. 14
Parts
edge .............................................................. 14
Tabbing ......................................................... 20
Parts .................................................................. 14
Parts .................................................................. 20
Paste
wish .............................................................. 26
Paste ................................................................. 26
Paste button ...................................................... 26
Perform All Through Cuts Last ........................ 19
Perform All Through Cuts Last ........................ 19
Perform All Through Cuts Last ........................ 19
PERPASS ......................................................... 63
Placement Inset Values ..................................... 53
Placement Pins Setup ....................................... 11
Placement Pins Setup ....................................... 11
Plunge Speed .............................................. 26, 27
Pocket Area ...................................................... 14
Pocket Settings ................................................. 13
Pocket Settings ................................................. 13
Pocket Step ....................................................... 14
Pocket’s ............................................................ 14
Pocketing .......................................................... 27
Point X .............................................................. 34
Point Y .............................................................. 34
Popup ................................................................ 11
Pre-Ramp Depths ............................................. 18
Pressing
F9 .................................................................. 26
Pressing.............................................................26
Print ..................................................................41
Print Labels .......................................................41
Print Sheets .......................................................41
Printing
Labels ...........................................................41
Sheets ............................................................41
Printing .............................................................41
R Ramp In Length .......................................... 17, 18
Ramp In Length ................................................17
Rectangular .......................................................34
Refer
eCabinet Systems Drawer Box Designer Setup
..................................................................54
Refer .................................................................54
Retract Height ...................................................17
Retract Height ...................................................17
Return ...............................................................36
Return button ....................................................36
Reverse Spindle .......................................... 26, 27
Rolling
Nest/Labels ...................................................41
Rolling ..............................................................41
Rolling Nest ................................................ 26, 28
Rotate Carving ..................................................63
Rotate Flip Op button .......................................51
Rotate Flip Operation .......................................51
Rotate Off Fall input .........................................35
Rotate Off-fall Input .........................................35
Rout/Dado.........................................................27
Router Off Every Sheet ....................................11
Router Off Every Sheet ....................................11
RPM ..................................................................27
Run
ShopBot Link ................................................. 9
Single Carving ..............................................63
Single Carving button ...................................63
Run .................................................................... 9
Run ...................................................................63
Run Opposite Direction ....................................19
Run Pockets ......................................................14
Run Pockets made ............................................14
S
Scanning
barcode .........................................................31
Scanning ...........................................................31
Scrap Part Recovery .......................................... 6
Screen
Control Nesting.............................................63
Screen ...............................................................63
Search Option ...................................................34
See
Dovetail Settings ...........................................53
See ....................................................................53
Select Carving File ...........................................63

Index
69
Select File button .............................................. 41
Select Material .................................................. 34
Select Tool Tolerance ....................................... 25
Selecting
Accept Sheet button ...................................... 36
Add Sheet ..................................................... 31
CNC .............................................................. 19
Delete Sheet button ....................................... 36
Done button .................................................. 31
Nest ............................................................... 37
Settings button ................................................ 9
Tooling button .............................................. 60
Selecting ............................................................. 9
Selecting ........................................................... 19
Selecting ........................................................... 19
Selecting ........................................................... 31
Selecting ........................................................... 36
Selecting ........................................................... 36
Selecting ........................................................... 37
Selecting ........................................................... 60
Selection Filter ................................................... 7
Set
50 .................................................................. 18
Conventional ................................................ 19
Outline tool ................................................... 18
Set ..................................................................... 18
Set ..................................................................... 19
Set ..................................................................... 54
Settings ........................................................... 6, 9
Settings button
selecting .......................................................... 9
Settings button .................................................... 9
Settings dialog .................................................. 22
Setup ................................................................. 27
Sheet ................................................................. 22
Printing ......................................................... 41
Sheet ................................................................... 6
Sheet ................................................................. 22
Sheet ................................................................. 36
Sheet ................................................................. 36
Sheet ................................................................. 36
Sheet ................................................................. 41
Sheet Entry ....................................................... 34
Sheet Entry. ...................................................... 34
Sheet Inkjet ....................................................... 41
Sheet Operations ............................................... 11
Sheet Selection ................................................. 11
Sheet Selection ................................................. 11
Sheet Settings ................................................... 41
Sheets and/or Off-fall
Adding .......................................................... 31
Sheets and/or Off-fall ....................................... 31
Shift .................................................................... 6
Shipping ........................................................... 41
ShopBot ............................................................ 49
Writing.......................................................... 49
ShopBot ............................................................26
ShopBot ............................................................49
ShopBot ............................................................63
ShopBot button
Write .............................................................63
ShopBot button .................................................63
ShopBot Control ................................................ 1
ShopBot Control Software ................................49
ShopBot Link
exiting ...........................................................26
running ........................................................... 9
ShopBot Link .............................................. 1, 2, 3
ShopBot Link ..................................................... 9
ShopBot Link ....................................................15
ShopBot Link ....................................................17
ShopBot Link ....................................................17
ShopBot Link ....................................................18
ShopBot Link ....................................................18
ShopBot Link ....................................................19
ShopBot Link ....................................................21
ShopBot Link ....................................................22
ShopBot Link ....................................................25
ShopBot Link ....................................................25
ShopBot Link ....................................................26
ShopBot Link ....................................................26
ShopBot Link ....................................................27
ShopBot Link ....................................................34
ShopBot Link ....................................................35
ShopBot Link ....................................................36
ShopBot Link ....................................................37
ShopBot Link ....................................................41
ShopBot Link ....................................................49
ShopBot Link ....................................................55
ShopBot Link ....................................................63
ShopBot Link dialog .........................................60
ShopBot Link Settings Dialog ..........................55
ShopBot Link Software ..................................... 5
ShopBot Link Tooling Dialog ..........................60
Single Carving
Run ...............................................................63
Single Carving ..................................................63
Single Carving button
Run ...............................................................63
Single Carving button .......................................63
Size
Leave Skin ....................................................15
Size ...................................................................15
Skin ...................................................................20
Skin Thickness ..................................................17
Skin Thickness ..................................................15
Skin Thickness ..................................................17
Skins .................................................................19
Specifications .................................................... 2
Spindle Speed ............................................. 26, 27
Spiral ................................................................13
Square
ShopBot Link Manual
70
Off Fall ......................................................... 21
Off Fall ......................................................... 21
Square ............................................................... 21
Start menu........................................................... 2
Starting
Corner ........................................................... 22
Starting ............................................................. 22
Starting Corner ................................................. 22
Step Percentage ................................................ 14
Suit
user’s .............................................................. 1
Suit ..................................................................... 1
Super Control’s Tool Table .............................. 26
T
Tab Parameters ................................................. 20
Tab Parameters ................................................. 20
Tabbing ............................................................. 20
Parts .............................................................. 20
Tabbing ............................................................. 20
Table ................................................................. 26
Table Parameters .............................................. 10
Table Parameters .............................................. 10
Thermwood .................................................. 3, 53
Thermwood Control Prior
Tool Management ......................................... 25
Thermwood Control Prior ................................ 25
Thermwood SuperControl’s tool ...................... 54
Thickness .......................................................... 53
Through Cuts .................................................... 18
Full Feed ....................................................... 18
Through Cuts .................................................... 14
Through Cuts .................................................... 18
Tool Management
Thermwood Control Prior ............................ 25
Tool Management ............................................. 25
Tool’s
uses ............................................................... 26
Tool’s ............................................................... 26
Tool’s ............................................................... 54
Tooling ............................................................. 28
Group ............................................................ 26
Tooling ............................................................. 19
Tooling ............................................................. 26
Tooling button
select ............................................................. 60
Tooling button .................................................. 60
Top
Bring Selections............................................ 34
Top ................................................................... 34
TWD
loading ........................................................ 5, 6
nesting .................................................... 10, 37
TWD ................................................................... 2
TWD ................................................................... 5
TWD ................................................................... 6
TWD .................................................................10
TWD .................................................................37
TWD Files ......................................................... 5
Type ..................................................................27
U
Undo .................................................................34
Use Part Name on Parts ....................................41
User Manual ...................................................... 1
User’s
suit ................................................................. 1
User’s ................................................................. 1
Uses
checking ........................................................60
Double Pass ..................................................19
Male Routs ....................................................27
tool’s .............................................................26
Uses ..................................................................19
Uses ..................................................................26
Uses ..................................................................27
Uses ..................................................................60
V Value
0 55
12 ..................................................................21
Value ................................................................21
Value ................................................................55
Version 1.x ........................................................ 1
Void Entry ........................................................35
Void Entry. .......................................................35
W
Wait ..................................................................11
Wasteboard ........................................... 10, 11, 63
Width. ...............................................................34
Width/length .....................................................15
Window’s .......................................................... 5
Wish
Paste ..............................................................26
Wish ..................................................................26
Write
CNC ..............................................................10
ShopBot ........................................................49
ShopBot button .............................................63
Write .................................................................10
Write .................................................................49
Write .................................................................63
Writing
ShopBot ........................................................49
Writing ..............................................................49
Www.ecabinetsystems.com ..............................63
Www.OnlineLabels.com ..................................41
Z
ZClearance ........................................................63
Zigzag ...............................................................13
ZSafe ................................................................63
ZShift ................................................................63

71