ServiceNow (previous versions) - Centrifydeprecated).pdf · ServiceNow (previous versions) ... The...
25
36 ServiceNow (previous versions) Note If you’re trying to configure the one of the previous versions of ServiceNow (Fuji, Geneva, Helsinki, or Istanbul), you’re in the right place. If you’re trying to configure the current version of ServiceNow (Jakarta), see the Centrify configuration guide for ServiceNow. If you don’t know what version you have, you can find it on the Stats > Stats page in your ServiceNow instance. ServiceNow integrations include self-service password reset, single sign-on (SSO) with built-in multi-factor authentication (MFA), application access and provisioning, and automated provisioning and de-provisioning of users based upon role membership within the source directory. ServiceNow integrations are included with your Centrify Identity Services license. To configure the ServiceNow app for single-sign on from the user portal (an overview) 1 Prepare ServiceNow for single sign-on. You need to make some changes to the SAML 2.0 login script, upload the signing certificate, and paste in some application settings from Admin Portal. 2 Configure the application settings in Admin Portal: Configure the ServiceNow web application in Admin Portal. Here you specify some of the settings you specified in the web app directly. See Requirements / what you need before configuring to continue. Requirements / what you need before configuring You need your own domain registered and verified with ServiceNow. For example, you have a login URL such as https://acme.service-now.com. A signed certificate in PEM format. You can either download the standard certificate from Admin Portal or use your organization’s trusted certificate. Make sure that your ServiceNow account is enabled for SAML 2.0 update 1. (Applies to Istanbul Patch 3 and earlier): If you have multiple SSO providers and are already using SSO with another IdP, you may need to add your tenant URL (IdP AuthnRequest) to the ServiceNow security URL whitelist. The field is located in System Property > Value. This is only required for SP-initiated SSO configurations. For additional information, see: https://hi.service-now.com/kb_view.do?sysparm_article=KB0621688.
Transcript of ServiceNow (previous versions) - Centrifydeprecated).pdf · ServiceNow (previous versions) ... The...

ServiceNow (previous versions)
Note If you’re trying to configure the one of the previous versions of ServiceNow (Fuji, Geneva, Helsinki, or Istanbul), you’re in the right place. If you’re trying to configure the current version of ServiceNow (Jakarta), see the Centrify configuration guide for ServiceNow. If you don’t know what version you have, you can find it on the Stats > Stats page in your ServiceNow instance.
ServiceNow integrations include self-service password reset, single sign-on (SSO) with built-in multi-factor authentication (MFA), application access and provisioning, and automated provisioning and de-provisioning of users based upon role membership within the source directory.
ServiceNow integrations are included with your Centrify Identity Services license.
To configure the ServiceNow app for single-sign on from the user portal (an overview)
1 Prepare ServiceNow for single sign-on. You need to make some changes to the SAML 2.0 login script, upload the signing certificate, and paste in some application settings from Admin Portal.
2 Configure the application settings in Admin Portal: Configure the ServiceNow web application in Admin Portal. Here you specify some of the settings you specified in the web app directly.
See Requirements / what you need before configuring to continue.
Requirements / what you need before configuring You need your own domain registered and verified with ServiceNow. For example, you
have a login URL such as https://acme.service-now.com.
A signed certificate in PEM format. You can either download the standard certificate from Admin Portal or use your organization’s trusted certificate.
Make sure that your ServiceNow account is enabled for SAML 2.0 update 1.
(Applies to Istanbul Patch 3 and earlier): If you have multiple SSO providers and are already using SSO with another IdP, you may need to add your tenant URL (IdP AuthnRequest) to the ServiceNow security URL whitelist. The field is located in System Property > Value. This is only required for SP-initiated SSO configurations. For additional information, see:https://hi.service-now.com/kb_view.do?sysparm_article=KB0621688.
36

Setting up the certificates for SSO
To establish a trusted connection between the web application and the Centrify Directory Service, you need to have the same signing certificate in both the application and the application settings in Admin Portal.
If you use your own certificate, you upload the signing certificate and its private key in a .pfx or .p12 file to the application settings in Admin Portal. You also upload the public key certificate in a .cer or .pem file to the web application.
Converting a certificate to PEM format
For ServiceNow, your certificate needs to be in PEM format. If you download the certificate from the Admin Portal, you must convert it to PEM format before you can use it in the ServiceNow application web site.
To convert a certificate to PEM format:
1 Double-click the certificate file to open it.
2 Click Details.
3 Click Copy to File.
The Certificate Export Wizard opens.
4 Click Next.
5 Select Base-64 encoded X.509 and click Next.
6 Enter a location and filename for the PEM certificate and click Next.
7 Click Finish.
8 Continue with Configuring ServiceNow for SSO.
Configuring ServiceNow for SSONote If you’re trying to configure the one of the previous versions of ServiceNow (Fuji, Geneva, Helsinki, or Istanbul), you’re in the right place. If you’re trying to configure the current version of ServiceNow (Jakarta), see the Centrify configuration guide for ServiceNow. If you don’t know what version you have, you can find it on the Stats > Stats page in your ServiceNow instance.
You need administrator privileges in ServiceNow to perform these steps.
Note If you plan on using the certificate generated by the Admin Portal, log in there first and download the certificate as described in Converting a certificate to PEM format before continuing.
Admin Portal user’s guide 37

Tip It can be useful to open the web application and Admin Portal simultaneously and have them both open, perhaps side by side. As part of the SSO configuration process, you’ll need to copy and paste settings between the two browser windows.
To configure ServiceNow for SSO:
1 In your web browser, go to your ServiceNow login URL. For example, you have a login URL such as https://acme.service-now.com where acme is your company instance name.
2 In the left pane, search for plugins.
3 Click Plugins in the search results.
4 In the System Plugins window, search for integration.
5 Click on Integration - Multiple Provider Single Sign-On Installer.
• 38

6 Click the Activate/Upgrade link.
7 Click the Activate button to confirm, and wait for the Plugin Activation progress bar to finish.
8 Click the Close & Reload Form button.
9 In the left pane, scroll down to Multi-Provider SSO and click Multi-Provider SSO > Identity Providers.
10 In the left pane under Administration, click x509 Certificate.
11 Click New.
12 For the Name enter SAML 2.0.
13 Select Active.
14 Select PEM as the Format.
15 In a text editor, open the certificate file you created in Converting a certificate to PEM format.
16 Copy the content of this file into the clipboard.
17 Paste the content of your clipboard into PEM Certificate.
18 Click Submit to save the certificate.
19 In the left pane, click Multi-Provider SSO > Identity Providers.
20 Click New to create a new Identity Provider.
21 Click SAML2 Update1 to select the type of Identity Provider to create.
22 Click Cancel when prompted to import metadata.
Admin Portal user’s guide 39

23 Specify the following:
Option Set it to What you do
Name The name you want to use for the IdP
Active Selected
Default (optional) Optional Select to enable SP-initiated SSO.
User Field user_name If you change this setting, you have to make sure that this setting matches the attribute used for user account mapping in the ServiceNow application settings.
If you change this setting, you have to also change the last part of the NameID policy to match the attribute.
Identity Provider URL Value set for this field in Admin Portal.
[To enable SP-initiated SSO, copy the contents of the Identity Provider URL from the Application Settings in the Admin Portal. For IdP-initiated only, enter another URL]
Click the lock icon to unlock, then copy from Identity Provider URL which will issue the SAML2 security token field in Admin Portal and paste here.
Identity Provider's AuthnRequest Value set for this field in Admin Portal
To enable SP-initiated or IdP-initiated SSO, click the lock icon to unlock, then copy the Identity Provider’s AuthnRequest service field in Admin Portal.
Identity Provider's SingleLogoutRequest (optional)
Optional If you want users to log out of the user portal when they log out of ServiceNow, click the lock icon to unlock, then copy the URL from the Identity Provider’s SingleLogoutRequest service field in the Admin Portal and paste the URL here.
If you want to keep users logged into the user portal after they log out of ServiceNow, enter a different URL or leave this field blank.
Failed Requirement Redirect value of Identity Provider's AuthnRequest
Click the lock icon to unlock, then copy from Identity Provider’s AuthnRequest service field in Admin Portal and paste here.
ServiceNow Homepage https://<yourinstance.service-now.com>/navpage.do
Click the lock icon to unlock, then replace <yourinstance> with acme where “acme” is your company instance name
• 40

Entity ID / Issuer https://<yourinstance.service-now.com>
Click the lock icon to unlock, then replace <yourinstance> with acme where “acme” is your company instance name
Audience URI https://<yourinstance.service-now.com>
Click the lock icon to unlock, then replace <yourinstance> with acme where “acme” is your company instance name
Protocol Binding for the IDP's SingleLogoutRequest
urn:oasis:names:tc:SAML: 2.0:bindings:HTTP-Redirect
Use the default value.
NameID Policy urn:oasis:names:tc:SAML:1.1:nameid-format:unspecified
Enter the new value: urn:oasis:names:tc:SAML:1.1:nameid-format:unspecified
NameID Attribute Empty
Create AuthnContextClass (optional)
Selected If selected, ServiceNow requires that you present a specific login mechanism such as a form, Kerberos, etc., to create an AuthnContextClass request in the AuthnRequest statement.
AuthnContextClassRef Method (optional)
urn:oasis:names:tc:SAML:2.0:ac: classes:PasswordProtectedTransport
Use the default value.
External logout redirect external_logout_complete.do
Use the default value.
Signing/Encryption Key Alias (optional)
Alias of key entry stored in SAML 2.0 SP store.
Copy from Multi-Provider SSO > x509 Certificate > SAML 2.0 SP Keystore.
Signing/Encryption Key Password (optional)
Password of key entry stored in SAML 2.0 SP store.
Set this and Signing/Encryption Key Alias to allow assertion encryption.
Encrypt Assertion (optional) Optional Select to show the encryption certificate in metadata.
Clock Skew 60 Provides a buffer on the valid period of the SAML token. When set to 60, provides a 60-second buffer when the token is valid before the notBefore constraint and after the notOnOrAfter constraint.
Force AuthnRequest Unselected
Is Passive AuthnRequest Unselected
Sign AuthnRequest Unselected
Option Set it to What you do
Admin Portal user’s guide 41

24 In the left pane under Administration, click Properties.
25 Specify the following:
26 Click Save.
27 Log out of your ServiceNow account.
28 Continue with Configuring ServiceNow in Admin Portal.
Configuring ServiceNow in Admin PortalNote If you’re trying to configure the one of the previous versions of ServiceNow (Fuji, Geneva, Helsinki, or Istanbul), you’re in the right place. If you’re trying to configure the current version of ServiceNow (Jakarta), see the Centrify configuration guide for ServiceNow. If you don’t know what version you have, you can find it on the Stats > Stats page in your ServiceNow instance.
The following steps are specific to the ServiceNow application and are required in order to enable SSO for ServiceNow. For information on optional Centrify Admin Portal configuration settings that you may wish to customize for your app, see Optional configuration settings.
To add and configure the ServiceNow app in Admin Portal:
1 In Admin Portal, click Apps, then click Add Web Apps.
Signing Signature Algorithm http://www.w3.org/2000/09/xmldsig#rsa-sha1
Use the default value.
Single Sign-On Script MultiSSO_SAML2_Update1 Click the magnifying glass and select the MultiSSO_SAML2_Update1 script.
Option Set it to What you do
Enable multiple provider SSO Yes Select the Yes box.
Enable debug logging for the multiple provider SSO integration (optional)
Optional
The field on the user table that identifies a user accessing the “User identification” login page
user_name Use the default.
Option Set it to What you do
• 42

The Add Web Apps screen appears.
2 On the Search tab, enter the partial or full application name in the Search field and click the search icon.
3 Next to the application, click Add.
4 In the Add Web App screen, click Yes to confirm.
Admin Portal adds the application.
5 Click Close to exit the Application Catalog.
The application that you just added opens to the Settings page.
6 Click the Trust page to begin configuring the application.
The UI is evolving in order to simplify application configuration. For example, many of the settings previously found on the Application Settings page are now on the Trust page.
Admin Portal user’s guide 43

You might have to select Manual Configuration to expose those settings, as shown in the following example.
Any previously configured applications retain their configuration and do not require reconfiguration. If you are configuring an application for the first time, refer to the Trust page for any settings previously found on the Application Settings page.
In addition, the description of how to choose and download a signing certificate in this document might differ slightly from your experience. See Choose a certificate file for the latest information.
1
• 44

Admin Portal user’s guide 45

2 Specify the following parameters:
3 Click Save.
4 (Optional) To configure the ServiceNow application for automatic provisioning, see ServiceNow provisioning.
ServiceNow provisioningNote If you’re trying to configure the one of the previous versions of ServiceNow (Fuji, Geneva, Helsinki, or Istanbul), you’re in the right place. If you’re trying to configure the current version of ServiceNow (Jakarta), see the Centrify configuration guide for ServiceNow. If you don’t know what version you have, you can find it on the Stats > Stats page in your ServiceNow instance.
Option Required or optional
Set it to Description
Identity Provider URL which will issue the SAML2 security token
Required http://cloud.centrify.com/
SAML/ServiceNow
The Admin Portal automatically generates the content of this field.
Your ServiceNow Instance Name
Required [your ServiceNow instance name]
Enter your ServiceNow instance. For example, if you login to ServiceNow using https://acme.service-now.com, enter acme.
Encrypt Assertion Optional Checked or unchecked. To use an encryption certificate: check this box, then choose a certificate file to use.
Identity Provider’s AuthnRequest Service
[this field is not editable] The Admin Portal automatically generates the content of this field.
If you want to do SP-initiated SSO, copy this URL into ServiceNow directly.
If you want IdP-initiated SSO, leave this field as is.
Identity Provider’s SingleLogoutRequest Service
[this field is not editable] The Admin Portal automatically generates the content of this field.
When a user logs out of ServiceNow, if you want the user to be logged out of the user portal also, copy this URL into ServiceNow directly.
Otherwise, leave this field as is.
• 46

Note Before configuring the ServiceNow application for provisioning, you must install, configure, and deploy the app.
Introduction and overview of ServiceNow provisioning
For ServiceNow, the overall work flow of configuring provisioning is as follows.
Configuring ServiceNow for automatic user provisioning (an overview):
1 You prepare your ServiceNow account for provisioning.
Prior to configuring provisioning in your ServiceNow application, you need to install the Centrify Identity Services app and activate the Multiple Provider Single Sign-On Installer plugin. For details see Installing the Centrify Identity Services app for ServiceNow.
The user account that you’ll use to configure provisioning has to either be a member of the x_cenr3_centrify_u.centrify_admin role or be granted specific access permissions. For details, see Configuring ServiceNow for Provisioning
2 In Admin Portal, you configure the ServiceNow application for automatic user provisioning:
Add and configure the ServiceNow application for single sign-on.
In the ServiceNow application, you enable provisioning.
You add the ServiceNow administrator credentials.
You add the role mappings and specify how to handle updates to existing ServiceNow user accounts.
3 Make sure that provisioning is working as desired.
Run preview synchronizations in Admin Portal, review the synchronization reports, and review the list of users in ServiceNow. Make changes as needed to get the desired provisioning results.
4 Continue with Installing the Centrify Identity Services app for ServiceNow.
Installing the Centrify Identity Services app for ServiceNow
In order to configure ServiceNow provisioning, you need to first install the Centrify Identity Services app available in the ServiceNow app store.
To install the Centrify Identity Services app
1 Go to the ServiceNow app store and search for Centrify Identity Services.
2 Click the Centrify Identity Services app.
3 Click Get to make the Centrify Identity Services app available for your ServiceNow instances.
Admin Portal user’s guide 47

4 Go to the ServiceNow instance, select System Applications > Applications > Downloads to locate the app then click Install to install the app.
5 In ServiceNow, manually create a new choice option value Inactive for the field State of the Table User Role (sys_user_has_role).
6 In ServiceNow, create a user with role x_cenr3_centrify_u.centrify_admin, whose credentials are used for configuring ServiceNow provisioning in Centrify Identity Services Admin Portal.
You can skip this step if you use the admin in ServiceNow directly to configure ServiceNow provisioning.
Note If you haven’t done so already, you must also activate the Multiple Provider Single Sign-On Installer plugin.
For activation information, see the instructions in Activating Multiple Provider Single Sign-On on the following ServiceNow page:
http://wiki.servicenow.com/index.php?title=Multiple_Provider_Single_Sign-On#Activating_Multiple_Provider_Single_Sign-On
Continue with Configuring ServiceNow for Provisioning.
Configuring ServiceNow for Provisioning
The ServiceNow user account that you use to configure provisioning must have a x_cenr3_centrify_u.centrify_admin provisioning administrator role or be assigned to a role with the following settings: Import Set User (imp_user): create access.
Table User (sys_user): read access.
Import Set User Role (imp_user_role): create access.
Table User Role (sys_user_has_role): read access.
Table Roles (sys_user_role): read access. soap, import_admin, import_transformer.
Note The provisioning admin role x_cenr3_centrify_u.centrify_admin is automatically installed along with the Centrify Identity Services app on ServiceNow.
Configuring ServiceNow for automatic provisioning:
1 In a new browser tab, go to your ServiceNow login URL. For example, you have a login URL such as https://acme.service-now.com where acme is your company instance name.
2 In the left pane, click User Administration > Users.
3 Click New.
• 48

4 Specify the following:
5 Click Submit.
6 Click the user you just created in the list of users.
7 Scroll down and click Edit in the Roles section.
8 Search for x_cenr3_centrify_u.centrify_admin and select it.
9 Click > to add it to the Roles list.
10 Click Save.
11 In the left pane, click System Definition > Tables.
12 Search for User Role and select it.
13 Select the State Column Label under Table Columns.
14 Scroll down to Choices and click Add.
15 Enter Inactive for the Label and Inactive for the Value.
16 Click Update.
17 (Optional) Continue with (Optional) Customizing the Import Set Web Services of Centrify Identity Services.
18 Continue with Configuring ServiceNow in Admin Portal for automatic provisioning.
(Optional) Customizing the Import Set Web Services of Centrify Identity Services
By default, ServiceNow provisioning syncs 8 user fields: email, first_name, home_phone, last_name, mobile_phone, phone, user_name, and roles. If you want to customize this list, you must do so both in the Centrify Identity Service > Centrify User page of your ServiceNow configuration web page, and also in Admin Portal.
(Optional) Customizing the Import Set Web Services of Centrify Identity Services
1 In the left pane, click Centrify Identity Services > Centrify User.
2 Add/remove web service fields as desired.
Option Set it to What you do
Field idservice Check the Yes box.
Email The email address for this account
Active Checked Leave the box checked.
Remaining fields Optional Fill in the remaining fields as desired.
Admin Portal user’s guide 49
3 Edit/add/remove Web Service Transformation Maps.
Note This setting decides how fields of the import set table are mapped to the system User table. Coalesce should be set to false for all field maps except user_name, and Choice action should be set to ignore for all field maps with non-string Target fields.
4 If you want to sync any additional fields, modify the provisioning script in Admin Portal,
Note The provisioning script is intended for advanced users who are familiar with editing server-side JavaScript code.
Configuring ServiceNow in Admin Portal for automatic provisioning
To configure ServiceNow in Admin Portal for automatic provisioning:
1 Click the Provisioning tab.
2 Select Enable provisioning for this application.
3 Select either Preview Mode or Live Mode.
Preview Mode: Use Preview Mode when you’re initially testing the application provisioning or making configuration changes. The identity platform does a test run to show you what changes it would make but the changes aren’t saved.
Live Mode: Use Live mode when you want to use application provisioning in your production system. The identity platform does the provisioning run and saves the changes to both the identity platform and the application’s account information.
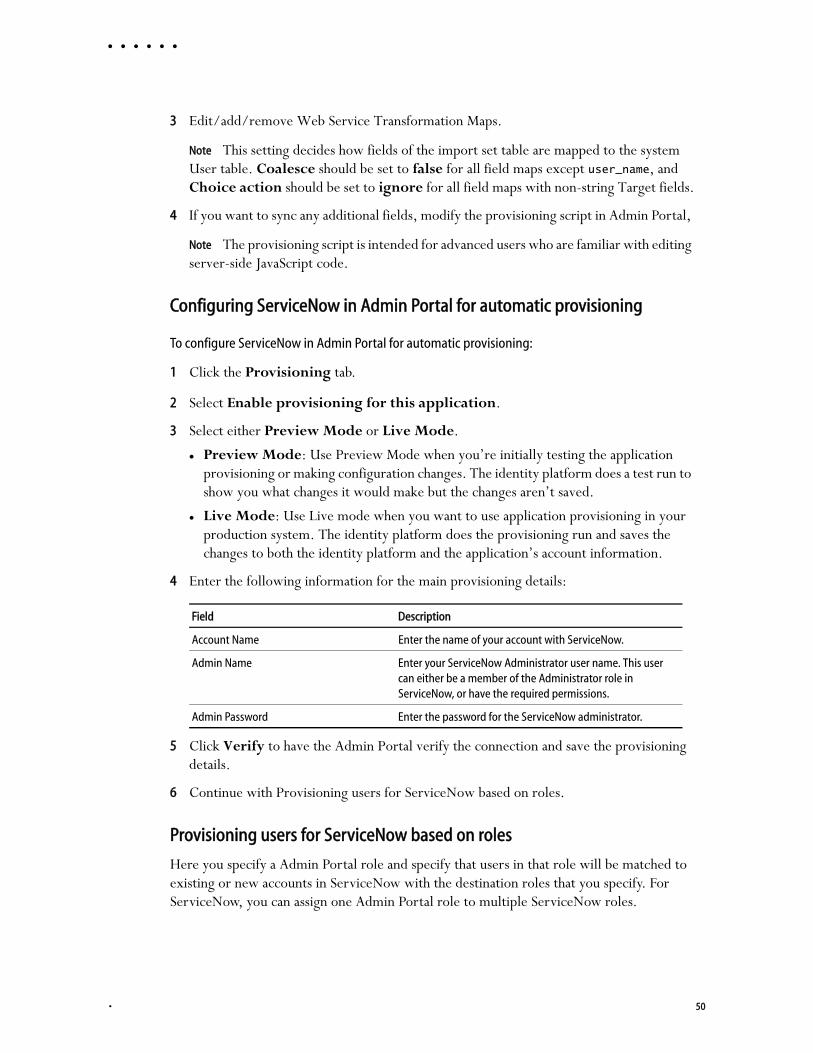
4 Enter the following information for the main provisioning details:
5 Click Verify to have the Admin Portal verify the connection and save the provisioning details.
6 Continue with Provisioning users for ServiceNow based on roles.
Provisioning users for ServiceNow based on roles
Here you specify a Admin Portal role and specify that users in that role will be matched to existing or new accounts in ServiceNow with the destination roles that you specify. For ServiceNow, you can assign one Admin Portal role to multiple ServiceNow roles.
Field Description
Account Name Enter the name of your account with ServiceNow.
Admin Name Enter your ServiceNow Administrator user name. This user can either be a member of the Administrator role in ServiceNow, or have the required permissions.
Admin Password Enter the password for the ServiceNow administrator.
• 50

When you change any role mappings, the Admin Portal synchronizes any user account or role mapping changes immediately.
Note ServiceNow single sign-on uses the email address to uniquely identify user accounts, whereas the ServiceNow provisioning API uses the user name to determine whether an account is unique or a duplicate. This is only an issue if two or more ServiceNow user accounts have the same email address, in which case ServiceNow logs the user in with the first account that matches.
Notes How the Admin Portal determines duplicate user accounts:
If the user accounts in the Admin Portal and the target application match for the fields that make a ServiceNow user unique, then the Admin Portal handles the user account updates according to your instructions. In many applications, the user’s email address or Active Directory userPrincipalName is the primary field used to identify a user—and in many cases, the userPrincipalName is the email address. You can look at the application’s provisioning script to see the fields that the Admin Portal uses to match user accounts.
To automatically provision users with ServiceNow accounts:
1 First, make sure that you’ve entered and verified the provisioning credentials.
2 In the Provisioning page, go to the Sync Options section.
3 Specify how the directory service handles situations when it determines that the user already has an account in the target application.
Sync (overwrite): Updates account information in the target application (this includes removing data if the target account has a value for a user attribute that is not available from the Centrify Identity Services).
Do not sync (no overwrite): Keeps the target user account as it is; Centrify Identity Services skips and does not update duplicate user accounts in the target application.
Do not de-provision (deactivate or delete): The user's account in the target application is not de-provisioned when a role membership change that would trigger a de-provisioning event occurs.
Select Deprovision users in this application when they are disabled in source directory to enable the feature.
If checked, a user will be deprovisioned when they are marked as disabled in the source directory. Deprovisioning behavior and available deprovisioning options depend on what the target application supports.
4 Scroll to the Role Mappings section.
5 To add role mappings and specify which users get provisioned to this application, click Add.
Admin Portal user’s guide 51

The Role Mapping dialog box opens.
6 To map user accounts in Admin Portal to ServiceNow user accounts, select a Role (the ones in Admin Portal) and a Destination role (the ones in ServiceNow).
Tip For best results, assign roles where users are only in one role.
Note For ServiceNow user provisioning, you can assign a Admin Portal role to multiple ServiceNow roles, if desired.
7 Click Done to save the role mapping and return to the Provisioning page.
8 Continue adding role mappings, as desired.
To change a mapping, select the role mapping and click Actions > Modify.
To remove a mapping, select the role mapping and click Actions > Delete.
To change the order of the role mappings, select the role mapping that you want to move higher in the list and click Actions > Move Up.
Tip Provisioning assigns users access and assignments based on the top-most role mapping. The order in which the roles display in the Role Mappings section matters. The role at the top of the list has priority when provisioning users. For instance, if a user is in multiple roles that you’ve mapped for provisioning, the Admin Portal provisions the user based on the role nearer the top of the list. For best results, assign roles where users are only in one role. If users are in multiple roles, rearrange the order of role mappings as desired. For more details, see Setting up app-specific provisioning.
Note The provisioning script is intended for advanced users who are familiar with editing server-side JavaScript code.
9 When you’re done, click Save to save the provisioning details.
Anytime that you make changes to the provisioning role mapping, the Admin Portal runs a synchronization automatically. You can also run a preview synchronization or a real synchronization, if desired.
ServiceNow Password Reset configurationNote If you’re trying to configure the one of the previous versions of ServiceNow (Fuji, Geneva, Helsinki, or Istanbul), you’re in the right place. If you’re trying to configure the current version of ServiceNow (Jakarta), see the Centrify configuration guide for ServiceNow. If you don’t know what version you have, you can find it on the Stats > Stats page in your ServiceNow instance.
You must complete the steps in Configuring ServiceNow for SSO, Configuring ServiceNow in Admin Portal, and ServiceNow provisioning before proceeding with the instructions in this section.
• 52

This following is an overview of the steps required to configure the ServiceNow web application section for provisioned users to reset their passwords from within the ServiceNow app.
Note To use the password reset function, the login authentication policy must be configured to request passwords only (multi-factor authentication must not be enabled in order to use the password reset function). Check the authentication policy controls in the Admin Portal > Core Services > Policies > User Security Policies > Login Authentication.
To configure ServiceNow password reset settings on your ServiceNow domain (an overview)
1 Install and configure the ServiceNow app.
Install the ServiceNow web application in Admin Portal. Configure the ServiceNow app in Admin Portal and on your registered and verified ServiceNow domain. See the Centrify Identity Services application configuration guide for ServiceNow (previous versions) for more information.
2 Configure password reset settings on your ServiceNow domain.
See Configuring ServiceNow for password reset for more information.
Configuring ServiceNow for password reset
Before configuring ServiceNow for password reset, the ServiceNow password reset plugin must be installed. For more information about this plugin, see http://wiki.servicenow.com/index.php?title=Password_Reset.
There are two types of password reset processes: Self service password reset for the ServiceNow app in Admin Portal: the user can go to
their ServiceNow password reset URL and change their own password.
For more information, see Configuring password reset for the ServiceNow app.
Service desk password reset for the ServiceNow app in Admin Portal: an account manager or administrator resets a user’s password from their ServiceNow admin portal.
For more information, see Configuring password reset for the ServiceNow app.
To install the password reset plugin:
1 In your web browser, go to your ServiceNow login URL and log in. For example, you have a login URL such as https://acme.service-now.com where acme is your company instance name.
2 Click System Definition > Plugins.
3 Search for Password Reset.
Admin Portal user’s guide 53

4 Click on the Password Reset plugin.
5 Click Activate.
Configuring password reset for the ServiceNow app
To configure user self-service password reset:
1 In your web browser, go to your ServiceNow login URL and log in. For example, you have a login URL such as https://acme.service-now.com where acme is your company instance name.
2 Click the gear icon at the top right to open Settings.
3 Scroll down to Application and select Centrify Password Reset.
4 In the left pane, click Centrify Password Reset > Properties.
5 Enter the URL of the Centrify cloud.
6 Enter the Admin name and Admin password for the Admin Portal administrator.
7 Click Save.
8 Go to Password Reset > Credential Stores > Centrify Cloud.
9 Click Save & Test Connection to verify whether the connection is configured correctly.
10 In the left pane, click Password Reset > Processes.
11 Click Employee Self-Service Process for Centrify.
12 Under Password Reset Details, make sure that all of these options are checked:
Option Set it to What it does
Enable account unlock Checked If a user is locked in Centrify, there will be an Unlock User button provided during password reset. Clicking the Unlock User button only unlocks the user in the Centrify app. For all users, password reset automatically resets their ServiceNow account.
Auto-generate password Checked Enables automatically-generated passwords.
User must reset password Checked After password reset, the Require password change at next login status is checked for this user in Centrify.
Display password Checked Displays the new password on the screen.
Email password Checked Sends the password to the user’s primary email address.
• 54

13 To provide your users with a password reset URL:
a Make sure the Public access box is checked.
b Specify the URL suffix for your password reset URL.
Note You can direct your users to your password reset URL when they need to reset their passwords. This URL is automatically generated if the Public access box is checked, and is based on the value you specify as your URL suffix.
14 (Optional) To see which verification is used, scroll down to the Verifications list in the Advanced section. You can change the verifications used if desired.
15 Click Update.
16 In the left pane, click Password Reset > Processes.
17 Click Service-Desk Password Reset for Centrify.
18 Make sure that all of these options are checked:
19 Make sure that Public access is not checked.
20 (Optional) To see which verification is used, scroll down to the Verifications list in the Advanced section. You can change the verifications used if desired.
21 Click Update.
22 Log out of your ServiceNow account.
Centrify App Access integration in ServiceNowNote If you’re trying to configure the one of the previous versions of ServiceNow (Fuji, Geneva, Helsinki, or Istanbul), you’re in the right place. If you’re trying to configure the
Option Set it to What it does
Enable account unlock Checked If a user is locked in Centrify, there will be an Unlock User button provided during password reset. Clicking the Unlock User button only unlocks the user in the Centrify app. For all users, password reset automatically resets their ServiceNow account.
Auto-generate password Checked Enables automatically-generated passwords.
User must reset password Checked After password reset, the Require password change at next login status is checked for this user in Centrify.
Display password Checked Displays the new password on the screen.
Email password Checked Sends the password to the user’s primary email address.
Admin Portal user’s guide 55

current version of ServiceNow (Jakarta), see the Centrify configuration guide for ServiceNow. If you don’t know what version you have, you can find it on the Stats > Stats page in your ServiceNow instance.
Centrify App Access enables automatic access and provisioning of applications selected from the ServiceNow Service Catalog. The following is an overview of the steps required to configure Centrify App Access to integrate the Centrify Identity Services with ServiceNow.
Note If you have not completed the configuration steps in Configuring ServiceNow for SSO, Configuring ServiceNow in Admin Portal, and ServiceNow provisioning, any user who will request or approve application access must have a user in the Centrify Identity Services where the username attribute matches the ServiceNow User ID attribute.
To configure Centrify App Access to integrate the Centrify Identity Service with ServiceNow (an overview)
1 Install and configure the ServiceNow app (recommended).
Install the ServiceNow web application in Admin Portal. Configure the ServiceNow app in Admin Portal and on your registered and verified ServiceNow domain. See ServiceNow (previous versions) for more information.
2 Download and configure the Centrify App Access application from the ServiceNow Store.
See Configuring the Centrify App Access application in ServiceNow for more information.
3 In Admin Portal, create role mappings for requesters and approvers (recommended).
See Create role mappings for requesters and approvers for more information.
See the following sections for more information about configuring the Centrify App Access integration. Configuring the Centrify App Access application in ServiceNow
Create role mappings for requesters and approvers
Reviewing the user experience
Troubleshooting
Configuring the Centrify App Access application in ServiceNow
You must install and configure the Centrify App Access application in your ServiceNow instance to enable access and provision users to applications requested from the ServiceNow Catalog.
This procedure requires a ServiceNow account with administrator privileges.
• 56

To download and configure the Centrify App Access application
1 Get Centrify App Access from the ServiceNow Store located at https://store.servicenow.com.
2 Log in to ServiceNow with an admin account and find Centrify App Access under ServiceNow > System Applications > Applications > Downloads, then click Install.
ServiceNow installs Centrify App Access.
3 Go to ServiceNow > Centrify App Access > Admin > Properties, then configure the Centrify Tenant Properties.
4 (Optional) Go to ServiceNow > Centrify App Access > Admin > Properties, then configure the Centrify App Access Default Properties.
5 Set up the sync schedule for syncing applications from the Centrify Identity Services tenant.
a Go to ServiceNow > Centrify App Access > Admin > Customize API Sync.
Property Description
Centrify Cloud Tenant URL The URL for your company’s Centrify tenant. To ensure the Centrify App Access application is configured correctly, do not use a vanity URL.
Centrify Directory Service directory service Account The User Name for a user account with at least Application and Role Management rights.
Centrify Directory Service Account Password The password for the user account with Application and Role Management rights.
Property Description
Default Approval Group Sets the Default Approval Group for all applications instead of per application. This field requires the group GUID.
To retrieve the group GUID, go to ServiceNow > System Security > Users and Groups > Groups, then right click the desired group and select copy sys_id. You can then paste the value into the Default Approval Group field.
Deactivate Applications that haven’t synced in this many days
This field requires an integer representing the desired number of days. Centrify recommends keeping the default value of 1.
Deactivate Roles that haven’t synced in this many days
This field requires an integer representing the desired number of days. Centrify recommends keeping the default value of 1.
Remove Application Role relationships that haven’t synced in this many days
This field requires an integer representing the desired number of days. Centrify recommends keeping the default value of 1.
Admin Portal user’s guide 57

b Check the Active checkbox.
c Use the drop-down menus and Time fields to set the sync interval.
d Either click Update and wait for the scheduled interval, or click Execute Now to sync immediately.
6 Set the Approval Group for each application in ServiceNow > Centrify App Access > Applications, then click the application that you want to set the approval group for.
Note If you prefer, you can set a default approval group for all applications rather than for each application. See Step 4 for more information.
7 (Optional) Mark any users that you want automatically provisioned without going through the approval process as Pre Approved.
a Go to ServiceNow > User Administration > Users, then click the user that you want to mark as Pre Approved.
b Scroll down to the Centrify App Access area and check the Pre Approved checkbox.
Create role mappings for requesters and approvers
To simplify the process of your users requesting and approving applications through the ServiceNow Catalog, Centrify recommends creating the following two role mappings. a role for users end users, mapped to the Destination Role user.
a role for approvers, mapped to two Destination Roles (itil and x_cenr3_app_access.approver).
Note The Destination Role itil gives approvers the ability to process or fulfill requests through the ServiceNow Catalog. The Destination Role x_cenr3_app_access.approver limits approvers scope to the functionality provided under Centrify App Access.
For example:
See Provisioning users for ServiceNow based on roles for more information about provisioning users for ServiceNow using Role Mappings.
Name Destination Role
ServiceNow Approvers Role itil, x_cenr3_app_access.approver
ServiceNow End Users Role user
• 58

Reviewing the user experience
After you configure Centrify App Access to integrate the Centrify Identity Service with ServiceNow, Centrify requesters and approvers have the following user experience.
Troubleshooting
Centrify App Access provides detailed logs for errors you might encounter providing access and provisioning users to applications selected through the ServiceNow Catalog.
Go to ServiceNow > Centrify App Access > Logs to find the logs.
For more information about ServiceNowHere are some useful links where you can learn more about ServiceNow single sign-on:
http://wiki.servicenow.com/?title=External_Authentication_%28Single_Sign-On_-_SSO%29
http://wiki.servicenow.com/index.php?title=Integration_Overview
User Experience
Requester 1 Access ServiceNow through the Centrify user portal.
2 Select Service Catalog > Software > Centrify, then click Centrify App Access.
3 Create the request for the application you need, then click Order Now.
ServiceNow generates a request number that you can use to track the request.4 Once the request is approved, the requester is provisioned and given access to the requested
application.
The application automatically appears in the user’s Centrify user portal.
Approver 1 Access ServiceNow through the Centrify user portal.
2 Select ServiceNow> Centrify App Access., then click My Group Approvals.
3 Assign the task to yourself if you want it to appear in ServiceNow > Centrify App Access. > My Approvals..
4 Close the task by putting the user into a role (you can choose from roles with access to the application), setting Approve Application Access? to Yes, and then clicking Close Task.
Admin Portal user’s guide 59

• 60