Seiko watch guide for watches with movement V172€¦ · su Reloj SEIKO. Por favor, guarde este...
18
Cal. V172 INSTRUCTIONS (P. 4) BEDIENUNGSANLEITUNG (S. 35) INSTRUCTIONS (P. 67) ISTRUZIONI (P. 99) INSTRUCCIONES (P. 131) INSTRUÇÕES (P. 163) ИНСТРУКЦИИ (P. 195) (227 )
Transcript of Seiko watch guide for watches with movement V172€¦ · su Reloj SEIKO. Por favor, guarde este...

Cal. V172
INSTRUCTIONS (P. 4)
BEDIENUNGSANLEITUNG (S. 35)
INSTRUCTIONS (P. 67)
ISTRUZIONI (P. 99)
INSTRUCCIONES (P. 131)
INSTRUÇÕES (P. 163)
ИНСТРУКЦИИ (P. 195)
(227 )

You are now the proud owner of a SEIKO Analogue Quartz Solar Cal. V172. For the best results, please read the instructions in this booklet carefully before using the watch. Please keep this manual handy for ready reference.
Wir gratulieren Ihnen zum Kauf der SEIKO Analog-Quarzuhr mit Solarzelle Kal. V172. Lesen Sie diese Bedienungsanleitung vor der Verwendung aufmerksam durch, um ihre optimale Nutzung zu gewährleisten. Heben Sie diese Bedienungsanleitung gut auf, um jederzeit wieder nachlesen zu können.
Vous êtes maintenant l’heureux propriétaire d’une montre à quartz solaire et analogique SEIKO Cal. V172. Pour en obtenir des performances optimales, veuillez lire attentivement cette brochure avant d'utiliser la montre. Conservez ce manuel pour vous y référer en cas de besoin.
Grazie di aver acquistato questo orologio SEIKO Analogico al Quarzo, Solar Cal. V172. Per poter utilizzare l’orologio al massimo delle sue prestazioni leggere attentamente questo manuale di istruzioni prima di passare all’uso dell’orologio stesso, e conservarlo poi per qualsiasi eventuale futura consultazione.
Usted es ahora un orgulloso propietario de un SEIKO Cuarzo Analógico Solar Cal. V172. Para los mejores resultados, por favor, lea cuidadosamente las instrucciones de este panfleto antes utilizar su Reloj SEIKO. Por favor, guarde este manual en un lugar conveniente para su futura referencia.
Agora pode sentir-se orgulhoso de possuir um Seiko Solar Quartz Analógico Cal. V172. Para obter os melhores resultados, leia atentamente as instruções contidas neste opúsculo antes de usá-lo. Conserve este manual para consultas futuras.
Теперь вы являетесь обладателем аналоговых кварцевых часов Сейко Соляр (Seiko Solar) Калибра V172. Перед использованием их, для достижения лучших результатов, пожалуйста, внимательно ознакомьтесь с данной инструкцией и обязательно сохраните ее.
歡迎購買 V172 機型精工石英指針式太陽能錶。為能更有效地利用本錶,使用本錶前,請仔細閱讀本手冊內的各項使用說明,並妥善保管本手冊,以便今後參考。

5
EnglishEN
GLI
SH
4
CONTENTS PAGE
FEATURES ......................................................................................................5DISPLAY AND BUTTONS ..............................................................................6SCREW-LOCK-TYPE CROWN .......................................................................7SETTING THE TIME AND ADJUSTING THE STOPWATCH HAND POSITION........8SETTING THE DATE .......................................................................................12STOPWATCH ..................................................................................................13SINGLE-TIME ALARM ...................................................................................16HOW TO CHARGE AND START THE WATCH ..............................................19OVERCHARGING PREVENTION FUNCTION ...............................................20GUIDELINE OF CHARGING TIME/ACCURACY ............................................21ENERGY DEPLETION FOREWARNING FUNCTION ....................................22NOTE ON POWER SUPPLY ...........................................................................23IMPROPER FUNCTION .................................................................................24ROTATING BEZEL ..........................................................................................25TACHYMETER ................................................................................................26TELEMETER ..................................................................................................28TROUBLESHOOTING ....................................................................................30SPECIFICATIONS ...........................................................................................34
FEATURESn TIME/CALENDAR n 60-MINUTE STOPWATCH IN 1/5-SECOND INCREMENTS WITH SPLIT TIME
MEASUREMENT FUNCTIONn SINGLE-TIME ALARM WITHIN 12 HOURS n POWERED BY LIGHT ENERGYn NO BATTERY CHANGE REQUIRED (Please refer to page 23 "NOTE ON POWER
SUPPLY")n LASTS FOR 6 MONTHS AFTER FULL CHARGE n ENERGY DEPLETION FOREWARNING FUNCTIONn OVERCHARGING PREVENTION FUNCTION
CAL. V172
7
EnglishEngl
ish
6
ALARM
MIN.1545
30
30
60
39
6
12
60
55 05
1015
5045
3025
20
35
40
60
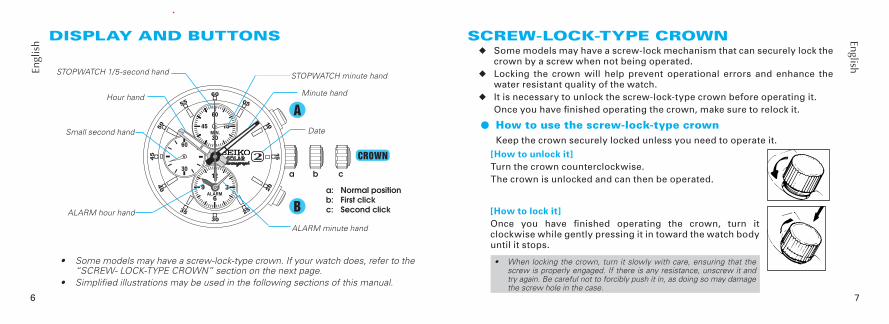
a b c
CROWN
Hour hand Minute hand
STOPWATCH 1/5-second hand STOPWATCH minute hand
ALARM minute hand
Small second hand Date
a: Normal positionb: First clickc: Second clickALARM hour hand
DISPLAY AND BUTTONS
• Somemodelsmayhaveascrew-lock-typecrown.Ifyourwatchdoes,refertothe“SCREW-LOCK-TYPECROWN”sectiononthenextpage.
• Simplifiedillustrationsmaybeusedinthefollowingsectionsofthismanual.
SCREW-LOCK-TYPE CROWNu Some models may have a screw-lock mechanism that can securely lock the
crown by a screw when not being operated. u Locking the crown will help prevent operational errors and enhance the
water resistant quality of the watch. u It is necessary to unlock the screw-lock-type crown before operating it. Once you have finished operating the crown, make sure to relock it.
l How to use the screw-lock-type crown Keep the crown securely locked unless you need to operate it.
• Whenlockingthecrown,turnitslowlywithcare,ensuringthatthescrewisproperlyengaged.Ifthereisanyresistance,unscrewitandtryagain.Becarefulnottoforciblypushitin,asdoingsomaydamagethescrewholeinthecase.
[How to unlock it]Turn the crown counterclockwise. The crown is unlocked and can then be operated.
[How to lock it]Once you have finished operating the crown, turn it clockwise while gently pressing it in toward the watch body until it stops.
A
B

9
EnglishEngl
ish
8
30
60
55 05
1015
5045
3025
20
35
40
60
SETTING THE TIME AND ADJUSTING THE STOPWATCH HAND POSITION
Minute handHour hand
Pull out to the second click when the second hand is at the 12 o'clock position.
Turn to set the hour and minute hands.
Small second hand
1. MAIN TIME SETTING
l This watch is designed so that the following adjustments are made with the crown at the second click position:
1) main time setting 2) alarm hand adjustment 3) stopwatch hand position adjustment
Once the crown is pulled out to the second click, be sure to check and adjust 1) and 2) at the same time. If needed, 3) should also be adjusted then.
30
60
55 05
1015
5045
3025
20
35
40
60
ALARM39
6
12
1. Whenthestopwatchisorhasbeenmeasuring,ifthecrownispulledouttothesecondclick,itwillautomaticallyresettheSTOPWATCHhandsto“0.”
2. Ifthealarmhasbeensetandthecrownispulledouttothesecondclick,theALARMhandswillturntoindicatethecurrenttime.
3. Itisrecommendedthatthehandsbesettothetimeafewminutesaheadofthecurrenttime,takinginto consideration the time required to set the ALARM hands and to adjust the STOPWATCH hand positionifnecessary.
4. Whensettingthehourhand,besuretocheckthatAM/PMiscorrectlyset.Thewatchdesignedsothatthedatechangesoncein24hours.
5. Whensettingtheminutehand,firstadvanceit4to5minutesaheadofthedesiredtimeandthenturnitbacktotheexactminute.
2. ALARM HAND ADJUSTMENT
Hour hand Minute hand
ALARM hour hand ALARM minute hand
Press repeatedly to set the ALARM hands to the time indicated by the main time hands.
I Set the ALARM hands to the time the main time hands indicate.
TheALARMhandsmovequicklyifButtonBiskeptpressed.
CROWN
CROWN
B
B

11
EnglishEngl
ish
10
MIN.1545
30
60
55 05
1015
5045
3025
20
35
40
60
3. STOPWATCH HAND POSITION ADJUSTMENT
STOPWATCH minute hand
t
t
Press for 2 seconds.TheSTOPWATCHminutehandturnsafullcircle.
Press repeatedly to set the STOPWATCH minute hand to the "0" position.
Press for 2 seconds.
Press repeatedly to set the STOPWATCH 1/5-second hand to the "0" position.
tSTOPWATCH 1/5-second hand The STOPWATCH 1/5-second hand turns a
fullcircle.
t
I If the STOPWATCH hands are not in the "0" position, follow the procedure below to set them to the "0" position.
ThehandmovesquicklyifButtonBiskeptpressed.
ThehandmovesquicklyifButtonBiskeptpressed.
t
t
l The ALARM and STOPWATCH hands can be readjusted in the following order by pressing Button for 2 seconds.
STOPWATCHminute hand
▲ STOPWATCH1/5-second hand
▲
ALARM hands
* The ALARM hands advance12hours. * The STOPWATCH minute
handturnsafullcircle.* T h e S T O P WAT C H
1/5-second hand turns afullcircle. ▲
Push back into the normal position in accordance with a time signal.
Afterall theadjustmentsarecompleted,checkthatthemaintimeandalarmhandsindicatethesametime.
A
B
A
B
A
B
A
CROWN

13
EnglishEngl
ish
12
55 05
1015
5045
3025
2035
40
60
SETTING THE DATEl Before setting the date, be sure to set the main time.
Pull out to the first click. t
Turn clockwise until the desired date appears. t
Push back into the normal position.
Date
1. ItisnecessarytoadjustthedateattheendofFebruaryand30-daymonths.2. Donotsetthedatebetween9:00p.m.and1:00a.m.Otherwise,thedatemaynotchangeproperly.3. DonotpressButtonBwhenthecrownisatthefirstclickposition,asthiswillmovetheALARM
hands.
MIN.1545
30
60
55 05
1015
5045
3025
20
35
40
60
STOPWATCHl The stopwatch can measure up to 60 minutes in 1/5-second increments.
When the measurement reaches 60 minutes, the stopwatch automatically stops.
l Split time measurement is available.
I Before using the stopwatch, be sure to check that the crown is set at the normal position and that the STOPWATCH hands are reset to the "0" position.
STOPWATCH minute hand
STOPWATCH 1/5-second hand
• IftheSTOPWATCHhandsdonotreturntothe“0”positionwhenthestopwatchisresetto“0,”followtheprocedurein“SETTINGTHETIMEANDADJUSTINGTHESTOPWATCHHANDPOSITION”.
CROWN
A
B

15
EnglishEngl
ish
14
<How to reset the stopwatch>WHILE THE STOPWATCH HANDS ARE MOVING
1. Press Button A to stop the stopwatch.2. Press Button B to reset the stopwatch.
WHILE THE STOPWATCH HANDS ARE STOPPEDOne of the following stopwatch operations has been made. Reset the stopwatch accordingly.
[When the stopwatch is stopped]1. Press Button B to reset the stopwatch.[When the split time measurement is displayed while the stopwatch is measuring]1. Press Button B to release the split time display. The stopwatch hands
move quickly, and then indicate the measurement in progress.2. Press Button A to stop the stopwatch.3. Press Button B to reset the stopwatch.[When the split time measurement is displayed and the stopwatch is stopped]1. Press Button B to release the split time display. The stopwatch hands
move quickly, and then stop.2. Press Button B to reset the stopwatch.
Accumulated elapsed time measurement
ASTART
ASTOP RESTART
t t ASTOP RESET
BtA t
RestartandstopofthestopwatchcanberepeatedbypressingButtonA.
Split time measurement
ASTART SPLIT
t t ASTOP RESET
BttB B
MeasurementandreleaseofsplittimecanberepeatedbypressingButtonB.
SPLIT RELEASE
Measurement of two competitors
ASTART
t t BRESET
BttB AFINISH TIME OF 1ST COM-
PETITOR
2ND COMPETI-TOR FINISHES
FINISH TIME OF 2ND COM-
PETITOR
Standard measurement
A A Bt t
START STOP RESET

17
EnglishEngl
ish
16
ALARM39
6
12
55 05
1015
5045
3025
20
35
40
60
B
SINGLE-TIME ALARMl The alarm can be set to ring only once at a designated time within the
coming 12 hours.l The alarm time can be set in one minute increments.l You can preview the alarm sound by using the sound demonstration
function.
I Before using the alarm, check that the ALARM hands are adjusted to the current time. (See "SETTING THE TIME AND ADJUSTING THE STOPWATCH HAND POSITION")
ALARM TIME SETTING
ALARM minute hand
Pull out to the first click.
B
t
t
Press repeatedly to set the desired alarm time.
Push back into the normal position.
Thealarmisautomaticallyengaged.ALARM hour hand
TheALARMhandsmovequicklyifButtonBiskeptpressed.
l HOW TO STOP THE ALARM
At the designated time the alarm rings for 20 seconds, and it is automatically disengaged as it stops. To stop it manually, press Button A or B.
1. Thesingle-timealarmcannotbesetforatimemorethan12hoursaheadofthecurrenttime.WhileyoukeepButtonBpressedtoadvancetheALARMhandsquickly,theystopwhentheyindicatethecurrenttimeandthealarmisdisengaged.Inthatcase,releaseButtonB,andthen,pressandholdthebuttonagaintosettheALARMhandstothedesiredtime.
2. Whilethecrownisatthenormalposition,theALARMhandsindicatethecurrenttimewhenthealarmisdisengagedandthedesignatedalarmtimewhenitisengaged.
1. Whilethestopwatchismeasuring,thealarmringsdifferentlythanusual.However,thisisnotamalfunction.
2. Whilethealarmisringing,pressingButtonAorBwillonlystopthealarm,andnostopwatchoperationcanbemade.CROWN
CROWN
Pull out to first click.
Press for longer than 3 seconds. The alarm sound can be heard while Button A is kept pressed.
ALARM SOUND DEMONSTRATION FUNCTION
t
55 05
1015
5045
3025
20
35
40
60
ACROWN
A

19
EnglishEngl
ish
18
ALARM39
6
12
55 05
1015
5045
3025
20
35
40
60
HOW TO CHARGE AND START THE WATCHu When you start the watch or when the energy in the rechargeable battery is
reduced to an extremely low level, charge it sufficiently by exposing the watch to light.
1 Expose the watch to sunlight or s trong artificial light.
Whenthewatchhasstoppedoperating,thesecondhandwillstartmovingat2-secondintervals.
See“GUIDELINEOFCHARGINGTIME/ACCURACY.”
2 Keep the watch exposed to the light until the second hand moves at 1-second intervals.
3 When the watch is charged af ter i t has completely stopped, set the date and time before wearing the watch.
l HOW TO CANCEL THE ALARM TIME YOU HAVE SET
Pull out to the first click.
t
t
Press and hold until the ALARM hands stop and indicate the current time.
Push back into the normal position.
• Tocorrectthealarmtimeyouhaveset,followtheproceduredescribedin“ALARMTIMESETTING.”
CROWN
B
CROWNB

21
EnglishEngl
ish
20
Caution for chargingl When charging the watch, do not place it too close to a photoflash
light, spotlight, incandescent light or other light sources as the watch temperature will become extremely high, causing damage to the parts inside the watch.
l When exposing the watch to sunlight to charge it, do not leave it on the dashboard of a car, etc., for a long time, as the watch temperature will become extremely high.
l While charging the watch, make sure the watch temperature does not exceed 60 °C.
CAUTION
OVERCHARGING PREVENTION FUNCTIONNo matter how long the secondary battery is charged, the performance of the watch will not be degraded. When the secondary battery becomes fully charged, the overcharging prevention function will be automatically activated to prevent it from being charged further.
v The above table provides only a general guideline.
GUIDELINE OF CHARGING TIME/ACCURACY
Environment/Lightsource (lux)V172
A (minutes) B (hours) C (hours)
General offices/ Fluorescent light (700) 150 60 -
30W20cm/ Fluorescent light (3000) 33 13 110
Cloudy weather/Sunlight (10000) 9 3.5 30
Fair weather/Sunlight (100000) 2 0.6 5
Expected life per charge from full charge to stoppage 6 months
Loss/gain (monthly rate)Less than 15 seconds when the watch
is worn on your wrist at a normal temperature range (5 ºC to 35 ºC)
Operational temperature range -10 ºC to 60 ºC
A: Time to charge 1 day of power B: Time required for steady operationC: Time required for full charge
u The watch operates while charg ing e lect r ic i ty by converting light received on the dial to electrical energy. It cannot properly operate unless the remaining energy is sufficient. Place or store the watch in a location receiv ing l ight etc. , to sufficiently charge electricity.
• W h e n t h e w a t c h i sstopped or the second h a n d s t a r t s m o v i n g at 2-second intervals, charge the watch by exposing it to light.
• The time required forc h a r g i n g t h e w a t c h var ies depending on the calibres. Check the calibre of your watch engraved on the back cover.
• It is recommended thatthe watch be charged for as long as the charging time "B" to assure the stable movement of the watch.

23
EnglishEngl
ish
22
ENERGY DEPLETION FOREWARNING FUNCTIONl When the energy stored in the rechargeable battery is reduced to an extremely
low level, the second hand starts moving at 2-second intervals instead of the normal 1-second intervals. The watch remains accurate even while the second hand is moving at 2-second intervals.
l When this occurs, recharge the watch as soon as possible by exposing it to light. Otherwise, the watch may stop operating in a few days. (For recharging the watch, see “HOW TO CHARGE AND START THE WATCH”)
• Whilethesecondhandismovingat2-secondintervals,thestopwatchcannotbeactivated.Thisisnotamalfunction.
• Ifthesecondhandstartstomoveat2-secondintervalswhilethestopwatchisoperating,thestopwatchwillbeautomaticallystoppedandthestopwatchhandswillreturntothe“0”position.
• Whilethesecondhandismovingat2-secondintervals,thealarmtimecannotbeset.
• Ifthetimereachesthealarmtimewhilethesecondhandismovingat2-secondintervals,thealarmwillnotsound,andthealarmwillbeautomaticallycancelled.
NOTE ON POWER SUPPLYl The battery used in this watch is a rechargeable battery, which is different
from ordinary silver oxide batteries. Unlike other disposable batteries such as dry-cell batteries or button cells, this rechargeable battery can be used over and over again by repeating the cycles of discharging and recharging.
l The capacity or recharging ef f iciency of the rechargeable bat tery may gradually deteriorate for various reasons such as long-term use or usage conditions. Worn or contaminated mechanical parts or degraded oils may also shorten recharging cycles. If the efficiency of the rechargeable battery decreases, it will be necessary to have the watch repaired.
l Do not remove the rechargeable battery yourself. Replacement of the rechargeable battery requires professional knowledge and skill. Please ask a watch retailer for replacement of the rechargeable battery.
l Installation of an ordinary silver oxide battery can generate heat that can cause bursting and ignition.
CAUTION
v TO PREVENT THE ENERGY DEPLETION
• When wearing the watch, make sure that the watch is not covered by clothing.
• When the watch is not in use, leave it in a bright place as long as possible.

25
EnglishEngl
ish
24
IMPROPER FUNCTIONWhen an abnormal display appears, follow the procedures below to reset the built-in IC. The watch will resume its normal operation.
<HOW TO RESET THE IC>
ALARM
MIN.1545
30
30
60
39
6
12
60
55 05
1015
5045
3025
20
35
40
601. Pull out the crown to the second click.
2. Keep pressing down Button A and B for 3 seconds or longer.
3. Push the c rown back in to the normal position and check if the s mal l s e c ond hand move s a s normal.
ROTATING BEZEL (for models with rotating bezel)l The rotating bezel can show up to 60 minutes of elapsed time.
1 Turn the rotating bezel to align its " " mark with the minute hand.
Note:Forsomemodels,therotatingbezelrotatesonlycounterclockwise.
Start
Elapsedtime
2 Read the number on the rotating bezel that the minute hand points to.
30minuteshaveelapsed.
B
A
CROWN
• ResettingtheICwillinitializethewatch.Beforestartingtousethewatch,itwillbenecessarytosetthetimeandadjusttheSTOPWATCHhandstothe“0”position.Refer to“SETTINGTHETIMEANDADJUSTINGTHESTOPWATCHHANDPOSITION”sectionofthismanual.

27
EnglishEngl
ish
26
TACHYMETER(for models with tachymeter scale on the dial)
l Tachymeter scale can be used only when the time required is less than 60 seconds.
TO MEASURE THE HOURLY AVERAGE SPEED OF A VEHICLE
Use the stopwatch to determine how many seconds it takes to go 1 km or 1 mile.
Tachymeter scale indicated by the STOPWATCH 1/5-second hand gives the average speed per hour.
Ex. 1
STOPWATCH 1/5- secondhand:
40seconds
Tachymeterscale:"90"
“90” (tachymeter scale figure) x 1 (km or mile)= 90 km/h or mph
Ex. 2: If the measuring distance is extended to 2 km or miles or shortened to 0.5 km or miles and the STOPWATCH 1/5-second hand indicates “90” on tachymeter scale:
"90" (tachymeter scale figure) x 2 (km or mile) = 180 km/h or mph "90" (tachymeter scale figure) x 0.5 (km or mile) = 45 km/h or mph
TO MEASURE THE HOURLY RATE OF OPERATION
Use the stopwatch to measure the time required to complete 1 job.
1
Tachymeter scale indicated by the STOPWATCH 1/5-second hand gives the average number of jobs accomplished per hour.
2
Ex. 1
STOPWATCH 1/5- secondhand:20seconds
Tachymeterscale:"180"
“180” (tachymeter scale figure) x 1 job= 180 jobs/hour
Ex. 2: If 15 jobs are completed in 20 seconds:
"180" (tachymeter scale figure) x 15 jobs = 2700 jobs/hour
1
2

29
EnglishEngl
ish
28
TELEMETER (for models with telemeter scale on the dial)lThe telemeter can provide a rough indication of the distance to the source of
light and sound.lThe telemeter indicates the distance from your location to an object that emits
both light and sound. For example, it can indicate the distance to the place where lightning struck by measuring the time elapsed after you see a flash of lightning until you hear the sound.
lA flash of lightning reaches you almost immediately while the sound travels to you at a speed of 0.33 km/second. The distance to the source of the light and sound can be calculated on the basis of this difference.
lThe telemeter scale is graduated so that the sound travels at a speed of 1 km in 3 seconds.*
*Undertheconditionoftemperatureof20° C(68° F)
The telemeter provides only a rough indication of the distance to the place where lightning struck, and therefore, the indication cannot be used as the guideline to avoid the danger of lightning. It should also be noted that the speed of the sound differs depending on the temperature of the atmosphere where it travels.
HOW TO USE THE TELEMETER
Before beginning, check that the stopwatch has been reset.
START(Flash of light)
STOP (Crash of thunder)
Press Button A to start the stopwatch as soon as you see light.
When you hear the sound, press Button A to stop the stopwatch.
Read the telemeter scale that the STOPWATCH 1/5- second hand points to.
Approx. 3 km
• PleasenotethattheSTOPWATCH1/5-secondhandmovesin1/5-secondincrementsanddoesnotalways pointexactlytothegraduationsofthetelemeterscale.Thetelemeterscalecanbeusedonlywhenthemeasuredtimeislessthan60seconds.
3
2
1
CAUTION

31
EnglishEngl
ish
30
TROUBLESHOOTINGTroubles Possible causes
The watch stops operating. The energy has been depleted.
The small second hand moves at two-second intervals. The energy is running short.
The stopped watch has been charged for longer than the time required for full charge, but the second hand does not resume one-second interval movement.
The light the watch has been exposed to was too weak.
The built-in IC has fallen into an unstable condition.
The watch temporarily gains or loses time.
The watch has been left or worn in extremely high or low temperatures.
The watch has been left close to an object with a strong magnetic field.
You have dropped the watch, hit it against a hard surface or worn it while playing active sports. The watch was exposed to strong vibrations.
Solutions
If you often encounter this problem even though you wear the watch everyday, the watch may not be exposed to sufficient light while you wear it. For example, the watch may be covered by the cuff of clothing. Recharge the watch sufficiently by exposing it to light.
The time required for charging will vary depending on the intensity of light. Recharge the watch referring to "GUIDELINE OF CHARGING TIME/ACCURACY."
Reset the watch by following the instructions in “IMPROPER FUNCTION."
Return the watch to a normal temperature so that it works accurately as usual, and then reset the time. The watch has been adjusted so that it works accurately when it is worn on your wrist under a normal temperature range between 5 ºC and 35 ºC.
Correct this condition by moving and keeping the watch away from the magnetic source. If this action does not correct the condition, contact the retailer from whom the watch was purchased.
Reset the time. If the watch does not return to its normal accuracy after resetting the time, contact the retailer from whom the watch was purchased.

33
EnglishEngl
ish
32
Troubles Possible causes
The STOPWATCH hands do not return to the "0" position when the stopwatch is reset.
Affected by external sources, or because the internal IC had been reset, the stopwatch hand positions have moved out of correct alignments.
Although the alarm time has not been set, the time on the alarm sub dial and the time on the main dial are not the same.
The watch has been left close to an object with a strong magnetic field. The watch has been exposed to strong vibrations.
The inner surface of the glass is clouded.
Moisture has entered the watch because the gasket has deteriorated.
The date changes during the day. The time is set 12 hours ahead of or behind the correct time.
Solutions
Adjust the STOPWATCH hands to the "0" position by following the instructions in “SETTING THE TIME AND ADJUSTING STOPWATCH HAND POSITION”
Reset the time for main dial and alarm sub dial.
Contact the retailer from whom the watch was purchased.
Reset the time correctly, referring to “SETTING THE TIME AND ADJUSTING STOPWATCH HAND POSITION”
• Intheeventofanyotherproblem,pleasecontacttheretailerfromwhomthewatchwaspurchased.
Engl
ish
34
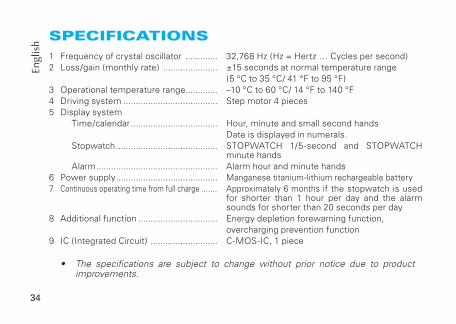
SPECIFICATIONS1 Frequency of crystal oscillator ............. 32,768 Hz (Hz = Hertz … Cycles per second)2 Loss/gain (monthly rate) ...................... ±15 seconds at normal temperature range (5 °C to 35 °C/ 41 °F to 95 °F)3 Operational temperature range............. –10 °C to 60 °C/ 14 °F to 140 °F4 Driving system ...................................... Step motor 4 pieces5 Display system Time/calendar ................................... Hour, minute and small second hands Date is displayed in numerals. Stopwatch ......................................... STOPWATCH 1/5-second and STOPWATCH
minute hands Alarm ................................................. Alarm hour and minute hands 6 Power supply ......................................... Manganese titanium-lithium rechargeable battery7 Continuous operating time from full charge ....... Approximately 6 months if the stopwatch is used
for shorter than 1 hour per day and the alarm sounds for shorter than 20 seconds per day
8 Additional function ................................ Energy depletion forewarning function, overcharging prevention function9 IC (Integrated Circuit) ........................... C-MOS-IC, 1 piece
• The specifications are subject to change without prior notice due to productimprovements.