SeeYou Helpdownload.naviter.com/seeyou/seeyou.pdf · 4 SeeYou Help © 1995 - 2014 ... Naviter...
131
© 1995 - 2014 ... Naviter d.o.o. SeeYou Help for version 6.03 Updated 01/03/2014
Transcript of SeeYou Helpdownload.naviter.com/seeyou/seeyou.pdf · 4 SeeYou Help © 1995 - 2014 ... Naviter...

© 1995 - 2014 ... Naviter d.o.o.
SeeYou Help for version 6.03
Updated 01/03/2014

SeeYou HelpI
© 1995 - 2014 ... Naviter d.o.o.
Table of Contents
Foreword 0
Part I Introduction 2
................................................................................................................................... 21 What is SeeYou
................................................................................................................................... 22 Installing and uninstalling
................................................................................................................................... 33 Registering SeeYou
................................................................................................................................... 44 How to contact Naviter
Part II Getting started 7
................................................................................................................................... 71 Viewing a flight
................................................................................................................................... 82 Using the 3D view
................................................................................................................................... 93 Viewing multiple flights
................................................................................................................................... 94 Animating flights
................................................................................................................................... 105 Using desktops
................................................................................................................................... 126 Picture Gallery in SeeYou
................................................................................................................................... 147 Managing waypoints
................................................................................................................................... 158 Planning a badge and record flight
................................................................................................................................... 169 Planning FAI Triangles
................................................................................................................................... 1710 Planning Assigned Area tasks
................................................................................................................................... 1811 Downloading flights
................................................................................................................................... 1912 Working with SeeYou Mobile
................................................................................................................................... 2013 Uploading competition to Soaring Spot
................................................................................................................................... 2214 SeeYou Cloud
Part III Main SeeYou Windows 24
................................................................................................................................... 241 Flight window
.......................................................................................................................................................... 25Route w indow
.......................................................................................................................................................... 263D window
.......................................................................................................................................................... 27Graph window
.......................................................................................................................................................... 29Statistics report
......................................................................................................................................................... 30General information
......................................................................................................................................................... 30Declared task
......................................................................................................................................................... 31Flight, task, leg or selection statistics
......................................................................................................................................................... 35Flight Phase statistics
.......................................................................................................................................................... 35Panels
......................................................................................................................................................... 36Instruments panel
......................................................................................................................................................... 36Pictures panel
......................................................................................................................................................... 38Airspace violation panel
......................................................................................................................................................... 38Optimization panel
.......................................................................................................................................................... 39Using desktops
................................................................................................................................... 392 Waypoints window

IIContents
II
© 1995 - 2014 ... Naviter d.o.o.
.......................................................................................................................................................... 40Large Icons view
.......................................................................................................................................................... 41Details view
.......................................................................................................................................................... 41List view
.......................................................................................................................................................... 42Map view
.......................................................................................................................................................... 42Home waypoint
................................................................................................................................... 423 Tasks window
.......................................................................................................................................................... 43Task list
.......................................................................................................................................................... 44List view
.......................................................................................................................................................... 44Map view
.......................................................................................................................................................... 44FAI Triangle assistant
................................................................................................................................... 454 Competition window
Part IV Menu commands 47
................................................................................................................................... 471 File
.......................................................................................................................................................... 47Open
.......................................................................................................................................................... 48Save As...
......................................................................................................................................................... 48Saving f lights
......................................................................................................................................................... 49Saving w aypoints
.......................................................................................................................................................... 50Close
.......................................................................................................................................................... 50Close All
.......................................................................................................................................................... 50Search...
.......................................................................................................................................................... 50Mobile Wizard
.......................................................................................................................................................... 51Connection w izard
.......................................................................................................................................................... 52Page Setup
......................................................................................................................................................... 52Page tab
......................................................................................................................................................... 53for Flights
......................................................................................................................................................... 54for Waypoints
......................................................................................................................................................... 54for Tasks
.......................................................................................................................................................... 55Print preview
.......................................................................................................................................................... 56Print
.......................................................................................................................................................... 56Exit
................................................................................................................................... 572 Edit
.......................................................................................................................................................... 57for Flight w indow
......................................................................................................................................................... 57Go To Location
......................................................................................................................................................... 57Select Active Flight
......................................................................................................................................................... 58Selection
......................................................................................................................................................... 58Add f light
......................................................................................................................................................... 58Remove f light
......................................................................................................................................................... 59Flight properties
......................................................................................................................................... 59Flight page
......................................................................................................................................... 59Task page
......................................................................................................................................... 60Observation Zones
......................................................................................................................................... 60Task options
......................................................................................................................................... 60Photos
......................................................................................................................................... 60Start points
......................................................................................................................................... 61Source page
......................................................................................................................................... 61Misc
......................................................................................................................................................... 61Task declaration
......................................................................................................................................................... 61Assign Task
......................................................................................................................................................... 62Optimize
......................................................................................................................................................... 62Waypoints
......................................................................................................................................................... 62Tasks

SeeYou HelpIII
© 1995 - 2014 ... Naviter d.o.o.
.......................................................................................................................................................... 62for Waypoints w indow
......................................................................................................................................................... 62Go to location
......................................................................................................................................................... 62Home w aypoint
......................................................................................................................................................... 63Edit w aypoint
......................................................................................................................................................... 64Add w aypoint
......................................................................................................................................................... 64Remove w aypoint
......................................................................................................................................................... 65Import Waypoints
......................................................................................................................................................... 65Waypoints
......................................................................................................................................................... 65Tasks
.......................................................................................................................................................... 65for Tasks window
......................................................................................................................................................... 65Go to location
......................................................................................................................................................... 66Insert w aypoint to task
......................................................................................................................................................... 66Delete w aypoint from task
......................................................................................................................................................... 66Home Waypoint
......................................................................................................................................................... 66Add Task
......................................................................................................................................................... 67Remove Task
......................................................................................................................................................... 67Copy Task
......................................................................................................................................................... 67Task Properties
......................................................................................................................................... 68Observation Zones
......................................................................................................................................... 69Options
......................................................................................................................................................... 70Waypoints
......................................................................................................................................................... 70Tasks
................................................................................................................................... 713 View
.......................................................................................................................................................... 71for Flight w indow
......................................................................................................................................................... 71Route
......................................................................................................................................................... 713D view
......................................................................................................................................................... 72Graph
......................................................................................................................................................... 72Statistics
......................................................................................................................................................... 73Show
......................................................................................................................................................... 73Instruments
......................................................................................................................................................... 73Flight parameters
......................................................................................................................................................... 74Photos
......................................................................................................................................................... 74Legend
......................................................................................................................................................... 74Airspace violation
......................................................................................................................................................... 74Colors
......................................................................................................................................................... 76Zoom
......................................................................................................................................................... 76Toolbars
......................................................................................................................................................... 76Status bar
.......................................................................................................................................................... 76for Waypoints w indow
......................................................................................................................................................... 76Large icons
......................................................................................................................................................... 76List
......................................................................................................................................................... 77Details
......................................................................................................................................................... 77Map
......................................................................................................................................................... 77Sort Waypoints
......................................................................................................................................................... 77Zoom
......................................................................................................................................................... 78Toolbars
......................................................................................................................................................... 78Status bar
.......................................................................................................................................................... 78for Tasks window
......................................................................................................................................................... 78List
......................................................................................................................................................... 78Map
......................................................................................................................................................... 78Task information
......................................................................................................................................................... 79Show FAI Area
......................................................................................................................................................... 79Rotate FAI Area
......................................................................................................................................................... 79Zoom

IVContents
IV
© 1995 - 2014 ... Naviter d.o.o.
......................................................................................................................................................... 80Toolbars
......................................................................................................................................................... 80Status bar
................................................................................................................................... 804 Animate
.......................................................................................................................................................... 80Play
.......................................................................................................................................................... 80Pause
.......................................................................................................................................................... 81Stop
.......................................................................................................................................................... 81Previous thermal
.......................................................................................................................................................... 81Previous position
.......................................................................................................................................................... 82Next position
.......................................................................................................................................................... 82Next thermal
.......................................................................................................................................................... 82Animation rate
.......................................................................................................................................................... 83Synchronization
................................................................................................................................... 835 Tools
.......................................................................................................................................................... 83Raster Maps
......................................................................................................................................................... 83About Raster Maps
......................................................................................................................................................... 84Add Raster Maps
......................................................................................................................................................... 86Remove Raster Maps
......................................................................................................................................................... 86Convert to CMR
......................................................................................................................................................... 88Edit properties of Raster Maps
.......................................................................................................................................................... 89Vector Maps
......................................................................................................................................................... 89About Vector Maps
......................................................................................................................................................... 89Add Vector Maps
......................................................................................................................................................... 90Remove Vector Maps
......................................................................................................................................................... 90Edit properties for Vector Maps
.......................................................................................................................................................... 92Airspace
.......................................................................................................................................................... 93Pilots
.......................................................................................................................................................... 94Polars
.......................................................................................................................................................... 95Options
......................................................................................................................................................... 95General
......................................................................................................................................................... 96Folders
......................................................................................................................................................... 96Flight
......................................................................................................................................................... 98Graphs
......................................................................................................................................................... 99Statistics
......................................................................................................................................................... 993D view
......................................................................................................................................................... 101Animation
......................................................................................................................................................... 101Map appearance
......................................................................................................................................................... 102Vector maps
......................................................................................................................................................... 104Airspace
......................................................................................................................................................... 104Task planning
......................................................................................................................................................... 105Optimization
......................................................................................................................................................... 106Observation Zone
......................................................................................................................................................... 106Proxy
......................................................................................................................................................... 107Miscellaneous
................................................................................................................................... 1086 Window
.......................................................................................................................................................... 108New window
.......................................................................................................................................................... 108Tile Horizontally
.......................................................................................................................................................... 108Tile Vertically
.......................................................................................................................................................... 108Desktops
.......................................................................................................................................................... 108Open windows
................................................................................................................................... 1087 Help
.......................................................................................................................................................... 108SeeYou Help
.......................................................................................................................................................... 108What's this?
.......................................................................................................................................................... 108SeeYou on the Web

SeeYou HelpV
© 1995 - 2014 ... Naviter d.o.o.
.......................................................................................................................................................... 109Registration
.......................................................................................................................................................... 109Check for updates
.......................................................................................................................................................... 109About
Part V Toolbars 111
................................................................................................................................... 1111 Standard
................................................................................................................................... 1122 Flight
................................................................................................................................... 1133 Animate
................................................................................................................................... 1134 Waypoint
................................................................................................................................... 1145 Task
................................................................................................................................... 1146 Edit Task
................................................................................................................................... 1157 Preview
Part VI Using Keyboard and Mouse 117
................................................................................................................................... 1171 Use SeeYou effectively
Index 120

Part
I

SeeYou Help2
© 1995 - 2014 ... Naviter d.o.o.
1 Introduction
1.1 What is SeeYou
SeeYou is flight analysis and planning software.
It combines powerful features with intuitive interface. Comprehensive statistics, free vector maps, directcommunication with flight recorders and numerous other functions which make SeeYou an essential toolfor glider pilots and competition organizers.
1.2 Installing and uninstalling
1. Downlad the latest SeeYou version fromhttp://www.naviter.com/2. Run wcusetup.exe or pcusetup.exe3. Follow the on-screen instructions to complete the installation
If you accept all of the default settings SeeYou will be installed in the folderc:\Program Files (x86)\Naviter\SeeYou
All data which will be downloaded by SeeYou will be stored in the folderc:\ProgramData\Naviter\SeeYou
Uninstalling SeeYouIt is recommended that you uninstall SeeYou from the Add/Remove programs feature in WindowsControl Panel.

Introduction 3
© 1995 - 2014 ... Naviter d.o.o.
1.3 Registering SeeYou
Buying SeeYouPlease purchase your Naviter products through your nearest Naviter Dealer. If there isn’t one in yourcountry you can also buy SeeYou directly from Naviter at www.naviter.comThank you!
SeeYou SubscriptionIn order to be able to use all of the features of the software at all times we will help you to make sureyour SeeYou Subscription is always up to date. For as long as your SeeYou Subscription is active you willbe able to use all features and all of the latest versions of SeeYou.
Registering SeeYouThe registration of SeeYou is conducted using SeeYou Cloud and is uniform and simple regardlesswhether you are using SeeYou on your PC, Mac, Smartphone or Tablet device. All you have to do is loginto SeeYou Cloud with your email address and the SeeYou Cloud password.
You can check the status of your Naviter licenses here:https://cloud.soaringspot.com/resetting/requestIf you forgot your password you can use the recover password functionality there too.

SeeYou Help4
© 1995 - 2014 ... Naviter d.o.o.
If you are still unable to register SeeYou, please contact our Support team at [email protected]
Order SeeYou on-line athttp://www.naviter.com/
1.4 How to contact Naviter
Before contacting Technical Support, you should first search Help for an answer. If that doesn't solve theproblem, you can obtain product support in several ways:
SeeYou Support Forumhttp://forum.naviter.com/
SeeYou websitehttp://www.naviter.com

Introduction 5
© 1995 - 2014 ... Naviter d.o.o.
Check our website regularly for updates, news, tips and tricks and make sure you subscribe to ourSupport Forum and RSS feeds in order to always be up-to-date with the developments at Naviter.
Our addressYou can reach us by snail mail atNaviter d.o.o.Gradnikova 894240 RadovljicaSloveniaEurope

Part
II

Getting started 7
© 1995 - 2014 ... Naviter d.o.o.
2 Getting started
2.1 Viewing a flight
Viewing flights is one of the main reasons you will want to use SeeYou in the first place.
What you need is IGC flight files stored somewhere on the disk. Once you know where they are, you maygo to File > Open , use the standard Windows graphics interface to select a flight file you would like toopen. You can also double click on an IGC file in Windows Explorer or drag and drop it to SeeYou:
Once the Flight file is read, it is automatically opened in 2D view. By using the View menu or icons in thetoolbar, you may change the view to either Route , 3D , Graph or Statistics . To enhance theexperience, you may turn on Flight parameters and the Legend . They will tell you more about theflight through a simple set of numbers and bars.
To move the glider along the track use the Arrow keys and Animation buttons . They will allow youto position the glider symbol anywhere on the flight to examin flight parameters at any given time of theflight. To further enhance the viewing experience, use the Desktops .
Picture above shows an example of a flight window with multiple flights over vector maps, with flightparameters and legend, undocked Animation toolbar and mouse-right click menu.
See alsoViewing multiple flightsUsing destopsAnimating flightsUsing the 3D view
47
25 26 27 29
73 74
117 113
10
9
10
9
8

SeeYou Help8
© 1995 - 2014 ... Naviter d.o.o.
2.2 Using the 3D view
Viewing flights in 3D view is one of the most spectacular features in SeeYou. Make sure you have theTerrain and Satellite imagery loaded for your area before you can understand why this is one ofSeeYou's most spectacular features.
All you need to do is Open a flight and change the view to 3D through Edit > 3D view or by pressing
the icon. Allow some time for the 3D view to build up.
Once you have the window that resembles the image above, you may use the mouse or keyboard tochange the perspective. With these mouse gestures you may be the ultimate cameramen for you andyour friends:. Press the left mouse button and move the mouse - this will change perspective. Press the right mouse button and move the mouse up or down - this will zoom the viewing point in andout. Press both mouse buttons simultaneously and move the mouse left or right to change the animationspeed. Ctrl + F7 will put you in and out of a view mode relative to the glider
If you prefer to use the keyboard over the mouse:. Up and Down arrows will Zoom the viewpoint in and out . Press Shift together with Left or Right arrow to rotate the view horizontally. Press Shift together with Up or Down arrows to rotate the view vertically
47

Getting started 9
© 1995 - 2014 ... Naviter d.o.o.
See alsoUsing desktopsUsing Keyboard and MouseOptions - 3D view
2.3 Viewing multiple flights
Viewing flights is by no means limited to viewing a single flight. Simultaneously you may load as manyflights as you wish and then compare the routes different pilots took on a given day. More and morecompetition organizers are publishing tracks on their websites. There is no better way to learn than tocompare your flights to the flights of the other competitors.
Once you have the flights you need, you may use one of the methods to open them simultaneously. . Drag and drop several flight files from Windows Explorer to the SeeYou window
. Use the File > Open dialog, select several flight files and click open
. Add flights to existing flights in a Flight window through Edit > Add Flight
Once you have them open you may assign the same task to everyone through Edit > Assign Taskdialog. You will need to have created a Task everyone was flying beforehand. The one thing you willwant to do with the open flights is to animate the flight tracks. By simply pressing the Play button you willget a real-time replay of what was going on in the air. There is however more to the story. You may alsocreate a maggot race where everyone starts at the same time and do some other interestingcomparisons this way. Please read more about Animating flights in the Getting started chapter of thismanual.
Consider using desktops to have lots more information available at a single glance.
See alsoViewing a flightUsing destopsAnimating flightsUsing the 3D view
2.4 Animating flights
Animating multiple flights must be one of the most entertaining things you will be doing with SeeYou.
By default the Play button will start to animate flights in real time. That is, positions of the gliders
10
117
99
47
61
15
9
10
7
10
9
8

SeeYou Help10
© 1995 - 2014 ... Naviter d.o.o.
will be the same as they were in real flights. You can see who was following whom and where the othercompetitors were when you had that stonking lift.
That is however not the only way to look at a day of flying. You may wish to organize a Maggot racewhere everyone starts at the same time. In an animation like that you can clearly see who was in thefront at each moment of the race. Some preparation is neccessary:1. You need to Create the task everyone was flying2. You need to select Animate > Synchronization > Start time . The list below the selection box shouldgive you the start times of everyone you are animating.3. Press the Play button and everyone will leave the start line at the same time.
See alsoViewing a flightViewing multiple flightsUsing destopsAnimating flightsUsing the 3D view
2.5 Using desktops
Using desktops will significantly improve the way you can view single or multiple flights. There are somebuilt-in desktops while others are freely configurable. Give it some thought about what you want to see toreally enjoy your setup.
1. Open a flight or multiple flights.
15
83
7
9
10
9
8
47

Getting started 11
© 1995 - 2014 ... Naviter d.o.o.
2. Select Window > New Window3. Repeat this procedure, until you get the desired number of windows.4. Resize the windows to fit your screen as you wish.5. Choose content for each window (Route , 3D , Graph , Statistics ).6. Choose color scheme for each window (Altitude, Vario, Gps status, Multiple flights...).7. You can choose from Route, Barogram, Variogram and other graphs and Statistics. You can also
have more windows showing the same thing, only differently - two Route windows, one with 300km,the other with 5km zoom, one with altitude and one with Vario color scheme, one with multiple andthree with single flights...
8. Save this layout through Window > Desktops > Save desktop... command
Next time you start SeeYou:1. Open any other flight(s)2. Choose Window > Desktops > Your Desktop3. You have other flights in the same window layout as before.
Here are some examples of different desktops:
108
71 26 72 72
74

SeeYou Help12
© 1995 - 2014 ... Naviter d.o.o.
See alsoViewing a flightViewing multiple flightsUsing destopsAnimating flightsUsing the 3D view
2.6 Picture Gallery in SeeYou
In version 4.2 a very nice feature was added in SeeYou - the ability to link photographs to your flight andcreate a stunning slideshow.
Adding pictures is a lot of fun even if you are not planning to show them to friends. Do you have lots ofpictures from your flights and you have lots of IGC files? Try dropping the pictures on your flight openedin SeeYou. If the camera time and UTC offset in SeeYou are in sync your pictures will automatically belocated where you took them (if they are not you can easily offset the pictures so that they will fit the
7
9
10
9
8
Getting started 13
© 1995 - 2014 ... Naviter d.o.o.
flight).
How to attach photos from your flight to your IGC files
First the prerequisites for the automatics to work well:1. Make sure that in SeeYou > Tools > Options > UTC offset matches the UTC offset of your flight2. Hopefully your camera date and time and/or time zone was set correctly when you took the pictures(make sure this is true for all your future pictures)
If these conditions are met then you can add photos by1. Opening your IGC file in SeeYou2. Drag & Drop the pictures from Windows Explorer to the SeeYou flight windowor2. Right click on the flight then Photos > Attach from File or Attach from Folderor
2. Edit > Flight properties > Photos > to add files or to add a all pictures from a folder
That's all really if the UTC offset and camera time were correct.
Manipulating the Photo panel
By clicking on a picture in the photo panel that picture becomes the active one and the glider positionmoves to the position where the picture has been taken.
Double clicking on the picture will open it in your default picture viewer in full size.
Rolling the mouse scroll wheel when hovered over the Photo panel will change the active photo (andconsecutively will move the glider position).
During the animation of a flight (Animate > Play) only the location of the active picture is presented witha photo icon on the map. As animation passes the next photo the Photo panel moves and active photoicon changes.
You may resize and dock the Photo panel just as any other panel. You may even move it to yoursecond monitor if you wish.
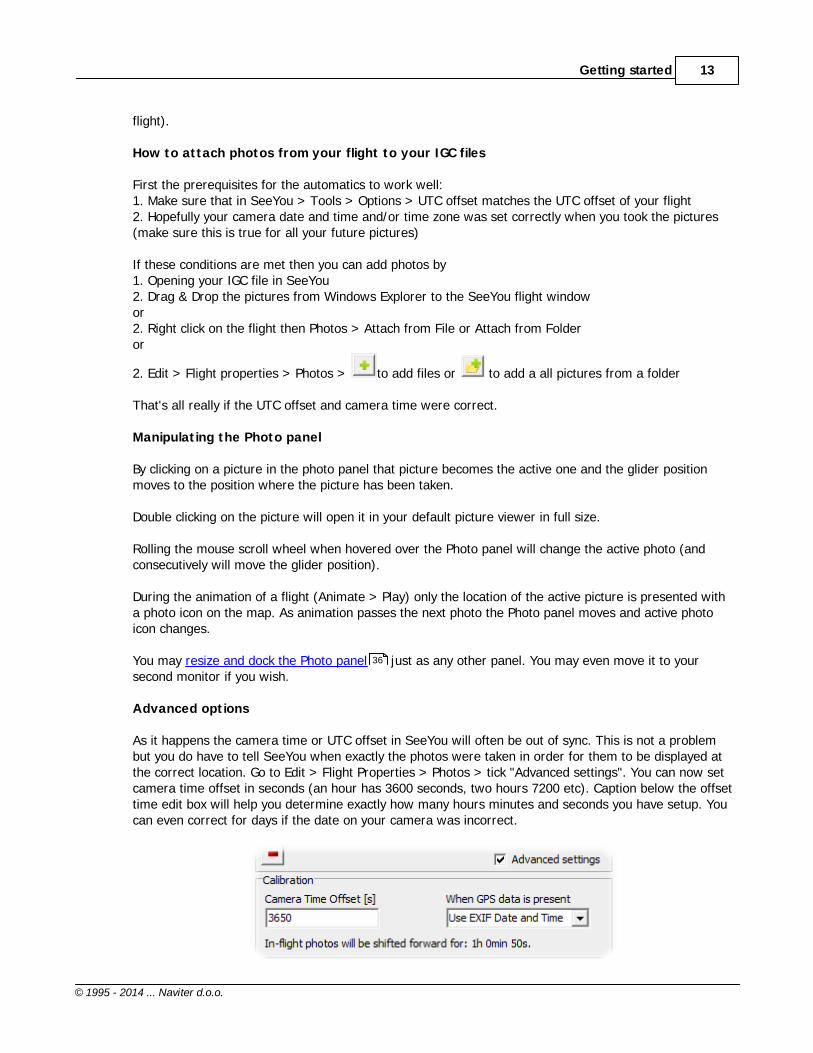
Advanced options
As it happens the camera time or UTC offset in SeeYou will often be out of sync. This is not a problembut you do have to tell SeeYou when exactly the photos were taken in order for them to be displayed atthe correct location. Go to Edit > Flight Properties > Photos > tick "Advanced settings". You can now setcamera time offset in seconds (an hour has 3600 seconds, two hours 7200 etc). Caption below the offsettime edit box will help you determine exactly how many hours minutes and seconds you have setup. Youcan even correct for days if the date on your camera was incorrect.
36
SeeYou Help14
© 1995 - 2014 ... Naviter d.o.o.
Please note: pictures taken before the takeoff will be attached to the first few fixes in the file. Picturestaken after landing will be attached to the last fixes of the IGC file. It makes a great impression to have apicture of the glider, airport or the people who have helped you get started as the first picture in yourIGC file.
Conveniently share with friends or on your blog in IGCX format
Once you have added all the pictures that you wanted to attach to the IGC file you may save the IGC filewith File > Save. Links to full resolution pictures on your hard drive will be added to the IGC file withoutloosing the IGC file integrity. This is great for viewing the files on your one and only computer.
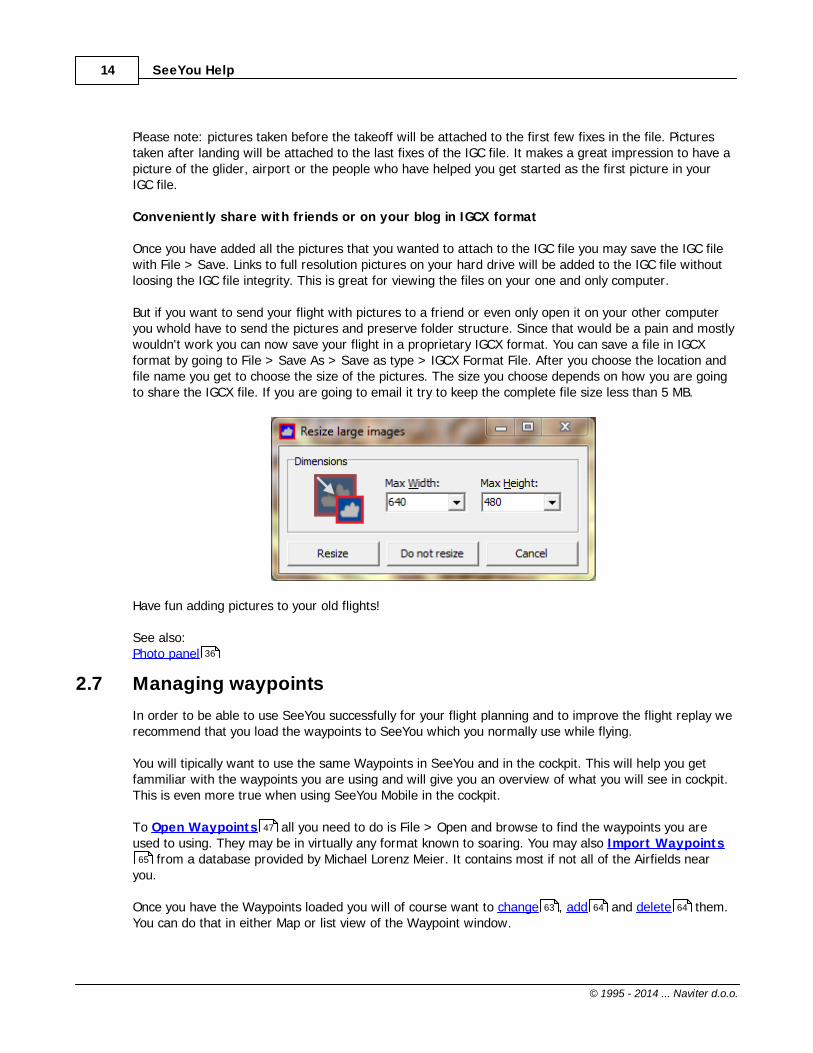
But if you want to send your flight with pictures to a friend or even only open it on your other computeryou whold have to send the pictures and preserve folder structure. Since that would be a pain and mostlywouldn't work you can now save your flight in a proprietary IGCX format. You can save a file in IGCXformat by going to File > Save As > Save as type > IGCX Format File. After you choose the location andfile name you get to choose the size of the pictures. The size you choose depends on how you are goingto share the IGCX file. If you are going to email it try to keep the complete file size less than 5 MB.
Have fun adding pictures to your old flights!
See also:Photo panel
2.7 Managing waypoints
In order to be able to use SeeYou successfully for your flight planning and to improve the flight replay werecommend that you load the waypoints to SeeYou which you normally use while flying.
You will tipically want to use the same Waypoints in SeeYou and in the cockpit. This will help you getfammiliar with the waypoints you are using and will give you an overview of what you will see in cockpit.This is even more true when using SeeYou Mobile in the cockpit.
To Open Waypoints all you need to do is File > Open and browse to find the waypoints you areused to using. They may be in virtually any format known to soaring. You may also Import Waypoints
from a database provided by Michael Lorenz Meier. It contains most if not all of the Airfields nearyou.
Once you have the Waypoints loaded you will of course want to change , add and delete them.You can do that in either Map or list view of the Waypoint window.
36
47
65
63 64 64

Getting started 15
© 1995 - 2014 ... Naviter d.o.o.
Managing multiple Waypoint databasesYou may want to have a separate waypoint database for your home airfileld and places you will gosoaring.
One thing you should know is that the waypoints that are opened by SeeYou when it starts are stored inthe Points.CUP file located in the same folder where SeeYou is installed. Changes you make to thewaypoints while running SeeYou are stored back to Points.CUP when you exit SeeYou.
The best way to manage multiple Waypoint databases is to store each one in a separate CUP (SeeYouWaypoint format) file.
1. After you have designed a database for a particular site (e.g. Lesce-Bled), save it under LesceBled.cup2. Create a new database for Gariep Dam for example. Save these points under GariepDam.cup
When you want to manage the Waypoint from Lesce-Bled again, simply File->Open the LesceBled.cupfile and do not append waypoints to the database. This way, your old waypoints are deleted, only newones remain in the software.
To find more information about Waypoint management, please read more aboutWaypoints windowAdding WaypointsRemoving WaypointsEditing WaypointsImporting WaypointsHome WaypointOpen Waypoint databasesSave Waypoint databasesImport Waypoints from database
2.8 Planning a badge and record flight
Planning flights is important for everyone who is trying to maximize the weather conditions. SeeYouoffers you a graphical tool to setup tasks.
Task with preset waypoints
49
49
47
39
64
64
63
65
42
47
49
65

SeeYou Help16
© 1995 - 2014 ... Naviter d.o.o.
1. To start planning flights, open the Tasks window
2. Select View > Map from the main menu or click on the icon to change view
3. To create a new task choose Edit > Add Task or the icon4. Click on the Start point, 1st Point, 2nd Point of your task in correct sequence. 5. Finish adding waypoints by pressing ESC button once.
That's all. You have created a new task.
Task without preset WaypointsTo create a task where its waypoints are not in the Waypoints database, press and hold the Shift key.Each click will create a new waypoint. New waypoints will have a name such as _Point_123. You canchange the name and other properties of this point by clicking the mouse right button over it andselecting Edit Waypoint .
See also:Tasks windowTask information windowFAI Triangle assistant
2.9 Planning FAI Triangles
FAI Triangles are considered Formula 1 in Cross Country soaring for many. You may be trianglespecialist or novice. You will always need help with defining FAI triangle waypoints.
There is no easy way to plan an FAI Triangle. It takes time and preparation. Mountain ranges will have tobe crossed and airspace avoided. Lots of terrain will be covered with many different types of weather.Thorough local and weather knowledge is required to plan for the largest of triangles. SeeYou tries tomake flight planning as easy as possible.
First you need to create a task that roughly resembles what you are going to fly. Define your waypointsby clicking on them in Map view or entering them manually in List view (see Planning a badge and recordflight for more on this subject). Then switch to View > Map mode.
Turn the FAI Triangle Assistant on by selecting View > Show FAI Area (Ctrl + E). Press Ctrl+R (View >Rotate FAI Area) to Rotate the Area over Task legs. Press Ctrl+R several times to see what it is doing.Once you have it located over the turnpoint you are trying to optimize, stop pressing Ctrl+R. Click on theWaypoint and drag it into place. When it is inside the FAI Area, the Task has a shape of an FAI Triangle.
66
63
42
78
44
15

Getting started 17
© 1995 - 2014 ... Naviter d.o.o.
As noted above - there is no quick way to create an optimum FAI Triangle. You have the tools, now youneed to use your imagination and experience to minimize the difficulty of rounding the Turnpoints.
See alsoTasks windowManaging WaypointsPlanning a badge and record flight
2.10 Planning Assigned Area tasks
Assigned Area tasks are growing increasingly popular with Competition organizers. They test imaginationand forecasting ability of the competing pilots. They also offer safety in terms of being able to avoid adifficult to predict bad weather areas.
In Assigned Area tasks, pilots must pass pre-declared areas in a given order. The fixes that producelongest distance (one from each area) become actual waypoints used for distance and speedcomputations.
To design an Assigned Area Task, follow this procedure:1. Design a normal task ,2. Choose Edit->Task Properties ,3. Change Type to "Assigned Area Task",4. Choose Observation Zones tab,5. Design each observation zone separately,
To Assign an assigned are task to a flight or competition day, select Edit > Assign Task while viewing theflight or competition day.
See alsoTask windowPlanning a badge and record flightTask Properties > Observation ZonesTask Properties > Options
42
14
15
15
67
68
42
15
68
69

SeeYou Help18
© 1995 - 2014 ... Naviter d.o.o.
2.11 Downloading flights
SeeYou can communicate with an increasing number of flight recorders. The Connection Wizard dialogallows you to connect to several types of loggers through a uniform user interface. For the gettingstarted tutorial it would probably be best if we tell you how to do it on a specific device.
Example of communication with a ColibriColibri is a famous FAI approved logger from LX Navigation. It is well known in gliding as well asparagliding and hanggliding. It will therefore feature as an example of how communication goes withSeeYou.
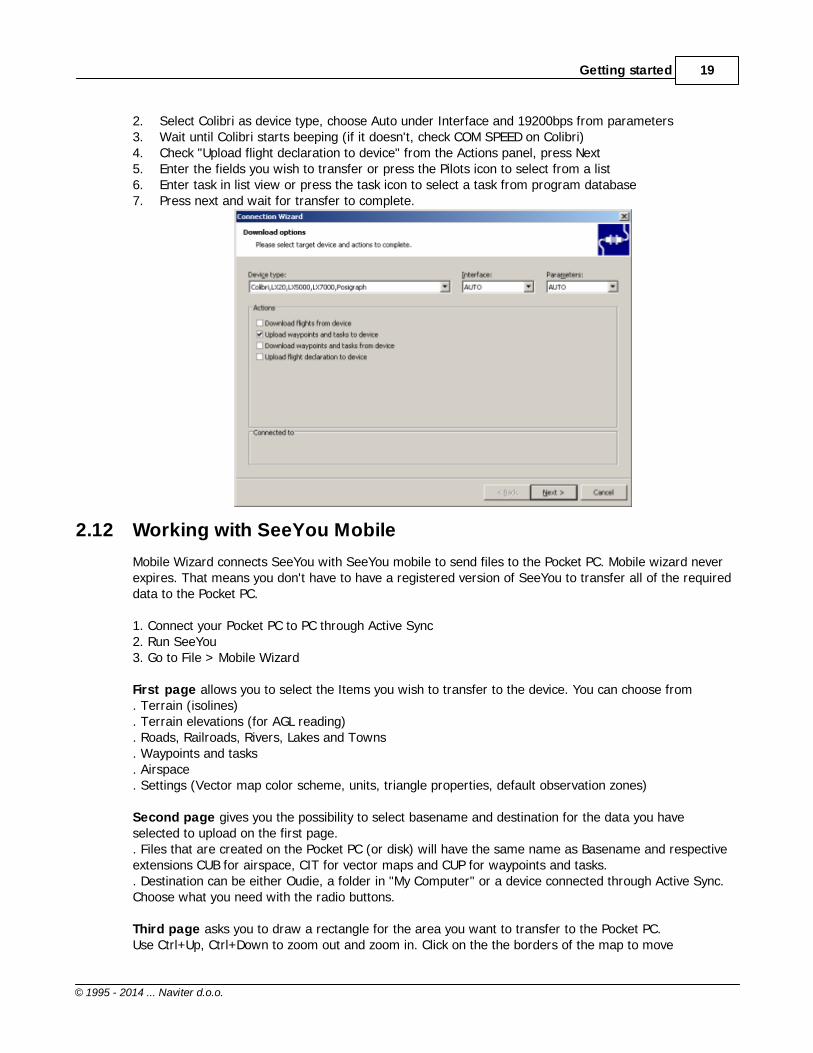
Download flight1. Select "File->Connection Wizard" from the menu or press F92. Select Colibri as device type, choose Auto under Interface and 19200bps from parameters3. Wait until Colibri starts beeping (if it doesn't, check COM SPEED on Colibri)4. Check "Download flights from device" under from the Actions panel, press Next5. Flight list is being downloaded. Wait until you see a list of flights.6. Select the destination folder for the flights (last used maps are in the combo box)7. Select the flights you want to download (newest flight is selected as default)8. Check the box "Open flights after download" if you wish9. Press Next, then wait for the transfer to completeYou are done. Open the flights from the folder where you have stored them or they may already be open if you checkedthe box under 8.
Upload waypoints and tasksColibri uploads waypoints and tasks as one.1. Select "File->Connection Wizard" from the menu or press F92. Select Colibri as device type, choose Auto under Interface and 19200bps from parameters3. Wait until Colibri starts beeping (if it doesn't, check COM SPEED on Colibri)4. Check "Upload waypoints and tasks to device" from the Actions panel, press Next5. Select whether you want to upload from the database in SeeYou or a file that you already have on
the disk6. Press Next7. Select which waypoints you want to upload (all are selected by default)8. Press Next9. Select which tasks you want to upload (all tasks are selected by default)10. Press Next and wait until transfer is finished.
Download waypoints and tasksColibri downloads waypoints and tasks as one.1. Select "File->Connection Wizard" from the menu or press F92. Select Colibri as device type, choose Auto under Interface and 19200bps from parameters3. Wait until Colibri starts beeping (if it doesn't, check COM SPEED on Colibri)4. Check "Download waypoints and tasks from device" from the Actions panel, press Next5. Wait until waypoints and tasks are downloaded from the device6. Select the waypoints you want to save, press Next7. Select the tasks you want to save, press Next8. Select whether you want to save them to program database or a file9. Press Next and you are done.
Upload flight declaration1. Select "File->Connection Wizard" from the menu or press F9
Getting started 19
© 1995 - 2014 ... Naviter d.o.o.
2. Select Colibri as device type, choose Auto under Interface and 19200bps from parameters3. Wait until Colibri starts beeping (if it doesn't, check COM SPEED on Colibri)4. Check "Upload flight declaration to device" from the Actions panel, press Next5. Enter the fields you wish to transfer or press the Pilots icon to select from a list6. Enter task in list view or press the task icon to select a task from program database7. Press next and wait for transfer to complete.
2.12 Working with SeeYou Mobile
Mobile Wizard connects SeeYou with SeeYou mobile to send files to the Pocket PC. Mobile wizard neverexpires. That means you don't have to have a registered version of SeeYou to transfer all of the requireddata to the Pocket PC.
1. Connect your Pocket PC to PC through Active Sync2. Run SeeYou3. Go to File > Mobile Wizard
First page allows you to select the Items you wish to transfer to the device. You can choose from . Terrain (isolines). Terrain elevations (for AGL reading). Roads, Railroads, Rivers, Lakes and Towns . Waypoints and tasks. Airspace. Settings (Vector map color scheme, units, triangle properties, default observation zones)
Second page gives you the possibility to select basename and destination for the data you haveselected to upload on the first page.. Files that are created on the Pocket PC (or disk) will have the same name as Basename and respectiveextensions CUB for airspace, CIT for vector maps and CUP for waypoints and tasks.. Destination can be either Oudie, a folder in "My Computer" or a device connected through Active Sync.Choose what you need with the radio buttons.
Third page asks you to draw a rectangle for the area you want to transfer to the Pocket PC.Use Ctrl+Up, Ctrl+Down to zoom out and zoom in. Click on the the borders of the map to move

SeeYou Help20
© 1995 - 2014 ... Naviter d.o.o.
horizontally and vertically. This is the same procedure as in the othe r Map views in SeeYou.
Note that if the maps for this area have not been downloaded yet you will be prompted to download themaps before proceeding.
Fourth page shows progress in transferring or saving files.
Once the transfer has completed successfully, you may close Mobile wizard with the Finish button.
If you get a connection error, first check whether or not SeeYou Mobile was closed on the Pocket PC. It isimportant to understand the difference between the "X" button in Pocket PC and "X" button in desktopWindows. The "X" on Pocket PC works more like "minimize" in Windows. To really quit SeeYou Mobileyou need to go to Menu > Next > "Exit".
You know SeeYou Mobile is not running when it is not listed under Start > Settings > System > Memory> Running programs. If it's there, stop it.
Then you will be able to communicate with SeeYou Mobile through Mobile Wizard.
2.13 Uploading competition to Soaring Spot
The core functionality of Soaring Spot (http://www.SoaringSpot.com/) allows you to manage glidingcompetitions online. If you are trying to organize a competition you need to stop worrying about howyou are going to upload results to the internet or where you are going to publish news about yourcompetition. Soaring Spot is the way to go and there is more than enough features there to cover basicand advanced needs you may have as competition manager.
There are three simple steps that you need to go through to start the competition at Soaring Spot:
1. Acquiring a competition keyneeds to be done through the email address [email protected] a request for Soaring Spot key and we will get back to you with key and instructions how toproceed.
2. Registering a competition at Soaring SpotFirst you need to sign in to Soaring Spot. Then enter the Competition key into the Competition Key formin the Manage Competition section of "MyAccount":

Getting started 21
© 1995 - 2014 ... Naviter d.o.o.
After that you must fill out all the required information including Official competition title, Shortcompetition title, Competition begin and end date, Competition location, Country , UTC offset and Class(es) of the competition (most important). For more information on these essential elements of SoaringSpot please read the Add or Edit Competition through MyAccount chapter:
3. Setting up the CUC file in SeeYou Competitionyou need to make sure of two operations:1. Enter the competition key to Edit > Contest Properties > Options > Registration key
2. Make sure that you have selected correct class in Edit > Contest Properties > General > Class

SeeYou Help22
© 1995 - 2014 ... Naviter d.o.o.
If you have completed the Setup correctly, then all you need to do is choose
Edit > Publish to Internet (or corresponding toolbar icon )to send competition data to Soaring Spot each time there is some news.
2.14 SeeYou Cloud
SeeYou Cloud is something that links all of the Naviter software into one seamless package.
You can login to SeeYou Cloud athttps://cloud.soaringspot.com/resetting/request
These are the very most basic features SeeYou Cloud has to offer:. Information about your Naviter licenses and expiration dates. Secure private online backup for your gliding related files. Access to your flights from PC, Mac, Smartphone and Tablets
For DevelopersSeeYou Cloud has an open REST/JSON API which you are welcome to use. Please write to [email protected] in order to gain access to the API.

Part
III

SeeYou Help24
© 1995 - 2014 ... Naviter d.o.o.
3 Main SeeYou Windows
SeeYou has four main windows:
Flight window where flights are displayed and analyzed.Waypoints window for managing databases of waypoints.Tasks window for designing tasks.Competition window for contest scoring.
3.1 Flight window
The Flight window is the main window in SeeYou.
All flights are viewed and analyzed over Vector maps in the Flight window. View flights in colors byselecting a color scheme . Choose the appropriate graph . Explore the Statistics for the flight.View more flights in the same window to see what other pilots have done or follow the flight in 3D. Run an animation to see the flight tactics of other pilots. Create desktops to view flights inmultiple windows.
The Flight window has four view options:Route window3D windowGraph windowStatistics window
See also How to use desktops to maximize the information viewed on screen.
Example of multiple flight windows opened, all showing one flight. The big one is 3D view, upper right isRoute the third one is Graph window with barogram view:
24
39
42
45
74 72 29
9 8
9 10
25
26
27
29
10

Main SeeYou Windows 25
© 1995 - 2014 ... Naviter d.o.o.
3.1.1 Route window
Route window shows flights over Vector or Raster maps .
Select View > Route from the main menu or use the icon to change view to Route window.
Route window showsFlight track of the open flight (or multiple flights)Flight tracks are painted in the active color schemeZoom value , which can be set through a combo box on the Standard ToolbarFlight parameters (if enabled)Legend (if enabled)Standard , Flight and Animate Toolbars
For shortcuts to the most important features click the mouse right-button.
Buttons at the bottom left corner of the main window (W A R V) turn these graphics on and off:Waypoints - WAirspace - AVector maps - VRaster maps - RPicutre icons - Pdistance measuring mode
You may right-click the R button in order to quickly turn a group of Raster maps on or off. See also AboutRaster Maps for more on how to group raster maps.You may also right click on the W button. A dialog will open that allows you to select which types of
89 83
71
74
76 111
73
74
111 112 113
83

SeeYou Help26
© 1995 - 2014 ... Naviter d.o.o.
waypoints you would like to display on the screen.
The F2 key switches between three modes:Zoom mode. Clicking mouse left button and dragging it over the screen will zoom into the selectedareaPan mode. Clicking mouse left button and dragging it over the screen will move the mapMeasure mode. Clicking mouse left button and dragging it over the screen will measure distance andbearing between two points
See alsoUsing desktopsUsing Keyboard and MouseTask optimizationOptions - Flight
Example of a flight window with multiple flights over vector maps, with flight parameters and legend,undocked Animation toolbar and mouse-right click menu:
3.1.2 3D window
In the 3D view you can analyze flights in the third dimension.
3D window showsFlight track of the open flight (or multiple flights)3D Terrain (if enabled)Flight tracks are painted in the active color schemeFlight parameters (if enabled)Legend (if enabled)Airspace in 3D (if loaded and enabled)Standard , Flight and Animate Toolbars
Create an animation of single or multiple flights, then use your mouse to do the camerawork. Like this:
108
117
62
96
74
73
74
92
111 112 113

Main SeeYou Windows 27
© 1995 - 2014 ... Naviter d.o.o.
Left button and move - change perspectiveRight button and up/down - zoom in/outBoth buttons and left/right - animation speed
Use the keyboard to do the same like this:Up/Down arrows - Zoom in/Zoom outShift + Left/Right - Rotate the view horizontallyShift + Up/Down - Rotate the view vertically
Ctrl + F7 will put you in and out of a view mode relative to the glider.Ctrl + F12 will tell you all parameters about focus, camera position and orientation.
See alsoUsing desktopsUsing Keyboard and MouseTask optimizationOptions - 3D view
Flight dispayed over 3D maps combined with satellite images
3.1.3 Graph window
In the Graph window six graphs are possible. Choosing a color scheme enables you to view additionaldata on one graph.
108
117
62
99
74

SeeYou Help28
© 1995 - 2014 ... Naviter d.o.o.
Select View > Graph from the main menu or use the icon from the Flight toolbar to change viewto Graph window.
Switch between graphs by pressing the again.
Graphs featured in SeeYou:AltitudeGPS AltitudeVertical speedTask speedGround speedFix accuracyEngine noise level
You can control the appearance and behavior of the graph by:setting the color scheme for the graphsetting the zoomenabling the Legendenabling Flight parametersusing Mouse right click
See AlsoUsing Keyboard and MouseUsing DesktopsOptions - Graph page
Example of a Graph window in Baroram view and with Ground speed color scheme. Flight parameters,Legend and mouse right-key menu are visible:
112
74
76
74
73
117
108
98

Main SeeYou Windows 29
© 1995 - 2014 ... Naviter d.o.o.
3.1.4 Statistics report
SeeYou features comprehensive statistics for the active flight.
Select View > Statistics from the main menu or use the icon from the Flight toolbar.
There are four pages for the statistics report:Flight - gives you the stats for the flight from take off to landingTask - gives you the stats for the declared taskSelection - gives you the stats for the selection you have made. This page is empty if no selection isdefinedPhases - gives you a list of all phases of your flight which you can sort on any available value
Doubleclicking in various sections of the Statistics report opens different windows:Flight properties in the General section and Flight statistics sectionFlight properties - Task in the Declared task section and Task pageSelection dialog in the Selection page
See also:General informationDeclared taskFlight, Task and selection statisticsFlight phase statisticsOptions - Statistics
Example of the statistics window with bars and wind vectors:
72
59
59
58
30
30
31
35
99

SeeYou Help30
© 1995 - 2014 ... Naviter d.o.o.
3.1.4.1 General information
This section gives you the info on the pilotthe glidertake off and landing times the duration of flightSurise and Sunset times for the take-off position and landing-position respectively
See also:StatisticsDeclared taskFlight, Task and selection statisticsFlight phase statisticsOptions - Statistics
3.1.4.2 Declared task
This section gives you this information about the task:Valid or invalid declaration (in the example, the task was entered after the flight making the taskdeclaration NOT VALID)
Date and time of the creation of task declarationTake off and landing pointsGeneral statistics for the flown task is entered in columns representing - name of the point, - Latitude/Longitudes, - leg distance, - altitude at the turning point, - time at the turning point, - leg time - achieved speed for the leg (start and finish times are interpolated to the nearest second)- average wind for the leg- average wind component on the leg
Below this section there is a section about the total result for the task:
29
30
31
35
99

Main SeeYou Windows 31
© 1995 - 2014 ... Naviter d.o.o.
The information on how turnpoints were reached. If a turnpoint was missed, but the distance to thepoint was less than Near enough distance, set in the Options window, then the point will be calculatedas reached, but this line will have an error message telling you that sector was not reached at thatturnpoint.distance of the taskduration of the flight on taskspeed achieved on taskif the task is a triangle, triangle speed is displayed last
Double click in this section will open Flight properties in the Task page .
See also:StatisticsGeneral informationFlight, Task and selection statisticsFlight phase statisticsOptions - Statistics
3.1.4.3 Flight, task, leg or selection statistics
The Flight statistics section (in the Flight page of Statistics) contains the same structure of data as theTask and Selection pages.
The data is structured into the General sectionCircling tableStraight flight tableBar graphs and Histograms
General section for the specified section (this is the only section not included in Flight statistics of theFlight page) contains information about:
flown distance on the task or leg, start and finish time of the section, duration achieved speed for this section.
XC speed is the speed that would have been achieved if the pilot had climbed back to the start altitude
59
29
30
31
35
99
SeeYou Help32
© 1995 - 2014 ... Naviter d.o.o.
with the average lift. If the finish altitude is lower than the start altitude, then XC speed is lower thanplain speed because time to climb back to the start altitude needs to be added to the time spent on task.If finish altitude is higher than the start altitude, then the time spent to climb above the start altitude issubtracted, thus XC speed is higher than speed. Start and finish are always referred to the start andfinish of the portion of the flight to which the statistics you are looking at at the moment is referring to.
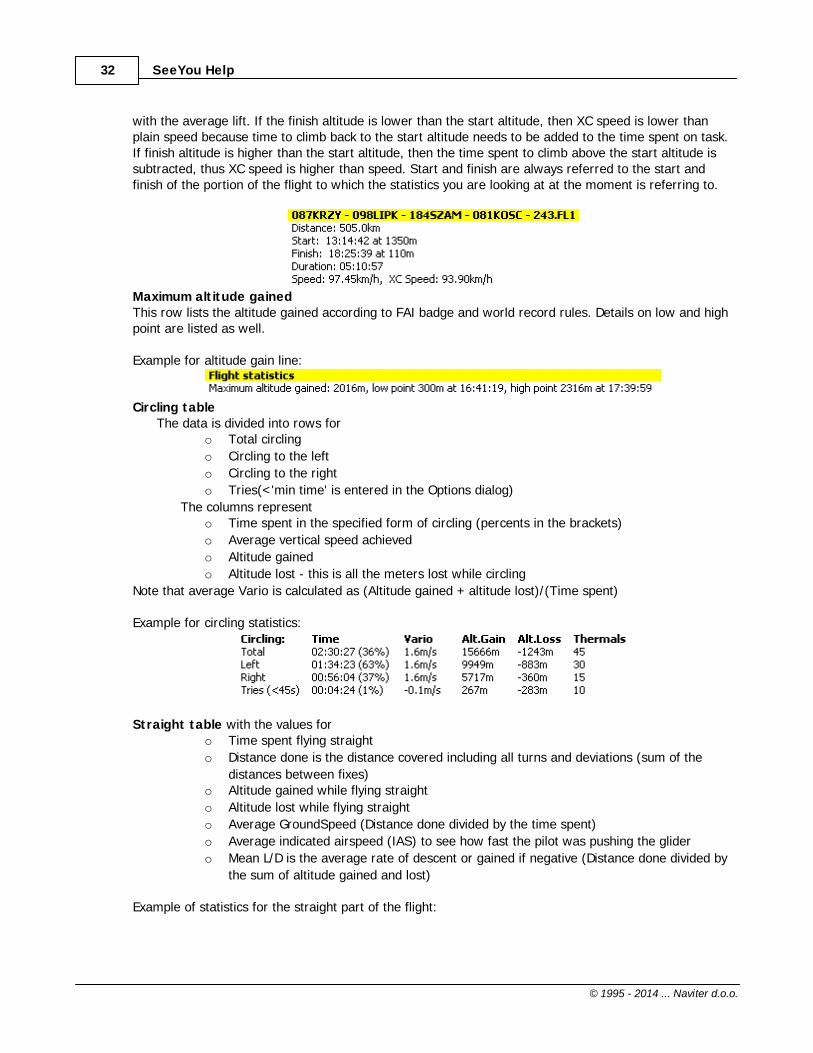
Maximum altitude gainedThis row lists the altitude gained according to FAI badge and world record rules. Details on low and highpoint are listed as well.
Example for altitude gain line:
Circling tableThe data is divided into rows for
o Total circling
o Circling to the left
o Circling to the right
o Tries(<'min time' is entered in the Options dialog)
The columns represento Time spent in the specified form of circling (percents in the brackets)
o Average vertical speed achieved
o Altitude gained
o Altitude lost - this is all the meters lost while circling
Note that average Vario is calculated as (Altitude gained + altitude lost)/(Time spent)
Example for circling statistics:
Straight table with the values foro Time spent flying straight
o Distance done is the distance covered including all turns and deviations (sum of the
distances between fixes)o Altitude gained while flying straight
o Altitude lost while flying straight
o Average GroundSpeed (Distance done divided by the time spent)
o Average indicated airspeed (IAS) to see how fast the pilot was pushing the glider
o Mean L/D is the average rate of descent or gained if negative (Distance done divided by
the sum of altitude gained and lost)
Example of statistics for the straight part of the flight:

Main SeeYou Windows 33
© 1995 - 2014 ... Naviter d.o.o.
Bar graphs and Histograms represent the respective data divided into small portions ranges of values(adjustable through Options dialog). The value representing the middle value of the range
o Wind histogram presents the distribution of the wind in different altitude layers. The
lines represent· Wind vectors. Longer arrow represents stronger wind· Altitude layer· Time spent in the altitude layer· Average wind in the altitude layer
o Vario histogram presents the distribution of thermal strength for the specified part of
flight. The lines represent· Red bar represents time spent in the vario range· Blue bar represents the altitude gained (or lost)· Strength of thermal· Time spent in that strength of thermal· Altitude gained climbing with that climb rate
o Altitude histogram presents the distribution of the strength of thermal in dependence
to the height above sea level. The lines represent· Red bar represents time spent in the altitude layer, · Blue bar represents the average thermal in the layer· Altitude layer (the number representing the mid value of the layer)· Time spent circling in this layer· Average Vario in this layer
o Speed histogram presents the distribution of the speeds used during flight. The lines
represent the · Red bar represents time spent in a range of speeds· Blue bar represents the distance covered in a range of speeds· Green bar represents the altitude lost in a range of speeds· Mid value of the speed range· Time spent flying straight with the respective speeds· Distance covered flying with the speed inside that range· Altitude lost (or gained if positive) flying with the speeds of this range.
Example of the Bars and Histograms:

SeeYou Help34
© 1995 - 2014 ... Naviter d.o.o.
See also:StatisticsGeneral informationDeclared taskFlight phase statisticsOptions - Statistics
29
30
30
35
99
Main SeeYou Windows 35
© 1995 - 2014 ... Naviter d.o.o.
3.1.4.4 Flight Phase statistics
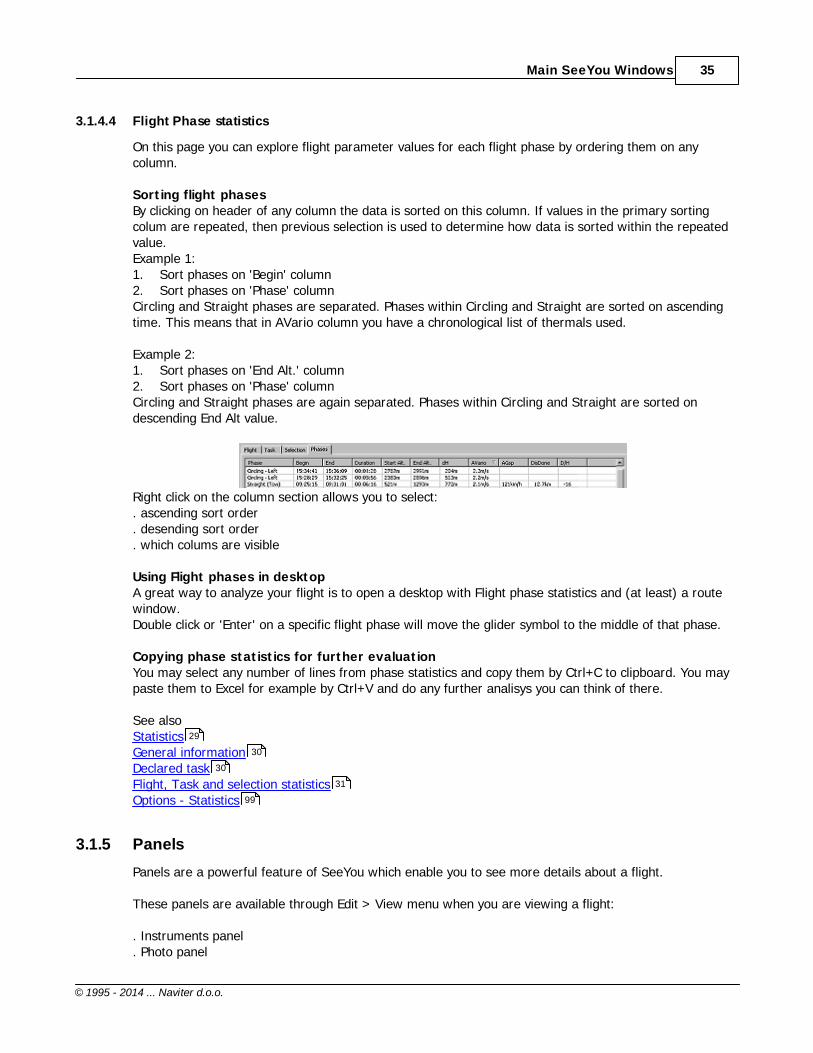
On this page you can explore flight parameter values for each flight phase by ordering them on anycolumn.
Sorting flight phasesBy clicking on header of any column the data is sorted on this column. If values in the primary sortingcolum are repeated, then previous selection is used to determine how data is sorted within the repeatedvalue.Example 1:1. Sort phases on 'Begin' column2. Sort phases on 'Phase' columnCircling and Straight phases are separated. Phases within Circling and Straight are sorted on ascendingtime. This means that in AVario column you have a chronological list of thermals used.
Example 2:1. Sort phases on 'End Alt.' column2. Sort phases on 'Phase' columnCircling and Straight phases are again separated. Phases within Circling and Straight are sorted ondescending End Alt value.
Right click on the column section allows you to select:. ascending sort order. desending sort order. which colums are visible
Using Flight phases in desktopA great way to analyze your flight is to open a desktop with Flight phase statistics and (at least) a routewindow.Double click or 'Enter' on a specific flight phase will move the glider symbol to the middle of that phase.
Copying phase statistics for further evaluationYou may select any number of lines from phase statistics and copy them by Ctrl+C to clipboard. You maypaste them to Excel for example by Ctrl+V and do any further analisys you can think of there.
See alsoStatisticsGeneral informationDeclared taskFlight, Task and selection statisticsOptions - Statistics
3.1.5 Panels
Panels are a powerful feature of SeeYou which enable you to see more details about a flight.
These panels are available through Edit > View menu when you are viewing a flight:
. Instruments panel
. Photo panel
29
30
30
31
99

SeeYou Help36
© 1995 - 2014 ... Naviter d.o.o.
. Airspace violation panel
. Optimization panel
Note that all panels are resizable and dock-able. By dragging the lateral limits of the panel you canchoose its size. The data in the panel will fit the the best it can. By dragging the caption you can undockand move the panel any place you like. Even to your second monitor if you wish (useful when presentinginstruments and/or photos). By dragging the caption to any of the corners of the SeeYou screen theinstruments become docked to that edge. Double click on the caption docks or undocks the panel. Trydragging it around to see how it works.
3.1.5.1 Instruments panel
Showing instruments is a very nice way to present the most important flight parameters to people youare presenting to. You should set the units through Tools > Options > General > Units. All instrumentsare available in metric and imperial units and then some.
Note that the Instruments panel is resizable and dock-able. By dragging the lateral limits of the panel youcan choose the size of the instruments which suits the purpouse best. The instruments will fit the panelthe best they can. By dragging the "Cockpit" caption you may undock and move the panel any place youlike. Even to your second monitor if you wish. By dragging the "Cockpit" caption to any of the corners ofthe SeeYou screen the instruments become docked to that edge.
3.1.5.2 Pictures panel
Adding pictures to IGC files is a lot of fun. The pictures are presented in a panel similar to theinsturments panel. It is resizable and dockable. By dragging the lateral limits of the panel you can chooseits size. The photos in the panel will fit the the best they can. By dragging the "Flight pictures" captionyou can undock and move the panel any place you like. Even to your second monitor if you wish. Bydragging the caption to any of the corners of the SeeYou screen the instruments become docked to thatedge. Double click on the caption docks or un-docks the panel. Try dragging it around to see how it
12

Main SeeYou Windows 37
© 1995 - 2014 ... Naviter d.o.o.
works.
Photo panel on the left, instruments enabled
Photo panel below, instruments disabled

SeeYou Help38
© 1995 - 2014 ... Naviter d.o.o.
3.1.5.3 Airspace violation panel
To see whether any airspace was crossed, you should open the panel View > Airspace Violation orpress Ctrl+I
This willOpen a small text window with a list of airspace violationsChange the color scheme to Airspace Violation
Note that only visible airspace is checked. Make sure you enable the types of airspace you are interestedin and disable the ones that don't matter. Do this using the Tools > Airspace command from the mainmenu.
See also:Flight window
3.1.5.4 Optimization panel
This option will find the longest flown distance for the active flight for different types of rules for cross-country flights.
SeeYou will optimize the flight from begin of soaring to the end of soaring. If you think that the calculatedvalues are incorrect, you may change the time period by making a selection .
Select Edit > Optimize from the main menu, Press Ctrl+L in the Flight window or click mouse rightbutton in the flight window and select Optimize.
It finds these optimized tasks (if enabled in Options > Optimization ):FAI badge and record flights (goal flight, out and return, FAI Triangle and Three turnpoint flights)OLC for gliders (start and finish + 4 points)OLC for Hanggliders and Paragliders (FAI Triangle, Triangle and Free flight with 3 points, 20% distanceallowed between start and finish)DMSt (FAI Triangle, Triangle and Free flight with 3 points)SIS-AT (Gummiband)
Click Copy if you would like to see Statistics for the optimized task. It is possible to save the flight with the optimized task.
74
92
24
58
105
72
48
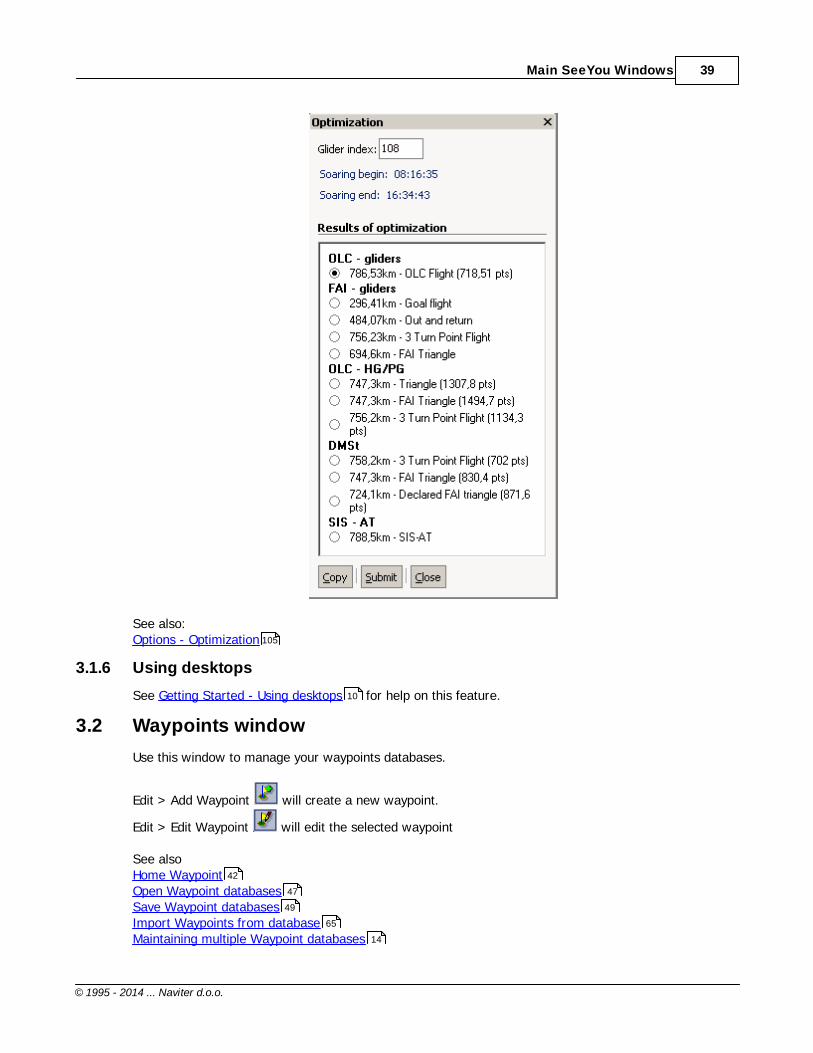
Main SeeYou Windows 39
© 1995 - 2014 ... Naviter d.o.o.
See also:Options - Optimization
3.1.6 Using desktops
See Getting Started - Using desktops for help on this feature.
3.2 Waypoints window
Use this window to manage your waypoints databases.
Edit > Add Waypoint will create a new waypoint.
Edit > Edit Waypoint will edit the selected waypoint
See alsoHome WaypointOpen Waypoint databasesSave Waypoint databasesImport Waypoints from databaseMaintaining multiple Waypoint databases
105
10
42
47
49
65
14

SeeYou Help40
© 1995 - 2014 ... Naviter d.o.o.
Example of a Waypoints window next to the Task window:
3.2.1 Large Icons view
The Large icons view enables you to quickly see the style of the waypoint.
Select View > Large icons or use the icon from the Waypoints toolbar.
Press Ctrl+Insert or mouse right click to add a waypoint.Select a waypoint or more waypoints and Press Ctrl+Delete to remove them from Points.cupSort the waypoints on any field through the View > Sort Waypoints menuSelect any waypoints and use Ctrl+C to copy their properties to clipboard. You can now paste them toprograms such as Excel to make further use of these points.
Select any waypoints and use File > Save As... to save them as a separate waypoints file.
See AlsoWaypoints windowUsing Keyboard and Mouse
76
77
49
39
117

Main SeeYou Windows 41
© 1995 - 2014 ... Naviter d.o.o.
3.2.2 Details view
In this view each waypoint is presented in detail:NameLatitudeLongitudeElevationDistance to Home waypointBearing to Home waypointStyle of the waypointCode - short name for the waypointCountry of the waypoint's locationDescription
Select View > List or use the icon from the Waypoints toolbar.
Press Ctrl+Insert or mouse right click to add a waypoint.Select a waypoint or more waypoints and Press Ctrl+Delete to remove them from Points.cupSort the waypoints on any field through the View > Sort Waypoints menuSelect any waypoints and use Ctrl+C to copy their properties to clipboard. You can now paste them toprograms such as Excel to make further use of these points.
Select any waypoints and use File > Save As... to save them as a separate waypoints file.
See AlsoWaypoints windowUsing Keyboard and Mouse
3.2.3 List view
In this view, waypoints are listed with their names only.
Select View > List or use the icon from the Waypoints toolbar.
Press Ctrl+Insert or mouse right click to add a waypoint.Select a waypoint or more waypoints and Press Ctrl+Delete to remove them from Points.cupSort the waypoints on any field through the View > Sort Waypoints menuSelect any waypoints and use Ctrl+C to copy their properties to clipboard. You can now paste them toprograms such as Excel to make further use of these points.
Select any waypoints and use File > Save As... to save them as a separate waypoints file.
See AlsoWaypoints windowUsing Keyboard and Mouse
77
49
39
117
77
49
39
117

SeeYou Help42
© 1995 - 2014 ... Naviter d.o.o.
3.2.4 Map view
In this view points are drawn over Vector and Raster maps (if applicable).
Select View > List or use the icon from the Waypoints toolbar.
Use mouse right-click to edit properties of a waypoint or to create a new waypoint.Press Ctrl + Up to Zoom outPress Ctrl + Down to Zoom in
See alsoWaypoints window
3.2.5 Home waypoint
Home waypoint is the origin waypoint for the Waypoints and Tasks window. The distance and bearing to a waypoint is measured from the Home waypoint in the Detail viewof the Waypoints windowMap view opens with the Home waypoint in the middleTake off and Landing point of newly created task are the Home Waypoint.
To change the Home waypoint write a name into the Home Waypoint combo box in the Waypointstoolbar or drag and drop a point from the list, large icons or details view into the Home Waypointscombo box.
In all views you can use the Edit > Home Waypoint menu or mouse right-click and select Homewaypoint.
See alsoWaypoints window
3.3 Tasks window
The task window enables you to create and modify tasks. The task creation can be done over vector andraster maps as well as in list view .
Select Edit > Tasks from main menu or use the icon from Standard toolbar or press Ctrl + T
The task window is divided in two windows. Task list window contains a list of all tasks saved in Points.cup.
The bottom window can be viewed in two ways:Use List view to create task using waypoint namesUse Map view to create and modify a task graphically
39
41
42
113
42
39
15 44
70
43
44
15

Main SeeYou Windows 43
© 1995 - 2014 ... Naviter d.o.o.
Example of a Tasks window next to the Waypoints window:
3.3.1 Task list
In this window all existing tasks are listed and are ordered by the takeoff point by default.
To create a new task, use Edit > Add Task or use the icon. A new task will be created. TheHome waypoint will be selected as take off and landing point.
To make an exact copy of an existing task select a task, then use Edit > Copy Task or use the icon.
After designing a task you can change task options where you can change to templates for AAT, PST ordesign your own type of task. Double click on the task or use Edit->Task properties to access thesefunctions. Choose Observation Zones tab from Task properties window to setup sectors for eachwaypoint separately.
The tasks are ordered by Takeoff point by default. A click on the Description header will order the flightsby Description, while a click on the Distance will order them by Distance. A second click will reverse theordering (A->Z will be Z->A)
Drag and drop a task to the flight window. This will change the Declared task for all flights in the Flightwindow. This is useful when analyzing multiple flights in a competition for example. Many pilots don'tdeclare tasks. This way you can declare the task for all flights with one mouse move.
See alsoTasks windowFAI Triangle assistant
66
69
68
42
44

SeeYou Help44
© 1995 - 2014 ... Naviter d.o.o.
3.3.2 List view
This view is useful when planning tasks from already existing waypoints.
Select View > List to change the view or use the icon.
To create a new task choose Edit > Add Task or the icon. The focus changes to the List view andyou can start typing the name of the waypoint. You can enter as many turnpoints as you wish.
To insert a waypoint you can select Edit > Insert waypoint to task or use the or press Ctrl + InsertTo delete a waypoint from the task select the waypoint you want to remove, then press Ctrl + Delete
Use Edit->Task Properties to edit task type options and observation zones for each waypoint.
See alsoTasks window
3.3.3 Map view
1. To start planning flights, open the Tasks window
2. Select View > Map from the main menu or click on the icon to change view
3. To create a new task choose Edit > Add Task or the icon4. Click on the Start point, 1st Point, 2nd Point of your task in correct sequence. 5. Finish adding waypoints by pressing ESC button once.
That's all. You have created a new task.
3.3.4 FAI Triangle assistant
FAI Triangle assistant is a very useful feature which helps you determine the very limits of an FAI area.This allows you to plan FAI Triangles as flat as they can be.
Use Ctrl+E to turn FAI Area on and off.Use Ctrl+R to rotate FAI Area around task legs.
Tasks window
69 68
42
66
42
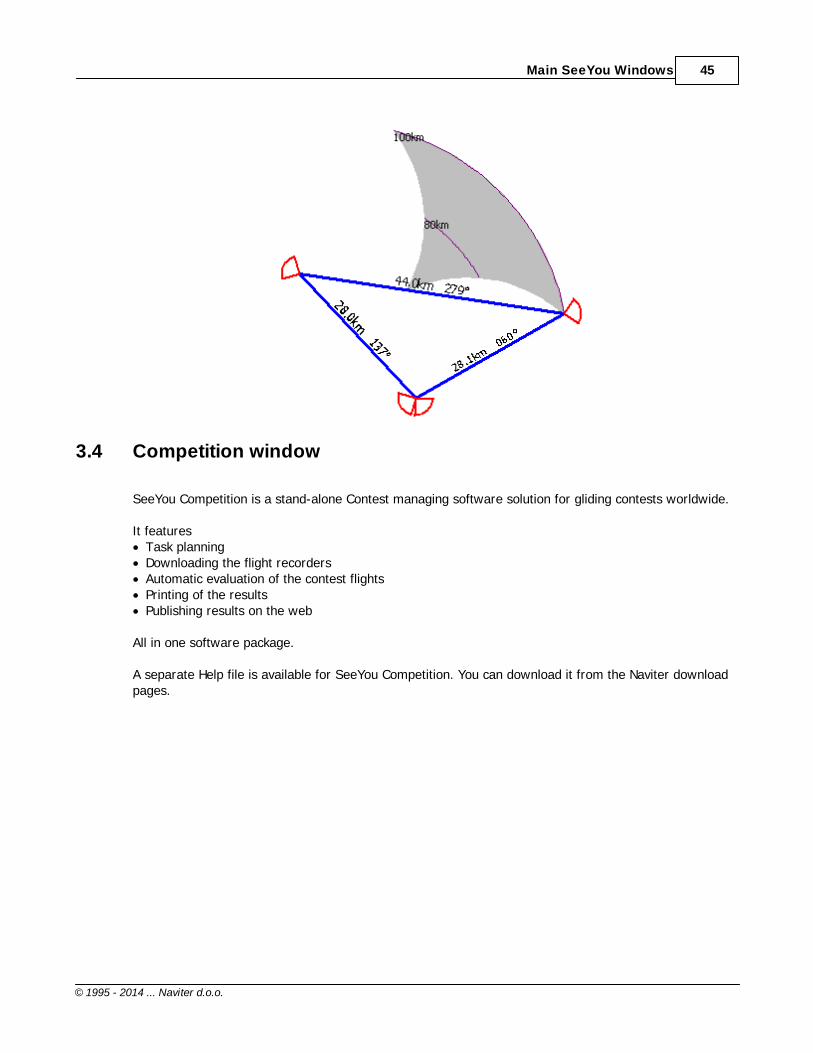
Main SeeYou Windows 45
© 1995 - 2014 ... Naviter d.o.o.
3.4 Competition window
SeeYou Competition is a stand-alone Contest managing software solution for gliding contests worldwide.
It features Task planningDownloading the flight recordersAutomatic evaluation of the contest flightsPrinting of the resultsPublishing results on the web
All in one software package.
A separate Help file is available for SeeYou Competition. You can download it from the Naviter downloadpages.

Part
IV

Menu commands 47
© 1995 - 2014 ... Naviter d.o.o.
4 Menu commands
4.1 File
4.1.1 Open
The Open dialog is the central way using files associated with SeeYou.
Through the File->Open dialog you can open. Flights (IGC, CAI, LXN, FIL, SDI, LO4, LOG, TRK, CTC, MUL, IGCX). Waypoints (CUP, DA4, ATT, WPZ, DAT, DBT, NDB, CDB, WHT, GRW, GPX, KML, KMZ). Airspace (CAR, CUB, TXT, VER, AIR, SUA). Vector maps (CIT). Raster maps (CMR, MDS, QMP, BMP, JPG). Contest file (CUC)
After the Open button is pressed, correct dialog opens where you can further manipulate imported data.
Open flight
To open a flight
1. Select File > Open from main menu or use this icon: 2. Find the appropriate folder3. Select a flight 4. Click the Open button or double-click the filename.
To open recently used flight:1. Select File from main menu or click the right part of the open icon2. Click on the flight filename you wish to reopen.
Open Waypoints
With this command you can open Waypoint databases from your disk and append them to your existingdatabase.
1. Select File > Open from the main menu2. Find the appropriate folder3. Select the waypoint file (or more files)4. Click on the Open button or double-click the filename5. You will be prompted whether to Append these points to database or not6. If you select Yes, the waypoints will be added to existing waypoints
Warning! If you select No, the existing waypoints will be deleted. Only new points will be in thewaypoints database.
See also:Flight windowWaypoints windowRaster MapsVector MapsAirspace dialog
24
39
83
89
92

SeeYou Help48
© 1995 - 2014 ... Naviter d.o.o.
4.1.2 Save As...
The Save dialog can be accessed through the main menu File > Save As... or by Clicking thecombination Ctrl+S on the keyboard or through the Save icon in the toolbar
It acts differently, depending on which widow was active when we used the command.In Route, Graph, Statistics and Flight list windows it will save the Active flight .In Waypoints and Tasks window it will save the Waypoints and Tasks .
Saving picturesBy selecting BMP or JPG File type you can save a custom size and quality screen shot of the flight. This is paricularly useful for web representation (small pictures) and high quality printouts (largepictures)
4.1.2.1 Saving flights
1. Open a flight2. Make changes to the flight3. Select File > Save from main menu or click the icon or Click Ctrl+S4. Select new filename5. Select the type6. Click Save button
Note that saving a flight does not affect the security signature of the flight. It remains OK even if a flightwas saved through SeeYou. This is true if you are using SeeYou 2.8 or later. It is not true for earlierversions.
Saving flight with pictures in IGCX format
Once you have added pictures to the IGC file you may save the IGC file with File > Save. Links to fullresolution pictures on your hard drive will be added to the IGC file without loosing the IGC file integrity.This is great for viewing the files on your one and only computer.
But if you want to send your flight with pictures to a friend or even only open it on your other computeryou whold have to send the pictures and preserve folder structure. Since that would be a pain and mostlywouldn't work you can now save your flight in a proprietary IGCX format. You can save a file in IGCXformat by going to File > Save As > Save as type > IGCX Format File. After you choose the location andfile name you get to choose the size of the pictures. The size you choose depends on how you are goingto share the IGCX file. If you are going to email it try to keep the complete file size less than 5 MB.
48
49
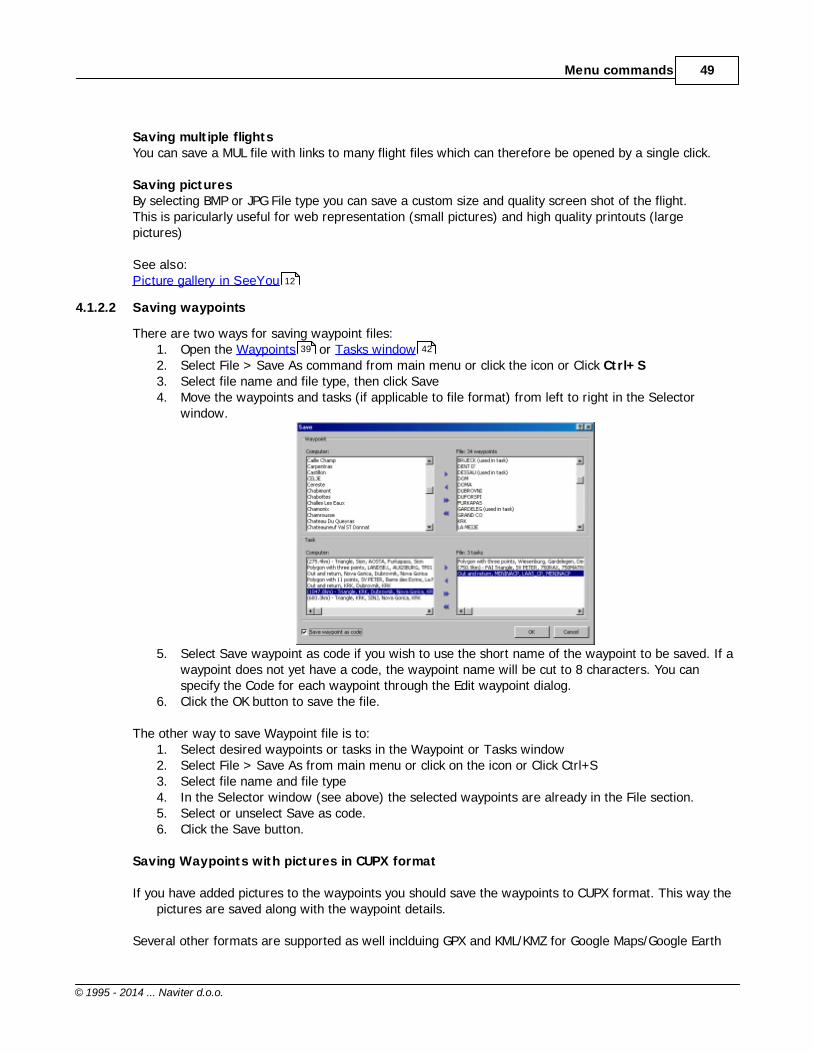
Menu commands 49
© 1995 - 2014 ... Naviter d.o.o.
Saving multiple flightsYou can save a MUL file with links to many flight files which can therefore be opened by a single click.
Saving picturesBy selecting BMP or JPG File type you can save a custom size and quality screen shot of the flight. This is paricularly useful for web representation (small pictures) and high quality printouts (largepictures)
See also:Picture gallery in SeeYou
4.1.2.2 Saving waypoints
There are two ways for saving waypoint files:1. Open the Waypoints or Tasks window2. Select File > Save As command from main menu or click the icon or Click Ctrl+S3. Select file name and file type, then click Save4. Move the waypoints and tasks (if applicable to file format) from left to right in the Selector
window.
5. Select Save waypoint as code if you wish to use the short name of the waypoint to be saved. If awaypoint does not yet have a code, the waypoint name will be cut to 8 characters. You canspecify the Code for each waypoint through the Edit waypoint dialog.
6. Click the OK button to save the file.
The other way to save Waypoint file is to:1. Select desired waypoints or tasks in the Waypoint or Tasks window2. Select File > Save As from main menu or click on the icon or Click Ctrl+S3. Select file name and file type4. In the Selector window (see above) the selected waypoints are already in the File section.5. Select or unselect Save as code.6. Click the Save button.
Saving Waypoints with pictures in CUPX format
If you have added pictures to the waypoints you should save the waypoints to CUPX format. This way thepictures are saved along with the waypoint details.
Several other formats are supported as well inclduing GPX and KML/KMZ for Google Maps/Google Earth
12
39 42

SeeYou Help50
© 1995 - 2014 ... Naviter d.o.o.
4.1.3 Close
Select File > Close from the main menu. This will close the active window. The active window is the onewith blue header part.
4.1.4 Close All
Select File > Close All from the main menu. This will close the all open windows within the SeeYou mainwindow.
4.1.5 Search...
Through Search dialog you can look for a specific flight or flights in many folders at once.
You can limit the search to specific keywords:Pilot's nameDate between two valuesTakeoff location
4.1.6 Mobile Wizard
Mobile Wizard connects SeeYou with SeeYou mobile to send files to the Pocket PC. Mobile wizard neverexpires. That means you don't have to have a registered version of SeeYou to transfer all of the requireddata to the Pocket PC.
1. Connect your Pocket PC to PC through Active Sync2. Run SeeYou3. Go to File > Mobile Wizard
See the Getting started chapter about how to work with SeeYou Mobile.19

Menu commands 51
© 1995 - 2014 ... Naviter d.o.o.
4.1.7 Connection wizard
Connection wizard allows you to download flights from flight recorders.
The wizard is just user interface. Correct Dinamic link libraries (.dll) are requred for communication. If alibrary is found the corresponding device is listed in the Device type combo box. There are manydifferent behaviors of the devices, so please refer to the users manual of your device for help on how toconnect the device to PC.
There are some basic tasks you will want to do with the recorder:download fights from the deviceupload or download waypointsupload or download tasksupload or download flight declaration
Not all of them are available for each device.
This is how the wizard works:select actions you want to complete, then press Nextselect flights or waypoints or enter flight declaration data, then press NextCommunication begins and is finished with a message on display
The wizard stores some last successful values for you to use next time.
G-record for non-approved flight recordersSince version 2.4 SeeYou will create a G-record at the end of each file downloaded through SeeYou'sConnection wizard from non-approved flight recorders like Garmin, MLR and similar (if supported). Aseparate validation file is available from the website to validate such flights.

SeeYou Help52
© 1995 - 2014 ... Naviter d.o.o.
4.1.8 Page Setup
SeeYou offers you a comprehensive printing and print-previewing functions.It is possible to print
Flights, Graphs and StatisticsTask sheetsWaypoints
General preferences are set up through a common Page dialog
See also:Print preview
Example of Task sheet print preview:
4.1.8.1 Page tab
Page tab is common to printing Flights, Tasks and Waypoints
Select which data to print from Print what section (not applicable everywhere).Set up margins for the paper from Margins sectionSelect whether or not to print header and footer from Header & Footer sectionSelect paper orientation from Orientation sectionA quick print preview will show you the changes you made. Click on the picture for next page.Click on the OK button to save changes, Cancel not to save changesClick on the Print button to send data to printerClick on the Print preview button to show pages on the screen
See also:Page setupPrining Flights, Graphs and StatisticsPrinting TasksPrinting WaypointsPrint preview
53
54
54
52
55
52
53
54
54
55

Menu commands 53
© 1995 - 2014 ... Naviter d.o.o.
4.1.8.2 for Flights
When setting up page for printing the flight you can set up preferences separately for:· Page - see above· Route· Graphs· Statistics
Route tab· Select what part of the route to print from Print what section
o Print Whole flight (All)
o Print what is selected with markers (Selection)
· Select how route should be printedo To fit the page
o In custom scale (1:500.000 or 1:20.000 as an example)
· Select the amount of page overlapping. This option is used when custom scale is selected fromPrinted route size and the size of the route exceeds one page.
· A quick print preview will show you the changes you made. Click on the picture for next page.· Click on the OK button to save changes, Cancel not to save changes· Click on the Print button to send data to printer· Click on the Print preview button to show pages on the screen
Graphs tab· Select what part of the route to print from Print what section
o Print Whole flight (All)
o Print what is selected with markers (Selection)
· Select the number of rows to brake the graph to from Options section.· A quick print preview will show you the changes you made. Click on the picture for next page.· Click on the OK button to save changes, Cancel not to save changes· Click on the Print button to send data to printer· Click on the Print preview button to show pages on the screen
Statistics tab· Select which statistics to print from Print what section
o Flight and task information
o Statistics for the task flown
o Statistics for all leg
o Statistics for flight phases
· A quick print preview will show you the changes you made. Click on the picture for next page.· Click on the OK button to save changes, Cancel not to save changes· Click on the Print button to send data to printer· Click on the Print preview button to show pages on the screen
See also:Page setupPrinting TasksPrinting WaypointsPrint preview
52
54
54
55

SeeYou Help54
© 1995 - 2014 ... Naviter d.o.o.
4.1.8.3 for Waypoints
When setting up page for printing waypoints you can choose from two tabs· Page· Waypoint
Waypoints tab· Select which from a waypoint to print from Print what section· Type what is to be printed in the header of the page in Header section· Type what is to be printed in the footer of the page in Footer section· A quick print preview will show you the changes you made. Click on the picture for next page.· Click on the OK button to save changes, Cancel not to save changes· Click on the Print button to send data to printer· Click on the Print preview button to show pages on the screen
See also:Page setupPrining Flights, Graphs and StatisticsPrinting TasksPrint preview
4.1.8.4 for Tasks
When setting up page for printing a task you can choose from two tabs· Page· Task
Task· Type the text, that should be printed in the header of the page in Header section· Type the text, that should be printed in the footer of the page in Footer section (left and right
part of the footer respectively)
Task Note· Type the text that should appear in the body of the page in Task Note section
A quick print preview will show you the changes you made. Click on the picture for next page.Click on the Print button to send data to printerClick on the Print preview button to show pages on the screenClick on the OK button to save changes, Cancel not to save changes
See also:Page setupPrining Flights, Graphs and StatisticsPrinting WaypointsPrint preview
52
52
53
54
55
52
52
53
54
55

Menu commands 55
© 1995 - 2014 ... Naviter d.o.o.
4.1.9 Print preview
Select File > Print preview or click on the iconThere are three different print previews depending on where you accessed Print preview from
· Print preview for a flight· Print preview for waypoints· Print preview for a task
A click on the page will show you the next page.
The content of the pages has been set up in Page Setup dialog, which can be accessed through the icon.
See also:Page setupPrining Flights, Graphs and StatisticsPrinting TasksPrinting Waypoints
Example of Task sheet print preview:
52
53
54
54

SeeYou Help56
© 1995 - 2014 ... Naviter d.o.o.
4.1.10 Print
Select File > Print or click on the icon or Click Ctrl+PThrough the Printer dialog select
· Which printer to use (if more printers are available) through Printer section· Which pages to print through Print range section· How many copies of the printout you need through Copies section· Click the OK button to start printing or Cancel not to print anything
All other options are accessible through Properties button and are dependent on your printer. See yourprinter documentation on how to use them.
See also:Page setupPrining Flights, Graphs and StatisticsPrinting TasksPrinting WaypointsPrint preview
4.1.11 Exit
This command will close SeeYou.When SeeYou is closed, these settings are saved:
· Points.cup file is saved· Window layout - maximized/normal/minimized· View settings are saved - Window (Route, Graph, Statistics, Flight list), Flight parameters, Graph
type
52
53
54
54
55

Menu commands 57
© 1995 - 2014 ... Naviter d.o.o.
4.2 Edit
4.2.1 for Flight window
4.2.1.1 Go To Location
When you want to quickly move the map to a known location, you can use the Go To Location dialog.Press Ctrl+G, then select either:
a waypoint from task,a waypoint from database,type the Latitude/Longitude coordinates of the desired point.
Use the preview panel to see where you are jumping to. This dialog is available in the Flight windowWaypoints window andTasks window
4.2.1.2 Select Active Flight
When multiple flights are loaded into the Flight window, you can only see Statistics, Flight Properties andTask Declaration for the active flight. Arrow keys for navigation only work on the Active flight. To changethe active flight, do the following:
1. Select Edit > Select Active flight from the main menu or use mouse right-click in the Flightwindow and select Select Active Flight
2. Choose a flight you want to be the Active flight from the list. The color of the date field is thecolor of the flight track in the multiple flights color scheme .
3. Click OK
24
39
42
74
SeeYou Help58
© 1995 - 2014 ... Naviter d.o.o.
4.2.1.3 Selection
Set Selection when you would like to see the Statistics report for a custom selection in time.Set Selection for flight optimization. For example when you don't want your tow to be a part of Optimizedtask.
Setting the Selection manually:1. Select Edit > Selection from the main menu or double-click the selection page in the Statistics
window.2. Type the times of the 1st and the 2nd marker into the text boxes. The red line is a visual check
for your selection.3. Click OK
Setting the selection with the keyboard1. In the Flight window navigate with arrow keys to the place, where you want your 1st marker.2. Press and hold Shift3. Hold Shift and navigate with arrows and Home/End keys to the desired position of the 2nd
marker. You will see two circles representing first and second marker respectively (red and blue)
After setting the selection you have immediate access to full Statistics of this section.Ctrl+L or Edit > Optimize will give you the longest task between markers.
Changing markers manually is the same as setting them.Changing markers in the Flight window (Route or Graph view):
1. Use arrow keys to navigate close to one of the markers.2. Press and hold Shift3. Holding Shift use the arrow keys to move the marker.
See also:Statistics
4.2.1.4 Add flight
Add flight will add a flight to the active Flight window.
Select Edit > Add Flight or use the icon on the toolbar or use mouse right-click in the Flight windowto access this option.This will open the Open dialog. The procedure was described in the File > Open command section.
4.2.1.5 Remove flight
Remove flight will remove flights from the active Flight window.
1. Select Edit > Remove flight or use the icon on the toolbar.2. Choose a flight or more flights to remove3. Click Remove button to remove selected flights or Cancel not to remove any flights
See alsoAdd flight
62
29
47
58

Menu commands 59
© 1995 - 2014 ... Naviter d.o.o.
4.2.1.6 Flight properties
4.2.1.6.1 Flight page
From Flight page of the Flight properties dialog you can set up:1. Time Offset in hours - the difference between UTC and local time2. QNH in hectopascal - GNSS loggers record QNE value (1013.25hPa). You can set the your own
QNH setting for the flight.3. Start altitude is the more accurate and intuitive way to set the appropriate QNH setting. Add m
for altitude in meters or ft for altitude in feet. If nothing is added, the default setting is taken.You may also choose QNH of QFE setting according to the 3D maps elevation at take off.
4. Pilot's name5. Glider type6. Glider's registration7. Competition Class8. Competition ID - Call sign9. Soaring begin and soaring end times (influences optimization and statistics)10. Whether or not it is a glider without an engine (disregards ENL if stored in the IGC file)11. Below this there is information about the logger.
Clicking on the Pilots button allows you to comfortably select the pilot's data from a list.Clicking on the Add Pilot button allows you to comfortably add a pilot to the Pilots list.Clicking on the Polar dialog allows you to select the polar for the glider.
Click OK to use changes, click Cancel not to change anything.
4.2.1.6.2 Task page
Through the Task page you can change the Task declaration for the active flight in Flight window.1. Change the task just like in the Tasks window's List view or2. Change the task on the Map by clicking on the Map Edit button. Additionally to what you are used
to in Tasks window you have to click on the close button in the Toolbar or press Escape.
By clicking on the Name column you will notice the lock to change its state. Changing it to unlocked isuseful for assigning names to waypoints of the optimized task.
Use Ctrl+Ins to insert a waypoint to task.Use Ctrl+Del to delete a waypoint from task.
93
93
94

SeeYou Help60
© 1995 - 2014 ... Naviter d.o.o.
4.2.1.6.3 Observation Zones
See Task Properties->Observation Zone
4.2.1.6.4 Task options
See Task Properties->Options
4.2.1.6.5 Photos
If you have added pictures to your flight you may add, remove and offset the pictures through thisdialog.
4.2.1.6.6 Start points
Some contests use multiple start points from which a pilot can choose. SeeYou can find the right startpoint automatically. You need to enter a list of allowed start points in this dialog, the rest will becalculated automatically.
68
69
12

Menu commands 61
© 1995 - 2014 ... Naviter d.o.o.
4.2.1.6.7 Source page
In this page you can view the .IGC source of the active flight in the Flight window.
For advanced users:Click into the list box and press Ctrl+F9. The page goes into Editing mode. You can now manually editany part of the .IGC file.This will make the flight's task declaration invalid (integrity check BAD). Changes will be written to fileonly after saving the flight.
4.2.1.6.8 Misc
This page allows you to setupCOM port on which the NMEA stream from the selected flight is outputGlider icon for the 3D view
4.2.1.7 Task declaration
See Task page of the Flight Properties dialog for help on this function
4.2.1.8 Assign Task
For this option to be available you must have at least one Task in your Tasks window.It is particularly useful for competition organization.
By selecting this option you can quickly assign a Task from your database to open flight or flights.A dialog with all existing tasks will open. You can sort these tasks on any given column.
59

SeeYou Help62
© 1995 - 2014 ... Naviter d.o.o.
4.2.1.9 Optimize
See Optimization panel
4.2.1.10 Waypoints
Select Edit > Waypoints, press Ctrl+W or use the icon from toolbar.The command Opens the Waypoints window.
See Waypoints window for more help
4.2.1.11 Tasks
Select Edit > Tasks, press Ctrl+T or use the icon from toolbar.The command Opens the Tasks window.
See Tasks window for more help
4.2.2 for Waypoints window
4.2.2.1 Go to location
See Edit->for Flight window->Go to location for help with this feature.
4.2.2.2 Home waypoint
This command selects the referencing waypoint for the Waypoints and Tasks window.
Select Edit > Home Waypoint, use mouse right-click and select Home Waypoint in the Waypoints andTasks windows or type the name of the Home waypoint into the Home Waypoint combo box on theWaypoints Toolbar.
See Waypoints window - home Waypoint for more help.
38
39
42
57
42

Menu commands 63
© 1995 - 2014 ... Naviter d.o.o.
4.2.2.3 Edit waypoint
Use this command to edit the properties of a waypoint.
First select a waypoint, then select Edit > Edit Waypoint or use the icon from toolbar. In Map view click mouse right button over the waypoint and select Edit > Edit Waypoint.
The Edit Waypoint dialog opens with 11 properties1. Name: The name of the waypoint (all alphanumeric signs are accepted)2. Style: Choose from 17 different styles for a waypoint
3. Elevation: the altitude of the waypoint (accepts numbers and altitude units)4. Latitude of the waypoint (must be entered through a mask corresponding to selected Lat/Lon
format)5. Longitude of the waypoint (must be entered through a mask corresponding to selected Lat/Lon
format)6. Code: The name that is used for this waypoint in your logger (Limited to 8 aphanumeric
characters)7. Country of the waypoint location (select from drop-down list)8. Direction of the runway (accepts numbers 0-360 in degrees)9. Length of the runway (accepts numbers with a distance unit)10. Frequency of the airport (checking for aviation frequencies not enabled, but user expects values
in MHz)11. Description (free text)
Fields 8, 9 and 10 are only applicable to landable waypoint styles (Airport with grass runway, Glider site,Airport with solid runway and Outlanding place)
Editing multiple waypoints at onceSometimes you will want to change a single parameter in many waypoints. Simply select all waypoints inquestion and change any of these fields:
CountryStyleElevationDescription
Adding pictures to waypoints
Use the button to add a picture which describes the waypoint you are editing. You may add anynumber of pictures to each waypoint. Make sure you save the changes in CUPX format to be able touse them in SeeYou Mobile and elsewhere.
49

SeeYou Help64
© 1995 - 2014 ... Naviter d.o.o.
See also:Waypoints window
4.2.2.4 Add waypoint
This command adds a waypoint to your Points.cup file.
Select Edit > Add Waypoint from main menu or through the iconIn Map view this function is called if mouse right-click is pressed and is selected. A blank Waypoint Editordialog is opened.
See Edit waypoint for details how to edit the waypoint.
See also:Waypoints windowImport Waypoints
4.2.2.5 Remove waypoint
This command will remove a waypoint from your Points.cup waypoint file.Select a waypoint or more waypoints from the list view and select Edit > Remove Waypoint from the
main menu or press the icon on the toolbar.
See also:Waypoints window
39
63
39
65
39

Menu commands 65
© 1995 - 2014 ... Naviter d.o.o.
4.2.2.6 Import Waypoints
This feature is only available if you have installed Waypoint and Airfield database for SeeYou.If you see this option in the Edit menu for Waypoints, you have. If not, you can download points.exe fromNaviter and run it on your computer. This will install seeyou.cup in your SeeYou directory.
By default this dialog will pop-up on start if your Waypoint database is empty. This will not happen if youhave disabled this function in Options - Miscellaneous
Use the various options to create a filter for 36.000+ waypoints in this database. Some options areselected by default.
See also:Waypoints window
4.2.2.7 Waypoints
Select Edit > Waypoints, press Ctrl+W or use the icon from toolbar.The command Opens the Waypoints window.
See Waypoints window for more help
4.2.2.8 Tasks
Select Edit > Tasks, press Ctrl+T or use the icon from toolbar.The command Opens the Tasks window.
See Tasks window for more help
4.2.3 for Tasks window
4.2.3.1 Go to location
See Edit->for Flight window->Go to location for help with this feature.
107
39
39
42
57

SeeYou Help66
© 1995 - 2014 ... Naviter d.o.o.
4.2.3.2 Insert waypoint to task
This command will add a waypoint into the active task.1. Select a task2. Select a waypoint from the task. It is not possible to insert a waypoint before Take off, Start and
Landing points.
3. Select Edit > Insert waypoint to task or click on the icon on the toolbar4. Select the waypoint by typing a name into the Name column.
See also:Tasks window
4.2.3.3 Delete waypoint from task
This command will delete the selected waypoint from the active task1. Select a Task2. Select a Waypoint
3. Select Edit > Delete a waypoint from Task or click on the icon on the toolbar or click mouseright-button and select Delete Waypoint from task.
See also:Tasks window
4.2.3.4 Home Waypoint
This command selects the referencing waypoint for the Waypoints and Tasks window.
Select Edit > Home Waypoint, use mouse right-click and select Home Waypoint in the Waypoints andTasks windows or type the name of the Home waypoint into the Home Waypoint combo box on theWaypoints Toolbar.
See Waypoints window - home Waypoint for more help.
4.2.3.5 Add Task
This command will add a new task to the list of tasks in Points.cup file.1. Open the Tasks Window
2. Select Edit > Add Task from main menu or click on the icon from the toolbar or click mouseright button and select Add Task.
3. A new Task opens with a blank list of Points, only Home Waypoint is selected as the Take off andLanding Point
See also:Tasks window
42
42
42
42

Menu commands 67
© 1995 - 2014 ... Naviter d.o.o.
4.2.3.6 Remove Task
This command will delete an existing task from the list of tasks in Points.cup file.1. Open the Tasks Window2. Select a task from Task list window.
3. Choose Edit->Remove Task or press to delete this task from Points.cup
See also:Tasks window
4.2.3.7 Copy Task
This command will make an exact copy of an existing task in the list of tasks in Points.cup file.1. Open the Tasks Window2. Select an existing task from Task List .
2. Select Edit > Copy Task from main menu or click on the icon from the toolbar or clickmouse right button and select Add Task.
3. A new Task opens with a blank list of Points, only Home Waypoint is selected as the Take off andLanding Point
See also:Tasks window
4.2.3.8 Task Properties
The Task Properties dialog is used to define Observation Zones and Task options for a given task. It hastwo Tabs:. Observation Zones. Options
42
43
42
68
69

SeeYou Help68
© 1995 - 2014 ... Naviter d.o.o.
4.2.3.8.1 Observation Zones
Use this dialog when planning Assigned Area tasks. It enables you to create a custom observation zonefor each waypoint. An observation zone can be determined by setting parameters of two arbitrary arcs.
You can access this dialog by choosing Edit->Task Properties->Observation Zones tab or by using mouseright-click over an observation zone in map view. The picture will let you see what you are doing.
To change an observation zone do the following:1. Select a waypoint you wish to edit2. Choose the Direction from which angles are calculated. You can choose from:
Fixed valueSymmetricalTo Next PointTo Previous PointTo Start Point
3. If you have chosen Fixed value you can enter the desired main direction in Angle12 field. Thisvalue represents the bearing of the bisector of the observation zone.
4. Set Radius1, Angle1, Radius2, Angle2 to set the two arbitrary arcs. Look at changes in thepicture for what's hapenning.
See also:Tasks windowTask Options
42
69

Menu commands 69
© 1995 - 2014 ... Naviter d.o.o.
4.2.3.8.2 Options
Use this dialog to determine how results and statistics is calculated.Select Edit->Task Properties from the main menu to open this dialog.
Description:This will replace the automatically assigned description for the Task in the Tasks window.
Type:You can choose from three predefined Task Types:. Assigned Speed Task (AST) is a classical Task with waypoints that need to be flown in designatedorder.. Distance Task with Assigned Areas (TDT/AA and DST/AA) is a task where competitors have to entereach Assigned Area in predefined order. One fix in each observation zone is used for calculatingmaximum flown distance.. Distance Task with Turn Points (TDT/TP and DST/TP) is a so called Cat's Craddle task, where pilotchooses which point he is going to turn next in the air.
No start before:This is the opening time of the start gate in competition.
Task time:Format of this field is HH:MM:SS (hours:minutes:seconds). If this value is not set to zero , then thecalculation assumes that a minimum task time has been set for this task. If task time is shorter than thisminimum task time then the speed is calculated by dividing task distance with task time rather than timeactually spent on task.
Task distance calculation. use waypoints: if this option is checked, then distance between reached waypoints will be used todetermine the length of the task flown.. use flight fixes: if this option is checked, then one fix in each observation zone will be used tocalculate distance flown so, that the result will be maximum distance flown.
Random order of waypointsThis option is used for Cat's Craddle tasks (TDT/TP, DST/TP). This option can only be used with "usewaypoints" type of distance calculation.
. Maximum number of waypoints that pilot can use. This value includes start and finish waypoints.
. Fixed number of waypoints at beginning 1 - start only, 2 - first waypoint after start is mandatory.
. Fixed number of waypoints at end 1 - finish only, 2 - last waypoint is mandatory before finishing.Note: If mandatory waypoints can be used in flight as well, they have to be declared twice.. Bonus for finish value is self explanatory
Uncompleted legWith this option you can choose how distance from last waypoint is calculated for outlanded pilots.. calculate minimum distance to next observation zone from point of landing or virtual outlanding(used for TDT/AA and DST/AA tasks). calculate maximum distance from last observation zone (used for TDT/TP and DST/TP tasks)
Allow missed zonesSeeYou has a "missed zone buffer" horizontally and vertically. If the flight passes misses an area for lessthan the values entered in these boxes, a warning is issued. If both values are 0, missed zones are notallowed.

SeeYou Help70
© 1995 - 2014 ... Naviter d.o.o.
See also:Tasks windowObservation Zones
4.2.3.9 Waypoints
Select Edit > Waypoints, press Ctrl+W or use the icon from toolbar.The command Opens the Waypoints window.
See Waypoints window for more help
4.2.3.10 Tasks
Select Edit > Tasks, press Ctrl+T or use the icon from toolbar.The command Opens the Tasks window.
See Tasks window for more help
42
68
39
42

Menu commands 71
© 1995 - 2014 ... Naviter d.o.o.
4.3 View
4.3.1 for Flight window
4.3.1.1 Route
This command will open the flight window in Route view mode. The flight will be shown over vector orraster maps, depending on which are available or enabled.
Select View > Route or click the icon on the toolbar.
See alsoFlight windowFlight Window - Route viewCreating Desktops
4.3.1.2 3D view
This command opens the flight in 3-dimensional view.
Select View > 3D view or use the icon.
See also:Flight window->3D windowOptions->3D view
24
25
108
26
99

SeeYou Help72
© 1995 - 2014 ... Naviter d.o.o.
4.3.1.3 Graph
This command will show the flights in active flight window in one of the graphs. The x-axis alwaysrepresents time, the y-axis represents one of the following:
1. Altitude2. GPS Altitude3. Vertical speed4. Netto vertical speed5. Task speed6. Ground speed7. True airspeed8. Fix accuracy9. Engine noise level10. Means of propulsion
See alsoFlight windowCreating Desktops
4.3.1.4 Statistics
This command will show you the statistics report for the active flight, the declared task of this flight andthe custom selection in the flight, if any.
Select View > Statistics in the Flight Window or click the icon from the toolbar.
See alsoFlight windowStatisticsCreating Desktops
24
108
24
29
108

Menu commands 73
© 1995 - 2014 ... Naviter d.o.o.
4.3.1.5 Show
You can choose which map layers to show in the map:. Waypoints (Ctrl + 1). Airspace (Ctrl + 2). Vector maps (Ctrl + 3). Raster maps (Ctrl + 4). Photo icons (Ctrl + 5)
4.3.1.6 Instruments
See Instruments panel
4.3.1.7 Flight parameters
This command shows or hides the Flight Parameter window at the bottom of the Flight Window.Select View > Flight Parameters from the main menu or click mouse right-button and select View >Flight parameters from the pop-up window.
Flight parameters present different data in circling
and in straight flight
Featured parameters:CN - Contest number of the gliderTime - Current time (Stored time+Time Offset)Alt - Current altitudeVario - Current variometer readingGsp - Current groundspeeddt - time of the featured section (either climbing or straight flight)dH - difference in altitude between the start and end of featured sectionAVario - average vario for the sectionAGsp - average groundspeed for the sectionDisDone - Sum of distances between fixes for the sectionL/D - Glide ration for the section
(The last three items are only represented for straight flight sections)Dis.Task - Distance since crossing the start lineVt - Travel speed - average speed for last 30 minutes (by default)Vavg. - Task speed - average speed since crossing the start lineL/D Finish - glide ratio to the fix in the IGC file where the finish or outlanding was calculatedWind - current wind, it is the same information as the wind arrow in the route viewAGL - altitude Above Ground Level IAS - current Indicated AirSpeedTAS - current True AirSpeedTrk - current track, the direction of flightGPS Alt. - current GPS AltitudeNetto - current raising or sinking of the air (very much affected by the selected Polar )Comp. - current wind component
36
94

SeeYou Help74
© 1995 - 2014 ... Naviter d.o.o.
Columns can also be mixed up. Use drag a column into its new position or use mouse right button toopen a dialog.
After a mouse has rested over a certain line of flight parameters, additional data is shown as hint. Suchhint will show pilot's name, glider type, date of flight etc.
See also:Flight window
4.3.1.8 Photos
Enter topic text here.
4.3.1.9 Legend
This command shows or hides the Legend on the right part of the Flight Window.
The colors presented in the Legend refer to the chosen color scheme for the active flight.
Note that a any Graph can be colored in any color scheme .
For those color schemes where it makes sense, the current value is displayed in the legend as a marker.
See also:Flight window
4.3.1.10 Airspace violation
See Airspace violation panel
4.3.1.11 Colors
Select View > Colors or use the combo box in the Flight Toolbar or use mouse right-click in the FlightWindow and select Colors.
This command enables you to set the color scheme for the active Flight window. You can choose fromthese Color schemes:
1. Fixed : the same color for all flights. You can select this color through the button next to thischoice
2. Multiple flights : each flight in another color3. Altitude : red=low, blue=high4. GPS Altitude : red=low, blue=high5. Vario : green=down, red=up6. Ground speed : green=slow, red=fast7. Task speed : blue=slow, red=fast8. GPS status : green=straight, orange=circling right, yellow=circling left, violett=on tow or with
engine9. Fix accuracy : stored in the IGC file10. Engine noise level (ENL) : green=quiet, red=loud11. Time : flight track changes from blue to red and vice versa every X minutes (30min in example
below)12. Airspace verification : flight track color changes inside of airspaces13. Task : Each leg is colored in its own color, flight before start and after finish is gray
24
74
72 74
24
38

Menu commands 75
© 1995 - 2014 ... Naviter d.o.o.
These values can also be set through the combo box in the Flight Toolbar
See also:Flight window 24

SeeYou Help76
© 1995 - 2014 ... Naviter d.o.o.
4.3.1.12 Zoom
This command enables you to set the Zoom value for the Flight Window.Select View > Zoom or use the combo box in the Standard Toolbar or use mouse right-click in the Flightwindow and select Zoom.
Choose a value for the horizontal axis. You can enter either:- Percents (see below for exact explanation)- Distance in kilometers (add km), nautical miles (nm) or statute miles (ml)- Scale in one to 'any value', for example 1:50000
See also:Flight window
4.3.1.13 Toolbars
With this command you can control which toolbars are visible.
Select View > Toolbars from the main menu or mouse right-click the toolbar part of any the SeeYoumain window. In Flight window you can only select or unselect these toolbars:
1. Standard2. Flight3. Animate
Customize option enables you to manually select which toolbars to use.
4.3.1.14 Status bar
Shows or hides the lowest line - Status bar - of the SeeYou window.
4.3.2 for Waypoints window
4.3.2.1 Large icons
Use this option to see the Waypoints with their respective icons for the Style.
Select View > Large Icons from the main menu or use the icon in the Waypoints toolbar or usemouse right-click and select View > Large Icons.
See alsoWaypoints window
4.3.2.2 List
Use this command to see the list of all the names of the Waypoints in your Points.cup file.
Select View > List from the main menu or use the icon in the Waypoints toolbar or use mouse right-click and select View > List.
See alsoWaypoints window
24
111
112
113
40
40

Menu commands 77
© 1995 - 2014 ... Naviter d.o.o.
4.3.2.3 Details
Use this command to see the list of all the waypoints and their attributes from your Points.cup file. Notethat you can click on the header to sort waypoint on the values in the respective column.
Select View > Details from the main menu or use the icon in the Waypoints toolbar or use mouseright-click and select View > List.
See alsoWaypoints window
4.3.2.4 Map
Use this command to see the Waypoints on the map.
Select View > Details from the main menu or use the icon in the Waypoints toolbar or use mouseright-click and select View > List.
See alsoWaypoints window
4.3.2.5 Sort Waypoints
Waypoints can be sorted in Large icons , list and details view . They can be sorted byNameLatitudeLongitudeElevationStyleDistance to Home WaypointBearing to Home WaypointCode (short name for the logger)Country
See alsoWaypoints window
4.3.2.6 Zoom
This command enables you to set the Zoom value for the Flight Window.Select View > Zoom or use the combo box in the Standard Toolbar or use mouse right-click in the Flightwindow and select Zoom.
Choose a value for the horizontal axis. You can enter either:- Percents (see below for exact explanation)- Distance in kilometers (add km), nautical miles (nm) or statute miles (ml)- Scale in one to 'any value', for example 1:50000
See alsoWaypoints window
40
40
76 76 77
40
40

SeeYou Help78
© 1995 - 2014 ... Naviter d.o.o.
4.3.2.7 Toolbars
With this command you can control which toolbars are visible.
Select View > Toolbars from the main menu or mouse right-click the toolbar part of any the SeeYoumain window. In Waypoints window you can only select or unselect these toolbars:
1. Standard2. Waypoint
See alsoWaypoints window
4.3.2.8 Status bar
Shows or hides the lowest line - Status bar - of the SeeYou window.
4.3.3 for Tasks window
4.3.3.1 List
Use this command to present the selected task in tabular view.
Select View > List from the main menu or use the icon from the Tasks toolbar or use the mouseright-click and select View > List.
See alsoTasks window
4.3.3.2 Map
Use this command to present the selected task over the maps (if available).
Select View > Map from the main menu or use the icon from the Tasks toolbar or use the mouseright-click and select View > Map.
See alsoTasks window
4.3.3.3 Task information
Task information window is only active in Map view.
It showsWaypoint nameLeg distanceLeg bearingLeg percentageTotal task distanceTask type and triangle distance if applicable
See alsoTasks window
111
113
40
42
42
42

Menu commands 79
© 1995 - 2014 ... Naviter d.o.o.
4.3.3.4 Show FAI Area
This feature enables you to show or hide the FAI Area assistant.
Select View > Show FAI Area, use the icon or press Ctrl+E.
FAI Area is shown for one of the already designed legs of a Task. If you put the third waypoint inside thisarea, the designed task will be in the shape of an FAI Triangle.
See also:Tasks windowFAI Triangle assistantOptions->Task planning
4.3.3.5 Rotate FAI Area
This feature enables you to move the FAI Area assistant around the legs.
Select View > Show FAI Area, use the icon or press Ctrl+R repeatedly.
FAI Area is shown for one of the already designed legs of a Task. If you put the third waypoint inside thisarea, the designed task will be in the shape of an FAI Triangle.
See also:Tasks windowFAI Triangle assistantOptions->Task planning
4.3.3.6 Zoom
This command enables you to set the Zoom value for the Flight Window.Select View > Zoom or use the combo box in the Standard Toolbar or use mouse right-click in the Flightwindow and select Zoom.
Choose a value for the horizontal axis. You can enter either:- Percents (see below for exact explanation)- Distance in kilometers (add km), nautical miles (nm) or statute miles (ml)- Scale in one to 'any value', for example 1:50000
See alsoTasks window
42
44
104
42
44
104
42

SeeYou Help80
© 1995 - 2014 ... Naviter d.o.o.
4.3.3.7 Toolbars
With this command you can control which toolbars are visible.
Select View > Toolbars from the main menu or mouse right-click the toolbar part of any the SeeYoumain window. In Flight window you can only select or unselect these toolbars:
1. Standard2. Task
Customize option enables you to manually select which toolbars to use.
See alsoTasks window
4.3.3.8 Status bar
Shows or hides the lowest line - Status bar - of the SeeYou window.
4.4 Animate
4.4.1 Play
Use this command to start or continue the animation of the flight or multiple flights in the active FlightWindow
Select Animate > Play form the main menu in the Flight Window or use the icon from the Animatetoolbar .
See alsoFlight windowSynchronizationUsing Keyboard and Mouse
4.4.2 Pause
Use this command to temporarily stop the animation. The positions of gliders and their synchronizationinformation is not changed. Using the next and previous icons from the Animation toolbar or using thearrow keys will move all gliders.
Select Animate > Pause from the main menu in the Flight Window or use the icon from theAnimation toolbar .
See alsoFlight windowSynchronizationUsing Keyboard and Mouse
111
114
42
113
24
83
117
113
24
83
117

Menu commands 81
© 1995 - 2014 ... Naviter d.o.o.
4.4.3 Stop
Use this command to terminate the animation. The synchronization and glider positions are reset.
Select Animate > Stop from the main menu in the Flight Window or use the icon from the Animationtoolbar .
See alsoFlight windowSynchronizationUsing Keyboard and Mouse
4.4.4 Previous thermal
Use this command to jump from the current position to the position of the start of the previous circling.If this command is used when the Pause button is pressed, then all flights in the active window will moveback for the same amount of time.
Select Animate > Previous Thermal from the main menu in the Flight Window or use the icon fromthe Animate toolbar or press Ctrl+Left arrow key.
See alsoFlight windowSynchronizationUsing Keyboard and Mouse
4.4.5 Previous position
Use this command to move the glider from the current position to the previous position.If this command is used when the Pause button is pressed, then all flights in the active window will moveback for the same amount of time.
Select Animate > Previous Position from the main menu in the Flight Window or use the icon fromthe Animate toolbar or press Left arrow key.
See alsoFlight windowSynchronizationUsing Keyboard and Mouse
113
24
83
117
113
24
83
117
113
24
83
117

SeeYou Help82
© 1995 - 2014 ... Naviter d.o.o.
4.4.6 Next position
Use this command to move the glider from the current position to the next position.If this command is used when the Pause button is pressed, then all flights in the active window will moveforward for the same amount of time.
Select Animate > Next Position from the main menu in the Flight Window or use the icon from theAnimate toolbar or press Right arrow key.
See alsoFlight windowSynchronizationUsing Keyboard and Mouse
4.4.7 Next thermal
Use this command to jump from the current position to the position of the start of the next circling.If this command is used when the Pause button is pressed, then all flights in the active window will moveback for the same amount of time.
Select Animate > Next Thermal from the main menu in the Flight Window or use the icon from theAnimate toolbar or press Ctrl+Left arrow key.
See alsoFlight windowSynchronizationUsing Keyboard and Mouse
4.4.8 Animation rate
Use this command to control the speed of the animation.
Select Animate > Animation rate from the main menu in the Flight Window or use the icon fromthe Animate toolbar .
See alsoFlight windowSynchronizationUsing Keyboard and Mouse
113
24
83
117
113
24
83
117
113
24
83
117

Menu commands 83
© 1995 - 2014 ... Naviter d.o.o.
4.4.9 Synchronization
Use this command to set the synchronization method for multiple flights in the active Flight Window.
Select Animate > Synchronization from the main menu in the Flight Window to use this command.
There are three automatic synchronization methods and a custom method:1. Real Time synchronization will show glider positions without time offset.
2. Take off time synchronization sets a time offset to each flight in the active Flight Window so, that allflights take off at the same time. The number next to each flight represents take off time.
3. Start Time synchronization sets a time offset to each flight in the active Flight Window so, that allflights leave start sector at the same time. The number next to each flight represents the start time.Note that multiple flights are synchronized to each own's task. To synchronize them to a given task (incompetition for example) you should assign them one task by dragging it from the Task list orchecking the 'Show message Copy Task' in the Options - Misc
4. Finish Time synchronizes all flights to their finish time.5. Landing Time sychronizes all flights to their landing time6. Custom Synchronization is possible if you move the glider to desired positions, then select Animate
> Synchronization > Synchronize > Selected time See alsoFlight window
4.5 Tools
4.5.1 Raster Maps
4.5.1.1 About Raster Maps
Use this command to add Raster Maps or to change the preferences of already loaded Raster Maps.
Select Tools > Raster Maps.
To control how to use Raster Maps, use these controls:· Edit properties of a raster map· Add a raster map· Remove raster map
CMR SeeYou Raster MapsCMR maps are the easiest way to use and share raster maps. CMR format stores calibration information,so all you need to do is File > Open the CMR raster map and the process is finished. The same goesfor sharing them. Send a CMR map (or a CD with CMR maps) to a friend. All he has to do is File > Openthem with SeeYou. Satellite images for many parts of the World in CMR format can be downloaded fromour web pages.
Raster maps come in many shapes and scales. In order to get the best out of viewing them, you mayselect groups for loaded maps. Select several maps from the Raster Maps dialog, then change the Mapgroup value for all of them. If you want to quickly turn one group on or off, simply right click the "R"button in the lower left corner of the SeeYou window and select/deselect the ones that apply.
107
24
88
84
86
47

SeeYou Help84
© 1995 - 2014 ... Naviter d.o.o.
Map Description FileMap Description file (.MDS) is a simple text file. A comma separated value file contains the properties ofthe raster maps in the following order:
1. file name2. Upper left corner Longitude3. Upper left corner Latitude4. Bottom right corner Longitude5. Bottom right corner Latitude6. Priority
Each raster map is presented with one line in Map description file.
In the List view, you can select which of the loaded maps to present in the Flight Window. Make surecheckbox next to the map is checked if you wish to see this map in the Flight window.
In the Details view, you can view the properties of each loaded raster map as well as select which onesto show. Make sure checkbox next to the map is checked if you wish to see this map in the Flightwindow.
See alsoFlight window
4.5.1.2 Add Raster Maps
CMR SeeYou Raster MapsCMR maps are the easiest way to use and share raster maps. CMR format stores calibration information,so all you need to do is File > Open the CMR raster map and the process is finished. The same goesfor sharing them. Send a CMR map (or a CD with CMR maps) to a friend. All he has to do is File > Openthem with SeeYou.
Calibrating JPG and BMP raster mapsAs a prerequisite you must have a picture of a map in a bmp or jpg format. The map on the picture musthave North facing up. It is our reccomendation to cut it into tiles of maximally 1x1 degree latitude andlongitude.
24
47
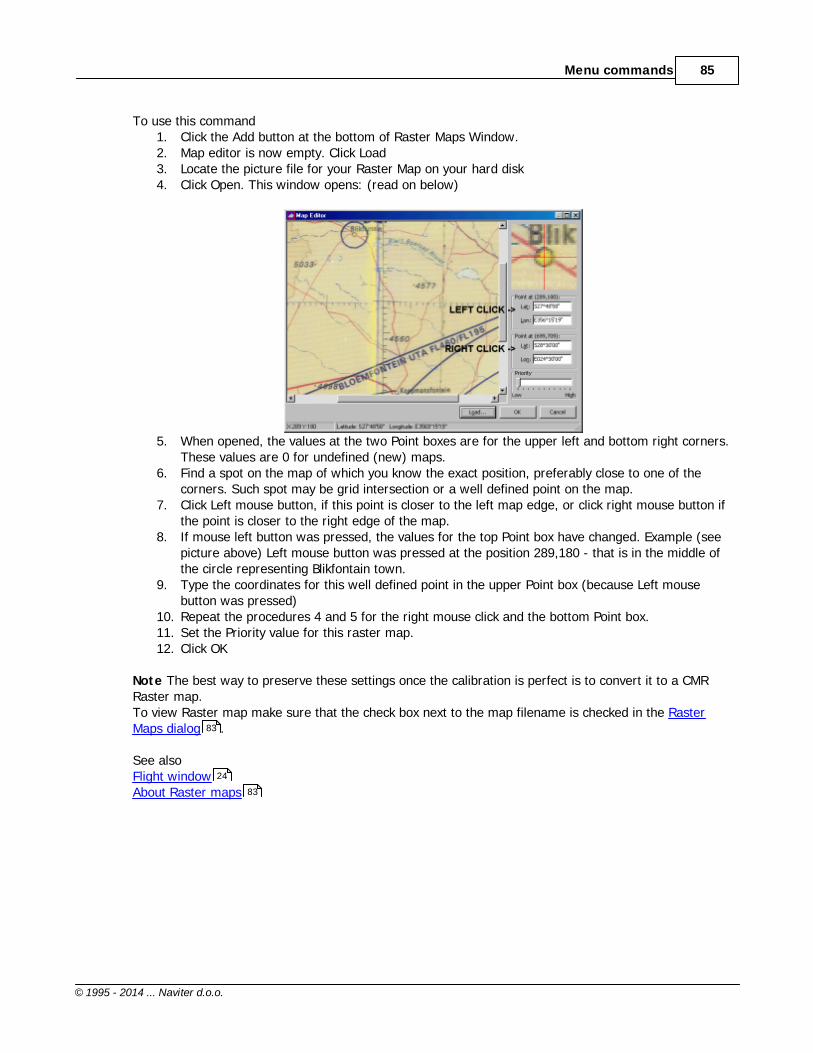
Menu commands 85
© 1995 - 2014 ... Naviter d.o.o.
To use this command 1. Click the Add button at the bottom of Raster Maps Window.2. Map editor is now empty. Click Load3. Locate the picture file for your Raster Map on your hard disk4. Click Open. This window opens: (read on below)
5. When opened, the values at the two Point boxes are for the upper left and bottom right corners.These values are 0 for undefined (new) maps.
6. Find a spot on the map of which you know the exact position, preferably close to one of thecorners. Such spot may be grid intersection or a well defined point on the map.
7. Click Left mouse button, if this point is closer to the left map edge, or click right mouse button ifthe point is closer to the right edge of the map.
8. If mouse left button was pressed, the values for the top Point box have changed. Example (seepicture above) Left mouse button was pressed at the position 289,180 - that is in the middle ofthe circle representing Blikfontain town.
9. Type the coordinates for this well defined point in the upper Point box (because Left mousebutton was pressed)
10. Repeat the procedures 4 and 5 for the right mouse click and the bottom Point box.11. Set the Priority value for this raster map.12. Click OK
Note The best way to preserve these settings once the calibration is perfect is to convert it to a CMRRaster map.To view Raster map make sure that the check box next to the map filename is checked in the RasterMaps dialog .
See alsoFlight windowAbout Raster maps
83
24
83

SeeYou Help86
© 1995 - 2014 ... Naviter d.o.o.
4.5.1.3 Remove Raster Maps
If you no longer need a raster map, use this command to remove them from the Raster Map list. Theywill not be deleted from your hard disk, though.
To use this command select Tools > Raster Maps from the main Menu.
Select a Raster map or more Raster maps and click the Remove button. You will be prompted if youreally want to remove this map. Click OK, if you are sure, click Cancel if this action was a mistake.
Note that if you only wish to disable a map for a short time you don't need to remove it, you can disableit by unchecking the checkbox next to it.
See alsoFlight windowAbout Raster maps
4.5.1.4 Convert to CMR
Once you have calibrated your raster maps you will want to make changes permanent. The best way todo it is to convert the maps to CMR format.
In Tools > Raster maps dialog select BMP or JPG maps and press Convert button.
Open the details tab if you want to have full control over converstion. You can setup. file name for the CMR map. caption. height and width of the smallest tile. maximum number of layers. format (JPG/BMP). compression rate (only available with JPG)
Press Start and wait until the process finishes.
24
83

Menu commands 87
© 1995 - 2014 ... Naviter d.o.o.
See alsoFlight windowAbout Raster maps
24
83

SeeYou Help88
© 1995 - 2014 ... Naviter d.o.o.
4.5.1.5 Edit properties of Raster Maps
Use this command if you want to change the properties of the selected raster map. This command is notavailable for CMR maps.
To use this command click the Edit button at the bottom of Raster Maps Window.1. When opened, the values at the two Point boxes are for the upper left and bottom right corners.
These values are 0 for undefined (new) maps.
2. Find a spot on the map of which you know the exact position, preferably close to one of thecorners. Such spot may be grid intersection or a well defined point on the map.
3. Click Left mouse button, if this point is closer to the left map edge, or click right mouse button ifthe point is closer to the right edge of the map.
4. If mouse left button was pressed, the values for the top Point box have changed. Example (seepicture above) Left mouse button was pressed at the position 289,180 - that is in the middle ofthe circle representing Blinkfontain town.
5. Type the coordinates for this well defined point in the upper Point box (because Left mousebutton was pressed)
6. Repeat the procedures 4 and 5 for the right mouse click and the bottom Point box.7. Set the Priority value for this raster map.8. Click OK
Note if you want to save these settings, you need to create a new Map Description file with the Exportcommand.To view the raster map make sure that the check box next to the map filename is checked.
See alsoFlight windowAbout Raster maps
24
83

Menu commands 89
© 1995 - 2014 ... Naviter d.o.o.
4.5.2 Vector Maps
4.5.2.1 About Vector Maps
Free Vector maps are an important part of SeeYou. Use this dialog to add , remove and control theappearance of Vector maps .
To use this command select Tools > Vector Maps from the main menu.
The dialog is divided into Options, Legend and Loaded Maps sections. They are described separately .
Note that this is not required for the HGT maps that are downloaded automatically from the NASA orSeeYou servers. All you need to do with the HGT maps is to have an open connection to the Internet. Therest is done automatically.
See alsoFlight windowEdit properties for Vector maps
4.5.2.2 Add Vector Maps
Use this command to add Vector maps to SeeYou.
To use it select Tools > Vector maps from main menu., then click the Add button.Locate the SeeYou Vector map (.CIT) on your hard disk or CD ROM, select it and click Open.
You should see the added vector map(s) listed in the Loaded Maps list box at the bottom of the VectorMaps dialog.
Note that this is not required for the HGT maps that are downloaded automatically from the NASA orSeeYou servers. All you need to do with the HGT maps is to have an open connection to the Internet. Therest is done automatically.
See alsoFlight windowAbout Vector mapsEdit properties for Vector maps
89 90
90
90
24
90
24
89
90

SeeYou Help90
© 1995 - 2014 ... Naviter d.o.o.
4.5.2.3 Remove Vector Maps
Use this command to remove a Vector map from Loaded Maps list box. This will not erase the map fromyour hard disk, but it will stop this Vector map from showing.
Select Tools > Vector Maps from the main menu.1. Select the Vector Map you want to remove2. Click on the Remove button
The map should disappear from your Loaded Maps list box.
See alsoFlight windowAbout Vector mapsEdit properties for Vector maps
4.5.2.4 Edit properties for Vector Maps
ColorsIt is possible to store color schemes you created in a color scheme for later use. Some color schemesare preselected:. Mountain landscape. Low land landscape. Optimized for PDA
By selecting a height layer from the Legend and clicking on the Shift up button you can move the colorscheme up. If you wish to do more advanced changes, see the "Creating your own height color scheme"lower in this chapter.
OptionsThere are four different possibilities for presenting the Vector maps:
1. None - do not show Vector Maps at all2. Lines only - show lines connecting the same altitude only.3. Filled Contours - The areas between the lines are filled, lines are not shown4. Filled Contours and Grey Lines is a combination of 2. and 3.
You may choose to change the default values also for the Topographical features of the map (like rivers,lakes, towns etc.). Select the desired feature from the Selected Layer drop down list and change thedefault color, change the visibility slider and width of the feature.
Shade terrain feature puts shades on one side of the slopes and light on the other thus making the 2Dview much more plastic.Shadow direction defines the direction from which the sun is shining on the maps thus creatingshadows on the other side of the mountain.
For help about using the Loaded maps section, see Add or Remove Vector maps sections.
24
89
90
89 90

Menu commands 91
© 1995 - 2014 ... Naviter d.o.o.
Creating your own Height color schemeYou can set your own colors for each 100m altitude layer. Here's how:
1. Select the altitude layer by clicking on the Legend or entering height into the Color At Altitudefield.
2. Select a color for this altitude from the button left of the Color at Altitude caption.3. Select a color for another height, repeating 1. and 2.4. Move mouse cursor to the Legend5. Select the first layer: Press Shift and click on the layer.6. Hold shift and move cursor to the other layer. Release Shift7. Click on the Spread button8. Repeat this as many times as you wish.
When you are finished, you may choose to save your scheme by using the Save As... button.
See alsoFlight windowAbout Vector maps
24
89
SeeYou Help92
© 1995 - 2014 ... Naviter d.o.o.
4.5.3 Airspace
Through this dialog you can Add, Remove and set visible objects of the Airspace.
Select Tools > Airspace to access this command through the main menu.
AddClick the Add button in the Loaded data box. Locate the Airspace (.CAR) files, select them and click Open.The selected Airspace data should appear in the Loaded data list box.
Supported airspace formats:.CAR - SeeYou airspace format.VER - Filser airspace format.TXT - OpenAir.AIR - Tim Newport-Peace format
RemoveThis command will remove the selected Airspace file from SeeYou. It will not erase it from your harddisk, but you will not be able to view the data on the map in SeeYou anymore.Select the airspace you would like to remove and click the Remove button.
Select visible airspaceUse the checkboxes to select which airspace should be visible in map view. Note that this also influenceswhich airspace will be checked with Airspace checker . By right clicking on this list you can check/uncheck the selection or all files.
Airspace files which are printed blue are the ones which are updated automatically. These airspace filescan not be removed, they can only be disabled. Note that updating the airspace files works even if it ismarked as disabled (it is disabled for viewing only). Airspace files which you have added manually areprinted black.
Change the appearance of the airspaceBy changing the Item, Style, Color and Line width properties for any given airspace you can control howAirspace is presented. There is a graphical representation of what you have setup to the right of thesettings.
If "use colors as defined in file" option is checked, then colors defined in OpenAir files will be used topaint the airspace. Each airspace item can be colored in a separate color this way.
Automatic updating of the airspace files
You may choose how to update the airspace files:. Install updated airspace automatically. Prompt to install updated airspace (Highly Recommended). Don't check for updates (Strongly discouraged)
You may check for updates at any time by clicking the Check for updates button.
74

Menu commands 93
© 1995 - 2014 ... Naviter d.o.o.
See also:Flight window
4.5.4 Pilots
Pilot list is useful in many ways like submitting flights to OLC, uploading flight declaration, SeeYouCompetition to loggers etc.
Through Tools->Pilots->Add you can add a pilot to the list manually. You many enter any of the fields:Given nameName (family name)Coutry/ClubBirth dateGlider typeGlider registrationCompetition IDCompetition classIndex (handicap) of a gliderCheckbox if a glider has engine or notUnique identifier of a flight recorder
Pilots are also added automatically after submitting flights to OLC or uploading to flight declaration tologgers.
The essential thing about setting up pilots in competition is linking Pilot's name to IGC flight file. Thelinking bit is the four letter code following the date letters in the IGC file name.Standard IGC file name consist of three parts:. First three letters are the date 27a for 10th of July 2002, 2ab for 11th of October 2002. Next four are a unique for each data logger, they represent the logger's serial number. The last one is consecutive number of a flight on the particular date.
The unique code can be anything, it is not limited to 4 letters or anything. Do it differently if yourdownloading software allows you. SeeYou will look for this string in the filename. If it can find it, that'syour flight.
24

SeeYou Help94
© 1995 - 2014 ... Naviter d.o.o.
4.5.5 Polars
Choosing the polar is all important for any good indication about how the air was moving around theglider. Netto vario is the value that describes the movement of the air around the glider by adding thesink of the glider at a given airspeed to the current sink rate. If the polar data is wrong, the netto variowill be too.
Select a polar from the list or calculate your own polar by entering three sink rate at three differentindicated airspeeds into the form at the right hand side of the dialog.

Menu commands 95
© 1995 - 2014 ... Naviter d.o.o.
4.5.6 Options
4.5.6.1 General
On this page you can set up the default Language, Units and Folders
LanguageChoose your language from the combo box at the top of the dialog.
HelpHelp files which are in your SeeYou directory are listed here
Toolbar & Menu styleChoose between different color schemes for toolbars and the menu.
Units· Distance: km, nm, ml· Altitude: m, ft· Speed: km/h, kts, mph, m/s· Vertical speed: m/s, kts, ft/min· Wind: km/h, kts, mph, m/s
Latitude/LongitudeChoose between these types of Lat/Lon presentation
· Decimal degrees (DD.dddd)· Degrees, decimal minutes (DD°MM.mmm')· Degrees, minutes, seconds (DD°MM'SS" - default)
UTC Offset [h]The default difference between UTC time and Local time of your country. This difference is applied to anyopened IGC file which doesn't carry a UTC Offset setting in the header of the IGC file.
Distance calculationYou can choose to measure distance on WGS-84 Ellipsoid or FAI Sphere. The FAI Sphere is the Earthapproximated with a fixed radius prescribed by IGC until October 2002. It is still used to measuredistance by CIVL.
See also:Options - GeneralOptions - FoldersOptions - FlightOptions - Flight - GraphsOptions - Flight - StatisticsOptions - Flight - 3D viewOptions - Flight - AnimationOptions - Map appearanceOptions - Map appearance - Vector mapsOptions - Map appearance - AirspaceOptions - Task planning
95
96
96
98
99
99
101
101
102
104
104

SeeYou Help96
© 1995 - 2014 ... Naviter d.o.o.
Options - OptimizationOptions - Observation ZoneOptions - Miscellaneous
4.5.6.2 Folders
Click on the button to locate the directory containing FlightsMapsWaypoints
See also:Options - GeneralOptions - FoldersOptions - FlightOptions - Flight - GraphsOptions - Flight - StatisticsOptions - Flight - 3D viewOptions - Flight - AnimationOptions - Map appearanceOptions - Map appearance - Vector mapsOptions - Map appearance - AirspaceOptions - Task planningOptions - OptimizationOptions - Observation ZoneOptions - Miscellaneous
4.5.6.3 Flight
You can setup the way flight is displayed on the screen here.
Select on of the items from the Style combo boxRouteDeclared task
105
106
107
95
96
96
98
99
99
101
101
102
104
104
105
106
107

Menu commands 97
© 1995 - 2014 ... Naviter d.o.o.
Observation zonePhoto landing markerBefore task start
For each of them you can select Color and line width.
For the Selected fix you can chooseColorSizeGlider symbol
You can also selectto colorize only the task part of the flightshow wind arrowshow tick every X minutessoaring begin equals takeoff and soaring end equals landing (useful for paragliders andhanggliders starting off the hill)Automatically adjust altitude to QNH, QFE or QNE when a flight is openedAutomatically validate IGC flight if you want each flight to be validated when it is opened.
See also:Options - GeneralOptions - FoldersOptions - FlightOptions - Flight - GraphsOptions - Flight - StatisticsOptions - Flight - 3D viewOptions - Flight - AnimationOptions - Map appearanceOptions - Map appearance - Vector mapsOptions - Map appearance - AirspaceOptions - Task planningOptions - OptimizationOptions - Observation ZoneOptions - Miscellaneous
95
96
96
98
99
99
101
101
102
104
104
105
106
107

SeeYou Help98
© 1995 - 2014 ... Naviter d.o.o.
4.5.6.4 Graphs
You can control how Graphs are drawn through this page.
StyleIn the Style box you can control the way these items are presented:
GraphValue GridTime Grid and Selected fix
1. Select the Item you want to change2. Choose Color for selected item3. Select Line width for selected item
Note that setting the color for the Graph Item will set the color for Fixed color scheme. Other colorschemes are preset.
GridControl how gridlines are displayed.
1. Choose the graph you want to change.2. Choose the increment value for selected graph. You can enter any number and units in this
window. If you skip the unit, default units will be used3. You can set the Minimum and Maximum values for the graph by turning Auto Range off and
entering custom numbers in the Minimum and Maximum fields.
You may check or uncheck whether or not you want to show terrain profile in barogram view.You may also check or uncheck whether or not you want to show airspace in barogram view.
See also:Options - GeneralOptions - FoldersOptions - FlightOptions - Flight - GraphsOptions - Flight - StatisticsOptions - Flight - 3D viewOptions - Flight - AnimationOptions - Map appearanceOptions - Map appearance - Vector mapsOptions - Map appearance - AirspaceOptions - Task planningOptions - OptimizationOptions - Observation ZoneOptions - Miscellaneous
95
96
96
98
99
99
101
101
102
104
104
105
106
107

Menu commands 99
© 1995 - 2014 ... Naviter d.o.o.
4.5.6.5 Statistics
Statistics report is divided into Calculated information (Distance, Speed, Average climb etc.) andHistograms (Vertical speed, Ground Speed, Altitude).
Calculated information is controlled through the filters below Histogram box. You can set values for
· Ground speed filter in seconds - ground speed is averaged over x seconds· Vertical speed filter in seconds - vertical speed is averaged over x seconds· Task speed filter in minutes - Task speed is averaged over x minutes· Minimum circling time - circling less than this time is considered to be Tries· Minimum distance - of straight flight to be considered not circling.· Header color is the color of the separator between fields in the Statistics.
Histogramsare the tables, which present the flight data. You can control the Width, minimum and maximum valuesfor the histograms for:
· Vertical speed· Ground speed· Altitude
Read more about the meaning of each histogram in the Flight window, statistics chapter.
See also:Options - GeneralOptions - FoldersOptions - FlightOptions - Flight - GraphsOptions - Flight - StatisticsOptions - Flight - 3D viewOptions - Flight - AnimationOptions - Map appearanceOptions - Map appearance - Vector mapsOptions - Map appearance - AirspaceOptions - Task planningOptions - OptimizationOptions - Observation ZoneOptions - Miscellaneous
4.5.6.6 3D view
Use this page to change appearance of your 3D window.
Flight can not be opened in 3D windowIt may take some time for the 3D window to appear. If you prefer not to open flights in 3D, check thisoption.
Show 3D terrainWhen checked, SeeYou will draw mountains in the 3D view provided there is a CIT map loaded in Vectormap dialog .
95
96
96
98
99
99
101
101
102
104
104
105
106
107
89

SeeYou Help100
© 1995 - 2014 ... Naviter d.o.o.
Show SkyWhen this option is selected you will see gradient blue sky above horizon.Disable this option if you are experiencing problems with 3D view.
Show textured groundWhen this option is selected you will see textured ground in 3D view. To change detail level see Texture size option.Disable this option if you are experiencing problems with 3D view.
Show viewing directionWhen selected, it will display a compass value of the direction where the camera is pointed.
Show glider shadowWhen selected, it will shows a gray track on the ground vertically below the glider.
Show windsockwill show a windsock in 3D view when selected.
Texture sizeThis value represents maximum width or height of the ground texture. Larger number means moredetailed ground texture and more work for your graphic card. 1024 is a good setting for 16MB cards butfeel free to experiment.
Terrain qualityThis feature controls how much terrain is drawn at once. The higher the terrain quality the better thegraphic card must be in order to still give smooth 3D experience. Experiment with this setting to find thelimits of your hardware.
Height exaggerationThis value multiplies the flight track and mountains height. Larger value makes them steeper.
Track widthInfluences the route width in pixels, meters or feet.
Visible layersYou can setup visible layers independently from the Route view. This makes it possible to use Rastermaps (sattelite images for example) in 3D view while you would use Vector maps in overhead view.
GliderThese options allow you to manipulate the way glider symbol and its shadow looks like in 3D view. If youselect "Custom" from the style drop down box, you may import your own 3DS models of gliders.
CameraYou can setup the default position of the camera in 3D view here.
See also:Options - GeneralOptions - FoldersOptions - FlightOptions - Flight - GraphsOptions - Flight - StatisticsOptions - Flight - 3D viewOptions - Flight - Animation
95
96
96
98
99
99
101

Menu commands 101
© 1995 - 2014 ... Naviter d.o.o.
Options - Map appearanceOptions - Map appearance - Vector mapsOptions - Map appearance - AirspaceOptions - Task planningOptions - OptimizationOptions - Observation ZoneOptions - Miscellaneous
4.5.6.7 Animation
Show only selected part of the flight in animation modeIf selected, the animation will not show the whole track all the time. Glider track will be represented witha custom length tail. You can adjust the tail's length through the edit boxes that follow.
Synchronize to:Sets the default synchronization method and default animation rate.
NMEA OutputThis function sends out NMEA clauses while animating the flight. It was intended for testing various flightequipment. For security reasons, the time of the output fixes is changed.
Replay animation after finishIf selected, the animation will start over after it has reached the end of the animated flight(s).
Follow selected fix in animationIf selected, the animation will keep the glider symbol on the map. If not, the view will not change afterthe glider leaves the visible area.
See also:Options - GeneralOptions - FoldersOptions - FlightOptions - Flight - GraphsOptions - Flight - StatisticsOptions - Flight - 3D viewOptions - Flight - AnimationOptions - Map appearanceOptions - Map appearance - Vector mapsOptions - Map appearance - AirspaceOptions - Task planningOptions - OptimizationOptions - Observation ZoneOptions - Miscellaneous
4.5.6.8 Map appearance
Setup the way maps and related features are diplayed in the Route view .
Visible layersThey are setup separately than in 3D view.
101
102
104
104
105
106
107
95
96
96
98
99
99
101
101
102
104
104
105
106
107
25

SeeYou Help102
© 1995 - 2014 ... Naviter d.o.o.
GridlinesControl how gridlines are displayed. You can choose from gridlines that represent
· Latitude / Longitude· distance units (Automatic by default, read below for more)
Entering a number with distance unit 10nm for example will make gridlines show each 10nm. Note thatall units can be entered, not only the default unit. The default unit will be used, if unit is not added to thenumber.
Hintsselect which hints to show and for how long they are displayed.
WaypointsYou can select up until which zoom level Label (the name of the waypoint) and symbol (e.g. airport icon)are dispayed in the maps.You may also check to display the code instead of the name
See also:Options - GeneralOptions - FoldersOptions - FlightOptions - Flight - GraphsOptions - Flight - StatisticsOptions - Flight - 3D viewOptions - Flight - AnimationOptions - Map appearanceOptions - Map appearance - Vector mapsOptions - Map appearance - AirspaceOptions - Task planningOptions - OptimizationOptions - Observation ZoneOptions - Miscellaneous
4.5.6.9 Vector maps
The maps will come to you when you need them
Since SeeYou 4 vector maps are downloaded automatically when your computer is connected to theinternet. If you would like to download a particular area before you go offline please go to File > MobileWizard > choose vector maps and all its features > select your area (size is limited) > Next > you will bewarned that not all data has been downloaded yet. Choose "Yes" - download the data now.
Choosing a color scheme
Selecting a color scheme that works for you mostly depends on what you are trying to analyze. Theseare the main options:. Mountain landscape - this is the default SeeYou color scheme. Open Street Maps - useful for flat areas because it adds more ground features such as woods andfields. Data is unfortunately not available worldwide. Europe and North America are covered much betterthan the rest of the world. The good news is that the data is public and people at OpenStreetMaps.orgwill be delighted if you could participate by adding data about your area.. Zebra - adds more contrast to the altitude colors. Make sure you use it in combination with HGT maps. Appalachians - a greenish color scheme which nicely depicts the relief in the Appalachians.
95
96
96
98
99
99
101
101
102
104
104
105
106
107

Menu commands 103
© 1995 - 2014 ... Naviter d.o.o.
Advance options
You may choose many details by ticking the Advanced options. Make sure you save a new color scheme ifyou like the changes you have made.
TerrainHere you can select how the maps are colorized.
BackgroundThis color selector defines the color used to fill places where Vector maps don't exist. It is blue by defaultto paint the sea blue.
Selected layerChoose one and select its color, width and zoom level until which it is visible.You can choose from:
RiversLakesRoadsHighwaysRailroadsTownsLabels (town names)100m Isolines50m Isolines
Share terrain feature puts shades on one side of the slopes and light on the other thus making the 2Dview much more plastic.Anti Aliasing makes the lines smoother (and redraw of the maps slower)Automatically download maps enables you to choose whether or not to download the maps from theinternet automatically. It is recommended to leave this option enabled because if we update a map tile itwill automatically update at your end if you have this option enabled.
Set Cache folder and size for your maps.
See also:Options - GeneralOptions - FoldersOptions - FlightOptions - Flight - GraphsOptions - Flight - StatisticsOptions - Flight - 3D viewOptions - Flight - AnimationOptions - Map appearanceOptions - Map appearance - Vector mapsOptions - Map appearance - AirspaceOptions - Task planningOptions - OptimizationOptions - Observation ZoneOptions - Miscellaneous
95
96
96
98
99
99
101
101
102
104
104
105
106
107

SeeYou Help104
© 1995 - 2014 ... Naviter d.o.o.
4.5.6.10 Airspace
Select how Airspace is displayed here.
Itemlets you choose the airspace type for which you would like to change settings.
Styleselect how the airspace is displayed. It can be either
Outlined onlySolid fillTransparent fillYou can also change color and line width here.
If "use colors as defined in file" option is checked, then colors defined in OpenAir files will be used topaint the airspace. Each airspace item can be colored in a separate color this way.
You can hide any airspace above a preset Flight level by entering a Flight level into the edit box.
Select visible airspaceUse the checkboxes to select which airspace should be visible in map view. Note that this also influenceswhich airspace will be checked with Airspace checker .
See also:Options - GeneralOptions - FoldersOptions - FlightOptions - Flight - GraphsOptions - Flight - StatisticsOptions - Flight - 3D viewOptions - Flight - AnimationOptions - Map appearanceOptions - Map appearance - Vector mapsOptions - Map appearance - AirspaceOptions - Task planningOptions - OptimizationOptions - Observation ZoneOptions - Miscellaneous
4.5.6.11 Task planning
Show points forSelect how points for the task are calculated at design time and in statistics .
Triangle propertiesThis controls the parameters which define an FAI triangle.
Triangle rule changing distance - this tells the program when the 25/45% rule is considered instead ofthe 28% rule (default 500km. Note that for FAI records and badges this rule is valid for triangles largerthan 750km)Rules for smaller triangles than what was set in previous paragraph (default 28%)Rules for larger triangles than above (default 25% and 45%)
FAI wizard
74
95
96
96
98
99
99
101
101
102
104
104
105
106
107
78 72

Menu commands 105
© 1995 - 2014 ... Naviter d.o.o.
Design the Color and Fill style for the FAI Area and determine whether or not the distances should bein kilometer regardless of the way units are setup.
See also:Options - GeneralOptions - FoldersOptions - FlightOptions - Flight - GraphsOptions - Flight - StatisticsOptions - Flight - 3D viewOptions - Flight - AnimationOptions - Map appearanceOptions - Map appearance - Vector mapsOptions - Map appearance - AirspaceOptions - Task planningOptions - OptimizationOptions - Observation ZoneOptions - Miscellaneous
4.5.6.12 Optimization
Basic preferences for Flight optimization can be set up through this dialog.
Start optimization when flight is openedCheck whether or not you want the optimization thread to run immediately after you open a flight.
Optimize forSelect which optimizations you want in the Optimize window . Use the Up and Down arrows todetermine which one is displayed first.
Use closest waypoint name for optimized pointsIf enabled, the closest waypoint from program database to each of the optimized waypoints is found. Theoptimized waypoint is named after it.
See also:Options - GeneralOptions - FoldersOptions - FlightOptions - Flight - GraphsOptions - Flight - StatisticsOptions - Flight - 3D viewOptions - Flight - AnimationOptions - Map appearanceOptions - Map appearance - Vector mapsOptions - Map appearance - AirspaceOptions - Task planningOptions - OptimizationOptions - Observation ZoneOptions - Miscellaneous
44
95
96
96
98
99
99
101
101
102
104
104
105
106
107
62
95
96
96
98
99
99
101
101
102
104
104
105
106
107

SeeYou Help106
© 1995 - 2014 ... Naviter d.o.o.
4.5.6.13 Observation Zone
It is possible to set custom shapes for Observation Zones by setting two arbitrary arcs.
1. Select a Observation Zone scheme from the Scheme combo box.2. Click on the zone you wish to edit. Note that there is a Start, a Finish and two Turnpoints zones. You
can also select which zone to edit with the Type combo box.3. Set the orientation for the selected observation zone. See the picture for better explanation. It can
be either:· Fixed value· Symmetrical (turnpoints only)· To next point (turnpoints or start point only)· To previous point (turnpoints or finish point only)· To start point (turnpoints only)
4. Set Radius1, Angle1, Radius2 and Angle2. Play around and see what happens on the picture tobecome familiar with the changes. Note that Radius1 must be greater than Radius2.
5. Set Angle12 value, if Fixed value was chosen6. If you wish, use Line only, Move origin and Reduce leg distance options. It's function should be self
explanatory from the picture in this dialog if you tick/untick each of these options.7. Save the Observation Zone with Save As button.
See also:Options - GeneralOptions - FoldersOptions - FlightOptions - Flight - GraphsOptions - Flight - StatisticsOptions - Flight - 3D viewOptions - Flight - AnimationOptions - Map appearanceOptions - Map appearance - Vector mapsOptions - Map appearance - AirspaceOptions - Task planningOptions - OptimizationOptions - Observation ZoneOptions - Miscellaneous
4.5.6.14 Proxy
If you are behind a proxy you will need to enter your proxy settings through this dialog in order to be ableto download the maps and get airspace and version update notifications.
Most users will not need to enter anything here. As a rule of thumb - if you don't know what to enter inthese settings leave them blank.
By choosing Automatically detect Proxy Settings the settings will be copied from Internet Explorer'ssettings.
By selecting Use Custom proxy settings you will be able to enter all of it manually.
95
96
96
98
99
99
101
101
102
104
104
105
106
107

Menu commands 107
© 1995 - 2014 ... Naviter d.o.o.
4.5.6.15 Miscellaneous
Set up the what you have not already set in the previous pages.· Show message 'Copy Task' when a flight is added to the Flight window.· Show message 'Copy Task to all flights' when a task is dropped into the Flight window.· Refresh all windows when settings change.· Show message 'Delete all waypoints' when a new Waypoint file is loaded and 'do not append todatabase' option is selected· Show 'Waypoints Wizard' on startup when waypoints database is empty· Program should check whether or not it is the default viewer for IGC flight documents· Program is default viewer, when checked.· Always show selector when saving waypoints and tasks. If checked then a window with available pointson the left and selected points on the right will be shown when using Save command in the Waypointsand Tasks window.· Use mask edit for Latitude and Longitude entries. You won't need to enter the characters for degrees,minutes and seconds if this option is checked.· Follow selected fix in animation will move the map together with the movement of the active flight ifthis option is checked.· When checked, SeeYou will look for CHM help files. If you can't use CHM, uncheck and download HLPfiles.. Checking the Confirm program exit option brings up a dialog when exiting which asks you if you reallywant to exit SeeYou. Download detailed elevation data from internet option connects SeeYou to the internet automaticallywhen checked to download any required maps
See also:Options - GeneralOptions - FoldersOptions - FlightOptions - Flight - GraphsOptions - Flight - StatisticsOptions - Flight - 3D viewOptions - Flight - AnimationOptions - Map appearanceOptions - Map appearance - Vector mapsOptions - Map appearance - AirspaceOptions - Task planningOptions - OptimizationOptions - Observation ZoneOptions - Miscellaneous
95
96
96
98
99
99
101
101
102
104
104
105
106
107
SeeYou Help108
© 1995 - 2014 ... Naviter d.o.o.
4.6 Window
4.6.1 New window
This command will open a new Flight window with the same content as the active Flight window
Select Window > New Window from the main menu to use this command.
See alsoFlight windowCreating Desktops
4.6.2 Tile Horizontally
This command will align all open windows horizontally
See alsoFlight windowCreating Desktops
4.6.3 Tile Vertically
This command will align all open windows vertically
See alsoFlight windowCreating Desktops
4.6.4 Desktops
See the Getting Started - Using desktops section .
4.6.5 Open windows
Below Desktops selection all open windows are listed.
4.7 Help
4.7.1 SeeYou Help
Opens this file.
4.7.2 What's this?
This is context sensitive help. Select this or press Shift+F1 to see how mouse pointer changes to ,then click on the item you need help with.
4.7.3 SeeYou on the Web
Check for free Updates!
24
108
24
108
24
108
10

Menu commands 109
© 1995 - 2014 ... Naviter d.o.o.
4.7.4 Registration
This dialog has different content in evaluation than in registered version
Evaluation versionThis dialog contains a box where you can write your Registration Key. It also lists any limitation imposedafter the free trial version expires.
Registration Key can be ordered on-line fromhttp://www.naviter.com/
Registered versionShows you the serial number of your SeeYou.
Unregistered. Enter your name and key. Registered. Shows name and S/N.
4.7.5 Check for updates
This feature will check if a new version exists. Please note that it is highly recommended that featureTools > Options > Miscellaneous > Check for updates is turned on. That way you will be notified aboutimportant updates automatically when SeeYou is started.
4.7.6 About
About window contains a
Thank you
to all who have contributed to making SeeYou such an enjoyable project.

Part
V
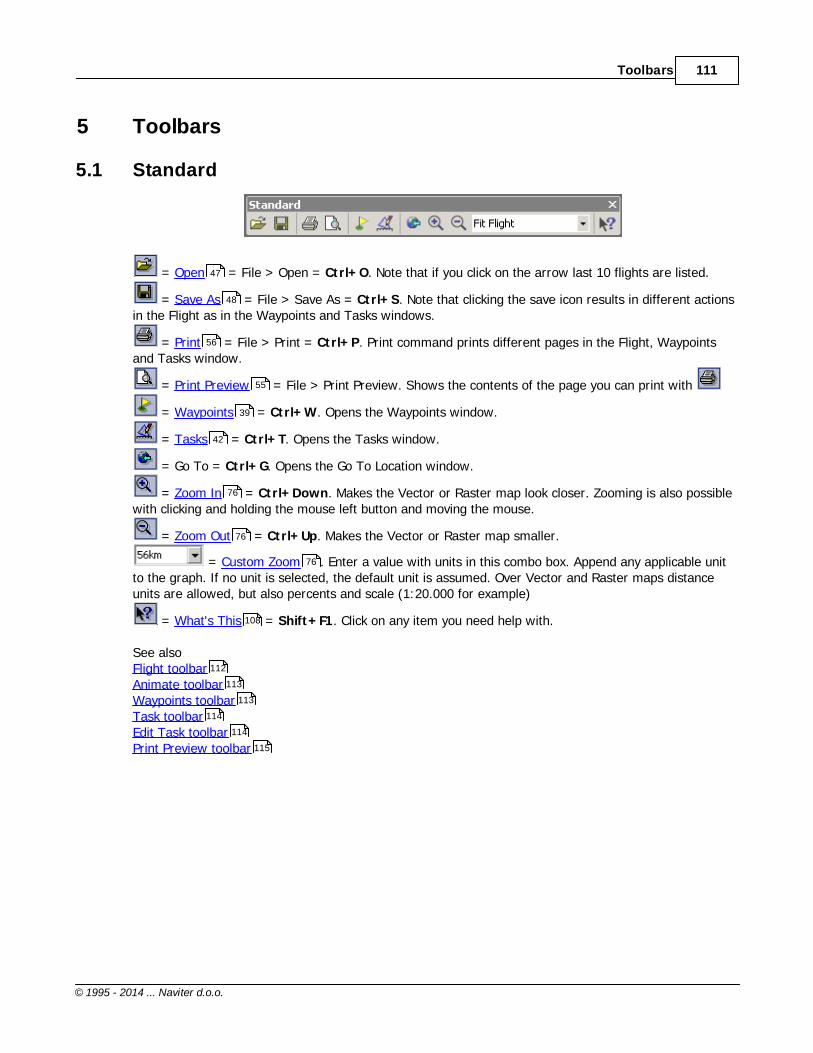
Toolbars 111
© 1995 - 2014 ... Naviter d.o.o.
5 Toolbars
5.1 Standard
= Open = File > Open = Ctrl+O. Note that if you click on the arrow last 10 flights are listed.
= Save As = File > Save As = Ctrl+S. Note that clicking the save icon results in different actionsin the Flight as in the Waypoints and Tasks windows.
= Print = File > Print = Ctrl+P. Print command prints different pages in the Flight, Waypointsand Tasks window.
= Print Preview = File > Print Preview. Shows the contents of the page you can print with
= Waypoints = Ctrl+W. Opens the Waypoints window.
= Tasks = Ctrl+T. Opens the Tasks window.
= Go To = Ctrl+G. Opens the Go To Location window.
= Zoom In = Ctrl+Down. Makes the Vector or Raster map look closer. Zooming is also possiblewith clicking and holding the mouse left button and moving the mouse.
= Zoom Out = Ctrl+Up. Makes the Vector or Raster map smaller.
= Custom Zoom . Enter a value with units in this combo box. Append any applicable unitto the graph. If no unit is selected, the default unit is assumed. Over Vector and Raster maps distanceunits are allowed, but also percents and scale (1:20.000 for example)
= What's This = Shift+F1. Click on any item you need help with.
See alsoFlight toolbarAnimate toolbarWaypoints toolbarTask toolbarEdit Task toolbarPrint Preview toolbar
47
48
56
55
39
42
76
76
76
108
112
113
113
114
114
115

SeeYou Help112
© 1995 - 2014 ... Naviter d.o.o.
5.2 Flight
= Add Flight = Edit > Add Flight. Adds a flight to the active Flight window.
= Remove Flight = Edit > Remove Flight. Removes the flight from the active Flight window.
= Color scheme = View > Colors. Changes the color scheme for active flightwindow.
= Route = View > Route. Changes the view of the Flight window to Route.
= 3D view = View > 3D view. Changes the view of the flight to 3D
= Graph = View > Graph. Changes the view of the Flight window to Graph. Note that clicking onthe icon again changes the graph from Altitude to Vertical speed etc.
= Statistics = View > Statistics. Changes the view of the Flight window to Statistics.
See alsoStandard toolbarAnimate toolbarWaypoints toolbarTask toolbarEdit Task toolbarPrint Preview toolbar
47
58
74
25
27
29
111
113
113
114
114
115

Toolbars 113
© 1995 - 2014 ... Naviter d.o.o.
5.3 Animate
= Animation rate = Animate > Animation rate. Changes the speed of animation.
= Play = Animate > Play = Ctrl+A. Starts or continues the animation.
= Pause = Animate > Pause. Stops the animation. Moving with arrow keys will move all flights
= Stop = Animate > Stop. Stops the animation. Moving with arrow keys will move active flight only.
= Previous thermal = Animate > Previous thermal = Ctrl+Left.
= Previous position = Animate > Previous position = Left arrow key.
= Next position = Animate > Next position = Right arrow key.
= Next Thermal = Animate > Next thermal = Ctrl+Right.
See alsoStandard toolbarFlight toolbarWaypoints toolbarTask toolbarEdit Task toolbarPrint Preview toolbar
5.4 Waypoint
= Edit waypoint = Edit > Edit waypoint.
= Add waypoint = Edit > Add waypoint.
= Remove waypoint = Edit > Remove waypoint. The waypoint or waypoints must be selected,the view must not be Map
= Home waypoint = Edit > Home waypoint. Enter new home waypoint.
= Change View. Click on the icon or select from the drop-down menu after clicking on the right partof the icon
See alsoStandard toolbarFlight toolbarAnimate toolbarTask toolbarEdit Task toolbarPrint Preview toolbar
82
111
112
113
114
114
115
63
64
64
42
111
112
113
114
114
115

SeeYou Help114
© 1995 - 2014 ... Naviter d.o.o.
5.5 Task
= Add Task = Edit > Add Task
= Remove Task = Edit > Remove task
= Copy Task = Edit > Copy task
= Insert waypoint to task = Edit > Insert waypoint to task = Double click on the leg
= Delete waypoint from task = Edit > Delete waypoint from task
= Show or Hide FAI Area = Ctrl+E = View > Show FAI Area
= Rotate FAI Area = Ctrl+R = View > Rotate FAI Area
= Change View. Click on the icon or select from the drop-down menu after clicking on the right partof the icon
See alsoStandard toolbarFlight toolbarAnimate toolbarWaypoints toolbarEdit Task toolbarPrint Preview toolbar
5.6 Edit Task
This toolbar only appears when Map edit button from Flight parameters > Task page or Task Declarationis pressed.
= Insert waypoint to task = Edit > Insert waypoint to task = Double click on the leg.
= Delete waypoint from task = Edit > Delete waypoint from task.
= Show or Hide FAI Area = View > Show FAI Area
= Rotate FAI Area = View > Rotate FAI Area
= Close Map edit mode = Esc.
See alsoStandard toolbarFlight toolbarAnimate toolbarWaypoints toolbarTask toolbarPrint Preview toolbar
66
66
66
111
112
113
113
114
115
66
66
111
112
113
113
114
115

Toolbars 115
© 1995 - 2014 ... Naviter d.o.o.
5.7 Preview
This toolbar appears after you have pressed the Print preview icon or have selected File > PrintPreview from the main menu.
= Print = File > Print = Ctrl+P. Print command prints different pages in the Flight, Waypointsand Tasks window.
= Page setup = File > Page setup = Setup the way your flight, task or waypoints print
= Page magnifier = Zooms in or out in the Print preview mode
= Zoom level for the Print Preview mode
= Previous page
= Next page
= Close the Print Preview mode
See alsoStandard toolbarFlight toolbarAnimate toolbarWaypoints toolbarTask toolbarEdit Task toolbar
56
52
55
55
55
111
112
113
113
114
114

Part
VI

Using Keyboard and Mouse 117
© 1995 - 2014 ... Naviter d.o.o.
6 Using Keyboard and Mouse
6.1 Use SeeYou effectively
SeeYou main window - whole ApplicationCtrl + O = OpenCtrl + S = Save (this command works differently for Flight, Waypoints and Tasks window)Ctrl + A = Animation
Ctrl + W = Waypoints windowCtrl + T = Tasks windowAlt + 1 = Route viewAlt + 2 = 3D view (if enabled)Alt + 3 = Graph viewAlt + 4 = StatisticsCtrl + 1 = Show/Hide WaypointsCtrl + 2 = Show/Hide AirpsaceCtrl + 3 = Show/Hide Vector mapsCtrl + 4 = Show/Hide Raster maps
Route window-> one fix forward<- one fix backCtrl + -> next circlingCtrl + <- previous circlingCtrl + Up Zoom inCtrl + Down Zoom outCtrl + B Zoom BackAlt + -> next WaypointAlt + <- previous Waypoint
left-click + drag the mouse = What this action does depends on which mode the Route view is in. Itcan be either
Zoom mode. Clicking mouse left button and dragging it over the screen will zoom into the selectedareaPan mode. Clicking mouse left button and dragging it over the screen will move the mapMeasure mode. Clicking mouse left button and dragging it over the screen will measure distance andbearing between two points
F2 key switches between these three modes.
Alt + left-click (hold the Alt key and drag mouse) = Ruler, measuring distance
Shift + -> Shift + <-Shift + HomeShift + End : - Where Shift is pressed, first marker is set.- Navigate with arrows and/or Home and End buttons to set the second marker. - After setting markers, you can view statistics for the selection you made or you can - optimize the flight for the selection only.
Ctrl + L Optimize task

SeeYou Help118
© 1995 - 2014 ... Naviter d.o.o.
Ctrl + I Airspace check
3D viewTo change camera position do this:. Left button and move - change perspective. Right button and up/down - zoom in/out. Both buttons and left/right - animation speed
Up arrow = Zoom inDown arrow = Zoom outShift + Left/Right = Rotate horizontalShift + Up/Down = Rotate vertical
Ctrl + F7 will lock or unlock the view relative to the gliderCtrl + F8 will tell you all parameters about focus, camera position and orientation.Ctrl + F11 will decrease focal lengthCtrl + F12 will increase focal length
Tasks windowIf the task list is active, using this combination will add or remove a task.If task waypoints are active, using this combination will add or remove a waypoint from the task.Ctrl + Ins to insert a waypoint or create a taskCtrl + Delete to delete a waypoint or taskIn map view use mouse right-click and mouse double-click
Shift in map view = Hold shift and click to create a new waypoint
Ctrl + Up = Zoom outCtrl + Down = Zoom in
In vicinity of a waypoint used in task, the mouse pointer changes to WPT. Click mouse left button onceand move the point somewhere else.In vicinity of a leg the mouse pointer changes to LEG. Double click mouse left button and you haveinserted a waypoint to the leg.
Waypoints windowIn Map view useMouse click to select a single waypointShift + Mouse click to select multiple waypointsShift + click + drag mouse to select waypoints from a rectangle
In List view useCtrl + Ins to create a waypointCtrl + Delete to remove a waypointIn map view use mouse right-click and mouse double-click
Ctrl + Up = Zoom outCtrl + Down = Zoom in
Ctrl+C = Copy to clipboard when Waypoints are selected(Ctrl+V = Paste in Excel)
See also

Using Keyboard and Mouse 119
© 1995 - 2014 ... Naviter d.o.o.
Flight windowWaypoints windowTasks window
24
39
42

SeeYou Help120
© 1995 - 2014 ... Naviter d.o.o.
Index- . -.AIR Tim Newport Peace 92
.ATT 47
.BMP 83
.CAR 47, 92
.CIS 89
.CIT 47
.CMR 47
.CUB 47
.CUC 47
.DA4 47
.DAT 47
.DBT 47
.FIL 47
.GIF 83
.IGC 47
.JPG 83
.LO4 47
.LOG 47
.LXN 47
.MDS 83
.NDB 47
.SDI 47
.SUA 47
.TRK 47
.TXT OpenAir 92
.VER 92
.WMF 83
.WPZ 47
- 3 -3D 26
3D window 24, 26
- A -about TeamCU 109
Active flight 57
Add
Airspace 92
Desktop 108
flight 58
Raster map 84
task 66
Vector maps 89
waypoint 64
add flight 58
add Raster map 84
add task 66
add waypoint 64
Address 4
AGsp 73
AIR Tim Newport Peace 92
airport 63
Airspace 74, 92
check 74
verification 74
airspace check 74
airspace colors 92
Allow missed zones 69
Alt 73
altitude 72
analyze 26
angle 106
Animate
Animation rate 82
Next position 82
Next thermal 82
Pause 80
Play 80
Previous position 81
Previous thermal 81
Stop 81
Synchronization 83
Assigned Areas 69
Assigned Speed Task 69
AST 69
ATT 47
AVario 73
- B -BMP 83
Bonus for finish 69

Index 121
© 1995 - 2014 ... Naviter d.o.o.
- C -calculate maximum distance from last observationzone 69
calculate minimum distance to next observation zone 69
call sign 59
CAR 92
Cat's Craddle 69
change task 59
CIS 89
Cities 90
close all windows 50
close window 50
CN 59, 73
Color 92
Airways 92
Cities and Villages 90
Control area 92
Control zone 92
Dangerous area 92
Flight Info region 92
Graph 98
Other airspace 92
Prohibited area 92
Railroads 90
Restricted area 92
Rivers and Lakes 90
Roads 90
Selected fix for graph 98
Terminal area 92
Time grid 98
Training area 92
Value grid 98
Color scheme 74
Airspace verification 74
Altitude 74
Engine noise level 74
ENL 74
Fix accuracy 74
Fixed 74
GPS status 74
Ground speed 74
Multiple flights 74
Time 74
Vario 74
colors for objects 90
communication 51
competition ID 59
Connect 51
Contact 4
Copy Task 67
Copy Task message 107
Copy Task to all message 107
create 15
Create desktop 108
Create the task 9
- D -D/H 73
DA4 47
DAT 47
DBT 47
declared task 59
Default viewer 107
delete raster map 86
Delete waypoint from task 66
Desktop examples 108
desktops 24
Device 51
dH 73
dimension 26
DisDone 73
dll 51
download 51
download flights 51
DST/AA 69
DST/TP 69
dt 73
- E -Edit
declared task 59
flight properties 59
flight source 61
properties for Raster map 88
properties for Vector maps 90
Task 66
waypoint 63
edit task 59
edit waypoint 63
Email 4

SeeYou Help122
© 1995 - 2014 ... Naviter d.o.o.
engine noise level 72
Export
Waypoints 49
export waypoints 49
- F -FAI 62
FAI triangle 62
FIL 47
Filled contours 90
Filled Contours and Grey lines 90
filters 99
fix accuracy 72
Fixed number of waypoints at beginning 69
Fixed number of waypoints at end 69
Flight 47
Flight list window 24
Flight parameres
AGsp 73
Alt 73
AVario 73
circling 73
CN 73
D/H 73
dH 73
DisDone 73
dt 73
Gsp 73
straight 73
Time 73
Vario 73
Flight properties 59
Flight window 24
Graph view 27
Route view 25
follow Selected fix in animation 107
fpm 95
Free flight 62
ft 95
ft/min 95
- G -g record 51
Getting started 50
GIF 83
glider registration 59
glider type 59
gliderport 63
gps altitude 72
Graph 72
altitude 72
engine noise level 72
fix accuracy 72
gps altitude 72
ground speed 72
vertical speed 72
Graph color 98
Graph line width 98
Graph window 24
grass runway 63
Grid 98
ground speed 72
Gsp 73
- H -Height margin 105
help 108
Hints 107
histogram 99
Home waypoint 42, 62
http://www.seeyou.ws/dload.php 2
- I -IGC 47
IGC source 61
Import 47, 65
Waypoints 47
Import Waypoints 65
insert waypoint 66
insert wp to task 66
Install 2
- J -JPG 83
- K -Key 3
Keyboard 117

Index 123
© 1995 - 2014 ... Naviter d.o.o.
km 95
km/h 95
kph 95
kts 95
- L -Lakes 90
legend 74
Lines only 90
LO4 47
LOG 47
logger info 59
longest task 62
LXN 47
- M -m 95
m/s 95
map 42
Map description file 83
Marker 58
Mask edit 107
Maximum number of waypoints 69
MDS 83
Memory managment 107
ml 95
mountain 63
Mouse 117
mph 95
- N -NDB 47
Near distance 69
New window 108
nm 95
No start before 69
- O -Observation zone 68, 106
OLC 62, 105
OLC Direct URL 105
online contest 62
Open 47
Flight 47
Waypoints 47
Open windows 108
Optimization options 105
Optimize 62
Optimize Task 62
Options - 3D view 26
Order 3, 109
Other options 107
outlanding 63
- P -pass 63
pilot name 59
points per kilometer 105
Polar 59
preview 55
Print 56
flight 53
preview 55
properties 52
task 54
waypoints 54
properties 59
- Q -QNH 59
- R -radius 106
Railroads 90
Random order of waypoints 69
Raster maps 83
Refresh 107
Register 3, 109
Registration 109
Registration Key 3
Remove
Airspace 92
flight 58
Raster map 86
Vector maps 90
waypoint 64
waypoint from task 66

SeeYou Help124
© 1995 - 2014 ... Naviter d.o.o.
remove flight 58
Remove Task 67
remove waypoint 64
Rivers 90
Roads 90
Route 71
Route options 99
Route window 24
- S -Save
Flight 48
Waypoints 49
Save desktop 108
scale 76
scheme 74
SDI 47
secure 51
Select visible airspace 92
selection 58, 62
Shortcut 117
Show selector 107
solid runway 63
sort waypoints 77
source 61
spread 90
start altitude 59
Statistics
Declared task 30
Flight 31
General information 30
Leg 31
Selection 31
Statistics options 99
Statistics window 24
style 63
Synchronization
Custom 83
Real time 83
Start time 83
Take off 83
- T -tabel 99
Task 15, 67, 68, 69
Task Properties 68, 69
Task time 69
Tasks window
list view 44
map view 15
Task list 43
TDT/AA 69
TDT/TP 69
TeamCU 4
Tile horizontally 108
Tile vertically 108
Time 73
time offset 59
Toolbar
Animate 113
Edit task 114
Flight 112
Standard 111
Task 114
Waypoint 113
top 63
Triangle 62
Triangle properties 105
TRK 47
TXT OpenAir 92
- U -Uninstall 2
Units
Altitude 95
Distance 95
Speed 95
Vertical speed 95
unknown 63
upload 51
use flight fixes 69
use waypoints 69
- V -Vario 73
Vector Maps 89
Vectormaps dialog 99
VER 92
vertical speed 72
View

Index 125
© 1995 - 2014 ... Naviter d.o.o.
View
Details 77
graph 72
Large Icons 76
List 76
Map 77
route 71
Sort waypoints 77
Task information 78
Villages 90
visible airspace 92
- W -waypoint 63
Waypoints 47, 65
Waypoints window
details view 41
large icons view 40
list view 41
map view 42
wizard 51
WMF 83
WPZ 47
- Z -Zoom 76