
Not Just ORM: Powerful Hibernate ORM Features and Capabilities


SDE-VS User’s Guide (Part 2, for ORM)
0-3
Smart Development Environment 4.0 for Visual Studio .NET User's Guide:
SDE-VS 4.0 User's Guide (for ORM)
The software and documentation are furnished under the Smart Development Environment license agreement and may be used only in accordance with the terms of the agreement.
Copyright Information Copyright© 1999-2007 by Visual Paradigm. All rights reserved.
The material made available by Visual Paradigm in this document is protected under the laws and various international laws and treaties. No portion of this document or the material contained on it may be reproduced in any form or by any means without prior written permission from Visual Paradigm.
Every effort has been made to ensure the accuracy of this document. However, Visual Paradigm makes no warranties with respect to this documentation and disclaims any implied warranties of merchantability and fitness for a particular purpose. The information in this document is subject to change without notice.
All examples with names, company names, or companies that appear in this document are imaginary and do not refer to, or portray, in name or substance, any actual names, companies, entities, or institutions. Any resemblance to any real person, company, entity, or institution is purely coincidental.
Trademark Information
Smart Development Environment is registered trademark of Visual Paradigm. Sun, Sun ONE, Java, Java2, J2EE and EJB, NetBeans are all registered trademarks of Sun Microsystems, Inc. Microsoft, Windows, Windows NT, Visual Studio, Visio, and the Windows logo are trademarks or registered trademarks of Microsoft Corporation. Oracle is a registered trademark of Oracle Corporation. Rational Rose is registered trademark of International Business Machines Corporation. WinZip is a registered trademark of WinZip Computing, Inc. Other trademarks or service marks referenced herein are property of their respective owners.
Smart Development Environment License Agreement
THE USE OF THE SOFTWARE LICENSED TO YOU IS SUBJECT TO THE TERMS AND CONDITIONS OF THIS SOFTWARE LICENSE AGREEMENT. BY INSTALLING, COPYING, OR OTHERWISE USING THE SOFTWARE, YOU ACKNOWLEDGE THAT YOU HAVE READ THIS AGREEMENT, UNDERSTAND IT, AND AGREE TO BE BOUNDED BY ALL OF THE TERMS AND CONDITIONS OF THIS SOFTWARE LICENSE AGREEMENT.
1. Limited License Grant. Visual Paradigm grants to you ("the Licensee") a personal, non-exclusive, non-transferable, limited, perpetual, revocable license to install and use Visual Paradigm Products ("the Software" or "the Product"). The Licensee must not re-distribute the Software in whole or in part, either separately or included with a product.
2. Restrictions. The Software is confidential copyrighted information of Visual Paradigm, and Visual Paradigm and/or its licensors retain title to all copies. The Licensee shall not modify, adapt, decompile, disassemble, decrypt, extract, or otherwise reverse engineer the Software. Software may not be leased, rented, transferred, distributed, assigned, or sublicensed, in whole or in part. The Software contains valuable trade secrets. The Licensee promises not to extract any information or concepts from it as part of an effort to compete with the licensor, nor to assist anyone else in such an effort. The Licensee agrees not to remove, modify, delete or destroy any proprietary right notices of Visual Paradigm and its licensors, including copyright notices, in the Software.
3. Disclaimer of Warranty. The software and documentation are provided "AS IS," WITH NO WARRANTIES WHATSOEVER. ALL EXPRESS OR IMPLIED REPRESENTATIONS AND WARRANTIES, INCLUDING ANY IMPLIED WARRANTY OF MERCHANTABILITY, FITNESS FOR A PARTICULAR PURPOSE, TITLE OR NON-INFRINGEMENT, ARE HEREBY EXCLUDED. THE ENTIRE RISK AS TO SATISFACTORY QUALITY, PERFORMANCE, ACCURACY AND EFFORT IS WITH THE LICENSEE. THERE IS NO WARRANTY THE DOCUMENTATION, Visual Paradigm's EFFORTS OR THE LICENSED SOFTWARE WILL FULFILL ANY OF LICENSEE'S PARTICULAR PURPOSES OR NEEDS. IF THESE WARRANTIES ARE UNENFORCEABLE UNDER APPLICABLE LAW, THEN Visual Paradigm DISCLAIMS SUCH WARRANTIES TO THE MAXIMUM EXTENT PERMITTED BY SUCH APPLICABLE LAW.
4. Limitation of Liability. Visual Paradigm AND ITS LICENSORS SHALL NOT BE LIABLE FOR ANY DAMAGES SUFFERED BY THE LICENSEE OR ANY THIRD PARTY AS A RESULT OF USING OR DISTRIBUTING SOFTWARE. IN NO EVENT WILL Visual Paradigm OR ITS LICENSORS BE LIABLE FOR ANY LOST REVENUE, PROFIT OR DATA, OR FOR DIRECT, INDIRECT, EXEMPLARY, SPECIAL, CONSEQUENTIAL, INCIDENTAL OR PUNITIVE DAMAGES, HOWEVER CAUSED AND REGARDLESS OF THE THEORY OF LIABILITY, ARISING OUT OF THE USE OF OR INABILITY TO USE THE SOFTWARE, EVEN IF Visual Paradigm HAS BEEN ADVISED OF THE POSSIBILITY OF SUCH DAMAGES.
SDE-VS User’s Guide (Part 2, for ORM)
5. Termination. The Licensee may terminate this License at any time by destroying all copies of Software. Visual Paradigm will not be obligated to refund any License Fees, if any, paid by the Licensee for such termination. This License will terminate immediately without notice from Visual Paradigm if the Licensee fails to comply with any provision of this License. Upon such termination, the Licensee must destroy all copies of the Software. Visual Paradigm reserves all rights to terminate this License.
SPECIFIC DISCLAIMER FOR HIGH-RISK ACTIVITIES. The SOFTWARE is not designed or intended for use in high-risk activities including, without restricting the generality of the foregoing, on-line control of aircraft, air traffic, aircraft navigation or aircraft communications; or in the design, construction, operation or maintenance of any nuclear facility. Visual Paradigm disclaims any express or implied warranty of fitness for such purposes or any other purposes.
NOTICE. The Product is not intended for personal, family or household use; rather, it is intended exclusively for professional use. Its utilization requires skills that differ from those needed to use consumer software products such as word processing or spreadsheet software.
GOVERNMENT RIGHTS. If the Software is licensed by or on behalf of a unit or agency of any government, the Licensee agrees that the Software is "commercial computer software", "commercial computer software documentation" or similar terms and that, in the absence of a written agreement to the contrary, the Licensee's rights with respect to the Software are limited by the terms of this Agreement.
Acknowledgements
This Product includes software developed by the Apache Software Foundation (http://www.apache.org). Copyright �1999 The Apache Software Foundation. All rights reserved.
SDE-VS User’s Guide (Part 2, for ORM)
0-5
Table of Contents
Part 2 - Working with Object-Relational Mapping
Chapter 14 - Introduction to Object-Relational Mapping
Introduction .................................................................................................................................................................... 14 -2 Key Benefits ................................................................................................................................................................... 14 -3
Chapter 15 - Getting Started with Object-Relational Mapping Database Configuration.................................................................................................................................................. 15 -2
Database Configuration for Java Project .............................................................................................................. 15 -3 Database Configuration for .Net Project............................................................................................................... 15 -5 Specifying JDBC Driver File, .NET Driver File and Adapter File ....................................................................... 15 -6
Supported Database, JDBC Drivers and .NET Drivers ................................................................................................ 15 -10 Supporting Multiple Database ............................................................................................................................ 15 -11
Chapter 16 - Using ORM Wizard Introduction .................................................................................................................................................................... 16 -2 Generating Code from Database .................................................................................................................................... 16 -4 Generating Code and Database From ERD.................................................................................................................. 16 -10 Generating Code and Database from Class Diagram ................................................................................................... 16 -15
Chapter 17 - Object Model Introduction .................................................................................................................................................................... 17 -2 Object Models ................................................................................................................................................................ 17 -2
Creating a Class Diagram ..................................................................................................................................... 17 -2 Defining Package for Classes .............................................................................................................................17 -10 Specifying Inheritance Strategy..........................................................................................................................17 -12 Specifying Collection Type ................................................................................................................................ 17 -14 Defining ORM Qualifier..................................................................................................................................... 17 -15 Customizing SQL ............................................................................................................................................... 17 -16 Mapping an Object Model to a Data Model........................................................................................................ 17 -17 Showing Mapping between Object and Data Models by ORM Diagram........................................................... 17 -24 Using ORM Pane................................................................................................................................................ 17 -34 Reverse Engineering Java Classes to Object Model ........................................................................................... 17 -38 Reverse Engineering Hibernate Model to Object Model.................................................................................... 17 -40
Chapter 18 - Data Model Introduction .................................................................................................................................................................... 18 -2 Entity Relationship Diagram.......................................................................................................................................... 18 -2
Creating an Entity Relationship Diagram ............................................................................................................. 18 -2 Specifying Index Column ..................................................................................................................................... 18 -9 Using the ID Generator....................................................................................................................................... 18 -10 Defining Discriminator ....................................................................................................................................... 18 -11 Creating an Array Table...................................................................................................................................... 18 -13 Creating a Partial Table ...................................................................................................................................... 18 -15 Copying SQL statements from Tables ................................................................................................................ 18 -17 Mapping a Data Model to an Object Model........................................................................................................ 18 -20
Chapter 19 - Database Schema Introduction .................................................................................................................................................................... 19 -2 Generating Data Definition Language and Database ..................................................................................................... 19 -2
Generating Database from Data Model................................................................................................................. 19 -2 Generating Database from Object Model ............................................................................................................. 19 -6
Mapping Data Model to Data Definition Language ....................................................................................................... 19 -6

SDE-VS User’s Guide (Part 2, for ORM)
Chapter 20 - Implementation Introduction ....................................................................................................................................................................20 -2 ORM-Persistable Class...................................................................................................................................................20 -2
Generating ORM-Persistable Class from Data Model ..........................................................................................20 -2 Generating ORM-Persistable Class from Object Model.......................................................................................20 -9 Generating ORM-Persistable Class from Database ..............................................................................................20 -9
Mapping Object Model to ORM-Persistable Java Class ..............................................................................................20 -10 Mapping Classes, Attributes and Data Type.......................................................................................................20 -10 Mapping Primary Key.........................................................................................................................................20 -11 Mapping Generalization......................................................................................................................................20 -11 Mapping Association and Multiplicity................................................................................................................20 -12
Mapping Object Model to ORM-Persistable .NET Class.............................................................................................20 -14 Mapping Classes, Attributes and Data Type.......................................................................................................20 -14 Mapping Primary Key.........................................................................................................................................20 -16 Mapping Generalization......................................................................................................................................20 -16 Mapping Association and Multiplicity................................................................................................................20 -17
Chapter 21 - Manipulating Persistent Data with Java Introduction ....................................................................................................................................................................21 -2 Using ORM-Persistable Class ........................................................................................................................................21 -2
Model API.............................................................................................................................................................21 -2 Persistent API......................................................................................................................................................21 -13 Running the Sample Code...................................................................................................................................21 -48 Running the Script File .......................................................................................................................................21 -53
Chapter 22 - Manipulating Persistent Data with .NET Introduction ....................................................................................................................................................................22 -2 Using ORM-Persistable .NET Class...............................................................................................................................22 -2
Model API.............................................................................................................................................................22 -2 Persistent API......................................................................................................................................................22 -13 Running the Sample Code...................................................................................................................................22 -47
Applying .NET Persistence Class to different .NET Language.......................................................................................... 52
Appendix D - JDBC and .NET Drivers JDBC Drivers .................................................................................................................................................................. D -2 .NET Drivers ................................................................................................................................................................... D -3
Appendix E – Glossary
Part 2 – Working with Object-Relational Mapping
SDE-VS User’s Guide (Part 2, for ORM)
Part 2 - Working with Object-Relational Mapping
Welcome to the Smart Development Environment for Visual Studio .NET (SDE-VS). SDE-VS is not only a visual UML modeling plugin, but also an Object-Relational Mapping tool supported in the Smart Development Environment Enterprise Edition for Visual Studio .NET (SDE-VS EE) and the Smart Development Environment Professional Edition for Visual Studio .NET (SDE-VS PE).
Being an Object-Relational Mapping tool, SDE-VS automates the mappings between Java / .NET objects, object models, data model and relational database; it supports not only the generation of persistent code and database, but also the synchronization between persistent code, object model, data model and relational database, thus reduces the development time significantly.
SDE-VS supports two types of object-relational mapping, that is, object-relational mapping for Java (called Java ORM) and the other for .NET (called .NET ORM). SDE-VS PE supports .NET ORM while SDE-VS EE supports both Java ORM and .NET ORM. This part introduces how to work with object-relational mapping in SDE-VS such that you can develop your object model and data model in an easier way.
In this chapter:
• Introduction to Object-Relational Mapping • Getting Started with Object-Relational Mapping • Using ORM Wizard • Object Model • Data Model • Database Schema • Implementation • Manipulating Persistent Data with Java • Manipulating Persistent Data with .NET
Introduction to Object-Relational Mapping 14

SDE-VS User’s Guide (Part 2, for ORM) Chapter 14 – Introduction Object-Relational Mapping
14-2
Chapter 14 - Introduction to Object-Relational Mapping
Smart Development Environment for Microsoft Visio Studio .NET (SDE-VS) is not only a visual UML modeling plug-in, but also an Object-Relational Mapping plug-in with IDE which supports building database application faster, better and cheaper. This chapter gives you an introduction to object-relational mapping and describes the key benefits of object-relational mapping.
In this chapter:
• Introduction • Key Benefits
Introduction
Software applications are most likely to be developed with a database such that all data working with the application system can be retained, resulting in information and knowledge. Hence, database application is widely adopted by businesses of all sizes. In order to access and manipulate the relational database, a standard computer language, Structured Query Language (SQL) has to be used. SQL statements play an important role when developing database application.
Taking a trading system as an example, if the end-user wants to update a Sales Order record, the system has to retrieve the corresponding record from the Sales Order table and display to the end-user. After the end-user confirms the modification of data, the system has to update the record accordingly. It is noticeable that a database application requires a lot of coding for handling SQL statements so as to access and manipulate the database.
Hence, it is inevitable that developers spend almost 50% of development time for implementing the code with SQL statement. Moreover, mapping between the persistent code and database table is maintained throughout the development life cycle. Once there is a change in the structure of a database table, SQL statements which related to the modified table have to be re-written. Developers have to keep an eye on every change in the database schema.
Smart Development Environment for Microsoft Visio Studio .NET (SDE-VS) provides a solution to develop database application by supporting Object-Relational Mapping (ORM). Being supported with object-relational mapping, an ease-to-use environment is provided bridging between object model, data model and relational database. SDE-VS not only provides you a visual modeling for both logical data design and physical data design, but also automates the mapping between object model and data model.
SDE-VS also generates a cost-effective, reliable, scalable and high-performance object to relational mapping layer. The generated mapping layer includes the support of transaction, cache and other optimized feature. SDE-VS increases the productivity and significantly reduces the risk of developing the mapping layer manually.
SDE-VS is capable of generating Java and .NET persistent code; Smart Development Environment Enterprise Edition for Visual Studio .NET (SDE-VS EE) supports both object-relational mapping for Java and .NET while Smart Development Environment Professional Edition for Visual Studio .NET (SDE-VS PE) supports object-relational mapping for .NET. You can thus develop your project in Java or .NET source with object-relational mapping easily.
Figure 14.1 - Introduction of SDE for ORM

SDE-VS User’s Guide (Part 2, for ORM) Chapter 14 – Introduction to Object-Relational Mapping
14-3
The overview of SDE-VS for Object-Relational Mapping
Overview Diagram
Figure 14.2 - The overview of SDE-VS for ORM
Key Benefits
SDE-VS provides the following key features of object-relational mapping so as to simplify your development:
• Persistence Made Easy
Traditionally developers spend a lot of effort in saving and loading objects between memory and database which makes the program complicated and difficult to maintain. These tasks can be simplified by generating a persistence layer between object and data models.
Figure 14.3 - Communicate between Object and Data model

SDE-VS User’s Guide (Part 2, for ORM) Chapter 14 – Introduction Object-Relational Mapping
14-4
• Sophisticated Object-Relational Mapping Generator
SDE-VS generates object-relational mapping layer which incorporates prime features such as transaction support, pluggable cache layer, connection pool and customizable SQL statement. With this mapping layer, developers can keep away from mundane implementation work and focus on the business requirements.
• Model Driven Development
A true model driven platform for application development is provided. Developers are allowed, not only to start from creating the models using class diagram or entity relationship diagram and generate the executable persistence layer from the models, but also to modify the entity-relational model which is from reversed engineered an existing database, transform into object model and generate persistence layer. With the sophisticated model-code generator, the persistent model will be updated automatically according to any modification.
• Extensive Database Coverage
A wide range of database are supported, including Oracle, DB2, Cloudscape/Derby, Sybase Adaptive Server Enterprise, Sybase SQL Anywhere, Microsoft SQL Server, PostgreSQL, MySQL and more. By enabling the same set of ORM Java objects to work with different databases, an easy migration between databases is promoted. Besides, the proprietary data type is transformed to suit the default database specified.
• Reverse Database Engineering
Reverse engineering an existing database through JDBC and/or .NET database connector into the entity-relational model is supported. Developers can transform the entity-relational model to object model and redesign the database for further development.
Figure 14.4 - Reverse database to ERD
• Visual Modeling for Object and Data Models
The visual modeling environment is inherited from Visual Paradigm for UML, a well-known UML CASE Tool, it not only provides an intuitive inline editing for both object and data models, but also adopts the resource-centric interface for assisting frequently performed tasks.
Getting Started with Object-Relational Mapping 15

SDE-VS User’s Guide (Part 2, for ORM) Chapter 15 – Getting Started with Object-Relational Mapping
15-2
Chapter 15 - Getting Started with Object-Relational Mapping
Connecting your database to the working environment facilitates bridging between object model, data model and relational database. This chapter shows you how to configure the database connection, automatically download the database driver files and describes the supported database driver for connecting database in the working environment.
In this chapter:
• Database Configuration • Automatic Downloading Driver Files • Supported Database • Supported JDBC Drivers • Supported .NET Drivers
Database Configuration
In order to bridge between object model, data model and relational database, you have to configure the database connection to ensure the environment.
To configure the database connection:
1. From the menu, click Modeling > ORM > Database Configuration....
Figure 15.1 - To open Database Configuration
The Database Configuration dialog box is displayed.
SDE-VS User’s Guide (Part 2, for ORM) Chapter 15 – Getting Started with Object-Relational Mapping
15-3
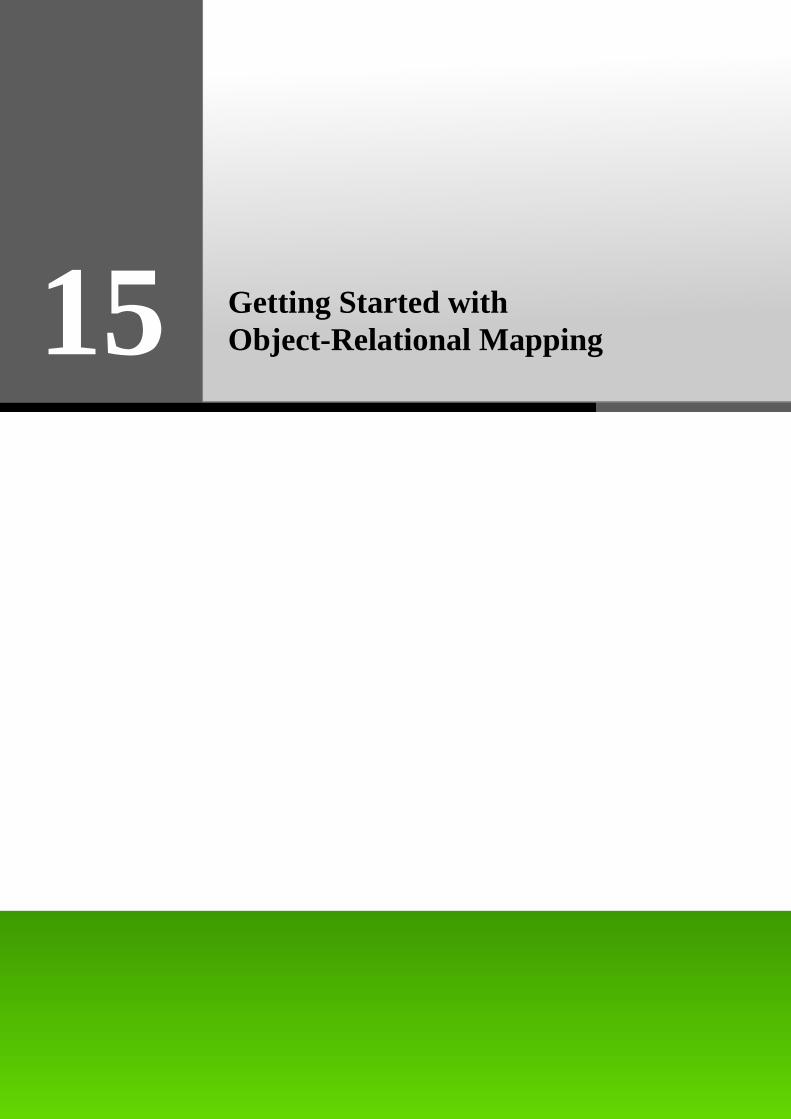
2. Select the Language for the project to be developed from the drop-down menu. By default, Java language is selected.
Figure 15.2 - Select the programming language
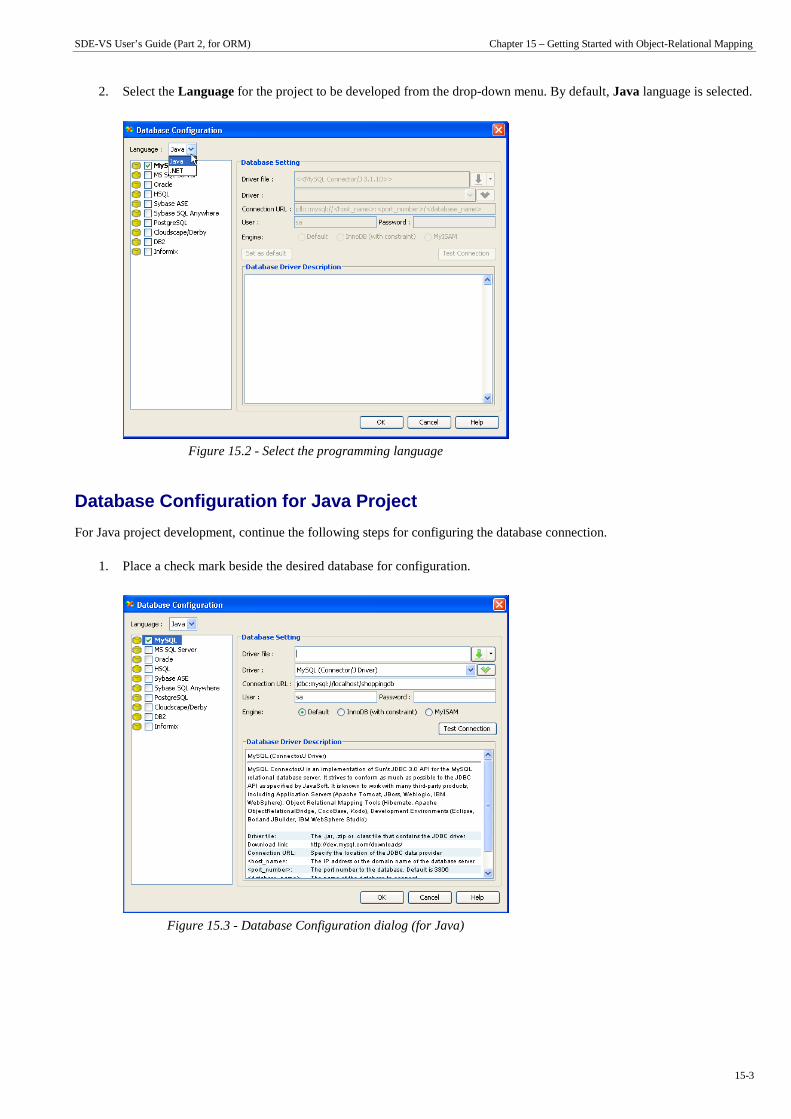
Database Configuration for Java Project
For Java project development, continue the following steps for configuring the database connection.
1. Place a check mark beside the desired database for configuration.
Figure 15.3 - Database Configuration dialog (for Java)

SDE-VS User’s Guide (Part 2, for ORM) Chapter 15 – Getting Started with Object-Relational Mapping
15-4
2. Enter the database setting.
For the Driver file , click button to specify the Driver file . The Driver file can be specified either by Download, Update or Browse. For more information, refer to the description of Specifying JDBC Driver File, .NET Driver and Adapter File section.
For the Driver , select the JDBC Driver from the drop-down menu. The driver's description will be shown in the Database Driver Description pane.
You can press to modify the Driver class and Dialect manually.
For the Connection URL, enter the information required for the JDBC Driver to connect to the database.
For the User, enter the valid username who has the access right to connect to the database.
For the Password, enter the corresponding password for the user to connect to the database.
For the Engine, select the type of engine used in generating the MySQL database.
The Engine option in the Database Setting is only provided when configuring MySQL database for Java project.
3. Click the Test Connection button to test whether the database can be connected.
Figure 15.4 - Test Connection button
If the database can be connected, you will be prompted by a dialog box showing Connect Successful. Otherwise, a Connection Exception Dialog Box will be prompted.
Figure 15.5 - The connect successful/failure message dialog
Configuring Multiple Database Settings Multiple database configurations can be set up in the same project environment. To configure multiple database settings, simply place check marks beside the desired databases and specify the configuration for each database.
Generally, only one database is used for an application. As multiple database configurations are supported, only one database configuration will be applied as the default database connection for the generation of code and database.
You can set the default database connection in one of the two ways:
• Right-click on the desired database, select Set as default.
Figure 15.6 - To set the database as default
SDE-VS User’s Guide (Part 2, for ORM) Chapter 15 – Getting Started with Object-Relational Mapping
15-5
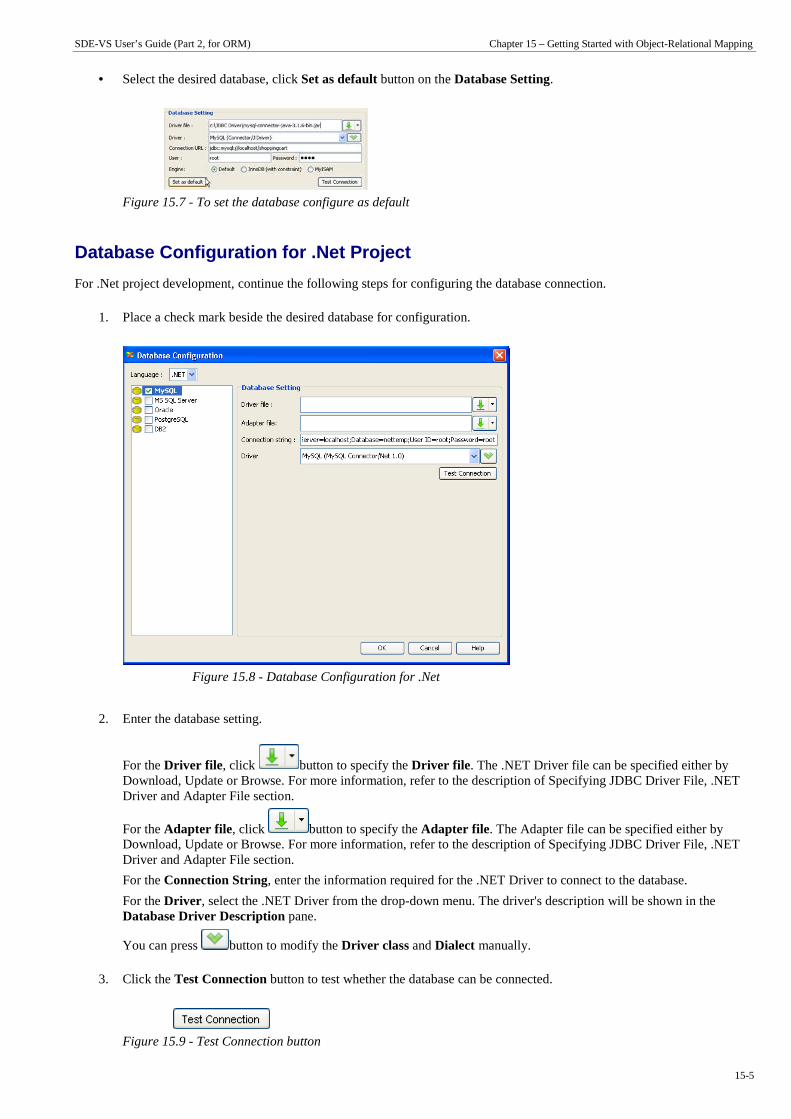
• Select the desired database, click Set as default button on the Database Setting.
Figure 15.7 - To set the database configure as default
Database Configuration for .Net Project
For .Net project development, continue the following steps for configuring the database connection.
1. Place a check mark beside the desired database for configuration.
Figure 15.8 - Database Configuration for .Net
2. Enter the database setting.
For the Driver file , click button to specify the Driver file . The .NET Driver file can be specified either by Download, Update or Browse. For more information, refer to the description of Specifying JDBC Driver File, .NET Driver and Adapter File section.
For the Adapter file, click button to specify the Adapter file. The Adapter file can be specified either by Download, Update or Browse. For more information, refer to the description of Specifying JDBC Driver File, .NET Driver and Adapter File section.
For the Connection String, enter the information required for the .NET Driver to connect to the database.
For the Driver , select the .NET Driver from the drop-down menu. The driver's description will be shown in the Database Driver Description pane.
You can press button to modify the Driver class and Dialect manually.
3. Click the Test Connection button to test whether the database can be connected.
Figure 15.9 - Test Connection button

SDE-VS User’s Guide (Part 2, for ORM) Chapter 15 – Getting Started with Object-Relational Mapping
15-6
If the database can be connected, you will be prompted by a dialog box showing Connect Successful. Otherwise, a Connection Exception Dialog Box will be prompted.
Figure 15.10 - Connect successful/failure message dialog
Configuring Multiple Database Settings Multiple database configurations can be set up in the same project environment. To configure multiple database settings, simply place check marks beside the desired databases and specify the configuration for each database.
Generally, only one database is used for an application. As multiple database configurations are supported, only one database configuration will be applied as the default database connection for the generation of code and database.
You can set the default database connection in one of the two ways:
• Right-click on the desired database, select Set as default.
Figure 15.11 - Set the database as default
• Select the desired database, click Set as default button on the Database Setting.
Figure 15.12 - Set the database configure as default
Specifying JDBC Driver File, .NET Driver File and Adapter File
In order to connect the database successfully, JDBC driver file must be specified for Java project. Meanwhile, .NET driver file and adapter file must be specified for .NET project. You are provided with three ways to specify the driver files. They are selecting the suitable driver file manually, downloading driver files automatically and updating the driver files automatically.
Automatic download of JDBC drivers, .NET drivers and Adapter files are supported for database connection in Java and .NET project development respectively. The drivers downloaded automatically are stored in the %VP_Suite_Installation_Directory%/ormlib/driver directory.
When configuring the database connection for any new projects, SDE-VS automatically checks if the desired driver file exists in the driver directory, the detected driver file will be specified in the database configuration automatically.
To specify the driver file, click on the button, either click Download, Update or Browse...from the drop-down menu.
Figure 15.13 - The driver options

SDE-VS User’s Guide (Part 2, for ORM) Chapter 15 – Getting Started with Object-Relational Mapping
15-7
• Download
If Download is clicked, the download of the desired driver file for the desired database proceeds automatically. For more information on downloading driver file automatically, refer to the description of Automatic Downloading Driver File section.
• Update
If Update is clicked, the update on the driver file proceeds automatically if there is an update version for the desired database.
• Browse
If Browse is clicked, a File Chooser is shown, specify the location of the driver file.
Update is only available if the driver file is automatically downloaded and stored in the %VP_Suite_Installation_Directory%/ormlib/driver directory in advance.
Automatic Downloading Driver Files As the automatic download of the driver files for connecting the database is supported, it reduces the effort to find the desired driver file from the Internet manually.
Automatic Downloading JDBC Driver
The following steps illustrate the automatic download of JDBC Driver for MySQL database as an example:
1. Click on the button, click Download from the drop-down menu.
Figure 15.14 - To download the driver
2. A Download Database Driver dialog box is shown allowing the proxy setting. To enable proxy for the Internet connection, check the Use proxy option, and then fill in the information for proxy setting.
Figure 15.15 - Download Database Driver dialog

SDE-VS User’s Guide (Part 2, for ORM) Chapter 15 – Getting Started with Object-Relational Mapping
15-8
The Download dialog box is shown indicating the download progress.
Figure 15.16 - Download dialog
3. Click Close when the download is completed.
Figure 15.17 - Download complete
The driver file is shown on the Driver file of the Database Setting after download is done.
Figure 15.18 - Database Setting for Java
After downloaded the driver file, <<MySQL Connector/J 3.1.10>> shown on the Driver file indicates that the JDBC driver file is downloaded with the specified version number.

SDE-VS User’s Guide (Part 2, for ORM) Chapter 15 – Getting Started with Object-Relational Mapping
15-9
Automatic Downloading .NET Driver and Adapter File
The following steps illustrate the automatic download of .NET Driver and Adapter for MySQL database as an example:
1. Click on the button, click Download both Driver from the drop-down menu to download the driver and adapter files at the same time.
Figure 15.19 - Download driver and adapter
The Driver file and Adapter file can be downloaded separately by selecting Download from its drop-down menu respectively.
Driver file
Adapter file
Table 15.1
2. A Download Database Driver dialog box is shown allowing the proxy setting. To enable proxy for the Internet connection, check the Use proxy option, and then fill in the information for proxy setting.
Figure 15.20 - Download Database Driver dialog

SDE-VS User’s Guide (Part 2, for ORM) Chapter 15 – Getting Started with Object-Relational Mapping
15-10
The Download dialog box is shown indicating the download progress.
Figure 15.21 - Download dialog
3. Click Close when the download is complete.
Figure 15.22 - Download complete
The driver file and adapter file are shown on the Driver file and Adapter file of the Database Setting after download is done.
Figure 15.23 - Database setting for .NET
After downloaded the driver file, <<MySQL Connector/NET 1.0.4>> shown on the Driver file indicates that the .NET driver file is downloaded with the specified version number.
After downloaded the adapter file, <<MySQL Connector/J 3.1.10>> shown on the Adapter file indicates that the adapter driver file is downloaded with the specified version number.
Supported Database, JDBC Drivers and .NET Drivers
SDE-VS provides an environment for visual modeling the developing system. By connecting to the relational database, the mapping between models and relational database can be automated. The most common relational database are supported, including Oracle, DB2, Microsoft SQL Server, Sybase Adaptive Server Enterprise, Sybase SQL Anywhere, MySQL,
SDE-VS User’s Guide (Part 2, for ORM) Chapter 15 – Getting Started with Object-Relational Mapping
15-11
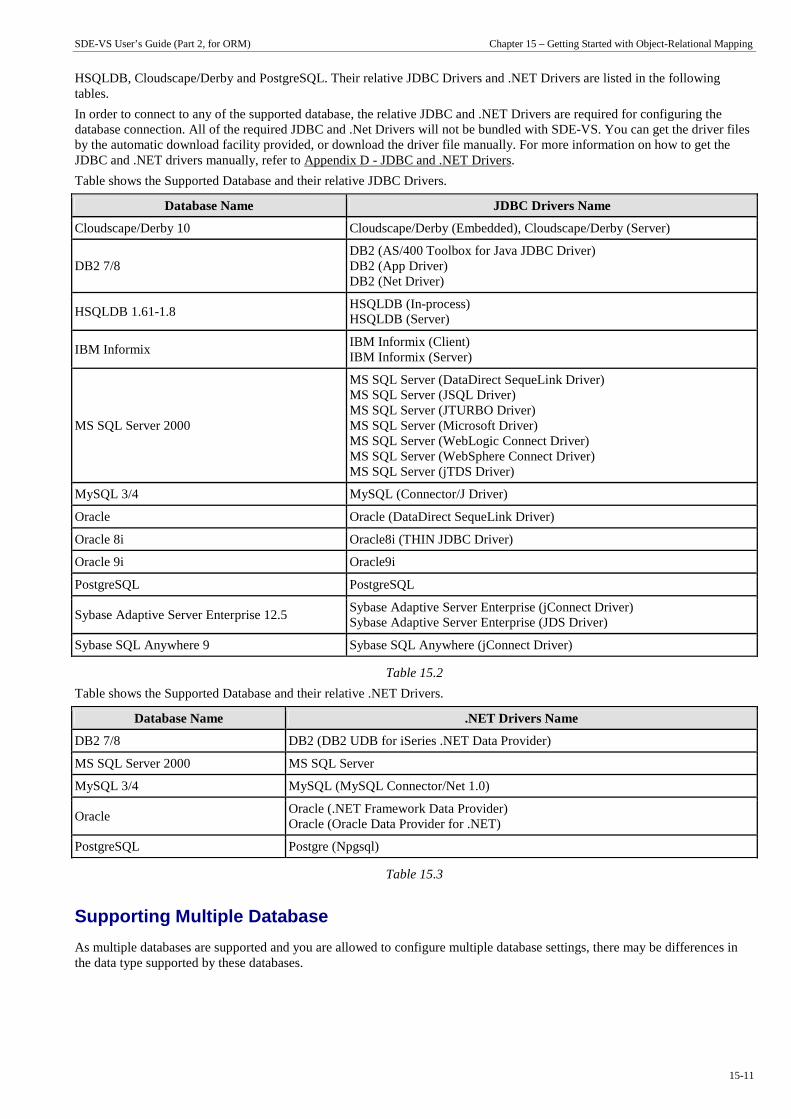
HSQLDB, Cloudscape/Derby and PostgreSQL. Their relative JDBC Drivers and .NET Drivers are listed in the following tables.
In order to connect to any of the supported database, the relative JDBC and .NET Drivers are required for configuring the database connection. All of the required JDBC and .Net Drivers will not be bundled with SDE-VS. You can get the driver files by the automatic download facility provided, or download the driver file manually. For more information on how to get the JDBC and .NET drivers manually, refer to Appendix D - JDBC and .NET Drivers.
Table shows the Supported Database and their relative JDBC Drivers.
Database Name JDBC Drivers Name
Cloudscape/Derby 10 Cloudscape/Derby (Embedded), Cloudscape/Derby (Server)
DB2 7/8 DB2 (AS/400 Toolbox for Java JDBC Driver) DB2 (App Driver) DB2 (Net Driver)
HSQLDB 1.61-1.8 HSQLDB (In-process) HSQLDB (Server)
IBM Informix IBM Informix (Client) IBM Informix (Server)
MS SQL Server 2000
MS SQL Server (DataDirect SequeLink Driver) MS SQL Server (JSQL Driver) MS SQL Server (JTURBO Driver) MS SQL Server (Microsoft Driver) MS SQL Server (WebLogic Connect Driver) MS SQL Server (WebSphere Connect Driver) MS SQL Server (jTDS Driver)
MySQL 3/4 MySQL (Connector/J Driver)
Oracle Oracle (DataDirect SequeLink Driver)
Oracle 8i Oracle8i (THIN JDBC Driver)
Oracle 9i Oracle9i
PostgreSQL PostgreSQL
Sybase Adaptive Server Enterprise 12.5 Sybase Adaptive Server Enterprise (jConnect Driver) Sybase Adaptive Server Enterprise (JDS Driver)
Sybase SQL Anywhere 9 Sybase SQL Anywhere (jConnect Driver)
Table 15.2
Table shows the Supported Database and their relative .NET Drivers.
Database Name .NET Drivers Name
DB2 7/8 DB2 (DB2 UDB for iSeries .NET Data Provider)
MS SQL Server 2000 MS SQL Server
MySQL 3/4 MySQL (MySQL Connector/Net 1.0)
Oracle Oracle (.NET Framework Data Provider) Oracle (Oracle Data Provider for .NET)
PostgreSQL Postgre (Npgsql)
Table 15.3
Supporting Multiple Database
As multiple databases are supported and you are allowed to configure multiple database settings, there may be differences in the data type supported by these databases.

SDE-VS User’s Guide (Part 2, for ORM) Chapter 15 – Getting Started with Object-Relational Mapping
15-12
Assigning Data Types from Multiple Database You are allowed to specify the data type of the column in the database by using the drop-down menu of Type in the Column Specification dialog box. By default, a list of pre-defined data types which is general to all databases is provided.
Figure 15.24 - Standard data types
You are also allowed to assign a data type which is database-specific.
1. Place a check mark beside the desired database in the Database Configuration dialog box.
Figure 15.25 - Select the Database
The database-specific data types will be automatically added to the list.
2. Select the database-specific data types from the drop-down menu. For example, data type, tinyint is specific to MySQL database.
Figure 15.26 - Database-specific data types
If you have checked multiple databases in the Database Configuration dialog box, all data types supported by these databases will be added as an option for the drop-down menu.
Porting to Other Database The generated persistent code, which maps to relational database tables, is capable of manipulating different databases. By default, the persistent code works with the database configured as default connection. On the other hand, you are allowed to port the persistent code to work with other databases by adding a few lines of code.
JDBCSettings setting = new JDBCSettings(); JDBCConnectionSetting connectionSetting = setting.getDefaultJDBCConnectionSetting( JDBCSettings_Constant );
The JDBCSettings_Constant is the constant for JDBC settings. Modify it by the corresponding constant value stated in the following table.
Table shows the constant for JDBC Settings for different database.
Database Constant for JDBC Settings
MySQL JDBCSettings.DBTYPE_MY_SQL
HSQLDB JDBCSettings.DBTYPE_HSQL
MY SQL Server JDBCSettings.DBTYPE_MS_SQL

SDE-VS User’s Guide (Part 2, for ORM) Chapter 15 – Getting Started with Object-Relational Mapping
15-13
Oracle JDBCSettings.DBTYPE_ORACLE
Sybase ASE JDBCSettings.DBTYPE_SYBASE
Sybase SQL Anywhere JDBCSettings.DBTYPE_SYBASE_ANYWHERE
Table 15.4
Porting to Database is only supported in Java project.
Example:
Figure 15.27 - Example for using JDBCSettings_Constraint
After adding these lines of code, the default database connection will be replaced by the database specified by the JDBCSettings_Constant.
Displaying Data Type based on Default Database As SDE-VS provides a visual data modeling of the database depicted by the Entity Relationship Diagram (ERD), you are allowed to enable and disable the display of data type for columns of the entities in the ERD. Since the default database is configured in the working environment, the data type will be displayed according to the data type supported by the default database.
To display the data type for columns of entities in the ERD:
1. Right-click on the background of the ERD, select Show Column Types.
Figure 15.28 - To show the column types
The data type for columns is displayed.
Figure 15.29 - The entity with column types
If the default database connection is changed, the data types for all columns will be changed with respect to the new database connection automatically.

SDE-VS User’s Guide (Part 2, for ORM) Chapter 15 – Getting Started with Object-Relational Mapping
15-14
Example:
There is an entity, Customer in the ERD. Modify the default database connection from MySQL to Oracle, the data types will be changed automatically.
Figure 15.30 - Data type change automatically when database changed

Using ORM Wizard 16

SDE-VS User’s Guide (Part 2, for ORM) Chapter 16 – Using ORM Wizard
16-2
Chapter 16 - Using ORM Wizard
An ORM Wizard is provided to you to generate persistent code and/or database either from database, class diagram or entity relationship diagrams. This chapter shows you how to activate the ORM Wizard and generate code and/or database by one of the three options provided by wizard.
In this chapter:
• Introduction • Generating Code from Database • Generating Code and Database from ERD • Generating Code and Database from Class Diagram
Introduction
Mapping objects to relational database is a complicated and error pound task in the development. Acting as a bridge between object model, data model and relational database, the mappings between these models are automated. Apart from these mappings, the mapping between object models and persistent code is also supported. Hence, the persistent code can thus map to the relational database.
The synchronization between persistent code, object model, data model and relational is supported, which reduces the development time for handling these tedious programming jobs between them. Moreover, your document will always keep up-to-date. To support synchronization in-between persistent code and relational database, you are allowed to generate database and persistent code for your development project.
An ORM Wizard for the generation of persistent code and database. The wizard provides you with three options:
1. Generate Code from Database. 2. Generate Code and Database from Entity Relationship Diagram (ERD). 3. Generate Code and Database from Class Diagram.
To activate the Wizard:
1. On the menu, click Modeling > ORM > Wizards....
Figure 16.1 - To open the ORM Wizard

SDE-VS User’s Guide (Part 2, for ORM) Chapter 16 – Using ORM Wizard
16-3
2. A Wizard Welcome Page will be shown, select Language of the code to be generated from the drop-down menu, either Java or C#.
Figure 16.2 - Select the programming language
3. Select one of the wizard options, and then click Next to proceed.
Figure 16.3 - Select the generation options
SDE-VS User’s Guide (Part 2, for ORM) Chapter 16 – Using ORM Wizard
16-4
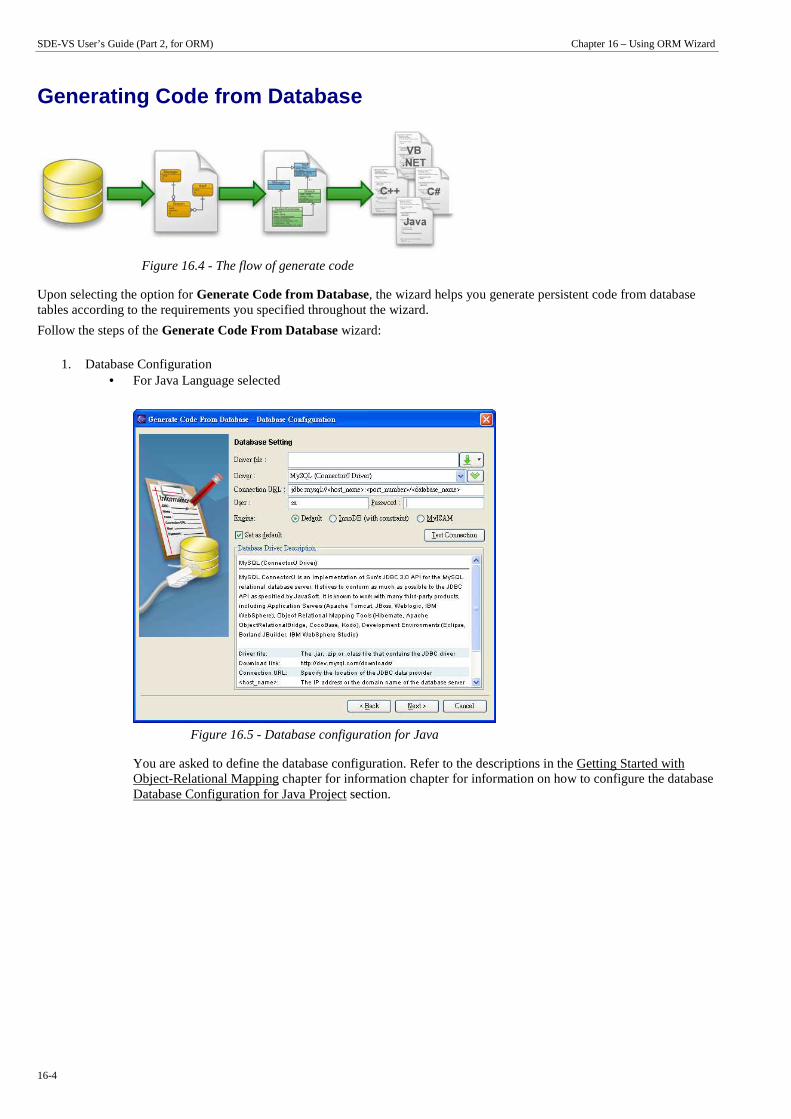
Generating Code from Database
Figure 16.4 - The flow of generate code
Upon selecting the option for Generate Code from Database, the wizard helps you generate persistent code from database tables according to the requirements you specified throughout the wizard.
Follow the steps of the Generate Code From Database wizard:
1. Database Configuration • For Java Language selected
Figure 16.5 - Database configuration for Java
You are asked to define the database configuration. Refer to the descriptions in the Getting Started with Object-Relational Mapping chapter for information chapter for information on how to configure the database Database Configuration for Java Project section.
SDE-VS User’s Guide (Part 2, for ORM) Chapter 16 – Using ORM Wizard
16-5
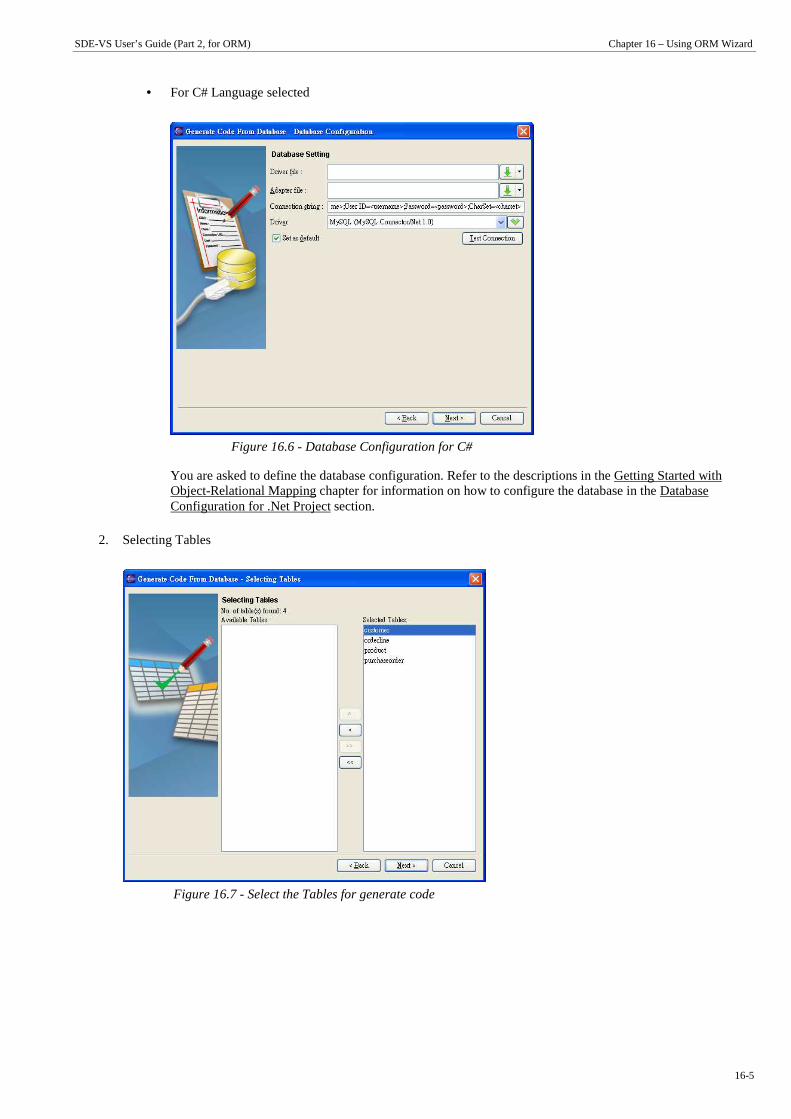
• For C# Language selected
Figure 16.6 - Database Configuration for C#
You are asked to define the database configuration. Refer to the descriptions in the Getting Started with Object-Relational Mapping chapter for information on how to configure the database in the Database Configuration for .Net Project section.
2. Selecting Tables
Figure 16.7 - Select the Tables for generate code
SDE-VS User’s Guide (Part 2, for ORM) Chapter 16 – Using ORM Wizard
16-6
The database is connected based on your options in the previous database configuration option pane and all database tables are reversed. You are asked to select the database tables which you want to generate persistent class to manipulate those tables. By default, all the database tables are selected for the generation of code shown in the list of Selected Tables. You can deselect the table by using the list of buttons between the list of Available Tables and Selected Tables.
• Add Selected
Add the selected table from Available Tables to Selected Tables.
• Remove Selected
Remove the selected table from Selected Tables to Available Tables.
• Add All
Add all tables from Available Tables to Selected Tables.
• Remove All
Remove all tables from Selected Tables to Available Tables.
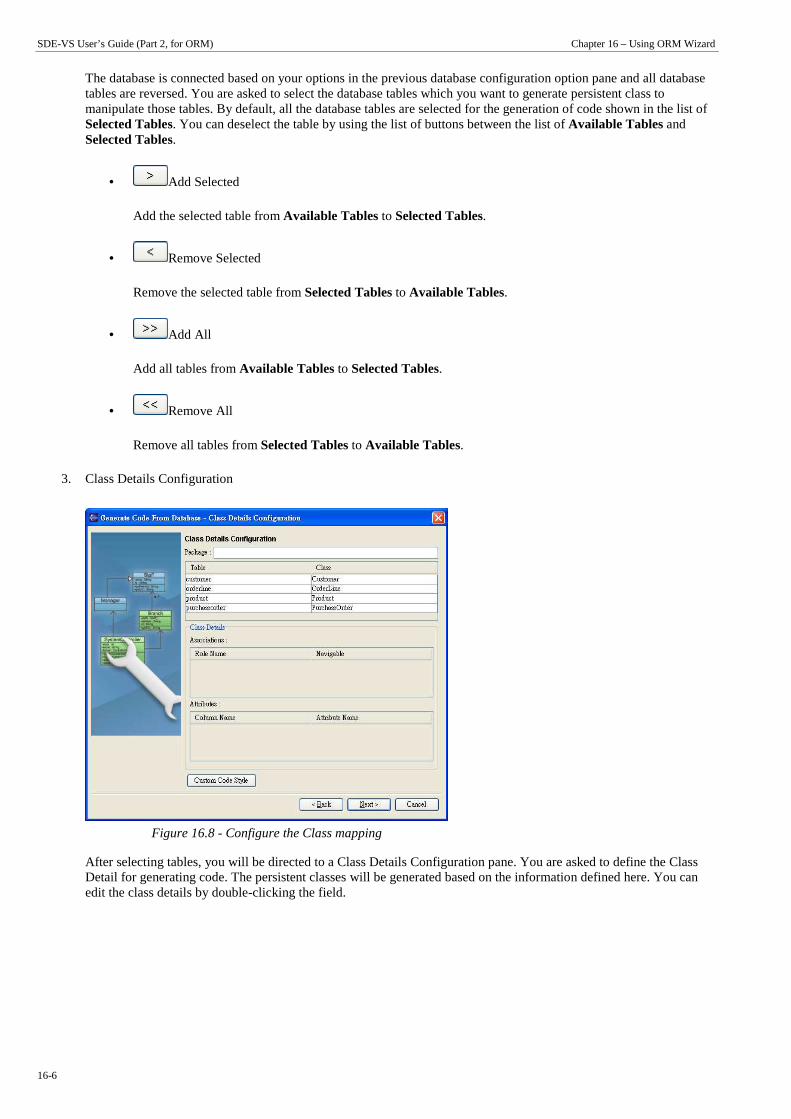
3. Class Details Configuration
Figure 16.8 - Configure the Class mapping
After selecting tables, you will be directed to a Class Details Configuration pane. You are asked to define the Class Detail for generating code. The persistent classes will be generated based on the information defined here. You can edit the class details by double-clicking the field.

SDE-VS User’s Guide (Part 2, for ORM) Chapter 16 – Using ORM Wizard
16-7
• Package
Enter the package name. A package will be created to store the generated persistent code. If the package name was not defined, you will be prompted by a dialog box warning you the classes will be generated in default package.
Figure 16.9 - Confirm generate class in default package message
• Class
You can edit the class name which will be used as the name of the generated persistent code for a corresponding table.
Figure 16.10 - Class mapping
• Associations
You can edit the role name for a reference in the class.
Figure 16.11 - Association mapping
You can deselect navigable for an association such that the reference for the target role will not be created.
Figure 16.12 - Set the navigable
• Attributes
You can edit the attribute name representing the column of the table.
Figure 16.13 - Attributes mapping

SDE-VS User’s Guide (Part 2, for ORM) Chapter 16 – Using ORM Wizard
16-8
• Custom Code Style
Click button, Custom Code Style Setting dialog box will be displayed. You can modify the prefix or suffix of the Class, Attribute and Role Name.
Figure 16.14 – Custom Code Style Setting dialog
For the Type, select the type of Class detail, either Class, Attribute or Role Name (PK) that you want to apply code style.
For the Prefix/Suffix , select either Prefix or Suffix to be added or removed.
For the Add/Remove option, select the option for the action of code style to be applied.
For the Textbox, enter the word for either prefix or suffix.
For the Scope, select the scope of the code style to be applied to, either All or Selected.
Table shows the result of applying Code Style.
Code Style Before Applying After Applying
Add Prefix (E.g. pre_) Item pre_Item
Remove Prefix (E.g. pre_) pre_Item Item
Add Suffix (E.g. _suf) Item Item_suf
Remove (E.g. _suf) Item_suf Item
Table 16.1
4. Generate Code • For Java Language selected
Figure 16.15 - Generate code setting for Java
You are asked to specify the code details. For information, refer to the description of Configuring Code Generation Setting for Java section in the Implementation chapter.

SDE-VS User’s Guide (Part 2, for ORM) Chapter 16 – Using ORM Wizard
16-9
• For C# Language selected
Figure 16.16 - Generate code setting for C#
You are asked to specify the code details. For information, refer to the description of Configuring Code Generation Setting for C# section in the Implementation chapter.
5. Click Finish, the Generate ORM Code/Database dialog box appears showing the progress of code generation. Click Close when the generation is complete.
Figure 16.17 - Generate ORM Code/Database dialog
A class diagram and an entity relationship diagram will be generated automatically and added to your project. The generated persistent code and required resources will be generated to the specified output path.

SDE-VS User’s Guide (Part 2, for ORM) Chapter 16 – Using ORM Wizard
16-10
Generating Code and Database From ERD
Figure 16.18 - Generating Code and Database From ERD
Upon selecting the option for Generate Code and Database from ERD, the wizard helps you generate persistent code and database from ERD with respect to the requirements you specified throughout the wizard.
Take the following ERD as an example:
Figure 16.19 - Entities Relationship Diagram
Follow the steps of the Generate Code and Database From ERD wizard:
1. Class Details Configuration
Figure 16.20 - Class Detail Configuration

SDE-VS User’s Guide (Part 2, for ORM) Chapter 16 – Using ORM Wizard
16-11
You are asked to define the Class Details for generating code. The persistent classes will be generated based on the information defined here. You can edit the class details by double-clicking the field.
• Package
Enter the package name. A package will be created to store the generated persistent code. If the package name was not defined, you will be prompted by a dialog box warning you the classes will be generated in default package.
Figure 16.21 - Confirm generate code in default package message
• Class
You can edit the class name which will be used as the name of the generated persistent code for a corresponding table.
Figure 16.22 - Mapping classes
• Associations
You can edit the role name for a reference in the class.
Figure 16.23 - Mapping associations
You can deselect navigable for an association such that the reference for the target role will not be created.
Figure 16.24 - Set the navigable
• Attributes
You can edit the attribute name representing the column of the table.
Figure 16.25 - Mapping attributes

SDE-VS User’s Guide (Part 2, for ORM) Chapter 16 – Using ORM Wizard
16-12
• Custom Code Style
Click button, Custom Code Style Setting dialog box will be displayed. You can modify the prefix or suffix of the Class, Attribute and Role Name.
Figure 16.26 - Custom Code Style Setting dialog
For the Type, select the type of Class detail, either Class, Attribute or Role Name (PK) that you want to apply code style.
For the Prefix/Suffix , select either Prefix or Suffix to be added or removed.
For the Add/Remove option, select the option for the action of code style to be applied.
For the Textbox, enter the word for either prefix or suffix.
For the Scope, select the scope of the code style to be applied to, either All or Selected.
Table shows the result of applying Code Style.
Code Style Before Applying After Applying
Add Prefix (E.g. pre_) Item pre_Item
Remove Prefix (E.g. pre_) pre_Item Item
Add Suffix (E.g. _suf) Item Item_suf
Remove (E.g. _suf) Item_suf Item
Table 16.2
2. Database Configuration • For Java Language selected
Figure 16.27 - Database Configuration for Java

SDE-VS User’s Guide (Part 2, for ORM) Chapter 16 – Using ORM Wizard
16-13
You are asked to define the database configuration. Refer to the descriptions in the Getting Started with Object-Relational Mapping chapter for information on how to configure the database in the Database Configuration for Java Project section
• For C# Language selected
Figure 16.28 - Database configuration for C#
You are asked to define the database configuration. Refer to the descriptions in the Getting Started with Object-Relational Mapping chapter for information on how to configure the database in the Database Configuration for .Net Project section.
3. Generate Code • For Java Language selected
Figure 16.29 - Generate Code Configure for Java
You are asked to specify the code details. For information, refer to the description of Configuring Code Generation Setting for Java section in the Implementation chapter.

SDE-VS User’s Guide (Part 2, for ORM) Chapter 16 – Using ORM Wizard
16-14
• For C# Language selected
Figure 16.29 - Generate Code configure for C#
You are asked to specify the code details. For information, refer to the description of Configuring Code Generation Setting for C# section in the Implementation chapter.
4. Click Finish, the Generate ORM Code/Database dialog box appears showing the progress of code generation. Click Close when the generation is complete.
Figure 16.30 - Generate ORM Code/Database dialog
A class diagram will be generated automatically and added to your project. The generated persistent code and required resources will be generated to the specified output path and the generated database will be set up to the specified database configuration.
SDE-VS User’s Guide (Part 2, for ORM) Chapter 16 – Using ORM Wizard
16-15
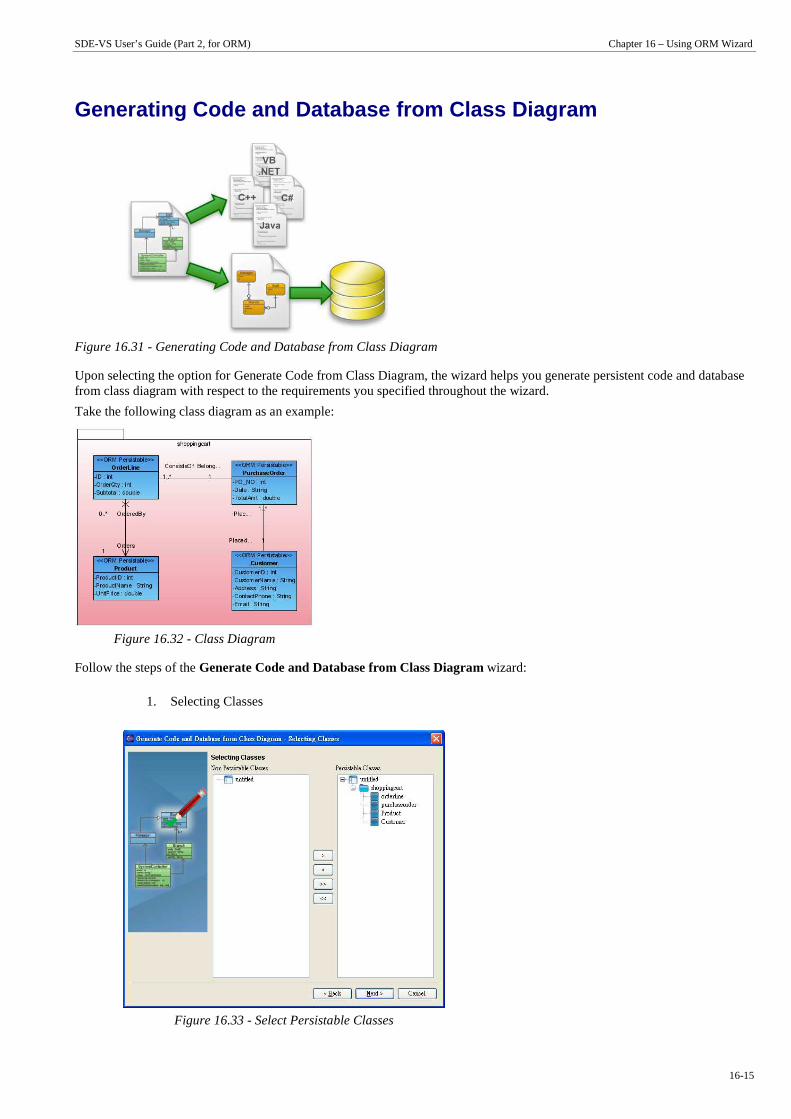
Generating Code and Database from Class Diagram
Figure 16.31 - Generating Code and Database from Class Diagram
Upon selecting the option for Generate Code from Class Diagram, the wizard helps you generate persistent code and database from class diagram with respect to the requirements you specified throughout the wizard.
Take the following class diagram as an example:
Figure 16.32 - Class Diagram
Follow the steps of the Generate Code and Database from Class Diagram wizard:
1. Selecting Classes
Figure 16.33 - Select Persistable Classes

SDE-VS User’s Guide (Part 2, for ORM) Chapter 16 – Using ORM Wizard
16-16
You are asked to select the classes on the class diagram which you want to generate persistent class to manipulate persistent data. By default, all the classes stereotyped as ORM-Persistable on the class diagram are selected for the generation of code and database shown in the list of Persistable Classes. You can deselect the persistable classes by using the list of buttons between the list of Non Persistable Classes and Persistable Classes.
• Add Selected
Add the selected class from Non Persistable Classes to Persistable Classes.
• Remove Selected
Remove the selected class from Persistable Classes to Non Persistable Classes.
• Add All
Add all classes from Non Persistable Classes to Persistable Classes.
• Remove All
Remove all classes from Persistable Classes to Non Persistable Classes.
For the classes shown in the list of Persistable Classes, they will be stereotyped as ORM-Persistable on the class diagram after the wizard is finished. Meanwhile, for the classes shown in the list of Non Persistable Classes, they will not be stereotyped on the class diagram after the wizard is finished.
2. Select Primary Key
Figure 16.34 - Select primary key for each table
You are asked to select the primary key for each class being mapped to data model and relational database. You can either select an attribute as the primary key or let SDE-VS generate the primary key automatically by using the drop-down menu. For more information, refer to the description of Mapping Primary key in the section of Mapping an Object Model to a Data Model in the Object Model chapter.

SDE-VS User’s Guide (Part 2, for ORM) Chapter 16 – Using ORM Wizard
16-17
3. Table Details Configuration
Figure 16.35 - Table details configuration
You are asked to define the Table Details for generating database and code. The database and persistent classes will be generated based on the information defined here. You can edit the table details by double-clicking the field.
• Package
Enter the package name. A package will be created to store the generated persistent code. If the package name was not defined, you will be prompted by a dialog box warning you the classes will be generated in default package.
Figure 16.36 - Confirm generate classes in default package message
• Table
You can edit the table name which will be used as the name of the generated database table.
• Columns
You can edit the column name represented by the class.
Figure 16.37 - Columns mapping
SDE-VS User’s Guide (Part 2, for ORM) Chapter 16 – Using ORM Wizard
16-18
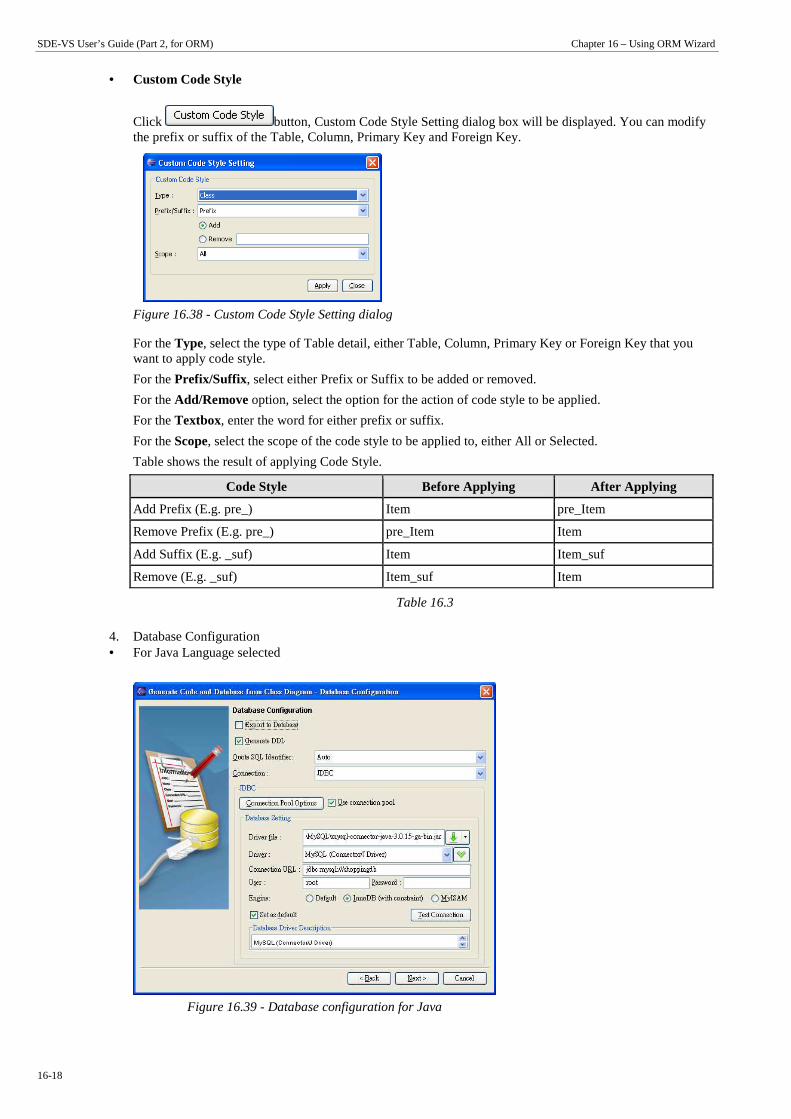
• Custom Code Style
Click button, Custom Code Style Setting dialog box will be displayed. You can modify the prefix or suffix of the Table, Column, Primary Key and Foreign Key.
Figure 16.38 - Custom Code Style Setting dialog
For the Type, select the type of Table detail, either Table, Column, Primary Key or Foreign Key that you want to apply code style.
For the Prefix/Suffix , select either Prefix or Suffix to be added or removed.
For the Add/Remove option, select the option for the action of code style to be applied.
For the Textbox, enter the word for either prefix or suffix.
For the Scope, select the scope of the code style to be applied to, either All or Selected.
Table shows the result of applying Code Style.
Code Style Before Applying After Applying
Add Prefix (E.g. pre_) Item pre_Item
Remove Prefix (E.g. pre_) pre_Item Item
Add Suffix (E.g. _suf) Item Item_suf
Remove (E.g. _suf) Item_suf Item
Table 16.3
4. Database Configuration • For Java Language selected
Figure 16.39 - Database configuration for Java

SDE-VS User’s Guide (Part 2, for ORM) Chapter 16 – Using ORM Wizard
16-19
You are asked to define the database configuration. Refer to the descriptions in the Getting Started with Object-Relational Mapping chapter for information on how to configure the database in the Database Configuration for Java Project section
• For C# Language selected
Figure 16.40 - Database Configuration for C#
You are asked to define the database configuration. Refer to the descriptions in the Getting Started with Object-Relational Mapping chapter for information on how to configure the database in the Database Configuration for .Net Project section.
5. Generate Code • For Java Language selected
Figure 16.41 - Generate code configuration for Java
You are asked to specify the code details. For information, refer to the description of Configuring Code Generation Setting for Java section in the Implementation chapter.

SDE-VS User’s Guide (Part 2, for ORM) Chapter 16 – Using ORM Wizard
16-20
• For C# Language selected
Figure 16.42 - Generate code configuration for C#
You are asked to specify the code details. For information, refer to the description of Configuring Code Generation Setting for C# section in the Implementation chapter.
Wizard for Generate Code and Database from Class Diagram option provides an option of generating code to you. By default, the Generate Code option is selected. If you do not want to generate code from class diagram, please deselect the Generate Code option. In this case, only database will be generated while persistent code will not be generated.
Click Finish, the Generate ORM Code/Database dialog box appears showing the progress of code generation. Click Close when the generation is complete.
Figure 16.43 - Generate ORM Code/Database dialog
An entity relationship diagram will be generated automatically and added to your project. The generated persistent code and required resources will be generated to the specified output path and the generated database will be set up to the specified database configuration.
Object Model 17

SDE-VS User’s Guide (Part 2, for ORM) Chapter 17 – Object Model
17-2
Chapter 17 - Object Model
Smart Development Environment for Microsoft Visio Studio .NET (SDE-VS) provides you a visual modeling environment for the object model of an application. This chapter shows you how to depict the object models by using a Class Diagram and describes how the object model maps to the data model.
In this chapter:
• Introduction • Creating Object Model • Mapping Object Model to Data Model
Introduction
An object is a self-contained entity with well-defined characteristics and behaviors while the characteristics and behaviors are represented by attributes and operations respectively. A class is a generic definition for a set of similar objects. Hence, an object is an instance of a class.
An object model provides a static conceptual view of an application. It shows the key components (objects) and their relationships (associations) within the application system. The object model can be used to generate the Java model API and .NET model API.
A visual modeling for object models is provided, not only for creating a new object model, but also for transforming from a data model. As object-relational mapping is automated, the database, code and persistent layer can be generated, which in turn streamlines the model-code-deploy software development process.
Object Models
A class diagram can be used to describe the objects and classes inside a system and the relationships between them; and thus, a class diagram is also known as an object model. The class diagram identifies the high-level entities of the system. The class diagram truly conforms to a complete UML 2.0.
The following section describes how you can depict an object model using the class diagram. The support for the generation of persistent code based on the object model will be briefly described in ORM-Persistable Class of Implementation chapter.
Creating a Class Diagram
You are provided with two ways to create a Class Diagram:
1. Drawing a Class Diagram 2. Synchronizing from a Data Model to an Object Model

SDE-VS User’s Guide (Part 2, for ORM) Chapter 17 – Object Model
17-3
Drawing a Class Diagram
1. You can create a new class diagram in one of the three ways: • On the menu, click File > New > File..., select Class Diagram from the New File dialog box.
Figure 17.1 - To create new files
Figure 17.2 - Select Class diagram
• On the Diagram Navigator, right-click Class Diagram > Create Class Diagram.
Figure 17.3 - Create Class Diagram on Diagram Navigator
• On the toolbar, click the New Class Diagram icon.
A new class diagram pane is displayed.
Creating a new Class element to the Class Diagram
1. On the diagram toolbar, click the Class shape icon.
Figure 17.4 - The Class shape icon
SDE-VS User’s Guide (Part 2, for ORM) Chapter 17 – Object Model
17-4
2. Click a location in the diagram pane.
An icon representing the class element is added to the diagram.
3. Type in a name for the Class element. • You can edit the name by double-clicking the name or by pressing the F2 button.
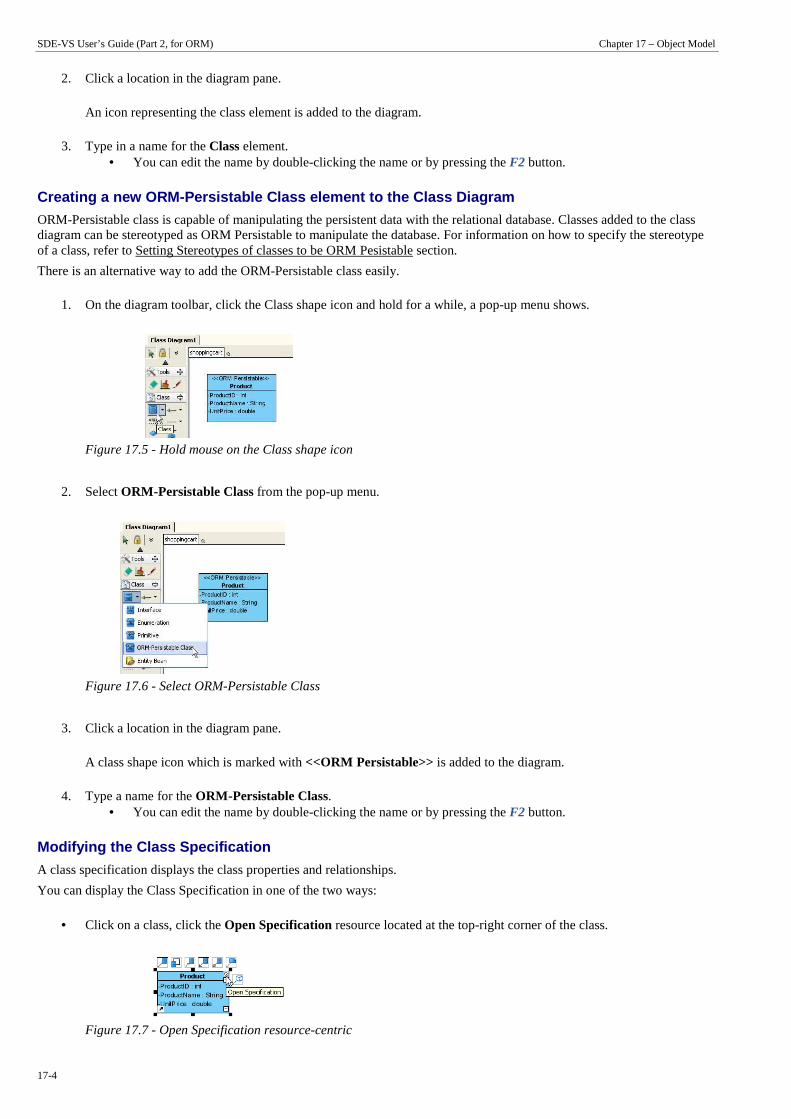
Creating a new ORM-Persistable Class element to the Class Diagram
ORM-Persistable class is capable of manipulating the persistent data with the relational database. Classes added to the class diagram can be stereotyped as ORM Persistable to manipulate the database. For information on how to specify the stereotype of a class, refer to Setting Stereotypes of classes to be ORM Pesistable section.
There is an alternative way to add the ORM-Persistable class easily.
1. On the diagram toolbar, click the Class shape icon and hold for a while, a pop-up menu shows.
Figure 17.5 - Hold mouse on the Class shape icon
2. Select ORM-Persistable Class from the pop-up menu.
Figure 17.6 - Select ORM-Persistable Class
3. Click a location in the diagram pane.
A class shape icon which is marked with <<ORM Persistable>> is added to the diagram.
4. Type a name for the ORM-Persistable Class. • You can edit the name by double-clicking the name or by pressing the F2 button.
Modifying the Class Specification
A class specification displays the class properties and relationships.
You can display the Class Specification in one of the two ways:
• Click on a class, click the Open Specification resource located at the top-right corner of the class.
Figure 17.7 - Open Specification resource-centric
SDE-VS User’s Guide (Part 2, for ORM) Chapter 17 – Object Model
17-5
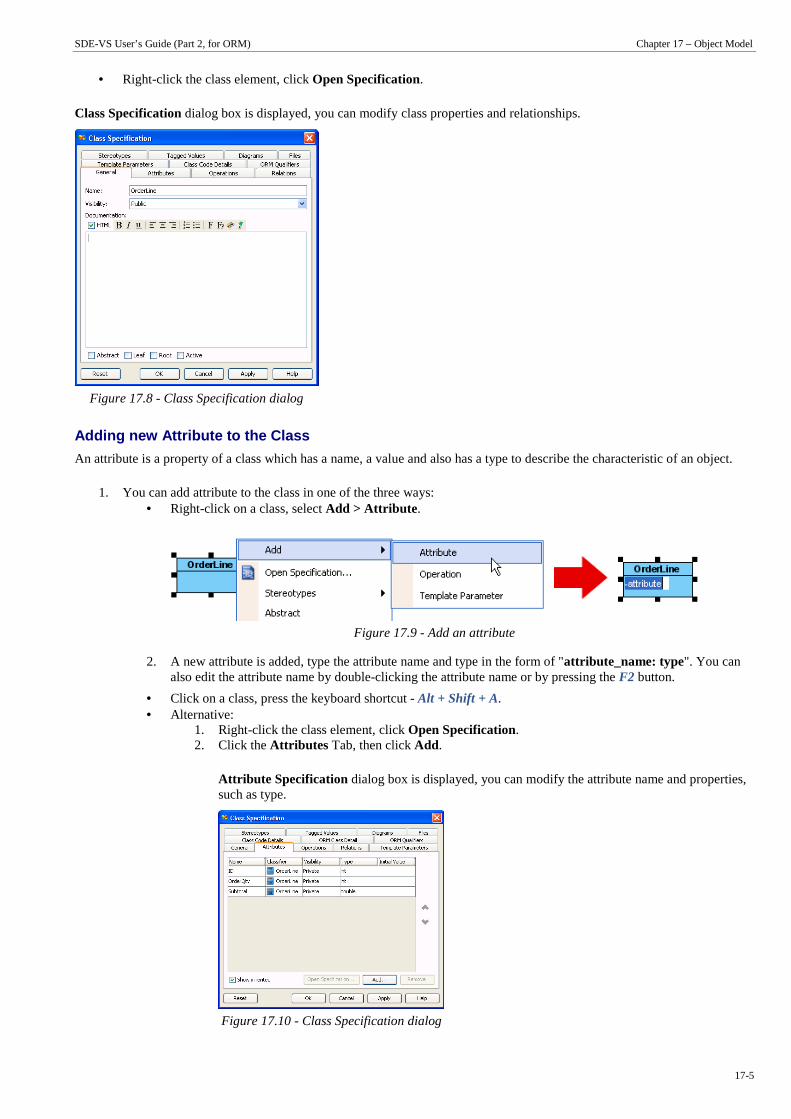
• Right-click the class element, click Open Specification.
Class Specification dialog box is displayed, you can modify class properties and relationships.
Figure 17.8 - Class Specification dialog
Adding new Attribute to the Class
An attribute is a property of a class which has a name, a value and also has a type to describe the characteristic of an object.
1. You can add attribute to the class in one of the three ways: • Right-click on a class, select Add > Attribute .
Figure 17.9 - Add an attribute
2. A new attribute is added, type the attribute name and type in the form of "attribute_name: type". You can also edit the attribute name by double-clicking the attribute name or by pressing the F2 button.
• Click on a class, press the keyboard shortcut - Alt + Shift + A. • Alternative:
1. Right-click the class element, click Open Specification. 2. Click the Attributes Tab, then click Add.
Attribute Specification dialog box is displayed, you can modify the attribute name and properties, such as type.
Figure 17.10 - Class Specification dialog

SDE-VS User’s Guide (Part 2, for ORM) Chapter 17 – Object Model
17-6
Adding Association to the Classes
An association refers to the relationship specifying the type of link that exists between objects. It shows how the objects are related to each other.
1. You can add an association to the classes in one of the three ways: • Using Resource-Centric Interface
1. Click on a class, a group of valid editing resources are displayed around the class element.
Figure 17.11 - Click on the Class
2. Mouse over the smart resource of association, drag the resource of "Association - > Class" to the associated class.
Figure 17.12 - "Association -> Class" resource-centric
Smart resource is a kind of resource which groups the resources of similar purpose together and enables the last selected resource (the default resource) of the group to be visible. To see all the resources, mouse over the default resource to expand it.
• Using Resource-Centric Interface for ORM-Persistable Class element 1. Click on an ORM-Persistable class, a group of valid editing resources is displayed around the class
element.
Figure 17.13 - Click on the class
2. Drag the resource of "Many-to-Many Association - > Class" to the associated ORM-Persistable class.
Figure 17.14 - "Many-to-many -> Class" resource centric
SDE-VS User’s Guide (Part 2, for ORM) Chapter 17 – Object Model
17-7
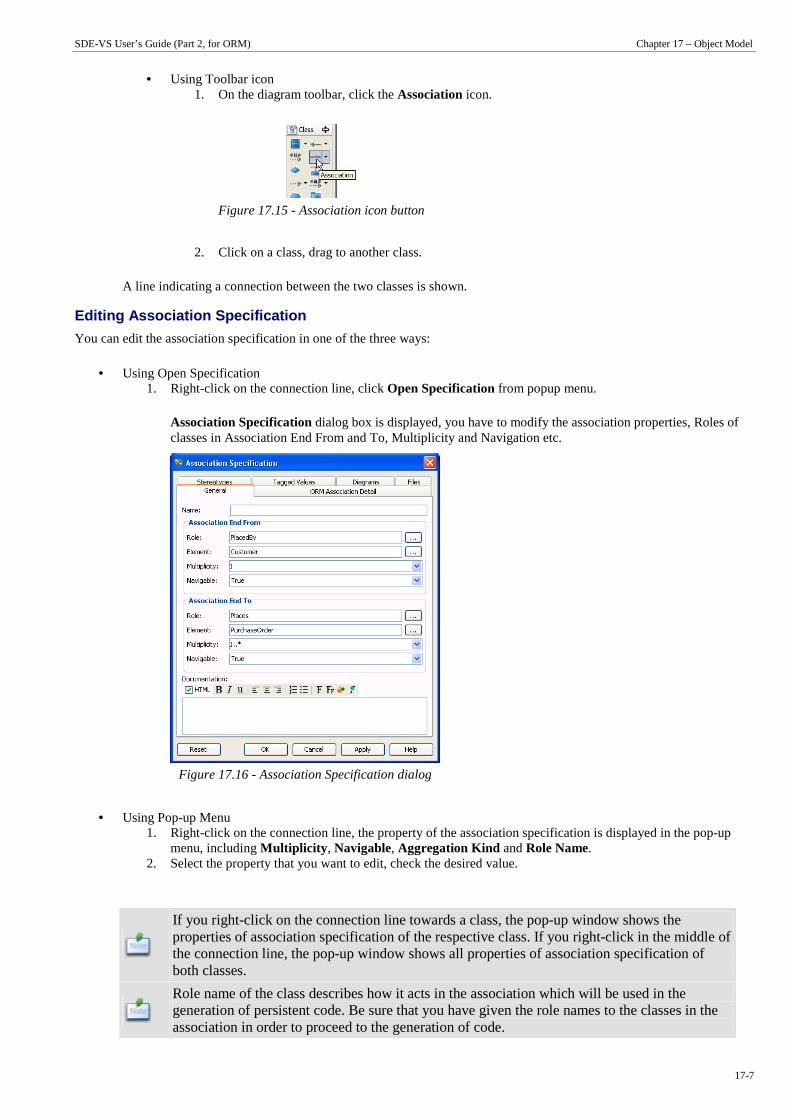
• Using Toolbar icon 1. On the diagram toolbar, click the Association icon.
Figure 17.15 - Association icon button
2. Click on a class, drag to another class.
A line indicating a connection between the two classes is shown.
Editing Association Specification
You can edit the association specification in one of the three ways:
• Using Open Specification 1. Right-click on the connection line, click Open Specification from popup menu.
Association Specification dialog box is displayed, you have to modify the association properties, Roles of classes in Association End From and To, Multiplicity and Navigation etc.
Figure 17.16 - Association Specification dialog
• Using Pop-up Menu 1. Right-click on the connection line, the property of the association specification is displayed in the pop-up
menu, including Multiplicity , Navigable, Aggregation Kind and Role Name. 2. Select the property that you want to edit, check the desired value.
If you right-click on the connection line towards a class, the pop-up window shows the properties of association specification of the respective class. If you right-click in the middle of the connection line, the pop-up window shows all properties of association specification of both classes.
Role name of the class describes how it acts in the association which will be used in the generation of persistent code. Be sure that you have given the role names to the classes in the association in order to proceed to the generation of code.
SDE-VS User’s Guide (Part 2, for ORM) Chapter 17 – Object Model
17-8
• Using Property Pane 1. On the menu, click View > SDE-VS Windows...> Property.
The property pane will be displayed.
2. Click on the connection line.
The properties of the association specification are displayed in the property pane. You can edit the property under the property pane.
As you have completed the class diagram, you can set the stereotypes of the classes to be ORM Persistable while the Class Diagram can be transformed into Entity Relationship Diagram.
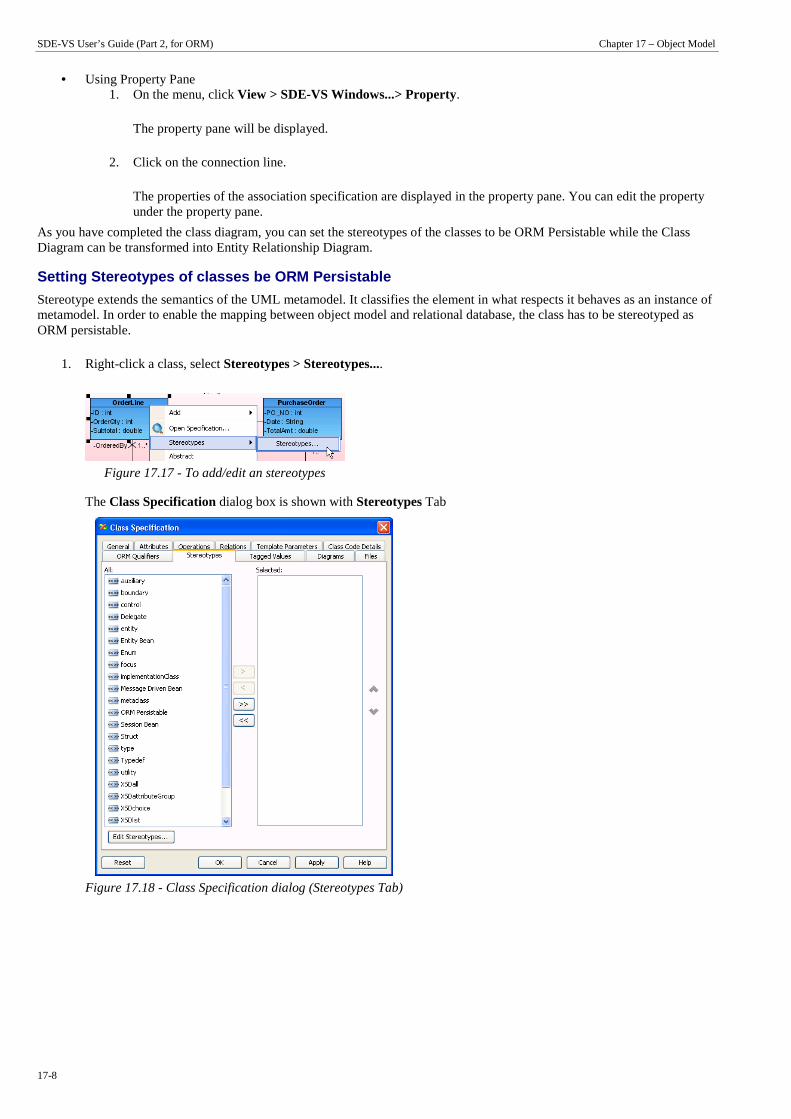
Setting Stereotypes of classes be ORM Persistable
Stereotype extends the semantics of the UML metamodel. It classifies the element in what respects it behaves as an instance of metamodel. In order to enable the mapping between object model and relational database, the class has to be stereotyped as ORM persistable.
1. Right-click a class, select Stereotypes > Stereotypes....
Figure 17.17 - To add/edit an stereotypes
The Class Specification dialog box is shown with Stereotypes Tab
Figure 17.18 - Class Specification dialog (Stereotypes Tab)

SDE-VS User’s Guide (Part 2, for ORM) Chapter 17 – Object Model
17-9
2. Select ORM Persistable, then > button and OK .
Figure 17.19 - Classes with Stereotypes
Synchronizing from a Data Model to an Object Model You can generate a Class Diagram from an ERD by synchronization if there is an ERD.
1. You can synchronize the ERD to Class Diagram in one of the three methods: • On the menu, click Modeling > ORM > Sync to Class Diagram.
Figure 17.20 - To synchronize to Class Diagram
• Right-Click on the ERD, select Synchronize to Class Diagram.
Figure 17.21 - To synchronize ERD to Class diagram by click on popup menu

SDE-VS User’s Guide (Part 2, for ORM) Chapter 17 – Object Model
17-10
• On the ERD, hold down the right-mouse button, move the mouse from right to left to form the gesture. A blue path is shown indicating the gesture.
Figure 17.22 - To synchronize ERD to Class diagram by gesture
A Class Diagram is generated and can be found under the Diagram Navigator.
Figure 17.23 - The Class Diagram generated from ERD
Defining Package for Classes
There are two ways to define the packages for the classes.
• Enter the package name to the default package located at the top-left corner of the class diagram by double-clicking the default package.
Figure 17.24 - Change the default package
SDE-VS User’s Guide (Part 2, for ORM) Chapter 17 – Object Model
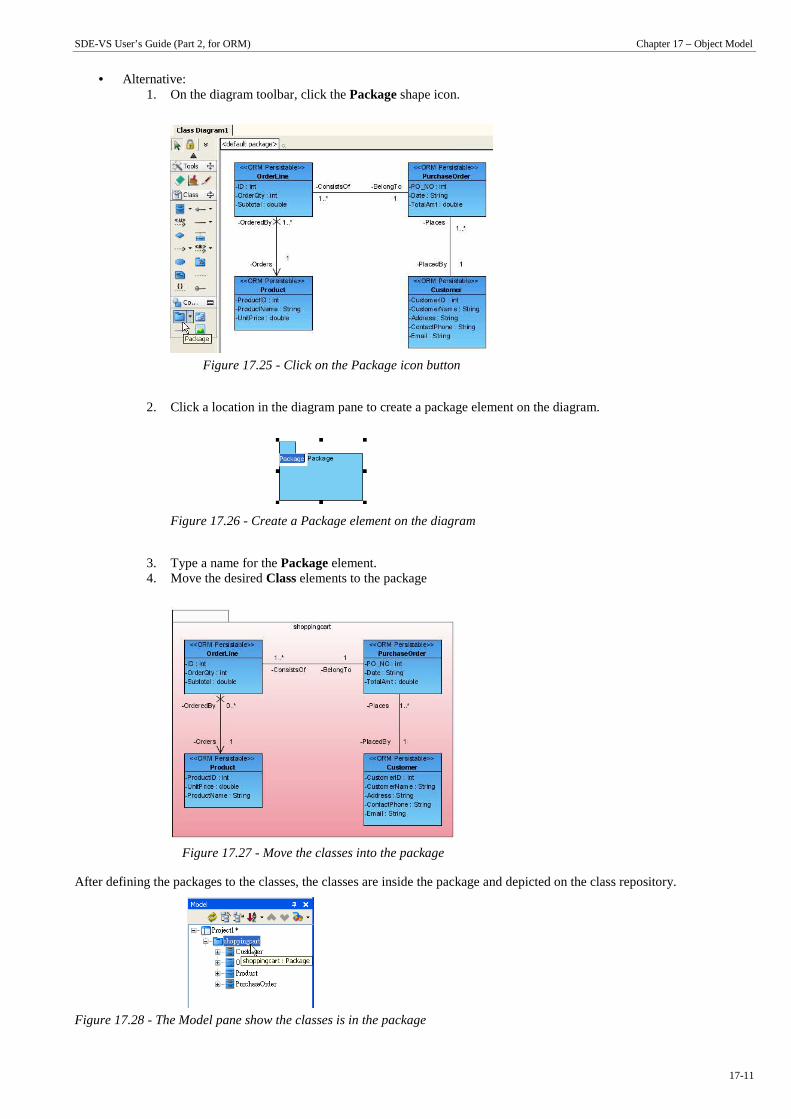
17-11
• Alternative: 1. On the diagram toolbar, click the Package shape icon.
Figure 17.25 - Click on the Package icon button
2. Click a location in the diagram pane to create a package element on the diagram.
Figure 17.26 - Create a Package element on the diagram
3. Type a name for the Package element. 4. Move the desired Class elements to the package
Figure 17.27 - Move the classes into the package
After defining the packages to the classes, the classes are inside the package and depicted on the class repository.
Figure 17.28 - The Model pane show the classes is in the package

SDE-VS User’s Guide (Part 2, for ORM) Chapter 17 – Object Model
17-12
Specifying Inheritance Strategy
In a generalization, the subclass inherits all the features of the superclass. Two inheritance strategies - table per class hierarchy and table per subclass are provided for transforming the generalization hierarchy to relational model. By default, table per class hierarchy is used for the generalization.
When transforming generalization into relational model, the generalization is transformed according to the inheritance strategy applied. For more information on the transformation, refer to the description of Mapping Inheritance/Generalization section.
You can specify the inheritance strategy in one of the two ways:
• Specifying from Superclass 1. Right-click the superclass, select ORM > ORM Class Detail...from the pop-up menu. The Class
Specification dialog showing the ORM Class Detail tab is displayed.
Figure 17.29 - Edit the ORM Class details
2. Click Subclasses...to open the Inheritance Strategy dialog box.
Figure 17.30 - Class Specification dialog (ORM Class Detail Tab)

SDE-VS User’s Guide (Part 2, for ORM) Chapter 17 – Object Model
17-13
3. Select the desired subclass from the generalization tree, select the Inheritance Strategy from the drop-down menu, and then click Apply .
Figure 17.31 - Inheritance Strategy dialog
4. Specifying from Subclass 1. Right-click the subclass, select ORM > ORM Class Detail...from the pop-up menu. The Class
Specification dialog box showing the ORM Class Detail tab is displayed.
Figure 17.32 - Edit ORM Class detail for Sub-Class
5. Select the Inheritance strategy from the drop-down menu.
Figure 17.33 - ORM Class Detail for Sub-class

SDE-VS User’s Guide (Part 2, for ORM) Chapter 17 – Object Model
17-14
These two inheritance strategies can be applied to different subclasses within a generalization hierarchy in Java project. Applying two strategies to different subclasses within a generalization in .NET project will result in error when the generation of code and database.
Specifying Collection Type
If one end of an association contains a multiplicity of many, a collection class will be generated for handling the multiple instances. You are allowed to specify the type of collection, including set, bag, list and map.
Set is an unordered collection that does not allow duplication of objects. Bag is an unordered collection that may contain duplicate objects. List is an ordered collection that allows duplication of objects. Map is an ordered collection that maps keys to values while each key can map to exactly one value.
For more information on the usage of Collection in Java code, refer to the description of Using Collection with Smart Association Handling and Using Collection with Standard Association Handling in the Manipulating Persistent Data with Java chapter.
For more information on the usage of Collection in .NET source code, refer to the description of Using Collection with Smart Association Handling and Using Collection with Standard Association Handling in the Manipulating Persistent Data with .NET chapter.
1. Right-click on the connection line, click Open Specification from popup menu.
Figure 17.34 - To Open specification
2. Click the ORM Association Detail Tab, select the Collection Type from the drop-down menu.
Figure 17.35 - ORM Association Detail Tab

SDE-VS User’s Guide (Part 2, for ORM) Chapter 17 – Object Model
17-15
Defining ORM Qualifier
ORM Qualifier is used to specify the extra retrieval rules of the generated persistent class querying the database. You are allowed to define the ORM Qualifiers of the classes in the class diagram before the generation of persistent code. For more information on the usage of ORM Qualifier, refer to the description of Using ORM Qualifier in the Manipulating Persistent Data with Java and Manipulating Persistent Data with .NET chapter.
1. Right-click on a class that you want to add extra retrieval rules, click Open Specification.
Figure 17.36 - Class Specification dialog (ORM Qualifiers Tab)
2. Click the ORM Qualifiers Tab, then click Add.
Figure 17.37 - ORM Qualifier Specification dialog
ORM Qualifier Specification (ORM Qualifiers) dialog box is displayed with a list of attributes of the selected class.
3. Enter the name of the ORM Qualifier, place a check mark for the Key column of the attribute that will be used in querying the database.
Figure 17.38 - ORM Qualifier Specification (ORM Qualifiers) dialog

SDE-VS User’s Guide (Part 2, for ORM) Chapter 17 – Object Model
17-16
Customizing SQL
Ready-to-use SQL statements will be generated and used by the persistent code to directly manipulate the database. In some cases, you may find the generated SQL statements not appropriate for your needs. You are allowed to override the generated SQL statements, including the Insert, Update and Delete statements whenever you want to.
To customize the generated SQL statements:
1. Right-click on an ORM-Persistable class that you want to customize the SQL statements, select ORM > ORM Class Detail...from the pop-up menu. The Class Specification dialog box showing the ORM Class Detail tab is displayed.
Figure 17.39 - To open ORM Class Details
2. Select the type of SQL statement that you want to customize.
Figure 17.40 - Class Specification dialog (ORM Class Detail Tab)

SDE-VS User’s Guide (Part 2, for ORM) Chapter 17 – Object Model
17-17
3. Click Generate SQL to generate the ready-to-use SQL statement.
Figure 17.41 - To generate insert SQL statement
The SQL statement is generated based on the property of class.
Figure 17.42 - The basic insert SQL statement is generated
4. Modify the SQL statement to the desired one.
Figure 17.43 - Custom the insert SQL statement
Mapping an Object Model to a Data Model
Object Relational Mapping (ORM) is supported which maps object models to entity relational models and vice versa.
Mapping between objects to relational database preserves not only the data, but also the state, foreign/primary key mapping, difference in data type and business logic. Thus, you are not required to handle those tedious tasks during software development.
Mapping Classes to Entities Object Model can be mapped to Data Model due to the persistent nature of classes. Persistent classes can act as persistent data storage during the application is running. And hence, all persistent classes can map to entities using a one-to-one mapping.
Example:
Figure 17.44 - Mapping Classes to Entities
In the above example, the Customer Class is mapped with the Customer Entity as the Customer instance can store the customer information from the Customer Entity.
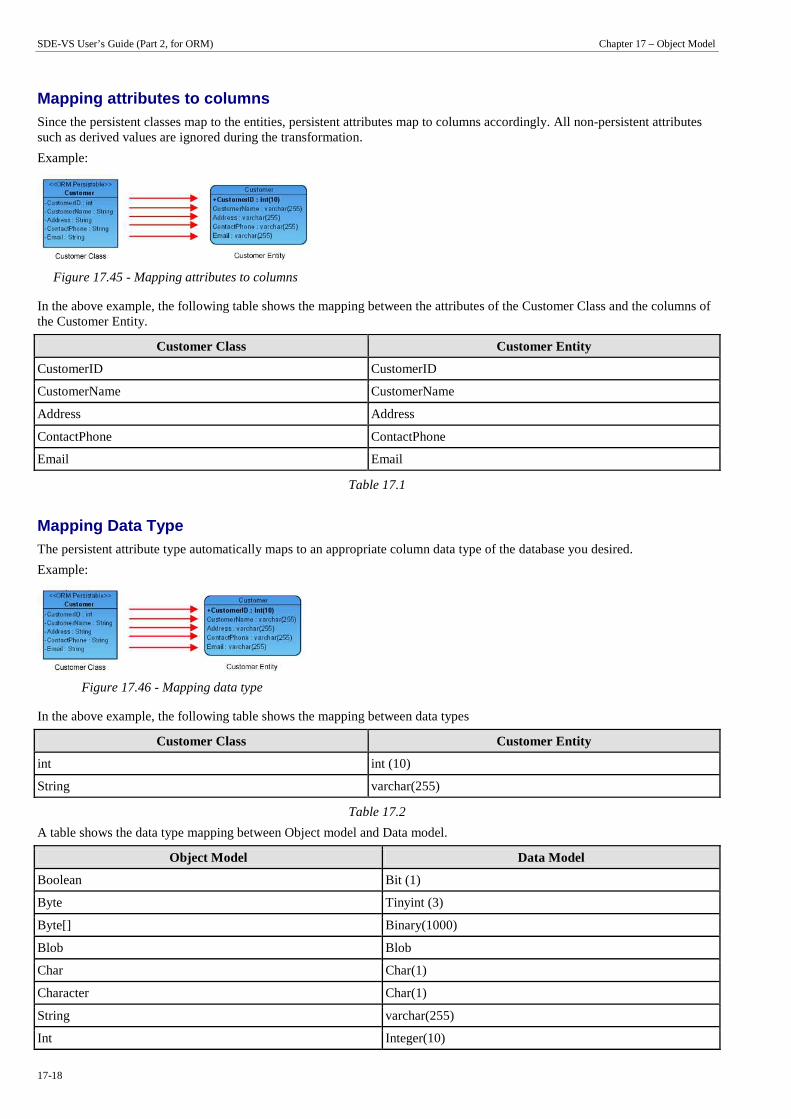
SDE-VS User’s Guide (Part 2, for ORM) Chapter 17 – Object Model
17-18
Mapping attributes to columns Since the persistent classes map to the entities, persistent attributes map to columns accordingly. All non-persistent attributes such as derived values are ignored during the transformation.
Example:
Figure 17.45 - Mapping attributes to columns
In the above example, the following table shows the mapping between the attributes of the Customer Class and the columns of the Customer Entity.
Customer Class Customer Entity
CustomerID CustomerID
CustomerName CustomerName
Address Address
ContactPhone ContactPhone
Email Email
Table 17.1
Mapping Data Type The persistent attribute type automatically maps to an appropriate column data type of the database you desired.
Example:
Figure 17.46 - Mapping data type
In the above example, the following table shows the mapping between data types
Customer Class Customer Entity
int int (10)
String varchar(255)
Table 17.2
A table shows the data type mapping between Object model and Data model.
Object Model Data Model
Boolean Bit (1)
Byte Tinyint (3)
Byte[] Binary(1000)
Blob Blob
Char Char(1)
Character Char(1)
String varchar(255)
Int Integer(10)

SDE-VS User’s Guide (Part 2, for ORM) Chapter 17 – Object Model
17-19
Integer Integer(10)
Double Double(10)
Decimal Integer
Bigdecimal Decimal(19)
Float Float(10)
Long Bigint(19)
Short Smallint(5)
Date Date
Time Time(7)
Timestamp Timestamp(7)
Table17.3
Mapping Primary Key You can map an attribute to a primary key column. When you synchronize the ORM-Persistable Class to the ERD, you will be prompted by a dialog box to select primary key.
• You can select an attribute as the primary key. • You can let SDE-VS generate the primary key automatically.
Example:
Figure 17.47 - Select the primary key
In the above example, when synchronizing the class of Product to entity relationship diagram, the above dialog box is shown to prompt you to select the primary key of the Product class.
Under the drop-down menu, you can select either one of the attributes of the Product class to be the primary key, or assign SDE-VS to generate the primary key automatically, or select "Do Not Generate" to leave the generated entity without primary key.
Figure 17.48 - Generate/Specific a primary key
The above diagram shows if you assign ProductID as primary key, the ProductID of the generated entity, Product will become bold; whereas if you select "Auto Generate" for the primary key, an additional attribute ID is generated as the primary key of the Product entity.
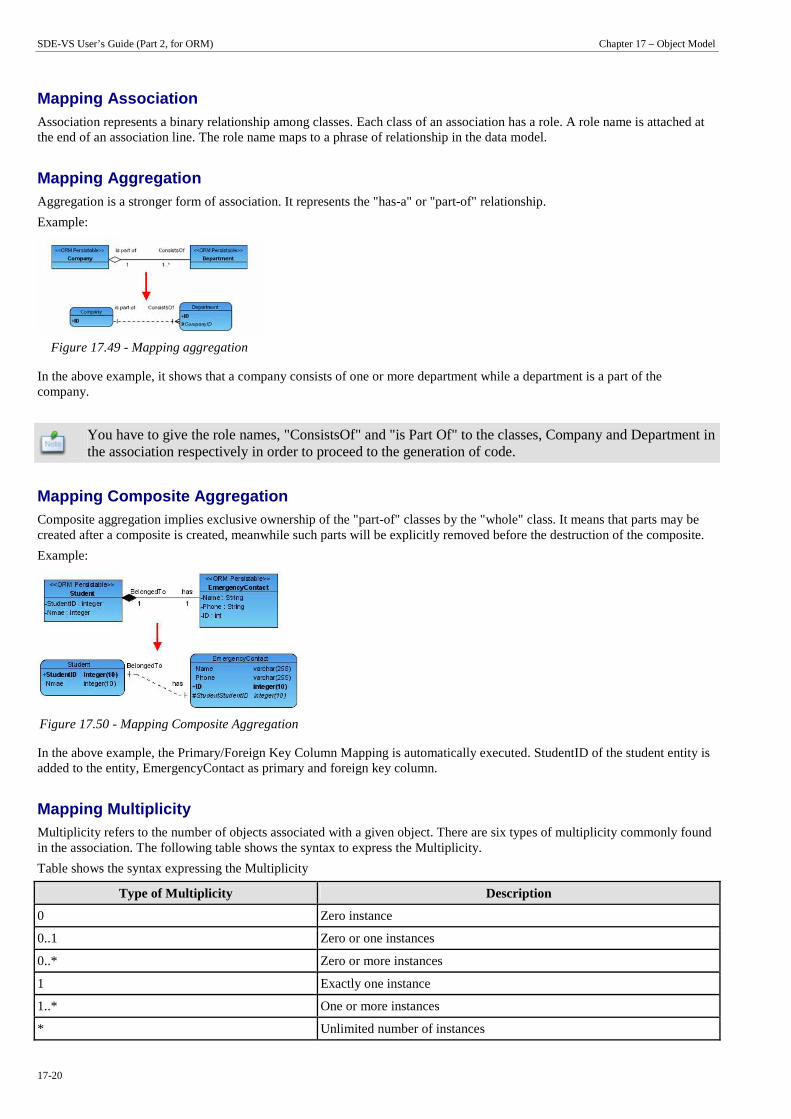
SDE-VS User’s Guide (Part 2, for ORM) Chapter 17 – Object Model
17-20
Mapping Association Association represents a binary relationship among classes. Each class of an association has a role. A role name is attached at the end of an association line. The role name maps to a phrase of relationship in the data model.
Mapping Aggregation Aggregation is a stronger form of association. It represents the "has-a" or "part-of" relationship.
Example:
Figure 17.49 - Mapping aggregation
In the above example, it shows that a company consists of one or more department while a department is a part of the company.
You have to give the role names, "ConsistsOf" and "is Part Of" to the classes, Company and Department in the association respectively in order to proceed to the generation of code.
Mapping Composite Aggregation Composite aggregation implies exclusive ownership of the "part-of" classes by the "whole" class. It means that parts may be created after a composite is created, meanwhile such parts will be explicitly removed before the destruction of the composite.
Example:
Figure 17.50 - Mapping Composite Aggregation
In the above example, the Primary/Foreign Key Column Mapping is automatically executed. StudentID of the student entity is added to the entity, EmergencyContact as primary and foreign key column.
Mapping Multiplicity Multiplicity refers to the number of objects associated with a given object. There are six types of multiplicity commonly found in the association. The following table shows the syntax to express the Multiplicity.
Table shows the syntax expressing the Multiplicity
Type of Multiplicity Description
0 Zero instance
0..1 Zero or one instances
0..* Zero or more instances
1 Exactly one instance
1..* One or more instances
* Unlimited number of instances
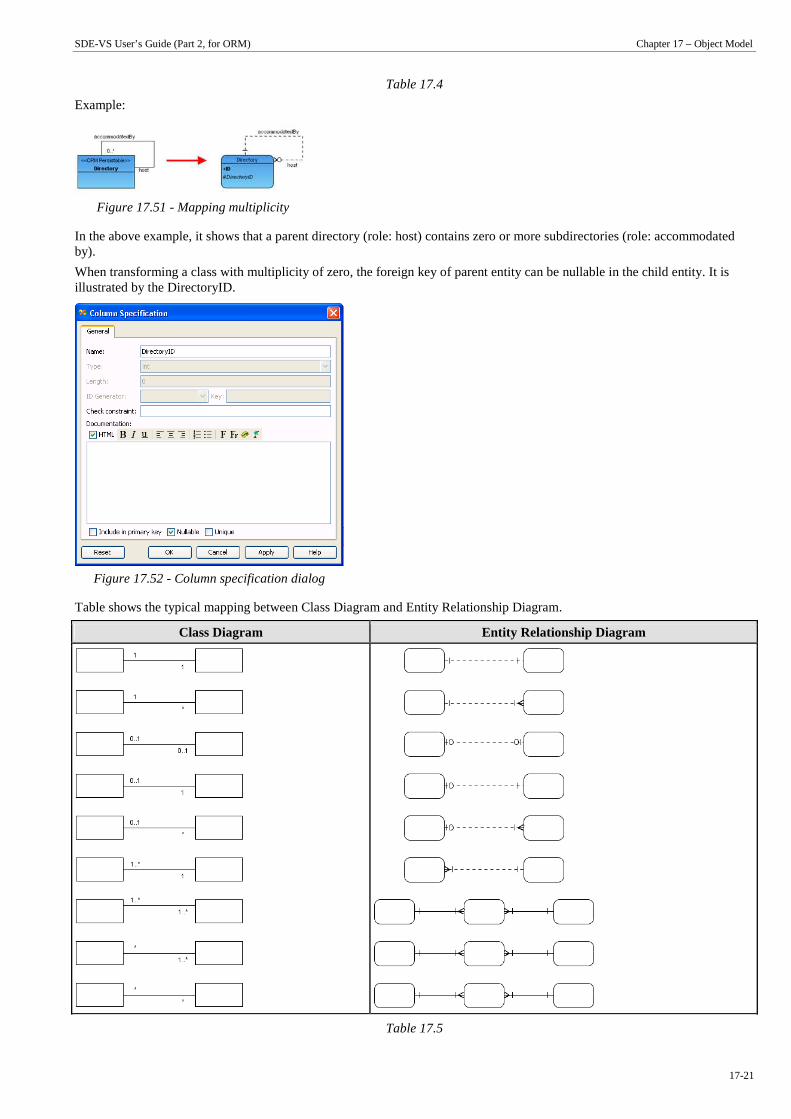
SDE-VS User’s Guide (Part 2, for ORM) Chapter 17 – Object Model
17-21
Table 17.4
Example:
Figure 17.51 - Mapping multiplicity
In the above example, it shows that a parent directory (role: host) contains zero or more subdirectories (role: accommodated by).
When transforming a class with multiplicity of zero, the foreign key of parent entity can be nullable in the child entity. It is illustrated by the DirectoryID.
Figure 17.52 - Column specification dialog
Table shows the typical mapping between Class Diagram and Entity Relationship Diagram.
Class Diagram Entity Relationship Diagram
Table 17.5
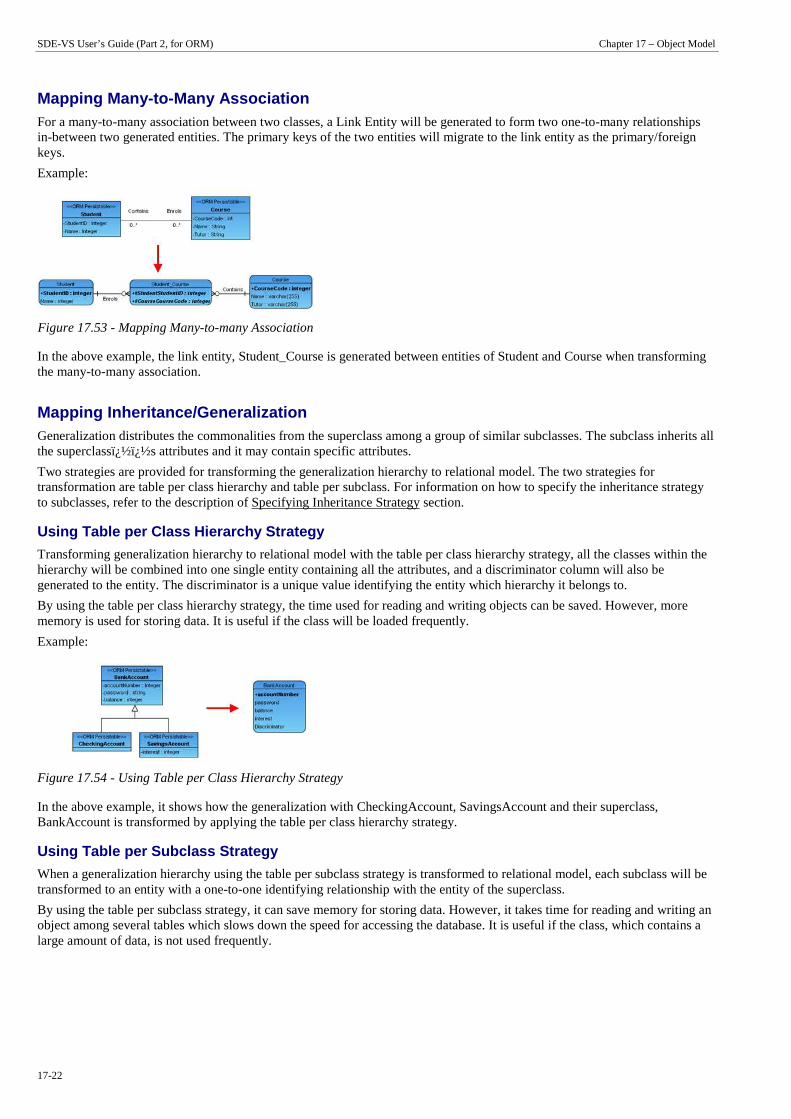
SDE-VS User’s Guide (Part 2, for ORM) Chapter 17 – Object Model
17-22
Mapping Many-to-Many Association For a many-to-many association between two classes, a Link Entity will be generated to form two one-to-many relationships in-between two generated entities. The primary keys of the two entities will migrate to the link entity as the primary/foreign keys.
Example:
Figure 17.53 - Mapping Many-to-many Association
In the above example, the link entity, Student_Course is generated between entities of Student and Course when transforming the many-to-many association.
Mapping Inheritance/Generalization Generalization distributes the commonalities from the superclass among a group of similar subclasses. The subclass inherits all the superclass��s attributes and it may contain specific attributes.
Two strategies are provided for transforming the generalization hierarchy to relational model. The two strategies for transformation are table per class hierarchy and table per subclass. For information on how to specify the inheritance strategy to subclasses, refer to the description of Specifying Inheritance Strategy section.
Using Table per Class Hierarchy Strategy
Transforming generalization hierarchy to relational model with the table per class hierarchy strategy, all the classes within the hierarchy will be combined into one single entity containing all the attributes, and a discriminator column will also be generated to the entity. The discriminator is a unique value identifying the entity which hierarchy it belongs to.
By using the table per class hierarchy strategy, the time used for reading and writing objects can be saved. However, more memory is used for storing data. It is useful if the class will be loaded frequently.
Example:
Figure 17.54 - Using Table per Class Hierarchy Strategy
In the above example, it shows how the generalization with CheckingAccount, SavingsAccount and their superclass, BankAccount is transformed by applying the table per class hierarchy strategy.
Using Table per Subclass Strategy
When a generalization hierarchy using the table per subclass strategy is transformed to relational model, each subclass will be transformed to an entity with a one-to-one identifying relationship with the entity of the superclass.
By using the table per subclass strategy, it can save memory for storing data. However, it takes time for reading and writing an object among several tables which slows down the speed for accessing the database. It is useful if the class, which contains a large amount of data, is not used frequently.

SDE-VS User’s Guide (Part 2, for ORM) Chapter 17 – Object Model
17-23
Example:
Figure 17.55 - Using Table per SubClass Strategy
In the above example, it shows how the generalization which applies the table per subclass hierarchy strategy is transformed to the CheckingAccount and SavingsAccount.
Using Mixed Strategies
The two inheritance strategies are allowed to be applied to different subclasses within a generalization hierarchy in Java project. By applying different strategies to different subclasses within a generalization hierarchy, the generalization hierarchy will be transformed with respect to the specified inheritance strategies.
Example:
Figure 17.56 - Inheritance Strategy dialog
Applying the above inheritance strategy to the generalization with the ChequePayment and CreditCardPayment and their superclass, Payment, two entities are resulted after transformation as shown below.
Figure 17.57 - Using Mixed Strategy
In the above example, it shows that applying table per hierarchy inheritance strategy will result in combining the attributes of the superclass and subclass into one single entity while table per subclass will result in forming an entity of subclass and a one-to-one identifying relationship between entities of superclass and subclass.
Applying two inheritance strategies to different subclasses within a generalization hierarchy is only available in Java project. If mixed strategies are applied to the generalization hierarchy in .NET project, it will result in error when the generation of code and database.

SDE-VS User’s Guide (Part 2, for ORM) Chapter 17 – Object Model
17-24
Mapping Collection of Objects to Array Table For a persistent class acting as persistent data storage, it may consist of a persistent data containing a collection of objects. The Array Table is promoted to be used to allow users retrieve objects in the form of primitive array.
When transforming a class with an attribute of array type modifier, this attribute will be converted to an Array Table automatically. The generated entity and the array table form a one-to-many relationship.
Example:
Figure 17.58 - Mapping Collection of Object to Array Table
In the above example, the phonebook has a contact entry for each contact person. Each contact person may have more than one phone numbers. In order to ease the retrieval of a collection of phone objects, the phone attribute is converted into a ContactEntry_Phone array table.
Mapping Object Model Terminology Table shows the shift from Object model to data model terminology.
Object Model Term Data Model Term
Class Entity
Object Instance of an entity
Association Relationship
Generalization Supertype/subtype
Attribute Column
Role Phrase
Multiplicity Cardinality
Table17.6
Showing Mapping between Object and Data Models by ORM Diagram
In order to identify the mapping between the object and data models clearly, an ORM diagram is provided to show the mappings between the ORM-Persistable class and its corresponding entity.
As you are allowed to name the ORM-Persistable class and its corresponding entity differently, and also the attributes and columns as well, you may find it difficult to identify the mappings not only between the ORM-Persistable classes and the corresponding entities, but also the attributes and columns. Taking the advantage of ORM diagram, the mappings between ORM-Persistable classes and entities and between attributes and columns can be clearly identified.
There are two ways to create the ORM diagram for showing the mapping between the object and data models:
1. Creating an ORM diagram from the existing class diagram and/or ERD. 2. Drawing an ORM Diagram
Creating an ORM Diagram from Existing Diagrams The following example shows you how to show the mapping between the existing object and data models by the ORM diagram.

SDE-VS User’s Guide (Part 2, for ORM) Chapter 17 – Object Model
17-25
Let us assume the following class diagram has been created and synchronized to the entity relationship diagram (ERD).
Class Diagram Synchronized ERD
Table 17.7
You can create an ORM diagram by either the object model, data model, or both. The following steps show you how to create the ORM diagram by using the object model.
1. Right-click on the class diagram, select Send to > ORM Diagram > New ORM Diagram from the pop-up menu.
Figure 17.59 - Send Class Model to a new ORM Diagram
A new ORM diagram is created which displays the ORM-Persistable classes.
Figure 17.60 - The Class Model in ORM Diagram
Alternatively, you can create the ORM diagram from the data model by right-clicking on the ERD, and selecting Send to > ORM Diagram > New ORM Diagram from the pop-up menu.
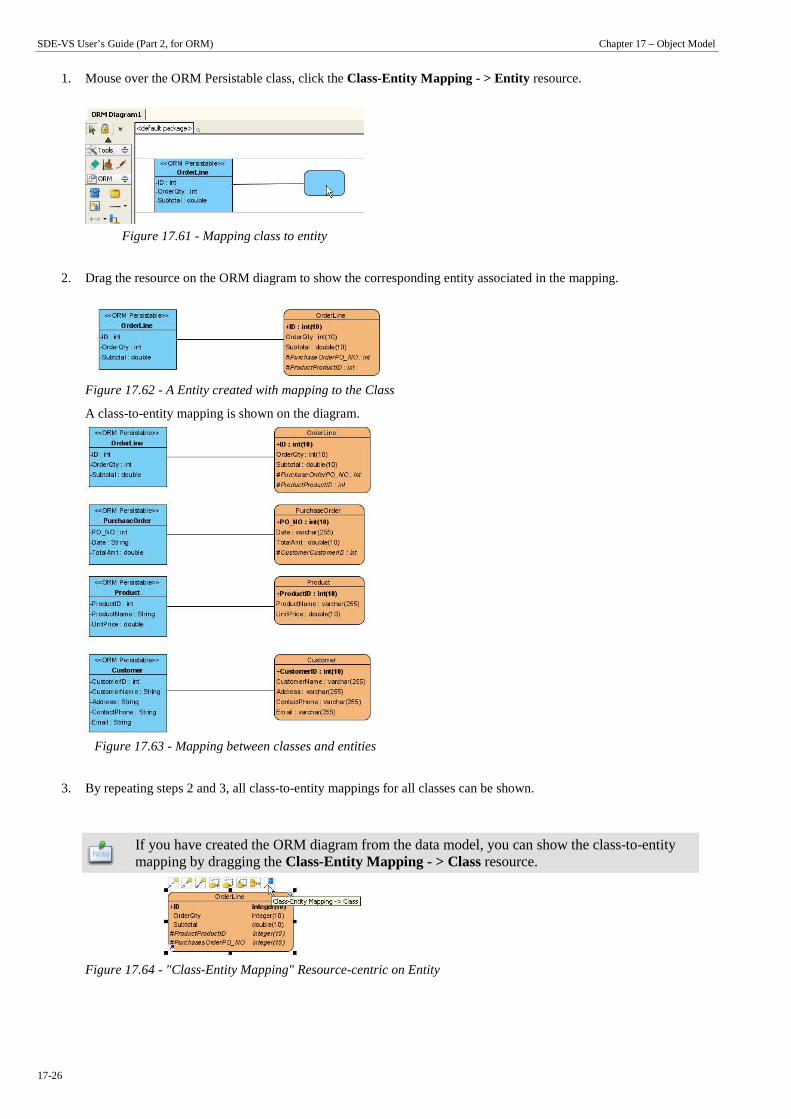
SDE-VS User’s Guide (Part 2, for ORM) Chapter 17 – Object Model
17-26
1. Mouse over the ORM Persistable class, click the Class-Entity Mapping - > Entity resource.
Figure 17.61 - Mapping class to entity
2. Drag the resource on the ORM diagram to show the corresponding entity associated in the mapping.
Figure 17.62 - A Entity created with mapping to the Class
A class-to-entity mapping is shown on the diagram.
Figure 17.63 - Mapping between classes and entities
3. By repeating steps 2 and 3, all class-to-entity mappings for all classes can be shown.
If you have created the ORM diagram from the data model, you can show the class-to-entity mapping by dragging the Class-Entity Mapping - > Class resource.
Figure 17.64 - "Class-Entity Mapping" Resource-centric on Entity
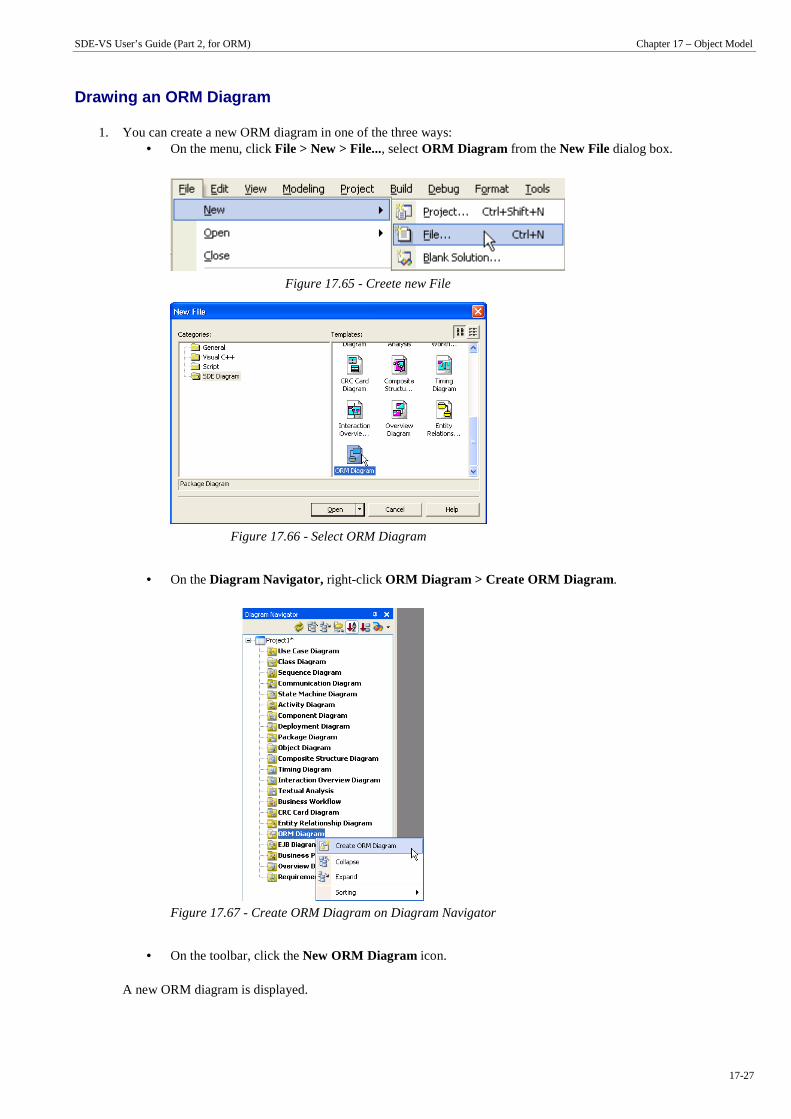
SDE-VS User’s Guide (Part 2, for ORM) Chapter 17 – Object Model
17-27
Drawing an ORM Diagram
1. You can create a new ORM diagram in one of the three ways: • On the menu, click File > New > File..., select ORM Diagram from the New File dialog box.
Figure 17.65 - Creete new File
Figure 17.66 - Select ORM Diagram
• On the Diagram Navigator, right-click ORM Diagram > Create ORM Diagram.
Figure 17.67 - Create ORM Diagram on Diagram Navigator
• On the toolbar, click the New ORM Diagram icon.
A new ORM diagram is displayed.

SDE-VS User’s Guide (Part 2, for ORM) Chapter 17 – Object Model
17-28
Creating ORM-Persistable Class and Mapping Entity to the ORM Diagram
After created a new ORM diagram, you can create ORM-Persistable class and its mapping entity on the ORM diagram.
To create an ORM-Persistable class on ORM diagram:
1. On the diagram toolbar, click ORM-Persistable Class shape icon.
Figure 17.68 - ORM-Persistable Class icon button
2. Click a location in the diagram pane.
A class shape icon which is marked with <<ORM-Persistable>> is added to the diagram.
3. Type the name for the ORM-Persistable Class. • You can edit the name by double-clicking the name or by pressing the F2 button.
Figure 17.69 - An ORM Persistable Class
Creating Associated ORM-Persistable Class to the ORM Diagram You can create an associated ORM-Persistable class by using the association resources of an ORM-Persistable class.
1. Mouse over the ORM-Persistable class, drag the One-to-One Association - > Class resource to the diagram to create another ORM-Persistable class with a one-to-one directional association.
Figure 17.70 - "One-to-one Association -> Class" resource-centric
2. Enter the name to the newly created class.
Figure 17.71 - A class is created with One-to-one association

SDE-VS User’s Guide (Part 2, for ORM) Chapter 17 – Object Model
17-29
Creating Mapping Entity to the ORM Diagram To create the mapping entity of the ORM-Persistable class:
1. Mouse over the ORM-Persistable class, click and drag the Class-Entity Mapping - > Entity resource to the diagram.
Figure 17.72 - "Class-Entity Mapping -> Entity" resource-centric
The corresponding mapping entity, Student is created automatically.
Figure 17.73 - The Student entity is created
2. Create the mapping entity of Profile class by using the Class-Entity Mapping - > Entity resource.
Figure 17.74 - Profile entity is created
You can create the Entity and the mapping ORM-Persistable class using the same approach of Creating ORM-Persistable Class and Mapping Entity by using the Entity icon on the diagram toolbar and the Class-Entity Mapping - > Class resource.

SDE-VS User’s Guide (Part 2, for ORM) Chapter 17 – Object Model
17-30
Showing Attribute Mapping The object-relational mapping exists not only between the ORM-Persistable class and entity, but also the attributes and columns. You can investigate the mapping between the attributes and columns by using the Attribute Mapping feature.
To view the attribute mapping:
1. Right-click on the ORM diagram, select View > Attribute Mapping from the pop-up menu.
Figure 17.75 - Switch to Attribute Mapping view
The class-to-entity mapping shown on the ORM diagram is changed to attribute-to-column mapping automatically.
Figure 17.76 ORM Diagram show the Attribute Mapping
Supporting Real-time Synchronization ORM diagram supports real-time synchronization; that is, any change in the class diagram, entity relationship diagram and/or ORM diagram will automatically synchronize to each other.
Let us take the ORM diagram created in the Drawing ORM Diagram section as an example to modify the ORM-Persistable Class and Entity.
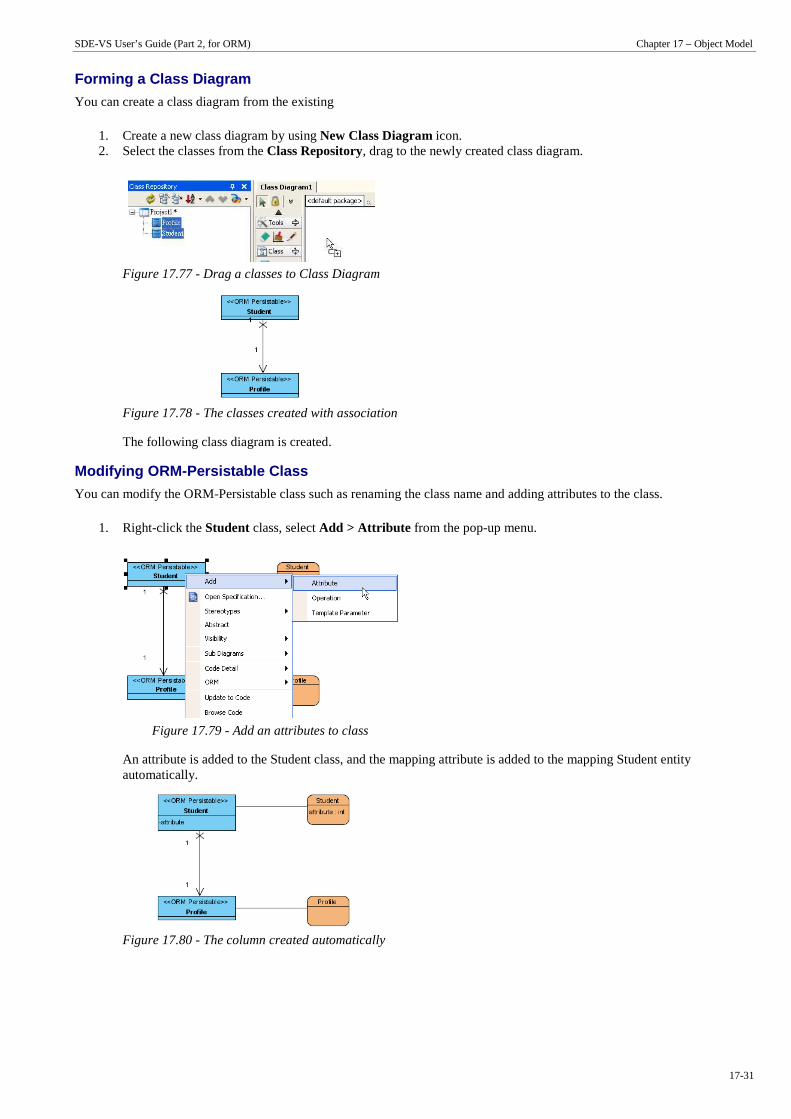
SDE-VS User’s Guide (Part 2, for ORM) Chapter 17 – Object Model
17-31
Forming a Class Diagram
You can create a class diagram from the existing
1. Create a new class diagram by using New Class Diagram icon. 2. Select the classes from the Class Repository, drag to the newly created class diagram.
Figure 17.77 - Drag a classes to Class Diagram
Figure 17.78 - The classes created with association
The following class diagram is created.
Modifying ORM-Persistable Class
You can modify the ORM-Persistable class such as renaming the class name and adding attributes to the class.
1. Right-click the Student class, select Add > Attribute from the pop-up menu.
Figure 17.79 - Add an attributes to class
An attribute is added to the Student class, and the mapping attribute is added to the mapping Student entity automatically.
Figure 17.80 - The column created automatically

SDE-VS User’s Guide (Part 2, for ORM) Chapter 17 – Object Model
17-32
2. Enter "StudentID : String" to the attribute of Student by double-clicking on the attribute. The type of the mapping column is mapped to varchar(255) automatically.
Figure 17.81 - Auto mapping data type
Modifying Entity
You can modify the entity such as renaming the entity name and adding columns to the entity.
1. Rename the column of Student entity from attribute to ID by double-clicking on it.
Figure 17.82 - Change column name
2. Right-click the Student entity, select New Column from the pop-up menu.
Figure 17.83 - Create new column
A new column is added to the Student entity and the corresponding attribute is added to the Student ORM-Persistable class automatically.
Figure 17.84 - Attribute created automatically
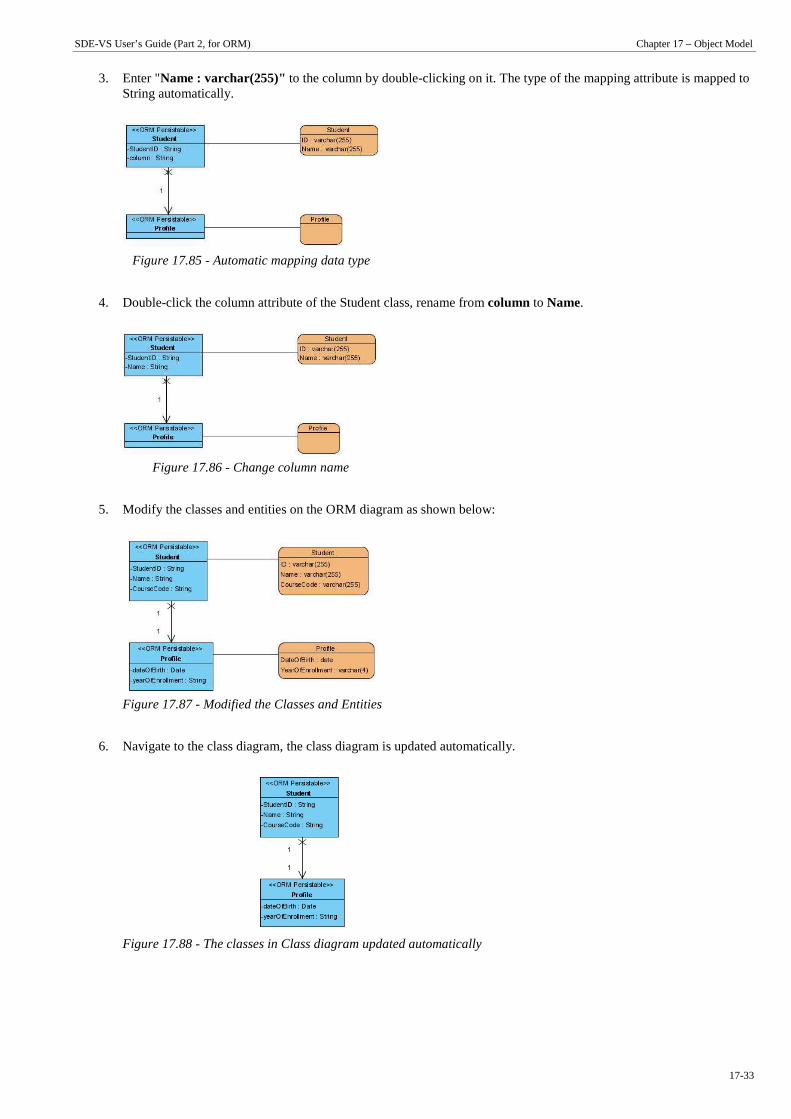
SDE-VS User’s Guide (Part 2, for ORM) Chapter 17 – Object Model
17-33
3. Enter "Name : varchar(255)" to the column by double-clicking on it. The type of the mapping attribute is mapped to String automatically.
Figure 17.85 - Automatic mapping data type
4. Double-click the column attribute of the Student class, rename from column to Name.
Figure 17.86 - Change column name
5. Modify the classes and entities on the ORM diagram as shown below:
Figure 17.87 - Modified the Classes and Entities
6. Navigate to the class diagram, the class diagram is updated automatically.
Figure 17.88 - The classes in Class diagram updated automatically

SDE-VS User’s Guide (Part 2, for ORM) Chapter 17 – Object Model
17-34
Switching the View of Mapping As ORM diagram provides two views of mapping, including the mapping between ORM-Persistable class and entity (called Class Mapping), and the mapping between attributes and columns (called Attribute Mapping).
To change the view of mapping, right-click on the ORM-diagram, select the desired view from the sub-menu of View.
Figure 17.89 - Switch to Attribute mapping
By selecting the View > Attribute Mapping from the pop-up menu, the class-to-entity mapping shown on the ORM diagram is changed to attribute-to-column mapping automatically.
Figure 17.90 - ORM Diagram show the attribute mapping
Using ORM Pane
An ORM pane is provided to generate persistent model and entity from an existing object model in Java classes and database respectively. Using the ORM pane, the existing object model and database will be transformed to ORM-Persistable class and entity; you can further develop the ORM-Persistable classes and entities by adding the desired classes and entities to the class diagram and entity relationship diagram respectively.
The ORM pane provides two views, including Class View and Database View. The class view allows you to transform the existing object model to class model while the database view allows you to transform the existing database to entity.
Figure 17.91 - ORM Pane

SDE-VS User’s Guide (Part 2, for ORM) Chapter 17 – Object Model
17-35
Class View As the class view of the ORM pane supports the transformation of the existing object model into ORM-Persistable class, you are allowed to further your development based on the transformed object model.
1. Select the Class View of the ORM pane. 2. Click the Classpath Configuration icon.
Figure 17.92 - Classpath Configuration
The Select Classpaths dialog box is displayed.
Figure 17.93 - Select Classpaths dialog
3. Click Add...button to select the desired classpath.
Figure 17.94 - Select Classpaths dialog show the selected classpath
All the available classes found from the specified classpath(s) are transformed and shown on the ORM pane.
Figure 17.95 - ORM Pane show the classes in the classpath
4. Create a new class diagram by using the New Class Diagram icon.

SDE-VS User’s Guide (Part 2, for ORM) Chapter 17 – Object Model
17-36
5. Select the desired classes and drag to the class diagram.
Figure 17.96 - Drag the desired classes to Class Diagram
The classes are added to the class diagram such that you can further develop the model by using the visual modeling feature.
Figure 17.97 - The classes show in the Class Diagram
Database View As the database view of the ORM pane supports the transformation of the existing database into entity, you are allowed to alter the database schema by modeling with the entity relationship diagram and exporting to the existing database.
1. Select the Database View of the ORM pane.
Figure 17.98 - Switch to database view
2. Click the Database Configuration icon.
Figure 17.99 - Database configuration
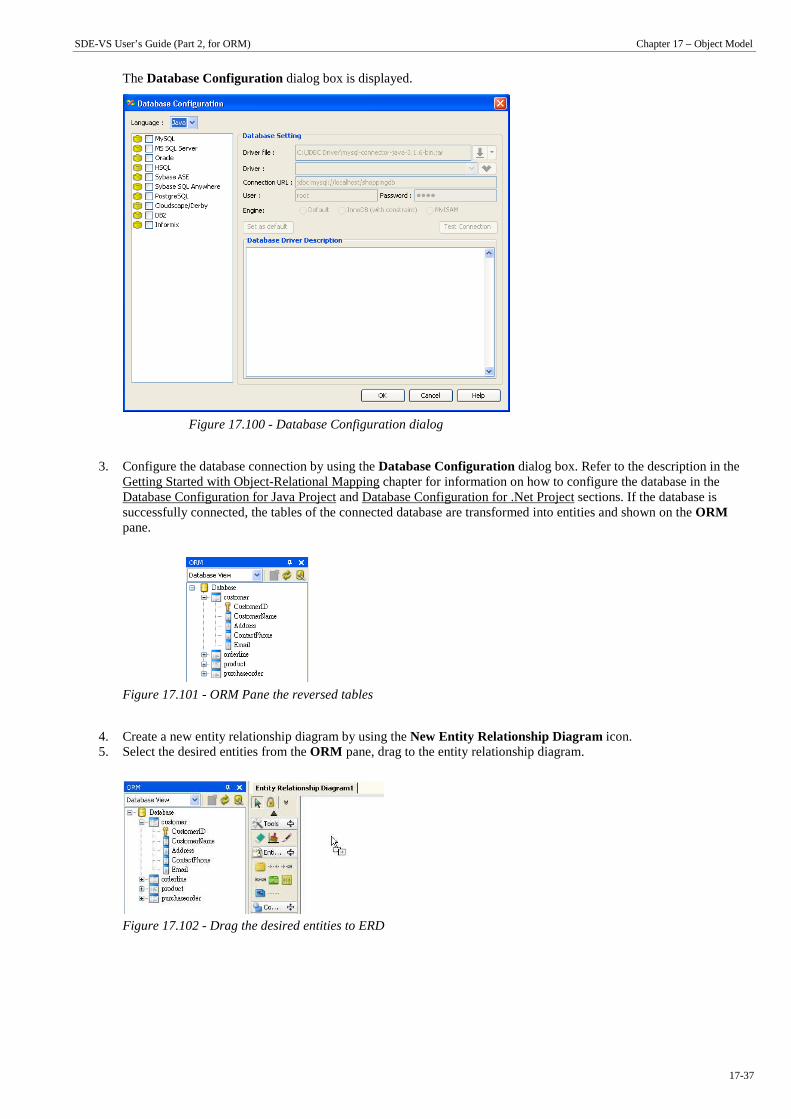
SDE-VS User’s Guide (Part 2, for ORM) Chapter 17 – Object Model
17-37
The Database Configuration dialog box is displayed.
Figure 17.100 - Database Configuration dialog
3. Configure the database connection by using the Database Configuration dialog box. Refer to the description in the Getting Started with Object-Relational Mapping chapter for information on how to configure the database in the Database Configuration for Java Project and Database Configuration for .Net Project sections. If the database is successfully connected, the tables of the connected database are transformed into entities and shown on the ORM pane.
Figure 17.101 - ORM Pane the reversed tables
4. Create a new entity relationship diagram by using the New Entity Relationship Diagram icon. 5. Select the desired entities from the ORM pane, drag to the entity relationship diagram.
Figure 17.102 - Drag the desired entities to ERD

SDE-VS User’s Guide (Part 2, for ORM) Chapter 17 – Object Model
17-38
The selected entities are added to the class diagram allowing
Figure 17.103 - The Entities show on ERD
Reverse Engineering Java Classes to Object Model
You can reverse engineer the Java classes into object model with ORM-Persistable stereotyped.
To reverse engineer Java classes:
1. On the menu, click Modeling > ORM > Reverse Java Classes....
Figure 17.104 - To reverse Java Classes
The Reverse Java Classes dialog box is displayed.
Figure 17.105 - Reverser Java Classes dialog
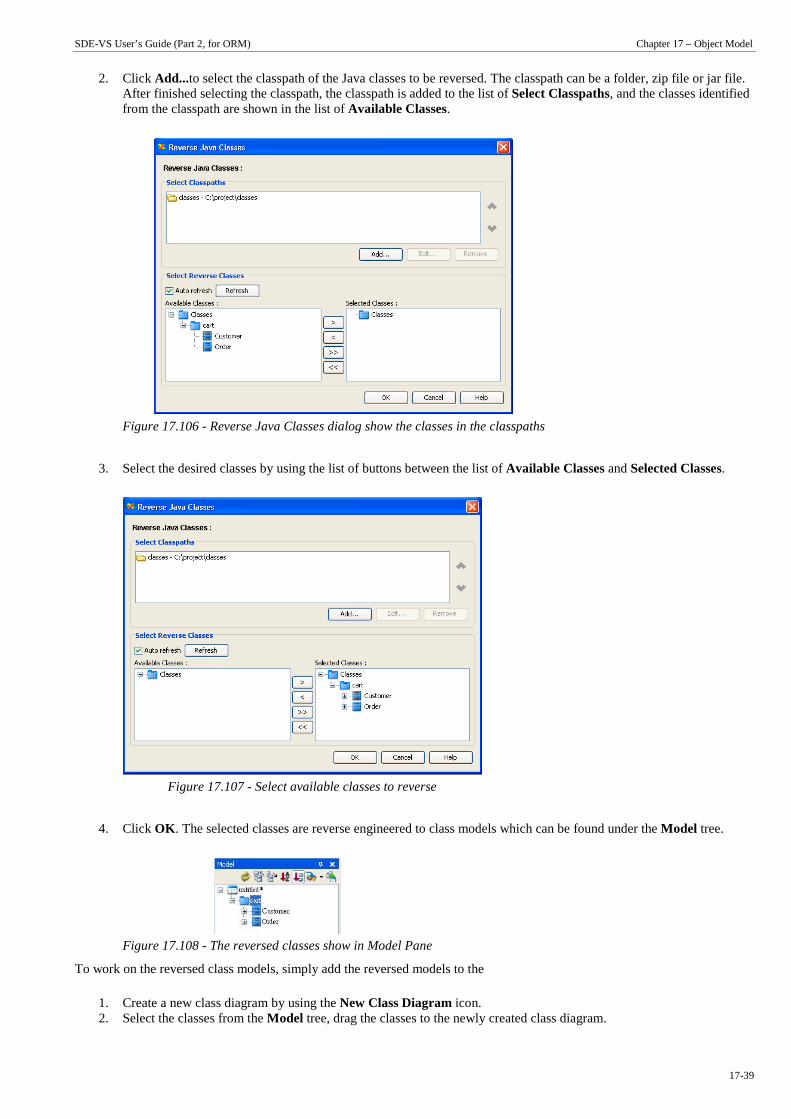
SDE-VS User’s Guide (Part 2, for ORM) Chapter 17 – Object Model
17-39
2. Click Add...to select the classpath of the Java classes to be reversed. The classpath can be a folder, zip file or jar file. After finished selecting the classpath, the classpath is added to the list of Select Classpaths, and the classes identified from the classpath are shown in the list of Available Classes.
Figure 17.106 - Reverse Java Classes dialog show the classes in the classpaths
3. Select the desired classes by using the list of buttons between the list of Available Classes and Selected Classes.
Figure 17.107 - Select available classes to reverse
4. Click OK . The selected classes are reverse engineered to class models which can be found under the Model tree.
Figure 17.108 - The reversed classes show in Model Pane
To work on the reversed class models, simply add the reversed models to the
1. Create a new class diagram by using the New Class Diagram icon. 2. Select the classes from the Model tree, drag the classes to the newly created class diagram.
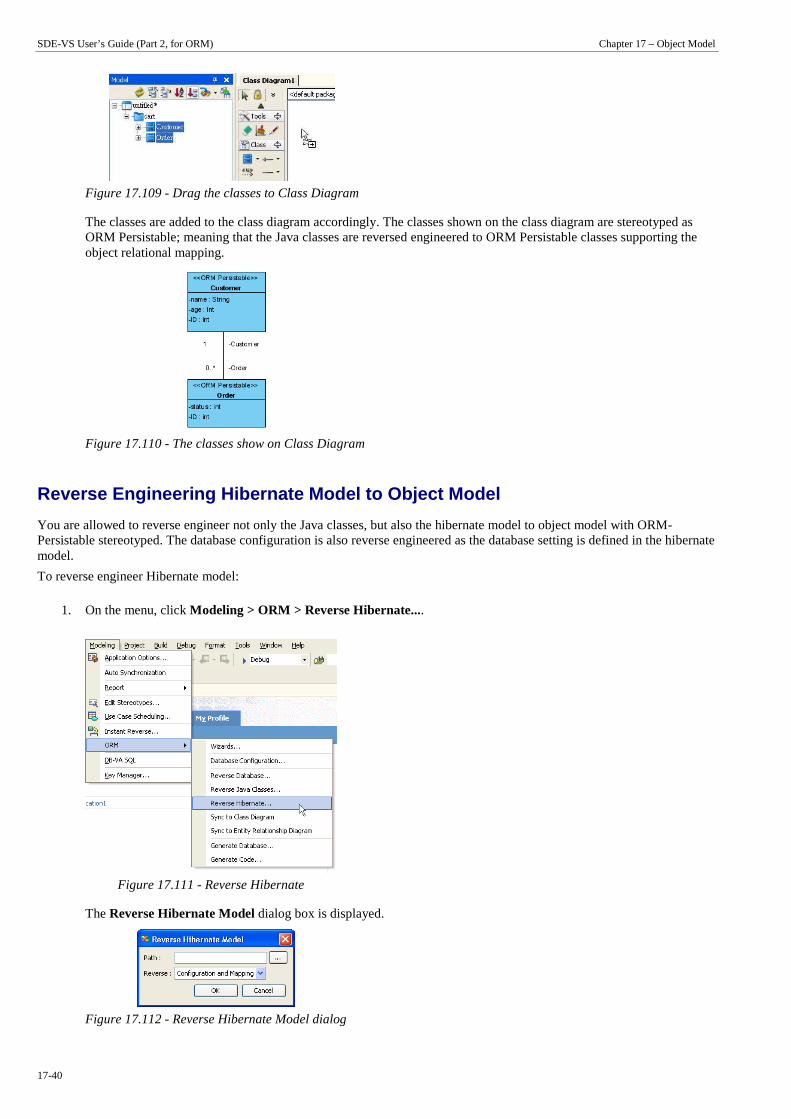
SDE-VS User’s Guide (Part 2, for ORM) Chapter 17 – Object Model
17-40
Figure 17.109 - Drag the classes to Class Diagram
The classes are added to the class diagram accordingly. The classes shown on the class diagram are stereotyped as ORM Persistable; meaning that the Java classes are reversed engineered to ORM Persistable classes supporting the object relational mapping.
Figure 17.110 - The classes show on Class Diagram
Reverse Engineering Hibernate Model to Object Model
You are allowed to reverse engineer not only the Java classes, but also the hibernate model to object model with ORM-Persistable stereotyped. The database configuration is also reverse engineered as the database setting is defined in the hibernate model.
To reverse engineer Hibernate model:
1. On the menu, click Modeling > ORM > Reverse Hibernate....
Figure 17.111 - Reverse Hibernate
The Reverse Hibernate Model dialog box is displayed.
Figure 17.112 - Reverse Hibernate Model dialog

SDE-VS User’s Guide (Part 2, for ORM) Chapter 17 – Object Model
17-41
2. Select the path of the Hibernate xml files by using the button. 3. Select the type of reverse engineering to be performed from the drop-down menu of Reverse, either Configuration
and Mapping, Configuration only or Mapping only.
Figure 17.113 - Select the type of reverse engineering to performed
4. Click OK . The hibernate model are reverse engineered to class models and entities which can be found under the Model tree.
Figure 17.114 - The reversed classes show in Model Pane
After reverse engineered the hibernate model, you can use an ORM diagram to view the mapping between the reversed classes and entities. For more information on ORM diagram, refer to the description of Showing Mapping between Object and Data Models by ORM Diagram section.
1. Create a new ORM diagram by using the New ORM Diagram icon. 2. Add the reversed classes to the ORM diagram by dragging the class models from the Model tree to the ORM diagram.
Figure 17.115 - The class show on ORM Diagram
3. Drag the entities from the Model tree to the ORM diagram to add the entities to the ORM diagram.
Figure 17.116 - The entities and classes show on ORM Diagram

SDE-VS User’s Guide (Part 2, for ORM) Chapter 17 – Object Model
17-42
4. Right-click the ORM diagram, select View > Attribute Mapping from the pop-up menu.
Figure 17.117 - Switch to Attributes mapping view
The mapping between the attributes of class models and columns of entities are shown.
Figure 17.118 - ORM Diagram show the attribute mapping
You can also check the reversed engineered database connection by the following steps:
1. Click the Database Configuration icon, to open the Database Configuration dialog box.
Figure 17.119 - Database Configuration dialog

SDE-VS User’s Guide (Part 2, for ORM) Chapter 17 – Object Model
17-43
2. Select the connected database from the Database Configuration dialog box, the Database Setting is shown which shows the database configuration has been reversed successfully.
Figure 17.120 - Database Setting

SDE-VS User’s Guide (Part 2, for ORM) Chapter 17 – Object Model
17-44

Data Model 18
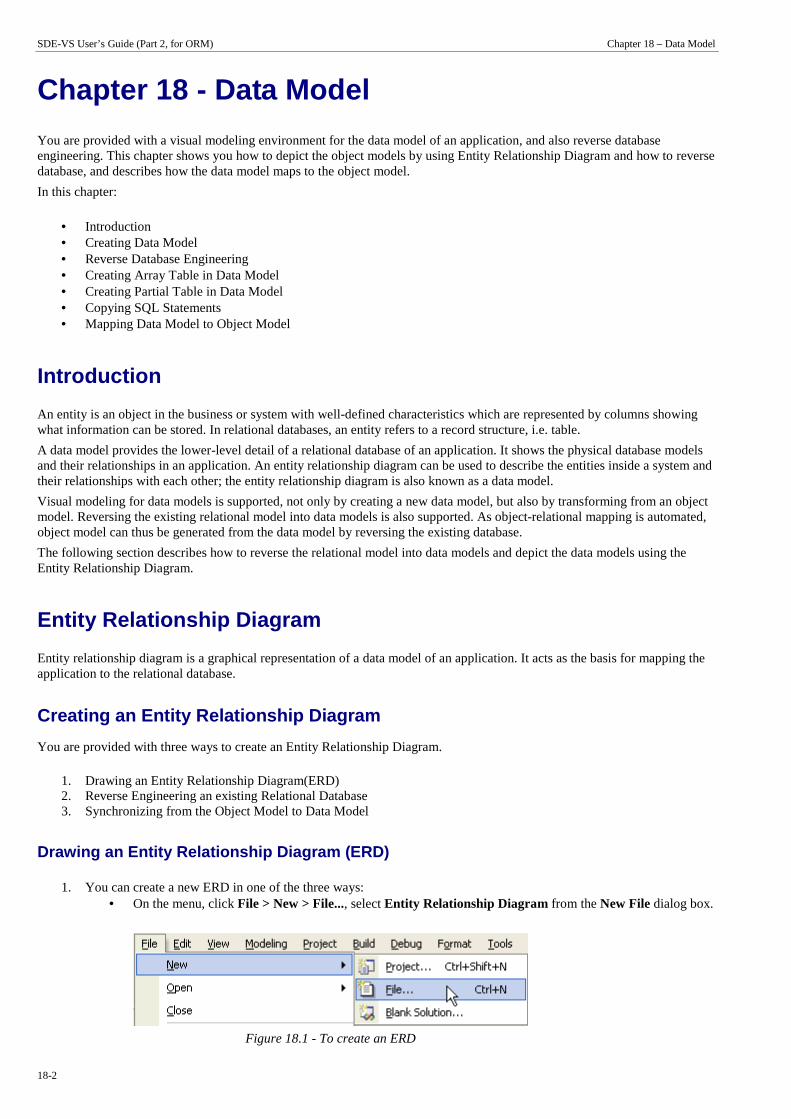
SDE-VS User’s Guide (Part 2, for ORM) Chapter 18 – Data Model
18-2
Chapter 18 - Data Model
You are provided with a visual modeling environment for the data model of an application, and also reverse database engineering. This chapter shows you how to depict the object models by using Entity Relationship Diagram and how to reverse database, and describes how the data model maps to the object model.
In this chapter:
• Introduction • Creating Data Model • Reverse Database Engineering • Creating Array Table in Data Model • Creating Partial Table in Data Model • Copying SQL Statements • Mapping Data Model to Object Model
Introduction
An entity is an object in the business or system with well-defined characteristics which are represented by columns showing what information can be stored. In relational databases, an entity refers to a record structure, i.e. table.
A data model provides the lower-level detail of a relational database of an application. It shows the physical database models and their relationships in an application. An entity relationship diagram can be used to describe the entities inside a system and their relationships with each other; the entity relationship diagram is also known as a data model.
Visual modeling for data models is supported, not only by creating a new data model, but also by transforming from an object model. Reversing the existing relational model into data models is also supported. As object-relational mapping is automated, object model can thus be generated from the data model by reversing the existing database.
The following section describes how to reverse the relational model into data models and depict the data models using the Entity Relationship Diagram.
Entity Relationship Diagram
Entity relationship diagram is a graphical representation of a data model of an application. It acts as the basis for mapping the application to the relational database.
Creating an Entity Relationship Diagram
You are provided with three ways to create an Entity Relationship Diagram.
1. Drawing an Entity Relationship Diagram(ERD) 2. Reverse Engineering an existing Relational Database 3. Synchronizing from the Object Model to Data Model
Drawing an Entity Relationship Diagram (ERD)
1. You can create a new ERD in one of the three ways: • On the menu, click File > New > File..., select Entity Relationship Diagram from the New File dialog box.
Figure 18.1 - To create an ERD

SDE-VS User’s Guide (Part 2, for ORM) Chapter 18 –Data Model
18-3
• On the Diagram Navigator, right-click Entity Relationship Diagram > Create Entity Relationship Diagram.
Figure 18.2 - Create Entity Diagram on Diagram Navigator
• On the toolbar, click the New Entity Relationship Diagram icon.
A new Entity Relationship Diagram pane is displayed.
Creating a new Entity element to the ERD
1. On the diagram toolbar, click the Entity shape icon.
Figure 18.3 - Entity icon button
2. Click a location in the diagram pane.
An icon representing the entity element is added to the diagram.
3. Type in a name for the Entity element. • You can edit the name by double-clicking the name or by pressing the F2 button.
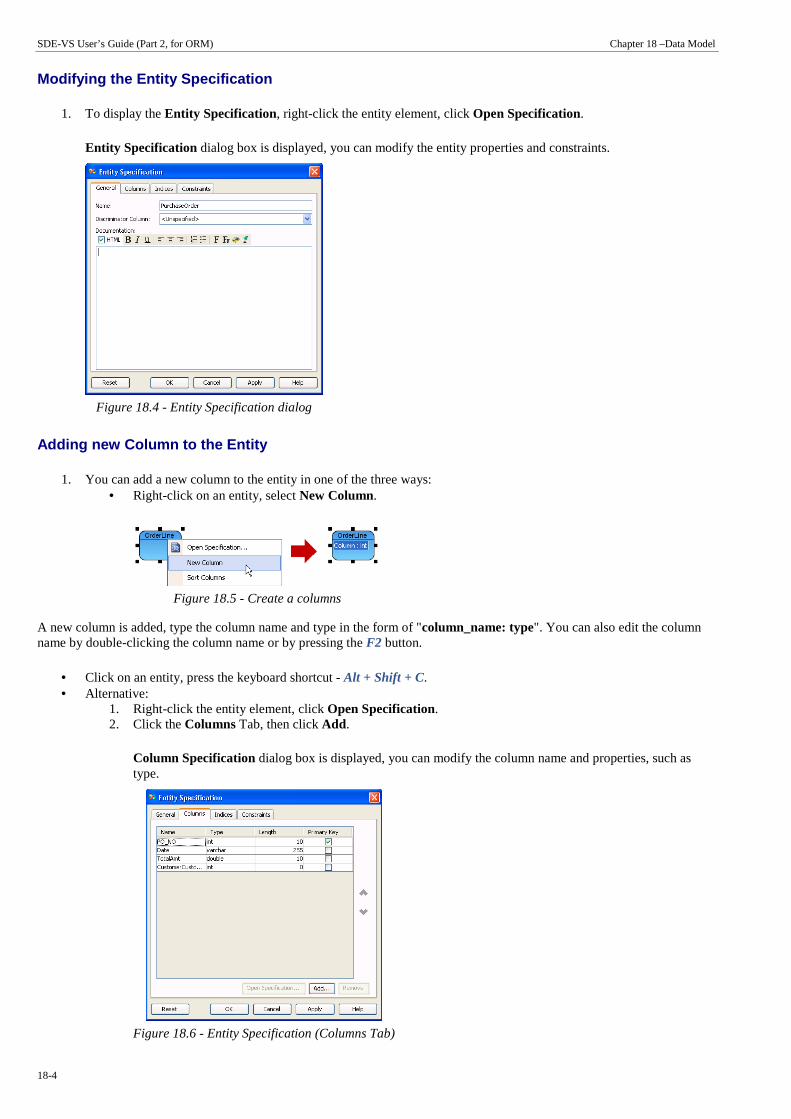
SDE-VS User’s Guide (Part 2, for ORM) Chapter 18 –Data Model
18-4
Modifying the Entity Specification
1. To display the Entity Specification, right-click the entity element, click Open Specification.
Entity Specification dialog box is displayed, you can modify the entity properties and constraints.
Figure 18.4 - Entity Specification dialog
Adding new Column to the Entity
1. You can add a new column to the entity in one of the three ways: • Right-click on an entity, select New Column.
Figure 18.5 - Create a columns
A new column is added, type the column name and type in the form of "column_name: type". You can also edit the column name by double-clicking the column name or by pressing the F2 button.
• Click on an entity, press the keyboard shortcut - Alt + Shift + C. • Alternative:
1. Right-click the entity element, click Open Specification. 2. Click the Columns Tab, then click Add.
Column Specification dialog box is displayed, you can modify the column name and properties, such as type.
Figure 18.6 - Entity Specification (Columns Tab)
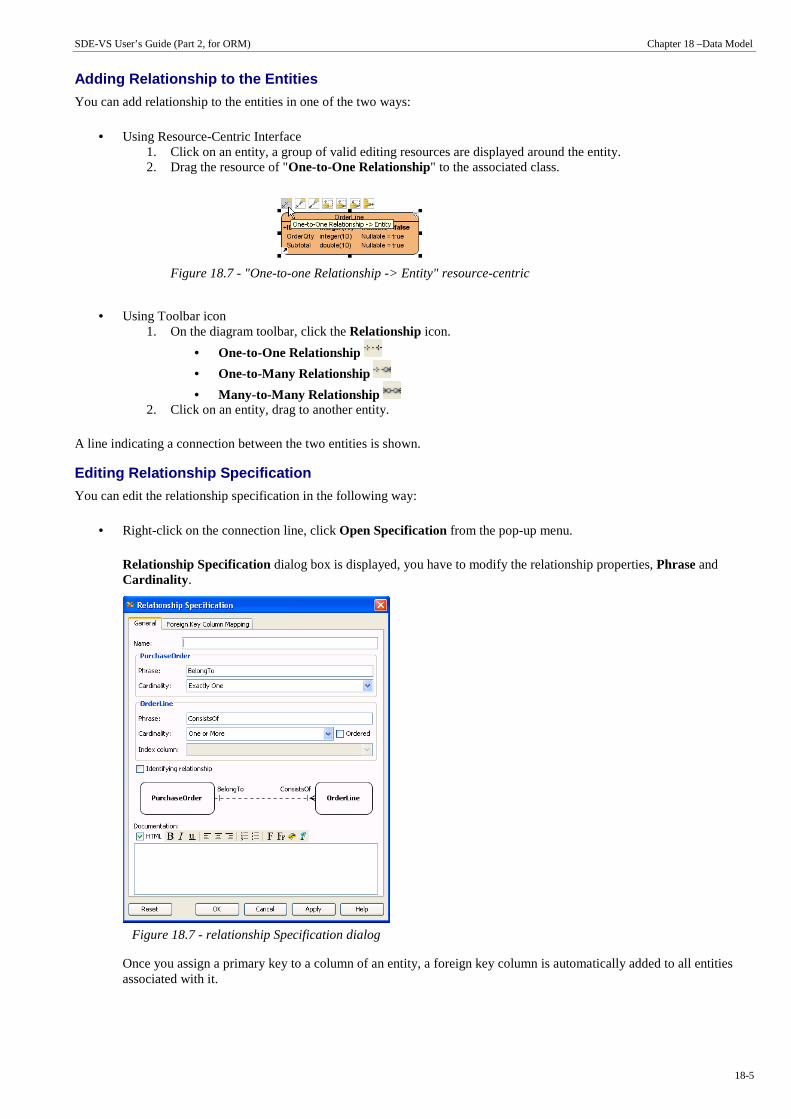
SDE-VS User’s Guide (Part 2, for ORM) Chapter 18 –Data Model
18-5
Adding Relationship to the Entities
You can add relationship to the entities in one of the two ways:
• Using Resource-Centric Interface 1. Click on an entity, a group of valid editing resources are displayed around the entity. 2. Drag the resource of "One-to-One Relationship" to the associated class.
Figure 18.7 - "One-to-one Relationship -> Entity" resource-centric
• Using Toolbar icon 1. On the diagram toolbar, click the Relationship icon.
• One-to-One Relationship
• One-to-Many Relationship
• Many-to-Many Relationship 2. Click on an entity, drag to another entity.
A line indicating a connection between the two entities is shown.
Editing Relationship Specification
You can edit the relationship specification in the following way:
• Right-click on the connection line, click Open Specification from the pop-up menu.
Relationship Specification dialog box is displayed, you have to modify the relationship properties, Phrase and Cardinality .
Figure 18.7 - relationship Specification dialog
Once you assign a primary key to a column of an entity, a foreign key column is automatically added to all entities associated with it.

SDE-VS User’s Guide (Part 2, for ORM) Chapter 18 –Data Model
18-6
An ERD is created.
Figure 18.8 - Entity Relationship Diagram
Reverse Engineering an existing Relational Database You can create an Entity Relationship Diagram by reverse engineering an existing relational database.
• On the menu, click Modeling > ORM > Reverse Database....
Figure 18.9 - To Reverse Database
The Database to Data Model dialog box is displayed.
Step 1: Select Language
Select the language of the project from the drop-down menu, either Java or C#, and then click Next > to proceed to Step 2.
Figure 18.10 - Database to Data Model dialog

SDE-VS User’s Guide (Part 2, for ORM) Chapter 18 –Data Model
18-7
Step 2: Database Configuration
You can configure the database connection for the desired database to be reversed.
1. You are asked to define the database configuration. Refer to the descriptions in the Database Configuration chapter for information on how to configure the database.
Figure 18.11 - Database Configuration
2. Click Next>, go to Step 3 of Reverse Database.
Step 3: Selecting Tables
All the available tables found from the connected database are listed.
1. Select the tables that you want to reverse to Data Model. 2. Click Finish.
Figure 18.12 - Selecting Tables
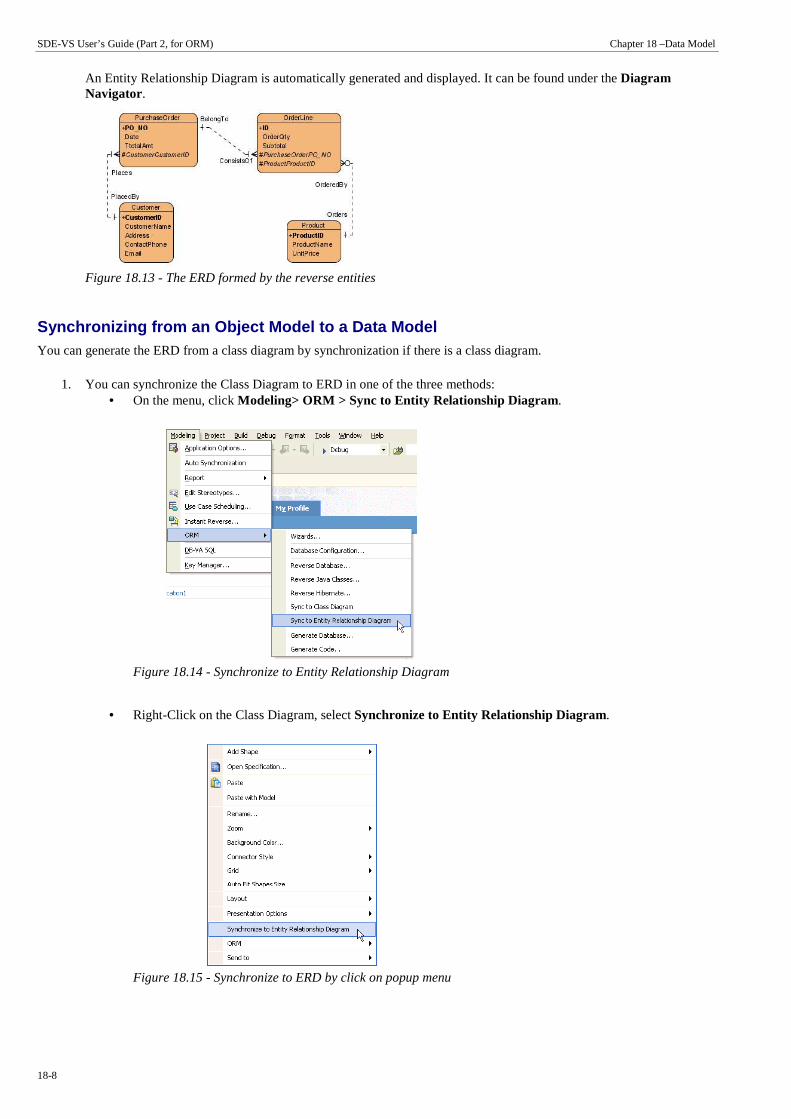
SDE-VS User’s Guide (Part 2, for ORM) Chapter 18 –Data Model
18-8
An Entity Relationship Diagram is automatically generated and displayed. It can be found under the Diagram Navigator.
Figure 18.13 - The ERD formed by the reverse entities
Synchronizing from an Object Model to a Data Model You can generate the ERD from a class diagram by synchronization if there is a class diagram.
1. You can synchronize the Class Diagram to ERD in one of the three methods: • On the menu, click Modeling> ORM > Sync to Entity Relationship Diagram.
Figure 18.14 - Synchronize to Entity Relationship Diagram
• Right-Click on the Class Diagram, select Synchronize to Entity Relationship Diagram.
Figure 18.15 - Synchronize to ERD by click on popup menu

SDE-VS User’s Guide (Part 2, for ORM) Chapter 18 –Data Model
18-9
• On the class diagram, hold down the right-mouse button, move the mouse from left to right to form the gesture. A blue path is shown indicating the gesture.
Figure 18.16 - The ERD formed by the reverse entities
2. An Entity Relationship Diagram is generated and can be found under the Diagram Navigator.
Figure 18.17 - The ERD formed by the reverse entities
Specifying Index Column
If a relationship with cardinality of many at one end, a corresponding collection class will be used for handling its multiple cardinality. You can specify an index column to sort the collection.
1. Right-click on the connection line, click Open Specification from the pop-up menu.
Figure 18.18 - Open the relationship specification
Relationship Specification dialog box is displayed.
2. Check the option for Ordered.

SDE-VS User’s Guide (Part 2, for ORM) Chapter 18 –Data Model
18-10
3. Select the index column from the drop-down menu of Index column, click OK .
Figure 18.19 - Relationship specification dialog
You can select Create Column from the drop-down menu to create a new index column for sorting.
Using the ID Generator
As the primary key is unique, the generation of primary key is supported. The ID Generator is specialized for generating a primary key value at runtime.
1. Right-click on the primary key of an entity, select Open Specification from the pop-up menu.
Figure 18.20 - To open Column specification
Column Specification of the primary key is displayed.

SDE-VS User’s Guide (Part 2, for ORM) Chapter 18 –Data Model
18-11
2. Select the ID generator from the drop-down menu of ID Generator, click OK to confirm setting.
Figure 18.21 - Column specification dialog
If the ID Generator is specified as either sequence, seqhilo or hilo, you have to enter the key for the sequence/table name.
Defining Discriminator
In generalization, the superclass distributes its commonalities to a group of similar subclasses. The subclass inherits all superclass's attributes and it may contain specific attributes. The entities within the hierarchy are combined into one single entity containing all the attributes and a discriminator column. The discriminator contains a unique value which is used for identifying the entity which hierarchy it belongs to.
You are allowed to define the discriminator in the entity and discriminator value in the classes.
Defining Discriminator Column for Entity You can add a new column acting as the discriminator column for an entity.
1. Right-click on an entity, select New Column.
Figure 18.22 - Create a column
2. Enter the name and type for the discriminator in the form of "discriminator_name: type".
Figure 18.23 - Enter the column name and type
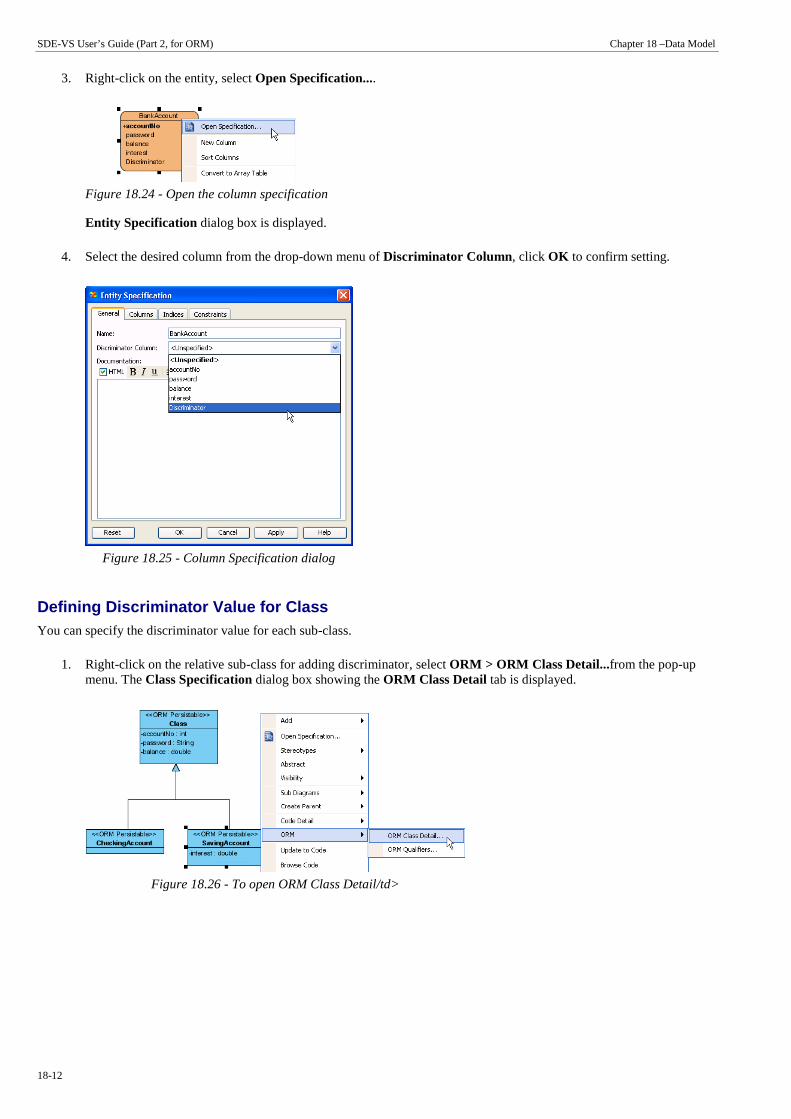
SDE-VS User’s Guide (Part 2, for ORM) Chapter 18 –Data Model
18-12
3. Right-click on the entity, select Open Specification....
Figure 18.24 - Open the column specification
Entity Specification dialog box is displayed.
4. Select the desired column from the drop-down menu of Discriminator Column , click OK to confirm setting.
Figure 18.25 - Column Specification dialog
Defining Discriminator Value for Class You can specify the discriminator value for each sub-class.
1. Right-click on the relative sub-class for adding discriminator, select ORM > ORM Class Detail...from the pop-up menu. The Class Specification dialog box showing the ORM Class Detail tab is displayed.
Figure 18.26 - To open ORM Class Detail/td>

SDE-VS User’s Guide (Part 2, for ORM) Chapter 18 –Data Model
18-13
2. Enter the discriminator value for identifying the sub-class.
Figure 18.27 - Class Specification dialog
Creating an Array Table
In a one-to-many relationship, a collection is used for handling the multiple objects such that it is simpler to retrieve each object from the collection one by one.
The idea of Array Table is promoted which allows users to retrieve objects in the form of primitive array, instead of a collection when handling a data column with cardinality of many.
You are allowed to create an array table in the entity and define an array type in the classes.
Defining an Array Table You can create an Array Table for the Entity with a column containing more than one instance of data.
1. Create a one-to-many relationship between the entity and one of its columns that may contain more than one instance of data.
Figure 18.28 - Entities with one-to-many relationship
In the above case, the phonebook has a contact entry for each contact person. Each contact person may have more than one phone numbers. A one-to-many relationship between contact entry and contact phone can be built.
2. Right-click on the entity for the data column with cardinality of many, select Convert to Array Table from the pop-up menu.
Figure 18.29 - Convert to Array Table
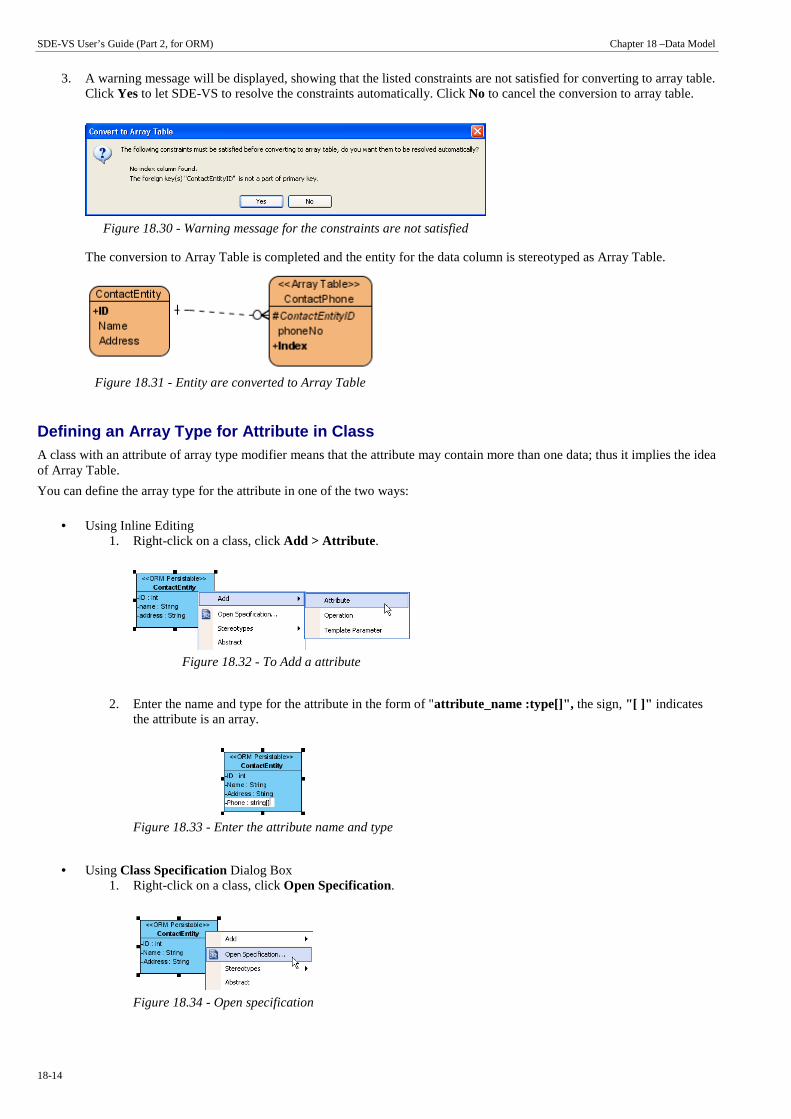
SDE-VS User’s Guide (Part 2, for ORM) Chapter 18 –Data Model
18-14
3. A warning message will be displayed, showing that the listed constraints are not satisfied for converting to array table. Click Yes to let SDE-VS to resolve the constraints automatically. Click No to cancel the conversion to array table.
Figure 18.30 - Warning message for the constraints are not satisfied
The conversion to Array Table is completed and the entity for the data column is stereotyped as Array Table.
Figure 18.31 - Entity are converted to Array Table
Defining an Array Type for Attribute in Class A class with an attribute of array type modifier means that the attribute may contain more than one data; thus it implies the idea of Array Table.
You can define the array type for the attribute in one of the two ways:
• Using Inline Editing 1. Right-click on a class, click Add > Attribute .
Figure 18.32 - To Add a attribute
2. Enter the name and type for the attribute in the form of "attribute_name :type[]", the sign, "[ ]" indicates the attribute is an array.
Figure 18.33 - Enter the attribute name and type
• Using Class Specification Dialog Box 1. Right-click on a class, click Open Specification.
Figure 18.34 - Open specification
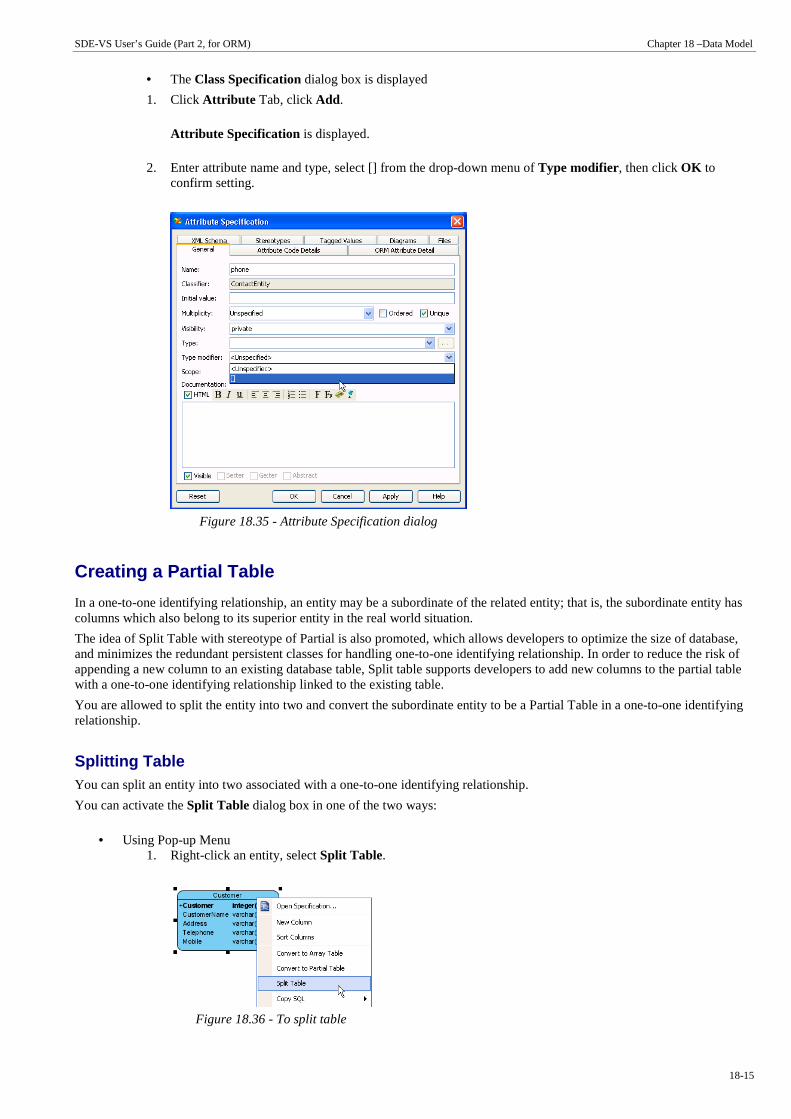
SDE-VS User’s Guide (Part 2, for ORM) Chapter 18 –Data Model
18-15
• The Class Specification dialog box is displayed
1. Click Attribute Tab, click Add.
Attribute Specification is displayed.
2. Enter attribute name and type, select [] from the drop-down menu of Type modifier, then click OK to confirm setting.
Figure 18.35 - Attribute Specification dialog
Creating a Partial Table
In a one-to-one identifying relationship, an entity may be a subordinate of the related entity; that is, the subordinate entity has columns which also belong to its superior entity in the real world situation.
The idea of Split Table with stereotype of Partial is also promoted, which allows developers to optimize the size of database, and minimizes the redundant persistent classes for handling one-to-one identifying relationship. In order to reduce the risk of appending a new column to an existing database table, Split table supports developers to add new columns to the partial table with a one-to-one identifying relationship linked to the existing table.
You are allowed to split the entity into two and convert the subordinate entity to be a Partial Table in a one-to-one identifying relationship.
Splitting Table You can split an entity into two associated with a one-to-one identifying relationship.
You can activate the Split Table dialog box in one of the two ways:
• Using Pop-up Menu 1. Right-click an entity, select Split Table.
Figure 18.36 - To split table
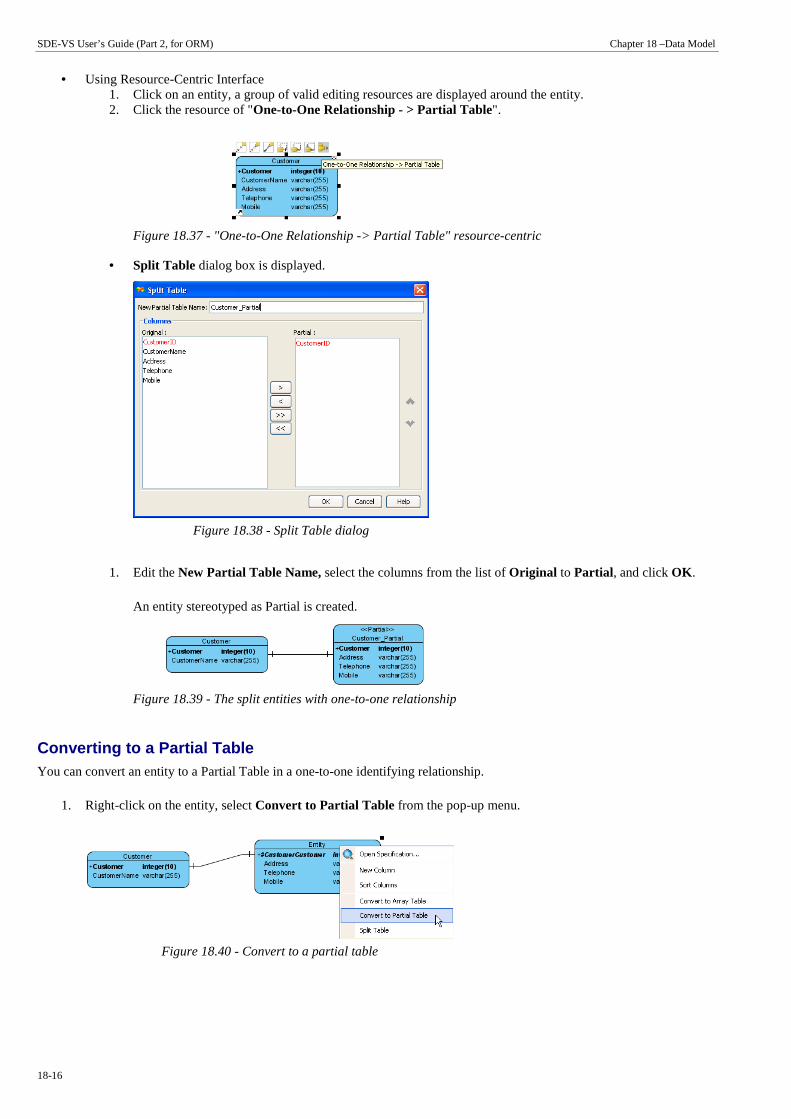
SDE-VS User’s Guide (Part 2, for ORM) Chapter 18 –Data Model
18-16
• Using Resource-Centric Interface 1. Click on an entity, a group of valid editing resources are displayed around the entity. 2. Click the resource of "One-to-One Relationship - > Partial Table".
Figure 18.37 - "One-to-One Relationship -> Partial Table" resource-centric
• Split Table dialog box is displayed.
Figure 18.38 - Split Table dialog
1. Edit the New Partial Table Name, select the columns from the list of Original to Partial , and click OK .
An entity stereotyped as Partial is created.
Figure 18.39 - The split entities with one-to-one relationship
Converting to a Partial Table You can convert an entity to a Partial Table in a one-to-one identifying relationship.
1. Right-click on the entity, select Convert to Partial Table from the pop-up menu.
Figure 18.40 - Convert to a partial table
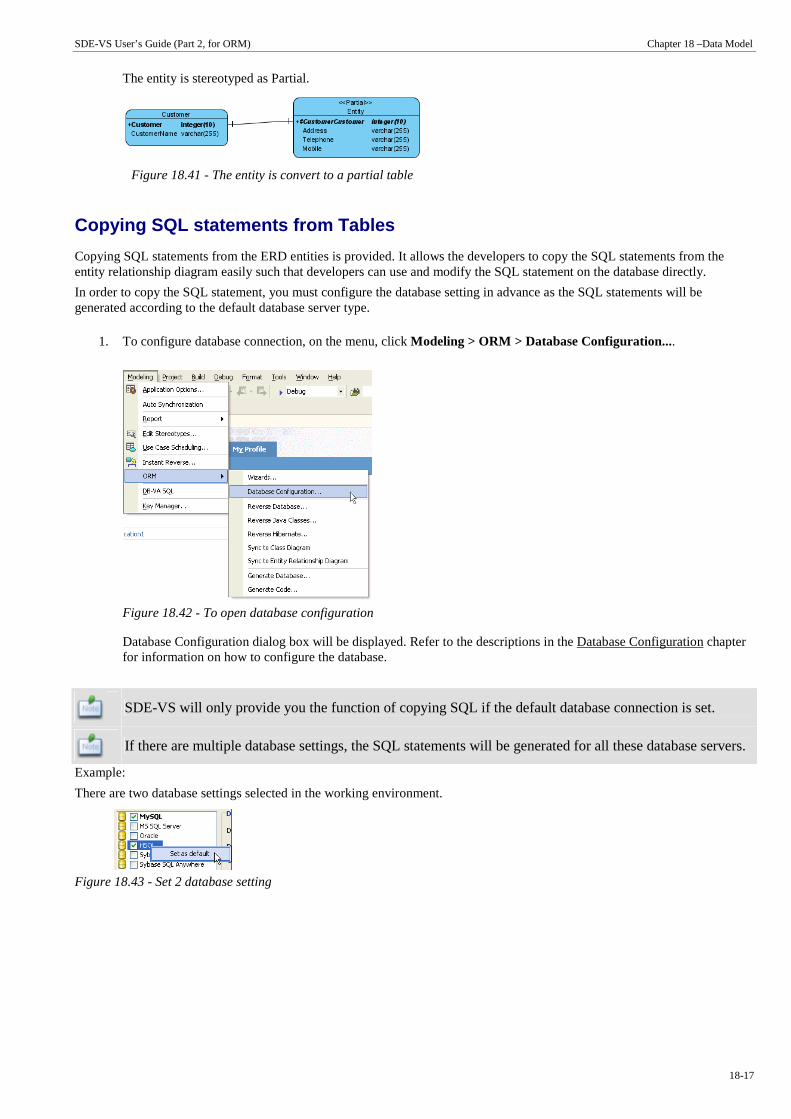
SDE-VS User’s Guide (Part 2, for ORM) Chapter 18 –Data Model
18-17
The entity is stereotyped as Partial.
Figure 18.41 - The entity is convert to a partial table
Copying SQL statements from Tables
Copying SQL statements from the ERD entities is provided. It allows the developers to copy the SQL statements from the entity relationship diagram easily such that developers can use and modify the SQL statement on the database directly.
In order to copy the SQL statement, you must configure the database setting in advance as the SQL statements will be generated according to the default database server type.
1. To configure database connection, on the menu, click Modeling > ORM > Database Configuration....
Figure 18.42 - To open database configuration
Database Configuration dialog box will be displayed. Refer to the descriptions in the Database Configuration chapter for information on how to configure the database.
SDE-VS will only provide you the function of copying SQL if the default database connection is set.
If there are multiple database settings, the SQL statements will be generated for all these database servers.
Example:
There are two database settings selected in the working environment.
Figure 18.43 - Set 2 database setting
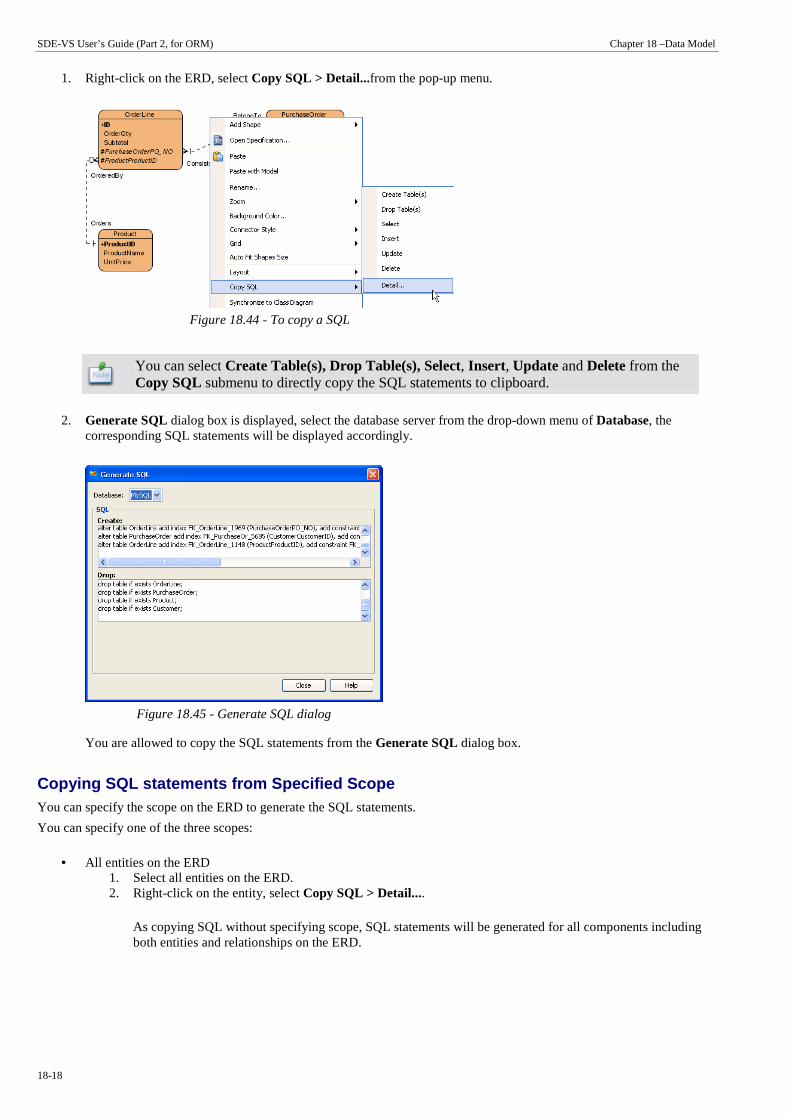
SDE-VS User’s Guide (Part 2, for ORM) Chapter 18 –Data Model
18-18
1. Right-click on the ERD, select Copy SQL > Detail...from the pop-up menu.
Figure 18.44 - To copy a SQL
You can select Create Table(s), Drop Table(s), Select, Insert, Update and Delete from the Copy SQL submenu to directly copy the SQL statements to clipboard.
2. Generate SQL dialog box is displayed, select the database server from the drop-down menu of Database, the corresponding SQL statements will be displayed accordingly.
Figure 18.45 - Generate SQL dialog
You are allowed to copy the SQL statements from the Generate SQL dialog box.
Copying SQL statements from Specified Scope You can specify the scope on the ERD to generate the SQL statements.
You can specify one of the three scopes:
• All entities on the ERD 1. Select all entities on the ERD. 2. Right-click on the entity, select Copy SQL > Detail....
As copying SQL without specifying scope, SQL statements will be generated for all components including both entities and relationships on the ERD.
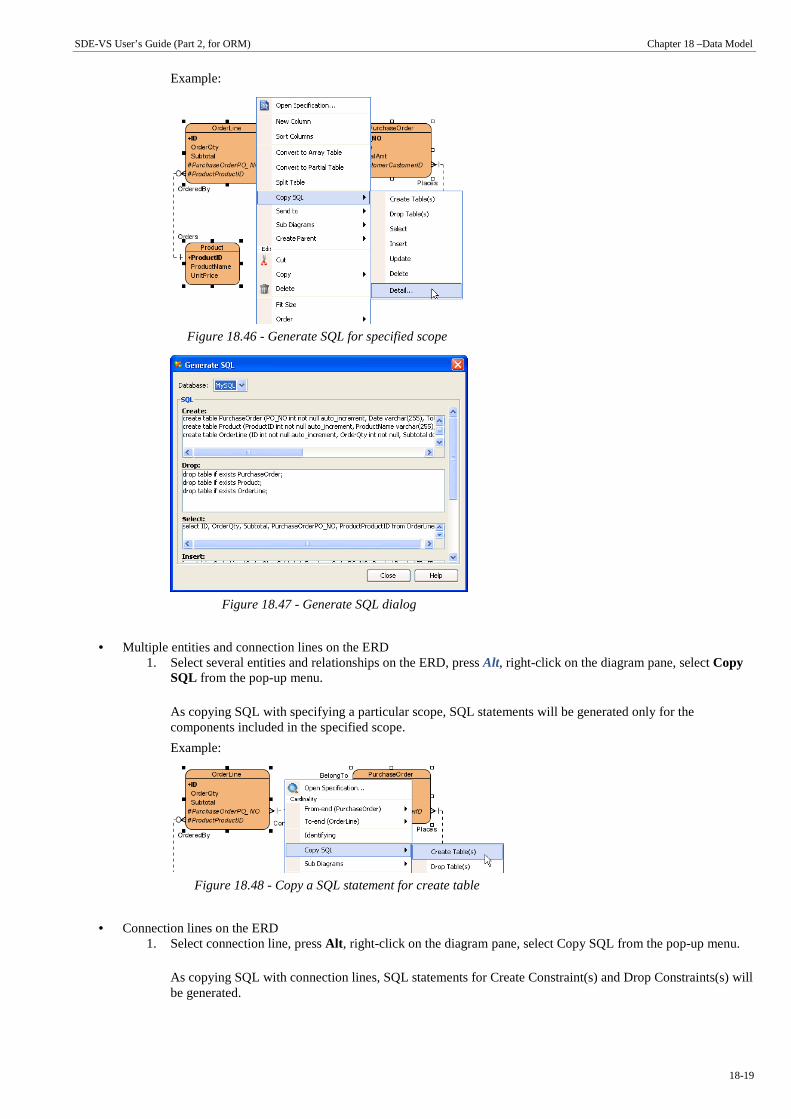
SDE-VS User’s Guide (Part 2, for ORM) Chapter 18 –Data Model
18-19
Example:
Figure 18.46 - Generate SQL for specified scope
Figure 18.47 - Generate SQL dialog
• Multiple entities and connection lines on the ERD 1. Select several entities and relationships on the ERD, press Alt, right-click on the diagram pane, select Copy
SQL from the pop-up menu.
As copying SQL with specifying a particular scope, SQL statements will be generated only for the components included in the specified scope.
Example:
Figure 18.48 - Copy a SQL statement for create table
• Connection lines on the ERD 1. Select connection line, press Alt , right-click on the diagram pane, select Copy SQL from the pop-up menu.
As copying SQL with connection lines, SQL statements for Create Constraint(s) and Drop Constraints(s) will be generated.
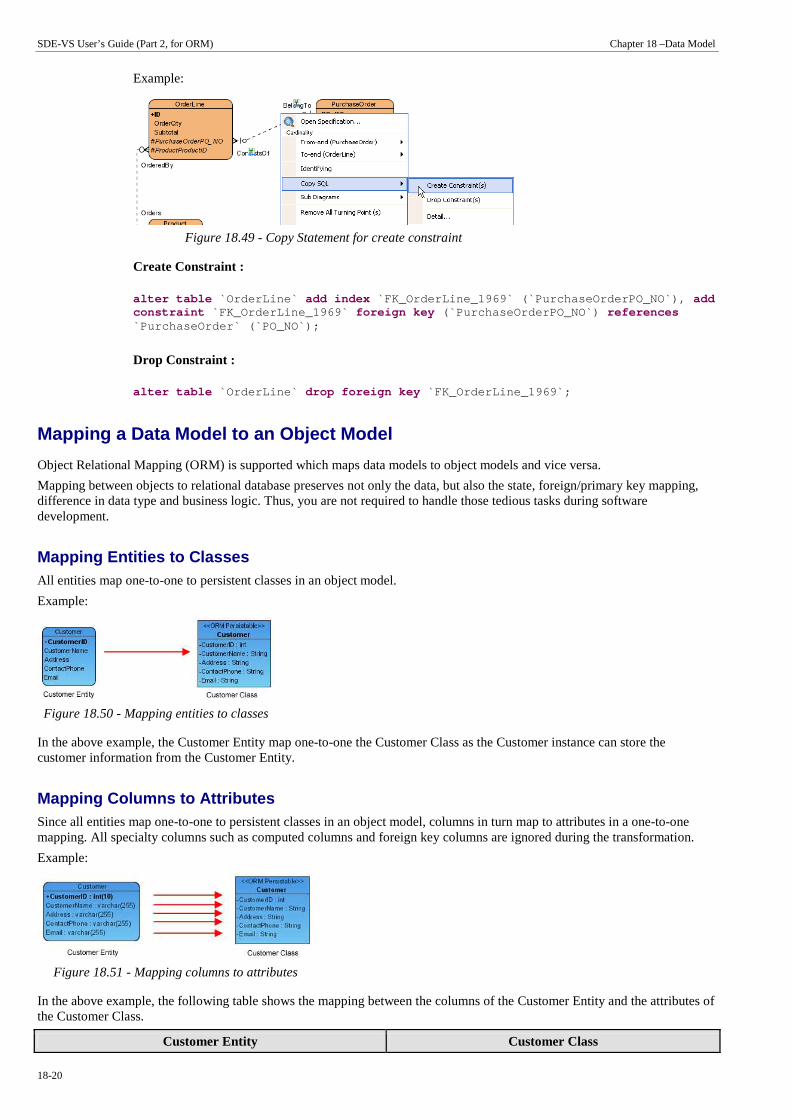
SDE-VS User’s Guide (Part 2, for ORM) Chapter 18 –Data Model
18-20
Example:
Figure 18.49 - Copy Statement for create constraint
Create Constraint :
alter table `OrderLine` add index `FK_OrderLine_1969` (`PurchaseOrderPO_NO`), add constraint `FK_OrderLine_1969` foreign key (`PurchaseOrderPO_NO`) references `PurchaseOrder` (`PO_NO`);
Drop Constraint :
alter table `OrderLine` drop foreign key `FK_OrderLine_1969`;
Mapping a Data Model to an Object Model
Object Relational Mapping (ORM) is supported which maps data models to object models and vice versa.
Mapping between objects to relational database preserves not only the data, but also the state, foreign/primary key mapping, difference in data type and business logic. Thus, you are not required to handle those tedious tasks during software development.
Mapping Entities to Classes All entities map one-to-one to persistent classes in an object model.
Example:
Figure 18.50 - Mapping entities to classes
In the above example, the Customer Entity map one-to-one the Customer Class as the Customer instance can store the customer information from the Customer Entity.
Mapping Columns to Attributes Since all entities map one-to-one to persistent classes in an object model, columns in turn map to attributes in a one-to-one mapping. All specialty columns such as computed columns and foreign key columns are ignored during the transformation.
Example:
Figure 18.51 - Mapping columns to attributes
In the above example, the following table shows the mapping between the columns of the Customer Entity and the attributes of the Customer Class.
Customer Entity Customer Class

SDE-VS User’s Guide (Part 2, for ORM) Chapter 18 –Data Model
18-21
CustomerID CustomerID
CustomerName CustomerName
Address Address
ContactPhone ContactPhone
Email Email
Table 18.1
Mapping Data Type The column data type automatically maps to an appropriate attribute type of object model.
Example:
Figure 18.52 - Mapping data types
In the above example, the following table shows the mapping between data types
Customer Entity Customer Class
int (10) int
varchar(255) String
Table 18.2
A table shows the data type mapping between Object model and Data model.
Data Model Object Model
Bigint Long
Binary Byte[]
Bit Boolean
Blob Blob
Varchar String
Char Character
Char(1) Character
Clob String
Date Date
Decimal BigDecimal
Double Double
Float Float
Integer Integer
Numeric BigDecimal
Real Float
Time Time
Timestamp Timestamp
Tinyint Byte
Smallint Short
Varbinary Byte[]
Table 18.3

SDE-VS User’s Guide (Part 2, for ORM) Chapter 18 –Data Model
18-22
Mapping Primary Key As the columns map to attributes in a one-to-one mapping, primary key columns in the entity map to attributes as a part of a class.
Example:
Figure 18.53 - Mapping primary key
In the example, the primary key of entity Product, ProductID maps to an attribute ProductID of the class Product.
Mapping Relationship Relationship represents the correlation among entities. Each entity of a relationship has a role, called Phrase describing how the entity acts in it. The phrase is attached at the end of a relationship connection line. The phrase maps to role name of association in the object model.
There are two types of relationships in data model mapping to object model - identifying and non-identifying.
Identifying relationship specifies the part-of-whole relationship. It means that the child instance cannot exist without the parent instance. Once the parent instance is destroyed, the child instance becomes meaningless.
Non-identifying relationship implies weak dependency relationship between parent and child entities. There are two kinds of non-identifying relationships, including optional and mandatory. The necessity of the parent entity is "exactly one" and "zero or one" in the mandatory and optional non-identifying relationship respectively.
Mapping Identifying Relationship
Since the identifying relationship specifies the part-of-whole relationship, it map to composite aggregations which implies that the part cannot exist without its corresponding whole.
Example:
Figure 18.54 - Mapping identifying Relationship
In the above example, the identifying relationship between the entities of EmergencyContact and Student maps to composition aggregation.
Mapping Non-identifying Relationship
Since non-identifying relationship implies weak relationship between entities, it maps to association.
Example:
Figure 18.55 - Mapping non-identifying relationship
In the above example, non-identifying relationship between entities Owner and Property maps to association between Classes of Owner and Property.

SDE-VS User’s Guide (Part 2, for ORM) Chapter 18 –Data Model
18-23
Mapping Cardinality Cardinality refers to the number of possible instances of an entity relate to one instance of another entity. The following table shows the syntax to express the Cardinality.
Table shows the syntax expressing the Cardinality
Type of Cardinality Description
Zero or one instance
Zero or more instances
Exactly one instance
One or more instances
Table 18.4
Table shows the typical mapping between Entity Relationship Diagram and Class Diagram.
Entity Relationship Diagram Class Diagram
Table 18.5
Mapping Many-to-Many Relationship For each many-to-many relationship between entities, a Link Entity will be generated to form two one-to-many relationships in between. The primary keys of the two entities will automatically migrate to the link entity to form the primary/foreign keys.
Example:
Figure 18.56 - Mapping Many-to-many relationship
In the above example, SDE-VS generates the link entity once a many-to-many relationship is setup between two entities. To transform the many-to-many relationship, the many-to-many relationship maps to many-to-many association.

SDE-VS User’s Guide (Part 2, for ORM) Chapter 18 –Data Model
18-24
Mapping Array Table to Collection of Objects The Array Table is promoted to allow users retrieve objects in the form of primitive array.
When transforming an array table, the array table will map to an attribute with array type modifier.
Example:
Figure 18.57 - Mapping Array Table to Collection of Object
In the above example, the phonebook has a contact entry for each contact person. Each contact person may have more than one phone numbers. The array table of ContactEntry_Phone maps into the phone attribute with array type modifier in the ContactEntry class.
Mapping Data Model Terminology The following table shows the shift from data model to object model terminology.
Data Model Term Object Model Term
Entity Class
Instance of an entity Object
Relationship Association
Supertype/subtype Generalization
Column Attribute
Phrase Role
Cardinality Multiplicity
Table 18.6

Database Schema 19

SDE-VS User’s Guide (Part 2, for ORM) Chapter 19 – Database Schema
19-2
Chapter 19 - Database Schema
The database can be generated from either Entity Relationship Diagram or Class Diagram. You are allowed to configure the database connection and generate the database schema by exporting the Entity Relationship Diagram or Class Diagram to relational database. This chapter shows you how to generate the database and data definition language and describes how the data model maps the data definition language.
In this chapter:
• Introduction • Generating Data Definition Language and Database • Mapping Data Model to Data Definition Language
Introduction
Database schema refers to the database structure while data definition language (DDL) is a database language which describes the data structure in a database; that is, the DDL is used to define the database schema. The DDL statements support the creation and destruction of a database and/or table.
As the visual modeling of data model is supported, database connection is allowed to configure to the working environment. According to the data model, the database and DDL can also be generated.
Generating Data Definition Language and Database
SDE-VS provides you with two ways to generate a relational database:
1. Generating Database from ERD 2. Generating Database from Class Diagram
Generating Database from Data Model
You can generate the database from data model in one of the two ways:
1. Using Database Code Generation Dialog Box 2. Using Wizard
Using Database Code Generation Dialog Box
1. On the menu, click Modeling > ORM > Generate Database....
Figure 19.1 - To edit the database configuration
The Database Code Generation dialog box is displayed.

SDE-VS User’s Guide (Part 2, for ORM) Chapter 19 – Database Schema
19-3
Generating Database for Java Project
For generating database for a Java project, configure the following options.
1. Click Database Options button, Database Configuration dialog box is displayed.
You are allowed to define the database configuration. Refer to the descriptions in the Database Configuration for Java Project in the Getting Started with Object-Relational Mapping chapter for information on how to configure the database for Java project.
Figure 19.2 - Database Code Generation dialog
2. Select the option Export to database to allow altering the database.
Figure 19.3 - Export to database option
3. Select the option Generate DDL to allow the generation of DDL file.
Figure 19.4 - Generate DDL option
4. Select the option for enabling Quote SQL Identifier from the drop-down menu. By enabling Quote SQL Identifier, the reserved word used in database can be used as ordinary word in generating database.
Figure 19.5 - Quote SQL Identifier options
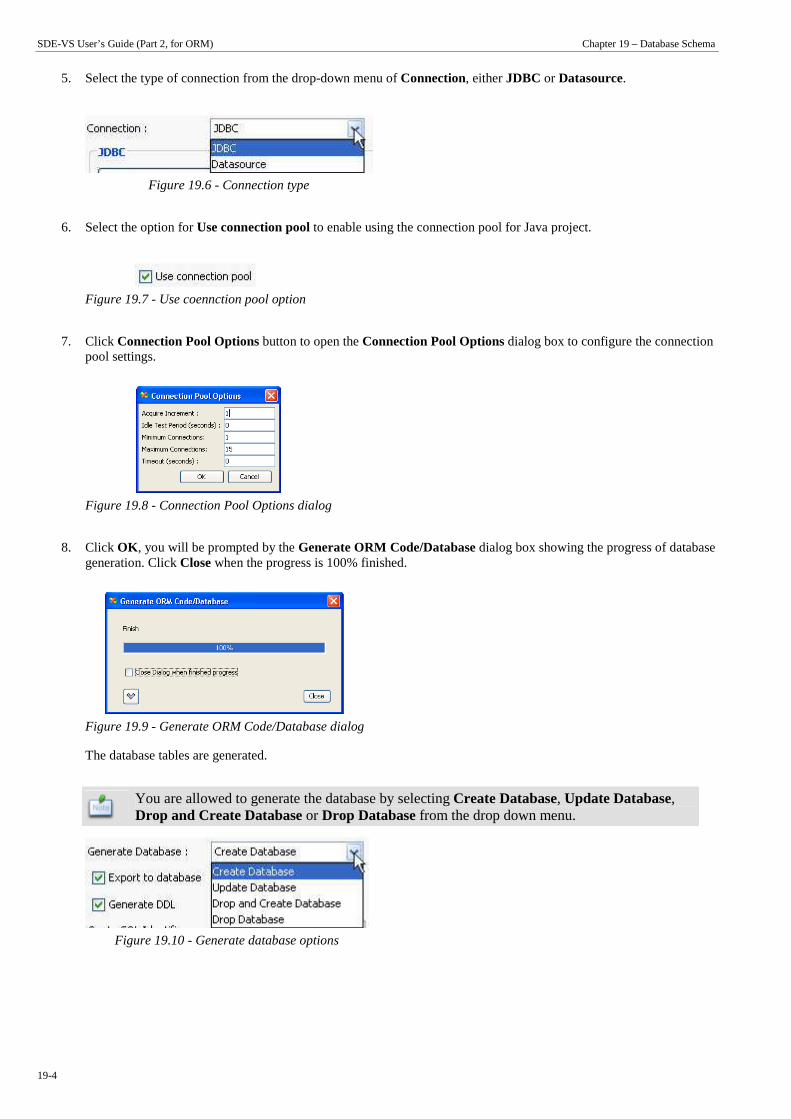
SDE-VS User’s Guide (Part 2, for ORM) Chapter 19 – Database Schema
19-4
5. Select the type of connection from the drop-down menu of Connection, either JDBC or Datasource.
Figure 19.6 - Connection type
6. Select the option for Use connection pool to enable using the connection pool for Java project.
Figure 19.7 - Use coennction pool option
7. Click Connection Pool Options button to open the Connection Pool Options dialog box to configure the connection pool settings.
Figure 19.8 - Connection Pool Options dialog
8. Click OK , you will be prompted by the Generate ORM Code/Database dialog box showing the progress of database generation. Click Close when the progress is 100% finished.
Figure 19.9 - Generate ORM Code/Database dialog
The database tables are generated.
You are allowed to generate the database by selecting Create Database, Update Database, Drop and Create Database or Drop Database from the drop down menu.
Figure 19.10 - Generate database options

SDE-VS User’s Guide (Part 2, for ORM) Chapter 19 – Database Schema
19-5
Generating Database for .NET Project
For generating database for a .NET project, configure the following options.
1. Click Database Options button, Database Configuration dialog box is displayed.
You are allowed to define the database configuration. Refer to the descriptions in the Database Configuration for .NET Project in the Getting Started with Object-Relational Mapping chapter for information on how to configure the database for .NET project.
Figure 19.11 - Database Code Generation dialog
2. Select the option for Export to database to allow altering the database.
Figure 19.12 - Export to database option/td>
3. Select the option for Generate DDL to allow the generation of DDL file.
Figure 19.13 - Generate DDL option
4. Select the option for enabling Quote SQL Identifier from the drop-down menu. By enabling Quote SQL Identifier, the reserved word used in database can be used as ordinary word in generating database.
Figure 19.14 - Quote SQL Identifier options

SDE-VS User’s Guide (Part 2, for ORM) Chapter 19 – Database Schema
19-6
5. Click OK , you will be prompted by the Generate ORM Code/Database dialog box showing the progress of database generation. Click Close when the progress is 100% finished.
Figure 19.15 - Generate ORM Code/Database dialog
The database tables are generated.
You are allowed to generate the database by selecting Create Database, Update Database, Drop and Create Database or Drop Database from the drop-down menu.
Figure 19.16 - Generate Database options
Using Wizard For information on generating database from data model by using wizard, refer to the descriptions in the Using ORM Wizard chapter.
Generating Database from Object Model
You can generate the database from object model by using wizard. For information, refers to the descriptions in the Using ORM Wizard chapter.
Mapping Data Model to Data Definition Language
As the database can be generated, it supports mapping from Data Model to Data Definition Language (DDL)
The following table shows the mapping between Data Model and DDL.
Data Model DDL
Entity Table
Column Column
Data Type Data Type
Primary Key Primary Key
Foreign Key Foreign Key
Table 19.1
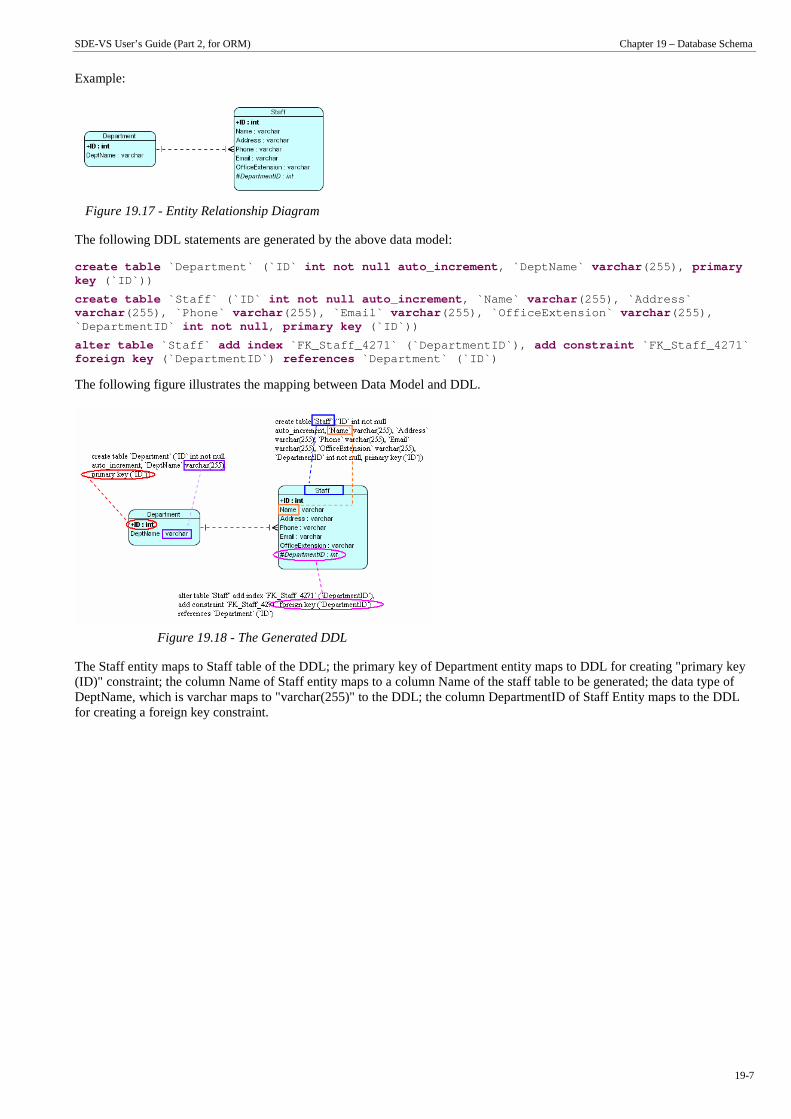
SDE-VS User’s Guide (Part 2, for ORM) Chapter 19 – Database Schema
19-7
Example:
Figure 19.17 - Entity Relationship Diagram
The following DDL statements are generated by the above data model:
create table `Department` (`ID` int not null auto_increment, `DeptName` varchar(255), primary key (`ID`))
create table `Staff` (`ID` int not null auto_increment, `Name` varchar(255), `Address` varchar(255), `Phone` varchar(255), `Email` varchar(255), `OfficeExtension` varchar(255), `DepartmentID` int not null, primary key (`ID`))
alter table `Staff` add index `FK_Staff_4271` (`DepartmentID`), add constraint `FK_Staff_4271` foreign key (`DepartmentID`) references `Department` (`ID`)
The following figure illustrates the mapping between Data Model and DDL.
Figure 19.18 - The Generated DDL
The Staff entity maps to Staff table of the DDL; the primary key of Department entity maps to DDL for creating "primary key (ID)" constraint; the column Name of Staff entity maps to a column Name of the staff table to be generated; the data type of DeptName, which is varchar maps to "varchar(255)" to the DDL; the column DepartmentID of Staff Entity maps to the DDL for creating a foreign key constraint.

SDE-VS User’s Guide (Part 2, for ORM) Chapter 19 – Database Schema
19-8

Implementation 20

SDE-VS User’s Guide (Part 2, for ORM) Chapter 20 - Implementation
20-2
Chapter 20 - Implementation
Class Diagram, Entity Relationship Diagram and Database can be used to generate the persistent code. This chapter shows you how to generate the persistent code and describes how the Object Model maps to ORM-Persistent Class.
In this chapter:
• Introduction • Generating ORM-Persistable Class from Data, Object Models and Database • Mapping Object Model to ORM-Persistable Java Class • Mapping Object Model to ORM-Persistable .NET class
Introduction
Persistent code is the object that exposes the ability to store and retrieve data in relational databases permanently. An instance of the persistence class represents a row of a database table. As the persistent code is generated based on the object models, a mapping between object models and relational models is automatically built, which in turn supports your software development in database applications in an easier way.
ORM-Persistable Class
You are provided with three ways to generate persistent code.
1. Generating Persistent Code from ERD 2. Generating Persistent Code from Class Diagram 3. Generating Persistent Code from Database
Generating ORM-Persistable Class from Data Model
You can generate the persistent code from data model in one of the two ways:
1. Using Database Code Generation Dialog Box 2. Using ORM Wizard
Using Database Code Generation Dialog Box As persistent code is generated based on the object model, and it will be used to manipulate the relational database which is the data model, if the object and data models were not synchronized, the generated persistent code may become malfunction.
Hence, there is a prerequisite of using Database Code Generation dialog box to generate persistent code, which is the synchronization between object and data models. The persistent code will be generated successfully as if the object and data models are synchronized in advance. For information on synchronization from data model to object model, refer to Synchronizing from a Data Model to an Object Model in the Object Model chapter.

SDE-VS User’s Guide (Part 2, for ORM) Chapter 20 - Implementation
20-3
To generate the persistent code from data model, synchronize the data model to object model before performing the following steps.
1. On the menu, click Modeling > ORM > Generate Code....
Figure 20.1 - To generate code
The Database Code Generation dialog box is displayed.
Figure 20.2 - Database Code Generation dialog
2. Select the language of code to be generated from the drop-down menu of Language, either Java or C#.
Figure 20.3 - Select programming code for generate
3. Configure the code generation setting with respect to the selected language of code. Refer to the descriptions of Configuring Code Generation Setting for Java and Configuring Code Generation Setting for C# for information on how to configure the code generation setting for Java and C# respectively.

SDE-VS User’s Guide (Part 2, for ORM) Chapter 20 - Implementation
20-4
4. Click OK , you will be prompted by the Generate ORM Code/Database dialog box showing the progress of database generation. Click Close when the generation is complete; whereas if generation is failed, you will be prompted by a Message dialog box informing you to find the error/warning message on the Message Pane.
Figure 20.4 - Generate ORM Code/Database dialog
The persistent code is generated.
Configuring Code Generation Setting for Java
By specifying the settings of code generation for Java, the Java persistence class will be generated accordingly.
Figure 20.5 - Generate code setting for Java
• Default Order Collection Type
Select the type of ordered collection to be used in handling the multiple cardinality relationship, either List or Map.
• Default Un-Order Collection Type
Select the type of un-ordered collection to be used in handling the multiple cardinality relationship, either Set or Bag.

SDE-VS User’s Guide (Part 2, for ORM) Chapter 20 - Implementation
20-5
• Override toString Method
Select the way that you want to override the toString method of the object. There are three options provided to override the toString method as follows:
• ID Only - the toString method returns the value of the primary key of the object as string. • All Properties - the toString method returns a string with the pattern
"Entity[<column1_name>=<column1_value><column2_name>=<column2_value>...]"
• No - the toString method will not be overridden. • Error Handling
Select the way to handle errors when they occur.
• Return false/null -It returns false/null in the method to terminate its execution. • Throw PersistentException -It throws a PersistentException which will be handled by the caller. • Throw RuntimeException -It throws a RuntimeException which will be handled by the caller.
Figure 20.6 - Error Handling options
• Lazy Collection Initialization
Check the option to avoid the associated objects from being loaded when the main object is loaded. Uncheck the option will result in loading the associated objects when the main object is loaded.
• Association Handling
Select the type of association handling to be used, either Smart, or Standard.
• Smart
With smart association handling, when you update one end of a bi-directional association, the generated persistent code is able to update the other end automatically. Besides, you do not need to cast the retrieved object(s) into its corresponding persistence class when retrieving object(s) from the collection.
• Standard
With standard association handling, you must update both ends of a bi-directional association manually to maintain the consistency of association. Besides, casting of object(s) to its corresponding persistence class is required when retrieving object(s) from the collection.
Figure 20.7 - Association Handling options
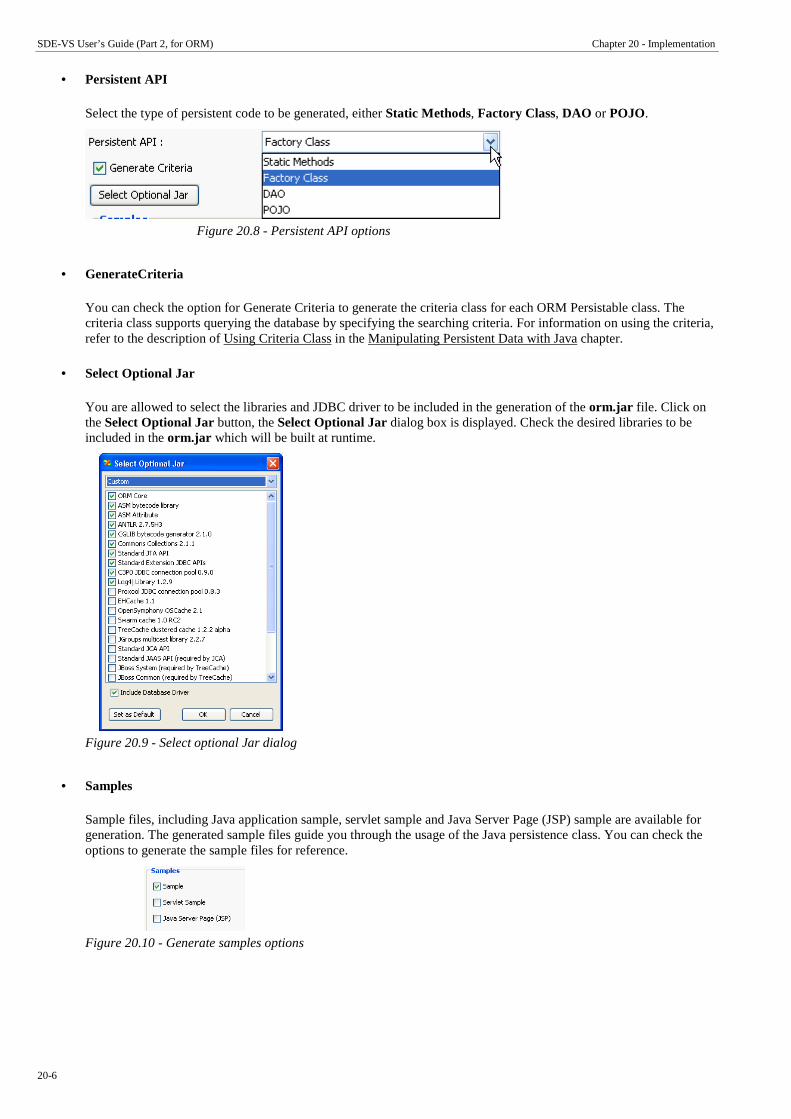
SDE-VS User’s Guide (Part 2, for ORM) Chapter 20 - Implementation
20-6
• Persistent API
Select the type of persistent code to be generated, either Static Methods, Factory Class, DAO or POJO.
Figure 20.8 - Persistent API options
• GenerateCriteria
You can check the option for Generate Criteria to generate the criteria class for each ORM Persistable class. The criteria class supports querying the database by specifying the searching criteria. For information on using the criteria, refer to the description of Using Criteria Class in the Manipulating Persistent Data with Java chapter.
• Select Optional Jar
You are allowed to select the libraries and JDBC driver to be included in the generation of the orm.jar file. Click on the Select Optional Jar button, the Select Optional Jar dialog box is displayed. Check the desired libraries to be included in the orm.jar which will be built at runtime.
Figure 20.9 - Select optional Jar dialog
• Samples
Sample files, including Java application sample, servlet sample and Java Server Page (JSP) sample are available for generation. The generated sample files guide you through the usage of the Java persistence class. You can check the options to generate the sample files for reference.
Figure 20.10 - Generate samples options
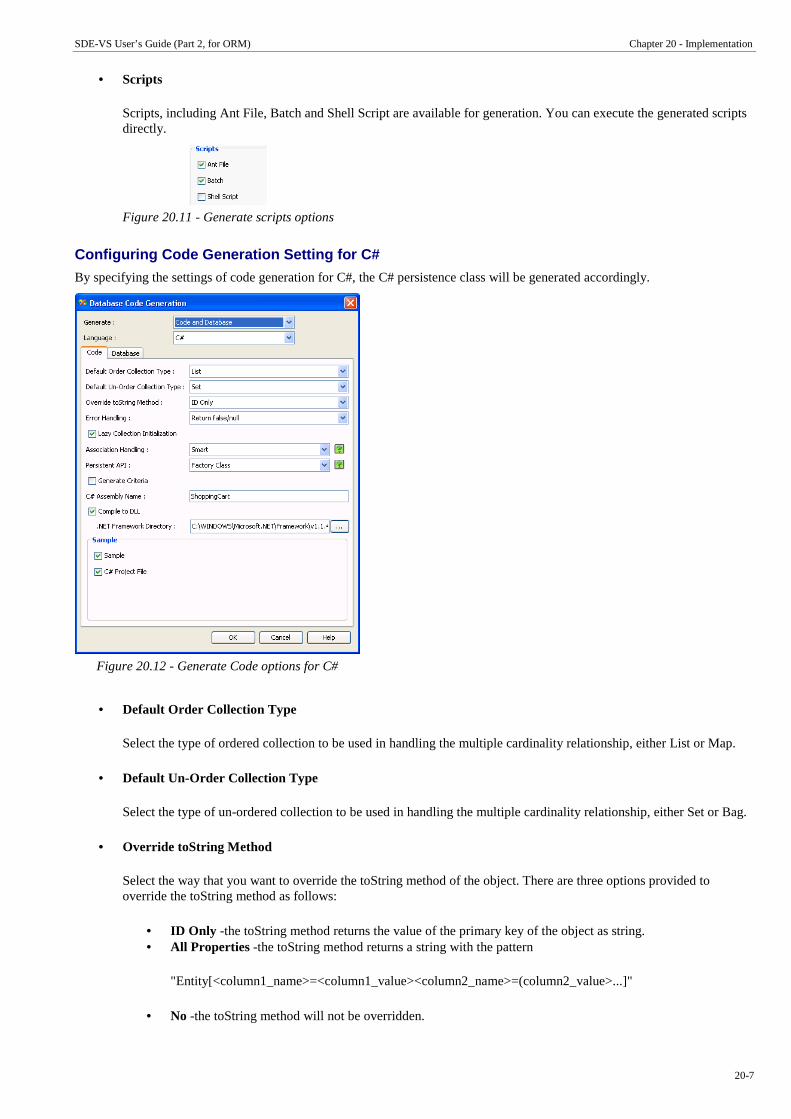
SDE-VS User’s Guide (Part 2, for ORM) Chapter 20 - Implementation
20-7
• Scripts
Scripts, including Ant File, Batch and Shell Script are available for generation. You can execute the generated scripts directly.
Figure 20.11 - Generate scripts options
Configuring Code Generation Setting for C#
By specifying the settings of code generation for C#, the C# persistence class will be generated accordingly.
Figure 20.12 - Generate Code options for C#
• Default Order Collection Type
Select the type of ordered collection to be used in handling the multiple cardinality relationship, either List or Map.
• Default Un-Order Collection Type
Select the type of un-ordered collection to be used in handling the multiple cardinality relationship, either Set or Bag.
• Override toString Method
Select the way that you want to override the toString method of the object. There are three options provided to override the toString method as follows:
• ID Only -the toString method returns the value of the primary key of the object as string. • All Properties -the toString method returns a string with the pattern
"Entity[<column1_name>=<column1_value><column2_name>=(column2_value>...]"
• No -the toString method will not be overridden.
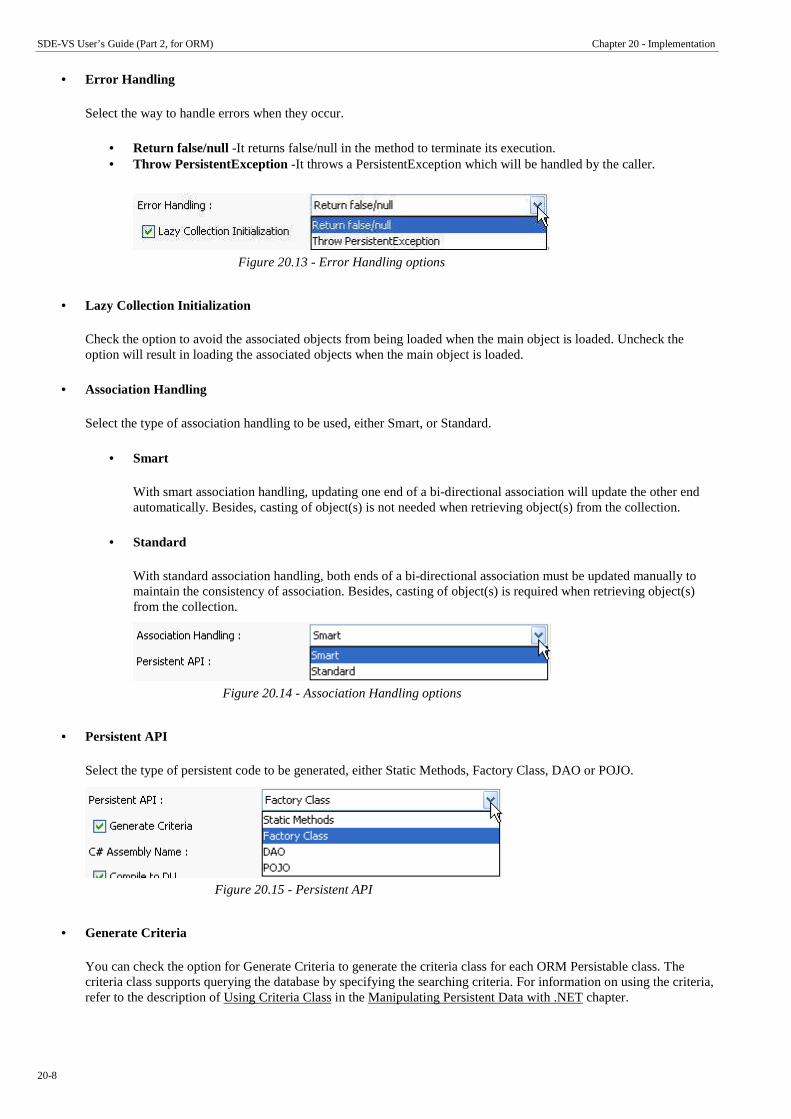
SDE-VS User’s Guide (Part 2, for ORM) Chapter 20 - Implementation
20-8
• Error Handling
Select the way to handle errors when they occur.
• Return false/null -It returns false/null in the method to terminate its execution. • Throw PersistentException -It throws a PersistentException which will be handled by the caller.
Figure 20.13 - Error Handling options
• Lazy Collection Initialization
Check the option to avoid the associated objects from being loaded when the main object is loaded. Uncheck the option will result in loading the associated objects when the main object is loaded.
• Association Handling
Select the type of association handling to be used, either Smart, or Standard.
• Smart
With smart association handling, updating one end of a bi-directional association will update the other end automatically. Besides, casting of object(s) is not needed when retrieving object(s) from the collection.
• Standard
With standard association handling, both ends of a bi-directional association must be updated manually to maintain the consistency of association. Besides, casting of object(s) is required when retrieving object(s) from the collection.
Figure 20.14 - Association Handling options
• Persistent API
Select the type of persistent code to be generated, either Static Methods, Factory Class, DAO or POJO.
Figure 20.15 - Persistent API
• Generate Criteria
You can check the option for Generate Criteria to generate the criteria class for each ORM Persistable class. The criteria class supports querying the database by specifying the searching criteria. For information on using the criteria, refer to the description of Using Criteria Class in the Manipulating Persistent Data with .NET chapter.
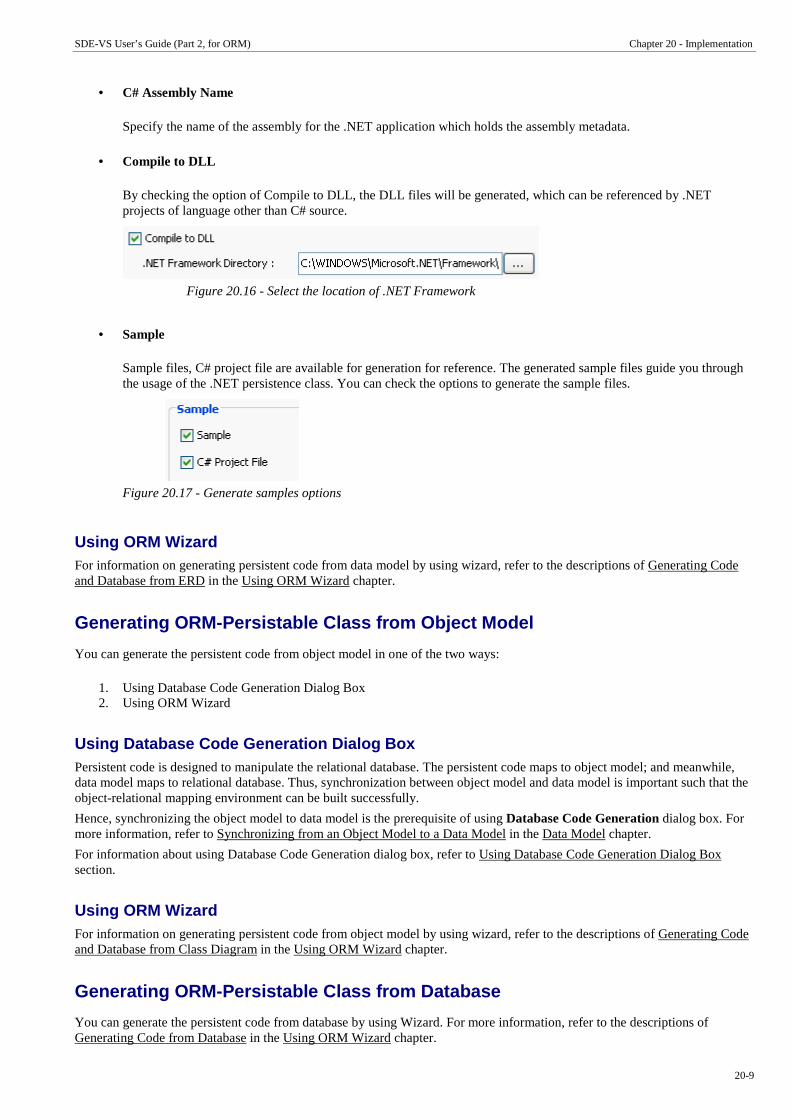
SDE-VS User’s Guide (Part 2, for ORM) Chapter 20 - Implementation
20-9
• C# Assembly Name
Specify the name of the assembly for the .NET application which holds the assembly metadata.
• Compile to DLL
By checking the option of Compile to DLL, the DLL files will be generated, which can be referenced by .NET projects of language other than C# source.
Figure 20.16 - Select the location of .NET Framework
• Sample
Sample files, C# project file are available for generation for reference. The generated sample files guide you through the usage of the .NET persistence class. You can check the options to generate the sample files.
Figure 20.17 - Generate samples options
Using ORM Wizard For information on generating persistent code from data model by using wizard, refer to the descriptions of Generating Code and Database from ERD in the Using ORM Wizard chapter.
Generating ORM-Persistable Class from Object Model
You can generate the persistent code from object model in one of the two ways:
1. Using Database Code Generation Dialog Box 2. Using ORM Wizard
Using Database Code Generation Dialog Box Persistent code is designed to manipulate the relational database. The persistent code maps to object model; and meanwhile, data model maps to relational database. Thus, synchronization between object model and data model is important such that the object-relational mapping environment can be built successfully.
Hence, synchronizing the object model to data model is the prerequisite of using Database Code Generation dialog box. For more information, refer to Synchronizing from an Object Model to a Data Model in the Data Model chapter.
For information about using Database Code Generation dialog box, refer to Using Database Code Generation Dialog Box section.
Using ORM Wizard For information on generating persistent code from object model by using wizard, refer to the descriptions of Generating Code and Database from Class Diagram in the Using ORM Wizard chapter.
Generating ORM-Persistable Class from Database
You can generate the persistent code from database by using Wizard. For more information, refer to the descriptions of Generating Code from Database in the Using ORM Wizard chapter.
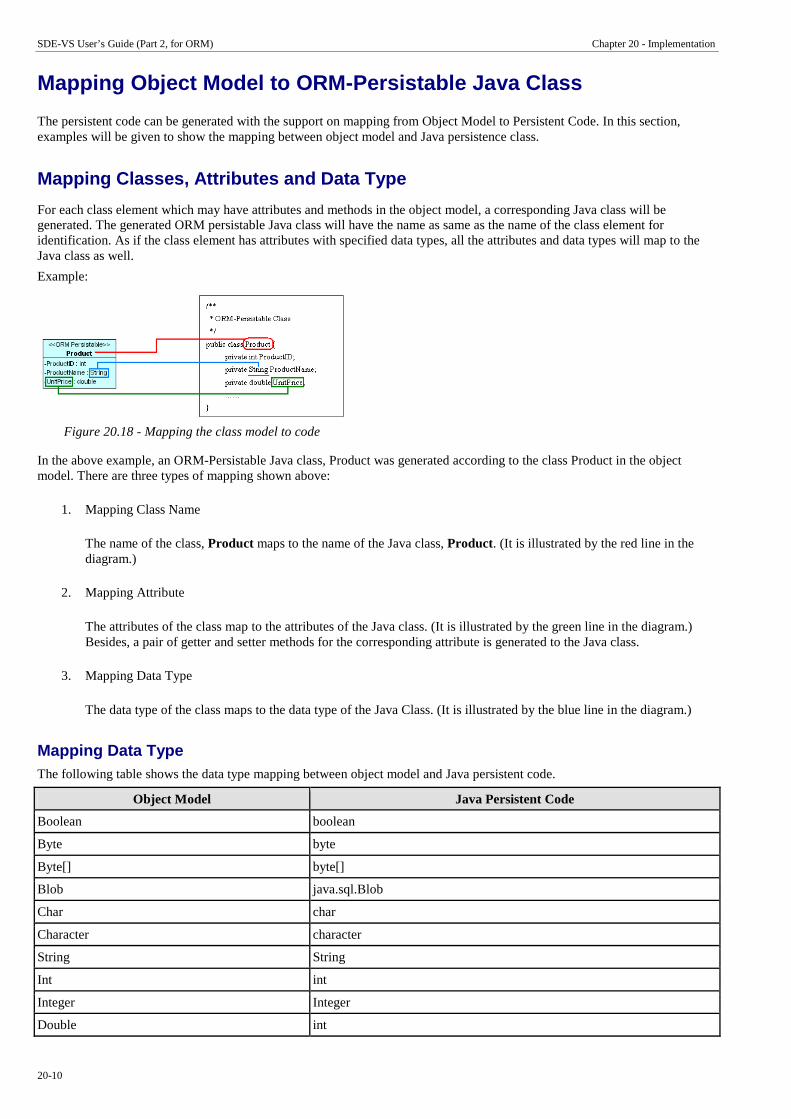
SDE-VS User’s Guide (Part 2, for ORM) Chapter 20 - Implementation
20-10
Mapping Object Model to ORM-Persistable Java Class
The persistent code can be generated with the support on mapping from Object Model to Persistent Code. In this section, examples will be given to show the mapping between object model and Java persistence class.
Mapping Classes, Attributes and Data Type
For each class element which may have attributes and methods in the object model, a corresponding Java class will be generated. The generated ORM persistable Java class will have the name as same as the name of the class element for identification. As if the class element has attributes with specified data types, all the attributes and data types will map to the Java class as well.
Example:
Figure 20.18 - Mapping the class model to code
In the above example, an ORM-Persistable Java class, Product was generated according to the class Product in the object model. There are three types of mapping shown above:
1. Mapping Class Name
The name of the class, Product maps to the name of the Java class, Product. (It is illustrated by the red line in the diagram.)
2. Mapping Attribute
The attributes of the class map to the attributes of the Java class. (It is illustrated by the green line in the diagram.) Besides, a pair of getter and setter methods for the corresponding attribute is generated to the Java class.
3. Mapping Data Type
The data type of the class maps to the data type of the Java Class. (It is illustrated by the blue line in the diagram.)
Mapping Data Type The following table shows the data type mapping between object model and Java persistent code.
Object Model Java Persistent Code
Boolean boolean
Byte byte
Byte[] byte[]
Blob java.sql.Blob
Char char
Character character
String String
Int int
Integer Integer
Double int

SDE-VS User’s Guide (Part 2, for ORM) Chapter 20 - Implementation
20-11
Bigdecimal BigDecimal
Float float
Long long
Short short
Date java.util.Date
Time java.sql.Time
Timestamp java.sql.Timestamp
Table 20.1
Mapping Primary Key
As object model maps to data model bridging the environment between object model and relational database, primary key is mapped. As the object model maps to persistent code, primary key is in turn mapped.
Example:
Figure 20.19 - Mapping primary key
In the above example, the primary key of Product entity, ProductID maps to an attribute, ProductID of class element, Product, which in turn becomes an attribute of the Java class.
In the ORM-Persistable class, a pair of getter and setter methods for the attribute is generated for accessing its value. Besides, the ORM-Persistable class has a method named as getORMID which returns the primary key value of the class.
In the above example, the getORMID() method returns the value by calling the method getProductID() which returns the value of ProductID. It thus signifies ProductID is the primary key of the class.
Mapping Generalization
Generalization distributes the commonalities from the superclass among a group of subclasses. The subclass is consistent with the superclass and it may contain additional attributes and methods to make it specific.
Mapping generalization hierarchy to persistent code, the superclass and its subclasses are generated to individual Java class while the subclasses inherit all the superclass attributes and methods.

SDE-VS User’s Guide (Part 2, for ORM) Chapter 20 - Implementation
20-12
Example:
Figure 20.20 - Mapping generalization
In the above example, the generalization hierarchy of BankAccount, CheckingAccount and SavingAccount maps to three ORM-Persistable Java classes where the subclasses, CheckingAccount and SavingAccount extend their superclass, BankAccoount so as to inherit the BankAccount's attributes and methods.
Mapping Association and Multiplicity
An association specifies the semantic relationship between two classes in the object model with a role attached at one end. The role specifies the detailed behavior of a class associated in the association, including its role name, which indicates how the class acts in the association; and multiplicity, which specifies the number of links between each instance of the associated classes.
The role name of the association maps to an attribute which specifies how the class associates with its associated supplier class with respect to multiplicity. If a class has a multiplicity of many in an association, the class maps not only to an ORM persistent Java class, but also to a collection class which supports manipulating the objects within a collection.
You are allowed to define the type of collection class for code generation. Meanwhile, List and Set are the default types for ordered and un-ordered collection respectively.
Example:
Figure 20.21 - Classes with one-to-many association
In the above object model, there is a one-to-many association between Customer class and PurchaseOrder class; defining that a customer can place many purchase order meanwhile a purchase order is placed by one customer. As object model maps to persistent code, three ORM-Persistable classes will be generated, including Customer, PurchaseOrder and PurchaseOrderSetCollection classes.

SDE-VS User’s Guide (Part 2, for ORM) Chapter 20 - Implementation
20-13
Figure 20.22 - Mapping class with multiplicity of one
From the above diagram, PurchaseOrder class has the role of "PlacedBy" in the association and it is associated with the Customer class with multiplicity of one. The role, "PlacedBy" maps as an attribute to the PurchaseOrder class which is defined as the data type of Customer class; it implies that the attribute "PlacedBy" stores a customer object which places the particular purchase order.
Figure 20.23 - Mapping class has the multiplicity of many
From the above diagram, Customer has the role of "Places" in the association which associates with many PurchaseOrder instances. As the PurchaseOrder class has the multiplicity of many in the association, a collection class is generated so as to manipulate the multiple instances of PurchaseOrder. The role, "Places" maps as an attribute to the Customer class with the data type of PurchaseOrderSetCollection class; it implies that the attribute "Places" represents a collection of PurchaseOrder objects which was placed by a particular customer.
Mapping Navigable Association An association, which specifies a semantic relationship occurring between typed instances, has at least two ends represented by properties. When a property at an end of the association is owned by an end class, it represents the association is navigable from the opposite ends. On the contrary, when a property does not appear in the namespace of any associated class, it represents a non-navigable end of the association.
An open arrowhead on the end of an association indicates the end is navigable. Meanwhile, a small cross (x) on the end of an association indicates the end is not navigable. If an association has two navigable ends, it is considered as bi-directional associations.
As the role name of the association maps to an attribute which specifies how the class associates with its associated class, however if the association has a non-navigable end, the corresponding role name will not map to an attribute, suppressing the ownership of the class.
Example:

SDE-VS User’s Guide (Part 2, for ORM) Chapter 20 - Implementation
20-14
Figure 20.24 - Classes with Navigable Association
In the above object model, it shows a binary association with one end navigable and the other non-navigable. It indicates that Product is owned by OrderLine while Product cannot own OrderLine. As the object model maps to persistent code, the ownership of OrderLine instance in Product class will not be generated in the persistent code.
Figure 20.25 - Mapping Navigable Association
From the above diagram, OrderLine class has the role of "Orders" in the association and associated with the one Product instance. The role, "Orders" maps as an attribute to OrderLine class which defines as the data type of Product; it implies that the attribute "Orders" stores a product instance.
On the other hand, Product class has the role of "OrderedBy" associated with many OrderLine instances in a non-navigable association; that is, Product class does not have the ownership of OrderLine. Even though the OrderLine class has the multiplicity of many in the association, the corresponding collection class of OrderLine for the Product class is not generated to manipulate it.
Mapping Object Model to ORM-Persistable .NET Class
As the .NET persistence class can be generated with the support on mapping from Object Model to Persistent Code. In this section, examples will be given to show the mapping between object model and .Net persistence class.
Mapping Classes, Attributes and Data Type
For each class element which may have attributes and methods in the object model, a corresponding persistence class of C# will be generated. The generated ORM persistable .NET class will have the name as same as the name of the class element for identification. As if the class element has attributes with specified data types, all the attributes and data types will map to the .NET persistence class as well.
Example:
Figure 20.26 - Mapping Classes, Attributes and Data Types
In the above example, an ORM-Persistable .NET class, Product was generated according to the class Product in the object model. There are three types of mapping shown above:

SDE-VS User’s Guide (Part 2, for ORM) Chapter 20 - Implementation
20-15
1. Mapping Class Name
The name of the class, Product maps to the name of the .NET persistence class, Product. (It is illustrated by the red line in the diagram.)
2. Mapping Attribute
The attributes of the class map to the attributes of the .NET persistence class. (It is illustrated by the green line in the diagram.) Besides, a pair of getter and setter methods for the corresponding attribute is generated to the persistence class.
3. Mapping Data Type
The data type of the class maps to the data type of the .NET persistence class. (It is illustrated by the blue line in the diagram.)
Mapping Data Type The following table shows the data type mapping between object model and .NET persistent code.
Object Model .NET Persistent Code
Boolean bool
Byte byte
Byte[] byte[]
Blob byte[]
Char char
Character char
String string
Int int
Integer int
Double double
Decimal Decimal
Float float
Long long
Short short
Date DateTime
Time DateTime
Timestamp DateTime
Table 20.2

SDE-VS User’s Guide (Part 2, for ORM) Chapter 20 - Implementation
20-16
Mapping Primary Key
As object model maps to data model bridging the environment between object model and relational database, primary key is mapped. As the object model maps to persistent code, primary key is in turn mapped.
Example:
Figure 20.27 - Mapping primary key
In the above example, the primary key of Product entity, ProductID maps to an attribute, ProductID of class element, Product, which in turn becomes an attribute of the .NET persistence class.
In the ORM-Persistable .NET class, a pair of getter and setter methods for the attribute is generated for accessing its value. Besides, the ORM-Persistable .NET class has a method of getting the ORMID which returns the primary key value of the class.
In the above example, the getter method of ORMID returns the value by calling the getter method of ProductID which returns the value of __ProductID. It thus signifies ProductID is the primary key of the class.
Mapping Generalization
Generalization distributes the commonalities from the superclass among a group of subclasses. The subclass is consistent with the superclass and it may contain additional attributes and methods to make it specific.
Mapping generalization hierarchy to persistent code, the superclass and its subclasses are generated to individual .NET persistence class while the subclasses inherit all the superclass attributes and methods.
Example:
Figure 20.28 - Mapping generalization
In the above example, the generalization hierarchy of BankAccount, CheckingAccount and SavingAccount maps to three ORM-Persistable .NET classes where the subclasses, CheckingAccount and SavingAccount extend their superclass, BankAccoount so as to inherit the BankAccount's attributes and methods.

SDE-VS User’s Guide (Part 2, for ORM) Chapter 20 - Implementation
20-17
Mapping Association and Multiplicity
An association specifies the semantic relationship between two classes in the object model with a role attached at one end. The role specifies the detailed behavior of a class associated in the association, including its role name, which indicates how the class acts in the association; and multiplicity, which specifies the number of links between each instance of the associated classes.
The role name of the association maps to an attribute which specifies how the class associates with its associated supplier class with respect to multiplicity. If a class has a multiplicity of many in an association, the class maps not only to an ORM persistent .NET class, but also to a collection class which supports manipulating the objects within a collection.
You are allowed to define the type of collection class for code generation. Meanwhile, List and Set are the default types for ordered and un-ordered collection respectively.
Example:
Figure 20.29 - Classes with one-to-many relationship
In the above object model, there is a one-to-many association between Customer class and PurchaseOrder class; defining that a customer can place many purchase order meanwhile a purchase order is placed by one customer. As object model maps to persistent code, three ORM-Persistable .NET classes will be generated, including Customer, PurchaseOrder and PurchaseOrderSetCollection classes.
Figure 20.30 - Mapping class with multiplicity of one
From the above diagram, PurchaseOrder class has the role of "PlacedBy" in the association and it is associated with the Customer class with multiplicity of one. The role, "PlacedBy" maps as an attribute to the PurchaseOrder class which is defined as the data type of Customer class; it implies that the attribute "PlacedBy" stores a customer object which places the particular purchase order.

SDE-VS User’s Guide (Part 2, for ORM) Chapter 20 - Implementation
20-18
Figure 20.31 - Mapping class has the multiplicity of many in the association
From the above diagram, Customer has the role of "Places" in the association which associates with many PurchaseOrder instances. As the PurchaseOrder class has the multiplicity of many in the association, a collection class is generated so as to manipulate the multiple instances of PurchaseOrder. The role, "Places" maps as an attribute to the Customer class with the data type of PurchaseOrderSetCollection class; it implies that the attribute "Places" represents a collection of PurchaseOrder objects which was placed by a particular customer.
Mapping Navigable Association An association, which specifies a semantic relationship occurring between typed instances, has at least two ends represented by properties. When a property at an end of the association is owned by an end class, it represents the association is navigable from the opposite ends. On the contrary, when a property does not appear in the namespace of any associated class, it represents a non-navigable end of the association.
An open arrowhead on the end of an association indicates the end is navigable. Meanwhile, a small cross (x) on the end of an association indicates the end is not navigable. If an association has two navigable ends, it is considered as bi-directional associations.
As the role name of the association maps to an attribute which specifies how the class associates with its associated class, however if the association has a non-navigable end, the corresponding role name will not map to an attribute, suppressing the ownership of the class.
Example:
Figure 20.32 - Classes with Navigable Association
In the above object model, it shows a binary association with one end navigable and the other non-navigable. It indicates that Product is owned by OrderLine while Product cannot own OrderLine. As the object model maps to persistent code, the ownership of OrderLine instance in Product class will not be generated in the persistent code.
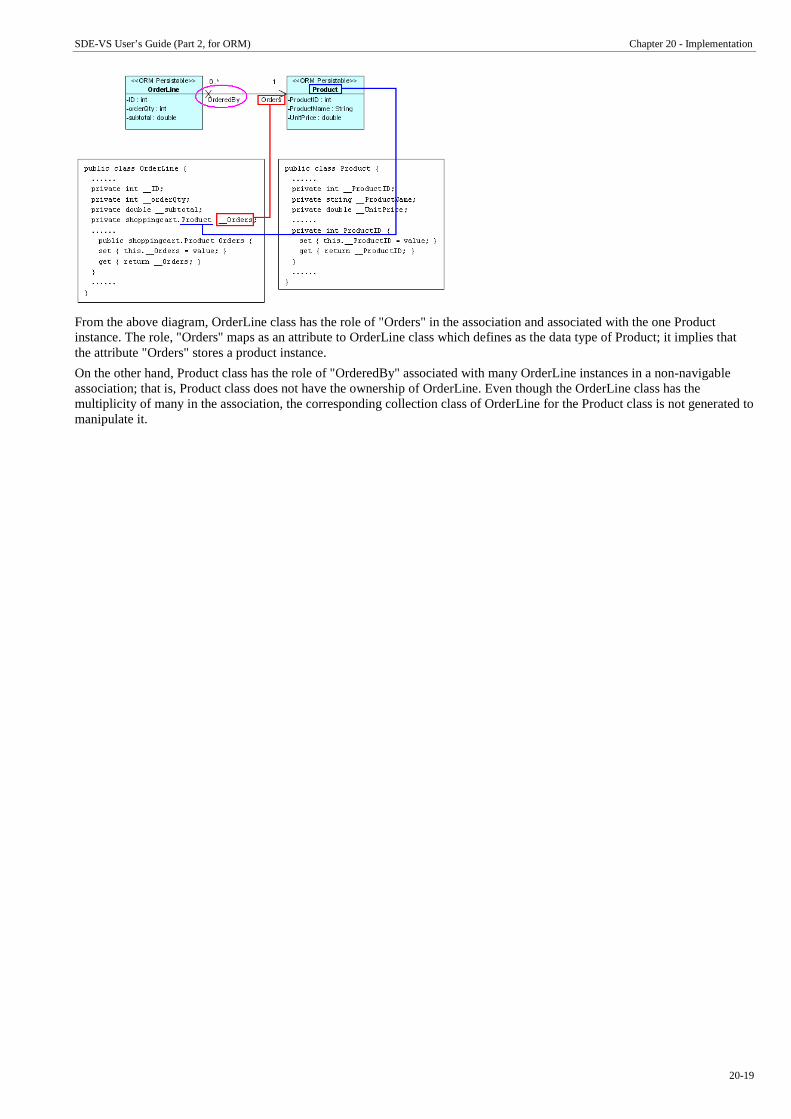
SDE-VS User’s Guide (Part 2, for ORM) Chapter 20 - Implementation
20-19
From the above diagram, OrderLine class has the role of "Orders" in the association and associated with the one Product instance. The role, "Orders" maps as an attribute to OrderLine class which defines as the data type of Product; it implies that the attribute "Orders" stores a product instance.
On the other hand, Product class has the role of "OrderedBy" associated with many OrderLine instances in a non-navigable association; that is, Product class does not have the ownership of OrderLine. Even though the OrderLine class has the multiplicity of many in the association, the corresponding collection class of OrderLine for the Product class is not generated to manipulate it.

SDE-VS User’s Guide (Part 2, for ORM) Chapter 20 - Implementation
20-20
Manipulating Persistent Data with Java 21
SDE-VS User’s Guide (Part 2, for ORM) Chapter 21 – Manipulating Persistent Data with Java
21-2
Chapter 21 - Manipulating Persistent Data with Java
Java and .NET persistent code can be generated to manipulate persistent data with the database. This chapter shows the use of the generated Java persistent code by inserting, retrieving, updating and deleting persistent data and demonstrates how to run the generated sample code.
In this chapter:
• Introduction • Using ORM-Persistable Class to manipulate persistent data • Using Criteria Class to retrieve persistent data • Using ORM Implementation
Introduction
With the Smart Development Environment Enterprise Edition for Visual Studio .NET (SDE-VS EE), you can generate Java persistence code to manipulate the persistent data of the relational database easily.
In the working environment, you are allowed to configure the database connection for your development project. As the database was configured before the generation of persistent code, the ORM persistable Java classes and a set of ORM files are generated together; while the set of ORM files configures the environment for connecting the generated persistence classes and the database. And hence, you are allowed to access the database directly by using the Java persistence class without using any code for setting up the database connection in your project.
There are several mappings in the SDE-VS environment:
1. Mapping between data model and relational database. 2. Mapping between data model and object model. 3. Mapping between object model and persistent code.
And hence, there is an indirect mapping between persistent code and relational database. Each persistence class represents a table in the database and an instance of the class represents one record of the table. In the generated persistence class, there is not only a pair of getter and setter methods for manipulating the corresponding attribute, but also a set of methods for manipulating records with the database.
Using ORM-Persistable Class
Java ORM-Persistable class is generated based on the object model defined in the class diagram. The generated Java persistence code can be identified into two categories � Model API and Persistent API. The Model API refers to the manipulation of attributes of models and associations between models while the Persistent API refers to the persistent code used to manipulate the persistent data with relational database.
Model API
Model API refers to the generated Java persistent code which is capable of manipulating the properties of the object model in terms of attributes and associations.
Manipulating Attributes In order to specify and retrieve the value to the attributes of the ORM-Persistable class, a pair of getter and setter methods for each attribute is generated to the Java ORM-Persistable class.
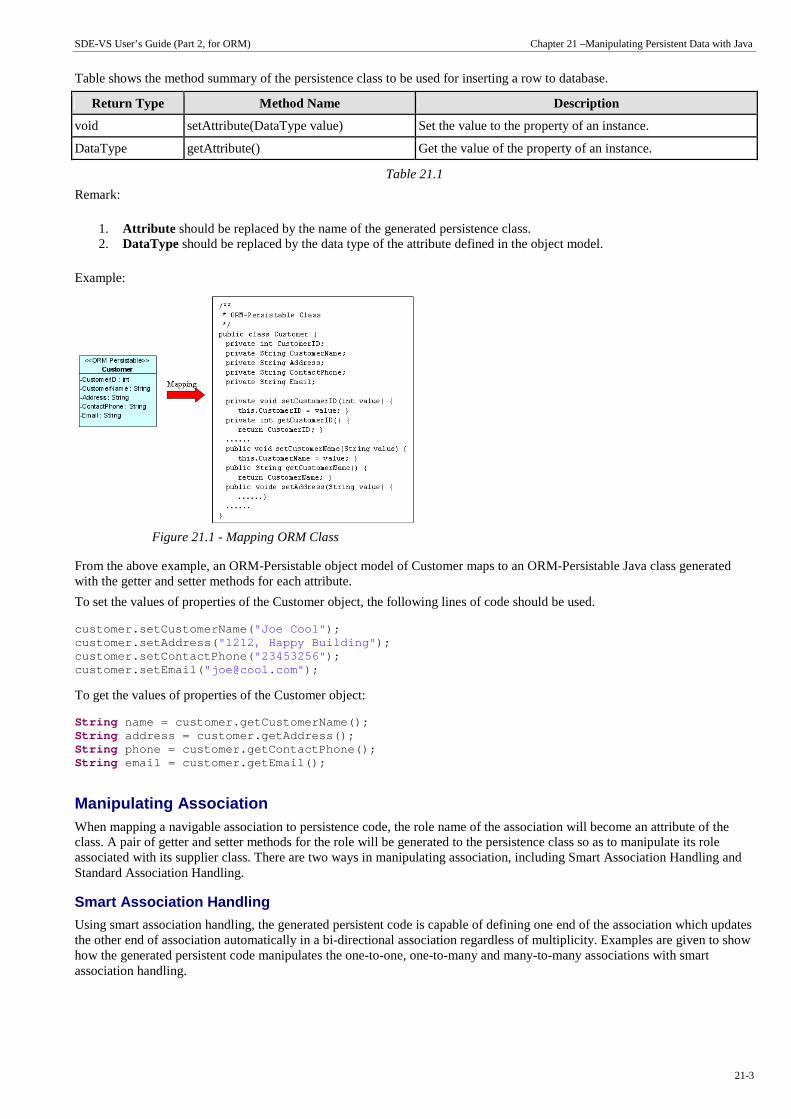
SDE-VS User’s Guide (Part 2, for ORM) Chapter 21 –Manipulating Persistent Data with Java
21-3
Table shows the method summary of the persistence class to be used for inserting a row to database.
Return Type Method Name Description
void setAttribute(DataType value) Set the value to the property of an instance.
DataType getAttribute() Get the value of the property of an instance.
Table 21.1
Remark:
1. Attribute should be replaced by the name of the generated persistence class. 2. DataType should be replaced by the data type of the attribute defined in the object model.
Example:
Figure 21.1 - Mapping ORM Class
From the above example, an ORM-Persistable object model of Customer maps to an ORM-Persistable Java class generated with the getter and setter methods for each attribute.
To set the values of properties of the Customer object, the following lines of code should be used.
customer.setCustomerName( "Joe Cool" ); customer.setAddress( "1212, Happy Building" ); customer.setContactPhone( "23453256" ); customer.setEmail( "[email protected]" );
To get the values of properties of the Customer object:
String name = customer.getCustomerName(); String address = customer.getAddress(); String phone = customer.getContactPhone(); String email = customer.getEmail();
Manipulating Association When mapping a navigable association to persistence code, the role name of the association will become an attribute of the class. A pair of getter and setter methods for the role will be generated to the persistence class so as to manipulate its role associated with its supplier class. There are two ways in manipulating association, including Smart Association Handling and Standard Association Handling.
Smart Association Handling
Using smart association handling, the generated persistent code is capable of defining one end of the association which updates the other end of association automatically in a bi-directional association regardless of multiplicity. Examples are given to show how the generated persistent code manipulates the one-to-one, one-to-many and many-to-many associations with smart association handling.

SDE-VS User’s Guide (Part 2, for ORM) Chapter 21 –Manipulating Persistent Data with Java
21-4
One-to-One Association In order to manipulate the directional association, implement the program with the following steps:
1. Set the properties of role name of the object.
Table shows the method summary of the persistence class to be used for setting the directional association.
Return Type Method Name Description
void setRoleName(Class value) Set the value to the role of an instance.
Table 21.2
Remark:
1. RoleName should be replaced by the role of the navigable association. 2. Class should be replaced by the data type of the supplier class in the navigable association.
Example:
Figure 21.2 - Mapping One-to-one association
From the above example, an ORM-Persistable object model of Software maps to an ORM-Persistable Java class with an attribute of role, "contains" in the association typed as its associated persistence class, License. Meanwhile, the object model of License maps to a Java class with an attribute of role, "belongsTo" typed as Software. It specifies the association that Software contains a particular License and a License belongs to particular software.
To manipulate the association, the following lines of code should be implemented.
Software software = Software.createSoftware(); License license = License.createLicense(); license.setBelongsTo(software);
In the above association, the primary key of the Software table will become a foreign key in License table when transforming to data model. Thus, after executing the lines of code, the primary key of the software will be referenced as a foreign key of the license record.
Figure 21.3 - Code for add an one-to-one association
It is a bi-directional association with smart association handling. The association link can be created by setting either the role of Software, or the role of License, i.e. setting one of the roles builds up a bi-directional association automatically. It is not required to set one role after the other. Hence, both license.setBelongsTo(software) and software.setContains(license) result in building up the bi-directional association.

SDE-VS User’s Guide (Part 2, for ORM) Chapter 21 –Manipulating Persistent Data with Java
21-5
One-to-Many Association In a bi-directional one-to-many association, a class has multiplicity of one while the other has many. If the class has multiplicity of many, the corresponding collection class will be automatically generated for manipulating the objects. When transforming the association to persistent code, the role name will map to an attribute with data type of a collection class. For more detailed information on the collection class, refer to the description in Using Collection section.
A bi-directional one-to-many association is shown below.
Figure 21.4 - Classes with One-to-Many association
To manipulate the bi-directional one-to-many association, you can create the association in one of the two ways:
• Set the properties of role with an instance of the associated class; i.e. classB.setRoleB(classA) • Add the objects to the collection of the associated class; i.e. classA.roleA.add(classB)
where classA is an object of ClassA; classB is an object of ClassB; roleA is the collection of ClassB; setRoleB is the setter method of property, roleB.
After specifying the association, the value of primary key of the object of ClassA will be referenced as a foreign key of the associated object of ClassB.
Setting the property of role
For information on setting the properties of role, refer to the description in the One-to-One Association section.
Adding objects to the collection
In order to add an object to the collection, implement the program with the following steps:
1. Create a new instance of the class which associates with more than one instance of associated class. 2. Create a new object of the associated class. 3. Add a new object or an existing object of the associated class to the collection belonging to the class.
Table shows the method summary of the collection class to be used for adding a new object to it
Return Type Method Name Description
void add(Class value) Add a new object to the collection of the associated class.
Table 21.3
Remark:
1. Class should be replaced by the name of the associated class.
Example:
Figure 21.5 - Mapping One-to-Many association
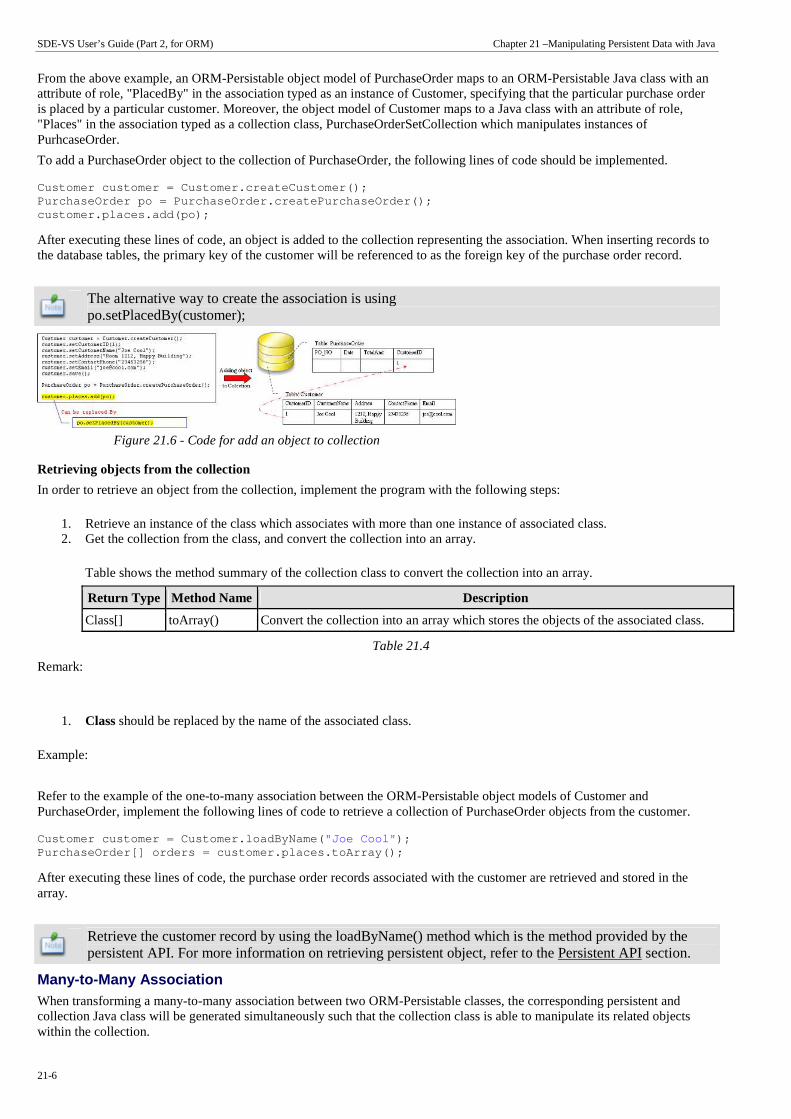
SDE-VS User’s Guide (Part 2, for ORM) Chapter 21 –Manipulating Persistent Data with Java
21-6
From the above example, an ORM-Persistable object model of PurchaseOrder maps to an ORM-Persistable Java class with an attribute of role, "PlacedBy" in the association typed as an instance of Customer, specifying that the particular purchase order is placed by a particular customer. Moreover, the object model of Customer maps to a Java class with an attribute of role, "Places" in the association typed as a collection class, PurchaseOrderSetCollection which manipulates instances of PurhcaseOrder.
To add a PurchaseOrder object to the collection of PurchaseOrder, the following lines of code should be implemented.
Customer customer = Customer.createCustomer(); PurchaseOrder po = PurchaseOrder.createPurchaseOrde r(); customer.places.add(po);
After executing these lines of code, an object is added to the collection representing the association. When inserting records to the database tables, the primary key of the customer will be referenced to as the foreign key of the purchase order record.
The alternative way to create the association is using po.setPlacedBy(customer);
Figure 21.6 - Code for add an object to collection
Retrieving objects from the collection
In order to retrieve an object from the collection, implement the program with the following steps:
1. Retrieve an instance of the class which associates with more than one instance of associated class. 2. Get the collection from the class, and convert the collection into an array.
Table shows the method summary of the collection class to convert the collection into an array.
Return Type Method Name Description
Class[] toArray() Convert the collection into an array which stores the objects of the associated class.
Table 21.4
Remark:
1. Class should be replaced by the name of the associated class.
Example:
Refer to the example of the one-to-many association between the ORM-Persistable object models of Customer and PurchaseOrder, implement the following lines of code to retrieve a collection of PurchaseOrder objects from the customer.
Customer customer = Customer.loadByName( "Joe Cool" ); PurchaseOrder[] orders = customer.places.toArray();
After executing these lines of code, the purchase order records associated with the customer are retrieved and stored in the array.
Retrieve the customer record by using the loadByName() method which is the method provided by the persistent API. For more information on retrieving persistent object, refer to the Persistent API section.
Many-to-Many Association When transforming a many-to-many association between two ORM-Persistable classes, the corresponding persistent and collection Java class will be generated simultaneously such that the collection class is able to manipulate its related objects within the collection.

SDE-VS User’s Guide (Part 2, for ORM) Chapter 21 –Manipulating Persistent Data with Java
21-7
In order to specify the many-to-many association, add the objects to the corresponding collection of the associated class. For information on adding objects to the collection, refer to the description in the One-to-Many Association section.
In addition, a many-to-many association in the object model is transformed to data model by generating a Link Entity to form two one-to-many relationships between two generated entities. The primary keys of the two entities will migrate to the link entity as the primary/foreign keys. When specifying the association by adding objects to the collection, the primary key of the two related instances will be inserted as a pair for a row of the Link Entity automatically.
Example:
Figure 21.7 - Mapping Many-to-Many association
Four classes including Student, StudentSetCollection, Course and CourseSetCollection are generated from the above object model.
By executing the following lines of code:
Student student = Student.createStudent(); student.setStudentID(0021345); student.setName( "Wenda Wong" ); Course course = Course.createCourse(); course.setCourseCode(5138); course.setName( "Object Oriented Technology" ); course.setTutor( "Kelvin Woo" ); course.contains.add(student);
Both the Student table and Course table are inserted with a new record. After specifying the association by course.contains.add(student) the corresponding primary keys of student record and course record migrate to the Student_Course Link Entity to form a row of record.
Figure 21.8 - Code for adding a many-to-many association
Using Collection A collection represents a group of objects. Some collections allow duplicate objects and others do not. Some collections are ordered and other unordered. A collection class thus supports the manipulation of the objects within a collection. There are four types of collection class supported, including set, bag, list and map.
The type of collection can be specified in advance of generating persistence code. Refer to Specifying Collection Type in the Object Model chapter for more information.
Set
Set is an unordered collection that does not allow duplication of objects. It is the default type for unordered collection.
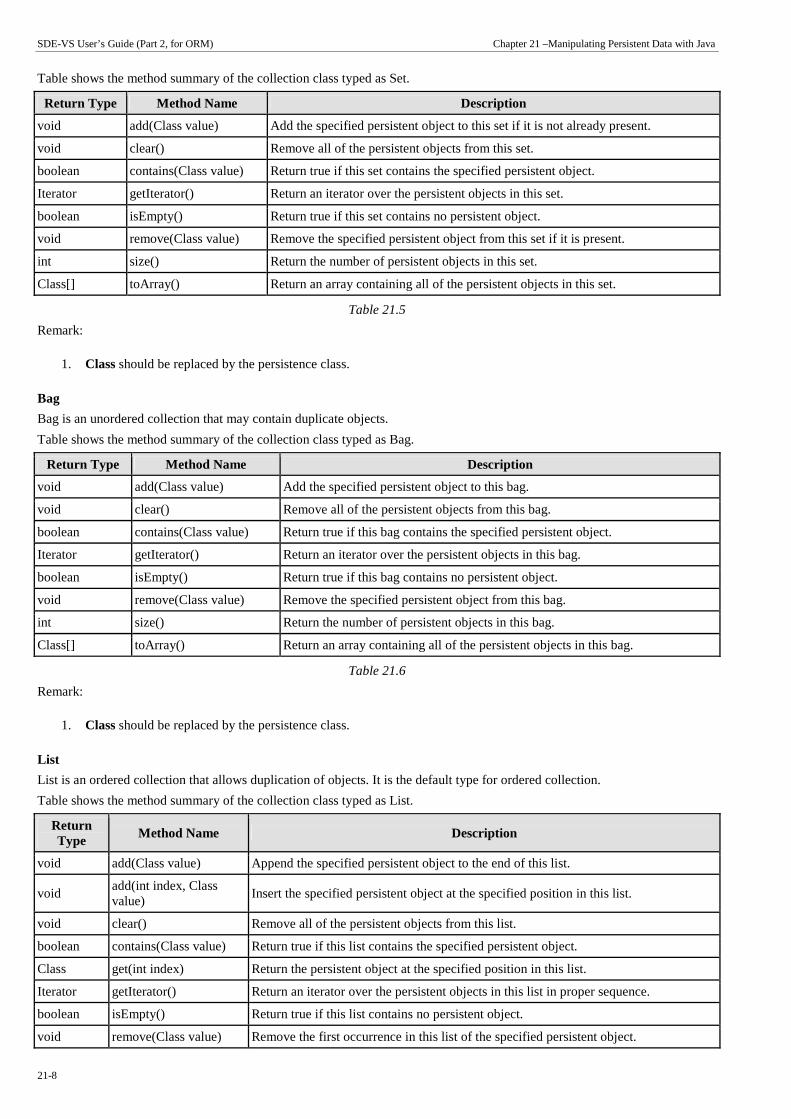
SDE-VS User’s Guide (Part 2, for ORM) Chapter 21 –Manipulating Persistent Data with Java
21-8
Table shows the method summary of the collection class typed as Set.
Return Type Method Name Description
void add(Class value) Add the specified persistent object to this set if it is not already present.
void clear() Remove all of the persistent objects from this set.
boolean contains(Class value) Return true if this set contains the specified persistent object.
Iterator getIterator() Return an iterator over the persistent objects in this set.
boolean isEmpty() Return true if this set contains no persistent object.
void remove(Class value) Remove the specified persistent object from this set if it is present.
int size() Return the number of persistent objects in this set.
Class[] toArray() Return an array containing all of the persistent objects in this set.
Table 21.5
Remark:
1. Class should be replaced by the persistence class.
Bag
Bag is an unordered collection that may contain duplicate objects.
Table shows the method summary of the collection class typed as Bag.
Return Type Method Name Description
void add(Class value) Add the specified persistent object to this bag.
void clear() Remove all of the persistent objects from this bag.
boolean contains(Class value) Return true if this bag contains the specified persistent object.
Iterator getIterator() Return an iterator over the persistent objects in this bag.
boolean isEmpty() Return true if this bag contains no persistent object.
void remove(Class value) Remove the specified persistent object from this bag.
int size() Return the number of persistent objects in this bag.
Class[] toArray() Return an array containing all of the persistent objects in this bag.
Table 21.6
Remark:
1. Class should be replaced by the persistence class.
List
List is an ordered collection that allows duplication of objects. It is the default type for ordered collection.
Table shows the method summary of the collection class typed as List.
Return Type
Method Name Description
void add(Class value) Append the specified persistent object to the end of this list.
void add(int index, Class value)
Insert the specified persistent object at the specified position in this list.
void clear() Remove all of the persistent objects from this list.
boolean contains(Class value) Return true if this list contains the specified persistent object.
Class get(int index) Return the persistent object at the specified position in this list.
Iterator getIterator() Return an iterator over the persistent objects in this list in proper sequence.
boolean isEmpty() Return true if this list contains no persistent object.
void remove(Class value) Remove the first occurrence in this list of the specified persistent object.

SDE-VS User’s Guide (Part 2, for ORM) Chapter 21 –Manipulating Persistent Data with Java
21-9
Class remove(int index) Remove the persistent object at the specified position in this list.
int set(int index, Class value)
Replace the persistent object at the specified position in this list with the specified persistent object.
int size() Return the number of persistent objects in this list.
Class[] toArray() Return an array containing all of the persistent objects in this list in proper sequence.
Table 21.7
Remark:
1. Class should be replaced by the persistence class.
Map
Map is an ordered collection which is a set of key-value pairs while duplicate keys are not allowed.
Table shows the method summary of the collection class typed as Map.
Return Type Method Name Description
void add(Object key, Class value) Add the specified persistent object with the specified key to this map.
void clear() Remove all mappings from this map.
boolean contains(Object key) Return true if this map contains a mapping for the specified key.
Class get(Object key) Return the persistent object to which this map maps the specified key.
Iterator getIterator() Return an iterator over the persistent objects in this map.
Iterator getKeyIterator() Return an iterator over the persistent objects in this map.
boolean isEmpty() Return true if this map contains no key-value mappings.
void remove(Object key) Remove the mapping for this key from this map if it is present.
int size() Return the number of key-value mappings in this map.
Class[] toArray() Return an array containing all of the persistent objects in this map.
Table 21.8
Remark:
1. Class should be replaced by the persistence class.
Standard Association Handling
With standard association handling, when updating one end of the association, the generated persistent code will not update the other end of a bi-directional association automatically. Hence, you have to define the two ends of the bi-directional association manually to maintain consistency. Examples are given to show how to manipulate the one-to-one, one-to-many and many-to-many associations with standard association handling.
One-to-One Association In order to manipulate the directional association, implement the program with the following steps:
1. Set the properties of role name of the object.
Table shows the method summary of the persistence class to be used for setting the directional association.
Return Type Method Name Description
void setRoleName(Class value) Set the value to the role of an instance.
Table 21.9
Remark:
1. RoleName should be replaced by the role of the navigable association. 2. Class should be replaced by the data type of the supplier class in the navigable association.

SDE-VS User’s Guide (Part 2, for ORM) Chapter 21 –Manipulating Persistent Data with Java
21-10
Example:
Figure 21.9 - Mapping One-to-one association
From the above example, an ORM-Persistable object model of Software maps to an ORM-Persistable Java class with an attribute of role, "contains" in the association typed as its associated persistence class, License. Meanwhile, the object model of License maps to a Java class with an attribute of role, "belongsTo" typed as Software. It specifies the association that Software contains a particular License and a License belongs to particular software.
To manipulate the association, the following lines of code should be implemented.
Software software = Software.createSoftware(); License license = License.createLicense(); license.setBelongsTo(software); software.setContains(license);
In the above association, the primary key of the Software table will become a foreign key in License table when transforming to data model. Thus, after executing the lines of code, the primary key of the software will be referenced as a foreign key of the license record.
Figure 21.10 - Code for add an one-to-one association
It is a bi-directional association with standard association handling. The association link must be created by setting both the roles of Software and License.
One-to-Many Association In a bi-directional one-to-many association, a class has multiplicity of one while the other has many. When transforming the association to persistent code, the role name will map to an attribute of the class with data type of a Java collection class. The type of collection is specified in the object model, refer to the description in Using Collection section for mapping the type of collection with Java collection class.
A bi-directional one-to-many association is shown below.
Figure 21.11 - Class with One-to-Many relationship

SDE-VS User’s Guide (Part 2, for ORM) Chapter 21 –Manipulating Persistent Data with Java
21-11
With standard association handling, you have to create the association with the following steps in order to manipulate the bi-directional one-to-many association:
• Set the properties of role with an instance of the associated class; i.e. classB.setRoleB(classA) • Add the objects to the collection of the associated class; i.e. classA.getRoleA().add(classB)
where classA is an object of ClassA; classB is an object of ClassB; getRoleA returns the collection of ClassB; setRoleB is the setter method of property, roleB.
After specifying the association, the value of primary key of the object of ClassA will be referenced as a foreign key of the associated object of ClassB.
Setting the property of role
For information on setting the properties of role, refer to the description in the One-to-One Association section.
Adding objects to the collection
In order to add an object to the collection, implement the program with the following steps:
1. Create a new instance of the class which associates with more than one instance of associated class. 2. Create a new object of the associated class. 3. Add a new object or an existing object of the associated class to the collection belonging to the class.
Example:
Figure 21.12 - Mapping many-to-many association with using collection
From the above example, an ORM-Persistable object model of PurchaseOrder maps to an ORM-Persistable Java class with an attribute of role, "PlacedBy" in the association typed as an instance of Customer, specifying that the particular purchase order is placed by a particular customer. Moreover, the object model of Customer maps to a Java class with an attribute of role, "Places" in the association typed as a collection, Set which is the specified type of collection in the model manipulating instances of PurhcaseOrder.
To add a PurchaseOrder object to the collection of PurchaseOrder, the following lines of code should be implemented.
Customer customer = Customer.createCustomer(); PurchaseOrder po = PurchaseOrder.createPurchaseOrde r(); customer.getPlaces().add(po); po.setPlacedBy(customer);
After executing these lines of code, an object is added to the collection representing the association. When inserting records to the database tables, the primary key of the customer will be referenced to as the foreign key of the purchase order record.
Figure 21.13 - Code for add a many-to-many association
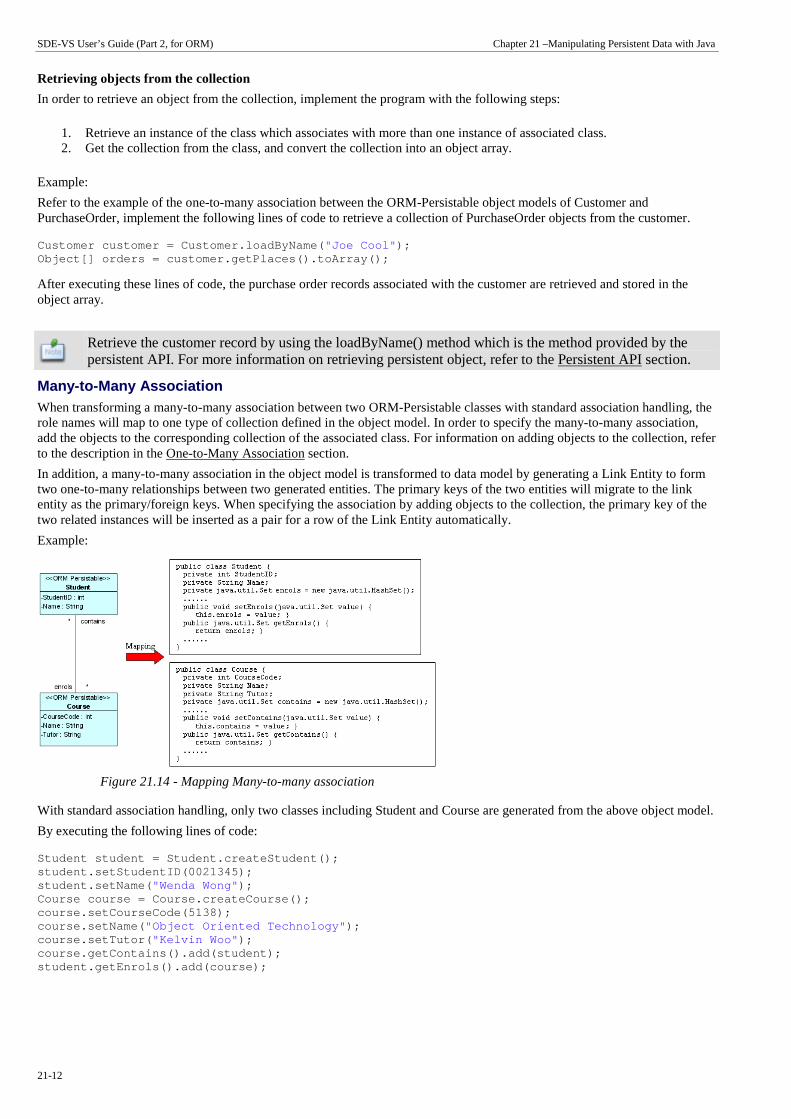
SDE-VS User’s Guide (Part 2, for ORM) Chapter 21 –Manipulating Persistent Data with Java
21-12
Retrieving objects from the collection
In order to retrieve an object from the collection, implement the program with the following steps:
1. Retrieve an instance of the class which associates with more than one instance of associated class. 2. Get the collection from the class, and convert the collection into an object array.
Example:
Refer to the example of the one-to-many association between the ORM-Persistable object models of Customer and PurchaseOrder, implement the following lines of code to retrieve a collection of PurchaseOrder objects from the customer.
Customer customer = Customer.loadByName( "Joe Cool" ); Object[] orders = customer.getPlaces().toArray();
After executing these lines of code, the purchase order records associated with the customer are retrieved and stored in the object array.
Retrieve the customer record by using the loadByName() method which is the method provided by the persistent API. For more information on retrieving persistent object, refer to the Persistent API section.
Many-to-Many Association When transforming a many-to-many association between two ORM-Persistable classes with standard association handling, the role names will map to one type of collection defined in the object model. In order to specify the many-to-many association, add the objects to the corresponding collection of the associated class. For information on adding objects to the collection, refer to the description in the One-to-Many Association section.
In addition, a many-to-many association in the object model is transformed to data model by generating a Link Entity to form two one-to-many relationships between two generated entities. The primary keys of the two entities will migrate to the link entity as the primary/foreign keys. When specifying the association by adding objects to the collection, the primary key of the two related instances will be inserted as a pair for a row of the Link Entity automatically.
Example:
Figure 21.14 - Mapping Many-to-many association
With standard association handling, only two classes including Student and Course are generated from the above object model.
By executing the following lines of code:
Student student = Student.createStudent(); student.setStudentID(0021345); student.setName( "Wenda Wong" ); Course course = Course.createCourse(); course.setCourseCode(5138); course.setName( "Object Oriented Technology" ); course.setTutor( "Kelvin Woo" ); course.getContains().add(student); student.getEnrols().add(course);
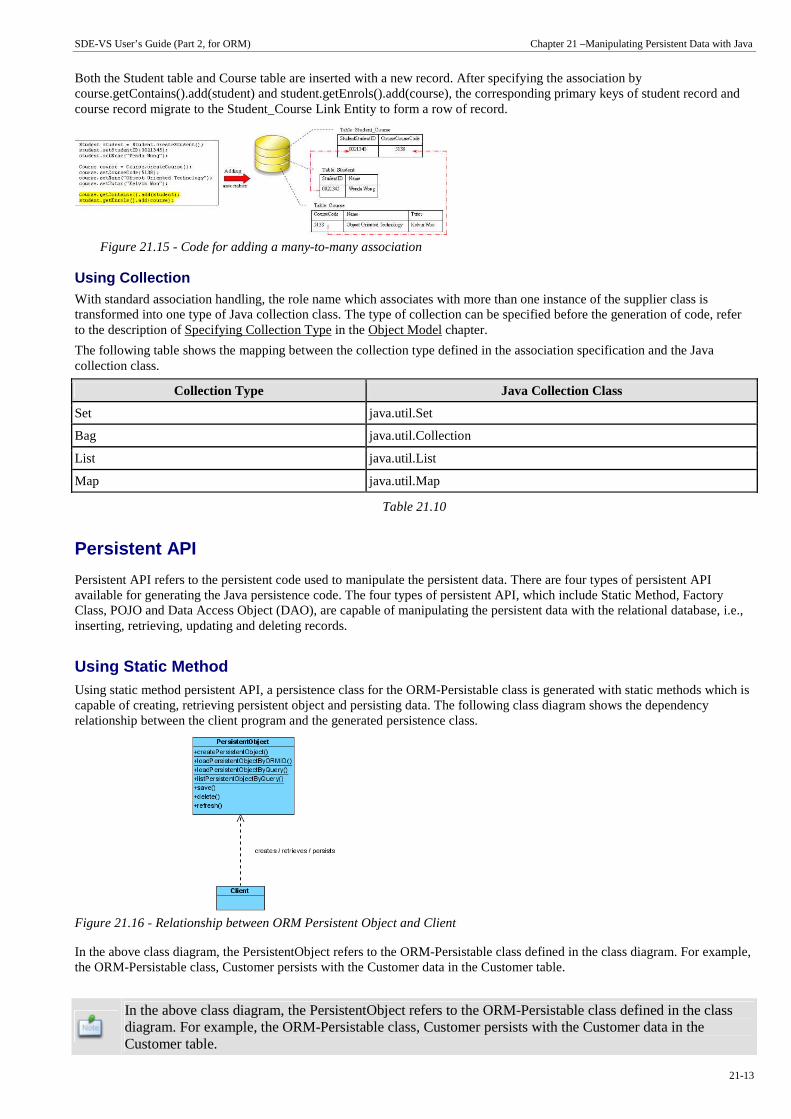
SDE-VS User’s Guide (Part 2, for ORM) Chapter 21 –Manipulating Persistent Data with Java
21-13
Both the Student table and Course table are inserted with a new record. After specifying the association by course.getContains().add(student) and student.getEnrols().add(course), the corresponding primary keys of student record and course record migrate to the Student_Course Link Entity to form a row of record.
Figure 21.15 - Code for adding a many-to-many association
Using Collection With standard association handling, the role name which associates with more than one instance of the supplier class is transformed into one type of Java collection class. The type of collection can be specified before the generation of code, refer to the description of Specifying Collection Type in the Object Model chapter.
The following table shows the mapping between the collection type defined in the association specification and the Java collection class.
Collection Type Java Collection Class
Set java.util.Set
Bag java.util.Collection
List java.util.List
Map java.util.Map
Table 21.10
Persistent API
Persistent API refers to the persistent code used to manipulate the persistent data. There are four types of persistent API available for generating the Java persistence code. The four types of persistent API, which include Static Method, Factory Class, POJO and Data Access Object (DAO), are capable of manipulating the persistent data with the relational database, i.e., inserting, retrieving, updating and deleting records.
Using Static Method Using static method persistent API, a persistence class for the ORM-Persistable class is generated with static methods which is capable of creating, retrieving persistent object and persisting data. The following class diagram shows the dependency relationship between the client program and the generated persistence class.
Figure 21.16 - Relationship between ORM Persistent Object and Client
In the above class diagram, the PersistentObject refers to the ORM-Persistable class defined in the class diagram. For example, the ORM-Persistable class, Customer persists with the Customer data in the Customer table.
In the above class diagram, the PersistentObject refers to the ORM-Persistable class defined in the class diagram. For example, the ORM-Persistable class, Customer persists with the Customer data in the Customer table.

SDE-VS User’s Guide (Part 2, for ORM) Chapter 21 –Manipulating Persistent Data with Java
21-14
Example:
Figure 21.17 - The Class generated with the persistent methods
From the above example, a Customer persistence class is generated with a set of methods supporting the database manipulation.
In this section, it introduces how to use the static methods of the generated persistence classes to manipulate the persistent data with the relational database.
Creating a Persistent Object
As a persistence class represents a table in the database and an instance of the class represents a record of the table, creating a persistent object in the application system is the same as adding a row of new record to the table.
In order to insert a new row to the database table, implement the program with the following steps:
1. Create a new instance of the class. 2. Set the properties of the object. 3. Insert the object as a row to the database.
Table shows the method summary of the persistence class to be used for inserting a row to database.
Return Type Method Name Description
Class createClass() Create a new instance of the class.
void setAttribute(DataType value) Set the value to the property of an instance.
boolean save() Insert the object as a row to the database table.
Table 21.11
Remark:
1. Class should be replaced by the name of the generated persistence class. 2. Attribute should be replaced by the name of the attribute. 3. DataType should be replaced by the data type of the attribute defined in the object model.
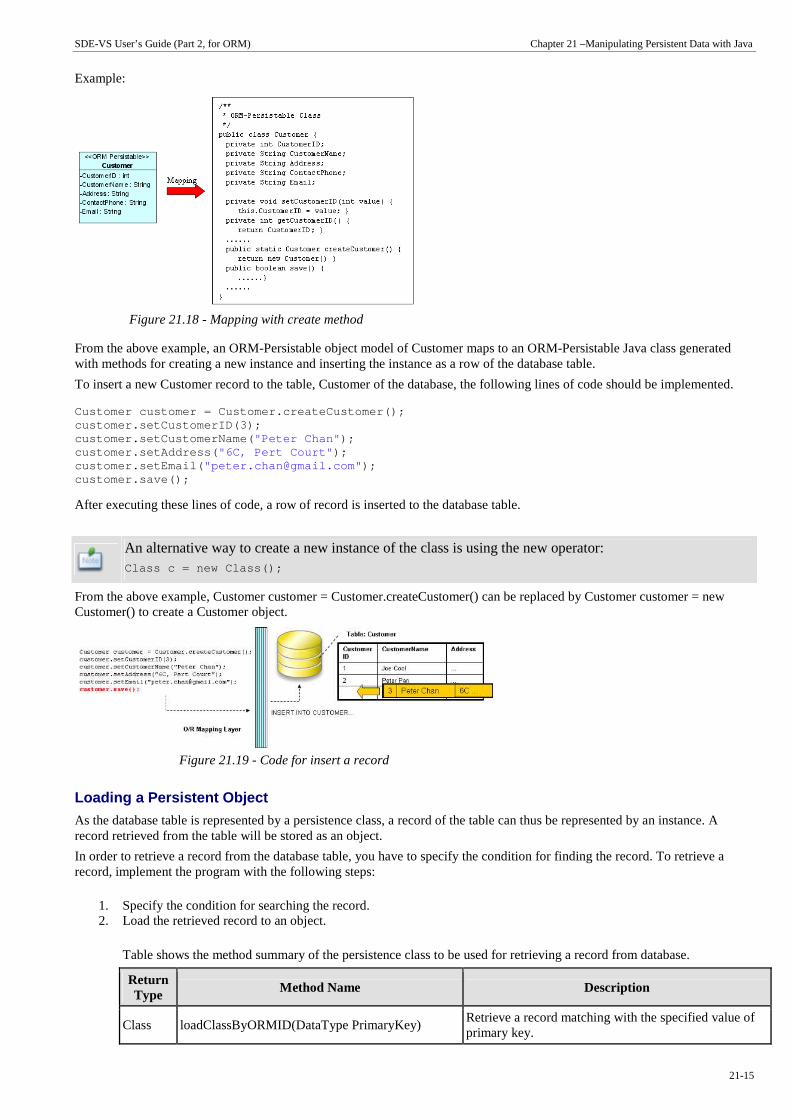
SDE-VS User’s Guide (Part 2, for ORM) Chapter 21 –Manipulating Persistent Data with Java
21-15
Example:
Figure 21.18 - Mapping with create method
From the above example, an ORM-Persistable object model of Customer maps to an ORM-Persistable Java class generated with methods for creating a new instance and inserting the instance as a row of the database table.
To insert a new Customer record to the table, Customer of the database, the following lines of code should be implemented.
Customer customer = Customer.createCustomer(); customer.setCustomerID(3); customer.setCustomerName( "Peter Chan" ); customer.setAddress( "6C, Pert Court" ); customer.setEmail( "[email protected]" ); customer.save();
After executing these lines of code, a row of record is inserted to the database table.
An alternative way to create a new instance of the class is using the new operator: Class c = new Class();
From the above example, Customer customer = Customer.createCustomer() can be replaced by Customer customer = new Customer() to create a Customer object.
Figure 21.19 - Code for insert a record
Loading a Persistent Object
As the database table is represented by a persistence class, a record of the table can thus be represented by an instance. A record retrieved from the table will be stored as an object.
In order to retrieve a record from the database table, you have to specify the condition for finding the record. To retrieve a record, implement the program with the following steps:
1. Specify the condition for searching the record. 2. Load the retrieved record to an object.
Table shows the method summary of the persistence class to be used for retrieving a record from database.
Return Type
Method Name Description
Class loadClassByORMID(DataType PrimaryKey) Retrieve a record matching with the specified value of primary key.

SDE-VS User’s Guide (Part 2, for ORM) Chapter 21 –Manipulating Persistent Data with Java
21-16
Class loadClassByORMID(PersistentSession session, DataType PrimaryKey)
Retrieve a record matching with the specified value of primary key and specified session.
Class loadClassByQuery(String condition, String orderBy)
Retrieve the first record matching the user defined condition while the matched records are ordered by a specified attribute.
Class loadClassByQuery(PersistentSession session, String condition, String orderBy)
Retrieve the first record matching the user defined condition and specified session while the matched records are ordered by a specified attribute.
Table 21.12
Remark:
1. Class should be replaced by the name of the persistence class. 2. DataType should be replaced by the data type of the attribute defined in the object model.
Example:
Figure 21.20 - Mapping with load methods
From the above example, an ORM-Persistable object model, Customer maps to an ORM-Persistable Java class generated with methods for retrieving a matched record.
To retrieve a record from the Customer table, the following line of code should be implemented.
Loading an object by passing the value of primary key:
Customer customer = Customer.loadCustomerByORMID(2) ;
Loading an object by specifying a user defined condition:
Customer customer = Customer.loadCustomerByQuery( "Customer.CustomerName='Peter'" , "Customer.CustomerName" );
After executing the code, a matched row is retrieved and loaded to a Customer object.
Figure 21.21 - Code for load an object
Updating a Persistent Object
As a record can be retrieved from the table and loaded to an object of the persistence class, the record is allowed to update by simply using the setter method of the property.
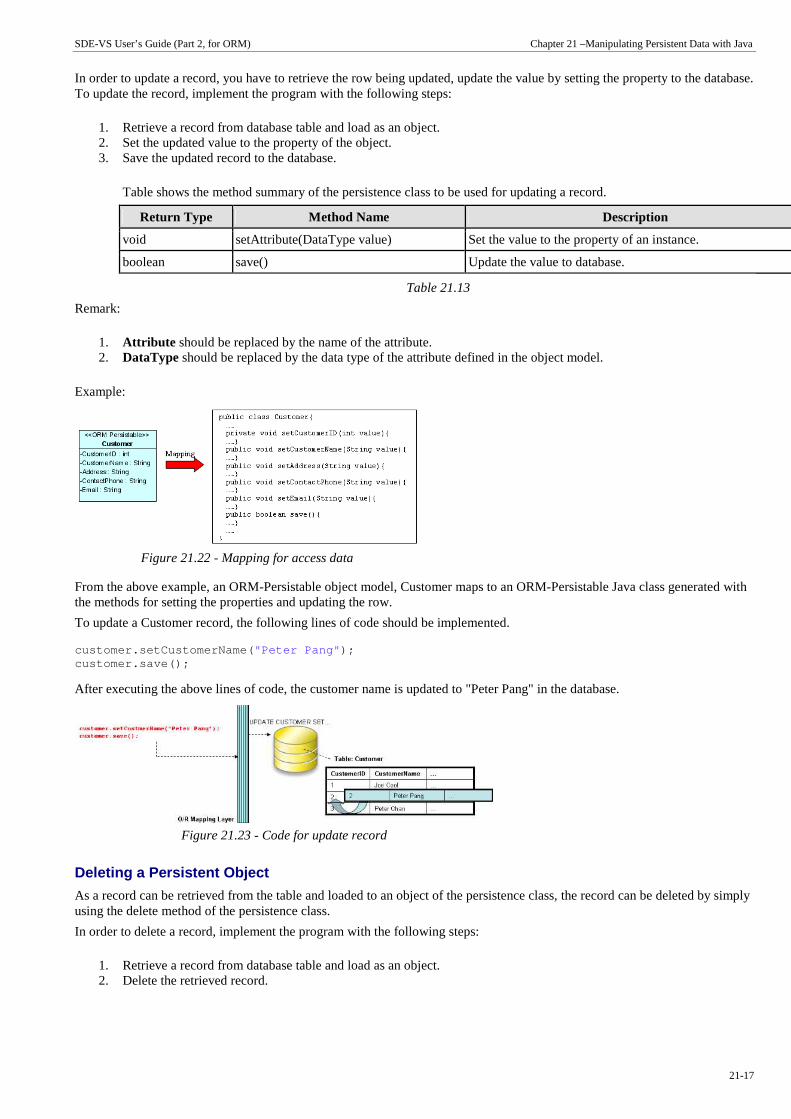
SDE-VS User’s Guide (Part 2, for ORM) Chapter 21 –Manipulating Persistent Data with Java
21-17
In order to update a record, you have to retrieve the row being updated, update the value by setting the property to the database. To update the record, implement the program with the following steps:
1. Retrieve a record from database table and load as an object. 2. Set the updated value to the property of the object. 3. Save the updated record to the database.
Table shows the method summary of the persistence class to be used for updating a record.
Return Type Method Name Description
void setAttribute(DataType value) Set the value to the property of an instance.
boolean save() Update the value to database.
Table 21.13
Remark:
1. Attribute should be replaced by the name of the attribute. 2. DataType should be replaced by the data type of the attribute defined in the object model.
Example:
Figure 21.22 - Mapping for access data
From the above example, an ORM-Persistable object model, Customer maps to an ORM-Persistable Java class generated with the methods for setting the properties and updating the row.
To update a Customer record, the following lines of code should be implemented.
customer.setCustomerName( "Peter Pang" ); customer.save();
After executing the above lines of code, the customer name is updated to "Peter Pang" in the database.
Figure 21.23 - Code for update record
Deleting a Persistent Object
As a record can be retrieved from the table and loaded to an object of the persistence class, the record can be deleted by simply using the delete method of the persistence class.
In order to delete a record, implement the program with the following steps:
1. Retrieve a record from database table and load as an object. 2. Delete the retrieved record.
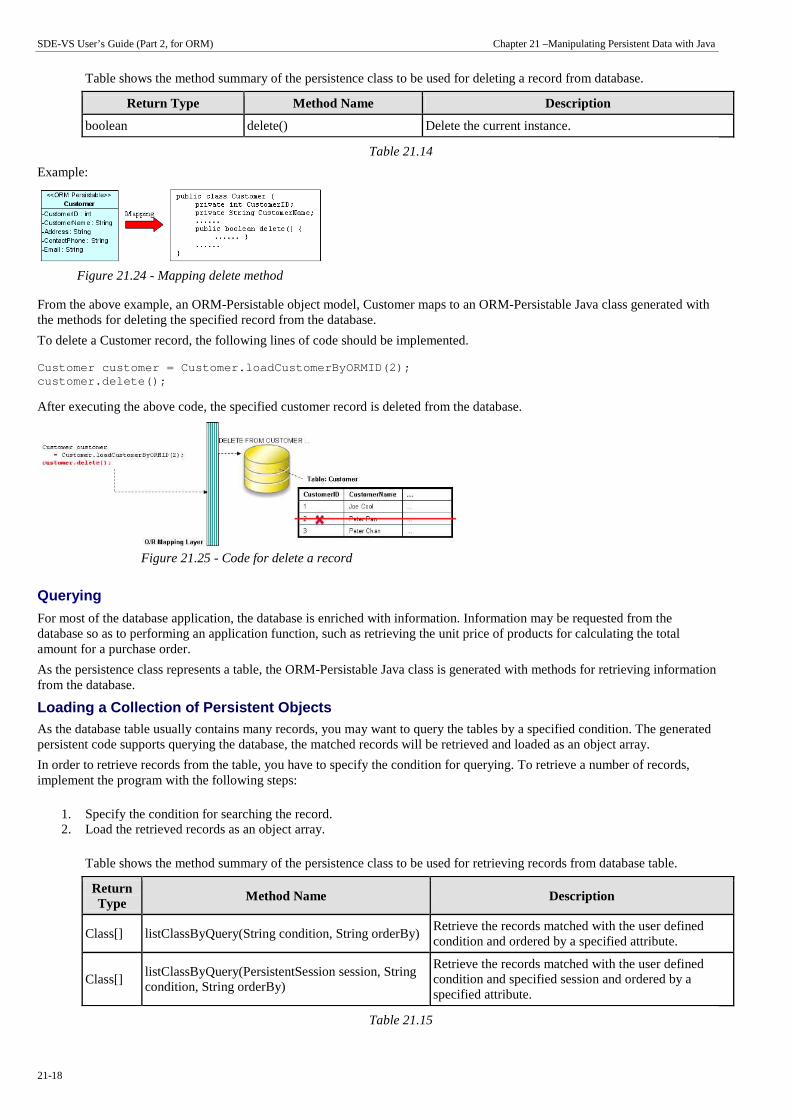
SDE-VS User’s Guide (Part 2, for ORM) Chapter 21 –Manipulating Persistent Data with Java
21-18
Table shows the method summary of the persistence class to be used for deleting a record from database.
Return Type Method Name Description
boolean delete() Delete the current instance.
Table 21.14
Example:
Figure 21.24 - Mapping delete method
From the above example, an ORM-Persistable object model, Customer maps to an ORM-Persistable Java class generated with the methods for deleting the specified record from the database.
To delete a Customer record, the following lines of code should be implemented.
Customer customer = Customer.loadCustomerByORMID(2) ; customer.delete();
After executing the above code, the specified customer record is deleted from the database.
Figure 21.25 - Code for delete a record
Querying
For most of the database application, the database is enriched with information. Information may be requested from the database so as to performing an application function, such as retrieving the unit price of products for calculating the total amount for a purchase order.
As the persistence class represents a table, the ORM-Persistable Java class is generated with methods for retrieving information from the database.
Loading a Collection of Persistent Objects As the database table usually contains many records, you may want to query the tables by a specified condition. The generated persistent code supports querying the database, the matched records will be retrieved and loaded as an object array.
In order to retrieve records from the table, you have to specify the condition for querying. To retrieve a number of records, implement the program with the following steps:
1. Specify the condition for searching the record. 2. Load the retrieved records as an object array.
Table shows the method summary of the persistence class to be used for retrieving records from database table.
Return Type Method Name Description
Class[] listClassByQuery(String condition, String orderBy) Retrieve the records matched with the user defined condition and ordered by a specified attribute.
Class[] listClassByQuery(PersistentSession session, String condition, String orderBy)
Retrieve the records matched with the user defined condition and specified session and ordered by a specified attribute.
Table 21.15
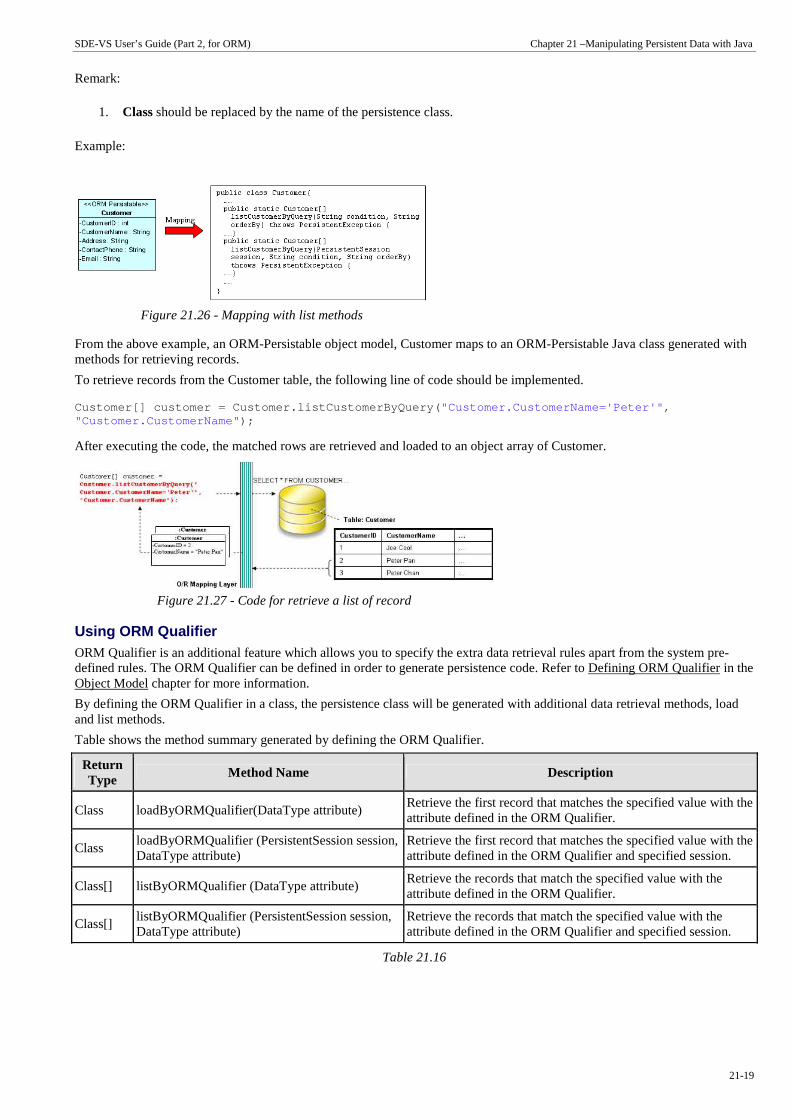
SDE-VS User’s Guide (Part 2, for ORM) Chapter 21 –Manipulating Persistent Data with Java
21-19
Remark:
1. Class should be replaced by the name of the persistence class.
Example:
Figure 21.26 - Mapping with list methods
From the above example, an ORM-Persistable object model, Customer maps to an ORM-Persistable Java class generated with methods for retrieving records.
To retrieve records from the Customer table, the following line of code should be implemented.
Customer[] customer = Customer.listCustomerByQuery( "Customer.CustomerName='Peter'" , "Customer.CustomerName" );
After executing the code, the matched rows are retrieved and loaded to an object array of Customer.
Figure 21.27 - Code for retrieve a list of record
Using ORM Qualifier ORM Qualifier is an additional feature which allows you to specify the extra data retrieval rules apart from the system pre-defined rules. The ORM Qualifier can be defined in order to generate persistence code. Refer to Defining ORM Qualifier in the Object Model chapter for more information.
By defining the ORM Qualifier in a class, the persistence class will be generated with additional data retrieval methods, load and list methods.
Table shows the method summary generated by defining the ORM Qualifier.
Return Type
Method Name Description
Class loadByORMQualifier(DataType attribute) Retrieve the first record that matches the specified value with the attribute defined in the ORM Qualifier.
Class loadByORMQualifier (PersistentSession session, DataType attribute)
Retrieve the first record that matches the specified value with the attribute defined in the ORM Qualifier and specified session.
Class[] listByORMQualifier (DataType attribute) Retrieve the records that match the specified value with the attribute defined in the ORM Qualifier.
Class[] listByORMQualifier (PersistentSession session, DataType attribute)
Retrieve the records that match the specified value with the attribute defined in the ORM Qualifier and specified session.
Table 21.16

SDE-VS User’s Guide (Part 2, for ORM) Chapter 21 –Manipulating Persistent Data with Java
21-20
Remark:
1. Class should be replaced by the name of the persistence class. 2. ORMQualifier should be replaced by the Name defined in the ORM Qualifier. 3. DataType should be replaced by the data type of the attribute which associated with the ORM Qualifier. 4. attribute is the specified value to be used for querying the table.
Example:
Figure 21.28 - Mapping with list methods
In the above example, a customer object model is defined with an ORM Qualifier named as Name and qualified with the attribute, CustomerName.
To query the Customer table with the ORM Qualifier in one of the two ways
• By Load method
Customer customer = Customer.loadByName( "Peter" );
After executing the code, the first occurrence of "Peter" in the CustomerName column in the Customer table will be loaded to the object identified as customer.
Figure 21.29 - Code for retrieve a record
• By List method
Customer[] customer = Customer.listByName( "Peter" );
After executing the code, all rows which contain "Peter" in the CustomerName column in the Customer table will be retrieved and stored in an array of Customer object.
Figure 21.30 - Code for retrieve a list of records
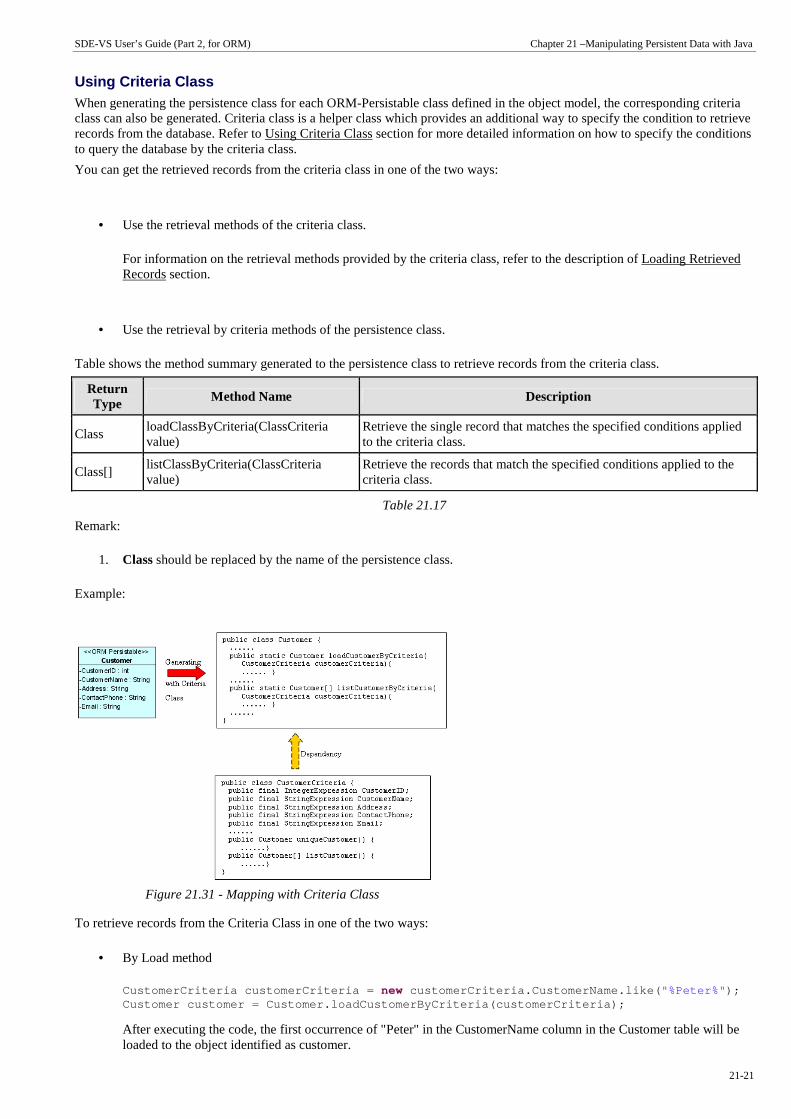
SDE-VS User’s Guide (Part 2, for ORM) Chapter 21 –Manipulating Persistent Data with Java
21-21
Using Criteria Class When generating the persistence class for each ORM-Persistable class defined in the object model, the corresponding criteria class can also be generated. Criteria class is a helper class which provides an additional way to specify the condition to retrieve records from the database. Refer to Using Criteria Class section for more detailed information on how to specify the conditions to query the database by the criteria class.
You can get the retrieved records from the criteria class in one of the two ways:
• Use the retrieval methods of the criteria class.
For information on the retrieval methods provided by the criteria class, refer to the description of Loading Retrieved Records section.
• Use the retrieval by criteria methods of the persistence class.
Table shows the method summary generated to the persistence class to retrieve records from the criteria class.
Return Type Method Name Description
Class loadClassByCriteria(ClassCriteria value)
Retrieve the single record that matches the specified conditions applied to the criteria class.
Class[] listClassByCriteria(ClassCriteria value)
Retrieve the records that match the specified conditions applied to the criteria class.
Table 21.17
Remark:
1. Class should be replaced by the name of the persistence class.
Example:
Figure 21.31 - Mapping with Criteria Class
To retrieve records from the Criteria Class in one of the two ways:
• By Load method
CustomerCriteria customerCriteria = new customerCriteria.CustomerName.like( "%Peter%" ); Customer customer = Customer.loadCustomerByCriteria (customerCriteria);
After executing the code, the first occurrence of "Peter" in the CustomerName column in the Customer table will be loaded to the object identified as customer.
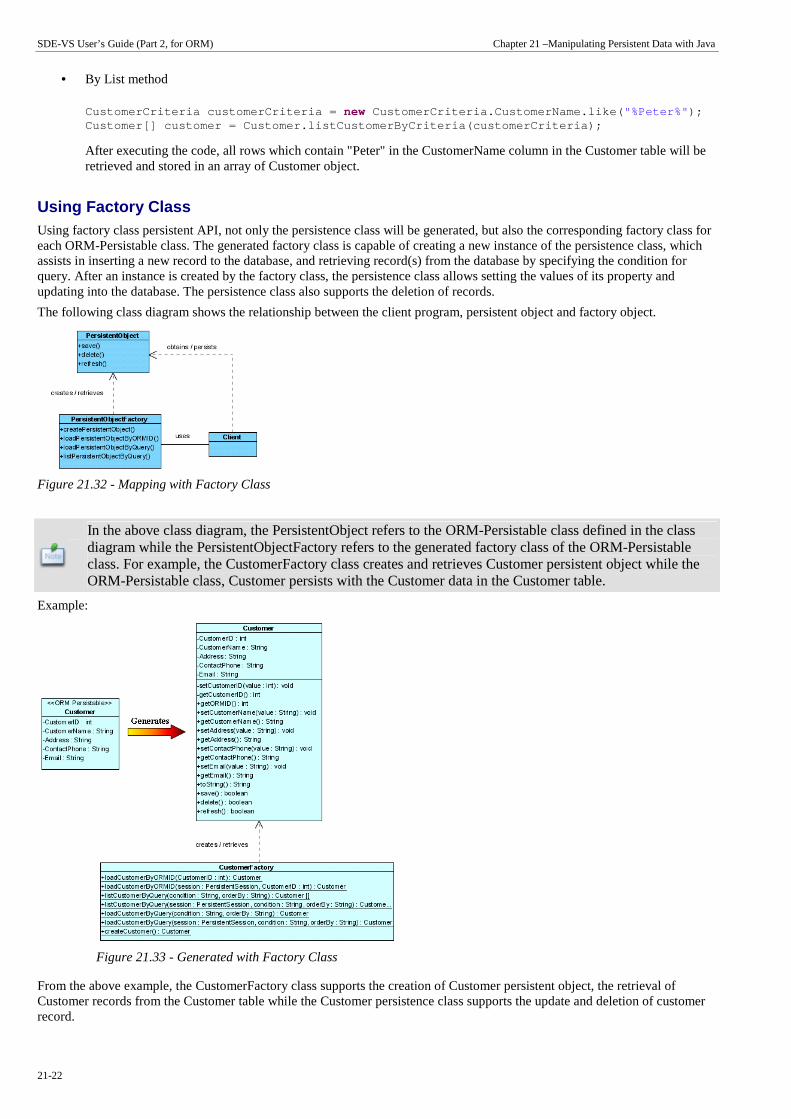
SDE-VS User’s Guide (Part 2, for ORM) Chapter 21 –Manipulating Persistent Data with Java
21-22
• By List method
CustomerCriteria customerCriteria = new CustomerCriteria.CustomerName.like( "%Peter%" ); Customer[] customer = Customer.listCustomerByCriter ia(customerCriteria);
After executing the code, all rows which contain "Peter" in the CustomerName column in the Customer table will be retrieved and stored in an array of Customer object.
Using Factory Class Using factory class persistent API, not only the persistence class will be generated, but also the corresponding factory class for each ORM-Persistable class. The generated factory class is capable of creating a new instance of the persistence class, which assists in inserting a new record to the database, and retrieving record(s) from the database by specifying the condition for query. After an instance is created by the factory class, the persistence class allows setting the values of its property and updating into the database. The persistence class also supports the deletion of records.
The following class diagram shows the relationship between the client program, persistent object and factory object.
Figure 21.32 - Mapping with Factory Class
In the above class diagram, the PersistentObject refers to the ORM-Persistable class defined in the class diagram while the PersistentObjectFactory refers to the generated factory class of the ORM-Persistable class. For example, the CustomerFactory class creates and retrieves Customer persistent object while the ORM-Persistable class, Customer persists with the Customer data in the Customer table.
Example:
Figure 21.33 - Generated with Factory Class
From the above example, the CustomerFactory class supports the creation of Customer persistent object, the retrieval of Customer records from the Customer table while the Customer persistence class supports the update and deletion of customer record.

SDE-VS User’s Guide (Part 2, for ORM) Chapter 21 –Manipulating Persistent Data with Java
21-23
Creating a Persistent Object
An instance of a persistence class represents a record of the corresponding table, creating a persistent object corresponds to inserting a new record to the table.
In order to insert a new row to the database table, implement the program with the following steps:
1. Create a new instance of the class by the factory class. 2. Set the properties of the object by the persistence class. 3. Insert the object as a row to the database by the persistence class.
Table shows the method summary of the factory and persistence classes to be used for inserting a row to database.
Class Type Return Type Method Name Description
Factory Class Class createClass() Create a new instance of the class.
Persistence Class void setAttribute(DataType value) Set the value to the property of an instance.
Persistence Class boolean save() Insert the object as a row to the database table.
Table 21.18
Remark:
1. Class should be replaced by the name of the generated persistence class. 2. Attribute should be replaced by the name of the attribute. 3. DataType should be replaced by the data type of the attribute defined in the object model.
Example:
Figure 21.34 - Mapping with Factory Class
From the above example, an ORM-Persistable object model of Customer maps to an ORM-Persistable Java class with methods for setting the properties. An ORM-Persistable factory class is generated with method for creating a new instance and; and thus these methods allow inserting the instance as a row of the database table.
To insert a new Customer record to the table, Customer of the database, the following lines of code should be implemented.
Customer customer = CustomerFactory.createCustomer( ); customer.setCustomerID(3); customer.setCustomerName( "Peter Chan" ); customer.setAddress( "6C, Pert Court" ); customer.setEmail( "[email protected]" ); customer.save();
After executing these lines of code, a row of record is inserted to the database table.
An alternative way to create a new instance of the class is using the new operator: Class c = new Class();
From the above example, Customer customer = CustomerFactory.createCustomer() can be replaced by Customer customer = new Customer() to create a Customer object.
Figure 21.35 - Code for creating record using Factory Class
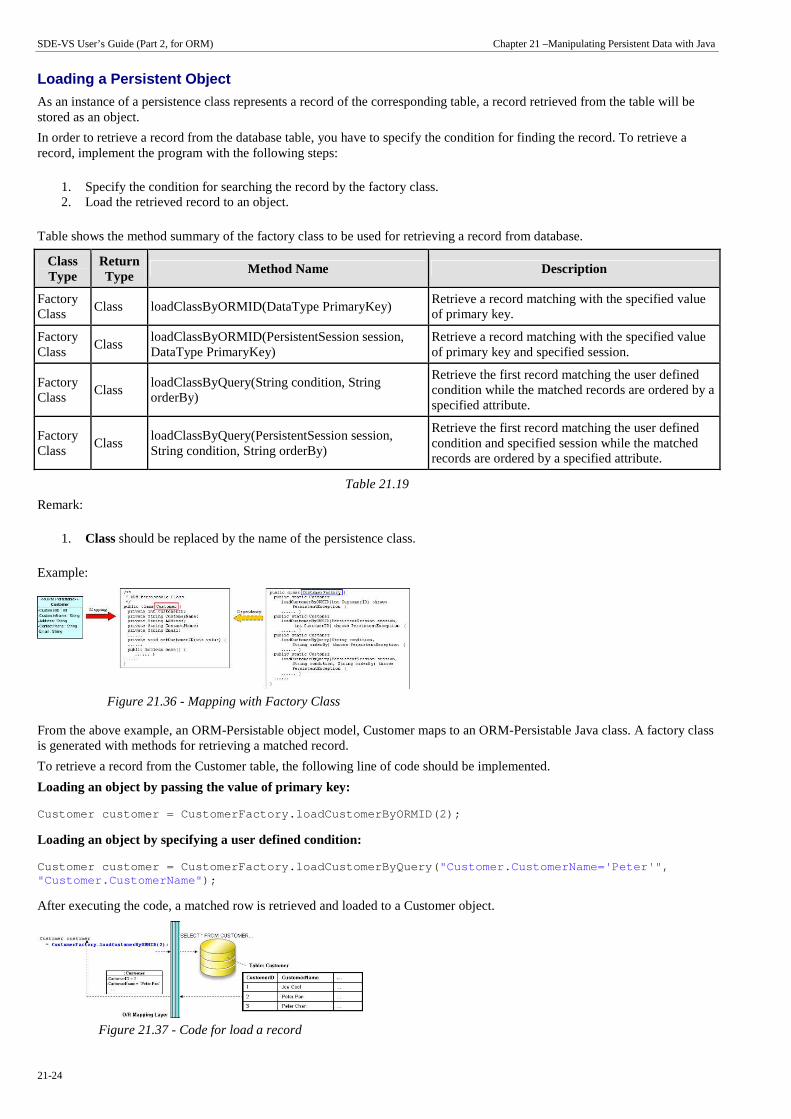
SDE-VS User’s Guide (Part 2, for ORM) Chapter 21 –Manipulating Persistent Data with Java
21-24
Loading a Persistent Object
As an instance of a persistence class represents a record of the corresponding table, a record retrieved from the table will be stored as an object.
In order to retrieve a record from the database table, you have to specify the condition for finding the record. To retrieve a record, implement the program with the following steps:
1. Specify the condition for searching the record by the factory class. 2. Load the retrieved record to an object.
Table shows the method summary of the factory class to be used for retrieving a record from database.
Class Type
Return Type
Method Name Description
Factory Class
Class loadClassByORMID(DataType PrimaryKey) Retrieve a record matching with the specified value of primary key.
Factory Class
Class loadClassByORMID(PersistentSession session, DataType PrimaryKey)
Retrieve a record matching with the specified value of primary key and specified session.
Factory Class
Class loadClassByQuery(String condition, String orderBy)
Retrieve the first record matching the user defined condition while the matched records are ordered by a specified attribute.
Factory Class
Class loadClassByQuery(PersistentSession session, String condition, String orderBy)
Retrieve the first record matching the user defined condition and specified session while the matched records are ordered by a specified attribute.
Table 21.19
Remark:
1. Class should be replaced by the name of the persistence class.
Example:
Figure 21.36 - Mapping with Factory Class
From the above example, an ORM-Persistable object model, Customer maps to an ORM-Persistable Java class. A factory class is generated with methods for retrieving a matched record.
To retrieve a record from the Customer table, the following line of code should be implemented.
Loading an object by passing the value of primary key:
Customer customer = CustomerFactory.loadCustomerByO RMID(2);
Loading an object by specifying a user defined condition:
Customer customer = CustomerFactory.loadCustomerByQ uery( "Customer.CustomerName='Peter'" , "Customer.CustomerName" );
After executing the code, a matched row is retrieved and loaded to a Customer object.
Figure 21.37 - Code for load a record
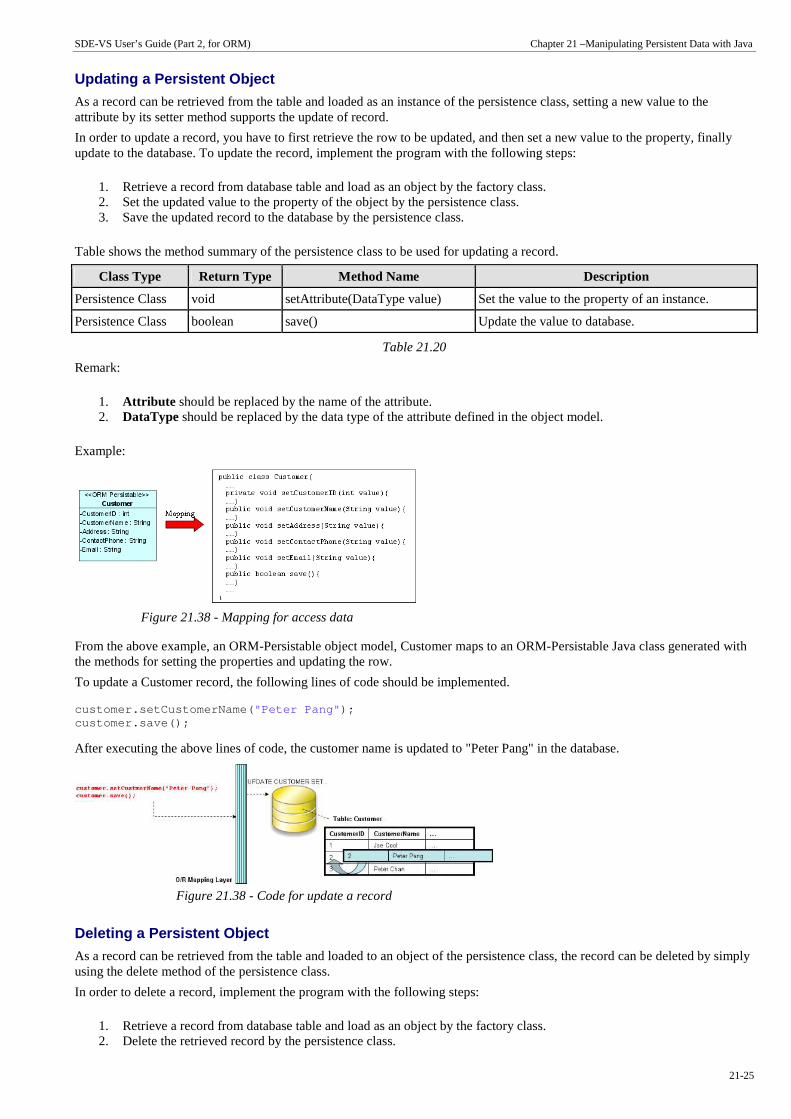
SDE-VS User’s Guide (Part 2, for ORM) Chapter 21 –Manipulating Persistent Data with Java
21-25
Updating a Persistent Object
As a record can be retrieved from the table and loaded as an instance of the persistence class, setting a new value to the attribute by its setter method supports the update of record.
In order to update a record, you have to first retrieve the row to be updated, and then set a new value to the property, finally update to the database. To update the record, implement the program with the following steps:
1. Retrieve a record from database table and load as an object by the factory class. 2. Set the updated value to the property of the object by the persistence class. 3. Save the updated record to the database by the persistence class.
Table shows the method summary of the persistence class to be used for updating a record.
Class Type Return Type Method Name Description
Persistence Class void setAttribute(DataType value) Set the value to the property of an instance.
Persistence Class boolean save() Update the value to database.
Table 21.20
Remark:
1. Attribute should be replaced by the name of the attribute. 2. DataType should be replaced by the data type of the attribute defined in the object model.
Example:
Figure 21.38 - Mapping for access data
From the above example, an ORM-Persistable object model, Customer maps to an ORM-Persistable Java class generated with the methods for setting the properties and updating the row.
To update a Customer record, the following lines of code should be implemented.
customer.setCustomerName( "Peter Pang" ); customer.save();
After executing the above lines of code, the customer name is updated to "Peter Pang" in the database.
Figure 21.38 - Code for update a record
Deleting a Persistent Object
As a record can be retrieved from the table and loaded to an object of the persistence class, the record can be deleted by simply using the delete method of the persistence class.
In order to delete a record, implement the program with the following steps:
1. Retrieve a record from database table and load as an object by the factory class. 2. Delete the retrieved record by the persistence class.

SDE-VS User’s Guide (Part 2, for ORM) Chapter 21 –Manipulating Persistent Data with Java
21-26
Table shows the method summary of the persistence class to be used for deleting a record from database
Class Type Return Type Method Name Description
Persistence Class boolean delete() Delete the current instance.
Table 21.21
Example:
Figure 21.39 - Mapping a delete method
From the above example, an ORM-Persistable object model, Customer maps to an ORM-Persistable Java class generated with the methods for deleting the specified record from the database.
To delete a Customer record, the following lines of code should be implemented.
Customer customer = CustomerFactory.loadCustomerByO RMID(2); customer.delete();
After executing the above code, the specified customer record is deleted from the database.
Figure 21.40 - Code for delete record
Querying
It is well known that the database is enriched with information. In some cases, information may be retrieved from the database to assist another function of the application, such as retrieving the unit price of products for calculating the total amount for a purchase order.
As the persistence factory class supports the retrieval of records, using the methods of the factory class can retrieve records from the database according to the specified condition.
Loading a Collection of Persistent Objects As the database table usually contains many records, you may want to query the tables by a specified condition. The generated factory class supports querying the database, the matched records will be retrieved and loaded as an object array.
In order to retrieve records from the table, you have to specify the condition for querying. To retrieve a number of records, implement the program with the following steps:
1. Specify the condition for searching the record by the factory class. 2. Load the retrieved records as an object array by the factory class.
Table shows the method summary of the factory class to be used for retrieving records from database table.
Class Type
Return Type Method Name Description
Factory Class
Class[] listClassByQuery(String condition, String orderBy) Retrieve the records matched with the user defined condition and ordered by a specified attribute.
Factory Class
Class[] listClassByQuery(PersistentSession session, String condition, String orderBy)
Retrieve the records matched with the user defined condition and specified session and ordered by a specified attribute.
Table 21.22
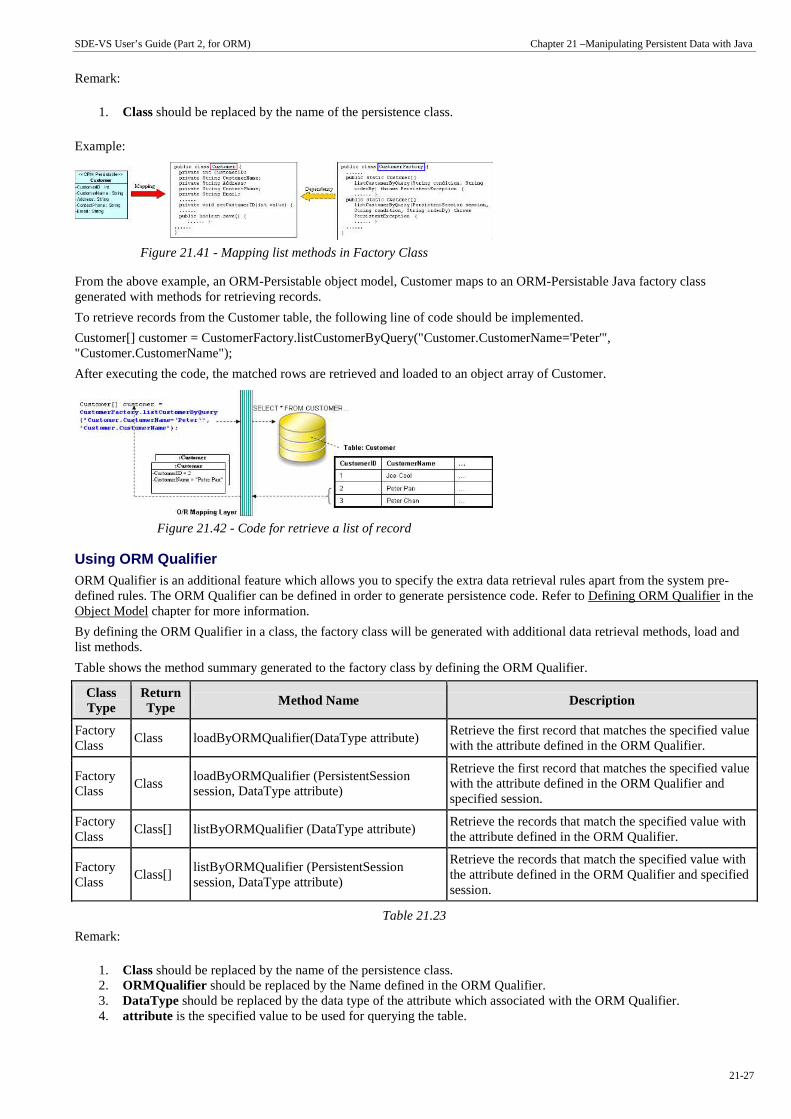
SDE-VS User’s Guide (Part 2, for ORM) Chapter 21 –Manipulating Persistent Data with Java
21-27
Remark:
1. Class should be replaced by the name of the persistence class.
Example:
Figure 21.41 - Mapping list methods in Factory Class
From the above example, an ORM-Persistable object model, Customer maps to an ORM-Persistable Java factory class generated with methods for retrieving records.
To retrieve records from the Customer table, the following line of code should be implemented.
Customer[] customer = CustomerFactory.listCustomerByQuery("Customer.CustomerName='Peter'", "Customer.CustomerName");
After executing the code, the matched rows are retrieved and loaded to an object array of Customer.
Figure 21.42 - Code for retrieve a list of record
Using ORM Qualifier ORM Qualifier is an additional feature which allows you to specify the extra data retrieval rules apart from the system pre-defined rules. The ORM Qualifier can be defined in order to generate persistence code. Refer to Defining ORM Qualifier in the Object Model chapter for more information.
By defining the ORM Qualifier in a class, the factory class will be generated with additional data retrieval methods, load and list methods.
Table shows the method summary generated to the factory class by defining the ORM Qualifier.
Class Type
Return Type Method Name Description
Factory Class
Class loadByORMQualifier(DataType attribute) Retrieve the first record that matches the specified value with the attribute defined in the ORM Qualifier.
Factory Class
Class loadByORMQualifier (PersistentSession session, DataType attribute)
Retrieve the first record that matches the specified value with the attribute defined in the ORM Qualifier and specified session.
Factory Class
Class[] listByORMQualifier (DataType attribute) Retrieve the records that match the specified value with the attribute defined in the ORM Qualifier.
Factory Class
Class[] listByORMQualifier (PersistentSession session, DataType attribute)
Retrieve the records that match the specified value with the attribute defined in the ORM Qualifier and specified session.
Table 21.23
Remark:
1. Class should be replaced by the name of the persistence class. 2. ORMQualifier should be replaced by the Name defined in the ORM Qualifier. 3. DataType should be replaced by the data type of the attribute which associated with the ORM Qualifier. 4. attribute is the specified value to be used for querying the table.

SDE-VS User’s Guide (Part 2, for ORM) Chapter 21 –Manipulating Persistent Data with Java
21-28
Example:
Figure 21.43 - Mapping list and load by criteria methods
In the above example, a customer object model is defined with an ORM Qualifier named as Name and qualified with the attribute, CustomerName.
To query the Customer table with the ORM Qualifier in one of the two ways
• By Load method
Customer customer = CustomerFactory.loadByName( "Peter" );
After executing the code, the first occurrence of "Peter" in the CustomerName column in the Customer table will be loaded to the object identified as customer.
Figure 21.44 - Code for load a record
• By List method
Customer[] customer = CustomerFactory.listByName( "Peter" );
After executing the code, all rows which contain "Peter" in the CustomerName column in the Customer table will be retrieved and stored in an array of Customer object.
Figure 21.45 - Code for retrieve a list of records
Using Criteria Class When generating the persistence class for each ORM-Persistable class defined in the object model, the corresponding criteria class can also be generated. Criteria class is a helper class which provides an additional way to specify the condition to retrieve records from the database. Refer to Using Criteria Class section for more detailed information on how to specify the conditions to query the database by the criteria class.
You can get the retrieved records from the criteria class in one of the two ways:
• Use the retrieval methods of the criteria class.
For information on the retrieval methods provided by the criteria class, refer to the description of Loading Retrieved Records section.

SDE-VS User’s Guide (Part 2, for ORM) Chapter 21 –Manipulating Persistent Data with Java
21-29
• Use the retrieval by criteria methods of the factory class.
Table shows the method summary generated to the persistence class
Class Type
Return Type
Method Name Description
Factory Class
Class loadClassByCriteria(ClassCriteria value)
Retrieve the single record that matches the specified conditions applied to the criteria class.
Factory Class
Class[] listClassByCriteria(ClassCriteria value)
Retrieve the records that match the specified conditions applied to the criteria class.
Table 21.24
Remark:
1. Class should be replaced by the name of the persistence class.
Example:
Figure 21.46 - Mapping for Criteria Class
To retrieve records from the Criteria Class in one of the two ways:
• By Load method
CustomerCriteria customerCriteria = new customerCriteria.CustomerName.like( "%Peter%" ); Customer customer = CustomerFactory.loadCustomerByC riteria(customerCriteria);
After executing the code, the first occurrence of "Peter" in the CustomerName column in the Customer table will be loaded to the object identified as customer.
• By List method
CustomerCriteria customerCriteria = new CustomerCriteria.CustomerName.like( "%Peter%" ); Customer[] customer = CustomerFactory.listCustomerB yCriteria(customerCriteria);
After executing the code, all rows which contain "Peter" in the CustomerName column in the Customer table will be retrieved and stored in an array of Customer object.
Using POJO Generating the persistence code with POJO, the persistence class will be generated only with the attributes and a pair of getter and setter methods for each attribute. As the persistence class is generated without the methods for database manipulation, the generated PersistentManager and PersistentSession classes are responsible for manipulating the database.
By also generating the corresponding Data Access Object (DAO) class for each ORM-Persistable class inside the defined package of orm package, you are allowed to use the generated DAO class as same as the DAO class generated from the DAO persistent API. For information on using the DAO class to manipulate the database, refer to the description in Using DAO section.
When using the DAO class generated with POJO persistent API, manipulate the database with the same persistent code of DAO class generated with DAO persistent API by replacing the DAO class with the DAO class inside the orm package.

SDE-VS User’s Guide (Part 2, for ORM) Chapter 21 –Manipulating Persistent Data with Java
21-30
When using the DAO class generated with POJO persistent API, manipulate the database with the same persistent code of DAO class generated with DAO persistent API by replacing the DAO class with the DAO class inside the orm package.
The following class diagram shows the relationship between the client program, persistent object, persistent session and persistent manager.
Figure 21.47 - Class Diagram for using POJO
In the above class diagram, the PersistentObject refers to the ORM-Persistable class defined in the class diagram.
In the above class diagram, the PersistentObject refers to the ORM-Persistable class defined in the class diagram.
Example:
Figure 21.48 - Mapping with Criteria Class
From the above example, the Customer persistence class is generated with only the getter and setter methods for each attribute while the Customer persistent object is managed by the generated PersistentManager and PersistentSession.
Creating a Persistent Object
As a persistence class represents a table, an instance of a persistence class represents a record of the corresponding table. Creating a persistent object represents a creation of new record. With the support of the PersistentManager class, the newly created object can be saved as a new record to the database.
In order to insert a new row to the database table, implement the program with the following steps:
1. Create a new instance of the class by using the new operator. 2. Set the properties of the object by the persistence class. 3. Insert the object as a row to the database by the PersistentSession class.
Table shows the method summary of the persistence class and the PersistentSession class to be used for inserting a row to database.
Class Type Return Type Method Name Description
Persistence Class void setAttribute(DataType value) Set the value to the property of an instance.
PersistentSession Class Serializable save(Object value) Insert the object as a row to the database table.
Table 21.25

SDE-VS User’s Guide (Part 2, for ORM) Chapter 21 –Manipulating Persistent Data with Java
21-31
Remark:
1. Attribute should be replaced by the name of the attribute. 2. DataType should be replaced by the data type of the attribute defined in the object model. 3. Object represents the newly created instance of the persistence class to be added to the database.
Example:
Figure 21.49 - Mapping with Persistent Manager and Persistent Session
From the above example, an ORM-Persistable object model of Customer maps to an ORM-Persistable class with a pair of getter and setter methods for each attributes. With the PersistentManager class, the PersistentSession object can assist in inserting the instance as a row of the database table.
To insert a new Customer record to the table, Customer of the database, the following lines of code should be implemented.
Customer customer = new Customer(); customer.setCustomerID(3); customer.setCustomerName( "Peter Chan" ); customer.setAddress( "6C, Pert Court" ); customer.setEmail( "[email protected]" ); customer.save(); orm.ShoppingCartPersistentManager.instance().getSes sion().save(customer);
After executing these lines of code, a row of record is inserted to the database table.
Figure 21.50 - Code for insert record
Loading a Persistent Object
As an instance of a persistence class represents a record of a table, a record retrieved from the table will be stored as an object. By specifying the query-like condition to the PersistentManager class, records can be retrieved from the database.
To retrieve a record, simply get the session by PersistentManager class and retrieve the records by defining the condition for query to the PersistentSession object and specify to return a single unique record.
Table shows the method summary of the PersistentSession class to be used for managing the retrieval of records
Class Type Return Type
Method Name Description
PersistentSession Class
Query createQuery(String arg)
Retrieve the records matched with the user defined condition and ordered by a specified attribute.
Table 21.26
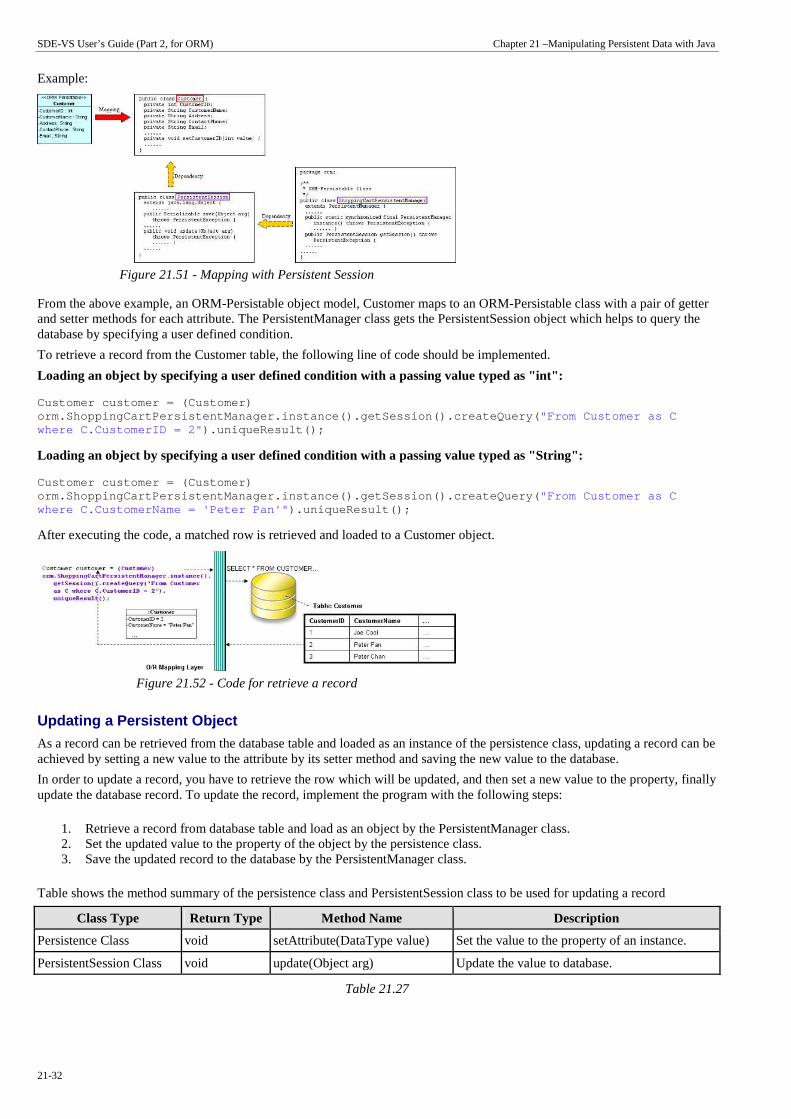
SDE-VS User’s Guide (Part 2, for ORM) Chapter 21 –Manipulating Persistent Data with Java
21-32
Example:
Figure 21.51 - Mapping with Persistent Session
From the above example, an ORM-Persistable object model, Customer maps to an ORM-Persistable class with a pair of getter and setter methods for each attribute. The PersistentManager class gets the PersistentSession object which helps to query the database by specifying a user defined condition.
To retrieve a record from the Customer table, the following line of code should be implemented.
Loading an object by specifying a user defined condition with a passing value typed as "int":
Customer customer = (Customer) orm.ShoppingCartPersistentManager.instance().getSes sion().createQuery( "From Customer as C where C.CustomerID = 2" ).uniqueResult();
Loading an object by specifying a user defined condition with a passing value typed as "String":
Customer customer = (Customer) orm.ShoppingCartPersistentManager.instance().getSes sion().createQuery( "From Customer as C where C.CustomerName = 'Peter Pan'" ).uniqueResult();
After executing the code, a matched row is retrieved and loaded to a Customer object.
Figure 21.52 - Code for retrieve a record
Updating a Persistent Object
As a record can be retrieved from the database table and loaded as an instance of the persistence class, updating a record can be achieved by setting a new value to the attribute by its setter method and saving the new value to the database.
In order to update a record, you have to retrieve the row which will be updated, and then set a new value to the property, finally update the database record. To update the record, implement the program with the following steps:
1. Retrieve a record from database table and load as an object by the PersistentManager class. 2. Set the updated value to the property of the object by the persistence class. 3. Save the updated record to the database by the PersistentManager class.
Table shows the method summary of the persistence class and PersistentSession class to be used for updating a record
Class Type Return Type Method Name Description
Persistence Class void setAttribute(DataType value) Set the value to the property of an instance.
PersistentSession Class void update(Object arg) Update the value to database.
Table 21.27

SDE-VS User’s Guide (Part 2, for ORM) Chapter 21 –Manipulating Persistent Data with Java
21-33
Remark:
1. Attribute should be replaced by the name of the attribute. 2. DataType should be replaced by the data type of the attribute defined in the object model. 3. Object represents the instance of the persistence class to be updated to the corresponding database record.
Example:
Figure 21.52 - Mapping method for update record
From the above example, an ORM-Persistable object model, Customer maps to an ORM-Persistable class with a pair of getter and setter methods for each attributes. The PersistentManager class gets the PersistentSession object which helps to save the updated record to database.
To update a Customer record, the following line of code should be implemented.
customer.setCustomerName("Peter Pang"); orm.ShoppingCartPersistentManager.instance().getSes sion().update(customer);
After executing the above lines of code, the customer name is updated to "Peter Pang" in the database.
Figure 21.53 - Code for update record
Deleting a Persistent Object
As a record can be retrieved from the table and loaded as an object of the persistence class, the record can be deleted with the help of the PersistentManager class.
In order to delete a record, implement the program with the following steps:
1. Retrieve a record from database table and load as an object by the PersistentManager class. 2. Delete the retrieved record by the PersistentManager class.
Table shows the method summary of the PersistentSession class to be used for deleting a record from database
Class Type Return Type Method Name Description
PersistentSession Class void delete(Object arg) Delete the current instance.
Table 21.28
Remark:
1. Object represents the instance of the persistence class corresponding to a record that will be deleted from the database.
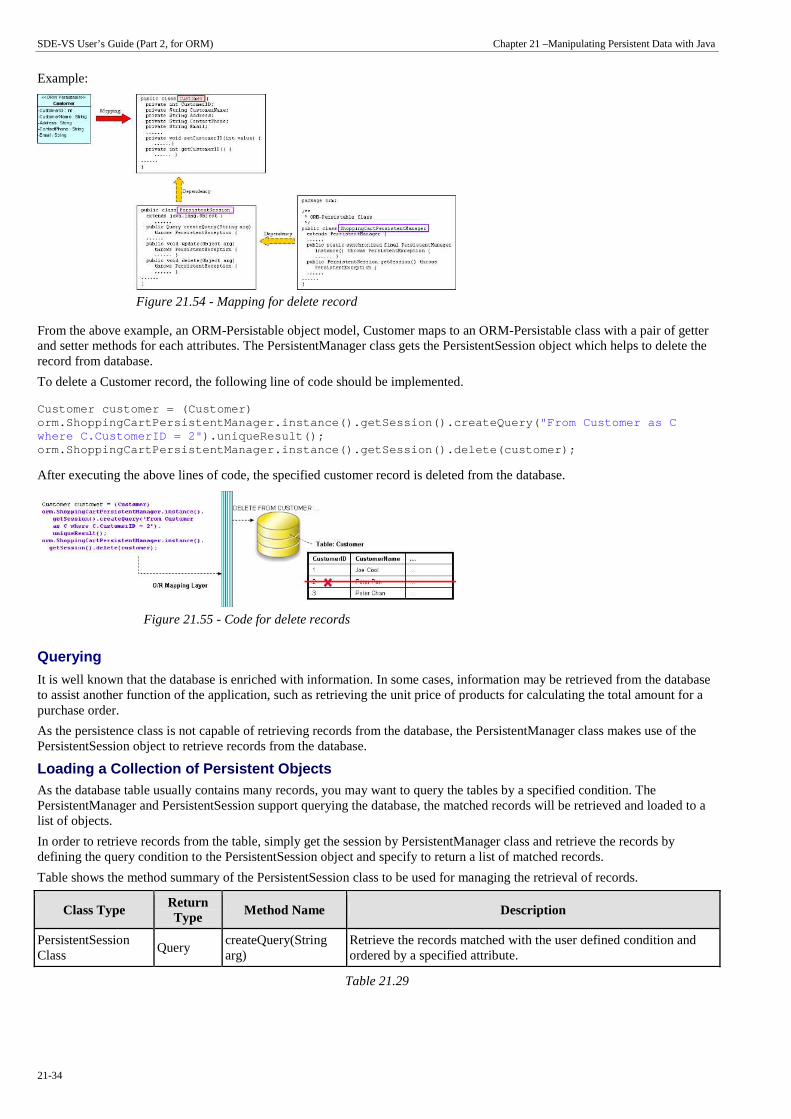
SDE-VS User’s Guide (Part 2, for ORM) Chapter 21 –Manipulating Persistent Data with Java
21-34
Example:
Figure 21.54 - Mapping for delete record
From the above example, an ORM-Persistable object model, Customer maps to an ORM-Persistable class with a pair of getter and setter methods for each attributes. The PersistentManager class gets the PersistentSession object which helps to delete the record from database.
To delete a Customer record, the following line of code should be implemented.
Customer customer = (Customer) orm.ShoppingCartPersistentManager.instance().getSes sion().createQuery( "From Customer as C where C.CustomerID = 2" ).uniqueResult(); orm.ShoppingCartPersistentManager.instance().getSes sion().delete(customer);
After executing the above lines of code, the specified customer record is deleted from the database.
Figure 21.55 - Code for delete records
Querying
It is well known that the database is enriched with information. In some cases, information may be retrieved from the database to assist another function of the application, such as retrieving the unit price of products for calculating the total amount for a purchase order.
As the persistence class is not capable of retrieving records from the database, the PersistentManager class makes use of the PersistentSession object to retrieve records from the database.
Loading a Collection of Persistent Objects As the database table usually contains many records, you may want to query the tables by a specified condition. The PersistentManager and PersistentSession support querying the database, the matched records will be retrieved and loaded to a list of objects.
In order to retrieve records from the table, simply get the session by PersistentManager class and retrieve the records by defining the query condition to the PersistentSession object and specify to return a list of matched records.
Table shows the method summary of the PersistentSession class to be used for managing the retrieval of records.
Class Type Return Type Method Name Description
PersistentSession Class
Query createQuery(String arg)
Retrieve the records matched with the user defined condition and ordered by a specified attribute.
Table 21.29

SDE-VS User’s Guide (Part 2, for ORM) Chapter 21 –Manipulating Persistent Data with Java
21-35
Example:
Figure 21.56 - Mapping for execute query
From the above example, an ORM-Persistable object model, Customer maps to an ORM-Persistable class generated with a pair of getter and setter methods for each attribute. The PersistentManager class gets the PersistentSession object which helps to query the database by giving a user defined condition.
To retrieve records from the Customer table, the following line of code should be implemented.
Loading objects by specifying a user defined condition with a passing value typed as "String":
List customers = orm.ShoppingCartPersistentManager. instance().getSession().createQuery( "From Customer as C where C.CustomerName like '%Peter%'" ).list();
After executing the code, the matched rows are retrieved and loaded to a list containing the Customer objects.
Figure 21.57 - Code for retrieve a list of records
Using DAO Generating the persistence code with data access object (DAO), not only the persistence class will be generated, but also the corresponding DAO class for each ORM-Persistable class.
The generated persistence class using DAO persistent API is as same as that using POJO; that is, the persistence class contains attributes and a pair of getter and setter methods for each attribute only. Instead of using the persistence class to manipulate the database, the DAO class supports creating a new instance for the addition of a new record to the database, and retrieving record(s) from the database, updating and deleting the records.
The following class diagram shows the relationship between the client program, persistent object and DAO object.
Figure 21.58 - Class Diagram for using DAO

SDE-VS User’s Guide (Part 2, for ORM) Chapter 21 –Manipulating Persistent Data with Java
21-36
In the above class diagram, the PersistentObject refers to the ORM-Persistable class defined in the class diagram while the PersistentObjectDAO refers to the generated DAO class of the ORM-Persistable class. For example, the CustomerDAO class persists with the Customer persistent object and the database.
Example:
Figure 21.59 - Classes generated with DAO
From the above example, the CustomerDAO class supports the creation of Customer persistent object, the retrieval of Customer records from the Customer table while the Customer persistence class supports the update and deletion of customer record.
Creating a Persistent Object
An instance of a persistence class represents a record of the corresponding table, creating a persistent object supports the addition of new record to the table.
In order to add a new row to the database table, implement the program with the following steps:
1. Create a new instance of the class by the DAO class. 2. Set the properties of the object by the persistence class. 3. Insert the object as a row to the database by the DAO class.
Table shows the method summary of the DAO and persistence classes to be used for inserting a row to database.
Class Type Return Type Method Name Description
DAO Class Class createClass() Create a new instance of the class.
Persistence Class void setAttribute(DataType value) Set the value to the property of an instance.
DAO Class boolean save(Class value) Insert the object as a row to the database table.
Table 21.30
Remark:
1. Class should be replaced by the name of the generated persistence class. 2. Attribute should be replaced by the name of the attribute. 3. DataType should be replaced by the data type of the attribute defined in the object model.

SDE-VS User’s Guide (Part 2, for ORM) Chapter 21 –Manipulating Persistent Data with Java
21-37
Example:
Figure 21.60 - Mapping for Create a record
From the above example, an ORM-Persistable object model of Customer maps to an ORM-Persistable class with methods for setting the properties. An ORM-Persistable DAO class is generated supporting the creation of persistent object and adding it into the database.
To add a new Customer record to the table, Customer of the database, the following lines of code should be implemented.
Customer customer = CustomerDAO.createCustomer(); customer.setCustomerID(3); customer.setCustomerName( "Peter Chan" ); customer.setAddress( "6C, Pert Court" ); customer.setEmail( "[email protected]" ); CustomerDAO.save(customer);
After executing these lines of code, a row of record is inserted to the database table.
An alternative way to create a new instance of the class is using the new operator: Class c = new Class();
From the above example, Customer customer = CustomerDAO.createCustomer() can be replaced by Customer customer = new Customer() to create a Customer object.
Figure 21.61 - Code for insert a record
Loading a Persistent Object
As an instance of a persistence class represents a record of the table, a record retrieved from the table will be stored as an object.
In order to retrieve a record from the database table, you have to specify the condition for finding the record. To retrieve a record, implement the program with the following steps:
1. Specify the condition for searching the record by the DAO class. 2. Load the retrieved record to an object.
Table shows the method summary of the DAO class to be used for retrieving a record from database.
Class Type
Return Type
Method Name Description
DAO Class
Class loadClassByORMID(DataType PrimaryKey) Retrieve a record matching with the specified value of primary key.
DAO Class
Class loadClassByORMID(PersistentSession session, DataType PrimaryKey)
Retrieve a record matching with the specified value of primary key and specified session.
DAO Class
Class loadClassByQuery(String condition, String orderBy)
Retrieve the first record matching the user defined condition while the matched records are ordered by a specified attribute.
DAO Class loadClassByQuery(PersistentSession session, Retrieve the first record matching the user defined

SDE-VS User’s Guide (Part 2, for ORM) Chapter 21 –Manipulating Persistent Data with Java
21-38
Class String condition, String orderBy) condition and specified session while the matched records are ordered by a specified attribute.
Table 21.31
Remark:
1. Class should be replaced by the name of the persistence class.
Example:
Figure 21.62 - Mapping for list and load record
From the above example, an ORM-Persistable object model, Customer maps to an ORM-Persistable Java class. A DAO class for the customer class is generated with methods for retrieving a matched record.
To retrieve a record from the Customer table, the following line of code should be implemented.
Loading an object by passing the value of primary key:
Customer customer = CustomerDAO.loadCustomerByORMID (2);
Loading an object by specifying a user defined condition:
Customer customer = CustomerDAO.loadCustomerByQuery ( "Customer.CustomerName='Peter'" , "Customer.CustomerName" );
After executing the code, a matched row is retrieved and loaded to a Customer object.
Figure 21.63 - Code for load a record
Updating a Persistent Object
The DAO class not only supports the retrieval of record, but also the update on the record with the assistance of the setter method of the persistence class.
In order to update a record, you have to retrieve the row to be updated first, and then set a new value to the property, and finally save the updated record to the database. To update the record, implement the program with the following steps:
1. Retrieve a record from database table and load as an object by the DAO class. 2. Set the updated value to the property of the object by the persistence class. 3. Save the updated record to the database by the DAO class.
Table shows the method summary of the persistence class and DAO class to be used for updating a record
Class Type Return Type Method Name Description
Persistence Class void setAttribute(DataType value) Set the value to the property of an instance.
DAO Class boolean save(Class value) Update the value to database.
Table 21.32
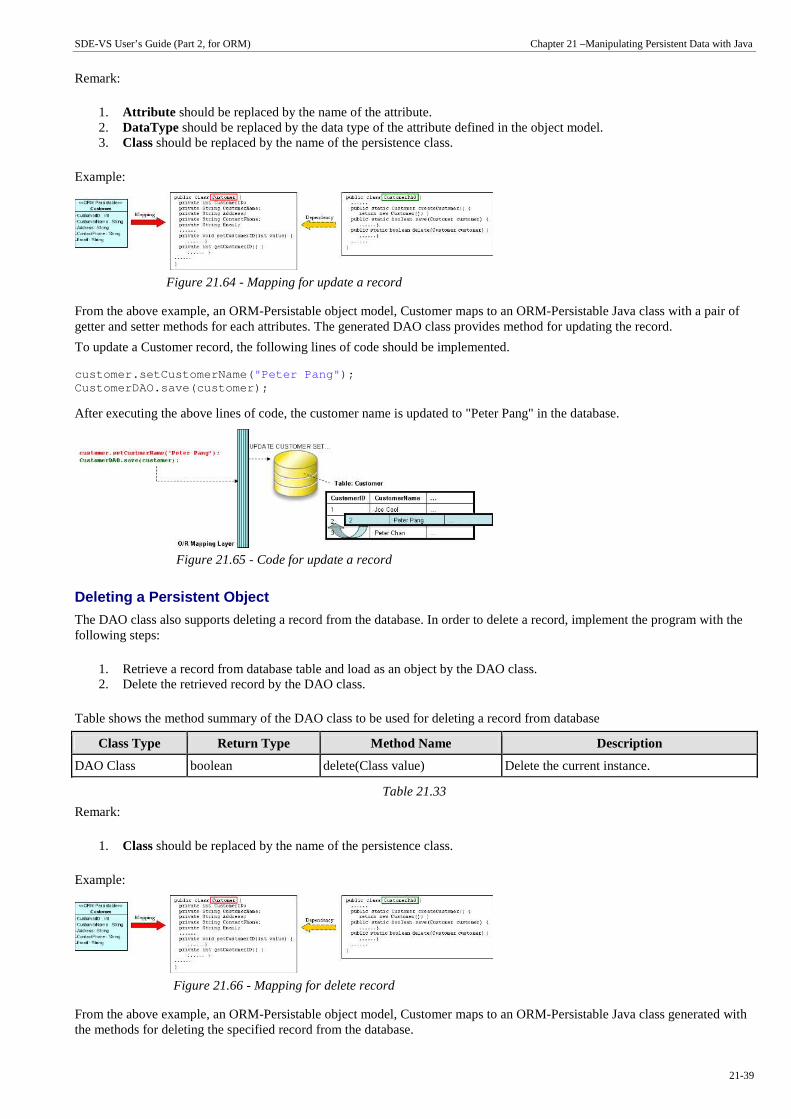
SDE-VS User’s Guide (Part 2, for ORM) Chapter 21 –Manipulating Persistent Data with Java
21-39
Remark:
1. Attribute should be replaced by the name of the attribute. 2. DataType should be replaced by the data type of the attribute defined in the object model. 3. Class should be replaced by the name of the persistence class.
Example:
Figure 21.64 - Mapping for update a record
From the above example, an ORM-Persistable object model, Customer maps to an ORM-Persistable Java class with a pair of getter and setter methods for each attributes. The generated DAO class provides method for updating the record.
To update a Customer record, the following lines of code should be implemented.
customer.setCustomerName( "Peter Pang" ); CustomerDAO.save(customer);
After executing the above lines of code, the customer name is updated to "Peter Pang" in the database.
Figure 21.65 - Code for update a record
Deleting a Persistent Object
The DAO class also supports deleting a record from the database. In order to delete a record, implement the program with the following steps:
1. Retrieve a record from database table and load as an object by the DAO class. 2. Delete the retrieved record by the DAO class.
Table shows the method summary of the DAO class to be used for deleting a record from database
Class Type Return Type Method Name Description
DAO Class boolean delete(Class value) Delete the current instance.
Table 21.33
Remark:
1. Class should be replaced by the name of the persistence class.
Example:
Figure 21.66 - Mapping for delete record
From the above example, an ORM-Persistable object model, Customer maps to an ORM-Persistable Java class generated with the methods for deleting the specified record from the database.
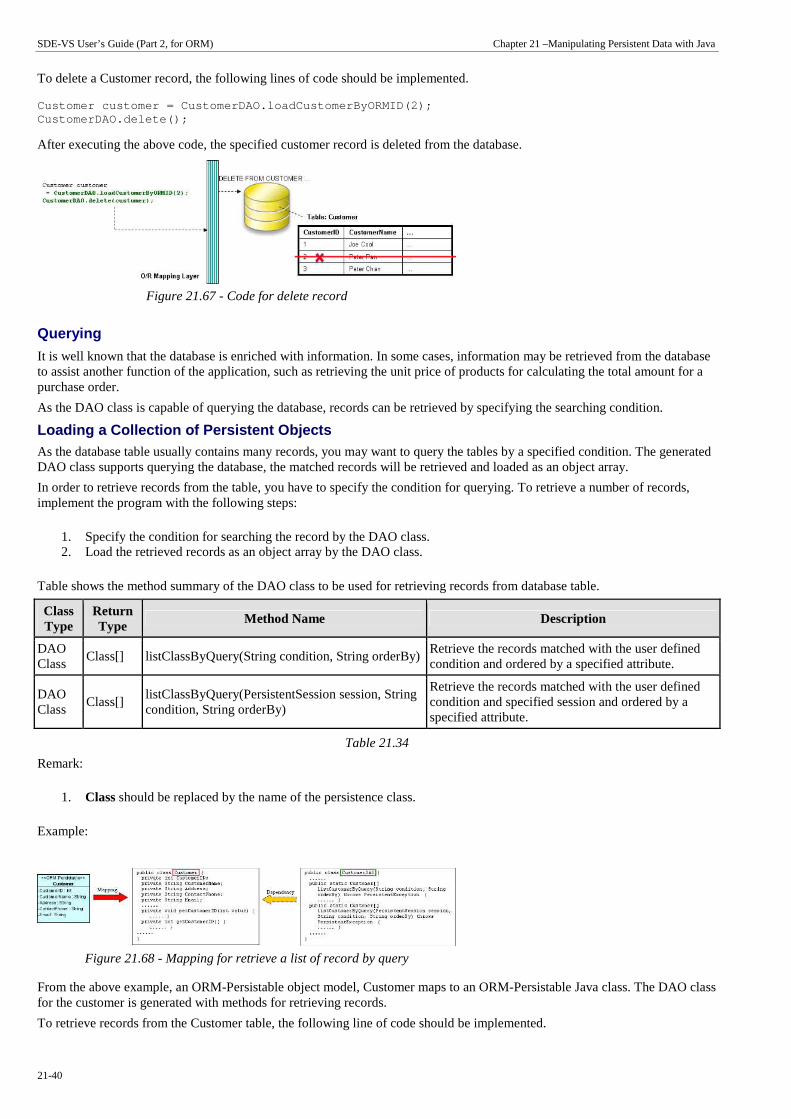
SDE-VS User’s Guide (Part 2, for ORM) Chapter 21 –Manipulating Persistent Data with Java
21-40
To delete a Customer record, the following lines of code should be implemented.
Customer customer = CustomerDAO.loadCustomerByORMID (2); CustomerDAO.delete();
After executing the above code, the specified customer record is deleted from the database.
Figure 21.67 - Code for delete record
Querying
It is well known that the database is enriched with information. In some cases, information may be retrieved from the database to assist another function of the application, such as retrieving the unit price of products for calculating the total amount for a purchase order.
As the DAO class is capable of querying the database, records can be retrieved by specifying the searching condition.
Loading a Collection of Persistent Objects As the database table usually contains many records, you may want to query the tables by a specified condition. The generated DAO class supports querying the database, the matched records will be retrieved and loaded as an object array.
In order to retrieve records from the table, you have to specify the condition for querying. To retrieve a number of records, implement the program with the following steps:
1. Specify the condition for searching the record by the DAO class. 2. Load the retrieved records as an object array by the DAO class.
Table shows the method summary of the DAO class to be used for retrieving records from database table.
Class Type
Return Type
Method Name Description
DAO Class
Class[] listClassByQuery(String condition, String orderBy) Retrieve the records matched with the user defined condition and ordered by a specified attribute.
DAO Class
Class[] listClassByQuery(PersistentSession session, String condition, String orderBy)
Retrieve the records matched with the user defined condition and specified session and ordered by a specified attribute.
Table 21.34
Remark:
1. Class should be replaced by the name of the persistence class.
Example:
Figure 21.68 - Mapping for retrieve a list of record by query
From the above example, an ORM-Persistable object model, Customer maps to an ORM-Persistable Java class. The DAO class for the customer is generated with methods for retrieving records.
To retrieve records from the Customer table, the following line of code should be implemented.

SDE-VS User’s Guide (Part 2, for ORM) Chapter 21 –Manipulating Persistent Data with Java
21-41
Customer[] customer = CustomerDAO.listCustomerByQue ry( "Customer.CustomerName='Peter'" , "Customer.CustomerName" );
After executing the code, the matched rows are retrieved and loaded to an object array of Customer.
Figure 21.69 - Code for retrieving a list of record by query
Using ORM Qualifier ORM Qualifier is an additional feature which allows you to specify the extra data retrieval rules apart from the system pre-defined rules. The ORM Qualifier can be defined in order to generate persistence code. Refer to Defining ORM Qualifier in the Object Model chapter for more information.
By defining the ORM Qualifier in a class, the persistence DAO class will be generated with additional data retrieval methods, load and list methods.
Table shows the method summary generated to the DAO class by defining the ORM Qualifier.
Class Type
Return Type
Method Name Description
DAO Class
Class loadByORMQualifier(DataType attribute) Retrieve the first record that matches the specified value with the attribute defined in the ORM Qualifier.
DAO Class
Class loadByORMQualifier (PersistentSession session, DataType attribute)
Retrieve the first record that matches the specified value with the attribute defined in the ORM Qualifier and specified session.
DAO Class
Class[] listByORMQualifier (DataType attribute) Retrieve the records that match the specified value with the attribute defined in the ORM Qualifier.
DAO Class
Class[] listByORMQualifier (PersistentSession session, DataType attribute)
Retrieve the records that match the specified value with the attribute defined in the ORM Qualifier and specified session.
Table 21.35
Remark:
1. Class should be replaced by the name of the persistence class. 2. ORMQualifier should be replaced by the Name defined in the ORM Qualifier. 3. DataType should be replaced by the data type of the attribute which associated with the ORM Qualifier. 4. attribute is the specified value to be used for querying the table.
Example:
Figure 21.70 - applying list and load record by qualifier
In the above example, a customer object model is defined with an ORM Qualifier named as Name and qualified with the attribute, CustomerName.

SDE-VS User’s Guide (Part 2, for ORM) Chapter 21 –Manipulating Persistent Data with Java
21-42
To query the Customer table with the ORM Qualifier in one of the two ways
• By Load method
Customer customer = CustomerDAO.loadByName("Peter") ;
After executing the code, the first occurrence of "Peter" in the CustomerName column in the Customer table will be loaded to the object identified as customer.
Figure 21.71 - Code for load a record
• By List method
Customer[] customer = CustomerDAO.listByName("Peter ");
After executing the code, all rows which contain "Peter" in the CustomerName column in the Customer table will be retrieved and stored in an array of Customer object.
Figure 21.72 - Code for retrieve a list of records
Using Criteria Class When generating the persistence class for each ORM-Persistable class defined in the object model, the corresponding criteria class can also be generated. Criteria class is a helper class which provides an additional way to specify the condition to retrieve records from the database. Refer to Using Criteria Class section for more detailed information on how to specify the conditions to query the database by the criteria class.
You can get the retrieved records from the criteria class in one of the two ways:
• Use the retrieval methods of the criteria class.
For information on the retrieval methods provided by the criteria class, refer to the description of Loading Retrieved Records section.
• Use the retrieval by criteria methods of the DAO class.
Table shows the method summary generated to the persistence class to retrieve records from the criteria class.
Class Type
Return Type
Method Name Description
DAO Class
Class loadClassByCriteria(ClassCriteria value)
Retrieve the single record that matches the specified conditions applied to the criteria class.
DAO Class
Class[] listClassByCriteria(ClassCriteria value)
Retrieve the records that match the specified conditions applied to the criteria class.
Table 21.36

SDE-VS User’s Guide (Part 2, for ORM) Chapter 21 –Manipulating Persistent Data with Java
21-43
Remark:
1. Class should be replaced by the name of the persistence class.
Example:
Figure 21.73 - Mapping methods for load and list by criteria
To retrieve records from the Criteria Class in one of the two ways:
• By Load method
CustomerCriteria customerCriteria = new customerCriteria.CustomerName.like( "%Peter%" ); Customer customer = CustomerDAO.loadCustomerByCrite ria(customerCriteria);
After executing the code, the first occurrence of "Peter" in the CustomerName column in the Customer table will be loaded to the object identified as customer.
• By List method
CustomerCriteria customerCriteria = new CustomerCriteria.CustomerName.like( "%Peter%" ); Customer[] customer = CustomerDAO.listCustomerByCri teria(customerCriteria);
After executing the code, all rows which contain "Peter" in the CustomerName column in the Customer table will be retrieved and stored in an array of Customer object.
Using Criteria Class As a database is normally enriched with information, there are two ways to retrieve records from the database by the generated persistent code. Firstly, the list and load methods to the persistence code are generated which retrieve matched records from the database with respect to the user defined condition. Secondly, a criteria class can be generated for each ORM-Persistable class which supports searching the records from the corresponding table.
By using the criteria class, it supports querying the database with multiple criteria. To generate the criteria class for query, simply check the Generate Criteria option before the generation of code. For more information on the setting of code generation, refer to Configuring Code Generation Setting for Java in the Implementation chapter.
Figure 21.74 - Generate Criteria option
Having selected the Generate Criteria option for the code generation, a criteria class is generated in addition to the classes generated with respect to the persistent API. The generated criteria class is named as "ClassCriteria" in which Class is the name of the ORM Persistable class accordingly. The criteria class is generated with attributes, which are defined in the object model, with type of one of Expression with respect to the type of attribute defined in the object model and two operations for specifying the type of record retrieval.
In order to query the database by the criteria class, implement the program with the following steps:
1. Create an instance of the criteria class. 2. Apply restriction to the property of the class which specifies the condition for query. 3. Apply ordering to the property if it is necessary. 4. Set the range of the number of records to be retrieved if it is necessary. 5. Load the retrieved record(s) to an object or array.

SDE-VS User’s Guide (Part 2, for ORM) Chapter 21 –Manipulating Persistent Data with Java
21-44
Applying Restriction to Property
To apply the restriction to the property, implement with the following code template:
criteria.property.expression(parameter);
where criteria is the instance of the criteria class; property is the property of the criteria; expression is the expression to be applied on the property; parameter is the parameter(s) of the expression.
Table shows the expression to be used for specifying the condition for query.
Expression Description
eq(value) The value of the property is equal to the specified value.
ne(value) The value of the property is not equal to the specified value.
gt(value) The value of the property is greater than to the specified value.
ge(value) The value of the property is greater than or equal to the specified value.
lt(value) The value of the property is less than the specified value.
le(value) The value of the property is less than or equal to the specified value.
isEmpty() The value of the property is empty.
isNotEmpty() The value of the property is not empty.
isNull() The value of the property is NULL.
isNotNull() The value of the property is not NULL.
in(values) The value of the property contains the specified values in the array.
between(value1, value2) The value of the property is between the two specified values, value1 and value2.
like(value) The value of the property matches the string pattern of value; use % in value for wildcard.
ilike(value) The value of the property matches the string pattern of value, ignoring case differences.
Table 21.37
Sorting Retrieved Records
There are two types of ordering to sort the retrieved records, that is, ascending and descending order.
To sort the retrieved records with respect to the property, implement the following code template:
criteria.property.order(ascending_order);
where the value of ascending_order is either true or false. True refers to sort the property in ascending order while false refers to sort the property in descending order.
Setting the Number of Retrieved Records
To set the range of the number of records to be retrieved by using one of the two methods listed in the following table.
Method Name Description
setFirstResult(int i) Retrieve the i-th record from the results as the first result.
setMaxResult(int i) Set the maximum number of retrieved records by specified value, i.
Table 21.38
Loading Retrieved Records
To load the retrieved record(s) to an object or array, use one of the two methods listed below.
Table shows the method summary of the criteria class to be used for retrieving records from database.
Return Type
Method Name
Description
Class uniqueClass() Retrieve a single record matching the specified condition(s) for the criteria; Throw exception if the number of retrieved record is not equal to 1.
Class[] listClass() Retrieve the records matched with the specified condition(s) for the criteria.
Table 21.39

SDE-VS User’s Guide (Part 2, for ORM) Chapter 21 –Manipulating Persistent Data with Java
21-45
Remark:
1. Class should be replaced by the name of the persistence class.
Example:
Figure 21.74 - Mapping for Criteria Class
Here is an object model of a Member class. After performing the generation of persistent code, an additional Java file is generated, named "MemberCriteria.java".
The following examples illustrate how to query the Member table using the MemberCriteria class:
• By specifying one criterion
Retrieving a member record whose name is "John":
MemberCriteria criteria = new MemberCriteria(); Criteria.name.eq( "John" ); Member member = criteria.uniqueMember(); System. out .println(member);
Retrieving all member records whose date of birth is between 1/1/1970 and 31/12/1985:
MemberCriteria criteria = new MemberCriteria(); criteria.dob.between( new GregorianCalendar(1970, 1, 1).getTime(), new GregorianCalendar(1985, 12, 31)); Member[] members = criteria.listMember(); for ( int i=0; i < members. length ; i++){
System. out .println(members[i]); }
• By specifying more than one criteria
Retrieving all male member records whose age is between 18 and 24, ordering by the name:
MemberCriteria criteria = new MemberCriteria(); criteria.age.in( new int[]{18, 24}); criteria.gender.eq( 'M' ); criteria.name.order( true); //true = ascending order; false = descending order Member[] members = criteria.listMember(); for ( int i=0; i < members. length ; i++){
System. out .println(members[i]); }
Retrieving all member records whose name starts with "Chan" and age is greater than 30:
MemberCriteria criteria = new MemberCriteria(); criteria.name.like( "Chan %" ); criteria.age.gt(30); Member[] members = criteria.listMember(); for ( int i=0; i < members. length ; i++){
System. out .println(members[i]); }
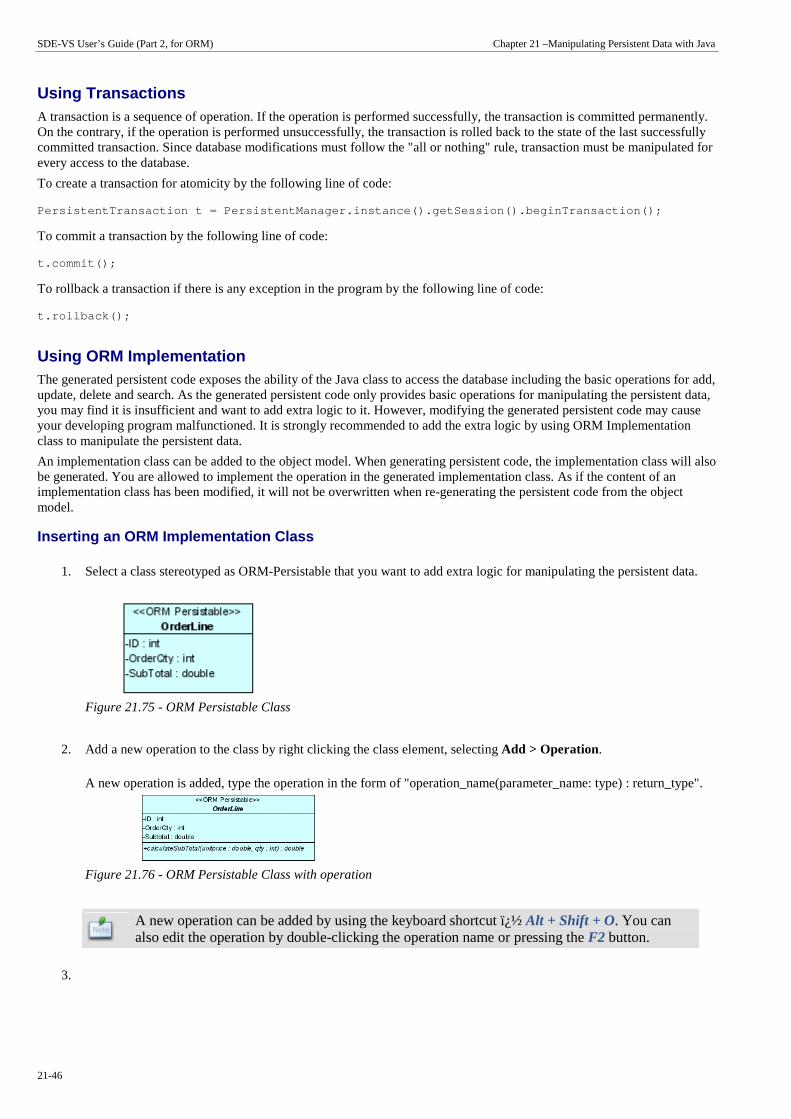
SDE-VS User’s Guide (Part 2, for ORM) Chapter 21 –Manipulating Persistent Data with Java
21-46
Using Transactions A transaction is a sequence of operation. If the operation is performed successfully, the transaction is committed permanently. On the contrary, if the operation is performed unsuccessfully, the transaction is rolled back to the state of the last successfully committed transaction. Since database modifications must follow the "all or nothing" rule, transaction must be manipulated for every access to the database.
To create a transaction for atomicity by the following line of code:
PersistentTransaction t = PersistentManager.instanc e().getSession().beginTransaction();
To commit a transaction by the following line of code:
t.commit();
To rollback a transaction if there is any exception in the program by the following line of code:
t.rollback();
Using ORM Implementation The generated persistent code exposes the ability of the Java class to access the database including the basic operations for add, update, delete and search. As the generated persistent code only provides basic operations for manipulating the persistent data, you may find it is insufficient and want to add extra logic to it. However, modifying the generated persistent code may cause your developing program malfunctioned. It is strongly recommended to add the extra logic by using ORM Implementation class to manipulate the persistent data.
An implementation class can be added to the object model. When generating persistent code, the implementation class will also be generated. You are allowed to implement the operation in the generated implementation class. As if the content of an implementation class has been modified, it will not be overwritten when re-generating the persistent code from the object model.
Inserting an ORM Implementation Class
1. Select a class stereotyped as ORM-Persistable that you want to add extra logic for manipulating the persistent data.
Figure 21.75 - ORM Persistable Class
2. Add a new operation to the class by right clicking the class element, selecting Add > Operation.
A new operation is added, type the operation in the form of "operation_name(parameter_name: type) : return_type".
Figure 21.76 - ORM Persistable Class with operation
A new operation can be added by using the keyboard shortcut � Alt + Shift + O. You can also edit the operation by double-clicking the operation name or pressing the F2 button.
3.

SDE-VS User’s Guide (Part 2, for ORM) Chapter 21 –Manipulating Persistent Data with Java
21-47
4. Drag the resource of Create ORM Implementation Class to the diagram pane.
Figure 21.77 - "Create ORM Implementation Class" resource-centric
A new implementation class is created and connected to the source class with generalization stereotyped as ORM Implementation. The source class becomes an abstract class with an abstract operation.
Figure 21.78 - ORM Persistable Class and Implement Class
After transforming the object model to persistent code, an implementation class will be generated. The generated code for the implementation class is shown below:
package shoppingcart; public class OrderLineImpl exteds OrderLine { public OrderLineImpl() { super(); } public dobule calculateSubTotal( double unitprice, int qty) { //TODO: Implement Method throw new UnsupportedOperationException(); } }
The generated implementation class is the same no matter which persistent API is selected for code generation.
You can implement the logic to the method in the generated implementation class.
Code Sample
Here is a sample demonstrating the usage of the implementation class from the above object model.
The implementation class is implemented with the following lines of code:
package shoppingcart; public class OrderLineImpl exteds OrderLine {
public OrderLineImpl() { super();
} public dobule calculateSubTotal( double unitprice, int qty) {
return unitprice * qty }
}
The following lines of code demonstrate how to invoke the logic of the implementation class with the persistence class, OrderLine generated using static method persistent API.
OrderLine orderline = OrderLine.createOrderLine(); orderline.setID(1); orderline.setOrderQty(5); dobule subtotal = orderline.calculateSubTotal(300, 5); orderline.setSubTotal(subTotal);
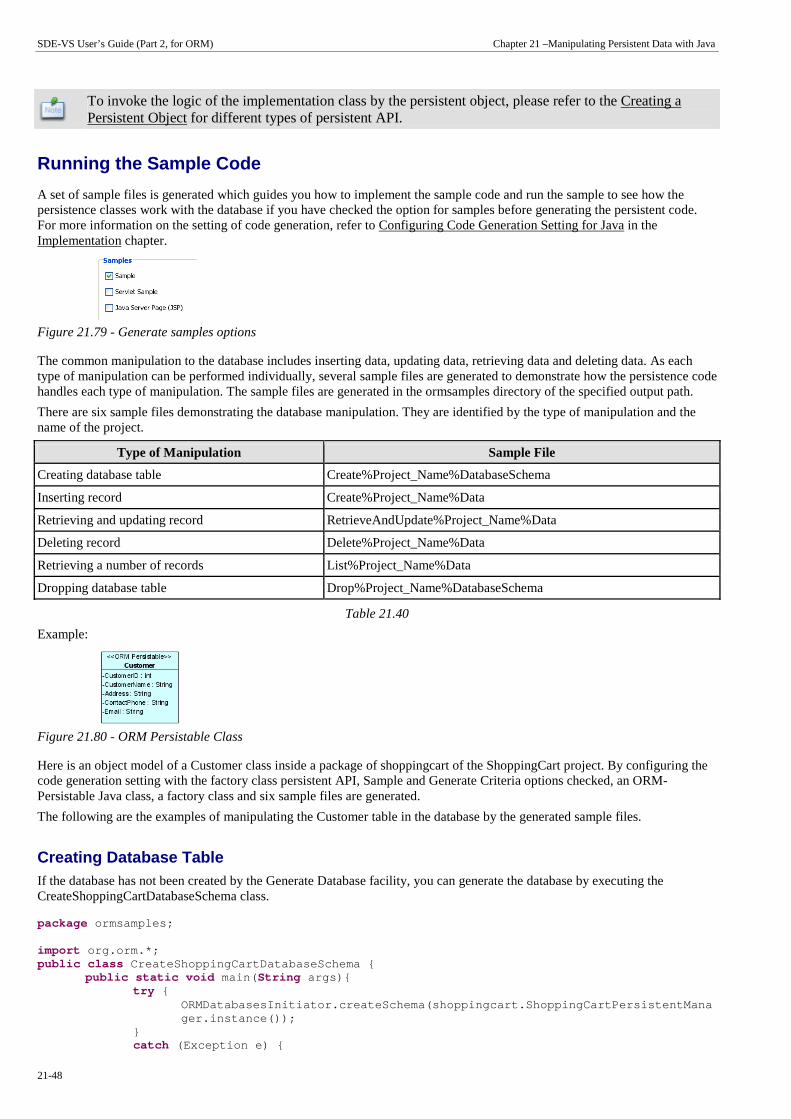
SDE-VS User’s Guide (Part 2, for ORM) Chapter 21 –Manipulating Persistent Data with Java
21-48
To invoke the logic of the implementation class by the persistent object, please refer to the Creating a Persistent Object for different types of persistent API.
Running the Sample Code
A set of sample files is generated which guides you how to implement the sample code and run the sample to see how the persistence classes work with the database if you have checked the option for samples before generating the persistent code. For more information on the setting of code generation, refer to Configuring Code Generation Setting for Java in the Implementation chapter.
Figure 21.79 - Generate samples options
The common manipulation to the database includes inserting data, updating data, retrieving data and deleting data. As each type of manipulation can be performed individually, several sample files are generated to demonstrate how the persistence code handles each type of manipulation. The sample files are generated in the ormsamples directory of the specified output path.
There are six sample files demonstrating the database manipulation. They are identified by the type of manipulation and the name of the project.
Type of Manipulation Sample File
Creating database table Create%Project_Name%DatabaseSchema
Inserting record Create%Project_Name%Data
Retrieving and updating record RetrieveAndUpdate%Project_Name%Data
Deleting record Delete%Project_Name%Data
Retrieving a number of records List%Project_Name%Data
Dropping database table Drop%Project_Name%DatabaseSchema
Table 21.40
Example:
Figure 21.80 - ORM Persistable Class
Here is an object model of a Customer class inside a package of shoppingcart of the ShoppingCart project. By configuring the code generation setting with the factory class persistent API, Sample and Generate Criteria options checked, an ORM-Persistable Java class, a factory class and six sample files are generated.
The following are the examples of manipulating the Customer table in the database by the generated sample files.
Creating Database Table If the database has not been created by the Generate Database facility, you can generate the database by executing the CreateShoppingCartDatabaseSchema class.
package ormsamples; import org.orm.*; public class CreateShoppingCartDatabaseSchema {
public static void main( String args){ try {
ORMDatabasesInitiator.createSchema(shoppingcart.Sho ppingCartPersistentManager.instance());
} catch (Exception e) {

SDE-VS User’s Guide (Part 2, for ORM) Chapter 21 –Manipulating Persistent Data with Java
21-49
e.printStackTrace(); }
} }
After executing the CreateShoppingCartDatabaseSchema class, the database is created with the Customer table.
Inserting Record As the database has been generated with the Customer table, a new customer record can be added to the table. By implementing the createTestData() method of the CreateShoppingCartData class, a new customer record can be inserted to the table. Insert the following lines of codes to the createTestData() method to initialize the properties of the customer object which will be inserted as a customer record to the database.
public void createTestData() throws PersistentException { PersistentTransacrion t = shoppingcart.ShoppingCartPersistentManager.instance ().getSession().beginTransaction(); try {
shoppint.Customer shoppingcartCustoemr = shoppingcart.CustomerFactory.createCustomer(); // Initialize the properties of the persistent obje ct
shoppingcartCustomer.setCustomerName("Joe Cool"); shoppingcartCustomer.setAddress("1212, Happy Buildi ng"); shoppingcartCustomer.setContactPhone("23453256"); shoppingcartCustomer.setEmail("[email protected]");
shoppingcartCustomer.save(); t.commit();
} catch (Exception e){
t.rollback(); shoppingcart.ShoppingCartPersistentManager.instance ().getSession().close();
} }
After running the sample code, a customer record is inserted into the Customer table.
Retrieving and Updating Record In order to update a record, the particular record must be retrieved first. By modifying the following lines of code to the retrieveAndUpdateTestData() method of the RetrieveAndUpdateShoppingCartData class, the customer record can be updated.
public void createTestData() throws PersistentException { PersistentTransacrion t = shoppingcart.ShoppingCartPersistentManager.instance ().getSession().beginTransaction(); try {
shoppint.Customer shoppingcartCustoemr = shoppingcart.CustomerFactory.loadCustomerByQuery("C ustomer.CustomerName='Joe Cool'", "Customer.CustomerName"); // Update the properties of the persistent object
shoppingcartCustomer.setContactPhone("28457126"); shoppingcartCustomer.setEmail("[email protected]") ;
shoppingcartCustomer.save(); t.commit();
} catch (Exception e){
t.rollback(); shoppingcart.ShoppingCartPersistentManager.instance ().getSession().close();
} }
After running the sample code, the contact phone and email of the customer is updated.
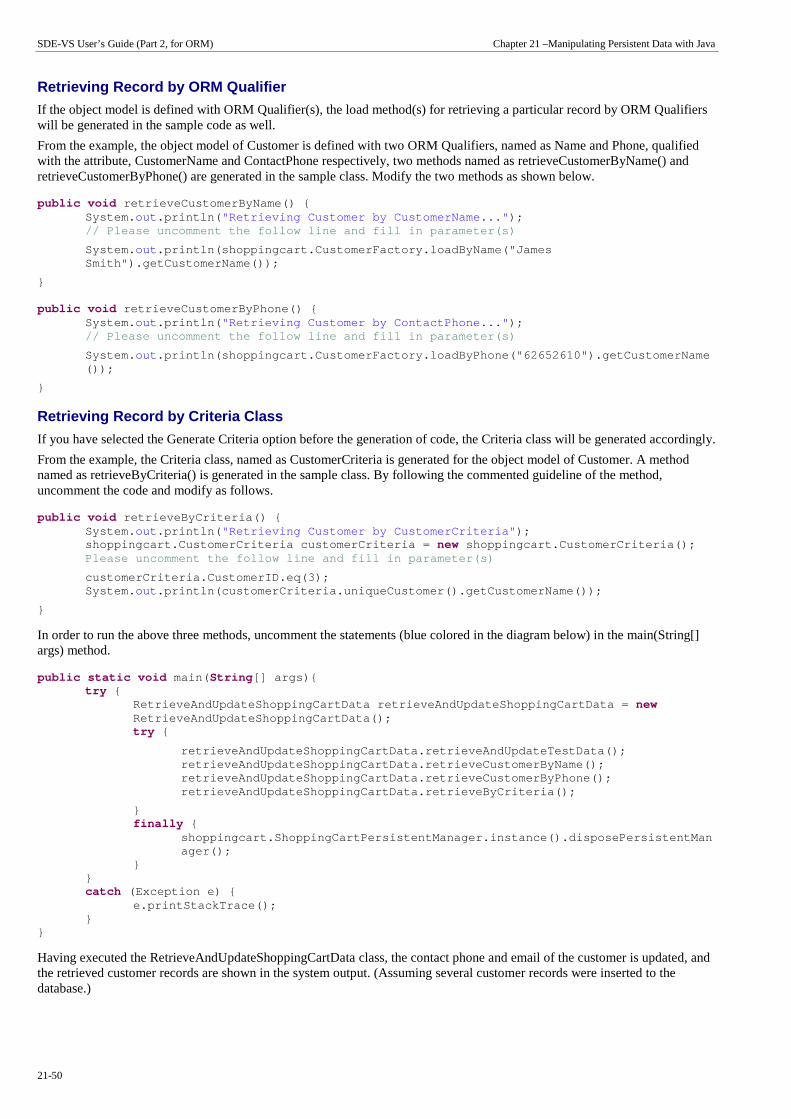
SDE-VS User’s Guide (Part 2, for ORM) Chapter 21 –Manipulating Persistent Data with Java
21-50
Retrieving Record by ORM Qualifier
If the object model is defined with ORM Qualifier(s), the load method(s) for retrieving a particular record by ORM Qualifiers will be generated in the sample code as well.
From the example, the object model of Customer is defined with two ORM Qualifiers, named as Name and Phone, qualified with the attribute, CustomerName and ContactPhone respectively, two methods named as retrieveCustomerByName() and retrieveCustomerByPhone() are generated in the sample class. Modify the two methods as shown below.
public void retrieveCustomerByName() { System. out .println( "Retrieving Customer by CustomerName..." ); // Please uncomment the follow line and fill in par ameter(s)
System. out .println(shoppingcart.CustomerFactory.loadByName("J ames Smith").getCustomerName());
} public void retrieveCustomerByPhone() {
System. out .println( "Retrieving Customer by ContactPhone..." ); // Please uncomment the follow line and fill in par ameter(s)
System. out .println(shoppingcart.CustomerFactory.loadByPhone(" 62652610").getCustomerName());
}
Retrieving Record by Criteria Class
If you have selected the Generate Criteria option before the generation of code, the Criteria class will be generated accordingly.
From the example, the Criteria class, named as CustomerCriteria is generated for the object model of Customer. A method named as retrieveByCriteria() is generated in the sample class. By following the commented guideline of the method, uncomment the code and modify as follows.
public void retrieveByCriteria() { System. out .println( "Retrieving Customer by CustomerCriteria" ); shoppingcart.CustomerCriteria customerCriteria = new shoppingcart.CustomerCriteria(); Please uncomment the follow line and fill in parame ter(s)
customerCriteria.CustomerID.eq(3); System. out .println(customerCriteria.uniqueCustomer().getCusto merName());
}
In order to run the above three methods, uncomment the statements (blue colored in the diagram below) in the main(String[] args) method.
public static void main( String[] args){ try {
RetrieveAndUpdateShoppingCartData retrieveAndUpdate ShoppingCartData = new RetrieveAndUpdateShoppingCartData(); try {
retrieveAndUpdateShoppingCartData.retrieveAndUpdate TestData(); retrieveAndUpdateShoppingCartData.retrieveCustomerB yName(); retrieveAndUpdateShoppingCartData.retrieveCustomerB yPhone(); retrieveAndUpdateShoppingCartData.retrieveByCriteri a();
} finally {
shoppingcart.ShoppingCartPersistentManager.instance ().disposePersistentManager();
} } catch (Exception e) {
e.printStackTrace(); }
}
Having executed the RetrieveAndUpdateShoppingCartData class, the contact phone and email of the customer is updated, and the retrieved customer records are shown in the system output. (Assuming several customer records were inserted to the database.)
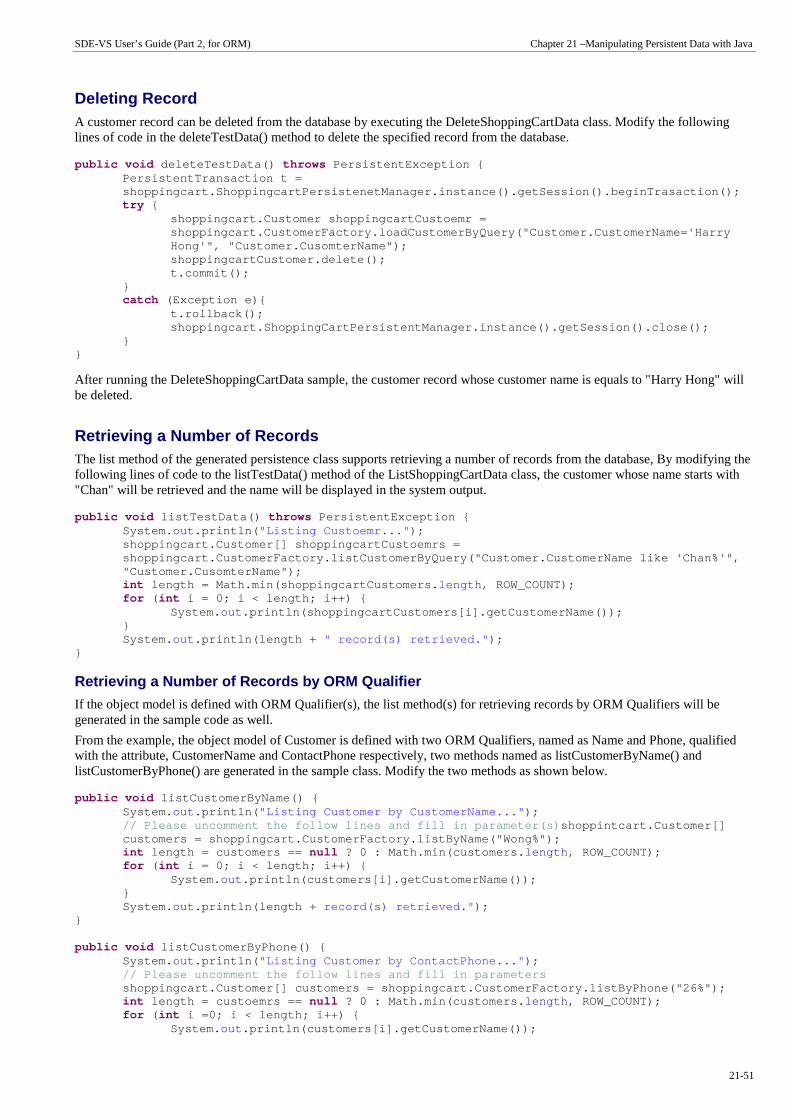
SDE-VS User’s Guide (Part 2, for ORM) Chapter 21 –Manipulating Persistent Data with Java
21-51
Deleting Record A customer record can be deleted from the database by executing the DeleteShoppingCartData class. Modify the following lines of code in the deleteTestData() method to delete the specified record from the database.
public void deleteTestData() throws PersistentException { PersistentTransaction t = shoppingcart.ShoppingcartPersistenetManager.instanc e().getSession().beginTrasaction(); try {
shoppingcart.Customer shoppingcartCustoemr = shoppingcart.CustomerFactory.loadCustomerByQuery("C ustomer.CustomerName='Harry Hong'", "Customer.CusomterName"); shoppingcartCustomer.delete(); t.commit();
} catch (Exception e){
t.rollback(); shoppingcart.ShoppingCartPersistentManager.instance ().getSession().close();
} }
After running the DeleteShoppingCartData sample, the customer record whose customer name is equals to "Harry Hong" will be deleted.
Retrieving a Number of Records The list method of the generated persistence class supports retrieving a number of records from the database, By modifying the following lines of code to the listTestData() method of the ListShoppingCartData class, the customer whose name starts with "Chan" will be retrieved and the name will be displayed in the system output.
public void listTestData() throws PersistentException { System. out .println( "Listing Custoemr..." ); shoppingcart.Customer[] shoppingcartCustoemrs = shoppingcart.CustomerFactory.listCustomerByQuery("C ustomer.CustomerName like 'Chan%'", "Customer.CusomterName"); int length = Math.min(shoppingcartCustomers. length , ROW_COUNT); for ( int i = 0; i < length; i++) {
System. out .println(shoppingcartCustomers[i].getCustomerName() ); } System. out .println(length + " record(s) retrieved." );
}
Retrieving a Number of Records by ORM Qualifier
If the object model is defined with ORM Qualifier(s), the list method(s) for retrieving records by ORM Qualifiers will be generated in the sample code as well.
From the example, the object model of Customer is defined with two ORM Qualifiers, named as Name and Phone, qualified with the attribute, CustomerName and ContactPhone respectively, two methods named as listCustomerByName() and listCustomerByPhone() are generated in the sample class. Modify the two methods as shown below.
public void listCustomerByName() { System. out .println( "Listing Customer by CustomerName..." ); // Please uncomment the follow lines and fill in pa rameter(s) shoppintcart.Customer[] customers = shoppingcart.CustomerFactory.listByName ("Wong%"); int length = customers == null ? 0 : Math.min(customers. length , ROW_COUNT); for ( int i = 0; i < length; i++) {
System. out .println(customers[i].getCustomerName()); } System. out .println(length + record(s) retrieved." );
} public void listCustomerByPhone() {
System. out .println( "Listing Customer by ContactPhone..." ); // Please uncomment the follow lines and fill in pa rameters shoppingcart.Customer[] customers = shoppingcart.Cu stomerFactory.listByPhone("26%"); int length = custoemrs == null ? 0 : Math.min(customers. length , ROW_COUNT); for ( int i =0; i < length; i++) {
System. out .println(customers[i].getCustomerName());

SDE-VS User’s Guide (Part 2, for ORM) Chapter 21 –Manipulating Persistent Data with Java
21-52
} System. out .println(length + " record(s) retrieved." );
}
Retrieving a Number of Records by Criteria
As the criteria class is generated for the Customer object model, a method named as ListByCriteria() is generated in the sample class. Modify the following lines of code.
public void listByCriteria() throws PersistentException { System.out.println("Listing Customer by Crieteria.. ."); shoppingcart.CustomerCriteria customerCriteria = new shoppingcart.CustomerCriteria(); //Please uncomment the follow line and fill in para meter(s) // customerCriteria.CustomerID.eq();
customerCriteria.CustomerName.like("Cheung%");
customerCriteria.setMaxResults(ROW_COUNT); shoppingcart.Customer[] customers = customerCriteri a.listCustomer(); int length = customers == null ? 0 : Math.min(customers. length , ROW_COUNT); for ( int i = 0; i < length; i++) {
System.out.println(customers[i].getCustomerName());
} System. out .println(length + " Customer record(s) retrieved." );
}
In order to run these three methods, uncomment the statements (blue colored in the diagram below) in the main(String[] args) method.
public static void main( String[] args) { try {
LsitShoppingCartData lsitShoppingCartData = new LsitShoppingCartData(); try {
lsitShoppingCartData.listTestData();
listShoppingCartData.listCustomerByName(); listShoppingCartData.listCustomerByPhone();
} finally {
shoppingcart.ShoppingCartPersistentManager.instance ().disposePersistentManager();
} } catch (Exception e) {
e.printStackTrace(); }
}
Having executed the ListShoppingCartData class, the matched records are retrieved and displayed with the customer name according to the condition defined in the listTestData(), listCustomerByName(), listCustomerByPhone() and listByCriteria() methods.
Dropping Database Table In some cases, you may want to drop the database tables and create the database tables again. By running the DropShoppingCartDatabaseSchema class first, all the database tables will be dropped accordingly.
package ormsamples; import org.orm.*; public class DropShoppingCartDatabaseSchema {
public static void main( String[] args){ try {
System. out .println( "Are you sure to drop tables(s)? (Y/N)" ); java.io.BufferReader reader = new java.io.BufferedReader( new java.io.InputStreamReader(System. in )); if( (reader.readLine().trim().toUpperCase().equals( "Y" );){
ORMDatabaseInitiator.dropSchema(shoppingcart.Shoppi ngCartPersistentManager());
} } catch (Exception e){

SDE-VS User’s Guide (Part 2, for ORM) Chapter 21 –Manipulating Persistent Data with Java
21-53
e.printStackTrace(); }
} }
Running the Script File
The script file can be generated for you, which allows you to compile all generated Java classes, both ORM-Persistable classes and sample files and directly execute the sample files to test the sample result. In order to generate the script files, you have to check the option for script files before generating the persistent code.
Figure 21.81 - Generate script options
By running the CompileAll batch file, all Java classes will be compiled at once. After compiled all Java classes, you are able to test the sample file by using the corresponding batch file, such as RunCreateShoppingCartDataSchema.bat, RunCreateShoppingCartData.bat and RunRetrieveShoppingCartData.bat etc.
For Linux user, please execute the CompileAll.sh file to compile all Java classes and test the sample file by the corresponding shell scripts, such as RunCreateShoppingCartDataSchema.sh, RunCreateShoppingCart.sh and RunRetrieveShoppingCartData.sh etc.

SDE-VS User’s Guide (Part 2, for ORM) Chapter 21 –Manipulating Persistent Data with Java
21-54
Manipulating Persistent Data with .NET 22
SDE-VS User’s Guide (Part 2, for ORM) Chapter 22 – Manipulating Persistent Data with .NET
22-2
Chapter 22 - Manipulating Persistent Data with .NET
Java and .NET persistent code can be generated to manipulate persistent data with the database. This chapter shows the use of the generated .NET persistent code by inserting, retrieving, updating and deleting persistent data and demonstrates how to run the generated sample code with C#.
In this chapter:
• Introduction • Using ORM-Persistable .NET Class to manipulate persistent data • Using Criteria Class to retrieve persistent data • Using ORM Implementation • Applying generated .NET persistence class to different .NET language
Introduction
With the Smart Development Environment Enterprise Edition for Visual Studio .NET (SDE-VS EE) and Smart Development Environment Professional Edition for Visual Studio .NET (SDE-VS PE), you can generate .NET persistence code to manipulate the persistent data of the relational database easily.
In the working environment, you are allowed to configure the database connection for your development project. As the database was configured before the generation of persistent code, not only the ORM persistable .NET classes are generated, but also a set of ORM files which configures the environment for connecting the generated persistence classes and the database. And hence, you are allowed to access the database directly by using the .NET persistence class without using any code for setting up the database connection in your .NET project.
The generated .NET persistence code is applicable to all .NET language such as C#, C++ and VB for .NET project development. C# is used as the sample source code illustrating how to manipulate persistent data with the generated .NET persistence code and ORM files. Using the same set of .NET persistence class and ORM files to develop a .NET project with other .NET languages instead of C# is briefly described at the end of this chapter.
There are several mappings in the SDE-VS environment:
1. Mapping between data model and relational database. 2. Mapping between data model and object model. 3. Mapping between object model and persistent code.
And hence, there is an indirect mapping between persistent code and relational database. Each persistence class represents a table in the database and an instance of the class represents one record of the table. In the generated persistence class, there is not only a pair of getter and setter methods for manipulating the corresponding attribute, but also a set of methods for manipulating records with the database.
Using ORM-Persistable .NET Class
ORM-Persistable .NET class is generated based on the object model defined in the class diagram. The generated .NET persistence code can be identified into two categories � Model API and Persistent API. The Model API refers to the manipulation of attributes of models and associations between models while the Persistent API refers to the persistent code used to manipulate the persistent data with relational database.
C# is used to show the manipulation on persistent data throughout this chapter. The generated .NET persistence code is applicable to all .NET language, such as C#, C++ and VB.
Model API
Model API refers to the generated .NET persistent code which is capable of manipulating the properties of the object model in terms of attributes and associations.

SDE-VS User’s Guide (Part 2, for ORM) Chapter 21 –Manipulating Persistent Data with .NET
22-3
Manipulating Attributes In order to specify and retrieve the value to the attributes of the ORM-Persistable class, a pair of getter and setter methods for each attribute is generated to the ORM-Persistable .NET class.
Example:
Figure 22.1 - Mapping attributes
From the above example, an ORM-Persistable object model of Customer maps to an ORM-Persistable .NET class generated with the getter and setter methods for each attribute.
To set the values of properties of the Customer object, the following lines of code should be used.
customer.CustomerName = "Joe Cool" ; customer.Address = "1212, Happy Building" ; customer.ContactPhone = "23453256" ; customer.Email = "[email protected]" ;
To get the values of properties of the Customer object:
String name = customer.CustomerName; String address = customer.Address; String phone = customer.ContactPhone; String email = customer.Email();
Manipulating Association When mapping a navigable association to persistence code, the role name of the association will become an attribute of the class. A pair of getter and setter methods for the role will be generated to the persistence class so as to manipulate its role associated with its supplier class. There are two ways in manipulating association, including Smart Association Handling and Standard Association Handling.
Smart Association Handling
Using smart association handling, the generated persistent code is capable of defining one end of the association which updates the other end of association automatically in a bi-directional association regardless of multiplicity. Examples are given to show how the generated persistent code manipulates the one-to-one, one-to-many and many-to-many associations with smart association handling.

SDE-VS User’s Guide (Part 2, for ORM) Chapter 22 – Manipulating Persistent Data with .NET
22-4
One-to-One Association In order to manipulate the directional association, implement the program by setting the properties of role name of the object.
Example:
Figure 22.2 - Mapping one-to-one association
From the above example, an ORM-Persistable object model of Software maps to an ORM-Persistable .NET class with an attribute of role, "__contains" in the association typed as its associated persistence class, License. Meanwhile, the object model of License maps to another .NET class with an attribute of role, "__belongsTo" typed as Software. It specifies the association that Software contains a particular License and a License belongs to particular software.
To manipulate the association, the following lines of code should be implemented.
Software software = Software.CreateSoftware(); License license = License.CreateLicense(); license.BelongsTo = software;
In the above association, the primary key of the Software table will become a foreign key in License table when transforming to data model. Thus, after executing the lines of code, the primary key of the software will be referenced as a foreign key of the license record.
Figure 22.3 - Code for add an one-to-one association
It is a bi-directional association with smart association handling. The association link can be created by setting either the role of Software, or the role of License, i.e. setting one of the roles builds up a bi-directional association automatically. It is not required to set one role after the other. Hence, both license.BelongsTo = software and software.Contains = license result in building up the bi-directional association.
One-to-Many Association In a bi-directional one-to-many association, a class has multiplicity of one while the other has many. If the class has multiplicity of many, the corresponding collection class will be automatically generated for manipulating the objects. When transforming the association to persistent code, the role name will map to an attribute with data type of a collection class. For more detailed information on the collection class, refer to the description in Using Collection section.

SDE-VS User’s Guide (Part 2, for ORM) Chapter 21 –Manipulating Persistent Data with .NET
22-5
A bi-directional one-to-many association is shown below.
Figure 22.4 - One-to-many relationship
To manipulate the bi-directional one-to-many association, you can create the association in one of the two ways:
• Set the properties of role with an instance of the associated class; i.e. classB.RoleB = classA • Add the objects to the collection of the associated class; i.e. classA.RoleA.Add(classB)
where classA is an object of ClassA; classB is an object of ClassB; RoleA is the collection of ClassB; RoleB is the setter method of property, roleB.
After specifying the association, the value of primary key of the object of ClassA will be referenced as a foreign key of the associated object of ClassB.
Setting the property of role
For information on setting the properties of role, refer to the description in the One-to-One Association section.
Adding objects to the collection
In order to add an object to the collection, implement the program with the following steps:
1. Create a new instance of the class which associates with more than one instance of associated class. 2. Create a new object of the associated class. 3. Add a new object or an existing object of the associated class to the collection belonging to the class.
Table shows the method summary of the collection class to be used for adding a new object to it
Return Type Method Name Description
void Add(Class value) Add a new object to the collection of the associated class.
Table 22.1
Remark:
1. Class should be replaced by the name of the associated class.
Example:
Figure 22.5 - Mapping one-to-many relationship
From the above example, an ORM-Persistable object model of PurchaseOrder maps to an ORM-Persistable .NET class with an attribute of role, "__PlacedBy" in the association typed as an instance of Customer, specifying that the particular purchase order is placed by a particular customer. Moreover, the object model of Customer maps to a .NET class with an attribute of role, "__Places" in the association typed as a collection class, PurchaseOrderSetCollection which manipulates instances of PurhcaseOrder.

SDE-VS User’s Guide (Part 2, for ORM) Chapter 22 – Manipulating Persistent Data with .NET
22-6
To add a PurchaseOrder object to the collection of PurchaseOrder, the following lines of code should be implemented.
Customer customer = Customer.CreateCustomer(); PurchaseOrder po = PurchaseOrder.CreatePurchaseOrde r(); customer.Places.Add(po);
After executing these lines of code, an object is added to the collection representing the association. When inserting records to the database tables, the primary key of the customer will be referenced to as the foreign key of the purchase order record.
The alternative way to create the association is using po.PlacedBy = customer;
Figure 22.6 - Code for add an one-to many relationship
Retrieving objects from the collection
In order to retrieve an object from the collection, implement the program with the following steps:
1. Retrieve an instance of the class which associates with more than one instance of associated class. 2. Get the collection from the class, and convert the collection into an array.
Table shows the method summary of the collection class to convert the collection into an array.
Return Type Method Name Description
Class[] ToArray() Convert the collection into an array which stores the objects of the associated class.
Table 22.2
Remark:
1. Class should be replaced by the name of the associated class.
Example:
Refer to the example of the one-to-many association between the ORM-Persistable object models of Customer and PurchaseOrder, implement the following lines of code to retrieve a collection of PurchaseOrder objects from the customer.
Customer customer = Customer.LoadByName( "Joe Cool" ); PurchaseOrder[] orders = customer.Places.ToArray();
After executing these lines of code, the purchase order records associated with the customer are retrieved and stored in the array.
Retrieve the customer record by the LoadByName() method which is the method provided by the persistent API. For more information on retrieving persistent object, refer to the Persistent API section.
Many-to-Many Association When transforming a many-to-many association between two ORM-Persistable classes, the corresponding persistent and collection class will be generated simultaneously such that the collection class is able to manipulate its related objects within the collection.
In order to specify the many-to-many association, add the objects to the corresponding collection of the associated class. For information on adding objects to the collection, refer to the description in the One-to-Many Association section.
In addition, a many-to-many association in the object model is transformed to data model by generating a Link Entity to form two one-to-many relationships between two generated entities. The primary keys of the two entities will migrate to the link entity as the primary/foreign keys. When specifying the association by adding objects to the collection, the primary key of the two related instances will be inserted as a pair for a row of the Link Entity automatically.
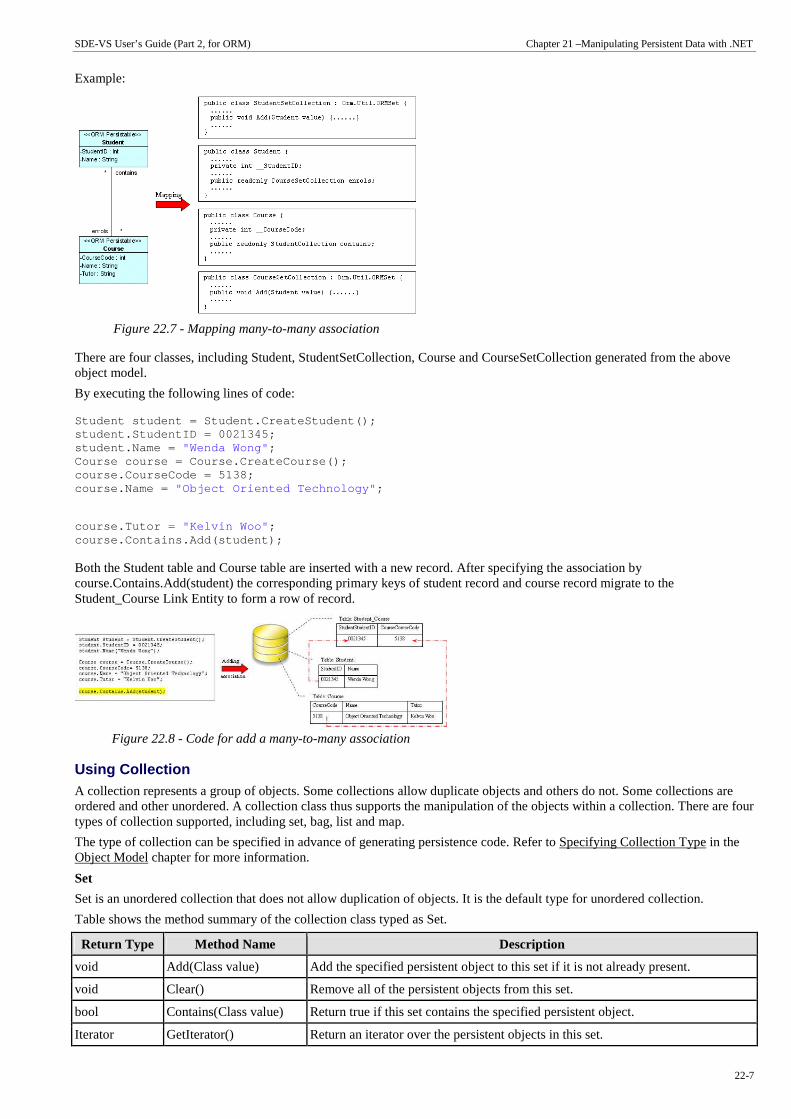
SDE-VS User’s Guide (Part 2, for ORM) Chapter 21 –Manipulating Persistent Data with .NET
22-7
Example:
Figure 22.7 - Mapping many-to-many association
There are four classes, including Student, StudentSetCollection, Course and CourseSetCollection generated from the above object model.
By executing the following lines of code:
Student student = Student.CreateStudent(); student.StudentID = 0021345; student.Name = "Wenda Wong" ; Course course = Course.CreateCourse(); course.CourseCode = 5138; course.Name = "Object Oriented Technology" ;
course.Tutor = "Kelvin Woo" ; course.Contains.Add(student);
Both the Student table and Course table are inserted with a new record. After specifying the association by course.Contains.Add(student) the corresponding primary keys of student record and course record migrate to the Student_Course Link Entity to form a row of record.
Figure 22.8 - Code for add a many-to-many association
Using Collection A collection represents a group of objects. Some collections allow duplicate objects and others do not. Some collections are ordered and other unordered. A collection class thus supports the manipulation of the objects within a collection. There are four types of collection supported, including set, bag, list and map.
The type of collection can be specified in advance of generating persistence code. Refer to Specifying Collection Type in the Object Model chapter for more information.
Set
Set is an unordered collection that does not allow duplication of objects. It is the default type for unordered collection.
Table shows the method summary of the collection class typed as Set.
Return Type Method Name Description
void Add(Class value) Add the specified persistent object to this set if it is not already present.
void Clear() Remove all of the persistent objects from this set.
bool Contains(Class value) Return true if this set contains the specified persistent object.
Iterator GetIterator() Return an iterator over the persistent objects in this set.

SDE-VS User’s Guide (Part 2, for ORM) Chapter 22 – Manipulating Persistent Data with .NET
22-8
bool IsEmpty() Return true if this set contains no persistent object.
void Remove(Class value) Remove the specified persistent object from this set if it is present.
int Size() Return the number of persistent objects in this set.
Class[] ToArray() Return an array containing all of the persistent objects in this set.
Table 22.3
Remark:
1. Class should be replaced by the persistence class.
Bag
Bag is an unordered collection that may contain duplicate objects.
Table shows the method summary of the collection class typed as Bag.
Return Type Method Name Description
void Add(Class value) Add the specified persistent object to this bag.
void Clear() Remove all of the persistent objects from this bag.
bool Contains(Class value) Return true if this bag contains the specified persistent object.
Iterator GetIterator() Return an iterator over the persistent objects in this bag.
bool IsEmpty() Return true if this bag contains no persistent object.
void Remove(Class value) Remove the specified persistent object from this bag.
int Size() Return the number of persistent objects in this bag.
Class[] ToArray() Return an array containing all of the persistent objects in this bag.
Table 22.4
Remark:
1. Class should be replaced by the persistence class.
List
List is an ordered collection that allows duplication of objects. It is the default type for ordered collection.
Table shows the method summary of the collection class typed as List.
Return Type
Method Name Description
void Add(Class value) Append the specified persistent object to the end of this list.
void Add(int index, Class value)
Insert the specified persistent object at the specified position in this list.
void Clear() Remove all of the persistent objects from this list.
bool Contains(Class value) Return true if this list contains the specified persistent object.
Object Get(int index) Return the persistent object at the specified position in this list.
Iterator GetIterator() Return an iterator over the persistent objects in this list in proper sequence.
bool IsEmpty() Return true if this list contains no persistent object.
void Remove(Class value) Remove the first occurrence in this list of the specified persistent object.
Class Remove(int index) Remove the persistent object at the specified position in this list.
Int Set(int index, Class value)
Replace the persistent object at the specified position in this list with the specified persistent object.
Int Size() Return the number of persistent objects in this list.
Class[] ToArray() Return an array containing all of the persistent objects in this list in proper sequence.
Table 22.4
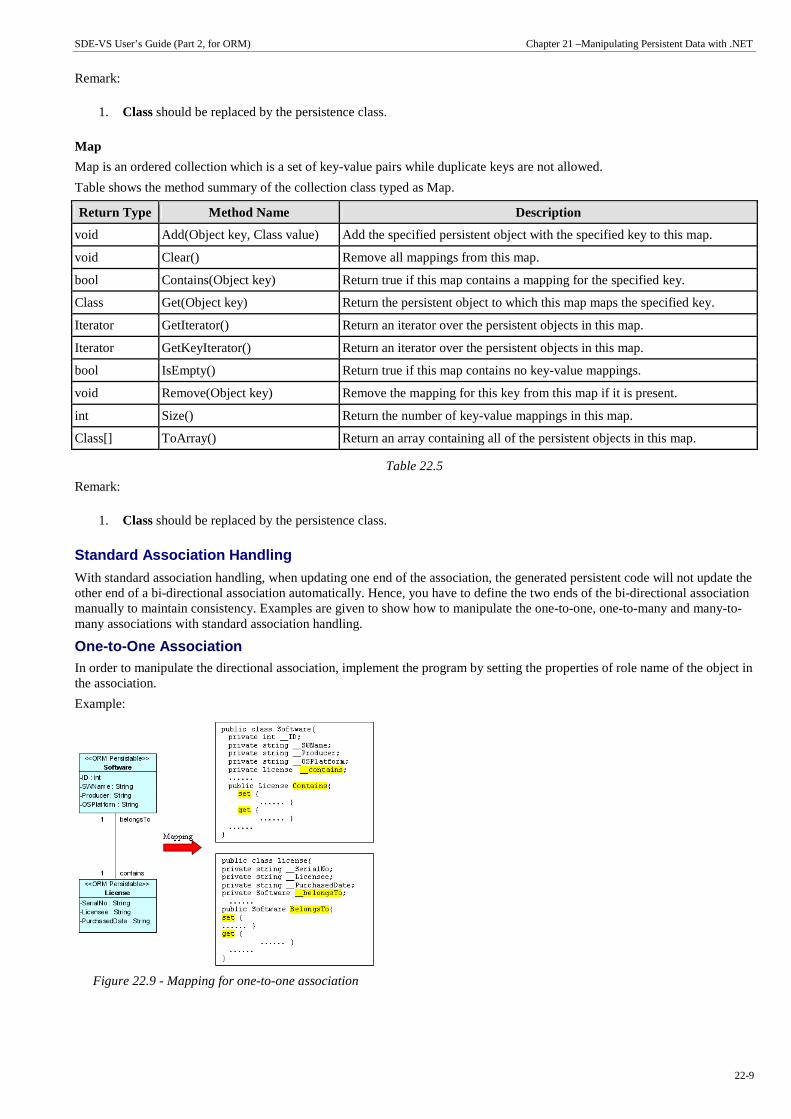
SDE-VS User’s Guide (Part 2, for ORM) Chapter 21 –Manipulating Persistent Data with .NET
22-9
Remark:
1. Class should be replaced by the persistence class.
Map
Map is an ordered collection which is a set of key-value pairs while duplicate keys are not allowed.
Table shows the method summary of the collection class typed as Map.
Return Type Method Name Description
void Add(Object key, Class value) Add the specified persistent object with the specified key to this map.
void Clear() Remove all mappings from this map.
bool Contains(Object key) Return true if this map contains a mapping for the specified key.
Class Get(Object key) Return the persistent object to which this map maps the specified key.
Iterator GetIterator() Return an iterator over the persistent objects in this map.
Iterator GetKeyIterator() Return an iterator over the persistent objects in this map.
bool IsEmpty() Return true if this map contains no key-value mappings.
void Remove(Object key) Remove the mapping for this key from this map if it is present.
int Size() Return the number of key-value mappings in this map.
Class[] ToArray() Return an array containing all of the persistent objects in this map.
Table 22.5
Remark:
1. Class should be replaced by the persistence class.
Standard Association Handling
With standard association handling, when updating one end of the association, the generated persistent code will not update the other end of a bi-directional association automatically. Hence, you have to define the two ends of the bi-directional association manually to maintain consistency. Examples are given to show how to manipulate the one-to-one, one-to-many and many-to-many associations with standard association handling.
One-to-One Association In order to manipulate the directional association, implement the program by setting the properties of role name of the object in the association.
Example:
Figure 22.9 - Mapping for one-to-one association

SDE-VS User’s Guide (Part 2, for ORM) Chapter 22 – Manipulating Persistent Data with .NET
22-10
From the above example, an ORM-Persistable object model of Software maps to an ORM-Persistable .NET class with an attribute of role, "__contains" in the association typed as its associated persistence class, License. Meanwhile, the object model of License maps to another .NET class with an attribute of role, "__belongsTo" typed as Software. It specifies the association that Software contains a particular License and a License belongs to particular software.
To manipulate the association, the following lines of code should be implemented.
Software software = Software.CreateSoftware(); License license = License.CreateLicense(); license.BelongsTo = software; software.Contains = license;
In the above association, the primary key of the Software table will become a foreign key in License table when transforming to data model. Thus, after executing the lines of code, the primary key of the software will be referenced as a foreign key of the license record.
Figure 22.10 - Code for adding one-to-one association
It is a bi-directional association with standard association handling. The association link can be created by setting both roles of Software and License.
One-to-Many Association In a bi-directional one-to-many association, a class has multiplicity of one while the other has many. When transforming the association to persistent code, the role name will map to an attribute with data type of a collection class. For more detailed information on the .NET collection class, refer to the description in Using Collection section.
A bi-directional one-to-many association is shown below.
Figure 22.11 - Many-to-many association
With standard association handling, you have to create the association with the following steps in order to manipulate the bi-directional one-to-many association:
• Set the properties of role with an instance of the associated class; i.e. classB.RoleB = classA • Add the objects to the collection of the associated class; i.e. classA.RoleA.Add(classB)
where classA is an object of ClassA; classB is an object of ClassB; RoleA is the collection of ClassB; RoleB is the setter method of property, roleB.
After specifying the association, the value of primary key of the object of ClassA will be referenced as a foreign key of the associated object of ClassB.
Setting the property of role
For information on setting the properties of role, refer to the description in the One-to-One Association section.
Adding objects to the collection
In order to add an object to the collection, implement the program with the following steps:
1. Create a new instance of the class which associates with more than one instance of associated class. 2. Create a new object of the associated class. 3. Add a new object or an existing object of the associated class to the collection belonging to the class.

SDE-VS User’s Guide (Part 2, for ORM) Chapter 21 –Manipulating Persistent Data with .NET
22-11
Table shows the method summary of the collection class to be used for adding a new object to it
Return Type Method Name Description
void Add(Class value) Add a new object to the collection of the associated class.
Table 22.6
Remark:
1. Class should be replaced by the name of the associated class.
Example:
Figure 22.12 -Mapping one-to-many association using collection
From the above example, an ORM-Persistable object model of PurchaseOrder maps to an ORM-Persistable .NET class with an attribute of role, "__PlacedBy" in the association typed as an instance of Customer, specifying that the particular purchase order is placed by a particular customer. Moreover, the object model of Customer maps to a .NET class with an attribute of role, "__Places" in the association typed as a .NET collection class, ISet which is the specified type of collection manipulating instances of PurhcaseOrder.
To add a PurchaseOrder object to the collection of PurchaseOrder, the following lines of code should be implemented.
Customer customer = Customer.CreateCustomer(); PurchaseOrder po = PurchaseOrder.CreatePurchaseOrde r(); customer.Places.Add(po); po.PlacedBy = customer;
After executing these lines of code, an object is added to the collection representing the association. When inserting records to the database tables, the primary key of the customer will be referenced to as the foreign key of the purchase order record.
Figure 22.13 - Code for add one-to-many association
Retrieving objects from the collection
In order to retrieve an object from the collection, implement the program with the following steps:
1. Retrieve an instance of the class which associates with more than one instance of associated class. 2. Get the collection from the class, and convert the collection into an object array.
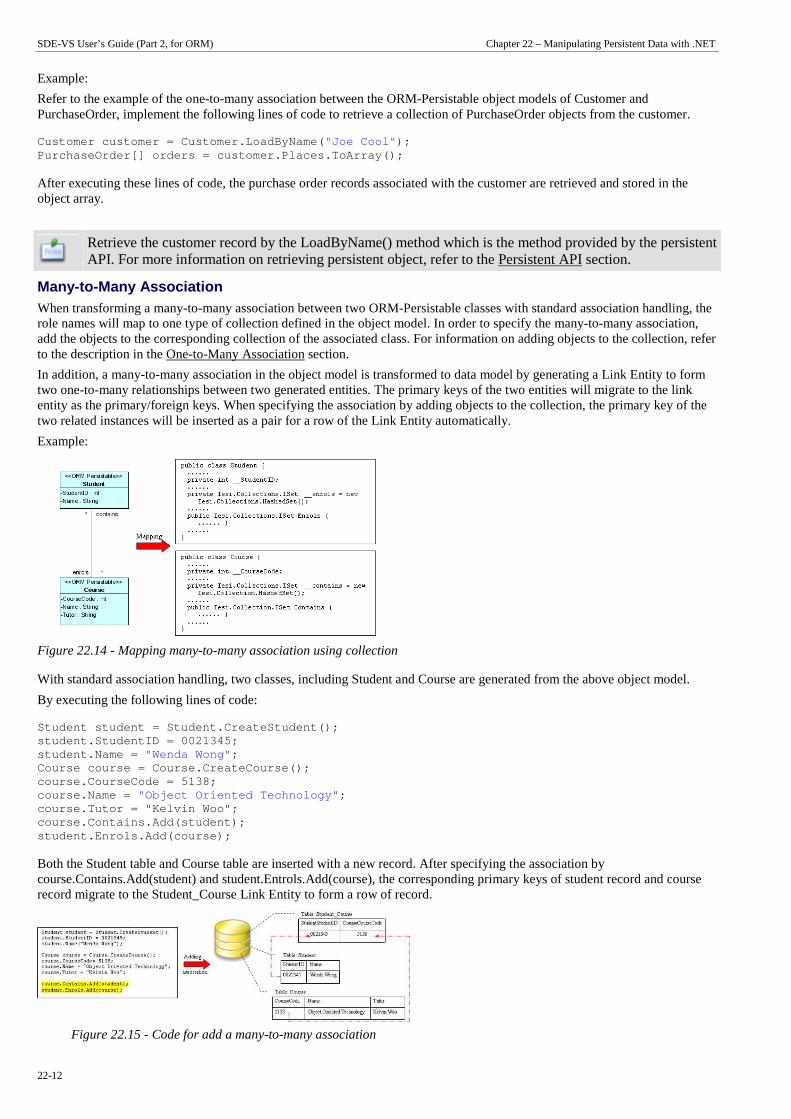
SDE-VS User’s Guide (Part 2, for ORM) Chapter 22 – Manipulating Persistent Data with .NET
22-12
Example:
Refer to the example of the one-to-many association between the ORM-Persistable object models of Customer and PurchaseOrder, implement the following lines of code to retrieve a collection of PurchaseOrder objects from the customer.
Customer customer = Customer.LoadByName( "Joe Cool" ); PurchaseOrder[] orders = customer.Places.ToArray();
After executing these lines of code, the purchase order records associated with the customer are retrieved and stored in the object array.
Retrieve the customer record by the LoadByName() method which is the method provided by the persistent API. For more information on retrieving persistent object, refer to the Persistent API section.
Many-to-Many Association When transforming a many-to-many association between two ORM-Persistable classes with standard association handling, the role names will map to one type of collection defined in the object model. In order to specify the many-to-many association, add the objects to the corresponding collection of the associated class. For information on adding objects to the collection, refer to the description in the One-to-Many Association section.
In addition, a many-to-many association in the object model is transformed to data model by generating a Link Entity to form two one-to-many relationships between two generated entities. The primary keys of the two entities will migrate to the link entity as the primary/foreign keys. When specifying the association by adding objects to the collection, the primary key of the two related instances will be inserted as a pair for a row of the Link Entity automatically.
Example:
Figure 22.14 - Mapping many-to-many association using collection
With standard association handling, two classes, including Student and Course are generated from the above object model.
By executing the following lines of code:
Student student = Student.CreateStudent(); student.StudentID = 0021345; student.Name = "Wenda Wong" ; Course course = Course.CreateCourse(); course.CourseCode = 5138; course.Name = "Object Oriented Technology" ; course.Tutor = "Kelvin Woo"; course.Contains.Add(student); student.Enrols.Add(course);
Both the Student table and Course table are inserted with a new record. After specifying the association by course.Contains.Add(student) and student.Entrols.Add(course), the corresponding primary keys of student record and course record migrate to the Student_Course Link Entity to form a row of record.
Figure 22.15 - Code for add a many-to-many association

SDE-VS User’s Guide (Part 2, for ORM) Chapter 21 –Manipulating Persistent Data with .NET
22-13
Using Collection With standard association handling, the role name which associates with more than one instance of the supplier class is transformed into one type of .NET collection class. The type of collection can be specified before the generation of code, refer to the description of Specifying Collection Type in the Object Model chapter.
The following table shows the mapping between the collection type defined in the association specification and the .NET collection class.
Collection Type .NET Collection Class
Set Iesi.Collections.ISet
Bag System.Collections.IList
List System.Collections.IList
Map System.Collections.IDictionary
Table 22.7
Persistent API
Persistent API refers to the persistent code used to manipulate the persistent data. There are four types of persistent API available for generating the .NET persistence code. The four types of persistent API which include Static Method, Factory Class, POJO and Data Access Object (DAO), are capable of manipulating the persistent data with the relational database, i.e., inserting, retrieving, updating and deleting records.
Using Static Method Generating the persistence code with static methods, the persistence class is generated with the static methods which is capable of creating, retrieving persistent object and persisting data. The following class diagram shows the dependency relationship between the client program and the generated persistence class.
Figure 22.16 - Using static method
In the above class diagram, the PersistentObject refers to the ORM-Persistable class defined in the class diagram. For example, the ORM-Persistable class, Customer persists with the Customer data in the Customer table.
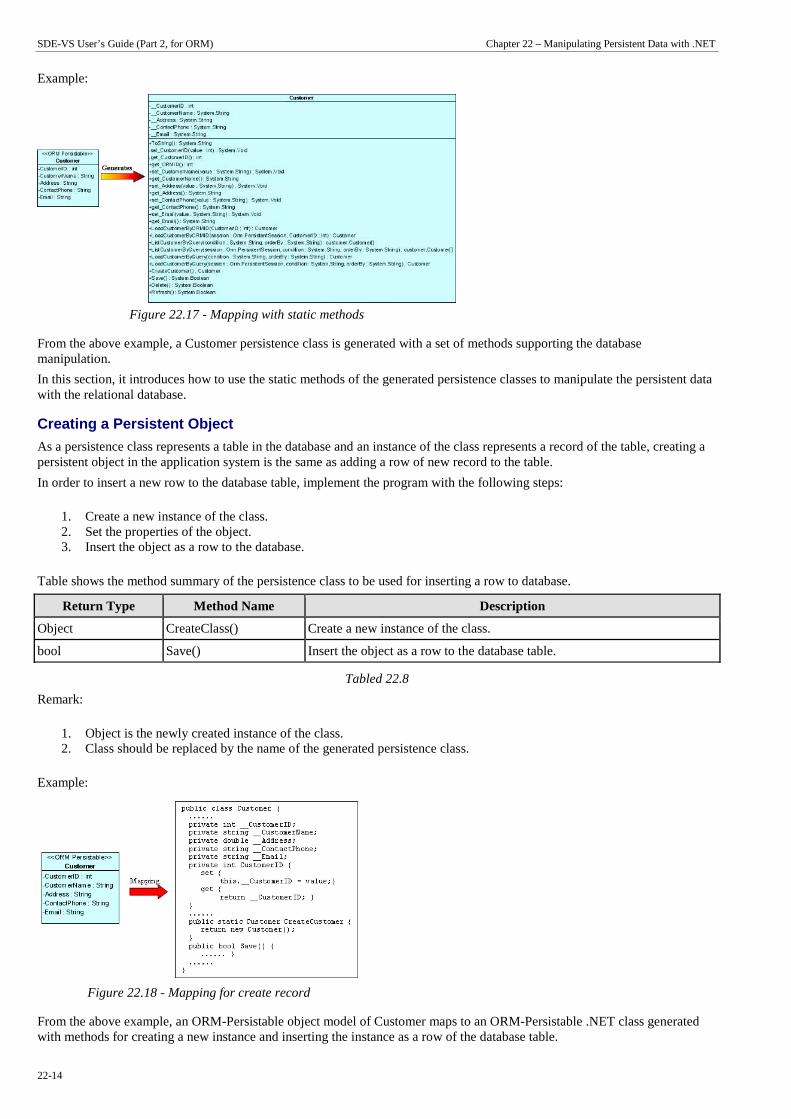
SDE-VS User’s Guide (Part 2, for ORM) Chapter 22 – Manipulating Persistent Data with .NET
22-14
Example:
Figure 22.17 - Mapping with static methods
From the above example, a Customer persistence class is generated with a set of methods supporting the database manipulation.
In this section, it introduces how to use the static methods of the generated persistence classes to manipulate the persistent data with the relational database.
Creating a Persistent Object
As a persistence class represents a table in the database and an instance of the class represents a record of the table, creating a persistent object in the application system is the same as adding a row of new record to the table.
In order to insert a new row to the database table, implement the program with the following steps:
1. Create a new instance of the class. 2. Set the properties of the object. 3. Insert the object as a row to the database.
Table shows the method summary of the persistence class to be used for inserting a row to database.
Return Type Method Name Description
Object CreateClass() Create a new instance of the class.
bool Save() Insert the object as a row to the database table.
Tabled 22.8
Remark:
1. Object is the newly created instance of the class. 2. Class should be replaced by the name of the generated persistence class.
Example:
Figure 22.18 - Mapping for create record
From the above example, an ORM-Persistable object model of Customer maps to an ORM-Persistable .NET class generated with methods for creating a new instance and inserting the instance as a row of the database table.

SDE-VS User’s Guide (Part 2, for ORM) Chapter 21 –Manipulating Persistent Data with .NET
22-15
To insert a new Customer record to the table, Customer of the database, the following lines of code should be implemented.
Customer customer = Customer.CreateCustomer(); customer.CustomerID = 3; customer.CustomerName = "Peter Chan" ; customer.Address = "6C, Pert Court" ; customer.Email = "[email protected]" ; customer.Save();
After executing these lines of code, a row of record is inserted to the database table.
An alternative way to create a new instance of the class is using the new operator: Class c = new Class();
From the above example, Customer customer = Customer.CreateCustomer() can be replaced by Customer customer = new Customer() to create a Customer object.
Figure 22.19 - Code for create record
Loading a Persistent Object
As the database table is represented by a persistence class, a record of the table can thus be represented by an instance. A record retrieved from the table will be stored as an object.
In order to retrieve a record from the database table, you have to specify the condition for finding the record. To retrieve a record, implement the program with the following steps:
1. Specify the condition for searching the record. 2. Load the retrieved record to an object.
Table shows the method summary of the persistence class to be used for retrieving a record from database.
Return Type Method Name Description
Class LoadClassByORMID(DataType PrimaryKey) Retrieve a record matching with the specified value of primary key.
Class LoadClassByORMID(PersistentSession session, DataType PrimaryKey)
Retrieve a record matching with the specified value of primary key and specified session.
Class LoadClassByQuery(string condition, string orderBy) Retrieve the first record matching the user defined condition while the matched records are ordered by a specified attribute.
Class LoadClassByQuery(PersistentSession session, string condition, string orderBy)
Retrieve the first record matching the user defined condition and specified session while the matched records are ordered by a specified attribute.
Table 22.9
Remark:
1. Class should be replaced by the name of the persistence class. 2. DataType should be replaced by the data type of the attribute defined in the object model.
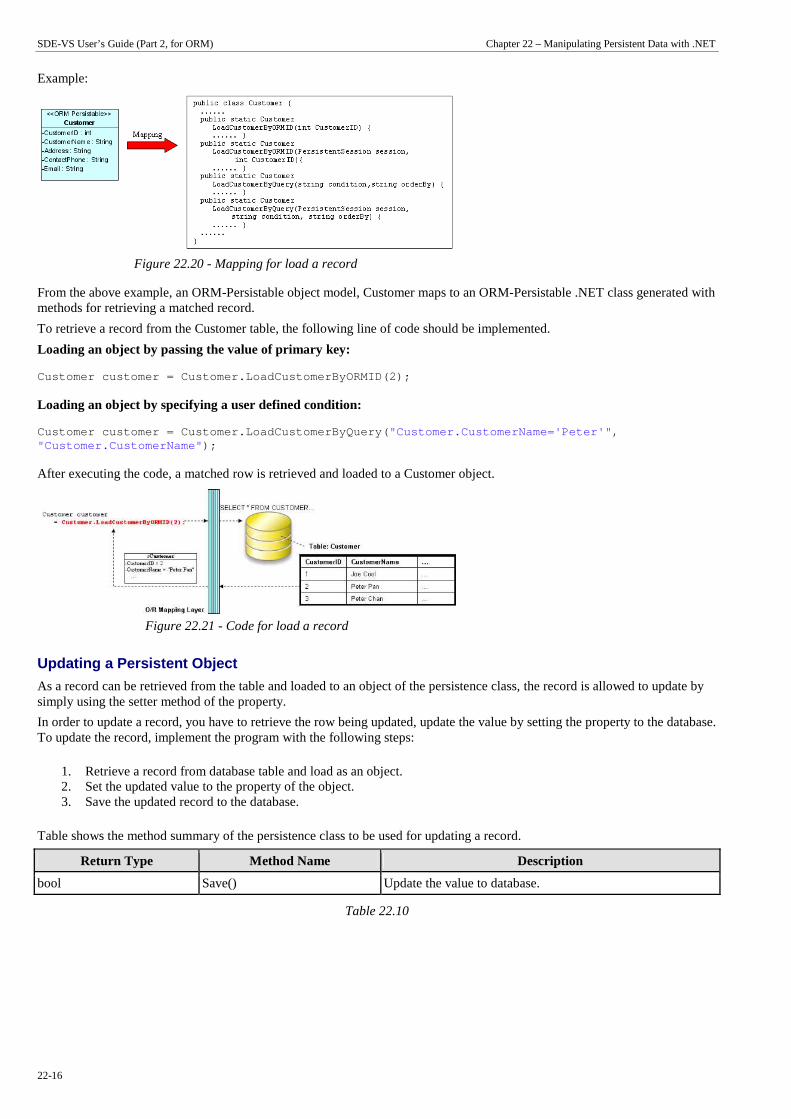
SDE-VS User’s Guide (Part 2, for ORM) Chapter 22 – Manipulating Persistent Data with .NET
22-16
Example:
Figure 22.20 - Mapping for load a record
From the above example, an ORM-Persistable object model, Customer maps to an ORM-Persistable .NET class generated with methods for retrieving a matched record.
To retrieve a record from the Customer table, the following line of code should be implemented.
Loading an object by passing the value of primary key:
Customer customer = Customer.LoadCustomerByORMID(2) ;
Loading an object by specifying a user defined condition:
Customer customer = Customer.LoadCustomerByQuery( "Customer.CustomerName='Peter'" , "Customer.CustomerName" );
After executing the code, a matched row is retrieved and loaded to a Customer object.
Figure 22.21 - Code for load a record
Updating a Persistent Object
As a record can be retrieved from the table and loaded to an object of the persistence class, the record is allowed to update by simply using the setter method of the property.
In order to update a record, you have to retrieve the row being updated, update the value by setting the property to the database. To update the record, implement the program with the following steps:
1. Retrieve a record from database table and load as an object. 2. Set the updated value to the property of the object. 3. Save the updated record to the database.
Table shows the method summary of the persistence class to be used for updating a record.
Return Type Method Name Description
bool Save() Update the value to database.
Table 22.10

SDE-VS User’s Guide (Part 2, for ORM) Chapter 21 –Manipulating Persistent Data with .NET
22-17
Example:
Figure 22.22 - Mapping for update record
From the above example, an ORM-Persistable object model, Customer maps to an ORM-Persistable .NET class generated with the methods for setting the properties and updating the row.
To update a Customer record, the following lines of code should be implemented.
customer.CustomerName = "Peter Pang" ; customer.Save();
After executing the above lines of code, the customer name is updated to "Peter Pang" in the database.
Figure 22.23 - Code for update a record
Deleting a Persistent Object
As a record can be retrieved from the table and loaded to an object of the persistence class, the record can be deleted by simply using the delete method of the persistence class.
In order to delete a record, implement the program with the following steps:
1. Retrieve a record from database table and load as an object. 2. Delete the retrieved record.
Table shows the method summary of the persistence class to be used for deleting a record from database.
Return Type Method Name Description
bool Delete() Delete the current instance.
Table 22.11
Example:
Figure 22.24 - Mapping for delete record
From the above example, an ORM-Persistable object model, Customer maps to an ORM-Persistable .NET class generated with the methods for deleting the specified record from the database.

SDE-VS User’s Guide (Part 2, for ORM) Chapter 22 – Manipulating Persistent Data with .NET
22-18
To delete a Customer record, the following lines of code should be implemented.
Customer customer = Customer.LoadCustomerByORMID(2) ; customer.Delete();
After executing the above code, the specified customer record is deleted from the database.
Figure 22.25 - Code for deleting record
Querying
For most of the database application, the database is enriched with information. Information may be requested from the database so as to performing an application function, such as retrieving the unit price of products for calculating the total amount for a purchase order.
As the persistence class represents a table, the ORM-Persistable .NET class is generated with methods for retrieving information from the database.
Loading a Collection of Persistent Objects As the database table usually contains many records, you may want to query the tables by a specified condition. The generated persistence class supports querying the database, the matched records will be retrieved and loaded as an object array.
In order to retrieve records from the table, you have to specify the condition for querying. To retrieve a number of records, implement the program with the following steps:
1. Specify the condition for searching the record. 2. Load the retrieved records as an object array.
Table shows the method summary of the persistence class to be used for retrieving records from database table.
Return Type
Method Name Description
Class[] ListClassByQuery(string condition, string orderBy) Retrieve the records matched with the user defined condition and ordered by a specified attribute.
Class[] ListClassByQuery(PersistentSession session, string condition, string orderBy)
Retrieve the records matched with the user defined condition and specified session and ordered by a specified attribute.
Table 22.12
Remark:
1. Class should be replaced by the name of the persistence class.
Example:
Figure 22.26 - Mapping for retrieve a list of records
From the above example, an ORM-Persistable object model, Customer maps to an ORM-Persistable .NET class generated with methods for retrieving records.

SDE-VS User’s Guide (Part 2, for ORM) Chapter 21 –Manipulating Persistent Data with .NET
22-19
To retrieve records from the Customer table, the following line of code should be implemented.
Customer[] customer = Customer.ListCustomerByQuery( "Customer.CustomerName='Peter'" , "Customer.CustomerName" );
After executing the code, the matched rows are retrieved and loaded to an object array of Customer.
Figure 22.27 - Code for retrieve a list of records
Using ORM Qualifier ORM Qualifier is an additional feature which allows you to specify the extra data retrieval rules apart from the system pre-defined rules. The ORM Qualifier can be defined in order to generate persistence code. Refer to Defining ORM Qualifier in the Object Model chapter for more information.
By defining the ORM Qualifier in a class, the persistence class will be generated with additional data retrieval methods, load and list methods.
Table shows the method summary generated by defining the ORM Qualifier.
Return Type Method Name Description
Class LoadByORMQualifier(DataType attribute) Retrieve the first record that matches the specified value with the attribute defined in the ORM Qualifier.
Class LoadByORMQualifier (PersistentSession session, DataType attribute)
Retrieve the first record that matches the specified value with the attribute defined in the ORM Qualifier and specified session.
Class[] ListByORMQualifier (DataType attribute) Retrieve the records matched that matches the specified value with the attribute defined in the ORM Qualifier.
Class[] ListByORMQualifier (PersistentSession session, DataType attribute)
Retrieve the records that match the specified value with the attribute defined in the ORM Qualifier and specified session.
Table 22.13
Remark:
1. Class should be replaced by the name of the persistence class. 2. ORMQualifier should be replaced by the Name defined in the ORM Qualifier. 3. DataType should be replaced by the data type of the attribute which associated with the ORM Qualifier. 4. attribute is the specified value to be used for querying the table.
Example:
Figure 22.28 - Mapping for retrieving a record by qualifier
In the above example, a customer object model is defined with an ORM Qualifier named as Name and qualified with the attribute, CustomerName.
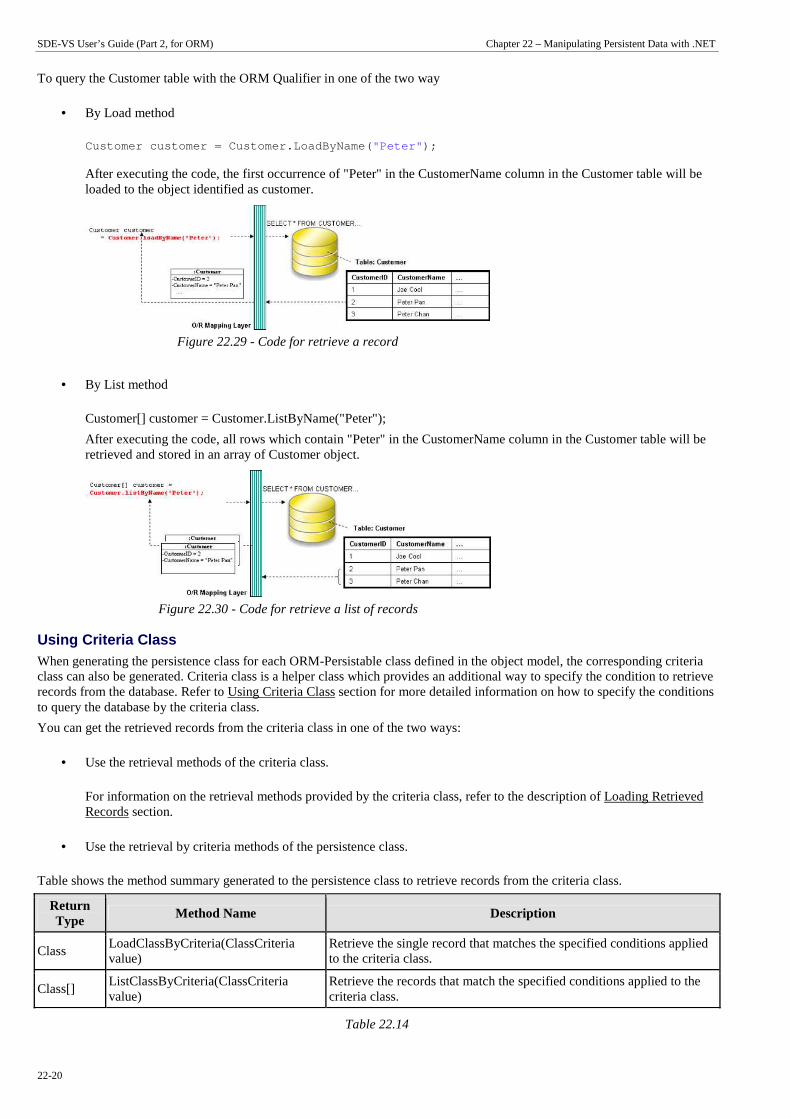
SDE-VS User’s Guide (Part 2, for ORM) Chapter 22 – Manipulating Persistent Data with .NET
22-20
To query the Customer table with the ORM Qualifier in one of the two way
• By Load method
Customer customer = Customer.LoadByName( "Peter" );
After executing the code, the first occurrence of "Peter" in the CustomerName column in the Customer table will be loaded to the object identified as customer.
Figure 22.29 - Code for retrieve a record
• By List method
Customer[] customer = Customer.ListByName("Peter");
After executing the code, all rows which contain "Peter" in the CustomerName column in the Customer table will be retrieved and stored in an array of Customer object.
Figure 22.30 - Code for retrieve a list of records
Using Criteria Class When generating the persistence class for each ORM-Persistable class defined in the object model, the corresponding criteria class can also be generated. Criteria class is a helper class which provides an additional way to specify the condition to retrieve records from the database. Refer to Using Criteria Class section for more detailed information on how to specify the conditions to query the database by the criteria class.
You can get the retrieved records from the criteria class in one of the two ways:
• Use the retrieval methods of the criteria class.
For information on the retrieval methods provided by the criteria class, refer to the description of Loading Retrieved Records section.
• Use the retrieval by criteria methods of the persistence class.
Table shows the method summary generated to the persistence class to retrieve records from the criteria class.
Return Type
Method Name Description
Class LoadClassByCriteria(ClassCriteria value)
Retrieve the single record that matches the specified conditions applied to the criteria class.
Class[] ListClassByCriteria(ClassCriteria value)
Retrieve the records that match the specified conditions applied to the criteria class.
Table 22.14
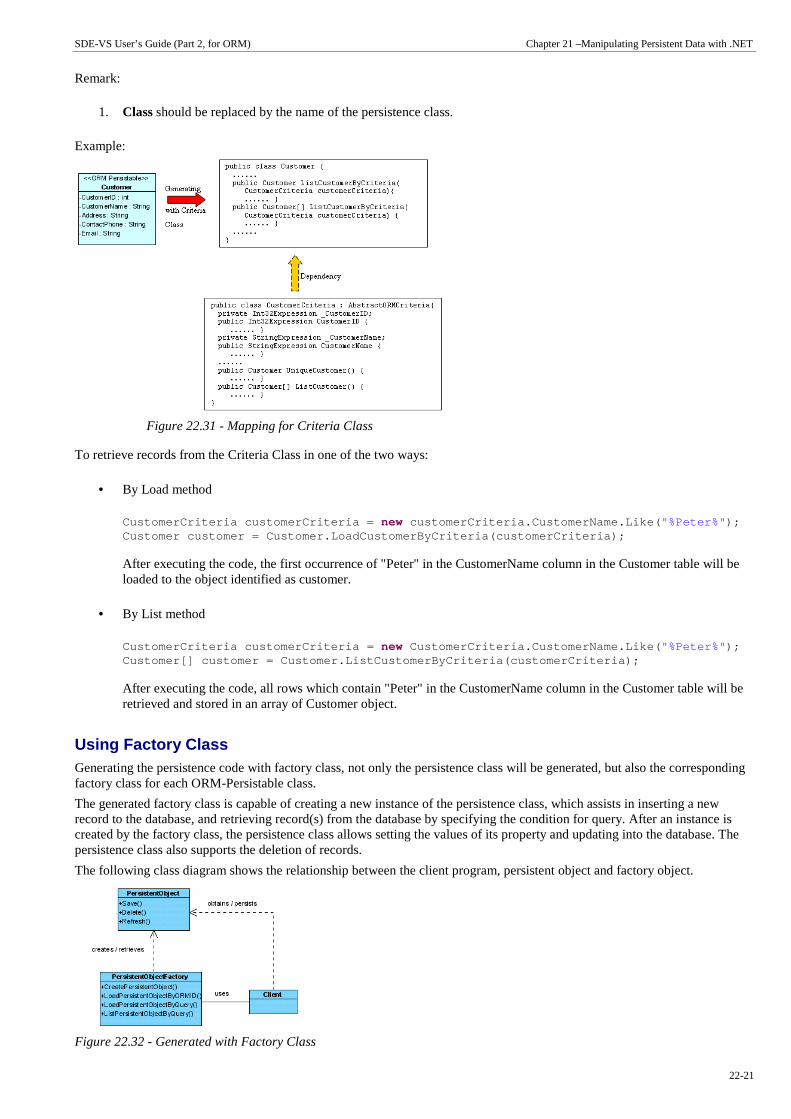
SDE-VS User’s Guide (Part 2, for ORM) Chapter 21 –Manipulating Persistent Data with .NET
22-21
Remark:
1. Class should be replaced by the name of the persistence class.
Example:
Figure 22.31 - Mapping for Criteria Class
To retrieve records from the Criteria Class in one of the two ways:
• By Load method
CustomerCriteria customerCriteria = new customerCriteria.CustomerName.Like( "%Peter%" ); Customer customer = Customer.LoadCustomerByCriteria (customerCriteria);
After executing the code, the first occurrence of "Peter" in the CustomerName column in the Customer table will be loaded to the object identified as customer.
• By List method
CustomerCriteria customerCriteria = new CustomerCriteria.CustomerName.Like( "%Peter%" ); Customer[] customer = Customer.ListCustomerByCriter ia(customerCriteria);
After executing the code, all rows which contain "Peter" in the CustomerName column in the Customer table will be retrieved and stored in an array of Customer object.
Using Factory Class Generating the persistence code with factory class, not only the persistence class will be generated, but also the corresponding factory class for each ORM-Persistable class.
The generated factory class is capable of creating a new instance of the persistence class, which assists in inserting a new record to the database, and retrieving record(s) from the database by specifying the condition for query. After an instance is created by the factory class, the persistence class allows setting the values of its property and updating into the database. The persistence class also supports the deletion of records.
The following class diagram shows the relationship between the client program, persistent object and factory object.
Figure 22.32 - Generated with Factory Class

SDE-VS User’s Guide (Part 2, for ORM) Chapter 22 – Manipulating Persistent Data with .NET
22-22
In the above class diagram, the PersistentObject refers to the ORM-Persistable class defined in the class diagram while the PersistentObjectFactory refers to the generated factory class of the ORM-Persistable class. For example, the CustomerFactory class creates and retrieves Customer persistent object while the ORM-Persistable class, Customer persists with the Customer data in the Customer table.
Example:
Figure 22.33 - Mapping for Criteria Class
From the above example, the CustomerFactory class supports the creation of Customer persistent object, the retrieval of Customer records from the Customer table while the Customer persistence class supports the update and deletion of customer record.
Creating a Persistent Object
An instance of a persistence class represents a record of the corresponding table, creating a persistent object corresponds to inserting a new record to the table.
In order to insert a new row to the database table, implement the program with the following steps:
1. Create a new instance of the class by the factory class. 2. Set the properties of the object by the persistence class. 3. Insert the object as a row to the database by the persistence class.
Table shows the method summary of the factory and persistence classes to be used for inserting a row to database.
Class Type Return Type Method Name Description
Factory Class Class CreateClass() Create a new instance of the class.
Persistence Class bool Save() Insert the object as a row to the database table.
Table 22.15
Remark:
1. Class should be replaced by the name of the generated persistence class.
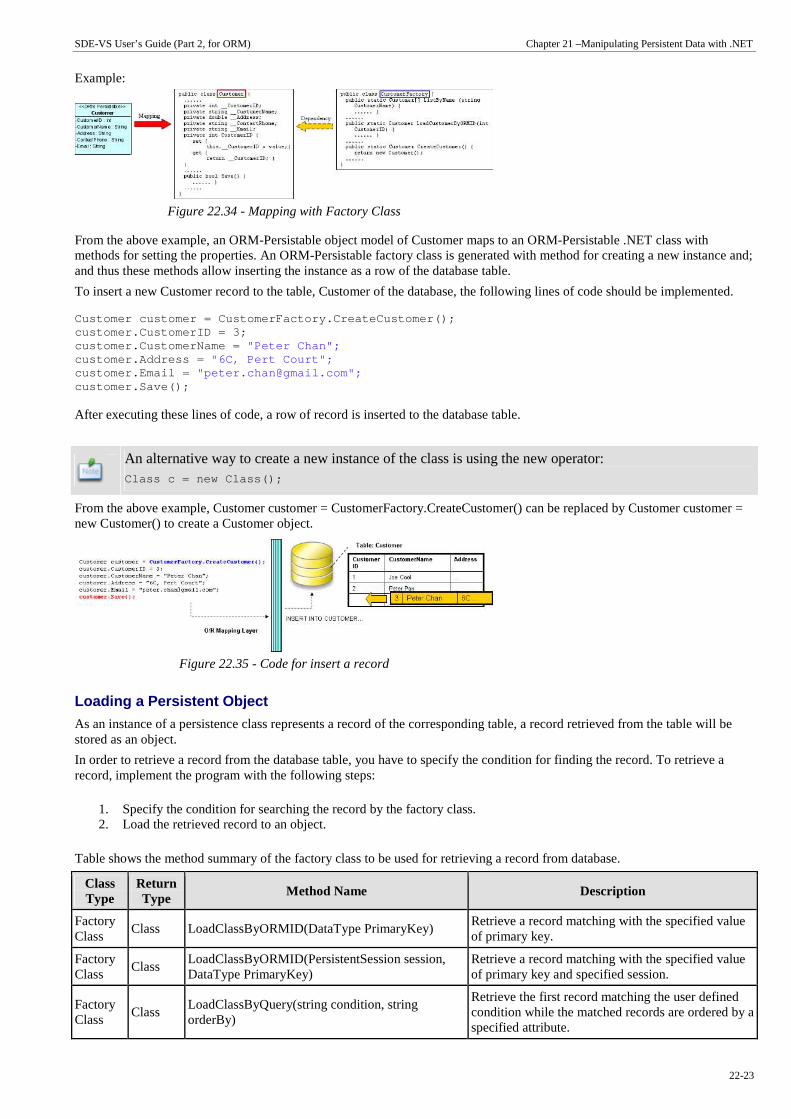
SDE-VS User’s Guide (Part 2, for ORM) Chapter 21 –Manipulating Persistent Data with .NET
22-23
Example:
Figure 22.34 - Mapping with Factory Class
From the above example, an ORM-Persistable object model of Customer maps to an ORM-Persistable .NET class with methods for setting the properties. An ORM-Persistable factory class is generated with method for creating a new instance and; and thus these methods allow inserting the instance as a row of the database table.
To insert a new Customer record to the table, Customer of the database, the following lines of code should be implemented.
Customer customer = CustomerFactory.CreateCustomer( ); customer.CustomerID = 3; customer.CustomerName = "Peter Chan"; customer.Address = "6C, Pert Court"; customer.Email = "[email protected]"; customer.Save();
After executing these lines of code, a row of record is inserted to the database table.
An alternative way to create a new instance of the class is using the new operator: Class c = new Class();
From the above example, Customer customer = CustomerFactory.CreateCustomer() can be replaced by Customer customer = new Customer() to create a Customer object.
Figure 22.35 - Code for insert a record
Loading a Persistent Object
As an instance of a persistence class represents a record of the corresponding table, a record retrieved from the table will be stored as an object.
In order to retrieve a record from the database table, you have to specify the condition for finding the record. To retrieve a record, implement the program with the following steps:
1. Specify the condition for searching the record by the factory class. 2. Load the retrieved record to an object.
Table shows the method summary of the factory class to be used for retrieving a record from database.
Class Type
Return Type
Method Name Description
Factory Class
Class LoadClassByORMID(DataType PrimaryKey) Retrieve a record matching with the specified value of primary key.
Factory Class
Class LoadClassByORMID(PersistentSession session, DataType PrimaryKey)
Retrieve a record matching with the specified value of primary key and specified session.
Factory Class
Class LoadClassByQuery(string condition, string orderBy)
Retrieve the first record matching the user defined condition while the matched records are ordered by a specified attribute.

SDE-VS User’s Guide (Part 2, for ORM) Chapter 22 – Manipulating Persistent Data with .NET
22-24
Factory Class
Class LoadClassByQuery(PersistentSession session, string condition, string orderBy)
Retrieve the first record matching the user defined condition and specified session while the matched records are ordered by a specified attribute.
Table 22.16
Remark:
1. Class should be replaced by the name of the persistence class.
Example:
Figure 22.36 - Mapping for retrieving record
From the above example, an ORM-Persistable object model, Customer maps to an ORM-Persistable .NET class. A factory class is generated with methods for retrieving a matched record.
To retrieve a record from the Customer table, the following line of code should be implemented.
Loading an object by passing the value of primary key:
Customer customer = CustomerFactory.LoadCustomerByO RMID(2);
Loading an object by specifying a user defined condition:
Customer customer = CustomerFactory.LoadCustomerByQ uery( "Customer.CustomerName='Peter'" , "Customer.CustomerName" );
After executing the code, a matched row is retrieved and loaded to a Customer object.
Figure 22.37 - Code for load a record
Updating a Persistent Object
As a record can be retrieved from the table and loaded as an instance of the persistence class, setting a new value to the attribute by its setter method supports the update of record.
In order to update a record, you have to first retrieve the row to be updated, and then set a new value to the property, finally update to the database. To update the record, implement the program with the following steps:
1. Retrieve a record from database table and load as an object by the factory class. 2. Set the updated value to the property of the object by the persistence class. 3. Save the updated record to the database by the persistence class.
Table shows the method summary of the persistence class to be used for updating a record.
Class Type Return Type Method Name Description
Persistence Class bool Save() Update the value to database.
Table 22.17

SDE-VS User’s Guide (Part 2, for ORM) Chapter 21 –Manipulating Persistent Data with .NET
22-25
Example:
Figure 22.38 Mapping for update record
From the above example, an ORM-Persistable object model, Customer maps to an ORM-Persistable .NET class generated with the methods for setting the properties and updating the row.
To update a Customer record, the following lines of code should be implemented.
customer.CustomerName = "Peter Pang"; customer.Save();
After executing the above lines of code, the customer name is updated to "Peter Pang" in the database.
Figure 22.39 - Code for update record
Deleting a Persistent Object
As a record can be retrieved from the table and loaded to an object of the persistence class, the record can be deleted by simply using the delete method of the persistence class.
In order to delete a record, implement the program with the following steps:
1. Retrieve a record from database table and load as an object by the factory class. 2. Delete the retrieved record by the persistence class.
Table shows the method summary of the persistence class to be used for deleting a record from database.
Class Type Return Type Method Name Description
Persistence Class bool Delete() Delete the current instance.
Table 22.18
Example:
Figure 22.40 - Mapping for delete record
From the above example, an ORM-Persistable object model, Customer maps to an ORM-Persistable .NET class generated with the methods for deleting the specified record from the database.

SDE-VS User’s Guide (Part 2, for ORM) Chapter 22 – Manipulating Persistent Data with .NET
22-26
To delete a Customer record, the following lines of code should be implemented.
Customer customer = CustomerFactory.LoadCustomerByO RMID(2); customer.Delete();
After executing the above code, the specified customer record is deleted from the database.
Figure 22.41 - Code for delete record
Querying
It is well known that the database is enriched with information. In some cases, information may be retrieved from the database to assist another function of the application, such as retrieving the unit price of products for calculating the total amount for a purchase order.
As the persistence factory class supports the retrieval of records, using the methods of the factory class can retrieve records from the database according to the specified condition.
Loading a Collection of Persistent Objects As the database table usually contains many records, you may want to query the tables by a specified condition. The generated factory class supports querying the database, the matched records will be retrieved and loaded as an object array.
In order to retrieve records from the table, you have to specify the condition for querying. To retrieve a number of records, implement the program with the following steps:
1. Specify the condition for searching the record by the factory class. 2. Load the retrieved records as an object array by the factory class.
Table shows the method summary of the factory class to be used for retrieving records from database table.
Class Type
Return Type
Method Name Description
Factory Class
Class[] ListClassByQuery(string condition, string orderBy) Retrieve the records matched with the user defined condition and ordered by a specified attribute.
Factory Class
Class[] ListClassByQuery(PersistentSession session, string condition, string orderBy)
Retrieve the records matched with the user defined condition and specified session and ordered by a specified attribute.
Table 22.19
Remark:
1. Class should be replaced by the name of the persistence class.
Example:
Figure 22.42 - Mapping for retrieve a list of record
From the above example, an ORM-Persistable object model, Customer maps to an ORM-Persistable .NET factory class generated with methods for retrieving records.

SDE-VS User’s Guide (Part 2, for ORM) Chapter 21 –Manipulating Persistent Data with .NET
22-27
To retrieve records from the Customer table, the following line of code should be implemented.
Customer[] customer = CustomerFactory.ListCustomerB yQuery( "Customer.CustomerName='Peter'" , "Customer.CustomerName" );
After executing the code, the matched rows are retrieved and loaded to an object array of Customer.
Figure 22.43 - Code for retrieve a list of records
Using ORM Qualifier ORM Qualifier is an additional feature which allows you to specify the extra data retrieval rules apart from the system pre-defined rules. The ORM Qualifier can be defined in order to generate persistence code. Refer to Defining ORM Qualifier in the Object Model chapter for more information.
By defining the ORM Qualifier in a class, the factory class will be generated with additional data retrieval methods, load and list methods.
Table shows the method summary generated to the factory class by defining the ORM Qualifier.
Class Type
Return Type Method Name Description
Factory Class
Class LoadByORMQualifier(DataType attribute) Retrieve the first record that matches the specified value with the attribute defined in the ORM Qualifier.
Factory Class
Class LoadByORMQualifier (PersistentSession session, DataType attribute)
Retrieve the first record that matches the specified value with the attribute defined in the ORM Qualifier and specified session.
Factory Class
Class[] ListByORMQualifier (DataType attribute) Retrieve the records matched that matches the specified value with the attribute defined in the ORM Qualifier.
Factory Class
Class[] ListByORMQualifier (PersistentSession session, DataType attribute)
Retrieve the records that match the specified value with the attribute defined in the ORM Qualifier and specified session.
Table 22.20
Remark:
1. Class should be replaced by the name of the persistence class. 2. ORMQualifier should be replaced by the Name defined in the ORM Qualifier. 3. DataType should be replaced by the data type of the attribute which associated with the ORM Qualifier. 4. attribute is the specified value to be used for querying the table.
Example:
Figure 22.44 - Mapping for load record by qualifier
In the above example, a customer object model is defined with an ORM Qualifier named as Name and qualified with the attribute, CustomerName.
To query the Customer table with the ORM Qualifier in one of the two way
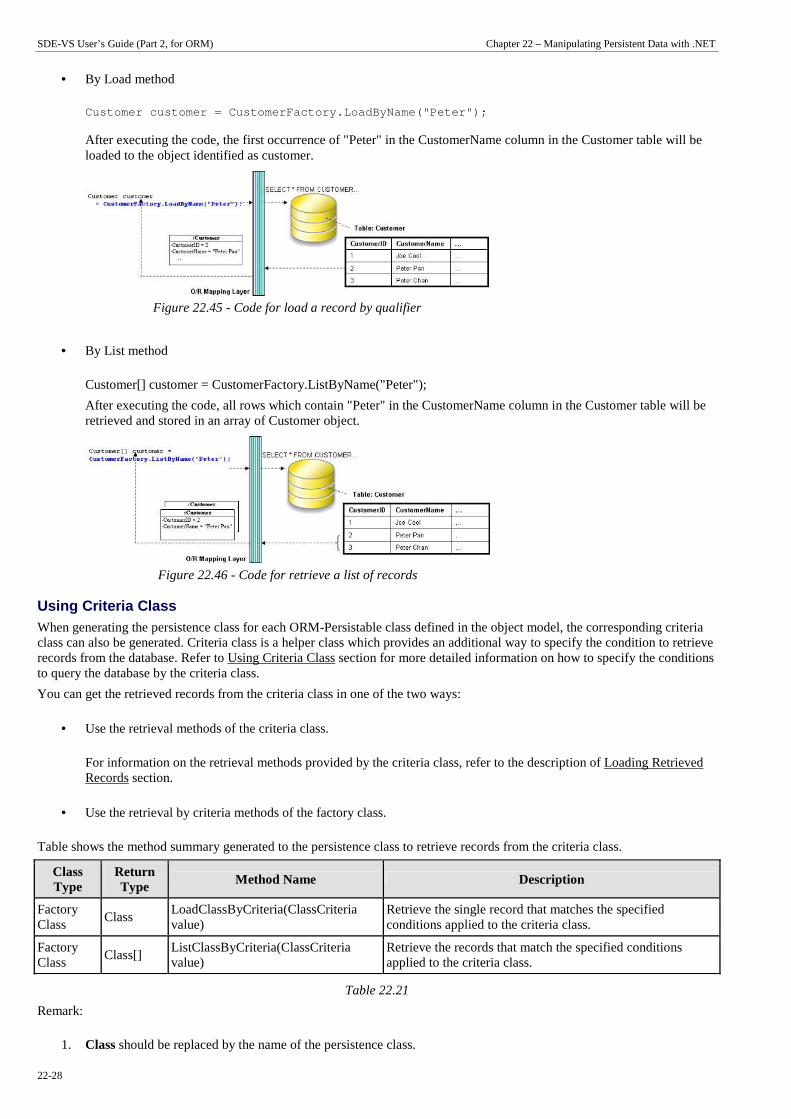
SDE-VS User’s Guide (Part 2, for ORM) Chapter 22 – Manipulating Persistent Data with .NET
22-28
• By Load method
Customer customer = CustomerFactory.LoadByName("Pet er");
After executing the code, the first occurrence of "Peter" in the CustomerName column in the Customer table will be loaded to the object identified as customer.
Figure 22.45 - Code for load a record by qualifier
• By List method
Customer[] customer = CustomerFactory.ListByName("Peter");
After executing the code, all rows which contain "Peter" in the CustomerName column in the Customer table will be retrieved and stored in an array of Customer object.
Figure 22.46 - Code for retrieve a list of records
Using Criteria Class When generating the persistence class for each ORM-Persistable class defined in the object model, the corresponding criteria class can also be generated. Criteria class is a helper class which provides an additional way to specify the condition to retrieve records from the database. Refer to Using Criteria Class section for more detailed information on how to specify the conditions to query the database by the criteria class.
You can get the retrieved records from the criteria class in one of the two ways:
• Use the retrieval methods of the criteria class.
For information on the retrieval methods provided by the criteria class, refer to the description of Loading Retrieved Records section.
• Use the retrieval by criteria methods of the factory class.
Table shows the method summary generated to the persistence class to retrieve records from the criteria class.
Class Type
Return Type Method Name Description
Factory Class
Class LoadClassByCriteria(ClassCriteria value)
Retrieve the single record that matches the specified conditions applied to the criteria class.
Factory Class
Class[] ListClassByCriteria(ClassCriteria value)
Retrieve the records that match the specified conditions applied to the criteria class.
Table 22.21
Remark:
1. Class should be replaced by the name of the persistence class.

SDE-VS User’s Guide (Part 2, for ORM) Chapter 21 –Manipulating Persistent Data with .NET
22-29
Example:
Figure 22.47 - Mapping for retrieve a list of record by criteria
To retrieve records from the Criteria Class in one of the two ways:
• By Load method
CustomerCriteria customerCriteria = new customerCriteria.CustomerName.Like( "%Peter%" ); Customer customer = CustomerFactory.LoadCustomerByC riteria(customerCriteria);
After executing the code, the first occurrence of "Peter" in the CustomerName column in the Customer table will be loaded to the object identified as customer.
• By List method
CustomerCriteria customerCriteria = new CustomerCriteria.CustomerName.Like( "%Peter%" ); Customer[] customer = CustomerFactory.ListCustomerB yCriteria(customerCriteria);
After executing the code, all rows which contain "Peter" in the CustomerName column in the Customer table will be retrieved and stored in an array of Customer object.
Using POJO Generating the persistence code with POJO, the persistence class will be generated only with the attributes and a pair of getter and setter methods for each attribute. As the persistence class is generated without the methods for database manipulation, the generated PersistentManager and PersistentSession classes are responsible for manipulating the database.
By also generating the corresponding Data Access Object (DAO) class for each ORM-Persistable class inside the defined package of orm package, you are allowed to use the generated DAO class as same as the DAO class generated from the DAO persistent API. For information on using the DAO class to manipulate the database, refer to the description in Using DAO section.
When using the DAO class generated with POJO persistent API, manipulate the database with the same persistent code of DAO class generated with DAO persistent API by replacing the DAO class with the DAO class inside the orm package.
The following class diagram shows the relationship between the client program, persistent object, persistent session and persistent manager.
Figure 22.48 - Class Diagram for using Persistent Manager

SDE-VS User’s Guide (Part 2, for ORM) Chapter 22 – Manipulating Persistent Data with .NET
22-30
In the above class diagram, the PersistentObject refers to the ORM-Persistable class defined in the class diagram.
Example:
Figure 22.49 - Mapping with Persistent Manager
From the above example, the Customer persistence class is generated with only the getter and setter methods for each attribute while the Customer persistent object is managed by the generated PersistentManager and PersistentSession.
Creating a Persistent Object
As a persistence class represents a table, an instance of a persistence class represents a record of the corresponding table. Creating a persistent object represents a creation of new record. With the support of the PersistentManager class, the newly created object can be saved as a new record to the database.
In order to insert a new row to the database table, implement the program with the following steps:
1. Create a new instance of the class by using the new operator. 2. Set the properties of the object by the persistence class. 3. Insert the object as a row to the database by the PersistentSession class.
Table shows the method summary of the PersistentSession class to be used for inserting a row to database.
Class Type Return Type Method Name Description
PersistentSession Class Serializable Save(Object value) Insert the object as a row to the database table.
Table 22.22
Remark:
1. Object represents the newly created instance of the persistence class to be added to the database.
Example:
Figure 22.50 - Mapping with Persistent Manager
From the above example, an ORM-Persistable object model of Customer maps to an ORM-Persistable class with a pair of getter and setter methods for each attributes. With the PersistentManager class, the PersistentSession object can assist in inserting the instance as a row of the database table.

SDE-VS User’s Guide (Part 2, for ORM) Chapter 21 –Manipulating Persistent Data with .NET
22-31
To insert a new Customer record to the table, Customer of the database, the following lines of code should be implemented.
Customer customer = new Customer(); customer.CustomerID = 3; customer.CustomerName = "Peter Chan" ; customer.Address = "6C, Pert Court" ; customer.Email = "[email protected]" ; orm.ShoppingCartPersistentManager.Instance().GetSes sion().Save(customer);
After executing these lines of code, a row of record is inserted to the database table.
Figure 22.51 - Code for insert a record
Loading a Persistent Object
As an instance of a persistence class represents a record of a table, a record retrieved from the table will be stored as an object. By specifying the query-like condition to the PersistentManager class, records can be retrieved from the database.
To retrieve a record, simply get the session by PersistentManager class and retrieve the records by defining the condition for query to the PersistentSession object and specify to return a single unique record.
Table shows the method summary of the PersistentSession class to be used for managing the retrieval of records
Class Type Return Type
Method Name Description
PersistentSession Class
Query CreateQuery(string arg)
Retrieve the records matched with the user defined condition and ordered by a specified attribute.
Table 22.23
Example:
Figure 22.52 - Mapping for load a record
From the above example, an ORM-Persistable object model, Customer maps to an ORM-Persistable class with a pair of getter and setter methods for each attribute. The PersistentManager class gets the PersistentSession object which helps to query the database by specifying a user defined condition.
To retrieve a record from the Customer table, the following line of code should be implemented.
Loading an object by specifying a user defined condition with a passing value typed as "int":
Customer customer = (Customer) orm.ShoppingCartPersistentManager.Instance().GetSes sion().CreateQuery( "From Customer as C where C.CustomerID = 2" ).UniqueResult();
Loading an object by specifying a user defined condition with a passing value typed as "String":
Customer customer = (Customer) orm.ShoppingCartPersistentManager.Instance().GetSes sion().CreateQuery( "From Customer as C where C.CustomerName = 'Peter Pan'" ).UniqueResult();

SDE-VS User’s Guide (Part 2, for ORM) Chapter 22 – Manipulating Persistent Data with .NET
22-32
After executing the code, a matched row is retrieved and loaded to a Customer object.
Figure 22.53 - Code for load a record
Updating a Persistent Object
As a record can be retrieved from the database table and loaded as an instance of the persistence class, updating a record can be achieved by setting a new value to the attribute by its setter method and saving the new value to the database.
In order to update a record, you have to retrieve the row which will be updated, and then set a new value to the property, finally update the database record. To update the record, implement the program with the following steps:
1. Retrieve a record from database table and load as an object by the PersistentManager class. 2. Set the updated value to the property of the object by the persistence class. 3. Save the updated record to the database by the PersistentManager class.
Table shows the method summary of the PersistentSession class to be used for updating a record.
Class Type Return Type Method Name Description
PersistentSession Class void Update(Object arg) Update the value to database.
Table 22.24
Remark:
1. Object represents the instance of the persistence class to be updated to the corresponding database record.
Example:
Figure 22.54 - Mapping for update record
From the above example, an ORM-Persistable object model, Customer maps to an ORM-Persistable class with a pair of getter and setter methods for each attributes. The PersistentManager class gets the PersistentSession object which helps to save the updated record to database.
To update a Customer record, the following line of code should be implemented.
customer.CustomerName = "Peter Pang" ; orm.ShoppingCartPersistentManager.Instance().GetSes sion().Update(customer);
After executing the above lines of code, the customer name is updated to "Peter Pang" in the database.

SDE-VS User’s Guide (Part 2, for ORM) Chapter 21 –Manipulating Persistent Data with .NET
22-33
Figure 22.55 - Code for update a record
Deleting a Persistent Object
As a record can be retrieved from the table and loaded as an object of the persistence class, the record can be deleted with the help of the PersistentManager class.
In order to delete a record, implement the program with the following steps:
1. Retrieve a record from database table and load as an object by the PersistentManager class. 2. Delete the retrieved record by the PersistentManager class.
Table shows the method summary of the PersistentSession class to be used for deleting a record from database
Class Type Return Type Method Name Description
PersistentSession Class void Delete(Object arg) Delete the current instance.
Table 22.25
Remark:
1. Object represents the instance of the persistence class corresponding to a record that will be deleted from the database.
Example:
Figure 22.56 - Mapping for delete record
From the above example, an ORM-Persistable object model, Customer maps to an ORM-Persistable class with a pair of getter and setter methods for each attributes. The PersistentManager class gets the PersistentSession object which helps to delete the record from database.
To delete a Customer record, the following line of code should be implemented.
Customer customer = (Customer) orm.ShoppingCartPersistentManager.Instance().GetSes sion().CreateQuery( "From Customer as C where C.CustomerID = 2" ).UniqueResult(); orm.ShoppingCartPersistentManager.Instance().GetSes sion().Delete(customer);
After executing the above lines of code, the specified customer record is deleted from the database.
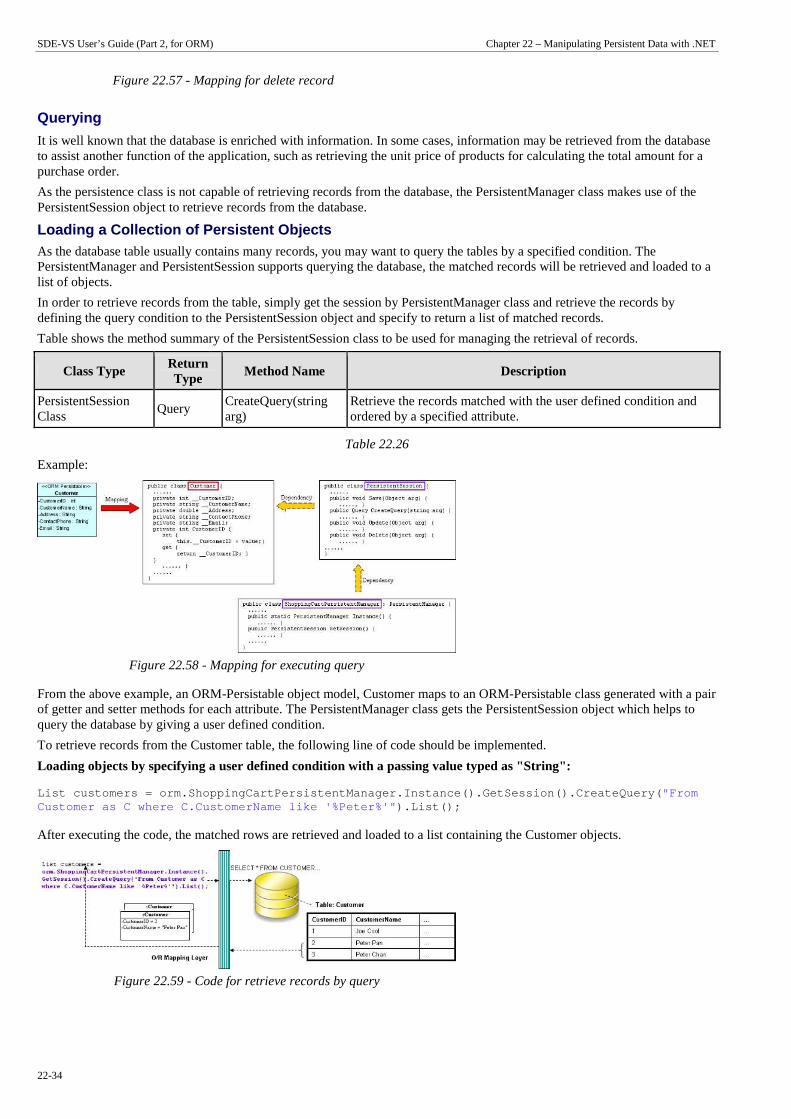
SDE-VS User’s Guide (Part 2, for ORM) Chapter 22 – Manipulating Persistent Data with .NET
22-34
Figure 22.57 - Mapping for delete record
Querying
It is well known that the database is enriched with information. In some cases, information may be retrieved from the database to assist another function of the application, such as retrieving the unit price of products for calculating the total amount for a purchase order.
As the persistence class is not capable of retrieving records from the database, the PersistentManager class makes use of the PersistentSession object to retrieve records from the database.
Loading a Collection of Persistent Objects As the database table usually contains many records, you may want to query the tables by a specified condition. The PersistentManager and PersistentSession supports querying the database, the matched records will be retrieved and loaded to a list of objects.
In order to retrieve records from the table, simply get the session by PersistentManager class and retrieve the records by defining the query condition to the PersistentSession object and specify to return a list of matched records.
Table shows the method summary of the PersistentSession class to be used for managing the retrieval of records.
Class Type Return Type
Method Name Description
PersistentSession Class
Query CreateQuery(string arg)
Retrieve the records matched with the user defined condition and ordered by a specified attribute.
Table 22.26
Example:
Figure 22.58 - Mapping for executing query
From the above example, an ORM-Persistable object model, Customer maps to an ORM-Persistable class generated with a pair of getter and setter methods for each attribute. The PersistentManager class gets the PersistentSession object which helps to query the database by giving a user defined condition.
To retrieve records from the Customer table, the following line of code should be implemented.
Loading objects by specifying a user defined condition with a passing value typed as "String":
List customers = orm.ShoppingCartPersistentManager. Instance().GetSession().CreateQuery( "From Customer as C where C.CustomerName like '%Peter%'" ).List();
After executing the code, the matched rows are retrieved and loaded to a list containing the Customer objects.
Figure 22.59 - Code for retrieve records by query

SDE-VS User’s Guide (Part 2, for ORM) Chapter 21 –Manipulating Persistent Data with .NET
22-35
Using DAO Generating the persistence code with data access object (DAO), not only the persistence class will be generated, but also the corresponding DAO class for each ORM-Persistable class.
The generated persistence class using DAO persistent API is as same as that using POJO; that is, the persistence class contains attributes and a pair of getter and setter methods for each attribute only. Instead of using the persistence class to manipulate the database, the DAO class supports creating a new instance for the addition of a new record to the database, and retrieving record(s) from the database, updating and deleting the records.
The following class diagram shows the relationship between the client program, persistent object and DAO object.
Figure 22.60 - Class Diagram for DAO
In the above class diagram, the PersistentObject refers to the ORM-Persistable class defined in the class diagram while the PersistentObjectDAO refers to the generated DAO class of the ORM-Persistable class. For example, the CustomerDAO class persists with the Customer persistent object and the database.
Example:
Figure 22.61 - Mapping with DAO
From the above example, the CustomerDAO class supports the creation of Customer persistent object, the retrieval of Customer records from the Customer table while the Customer persistence class supports the update and deletion of customer record.
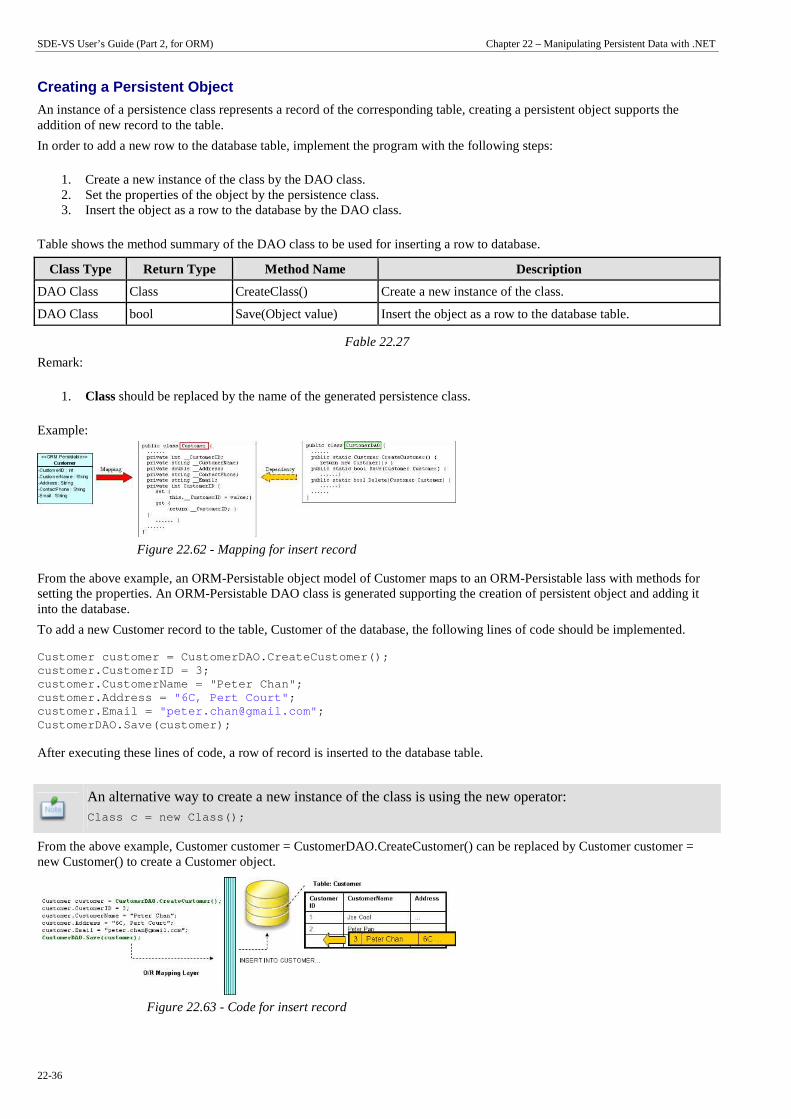
SDE-VS User’s Guide (Part 2, for ORM) Chapter 22 – Manipulating Persistent Data with .NET
22-36
Creating a Persistent Object
An instance of a persistence class represents a record of the corresponding table, creating a persistent object supports the addition of new record to the table.
In order to add a new row to the database table, implement the program with the following steps:
1. Create a new instance of the class by the DAO class. 2. Set the properties of the object by the persistence class. 3. Insert the object as a row to the database by the DAO class.
Table shows the method summary of the DAO class to be used for inserting a row to database.
Class Type Return Type Method Name Description
DAO Class Class CreateClass() Create a new instance of the class.
DAO Class bool Save(Object value) Insert the object as a row to the database table.
Fable 22.27
Remark:
1. Class should be replaced by the name of the generated persistence class.
Example:
Figure 22.62 - Mapping for insert record
From the above example, an ORM-Persistable object model of Customer maps to an ORM-Persistable lass with methods for setting the properties. An ORM-Persistable DAO class is generated supporting the creation of persistent object and adding it into the database.
To add a new Customer record to the table, Customer of the database, the following lines of code should be implemented.
Customer customer = CustomerDAO.CreateCustomer(); customer.CustomerID = 3; customer.CustomerName = "Peter Chan"; customer.Address = "6C, Pert Court" ; customer.Email = "[email protected]" ; CustomerDAO.Save(customer);
After executing these lines of code, a row of record is inserted to the database table.
An alternative way to create a new instance of the class is using the new operator: Class c = new Class();
From the above example, Customer customer = CustomerDAO.CreateCustomer() can be replaced by Customer customer = new Customer() to create a Customer object.
Figure 22.63 - Code for insert record
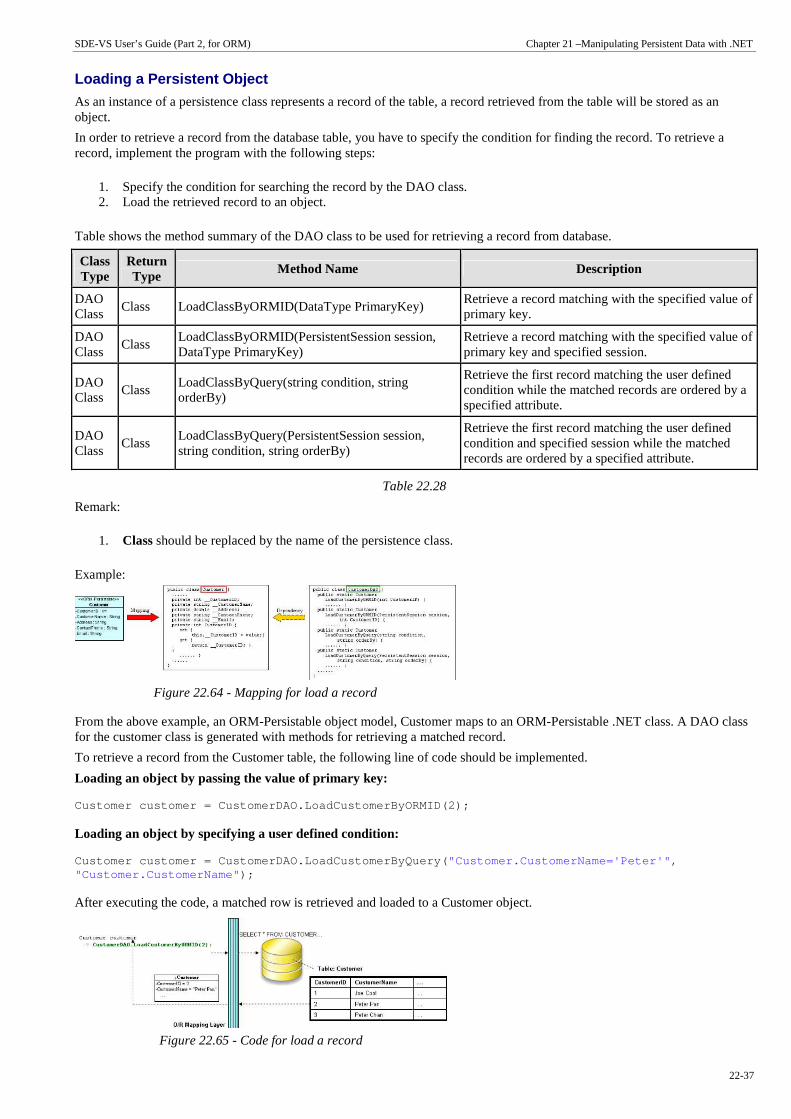
SDE-VS User’s Guide (Part 2, for ORM) Chapter 21 –Manipulating Persistent Data with .NET
22-37
Loading a Persistent Object
As an instance of a persistence class represents a record of the table, a record retrieved from the table will be stored as an object.
In order to retrieve a record from the database table, you have to specify the condition for finding the record. To retrieve a record, implement the program with the following steps:
1. Specify the condition for searching the record by the DAO class. 2. Load the retrieved record to an object.
Table shows the method summary of the DAO class to be used for retrieving a record from database.
Class Type
Return Type
Method Name Description
DAO Class
Class LoadClassByORMID(DataType PrimaryKey) Retrieve a record matching with the specified value of primary key.
DAO Class
Class LoadClassByORMID(PersistentSession session, DataType PrimaryKey)
Retrieve a record matching with the specified value of primary key and specified session.
DAO Class
Class LoadClassByQuery(string condition, string orderBy)
Retrieve the first record matching the user defined condition while the matched records are ordered by a specified attribute.
DAO Class
Class LoadClassByQuery(PersistentSession session, string condition, string orderBy)
Retrieve the first record matching the user defined condition and specified session while the matched records are ordered by a specified attribute.
Table 22.28
Remark:
1. Class should be replaced by the name of the persistence class.
Example:
Figure 22.64 - Mapping for load a record
From the above example, an ORM-Persistable object model, Customer maps to an ORM-Persistable .NET class. A DAO class for the customer class is generated with methods for retrieving a matched record.
To retrieve a record from the Customer table, the following line of code should be implemented.
Loading an object by passing the value of primary key:
Customer customer = CustomerDAO.LoadCustomerByORMID (2);
Loading an object by specifying a user defined condition:
Customer customer = CustomerDAO.LoadCustomerByQuery ( "Customer.CustomerName='Peter'" , "Customer.CustomerName" );
After executing the code, a matched row is retrieved and loaded to a Customer object.
Figure 22.65 - Code for load a record

SDE-VS User’s Guide (Part 2, for ORM) Chapter 22 – Manipulating Persistent Data with .NET
22-38
Updating a Persistent Object
The DAO class not only supports the retrieval of record, but also the update on the record with the assistance of the setter method of the persistence class.
In order to update a record, you have to retrieve the row to be updated first, and then set a new value to the property, and finally save the updated record to the database. To update the record, implement the program with the following steps:
1. Retrieve a record from database table and load as an object by the DAO class. 2. Set the updated value to the property of the object by the persistence class. 3. Save the updated record to the database by the DAO class.
Table shows the method summary of the DAO class to be used for updating a record.
Class Type Return Type Method Name Description
DAO Class bool Save(Object value) Update the value to database.
Table 22.29
Remark:
1. Object represents the instance of the persistence class to be updated to the corresponding database record.
Example:
Figure 22.66 - Mapping for update record
From the above example, an ORM-Persistable object model, Customer maps to an ORM-Persistable .NET class with a pair of getter and setter methods for each attributes. The generated DAO class provides method for updating the record.
To update a Customer record, the following lines of code should be implemented.
customer.CustomerName = "Peter Pang" ; CustomerDAO.Save(customer);
After executing the above lines of code, the customer name is updated to "Peter Pang" in the database.
Figure 22.67 - Code for update record
Deleting a Persistent Object
The DAO class also supports deleting a record from the database. In order to delete a record, implement the program with the following steps:
1. Retrieve a record from database table and load as an object by the DAO class. 2. Delete the retrieved record by the DAO class.
Table shows the method summary of the DAO class to be used for deleting a record from database
Class Type Return Type Method Name Description
DAO Class bool Delete(Class value) Delete the current instance.
Table 22.30
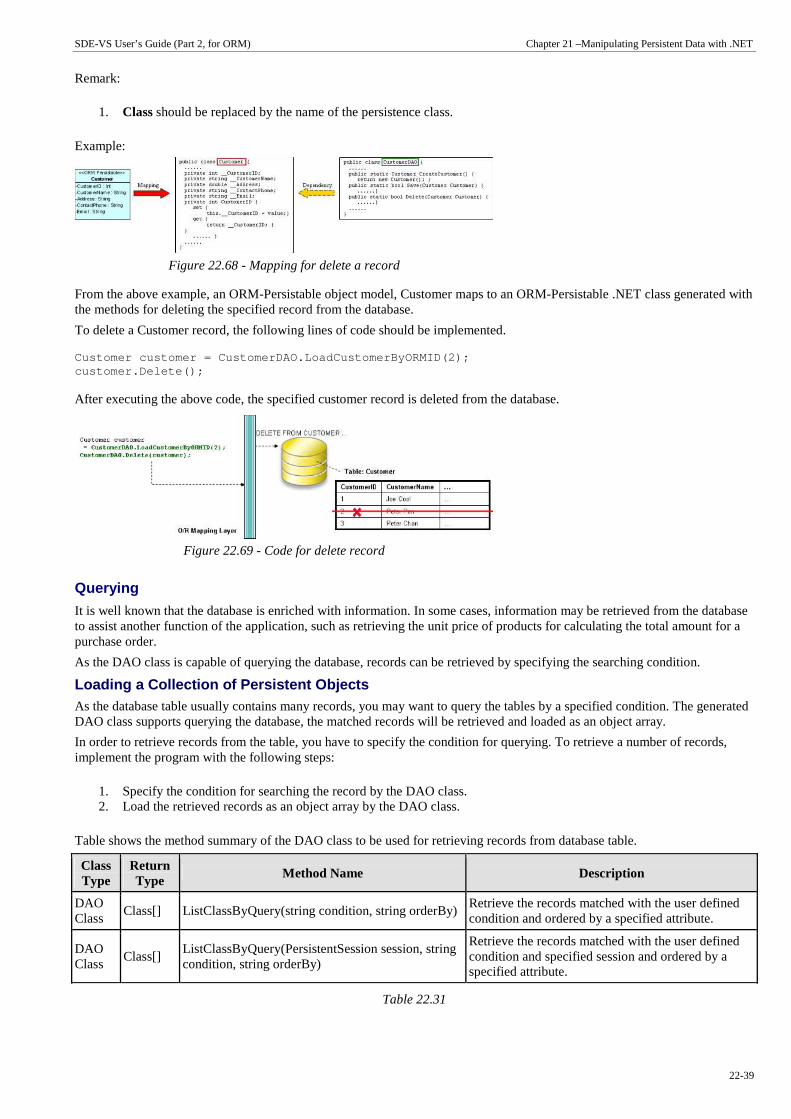
SDE-VS User’s Guide (Part 2, for ORM) Chapter 21 –Manipulating Persistent Data with .NET
22-39
Remark:
1. Class should be replaced by the name of the persistence class.
Example:
Figure 22.68 - Mapping for delete a record
From the above example, an ORM-Persistable object model, Customer maps to an ORM-Persistable .NET class generated with the methods for deleting the specified record from the database.
To delete a Customer record, the following lines of code should be implemented.
Customer customer = CustomerDAO.LoadCustomerByORMID (2); customer.Delete();
After executing the above code, the specified customer record is deleted from the database.
Figure 22.69 - Code for delete record
Querying
It is well known that the database is enriched with information. In some cases, information may be retrieved from the database to assist another function of the application, such as retrieving the unit price of products for calculating the total amount for a purchase order.
As the DAO class is capable of querying the database, records can be retrieved by specifying the searching condition.
Loading a Collection of Persistent Objects As the database table usually contains many records, you may want to query the tables by a specified condition. The generated DAO class supports querying the database, the matched records will be retrieved and loaded as an object array.
In order to retrieve records from the table, you have to specify the condition for querying. To retrieve a number of records, implement the program with the following steps:
1. Specify the condition for searching the record by the DAO class. 2. Load the retrieved records as an object array by the DAO class.
Table shows the method summary of the DAO class to be used for retrieving records from database table.
Class Type
Return Type
Method Name Description
DAO Class
Class[] ListClassByQuery(string condition, string orderBy) Retrieve the records matched with the user defined condition and ordered by a specified attribute.
DAO Class
Class[] ListClassByQuery(PersistentSession session, string condition, string orderBy)
Retrieve the records matched with the user defined condition and specified session and ordered by a specified attribute.
Table 22.31

SDE-VS User’s Guide (Part 2, for ORM) Chapter 22 – Manipulating Persistent Data with .NET
22-40
Remark:
1. Class should be replaced by the name of the persistence class.
Example:
Figure 22.70 - Mapping for retrieve a list of records
From the above example, an ORM-Persistable object model, Customer maps to an ORM-Persistable .NET class. The DAO class for the customer is generated with methods for retrieving records.
To retrieve records from the Customer table, the following line of code should be implemented.
Customer[] customer = CustomerDAO.ListCustomerByQue ry( "Customer.CustomerName='Peter'" , "Customer.CustomerName" );
After executing the code, the matched rows are retrieved and loaded to an object array of Customer.
Figure 22.71 - Code for retrieve a list of records
Using ORM Qualifier ORM Qualifier is an additional feature which allows you to specify the extra data retrieval rules apart from the system pre-defined rules. The ORM Qualifier can be defined in order to generate persistence code. Refer to Defining ORM Qualifier in the Object Model chapter for more information.
By defining the ORM Qualifier in a class, the persistence DAO class will be generated with additional data retrieval methods, load and list methods.
Table shows the method summary generated to the DAO class by defining the ORM Qualifier.
Class Type
Return Type
Method Name Description
DAO Class
Class LoadByORMQualifier(DataType attribute) Retrieve the first record that matches the specified value with the attribute defined in the ORM Qualifier.
DAO Class
Class LoadByORMQualifier (PersistentSession session, DataType attribute)
Retrieve the first record that matches the specified value with the attribute defined in the ORM Qualifier and specified session.
DAO Class
Class[] ListByORMQualifier (DataType attribute) Retrieve the records matched that matches the specified value with the attribute defined in the ORM Qualifier.
DAO Class
Class[] ListByORMQualifier (PersistentSession session, DataType attribute)
Retrieve the records that match the specified value with the attribute defined in the ORM Qualifier and specified session.
Table 22.32
Remark:
1. Class should be replaced by the name of the persistence class. 2. ORMQualifier should be replaced by the Name defined in the ORM Qualifier. 3. DataType should be replaced by the data type of the attribute which associated with the ORM Qualifier. 4. attribute is the specified value to be used for querying the table.

SDE-VS User’s Guide (Part 2, for ORM) Chapter 21 –Manipulating Persistent Data with .NET
22-41
Example:
Figure 22.72 - Mapping for retrieve records by qualifier
In the above example, a customer object model is defined with an ORM Qualifier named as Name and qualified with the attribute, CustomerName.
To query the Customer table with the ORM Qualifier in one of the two way
• By Load method
Customer customer = CustomerDAO.LoadByName( "Peter" );
After executing the code, the first occurrence of "Peter" in the CustomerName column in the Customer table will be loaded to the object identified as customer.
Figure 22.73 - Code for retrieve a record by qualifier
• By List method
Customer[] customer = CustomerDAO.ListByName( "Peter" );
After executing the code, all rows which contain "Peter" in the CustomerName column in the Customer table will be retrieved and stored in an array of Customer object.
Figure 22.74 - Code for retrieve a list of records by qualifier
Using Criteria Class When generating the persistence class for each ORM-Persistable class defined in the object model, the corresponding criteria class can also be generated. Criteria class is a helper class which provides an additional way to specify the condition to retrieve records from the database. Refer to Using Criteria Class section for more detailed information on how to specify the conditions to query the database by the criteria class.
You can get the retrieved records from the criteria class in one of the two ways:
• Use the retrieval methods of the criteria class.
For information on the retrieval methods provided by the criteria class, refer to the description of Loading Retrieved Records section.
• Use the retrieval by criteria methods of the DAO class.

SDE-VS User’s Guide (Part 2, for ORM) Chapter 22 – Manipulating Persistent Data with .NET
22-42
Table shows the method summary generated to the persistence class to retrieve records from the criteria class.
Class Type
Return Type
Method Name Description
Factory Class
Class LoadClassByCriteria(ClassCriteria value)
Retrieve the single record that matches the specified conditions applied to the criteria class.
Factory Class
Class[] ListClassByCriteria(ClassCriteria value)
Retrieve the records that match the specified conditions applied to the criteria class.
Table 22.33
Remark:
1. Class should be replaced by the name of the persistence class.
Example:
Figure 22.75 - Mapping with Criteria Class
To retrieve records from the Criteria Class in one of the two ways:
• By Load method
CustomerCriteria customerCriteria = new customerCriteria.CustomerName.Like( "%Peter%" ); Customer customer = CustomerDAO.LoadCustomerByCrite ria(customerCriteria);
After executing the code, the first occurrence of "Peter" in the CustomerName column in the Customer table will be loaded to the object identified as customer.
• By List method
CustomerCriteria customerCriteria = new CustomerCriteria.CustomerName.Like( "%Peter%" ); Customer[] customer = CustomerDAO.ListCustomerByCri teria(customerCriteria);
After executing the code, all rows which contain "Peter" in the CustomerName column in the Customer table will be retrieved and stored in an array of Customer object.
Using Criteria Class As a database is normally enriched with information, there are two ways to retrieve records from the database. Firstly, the list and load methods to the persistence code are generated which retrieve matched records from the database with respect to the user defined condition. Secondly, a criteria class can be generated for each ORM-Persistable class which supports searching the records from the corresponding table.
By using the criteria class, it supports querying the database with multiple criteria. To generate the criteria class for query, simply check the Generate Criteria option before the generation of code. For more information on the setting of code generation, refer to Configuring Code Generation Setting for C# in the Implementation chapter.
Figure 22.76 - Generate criteria option

SDE-VS User’s Guide (Part 2, for ORM) Chapter 21 –Manipulating Persistent Data with .NET
22-43
Having selected the Generate Criteria option for the code generation, a criteria class is generated in addition to the classes generated with respect to the persistent API. The generated criteria class is named as "ClassCriteria" in which Class is the name of the ORM Persistable class accordingly. The criteria class is generated with attributes, which are defined in the object model, with type of one of Expression with respect to the type of attribute defined in the object model and two operations for specifying the type of record retrieval.
In order to query the database by the criteria class, implement the program with the following steps:
1. Create an instance of the criteria class. 2. Apply restriction to the property of the class which specifies the condition for query. 3. Apply ordering to the property if it is necessary. 4. Set the range of the number of records to be retrieved if it is necessary. 5. Load the retrieved record(s) to an object or array.
Applying Restriction to Property
To apply the restriction to the property, implement with the following code template:
criteria.property.expression(parameter);
where criteria is the instance of the criteria class; property is the property of the criteria; expression is the expression to be applied on the property; parameter is the parameter(s) of the expression.
Table shows the expression to be used for specifying the condition for query.
Expression Description
Eq(value) The value of the property is equal to the specified value.
Ne(value) The value of the property is not equal to the specified value.
Gt(value) The value of the property is greater than to the specified value.
Ge(value) The value of the property is greater than or equal to the specified value.
Lt(value) The value of the property is less than the specified value.
Le(value) The value of the property is less than or equal to the specified value.
IsEmpty() The value of the property is empty.
IsNotEmpty() The value of the property is not empty.
IsNull() The value of the property is NULL.
IsNotNull() The value of the property is not NULL.
In(values) The value of the property contains the specified values in the array.
Between(value1, value2) The value of the property is between the two specified values, value1 and value2.
Like(value) The value of the property matches the string pattern of value; use % in value for wildcard.
Ilike(value) The value of the property matches the string pattern of value, ignoring case differences.
Table 22.34
Sorting Retrieved Records
There are two types of ordering to sort the retrieved records, that is, ascending and descending order.
To sort the retrieved records with respect to the property, implement the following code template:
criteria.property.Order(ascending_order);
where the value of ascending_order is either true or false. True refers to sort the property in ascending order while false refers to sort the property in descending order.

SDE-VS User’s Guide (Part 2, for ORM) Chapter 22 – Manipulating Persistent Data with .NET
22-44
Setting the Number of Retrieved Records
To set the range of the number of records to be retrieved by using one of the two methods listed in the following table.
Method Name Description
setFirstResult(int i) Retrieve the i-th record from the results as the first result.
setMaxResult(int i) Set the maximum number of retrieved records by specified value, i.
Table 22.35
Loading Retrieved Records
To load the retrieved record(s) to an object or array, use one of the two methods listed below.
Table shows the method summary of the criteria class to be used for retrieving records from database.
Return Type Method Name Description
Class UniqueClass() Retrieve the first record matching the specified condition(s) for the criteria.
Class[] ListClass() Retrieve the records matched with the specified condition(s) for the criteria.
Table 22.36
Remark:
1. Class should be replaced by the name of the persistence class.
Example:
Figure 22.77 - Mapping Criteria Class
The generated attributes is typed as one type of Expression with respect to the type of attribute defined in the object model. The attribute defined as primary key will not be generated as an attribute of the criteria class.
Here is an object model of a Member class. After performing the generation of persistent code, an additional .NET file is generated, named "MemberCriteria.cs".
The following examples illustrate how to query the Member table using the MemberCriteria class:
• By specifying one criterion
Retrieving a member record whose name is "John":
MemberCriteria criteria = new MemberCriteria(); criteria.Name.Eq( "John" ); Member member= criteria.UniqueMember(); Console.WriteLine(member);

SDE-VS User’s Guide (Part 2, for ORM) Chapter 21 –Manipulating Persistent Data with .NET
22-45
Retrieving all member records whose date of birth is between 1/1/1970 and 31/12/1985:
MemberCriteria criteria = new MemberCriteria(); criteria.Dob.Between( new GregorianCalendar(1970, 1, 1).GetTime(), new GregorianCalendar(1985, 12, 31).GetTime()); Member[] members = criteria.ListMember(); foreach ( int i in members) { Console.WriteLine(members[i]); }
• By specifying more than one criteria
Retrieving all male member records whose age is between 18 and 24, ordering by the name:
MemberCriteria criteria = new MemberCriteria(); criteria.Age.In( new int[] {18, 24}); criteria.Gender.Eq( 'M' );
criteria.Name.Order( true); //true = ascending order; flase = descending order Member[] members = criteria.ListMember(); foreach ( int i in members) { Console.WriteLine(members[i]); }
Retrieving all member records whose name starts with "Chan" and age is greater than 30:
MemberCriteria criteria = new MemberCriteria(); criteria.Name.Like( "Chan %" ); criteria.Age.Gt(30); Member[] members = criteria.ListMember(); foreach ( int i in members) { Console.WriteLine(members[i]); }
Using Transactions A transaction is a sequence of operation. If the operation is performed successfully, the transaction is committed permanently. On the contrary, if the operation is performed unsuccessfully, the transaction is rolled back to the state of the last successfully committed transaction. Since database modifications must follow the "all or nothing" rule, transaction must be manipulated for every access to the database.
To create a transaction for atomicity by the following line of code:
PersistentTransaction t = PersistentManager.Instanc e().GetSession().BeginTransaction();
To commit a transaction by the following line of code:
t.Commit();
To rollback a transaction if there is any exception in the program by the following line of code:
t.RollBack();
Using ORM Implementation The generated persistent code exposes the ability of the .NET class to access the database including the basic operations for add, update, delete and search. As the generated persistent code only provides basic operations for manipulating the persistent data, you may find it is insufficient and want to add extra logic to it. However, modifying the generated persistent code may cause your developing program malfunctioned. It is strongly recommended to add the extra logic by using ORM Implementation class to manipulate the persistent data.
An implementation class can be added to the object model. When generating persistent code, the implementation class will also be generated. You are allowed to implement the operation in the generated implementation class. As if the content of an implementation class has been modified, it will not be overwritten when re-generating the persistent code from the object model.

SDE-VS User’s Guide (Part 2, for ORM) Chapter 22 – Manipulating Persistent Data with .NET
22-46
Inserting an ORM Implementation Class
1. Select a class stereotyped as ORM-Persistable that you want to add extra logic for manipulating the persistent data.
Figure 22.78 - ORM Persistable Class
2. Add a new operation to the class by right clicking the class element, selecting Add > Operation.
A new operation is added, type the operation in the form of "operation_name(parameter_name: type) : return_type".
Figure 22.79 - A ORM Persistable Clas with method
A new operation can be added by using the keyboard shortcut � Alt + Shift + O. You can also edit the operation by double-clicking the operation name or pressing the F2 button.
3. Drag the resource of Create ORM Implementation Class to the diagram pane.
Figure 22.80 - "Create ORM Implementation Class" resource-centric
A new implementation class is created and connected to the source class with generalization stereotyped as ORM Implementation. The source class becomes an abstract class with an abstract operation.
Figure 22.81 - ORM Persistable Class and ORM Implementation Class
After transforming the object model to persistent code, an implementation class will be generated. The generated code for the implementation class is shown below:
using System; namespace shoppingcart { public class OrderLineIml : OrderLine {
public OrderLineImpl() : base() { } public override double calculateSubTotal( double unitprice, int qty){
// TODO: Implement Method throw new System.Exception( "Not implemented" );
} } }

SDE-VS User’s Guide (Part 2, for ORM) Chapter 21 –Manipulating Persistent Data with .NET
22-47
The generated implementation class is the same no matter which persistent API is selected for code generation.
You can implement the logic to the method in the generated implementation class.
Code Sample
Here is a sample demonstrating the usage of the implementation class from the above object model.
The implementation class is implemented with the following lines of code:
using System; namespace shoppingcart { public class OrderLineIml : OrderLine {
public OrderLineImpl() : base() { } public override double calculateSubTotal( double unitprice, int qty){
return unitprice * qty; }
} }
The following lines of code demonstrate how to invoke the logic of the implementation class with the persistence class, OrderLine generated using static method persistent API.
OrderLine orderline = OrderLine.CreateOrderLine(); orderline.ID = 1; orderline.OrderQty = 5; double subtotal = orderline.calculateSubTotal(300, 5); orderlin.SubTotal = subtotal;
To invoke the logic of the implementation class by the persistent object, please refer to the Creating a Persistent Object for different types of persistent API.
Running the Sample Code
A set of C# sample files is generated which guides you how to implement the sample code and run the sample to see how the persistence classes work with the database if you have checked the option for samples before generating the persistent code. For more information on the setting of code generation, refer to Configuring Code Generation Setting for C# in the Implementation chapter.
Figure 22.82 - Generate sample options
The common manipulation to the database includes inserting data, updating data, retrieving data and deleting data. As each type of manipulation can be performed individually, several sample files are generated to demonstrate how the persistence code handles each type of manipulation. The sample files are generated in the ormsamples directory of the specified output path.
There are six sample files demonstrating the database manipulation. They are identified by the type of manipulation and the name of the project.
Type of Manipulation Sample File
Creating database table Create%Project_Name%DatabaseSchema
Inserting record Create%Project_Name%Data
Retrieving and updating record RetrieveAndUpdate%Project_Name%Data
Deleting record Delete%Project_Name%Data
Retrieving a number of records List%Project_Name%Data

SDE-VS User’s Guide (Part 2, for ORM) Chapter 22 – Manipulating Persistent Data with .NET
22-48
Dropping database table Drop%Project_Name%DatabaseSchema
Table 22.36
Example:
Figure 22.83 - ORM Persistable Class
Here is an object model of a Customer class inside a package of shoppingcart of the ShoppingCart project. By configuring the code generation setting with the factory class persistent API and Sample options checked, an ORM-Persistable .NET class, a factory class and six sample files are generated.
The following are the examples of manipulating the Customer table in the database by the generated sample files.
Creating Database Table If the database has not been created by the Generate Database facility, you can generate the database by executing the CreateShoppingCartDatabaseSchema class.
using system; using Orm; namespace ormsamples { public class CreateShoppingCartDatabaseSchema {
[STAThread] public static void Main( string[] args){
ORMDatabaseInitiator.CreateSchema(shoppingcart.Shop pingCartPersistentManager.Instance());
} } }
After executing the CreateShoppingCartDatabaseSchema class, the database is created with the Customer table.
Inserting Record As the database has been generated with the Customer table, a new customer record can be added to the table. By implementing the CreateTestData() method of the CreateShoppingCartData class, a new customer record can be inserted to the table. Insert the following lines of codes to the CreateTestData() method to initialize the properties of the customer object which will be inserted as a customer record to the database.
public void CreateTestData() { PersistentTransaction t = shoppingcart.ShoppingCartPersistentManager.Instance ().GetSession().BeginTransaction(); try {
shoppingcart.Customer shoppingcartCustomer = shoppingcart.CustomerFactory.CreateCustomer();
// Initialize the properties of the persistent object shoppingcartCustomer.CustomerName = "Joe Cool" ; shoppingcartCustomer.Address = "1212, Happy Building" ; shoppingcartCustomer.ContactPhone = "23453256" ; shoppingcartCustomer.Email = "[email protected]" ;
shoppingcartCuetomer.Save(); t.Commit();
} catch (Exception e) {
t.RollBack(0); shoppingcart.ShoppingCartPersistentManager.Instance ().GetSession().Close(); Console.WriteLine(e);
} }
After running the sample code, a customer record is inserted into the Customer table.

SDE-VS User’s Guide (Part 2, for ORM) Chapter 21 –Manipulating Persistent Data with .NET
22-49
Retrieving and Updating Record In order to update a record, the particular record must be retrieved first. By modifying the following lines of code to the RetrieveAndUpdateTestData() method of the RetrieveAndUpdateShoppingCartData class, the customer record can be updated.
private void RetrieveAndUpdateTestData() { PersistentTransaction t = shoppingcart.ShoppingCartPersistentManager.Instance ().GetSession().BeginTransaction(); try {
shoppingcart.Customer shoppingcartCustomer = shoppingcart.CustomerFactory.loadCustomerByQuery("C ustomer.CustomerName='Joe Cool'", "Customer.CustomerName");
// Update the properties of the persistent object
shoppingcartCustomer.ContactPhone = "28457126" ; shoppingcartCustomer.Email = "[email protected]" ;
shoppingcartCustomer.Save(); t.Commit();
} catch (Exception e) {
t.RollBack(0); shoppingcart.ShoppingCartPersistentManager.Instance ().GetSession().Close(); Console.WriteLine(e);
} }
After running the sample code, the contact phone and email of the customer is updated.
Retrieving Record by ORM Qualifier
If the object model is defined with ORM Qualifier(s), the load method(s) for retrieving a particular record by ORM Qualifiers will be generated in the sample code as well.
From the example, the object model of Customer is defined with two ORM Qualifiers, named as Name and Phone, qualified with the attribute, CustomerName and ContactPhone respectively, two methods named as RetrieveCustomerByName() and RetrieveCustomerByPhone() are generated in the sample class. Modify the two methods as shown below.
public void RetrieveCustomerByName(){ System.Console.WriteLine("Retrieving Customer by Cu stomerName...");
// Please uncomment the follow line and fill in parameter(s) System.Console.WriteLine(shoppingcart.CustomerFacto ry.LoadByName("James Smith");
} public void RetriveCustomerByPhone() {
System.Console.WriteLine( "Retrieving Customer by ContactPhone..." );
// Please uncomment the follow line and fill in parameter(s) System.Console.WriteLine(shoppingcart.CustomerFacto ry.LoadByPhone("62652610");
}
Retrieving Record by Criteria Class
If you have selected the Generate Criteria option before the generation of persistent code, the Criteria class will be generatedaacordingly.
For the example, the Criteria class, named as CustomerCritera is generated for the object model of Customer. A method named as RetrieveByCriteria() is generated in the sample class. By following the commented guideline of the method, uncomment the code and modify as follows.
pbulic void RetrieveByCriteria() { System.Console.WriteLine( "Retrieving Customer by CustomerCriteria" ); shoppingcart.CustomerCriteria customerCriteria = new shoppingcart.CustomerCriteria();
//Please uncomment the follow line and fill in parameter(s) customerCriteria.CustomerID.Eq(3); System.Console.WriteLine(customerCriteria.UniqueCus tomer().CustomerName);
}

SDE-VS User’s Guide (Part 2, for ORM) Chapter 22 – Manipulating Persistent Data with .NET
22-50
In order to run these two methods, uncomment the statements (blue colored in the diagram below) in the Main(string[] args) method.
public static void Main( string [] args){ RetrieveShoppingCartData retrieveShoppingCartData = new RetrieveShoppingCartData(); try {
retrieveShoppingCartData.RetrieveAndUpdateTestData( );
retrieveShoppingCartData.RetrieveCustomerByName(); retrieveShoppingCartData.RetrieveCustomerByPhone(); retrieveAndUpdateShoppingCartData.RetrieveByCriteri a();
} finally {
shoppingcart.ShoppingCartPersistentManager.Instance ().DisposePersistManger(); }
}
Having executed the RetrieveAndUpdateShoppingCartData class, the contact phone and email of the customer is updated, and the retrieved customer records are shown in the system output. (Assuming several customer records are inserted to the database.)
Deleting Record A customer record can be deleted from the database by executing the DeleteShoppingCartData class. Modify the following lines of code in the DeleteTestData() method to delete the specified record from the database.
private void DeletetestData() { PersistentTransaction t = shoppingcartPersistentManager.Instance().GetSession .BeginTransaction(); try {
shoppingcart.Customer shoppingcartCustomer = shoppingcart.CustomerFactory.LoadCustomerByQuery("C ustomer.CustomerName='Harry Hong'", "Customer.CustomerName"); shoppingcartCustomer.Delete(); t.Commit();
} catch (Exception e) {
t.RollBack(); shoppingcart.ShoppingCartPersistentManager.Instance ().GetSession().Close(); Console.WriteLine(e);
} }
After running the DeleteShoppingCartData sample, the customer record whose customer name is equals to "Harry Hong" will be deleted.
Retrieving a Number of Records The list method of the generated persistence class supports retrieving a number of records from the database, By modifying the following lines of code to the ListTestData() method of the ListShoppingCartData class, the customer whose name starts with "Chan" will be retrieved and the name will be displayed in the system output.
public void LsitTestData(){ System.Console.WriteLine("Listing Customer..."); shoppingcart.Customer[] shoppingcartCustomers = shopping.CustomerFactory.ListCustomerByQuery("Custo mer.CustomerName like 'Chan%'", "Customer.CustomerName"); int length = Math.Min(shoppingcartCustomers.Length, RO W_COUNT); for ( int i=0; i<length; i++){
System.Console.WroteLine(shoppingcartCustomers[i].C ustomerName); } System.Console.WriteLine(length + " record(s) retrieved." );
}
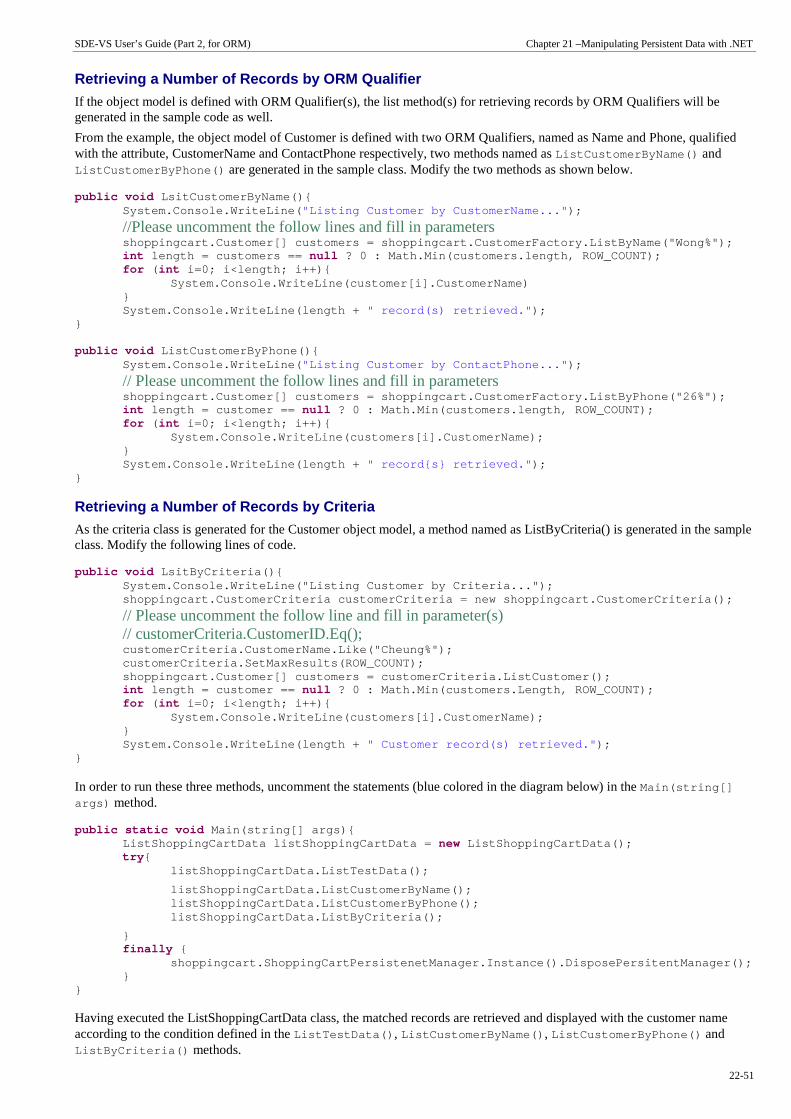
SDE-VS User’s Guide (Part 2, for ORM) Chapter 21 –Manipulating Persistent Data with .NET
22-51
Retrieving a Number of Records by ORM Qualifier
If the object model is defined with ORM Qualifier(s), the list method(s) for retrieving records by ORM Qualifiers will be generated in the sample code as well.
From the example, the object model of Customer is defined with two ORM Qualifiers, named as Name and Phone, qualified with the attribute, CustomerName and ContactPhone respectively, two methods named as ListCustomerByName() and ListCustomerByPhone() are generated in the sample class. Modify the two methods as shown below.
public void LsitCustomerByName(){ System.Console.WriteLine( "Listing Customer by CustomerName..." );
//Please uncomment the follow lines and fill in parameters shoppingcart.Customer[] customers = shoppingcart.Cu stomerFactory.ListByName("Wong%"); int length = customers == null ? 0 : Math.Min(customers.length, ROW_COUNT); for ( int i=0; i<length; i++){
System.Console.WriteLine(customer[i].CustomerName) } System.Console.WriteLine(length + " record(s) retrieved." );
} public void ListCustomerByPhone(){
System.Console.WriteLine( "Listing Customer by ContactPhone..." );
// Please uncomment the follow lines and fill in parameters shoppingcart.Customer[] customers = shoppingcart.Cu stomerFactory.ListByPhone("26%"); int length = customer == null ? 0 : Math.Min(customers.length, ROW_COUNT); for ( int i=0; i<length; i++){
System.Console.WriteLine(customers[i].CustomerName) ; } System.Console.WriteLine(length + " record{s} retrieved." );
}
Retrieving a Number of Records by Criteria
As the criteria class is generated for the Customer object model, a method named as ListByCriteria() is generated in the sample class. Modify the following lines of code.
public void LsitByCriteria(){ System.Console.WriteLine("Listing Customer by Crite ria..."); shoppingcart.CustomerCriteria customerCriteria = ne w shoppingcart.CustomerCriteria();
// Please uncomment the follow line and fill in parameter(s) // customerCriteria.CustomerID.Eq(); customerCriteria.CustomerName.Like("Cheung%"); customerCriteria.SetMaxResults(ROW_COUNT); shoppingcart.Customer[] customers = customerCriteri a.ListCustomer(); int length = customer == null ? 0 : Math.Min(customers.Length, ROW_COUNT); for ( int i=0; i<length; i++){
System.Console.WriteLine(customers[i].CustomerName) ; } System.Console.WriteLine(length + " Customer record(s) retrieved." );
}
In order to run these three methods, uncomment the statements (blue colored in the diagram below) in the Main(string[]
args) method.
public static void Main(string[] args){ ListShoppingCartData listShoppingCartData = new ListShoppingCartData(); try{
listShoppingCartData.ListTestData();
listShoppingCartData.ListCustomerByName(); listShoppingCartData.ListCustomerByPhone(); listShoppingCartData.ListByCriteria();
} finally {
shoppingcart.ShoppingCartPersistenetManager.Instanc e().DisposePersitentManager(); }
}
Having executed the ListShoppingCartData class, the matched records are retrieved and displayed with the customer name according to the condition defined in the ListTestData() , ListCustomerByName() , ListCustomerByPhone() and ListByCriteria() methods.
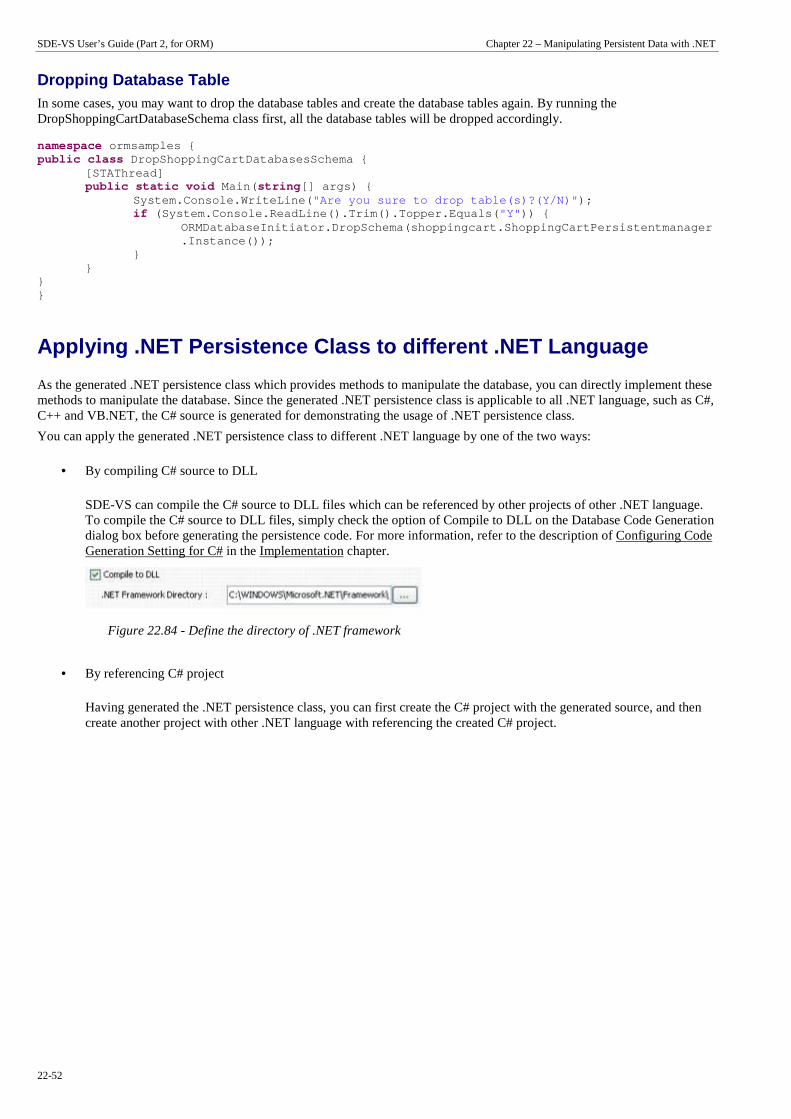
SDE-VS User’s Guide (Part 2, for ORM) Chapter 22 – Manipulating Persistent Data with .NET
22-52
Dropping Database Table In some cases, you may want to drop the database tables and create the database tables again. By running the DropShoppingCartDatabaseSchema class first, all the database tables will be dropped accordingly.
namespace ormsamples { public class DropShoppingCartDatabasesSchema {
[STAThread] public static void Main( string[] args) {
System.Console.WriteLine( "Are you sure to drop table(s)?(Y/N)" ); if (System.Console.ReadLine().Trim().Topper.Equals( "Y" )) {
ORMDatabaseInitiator.DropSchema(shoppingcart.Shoppi ngCartPersistentmanager.Instance());
} }
} }
Applying .NET Persistence Class to different .NET Language
As the generated .NET persistence class which provides methods to manipulate the database, you can directly implement these methods to manipulate the database. Since the generated .NET persistence class is applicable to all .NET language, such as C#, C++ and VB.NET, the C# source is generated for demonstrating the usage of .NET persistence class.
You can apply the generated .NET persistence class to different .NET language by one of the two ways:
• By compiling C# source to DLL
SDE-VS can compile the C# source to DLL files which can be referenced by other projects of other .NET language. To compile the C# source to DLL files, simply check the option of Compile to DLL on the Database Code Generation dialog box before generating the persistence code. For more information, refer to the description of Configuring Code Generation Setting for C# in the Implementation chapter.
Figure 22.84 - Define the directory of .NET framework
• By referencing C# project
Having generated the .NET persistence class, you can first create the C# project with the generated source, and then create another project with other .NET language with referencing the created C# project.
JDBC and .NET Drivers D
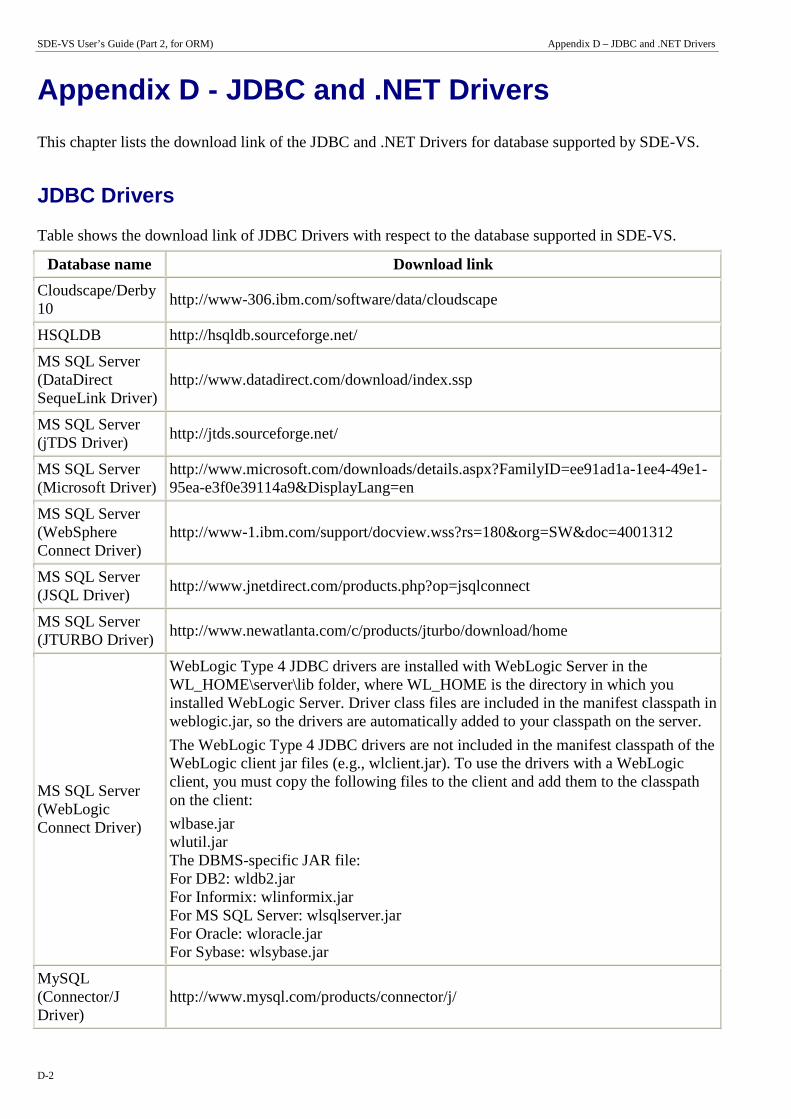
SDE-VS User’s Guide (Part 2, for ORM) Appendix D – JDBC and .NET Drivers
D-2
Appendix D - JDBC and .NET Drivers
This chapter lists the download link of the JDBC and .NET Drivers for database supported by SDE-VS.
JDBC Drivers
Table shows the download link of JDBC Drivers with respect to the database supported in SDE-VS.
Database name Download link
Cloudscape/Derby 10
http://www-306.ibm.com/software/data/cloudscape
HSQLDB http://hsqldb.sourceforge.net/
MS SQL Server (DataDirect SequeLink Driver)
http://www.datadirect.com/download/index.ssp
MS SQL Server (jTDS Driver)
http://jtds.sourceforge.net/
MS SQL Server (Microsoft Driver)
http://www.microsoft.com/downloads/details.aspx?FamilyID=ee91ad1a-1ee4-49e1-95ea-e3f0e39114a9&DisplayLang=en
MS SQL Server (WebSphere Connect Driver)
http://www-1.ibm.com/support/docview.wss?rs=180&org=SW&doc=4001312
MS SQL Server (JSQL Driver)
http://www.jnetdirect.com/products.php?op=jsqlconnect
MS SQL Server (JTURBO Driver)
http://www.newatlanta.com/c/products/jturbo/download/home
MS SQL Server (WebLogic Connect Driver)
WebLogic Type 4 JDBC drivers are installed with WebLogic Server in the WL_HOME\server\lib folder, where WL_HOME is the directory in which you installed WebLogic Server. Driver class files are included in the manifest classpath in weblogic.jar, so the drivers are automatically added to your classpath on the server.
The WebLogic Type 4 JDBC drivers are not included in the manifest classpath of the WebLogic client jar files (e.g., wlclient.jar). To use the drivers with a WebLogic client, you must copy the following files to the client and add them to the classpath on the client:
wlbase.jar wlutil.jar The DBMS-specific JAR file: For DB2: wldb2.jar For Informix: wlinformix.jar For MS SQL Server: wlsqlserver.jar For Oracle: wloracle.jar For Sybase: wlsybase.jar
MySQL (Connector/J Driver)
http://www.mysql.com/products/connector/j/
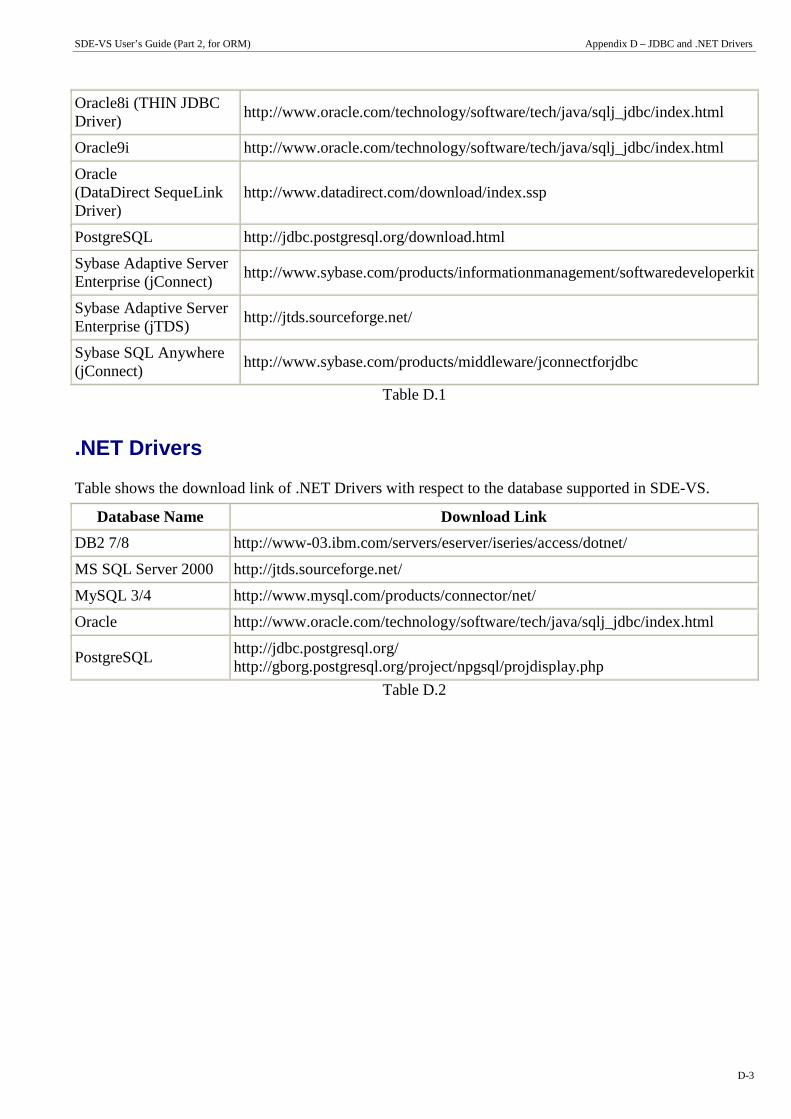
SDE-VS User’s Guide (Part 2, for ORM) Appendix D – JDBC and .NET Drivers
D-3
Oracle8i (THIN JDBC Driver)
http://www.oracle.com/technology/software/tech/java/sqlj_jdbc/index.html
Oracle9i http://www.oracle.com/technology/software/tech/java/sqlj_jdbc/index.html
Oracle (DataDirect SequeLink Driver)
http://www.datadirect.com/download/index.ssp
PostgreSQL http://jdbc.postgresql.org/download.html
Sybase Adaptive Server Enterprise (jConnect)
http://www.sybase.com/products/informationmanagement/softwaredeveloperkit
Sybase Adaptive Server Enterprise (jTDS)
http://jtds.sourceforge.net/
Sybase SQL Anywhere (jConnect)
http://www.sybase.com/products/middleware/jconnectforjdbc
Table D.1
.NET Drivers
Table shows the download link of .NET Drivers with respect to the database supported in SDE-VS.
Database Name Download Link
DB2 7/8 http://www-03.ibm.com/servers/eserver/iseries/access/dotnet/
MS SQL Server 2000 http://jtds.sourceforge.net/
MySQL 3/4 http://www.mysql.com/products/connector/net/
Oracle http://www.oracle.com/technology/software/tech/java/sqlj_jdbc/index.html
PostgreSQL http://jdbc.postgresql.org/ http://gborg.postgresql.org/project/npgsql/projdisplay.php
Table D.2

SDE-VS User’s Guide (Part 2, for ORM) Appendix D – JDBC and .NET Drivers
D-4

Glossary E

SDE-VS User’s Guide (Part 2, for ORM) Appendix E - Glossary
E-2
Appendix E - Glossary
A
Activity diagram
Activity diagrams are an amalgamation of a number of techniques: Jim Odell's event diagrams, SDL state modeling techniques, workflow modeling and petri-nets. They can also be considered as variants of state diagrams. Activity diagrams are organized according to actions and mainly target towards representing the internal behaviors of a method or a use case. They describe the sequencing of activities, with support for both conditional and parallel behaviors.
Actor input In editing flow of event, an actor input is the input from an actor to the system.
Align to grid Whether diagram elements should align to grid when being moved.
Anti-aliasing A method which handles the staircase pixels of slanted lines and curves to make them look smoother.
Application Options
The global options in SDE.
Auto save SDE provides an auto save feature that saves a copy of the current project periodically. If the application terminates abnormally, with this feature turned on, when you start SDE again the system will check if an auto save file exists. If so, it will ask you whether you want to recover the project.
Automatic containment rule detection
A facility to automatically detect the containment rule for a container. For example, an Actor will not be contained in the System Boundary even if they are moved into the container's region.
B
Backup files Every time you save a project a backup file will be created. The backup file name is determined by the original project file name, followed by a "~" and the version number. A backup file with a larger version number means that it is more recent than those with smaller version numbers.
Button group
The diagram toolbar groups some of the diagram elements that are similar in nature. For example, Package and Subsystem are grouped into a single button group. Buttons that are grouped are indicated by a small triangle on the lower-right-hand corner. To view the list of items under the group click on the small triangle, or click on the button and hold until the selection list appears.
C
Candidate Class Pane
The candidate class pane, located at the upper-right corner of the textual analysis pane, displays the candidate classes as rectangle shapes.
Candidate class view
In performing textual analysis, the Candidate Class View hides the Problem Statement Editor and only displays the Candidate Class Pane and the Data Dictionary Table. It allows you to concentrate on further editing of the identified candidate classes, such as specifying the candidate class type or creating models.
Cascade Arrange the opened windows diagonally, with the active window on top.
Class diagram
Class diagrams are the most common diagram found for modeling object-oriented systems. They are used to describe the types of objects and their relationships by providing a static, structural view of a system. They are important not only for visualizing, specifying, and documenting structural models, but also for constructing executable systems through forward and reverse engineering.
Class repository A project may contain many classes. The Class Repository View lists all the classes within the current project.
Collaboration diagram
Collaboration diagrams emphasize the organization of objects that are involved in an interaction. Collaboration is a mechanism composed of both structural and behavioral elements. Two important features - the concept of a path and the sequence number - distinguish collaboration diagrams from sequence diagrams.
Component diagram
Component diagrams show the various components (physical modules of code) in a system and their dependencies. A component can often be the same as a package.
Copy as image To copy the selected diagram elements to the system clipboard as image. This feature is supported in both the Windows platform and the Linux platform.
Copy to system clipboard
To copy the selected diagram elements to the system clipboard as OLE objects, so that the copied content can be pasted to OLE containers like Microsoft Word/Excel/PowerPoint. And you can directly edit the OLE object inside the document. This feature is supported in Windows platform only.
Copy within SDE To copy the selected diagram elements to the application clipboard. You can then paste the diagram elements to other SDE diagrams.

SDE-VS User’s Guide (Part 2, for ORM) Appendix E - Glossary
E-3
D
Data dictionary table
The data dictionary table, which located at the lower-right area of the textual analysis pane, provides a table view for the candidate classes. It displays all the information of a candidate class. You can edit its name and type, as well as adding description to the candidate class.
Data dictionary view
In performing textual analysis, the Data Dictionary View displays only the Data Dictionary Table. It allows you to concentrate on filling the candidate class information in the data dictionary.
Deployment diagram
Deployment diagrams show the physical layout and relationships among software and hardware components in the implemented system. It shows how components and objects are routed and moved around a distributed system.
Diagram base layout
In the print preview pane, if the Fit to Pages option is selected, and there are multiple pages in the printout, selecting Diagram Base Layout will cause the distribution of pages to be diagram-oriented. Note that this option affects the preview only, the order of the printout remains unchanged.
Diagram element A diagram element is a shape or a connector that represent the view of its underlying model element.
Diagram exporter The diagram exporter allows you to export selected diagrams as images in JPG, PNG or SVG format.
Diagram pane The diagram pane contains the opened diagrams; it allows you edit multiple diagrams at the same time.
Diagram toolbar The diagram toolbar contains the buttons of the diagram elements available for developing the active diagram.
Diagram navigator A project may consist of many diagrams. The Diagram Navigator lists all the diagrams within the project. Through the use of a folding tree structure, you can browse the names of these diagrams by expanding or collapsing the folders and perform sorting by diagram type.
Document info When generating HTML/PDF reports, the document info (such as title, author, keywords) you specified becomes the meta data of the report. Users can open the HTML source/PDF document summary to view this information.
Documentation pane
The Documentation pane allows you to enter a description about a diagram or a diagram element.
E
Extra Resource-Centric
By default, the resource-centric interface displays the most commonly used resources of a diagram element. The least commonly used resources are hidden by default, and they are called the extra resources.
F
Flow of event A section in the use case description for editing the base paths and the alternative paths in a use case.
H
HTML report generation
To generate report for the SDE project in HTML format.
J
Java-enabled platforms
Any platforms that have Java runtime installed and thus able to run Java programs.
L
Layout diagram A feature to layout the shapes so that they do not overlap, and to layout the connectors so that they do not cross with one another.
License key The license key is a file that you import using the License Key Manager so that you can start using SDE.
License Key Manager
The License Key Manager allows you to manage the license key files of Visual Paradigm products.
Logical View The Logical View refers to a user's view of the way project is organized. It provides another view of creating, structuring and sharing the UML diagrams and models apart from the traditional Diagram Navigator, Model Tree View and Class Repository.
Look and Feel The appearance of SDE user interface.
M
Message pane The message pane logs the messages for the operations that you performed. For example, Java language syntax checking, model validation, report generation, etc.
Model element A model element stores the model data. A diagram element associates a model element, and a model element may be associated with more than one diagram element (multiple views).

SDE-VS User’s Guide (Part 2, for ORM) Appendix E - Glossary
E-4
Model repository The repository where the model elements are stored.
Model tree view The Model Tree View lists all the model elements within the current project. Model elements can be dragged to appropriate diagrams to create a new diagram element.
Model validation A process to validate the models against UML syntax.
O
OLE An object that supports the OLE protocol for object linking and embedding.
Open specification dialog
The open specification dialog of a diagram allows you to configure the diagram settings, such as the diagram name and grid settings; while the open specification dialog of a model element allows you to configure its model data.
ORM Pane
Display a list of classes and database tables from the specified classpath (s) and database (s). You can click Refresh to update the content under Class View and DataBase View whenever there are changes to source code or database. You can drag classes or entities onto diagrams and generate source code/database from them when necessary.
P
Paper base layout If the Fit to Pages option is selected, and there are multiple pages in the printout, selecting Paper Base Layout will cause the distribution of pages to be paper-oriented (the diagram size is ignored in arranging the preview). Note that this option affects the preview only; the order of the printout remains unchanged.
Paper place style
To change the order of the printout. Consider a large diagram is divided into many pages, selecting From left to right will arrange the printout order from the pages on the left to the pages on the right, while selecting From top to bottom will arrange the print order from the pages on the top to the pages on the bottom.
Pattern watermark The watermark that repeats the product name diagonally in the printout, exported image or copied content.
PDF report generation
To generate report for the SDE project in PDF format.
Preview pane The Preview pane, also known as the Diagram Monitor, shows an overall view of the diagram. The Diagram Monitor allows you to navigate the whole diagram pane when the diagram is larger than the display area of the diagram pane.
Print preview pane The print preview pane allows you to configure various print settings, preview the printout and print the diagrams.
Problem statement A description about the problem to investigate.
Problem statement editor
The problem statement editor is the text editor located on the left of the text analysis pane, which allows you to view and edit the problem statement.
Problem statement view
The Problem Statement View displays the Problem Statement Editor, the Candidate Class Pane and the Data Dictionary Table; it allows you to concentrate on editing the problem statement.
Project explorer The project explorer pane contains three views: the Diagram Navigator, the Model Tree View, and the Class Repository View. Each view shows different perspectives of the project.
Properties pane There are four pages associated with the Properties Pane: the Property page, the Preview page, the Documentation page and the Element Viewer page.
Property pane Every diagram and diagram element has its own properties. The Property pane in the Properties Pane allows you to view and edit various its properties.
Q
Quick Print To print diagrams without previewing them hence speeds the print job.
R
Realistic containment interaction
A specific effect to indicate a diagram element moving in/out of a container.
Reference shape for alignment
When there are multiple shapes selected, the last selected shape will be used as the referenced shape for alignment. That is, the alignment methods will be performed based on the position/size of the referenced shape. The referenced shape will be rendered with its resize handles surrounded by black rectangles.
Report Writer A feature for performing agile report creation.
Resource-centric A user interface based on the Resource-Centric approach is adopted in SDE to enable UML diagrams to be constructed intuitively with minimal efforts. With the novel interface, only valid editing resources are grouped around a graphical entity, totally eliminating invalid operations during diagram construction.
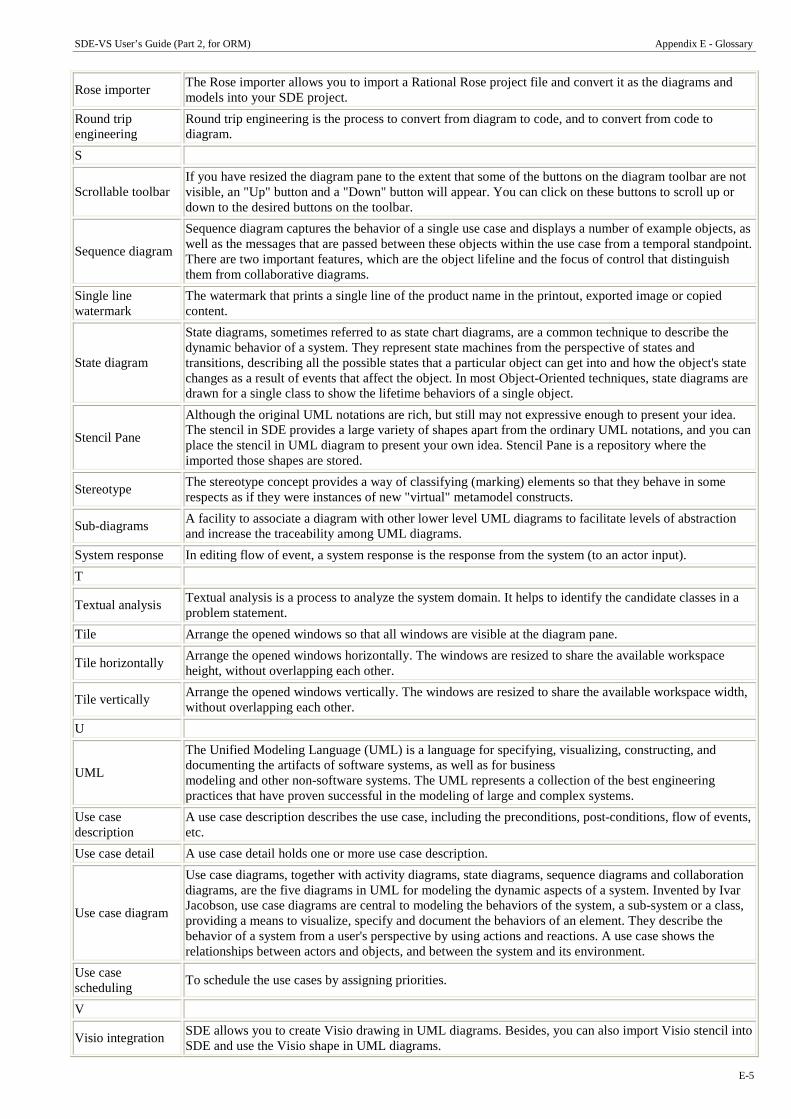
SDE-VS User’s Guide (Part 2, for ORM) Appendix E - Glossary
E-5
Rose importer The Rose importer allows you to import a Rational Rose project file and convert it as the diagrams and models into your SDE project.
Round trip engineering
Round trip engineering is the process to convert from diagram to code, and to convert from code to diagram.
S
Scrollable toolbar If you have resized the diagram pane to the extent that some of the buttons on the diagram toolbar are not visible, an "Up" button and a "Down" button will appear. You can click on these buttons to scroll up or down to the desired buttons on the toolbar.
Sequence diagram
Sequence diagram captures the behavior of a single use case and displays a number of example objects, as well as the messages that are passed between these objects within the use case from a temporal standpoint. There are two important features, which are the object lifeline and the focus of control that distinguish them from collaborative diagrams.
Single line watermark
The watermark that prints a single line of the product name in the printout, exported image or copied content.
State diagram
State diagrams, sometimes referred to as state chart diagrams, are a common technique to describe the dynamic behavior of a system. They represent state machines from the perspective of states and transitions, describing all the possible states that a particular object can get into and how the object's state changes as a result of events that affect the object. In most Object-Oriented techniques, state diagrams are drawn for a single class to show the lifetime behaviors of a single object.
Stencil Pane
Although the original UML notations are rich, but still may not expressive enough to present your idea. The stencil in SDE provides a large variety of shapes apart from the ordinary UML notations, and you can place the stencil in UML diagram to present your own idea. Stencil Pane is a repository where the imported those shapes are stored.
Stereotype The stereotype concept provides a way of classifying (marking) elements so that they behave in some respects as if they were instances of new "virtual" metamodel constructs.
Sub-diagrams A facility to associate a diagram with other lower level UML diagrams to facilitate levels of abstraction and increase the traceability among UML diagrams.
System response In editing flow of event, a system response is the response from the system (to an actor input).
T
Textual analysis Textual analysis is a process to analyze the system domain. It helps to identify the candidate classes in a problem statement.
Tile Arrange the opened windows so that all windows are visible at the diagram pane.
Tile horizontally Arrange the opened windows horizontally. The windows are resized to share the available workspace height, without overlapping each other.
Tile vertically Arrange the opened windows vertically. The windows are resized to share the available workspace width, without overlapping each other.
U
UML
The Unified Modeling Language (UML) is a language for specifying, visualizing, constructing, and documenting the artifacts of software systems, as well as for business modeling and other non-software systems. The UML represents a collection of the best engineering practices that have proven successful in the modeling of large and complex systems.
Use case description
A use case description describes the use case, including the preconditions, post-conditions, flow of events, etc.
Use case detail A use case detail holds one or more use case description.
Use case diagram
Use case diagrams, together with activity diagrams, state diagrams, sequence diagrams and collaboration diagrams, are the five diagrams in UML for modeling the dynamic aspects of a system. Invented by Ivar Jacobson, use case diagrams are central to modeling the behaviors of the system, a sub-system or a class, providing a means to visualize, specify and document the behaviors of an element. They describe the behavior of a system from a user's perspective by using actions and reactions. A use case shows the relationships between actors and objects, and between the system and its environment.
Use case scheduling
To schedule the use cases by assigning priorities.
V
Visio integration SDE allows you to create Visio drawing in UML diagrams. Besides, you can also import Visio stencil into SDE and use the Visio shape in UML diagrams.
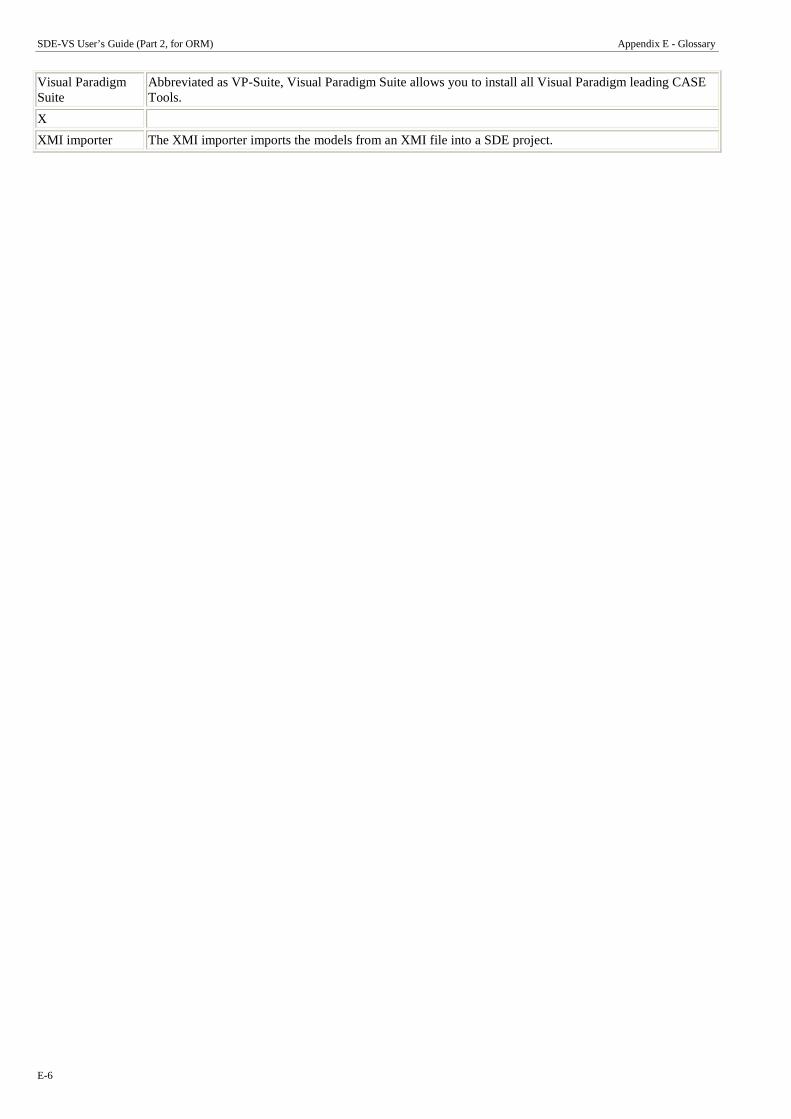
SDE-VS User’s Guide (Part 2, for ORM) Appendix E - Glossary
E-6
Visual Paradigm Suite
Abbreviated as VP-Suite, Visual Paradigm Suite allows you to install all Visual Paradigm leading CASE Tools.
X
XMI importer The XMI importer imports the models from an XMI file into a SDE project.