Scooters & Mopeds Unlimited Manual for Euro, Retro, Sport ...€¦ · Scooters & Mopeds Unlimited...
39
Transcript of Scooters & Mopeds Unlimited Manual for Euro, Retro, Sport ...€¦ · Scooters & Mopeds Unlimited...

Scooters & Mopeds UnlimitedManual for Euro, Retro, Sport Owners
1. Introduction2. Scooter Start Up Procedure A. Use a Professional Mechanic B. Scooter Assembly C. Required Tools D. Uncrating your Scooter E. Installing the Battery F. Fuel and Oil G. Starting your Scooter H. Making Adjustments Before Riding3. Consumable Items A. Spark Plugs B. Oil and Lubricants
1. Motor Oil2. Transmission Oil3. 2 Stroke Oil4. Brake and Throttle Cables5. Wheel and Steering Neck Bearings
4. Troubleshooting5. Winter Operation6. Storing your Scooter7. Recommended Tools for your Scooter8. 2-Stroke Carburetor Adjustment9. Warranty10. Contact Us

Thank you for purchasing your new scooter from Scooters & Mopeds Unlimited. We are very glad to be able to offer you this scooter. We are confident, with the proper maintenance schedule, that you will enjoy your scooter for a long time.
You have purchased a new motor scooter, which is not a toy. These scooters are made in China where scooters are a way of life for many people. A scooter may be the only transportation a person has, so they take great care in manufacturing. If you were to buy a scooter locally, you would pay twice the price, plus pay a set-up fee to have a professional assemble your scooter and adjust it properly. You got a great price on a brand new motor scooter, which will last a very long time if you follow the manufacturer’s break-in instructions and maintenance schedule.
SCOOTER START UP PROCEDURE
Use a Professional Mechanic
Please have a professional motorcycle technician prep your scooter.
We highly recommend paying $50-$75 to have a professional mechanic assemble your new scooter to be sure it runs 100% perfectly.
The number one reason to use a professional mechanic is because the carburetor may require some adjustment to get your scooter running perfect. This is best done by a professional. The reason your carburetor many need adjusting is simple:
1. Your altitude above sea level may be different than the manufacturers 2. Your scooter has been sitting in a ship for a few weeks, then customs, and our warehouse3. After the engine is broken in, the idle will need to be set properly
The carburetor adjustment information is located at the end of this manual, before the warranty. Please read it carefully if your scooter needs the adjustment.
Do not void your warranty by not breaking in your scooter correctly.

Scooter Assembly
Print this and give it to you professional to use as the step-by-step instructions
Before starting, please read our disclaimer page, it contains important information about the operation and ownership of your new scooter. The following instructions assume that you have some mechanical abilities and general motorcycle knowledge. These are just general instructions; you should have a motorcycle shop do the set-up. Most motorcycle or lawn mover repair centers will be able to help you for a small fee. The average is $50. Be careful moving around the crate, it weighs 210 pounds, so get some help!
Tools and Supplies Needed
Claw hammer10mm wrenchWire cuttersEye protectionGlovesLong sleeve shirtRazor knife2 pints of 2 cycle oil (for 2 stroke engines only)1.5 gallons of unleaded fuel, 90 octane or better.300ml clean container to hold oilSmall funnelFlat head and Phillips screwdriversSome friends to help and the thing between you rears!

Uncrating your Scooter
Wear gloves and eye protection at all times during assembly. Before uncrating the scooter or opening the crate, please check the model number on the crate to verify that you received the correct scooter model and color. These are the model numbers for the scooters we sell:
JL50QT-15 EuroJL50QT-2B SportJL50QT-21 Retro
If the color or model is different from the scooter you purchased from us, please call us at 928-772-2203.
Also, be sure to check the crate for external damage. If the crate is damaged in anyway, STOP, and call us at 928-772-2203 to file a claim with the shipping company. The shipping company will want to see the crate as it was delivered, so do not open it! We insure all shipments and when they leave our warehouse they are not damaged in anyway.
We do not guarantee the shipment; the shipping company is responsible for shipping your scooter without damages.
Once you are sure the crate is in perfect condition, use the following steps to uncrate your scooter:
1. We have found the easiest way to uncrate the scooter is:A. Remove the cardboard box from around the wood frame crate,
This is the crate without cardboard around it
B. Remove all the angle support boards with a claw hammer. Be careful with the nails and pick them up as you go.C. Cut the three wires holding the scooter in place. There are two on the luggage rack

and one on the left handle bar grip.D. Clip the tie wrap on the left hand brake. (This is holding the rear brake in the lock position)E. Remove two 10mm nuts on the board holding the footrest in place.F. Remove the foot brace or move it aside. Be careful not to scratch the scooter with the wires or bolts.G. Remove the center support boards with a claw hammer.H. Remove the top and sides with a claw hammer.I. You should be able to remove the scooter. Get some help, its heavy!
2. Remove everything from under the seat.

Installing the Battery
Be careful not to touch the battery chemicals. Use gloves, wear a long sleeve shirt and wear eye protection.

A. Remove the battery and electrolyte from the box.B. Remove the red tape from the battery.C. Carefully remove the black plastic top on the electrolyte and save the top. (It will be used to seal the battery later)D. Flip the bottles of electrolyte over and sit each bottle over the top of the battery hole.
Now push down on the bottles and the battery will break the aluminum foil. Use a razor knife to make air holes in the bottles.E. Let the fluid completely drain into the battery.F. Use the black lid to seal the battery.G. Allow the battery to sit for 6 minutes before charging it with a 0.7 amp charger for 5 hours.H. The battery will either install under the floor mat or under the seat, depending on the model.I. Using the nuts and bolts from the battery box, install the two (2) positive connections to the positive side of the battery and the one (1) black wire to the ground. Install the wires on top, if they will not slide in the side.J. Place the battery and replace the cover. If screws are used to hold the cover in place, they are in a plastic bag that was under the seat.K. Dispose of the empty fluid bottle properly.
Fuel and Oil
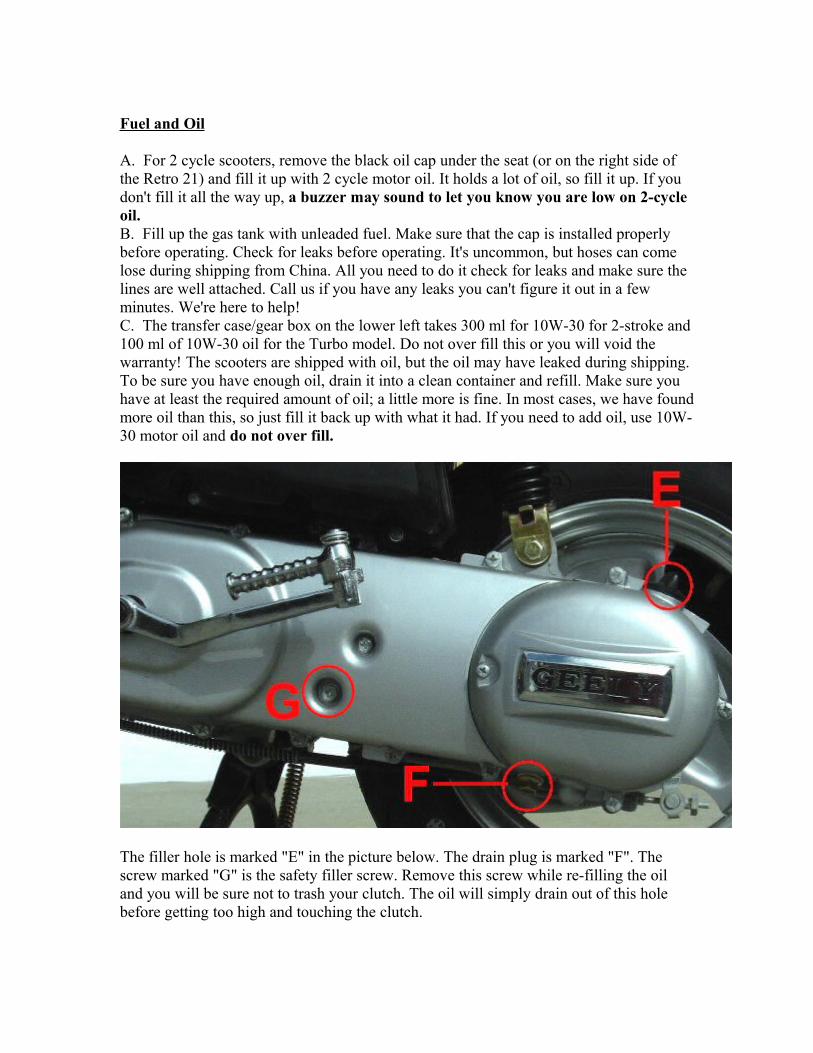
A. For 2 cycle scooters, remove the black oil cap under the seat (or on the right side of the Retro 21) and fill it up with 2 cycle motor oil. It holds a lot of oil, so fill it up. If you don't fill it all the way up, a buzzer may sound to let you know you are low on 2-cycle oil.B. Fill up the gas tank with unleaded fuel. Make sure that the cap is installed properly before operating. Check for leaks before operating. It's uncommon, but hoses can come lose during shipping from China. All you need to do it check for leaks and make sure the lines are well attached. Call us if you have any leaks you can't figure it out in a few minutes. We're here to help!C. The transfer case/gear box on the lower left takes 300 ml for 10W-30 for 2-stroke and 100 ml of 10W-30 oil for the Turbo model. Do not over fill this or you will void the warranty! The scooters are shipped with oil, but the oil may have leaked during shipping. To be sure you have enough oil, drain it into a clean container and refill. Make sure you have at least the required amount of oil; a little more is fine. In most cases, we have found more oil than this, so just fill it back up with what it had. If you need to add oil, use 10W-30 motor oil and do not over fill.
The filler hole is marked "E" in the picture below. The drain plug is marked "F". The screw marked "G" is the safety filler screw. Remove this screw while re-filling the oil and you will be sure not to trash your clutch. The oil will simply drain out of this hole before getting too high and touching the clutch.
D. In your first tank of gas, put 5 fluid ounces of 2-stroke oil in the gas tank. Reduce this amount by one ounce each subsequent fill up. Use 4 ounces on the second fill up, 3 ounces on the third, 2 ounces on the 4th and 1 ounce on the 5th. After 5 fill ups, you do not have to add any more 2 stroke oil into the gas tank. This helps break in and condition the engine.
HOT TIP - We have seen Euro, Retro and Sport scooters with kinked oil lines going into the oil injector. STOP and make sure your scooter is getting oil properly. You should see smoke coming out of the tail pipe. If you do not, please have a professional check your oil pump and make sure the line coming from the tank to the pump is not kinked. Not doing this could ruin a piston and you'll be without your scooter while you have someone repair it. So it's easier to check this and fix it now. If you need further info, contact us.
Warning: Never start a motor vehicle in an enclosed area. Always allow for plenty of ventilation. The fumes could be harmful or even cause death.
Starting your Scooter
A. The kick-start is the only way we have found to start the bikes initially.B. Place the scooter on the center stand, not the side stand.C. Some scooters have an electric choke. If not, you will need to choke the scooter while starting.D. Do not give too much gas and keep pumping the kick-starter!E. It will take anywhere from 2 - 10 minutes to start the first time. But once it starts, it will run fine and start fine with the electric starter button.
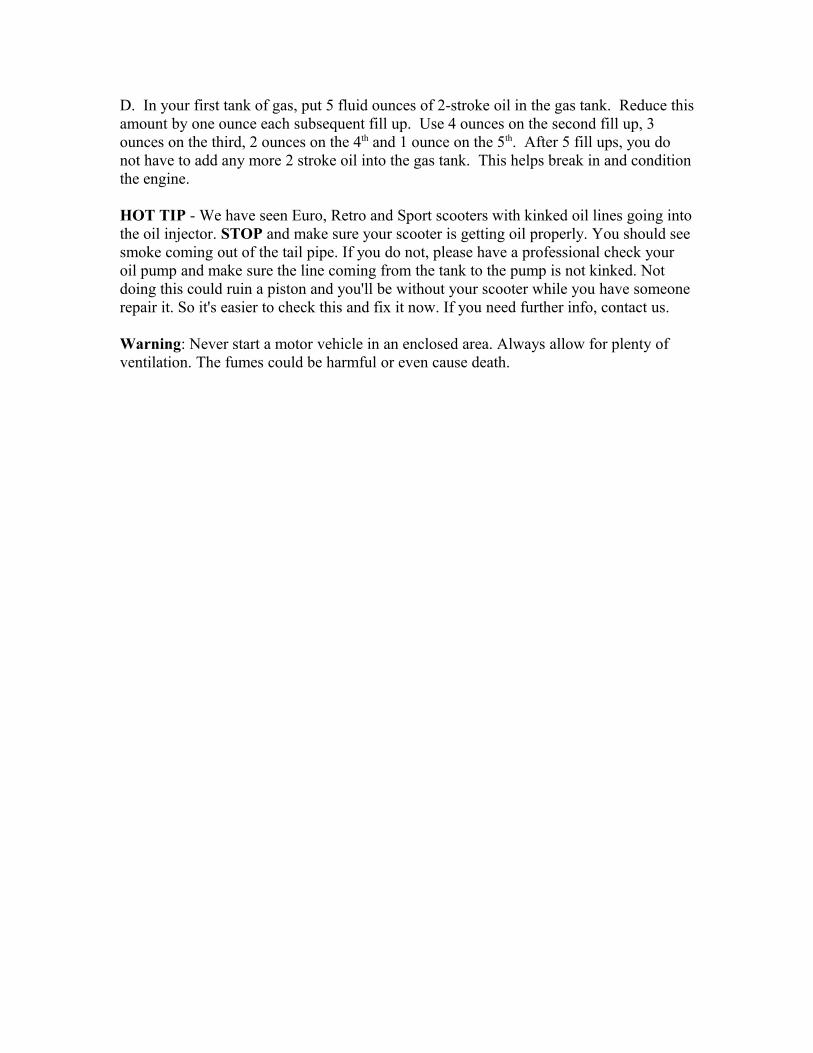
Problems Starting New Scooter The first time you start your new scooter will always be the hardest. The reason is because on initial startup, there is no fuel in the carburetor fuel bowl. There is air that is trapped in the fuel lines, which prevents the fuel from reaching the carburetor.
The fuel shut off value on our Geely scooters has an automatic shutoff. No manual shutoff is required. The scooter has several fuel lines connecting together and running to different places. As part of the automatic operation of this valve, the valve itself is located higher than the gas tank. On initial startups, air is trapped in the gas lines. Since the valve is higher than the gas tank; the fuel will not defy gravity and run uphill. We have a solution that will help the fuel push the trapped air out of the gas lines.
Note: If you do not feel comfortable trying these steps to fix the scooter startup problems as described below, have a mechanic do these steps. Also, it is often
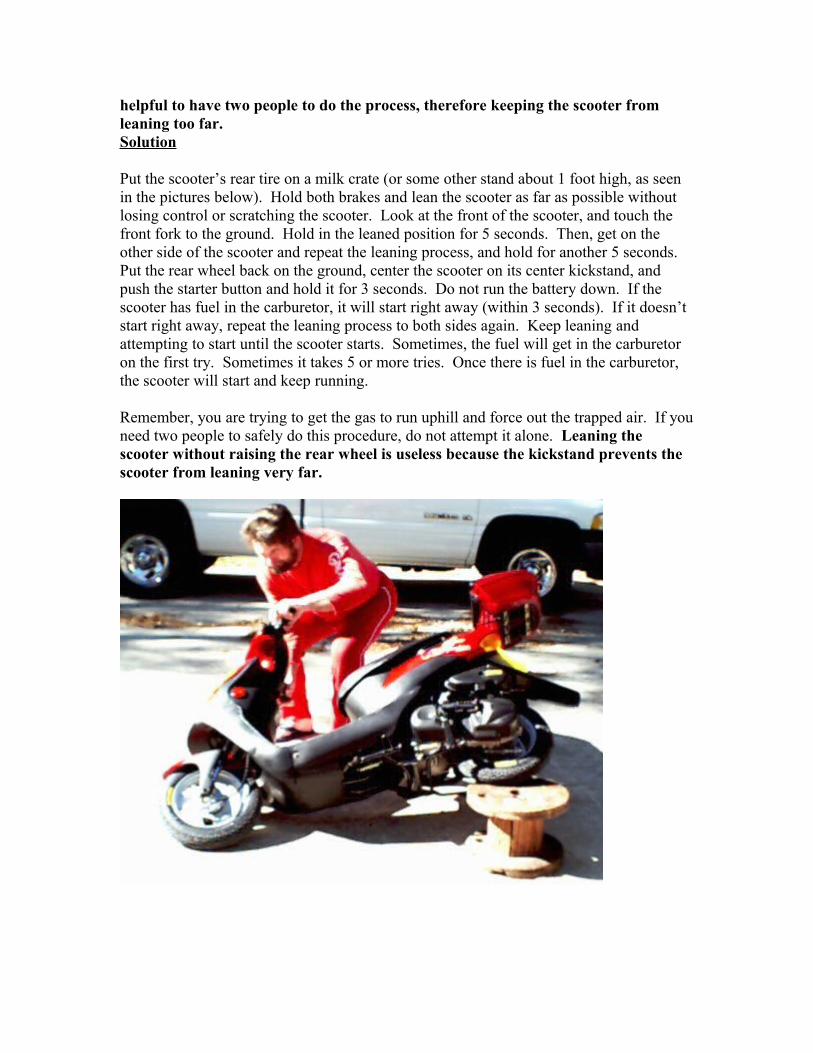
helpful to have two people to do the process, therefore keeping the scooter from leaning too far. Solution
Put the scooter’s rear tire on a milk crate (or some other stand about 1 foot high, as seen in the pictures below). Hold both brakes and lean the scooter as far as possible without losing control or scratching the scooter. Look at the front of the scooter, and touch the front fork to the ground. Hold in the leaned position for 5 seconds. Then, get on the other side of the scooter and repeat the leaning process, and hold for another 5 seconds. Put the rear wheel back on the ground, center the scooter on its center kickstand, and push the starter button and hold it for 3 seconds. Do not run the battery down. If the scooter has fuel in the carburetor, it will start right away (within 3 seconds). If it doesn’t start right away, repeat the leaning process to both sides again. Keep leaning and attempting to start until the scooter starts. Sometimes, the fuel will get in the carburetor on the first try. Sometimes it takes 5 or more tries. Once there is fuel in the carburetor, the scooter will start and keep running.
Remember, you are trying to get the gas to run uphill and force out the trapped air. If you need two people to safely do this procedure, do not attempt it alone. Leaning the scooter without raising the rear wheel is useless because the kickstand prevents the scooter from leaning very far.

It has been our experience that if you scooter will not start initially, the lack of fuel in the carburetor is the only problem. We have never encountered another reason why your scooter won’t start. Once the carburetor gets gas, the scooters start. Our scooters are all tested at the factory (which is why you will see a little mileage on the speedometer). They are started up and driven for a couple of miles, so you can have confidence that they do start and work fine, se the factory would not ship us a scooter that didn’t work.

Making Adjustments Before Riding
A. Check the tire pressure. You should run 36 psi (cold) in the front and rear.B. Check the movement of everything. Also check all of the bolts to be sure they are tight. You should check the bolts after a few hundred miles of use to be sure they have not worked lose.C. Adjust the brakes if needed. Make sure the brakes work before riding.D. Test the lights and turn signals.E. Read the manual if included. The manual gives you good advice on riding and maintaining your scooter, including your break-in procedure and periods. Also familiarize yourself with the controls before riding.F. Some carburetors require adjusting. This is best done by someone with small engine mechanical experience. If the scooter doesn't idle very well, this is easy to fix by turning the idle screw on the carburetor. Do not attempt if you are not sure how it works. See the section on carburetor adjustment for a step-by-step process on doing this.G. Take it easy for the first few hundred miles. Statistics show that most accidents happen within the first few hundred miles. So take it easy! We also recommend you take a class on motor scooter riding. This might save your life! H. Loaning your scooter to a friend may sound like a great idea, but many accidents happen this way, so think before you loan.
CONSUMABLE ITEMS
Spark Plugs
The following is a list of commonly available spark plugs that will work. Please bear in mind that most of this information comes from cross references provided by a variety of manufacturers, and you may find one brand works better than another for your particular scooter. Personally, I prefer the NGK plugs simply because I know them better than the rest.
These spark plugs will work for the Euro, Retro, Sport and Turbo models:
NGK - BP6HS, BPR6HSND - W22FPR-UAC - R42CFSChampion - QL82YCACCEL - 453
Some general notes on spark plugs:
The Geely scooter works best with a Projected tip sparkplug (usually designated by a "P" in the number, ie: BP6HS). The center electrode in this type of plug sticks out of the bottom slightly. You can use a standard plug (like a B6HS), but the shorter electrode has the same effect as retarding the timing slightly, and the scooter may not run as well as it does with the projected type. Do NOT try to run a plug that is projected more than a millimeter or two or it might connect with the piston! Compare the new plug to the old one, and if you have any doubts about the tip length after installing a new sparkplug, turn the engine over slowly by hand to make sure it spins easily.
The "R" in most numbers usually stands for "Resistor" type plugs, as in CR7HS. The scooter generally doesn’t care if you run an "R" type plug or not, but your neighbors might! The main purpose of "R" type plugs is to reduce radio and TV interference. If you’re getting complaints about your scooter causing noise on nearby radios and other electronic devices, you might want to run with "R" type plugs.
Spark Plugs come in different heat ranges as indicated by the actual number in the ID. With Japanese plugs, the heat range goes UP as the number goes DOWN. For example, an NGK BPR5HS is the same plug as an NGK BPR6HS except that it operates at a higher temperature. Likewise, an NGK BPR7HS operates at a cooler temperature.
With American spark plugs, the numbers are reversed. A Champion RZ7 is a cooler plug than an RZ8, and an RZ9 would be the hotter one.
With European plugs, there is no easy way to tell, so you’d best stick to the manufacturer’s cross-reference for the plug you want.

Why worry about heat ranges? In all likelihood, you won’t have to. It depends mostly on the type of riding you do, and the quality of fuel (and oil in the case of 2 strokes) you use. If you make a lot of short trips where the engine does not get up to operating temperature for very long, the plug may become "carbon fouled" after a while with a buildup of thick, sooty black stuff on the electrode. The scooter may run poorly, misfire, or may not start easily because carbon, being conductive, will draw the spark away from the gap without igniting the fuel in the cylinder. A new plug will cure the problem, but you might consider going one heat range "hotter" so the new plug has a chance to burn off the carbon build up before it becomes a problem again.
If you make a lot of long trips where the engine stays at operating temperature for a long time, you might notice the plug develops a light gray or white colored buildup, and the electrode may look overheated. You might try a new plug that’s one heat range "cooler".If you find your old sparkplug has a nice tan to chocolate brown color, stick with the same type. That’s about as good as it can get.
OILS AND LUBRICANTS
Motor Oil
People have asked us a lot of questions about motor oil for their vehicles, and we have narrowed it down to one simple answer. Here’s everything the modern consumer needs to know about motor oil:
Buy the best oil you can afford, and change it regularly. Change your oil after the first 300km, then every 1000km thereafter.
That’s it! Of course there’s a lot *more* to oil than that. There are tons of research papers on the subject, but in the end, the only thing your Geely scooter cares about the oil in its crankcase is that it’s clean, fresh, and there’s enough of it.
Choose a seasonable grade of oil, 10w30 in colder weather and 20w40 in warmer weather, and make sure its API Rating is SF or better. You find the API Rating inside the little circle on the back of the container. The current API rating on most motor oils is SL, which is more than adequate for Geely 4 stroke Scooters.
Transmission Oil
On all Geely 2 strokes with the exception of the Turbo because of its CVT drive, use 300ml to 450ml of seasonal grade motor oil. Using more than that can make a mess of the centrifugal clutch. You just need enough to keep the drive chain and gears wet. In this case, the cheaper stuff is probably better se you want to avoid synthetic oils with friction modifiers that can also have an adverse effect on the clutch.
On the Turbo, the final drive gets 100ml of a seasonal grade of motor oil. Since the CVT (Constant Velocity Transmission) is a dry belt drive, you only need enough oil to lubricate the rear wheel bearings.
The 4 stroke scooters also have a type of CVT called a Variable Sheave, which does not require lubrication like the chain in the 2 stroke transmissions. These also require very little oil, about 100ml. Fill them until oil runs back out of the filler bolt hole, and let it drip out until it stops. Note that the filler hole is located in such a way that you can’t overfill it, unless you stand the scooter vertically on its front wheel!
2 Stroke Oil
Please don’t be afraid to spend some money here! Buy the best quality oil you can afford.
I get complaints from 2 stroke owners about too much smoke; oil fouled spark plugs, and black oily discharge from the tailpipe. What I usually find in their oil tank is a dark green or blue "Premix" type of 2-stroke oil that is better suited for chainsaws and leaf blowers.
This type of oil is generally petroleum based, and is supposed to be mixed with gasoline in the fuel tank. Although the scooters usually run fine with it, it tends to be smoky, dirty, and smells nasty.
A much better choice for the oil injected Geely 2 stroke motors is a synthetic or semi-synthetic blend of "injector" oil, which is vegetable based rather than petroleum based. These oils are virtually smoke free, very low in residual carbon content, have superior lubricating qualities, and actually smell rather pleasant. They’re also a lot friendlier to the environment.
These 2 Stroke Injector Oils can be found at most Motorcycle and Marine shops. They are more expensive than the Petroleum Premix oils, but remember that a gallon will probably last you a year, and they are definitely worth the expense in making your 2-stroke scooter more pleasant to ride. The quantity of oil you will use depends on how you ride. Just top-off the oil tank to within ½" of the neck of the tank – DO NOT OVERFILL!
Do not use pre-mix oil. Premix oil tends to deteriorate the rubber components in an oil injector system causing them to leak. There are a number of different brands of 2-stroke oil on the market, and some of them can be used either as "Premix" oil or "Injector" oil. Just make sure that the oil you use is suitable for use in Oil Injected Motors. This information should be on the container, but if you have any doubts, ask the sales person where you purchase your 2-stroke oil.
A good brand that we recommend is Amsoil. A gallon costs $19.20 on their website.
You can see their product info here:
http://www.amsoil.com/products/aio.html
Brake and Throttle Cables
Once a year or so, disconnect the cables from their control levers or twist grip, and dribble a few drops of household oil, such as 3 in 1 or WD-40, into the cable. A "funnel" made of aluminum foil taped around the cable housing end will make this job a little less messy. Add a touch of grease to the little "barrel" shaped end as you re-install it, and your cables will last a very long time.
Wheel and Steering Neck Bearings
Normally, these won’t need much attention as long as they are not loose or "sloppy", although they should be inspected from time to time. With the front wheel off the ground, push and pull on the handlebars to feel any "clicking" that indicates wear is present or adjustment is necessary in the steering neck bearings. Likewise, grab the front wheel and push-pull sideways to feel for the same "clicking". If you suspect adjustment or replacement is necessary, it would be wise to take the scooter to a shop with the

necessary tools to do the job correctly.
The rear wheel does not have bearings in it, but it is a good idea to smear a dab of grease on the axle splines once a year, or every time the rear wheel is removed from the scooter. Use care to keep the grease off of the brake shoes!

TROUBLESHOOTING
Q: My scooter makes a loud noise, and then stalls when I'm riding it.A: You're flooding the engine out. Read the manual and break it in before doing full throttle runs. After the scooter has been properly broken in, you can accelerate to the speed you wish to ride, then back off of the throttle to maintain the speed. If you hold the throttle wide-open, it will flood the engine and stall the scooter, which may cause damage.
Q: My scooter will barely run.A1: Sounds like a carb adjustment is needed. Carb Adjustment ranged from "spot-on" to "barely able to run". If you are having problems with it, gently turn the mixture screw in until it stops, then back it out 1 1/2 to 1 3/4 turns and adjust the idle speed screw for the lowest, smooth idle, and they should be close enough. Be sure that you back the mixture screw out. If you run your scooter with the maximum air mixture, your scooter will run too lean, and you will “cold seize” your scooter. The pistons will be seized to the cylinder, and this is, of course, not covered under warranty. You can read more about adjusting the carb in this tech area.A2: Sparkplug Gap - Geely recommends a gap of 0.6 to 0.8mm. I found most plugs gapped at 0.3 to 0.5mm. The wider gap provides a larger, more reliable spark, and is less prone to fouling.
We've received several calls on this problem, mostly with the QT 50 2 stroke scooters. The Typical symptoms are:
"The scooter ran fine when I first got it, then it started stalling when I opened the throttle past halfway or so. Now it won't start at all. What's wrong?".
We have found that on some of the Wabron Carburetors supplied to Geely, the midrange Jet Needle is set too rich. What happens is that the extra fuel collects in the engine case, and eventually the mixture becomes so rich that it immediately fouls the spark plug. If you have run into this problem, we suggest you try the following:
1. Refer to the Tech article on Two Stroke Carburetor Adjustment Part II, The Midrange.
2. Unscrew the top from the carburetor tower to remove the Slide and Jet Needle assembly.
3. Remove the Slide from the throttle cable, and gently push the Jet Needle out of the slide. Don't lose the Throttle return spring, or the spring clip that holds the Jet Needle in place!
4. Verify that the "C" clip on the Jet Needle is in the CENTER (3rd) position. This is where it belongs on a new Geely. If it is there already, and you still have the same running problems, try moving the clip up to the 2nd position from the "head" of the
needle, but no further! It's better to run a little too rich than too lean.
5. Re-assemble the throttle slide assembly onto the throttle cable, but do not install it into the carburetor yet.
6. Remove the spark plug, clean it, check the gap, and set it aside for now.
7. With the ignition switch in the OFF position, spin the motor over with the kick-starter for a few minutes. Do not use the electric starter as that will only kill your battery, and generate sparks from the ignition coil - something you DON'T want around gasoline fumes! When you get tired, leave the scooter sit for a while. Repeat this procedure about three or four times. The point in doing this is to pump out the excess fuel vapors in the crankcase.8. Reinstall the sparkplug and verify that you have spark. Reinstall the throttle slide assembly into the carburetor.
9. With the scooter on the center stand, try to start it. Open the throttle slightly at first, then try less throttle. A small amount of choke may be necessary, and it may take several attempts.
10. When the scooter starts, it will smoke heavily. This will reduce to normal after it is ridden a few miles.
NOTE to Dealers and others who have a new QT 50 2 stroke scooter: It would be a good idea to verify the Jet Needle clip is in the CENTER position before starting it for the first time.
Q: My scooter is leaking fuel.A1: It's important that you don't operate your scooter if it leaks fuel or oil. Have a professional work on it if you are not familiar with small engine repair. These tech tips assume you have some mechanical ability.
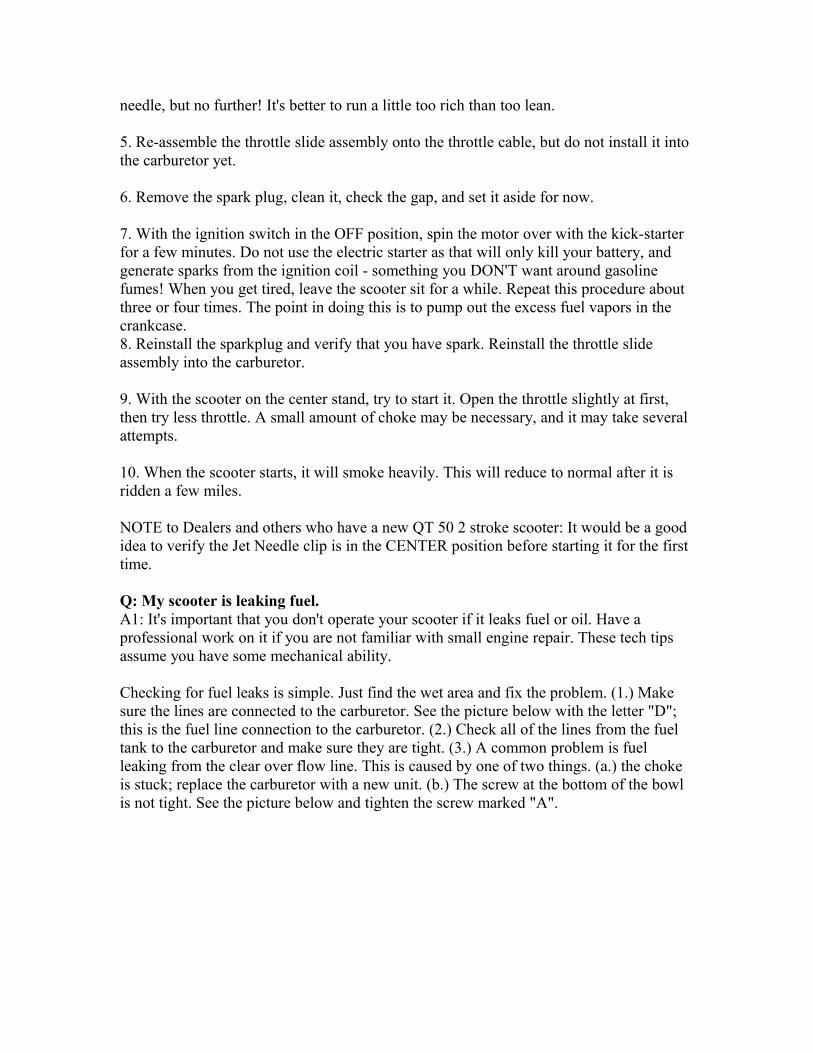
Checking for fuel leaks is simple. Just find the wet area and fix the problem. (1.) Make sure the lines are connected to the carburetor. See the picture below with the letter "D"; this is the fuel line connection to the carburetor. (2.) Check all of the lines from the fuel tank to the carburetor and make sure they are tight. (3.) A common problem is fuel leaking from the clear over flow line. This is caused by one of two things. (a.) the choke is stuck; replace the carburetor with a new unit. (b.) The screw at the bottom of the bowl is not tight. See the picture below and tighten the screw marked "A".
The fuel leak mentioned above is in reference to the VENT connector on the vacuum operated fuel valve. On the Retro and FX16 models, this connector is not used. Geely blocks it off with a short hose plugged with a screw. Sometimes, these begin to leak fuel, which presents a safety hazard. The best way to seal the leak is to replace the screw with a 1/4" Ball Bearing followed with a small clamp to hold it into place.
Another problem may be the block off screw used on some carbs. Replace that screw with a better plug.
Q: My front headlamp does not get bright until I ride the scooter, is that a problem?A: No, the headlight works off of the engines energy. So as you drive faster it will get brighter. The tail light, brake and turn signals work off of the battery.
Q: My kick-starter has no resistance.A: You need to pull the back brake handle. The brake cable has a hook that latches on to the chain and allows you to crank the engine with your foot.
Q: My starter won't work.A1: Be sure you have two (2) positive wires connected to the battery and one (1) negative wire. The positive wires are covered in black, but are red underneath. Just pull back the black casing to see the red wires.
A2: You need to pull the back brake handle when trying to start the scooter.
A3: Dead Battery - Once a maintenance free battery has been "wet down", it needs to sit with the caps off for an hour to develop a surface charge before being hooked up to a
battery charger. We were surprised to see several batteries we first thought were ruined come back and charge reliably after a few hours on a YUASA 1.5 amp 5 stage charger / maintainer. These "automatic" chargers cost about $35, and are a worthwhile investment, but an ordinary 2-amp charger would work if the battery is disconnected and tested every half hour until it reads a charge of 13.0 to 13.4 VDC. It's a little extra work, but the benefit is a battery that will last years rather than weeks.
Q: When I push the electric starter button, the starter will not turn off. It continues to run after I stop pushing the button.A: Call our parts department at 928-772-2203. You need a new starter relay.
Q: My Kick Starter doesn't work even when I squeeze in the rear brake lever. I think the gears are stripped.
Not likely! The gears in the kick-starter are pretty beefy and will survive a lot of abuse. What is more likely is that the Kick Starter Lock-out mechanism is out of adjustment, especially if you've adjusted the rear brake. If you're familiar with adjusting the rear brake, this one will be pretty easy.
On the rear brake cable below the drive case, there is a rod with a small fork on the end bent at 90 degrees. The small fork slips over the cable, and is held in place by two 8mm nuts, one in front, and one in the rear. There is a return spring that pushes the rod toward the back of the scooter. This rod moves with the brake cable, and disengages the kick-starter lockout when the rear brake is applied.
Push the return spring out of the way and loosen these nuts. Turn them towards the front of the scooter until they move the forked rod about 1/4 h further onto the cable, and retighten them. Now, give your kick-starter another try. If it still doesn't work, try adjusting them another 1/8 h or so. It may take a few tries, but this adjustment will probably fix your kick-starter problem.
WINTER OPERATION
The small 2-stroke engine in your scooter can be difficult to start as the weather gets colder. When temperatures consistently are 50 degrees F. or below, if you still plan on riding your scooter, there are 3 things that must be in place, or you will have difficulty getting your scooter started.
1. Strong Battery – The small battery that comes with your scooter does not like cold weather. It will normally start to lose voltage, as is common with all small scooter/motorcycle batteries, at a rate of about one volt per month. One volt may not sound like a lot, but it will keep your scooter from starting in less than 50 degrees F. weather. Therefore, you should charge your battery every three weeks with a .5 or .7 amp less battery charge. To make things simpler, plug in an automatic battery charger.
2. Synthetic Gear and Injection Oil –When the temperatures get below 50 degrees, it is important to switch to synthetic injection oil, if you are not already using one. Synthetics flow freely at subzero temperatures, pouring easily at -40 or -50 degrees F., where ordinary oils turn to molasses. This makes for easier cold starts and provides faster upper valve train lubrication during the first critical moments when most engine wear occurs. We highly recommend using Amsoil injection oil.
http://www.amsoil.com/products/aio.html
For your gearbox, be sure to switch to a synthetic 5W-30, or whatever is recommended in your car at your altitude and climate.
3. Carburetor - Very Important - The idle must be set properly in order to start your scooter. If the idle is set too high, it dramatically reduces the effect of the choke. It is better to run your scooter a little rich during winter operation. The winter idle mix may have to be as much as a full turn richer than the summer setting. Be sure to make the adjustment back when the temperatures get warmer. Refer to the Carburetor adjustment section for step-by-step instructions on doing the adjustment.
Finally, you need to avoid condensation. Condensation is the water vapor that builds up from temperature changes inside your engine. Going from cold to hot water vapor and petroleum base oils = metal corroding acid. When you start your scooter in colder weather, take it for a minimum of 10 minutes, if you have the time. In doing so, you will get the oil warmed up to a minimum of 180-degree F. At 180 degrees F. water vapor will burn off and acid will not build up in your oil to attack your bearings.
With these tips, you should have a much better success rate at getting your scooter started in colder weather.
STORING YOUR SCOOTER Not everyone is lucky enough to live in an area where the riding season lasts all year long. When the weather turns too cold to ride, or if you won’t be riding your Geely for a period lasting longer than 30 days for any reason, there are a few things you need to do to make sure it’s ready to go riding when you are. Simply starting the scooter and letting it run for a few minutes every few days during storage actually does more harm than good. Here’s how to do it right, and it will only take you about an hour.
First, wash the scooter from top to bottom. This isn’t an absolute necessity, but it will save you the trouble of doing it in spring when you’ll more likely be in the mood to go riding than cleaning. It will also decrease the chance that potentially corrosive road contaminants will damage the scooter.
Next, you want to fill the tank with gasoline to reduce the air space inside to an absolute minimum. This will decrease the chance for water to condense inside the tank during the storage period, contaminating the fuel and possibly causing the tank to begin rusting from the inside out. Add a FUEL STABILIZER to the tank before you fill it if you expect to be storing the scooter for longer than 30 days. STA-BIL is the name of one brand, but there are others. You can find them at most hardware or Automotive stores.
Do the same with the injector oil tank if you have a 2-stroke model by filling it completely with 2-stroke oil. Adding a stabilizer is not necessary for the oil as it already has stabilizers blended into it.
On the subject of storing gasoline, there are a few good rules to follow:
- ALWAYS use a proper storage container approved for gasoline.
- Store the container AWAY from ignition sources, sparks, and open flames. Explosive vapors can leak out of the most tightly sealed containers. That includes the fuel tank on your scooter.
- ADD Fuel Stabilizer if you are going to be storing the gasoline for longer than 30 days.
Now, you want to take the scooter for a nice, long ride to make sure the stabilizer treated gasoline has worked its way throughout the fuel system. About 15 to 20 minutes ought to do it. Putter on back home, and park the scooter on its center-stand wherever you intend to store it.
Even with the fuel stabilizer added to the fuel, the gasoline in the float bowl of the carburetor will evaporate within a few weeks leaving a nasty, sticky residue behind, gumming up the internal workings. Taking a few minutes to drain the carburetor now will save you hours of frustration a few months later.

For the 2 Stroke Carburerator
Locate the carburetor under the rear fender mounted to the front of the engine. From the right side of the scooter, you will see two black hoses going into the carburetor. The lower black hose is the fuel line. Pull the fuel line from the carburetor, and quickly plug it with a wooden golf tee, making sure it doesn’t leak. That will prevent the carburetor from re-filling with gasoline in the event that the fuel valve develops a slow leak.
From the left side of the scooter, you will find a clear tube attached to the bottom of the carburetor. There will also be a brass screw on the same fitting with the hose. An access hole in the swing-arm allows you to get to this screw with a long, thin straight screwdriver. Place a clean glass container under the clear drain hose, and open the screw a few turns counterclockwise. Gasoline will drain from the float-bowl, through the tube, and into the glass container. Let it run until it stops, then close the drain screw. If the gas is clear and uncontaminated, pour it back into the gas tank. If you see a lot of crud or water in the bottom of the glass, you might want to check the fuel filter.
The Battery
I generally get two to three years service out of even the cheapest, no-name lead-acid batteries as long as I take care of them. The Geely comes with a Maintenance Free battery located under the panel in the storage compartment. “Maintenance Free”, however, does not mean the battery will last forever if you ignore it. Lead-Acid batteries do not like to sit unused for long periods of time. If the battery is not kept actively charged, a deteriorating process called “sulfation” occurs which will greatly shorten its useful life.
ALWAYS disconnect the negative (-) terminal first, and the positive (+) terminal second to prevent sparks. Remove the battery from its compartment and wipe it down with a solution of Baking Soda and water to neutralize any acid that may have seeped out of it, then wipe it down a second time with clear water. If you have a battery with individual cell caps, check the electrolyte levels and top them up to the full mark with distilled water ONLY! Tap water is full of ions that wreak havoc on the electro-chemical process that happens inside, and more acid only upsets the chemical balance. Wear gloves and eye protection when doing this, and don’t touch anything else until you’ve finished the job and washed up!
Hook the battery up to a 12-volt Charger/Maintainer for the duration of the storage period. These are small, 1-amp chargers that look like an AC adapter that plugs into the wall. You can find them at most Automotive Stores, and they usually cost about $20. DON’T use a larger automotive type charger! Even the 2 amp chargers can overcharge the tiny Geely battery and damage it beyond use.
Prepping the scooter for a long winter’s nap is also a good time to clean the air filter, change the engine oil in the 4 stroke model, and the transmission oil in both the 2 and 4

stroke models. Your Geely Owner’s Manual has instructions on how to do this. Remember, anything you do to the scooter now you won’t have to do in the Spring.
Make a final check of everything you’ve done so far. Top-up the fluids, and cover the scooter with a piece of plastic sheet or a tarp. Now, you’re ready to get busy waiting for Springtime!
To pull your scooter out of storage is a lot easier and only takes a few minutes. Hook up the fuel line to the carburetor, and re-install the battery. Remember to install the battery exactly the reverse of removing it. Connect the positive (+) wire FIRST, then hook up the negative wire (-) to prevent sparks. Get the scooter started and you’re ready to go for another riding season!
…And, yes, it’s OK to laugh at your friends who simply parked their scooters last fall, and are now spending hours cleaning their carburetors, cursing their dead batteries, and pumping on their kick starters…
RECOMMENDED TOOLS FOR YOUR SCOOTER
The Geely scooter comes with its own tool kit. It’s good to have on hand, but if you plan to do your own maintenance, you’re going to need more.
It’s important to buy good, quality tools. You don’t have to spend a small fortune to get good tools, but the 80-piece socket set for $6.95 is definitely not the bargain it seems when you start stripping bolts and damaging parts. Most automotive stores have good quality ready-made kits that have almost everything you will need.
Here is a list of tools you will find useful (which is by no means comprehensive – you can never have too many tools!). I have listed them by category, along with an approximate cost range for all the tools in that category. Shop around for bargains on GOOD tools. SCREWDRIVERS: Approximate cost: $10 to $25 -One #2 Phillips driver-One #3 Phillips driver-One ¼" straight thin screwdriver, about 8" long-One 3/8" straight screwdriver 6" long-One ½" straight screwdriver 6" to 8" longNote: for most purposes, a "6 in one" type screwdriver will be sufficient.-One "Impact Driver" with a variety of bits. Very useful for loosening those stubborn drive case screws.
WRENCHES: Approximate cost: $15 to $40-A set of "Combination Wrenches" sized from 8mm to 19mm. These are the ones that have the open-end on one side with the box-end on the other.-One 8" adjustable wrench
SOCKET SET: Approximate cost: $15 to $40-One 3/8" drive ratchet wrench-A collection of sockets to fit the above, sized from 8mm to 19mm-A spark plug socket. I like the ones with a Hex-Drive so you can use it with a combination wrench as well as the ratchet wrench. You will need a 13/16" socket for 2 stroke spark plugs, and/or a 5/8" socket for 4 stroke spark plugs.-A 24mm socket, 6 sided, for the rear axle nut on 2 stroke and 4 stroke scooters. For the FX 16, you can use a 19mm combination wrench.-A 2" extension and a 6" extension for the 3/8" drive ratchet wrench. You will be happy if you bought the "wobble" type.
Note: A 1/4" drive socket set similar to the 3/8" drive set above is useful, but not absolutely necessary. Likewise, a half-h drive Ratchet set would be nice to have if you have the money for it.

ALLEN WRENCH SET: Approximate cost: $5 to $12-Usually sized from 3mm to 8mm, but for the most part you will only need the 5mm size.
PLIERS: Approximate cost: $20 to $45-6" Slip-Jaw-6" Needle nose-6" Diagonal Cutters-6" or 8" Vise-Grip type-A Chain Wrench is useful for holding onto parts that spin while you try to loosen them, like clutches and magnetos.-A pair of tweezers
HAMMERS: Approximate cost: $%10 to $25-A 16 ounce Ball Pean Hammer-A 1 ½ lb. Dead Blow Hammer
MEASURING TOOLS: Approximate cost: $10 to $15-A 500ml Plastic Measuring Cup-A Spark Plug Gapping tool-A tire gauge reading in both PSI and KPa
ELECTRICAL TOOLS: Approximate cost listed for each tool-A VOM (Volts/Ohm Meter) with a 10 amp setting - $15 to $50-A soldering iron with solder and flux - $10 to $15-A pair of Wire Crimpers and terminal kit - $8 to $12-A Continuity Tester, the wireless ones work great! - $3 to $15-A set of jumper leads (Radio Shack has them) - $2 to $5-A paperclip – You will be amazed at how useful it is! - FREE!-A 1.5amp Battery Charger/Maintainer - $25 to $40
MISCELLANEOUS:-A small Funnel - $1 to $2-A set of Files - $10 to $15-A 1/8" Punch - $3 to $5-A ½" chisel - $3 to $5-A Tire Pump - $10 to $20-A wire brush - $3 to $5-Golf Tees for plugging hoses - $1 to $3 for a whole bag of them-A set of Tire Irons, available at most Motorcycle Shops, and MUCH better than changing tires with a screwdriver. - $15 to $25 for the set of two-A KNOWN-GOOD sparkplug - $2 to $4-A 1" wide paint scraper - $2 to $4-A GOOD Tool Box to keep everything in - $20 to $40
ADVANCED TOOLS (Optional):-A Compression Tester, with a hose that screws into the spark plug hole - $20 to $30

-An Inductive Tachometer - $35 to $50-An Inductive Timing Light - $25 to $35-Mechanic’s Stethoscope - $10 to $15-A Mitey Vac ™ vacuum pump with gauge - $30 to $65 depending on the set-A set of Dial or Vernier Calipers for fine measurements - $15 to $50
Take care of your tools! Keep them clean and organized. There's nothing more frustrating than spending ten minutes digging around for a tool you need to do a two-minute job!
2 STROKE CARBURETOR ADJUSTMENT
Part 1, The Idle Mixture
It is no surprise that the Idle Mixture on a brand new Geely Scooter may need to be adjusted when you receive it. The carburetor is adjusted at the factory where the atmospheric conditions could be quite different than they are in your area. Fortunately, it isn’t a difficult process for anyone with a small degree of Mechanical Aptitude. An Inductive Lead Tachometer would be a nice tool to have on hand for this, but all you really need is a screwdriver and a good set of ears.
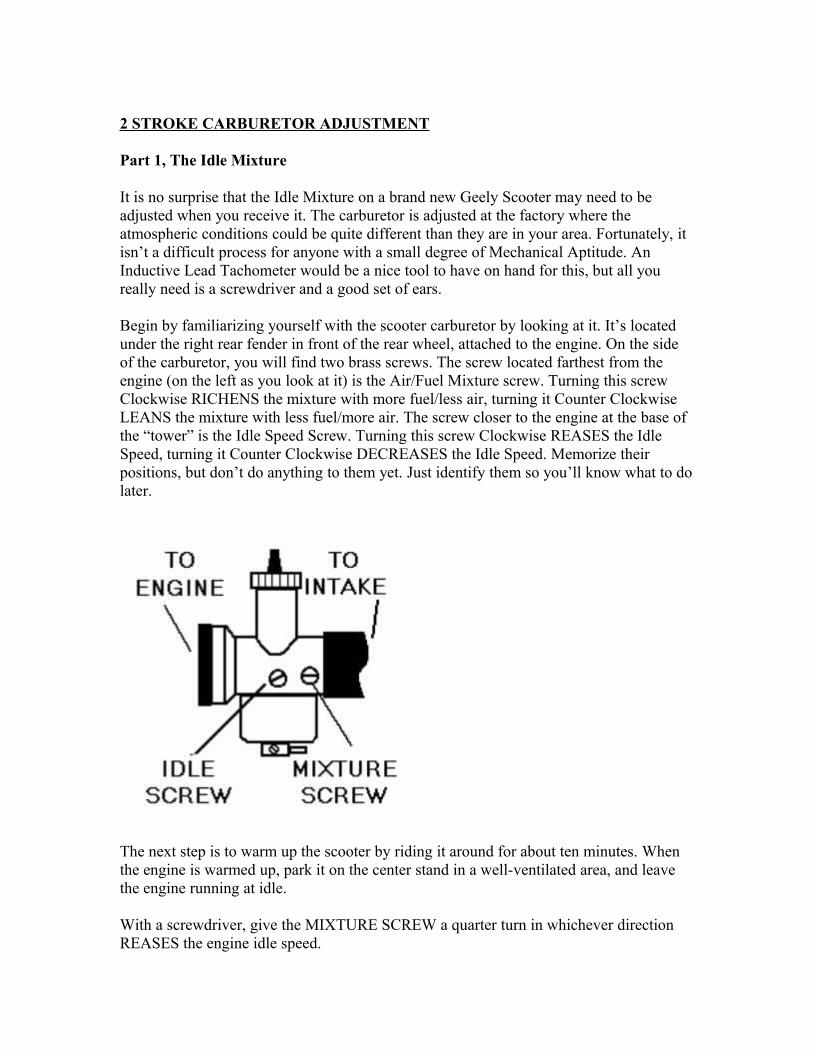
Begin by familiarizing yourself with the scooter carburetor by looking at it. It’s located under the right rear fender in front of the rear wheel, attached to the engine. On the side of the carburetor, you will find two brass screws. The screw located farthest from the engine (on the left as you look at it) is the Air/Fuel Mixture screw. Turning this screw Clockwise RICHENS the mixture with more fuel/less air, turning it Counter Clockwise LEANS the mixture with less fuel/more air. The screw closer to the engine at the base of the “tower” is the Idle Speed Screw. Turning this screw Clockwise REASES the Idle Speed, turning it Counter Clockwise DECREASES the Idle Speed. Memorize their positions, but don’t do anything to them yet. Just identify them so you’ll know what to do later.
The next step is to warm up the scooter by riding it around for about ten minutes. When the engine is warmed up, park it on the center stand in a well-ventilated area, and leave the engine running at idle.
With a screwdriver, give the MIXTURE SCREW a quarter turn in whichever direction REASES the engine idle speed.

IF turning the screw in either direction causes the Idle Speed to DECREASE, that’s it! Set the screw back to its original position, and you’re done already. Move on to the IDLE SPEED adjustment. IF turning the mixture screw in one direction or the other causes the idle speed to REASE, continue turning the screw in that direction another QUARTER TURN , and listen carefully to the engine speed for a few seconds. Continue doing this a quarter turn at a time until you hear the engine idle speed begin to DECREASE, and return the screw setting to where the engine runs at the fastest idle. As a final touch, give the screw 1/8th turn clockwise no matter which direction you’ve been turning it (to err on the rich side which runs cooler). Now, you’re ready to set the IDLE SPEED. Turn the IDLE SPEED screw Counter Clockwise until the engine sounds like it wants to stall, then Clockwise again about 1/8th to a quarter turn to smooth it out. The Geely 2 Stroke seems happy to idle at about 1800 to 2000 rpm.
When you tinker with the MIXTURE SCREW, be sure that you do not set it too lean. This is how you it should be set. Gently turn the mixture screw in until it stops, then back it out 1 1/2 to 1 3/4 turns and adjust the idle speed screw for the lowest, smooth idle, and they should be close enough. Be sure that you back the mixture screw out. If you run your scooter with the maximum air mixture, your scooter will run too lean, and you will “cold seize” your scooter. The pistons will be seized to the cylinder, and this is, of course, not covered under warranty.
To summarize the process:
1. Warm up the engine.
2. Adjust the MIXTURE screw either way for the fastest idle speed, (Remember to err on the RICH side by giving the mixture screw 1/8th turn clockwise from fastest idle).
3. Adjust the IDLE screw for a normal sounding idle
It’s almost like tuning a radio, first for the strongest signal, then adjusting the volume to a comfortable listening level.
A few things to keep in mind while you’re working on the idle mixture settings:
- The Oil Pump is driven by the rear wheel. Every few minutes when the engine is running at idle, rev the motor up a bit to spin the rear wheel for a few seconds. That will keep the engine lubricated during the process, and one reason to do it with the scooter sitting on its centerstand.
- If you’ve already been tweaking on the adjustment settings, and have no idea where the were originally, turn the mixture screw clockwise until it just stops (- DO NOT OVERTIGHTEN IT! -), then back it out counter clockwise 1 ½ turns as a starting point for the procedure. Start the engine, and set the idle speed screw for a “normal” low idle, and begin the adjustment procedure from step 1.
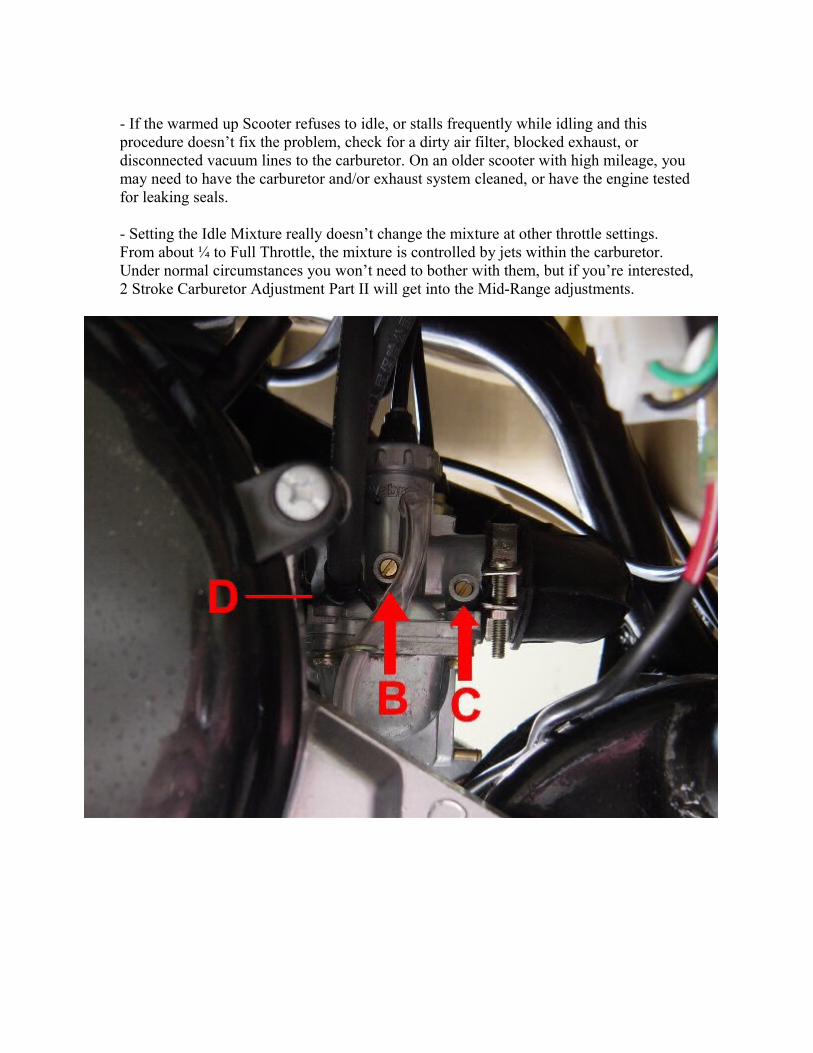
- If the warmed up Scooter refuses to idle, or stalls frequently while idling and this procedure doesn’t fix the problem, check for a dirty air filter, blocked exhaust, or disconnected vacuum lines to the carburetor. On an older scooter with high mileage, you may need to have the carburetor and/or exhaust system cleaned, or have the engine tested for leaking seals.
- Setting the Idle Mixture really doesn’t change the mixture at other throttle settings. From about ¼ to Full Throttle, the mixture is controlled by jets within the carburetor. Under normal circumstances you won’t need to bother with them, but if you’re interested, 2 Stroke Carburetor Adjustment Part II will get into the Mid-Range adjustments.
Part II, The Jet Needle
* Caution: this is more difficult than Part I. This is offered as reference, we do not support working on your own scooter. You should have a qualified technician work on your scooter. However, we know many of you want to know how things work, so we will continue to provide this valuable information to our customers.
OK, so you’ve adjusted the Idle Mixture on your 2 stroke Geely as described in Part I, and it runs a lot smoother when you first start taking off down the road. The only problem is that now you’ve noticed that when you get to about ¾ throttle or so, the scooter seems to lag, and maybe even seems to run slower as you open it up to Wide Open Throttle (WOT). You might suspect that the Fuel Mixture still has something to do with it, and you might be right, but don’t go back to tweaking on the mixture screw. As stated in Part I, the mixture screw only affects the fuel mixture from idle to about ¼ throttle. Beyond that, it has very little effect on the way your Geely runs in the Midrange. Fortunately, this is not a particularly difficult adjustment to make either, and the only tool you will need is a pair of Needle Nose pliers.
First, crawl back under the right rear fender, and take another look at the carburetor. You already know about the Idle adjustment screws, now take a close look at the “Tower” above the Idle Speed Screw (the one on the left). You can see where the throttle cable goes into the top of the tower, and the top looks like it can unscrew like a bottle cap, doesn’t it? Well, that’s because it does! Don’t go playing with it yet.
Start the scooter, and take it for a ride. When the engine is all warmed up, come to a stop at a place where you can make a long, straight, level run, and slowly begin to accelerate. Gradually, open the throttle to the point where the engine feels like it’s beginning to lag. Hold the throttle steady at that position, and gradually push open the choke lever. The scooter usually will do one of two things. It will either begin to run a little better, or a little worse. In fact, it might even die altogether if you hold the choke too far open for too long. If it does, start it up, ride it around a bit, and try the test again. Do it several times. Be certain that the scooter responds the same way every time you give the choke lever a “nudge”.
Once you’re sure of that, putt back home, shut the engine off, and get ready to do a little work on your machine. With the scooter on the center stand, reach up under the right rear fender and unscrew the top of the Carburetor “Tower”. When it’s loosened, lift it straight up to pull out the SLIDE and the JET NEEDLE. Be gentle, don’t yank on it! The cable should be long enough for you to pull the SLIDE / JET NEEDLE assembly out where you can get a good look at it.
Under the CAP, you should see a spring squeezed into the cylinder shaped SLIDE, with the JET NEEDLE sticking out the bottom. First, let’s take a good look at the SLIDE. Notice how the bottom has an ANGLE cut halfway across it. This ANGLE faces the INTAKE side in the Carburetor. It helps the air mix with the fuel while the SLIDE acts
like a throttle valve. There is also a NOTCH near the bottom and on one side of the slide. This NOTCH is where the IDLE SPEED screw (not the mixture screw) fits, and does its job of holding the slide up just a little so the scooter can idle.
On the other side of the SLIDE, there is a GROOVE that runs the entire length of it. The GROOVE has two purposes. First, it allows the throttle cable to be removed from the slide, and second, inside the “Tower” there is a pin that runs in the GROOVE as the SLIDE runs up and down inside it. That keeps the SLIDE from twisting and turning as it does its job. It’s VERY IMPORTANT to remember all this for when you’re ready to put it all back together! Removing the SLIDE from the cable is easier if you hold the SLIDE ASSEMBLY in your left hand while you twist the throttle grip with your right hand. The SLIDE will compress the spring. Hold it together with your fingers as you twist the throttle grip back, and the end of the cable should poke out the bottom of the SLIDE. Lift the end of the cable up out of the groove, and let the spring push the slide off the cable. Hold onto it! You don’t want it shooting off to God knows where.
Now, you should be holding the SLIDE / JET NEEDLE assembly in your hand. Look inside the slide, and you will see a hairpin type spring holding the JET NEEDLE in the bottom of the slide. Reach in there with your NEEDLE NOSE PLIERS to squeeze it gently and pull it out. Be careful, these things love to jump and hide too. Once the JET NEEDLE retaining spring has been removed, you can push the JET NEEDLE out of the SLIDE.
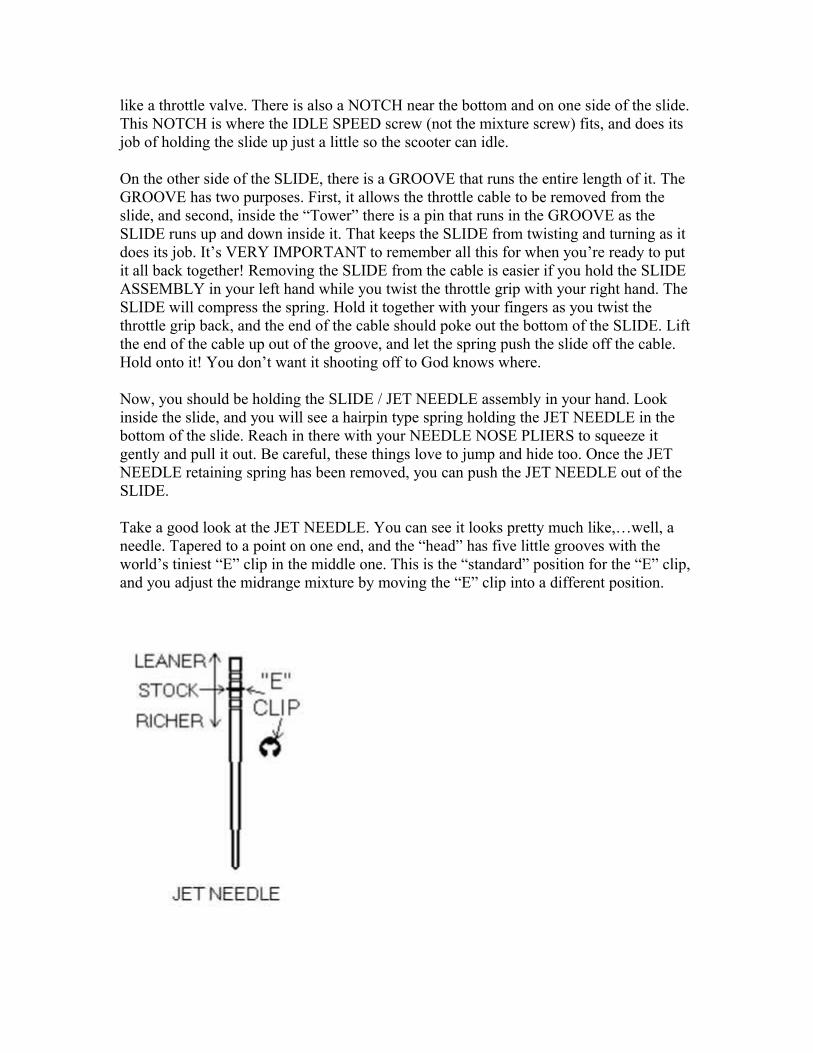
Take a good look at the JET NEEDLE. You can see it looks pretty much like,…well, a needle. Tapered to a point on one end, and the “head” has five little grooves with the world’s tiniest “E” clip in the middle one. This is the “standard” position for the “E” clip, and you adjust the midrange mixture by moving the “E” clip into a different position.
Hold the JET NEEDLE in front of you point down, and imagine how it moves up and down inside the carburetor with the SLIDE. The pointed end fits into a hole in the carburetor called the NEEDLE JET. Se the NEEDLE JET remains stationary, the taper of the JET NEEDLE allows more or less fuel to mix with the incoming air depending on the thickness of the taper that remains in the NEEDLE JET. Moving the JET NEEDLE up lets MORE fuel into the airstream. Moving it down lets LESS fuel into the mix. You change the midrange air / fuel ratio by making the JET NEEDLE move higher or lower in relation to the SLIDE. All you need to know is which way to move it. Remember your test ride when you turned on the choke lever? That temporarily added more fuel to the mix. If your scooter ran BETTER, then the midrange mix is lean, and you need to move the “E” clip one notch down toward the pointed end. If your scooter ran WORSE, then the midrange mix is rich, and you need to move the “E” clip up one notch toward the “head” end. Decide now which groove you’re going to put it in, but don’t move it more than one notch at a time or you might adjust it too much. The easiest way to remove the “E” clip is to lay the JET NEEDLE on a hard, flat surface with the opening of the “E” clip down. Cover it with your hand or a cloth in case the little clip decides to make a leap for freedom, and press the JET NEEDLE partly out the opening. If the clip doesn’t pop off, grab it tightly with your needle nose pliers and carefully pull it off the rest of the way, (if you do lose it, you can get another at most Hardware stores). Using the same hard, flat surface method, press the “E” clip back onto the NEEDLE JET in it’s new position, making certain that it’s completely snapped into place in it’s new groove. Drop the JET NEEDLE back into the SLIDE, and replace the hairpin type JET NEEDLE retaining spring with your pliers, pushing it all the way to the bottom of the SLIDE. Make sure the JET NEEDLE stays in place when you’re done. Now comes the hardest part. You have to put the SLIDE SPRING onto the throttle cable where it sticks out under the Tower Cap, and squeeze it past the little ball on the end of the cable as far as you can. Don’t get frustrated, I swear it can be done with some practice. Fit the little ball end into its special place in the bottom of the slide groove, and pull the cable into the groove as you push the spring up and over the top of the slide and let it pop into place.
Gently, put the SLIDE / JET NEEDLE assembly back into the “Tower” of the carburetor. DO NOT FORCE IT! It will practically fall inside when you have it lined up right. Remember to keep it properly oriented as described before. Jiggle, twist, up / down, play with it until it slips inside the Tower all the way to the bottom, and screw the cap back on. If you have to push the cap down to compress the spring more than a millimeter or two, it isn’t right. Pull it out and try again. Once you have the Carburetor back together, take another test ride, (You may want to re adjust the IDLE mixture per Part I of this series). Hopefully, your scooter will accelerate much more smoothly than before. If not, then go back to the beginning and try the “Choke” test again to determine if the “E” clip needs to be moved yet another groove up or down. When in doubt, leave it in the center JET NEEDLE groove as that’s the standard position set by the factory, and be happy you saved yourself the $40 a bike shop would have charged you to do the same thing!
WARRANTY INFORMATION
90 DAYS OR 2,000 KM LIMITED WARRANTY - PARTS ONLY, LABOR IS NOT COVERED
THIS LIMITED WARRANTY COVERS THE FOLLOWING PARTS:
ENGINE: Engine long block assembly, including all internal lubricated parts, i.e. rings, pistons, pins, crankshaft and, main bearings, the connecting rods, and rod bearings, camshaft bearings, timing chain gears, rocker arms, valve springs, valve guides, valve seats, valve push rods, valve lifters, and oil pump. Additionally, the engine head (s), engine block and cylinder barrels will be covered if they are solely as a result of the mechanical failure of one or more of the internal lubricated components specified above. The Cooling system must be in good working order including cooling fans. Accessory items, including but not limited to electrical components of all types (distributor, alternator and all sensors and electrical control devices), fuel systems, gaskets, seals, filters, mounts linkage and fluids are not covered by this agreement.
TRANSFER CASE: All internal lubricated parts contained within the transfer case. The transfer case itself will be covered if damage solely as a result of the mechanical failure of one or more of the internal lubricated components contained within the transfer case. Accessory items, including but not limited to, U-joints, electrical components, linkage, seals, gaskets, mounts or fluids are not covered by this Agreement.
DIFFERENTIAL: All internal lubricated parts contained within the drive axle housing case. The drive axle housing itself if damaged solely as a result of the mechanical failure of one or more or the internal lubricated components contained the drive axle housing. Accessory items, including but not limited to, backing plates, all brake system components, cables, controls, linkage, vents, pumps, U-joints, electrical controls, mounts, seals, gaskets, and fluids are not covered by this Agreement.
TRANSMISSION (Automatic or Standard): All internal lubricated parts contained within the transmission case. The transmission case itself if damaged solely as a result of mechanical failure of one or more of the internal lubricated components contained within the transmission case. The Complete hydraulic system must be flushed including integral transfer case, oil cooler, lines, and new filter(s) installed Accessory items, including but not limited to, modulators, governors, electrical controls, linkage, mounts, seals, gaskets, and fluids are not covered by this Agreement.
COVERAGE AND LIMITATIONS
IMPORTANT: You must have a professional mechanic (any small engine repair shop, motorcycle shop, or local auto repair shop) assemble your new scooter and do the prep work to assure your scooter is in good working condition or your warranty is only 60-days. You will need to provide proof of this when filing a warranty claim, so please keep
your receipts. You must also have a professional mechanic work on your scooter to file a claim on the warranty.
Subject to the limitations stated in this agreement, Scooters & Mopeds Unlimited agrees (at its election) to replace a covered component if the covered component fails as a result of one or more of the internal lubricated parts within the component stated warranty period from the date of purchase, while the component is being used under the conditions and in the manner specified by its original manufacturer.
REPAIRED COMPONENTS: If the components are repaired under the terms of this Agreement they will be repaired or with components parts of like kind and quality.
LABOR TO REPAIR OR REPLACE PARTS: Scooters & Mopeds Unlimited does not pay for labor for the removal and replacement of such component (s) or part (s).
IMPORTANT NOTES
This warranty does not include labor, wearable parts or damaged parts from accidents, abuse, or shipping. If you have a part that needs replacing, please contact us and we'll send the part within 5 days, or let you know the lead-time for the part. In some cases, the parts may have to be shipped from China and may take up to 8 weeks for delivery.
Scooters & Mopeds Unlimited reserves the right to inspect the component(s) or part(s) covered by this Agreement prior to any repair or replacement of or reimbursement for such component(s) or part(s) is authorized.
THIS AGREEMENT AND LIMITED WARRANTY IS VOID IF:
SCOOTERS & MOPEDS UNLIMITED IS NOT PROVIDED A REASONABLE OPPORTUNITY FOR INSPECTION OF A COVERED COMPONENT PRIOR TO REMOVAL, REPAIR OR REPLACEMENT OF ANY COVERED COMPONENT.
THE CUSTOMER DOES NOT USE A PROFESSIONAL MECHANIC (SMALL ENGINE REPAIR SHOP, MOTORCYCLE SHOP, OR AUTO REPAIR SHOP) TO ASSEMBLE AND PREP THE SCOOTER PRIOR TO OPERATION. PROOF OF THIS WILL BE REQUIRED (WITH A VERIFIABLE RECEIPT) BEFORE PARTS WILL BE REPLACED. SCOOTERS & MOPEDS UNLIMITED WILL OFFER A 90-DAY LIMITED WARRANTY TO ANYONE ASSEMBLING THEIR OWN SCOOTER.
THE COMPONENTS ARE NOT INSTALLED BY A CERTIFIED LICENSED REPAIR FACILITY OR AN AUTHORIZED SCOOTERS & MOPEDS UNLIMITED DEALER WITHIN 180 DAYS OF THE DATE OF PURCHASE AS INDICATED ON THE FACE OF THIS AGREEMENT.

THE DAMAGE TO THE COMPONENT IS CAUSED BY A NON-COVERED COMPONENT OR PART OR BY ANY PART OR COMPONENT NOT PURCHASED FROM SCOOTERS & MOPEDS UNLIMITED .
THE CUSTOMER FAILS TO FOLLOW THE MINIMUM MAINTENANCE AND BREAK-IN REQUIREMENTS SUGGESTED BY THE MANUFACTURER. AND FAILS TO PROVIDE PROPER SERVICE DOCUMENTS.
WARRANTY IS VOID IF HEAT TABS ARE MELTED.
LIMITED WARRANTY TRANSFERABILITY:
This Agreement is provided to the original purchaser and is non transferable. And, does not cover damage due to misuse, neglect, or accident.
NO IMPLIED WARRANTIES OR AGREEMENTS: THERE ARE NO AGREEMENTS OR WARRANTIES, EXPRESSED OR IMPLIED LUDING WARRANTIES OF MERCHANTABILITY OR FITNESS FOR A PARTICULAR PURPOSE, OTHER THAN THOSE STATED IN THIS AGREEMENT. SCOOTERS & MOPEDS UNLIMITED SHALL NOT BE RESPONSIBLE FOR THE PAYMENT OF DAMAGES, OTHER THAN THE SUMS SPECIFIED IN THIS AGREEMENT AND LIMITED WARRANTY, FOR IDENTAL OR CONSEQUENTIAL LOSS OR DAMAGE ARISING FROM INJURY, LOSS OF USE, LOSS OF TIME, RENTAL VEHICLES, PROFITS, OR INCOME TO THE CUSTOMER AS A RESULT OF A FAILURE OF ANY COMPONENT OR PART.
TOWING CHARGES: All towing charges incurred are the responsibility of the customer.
NO OTHER AGREEMENT: There are no other agreements between the parties with regards to the components purchased except as stated in this agreement & limited warranty.
CONTACT US
Return all parts covered under warranty to:
Scooters & Mopeds Unlimited7600 Long Look DrivePrescott Valley, AZ 86314
928-772-2203 office928-772-3706 fax