SAP Offline Word Template · To model a message flow using IDocs or ... for all outbound and...
22
Configuration Guide SAP Business One 9.0 integration for SAP NetWeaver Document Version: 1.0 – 2012-03-22 PUBLIC Liquidity Forecasting All Countries
Transcript of SAP Offline Word Template · To model a message flow using IDocs or ... for all outbound and...

Configuration Guide
SAP Business One 9.0 integration for SAP NetWeaver
Document Version: 1.0 – 2012-03-22
PUBLIC
Liquidity Forecasting All Countries
2
PUBLIC
© 2013 SAP AG. All rights reserved.
Liquidity Forecasting
Typographic Conventions
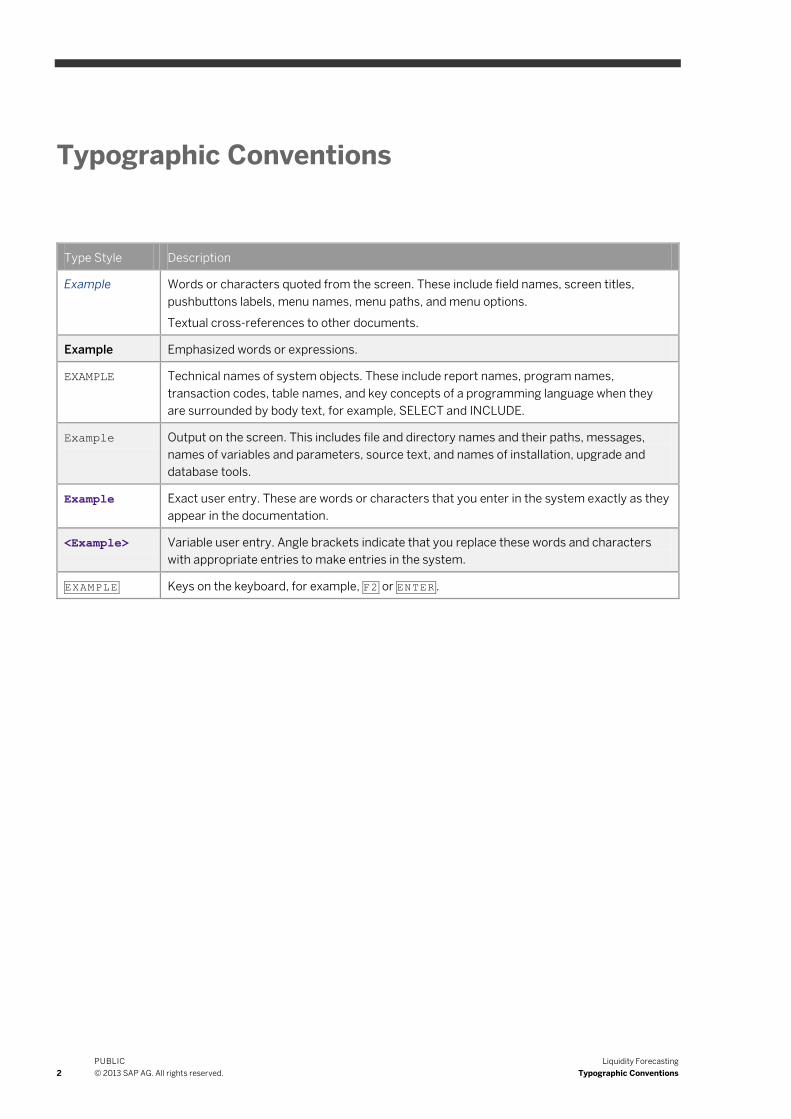
Typographic Conventions
Type Style Description
Example Words or characters quoted from the screen. These include field names, screen titles,
pushbuttons labels, menu names, menu paths, and menu options.
Textual cross-references to other documents.
Example Emphasized words or expressions.
EXAMPLE Technical names of system objects. These include report names, program names,
transaction codes, table names, and key concepts of a programming language when they
are surrounded by body text, for example, SELECT and INCLUDE.
Example Output on the screen. This includes file and directory names and their paths, messages,
names of variables and parameters, source text, and names of installation, upgrade and
database tools.
Example Exact user entry. These are words or characters that you enter in the system exactly as they
appear in the documentation.
<Example> Variable user entry. Angle brackets indicate that you replace these words and characters
with appropriate entries to make entries in the system.
EXAMPLE Keys on the keyboard, for example, F2 or ENTER .
Liquidity Forecasting
Document History
PUBLIC
© 2013 SAP AG. All rights reserved. 3
Document History
Version Date Change
1.0 2013-03-22 Release to Customer
4
PUBLIC
© 2013 SAP AG. All rights reserved.
Liquidity Forecasting
Table of Contents
Table of Contents
1 Introduction .................................................................................................................................................... 5 1.1 Scenario Description ............................................................................................................................................... 5 1.2 Systems and Releases ............................................................................................................................................ 6 1.3 General Prerequisites .............................................................................................................................................. 6
2 Configuration in SAP ERP ............................................................................................................................. 8 2.1 Creating a Company Code for Each Subsidiary.................................................................................................... 8 2.2 Creating Cross-Company Codes ........................................................................................................................... 8 2.3 Creating the Distribution Model ............................................................................................................................. 9 2.4 Generating Partner Profiles .................................................................................................................................. 10
2.4.1 Changing Partner Profiles ..................................................................................................................... 11 2.5 Checking Planning Levels ..................................................................................................................................... 12 2.6 Checking Planning Groups ................................................................................................................................... 13 2.7 Creating Cross-Application Customizing Settings for TR-CM .......................................................................... 14
2.7.1 Defining TR-CM Subsystem Company Codes.................................................................................... 14 2.7.2 Converting Planning Levels .................................................................................................................. 15
3 Configuration in SAP Business One .......................................................................................................... 17 3.1 Creating Planning Levels ...................................................................................................................................... 17 3.2 Creating Planning Groups ..................................................................................................................................... 17
4 Configuration in SAP Business One integration for SAP NetWeaver ................................................... 19 4.1 Creating System ID-Specific Properties for Subsidiary SAP Business One Systems .................................... 19 4.2 Setting up and Activating the Scenario Package ................................................................................................20
Liquidity Forecasting
Introduction
PUBLIC
© 2013 SAP AG. All rights reserved. 5
1 Introduction
1.1 Scenario Description
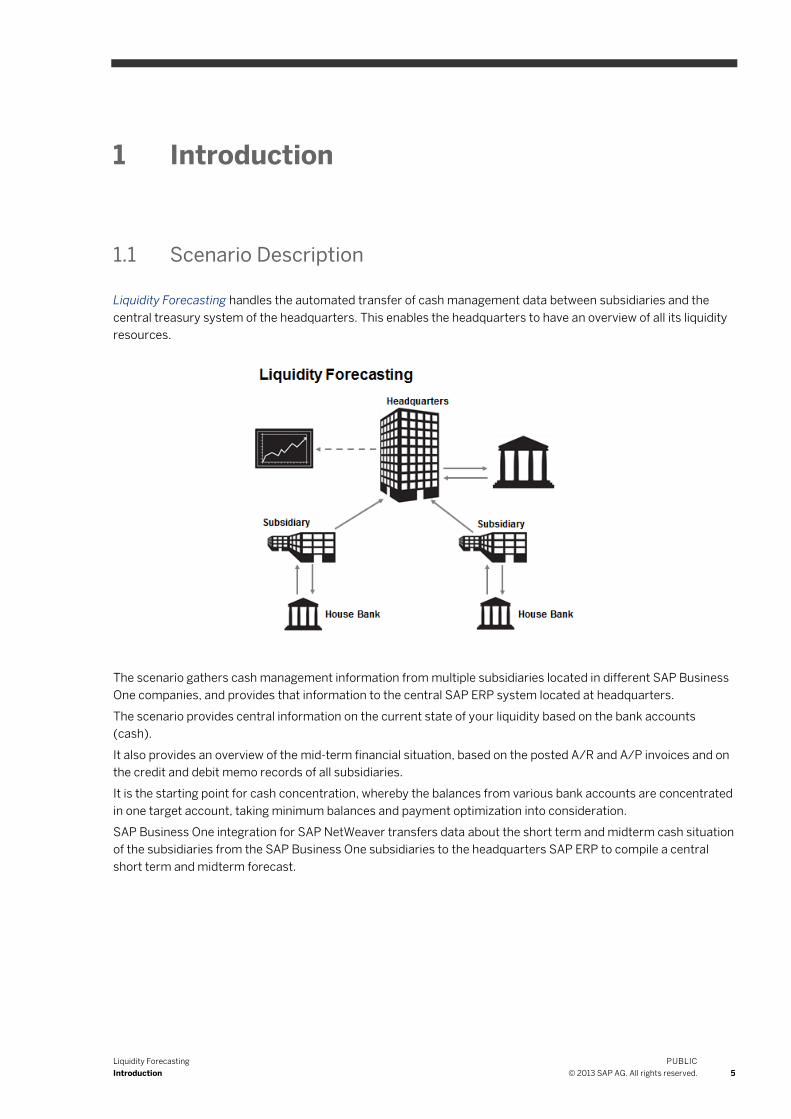
Liquidity Forecasting handles the automated transfer of cash management data between subsidiaries and the
central treasury system of the headquarters. This enables the headquarters to have an overview of all its liquidity
resources.
The scenario gathers cash management information from multiple subsidiaries located in different SAP Business
One companies, and provides that information to the central SAP ERP system located at headquarters.
The scenario provides central information on the current state of your liquidity based on the bank accounts
(cash).
It also provides an overview of the mid-term financial situation, based on the posted A/R and A/P invoices and on
the credit and debit memo records of all subsidiaries.
It is the starting point for cash concentration, whereby the balances from various bank accounts are concentrated
in one target account, taking minimum balances and payment optimization into consideration.
SAP Business One integration for SAP NetWeaver transfers data about the short term and midterm cash situation
of the subsidiaries from the SAP Business One subsidiaries to the headquarters SAP ERP to compile a central
short term and midterm forecast.

6
PUBLIC
© 2013 SAP AG. All rights reserved.
Liquidity Forecasting
Introduction
The picture above gives you an overview of the process between house bank, subsidiary and headquarters.
1.2 Systems and Releases
You can use the scenario with the following systems and releases:
System Release
SAP ERP ECC 6.0
SAP Business One 8.82, 9.0,
SAP Business One integration for SAP NetWeaver 9.0
Note
The liquidity forecasting scenario uses SQL retrieval statements optimized for the Microsoft SQL server.
The statements use specific Microsoft SQL server functions. If you want to run the scenario together with
SAP Business One, version for SAP HANA, copy the scenario steps to your namespace and modify the
SQL retrieval statements so that they work with SAP HANA.
1.3 General Prerequisites
You have installed SAP Business One integration for SAP NetWeaver.
For more information, see the Installation Guide
You have created system entries for all systems, you have set up technical connections between the systems
and you have tested them.
For more information about setting up your technical system landscape, see the Administrator's Guide.
Liquidity Forecasting
Introduction
PUBLIC
© 2013 SAP AG. All rights reserved. 7
If you cannot use the scenario packages without changes, copy the scenario steps of the packages to your
namespace and adjust the definitions.
8
PUBLIC
© 2013 SAP AG. All rights reserved.
Liquidity Forecasting
Configuration in SAP ERP
2 Configuration in SAP ERP
The configuration of SAP ERP enables the integration process flow and consists of the following steps:
Creating a company code for each subsidiary
Setting up cross-company codes
Creating the distribution model
Generating and changing partner profiles
Checking Planning Levels
Checking Planning Groups
Defining TR-CM subsystem company codes
This step is mandatory.
Converting sender planning levels
This step is mandatory.
As of ECC 6.0, the configuration steps to set up the integration process using ALE are no longer completely
assigned to the ALE section in IMG. The following procedures describe whether you access functions from the
SAP menu or from IMG.
The SALE transaction SALE contains all necessary ALE customizing IMG steps. You can use this transaction to
make the ALE configuration process easier. This area menu only displays the ALE-relevant customizing entries.
To open IMG, call the SPRO transaction and choose SAP Reference IMG.
2.1 Creating a Company Code for Each Subsidiary
In SAP ERP create a company code for each data-sending SAP Business One. Maintain the local currency of the
sender SAP Business One as local currency in this company code entry.
This step is mandatory. Without it, SAP ERP IDoc inbound processing rejects to process the IDoc, if the local
currency of the sender SAP Business One differs from the SAP ERP local currency.
Without the company code information, it is not possible to distinguish the liquidity situation for each SAP
Business One subsidiary.
SAP ERP system provides you with a copy function to create the company code entries. You copy an entry and
then you only enter the local currency code.
We recommend naming the company codes equal to the subsidiary company name. This enables easy
identification of the SAP Business One subsidiary in the headquarters SAP ERP.
2.2 Creating Cross-Company Codes
The distribution of financial accounting data uses cross-system company for product master records. There is
one central system for each cross-system company code in the distributed environment.
Liquidity Forecasting
Configuration in SAP ERP
PUBLIC
© 2013 SAP AG. All rights reserved. 9
Assign one company code to the cross-system company code for each system involved in the distribution. When
you send a cash management data message with company code-dependent data, the system replaces the
company code with the cross-system company code in all company code fields.
Create cross-system company codes in the headquarters ERP and assign them to the company codes of each
subsidiary. Define identifiers of the relevant cross-system company codes for each of company code.
2.3 Creating the Distribution Model
When you model the message flow, you specify the applications that communicate with each other in an ALE
business process. A message flow defines the sending and receiving systems and the message type. Define the
message flow in the distribution model.
To model a message flow using IDocs or BAPIs, specify a model view in the distribution model. In the model view,
add the respective message type.
To model the communication between SAP Business One integration for SAP NetWeaver and SAP ERP for the
Liquidity Forecast scenario, define the CMSEND message type in the distribution model:
Prerequisites
You have set up the logical systems for your sender and receiver systems.
You have set up the RFC connection to your SAP Business One integration for SAP NetWeaver server.
The model view names in the entire distributed environment of the organization are unique.
For more information about setting up your technical system landscape, see the Administrator's Guide.
Procedure
1. From the IMG menu, choose SAP NetWeaver Application Server IDoc Interface / Application Link
Enabling (ALE) Modeling and Implementing Business Processes Maintain Distribution Model and
Distribute Views.
Alternatively, call the BD64 transaction.
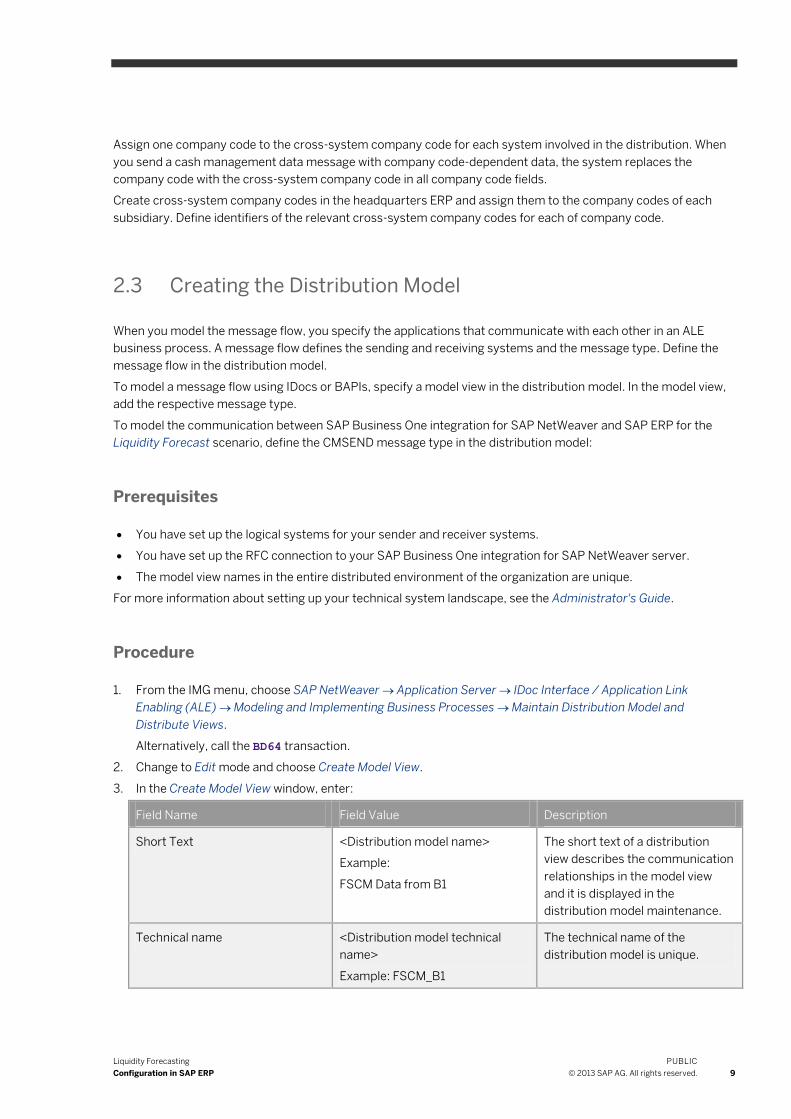
2. Change to Edit mode and choose Create Model View.
3. In the Create Model View window, enter:
Field Name Field Value Description
Short Text <Distribution model name>
Example:
FSCM Data from B1
The short text of a distribution
view describes the communication
relationships in the model view
and it is displayed in the
distribution model maintenance.
Technical name <Distribution model technical
name>
Example: FSCM_B1
The technical name of the
distribution model is unique.
10
PUBLIC
© 2013 SAP AG. All rights reserved.
Liquidity Forecasting
Configuration in SAP ERP
Field Name Field Value Description
Start date The creation date is the default
value.
This is the start date of the validity
period. Change the default value
only, if you want the validity period
to start later.
End date The default value is 31.12.9999. This is the last day of the validity
period.
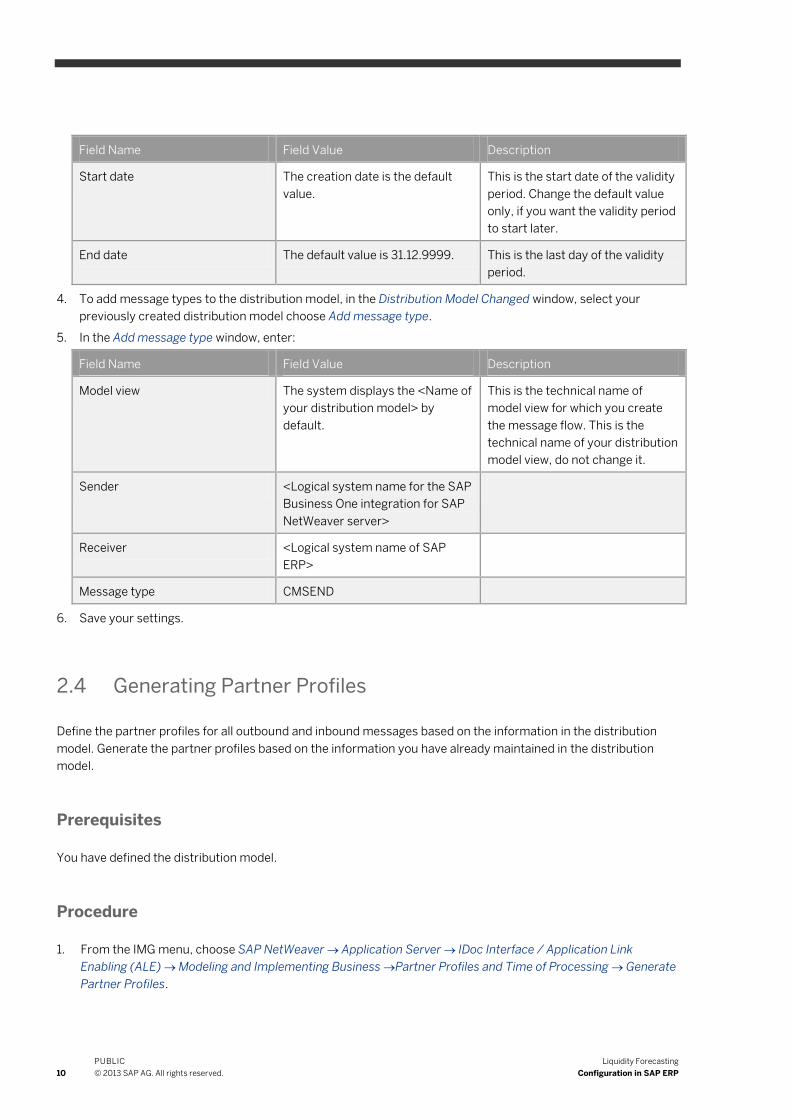
4. To add message types to the distribution model, in the Distribution Model Changed window, select your
previously created distribution model choose Add message type.
5. In the Add message type window, enter:
Field Name Field Value Description
Model view The system displays the <Name of
your distribution model> by
default.
This is the technical name of
model view for which you create
the message flow. This is the
technical name of your distribution
model view, do not change it.
Sender <Logical system name for the SAP
Business One integration for SAP
NetWeaver server>
Receiver <Logical system name of SAP
ERP>
Message type CMSEND
6. Save your settings.
2.4 Generating Partner Profiles
Define the partner profiles for all outbound and inbound messages based on the information in the distribution
model. Generate the partner profiles based on the information you have already maintained in the distribution
model.
Prerequisites
You have defined the distribution model.
Procedure
1. From the IMG menu, choose SAP NetWeaver Application Server IDoc Interface / Application Link
Enabling (ALE) Modeling and Implementing Business Partner Profiles and Time of Processing Generate
Partner Profiles.
Liquidity Forecasting
Configuration in SAP ERP
PUBLIC
© 2013 SAP AG. All rights reserved. 11
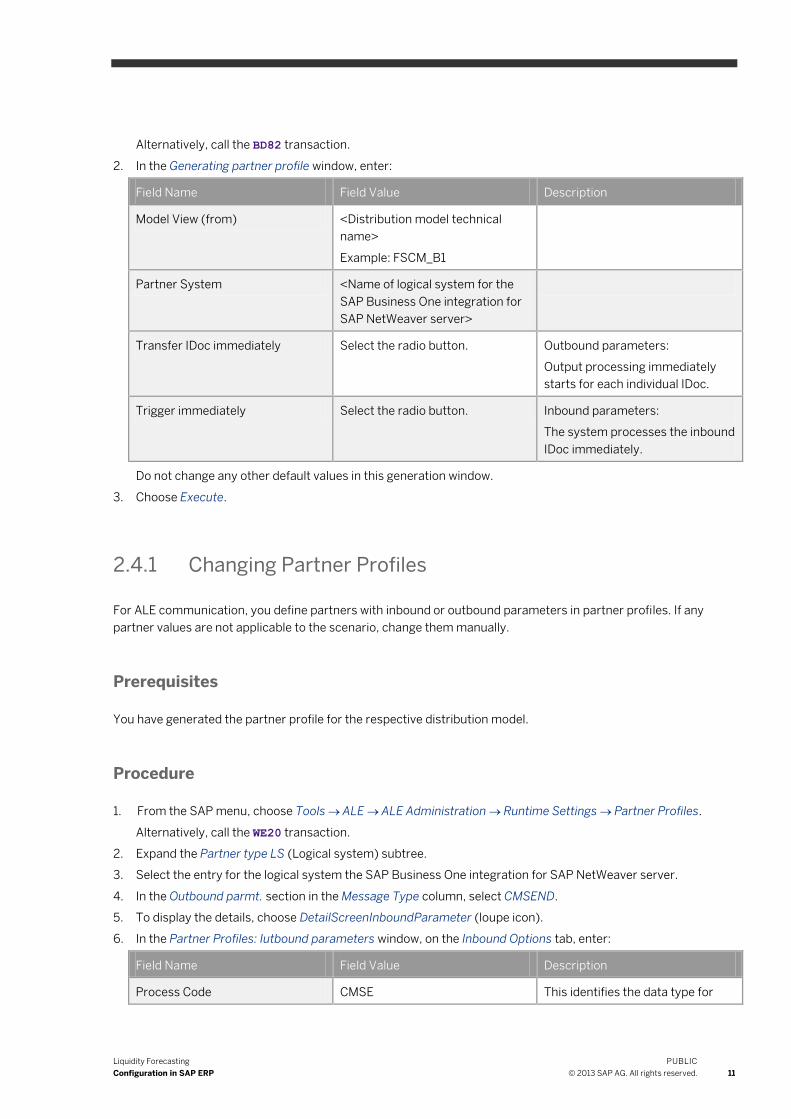
Alternatively, call the BD82 transaction.
2. In the Generating partner profile window, enter:
Field Name Field Value Description
Model View (from) <Distribution model technical
name>
Example: FSCM_B1
Partner System <Name of logical system for the
SAP Business One integration for
SAP NetWeaver server>
Transfer IDoc immediately Select the radio button. Outbound parameters:
Output processing immediately
starts for each individual IDoc.
Trigger immediately Select the radio button. Inbound parameters:
The system processes the inbound
IDoc immediately.
Do not change any other default values in this generation window.
3. Choose Execute.
2.4.1 Changing Partner Profiles
For ALE communication, you define partners with inbound or outbound parameters in partner profiles. If any
partner values are not applicable to the scenario, change them manually.
Prerequisites
You have generated the partner profile for the respective distribution model.
Procedure
1. From the SAP menu, choose Tools ALE ALE Administration Runtime Settings Partner Profiles.
Alternatively, call the WE20 transaction.
2. Expand the Partner type LS (Logical system) subtree.
3. Select the entry for the logical system the SAP Business One integration for SAP NetWeaver server.
4. In the Outbound parmt. section in the Message Type column, select CMSEND.
5. To display the details, choose DetailScreenInboundParameter (loupe icon).
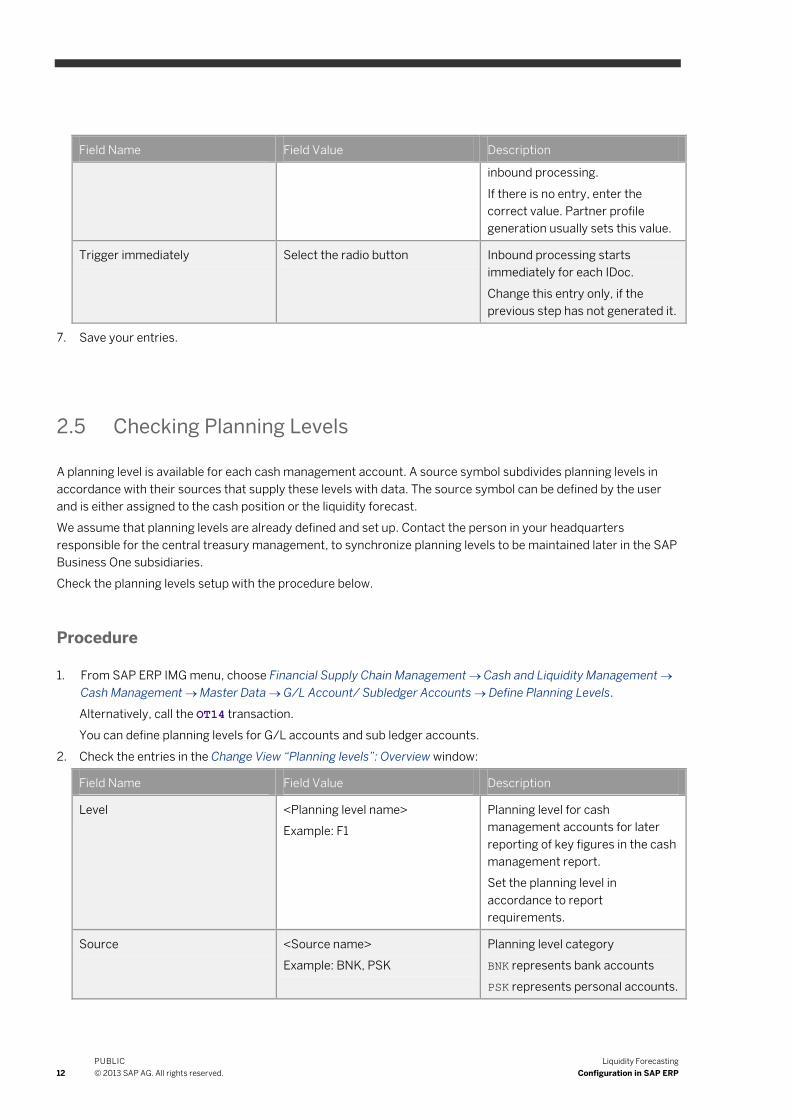
6. In the Partner Profiles: Iutbound parameters window, on the Inbound Options tab, enter:
Field Name Field Value Description
Process Code CMSE This identifies the data type for
12
PUBLIC
© 2013 SAP AG. All rights reserved.
Liquidity Forecasting
Configuration in SAP ERP
Field Name Field Value Description
inbound processing.
If there is no entry, enter the
correct value. Partner profile
generation usually sets this value.
Trigger immediately Select the radio button Inbound processing starts
immediately for each IDoc.
Change this entry only, if the
previous step has not generated it.
7. Save your entries.
2.5 Checking Planning Levels
A planning level is available for each cash management account. A source symbol subdivides planning levels in
accordance with their sources that supply these levels with data. The source symbol can be defined by the user
and is either assigned to the cash position or the liquidity forecast.
We assume that planning levels are already defined and set up. Contact the person in your headquarters
responsible for the central treasury management, to synchronize planning levels to be maintained later in the SAP
Business One subsidiaries.
Check the planning levels setup with the procedure below.
Procedure
1. From SAP ERP IMG menu, choose Financial Supply Chain Management Cash and Liquidity Management
Cash Management Master Data G/L Account/ Subledger Accounts Define Planning Levels.
Alternatively, call the OT14 transaction.
You can define planning levels for G/L accounts and sub ledger accounts.
2. Check the entries in the Change View “Planning levels”: Overview window:
Field Name Field Value Description
Level <Planning level name>
Example: F1
Planning level for cash
management accounts for later
reporting of key figures in the cash
management report.
Set the planning level in
accordance to report
requirements.
Source <Source name>
Example: BNK, PSK
Planning level category
BNK represents bank accounts
PSK represents personal accounts.
Liquidity Forecasting
Configuration in SAP ERP
PUBLIC
© 2013 SAP AG. All rights reserved. 13
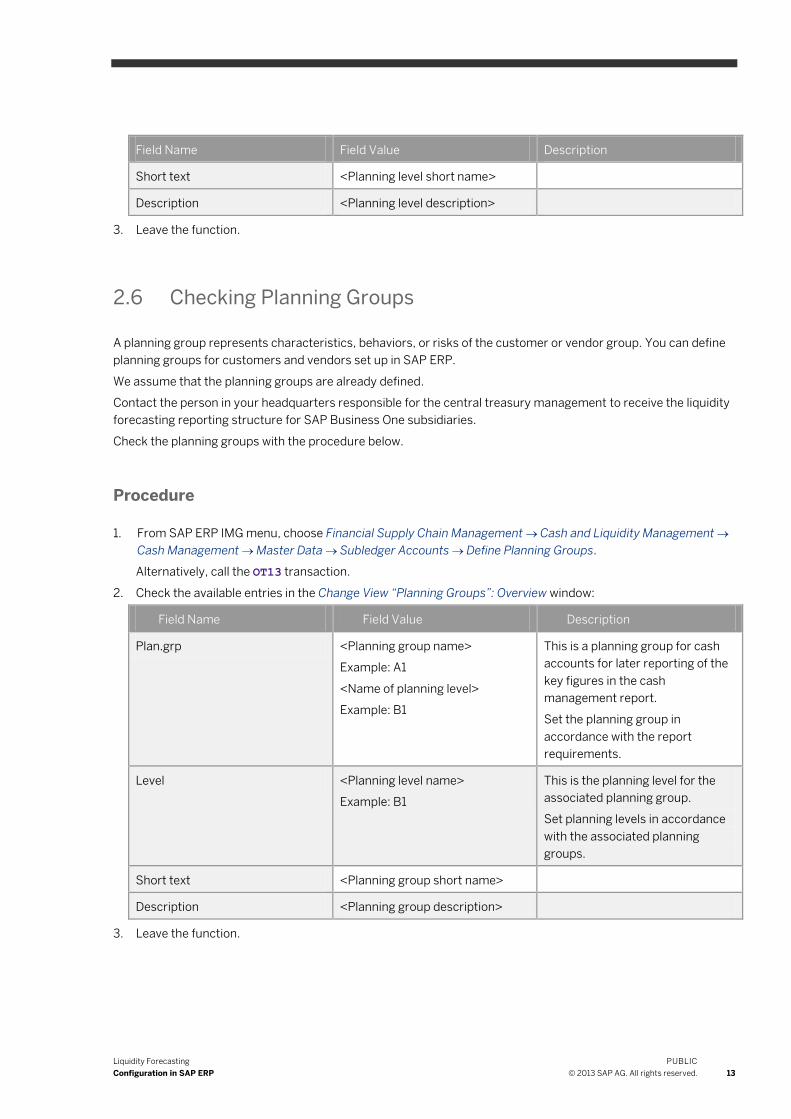
Field Name Field Value Description
Short text <Planning level short name>
Description <Planning level description>
3. Leave the function.
2.6 Checking Planning Groups
A planning group represents characteristics, behaviors, or risks of the customer or vendor group. You can define
planning groups for customers and vendors set up in SAP ERP.
We assume that the planning groups are already defined.
Contact the person in your headquarters responsible for the central treasury management to receive the liquidity
forecasting reporting structure for SAP Business One subsidiaries.
Check the planning groups with the procedure below.
Procedure
1. From SAP ERP IMG menu, choose Financial Supply Chain Management Cash and Liquidity Management
Cash Management Master Data Subledger Accounts Define Planning Groups.
Alternatively, call the OT13 transaction.
2. Check the available entries in the Change View “Planning Groups”: Overview window:
Field Name Field Value Description
Plan.grp <Planning group name>
Example: A1
<Name of planning level>
Example: B1
This is a planning group for cash
accounts for later reporting of the
key figures in the cash
management report.
Set the planning group in
accordance with the report
requirements.
Level <Planning level name>
Example: B1
This is the planning level for the
associated planning group.
Set planning levels in accordance
with the associated planning
groups.
Short text <Planning group short name>
Description <Planning group description>
3. Leave the function.
14
PUBLIC
© 2013 SAP AG. All rights reserved.
Liquidity Forecasting
Configuration in SAP ERP
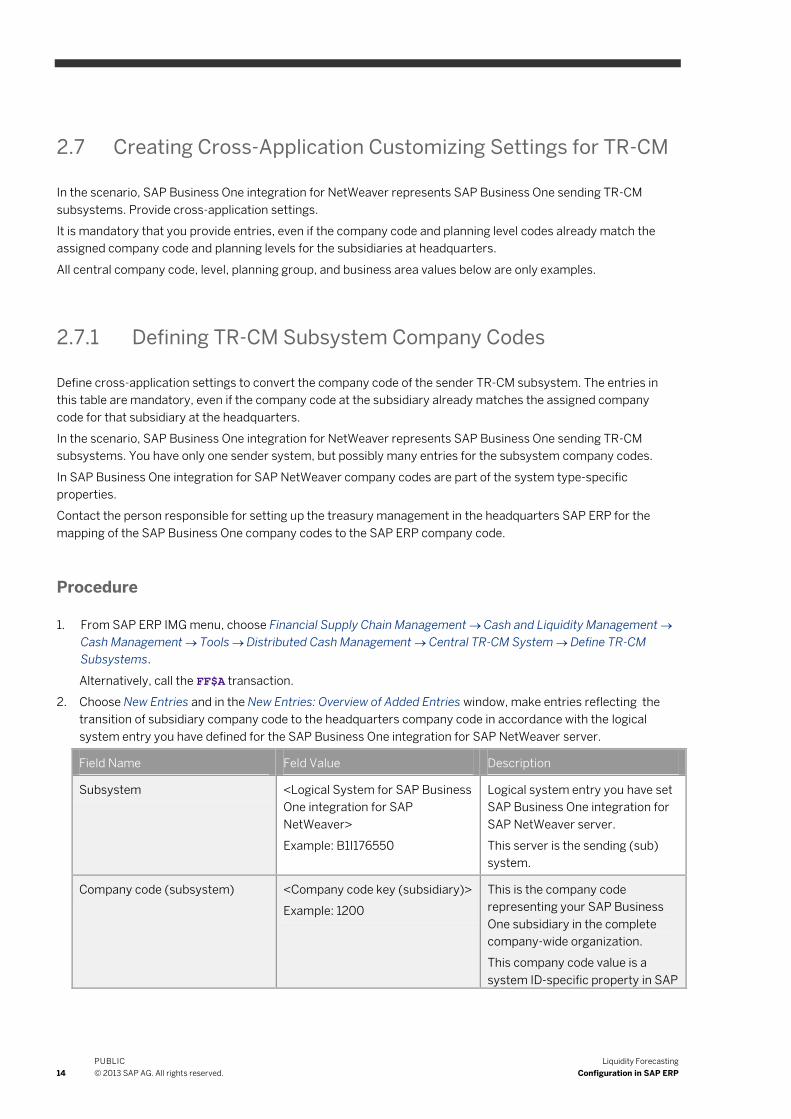
2.7 Creating Cross-Application Customizing Settings for TR-CM
In the scenario, SAP Business One integration for NetWeaver represents SAP Business One sending TR-CM
subsystems. Provide cross-application settings.
It is mandatory that you provide entries, even if the company code and planning level codes already match the
assigned company code and planning levels for the subsidiaries at headquarters.
All central company code, level, planning group, and business area values below are only examples.
2.7.1 Defining TR-CM Subsystem Company Codes
Define cross-application settings to convert the company code of the sender TR-CM subsystem. The entries in
this table are mandatory, even if the company code at the subsidiary already matches the assigned company
code for that subsidiary at the headquarters.
In the scenario, SAP Business One integration for NetWeaver represents SAP Business One sending TR-CM
subsystems. You have only one sender system, but possibly many entries for the subsystem company codes.
In SAP Business One integration for SAP NetWeaver company codes are part of the system type-specific
properties.
Contact the person responsible for setting up the treasury management in the headquarters SAP ERP for the
mapping of the SAP Business One company codes to the SAP ERP company code.
Procedure
1. From SAP ERP IMG menu, choose Financial Supply Chain Management Cash and Liquidity Management
Cash Management Tools Distributed Cash Management Central TR-CM System Define TR-CM
Subsystems.
Alternatively, call the FF$A transaction.
2. Choose New Entries and in the New Entries: Overview of Added Entries window, make entries reflecting the
transition of subsidiary company code to the headquarters company code in accordance with the logical
system entry you have defined for the SAP Business One integration for SAP NetWeaver server.
Field Name Feld Value Description
Subsystem <Logical System for SAP Business
One integration for SAP
NetWeaver>
Example: B1I176550
Logical system entry you have set
SAP Business One integration for
SAP NetWeaver server.
This server is the sending (sub)
system.
Company code (subsystem) <Company code key (subsidiary)>
Example: 1200
This is the company code
representing your SAP Business
One subsidiary in the complete
company-wide organization.
This company code value is a
system ID-specific property in SAP

Liquidity Forecasting
Configuration in SAP ERP
PUBLIC
© 2013 SAP AG. All rights reserved. 15
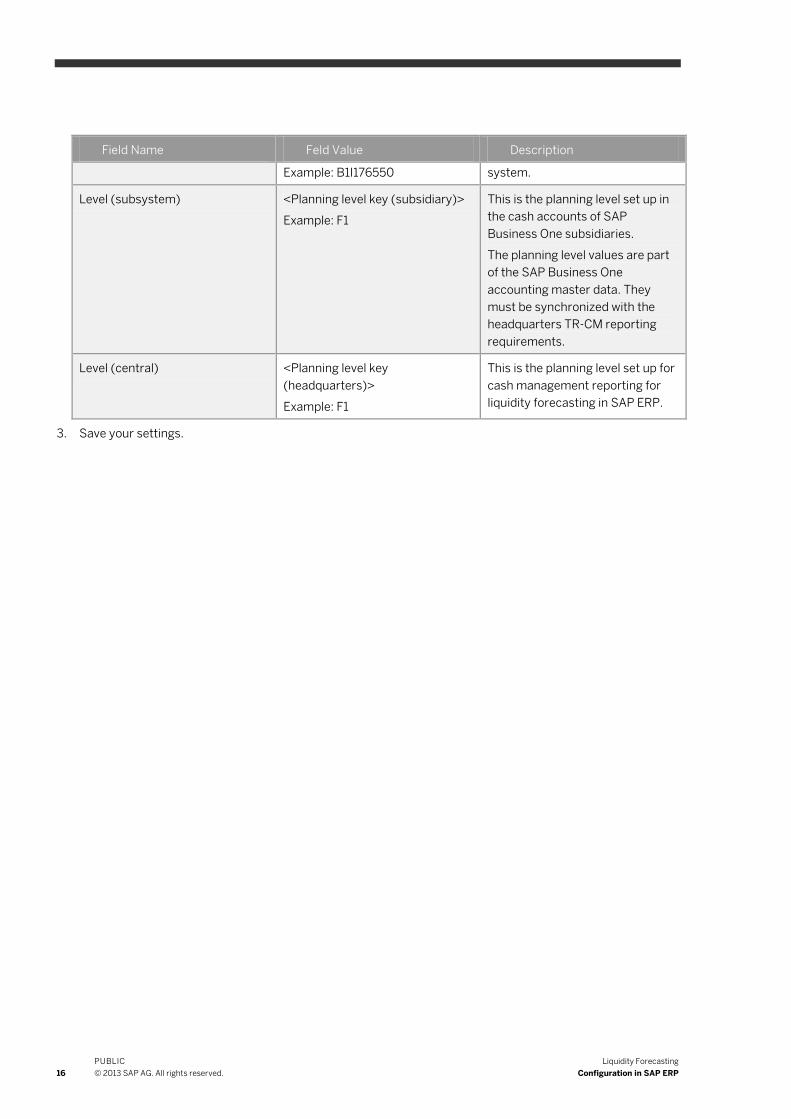
Field Name Feld Value Description
Business One integration for SAP
NetWeaver.
Company code (central) <Company code key
(headquarters)>
Example: 1000
This is the company code to be
associated for the mapping of the
SAP Business One subsidiary
company code to a central SAP
ERP company code.
This company code value is
maintained in SAP ERP as the valid
company code for the central TR-
CM system.
3. Save your settings.
2.7.2 Converting Planning Levels
Convert the planning levels of the sender TR-CM subsystems to the central TR-CM system and define to which
sender TR-CM subsystems the conversions applies.
The planning levels of each subsidiary must be mapped to corresponding planning levels in the headquarters. The
entries in this table are mandatory, even if the planning level at a subsidiary already corresponds to a planning
level at the headquarters.
In the scenario, SAP Business One integration for SAP NetWeaver represents all SAP Business One systems. You
have only one sender system, but possibly many entries for the subsystem planning levels. The planning level
information for your SAP Business One subsidiary is part of the cash accounts master data.
Contact the person responsible for setting up the treasury management in the headquarters SAP ERP for the
mapping of the SAP Business One planning levels to the SAP ERP planning levels.
Procedure
1. From SAP ERP IMG menu, choose Financial Supply Chain Management Cash and Liquidity Management
Cash Management Tools Distributed Cash Management Central TR-CM System Convert Sender
Level.
Alternatively, call the FF$C transaction.
2. Choose New Entries and in the New Entries: Overview of Added Entries window, make entries that reflect the
transition of the subsidiary planning level to the headquarters planning level in accordance with the logical
system entry you defined for you have defined for the SAP Business One integration for SAP NetWeaver
server.
Field Name Feld Value Description
Subsystem <Logical System entry for SAP
Business One integration for SAP
NetWeaver>
Logical system entry you have set
SAP Business One integration for
SAP NetWeaver server.
This server is the sending (sub)
16
PUBLIC
© 2013 SAP AG. All rights reserved.
Liquidity Forecasting
Configuration in SAP ERP
Field Name Feld Value Description
Example: B1I176550 system.
Level (subsystem) <Planning level key (subsidiary)>
Example: F1
This is the planning level set up in
the cash accounts of SAP
Business One subsidiaries.
The planning level values are part
of the SAP Business One
accounting master data. They
must be synchronized with the
headquarters TR-CM reporting
requirements.
Level (central) <Planning level key
(headquarters)>
Example: F1
This is the planning level set up for
cash management reporting for
liquidity forecasting in SAP ERP.
3. Save your settings.
Liquidity Forecasting
Configuration in SAP Business One
PUBLIC
© 2013 SAP AG. All rights reserved. 17
3 Configuration in SAP Business One
The setup in SAP Business One consists of the following steps:
Creating planning levels
Creating planning groups
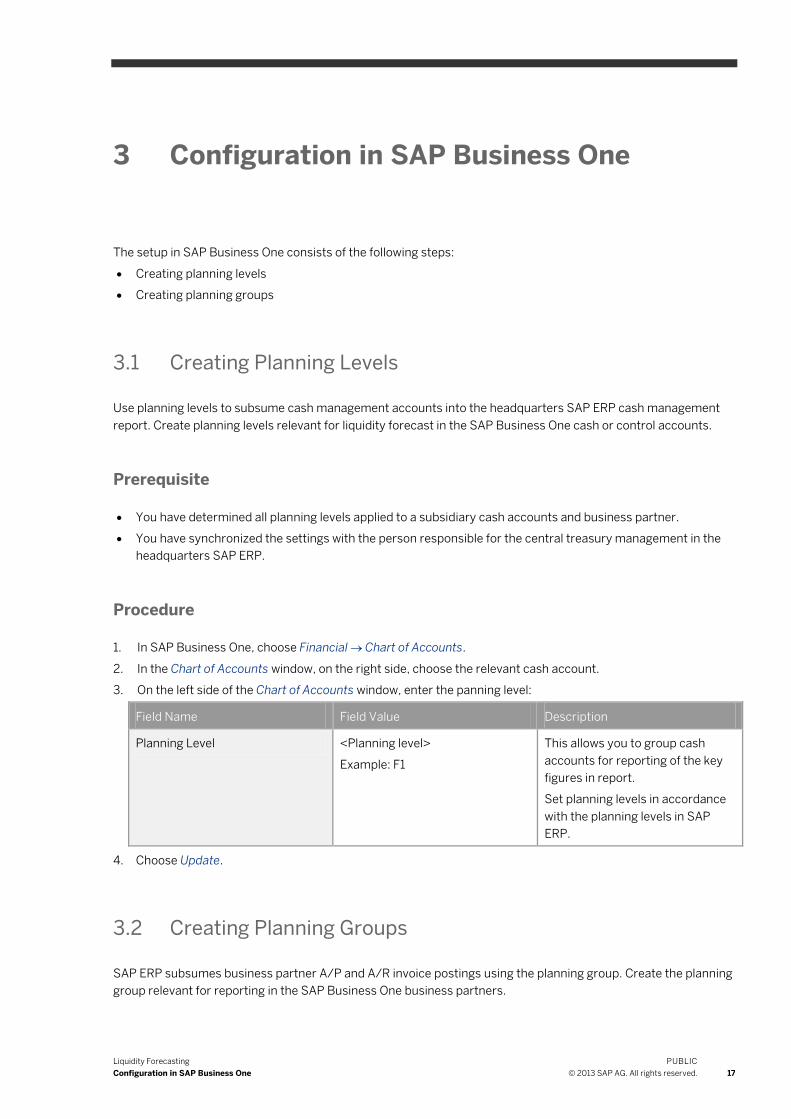
3.1 Creating Planning Levels
Use planning levels to subsume cash management accounts into the headquarters SAP ERP cash management
report. Create planning levels relevant for liquidity forecast in the SAP Business One cash or control accounts.
Prerequisite
You have determined all planning levels applied to a subsidiary cash accounts and business partner.
You have synchronized the settings with the person responsible for the central treasury management in the
headquarters SAP ERP.
Procedure
1. In SAP Business One, choose Financial Chart of Accounts.
2. In the Chart of Accounts window, on the right side, choose the relevant cash account.
3. On the left side of the Chart of Accounts window, enter the panning level:
Field Name Field Value Description
Planning Level <Planning level>
Example: F1
This allows you to group cash
accounts for reporting of the key
figures in report.
Set planning levels in accordance
with the planning levels in SAP
ERP.
4. Choose Update.
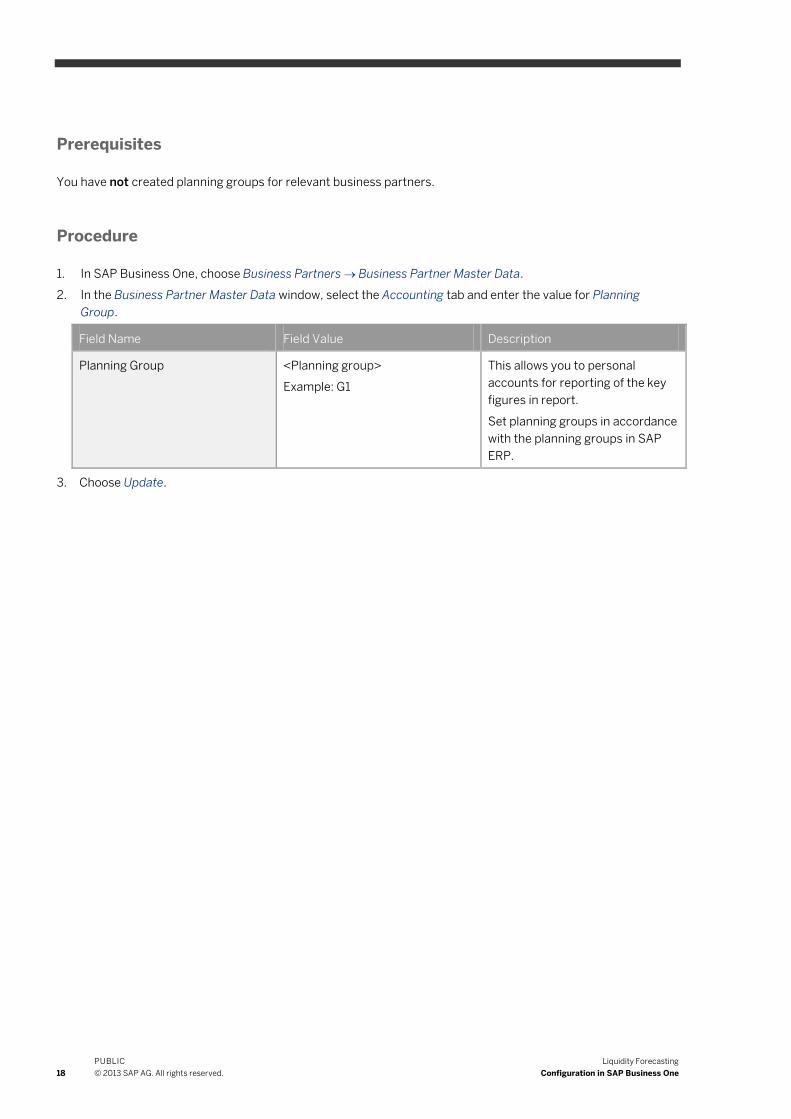
3.2 Creating Planning Groups
SAP ERP subsumes business partner A/P and A/R invoice postings using the planning group. Create the planning
group relevant for reporting in the SAP Business One business partners.
18
PUBLIC
© 2013 SAP AG. All rights reserved.
Liquidity Forecasting
Configuration in SAP Business One
Prerequisites
You have not created planning groups for relevant business partners.
Procedure
1. In SAP Business One, choose Business Partners Business Partner Master Data.
2. In the Business Partner Master Data window, select the Accounting tab and enter the value for Planning
Group.
Field Name Field Value Description
Planning Group <Planning group>
Example: G1
This allows you to personal
accounts for reporting of the key
figures in report.
Set planning groups in accordance
with the planning groups in SAP
ERP.
3. Choose Update.
Liquidity Forecasting
Configuration in SAP Business One integration for SAP NetWeaver
PUBLIC
© 2013 SAP AG. All rights reserved. 19
4 Configuration in SAP Business One integration for SAP NetWeaver
4.1 Creating System ID-Specific Properties for Subsidiary SAP Business One Systems
Maintain SysID-specific properties for each subsidiary in the system landscape. System ID-specific properties are
available per system type. When you create a system landscape entry, this entry gets a unique system ID (SysID).
You can maintain fixed values for properties for the SysID.
SAP Business One integration for SAP NetWeaver accesses the properties at runtime and uses them for message
processing, for example for automatically setting defaults, option selection, and so on.
All scenario packages that use the systems as senders or receivers, can access the SysID-specific properties.
From a business point of view, the aim of using the SysID-specific properties is to place the subsidiary in the
company organization environment. In the large account environment, the settings represent the organizational
entity of the subsidiary from the headquarters’ point of view. The settings describe the subsidiary with SAP ERP
organization units. For example, the subsidiary represents the sales channel for the headquarters’ products in a
foreign country.
Prerequisites
You have set up the system landscape with all sender and receiver systems in SAP ERP and in SAP Business One
integration for SAP NetWeaver.
For more information about setting up your technical system landscape, see the Administrator's Guide.
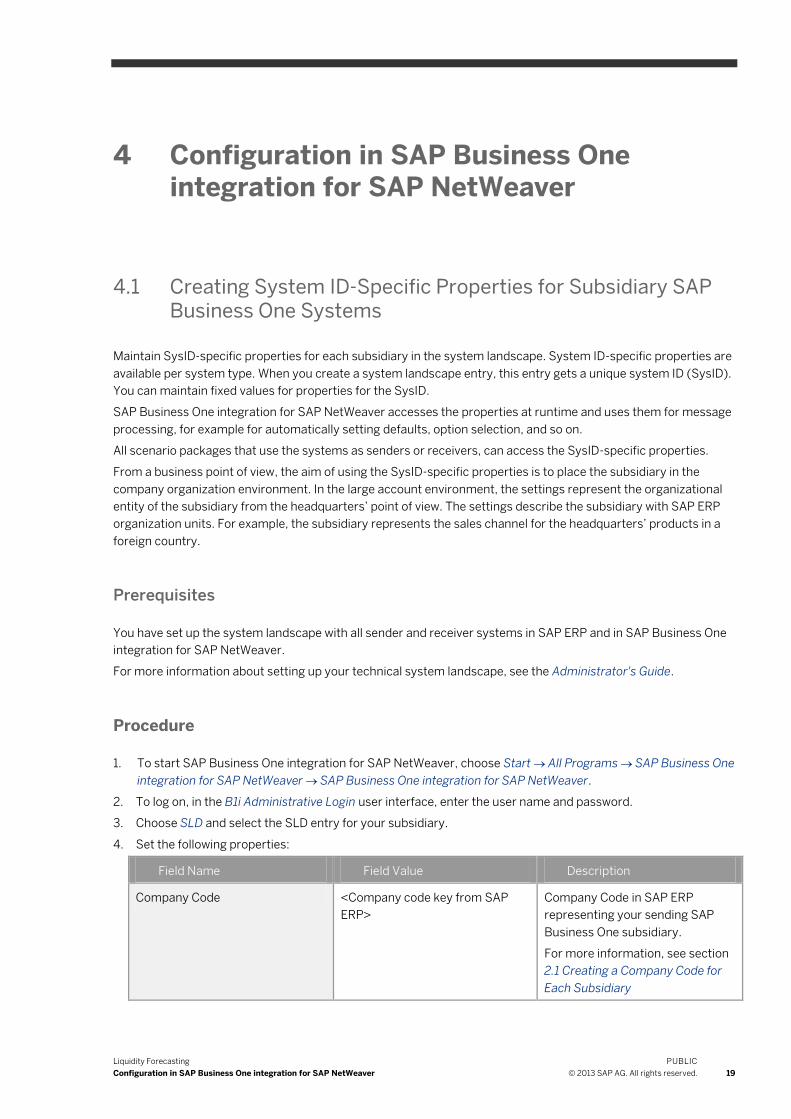
Procedure
1. To start SAP Business One integration for SAP NetWeaver, choose Start All Programs SAP Business One
integration for SAP NetWeaver SAP Business One integration for SAP NetWeaver.
2. To log on, in the B1i Administrative Login user interface, enter the user name and password.
3. Choose SLD and select the SLD entry for your subsidiary.
4. Set the following properties:
Field Name Field Value Description
Company Code <Company code key from SAP
ERP>
Company Code in SAP ERP
representing your sending SAP
Business One subsidiary.
For more information, see section
2.1 Creating a Company Code for
Each Subsidiary
20
PUBLIC
© 2013 SAP AG. All rights reserved.
Liquidity Forecasting
Configuration in SAP Business One integration for SAP NetWeaver
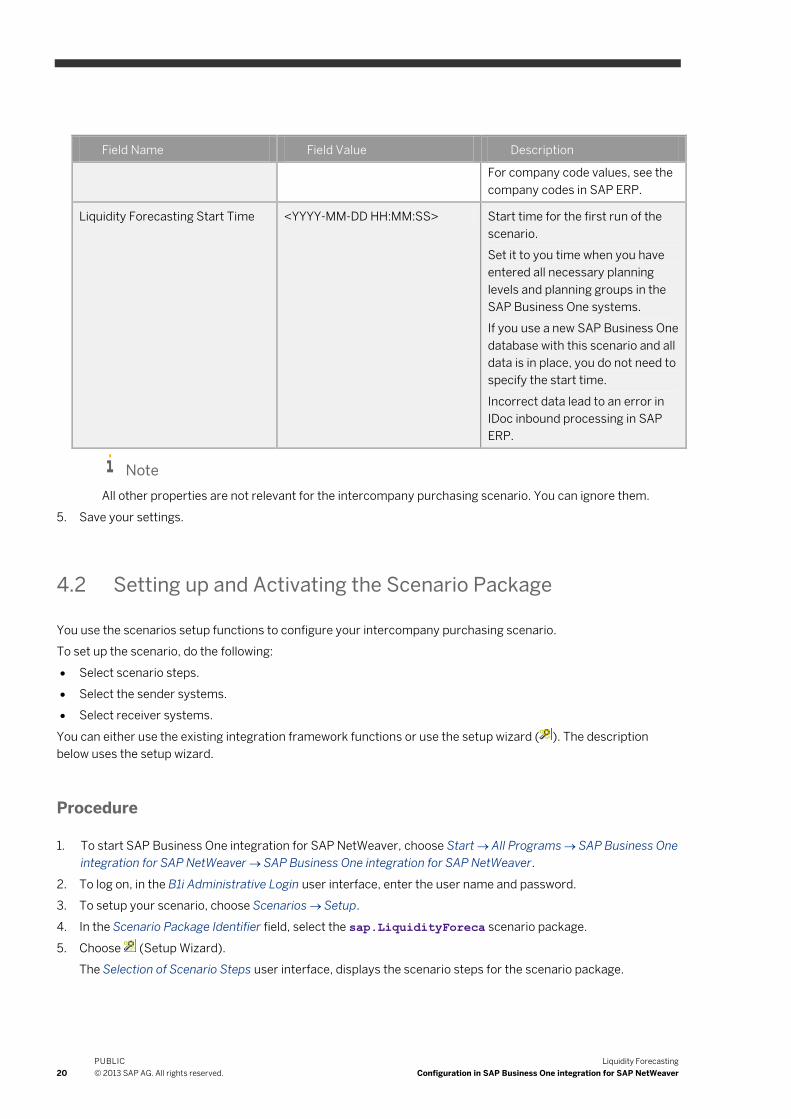
Field Name Field Value Description
For company code values, see the
company codes in SAP ERP.
Liquidity Forecasting Start Time <YYYY-MM-DD HH:MM:SS> Start time for the first run of the
scenario.
Set it to you time when you have
entered all necessary planning
levels and planning groups in the
SAP Business One systems.
If you use a new SAP Business One
database with this scenario and all
data is in place, you do not need to
specify the start time.
Incorrect data lead to an error in
IDoc inbound processing in SAP
ERP.
Note
All other properties are not relevant for the intercompany purchasing scenario. You can ignore them.
5. Save your settings.
4.2 Setting up and Activating the Scenario Package
You use the scenarios setup functions to configure your intercompany purchasing scenario.
To set up the scenario, do the following:
Select scenario steps.
Select the sender systems.
Select receiver systems.
You can either use the existing integration framework functions or use the setup wizard ( ). The description
below uses the setup wizard.
Procedure
1. To start SAP Business One integration for SAP NetWeaver, choose Start All Programs SAP Business One
integration for SAP NetWeaver SAP Business One integration for SAP NetWeaver.
2. To log on, in the B1i Administrative Login user interface, enter the user name and password.
3. To setup your scenario, choose Scenarios Setup.
4. In the Scenario Package Identifier field, select the sap.LiquidityForeca scenario package.
5. Choose (Setup Wizard).
The Selection of Scenario Steps user interface, displays the scenario steps for the scenario package.

Liquidity Forecasting
Configuration in SAP Business One integration for SAP NetWeaver
PUBLIC
© 2013 SAP AG. All rights reserved. 21
6. Choose the Activate checkbox for the sap.B1TRCM2R3TRCM scenario step, choose the Save button and
choose Next.
7. In the senders section select your headquarters system. In the receiver section select all subsidiary SAP
Business One systems that provide data to the scenario and choose Next.
The headquarters system is the sender and all subsidiary systems are the receivers in this scenario.
8. You do not need to define filter definition, global or local properties, choose Next until you reach the Scheduler
step.
9. In the Scheduler user interface, define values for the scheduler and choose Next.
10. Choose Deploy to finalize the scenario setup.
11. To activate your scenario, choose the Activate button.
www.sap.com/contactsap
.
© 2013 SAP AG. All rights reserved.
No part of this publication may be reproduced or transmitted in any
form or for any purpose without the express permission of SAP AG.
The information contained herein may be changed without prior
notice.
Some software products marketed by SAP AG and its distributors
contain proprietary software components of other software
vendors.
Microsoft, Windows, Excel, Outlook, and PowerPoint are registered
trademarks of Microsoft Corporation.
IBM, DB2, DB2 Universal Database, System ads, System i5, System
p, System p5, System x, System z, System z10, System z9, z10, z9,
iSeries, pSeries, xSeries, zSeries, eServer, z/VM, z/OS, i5/OS,
S/390, OS/390, OS/400, AS/400, S/390 Parallel Enterprise
Server, PowerVM, Power Architecture, POWER6+, POWER6,
POWER5+, POWER5, POWER, OpenPower, PowerPC, BatchPipes,
BladeCenter, System Storage, GPFS, HACMP, RETAIN, DB2
Connect, RACF, Redbooks, OS/2, Parallel Sysplex, MVS/ESA, AIX,
Intelligent Miner, WebSphere, Netfinity, Tivoli and Informix are
trademarks or registered trademarks of IBM Corporation.
Linux is the registered trademark of Linus Torvalds in the U.S. and
other countries.
Adobe, the Adobe logo, Acrobat, PostScript, and Reader are either
trademarks or registered trademarks of Adobe Systems
Incorporated in the United States and/or other countries.
Oracle is a registered trademark of Oracle Corporation.
UNIX, X/Open, OSF/1, and Motif are registered trademarks of the
Open Group.
Citrix, ICA, Program Neighborhood, MetaFrame, WinFrame,
VideoFrame, and MultiWin are trademarks or registered trademarks
of Citrix Systems, Inc.
HTML, XML, XHTML and W3C are trademarks or registered
trademarks of W3C®, World Wide Web Consortium, Massachusetts
Institute of Technology.
Java is a registered trademark of Sun Microsystems, Inc.
JavaScript is a registered trademark of Sun Microsystems, Inc.,
used under license for technology invented and implemented by
Netscape.
SAP, R/3, xApps, xApp, SAP NetWeaver, Duet, PartnerEdge,
ByDesign, SAP Business ByDesign, and other SAP products and
services mentioned herein as well as their respective logos are
trademarks or registered trademarks of SAP AG in Germany and in
several other countries all over the world. All other product and
service names mentioned are the trademarks of their respective
companies. Data contained in this document serves informational
purposes only. National product specifications may vary.
These materials are subject to change without notice. These
materials are provided by SAP AG and its affiliated companies ("SAP
Group") for informational purposes only, without representation or
warranty of any kind, and SAP Group shall not be liable for errors or
omissions with respect to the materials. The only warranties for SAP
Group products and services are those that are set forth in the
express warranty statements accompanying such products and
services, if any. Nothing herein should be construed as constituting
an additional warranty.