SAP Energy and Environmental Intelligence Installation Guide · SAP Energy and Environmental...
12
SAP Energy and Environmental Intelligence Document Version: 1.0.1 - 2013-12-16 SAP Energy and Environmental Intelligence Installation Guide
Transcript of SAP Energy and Environmental Intelligence Installation Guide · SAP Energy and Environmental...
SAP Energy and Environmental IntelligenceDocument Version: 1.0.1 - 2013-12-16
SAP Energy and Environmental Intelligence Installation Guide
Table of Contents1 Prerequisites checklist. . . . . . . . . . . . . . . . . . . . . . . . . . . . . . . . . . . . . . . . . . . . . . . . . . . . . . . . . . 3
2 Overview and workflow. . . . . . . . . . . . . . . . . . . . . . . . . . . . . . . . . . . . . . . . . . . . . . . . . . . . . . . . . . 4
3 Prepare SAP HANA for installation. . . . . . . . . . . . . . . . . . . . . . . . . . . . . . . . . . . . . . . . . . . . . . . . . 5
4 Importing a Delivery Unit. . . . . . . . . . . . . . . . . . . . . . . . . . . . . . . . . . . . . . . . . . . . . . . . . . . . . . . . .7
5 Post-installation configuration. . . . . . . . . . . . . . . . . . . . . . . . . . . . . . . . . . . . . . . . . . . . . . . . . . . . 95.1 Copy and activate the SAP sample model. . . . . . . . . . . . . . . . . . . . . . . . . . . . . . . . . . . . . . . . . . . . . . 9
5.1.1 Copy and activate master data types. . . . . . . . . . . . . . . . . . . . . . . . . . . . . . . . . . . . . . . . . . 105.1.2 Copy and activate time profiles. . . . . . . . . . . . . . . . . . . . . . . . . . . . . . . . . . . . . . . . . . . . . . 105.1.3 Copy and activate the planning area. . . . . . . . . . . . . . . . . . . . . . . . . . . . . . . . . . . . . . . . . . 10
5.2 Set the default planning area. . . . . . . . . . . . . . . . . . . . . . . . . . . . . . . . . . . . . . . . . . . . . . . . . . . . . . .105.2.1 To set the default planning area for a specific user. . . . . . . . . . . . . . . . . . . . . . . . . . . . . . . . 105.2.2 To set the default planning area for all users. . . . . . . . . . . . . . . . . . . . . . . . . . . . . . . . . . . . . 11
5.3 Install and configure the add-in for Microsoft Excel. . . . . . . . . . . . . . . . . . . . . . . . . . . . . . . . . . . . . . . 11
2 © 2013 SAP AG or an SAP affiliate company. All rights reserved.SAP Energy and Environmental Intelligence Installation Guide
Table of Contents
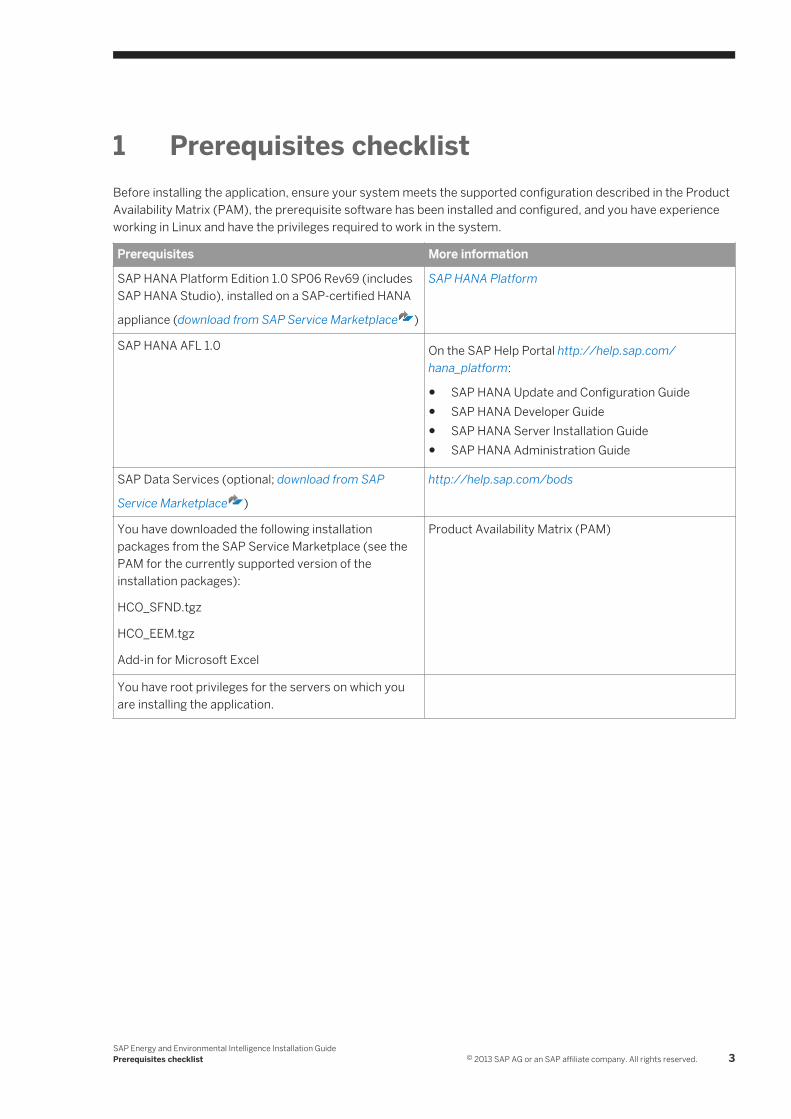
1 Prerequisites checklistBefore installing the application, ensure your system meets the supported configuration described in the Product Availability Matrix (PAM), the prerequisite software has been installed and configured, and you have experience working in Linux and have the privileges required to work in the system.
Prerequisites More information
SAP HANA Platform Edition 1.0 SP06 Rev69 (includes SAP HANA Studio), installed on a SAP-certified HANA
appliance (download from SAP Service Marketplace )
SAP HANA Platform
SAP HANA AFL 1.0 On the SAP Help Portal http://help.sap.com/hana_platform:
● SAP HANA Update and Configuration Guide● SAP HANA Developer Guide● SAP HANA Server Installation Guide● SAP HANA Administration Guide
SAP Data Services (optional; download from SAP
Service Marketplace )
http://help.sap.com/bods
You have downloaded the following installation packages from the SAP Service Marketplace (see the PAM for the currently supported version of the installation packages):
HCO_SFND.tgz
HCO_EEM.tgz
Add-in for Microsoft Excel
Product Availability Matrix (PAM)
You have root privileges for the servers on which you are installing the application.
SAP Energy and Environmental Intelligence Installation GuidePrerequisites checklist © 2013 SAP AG or an SAP affiliate company. All rights reserved. 3

2 Overview and workflowUse this workflow as a guide to install and configure the application.
1. Ensure that your environment meets all prerequisites. Prerequisites checklist [page 3].2. Prepare SAP HANA for installing the application.3. Import the application files from SMP in the following order:
a. HCO_SFND.tgzb. HCO_EEM.tgz
4. Install the application on HANA.5. Perform post-installation configuration steps.6. Activate the data model.7. Set up your master data library and manage the miscellaneous settings for your home page and planning view
settings.8. (Optional) Create additional, custom roles with permission combinations that you choose.9. Create and provision new user accounts in the system.10. (Optional) Create Visibility Filters to control the view for selected users.11. Notify users of their new account and credentials and push the Add-in for Microsoft Excel to their client
systems.
For more information, see the web client help and the Model Configuration Reference Guide.
4 © 2013 SAP AG or an SAP affiliate company. All rights reserved.SAP Energy and Environmental Intelligence Installation Guide
Overview and workflow
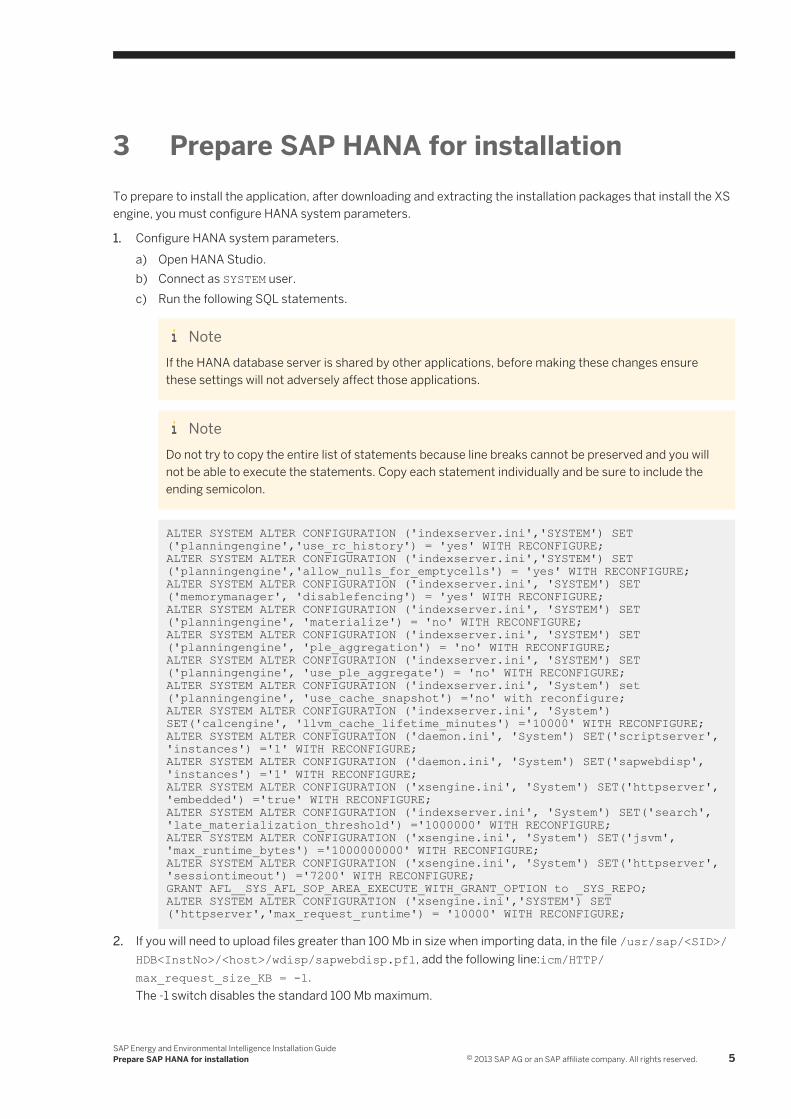
3 Prepare SAP HANA for installationTo prepare to install the application, after downloading and extracting the installation packages that install the XS engine, you must configure HANA system parameters.
1. Configure HANA system parameters.a) Open HANA Studio.b) Connect as SYSTEM user.c) Run the following SQL statements.
NoteIf the HANA database server is shared by other applications, before making these changes ensure these settings will not adversely affect those applications.
NoteDo not try to copy the entire list of statements because line breaks cannot be preserved and you will not be able to execute the statements. Copy each statement individually and be sure to include the ending semicolon.
ALTER SYSTEM ALTER CONFIGURATION ('indexserver.ini','SYSTEM') SET ('planningengine','use_rc_history') = 'yes' WITH RECONFIGURE;ALTER SYSTEM ALTER CONFIGURATION ('indexserver.ini','SYSTEM') SET ('planningengine','allow_nulls_for_emptycells') = 'yes' WITH RECONFIGURE;ALTER SYSTEM ALTER CONFIGURATION ('indexserver.ini', 'SYSTEM') SET ('memorymanager', 'disablefencing') = 'yes' WITH RECONFIGURE;ALTER SYSTEM ALTER CONFIGURATION ('indexserver.ini', 'SYSTEM') SET ('planningengine', 'materialize') = 'no' WITH RECONFIGURE;ALTER SYSTEM ALTER CONFIGURATION ('indexserver.ini', 'SYSTEM') SET ('planningengine', 'ple_aggregation') = 'no' WITH RECONFIGURE;ALTER SYSTEM ALTER CONFIGURATION ('indexserver.ini', 'SYSTEM') SET ('planningengine', 'use_ple_aggregate') = 'no' WITH RECONFIGURE;ALTER SYSTEM ALTER CONFIGURATION ('indexserver.ini', 'System') set ('planningengine', 'use_cache_snapshot') ='no' with reconfigure;ALTER SYSTEM ALTER CONFIGURATION ('indexserver.ini', 'System') SET('calcengine', 'llvm_cache_lifetime_minutes') ='10000' WITH RECONFIGURE;ALTER SYSTEM ALTER CONFIGURATION ('daemon.ini', 'System') SET('scriptserver', 'instances') ='1' WITH RECONFIGURE;ALTER SYSTEM ALTER CONFIGURATION ('daemon.ini', 'System') SET('sapwebdisp', 'instances') ='1' WITH RECONFIGURE;ALTER SYSTEM ALTER CONFIGURATION ('xsengine.ini', 'System') SET('httpserver', 'embedded') ='true' WITH RECONFIGURE;ALTER SYSTEM ALTER CONFIGURATION ('indexserver.ini', 'System') SET('search', 'late_materialization_threshold') ='1000000' WITH RECONFIGURE;ALTER SYSTEM ALTER CONFIGURATION ('xsengine.ini', 'System') SET('jsvm', 'max_runtime_bytes') ='1000000000' WITH RECONFIGURE;ALTER SYSTEM ALTER CONFIGURATION ('xsengine.ini', 'System') SET('httpserver', 'sessiontimeout') ='7200' WITH RECONFIGURE;GRANT AFL__SYS_AFL_SOP_AREA_EXECUTE_WITH_GRANT_OPTION to _SYS_REPO;ALTER SYSTEM ALTER CONFIGURATION ('xsengine.ini','SYSTEM') SET ('httpserver','max_request_runtime') = '10000' WITH RECONFIGURE;
2. If you will need to upload files greater than 100 Mb in size when importing data, in the file /usr/sap/<SID>/HDB<InstNo>/<host>/wdisp/sapwebdisp.pfl, add the following line:icm/HTTP/max_request_size_KB = -1.The -1 switch disables the standard 100 Mb maximum.
SAP Energy and Environmental Intelligence Installation GuidePrepare SAP HANA for installation © 2013 SAP AG or an SAP affiliate company. All rights reserved. 5
3. Restart the server to implement the updates.4. Test whether the HANA XS engine is accessible by opening it in a browser with a URL in the following format:
http://<hostname>:80<instance number>
For example:http://zoocorp.biz:8000
After preparing SAP HANA, next import the delivery units (HCO_SFND.tgz and HCO_EEM.tgz) to your HANA instance per the procedure Importing a Delivery Unit [page 7].
6 © 2013 SAP AG or an SAP affiliate company. All rights reserved.SAP Energy and Environmental Intelligence Installation Guide
Prepare SAP HANA for installation
4 Importing a Delivery UnitYou can import a delivery unit (for example, from a file) for your application content or your software components using the SAP HANA Application Lifecycle Manager.
To import a delivery unit with the SAP HANA Application Lifecycle Manager, you must ensure the following prerequisites are met:
● You have access to an SAP HANA system● You have been granted the SAP HANA user role sap.hana.xs.lm.roles::Administrator
A delivery unit is a group of transportable objects used for content delivery. You can use a delivery unit to transport the design-time objects that are stored in the SAP HANA repository between two systems, for example, from a development system to a consolidation system.
NoteIf a system is configured to work with object Change Management, all activated objects must be approved before their release. Only released objects can be exported thereafter from that system..
To import a delivery unit (for example, from a file to the SAP HANA repository) using the SAP HANA Application Lifecycle Manager, perform the following steps.
1. Open the SAP HANA Application Lifecycle Manager.The SAP HANA Application Lifecycle Manager is available on the SAP HANA XS Web server at the following URL: http://<WebServerHost>:80<SAPHANAinstance>/sap/hana/xs/lm
2. Choose the UPLOAD/DOWNLOAD tab.3. Choose the IMPORT FROM FILE tab.4. Select the delivery unit you want to import.
Choose Browse to display a file explorer, which you can use to locate the DU you want to import, and choose Open.
TipExported DUs have the file extension .tgz, for example, MyDU.tgz.
The Delivery Unit Import screen appears containing the list of objects included in that DU.
SAP Energy and Environmental Intelligence Installation GuideImporting a Delivery Unit © 2013 SAP AG or an SAP affiliate company. All rights reserved. 7
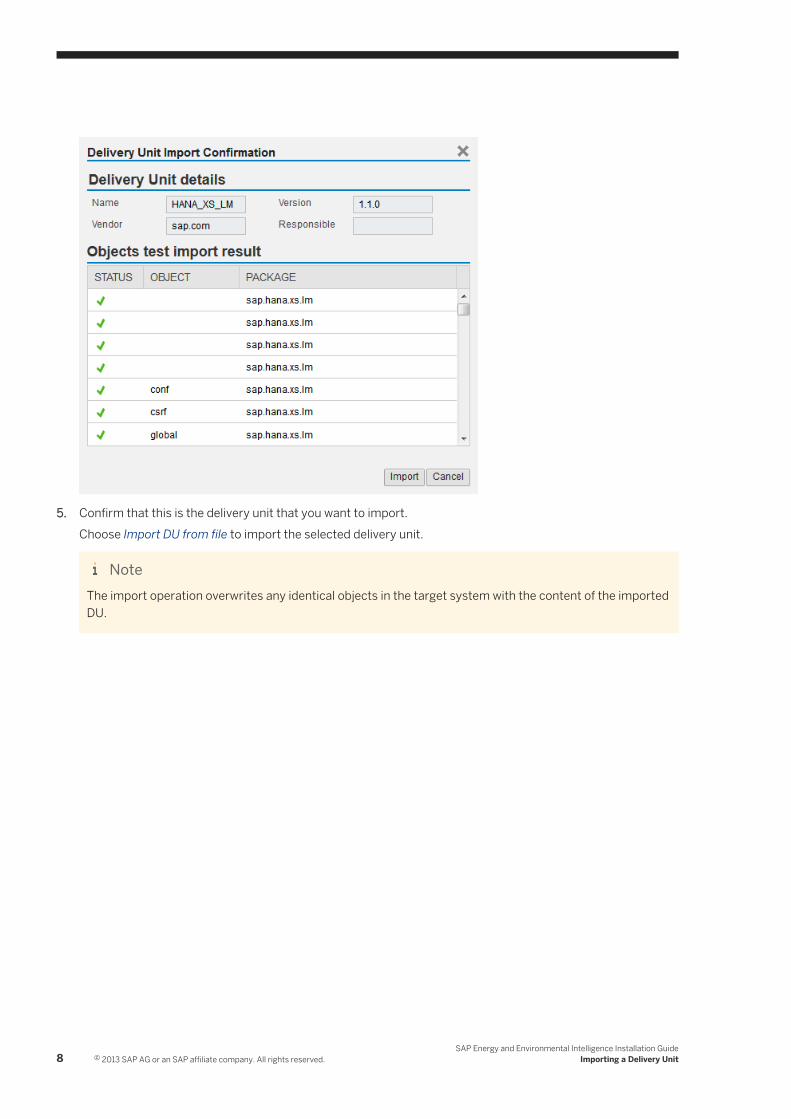
5. Confirm that this is the delivery unit that you want to import.Choose Import DU from file to import the selected delivery unit.
NoteThe import operation overwrites any identical objects in the target system with the content of the imported DU.
8 © 2013 SAP AG or an SAP affiliate company. All rights reserved.SAP Energy and Environmental Intelligence Installation Guide
Importing a Delivery Unit
5 Post-installation configurationAfter installing or upgrading the application, perform the following tasks.
1. Restart SAP HANA.2. Using SAP HANA Studio, verify or create the following technical user:
eeiitadminAssign the role sap.eem.catalogue::SAPSOPROLE_EEM_ITADMIN.
NoteAfter creating users, verify they can log in from SAP HANA Studio. Users may be forced to reset passwords the first time they log in. Be sure that the passwords are regularly changed for these accounts.
3. Launch the web client interface using the following URL:http://<host-name>:80<instance number>/sap/eem/ui/login.htmlFor example:
http://zoocorp.biz:8000/sap/eem/ui/login.html
4. Log in as the user eeiitadmin.5. Enter (and confirm) initial passwords for the displayed users.6. Click Execute Post Installation Script.
This action generates some of the required dynamic objects such as additional users, roles, and procedures and verifies some required system configurations.
7. The users generated by the Post Installation Script include:EEIADMIN: Used for EEI administration and user supportSOPBGADMIN: Used for running background jobsSAPSOPINTEG: Used for importing data from SAP Data Services or SAP HANA Cloud Integration. The script assigns to this user the same password as entered for SOPBGADMIN.When logging in to SAP HANA Studio, these users will be prompted to change their passwords.
8. Copy and activate the data model as described in the following section Copy and activate the SAP sample model [page 9].
9. Configure application settings, the model, and users, and import your data as described in the online help for the web client.
10. Install and configure the add-in for Microsoft Excel as described in Install and configure the add-in for Microsoft Excel [page 11].
5.1 Copy and activate the SAP sample model
To copy and activate the sample model, you must copy and activate the master data types, time profiles, and planning area.
For more details about the SAP sample model, refer to the online help for the web client and the Model Configuration Reference Guide.
SAP Energy and Environmental Intelligence Installation GuidePost-installation configuration © 2013 SAP AG or an SAP affiliate company. All rights reserved. 9
5.1.1 Copy and activate master data types
1. Navigate to Configuration > Master Data Types.2. Go to Display SAP Sample view and copy all sample master types E1*.3. Select Create New with same name as source and the checkbox for Include attributes of the master data type
selected as source in the Copy dialog box.4. Switch to the Edit Active and Inactive view, and activate all copied master types E1*.
5.1.2 Copy and activate time profiles
1. Navigate to Configuration > Time Profiles.2. Go to the Display SAP Sample view and copy the sample time profile 101.3. Select the option Create New with same name as source in the Copy dialog box.4. Switch to the Edit Active and Inactive view and activate time profile 101.
5.1.3 Copy and activate the planning area
1. Navigate to Configuration > Planning Area & Details.2. Go to the Display SAP Sample view and copy the sample planning area E101.3. Select the option Create New with same name as source in the Copy pop-up.4. If you plan to use the standard data service integration contents, log on to HANA Studio with user eeiadmin
and trigger the following SQL statements:
delete from "SAP_SFND"."sap.sop.sopfnd.catalogue::SOPDM_PLANAREASET" where plset = 'E101SPE101'insert into "SAP_SFND"."sap.sop.sopfnd.catalogue::SOPDM_PLANAREASET"values('E101SP','I','E101',null,null,null,null,'X','SAP','2011-07-13 17:52:47.624','SAP','2011-07-13 17:52:47.624',0,-75000,7500,null,'0',null,null);
5. Switch to the Edit Active and Inactive view and activate planning area E101.
5.2 Set the default planning area
5.2.1 To set the default planning area for a specific user
1. Log on to the web client with the specific user's credentials.
10 © 2013 SAP AG or an SAP affiliate company. All rights reserved.SAP Energy and Environmental Intelligence Installation Guide
Post-installation configuration
2. Select Settings from the drop down menu.3. For Default Planning Area, enter E101.
5.2.2 To set the default planning area for all users
1. Log on to HANA Studio as an administrative user.2. Trigger the following SQL statement:
upsert "SAP_SFND"."sap.sop.sopfnd.catalogue::sopdm_globalconfig" values ('HOME_PAGE','DEFAULT_PLAN_AREA','E101') WITH PRIMARY KEY;
5.3 Install and configure the add-in for Microsoft Excel
1. Launch the installer executable file.2. Open Microsoft Excel.
An EEI ribbon displays.3. On the ribbon, click Log On.4. In the Logon dialog box, click the value help (…) for the Connection field.5. In the Connection Manager dialog box, click Create and create a connection as follows:
1. Enter a connection name of your choice.2. Enter the server URL in the following format:
http://zoocorp.biz:<number>/
For example, http://zoocorp.biz:80003. Enter a planning area. If you need to look up the planning areas, log on with your EEI home page
credentials when prompted.4. Click OK.5. In the Connection Manager dialog box, select your connection and choose Set As Default.
SAP Energy and Environmental Intelligence Installation GuidePost-installation configuration © 2013 SAP AG or an SAP affiliate company. All rights reserved. 11
www.sap.com/contactsap
© 2013 SAP AG or an SAP affiliate company. All rights reserved.No part of this publication may be reproduced or transmitted in any form or for any purpose without the express permission of SAP AG. The information contained herein may be changed without prior notice.Some software products marketed by SAP AG and its distributors contain proprietary software components of other software vendors. National product specifications may vary.These materials are provided by SAP AG and its affiliated companies ("SAP Group") for informational purposes only, without representation or warranty of any kind, and SAP Group shall not be liable for errors or omissions with respect to the materials. The only warranties for SAP Group products and services are those that are set forth in the express warranty statements accompanying such products and services, if any. Nothing herein should be construed as constituting an additional warranty.SAP and other SAP products and services mentioned herein as well as their respective logos are trademarks or registered trademarks of SAP AG in Germany and other countries.Please see http://www.sap.com/corporate-en/legal/copyright/index.epx for additional trademark information and notices.