SAP BC Developer Tutorial 4
104
SAP Business Connector Developer Tutorial SAP System Release 4.8 SAP AG - Dietmar-Hopp-Allee 16 - D69190 Walldorf
Transcript of SAP BC Developer Tutorial 4

SAP Business ConnectorDeveloper Tutorial
SAP System
Release 4.8
SAP AG - Dietmar-Hopp-Allee 16 - D69190 Walldorf

2 SAP BC Developer Tutorial 4.8
Copyright
©Copyright 2008 SAP AG.. All rights reserved.
No part of this description of functions may be reproduced or transmitted in any form or for anypurpose without the express permission of SAP AG.. The information contained herein may bechanged without prior notice.
Some software products marketed by SAP AG and its distributors contain proprietary softwarecomponents of other software vendors.
Microsoft® , WINDOWS® and EXCEL®, NT® and SQL-Server® are registered trademarksof Microsoft Corporation.
IBM®, OS/2®, DB2/6000®, AIX®, OS/400® and AS/400® are registered trademarks of IBMCorporation.
OSF/Motif® is a registered trademark of Open Software Foundation.
ORACLE®, is a registered trademark of ORACLE Corporation, California, USA.
webMethods® is a registered trademark of webMethods Incorporated, Virginia, USA.
INFORMIX®-OnLine for SAP is a registered trademark of Informix Software Incorporated.
UNIX ® and X/Open® are registered trademarks of SCO Santa Cruz Operation.
SAP®, R/2®, R/3®, RIVA®, ABAP/4®, SAPaccess®, SAPmai®l, SAPoffice®, SAP-EDI®,SAP Business Workflow®, SAP Early Watch®, SAP Archive Link®, R/3 Retail®,ALE/WEB®, SAPTRONIC® are registered trademarks of SAP AG.
All rights reserved.

Contents
Contents
Introduction . . . . . . . . . . . . . . . . . . . . . . . . . . . . . . . . . . . . . . . . . . . . . . . . . . . . . . . . . . . . . . . . 7Welcome! . . . . . . . . . . . . . . . . . . . . . . . . . . . . . . . . . . . . . . . . . . . . . . . . . . . . . . . . . . . . . . . . . . . . . . 8
About this Tutorial . . . . . . . . . . . . . . . . . . . . . . . . . . . . . . . . . . . . . . . . . . . . . . . . . . . . . . . . . . . . 8Typographical Conventions . . . . . . . . . . . . . . . . . . . . . . . . . . . . . . . . . . . . . . . . . . . . . . . . . . . . . 8
Global Sporting Goods Case Study . . . . . . . . . . . . . . . . . . . . . . . . . . . . . . . . . . . . . . . . . . . . . . . . . . 10The Problem . . . . . . . . . . . . . . . . . . . . . . . . . . . . . . . . . . . . . . . . . . . . . . . . . . . . . . . . . . . . . . . . 10
Requesting Items from Suppliers . . . . . . . . . . . . . . . . . . . . . . . . . . . . . . . . . . . . . . . . . . . . 10When Items Arrive . . . . . . . . . . . . . . . . . . . . . . . . . . . . . . . . . . . . . . . . . . . . . . . . . . . . . . . . 10Paying Suppliers . . . . . . . . . . . . . . . . . . . . . . . . . . . . . . . . . . . . . . . . . . . . . . . . . . . . . . . . . 10
The Solution . . . . . . . . . . . . . . . . . . . . . . . . . . . . . . . . . . . . . . . . . . . . . . . . . . . . . . . . . . . . . . . . 10Bitterroot Boards . . . . . . . . . . . . . . . . . . . . . . . . . . . . . . . . . . . . . . . . . . . . . . . . . . . . . . . . . . . . . 11Purchase Process . . . . . . . . . . . . . . . . . . . . . . . . . . . . . . . . . . . . . . . . . . . . . . . . . . . . . . . . . . . . 13Architecture and Components . . . . . . . . . . . . . . . . . . . . . . . . . . . . . . . . . . . . . . . . . . . . . . . . . . . 13
Lesson 1. Starting SAP BC Developer . . . . . . . . . . . . . . . . . . . . . . . . . . . . . . . . . . . . . . . . 15Launching the SAP BC Server . . . . . . . . . . . . . . . . . . . . . . . . . . . . . . . . . . . . . . . . . . . . . . . . . . . . . . 16Launching the SAP BC Developer . . . . . . . . . . . . . . . . . . . . . . . . . . . . . . . . . . . . . . . . . . . . . . . . . . . 16The SAP BC Developer Window . . . . . . . . . . . . . . . . . . . . . . . . . . . . . . . . . . . . . . . . . . . . . . . . . . . . . 17
The Service Browser . . . . . . . . . . . . . . . . . . . . . . . . . . . . . . . . . . . . . . . . . . . . . . . . . . . . . . 18Service Browser Icons . . . . . . . . . . . . . . . . . . . . . . . . . . . . . . . . . . . . . . . . . . . . . . . . . . . . . 18Refreshing the Contents of the Service Browser . . . . . . . . . . . . . . . . . . . . . . . . . . . . . . . . . 19The Editor . . . . . . . . . . . . . . . . . . . . . . . . . . . . . . . . . . . . . . . . . . . . . . . . . . . . . . . . . . . . . . 20Data Types . . . . . . . . . . . . . . . . . . . . . . . . . . . . . . . . . . . . . . . . . . . . . . . . . . . . . . . . . . . . . 21
Basic Operations . . . . . . . . . . . . . . . . . . . . . . . . . . . . . . . . . . . . . . . . . . . . . . . . . . . . . . . . . . . . . . . . . 22Working in the SAP BC Developer Window . . . . . . . . . . . . . . . . . . . . . . . . . . . . . . . . . . . . . . . . 22Resizing the Areas in the Window . . . . . . . . . . . . . . . . . . . . . . . . . . . . . . . . . . . . . . . . . . . . . . . . 23Creating New Elements . . . . . . . . . . . . . . . . . . . . . . . . . . . . . . . . . . . . . . . . . . . . . . . . . . . . . . . . 24Moving and Copying Elements . . . . . . . . . . . . . . . . . . . . . . . . . . . . . . . . . . . . . . . . . . . . . . . . . . 24Saving Your Work . . . . . . . . . . . . . . . . . . . . . . . . . . . . . . . . . . . . . . . . . . . . . . . . . . . . . . . . . . . . 25
Lesson 2. Creating a Flow Service . . . . . . . . . . . . . . . . . . . . . . . . . . . . . . . . . . . . . . . . . . . 27Basic Concepts . . . . . . . . . . . . . . . . . . . . . . . . . . . . . . . . . . . . . . . . . . . . . . . . . . . . . . . . . . . . . . . . . . 28
What Is a Flow Service? . . . . . . . . . . . . . . . . . . . . . . . . . . . . . . . . . . . . . . . . . . . . . . . . . . . . . . . 28What Is a Flow Step? . . . . . . . . . . . . . . . . . . . . . . . . . . . . . . . . . . . . . . . . . . . . . . . . . . . . . . . . . 28What Is the Pipeline? . . . . . . . . . . . . . . . . . . . . . . . . . . . . . . . . . . . . . . . . . . . . . . . . . . . . . . . . . . 30What are Input and Output Parameters? . . . . . . . . . . . . . . . . . . . . . . . . . . . . . . . . . . . . . . . . . . . 31
Creating a Folder . . . . . . . . . . . . . . . . . . . . . . . . . . . . . . . . . . . . . . . . . . . . . . . . . . . . . . . . . . . . . . . . . 32
SAP BC Developer Tutorial 4.8 3
C o n t e n t s
Creating a Flow Service . . . . . . . . . . . . . . . . . . . . . . . . . . . . . . . . . . . . . . . . . . . . . . . . . . . . . . . . . . . 35Invoking Other Services . . . . . . . . . . . . . . . . . . . . . . . . . . . . . . . . . . . . . . . . . . . . . . . . . . . . . . . . . . . 37
Specifying Input Variables for a Flow Service . . . . . . . . . . . . . . . . . . . . . . . . . . . . . . . . . . . . . . . 39Specifying Output Variables for a Flow Service . . . . . . . . . . . . . . . . . . . . . . . . . . . . . . . . . . . . . 39
Testing the Flow . . . . . . . . . . . . . . . . . . . . . . . . . . . . . . . . . . . . . . . . . . . . . . . . . . . . . . . . . . . . . . . . . 40Invoking Services from a Flow . . . . . . . . . . . . . . . . . . . . . . . . . . . . . . . . . . . . . . . . . . . . . . . . . . . . . . 42
Invoking the GenerateTranNumber Service . . . . . . . . . . . . . . . . . . . . . . . . . . . . . . . . . . . . . . . . 42Invoking the IncomingTransactions Service . . . . . . . . . . . . . . . . . . . . . . . . . . . . . . . . . . . . . . . . 44
Mapping Pipeline Variables . . . . . . . . . . . . . . . . . . . . . . . . . . . . . . . . . . . . . . . . . . . . . . . . . . . . . . . . . 47
Lesson 3. Working with Flows . . . . . . . . . . . . . . . . . . . . . . . . . . . . . . . . . . . . . . . . . . . . . . . 49Creating a Second Flow Service . . . . . . . . . . . . . . . . . . . . . . . . . . . . . . . . . . . . . . . . . . . . . . . . . . . . . 50Using a Service to Validate Input . . . . . . . . . . . . . . . . . . . . . . . . . . . . . . . . . . . . . . . . . . . . . . . . . . . . 51Building a BRANCH Step . . . . . . . . . . . . . . . . . . . . . . . . . . . . . . . . . . . . . . . . . . . . . . . . . . . . . . . . . . 52Building a SEQUENCE Step . . . . . . . . . . . . . . . . . . . . . . . . . . . . . . . . . . . . . . . . . . . . . . . . . . . . . . . . 55Building a REPEAT Step . . . . . . . . . . . . . . . . . . . . . . . . . . . . . . . . . . . . . . . . . . . . . . . . . . . . . . . . . . . 56Creating a Service Output Template for the Core Service . . . . . . . . . . . . . . . . . . . . . . . . . . . . . . . . . 57Creating a Service Output Template for the RejectData Service . . . . . . . . . . . . . . . . . . . . . . . . . . . . 58Changing the Service Output Template in Mid-Flow . . . . . . . . . . . . . . . . . . . . . . . . . . . . . . . . . . . . . . 59Testing the Core Service . . . . . . . . . . . . . . . . . . . . . . . . . . . . . . . . . . . . . . . . . . . . . . . . . . . . . . . . . . . 62
Lesson 4. Advanced Flows . . . . . . . . . . . . . . . . . . . . . . . . . . . . . . . . . . . . . . . . . . . . . . . . . . 65Creating a Third Flow Service . . . . . . . . . . . . . . . . . . . . . . . . . . . . . . . . . . . . . . . . . . . . . . . . . . . . . . . 66Declaring the Input and Output Parameters . . . . . . . . . . . . . . . . . . . . . . . . . . . . . . . . . . . . . . . . . . . . 68
Specifying Input Variables for a Flow Service . . . . . . . . . . . . . . . . . . . . . . . . . . . . . . . . . . . . . . . 68Specifying Output Variables for a Flow Service . . . . . . . . . . . . . . . . . . . . . . . . . . . . . . . . . . . . . 68
Flow Backbone . . . . . . . . . . . . . . . . . . . . . . . . . . . . . . . . . . . . . . . . . . . . . . . . . . . . . . . . . . . . . . . . . . 70Load the Catalog . . . . . . . . . . . . . . . . . . . . . . . . . . . . . . . . . . . . . . . . . . . . . . . . . . . . . . . . . . . . . 70Loop Through the Catalog . . . . . . . . . . . . . . . . . . . . . . . . . . . . . . . . . . . . . . . . . . . . . . . . . . . . . . 71
Building a LOOP Step . . . . . . . . . . . . . . . . . . . . . . . . . . . . . . . . . . . . . . . . . . . . . . . . . . . . . . . . . . . . . 72Building a Conditional Label . . . . . . . . . . . . . . . . . . . . . . . . . . . . . . . . . . . . . . . . . . . . . . . . . . . . . . . . 73Building an EXIT Step . . . . . . . . . . . . . . . . . . . . . . . . . . . . . . . . . . . . . . . . . . . . . . . . . . . . . . . . . . . . . 76Testing the Service . . . . . . . . . . . . . . . . . . . . . . . . . . . . . . . . . . . . . . . . . . . . . . . . . . . . . . . . . . . . . . . 81
Lesson 5. Constructing Java Services . . . . . . . . . . . . . . . . . . . . . . . . . . . . . . . . . . . . . . . . . 85Building a Java Service . . . . . . . . . . . . . . . . . . . . . . . . . . . . . . . . . . . . . . . . . . . . . . . . . . . . . . . . . . . . 86Creating a Specification . . . . . . . . . . . . . . . . . . . . . . . . . . . . . . . . . . . . . . . . . . . . . . . . . . . . . . . . . . . 88The Shared Tab . . . . . . . . . . . . . . . . . . . . . . . . . . . . . . . . . . . . . . . . . . . . . . . . . . . . . . . . . . . . . . . . . 89Specifying Code on the Source Tab . . . . . . . . . . . . . . . . . . . . . . . . . . . . . . . . . . . . . . . . . . . . . . . . . . 90Invoking a Java Service . . . . . . . . . . . . . . . . . . . . . . . . . . . . . . . . . . . . . . . . . . . . . . . . . . . . . . . . . . . 92
Testing the Core Service . . . . . . . . . . . . . . . . . . . . . . . . . . . . . . . . . . . . . . . . . . . . . . . . . . . . . . . 93
4 SAP BC Developer Tutorial 4.8
Contents
Lesson 6. Generating Client Code . . . . . . . . . . . . . . . . . . . . . . . . . . . . . . . . . . . . . . . . . . . . 95Generating Java Code . . . . . . . . . . . . . . . . . . . . . . . . . . . . . . . . . . . . . . . . . . . . . . . . . . . . . . . . . . . . 96
Pre-Built Sample . . . . . . . . . . . . . . . . . . . . . . . . . . . . . . . . . . . . . . . . . . . . . . . . . . . . . . . . . . . . 99goesSample . . . . . . . . . . . . . . . . . . . . . . . . . . . . . . . . . . . . . . . . . . . . . . . . . . . . . . . . . . . . . . . . . . . . 100Web Pages . . . . . . . . . . . . . . . . . . . . . . . . . . . . . . . . . . . . . . . . . . . . . . . . . . . . . . . . . . . . . . . . . . . . . 100
SAP BC Developer Tutorial 4.8 5

C o n t e n t s
6 SAP BC Developer Tutorial 4.8
Introduct ion
Welcome! . . . . . . . . . . . . . . . . . . . . . . . . . . . . . . . . . . . . . . . . . . . . . . . . . . . . . . . . . . . . . . . . . 8
Global Sporting Goods Case Study . . . . . . . . . . . . . . . . . . . . . . . . . . . . . . . . . . . . . . . . . . . . 10
SAP BC Developer Tutorial 4.8 7

I n t r o d u c t i o n
Welcome!For this tutorial, you are assuming the role of a software engineer for Bitterroot Boards. Read the case study to learn about how Bitterroot Boards currently processes business orders with the major sports supply company, Global Sporting Goods (GSG). After understanding what your goals are, start SAP BC Server and SAP BC Developer and follow the instructions to create Bitterroot’s new automated ordering system.
This tutorial requires that you have SAP BC Developer™ 4.8 installed and access to a SAP BC Server™ 4.8. The server can run on the same machine.
This tutorial is divided into five lessons. You can complete all five lessons in one sitting (about 2–3 hours) or follow each lesson one at a time.
Knowledge of Java or e‐commerce systems is not required for this tutorial.
About this TutorialThis tutorial will help you develop the client system that Bitterroot Boards will use to interact with GSG.
A version of the completed Bitterroot system can be tested at:
http://localhost:5555/WmSamples/goes
(Replace localhost and 5555 with your server and port.)
The WmSamples package includes several pre‐built services used in creating the tutorial project. Without these services, the tutorial will not work.
This tutorial will lead you in creating a portion of Bitterroot’s system. It will not create the entire system. The primary goal is to learn SAP BC Developer, not to build a fully functional system.
Typographical ConventionsThis document uses the following typographical conventions:
This folder… Provides…
tutorial.catalogue A catalog system for accessing the Bitterroot XML‐based catalogue
tutorial.goes Several public functions that will be used in Bitterroot’s system
tutorial.goesSample A completed application with some extra features such as an XML catalog
tutorial.gsg Private services that “reside” on GSG’s central system
8 SAP BC Developer Tutorial 4.8

Welcome!
Convention Example
Procedures are designated by a blue box in the left column. Procedures are presented as a series of numbered steps.
1 On the Activity menu, click File.
Terms that identify elements, options, selections, and commands on the screen are shown in bold.
The Service field on the Properties tab specifies the name of the requested service.
Characters that you must type exactly are shown in a typewriter font.
Type: setup and then press ENTER.
Variable information that you must type based on your specific situation or environment is shown in italics.
Type: <sapbc>\setupand then press ENTER.
Keyboard keys are shown in uppercase.
Press ENTER; then press TAB.
Keys that you must press simultaneously are joined with the “+” symbol.
Press CTRL+ALT+M.
Directory paths are shown with the “\” directory delimiter unless the subject is UNIX‐specific. In these cases, the “/” is used. If you are working in a UNIX environment, substitute a “/” for the “\” shown in the procedures in this book.
<sapbc>\server\packages\Default
Information that you must read before beginning a procedure or that alerts you to negative consequences of certain actions is denoted using this notation.
Important! If the folder is not already open in the Service Browser, open it before you start the following procedure.
Notes that provide related, but non‐critical, information are denoted using this notation.
Note: When you start SAP BC Developer, you are prompted to log on to a SAP BC Server.
Helpful information such as shortcuts and alternatives. Tip! You can also use CTRL+C to copy
an object.
SAP BC Developer Tutorial 4.8 9

I n t r o d u c t i o n
Global Sporting Goods Case StudyGlobal Sporting Goods, Inc. (GSG) is a national distributor of all types of sporting equipment. They regularly deal with a vast number of suppliers, both large and small. Their customers are sporting‐good retailers, large (e.g., Sports Authority, Target, Sears) and small (Ricky’s Bait and Tackle). Apart from bricks‐and‐mortar retailers, they also supply goods to mail‐order houses and online stores.
The ProblemGSG has created a database system called Global Order Entry System (GOES) for its employees to use to generate a purchase order (PO).
This is how the system currently works:
Requesting Items from SuppliersA GSG buyer enters the purchase order information into GOES.
A clerk prints this order.
The clerk gives the order to the mailroom, where it is faxed or mailed to the supplier.
Shipping & Receiving personnel query orders in GOES to forecast delivery dates.
When Items ArriveShipping & Receiving personnel access GOES to match received goods with purchase orders based on information from the packing slips.
Paying SuppliersGSG’s Accounts Payable department receives an invoice for payment.
A data clerk manually assigns the invoice to the purchase order to which it belongs (which is often difficult because the invoice does not reference a PO).
The clerk verifies that the goods have been received.
A manager authorizes payment of the invoice.
If all goods have been received, then the purchase order and GOES entry are closed.
The SolutionGSG wants to streamline the entire procurement process by exchanging routine, order‐related, business documents electronically with all of their suppliers except those who provide one‐off goods or services. GSG wants to ensure that a GSG buyer can submit an order to a registered supplier by simply entering the order into GOES. They also want to
10 SAP BC Developer Tutorial 4.8

Global Sporting Goods Case Study
require suppliers to electronically submit shipping notices and invoices for orders they fulfill. In addition, GSG will require these documents to include the purchase order number that was originally issued with the order. This provision will eliminate the labor‐intensive, PO‐matching process required when GSG receives goods and process invoices.
As an incentive for suppliers to begin doing business with GSG electronically, GSG is implementing a preferred‐supplier program. Suppliers who register for this program agree to:
Accept orders electronically and acknowledge those orders electronically
Submit a shipping notice when they ship an order to GSG
Submit invoices to GSG electronically
Make their product catalogues available in XML format
In return, GSG will:
Provide suppliers with an SAP BC Server (or access to such a server) that they can use to securely submit these documents through the Internet
Give suppliers browser‐based access to GSG’s customer database for marketing and promotional purposes
Issue payments to preferred suppliers within 15 days of receiving an electronic invoice and goods
Bitterroot BoardsOne of GSG’s suppliers is Bitterroot Boards, LLC. Bitterroot is a small (60‐person) manufacturer of high‐performance snowboards in Missoula, Montana. Since GSG is its largest customer, Bitterroot Boards decides to register in the preferred‐supplier program. Bitterroot Boards currently has a Web site with a catalog of their products and information about their boards. The Web site also contains a Q&A section for boarders, reviews of the best slopes for boarding in North America, dealer lists, and feature articles about the sport of snowboarding. Bitterroot Boards does not take orders through their Web site because they sell their products only to dealers and distributors.
Currently, Bitterroot Boards accepts orders any way they can—by telephone, fax, and mail.
They accept orders from larger, established customers such as GSG by purchase order.
The staff members in the front office write up orders and enter them into their order database.
Then, they send paper copies of the orders to the Accounting office for entry into the accounting application.
SAP BC Developer Tutorial 4.8 11

I n t r o d u c t i o n
Once the Shipping department notifies Accounting that an order has been shipped, the Accounting office mails paper invoices, which are generated by the accounting application.
Because Bitterroot Boards does high‐volume business with GSG, they plan to accept and submit documents through a server that GSG has set up for small partners to share. Bitterroot Boards will use a web browser to accept orders and submit invoices. Additionally, they will create and maintain an XML‐based catalog in GSG’s required format, and provide GSG with the URL for that catalog.
SAP BC Developer
SAP BC Server SAP BC Server
12 SAP BC Developer Tutorial 4.8

Global Sporting Goods Case Study
Purchase Process
Architecture and Components
GSG browses Bitterroot’s catalog to see what is available. When GSG finds something of interest, they place the order.
The arrival date and other information is processed and sent to GSG’s server.
GSG’s server logs the data and sends back an acknowledgment key.
Bitterroot stores the transaction data in its logs.
As the software engineer for Bitterroot Boards, you use your local copy of Developer.
The services you create are hosted on Bitterroot’s SAP BC Server. (The server can be running on the same machine as Developer, or on a separate computer.)
The server at Global Sporting Goods listens for incoming transactions from sporting goods suppliers such as Bitterroot. (For this tutorial, these services are running on the same server as Bitterroot.)
1
2
3
4
A
B
C
SAP BC Developer Tutorial 4.8 13

I n t r o d u c t i o n
14 SAP BC Developer Tutorial 4.8

L E S S O N 1
Start ing SAP BC DeveloperLaunching the SAP BC Server . . . . . . . . . . . . . . . . . . . . . . . . . . . . . . . . . . . . . . . . . . . . . . . . 16
Launching the SAP BC Developer . . . . . . . . . . . . . . . . . . . . . . . . . . . . . . . . . . . . . . . . . . . . . 16
The SAP BC Developer Window . . . . . . . . . . . . . . . . . . . . . . . . . . . . . . . . . . . . . . . . . . . . . . 17
Basic Operations . . . . . . . . . . . . . . . . . . . . . . . . . . . . . . . . . . . . . . . . . . . . . . . . . . . . . . . . . . 22
SAP BC Developer Tutorial 4.8 15

L E S S O N 1 S t a r t i n g S A P B C D e v e l o p e r
Launching the SAP BC ServerSAP BC Developer 4.8 requires a connection to SAP BC Server 4.8. SAP BC Developer 4.8 will not work with previous versions of SAP BC Server or without a server.
The following instructions are for starting the SAP BC Server on Windows NT or Windows 2000. UNIX works in a similar way.
In Windows, you can launch both the SAP BC Server and Developer from shortcuts in the Start menu but you will lose the ability to see debug output. (Debug output is chiefly used for reporting problems to SAP Support.)
At the command prompt, type:
CD \<sapbc>\server\bin
server.bat
While the server is running, this window will be blank, which is normal. If you do a System.out.println() in a Java service, then you will see the output in the command window. Other debug output will be sent here as well.
Launching the SAP BC DeveloperNow start Developer. (Again, this can be run from a short cut in the Start menu if you prefer.)
1 Type the following at the command prompt:
CD \<sapbc>\developer\bin
integrator.bat
The SAP BC Developer starts and you are prompted to open a session.
To start the SAP BC Server
Note: You can also start the SAP BC Server by clicking the Start button on the taskbar, then clicking Run. In the Run dialog box, type cmd, and press ENTER. Then, at the CMD prompt, type the above text.
To start SAP BC Developer
Note: You can also start the SAP BC Server by clicking the Start button on the taskbar, then clicking Run. In the Run dialog box, type cmd, and press ENTER. Then, at the CMD prompt, type the above text.
16 SAP BC Developer Tutorial 4.8

The SAP BC Developer Window
2 In the Server field, type in the name of the SAP BC Server along with the default port of 5555. If you are running the SAP BC Server on the same machine as Developer, then use localhost:5555.
3 In the Username field, type your user name. The server is installed with a default account named Developer.
4 In the Password field, type your password. If you are using the default user account Developer, the default password is isdev.
5 Click OK. Developer has opened a session on the SAP BC Server.
The SAP BC Developer WindowThe Developer window is divided into two areas: the “Service Browser” (on the left) and the “Editor” (on the right).
SAP BC Developer Tutorial 4.8 17

L E S S O N 1 S t a r t i n g S A P B C D e v e l o p e r
Developer main window
The Service BrowserThe Service Browser displays the contents of packages on the SAP BC Server to which you are connected. In the Service Browser you can, among other things;
Select an element that you want to view or edit.
Copy, move, delete, or rename an element.
Elements in the Service Browser are shown in a hierarchical structure where packages are the topmost element in the hierarchy. Packages contain one or more folders, which contain elements that you can create and edit using Developer (e.g., services, specifications, records).
Service Browser IconsThe icon adjacent to the name of an element denotes the element’s type.
Select a componentin the Service
Browser...
...to view and/or editthat component in
the Editor
18 SAP BC Developer Tutorial 4.8

The SAP BC Developer Window
Refreshing the Contents of the Service BrowserThe Service Browser on your screen is not dynamically updated when other users on the same server add, delete, or rename elements in a package. To refresh the contents of the Service Browser while you are working with Developer, click Refresh on the Service Browser’s toolbar.
This icon… Represents…
A package. A package contains a set of services and related files, such as specifications, records, and output templates. To display the contents of a
package, click next to its name.
A folder. A folder contains related services and optional folders (called subfolders). To display the contents of a folder, click next to its name.
A flow service. A flow service is a service written in webMethods’ flow language. To display or edit the attributes of a flow service, click its name.
A Java service. A Java service is a service written in Java. To display or edit the Java class file for this service, click its name.
A WebTap service. A WebTap service provides control of an end‐user’s browser experience while allowing SAP BC services to intercept and modify data that passes through the SAP BC Server. To display or edit the attributes of a WebTap service, click its name.
A C service. A C service is a service written in C/C++. To display or edit the attributes of a C service, click its name.
A specification. A specification is a formal description of an SAP BC service’s inputs and outputs. To display or edit a specification, click its name.
A record. A record contains a set of variables. To display or edit a record, click its name.
An SAP BC schema. An SAP BC schema is the blueprint or model document that you validate an XML document against. The SAP BC schema defines what can and cannot be contained in the XML documents it validates. To display an SAP BC schema, click its name.
A WIDL service. A WIDL service is a service that was created in previous versions of SAP BC server. WIDL services will run on the SAP BC Server 4.x; however, they cannot be modified in Developer 4.x.
If you want to modify or extend your WIDL services, you can convert them to flow services using the WIDL‐To‐Flow Assistant. The WIDL‐To‐Flow Assistant is packaged separately from Developer. Contact SAP Support for information about downloading the utility.
SAP BC Developer Tutorial 4.8 19

L E S S O N 1 S t a r t i n g S A P B C D e v e l o p e r
Refreshing the Service Browser
The EditorThe Editor contains the controls that you use to examine and edit an element you select in the Service Browser. The contents of the Editor vary depending on the type of element you select. For example, the Editor is empty when you select a package or folder, because these elements are containers that do not have any properties you can view or edit with Developer. However, when you select an editable element such as a flow service or a specification, the Editor displays the appropriate screen for that element.
Viewing/Editing Service Flows
Click Refresh toupdate the contents of
the Service Browser
If you select a servicein the Service
Browser
...the Service Editor isdisplayed
20 SAP BC Developer Tutorial 4.8

The SAP BC Developer Window
Data TypesSAP BC server supports several data types for use in services. Each data type supported by SAP BC server corresponds to a Java data type and has an associated icon. When working in the Editor, you can determine the data type for a variable by looking at the icon next to the variable name. Two exceptions to this are the Object and Object List icons. These icons are used to represent variables whose data types are not any of the following: Strings, String Lists, String Tables, Records, or Record Lists.
Variables in a service can be any of the following data types.
This icon… Represents… Java Data Type
A String. A String of characters. java.lang.String
A String List. A one‐dimensional String array.
java.lang.String [ ]
A String Table. A two‐dimensional String array.
java.lang.String [ ] [ ]
A Record. A data structure that is a container for other variables. Records can contain variables of any other data type. The contents of a record are stored as key/value pairs where the variable name is the key.
com.wm.data.IData
com.wm.util.Values
For more information, see the SAP BC Java API Reference.
A Record List. A one‐dimensional array of Records (IData or Values [ ]).
Tables that are instances of com.wm.util.Table appear as Record Lists in SAP BC Developer. These tables can be used as Record Lists in flows. Services in the WmDB package use tables that are instances of wm.com.util.Table.
Tables can also be declared as Objects. Objects and user‐defined table‐like objects that do not implement the comwm.util.pluggable.WMIDataList interface appear as Objects in SAP BC Developer.
com.wm.data.IData [ ]
com.wm.util.Values [ ]
com.wm.util.Table
SAP BC Developer Tutorial 4.8 21

L E S S O N 1 S t a r t i n g S A P B C D e v e l o p e r
Basic Operations
Working in the SAP BC Developer WindowTo perform an operation on an object displayed in the Developer window, the area in which that object appears must be “selected” (i.e., that area must have the focus). Only one area of the window can be selected at a time. For example, when you work in the Service Browser, it is the “selected” area—the menu commands and toolbar buttons operate only within that area. Commands and buttons that cannot be used with the selected area are “grayed” to show that they are not available.
To switch from one area to another, simply click any white area within the area to which you want to switch. This action changes the focus to the new area and makes its menu commands and toolbar buttons available for use.
Sometimes, editing controls within an area are grouped onto tabs. To display the contents of a tab, click the tab’s name.
An Record Reference. A Record whose structure is defined by a Record in the Service Browser.
Reference to an existing object which implements the com.wm.data.IData interface or a reference to an existing com.wm.util.Values object.
A Record Reference List. An array of records whose structure is defined by a Record in the service browser.
Reference to an existing object that implements the com.wm.data.IData interface or a reference to an existing com.wm.util.Values object.
An Object. Any data type that does not fall into any of the data types described in the above rows, will be shown as an Object.
Any subclass of java.lang.Object.
Example java.util.Vector
An Object List. An array of Objects. An array of any subclass of java.lang.Object.
Example java.util.Vector [ ]
This icon… Represents… Java Data Type
22 SAP BC Developer Tutorial 4.8

Basic Operations
Multiple Areas and Tabs in the Editor
Resizing the Areas in the WindowYou can resize areas in the Developer window by dragging borders with your mouse. Movable borders are marked with symbols. You can also click the symbols to expand a area to the full height or width of the current window.
You can also click to maximize the area that has focus. Click to restore the Developer window to the normal view.
Sometimes the Editorcontains multiple
areas...
...and tabs
SAP BC Developer Tutorial 4.8 23

L E S S O N 1 S t a r t i n g S A P B C D e v e l o p e r
Resizing areas
Creating New ElementsTo create a new element, on the File menu, click New. Follow the instructions given by Developer. If you need assistance at any step in the process, click Help.
Moving and Copying ElementsYou can move and copy services, specifications, and records within the Service Browser using your mouse. However, you cannot move or copy packages, folders, or WIDL services. To move an element, click the element in the Service Browser and drag it to the new location. You can move elements between folders and packages.
To copy an element, select the element in the Service Browser and right‐click the mouse. On the right‐click menu, click Copy. Select the folder where you want to copy the element and right‐click (this can be the same folder). On the right‐click menu, click Paste. A copy of the element is inserted in the selected folder. If you copied the element to the same folder, “Copy” is appended to the element name. If you want to rename the element, select it and press ENTER, or use the Rename command on the right‐click menu.
Drag movableborders to resize
areas
24 SAP BC Developer Tutorial 4.8

Basic Operations
Saving Your WorkWhen you open Developer and select an element in the Service Browser, Developer opens a copy of that element for you to edit. Changes that you make to the element are not written to the SAP BC Server until you explicitly save your work using the Save command.
If you attempt to exit Developer or close your session without saving your changes, Developer will prompt you to save them before you exit or close your session on the server.
End of Lesson 1!The next lesson will show you how to create folders, flow services, invoke services, and map the pipeline.
Note: When you copy a Java service from one folder to another, you must respecify the Shared tab information in the copy of the service. (You can copy the information from the Shared tab for the original service to the Shared tab for the copy of the service.) In addition, you must recompile the copy of the Java service (using Jcode or the Save command in Developer) before running it on the SAP BC Server.
Note: If you are editing elements on a server that you share with other developers, be sure to coordinate your work with the others so that you do not inadvertently edit the same element simultaneously and overwrite one another’s work. To avoid conflicts, you may want to make a practice of allowing only one developer to work on a given package at a time.
SAP BC Developer Tutorial 4.8 25

L E S S O N 1 S t a r t i n g S A P B C D e v e l o p e r
26 SAP BC Developer Tutorial 4.8
L E S S O N 2
Creat ing a Flow ServiceBasic Concepts. . . . . . . . . . . . . . . . . . . . . . . . . . . . . . . . . . . . . . . . . . . . . . . . . . . . . . . . . . . . 28
Creating a Folder . . . . . . . . . . . . . . . . . . . . . . . . . . . . . . . . . . . . . . . . . . . . . . . . . . . . . . . . . . 32
Creating a Flow Service . . . . . . . . . . . . . . . . . . . . . . . . . . . . . . . . . . . . . . . . . . . . . . . . . . . . . 35
Invoking Other Services . . . . . . . . . . . . . . . . . . . . . . . . . . . . . . . . . . . . . . . . . . . . . . . . . . . . . 37
Testing the Flow . . . . . . . . . . . . . . . . . . . . . . . . . . . . . . . . . . . . . . . . . . . . . . . . . . . . . . . . . . . 40
Invoking Services from a Flow . . . . . . . . . . . . . . . . . . . . . . . . . . . . . . . . . . . . . . . . . . . . . . . . 42
Mapping Pipeline Variables . . . . . . . . . . . . . . . . . . . . . . . . . . . . . . . . . . . . . . . . . . . . . . . . . . 47
SAP BC Developer Tutorial 4.8 27

L E S S O N 2 C r e a t i n g a F l o w S e r v i c e
Basic ConceptsTo successfully build a flow service, you should understand the following basic concepts and terms.
What Is a Flow Service?A flow service is a service that is written in webMethods’ flow language. This simple yet powerful language lets you encapsulate a sequence of services within a single service and manage the flow of data among them. For example, you might create a flow service that takes a purchase order from a buyer and executes the following series of services before submitting it to an internal ordering system:
1 Gets a purchase order submitted by a buyer
2 Logs the order in an audit‐trail file
3 Performs a credit check
4 Posts the order to the ordering system
Flow services encapsulate other services
What Is a Flow Step?A flow service contains flow steps. A flow step is a basic unit of work (expressed in webMethods flow language) that the SAP BC Server interprets and executes at run time. webMethods’s flow language provides flow steps that invoke services and flow steps that let you edit data in the pipeline.
webMethods’ flow language also provides a set of flow‐control steps that allow you to direct the execution of a flow service at run time. The flow‐control steps allow you to:
...which performs a sequenceof four services
Client application invokes Purch:SubmitPO...
1
3
4
2
28 SAP BC Developer Tutorial 4.8

Basic Concepts
Conditionally execute a specified sequence based on a variable value.
Retry a specified sequence until it succeeds.
Repeat a specified sequence (loop) for each element in an array variable.
In the following flow service, flow‐control steps have been inserted to loop through a subset of the flow service and branch to one of two services in the last step of the loop.
Flow-control steps are used to direct the execution of a flow
A flow service can contain the following types of flow steps:
Invocation Steps
INVOKE Executes a specified service.
Data-Handling Steps
MAP Performs specified editing operations on the pipeline (e.g., mapping variables in the pipeline, adding variables to the pipeline, dropping variables from the pipeline, and so forth).
Flow Control Steps
BRANCH Executes a specified flow step based on the value of a specified variable in the pipeline.
LOOP Executes a set of flow steps once for each element in a specified array.
A LOOP steprepeats a set of
flow steps
A BRANCH step selects aspecified flow step
for execution
SAP BC Developer Tutorial 4.8 29

L E S S O N 2 C r e a t i n g a F l o w S e r v i c e
What Is the Pipeline?The pipeline is the general term used to refer to the data structure in which input and output values are maintained for a flow service. It allows services in the flow to share data.
The pipeline starts with the input to the flow service and collects inputs and outputs from subsequent services in the flow. When a service in the flow executes, it has access to all data in the pipeline at that point.
REPEAT Re‐executes a set of flow steps up to a specified number of times based on the successful or non‐successful completion of the set.
SEQUENCE Groups a set of flow steps into a series. The SEQUENCE step is implicit in most flow services (that is, the steps in a flow service are treated as a series). However, at times it is necessary to explicitly group a subset of flow steps using SEQUENCE so that they can be treated as a unit.
EXIT Controls the execution of a flow step; for example, abort an entire flow service from within a series of deeply nested steps, throw an exception without writing a Java service, or exit a LOOP or REPEAT without throwing an exception.
30 SAP BC Developer Tutorial 4.8

Basic Concepts
The pipeline holds the input and output for a flow service
What are Input and Output Parameters?Input and output parameters are the names and types of variables that the service requires as input and generates as output. For example, a service that takes two string values—an account number (AcctNum) and a dollar amount (OrderTotal)—as input and produces an authorization code (AuthCode) as output, has the following input and output parameters:
Input and output parameters define the variables that the service requires as input and generates as output
Part of the process of creating a service is declaring its input and output parameters—i.e., explicitly specifying the variables it expects as input and produces as output.
Input Output
Name Data Type Name Data Type
AcctNum String AuthCode String
OrderTotal String
Services in a flow get their input from and place their output in the pipeline.
input
output
output
output
output
input
input
input
SAP BC Developer Tutorial 4.8 31

L E S S O N 2 C r e a t i n g a F l o w S e r v i c e
Creating a FolderBefore you create any flows, you need to create a folder to store the flow services in. Folders can contain services, specifications, records, and other folders. When you create a folder, you also need to select the package in which it will be stored. In this task, you will create an folder named “Bitterroot” and save it in the Default package.
1 Click on the Service Browser toolbar. The New dialog box opens.
2 Select Folder.
3 Click Next. The New Folder dialog box appears.
To create a folder
32 SAP BC Developer Tutorial 4.8

Creating a Folder
4 In the Name field, type Bitterroot.
5 Next to Folder, select the Default package.
6 Click Finish.
Developer returns you to the main window. Your new folder appears in the Service Browser as follows:
SAP BC Developer Tutorial 4.8 33

L E S S O N 2 C r e a t i n g a F l o w S e r v i c e
34 SAP BC Developer Tutorial 4.8

Creating a Flow Service
Creating a Flow ServiceA flow service is a service written in the webMethods’ flow language. In this task, you will create a flow service to submit shipping notices to GSG.
This master flow, which will be named Core, will contain the business logic for accepting orders, calculating arrival date, and intercepting errors. Many of these functions, such as calculating arrival date, have already been written, so you will be able to simply invoke the pre‐written service. The Core flow will invoke other flows.
1 Click on the Service Browser toolbar. The New dialog box opens.
2 Select Flow Service, and click Next. The New Flow Service dialog box appears.
Note: When creating new elements in SAP BC Developer, it is important to remember that Service names and Pipeline variables are case sensitive.
To create a flow service
SAP BC Developer Tutorial 4.8 35

L E S S O N 2 C r e a t i n g a F l o w S e r v i c e
3 In the Name field, type Core.
4 In the Folder tree, select the Bitterroot folder.
5 Click Next. The New Flow Service – Bitterroot:Core dialog box appears.
36 SAP BC Developer Tutorial 4.8

Invoking Other Services
6 Select Empty Flow if it is not already selected.
7 Click Finish.
Invoking Other ServicesTo execute a service from within a flow, you use an INVOKE step.
In this tutorial, you will add some existing services to the Core flow. The first service is called “CalculateArrivalDate.” The CalculateArrivalDate service takes in delivery information and outputs the date that the delivery should arrive.
1 Make sure the Core service is selected in the Service Browser.
2 Click the Flow Editor. This is the large white area at the top of the Editor.
3 Click on the Flow Editor toolbar.
4 Select Browse.
5 In the Select dialog box, in the Folder tree, open the WmSamples package, open the tutorial.goes folder, and select the CalculateArrivalDate flow (see screen below).
Note: Though you now have the option of automating the first several steps of setting up a flow, the following steps of this procedure will guide you through setting up the flow manually. This will help you understand how flows work.
Note: This tutorial has several pre‐built services. These can be modified or replaced, but for the scope of this tutorial, you will simply invoke them.
To invoke a service in a flow
SAP BC Developer Tutorial 4.8 37

L E S S O N 2 C r e a t i n g a F l o w S e r v i c e
6 Click OK.
The Developer window should now look like the following:
38 SAP BC Developer Tutorial 4.8

Invoking Other Services
Specifying Input Variables for a Flow ServiceThe CalculateArrivalDate service has several inputs such as send_day and outputs such as arrive_day. We want our flow to have similar inputs so that we can invoke CalculateArrivalDate with the appropriate information.
1 Click the Input/Output tab (located at the bottom of your screen).
2 Click the large white text box below Input.
3 Click on the toolbar, and select String.
4 Name the string send_month.
5 Press ENTER (if you need to make changes, select the variable, and press ENTER again).
6 Using step 3–5 as a guide, add the following strings:
Specifying Output Variables for a Flow ServiceNow you need to do something similar with the output for the Core flow service.
1 On the Input/Output tab, click the large white text box below Output.
2 Click on the toolbar, and select String.
3 Name the string arrive_month.
4 Press ENTER.
5 Using steps 2–4 as a guide, add the following strings:
To specify input variables for a flow service
String Name
send_day
send_year
shipping_company
shipping_method
To specify output variables for a flow service
SAP BC Developer Tutorial 4.8 39

L E S S O N 2 C r e a t i n g a F l o w S e r v i c e
The Developer window should now look like the following:
Testing the FlowYou now have your first working flow. Before continuing, you should test the flow.
1 On the Test menu, click Trace.
–OR–
Press F5.
2 If you are prompted to save changes, click OK.
3 In the Input for Core dialog box, type in the following input values for the service:
String Name
arrive_day
arrive_year
Error_Reason
To test a flow
40 SAP BC Developer Tutorial 4.8

Testing the Flow
The Input for ‘Core’ dialog box should look like the following:
4 Click OK. The SAP BC Server tests the service and displays the results on the Results tab in the Developer window.
In this field… Type…
send_month 10
send_day 30
send_year 2002
ship_company UPS
ship_method Ground
SAP BC Developer Tutorial 4.8 41

L E S S O N 2 C r e a t i n g a F l o w S e r v i c e
Look at the arrive_day, arrive_month, and arrive_year data and make sure the values are correct. The data was created by the CalculateArrivalDate service.
Invoking Services from a FlowIn this section, you will add two more services to the Core flow—the GenerateTranNumber service and the IncomingTransactions service.
Invoking the GenerateTranNumber ServiceTo request a service from within a flow, you use the INVOKE step. In this task, you will insert the GenerateTranNumber service into the Core flow. This service generates a transaction number, connects to GSG’s main GOES server, and transmits that number.
1 Click the Flow tab.
2 Click the Flow Editor.
3 Click on the Flow Editor toolbar, and select Browse.
Note: The input values might display in a different order on your screen.
To invoke a service in a flow
42 SAP BC Developer Tutorial 4.8

Invoking Services from a Flow
4 In the Select dialog box, in the Folder tree, open the WmSamples package, open the tutorial.goes folder, and select GenerateTranNumber.
5 Click OK.
The Developer window should now look like the following:
SAP BC Developer Tutorial 4.8 43

L E S S O N 2 C r e a t i n g a F l o w S e r v i c e
Invoking the IncomingTransactions Service The GenerateTranNumber service generates a transaction number based on the send information. The output of this function is a string called transaction_number. However, GSG’s system requires the string to be named TransID. The following steps will create a mock‐connection to GSG’s server. In the next task, you will map the transaction_number variable to the TransID variable so that their server receives the data correctly.
1 Click the button on the Flow Editor toolbar, and select Browse.
2 In the Select dialog box, in the Folder tree, open the WmSamples package, open the tutorial.gsg folder, and select IncomingTransactions.
Note: Make sure that the GenerateTranNumber service follows (the service is located/ moved below) the CalculateArrivalDate service in the Flow Editor. This is necessary because the GenerateTranNumber service requires the output of the CalculateArrivalDate service.
To invoke a service in a flow
44 SAP BC Developer Tutorial 4.8

Invoking Services from a Flow
3 Click OK.
The Developer window displays the following:
Note: For this tutorial, the remote service is on the same server that you are currently using. If you wish, you can set up two servers and use a Remote Invoke to call the service. The output should be the same either way.
SAP BC Developer Tutorial 4.8 45

L E S S O N 2 C r e a t i n g a F l o w S e r v i c e
Note that the input variable for the IncomingTransactions service is TransID (TransID is listed under Service In on the Pipeline tab). However, the variable in the pipeline is named transaction_number. To resolve the name difference, you need to “map” (copy) the value from one variable to another at run time.
46 SAP BC Developer Tutorial 4.8

Mapping Pipeline Variables
Mapping Pipeline VariablesBecause the variables have different names, you are going to use the Pipeline Editor to map a variable from the pipeline to the service. Then, you will trace the Core service to make sure the variables are properly mapped.
1 Click and drag transaction_number from the left‐hand column (Pipeline In) to TransID (Service In) and release the mouse button.
–or–
If both transaction_number and TransID don’t fit on your screen at the same time, click
transaction_number, scroll up to and click TransID. Then click to connect them.
A dark black line connects transaction_number to TransID
2 On the Test menu, click Trace. If you are prompted to save changes, click OK.
3 In the Input for Core dialog box, enter input variables as indicated in the following graphic (if they are not already filled in).
To map one variable to another
SAP BC Developer Tutorial 4.8 47

L E S S O N 2 C r e a t i n g a F l o w S e r v i c e
4 Click OK. The SAP BC Server tests the service and displays the results on the Results tab in the Developer window.
GSG_ack_number should have a value. If there is no value, then transaction_number did not get a value for TransID and there may be a problem in your flow.
End of Lesson 2!You may stop here and experiment further with SAP BC server on your own, or continue with the tutorial.
Lesson 3 will show you how to create output templates and use the BRANCH, SEQUENCE, and REPEAT steps.
48 SAP BC Developer Tutorial 4.8

L E S S O N 3
Working with FlowsCreating a Second Flow Service . . . . . . . . . . . . . . . . . . . . . . . . . . . . . . . . . . . . . . . . . . . . . . 51
Using a Service to Validate Input . . . . . . . . . . . . . . . . . . . . . . . . . . . . . . . . . . . . . . . . . . . . . . 52
Building a BRANCH Step . . . . . . . . . . . . . . . . . . . . . . . . . . . . . . . . . . . . . . . . . . . . . . . . . . . . 55
Building a SEQUENCE Step . . . . . . . . . . . . . . . . . . . . . . . . . . . . . . . . . . . . . . . . . . . . . . . . . 56
Building a REPEAT Step . . . . . . . . . . . . . . . . . . . . . . . . . . . . . . . . . . . . . . . . . . . . . . . . . . . . 57
Creating a Service Output Template for the Core Service . . . . . . . . . . . . . . . . . . . . . . . . . . . 57
Creating a Service Output Template for the RejectData Service . . . . . . . . . . . . . . . . . . . . . . 58
Changing the Service Output Template in Mid-Flow . . . . . . . . . . . . . . . . . . . . . . . . . . . . . . . 59
Testing the Core Service . . . . . . . . . . . . . . . . . . . . . . . . . . . . . . . . . . . . . . . . . . . . . . . . . . . . 62
SAP BC Developer Tutorial 4.8 49

L E S S O N 3 W o r k i n g w i t h F l o w s
Creating a Second Flow ServiceSuppose the user chooses a product shipping date that is invalid (February 31st) or not possible (before today). In these cases, the system should return an error to that user.
You will now create an error‐handling flow called “RejectData.” This new flow will do whatever should be done when the date data is invalid. For the purpose of this tutorial, you are only going to display the results of the error‐handling flow in a specific service output template (you will create the service output template later). In a real‐world setting, you could have the flow write to an error log or attempt to correct the error.
1 Start the SAP BC Server and Developer if they are not running.
2 Click the Flow tab.
3 Click on the Service Browser toolbar.
4 In the New dialog box, select Flow Service, and click Next.
5 In the Name field, type RejectData.
6 In the Folder tree, select Bitterroot if it is not already selected.
7 Click Next.
To create a flow
50 SAP BC Developer Tutorial 4.8

Using a Service to Validate Input
8 If it is not already selected, select Empty Flow, and click Finish.
The Developer window should now look like the following:
Using a Service to Validate InputYou want the Core flow to invoke the RejectData service when input values are not valid. Before you do this, however, you need to invoke a service that will determine whether the input values are valid. In the following task, you will insert an INVOKE step to execute this service.
1 Return to the Core flow by selecting Core in the Service Browser.
2 Click the Flow tab, and then click the Flow Editor.
3 Click on the Flow Editor toolbar, and select Browse.
4 In the Select dialog box, in the Folder tree, open the WmSamples package, open the tutorial.goes folder, select ValidateInput.
To invoke a service in a flow
SAP BC Developer Tutorial 4.8 51

L E S S O N 3 W o r k i n g w i t h F l o w s
5 Click OK.
6 On the Flow tab, in the Flow Editor, click the ValidateInput service to make it active,
then click on the Flow Editor toolbar until the service is first in the flow.
Building a BRANCH StepThe ValidateInput service will set the DataValidity variable to “VALID” or “INVALID” depending on the state of the data. Now, you need to insert a BRANCH step to indicate which services will run based on the value of the DataValidity variable. The DataValidity variable is the switch for this BRANCH step.
When you build a BRANCH step, you also insert target steps. The target steps are the children of the BRANCH step that are conditionally executed based on the value of the switch variable (in this case, DataValidity). For this BRANCH step, the target steps will be the RejectData service (executes when DataValidity is “INVALID”) and a SEQUENCE step (executes when DataValidity is “VALID”). You will build the SEQUENCE step in the next procedure.
52 SAP BC Developer Tutorial 4.8

Building a BRANCH Step
1 Select the Flow Editor.
2 Click on the Flow Editor toolbar to select BRANCH.
3 Click on the Flow Editor toolbar to move the BRANCH step to be the second step in the flow if it isn’t already. (You might need to resize the Flow Editor.)
4 In the Flow Editor, select BRANCH. The bottom portion of the Editor displays the properties of the branch.
5 On the Properties tab, in the switch field, type DataValidity. Press ENTER.
The Developer window should look like the following.
Because you want the BRANCH step to execute the RejectData service when DataValidity equals INVALID, you need to insert the RejectData service as a child of the BRANCH step.
6 Click on the Flow Editor toolbar, and select Browse.
7 In the Select dialog box, open the Default package, in the Bitterroot folder, select RejectData, and click OK. This is the flow service that you created earlier.
To build a BRANCH step
SAP BC Developer Tutorial 4.8 53

L E S S O N 3 W o r k i n g w i t h F l o w s
8 Make sure the RejectData service step is a child of the BRANCH step. If it is not a
child, drag it onto the branch step or use to move it under branch and then press
to make it a child of branch.
9 Make sure that RejectData is selected in the Flow Editor.
10 Click the Properties tab.
11 In the label field, type INVALID (all caps) and press ENTER. The label specifies the switch value that will trigger this step at run time. You want the RejectData service to execute if the value of the DataValidity variable is INVALID.
The Developer window should look like the following:
The remaining steps below the BRANCH need to run if DataValidity is VALID. To make a BRANCH step conditionally trigger a series of multiple steps, you make the steps children of a SEQUENCE step, and make the SEQUENCE step a target of the BRANCH step. You will do this in the next procedure.
54 SAP BC Developer Tutorial 4.8

Building a SEQUENCE Step
Building a SEQUENCE StepYou use a SEQUENCE step to build a set of steps that you want to treat as a group. Steps in the group are executed in order, one after the other.
If you want a BRANCH step to trigger a series of steps, instead of a single step, you can insert a SEQUENCE step as the target of the BRANCH step. Then, make the series of steps children of the SEQUENCE step.
In this task, you will build a SEQUENCE step, put the other three INVOKE steps in that sequence (make them children of the SEQUENCE step), and then make the SEQUENCE step a child of the BRANCH step. You will then set the properties of the SEQUENCE step so that the step will run only if DataValidity is VALID.
1 In the Flow Editor, click the BRANCH step to make it active.
2 Click on the Flow Editor toolbar to select SEQUENCE.
3 Make the CalculateArrivalDate, GenerateTranNum, and IncomingTransactions services children of the SEQUENCE step (make sure the order is correct).
4 In the Flow Editor, select the SEQUENCE step. Click to make it a child of the BRANCH step.
5 On the Properties tab, in the label field, type VALID (all caps) and press ENTER. The label specifies the switch value that will trigger this SEQUENCE at run time. You want the SEQUENCE step to execute if the value of the DataValidity variable is VALID.
Expand the SEQUENCE step. The Developer window should look like the following:
Note: Remember there are multiple ways of moving flow elements around, including dragging them with the mouse, using the blue arrow buttons, or using control‐shift‐arrow keys.
To build a SEQUENCE step
SAP BC Developer Tutorial 4.8 55

L E S S O N 3 W o r k i n g w i t h F l o w s
Notice that exit-on is set to “FAILURE.” This means that if any services in the flow fail, the entire sequence will stop running.
Building a REPEAT StepConsider a case where the IncomingTransactions service may fail because an Internet connection isn’t reliable. In this case, the server should try to invoke the service a specified number of times before “failing.” You can set this up using the Repeat step. The REPEAT step allows you to conditionally repeat a sequence of child steps based on the successes or failure of the child steps.
1 Click on the Flow Editor toolbar to select REPEAT.
2 Make the REPEAT step a child of the SEQUENCE step.
3 Use to move the REPEAT step immediately above the IncomingTransactions step.
4 In the Flow Editor, select IncomingTransactions, and click to make it a child of the Repeat step.
To build a REPEAT step
56 SAP BC Developer Tutorial 4.8

Creating a Service Output Template for the Core Service
5 Click the Repeat step to make it active.
6 If it is not already selected, click the Flow tab.
7 In the count field, type 5 and press ENTER. The count property indicates how many times the child step (IncomingTransactions) will be repeated. Here, the REPEAT step will retry the IncomingTransactions step up to 5 times.
The Developer window should look like the following:
Creating a Service Output Template for the Core ServiceService output templates are used to insert output values from a service into a string that you define. Output templates are most frequently used to customize the HTML page that a service returns to a browser‐based application.
In this task, you will create a service output template for the Core service.
To create an service output template
SAP BC Developer Tutorial 4.8 57

L E S S O N 3 W o r k i n g w i t h F l o w s
1 In the Service Browser, select the Core service.
2 Click the Settings tab.
3 Click New to enter the service output template editor.
4 Type in the following HTML:
<HTML><BODY><H1>Order Processed</H1>
Send: <B>%value send_month%/%value send_day%/%value send_year%</B><BR>
Arrive: <B>%value arrive_month%/%value arrive_day%/%value arrive_year%</B><BR>
Transaction Number: <B>%value transaction_number%</B><BR>
GSG Acknowledgment: <B>%value GSG_ack_number%</B>
</BODY></HTML>
5 Click Save to save the service output template and close the service output template editor.
6 Click to save the entire flow.
Creating a Service Output Template for the RejectData ServiceYou are now going to create a service output template for the RejectData service.
1 In the Service Browser, select the RejectData flow service.
2 If it is not already selected, click the Settings tab.
3 Click the New button to enter the service output template editor.
4 Type in the following HTML:
<HTML><BODY><H1>Error</H1>Cannot process this order.<P>Reason: <B>%value Error_Reason%</B></BODY></HTML>
To create a service output template
58 SAP BC Developer Tutorial 4.8

Changing the Service Output Template in Mid-Flow
5 Click Save to save the service output template and close the service output template editor.
The Developer window should look like the following:
Changing the Service Output Template in Mid-FlowAfter you assign a service output template to a service, the SAP BC Server automatically uses that service output template to return output for the service. For example, when the Core service runs correctly, it will use the service output template assigned to the Core service to display results. However, if an error occurs, you want the Core service to display results using the service output template assigned to the RejectData service. To accomplish this, you need to change the service output template in mid‐flow. To override the service output template assigned to the Core service, all you have to do is change the $template variable to the name of the alternative service output template.
SAP BC Developer Tutorial 4.8 59

L E S S O N 3 W o r k i n g w i t h F l o w s
1 Make sure the RejectData flow is selected in the Service Browser, and click the Input/Output tab.
2 On the Input/Output tab, click the large white text box below Output.
3 Click on the toolbar, and select String.
4 Name the variable $template. Press ENTER.
The Developer window should now look like the following:
5 Click the Flow tab to return to the Flow Editor.
6 Click on the Flow Editor toolbar to select MAP.
7 In the Pipeline Editor, click $template to make it active.
8 Click on the toolbar to assign the $template variable a default value.
9 In the $template field, type Bitterroot_RejectData. You have now assigned a value to the $template variable.
To change the service output template in mid-flow
60 SAP BC Developer Tutorial 4.8

Changing the Service Output Template in Mid-Flow
10 Leave the other settings as they are and click OK.
11 Click on the Service Browser toolbar to save your changes to the flow.
The Developer window should now look like the following:
SAP BC Developer Tutorial 4.8 61

L E S S O N 3 W o r k i n g w i t h F l o w s
Testing the Core ServiceIn this task, you will test the Core service by running the service in a browser. When you run a service, you run it on the SAP BC Server to which you are currently connected.
1 In the Service Browser, select Core.
2 On the Test menu, select Run in Browser. If you are prompted to save changes, click OK.
3 Enter the input as indicated in the following graphic (this is the same input as before), and click OK.
If you are prompted for a user name and password, enter them as you did when you started Developer. The SAP BC Server tests the service and displays the results in a browser window.
To run a service in a browser
62 SAP BC Developer Tutorial 4.8

Testing the Core Service
4 Exit the browser.
5 On the Test menu, select Run in Browser.
6 Try entering invalid dates as input to see if the output template changes. For example, if you use the following inputs:
You receive an error message:
SAP BC Developer Tutorial 4.8 63

L E S S O N 3 W o r k i n g w i t h F l o w s
End of Lesson 3!You may stop here and experiment further with SAP BC server on your own, or continue with the tutorial.
Lesson 4 will show you more flow techniques such as LOOP, EXIT, and conditional labels
64 SAP BC Developer Tutorial 4.8

L E S S O N 4
Advanced FlowsCreating a Third Flow Service . . . . . . . . . . . . . . . . . . . . . . . . . . . . . . . . . . . . . . . . . . . . . . . . 66
Declaring the Input and Output Parameters . . . . . . . . . . . . . . . . . . . . . . . . . . . . . . . . . . . . . . 68
Flow Backbone . . . . . . . . . . . . . . . . . . . . . . . . . . . . . . . . . . . . . . . . . . . . . . . . . . . . . . . . . . . . 70
Building a LOOP Step . . . . . . . . . . . . . . . . . . . . . . . . . . . . . . . . . . . . . . . . . . . . . . . . . . . . . . 72
Building a Conditional Label . . . . . . . . . . . . . . . . . . . . . . . . . . . . . . . . . . . . . . . . . . . . . . . . . . 73
Building an EXIT Step . . . . . . . . . . . . . . . . . . . . . . . . . . . . . . . . . . . . . . . . . . . . . . . . . . . . . . 76
Testing the Service. . . . . . . . . . . . . . . . . . . . . . . . . . . . . . . . . . . . . . . . . . . . . . . . . . . . . . . . . 81
SAP BC Developer Tutorial 4.8 65
L E S S O N 4 A d v a n c e d F l o w s
Creating a Third Flow ServiceSo far all of the data that you have been using has been Strings. This lesson will introduce Records and Record Lists, and how to use them. You will be using a LOOP step to access data in a Record List, a Conditional Label to match correct values, and an EXIT step to speed up your flow.
You will now create a flow called “getProductData.” When you give this flow an SKU (Stock Keeping Unit) for input it will return the name of the product, the price, availability, and other information. If the SKU is not found in the catalog, then the name will be set to “not found” and the other fields will be left as NULL.
This flow is not used by the Core flow you built in previous exercises, but you could modify Core to use it.
Data for this service comes from an XML file located in packages\WmSamples\pub\goes\catalogue.xml. A pre‐written flow called loadCatalog in tutorial.catalogue will load this data and output it as a record list.
This section should take about 20 minutes to complete.
1 Start the SAP BC Server and Developer if they are not running. Open a session to your server.
2 Click on the Service Browser toolbar.
3 In the New dialog box, select Flow Service, and click Next.
4 In the Name field, type getProductData.
5 In the Folder tree, select Bitterroot.
Note: A complete version of the flow you will be building is included in WmSamples. Take a look at the flow getProductData in the tutorial.catalogue folder if you need help or want to see what you will be building.
To create a flow
66 SAP BC Developer Tutorial 4.8

Creating a Third Flow Service
6 Click Finish.
The Developer window should now look like the following:
SAP BC Developer Tutorial 4.8 67

L E S S O N 4 A d v a n c e d F l o w s
Declaring the Input and Output ParametersThe first thing you need to do is declare the input and output variable for the flow service.
Specifying Input Variables for a Flow ServiceThe getProductData service needs a SKU to find. This is the only input.
1 Click the Input/Output tab.
2 Click the large white text box below Input.
3 Click on the toolbar, and select String.
4 Name the string SKU.
5 Press ENTER.
Specifying Output Variables for a Flow ServiceThe output of this service is going to be information from the catalog pertaining to this particular SKU.
To specify input variables for a flow service
68 SAP BC Developer Tutorial 4.8

Declaring the Input and Output Parameters
1 On the Input/Output tab, click the large white text box below Output.
2 Click on the toolbar, and select String.
3 Name the string SKU.
4 Press ENTER.
Using steps 2–4 as a guide, add the following strings to the Output text box:
The Developer window should now look like the following:
To specify output variables for a flow service
String Name
NAME
LENGTH
TYPE
PRODUCT_WIDTH
PRICE
AVAILABILITY
SAP BC Developer Tutorial 4.8 69

L E S S O N 4 A d v a n c e d F l o w s
Flow BackboneBuilding a complex flow is easier if you separate it into logical sections. This flow has three major sections:
Load the catalog
Loop through the catalog
Clean up the pipeline
The first stage is to build each of these sections.
Load the CatalogThis tutorial comes with a flow already built to load a catalog and convert it to a record. The service is called loadCatalog and is in the tutorial.catalogue folder. This service has no inputs. It produces a Record List containing the catalog.
To invoke loadCatalog
70 SAP BC Developer Tutorial 4.8

Flow Backbone
1 Click on the Flow tab.
2 Click on the Flow Editor toolbar, and select Browse.
3 Find loadCatalog in the tutorial.catalogue folder in the WmSamples package.
4 Click OK.
Loop Through the CatalogThis is where the bulk of this service will be. For now, just put a SEQUENCE here and label it FindSKU, as explained below. (The importance of giving this SEQUENCE a label will be explained later when you add an EXIT.)
1 Click on the Flow tab.
2 Click on the Flow Editor toolbar to select SEQUENCE).
3 In the Properties tab, set the label to FindSKU. Press ENTER.
To add a SEQUENCE
SAP BC Developer Tutorial 4.8 71

L E S S O N 4 A d v a n c e d F l o w s
Building a LOOP StepThe LOOP step works by taking a string list or record list and running code once for each item in the list. In a sense, you are looping through the array.
At each iteration, one item from the list is put on the pipeline. Developer shows this as a single‐version of the item with the same name.
The loadCatalog service outputs a Record List called items. You will loop over items by setting the in‐array to “items”.
1 In the Flow Editor, click the FindSKU: SEQUENCE step to make it active.
2 Click on the Flow Editor toolbar to select LOOP.
Note: If you loop over a String List, the code in the loop will have a String with the same name.
If you loop over a Record List, the code in the loop will have a Record with the same name.
To build a LOOP step
72 SAP BC Developer Tutorial 4.8

Building a Conditional Label
3 Click to make it a child of the SEQUENCE step.
4 In the Properties tab for LOOP, set in-array to items. Press ENTER
The Developer window should look like the following:
Building a Conditional LabelYou are looping over each record in items and you want to find the data with the SKU from the input. To do this you will use a branch, and if the SKU is matching, copy the data to the pipeline.
Note: Developer will show ‘/items’ instead of ‘items’. The leading / is to show that this is something in the pipeline. You can loop over deeply nested records by using /, such as /data/customers/eastcoast.
Note: If you set the out-array value, then you can collect the output into a list by the name of that value. Out‐array works the same way as in‐array: at each iteration of the loop, you have access to one item in the out‐array to set data. After the loop is done, you should have a new list full of data.
SAP BC Developer Tutorial 4.8 73

L E S S O N 4 A d v a n c e d F l o w s
To see if the SKUs match, you will use a conditional label. A conditional label is a label with a condition in it. A condition is a test that either results in a true or false value. The condition you will use in this case is:
%/items/SKU% = %SKU%
where /items/SKU is the SKU of a particular record from the record list and SKU is the value from the input.
1 Click on the Flow Editor toolbar to select BRANCH.
2 In the Properties tab, set evaluate-labels to true.
3 Use to make the BRANCH a child of the LOOP.
4 Click on the Flow Editor toolbar to select SEQUENCE.
5 Click on the Flow Editor toolbar to select SEQUENCE (again).
6 Use to make both SEQUENCES children of the BRANCH.
7 Click on the first SEQUENCE.
8 Set the label to %/items/SKU% = %SKU%. Press ENTER.
Note: Variables must have their names surrounded with % signs. If you want to match an SKU with a particular string, you can use quotes. (Example: %SKU% = "A")
To build a Conditional Label
74 SAP BC Developer Tutorial 4.8

Building a Conditional Label
9 Click on the second SEQUENCE.
10 Set the label to $default.
The Developer window should look like the following:
SAP BC Developer Tutorial 4.8 75

L E S S O N 4 A d v a n c e d F l o w s
In this tutorial you will not be putting additional code in the $default branch. The reason you created this branch is to aid in debugging. When tracing or stepping through the flow, you will execute the $default line when the Conditional Label is false.
Building an EXIT StepIf the SKU matches, then you are going to put the data for that item on the pipeline and then exit the LOOP. If the SKU is never found, then you will put “not found” in the pipeline. This will be done after the loop runs.
In this task, you insert a MAP to map the data to the pipeline, an EXIT to leave the LOOP early, and another MAP to update the pipeline if the SKU is never found.
1 Click on the %/items/SKU% = %SKU%: SEQUENCE.
2 Click on in the toolbar to add a MAP step.
3 Use to make the MAP a child of the SEQUENCE.
To copy data to the pipeline
76 SAP BC Developer Tutorial 4.8

Building an EXIT Step
4 With MAP selected, expand items in Pipeline In.
5 Click on the Pipeline Out side.
6 Use to add a String to Pipeline Out.
7 Name the String NAME. Press ENTER.
8 Drag NAME from Pipeline In to NAME in Pipeline Out.
9 Using steps 6–8 as a guide, add and map the following strings:
Note: If you click on the icon, Developer will expand the current area to take up
more space. This can make mapping easier. The icon will change to , which will restore the layout.
SAP BC Developer Tutorial 4.8 77

L E S S O N 4 A d v a n c e d F l o w s
The Developer window should look like the following:
You are now going to add the EXIT.
1 Click on MAP in the Flow Editor, if it is not already active.
String Name
LENGTH
TYPE
PRODUCT_WIDTH
PRICE
AVAILABILITY
To build an EXIT Step
Note: If you clicked on the icon to expand the Pipeline area in the previous
procedure, click the , icon to restore the layout and the Flow Editor.
78 SAP BC Developer Tutorial 4.8

Building an EXIT Step
2 Click on in the toolbar to add an EXIT step.
3 In the properties of EXIT, set from to FindSKU. Press ENTER.
The Developer window should look like the following:
After the LOOP you will set the value of NAME to “not found.” Typically leaving it null would be fine, but for sake of this tutorial, this is showing you how to have code run when a LOOP does not find what you needed.
1 Click on the LOOP step in the Flow Editor.
2 Click on the toolbar to select MAP.
3 Click on NAME in the Pipeline Out.
4 Click on (Set Value).
5 Type not found and click OK.
6 If this MAP is not the last child of FindSKU, use the blue arrows to adjust it.
To reflect the “failed” case in the pipeline
SAP BC Developer Tutorial 4.8 79

L E S S O N 4 A d v a n c e d F l o w s
The Developer window should now look like the following:
Finally, the last step in our flow is to clean up the pipeline.
1 Click on the last map step in the Flow.
2 Click on items in Pipeline In.
3 Click on to drop the variable from the pipeline.
The Developer window should now look like the following:
To clean up the pipeline
80 SAP BC Developer Tutorial 4.8

Testing the Service
Testing the ServiceYou can do the testing from within Developer.
1 Save the flow by clicking (Save).
2 Trace the flow by clicking the (Trace).
3 Developer will automatically ask for the input. Enter a valid input from the table below and then click OK.
To test the service
SAP BC Developer Tutorial 4.8 81

L E S S O N 4 A d v a n c e d F l o w s
The output should look like the following when you enter an SKU from the list:
Try entering an SKU that is not from the list. For example, if you enter dsaljdsaf, the Developer responds as follows:
Valid SKU Input Expected NAME in Output
A Globe
B Pro Series
C Yaqui
D Vert
E Trauma
Note: You can run the flow one step at a time by using (Step). This can help in debugging LOOP and BRANCH steps.
82 SAP BC Developer Tutorial 4.8

Testing the Service
End of Lesson 4You may stop here and experiment further with SAP BC server on your own, or continue with the tutorial.
Lesson 5 will show you how to write your own Java service.
SAP BC Developer Tutorial 4.8 83

L E S S O N 4 A d v a n c e d F l o w s
84 SAP BC Developer Tutorial 4.8

L E S S O N 5
Construct ing Java ServicesBuilding a Java Service . . . . . . . . . . . . . . . . . . . . . . . . . . . . . . . . . . . . . . . . . . . . . . . . . . . . . 86
Creating a Specification . . . . . . . . . . . . . . . . . . . . . . . . . . . . . . . . . . . . . . . . . . . . . . . . . . . . . 88
The Shared Tab . . . . . . . . . . . . . . . . . . . . . . . . . . . . . . . . . . . . . . . . . . . . . . . . . . . . . . . . . . . 89
Specifying Code on the Source Tab. . . . . . . . . . . . . . . . . . . . . . . . . . . . . . . . . . . . . . . . . . . . 90
Invoking a Java Service . . . . . . . . . . . . . . . . . . . . . . . . . . . . . . . . . . . . . . . . . . . . . . . . . . . . . 92
SAP BC Developer Tutorial 4.8 85

L E S S O N 5 C o n s t r u c t i n g J a v a S e r v i c e s
Building a Java ServiceDeveloper provides an Integrated Development Environment (IDE) that you can use to create, compile, and publish Java services.
Bitterroot’s system needs to keep a local log of transaction numbers. To meet this requirement, you will build a logging service in Java, then invoke it from the Core flow.
1 Click on the Service Browser toolbar.
2 In the New dialog box, select Java Service, and click Next.
3 In the New Java Service dialog box, in the Name field, type LogData.
4 In the New Java Service dialog box, in the Folder tree, select the Bitterroot folder.
To create a Java service with Developer
86 SAP BC Developer Tutorial 4.8

Building a Java Service
5 Click Finish.
After adding the LogData Java service, the Developer window should look like the following:
SAP BC Developer Tutorial 4.8 87

L E S S O N 5 C o n s t r u c t i n g J a v a S e r v i c e s
Creating a SpecificationWhen you create a Java service, you can define the specification for the service—declare the inputs and outputs for the service. This Java service will take GSG_ack_number and transaction_number as input, so you need to add these to the Input/Output tab.
1 Make sure LogData is selected in the Service Browser.
2 Click the Input/Output tab.
3 Click the large white text area below Input.
4 Click on the toolbar, and select String.
5 Name the string GSG_ack_number.
6 Press ENTER.
7 Using steps 4–6 as a guide, add the string transaction_number to the input.
The Developer window should look like the following:
To create a specification for a Java service
88 SAP BC Developer Tutorial 4.8

The Shared Tab
The Shared TabYou use the Shared tab to specify common (i.e., shared) attributes of this service. This can include the superclass and folder declarations, required imports, and member variables that are exposed as services. All Java services in this folder will use anything set in this tab.
The LogData Java service is going to use several imports, so you will add them using the Shared tab.
1 Make sure LogData is selected in the Service Browser.
2 Click the Shared tab.
3 Click next to Imports to add a row.
4 In the new row next to Imports, type java.util.Date and press ENTER.
5 In the new row next to Imports, type java.io.* and press ENTER.
6 In the new row next to Imports, type java.text.*, then click on another part of the window.
The Developer window should look like the following:
To add information to the Shared tab
SAP BC Developer Tutorial 4.8 89

L E S S O N 5 C o n s t r u c t i n g J a v a S e r v i c e s
Specifying Code on the Source TabWhen you build a Java service, you type (or paste) your code in the text box on the Source tab. The Source tab is like a template you “fill in” with custom Java code. Standard blocks of required code appear in the shaded areas at the top and bottom of the Source tab.
In this task, you will type in the Java source for this service. Make sure you type it correctly.
1 Make sure the LogData Java service is selected in the Service Browser.
2 Click the Source tab.
3 Type the following Java code:// input from pipeline
IDataCursor pipelineCursor = pipeline.getCursor();pipelineCursor.first( "GSG_ack_number" );String GSG_ack_number = (String)pipelineCursor.getValue();pipelineCursor.first( "transaction_number" );String transaction_number = (String)pipelineCursor.getValue();pipelineCursor.destroy();
// Build log file directory// save in package's pub directory
String Curr_Dir = System.getProperty("user.dir");String File_Sep = System.getProperty("file.separator");
String This_Package = Service.getPackageName ( Values.use( pipeline ) );
String Pub_Dir = Curr_Dir + File_Sep +"packages" + File_Sep + This_Package + File_Sep + "pub";
String Log_File = Pub_Dir + File_Sep + "log.txt";
// Date for log file
Date currentDate = new Date();
SimpleDateFormat sdf;sdf = new SimpleDateFormat( "yyy-MMM-dd hh:mm:ss zzz" );String Date_String = sdf.format( currentDate );
// Write the file
try{FileWriter log = new FileWriter( Log_File, true );
To specify code on the Source tab
90 SAP BC Developer Tutorial 4.8

Specifying Code on the Source Tab
log.write( Date_String );log.write( ", " );log.write( transaction_number );log.write( ", " );log.write( GSG_ack_number );log.write( System.getProperty("line.separator") );log.close();} catch( IOException e) {System.out.println( e.toString() );}
4 Click on the Service Browser toolbar to save the LogData Java service. This action also compiles the code. If you get any compiler errors, make sure that the code and imports are typed correctly.
The Developer window should look like the following:
Note: You can test this flow by running it. It will prompt for a GSG_ack_number and transaction_number. You can enter whatever you want as the values for those two variables. To see the result of the LogData Java service, go to this address:
http://SERVER:PORT/Default/log.txt(example: http://localhost:5555/Default/log.txt)
You will see a text file with the log entry you added.
SAP BC Developer Tutorial 4.8 91

L E S S O N 5 C o n s t r u c t i n g J a v a S e r v i c e s
Invoking a Java ServiceYou will now add a step that invokes the LogData service.
1 Click the Core flow in the Service Browser.
2 Click the Flow tab.
3 Click the Flow Editor.
4 Click on the Flow Editor toolbar, and select Browse.
5 In the Select dialog box, select LogData from the Bitterroot folder and click OK.
6 Move LogData so that it is the last step in the SEQUENCE step if it isn’t already.
The Developer window should look like the following:
To invoke a Java service
92 SAP BC Developer Tutorial 4.8

Invoking a Java Service
Testing the Core ServiceNow you will test the Core flow service again to make sure it is working properly. If IncomingTransactions works correctly (within five attempts), then it returns GSG_ack_number and a log entry is written.
You should get the same results as before.
1 On the Test menu, select Run in Browser. If you are prompted to save changes, click OK.
2 Enter the input as indicated in the following graphic (this is the same input as before), and click OK.
SAP BC Server tests the service and displays the results in a browser window.
To test the Core service
SAP BC Developer Tutorial 4.8 93

L E S S O N 5 C o n s t r u c t i n g J a v a S e r v i c e s
End of Lesson 5!You may stop here and experiment further with SAP BC server on your own, or continue with the tutorial.
Lesson 6 will show you how to create client code so you can invoke services from Java or other languages.
Note: You can look at the log file by going to http://localhost:5555/Default/log.txt. (Replace localhost and the port with the information pertaining to your server.)
94 SAP BC Developer Tutorial 4.8

L E S S O N 6
Generat ing Cl ient CodeGenerating Java Code . . . . . . . . . . . . . . . . . . . . . . . . . . . . . . . . . . . . . . . . . . . . . . . . . . . . . . 96
SAP BC Developer Tutorial 4.8 95

L E S S O N 6 G e n e r a t i n g C l i e n t C o d e
Generating Java CodeIf you wanted to build a custom front‐end to Global Sporting Goods’ GOES for access by Bitterroot, then you would use the Generate Code feature. This will produce a working client program that connects to the SAP BC Server and handles the input and output from the server.
1 Make sure Core is selected in the Service Browser
2 On the Compose menu, select Generate Code.
3 In the Code Generation dialog box, select For calling this service from a client.
4 Click Next. This creates an independent client that connects to the SAP BC Server via the SAP BC client library.
5 In the Code Generation dialog box, make sure Java is selected. (This is the default.)
To generate Java code
96 SAP BC Developer Tutorial 4.8

Generating Java Code
6 Click Next.
7 In the Code Generation dialog box, select the directory or type the name of the new directory in which you want to save the Java source file.
8 Click Finish. This is going to create a Java source file and a readme.txt file.
You can now go to the directory you selected in step 7, compile the Java code, and run it. Read the readme.txt file for information about what needs to be appended to your class path for the code to compile correctly.
SAP BC Developer Tutorial 4.8 97

L E S S O N 6 G e n e r a t i n g C l i e n t C o d e
Successful compilation output for the Core flow:
End of Lesson 6!Congratulations! You have completed the SAP BC Developer Tutorial.
Sample files for this tutorial are included with SAP BC server. The following section explains any differences between the samples and the tutorial output and includes some custom screen examples.
98 SAP BC Developer Tutorial 4.8

Pre-Bui l t Sample
goesSample . . . . . . . . . . . . . . . . . . . . . . . . . . . . . . . . . . . . . . . . . . . . . . . . . . . . . . . . . . . . . 100
Web Pages . . . . . . . . . . . . . . . . . . . . . . . . . . . . . . . . . . . . . . . . . . . . . . . . . . . . . . . . . . . . . . 100
SAP BC Developer Tutorial 4.8 99

P r e - B u i l t S a m p l e
goesSampleThe WmSamples package contains a folder that uses all of the pre‐built services used in this tutorial. The goesSample folder includes services that are similar to those you built while working through the tutorial.
Web PagesThe major difference between the goesSample flow and the flow you built using the tutorial is that the goesSample flow makes extensive use of service output templates, and also uses an XML catalogue.
100 SAP BC Developer Tutorial 4.8

Web Pages
SAP BC Developer Tutorial 4.8 101

P r e - B u i l t S a m p l e
A catalogue screen:
102 SAP BC Developer Tutorial 4.8
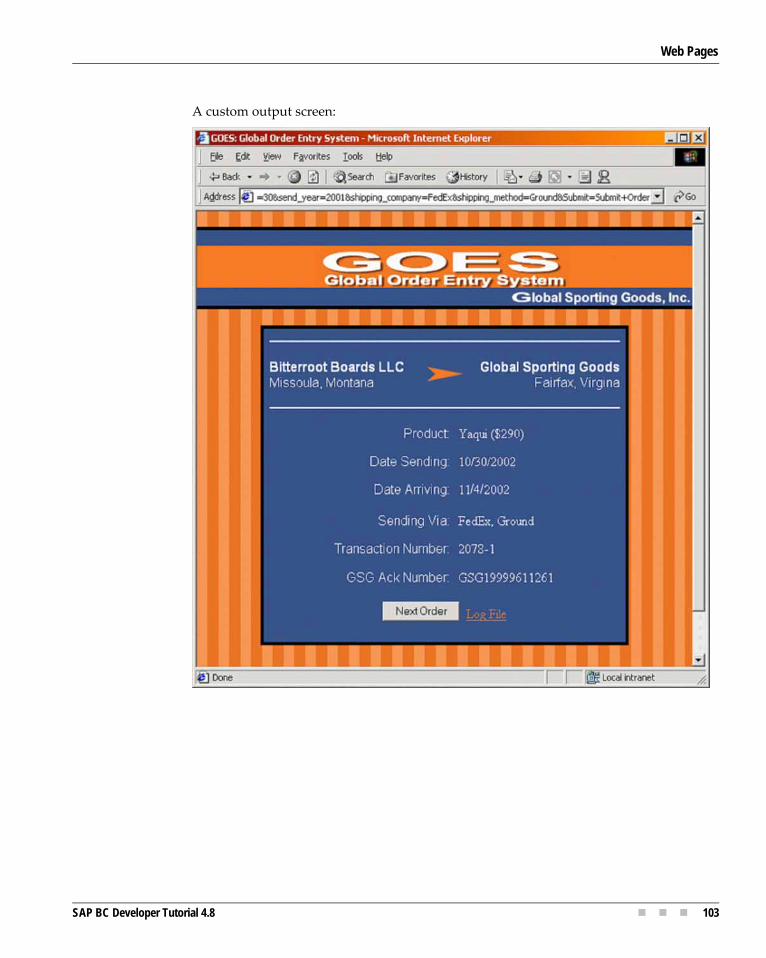
Web Pages
A custom output screen:
SAP BC Developer Tutorial 4.8 103
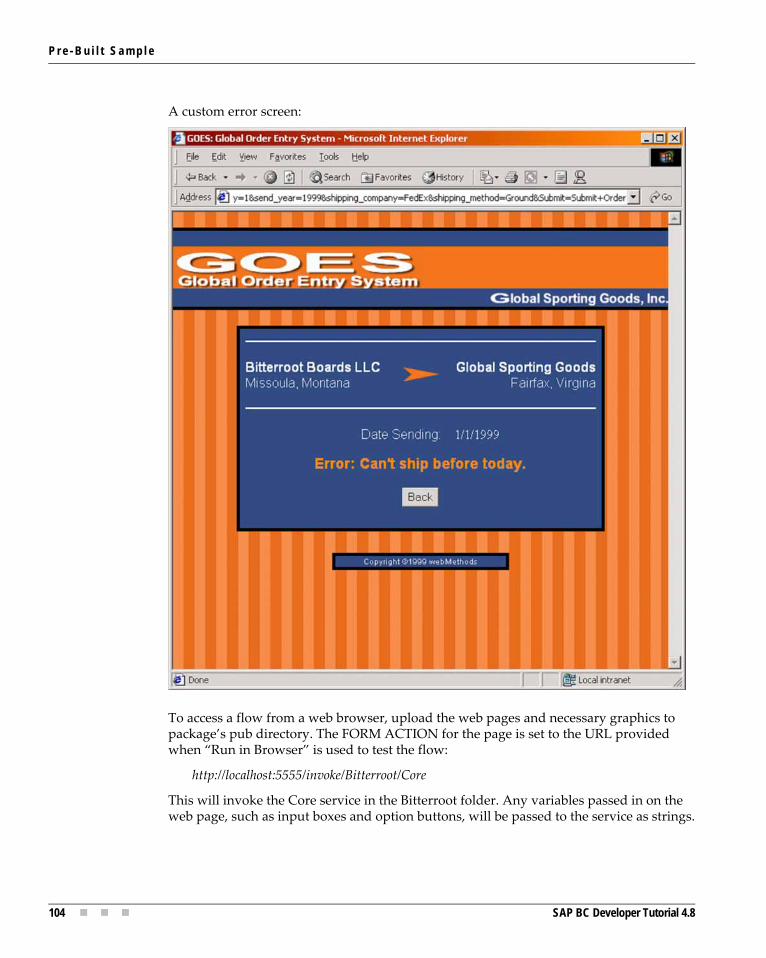
P r e - B u i l t S a m p l e
A custom error screen:
To access a flow from a web browser, upload the web pages and necessary graphics to package’s pub directory. The FORM ACTION for the page is set to the URL provided when “Run in Browser” is used to test the flow:
http://localhost:5555/invoke/Bitterroot/Core
This will invoke the Core service in the Bitterroot folder. Any variables passed in on the web page, such as input boxes and option buttons, will be passed to the service as strings.
104 SAP BC Developer Tutorial 4.8