Sage HRMS 2012 Installation Guide/media/site/Sage HRMS/pdf/inproduct/Sage-HRM… · • Sage HRMS...
73
Sage HRMS 2012 Installation Guide
Transcript of Sage HRMS 2012 Installation Guide/media/site/Sage HRMS/pdf/inproduct/Sage-HRM… · • Sage HRMS...

Sage HRMS 2012 Installation Guide

This document was last updated on March 20, 2014.
© 2014 Sage Software, Inc. All rights reserved. Sage, the Sage logos, and the Sage product and service names mentioned herein are registered trademarks or trademarks of Sage Software, Inc., or its affiliated entities. Business Objects, the Business Objects logo, and Crystal Reports are registered trademarks of SAP France in the United States and in other countries. NetLib is a registered trademark of Communication Horizons. OrgPlus is a trademark of HumanConcepts, LLC. TextBridge is a registered trademark of ScanSoft, Inc. Microsoft, Outlook, Windows, Windows NT, Windows Server, the .NET logo, Windows Vista and the Windows logo are trademarks or registered trademarks of Microsoft Corporation in the United States and /or other countries. The names of all other products and services are the property of their respective holders.
Sage has made every effort to ensure this documentation is correct and accurate but reserves the right to make changes without notice at its sole discretion. Use, duplication, modification, or transfer of the product described in this publication, except as expressly permitted by the Sage License Agreement is strictly prohibited. Individuals who make any unauthorized use of this product may be subject to civil and criminal penalties.
For additional assistance on this and other Sage products and services, visit our Web site at: http://www.sageabra.com

Installation Guide i
Table of Contents Overview ........................................................................................................................ 1
Introduction ......................................................................................................................................... 1
Support and Documentation ............................................................................................................. 2
Install Sage HRMS 2012 ................................................................................................. 3
Before You Begin ................................................................................................................................. 3 For Payroll installs ....................................................................................................................................... 3 Installation requires Database Create credentials ................................................................................... 3 Only alphanumeric characters permitted on install screens .................................................................. 3
Install Sage HRMS ............................................................................................................................... 4
Step 1 - Install the Server .................................................................................................................... 4
Step 2 - Install the Client ................................................................................................................... 13
Upgrade from Sage Abra HRMS v10.1 ...................................................................... 21
Step 1 - Upgrade the Server ...................................................................................................................... 21 Step 2 - Upgrade the Client ....................................................................................................................... 24
Upgrade from Sage Abra HRMS v10.0 ...................................................................... 31
Read the following before you begin the upgrade ....................................................................... 31
New Product Installation Process ................................................................................................... 31 Prepare for Payroll Upgrade .................................................................................................................... 32
Custom data and third-party applications .................................................................................... 33 Do the following after you upgrade ........................................................................................................ 33 Upgrading on a different server than original configuration .............................................................. 34 Sample data overwritten ........................................................................................................................... 34
Start the Upgrade .............................................................................................................................. 35 Step 1 - Upgrade the Server ...................................................................................................................... 35 Step 2 - Upgrade the Client ....................................................................................................................... 38 Required tasks after the upgrade ............................................................................................................. 43 Optional tasks after the upgrade ............................................................................................................. 44
Convert Sage Abra Suite v7.x or v9.x ........................................................................ 45
To convert from Sage Abra Suite v7.x or v9.x ............................................................................... 45

ii Sage HRMS 2012
Install Crystal Reports 2008 for Sage ......................................................................... 47
To Install Crystal Reports 2008 for Sage ......................................................................................... 47
If you have reports from a previous Crystal Reports version ..................................................... 49
Appendix ..................................................................................................................... 51
Enable the proper protocols on the server ..................................................................................... 51
Enable the SQL Browser Service ...................................................................................................... 52
Re-register: add a new module or option ....................................................................................... 54
Uninstall Sage HRMS 2012 ............................................................................................................... 56
Install sample data manually ........................................................................................................... 57
Verify Database Connections ........................................................................................................... 58
Upsize data from FoxPro to SQL Server ........................................................................................ 59 To run the Data Upsizing Wizard ........................................................................................................... 60 To run the Data Upsizing Elf.................................................................................................................... 62
Upgrade Sage Abra Suite Custom Reports .................................................................................... 64 Before you begin ........................................................................................................................................ 64 To change the data source ........................................................................................................................ 64 Field Name Changes ................................................................................................................................. 67 Checking for Empty Dates ........................................................................................................................ 68
Hardware/Software Requirements and Recommendations ........................................................ 69

Installation Guide 1
Overview Important! We recommend that this product be installed by a certified Business Partner or a member
of the Sage Professional Services Group.
Introduction This document contains the following installation, upgrade, and maintenance procedures.
• Install Sage HRMS 2012
• Upgrade to Sage HRMS 2012 from Sage Abra HRMS v10.1
• Upgrade to Sage HRMS 2012 from Sage Abra HRMS v10.0
• Convert to Sage HRMS 2012 from Sage Abra Suite v7.x or v9.x
• Upgrade Sage Abra Suite Custom Reports
• Install Crystal Reports
• Re-register to add another product or option
• Uninstall Sage HRMS 2012
Make sure you have the following items before you begin a new installation or an upgrade:
• Sage HRMS 2012 Installer DVD
• Sage HRMS 2012 Installation Guide (this document)
• Sage HRMS 2012 Release Notes (to learn about the new features, enhancements, and modifications in Sage HRMS 2012)

Support and Documentation
2 Sage HRMS 2012
Support and Documentation Sage strives to provide you with the very best support in the industry. If you have a question, we provide the following methods for you to get your answer as soon as possible.
• Refer to the online Help for assistance. To access online Help, select Contents from the Sage HRMS Help menu and use the Table of Contents, Index, and Search function to find what you need. You can also click to open Help for the function you are currently using.
• Visit the Technical Forum and Solution Center on Sage Business Care Online at: https://support.na.sage.com
• Documentation for 2012 is available on the Sage HRMS Product Documentation website at: http://na.sage.com/us/sage%20hrms/lp/In%20Product/hrmsexthelp/SageAbraSQLHRMSGuides
• Send an email (include your Customer ID number) to: [email protected]
• Call Sage Customer Support, Monday through Friday from 8:00 a.m. to 8:00 p.m. ET at 800-829-0170.
• Visit Sage Business Care Online and use Sage Live Chat, Monday through Friday from 9:00 A.M. to 5:00 P.M. (ET) at: https://support.na.sage.com. Please have your Customer ID number available.

Installation Guide 3
Install Sage HRMS 2012 This section steps you through installing Sage HRMS 2012 for the first time. To familiarize yourself with the installation process, be sure to read all the steps before you start the installation.
Note: If you are upgrading from a previous version, skip to the appropriate upgrade section for the version from which you are upgrading.
Before You Begin
For Payroll installs
If you will be installing Sage Payroll, be advised that Sage Accpac ERP and Sage Payroll cannot reside on the same server. Before you start the installation, make sure that Sage Accpac ERP is not on the server on which you are installing Sage Payroll.
Note: When installed as HRMS 2012 without Payroll and Sage Accpac ERP standalone, HRMS 2012 supports Accpac ERP 100, 200, and 500.
Installation requires Database Create credentials
For the installation, the SQL account to be used during the installation must have full DB Create (administrative) credentials. If the Enterprise SQL DB Administrator will not provide an account with DB Create credentials, do the following:
• Have the Enterprise SQL DB Administrator create a SQL account especially for the Sage HRMS database and give that account name to the install team.
• Immediately after the install have the Enterprise SQL DB Administrator downgrade this account to DB Owner credentials only. Be advised that the account used during installation is the same account and password that will be used by the Sage HRMS application. To test this account and password combination, refer to the Database Connection Tool instructions on page 58.
Only alphanumeric characters permitted on install screens
When you enter text in fields on the installation screens (such as company name or server name), the text must contain only alpha or numeric characters (alphabetic characters a-z, A-Z and numeric characters 0-9). You must not use any spaces or special characters, such as #, -, @ or punctuation marks.

Install Sage HRMS
4 Sage HRMS 2012
Install Sage HRMS The installation of Sage HRMS consists of two separate installations: installing on the server and installing on clients.
Important! You must have administrator rights to install this product.
Follow the steps below to first install Sage HRMS on a server, and then install a client either on the same server machine or on a separate client machine. If you will be running Sage HRMS on a network, the first user to log on each machine must do a separate client install.
Step 1 - Install the Server 1. At the server machine, insert the Sage HRMS 2012 Installer DVD into your DVD drive. If
Autorun is enabled, the Installation dialog box opens. If the Installation dialog box does not automatically open, browse to your DVD drive, and then double-click Launch.exe. The Sage HRMS Installer opens.

Step 1 - Install the Server
Installation Guide 5
2. Click Sage HRMS to open the Sage HRMS 2012 installer.
3. If you will be using Sage HRMS with SQL Server 2005, SQL Server 2008, or SQL Server 2008 Express Edition and the SQL Server is installed, proceed to 6.
If you will be using Sage HRMS with SQL Server Express Edition and need to install SQL Server Express Edition, complete the following (step 4) to install SQL Server Express 2008 R2 Edition.
4. Select Install SQL Server Express Edition and proceed with the installation. The system checks for, and if necessary, installs prerequisites for installation (such as Windows Installer 4.5, .NET Framework 3.5, and MDAC 2.8) before it begins installing SQL Server Express 2008 R2 edition.

Step 1 - Install the Server
6 Sage HRMS 2012
5. When the SQL Server Express 2008 R2 Edition installation is complete, restart your system. If the Sage HRMS Installation dialog box does not automatically open as shown below, repeat step 2 above.
6. Click Install Sage HRMS 2012 to open the Preparing to Install window.
Step 1 - Install the Server
Installation Guide 7
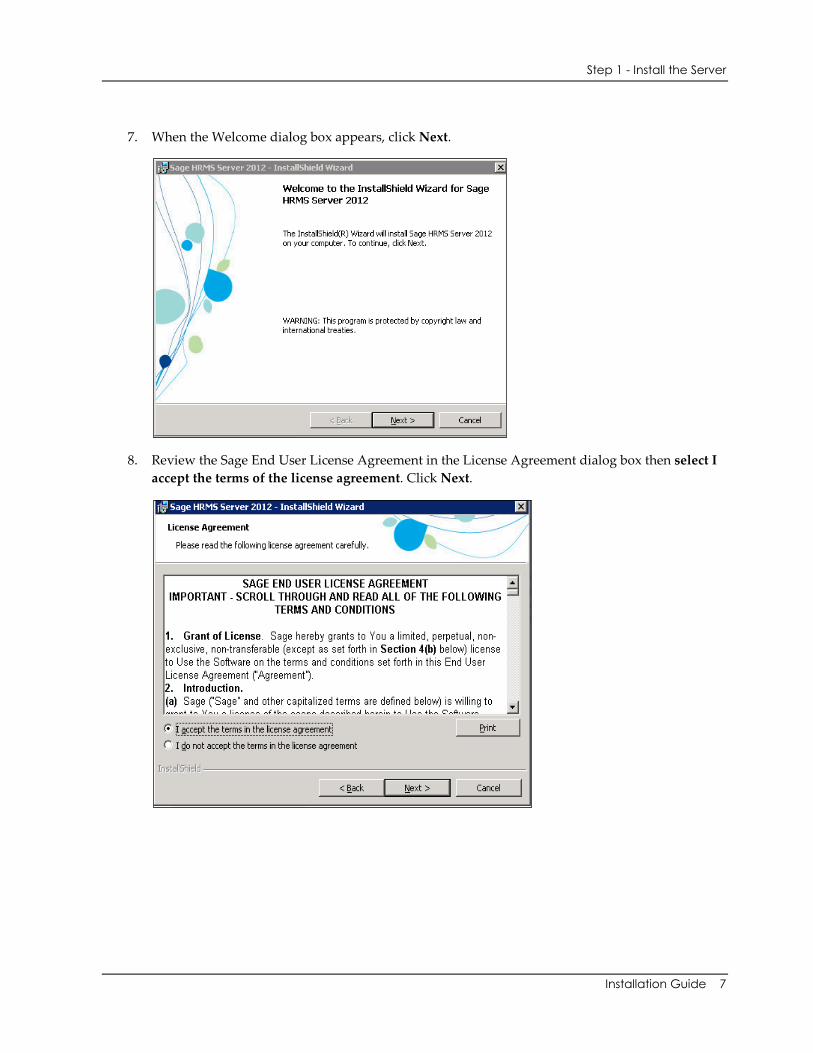
7. When the Welcome dialog box appears, click Next.
8. Review the Sage End User License Agreement in the License Agreement dialog box then select I accept the terms of the license agreement. Click Next.

Step 1 - Install the Server
8 Sage HRMS 2012
9. In the Customer Information dialog box, enter your User Name and Organization. Click Next.
10. The Destination Folder dialog box shows the default destination folder where Sage HRMS Server will be installed: C:\ProgramData\Sage\SageHRMSServer (on Windows Server 2008) or C:\Documents and Settings\All Users\Application data\Sage\SageHRMSServer (on Windows Server 2003). Click Next to accept the default destination; otherwise click Change and select another destination.

Step 1 - Install the Server
Installation Guide 9
11. Enter the required information in the SQL Setup dialog box.
As you enter information, note the following:
Server, User, Password
• If you are using SQL Server Express, enter <computer name>\abrahrmsx (for example, flh5109901\abrahrmsx) for the Server Name, then enter sa in the User Name field and Abrahrms! in the Password field.
• If you are using SQL Server, enter the Server Name, User Name, and Password in the corresponding fields. The SQL Server logon must be included in the administrator group.
• Do not use localhost for the server name if you plan to install remote clients.
Databases
Periods are not permitted in database names, so make sure the database names entered do not contain a period.
• The databases displayed are the default SQL databases that will be installed. AbraHRMS_Live and AbraHRMS_System are required.
• Optionally, the Sample databases can be installed. Sample data allows you to exercise the system using data from a simulated company that does not affect your live company data.

Step 1 - Install the Server
10 Sage HRMS 2012
Select the Install Sample Data check box if you want to include sample data with your installation. Three sets of sample data are installed:
− Sample Database is the sample HR database.
− Sample Payroll Database is the sample U.S. Payroll database.
− Sample Canadian Payroll Database is the sample Canadian Payroll database.
Note: When you select the Install Sample Data check box, the system will install all three sets of sample data, regardless of your configuration. If you do not want to include sample data at the time of installation, you can install it at a later time. See page 57 for instructions.
12. Click Next to establish a connection with the server.
• If you receive a message that the server name, user name, or password is invalid, verify that your entries are correct. If you are installing for SQL Server Express and you did not restart your system before installing Sage HRMS, restart your computer, and start the install again.
• If you receive the following message, it means you selected to install sample data, but did not provide the sample database names. You must enter the database names for all three sample databases.

Step 1 - Install the Server
Installation Guide 11
13. The Ready to Install the Program dialog box opens.
14. You can review your settings by clicking < Back through the previous screens. After you verify your settings are correct, click Install. The progress bar appears during the installation.

Step 1 - Install the Server
12 Sage HRMS 2012
15. When the server installation is complete, the Install Completed dialog box opens.
16. Click Finish.
17. Restart your system if you are prompted to do so.
18. After restart, from Windows Explorer, go to the destination folder where you installed the server, By default, it is C:\ProgramData\Sage\SageHRMSServer (on Windows Server 2008) or C:\Documents and Settings\All Users\Application data\Sage\SageHRMSServer (on Windows Server 2003)
Step 2 - Install the Client
Installation Guide 13
Notes: Set your Sharing settings.
Right-click the SageHRMSServer folder and select Sharing and Security to open the Properties dialog box.
Click the Sharing tab and share the folder. Set the permissions for users who access this folder over the network on the shared folder to Full Control. (Right-click the SageHRMSServer folder, select Properties, select the Sharing tab, click Permissions, then set Full Control for the appropriate groups or users.)
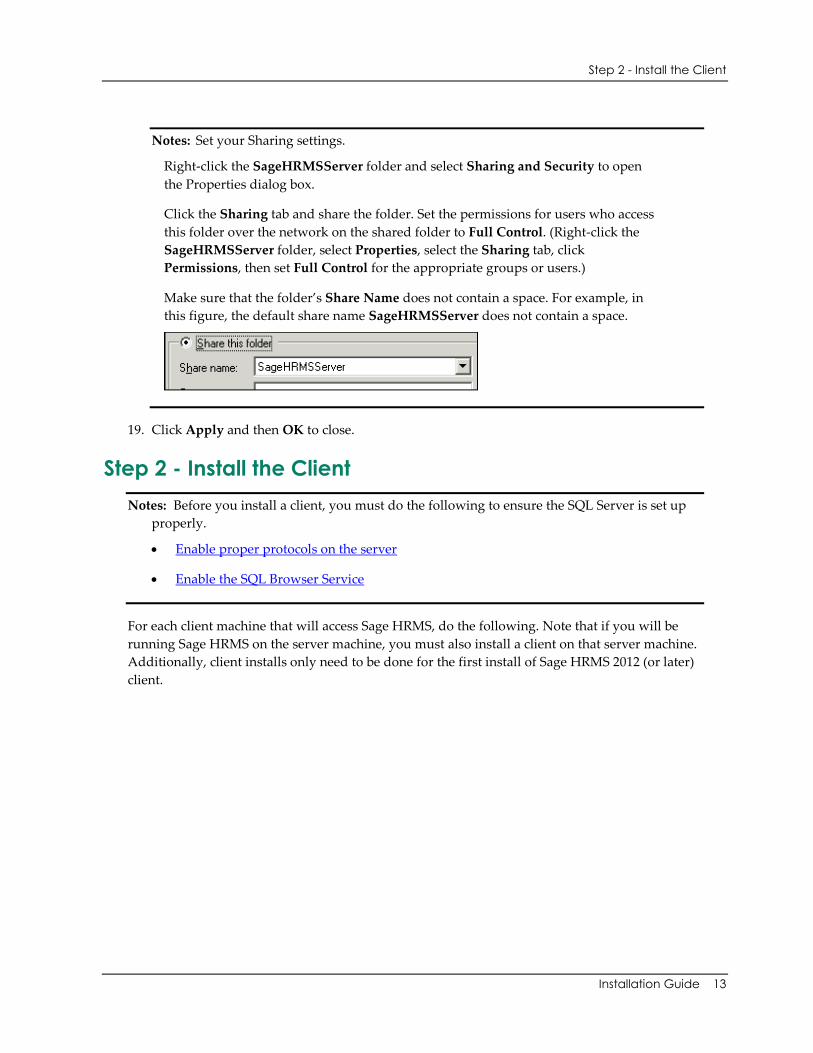
Make sure that the folder’s Share Name does not contain a space. For example, in this figure, the default share name SageHRMSServer does not contain a space.
19. Click Apply and then OK to close.
Step 2 - Install the Client Notes: Before you install a client, you must do the following to ensure the SQL Server is set up
properly.
• Enable proper protocols on the server
• Enable the SQL Browser Service
For each client machine that will access Sage HRMS, do the following. Note that if you will be running Sage HRMS on the server machine, you must also install a client on that server machine. Additionally, client installs only need to be done for the first install of Sage HRMS 2012 (or later) client.

Step 2 - Install the Client
14 Sage HRMS 2012
1. At the client machine, go to the shared folder on the server (either by using a UNC path or by creating a mapped drive) and, from the Client folder, double-click setup.exe.
If you are installing a client on the server machine, you can start the client installation using the shortcut Sage HRMS Client Install that was placed on the desktop during the server installation:

Step 2 - Install the Client
Installation Guide 15
2. The client installation begins and searches your machine for the required components. If a required component is not found, a dialog box lists the components required to be installed.
Important! Administrator privileges are required to install these components. If you are installing on Windows XP/Windows 2003 Server and you are not a member of the Administrators group, you will likely encounter errors if you proceed with the install. If you are installing on a later operating system such as Windows 7 or Windows 2008 Server and you are not a member of the Administrators group, you will be asked to enter an administrator user account and password to proceed with the install.
3. Click Install to start installing the required components. When component installation is complete, you could be asked to restart your computer. If this is the case, restart immediately (not later).

Step 2 - Install the Client
16 Sage HRMS 2012
4. When computer restart is complete, the Sage HRMS Client 2012 Install Welcome window appears. Click Next to continue with the client installation.
5. The Destination Folder dialog box shows the default destination folder (on a 32-bit operating system) where Sage HRMS Client 2012 will be installed at: C:\Program Files\Sage\Sage HRMS Client. If you are using a 64-bit operating system, the path would be C:\Program Files (x86)\Sage\Sage HRMS Client.
Click Next to accept the default destination; otherwise click Change and select another destination.
Step 2 - Install the Client
Installation Guide 17
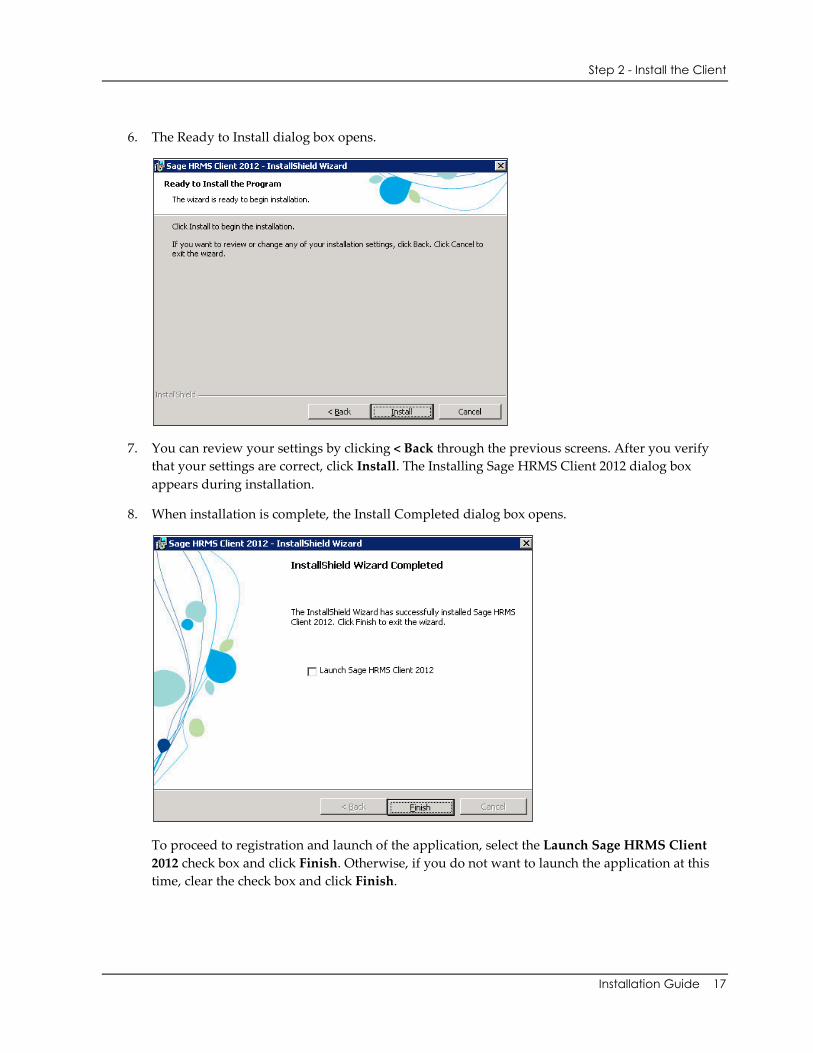
6. The Ready to Install dialog box opens.
7. You can review your settings by clicking < Back through the previous screens. After you verify that your settings are correct, click Install. The Installing Sage HRMS Client 2012 dialog box appears during installation.
8. When installation is complete, the Install Completed dialog box opens.
To proceed to registration and launch of the application, select the Launch Sage HRMS Client 2012 check box and click Finish. Otherwise, if you do not want to launch the application at this time, clear the check box and click Finish.

Step 2 - Install the Client
18 Sage HRMS 2012
9. If you chose to launch the application, the Register dialog box appears. Note that registration is required only on the first client installation. Enter the Serial Number and Installation Code you obtained from Sage Customer Service. If you want to add the Sage HR for MAS 90 Link, Sage Abra MAS 200 G/L Interface, or Sage Abra X3 G/L Interface, select the associated check boxes (G/L Interfaces are available only with Payroll systems). Click OK.
If your installation code includes Payroll (U.S., Canadian, or Both), the following Payroll Modules message appears during registration.
The Payroll modules are about to be installed and you must have administrator privileges to install them.
• If you do have administrator privileges, click Yes to proceed with the Payroll modules installation and then proceed to the next step.
• If you do not have administrator privileges, click No to end the installation. Note that this is an incomplete installation. When you next log on as a user with administrator privileges, you can continue installing the client. You must click Yes to this message to perform a complete installation and then you can proceed to the next step.
Step 2 - Install the Client
Installation Guide 19
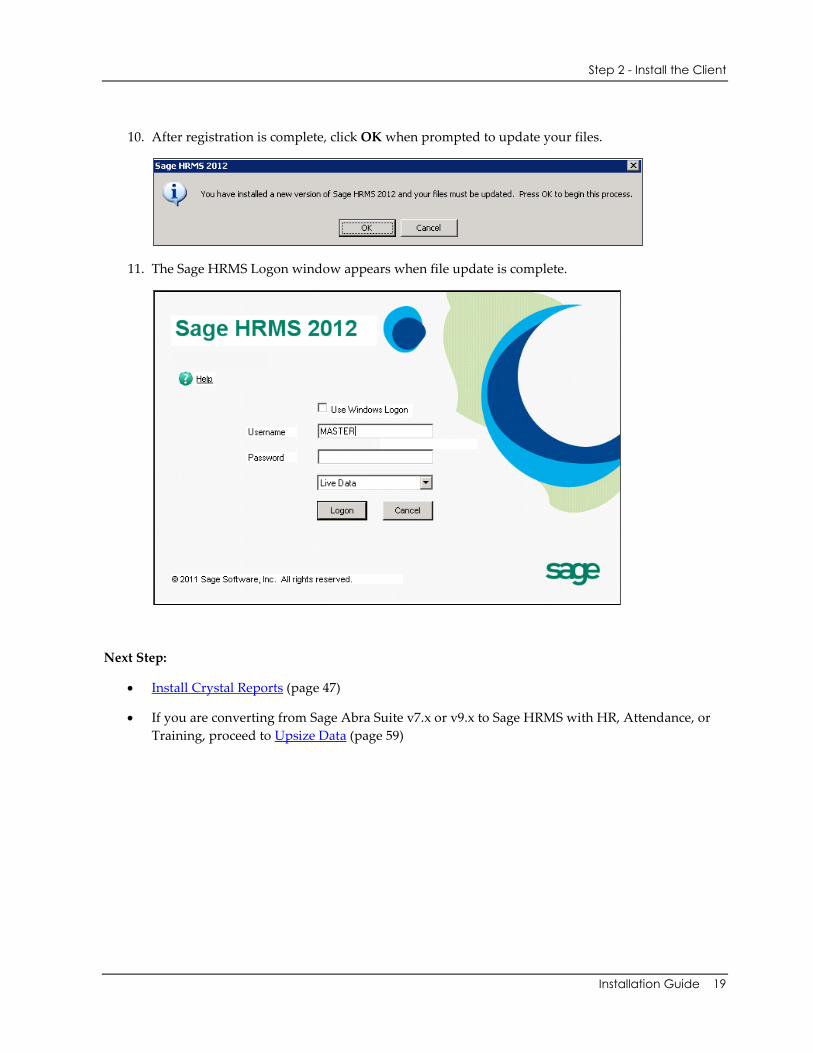
10. After registration is complete, click OK when prompted to update your files.
11. The Sage HRMS Logon window appears when file update is complete.
Next Step:
• Install Crystal Reports (page 47)
• If you are converting from Sage Abra Suite v7.x or v9.x to Sage HRMS with HR, Attendance, or Training, proceed to Upsize Data (page 59)


Installation Guide 21
Upgrade from Sage Abra HRMS v10.1 This section steps you through upgrading your Sage Abra HRMS v10.1 to Sage HRMS 2012. To familiarize yourself with this process, be sure to read all the steps before you start the upgrade. To install this upgrade, you must have administrator privileges.
Note: If you are upgrading from version 10.0, go to the next upgrade section on page 31.
Step 1 - Upgrade the Server
Important! You must have administrator rights to install this upgrade.
1. Back up your data.
2. At the server machine, insert the version 2012 Sage Installer DVD into your DVD drive. If Autorun is enabled, the Installation dialog box opens. If the Installation dialog box does not automatically open, browse to your DVD drive, and then double-click Launch.exe. The Sage HRMS Installer opens.

Step 2 - Install the Client
22 Sage HRMS 2012
3. Click Sage HRMS to open the Sage HRMS 2012 installer.
4. Click Install Sage HRMS. The Preparing to Install window opens and the server upgrade process begins.

Step 2 - Install the Client
Installation Guide 23
5. When the Welcome dialog box appears, click Next.
6. The installation starts and the progress bar appears during the installation.

Step 2 - Install the Client
24 Sage HRMS 2012
7. After the server installation is complete, the Install Completed dialog box opens.
8. Click Finish.
9. Restart your system if you are prompted to do so.
Step 2 - Upgrade the Client
Important! You must be logged in as a user with administrator privileges before you begin upgrading clients.
For each remote client machine accessing Sage HRMS, do the following.
1. Launch Sage HRMS. A message appears stating that this will perform an upgrade to the Sage HRMS Client 2012. To continue, click Yes.

Step 2 - Install the Client
Installation Guide 25
2. The Welcome to the Upgrade for Sage HRMS Client 2012 window appears. Click Update >.
3. The Installing Sage HRMS Client 2012 window opens and the server upgrade process begins.
Step 2 - Install the Client
26 Sage HRMS 2012
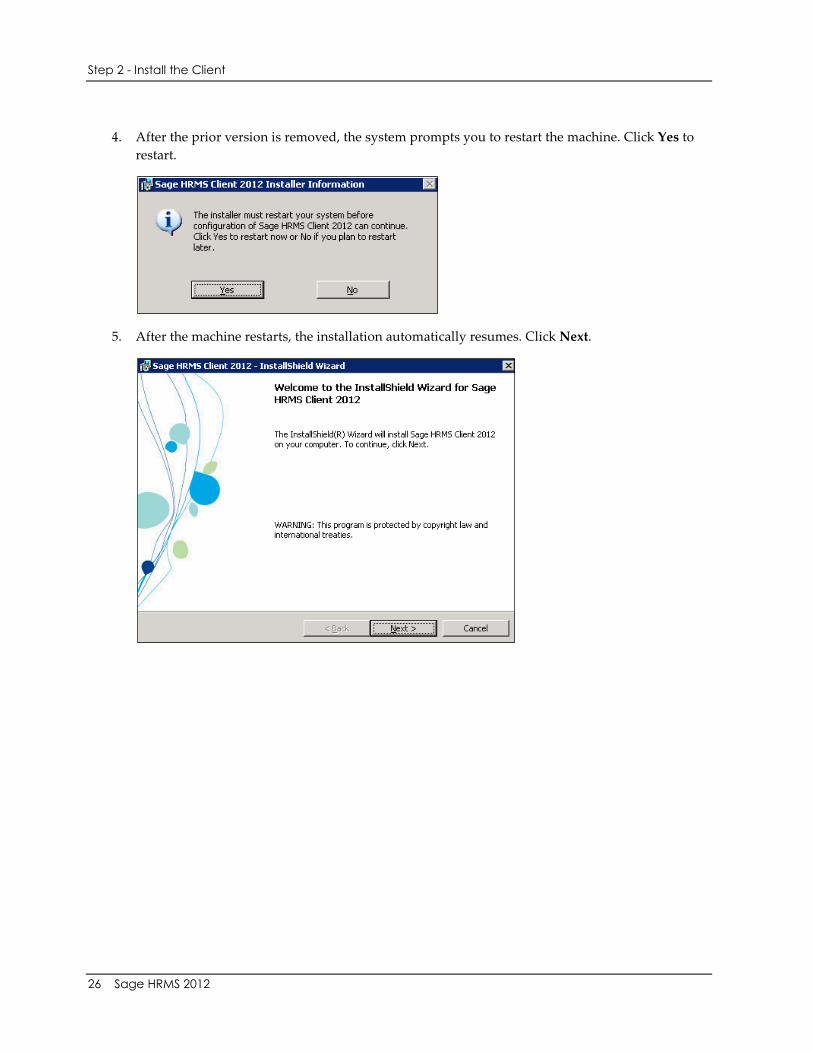
4. After the prior version is removed, the system prompts you to restart the machine. Click Yes to restart.
5. After the machine restarts, the installation automatically resumes. Click Next.

Step 2 - Install the Client
Installation Guide 27
6. The Destination Folder dialog box shows the default destination folder (on a 32-bit operating system) where Sage HRMS Client 2012 will be installed at: C:\Program Files\Sage\Sage HRMS Client. If you are using a 64-bit operating system, the path would be C:\Program Files (x86)\Sage\Sage HRMS Client.
Click Next to accept the default destination; otherwise click Change and select another destination.
7. The Ready to Install the Program dialog box opens.

Step 2 - Install the Client
28 Sage HRMS 2012
8. You can review your settings by clicking < Back through the previous screens. After you verify that your settings are correct, click Install. The Installing Sage HRMS Client 2012 dialog box appears during installation.
9. When installation is complete, the Install Completed dialog box opens.
10. Launch the application by selecting the Launch Sage HRMS Client 2012 check box and clicking Finish.
If you have installed Payroll, after launching Sage HRMS for the first time, set two options in Group Security in order to enable some new functions:
Step 2 - Install the Client
Installation Guide 29
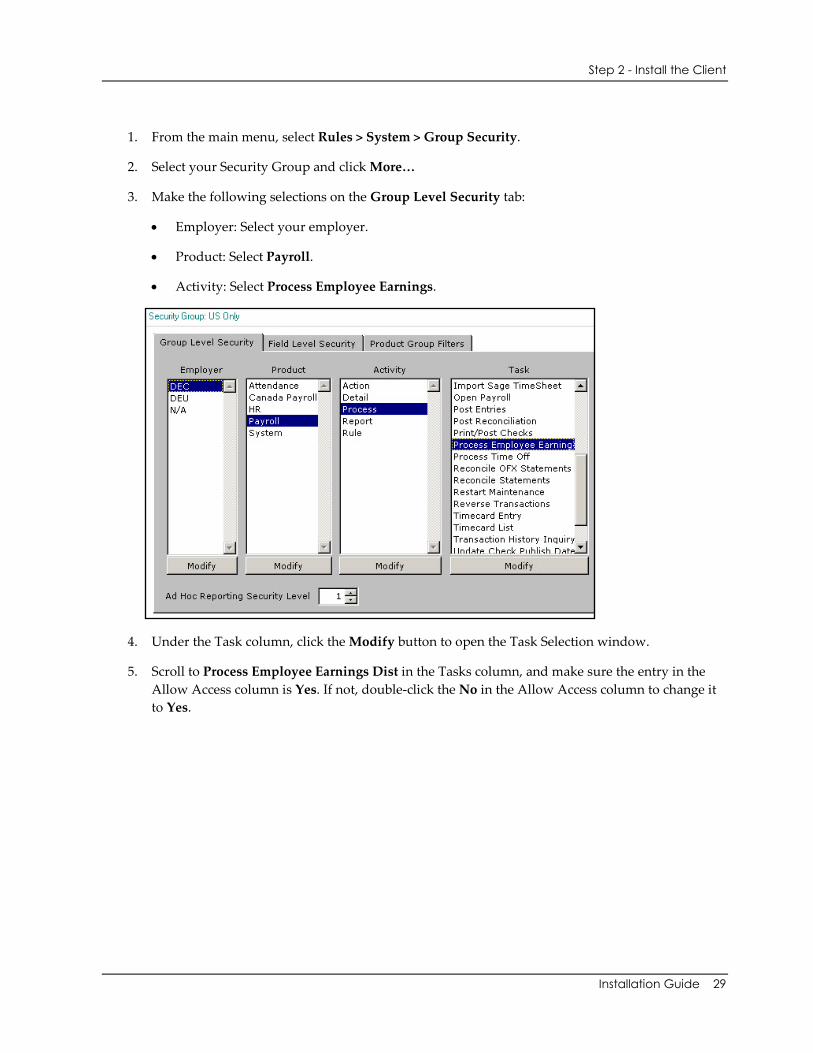
1. From the main menu, select Rules > System > Group Security.
2. Select your Security Group and click More…
3. Make the following selections on the Group Level Security tab:
• Employer: Select your employer.
• Product: Select Payroll.
• Activity: Select Process Employee Earnings.
4. Under the Task column, click the Modify button to open the Task Selection window.
5. Scroll to Process Employee Earnings Dist in the Tasks column, and make sure the entry in the Allow Access column is Yes. If not, double-click the No in the Allow Access column to change it to Yes.

Step 2 - Install the Client
30 Sage HRMS 2012
6. Repeat Step 5 for Process Time Off.
7. Click OK. You are ready to begin using Sage HRMS 2012.
Read the following before you begin the upgrade
Installation Guide 31
Upgrade from Sage Abra HRMS v10.0
This section steps you through upgrading your Sage Abra HRMS 10.0 to Sage HRMS 2012. To familiarize yourself with this process, be sure to read all the steps before you start the upgrade.
Note: With Sage HRMS 2012, the product installation/upgrade process has significantly changed (see below for details).
Read the following before you begin the upgrade Important! You must have administrator rights to install this upgrade.
New Product Installation Process The product install for Sage HRMS 2012 has been rewritten to leverage new technologies in order to simplify the install process and to provide seamless support for all versions of Microsoft Windows. By using the latest Windows Installer technologies, the new install inherits some very useful capabilities including the following.
• Shared data files are no longer stored in the Program Files folder by default. Instead, they are stored in C:\ProgramData\Sage\SageHRMSServer (on Windows Server 2008) or C:\Documents and Settings\All Users\Application data\Sage\SageHRMSServer (on Windows Server 2003).
• The AbraWin.ini file is now stored on the server so that all clients use the same set of shared data.
• The server install now only installs the shared data files and the client install. If you run the application on the server, you must also install the client on the server.
• When the client is launched, it automatically checks for application updates stored on the server. If new updates are detected, they are copied down to the client when each client is started for the first time after the update has been applied.
• The registration process has been simplified so that when you purchase a new module, you enter the new install code from inside the application (from the Menu, select Help > Register Sage HRMS 2012), instead of re-running the install.
• For security purposes, the server installation does not set up any permissions to the Sage HRMS data. This means that after installation, permissions to the SageHRMSServer folder must be explicitly configured before you can run Sage HRMS or access the data in another capacity (such as creating Crystal Reports).
• User Account Control (UAC) is now supported.
New Product Installation Process
32 Sage HRMS 2012
Prepare for Payroll Upgrade
If you are upgrading a system with Sage Payroll, there are several procedures that must be completed on the current v10.0 system to prepare the system for the upgrade to Sage HRMS 2012. These procedures are provided below. It is imperative that the procedures are completed before upgrading the system. For non-Payroll systems, proceed to step 2.
1. For Payroll systems, do the following in your current version of Sage Payroll before you begin the upgrade.
a. Complete all payroll processing. There must not be any open payrolls when upgrading.
b. Post bank reconciliations for all banks, create a bank G/L batch, and clear the Bank Reconciliation Posting Journal.
c. Post all open G/L batches in General Ledger.
d. Synchronize employees with updates.
e. Run Restart Maintenance to see if any tasks were not completed and then correct as appropriate.
f. From the Start menu on the server, go to All Programs > Sage Software > Sage HRMS > Payroll Database Setup. Log on, select the SYS database profile, and verify the Enable application security checkbox is selected.
g. Activating G/L requires you to enter the company’s oldest fiscal year calendar start date. Take note of the calendar start date now so you can easily enter it during the upgrade.
2. Back up your company data.
3. Upgrade the server.
4. Upgrade each client workstation. Note that you must be logged on as a user with administrative privileges. This completes the upgrade process for non-Payroll systems.
For Payroll systems, continue the upgrade by completing the following steps.
1. Launch Sage HRMS and go to Setup > Payroll > Database Setup > Employee Configuration.
2. Open each profile and click Save. This step is necessary to update the mapping for all Employee Configuration profiles created in the previous version.
3. Go to Setup > System > Group Security and set the new items added for G/L functionality to Allow Access for the appropriate users. Note that user MASTER automatically has access to all G/L functionality after the upgrade.
4. Before running a payroll, you must set up General Ledger for all employers. In online Help, go to index entry “setting up G/L.”

Custom data and third-party applications
Installation Guide 33
Custom data and third-party applications If you are upgrading from a previous version and have been using custom data or third-party applications, be advised that as part of the new product installation process, Sage HR data migrates to a new location during the upgrade.
• If you are using Windows 2003 or Windows XP, your data will now be stored in: \Documents and Settings\All Users\Application Data\Sage\SageHRMSServer\Data
• If you are using Windows 2008, Windows 7, or Windows Vista, your data will now be stored in: \ProgramData\Sage\SageHRMSServer\Data
As a safety precaution, the old \Data folder is renamed to \Data_Old and the Share permissions are removed from the \Data folder. This eliminates the possibility of the old data being used. Note that renaming the folder might cause an error or other unusual response if the third-party application still points to the old data location.
Note: The Data folder refers to the location where your Sage HRMS data resides. If your data resides in a folder named something other than Data, the same renaming applies. For example, if the data folder is named Dataset, the system renames the folder to Dataset_Old.
Do the following after you upgrade
• After the upgrade, you must update the third-party application so that the path to the data is redirected to the new location of the \Data folder. To redirect the application to the new Data location, you can do this by using the Share name for the SageHRMSServer\Data folder or by using the AbraWin.ini file (now located in the \SageHRMSServer folder).
• If you had any shares above the \Data folder (for example, on the \Programs folder), you should either re-create identically named shares on the equivalent folder in the new location, or reconfigure Sage Employee Self Service (or other applications that reference your Sage programs through a share) to use the new or changed UNC path.
Custom data and third-party applications
34 Sage HRMS 2012
• Prior to Sage HRMS 2012, custom and third-party applications were copied to the \Programs folder. With this new version, these applications can no longer be copied to the \Programs folder. However, you can do the following procedure to use the Abrawin.ini file to locate the custom applications in any specified location.
On the server machine, create a folder where your custom or third-party applications will 1.be located.
Install your custom or third-party applications into this folder. 2.
Open the Abrawin.ini file (now located in the \SageHRMSServer folder) and add a 3.[SageHRMSServer] section that designates the path to the custom applications folder. For example, the following two lines added to the Abrawin.ini file will direct Sage HRMS to search the Third Party Apps folder for the custom applications installed in the folder. (Sage HRMS will search only in the root path, not in sub-folders.)
[SageHRMSServer]
CustomApps = C:\SageHRMSServer\Third Party Apps\
Upgrading on a different server than original configuration
When upgrading Sage HRMS on a server that is different from the SQL Server configured for use by Sage HRMS (that is, the server has changed from when Sage HRMS 10.0 was initially configured), you must restore the following databases from the Abra\Backup folder on your product install DVD, to your SQL Server.
Note: If you do not use sample data, it is not necessary to restore the sample database. However, any time a user selects to use sample data without restoring Abra HRMS_Sample.bak, an error will occur, requiring a restart.
When using Sage HRMS without Payroll, restore the following database:
• Abra HRMS_Sample.bak
When using Sage HRMS with Payroll, restore the following databases:
• Abra HRMS_Sample.bak
• AbraHRMS_System.bak
Sample data overwritten
Sample data is always overwritten during an upgrade. Live data is never overwritten.

Start the Upgrade
Installation Guide 35
Start the Upgrade
Step 1 - Upgrade the Server
Important! You must have administrator rights to install this upgrade.
1. Back up your data.
2. At the server machine, insert the version 2012 Sage Installer DVD into your DVD drive. If Autorun is enabled, the Installation dialog box opens. If the Installation dialog box does not automatically open, browse to your DVD drive, and then double-click Launch.exe. The Sage HRMS Installer opens.
3. Click Sage HRMS to open the Sage HRMS 2012 installer.

Start the Upgrade
36 Sage HRMS 2012
4. Click Install Sage HRMS 2012. The Preparing to Install window opens and the server upgrade process begins.
5. When the Welcome dialog box appears, click Next.

Start the Upgrade
Installation Guide 37
6. The installation starts and the progress bar appears during the installation.
7. After the server installation is complete, the Install Completed dialog box opens.
8. Click Finish.

Start the Upgrade
38 Sage HRMS 2012
9. Restart your system if you are prompted to do so.
10. After restart, from Windows Explorer, go to the destination folder where you installed the server, By default, it is C:\ProgramData\Sage\SageHRMSServer (on Windows Server 2008) or C:\Documents and Settings\All Users\Application data\Sage\SageHRMSServer (on Windows Server 2003).
11. Right-click the SageHRMSServer folder and select Sharing and Security to open the Properties dialog box.
12. Click the Sharing tab and share the folder. Set the permissions for users who access this folder over the network on the shared folder to Full Control. (Right-click the SageHRMSServer folder, select Properties > Sharing tab, click Permissions, then set Full Control for the appropriate groups or users.)
Make sure that the folder’s Share Name does not contain a space. For example, in this figure, the default share name SageHRMSServer does not contain a space.
13. Click Apply and then OK to close.
Step 2 - Upgrade the Client
Important! You must be logged in as a user with administrator privileges before you begin upgrading clients.
For each remote client machine accessing Sage HRMS, do the following.
1. At the client machine, go to the shared folder on the server (either by using a UNC path or by creating a mapped drive) and, from the Client folder, double-click setup.exe.
If you receive the message “There was an error locating the Sage HRMS Server Directory to check for updates. Make sure [Drive]:\Client\Sage HRMS Client.msi still exists,” it is likely that a mapped

Start the Upgrade
Installation Guide 39
drive is being used to locate the server and UAC (User Account Control) is enabled. If this is the case, either disable UAC to use a mapped drive, or keep UAC enabled and access the server through a Share instead of a mapped drive.
2. A message appears stating that this will perform an upgrade to the Sage HRMS Client 2012. To continue, click Yes.

Start the Upgrade
40 Sage HRMS 2012
3. The Resuming the InstallShield Wizard for Sage HRMS Client 2012 windows appears. Click Next to continue.
4. Click Next to start the install.

Start the Upgrade
Installation Guide 41
5. When the client upgrade is complete, the Install Completed dialog box opens.
• To launch the application, select the Launch Sage HRMS Client check box and click Finish. (If you do not want to launch the application at this time, clear the Launch Sage HRMS Client check box and click Finish.)
• The next procedures depend on whether or not you are also installing Payroll.
If you are not installing Payroll
The Update dialog box opens after clicking Finish. Click OK to update your files. 1.

Start the Upgrade
42 Sage HRMS 2012
When file update is complete, the Sage HRMS Logon window appears. 2.
Select Use Windows Logon if you are using Windows authentication to log on. 3.Otherwise, enter a user name and password and click Logon.
Click OK when prompted to update your files. 4.
Installation is now complete for non-Payroll systems. 5.
If you are installing Payroll:
The Payroll modules dialog box opens after you click Finish. Click Yes to install the 1.Payroll modules (you must have administrator privileges).
When the Payroll modules installation is complete, the Update dialog box opens. Click 2.OK to update your files.

Start the Upgrade
Installation Guide 43
Sage HRMS 2012 is launched, the files are updated, and the Logon page appears. 3.
Required tasks after the upgrade
• Go to Group Security and make sure the new items added for G/L functionality are set to Allow Access for the appropriate users. Note that user MASTER automatically has access to all G/L functionality after the upgrade.
• Due to new security features for payroll, the employee selection lists created in a previous version are not carried over during the upgrade, so you must create new selection lists. It is important to note that each selection list is specific to the logged on user who created the list. That is, no user has access to another user’s selection list. From the Navigation Pane, go to Payroll > Tasks > Employee Selection to create selection lists (search for “create employee selection list” in Help for instructions).
• Before running a payroll, you must set up G/L for all employers. Refer to online Help for instructions (go to index entry “setting up G/L”).
• Before running a payroll, you must update the mapping for all Employee Configuration Profiles created in the previous version. To update mapping, open Sage HRMS and from the Navigation Pane, go to Setup > Payroll > Database Setup > Employee Configuration. Open each profile and click Save.

Start the Upgrade
44 Sage HRMS 2012
Optional tasks after the upgrade
• If you have custom applications (including Sage Employee Self Service) that use Sage HRMS data, you must now update the custom application so that the path to the data is redirected to the new location of the \Data folder.
To redirect the application to the new Data location, we suggest doing this by using the Share name for the SageHRMSServer\Data folder or by using the AbraWin.ini file. If you use the AbraWin.ini file, please note that its location is also changed after the upgrade. It is located in the \SageHRMSServer folder.
• If you have custom applications, you must designate their location. Do the following procedure to use the Abrawin.ini file to locate the custom applications in any specified location.
On the server machine, create a folder where your custom or third-party applications will 1.be located.
Install your custom or third-party applications into this folder. 2.
Open the Abrawin.ini file (now located in the \SageHRMSServer folder) and add a [Sage 3.HRMS] section that designates the path to the custom applications folder. For example, the following two lines added to the Abrawin.ini file will direct Sage HRMS to search the Third Party Apps folder for the custom applications installed in the folder. (Sage HRMS will search only in the root path, not in sub-folders.)
[Sage HRMS]
CustomApps = C:\Sage HRMS\Third Party Apps\
Installation Guide 45
Convert Sage Abra Suite v7.x or v9.x This section discusses the procedures for converting your HR-only Visual FoxPro database in Sage Abra Suite to SQL Server database in Sage HRMS.
These procedures basically consist of installing Sage HRMS 2012, converting your existing Abra Suite Visual FoxPro data to Sage HRMS SQL Server data, and changing the data source for custom reports from Abra Data Access to Sage HRMS Data Access.
Note: If your 7.x or 8.x system includes Payroll, contact Customer Support for assistance in converting to Sage HRMS.
To convert from Sage Abra Suite v7.x or v9.x Important! You must have administrator rights to install this upgrade.
1. Go to the section Install Sage HRMS for the first time and follow the steps to do the installation.
Notes:
• You must install the server as well as all remote clients.
• You can install Sage HRMS on the same server machine as your Abra Suite version (this is called a side-by-side installation).
2. When server and client installations are complete, you must now upsize your data. This converts your HR-only database from Visual FoxPro to SQL Server or SQL Server 2005 Express Edition. Go to the section Upsize data from FoxPro to SQL Server.
3. If you are using Abra Link or custom Visual FoxPro databases (such as for third-party applications), you must now upsize your Abra Link and custom data. Go to the section To run the Data Upsizing Elf.
4. If you created custom reports in Abra Suite, you must now update the reports’ data source from Abra Suite Data Access to Sage HRMS Data Access. Go to the section Upgrade Abra Suite Custom Reports.


Installation Guide 47
Install Crystal Reports 2008 for Sage You must install Crystal Reports version 2008 separately on each workstation that will be used to create custom reports. Before you install Crystal Reports 2008, we recommend that you first remove any other versions of Crystal Reports you may have installed on your system.
To Install Crystal Reports 2008 for Sage 1. At the server machine, insert the Sage HRMS 2012 Installer DVD into your DVD drive. If
Autorun is enabled, the Installation dialog box opens. If the Installation dialog box does not automatically open, browse to your DVD drive, and then double-click Launch.exe. The Sage Installer opens.
2. Click Crystal Reports to open the Crystal Reports Installation Wizard.

To Install Crystal Reports 2008 for Sage
48 Sage HRMS 2012
3. Follow the on-screen instructions to install Crystal Reports.
Note: When the Choose Language Packs window appears, you must clear the All Languages check box as shown below. Otherwise, the installation may stop with the message Please wait while the installer finishes determining disk space requirements.
4. When installation is complete, you can access Crystal Reports from the Quick Launch Toolbar in Sage HRMS.
5. Click Crystal Reports to open the Crystal Start Page.

If you have reports from a previous Crystal Reports version
Installation Guide 49
If you have reports from a previous Crystal Reports version After installing Crystal Reports 2008, the next time you save a report that you either modified or created in a previous version of Crystal Reports, the following message appears.
Click Yes to save the report with the latest Crystal Reports 2008 report format.

If you have reports from a previous Crystal Reports version
50 Sage HRMS 2012

Installation Guide 51
Appendix This appendix contains information on the following:
• Enable the proper protocols on the server
• Enable the SQL Browser Service
• Add a new module or option
• Uninstall the product
• Install sample data manually
• Verify database connections
• Upsize data from FoxPro to SQL Server
• Upgrade custom reports from Abra Suite
• Hardware and software requirements/recommendations
Enable the proper protocols on the server 1. From the Start Menu, select All Programs > Microsoft SQL Server 2005 > Configuration Tools >
SQL Server Configuration Manager.
2. In the SQL Server Configuration Manager, on the left panel, expand SQL Server 2005 Network Configuration.
3. Click Protocols for ABRAHRMSX. Note that ABRAHRMSX is the name of the SQL instance created by the SQL Express install provided on the Sage Installer DVD. Another instance name may display if SQL Server is already installed on the machine.
4. Set the TCP/IP protocol to Enabled. For the purpose of client installs, the status of the other protocols does not matter.
5. Exit the SQL Server Configuration Manager.
Enable the SQL Browser Service
52 Sage HRMS 2012
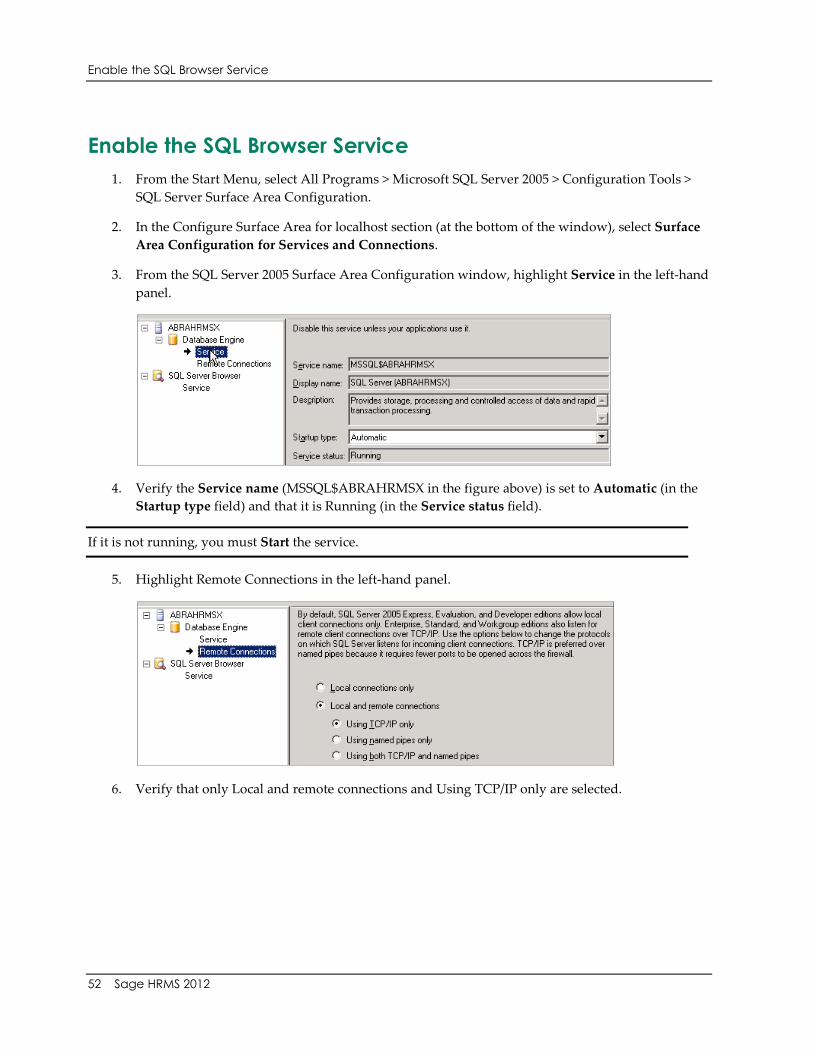
Enable the SQL Browser Service 1. From the Start Menu, select All Programs > Microsoft SQL Server 2005 > Configuration Tools >
SQL Server Surface Area Configuration.
2. In the Configure Surface Area for localhost section (at the bottom of the window), select Surface Area Configuration for Services and Connections.
3. From the SQL Server 2005 Surface Area Configuration window, highlight Service in the left-hand panel.
4. Verify the Service name (MSSQL$ABRAHRMSX in the figure above) is set to Automatic (in the Startup type field) and that it is Running (in the Service status field).
If it is not running, you must Start the service.
5. Highlight Remote Connections in the left-hand panel.
6. Verify that only Local and remote connections and Using TCP/IP only are selected.

Enable the SQL Browser Service
Installation Guide 53
7. Highlight SQL Server Browser in the left-hand panel. The Startup type will be set to Disabled and the Service status will be set to Stopped.
8. Change the Startup type to Automatic and click Apply.
9. Click Start to start the SQLBrowser service. The Startup type is Automatic and the Service status is Running.
10. Click OK and then close the SQL Server 2005 Surface Area Configuration window.
11. Go to All Programs > Administrative Tools > Computer Management to open the Computer Management window.

Re-register: add a new module or option
54 Sage HRMS 2012
12. Select Services from the Services and Applications section and scroll down to the SQL Server entries.
13. Ensure that both the SQL Server and SQL Server Browser services are set to Started and Automatic.
14. Close the Computer Management window.
You are now ready to install the client.
Re-register: add a new module or option If you have an existing Sage HRMS system and want to add another module or option, simply re-register Sage HRMS. (If you are adding Sage U.S. Payroll or Sage Canadian Payroll you must set up the payroll database. For more information, refer to the Sage Payroll Getting Started Guide.)
Notes:
• Changing the serial number or installation code requires a restart of Sage HRMS.
• If you add U.S. payroll to a Canadian payroll system or add Canadian payroll to a U.S. payroll system, you must change the Country setting to Both after re-registering and restarting Sage HRMS. (From the Navigation Pane, go to Setup > System > Setup > Enterprise Setup to change the Country setting.)
1. Obtain a serial number and installation code for the new items you are adding to your system. You can obtain this information by calling Sage Customer Service Monday through Friday from 8:30 a.m. to 5:30 p.m. ET at 800-424-9392.
2. Launch Sage HRMS.

Re-register: add a new module or option
Installation Guide 55
3. Select Register Sage HRMS 2012 from the Help menu.
4. The Register Sage HRMS dialog box opens.
This dialog box shows your current serial number and installation code. If you are re-registering to add another module, option, or link, enter your new serial number and installation code. If you want to add the Sage HR for MAS 90 Link, Sage Abra MAS 200 Interface, or Sage Abra X3 G/L Interface, select the appropriate check box.
5. Click OK to complete the registration and close Sage HRMS. If you made a change to the serial number or installation code, a message appears for you to restart Sage HRMS.
6. Launch Sage HRMS and then log on. The Main Menu and Navigation Pane reflect the new options and modules you registered.
When you add a link or interface, they are accessible from the Quick Launch Toolbar.

Uninstall Sage HRMS 2012
56 Sage HRMS 2012
7. To keep your system secure, review your user and group security and make any necessary changes for the new products or options you installed.
8. If you have previously applied any patches or Payroll (tax) updates, you must re-apply them after installing the new items.
Uninstall Sage HRMS 2012 To completely uninstall Sage HRMS 2012, you must uninstall the clients and the server. If your system includes Payroll, there are several payroll modules that will also be uninstalled.
The following figure shows the programs that are installed for an HR/Payroll system. Only the first two programs, Sage HRMS Client and Sage HRMS Server, are installed for both HR and Payroll. The remaining programs are the payroll modules.
To uninstall Sage HRMS, remove the following programs, in the order listed. You must have administrator privileges to uninstall.
Note: You can only use the Add/Remove Programs function to uninstall the Sage HRMS application. You cannot use setup.exe to uninstall.
1. Go to Add/Remove Programs.
2. Remove Sage HRMS Client. Note that when the client is uninstalled, all Payroll modules are also automatically uninstalled.
3. Remove Sage HRMS Server.

Install sample data manually
Installation Guide 57
Install sample data manually If you did not choose to install sample data during installation, you can install it manually.
1. Perform a SQL database restore of the following sample database backups. They are stored on the server at …Sage\SageHRMSServer\Sample\SQL.
• AbraHRMS_CAN.bak (Canadian Payroll sample database backup)
• AbraHRMS_ZSI.bak (U.S. Payroll sample database backup)
• AbraHRMS_Sample.bak (HR sample database backup)
2. Edit the Abrawin.ini file located on the server at …Sage\SageHRMSServer. Add the following database install lines to the file.
InstallSample=1
SampleDB=AbraHRMS_Sample
SamplePayDB=AbraHRMS_ZSI
SamplePayCadDB=AbraHRMS_CAN
Notes: • The database names above are the default names. Make sure that the database names you
enter are the correct ones for your configuration.
• The specific install lines you add to Abrawin.ini depend on your system configuration. That is:
− If only U.S. Payroll is installed, you only need to install SampleDB and SamplePayDB.
− If only Canadian Payroll is installed, you only need to install SampleDB and SamplePayCadDB.
− If no Payroll is installed, you only need to install SampleDB.
− Otherwise, you need to install all three databases.
• Go to All Programs > Sage > Sage Payroll > Database Setup and configure the sample database entries you just added.

Verify Database Connections
58 Sage HRMS 2012
Verify Database Connections Use the Database Connection Tool to:
1. Verify an existing database connection.
2. Change existing information in order to establish a connection with a different server if you move your Sage HRMS database.
3. From the Start Menu on the server, select All Programs > Sage > Sage HRMS Server > Database Connection Tool.
4. In the Database Connection Tool dialog box, enter your server name, user ID, and password. You must provide a SQL Server logon that has been given administrator privileges.
5. Enter the names of your Live Database and Sample Database, and if you are using Payroll, the Payroll System Database and Payroll Sample Database. If you are using Payroll, enter the User ID and Password for the payroll link.

Upsize data from FoxPro to SQL Server
Installation Guide 59
6. Click Test Connections to test for valid connections to the databases. If all connections are successful, the test results display:
If you receive a message that the connections failed, verify your entries are correct.
7. Click OK to return to the Database Connection Tool dialog box and click Save to establish your database connections.
Upsize data from FoxPro to SQL Server The Data Upsizing Wizard converts an HR-only Sage Abra Suite Visual FoxPro database to a SQL Server or SQL Server 2005 Express Edition database. If your 7.x or 8.x system includes Payroll, contact Customer Support for assistance in converting to Sage HRMS.
Note: If you need to convert Sage Abra Link databases or databases you have created for custom applications, you must also run the Data Upsizing Elf (page 62) after you run the Data Upsizing Wizard.
When you run the Data Upsizing Wizard, the structure of the database changes as follows:
• An integer type field named ID_Col is added to all tables that are automatically populated. The field value increments by one each time a new record is added.
• All date types are converted to date/time types.
• To avoid conflict with T-SQL, all field names that are T-SQL reserved words, that is desc, rule, table, and group, are converted to fdesc, frule, ftable, and fgroup.
When upsizing to a SQL Server or SQL Server 2005 Express database:
• The Toolkit tables in the custom folder (such as TKSCREEN.DBF and TKTABLES.DBF) are added to the database.
• If any errors occur during the upsize, a message is displayed when the upsize is finished.
• If the table already exists in the target database, it is dropped and upsized again.
Upsize data from FoxPro to SQL Server
60 Sage HRMS 2012
The following table shows the data type conversions from Visual Fox Pro to SQL Server.
VFP Data Type SQL Server Data Type
character char numeric float integer int date date/time (All empty dates are converted to NULLs) logical bit memo text general image
To run the Data Upsizing Wizard
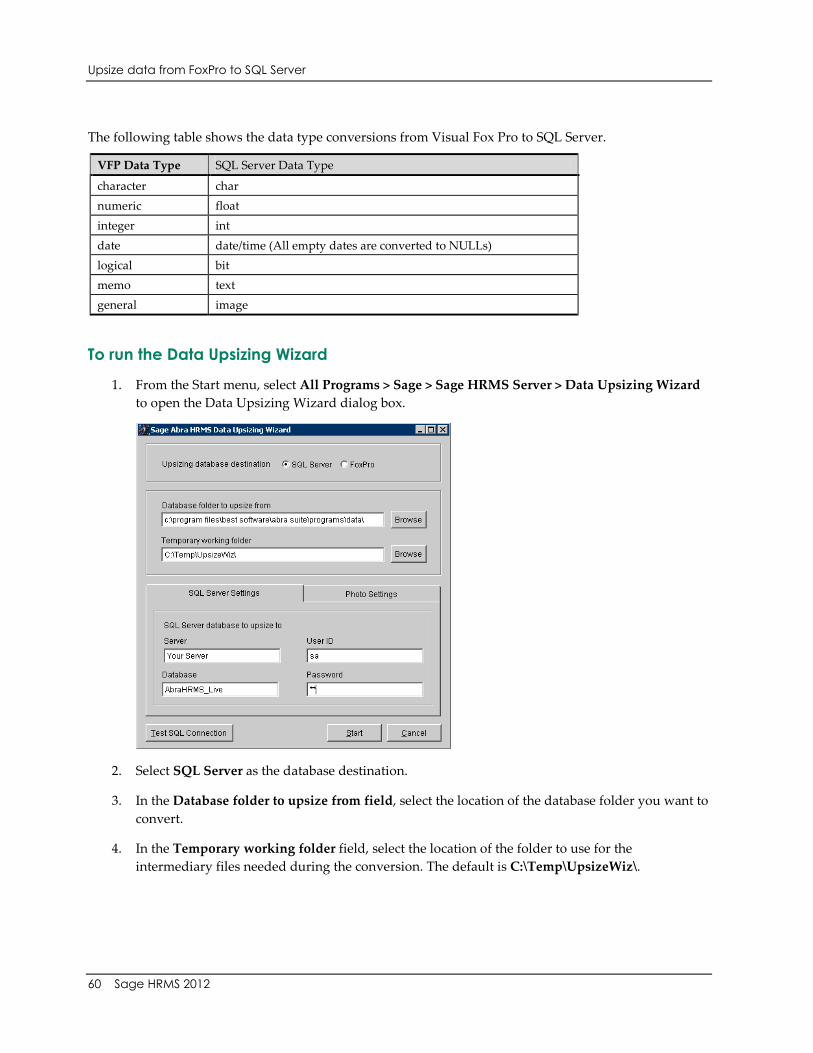
1. From the Start menu, select All Programs > Sage > Sage HRMS Server > Data Upsizing Wizard to open the Data Upsizing Wizard dialog box.
2. Select SQL Server as the database destination.
3. In the Database folder to upsize from field, select the location of the database folder you want to convert.
4. In the Temporary working folder field, select the location of the folder to use for the intermediary files needed during the conversion. The default is C:\Temp\UpsizeWiz\.

Upsize data from FoxPro to SQL Server
Installation Guide 61
5. Enter the following information and then click Test SQL Connection to make sure the connection is valid. Note that the defaults display as a result of the installation, but you can change them if necessary.
• Server. This is stored in the Abrawin.ini file.
• Database name. This is the Live database name stored in the Abrawin.ini file.
• User ID. This is stored in the DBAccount.ini file.
• Password. This is stored in the DBAccount.ini file and is displayed as asterisks.
• Select the Photo Settings tab and set the location for your employee photos.
Warnings: If you have photos in Sage Abra Suite you want to move to Sage HRMS, select Copy existing employee photos.
In the Photo folder to copy from field, select the photo folder you want to copy.
In the Photo folder to copy to field, select the location of the folder to use for your photos.
6. Click Start to begin the upsize process. The progress of the data upsizing is conveyed by two status bars. The first one represents the specific table being converted; the second one represents all tables in the database being converted.
When upsizing is complete, click OK.

Upsize data from FoxPro to SQL Server
62 Sage HRMS 2012
Next Step: Run the Data Upsizing Elf (only for Sage Abra Link and custom databases).
To run the Data Upsizing Elf
The Data Upsizing Elf converts Sage Abra Link databases and custom Visual FoxPro databases (such as those created for custom applications). When you run the Data Upsizing Elf, the structure of the database changes as follows:
• DBF files used in custom applications you have created are converted.
• Selected files from any folder containing DBF files are converted.
• If the table already exists in the target database, it is dropped and upsized again.
The table below shows the data type conversions from Visual FoxPro to SQL Server.
VFP Data Type SQL Server Data Type character char numeric float integer int date date/time (All empty dates are converted to NULLs) logical bit memo text general image

Upsize data from FoxPro to SQL Server
Installation Guide 63
1. From the Start menu, select All Programs > Sage > Sage HRMS Server > Data Upsizing Elf to open the Data Upsizing Elf dialog box.
2. Select FoxPro as the Upsizing database destination.
3. In the Database folder to upsize from field, select the location of the database folder you want to convert.
4. In the Database table(s) to upsize field, select the database files you want to convert.
5. In the Temporary working folder field, select the location of the folder to use for the intermediary files needed during the conversion. The default is C:\Temp\UpsizeElf.
6. If you are upsizing Sage HRMS tables or developing custom applications and you want to use the Abra Data Layer to access the data, select Add Abra HRMS data layer fields to upsized table.

Upgrade Sage Abra Suite Custom Reports
64 Sage HRMS 2012
7. Click Start to begin the upsize process. The progress of the data upsizing is conveyed by two status bars. The first one represents the specific table being converted; the second one represents all tables in the database being converted.
8. When upsizing is complete, click OK.
Upgrade Sage Abra Suite Custom Reports This section applies to custom reports created with Sage Abra Suite. When you upgrade to Sage HRMS, you must change the data source for each report and save it to a new folder.
Before you begin
• You must have Sage HRMS and Crystal 2008 installed.
• You must have run the Data Upsizing Wizard to upsize your data.
To change the data source
1. Log on to Sage HRMS. You must also be logged on to Sage Abra Suite, because the data source in the reports you are upgrading still references the ADA (Abra Data Access).
2. From the Sage Quick Launch Toolbar, click Crystal > Crystal Reports to launch Crystal Reports. The Welcome to Crystal Reports dialog opens.
3. Open one of your custom reports.
4. From the Crystal Reports main menu, select Database > Set Datasource Location. The Set Datasource Location dialog box opens.

Upgrade Sage Abra Suite Custom Reports
Installation Guide 65
If Sage HRMS Data Access has been created under OLE DB (ADO), select Abra HRMS Data Access, and click Update. Repeat for subreports if needed. If a field name has changed, proceed to the following Field Name Changes section.
5. In the Replace With section, click the plus sign to expand Create New Connection.
6. Click the plus sign to expand OLE DB (ADO).
7. Double-click Make New Connection.

Upgrade Sage Abra Suite Custom Reports
66 Sage HRMS 2012
8. The OLE DB (ADO) dialog box opens. Click once to highlight Abra HRMS Data Access (OLE DB Provider).
9. Click Finish. The Set Datasource Location dialog box opens.
10. In the Replace with section, click once to highlight Abra HRMS Data Access.
11. In the Current Data Source section, click once to highlight Abra Data Access.

Upgrade Sage Abra Suite Custom Reports
Installation Guide 67
12. Click Update to update the old Sage Abra Suite data source with the new Sage HRMS data source.
You must have the data source to change from selected in the top section and the data source to change to selected in the bottom section before you Update.
13. In the Create New Connection/OLE DB folder, right-click Abra HRMS Data Access and select Add to Favorites.
14. Repeat Steps 3 through 13 for each custom report and subreport. Depending on the complexity of your report, you may also need to change field names that are T-SQL reserved words, that is desc, rule, table, and group, and check for empty dates. See the following Field Name Changes section.
Field Name Changes
You must change the field name for all fields that conflict with keywords in T-SQL such as table, group, description, and rule. The new fields are named the same as the old, but with an F prefix. The table below shows the field name changes in the Sage HRMS database.
Table Sage HRMS field name T-SQL Reserved word
HBEPLAN FDESC DESC SYREPORT FGROUP GROUP SYSCHED FDESC DESC HRTABLES FDESC DESC HRTABLES FRULE RULE HRTABLES FTABLE TABLE TKTABLES FDESC DESC GENEMAIL FDESC DESC OEBEPLAN FDESC DESC

Upgrade Sage Abra Suite Custom Reports
68 Sage HRMS 2012
If your report requires field name changes, when you update the data source, the Map Fields dialog box opens.
1. In the left box in the Unmapped Fields section, click once to highlight the old field name. In the right box, click once to highlight the new field name. For example, if your report uses desc, select desc in the left box and fdesc in the right box.
2. Click Map.
3. Preview the report. If you receive a message stating that one or more database tables have changed, click OK.
Checking for Empty Dates
In Sage HRMS, all date fields that do not have a specific date assigned to them are now NULL. If you have any reports in which you check for an empty date in a selection formula using the EMPTY() function, you need to now use the ISNULL() function. The example below shows selecting benefit records in the HBENE table.
Before:
{hbene.b_beneid} in ["S", "I"] and {hrpersnl.p_active} = "A" and (EMPTY({hbene.b_expdate}) or {hbene.b_expdate} > CurrentDate)
After:
{hbene.b_beneid} in ["S", "I"] and {hrpersnl.p_active} = "A" and (ISNULL({hbene.b_expdate}) or {hbene.b_expdate} > CurrentDate)

Hardware/Software Requirements and Recommendations
Installation Guide 69
Hardware/Software Requirements and Recommendations The latest information on Sage HRMS 2012 hardware and software requirements and recommendations is available at: http://na.sage.com/us/sage%20hrms/lp/In%20Product/hrmsexthelp/SageAbraSQLHRMSGuides