Sage HRMS Payroll Getting Started Guide · Sage HRMS Payroll Getting Started 6 Getting Started with...
154
Sage HRMS 2016 Payroll Getting Started Guide October 2015
Transcript of Sage HRMS Payroll Getting Started Guide · Sage HRMS Payroll Getting Started 6 Getting Started with...

Sage HRMS 2016 Payroll Getting Started Guide
October 2015
This is a publication of Sage Software, Inc.
Document version: October 30, 2015
Copyright © 2015. Sage Software, Inc. All rights reserved. Sage, the Sage logos, and the Sage product and
service names mentioned herein are registered trademarks or trademarks of Sage Software, Inc. or its
affiliated entities. All other trademarks are the property of their respective owners. Your use of this
document and the Sage product(s) described herein is governed by the terms and conditions of the Sage
End User License Agreement ("EULA") or other agreement that is provided with or included in the Sage
product. Nothing in this document supplements, modifies or amends those terms and conditions. Except
as expressly stated in those terms and conditions, the information in this document is provided by Sage
"AS IS" and Sage disclaims all express, implied or statutory warranties of any kind, including but not
limited to the warranties of merchantability, fitness for a particular purpose or of non-infringement. No
implied license is granted to you under any Sage intellectual property or trade secret right. Sage reserves
the right to revise, supplement, or remove information in this document at any time without notice to you
or others.
Sage End User License: http://na.sage.com/us/legal/eula
Sage HRMS Payroll Getting Started iii
Contents
Introduction .................................................................................................................... 5
Support and Resources ....................................................................................................................................... 5
Getting Started with Sage HRMS Payroll...................................................................... 6
About Sage HRMS Payroll ................................................................................................................................. 6
Installation and Configuration.................................................................................... 10
Installation and System Requirements ........................................................................................................... 10
Configuring the Payroll Database ................................................................................................................... 10
Creating a New SQL database .................................................................................. 11
To create a new SQL database ......................................................................................................................... 11
Set Up Your Company Database ..................................................................................................................... 11
Add Employer ................................................................................................................................................... 12
Set Up the Database .......................................................................................................................................... 13
Open Payroll ...................................................................................................................................................... 15
Setting Up Payroll......................................................................................................... 18
Step 1: Prepare Payroll Data ............................................................................................................................ 18
Step 2: Set Up General Ledger Accounts ....................................................................................................... 19
Step 3: Set Up Bank Information and Check Stock ....................................................................................... 20
Step 4: Set Up Payroll Processing Defaults .................................................................................................... 21
Step 5: Set up Payroll G/L Integration ............................................................................................................ 24
Step 6: Set Up Optional Fields (optional) ....................................................................................................... 30
Step 7: Set Up Class Codes (optional) ............................................................................................................. 39
Step 8: Set Up Earnings, Deductions, and Other Pay Factors ..................................................................... 40
Step 9: Set Up Workers' Compensation Codes .............................................................................................. 74
Step 10: Set Up Overtime Schedules (optional) ............................................................................................. 75
Step 11: Set Up Shift Differential Schedules (optional) ................................................................................ 79
Step 12: Set Up Work Classification Codes (optional) ................................................................................. 81
Step 13: Set Up Taxes ........................................................................................................................................ 82
Step 14: Set Up Local and Other Taxes (U.S. only) ....................................................................................... 88
Step 15: Set Up Employee Payroll Records .................................................................................................. 100
Step 16: Enter Employee Historical Payroll Data ........................................................................................ 115
Sage HRMS Payroll Getting Started iv
Step 17: Set Up Employee Selection Lists (optional) .................................................................................. 120
Step 18: Set up Common Deduction Limits (optional) .............................................................................. 122
Step 19: Set Up EFT/Direct Deposit (optional) ............................................................................................ 123
Step 20: Back Up your Company Data ......................................................................................................... 132
Where to Now? ................................................................................................................................................ 132
Earnings, Deductions, and Taxes ............................................................................. 133
Using Earning/Deduction Hierarchies ......................................................................................................... 133
Tax Hierarchies ................................................................................................................................................ 136
Setting Up Vacation, Sick, and Compensatory Time ................................................................................. 139
Sage HRMS Payroll Setup Checklist ......................................................................... 152
Sage HRMS Payroll Getting Started 5
Introduction
This guide provides an overview for setting up and using Sage HRMS Payroll.
Support and Resources
Sage strives to provide you with the best help and support in the industry. If you have a question, we're
here to help!
Help and documentation: Many answers to common questions can be found in the help and
documentation included with Sage HRMS, Sage HRMS Payroll, and Sage Employee Self Service.
Visit the Sage HRMS product documentation website for a library of guides.
Sage University: Learn pro tips for using Sage HRMS in online or classroom courses. Visit
http://SageU.com and log on or create an account to register for training.
Sage City: Visit http://sagecity.na.sage.com for help, guidance, documents, and downloads specific
to Sage HRMS and modules.
Customer Support: For additional articles and resources, visit https://support.na.sage.com or
contact Customer Support at 800-829-0170 (U.S. and Canada). Please have your Customer ID
handy when contacting Customer Support.
Tax forms: Because all printed forms have variations, Sage HRMS Payroll only supports forms
printed by Sage Checks and Forms. Call Sage Checks and Forms at 800-617-3224 or order online at
www.SageChecks.com.
Sage HRMS Payroll Getting Started 6
Getting Started with Sage HRMS Payroll
Sage HRMS Payroll provides flexible tools for you to maintain data about your company and its
employees, and the earnings, deductions, and taxes involved in processing the company's payroll.
After you set up your Sage HRMS Payroll system (U.S., Canadian, or both), you can process your payroll
based on employee and earning and deduction information you set up for your company, or based on
timecards entered during the course of each pay period.
Sage HRMS Payroll prints payroll checks, produces government reports such as W-2 (U.S.) and T4
(Canada) forms, and other reports that track the results of payroll processing.
About Sage HRMS Payroll
Sage HRMS Payroll handles all your payroll record-keeping and calculations, regardless of the size and
complexity of your business.
You can use Sage HRMS Payroll to set up and maintain your payroll employees and the earnings,
deductions, taxes, general ledger, and other pay factors used in calculating their pay. You can process
payroll in Sage HRMS Payroll based on timecards or based on information you add when you set up
employees. You can track the results of payroll processing on displays and printed reports.
Tailor the System to Your Business
Set up the earnings, deductions, benefits, advances, accruals, expense reimbursements, and
taxes that fit your company today and allow for growth in the future.
Set up selection lists of employees for whom you can Calculate Payroll and perform other
processing functions.
Create overtime and shift differential schedules that accommodate all types of overtime and
shift pay arrangements.
Create up to four different classes, or sort orders, to allow you to Calculate Payroll, sort
paychecks, and produce reports for any combination of employees.
Create work classification codes that you can assign to employees, and produce reports based
on the codes.
Define the order in which earnings and deductions and taxes are to be calculated and the
base hours, earnings, deductions, and taxes to use in calculating their amounts.
Define and use as many optional fields as you wish to store additional information for all
types of transactions and employee records.
Getting Started with Sage HRMS Payroll
Sage HRMS Payroll Getting Started 7
Process Payroll in a Variety of Ways
Process Payroll based on the earnings, deductions, and taxes you set up and assign to each
employee on the Employees window.
Process Payroll based on information in the employee record and information entered on
timecards to override or supplement the data in the employee record.
Create, calculate, and post check data for an "after the fact" record of checks written manually
and issued to employees.
Directly Deposit Paychecks
Sage HRMS Payroll allows you to deposit paychecks directly to employees' bank accounts.
Choose Your Method of Posting to General Ledger
Create G/L batches automatically upon printing and approving payroll checks.
Create G/L batches on demand using the Generate G/L Batch function.
Create detailed batches or batches consolidated by account and fiscal period or by account,
fiscal period, and source code.
Create a new batch of payroll entries each time you process payroll (with an option to post
the transactions in General Ledger as well during that time), or add the results of payroll
calculation to an existing batch.
Post each payroll check to the check date or the pay period end date.
Use the G/L Integration window to choose the information that you want to transfer to
General Ledger in the description, reference, and comment fields of General Ledger
transactions arising from payroll transactions.
Post to the general ledger using Sage HRMS Payroll-specific G/L cost center segments
representing company departments, divisions, regions, and so forth.
Produce Complete Audit Trails
Print the Employee Information report to track changes you make to any employee
information, including information about the earnings, deductions, and taxes assigned to the
employee.
Print the Transaction History Audit report for a record of the payroll history that you entered
during setup and to track the adjustments you make to Employee Payroll totals.
Print Timecards and Payroll reports to verify the data you enter for processing the timecards.
Getting Started with Sage HRMS Payroll
Sage HRMS Payroll Getting Started 8
Print the Pre-Check Payroll Register and the Payroll Register to verify and record the results
of payroll processing.
Print the Pre-Check Payroll Register to verify and record the information entered for earnings
and deductions.
Print the Payroll G/L Transactions report to produce an audit trail of all G/L transactions
created by Payroll Processing.
Protect the Integrity of Your Data
Several built-in controls prevent you from taking actions that could damage your data. For example:
The system warns you if you modify an earning, deduction, or tax that is referenced on a
timecard or check.
If you integrate with General Ledger, you cannot inadvertently leave G/L account fields
blank. The system prompts you to enter at least one distribution account set for each tax and
each earning and deduction you set up.
You cannot delete an employee, earning, deduction, or tax that is referenced in the years of
payroll history you opt to keep.
Quickly Review Data On-Screen
Look up an employee's payroll activity, such as the amounts and hours spent on the
employee's assigned earning/deduction codes, and the employee's paychecks.
Look up the timecards that have been entered for employees.
Display a list of employees' paychecks, and view the paycheck details.
Produce Comprehensive Management Reports
Sage HRMS Payroll provides a full range of reports, journals, and lists, including:
Earnings and Hours - Print for a range of dates or print through any month for a look at
employee totals for the month, quarter, and year to date.
Earnings/Deductions Summary - Print for a range of dates, print current balances, or print
through any month to focus on month, quarter, and year to date earning/deduction amounts.
Tax Calculation Analysis - Print for a range of dates or print through any month to focus on
month, quarter, and year to date tax amounts.
Workers' Compensation - Print for details about employee wages subject to workers'
compensation premiums and the calculated premiums.

Getting Started with Sage HRMS Payroll
Sage HRMS Payroll Getting Started 9
Perform Time-Consuming Tasks Quickly and Easily
In one step, assign earnings and deductions to all or a range of employees.
Globally update particular fields in the earnings, deductions, and taxes you have assigned to
employees.
In one step, delete terminated employees, inactive earnings, deductions, and taxes, and
payroll history you no longer need.
Sage HRMS Payroll Getting Started 10
Installation and Configuration
Sage HRMS must be installed before you can activate Sage HRMS Payroll. For help installing Sage HRMS
and read the Sage HRMS Installation Guide.
Installation and System Requirements
After Sage HRMS is installed, you can activate Sage HRMS Payroll. Use the installation code and serial
number provided by sales or customer service when you purchased Sage HRMS Payroll and enter it
under Help > Register Sage HRMS.
For system requirements for Sage HRMS 2016 including payroll, see the Knowledgebase article 68933 at
https://support.na.sage.com.
Configuring the Payroll Database
After installing Sage HRMS Payroll, you must open your company and set up Database Configuration
before you can start using the program for your payroll. For information on Database Configuration, go
to page 13.
Sage HRMS Payroll Getting Started 11
Creating a New SQL database
Before setting up a new company database, you must create a database in SQL Server.
To create a new SQL database
1. Select Start > All Programs > Microsoft SQL Server 2008 (R2) > SQL Server Management
Studio.
2. Enter the Server Name and administrator login credentials and click Connect to connect to your
server.
3. Right-click the Databases folder and select New Database.
4. In the Database name field, enter a three digit (abbreviated) name for your database. The
database name will later be referred to as a Database ID which the system automatically detects.
Periods (.) are not permitted in database names so make sure the database name you enter does
not contain a period.
Tip: Save time by entering the Database name of “SageHRMS_XXX” where XXX represents the
three digit name of your choice for your database. By entering “SageHRMS_ “as the prefix for
your database name, the system can then automatically set up your company database in Sage
HRMS Payroll.
Note: The default Initial Size and Autogrowth numbers are not intended to reflect the
correct settings for your system. You must take into consideration the best practices for your
company’s SQL environment and maintenance guidelines.
4. Click OK. The database you created has been added.
5. Exit Microsoft SQL Server Management Studio.
Set Up Your Company Database
If you named your database “SageHRMS_XXX” (where XXX represents your three digit database name),
skip this section and proceed to the next section; Add Employer.
1. Select All Programs > Sage > Sage Payroll > Database Setup. The Database Setup window
displays.
2. The Payroll Database requires a password. Enter admin.
3. Click New. The New Database window displays.
4. Enter the Database ID (your database name as set up in SQL Server Management Studio), set the
Database Format to Microsoft SQL Server.
Creating a New SQL database
Sage HRMS Payroll Getting Started 12
5. For Database Category select Company, and for System Database ID, select SYS for System
Database.
6. Click OK. The Edit SQL Server Database Profile window displays.
7. Enter the server Description, Server name, Login ID, Password, and Database.
8. Click OK. The Database Setup window displays.
9. Click Verify to confirm the information has been entered correctly. The Verify Database window
displays.
10. The database you just created is in the Include column.
11. Click Verify. The system runs through several processes and a Verification complete message
appears.
12. Click OK. Then click Close. The Verify Database window displays.
13. Click Cancel. The Database Setup window displays.
14. To add additional company databases, click New, or click Exit if you are finished.
Add Employer
1. Launch Sage HRMS: From the Start menu, select All Programs > Sage > Sage HRMS Client >
Sage HRMS Client.
2. Enter MASTER in the Username field, leave the password blank, then select Live Data and click
Logon.
3. At the prompt, select your country code: US, Canada, or Both. This setting cannot be changed
(without creating a new database).
4. If this is your first time using Sage HRMS Payroll, a notification appears; “No employers have
been set up yet.” Click OK.
5. From the navigation pane, select Setup > System > Add Employer. Click OK to open the
Employer Setup window.
6. Enter your employer information. For Payroll Database ID, enter the ID for the new database
you created in SQL Enterprise Manager. If you named your database “SageHRMS_XXX”, then
enter the full name and prefix here.
7. Click OK. The system will now activate applications and add your company.
8. Once the process is complete, click OK to close and reopen Sage HRMS.
Creating a New SQL database
Sage HRMS Payroll Getting Started 13
Set Up the Database
To finalize setup for the Sage HRMS Payroll module, the Database Configuration, Employer
Configuration, and Employee Configuration must be completed.
Database Configuration
1. Launch Sage HRMS: From the Start menu, select All Programs > Sage > Sage HRMS Client >
Sage HRMS Client
2. Enter MASTER in the Username field, select your employer, then select Live Data and click
Logon.
3. From the navigation pane, select Setup > Payroll > Database Setup > Database Configuration.
In the Sage HRMS SQL Server Name field, enter or select the machine where Sage HRMS
Server is installed.
In the Sage HRMS Database Name field, enter the name of the HRMS database from which
the employee information will be transferred into Sage HRMS Payroll:
SageHRMS_XXX (where XXX is your three digit database ID as setup previously in this
guide) for your new company database
SageHRMS_Live for the default live database
SageHRMS_DEU for the U.S. Payroll sample database
SageHRMS_DEC for the Canadian Payroll sample database
Enter the SQL logon credentials in the Database User and Database Password fields.
4. Click Test Connection to ensure the database connections are successful.
5. Click Save to save database connection information, and then click Close to exit the window.
Employer Configuration
1. From the navigation pane, select Setup > Payroll > Database Setup > Employer Configuration to
open the Employer Configuration window.
If you are using U.S. Payroll, select the U.S. Payroll tab and do the following:
a. Select Use Interface – US Payroll to activate a connection to U.S. Payroll. (This box
can be cleared to temporarily disengage integration for maintenance or other
purposes.)
b. For Link Payroll Company to US Payroll, select the organizational relationship between
U.S. Payroll and Sage HRMS: in this case Employer.
Creating a New SQL database
Sage HRMS Payroll Getting Started 14
c. For Sage HRMS Employer to US Payroll, select the Sage HRMS employer that includes
the employees you want to pay.
If you are using Canadian Payroll, select the Canadian Payroll tab and do the following:
a. Select Use Interface – Canadian Payroll to activate a connection to Canadian Payroll.
(This box can be cleared to temporarily disengage integration for maintenance or
other purposes.)
b. For Link Payroll Company to Canadian Payroll, select the organizational relationship
between Canadian Payroll and Sage HRMS: in this case Employer.
c. For Sage HRMS Employer to Canadian Payroll, select the Sage HRMS employer that
includes the employees you want to pay.
2. Click Save to save the Employer Configuration and then click Close.
Employee Configuration
Before you can start processing payroll, payroll fields must be mapped to HR fields. An employee
configuration profile enables this mapping.
Before you create an employee configuration profile, verify that HR information is already set up.
That is, all employees have been added to the employer, as well as benefits, earnings, deductions,
shift differentials, and accruals. When HR setup is complete, you can create profiles for employee
configuration.
1. From the navigation pane, select Setup > Payroll > Database Setup > Employee Configuration
to open the Employee Configuration window, where you can map employee record fields in
Payroll to HR, based on Payroll Profile IDs.
2. Enter a Profile ID and Description.
3. Press F7 to load the HRMS data to be mapped. The Sage HRMS Payroll fields that appear need to
be mapped to appropriate Sage HRMS fields. Refer to the in-product Help for detailed
instructions on how to map the fields.
Creating a New SQL database
Sage HRMS Payroll Getting Started 15
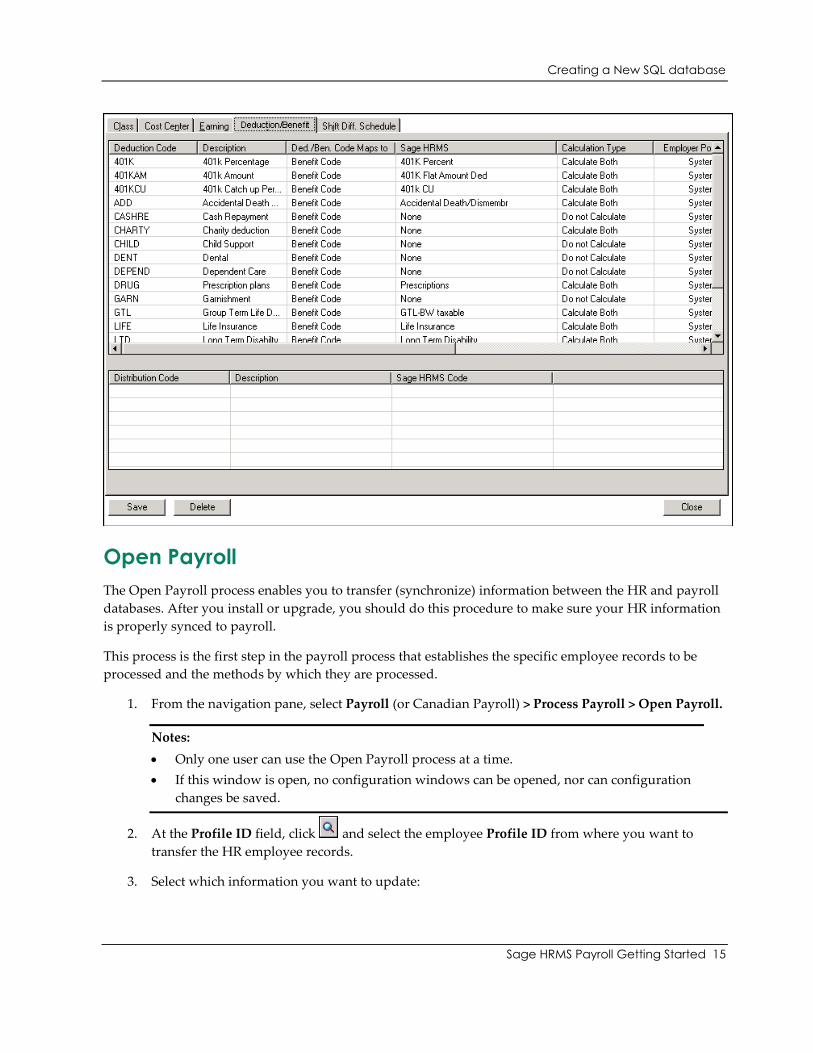
Open Payroll
The Open Payroll process enables you to transfer (synchronize) information between the HR and payroll
databases. After you install or upgrade, you should do this procedure to make sure your HR information
is properly synced to payroll.
This process is the first step in the payroll process that establishes the specific employee records to be
processed and the methods by which they are processed.
1. From the navigation pane, select Payroll (or Canadian Payroll) > Process Payroll > Open Payroll.
Notes:
Only one user can use the Open Payroll process at a time.
If this window is open, no configuration windows can be opened, nor can configuration
changes be saved.
2. At the Profile ID field, click and select the employee Profile ID from where you want to
transfer the HR employee records.
3. Select which information you want to update:
Creating a New SQL database
Sage HRMS Payroll Getting Started 16
Update Time Off: Select to synchronize only time off information. This includes any changes
mapped to the current Accruals tab in the Employee Configuration window as well as any
predefined fields.
Update Pay Information: When selected, only payroll information will be synced. This
includes changes mapped to the current Earnings, Cost Center, and Shift Diff tab in the
Employee Configuration window as well as any predefined fields.
Update Benefits: When selected, only benefits information will be synced. This includes
changes mapped to the current Deduction/Benefit tab in the Employee Configuration
window as well as any predefined fields.
Update All: Select to update all of the above.
Important! Updating all records could take a significant amount of time based on the
number of records to be updated. For this reason, a best practice is to update the least
possible amount of records. However, Update All would be the best choice if you have
made significant employee configuration mapping changes or if you have imported data
from another application.
4. Select what type of employees you want to synchronize: Active, Inactive, or Terminated.
5. Click the Get Employees button to display a list of employees who fit the selected profile.
6. Additional synchronization options are available by clicking the Advanced Options button .
Make sure the options you choose are appropriate for the type of synchronization you need.
Calculate Pay Rates as Hourly transfers an employee as hourly regardless of the HR setting.
For example, select this to transfer the hourly rate of a salaried employee to Payroll.
Overwrite Distribution Codes overwrites the existing distribution codes while updating
existing records in Payroll.
Important! The default for this setting is selected, so distribution codes in payroll will be
overwritten with the distribution codes mapped in the employee configuration profile
you selected for synching.
Overwrite Payroll Pay Frequencies overwrites existing pay frequencies. Sage HRMS
supports four pay frequencies (bi-weekly, monthly, semi-monthly, and weekly), while
Payroll supports five additional pay frequencies (daily, 22 per, 13 per, 10 per, and quarterly).
For example, suppose the existing pay frequency is daily in Payroll. If you select this check
box, the system overwrites the existing pay frequency (daily) with the value retrieved from
HR; otherwise, the system does not update the existing five specific pay frequencies.
Additional employee selection criteria are available by using Pay Frequency, Organization
Level, Organization Code, or a specific Employee ID range.

Creating a New SQL database
Sage HRMS Payroll Getting Started 17
7. Click the Get Employees button again to update the Employee list
8. In the Benefit section, select the benefits to be included or excluded from the sync process.
9. In the Employee list, select or clear individual employee records for processing (without
changing the overall selection criteria) by changing the value of the cells in the Include? column
to Yes (to include) or No (to exclude) the employee record. You can also click Include All or
Exclude All to change them all at once.
10. Click Process when you are ready to transfer the employees. The result of the transfer appears for
you to review.
11. Click Print to print the results if needed.
12. After reviewing the results, click Update to complete the process and update Payroll. The Update
process can take several minutes. Once complete, the items in the Status column change to
Updated.
13. Upon completion you will be prompted to print a result report.
14. Click Yes to print the results of the update, to view any errors that may have occurred. You can
also export the reports to a file to serve as an ongoing log of all the data transfers.
15. Click Finish and then click Close when you are finished updating employees.

Sage HRMS Payroll Getting Started 18
Setting Up Payroll
The following steps guide you through the setup of Sage HRMS Payroll.
Step 1: Prepare Payroll Data
After you have installed and configured your Sage HRMS Payroll data files, the next step is to add the
data from your company's present payroll system and prepare Sage HRMS Payroll for your day-to-day
operations.
To begin, gather all your current payroll records. These can be manual records or printed listings and
reports from other accounting software, such as:
A list of the general ledger accounts used in your payroll system, including accounts for salary
and wages payable, suspense, wage expense, employee liability, and employer liability.
Listings of the earnings, deductions, and other pay factors you use to process payroll. When you
set up Sage HRMS Payroll, you create a master record for each pay factor you will use in
processing. Each master record is assigned one of the following categories:
Accrual (vacation, sick, or compensatory time)
Advance
Benefit
Deduction
Earning
Expense Reimbursement
To prepare your Sage HRMS Payroll system, gather information about each earning and deduction you
assign to employees. The information should include:
A meaningful six-character code (alpha-numeric, for reference and reporting)
A record Type (for accruals: vacation, sick, or compensatory time; for earnings: salary and wages,
reported tips, and so forth)
A frequency (weekly, monthly, and so forth)
A method of calculation (for example, at an hourly rate or as a percentage of the employee's base
wages)
A rate, percent, or amount
An annual maximum and period minimums and maximums, if applicable
G/L account distribution information
Tax information used in payroll processing, including the following for each tax:
Setting Up Payroll
Sage HRMS Payroll Getting Started 19
Base wage and surtax multipliers, if appropriate
The method for calculating the tax (percent, flat, etc.), if appropriate
G/L account distribution information
Standard deductions, exemption amounts, and calculation bases, if appropriate
Employee information, including the following:
Personal data such as address, phone number, SSN/SIN, and birth date
Payroll data such as position, status, pay frequency, overtime and shift differential schedules,
overtime calculation method, and workers' compensation information
Pay factors, including earnings, deductions, benefits, accruals, advances, expense
reimbursements, and taxes assigned to the employee
Optional information, including cost center segment codes and additional human resource
data
Employee to date amounts for the current year (if you are setting up a Sage HRMS Payroll system
partway through a calendar year) and historical data from the previous years for which you want
to enter employee history (which is an optional process).
Step 2: Set Up General Ledger Accounts
Add the G/L accounts you need for your payroll data, including the Salary and Wages Payable account,
the Suspense account, and all the other expense and liability accounts you use to process payroll.
Notes:
As you set up your General Ledger system, use the in-product Help for detailed setup instructions.
From the main menu in the application, select Help > Contents or Search, then search for Setting up
G/L.
See also the section; Importing Data into Sage HRMS Payroll for help importing G/L information
into Sage HRMS.
1. Set up fiscal year information. From the navigation pane, select Setup > Payroll > Payroll Setup
> Fiscal Year Calendar. Enter the starting date for the first period in your fiscal year. For
example, if your year starts in April, specify April 1 of the first year that you want data.
General Ledger creates a calendar for the year before the oldest year you specify, so you can post
the opening entries for the oldest fiscal year.
2. Set up G/L Options. From the navigation pane, select Setup > Payroll > General Ledger >
Options and select the Segments tab to select basic processing options and define all the
segments used in your General Ledger account numbers.
Setting Up Payroll
Sage HRMS Payroll Getting Started 20
Note: On this tab, after you have chosen and saved the Account Segment for your main
account, you can no longer change the Account Segment. Therefore, it is imperative that you
select the correct Account Segment before you save G/L Options.
3. Set up Segment Codes. From the navigation pane, select Setup > Payroll > General Ledger >
Segment Codes to further define how you will structure your chart of accounts.
4. Set up Account Structures. From the navigation pane, select Setup > Payroll > General Ledger >
Account Structures to identify the format of the account numbers that are assigned to the
account structure code.
5. Set up G/L Accounts. From the navigation pane, select Setup > Payroll > General Ledger >
Accounts to add new accounts to the general ledger.
6. Set up Banks. From the navigation pane, select Setup > Payroll > Bank Services > Banks to add a
new record for each bank account on your chart of accounts.
7. Do G/L Integration. From the navigation pane, select Setup > Payroll > Bank Services > G/L
Integration to determine how Bank Services produces transactions for G/L from posted bank
transactions and to specify the data to include for G/L transactions.
Importing existing G/L data
If you are upgrading to Sage HRMS Payroll and already have a general ledger system set up, you can
use the Import function to import your existing G/L data. Each G/L window that enables you to enter
your accounts and segments information includes an Import and Export button.
You must create the file from your other system in the correct format in order for it to be imported
into Sage HRMS. To do this, first add several entries in Sage HRMS (such as G/L accounts), and then
use the Export button to export the information in the appropriate file type (for example, CSV file,
XML, Access, Excel 2000, etc.). Review the format of the exported file so you can determine the
specifications in which the file must be created for it to be imported into Sage HRMS Payroll. When
you have created your file, use the Import button on the appropriate window (such as G/L Accounts)
to import the file.
If you will be importing the data more than once, you can create a script (template) to speed up the
process.
Search online Help for importing data into Sage HRMS Payroll for detailed instructions on using the
Import Data function.
Step 3: Set Up Bank Information and Check Stock
Use the Banks window (from the navigation pane, select Setup > Payroll > Bank Services > Banks) to set
up bank accounts and check forms used in Sage HRMS Payroll.

Setting Up Payroll
Sage HRMS Payroll Getting Started 21
Step 4: Set Up Payroll Processing Defaults
The Options window under Payroll Setup allows you to display and define settings for basic company
information, payroll-processing criteria, and pay frequencies. You keep and update most company
information using Sage HRMS.
Employee pay history is comprised of the data from each Sage HRMS Payroll check issued to the
employee. Check data includes the amounts calculated for each earning, deduction, or other pay factor
assigned to the employee, as well as the amounts deducted for Sage HRMS Payroll taxes and the G/L
account to which each amount is posted. Sage HRMS Payroll history also records the hours, pieces, sales
amounts, or wage bases upon which Sage HRMS Payroll amounts are calculated and the rates, amounts,
and percentages used to calculate them.
When you first set up Sage HRMS Payroll, you enter employee historical amounts on the Transaction
History window. (After Payroll Processing is underway, you use the Transaction History window to
make adjustments to an employee's Sage HRMS Payroll totals.)
Historical data includes:
The employee history you add during setup. You can track and print this pre Sage HRMS Payroll
history, and the subsequent entries you make to adjust an employee's totals, by printing the
Transaction History Audit report.
The employee history that results from Payroll Processing in Sage HRMS Payroll. To view
employee history generated by processing payroll in Sage HRMS Payroll, print the Earnings and
Hours report (from the navigation pane, select Reports > Payroll > Transaction Reports >
Earnings and Hours).
You can retain several years of Sage HRMS Payroll history, although normally two to five years of history
should suit your purposes (the minimum is one year, that year being the current year). When Sage HRMS
Payroll history becomes older than the number of years you choose to retain in Options, you can delete it
using Delete Inactive Records (from the navigation pane, select Payroll > Delete Inactive Records).
Open the Options window from the navigation pane by selecting Setup > Payroll > Payroll Setup >
Options.
Company Tab
The Company tab of the Options window displays the Sage HRMS company name (and address) you
selected on the Employer Configuration window and allows you to enter a tax number, specific
contact name, telephone number, and fax number. You can change the contact name and the phone
and fax numbers at any time.
Complete the fields on the Company tab, as follows:
Tax Number. Enter the company’s Tax Number.
Setting Up Payroll
Sage HRMS Payroll Getting Started 22
Contact Name. Type a name, in up to 60 characters, that identifies a contact person or
position in the company for whom you are creating the system, or use the field for your own
purposes.
Telephone. Type the telephone number of the company.
Fax Number. Type the fax number of the company.
Processing Tab
The Processing tab of the Options window lets you specify Sage HRMS Payroll settings such as:
Minimum wage
Years of employee history to keep
Bank and check form
Whether or not to print employees' social security numbers (or social insurance numbers) on
paychecks
The Processing tab of the Options window lets you define company wide information. You can
change your entries at any field on this tab, with the exception of the Enter Start/Stop Fractional
Hours As field, at any time. To change the Enter Start/Stop Fractional Hours As field, there can be
no active timecards in the system.
Determine your choice at each option and complete the Processing tab as follows:
Minimum Wage: Enter the current federal minimum wage.
Years of History to Keep: Enter the number of full calendar years (including the current
year) of posted payroll detail your company wants to retain. Sage HRMS Payroll uses this
information at Year-End to determine the detailed history you can delete. You can maintain
several years of historical data. Keep in mind, however, that historical data consumes disk
space. Two to five years of detailed history will usually provide the information you need.
Enter Start/Stop Fractional Hours As: Select either Minutes (the default) or Hundredths Of
An Hour from the list field to instruct the system in the way to interpret entries at the
timecard Start Time and Stop Time fields. Fractional entries in the timecard Hours field are
always interpreted as hundredths of an hour.
You cannot change your entry at this field if active timecards exist within the system.
Number Of Decimal Places For Hourly Rates: This option allows you to use fractional pay
rates. Your entry controls the number of decimal places (from two, the default, to five) you
can enter for earning/deduction hourly rates throughout the system (for example, employee
hourly earnings rates and shift differential rates).
Setting Up Payroll
Sage HRMS Payroll Getting Started 23
Maximum Annual Part-time Hours: Enter a maximum number of allowable part time hours
if your company employs part time workers and wants to receive a warning message when a
part time employee has reached the annual maximum.
Default Bank: The bank you enter here will automatically appear on the Print/Post Checks
window. Use the Finder to select a bank that was set up on the Banks window.
Use Original Dates When Reversing Checks: If you choose this option, Sage HRMS Payroll
will set the date of a reversed paycheck to the date of its original check, regardless of the
Reversal Date field entered on the Reverse Transactions window (from the navigation pane,
select Payroll > Reverse Transactions). If you do not choose this option, Sage HRMS Payroll
will set the date of a reversed paycheck to the Reversal Date field entered on the Reverse
Transactions window.
Print SSN (SIN for Canada) on Checks: If you want employees' social security numbers (or
social insurance numbers) to print on paychecks, choose this option; otherwise clear this
option. Your choice becomes the default setting on the Print/Post Checks window but you
can change it later on that window.
Frequency Tab
The Frequency tab of the Options window enables you to define your Sage HRMS Payroll system's
pay frequencies. You can define the number of Pay Periods Per Year for daily, weekly, and biweekly
pay frequencies. Pay periods per year are pre-defined for all the other pay frequencies supported by
the system. You can also specify the Hours per Pay Frequency for each of the pay frequencies your
company will use.
Review your pay frequencies and complete the Frequency tab as follows:
Pay Periods per Year: For Daily, Weekly, and Biweekly pay periods, enter the number of pay
periods per year.
The number of daily, weekly, and biweekly pay periods per year can vary from year to year.
To allow the system to annualize wages for taxes and for earnings or deductions that use the
Wage Bracket Table calculation method, be sure to update the Pay Periods Per Year fields
when necessary.
Hours per Pay Frequency: For each pay frequency your Sage HRMS Payroll system uses,
enter the number of hours per period that defines the frequency.
When you enter the pay frequency for each employee on the Employees window, the system
displays the hours per pay period associated with the employee's frequency.
You can change your company's pay frequency information at any time. If timecards or
unposted payroll transactions exist in your data when you change the frequency information,
the changes will not affect them. Frequency changes apply only to data entered after the
changes are made.
Setting Up Payroll
Sage HRMS Payroll Getting Started 24
After Completing the Tabs
Review the options you have selected and the information you have entered on the tabs of the
Options window to verify your entries are correct. When you finish, click the Save button.
Verify that the setup is correct and complete by printing a listing of your choices; select Reports
>Payroll > Setup Reports > and print the Options report.
Step 5: Set up Payroll G/L Integration
Sage HRMS Payroll produces general ledger transactions from the payroll transactions you post. Each
general ledger transaction includes all the information you need to update payroll data in your general
ledger:
Sage HRMS Payroll creates batches of payroll transactions right in General Ledger, where you can edit
and post them.
Sage HRMS Payroll provides several options you can use to produce general ledger transactions in the
form that best suits your requirements.
From the navigation pane, select Setup > Payroll > Payroll G/L Integration. Be sure you have completed
G/L setup before you do G/L Integration.
Integration Tab
The Integration tab of the Sage HRMS Payroll G/L Integration window enables you to:
Choose when to create the G/L transactions: either automatically during posting, or
manually, upon request.
Choose either the check date or the pay period end date as the journal entry date.
Choose whether to create new batches for G/L transactions (and optionally post them) or to
add them to existing G/L batches.
Choose whether to consolidate general ledger transactions during posting of Sage HRMS
Payroll batches.
Specify a Salary and Wages Payable account and a Suspense account.
Creating G/L Transactions
G/L Transactions are created During Posting. This means that G/L transactions are
created automatically each pay period after printing and then approving checks (which is
when posting occurs) and posting after-the-fact checks.
To print the Payroll G/L Transactions report, you must choose to generate G/L
transactions using the Create G/L Batch function.
Setting Up Payroll
Sage HRMS Payroll Getting Started 25
You can change your selection in the Create G/L Transactions field on the Payroll G/L
Integration window at any time. If you decide to change from deferring G/L transactions
to creating them automatically after you have processed a Sage HRMS Payroll and
approved the resulting checks, you will still need to use the Generate G/L Batch (Payroll
> Tasks > Generate G/L Batch) function to generate transactions for the pay period just
completed. The system generates automatic transactions for a pay period only when that
option is in effect during processing.
Choosing the Journal Entry Date
You can opt to use either the check date or the pay period end date as the journal entry date for
the transaction in General Ledger. Your choice determines the date for expense and employer
liability account posting only; the system always uses the check date when posting to the bank
and employee liabilities accounts.
Creating a New G/L Batch or Adding to an Existing Batch
The Create G/L Transactions By field lets you choose how and where to create the G/L
transactions. You have the following options:
Add Sage HRMS Payroll transactions to a batch that currently exists in the General
Ledger. The batch must have an OPEN status. When you print a batch in General Ledger
or set it as ready to post, its status is no longer OPEN.
Create a new batch in General Ledger each time Sage HRMS Payroll generates G/L
transactions.
Create a new batch in General Ledger each time Sage HRMS Payroll generates G/L
transactions, and automatically post the batch in the General Ledger.
Creating Detailed or Consolidated Batches
Consolidation options let you combine transaction details in general ledger transactions, or leave
them unconsolidated to include all the details posted to each general ledger account.
Consolidation reduces the amount of information in the general ledger batch and results in a
shorter Transactions Listing report.
However, consolidation also removes transaction-specific information from the Reference and
Description fields for each transaction, as described in the later section, "Selecting References and
Descriptions for G/L Transactions."
Sage HRMS Payroll provides the following choices for consolidating general ledger entries
arising from Sage HRMS Payroll transactions:
Do Not Consolidate. All the details posted in Sage HRMS Payroll will be included in the
General Ledger transaction batch. The system posts every account/amount detail in the
batch separately, in G/L account order. Details include the G/L account, fiscal period,
Setting Up Payroll
Sage HRMS Payroll Getting Started 26
date, posting sequence number, source code, reference and description, and transaction
amount.
Consolidate by Acct/Fiscal Period. All the details with the same general ledger account
number and fiscal period are combined into one detail. If you do not need to retain
transaction source codes, you can choose this option. Source codes indicate a
transaction's type (payroll check, reversed check, etc.).
Consolidate by Acct/Fiscal Period and Source Code. All the details with the same
general ledger account number, fiscal period, and source code are combined into one
detail. Consolidate by account, fiscal period, and source code, to consolidate transactions
that post to the same G/L account in the same fiscal period, but retain transaction source
codes.
If you create batches of G/L transactions immediately upon posting, consolidation does not occur
across Sage HRMS Payroll checks. The details of each check will be consolidated within the check
according to your choice of consolidation option.
If you choose to consolidate G/L transactions, certain details will be consolidated on the Payroll
G/L Transactions report.
To print all transactions in detail on the Payroll G/L Transactions report yet send consolidated
batches to General Ledger, set the option to Do Not Consolidate when you are processing Sage
HRMS Payroll. Then, when you are ready to run the function to create G/L batches, change the
option to either of the Consolidate G/L Batches options (account/fiscal period or account/fiscal
period/source code).
Consider the amount of detail you require in your general ledger before you decide whether to
produce detailed or consolidated batches.
Salary and Wages Payable Account: Enter the account number of the G/L liability account to
which employee pay amounts are credited. This account is also debited with the total amount of
the checks written manually or printed by Sage HRMS Payroll. The Salary and Wages Payable
Account is a required account.
Suspense Account: Enter the G/L account number of the asset account that is debited with the
amounts, if any, by which deductions from paychecks exceed wages owed. The Suspense
Account is a required account.
Transactions Tab
The Transactions tab on the Payroll G/L Integration window lets you specify the type of information
to use in the transaction description, detail reference, detail description, and detail comment fields for
general ledger transactions. This information also appears on the G/L Transactions report.
Setting Up Payroll
Sage HRMS Payroll Getting Started 27
You can assign one or more pieces of information (segments) to each field, provided that the
combined length of the segments and separators does not exceed 60 characters. Fields exceeding this
limit will be truncated when you post general ledger transactions.
The segments you can select depend on the type of transaction to which you are assigning
information and whether the information is for the transaction header or the details. This ensures that
the information passed to General Ledger is relevant for each type of transaction.
For example, for the reference, description and comments associated with each type of general ledger
transaction, you can choose:
The calculation sequence number generated by Calculate Payroll for all transactions
processed at the same time.
The posting sequence number generated by Sage HRMS Payroll Checks (when you approve
the checks) for all transactions posted at the same time.
The calculation sequence number prints on the Pre-Check Payroll Register and both the calculation
and posting sequence numbers print on the Payroll Register.
When you create general ledger transactions, if no data exists in the source transaction field, the field
will be blank in the general ledger transaction.
Unconsolidated transactions - If you do not consolidate general ledger transactions,
information for all the G/L fields is passed to General Ledger, as specified on the G/L
Integration setup window.
Consolidated transactions - If you consolidate general ledger transactions, only the
information for the G/L Entry Description field is passed to General Ledger. The detail
reference, description, and comment are lost in consolidation.
When you consolidate general ledger transactions in Sage HRMS Payroll, shown in General Ledger
reporting (after you use the Create G/L Batch function) are the following descriptions:
The description given to consolidated entries is "Transactions consol. by UP on <date>."
The description for consolidated details (if the original descriptions were different) is "Details
consol. by UP." Consolidation will keep the original descriptions if they were the same for all
original details.
Sage HRMS Payroll Distribution Accounts
As part of payroll setup, you enter the G/L accounts to which payroll transactions will post. (You
must add the accounts to the G/L chart of accounts before you can enter them in payroll.) First, you
enter the Salary and Wages Payable account and the Suspense account, which are required, in Payroll
G/L Integration. You then enter all of the other payroll expense and liability accounts as parts of an
unlimited number of distribution account sets you associate with a particular earning/deduction or
tax.
Setting Up Payroll
Sage HRMS Payroll Getting Started 28
For instance, suppose you set up an earning that will be assigned to all of your hourly employees.
You can define for this particular earning any number of distribution account sets, each set made up
of the following accounts:
Regular Wages Expense
Overtime Wages Expense
Shift Differential Wages Expense
You identify each account set by a distribution code and description. Then, when you assign the
earning to an employee, you also assign the distribution code for the set of accounts you want to use
when posting the employee's earnings.
Using the example given at the beginning of this section, suppose that:
Your company has two departments (100 and 200), and you post payroll totals to G/L
accounts that include the department code.
Wage amounts for an employee who works in department 100 post to account 6400 100 and
wage amounts for an employee who works in department 200 post to account 6400 200.
Other totals, such as benefit and deduction amounts and taxes, similarly post to expense and
liability accounts that include one of the two department codes.
To accommodate a fairly simple posting scheme - one in which each expense or liability posts to one
of only a small number of distinct G/L accounts set up to track the expense or liability - you can take
advantage of the multiple distribution code feature and set up two (or more) account sets for each
earning/deduction and tax.
For the company with departments 100 and 200, you could set up an account set for department 100
amounts and an account set for department 200 amounts.
When you assign an earning/deduction or tax to an employee, depending upon whether the
employee works in department 100 or department 200 you assign either the distribution code for the
department 100 account set or the distribution code for the department 200 account set. If a
department 100 employee occasionally works in department 200, you can enter a timecard to
override the department segment of the wage expense account.
It may be, though, that you want to post Employee Payroll amounts to a greater number of G/L
accounts, using account segments to represent different employees, sections of the company, regions
of the country, and so forth.
Setting up the number of unique accounts you require for complex cost center posting by adding a
multitude of distribution account sets could entail hours of tedious data entry. The cost center
override option provides a much easier way for you to post to unique G/L accounts by division,
department, employee, or any other company entity.

Setting Up Payroll
Sage HRMS Payroll Getting Started 29
The Transactions tab of the G/L Integration window lets you specify the type of information to use in
the transaction description, detail reference, detail description, and detail comment fields in the
general ledger transactions arising from Sage HRMS Payroll transactions.
This information also appears on payroll posting journals and reports.
On the Transactions tab, the table shows a list of Sage HRMS Payroll transaction types.
For each transaction type, the table shows the segments (information) that were selected to be the
transaction:
G/L Entry Description (that is, the overall description of the transaction)
G/L Detail Reference
G/L Detail Description
G/L Detail Comments
The G/L Detail options refer to the reference, description, and comments that apply to the each detail
line of the transaction.
When you double-click a transaction type from the table, a G/L Integration Details window appears.
The fields on this window are:
Transaction Type: From the drop-down list, choose the Sage HRMS Payroll transaction type
that will transfer to the General Ledger.
G/L Transaction Field: From the drop-down list, choose the G/L Transaction field for which
you are defining the segments. This can be a transaction description, detail reference, detail
description, or detail comment.
Example: As you include or exclude segments, the Example field shows the segments you
have selected for the transaction type.
Segment Separator: Select a character to separate segments of information. (The separator is
used only if you assign more than one segment. The default separator is a hyphen.)
Choose Segments From List: From the list, choose the information (segment) you want to
accompany each General Ledger transaction created by Sage HRMS Payroll, as an additional
audit trail marker.
To assign one or more segments to the selected transaction field, select the segments from the Choose
Segments From List section, then click Include.
You can assign a maximum of five segments to a G/L Transaction field, providing that the
combination does not exceed 60 characters. If the assigned information exceeds this number of
characters (including separators), it will be truncated when the transaction is posted.
Among the options are:
Setting Up Payroll
Sage HRMS Payroll Getting Started 30
If you choose Posting Date, the description, reference or comment will contain either the
check date or the pay period end date, depending upon which of these you chose as the
journal entry date, on the Integration tab of this window.
If you choose Posting Sequence, the description, reference or comment will contain the
posting sequence number generated by Payroll Checks (when you approve the checks) for all
transactions posted at the same time.
If you choose Calculation Sequence, the description, reference or comment will contain the
calculation sequence number generated by Calculate Payroll for all transactions processed at
the same time. The calculation sequence number prints on the Pre Check Payroll Register and
both the calculation and posting sequence numbers print on the Payroll Register.
Segments Currently Used: This shows the segments currently selected. To remove a segment, select
the segments from the Segments Currently Used, and click Exclude.
After Completing the Tabs
Review the options you have selected and the information you have entered on the tabs of
the G/L Integration window to be sure your entries are correct. When you finish, click the
Save button.
To print a listing of your choices, to verify that they are correct and complete select Reports >
Payroll >Bank Reports > G/L Integration.
Step 6: Set Up Optional Fields (optional)
You can use optional fields to store additional information in your Sage HRMS Payroll system.
Before you can define optional fields for use in payroll, you must first set them up for system-wide use on
the Optional Fields window. For information on setting up system-wide optional fields, see the Sage
HRMS Payroll in-product Help menu.
Optional fields let you customize payroll by letting you store an unlimited amount of additional
information with employee, earning/deduction, and tax records, and with timecards, transactions, and
payroll processing.
Because you can select records by optional field code on several reports, optional fields also provide an
additional means of analyzing employees and transactions in payroll.
You can use an unlimited number of optional fields. However, you must first define optional fields for
your payroll system using the Optional Fields window. (For more information about setting up optional
fields, see the System Manager Guide.)
After you have set up optional fields for payroll, use the Assign Optional Fields window to define
optional fields for use with the following payroll records and transactions:
Employees Timecard Earnings/Deductions
Setting Up Payroll
Sage HRMS Payroll Getting Started 31
Employee Earnings/Deductions
Employee Taxes
Earnings/Deductions
Taxes
Timecards
Timecard Taxes
Transactions
Transaction Earnings/Deductions
Transaction Taxes
Payroll Processing
The previous list represents the specific areas of a record or transactions for which you can define
optional fields. For example, you can define optional fields for the employee in general, for the
employee's earnings and deductions, or for the employee's taxes
For each optional field you plan to use in Sage HRMS Payroll, you specify:
The type of optional field you are entering, indicating whether the optional field is to be used
with specific Sage HRMS Payroll setup records (employees, earnings, deductions, and taxes),
timecard, transactions, or Payroll Processing. You can set up an unlimited number of optional
fields for each type.
The optional field code for each optional field you are defining. If you want to retain optional
field information from Sage HRMS Payroll transactions when you create batches for General
Ledger, you must use the same optional fields for transactions in Sage HRMS Payroll as you use
in General Ledger.
The default entry (value and description) to use for the optional field. However, the value
entered here may be overridden by values entered elsewhere in Sage HRMS Payroll.
You can accept or change the default values on any of the forms.
Whether the program will display the optional field and its default entry on the window for the
type of optional field when you set up new records or enter transactions.
For example, if you define Carpool as an optional field for Employees and you select Yes in the
Auto Insert field, the Carpool field will appear automatically on the Optional Fields tab of the
Employees window when you add a new employee.
Settings that determine whether General Ledger accounts can be updated with optional field
information from posted transactions, as described in the next section, "Optional Fields from Sage
HRMS Payroll to General Ledger."
After defining optional fields, you can assign them to particular records (employee earnings, deductions,
and taxes), or when you enter timecards.
Sage HRMS Payroll assigns the optional fields you define for Sage HRMS Payroll transactions when you
generate transactions using the Calculate Payroll window.
For example, assume your employees serve on various committees (a uniform committee, an employee
education committee, and a community service committee) set up to address work related issues.
Setting Up Payroll
Sage HRMS Payroll Getting Started 32
On the Optional Fields window, you might set up an optional field called Committees and make three
entries in the Value column: Uniform, Education, and Community. For each entry, you could enter a 60
character description.
To ensure that users entered only one of those three values when assigning the Committees optional field
to the employee record, you would select the Validate check box. (To allow users to enter any value, do
not select it.) With the Validate check box selected, you can also specify that users could leave the
Committees field blank in the employee record, by selecting the Allow Blank check box (available only
for optional fields defined as text or date).
Then on the Optional Fields window, when you set up the optional fields for Employees, you would
select Committees as one of the Employees' optional fields. You could then:
Assign it a default value. If you had selected the Validate check box, the default value must be
Uniform, Education, or Community.
Select the Auto Insert option if you wanted the Committees optional field to appear
automatically on the Employees window whenever you add employees.
After you complete these steps, you can assign the Committees optional field when you set up each
employee. If you had selected the Validate check box, you ensure that the system validates your response
at the Committees field in Employees. You can enter Uniform, Education, or Community (all three
appear in the Finder at the Committees field). If you had also selected the Allow Blank check box, you
can leave the field blank if the employee is not currently serving on a committee.
If you did not select the Validate check box, you can make any entry you want, up to the specified
character length for the field, at the Committees optional field in Employees.
Optional Fields from Sage HRMS Payroll to General Ledger
You can restrict the flow of information that is passed to General Ledger when you post transactions
that use optional fields.
For optional field values to pass from Sage HRMS Payroll to General Ledger, use the Optional Fields
window (from the navigation pane, select Setup > Payroll > Optional Fields) to:
Define optional fields for any of the following:
Transactions
Transactions Earnings/Deductions
Transaction Taxes
Payroll Processing
Specify the accounts for which values for an optional field can be passed to General Ledger.
Setting Up Payroll
Sage HRMS Payroll Getting Started 33
When you create general ledger transactions in payroll, the program passes the optional field
values used in a transaction to General Ledger if:
The optional fields are the same as the transaction details optional fields assigned to the
affected account in General Ledger.
The optional field settings specify that optional field information be passed to the type of
account used in the transaction. (You specify the settings by clicking the Settings button
on the Optional Fields window, described later.)
For example, assume you have defined an optional field called ABC for "Transactions" that you
want passed to the Bank account in General Ledger. On the Settings dialog box, you must have
selected the Bank account, and in General Ledger, you must have defined an optional field ABC
as well.
The values then appear in General Ledger in:
The G/L journal entry for the account.
The G/L Transactions report.
The G/L Integration report (before the G/L batch is posted).
Note: While all account groups are initially selected for new optional fields, you need to
consider carefully the purpose of the optional field you are defining. You should send
values to General Ledger only for optional fields that require Sage HRMS Payroll
analyses and only to accounts where they are required.
You do not need to send optional field information for analysis that is performed only in Sage
HRMS Payroll. If you routinely send all the optional fields you use in Sage HRMS Payroll
transactions, your General Ledger may become unwieldy, and you may also slow down
processing considerably.
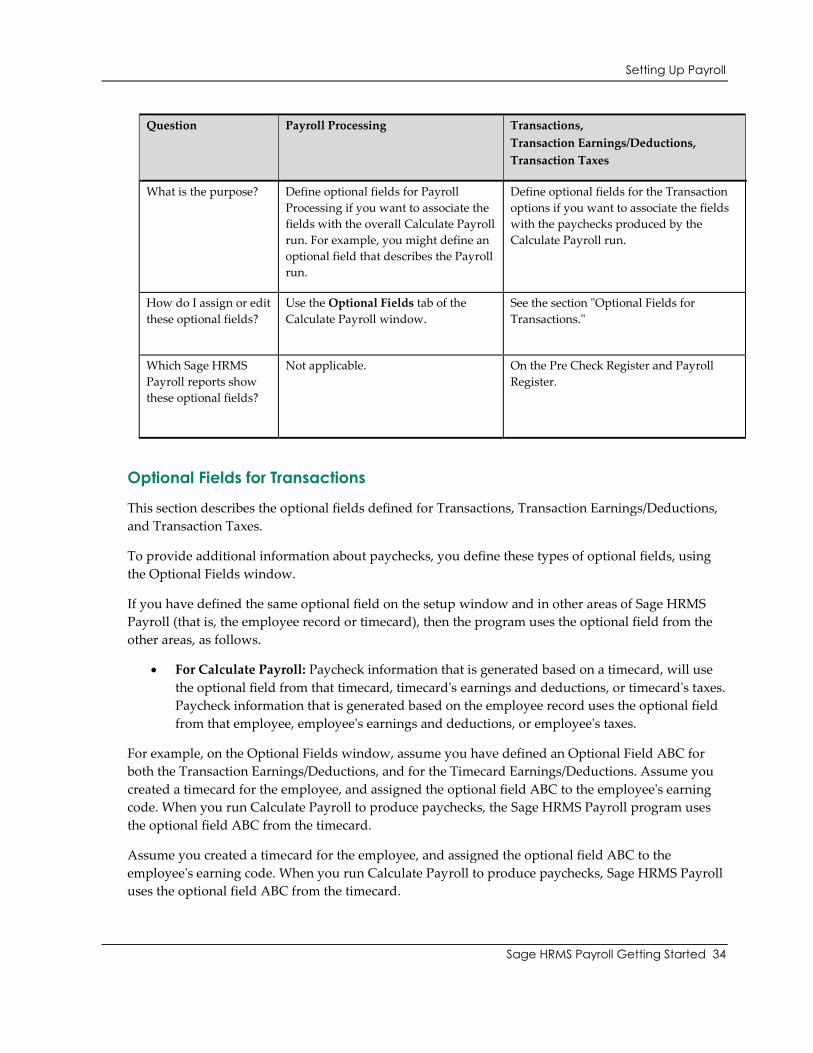
Payroll Processing versus Transactions
This section discusses the optional fields defined for Transactions, Transaction Earnings and
Deductions, Transaction Taxes, and Payroll Processing, on the Optional Fields window.
You can set up these types of optional fields so that they are passed to General Ledger when you run
Calculate Payroll.
The following table summarizes the main differences between the optional fields defined for the
Payroll processing option and those for the transaction options.
Setting Up Payroll
Sage HRMS Payroll Getting Started 34
Question Payroll Processing Transactions,
Transaction Earnings/Deductions,
Transaction Taxes
What is the purpose? Define optional fields for Payroll
Processing if you want to associate the
fields with the overall Calculate Payroll
run. For example, you might define an
optional field that describes the Payroll
run.
Define optional fields for the Transaction
options if you want to associate the fields
with the paychecks produced by the
Calculate Payroll run.
How do I assign or edit
these optional fields?
Use the Optional Fields tab of the
Calculate Payroll window.
See the section "Optional Fields for
Transactions."
Which Sage HRMS
Payroll reports show
these optional fields?
Not applicable. On the Pre Check Register and Payroll
Register.
Optional Fields for Transactions
This section describes the optional fields defined for Transactions, Transaction Earnings/Deductions,
and Transaction Taxes.
To provide additional information about paychecks, you define these types of optional fields, using
the Optional Fields window.
If you have defined the same optional field on the setup window and in other areas of Sage HRMS
Payroll (that is, the employee record or timecard), then the program uses the optional field from the
other areas, as follows.
For Calculate Payroll: Paycheck information that is generated based on a timecard, will use
the optional field from that timecard, timecard's earnings and deductions, or timecard's taxes.
Paycheck information that is generated based on the employee record uses the optional field
from that employee, employee's earnings and deductions, or employee's taxes.
For example, on the Optional Fields window, assume you have defined an Optional Field ABC for
both the Transaction Earnings/Deductions, and for the Timecard Earnings/Deductions. Assume you
created a timecard for the employee, and assigned the optional field ABC to the employee's earning
code. When you run Calculate Payroll to produce paychecks, the Sage HRMS Payroll program uses
the optional field ABC from the timecard.
Assume you created a timecard for the employee, and assigned the optional field ABC to the
employee's earning code. When you run Calculate Payroll to produce paychecks, Sage HRMS Payroll
uses the optional field ABC from the timecard.
Setting Up Payroll
Sage HRMS Payroll Getting Started 35
Note: On the Optional Fields window, setting the Auto Insert field for a transactional optional
field to Yes means that Sage HRMS Payroll will always add that optional field to the paycheck.
This could inflate your database and slow down processing considerably. For example, if you set
the Auto Insert field to Yes for an optional field for "Transaction Earnings/Deductions," the
optional field will be added to every earning/deduction on every paycheck. If you process weekly
paychecks for hundreds of employees, this would result in a huge number of optional fields
stored in your database.
A more efficient method would be to set the optional field's Auto Insert to No. Then you can decide
later whether to include the optional field in the paycheck information, by adding or deleting the
optional field from the employee record or timecard.
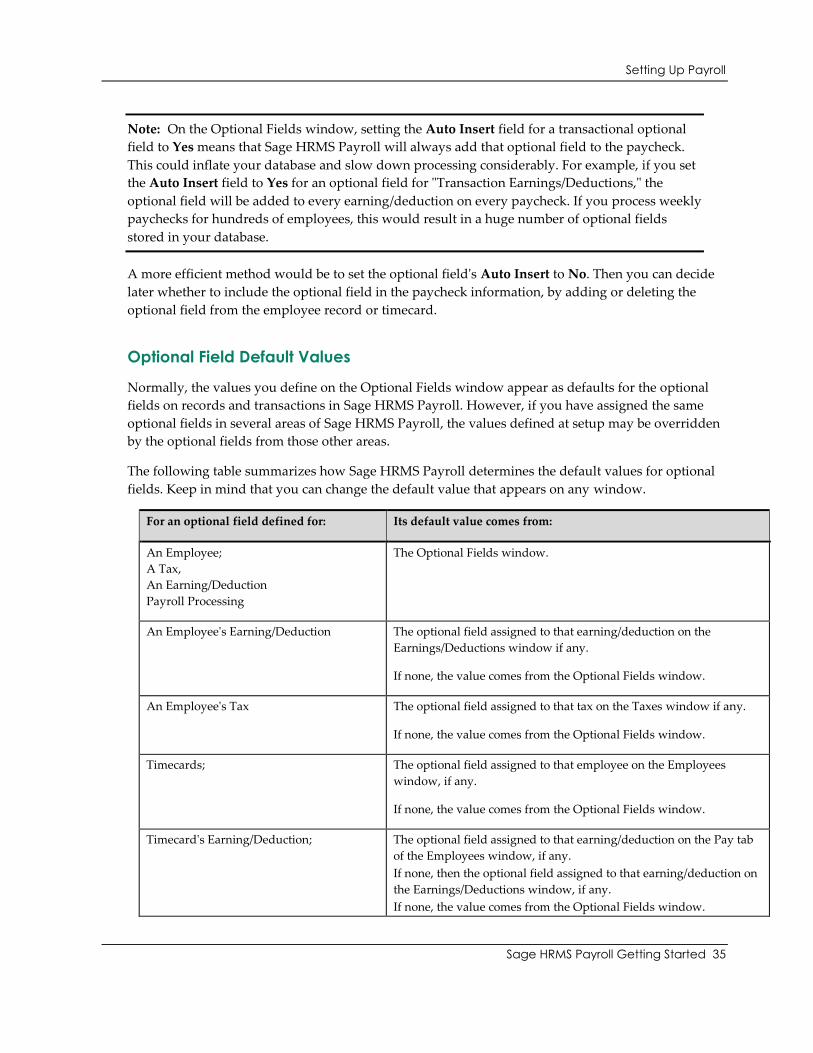
Optional Field Default Values
Normally, the values you define on the Optional Fields window appear as defaults for the optional
fields on records and transactions in Sage HRMS Payroll. However, if you have assigned the same
optional fields in several areas of Sage HRMS Payroll, the values defined at setup may be overridden
by the optional fields from those other areas.
The following table summarizes how Sage HRMS Payroll determines the default values for optional
fields. Keep in mind that you can change the default value that appears on any window.
For an optional field defined for: Its default value comes from:
An Employee;
A Tax,
An Earning/Deduction
Payroll Processing
The Optional Fields window.
An Employee's Earning/Deduction The optional field assigned to that earning/deduction on the
Earnings/Deductions window if any.
If none, the value comes from the Optional Fields window.
An Employee's Tax The optional field assigned to that tax on the Taxes window if any.
If none, the value comes from the Optional Fields window.
Timecards;
The optional field assigned to that employee on the Employees
window, if any.
If none, the value comes from the Optional Fields window.
Timecard's Earning/Deduction;
The optional field assigned to that earning/deduction on the Pay tab
of the Employees window, if any.
If none, then the optional field assigned to that earning/deduction on
the Earnings/Deductions window, if any.
If none, the value comes from the Optional Fields window.
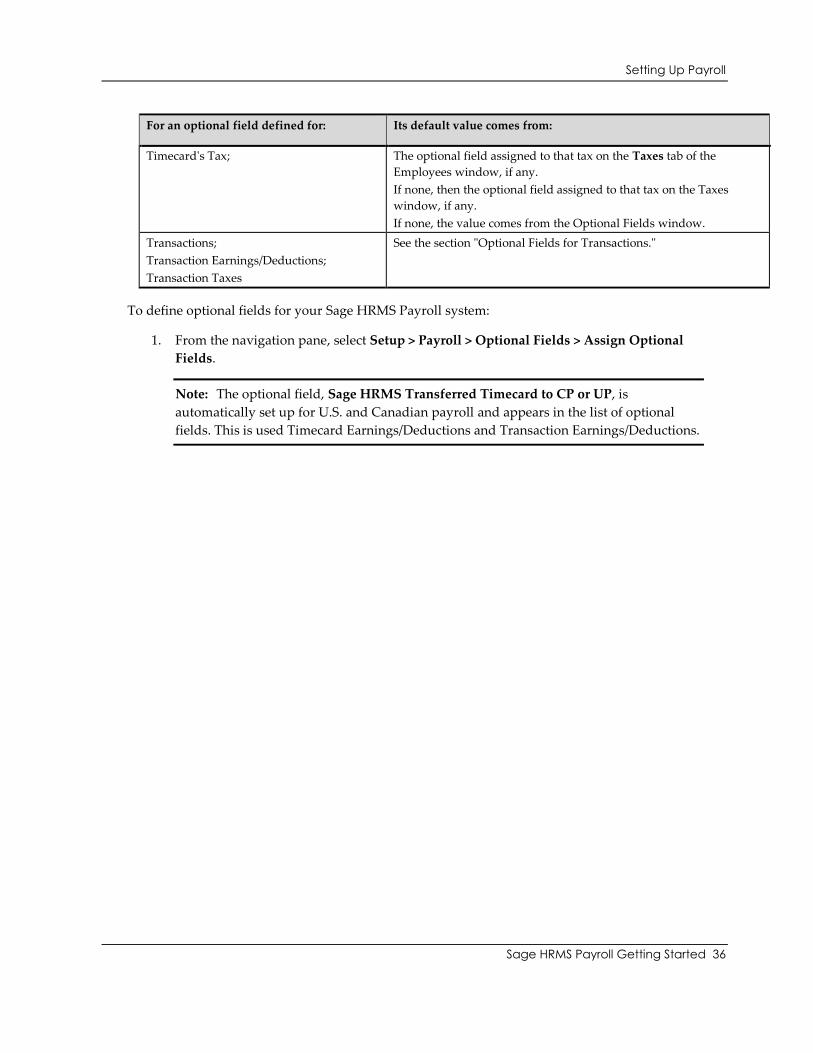
Setting Up Payroll
Sage HRMS Payroll Getting Started 36
For an optional field defined for: Its default value comes from:
Timecard's Tax;
The optional field assigned to that tax on the Taxes tab of the
Employees window, if any.
If none, then the optional field assigned to that tax on the Taxes
window, if any.
If none, the value comes from the Optional Fields window.
Transactions;
Transaction Earnings/Deductions;
Transaction Taxes
See the section "Optional Fields for Transactions."
To define optional fields for your Sage HRMS Payroll system:
1. From the navigation pane, select Setup > Payroll > Optional Fields > Assign Optional
Fields.
Note: The optional field, Sage HRMS Transferred Timecard to CP or UP, is
automatically set up for U.S. and Canadian payroll and appears in the list of optional
fields. This is used Timecard Earnings/Deductions and Transaction Earnings/Deductions.
Setting Up Payroll
Sage HRMS Payroll Getting Started 37
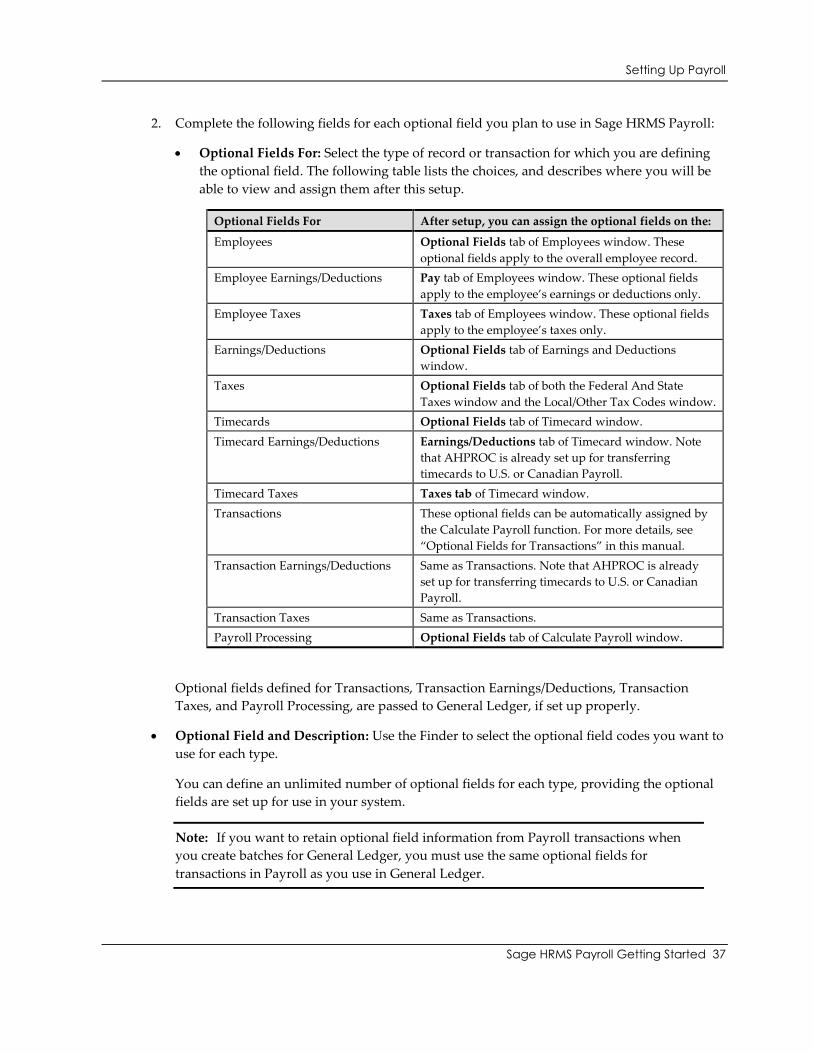
2. Complete the following fields for each optional field you plan to use in Sage HRMS Payroll:
Optional Fields For: Select the type of record or transaction for which you are defining
the optional field. The following table lists the choices, and describes where you will be
able to view and assign them after this setup.
Optional Fields For After setup, you can assign the optional fields on the:
Employees Optional Fields tab of Employees window. These
optional fields apply to the overall employee record.
Employee Earnings/Deductions Pay tab of Employees window. These optional fields
apply to the employee’s earnings or deductions only.
Employee Taxes Taxes tab of Employees window. These optional fields
apply to the employee’s taxes only.
Earnings/Deductions Optional Fields tab of Earnings and Deductions
window.
Taxes Optional Fields tab of both the Federal And State
Taxes window and the Local/Other Tax Codes window.
Timecards Optional Fields tab of Timecard window.
Timecard Earnings/Deductions Earnings/Deductions tab of Timecard window. Note
that AHPROC is already set up for transferring
timecards to U.S. or Canadian Payroll.
Timecard Taxes Taxes tab of Timecard window.
Transactions These optional fields can be automatically assigned by
the Calculate Payroll function. For more details, see
“Optional Fields for Transactions” in this manual.
Transaction Earnings/Deductions Same as Transactions. Note that AHPROC is already
set up for transferring timecards to U.S. or Canadian
Payroll.
Transaction Taxes Same as Transactions.
Payroll Processing Optional Fields tab of Calculate Payroll window.
Optional fields defined for Transactions, Transaction Earnings/Deductions, Transaction
Taxes, and Payroll Processing, are passed to General Ledger, if set up properly.
Optional Field and Description: Use the Finder to select the optional field codes you want to
use for each type.
You can define an unlimited number of optional fields for each type, providing the optional
fields are set up for use in your system.
Note: If you want to retain optional field information from Payroll transactions when
you create batches for General Ledger, you must use the same optional fields for
transactions in Payroll as you use in General Ledger.
Setting Up Payroll
Sage HRMS Payroll Getting Started 38
When you select an optional field code, the program displays the description for the optional
field.
Value Set: If you want to set a default value for the optional field, double-click in the Value
Set column to change it to Yes.
The Yes indicator in the Value Set field alerts the data entry clerk that a seemingly blank
optional field actually has an entry. By looking at the Value field, you cannot tell whether it
has a "blank" default value or no value at all.
Default Value and Description: Enter or select the value that the program will display as the
default for the optional field.
If the optional field you selected requires validation, you must select a value that is defined
for the optional field. However, if the optional field allows blanks, you can leave the default
value field blank.
If the optional field does not use validation, you can do one of the following:
Select a value that is defined for the optional field.
Leave the field blank.
Enter a combination of alphanumeric or special characters and spaces. The entry must be
consistent with the type of field (text, number, date, amount, and so on) and must not
exceed the number of characters specified for the optional field. In a Yes/No field, you
can enter only Yes or No. In an Integer field you can enter any integer with an absolute
value less than 2,147,483,647.
When you specify a value, the program displays the description for the value.
Required: To make the optional field mandatory, double-click in the Required column.
During data entry, if an optional field is required, but does not have a default value, you
must fill in the field before you can proceed. If the optional field has a default value, you can
accept the value that appears or assign a different one.
If you make an optional field a required field, the Auto Insert field must also be Yes.
Auto Insert: Select Yes in this field if you want the program to display the optional field and
its default value on the window for the type of optional field when you set up new records or
enter transactions.
Select No if you do not want the optional field to appear automatically.
For example, if you define Carpool as an optional field for employees and you select Yes in
the Auto Insert field, the Carpool field will appear automatically on the Optional Fields tab
of the Employee Payroll window when you add a new employee.
Setting Up Payroll
Sage HRMS Payroll Getting Started 39
Note: Selecting Yes for optional fields for Transactions, Transaction
Earnings/Deductions, or Transaction Taxes may result in a large database, and slow
down processing.
3. The Settings button is available only if you are adding optional fields for transactions,
transaction earnings and deductions, transaction taxes, or Payroll Processing. The Settings
button is disabled if optional fields have not been entered. To enable it, enter an optional field
code and move the cursor to another field. Then click the Settings button.
A separate window appears that lists all the groups of accounts that are affected when you
post transactions of the type for which you are defining the optional field. Use the window to
select the accounts for which you want to pass values to General Ledger when you post
transactions that include the optional field.
4. Click Add (or Save) to add the optional field.
Step 7: Set Up Class Codes (optional)
The Sage HRMS Payroll Class Codes feature provides you with up to four ways of sorting, grouping, or
classifying your employees. The class codes you set up are used for sorting and selecting employees for
processing and reporting purposes only and have no relationship to G/L posting.
Your first step, if you decide to use Sage HRMS Payroll classes, is to define the valid codes for up to four
classes on the Class Codes window.
For example, if your company has five offices - one in California, one in Colorado, one in Ohio, one in
Delaware, and one in Texas - and you want the ability to sort employees according to the home office to
which they report, you might decide to use Class 1 to represent your company's office locations. In the
Class Codes function, you define the valid codes for Class 1: CA, CO, OH, DE, and TX. You can then
enter the appropriate class code whenever you are prompted for Class 1 on the Employees window.
Similarly, if you process a departmentalized payroll but you do not post the results of payroll processing
by department (in other words, you are not going to set up a cost center segment for Departments), you
can set up Class 2 to define an employee's department. On the Class Codes window, you can set up a
class code for each department. The label Class 2 will appear when you set up each employee and you
can enter the employee's department code. You can then process employees or print reports by
department.
The table below illustrates the steps you take to set up Sage HRMS Payroll classes.
Do this Using these windows
1 Enter codes for up to four Sage HRMS Payroll classes:
Class 1, Class 2, Class 3, and Class 4.
Class Codes
2 For each class you define, enter an employee-specific class
code.
Class/Schedules tab of Employee Payroll
window
Setting Up Payroll
Sage HRMS Payroll Getting Started 40
Do this Using these windows
3 Enter class codes associated with each employee
transaction history entry.
Transaction History
4 Calculate Payroll and sort Payroll checks based on a range
of Payroll class codes.
Calculate Payroll
5 Print a variety of reports by employee class code,
including the Employee Information report, Earnings and
Hours report, Earnings and Deductions Summary, Payroll
Register, Quarterly Wage report, and Employee W 2s.
Reports found under Payroll > Reports >:
Setup Reports
Employee Reports
Transaction Reports
Government Reports
For example, you might decide to use Class 1 to indicate the sales teams to which employees belong. In
this case, the codes you set up on the Class Codes window for Class 1 could be SALES1, SALES2,
SALES3, and so on. You might then decide to use Class 2 to indicate an employee's location. You could
set up the Class 2 codes to correspond to the areas within your company or the cities in which your
company has offices.
The Class 1 through Class 4 fields are listed in the Employees function for each employee you set up. At
each field, enter one of the codes you set up on the Class Codes window.
To set up class codes, from the navigation pane select Setup > Payroll > Class Codes.
You can add new class codes at any time. You cannot delete a class code if it has been entered at an
employee Class field.
Determine your employee class codes and complete the Class Codes window:
Class: In this list field appear four classes, Class 1, Class 2, Class 3, and Class 4. Select the class
you want to define.
Class Code: For each class, enter as many codes, using up to six characters (letters and numbers),
as you need.
Description: For each code, enter a description of up to 20 characters.
Review the entries on the Class Codes window. When you finish, click the Add button.
To print a listing of the class codes you defined, to verify that they are correct and complete, select
Reports > Setup Reports > Class Codes.
Step 8: Set Up Earnings, Deductions, and Other Pay Factors
Sage HRMS Payroll earnings and deductions are amounts, other than taxes, that are added to, deducted
from, or otherwise used to calculate an employee's pay. In the Sage HRMS Payroll application and in the
manuals, these pay factors are referred to generically as earnings and deductions. Keep in mind when
you see the term earning/deduction that the system and the manuals are referring to any one of the six
Setting Up Payroll
Sage HRMS Payroll Getting Started 41
pay factor categories you can set up on the Earnings and Deductions window (from the navigation pane,
select Setup > Payroll > Earning/Deduction Codes.)
On the Earning/Deduction Codes window, you set up the pay factors that are paid, deducted, or
otherwise used in calculating employees' pay. After you set up all the earnings/deductions you need to
process your company's payroll, you will return to these windows as needed to make modifications and
to delete pay factors you no longer need.
This section steps you through the setup of earnings and deductions. The six categories of earnings and
deductions, and their corresponding types, are:
Accruals (page 139)
o Vacation time
o Sick time
o Compensatory time
Advances
o Cash
o Noncash
Benefits
o Cash
o Noncash
Deductions (page 133)
Earnings (page 133)
o Salary and wages
o Reported tips
o Allocated tips
Expense reimbursements
Set up each accrual, advance, benefit, deduction, earning, and expense reimbursement that your payroll
processing requires. Each earning/deduction is identified by a code of up to six characters. Each record
includes the name, category, type, frequency (how often the earning/deduction can be calculated),
employee and employer calculation methods, G/L distribution accounts, and other information.
When you assign an earning/deduction to an employee, the system displays as defaults the rate, amount,
or percent; start and end dates; and, in the case of accruals, the carry over date you set up in the
earning/deduction master. Other defaults (workers' compensation group/code and G/L segment
overrides for the earning/deduction) come from the employee record itself.
You can further configure earnings and deductions specifically for each employee. When you Calculate
Payroll, the system draws on the earning/deduction information you set up for each employee.
To open the Earning/Deduction Codes window, from the navigation pane select Setup > Payroll >
Earning/Deduction Codes.
Because the tabs and fields that display on the Earning/Deduction Codes window vary according to the
category, type, and calculation method of the earning/deduction you are setting up, the illustrations in
this section may not show all of the tabs and fields described in the text.
Setting Up Payroll
Sage HRMS Payroll Getting Started 42
Basic Information Tab
The Basic Information tab of the Earning/Deduction Codes window provides fields for specifying
the category and type of earning/deduction you are setting up, as well as the employee and employer
calculation methods, frequency, start and end dates, level, workers' compensation status, and other
information.
Review your Payroll Processing needs and complete the fields on the Basic Information tab as
required, as follows:
Earning/Deduction: Type an identifying code of up to six characters.
Description: Type a description, in up to 60 characters, to identify the earning/deduction in a
meaningful way; for example: Hourly Wage Level 1, United Way Monthly Deduction, or
Dept. 206 Bonus Pay. Because an earning/deduction's description is used to identify the
earning/deduction in Finder fields and on Sage HRMS Payroll reports, you must enter a
description before the system will allow you to add the earning/deduction.
Short Description: Type a description, in up to 15 characters, to identify the
earning/deduction in a meaningful but brief way appropriate for printing on reports. An
earning/deduction's short description is used to identify the earning/deduction on employee
Forms W-2; therefore you must enter a short description before the system will allow you to
add the earning/deduction.
Category: From the selection list, choose one of the following categories:
o Accrual. Vacation, sick and compensatory time accruals, and payments.
o Advance. Money or goods provided in anticipation of repayment.
o Benefit. Cash and noncash contributions made by the employer on behalf of the
employee.
o Deduction. Amounts taken from employee pay for union dues, disability insurance,
retirement funds, and other items.
o Earning. Salaries, wages, commissions, bonuses, reported and allocated tips, and so
forth.
o Expense Reimbursement. Payments to the employee to reimburse company-related
expenses incurred by the employee.
If you are setting up an earning/deduction that represents excludable moving expense
reimbursements, do not select Expense Reimbursement as the earning/deduction's category. Select
Benefit and, at the W-2 Reporting field described later in this section, select Excludable Moving
Expense Reimbursement. For more information about excludable moving expense reimbursements,
see the government's Instructions for Form W-2.
Setting Up Payroll
Sage HRMS Payroll Getting Started 43
Type: For the category of earning/deduction you are setting up, enter a type, if applicable. The
selections that appear depend upon your entry at the Category field. The categories
"Deduction" and "Expense Reimbursement" have no types.
Benefits can be cash or noncash. A cash benefit increases the employee's net pay. When setting up
distribution account sets for cash benefits, you enter an expense account only.
A noncash benefit does not increase an employee's net pay. Allowing an employee use of an
automobile would be considered a noncash benefit. When you set up a noncash benefit, you can
choose to post amounts for it to expense and employer liability accounts or not to post amounts for it
at all.
To track the uncollected Social Security and Medicare taxes on the cost of group term life insurance
over $50,000, set up noncash benefits. For each benefit, at the W 2 Reporting field on the Employer
tab of the Earning/Deduction Codes window, select either Uncollected Social Security Tax on the Cost
of Group Term over $50,000 or Uncollected Medicare Tax on the Cost of Group Term over $50,000.
Because the uncollected taxes pertain to former employees, you cannot calculate amounts for these
benefits through regular Payroll Processing. Instead, to establish the uncollected tax amounts you
will report on the employees' W-2 forms, use the Transaction History window to enter for each
employee the calculated values of the uncollected Social Security and Medicare taxes.
Advances can be cash or noncash. A cash advance is typically an amount of money paid in advance
to an employee, who is expected to repay the loan. Supplying that employee with uniforms or tools
in expectation of payment would be considered a noncash advance.
To set up an earning that tracks the amounts that employees report in tips, select the category
Earnings and the type Reported Tips.
To set up an earning that reports allocated tips on the Form W-2, select the category Earnings and the
type Allocated Tips. (You can provide the allocated tips amount either through timecard entry or by
entering the amount in Employee Transaction History at Year-End.)
Earning/Deduction Calculation Methods
You select a method for the system to use in calculating each earning/deduction. You set up an
employee calculation method for accruals, deductions, and earnings. You set up an employer
calculation method for benefits and for employee deductions such as 401(k) plans, which have
employer contributions as well as employee deductions. (Deductions that use both an employee
and an employer calculation method are referred to as "two sided deductions" in the Sage HRMS
Payroll manuals).
Advances and expense reimbursements are always calculated as flat amounts and therefore do
not require a calculation method.
Employee Calculation Method: Select from the list the method for calculating the
amount deducted from, paid to, or accrued by the employee for this earning/deduction.
You select an employee calculation method for accruals, deductions, and earnings only.
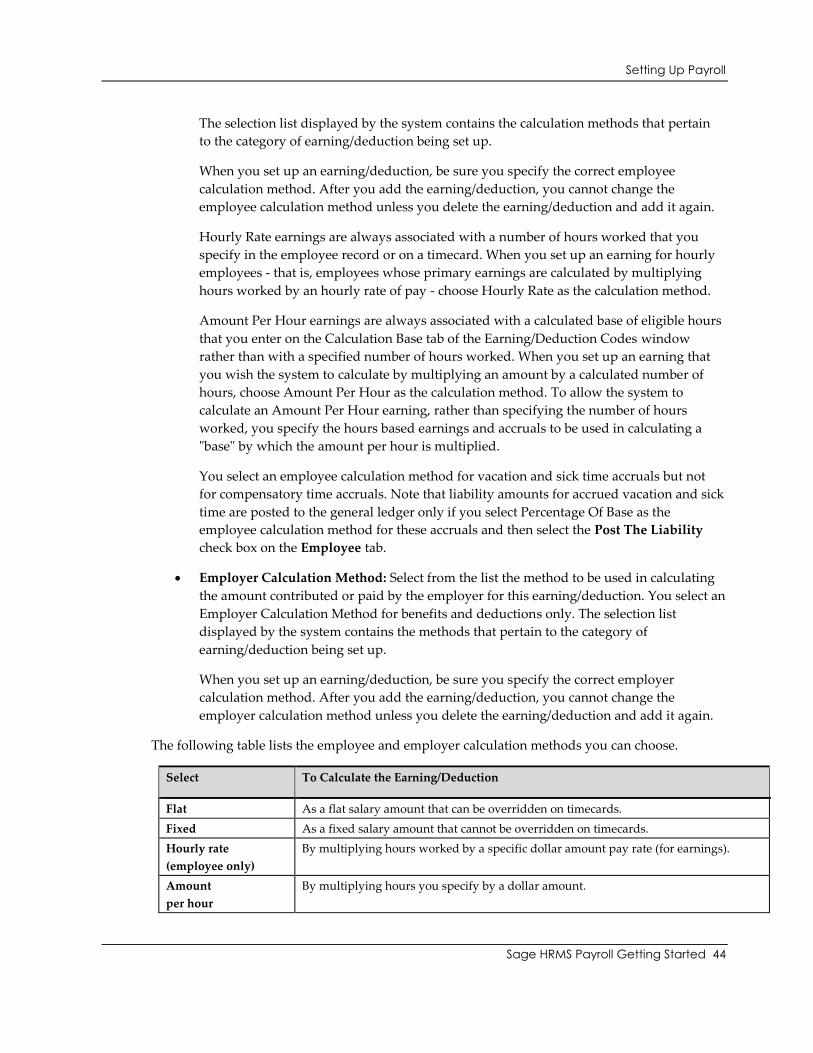
Setting Up Payroll
Sage HRMS Payroll Getting Started 44
The selection list displayed by the system contains the calculation methods that pertain
to the category of earning/deduction being set up.
When you set up an earning/deduction, be sure you specify the correct employee
calculation method. After you add the earning/deduction, you cannot change the
employee calculation method unless you delete the earning/deduction and add it again.
Hourly Rate earnings are always associated with a number of hours worked that you
specify in the employee record or on a timecard. When you set up an earning for hourly
employees - that is, employees whose primary earnings are calculated by multiplying
hours worked by an hourly rate of pay - choose Hourly Rate as the calculation method.
Amount Per Hour earnings are always associated with a calculated base of eligible hours
that you enter on the Calculation Base tab of the Earning/Deduction Codes window
rather than with a specified number of hours worked. When you set up an earning that
you wish the system to calculate by multiplying an amount by a calculated number of
hours, choose Amount Per Hour as the calculation method. To allow the system to
calculate an Amount Per Hour earning, rather than specifying the number of hours
worked, you specify the hours based earnings and accruals to be used in calculating a
"base" by which the amount per hour is multiplied.
You select an employee calculation method for vacation and sick time accruals but not
for compensatory time accruals. Note that liability amounts for accrued vacation and sick
time are posted to the general ledger only if you select Percentage Of Base as the
employee calculation method for these accruals and then select the Post The Liability
check box on the Employee tab.
Employer Calculation Method: Select from the list the method to be used in calculating
the amount contributed or paid by the employer for this earning/deduction. You select an
Employer Calculation Method for benefits and deductions only. The selection list
displayed by the system contains the methods that pertain to the category of
earning/deduction being set up.
When you set up an earning/deduction, be sure you specify the correct employer
calculation method. After you add the earning/deduction, you cannot change the
employer calculation method unless you delete the earning/deduction and add it again.
The following table lists the employee and employer calculation methods you can choose.
Select To Calculate the Earning/Deduction
Flat As a flat salary amount that can be overridden on timecards.
Fixed As a fixed salary amount that cannot be overridden on timecards.
Hourly rate
(employee only)
By multiplying hours worked by a specific dollar amount pay rate (for earnings).
Amount
per hour
By multiplying hours you specify by a dollar amount.

Setting Up Payroll
Sage HRMS Payroll Getting Started 45
Select To Calculate the Earning/Deduction
Piece rate table By multiplying the number of units entered on the employee's timecard by a dollar
amount defined in the Piece Rate Table you set up.
Percentage of base As a percentage of employee's base wages in the current pay period.
Sales table
(employee only)
As a percentage of the employee's sales, according to the Sales Commission Table you
set up.
The Flat and Fixed calculation methods for earnings are designed to pay salaries (as opposed to
hourly wages). Use either Flat or Fixed as appropriate for the following situations:
Use the Fixed calculation method to pay employees whose salaries will be apportioned
across cost centers.
Use the Flat calculation method for employees whose salaries will always be posted to a
single cost center.
Suppose you set up a Fixed salary of $600 per week for an employee who works equal time in
five departments.
On the employee's timecard, you would enter the earning five times, specifying for each entry the
eight hours worked in that department. $600 would appear in the Rate/Amt/Pct field for each
entry and you cannot override it. However, when Calculate Payroll processes the timecard, the
system calculates an hourly rate (in this case, $15.00) and apportions the fixed $600 among the
five departments. The employee's salary remains fixed at $600.
The following illustrates the entry of an apportioned fixed earning:
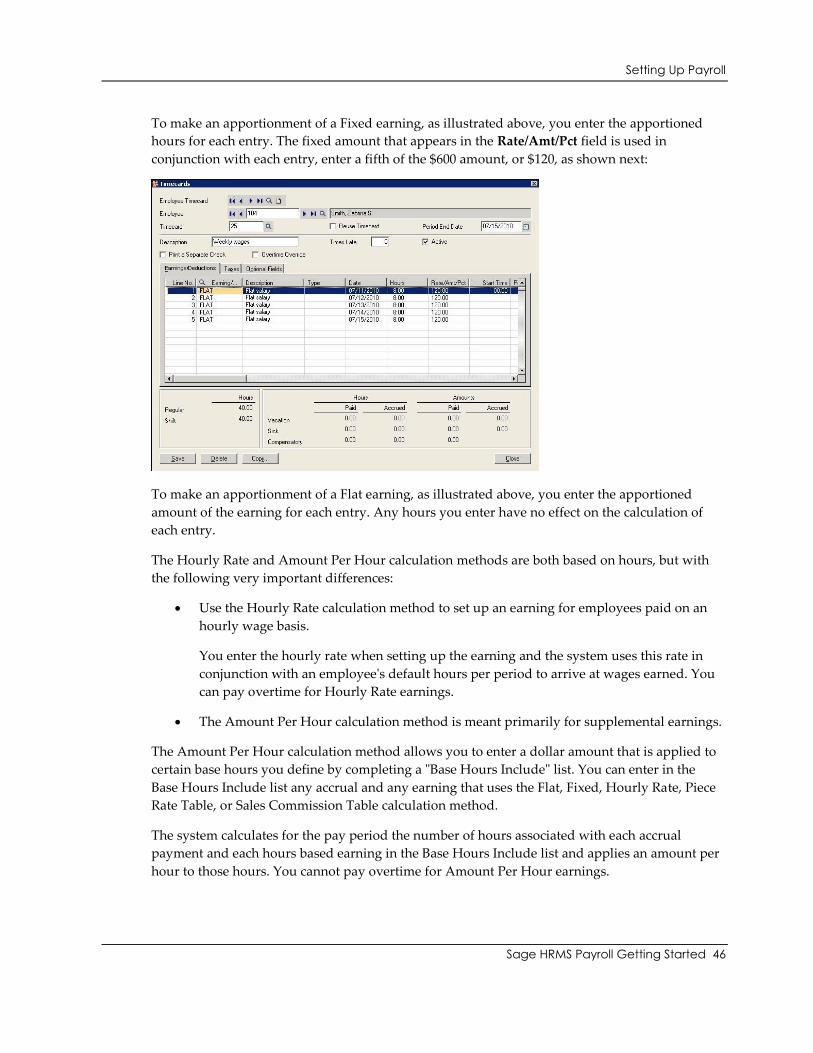
Setting Up Payroll
Sage HRMS Payroll Getting Started 46
To make an apportionment of a Fixed earning, as illustrated above, you enter the apportioned
hours for each entry. The fixed amount that appears in the Rate/Amt/Pct field is used in
conjunction with each entry, enter a fifth of the $600 amount, or $120, as shown next:
To make an apportionment of a Flat earning, as illustrated above, you enter the apportioned
amount of the earning for each entry. Any hours you enter have no effect on the calculation of
each entry.
The Hourly Rate and Amount Per Hour calculation methods are both based on hours, but with
the following very important differences:
Use the Hourly Rate calculation method to set up an earning for employees paid on an
hourly wage basis.
You enter the hourly rate when setting up the earning and the system uses this rate in
conjunction with an employee's default hours per period to arrive at wages earned. You
can pay overtime for Hourly Rate earnings.
The Amount Per Hour calculation method is meant primarily for supplemental earnings.
The Amount Per Hour calculation method allows you to enter a dollar amount that is applied to
certain base hours you define by completing a "Base Hours Include" list. You can enter in the
Base Hours Include list any accrual and any earning that uses the Flat, Fixed, Hourly Rate, Piece
Rate Table, or Sales Commission Table calculation method.
The system calculates for the pay period the number of hours associated with each accrual
payment and each hours based earning in the Base Hours Include list and applies an amount per
hour to those hours. You cannot pay overtime for Amount Per Hour earnings.

Setting Up Payroll
Sage HRMS Payroll Getting Started 47
Select Hourly Rate-not Amount Per Hour-as the employee calculation method for earnings
assigned to hourly employees.
If you choose to use the Piece Rate Table, Sales Commission Table calculation method, part of
earning/deduction setup involves setting up the table to which the system refers for information
about piece rates and sales commissions.
If you choose to use the Amount Per Hour, Percentage Of Base, or Hours Per Hour Worked
calculation method, you must specify the base hours, earnings, deductions, and taxes that make
up the calculation base for the earning/deduction.
Earning/Deduction Frequencies
Frequency is provided for earnings and deductions as well as employees so you can set up a
deduction, for example, that is taken monthly from a weekly employee's pay.
You can assign an earning/deduction to an employee only if the earning/ deduction's frequency is
the same as, or less frequent than, the employee's pay frequency. For example, if the employee's
pay frequency is monthly, you can assign to the employee an earning/deduction whose
frequency is monthly, ten times per year, or quarterly.
The Float frequency allows you to set up an earning/deduction that can be assigned to employees
with any pay frequencies.
The Float earning/deduction assumes the frequency of the employee to whom it is assigned and
is calculated each time you Calculate Payroll for the employee (as long as you select the
earning/deduction frequency when you Calculate Payroll).
Because Float earnings and deductions can be assigned to employees with varying pay
frequencies, you may want to leave the earning/deduction's rate/amount/percent blank when you
set it up on the Earnings and Deductions window and enter employee specific rates, amounts, or
percentages when you assign it to the individual employees.
The following table lists the earning/deduction frequencies you can select and the employees to
whom you can assign the earning/deduction.
Select To Allow the Earning/
Deduction to be Calculated
So It Can Be Assigned to Employees with
these Pay Frequencies
Float Every time you process Payroll
for an employee
Any pay frequency
Daily Daily Daily
Weekly Weekly Daily, Weekly
Biweekly Every two weeks Daily, Weekly, Biweekly
Semimonthly Twice a month Daily, Weekly, Biweekly, Semimonthly
22 Pay Periods/Year 22 times a year Daily, Weekly, Biweekly, Semimonthly, 22
times per year
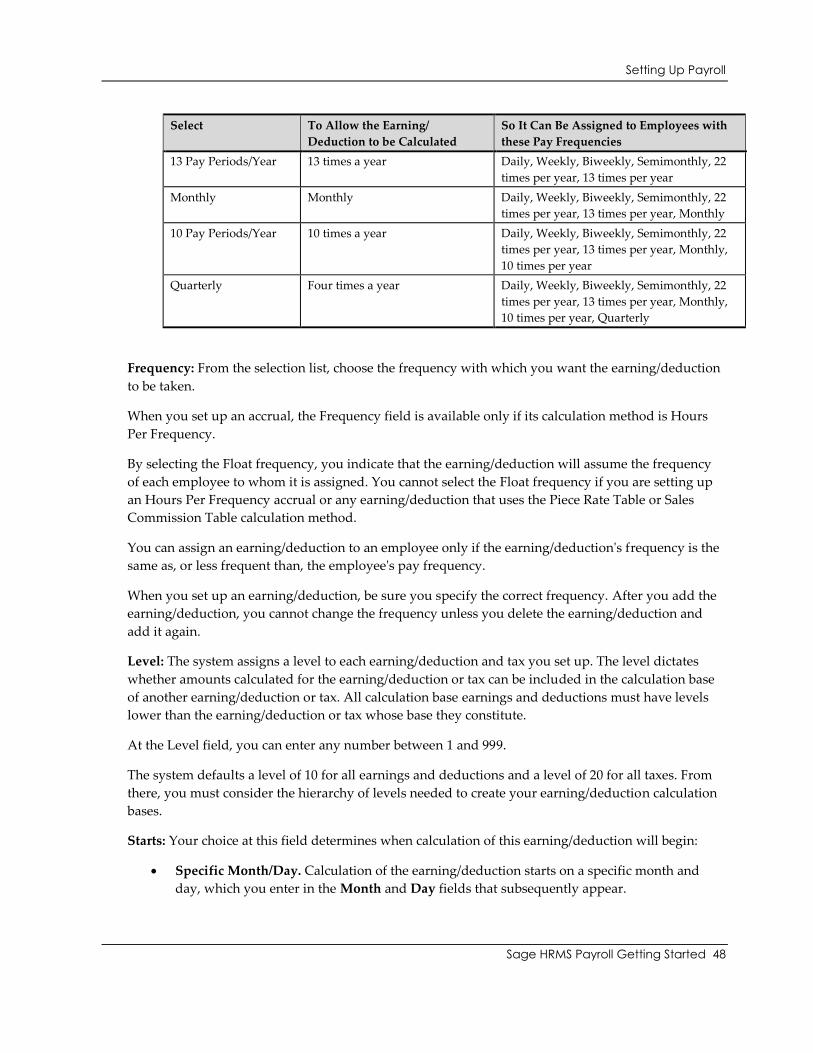
Setting Up Payroll
Sage HRMS Payroll Getting Started 48
Select To Allow the Earning/
Deduction to be Calculated
So It Can Be Assigned to Employees with
these Pay Frequencies
13 Pay Periods/Year 13 times a year Daily, Weekly, Biweekly, Semimonthly, 22
times per year, 13 times per year
Monthly Monthly Daily, Weekly, Biweekly, Semimonthly, 22
times per year, 13 times per year, Monthly
10 Pay Periods/Year 10 times a year Daily, Weekly, Biweekly, Semimonthly, 22
times per year, 13 times per year, Monthly,
10 times per year
Quarterly Four times a year Daily, Weekly, Biweekly, Semimonthly, 22
times per year, 13 times per year, Monthly,
10 times per year, Quarterly
Frequency: From the selection list, choose the frequency with which you want the earning/deduction
to be taken.
When you set up an accrual, the Frequency field is available only if its calculation method is Hours
Per Frequency.
By selecting the Float frequency, you indicate that the earning/deduction will assume the frequency
of each employee to whom it is assigned. You cannot select the Float frequency if you are setting up
an Hours Per Frequency accrual or any earning/deduction that uses the Piece Rate Table or Sales
Commission Table calculation method.
You can assign an earning/deduction to an employee only if the earning/deduction's frequency is the
same as, or less frequent than, the employee's pay frequency.
When you set up an earning/deduction, be sure you specify the correct frequency. After you add the
earning/deduction, you cannot change the frequency unless you delete the earning/deduction and
add it again.
Level: The system assigns a level to each earning/deduction and tax you set up. The level dictates
whether amounts calculated for the earning/deduction or tax can be included in the calculation base
of another earning/deduction or tax. All calculation base earnings and deductions must have levels
lower than the earning/deduction or tax whose base they constitute.
At the Level field, you can enter any number between 1 and 999.
The system defaults a level of 10 for all earnings and deductions and a level of 20 for all taxes. From
there, you must consider the hierarchy of levels needed to create your earning/deduction calculation
bases.
Starts: Your choice at this field determines when calculation of this earning/deduction will begin:
Specific Month/Day. Calculation of the earning/deduction starts on a specific month and
day, which you enter in the Month and Day fields that subsequently appear.
Setting Up Payroll
Sage HRMS Payroll Getting Started 49
Date of Hire. Calculation of the earning/deduction starts on the employee's hire date.
Months After Hire. Calculation of the earning/deduction starts a specific number of months
after the employee's hire date. You enter the number of months in the Months After Hire
field that subsequently appears.
Days After Hire. Calculation of the earning/deduction starts a specific number of days after
the employee's hire date. You enter the number of days in the Days After Hire field that
subsequently appears.
When you assign this earning/deduction to an employee, the system defaults an employee specific
start date for it.
Ends: Type the date, if any, that calculation of the earning/deduction is to end.
Last Maintained: The system displays the (DOS) date on which you last modified this
earning/deduction.
Inactive As Of ___: Select the Inactive check box if you want to prevent this earning/deduction from
being assigned to any new employees. If you choose to make an earning/ deduction inactive, the
system displays the current date in the As Of field to indicate the date on which you changed the
status. As it does at the Last Maintained field, the system uses the DOS date and not the session date
you enter when you begin running Sage HRMS Payroll.
Setting an earning/deduction's status to Inactive has no effect on the payroll calculation of employees
who have already been assigned this earning/deduction.
Print Earning/Deduction on Check: Select this check box if you want the amounts for this
earning/deduction to print on employees' pay stubs.
Subject to Workers' Compensation: Select this check box to indicate that the accrual, earning, or
benefit you are setting up is subject to workers' compensation premiums.
Only the payment of vacation, sick, or compensatory time (and not the accrual of vacation, sick, or
compensatory time hours) is subject to the premiums.
Include in FLSA Overtime Calculation: This field appears only for the following types of earnings:
Salary & Wages that uses an employee calculation method of Flat, Fixed, or Hourly Rate.
Reported Tips.
Allocated Tips.
Select this check box if you want to include this earning in the regular pay rate that is used to
calculate FLSA overtime. After you save this setting, this will be the earning's default setting when
you subsequently assign the earning to employees.
Changing this field does not update the setting for existing employees who already have the earning
assigned.
Setting Up Payroll
Sage HRMS Payroll Getting Started 50
You can change the setting for employees who are assigned the earning, using the Pay tab table of the
Employees window or the Update Earnings/Deductions for All Employees window in the Employees
folder.
Post Benefit To General Ledger: Select this check box, which appears for noncash benefits only, if
you want to post amounts for this noncash benefit to G/L expense and employer liability accounts.
Tip Disbursement: This check box appears only for a Reported Tips earning. Tip disbursements
occur when tip amounts are added to a customer's credit card total rather than paid directly to the
employee in cash by the customer. Select this check box to indicate, for a reported tips earning, that
the reported tips are disbursed from customer credit card payments. Tip disbursement earnings are
added to net pay on an employee's paycheck.
Repayment Deduction: Select this check box, available for deductions only, to indicate that the
deduction you are setting up is an automatic deduction to repay a cash or noncash advance.
Advance To Be Repaid: This field appears only if you have selected the Repayment Deduction check
box. Type the code for the advance the employee will repay with this deduction. You can override
the advance code when you assign the deduction to an employee.
If you leave the Advance To Be Repaid field blank, the system gives a warning message because it is
essential that you link a repayment deduction to the advance it was set up to repay. Be sure to return
to this field and enter the advance code as soon as you have set up the advance.
Link Accrual Earning: This field appears only for vacation and sick accruals. To enable the program
to automatically calculate the dollar value of vacation (or sick) time paid out in a timecard, enter the
earning that is associated with the vacation (or sick) accrual. The earning you enter must have an
employee calculation method of Hourly Rate, Fixed, or Flat.
In order for the program to calculate the dollar value of the accrual payout:
If you entered an Hourly earning in the Link Accrual Earning field, ensure that you have
entered an hourly amount in the Rate/Amt/Pct field for that Hourly earning in the
employee's record.
If you entered a Fixed or Flat earning in the Link Accrual Earning field, ensure that you have
entered for that Fixed or Flat earning in the employee's record:
A fixed or flat amount in the Rate/Amt/Pct field.
The hours associated with that amount, in the Default Hours field.
For example, assume for a Vacation accrual, you enter a flat Salary earning in the Link Accrual
Earning field. You then pay out eight hours of accrued vacation in an employee's timecard. Assume
the flat Salary earning is assigned to the employee's record, with $1000 in the Rate/Amt/Pct field and
40 in the Default Hours field. Sage HRMS Payroll will automatically calculate the dollar value each
of the eight hours as $25 ($1000 / 40), for a total accrual payout value of $200.
Setting Up Payroll
Sage HRMS Payroll Getting Started 51
In the example, if you did not enter the Salary earning in the Link Accrual Earning field, you would
have to manually enter the dollar value of the eight hours ($200) in the Rate/Amt/Pct field of the
timecard.
Employee Tab
The Employee tab of the Earning/Deduction Codes window prompts you for information needed by
the system to calculate the amount for an earning/deduction. You complete this tab of the
Earning/Deduction Codes window for all earning/deduction categories except benefits. The entries
you make depend upon the employee calculation method you choose for the earning/deduction.
This section presents all of the fields that can appear on the Employee tab for advances, deductions,
earnings, and expense reimbursements (not all fields appear for each category of earning/deduction).
Review the employee calculation method for this earning/deduction and complete the fields on the
Employee tab as follows:
W-2 Reporting: From the selection list, choose the term that applies to the deduction. Your
choice determines the placement of information about the deduction on the employee's Form
W-2. If you choose Not Applicable, it means that information about the deduction does not
need to print as one of the detailed items on the Form W-2, but may be a part of other totals
that print on the Form W-2.
The W-2 Reporting field appears on this tab for deductions only.
Rate/Amount/Percent: Depending upon the calculation method chosen for this
earning/deduction, type the rate, amount, or percent to be used in the calculation of this
earning/deduction. You can override the rate, amount, or percent when you assign the
earning/deduction to the employee.
This field does not appear for earnings and deductions that use the Piece Rate Table or Sales
Commission Table calculation method.
Minimum And Maximum Based On:. Choose from the selection list the unit or amount on
which the annual and period minimums and maximums for the earning/deduction are based.
Period minimum and period maximum refer to the minimum and maximum amounts that can
be calculated for the earning/deduction in the period dictated by the frequency. For example,
an earning/deduction with a weekly frequency have weekly minimum and maximum
amounts; an earning/deduction with a monthly frequency have monthly minimum and
maximum amounts.
Your selections for entry in this field depend upon your entry in the Employee Calculation
Method field. (The Minimum And Maximum Based On field does not appear for advances or
expense reimbursements or for any earnings and deductions with the calculation methods Flat,
Fixed, and Hourly Rate.)
If the calculation method is:
Setting Up Payroll
Sage HRMS Payroll Getting Started 52
Piece Rate, select No Limit, Piece Count, or Dollar Value.
Amount Per Hour, select No Limit, Hour Count, or Dollar Value.
Percentage Of Base, select No Limit, Pay/Deduction Amount, or Base Amount.
Sales Commission Table, select No Limit, Commission Amount, or Sales Amount.
If you select No Limit, the system calculates the earning/deduction each period without regard to any
minimums or maximums. (The Annual Maximum and Period Minimum and Maximum fields do
not appear.)
If you select an item other than No Limit and you are adding an earning/deduction with the
frequency Float, the period minimum and maximum fields are labeled Minimum And Maximum
Amounts By Frequency. If you are setting up an earning/deduction with any frequency other than
Float, the period fields are labeled (Frequency) Minimum and (Frequency) Maximum.
Minimum And Maximum Amounts By Frequency or Period Minimum And Period Maximum. In
the case of a Float earning/deduction, type the smallest and largest amounts or numbers of units that
may be used in calculating the amount for the earning/deduction in each pay frequency your
company uses. For earnings and deductions with frequencies other than Float, type the minimum
and the maximum for the frequency.
The minimum and maximum fields appear for any earning/deduction that have its Minimum And
Maximum Based On field set to something other than No Limit.
Annual Maximum. Type the annual amount at which calculations for this earning/deduction should
stop.
The Annual Maximum field does not apply to tips earnings, to any earning with the calculation
method Fixed, or Hourly Rate or to any earning/deduction that has its Minimum And Maximum
Based On field set to No Limit.
If you set up a two sided deduction using Amount Per Hour as the calculation method for both sides
and you choose Hour Count as the item upon which minimums and maximums are based, you must
either enter the same amounts for the employee and employer annual maximums or set the
maximum for one side to zero.
If you set up a two sided deduction using Percentage Of Base as the calculation method for both sides
and you choose Base Amount as the item upon which minimums and maximums are based, you
must either enter the same amounts for the employee and employer annual maximums or set the
maximum for one side to zero.
Lifetime Maximum. For earnings and deductions (except accruals) that let you enter an Annual
Maximum amount, you can also enter a Lifetime Maximum amount.
The Lifetime Maximum field enables you to specify when Sage HRMS Payroll should stop
calculating the earning or deduction, without specifying a time limit.
Setting Up Payroll
Sage HRMS Payroll Getting Started 53
For example, if you create a Car Payment deduction with a lifetime maximum of $100,000, then
during every Calculate Payroll run, the program will deduct a Car Payment amount for employees
who have been assigned that deduction, until $100,000 has been deducted.
The value you enter on the Earning/Deduction Codes window becomes the default for all employees.
However, you can change the value on individual employee records, where appropriate.
Secondary Rate (Percent/Amount/Amount Per Hour). This field applies only to deductions that let
you enter an Annual Maximum amount (that is, if you have set the Minimum And Maximum Based
On field to an option other than No Limit), and that uses an employee calculation method of Flat,
Amount per Hour, or Percentage of Base.
This field enables you to specify a second rate (expressed as a percentage, amount, or amount per
hour, in accordance to the calculation method chosen) to be used for a deduction, after the maximum
(Annual or Lifetime Maximum fields) for the first rate has been reached.
An associated field, Secondary Rate (Percent/Amount/Amount Per Hour) Effective, enables you to
specify when the Secondary Rate should be effective.
Note: There is no maximum after the secondary rate commences, so Sage HRMS Payroll will
continue to deduct the secondary rate until you de-activate the rate.
To stop deducting the secondary rate for all employees, set the Secondary Rate Effective
field to Never.
To stop deducting the secondary rate for individual employees, open the Employees
window, select the deduction on the Pay tab, and clear the "Calculate Earning/Deduction"
option.
For example, assume you created a flat $1,000 Car Payment deduction with a lifetime maximum of
$100,000. You also specified a secondary rate amount of $500, to be effective "After Lifetime
Maximum Reached."
Then during every Calculate Payroll run, the program will deduct a $1,000 car payment for each
employee who has been assigned that deduction, until $100,000 has been deducted for the employee.
The program will then deduct $500 during every Calculate Payroll run, until you stop the deduction,
using one of the methods described earlier.
Secondary Rate (Percent/Amount/Amount Per Hour) Effective. This field appears if the Secondary
Rate (Percent/Amount/Amount Per Hour) field appears.
You can use the Secondary Rate (Percent/Amount/Amount Per Hour) Effective field to designate
when the secondary rate comes into effect (never, or after the Annual Maximum or the Lifetime
Maximum is reached).
Associate W 2 Printing. If you chose Other Information Field at the W-2 Reporting field earlier on
this tab, the Associate W-2 Printing option becomes available to you.
Setting Up Payroll
Sage HRMS Payroll Getting Started 54
Select this option if the deduction you are setting up needs to be associated on the W-2 form with a
particular state or tax update supported local tax or with a custom tax you configured using the
Local/Other Tax Codes window. Then, if an employee works in more than two states or localities and
requires more than one FormW-2, you can be sure that the deduction appears on the same W 2 form
as the taxing entity with which it is associated.
Associated Tax. Type or select from the Finder the state, tax update supported local, or custom local
tax with which you want to associate the deduction you are adding. Any custom tax you select has to
be set to print in the Local Tax or Other Information field on the Form W-2 and cannot be associated
or combined with any other tax.
For example, say you set up a deduction for New York State union dues. The employees to whom
you assign the union dues work in New York, New Jersey, and Connecticut. Since you want to
ensure that the union dues print on the employee W 2 that also prints New York State tax amounts,
enter Other Information Field at the W-2 Reporting field, select the Associate W-2 Printing option,
and then select NYSIT (New York State income tax) at the Associated Tax field.
The fields remaining to be completed, which specify the earning/deduction's relationship to Sage
HRMS Payroll taxes, depend on the category of earning/deduction you are setting up:
When you set up a deduction, the remaining fields on the tab are labeled "Take Deduction
Before."
When you set up an earning, the remaining fields on the tab are labeled "Subject To The
Following Taxes."
Because you are adding earnings and deductions before you add your company taxes, you cannot
invoke the Finder or enter any taxes in the following fields during setup. When you add and
configure your taxes, later in setup, you will specify the calculation base for each tax - that is, the
earnings and deductions that are to be calculated before a particular tax is deducted.
According to the entries you make on the Calculation Base tab for each tax, the system makes the
appropriate tax entries in the Take Deduction Before and Subject To The Following Taxes fields for
each earning/deduction. Therefore, although both the Earnings and Deductions and the Taxes
windows allow you to specify the relationships between earnings and deductions and taxes, you only
need to enter the information in one place and the system creates the entries in the other.
Take Deduction Before. When you set up a deduction, you select the taxes that are to be taken after
the deduction is deducted. The deduction is a pre-tax deduction in relation to the taxes you select in
the Tax field.
The taxes you enter in the Take Deduction Before field must have levels higher than the level of the
deduction. You can type in the taxes or click the Finder to choose from a list of all taxes with levels
higher than the level of the deduction you are adding.
Subject To The Following Taxes. If you are setting up an earning, you select the taxes the earning is
subject to and the withholding type (Regular Rate; Supplemental Withholding; Taxable, No
Withholding) for each tax.
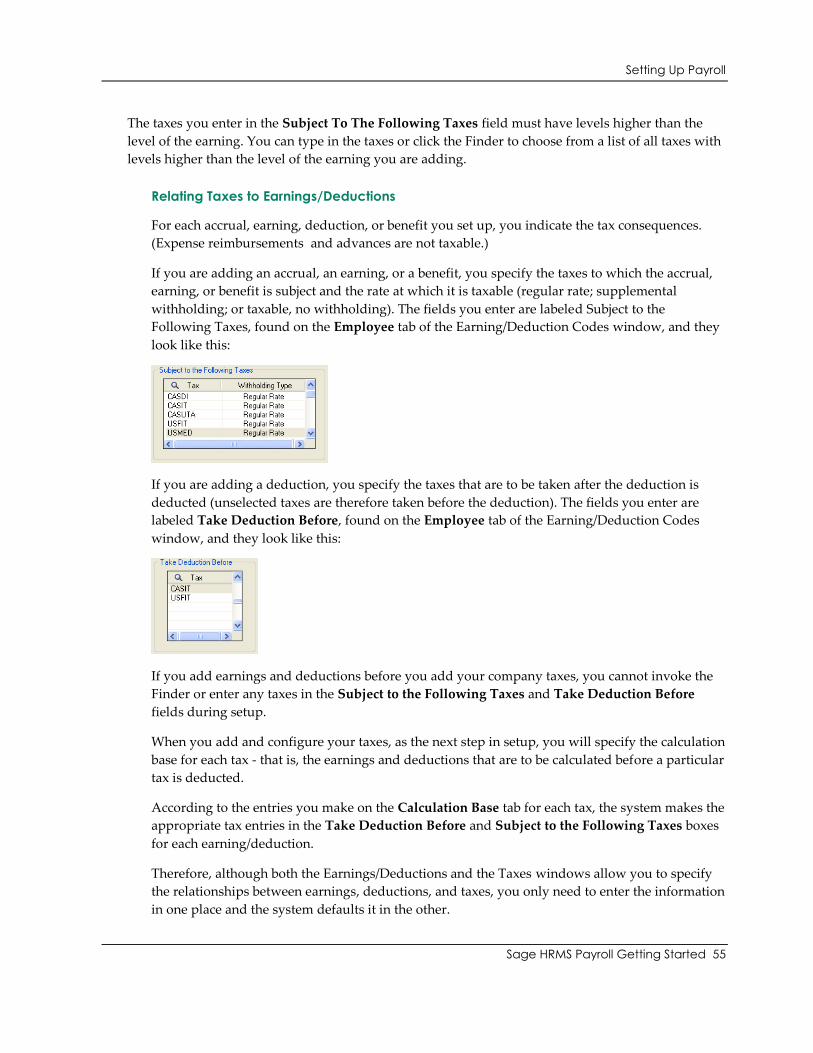
Setting Up Payroll
Sage HRMS Payroll Getting Started 55
The taxes you enter in the Subject To The Following Taxes field must have levels higher than the
level of the earning. You can type in the taxes or click the Finder to choose from a list of all taxes with
levels higher than the level of the earning you are adding.
Relating Taxes to Earnings/Deductions
For each accrual, earning, deduction, or benefit you set up, you indicate the tax consequences.
(Expense reimbursements and advances are not taxable.)
If you are adding an accrual, an earning, or a benefit, you specify the taxes to which the accrual,
earning, or benefit is subject and the rate at which it is taxable (regular rate; supplemental
withholding; or taxable, no withholding). The fields you enter are labeled Subject to the
Following Taxes, found on the Employee tab of the Earning/Deduction Codes window, and they
look like this:
If you are adding a deduction, you specify the taxes that are to be taken after the deduction is
deducted (unselected taxes are therefore taken before the deduction). The fields you enter are
labeled Take Deduction Before, found on the Employee tab of the Earning/Deduction Codes
window, and they look like this:
If you add earnings and deductions before you add your company taxes, you cannot invoke the
Finder or enter any taxes in the Subject to the Following Taxes and Take Deduction Before
fields during setup.
When you add and configure your taxes, as the next step in setup, you will specify the calculation
base for each tax - that is, the earnings and deductions that are to be calculated before a particular
tax is deducted.
According to the entries you make on the Calculation Base tab for each tax, the system makes the
appropriate tax entries in the Take Deduction Before and Subject to the Following Taxes boxes
for each earning/deduction.
Therefore, although both the Earnings/Deductions and the Taxes windows allow you to specify
the relationships between earnings, deductions, and taxes, you only need to enter the information
in one place and the system defaults it in the other.
Setting Up Payroll
Sage HRMS Payroll Getting Started 56
Configuring an Earning/Deduction's Calculation Base
The sections that follow describe the four possible components of an earning/deduction
calculation base. Depending upon the calculation method you associate with an
earning/deduction, you may need to define one, two, three, or all of these components.
If you set up an accrual, earning, deduction, or benefit that uses either the Amount Per Hour
calculation method, you must indicate which of the hours worked the earning/deduction is to be
based on.
As part of the earning/deduction setup, the Finder displays a list of the hours based earnings and
accruals you can use in calculating the number of hours on which an earning/deduction is based.
The earnings and accruals that appear for selection have levels lower than the level of the accrual,
earning, deduction, or benefit you are setting up.
Hours-based earnings - The earnings included in the calculation base of an Amount Per Hour
earning/deduction must be of the type Salary and Wages and must use the calculation method
Flat, Fixed, Hourly Rate, Piece Rate Table, or Sales Commission Table. You can choose to include
or exclude regular or overtime hours.
Hours-based accruals - Only accrual payments are included in the calculation base of an Amount
Per Hour earning/deduction. The accrual payments can use any calculation method.
In the Base Hours Include field, you select some or all of the hours based earnings and accruals
to build the calculation base used in calculating amounts for the earning/deduction you are
setting up.
Suppose your company's employees wear company supplied uniforms that are laundered on site
each evening. Your company has set up a small employee deduction to cover the cost of the
laundering. Employees are charged according to the number of hours they work each week.
The employees' hours each week are paid via the hourly rate earnings HRLY1, HRLY2, HRLY3,
and HRLY4 (each representing a different rung of the wage ladder).
To set up the laundering deduction, you would select Amount Per Hour as the calculation base,
enter the amount per hour to be deducted (say, 25 cents), and configure the calculation base for
the deduction this way:
BASE HOURS INCLUDE
HRLY1
HRLY2
HRLY3
HRLY4
When you Calculate Payroll, the system calculates the laundering deduction for each employee
who earns wages at one of the four hourly rates. An employee who worked 22 hours would have
$5.50 (.25 X 22 hours) deducted from pay.
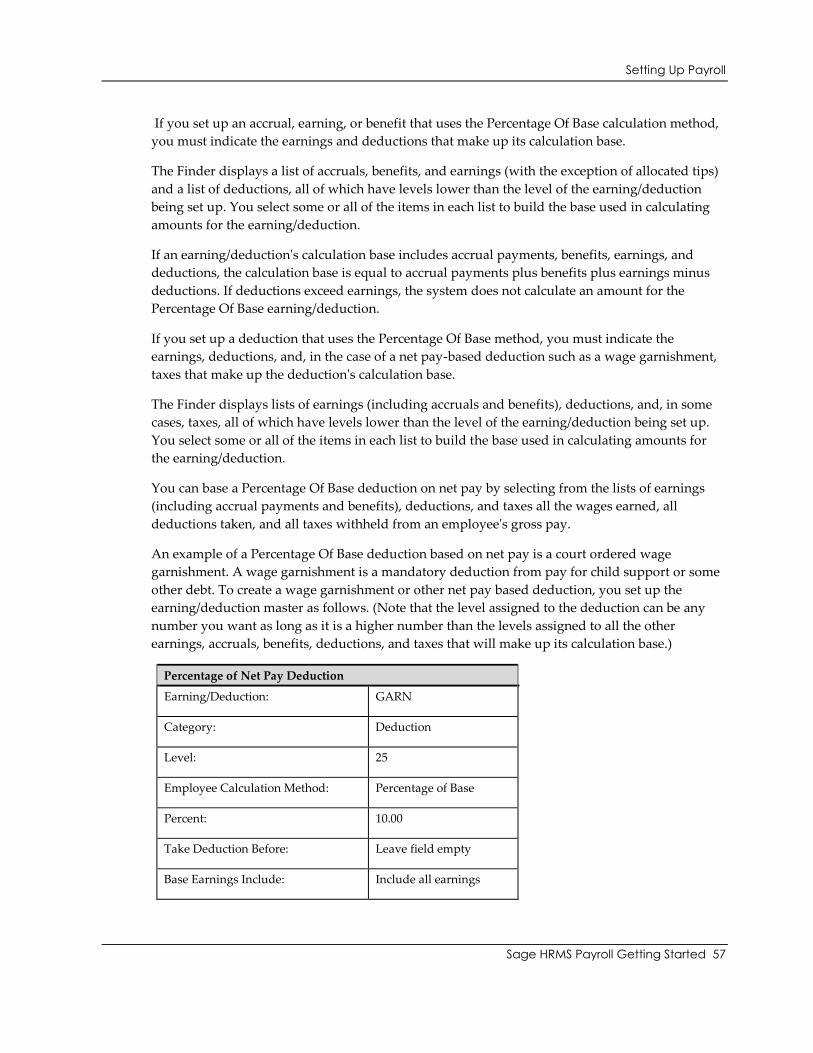
Setting Up Payroll
Sage HRMS Payroll Getting Started 57
If you set up an accrual, earning, or benefit that uses the Percentage Of Base calculation method,
you must indicate the earnings and deductions that make up its calculation base.
The Finder displays a list of accruals, benefits, and earnings (with the exception of allocated tips)
and a list of deductions, all of which have levels lower than the level of the earning/deduction
being set up. You select some or all of the items in each list to build the base used in calculating
amounts for the earning/deduction.
If an earning/deduction's calculation base includes accrual payments, benefits, earnings, and
deductions, the calculation base is equal to accrual payments plus benefits plus earnings minus
deductions. If deductions exceed earnings, the system does not calculate an amount for the
Percentage Of Base earning/deduction.
If you set up a deduction that uses the Percentage Of Base method, you must indicate the
earnings, deductions, and, in the case of a net pay-based deduction such as a wage garnishment,
taxes that make up the deduction's calculation base.
The Finder displays lists of earnings (including accruals and benefits), deductions, and, in some
cases, taxes, all of which have levels lower than the level of the earning/deduction being set up.
You select some or all of the items in each list to build the base used in calculating amounts for
the earning/deduction.
You can base a Percentage Of Base deduction on net pay by selecting from the lists of earnings
(including accrual payments and benefits), deductions, and taxes all the wages earned, all
deductions taken, and all taxes withheld from an employee's gross pay.
An example of a Percentage Of Base deduction based on net pay is a court ordered wage
garnishment. A wage garnishment is a mandatory deduction from pay for child support or some
other debt. To create a wage garnishment or other net pay based deduction, you set up the
earning/deduction master as follows. (Note that the level assigned to the deduction can be any
number you want as long as it is a higher number than the levels assigned to all the other
earnings, accruals, benefits, deductions, and taxes that will make up its calculation base.)
Percentage of Net Pay Deduction
Earning/Deduction: GARN
Category: Deduction
Level: 25
Employee Calculation Method: Percentage of Base
Percent: 10.00
Take Deduction Before: Leave field empty
Base Earnings Include: Include all earnings
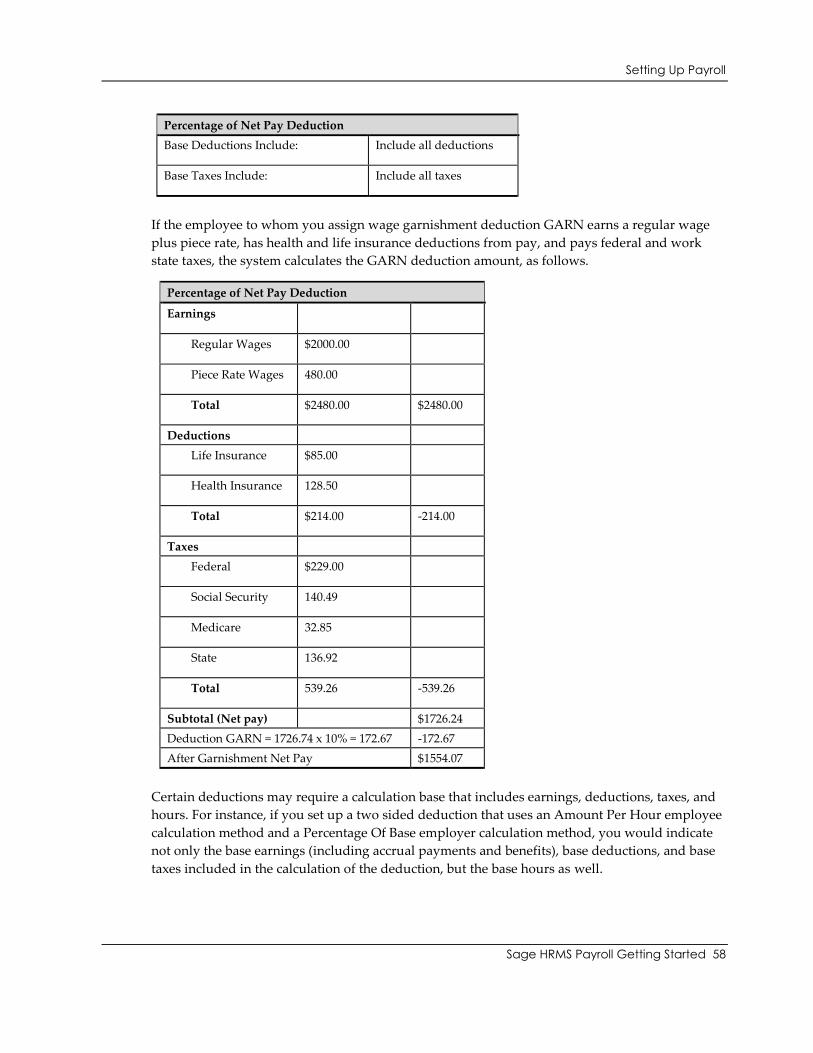
Setting Up Payroll
Sage HRMS Payroll Getting Started 58
Percentage of Net Pay Deduction
Base Deductions Include: Include all deductions
Base Taxes Include: Include all taxes
If the employee to whom you assign wage garnishment deduction GARN earns a regular wage
plus piece rate, has health and life insurance deductions from pay, and pays federal and work
state taxes, the system calculates the GARN deduction amount, as follows.
Percentage of Net Pay Deduction
Earnings
Regular Wages $2000.00
Piece Rate Wages 480.00
Total $2480.00 $2480.00
Deductions
Life Insurance $85.00
Health Insurance 128.50
Total $214.00 -214.00
Taxes
Federal $229.00
Social Security 140.49
Medicare 32.85
State 136.92
Total 539.26 -539.26
Subtotal (Net pay) $1726.24
Deduction GARN = 1726.74 x 10% = 172.67 -172.67
After Garnishment Net Pay $1554.07
Certain deductions may require a calculation base that includes earnings, deductions, taxes, and
hours. For instance, if you set up a two sided deduction that uses an Amount Per Hour employee
calculation method and a Percentage Of Base employer calculation method, you would indicate
not only the base earnings (including accrual payments and benefits), base deductions, and base
taxes included in the calculation of the deduction, but the base hours as well.
Setting Up Payroll
Sage HRMS Payroll Getting Started 59
When you add an earning/deduction, be sure you specify the correct calculation method before
you save your work. After you add the earning/deduction, you cannot change the calculation
method unless you delete the earning/deduction and add it again.
Defining Advances and Repayment Deductions
You can set up earnings and deductions with the category Advance to track cash amounts and
noncash items (such as uniforms or tools) you advance to employees with the expectation of
repayment. You indicate the amount of the advance and an Advances Receivable account to
which advance amounts post, among other information. You then assign the advance to the
employees to whom you are making the advance.
To track the employee's repayment of the advance, you can set up a deduction and indicate that it
is a repayment deduction, that is, a deduction set up to repay a particular advance. You link the
deduction to the advance by entering the advance's code in the repayment deduction record
itself.
When you assign the repayment deduction to an employee, as long as you assigned the
associated advance to the employee first, the system defaults the advance code to which the
deduction is linked. Establishing the link between an advance and its repayment deduction
allows the system to maintain an internal "balance due" on the advance.
The system calculates the repayment deduction only if the advance it is intended to repay has
been processed, and its balance established, during a previous calculation. And, the system
calculates the deduction only until the advance has been fully repaid.
Employee Tab (Accruals)
The Employee tab for accruals allows you to enter information about employee vacation, sick, and
compensatory time accruals.
Review your vacation, sick and compensatory time accrual information and complete the fields on
the Employee tab for accruals as follows:
Accrual Carry over Date. Your entry in this field determines the default date when unused vacation,
sick, and compensatory time, up to the limit specified in the Maximum Annual Carry over column
for the employee's years of service, is carried over to the new accrual period. (You can override the
default when you assign the accrual to each employee.) Select from the following choices:
Specific Month/Day. Carry over of the unused accrual hours or amount occurs on a specific
month and day, which you enter in the Month and Day fields that subsequently appear.
Date of Hire. Carry over of the unused accrual hours or amount occurs on the month and
day of the employee's hire date.
Setting Up Payroll
Sage HRMS Payroll Getting Started 60
Months After Hire. Carry over of the unused accrual hours or amount occurs a specific
number of months after the employee's hire date. You enter the number of months in the
Months After Hire field that subsequently appears.
Days After Hire. Carry over of the accrual hours or amount occurs a specific number of days
after the employee's hire date. You enter the number of days in the Days After Hire field that
subsequently appears.
Post The Liability. Select this check box, valid only for Percentage Of Base vacation and sick time
accruals, if you want the vacation or sick dollars accrued to be debited to the expense account and
credited to the liability account. When you pay the vacation or sick time dollars, the system debits the
liability account and credits your cash account.
Accrual Payments Subject To The Following Taxes. To set up a vacation, sick, or compensatory time
accrual, you select the taxes the accrual payment is subject to and the withholding type (Regular Rate;
Supplemental; Taxable, No Withholding) for each tax.
The taxes you enter in the Accrual Payments Subject To The Following Taxes field must have levels
higher than the level of the accrual. You can type in the taxes or click the Finder to choose from a list
of all taxes with levels higher than the level of the accrual you are adding.
Calc Max. Carry-over Based On Remaining Balance. For the accrual, this check box lets you specify
how Sage HRMS Payroll calculates an employee's carry-over amount (or hours) for a new year. It
tells Sage HRMS Payroll which component to compare with the Maximum Carry-Over field. The
calculated carry-over amount (or hours) will vary, depending on the method chosen.
Select this check box, if you do not want the employee's carry over amount (or hours) to
exceed the value specified in the Maximum Carry-Over field of the Earning/Deduction
Codes window.
In this method, Sage HRMS Payroll compares the employee's remaining balance at accrual
year-end (that is, the entire unused amount or hours) with the Maximum Carry-Over field.
This means that the employee's starting balance for a new accrual year cannot exceed the
Maximum Carry Over field (unless a number is specified in the Beginning column of the
Earning/Deduction Codes window).
Do not select this check box, if you allow employees to carry over the unused portion of the
amount (or hours) accrued during the year, up to the specified maximum carry-over, PLUS
any unused amounts (or hours) carried over from the previous year.
In this method, Sage HRMS Payroll compares only the employee's unused portion of the
amount (or hours) accrued during the year with the Maximum Carry-Over field, and also
carries over any unused amounts carried over from the previous year, up to the maximum
accrual.
This means that the employee's starting balance for a new year can exceed the amount
specified in the Maximum Carry-Over field.
Setting Up Payroll
Sage HRMS Payroll Getting Started 61
In both methods:
After carry-over is calculated, any value you entered in the Beginning column of the
accrual's setup record, will be added to the carry-over amount to arrive at the employee's
starting balance for the accrual, up to the maximum accrual.
Accrual amounts are subject to the amount specified in the accrual's Maximum Accrual field.
After the employee's accrual amount reaches the maximum accrual, the employee stops
accruing.
For more details and examples, see the sections on setting up and carrying over vacation, sick, and
compensatory time, in this manual.
Through Service Year. In this column, enter each service year bracket for which the accrual is
different.
For example, suppose that vacation time is accrued at three weeks (120 hours) per year for an
employee's first five years of employment, at four and one half weeks (180 hours) per year for
employment years six through ten, and at six weeks (240 hours) per year thereafter.
You would enter 5 in the first Through Service Year field, 10 in the second Through Service Year
field, and 99 (or another appropriately high number) in the third Through Service Year field.
You can define up to 10 periods.
At the following fields, you enter the accrual statistics that pertain to each period of employment.
Beginning (Amt/Hours). In this column, enter the vacation or sick time dollar amounts or hours
added to an employee's outstanding balance at the beginning of each carry over year. (This column is
not shown for compensatory time entries.) For example, your company may provide 8 days (64
hours) of paid sick leave per year regardless of the number of service years or hours worked. You
would enter 64 in the row corresponding to Through Service Year 99. In this example, the value in the
next field, Increment, would be 0.
Increment (Pct/Hour). The increment percentage or hours refers to the percentage of a dollar amount
or the number of hours by which the employee's vacation or sick time is automatically increased each
time you process the accrual. This field is not shown for compensatory time entries.
Using the vacation time example above, suppose you are accruing vacation for your employees by
means of a monthly Hours Per Frequency accrual. On the line that corresponds to Through Service
Year 5, you would enter 10 hours as the monthly increment. On the line corresponding to Through
Service Year 10, you would enter 15 hours as the monthly increment. On the line corresponding to
Through Service Year 99, you would enter 20 hours as the monthly increment.
Maximum Accrual. Type the maximum dollar amount or number of hours of vacation, sick, or
compensatory time that an employee may accrue in each service year range.
Suppose, again using the example, that for employees with five or fewer years of service, you allow a
maximum unused accrual of six weeks, or 240 hours. In the Max. Accrual field corresponding to the
Setting Up Payroll
Sage HRMS Payroll Getting Started 62
first five years of service, you would enter 240 hours.
For employees with between six and ten years of service, you allow a maximum unused accrual of 9
weeks, or 360 hours. In the Max. Accrual field corresponding to service years six through ten, you
would enter 360.
Finally, for service years over ten, you allow a maximum unused accrual of 12 weeks, or 480 hours. In
the Max. Accrual field corresponding to service years 11 through 99, you would enter 480.
Maximum Carry over. Type the maximum dollar amount or number of hours of unused vacation,
sick, or compensatory time that an employee may roll forward into the next carry over period.
Note that:
If employees are not permitted to carry over any unused accrual amount or hours, leave this
field as zeroes.
If employees are permitted to carry over all unused accrual amount or hours (up to the value
entered in the Maximum Accrual field), enter the highest accrual value possible (for instance,
all 9s) in this field.
Sage HRMS Payroll evaluates the Maximum Carry over field according to the carry over method you
select in the Calc Max. Carry-over Based On Remaining Balance check box.
For more details about the two carry-over methods, see the description of the Calc Max. Carry-over
Based On Remaining Balance check box, and the sections on setting up and carrying over vacation,
sick, and compensatory time, in this manual.
As an example, for the accrual scenario described throughout this section, suppose that employees in
the first bracket (through service year five) can carry over one week of unused vacation time,
employees in the second bracket can carry over one and one half weeks, and employees in the third
and final bracket can carry over two weeks. Enter 40 hours as the maximum carry-over for the first
group, 60 hours for the second, and 80 for the third.
Accrual amounts or hours cannot exceed the Maximum Accrual field.
Employer Tab (Benefit)
The Employer tab of the Earning/Deduction Codes window prompts you for information needed by
the system to calculate amounts contributed by the employer for benefits and two sided deductions
only.
Some of the entries you make depend upon the employer calculation method you choose for the
benefit or deduction.
When both an employee and an employer contribute to a plan, such as a 401(k), you can set up an
employee deduction for the 401(k) and, by indicating employer calculation methods as well as an
employee calculation method, take care of both sides of the contribution.
Setting Up Payroll
Sage HRMS Payroll Getting Started 63
If you want to calculate the employer contribution as a percentage of the employee's contribution,
you must set up a two sided deduction and select Percentage Of Employee Contribution as the
employer calculation method.
If the employer contribution is not a percentage of the employee's, you can opt instead to set up a
deduction for the employee's portion and a benefit for the employer's.
Review the employer calculation method for this benefit or deduction and complete the fields on the
Employer tab as follows:
W-2 Reporting. This field appears for benefits only. From the selection list, choose the term that
applies to the benefit. Your choice dictates the placement of information about the benefit on the W-2
form. Not Applicable means that information about the benefit does not print as a separate item on
the Form W-2, although it may be part of other totals that print on the Form W-2. (Some benefits that
print as separate items on the Form W-2 are also a part of other totals.)
Amount or Percent. Depending upon the calculation method chosen, type the amount or the percent
to be used in the calculation of this benefit or deduction. You can override the amount or percent
when you assign the benefit or deduction to the employee.
This field does not appear for benefits or deductions that use the Piece Rate Table, Sales Commission
Table, or Wage Bracket Table calculation method.
Minimum And Maximum Based On. Choose from the selection list the unit or amount on which the
annual and period minimums and maximums for the benefit or deduction are based.
Period minimum and period maximum refer to the minimum and maximum amounts that can be
calculated for the benefit or deduction in the period dictated by its frequency. For example, a benefit
with a weekly frequency has weekly minimum and maximum amounts; a deduction with a monthly
frequency has monthly minimum and maximum amounts.
Your selections for entry in this field depend upon your entry in the Employer Calculation Method
field. (The Minimum And Maximum Based On field does not appear for benefits and deductions
with the calculation method Flat or Wage Bracket Table.)
If the calculation method is: Select:
Piece Rate No Limit, Piece Count, or Dollar Value
Amount Per Hour No Limit, Hour Count, or Dollar Value
Percentage Of Base No Limit, Pay/Deduction Amount, or Base Amount
Sales Commission Table No Limit, Commission Amount, or Sales Amount
Percentage Of Employee Contribution No Limit, Deduction Amount, or Employee Contribution
If you select No Limit, the system calculates the benefit or deduction each period without regard to
any annual or period minimum or maximum (and the Annual Maximum and Period Minimum and
Maximum fields do not appear).
Setting Up Payroll
Sage HRMS Payroll Getting Started 64
If you select an item other than No Limit and you are adding a benefit or deduction with the
frequency Float, the period minimum and maximum fields are labeled Minimum And Maximum
Amounts By Frequency.
If you are setting up a benefit or deduction with any frequency other than Float, the period fields are
labeled (Frequency) Minimum and (Frequency) Maximum.
Minimum And Maximum Amounts By Frequency. or Period Minimum And Period Maximum. In
the case of a Float benefit or deduction, type the smallest and largest amounts or numbers of units
that may be used in calculating the amount for the benefit or deduction in each pay frequency your
company uses. For benefits and deductions with frequencies other than Float, type the minimum and
the maximum for the frequency period only.
The minimum and maximum fields appear for any benefit or deduction that has its Minimum And
Maximum Based On field set to something other than No Limit.
Annual Maximum. Type the annual amount at which calculations for this benefit or deduction will
stop.
The Annual Maximum field does not appear for any benefit or deduction with the calculation
method Wage Bracket Table or for any benefit or deduction that has its Minimum And Maximum
Based On field set to No Limit.
If you are setting up a two sided deduction using Amount Per Hour as the calculation method for
both sides and you choose Hour Count as the item upon which minimums and maximums are based,
you must either enter the same amounts for the employee and employer annual maximums or set the
maximum for one side to zero.
If you are setting up a two sided deduction using Percentage Of Base as the calculation method for
both sides and you choose Base Amount as the item upon which minimums and maximums are
based, you must either enter the same amounts for the employee and employer annual maximums or
set the maximum for one side to zero.
If entering the same amounts or setting one side to zero for the annual maximums will not achieve
the desired result, consider setting up a deduction and a benefit in place of a two sided deduction.
Lifetime Maximum. For deductions or benefits that let you enter an Annual Maximum amount, you
can also enter a Lifetime Maximum amount.
The Lifetime Maximum field enables you to specify when the Sage HRMS Payroll program should
stop calculating the deduction or benefit, without specifying a time limit.
The value you enter on the Earning/Deduction Codes window becomes the default for all employees.
However, you can change the value on individual employee records, where appropriate.
Secondary Rate (Percent/Amount/Amount Per Hour). This field applies only to deductions that let
you enter an Annual Maximum amount (that is, if you have set the Minimum And Maximum Based
On field to an option other than No Limit), and that uses an employer calculation method of Flat,
Amount per Hour, Percentage of Base, or Percentage of Employee Contributions.
Setting Up Payroll
Sage HRMS Payroll Getting Started 65
This field enables you to specify a second rate (expressed as a percentage, amount, or amount per
hour, in accordance to the calculation method chosen) to be used for a deduction, after the maximum
(Annual or Lifetime Maximum fields) for the first rate has been reached.
An associated field, Secondary Rate (Percent/Amount/Amount Per Hour) Effective, enables you to
specify when the Secondary Rate should be effective.
Note: There is no maximum after the secondary rate commences, so Sage HRMS Payroll will
continue to deduct the secondary rate, until you de-activate the rate.
To stop deducting the secondary rate for all employees, set the Secondary Rate Effective
field to Never.
To stop deducting the secondary rate for individual employees, open the Employee Payroll
window, select the deduction on the Pay tab, and clear the Calculate Earning/Deduction
check box.
Secondary Rate (Percent/Amount/Amount Per Hour) Effective. This field appears if the Secondary
Rate (Percent/Amount/Amount Per Hour) field appears.
You can use the Secondary Rate (Percent/Amount/Amount Per Hour) Effective field to designate
when the secondary rate comes into effect (never, or after the Annual Maximum or the Lifetime
Maximum is reached).
Associate W 2 Printing. If you chose Other Information Box at the W-2 Reporting field earlier on
this tab, the Associate W-2 Printing option becomes available to you. Select this option if the benefit
you are setting up needs to be associated with a particular state or tax update supported local tax on
the W 2 form. Then, if an employee works in more than two states or localities and requires more
than one W 2 form, you can be sure that the benefit appears on the same Form W-2 as the taxing
entity with which it is associated.
Associated Tax. Type or select from the Finder the state or tax update supported local tax with which
you want to associate the benefit you are adding.
Subject To The Following Taxes. If you are setting up a benefit, you select the taxes the benefit is
subject to and the withholding type (Regular Rate; Supplemental Withholding; Taxable, No
Withholding) for each tax.
The taxes you enter in the Subject To The Following Taxes field must have levels higher than the
level of the benefit you are setting up. You can type in the taxes or click the Finder box to choose from
a list of all taxes with levels higher than the level of the benefit you are adding.
If you are setting up the employer side of a deduction (for a 401(k) plan, for example), there are no tax
fields to complete. Sage HRMS Payroll does not support any tax processing or reporting for the
employer portion of a two sided deduction.
Setting Up Payroll
Sage HRMS Payroll Getting Started 66
G/L Distributions Tab
The G/L Distributions tab of the Earning/Deduction Codes window allows you to assign default
expense and liability accounts to any number of distribution codes. When you assign an
earning/deduction to an employee, you also assign a G/L distribution code for the earning/deduction,
which sets up the G/L accounts to which the earning/deduction amounts will be posted.
If you plan to use cost center overrides to replace segments of the G/L accounts to which you post
Sage HRMS Payroll transactions, you may want to use "base accounts" as part of your distribution
account sets. An earning's base expense account might be made up of the account segment followed
by zeros for all segments that will be replaced.
You can replace segments for each employee assigned a particular earning/deduction, either on the
Employee Payroll window or during timecard entry.
The G/L Distributions tab is not available for repayment deductions, noncash benefits that are not
marked for posting to the general ledger, or earnings that represent reported cash tips or allocated
tips.
Review your G/L posting needs and complete the fields on the G/L Distributions tab as follows:
Distribution Code. Type a distribution code of up to six characters to identify the set of G/L expense
and liability accounts for the earning/deduction.
Description. Type a name or description of up to 15 characters for the distribution code. Be sure to
make the description distinctive enough that when you assign the earning/deduction to an employee,
you can select from a Finder list of distribution code descriptions the correct account set for posting.
Regular Expense Account. Enter the Regular Expense account to which you will post amounts
calculated for earnings and deductions assigned this distribution code.
The Regular Expense account column appears in the G/L Distributions for accruals, earnings (other
than reported tips), two sided deductions, expense reimbursements, cash benefits, and noncash
benefits marked for posting to the general ledger.
Overtime Expense Account. Enter the Overtime Expense account to which you will post overtime
wages that are assigned this distribution code.
The Overtime Expense account column appears in the G/L Distributions box for earnings that use the
calculation methods Flat, Fixed, and Hourly Rate.
Shift Expense Account. Enter the Shift Expense account to which you will post shift differential
wages assigned this distribution code.
The Shift Expense account column appears in the G/L Distributions box for earnings that use the
calculation methods Flat, Fixed, and Hourly Rate.
Employee Liability Account. Enter the Employee Liability account to which you will post amounts
calculated for earnings and deductions assigned this distribution code.
Setting Up Payroll
Sage HRMS Payroll Getting Started 67
The Employee Liability account column appears in the G/L Distributions field for employee and
two sided deductions.
Employer Liability Account. Enter the Employer Liability account to which you will post the
amounts calculated for earnings and deductions assigned this distribution code.
The Employer Liability account column appears in the G/L Distributions field for the following
types of earnings and deductions:
Percentage Of Base vacation and sick time accruals for which you have selected the Post
The Liability check box.
Reported Tips earnings for which you have selected the Tip Disbursement box.
Two sided deductions.
Noncash benefits that are marked for posting to the general ledger.
Piece Rate Tab
The Piece Rate tab of the Earning/Deduction Codes window allows you to set up a piece rate table
used in calculating amounts for earnings, deductions, and benefits with the employee or employer
calculation method Piece Rate Table.
Progressive Calculation. Select the check box if you want the system to use progressive calculation to
calculate the Select the check box if you want the system to use progressive calculation to calculate
the total amount of a piece rate earning. If you want to use the non-progressive method, clear the
check box.
In both types of calculations, the rate varies according to the number of pieces produced.
In progressive calculation, one rate is paid for each piece produced during a pay period up to a set
threshold. A different rate is paid for each additional piece produced in the same pay period after the
threshold has been reached.
For example, suppose you set up a piece rate table with a pay amount of $1.00 per piece for 1 to 50
pieces, and $1.50 per piece for 51 pieces or more.
If an employee produced 60 pieces during a pay period, the system would calculate a total piece rate
pay of $65.00, as follows:
$50.00 of pay for the first 50 pieces produced (50 x $1.00), and
$15.00 of pay for the next 10 pieces produced (10 x $1.50).
In non-progressive calculation, the same rate is paid for all the pieces produced, but that rate is
determined by the number of pieces produced during a pay period.
Setting Up Payroll
Sage HRMS Payroll Getting Started 68
For example, suppose you set up a piece rate table with a pay amount of $1.00 per piece for 1 to 50
pieces, and $1.50 per piece for 51 pieces or more.
If an employee produced 60 pieces during a pay period, the system would calculate $1.50 of
pay for each piece produced (60 x $1.50) for a total piece rate pay of $90.00.
If an employee produced 40 pieces, the system would calculate $1.00 of pay for each piece
produced (40 x $1.00) for a total piece rate pay of $40.00.
Sage HRMS Payroll handles each pay period entry on the timecard separately. For example, suppose
you set up a piece rate table with a pay amount of $1.00 per piece for 1 to 50 pieces, and $1.50 per
piece for 51 pieces or more.
For progressive calculation:
If the employee produced 60 pieces and reports this as one timecard entry, the total piece rate
pay would be $65.00, as described earlier in the progressive calculation example.
If, however, the employee produced 60 pieces but reports this as two timecard entries of 30
pieces each, the system would calculate a piece rate pay of $60.00 - that is, (30 x $1.00) + (30 x
$1.00).
For non-progressive calculation:
If the employee produced 60 pieces and reports this as one timecard entry, the total piece rate
pay would be $90.00, as described earlier in the non-progressive calculation example.
If the employee produced 60 pieces but reports this as two timecard entries of 30 pieces each,
the system would calculate a total of $60.00 pay - that is, (30 x $1.00) + (30 x $1.00).
Fields in the Piece Rate Table
Review your piece rates and complete the columns of the Piece Rate Table as follows:
From. This column displays the lower limit (number of pieces or units) of each range for which
you have set a specific pay amount. The system displays zeros as the first lower limit, and the
upper limit of the previous range (plus one) for each subsequent lower limit.
To. Type the upper limit (number of pieces or units) of each range for which you have set a
specific pay amount.
Over. In this field, the system displays the number you entered in the last To field.
Pay This Amount Per Piece. Type the dollar amount per piece to be paid employees for each
range of pieces you entered.
Setting Up Payroll
Sage HRMS Payroll Getting Started 69
Sales Tab
The Sales tab of the Earning/Deduction Codes window allows you to set up a sales commission table
used in calculating amounts for earnings, deductions, and benefits that use the employee or employer
calculation method Sales Commission Table.
Progressive Calculation. Select the check box to use progressive calculation to calculate the total
commission on sales. To use the non-progressive method, clear the check box.
In both types of calculations, the rate varies according to the total sales during the pay period.
In progressive calculation, one commission rate is paid for sales up to a set threshold. A second rate is
paid on any sales above the threshold during the same pay period.
For example, suppose you set up a sales commission table with a commission percentage of 10% for
sales between $1.00 and $5,000.00 and a commission percentage of 15% for sales between $5,000.01
and $7,500.00.
If an employee's sales were $6,800.00 during a pay period, the system would calculate a total
commission of $770.00, as follows:
$500.00 of commission for the first $5,000.00 worth of sales (10% x $5,000.00)
$270.00 of commission for the next $1,800.00 worth of sales (15% x $1,800.00)
In non-progressive calculation, the same commission rate is paid for all the sales, but that rate is
determined by the total amount of sales during a pay period.
For example, suppose you set up the same sales commission table as described earlier in the
progressive calculation example.
If an employee's sales were $6,800.00 during a pay period, the system would calculate a total of
$1,020.00 commission (15% x $6,800.00).
Sage HRMS Payroll handles each pay period entry on the timecard separately. For example, suppose
you set up the same sales commission table as described earlier in the progressive calculation
example.
For progressive calculation:
If the employee reports $6,800.00 of sales as one timecard entry, the system calculates a
commission of $770.00, as described earlier in the progressive calculation example.
If the employee reports the $6,800.00 as two timecard entries, of $3,400 each, the system
calculates a commission of $680.00 - that is, (10% x $3,400) + (10% x $3,400).
For non-progressive calculation:
If the employee reports $6,800 of sales as one timecard entry, the system calculates a
commission of $1,020.00, as described earlier in the non-progressive calculation example.
Setting Up Payroll
Sage HRMS Payroll Getting Started 70
If the employee reports the $6,800 as two timecard entries of $3,400 each, the system would
calculate a commission of $680.00 - that is, (10% x $3,400) + (10% x $3,400).
Fields in the Sales Table
Review your sales amounts and commissions and complete the columns of the Sales tab as
follows:
From. This column displays the lower limit (dollar amount of sales) of each range for which you
have set a specific commission percentage. The system displays zeros as the first lower limit, and
the upper limit of the previous range (plus a penny) for each subsequent lower limit.
To. Type the upper limit (dollar amount of sales) of each range for which you have set a specific
commission percentage.
Over. In this field, the system displays the dollar amount you entered in the last To field.
Pay This Percentage. For each range of sales you enter, type the percentage of sales to be used in
calculating the sales commission.
Calculation Base Tab
The Calculation Base tab of the Earning/Deduction Codes window allows you to indicate the hours,
earnings, deductions, and taxes that constitute the calculation base of the accrual, earning, deduction,
or benefit you are setting up (expense reimbursements and advances do not use a calculation base).
The earnings, deductions, and taxes you enter into the calculation base boxes must have levels lower
than the level of the earning/deduction you are setting up.
Depending upon the calculation method used by the earning/deduction, you may need to complete
one, two, three, or all four of the following calculation base lists.
The following shows the Calculation Base tab for a deduction whose Employee Calculation Method
is Amount per Hour and Employer Calculation Method is Percentage of Base:
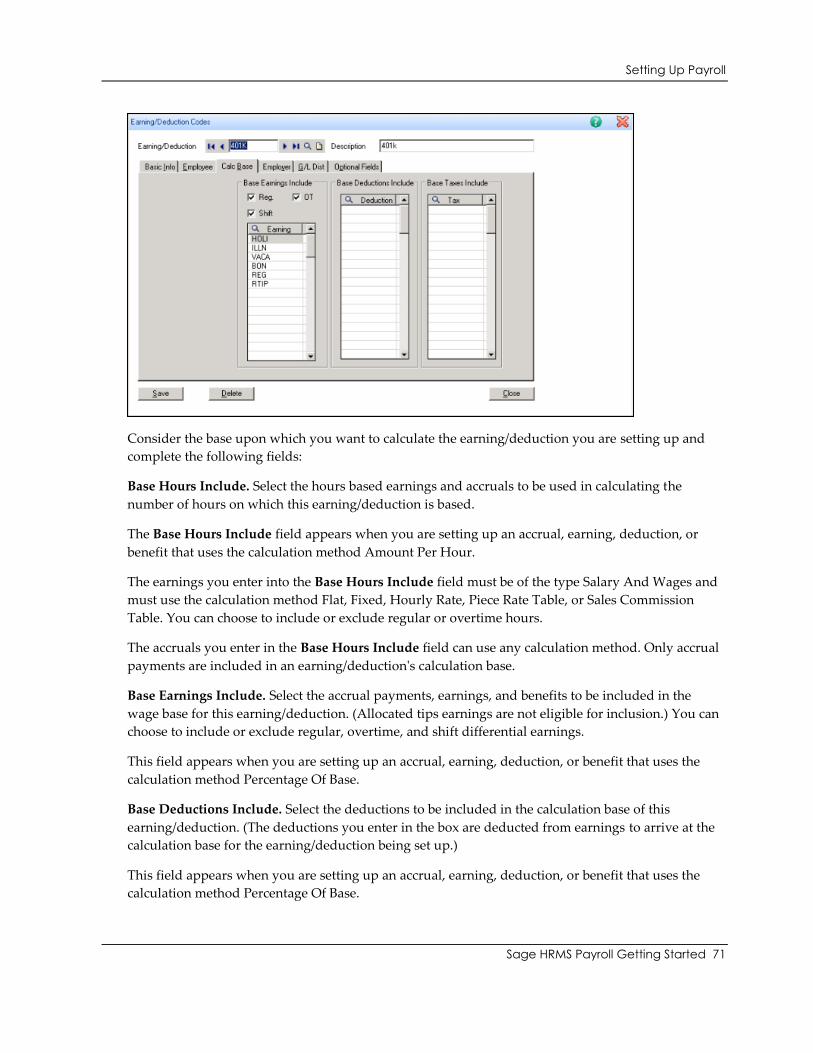
Setting Up Payroll
Sage HRMS Payroll Getting Started 71
Consider the base upon which you want to calculate the earning/deduction you are setting up and
complete the following fields:
Base Hours Include. Select the hours based earnings and accruals to be used in calculating the
number of hours on which this earning/deduction is based.
The Base Hours Include field appears when you are setting up an accrual, earning, deduction, or
benefit that uses the calculation method Amount Per Hour.
The earnings you enter into the Base Hours Include field must be of the type Salary And Wages and
must use the calculation method Flat, Fixed, Hourly Rate, Piece Rate Table, or Sales Commission
Table. You can choose to include or exclude regular or overtime hours.
The accruals you enter in the Base Hours Include field can use any calculation method. Only accrual
payments are included in an earning/deduction's calculation base.
Base Earnings Include. Select the accrual payments, earnings, and benefits to be included in the
wage base for this earning/deduction. (Allocated tips earnings are not eligible for inclusion.) You can
choose to include or exclude regular, overtime, and shift differential earnings.
This field appears when you are setting up an accrual, earning, deduction, or benefit that uses the
calculation method Percentage Of Base.
Base Deductions Include. Select the deductions to be included in the calculation base of this
earning/deduction. (The deductions you enter in the box are deducted from earnings to arrive at the
calculation base for the earning/deduction being set up.)
This field appears when you are setting up an accrual, earning, deduction, or benefit that uses the
calculation method Percentage Of Base.
Setting Up Payroll
Sage HRMS Payroll Getting Started 72
Base Taxes Include. Select the taxes to be included in the calculation of this earning/deduction. (The
taxes you enter in the box are deducted from earnings to arrive at the calculation base for the
earning/deduction being set up.)
This field appears when you are setting up a deduction that uses the calculation method Percentage
Of Base.
Optional Fields Tab
On the Assign Earnings/Deductions window (from the navigation pane, select Payroll > Assign
Earnings/Deductions), you can assign optional fields to an earning or deduction, if you have defined
earning/deduction optional fields on the Optional Fields window.
To assign optional fields to this earning/deduction, click the Optional Fields tab.
Optional fields that you set up for automatic insertion in earning/deduction records automatically
appear on this tab, along with their default values.
You can accept or change any default values that appear. You can accept the optional fields that
appear, or you can delete or add them.
To delete an optional field, select the line on the table, and then press Delete on the
keyboard.
To assign additional optional fields, select the table, and then press Insert on the keyboard.
Complete the fields on the new line as follows.
Optional Field and Description. Use the Finder to select the optional field codes you want to use
with this earning or deduction.
When you select an optional field code, the program displays the description for the optional field.
Value Set. This field alerts you whether a seemingly blank optional field has an automatically
inserted - but "blank" - default value. If it has a blank value, the Value Set field displays Yes. (You
cannot tell whether an optional field has a blank default value, or no value, just by looking at the
Value field.)
The Value Set field will change from No to Yes if you make an entry in the Value field.
Value and Value Description. Enter or select the value for this earning or deduction.
If the optional field you selected requires validation, you must select a value that is defined for the
optional field. However, if the optional field allows blanks, you can leave the default value field
blank.
If you select a value, the description of the value will appear in the Value Description column.
After Completing the Tabs:
Setting Up Payroll
Sage HRMS Payroll Getting Started 73
Review the tabs on the Earning/Deduction Codes window to make sure your choices and
entries are correct. When you finish, click the Add button.
To print a listing of pay factors you set up, to verify that they are correct and complete select
Reports > Payroll > Setup Reports > Earnings and Deductions.
Back Up the Data
You have invested a considerable amount of time and thought in the information you have entered so
far into Sage HRMS Payroll. To protect the information, back up the data. Store the copy in a safe
place.
If something damages your data during the next phase of setting up (and before you back up again),
you can restore the information you have entered up to this point from the backup copy instead of
having to start from scratch.
Assigning Earnings/Deductions to Employees
Before you can assign an earning or deduction to an employee, you must set up the earning or
deduction record itself on the Earning/Deduction Codes window. The frequencies of the earnings or
deductions you assign to an employee must be the same as, or less frequent than, the pay frequency
of the employee.
The Pay tab of the Employee Payroll window allows you to associate with each employee the
earnings, deductions, and other pay factors used in payroll calculation.
In addition to entering each earning or deduction code, an employee or employer override amount or
percent, and the distribution code for the G/L accounts to which employee amounts should post, you
can also specify default hours for each Flat, Fixed, Hourly Rate, Piece Rate Table, or Sales
Commission Table earning. By entering default hours for these earnings, you can process payroll for
the employee without needing to enter timecards.
Other information you can tailor specifically for an employee includes the earning or deduction start
and end dates and, in the case of an accrual, the carry over date.
You can turn an employee earning or deduction on and off by entering Yes or No at the Calculate?
field. If you enter No, the system ignores the earning or deduction during payroll calculation.
You can also change the workers' compensation group and code, which defaults from the Classes
and Schedules tab of the Employee Payroll window.
If you are assigning an advance and its associated repayment deduction to an employee, be sure to
assign the advance first. When you add the repayment deduction, the system verifies that the
advance it was designed to repay is already assigned to the employee.
Setting Up Payroll
Sage HRMS Payroll Getting Started 74
Step 9: Set Up Workers' Compensation Codes
On the Workers' Compensation Codes window, you set up and maintain the information you need to
produce the Workers' Compensation Report. You enter information about the company's workers'
compensation policy and the workers' compensation codes you assign to employees and employees'
earnings and deductions.
You can add workers' compensation groups and codes at any time. You cannot delete a code if it is
referenced in Sage HRMS Payroll history or has been assigned to an employee, linked to an employee
earning/deduction, or entered on a timecard.
To enter Workers' Compensation information, select Setup > Payroll > Code Tables > Workers'
Compensation.
Review your worker's compensation insurance policy and complete the Workers' Compensation Codes
window as follows:
WCC Group. Enter a label that identifies the workers' compensation policy.
Policy Number. Enter your policy number in up to 60 characters.
Description. Enter a description of the policy in up to 60 characters.
Last Maintained. The system displays the DOS date on which you last modified workers' compensation
codes.
Calculation Method. Select the premium calculation method your policy uses. Choose between Rate Per
Hour Worked and Rate Per $100.
If you choose Rate Per $100, use the Ceiling field that follows to enter the ceiling as a dollar
amount.
If you choose Rate Per Hour, enter the ceiling in hours.
Start Date (Current). Enter the starting date of the policy. If your workers' compensation policy uses a
ceiling, the Workers' Compensation Report calculates employee ceilings from the Start Date forward.
Start Date (Previous). Enter the start date of the workers' compensation policy used previously.
Ceiling (Current). Enter the annual wage ceiling or the maximum number of work hours used in the
premium calculation. The figure you enter represents the maximum amount of earnings or the maximum
number of hours worked subject to workers' compensation premiums. The wages or hours are calculated
from the start of the policy period.
Ceiling (Previous). If you entered the Previous Start Date, enter the ceiling used previously.
Adjust Overtime Pay To Regular Rate. If you want the system to adjust an employee's overtime pay to
the employee's regular rate of pay when you print the Workers' Compensation Report, select this check
box.
Setting Up Payroll
Sage HRMS Payroll Getting Started 75
Code. Enter a workers' compensation code of up to six characters for each workers' compensation rate
your company uses.
Description. Enter a description of up to 60 characters for each code.
Rate. Enter the rate per hour worked or per $100 of pay for each code you set up. You can enter a dollar
amount with a precision of up to six decimal places.
Previous Rate. If you entered the Previous Start Date, enter the rate used previously.
Review the fields on the Workers' Compensation Codes window to make sure your entries are correct.
When you finish, click the Add button.
To print a listing of the codes you defined, to verify that they are correct and complete select Reports >
Payroll > Setup Reports > Workers' Compensation Codes.
Tracking Workers' Compensation Information
The Workers' Compensation Codes window allows you to enter information about your company's
workers' compensation insurance policy and to set up the workers' compensation codes you assign to
employee earnings and benefits.
Policy information you enter includes the policy number, description, start date, and wage ceiling.
You also specify whether the workers' compensation rates associated with workers' compensation
codes should be applied per hour worked or per $100 of pay.
An option on the Workers' Compensation Codes window allows you to instruct the system to adjust
an employee's overtime pay to the employee's regular rate of pay when you print the Workers'
Compensation Report.
After you set up all the workers' compensation groups and codes you need, you assign a group and
code to each employee in the company. The employee group and code becomes the default for
earnings and benefits assigned to the employee. You can override the default at the time you assign
an earning or benefit to an employee or during timecard entry.
At any time, you can print the Workers' Compensation Report, which uses check dates to determine
wages subject to workers' compensation premiums.
Step 10: Set Up Overtime Schedules (optional)
Creating Overtime Schedules
When creating an overtime schedule, you can define overtime rate multipliers for numbers of hours
worked over a period of days. For example, you can indicate that all hours over 40 in a week should
be paid at the employee's regular hourly rate times a multiplier of 1.5. You might further indicate that
all hours over 60 in a week should be paid at the employee's regular hourly rate times a multiplier of

Setting Up Payroll
Sage HRMS Payroll Getting Started 76
2. Or, you might want to apply an overtime multiplier to any hours over 8 worked in a day. The
system offers the flexibility to accommodate all of these situations.
Overtime rates can be applied to earnings that use the calculation methods Hourly Rate, Flat, and
Fixed. On the Overtime Schedule Codes window, you set up and maintain information the system
uses to calculate employee overtime pay.
After you set up overtime schedules, you assign a schedule to each employee. Then, when the
employee works overtime hours, the system uses the overtime schedule in conjunction with the
employee's timecard entries to calculate the correct amount of overtime pay. To apply to an
employee's wages an overtime schedule other than the schedule assigned to the employee, you can
enter the appropriate overtime schedule for each overtime entry on the timecard.
In Sage HRMS Payroll, a single overtime schedule can accommodate overtime rates based on varying
numbers of days. For example, you might set up an overtime schedule that pays time and a half for
hours over 8 in a day, double time for hours over 12 in a day, and time and a half again for hours
over 40 in 7 days. Unless your employees work very large amounts of overtime or adhere to unusual
overtime schedules, the system correctly calculates their overtime pay regardless of whether you
make daily timecard entries for each employee or one weekly, biweekly, or other lump sum entry of
their hours.
You can add overtime schedules at any time. You cannot modify or delete an overtime schedule after
it has been assigned to an employee or entered on an employee's timecard.
To set up an overtime schedule, from the navigation pane, select Setup > Payroll > Code Tables >
Overtime Schedule.
Review your company's overtime policies and rates and complete the window as follows:
Overtime Schedule. Enter an identifying code of up to six characters for the schedule.
Description. Enter a description of the schedule in up to 60 characters.
Last Maintained. The system displays the DOS date on which you last modified this overtime
schedule.
Inactive As Of ____. Select the Inactive check box if you want to prevent this overtime schedule from
being assigned to any new employees. If you choose to make an overtime schedule inactive, the
system displays the current DOS date in the As Of field to indicate the date on which you changed
the status.
Setting an overtime schedule's status to Inactive has no effect on the Sage HRMS Payroll calculation
of employees who have already been assigned the schedule.
Pay Overtime As. Select the way in which the system is to calculate and pay the overtime. Choose
either Overtime Rate Pay, to pay overtime at a calculated amount per hour, or Compensatory Time
Hours, to pay the overtime as compensatory time, hour per hour.
Setting Up Payroll
Sage HRMS Payroll Getting Started 77
Pay Regular Hours Shortage From Compensatory Time. If you want the system to use available
compensatory time hours to cover a shortage in regular hours for all employees assigned the
overtime schedule, select this check box.
If you choose this option, keep in mind that the system calculates earnings and deductions in
ascending order by level.
If you select the Pay Regular Hours Shortage From Compensatory Time check box and then
set up a compensatory time accrual with a level of 20, the system calculates earnings with
levels 1 through 19 first to determine any shortage of regular hours.
Because accruals are calculated first among categories of earnings and deductions having the same
levels, earnings with levels of 20 or higher would not be included in the calculation of regular hours
to which the compensatory time accrual hours might be applied.
Be sure when setting up compensatory time accruals, that the levels of the compensatory time
accruals you use to make up a shortage of hours are higher than the levels of the earnings making up
your employee's regular pay. Further, make sure your taxes have higher levels than the earnings and
accruals subject to them.
For a full discussion of earning/deduction levels, see the section Earning/Deduction Hierarchies.
Hours Over.- For Period Of Days. Enter the number of hours, in a given period of days, over which
an employee is considered to be working overtime. The entries in these columns are considered to
determine when employee overtime occurs.
For example, you may consider any hours worked over 8 in a day to be overtime. If so, type 8 in the
Hours Over column and 1 in the For Period Of Days column. Or, overtime may not be paid at your
company until an employee has worked more than 40 hours in a seven day period. In this case, type
40 in the Hours Over column and 7 in the For Period Of Days column.
If you are setting up an overtime schedule for semimonthly employees, and you are not using hours
over 8 in a day as the criterion, in the Hours Over column enter the number of hours above which
overtime is earned and in the For Period Of Days column, enter any number between 10 and 15.
Rate Multiplier. If you pay overtime at overtime rates, enter a rate multiplier for each set of overtime
criteria (hours over within a period) you have entered. This column does not appear if you select
Compensatory Time Hours at the Pay Overtime As field; compensatory time is one hour per one
hour.
When employees earn time and a half for overtime pay, type 1.5 as the rate multiplier. When
employees earn double time, type 2.0 as the multiplier, and so forth.
Review the fields on the Overtime Schedules window to make sure your entries are correct. When
you finish, click the Add button.
To print a listing of the overtime schedules you defined, to verify that they are correct and complete
select Reports > Payroll > Setup Reports > Overtime Schedules.
Setting Up Payroll
Sage HRMS Payroll Getting Started 78
Setting Up for Overtime Calculation
You can choose among several methods for calculating overtime pay for employees. For example,
you can set up your records so that Sage HRMS Payroll calculates overtime based on the FLSA (Fair
Labor Standards Act) for some or all of your employees.
The FLSA rate generally refers to a rate that is:
The total pay for employment (including other compensation such as bonuses, shift
differential, and so on), divided by the number of hours worked.
Sage HRMS Payroll automatically calculates overtime based on the overtime calculation method,
overtime schedule and regular hours, specified on the Employees window.
You can override the automatic overtime calculation for an employee when you enter a timecard.
To set up for an overtime calculation:
1. Create at least one overtime schedule, if you have not already done so.
2. You may want to set up certain earnings to be included in an overtime calculation that is
based on the FLSA rate. For each such earning:
a. On the Earning/Deduction Codes window (from the navigation pane, select Setup >
Payroll > Earning/Deduction Codes), select the earning, which must be one of these
types:
A Salary & Wages type that uses an employee calculation method of either a flat,
fixed, or hourly rate
Reported tips
Allocated tips
b. Select the Include In FLSA Overtime Calculation check box.
c. Click Save.
d. Open the Employee Payroll window. On the Pay tab, for each employee:
3. In the Overtime Calculation field, select one of the Overtime Calculation options (the
default is Hourly Rate). If you want to calculate overtime based on the FLSA, be sure to
choose one of the FLSA methods. Overtime calculation methods are explained in the section
on setting up employees (Pay tab) in this manual.
4. In the Earnings/Deductions table, for each earning that has been set up as described in step 2,
you can change the Include in FLSA Overtime Calculation field.
Setting Up Payroll
Sage HRMS Payroll Getting Started 79
Note: If you want to update the Include in FLSA Overtime Calculation field for a set of
employees, you can use the Update Earnings/Deductions window (from the navigation
pane, select Payroll > Update Earnings/Deductions).
On the Employee Payroll window, verify the employee's regular hours (per period, day,
or week) are appropriate.
On the Class/Schd tab of the Employee Payroll window, ensure that you have assigned
an overtime schedule to the employee.
Assigning an Overtime Calculation Method
For each employee, you select a method for calculating overtime. Sage HRMS Payroll automatically
calculates overtime based on the overtime calculation method, overtime schedule and regular hours,
specified on the Employee Payroll window.
You can override the automatic overtime calculation for an employee when you enter a timecard.
To calculate overtime pay, enter a timecard:
If an employee worked overtime, enter the overtime information on a non-reusable timecard
to have Sage HRMS Payroll automatically calculate overtime pay.
You can override the overtime setup. More details are provided in the section that describes
how to use the detailed timecard in the Sage HRMS Payroll in-product Help menu.
You should verify that the number of days worked on the timecard reflects your intentions.
Step 11: Set Up Shift Differential Schedules (optional)
Creating Shift Differential Schedules
To increase an employee's regular pay rate when the employee works a particular shift, you can
assign a separate pay amount to each shift. Sage HRMS Payroll can accommodate up to four shifts.
You set the differentials up and calculate shift differential pay through the use of shift differential
schedules. As with overtime schedules, you can set up as many as you need for your company.
When creating a shift differential schedule, you enter a pay amount by which the regular hourly rate
will be increased for each shift in the company. For example, you can indicate that all employees on
shift 1 are paid an additional .50 per hour; all employees on shift 2 are paid an additional $1.00 per
hour, and so forth. After you set up the schedules you need, all you have to do is associate the
appropriate schedule with each employee, and the system automatically calculates the correct pay.
The system distributes shift differential pay to the Shift Differential Expense account associated with
the employee's hourly earnings.
Setting Up Payroll
Sage HRMS Payroll Getting Started 80
You can assign a shift differential schedule to each employee and a Shift Differential Expense account
to each employee earning on the Employees window.
You can also override the shift differential schedule to be used and the Shift Differential Expense
account to which shift differential amounts are posted on the employee's timecard. When you enter
shift pay onto the timecard, it is essential that you enter hours for the entries accurately; the system
uses the hours you enter, in conjunction with the shift differential schedule, to determine an hourly
rate for Fixed and Flat earnings and the hours to be paid at shift differential rates.
On the Shift Differential Codes window, you can set up schedules of pay differentials for up to four
different work shifts. You can then assign a shift schedule to each employee. During Payroll
Processing, the employee's pay for a particular shift is adjusted according to the schedule assigned.
To apply to an employee's wages a shift differential schedule other than the schedule assigned to the
employee, you can enter a timecard. Shift differentials can be applied to earnings that use the
calculation methods Hourly Rate, Flat, and Fixed.
You can add shift differential schedules at any time. You cannot modify or delete a shift differential
schedule after it has been assigned to an employee or entered on an employee's timecard.
To set up a shift differential schedule, select Setup > Payroll > Code Tables > Shift Differential.
Review your company's shift differential policies and rates and complete the Shift Differentials
window as follows:
Shift Differential Schedule. Enter an identifying code for the shift differential schedule you are
creating, in up to six characters.
Description. Enter a description for the schedule in up to 60 characters.
Last Maintained. The system displays the (DOS) date on which you last modified this shift
differential schedule.
Inactive As Of ____. Select the Inactive check box if you want to prevent this shift differential
schedule from being assigned to any new employees. If you choose to make a shift differential
schedule inactive, the system displays the DOS date in the As Of field to indicate the date on which
you changed the status.
Setting a shift differential schedule's status to Inactive has no effect on the Payroll calculation of
employees who have already been assigned this schedule.
Differential Rate. For each of up to four different shifts, enter the hourly amount the employee is to
be paid above the employee's regular hourly wage.
Review the fields on the Shift Differential Codes window to make sure your entries are correct. When
you finish, click the Add button.
To print a listing of the shift differential schedules you defined, to verify that they are correct and
complete select Reports > Payroll > Setup Reports > Shift Differential Schedules.
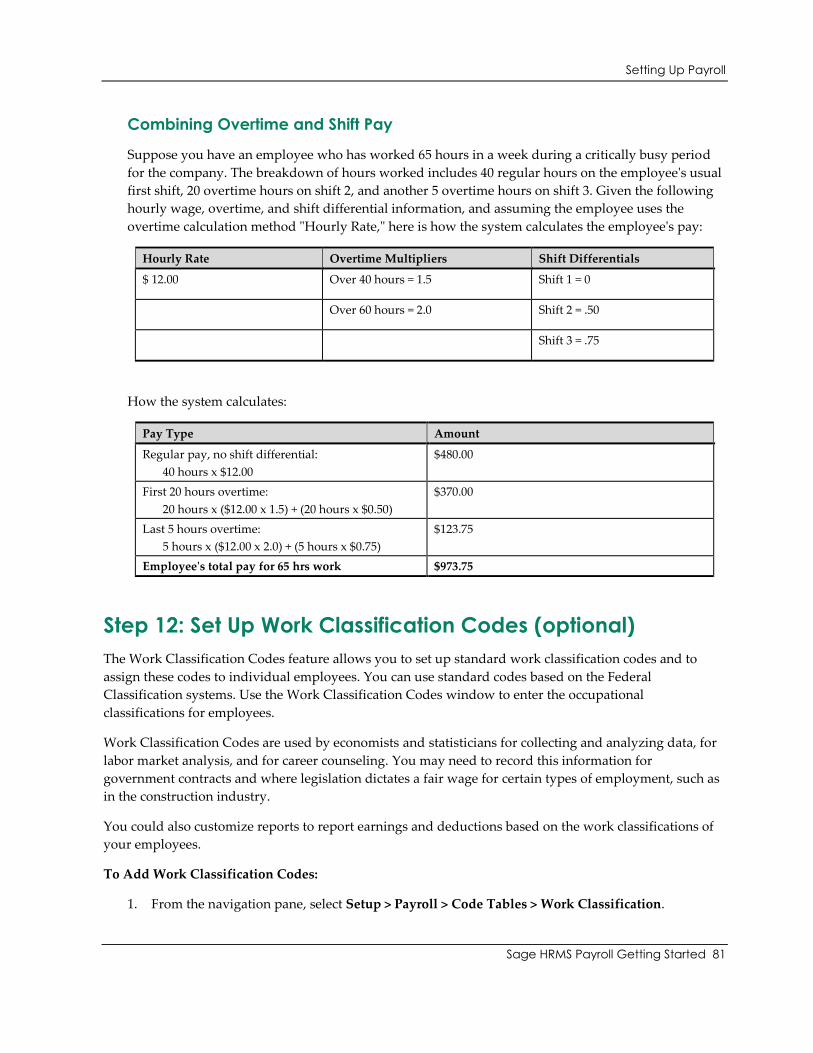
Setting Up Payroll
Sage HRMS Payroll Getting Started 81
Combining Overtime and Shift Pay
Suppose you have an employee who has worked 65 hours in a week during a critically busy period
for the company. The breakdown of hours worked includes 40 regular hours on the employee's usual
first shift, 20 overtime hours on shift 2, and another 5 overtime hours on shift 3. Given the following
hourly wage, overtime, and shift differential information, and assuming the employee uses the
overtime calculation method "Hourly Rate," here is how the system calculates the employee's pay:
Hourly Rate Overtime Multipliers Shift Differentials
$ 12.00 Over 40 hours = 1.5 Shift 1 = 0
Over 60 hours = 2.0 Shift 2 = .50
Shift 3 = .75
How the system calculates:
Pay Type Amount
Regular pay, no shift differential:
40 hours x $12.00
$480.00
First 20 hours overtime:
20 hours x ($12.00 x 1.5) + (20 hours x $0.50)
$370.00
Last 5 hours overtime:
5 hours x ($12.00 x 2.0) + (5 hours x $0.75)
$123.75
Employee's total pay for 65 hrs work $973.75
Step 12: Set Up Work Classification Codes (optional)
The Work Classification Codes feature allows you to set up standard work classification codes and to
assign these codes to individual employees. You can use standard codes based on the Federal
Classification systems. Use the Work Classification Codes window to enter the occupational
classifications for employees.
Work Classification Codes are used by economists and statisticians for collecting and analyzing data, for
labor market analysis, and for career counseling. You may need to record this information for
government contracts and where legislation dictates a fair wage for certain types of employment, such as
in the construction industry.
You could also customize reports to report earnings and deductions based on the work classifications of
your employees.
To Add Work Classification Codes:
1. From the navigation pane, select Setup > Payroll > Code Tables > Work Classification.
Setting Up Payroll
Sage HRMS Payroll Getting Started 82
2. Enter the Work Classification code (up to 6 characters) and the Description (up to 60 characters).
3. When you enter this information, the system automatically enters the current date in the Last
Maintained field.
4. Add any comments you want to include.
5. Click Add.
6. Repeat steps 2 to 4 for each work classification code you need to add.
7. When you set up employees you can select the appropriate work classification for each employee
from the list of work classifications you set up here.
8. Click Save.
9. You can delete any work classification code as long as it is not assigned to any employees.
Step 13: Set Up Taxes
Before adding your employees to Sage HRMS Payroll, set up the federal, state, local, income, and
other custom taxes you will assign to those employees.
Federal, state, local, and income taxes are calculated by the system by way of tax tables supplied by
Sage HRMS Payroll. For more information on taxes see the section about Tax Hierarchy.
You can see a list of these tax tables by clicking the Select Federal or State Tax button at the bottom
of the Federal/State Tax Codes window.
The current tax tables provide support for the following:
Canadian Federal, Provincial, and Territorial Taxes
US Federal Income Tax (USFIT)
US Federal Unemployment Tax (USFUTA)
Social Security Tax (USSS)
Medicare Tax (USMED)
Advance Earned Income Credit (USEIC)
In addition, the current tax tables support state income tax and state unemployment tax for all 50
states, Puerto Rico, and City Income Tax for the cities of New York and Yonkers, NY.
Local taxes (U.S. only) are supported using a repository table that allows you to update local taxes
quarterly. The table includes taxes for counties and cities.
Setting Up Payroll
Sage HRMS Payroll Getting Started 83
Custom (“Other”) taxes (U.S. only) are taxes you define yourself for local taxing entities which may
not be supported. When you set up custom taxes, you indicate to the system exactly how it is to
calculate the tax; the system receives no information about these taxes from the installed tax tables.
The "US" tax table contains Social Security and Medicare tax percentages and the Social Security wage
ceiling; the Unemployment tax wage ceiling; federal income tax withholding information; and data
used by the system to calculate Earned Income Credit (EIC). You can enter the unemployment tax
percentage on the first tab of the Federal/State Tax Codes window.
During setup you can create custom taxes using the Local/Other Tax Codes window. For example,
you may require a city tax that is not supported by the tax table included with Sage HRMS Payroll.
You can also use the Local/Other Tax Codes window to define taxes which have special
configurations; for example, a tax which is a combination of state and local taxes.
Activating and Configuring Federal and State Taxes (U.S.) and Federal and
Provincial Taxes (Canadian)
To configure the tax table supported taxes your company requires, in the Federal/State Tax Codes
window (U.S.) or the Income Taxes window (Canadian), click the Select Federal or State Tax (U.S.)
or Select Income Tax (Canadian) button. A list of all taxes supported by the tax tables appears. You
select each tax to activate it for your company.
When you select the tax, the system displays the tax code, type, level, descriptive information from
the tax tables, and, in the case of an unemployment tax, the annual maximum earnings. You can then
configure the tax by entering or editing the following:
Reporting ID
Level (if the default level doesn't suit your needs)
Percentage for FUTA and SUTA
G/L distribution accounts for the tax amounts
Calculation base information
To work with U.S. Federal/State Tax Codes, select Setup > Payroll > Earnings/Deductions/Taxes >
Federal/State Tax Codes. To work with Canadian Income Taxes, select Setup > Canadian Payroll >
Earnings/Deductions/Taxes > Income Taxes.

Setting Up Payroll
Sage HRMS Payroll Getting Started 84
U.S Federal/State Tax Codes Canadian Income Taxes
You can now configure the taxes that you will assign to your company's employees. Configure each
tax only once, during setup; you do not need to repeat the procedure after installing quarterly tax
updates.
After you configure all the taxes you need to process your company's payroll, return to this function
to make modifications and to delete taxes you no longer need.
Basic Information Tab
The Basic Information tab provides fields for specifying a tax's reporting ID, level, and other
information.
Review your Payroll Processing needs and complete the fields on the Basic Information tab as
required, as follows:
Tax. To activate and configure a federal or state tax, click the Select Tax button at the bottom of the
window. The system displays a list of all available tax update supported taxes. The Tax Finder
always lists all tax update supported taxes, even the ones you have already activated. (The Finder
button next to the Tax field at the top of the window, on the other hand, lists only those taxes that
have already been activated.)
New button. If you know the code for the tax update supported tax you want to activate, click the
New button at the Tax field and enter the tax code. Clicking the New button clears the tab in
preparation for the activation of a new tax.
Description. The system displays a description for the tax you selected. You can accept the
description supplied by the system or enter a new description. The Description field is not optional.
Type. The Type field is display-only.
Setting Up Payroll
Sage HRMS Payroll Getting Started 85
Short Description. The purpose of the tax's short description is to provide a meaningful but brief
identifier for the tax on checks and reports. The system supplies the name but you can edit it, using
up to 15 characters. The Short Description field is not optional.
Reporting ID. Use up to 15 characters to type your company's identification number for the taxing
authority.
Level. As it does with earnings and deductions, the system assigns a level to each tax you set up. A
tax’s level dictates whether or not a particular earning or deduction can be used in the tax’s
calculation base (whether it can be subject to the tax in the case of an earning, accrual, or benefit and
whether it can be deducted before the tax is calculated in the case of a deduction). Conversely, a tax’s
level dictates whether the tax can be used in the calculation base of a particular deduction (whether
the tax can be taken before the deduction).
In order for an earning to be subject to a specific tax, the earning's level must be lower than the level
of the tax. In order for a deduction to be taken from pay before a particular tax is applied to earnings,
the deduction's level must be lower than the tax's level.
A tax's level also dictates whether or not the tax can be based on another tax. For example, Arizona
state tax is based on (calculated as a percentage of) federal tax. Federal tax, therefore, constitutes the
base for Arizona tax. To accommodate this relationship, you must assign a higher level to Arizona
state income tax than you assign to federal income tax.
Because most employee wages are subject to federal and state taxes, the system assigns each federal
and state tax a level of 20 (earning/deduction levels default to 10). You can edit the level of any tax
table tax, entering a number between 1 and 999.
For a complete discussion of the relationships between tax calculation methods, calculation bases,
and levels, see the Sage HRMS Payroll in-product Help.
Percentage. For an employment tax or unemployment tax, enter the percentage to be used in
calculating the tax.
Annual Maximum Earnings. For a federal or state unemployment tax, the system displays the wage
ceiling from the currently activated tax update.
Last Maintained. The system displays the date on which you last modified this tax.
Inactive As Of ___. Select the Inactive check box if you want to prevent this tax from being assigned
to any new employees. If you choose to make a tax inactive, the system displays the current DOS date
in the As Of field to indicate the date on which you changed the tax's status.
Setting a tax's status to Inactive has no effect on the Payroll calculation of employees who have
already been assigned the tax.
Setting Up Payroll
Sage HRMS Payroll Getting Started 86
Calculation Base Tab
The Calculation Base tab allows you to specify the base earnings and base deductions used in the
calculation of the federal or state tax.
Review your tax setup and complete the fields on the Calculation Base tab as follows:
Base Earnings Include. Click the Finder to select the accruals, benefits, and earnings (with the
exception of allocated tips earnings) that will be subject to the tax. For each item included, you must
indicate one of the following withholding types:
Regular Rate
Taxable, No Withholding
Supplemental Withholding
Base Deductions Include. Click the Finder to select the deductions that are to be taken from an
employee's pay before the tax is deducted.
G/L Distribution Tab
The G/L Distribution tab enables you to assign default expense and liability accounts to any number
of distribution codes. When you assign a tax to an employee, you also assign a G/L distribution code
to the employee, which sets up the G/L accounts to which the tax amounts will be posted.
The column headings for the G/L Distribution field that appears depend upon the type of tax you are
adding.
If the tax you are adding involves employee liability only, you set up only an Employee Liability
account for the distribution code. If the tax you are adding involves employer liability only, you set
up Employer Expense and Liability accounts for the distribution code. And, finally, if the tax you are
adding involves employee and employer liability, you set up accounts for Employee Liability,
Employer Expense, and Employer Liability.
Review your G/L posting needs and complete the fields on the G/L Distribution tab as follows:
Distribution Code. Type a distribution code of up to six characters to define the G/L expense and
liability accounts you are setting up for the tax.
Description. Type a name or description for the distribution code, in up to 15 characters. Be sure to
make the description distinctive enough that when you assign the tax to an employee, you can select
the correct account set from a Finder list that displays codes and descriptions only.
Employee Liability Account. Enter the Employee Liability account to which you will credit the
withholding for any employee assigned this distribution code.
Employer Expense Account. Enter the Employer Expense account to which you will debit the
employer's portion of this tax for any employee assigned this distribution code.
Setting Up Payroll
Sage HRMS Payroll Getting Started 87
Employer Liability Account. Enter the Employer Liability account to which you will credit the
employer's liability for this tax for any employee assigned this distribution code.
Optional Fields Tab
If you want to assign optional fields to this tax, click the Optional Fields tab. Optional fields that you
set up for automatic insertion in tax records automatically appear on this tab, along with their default
values.
You can accept or change any default values that appear. You can accept the optional fields that
appear, or you can delete or add them.
To delete an optional field, select the line on the table, and then press Delete on the
keyboard.
To assign additional optional fields, select the table, and then press Insert on the keyboard.
Complete the fields on the new line as follows:
Optional Field and Description. Use the Finder to select the optional field codes you want to use
with this tax.
When you select an optional field code, the program displays the description for the optional field.
Value Set. This field alerts you whether a seemingly blank optional field has an automatically
inserted - but "blank" - default value. If it has a blank value, the Value Set field displays Yes. (You
cannot tell whether an optional field has a blank default value, or no value, just by looking at the
Value field.)
The Value Set field will change from No to Yes if you make an entry in the Value field.
Value and Value Description. Enter or select the value for this tax.
If the optional field you selected requires validation, you must select a value that is defined for the
optional field. However, if the optional field allows blanks, you can leave the default value field
blank.
If you select a value, the description of the value will appear in the Value Description column.
After Completing the Tabs
Review the tabs on the Taxes window to make sure your choices and entries are correct.
When you finish, click the Add button.
To print a listing of taxes you set up, to verify that they are correct and complete select
Reports > Payroll > Setup Reports > Tax Profiles.
Setting Up Payroll
Sage HRMS Payroll Getting Started 88
Assigning Taxes to Employees
On the Taxes tab of the Employee Payroll window, you assign to each employee the taxes used in
Sage HRMS Payroll calculation. In addition to entering each tax code, you also enter a withholding
method; an override amount or percent, if appropriate; any extra withholding for the tax; and the
distribution code for the G/L accounts to which tax amounts should post.
Step 14: Set Up Local and Other Taxes (U.S. only)
After you set up the federal, state, you need to set up local and other custom taxes you will assign to
those employees.
Local taxes are provided in a tax repository table that allows you to update local taxes quarterly. The
table includes taxes for counties and cities. Custom taxes are taxes you define yourself for local taxing
entities which may not be supported.
Use the Local/Other Tax Codes window to add the taxes you define yourself for local taxing entities
such as counties and cities. When you set up a custom tax, you indicate to the system exactly how to
calculate the tax; the system receives no information about the tax from the installed tax tables. You
will return to this window to update, add, and remove taxes as necessary.
To set up new local tax codes:
1. From the navigation pane, select Setup > Payroll > Earnings/Deductions/Taxes >
Local/Other Tax Codes.
2. Click Select Local Taxes.
3. The Finder – Local Tax Repository Table dialog box appears.
4. Select the local tax to add.
5. The system returns you to the Local/Other Tax Codes window and the information for that
tax is entered in the fields. Click Save to save the data.
Note: You must repeat this process for each new tax setup you want to add.
6. After you have added all the local taxes, click Close.
You can now update this tax for your employees using the Taxes tab on the Employee Payroll
window (from the navigation pane, select Employees > View/Edit Employee. Select the Payroll
tab and then Employee Payroll).
Notes:
The Local/Other Tax Codes window allows you to set up the taxes your
company needs that are not supported by the installed tax tables.
Setting Up Payroll
Sage HRMS Payroll Getting Started 89
The custom taxes you create can use the following employee or employer
calculation methods:
- Flat
- Amount Per Hour
- Percentage Of Base
- Tax Bracket Table
- Percentage Of Another Tax
- Percentage Of Employee Withholding (employer side only)
Among other information you enter to configure a custom tax, you define
the G/L accounts to which custom tax amounts will post and, depending
upon the calculation method used for the tax, specify the hours, earnings,
and deductions that will compose the calculation base for the tax.
Basic Information Tab
The Basic Information tab of the Local/Other Tax Codes window provides fields for specifying a
tax's type, reporting ID, base wage and surtax multipliers, employee and employer calculation
methods, and other information.
Review your Payroll Processing needs and complete the fields on the Basic Information tab as
required, as follows:
Tax. Type an identifying code for the tax, using up to six characters.
Description. Type a description, using up to 60 characters, to identify the tax in a meaningful way.
The Description field is not optional.
Short Description. Type another description, of up to 15 characters, to identify the tax in a
meaningful but brief way appropriate for printing on reports and on the W-2 form. Because of space
considerations, the system truncates the short description when printing it on the W-2 form. The
Short Description field is not optional.
You cannot add a custom tax without entering a short description for it.
Type. From the selection list, choose the type of tax. The selections are:
Income Tax
Unemployment Tax
Insurance Tax
Pension Plan Tax
Health Tax
Other Tax
You select a type to allow the system to identify taxes for certain kinds of processing.
The category Insurance Tax includes disability insurance taxes.
Setting Up Payroll
Sage HRMS Payroll Getting Started 90
Reporting ID. Use up to 12 characters to type your company's identification number for the taxing
authority.
Level. As with earnings and deductions and tax update supported federal and state taxes, the system
assigns a level to each custom tax you set up. A tax's level dictates whether or not a particular
earning/deduction can be used in its calculation base and whether it can be used in the calculation
base of a particular earning/deduction. (A tax's calculation base, depending upon the calculation
method chosen, is made up of the accruals, benefits, and earnings that are subject to the tax and the
deductions that are to be deducted before the tax is applied to wages.)
Taxes with the calculation methods Percentage Of Another Tax and Percentage Of Employee
Contribution do not directly use other earnings and deductions in their calculation bases. (A tax
calculated as a percentage of another tax, however, must have a level higher than that of the "other"
tax.)
Taxes using the calculation methods Flat, Amount Per Hour, Percentage Of Base, and Tax Bracket
Table are based on hours worked or wages earned and amounts deducted from pay. So, these taxes
do use other earnings and deductions in their calculation bases. (In the case of Flat taxes, the
calculation base is maintained as a way of tracking taxable wages and not for the purpose of
calculating the amount of the tax.)
The system assigns all taxes a level of 20. You can edit the level of any tax, entering any number
between 1 and 999.
For a complete discussion of the relationships between tax calculation methods, calculation bases,
and levels, see the Sage HRMS Payroll in-product Help.
Base Wage Multiplier. Enter the rate by which the withholding wage base (the employee's total
earnings, for example) is multiplied before the withholding tax is calculated.
Surtax Multiplier. Type the rate by which the withholding tax is multiplied to increase or reduce the
amount of tax owed (to include a surtax in your withholdings, for example).
Employee Calculation Method. Select from the list the method to be used in calculating the amount
deducted from the employee's pay for this tax.
Be sure you specify the correct employee calculation method. After you add the tax, you cannot
change the employee calculation method unless you delete the tax and add it again.
% Of. If you selected Percentage Of Another Tax at the Employee Calculation Method field, type
the code for the other tax or click the Finder to choose from a list of all federal, state, and custom
taxes. The tax you select must have a level lower than that of the tax you are setting up.
Employer Calculation Method. Select from the list the method to be used in calculating the amount
paid by the employer for this tax.
Be sure you specify the correct employer calculation method. After you add the tax, you cannot
change the employer calculation method unless you delete the tax and add it again.
Setting Up Payroll
Sage HRMS Payroll Getting Started 91
If you select Flat, Amount Per Hour Worked, Percentage Of Base, or Tax Bracket Table as the
employee or employer calculation method for the tax, an additional tab, Calculation Base, becomes
available for you to enter the hours, earnings, and/or deductions that make up the calculation base for
the tax.
On the Calculation Base tab, you also enter (for taxes with particular calculation methods) standard
deductions, exemption amounts, annual minimum and maximum earnings, and other information
about the tax. For instructions on completing the Calculation Base tab.
If you create a custom tax with both an employee and an employer side, you cannot choose Tax
Bracket Table as the calculation method for both sides. Tax bracket table can be chosen as the
calculation method for only one side of a two sided tax.
If you select Tax Bracket Table as the employee or employer calculation method for a tax, an
additional tab, Brackets, becomes available for you to set up an annualized wage bracket table.
Taxes that use the Flat calculation method are always deducted during Payroll calculation even if the
employee has no wages for the period. If the employee has no wages or has earned wages that are
insufficient to cover the tax, calculation of the tax results in negative net pay.
Last Maintained. The system displays the (DOS) date on which you last modified this tax.
Inactive As Of ___ . Select the Inactive check box if you want to prevent this tax from being assigned
to any new employees. If you choose to make a tax inactive, the system displays the DOS date in the
As Of field to indicate the date on which you changed the tax's status.
Setting a tax's status to Inactive has no effect on the payroll calculation of employees who have
already been assigned this tax.
Round Tax To Whole Dollars. Select this check box to instruct the system to round the withholding
tax for this taxing authority to whole dollars. If you choose this option, the system rounds decimals of
.5 and higher to the next greater whole number and decimals smaller than .5 to the next smaller
whole number.
Daily Periods Per Year. To enable the system to annualize the tax, type the number of daily pay
periods defined for the tax year. The system defaults the number of daily pay periods you entered on
the Frequency tab of the Options window.
Employee Tab
The Employee tab of the Local/Other Tax Codes window prompts you for information needed by the
system to calculate the amount deducted from the employee's pay for this tax. The entries you make
depend largely upon the employee calculation method you chose for this tax.
Complete the fields on the Employee tab as follows.
Amount or Percent. This field's label varies with the employee calculation method used by the tax. If
the tax's employee calculation method is Flat or Amount Per Hour, enter the amount to be deducted
Setting Up Payroll
Sage HRMS Payroll Getting Started 92
for this tax. If the tax's employee calculation method is one of the two Percentage methods, enter the
percentage to be used in the calculation of the tax.
This field is not applicable if the tax's employee calculation method is Tax Bracket Table.
Minimum And Maximum Based On. Choose from the selection list the unit on which the period
minimums and maximums for the tax are based. Your selections in this field depend upon your entry
in the Employee Calculation Method field.
If the calculation method is: Select:
Amount Per Hour No Limit, Withholding, or Hours
Percentage Of Base No Limit, Withholding, or Base
Note: If you select No Limit, there will be no period minimums or maximums for the employee
portion of the tax.
Annual Maximum Withholding. For taxes with the calculation methods Flat, Amount Per Hour, and
Percentage Of Base, enters the annual amount at which calculations for this tax will stop.
Supplemental Rate. If you are defining a Percentage Of Base or Tax Bracket Table tax that uses a
supplemental rate, type the rate here.
Calculate Minimum/Maximum Based on Tax Weeks Worked. Select this check box if you are
defining an Amount Per Hour or Percentage Of Base tax, such as New York or Hawaii State disability
insurance tax that is calculated by the week rather than on an annualized basis. Selecting this check
box instructs the system to use the Tax Weeks Worked specified on timecards rather than the weeks
derived from the employee's pay frequency to prorate the tax calculation.
W-2 Reporting. From the selection list, choose the entry that applies to the tax:
Not Applicable. The tax does not print on the Form W-2.
Other Information Box. The tax prints in the Other Information box on the Form W-2.
Combine With Another Tax. The tax amount is added to another tax amount, which you
specify in the next field, and the sum prints wherever the "other" tax is set to print on the
Form W-2.
Local Tax Box. The tax prints in the Local tax box on the Form W-2.
Combine With Tax. If you responded Combine With Another Tax at the preceding field, type the
code of the tax with which you want to combine the tax you are setting up, or click the Finder to
select from a list of all configured taxes (federal, state, local, and custom).
Setting Up Payroll
Sage HRMS Payroll Getting Started 93
The tax you select (the "combine with" tax) does not have to be assigned to each employee who is
subject to the custom tax you are setting up. For employees to whom it is not assigned, the system
prints the amount of the custom tax in the location specified for the "combine with" tax.
Associate W 2 Printing. If you chose Other Information Box or Local Tax Box at the preceding W-2
Reporting field, the Associate W-2 Printing option becomes available to you. Select this option if the
tax you are setting up needs to be associated with another tax on the same Form W-2. Then, if an
employee works in more than two states or localities and requires more than one Form W-2, you can
be sure that the tax you are setting up appears on the same Form W-2 as the taxing entity with which
it is associated.
Associated Tax. Type, or select from the Finder, the state or local tax with which you want to
associate the tax you are adding. If you select Other Information Box at the W-2 Reporting field, you
can associate the tax you are adding with a tax update supported state or local tax. If you selected
Local Tax Box at the W-2 Reporting field, you can associate the tax you are setting up with a tax
update supported state tax only.
During setup, the system does not restrict the number of tax associations you create for a given tax.
When you print Forms W-2, however, the system processes only as many associations per tax as will
fit on one Form W-2. For example, during setup, you might associate five "Other Information Box"
taxes with one particular state income tax. For any employee, the system will associate and print with
the state income tax only the first three "Other Information Box" taxes.
Weekly Minimum Withholding/Base/Hours. If you selected the Calculate Minimum/Maximum
Based On Tax Weeks Worked box earlier on this tab (for an Amount Per Hour or Percentage Of Base
tax), type the minimum weekly withholding amount, base wage amount, or number of hours
(depending upon your selection at the Minimum And Maximum Based On field) for this tax.
Weekly Maximum Withholding/Base/Hours. If you selected the Calculate Minimum/Maximum
Based On Tax Weeks Worked box earlier on this tab (for an Amount Per Hour or Percentage Of Base
tax), type the maximum weekly withholding amount, base wage amount, or number of hours
(depending upon your selection at the Minimum And Maximum Based On field) for this tax.
Min/Max Withholding/Base/Hours By Frequency. If you are not calculating minimums and
maximums based on tax weeks worked, type the smallest and the largest withholding amounts, base
amounts, or numbers of hours, based on your response at the Minimum And Maximum Based On
field, that may be used in calculating the amount for the tax for each pay frequency your company
uses.
The Minimum and Maximum By Frequency fields do not appear if the Minimum and Maximum
Based On field for the tax is set to No Limit.
The system validates period minimums and maximums. The system validates the period minimum
and period maximum amounts you enter as follows:
If you select Withholding at the Minimum And Maximum Based On field, the system
validates period minimums and maximums against the Annual Maximum Withholding you
enter on the Employee tab or Employer tab for the tax.
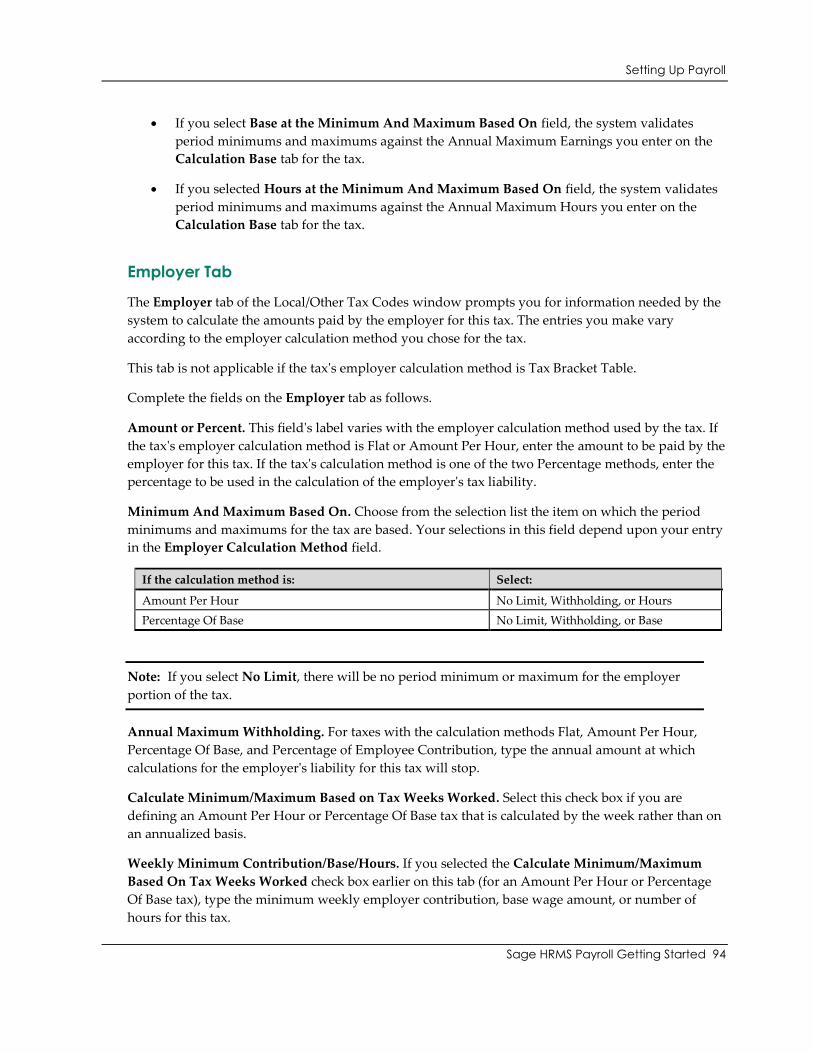
Setting Up Payroll
Sage HRMS Payroll Getting Started 94
If you select Base at the Minimum And Maximum Based On field, the system validates
period minimums and maximums against the Annual Maximum Earnings you enter on the
Calculation Base tab for the tax.
If you selected Hours at the Minimum And Maximum Based On field, the system validates
period minimums and maximums against the Annual Maximum Hours you enter on the
Calculation Base tab for the tax.
Employer Tab
The Employer tab of the Local/Other Tax Codes window prompts you for information needed by the
system to calculate the amounts paid by the employer for this tax. The entries you make vary
according to the employer calculation method you chose for the tax.
This tab is not applicable if the tax's employer calculation method is Tax Bracket Table.
Complete the fields on the Employer tab as follows.
Amount or Percent. This field's label varies with the employer calculation method used by the tax. If
the tax's employer calculation method is Flat or Amount Per Hour, enter the amount to be paid by the
employer for this tax. If the tax's calculation method is one of the two Percentage methods, enter the
percentage to be used in the calculation of the employer's tax liability.
Minimum And Maximum Based On. Choose from the selection list the item on which the period
minimums and maximums for the tax are based. Your selections in this field depend upon your entry
in the Employer Calculation Method field.
If the calculation method is: Select:
Amount Per Hour No Limit, Withholding, or Hours
Percentage Of Base No Limit, Withholding, or Base
Note: If you select No Limit, there will be no period minimum or maximum for the employer
portion of the tax.
Annual Maximum Withholding. For taxes with the calculation methods Flat, Amount Per Hour,
Percentage Of Base, and Percentage of Employee Contribution, type the annual amount at which
calculations for the employer's liability for this tax will stop.
Calculate Minimum/Maximum Based on Tax Weeks Worked. Select this check box if you are
defining an Amount Per Hour or Percentage Of Base tax that is calculated by the week rather than on
an annualized basis.
Weekly Minimum Contribution/Base/Hours. If you selected the Calculate Minimum/Maximum
Based On Tax Weeks Worked check box earlier on this tab (for an Amount Per Hour or Percentage
Of Base tax), type the minimum weekly employer contribution, base wage amount, or number of
hours for this tax.
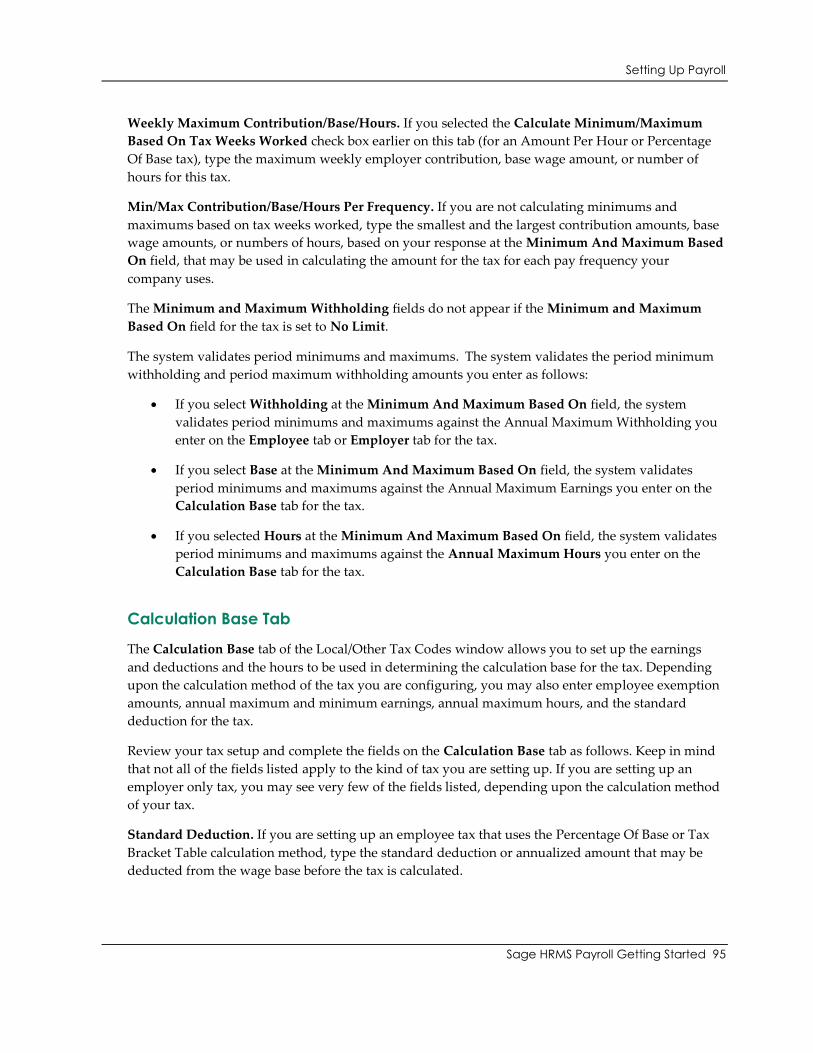
Setting Up Payroll
Sage HRMS Payroll Getting Started 95
Weekly Maximum Contribution/Base/Hours. If you selected the Calculate Minimum/Maximum
Based On Tax Weeks Worked check box earlier on this tab (for an Amount Per Hour or Percentage
Of Base tax), type the maximum weekly employer contribution, base wage amount, or number of
hours for this tax.
Min/Max Contribution/Base/Hours Per Frequency. If you are not calculating minimums and
maximums based on tax weeks worked, type the smallest and the largest contribution amounts, base
wage amounts, or numbers of hours, based on your response at the Minimum And Maximum Based
On field, that may be used in calculating the amount for the tax for each pay frequency your
company uses.
The Minimum and Maximum Withholding fields do not appear if the Minimum and Maximum
Based On field for the tax is set to No Limit.
The system validates period minimums and maximums. The system validates the period minimum
withholding and period maximum withholding amounts you enter as follows:
If you select Withholding at the Minimum And Maximum Based On field, the system
validates period minimums and maximums against the Annual Maximum Withholding you
enter on the Employee tab or Employer tab for the tax.
If you select Base at the Minimum And Maximum Based On field, the system validates
period minimums and maximums against the Annual Maximum Earnings you enter on the
Calculation Base tab for the tax.
If you selected Hours at the Minimum And Maximum Based On field, the system validates
period minimums and maximums against the Annual Maximum Hours you enter on the
Calculation Base tab for the tax.
Calculation Base Tab
The Calculation Base tab of the Local/Other Tax Codes window allows you to set up the earnings
and deductions and the hours to be used in determining the calculation base for the tax. Depending
upon the calculation method of the tax you are configuring, you may also enter employee exemption
amounts, annual maximum and minimum earnings, annual maximum hours, and the standard
deduction for the tax.
Review your tax setup and complete the fields on the Calculation Base tab as follows. Keep in mind
that not all of the fields listed apply to the kind of tax you are setting up. If you are setting up an
employer only tax, you may see very few of the fields listed, depending upon the calculation method
of your tax.
Standard Deduction. If you are setting up an employee tax that uses the Percentage Of Base or Tax
Bracket Table calculation method, type the standard deduction or annualized amount that may be
deducted from the wage base before the tax is calculated.

Setting Up Payroll
Sage HRMS Payroll Getting Started 96
Exemption Amount. For employee taxes that use the Percentage Of Base or Tax Bracket Table
calculation method, type the annual amount that may be deducted, either from the calculated tax or
from taxable earnings, per exemption.
Exemption Is Tax Credit. If you select this check box, the exemption amount you entered in the
previous field reduces the calculated tax. If you do not select this box, the exemption amount reduces
taxable earnings for the tax.
Annual Maximum Hours. If you are setting up a tax that uses the Amount Per Hour calculation
method, type the maximum number of earnings hours to withhold on in a year.
Annual Maximum Earnings. If you are setting up a tax that uses the Percentage Of Base calculation
method, type the maximum amount of taxable earnings to withhold on in a year.
Annual Minimum Earnings. If you are setting up a tax that uses the Percentage Of Base calculation
method, type the minimum amount the annualized withholding base (taxable earnings) must be to be
subject to withholding tax.
Base Hours Include. For taxes using the Amount Per Hour calculation method, select the hours
associated with accrual payments or the earnings hours to be included in the calculation base of the
tax. If you click the Finder, the system displays a list of all lower level accruals and all lower level
earnings of the type Salary And Wages that use the calculation method Flat, Fixed, Hourly Rate, Piece
Rate, or Sales Commission Table.
Base Earnings Include. For taxes using the Flat, Amount Per Hour, Percentage Of Base, or Tax
Bracket Table calculation method, select the accruals, benefits, and earnings to be included in the
calculation base of this tax. If you click the Finder, the system displays a list of all lower level
accruals, benefits, and earnings, with the exception of allocated tips. You must indicate one of the
following withholding types for each:
Regular Rate
Taxable, No Withholding
Supplemental Withholding
If you are setting up a tax that uses the Flat or Amount Per Hour calculation method only, your
selection of base earnings defines, for reporting purposes, the gross Payroll wages associated with the
tax.
Base Deductions Include. For taxes using the Percentage Of Base or Tax Bracket Table calculation
method, select the deductions to be included in the calculation base of this tax. Each deduction you
enter into the box is deducted from pay before the tax you are adding is calculated.
G/L Distribution Tab
The G/L Distribution tab of the Local/Other Tax Codes window allows you to assign default expense
and liability accounts to any number of distribution codes. When you assign a tax to an employee,

Setting Up Payroll
Sage HRMS Payroll Getting Started 97
you also assign a G/L distribution code to the employee, which sets up the G/L accounts to which the
tax amounts will be posted or, if you use cost center overrides, defines the base accounts to which tax
amounts are allocated.
The column headings for the G/L Distribution box that appears depend upon the type of tax you are
adding.
If the tax you are adding involves employee liability only, you set up only an Employee Liability
account for the distribution code. If the tax you are adding involves employer liability only, you set
up Employer Expense and Liability accounts for the distribution code. And, finally, if the tax you are
adding involves employee and employer liability, you set up accounts for Employee Liability,
Employer Expense, and Employer Liability.
If you use cost center overrides, to the extent that the cost center segments appear in the tax accounts,
the tax amounts posted are distributed to the cost centers in which the taxable wages were earned.
Review your G/L posting needs and complete the fields on the G/L Distribution tab as follows:
Distribution Code. Type a distribution code of up to six characters to define the G/L expense and
liability accounts you are setting up for the tax.
Description. Type a name or description for the distribution code, using up to 15 characters. Be sure
to make the description distinctive enough that when you assign the tax to an employee, you can
select from a Finder list of distribution codes (that displays codes and descriptions only) the correct
account set for posting.
Employee Liability Account. Enter the Employee Liability account to which you will post the
withholding tax for any employee assigned this distribution code.
Employer Expense Account. Enter the Employer Expense account to which you will post the
employer's portion of this tax for any employee assigned this distribution code.
Employer Liability Account. Enter the Employer Liability account to which you will post the
employer's liability for this tax for any employee assigned this distribution code.
Brackets Tab
The Brackets tab of the Local/Other Tax Codes window allows you to set up an annualized wage
brackets table that the system refers to when calculating amounts for taxes with the calculation
method Tax Bracket Table.
All amounts you set up on the wage brackets table must be annualized. Be sure to convert ranges of
pay for your employees to an annual basis. For example, enter a pay range of $1000 to $1500 per
month as $12,000 to $18,000 in the wage bracket table. The system converts wage table based tax
amounts back to amounts appropriate for the pay frequency when the tax is calculated.
Review your wage brackets and percentages and complete the columns of the wage brackets table as
follows:

Setting Up Payroll
Sage HRMS Payroll Getting Started 98
From. This column displays the lower limit (dollar amount of wages) of each range for which you
have set a specific tax deduction amount and percentage of excess. The system displays zeros as the
first lower limit, and the upper limit of the previous range (plus a penny) for each subsequent lower
limit.
To. Type the upper limit (dollar amount of wages) of each range for which you have set a specific tax
deduction amount and percentage of excess. As you enter an amount on one line of the To column,
the system defaults 999,999,999,999.99 on the next line of the To column. $999,999,999,999.99
represents the uppermost limit of the wage bracket table.
Amount. In this field, type the dollar amount of tax to be deducted from wages.
Plus Percent. Type the percentage to be applied to the amount of employee wages that exceed the
upper limit of the previous range in the bracket table. The product of this calculation is also deducted
from wages.
Of Excess Over. This column displays, for each range of wages, the upper limit of the preceding
range. For example, on a line that covers wages falling between $15,000.01 and $20,000, the Of Excess
Over field would display $15,000.00.
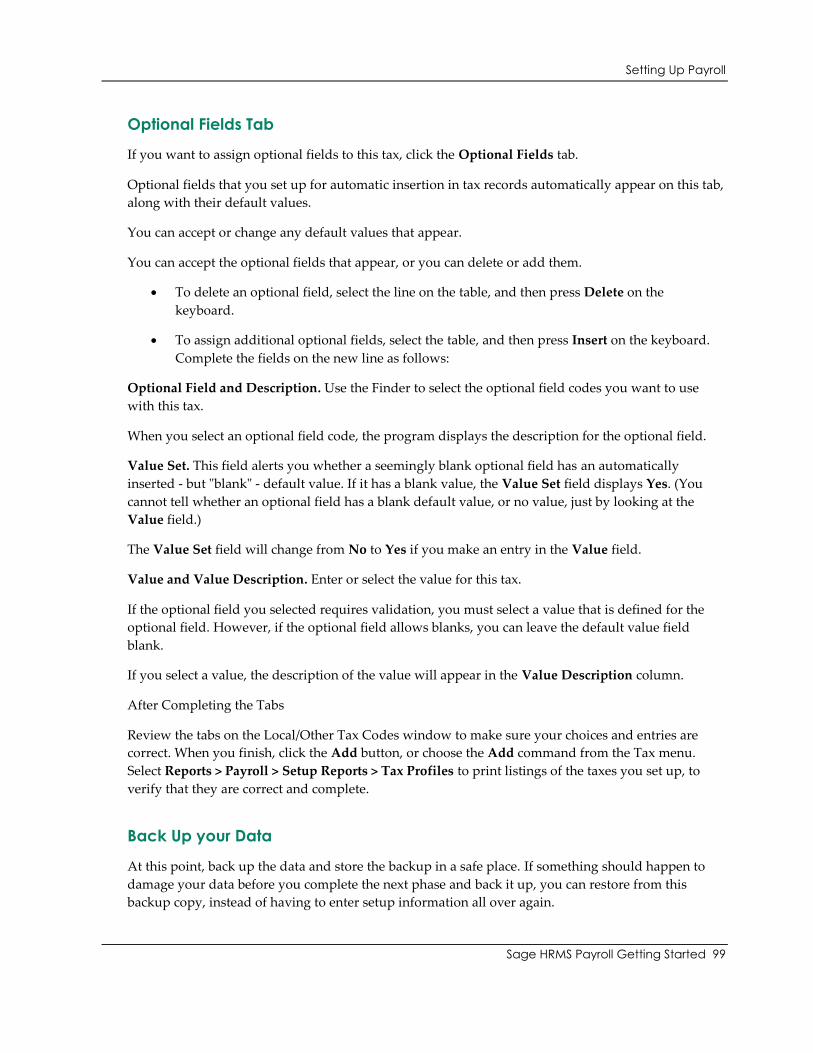
Setting Up Payroll
Sage HRMS Payroll Getting Started 99
Optional Fields Tab
If you want to assign optional fields to this tax, click the Optional Fields tab.
Optional fields that you set up for automatic insertion in tax records automatically appear on this tab,
along with their default values.
You can accept or change any default values that appear.
You can accept the optional fields that appear, or you can delete or add them.
To delete an optional field, select the line on the table, and then press Delete on the
keyboard.
To assign additional optional fields, select the table, and then press Insert on the keyboard.
Complete the fields on the new line as follows:
Optional Field and Description. Use the Finder to select the optional field codes you want to use
with this tax.
When you select an optional field code, the program displays the description for the optional field.
Value Set. This field alerts you whether a seemingly blank optional field has an automatically
inserted - but "blank" - default value. If it has a blank value, the Value Set field displays Yes. (You
cannot tell whether an optional field has a blank default value, or no value, just by looking at the
Value field.)
The Value Set field will change from No to Yes if you make an entry in the Value field.
Value and Value Description. Enter or select the value for this tax.
If the optional field you selected requires validation, you must select a value that is defined for the
optional field. However, if the optional field allows blanks, you can leave the default value field
blank.
If you select a value, the description of the value will appear in the Value Description column.
After Completing the Tabs
Review the tabs on the Local/Other Tax Codes window to make sure your choices and entries are
correct. When you finish, click the Add button, or choose the Add command from the Tax menu.
Select Reports > Payroll > Setup Reports > Tax Profiles to print listings of the taxes you set up, to
verify that they are correct and complete.
Back Up your Data
At this point, back up the data and store the backup in a safe place. If something should happen to
damage your data before you complete the next phase and back it up, you can restore from this
backup copy, instead of having to enter setup information all over again.
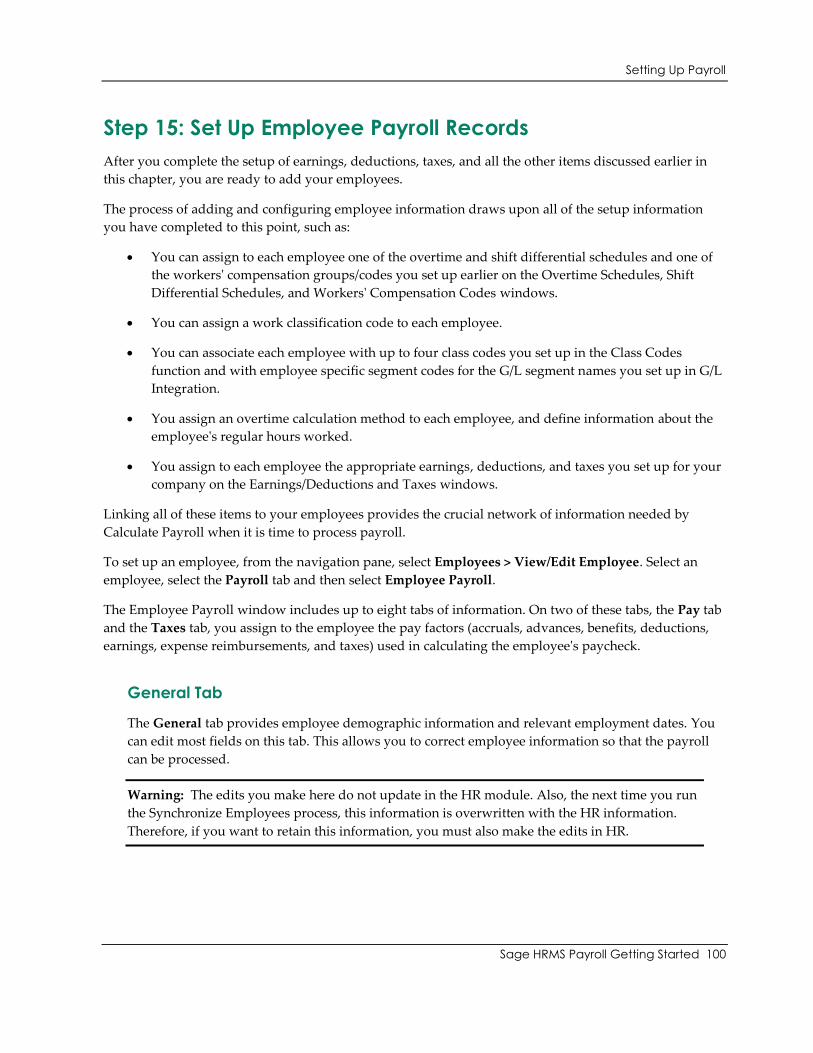
Setting Up Payroll
Sage HRMS Payroll Getting Started 100
Step 15: Set Up Employee Payroll Records
After you complete the setup of earnings, deductions, taxes, and all the other items discussed earlier in
this chapter, you are ready to add your employees.
The process of adding and configuring employee information draws upon all of the setup information
you have completed to this point, such as:
You can assign to each employee one of the overtime and shift differential schedules and one of
the workers' compensation groups/codes you set up earlier on the Overtime Schedules, Shift
Differential Schedules, and Workers' Compensation Codes windows.
You can assign a work classification code to each employee.
You can associate each employee with up to four class codes you set up in the Class Codes
function and with employee specific segment codes for the G/L segment names you set up in G/L
Integration.
You assign an overtime calculation method to each employee, and define information about the
employee's regular hours worked.
You assign to each employee the appropriate earnings, deductions, and taxes you set up for your
company on the Earnings/Deductions and Taxes windows.
Linking all of these items to your employees provides the crucial network of information needed by
Calculate Payroll when it is time to process payroll.
To set up an employee, from the navigation pane, select Employees > View/Edit Employee. Select an
employee, select the Payroll tab and then select Employee Payroll.
The Employee Payroll window includes up to eight tabs of information. On two of these tabs, the Pay tab
and the Taxes tab, you assign to the employee the pay factors (accruals, advances, benefits, deductions,
earnings, expense reimbursements, and taxes) used in calculating the employee's paycheck.
General Tab
The General tab provides employee demographic information and relevant employment dates. You
can edit most fields on this tab. This allows you to correct employee information so that the payroll
can be processed.
Warning: The edits you make here do not update in the HR module. Also, the next time you run
the Synchronize Employees process, this information is overwritten with the HR information.
Therefore, if you want to retain this information, you must also make the edits in HR.
Setting Up Payroll
Sage HRMS Payroll Getting Started 101
Class/Schd Tab
The Class/Schd tab provides fields for specifying the employee's status, position, overtime and shift
differential schedules, workers' compensation group and code, Payroll class codes, and other
information.
Complete the fields on the Class/Schd tab, as follows:
Status. Choose the employee's status from the selection list. The choices are:
Active. The employee is working for the company now. This is the default entry for this field.
Inactive. The employee is not presently working for the company but is expected to return.
The system does not calculate pay for an inactive employee nor does an inactive employee
accrue vacation or sick time. Choose the Inactive status for employees you use solely as
templates.
Terminated. The employee has left the company. If the termination date is earlier than the
pay period end date, the system does not calculate pay for the employee. The system does
include the employee in W-2s.
Position. Type the employee's position within the company, using up to 25 characters.
Supervisor. Type the name of the employee's supervisor, using up to 25 characters.
Times Late. Type the number of times this year the employee has been late. This field is
informational and is updated by entries you make in Timecards.
Paycheck Language. By default, Sage HRMS Payroll sets this field to English.
Overtime Schedule. Type the code for the overtime schedule you will use for this employee. Clicking
the Finder provides a list of all the overtime schedules set up for the company. During timecard
entry, you can associate other overtime schedules with the employee's work hours.
WCC Group. Type the employee's workers' compensation group. Clicking the Finder button
provides a list of all the workers' compensation groups set up for the company.
Workers' Compensation Code. This field appears only if you entered a WCC Group. Type the
employee's workers' compensation code. Clicking the Finder button provides a list of all the workers'
compensation codes set up for the WCC Group that you entered.
A workers' compensation code assigns a workers' compensation insurance rate to an employee's
accruals, earnings, and benefits. If you do not enter the code, the Sage HRMS Payroll program will
skip the employee's workers' compensation information when producing the Workers' Compensation
report.
Workers' compensation group and code you enter becomes the default group and code used for all
accruals, earnings, and benefits subject to workers' compensation that you assign to the employee.
You can override this code for each accrual, earning, or benefit when you assign it to the employee or
during timecard entry.
Setting Up Payroll
Sage HRMS Payroll Getting Started 102
Work Classification. Use the finder to select a work classification code for this employee. (You set up
the work classification codes you want to use in the Work Classification Codes window.)
Shift Differential Schedule. Type the code for the shift differential schedule you will use for this
employee. Clicking the Finder provides a list of all the shift differential schedules set up for the
company. During timecard entry, you can associate other shift differential schedules with the
employee's work hours.
Work Shift. If you entered a shift schedule for the employee, type the work shift to which the
employee is assigned. The shift differential schedule and the shift number determine the shift
differential rate to be used in calculating the employee's pay.
The work shift number you enter here appears as the default shift number on the employee's
timecard, where it can be changed. If you leave the Work Shift field blank, no shift differential
amounts are calculated for this employee during payroll calculation and the Shift field on the
employee's timecard is skipped.
Class Codes. At these fields, the system displays as prompts the classes (Class 1, Class 2, Class 3, and
Class 4) for which you defined class codes in the Class Codes function. At each class, enter the class
code that pertains to the employee.
For example, suppose you are using Class 1 to signify sales teams and you defined the Class 1 codes
as SALES1, SALES2, SALES3, and SALES4. If you are adding a new employee whose territory falls in
the fourth sales district, at the Class 1 prompt, click the Finder and select SALES4.
Cost Center
Note: Available only when the Use Cost Center Overrides option is selected on the Payroll G/L
Integration window.
The Cost Center tab allows you to specify a default set of General Ledger account segments to use to
build a cost center for the employee when you post payroll data.
Beside each G/L segment name, enter the segment code (defined in the General Ledger Segment
Codes window) that pertains to the employee.
For example, suppose you set up Department as a G/L segment name in G/L Options and defined the
G/L segment codes for Department in General Ledger as 101, 202, 303, and 404. If you are adding a
new employee who will be assigned to department 303, at the Department prompt, click the Finder
button and select 303.
Pay Tab
The Pay tab provides fields for specifying the employee's regular hours per period, how overtime pay
is calculated, pay frequency, minimum wage, and part or full time status as well as the earnings and
deductions that will be used to calculate the employee's pay.
Setting Up Payroll
Sage HRMS Payroll Getting Started 103
You can also enter fields on the Pay tab to enable the employee to enter their own timecard and to
specify the earnings that should appear on the timecard.
Complete the fields on the Pay tab as required, as follows:
Pay Frequency. From the selection list, choose the frequency with which the employee will be paid.
Regular Hours Per Period. Enter the number of regular (not overtime) hours the employee normally
works within each pay period.
When an employee's regular number of work hours is not met during a pay period, the system can
make up the shortage of regular hours from the employee's accrued compensatory time. (To
implement this, you select the Pay Regular Hours Shortage From Compensatory Time check box
when setting up your company's overtime schedules.)
To determine the number of accrued compensatory time hours to apply, the system calculates the
difference between the regular hours worked and the regular hours per pay period you enter in this
field.
Regular Hours Per Day. Type the number of regular (not overtime) hours the employee normally
works in a day. The default is 8. Sage HRMS Payroll uses this field to calculate the Days Worked on
the timecard.
Regular Hours Per Week. This field is available for editing if you choose FLSA - Salary Fixed Hours
in the Overtime Calculation field. Type the number of regular (not overtime) hours the employee
normally works in a week.
The default for this field is calculated to be the weekly equivalent of the value in the Regular Hours
Per Period field (based on the periods per year options on the Payroll Options window). For
example, if an employee is paid monthly, and the Regular Hours Per Period field contains 160 hours ,
then Sage HRMS Payroll calculates the Regular Hours Per Week field as 37; that is, (160 * 12) / 52.
Part-time Worker. Select this check box if the employee works for your company part time. When
you enter timecards, the system checks that a part time worker's hours have not exceeded the
maximum number of annual part time hours you entered in Options.
Minimum Wage. Type the minimum wage for the employee. If all of your employees work in the
same state, your response at this field will be the minimum wage you entered on the Options
window. If an employee works in more than one state, at this field type the highest minimum wage
among those set by the states in which the employee works.
Overtime Calculation. Sage HRMS Payroll supports FLSA overtime calculations for salaried
employees on a flat, fixed, or hourly rate. Under the FLSA, overtime pay is based on an average
hourly rate or regular rate that is derived from all earnings (including salary, bonuses, shift
differentials, and so on). The regular rate is calculated by dividing the straight time compensation
from all sources by the total hours actually worked.
Select the method you want to use to calculate overtime pay. Choose from the following options:
Setting Up Payroll
Sage HRMS Payroll Getting Started 104
Hourly Rate. Use this option for overtime calculations based on an hourly rate. This option
does not support FLSA overtime calculations.
Minimum Wage. Use this option for overtime calculations based on the minimum wage that
is stored in an employee's record. This option does not support FLSA overtime calculations.
Shift Rate. Use this option for overtime calculations based on the shift rate. This option does
not support FLSA overtime calculations.
FLSA-Hourly. Use this option for overtime calculations based on the hourly rate that may
include other types of earnings, as required by FLSA regulations.
FLSA-Salary Fixed Hours. Use this option to calculate FLSA overtime for salaried employees
who work a fixed number of hours per week. Sage HRMS Payroll will calculate the weekly
equivalent salary that includes any earnings you have set to be included in FLSA overtime
calculations. Sage HRMS Payroll divides the weekly equivalent salary by the regular hours to
establish the regular rate used to calculate overtime.
FLSA-Salary Fluctuating Hours. Use this option for overtime calculations for salaried
employees who are paid weekly, and whose hours change (or may change) from week to
week. If you select this option, Sage HRMS Payroll will divide the straight time
compensation by the total hours actually worked to calculate the regular rate. Sage HRMS
Payroll will then override the rate multiplier in the overtime schedule and the overtime rate
will automatically be half the regular rate. With this option, you can include other types of
earnings in the overtime calculations, as required by FLSA regulations.
Note: To calculate overtime using FLSA calculations, choose one of the FLSA options and
then use the Include in FLSA Calculations column in the detail table to select the types of
compensation you want to include in the FLSA overtime calculations.
For special cases where none of these options is appropriate, for example if you are paying a weekly
employee bi-monthly, you can override the automatic overtime calculation chosen here when you
complete the timecard.
Calculate Overtime on a Weekly Basis. This option is available only if:
The employee's pay frequency is Biweekly.
The employee's overtime calculation is FLSA-Hourly.
Note: This option is the default for new biweekly employees when you select FLSA-Hourly as
the overtime calculation, but you can change the option for individual employees.
This determines whether the program calculates overtime on a weekly or a biweekly basis for the
employee.
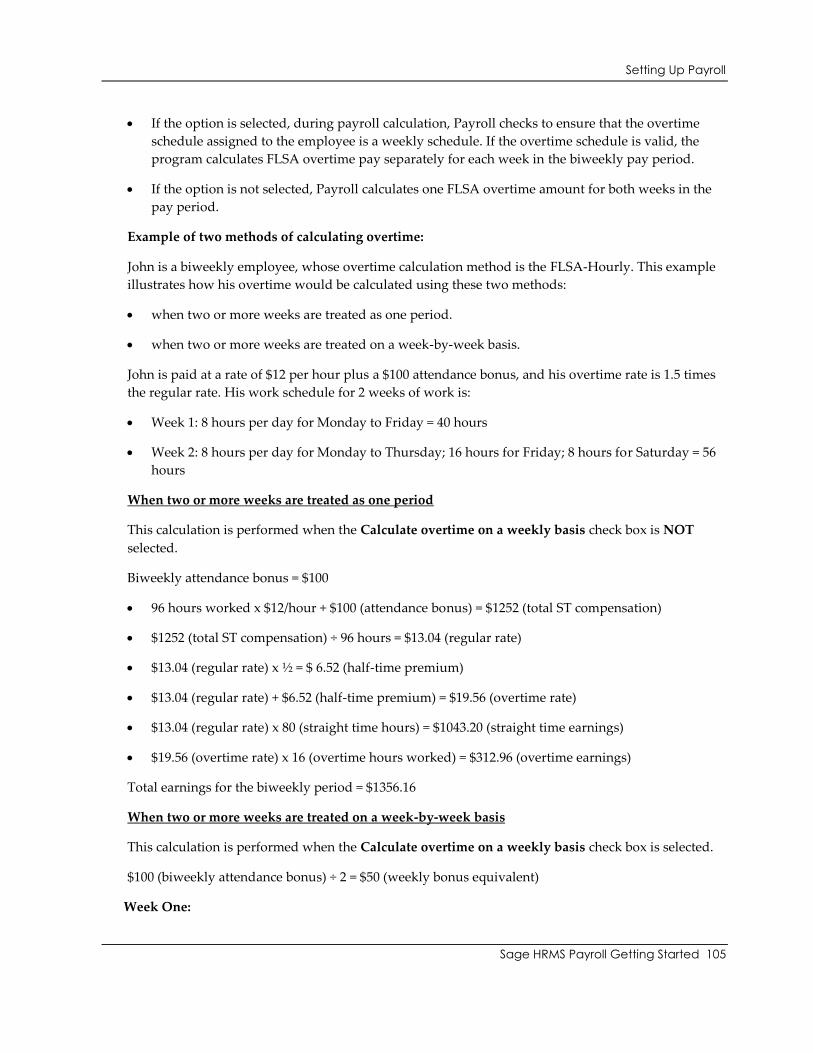
Setting Up Payroll
Sage HRMS Payroll Getting Started 105
If the option is selected, during payroll calculation, Payroll checks to ensure that the overtime
schedule assigned to the employee is a weekly schedule. If the overtime schedule is valid, the
program calculates FLSA overtime pay separately for each week in the biweekly pay period.
If the option is not selected, Payroll calculates one FLSA overtime amount for both weeks in the
pay period.
Example of two methods of calculating overtime:
John is a biweekly employee, whose overtime calculation method is the FLSA-Hourly. This example
illustrates how his overtime would be calculated using these two methods:
when two or more weeks are treated as one period.
when two or more weeks are treated on a week-by-week basis.
John is paid at a rate of $12 per hour plus a $100 attendance bonus, and his overtime rate is 1.5 times
the regular rate. His work schedule for 2 weeks of work is:
Week 1: 8 hours per day for Monday to Friday = 40 hours
Week 2: 8 hours per day for Monday to Thursday; 16 hours for Friday; 8 hours for Saturday = 56
hours
When two or more weeks are treated as one period
This calculation is performed when the Calculate overtime on a weekly basis check box is NOT
selected.
Biweekly attendance bonus = $100
96 hours worked x $12/hour + $100 (attendance bonus) = $1252 (total ST compensation)
$1252 (total ST compensation) ÷ 96 hours = $13.04 (regular rate)
$13.04 (regular rate) x ½ = $ 6.52 (half-time premium)
$13.04 (regular rate) + $6.52 (half-time premium) = $19.56 (overtime rate)
$13.04 (regular rate) x 80 (straight time hours) = $1043.20 (straight time earnings)
$19.56 (overtime rate) x 16 (overtime hours worked) = $312.96 (overtime earnings)
Total earnings for the biweekly period = $1356.16
When two or more weeks are treated on a week-by-week basis
This calculation is performed when the Calculate overtime on a weekly basis check box is selected.
$100 (biweekly attendance bonus) ÷ 2 = $50 (weekly bonus equivalent)
Week One:
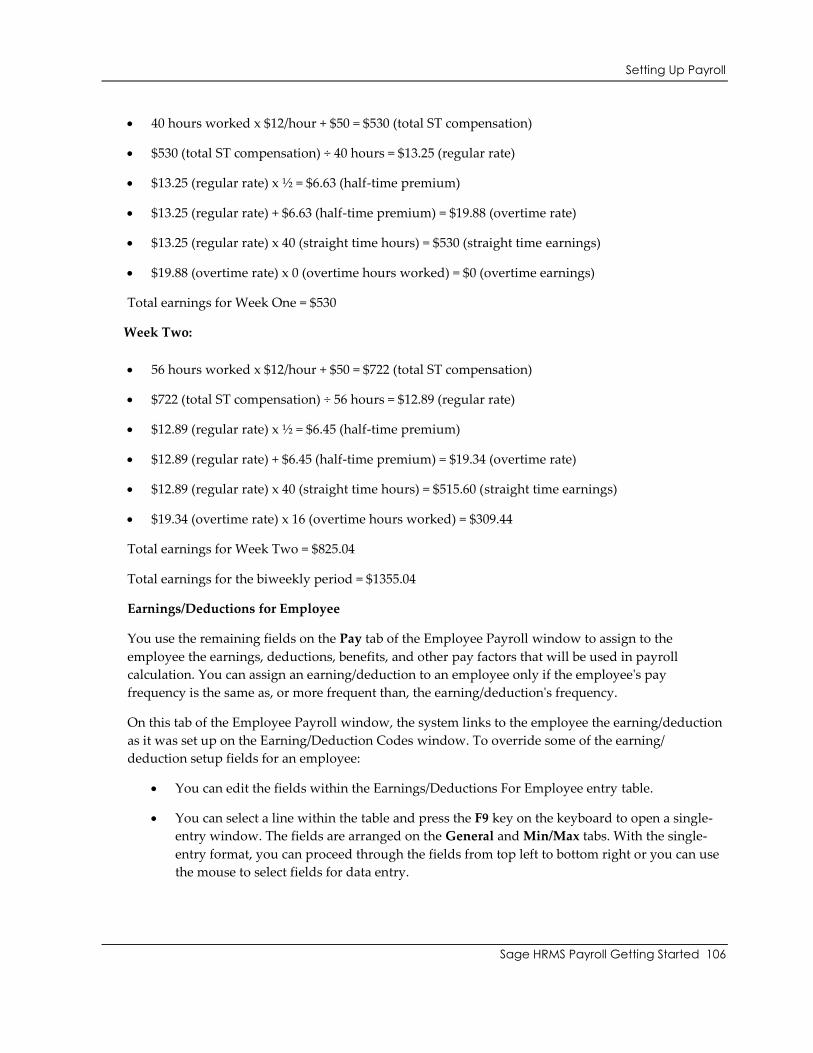
Setting Up Payroll
Sage HRMS Payroll Getting Started 106
40 hours worked x $12/hour + $50 = $530 (total ST compensation)
$530 (total ST compensation) ÷ 40 hours = $13.25 (regular rate)
$13.25 (regular rate) x ½ = $6.63 (half-time premium)
$13.25 (regular rate) + $6.63 (half-time premium) = $19.88 (overtime rate)
$13.25 (regular rate) x 40 (straight time hours) = $530 (straight time earnings)
$19.88 (overtime rate) x 0 (overtime hours worked) = $0 (overtime earnings)
Total earnings for Week One = $530
Week Two:
56 hours worked x $12/hour + $50 = $722 (total ST compensation)
$722 (total ST compensation) ÷ 56 hours = $12.89 (regular rate)
$12.89 (regular rate) x ½ = $6.45 (half-time premium)
$12.89 (regular rate) + $6.45 (half-time premium) = $19.34 (overtime rate)
$12.89 (regular rate) x 40 (straight time hours) = $515.60 (straight time earnings)
$19.34 (overtime rate) x 16 (overtime hours worked) = $309.44
Total earnings for Week Two = $825.04
Total earnings for the biweekly period = $1355.04
Earnings/Deductions for Employee
You use the remaining fields on the Pay tab of the Employee Payroll window to assign to the
employee the earnings, deductions, benefits, and other pay factors that will be used in payroll
calculation. You can assign an earning/deduction to an employee only if the employee's pay
frequency is the same as, or more frequent than, the earning/deduction's frequency.
On this tab of the Employee Payroll window, the system links to the employee the earning/deduction
as it was set up on the Earning/Deduction Codes window. To override some of the earning/
deduction setup fields for an employee:
You can edit the fields within the Earnings/Deductions For Employee entry table.
You can select a line within the table and press the F9 key on the keyboard to open a single-
entry window. The fields are arranged on the General and Min/Max tabs. With the single-
entry format, you can proceed through the fields from top left to bottom right or you can use
the mouse to select fields for data entry.
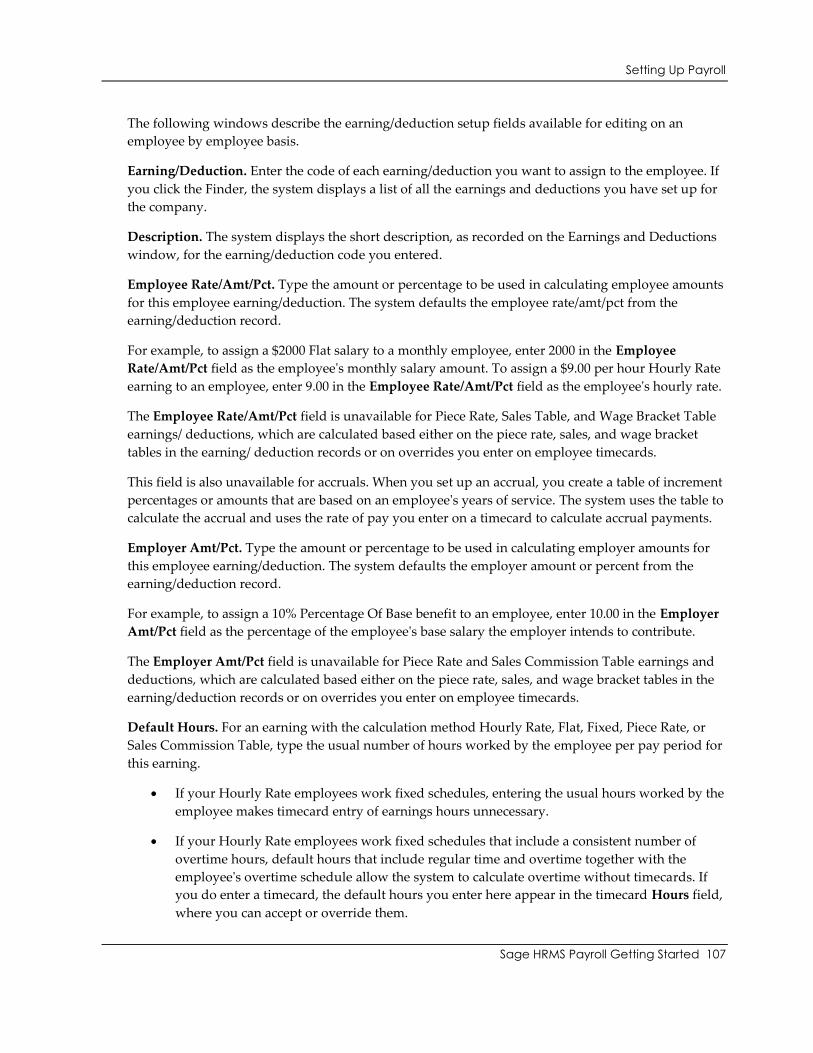
Setting Up Payroll
Sage HRMS Payroll Getting Started 107
The following windows describe the earning/deduction setup fields available for editing on an
employee by employee basis.
Earning/Deduction. Enter the code of each earning/deduction you want to assign to the employee. If
you click the Finder, the system displays a list of all the earnings and deductions you have set up for
the company.
Description. The system displays the short description, as recorded on the Earnings and Deductions
window, for the earning/deduction code you entered.
Employee Rate/Amt/Pct. Type the amount or percentage to be used in calculating employee amounts
for this employee earning/deduction. The system defaults the employee rate/amt/pct from the
earning/deduction record.
For example, to assign a $2000 Flat salary to a monthly employee, enter 2000 in the Employee
Rate/Amt/Pct field as the employee's monthly salary amount. To assign a $9.00 per hour Hourly Rate
earning to an employee, enter 9.00 in the Employee Rate/Amt/Pct field as the employee's hourly rate.
The Employee Rate/Amt/Pct field is unavailable for Piece Rate, Sales Table, and Wage Bracket Table
earnings/ deductions, which are calculated based either on the piece rate, sales, and wage bracket
tables in the earning/ deduction records or on overrides you enter on employee timecards.
This field is also unavailable for accruals. When you set up an accrual, you create a table of increment
percentages or amounts that are based on an employee's years of service. The system uses the table to
calculate the accrual and uses the rate of pay you enter on a timecard to calculate accrual payments.
Employer Amt/Pct. Type the amount or percentage to be used in calculating employer amounts for
this employee earning/deduction. The system defaults the employer amount or percent from the
earning/deduction record.
For example, to assign a 10% Percentage Of Base benefit to an employee, enter 10.00 in the Employer
Amt/Pct field as the percentage of the employee's base salary the employer intends to contribute.
The Employer Amt/Pct field is unavailable for Piece Rate and Sales Commission Table earnings and
deductions, which are calculated based either on the piece rate, sales, and wage bracket tables in the
earning/deduction records or on overrides you enter on employee timecards.
Default Hours. For an earning with the calculation method Hourly Rate, Flat, Fixed, Piece Rate, or
Sales Commission Table, type the usual number of hours worked by the employee per pay period for
this earning.
If your Hourly Rate employees work fixed schedules, entering the usual hours worked by the
employee makes timecard entry of earnings hours unnecessary.
If your Hourly Rate employees work fixed schedules that include a consistent number of
overtime hours, default hours that include regular time and overtime together with the
employee's overtime schedule allow the system to calculate overtime without timecards. If
you do enter a timecard, the default hours you enter here appear in the timecard Hours field,
where you can accept or override them.
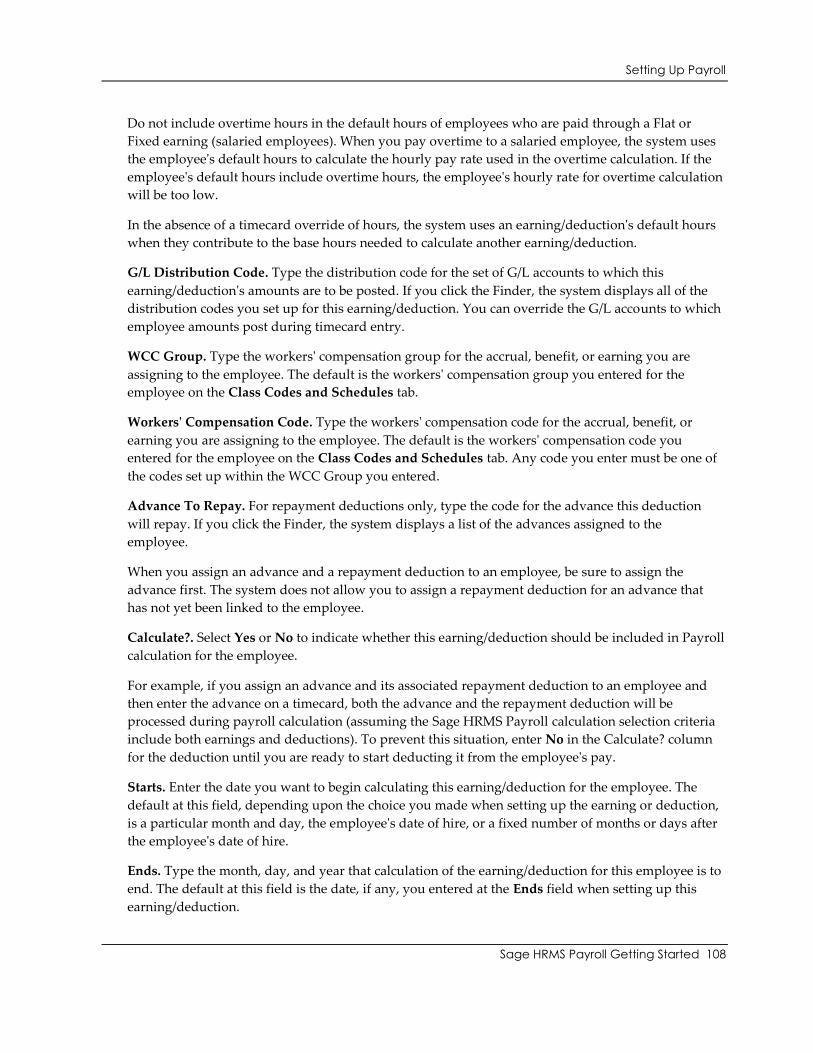
Setting Up Payroll
Sage HRMS Payroll Getting Started 108
Do not include overtime hours in the default hours of employees who are paid through a Flat or
Fixed earning (salaried employees). When you pay overtime to a salaried employee, the system uses
the employee's default hours to calculate the hourly pay rate used in the overtime calculation. If the
employee's default hours include overtime hours, the employee's hourly rate for overtime calculation
will be too low.
In the absence of a timecard override of hours, the system uses an earning/deduction's default hours
when they contribute to the base hours needed to calculate another earning/deduction.
G/L Distribution Code. Type the distribution code for the set of G/L accounts to which this
earning/deduction's amounts are to be posted. If you click the Finder, the system displays all of the
distribution codes you set up for this earning/deduction. You can override the G/L accounts to which
employee amounts post during timecard entry.
WCC Group. Type the workers' compensation group for the accrual, benefit, or earning you are
assigning to the employee. The default is the workers' compensation group you entered for the
employee on the Class Codes and Schedules tab.
Workers' Compensation Code. Type the workers' compensation code for the accrual, benefit, or
earning you are assigning to the employee. The default is the workers' compensation code you
entered for the employee on the Class Codes and Schedules tab. Any code you enter must be one of
the codes set up within the WCC Group you entered.
Advance To Repay. For repayment deductions only, type the code for the advance this deduction
will repay. If you click the Finder, the system displays a list of the advances assigned to the
employee.
When you assign an advance and a repayment deduction to an employee, be sure to assign the
advance first. The system does not allow you to assign a repayment deduction for an advance that
has not yet been linked to the employee.
Calculate?. Select Yes or No to indicate whether this earning/deduction should be included in Payroll
calculation for the employee.
For example, if you assign an advance and its associated repayment deduction to an employee and
then enter the advance on a timecard, both the advance and the repayment deduction will be
processed during payroll calculation (assuming the Sage HRMS Payroll calculation selection criteria
include both earnings and deductions). To prevent this situation, enter No in the Calculate? column
for the deduction until you are ready to start deducting it from the employee's pay.
Starts. Enter the date you want to begin calculating this earning/deduction for the employee. The
default at this field, depending upon the choice you made when setting up the earning or deduction,
is a particular month and day, the employee's date of hire, or a fixed number of months or days after
the employee's date of hire.
Ends. Type the month, day, and year that calculation of the earning/deduction for this employee is to
end. The default at this field is the date, if any, you entered at the Ends field when setting up this
earning/deduction.
Setting Up Payroll
Sage HRMS Payroll Getting Started 109
If the earning/deduction's end date is equal to or after the pay period end date, the system uses the
earning/deduction in calculation.
Carry-over. Type the next date after which unused vacation, sick, and compensatory time is carried
over to the new year, up to the limit specified for the accrual in the Maximum Carry-over field. The
default at this field, depending upon the choice you made when setting up the accrual, is a particular
month and day, the employee's date of hire, or a fixed number of months or days after the employee's
date of hire.
When the carry over date is reached, the system automatically increases the year by one to set the
next carry over date.
Use Optional Fields. If you want to assign optional fields to this employee's earning or deduction,
double click the Use Optional Field column to open the Optional Fields entry table.
On the Optional Fields entry table, enter or change optional field information, as you require.
You can enter different values for the optional fields.
If an optional field requires validation, you must enter a value that is specified for the
optional field. (If the optional field allows a blank, you can leave the field blank.) Otherwise,
you can enter any combination of character.
To delete an optional field, click it on the list, and press Delete on the keyboard.
To add a different optional field, press Insert on the keyboard, then use the Finder to select
the code for the optional field you want to use. Note that you can select only optional fields
that you set up previously for employee earnings and deductions, using the Optional Fields
window.
When you are finished, click the Close button to return to the previous window.
Include in FLSA Calculation. You can edit this field only if the employee's overtime calculation
method (on the Pay tab of the Employee Payroll window) is one of the FLSA options, and if the
earning is one of these types:
Salary & Wages that uses an employee calculation method of Flat, Fixed, or Hourly Rate.
Reported Tips.
Allocated Tips.
Use this field if you want to indicate whether or not this earning will be included in the FLSA
overtime calculations. The default value in this field comes from the Earning/Deduction Codes
window. To change it for the employee, double click the field on the table to switch between Yes and
No.
Employee Period Minimum. This column displays the employee minimum for a time period based
on the pay frequency. You set this value in the Earning/Deduction Codes window.
Setting Up Payroll
Sage HRMS Payroll Getting Started 110
Employee Period Maximum. This column displays the employee maximum for a time period based
on the pay frequency. You set this value in the Earning/Deduction Codes window.
Employee Annual Maximum. This column displays the employee's annual maximum for this
earning/deduction. You set this value in the Earning/Deduction Codes window.
Employee Lifetime Maximum. This column displays the employee's lifetime maximum for this
earning/deduction. You set this value in the Earning/Deduction Codes window.
Employee Lifetime Accumulation. This field maintains a lifetime sum of the employee's portion of
this earning/deduction. Edit this field if necessary.
Employee Secondary Rate (Amt/Amt per Hour/Pct). If you have set up a deduction that has two
rates, this column displays the secondary rate that takes effect after the Annual Maximum or a
Lifetime Maximum is reached. You set this value in the Earning/Deduction Codes window. The
secondary rate is expressed as an amount, amount per hour, or percent, depending on the
deduction's calculation method.
Employer Period Minimum. This column displays the employer minimum for a time period based
on the pay frequency. You set this value in the Earning/Deduction Codes window.
Employer Period Maximum. This column displays the employer maximum for a time period based
on the pay frequency. You set this value in the Earning/Deduction Codes window.
Employer Annual Maximum. This column displays the employer's annual maximum for this
earning/deduction. You set this value in the Earning/Deduction Codes window.
Employer Lifetime Maximum. This field displays the employer's lifetime maximum for this
earning/deduction. You set this value in the Earning/Deduction Codes window.
Employer Lifetime Accumulation. This field maintains a lifetime sum of the employer's portion of
this earning/deduction. Edit this field if necessary.
Employer Secondary Rate (Amt/Amt per Hour/Pct). If you have set up a deduction that has two
rates, this column displays the secondary rate that takes effect after the Annual Maximum or a
Lifetime Maximum is reached. You set up this field in the Earning/Deduction Codes window. The
secondary rate is expressed as an amount, amount per hour, or percent, depending on the
deduction's calculation method.
Taxes Tab
The Taxes tab of the Employee Payroll window provides fields for specifying the taxes to which the
employee's pay will be subject; the withholding method, override amount, or percent, extra
withholding for the tax; and the distribution code for the posting of the tax.
When you enter a tax code into the taxes entry table, the system assigns the tax to the employee.
Complete the fields on the Taxes tab as required, as follows:
Setting Up Payroll
Sage HRMS Payroll Getting Started 111
Tax. In this column, type the codes for the taxes to which the employee's pay is subject. If you click
the Finder in this field, the system displays all the tax codes you configured on the Federal and State
Taxes and the Local/Other Tax Codes windows.
Description. When you enter a tax code, the system displays the description of the tax entered.
Withholding Method. From the selection box, choose the method to use when withholding this tax
from the employee's pay. The withholding methods are:
Standard Calculation. The system calculates the tax according to the installed tax tables and
your specifications on the Federal/State Tax Codes window or, in the case of a custom tax,
according to the calculation method and the amount, percent, or wage bracket table you
define for the tax. If applicable, the system considers period minimum and maximum
amounts, standard deductions, exemption allowances, and so forth, in the calculation of the
tax.
If you choose Standard Calculation for a local or other custom tax that does not use the Tax
Bracket Table calculation method, the system defaults in the Amount/Percent field the
amount or percent you set up for the tax on the Local/Other Tax Codes window. You can
enter an employee specific amount or percent to be used in the calculation of the tax.
Amount Override. The system overrides the standard calculation of the tax with the amount
entered in the Amount/Percent field. The amount you enter is the amount deducted from the
employee's pay, without regard for exemptions, minimums/maximums, or other factors used
in the standard calculation.
Percent Override. The system overrides the standard calculation of the tax with the
percentage entered in the Amount/Percent field. The percentage you enter is applied to the
calculation base for the tax and deducted from pay, without regard to exemptions,
minimums/maximums, or other factors used in the standard calculation. (Note that you must
set up a calculation base for the tax, even if it is a Flat tax, for this option to be meaningful.)
Taxable, No Withholding. The employee's earnings are subject to this tax but the system will
not calculate any withholding for this tax.
Calculation Base Only. This tax will serve only as a calculation base for another tax to which
the employee's wages are subject.
Amount/Percent. If you selected Amount Override or Percent Override as a tax's withholding
method, enter the full dollar amount of the tax override or the percentage by which the tax's
calculation base will be multiplied. If you are assigning a local or other custom tax to the employee
and you chose Standard Calculation at the Withholding Method field, in this field, you can override
the amount/percent that defaults from the tax record.
If you are assigning a federal or state tax to an employee and wish to override the amount of tax
deducted for the employee, choose either the Amount Override or Percent Override withholding
method to override the tax as described above.
Setting Up Payroll
Sage HRMS Payroll Getting Started 112
If you want to override the amount deducted for a local or other custom tax, however, you can
choose among the Standard Calculation, Amount Override, and Percent Override methods.
Suppose that you want to override a local Amount Per Hour tax for an employee. You can override
the amount per hour used in the calculation of the tax by selecting Standard Calculation at the
Withholding Method field and entering the employee specific amount per hour at the
Amount/Percent field.
The system calculates the employee's tax based on all the information you set up for the tax on the
Local/Other Tax Codes and Employee Payroll windows, but uses the amount per hour entered on the
employee's Taxes tab instead of the amount per hour entered on the Local/Other Tax Codes window.
Or, you can override the full calculated amount of the tax by selecting Amount Override at the
Withholding Method field and entering the employee specific amount to be deducted for the tax at
the Amount/Percent field.
The system ignores the information you set up for the tax in the Local/Other Tax Codes window and
deducts the amount you enter at the Amount/Percent field.
Select Standard Calculation when assigning a percentage tax that can be defined via one tax record
and then assigned to employees using differing calculation percentages, according to the county in
which each employee's wages are considered taxable.
Extra Withholding. Enter any flat amount to be withheld for this tax in addition to the standard
calculation or override amount/percent.
G/L Distribution Code. Type the distribution code for the G/L accounts to which you want tax
amounts posted. If you click the Finder, the system displays all of the distribution codes you set up
for the tax.
If you use cost center overrides (G/L segment replacement), when you Calculate Payroll the tax
amounts posted are distributed to the cost centers in which the taxable wages were earned. That is to
say, the system distributes tax amounts proportionately among the cost center segments to which the
wage expenses were posted.
Use Optional Fields. If you want to assign optional fields to this employee's taxes, double click the
Use Optional Field column to open the Optional Fields entry table. You must have already defined
optional fields.
You can enter different values for the optional fields.
If an optional field requires validation, you must enter a value that is specified for the
optional field. (If the optional field allows a blank, you can leave the field blank.) Otherwise,
you can enter any combination of characters that is consistent with the type of field (text,
amount, date, and so on).
To delete an optional field, click it on the list, and press Delete on the keyboard.
Setting Up Payroll
Sage HRMS Payroll Getting Started 113
To add a different optional field, press Insert on the keyboard, then use the Finder to select
the code for the optional field you want to use. Note that you can select only optional fields
that you set up previously for employee taxes, using the Optional Fields window.
When you are finished, click the Close button to return to the previous window.
If you are assigning a federal or state income tax (such as USFIT or CASIT) to the
employee, you must highlight the tax and click the Tax Info button (or press F9 on the keyboard) to
enter the employee's filing status, number of exemptions, and other information for a particular tax.
The additional fields that appear on the Tax Information window vary according to the tax you are
assigning to the employee.
For example, in the case of USFIT, you indicate the following:
Filing Status. Enter the employee's filing status for the selected tax. Your choices are:
Married
Single
Head of Household
Your selection at this field determines the withholding tables that are used for the employee.
Exemptions From W 4. Type the number of exemptions to be applied when calculating this tax for
the employee.
W-2 Information (Statutory Employee, Pension Plan, Third Party Sick Pay, and so on). Select the
terms that apply to the employee. Sage HRMS Payroll uses the entries in the table to produce the
appropriate information on the employee's W-2 income tax slip.
The Delete button on the Tax Information window removes (unassigns) the selected tax from the
employee's record.
On the Tax Information window, you can also add (assign) a tax to the employee. Click the New
button to clear the fields, select a tax, complete the fields as necessary, and click the Add button
(which appears when you click the New button).
Other Tab
The Other tab of the Employee Payroll window provides fields for specifying an alternate address
and emergency contact for the employee, and the employee's gender.
Complete the fields on the Other tab, as follows:
Alternate Address. Type an alternate address for the employee, using up to four lines of 60
characters each.
Setting Up Payroll
Sage HRMS Payroll Getting Started 114
City. Type the city of the employee's alternate address.
State/Prov. Type the state of the employee's alternate address.
Zip/Postal Code. Type the zip code for the employee's alternate address.
Country. Type the country of the employee's alternate address.
Gender. Select either Male or Female as the employee's gender. If you are setting up a template
employee, you can enter a blank in this field.
Emergency Contact Name. Type the name of an emergency contact person for the employee.
Emergency Contact Telephone. Type the emergency contact person's telephone number.
Notes. This is a 250 character open text field that you can use to enter any additional information or
notes about the employee.
As you enter employee notes, press the Ctrl + Enter key combination when you want to insert a line
break. If you do not insert line breaks, the system records your entry as one long line, which you can
scroll using the Left and Right Arrow keys or the Home and End keys.
Optional Fields Tab
If you want to assign optional fields to this employee, click the Optional Fields tab.
Optional fields that you set up for automatic insertion in employee records automatically appear on
this tab, along with their default values.
You can accept or change any default values that appear.
You can accept the optional fields that appear, or you can delete or add them.
To delete an optional field, select the line on the table, and then press Delete on the
keyboard.
To assign additional optional fields, select the table, and then press Insert on the keyboard.
Complete the fields on the new line as follows:
Optional Field and Description. Use the Finder to select the optional field codes you want to use
with this employee.
When you select an optional field code, the program displays the description for the optional field.
Value Set. This field alerts you whether a seemingly blank optional field has an automatically
inserted - but "blank" - default value. If it has a blank value, the Value Set field displays Yes. (You
cannot tell whether an optional field has a blank default value, or no value, just by looking at the
Value field.)
The Value Set field will change from No to Yes if you make an entry in the Value field.
Setting Up Payroll
Sage HRMS Payroll Getting Started 115
Value and Value Description. Enter or select the value for this employee.
If the optional field you selected requires validation, you must select a value that is defined for the
optional field. However, if the optional field allows blanks, you can leave the default value field
blank.
If you select a value, the description of the value will appear in the Value Description column.
EFT Tab
The EFT tab of the Employee Payroll window allows you to enter the fields on this tab so that the
employee's paychecks can be directly deposited to the employee's bank account.
After completing the tabs on the Employee Payroll window:
Review the tabs in the Employee Payroll window to make sure your choices and entries are
correct. When you finish, click the Add button.
Print a listing of the employees you set up to verify that they are correct and complete. To do
this, from the navigation pane, select Reports > Employee Reports > Employee Information.
Step 16: Enter Employee Historical Payroll Data
After you have completed employee setup, you can enter employee historical data from your previous
payroll system. The Transaction History function allows you to enter payroll history for any historical
periods. The transaction history you enter is retained by the system for the number of years you chose to
keep, as specified on the Options window.
You enter history for each accrual, advance, benefit, earning, deduction, expense reimbursement, and tax
used to Calculate Payroll for an employee in your previous system. To enter employee historical amounts
for an earning/deduction or tax, you must have assigned it to the employee in Sage HRMS Payroll.
Unless you are setting up Sage HRMS Payroll for a new business with no previous accounting data, you
probably want to enter historical Sage HRMS Payroll data for employees. The entries you make affect
Sage HRMS Payroll only; to adjust your general ledger, you must make general journal entries.
On the Transaction History window, you can enter historical amounts for each of the following pay
factors for each employee:
Accruals
Advances
Benefits
Deductions
Earnings
Setting Up Payroll
Sage HRMS Payroll Getting Started 116
Expense Reimbursements
Taxes
These amounts can be for any period of time you choose: life-to-date, year-to-date, month-to-date, and so
forth. You can also use the Transaction History window to make changes or adjustments to historical data
any time after setup.
Note that carry over amounts can be initiated as a result of transaction history entries, as well as system
postings.
To open the Transaction History window, from the navigation pane, select Payroll > Tasks > Transaction
History.
The following fields apply to all the entries you make for a specific date:
Employee Transaction History. To find an existing transaction history entry, use the navigation
buttons or the Finder adjacent to this field.
Employee. Type the code of the employee for whom you want to enter historical information.
Date. Type the date of the history entry.
Description. This field is for your own information or reference.
Class 1, Class 2, Class 3, Class 4. For each class you have set up in Sage HRMS Payroll, specify the
class code you want to associate with the historical information you enter.
Net Pay. A running total of net pay for the entire employee historical entry displays.
After entering the historical data for one transaction date, you move to the Earnings/Deductions tab
or the Taxes tab. The Earnings/Deductions tab contains columns for all the entries you make for all
categories of earnings and deductions.
Note that not all of the columns are relevant to a particular earning/deduction category. Similarly, not
all of the columns on the Taxes tab are relevant to a particular tax. You cannot make entries in
columns that are inappropriate to the category of earning/deduction or the type of tax you are
adding.
The following instructions are divided by earning/deduction category. Instructions for entering
historical tax information follow. The instructions specify the columns that are pertinent to the
category of earning/deduction or type of tax you are entering.
Accruals History
Earning/Deduction and Description. Enter the vacation, sick, or compensatory time accrual code.
The system displays the description.
Setting Up Payroll
Sage HRMS Payroll Getting Started 117
Type. Select either Accrual or Payment: Accrual for vacation, sick, and compensatory time accrued
during the period, Payment for vacation, sick, and compensatory time paid during the period.
Hours. If you are entering historical compensatory time, enter the hours paid or accrued. If you are
entering a vacation or sick time accrual whose calculation method is Percentage Of Base and type is
Payment, enter the number of hours associated with the payment. If the vacation or sick time
accrual's calculation method is Hours Per Hour Worked or Hours Per Frequency, enter the number of
hours paid or accrued.
Employee Pieces/Base. If the vacation or sick time accrual's calculation method is Percentage Of
Base and the type is Accrual, enter the wage base on which the accrual was calculated. If the vacation
or sick time accrual's calculation method is Hours Per Hour Worked and the type is Accrual, enter
the base hours used to calculate the accrual.
Employee Rate/Amt/Pct. If the accrual type is Payment, enter the rate (per hour worked) used in
paying the accrual. If the accrual type is Accrual and the calculation method is Percentage Of Base,
enter the percentage applied to the base. If the accrual type is Accrual and the calculation method is
Hours Per Hour Worked, enter the fractional hours accrued per hour worked.
Employee Extended Amount. If the accrual type is Payment, enter the amount of the employee's
vacation, sick, or compensatory pay. If the accrual type is Accrual and the calculation method is
Percentage Of Base, enter the dollar value of vacation or sick time pay accrued.
WCC Group. If the accrual payment is subject to workers' compensation, enter the appropriate
workers' compensation group.
Workers' Compensation Code. If you have entered a WCC Group, enter the appropriate workers'
compensation code.
Advances History
Earning/Deduction and Description. Enter the advance code. The system displays the description.
Employee Rate/Amt/Pct. Enter the amount of the advance.
Employee Extended Amount. Enter the amount of the employee advance for the period.
Benefits History
Earning/Deduction and Description. Enter the benefit code. The system displays the description.
Employer Pieces/Base. If the benefit calculation method is Amount Per Hour, enter the base hours
used to calculate the amount of the benefit. If it is Piece Rate Table, enter the number of pieces. If it is
Percentage Of Base, or Sales Commission Table enter the wage or sales base on which the benefit
amount is calculated.
Setting Up Payroll
Sage HRMS Payroll Getting Started 118
Employer Amt/Pct. Depending upon the calculation method, enter the flat amount, amount per hour,
piece rate, or percentage.
Employer Extended Amount. Enter the amount of the benefit for the period.
WCC Group. If this benefit is subject to workers' compensation, enter the appropriate workers'
compensation group.
Workers' Compensation Code. If you have entered a WCC Group, enter the appropriate workers'
compensation code.
Deductions History
Earning/Deduction and Description. Enter the deduction code. The system displays the deduction's
description.
Employee Pieces/Base. If the employee calculation method is Amount Per Hour, enter the base hours
used to calculate the amount of the deduction. If the calculation method is Percentage Of Base, or
Sales Commission Table, enter the wage or sales base. If it is Piece Rate Table, enter the number of
pieces.
Employee Rate/Amt/Pct. Depending upon the calculation method, enter the flat amount, amount per
hour, piece rate, or percentage.
Employee Extended Amount. Enter the amount of the employee deduction for the period.
Employer Pieces/Base. If the employer calculation method is Amount Per Hour, enter the base hours
used to calculate the deduction amount. If it is Piece Rate Table, enter the number of pieces. If it is
Percentage Of Base, enter the wage base. If it is Percentage of Employee Contribution, enter the
amount of the employee contribution.
Employer Amt/Pct. Depending upon the calculation method, enter the amount per hour or
percentage.
If you are entering a Flat deduction, enter the employer amount at the Employer Extended Amount
field.
Employer Extended Amount. Enter the amount of the employer's portion of the deduction for the
period.
Earnings History
Earning/Deduction and Description. Enter the earning code. The system displays the description.
Type. If the earning type is Salary And Wages, select the wage type: Regular, Overtime, or Shift
Differential.
Setting Up Payroll
Sage HRMS Payroll Getting Started 119
Hours. If the earning type is Salary And Wages and the employee calculation method is Flat, Fixed,
Hourly Rate, Piece Rate Table, or Sales Commission Table, enter the number of hours associated
with the earning in the period for which you are entering history.
Employee Pieces/Base. If the earning's calculation method is Amount Per Hour, Percentage Of Base,
or Sales Commission Table, enter the base hours, wage base, or sales base on which the earning
amount is calculated. If it is Piece Rate Table, enter the number of pieces.
Employee Rate/Amt/Pct. Depending upon the calculation method, enter the flat amount, hourly rate,
amount per hour, piece rate, or percentage used to calculate the earning.
Employee Extended Amount. Enter the amount of salary and wage, reported tip, or allocated tip
earnings for the period.
WCC Group. If this Salary And Wages or Reported Tips earning is subject to workers'
compensation, enter the appropriate workers' compensation group.
Workers' Compensation Code. If you have entered a WCC Group, enter the appropriate workers'
compensation code.
Regular Rate. For each line of overtime pay, which is always associated with Flat, Fixed, and Hourly
Rate earnings, enter the employee's regular rate of pay. (If you chose the Adjust Overtime Pay To
Regular Rate option on the Workers' Compensation Codes window, the system adjusts an employee's
overtime pay to the employee's regular rate of pay when you print the Workers' Compensation
report.)
Expense Reimbursements History
Earning/Deduction and Description. Enter the expense reimbursement code. The system displays
the description.
Employee Rate/Amt/Pct. Enter the amount of the expense reimbursement.
Employee Extended Amount. Enter the amount of the employee expense reimbursement for the
period.
Taxes History
Tax and Description. Enter the code for the tax. The system displays the description.
Employee Extended Amount. Enter the amount withheld from the employee's pay for the tax.
Enter amounts representing earned income credit as negative numbers.
Employer Extended Amount. Enter the amount paid by the employer for the tax.
Ceiling Wage. If the tax has a wage ceiling, enter the amount of wages earned that applies toward the
ceiling.
Setting Up Payroll
Sage HRMS Payroll Getting Started 120
No Ceiling Wage. Enter the amount of employee wages subject to the tax, regardless of the ceiling.
For taxes that do not have a wage ceiling, such as federal income tax, you must enter the wages in
this field, in order for the wages to appear in the appropriate box on the employee's W 2 form.
Ceiling Tips. If the tax is calculated on tips, and the taxing authority wants tip information reported
separately, enter the amount of tips earned that applies toward the wage ceiling.
No Ceiling Tips. If the taxing authority wants tip information reported separately, enter the amount
of employee tips subject to the tax, regardless of the wage ceiling.
Tax on Tips. If the tax is calculated on tips, and the taxing authority wants tip information reported
separately, enter the portion of the total tax amount derived from tips.
Uncollected Tax on Tips. If the tax is calculated on tips, and the taxing authority wants tip
information reported separately, enter the amount of the employee's tip-based tax liability that has
not been withheld from the employee's pay.
Weeks Worked. Enter the number of weeks that should be reported as worked for the taxing
authority in the period covered by this historical transaction.
Review the entries on the Transaction History window to make sure they are correct. When you
finish, click the Add button. Select Payroll > Reports > Employee Reports > Transaction History
Audit to print the employee histories you entered, to verify that they are correct and complete.
Step 17: Set Up Employee Selection Lists (optional)
You can create lists of employees to be used in calculating payroll and printing reports. A selection list
can include as many employees as you require. The Sage HRMS Payroll in-product Help menu provides
more details about selection lists.
Several forms in Sage HRMS Payroll contain Employee From and To fields that enable you to process or
report a sequential range of employees. For example, on the Calculate Payroll window, you could specify
from Employee 24 to Employee 320.
To process or print a set of random, non-sequential employees of your choice, you can set up and use an
employee selection list. A selection list can include as many employees as you require.
For example, you can set up a selection list that consists of employee numbers 4, 18, and 25. You can then
use that list to select only those employees when calculating payroll or printing certain Sage HRMS
Payroll reports, such as the Accruals report.
You can use the same selection list as often as you need, on any Sage HRMS Payroll window that lets you
specify a selection list. You can create as many selection lists as you need.
To set up an employee selection list:
1. From the navigation pane, select Payroll > Employee Selection.
2. Enter the following fields at the top of the window:
Setting Up Payroll
Sage HRMS Payroll Getting Started 121
Selection List. Enter a code, up to six characters, to identify the employee selection list you are
setting up.
Description. Enter a description of the selection list, using up to 60 characters.
3. In the table, enter the employees to be included in this list. You can do this in the following ways.
Manually enter employees, one at a time.
In the Employee Number field, enter the twelve character number for each employee
you want to add to the list, or click the Finder button to select each employee from a list
of all employees. When you enter the employee number, the system automatically fills in
the Last Name, First Name, Middle Name, Pay Frequency, and Employment Status
columns.
Automatically enter several employees, by using the windows that open when you click
the Copy, Criteria, or Combine buttons, as explained below. You can then manually add
more employees to the table.
To enable these buttons, do not enter any employee numbers in the table. After Sage
HRMS Payroll returns employee data to the Employee Selection window, the buttons are
no longer available.
Copy. You can copy all the employees of an existing selection list to the list that you are
creating. This button opens the Copy Employee Selection List window.
In the Selection List field, enter or choose a list. To copy all the employees in that list, click Copy.
Sage HRMS Payroll then closes this window, and returns to the Employee Selection window,
filling it with the copied employees.
Criteria button. You can specify a broad range of criteria by which to select employees for your
list. Click the Criteria button to open the Employee Selection List Criteria window.
Enter your criteria, and click Create. Sage HRMS Payroll then closes this window, and returns to
the Employee Selection window, filling it with a list of employees who fit the criteria you
specified.
Combine button. You can choose employees from two existing selection lists when creating a
new list. Click the Combine button to open the Combine Payroll Employee Selection List
window.
In the two Selection List fields, enter the name of your two existing selection lists. You can then
choose one of the following buttons:
Combine - combine ALL employees from the two lists.
Combine Matching Entries - combine only employees whose names appear on both lists.
Setting Up Payroll
Sage HRMS Payroll Getting Started 122
Combine Non-matching Entries -combine only employees whose names appear on only
one of the existing lists.
4. Review the entries on the Employee Selection window to make sure they are correct.
5. When you finish, click the Add button.
To print a listing of the selection lists you defined, to verify that they are correct and complete, from
the navigation pane, select Reports > Employee Reports > Employee Selection.
Note: After you have created selection lists, from the navigation pane, select Payroll > Assign
Selection Lists to quickly add (or remove) employees to selection lists.
Step 18: Set up Common Deduction Limits (optional)
After setting up deductions, you can associate multiple deductions based on a single limit and ensure
that employee deductions do not exceed defined maximums (for example, multiple garnishments,
retirement plans, and union dues).
The deduction group contains the deduction codes which are combined for a single limit. When the
defined maximum is reached for the deduction group, the system will no longer deduct the amounts for
the defined codes.
This function enables you to:
Define new deduction groups
Edit or delete existing deduction groups
Assign a selection list to a deduction group
Define the annual and lifetime maximums
Define the deduction codes included in the deduction group
To enter Common Deduction Limits information, select Setup > Payroll > Earnings/Deductions/Taxes >
Common Deduction Limits.
Deduction Group. Enter an identifying code for the deduction group that will include the deduction
codes with a common limit.
Description. Enter a description for the Deduction Group. This description can be up to 60 characters.
Because a deduction group's description is used to identify the deduction group in Finder boxes and on
payroll reports, you must enter a description before the system will allow you to add the deduction
group.
Last Maintained. This is an informational field in which the program displays the date of the last change
made. You do not make an entry in this field.

Setting Up Payroll
Sage HRMS Payroll Getting Started 123
Inactive as of. If you choose to make a deduction group inactive, the system displays the current date in
the As Of field to indicate the date on which the inactive status was set. After a deduction group is
inactive, it will not be used in payroll calculations, even if the period end date is before the As Of Date.
Selection List. Choose the selection list for which you want to apply the deduction group. If you have
only one employee, you must create a selection list for that employee. If you leave the selection list blank,
the deduction group will apply to all employees.
Annual Maximum (Employee and Employer). Enter the annual amount at which calculations for this
deduction group should stop.
Lifetime Maximum (Employee and Employer). The Lifetime Maximum field enables you to specify
when the Payroll program should stop calculating the deductions, without specifying a time limit. For
example, if you create a 401K deduction group with a lifetime maximum of $100,000, then during every
Calculate Payroll run, the program will deduct a 401K amount for employees who have been assigned
that deduction, until $100,000 has been deducted.
Deduction/Description. Select the deduction codes to be included in this deduction group. A deduction
code can belong to only one deduction group. The system will use the order by which the deduction
codes are listed on the Common Deduction Limits window to determine the order in which the
deductions will reduce the limit. Therefore, you want to verify the order to assure accurate processing.
Step 19: Set Up EFT/Direct Deposit (optional)
EFT enables you to electronically transfer Sage HRMS Payroll checks from your company's bank account
directly to your employees' bank accounts. This is also known as direct deposit.
Before you can start producing paychecks to be directly deposited, you must set up your Sage HRMS
Payroll system. This involves:
Setting up the company's (employer's) bank information.
Setting up employee EFT information.
Optionally setting up to enable combining multiple EFT files into a single file for submission.
After you complete the setup, you can then:
Use the Calculate Payroll and Print/Post Checks functions to produce paychecks to be directly
deposited.
Generate the EFT file.
If you have generated several EFT files, you can combine them into a single file to submit to
the bank.
Submit the EFT file to the company's bank.
Setting Up Payroll
Sage HRMS Payroll Getting Started 124
Before You Begin
Before you begin using the EFT (direct deposit) feature:
1. Contact your bank branch to advise them that you are going to use direct deposit software.
You will need the following from them:
2. A user number (ID #) such as the Originator or Organization number. The banks use this
number to identify your company.
3. Your bank's publications describing direct deposit procedures. This book will discuss any
special changes that must be made to the way you send a file. For example, they may want
you to use their communications package instead of an off-the-shelf brand to ensure that they
can assist you with any technical problems that arise.
4. Allow adequate time to collect all the employee information and perform, at a minimum, one
test run so that the banks can verify that your files, when received on a live status, are correct
and that no adjustments need to be made.
Overview of Setup for EFT
The main steps in setting up for EFT (direct deposit) are:
1. Set up the company's (employer's) bank information.
2. Set up employee EFT information.
3. Optionally set up to enable combining multiple EFT files into a single file for submission.
Setting Up the Company's Bank Account for EFT
Use the EFT Options window to set up information about your company's bank account. The
program will incorporate this information in the direct deposit files you generate for submission to
the bank.
1. From the navigation pane, select Setup > Payroll > EFT Options.
2. In the Bank field, select a bank that you have already set up using the Banks window.
3. On the General tab, select the bank format, and complete the information in the fields.
The fields on the EFT Options window depend on the bank and bank format you chose. For
field descriptions, refer to the topic "Company Bank Information" later in this chapter. All
information entered in these fields should be based on the bank's guideline book.
4. On the Other tab, you can view information about the date, number, entry description, and
ID modifier of the last file created. You also enter offset record information on this tab.
5. Click Save to save the information entered.
Setting Up Payroll
Sage HRMS Payroll Getting Started 125
6. To print a report showing the information you have entered on the EFT Options window,
from the navigation pane, select Reports > Setup Reports > EFT Options.
Company Bank Information
Information listed below contains most of the requirements needed by the banks to process direct
deposit files. Some banks may not require some fields. Refer to your bank's guideline book to
validate the information.
Bank Format. From the dropdown list, select the file format required by the bank.
Originator (Organization) Number. Insert the originator (organization) number, maximum 10
characters. If this number is not supplied to you by your bank, you should enter 1XXXXXXXXX
where XXXXXXXXX is your nine digit federal tax ID number.
Discretionary Name. (Optional) Enter your company name (20 characters maximum).
This field is optional, but we recommend that you use it. The most common entry is the name of
your company, but you may wish to use this as a way to define payrolls by divisions. (For
example, if you have more than one office: east coast, west coast, mid-west and central, and you
process separate payrolls from one central office). If all files go to the same bank for all divisions,
you could install this product for each Sage HRMS Payroll setup and identify each file with the
appropriate discretionary name.
Abbreviated Name. You should enter an abbreviated version (16 characters maximum) of your
company name.
Service Class Code. Code 200 should be used (ACH entries Mixed Debits and Credits).
Originator Status Code. This code refers to the originator initiating the entry. Enter 1 or 2 as
indicated below:
Code 1. Identifies the user as a depository financial institution who has agreed to be
bound by ACH rules. Code 1 will be the most frequently used.
Code 2. Identifies the user as a federal government entity or agency not subject to ACH
rules. This applies to government agencies which may be allowed to process the files
themselves.
Originator DFI ID (Originator Depository Financial Institution Identification). Enter the bank's
transit or routing number (9 digits). This information must be obtained from the bank.
Immediate Destination. This field contains the transit or routing number (9 digits) of the ACH
operator or receiving point (usually the Federal Reserve) to which the file is being sent.
In the generated file, the first position of the 10 character field begins with a blank (already set)
followed by the four digit transit number, the four digit ABA number, and the check digit.
Verify with your bank the transit and ABA numbers.
Setting Up Payroll
Sage HRMS Payroll Getting Started 126
Use Alternate (Immediate Destination). The Use Alternate check box (next to the Immediate
Destination field) is unavailable if you chose the bank format ACH (NACHA) Standard.
If your bank does not follow the ACH standard for the Immediate Destination field, check the
Use Alternate box. Then, in the adjacent Alternate Immediate Destination field, enter your
financial institution's particular standard. You can enter 10 alphanumeric characters maximum,
instead of 9 digits.
Destination Name. (Optional but recommended) This field is optional and allows the user to
enter the name (23 characters maximum) of the institution receiving point to which the file is
being sent.
Immediate Origin. This field contains the transit or routing number (9 digits) of the ACH
operator or sending point that is forwarding the file. This number will be that of the bank (the
same number as in the Originator DFI ID field) or this may be another number assigned by your
bank such as your account number. The ODFI (the bank in most cases) may ask the Originator
(you) to put the tax identification number in this field; however, the field must contain the
routing number of the sending point when the file is delivered to the ACH operator.
Use Alternate (Immediate Origin). If your bank does not follow the ACH standard for the
Immediate Origin field, select the Use Alternate check box. Then, in the adjacent Alternate
Immediate Origin field, enter a value to override the ACH standard. You can enter 10
alphanumeric characters maximum, instead of 9 digits.
Origin Name. (Optional but recommended) This field is the name (23 characters maximum) of
the ACH operator (user) or sending point that is forwarding the file.
Carriage Return/Line Feed. Used by some banks to indicate the end of individual records in the
file. See the guideline book from your banking institution prior to selecting this option. Most
banks will require that you indicate the record's end.
Direct Deposit File Name. Enter the Direct Deposit File Name extension; this is the extension of
the file to be transferred to the bank (using a standard DOS file format, for example
UPDIRECT.TXT). You cannot change the name of the file (UPDIRECT).
Header, Footer. Some banks may require specific information to be placed at the beginning
(header) or end (footer) of the file. Check with your company's bank.
(Last) Creation Date. As you generate direct deposits, the system will automatically update this
field with the generation date.
(Last) Creation Number. As you generate direct deposits, the system will automatically update
this field with a sequential number.
(Last) Entry Description. This is the Entry Description you specified on the Generate EFT File
window during your last file generation.
(Last) ID Modifier. This is the file ID modifier you specified on the Generate EFT File window
during your last file generation. The file ID modifier allows for multiple files to be created on the
Setting Up Payroll
Sage HRMS Payroll Getting Started 127
same date. For a description of this field, see the topic that describes generating the EFT file, in
"Processing Payroll" of the Sage HRMS Payroll in-product Help menu.
Record Type. You cannot edit this field; the program assigns this number.
Transaction Code. The options available from the list depend on the bank format you chose. If
you chose ACH (NACHA) Standard, this field is unavailable to you. Otherwise, choose one of
these transaction code options:
27- Checking
37- Savings
Blank, if you chose the bank format CSB CoreState Bank, and an Offset Record is not
required.
Receiving DFI. This field is also contained in the employee file. The bank will indicate the
receiving DFI number to be used for the Offset.
DFI Account Number. The account number for the Offset Receiving DFI will be assigned by the
bank.
Identification Number; Name; Discretionary Data. As with the other offset fields, this
information will come from your financial institution.
Setting Up Employees for EFT
To set up employees for EFT (direct deposit), follow these steps.
1. From the navigation pane, select Employees > View/Edit Employee and select the employee.
2. Click the Payroll tab and then click the Employee Payroll icon.
3. Click the EFT tab.
4. On the EFT tab, complete the following:
Direct Deposit. To activate direct depositing for the employee, select the Direct Deposit
check box.
Bank Transfer Name. Enter the employee's name designated to the employee's bank account.
Reference. This is the employee ID for EFT purposes. You can keep the Reference field the
same as the Employee field, or change it if you use a different employee ID for EFT. The
Reference field (not the Employee field) will be included in the file that is generated for
submission to the bank.
Discretionary Data. (Optional) This two character field can be used at your convenience, for
example to enable special handling of entries. Leave this field blank if you do not have any
special Sage HRMS Payroll handling requirements.
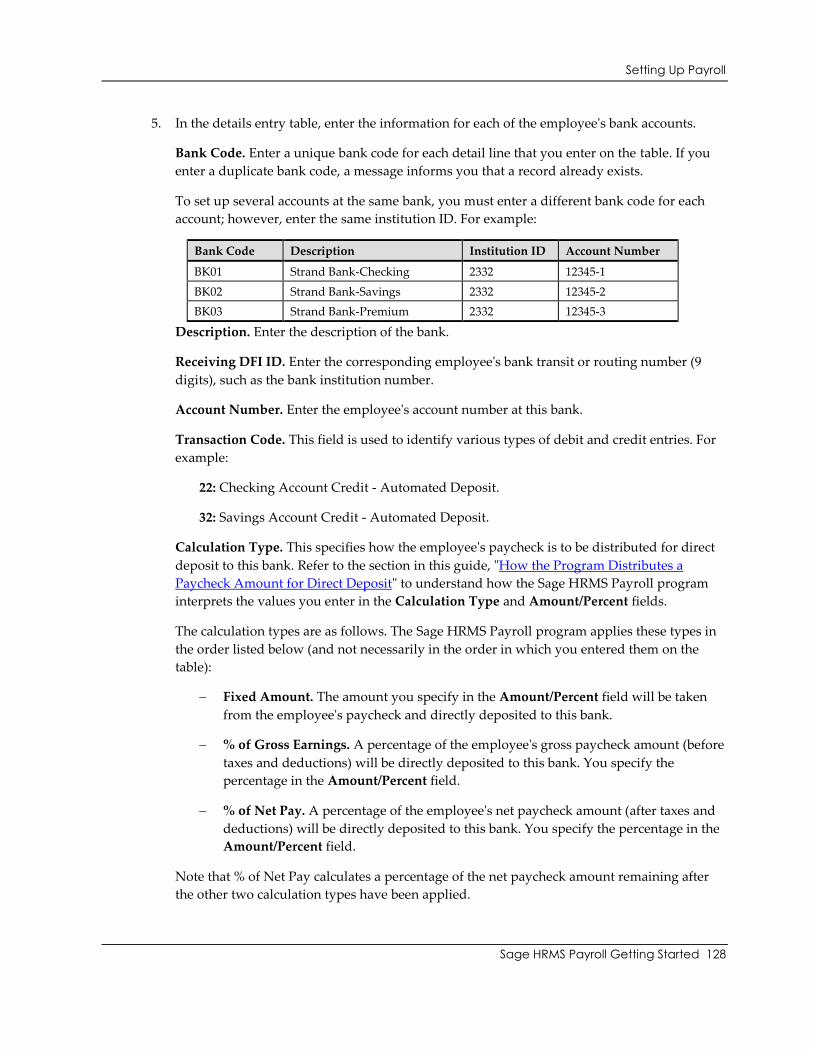
Setting Up Payroll
Sage HRMS Payroll Getting Started 128
5. In the details entry table, enter the information for each of the employee's bank accounts.
Bank Code. Enter a unique bank code for each detail line that you enter on the table. If you
enter a duplicate bank code, a message informs you that a record already exists.
To set up several accounts at the same bank, you must enter a different bank code for each
account; however, enter the same institution ID. For example:
Bank Code Description Institution ID Account Number
BK01 Strand Bank-Checking 2332 12345-1
BK02 Strand Bank-Savings 2332 12345-2
BK03 Strand Bank-Premium 2332 12345-3
Description. Enter the description of the bank.
Receiving DFI ID. Enter the corresponding employee's bank transit or routing number (9
digits), such as the bank institution number.
Account Number. Enter the employee's account number at this bank.
Transaction Code. This field is used to identify various types of debit and credit entries. For
example:
22: Checking Account Credit - Automated Deposit.
32: Savings Account Credit - Automated Deposit.
Calculation Type. This specifies how the employee's paycheck is to be distributed for direct
deposit to this bank. Refer to the section in this guide, "How the Program Distributes a
Paycheck Amount for Direct Deposit" to understand how the Sage HRMS Payroll program
interprets the values you enter in the Calculation Type and Amount/Percent fields.
The calculation types are as follows. The Sage HRMS Payroll program applies these types in
the order listed below (and not necessarily in the order in which you entered them on the
table):
Fixed Amount. The amount you specify in the Amount/Percent field will be taken
from the employee's paycheck and directly deposited to this bank.
% of Gross Earnings. A percentage of the employee's gross paycheck amount (before
taxes and deductions) will be directly deposited to this bank. You specify the
percentage in the Amount/Percent field.
% of Net Pay. A percentage of the employee's net paycheck amount (after taxes and
deductions) will be directly deposited to this bank. You specify the percentage in the
Amount/Percent field.
Note that % of Net Pay calculates a percentage of the net paycheck amount remaining after
the other two calculation types have been applied.
Setting Up Payroll
Sage HRMS Payroll Getting Started 129
Amount/Percent. Depending on the Calculation Type you selected, enter either an amount
or percentage.
Start Date. The date on which the program can start using the bank account to directly
deposit the employee's paychecks.
End Date. The date on which the program must stop using the bank account to directly
deposit the employee's paychecks.
6. To save the information, click Save.
7. To print the employee's EFT information, from the navigation pane, select Reports >
Employee Reports > Employee Information and select the EFT check box.
How the Program Distributes a Paycheck Amount for Direct Deposit
For direct deposit, paychecks will be distributed according to the setup on the employees' EFT
tab. You should note the following.
When calculating and distributing a paycheck amount, the Sage HRMS Payroll program applies
the calculation types (specified on the employee's EFT tab) in this order: Fixed Amount, % of
Gross Earnings, then % of Net Pay. Note that % of Net Pay calculates a percentage of the net
paycheck amount remaining after the other two calculation types have been applied.
If you have assigned the same calculation type to more than one bank code, the paycheck will be
distributed to the banks in alphabetic sequence of bank code. For example, if you had assigned
Fixed Amount to bank codes AB, AB01, and A01, the fixed amount is distributed in the order of
bank code A01, AB, and AB01.
During the paycheck distribution, even if the outstanding paycheck amount is insufficient to
cover the amount required by the bank's setup, the outstanding paycheck amount will still be
deposited to the bank. For example, suppose after an amount was deposited to the first bank, the
outstanding paycheck amount was $500. Suppose the program calculated that $1000 should be
deposited to the second bank. The $500 would be deposited to the second bank.
During the paycheck distribution, when the Sage HRMS Payroll program reaches the last bank, it
will deposit the outstanding amount of the paycheck to the last bank, regardless of that bank's
setup.
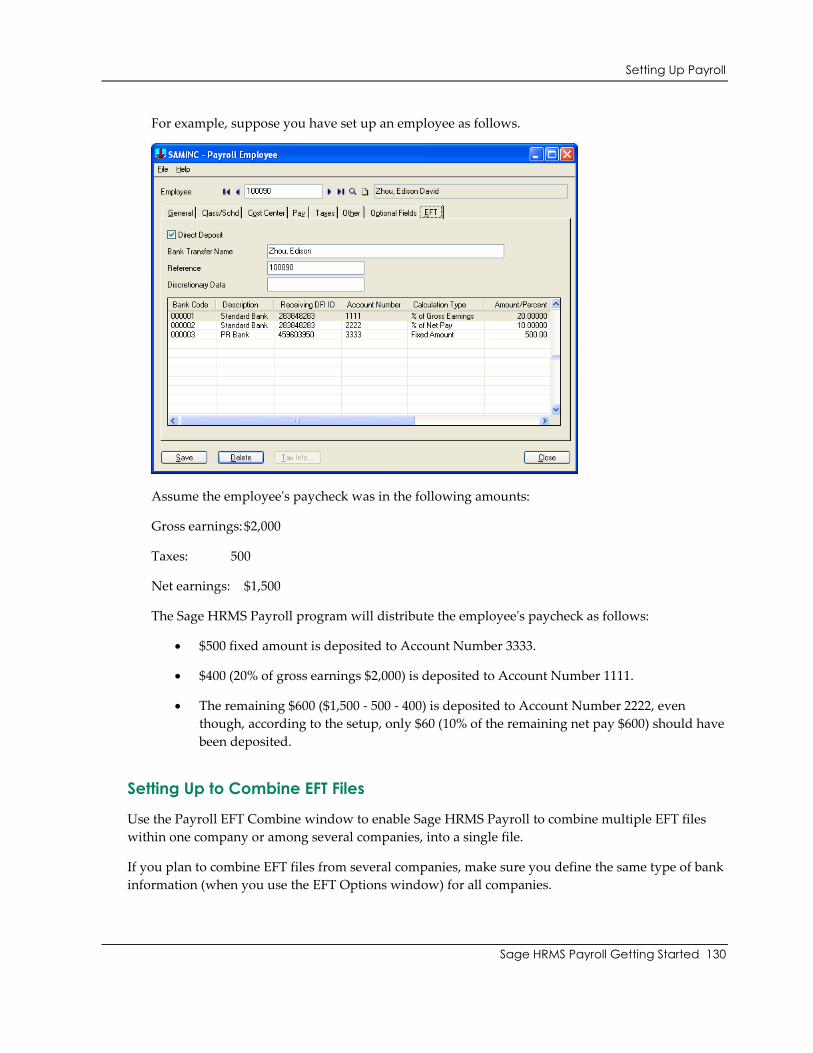
Setting Up Payroll
Sage HRMS Payroll Getting Started 130
For example, suppose you have set up an employee as follows.
Assume the employee's paycheck was in the following amounts:
Gross earnings: $2,000
Taxes: 500
Net earnings: $1,500
The Sage HRMS Payroll program will distribute the employee's paycheck as follows:
$500 fixed amount is deposited to Account Number 3333.
$400 (20% of gross earnings $2,000) is deposited to Account Number 1111.
The remaining $600 ($1,500 - 500 - 400) is deposited to Account Number 2222, even
though, according to the setup, only $60 (10% of the remaining net pay $600) should have
been deposited.
Setting Up to Combine EFT Files
Use the Payroll EFT Combine window to enable Sage HRMS Payroll to combine multiple EFT files
within one company or among several companies, into a single file.
If you plan to combine EFT files from several companies, make sure you define the same type of bank
information (when you use the EFT Options window) for all companies.
Setting Up Payroll
Sage HRMS Payroll Getting Started 131
On the Payroll EFT Combine window, you:
Set a company to act as an Administrator (that is, the company from where you will
search for and combine the EFT files).
Create a list of companies you want to include in your search for EFT files to combine.
Note that if you plan to combine EFT files within just one company, you still need to do this setup.
You would create a list that would contain only that company.
After you set this up, and have generated multiple EFT files, you can use the Combine EFT Files
function (from the navigation pane, select Payroll > Processes > EFT > Combine EFT File) from the
administrator company, to combine files for a specific bank.
To set a company as administrator for the EFT combine feature:
1. From the navigation pane, select Setup > Payroll > EFT Combine.
If you open the window from a company that is not set as an administrator and is not on any
other administrator's list, the Administer Combined Files from this Database check box is
enabled but not selected.
2. To make this company an administrator for the EFT combine feature, select the check box. A
table then appears, displaying the current company.
3. If you plan to combine files within only this company, then leave the company in the table.
Otherwise, add the other companies that are to be administered from this company, as
follows:
Highlight a company on the list.
Press Insert on the keyboard.
Type the Database ID for the company you want to add or use the Finder to locate it.
The company name appears automatically in the next column.
4. Click Save.
To remove a company from the list:
On the list, highlight the company you want to remove.
Press Delete on the keyboard.
Notes: :
If you open the window from a company that is already set as an
administrator for the EFT combine feature, the Administer Combined Files
from this Database check box is selected and the window shows a list of
Setting Up Payroll
Sage HRMS Payroll Getting Started 132
companies whose files you can include when you search for EFT files to
combine. You can then edit the list of companies.
If you open the window from a company that is not an administrator for the
EFT combine feature, but it appears on a list administered by another
company, the Administer Combined Files from this Database check box is
not selected and not available, and a message appears below the check box to
tell you which company administers the combine feature for this company. If
you want to make any changes, you must open the window from the
company that administers the combine feature.
You cannot remove the company that is selected to administer the combine
files function from the list.
A company cannot be on more than one Combine Administrator's list. Before
adding a company to a new list, you must delete it from any lists that it is
already on.
Step 20: Back Up your Company Data
When you have finished entering data from your old system into Sage HRMS Payroll, create a backup of
the data and store the backup in a safe place. If something should happen to damage your data, you can
restore it from the backup instead of having to enter it all over again.
Where to Now?
Your Sage HRMS Payroll system is now ready for use. You can begin to process payroll. You calculate
payroll based on employee data added during setup and timecards entered to record variations in the
normal pay period.
After calculating Sage HRMS Payroll, you can print employee paychecks, which posts Sage HRMS
Payroll totals and, depending upon your choice of options, creates transaction batches in General Ledger.
You can produce a variety of listings, reports, and registers including Earnings and Hours, Earnings/
Deductions Summary, Pre-Check Payroll Register, Tax Calculation Analysis, Forms W-2 on paper or
magnetic media, and many more.
For assistance in working in your payroll system, refer to the Sage HRMS Payroll in-product Help.
Sage HRMS Payroll Getting Started 133
Earnings, Deductions, and Taxes
Using Earning/Deduction Hierarchies
You must specify the relationships and define payroll processing priority between earnings, deductions,
and payroll taxes. Depending upon the calculation method you choose for an earning or deduction, you
may need to enter information about the hours, earnings, deductions, or taxes that constitute the
calculation base for the earning or deduction. Sage HRMS Payroll uses the concept of levels to control how
earnings and deductions relate to each other and to the taxes that pertain to them.
Earning/Deduction Levels
The system assigns to each earning/deduction (and to each tax) a level, which determines whether
one earning/deduction can be used in the calculation base of another. The level also determines
which taxes an accrual, earning, or benefit may be subject to and which taxes can be taken after a
deduction is taken.
You can include in the calculation base of an earning/deduction the amounts calculated for earnings
and deductions assigned lower levels. For example, the calculation base of a Percentage Of Base
method earning assigned a level of 15 can include the amounts calculated for earnings and
deductions assigned levels between 1 and 14.
Earnings and deductions with the calculation methods Flat, Fixed, Hourly Rate, Hours Per
Frequency, Piece Rate Table, and Sales Commission Table do not use other earnings and deductions
or taxes in their calculation bases so their levels can be low.
The system calculates these earnings and deductions using either a specific dollar amount, a number
of hours, or a table you set up to define piece rates or sales commissions. These earnings and
deductions may be part of the calculation base of another earning/deduction with a higher level.
Earnings and deductions that are assigned the Amount Per Hour, Hours Per Hour Worked, and
Percentage Of Base calculation methods do use other earnings and deductions and taxes in their
calculation bases so their levels need to be higher.
In addition, when you set up an accrual, earning, or benefit that uses any of the calculation methods,
the accrual, earning, or benefit must have a level lower than the levels of the taxes to which it is
subject.
In the same way, when you set up a pre-tax deduction with any calculation method, the deduction
must have a level lower than the levels of the taxes it precedes in the calculation.
Because most earnings are subject to tax and most deductions are taken after taxes, the system
defaults a level of 10 for all earnings and deductions and a level of 20 for all taxes. You may need to
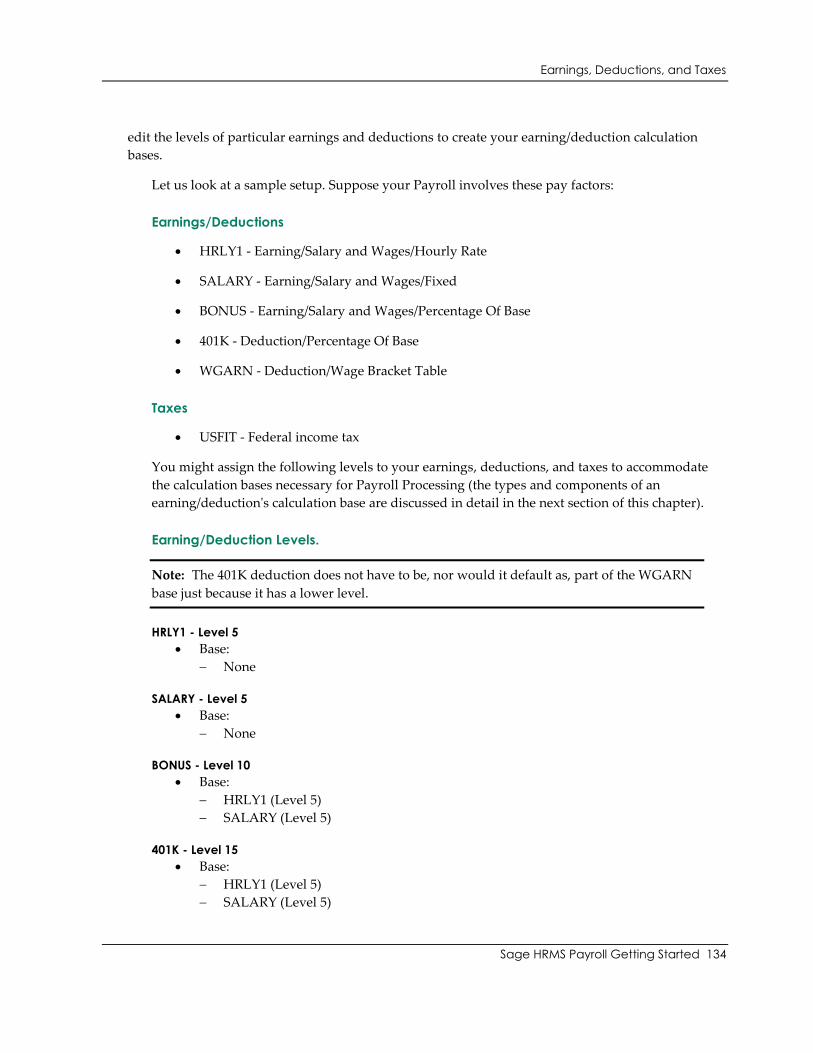
Earnings, Deductions, and Taxes
Sage HRMS Payroll Getting Started 134
edit the levels of particular earnings and deductions to create your earning/deduction calculation
bases.
Let us look at a sample setup. Suppose your Payroll involves these pay factors:
Earnings/Deductions
HRLY1 - Earning/Salary and Wages/Hourly Rate
SALARY - Earning/Salary and Wages/Fixed
BONUS - Earning/Salary and Wages/Percentage Of Base
401K - Deduction/Percentage Of Base
WGARN - Deduction/Wage Bracket Table
Taxes
USFIT - Federal income tax
You might assign the following levels to your earnings, deductions, and taxes to accommodate
the calculation bases necessary for Payroll Processing (the types and components of an
earning/deduction's calculation base are discussed in detail in the next section of this chapter).
Earning/Deduction Levels.
Note: The 401K deduction does not have to be, nor would it default as, part of the WGARN
base just because it has a lower level.
HRLY1 - Level 5
Base:
None
SALARY - Level 5
Base:
None
BONUS - Level 10
Base:
HRLY1 (Level 5)
SALARY (Level 5)
401K - Level 15
Base:
HRLY1 (Level 5)
SALARY (Level 5)
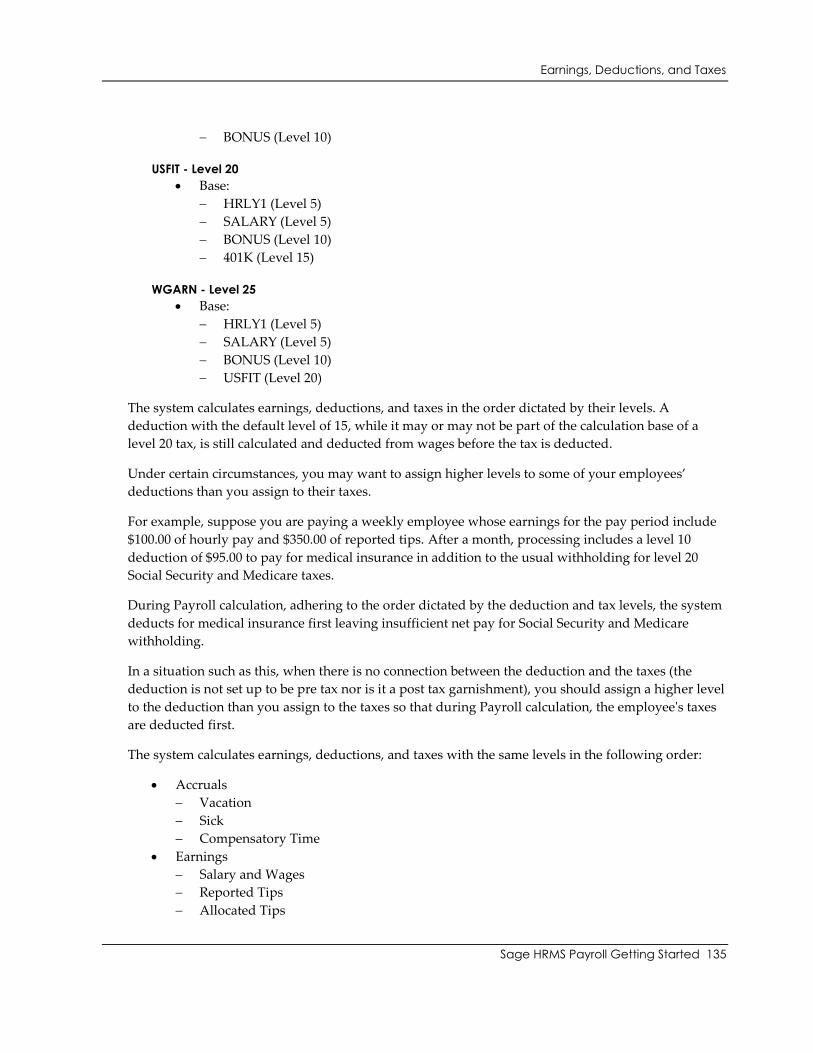
Earnings, Deductions, and Taxes
Sage HRMS Payroll Getting Started 135
BONUS (Level 10)
USFIT - Level 20
Base:
HRLY1 (Level 5)
SALARY (Level 5)
BONUS (Level 10)
401K (Level 15)
WGARN - Level 25
Base:
HRLY1 (Level 5)
SALARY (Level 5)
BONUS (Level 10)
USFIT (Level 20)
The system calculates earnings, deductions, and taxes in the order dictated by their levels. A
deduction with the default level of 15, while it may or may not be part of the calculation base of a
level 20 tax, is still calculated and deducted from wages before the tax is deducted.
Under certain circumstances, you may want to assign higher levels to some of your employees’
deductions than you assign to their taxes.
For example, suppose you are paying a weekly employee whose earnings for the pay period include
$100.00 of hourly pay and $350.00 of reported tips. After a month, processing includes a level 10
deduction of $95.00 to pay for medical insurance in addition to the usual withholding for level 20
Social Security and Medicare taxes.
During Payroll calculation, adhering to the order dictated by the deduction and tax levels, the system
deducts for medical insurance first leaving insufficient net pay for Social Security and Medicare
withholding.
In a situation such as this, when there is no connection between the deduction and the taxes (the
deduction is not set up to be pre tax nor is it a post tax garnishment), you should assign a higher level
to the deduction than you assign to the taxes so that during Payroll calculation, the employee's taxes
are deducted first.
The system calculates earnings, deductions, and taxes with the same levels in the following order:
Accruals
Vacation
Sick
Compensatory Time
Earnings
Salary and Wages
Reported Tips
Allocated Tips
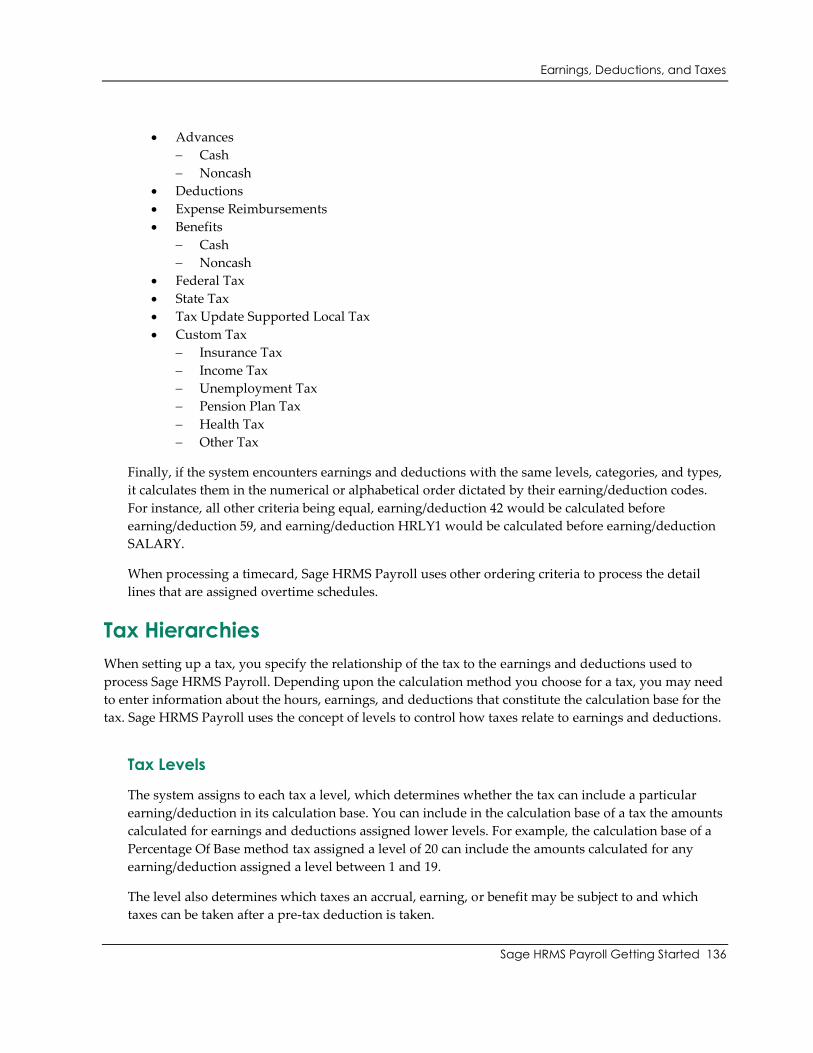
Earnings, Deductions, and Taxes
Sage HRMS Payroll Getting Started 136
Advances
Cash
Noncash
Deductions
Expense Reimbursements
Benefits
Cash
Noncash
Federal Tax
State Tax
Tax Update Supported Local Tax
Custom Tax
Insurance Tax
Income Tax
Unemployment Tax
Pension Plan Tax
Health Tax
Other Tax
Finally, if the system encounters earnings and deductions with the same levels, categories, and types,
it calculates them in the numerical or alphabetical order dictated by their earning/deduction codes.
For instance, all other criteria being equal, earning/deduction 42 would be calculated before
earning/deduction 59, and earning/deduction HRLY1 would be calculated before earning/deduction
SALARY.
When processing a timecard, Sage HRMS Payroll uses other ordering criteria to process the detail
lines that are assigned overtime schedules.
Tax Hierarchies
When setting up a tax, you specify the relationship of the tax to the earnings and deductions used to
process Sage HRMS Payroll. Depending upon the calculation method you choose for a tax, you may need
to enter information about the hours, earnings, and deductions that constitute the calculation base for the
tax. Sage HRMS Payroll uses the concept of levels to control how taxes relate to earnings and deductions.
Tax Levels
The system assigns to each tax a level, which determines whether the tax can include a particular
earning/deduction in its calculation base. You can include in the calculation base of a tax the amounts
calculated for earnings and deductions assigned lower levels. For example, the calculation base of a
Percentage Of Base method tax assigned a level of 20 can include the amounts calculated for any
earning/deduction assigned a level between 1 and 19.
The level also determines which taxes an accrual, earning, or benefit may be subject to and which
taxes can be taken after a pre-tax deduction is taken.
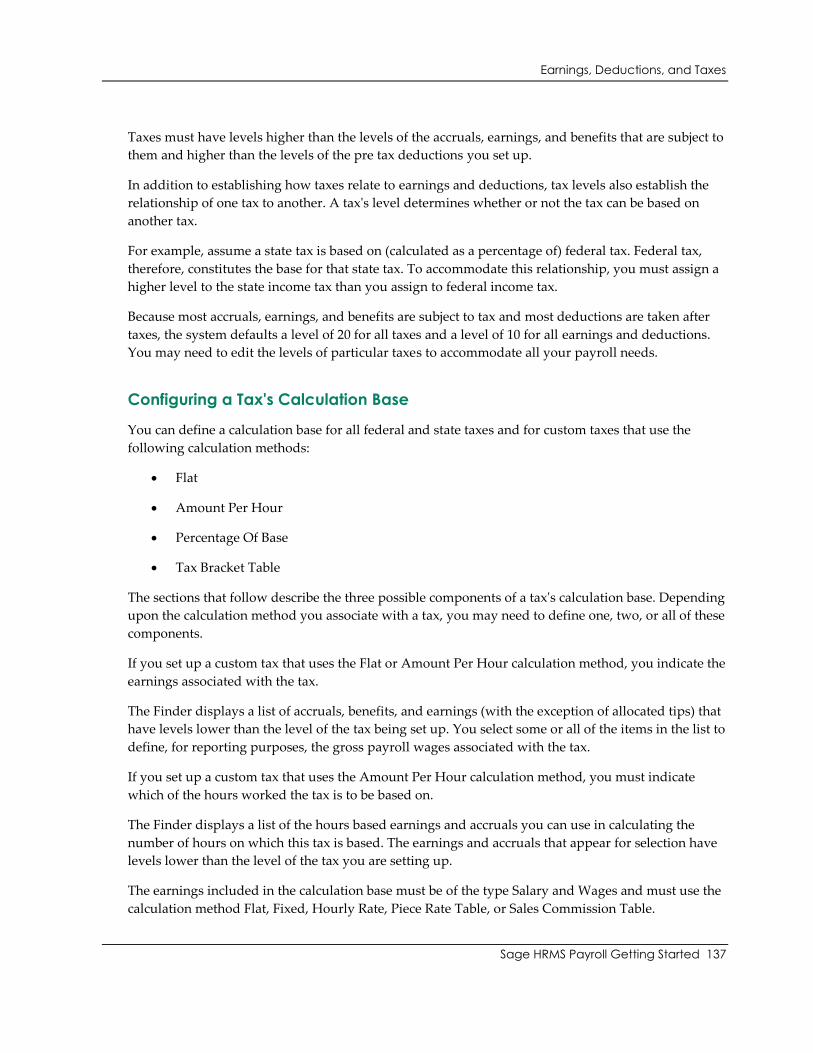
Earnings, Deductions, and Taxes
Sage HRMS Payroll Getting Started 137
Taxes must have levels higher than the levels of the accruals, earnings, and benefits that are subject to
them and higher than the levels of the pre tax deductions you set up.
In addition to establishing how taxes relate to earnings and deductions, tax levels also establish the
relationship of one tax to another. A tax's level determines whether or not the tax can be based on
another tax.
For example, assume a state tax is based on (calculated as a percentage of) federal tax. Federal tax,
therefore, constitutes the base for that state tax. To accommodate this relationship, you must assign a
higher level to the state income tax than you assign to federal income tax.
Because most accruals, earnings, and benefits are subject to tax and most deductions are taken after
taxes, the system defaults a level of 20 for all taxes and a level of 10 for all earnings and deductions.
You may need to edit the levels of particular taxes to accommodate all your payroll needs.
Configuring a Tax's Calculation Base
You can define a calculation base for all federal and state taxes and for custom taxes that use the
following calculation methods:
Flat
Amount Per Hour
Percentage Of Base
Tax Bracket Table
The sections that follow describe the three possible components of a tax's calculation base. Depending
upon the calculation method you associate with a tax, you may need to define one, two, or all of these
components.
If you set up a custom tax that uses the Flat or Amount Per Hour calculation method, you indicate the
earnings associated with the tax.
The Finder displays a list of accruals, benefits, and earnings (with the exception of allocated tips) that
have levels lower than the level of the tax being set up. You select some or all of the items in the list to
define, for reporting purposes, the gross payroll wages associated with the tax.
If you set up a custom tax that uses the Amount Per Hour calculation method, you must indicate
which of the hours worked the tax is to be based on.
The Finder displays a list of the hours based earnings and accruals you can use in calculating the
number of hours on which this tax is based. The earnings and accruals that appear for selection have
levels lower than the level of the tax you are setting up.
The earnings included in the calculation base must be of the type Salary and Wages and must use the
calculation method Flat, Fixed, Hourly Rate, Piece Rate Table, or Sales Commission Table.
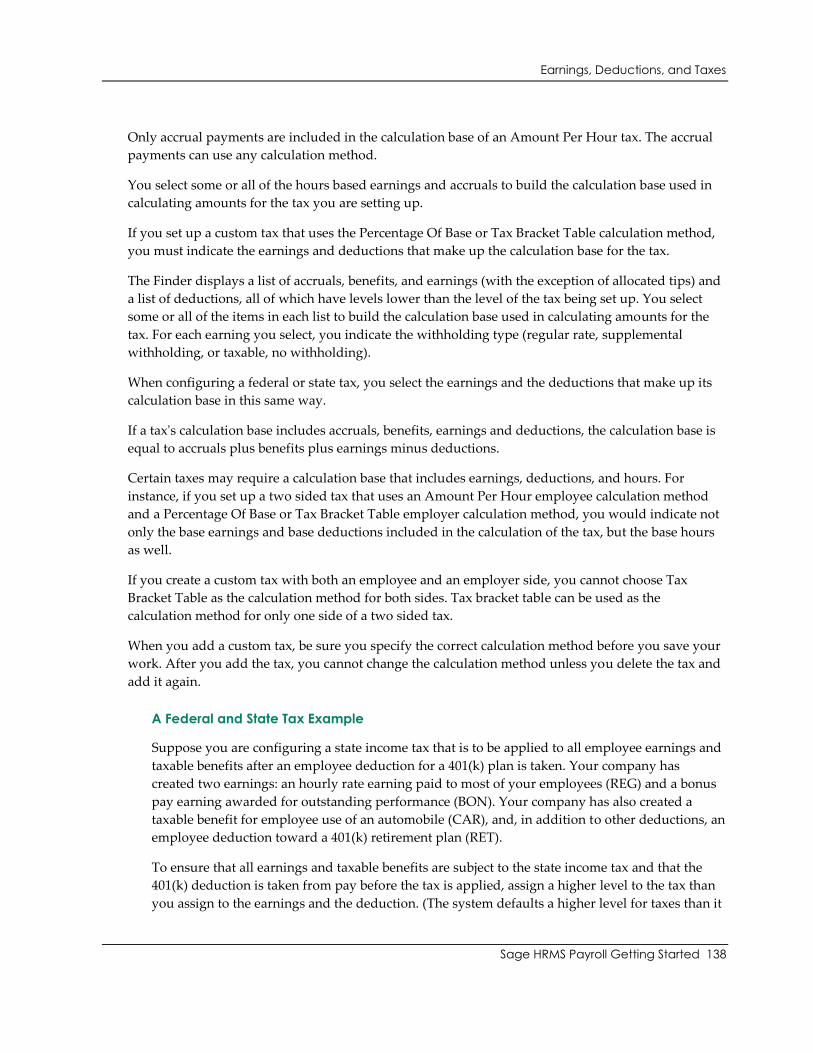
Earnings, Deductions, and Taxes
Sage HRMS Payroll Getting Started 138
Only accrual payments are included in the calculation base of an Amount Per Hour tax. The accrual
payments can use any calculation method.
You select some or all of the hours based earnings and accruals to build the calculation base used in
calculating amounts for the tax you are setting up.
If you set up a custom tax that uses the Percentage Of Base or Tax Bracket Table calculation method,
you must indicate the earnings and deductions that make up the calculation base for the tax.
The Finder displays a list of accruals, benefits, and earnings (with the exception of allocated tips) and
a list of deductions, all of which have levels lower than the level of the tax being set up. You select
some or all of the items in each list to build the calculation base used in calculating amounts for the
tax. For each earning you select, you indicate the withholding type (regular rate, supplemental
withholding, or taxable, no withholding).
When configuring a federal or state tax, you select the earnings and the deductions that make up its
calculation base in this same way.
If a tax's calculation base includes accruals, benefits, earnings and deductions, the calculation base is
equal to accruals plus benefits plus earnings minus deductions.
Certain taxes may require a calculation base that includes earnings, deductions, and hours. For
instance, if you set up a two sided tax that uses an Amount Per Hour employee calculation method
and a Percentage Of Base or Tax Bracket Table employer calculation method, you would indicate not
only the base earnings and base deductions included in the calculation of the tax, but the base hours
as well.
If you create a custom tax with both an employee and an employer side, you cannot choose Tax
Bracket Table as the calculation method for both sides. Tax bracket table can be used as the
calculation method for only one side of a two sided tax.
When you add a custom tax, be sure you specify the correct calculation method before you save your
work. After you add the tax, you cannot change the calculation method unless you delete the tax and
add it again.
A Federal and State Tax Example
Suppose you are configuring a state income tax that is to be applied to all employee earnings and
taxable benefits after an employee deduction for a 401(k) plan is taken. Your company has
created two earnings: an hourly rate earning paid to most of your employees (REG) and a bonus
pay earning awarded for outstanding performance (BON). Your company has also created a
taxable benefit for employee use of an automobile (CAR), and, in addition to other deductions, an
employee deduction toward a 401(k) retirement plan (RET).
To ensure that all earnings and taxable benefits are subject to the state income tax and that the
401(k) deduction is taken from pay before the tax is applied, assign a higher level to the tax than
you assign to the earnings and the deduction. (The system defaults a higher level for taxes than it
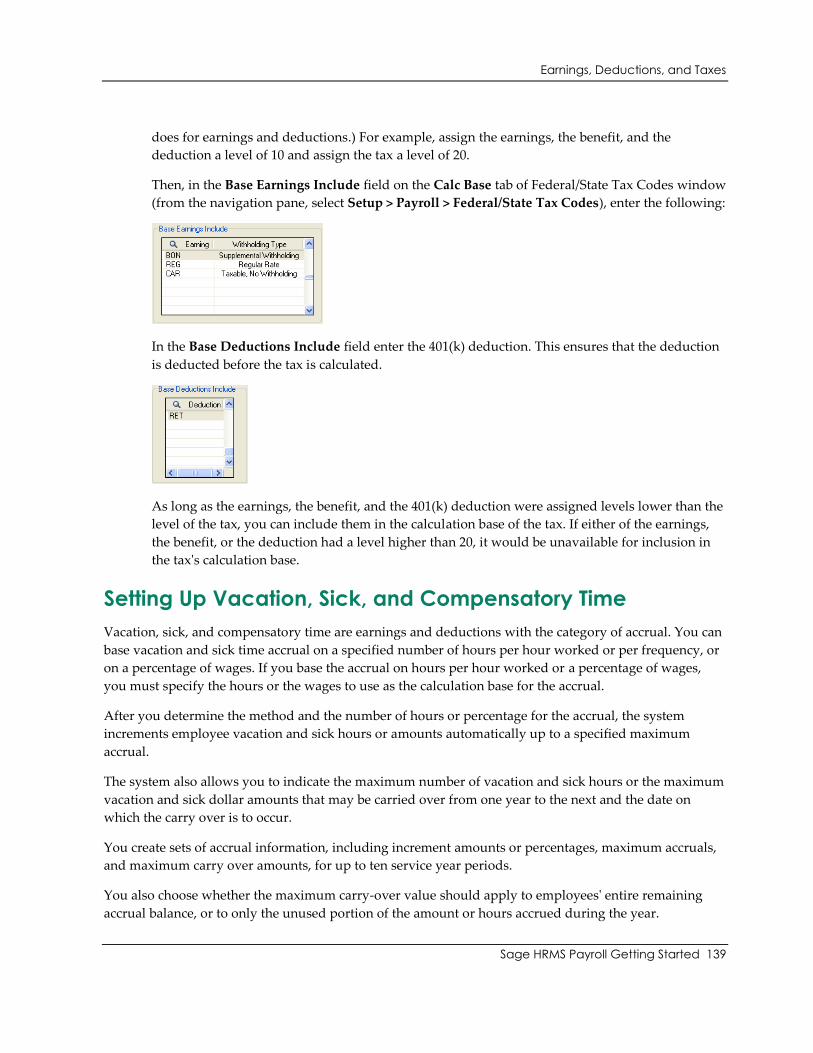
Earnings, Deductions, and Taxes
Sage HRMS Payroll Getting Started 139
does for earnings and deductions.) For example, assign the earnings, the benefit, and the
deduction a level of 10 and assign the tax a level of 20.
Then, in the Base Earnings Include field on the Calc Base tab of Federal/State Tax Codes window
(from the navigation pane, select Setup > Payroll > Federal/State Tax Codes), enter the following:
In the Base Deductions Include field enter the 401(k) deduction. This ensures that the deduction
is deducted before the tax is calculated.
As long as the earnings, the benefit, and the 401(k) deduction were assigned levels lower than the
level of the tax, you can include them in the calculation base of the tax. If either of the earnings,
the benefit, or the deduction had a level higher than 20, it would be unavailable for inclusion in
the tax's calculation base.
Setting Up Vacation, Sick, and Compensatory Time
Vacation, sick, and compensatory time are earnings and deductions with the category of accrual. You can
base vacation and sick time accrual on a specified number of hours per hour worked or per frequency, or
on a percentage of wages. If you base the accrual on hours per hour worked or a percentage of wages,
you must specify the hours or the wages to use as the calculation base for the accrual.
After you determine the method and the number of hours or percentage for the accrual, the system
increments employee vacation and sick hours or amounts automatically up to a specified maximum
accrual.
The system also allows you to indicate the maximum number of vacation and sick hours or the maximum
vacation and sick dollar amounts that may be carried over from one year to the next and the date on
which the carry over is to occur.
You create sets of accrual information, including increment amounts or percentages, maximum accruals,
and maximum carry over amounts, for up to ten service year periods.
You also choose whether the maximum carry-over value should apply to employees' entire remaining
accrual balance, or to only the unused portion of the amount or hours accrued during the year.

Earnings, Deductions, and Taxes
Sage HRMS Payroll Getting Started 140
You do not select a calculation method or an increment amount or percentage for the accrual of
compensatory time; employees accrue compensatory time based on timecard entries. You can, however,
set a maximum accrual and a maximum amount to carry over from one year to the next.
You pay an employee vacation, sick, or compensatory time by entering a timecard. When you process
vacation, sick, or compensatory time pay, the system posts the Regular Expense account associated with
the accrual. If you choose the Percentage Of Base calculation method for a vacation or sick time accrual,
you also have the option of posting to the Employer Liability account the amounts of the accrued
vacation or sick time.
Carrying Over Vacation, Sick, and Compensatory time Accruals
Carry-overs are initiated as a result of payroll postings and transaction history entries.
Sage HRMS Payroll automatically calculates accrual and carry-over amounts or hours according to
the accrual setup information, such as the increment amounts or percentages, maximum accrual, and
maximum carry-over for each service year, and the accrual carry over date.
The topics to follow describe the accrual and carry-over processes in Sage HRMS Payroll, including
the significance of the accrual carry-over date, an overview of the carry-over process, the two ways
that Sage HRMS Payroll can calculate carry over, and examples of setting up the carry-over
parameters.
How Dates Influence Accrual and Carry-Over Processing
The system processes and carries over accruals (vacation, sick, and compensatory time hours and
amounts) according to the following specifications:
The accrual is carried over on the first payroll posting following the accrual carry-over
date. (You set the default carry over date when you set up the accrual on the
Earning/Deduction Codes window. The carry-over year is automatically increased when
a carry-over is posted.)
For example, if the accrual carry-over date is the date of hire, Sage HRMS Payroll
calculates carry-over and, upon posting the employee's first payroll after hire, consults
the Service Year table set up (on the Earning/Deduction Codes window) for the accrual.
The beginning amount or hours that you enter in the Beginning column of the first
bracket of the Service Year table will be accrued on the first payroll. Posting then
increases the carry-over year by one.
For carry over processing, Sage HRMS Payroll uses the accrual carry-over date and the
employee's hire date to determine the service year (that is, which entry in the Service
Year table to use). The employee moves into the next service year when the carry-over
date is one year (or more) after the hire date.
Earnings, Deductions, and Taxes
Sage HRMS Payroll Getting Started 141
For routine accrual processing (that is, determine how much the employee accrues per
pay period), Sage HRMS Payroll uses the check date and the employee's hire date to
determine the service year (that is, which entry in the Service Year table to use). The
employee moves into the next service year when the check date is one year (or more)
after the hire date.
For example, suppose the employee's hire date is 01/01/2014. Consider these two scenarios, in
which the accrual carry-over date differs by one day (12/31/2014 versus 01/01/2015).
If the accrual carry-over date is 12/31/2014:
Assume the employee's first payroll posted after the carry-over date was on 01/15/2015.
For carry over processing, the payroll posted on 01/15/2015 is considered to be in the first
service year because the carry-over date is less than one year after the hire date.
Consequently, when processing the carry over, the system refers to the carry over parameters
(that is, the Beginning Amt./Hrs., Maximum Accrual, and Maximum Carry over columns of the
Service Year table) for the service year bracket covering the first service year. Posting then
increases the carry-over year by one.
For routine accrual processing, however, the payroll posted on 01/15/2015 is considered
to be in the second service year because the check date is more than one year after the
hire date.
Consequently, when processing the accrual for the pay period, the system refers to the accrual
parameter (that is, the Increment column of the Service Year table) for the service year bracket
covering the second service year.
If the accrual carry-over date is 01/01/2015:
A payroll posted on 01/15/2015 is considered to be in the second service year for both carry over
processing and routine accrual processing because both the carry over date and the check date
are a year (or more) after the hire date.
Consequently, carry over and routine accrual processing occurs according to the parameters for
the second service year. Posting then increases the carry-over year by one.
Overview of the Carry-Over Process
When calculating the employee's accrual balance at the start of a new accrual year, Sage HRMS
Payroll generally follows this procedure:
Sage HRMS Payroll calculates the amount or hours to carry over, by evaluating:
The employee's balance at the start of the year.
The employee's accrued amount or hours during the year.
Earnings, Deductions, and Taxes
Sage HRMS Payroll Getting Started 142
The accrued amount or hours used (paid out) by the employee during the year.
During calculation, Sage HRMS Payroll also evaluates the "Calc Max. Carry-over Based
on Remaining Balance" option and the maximum carry-over amount (both specified on
the Earning/Deduction Codes window for an accrual).
After the carry-over amount is calculated, Sage HRMS Payroll adds the amount specified
in the Beginning column of the table on the Employee tab of the Earning/Deduction
Codes window. The "Beginning" amount is a flat amount that is always added at the start
of a new accrual period, regardless of what is specified in the Maximum Carry-Over
field.
The carry-over amount plus the "Beginning" amount cannot exceed the maximum
accrual that is specified on the accrual (earning/deduction) setup record.
Calculating Maximum Carry-Over
When you set up a vacation, sick, or compensatory time accrual, you will see the Calc Max.
Carry-over Based On Remaining Balance check box on the Employee tab of the
Earning/Deduction Codes window. This check box lets you specify how the maximum carry-over
value should be used during carry-over calculation.
To illustrate the two methods, consider the following example.
Suppose your employees are paid bi-weekly (26 pay periods). Regardless of years of service, your
employees accrue 80 hours of vacation per year, with no "beginning" flat amount. The maximum
carry-over per year is 30 hours, up to a maximum accrual at any time of 400 hours. (You use the
Employee tab of the Earnings and Deductions window to set these values for an accrual.)
Assume an employee starts year 1 without any accrued vacation time, and then:
In year 1, the employee accrues 80 hours of vacation, and uses 20 hours.
In year 2, the employee accrues another 80 hours, and uses 25 hours.
In year 3, the employee accrues another 80 hours, and uses 90 hours.
In year 4, the employee accrues another 80 hours, and does not use any of the hours.
If you select the Calc Max. Carry-over Based On Remaining Balance option, then:
The employee's starting balance for a new accrual year cannot exceed the Maximum Carry
Over field (unless a number is specified in the Beginning column of the Earnings And
Deductions setup window).
To calculate the employee's starting balance for the new year, Sage HRMS Payroll takes the
lesser of these two amounts:
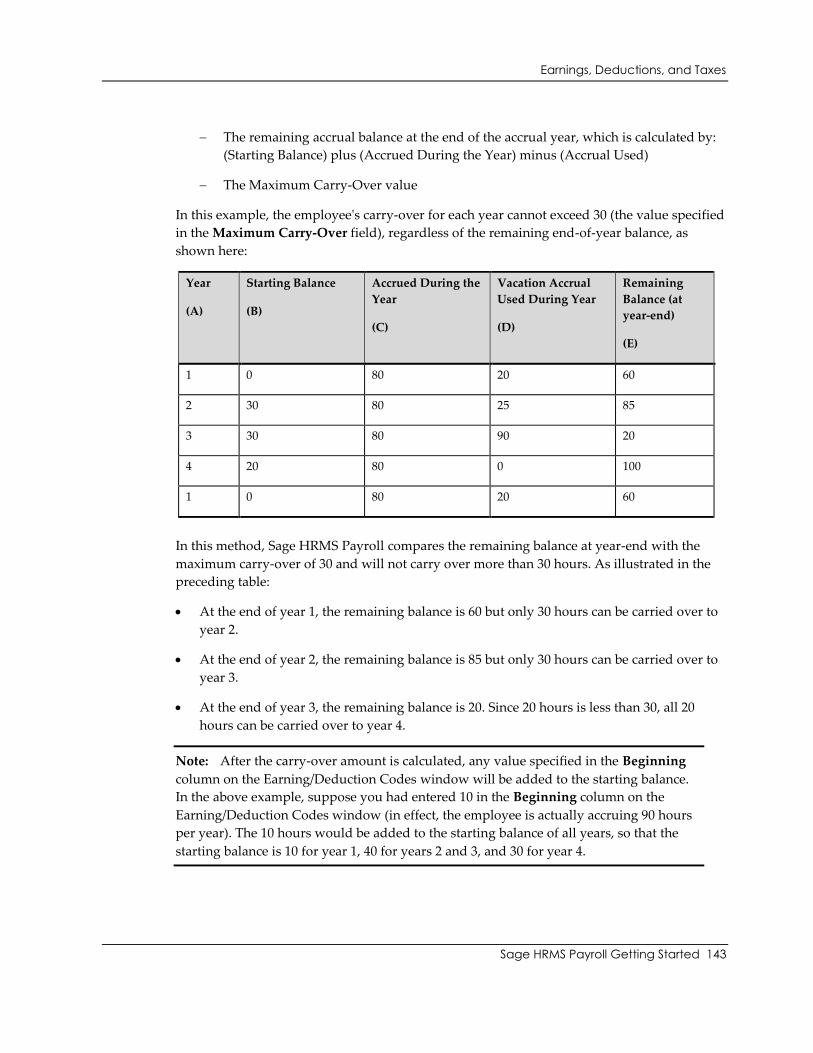
Earnings, Deductions, and Taxes
Sage HRMS Payroll Getting Started 143
The remaining accrual balance at the end of the accrual year, which is calculated by:
(Starting Balance) plus (Accrued During the Year) minus (Accrual Used)
The Maximum Carry-Over value
In this example, the employee's carry-over for each year cannot exceed 30 (the value specified
in the Maximum Carry-Over field), regardless of the remaining end-of-year balance, as
shown here:
Year
(A)
Starting Balance
(B)
Accrued During the
Year
(C)
Vacation Accrual
Used During Year
(D)
Remaining
Balance (at
year-end)
(E)
1 0 80 20 60
2 30 80 25 85
3 30 80 90 20
4 20 80 0 100
1 0 80 20 60
In this method, Sage HRMS Payroll compares the remaining balance at year-end with the
maximum carry-over of 30 and will not carry over more than 30 hours. As illustrated in the
preceding table:
At the end of year 1, the remaining balance is 60 but only 30 hours can be carried over to
year 2.
At the end of year 2, the remaining balance is 85 but only 30 hours can be carried over to
year 3.
At the end of year 3, the remaining balance is 20. Since 20 hours is less than 30, all 20
hours can be carried over to year 4.
Note: After the carry-over amount is calculated, any value specified in the Beginning
column on the Earning/Deduction Codes window will be added to the starting balance.
In the above example, suppose you had entered 10 in the Beginning column on the
Earning/Deduction Codes window (in effect, the employee is actually accruing 90 hours
per year). The 10 hours would be added to the starting balance of all years, so that the
starting balance is 10 for year 1, 40 for years 2 and 3, and 30 for year 4.
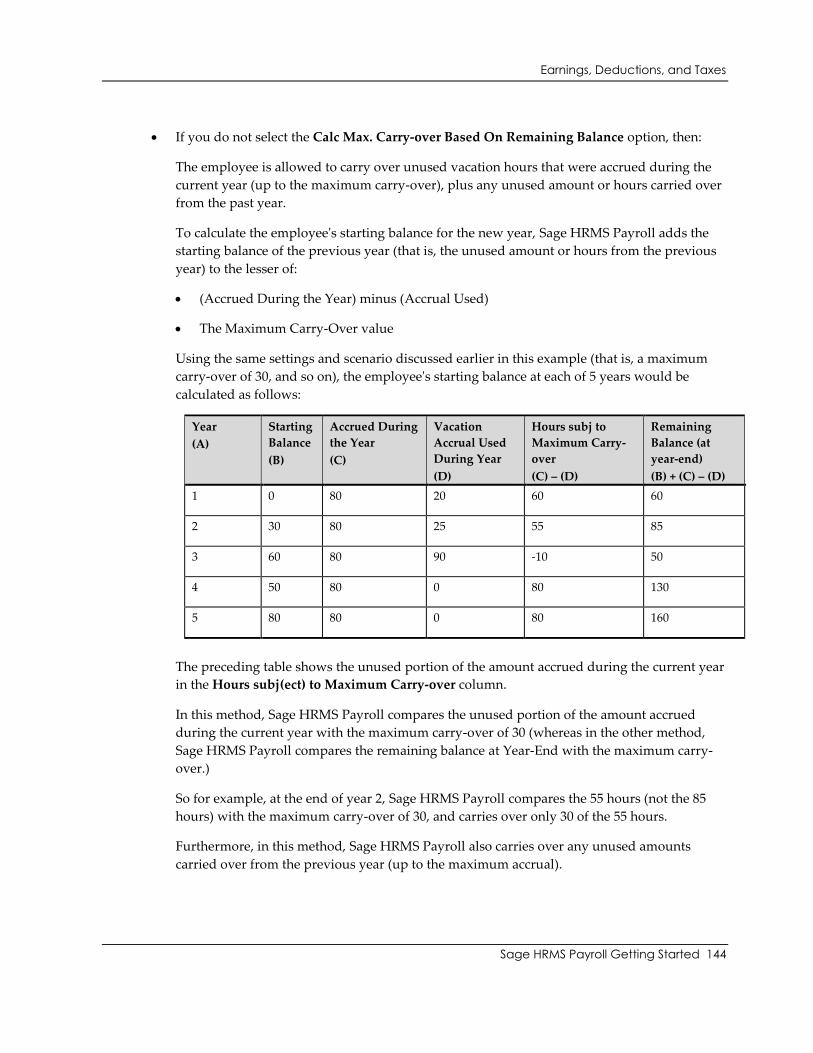
Earnings, Deductions, and Taxes
Sage HRMS Payroll Getting Started 144
If you do not select the Calc Max. Carry-over Based On Remaining Balance option, then:
The employee is allowed to carry over unused vacation hours that were accrued during the
current year (up to the maximum carry-over), plus any unused amount or hours carried over
from the past year.
To calculate the employee's starting balance for the new year, Sage HRMS Payroll adds the
starting balance of the previous year (that is, the unused amount or hours from the previous
year) to the lesser of:
(Accrued During the Year) minus (Accrual Used)
The Maximum Carry-Over value
Using the same settings and scenario discussed earlier in this example (that is, a maximum
carry-over of 30, and so on), the employee's starting balance at each of 5 years would be
calculated as follows:
Year
(A)
Starting
Balance
(B)
Accrued During
the Year
(C)
Vacation
Accrual Used
During Year
(D)
Hours subj to
Maximum Carry-
over
(C) – (D)
Remaining
Balance (at
year-end)
(B) + (C) – (D)
1 0 80 20 60 60
2 30 80 25 55 85
3 60 80 90 -10 50
4 50 80 0 80 130
5 80 80 0 80 160
The preceding table shows the unused portion of the amount accrued during the current year
in the Hours subj(ect) to Maximum Carry-over column.
In this method, Sage HRMS Payroll compares the unused portion of the amount accrued
during the current year with the maximum carry-over of 30 (whereas in the other method,
Sage HRMS Payroll compares the remaining balance at Year-End with the maximum carry-
over.)
So for example, at the end of year 2, Sage HRMS Payroll compares the 55 hours (not the 85
hours) with the maximum carry-over of 30, and carries over only 30 of the 55 hours.
Furthermore, in this method, Sage HRMS Payroll also carries over any unused amounts
carried over from the previous year (up to the maximum accrual).
Earnings, Deductions, and Taxes
Sage HRMS Payroll Getting Started 145
In this example, where the maximum carry-over is 30 hours, this type of method encourages
an employee to take at least 50 of the 80 vacation hours accrued during the year - otherwise,
the employee forfeits any part of the 50 hours not taken during the year:
In year 1, the employee took only 20 of the 80 vacation hours accrued during the year. Of
the remaining 60 hours accrued during the year, the employee is permitted to carry over
only 30 hours, thus forfeiting 30 hours. The employee has nothing from the previous year
to carry over, so the starting balance for year 2 is 30 hours.
In year 2, the employee took only 25 of the 80 vacation hours accrued during the year. Of
the remaining 55 hours accrued during the year, the employee can carry over only 30
hours. In addition, the employee can carry over the unused 30 hours from the previous
year, so the starting balance for year 3 is 60 hours. Because the employee used only 25 of
the 50 mandatory hours, the employee forfeits 25 hours (in other words, of the 85 hours
remaining balance, the employee can carry over only 60).
In year 3, the employee started with 60 vacation hours, accrued another 80, and took 90
hours of vacation. The result is that the number of accrued hours during the year
becomes -10; that is, (80 minus 90). The employee took more than the 50 mandatory
hours, so does not lose any accrued vacation. The employee carries over the remaining
year-end balance of 50.
In year 4, the employee did not take any vacation. Of the 80 hours accrued during year 4,
the employee must forfeit all 50 unused hours, but can carry over the remaining 30
unused hours, plus the 50 hours from the previous year. Of the 130 total hours at the end
of the year, the employee will carry over only 80 hours to year 5.
The employee can continue carrying over in this manner, up to the value specified in the
Maximum Accrual field of the accrual's setup record (Earning/Deduction Codes window).
Examples of Setting up the "Through Service Year" Table for an Accrual
(Vacation)
This section provides a few examples of how to set up the "Through Service Year" table and the Calc
Max. Carry-over based on Remaining Balance option on the on the Employee tab of the
Earning/Deduction Codes window for an accrual. The examples specifically describe vacation time
accrual, but the principles would also apply to sick time accrual. For compensatory time, you do not
specify beginning and increment amounts.
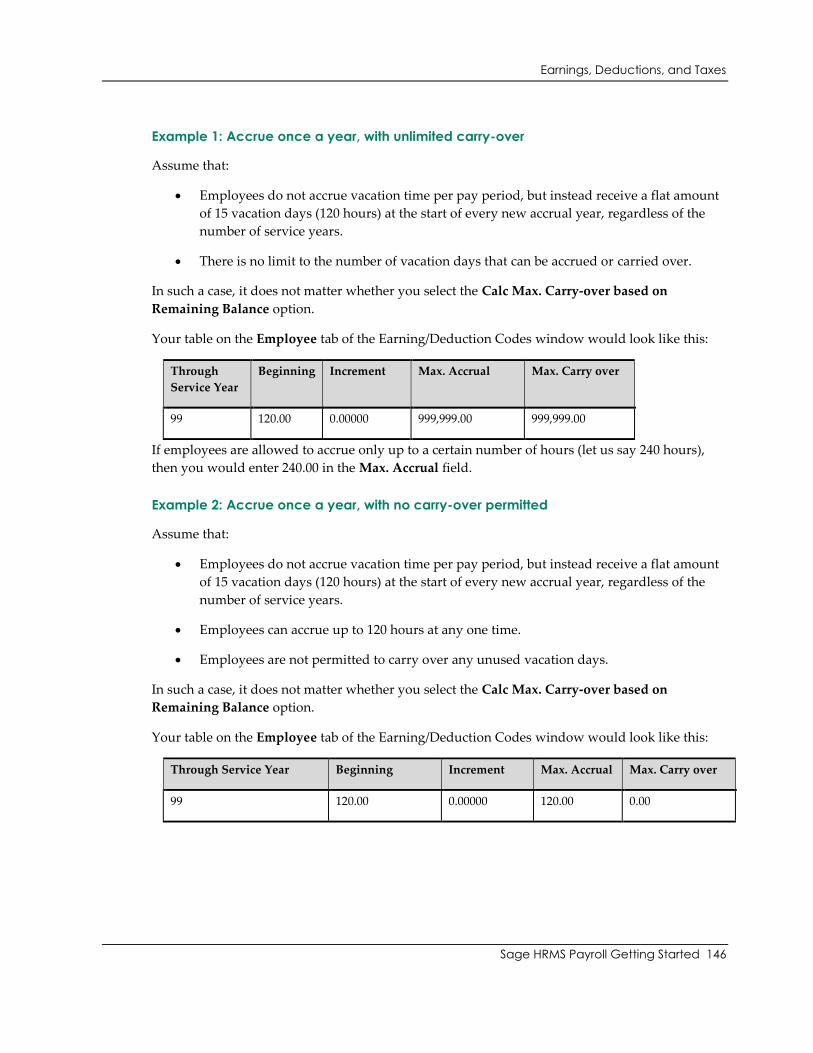
Earnings, Deductions, and Taxes
Sage HRMS Payroll Getting Started 146
Example 1: Accrue once a year, with unlimited carry-over
Assume that:
Employees do not accrue vacation time per pay period, but instead receive a flat amount
of 15 vacation days (120 hours) at the start of every new accrual year, regardless of the
number of service years.
There is no limit to the number of vacation days that can be accrued or carried over.
In such a case, it does not matter whether you select the Calc Max. Carry-over based on
Remaining Balance option.
Your table on the Employee tab of the Earning/Deduction Codes window would look like this:
Through
Service Year
Beginning Increment Max. Accrual Max. Carry over
99 120.00 0.00000 999,999.00 999,999.00
If employees are allowed to accrue only up to a certain number of hours (let us say 240 hours),
then you would enter 240.00 in the Max. Accrual field.
Example 2: Accrue once a year, with no carry-over permitted
Assume that:
Employees do not accrue vacation time per pay period, but instead receive a flat amount
of 15 vacation days (120 hours) at the start of every new accrual year, regardless of the
number of service years.
Employees can accrue up to 120 hours at any one time.
Employees are not permitted to carry over any unused vacation days.
In such a case, it does not matter whether you select the Calc Max. Carry-over based on
Remaining Balance option.
Your table on the Employee tab of the Earning/Deduction Codes window would look like this:
Through Service Year Beginning Increment Max. Accrual Max. Carry over
99 120.00 0.00000 120.00 0.00
Earnings, Deductions, and Taxes
Sage HRMS Payroll Getting Started 147
Example 3: Accrue per pay period, without the "Calc Max. Carry-over based on
Remaining Balance" option
This example illustrates a situation where:
Employees can carry over the unused portion of vacation accrued during the current
year, up to a specified maximum carry over. (The company they work for allows them to
roll over some of their vacation hours into the new period but encourages the use of most
of it as needed breaks from the work world.)
Employees can also carry over any unused vacation hours accumulated from past years.
Setting Up the Table
Suppose that vacation time is accrued depending on the years of service as follows:
Three weeks (120 hours) per year, for an employee's first five years of employment.
Four and one half weeks (180 hours) per year, for employment years six through ten.
Six weeks (240 hours) per year thereafter.
You would enter 5 in the first Through Service Year field, 10 in the second Through Service Year
field, and 99 (or another appropriately high number) in the third Through Service Year field.
Suppose that, as a bonus for long-term employment:
Employees with six through ten years of employment receive one extra day (8 hours) of
vacation at the start of each accrual year.
Employees with more than 10 years of employment receive two extra days (16 hours) of
vacation at the start of each accrual year.
In the Beginning column, you would enter 0 for the first Through Service Year line, 8 in the
second Through Service Year line, and 16 in the third Through Service Year.
Suppose you are accruing vacation for your employees by means of a monthly Hours Per
Frequency accrual.
On the line that corresponds to Through Service Year 5, you would enter 10 hours as the
monthly increment. (120 hours divided by 12 pay periods = 10)
On the line corresponding to Through Service Year 10, you would enter 15 hours as the
monthly increment. (180 hours divided by 12 pay periods = 15)
On the line corresponding to Through Service Year 99, you would enter 20 hours as the
monthly increment. (240 hours divided by 12 pay periods = 20)
Earnings, Deductions, and Taxes
Sage HRMS Payroll Getting Started 148
Suppose that:
For employees with five or fewer years of service, you allow a maximum unused accrual
of six weeks, or 240 hours. In the Max. Accrual field corresponding to the first five years
of service, you would enter 240 hours.
For employees with between six and ten years of service, you allow a maximum accrual
of 9 weeks, or 360 hours. In the Max. Accrual field corresponding to service years six
through ten, you would enter 360.
Finally, for service years over ten, you allow a maximum accrual of 12 weeks, or 480
hours. In the Max. Accrual field corresponding to service years 11 through 99, you would
enter 480.
Suppose that, of the vacation time accrued during the year:
Employees in the first bracket (through service year five) can carry over one week (40
hours) of the 120 hours.
Employees in the second bracket can carry over one and one half weeks (60 hours) of the
180 hours.
Employees in the third and final bracket can carry over two weeks (80 hours) of the 240
hours.
In addition, assume that employees are also allowed to carry over any unused vacation
accumulated from past years, regardless of the service year level.
To set this up:
Enter 40 hours as the maximum carry-over for the first group, 60 hours for the second,
and 80 for the third.
Do not select the Calc Max. Carry-over based on Remaining Balance check box. If you
do not select the option, you are instructing Sage HRMS Payroll to compare the
maximum carry-over value with the employee's unused portion of the hours accrued
during the current year, and to also carry over any unused hours from the previous year.
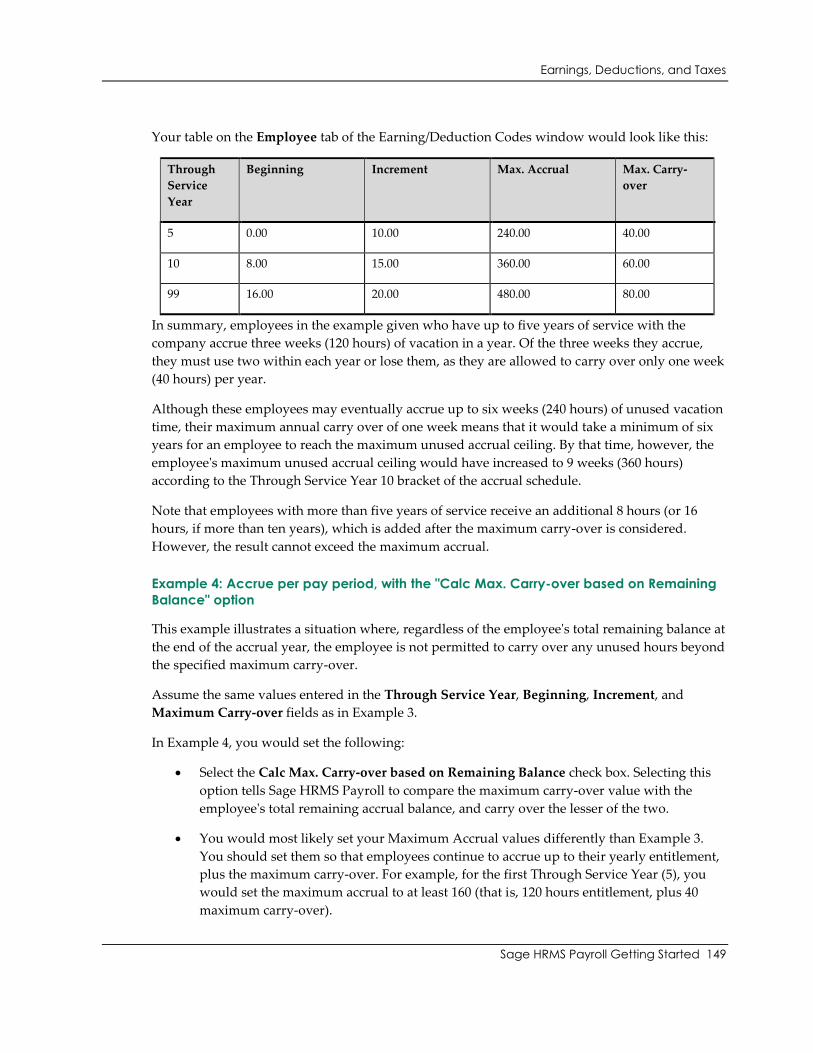
Earnings, Deductions, and Taxes
Sage HRMS Payroll Getting Started 149
Your table on the Employee tab of the Earning/Deduction Codes window would look like this:
Through
Service
Year
Beginning Increment Max. Accrual Max. Carry-
over
5 0.00 10.00 240.00 40.00
10 8.00 15.00 360.00 60.00
99 16.00 20.00 480.00 80.00
In summary, employees in the example given who have up to five years of service with the
company accrue three weeks (120 hours) of vacation in a year. Of the three weeks they accrue,
they must use two within each year or lose them, as they are allowed to carry over only one week
(40 hours) per year.
Although these employees may eventually accrue up to six weeks (240 hours) of unused vacation
time, their maximum annual carry over of one week means that it would take a minimum of six
years for an employee to reach the maximum unused accrual ceiling. By that time, however, the
employee's maximum unused accrual ceiling would have increased to 9 weeks (360 hours)
according to the Through Service Year 10 bracket of the accrual schedule.
Note that employees with more than five years of service receive an additional 8 hours (or 16
hours, if more than ten years), which is added after the maximum carry-over is considered.
However, the result cannot exceed the maximum accrual.
Example 4: Accrue per pay period, with the "Calc Max. Carry-over based on Remaining
Balance" option
This example illustrates a situation where, regardless of the employee's total remaining balance at
the end of the accrual year, the employee is not permitted to carry over any unused hours beyond
the specified maximum carry-over.
Assume the same values entered in the Through Service Year, Beginning, Increment, and
Maximum Carry-over fields as in Example 3.
In Example 4, you would set the following:
Select the Calc Max. Carry-over based on Remaining Balance check box. Selecting this
option tells Sage HRMS Payroll to compare the maximum carry-over value with the
employee's total remaining accrual balance, and carry over the lesser of the two.
You would most likely set your Maximum Accrual values differently than Example 3.
You should set them so that employees continue to accrue up to their yearly entitlement,
plus the maximum carry-over. For example, for the first Through Service Year (5), you
would set the maximum accrual to at least 160 (that is, 120 hours entitlement, plus 40
maximum carry-over).
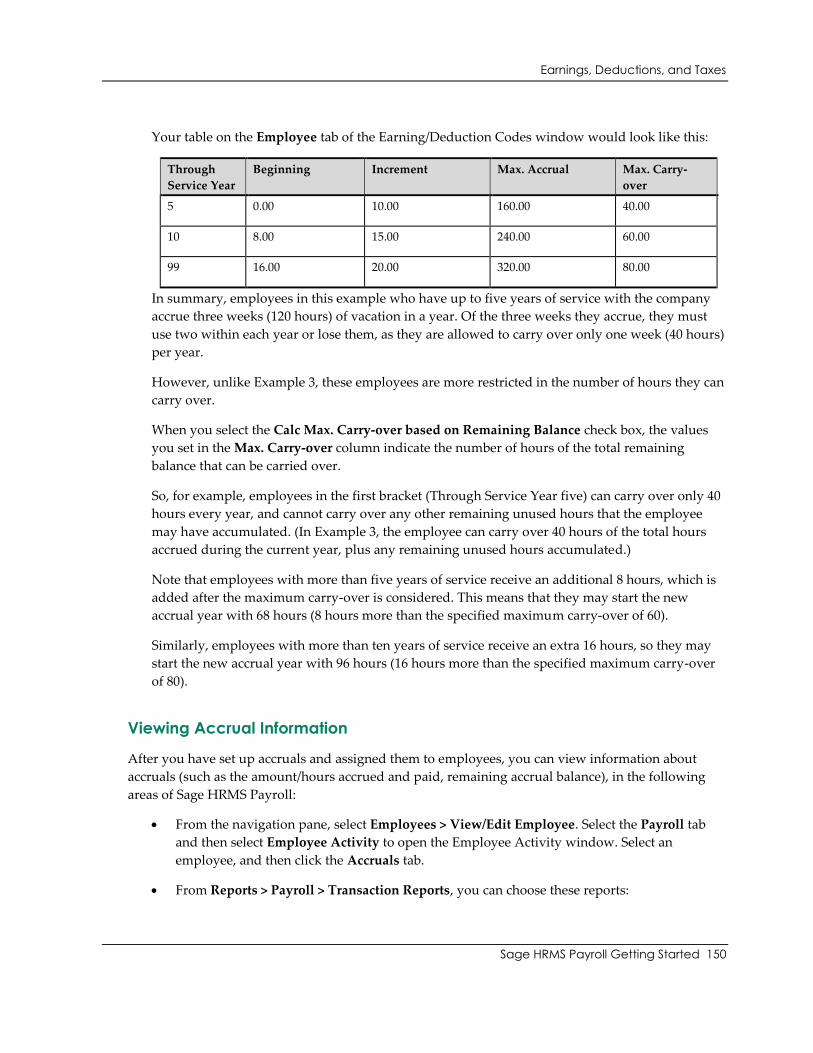
Earnings, Deductions, and Taxes
Sage HRMS Payroll Getting Started 150
Your table on the Employee tab of the Earning/Deduction Codes window would look like this:
Through
Service Year
Beginning Increment Max. Accrual Max. Carry-
over
5 0.00 10.00 160.00 40.00
10 8.00 15.00 240.00 60.00
99 16.00 20.00 320.00 80.00
In summary, employees in this example who have up to five years of service with the company
accrue three weeks (120 hours) of vacation in a year. Of the three weeks they accrue, they must
use two within each year or lose them, as they are allowed to carry over only one week (40 hours)
per year.
However, unlike Example 3, these employees are more restricted in the number of hours they can
carry over.
When you select the Calc Max. Carry-over based on Remaining Balance check box, the values
you set in the Max. Carry-over column indicate the number of hours of the total remaining
balance that can be carried over.
So, for example, employees in the first bracket (Through Service Year five) can carry over only 40
hours every year, and cannot carry over any other remaining unused hours that the employee
may have accumulated. (In Example 3, the employee can carry over 40 hours of the total hours
accrued during the current year, plus any remaining unused hours accumulated.)
Note that employees with more than five years of service receive an additional 8 hours, which is
added after the maximum carry-over is considered. This means that they may start the new
accrual year with 68 hours (8 hours more than the specified maximum carry-over of 60).
Similarly, employees with more than ten years of service receive an extra 16 hours, so they may
start the new accrual year with 96 hours (16 hours more than the specified maximum carry-over
of 80).
Viewing Accrual Information
After you have set up accruals and assigned them to employees, you can view information about
accruals (such as the amount/hours accrued and paid, remaining accrual balance), in the following
areas of Sage HRMS Payroll:
From the navigation pane, select Employees > View/Edit Employee. Select the Payroll tab
and then select Employee Activity to open the Employee Activity window. Select an
employee, and then click the Accruals tab.
From Reports > Payroll > Transaction Reports, you can choose these reports:

Earnings, Deductions, and Taxes
Sage HRMS Payroll Getting Started 151
Earnings/Deductions Summary. Choose the Accrual category, and the Current Balances
report type.
Accruals. Choose the Current Balances report format. To view carry-over information,
choose the Carry-over Log report format.
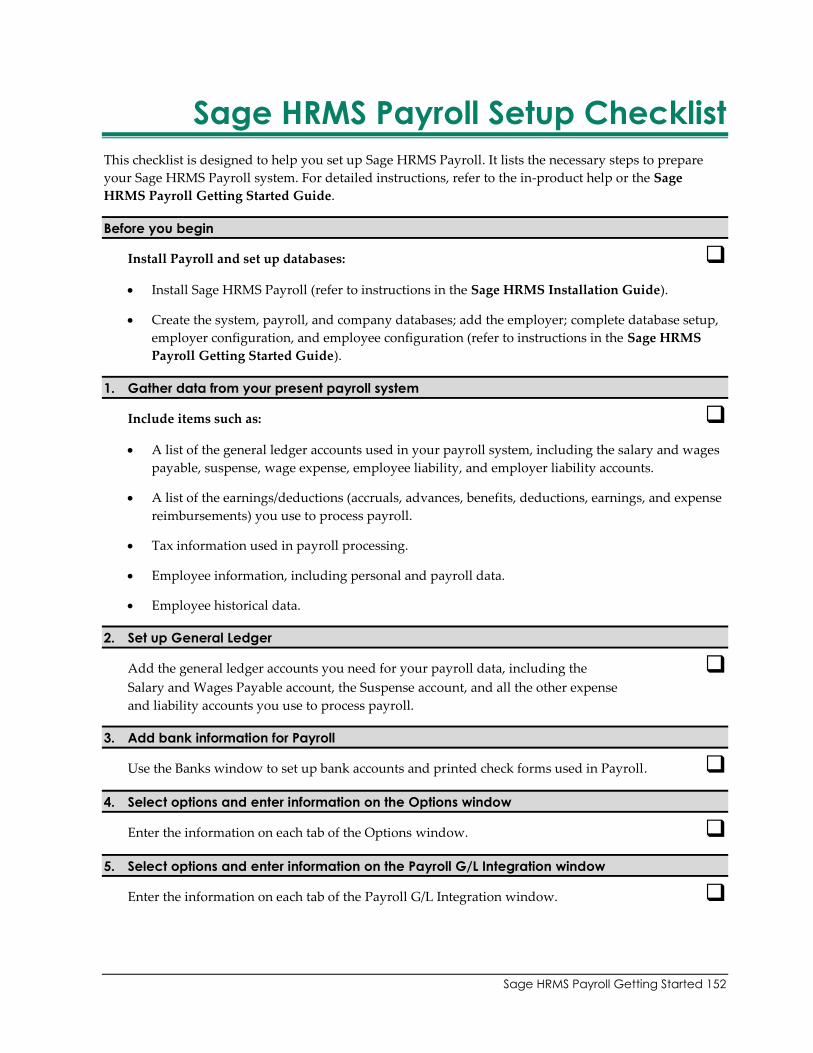
Sage HRMS Payroll Getting Started 152
Sage HRMS Payroll Setup Checklist
This checklist is designed to help you set up Sage HRMS Payroll. It lists the necessary steps to prepare
your Sage HRMS Payroll system. For detailed instructions, refer to the in-product help or the Sage
HRMS Payroll Getting Started Guide.
Before you begin
Install Payroll and set up databases:
Install Sage HRMS Payroll (refer to instructions in the Sage HRMS Installation Guide).
Create the system, payroll, and company databases; add the employer; complete database setup,
employer configuration, and employee configuration (refer to instructions in the Sage HRMS
Payroll Getting Started Guide).
1. Gather data from your present payroll system
Include items such as:
A list of the general ledger accounts used in your payroll system, including the salary and wages
payable, suspense, wage expense, employee liability, and employer liability accounts.
A list of the earnings/deductions (accruals, advances, benefits, deductions, earnings, and expense
reimbursements) you use to process payroll.
Tax information used in payroll processing.
Employee information, including personal and payroll data.
Employee historical data.
2. Set up General Ledger
Add the general ledger accounts you need for your payroll data, including the
Salary and Wages Payable account, the Suspense account, and all the other expense
and liability accounts you use to process payroll.
3. Add bank information for Payroll
Use the Banks window to set up bank accounts and printed check forms used in Payroll.
4. Select options and enter information on the Options window
Enter the information on each tab of the Options window.
5. Select options and enter information on the Payroll G/L Integration window
Enter the information on each tab of the Payroll G/L Integration window.
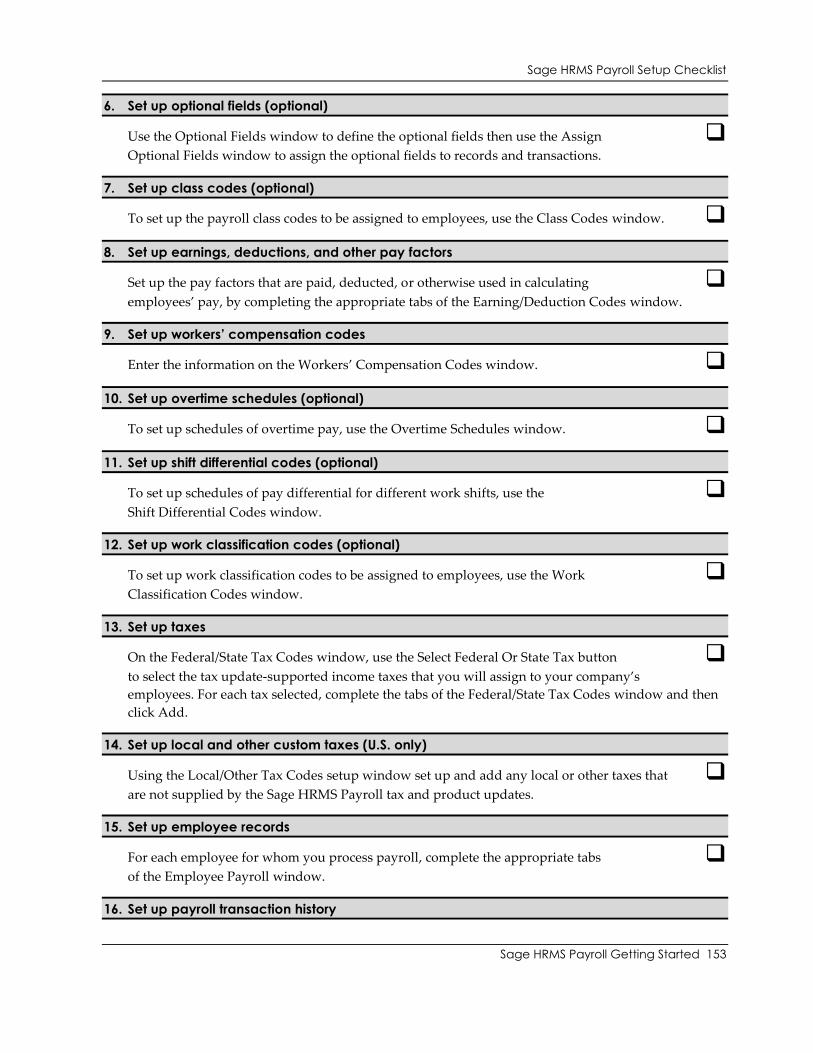
Sage HRMS Payroll Setup Checklist
Sage HRMS Payroll Getting Started 153
6. Set up optional fields (optional)
Use the Optional Fields window to define the optional fields then use the Assign
Optional Fields window to assign the optional fields to records and transactions.
7. Set up class codes (optional)
To set up the payroll class codes to be assigned to employees, use the Class Codes window.
8. Set up earnings, deductions, and other pay factors
Set up the pay factors that are paid, deducted, or otherwise used in calculating
employees’ pay, by completing the appropriate tabs of the Earning/Deduction Codes window.
9. Set up workers’ compensation codes
Enter the information on the Workers’ Compensation Codes window.
10. Set up overtime schedules (optional)
To set up schedules of overtime pay, use the Overtime Schedules window.
11. Set up shift differential codes (optional)
To set up schedules of pay differential for different work shifts, use the
Shift Differential Codes window.
12. Set up work classification codes (optional)
To set up work classification codes to be assigned to employees, use the Work
Classification Codes window.
13. Set up taxes
On the Federal/State Tax Codes window, use the Select Federal Or State Tax button
to select the tax update-supported income taxes that you will assign to your company’s
employees. For each tax selected, complete the tabs of the Federal/State Tax Codes window and then
click Add.
14. Set up local and other custom taxes (U.S. only)
Using the Local/Other Tax Codes setup window set up and add any local or other taxes that
are not supplied by the Sage HRMS Payroll tax and product updates.
15. Set up employee records
For each employee for whom you process payroll, complete the appropriate tabs
of the Employee Payroll window.
16. Set up payroll transaction history
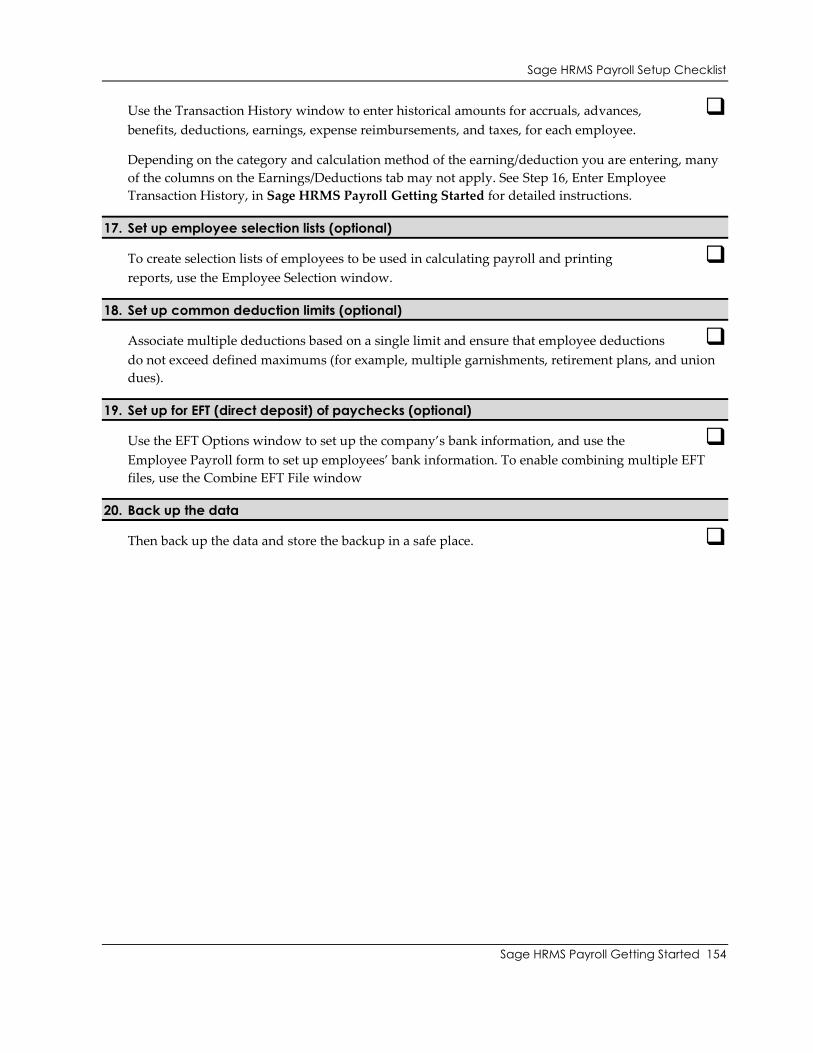
Sage HRMS Payroll Setup Checklist
Sage HRMS Payroll Getting Started 154
Use the Transaction History window to enter historical amounts for accruals, advances,
benefits, deductions, earnings, expense reimbursements, and taxes, for each employee.
Depending on the category and calculation method of the earning/deduction you are entering, many
of the columns on the Earnings/Deductions tab may not apply. See Step 16, Enter Employee
Transaction History, in Sage HRMS Payroll Getting Started for detailed instructions.
17. Set up employee selection lists (optional)
To create selection lists of employees to be used in calculating payroll and printing
reports, use the Employee Selection window.
18. Set up common deduction limits (optional)
Associate multiple deductions based on a single limit and ensure that employee deductions
do not exceed defined maximums (for example, multiple garnishments, retirement plans, and union
dues).
19. Set up for EFT (direct deposit) of paychecks (optional)
Use the EFT Options window to set up the company’s bank information, and use the
Employee Payroll form to set up employees’ bank information. To enable combining multiple EFT
files, use the Combine EFT File window
20. Back up the data
Then back up the data and store the backup in a safe place.