Sacco system
77
Sacco Information Management System SIMS USER MANUAL Sacco information Management system Release 1.0 SIMS Date published: August 22 , 2011 Date of last Revision: June , 2012 Page 1 of 77
-
Upload
kamau-sakks -
Category
Documents
-
view
242 -
download
27
description
Sacco management system documentation
Transcript of Sacco system
Sacco Information Management System
SIMS USER MANUAL
Sacco information Management system
Release 1.0
SIMS
Date published: August 22 , 2011
Date of last Revision: June , 2012
Contents
LIST OF FIGURES.......................................................................................................................... 2
Page 1 of 65
Sacco Information Management System
CHAPTER 1...................................................................................................................................... 2
1. INTRODUCTION................................................................................................................................2
1.1. The purpose of this User Reference Manual..........................................................2
1.2. Updating SIMS Software................................................................................................3
1.3. Overview.............................................................................................................................3
1.4. Architecture.......................................................................................................................4
1.5. About SIMS – SIMS Dimensions/Modules.................................................................4
1.6. Using this Manual............................................................................................................5
CHAPTER 2...................................................................................................................................... 6
2.1. Basic SIMS procedure help...........................................................................................6
CHAPTER 3.................................................................................................................................... 18
3. VIEWING CONTENT.......................................................................................................................18
3.1. Overview..............................................................................................................................18
3.2. In this Chapter......................................................................................................................19
CHAPTER 4.................................................................................................................................... 25
4. MAIN MENU OPTIONS...................................................................................................................25
4.1. Overview...........................................................................................................................25
4.2. In this Chapter................................................................................................................25
CHAPTER 5.................................................................................................................................... 28
1.1. System...............................................................................................................................28
CHAPTER 6.................................................................................................................................... 38
6.1. Configuration...................................................................................................................38
CHAPTER 7.................................................................................................................................... 41
7.1. Members Register.........................................................................................................41
CHAPTER 8.................................................................................................................................... 45
8.1. Loans..................................................................................................................................45
CHAPTER 9.................................................................................................................................... 49
Page 2 of 65

Sacco Information Management System
9. Finance...................................................................................................................................49
9.3.1. General ledger................................................................................................................50
9.3.2. Receipts............................................................................................................................52
9.3.3. Payment vouchers.........................................................................................................54
9.3.4. Bank transacations........................................................................................................55
9.3.5. Journal vouchers............................................................................................................55
9.3.6. Reconciliation and budget..........................................................................................56
CHAPTER 10.................................................................................................................................. 56
10. INVESTMENTS...........................................................................................................................56
10.1. Overview...........................................................................................................................56
10.1.1. Configure.....................................................................................................................57
CHAPTER 11.................................................................................................................................. 63
CHAPTER 12.................................................................................................................................. 63
SIMS Help Desk
Page 3 of 65
Sacco Information Management System
Phone: 0723 600 020
Email: [email protected]
List of Figures
Chapter 11. Introduction
1.1. The purpose of this User Reference ManualThis User Reference Manual (hereafter referred to as User Manual) is
intended to help facilitate the use of SIMS by presenting step by step
instructions of its functionality and use. It has been written assuming that the
user has a basic understanding of how to use Microsoft Windows®, and
Microsoft Office® tools.
Page 4 of 65

Sacco Information Management System
1.2. Updating SIMS Software
The SIMS software is updated, as required, using an executable file, which
modifies the software to reflect, for example, new functionality, other SIMS
changes etc. As a user of SIMS you will be notified of updates by e-mail or
other relevant means as per the product provision agreement. You do not
have to worry about software updates, as these will be the work of the
development Team®.
1.3. OverviewWelcome to the Sacco Information Management System (SIMS). SIMS is a
feature-rich, fully integrated system for managing your Sacco’s information, a
comprehensive intelligent technology and system solution unparalleled in its
class to back alloperations from a Sacco organization perspective. SIMS
fulfills
SIMS delivers global collection, financial consolidation, reporting, and analysis
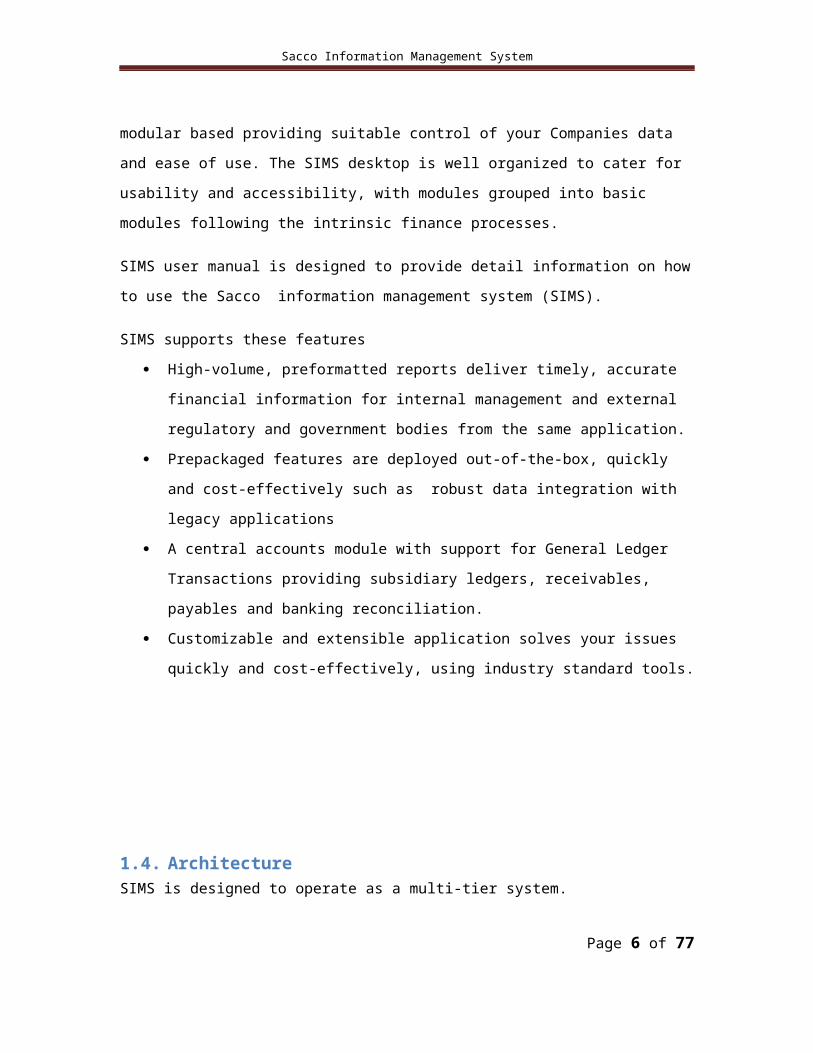
in one highly scalable solution. It is modular based providing suitable control
of your Companies data and ease of use. The SIMS desktop is well organized
to cater for usability and accessibility, with modules grouped into basic
modules following the intrinsic finance processes.
SIMS user manual is designed to provide detail information on how to use the
Sacco information management system (SIMS).
SIMS supports these features
High-volume, preformatted reports deliver timely, accurate financial
information for internal management and external regulatory and
government bodies from the same application.
Prepackaged features are deployed out-of-the-box, quickly and cost-
effectively such as robust data integration with legacy applications
A central accounts module with support for General Ledger
Transactions providing subsidiary ledgers, receivables, payables and
banking reconciliation.
Page 5 of 65
Sacco Information Management System
Customizable and extensible application solves your issues quickly and
cost-effectively, using industry standard tools.
1.4. ArchitectureSIMS is designed to operate as a multi-tier system.
The client tier contains the user interface and the ability to communicate
with the application tier, build as application modules. You can display
data and metadata, and enter data in this tier. User forms and screens for
data entry and general SIMS navigation and control are provided in this
layer.
The middle tier contains the domain intelligence and connections to the
relational database. Users are limited to accessing this layer. Domain
intelligence is the expert shell of the system and allows a link between the
top layer and the bottom layer.
The data tier contains the relational database and all SIMS data and
metadata. SIMS supports several database management systems as shall
be described, allowing departmental and technology diversification and
adaptation
1.5. About SIMS – SIMS Dimensions/ModulesSIMS allows a company to manage its financial data. Dimensions describe an
organization’s data and usually contain groups of related members, which are
referred to as application modules in SIMS. SIMS supplies seven system-
defined dimensions as application modules namely; System,
Configurations ,Members register, loans, investments, Finance,Reports and
Window and Help. These application modules have been effectively designed
with the user and business procedures in mind. Dimension members are
Page 6 of 65
Sacco Information Management System
arranged in hierarchies. Upper-level modules are the parent modules, and a
member immediately below a parent module is the child of a parent module.
All members below a parent are its descendants. The bottom-level hierarchy
members are the base-level members.
1.6. Using this ManualThis manual is best read as a reference, rather than as a book read cover to
cover. If the manual is viewed online, the embedded links enable the user to
navigate quickly through topics. For readers that prefer to print out and read
a paper copy of the manual, refer to the table of contents to locate topics
that are referenced in the text.
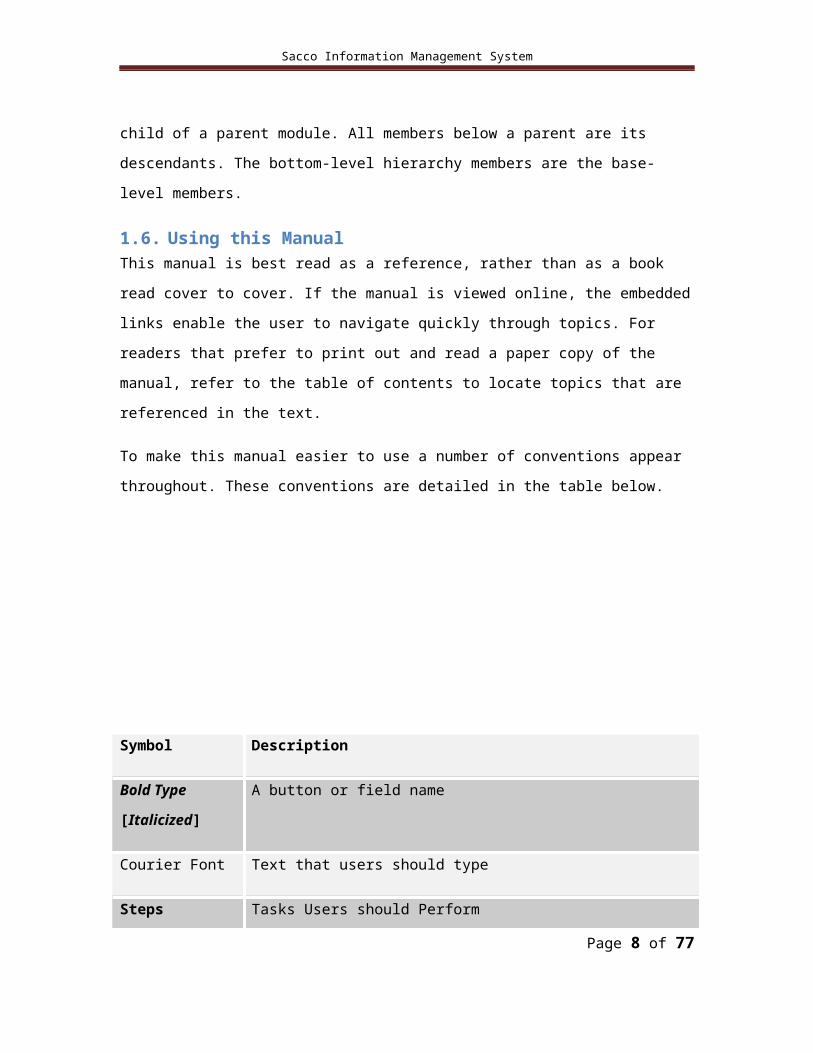
To make this manual easier to use a number of conventions appear
throughout. These conventions are detailed in the table below.
Symbol Description
Bold Type
[Italicized]
A button or field name
Courier Font Text that users should type
Steps Tasks Users should Perform
Italics Italicized text is used for titles as well as to identify a
variable. For example, The title Modify Module page is
actually Modify followed by the exact name of the module
Page 7 of 65
Sacco Information Management System
that is to be modified.
[ R ] Indicates a required field. For example client name is a
required field and must be entered for data to be saved.
Table 1: Manual Conventions
Chapter 2
2.1. Basic SIMS procedure help
2.1.1. OverviewThis chapter describes the procedures and processes for running SIMS as an
application. These are described with the user in mind and are the basic
guidelines overriding the running of SIMS as a system application. Users need
to familiarize themselves with these procedures since they are the basic
fingertip knowledge on running and operating SIMS, per se.
2.1.2. In this ChapterThe following are the major ‘procedures’ involved in quick starting and
running the SIMS system.
NOTE:
SIMS procedures refer to step-wisely-defined modes and ways of accessing
SIMS from the desktop environment or from a browser environment and not
necessarily system procedures, per se.
Page 8 of 65

Sacco Information Management System
Starting SIMS application
Opening SIMS applications
Setting SIMS User Preferences
Using SIMS Help
Exiting SIMS
Using SIMS
Using SIMS Data Forms
Entering Data in SIMS Data Forms
Working with SIMS List views
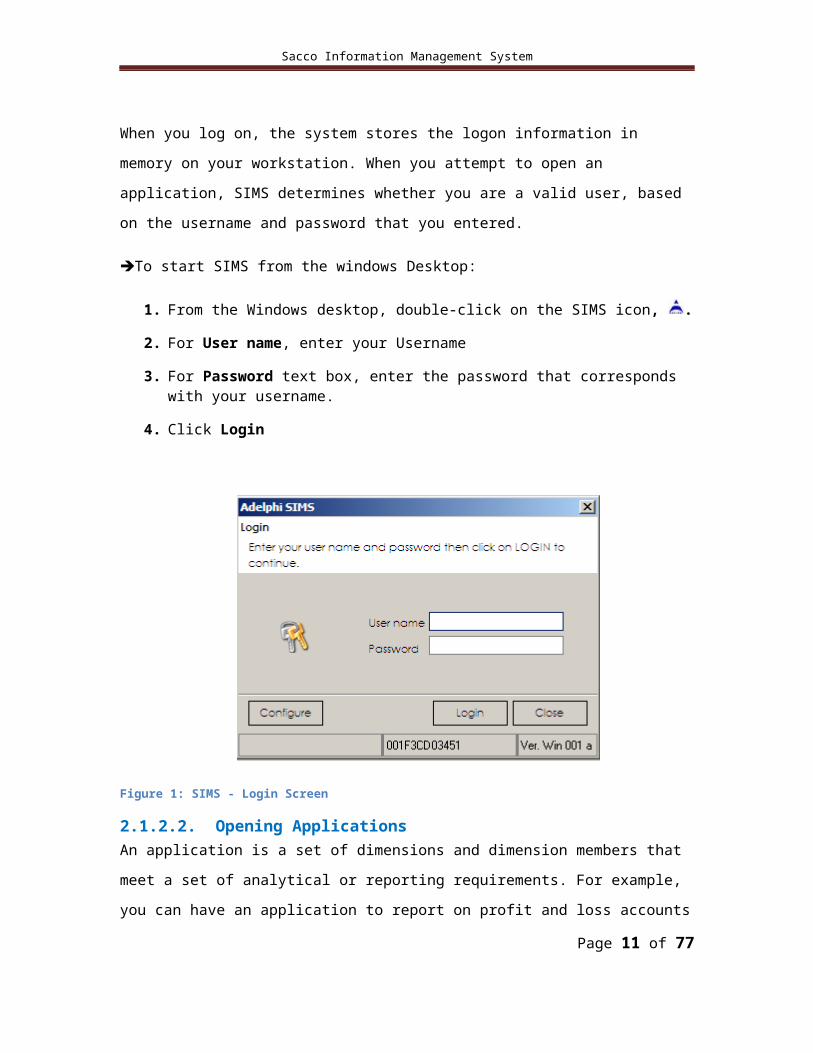
2.1.2.1. Starting SIMS from the Windows DesktopWhen you start SIMS, the Logon dialog box is displayed. SIMS uses its own
usernames and passwords for authentication
NOTE:
This is not your Windows Usernames and Passwords but SIMS
provided login credentials by the system administrator
You enter your username and password as provided by the system
administrator.
When you log on, the system stores the logon information in memory on your
workstation. When you attempt to open an application, SIMS determines
whether you are a valid user, based on the username and password that you
entered.
To start SIMS from the windows Desktop:
1. From the Windows desktop, double-click on the SIMS icon, .
2. For User name, enter your Username
3. For Password text box, enter the password that corresponds with your username.
4. Click Login
Page 9 of 65
Sacco Information Management System
Figure 1: SIMS - Login Screen
2.1.2.2. Opening ApplicationsAn application is a set of dimensions and dimension members that meet a set
of analytical or reporting requirements. For example, you can have an
application to report on profit and loss accounts and a separate application
for adding a Sacco Member. You can open several applications for each
finance session that you are running. These are typically provided by
different user screens. SIMS organizes applications in a modular form. Each
module forms a basic set of applications i.e. system service
NOTE:
To access an application, you must be assigned as a user of the
application.
2.1.2.3. Setting User PreferencesYou can specify user preferences for applications; user preferences for screen
color, font, and dimensions. Changes in user preferences should be specified
before login in the Configureoption in the login screen.
See these procedures/options
Specifying database connection information on page
Page 10 of 65
Sacco Information Management System
Specifying application information on page
Specifying reports information on page
Specifying additional system information on page
2.1.2.4. Specifying Database Connection InformationThis configures database preferences.
Note: This is only available to SIMS system administrators
To configure database
Open SIMS login screen
Click Configure [This opens SIMS configuration screen].
Under Database Configuration Information, select the Driver ID from the
drop-down list, depending on the database you are using.
The supported driver IDs by SIMS are
Driver
ID
Database
Name
Database Description
ADS Sybase
Database
Driver ID for Sybase. Support for Sybase database
connection
ASA Sybase
database
Driver ID for Sybase. Support for Sybase database
connection
DB2 DB2 database Driver ID for DB2. Support for DB2 database
Page 11 of 65
Sacco Information Management System
MSAcc Microsoft
Access
Database
Driver support for Microsoft Access 2003, 2005
database
MSSQL Microsoft
SQLServer
Database
SIMS supports SQLServer 2000, and SQLServer
2005 which work in database instances. For more
information on SQLServer database instances, see
SQLServer documentation
MySQL MySQL
Database
SIMS supports current versions of MySQL Database
ODBC ODBC driver Provides ODBC support for database access
Ora Oracle
Database
SIMS supports Oracle 10g Database
Table 2: Database Options
Enter the DB Server name. [Name of database server]
Enter DB Server suffix. [For Instance, SQLServer supports several
database instances. The instance should be specified here. If Instance
name is SQL2005, it should be input as ‘\SQL2005’].
Enter database name. [SIMS database name].
Enter DB Username. [Database login credentials]
Enter DB User Password. [Database login credentials]
Enter login timeout. [Should be specified in seconds. For instance if
timeout should be 60 seconds, enter 60. This is the length of time in
seconds a session should expire during unsuccessful login attempts]
Enter application name. [In this case, if application name is SIMS, input
SIMS]
Click Apply.
Page 12 of 65

Sacco Information Management System
2.1.2.5. Specifying Application InformationThis is used to configure the application on your local server/station.
Note: This is only provided for SIMS system administrators.
To configure Application
Open SIMS login Screen
Click Configure
Under application information, enter company name
Enter company logo. [This logo should be located in the SIMS home
directory]
Select font name from the drop-down list [Remember this is the
font option to be used in displaying application menus – in
SIMS]
Select font size from the selection box
Select font colour from the drop-down list
Click Apply
2.1.2.6. Specifying Reports InformationConfiguration for all SIMS system reports
NOTE:
This option applies to SIMS system administrators only.
To configure reports
Open SIMS login screen
Click Configure
Under Reports information, Select Font name. [This is the font to be
used for SIMS reports]
Enter Font size
Input the reports path. [This is the system path where reports will
be stored]
Click Apply
Page 13 of 65

Sacco Information Management System
2.1.2.7. Specifying Additional InformationAdditional information for SIMS system
To configure Additional information
Open SIMS login screen
Click Configure
Under Additional Information, Select Required Field Font Colour.
[Colour to be used for fields in SIMS]
Select Error font colour
Enter TCP Server port. By default this should be set to 6000.
Tick Custom Draw Cells
Select Row Colour
Select Row alternate colour
Select Row Font Colour
Click Apply
2.1.3. Exiting SIMSYou can exit SIMS from any application module, sub-module, and user form
[Basically, from any point in the system]. This gives the user flexibility in
using the system, making the system more accessible and faster to navigate.
Close buttons are provided to exit or close a specific function.
The basic exit button is provided to exit the application.
To exit application
ClickSystem
Click Quit Application
Page 14 of 65
Sacco Information Management System
2.1.4. Using SIMSWhen you log on to SIMS in Windows, the SIMS Desktop is displayed. The
Desktop is the starting point for all Finance operations. The SIMS desktop
displays a blank screen with the company logo at the centre. The top side of
the Desktop displays the modules a logged in user has access to. Each
module encompasses several sub-modules and user forms for data entry. All
functionality relating to a particular instance is incorporated in one single
screen for system usability.
If you do not have the appropriate security rights for a certain task, that task
is not an option in your SIMS desktop and you have to consult with your
system administrator for your user rights.
2.1.5. Using Data Forms / Uses ScreensYou can select Data Form options from the toolbar at the top of the form/user
screen.
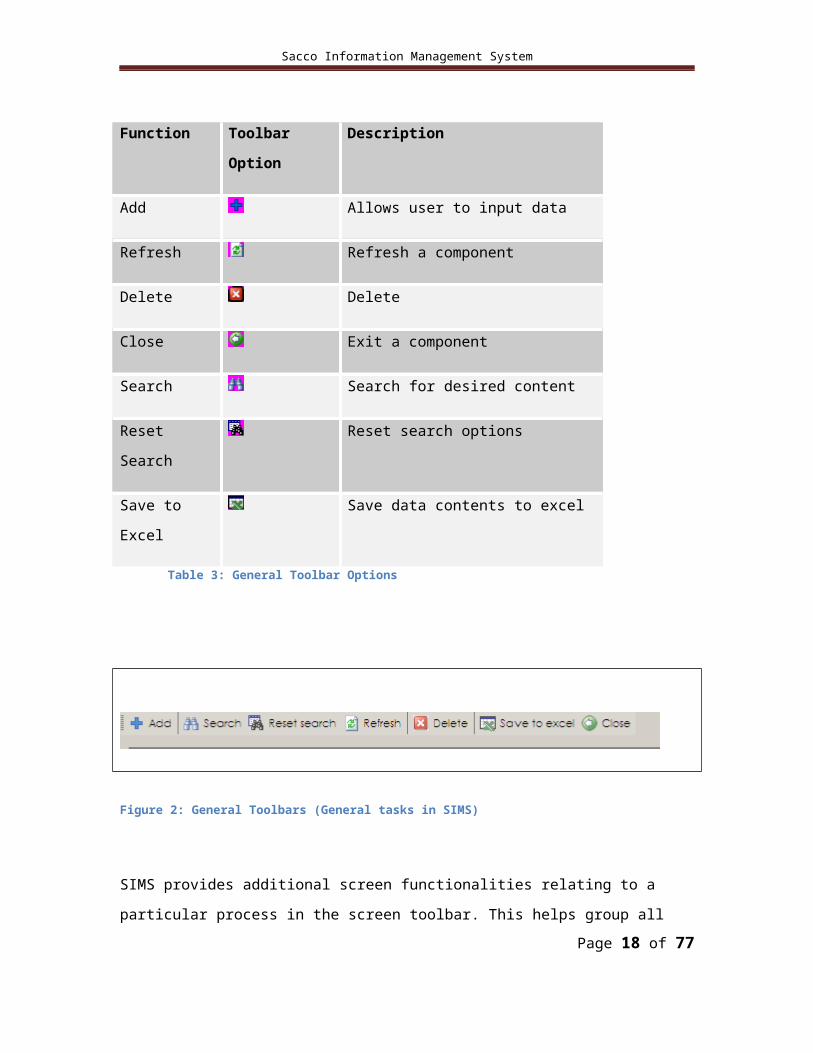
The following table shows the toolbar buttons available when a form/screen is
opened:
Function Toolbar
Option
Description
Add Allows user to input data
Refresh Refresh a component
Delete Delete
Close Exit a component
Search Search for desired content
Page 15 of 65
Sacco Information Management System
Reset
Search
Reset search options
Save to
Excel
Save data contents to excel
Table 3: General Toolbar Options
Figure 2: General Toolbars (General tasks in SIMS)
SIMS provides additional screen functionalities relating to a particular process
in the screen toolbar. This helps group all related tasks together and the user
doesn’t have to keep navigating back and forth searching for a particular task
that has to be precede another.
This is one of the basic strengths in SIMS. All related tasks are grouped under
a single screen and navigation is easy.
2.1.6. Entering Data in Data FormsYou can enter or edit data in predefined Data Forms that the development
team has created for you. You can enter data in input (off-white) cells. You
cannot enter data into calculated or cells at invalid intersections.
To enter data in a Data Form, you must have access to the security class for
the form and security rights for the data in the cells on the form.
Page 16 of 65
Sacco Information Management System
To enter data in Data Forms:
Open a data form which is a basic user screen
Enter data into input (off-white) cells. Required fields are underlined in
‘Blue’. Data must be entered in the required fields.
When you finish entering data, click Save
To refresh the data, click Refresh on the specific screen’s toolbar
options.
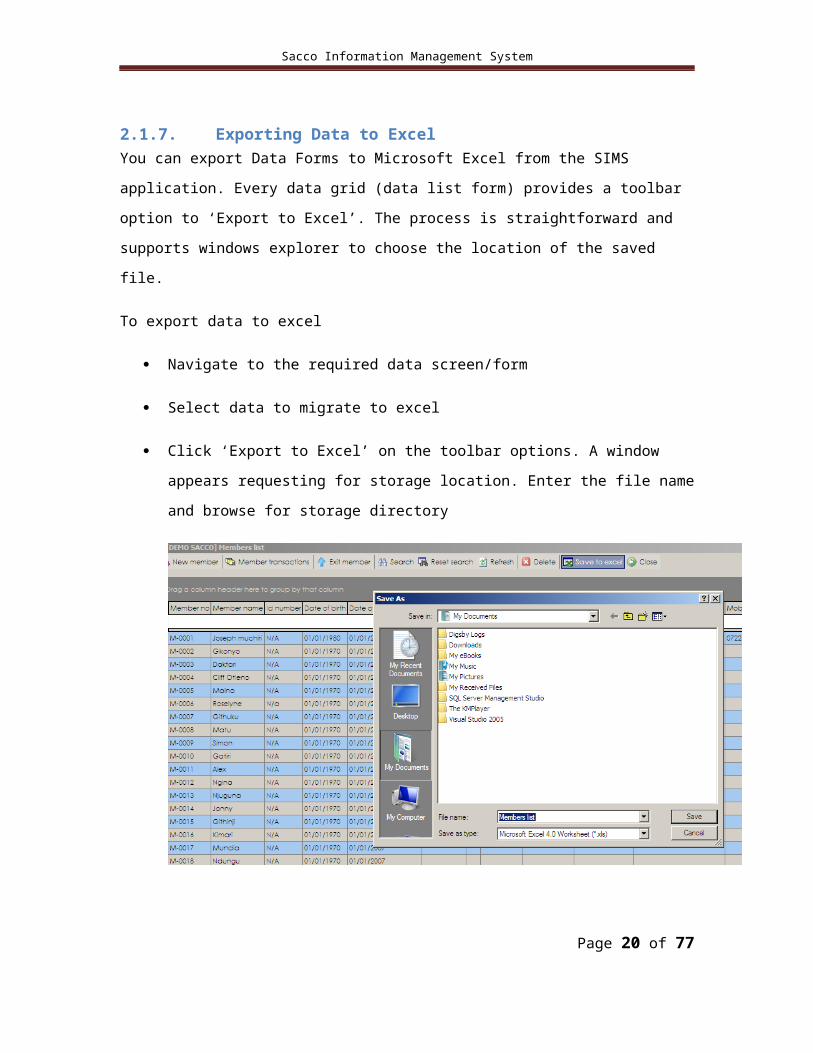
2.1.7. Exporting Data to ExcelYou can export Data Forms to Microsoft Excel from the SIMS application.
Every data grid (data list form) provides a toolbar option to ‘Export to Excel’.
The process is straightforward and supports windows explorer to choose the
location of the saved file.
To export data to excel
Navigate to the required data screen/form
Select data to migrate to excel
Click ‘Export to Excel’ on the toolbar options. A window appears
requesting for storage location. Enter the file name and browse for
storage directory
Page 17 of 65
Sacco Information Management System
Click on save. You can now navigate to the directory and access the
saved file there in excel.
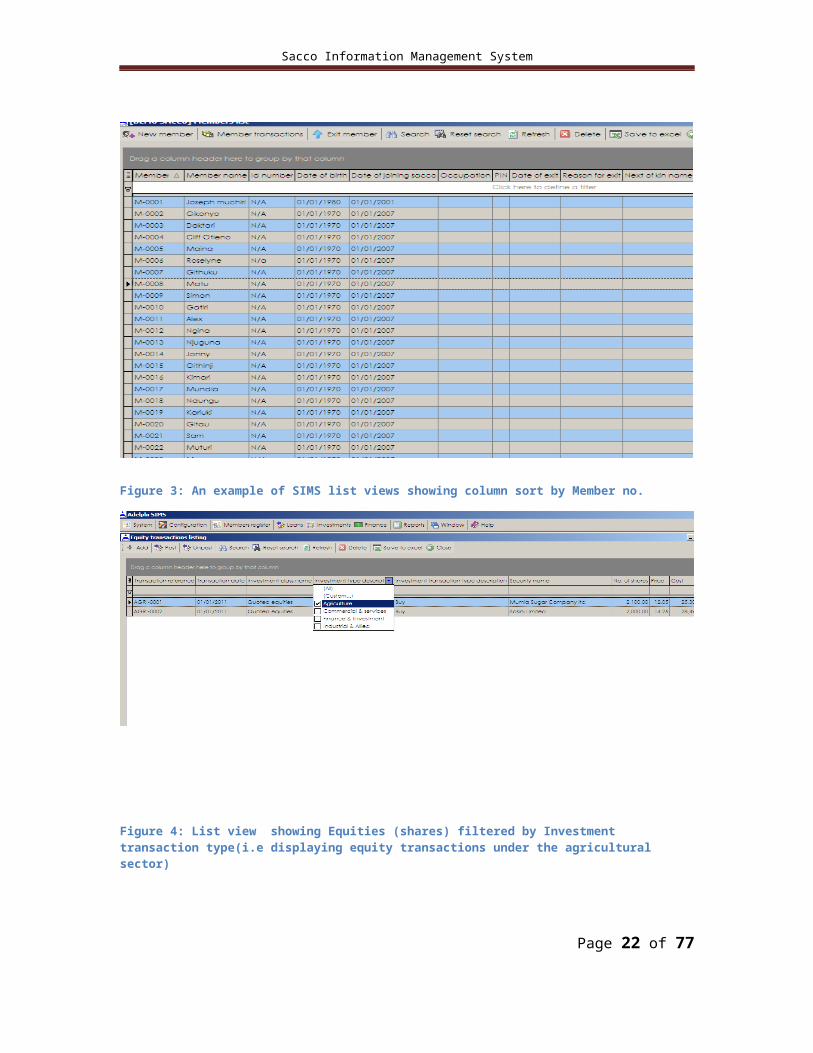
2.1.8. Working with SIMS List viewsSIMS uses list views to display data lists for users. SIMS list views support
grouping, multiple columns with headings, columnar row search, column
ordering in alphabetical order (Both ascending and descending) i.e. sorting by
columns, changing column widths and order, being a drag source or a drop
target, and copying data to and from the clipboard. This allows screen
flexibility for the end-user.
Working with SIMS list views is very friendly for the user and the user needs
to be fully aware of all list view functionalities in order to fully utilize the
inbuilt SIMS usability and accessibility support.
Page 18 of 65
Sacco Information Management System
Figure 3: An example of SIMS list views showing column sort by Member no.
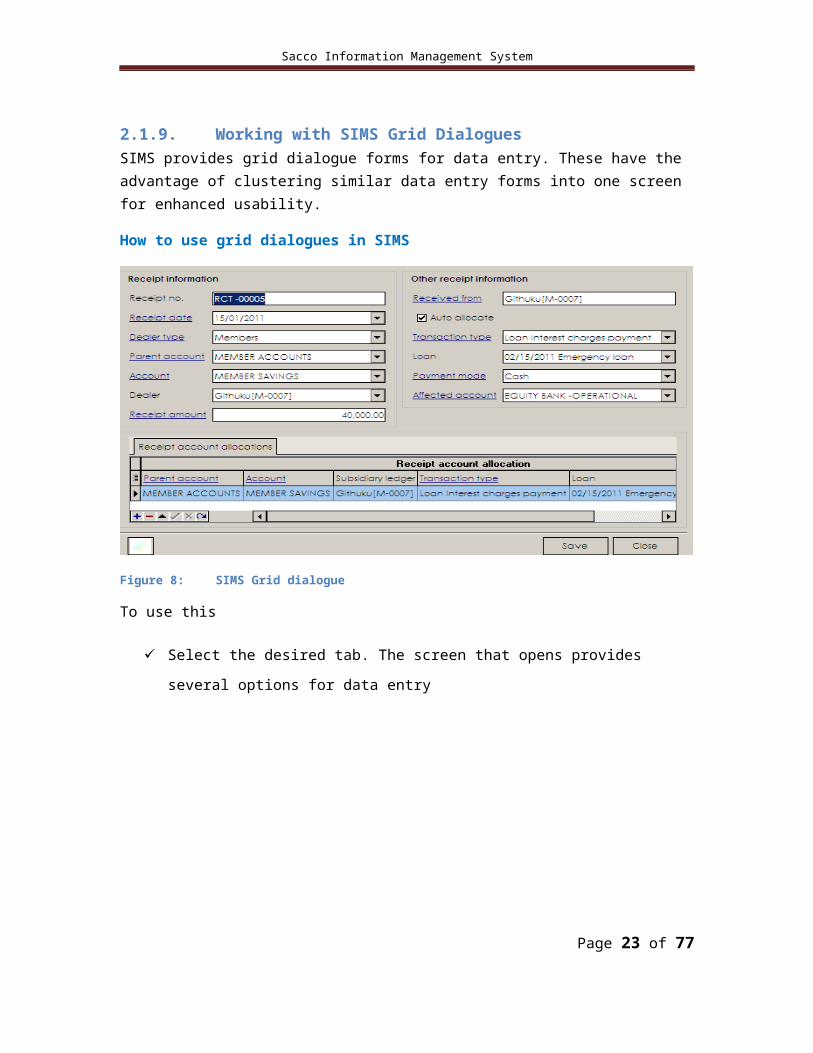
Figure 4: List view showing Equities (shares) filtered by Investment transaction type(i.e displaying equity transactions under the agricultural sector)
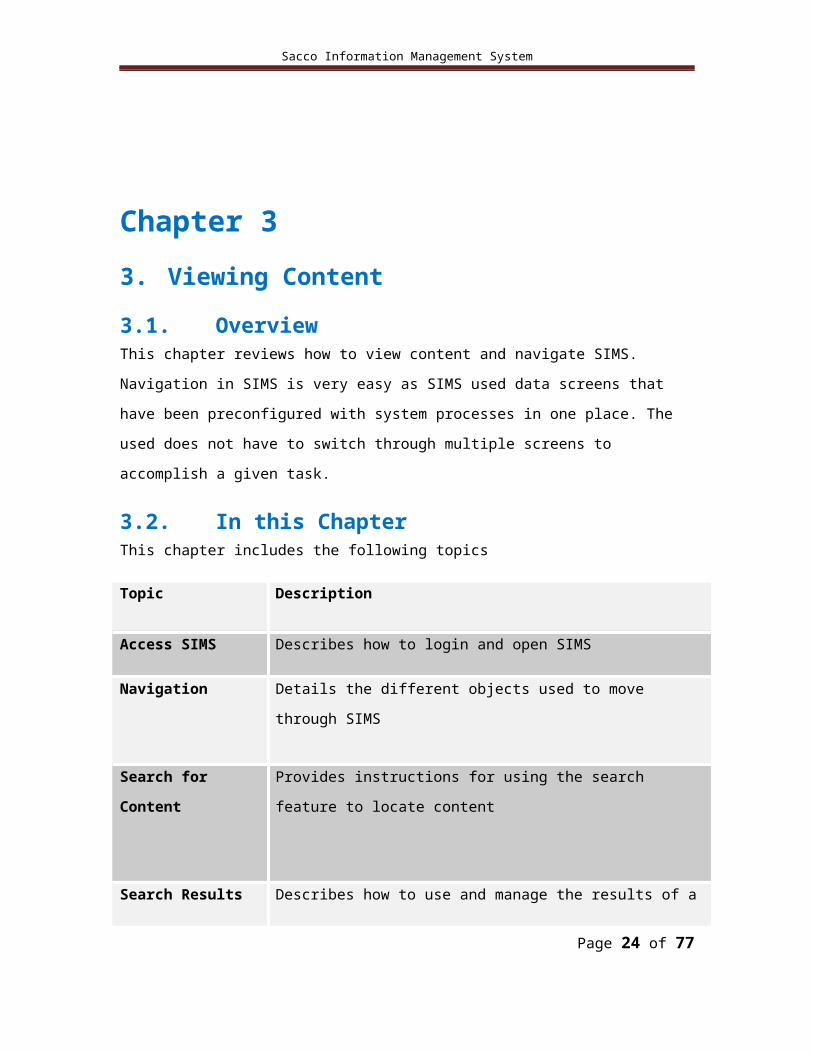
2.1.9. Working with SIMS Grid DialoguesSIMS provides grid dialogue forms for data entry. These have the advantage of clustering similar data entry forms into one screen for enhanced usability.
Page 19 of 65
Sacco Information Management System
How to use grid dialogues in SIMS
Figure 8: SIMS Grid dialogue
To use this
Select the desired tab. The screen that opens provides several options
for data entry
Chapter 3
3.Viewing Content
3.1. OverviewThis chapter reviews how to view content and navigate SIMS. Navigation in
SIMS is very easy as SIMS used data screens that have been preconfigured
Page 20 of 65
Sacco Information Management System
with system processes in one place. The used does not have to switch
through multiple screens to accomplish a given task.
3.2. In this ChapterThis chapter includes the following topics
Topic Description
Access SIMS Describes how to login and open SIMS
Navigation Details the different objects used to move through SIMS
Search for
Content
Provides instructions for using the search feature to
locate content
Search Results Describes how to use and manage the results of a search
Toolbar Options Describes toolbars in SIMS
Table 4: Chapter 3 - Viewing Content – Topics
3.2.1.Access SIMSOverview
The login allows you to access the system.
Login to SIMS
Follow these steps to login to SIMS
Step 1: Go to SIMS directory
Step 2: Click SIMS system Icon
Page 21 of 65
Sacco Information Management System
Step 3: Enter the Username and Password for an active account
Step 4: Click OK
Note: Your Password will be hidden for security reasons
This is described more underLogin
3.2.2.NavigationNavigating SIMS is easy. The modules are organized with the user and
standard business processes in mind. The modular organization is easy to use
and groups user tasks under a common group.Clicking on a particular module
gives all tasks under that module. Every screen incorporates a standard
‘close’ button that acts as an exit tool from that screen. The window module
gives a listing of all open screens by a single user. This ensures the user can
interact with many screens at the same time.
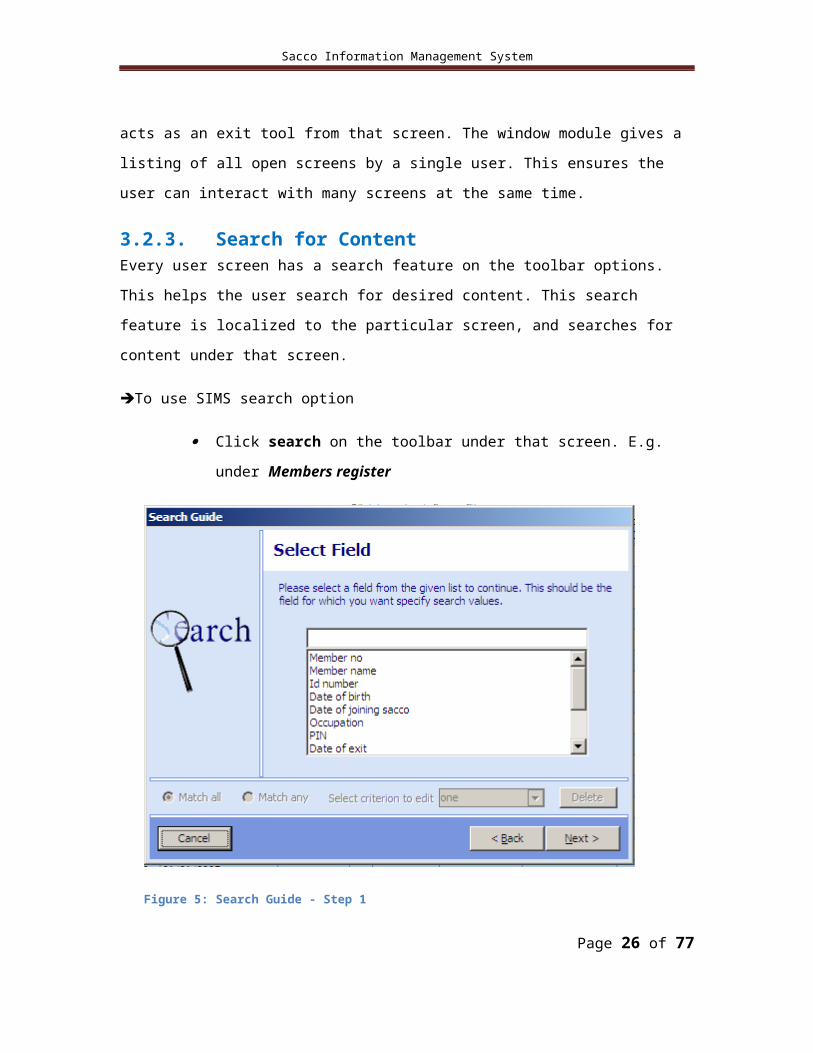
3.2.3.Search for ContentEvery user screen has a search feature on the toolbar options. This helps the
user search for desired content. This search feature is localized to the
particular screen, and searches for content under that screen.
To use SIMS search option
Click search on the toolbar under that screen. E.g. under
Members register
Page 22 of 65
Sacco Information Management System
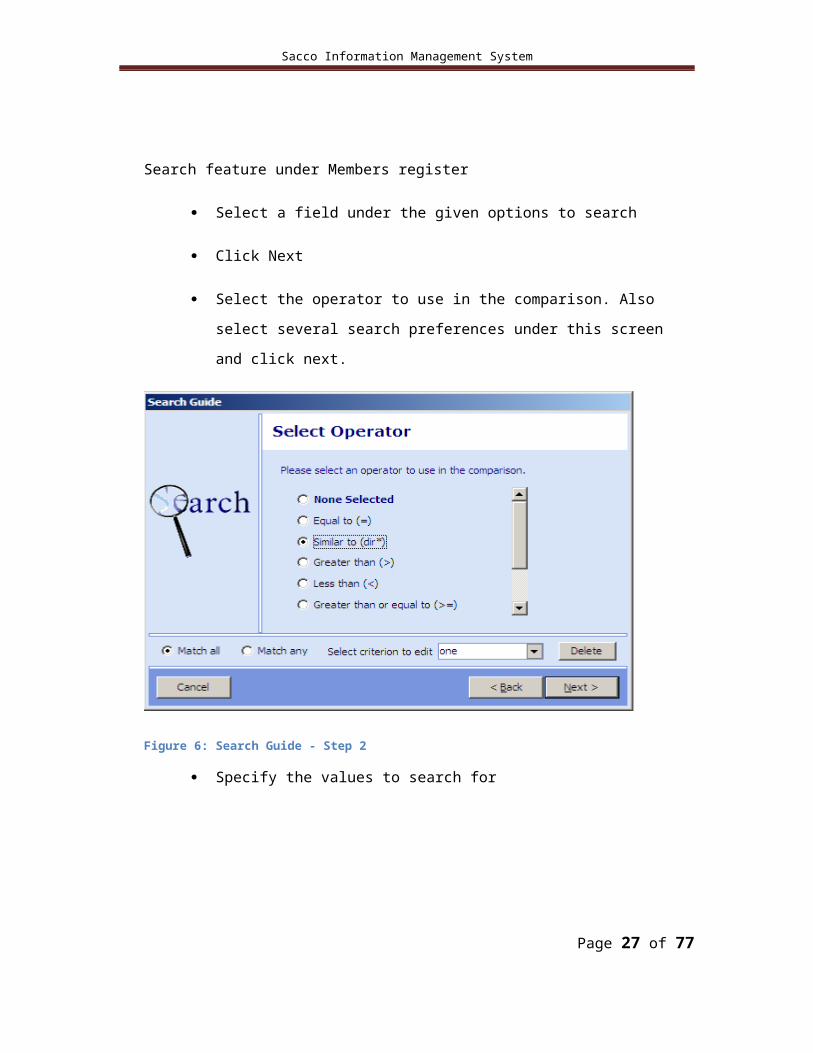
Figure 5: Search Guide - Step 1
Search feature under Members register
Select a field under the given options to search
Click Next
Select the operator to use in the comparison. Also select several
search preferences under this screen and click next.
Page 23 of 65
Sacco Information Management System
Figure 6: Search Guide - Step 2
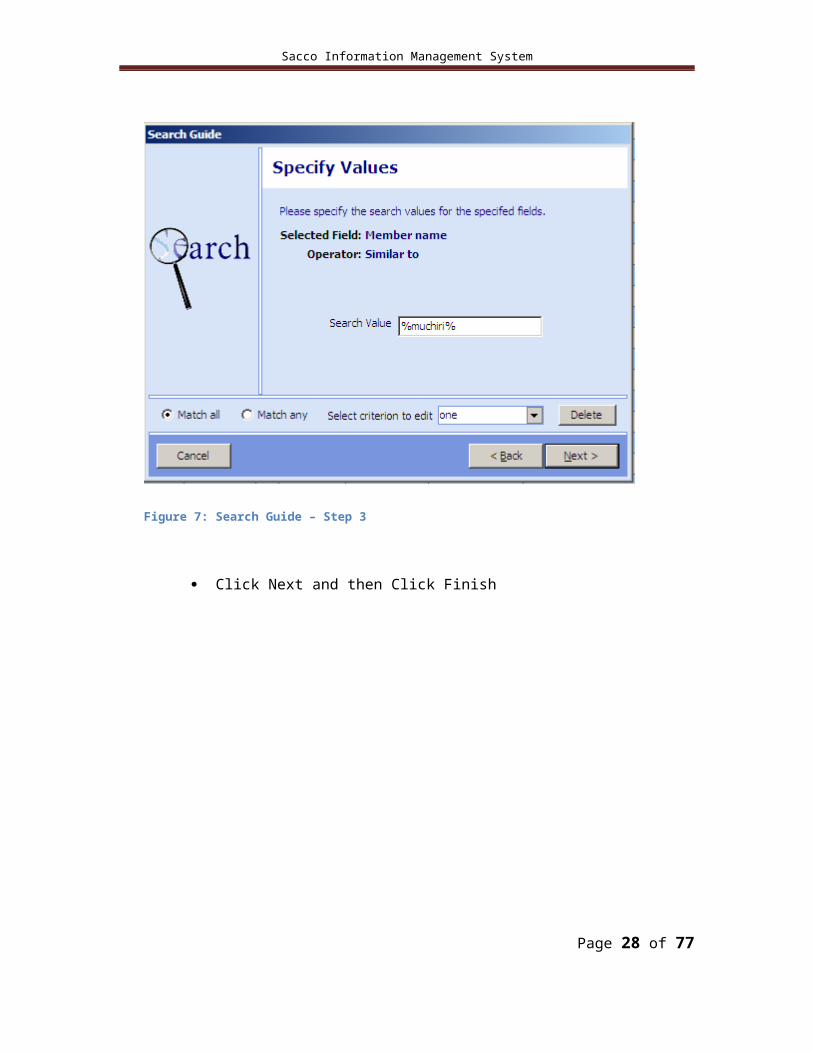
Specify the values to search for
Figure 7: Search Guide – Step 3
Page 24 of 65

Sacco Information Management System
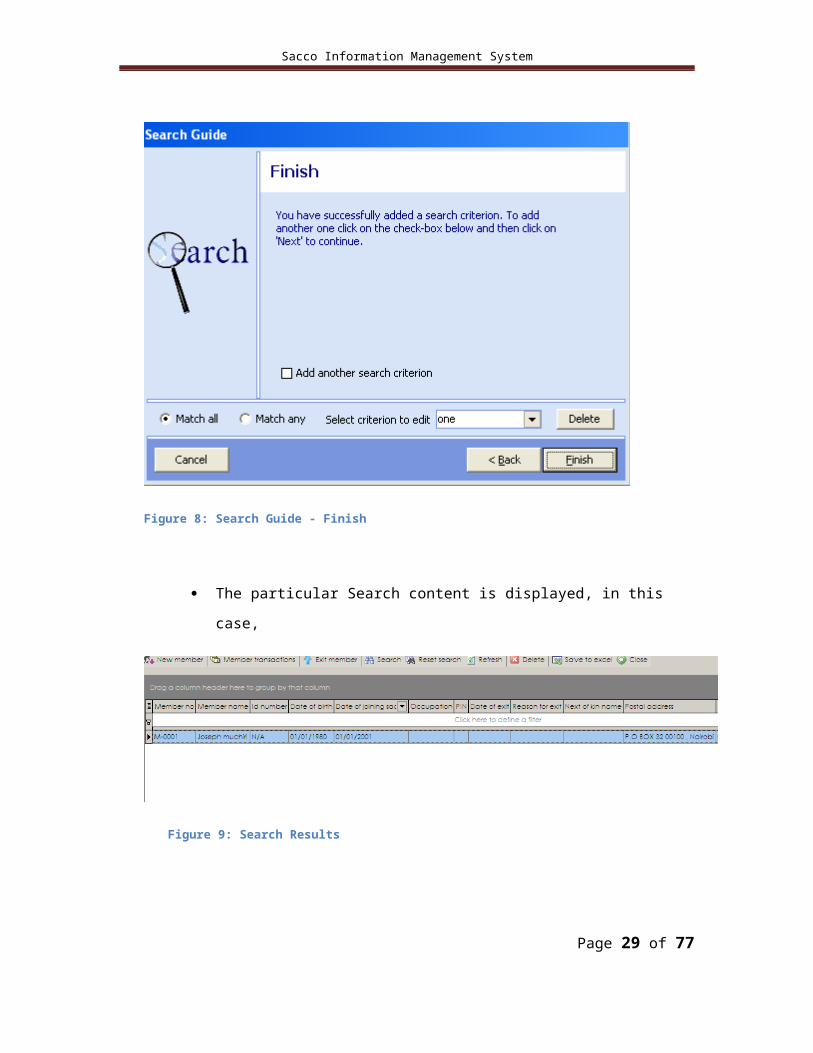
Click Next and then Click Finish
Figure 8: Search Guide - Finish
The particular Search content is displayed, in this case,
Figure 9: Search Results
Page 25 of 65
Sacco Information Management System
3.2.4.Search ResultsSearch results are displayed in a list view as shown in figure 8, above.
The Reset Search toolbar resets the search to the beginning of the list.
This allows the user to start the search again and the ability to change
the search parameters.
3.2.5.Toolbar OptionsSIMS toolbars provide functionality pertinent to a particular screen.
This groups all the required tasks together. The basic toolbar options
are described in basic toolbars in. Other toolbar options are particular
to a given SIMS screen. For instance under Members Register list
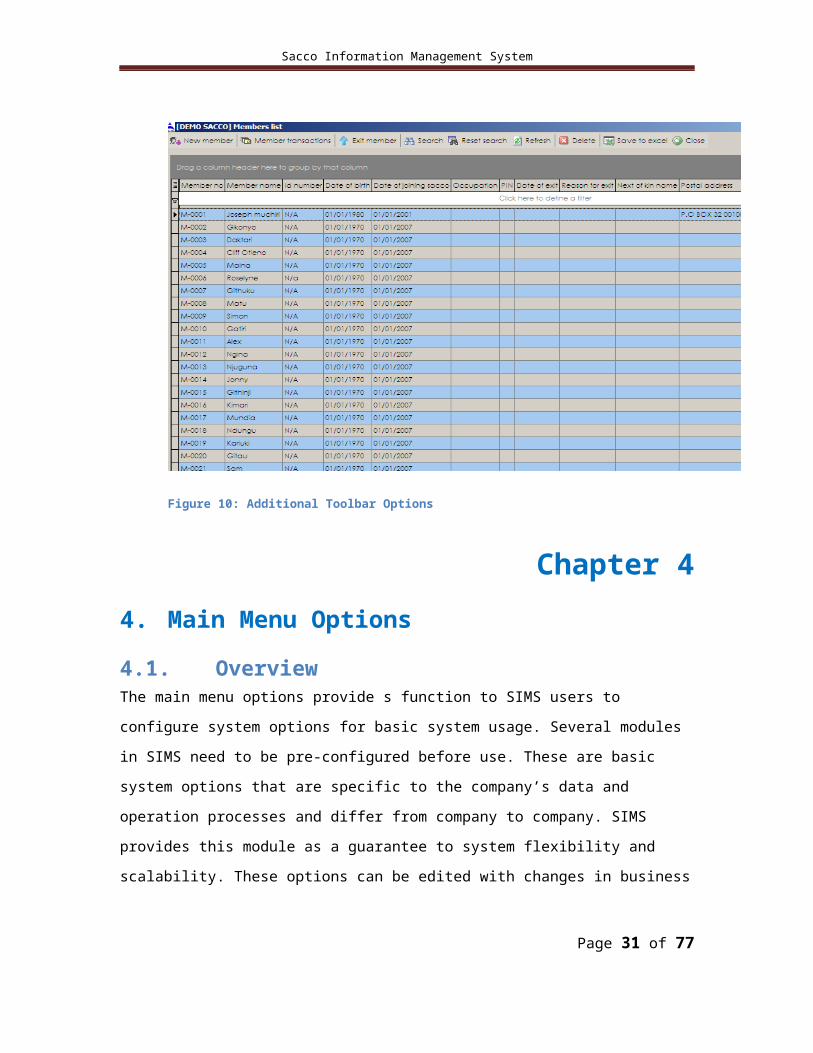
view, the additional toolbar options are
Member transactions Exit member
This gives all the functionality relating to a member in one screen.
Figure 10: Additional Toolbar Options
Page 26 of 65
Sacco Information Management System
Chapter 4
4.Main Menu Options
4.1.OverviewThe main menu options provide s function to SIMS users to configure system
options for basic system usage. Several modules in SIMS need to be pre-
configured before use. These are basic system options that are specific to the
company’s data and operation processes and differ from company to
company. SIMS provides this module as a guarantee to system flexibility and
scalability. These options can be edited with changes in business processes
or data and this allows users to have a flexible and usable system.
4.2.In this ChapterThe following main menu options are available to SIMS users.
Item Name Toolbar Option
Description
1. System This module consists of technical
system functions that are that control
the support usability, security and
accessibility of the system. For
example, changing password, setting
users and their access levels etc
2. Configuration This is the main system configuration
module. Used to configure global
system parameters for the company
business processes. For example
gender, Loan type , Company
information etc, Depending on your
company set options.
Page 27 of 65
Sacco Information Management System
3. Members
register
This modules deals with registration of
new members and tracking of all
operations(Transactions ) related to a
particular member from inception to
exit. E.g member contributions,
penalties, loans etc
4. Loans The Loans module captures loan
applications by members and tracks
the loans repayment and generations
of loan interests for outstanding loans.
5. Investments This module deals with tracking of
investments of members contributions.
Information related to purchases of
equities and real estate investment,
related transactions like share
revaluations and selling or real estate
leasing, selling are captured within this
module
6. Finance The Finance module covers all aspects
of finance in the business. It maintains
a general ledger that keeps track of all
transactions in the business operations
7. Reports The reports module. Major system
reports are available here.
8. Windows Shows all open windows during a
particular session and helps in easier
navigation
Page 28 of 65
Sacco Information Management System
9. Help The Help module for the general user.
Table 5: Main Menu Options
Figure 11: The standard SIMS desktop and workspace
Page 29 of 65
Sacco Information Management System
Chapter 51.1. System
1.1.1. OverviewThis module gives basic system functionalities to users during system
administration. It provides the user with a function to configure the basic
system options and provides access control for the users of the system. This
module is provided for the system administrator.
The following system functions are available to SIMS users:
Item
Name
Description
Refresh Allows entire system refresh. An alternative to this is the F5
button.
Page 30 of 65
Sacco Information Management System
Change
password
Allows users to change their passwords to comply with the
password expiry policy.
Access
Control
Provided configurations of user groups, users and access
rights to system components.
Audit Trail Provides an audit trail for both users and system modules.
Update Users can update the application signature database using
this option in SIMS
Current DB
version
SIMS administrators can send the current DB version to
vendors using this function
Quit
Application
Allows users to quit the application
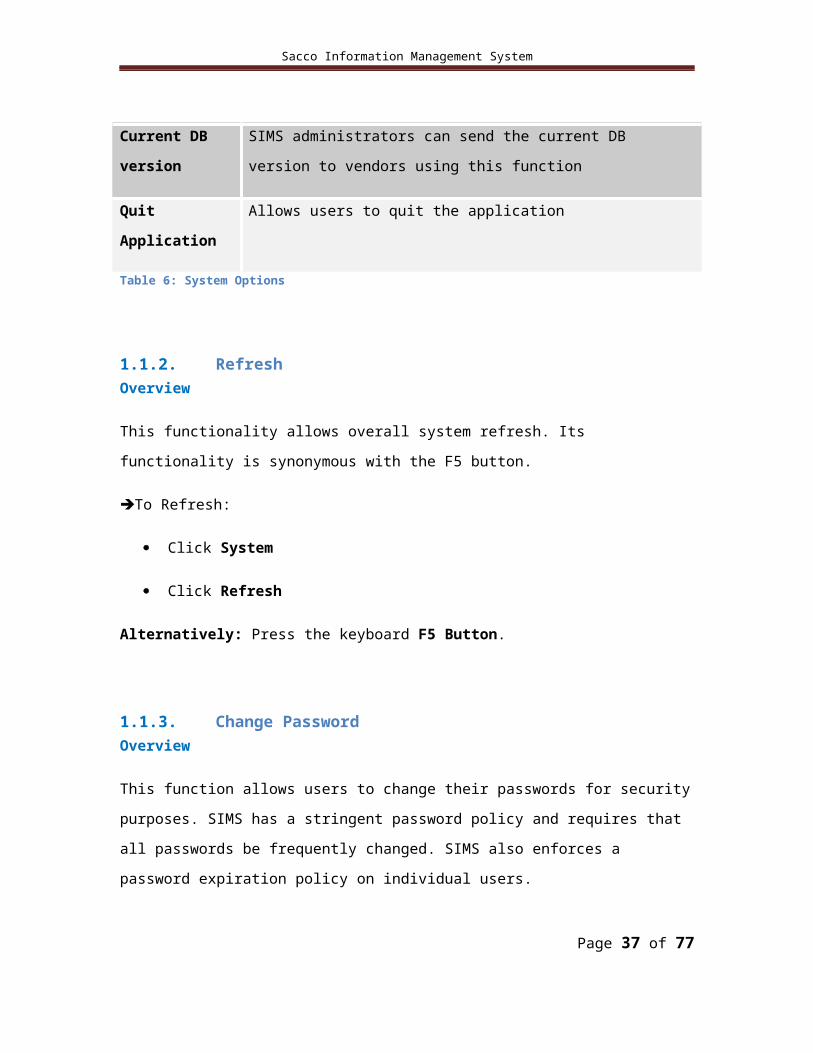
Table 6: System Options
1.1.2. RefreshOverview
This functionality allows overall system refresh. Its functionality is
synonymous with the F5 button.
To Refresh:
Click System
Click Refresh
Alternatively: Press the keyboard F5 Button.
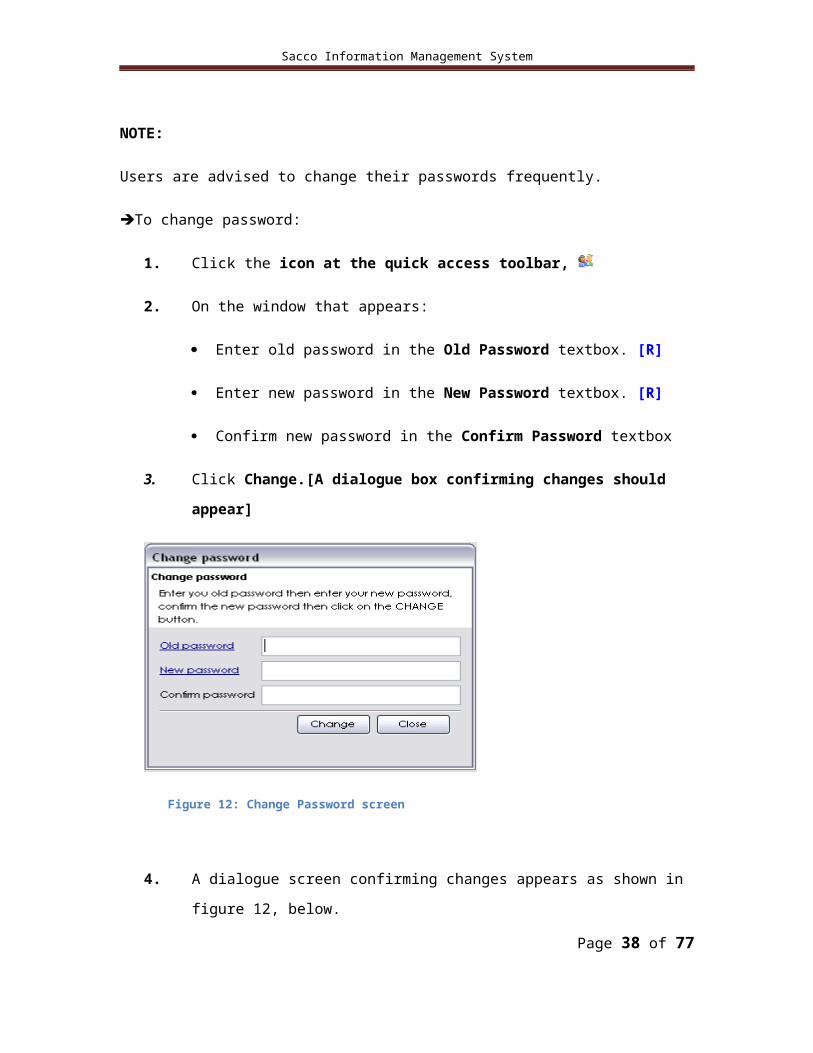
1.1.3. Change PasswordOverview
Page 31 of 65
Sacco Information Management System
This function allows users to change their passwords for security purposes.
SIMS has a stringent password policy and requires that all passwords be
frequently changed. SIMS also enforces a password expiration policy on
individual users.
NOTE:
Users are advised to change their passwords frequently.
To change password:
1. Click the icon at the quick access toolbar,
2. On the window that appears:
Enter old password in the Old Password textbox. [R]
Enter new password in the New Password textbox. [R]
Confirm new password in the Confirm Password textbox
3. Click Change.[A dialogue box confirming changes should
appear]
Figure 12: Change Password screen
Page 32 of 65
Sacco Information Management System
4. A dialogue screen confirming changes appears as shown in figure
12, below.
Figure 13: Successful Password Change
1.1.4. Access ControlOverview
This function allows the management of users groups, users the relevant
access rights. Access control is one of the key components of system security
and controls system access against unauthorized users.
To open Access Control
1. Click System
2. ClickAccess Control[The Access Control window appears].
This window offers the following functions
User Groups
Users
1.1.5. User GroupsThis window allows you to manage user groups in the system. User groups
are administrator defined groups that have been assigned collective rights to
Page 33 of 65
Sacco Information Management System
certain functionalities in the system. SIMS administrator should use this
screen to grant and revoke usage rights to user groups.
To Add a User Group
1. While inside access control, click User Groups
2. Click the Add toolbar
3. Enter group name in the Group Name textbox. [R]
4. Enter group description in the Group Description textbox
5. For security administrator, Tick the Security Administrator option
6. Tick relevant options in the Group rights selection box.
7. Click Save.
Page 34 of 65

Sacco Information Management System
Figure 14: Adding User Group Information
To Edit a User Group:
1. While inside access control, click User Groups
2. Select a user group from the user group list. [The particular user group
to edit]
3. Edit the required details
4. Click Save.
Page 35 of 65

Sacco Information Management System
To Delete a User Group:
1. While inside access control, click User Groups
2. Select a user group from the user group list. [The particular user group
to delete]
3. Click delete on the Delete toolbar. [A delete box should appear.]
4. Click Yes to delete particular user group record
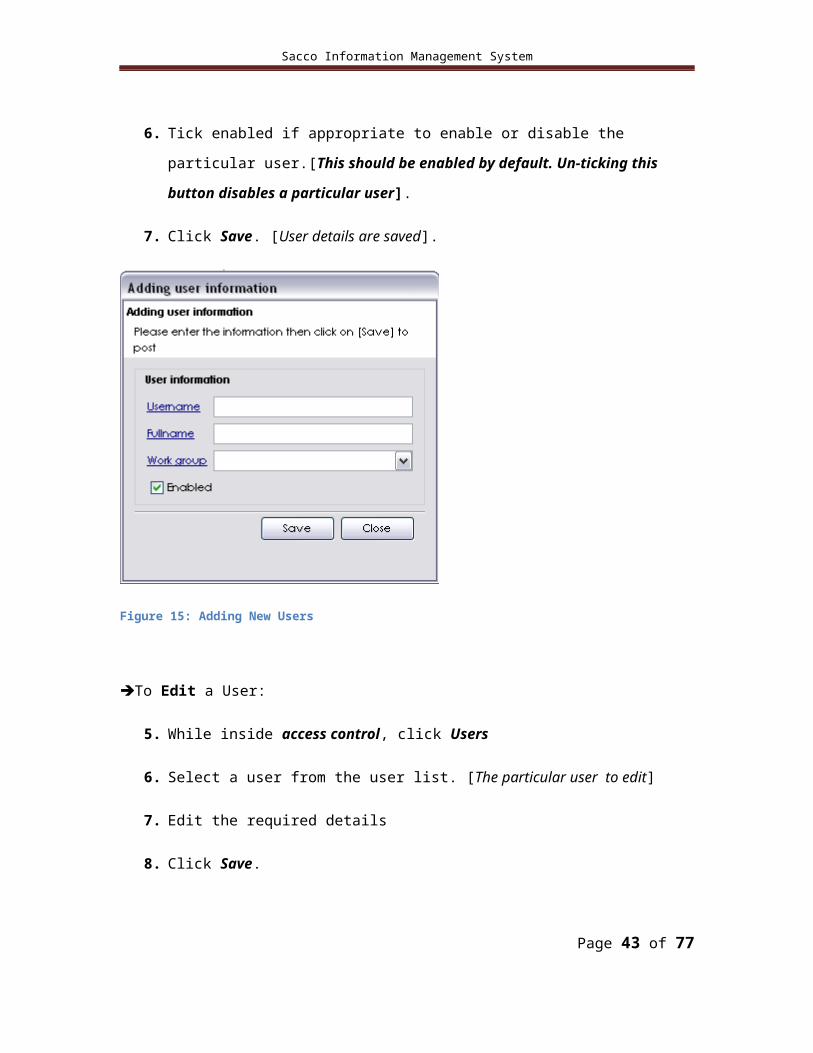
1.1.6. UsersThis window allows you to manage users in the system. Users are assigned to
defined user groups.
To Add a User
1. While inside access control, click Users
2. Click the Add toolbar. [This opens the Add User form].
3. Enter Username. [R]
4. Enter Full name of the user in the Fullname textbox. [R]
5. Select Workgroup from the Workgroup dropdown list [R]. [This
assigns the user to a particular user group as defined in User
Groups above.]
6. Tick enabled if appropriate to enable or disable the particular user.
[This should be enabled by default. Un-ticking this button
disables a particular user].
7. Click Save. [User details are saved].
Page 36 of 65
Sacco Information Management System
Figure 15: Adding New Users
To Edit a User:
5. While inside access control, click Users
6. Select a user from the user list. [The particular user to edit]
7. Edit the required details
8. Click Save.
To Delete a User:
5. While inside access control, click Users
6. Select a user from the user list. [The particular user to delete]
7. Click delete on the Delete toolbar. [A delete box should appear.]
8. Click Yes to delete particular user record
Page 37 of 65
Sacco Information Management System
Figure 16: SIMSAccess Control
1.1.7. Audit TrailThis function tracks sessions per user and per module based on login and
access session events.
To open the Audit Trail
Click System on the main menu
Select Audit Trail [The login Track and Module track are displayed in
the ensuing window.]
NOTE:
The Login Track and the Module Track provide a function to save to excel.
To save login track to excel
1. While inside Audit trail, Click Login Track
2. Click Save to Excel
Page 38 of 65

Sacco Information Management System
3. Enter the particular path of the file
4. Click Save.
To save Module track to excel
5. While inside Audit trail, Click Module Track
6. Click Save to Excel
7. Enter the particular path of the file
8. Click Save.
Figure 17: A sample Audit Trail
1.1.8. UpdateThis module allows users to update the Application Signature Database. It
shows the status information of the last update and a patch of the current
application signature database.
Page 39 of 65
Sacco Information Management System
To update application signature database:
1. Click System
2. Click Update [The update window appears].
3. Click download to download the update file location. [For update
file location.]
4. Click Update Now. [Application Signature Database is
updated].
1.1.9. Current DB VersionThis function allows users to send the current DB Version to vendors
To send Current DB version to Vendor
1. Click System
2. Click Current DB Version
3. Select Send to Vendor
Chapter 6
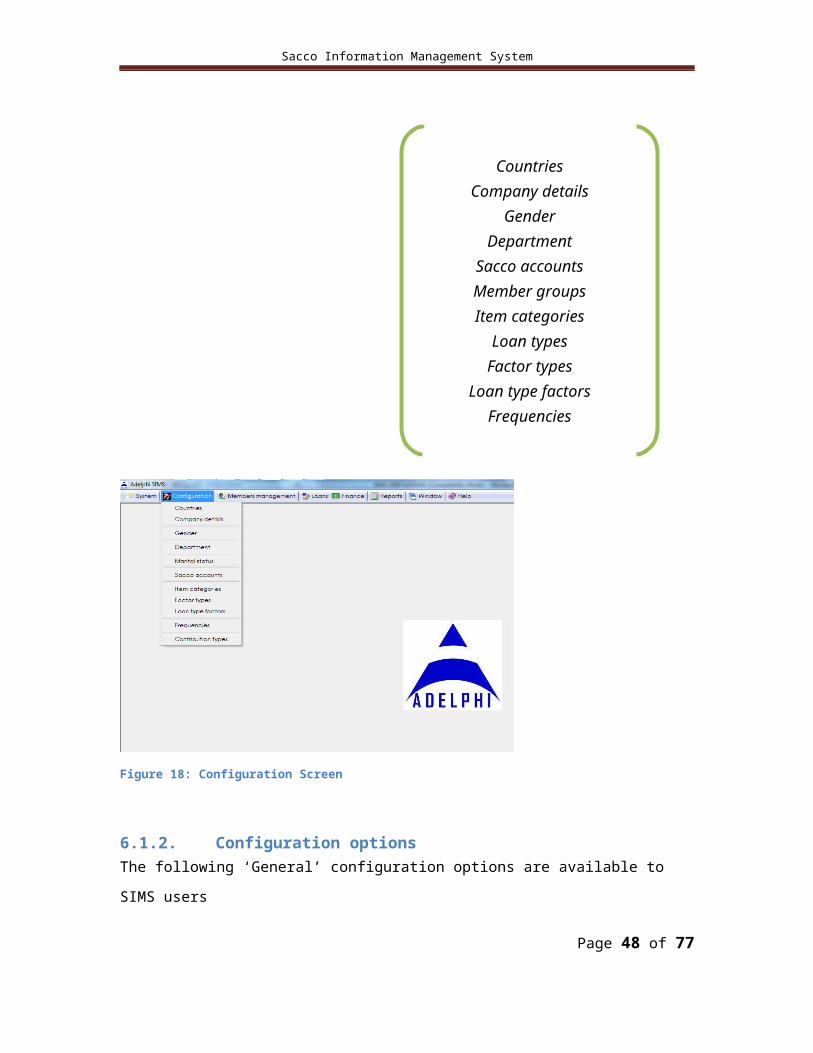
6.1. Configuration
6.1.1. OverviewThe configuration menu allows users to configure different system options
suited for the company, based on specific company procedures and data.
Page 40 of 65

Sacco Information Management System
This should be specific to the
company and should be done prior to
launching SIMS applications.
Figure 18: Configuration Screen
6.1.2. Configuration optionsThe following ‘General’ configuration options are available to SIMS users
6.1.2.1. CountriesOverview
Page 41 of 65
CountriesCompany details
Gender Department
Sacco accountsMember groupsItem categories
Loan typesFactor types
Loan type factorsFrequencies
Sacco Information Management System
The countries screen allows users to preset countries and their postal
codes for the purpose of capturing different contact details of entities within
the system
Find this Screen
Follow these steps to open the countries screen for an item.
Click on Configurations
Click on countries
Add
To add a country
Click on the “Add” button on the Company Branch Listing screen
The ‘Adding Country information screen opens.Fill in the fields with relevant data and ensure that the required [R]fields are filed (Field in Blue)
click on Save
Double click the save record to make any changes and resave after editing
Toolbar Options
Postal Branches
Allows the user to configure postal branch listings for a particular country
ConfigurationsGeneralCountriesPostal Branches
To add a postal branch
Select country
Click postal branches
The ‘Postal Branches listing’ screen opens.
Page 42 of 65
Sacco Information Management System
Click Add, the following cells are available to fill in:
Country [R] Postal branch code Postal branch name [R]
Enter details and Click on Save
6.1.2.2. Company detailsIt allows the user to add Sacco general and contact details.
To Add Company details
Click configurations
Company details
Add
The ‘Adding Company details’ screen opens.
Enter details and Click on Save
Chapter 7
7.1. Members Register
7.1.1. OverviewThis is the members’ management module. It allows users to manage the
register members exit into the Company , track transactions per member
within the Company and withdraw member from the Company.
To access members register module
Click Members register on the main menu
Page 43 of 65

Sacco Information Management System
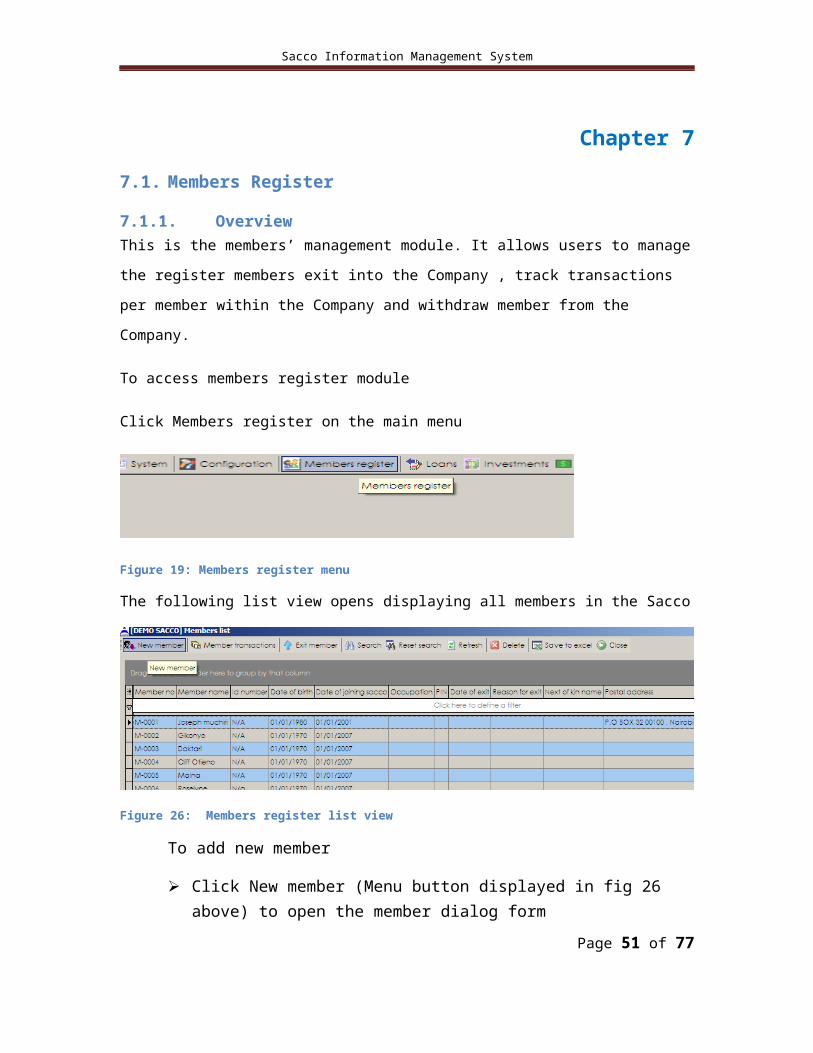
Figure 19: Members register menu
The following list view opens displaying all members in the Sacco
Figure 26: Members register list view
To add new member
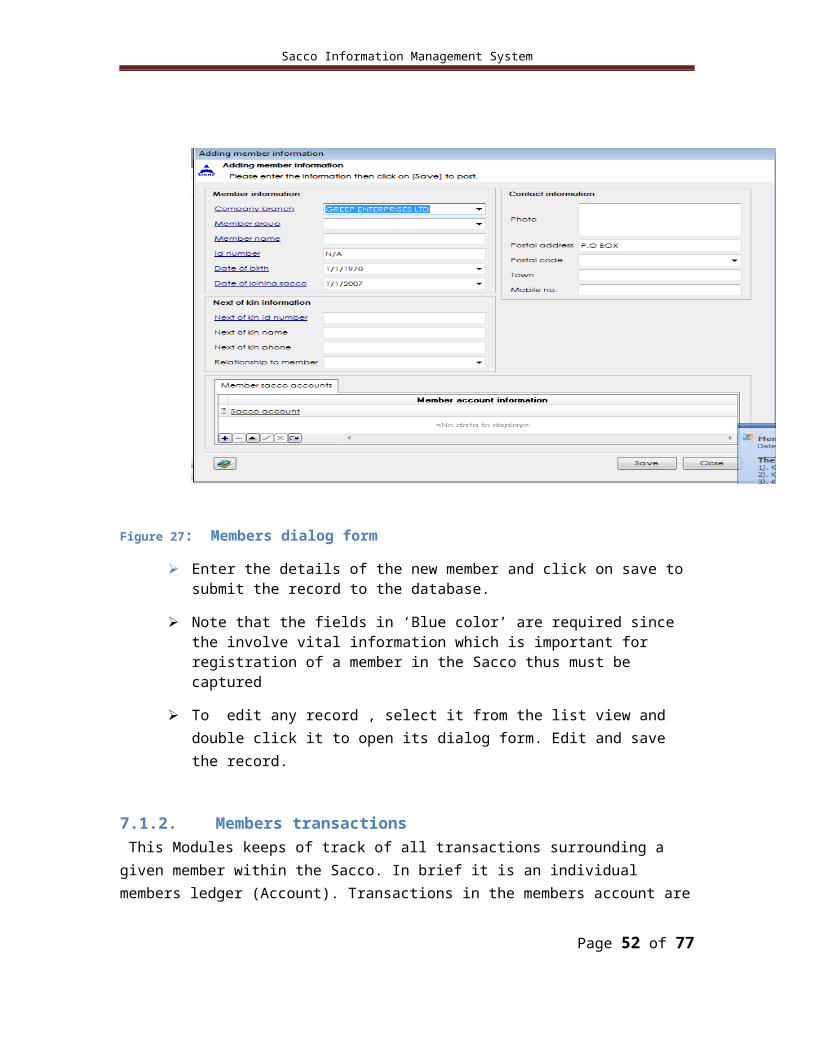
Click New member (Menu button displayed in fig 26 above) to open the member dialog form
Figure 27: Members dialog form
Enter the details of the new member and click on save to submit the record to the database.
Page 44 of 65
Sacco Information Management System
Note that the fields in ‘Blue color’ are required since the involve vital information which is important for registration of a member in the Sacco thus must be captured
To edit any record , select it from the list view and double click it to open its dialog form. Edit and save the record.
7.1.2. Members transactions This Modules keeps of track of all transactions surrounding a given member within the Sacco. In brief it is an individual members ledger (Account). Transactions in the members account are auto inserted automatically from various points of capture within the system(other system modules).
Contributions and loan repayments will be auto created when a members savings are receipted
Loans interests will be auto generated when a members loan application is approved and when user generated monthly interests from outstanding loan balances
Loan disbursement will be debited when a member receives a loan cheque(from payment vouchers)
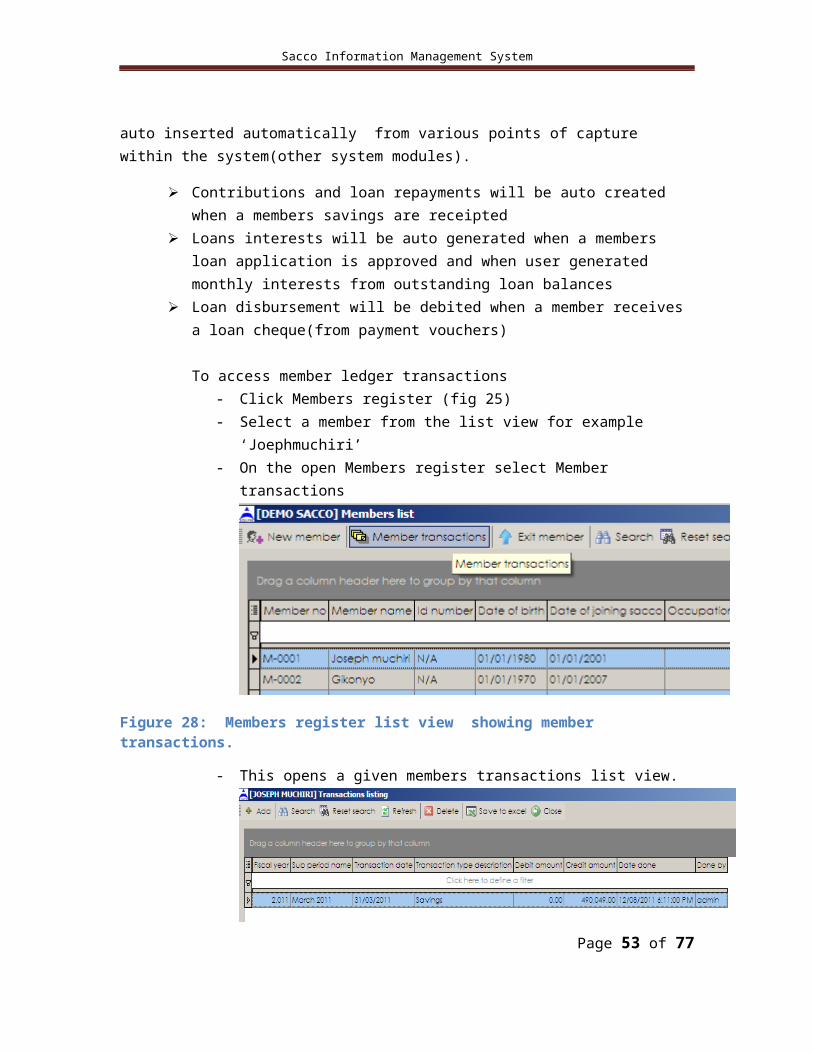
To access member ledger transactions- Click Members register (fig 25)- Select a member from the list view for example
‘Joephmuchiri’- On the open Members register select Member transactions
Figure 28: Members register list view showing member transactions.
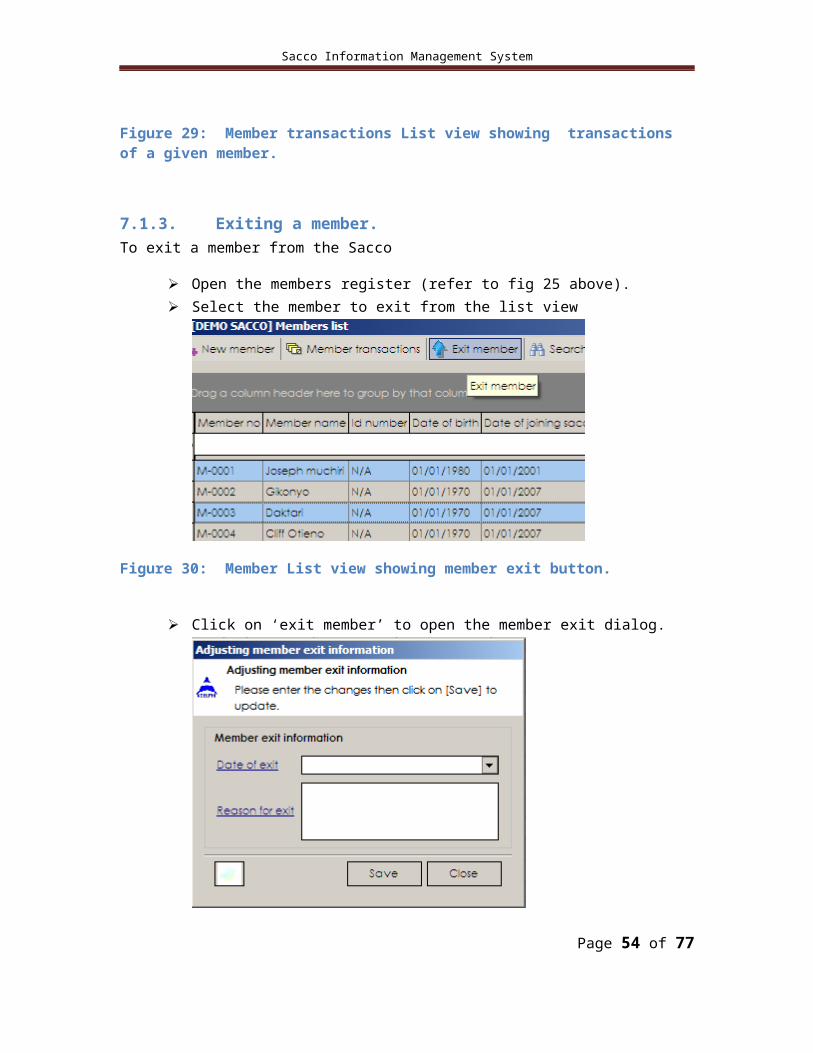
- This opens a given members transactions list view.
Page 45 of 65

Sacco Information Management System
Figure 29: Member transactions List view showing transactions of a given member.
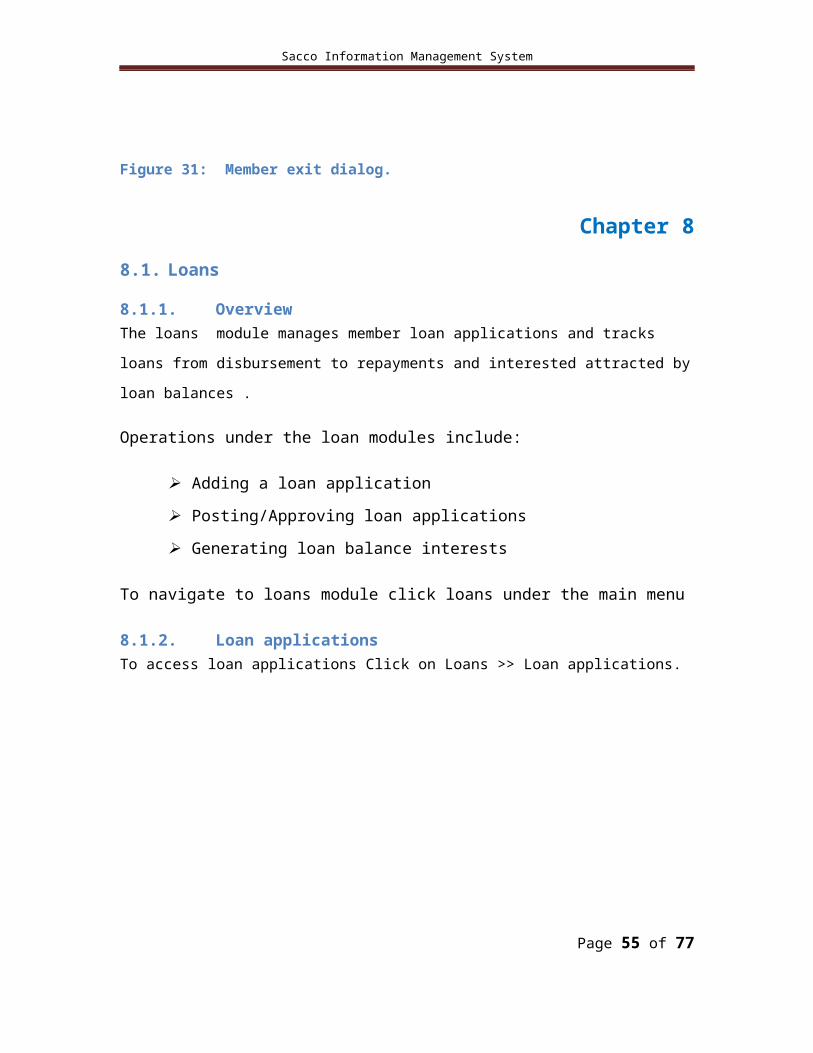
7.1.3. Exiting a member.To exit a member from the Sacco
Open the members register (refer to fig 25 above). Select the member to exit from the list view
Figure 30: Member List view showing member exit button.
Click on ‘exit member’ to open the member exit dialog.
Page 46 of 65
Sacco Information Management System
Figure 31: Member exit dialog.
Chapter 8
8.1. Loans
8.1.1. OverviewThe loans module manages member loan applications and tracks loans from
disbursement to repayments and interested attracted by loan balances .
Operations under the loan modules include:
Adding a loan application
Posting/Approving loan applications
Generating loan balance interests
To navigate to loans module click loans under the main menu
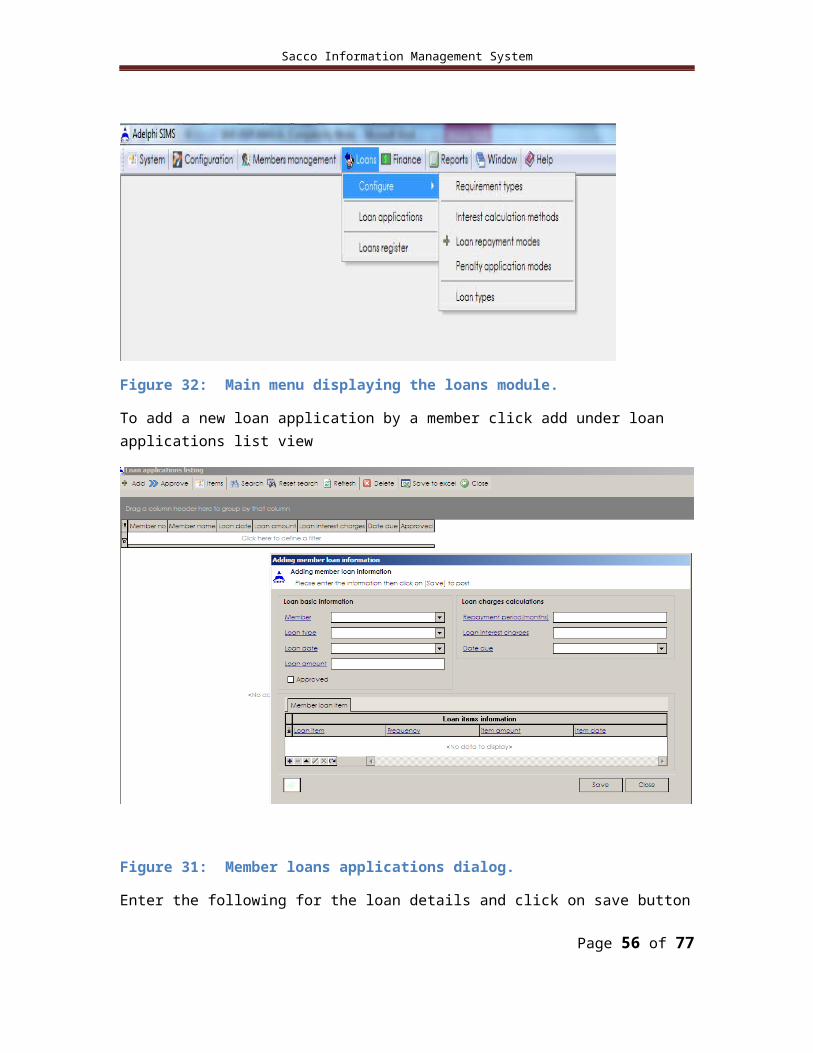
8.1.2. Loan applicationsTo access loan applications Click on Loans >> Loan applications.
Page 47 of 65
Sacco Information Management System
Figure 32: Main menu displaying the loans module.
To add a new loan application by a member click add under loan applications list view
Figure 31: Member loans applications dialog.
Enter the following for the loan details and click on save button
Member loan information
Page 48 of 65
Sacco Information Management System
Member Loan type Loan date Loan amount
The following fields are computed automatically by the systemLoan charges information
Loan interest charges Date due Member loan items Client claim ref.
8.1.2.1. Loan approvalApproval of loan applications performs the following processes.
1. Posts the advance loan interest into members account and sacco income account into the general ledger.
2. Recognizes the loan for disbursement under the finance module (i.e the significance is that the member has paid the loan interest charges ,other processing fees, and has met the necessary requirements for obtaining the loan)
3. The loan clears from loan applications to loans register.
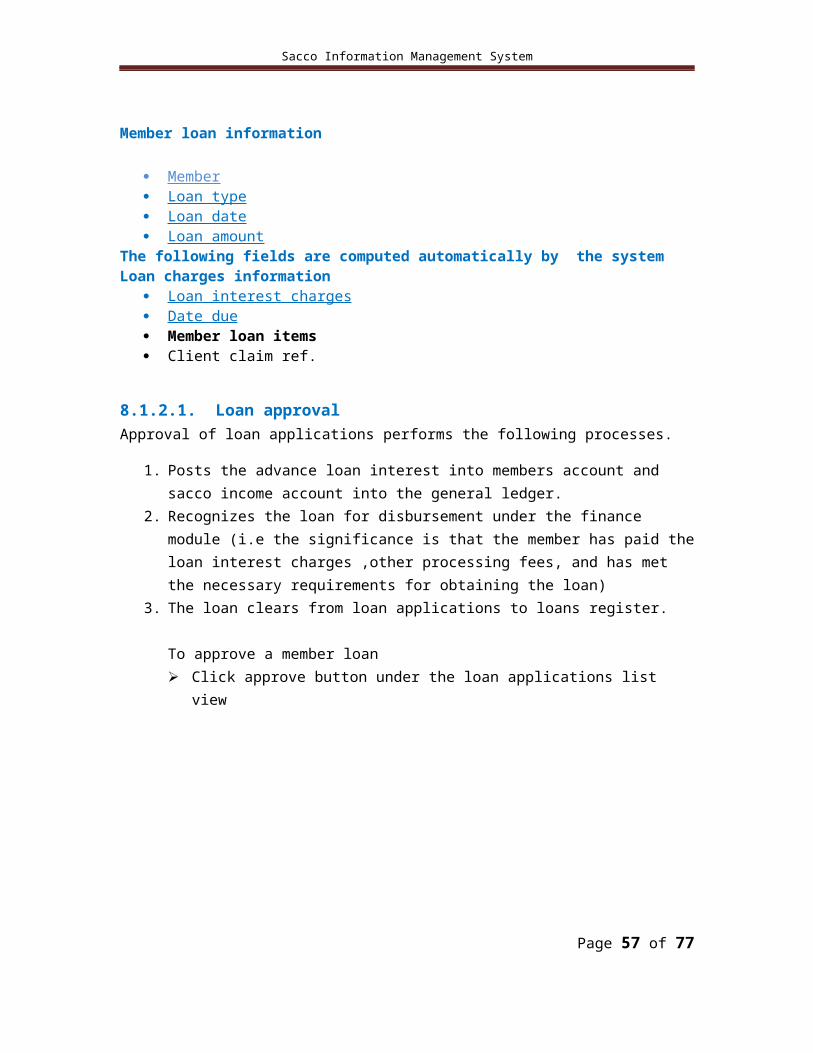
To approve a member loan Click approve button under the loan applications list view
Figure 32: Member loan approval button
Page 49 of 65
Sacco Information Management System
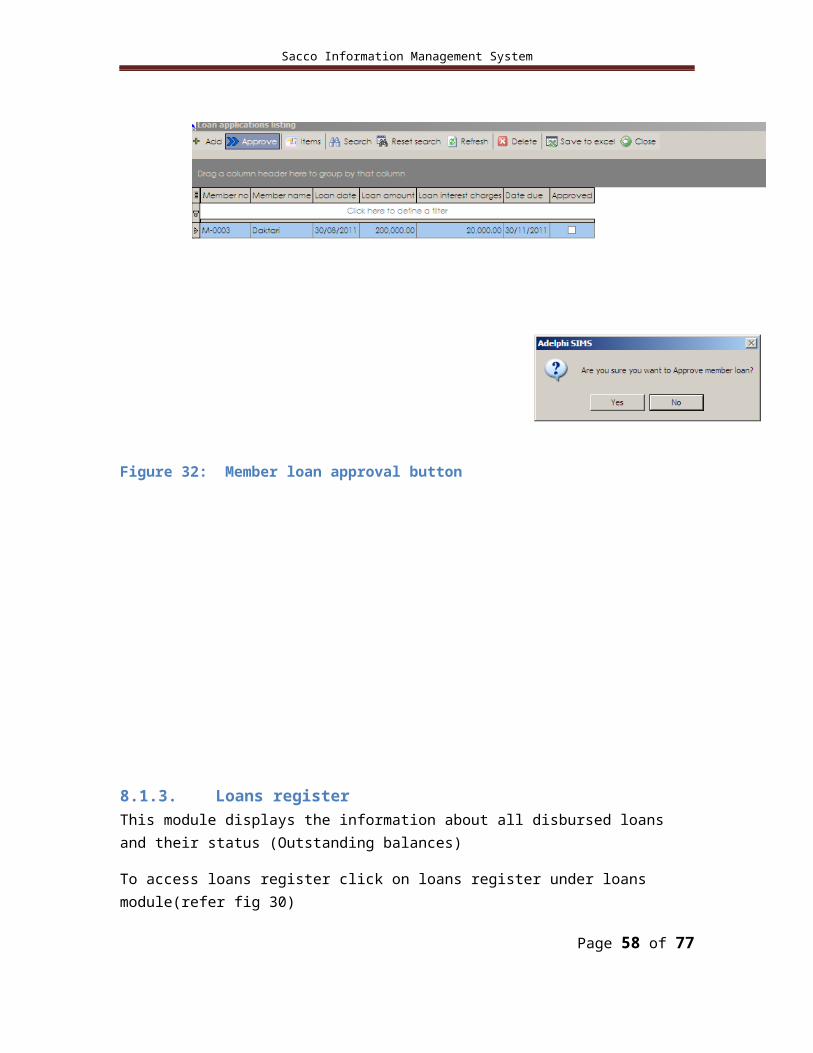
8.1.3. Loans registerThis module displays the information about all disbursed loans and their status (Outstanding balances)
To access loans register click on loans register under loans module(refer fig 30)
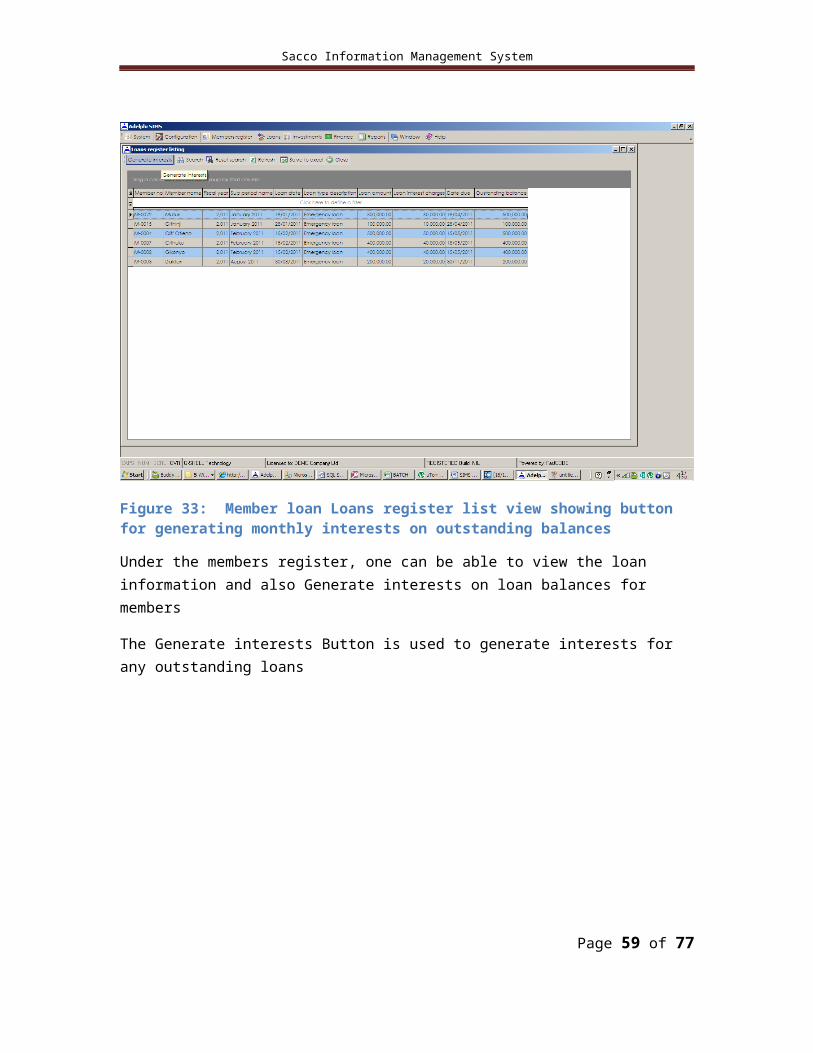
Figure 33: Member loan Loans register list view showing button for generating monthly interests on outstanding balances
Page 50 of 65
Sacco Information Management System
Under the members register, one can be able to view the loan information and also Generate interests on loan balances for members
The Generate interests Button is used to generate interests for any outstanding loans
Chapter 9
9. Finance
9.1. OverviewThe Finance module manages all your financial data
9.2. Find this Screen Click Finance on the main menu
9.3. Inside accountsSerial
Numbe
r
Group Account
Menu
Description
1. Configure Accounting
periods
Maintains the financial period and
sub periods setup
Account
types
Categorizes chart of accounts as
either Header or actual account
Page 51 of 65
Sacco Information Management System
Account
category
Categorizes account as either
balance sheet or profit and loss
Chart of
accounts
Defines all the accounts applicable to
Sacco operations
2 General
ledger
General
ledger
Maintains all financial transactions
from various operations of the
saccoe.g member contributions,
loans, investments
3. Receivables Receipts Keeps a register of all cash received
from members or other income
sources
4. Payables Payment
Vouchers
Keeps track of all payments made by
the Sacco to members or other
external entities
5. Bank
transactions
Bank
transactions
Keeps track of cash movement
between bank account and cash in
hand/transit account e.g bank
deposits, withdrawals , credit advices
e.t.c
6. Journal
vouchers
Journal
vouchers
This module is used to record
transactions which affect more than
one account unrelatively. E.g
inputting cumulative balances for
members.
Page 52 of 65
Sacco Information Management System
9.3.1. General ledgerThe General Ledger function manages all general ledger transactions. The
general ledger is at the heart of your accounting system. SIMS follows this up
by making sure that all transactions are recorded at the General Ledger. The
general ledger contains the accounts from which data is obtained to prepare
the financial statements of the business. SIMS allows the user to view a listing
of General Ledger transactions. The GL processes and generates various
reports regarding account information. This module interacts with other sub-
Systems and performs financial and accounting functions including budgets.
Provided in this listing information is the;
Transaction date
Parent account name
Account name
Subsidiary account name
Accounting Period Description
Sub-period Description
Parent Account Description
Transaction reference no.
Transaction description.
For every individual transaction
To View the General Ledger transaction listing
Click Finance
Click General Ledger
Page 53 of 65
Sacco Information Management System
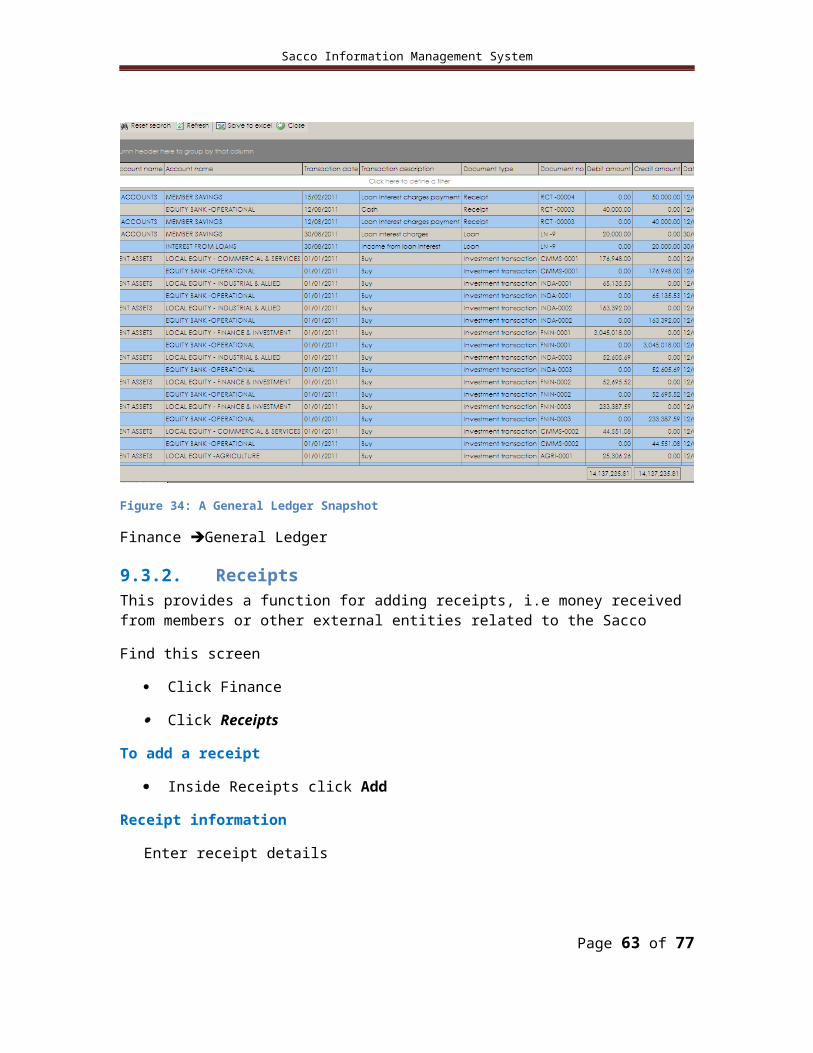
Figure 34: A General Ledger Snapshot
Finance General Ledger
9.3.2. ReceiptsThis provides a function for adding receipts, i.e money received from members or other external entities related to the Sacco
Find this screen
Click Finance
Click Receipts
To add a receipt
Inside Receipts click Add
Receipt information
Enter receipt details
Page 54 of 65
Sacco Information Management System
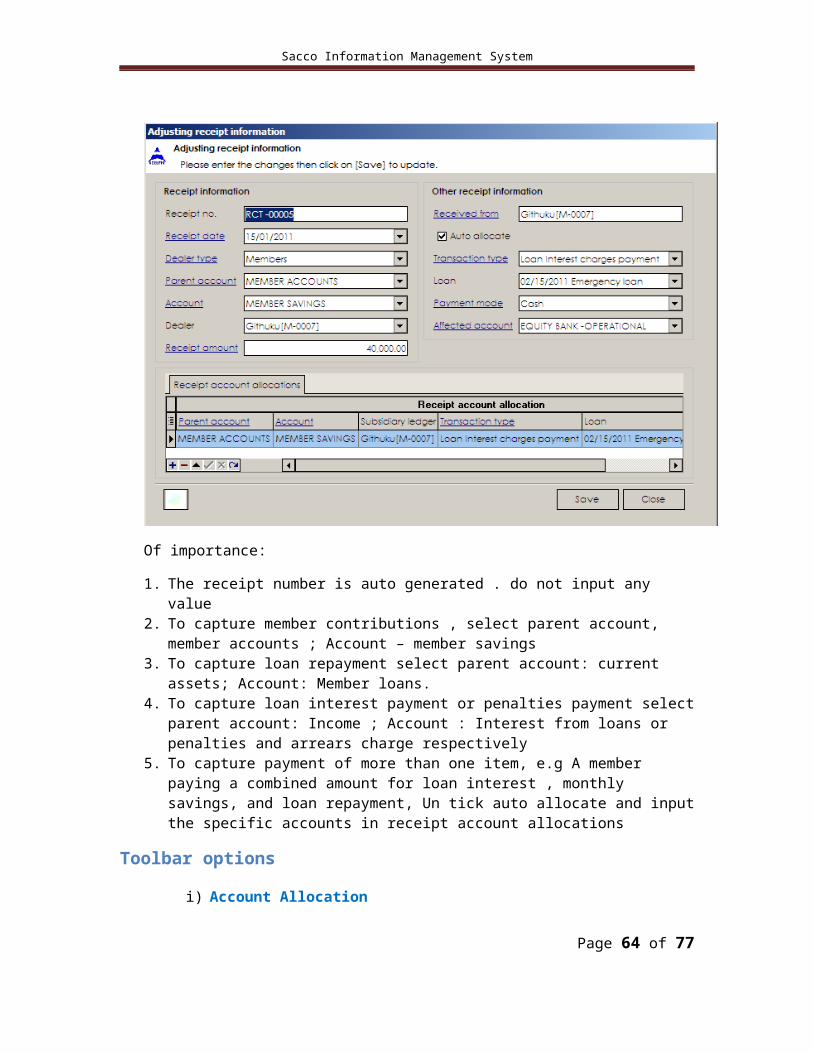
Of importance:
1. The receipt number is auto generated . do not input any value2. To capture member contributions , select parent account, member
accounts ; Account – member savings3. To capture loan repayment select parent account: current assets;
Account: Member loans.4. To capture loan interest payment or penalties payment select parent
account: Income ; Account : Interest from loans or penalties and arrears charge respectively
5. To capture payment of more than one item, e.g A member paying a combined amount for loan interest , monthly savings, and loan repayment, Un tick auto allocate and input the specific accounts in receipt account allocations
Toolbar options
i) Account Allocation
ii) Post
Post receipts into the GL – commits the recorded transaction to the GL
Page 55 of 65
Sacco Information Management System
9.3.3. Payment vouchers
Menu | Finance | Payment vouchers
From this screen, users can
Add a payment voucher
Captures details from a new payment voucher
Carry out account allocations
Post a payment voucher to GL
Payment vouchers work the same as the receipts except the fact that they record movement of cash out of the Sacco accounts(as indicated by the transaction type field)
Page 56 of 65
Sacco Information Management System
9.3.4. Bank transacations
The SIMSoffers a module for carrying out bank transactions. This module permits the Sacco to record transactions in the likes of ; Deposit of savings collected from members, Interest earned from bank balances, Bank debit / credit advice, Bank charges , e.t.c
To access bank transactions, click on
Finance> bank transactions
After recording a bank transaction , it is required that you post it to the general ledger so that the relevant accounts can be affected accordingly.
9.3.5. Journal vouchersIt keeps a register of journal vouchers. Users can add , post or unpostournal vouchers into the GL.
Page 57 of 65
Sacco Information Management System
To add a journal voucher, click on add and input journal voucher details, then click save.
To post, select journal voucher and click on post
To Unpost a JV transaction, select journal voucher from the listing and click ‘Un post’
9.3.5.1. Journal vouchers – posted Keeps a register of all posted journal vouchers, giving options to unpost and print
9.3.6. Reconciliation and budget
9.3.6.1. Bank reconciliationAllows for bank reconciliation, keeping a register of all bank reconciliations and allowing users to add new bank reconciliation transactions
To add click add, input details and save
To print, select record and click save
9.3.6.2. BudgetThe SIMS budget feature keeps a budget register. Users can add new budgets
Chapter 10
10. Investments
10.1. OverviewThis option in SIMS keeps the Sacco’s investmentsand manages changes in Money value of the investments.
Page 58 of 65
Sacco Information Management System
10.1.1. Configure
This option helps the user to setup parameters for various investments which the Sacco invests the members share capital(Savings)
a) Investment categories – This setup option allows the user to capture the various investment division option available for the Sacco.For instance: Equities Real estate
b) Investment classesThis is a subdivision of the investment categories. E.g Under real estate, a user can define Commercial or residential, Under Equities, a user can define Quoted or unquoted equities
c) Investment types : Investment types Categorizes the investment classes into specific market options . For instance quoted equities can be grouped as Financial and investment institutions(banks, micro finance e.t.c)
d) Securities : This option enhances a user to define specific market securities from which the Sacco is interested in obtaining equities(Shares) from e.g East Africa breweries, Safaricom IPO .
Page 59 of 65
Sacco Information Management System
e) Investment markets: This Option categorizes investments based the geographical location.
f) Equity prices : This option allows the user to capture various share prices as defined the financial market for the purposes of equity revaluations
g) Investment transaction types : this is a definition of the transactions that can be carried out under a given investment e.g revaluation, Buying, Selling , leasing e.t.c
h) Investment accounts: This option defines Which accounts will be affected by specific transactions on a particular investment
10.1.1.1. Real estate investmentsThis option allows the user to capture and manage real estate investments acquired by the sacco.
To navigate to real estate investments,
Click investments > Real estate investments
To add a real estate investment,
Click Add
Input the real estate investment details and save
Page 60 of 65
Sacco Information Management System
10.1.1.1.1. Tool bar options
1.)Investment transactions
This option allows the user to manage all transactions related to a specific real estate investment
To navigate to real estate investment transactions, click investment transactions under the real estate investments list view tool bar
The following operations are available under real estate investment transactions
1) Add real estate investment transaction2) Post real estate investment transaction3) Un post real estate investment transaction
Point to note: The transaction for acquiring real estate investment is automatically created under the investment transactions when a user adds it under the real estate investments screen. It is required the user posts the transaction to affect the relevant accounts under the general ledger.
10.1.1.1.2. Equities
This option allows the user to capture shares(Investments in equites) obtained by the Sacco and track them
To access the Equities screen
Click Investment>Equities
Page 61 of 65
Sacco Information Management System
Under equities the following operations are available:
1) A user may add bought shares2) A user may add sold shares3) User may post / Un post equity transaction (Selling or
buying)
10.1.1.1.3. Equity revaluations
This option allows the user to capture security market revaluations of the Sacco’s Equity investments
To access equity market revaluations
Click investments> Equity market revaluations
Page 62 of 65
Sacco Information Management System
Under this option user can
1. Add market revaluation period2. View and add Individual security revaluations3. Post/Un post security market revaulations
10.1.1.1.4. Security market revaluation
This Option is available under equity market revaluation.
It enables the user to capture individual equity revaluations per security and computes the gain or loss on equity
To add a security revaluation, click on Add under the security market revaluation
Page 63 of 65
Sacco Information Management System
Select the investment security to do revaluation on, and input the current price and save.
Page 64 of 65
Sacco Information Management System
Chapter 11
Chapter 1211. Reports11.1. OverviewThe reports module in SIMS is a standalone function for all company reports. Reports are grouped in major functions based on the system. SIMS provides standard reports that have been customized to suite your business. New reports can be added into this module with request. This option keeps a listing of all company reports.11.2. Member management 11.2.1. Members register11.2.2. Member statement11.2.3. Member summary balances11.3. Finance11.3.1. GL transactions11.3.2. Cash position report11.3.3. Trial balance11.3.4. Profit and loss statement11.3.5. Balance sheet statement
Page 65 of 65