
RURAL KIOSK BANKING SOLUTION FOR STATE … KIOSK BANKING SOLUTION FOR STATE BANK OF INDIA User...
24
RURAL KIOSK BANKING SOLUTION FOR STATE BANK OF INDIA User Manual For BC TCS Confidential
Transcript of RURAL KIOSK BANKING SOLUTION FOR STATE … KIOSK BANKING SOLUTION FOR STATE BANK OF INDIA User...

RURAL KIOSK BANKING SOLUTION
FOR
STATE BANK OF INDIA
User Manual
For
BC
TCS Confidential

Application User Manual1LOGIN --------------------------------------------------------------------------------------------------------------------------- 3
2User Maintenance ------------------------------------------------------------------------------------------------------------ 4
3User Configuration ------------------------------------------------------------------------------------------------------------ 4
4KO Finger Print Capture ----------------------------------------------------------------------------------------------------- 5
5User Pin Status Change ------------------------------------------------------------------------------------------------------ 6
6User Group Services ----------------------------------------------------------------------------------------------------------- 7
7User Services ------------------------------------------------------------------------------------------------------------------- 8
8Logs 9
9Transaction Log ---------------------------------------------------------------------------------------------------------------- 9
10Session Log ------------------------------------------------------------------------------------------------------------------ 10
11Error Log --------------------------------------------------------------------------------------------------------------------- 11
12Audit log ---------------------------------------------------------------------------------------------------------------------- 12
13Reports ------------------------------------------------------------------------------------------------------------------------ 13
14 Users Created Report ---------------------------------------------------------------------------------------------------- 13
4.2 KO Operation Report ----------------------------------------------------------------------------------------------------- 14
4.3 User Statistics Report ----------------------------------------------------------------------------------------------------- 15
4KO Consolidated Report ---------------------------------------------------------------------------------------------------- 16
15Password Maintenance ---------------------------------------------------------------------------------------------------- 17
16 Change Password ---------------------------------------------------------------------------------------------------------- 17
6 KO Limit Configuration --------------------------------------------------------------------------------------------------- 18
7 Sub KO Requests ------------------------------------------------------------------------------------------------------------ 20
7.1 Sub KO Requests ---------------------------------------------------------------------------------------------------------- 20
8Sub KO Authorization ------------------------------------------------------------------------------------------------------- 22
8.1 Sub KO Authorization ---------------------------------------------------------------------------------------------------- 22
9Download Extract Files ----------------------------------------------------------------------------------------------------- 22
9 Download Extract Files____________________________________________________________23
2

Application User Manual
1 LOGIN
This option allows the user (BC/Admin) to login to access the administrative services for kiosk banking. The user has to enter the below link in internet explorer browser.
https://www.sbikiosk.com/jsp/login.jsp
The user will get the screen.
1 Enter BC user Id in the Administrator Id text box.2 Enter the password in the password text box.3 Select BC from the User Type Select Box.4 Click on the “Login” button.
Note: Login Id and Password are case sensitive.
3
Admin Password Admin IdType of user (BC/Admin)

Application User Manual2 User Maintenance
3 User Configuration
To invoke this screen, Click on User Configuration under User Maintenance submenu. This option allows the BC to create new KO users or update the details of the existing users.
Adding a new User:
1 Enter the details in all mandatory fields. In the User Info Tab, User Base Branch (mandatory), Title (mandatory), First Name (mandatory), Middle Name, Last Name Identification type, Identification Number and Date of Birth have to be entered.
3 Enter User Group Id, this is a mandatory field.4 In the Address Details Tab, there are fours lines of address (Line1 and 3 are mandatory field)
and Pin code (mandatory field), Phone Number have to be entered.5 Enter the user id for the KO being created.5 Click on Add Button to continue.6 The response message will appear on the same screen for acknowledgement along with user
id for newly created user. The 8 digit KO ID will be displayed on the screen after successful KO creation or if KO creation fails, an error message will be displayed.
Querying the User Details:
4

Application User Manual1 Enter the KO Id in the user id text box.2 The BC user can query any KO user by clicking the Query Button at the bottom of the page.
Updating the User Details:
1 After querying the KO details, change the required fields, and Click on Update Button to update the KO user details.
2 The response message will appear on the same screen for acknowledgement.
Deleting the User:
1 After querying the KO details, click on Delete button to delete the KO from the system.(The deleted KO is no more a valid KO and can’t login into the system.)
2 After deleting a KO, the response message will be displayed on the same screen.
4 KO Finger Print CaptureTo invoke this screen, click on KO Finger Print Capture under User Maintenance sub-menu. BC has to capture the Finger prints of a new KO user to complete the User creation process.
1 Click on KO finger print capture link of user maintenance and then select KO id from the list and click Capture to start the finger print capture process.
5

Application User Manual2 New window will be opened indicating which finger to be captured. Now BC has to click on
capture button to capture the corresponding Finger print. 3 BC has to click on Submit button once the finger print is captured successfully. If finger print
is not captured properly then above procedure should be repeated for same finger till capturing is successful. BC can skip capturing a finger by entering the reason.
4 The above procedure should be repeated for 6 fingers of KO which will be indicated in the window.
5 When all finger prints are captured successfully, BC can choose 3 preferred fingers for verification. These chosen 3 preferred fingers only will be asked during the verification process.
5 User Pin Status ChangeTo invoke this screen, click on User Pin Status Change. If the KO loses the PIN, then Regeneration of Pin is to be done. This service allows the BC to change the pin (login or transaction) status of a KO and to regenerate the pin (login or transaction) of a KO. The regenerated password will be the default password, which is configurable by administrator.
If user forgets his PIN then the status of PIN should be changed to LOST or FORGOT.
1 Enter the User id for which the PIN Status needs to be changed.2 Select the type of pin (Password) either login or transaction.3 After entering the input click on the “Query” link.
6

Application User ManualThe PIN status change page is displayed with User Id, Current Status and the status to be changed (LOST or FORGOT). On clicking Change button, the pin status is changed and the new default PIN will be generated.
6 User Group Services
To invoke this screen, click on User Group Services under User Maintenance sub-menu. This option allows the User to create a new KO user group and can assign services and or update services available for existing KO user group.
Adding a new User Group
1 Enter Group Name for a new group. 2 Select Group Category for the user group. Then click on Add button.3 The services enabled for the branch are displayed. These services can be enabled by selecting
the corresponding check box and disabled by unselecting the corresponding check box.4 Click on Add button to complete the process.5 A new user group will be created and the response message will be displayed on the screen.
Querying/Updating a new User Group
7

Application User Manual
1 Enter Group Name. The user can also select the group name from the search button. This is a mandatory field.
2 Click on query button. The services provided for that group will be displayed. Services for a group can be updated by checking/unchecking the services.
4 Make necessary changes by checking or un-checking the services check boxes.5 Click on Update to update the details.6 The acknowledgement screen appears with response message.
7 User Services
To invoke this screen, click on User Services under User Maintenance sub-menu. This option allows the user to enable/disable various services specific to KO users. It will allow the user to enable/disable only those services which are enabled for that users group.
8

Application User Manual
Display User Services
1 Choose user id. The user can also select it from the search button nearby. 2 Click on the Query button to continue or Clear button to reset the user id.
Update User Services
1 To remove the service, uncheck the check box next to the service that has to be deleted.2 To enable a service, click on the check box next to the service that has to be added.3 Click on the Update button to continue.4 The acknowledgement screen appears with acknowledgement message.
8 Logs
9 Transaction Log
To invoke this screen, and click on “Transaction Log”, under “Logs” submenu.
9

Application User Manual
1 Enter the KO user id (optional) whose transaction logs are required in the text box provided. 2 Enter From Date (optional) and To Date (optional) in the text boxes provided in
DD/MM/YYYY format. 3 Click on Query button to get the transaction details for corresponding to the entered inputs.
10 Session Log
To invoke this screen, click on “Session Log” under “logs” sub-menu.
10

Application User Manual
1 Click on Logged Users button to get the session details of users who are currently logged in.2 Enter the user id (optional) whose session details are required in the text box provided. 3 Enter “Login from Date” (optional) and Login “To Date” (optional) in the text boxes
provided in DD/MM/YYYY format4 Click on Query button to get the session log details corresponding for the entered inputs.
11 Error Log
To invoke this screen, click on “Error Log” under “Logs” sub-menu.
11

Application User Manual
1 Enter the user id (optional) whose error log details are required in the text box provided. 2 Enter “Login from Date” (optional) and “Login To Date” (optional) in the text boxes
provided in DD/MM/YYYY format3 Click on Query button to get the error log details corresponding for the entered inputs.
12 Audit log
To invoke this screen, click on “Audit Log” under “Logs” sub-menu.
12

Application User Manual
1 Select the service description from the drop down box provided.2 Enter From Date (optional) and To Date (optional) in the text boxes provided in
DD/MM/YYYY format. 3 Click on Query button to get the audit logs corresponding to the 4 Click on the audit sequence id to get the details of the corresponding activity.
13 Reports
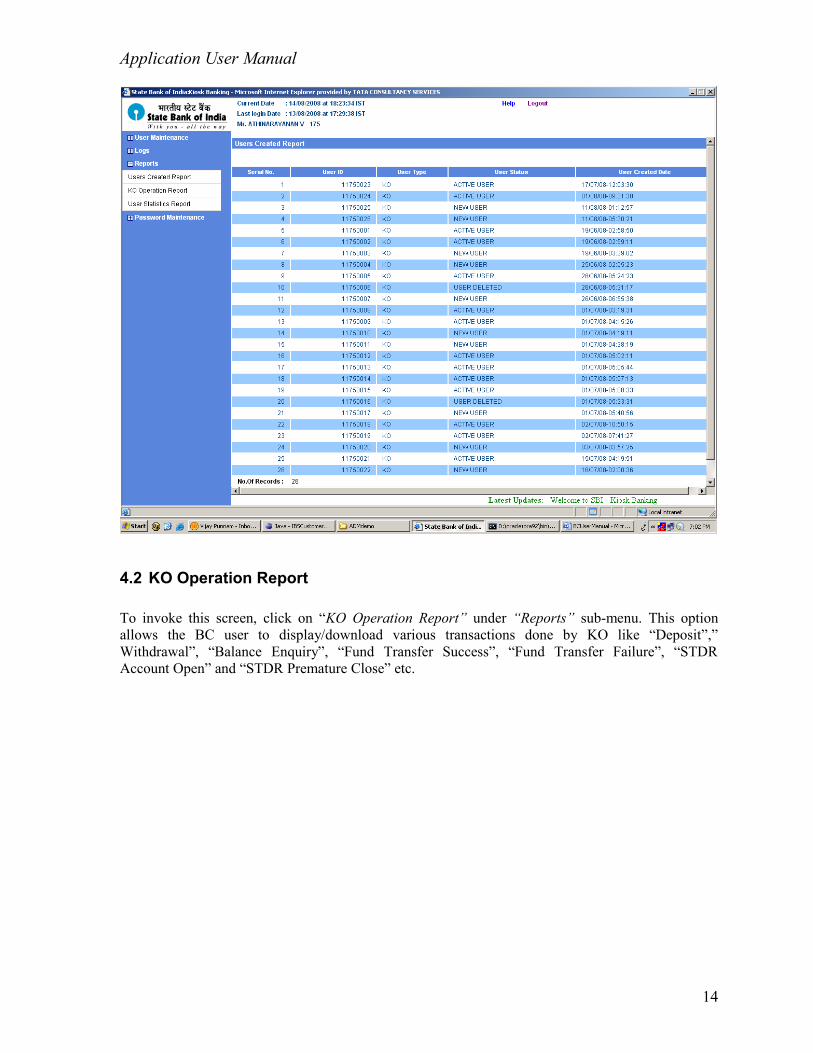
14 Users Created ReportTo invoke this screen, click on “Users Created Reports” under “Reports” sub-menu. This report shows all the KO created by the BC along with status of the KO and KO Created date.
13
Application User Manual
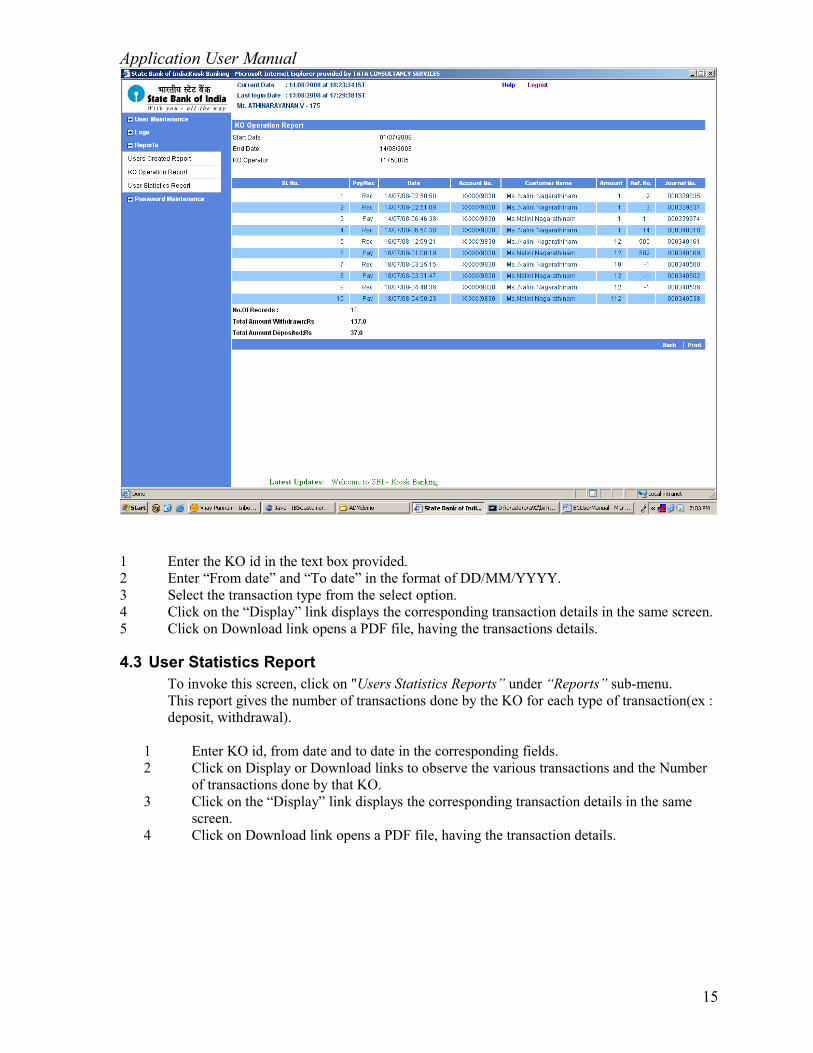
4.2 KO Operation Report
To invoke this screen, click on “KO Operation Report” under “Reports” sub-menu. This option allows the BC user to display/download various transactions done by KO like “Deposit”,” Withdrawal”, “Balance Enquiry”, “Fund Transfer Success”, “Fund Transfer Failure”, “STDR Account Open” and “STDR Premature Close” etc.
14
Application User Manual
1 Enter the KO id in the text box provided. 2 Enter “From date” and “To date” in the format of DD/MM/YYYY.3 Select the transaction type from the select option. 4 Click on the “Display” link displays the corresponding transaction details in the same screen.5 Click on Download link opens a PDF file, having the transactions details.
4.3 User Statistics ReportTo invoke this screen, click on "Users Statistics Reports” under “Reports” sub-menu. This report gives the number of transactions done by the KO for each type of transaction(ex : deposit, withdrawal).
1 Enter KO id, from date and to date in the corresponding fields.2 Click on Display or Download links to observe the various transactions and the Number
of transactions done by that KO.3 Click on the “Display” link displays the corresponding transaction details in the same
screen.4 Click on Download link opens a PDF file, having the transaction details.
15

Application User Manual
4 KO Consolidated ReportTo invoke this screen, click on "KO Consolidated Report” under “Reports” sub-menu. This report gives the total amount deposited to a KO and amount withdrawn from a KO and the current outstanding amount with a KO. This is given for all the Kos under the BC for a particular day.
1 Enter the date for which the report is required.2 Click on “Display”.
16

Application User Manual
15 Password Maintenance
16 Change PasswordTo invoke this screen, click on “Change Password” under “Password Maintenance” sub-menu. This option allows the BC to change his Logon password. To change logon password (Note: Passwords are Case sensitive) follow the below steps,
1 Enter Current Password which is to be changed.2 Enter the new password in accordance to the password policy displayed. Any password that
does not confer with the policy will not be accepted. 3 Re-enter New Password in the Repeat New password box. 4 Click on the Submit Button.5 Acknowledge message will be displayed for the password change operation. BC can use new
password from next login in to system.
17

Application User Manual
6 KO Limit Configuration
6.1 KO Limit Configuration
To invoke this screen, click on KO Limit Configuration under KO Limit Configuration sub menu.This service is used to update the current holding limit( amount which the KO holds in hand) whenever he deposits any amount to the bank or he takes any amount from the bank.
1 Enter KO id. Click on “Query “.2 A screen with the current holding limit of the KO , KO limit, will be displayed (both are read
only fields and can’t be changed) along with type of transaction and amount fields(can select/enter values for these fields ).
3 Select the type of operation “withdrawal” if KO is taking money from the bank or select “deposit” if KO is depositing money to the bank.
4 Enter the amount being withdrawn / deposited by KO.5 Click on “Update”. An acknowledgement message will be displayed showing the holding
limit after updating.
18

Application User Manual
19

Application User Manual
7 Sub KO Requests
7.1 Sub KO Requests
To invoke this screen, click on Sub KO Requests under Sub KO Requests sub menu. Whenever a KO creates a new SUB KO, a request will come to the corresponding BC for approval. In this service the BC will be able to view all such requests.
20

Application User Manual
The BC can approve or reject a particular SUB KO.
21

Application User Manual8 Sub KO Authorization
8.1 Sub KO Authorization
To invoke this screen, click on Authorize Sub KO under Authorize Sub KO sub menu. Whenever a BC is required to give login privilege to a KO/SUB KO to the his/corresponding KO’s login, he has to authorize that user.
1. Select the KO/SUB KO id using the search provided.2. Enter remarks for authorizing the KO.3. Click on Authorize to authorize the user. Acknowledgement message is displayed.
9 Download Extract Files
To invoke this screen, click on Download Extract Files under Download Extract Files sub menu. Whenever a BC is requires a report of the transaction and the limit details that had happened on a date this option could be used.
22

Application User Manual
1. Select the desired Date from the dropdown option that has been provided.2. Select the report that has to be downloaded it can be either the transaction report or the
Limit report.3. Click on Download button to extract the report.
23

Application User Manual
24