Rules of Play - Amazon S3
36
GMT Games, LLC P.O. Box 1308, Hanford, CA 93232-1308 www.GMTGames.com Rules of Play Game Design: Vance von Borries
Transcript of Rules of Play - Amazon S3

GMT Games, LLCP.O. Box 1308, Hanford, CA 93232-1308www.GMTGames.com
Rules of Play
Game Design:Vance von Borries

Roads to Moscow ~ Rules of Play2
© 2013 GMT Games, LLC
1.0 Introduction1.1 Historical Setting .......................................... 31.2 General Introduction .................................... 3
2.0 Game Equipment2.1 The Game Maps ........................................... 32.2 The Playing Pieces ....................................... 3 How to Read the Units ................................. 42.3 Charts and Tables ......................................... 62.4 The Die ......................................................... 6
3.0 Basic Concepts3.1 Terminology ................................................. 63.2 Zones of Control ........................................... 63.3 Stacking ........................................................ 73.4 Efficiency and Lead Units ............................ 73.5 Halving and Rounding ................................. 83.6 Unit Steps ..................................................... 83.7 Disruption ..................................................... 8
4.0 Playing the Game4.1 The Turn ....................................................... 94.2 Formations and Activations .......................... 9
5.0 The Strategic Segment5.1 Weather ......................................................... 105.2 Reinforcements ............................................. 105.3 Reserve Status .............................................. 10
6.0 Supply6.1 Supply Status ................................................ 116.2 Supply Routes .............................................. 116.3 Supply Sources ............................................. 126.4 Fuel Supply .................................................. 12
7.0 Operations7.1 Initiative ....................................................... 137.2 Activation and Operations Sequences .......... 137.3 Combining Formations ................................. 147.4 Activation of Army Units ............................. 15
8.0 Ground Unit Movement8.1 Movement Restrictions ................................ 158.2 ZOC Effects on Movement .......................... 168.3 Terrain Effects on Movement ....................... 168.4 Weather Effects on Movement ..................... 178.5 Overruns ....................................................... 18
9.0 Pre-Combat Actions9.1 Combat Declaration ...................................... 199.2 Combat Refusal ............................................ 209.3 Reaction Movement ..................................... 209.4 No Retreat Declaration ................................. 21
10.0 Combat10.1 Attack Restrictions ..................................... 2210.2 Effects of Terrain on Combat ..................... 2210.3 Choosing the CRT ...................................... 2210.4 Combat Coordination ................................. 2210.5 Determining Combat Odds ......................... 2310.6 Resolving Combat ...................................... 24
11.0 Combat Results11.1 Reading the CRT ........................................ 2411.2 Combat Losses ........................................... 2511.3 Retreats ....................................................... 2511.4 No Retreat Option Applied ......................... 2611.5 Retreating through Enemy ZOC ................. 2611.6 Advance After Combat ............................... 26
12.0 Artillery12.1 Artillery Fire Support ................................. 2712.2 Artillery in Defense .................................... 28
13.0 Air Units13.1 Air Unit Restrictions ................................... 2913.2 Close Air Support Mission ......................... 29
14.0 Strongpoints and Fortified Line14.1 General Effects ........................................... 2914.2 Strongpoint Construction ........................... 3014.3 Strongpoint Removal and Fortified Line De-
struction ................................................... 3015.0 HQ Units and Leaders
15.1 HQ Characteristics ..................................... 3115.2 Command Points ........................................ 3115.3 Leaders ....................................................... 32
16.0 Special Units16.1 German Artillery HQ .................................. 3216.2 Fuel Units ................................................... 3316.3 Soviet Rocket Artillery ............................... 33
Index ...................................................................... 34The Operations Sequences .................................. 35Expanded Sequence of Play ................................ 36
T a b l e o f C o n t e n t s

3Roads to Moscow ~ Rules of Play
© 2013 GMT Games, LLC
2.0 Game EquipmentRoads to Moscow contains:
• One 22x34 inch front and back printed map • 528 die-cut counters in three counter sheets• one Rules Book• two German Set Up Cards• two Soviet Set Up Cards• one bi-fold Player Aid Card• one single-sided Turn Record Track Card• one ten-sided die
2.1 The Game MapsThe maps portray portions of the Soviet Union in the vicinity of Moscow where the battles took place. The grid of hexagons superimposed over the terrain features facilitates movement and the positioning of the playing pieces. A game piece is considered to be in only one hexagon at any one time. These hexagons are hereafter called “hexes.” Each hex has a four-digit identification number, used for game reference purposes only. Each hex on the Mozhaysk map represents 1.4 km of terrain from side to side; each hex on the Mtsensk map represents 1.2 km.
2.2 The Playing Pieces2.21 There are six types of playing pieces:a. Combat units. These represent the military units that fought
(or could have fought) in the historical campaign.b. Non-combat units. These are Leader units and Fuel units.c. Air units. These are any piece with an aircraft silhouette.d. Activation markers (AM). These are any pieces with a flag
symbol. These are not placed on the map, but are used to determine which Formations are active [4.2].
e. Force markers. Each side has several to use as placeholders for large stacks on the map [3.35].
f. Player Aid markers. All remaining pieces are player aid markers. These are used to assist game play. There should be enough markers provided with the game. If at any time you need more, make some with blank counters. The number of markers does not constitute a design limit.
2.22 For an explanation of the numbers and symbols on the units, refer to the How to Read the Units section at the front of the rulebook.
2.23 All combat units are marked with unit designations. These are the historical unit identifications. For an explanation of ab-breviations on the units, refer to 20.1.
2.24 Unit Type (combat units). Each Unit Type Box [“How to Read the Units” section on page 4 of this manual] is colored to distinguish units controlled by each HQ, as well as those not controlled by any HQ. This color scheme affects play [4.2, 5.2, 7.2, 7.3, 12.13b, 12.13c, 15.13].
1.0 Introduction1.1 Historical Setting
During the summer of 1941, the world watched as the forces of the German Army Group Center advanced rapidly toward the city of Moscow. Moscow, the largest city in the Soviet Union and its capital, was a key objective for the Germans. To the Germans its fall seemed inevitable during the month of Octo-ber. But Moscow is a long way from Germany, and the closer the Germans got to it, the more difficulties they encountered with terrain, their own lengthening supply lines, and stiffening Soviet resistance.
In early October the Soviets tangled with a major German spearhead, this one led by the most famous of German Panzer leaders, Gen. Heinz Guderian. Here, Soviet troops repeatedly struck against the flank of the German advance along the one road to Mtsensk, 125 miles south-southeast of Moscow. Along this road the German offensive was frustrated again and again, allowing Soviet Defenders farther north to dig in for their own final stand. Overall, the German advance was slowed down just enough by the stand at Mtsensk that ultimately they could not threaten Moscow from this direction.
Only a few days later, about 100 kilometers west of Moscow, just west of the town Mozhaysk, a surprisingly strong Soviet force dug in against another German armored spearhead. In a fight to the death, the German advance was nearly stopped and the Germans suffered many losses. Most importantly, the attack caused the Germans in this sector to lose a critical week in their drive on Moscow.
The battles of Mozhaysk and Mtsensk may have been small, but they played an important role in saving Moscow.
1.2 General IntroductionRoads to Moscow is an operational-level game of the WWII
battles near the towns of Mozhaysk and Mtsensk that took place in October 1941. The game is intended for two players. One player controls the German forces, and his opponent controls the Soviet forces. The players maneuver their units across the map and conduct combat according to the rules of play.
Several scenarios are provided, showing historical en-gagements where one side or the other was attacking. In each scenario the attacking player wins by capturing and holding various objectives. These objectives are worth victory points towards the victory conditions of that scenario. His opponent wins the game by avoiding these conditions.
Roads to Moscow

Roads to Moscow ~ Rules of Play4
© 2013 GMT Games, LLC
Explanation of Unit ValuesAttack Strength: is the strength a non-artillery Combat Unit contributes when attacking. A red number means the unit is armor.Command Point: a DRM equal to the number of points available to be applied to Coordination Checks for: Reaction Movement, No Retreat, and Declared Combat Coordination (Artillery, CAS, or Ground Unit). No more Strongpoints Under construction can be started during a single activation than the combined Command Points of all HQs currently in play of the active Formation. Defense Strength: is the strength a Combat Unit (except for supporting artillery) contributes when occupying a defender hex. A red defense strength may cause the loss of a step from an attacking Armored unit if the conditions of Armor Attrition are met [11.23].Efficiency Rating (ER): A number quantifying a unit’s relative ability to perform well in combat. The higher the number, the better the unit, and the greater the chance it will either undertake combat actions or perform at peak efficiency.Movement Allowance (MA): is the max number of clear ter-rain hexes a unit can enter in Dry weather during the Movement Phase.No ZOC Band: denotes the unit does not exert a zone of control (ZOC) into any adjacent hex.Orange Circle: denotes units that pay motorized terrain costs, but do not conduct Reaction Movement, Combat Refusal or Overruns. Orange-Circle MA artillery, anti-tank, and anti-aircraft units cannot advance after combat.Range: is the maximum number of hexes an artillery unit can be from a Defender Hex and still provide support. When counting, do not count the artillery unit hex, but do count the Defender Hex.Red Box: denotes the unit pays motorized terrain costs, and has the ability to conduct Reaction Movement, Combat Refusal, and Overruns.Stacking Value: is the amount of space a ground unit occupies in a hex. For both sides, 9 stacking points is the maximum al-lowed in any hex at the end of a movement phase or retreat.Support Strength: is the strength a qualifying artillery unit contributes to a declared combat on attack or defense.
Unit Designation: are the actual names or numbers of units.Unit Size: I = Battery/Company II = Battalion III = Regiment X = Brigade XX = Division
Unit Type Box: denotes the unit’s tactical combat symbol (see Unit Type Symbols for listing).
A double box ( ): denotes two like sized units combined on one counter and has no effect on play.
How to Read the Units
AircraftType
Unspent Side “Flown” Side
CASRating
EfficiencyRating
Non-Artillery
Unit SizeUnit
DesignationFormation
Mechanized Unit Infantry Unit
Unit TypeBox
Stacking Value
AttackStrength
DefenseStrength
EfficiencyRating
MovementAllowance(within a red box)
Artillery
Range NoZOCBand
Unfired Side Fired Side
SupportStrength
MovementAllowance(within an orange circle)
Note: Only Artillery units have Range circles.
HQ
Formation CommandPoints
Undepleted Side Depleted Side
EfficiencyRating
Leader Units
StackingValue
No ZOCBand
Lelyushenko Hausser
CommandPoints
FormationI.D.
Activation Markers
Air Units
I.D.Unspent Side “Being Spent” Side
FuelPoint
Fuel Units
FormationI.D. Combination
Value

5Roads to Moscow ~ Rules of Play
© 2013 GMT Games, LLC
Formation ColorsAll units within the same formation share a common color.
a. HQ units display the color in their unit type boxes.b. Combat units display the color in their unit type box, or
their unit size box (if the counter bears a vehicle icon).c. Army level (non-formation) units all have white unit
type or size boxes.
Unit AbbreviationsGerman
AA Aufklarungs Abteilung (Reconnaissance)
K Kradschutzen (Motorcycle)
M Motorized Division
Pz Panzer Division
SS R SS Reich Division
SovietGD Guards
MG Machine gun
NKVD Narodnyy Komissariat Vnutrennykh Dyel (People’s Commissariat of Internal Affairs)
Sep Separate. An independent unit under Army or Front command
T Independent Tank Brigade
Unit ColorsNationality/Type Background ColorSoviet .....................................................BrownGerman Wehrmacht ................................GrayGerman Luftwaffe ...................................Steel BlueGerman SS ..............................................Black
Game Turn
VP
Out ofSupply
No Retreat
Weather
Low Fuel
EmergencySupply
Fortified LineDestroyed
Activation
Force
Disruption
DeclaredAttack
InitiativeDRMs
FirstActivation
CombatRefusal
Strongpoint
* = Not Armored.** = Causes Armor Attrition [11.23] and denies Combined Arms [10.61f]. = Capable of Overrunning alone or making stacks of
other Red-Box MA and/or cavalry units eligible to conduct Overrun [8.52].
= Eligible to build strongpoints [14.23]
Markers
Unit Types Reconnaissance (Recon)
Motorcycle Infantry
Bicycle Infantry
Motorized Infantry
Infantry
Motorized Engineer
Engineer
Cavalry
Anti-Aircraft (AA)
Heavy Anti-Aircraft (AA)**
Anti-Tank (AT) (if red defense strength)**
Field Artillery
Rocket Artillery
Headquarters
Soviet Silhouettes
KVI**
BT-5/BT-7**
T-26**
T-34**
T-40
T-38
Armored Car BA-10*
German Silhouettes
Pzkw IV**
Pzkw III**
PzJg I* and **
sIG 33*
Armored Car*
1) Armored [3.14d]
2) Capable of Overrunning alone or making stacks of other Red-Box MA and/or cavalry units eligible to conduct Overrun [8.52].

Roads to Moscow ~ Rules of Play6
© 2013 GMT Games, LLC
2.25 Nationality. The background color on each unit indicates its nationality.
Nationality ColorGerman grayGerman SS blackGerman Luftwaffe blueSoviet khaki
2.3 Charts and TablesRoads to Moscow includes set up cards, a turn record track card, and a player aid card to help players set up the game, keep track of reinforcements, and resolve movement and combat functions. Place these to the side of the map for easy reference.
2.4 The Die2.41 The game uses a ten-sided die. The number “0” is read as ten, not zero.
2.42 To perform many game functions, you will roll one die to determine a result. Often you will modify the actual die roll result by positive (+) or negative (–) amounts. These are called Die Roll Modifiers (DRMs).
3.0 Basic Concepts3.1 Terminology3.11 Friendly and Enemya. Units. If you are the German player, all German units are
friendly; all Soviet units are enemy units. The situation is reversed for the Soviet player.
b. Sequences and Phases. Each of the three Segments of a turn consists of sequences and phases [4.11 and 7.2]. During some, both players can perform activities, during others only one player, called the active, or friendly player, can perform activities. German sequences and phases are friendly to the German player, and enemy to the Soviet player. Soviet sequences and phases are friendly to the Soviet player, and enemy to the German player.
c. Hexes. Those last occupied or controlled by German units are friendly to the German player; those last occupied or controlled by Soviet units are friendly to the Soviet player.
3.12 Controlled and Contested Hexesa. A hex is controlled by one side if:
• That side controlled the hex at the beginning of the sce-nario being played, or
• One or more of that side’s combat units occupy the hex, or • One or more of that side’s combat units either currently
project—or was the last to project—an uncontested Zone of Control into that hex [3.2].
b. If both friendly and enemy combat units project a ZOC into a vacant hex, both ZOCs co-exist and the hex is contested.
3.13 Contiguous Hexes. This is an unbroken series of con-nected adjacent hexes used for movement, range, and tracing Supply Routes.
3.14 Ground Unit Classesa. Red-Box MA units. These are motorized units with their
movement allowance shown in a red box.b. Orange-Circle MA Units. These are motorized units with
their movement allowance shown in an orange circle. Their movement abilities are more restricted than Red-Box MA units.
Design Note: These units consist primarily of tractor-towed artillery, anti-tank, and anti-aircraft guns. They have a rel-ative lack of mobility compared to other types of units.
c. Vehicle Silhouette Units. These units are motorized. Only those with a red attack strength are armored for game pur-poses.
d. Armored Units. These are motorized units that have both a vehicle silhouette and red attack strength.
Design Note: The armor protection and armament of certain early WWII-era armored vehicles was too light to give them the same combat effects as the heavier tanks and assault guns.
e. Non-Motorized Units. Units with a plain black movement allowance are non-motorized.
f. Artillery Units. Any combat unit with a range value is artil-lery.
g. Non-combat Units. A non-combat unit has no stacking value, ZOC, or combat strength. It cannot be taken as a step loss. If an enemy combat unit enters its hex, remove it from the map. A non-combat unit cannot enter a hex occupied by an enemy non-combat unit.
3.15 Frequently Used Abbreviations. The following are used throughout these rules, and on the charts and tables:
AM Activation MarkerCAB Combined Arms BonusCAS Close Air SupportCRT Combat Results TableDRM Die Roll ModifierER Efficiency RatingHQ Headquarters (unit)MA Movement AllowanceMP Movement PointTEC Terrain Effects ChartVP Victory PointZOC Zone of Control
3.2 Zones of ControlAll combat units have a Zone of Control (ZOC). An enemy ZOC inhibits the movement of friendly units [8.2], affects tracing a Supply Route [6.2], and restricts a unit’s retreat after combat [11.35 and 11.5].
3.21 The hex a combat unit occupies and the six hexes imme-diately surrounding it constitute that unit’s ZOC [Exception: 3.23]. A combat unit exerts a ZOC at all times.
3.22 Non-combat units and player aid markers never exert a ZOC.
7Roads to Moscow ~ Rules of Play
© 2013 GMT Games, LLC
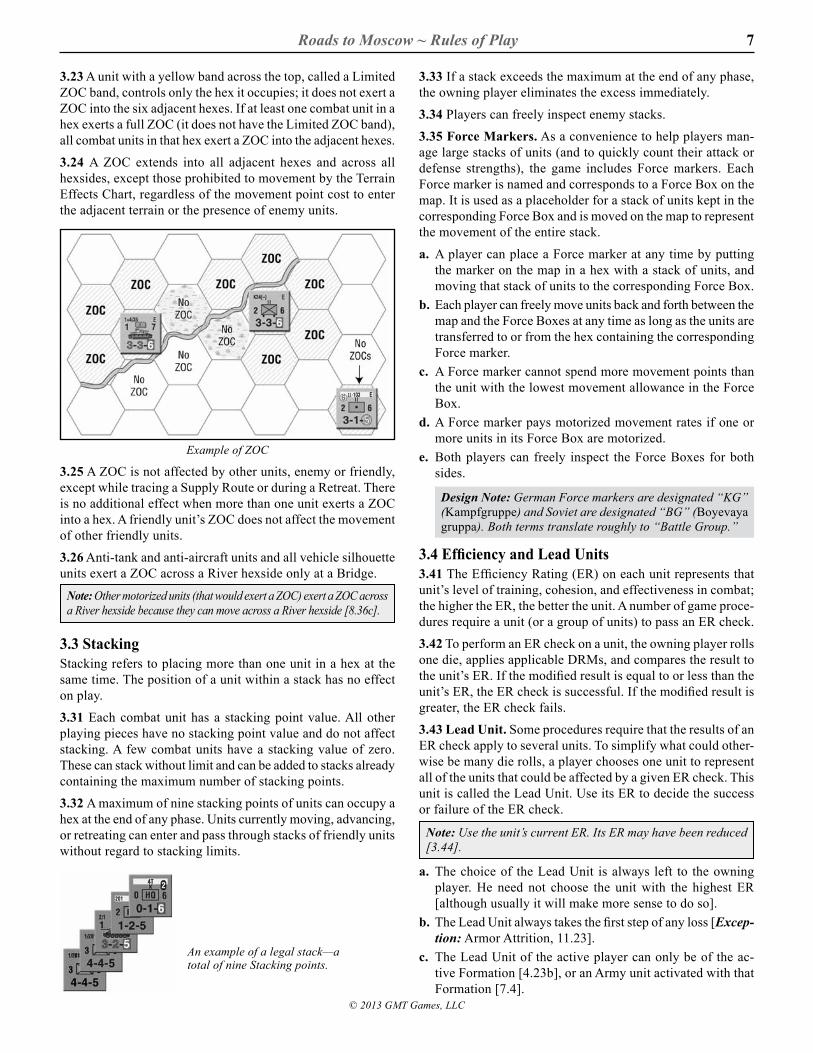
3.23 A unit with a yellow band across the top, called a Limited ZOC band, controls only the hex it occupies; it does not exert a ZOC into the six adjacent hexes. If at least one combat unit in a hex exerts a full ZOC (it does not have the Limited ZOC band), all combat units in that hex exert a ZOC into the adjacent hexes.
3.24 A ZOC extends into all adjacent hexes and across all hexsides, except those prohibited to movement by the Terrain Effects Chart, regardless of the movement point cost to enter the adjacent terrain or the presence of enemy units.
Example of ZOC
3.25 A ZOC is not affected by other units, enemy or friendly, except while tracing a Supply Route or during a Retreat. There is no additional effect when more than one unit exerts a ZOC into a hex. A friendly unit’s ZOC does not affect the movement of other friendly units.
3.26 Anti-tank and anti-aircraft units and all vehicle silhouette units exert a ZOC across a River hexside only at a Bridge.
Note: Other motorized units (that would exert a ZOC) exert a ZOC across a River hexside because they can move across a River hexside [8.36c].
3.3 StackingStacking refers to placing more than one unit in a hex at the same time. The position of a unit within a stack has no effect on play.
3.31 Each combat unit has a stacking point value. All other playing pieces have no stacking point value and do not affect stacking. A few combat units have a stacking value of zero. These can stack without limit and can be added to stacks already containing the maximum number of stacking points.
3.32 A maximum of nine stacking points of units can occupy a hex at the end of any phase. Units currently moving, advancing, or retreating can enter and pass through stacks of friendly units without regard to stacking limits.
An example of a legal stack—a total of nine Stacking points.
3.33 If a stack exceeds the maximum at the end of any phase, the owning player eliminates the excess immediately.
3.34 Players can freely inspect enemy stacks.
3.35 Force Markers. As a convenience to help players man-age large stacks of units (and to quickly count their attack or defense strengths), the game includes Force markers. Each Force marker is named and corresponds to a Force Box on the map. It is used as a placeholder for a stack of units kept in the corresponding Force Box and is moved on the map to represent the movement of the entire stack.
a. A player can place a Force marker at any time by putting the marker on the map in a hex with a stack of units, and moving that stack of units to the corresponding Force Box.
b. Each player can freely move units back and forth between the map and the Force Boxes at any time as long as the units are transferred to or from the hex containing the corresponding Force marker.
c. A Force marker cannot spend more movement points than the unit with the lowest movement allowance in the Force Box.
d. A Force marker pays motorized movement rates if one or more units in its Force Box are motorized.
e. Both players can freely inspect the Force Boxes for both sides.
Design Note: German Force markers are designated “KG” (Kampfgruppe) and Soviet are designated “BG” (Boyevaya gruppa). Both terms translate roughly to “Battle Group.”
3.4 Efficiency and Lead Units3.41 The Efficiency Rating (ER) on each unit represents that unit’s level of training, cohesion, and effectiveness in combat; the higher the ER, the better the unit. A number of game proce-dures require a unit (or a group of units) to pass an ER check.
3.42 To perform an ER check on a unit, the owning player rolls one die, applies applicable DRMs, and compares the result to the unit’s ER. If the modified result is equal to or less than the unit’s ER, the ER check is successful. If the modified result is greater, the ER check fails.
3.43 Lead Unit. Some procedures require that the results of an ER check apply to several units. To simplify what could other-wise be many die rolls, a player chooses one unit to represent all of the units that could be affected by a given ER check. This unit is called the Lead Unit. Use its ER to decide the success or failure of the ER check.
Note: Use the unit’s current ER. Its ER may have been reduced [3.44].
a. The choice of the Lead Unit is always left to the owning player. He need not choose the unit with the highest ER [although usually it will make more sense to do so].
b. The Lead Unit always takes the first step of any loss [Excep-tion: Armor Attrition, 11.23].
c. The Lead Unit of the active player can only be of the ac-tive Formation [4.23b], or an Army unit activated with that Formation [7.4].

Roads to Moscow ~ Rules of Play8
© 2013 GMT Games, LLC
3.44 A unit’s ER can be reduced permanently by combat loss or temporarily due to Disruption [3.72b], being Out of Supply [6.14b], or Low Fuel [6.44b]. A unit’s ER cannot be reduced below one.
3.5 Halving and Rounding3.51 Attack strength, support strength, or movement allowance can be halved. Defense strength is never halved.
Examples of halving:1. Out of Supply status [6.14]2. Combat effects of certain terrain [10.24]3. An artillery unit that fails Artillery Coordination [10.42c]
3.52 Halving of attack or support strength is cumulative. It can happen more than once to the same unit or group of units in a combat. Follow the How to Halve and Round sequence in 3.54.
3.53 Some units are subject to halving while others are not; total the strengths of the affected units and halve them (round down), prior to adding them to the units that are not halved.
3.54 How to Halve and Rounda. Supporting artillery units (attacking or defending) are halved
individually (drop fraction).b. Attacking non-artillery combat units are all totaled and then
halved (drop fraction).c. Because fractions are dropped, a unit’s attack strength might
be reduced to zero. If reduced to zero, it cannot attack and therefore does not participate in combat, even if still with units that are allowed to attack; if attacking alone, cancel that combat; if it is artillery, it cannot participate.
3.55 The support strength of an artillery unit is halved when:
• It fails an ER check for Artillery Coordination [10.42c], or
• Firing into a Marsh hex [12.18b]
3.56 The attack strengths of non-artillery combat units are halved in the following order:
1. Units with Out of Supply markers.2. All units that attack across a River hexside.
3.57 A unit’s Movement Allowance (MA) can be halved only once during a Segment and is done individually, unit-by-unit. Retain fractions [since half of a movement point (MP) can be spent to move along roads or trails.]
Examples of halving MAs:1. Out of Supply status [6.14]2. Low Fuel [6.44b]3. Assault Sequence [7.21B]4. Reaction Movement [9.32]
If a unit is Out of Supply or Low Fuel, its MA is not halved again for Assault Sequence movement.
3.6 Unit Steps3.61 Steps represent the durability or staying power of combat units. Combat units have either one or two steps of strength. A unit with values printed on both sides has two steps [Excep-tion: 3.62]; its front side shows the unit at full strength, and its reverse side represents the unit at reduced strength. A unit with values printed only on its front side has only one step of strength. Units lose steps as a result of combat [11.0].3.62 HQ and artillery units have only one step. The reverse side of an HQ unit indicates that the HQ has spent its Command Points [15.2]. The reverse side of an artillery unit indicates that the artillery unit has conducted Artillery Fire Support and is not eligible to use its support strength again during the current turn [10.42, 12.13d].
3.7 DisruptionDisruption is the temporary impairment of a unit’s capabilities.
3.71 A Disruption result affects all the units in the stack.3.72 Disruption Effects on a Unita. Reduce MA by 2 MPs, cumulative with other effects before
computing other MA halving as in 3.57 above.b. Reduce ER by two for all purposes [cumulative with Out of
Supply ER reduction; 6.14b].c. Reduce HQ unit Command Points to zero (turn it over to
its zero Command Points side); it is then ineligible to allow CAS missions [13.2].
d. The unit cannot attempt:• Overrun [8.5]• Combat Refusal [9.2]• Reaction Movement [9.3]
e. If it is artillery, it cannot use its Support Strength [12.13d].f. It can advance only one hex after combat [Exception:
11.61b].g. It cannot begin or complete construction of a Strongpoint
[14.25] or remove an enemy Strongpoint [14.31].h. It cannot be used to qualify for Combined Arms Bonus
[10.61f].
3.73 Place a Disruption marker on top of a unit (or stack) when it becomes Disrupted. If a Disrupted unit subsequently becomes part of a stack containing both Disrupted and non-Disrupted units, place the non-Disrupted units on top of the Disrupted marker and leave the Disrupted units beneath the marker.3.74 Any additional Disruption result suffered by a unit has no additional effect.3.75 Remove Disruption markers during the Reorganization Phase as follows.a. Automatically remove Disruption markers from all units
that are not in an enemy ZOC.b. Make an ER check for each Disrupted unit in an enemy ZOC
(use the lowered ER for Disruption or Out of Supply). If the unit passes, remove its Disruption marker. If it fails, it remains Disrupted. Command Points [15.2] can be applied as DRMs.

9Roads to Moscow ~ Rules of Play
© 2013 GMT Games, LLC
4.0 Playing the Game4.1 The TurnRoads to Moscow is played in successive turns, each composed of the Segments outlined below. Examine the Expanded Sequence of Play for a more detailed listing of the events within each phase.
4.11 Sequence of PlayA. Strategic Segment
1. Weather Phase2. Reinforcement Phase3. Supply Status Phase4. Readiness Phase5. Initiative Phase
B. Operations Segment1. First Player Operations Sequence
a. First player randomly draws one Activation Marker*
* Exception: First turn of a scenario. See 18.13d1 for the first Operations Sequence of the first turn of a scenario.
b. First player conducts any one of three possible Operations Sequences.
2. Second Player Operations Sequencea. Second player randomly draws one Activation
Marker.b. Second player conducts any one of three possible
Operations Sequences.3. Players alternate Operations Sequences until all
Formations have been activated.C. Reorganization Segment
1. Engineering Phase2. Reorganization Phase3. Victory Determination Phase4. Turn Record Phase
4.12 Play proceeds each turn according to the sequence above until the end of the final turn of the scenario. At that point evaluate the players’ performance according to the scenario victory conditions to determine the winner.
4.2 Formations and ActivationsA Formation represents a historical division, or grouping of units, normally consisting of at least one Headquarters (HQ) unit plus other units of various types. A Formation HQ does not belong to a higher Formation for game purposes.
Example of a Formation
4.21 Formation Color. Each Formation has a different color in the unit type boxes (or unit size boxes, for vehicle silhouette units). All units belonging to the same Formation have the same color in their unit type or size boxes.
4.22 Units with white unit type or size boxes are “Army” units. These can be used, within limits, with any Formation [7.4].
4.23 Activation Markersa. Each Formation has one or more Activation Markers (AM). We suggest that all AMs be kept in opaque cups,
one for the German player and another for the Soviet player. During the Operations Segment, players alternate drawing their AMs at random, one at a time, at the start of each of their Operations Sequences.
b. When an AM is drawn, all units (regardless of location or type) of that Formation are available to be activated. If activated, this Formation becomes the active Formation; all other Formations, including others on the same side, are non-active Formations, and their units cannot now move. Do not return the AMs to the opaque cup until the Initiative Phase. Army units can also be activated [7.4].
Note: If the Assault Sequence is chosen, units of non-active Formations cannot move, but might be able to participate in combat [7.21B, 7.35, 9.11b, and 10.11 Note].
Example: It is the German player’s turn to conduct an Oper-ations Sequence. He randomly draws one AM, and sees it is for the 10th Panzer Division. He chooses to play it, thereby activating all units of the 10th Panzer Division. He then declares either a Mobile Sequence [7.21A] or an Assault Sequence [7.21B]. If he declares a Pass Sequence [7.21C], no Formation is activated. The German player now moves units of only the 10th Panzer Division during this Opera-tions Segment, plus any activated Army units [7.4].
4.24 Some Formations have two AMs. If both AMs are put into the opaque cup then that Formation will activate twice during the same turn.
4.25 Special Activationsa. Play of the “Activate any Formation” marker allows the active player to activate any one of his available Formations, as he chooses, including a
Formation that has already been activated this turn. The “Activate any Formation” marker cannot be used in any Combining Formations attempt [7.32].
b. A Formation currently in Reserve status [5.3] can be acti-vated by play of this marker. If it is, then its Reserve status ends; place its AM(s) in the Activated Formations Box.
4.26 If all the units of a Formation are eliminated (or have ex-ited the game map), remove that Formation’s AM(s) from play.
4.27 Under certain circumstances, it is possible for two Forma-tions to be active at the same time. This is called “Combining Formations” [7.3]. The “Activate any Formation” marker cannot be used in any Combining Formations attempt [7.32].

Roads to Moscow ~ Rules of Play10
© 2013 GMT Games, LLC
5.0 The Strategic Segment5.1 WeatherWeather conditions governed much of combat in Russia. Both sides were affected. The game rules assume Dry weather.
5.11 Weather Conditionsa. Determine the turn’s weather condition during the Weather
Phase. The German player rolls one die and consults the Weather Boxes of the current turn, as shown on the Turn Record Track. There are no DRMs.
b. There are three possible weather conditions: Dry, Cloudy, and Rain. The Weather Boxes show the die roll range for each type of weather each turn.
c. The weather condition for the turn applies to the entire map and all game functions.
d. Optional. The historical weather condition is marked with an “H” on the Turn Record Track. If both players agree, they can choose to apply the historical weather conditions for the entire game.
5.12 Cloudy Weather Effects. There are no effects on supply or ground movement. Cloudy weather affects air unit Combat Coordination [see Combat Coordination Table].
5.13 Rain Weather Effectsa. The movement point cost to enter or cross the various terrain
types changes to that listed under the Rain column on the Terrain Effects Chart (TEC).
b. A Supply Line [6.21] traced to a Supply Road decreases from seven to five hexes in length.
c. Trails have no effect on movement [Exception, 8.42], but Bridges located along a Trail can still be used.
d. Overruns [8.55] are prohibited.e. Use the Assault CRT for all combats.f. Rain weather affects air unit Combat Coordination [see
Combat Coordination Table].
5.14 Winter Weathera. Winter effects apply for each turn marked “W” on the Turn
Record Track. The effects apply automatically for the whole turn and are in addition to other weather condition results.
b. All Orange-Circle MA units (of both sides) and all German Red-Box MA units lose one MP from their Movement Allow-ance at the start of their Movement or Reaction Movement Phases (before counting the terrain MP costs for terrain entered).
c. Fewer unit types can build Strongpoints [14.24].
5.2 ReinforcementsBoth players receive reinforcements. Reinforcements are new units arriving from outside the game area. The scenario Set Up Cards provide specific information on turn and entry location of scheduled reinforcements (usually through a map edge). When multiple locations are listed, the owning player chooses which units, if any, will enter at each location.
5.21 Ground units cannot end a phase in a map edge enemy reinforcement entry hex, but can move or retreat through it. Units can remain in the hex once there are no more enemy units available to enter through this hex [Exception: see 19.44g].
Example: In Scenario 4 Soviet ground units cannot occupy map edge hex 4224 to deny the German 7th Infantry Division one of its entry hexes. Soviet units could occupy hex 4223, adjacent to entry hex 4224.
Note: Without this rule, it would be possible to place strings of weak units in map edge hexes to deny entry to reinforcement units of the other side, a practice that violates the tactical real-ity of the battles being simulated.
5.22 Map Edge Entry Procedurea. A reinforcement unit that will enter through the map edge
can do so at any time during the Movement Phase when its Formation activates; it cannot enter at any other time.
b. It pays the terrain entry cost for that first hex. When enter-ing along a Road, Railroad, or Trail it uses the appropriate Road, Railroad, or Trail movement rate.
c. Reinforcement units can enter play one at a time, or stacked.
5.23 Formation Sequence and Entrya. A reinforcement unit of a Formation that is conducting a
Mobile Sequence enters using its full MA, and engages in combat, just as if it had started on map.
b. A reinforcement unit of a Formation that is conducting an Assault Sequence enters the map with only half of its MA, and engages in combat, just as if it had started on map.
5.24 Place air unit reinforcements in the Ready Box of the Air Display during the Reinforcement Phase.
5.25 A player can, at his option, delay the arrival of any friendly unit (or group of units) to any later turn.
5.26 All reinforcements are Supplied [6.15] during their turn of entry.
5.27 HQ, Leader, Supply, and artillery reinforcements cannot function in any manner until they are on the map.
5.3 Reserve Status5.31 During the Reinforcement Phase first the German player, then the Soviet player, has the option to place any number of his Formations in “Reserve” status. Remove the AMs for each such Formation from those “available” [7.14], and place them two turns ahead on the Turn Record Track.
5.32 A Formation in Reserve cannot activate (it is no longer pos-sible to draw AMs for it) unless activated by the “Activate any Formation” marker [4.25], but its units in play are still affected by Supply Status [6.1], defend normally, provide Artillery Fire Support (if Supplied) and Command Points to units of its own Formation, receive Combat Air Support, and suffer all effects of combat. They can perform no other functions.

11Roads to Moscow ~ Rules of Play
© 2013 GMT Games, LLC
5.33 When the turn is reached on the Turn Record Track that contains the AMs of the Formations in Reserve, return those AMs to those available for the opaque cup; or if the owning player desires, place them back into Reserve status.
Note: Reserve status is useful for increasing the chance that another Formation will be activated earlier. However, units of the Formation will be effectively out of play for two turns.
5.34 Army units cannot be placed in Reserve.
6.0 SupplyA unit’s supply status affects its movement and combat abilities. A unit must be in Supplied status to move and fight without penalty.
6.1 Supply Status6.11 A unit or Strongpoint is judged as Supplied if it can trace a Supply Route [6.2] through a path of contiguous hexes to a friendly Supply Source [6.3] during the Supply Status Phase.
6.12 A unit judged as Supplied is supplied for the entire turn. Remove the Emergency Supply (or Out of Supply) marker from that unit. If a unit cannot trace a Supply Route during the Supply Status Phase:
a. Place an Emergency Supply marker on the unit, if it does not already have an Emergency Supply or an Out of Supply marker.
b. If the unit already has an Emergency Supply marker, turn the marker over to Out of Supply.
c. If the unit already has an Out of Supply marker, the marker remains.
6.13 A unit with an Emergency Supply marker is not subject to Out of Supply effects [6.14]. Emergency Supply cannot last for more than one turn.
Design Note: Units generally maintained a small reserve stock of fuel and ammunition, which would last for a short time if they became cut off from their supply source.
6.14 Out of Supply Effectsa. Reduce the Movement Allowance (MA) of all motorized
units by half, retaining fractions (not cumulative with MA halving due to Assault Sequence [7.21B] or Reaction Movement [9.3]). Calculate this before MA reduction due to Disruption [3.72a]. Non-motorized units lose 2 MPs.
Example: A motorized unit with an MA of 5 has its MA reduced first for Out of Supply from 5 to 2.5 MPs. Retain the fraction. Then for Disruption reduce its MA from 2.5 to 0.5 MPs.
b. Reduce its ER by one, cumulative with the 2 ER reduction due to Disruption [3.72b].
c. Reduce its attack strength by half (round fraction down).
d. When an Out of Supply artillery unit uses its support strength (and is thereby turned to its Fired side), it cannot turn back to its Support Strength side until it is Supplied [12.13e].
e. Remove an unoccupied Strongpoint if it cannot trace a Sup-ply Line during the Supply Status Phase [14.32].
6.15 Units available for play, but currently held off the map, are always Supplied while off map. Any reinforcement unit is automatically Supplied during the turn it enters the map.
Note: These units may still require Fuel Supply to enter the map Fueled [6.4].
6.16 A unit cannot be eliminated solely through lack of supply.
6.17 Players can elect to leave units Out of Supply.
6.2 Supply RoutesA Supply Route is any designated path of contiguous hexes that contains no enemy combat units and has no contested or enemy controlled hex. A Supply Route consists of a Supply Line [6.21] traced from the unit either directly to a Supply Source [6.3], or to a Supply Road [6.22] that leads to a friendly Supply Source.
6.21 A Supply Line cannot be more than seven hexes long, from the unit to a Supply Road (do not count the hex the unit occupies). During Rain weather, or if any hex in the Supply Line is Marsh, reduce the length of the Supply Line to five hexes. A Supply Line cannot include:
• A completed enemy Strongpoint• An active enemy Fortified Line hexside• A River hexside (except at a Bridge)• A Stream hexside (except at a Bridge)
6.22 A Supply Road is any network of connected main or mi-nor Road hexes free from enemy combat units (and no hex is contested or enemy controlled) that leads to a friendly Supply Source. The network can be of any length. A Supply Road can-not be traced across a Stream or River hexside without a Bridge.
Example of a Supply Line
6.23 A Trail never qualifies as a Supply Road for Red-Box or Orange-Circle MA units. A Trail always qualifies as a Supply Road for all other units.
Note: Trails are ignored for movement purposes [Exception: 8.42]—but not supply purposes—during Rain weather [5.13c].

Roads to Moscow ~ Rules of Play12
© 2013 GMT Games, LLC
6.24 A Supply Line or a Supply Road can be traced through a hex in an enemy ZOC only if a friendly combat unit occupies that hex.
6.3 Supply Sources6.31 German and Soviet Supply Sources are all printed on the map.
6.32 A Supply Source friendly to one player can never be friendly to the other player, even if captured. If captured, a Sup-ply Source will cease to be a source of supply, but if recaptured by the friendly player, it will again provide supply beginning on the next friendly Supply Status Phase.
6.4 Fuel Supply
A player may be required to spend Fuel points in certain scenarios. Fuel Supply is required for mo-torized units to move and fight without penalty.
6.41 Fuel points are represented by Fuel units [16.2]. Each Fuel unit is one Fuel point. Each Fuel point received during a turn enters play individually as a Fuel unit. The number re-ceived each turn is designated by the scenario rules. All Fuel points received during a turn must enter the map that turn or be used; those that are not, are lost. Unused Fuel points cannot be saved off map [they go to some other needy Formation not in this game].
6.42 When a Fuel unit is designated for use, turn it over to its “Being Spent” side. It cannot move. Once all movement is complete for the Movement Phase, remove that Fuel unit. It is now available
for the next turn. Unused Fuel units can remain on the map indefinitely.
6.43 How to Use Fuel Pointsa. Each time a player activates one of his Formations, he de-
cides whether to provide a Fuel point to that Formation. If a Fuel point is spent for a Formation, place a Fueled marker on the AM of that Formation as it activates and place both together in the Activated Formations Box [7.21]. As he moves each unit of that Formation, the unit must trace a Supply Route [6.2] to the Fuel unit designated to be spent. At a player’s option, additional Fuel points can be spent to provide Fuel Supply to units that cannot trace a Supply Route to the first Fuel unit. A unit that will conduct movement and cannot trace a Supply Route to the Fuel unit being spent immediately suffers Low Fuel effects [6.44].
b. If no Fuel point is spent then each motorized unit that moves will suffer Low Fuel effects as soon as it starts movement.
c. If a unit does not move, it does not suffer Low Fuel effects.d. When Combining Formations [7.3] one Fuel point supplies
only one Formation.e. A motorized Army unit requires Fuel Supply and uses the
Fuel status of the Formation activating it.
6.44 Low Fuela. If a Fuel point is not spent for a Formation, place a Low Fuel marker on the AM of that Formation as it activates and place both together in the Activated
Formations Box [7.21]. If an individual unit in a Formation lacks Fuel Supply (despite the Formation being provided Fuel Supply), place a Low Fuel marker with that unit.
b. Units with Low Fuel have their MA reduced by half (retain fraction) and their ER reduced by one, for all purposes for as long as they are in Low Fuel status. If the Formation AM has a Low Fuel marker, all motorized units in that Formation are affected. Units with Low Fuel cannot conduct overruns [8.52 Note 1] or Reaction Movement [9.33].
c. Units already marked as Out of Supply do not suffer the effects of Low Fuel. A unit already marked as Out of Supply and now provided Fuel Supply (place a Fueled marker on it) retains its Out of Supply marker (or Emergency Supply marker). It does not suffer the MA reduction [6.14a] and ER reduction [6.14b] effects of Out of Supply or Low Fuel effects [6.44b]. The intent of this rule is to ensure that the Supply status of a unit can only be changed during the Supply Status Phase [6.1].
Exception: Artillery units on their Fired side and still Out of Supply do not return to their Support Strength side when being provided Fuel Supply.
Design Note: Fuel is normally a component of overall gen-eral supply but certain historical scenarios require a distinc-tion between fuel and other supply (mostly ammunition). Here, artillery would benefit from being able to move but would still lack ammunition.
6.45 Fuel for Reinforcementsa. A Fuel unit on the map at a map edge hex can also provide
Fuel Supply to reinforcement units using an entry hex within Supply Line distance.
b. A Fuel unit that has not yet entered the map can be used to provide Fuel Supply to reinforcement units that will enter play during this Operations Segment and to units on the map that can trace a Supply Route to the entry hex designated for that Fuel unit.
6.46 Units Not Requiring Fuel• Air units [They had their own separate supply system].• A Formation in Reserve status• Non-motorized Formations• Non-motorized units• Fuel units

13Roads to Moscow ~ Rules of Play
© 2013 GMT Games, LLC
7.0 Operations7.1 Initiative7.11 During the Initiative Phase both players separately deter-mine their DRMs as shown on the VP Track and individually roll one die.
IMPORTANT: The German player automatically has the Ini-tiative for the first turn in all scenarios.
7.12 Initiative DRMsa. Use the German and Soviet Initiative DRMs markers on
the VP Track to record the number of DRMs for each turn. Reset each marker to zero at the conclusion of each Initiative Phase.
b. A player receives a +1 DRM for each Pass Sequence [7.21C] his opponent took last turn.
c. A player receives a +1 DRM for each combat result during last turn where he conducted a complete two-hex advance after combat [11.61c] (at least one unit at two hexes from its original position).
7.13 The player whose modified die roll is highest has the Initiative. In case of a tie, the player who had Initiative on the previous turn again has the Initiative. The player with the Initiative becomes the First Player during the Operations Seg-ment. The other player becomes the Second Player. These roles may reverse next turn, and could change every turn during the course of the game.
7.14 During the Initiative Phase the First Player places all of his available [7.15] AMs in his opaque cup. He cannot omit any. The Second Player places up to the same number (also counting those the First Player places in Reserve), plus one, of his available AMs into his opaque cup. His excess AMs will be available next turn. A player cannot examine the AMs his opponent did not choose.
Examples:(1) The German player has the Initiative and places all his 4 AMs into the cup; the Soviet player has 7 available but is allowed no more than 5 (4 + 1 = 5); his sixth and seventh AMs, his choice of AMs, have to sit out the turn.(2) The Soviet player has the Initiative and must put all his 7 available AMs into the cup; the German player has 4 available and so can place up to 4 into his cup.(3) The Soviet player has the Initiative and has 7 AMs in play. He places 5 AMs in Reserve leaving only two available. He then places those two into the opaque cup. The German player could place up to 8 AMs into his cup (2 + 5 + 1) but has only four available. He places all four into the cup.(4) The Soviet player has the Initiative and has 4 AMs in play. He places all 4 into his opaque cup. The German player has 6 AMs (2 each from 3 Formations) but can place only 5 AMs into his opaque cup (4 + 1). One German Formation does not get its second Activation.
7.15 Available AMs. For both sides, all AMs currently in play are available each turn.
7.2 Activation and Operations SequencesDuring the Operations Segment, both players move their units and engage in combat through the activation process. Units must first be activated by drawing their AM so they can move and attack. Players alternate in activating their Formations. When both players have completed all their activations, the Operations Segment is concluded.
7.21 Procedure. At the beginning of his Operations Sequence, the active player randomly draws one AM from his opaque cup [Exception: 18.13d1]. He notes the Formation shown on the AM without revealing it to his opponent. He now chooses one of the two possible Operations Sequences that the Formation activated by the AM must follow: Mobile or Assault, or he chooses a Pass Sequence where no Formation activates. He then verbally declares which Operations Sequence he desires and, if Mobile or Assault, reveals the AM and places it in the Activated Formations Box. The Formation thus activated be-comes the active Formation.
The active player then completes the Operations Sequence that he chose as outlined below. See the Expanded Sequence of Play for a more detailed listing of the events in each phase.
Note: Mobile and Assault Sequences are not identical to Mobile and Assault Combat Results Tables (CRTs). Only the Assault CRT can be used to determine combat outcomes within the Assault Sequence. Either the Assault or Mobile CRTs can be used to determine combat outcomes within the Mobile Sequence.
A. MOBILE SEQUENCE1. Movement Phase (full MA)2. Enemy Reaction Phase
a. Combat Refusalb. Reaction Movementc. No Retreat
3. Combat Phase (Mobile or Assault CRT)
Notes:1. All units of the active Formation are eligible to move and attack; follow the steps shown in the Expanded Sequence of Play.2. Units of non-active Formations cannot move or attack.3. Units (or stacks) of the active Formation can spend MPs up to their full Movement Allowances; Overruns are allowed.4. Combat uses either the Mobile or Assault CRTs [some com-bat conditions require the Assault CRT; see 10.32].5. The Mobile Sequence can be selected during a Rain weather turn, but use the Rain column of the TEC to determine MP costs.6. Because units can move their full MA, Combat Coordination is more difficult for both sides. Refer to the Combat Coordina-tion Table for applicable DRMs.

Roads to Moscow ~ Rules of Play14
© 2013 GMT Games, LLC
B. ASSAULT SEQUENCE1. Engineering Phase2. Movement Phase (half MA)3. Enemy Reaction Phase
a. Combat Refusalb. Reaction Movementc. No Retreat
4. Combat Phase (Assault CRT only)
Notes:1. All units of the active Formation are eligible to move and attack; follow the steps shown in the Expanded Sequence of Play.2. Units of non-active Formations cannot move, but can par-ticipate in attacks if all other requirements are met [9.11b].3. Units of the active Formation can spend only half of their MA (retain fractions), cumulative with MA reduction due to Disruption [3.72a].4. All combat uses the Assault CRT.5. Overruns are not allowed.
C. PASS SEQUENCEHold the AM in the Activation Pool [7.22] for later activation or a possible later attempt to combine Formations [7.3].
Notes:1. No Formation activates.2. No unit can move or attack.3. The active player places the AM facedown, in his Activation Pool, keeping it hidden from view of his opponent (for use dur-ing a later Segment).
Note: A player may, conceivably, take more than one Pass dur-ing the course of a full turn.
7.22 Activation Pool. Each player has an off-map box labeled “Activation Pool.” No more than one AM can be in his Activa-tion Pool at the end of any Sequence. If a player already has an AM in his Activation Pool at the time he draws a new one, he chooses either the AM he just drew or the one in the Activation Pool; or he can attempt Combining Formations [7.3] to acti-vate both simultaneously; he cannot choose a Pass Sequence. The AM for the Formation not becoming active goes into his Activation Pool.
7.23 After the First Player has completed his first Operations Sequence, the Second Player conducts his first Operations Se-quence. Players alternate Operations Sequences until all AMs have been drawn and played. Once all AMs have been drawn and played, the Operations Segment of the turn is complete and play proceeds to the Reorganization Segment.
7.24 A player cannot select a Pass Sequence when he is down to his last AM to play (it is the last one in the opaque cup or the Activation Pool).
Note 1: In essence, a player cannot decline to play an avail-able AM. He can, however, decline to move or attack with the units of the Formation represented by that AM.Note 2: A player who draws an AM for which no units are on the map can still choose any Sequence even though nothing happens on the game map. Units of that Formation may be reinforcements that he chooses to bring into play.
7.25 A player who has more than one AM remaining to draw, after his opponent has drawn all of his, will continue to draw his remaining AMs one at a time, activating his remaining Formations in succession, in separate Operations Sequences. His opponent does not take Pass Sequences if he has no AM to draw; he is non-active (no activity). A player cannot continue to hold an AM beyond the end of the turn.
7.26 Return AMs to the opaque cup during the Initiative Phase.
7.3 Combining Formations7.31 A player who already has an AM in his Activation Pool at the time he draws another can attempt to combine the two AMs, so that both Formations activate simultaneously.
7.32 Combining Formations can be attempted only if the two AMs represent different Formations. If they represent the same Formation, one of the AMs is used to activate the Formation for the current Operations Sequence, while the other AM remains in the Activation Pool. The “Activate any Formation” marker cannot be used in any Combining Formations attempt.
7.33 Procedure for Combining Formationsa. The active player declares that he will attempt Combining
Formations.b. He turns one of the two AMs face up.c. He rolls one die and adds the Combination Value shown on
the displayed AM, plus any available Leader DRM [15.32], to the result.
d. If the modified result is eight or more, then both Formations activate and together conduct the same Sequence chosen by the owning player.
e. If the result is seven or less, then only the face up AM acti-vates; the other does not, it remains in the Activation Pool, and its identity remains unknown to the opposing player.
7.34 A player can again attempt to combine a Formation that failed to combine, on any future friendly Operations Sequence in the same turn. A failure to combine in what would otherwise be the last friendly Operations Sequence (when no AMs remain in the player’s cup) means that the Formation in the Activation Pool activates separately, during the next friendly Operations Sequence.
7.35 Units from two different Formations that are Combined can attack together in the same combat but only, if there are non-artillery units from both formations stacked together in one of the attacking hexes [see 10.43]. Additional adjacent units from each Formation can also participate in the combat. Artillery

15Roads to Moscow ~ Rules of Play
© 2013 GMT Games, LLC
units from two different Formations that are Combined can only support the same combat if there are non-artillery units from both formations stacked together in one of the attacking hexes.
Note: When combining Formations one Fuel point supplies only one Formation [6.43].
7.4 Activation of Army UnitsAll units with a white unit type or size box represent Army units. Army units were independent support units frequently assigned and re-assigned to dif-ferent Formations during the course of a battle.
7.41 Army units activate individually, unit-by-unit. They are activated by any active Formation. Army units cannot activate separately from Formation activations. An Army artillery unit provides attack Artillery Fire Support only during an Operations Sequence in which the Army artillery unit is active [12.13b].
7.42 Motorized Army units can attempt activation twice per turn, and thereby can potentially be active during two differ-ent Operations Sequences in the same turn, since they can be part of two different Formations or, the same Formation twice (for Formations that have two AMs). After the first activation attempt, place a First Activation marker on the Army unit; after the second activation attempt, turn the marker over to its Final Activation side. Remove all Activation markers during the Reorganization Phase.
Example: Because the Soviet Lelyushenko unit has a Red-Box MA, it can activate twice and thereby move twice in one turn.
7.43 All other Army units can attempt activation only once per turn. After making the activation attempt, place a Final Activa-tion marker on the unit.
7.44 An active Formation can activate an Army unit automati-cally if both:
a. The Army unit does not have a Final Activation marker, andb. The Army unit is within Command Range [15.14] of any
HQ unit of the activated Formation at the beginning of the phase.
7.45 An active Formation can attempt to activate up to two Army units outside of Command Range at the beginning of its Formation activation, but only if the Army unit does not have a Final Activation marker on it and passes an ER check. Remem-ber to apply applicable DRMs for Disrupted and Out of Supply status. If the Army unit fails its ER check, it does not activate during the current Operations Sequence. In either case place either a First or Final Activation marker on it, as applicable.
Note 1: A Formation HQ off-map at the time of activation becomes active because of activation and can attempt to acti-vate Army units. For this purpose those Army units are out of Command Range.Note 2: Both Formations in a Combined Activation [7.3] can activate Army units (two units each of those outside Command Range).
7.46 Army units that enter the map as reinforcements activate automatically upon the activation of any friendly Formation and as part of that activated Formation.
7.47 An activated Army unit becomes part of the active For-mation for the rest of that Operations Sequence. It can be a Lead Unit and receive Command Points. Place either a First or Final Activation marker on it at the end of the Sequence, as appropriate.
7.48 An Army unit cannot attack unless it is activated. An Army artillery unit cannot provide attack Artillery Fire Support unless it is activated [12.13b] but can provide defensive Artillery Fire Support [12.13c].
8.0 Ground Unit MovementDuring the Movement Phase of his Operations Sequence, a player can move any number of his eligible units. Movement is affected by supply, terrain, weather, enemy ZOC, and Op-erations Sequence. Movement of Red-Box MA units can also take place during Reaction Movement [9.3]. Combat Refusal [9.2], Retreat [11.3], and Advance after Combat [11.6] are not considered “movement” and use no MPs.
8.1 Movement Restrictions8.11 Move units one at a time from hex to adjacent contigu-ous hex. Each unit spends Movement Points (MPs) from its Movement Allowance (MA) to enter each hex or cross certain hexsides. The Terrain Effects Chart (TEC) lists the costs in MPs for the various types of terrain. A unit cannot jump over a hex. There is no limit to the number of units that can move through a single hex.
8.12 Units can move together as a stack. When a stack begins movement, the MA of the stack is that of the unit with the lowest MA in that stack. Stacks cannot pick up or add units while moving. Once a stack has ceased moving, other units can move into its hex (within stacking limits). Units dropped off by a stack have completed their movement for that phase. Units in a stack that have not moved can move away from the stack singly, or in smaller stacks.
8.13 A unit can move only once during a Movement Phase. It can never spend more MPs than its total MA, and it cannot enter a hex if it does not have sufficient MPs available. There is no “minimum one-hex move,” and this may mean that on occasion, some units will be unable to move at all. A unit is never forced to move. Unused MPs cannot be accumulated for future turns, or transferred to other units.
8.14 A unit can never enter a hex containing an enemy combat unit [Exception: Overrun, 8.5]. It can enter or move through friendly occupied or controlled hexes at no limit or extra MP cost.
8.15 Non-combat units cannot move adjacent to enemy combat units unless moving with a combat unit or joining a combat unit in that hex.

Roads to Moscow ~ Rules of Play16
© 2013 GMT Games, LLC
8.16 Out of Supply effects on Movement. Motorized units are reduced in MA by half [6.14a] and they cannot conduct Over-runs [8.52 Note 1] or Reaction Movement [9.33]. All other unit types lose 2 MPs. Units can voluntarily move to a hex where they would be Out of Supply.
8.17 Orange-Circle MA units use the same column as motorized units on the TEC to determine the MP costs of the various ter-rain types. They are not eligible to conduct Overruns, Reaction Movement, or Combat Refusal.
8.2 ZOC Effects on Movement8.21 A unit spends one MP in addition to terrain costs to enter an enemy ZOC [Exception: 9.36], regardless of the number of enemy units extending a ZOC into that hex, even if the hex is already occupied by other friendly units. If the unit does not have sufficient MPs remaining, it cannot enter the hex.
8.22 Once a unit has entered an enemy ZOC, it ceases moving for the remainder of its Movement Phase, unless the unit is a Red-Box MA unit. If it has sufficient MPs available, a Red-Box MA unit can continue moving, even into other hexes also in an enemy ZOC but cannot use Road, Railroad, or Trail move-ment rates when moving directly from one enemy controlled hex to another.
Example of ZOC:
8.23 If a unit begins its Movement Phase in an enemy ZOC:a. A Red-Box MA unit can enter an adjacent hex in an enemy
ZOC by paying the non-Road terrain cost plus one additional MP, and (if sufficient MPs are available) can continue move-ment, even into other adjacent hexes also in an enemy ZOC, paying one additional MP for each hex in the enemy ZOC.
b. All other units spend their entire MA in order to move one hex through an enemy ZOC. They cannot keep moving after entering that hex. Their MA must be sufficient to cover the normal MP cost (terrain plus one MP for the ZOC) to enter the one hex; otherwise, they cannot enter that hex.
c. There is no MP cost to leave an enemy ZOC.
8.24 Friendly ZOCs do not affect the movement of friendly units.
8.3 Terrain Effects on MovementThe Terrain Key identifies all terrain types, and the Terrain Effects Chart lists the MP costs a unit spends to enter those terrain types.
8.31 Each hex contains one or more terrain types. Where a single hex contains more than one type of terrain, apply the following:a. If the hex contains more than one type of Natural Terrain,
assume that the whole hex consists of the terrain that has the highest MP cost. The types or Natural Terrain are: Clear, Rough, Marsh, Clear plus Woods, Rough plus Woods and Marsh plus Woods.
Example: In Dry weather an infantry unit, not moving on a Road, would pay 2 MPs to enter a hex containing both Clear and Rough terrain, since the cost for Rough, at 2 MPs, is greater than for Clear at 1 MP.
b. Units not moving along Roads, Railroads, or a Trail pay the highest MP cost of the terrain types within the hex.
c. If the hex contains an enemy Strongpoint, units pay the +1 MP cost for the enemy Strongpoint, in addition to any other terrain cost.
8.32 A unit cannot enter a hex if it does not have sufficient MPs remaining to pay the cost to cross the hexside and enter the hex.
8.33 Roads and Trails. A unit moving from one Road or Trail hex directly into another adjacent Road or Trail hex must follow that specific Road or Trail through a hexside crossed by that Road or Trail to qualify for paying the Road or Trail MP cost. If moving along a road, the unit ignores the MP cost of other terrain in the hex. If moving along a trail during a Dry weather turn, the unit pays ½ MP for entering a clear hex (that may contain a Town, Village or Hamlet) and 1 MP for entering a hex containing any other type of terrain, such as a Woods hex, Rough hex, etc.), etc. To enter an Enemy Strongpoint in a Clear hex along a Trail in during a Dry weather turn costs 2 MPs (1 MP for the Trail in Other and 1 MP for the Enemy Strongpoint). During a Rain weather turn, Trails have no effect on movement costs other than the ability of for Motorized units to ignore the +1 MP for enter-ing a hex containing Woods terrain [8.42]. A moving unit may switch between two unconnected Roads, two unconnected Trails or an unconnected Road and a Trail in the same hex by paying the non-Road/non-Trail MP cost for the hex. A unit starting its movement in a hex with two unconnected Roads, two uncon-nected Trails or an unconnected Road and a Trail may choose the Road or Trail it wishes to move along when exiting the hex.
Note: There are three types of road: Main Road, Minor Road, and Trail. They can have different MP costs, depending on the type of unit moving along it, the weather condition, and what type of other terrain is in the hex.
8.34 Railroads. During Dry weather turns, units move along a Railroad just like along a Trail in “other” terrain [see TEC], if the Railroad provides a lower MP cost; otherwise, ignore the Railroad. There is no movement by trains.
Design Note: For much of the year and throughout most of Russia, railroads doubled as highways, facilitating movement for all types of units. Movement along a rail line, even for trucks and horse-drawn units, was often faster and easier than on the wretched roads, especially in swampy areas and dur-ing muddy weather. This was because the railroad beds were more likely to be dry and firm, due to their raised, graded, and drained roadbeds.

17Roads to Moscow ~ Rules of Play
© 2013 GMT Games, LLC
8.35 Woodsa. The terrain MP cost for Woods is always in addition to the
other terrain in the hex [Exceptions: 8.33 and 8.42].
Examples:The cost to enter the hex during Dry weather:
Clear plus Woods is 1 + 1 MP = 2 MPsRough plus Woods is 2 + 1 MP = 3 MPsIn Rain weather for motorized units:Rough plus Woods is 3 + 1 MP = 4 MPs
b. Ignore the effect of Woods when moving along a Road, Trail, or Railroad, regardless of weather effects [Exceptions: 8.33 and 8.42].
8.36 Streams, Rivers, and Bridgesa. Streams and Rivers are terrain features located on hexsides.
A unit spends MPs to cross these hexsides in addition to the cost of the terrain in the hex entered (regardless of direction when crossing the hexside).
b. Bridges are shown on the map where most Roads, and some Trails, cross Stream and River hexsides. When moving along a Road, Railroad, or Trail that crosses a Stream or River at a Bridge, there is no additional MP cost to cross the Stream or River along the Bridge.
Note: If the map does not show a Bridge symbol, then no Bridge is present, and units pay the extra MP cost to cross the Stream or River, even when moving along the Road or Trail.
c. Artillery, anti-tank and anti-aircraft units and vehicle silhou-ette units cannot cross non-bridged River hexsides during any phase. All other units can cross but spend their entire MA to do so [they must begin the Movement Phase in the hex that includes the River hexside]; they can conduct an Advance after Combat [11.6] across a River hexside, but they cannot conduct retreat, Combat Refusal, or Reaction Movement across a River hexside.
8.37 Slope and Fortified Line. These terrain features are lo-cated on hexsides. All units can cross these hexsides provided they have sufficient MPs to pay the +1 MP cost to cross the hexside plus the cost to enter the terrain on the other side. Roads and Trails negate the +1 MP cost for a Slope hexside but not a Fortified Line hexside. The cost to cross a Slope hexside is spent only for moving up a Slope, not down a Slope when not moving along a main (or minor) Road or Trail.
8.4 Weather Effects on Movement8.41 The TEC includes separate columns for use on Dry/Cloudy or Rain turns. Rain is worse for movement. In addi-tion to causing most terrain types to cost more MPs, Rain also causes certain terrain types to act as a worse terrain type for movement and other effects.Example: If the current weather condition is Rain, the cost for motorized units to enter Rough terrain increases from 2 MPs to 3 MPs.
Example of Movement: The cost to enter each hex, or cross a stream hexside is indicated on the map. The Weather is Dry. Unit A, a Heavy Equipment unit (Orange-Circle MA Motorized unit), spends its 5 MPs to move two hexes, 1 MP for entering a Woods hex along a Trail (Trail in Other) and 4 MP for entering a Woods-Marsh hex (3 MP for entering Marsh hex for a Motorized unit + 1 MP for Woods). Unit B, a Red-Box MA Motorized unit, pays 7 MPs, 1 MP to enter a Woods-Marsh hex along a Trail (Trail in Other), 2 MPs to enter a clear hex with a Strongpoint along a Trail (1 MP for Trail in Other + 1 MP for Stronpoint), +1 MP to move up a Slope hexside, and 3 MPs to enter a Woods-Rough hex (2 MPs
for entering Rough hex for a Motorized unit +1 MP for Woods). Unit C, a Red-Box MA Armored unit, spends 6 MPs; note that the Trail and road do not negate the +1 MP cost for crossing a Forti-fied Line hexside [8.37], but the Bridge negates the +1 MP cost of one of the stream hexsides, and the road negates +1 MP cost to cross a slope hexside and the 3 MP cost to enter a Woods-Rough hex. Unit D, a Non-Motorized unit, spends 5 MPs: 2 MPs for enter-ing a Clear hex through an up-Slope hexside, 2 MP for entering an Enemy Strongpoint hex (1 MP for the Clear hex, +1 MP for the Enemy Strongpoint, but no cost for moving down the Slope hex-side), and 1 MP for entering a Woods-Clear hex.

Roads to Moscow ~ Rules of Play18
© 2013 GMT Games, LLC
8.42 When moving along a Trail during Rain weather, ignore the MP benefit of the Trail (half the “other terrain” cost), and use only the other terrain in the hex (ignore Woods) to determine the entry cost of the hex (plus any applicable hexside costs).
Note: The Trail MP benefit a unit receives when moving up-Slope is lost during Rain.
8.5 OverrunOverrun is an attempt to move into an enemy occupied hex dur-ing the friendly Movement Phase. Although similar to Combat [10.0], Overrun is a feature of movement. Units can continue moving after a successful Overrun.
8.51 Overrun is allowed only during the Movement Phase of a Mobile Sequence. It is not allowed during an Assault Sequence. The hex subjected to the Overrun is called the Defender hex. Only one hex can be the object of an Overrun at any one time. Eligible units can conduct one or more Overruns during their Movement Phase, if they have sufficient MPs available, and still conduct an attack during the Combat Phase. Use the Mobile CRT to resolve each Overrun.
Note: Overrun is not a Declared Attack [9.1]; therefore, the Defender cannot conduct Combat Refusal [9.2], Reaction Movement [9.3], or No Retreat [9.4], or receive Artillery Fire Support [12.1].
8.52 Any combat unit is subject to Overrun. Any Red-Box MA or Cavalry unit, which is not Disrupted can conduct an Overrun. An Overrun occurs while the unit (or stack) is moving. Units performing an Overrun:
• Begin the Movement Phase stacked together in the same hex• Leave behind any Orange-Circle MA or non-motorized
units, or other ineligible units in the hex where it starts moving
• Include at least one Armored, Armored Car, or Cavalry unit
Note 1: A unit Out of Supply or with Low Fuel cannot con-duct an Overrun [8.16 and 6.44b].Note 2: A defending unit (or stack) could be subjected to an Overrun by two or more successive enemy units (or stacks).
8.53 The overrunning unit (or stack) cannot exceed stacking limits in its attack hex at the moment of conducting the Overrun.
8.54 Overrun MP Costsa. The MP costs to enter a hex to be Overrun are:
• One MP for the Overrun• All normal terrain and hexside MP costs to enter the De-
fender hex
Note: Remember that units in the Defender hex that proj-ect a ZOC into adjacent hexes cause overrunning units to spend an MP when they first enter that ZOC. If they start adjacent to the Defender hex, then they have already spent that MP cost in a prior activation and so will not spend it again for the same hex.
b. Any other enemy unit ZOC that extends into the Defender hex causes no additional cost for entry by overrunning units.
Design Note: Here, the overrunning force literally drives into the enemy position, and if successful, the retreating Defenders are in such close proximity to the advancing units that they mask the fires (negate the ZOC) of adjacent friendly units. On the game map the overrunning force halts in the adjacent hex to allow resolution of the Overrun. If successful, the Defender retreats and then the overrunning force advances. In reality, the retreat and advance are nearly simultaneous.
c. All units in a stack require sufficient MPs still available to conduct the Overrun. Units without sufficient MPs will cease movement.
8.55 Weather and Terrain Restrictionsa. An Overrun cannot occur during Rain weather.b. An Overrun is prohibited across the following hexsides:
• River (even at a Bridge)• Fortified Line• A hexside prohibited to its movement
c. An Overrun is prohibited into a Town or Completed enemy Strongpoint.
d. Units cannot conduct an Overrun from a hex that is in the ZOC of enemy units located in more than one hex.
e. If an Overrun is made along a Road, Railroad, or Trail, use the movement rate applicable to those terrain types to enter the Defender hex.
Example of Overrun: A German stack in hex 2631 with an MA of 6 is conducting an Overrun (Although one unit in the stack has an MA of 7, the MA of the stack is the MA of the slowest unit, which is 6 in this case). The stack begins its Movement Phase on a trail, three hexes away from a Soviet unit in hex 2728 that will be the target of the Overrun. The Soviet unit is located on the same trail, with two intervening hexes between the German stack and Soviet unit. The German stack spends1 MP to traverse the two interven-ing hexes along the trail (1/2 MP per hex), 1 MP to enter the ZOC of the Soviet unit, 1 MP to enter the Defender Hex via the trail hexside (because it is a woods hex), and 1 MP to conduct the Overrun, for a total of 4 MPs spent to conduct the Overrun. A Soviet ZOC extending into the Defender Hex from the next hex to the rear has no effect, and is ignored. If the Overrun combat is successful and the Overrunning stack occupies the Defender Hex, the Overrunning stack can continue movement since it still has 2

19Roads to Moscow ~ Rules of Play
© 2013 GMT Games, LLC
MPs remaining. If there were a Soviet unit A in hex 2829, German stack could not conduct an overrun from hex 2729 against the Soviet unit in hex 2728, because hex 2729 would be in the ZOC of two Soviet units, unit A and the Soviet unit in hex 2728 [8.55d]. If there were a Soviet unit B in hex 2727, after a successful overrun by the German stack against the Soviet unit in hex 2728, the Ger-man stack would have to stop its movement in hex 2728 because the stack would be in the ZOC of unit B and would not have suf-ficient MPs left to conduct an Overrun against unit B (8.56i); it would require 3 MPs to conduct an overrun against unit B, 2 MP to enter hex 2727 (1 MP for clear + 1 MP for woods) + 1 MP to conduct the Overrun. Note that the presence of unit B in hex 2727 would have no effect on the number of MPs required to conduct an Overrun against the Soviet unit in hex 2728 [8.54b].
8.56 Overrun Combat Procedurea. An Overrun can be made at any odds, 1-4 or greater. Artillery
and Ground Unit Coordination [10.4] are not applicable to an Overrun.
b. Total the attack strength for the Attacker and the defense strength for the Defender and compute combat odds [10.5]. Both sides select Lead Units.
c. Artillery Fire Support is not allowed for either side during an Overrun.
Exception: Any one artillery unit in the Defender hex can provide Artillery Fire Support automatically, at full support strength. Any others would provide only their defense strength, not Artillery Fire Support.
d. The German player can allocate a maximum of one avail-able air unit to Close Air Support (CAS) for each Overrun he makes, subject to CAS Coordination [10.41]. No Soviet CAS is allowed during an Overrun [inadequate training].
e. Determine DRMs from:• Terrain (both hex and hexside terrain)• ER Differential Calculation [10.61c] • Combined Arms Bonus [10.61f] • German CAS [8.56d and 13.2]
Note: Overrun DRMs can differ from those for regular combat.
f. Roll one die, apply the net DRM, and consult the Mobile CRT to obtain the combat result [11.0].
g. The owning player removes any losses. Defending units forced to retreat by the CRT result are retreated two hexes by the attacking player (the player making the Overrun); according to rules 11.3 and 11.5. Place a Disruption marker on all units retreating as a result of an Overrun [Exception: 15.33]. Turn retreating artillery units to their Fired side. The retreat path chosen by the attacking player must comply with 11.52.and 11.53 (defending units retreat through as few enemy ZOCs as possible and cannot end in an enemy ZOC).
h. If the Overrun clears the Defender hex of all combat units, the overrunning units must enter the Defender hex.
Note: They have already paid the Overrun and terrain costs to enter the hex.
i. The overrunning stack can now continue moving up to the limit of its remaining MA, and can conduct another Over-run, if sufficient MPs remain; but if the stack is now in an enemy ZOC, the stack either conducts an Overrun of that enemy hex or the stack’s movement ends.
8.57 If the Overrun does not succeed in clearing the Defender hex, the stack ceases movement and loses one step (owning player’s choice), in addition to any step loss already required by the CRT. Ignore any Attacker Retreat results on the CRT.
9.0 Pre-Combat ActionsCombat resolution is preceded by a series of actions that set the stage for combat:
• Combat Declaration• Combat Refusal• Reaction Movement• No Retreat Declaration
9.1 Combat DeclarationCombat takes place between adjacent opposing combat units. Attacking is always voluntary. Friendly units are never required to attack enemy units. Units are not required to attack all the enemy units that they are adjacent to or that exert a ZOC into hexes with attacking units.
9.11 At the conclusion of his Movement Phase, the active player declares which enemy occupied hexes his units will attack, and designates which friendly units will attack each adjacent enemy hex.
a. During a Mobile Sequence, only units of the active Forma-tion, including activated Army units, can attack.
b. During an Assault Sequence units of non-active Formations can participate in combat against adjacent defending units that are being attacked by active units. They can absorb non-Lead Unit step losses and can advance after combat.
c. Individual units in a stack can attack different adjacent hexes.d. Unoccupied hexes cannot be attacked.
9.12 No more than one enemy hex can be attacked in any single combat. Place a Declared Attack marker on each at-tacking unit (or stack). Position the
arrow toward the hex that will be attacked (the Defender hex). Enemy hexes with no adjacent Declared Attack marker point-ing toward them cannot be attacked.
Note: More than one Declared Attack marker can be placed in the same hex, on top of each group of units attacking a differ-ent adjacent Defender hex.
9.13 A Defender hex can be attacked by as many units as can be placed in the six adjacent hexes. The Defender cannot withhold a unit in a hex under Declared Attack.

Roads to Moscow ~ Rules of Play20
© 2013 GMT Games, LLC
9.14 Units with an attack strength of zero cannot declare or participate in attacks. Any unit (or stack) whose total attack strength has been reduced to less than one because of halving [3.54c] cannot attack.
9.15 A unit cannot declare combat into a hex, or across a hex-side, through which the TEC prohibits it from moving.
Exception: Artillery can contribute its support strength to any Declared Attack in range, regardless of the terrain in the Defender hex [12.17] or terrain or units between the artillery unit and the defending hex [12.18].
9.16 Vehicle silhouette units can attack across a River hexside only at a Bridge.
9.17 Once the Declared Attack markers have been placed, the attack is irrevocable. The Defender hex must be attacked by all units that have declared combat against it, unless the units in the Defender hex conduct Combat Refusal.
9.2 Combat Refusal9.21 After all attacks have been declared, the defending player has the option to attempt Combat Refusal in all eligible De-fender hexes. Eligibility requirements are:
• All units in the Defender hex have a Red-Box MA or are cavalry.
• No unit in the Defender hex is Disrupted.
9.22 Combat Refusal is not movement. It is a retreat and follows all retreat restrictions except as noted below.
Note: An Army unit is eligible for Combat Refusal because this is not movement. It requires activation only for movement.
9.23 Procedurea. Conduct an ER check on the Lead Unit in the Defender hex.
1. ER check fails: the stack remains in the Defender hex, and it must defend in combat.
Note: The Lead Unit for the ensuing combat (if the Combat Refusal attempt fails) may be a different unit than the Lead Unit used for the Combat Refusal attempt.
2. ER check passes: the owning player retreats the entire stack two hexes [11.3].
b. Now attacking units can advance up to two hexes [as in 11.61b], or just one hex for advancing units that do not have a Red-Box MA, the first hex being the vacated hex.
Note: This does not count as a two-hex advance for rule 7.12c.
c. Remove all Declared Attack markers from that attacking force. Attacking units from this Declared Attack cannot de-clare or participate in any other combats during this Combat Phase [in effect, their combat has already been resolved].
Example of Combat Refusal: The Soviet Player has commit-ted to three attacks—A, B and C. The German player cannot use Combat Refulsal in A because his unit is surrounded by enemy ZOCs. He cannot use Combat Refusal in B because his unit is not a Red-Box MA or cavalry unit. He can use Combat Refusal in C and does so. He uses the cavalry unit as his Lead Unit in the stack and makes an ER check. A die roll of 1–6 will allow the German player to retreat both units two hexes. The units may retreat to separate hexes.
9.24 A stack that succeeds in Combat Refusal cannot end its retreat in a hex that is under Declared Attack, although it can pass through such a hex during its retreat.
9.25 Combat Refusal cannot occur if the retreat path passes through a vacant hex in an enemy ZOC.
9.26 Units retreated due to Combat Refusal cannot subsequently conduct Reaction Movement during this Sequence.
9.3 Reaction MovementReaction Movement takes place after all Combat Refusal.
9.31 Reaction is always determined on a unit-by-unit basis. Declare and resolve each eligible unit separately.
9.32 The Defender moves an eligible unit up to half of its MA (not cumulative with other MA halving [6.44b and 7.21B]).
9.33 Eligibility Requirements• It is within two hexes of a Defender hex and does not
already occupy a Defender hex• It has a Red-Box MA• It is not Disrupted, Out of Supply or with Low Fuel• It is part of the same Formation as the Lead Unit in the
Defender hex; an Army unit can be made eligible if now activated by rule 7.4 (place a First or Final Activation marker on it, as appropriate)
• Soviet units cannot be in a German ZOC (German units can be in a Soviet ZOC)

21Roads to Moscow ~ Rules of Play
© 2013 GMT Games, LLC
Example of Reaction Movement: German unit A is under attack and the German player wishes to use Reaction Move-ment. Units C and D are not eligible. C belongs to a different formation than the unit in the defender hex, and D is not within the required two hexes of the defender hex. Unit B is eligible because, being German, it can react in an enemy ZOC, but it is not chosen. Unit E is also eligible, so the German player makes an ER check for the unit with a die roll of 1–6 required for success. The attempt is successful which allows the Ger-man player to move Unit D up to 3 MPs (half its MA). The unit does not have to reinforce the defender’s hex—it could move away. It cannot enter the shaded hexes because it may only move adjacent to an enemy unit if a friendly unit occupies the hex.
9.34 HQ units are not eligible for Reaction Movement.
Note: This phase gives the Defender the opportunity for local reaction to combat. If there are no Declared Attacks, Reaction Movement is not possible. Also note that the same unit might be eligible for Reaction Movement more than once during a turn.
9.35 Procedurea. Conduct an ER check on the unit to react. DRMs can be
applied from the use of Command Points [15.2].b. If the ER check fails, the unit remains in place, and cannot
make another attempt this phase.
9.36 During Reaction Movement a unit can move adjacent to an enemy unit only if a friendly combat unit already occupies that hex. Entering the hex subject to stacking limits. If it enters a friendly occupied hex in an enemy ZOC, it does not pay the MP cost to enter the enemy ZOC, but stops immediately.
Note: The reacting unit can become a Lead Unit for later pro-cedures such as No Retreat Declaration [9.4] or combat.
9.37 Reaction Movement need not be into a Defender hex, or toward any combat. A unit cannot react into a hex or across a hexside containing terrain that is prohibited to that unit for movement and cannot react across an un-bridged River hexside.
9.4 No Retreat Declaration9.41 A No Retreat Declaration is optional for non-active units when they are the object of an attack. It allows them to avoid re-treat after combat [11.3], but at the possible cost of an additional step loss [11.41]. The option applies to the entire Defender hex.
9.42 Units can attempt a No Retreat Declaration only if the hex contains at least three steps of strength and the units did not fail Combat Refusal during this Operation, and either:
• It contains a friendly Strongpoint, or Fortified Line effects apply, or
• It contains an HQ of its Formation, or a Leader unitNote: An Army unit is eligible to attempt a No Retreat Decla-ration because this is not movement.
9.43 Procedurea. Conduct an ER check on the Lead Unit in the Defender hex.
DRMs can be applied from the use of Command Points [15.2].b. If the ER check succeeds, place a No Retreat marker on the
Defender hex.c. If the ER check fails, conduct any retreat normally [per 11.3].
Note: The Lead Unit for the ensuing combat may be a different unit than the Lead Unit used for the No Retreat Declaration attempt.
9.44 The ER check automatically succeeds when either:• A non-Disrupted “NKVD” unit is the Lead Unit, or• A non-Disrupted HQ or Leader unit is in the hex (this does
not cause Command Points to be spent)
9.45 A No Retreat marker remains until:• A new friendly unit enters and stays in the hex• Voluntarily removed by the friendly player• Rule 9.42 conditions are not valid• The Reorganization Phase
9.46 No Retreat Effectsa. Apply a +1 DRM to the combat die roll.b. The defending unit (or stack of units) loses one additional
step if the CRT results include a retreat (“R”) result. Apply this loss to the Lead Unit [11.42b]. This additional step loss is considered part of the numerical result for the purposes of possible reduced loss for the attacking units [11.25].
c. Units in the Defender hex do not retreat.

Roads to Moscow ~ Rules of Play22
© 2013 GMT Games, LLC
10.0 CombatThe player who is currently conducting an Operations Sequence (and who just placed his Declared Attack markers on the map) is the Attacker. The other player is the Defender, regardless of the overall game situation. The Attacker resolves his declared attacks individually, in any order he desires.
10.1 Attack Restrictions10.11 No unit can attack or defend more than once per Combat Phase.
Note: It is possible for units to attack two or more times per turn: each time when activated, and each time when adjacent to Defender hexes being attacked by other activated friendly Formations using the Assault Sequence. Likewise, it is pos-sible for defending units to be attacked several times.
10.12 A unit without a Declared Attack marker cannot attack. However, an artillery unit does not require an Attack Declara-tion marker to provide Artillery Fire Support [12.1].
10.13 A unit cannot divide its attack strength among different combats, or lend it to other units.
10.14 No more than one Defender hex can be the object of a single Declared Attack.
10.15 A unit cannot be engaged in combat solely by artillery or air units.
10.16 All units in a Defender hex defend together as one com-bined defense strength. The Attacker cannot attack individual units in a stack, and the Defender cannot withhold a unit in a stack from participating in combat.
10.17 The Attacker removes the Declared Attack markers before resolving Combat Coordination for that attack. Then the Attacker designates a Lead Unit for the attack [10.43] and continues with the remaining combat procedure for that combat.
10.2 Effects of Terrain on Combat10.21 A defending unit benefits from the terrain in the hex it occupies, and from the terrain on the hexside(s) it is being attacked through [see TEC]. Terrain in hexes occupied by at-tacking units has no effect on combat.
10.22 The Defender receives the following cumulative DRM benefits for terrain.
a. Apply only one DRM for terrain in the Defender hex. Al-ways use the most favorable DRM available, if more than one terrain type exists in the Defender hex.
b. Apply hexside terrain as an additional DRM, if all attacking, non-artillery units are attacking through that type of hexside.
Note: The DRMs for Slope and Stream are cumulative.
Design Note: All combat is presumed to take place within the Defender’s hex. Hexside terrain presents an additional obstacle to entering the hex, thereby also benefiting the Defender.
10.23 Supply and terrain might reduce an attacking unit’s attack strength by half one or more times. Any attacking unit thereby reduced to less than one attack strength point cannot attack [since fractions are dropped; 3.54].
10.24 Reduce the attack strengths of all non-artillery units by half (round down) when they attack across River hexsides, re-gardless of the presence of a Bridge. Artillery support strength is not affected by a River hexside.
10.25 Both the Attacker and Defender’s artillery support strengths are halved when the Defender hex is Marsh.
10.3 Choosing the CRT10.31 Only one of the two Combat Results Tables (CRTs) will be used for each combat. The attacking player identifies which CRT will be used for each combat.
10.32 When the Assault CRT is mandatory:• During an Assault Sequence• During Rain turns• No attacking armored unit included• The Defender hex contains a Town or an enemy Strong-
point• All units attack across a River hexside, regardless of the
presence of a Bridge• All attacking units attack through a Fortified Line hexside
10.33 The Attacker can choose the Mobile CRT if all of the following apply:
• When using the Assault CRT is not mandatory• If at least one attacking unit is armored, armored car, or
cavalry
10.4 Combat CoordinationCoordination between units is critical to the success of any attack or defense. This game represents this by requiring coordination (ER checks) during combat. Once Pre-Combat Actions [9.0] are concluded, the Attacker makes up to three Combat Coordination checks per combat (the first for Close Air Support, the second for Artillery Fire Support, and the third for non-artillery ground units). The Defender makes up to two Combat Coordination checks per combat (the first for CAS and the second for Artillery Fire Support). As players make ER checks, refer to the Combat Coordination Table.
10.41 Close Air Support Coordinationa. First, the Soviet player commits air units to Close Air Sup-
port (CAS) [13.2] for the Declared Attack, and then the German player does the same. CAS air units are placed on the Defender hex. Once CAS missions are placed, they cannot be removed before that Declared Attack is resolved, nor can additional air units be added.
b. Each player designates one committed CAS air unit as his Lead air unit and makes an ER check on it, applying any DRMs [see the Combat Coordination Table for applicable DRMs].
c. If the ER check succeeds, all friendly air units in that combat provide CAS.

23Roads to Moscow ~ Rules of Play
© 2013 GMT Games, LLC
d. If the ER check fails, none of the friendly air units contribute CAS points as DRMs.
e. Optional: If both players agree, fog of war can be added to CAS commitment by having both players secretly allocate their air units for CAS, and then simultaneously display the number of units each has committed.
10.42 Artillery Coordinationa. Each player (Defender first) indicates which of his eligible
artillery units [12.13] will attempt to provide Artillery Fire Support to the Declared Attack, and selects one artillery unit to be the Lead artillery unit. Once artillery units have been designated, they cannot be cancelled before that combat is resolved, nor can additional artillery units be added.
b. Each player then makes an ER check against his Lead artil-lery unit. The result applies to all friendly artillery unit types providing Artillery Fire Support in that Declared Attack [see Combat Coordination Table for applicable DRMs].
Exceptions: One artillery unit in the Defender hex is always Combat Coordinated, and one attacking artillery unit adjacent to the Defender hex is always Combat Co-ordinated [12.17].
c. Artillery Coordination Results• If the Lead artillery unit passes its ER check, all attacking
artillery units contribute their full support strengths.• A modified result greater than the Lead artillery unit ER,
but less than 10, halves each supporting artillery unit’s support strength (round down). This halving is in addi-tion to any halving for firing into a Defender hex that is in Marsh terrain [12.18b].
• A modified result of 10 (or more) means that none of the committed artillery units contribute any support strength to that combat.
d. Regardless of the result of the ER check, turn each participat-ing artillery unit to its Fired side after the Declared Attack is completed.
e. The total artillery support strength added for each side after Artillery Coordination cannot exceed that side’s total modi-fied (ground) combat strength in that combat. [12.13f].
Example: A Defender hex contains combat units with a total defense strength of five. Two friendly artillery units with support strengths of 4 each are within range and the Lead artillery unit passes its ER check. Even though the two artillery units have eight support points available for the Defender hex, only five of those support points can be applied because there are only five Defender strength points in the Defender hex.
10.43 Attacker Ground Unit Coordinationa. To conduct Ground Unit Coordination the Attacker makes
an ER check on his Lead ground unit in that combat.1. If the unit fails its ER check, apply a +2 Coordination
DRM to the combat die roll [10.61g].2. If the unit passes its ER check, the Coordination DRM is
not applied to the combat die roll.b. If using the Assault CRT:
1. If all attacking combat units are of the same Formation and none of them is Disrupted, then the Attacker’s combat units automatically pass Ground Unit Coordination.
2. If units of more than one Formation are attacking together in that combat [7.35 and 9.11b], then conduct Ground Unit Coordination.
c. If using the Mobile CRT the Attacker must conduct Ground Unit Coordination [Exception: 10.43d1].
d. Regardless of CRT:1. If all attacking units are located in the same hex and none
of them are Disrupted, they automatically pass Ground Unit Coordination.
2. If any attacking unit is Disrupted, the Attacker must con-duct Ground Unit Coordination.
e. See Combat Coordination Table for applicable DRMs.
10.44 Defender Ground Unit Coordination. The Defender never makes a check for Ground Unit Coordination. He does, however, designate a Lead Unit for the Combat Phase (including for purposes of 10.61c). The Defender may designate a Lead Unit for the Combat Phase that is different than the Lead Unit the Defender may have designated during the Enemy Reac-tion Phase for making a Combat Refusal attempt [9.2] or a No Retreat Declaration attempt [9.4].
10.5 Determining Combat Odds10.51 Compute Final Strengths. Both the Attacker and De-fender total their attack and defense strengths, respectively, as follows.
a. Total all ground units for each side in the combat. Some attacking units (or stacks) may have their attack strengths halved. Halving is cumulative; some units or stacks may be halved more than once [3.5].
b. Add the support strength of artillery units [12.1].
10.52 Compute Combat Odds. Divide the total attacking strength by the total defending strength to arrive at a combat odds ratio. Always round off the ratio in favor of the Defender, to the nearest odds column listed on the CRT.
Examples: 8 attack strength points against 2 defense strength points is 4-1 odds; 8 to 3 is 2-1 odds; 8 to 4 is 2-1 odds; 8 to 5 is 3-2 odds.

Roads to Moscow ~ Rules of Play24
© 2013 GMT Games, LLC
10.53 Special Combat Oddsa. The minimum initial odds for any Declared Attack (before
artillery for either side has been committed, and prior to the Defender’s reaction movement) are 1:4, in order to conduct the attack. Final odds of less than 1:4 result in an automatic A2R result if using the Mobile CRT, or A2Rd if using the Assault CRT.
b. Final odds greater than 7-1 on the Assault CRT are resolved on the 7-1 column.
c. Final odds greater than 8-1 on the Mobile CRT are resolved on the 8-1 column.
d. The Attacker can never voluntarily reduce the combat odds of any given attack.
Example: The Attacker cannot declare 2-1 odds when he has 3-1 odds.
10.6 Resolving CombatAfter all Combat Coordination and odds calculation is complete, the Attacker computes the applicable DRMs for the combat, and then resolves the combat.
10.61 Combat DRMs. Determine DRMs for:
a. Terrain for both hex and hexside [see TEC].b. Friendly Strongpoint in Defender hex (or Fortified Line
conditions apply): +1 DRM.c. ER Differential Calculation. Compare the ER of the Lead
ground unit in the Lead attack hex to that of the Lead ground unit in the Defender hex. If the ER of the Defender’s Lead Unit is greater than the ER of the Attacker’s Lead Unit (use the same Lead Unit used in Combat Coordination), a positive (+) DRM results; if the Attacker’s ER is greater, a negative (–) DRM results. The amount of the DRM is equal to the difference between the two ER ratings. Remember to take Disruption and Out of Supply status into account when determining unit ERs.
Example: The Attacker’s Lead ground unit has an ER of 5, and the Defender’s Lead ground unit has an ER of 7. Subtract Attacker 5 from Defender 7. This results in a +2; meaning: a +2 DRM. The Attacker now includes a +2 in his DRM calculation.
d. Attacker and Defender CAS [10.41 and 13.2].e. Defender hex contains No Retreat marker [9.46]: +1 DRM.f. Combined Arms Bonus (CAB). Apply a –1 DRM to the
combat if all of the following requirements are met:1. The attacking force includes one or more armored [3.14d]
units.2. The attacking force also includes one or more units of:
motorcycle, motorized infantry, motorized engineer, or reconnaissance type. This type and the qualifying armored unit need not be in the same hex.
3. The Defender does not have a red defense strength unit in the Defender hex.
4. The Defender is not located in a Town, or completed friendly Strongpoint, or behind a non-destroyed Fortified Line hexside.
5. The qualifying attacking units in 1 and 2 above are not attacking through a bridged River hexside and are not Disrupted [3.72h].
g. Failed Ground Unit Coordination. If the Attacker fails his Ground Unit Coordination ER check [10.43a], apply a +2 DRM to the combat.
h. Attacking Engineer Effects. Apply a –1 DRM whenever attacking units include a non-Disrupted engineer unit as the Lead Unit and the Defender receives a DRM for Town, Strongpoint, or Fortified Line. The engineer unit does not need to be the Lead Unit. Additional engineer units have no extra DRM effect. Defending engineer units have no effect.
10.62 Netting DRMs. Net all Attacker and Defender DRMs. Each +1 DRM offsets a –1 DRM. The positive or negative DRM total remaining after offsetting is the final DRM. Final DRMs are further limited to no more than +5 or less than –5. Disregard final DRM values beyond these limits.
10.63 Roll One Die. The attacking player rolls a die, and ad-justs the die roll by the net DRM. Cross-index the modified die roll result with the final odds column on the appropriate CRT. Apply the combat result to the involved units before going on to any other combat.
11.0 Combat Results11.1 Reading the CRT11.11 Interpret the results on the CRT as follows: A = Attacker; numerals and letters following the ‘A’
refer to attacking units. D = Defender; numerals and letters following the ‘D’
refer to defending units. R = Retreat; all units of the affected force retreat
[11.3], unless under a No Retreat marker [9.4]. E = Eliminated; all units of the affected force are
eliminated.
1, 2, 3 = 1, 2, or 3 steps (as indicated) lost from the affect-ed force. The Lead ground unit of the affected force must always lose the first step [Exception: Armor Attrition, 11.23]. Always apply step loss results before applying retreat results.
d = Disrupted. All involved units of the indicated side are Disrupted [3.7].
Result is printed in red. Additional special losses may apply: Armor Attrition [11.23], air units [13.17], and Leaders [15.34].
11.12 Attacker artillery units not adjacent to the Defender hex, and Defender artillery units not in the Defender hex, never suf-fer any combat results; they do not retreat or advance; are not Disrupted; and do not suffer step losses.

25Roads to Moscow ~ Rules of Play
© 2013 GMT Games, LLC
11.2 Combat Losses11.21 When called for by the CRT, the owning player removes the indicated number of steps from the total force, not from each unit in that force.a. The process of applying each step loss to a unit varies ac-
cording to the number of steps a unit has.1. When a one step unit takes a step loss, remove it from
play.2. When a two-step unit takes its first step loss turn the unit
over to its Reduced Strength side. A second step loss then removes the unit from play.
b. The following unit types have only one step of combat strength:• HQ• Artillery• Combat units with unit strengths on only one side of the
counterc. When a combat result requires a unit to be eliminated, re-
move it from play. Any unit required to lose more steps of strength than it has, is removed from play.
11.22 Lead Unit Losses. The Lead ground unit for both sides normally takes the first step of any combat loss required by the CRT. [Exception: Red results on the CRT, 11.23].
11.23 Armor Attritiona. Results printed in red on both CRTs require an armored loss
if the attacking force contains one or more armored steps and one or more units in the Defender hex are armored or have a red defense strength. If these conditions are true, the first Attacker step loss must be an armored step, regardless of which unit was the Lead Unit for the attack [Exception to 3.43b]. If the CRT does not require an Attacker step loss, one attacking armored step is still lost.
b. Whenever the Attacker suffers Armor Attrition and the CRT requires any Defender loss, that loss must be from the unit (armored or red defense strength) that that qualifies the combat for Armor Attrition.
Examples:1. A Soviet stack containing a two-step armored unit and a non-armored unit (the Lead Unit) attack a German heavy anti-aircraft unit and infantry unit (no red defense strength). Odds are 3-1 on the Assault CRT. The modified die roll is 5, yielding a result of ‘DR,’ printed in red. The German units retreat, but because of the red printed result, the Soviet armor unit must take a step loss because one defending unit has a red defense strength, even though the CRT did not call for a numerical step loss for the Attacker.2. If the result is a “7” instead, then the Attacker’s loss is just the armor step. The Defender must reduce the anti-air-craft unit because that unit qualified the combat for Armor Attrition.3. If the odds were 5-1 and the final die roll result is “2,” yielding “A1/D3R,” the armor loss is still required even though there are not enough defending steps [11.25].
11.24 No Retreat Losses. In addition to any other losses, if the defending force has a No Retreat marker and the combat result indicated a Defender retreat, the defending force suffers an additional step loss [11.4].
11.25 Reduced Loss. If one side has fewer steps available to lose than indicated by the numerical result (and thereby is completely removed, with an unfulfilled loss left over), reduce any step loss incurred by the opposing side by one step. This does not negate Armor Attrition. If the defending force has a No Retreat marker, the additional step loss is considered part of the numerical result.
11.3 Retreats“We’re leaving, but we’ll come back.”
~ Mozhaysk wall graffiti by Col. Polosukin, 18 October 1941
When a combat result requires units to retreat, the owning player immediately moves the affected units individually (or as a stack) either one or two hexes, in any direction away from the Defender hex. A unit unable to retreat within the restrictions given below is eliminated.
Exception: In an Overrun, the attacking player retreats the affected units.
11.31 Length of Retreata. Retreats caused by the Mobile CRT must be two hexes.b. Retreats caused by the Assault CRT can be either one or two
hexes, as the owning player desires, for each retreating unit.c. Retreats caused by Combat Refusal [9.2] must be two hexes.d. Regardless, no retreat can exceed two hexes [Exception:
Soviet Rocket Artillery, 16.3].
11.32 Retreats are not movement, and do not cost any MPs.
11.33 A unit can retreat in any direction or combination of directions [Exception: 19.44e]. Required retreats of two hexes require the retreat to end two hexes away from the original Defender hex or be eliminated. Retreating stacks can split up and retreat to different hexes.
11.34 A unit can retreat through a hex containing friendly units, even if that means a temporary violation of stacking limits. A unit cannot end its retreat in violation of the stacking limit. If it does, the owning player eliminates retreating units until the stacking limit is reached.
11.35 A unit cannot end its retreat in an enemy ZOC, unless another friendly unit is already in the hex. Friendly units negate enemy ZOCs for purposes of retreat.
11.36 A unit can end its retreat in a Defender hex where combat has not yet been resolved (subject to stacking restrictions). However, it contributes no defense strength to the subsequent combat and cannot act as a Lead Defender unit. It is subject to any retreat result applied to the Defenders in the subsequent combat, but is not subject to any loss result unless the Defenders in the subsequent combat are completely eliminated with an unfulfilled Defender loss result remaining; in this case previ-ously retreated units fulfill the remaining loss requirement.

Roads to Moscow ~ Rules of Play26
© 2013 GMT Games, LLC
11.37 A unit forced to retreat across a terrain hexside that is prohibited to its movement, off the edge of the map, beyond a scenario boundary line, or into or through enemy combat units is eliminated.
11.4 No Retreat Option Applied11.41 Units in Defender hexes with No Retreat markers [9.4] do not retreat, but suffer one addi-tional step loss if the CRT calls for a Defender Retreat result.
11.42 Procedurea. Remove any numerical step losses mandated by the CRT,
taking the first step loss from the Lead Unit.b. The defending force now suffers one additional step loss,
instead of retreating. The Defender’s Lead Unit normally takes this step loss; if it has already been eliminated, take the step loss from the unit in the Defender hex with the highest ER (Defender’s choice in case two or more units have the highest ER). This additional step loss is considered part of the numerical result for the purposes of possible reduced loss for the attacking units [11.25].
c. Remove the No Retreat marker.
11.5 Retreating Through Enemy ZOC11.51 A unit cannot retreat into or through a hex in an enemy ZOC, unless no alternate path exists.
11.52 A unit can retreat into or through a hex occupied by friendly combat units, even if enemy combat units project a ZOC into that hex [Exception to 11.51].
11.53 Only eligible units can retreat through a vacant hex in an enemy ZOC but they must retreat a second hex to end in a hex either not in an enemy ZOC or in a friendly occupied hex in an enemy ZOC. In doing so they may suffer one or more step losses [11.56].
11.54 All unit types are eligible to retreat through a vacant hex in an enemy ZOC except the following:
• Artillery (including rocket artillery)• Anti-Tank• Anti-Aircraft• Heavy Anti-Aircraft
A player can choose to eliminate ineligible units in order to retreat the remainder of the stack. These eliminated units do not satisfy the potential one-step loss [11.56c or d].
11.55 A unit (or stack) is eliminated if its only path of retreat ends in a vacant hex in enemy ZOCs.
11.56 Procedurea. Conduct the two-hex retreat. Retreating stacks of units re-
main stacked together. The second hex of the retreat cannot be a vacant hex in an enemy ZOC.
b. When the retreat is complete, the owning player conducts an ER check on the retreating unit (no Command Points can be applied). If it is a stack, he conducts an ER check on the Lead Unit of that stack.
Note: Remember that the printed ER ratings are reduced if the unit is Out of Supply or Disrupted. Also, the Lead Unit of the retreating stack does not have to have been the Defender Lead Unit in the combat that caused the retreat.
c. If the ER check fails, the Lead Unit takes a one step loss. If it passes, there is no loss.
d. Motorized Advantage. If the retreating unit (or stack) contains no Red-Box MA units, and one or more enemy Red-Box MA units exerts a ZOC into the vacant hex, one step (owning player’s choice) is automatically lost before making an ER check for the remaining units.
Example of Retreat through Enemy ZOC: German player must retreat stack A two hexes. The Orange-Circle MA unit is eliminated because it cannot retreat into an enemy ZOC. The motorized unit can retreat through an enemy ZOC but only in the first hex. That only leaves two choices: hex B or hex C. After the retreat the German Player must make an ER check to see if the unit loses a step.
11.6 Advance After CombatWhenever the original Defender hex has been vacated as a result of combat, the attacking units may be able to advance. Advance after combat is not movement, and does not cost MPs. However, a unit cannot advance across a terrain hexside that is prohibited to its movement or off the edge of the map or through enemy combat units.
11.61 Length of Advancea. When using the Assault CRT attacking units can advance
only one hex (into the vacated Defender hex).b. When using the Mobile CRT attacking Red-Box MA units
can advance up to two hexes. The first hex must be the De-fender hex (the hex that was attacked), and the second hex can be any adjacent hex the Attacker chooses that has no enemy combat units in it.
Exception: Disrupted Red-Box MA units cannot advance more than one hex.
c. Each completed full two-hex advance also provides the Attacker with a +1 DRM for the Attacker’s Initiative roll during the next turn [7.12c].

27Roads to Moscow ~ Rules of Play
© 2013 GMT Games, LLC
d. Non-motorized units cannot advance more than one hex (into the vacated Defender hex).
e. Orange-Circle MA artillery, anti-tank, and anti-aircraft units cannot advance after combat.
Note: Other Orange-Circle MA unit types are allowed to advance after combat.
f. Defending units can never advance after an Attacker Retreat result.
11.62 A player exercises the option to advance immediately, before resolving any other combat. A player is not forced to advance a unit. After advancing, units cannot attack again in that Combat Phase, even if their advance places them adjacent to enemy units.
11.63 Only those attacking units that participated in that combat can advance. They advance from any of the hexes from which the attack was made. Units that served only to block enemy retreat routes (those not having Declared Attack markers for that combat) cannot advance.
11.64 Advancing units ignore all enemy ZOCs, regardless of advancing one or two hexes, but cannot advance onto enemy combat units.
11.65 Units cannot violate stacking limits at the end of an advance after combat.
Example of Advance after Combat: The Soviet player had two successful attacks. Dashed boxes indicate the defender’s vacated hex. Attack A used the Assault CRT so only a one hex advance was allowed. Note that the heavy weapons unit cannot advance at all. Attack B used the Mobile CRT and so all three Soviet units can advance up to two hexes and enter enemy ZOCs in the second hex.
12.0 ArtilleryArtillery units [3.14f] participate in combat either from adjacent hexes or from non-adjacent hexes. Artillery units do not have an attack strength, but instead have a support strength, which is used to supplement the attack or defense strengths of other friendly units. Artillery units need not be adjacent to, but must be within range of, the Defender hex any time they participate in Artillery Fire Support. In most cases [Exception: 12.17] artillery checks Artillery Coordination [10.42] to participate in Artillery Fire Support.
Some artillery units have the letter “A” following their sup-port strengths. These represent special artillery units, which are limited to offensive Artillery Fire Support. They can never conduct Artillery Fire Support defensively.
12.1 Artillery Fire Support12.11 Declaration. During Combat Coordination first the De-fender and then the Attacker declares which eligible artillery units will attempt to support that combat.
12.12 Only eligible artillery units can participate in Artillery Fire Support. No artillery unit is required to contribute its sup-port strength.
12.13 Eligibility Requirementsa. Only those artillery units within range of the Defender hex
can participate in that combat. Each artillery unit has a range, expressed in hexes. Count range as from the artillery unit’s hex to the Defender hex; include the Defender hex, but not the artillery unit’s hex.
b. For the Attacker, only the artillery units of the active Forma-tion, plus activated Army artillery units, can participate.
c. For the Defender, only the artillery units of the same Forma-tion as the Lead Unit in the Defender hex, plus any Army artillery units within Command Range (four hexes) of the Lead defending unit’s Formation HQ, can be used to provide Artillery Fire Support. Whatever the result of the Coordina-tion check, turn the artillery unit to its Fired side [12.19]. The attempt by an Army artillery unit to provide (defensive) Artillery Fire Support does not require Activation; it can activate later in the turn.
d. An artillery unit on its Fired side (or that is Disrupted), at the moment when Attacker or Defender Artillery Fire Support is declared, cannot use its support strength.
e. An artillery unit on its Support Strength side with an Emer-gency Supply or Out of Supply marker can use its support strength. However, once turned to its Fired side the artillery unit cannot return to its Support Strength side until it is again Supplied.
f. Support Strength Limits1. In any Declared Attack, the Attacker’s total artillery sup-
port strength cannot exceed the total (modified) attack strength of his non-artillery units, and the Defender’s total artillery support strength cannot exceed the total (modi-fied) defense strength of his non-artillery units. Disregard excess support strength points.

Roads to Moscow ~ Rules of Play28
© 2013 GMT Games, LLC
2. Both players are limited to no more than two non-adjacent artillery units conducting Artillery Fire Support for any one combat situation.
Design Note: Both German and Soviet artillery fire con-trol procedures in WWII were rather limited by modern standards. In most cases, a given forward observer could only call for, and correct, the fire from a single battery of artillery, or in some cases, one battalion.
12.14 Whenever an artillery unit (of any type) is in an enemy ZOC, it can only provide Artillery Fire Support to an adjacent enemy occupied hex (when attacking), or to its own hex (when defending).
12.15 A defending artillery unit can use its support strength or its defense strength in a single combat, but not both. A single artillery unit can fire on only one Defender hex during a Com-bat Phase; it cannot split its strength, or lend unused points to other artillery units.
12.16 Defender artillery units that are not in the Defender hex, and Attacker artillery units not adjacent to it, never suffer adverse results from the combat they are supporting [11.12]. Artillery units in the Defender hex are subject to all combat results, as are attacking artillery units that are adjacent to the Defender hex.
Note: If stacked with other unit types that retreat as a result of combat, the artillery unit must also retreat (or be eliminated).
12.17 One attacking artillery unit (Attacker’s choice), providing Artillery Fire Support from a hex adjacent to the Defender’s hex, automatically passes Artillery Coordination at full support strength (even if other artillery units are included in the attack, and even if they fail Artillery Coordination). One artillery unit (Defender’s choice) in the Defender hex can provide Artillery Fire Support to the Defender hex and automatically passes Artillery Coordination at full support strength (even if other artillery units are included in the attack, and even if they fail Artillery Coordination).
12.18 Terrain Effectsa. Terrain or intervening units do not block Artillery Fire Sup-
port.b. Both the Attacker and Defender’s artillery support strengths
are halved when the Defender hex is in Marsh terrain. Design Note: Continual standing water in such hexes, along
with the preponderance of soft muddy ground considerably reduced the effectiveness of artillery fire.
12.19 Turn each artillery unit (Attacker or Defender) over to its Fired side after making its Coordination check (include those automatically passing the ER check). Units that are one their Fired sides cannot contribute their support strengths for the remainder of the Combat Phase, even if their support strengths were halved or unused due to failed Coordination checks. Both players turn all Supplied artillery units back to their Support Strength side during the Reorganization Phase.
Note: The Fired side has unit values because the unit might still have a remaining activation or be required to defend in combat before it is returned to its Support Strength side.
12.2 Artillery in Defense12.21 When an artillery unit is alone in a hex, use its defense strength, not its support strength.
12.22 When two or more artillery units are the only unit type in the same Defender hex, use only their combined defense strengths, not their support strengths.
12.23 When one artillery unit that is not yet on its Fired side is in a Defender hex with a non-artillery unit, apply its sup-port strength to the defense strength of the hex [12.17]. If two or more artillery units are present, use the support strength of just one of those artillery units; the remainder use their defense strength. All are subject to combat results.
12.24 Turn all artillery units in the Defender hex to their Fired sides (including those that did not provide Artillery Fire Sup-port) after combat.
12.25 If a Defender artillery unit begins a Combat Phase in an enemy ZOC, or if before the battle it is supporting is resolved, an enemy combat unit moves (or advances) adjacent to it thereby placing a ZOC on it, then it cannot use its support strength dur-ing that Combat Phase, except in defense of the hex it occupies.
Example of Artillery in Defense: The Soviet player used the Mobile CRT in combat A which allowed the Soviet units to advance two hexes and adjacent to the enemy artillery unit. So now, neither enemy artillery unit C or D may be used in defense against Soviet combat B.

29Roads to Moscow ~ Rules of Play
© 2013 GMT Games, LLC
13.0 Air UnitsThe air units in the game represent only the ground attack forces that partici-pated in the battle; air-to-air combat is not shown. Each air unit is available
each turn according to Readiness.
13.1 Air Unit Restrictions13.11 Keep air units in the appropriate box of the Air Display whenever they are not on the map performing a mission. The capacity of each box is unlimited.
13.12 Air Readiness Procedurea. During the Readiness Phase turn all air units back to their
aircraft silhouette side and move them from the Flown Box to the Ready Box. No die rolls are required.
b. Air units unused from the prior turn remain in the Ready Box until used on a future turn. They can remain in Ready status indefinitely.
c. Air units do not require Activation and do not require supply. They are not subject to Army unit activation or use restric-tions [7.4].
13.13 Only air units in the Ready Box can be selected for mis-sions. Each unit in the Ready Box is available to perform only one air mission in a turn. An air unit is not available to perform a mission unless it is in the Ready Box.
13.14 Air units neither exert nor are affected by ZOCs.
13.15 Air units are subject to CAS Coordination whenever they perform a mission [10.41]. Apply DRMs as listed on the Combat Coordination Table.
13.16 When an air unit completes its mission, place it upside-down on its “Flown” side in the Flown Box.
Note: The back of the air unit is marked “Flown” to provide an additional graphic device so that the air unit status is not confused.
13.17 If an air unit participates in a combat where a red com-bat result occurs, that air unit must pass an ER check to avoid elimination. Each air unit must make a separate ER check. This ER check must be made regardless of the combat meeting the requirements for Armor Attrition [11.23].
13.2 Close Air Support Mission13.21 Air units can perform CAS missions anywhere on the map, on any eligible Defender hex, regardless of terrain or the presence of enemy ground units so long as an eligible [see Note 15.13], friendly, non-Disrupted HQ is within four hexes of that Defender hex. For purposes of defensive CAS mission, an Army unit may receive defensive CAS if within four hexes of any friendly HQ unit.
13.22 At the beginning of each combat resolution procedure, first the Soviet player, then the German player, assigns air units, as desired, from the Ready Box to CAS missions.
13.23 Air units are subject to an ER check whenever they perform CAS missions. Apply DRMs as listed on the Combat Coordination Table.13.24 Each player can assign up to two air units to a CAS mis-sions in a single combat.13.25 Each air unit assigned to a CAS mission by the attacking player provides a –1 or –2 DRM, as printed on the unit; each air unit assigned by the defending player provides a +1 or +2 DRM, as printed on the unit.
13.26 Restrictions on Usea. Defensive CAS missions are allowed regardless of the type
of combat unit occupying the Defender hex.b. Defensive CAS missions are not allowed during an Overrun.
13.27 Air units are not affected by combat results [Exception: 13.17] and cannot be taken as losses, regardless of the combat result.
13.28 Remove air units at the end of each combat resolution and place them in the Flown Box.
14.0 Strongpoints and Fortified LineStrongpoints represent a variety of field fortifications prepared for defense from all directions. A Fortified Line represents prepared defenses including
bunkers, trenches, mines, and roadblocks. A Fortified Line cannot be built and is printed on the map. Strongpoints must be built; they are not printed on the map.
14.1 General Effects14.11 An enemy Strongpoint blocks tracing a friendly Supply Route through the hex it occupies An enemy Strongpoint costs +1 MP to enter [8.31c]. An enemy Fortified Line hexside costs +1 MP to cross [8.37]. An enemy Strongpoint must be removed, or Forti-fied Line hexside must be destroyed [14.3], before a friendly Sup-ply Route can be traced through that hex. A Fortified Line blocks a Supply Route being traced through its hexside (not the hex).
14.12 Combat Effectsa. The Assault CRT is required when the Defender hex contains
a Strongpoint or the Defender is entirely behind an active Fortified Line hexside, regardless of other terrain or the type of Operations Sequence chosen.
b. Overruns cannot be conducted against units located in hexes with Strongpoints or across an active Fortified Line.
c. Units defending in a hex containing a Strongpoint benefit from a +1 DRM to the combat die roll. Units defending entirely behind a Fortified Line hexside benefit from a +2 DRM. These effects are not cumulative. There is no DRM when attacking from (out of) a Strongpoint or Fortified Line.
d. A Strongpoint in a Defender hex (or when entirely behind an active Fortified Line) allows the Defender to attempt a No Retreat Declaration [9.4].
e. Unoccupied Strongpoints or active Fortified Line hexsides do not block the retreat of enemy units.

Roads to Moscow ~ Rules of Play30
© 2013 GMT Games, LLC
14.13 Once constructed, Strongpoints do not have to be occu-pied by friendly units to remain in play. A completed Strong-point remains on the map until it is removed [14.3].
14.14 Once destroyed [14.36], a Fortified Line hexside is no longer active and cannot be rebuilt.
14.2 Strongpoint Construction14.21 Eligible units on both sides can build Strong-points. A Strongpoint can be built in any eligible hex. The hex can be in an enemy ZOC.
14.22 Hexes eligible for construction:• Occupied by an eligible friendly unit• Does not contain another Strongpoint
14.23 Eligible unit types:• Infantry• Motorized Infantry• Engineer• Motorized Engineer• Bicycle
14.24 During Winter weather [5.14] only the following types are eligible:
• Engineer• Motorized Engineer
14.25 A Disrupted unit is never eligible. If a unit becomes in-eligible at any time during the construction process, the process ends for it. Remove the Strongpoint Under construction marker. It can later restart the process, if eligible again.
14.26 Construction Procedurea. During the Engineering Phase of a friendly Assault Se-
quence, place a Strongpoint Under construction marker on top of an eligible unit. The unit must be of the active Formation, or be an Army unit activated by that Formation. Non-active units wait until they activate with an Assault Sequence.
b. The constructing unit remains in place [14.33] until the Reorganization Segment’s Engineering Phase.
c. During the Reorganization Segment’s Engineering Phase turn each remaining Strongpoint Under construction marker to its completed Strongpoint side. The constructing unit is now free to move next turn and the Strongpoint remains, even if the hex is otherwise unoccupied.
Example: A Soviet infantry unit moves into the desired hex on the 16AM turn. During the Engineering Phase of its activation Segment, place a Strongpoint marker on top of that hex with its Under construction side showing. If the Soviet infantry unit has remained in that hex, and not par-ticipated in an attack, then during the Engineering Phase of the 16AM Reorganization Segment, turn the marker to the Strongpoint side. The infantry unit can move away from the completed Strongpoint during the 16PM turn.
d. If an activated Army unit is an eligible unit type, it can construct a Strongpoint.
14.27 Construction Limitationsa. Except for Strongpoints constructed by active engineers, no
more Strongpoints can be put Under Construction during a single activation than the combined Command Points of all the HQs currently in play of the active Formation. In ad-dition to the Strongpoints constructed using the Command Points of the active HQs, each active engineer (or motorized engineer) unit of that Formation can also start construction of a Strongpoint; active Army-level engineer (or motorized engineer) are also eligible.
Note: If a Formation is activated a second time, additional eligible units can place a Strongpoint Under construction, effectively using Command Points twice.
b. Count the Command Points on the undepleted sides the Ac-tive Formation’s HQs still in play, regardless of whether the Command Points have already been used this turn. Building Strongpoints does not require an HQ to spend Command Points and the Command Points of an HQ may be used every time the HQ unit’s Formation is activated and conducts an Assault Sequence
c. An HQ cannot be counted unless it can itself pass eligibil-ity requirements [14.25 and 14.26] during that Engineering Phase.
14.3 Strongpoint Removal and Fortified Line Destruction14.31 Remove a Strongpoint whenever any type of non-Dis-rupted enemy combat unit occupies its hex at the end of any Engineering Phase.
14.32 Remove an unoccupied Strongpoint if it cannot trace a Supply Line during the Supply Status Phase. It traces like a unit that has no Red-Box or Orange-Circle MA [6.23].
14.33 Remove a Strongpoint Under construction marker im-mediately if its constructing unit moves, attacks, or defends in combat.
14.34 The owning player can voluntarily remove unoccupied Strongpoints at any time.
14.35 Removed Strongpoint markers can be reused.
14.36 Fortified Line Destruction. All of the Fortified Line hexsides in a hex are destroyed (a) whenever any type of non-Disrupted enemy combat unit occupies the hex at the end of any Engineering Phase or (b) whenever the hex cannot trace a Supply Line during the Supply Status Phase; the hex traces like a unit that is not Red-Box or Orange-Circle MA [6.23]. Place a Fortified Line Destroyed marker in those hexes to indicate all Fortified Line hexsides of the hex are destroyed.

31Roads to Moscow ~ Rules of Play
© 2013 GMT Games, LLC
15.0 HQ Units and Leaders15.1 HQ Characteristics
15.11 Headquarters (HQ) units represent formation staff and control units along with various non-combat support units. Some Formations have more than one HQ.
15.12 HQs in Combat and Overrun. An HQ unit cannot be the Lead attacking unit and it cannot be the Lead Unit in a De-fender hex (unless alone in that hex or stacked only with other HQ units). An HQ contributes its defense strength if it occupies a Defender hex. Any HQ with a Red-Box MA can participate in Overrun attempts.
15.13 In order for an HQ to contribute its Command Points as DRMs to ER checks, the Lead Unit conducting the ER check must be of the same Formation as the HQ.
Note: An Army unit becomes part of a Formation for all pur-poses while activated including acting as a Lead Unit for an attack, receiving CAS if within four hexes of an activated HQ, and receiving Artillery Fire Support. For purposes of defen-sive CAS missions, but not artillery support, an Army unit may receive defensive CAS if within four hexes of any friendly HQ unit.
15.14 Command Rangea. Every HQ (or Leader) has a Command Range of four hexes.
Trace range without regard to terrain, enemy units, or enemy ZOC. When counting range, do not count the hex occupied by the HQ (or Leader), but do include the hex occupied by the Lead Unit (disregard range to non-Lead Units).
b. An HQ in a Defender hex can apply its Command Points to other hexes within Command Range, even though the HQ itself might be under attack.
15.15 Disrupted HQs. Disrupted HQs cannot spend any Command Points. Like other units, Disrupted HQs automatically recover from Disrup-tion if they are not in an enemy ZOC during the
Reorganization Phase. If a Disrupted HQ is in an enemy ZOC during the Reorganization Phase, conduct an ER check to at-tempt recovery.
Note: Since Disruption reduces its ER by two, a 5 ER HQ would have to roll a 3 or less to recover from Disruption [3.7].
15.16 Summary of HQ Functions:• Activate Army units [7.44]• No Retreat Option [9.44]• Allow Combat Air Support [13.21]
15.2 Command PointsCommand Points generally represent a staff capability of pro-cessing and distribution of battlefield information and orders. HQ units affect ER and Combat Coordination checks of their subordinate units through spending Command Points.
15.21 Number Available. Each non-Disrupted HQ (or Leader) possesses either one or two Command Points. The HQ (or Lead-er) has this number available during each Operations Sequence (both friendly and enemy) of the turn. Unused Command Points cannot be saved from one Operation to the next and cannot be loaned to other HQs (or Leaders). Each Command Point acts as a –1 DRM for one ER check, or Combat Coordination die roll. Command Points can be applied to units in other hexes, as long as they are within Command Range.
15.22 When an HQ (or Leader) spends Command Points, it always spends its full value (no partial commitment for those with 2 Command Points). Whenever an HQ (or Leader) spends its Command Points, turn it to its reverse (Spent) side, where the Command Point value is zero.

Roads to Moscow ~ Rules of Play32
© 2013 GMT Games, LLC
15.23 When Command Points can be spent:a. Friendly Reaction Phase. Each HQ (or Leader) can spend
its Command Points as DRMs for one of the following:• One Reaction Movement attempt• One No Retreat Declaration attempt.
b. Friendly Combat Phase1. If the HQ and the Lead Unit in a combat belong to the
same Formation, then that HQ can use its Command Points to affect Combat Coordination for that combat (if within Command Range).
2. Only one HQ can spend Command Points on a single Coordination attempt; however, one HQ and one Leader can combine to spend their Command Points on the same attempt.
Example: The German 10th Panzer Division has two of its HQs, 69th and 86th, within Command Range of the Lead Unit of a Declared Attack. Only one of the two HQs can allocate its Command Points to Ground Unit Coor-dination.
3. When spending Command Points on a Declared Attack, an HQ (or Leader) spends its Command Points for either:
• CAS Coordination, or• Artillery Coordination, or• Ground Unit Coordination
c. Enemy Combat Phase1. No more than one HQ can spend Command Points on a
given Defender hex, although one HQ plus one Leader can spend their Command Points on the same Defender hex.
2. When spending Command Points on a Defender hex, an HQ or Leader spends its Command Points for either:
• CAS, or• Artillery Coordination
d. An HQ can use Command Points to help activate an Army unit [7.4].
15.24 During the Reorganization Phase turn all Spent HQs (and Leaders) of both players to their full Command Point sides.
15.3 LeadersLeaders are non-combat units [3.14g] with special capabilities. A Leader is not an HQ unit; it represents just the individual person.
15.31 A Leader automatically activates, as desired, up to twice during an Operations Segment, whenever a friendly Formation activates. It does not count as an Army unit activation [7.4]. Use First Activation and Final Activation markers, as used by Army units, to keep track of its activation status.
15.32 Leader Functionsa. Formation Activation. At the start of any friendly Operations
Sequence, a Leader that is stacked with an HQ of the acti-vated Formation can use its Command Points to contribute a positive (+) DRM (favorable) to the Combining Forma-tion [7.3] die roll attempt. The amount of DRM equals the number of Command Points possessed by the Leader.
b. In order for a Leader unit to contribute its Command Points as DRMs to ER checks, it must be stacked with an HQ of the Lead Unit’s Formation, or any HQ to aid an air unit.
15.33 A Leader can advance after combat if stacked with ad-vancing units. It retreats when stacked with retreating units. It cannot be Disrupted or Out of Supply, and is subject to normal movement restrictions [8.1].
15.34 Eliminationa. A Leader is eliminated if an enemy combat unit enters its
hex.b. If a Leader applies its DRM in any Coordination attempt
where it is in the Defender hex or an attacking hex and a red combat result occurs for that combat, that Leader must pass an ER check or be eliminated (regardless of where it is located). This ER check must be made regardless of the combat meeting the requirements for Armor Attrition [11.23].
16.0 Special Units16.1 German Artillery HQ
16.11 The German Arko (Artillery) HQ unit can be used as a second HQ in any German Declared Attack [as an exception to 15.23b2]. However, it can only be used for Artillery Coordination [10.42],
even if it is the only HQ in a Declared Attack. All of the artil-lery units that the Arko HQ coordinates must be within Com-mand Range (four hexes) of the Arko HQ.
16.12 It allows as many artillery units as desired, within range and limited by rule 12.13 (disregard 12.13f2), to combine in any German Declared Attack.
Historical Note: The German “Arko” HQ unit represents a special artillery command and staff unit. Its mission was to plan and execute Artillery Fire Support in a main attack, serve as a fire control center, and coordinate the fire of divisional and corps level artillery. It was located away from divisional command posts to free those HQs from the pressure of Artil-lery Fire Support apparatus and associated technical issues thereby freeing both for quicker tactical deployment.

33Roads to Moscow ~ Rules of Play
© 2013 GMT Games, LLC
16.2 Fuel Units16.21 A Fuel unit is a non-combat unit. On-map Fuel units automatically activate, as desired, each up to twice during an Operations Segment, when-ever a friendly Formation activates. They do not
count as Army unit activations [7.4]. However, use First Acti-vation and Final Activation markers, as used by Army units, to keep track of each unit’s activation status. Fuel units may only use half their MA during an Assault Sequence [7.21B] and are never considered to be Out of Supply [6.1].
16.22 A Fuel unit can advance after combat if stacked with advancing units. It retreats when stacked with retreating units; but does not retreat during an Overrun. It cannot be Disrupted or Out of Supply, and is subject to normal movement restric-tions [8.1]. It is eliminated if an enemy combat unit enters its hex. It cannot be captured.
16.3 Soviet Rocket Artillery16.31 Whenever a Soviet rocket artillery unit en-gages in combat or provides Artillery Fire Support, attacking, it is required to make a Special Retreat, even if its side is not affected by CRT results [see
Designer’s Notes, 20.3].
16.32 Special Retreat is a retreat of up to a total of six hexes away from its original position. Other unit types stacked with it are not affected by this Special Retreat. Special Retreat is in two parts:
a. First, the unit must make a mandatory retreat of two hexes. This retreat is not in addition to a retreat already called for by the CRT; it converts a regular retreat result into the Special Retreat covered by these rules.
b. Second, the unit makes an additional retreat consisting of up to four more hexes if these hexes are available as a valid retreat route. If fewer than four hexes (even zero) are available, then the unit retreats only the distance actually available.
16.33 Both parts of the Special Retreat must be made in a man-ner that reduces the distance from the rocket unit to the nearest friendly Soviet Supply Source, should such a path be available.
16.34 A Special Retreat is subject to rules 11.3 and 11.5. Note that all rocket artillery units have an Orange-Circle MA and therefore are not eligible to retreat through vacant hexes in an enemy ZOC [11.54].
16.35 If a rocket artillery unit is unable to retreat the minimum two hexes [16.32a], it is eliminated. Lack of all or part of the additional four-hex retreat path [16.32b] does not cause a loss of steps.
16.36 The German player scores VPs [see VP Schedules] for each Soviet rocket artillery unit eliminated.

Roads to Moscow ~ Rules of Play34
© 2013 GMT Games, LLC
I n D E xActivations . . . . . . . . . . . . . . . . . . . . .4.2
Activation of Army Units . . . . . . . . . .7.4
Activation Markers (AMs) . . . . . . . .4.23
Activation Pool . . . . . . . . . . . . . . . . .7.22
Air Units . . . . . . . . . . . . . . . . . . . . . .13.0
Advance After Combat . . . . . . . . . . .11.6
Armor Attrition . . . . . . . . . . . . . . . .11.23
Artillery . . . . . . . . . . . . . . . . . . . . . . .12.0
Artillery Coordination . . . . . . . . . . .10.42
Artillery in Defense . . . . . . . . . . . . . .12.2
Artillery Fire Support . . . . . . . . . . . .12.1
Assault Sequence . . . . . . . . . . . . . 7.21B
Attack Restrictions . . . . . . . . . . . . . .10.1
Bridges . . . . . . . . . . . . . . . . . . . . . . .8.36
Close Air Support (CAS) . . . . . . . .10.41
Combat . . . . . . . . . . . . . . . . . . 10.0, 10.6
Combat Coordination . . . . . . . . .10.4
Combat Declaration . . . . . . . . . . .9.1
Combat Losses . . . . . . . . . . . . . .11.2
Combat Refusal . . . . . . . . . . . . . .9.2
Combining Formations . . . . . . . . . . . .7.3
Command Points . . . . . . . . . . . . . . . .15.2
Command Range . . . . . . . . . . . . . . .15.14
Declared Attack Markers . . . . . . . . .9.12
Disruption . . . . . . . . . . . . . . . . . . . . . .3.7
Efficiency . . . . . . . . . . . . . . . . . . . . . .3.4
Emergency Supply . . . . . . . . . 6.12-6.13
ER Check . . . . . . . . . . . . . . . 3.42, 10.42
Fire Support . . .see Artillery Fire Support
Force Markers . . . . . . . . . . . . . . . . . .3.35
Formations . . . . . . . . . . . . . . . . . . . . .4.2
Fortified Line . . . . . . . . . . . . . . . . . .14.0
Fuel Supply . . . . . . . . . . . . . . . . . . . . .6.4
Fuel Units . . . . . . . . . . . . . . . . . . . . .16.2
German Arko (Artillery) HQ . . . . . .16.1
Ground Unit Movement . . . . . . . . . . .8.0
Halving and Rounding . . . . . . . . . . . .3.5
HQ Units . . . . . . . . . . . . . . . . . . . . . .15.1
Initiative . . . . . . . . . . . . . . . . . . . . . . .7.1
Lead Units . . . . . . . . . .3.43, 10.61, 11.22
Leaders . . . . . . . . . . . . . . . . . . . . . . .15.3
Low Fuel . . . . . . . . . . . . . . . . . . . . . .6.44
Mobile Sequence . . . . . . . . . . . . . . 7.21A
Motorized Advantage . . . . . . . . . .11.56d
No Retreat Declaration . . . . . . . . . . . .9.4
No Retreat Option Applied . . . . . . . .11.4
Operations . . . . . . . . . . . . . . . . . . . . . .7.0
Out of Supply Effects . . . . . . . . . . . .6.14
Overruns . . . . . . . . . . . . . . . . . . . . . . .8.5
Pass Sequence . . . . . . . . . . . . . . . . 7.21C
Pre-Combat Actions . . . . . . . . . . . . . .9.0
Railroads . . . . . . . . . . . . . . . . . . . . . .8.34
Reaction Movement . . . . . . . . . . . . . .9.3
Reinforcements . . . . . . . . . . . . . . . . . .5.2
Reserve Status . . . . . . . . . . . . . . . . . . .5.3
Retreats . . . . . . . . . . . . . . . . . . . . . . .11.3
Roads. . . . . . . . . . . . . . . . . . . . . . . . .8.33
Soviet Rocket Artillery . . . . . . . . . . .16.3
Stacking . . . . . . . . . . . . . . .see Unit Steps
Steps . . . . . . . . . . . . . . . . . . . . . . . . . .3.6
Strongpoints . . . . . . . . . . . . . . . . . . .14.0
Supply . . . . . . . . . . . . . . . . . . . . . . . . .6.0
Supply Routes . . . . . . . . . . . . . . .6.2
Supply Sources . . . . . . . . . . . . . .6.3
Supply Status . . . . . . . . . . . . . . . .6.1
Terrain Effects . . . . . . . .8.3, 10.61, 12.18
Trails . . . . . . . . . . . . . . . . . . . . . . . . .8.33
Unit Steps . . . . . . . . . . . . . . . . . . . . . .3.6
Victory Points . . . . . . . see Playbook 17.0
and Victory Points Schedules Chart
Weather . . . . . . . . . . . . . . . . . . . . 5.1, 8.4
Woods Terrain . . . . . . . . .8.33, 8.35, 8.42
Zones of Control . . . . . . . . .3.2, 8.2, 11.5

35Roads to Moscow ~ Rules of Play
© 2013 GMT Games, LLC
A. MOBILE SEQUENCE1. Movement Phase (full MA)
a. Activation [7.4]. Attempt Activation of up to two Army units outside the Command Range of the HQ that still have an allowed Activation.
b. Movement [8.0]. Conduct ground unit movement and Overruns [8.5] for all units. Reinforcements [5.2] enter the map.
c. Combat Declaration [9.1]. Declare attacks against all desired Defender hexes. Place Declared Attack markers on all attacking units with Declared Attack marker arrows pointing to Defender hexes; and place the marker with its Assault or Mobile Attack side to show the CRT to be used.
2. Enemy Reaction Phasea. Attempt Combat Refusal [9.2]. Make an ER check on the Lead
defending unit.b. Attempt Reaction Movement [9.3]. Each unit to move makes an
ER check.c. Attempt No Retreat Declaration [9.4]. Make an ER check on the
Lead defending unit.
3. Combat Phase (Mobile or Assault CRT) The attacking player resolves each Declared Attack in the order he
chooses. He follows steps ‘a’ through ‘l’ below separately for each attack:
a. Each player (Attacker first) designates his Lead ground unit. Now remove the Declared Attack markers for this combat.
b. Each player (Soviet player first) commits air units to Close Air Support (CAS) missions.1) Place committed air units onto the Defender hex.2) Each player, (Soviet player first) designates his Lead air unit
and conducts CAS Coordination. 3) Those air units still remaining conduct CAS missions.4) Turn uncoordinated air units to their Flown side and remove to
the Flown Boxc. Both sides (Defender first) designate all supporting artillery units
(only those in range of the Defender hex).d. Artillery Coordination. Each player (Defender first) selects a Lead
artillery unit and makes an ER check [10.42, see Combat Coordina-tion Table for DRMs]. Possible outcomes:1) Lead artillery unit passes: all artillery units contribute their full
support strengths.2) Lead artillery unit fails but the die roll is less than “10,” then each
artillery unit contributes half its support strength (round down).3) Lead artillery unit fails with die roll of “10” or more: none of
the artillery units contribute any support strength.
Note: One artillery unit in the Defender hex always has Combat Coordination, and any one attacking artillery unit adjacent to the Defender hex always has Combat Coordi-nation [12.17].
Regardless of the Coordination result, turn all artillery units which participated (or attempted to participate) to their Fired side.
e. Ground Unit Coordination (Attacker only). Attacker makes an ER check on his Lead ground unit [10.43, see Combat Coordination Table for DRMs]. Possible outcomes:
1) Lead unit passes: no adjustments to the combat die roll.2) Lead unit fails: add +2 DRM to the combat die roll.
Note: Certain ground attack situations automatically pass Ground Unit Coordination [10.43].
f. Attacker totals his final unit strengths (ground units plus supporting artillery)
g. Defender totals its final unit strengths (ground units plus supporting artillery).
h. Determine Combat Odds.i. Total all applicable Attacker and Defender DRMs. Net the DRMs;
limit of + or - 5.j. Find the correct column on the designated CRT. Roll one die and
apply the net DRM to obtain the combat result.k. Apply the results to affected units.
1) Remove step losses, Defender first.2) Remove No Retreat marker, and apply step loss to the Lead
Defender unit.3) Conduct retreats, Defender first, including Special Retreats
through an enemy ZOC. Mobile CRT mandates 2 hex retreats; Assault CRT allows one or two hex retreats (Defender choice).
4 Turn to their Flown side any air units from that combat and remove these air units to the Flown Box.
l. If the Defender hex is vacated, surviving attacking units are allowed Advance after Combat [11.6].
Now repeat steps ‘a’ through ‘l’ for the next Declared Combat.
B. ASSAULT SEQUENCE1. Engineering Phase
a. Begin new friendly Strongpoints. Place this marker with the Strongpoint Under Construction side face up.
b. Remove an enemy Strongpoint from a hex if the hex is occupied by a friendly non-Disrupted combat unit.
2. Movement Phase (half MA)a. Activation. Attempt Activation of up to two Army units outside the
Command Range of the HQ that still have an allowed Activation.b. Movement. Conduct ground unit movement for all units. Reinforce-
ments enter the map. Overruns cannot be conducted.c. Combat Declaration. Declare Attacks against all desired Defender
hexes. Place a Declared Attack marker on all Attacker hexes.
3. Enemy Reaction Phase(Same as in Mobile Sequence)
4. Combat Phase (Assault CRT only) Each Declared Attack is resolved, in the order desired by the at-
tacking player. Follow steps 3a through 3m, as shown above for the Mobile Sequence Combat Phase, for each Declared Attack.
C. PASS SEQUENCEHold AM in Activation Pool, for later activation or later attempt at Combin-ing Formations [7.3].
Note: When conducting attacks using the Assault Sequence, it may be required to place Disruption markers as part of the com-bat results in Mobile Sequence Step 3.l.
The Operat ions Sequences

Roads to Moscow ~ Rules of Play36
A. Strategic Segment (both players)1. Weather Phase. The German player rolls one die and
consults the Weather Boxes for the current turn, as shown on the Turn Record Track for the scenario, to determine the weather condition for the entire turn [5.11].
2. Reinforcement Phasea. If rule 6.4 is in effect, the German player resolves the
Fuel Supply Table to determine the number of Fuel units received as reinforcements.
b. Both sides transfer available reinforcements [5.2] and chosen Optional Groups to the map (or map edge) as directed by their Set Up Cards.
c. Place air unit reinforcements in the Ready Box on the Air Unit Display.
d. Both players can place any desired Formation into Re-serve [5.3].
3. Readiness Phase. Move air units from the Flown Box to the Ready Box and turn them back to their aircraft silhouette side.
4. Supply Status Phase. Both players trace a Supply Route to all their on-map units [6.2].a. Remove Emergency Supply or Out of Supply markers
from units now able to trace.b. Turn Emergency Supply markers to their Out of Supply
side on units unable to trace.c. Place an Emergency Supply marker on units newly un-
able to trace.d. Remove Strongpoints that cannot trace.
5. Initiative Phase [7.1]a. Both players roll one die. Apply DRMs. The player with
the highest modified die roll has the Initiative [Exception: First turn of a scenario, 7.11].
b. The First Player places all of his allowed AMs into his opaque cup [Exception: 18.13d1]; the Second Player places up to the same number as the First Player, plus one into his cup.
B. Operations Segment(Players alternate Operations Sequences)1. First Player Operations Sequence
a. First Player randomly draws one Activation Marker [Exception: First Operations Sequence of the first turn of a scenario, 18.13d1].
b. If he is the German player, the First Player decides whether to provide Fuel. If provided, then he traces a Supply Line again for all units of the activated Forma-tion. If not provided, then all units of the activated Formation are marked Out of Supply.
c. First Player attempts Combining Formations [7.3].d. First Player attempts activation of Army units [7.4].e. First Player conducts either one of two possible Opera-
tions Sequences [see below], or takes the Pass Sequence.2. Second Player Operations Sequence
a. Second Player randomly draws one Activation Marker.b. If he is the German player, the Second Player decides
whether to provide Fuel [see step B.1.b above].c. Second Player attempts Combining Formations [7.3].d. Second Player attempts activation of Army units [7.4].e. Second Player conducts either of two possible Operations
Sequences [see page 35], or takes a Pass Sequence.3. Players alternate Operations Sequences until all Activa-
tion Markers have been played.
C. Reorganization Segment (Both players)1. Engineering Phase
a. Complete building all friendly Strongpoints by turning the Strongpoint Under Construction markers to their completed sides.
b. Remove enemy Strongpoints from any hexes that are occupied by friendly non-Disrupted combat units.
2. Reorganization Phasea. Remove Disruption markers from units not in an enemy
ZOC. Make ER checks for Disrupted units in enemy ZOC.
b. Remove all No Retreat markers.c. Turn all Leader and HQ units back to their “full” Com-
mand Point side.d. Turn all Supplied Fired artillery back to their Support
Strength sides.e. Remove all Activation Markers from Army units.
3. Victory Determination Phase. Check the scenario vic-tory conditions. If a player has achieved his set of victory conditions, the game ends (and ignore step C.4).
4. Turn Record Phase. Unless this is the last turn of the scenario, move the Turn marker ahead one space on the Turn Record Track and begin play of the next turn.
Expanded Sequence of P lay
GMT Games, LLCP.O. Box 1308, Hanford, CA 93232-1308www.GMTGames.com