
ROTEX A1 BO Inline
76
For specialist technical operation ROTEX A1 BO Inline Öl-Brennwertkessel Installation and maintenance instructions Type Rated thermal output ROTEX A1 BO 20i 12 - 20 kW ROTEX A1 BO 27i 20 - 27 kW ROTEX A1 BO 35i 25 - 35 kW Manufacture number Customer 0645 BM DE, AT, CH Edition 03/2007
Transcript of ROTEX A1 BO Inline

For specialist technical operation
ROTEX A1 BO InlineÖl-Brennwertkessel
Installation and maintenance instructions
Type Rated thermal output
ROTEX A1 BO 20i 12 - 20 kW
ROTEX A1 BO 27i 20 - 27 kW
ROTEX A1 BO 35i 25 - 35 kW
Manufacture number
Customer
0645 BM
DE, AT, CHEdition 03/2007

Guarantee and conformity
2 A1 ROTEX A1 BO Inline - 03/2007
ROTEX accepts the guarantee for material and manufacturing defects according to this statement. Within the guarantee period, ROTEX agrees to have the device repaired by a person assigned by the company, free of charge.
ROTEX reserves the right to replace the device.
The guarantee is only valid if the device has been used properly and it can be proved that it was installed properly by an expert firm. As proof, we strongly recommend completing the enclosed installation and instruction forms and returning them to ROTEX.
Guarantee period
The guarantee period begins on the day of installation (billing date of the installation company), however at the latest 6 months after the date of manufacture (billing date). The guarantee period is not extended if the device is returned for repairs or if the device is replaced.
Guarantee period for the burner and boiler electronics: 2 yearsGuarantee period for the boiler body: 10 years
Guarantee exclusion
Improper use, intervention in the device and unprofessional modifications immediately invalidate the guarantee claim.
Dispatch and transport damage are excluded from the guarantee offer.
The guarantee explicitly excludes follow-up costs, especially the assembly and disassembly costs of the device.
There is no guarantee claim for wearing parts (according to the manufacturer's definition), such as lights, switches, fuses.
Declaration of conformity
für die Brennwert-Heizzentralen der Kesselserie ROTEX A1 BO xxi.
We, ROTEX GmbH, declare under our sole responsibility that the products
Product Order No. CE-Nummer
ROTEX A1 B0 20i 15 48 00 CE 0645 BM-105.2
ROTEX A1 BO 27i 15 48 01 CE 0645 BQ-103
ROTEX A1 BG 35i 15 48 02 CE 0645 BM-104.2
in Verbindung mit einer der nachfolgenden Regelungen
Product Order No.
ROTEX THETA 23R (N) 15 40 52
ROTEX THETA 23R (S) 15 40 53
ROTEX ALPHA 23R 15 40 54
comply, in their standard design, with the following European Directives:
2004/108/EG Electromagnetic compatibility directive
98/37/EG EG-Maschinenrichtlinie
2006/95/EG Low voltage directive
92/42/EEC Boiler efficiency requirements directive
Güglingen, 1.1.2007 Dr Eng. Franz GrammlingManaging Director

Table of contents
3FA ROTEX A1 BO Inline - 03/2007
1 Safety . . . . . . . . . . . . . . . . . . . . . . . . . . . . . . . . . . . . . . . . . . . . . . . . . . . . . . . . . . . . . . . . . . . . . . . . . . . . . . . . . . . 51.1 See the manual . . . . . . . . . . . . . . . . . . . . . . . . . . . . . . . . . . . . . . . . . . . . . . . . . . . . . . . . . . . . . . . . . . . . . . . . . . . . . . . . . . . . . . . . . 51.2 Warnings and symbols. . . . . . . . . . . . . . . . . . . . . . . . . . . . . . . . . . . . . . . . . . . . . . . . . . . . . . . . . . . . . . . . . . . . . . . . . . . . . . . . . . . . 51.3 Danger prevention . . . . . . . . . . . . . . . . . . . . . . . . . . . . . . . . . . . . . . . . . . . . . . . . . . . . . . . . . . . . . . . . . . . . . . . . . . . . . . . . . . . . . . . 61.4 Proper use. . . . . . . . . . . . . . . . . . . . . . . . . . . . . . . . . . . . . . . . . . . . . . . . . . . . . . . . . . . . . . . . . . . . . . . . . . . . . . . . . . . . . . . . . . . . . 61.5 Instructions for operating safety . . . . . . . . . . . . . . . . . . . . . . . . . . . . . . . . . . . . . . . . . . . . . . . . . . . . . . . . . . . . . . . . . . . . . . . . . . . . 7
2 Product description. . . . . . . . . . . . . . . . . . . . . . . . . . . . . . . . . . . . . . . . . . . . . . . . . . . . . . . . . . . . . . . . . . . . . . . . . 82.1 Boiler structure and components . . . . . . . . . . . . . . . . . . . . . . . . . . . . . . . . . . . . . . . . . . . . . . . . . . . . . . . . . . . . . . . . . . . . . . . . . . . . 82.2 Brief description . . . . . . . . . . . . . . . . . . . . . . . . . . . . . . . . . . . . . . . . . . . . . . . . . . . . . . . . . . . . . . . . . . . . . . . . . . . . . . . . . . . . . . . . 9
3 Erection and installation . . . . . . . . . . . . . . . . . . . . . . . . . . . . . . . . . . . . . . . . . . . . . . . . . . . . . . . . . . . . . . . . . . . 103.1 Dimensions and connection dimensions . . . . . . . . . . . . . . . . . . . . . . . . . . . . . . . . . . . . . . . . . . . . . . . . . . . . . . . . . . . . . . . . . . . . . . 103.2 Installation versions . . . . . . . . . . . . . . . . . . . . . . . . . . . . . . . . . . . . . . . . . . . . . . . . . . . . . . . . . . . . . . . . . . . . . . . . . . . . . . . . . . . . 12
3.2.1 Ambient air-independent mode . . . . . . . . . . . . . . . . . . . . . . . . . . . . . . . . . . . . . . . . . . . . . . . . . . . . . . . . . . . . . . . . . . . . . . . . . 133.2.2 Partial ambient air-independent mode . . . . . . . . . . . . . . . . . . . . . . . . . . . . . . . . . . . . . . . . . . . . . . . . . . . . . . . . . . . . . . . . . . . . 133.2.3 Ambient air-dependent mode . . . . . . . . . . . . . . . . . . . . . . . . . . . . . . . . . . . . . . . . . . . . . . . . . . . . . . . . . . . . . . . . . . . . . . . . . . . 14
3.3 Transport and delivery. . . . . . . . . . . . . . . . . . . . . . . . . . . . . . . . . . . . . . . . . . . . . . . . . . . . . . . . . . . . . . . . . . . . . . . . . . . . . . . . . . . 143.4 Installing oil condensing boiler . . . . . . . . . . . . . . . . . . . . . . . . . . . . . . . . . . . . . . . . . . . . . . . . . . . . . . . . . . . . . . . . . . . . . . . . . . . . . 15
3.4.1 Selecting the installation site . . . . . . . . . . . . . . . . . . . . . . . . . . . . . . . . . . . . . . . . . . . . . . . . . . . . . . . . . . . . . . . . . . . . . . . . . . 153.4.2 Erecting the unit . . . . . . . . . . . . . . . . . . . . . . . . . . . . . . . . . . . . . . . . . . . . . . . . . . . . . . . . . . . . . . . . . . . . . . . . . . . . . . . . . . . . 16
3.5 Air/flue gas system (LAS) . . . . . . . . . . . . . . . . . . . . . . . . . . . . . . . . . . . . . . . . . . . . . . . . . . . . . . . . . . . . . . . . . . . . . . . . . . . . . . . . 163.5.1 General instructions for flue gas system . . . . . . . . . . . . . . . . . . . . . . . . . . . . . . . . . . . . . . . . . . . . . . . . . . . . . . . . . . . . . . . . . . 163.5.2 Connect the flue gas duct to the oil condensing boiler . . . . . . . . . . . . . . . . . . . . . . . . . . . . . . . . . . . . . . . . . . . . . . . . . . . . . . . . 183.5.3 Flue gas system kits . . . . . . . . . . . . . . . . . . . . . . . . . . . . . . . . . . . . . . . . . . . . . . . . . . . . . . . . . . . . . . . . . . . . . . . . . . . . . . . . . 19
3.6 Water connection . . . . . . . . . . . . . . . . . . . . . . . . . . . . . . . . . . . . . . . . . . . . . . . . . . . . . . . . . . . . . . . . . . . . . . . . . . . . . . . . . . . . . . 203.7 Connecting the condensate preparation . . . . . . . . . . . . . . . . . . . . . . . . . . . . . . . . . . . . . . . . . . . . . . . . . . . . . . . . . . . . . . . . . . . . . . 203.8 Connect the 3-way switch valve . . . . . . . . . . . . . . . . . . . . . . . . . . . . . . . . . . . . . . . . . . . . . . . . . . . . . . . . . . . . . . . . . . . . . . . . . . . 213.9 Connect control and electricals . . . . . . . . . . . . . . . . . . . . . . . . . . . . . . . . . . . . . . . . . . . . . . . . . . . . . . . . . . . . . . . . . . . . . . . . . . . . 213.10 Temperature sensor . . . . . . . . . . . . . . . . . . . . . . . . . . . . . . . . . . . . . . . . . . . . . . . . . . . . . . . . . . . . . . . . . . . . . . . . . . . . . . . . . . . . 22
3.10.1 General instructions for the temperature sensors . . . . . . . . . . . . . . . . . . . . . . . . . . . . . . . . . . . . . . . . . . . . . . . . . . . . . . . . . . . 223.10.2 Connecting the temperature sensor . . . . . . . . . . . . . . . . . . . . . . . . . . . . . . . . . . . . . . . . . . . . . . . . . . . . . . . . . . . . . . . . . . . . . . 23
3.11 Connect and fill up oil conduit . . . . . . . . . . . . . . . . . . . . . . . . . . . . . . . . . . . . . . . . . . . . . . . . . . . . . . . . . . . . . . . . . . . . . . . . . . . . . 233.12 Optional connections . . . . . . . . . . . . . . . . . . . . . . . . . . . . . . . . . . . . . . . . . . . . . . . . . . . . . . . . . . . . . . . . . . . . . . . . . . . . . . . . . . . . 24
3.12.1 Mixer circuit . . . . . . . . . . . . . . . . . . . . . . . . . . . . . . . . . . . . . . . . . . . . . . . . . . . . . . . . . . . . . . . . . . . . . . . . . . . . . . . . . . . . . . . 243.12.2 Room controller . . . . . . . . . . . . . . . . . . . . . . . . . . . . . . . . . . . . . . . . . . . . . . . . . . . . . . . . . . . . . . . . . . . . . . . . . . . . . . . . . . . . 243.12.3 Room station . . . . . . . . . . . . . . . . . . . . . . . . . . . . . . . . . . . . . . . . . . . . . . . . . . . . . . . . . . . . . . . . . . . . . . . . . . . . . . . . . . . . . . 24
3.13 Filling the heating system . . . . . . . . . . . . . . . . . . . . . . . . . . . . . . . . . . . . . . . . . . . . . . . . . . . . . . . . . . . . . . . . . . . . . . . . . . . . . . . . 24
4 Start-up . . . . . . . . . . . . . . . . . . . . . . . . . . . . . . . . . . . . . . . . . . . . . . . . . . . . . . . . . . . . . . . . . . . . . . . . . . . . . . . . . 254.1 Initial start-up . . . . . . . . . . . . . . . . . . . . . . . . . . . . . . . . . . . . . . . . . . . . . . . . . . . . . . . . . . . . . . . . . . . . . . . . . . . . . . . . . . . . . . . . . 254.2 Testing safety temperature limit (STB) function . . . . . . . . . . . . . . . . . . . . . . . . . . . . . . . . . . . . . . . . . . . . . . . . . . . . . . . . . . . . . . . 264.3 Checklists for start-up. . . . . . . . . . . . . . . . . . . . . . . . . . . . . . . . . . . . . . . . . . . . . . . . . . . . . . . . . . . . . . . . . . . . . . . . . . . . . . . . . . . 27
5 Control . . . . . . . . . . . . . . . . . . . . . . . . . . . . . . . . . . . . . . . . . . . . . . . . . . . . . . . . . . . . . . . . . . . . . . . . . . . . . . . . . . 285.1 Operating elements on the boiler control panel. . . . . . . . . . . . . . . . . . . . . . . . . . . . . . . . . . . . . . . . . . . . . . . . . . . . . . . . . . . . . . . . . 28
5.1.1 Control THETA 23R . . . . . . . . . . . . . . . . . . . . . . . . . . . . . . . . . . . . . . . . . . . . . . . . . . . . . . . . . . . . . . . . . . . . . . . . . . . . . . . . . 285.1.2 Control THETA 23R . . . . . . . . . . . . . . . . . . . . . . . . . . . . . . . . . . . . . . . . . . . . . . . . . . . . . . . . . . . . . . . . . . . . . . . . . . . . . . . . . 30
5.2 Changing the central unit. . . . . . . . . . . . . . . . . . . . . . . . . . . . . . . . . . . . . . . . . . . . . . . . . . . . . . . . . . . . . . . . . . . . . . . . . . . . . . . . . 325.3 Changing the boiler control panel. . . . . . . . . . . . . . . . . . . . . . . . . . . . . . . . . . . . . . . . . . . . . . . . . . . . . . . . . . . . . . . . . . . . . . . . . . . 325.4 Change cables . . . . . . . . . . . . . . . . . . . . . . . . . . . . . . . . . . . . . . . . . . . . . . . . . . . . . . . . . . . . . . . . . . . . . . . . . . . . . . . . . . . . . . . . . 345.5 Changing the sensors . . . . . . . . . . . . . . . . . . . . . . . . . . . . . . . . . . . . . . . . . . . . . . . . . . . . . . . . . . . . . . . . . . . . . . . . . . . . . . . . . . . 355.6 Change flue gas temperature sensor . . . . . . . . . . . . . . . . . . . . . . . . . . . . . . . . . . . . . . . . . . . . . . . . . . . . . . . . . . . . . . . . . . . . . . . . 365.7 Changing the fuse . . . . . . . . . . . . . . . . . . . . . . . . . . . . . . . . . . . . . . . . . . . . . . . . . . . . . . . . . . . . . . . . . . . . . . . . . . . . . . . . . . . . . . 375.8 Wiring diagram . . . . . . . . . . . . . . . . . . . . . . . . . . . . . . . . . . . . . . . . . . . . . . . . . . . . . . . . . . . . . . . . . . . . . . . . . . . . . . . . . . . . . . . . 38

Table of contents
4 FA ROTEX A1 BO Inline - 03/2007
6 Oil burner . . . . . . . . . . . . . . . . . . . . . . . . . . . . . . . . . . . . . . . . . . . . . . . . . . . . . . . . . . . . . . . . . . . . . . . . . . . . . . . 396.1 Structure and brief description . . . . . . . . . . . . . . . . . . . . . . . . . . . . . . . . . . . . . . . . . . . . . . . . . . . . . . . . . . . . . . . . . . . . . . . . . . . . . 396.2 Safety function . . . . . . . . . . . . . . . . . . . . . . . . . . . . . . . . . . . . . . . . . . . . . . . . . . . . . . . . . . . . . . . . . . . . . . . . . . . . . . . . . . . . . . . . 406.3 Burner setting . . . . . . . . . . . . . . . . . . . . . . . . . . . . . . . . . . . . . . . . . . . . . . . . . . . . . . . . . . . . . . . . . . . . . . . . . . . . . . . . . . . . . . . . . 40
6.3.1 Setting values . . . . . . . . . . . . . . . . . . . . . . . . . . . . . . . . . . . . . . . . . . . . . . . . . . . . . . . . . . . . . . . . . . . . . . . . . . . . . . . . . . . . . . 416.3.2 Instructions for burner setting . . . . . . . . . . . . . . . . . . . . . . . . . . . . . . . . . . . . . . . . . . . . . . . . . . . . . . . . . . . . . . . . . . . . . . . . . . 426.3.3 Check depression on the oil pump and set the oil pump pressure. . . . . . . . . . . . . . . . . . . . . . . . . . . . . . . . . . . . . . . . . . . . . . . . . 426.3.4 Set air quantity . . . . . . . . . . . . . . . . . . . . . . . . . . . . . . . . . . . . . . . . . . . . . . . . . . . . . . . . . . . . . . . . . . . . . . . . . . . . . . . . . . . . . 436.3.5 Set recirculation gap . . . . . . . . . . . . . . . . . . . . . . . . . . . . . . . . . . . . . . . . . . . . . . . . . . . . . . . . . . . . . . . . . . . . . . . . . . . . . . . . . 436.3.6 Check electrode distance and check and set the distance between oil nozzles and air nozzles. . . . . . . . . . . . . . . . . . . . . . . . . . . 44
6.4 Dismantling the burner . . . . . . . . . . . . . . . . . . . . . . . . . . . . . . . . . . . . . . . . . . . . . . . . . . . . . . . . . . . . . . . . . . . . . . . . . . . . . . . . . . 456.5 Oil burner pump with LE system . . . . . . . . . . . . . . . . . . . . . . . . . . . . . . . . . . . . . . . . . . . . . . . . . . . . . . . . . . . . . . . . . . . . . . . . . . . . 47
7 Hydraulic connection . . . . . . . . . . . . . . . . . . . . . . . . . . . . . . . . . . . . . . . . . . . . . . . . . . . . . . . . . . . . . . . . . . . . . . 487.1 Integrated connection group . . . . . . . . . . . . . . . . . . . . . . . . . . . . . . . . . . . . . . . . . . . . . . . . . . . . . . . . . . . . . . . . . . . . . . . . . . . . . . . 48
7.1.1 Structure and function . . . . . . . . . . . . . . . . . . . . . . . . . . . . . . . . . . . . . . . . . . . . . . . . . . . . . . . . . . . . . . . . . . . . . . . . . . . . . . . . 487.1.2 Releasing / restoring electrical connections . . . . . . . . . . . . . . . . . . . . . . . . . . . . . . . . . . . . . . . . . . . . . . . . . . . . . . . . . . . . . . . . 48
7.2 Hydraulic system connection . . . . . . . . . . . . . . . . . . . . . . . . . . . . . . . . . . . . . . . . . . . . . . . . . . . . . . . . . . . . . . . . . . . . . . . . . . . . . . 497.3 Hot water storage tank (not included in scope of supply) . . . . . . . . . . . . . . . . . . . . . . . . . . . . . . . . . . . . . . . . . . . . . . . . . . . . . . . . . 50
8 Inspection and maintenance . . . . . . . . . . . . . . . . . . . . . . . . . . . . . . . . . . . . . . . . . . . . . . . . . . . . . . . . . . . . . . . . 528.1 General overview of inspection and maintenance . . . . . . . . . . . . . . . . . . . . . . . . . . . . . . . . . . . . . . . . . . . . . . . . . . . . . . . . . . . . . . . 528.2 Inspection and maintenance tasks . . . . . . . . . . . . . . . . . . . . . . . . . . . . . . . . . . . . . . . . . . . . . . . . . . . . . . . . . . . . . . . . . . . . . . . . . . 52
8.2.1 Removing panelling (and cleaning it) . . . . . . . . . . . . . . . . . . . . . . . . . . . . . . . . . . . . . . . . . . . . . . . . . . . . . . . . . . . . . . . . . . . . . . 528.2.2 Checking the connections and conduits . . . . . . . . . . . . . . . . . . . . . . . . . . . . . . . . . . . . . . . . . . . . . . . . . . . . . . . . . . . . . . . . . . . 538.2.3 Checking and purifying the condensate preparation . . . . . . . . . . . . . . . . . . . . . . . . . . . . . . . . . . . . . . . . . . . . . . . . . . . . . . . . . . 538.2.4 Clean the pump filter . . . . . . . . . . . . . . . . . . . . . . . . . . . . . . . . . . . . . . . . . . . . . . . . . . . . . . . . . . . . . . . . . . . . . . . . . . . . . . . . . 558.2.5 Checking the flue gas temperature . . . . . . . . . . . . . . . . . . . . . . . . . . . . . . . . . . . . . . . . . . . . . . . . . . . . . . . . . . . . . . . . . . . . . . . 568.2.6 Checking and cleaning the burner . . . . . . . . . . . . . . . . . . . . . . . . . . . . . . . . . . . . . . . . . . . . . . . . . . . . . . . . . . . . . . . . . . . . . . . 568.2.7 Change oil nozzle . . . . . . . . . . . . . . . . . . . . . . . . . . . . . . . . . . . . . . . . . . . . . . . . . . . . . . . . . . . . . . . . . . . . . . . . . . . . . . . . . . . . 58
9 Faults and Failures . . . . . . . . . . . . . . . . . . . . . . . . . . . . . . . . . . . . . . . . . . . . . . . . . . . . . . . . . . . . . . . . . . . . . . . . 609.1 Troubleshooting . . . . . . . . . . . . . . . . . . . . . . . . . . . . . . . . . . . . . . . . . . . . . . . . . . . . . . . . . . . . . . . . . . . . . . . . . . . . . . . . . . . . . . . . 609.2 Failures . . . . . . . . . . . . . . . . . . . . . . . . . . . . . . . . . . . . . . . . . . . . . . . . . . . . . . . . . . . . . . . . . . . . . . . . . . . . . . . . . . . . . . . . . . . . . . 609.3 Fault codes of the THETA 23R control . . . . . . . . . . . . . . . . . . . . . . . . . . . . . . . . . . . . . . . . . . . . . . . . . . . . . . . . . . . . . . . . . . . . . . . 629.4 Fault codes of the ALPHA23R control . . . . . . . . . . . . . . . . . . . . . . . . . . . . . . . . . . . . . . . . . . . . . . . . . . . . . . . . . . . . . . . . . . . . . . . 639.5 Fault codes of the automatic firing units. . . . . . . . . . . . . . . . . . . . . . . . . . . . . . . . . . . . . . . . . . . . . . . . . . . . . . . . . . . . . . . . . . . . . . 659.6 Emergency operation . . . . . . . . . . . . . . . . . . . . . . . . . . . . . . . . . . . . . . . . . . . . . . . . . . . . . . . . . . . . . . . . . . . . . . . . . . . . . . . . . . . . 65
10 Decommissioning . . . . . . . . . . . . . . . . . . . . . . . . . . . . . . . . . . . . . . . . . . . . . . . . . . . . . . . . . . . . . . . . . . . . . . . . . 6610.1 Temporary shutdown . . . . . . . . . . . . . . . . . . . . . . . . . . . . . . . . . . . . . . . . . . . . . . . . . . . . . . . . . . . . . . . . . . . . . . . . . . . . . . . . . . . . 6610.2 Final decommissioning and disposal . . . . . . . . . . . . . . . . . . . . . . . . . . . . . . . . . . . . . . . . . . . . . . . . . . . . . . . . . . . . . . . . . . . . . . . . . 66
11 Technical data. . . . . . . . . . . . . . . . . . . . . . . . . . . . . . . . . . . . . . . . . . . . . . . . . . . . . . . . . . . . . . . . . . . . . . . . . . . . 67
13 Maintenance log . . . . . . . . . . . . . . . . . . . . . . . . . . . . . . . . . . . . . . . . . . . . . . . . . . . . . . . . . . . . . . . . . . . . . . . . . . 75
14 For the chimney sweep . . . . . . . . . . . . . . . . . . . . . . . . . . . . . . . . . . . . . . . . . . . . . . . . . . . . . . . . . . . . . . . . . . . . 76

1 x Safety
5FA ROTEX A1 BO Inline - 03/2007
1 Safety1.1 See the manual
This manual is intended for authorised and trained heating engineers who have experience with the proper installation and mainte-nance of heating systems on account of their technical training and knowledge.
This manual provides all the necessary information for installation, start-up and maintenance, as well as basic information on operation and setting. Please go through the attached documents for a detailed description of operation and control.
All heating parameters needed for smooth operation are already factory-set. Please refer to the documentation of the concerned control for setting the controls.
Please read this manual carefully and thoroughly before proceeding with the installation or modification of the heating system.
Relevant documents– ROTEX A1 BO Inline: Operating instructions for the operator. The document is included in the scope of supply.– The documentation of the ROTEX Control used. It is included in the scope of supply of the Control.
1.2 Warnings and symbols
Meaning of the warningsThe warnings are classified in this manual according to their severity and probability of occurrence.
DANGER!
Indicates a direct threat of danger.
Disregarding this warning leads to serious physical injury or death.
WARNING!
Indicates a potentially dangerous situation.
Disregarding this warning leads to serious physical injury or death.
CAUTION!
Indicates a possibly damaging situation.
Disregarding this warning can cause damage to property and the environment.
This symbol identifies user tips and particularly useful information, but not warnings or hazards.

1 x Safety
6 FA ROTEX A1 BO Inline - 03/2007
Special warning symbolsSome types of dangers are represented by special symbols:
ValiditySome of the information in this manual has limited validity. The validity is pointed out by using a symbol.
Order numberReferences to order numbers can be recognised from the goods symbol .
Handling instructions• Handling instructions are shown as a list. Actions during which the sequential order must be maintained are numbered.
Results of actions are identified with an arrow.
1.3 Danger prevention
ROTEX oil condensing boilers are built according to the state-of-the-art and meet all recognised technical requirements. However, improper use can cause serious physical injuries or death, as well as property damage. To avoid danger, install and operate ROTEX oil condensing boilers only:– As stipulated and in perfect conditions,– With an awareness of safety and dangers.This assumes knowledge and use of the contents of this manual, of the relevant accident prevention regulations as well as the recognised safety-related and occupational medicine rules.
1.4 Proper use
The oil condensing boiler ROTEX A1 BO xxi can only be used for the heating of hot water heating systems. The oil condensing boiler must be installed, connected and operated as indicated in this manual.
The oil condensing boiler ROTEX A1 BO xxi may be operated only in combination with a control approved by ROTEX (see Conformity Declaration on Page 2 of this manual).
Any other use outside the above considered as improper. The owner will be solely responsible for any resulting damage.
Proper use also includes the observance of maintenance and inspection conditions. Spare parts must at least satisfy the technical requirements defined by the manufacturer. This is the case, for example, with original spare parts.
Danger of explosion Electrical current, Danger of burning or scalding.
Valid only for ROTEX Control ALPHA 23R Valid only for ROTEX Control THETA 23R� �

1 x Safety
7FA ROTEX A1 BO Inline - 03/2007
1.5 Instructions for operating safety
Before working on the heating system• Only authorised and trained heating engineers should work on the heating system (e.g. erection, connection and initial
start-up).• Switch off the mains switch when undertaking any work on the heating system and secure it against being unintentionally
restarted.
Electrical installation• Electrical installation should only be carried out by qualified electrical engineers observing the technical electrical guidelines
and regulations of the relevant electric power supply company.• Compare the mains voltage (230 V, 50 Hz) indicated on the nameplate with the supply voltage before connecting to the mains.
Unit installation room• Operate the oil condensing boiler only if sufficient combustible air supply is guaranteed. If operating the oil condensing boiler
independently of the ambient air with an air/flue gas system (LAS) with dimensions according to ROTEX-Standard, this is automatically guaranteed and there will be no further conditions required of the device installation room.
• Note that there must be an outside air opening of at least 150 cm2 for ambient air-dependent operation.• Do not operate the oil condensing boiler as ambient air-dependent in rooms with aggressive vapours (e.g. hair spray, perchlo-
roethylene, carbon tetrachloride), strong dust formation (e.g. workshop) or high atmospheric humidity (e.g. laundry). • Strictly keep the minimum distances to walls and other objects (see chapter 3.1).
Heating system• Create a heating system according to the safety requirements of EN 12828, as an open or closed heating system.• Note that the safety valves must comply with DIN EN ISO 4126-1 and be type tested. The safety valves must be installed
in the safety flow.• Check the correct installation of the temperature sensor and safety temperature controller before the initial start up.• Always operate the oil condensing boiler with the silencer hoods closed.
Fuel• Use only the approved heating oils as fuel (see chapter 11).
Instruct the owner• Before you hand over the heating system, explain to the owner how he/she can operate and check the heating system.• Document the handover by filling out the installation and instruction forms together with the owner and sign them.

2 x Product description
8 FA ROTEX A1 BO Inline - 03/2007
2 Product description2.1 Boiler structure and components
A1 BO 20i A1 BO 35i (A1 BO 27i) A1 Schematic drawing
Figure 2-1 Boiler components - View from the front Figure 2-2 Diagram A1-boiler
A1 BO 20i A1 BO 25i (A1 BO 27i)
Figure 2-3 Boiler components - View from the back
1 Silencer hood 2 Boiler control panel3 Boiler panelling4 Burner 5 Control6 Boiler main body with heat and sound
insulation7 Nameplate with manufacture number8 Circulation pump9 3-way switch valve
10 Heater return flow (cold)11 Heater inflow (hot)12 Pressure gauge13 Filling and draining cock14 Safety valve15 Flue gas/ supply air connection16 Condensate preparation17 Condensation discharge18 Supply Air hose19 Flame tube
20 Combustion chamber insert21 Flue gas temperature sensor22 Circuit board (electrical connections)23 Stickers for identification of the usable oil quality24 Documents pocket25 Ball stopcock26 Inflow temperature sensor 27 Return flow temperature sensor 28 Setting sticker
Safety devices

2 x Product description
9FA ROTEX A1 BO Inline - 03/2007
2.2 Brief description
The ROTEX oil condensing boiler from the series A1 BO xxi is a completely pre-assembled oil condensing unit.
Operating instructionsThe ROTEX oil condensing boiler A1 BO xxi is designed in such a way that it can be operated independently of ambient air. The burner sucks the combustible air directly from the outside through an installation shaft or a double-walled flue gas duct. This method has several advantages:– The heating room does not need any air suction opening to the outside and therefore does not cool down.– Lower energy consumption.– Additional energy recovery in the flue gas duct by preheating of the combustible air.– Dirt from the burner environment is not sucked in. The heating room can thus be used as a workspace, laundry room etc. at
the same time.– Possible to install in loft areas or attic.– Possible to install in garages.The collecting condensate is neutralised in the integrated ROTEX condensate preparation and then conducted into the drainage system through a plastic tube.
Safety managementThe entire safety management of the oil condensing boiler is managed through an electronic control panel. If there is water shortage, oil shortage or undefined operating conditions, there is a safety shutdown. A corresponding error message shows the technician all the necessary information needed for troubleshooting.
Electronic controlA full electronic digital control panel, together with the "intelligent" automatic firing unit for the burner, controls all the heating and hot water functions fully automatically for the direct heating circuit, an optional connectable mixed heating circuit as well as a storage tank charging circuit.
All settings, displays and functions are carried out by the ROTEX-THETA control. The ROTEX THETA 23R control or the ROTEX ALPHA 23R control can be used according to the equipment version. The display and the keyboard ensure that the operating is comfortable.
To increase comfort, a digital room station (ROTEX THETA RS, 15 70 18) or a room control set (THETA RFF, 15 40 70) are also available as options.
The room temperature controller (ALPHA RTR-E, 17 51 26) is available as option, to increase the convenience.
Condensing technologyCondensing technology makes optimum use of the energy contained in the heating oil. The flue gas is cooled in the boiler and, in the case of the ambient air-independent method, in the flue gas system, until the temperature falls below the dew point. Part of the water vapour created on combustion of the oil thereby condenses. The condensation heat is fed to the heating, in contrast to low-temperature boilers, thus making it possible to achieve over 100% efficiency.
FuelThe ROTEX oil condensing boiler A1 BO xxi can be operated with standard or low sulphur heating oil (sulphur content < 50 ppm).
Condensate preparationThe condensate generated during the combustion in an oil condensing boiler has a pH value of 1.8-3.7. It must be neutralised before it enters the drainage system.
The ROTEX condensate preparation fulfils the following functions:– Removal of floating particles in the settling basin,– Neutralisation of the condensate in the shell limestone.
ROTEX recommends using EL low sulphur heating oil, in order to achieve the highest efficiency and to keep the maintenance expenditure low.
�
�

3 Erection and installation
10 FA ROTEX A1 BO Inline - 03/2007
3 Erection and installation
An incorrect erection and installation would void the manufacturer's guarantee. If you have questions, please contact our Technical Customer Service.
3.1 Dimensions and connection dimensions
WARNING!
Incorrectly erected and installed devices may not operate properly and can be dangerous for the health and safety of individuals.
• The erection and installation of the oil condensing boiler should only be carried out by heating engineers, authorised and trained by an energy supply company.
Figure 3-1 Dimensions of the model versions, side view
Figure 3-2 Dimensions and connection dimensions of the model versions, rear view

3 Erection and installation
11FA ROTEX A1 BO Inline - 03/2007
Tab. 3-1 Erection dimension (in mm) for oil condensation boiler A1 B0 xxi
Figure 3-3 Dimensions and connection dimensions of the installation versions
1 Boiler return flow2 Boiler inflow3 KFE-cock connection on ther device
filling line connection on KFE-cock4 Flue gas/ supply air connection5 Connection expansion vessel6 Burner7 Safety valve8 3-way switch valve
G 1" IG (Box nut)G 1¼" AG / G 1" IGG ½" IGG ½" AGDN 80/125G ½" IG
G ½" IG (Bleeding line G ¾" IG)G 1" AG
9 Hot water10 Circulation11 Heat exchanger return flow12 Sensor immersion sleeve13 Heat exchanger inflow14 Cold water15 Air/flue gas system (LAS) Connection piece16 Air supply hose17 Condensate discharge hose
G ¾" IGG ¾" IGG ¾" AG
G ¾" AGG ¾" IGDN 80/120DN 50DN 40
A1 B0 20i / mm A1 BO 27i / mm A1 BO 35i / mm
Dimension on the floor
on US 150 on underframe on the floor on US 150 on under-frame
on the floor on US 150 on under-frame
a U400
b 720
c Y137 Y785 Y499 Y137 Y785 Y499 Y137 Y785 Y499
d 230F15 880F15 590F15 230F15 880F15 590F15 230F15 880F15 590F15
e 400F15 1040F15 790F15 460F15 1100F15 850F15 460F15 1100F15 850F15
f U1340 U1890 U1650 U1470 U2020 U1770 U1590 U2140 U1890
g 1100 1730 1480 1220 1850 1600 1340 1970 1720
h 625
i 300

3 Erection and installation
12 FA ROTEX A1 BO Inline - 03/2007
3.2 Installation versions
The oil condensing boilers A1 BO 20i, A1 BO 27i and A1 BO 35i have been generally designed for ambient air -independent operation. They are fitted with a concentric flue gas /air supply connection DN 80/125.
ROTEX recommends using the oil condensing boiler in ambient air-independent mode. If possible, choose this installation version!
In partial ambient air-independent and ambient air-dependent mode, the installation room must have a ventilation opening of at least 150 cm2 into the open air. As such, the installation room will not be assigned the heated building envelope under the Energy Conservation Ordinance (EnEV), which downgrades the energy rating of the building.
Figure 3-4 Installation versions for the oil condensing boilers A1 BO 20i, A1 BO 27i and A1 BO 35i
1-8 Installation versions (For details, refer to chapter 3.2.1, chapter 3.2.2, chapter 3.2.3)
1) Installation version for ambient air-independent mode2) Installation version for partial ambient air-independent mode3) Installation version for ambient air-dependent mode
Air supplyFlue gas
a) Longitudinally ventilated shaft with a fire-resistance period of 90 minutes (30 minutes in low height residential buildings). Observe country-specific regulations for fire-resistance periods!
b) Humidity-sensitive flue gas conduit as specified in DIN 18160-1 (Temperature category T120 or higher, condensate-resistancecategory W, corrosion resistance category 2)
c) Ventilation opening 1 x 150 cm2 or 2 x 75 cm2d) Rear ventilation

3 Erection and installation
13FA ROTEX A1 BO Inline - 03/2007
3.2.1 Ambient air-independent mode
Installation version 1The oil condensing boiler is connected to the LAS connection line kit C or kit D at the chimney or an installation shaft.– The combustible air supply from the outside runs through the chimney or through an installation shaft.– The flue gas discharge to the outside runs through the same shaft as the air supply.– Minimum distance between flue gas exit and crest: 40 cm.
Installation version 4The oil condensing boiler is connected to the external wall system kit G by means of the LAS connecting line kit C or kit D.– The combustible air supply from the outside runs through the ring-shaped gap in the dual pipe, through the outer wall (suction
from below).– The flue gas discharge to the outside runs through a concentric pipe, through the outer wall and then up to at least 40 cm
over the roof surface. In the external area, the outer air gap serves as heat insulation for the flue gas pipe.
Installation version 5The oil condensing boiler is located directly under the roof. Connection with kit F.– The combustible air supply from the outside runs through the outer ring-shaped gap of the dual pipe, and the flue gas
discharge to the outside runs through the inner tube.– Minimum distance between flue gas exit and roof surface: 40 cm.– Minimum height of the flue gas duct: 2 m.
Installation version 6The oil condensing boiler is not located directly under the roof. The dual pipe for the combustible air supply and flue gas duct runs through the roof truss.– The combustible air supply and the flue gas discharge run through a concentric dual pipe (as in Installation version 5).– In the area of the roof truss, the dual pipe for the combustible air supply and the flue gas duct must be laid through a
protective pipe with sufficient fire resistance or be structurally separated from the roof truss.
3.2.2 Partial ambient air-independent mode
If the flue gas duct is too high (see Tab. 3-3, Page 17), it may be advisable to suck the supply air through a separate air supply line with a lower resistance.
• Pull off the air supply hose at the air supply connecting manifold of the boiler body and connect the separate air supply line.
Installation version 3– The combustible air supply from the outside runs through a separate air supply line through the external wall.– The flue gas discharge to the outside runs through the chimney or through an installation shaft (as in installation version 1).
Installation version 8The oil condensing boiler is connected to a ceramic chimney by means of kit A or kit B.– The combustible air supply from the outside runs through a separate air supply line through the external wall.– The ceramic chimney for the flue gas discharge should be humidity-resistant, as specified in DIN 18160, and it must have
the corresponding approval (suitability for overpressure operation).– If the ceramic chimney does not have an approval for the flue gas duct for overpressure operation, it must be possible to
prove, through a flue gas calculation, that there is a vacuum in the shaft when the flue gas enters.
If the wall feedthrough has a height of less than one meter above the plot, ROTEX recommends sending the combustible air through a separate air supply pipe (mounting height: about 2 m). PPW-ZR, 15 50 79.00 66

3 Erection and installation
14 FA ROTEX A1 BO Inline - 03/2007
3.2.3 Ambient air-dependent mode
The oil condensing boilers A1 BO 20i, A1 BO 27i and A1 BO 35i can also be connected for ambient air-dependent operation. The device sucks the combustible air from the installation room through the ring-shaped gap of the jacket pipe.
Installation version 2– Combustion air supply from the installation room.– The flue gas discharge to the outside runs through the chimney or through an installation shaft (as in installation version 1).
Installation version 7The oil condensing boiler is connected to a ceramic chimney by means of kit A or kit C.– Combustion air supply from the installation room.– The ceramic chimney for the flue gas discharge should be humidity-resistant, as specified in DIN 18160, and it must have
the corresponding approval (suitability for overpressure operation).– If the ceramic chimney does not have an approval for the flue gas duct for overpressure operation, it must be possible to
prove, through a flue gas calculation, that there is a vacuum in the shaft when the flue gas enters.
3.3 Transport and delivery
The oil condensing boiler is delivered on a pallet. All industrial trucks, such as lifting trucks and forklift trucks, are suitable for its transport.
Scope of delivery– Oil condensing boiler (pre-assembled),– Accessories package (switch valve, T-piece, ball cocks, external temperature sensor(s), spare microfilters inserts, seals,
double box nuts),– The document folder with installation and maintenance instructions, operating manual, installation and instruction forms.
State at deliveryThe following outputs are factory-set:
Tab. 3-2 Factory-setting and output range
The ambient-dependent mode produces air suction noises, which raise the operating noise of the boiler. You can use an air supply noise damper to reduce the noise. 15 45 77
CAUTION!
Lifting or displacing the oil condensing boiler by the panels can damage the unit.
• Lift the gas condensing boiler only by the carrying straps provided for this purpose.
The oil condensing boiler cannot function without central control unit. The control in the desired version must be ordered separately (operation allowed only with ROTEX controls).
Type Pre-set output Output range
A1 BO 20i 18 kW 12-20 kW
A1 BO 27i 25 kW 20-27 kW
A1 BO 35i 30 kW 25-35 kW

3 Erection and installation
15FA ROTEX A1 BO Inline - 03/2007
3.4 Installing oil condensing boiler
3.4.1 Selecting the installation site
The installation site for the oil condensing boiler must satisfy the following minimum requirements:
Installation heightThe bottom edge of the condensate drain connection on the unit must be higher than the drain height of the condensate drain hose, otherwise condensation can accumulate in the drain.• If installing with an extension storage tank, keep a boiler pedestal height of at least 80 mm.
Installation surface– The base is solid, even and horizontal, and has sufficient load bearing strength. Install a pedestal if necessary.– Observe the installation dimensions (see chapter 3.1).
Installation room general– There are no special conditions for ventilation of the installation room for ambient air-independent operations (using a
concentric air/flue gas system).– In partial ambient air-independent and ambient air-dependent mode, the installation room must have a ventilation opening of
at least 150 cm2 into the open air.– For partial ambient air-independent and for ambient air-dependent mode, the installation room must be free from aggressive
vapours (e.g. hair spray, perchloroethylene, carbon tetrachloride), heavy dust formation and high atmospheric humidity (e.g. washhouse).
Installation in the atticIf the A1 condensing boiler is installed in the attic and the oil is stored in the rooms below it, the oil pump of the burner is generally not adequate. Since the depression on the suction side exceeds the value 0.4 bar, the oil must be supplied to the burner through a separate pump. ROTEX earnestly recommends using a suction aggregate.
The minimum height of the flue gas conduit must be 2 m m in order to avoid malfunction at start or during operation of the burner.
Installation in garagesThe oil condensing boilers A1 BO 20i, A1 BO 27i and A1 BO 35i are generally suitable for installation and operation within garages. Requirements:– Ambient air-independent operation,– A durable operating manual placed in a very visible place near the boiler,– The construction must include a protective device against mechanical damage (vehicle!) for the entire system (e.g. bracket
or deflector).
Hot air storage in the installation room
The construction specifications allow, as a rule, hot oil storage of up to 5000 litres (according to the firing ordinance of the country), if the building is First Class construction and the installation room is not a living room.
CAUTION!
If using a pressure aggregate, oil could escape if there is a failure. Escaping oil can cause serious damage to the environment.
• Install boiler in a leakproof tray and secure through a float switch (connection through additional plug strip ZSÖ, 15 40 67).
• Use only a metallic filter cup (never Plexiglas).

3 Erection and installation
16 FA ROTEX A1 BO Inline - 03/2007
Surface temperature– In ambient air-independent mode with rated power, the design does not allow temperatures > 70°C on any component
outside the unit panels. Therefore, no minimum distance is required to components made with flammable materials.– A minimum distance of 50 mm between the flue gas duct and flammable components should be maintained in a partial
ambient air-independent and ambient air-dependent mode.– Do not store or use highly combustible and flammable materials in the immediate vicinity of the oil condensing boiler.
3.4.2 Erecting the unit
Prerequisite:– The installation site follows country-specific regulations, as well as the minimum requirements described in chapter 3.4.1.– Install a leakproof tray in the construction if using a pressure device..
Erection:• Remove packing and dispose of it in an environment-friendly manner.• Install the oil condensing boiler at the installation site. Do not lift or displace the unit by the panels.• Position the oil condensing boiler such that it can be folded out without any restrictions.• Check the horizontal position and the correct installation height of the oil condensing boiler. You can adjust the height by
using the four legs.
3.5 Air/flue gas system (LAS)
3.5.1 General instructions for flue gas system
The firing regulations for the country in question and the DIN 18160 standard are valid for the model and design of the flue gas system.
Minimum requirements:Any flue gas duct with a technical approval (DIBT - German Institution for Approvals in Construction) can be generally be used for the flue gas system, as long as it satisfies the following minimum requirements in compliance with DIN 18160-1:– Suitable for flue gas temperatures of at least 120 °C (temperature class T120 or higher).– Suitable for at least 200 Pa overpressure (pressure class P1 or H1).– Humidity-resistant (condensation resistance class W).– Sufficiently corrosion-resistant (corrosion resistance class 2).The properties of the flue gas system must be identifiable on the installed system (nameplate in the installation room).
A flue gas temperature sensor integrated in the control of the oil condensing boiler causes a safety shutdown if the flue gas temperature is too high. No additional insulation is needed in Germany.
We recommend using the corresponding ROTEX flue gas kits. They satisfy all requirements and are also fitted with special acid-proof seals.

3 Erection and installation
17FA ROTEX A1 BO Inline - 03/2007
Assembled position and piping height:– The maximum allowable counter flue gas counter-pressure is 200 Pa. The pressure loss in the supply air conduit must not
be higher than 50 Pa.– Angle of entry of the flue gas pipe into the chimney or installation shaft: ca. 3°.– Slope for horizontal parts of the flue gas duct: ca. 3°. Counter-slopes are not allowed at any point in the flue gas duct.– If the flue gas duct needs more than 3 deflections >45° for the flue gas duct, the maximum height for the flue gas duct
reduces by at least 1 m per deflection (flue gas calculations may be needed).– If the horizontal connecting piece is extended, the maximum permitted height of the flue gas duct is reduced by exactly that
length.– The minimum height of the flue gas conduit must be 2 m m in order to avoid malfunction at start or during operation of
the burner.
Tab. 3-3 Maximum allowable height of the flue gas conduit in m (when operating in the rated output range)
1) Shaft cross section for DN 80: 135 mm x 135 mmShaft cross section for DN 110: 160 mm x 160 mm
Any restriction on the output range may require a recalculation of the maximum permitted height for the flue gas duct. The characteristics for the flue gas calculation can be obtained from Fig 3-5 and the Chapter 11 "Technical data".
The flue gas mass flow of the systems depends on the set burner output.
Installation version (ref. Fig 3-4)
A1 BO 20i DN 80
A1 BO 27i DN 80
A1 BO 35i 30 kW/DN 80
A1 BO 35i 33 kW/DN 80
A1 BO 35i 35 kW/DN 80
A1 BO 35i 35 kW/DN 110
11) 16 16 20 16 8 24
21) 21 21 21 21 21 30
31) 17 17 21 21 17 30
4 16 16 20 20 20 28
5 17 17 11 11 11 23
6 17 17 11 11 11 23
Figure 3-5 Flue gas volume flow in relation to the burner output

3 Erection and installation
18 FA ROTEX A1 BO Inline - 03/2007
3.5.2 Connect the flue gas duct to the oil condensing boiler
Prerequisites:– The flue gas system fulfils the requirements described in chapter 3.5.1.– The flue gas system fulfils any required other national or regional safety requirements.– The oil condensing boiler is correctly connected.
Connection:
• Connect the oil condensing boiler to the flue gas system in the installation room (for connection dimensions refer to Fig 3-6 and Tab. 3-4).
• Place the nameplate of the flue gas duct in the installation room.
Tab. 3-4 Connection dimensions for the LAS connection of the oil condensing boiler
The specialised company carrying out the work must come to an agreement with the district chimney sweep before beginning the work. Even in regions where it is not legally specified, we recommend documenting the participation of the district chimney sweep on a form.
Any flue gas duct with technical approval (DIBT approval) can be generally used, as long as it satisfies the minimum requirements in compliance with DIN 18160-1, (ref. to chapter 3.5.1):
We recommend using the associated ROTEX flue gas kits (see Fig 3-7). They satisfy all requirements and are also fitted with special acid-proof seals.
Figure 3-6 Connection dimensions of LAS connection for oil condensing boilers A1 BO 20i, A1 BO 27i and A1 BO 35i
A Boiler connectionB Flue gas connection
C Flue gas temperature sensorD Connection for condensate drainE Flue gas -silencer (not in A1 BO 35i)
Connection side Connection Connection dimension in mm
A Boiler side A1 Flue gas DN 80 Collar Inner diameter = 80.4 +0.8
A2 Supply air DN 125 Collar Inner diameter = 127.0 -0.5
B Flue gas side B1 Flue gas DN 80 Outer diameter = 80.0 +0.3
B2 Supply air DN 125 Outer diameter = 126.0 F0.3
In some cases, the resonance in the flue gas system can amplify the noise at the mouth of the flue gas duct. The noise level can be effectively reduced by using a silencer ( 15 45 78).
Air suction noises are generated in ambient air-dependent operations. The noise level can be effectively reduced by using a silencer ( 15 45 77).

3 Erection and installation
19FA ROTEX A1 BO Inline - 03/2007
3.5.3 Flue gas system kits
Figure 3-7 Plastic (PP) flue gas system kits
* If needed

3 Erection and installation
20 FA ROTEX A1 BO Inline - 03/2007
3.6 Water connection
The oil condensing boiler has a joint inflow and return flow for the heating circuit and storage tank charging. The connections are on the back of the units (see Fig 3-2 and Fig 3-3).
Instructions for water connection
– Water shortage protection: The overheating protection in the A1 BO 20i, A1 BO 27i and A1 BO 35i switches off the oil condensing boiler in the event of water shortage and locks it. No additional water shortage protection is needed in the construction.
– Avoiding deposits: Observe the regulations in VDI 2035 in order to avoid corrosive products and deposits. If the filling and make-up water has a very high hardness level, measures for hardness stabilisation and softening would be needed.
3.7 Connecting the condensate preparation
The condensation in oil condensing technology has a pH value between 1.8 and 3.7. According to the Wastewater Purification Guidelines (ATV A251) the condensation need not, as a rule, be neutralised before it enters the public sewerage system.
ConnectionThe condensate preparation is factory-assembled in the boiler cradle and connected to the flue gas connecting piece of the boiler. The connection to the wastewater network is designed for HT pipe DN 40.• Lay the condensate drain sloping down from the boiler, so that condensation will not accumulate in the flue gas pipe.• In order to avoid accumulation in the flue gas connection of the boiler, make sure that no siphon is formed from the
condensate drain hose to the connection to the wastewater line.• Fill the condensate line with water in order to prevent flue gas from escaping into the installation room. To do this, either:
– Open the boiler body and lift up the combustion chamber insert (see section 8.2.6); top up condensate conduit through a hose (see Fig 3-9),
or– Unscrew the inspection lid of the flue gas duct and fill the condensate conduit by using a hose held in the flue gas pipe.
• Check the condensate drain section for leakage.
CAUTION!
If the oil condensing boiler is connected to a heating system with steel pipelines, radiators or non-diffusion-proof floor heating pipes, slurry and chips could enter the boiler and cause blockages, overheating or corrosion.
• Rinse the heat distribution network (in the existing heating system).• Install a dirt filter in the heating return flow.
Depending on the stipulations of the community waster water regulations, the neutralisation can be dispensed with, if the condensing boiler is operated exclusively with heating oil EL low-sulphur.
Figure 3-8 Connection of the condensate preparation Figure 3-9 Fill condensate line with water

3 Erection and installation
21FA ROTEX A1 BO Inline - 03/2007
3.8 Connect the 3-way switch valve
The oil condensing boiler is fitted with an integrated circulation pump and a 3-way switch valve (3-w SV) as standard. The circulation pump is already factory-connected; the 3-way switch valve is supplied as an accessory.
• Mount the 3-way switch valve on the inflow connection. Ensure the correct position: Connect connection B to the heating and connection A to the storage tank (see Fig 3-10).
• Insert the connection plug to the cable of the 3-way switch valve to the valve drive.
3.9 Connect control and electricals
Apart from the central unit, all control and safety devices of the oil condensing boiler are connected ready for operation and inspected. Modifications on the electrical installation are dangerous and prohibited. The owner will be solely responsible for any resulting damage.
There are two 3 m flexible cables connected inside the device for the mains connection and for the external temperature sensor; they are located in the control panel on the circuit board. Only the optional applications (e.g. mixer circuit, circulation pump) still have to be connected to the boiler control panel.
1 Boiler inflow2 Heating inflow3 Storage tank charging inflow4 3-way switch valve
5.1 Valve drive5.2 Unlocking key of the drive lock5.3 Hand lever
Figure 3-10 3-way switch valve
The circulation pump and the 3-way switch valve have one cable each with a connection plugs. These cables are assembled and ready.
If the storage charging circuit is to be operated through a charging pump (parallel operation, cascade circuit etc.), a storage tank charge pump will have to be installed in the heating system instead of the 3-way switch valve. An adapter cable is needed for controlling the storage tank charge pump ( E 1500430).
WARNING!
Live parts can cause an electric shock on contact and cause life-threatening burns and injuries.
• Before beginning work on live parts, disconnect them from the power supply (switch off fuse, main switch) and secure against unintentional restart.
• The electrical connection should only be performed by electrical engineers in compliance with valid standards and guidelines as well as the specifications of the energy supply company.

3 Erection and installation
22 FA ROTEX A1 BO Inline - 03/2007
Assembling the central unitThe oil condensing boiler can be operated either with the ROTEX Control ALPHA or with the ROTEX Control THETA. The central control unit to be used is supplied separately and must be installed at the time of installation (also refer to Chapter 5.2 "Changing the central unit").• Push the central control carefully into the boiler control panel. Ensure that the connecting pins are not damaged.
• Tighten the fixing screws (right handed threads).
• Close the bayonet lock (90°-rotation).
Establishing the electrical connection• Check the supply voltage (~230 V, 50 Hz).• Connect the indoor installation distributor box with the power switched off.• Connect the cables for the mains on the indoor installation distributor box. Ensure that the polarity is correct.• Restore power supply for the indoor installation distributor box.
Switching circuit board:
3.10 Temperature sensor
3.10.1 General instructions for the temperature sensors
The oil condensing boiler has a weather-driven control for the inflow temperature. This function requires an external temperature sensor. A 3 m flexible cable is already connected inside the device and placed in the control panel on the circuit board.
The temperatures captured by the unit's internal temperature sensors (inflow and return flow temperature sensor, flue gas temperature sensor) are used for the output control of the burner and for fault detection. They are already factory-connected and can be plugged directly to the respective sensor, if they are to be swapped.
If a hot water storage tank is used, the connected storage tank temperature sensor must be mounted at the suitable position in the hot water storage tank (observe assembly instructions for the hot water storage tank). The mixer circuit inflow sensor (TMKF, 15 60 62) is required for the control of the mixer circuit .
�
�
Figure 3-11 Connection diagram of the circuit board jumpers and cable colours of the factory-installed connection cable
Connections of the circuit jumpers:J1Pump PkJ23-way switch valve or storage charge pump PL
*
J3Burner power supplyJ4Burner communicationJ6Mains connectionJ7MixerJ8Communication, sensorsJ10SensorsJ14Circulation pump PZ
Cable colours:bl Bluebr Brownye Yellowgn Greengr Greyrd Redbk Blackwt Whiten.a. Contact not assigned
* If an adapter cable is used for the charge pump ( E 1500430)
The electronic control detects the existing sensor configuration automatically when switching on the oil condensing boiler.
You will find detailed instructions and an exact description in the documentation "ROTEX Control". It is included in the electronic control to be ordered separately within the scope of supply.

3 Erection and installation
23FA ROTEX A1 BO Inline - 03/2007
3.10.2 Connecting the temperature sensor
External temperature sensor• Choose a location at about one third of the building height (minimum distance from floor: 2 m) on the coldest side (north or
north-east) of the building (not near other heat sources (chimneys, air shafts) and not subjected to direct sunlight).• Place external temperature sensors in such a way that the cable exit points face downwards (prevents humidity ingress).
• Lay the sensor line and connect it to the control of the oil condensing boiler.• Connect the external temperature sensors with a dual core cable (minimum cross section 1 mm2).
Mixer circuit inflow sensor• Connect the sensor line to the sensor plug J8 (see Fig 3-11).
Storage tank temperature sensor• Disconnect the storage tank temperature sensor for operation without a hot water storage tank.
3.11 Connect and fill up oil conduit
Execute the oil connection in the single strand system with a venting oil filter on suction-side as specified in DIN 4755.
• Lay oil hoses. Whilst doing so, ensure the following:– that the combustion chamber can be opened without dismantling the oil hoses,– that oil hoses do not buckle.
• Place the denting oil filter such that the oil hoses are connected without tension and the top hald of the boiler can be opened without hindrances.
• Insert the supplied spare Universal Micro-filter insert MC-7 in the venting oil filter (generally use only filters with maximum 25 µm).
• Connect oil line Whilst doing so, ensure the following:– The inner diameter of the oil conduit must not be greater than 8 mm. Use the ROTEX VA-Oil oil delivery line or copper
tubes with diameter between 6 and 8 mm as the oil conduit.– The total resistance of the suction line (total of height difference, line resistance and individual resistances) must not
exceed 4 m WS (0.4 bar).• Fill up oil conduit. Suction the oil by using a hand pump.• Check the oil conduit for leakage with a pressure of at least 5 bar (DIN 4755).
CAUTION!
Using unapproved temperature sensors or those which do not match the device can cause considerable malfunctioning in the regular operation of the oil condensing boiler, damaging the device control.
• Only use external temperature sensors and storage tank temperature sensors supplied within the scope of delivery.
CAUTION!
The parallel routing of sensor and mains lines within an installation pipe can cause considerable malfunctioning in the regular operation of oil condensing boiler.
• Always lay the sensor line separately.
ROTEX recommends using EL low sulphur heating oil, in order to achieve the highest efficiency and to keep the maintenance expenditure low.

3 Erection and installation
24 FA ROTEX A1 BO Inline - 03/2007
3.12 Optional connections
3.12.1 Mixer circuit
A mixer circuit can be connected directly to the oil condensing boiler, which is controlled through the electronic boiler control. ROTEX offers the following:
– The ready-to-connect mixer group AMK1 ( 15 60 44), which contains a circulation pump integrated in the heat insulated housing, a motor mixer and check valves with temperature displays.
– The mixer circuit contact sensor TMKF ( 15 60 62).
Cascading
By cascading from the heat circuit expansion modules THETA HEM1 ( 15 60 61), the system can be expanded by up to 5 mixer circuits and/or storage tank charging circuits. The required temperature sensors need to be ordered separately (mixer circuit contact sensor TMKF ( 15 60 62), storage tank temperature sensor TSF ( 15 60 63)).– Connection and communication of the heating circuit expansion module THETA HEM1 through a databus on the central unit.
3.12.2 Room controller
A separate room control THETA RFF ( 15 40 70) can be connected for each heating circuit for a remote setting of modes and room temperature from another room.
– Connection and communication of the room controller THETA REF1 through a databus on the central unit.
A separate room control ALPHA RTR ( 17 51 26) can be connected for each heating circuit for a remote setting of modes and room temperature from another room.
– Connecting the room control ALPHA RTR-E to the terminal AB of the circuit board connector J8 on the central unit (see Fig 3-11).
3.12.3 Room station
All temperature values and modes of the control unit THETA 23R (central unit) can be displayed and changed through the room station THETA RS ( 15 70 18). Apart from the chimney sweep and manual operation function, all operating elements (display, keys, rotary switch) and functions (e.g. timer programs) are identical to those of the central unit.
The room station THETA RS can be installed in a suitable place in the building and can be used for the remote operation of the boiler control.– Connection and communication of the room station THETA RS through a databus on the central unit.
3.13 Filling the heating system
Only fill the heating system if all installation work has been completed.
Adjusting the pressure gaugeThe correct minimum pressure marking must be set on the pressure gauge glass before the first filling of the system:• Rotate the pressure gauge glass (Fig 2-1, item 12) in such a way that the minimum pressure marking corresponds to the
system height + 2 m (1 m water column corresponds to 0.1 bar).
Filling the system:• Connect the filling hose with return flow inhibitor (½") to the filling and draining fittings (KFE cock, Fig 3-3, item 3) and
secure against sliding by using a hose clamp.• Open the KFE cock and observe the pressure gauge (Fig 2-1, item 12).• Fill the system with water until the marking of the system overpressure is roughly in the centre of the green range of the
pressure gauge display.• Shut off the KFE cock.• Vent the entire heating network (open the system control valves).• Check the water pressure on the pressure gauge again and top up with water if necessary.• Close the KFE cock, remove the hose with return flow inhibitor from the filling and draining fittings.
�
�
�
�

4 x Initial start-up
25FA ROTEX A1 BO Inline - 03/2007
4 Start-up
Incorrect start-up voids the manufacturer's guarantee for the device. If you have questions, please contact our Technical Customer Service.
4.1 Initial start-up
After the oil condensing boiler has been erected and fully connected, it can be put into service by skilled staff.
Prerequisites– The oil condensing boiler is correctly connected. The erection site has additional insurance (tight tray, filter cup of metal), in
case a pressure device is used as separate oil pump (see section 3.4.1).– The oil condensing boiler is fully connected.– The heating system is filled and charged with the correct pressure.– The oil valves are open and the oil line is topped up.
Tests prior to start-up• Check all connections for leakage.• Check all points on the checklist supplied (see chapter 4.3). Log the test result on the checklist.
The oil condensing boiler can only be provisionally put into service if all points on the checklist can be answered with Yes.
Bleed oil line, check oil pressureThe oil line must be completely vented at the beginning of the start-up and the oil pressure must be checked.
• Connect vacuum meter to the oil pump (Vacuum meter connection, Fig 4-2, item.1)• Switch on the mains switch. Wait for the start phase.• Open the venting screw on the oil filter.• Vent oil line and measure the oil pressure on cacuum meter.
The depression may be maximum 0.4 bar (better: 0.2 bar).
WARNING!
An improperly commissioned oil condensing boiler is a risk to the health and safety of individuals and can adversely affect its functioning.
Initial start-up of the oil condensing boiler may be executed only by authorised and trained heating experts.
Fig.4-1 Oil connection with venting oil filter Fig.4-2 Oil pump
1 Filter3 Filter cup
1 Vacuum meter connection2 Manometer connection

4 x Initial start-up
26 FA ROTEX A1 BO Inline - 03/2007
Start-up• Switch on the mains switch. Wait for the start phase.
• Put the rotary switch II in position . press and simultaneously.
4.2 Testing safety temperature limit (STB) function
• Lock the ball cock on the heater inflow connection.• Remove the drive on the 3-way switch valve. Do so by pressing the unlocking key on the valve drive (see Fig 3-10) and
rotating the motor to the left by a quarter turn.
• Set the operating temperature for manual operation. To do so, operate the manual key for about 5 sec and set the operating temperature on the rotary switch.
Fig.4-3 Manual operation for THETA 23R control
Before the final start-up, it is necessary to test that the safety temperature limit (STB) is working correctly (see chapter 4.2) and to set the oil burner accurately by using a flue gas analyser (see chapter 6.3).
�
�
WARNING!
Risk of burns due to hot boiler body.
• Do not touch any metallic parts on the boiler or boiler body.• Wear protective gloves.
• Press the hand key briefly.• Press the rotary switch.
The display shows "STB Test".
• Keep the rotary switch pressed until the STB function is triggered.
• Let the boiler cool down. To do so, reinsert the drive on the 3-way switch valve and open the ball cock on the heater inflow.
• Press the hand key briefly when the display shows "RESET".
The STB function is unlocked again. Fig.4-4 STB function check

4 x Initial start-up
27FA ROTEX A1 BO Inline - 03/2007
4.3 Checklists for start-up
Checklist before start-up
1. Is the boiler properly assembled according to a permitted assembly variant and without visible damage? Yes
2. When using a pressure assembly: Is the erection site has additional insurance (tight tray, filter cup of metal)? Yes
3. Is the combustion air supply secured? Yes
4. Is sufficient venting secured for the heating room in ambient air - dependent operation? Yes
5. Does the mains connection comply with regulations? Yes
6. Is the mains voltage 230 Volt, 50 Hz? Yes
7. LAS flue gas conduit connected correctly and leakproof? Yes
8. Is the condensate preparation correctly connected, filled with water and leakproof? Yes
9. For sanitation: Has the heat distribution network been rinsed? Is a dirt filter built into the heating return flow? Yes
10. Is a membrane expansion tank mounted according to regulations and in the required size? Yes
11. Is the safety valve connected to a free discharge? Yes
12. Is the system water pressure in the green range? Yes
13. Are boilers and heating systems vented? Yes
14. In case of systems with a hot water storage tank: Is the storage container filled? Yes
15. Are all sensors connected and correctly positioned? Yes
16. Is the 3-way switch valve correctly mounted and inserted on the inflow connection? Yes
17. Is the mixer group and the mixer circuit sensor (optional) correctly connected to the circuit board? Yes
18. Is the room control or room station (optional) correctly connected to the circuit board? Yes
19. Is the oil connection installed according to regulations, professionally and correctly? Yes
20. Is the oil tank topped up sufficiently and are the oil valves opened? Yes
The system may only be put into service if all questions can be answered with "Yes".
Checklist after the start-up
A Does the circulation pump run? Does the heater heat up? Yes
B Is the oil conduit vented? Yes
C Is the oil pressure within the permissible range? Yes
D Have the burner settings been checked by using a flue gas analyser and readjusted if necessary? Yes
The system may only be handed over to the owner if all questions can be answered with "Yes".
• Fill in the supplied installation and instruction form along with the owner.
5 x Control
28 FA ROTEX A1 BG Inline - 03/2007
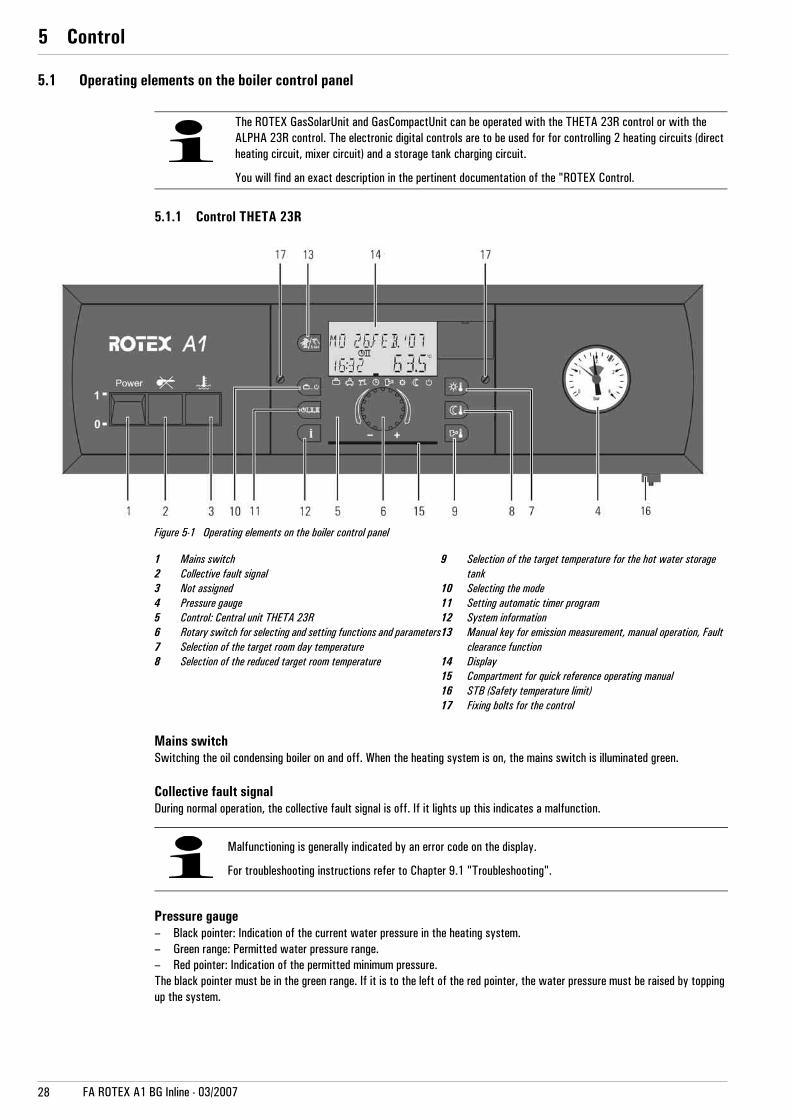
5 Control5.1 Operating elements on the boiler control panel
5.1.1 Control THETA 23R
Mains switchSwitching the oil condensing boiler on and off. When the heating system is on, the mains switch is illuminated green.
Collective fault signalDuring normal operation, the collective fault signal is off. If it lights up this indicates a malfunction.
Pressure gauge– Black pointer: Indication of the current water pressure in the heating system.– Green range: Permitted water pressure range.– Red pointer: Indication of the permitted minimum pressure.The black pointer must be in the green range. If it is to the left of the red pointer, the water pressure must be raised by topping up the system.
The ROTEX GasSolarUnit and GasCompactUnit can be operated with the THETA 23R control or with the ALPHA 23R control. The electronic digital controls are to be used for for controlling 2 heating circuits (direct heating circuit, mixer circuit) and a storage tank charging circuit.
You will find an exact description in the pertinent documentation of the "ROTEX Control.
Figure 5-1 Operating elements on the boiler control panel
1 Mains switch2 Collective fault signal3 Not assigned4 Pressure gauge5 Control: Central unit THETA 23R6 Rotary switch for selecting and setting functions and parameters7 Selection of the target room day temperature8 Selection of the reduced target room temperature
9 Selection of the target temperature for the hot water storage tank
10 Selecting the mode11 Setting automatic timer program12 System information13 Manual key for emission measurement, manual operation, Fault
clearance function14 Display15 Compartment for quick reference operating manual16 STB (Safety temperature limit)17 Fixing bolts for the control
Malfunctioning is generally indicated by an error code on the display.
For troubleshooting instructions refer to Chapter 9.1 "Troubleshooting".

5 x Control
29FA ROTEX A1 BO Inline - 03/2007
Rotary switchThe rotary switch can be used for selecting operating settings, changing and storing target values.
Day-target room temperatureSelection and setting of the target temperature in normal operation. Setting according to individual temperature sensitivity.
Reduced target room temperatureSelection and setting of the target temperature in economy operation (night reduction). Setting according to individual temperature sensitivity.
Target temperature of the hot water storage tankSelection and setting of the target hot water storage tank temperature Setting according to specific hot water requirement.
Selecting the modeSetting the mode by tapping the mode selection key. The mode currently active flashes on the display. Selection and activation of another mode with the rotary switch. A marking on the display through the respective symbol shows the mode currently selected.
* This function is not available if a room controller THETA RFF is connected or if the operating mode of the control has been set on different settings for the individual heating circuits.
Settingautomatic timer programSelection of one of 3 pre-installed timer programs P1, P2 or P3. You can find a more exact description in the documentation "ROTEX Control". It is included in the electronic control to be ordered separately within the scope of supply.
System informationQuerying all system temperatures and operating statuses of the system components.• Tap the system information key.• Query the desired information successively by using the rotary switch.
• Rotate to the right (+): Increased regulation• Rotate to the left (-): Reduced regulation
• Tapping: Saving the selected value
• Press and hold (3 sec): Enter the programming level (select level)
It is possible to trigger an unplanned storage tank charge by keeping the key pressed for a long time (during an economy phase).
HOLIDAY Frost -protected shutdown of heating and hot water (e.g. during holidays).
ABSENT Brief break in the heating mode during absence.
PARTY Extended heating mode over and above the heating period preset in the AUTOMATIC MODE.
AUTOMATIC Automatic heating and economy mode according to timer program.
SUMMER Hot water mode according to timer program, heating switched off with frost-protection. *
HEATING Continuous heating mode without time restriction.
REDUCED Continuous reduced heating mode without time restriction.
STAND-BY Frost-protected shutdown of heating and hot water.

5 x Control
30 FA ROTEX A1 BG Inline - 03/2007
Emission measurement, manual operation, fault clearance functionYou can request 3 functions by using the manual button.– Functions for emission measurement for the chimney sweep: Tap the manual button. First tap: the burner runs with the
maximum output, second tap: the burner runs with minimum output.– Manual operation: press the manual button for 5 sec. The oil condensing boiler is controlled according to the set target value
(heat generator temperature). The storage tank charges until the maximum adjustable storage tank temperature is reached. It then switches over to heating.
– Fault clearance: If the display shows "RESET", tap the manual button. If a problem recurs, the root cause must be eliminated.
DisplayAll system temperatures and operating statuses of the system components can be indicated on the display. In the event of a fault, the corresponding fault signal is issued.
Standard display in normal operation: Current day of the week, current date, current time, heat generator temperature and active operating mode (marking bar).
5.1.2 Control THETA 23R
Only the operating and display elements of the central unit of the ROTEX Control ALPHA 23R are described below. For the operating elements of the complete boiler switchboard, refer to section 5.1.1.
Figure 5-2 Operating elements on the boiler switchboard with integrated control ALPHA 23R
1 Mains switch2 Collective fault signal3 Not assigned4 Pressure gauge5 Central unit ALPHA 23R6 Rotary switch (I) for selecting functions and parameters10 Rotary switch (II) for selecting the mode
14 Display15 Compartment for quick reference operating manual16 STB (Safety temperature limit)17 Fixing lock for the control27 "+" key28 "–"key29 Fault clearance key

5 x Control
31FA ROTEX A1 BO Inline - 03/2007
Rotary switch I
You can use the rotary switch (I) to carry out settings on the ALPHA 23R Control.
Rotary switch IIYou can use the rotary switch (II) to select the modes of the ALPHA 23R Control.
Modification of values, Navigation– Modification of values.– The keys are to be used for navigation within the menu items "Parameter", "Information" and "Switching time program (I)".– Press briefly the and keys simultaneously to confirm and/or save the selected setting.
RESET– Resetting the fault message in the event of a burner malfunction.– Aborting the "Emission" mode.– Rejecting the inputs within the selection menu.– Return to the higher selection item within the selecgtion menu.– Acknowledgement of fault messages by the user and return to standard display.
Special functionsSimultaneously pressing the and keys for longer than 2 seconds activates the Emission measurement .
Simultaneous pressing of the and keys activates the Switching time programming for the switching time program (I) (for detailed information, see ROTEX Control ALPHA).
DisplayAll system temperatures and operating statuses of the system components can be indicated on the display. A fault code is displayed in the event of a malfunction.
Standard display in normal operation: Inflow temperature.
NORMAL MODE Normal heating operation, no settings possible.
TARGET HOT WATER TEMPERATURE
Display and modify Target hot water temperature.
TARGET ROOM TEMPERATURE
Display and modify Target room temperature.
SYSTEM STATUS Read off information about System status.
DAY OF THE WEEK Display and modify Day of the week.
CLOCK TIME Display and modify Clock time.
PARAMETER Select and modify parameters.
STAND-BY Frost-protected shutdown of heating and hot water.
REDUCED Continuous reduced heating mode without time restriction.
HEATING Continuous heating mode without time restriction.
SUMMERHot water mode according to Switching timer program, anti-freeze function switched off.
AUTOMATIC IAutomatic heating and reduction mode according to the switchinhg time program "Professional" (individually adjustable).
AUTOMATIC II Automatic heating and economy mode according to switching time program "Family".
AUTOMATIC III Automatic heating and economy mode according to switching time program "Solar".

5 x Control
32 FA ROTEX A1 BG Inline - 03/2007
5.2 Changing the central unit
Disassembling the central unit• Release fixing screws (Fig 5-3, item 16) (turn left), pull out central unit forward.
• Release bayonet lock, pull out the central unit forward.
Assembling the central unit• Push the central control carefully into the boiler control panel. Ensure that the connecting pins are not damaged.
• Tighten the fixing screws (right handed threads).
• Close the bayonet lock (90°-rotation).
5.3 Changing the boiler control panel
WARNING!
Live parts can cause an electric shock on contact and cause life-threatening burns and injuries.
• Before beginning work on live parts, disconnect them from the power supply (switch of fuse, main switch) and secure against unintentional restart.
A Front viewB Rear view16 Fixing bolts
C Loosen fixing boltsD Tightening fixing bolts
Figure 5-3 Assembling/ disassembling central unit (shown on THETA 23R Control)
�
�
�
�
WARNING!
Live parts can cause an electric shock on contact and cause life-threatening burns and injuries.
• Before beginning work on live parts, disconnect them from the power supply (switch of fuse, main switch) and secure against unintentional restart.

5 x Control
33FA ROTEX A1 BO Inline - 03/2007
Disassembly (observe sequence)
The position and arrangement of the components described below is shown in Fig 5-18 on Page 38.
1. Remove the silencer hood and the boiler panelling. Remove the two upper insulation mouldings (see section 8.2.1).
2. Shut the stop cocks in the heating inflow and in the heating return flow. Connect the hose to the KFE cock and release water pressure from the boiler.
3. Unscrew the pressure gauge capillary tube with the key SW 14 (Fig 5-4). Use a cloth to absorb the small amount of water escaping when unscrewing.
4. Unscrew the control panel cover (Fig 5-5) and remove the cable duct cover.
5. Pull all connectors from the circuit board (Fig 5-6).
6. Extract the sensor and the connection cables from the cable ducts of the control panel (Fig 5-7).
CAUTION!
There is a danger of scalding from heating water.
The capillary tube of the pressure gauge is directly connected to the pressurised heating water.
• Close the ball cocks on the boiler inflow before removing the pressure gauge and depressurise the system.
Figure 5-4 Remove pressure gauge capillary tube Figure 5-5 Unscrew control panel cover
Figure 5-6 Pull off the coded connector Figure 5-7 Extract the cable

5 x Control
34 FA ROTEX A1 BG Inline - 03/2007
7. Loosen, but do not remove, the fixing bolt of the cable duct holder (Fig 5-8).
8. Remove the fixing bolts of the boiler control panel (SW 8) (Fig 5-9). Remove the control panel.
Assembly (observe sequence)
1. Insert the boiler control panel into the attachment. Insert and tighten the fixing bolts.
2. Tighten the fixing bolt for the cable duct holder.
3. Place all sensor and connecting cables into the cable ducts of the control panel. Ensure the correct cable routing through the strain relief plates.
4. Insert all connectors on the circuit board. The connectors are colour and shape-coded to avoid confusion. Do not force the connector!
5. Mount the control panel cover.
6. Screw in the pressure gauge capillary tube. Ensure the correct seating of the ring seal.
7. Top up with water until the required system pressure is restored.
8. Open the stopcocks for heating. Vent the system again (top up with water if required).
9. Mount the insulation mouldings and put on the silencer hood.
5.4 Change cables
The connection cables can be loosened either on the boiler control panel or on the component in question.– The cables for the internal components in the unit are connected to the circuit board connectors and cannot be released. They
are connected to the corresponding element with connectors and can be released.– The cables for external components (e.g. external temperature sensors), or for components not included in the scope of supply
(e.g. mixer), are connected to the circuit board connectors by bolted terminals.
Changing the cables (observe sequence)
1. Remove silencer hoods.
2. Unscrew control panel cover and remove cable duct cover.
3. Lift out the corresponding sensor or connection cable from the cable duct of the control panel.
4. Pull out the associated connector from the circuit board.
5. Separate the other cable end from the component (release plug connection or remove the cable from the terminal).
6. Replace the cable. Ensure that the cable cross section is correct.
Assemble the new cable in reverse order. Whilst doing so, ensure the following:– The technical specification of the new cable must correspond to the values of the replaced cables (e.g. conductor cross
section).– The circuit board connectors are colour and shape-coded. Do not force the connector!
Figure 5-8 Fixing bolt on the cable duct holder Figure 5-9 Loosen the fixing bolts for the boiler control panel
WARNING!
Live parts can cause an electric shock on contact and cause life-threatening burns and injuries.
• Before beginning work on live parts, disconnect them from the power supply (switch of fuse, main switch) and secure against unintentional restart.

5 x Control
35FA ROTEX A1 BO Inline - 03/2007
5.5 Changing the sensors
Sensors inside the unit can be changed without having to open the boiler control panel.
Changing inflow / return flow temperature sensor
1. Remove the silencer hood and the boiler panelling. Remove the insulating mouldings for changing the inflow temperature sensor (see section 8.2.1).
2. Pull out the connectors on the inflow temperature sensor/ return flow temperature sensor.
3. Unscrew the inflow /return flow temperature sensor using a socket wrench SW 15.
4. Screw in the new inflow /return flow temperature sensor and plug in the cable with connector. The connectors are shape-coded. Do not force the connector!
WARNING!
Live parts can cause an electric shock on contact and cause life-threatening burns and injuries.
• Before beginning work on the oil condensing boiler, disconnect it from the power supply (switch off fuse, main switch) and secure against unintentional restart.
Figure 5-10 Position of the temperature sensor on the boiler (1) Figure 5-11 Position of the temperature sensor on the boiler (2)
33 Inflow temperature sensor 34 Return flow temperature sensor 37 Flue gas temperature sensor
CAUTION!
There is a danger of scalding from heating water.
Inflow and return flow temperature sensors are connected directly to the pressurised heating water.
• Close the ball cocks on the boiler inflow and boiler return flow before removing the sensor, and depressurise the system through the KFE cock.
Figure 5-12 Pull out the connector on the inflow temperature sensor Figure 5-13 Unscrew the inflow temperature sensor

5 x Control
36 FA ROTEX A1 BG Inline - 03/2007
5.6 Change flue gas temperature sensor
The flue gas temperature sensor is mounted in the flue gas duct of the heat generator through a packing gland and connected by the sensor cable through a floating plug connection.
1. Remove the silencer hood and the boiler panelling. Release the plug connection on the sensor cable.
2. Unscrew the sensor sleeve from the flue gas duct by using an SW 24 wrench. The flue gas temperature sensor can only be completely changed with the sleeve.
3. Screw in the new sensor sleeve into the flue gas duct and tighten it carefully using the SW 24 wrench (plastic thread!).
4. Restore the plug connection on the sensor cable.
Changing the storage tank temperature sensorThe storage tank temperature sensor is connected directly to the connection terminals 11 and 12 of the 12-pin sensor connector J8 in the boiler control panel.
1. Open the boiler control panel and pull out the J8 connector from the circuit board (see section 5.4, steps 1 to 4).
2. Pull out the sensor from the sensor immersion sleeve on the storage tank.
3. Bend the pressing springs on the new sensor and push the sensor into the sensor immersion sleeve. The insertion depth is marked on the ROTEX storage tank by a coloured marking, depending on the storage tank type.
4. Clamp the sensor cable on the connector of the connection terminals 11 and 12 of the 12-pin sensor connector J8, plug in the connector on the circuit board and close the boiler control panel.
Figure 5-14 Release the plug connection for the flue gas temperature sensor
Figure 5-15 Unscrew the flue gas temperature sensor
For further information on the storage tank sensor assembly, see: Assembly instructions "Storage tank sensor".

5 x Control
37FA ROTEX A1 BO Inline - 03/2007
5.7 Changing the fuse
The fuse is in the control panel circuit board. Fuse type: 250 V, 6.3 AT.
1. Open the boiler control panel and pull out all connection plugs from the circuit board (see section 5.4, steps 1 to 4).
2. Remove the 4 locking screws on the control panel casing using a screwdriver (Fig 5-16).
3. Remove the top of the casing.
4. Change the fuse (Fig 5-17).
WARNING!
Live parts can cause an electric shock on contact and cause life-threatening burns and injuries.
• Before beginning work on the oil condensing boiler, disconnect it from the power supply (switch off fuse, main switch) and secure against unintentional restart.
CAUTION!
Electrostatic charge can damage the electronic components and connections on the circuit board.
• Do not touch the electronic components and connection with bare hands.
Figure 5-16 Remove the locking screws from the control panel casing Figure 5-17 Changing the fuse
If the fuse immediately blows upon switching on again, there is a short circuit in the electrical system. Have a professional electrician remedy the cause for the short circuit before putting in a new fuse.

5 x Control
38 FA ROTEX A1 BG Inline - 03/2007
5.8 Wiring diagram
Figure 5-18 Wiring diagram for oil condensing boiler A1 xxi (shown with ROTEX THETA 23R Control)
1 Mains switch2 Collective fault signal3 Not assigned4 Pressure gauge5 Control: Central unit THETA 23R16 STB (Safety temperature limit)17 Control panel circuit board18 Stickers for connection diagram19 Circulation pump for heating20 3-way switch valve21 Oil burner22 External temperature sensor23 Storage tank temperature sensor
24 Flue gas temperature sensor25 Return flow temperature sensor26 Inflow temperature sensorJ1 3-pin circuit board connector with pump cableJ2 4-pin circuit board connector with valve cableJ3 6-pin circuit board connector with clamped burner cableJ3A Standard-7-pin oil burner-connectorJ3B 2-Pin -plug for remote burner unlockingJ4 Communication connection internal (not loaded)J5 4-pin circuit board connector with fault indicator light cable J6 4-pin circuit board connector with clamped mains cable and
earthing slots
J7 7-pin circuit board connector for clamping a mixer motor and a mixer circulation pump
J8 12- pin circuit board connector for clamping sensors, BUS- and control lines (storage tank sensor and cable for external sensor are clamped)
J9 5- pin circuit board connector with STB cableJ10 8-pin -circuit board connector with flue gas-, inflow
and return flow sensor cableJ14 3-pin circuit board connector for clamping a
circulation pumpJ15 4-pin circuit board connector with switch cable

6 x Oil burner
39FA ROTEX A1 BO Inline - 03/2007
6 Oil burner6.1 Structure and brief description
1 Automatic oil firing unit2 Oil pump3 Connection suction line4 Connection Return flow line5 Adjusting screw for recirculation opening6 Scale for recirculation opening7 Scale air throttle8 Adjusting screw for air throttle9 Fault clearance button for oil burner10 Holder for service position11 Blue Flame Meter12 Service Allen key13 Burner flange with gasket14 Flame tube15 Flame monitor16 Connection for remote unlocking17 Connector socket, 7-pin18 Fan rigid in compression19 Supply air connection20 Electrical motor21 Service screw22 Recirculation tube
Figure 6-1 Oil burner top view (view from rear)
Figure 6-2 Oil burner - Side view from left
Figure 6-3 Oil burner - Side view from right

6 x Oil burner
40 FA ROTEX A1 BO Inline - 03/2007
The standard installed blue burner is similar in construction and functioning to EN 267. The burner is engaged on the burner flange with a bayonet lock and secured with a service screw. The construction of the burner head with internal flue gas circulation makes it possible to have a low nitrogen oxide combustion with high efficiency. The recirculation tube is firmly mounted in the burner flange.
Pre-heating of oilThe heating oil is pre-heated during the start phase. For this purpose, the boiler control first switches on the nozzle bar heating (the orange lights on the automatic oil firing unit light up). As soon as the oil pre-heating temperature is reached, the thermostat of the nozzle bar heating triggers the program run. The heating time on cold start is 2 to 3 minutes.
Firing program runThe firing program is monitored by the automatic firing unit. It proceeds with the following steps:– Oil pre-heating.– Electrical motor starts, ignition switches on.– Pre-ventilation.– Solenoid valve opens.– Flame formation (green LED lights up).– Ignition switches off.– Burner runs, as long as there is demand for burner by the Control and the flame monitor enables the burning process.– If the burner demand by the Control ends: oil pre-heating and electrical motor switch off, solenoid valve closes.– Post-ventilation corresponding to the control setting.
Automatic firing unit DKO 974The automatic oil firing unit DKO 974 controlled by a microprocessor controls and monitors the firing program. It is distinguished by the following properties:– Stable program times, independent of the variations in the mains voltage or the ambient temperature.– Operating safety even in the event of power failures. The automatic firing unit switches off in the event of a power failure
without fault alarm and on again on resumption of the normal voltage.An LED in the fault clearance button of the automatic firing units indicates the processes of the burner control. In the normal mode, the LED transmits a brief flashing signal, followed by a long pause. In the event of a failure a flash code informs about the cause of fault (see chapter 9).
6.2 Safety function
Fault shutdown and fault indicationThis is followed by a fault shutdown:– if a flame signal is present during the pre-ventilation (remote light monitoring),– if no flame is formed at the start (fuel release) after 5 sec (safety period) (5 start attempts),– if there is a flame failure during operation on failed program repetition and no flame starts.
A fault is displayed:– by the collective fault lights lighting up on the boiler control panel (Fig 5-1, item.2),– by continuous lighting up of the LED in the fault clearance button of the automatic firing units (Fig 6-1, item.9),– by "E" and a two digit fault code in the display of the boiler control panel.
Unlocking burner• Unlock the burner by pressing the hand key on the boiler control panel briefly (Fig 5-1, item 13) (maximum 5 times/hr).• If there are several fault shutdowns successively, check the heating system (e.g. flue system, fuel supply).
6.3 Burner setting
�
CAUTION!
Improperly set oil burner can cause considerable malfunctioning in the regular operation of the oil condensing boiler impermissible deterioration in the oil consumption and flue gas values.
• Burner setting should be carried out only by authorised and recognised heating engineers.

6 x Oil burner
41FA ROTEX A1 BO Inline - 03/2007
6.3.1 Setting values
Tab. 6-1 Set values of the oil condensing boiler for ambient-air-dependent operation
* The values can differ considerably, depending on air and flue gas conduit. It is therefore absolutely essential to measure the air surplus (Lambda) by using CO2- or O2-(CO2-target value = 12.5 - 13.0 %).
URS12 Conversion kit for the output range 12-15 kW. 15 46 15URS20 Conversion kit for the output range 20-24 kW. 15 46 24URS25 Conversion kit for the output range 25-27 kW. 15 46 28URS35 Conversion kit for the output range 33-35 kW. 15 46 35
The factory-preset values are printed in bold in Tab. 6-1.
Appliance Boiler output
Air nozzle Oil nozzle Danfoss
80°H
Oil pump pressure
Oil-through-
put
Distance oil-air nozzle
Recirculation gap
Air throttle* Fan pres-sure
Conver-sion kit
kW ∅ / mm USgal/h(GpH)
bar kg/h Dimension Y/mm
Scale/mm % mbar Type
A1 BO 20i(Oil blue burner BL 20)
12 19 0.30 12.0 Y1.05 3 2 Y10 Y4.5URS 12
13 19 0.30 13.5 Y1.14 3 2 Y11 Y5.0
14 19 0.30 15.5 Y1.23 4 2 Y13 Y5.7
15 19 0.40 10,0 Y1.32 4 2 Y20 Y6.3
Series status
16 19 0,40 11.5 Y1.41 4 2 Y23 Y7.2
17 19 0.40 13.0 Y1.49 4 2 Y26 Y7.9
18 19 0.40 14.5 Y1.58 4 2 Y29 Y8.5
19 19 0.40 16.5 Y1.67 4 2 Y41 Y9.4
20 19 0.40 18.0 Y1.75 4 2 Y100 Y10.4
A1 BO 27i(Oil blue burner BL 27)
20 22 0.50 11.3 1.77 2 7 Y32 Y7.4
URS 20
21 22 0.50 12.7 1.86 2 7 Y40 Y7.9
22 22 0.50 14.0 1.92 2 7 Y60 Y8.6
23 22 0.50 15.4 1.98 2 7 Y90 Y9.2
24 22 0.50 16.8 2.10 4 7 Y100 Y8.6
25 24 0.55 11.5 2.16 4 7 Y44 Y6.9Series sta-tus
26 24 0.55 13.0 2.25 4 7 Y66 Y7.8
27 24 0.55 14.0 2.34 4 7 Y100 Y8.9
A1 BO 35i(Oil-Blue burner BL 35)
25 21 0.55 14.5 2.19 5 2 Y25 Y7.2URS 25
26 21 0,55 16.7 2.28 5 2 Y29 Y7.8
27 24 0.60 11.5 2.37 2 2 Y30 Y6.7
Series status
28 24 0.60 13.0 2.46 4 2 Y34 Y6.5
29 24 0.60 13.5 2.55 4 2 Y46 Y7.0
30 24 0.60 14.5 2.65 4 2 Y50 Y7.5
31 24 0.60 15.5 2.72 4 2 Y70 Y7.8
32 24 0.60 16.5 2.81 4 2 Y78 Y8.1
33 27 0.65 13.0 2.90 0 4 Y36 Y6.2
URS 3534 27 0.65 13.7 2.99 0 4 Y40 Y6.7
35 27 0.65 14.8 3.07 0 4 Y42 Y7.2

6 x Oil burner
42 FA ROTEX A1 BO Inline - 03/2007
6.3.2 Instructions for burner setting
The oil burner is factory-set for a certain output range (see Tab. 6-1, values printed in bold).
To change the burner output:– Change the pump pressure,– Adjust air quantity,– Regulate the oil-air nozzles distance,– If the output adjustment is major: change oil nozzle and air nozzle.
Conversion kitSetting some output ranges needs a Conversion kit URS (see Tab. 6-1).
Oil nozzlesROTEX recommends using Danfoss Type 80° H oil nozzles to maintain the emission limits as specified in RAL-UZ 46 (see Tab. 6-1).
6.3.3 Check depression on the oil pump and set the oil pump pressure
Setting oil pressureThe oil pressure on the pump can be varied within the range 10-18 bar. Increase in the oil pressure leads to higher boiler output, while reduction in the oil pressure leads to lower boiler output.Tools required: Screw driver; Allen key SW 4 mm; Manometer 1/8", 0-20 bar.
• To increase pressure: Regulating screw (Fig 6-4, item 2) for oil pressure to be turned to the right.• To reduce the pressure: Regulating screw (Fig 6-4, item 2) for oil pressure to be turned to the left.• To check the oil pressure, connect the manometer to the manometer connection (Fig 6-4, item 5) of the oil pump.
Check depressionThe oil supply system must be adjusted for a long and non-fault-prone operation such that the depression is not exceed 0.2 bar.
Tools required: Vacuum meter R 1/8"; Allen key SW 4 mm;
• Connect vacuum meter to the V connection (Fig 6-4, item1) and measure depression.
1 Vacuum meter connection2 Regulating screw for oil pressure3 Solenoid valve4 Pump roof5 Manometer connection6 Inflow connection7 Return flow connection8 Pump filter
Figure 6-4 Oil pump
CAUTION!
Too high a depression on the oil pump causes higher pump wear and can ruin the pump.
If the depression is greater than 0.4 bar, the heating oil can degasify. There are whistling noises in the pump, the pump can be ruined. Depression greater than 0.2 bar causes greater pump wear.
• Reduce the depression, recheck oil supply if necessary.

6 x Oil burner
43FA ROTEX A1 BO Inline - 03/2007
6.3.4 Set air quantity
The combustion air quantity is set on the air throttle adjusting screw (Fig 6-5, item 1). The CO2-content in the flue gas must be regulated to 12.5-13,0 %.
Tools required: Flue gas analysis device to determine the CO2-content in the flue gas.
• Connect the flue gas analysis unit.• To reduce air quantity: Turn air throttle adjusting screw to the left (lower scale value) O2 , CO2• To increase air quantity: Turn air throttle adjusting screw to the right (higher scale value) O2 , CO2
6.3.5 Set recirculation gap
The recirculation gap is set on the adjustment screw (Fig 6-6, item 1), which causes an axial shift in the mixer device in the combustion tube (see Fig 6-7).
The oil condensing boiler is generally designed for ambient air-independent operation and equipped with a concentric flue gas / supply air connection DN 80/125. If the operation is ambient air-dependent and connection is made only a single wall flue gas duct, the set values can differ considerably from the values indicated in Tab. 6-1.
1 Adjusting screw for air throttle2 Scale air throttle
Figure 6-5 Setting the air throttle
You can make a rough pilot adjustment in the air quantity by using the values from Tab. 6-1. But the rough adjustment cannot replace the fine adjustment with CO2-measurement in any case.
Figure 6-6 Setting the recirculation gap Figure 6-7 Flame tube and recirculation gap1 Adjustment screw for recirculation gap2 Scale recirculation gap
1 Recirculation gap2 Flame tube
The scale (Fig 6-6, item 2) shows the set width of the recirculation gap (in mm) an. If the penstock tube or the oil preheater is changed or an oil nozzle type different from the regular production type is used, there can be a difference between the scale display and the actual width of the recirculation gap.

6 x Oil burner
44 FA ROTEX A1 BO Inline - 03/2007
Tools required: Flue gas analysis device to determine the NO and CO2-content in the flue gas.
• Connect the flue gas analysis unit.• Adjust the position of the recirculation gap with setting screw (for setting value, see Tab. 6-1).• Wait for an operating pause of about 5 minutes.• Restart the burner.
Burner does not start or is late: Reduce the width of the recirculation gap (lower scale value).
6.3.6 Check electrode distance and check and set the distance between oil nozzles and air nozzles
Checking and setting electrodes distance
Tools required: Feeler gauge "Blue Flame Meter" (fixed on the holder for the service position); Allen key SW 3 mm;
• Bring burner in service position (see chapter ).• Check electrode distance and position with feeler gauge "Blue Flame Meter".• If necessary, readjust electrodes by bending.
CAUTION!
Too small or closed recirculation gap leads to sudden temperature rise in the mixing device and can damage the mixing device.
Figure 6-8 Check electrodes setting and distance of oil nozzles and air nozzles
a Mixing deviceb Ignition electrodesc Fixing screwd Tube lighte Oil nozzle
f Air nozzleg Nozzle linkageX1 Electrode position BL 20 and BL 27X2 Electrode position BL 35Y DIstance oil nozzle -air nozzle

6 x Oil burner
45FA ROTEX A1 BO Inline - 03/2007
Set oil nozzle -air nozzle distance
Tools required: Feeler gauge "Blue Flame Meter" (fixed on the holder for the service position); Allen key SW 4 mm;
• Bring burner in service position (see chapter Page 45).• Check distance with the feeler gauge "Blue Flame Meter". For setting values refer to Tab. 6-1.• To adjust, loosen the fixing screw and push the mixing device on the nozzle linkage (also refer to Fig 8-15 on Page 58).
6.4 Dismantling the burner
The burner is normally in the operating position. In order to carry out work on the nozzle linkage (e.g. changing nozzle or electrodes) or within the flame tube, the burner is brought into the service position. It may be necessary to dismantle the burner for, maintenance and cleaning jobs or if there is damage in the combustion chamber area.
Bringing the burner in service position
1. Switch off main heater switch.
2. Take off the noise damper hood and boiler panels, remove upper insulation mouldings.
3. Pull off the air supply hose from the burner and rotate sideways.
4. Loosen the service screw (Fig 6-10, item 1).
CAUTION!
Wrong distance setting can cause unclean burning, bad starting behaviour and increased burner wear.
• Use the correct side of the feeler gauge.
WARNING!
Live parts can cause an electric shock on contact and cause life-threatening burns and injuries.
• Switch off the heating main switch before dismantling the burner and secure it from being unintentionally switched on.
CAUTION!
Danger of burning from hot surfaces (flame tube).
• Let the burner cool down sufficiently before dismantling.• Wear protective gloves.
Figure 6-9 Burner in operating position Figure 6-10 Loosen service screw on the burner1 Service screw2 Bayonet lock

6 x Oil burner
46 FA ROTEX A1 BO Inline - 03/2007
5. Rotate burner counter-clockwise from the bayonet lock (Fig 6-10, item 2) and lift upwards.
6. Rotate burner by 180° around the motor axis and put aside on the burner flange.
7. Hang in the burner through the opening in the holder plate in the service screw and engage in the bayonet lock. TIghten the service screw. The burner is now in the service position.
Burner dismantling
1. Switch off main heater switch.
2. Take off the noise damper hood and boiler panels, remove upper insulation mouldings.
3. Pull out supply air hose, remote unlocking connector and burner plug (7-pin).
4. Unscrew the oil hoses from the filter.
5. Unscrew four fixing screws of the burner flange.
6. Raise the burner out from the combustion chamber.
Burner installation
1. Insert the burner into the combustion chamber, attach the burner flange securely with the four fixing bolts.
2. Screw on the oil hoses on the filter.
3. Restore the electrical plug connections and connect the supply air hose to the burner.
4. Start burner, check functioning and settings (see chapter Fig 6.3).
5. Reassemble the insulation mouldings, boiler panels and noise damping hood.
lRemove flame tubeThe flame tube can be dismantled with mounted burner and open boiler.
1. Switch off main heater switch.
2. Take off the noise damper hood and boiler panels, remove upper insulation mouldings.
3. Open combustion boiler.
4. Thread off flame tube (turn bayonet lock counter clockwise by 1/8 rotation).
Figure 6-11 Pull off burner Figure 6-12 Service position
CAUTION!
Danger of burning from hot surfaces (flame tube).
• Let the burner cool down sufficiently before dismantling the flame tube.• Wear protective gloves.
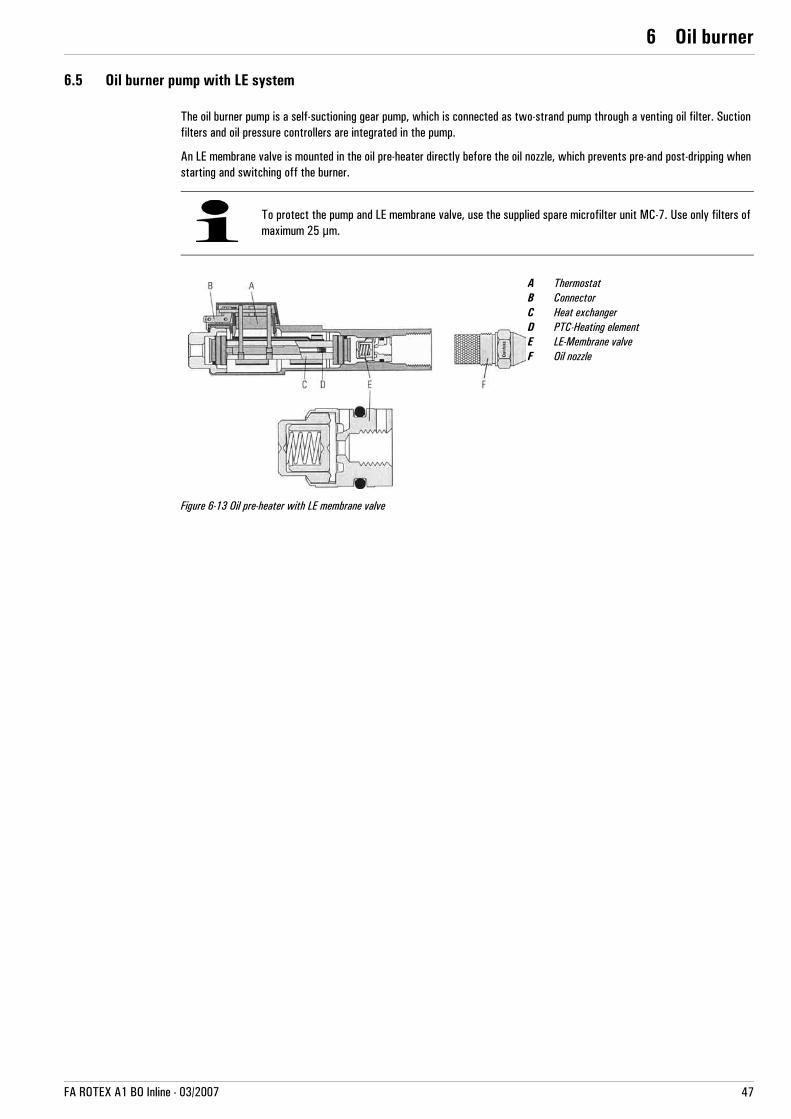
6 x Oil burner
47FA ROTEX A1 BO Inline - 03/2007
6.5 Oil burner pump with LE system
The oil burner pump is a self-suctioning gear pump, which is connected as two-strand pump through a venting oil filter. Suction filters and oil pressure controllers are integrated in the pump.
An LE membrane valve is mounted in the oil pre-heater directly before the oil nozzle, which prevents pre-and post-dripping when starting and switching off the burner.
To protect the pump and LE membrane valve, use the supplied spare microfilter unit MC-7. Use only filters of maximum 25 µm.
A ThermostatB ConnectorC Heat exchangerD PTC-Heating elementE LE-Membrane valveF Oil nozzle
Figure 6-13 Oil pre-heater with LE membrane valve

7 x Hydraulic connection
48 FA ROTEX A1 BO Inline - 03/2007
7 x Hydraulic connection7.1 Integrated connection group
7.1.1 Structure and function
The integrated connection group is a compact unit for connecting a heating circuit and a hot water tank to the oil condensing boiler ROTEX A1.
The integrated circulation pump allows the required water to flow through the oil condensing boiler and the active circuit (hot water storage tank or heating circuit). The 3-way switch valve switches between the heating circuit and the hot water storage tank as required by the boiler control.
7.1.2 Releasing / restoring electrical connections
The integrated connection group is wired in the boiler switchboard. The integrated heating circuit pump and the 3-way switch valve on the device are connected with plugs.• When changing the boiler switchboard or the pump, unplug the pump cable located on the pump terminals.• Plug the 6-pin plug into the valve drive socket for connecting the 3-way switch valve (shape-coded).
Note the following for emergency operation if the valve drive is faulty:• Press the unlocking key (Fig 7-1, item 2.2) and rotate the motor head of the valve drive (Fig 7-1, item 2.1) 1/4 turn to the
left and remove.
The 3-way switch valve is set to the "Heating" position.
Note the following for the temporary manual parallel operation of the heating circuit and the hot water storage tank:• Pull out the 6-pin plug from the valve drive.• Position the switch valve to the middle position on the hand lever (Fig 7-1, item 2.3). (Possible only if the valve drive was
already set to the "Heating" position.
Figure 7-1 Integrated connection group
1 Circulation pump2 3-way switch valve2.1 Valve drive2.2 Unlocking key of the drive lock2.3 Manual lever (shown in filling position)3 Boiler inflow (Connection AB)
4 Heating inflow (connection B)5 Storage tank charging inflow (connection A)a Heating inflow 1" IGb Heating return flow 1" IGc Storage inflow 1" AGd Storage tank return flow 1" AG
WARNING!
Live parts can cause an electric shock on contact and cause life-threatening burns and injuries.
• Disconnect from the power supply before beginning work on the integrated connection group (remove fuse, switch off main switch) and secure against unintentional restart.

7 x Hydraulic connection
49FA ROTEX A1 BO Inline - 03/2007
7.2 Hydraulic system connection
Fig 7-2 and Fig 7-3 show examples of the connection of a Sanicube INOX hot water storage tank and a sub-tank US 150. Note that the hydraulic circuit shown does not claim to be complete and you system planning must, therefore, still be carried out thoroughly.
1 Oil condensatin boiler A1 BO xxi2 Boiler circuit pump3 3-way switch valve4 Hot water storage tank4.1 Storage tank container4.2 Storage tank charging heat exchanger
(stainless steel corrugated pipe in SC38/16/0)
4.3 Drinking water heat exchanger (stainless steel corrugated pipe)
5 Storage tank sensor for topping up6 Cold water connection according to
DIN 19887 Hot water tapping point8 Circulation pump (optional)9 Heating inflow10 Heating return flow11 Storage tank container (stainless steel)12 Storage tank charging inflow13 Storage tank return flow14 Non-return valve15 Pressure relief valve16 Anti-scalding
(storage tank operating temperature >60 °C)
17 Cold water distribution network18 Gravity brake19 Pipe vent
H1...HmHeating circuits
Figure 7-2 Hydraulic circuit ROTEX A1 BO xxi with Sanicube STAINLESS STEEL
Figure 7-3 Hydraulic circuit ROTEX A1 BO xxi with US 150

7 x Hydraulic connection
50 FA ROTEX A1 BO Inline - 03/2007
7.3 Hot water storage tank (not included in scope of supply)
Five types of hot water storage tanks are available for the oil condensing boiler A1 BO xxi (see Tab. 7-1). The correct integration of the hot water storage tank into the heating network is shown by Fig 7-2 and Fig 7-3. Alternatively, the ROTEX Solaris System can be integrated for hot water preparation.
Technical data hot water storage tank
Tab. 7-1 Basic technical data of the ROTEX hot water storage tank which can be connected to the oil condensing boiler
For further information about the hot water tanks, refer to documents for Sanicube INOX, Sanicube PEX and Solaris.
Type Sanicube INOX Sanicube INOX SanicubeSolaris INOX
SanicubeSolaris PEX
Sub-tank for hot water storage tank
Parameter SCS 328/14/0 SC 538/16/0 SCS 538/16/0 SCS 580/1 US 150
Basic data
Total storage capacity 285 Litres 500 Litres 500 Litres 500 Litres 148 Litres
Empty weight 55 kg 84 kg 87 kg 109 kg 44 kg
Total filled weight 335 kg 564 kg 587 kg 609 kg 192 kg
Dimensions (L x B x H) 59.5 x 61.5 x 159 79 x 79 x 159 79 x 79 x 159 79 x 79 x 159 100 x 66 x 66
Maximum permissible storage water temperature
85 °C 85 °C 85 °C 85 °C 90 °C
Stand-by heating power 2.3 kWh/24h 1.4 kWh/24h 1.4 kWh/24h 1.4 kWh/24h 1.1 kWh/24h
Maximum operating pressure 10 bar 10 bar 10 bar 6 bar 10 bar
Drinking water heat exchanger materialStainless steel
(1.4404)Stainless steel
(1.4404)Stainless steel
(1.4404)PEX Pressure vessel (ES)
Drinking water heating
Drinking water capacity 18 Litres 24.5 Litres 24.5 Litres 80 Litres 144 Litres
Drinking water heat exchanger surface 4.1 m2 5.5 m2 5.5 m2 25 m2
Average specific heat capacity 1820 W/K 2470 W/K 2470 W/K 1620 W/K
Storage tank charging heat exchanger (stainless steel)
Water capacity heat exchanger 10 Litres 10.4 Litres 10.4 Litres 10.4 Litres 3.3 Litres
Heat exchanger surface area 2.1 m2 2.3 m2 2.3 m2 2.3 m2 0.7 m2
Average specific heat capacity 910 W/K 1040 W/K 1040 W/K 1040 W/K 700 W/K
Solar heating support (stainless steel)
Water capacity heat exchanger 2 Litres
Heat exchanger surface area 0.43 m2
Average specific heat capacity 200 W/K
Pipe connections
Cold and hot water 1" AG 1" AG ¾" IG ¾" IG
Heating inflow and return flow 1" AG 1" AG 1" AG ¾" AG
Order number 16 50 10 16 50 16 16 45 16 16 50 06 16 01 50

7 x Hydraulic connection
51FA ROTEX A1 BO Inline - 03/2007
Thermal output data Hot water storage tank
Tab. 7-2 Thermal output data of the ROTEX hot water storage tank which can be connected to the oil condensing boiler
CAUTION!
The plastic gravity brakes in the pipe connections are suitable for temperatures up to a maximum of 90 °C.
• The plastic gravity brakes should be replaced with suitable gravity brakes for operating temperatures > 90 °C.
Type Sanicube INOX Sanicube INOX SanicubeSolaris INOX
SanicubeSolaris PEX
Sub-tank for hot water storage tank
Parameter SCS 328/16/0 SC 538/16/0 SCS 538/16/0 SCS 580/1 US 150
Key performance indicator NL according to DIN 4708 (on recharging at 35 kW, TKW = 10°C / TWW = 45°C / TSP = 65°C / Tv: 80°C)
2.2 4.1 2.3 3.5 2.2
Continuous rating QD according to DIN 4708 27 kW 35 kW 35 kW 35 kW 25 kW
Maximum tapping rate for the duration of 10 min at 35 kW recharging (TKW = 10°C / TWW = 40°C / TSP = 60°C)
21 l/min 30 l/min 22 l/min 25 l/min 16 l/min
Hot water quantity without reheating up to 15 l/min tapping rate (TKW = 10°C / TWW = 40°C / TSP = 60°C)
200 Litres 412 Litres 220 Litres 335 Litres 250 Litres
Hot water quantity with reheating at 20 kW reheating power and 15 l/min tapping rate(TKW = 10°C / TWW = 40°C / TSP = 60°C)
400 Litres 837 Litres 442 Litres 600 Litres 300 Litres
Short-term water quantity in 10 min 210 Litres 300 Litres 220 Litres 250 Litres 160 Litres

8 xInspection and maintenance
52 FA ROTEX A1 BO Inline - 03/2007
8 Inspection and maintenance8.1 General overview of inspection and maintenance
Regular inspection and maintenance of the heating system reduces energy consumption and ensures a long life and smooth operation.
Tests during the annual inspection:– General condition of the heating system, visual inspection of connections and conduits.– Flue gas temperature and flue gas temperature sensor.– Functioning of the condensate preparation (determination of pH value).– Burner operation and burner settings.
Maintenance work to be carried out annually:– Cleaning of the burner components, the combustion chamber and the heating surfaces.– Cleaning of the storage container and the silencer hood.– Cleaning and regeneration of the condensate preparation.– Replacement of the wearing parts (if required).
8.2 Inspection and maintenance tasks
8.2.1 Removing panelling (and cleaning it)
For maintenance, it is necessary to remove the silencer hood, the boiler panelling and the insulating mouldings.
Have the inspection and maintenance carried out by authorised and trained heating engineers once a year and, if possible, before the heating period. This will avoid malfunctions during the heating period.
ROTEX recommends an inspection and maintenance contract to ensure regular inspection and maintenance.
WARNING!
Live parts can cause an electric shock on contact and cause life-threatening burns and injuries.
• Before beginning maintenance work, disconnect the oil condensing boiler from the power supply (switch of fuse, main switch) and secure against unintentional restart.
CAUTION!
Danger of burning on hot surfaces.
• Let the burner cool down for a reasonably long time before maintenance and inspection work.• Wear protective gloves.
Figure 8-1 Remove the silencer hood. Figure 8-2 Remove the holding clamps on the insulating mouldings

8 xInspection and maintenance
53FA ROTEX A1 BO Inline - 03/2007
1. Remove the silencer hood (Fig 8-1).
2. Lift and remove the boiler panelling.
3. Remove the holding clamps on both upper insulation mouldings (Fig 8-2). Remove both upper insulating mouldings.
Cleaning panelsThe silencer hood and the boiler panels are made of easy-to-maintain plastic. Clean them only using soft cloths and a mild water and soap cleaning solution. Aggressive cleaning agents with solvents can damage the plastic surface.
8.2.2 Checking the connections and conduits
• Check all oil and water-conducting components and connections for leakage and damage. If damaged, determine the cause and replace the damaged parts.
• Check all components of the flue gas system for leakage and damage. Recondition the damaged parts or replace them.• Check all electrical components, connections and conduits. Recondition damaged parts.
8.2.3 Checking and purifying the condensate preparation
If the condensate preparation works smoothly, the outflowing condensate must be purified and made pH-neutral. Connection and outflow line must be free from contamination.
Checking the functioning of the condensate preparation (pH value).
1. Dip indicator strips (provided with condensate preparation) into the water from the outflow of the neutralisation box.
2. Remove the indicator strips after about 1 minute and compare the colour of the indicator strip with the accompanying colour table.
The numerical value above the colour combination corresponds to the pH value of the water.
pH value = 7F1: Condensate preparation neutralised correctly.
pH value < 6: Regenerate condensate preparation.
WARNING!
Improper work on live components can endanger human life and health and adversely affect the operation of the oil condensing boiler.
• Damage restoration on live components of the oil condensing boiler may be carried out only by authorised and recognised heating engineers.
CAUTION!
Escaping gases can cause breathing problems and poisoning.
• The condensate preparation must always be connected and filled up, otherwise flue gases could escape into the installation room.
The pH value measurement can be dispensed with if exclusively low sulphur EL heating oil is used and the competent Water Authorities do not specify neutralisation.
A pH value below 5 with regular maintenance points out that the neutralisation medium is spent and the filling quantity is no longer sufficient. In such a case, change the neutralisation medium ( 15 45 75)

8 xInspection and maintenance
54 FA ROTEX A1 BO Inline - 03/2007
Disassemble and drain condensate preparation
1. Open the fixing belt (Fig 8-3, item 3).
2. Lift the stabiilisation tab (Fig 8-4, item.1) and pull out the connecting muff (Fig 8-4, item.2) from the condensate outflow.
3. Lift up condensate preparation and drain the container through the connecting hose (Fig 8-5).
4. Place collector container under the hose connection. Pull out the flexible connecting hose from the condensate preparation (Fig 8-6).
5. Pull the condensate preparation under the boiler.
CAUTION!
Danger of chemical burn! The condensate preparation contains acid, which can cause injury on skin contact.
• Wear protective clothing when working on condensate preparation (protective goggles, rubber hand gloves).
• If the skin comes in contact, wash the affected area with tap water immediately.• If the chemicals come in contact with eyes, wash with tap water immediately and visit an
ophthalmologist.
Figure 8-3 Connections for condensate preparation Figure 8-4 Condensate preparation- Wrapped connections
1 Condensate preparation2 Wrapped connection on flue gas arc3 Fixing belt with snap closing4 Flexible connecting hose
1 Stabilisation tab2 Wrapped connections
Figure 8-5 Draining the condensate preparation Figure 8-6 Pull out connecting flexible hose

8 xInspection and maintenance
55FA ROTEX A1 BO Inline - 03/2007
Regenerate condensate preparation.For regeneration of the condensate preparation, rinse and fluff the shell limestone in it forcefully.
Prerequisite: The condensate preparation is dismounted and drained.
Mounting the condensate preparation
1. Push the condensate preparation under the boiler.
2. Plug the flexible connecting hose to the condensate preparation (Fig 8-6).
3. Plug the connecting muff (Fig 8-4, item 2) firmly on the condensate outflow socket, close the fastening belt (Fig 8-3, item 3) and s=clamp securely. Tighten the belt so much that the wrapped connection cannot loosen itself (insert a wedge if necessary).
4. Fill condensate preparation with water.
Fill condensate preparation with waterThe condensate preparation holds about 2.5 litres of water. You have two options for filling:
8.2.4 Clean the pump filter
The pump filter is located under the pump cover (see Fig 6-4, Page 42).• Loosen screw (Fig 6-4, item 8) and remove pump lid.• Remove pump filter and clean it.• Insert new or cleaned pump filter.• Check pump lid gasket and replace it if necessary.• Put the pump lid in place and bolt it down.
• Rinse condensate preparation several times with flowing water (counter current), until clear water emerges. Fluff the condensate preparation several times so that the deposits will loosen up.
• If necessary, replace the neutralisation medium (shell limestone) 15 45 75).
Figure 8-7 Rinse condensate preparation
• Open the boiler body and remove the combustion chamber insert (see section 8.2.6). Fill the condensate preparation by using a hose (see Fig 8-8).
• Unscrew the inspection lid of the flue gas duct and fill the condensate preparation by using a hose held in the flue gas pipe.
The superfluous water flows into the drainage system through the flexible hose.
Figure 8-8 Fill condensate preparation with water

8 xInspection and maintenance
56 FA ROTEX A1 BO Inline - 03/2007
8.2.5 Checking the flue gas temperature
The flue gas temperature can be checked:– on the boiler control panel by using the Info key (see manual "ROTEX Control"),– on the measuring piece of the flue gas duct by using a flue gas thermometer.If the flue gas temperature exceeds the boiler temperature by more than 40 K after 10 minutes of burner operation, the combustion chamber should be cleaned (see section 8.2.6).
Checking the flue gas temperature sensor
• Unscrew the box nut (Fig 8-9, item 4) and pull out the flue gas temperature sensor carefully with the guide sleeve (Fig 8-9, item 3).
• Check the flue gas temperature sensor for cleanliness and corrosion and clean if necessary. Do not use any metallic cleaning devices (e.g. wire brush).
• When replacing the flue gas temperature sensor ensure that the end of the flue gas temperature sensor projects 28±2 mm out of the guide sleeve.
8.2.6 Checking and cleaning the burner
If there are impurities, or if unsatisfactory combustion values are detected, the burner must be cleaned and readjusted if necessary.
Opening the combustion chamber
Special tool: Combustion chamber key, fixed on the inside of the boiler panels (included in the supply).
CAUTION!
The assembly position of the flue gas temperature sensors is factory-adjusted by a fixing screw. The modification of the assembly position adversely affects the correct functioning of the flue gas temperature sensor.
• Never loosen the fixing screw (Fig 8-9, item 2) when inspecting the flue gas temperature sensor.
1 Sensor cable to the boiler control panel2 Fixing screw - Do not loosen!3 Guide sleeve4 Box nut5 Flue gas temperature sensor
Figure 8-9 Position of the flue gas temperature sensor
CAUTION!
Danger of burning on hot surfaces.
• Before starting work on the burners, the combustion chamber and the combustion chamber inserts, allow them to cool down.
• Wear protective gloves.

8 xInspection and maintenance
57FA ROTEX A1 BO Inline - 03/2007
• Disconnect the oil condensing boiler from the power supply (fuse, main switch off) and secure against unintentional restart.• Remove the four M10 hexagonal socket screws.• Open the combustion chamber upwards An air pressure spring keeps the upper half of the combustion chamber open.
• Remove the top combustion chamber insert by using the combustion chamber key.– In case of A1 BO 27i and A1 BO 35i take out the cylindrical combustion chamber ring beforehand.
• Remove the bottom combustion chamber insert by using the combustion chamber key.
Cleaning the combustion chamber
Prerequisites:– The condensate drain is covered, to avoid choking of the drain line.– The gap between the boiler half shell in the joint area is covered to prevent residues from the upper boiler half shell from
falling into the gap.Special tool: Cleaning brush, cleaning scraper (included in scope of supply).
Figure 8-10 Open the combustion chamber Figure 8-11 Fold the combustion chamber upwards
Figure 8-12 Place combustion chamber key(shown A1 BO 20i)
Figure 8-13 Lift out the bottom combustion chamber insert (shown A1 BG 20i)
• Loosen the dirt and soot on the combustion chamber ribs by using the cleaning brush and cleaning scraper.
• Suction off the loosened dirt and soot by using a vacuum cleaner.
Figure 8-14 Cleaning the combustion chamber

8 xInspection and maintenance
58 FA ROTEX A1 BO Inline - 03/2007
Checking the burner
The burner inspection includes the visual inspection of the burner's condition as well as flue gas measurements.The scope of inspection includes:• Open the combustion chamber Disassemble the burner only if the area of the combustion chamber is damaged.• Clean the burner surface (cloth, plastic brush).• Visual inspection of the fuel lines for clogging and denting. • Check oil filter of the suction line, change the filter set if necessary.• Clean the burner head at fuel exit in the area of baffle plate.
• If necessary, replace faulty parts.• Close the combustion chamber.• Put the burner into operation and let it run for about 10 minutes in the chimney sweep position.• Check combustion values:
– Flue gas temperature at measuring sockets of the flue gas duct. (Target value < 120 °C),– O2 or CO2 content (see section 6.3.1),– CO content (target value < 50 ppm),– Soot number according to Bacharach-Scale < 1.
If the combustion values do not fall within the target range, the burner must be adjusted accordingly (see chapter 6.3).
8.2.7 Change oil nozzle
Prerequisite: Burner is in service position.
For exact information regarding the checking and setting of the burner, see Chapter 6.3 "Burner setting".
For exact information regarding the assembly and disassembly of the burner, see Chapter 6.4 "Dismantling the burner".
In the course of the maintenance activities, the automatic firing unit DKO 974 must also be rechecked to see whether it attains the rated life cycle: 10 years or 250,000 burner starts.
We recommend completing the service log provided with all the measured values and the tasks performed with dates and signature.
CAUTION!
Danger of burning on hot surfaces.
• Before starting work on burners and combustion chamber, allow them to cool down sufficiently.• Wear protective gloves.
a Mixing deviceb Ignition electrodesc Fixing screwd Tube lightg Nozzle linkage (oil pre-heater)
Figure 8-15 Mixing head and ignition electrodes

8 xInspection and maintenance
59FA ROTEX A1 BO Inline - 03/2007
Dismantling oil nozzles
1. Pull out ignition cables from ignition electrodes (Fig 8-15, item a).
2. Loosen fixing screws (Fig 8-15, item c) and pull out mixing device upwards.
3. Unscrew nozzles with wrench or ring spanner SW 16. Hold back the nozzle linkage with an open-end wrench SW 16.
Assembling oil nozzle
1. Screw in the nozzle with open end or ring spanner SW 16 on the nozzle linkage. Hold back the nozzle linkage with an open-end wrench SW 16.
2. Assemble mixing device. Position the tube light (Fig 8-15, item d) between the guide bolts in the nozzle stock covers. Adhere to setting dimension "Y" (Tab. 6-1, chapter 6.3).
3. Plug on ignition cable on the ignition electrodes.
If the LE membrane valve (Fig 6-13, Page 47) is clogged and needs to be changed, it can be pulled out after unscrewing the oil nozzle from the nozzle holder of the oil pre-heater by using a M5 screw.
To protect the oil pump and LE membrane valve, insert the supplied spare Microfilter insert MC-7 into the ventilation oil filter. Use only filters of maximum 25 µm.

9 x Faults and Failures
60 FA ROTEX A1 BO Inline - 03/2007
9 x Faults and Failures9.1 Troubleshooting
The electronic system in the oil condensing boiler detects faults and displays them:– Through a fault code in the display, for faults detected by the boiler control.– Through the collective fault signals in the boiler control panel and through a fault code on the display, for faults detected by
the DKO automatic firing unit, which leads to an interlocking failure.
Solving failures• Detecting and solving the cause for the failure.• Interlocking fault: Lift the interlocking by briefly pressing the manual button on the boiler control panel (max. 5 times per
hour).• Non-interlocking failures are indicated as long as failure conditions are present. If the cause has been eliminated, the unit
continues to work normally.
9.2 Failures
You will find exact information regarding control and the boiler control panel, as well as regarding the mode and parameter settings, in the documentation "ROTEX Control", supplied with the pertinent Control.
Failure Possible cause Possible solution
Heating system not functioning (main switch not illuminated, no display)
No mains voltage • Switch on boiler main switch• Switch on heating room main switch• Check / switch on fuse house connection• Check/ renew fuse boiler control panel
Heating does not warm up Central heating stand-by switched off (e.g. timer is in economy phase, outside temperature too high)
• Check operating setting• Check demand parameters
Heating does not warm up enough
Heating characteristic too low • Raise parameter value
Process water not heating up
Storage charging stand-by switched off (e.g. timer is in economy phase)
• Check operating setting• Check demand parameters
Process water not heating up enough
Storage tank charging temperature too low • Raise hot water target temperature
Tapping rate too high • Reduce the tapping rate, Limit throughput
Burner output too low • See Failure "Maximum burner output too low"
Maximum burner output too low
Incorrect setting parameters • Adjust output parameters
Air/flue gas resistance too high • Check ducts for dirt.• Use ducts with larger cross section for supply air or flue gas if
necessary
Burner does not start Interlocking failure • Establish cause of failure and eliminate it• Lift the interlocking by briefly pressing the manual button (max.
5 times per hour).
Burner motor not running despite burner demand
No mains voltage on burner • Insert the 7-pin plug on the motor until it engages• Check voltage at the terminals L-N of the 7-pin plug• Check/ renew fuse.
Plug connections of the control device are loose • Check/ insert plug connections
Heater element or thermostat for pre-heating of the heating oil defective
• Change oil pre-heater
Burner motor defective (bearing has seized) • Change burner motor
Condenser defective • Change condenser
Oil pump has seized • Change oil pump
Burner starting is hard Start delay due to bad ignition • Adjust ignition electrodes

9 x Faults and Failures
61FA ROTEX A1 BO Inline - 03/2007
Burner starts with blue flame, but tears out at intervals
Recirculation too large • Reduce recirculation a little
Flame has gold strands, higher NOx-component
Recirculation too low • Raise recirculation further
Flame is all blue and stable in operation, but cold start not possible
Recirculation too large • Reduce recirculation a little
No ignition Ignition electrodes short circuited • Set / change ignition electrodes
Ignition electrodes too far apart • Set ignition electrodes
Ignition electrodes contaminated or humid • Clean ignition electrodes
Ignition electrodes burnt out • Change ignition electrodes
Insulating body cracked • Change ignition electrodes
Ignition transforer defective • Change ignitioin transformer
Ignition cable burnt • Change cable and determine the cause
Automatic firing unit faulty • Change automatic firing unit
Loudly whistling mechanical noise
Oil pump is suctioning air • Check bolting
Vacuum in the oil line too high • Clean the filter, open valves fully
Bearing defective • Change burner motor
Oil pump defective • Change oil pump
Oil pump does not pump any oil
Check valve oil filter is closed • Open check valve
Gearbox damaged • Change oil pump
Suctiin valve has leakage • Clean/ change suction valve
Oil line has leakage (pump sucks air) • Check bolting
Check valve closed • Open check valve
Filter clogged • Clean the filter
Filter not leakproof • Change filter
Oil pump power insufficient • Change oil pump
Clutch defective • Change clutch
Oil atomisation not uniform - heavy soot deposition in flame tube
Nozzle loose, clogged or worn out • Check/ tighten/ change nozzle
Nozzle apraying angle is wrong • Change nozzle
No oil passage Nozzle clogged • Change nozzle
LE membrane valve clogged • Change LE-membrane valve or oil pre-heater
Mixer device has thick oil layer or heavy carbon deposition
Installation room ventilation is insufficient • Ensure ventilation: up to 50 kW at least 150 cm² unwearable supply air opening, for every additional kW burner output, increase the supply air quantity by 2.0 cm²
Air supply line contaminated/clogged • Clean air supply line
Flue gas conduit of the LAS has leakage • Seal the flue gas conduit, change gasket
Burner setting wrong • Check/' correct burner setting
Nozzle dimensioning wrong • Check / change nozzle type
Combustion air quantity wrong • Measure fan pressure, correct burner setting
Air in suction line (leakage) • Seal suction line
Failure Possible cause Possible solution

9 x Faults and Failures
62 FA ROTEX A1 BO Inline - 03/2007
Tab. 9-1 Possible oil condensing boiler failures
9.3 Fault codes of the THETA 23R control
Tab. 9-2 Fault codes of the oil condensing boiler A1 for the THETA 23R control (recognisable by the central unit)
Soot formation on the air nozzle
Recirculation too low • Open recirculation slightly
Solenoid valve does not open
Coil defective • Change coil
Automatic firing unit faulty • Change automatic firing unit
Flame sensor (IRD) does not respond
Flame sensor contaminated or defective • Clean or change flame sensor
Glass on tubelight dirty • Clean or change glass or tubelight
STB switch off Water throughput too low due to air inclusion • Vent system
Pump down • Check network connection, change pump if necessary
Storage tank not deregistered in operation without hot water storage tank
• Declamp storage tank sensor• Execute Auto-Set (see Operating manual Control)
Flue gas temperature sensor switch off
Flue gas temperature too high • Clean the boiler
Failure Possible cause Possible solution
Fault code Component/name Fault
10-0 External sensor Interruption
10-1 Short circuit
12-0 Mixer circuit inflow sensor Interruption, mixer circuit pump is switched off, mixer motor is switched de-energised
12-1 Short circuit, mixer circuit pump is switched off, mixer motor is switched de-energised
13-0 Hot water storage tank temperature sensor
Interruption
13-1 Short circuit
14-7 Modem contact Fault signal
15-7 Burner blockage contact Fault signal
16-0 Flue gas temperature sensor Short circuit
16-1 Interruption
16-7 Fault signal
17-0 Return flow sensor Interruption
17-1 Short circuit
30-2 Burner No switching off
30-3 No switching on
33-5 Flue gas temperature Overshooting
70-0 Address Address collision of the BUS subscribers
70-1 Activity No T2B signal, check BUS cable and connections
70-6 Communication between THETA control and DKO automatic firing unit
Interruption
71-0 EEPROM Internal fault
71-1 EEPROM faulty Internal fault

9 x Faults and Failures
63FA ROTEX A1 BO Inline - 03/2007
Tab. 9-3 Fault code for oil condensing boiler A1 (recognisable by automatic firing unit )
9.4 Fault codes of the ALPHA23R control
Fault code Component/name Fault
E 01 DKO automatic firing unit interlocking fault
No flame detection during the 5 possible start attempts
E 02 Wrong flame signal ionisation current outside the permitted range
E 03 STB failure: Inflow temperature too high
E 05 No speed signal from burner fan within 10 sec
E 08 Fault in the flame monitoring routine
E 10 EEPROM communication error
E 11 DKO automatic firing unit interlocking fault
Sensor equalisation procedure for electronic STB function faulty or return flow temperature higher by 3 K than inflow temperature for more than 3 min.
E 19 Microprocessor H - I/O error
E 20 Microprocessor L - I/O error
E 21 Microprocessor H - A/D-converter error
E 22 Microprocessor L - A/D-converter error
E 25 Internal fault
E 26 5 times flame stalling within 4 minutes
B 30 DKO automatic firing unit temporary failure
Inflow sensor short circuit
B 31 Inflow sensor interruption
B 34 Low voltage (< 185 V)
B 35 Fluctuating mains frequency (more than ±2 Hz)
B 37 Internal fault
B 43 Return flow sensor short circuit
B 44 Return flow sensor interruption
B 99 Internal communication between THETA control and DKO automatic firing unit interrupted.
Fault code Component/name Fault
00-0 Internal fault The process has detected an undefined status. An entry is made in the fault register. The system goes out of operation.
10-0 Outside temperature sensor interruption The resistance of the outside temperature sensor is high Ohm or the calculated value is above 130 °C. The system continues to work with constant outside temperature value of 0 °C until measurands are measured in the correct range again.
10-1 Outside temperature sensor short circuit The resistance of the outside temperature sensor is zero or the calculated value is below -40 °C. The system continues to work with a constant outside temperature value of 0 °C until measurands are measured in the correct range again.
11-0 Inflow temperature sensor interruption The resistance of the inflow temperature sensor is high Ohm or the calculated value is above 130 °C. The system goes out of operation. The system resumes operation only after the measurands last for longer than 1 sec..
11-1 Inflow temperature sensor short circuit The resistance of the inflow temperature sensor is zero or the calculated value is below -40 °C. The system goes out of operation. Control functions continue to run. The system resumes operation only after the measurands last for longer than 1 sec..
12-0 Mixer circuit temperature sensor interruption
The resistance of the mixer circuit temperature sensor is high Ohm or the calculated value is above 130 °C. The system goes out of operation. The system resumes operation only after the measurands last for longer than 1 sec..

9 x Faults and Failures
64 FA ROTEX A1 BO Inline - 03/2007
Tab. 9-4 Fault codes of the oil condensing boiler A1 for the ALPHA 23R Control
12-1 Mixer circuit temperature sensor short circuit
The resistance of the mixer circuit temperature sensor is zero or the calculated value is below -40 °C. The system goes out of operation. The system resumes operation only after the measurands last for longer than 1 sec..
13-0 Storage tank temperature sensor interruption (if sensor registered)
The resistance of the storage tank temperature sensor is high Ohm or the calculated value is above 120 °C. A hot water demand with a fixed inflow temperature 40 °C is generated at intervals of 30 minutes. This has a time deadline of 10 minutes. The system resumes regular operation only after the measurands last for longer than 1 sec..
13-1 Storage tank temperature sensor short circuit (if sensor registered)
The resistance of the storage tank temperature sensor is zero or the calculated value is below -40 °C. A hot water demand with a fixed inflow temperature 40 °C is generated at intervals of 30 minutes. This has a time deadline of 10 minutes. The system resumes regular operation only after the measurands last for longer than 1 sec..
16-0 Flue gas temperature sensor interruption (if registered by parameter [1])
Measurand >150°C
The system goes out of operation. The system resumes operation only after the measurands last for longer than 1 sec..
16-1 Flue gas temperature short circuit (if registered by parameter [1])
Measurand <-10°C
The system goes out of operation. The system resumes operation only after the measurands last for longer than 1 sec.
30-3 Burner failure: No switching on There is a burner requirement. However, no burner counter signal (oil) or no burner flame signal (gas) could be detected after expiry of 20 minutes. The display issues a warning, which can be deleted by "RESET". The control functions continue to work normally.
30-9 Burner failure Gas The automatic firing unit registers a failure through the bus. The burner can be reset by pressing s key. The control functions continue to work normally.
33-5 Flue gas temperature sensor: Warning temperature reached
Measurand > Parameter [23]
The display issues a warning, which can be deleted by "RESET". The system continues to work normally.
33-8 Flue gas temperature sensor: Switch-off temperature reached
Measurand ≥ Parameter [22]
The burner is taken out of operation for 10 minutes. There there is an unlocking until the next time the temperature [22] is exceeded. The system resumes normal operation after expiry of the cooling phase.
99-9 Undervoltage The mains voltage sinks to below 190 V for at least 1 sec.
The processer backs up all data and goes into Sleep mode. All relay contacts drop out. If the mains voltage goes over 195 V for at least 5 secs, a new start is triggered.
uuuu Interruption of a sensor
nnnn Short circuit of a sensor
Fault code Component/name Fault

9 x Faults and Failures
65FA ROTEX A1 BO Inline - 03/2007
9.5 Fault codes of the automatic firing units
The LED in the fault clearance button of the automatic firing units indicates the processes of the burner control. In the normal mode, the LED transmits a brief flashing signal, followed by a long pause.LED display in the event of a failure:– LED lights up continuously, until the fault is acknowledged (fault clearance).– The continuous lighting is interrupted every 10 seconds and a flash code is broadcast, which gives information about the
cause of the last fault.
Figure 9-1 Fault codes of the automatic firing units
l Short signall Long signal— Pause
9.6 Emergency operation
In manual operation, the 3-way switch valve is in the "Storage tank charging" position first. On reaching the maximum adjustable storage tank temperature, the 3-way switch valve is switched to the "Heating" position.
If the 3-way switch valve is faulty, the motor head of the valve drive can be removed (see section 7.1.2). The switch valve is in the Heating setting.
A manual parallel operation of the heating circuit and hot water storage tank can be set provisionally (see section 7.1.2)
In the event of failure or incorrect settings of the electronic control, an emergency heating operation can be maintained.• Press the manual button on the control for about 5 sec.
The indication "Manual operation" appears on the display.
• Adjust the desired temperature with the rotary switch (setting range 5 - 80 °C).
Flash Code Cause of the fault
l l l l l No flame signal within safety period
l l l l l External light during pre-ventilation time/ pre-ignition time
l l l l l Contact release thermostat does not close within 400 s
l l l l l — l l l l l Manual Fault lockout
The cause of the last fault is saved in the device and can be reconstructed, even after power failure, on restarting the device.
Further information about operating processes and failures can be obtained from the automatic units by using a reading device (accessory).
�

10 x Decommissioning
66 FA ROTEX A1 BO Inline - 03/2007
10 Decommissioning10.1 Temporary shutdown
If no heating and no hot water supply is needed over a long period, the oil condensing boiler can be temporarily shut down. ROTEX, however, recommends putting the system on Stand-By mode (see Documentation "ROTEX Control"). The heating system is then protected from frost. The pumps and valve protection functions are active.If it is not possible to guarantee the oil and power supply when there is danger of frost,– the oil condensing boiler must be drained,– the condensate preparation must be drained,– suitable antifreeze measures must be adopted for the connected heating system and hot water storage tank (e.g. draining).
Draining the heating system• Switch off the main switch and secure against restarting.• Close the check valve on the oil filter.• Bleed the water content for the entire system at the filling and draining sockets (KFE cock).
10.2 Final decommissioning and disposal
For final decommissioning, shut down the oil condensing boiler• Put it out of service,• disconnect it from all electrical, oil and water connections,• dispose of it in a professional manner.
Recommendations for disposalThe ROTEX oil condensing boilers have an environmentally-friendly design. During the disposal process, the only waste accrued is that which can be used for material or thermal recycling. The materials used can be separated into different types.
CAUTION!
A heating system which is shut down can freeze in the event of frost and may suffer damage.
• Drain the shut down heating system if there is danger of frost.• If the heating system is not drained, the oil and power supplies must be secured and the main switch must
remain switched on.
Through the environmentally-friendly design of the oil condensing boiler, ROTEX has complied with the standards for environmentally-friendly disposal. Proper disposal in compliance with the respective national stipulations of the country of use is the responsibility of the owner.

11 xTechnical data
67FA ROTEX A1 BO Inline - 03/2007
11 Technical data Basic data
Tab. 11-1 Basic data oil condensing boiler
Tab. 11-2 Basic data oil burner
Parameter A1 B0 20i A1 BO 27i A1 BO 35i
Product Identification Number (CE number) CE 0645 BM-105.2 CE 0645 BQ-103 CE 0645 BM-104.2
Length 720 mm
Width 625 mm
Height 1100 mm 1220 mm 1340 mm
Weight of the boiler body 49 kg 58 kg 67 kg
Transport weight Unit (without panels and condensate preparation)
81 kg 96 kg 113 kg
Water content 3.0 l 4.5 l 5.0 l
Rated thermal output (according to DIN-EN 303) 12-20 kW 20-27 kW 25-35 kW
Set rated thermal output upon delivery 18 kW 25 kW 30 kW
Setting range with standard burner equipment 15-20 kW 25-27 kW 27-32 kW
Output range for burner conversion URS 12: 12-15 kW URS 20: 20-24 kW URS 25: 25-27 kWURS 35: 33-35 kW
Maximum permissible inflow temperature 80 °C
Maximum permitted operating overpressure 4 bar
Boiler efficiency up to 105 %
Energy efficiency according to efficiency guidelines
Flue gas connection /supply air connection 80/125 mm
Voltage supply 230 V~, 50 Hz
Parameter A1 B0 20i(ROTEX BL 20)
A1 BO 27i(ROTEX BL 27)
A1 BO 35i(ROTEX BL 35)
Limiting the burner 12.4- 20.8 kW 20.4-27.8 kW 25.5-36.8 kW
Oil-throughput 1.05 kWh/-1.75h 1.72-2.34 kg/h 2.15-3.10 kg/h
Heating oil EL as specified in DIN 51603, preferably low sulphur
Emission category by DIN EN 267 3
Dimension suction line 4 mm x 6 mm
Hydraulic system Single stage with oil pre-heating
Air regulation Linearised air metering drum
Regulation ratio 1:1
Voltage supply 230 V~, 50 Hz
Electrical power consumption (pre-ventilation) 260 W (14.5 bar) 260 W (11.5 bar) 265 W (14.5 bar)
Electrical power consumption (continuous operation)
230 W (14.5 bar) 225 W (11.5 bar) 250 W (14.5 bar)
Weight 9.5 kg 9.5 kg 10.5 kg
Test as specified in EN 267 Registration number: 5 G 966/2001
Output electrical motor at 2800 min-1 90 W 90 W 180 W
Protection type IP 40

11 xTechnical data
68 FA ROTEX A1 BO Inline - 03/2007
Tab. 11-3 Type designation of the components A1 BO xxiS
Integrated connection group
Tab. 11-4 Technical data of the integrated connection group
Parameter automatic firing unit A1 BO 20i A1 BO 27i A1 BO 35i
Automatic firing unit DKO 974 Mod. 5 (Satronic)
Flame monitor Satronic IRD 1010 red axial or BST Solutions KLC 2002 axial
Ignition transformer Danfoss Type EBI No. 052 F0030: 15 kV, 20 kHzor Beru Type MKZ 100 No. 0 096 600 017: 15 kV, 25 kHz
Solenoid valve Danfoss Type 071 N 0051
Oil pressure pump, delivery output Danfoss Type BFP 21 L3 LE No. 071 N2108, 45 l/h at 10 bar
Oil pre-heating Danfoss Type FPHB-LE/PTC 70 No. 030 N4101or Danfoss Type FPHB-LE/PTC 50 No. 030 N4257
Motor FHP EB 95C 28/2, 90 W FHP EB 95C 28/2, 90 W FHP EB 95C 52/2,180 W
A1 BO 20i A1 BO 27i/A1 BO 35i
Heating circulation pump Grundfos UPS 15-60 N1 CES 87 Grundfos ALPHA+15-60 N1 CES
Voltage 230 V, 50 Hz
Maximum power consumption 90 W
Capacity 2.5 µF
Protection type IP 44 IP 42
Permitted overpressure 3 bar
Maximum pumping height 6.0 m 6.2 m
3-way switch valve
Voltage 230 V, 50 Hz
Maximum power consumption 4.3 W
Protection type IP 40
Turnaround time 6 s

11 xTechnical data
69FA ROTEX A1 BO Inline - 03/2007
Temperature sensor
Tab. 11-5 Resistance values of the temperature sensor
Remaining pumping height
Figure 11-1 Resistance characteristics of the temperature sensor
PTC resistance Outside temperature, mixer circuit inflow temperaturePt 1000 resistance Flue gas temperature
Sensor Temperature sensor Measured temperature in °C
-20 -10 0 10 20 30 40 50 60 70 80 90 100 110 120
Sensor resistance in Ohm according to standard or manufacturer's indications
PTC Outside temperature Heat generator (inflow temperature, Return flow temperature)Hot water temperature
1383 1511 1644 1783 1928 2078 2234 2395 2563 2735 2914 3098 3287
Pt 1000 Flue gas temperature 922 961 1000 1039 1078 1117 1155 1194 1232 1271 1309 1374 1385 1423 1461
Figure 11-2 Remaining pumping heightA1 BO 20i

11 xTechnical data
70 FA ROTEX A1 BO Inline - 03/2007
Figure 11-3 Remaining pumping heightA1 BO 27i
Figure 11-4 Remaining pumping height ROTEX A1 BO 35i

11 xTechnical data
71FA ROTEX A1 BO Inline - 03/2007
Circuit diagram
Conn
ectio
n ca
ble
colo
urs
blBl
uebr
Brow
nye
Yello
wgn
Gree
ngr
Grey
rdRe
dbk
Blac
kw
tW
hite
n.a.
Cont
act
not a
ssign
ed
Figur
e 11
-5Ci
rcuit
dia
gram
for o
il co
nden
sing
boile
r A1
BC x
xi (sh
own
with
ROT
EX T
HETA
23R
Con
trol)

12 x Keywords list
72 FA ROTEX A1 BO Inline - 03/2007
AAir nozzle
Distance to oil nozzle . . . . . . . . . .45Air quantity . . . . . . . . . . . . . . . . . . . .43Air supply noise damper . . . . . . . . . . .14Annual inspection . . . . . . . . . . . . . . . .52Annual maintenance tasks . . . . . . . . .52Assembling the central unit . . . . . . . .22Automatic timer program . . . . . . 29, 31
BBoiler control panel . . . . . . . . . . . . . .28
Assembly . . . . . . . . . . . . . . . . . . .34Burner
Cleaning . . . . . . . . . . . . . . . . . . . .56To be checked . . . . . . . . . . . . . . .56
Burner setting . . . . . . . . . . . . . . . . . .40C
Cable duct holder . . . . . . . . . . . . . . . .34Cascading . . . . . . . . . . . . . . . . . . . . .24Check condensate preparation . . . . . .53Circuit board . . . . . . . . . . . . . . . . . . .33Circulation pump . . . . . . . . . . . . . . . .21Combustion chamber
Chamber . . . . . . . . . . . . . . . . . . . .56Cleaning . . . . . . . . . . . . . . . . . . . .57
Condensate preparation . . . . . . . . . . .20Connection . . . . . . . . . . . . . . . . . .20Instructions . . . . . . . . . . . . . . . . . . 9
Condensing technologyInstructions . . . . . . . . . . . . . . . . . . 9
Connect oil line . . . . . . . . . . . . . . . . . .23Connect the power supply . . . . . . . . .22Connecting the mixer circuit . . . . . . . .24Connection cables . . . . . . . . . . . . . . .34Connection dimensions . . . . . . . . . . . .10Control
ALPHA 23R . . . . . . . . . . . . . . . . .30THETA 23R . . . . . . . . . . . . . . . . .28
Control panel cover . . . . . . . . . . . . . .33D
Danger of frost . . . . . . . . . . . . . . . . .66Day-target room temperature . . . . . . .29Dimensions . . . . . . . . . . . . . . . . . . . . .10Display . . . . . . . . . . . . . . . . . . . . 30, 31Disposal . . . . . . . . . . . . . . . . . . . . . . .66Drinking water heating
Technical data . . . . . . . . . . . . . . .50E
Efficiency . . . . . . . . . . . . . . . . . . . . . . . 9Electrical installation . . . . . . . . . . . . .21Electrodes distance . . . . . . . . . . . . . .44Electronic control . . . . . . . . . . . . . . . . . 9Emergency operation . . . . . . . . . 48, 65Emission measurement . . . . . . . . 30, 31
FFailure
Collective fault signal . . . . . . . . . . 28Failures . . . . . . . . . . . . . . . . . . . . . . . 60Fault clearance function . . . . . . . .30, 31Filling the heating system . . . . . . . . . 24Filling water . . . . . . . . . . . . . . . . . . . . 20Flame tube . . . . . . . . . . . . . . . . . . . . . 46Flue gas mass flow . . . . . . . . . . .17, 76Flue gas system
Design . . . . . . . . . . . . . . . . . . . . . 16Kits . . . . . . . . . . . . . . . . . . . . . . . 19Minimum requirements . . . . . . . . . 16Piping height . . . . . . . . . . . . . . . . 17
Flue gas system kits . . . . . . . . . . . . . 19Flue gas temperature sensor . . . . . . . 36
To be checked . . . . . . . . . . . . . . . 56Fuel . . . . . . . . . . . . . . . . . . . . . . . . . . . 9Fuse . . . . . . . . . . . . . . . . . . . . . . . . . 37
HHeating circuit expansion module
Cascading . . . . . . . . . . . . . . . . . . 24Heating system
Draining . . . . . . . . . . . . . . . . . . . . 66Hot water storage tank . . . . . . . . . . . 50
Target temperature . . . . . . . .29, 31Technical data . . . . . . . . . . . . . . . 50Thermal data . . . . . . . . . . . . . . . . 51
Hydraulic system connection . . . . . . . 49I
Inflow temperature sensor . . . . . . . . . 35Inspection . . . . . . . . . . . . . . . . . . . . . 52Installation dimensions . . . . . . . . . . . . 11Installation height . . . . . . . . . . . . . . . 15Installation room . . . . . . . . . . . . . . . . 15Installation site . . . . . . . . . . . . . . . . . 15Installation surface . . . . . . . . . . . . . . 15Installation versions
Ambient air-dependent . . . . . . . . . 14Ambient-air-independent . . . . . . . . 13Overview . . . . . . . . . . . . . . . . . . . 12Partially ambient air-independent . 13
Integrated connection group . . . . . . . 48L
LAS connectionConnection dimensions . . . . . . . . . 18
MMains switch . . . . . . . . . . . . . . . . . . . 28Mains voltage . . . . . . . . . . . . . . . . . . 64Maintenance . . . . . . . . . . . . . . . . . . . 52Maintenance log . . . . . . . . . . . . . . . . 75Make-up water . . . . . . . . . . . . . . . . . 20Manual operation . . . . . . . . . . . . .26, 30Mixer circuit inflow sensor . . . . . . . . . 22Mode selector key . . . . . . . . . . . . . . . 29
OOil nozzle
Distance to air nozzle . . . . . . . . . . 45Oil pump . . . . . . . . . . . . . . . . . . . . . . 47Operating elements . . . . . . . . . . . . . . 28Operating instructions . . . . . . . . . . . . . 9Operating mode . . . . . . . . . . . . . . . . . 29
Selection . . . . . . . . . . . . . . . . . . . 31Operating safety
Instructions . . . . . . . . . . . . . . . . . . 7P
Parallel operation . . . . . . . . . . . . . . . 48pH value . . . . . . . . . . . . . . . . . . . . . . 20Pre-heating of oil . . . . . . . . . . . . . . . . 40Proper use . . . . . . . . . . . . . . . . . . . . . . 6
RRecirculation . . . . . . . . . . . . . . . . . . . 43Remove the silencer hood. . . . . . . . . . 52Room controller . . . . . . . . . . . . . . . . . 24Room station . . . . . . . . . . . . . . . . . . . 24Rotary switch . . . . . . . . . . . . . . . . . . 29Rotary switch I . . . . . . . . . . . . . . . . . 31Rotary switch II . . . . . . . . . . . . . . . . 31
SSafety management . . . . . . . . . . . . . . 9Safety shutdown . . . . . . . . . . . . . . . . . 9Scope of delivery . . . . . . . . . . . . . . . . 14Service position . . . . . . . . . . . . . . . . . 45Shutdown . . . . . . . . . . . . . . . . . . . . . 66Start-up . . . . . . . . . . . . . . . . . . . . . . 25
Checklist . . . . . . . . . . . . . . . . . . . 27Prerequisites . . . . . . . . . . . . . . . . 25
STB Function . . . . . . . . . . . . . . . . . . 26Storage tank temperature sensor 22, 36Structure . . . . . . . . . . . . . . . . . . . . . . . 8Surface temperature . . . . . . . . . . . . . 16System information . . . . . . . . . . . 29, 31
TTarget room temperature . . . . . . . 29, 31Target temperature of the hot water storage tank . . . . . . . . . . . . . . . . 29, 31Temperature sensor
Connection . . . . . . . . . . . . . . . . . 23Instructions . . . . . . . . . . . . . . . . . 22
Three-way switch valve . . . . . . . . . . 21U
Unit installation roomRequirements . . . . . . . . . . . . . . . . . 7
WWater hardness . . . . . . . . . . . . . . . . . 20Water shortage protection . . . . . . . . . 20Wiring diagram . . . . . . . . . . . . . . . . . 38

12 x Notes
73FA ROTEX A1 BO Inline - 03/2007

12 x Notes
74 FA ROTEX A1 BO Inline - 03/2007

13 x Maintenance log
75FA ROTEX A1 BO Inline - 03/2007
13 Maintenance logPlease complete the maintenance log with the maintenance work carried out and the measured values recorded.
Maintenance jobs Initial start-up 1st service 2nd service 3rd service 4th serviceLeakage testing heating pipe connection
Leakage testing process water connections
Leakage testing Oil connection
Visual inspection of electrical components, testing of electrical connections
Testing the pH value on condensate outflow (enter value)
Function testing and purification of condensate preparation and outflow
Inspection of the flue gas connection
Cleaning of the combustion chamber
Cleaning and inspection of the burner
Oil nozzle change Used nozzles: Manufacturer/Type
Rechecking burner setting
Distance checking ignition electrodes
Cleaning of silencer hood, boiler panelling, storage tank
Putting the burner into operation and recording measured valuesOil pressure at the burner
Carbon dioxide (CO2) in the flue gas duct
Oxygen (O2) in the flue gas duct
Carbon dioxide (CO2) in the supply air (ring-shaped gap measurement)Flue gas temperature in the flue gas duct
Temperature of the suction air
Carbon monoxide (CO)
Maintenance confirmed
(Company stamp,Date, Signature)
Modifications made to the control setting parameters, other remarks on the heating system
Date Signature Remarks

For the chimney sweep
76 ---Advance version--- FA ROTEX A1 BO Inline - 01/2007
14
008.
15 1
10 4
9· E
rrors
and
tech
nica
l mod
ifica
tions
rese
rved
· Or
igin
al m
anua
l 10/
2006
14 For the chimney sweepData for designing the flue gas duct
Tab. 14-1 Triple values for chimney design
Figure 14-1 Flue gas mass flow / burner output ROTEX oil condensing boiler A1 BO xxi
Device type
Boiler rated output in kW
Flue gas mass flow (humid) in g/s Flue gas temperature in °C Available pumping pressure in Pa
at 75/60°C at 40/30°C 75/60 °C 40/30 °CA1 BO 20i 12 5.32 5.17 70 48 150
15 6.72 6.49 75 52 15020 9.03 8.67 85 65 150
A1 BO 27i 20 9.03 8.55 79 53 10023 10.49 9.86 84 61 10027 12.40 11.61 89 68 80
A1 BO 35i 25 11.29 10.69 84 58 10030 13.68 12.86 95 66 10035 16.08 15.05 98 74 80
Check measurement ROTEX THETA 23R
The control measurement can be carried out by using a selectable automatic function (see the supplied "Quick reference operating instructions" or the "Operating manual ROTEX-control".
• Press the manual button.
The gas condensing boiler controls the maximum boiler temperature for a period of 20 min.
• Press the manual button again..
The gas condensing boiler regulates back to the minimum output. The running time for this setting is also 20 minutes.
Another pressing of the button within these 20 minutes will prematurely terminate the emission measurement.
Figure 14-2 Symbolic short manual for chimney mode of the ROTEX THETA 23R Control
Check measurement ROTEX THETA 23R
1. The rotary switch (I) is, or must be, set in position .
2. Start by simultaneously pressing the and keys.
3. The function is limited to 20 minutes for safety reasons and then jumps back to the previously selected mode. It can be restarted later if necessary.If the functioning is interrupted, a simultaneous pressing of the and
keys is sufficient.


