
Rotax 912 ULS engine installation - OIL COOLER & LINES · 2015-06-03 · ENGINE INSTALLATION OIL...
14
STOL CH 701 Zenith Aircraft Company www.zenithair.com 912S RING MOUNT Section 4 - Page 1 of 14 Revision 2 (9/17/2012) © 2012 Zenith Aircraft Co SECTION 4 ENGINE INSTALLATION OIL COOLER OIL LINES Rotax aircraft engines are manufactured and supported by Rotax GmbH of Austria. Read and understand the Rotax manuals completely before starting with the engine installation, as they contain important engine installation, operation and maintenance information. Follow all of the important safety information provided in the Rotax manuals regarding the installation, operation and maintenance of the Rotax engine. Read and understand the Rotax Operator's Manual before starting the engine . Make sure that your engine is registered with Rotax or an authorized distributor so that the factory warranty is in effect. In the United States, the Rotax distributor is Kodiak Research: http://www.kodiakbs.com Contact a Rotax distribution or service partner if you do not understand the instructions or if you have any additional questions. Maintain copies the manuals with the aircraft in case of sale. Obtain current versions of the manuals from the official Rotax website, as well as current service and maintenance information: www.rotax-aircraft-engines.com If a discrepancy arises between the information provided by Rotax and the following pages, the Rotax manuals and/or service information and instructions take precedence. Zenith Aircraft Company does not manufacture or directly support engines. Alternative engines will affect performance, specifications and flight characteristics of the aircraft. Also, the weight and balance of the aircraft may be adversely affected by alternative engines, and the original fuel system may not be adequate or suitable for some engines. Most alternative engines will require a custom engine mount and engine cowl.
Transcript of Rotax 912 ULS engine installation - OIL COOLER & LINES · 2015-06-03 · ENGINE INSTALLATION OIL...

STOL CH 701
Zenith Aircraft Company www.zenithair.com
912S RING MOUNT Section 4 - Page 1 of 14
Revision 2 (9/17/2012) © 2012 Zenith Aircraft Co
SECTION 4
ENGINE INSTALLATION OIL COOLER
OIL LINES
Rotax aircraft engines are manufactured and supported by Rotax GmbH of Austria. Read and understand the Rotax manuals completely before starting with the engine installation, as they contain important engine installation, operation and maintenance information. Follow all of the important safety information provided in the Rotax manuals regarding the installation, operation and maintenance of the Rotax engine. Read and understand the Rotax Operator's Manual before starting the engine. Make sure that your engine is registered with Rotax or an authorized distributor so that the factory warranty is in effect. In the United States, the Rotax distributor is Kodiak Research: http://www.kodiakbs.com Contact a Rotax distribution or service partner if you do not understand the instructions or if you have any additional questions. Maintain copies the manuals with the aircraft in case of sale. Obtain current versions of the manuals from the official Rotax website, as well as current service and maintenance information: www.rotax-aircraft-engines.com If a discrepancy arises between the information provided by Rotax and the following pages, the Rotax manuals and/or service information and instructions take precedence. Zenith Aircraft Company does not manufacture or directly support engines. Alternative engines will affect performance, specifications and flight characteristics of the aircraft. Also, the weight and balance of the aircraft may be adversely affected by alternative engines, and the original fuel system may not be adequate or suitable for some engines. Most alternative engines will require a custom engine mount and engine cowl.

STOL CH 701
Zenith Aircraft Company www.zenithair.com
912S RING MOUNT Section 4 - Page 2 of 14
Revision 2 (9/17/2012) © 2012 Zenith Aircraft Co
P/N: 944-240 Cup washers (steel washers with ridge). P/N: 860-690 Shock mounts. P/N: AN7-41A 7/16” airframe bolt, SL nut. STRUT Distance tube 1/2x.058” length =45mm.
Insert AN7-41A bolt through 944-240 Cup washers and 860-690 Shock mounts.

STOL CH 701
Zenith Aircraft Company www.zenithair.com
912S RING MOUNT Section 4 - Page 3 of 14
Revision 2 (9/17/2012) © 2012 Zenith Aircraft Co
Insert the assembly from the back side of the engine mount.
Insert the STRUT Distance tube 1/2x.058” length =45mm on the AN7 bolt.

STOL CH 701
Zenith Aircraft Company www.zenithair.com
912S RING MOUNT Section 4 - Page 4 of 14
Revision 2 (9/17/2012) © 2012 Zenith Aircraft Co
Insert 860-690 Shock mounts and 944-240 Cup washers.
Prepare the 4 shock mounts on the engine mount.
Install the engine mount to the ring mount. Add the SL nut. Torque for AN7 bolt 450 to 500 inch pounds.
Left side, hoses through ring mount.

STOL CH 701
Zenith Aircraft Company www.zenithair.com
912S RING MOUNT Section 4 - Page 5 of 14
Revision 2 (9/17/2012) © 2012 Zenith Aircraft Co
Looking down at left side.
Bolt the engine mount to the firewall.
Looking at the bottom of the firewall.
Optional equipment shown in picture to left. P/N: M12175 Oil Drain Valve

STOL CH 701
Zenith Aircraft Company www.zenithair.com
912S RING MOUNT Section 4 - Page 6 of 14
Revision 2 (9/17/2012) © 2012 Zenith Aircraft Co
Looking up at left side.
P/N: TOP
Looking up at the right side.
TOP oil cooler attachment plate.

STOL CH 701
Zenith Aircraft Company www.zenithair.com
912S RING MOUNT Section 4 - Page 7 of 14
Revision 2 (9/17/2012) © 2012 Zenith Aircraft Co
P/N: 886-34 Oil Cooler.
P/N: 156-088 Nut M22.
P/N: 156-088 Nut M22. P/N: 156-088 Nut M22. Cut off the bottom portion of the screw to make room for the cooler.
STOL CH 701
Zenith Aircraft Company www.zenithair.com
912S RING MOUNT Section 4 - Page 8 of 14
Revision 2 (9/17/2012) © 2012 Zenith Aircraft Co
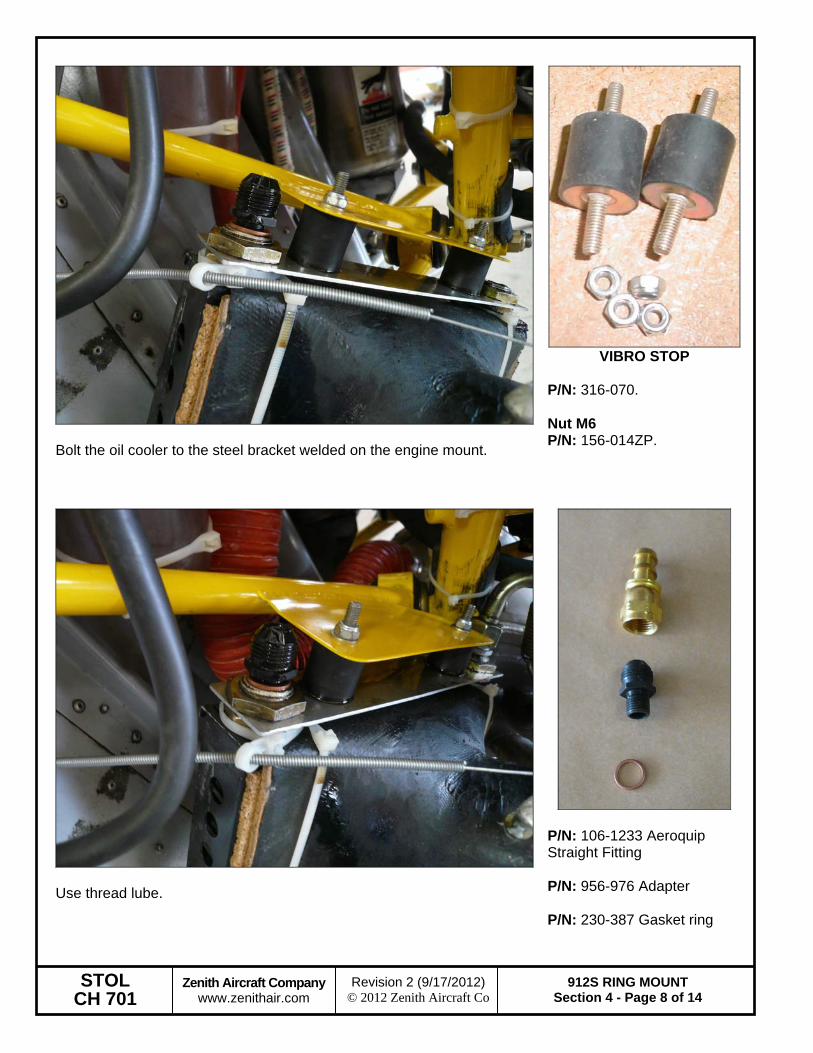
Bolt the oil cooler to the steel bracket welded on the engine mount.
VIBRO STOP
P/N: 316-070. Nut M6 P/N: 156-014ZP.
Use thread lube.
P/N: 106-1233 Aeroquip Straight Fitting P/N: 956-976 Adapter P/N: 230-387 Gasket ring
STOL CH 701
Zenith Aircraft Company www.zenithair.com
912S RING MOUNT Section 4 - Page 9 of 14
Revision 2 (9/17/2012) © 2012 Zenith Aircraft Co
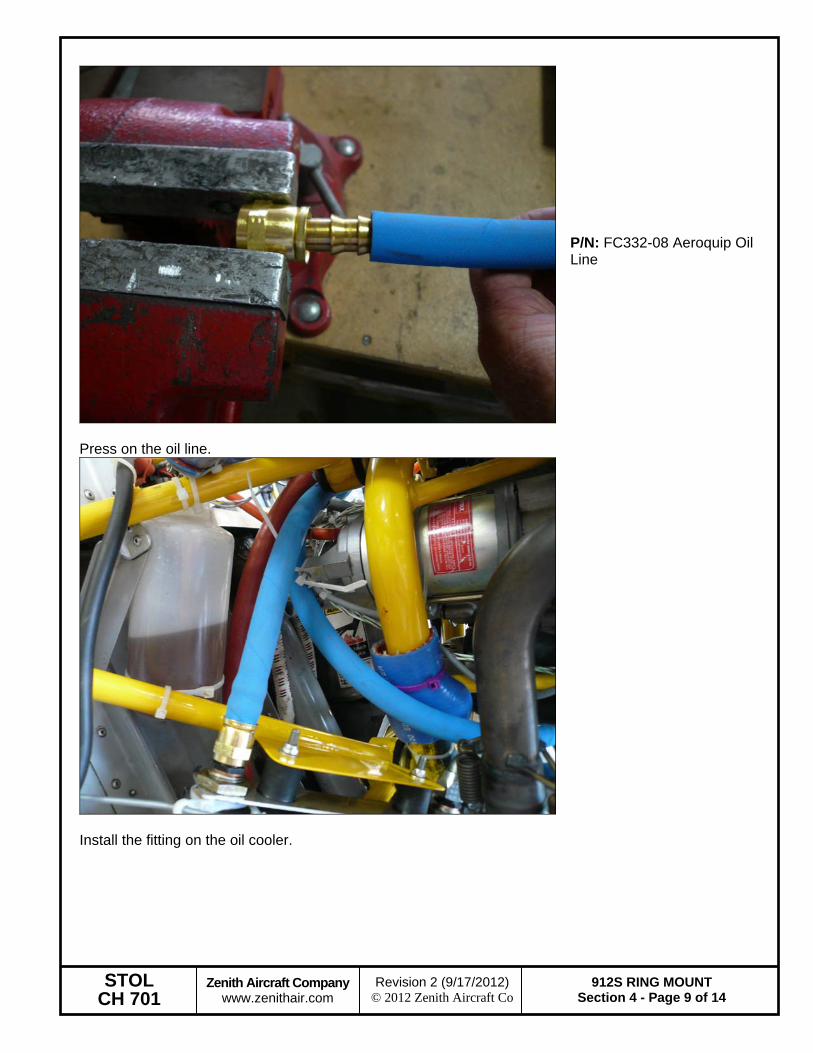
Press on the oil line.
P/N: FC332-08 Aeroquip Oil Line
Install the fitting on the oil cooler.

STOL CH 701
Zenith Aircraft Company www.zenithair.com
912S RING MOUNT Section 4 - Page 10 of 14
Revision 2 (9/17/2012) © 2012 Zenith Aircraft Co
Press on the oil line. Left attachment of the Oil Cooler.
P/N: 106-1243 90 deg Aeroquip Fitting P/N: 956-976 Adaptor P/N: 230-387 Gasket ring.
Fiberglass DUCT with 3-1/2” inlet. Add cork on the inside of the scoop.
3-1/2” Scatt hose P/N: SCATT-14
Hose clamp P/N: QS200-44H

STOL CH 701
Zenith Aircraft Company www.zenithair.com
912S RING MOUNT Section 4 - Page 11 of 14
Revision 2 (9/17/2012) © 2012 Zenith Aircraft Co
Add cork on the sides of the oil cooler. (Peal back self adhesive tape).
P/N: P10412 CORK
Attached cover with tie warps. Connect 2 tie wraps together to make one longer one.
If necessary trim the corners on the top flange to make room for the fittings.
STOL CH 701
Zenith Aircraft Company www.zenithair.com
912S RING MOUNT Section 4 - Page 12 of 14
Revision 2 (9/17/2012) © 2012 Zenith Aircraft Co
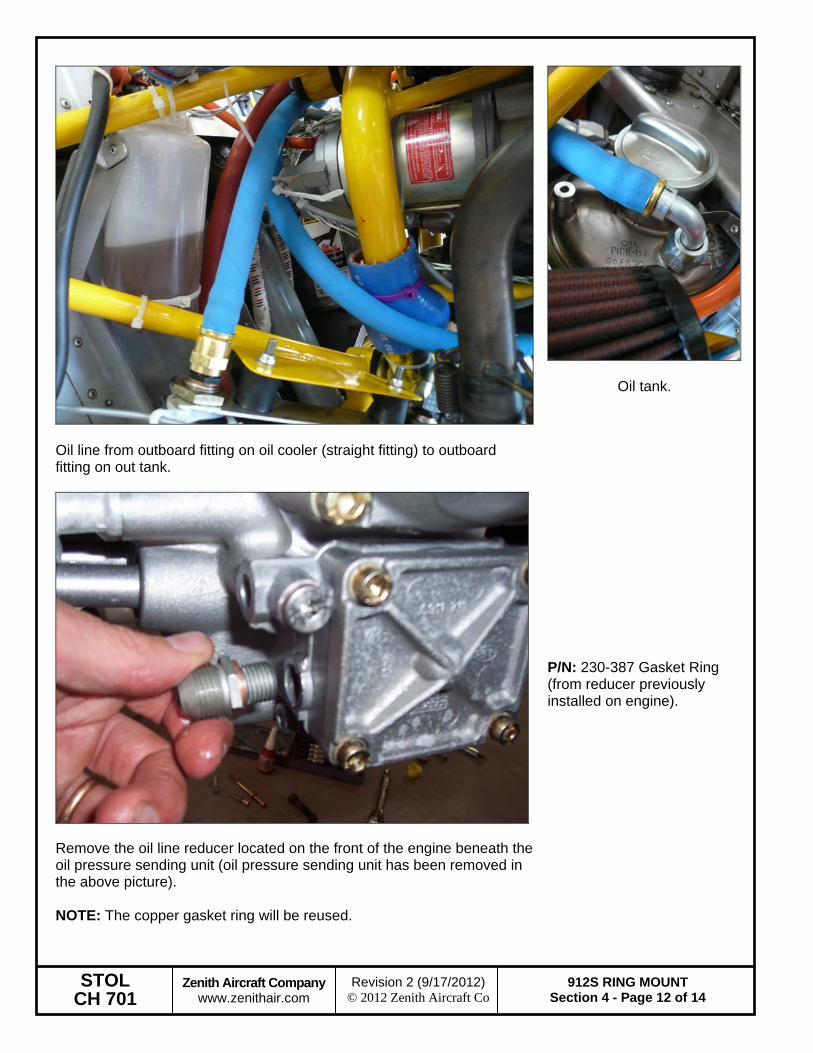
Oil line from outboard fitting on oil cooler (straight fitting) to outboard fitting on out tank.
Oil tank.
Remove the oil line reducer located on the front of the engine beneath the oil pressure sending unit (oil pressure sending unit has been removed in the above picture). NOTE: The copper gasket ring will be reused.
P/N: 230-387 Gasket Ring (from reducer previously installed on engine).

STOL CH 701
Zenith Aircraft Company www.zenithair.com
912S RING MOUNT Section 4 - Page 13 of 14
Revision 2 (9/17/2012) © 2012 Zenith Aircraft Co
Install Adapter with copper Gasket Ring (from reducer) in place of reducer. Press on Oil Line from left side of the Oil Cooler on the Aeroquip Fitting and install on the Adapter.
P/N: 956-976 Adaptor P/N: 106-1243 90 deg Aeroquip Fitting
Oil tanks located on left side of engine. Press on the Oil Line on the 90 Degree Aeroquip Fitting. Install the 90 Degree Aeroquip Fittings to the top of the Oil Tank on both I/B and O/B side of the Oil Tank. Fitting on I/B side of tank connects to the bottom of the engine.
P/N: 106-1243 90 Deg Aeroquip Fitting

STOL CH 701
Zenith Aircraft Company www.zenithair.com
912S RING MOUNT Section 4 - Page 14 of 14
Revision 2 (9/17/2012) © 2012 Zenith Aircraft Co
Determine the length of the Oil Line and cut to length. Press the Oil Line on the Straight Aeroquip Fitting and install it on the Banjo Fitting.
P/N: P/N: 106-1233 Aeroquip Straight Fitting