RoomWizard Exchange Online Connector
40
RoomWizard Exchange Online Connector Complete Implementation Guide
Transcript of RoomWizard Exchange Online Connector

RoomWizard Exchange Online Connector
Complete Implementation Guide
ROOMWIZARD EXCHANGE ONLINE CONNECTOR INSTALLATION GUIDE
Exchange Online Connector Installation
2
Before installing and configuring the Exchange Cloud Connector, you will need the following:
• Windows server on which to install the connector (details below)
• Connector package, downloaded and unzipped, on the desktop of the Web Server
• Local domain service account that can be used to log in to the Web Server
• User account configured in Exchange that the connector will use to connect
to Exchange (one Enterprise-type account, E1 and above) Microsoft link
• Resources with mailboxes for calendars (one for each RoomWizard)
Note: Newly created accounts and resources take three hours to replicate with Microsoft
• Full mailbox permissions between user account and each resource mailbox
• Exchange Web Services (EWS) server URL for the customer’s Exchange service
(not applicable in Exchange 2013 environments)
URL will be different for each hosting provider
Connector will use Exchange’s autodiscovery to locate the EWS server,
but some environments won’t have autodiscovery configured
What is autodiscovery and how does it work? (See Appendix B for testing)
Autodiscovery is a process that Microsoft supports for locating Exchange Web Services servers based
on an email address or domain. This is usually easier than specifying an EWS URL because most people
know an email address but not the name of a server. To test Exchange Web Services connections, you
can use Microsoft’s Test Connectivity Analyzer: testconnectivity.microsoft.com
What is Impersonation and how does it work?
Exchange Impersonation is a mechanism that allows a single Windows Active Directory account
(your RoomWizard Service account) to act on behalf of other users on a Microsoft Exchange mailbox
(your RoomWizard Resource Mailboxes), as if they were performing the action themselves.
This greatly reduces the number of connections counted against the service account. Too many connections
by any one account will result in Exchange throttling back access by that account through the EWS API.
See Appendix D for configuring Exchange and Impersonation.

3
ROOMWIZARD EXCHANGE ONLINE CONNECTOR INSTALLATION GUIDE
System Requirements
• Server 2008 or Server 2012 (see Appendix C for details on installing on Server 2012)
• Port 8080 open in Server firewall; this will be used when configuring the Connector Website
Server Manager
• .NET Framework 3.5.1 (Features), 4.0 and 4.5 (Programs/Features) microsoft.com/net
• ASP.NET (Application Development): Install via Server Manager, Web Server (IIS)
Role Services, Add Role Services
• Basic Authentication module (Security): Install via Server Manager, Web Server (IIS)
Role Services, Add Role Services
IIS (Internet Information Service)
• IIS 7 or IIS 8 (see Appendix C for details on installing on Server 2012) iis.net
• Web Platform Installer in IIS (Installer only, to be used in later steps)
microsoft.com/web/downloads/platform.aspx
• Web Deploy (Web Deployment Tool) in IIS iis.net/download/webdeploy

4
ROOMWIZARD EXCHANGE ONLINE CONNECTOR INSTALLATION GUIDE
Configure Room Mailboxes
The Exchange Online Connector requires full user access to the room mailboxes managed
by the RoomWizard devices.
There are several ways that an administrator can provide full access to the RoomWizard service using
PowerShell. We have provided a script that can automatically grant full access to resource mailboxes.
However, if you choose to bypass the script, we have provided alternative PowerShell instructions.
Granting Access Using The PowerShell Script
1. Right-click GrantFullAccess.ps1 and select Run with PowerShell.
5
CONFIGURE ROOM MAILBOXES ROOMWIZARD EXCHANGE ONLINE CONNECTOR INSTALLATION GUIDE
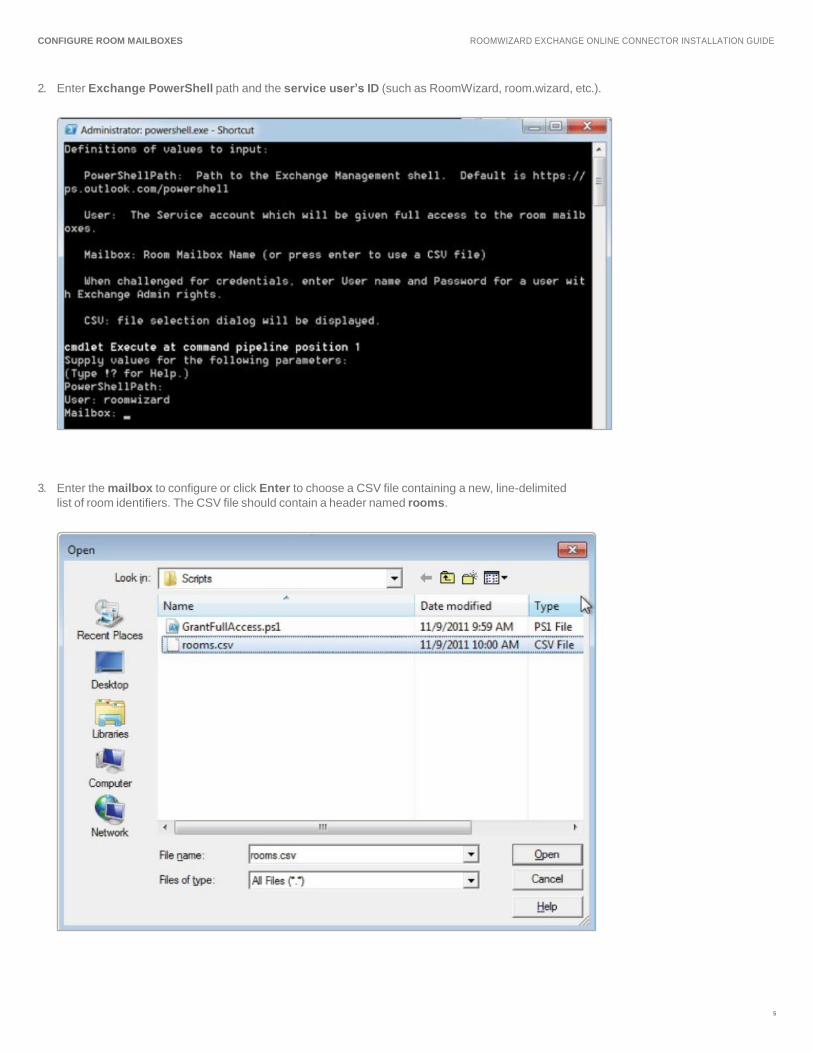
2. Enter Exchange PowerShell path and the service user’s ID (such as RoomWizard, room.wizard, etc.).
3. Enter the mailbox to configure or click Enter to choose a CSV file containing a new, line-delimited
list of room identifiers. The CSV file should contain a header named rooms.
6
CONFIGURE ROOM MAILBOXES ROOMWIZARD EXCHANGE ONLINE CONNECTOR INSTALLATION GUIDE
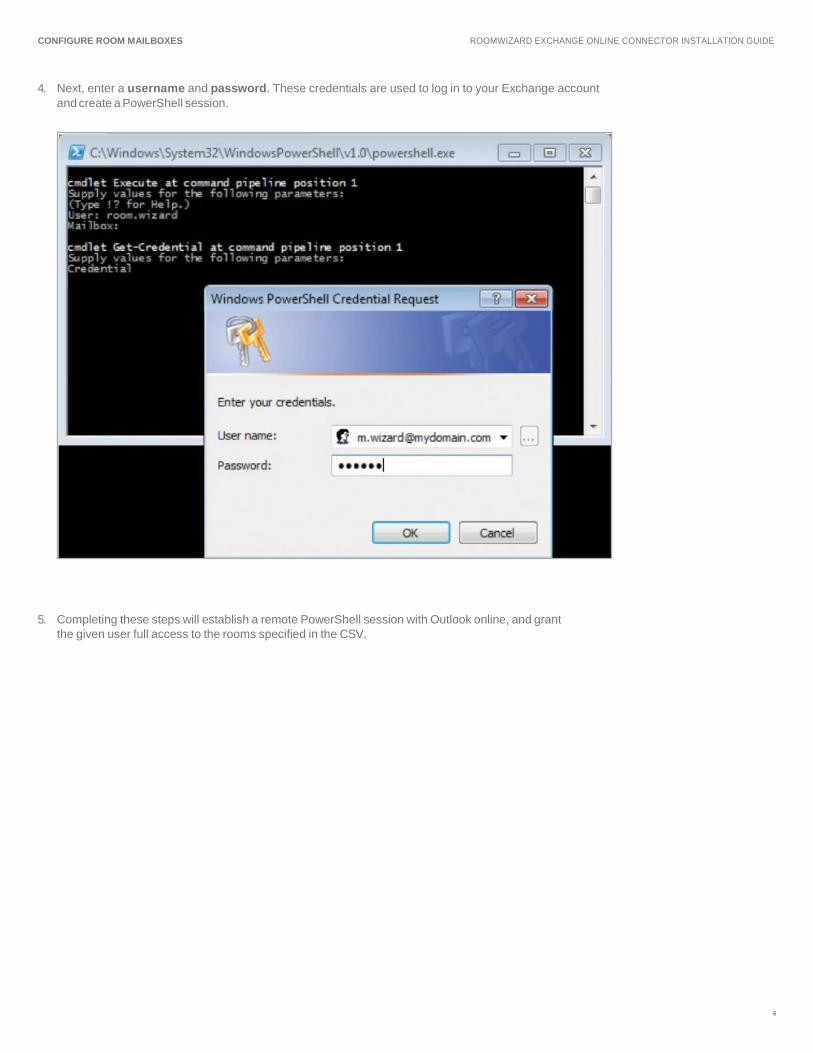
4. Next, enter a username and password. These credentials are used to log in to your Exchange account
and create a PowerShell session.
5. Completing these steps will establish a remote PowerShell session with Outlook online, and grant
the given user full access to the rooms specified in the CSV.

7
CONFIGURE ROOM MAILBOXES ROOMWIZARD EXCHANGE ONLINE CONNECTOR INSTALLATION GUIDE
Granting Application Impersonation Role Manually via PowerShell
This section provides the necessary commands to configure a service user that has the Application Impersonation
role. To proceed, a working knowledge of PowerShell is recommended.
The following command is used to grant the Application Impersonation role:
New-ManagementRoleAssignment –Name:impersonationAssignmentName –Role:ApplicationImpersonation
–User: <Service User>
For example: New-ManagementRoleAssignment –Name:impersonationAssignmentName –
Role:ApplicationImpersonation –User: “[email protected]”
The following command checks if a user has the Application Impersonation role:
Get-ManagementRoleAssignment -RoleAssignee <Service User> -Role ApplicationImpersonation
-RoleAssigneeType user
For example: Get-ManagementRoleAssignment -RoleAssignee “[email protected]”
-Role ApplicationImpersonation -RoleAssigneeType user
Configuring Room Mailbox
By default, a room does not auto-accept invitations. In order for the RoomWizard and Exchange Connector
to work properly, the room needs to be configured to auto-accept invitations. The room should also be
configured to reject conflicting meetings.
The following command configures every room’s mailbox to auto-accept invitations:
Get-Mailbox | where{$_.ResourceType -eq “Room”} | Set-CalendarProcessing -AutomateProcessing
AutoAccept -AllowConflicts $false
If you want to maintain the comments and private flag between the resource and the user, add the following
arguments to the command above: -RemovePrivateProperty $false -DeleteComments $false
Reference: http://technet.microsoft.com/en-us/library/dd335046.aspx
The following command configures a specific room’s mailbox to auto-accept invitations:
Get-Mailbox “UpstairsConferenceRoom” | Set-CalendarProcessing -AutomateProcessing AutoAccept
By default, the room does not display the original subject of an invitation. Instead, the room shows the organizer’s
name as the subject. If this format is not desired, the following command will reconfigure the room mailbox to show
the invitation subject:
Set-CalendarProcessing -Identity “$$ResourceName$$” -AddOrganizerToSubject $false -DeleteSubject $false
8
ROOMWIZARD EXCHANGE ONLINE CONNECTOR INSTALLATION GUIDE
Use the Web Platform Installer to Install ASP.NET MVC 3
This section walks through the process of setting up the environment to run the Exchange Online Connector.
You should already have the appropriate software installed as listed in the System Requirements section.
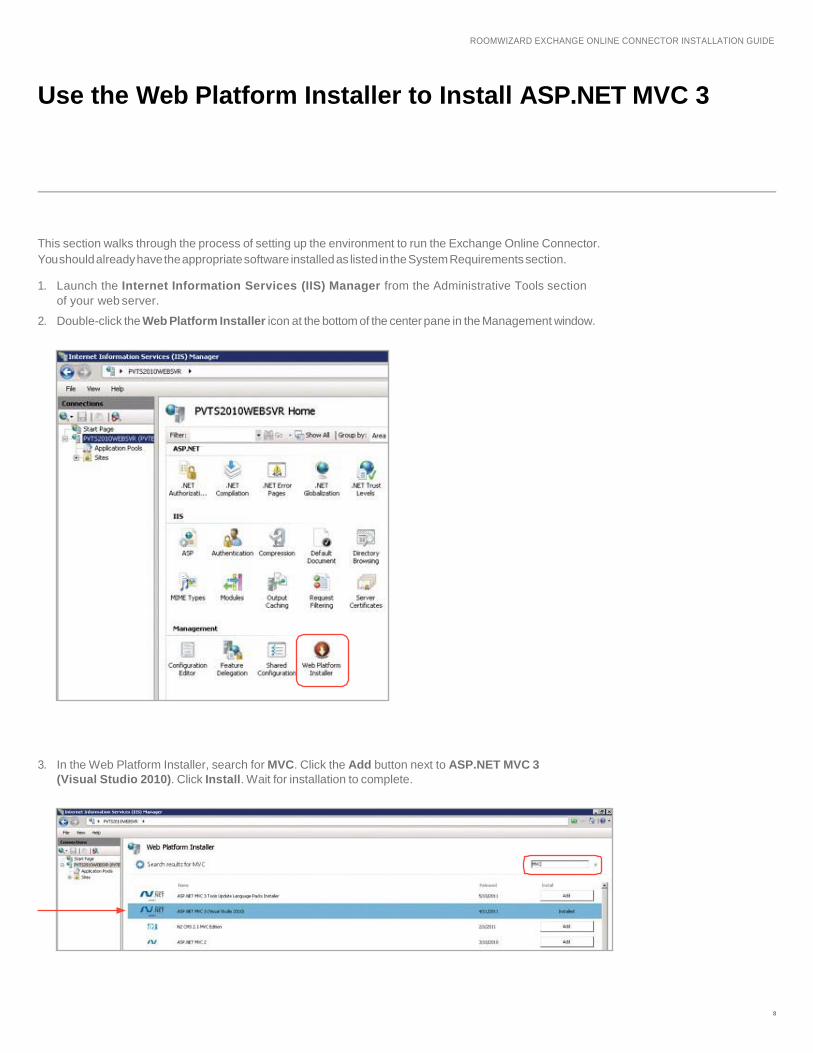
1. Launch the Internet Information Services (IIS) Manager from the Administrative Tools section
of your web server.
2. Double-click the Web Platform Installer icon at the bottom of the center pane in the Management window.
3. In the Web Platform Installer, search for MVC. Click the Add button next to ASP.NET MVC 3
(Visual Studio 2010). Click Install. Wait for installation to complete.
9
ROOMWIZARD EXCHANGE ONLINE CONNECTOR INSTALLATION GUIDE
Create a New Website Running on a .NET 4.0 Application Pool
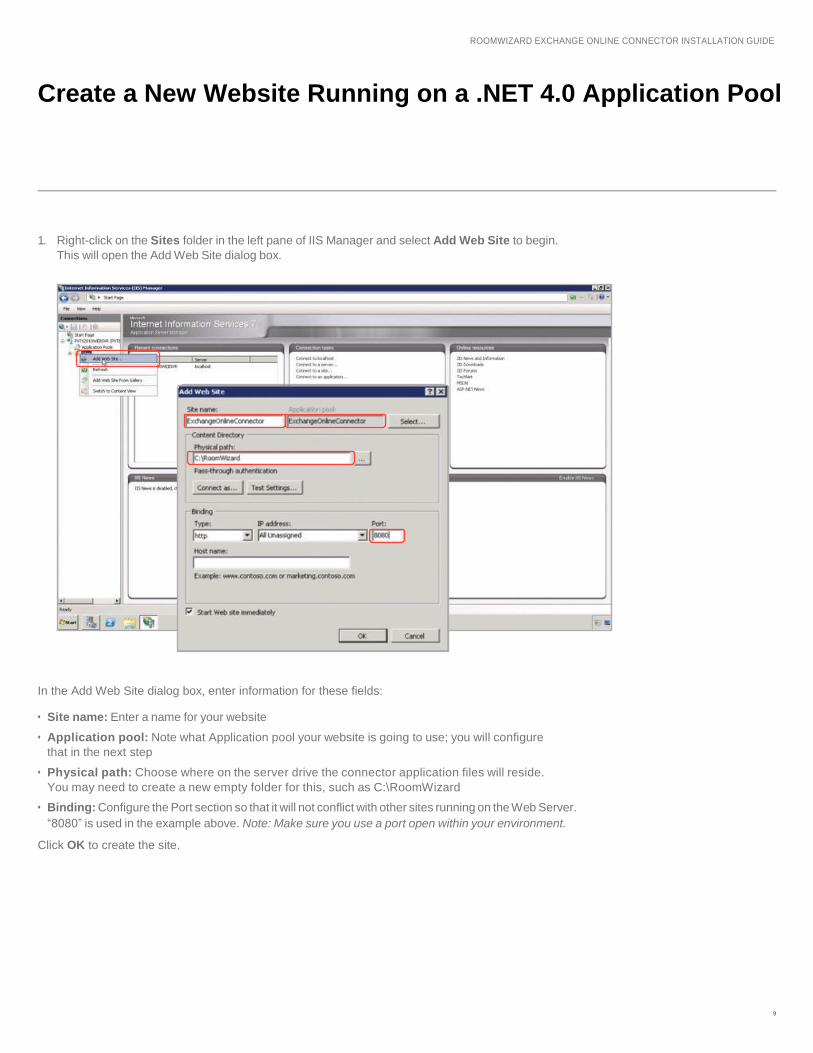
1. Right-click on the Sites folder in the left pane of IIS Manager and select Add Web Site to begin.
This will open the Add Web Site dialog box.
In the Add Web Site dialog box, enter information for these fields:
• Site name: Enter a name for your website
• Application pool: Note what Application pool your website is going to use; you will configure
that in the next step
• Physical path: Choose where on the server drive the connector application files will reside.
You may need to create a new empty folder for this, such as C:\RoomWizard
• Binding: Configure the Port section so that it will not conflict with other sites running on the Web Server.
“8080” is used in the example above. Note: Make sure you use a port open within your environment.
Click OK to create the site.
CREATE A NEW WEBSITE RUNNING ON A .NET 4.0 APPLICATION POOL ROOMWIZARD EXCHANGE ONLINE CONNECTOR INSTALLATION GUIDE
10
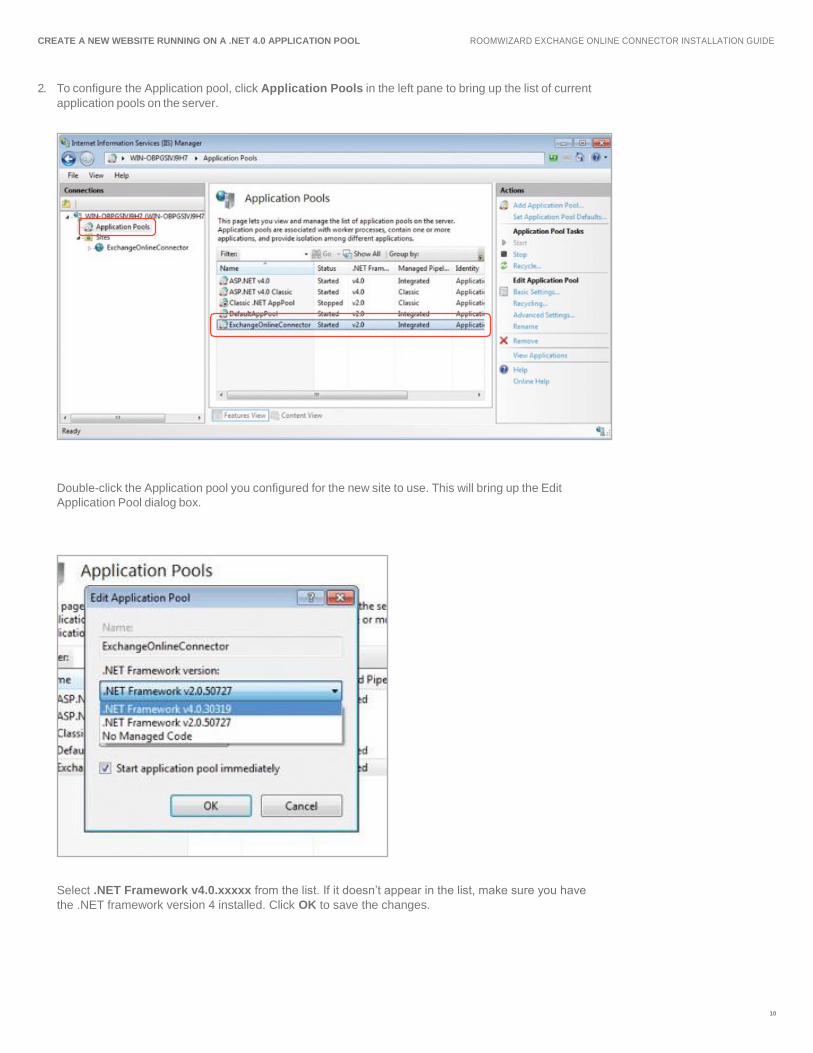
2. To configure the Application pool, click Application Pools in the left pane to bring up the list of current
application pools on the server.
Double-click the Application pool you configured for the new site to use. This will bring up the Edit
Application Pool dialog box.
Select .NET Framework v4.0.xxxxx from the list. If it doesn’t appear in the list, make sure you have
the .NET framework version 4 installed. Click OK to save the changes.

CREATE A NEW WEBSITE RUNNING ON A .NET 4.0 APPLICATION POOL ROOMWIZARD EXCHANGE ONLINE CONNECTOR INSTALLATION GUIDE
11
3. Now click back on the new website you created. Next, in the right-hand pane click on
Import Application. This will let you import a zipped application bundle into the website.
4. Click Browse and locate the zip file containing the Exchange Online Connector (this is in the Connector
package you downloaded and unzipped on the Desktop of Web Server). Click Next to continue.

CREATE A NEW WEBSITE RUNNING ON A .NET 4.0 APPLICATION POOL ROOMWIZARD EXCHANGE ONLINE CONNECTOR INSTALLATION GUIDE
12
The defaults are correct below. Copy all of the contents of the zip file and click Next to continue.
Clear the text in the Application Path box to install it in the root of the site. A dialog box will appear
confirming your choice to install the application at the root of the site instead of in a folder beneath the
root. Click OK, then click Next to continue.
CREATE A NEW WEBSITE RUNNING ON A .NET 4.0 APPLICATION POOL ROOMWIZARD EXCHANGE ONLINE CONNECTOR INSTALLATION GUIDE
13
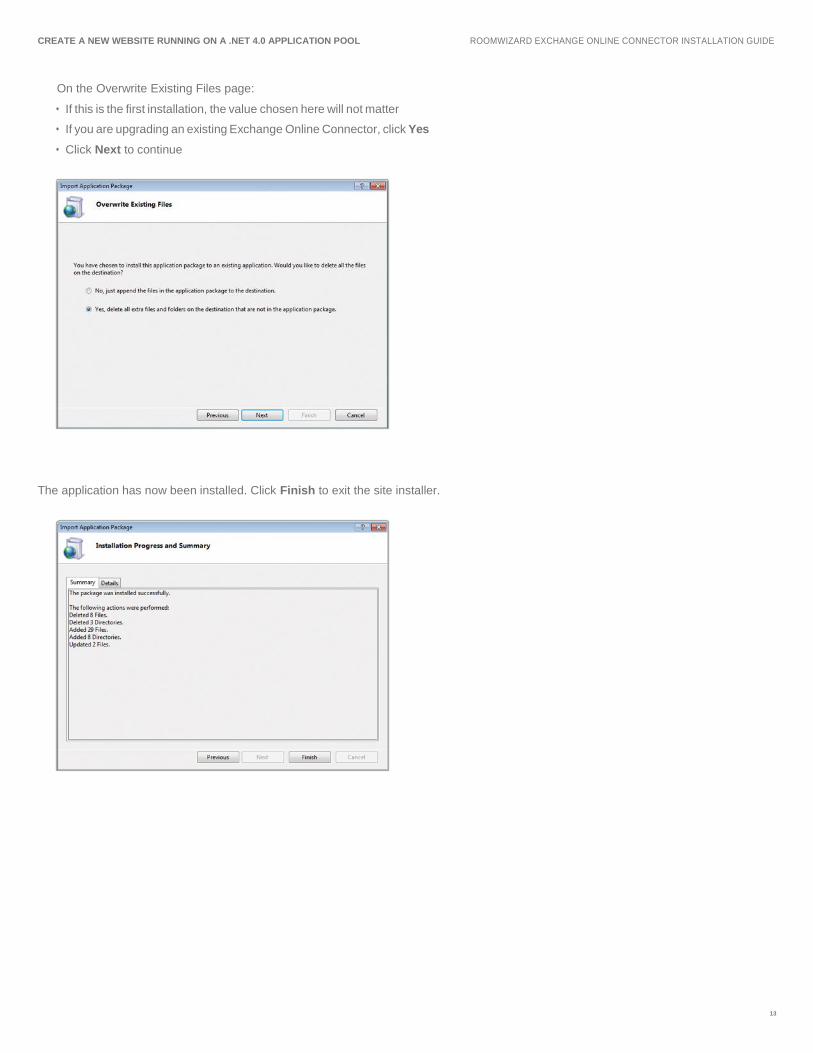
On the Overwrite Existing Files page:
• If this is the first installation, the value chosen here will not matter
• If you are upgrading an existing Exchange Online Connector, click Yes
• Click Next to continue
The application has now been installed. Click Finish to exit the site installer.
CREATE A NEW WEBSITE RUNNING ON A .NET 4.0 APPLICATION POOL ROOMWIZARD EXCHANGE ONLINE CONNECTOR INSTALLATION GUIDE
14
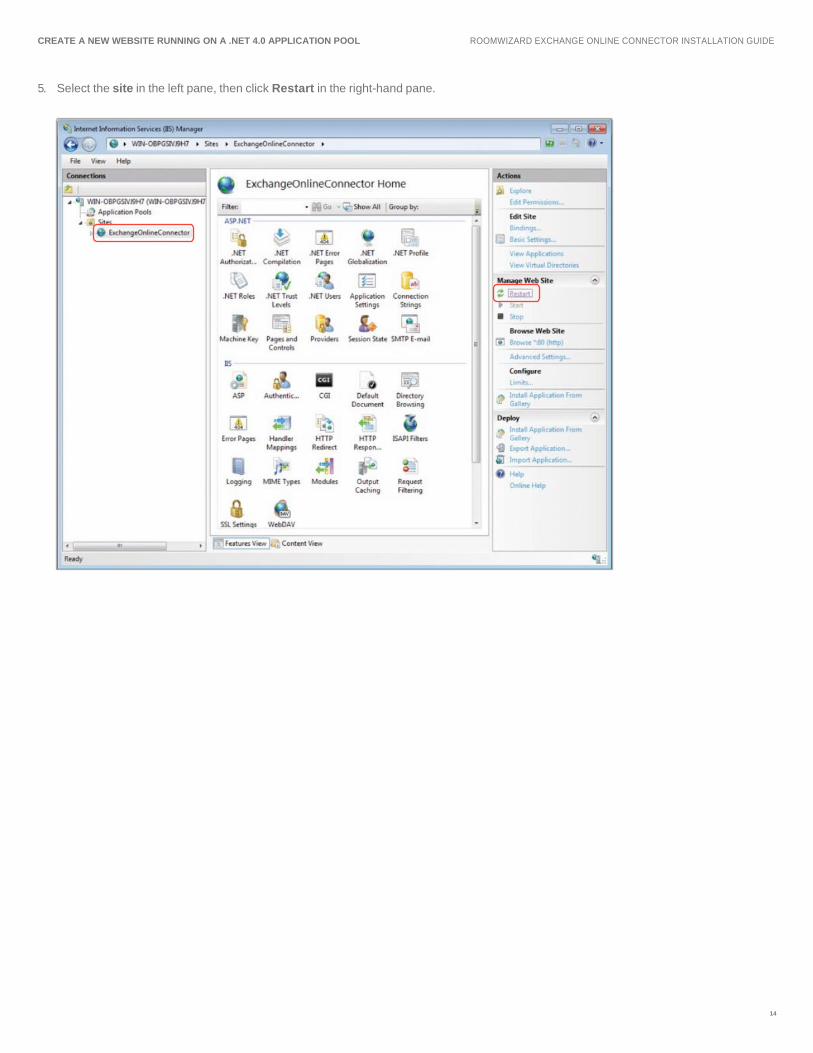
5. Select the site in the left pane, then click Restart in the right-hand pane.
15
ROOMWIZARD EXCHANGE ONLINE CONNECTOR INSTALLATION GUIDE
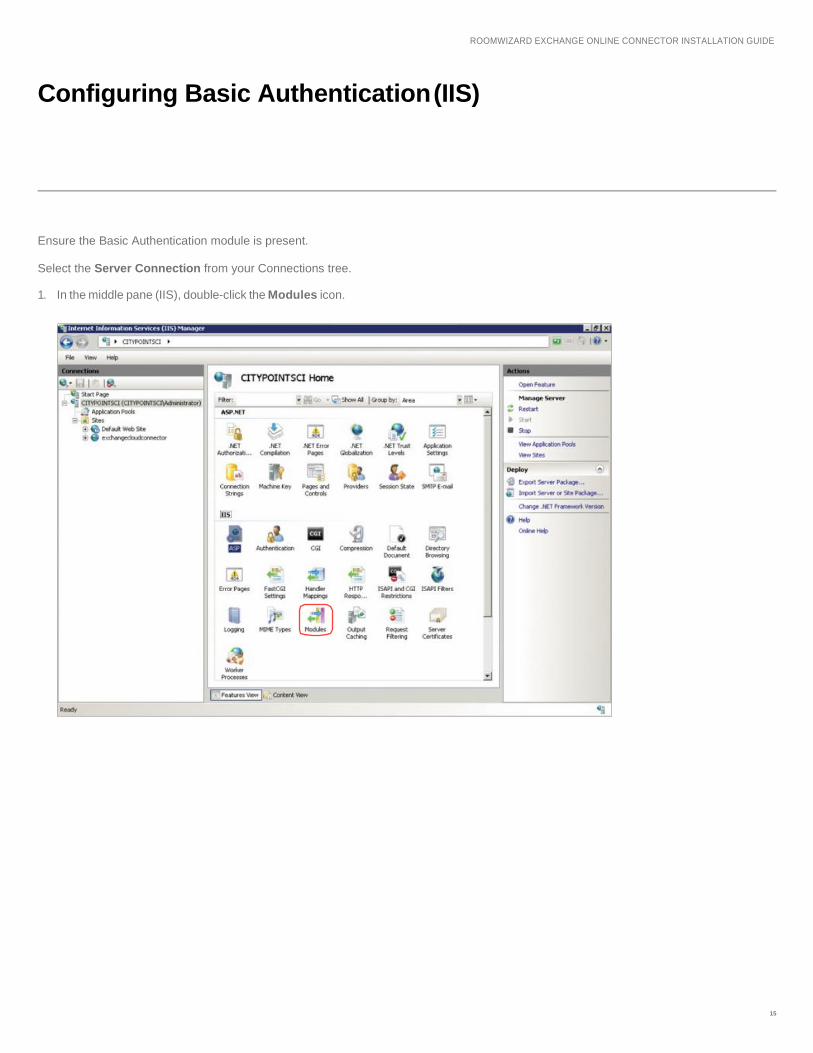
Configuring Basic Authentication (IIS)
Ensure the Basic Authentication module is present.
Select the Server Connection from your Connections tree.
1. In the middle pane (IIS), double-click the Modules icon.

16
CONFIGURING BASIC AUTHENTICATION (IIS) ROOMWIZARD EXCHANGE ONLINE CONNECTOR INSTALLATION GUIDE
2. Click on BasicAuthenticationModule.
3. In the right-hand pane, click Configure Native Modules link.
4. TokenCacheModule should be in the list that appears. Check the box next to it. (If TokenCacheModule
does not show in the list, disregard this step.)
5. Click OK.

17
CONFIGURING BASIC AUTHENTICATION (IIS) ROOMWIZARD EXCHANGE ONLINE CONNECTOR INSTALLATION GUIDE
6. Click BasicAuthenticationModule in the Modules list.
7. In the right-hand pane, if Unlock is present under Edit, click it. The word Lock should now appear
below Edit. This indicates that individual sites running on the server can configure the module.
18
CONFIGURING BASIC AUTHENTICATION (IIS) ROOMWIZARD EXCHANGE ONLINE CONNECTOR INSTALLATION GUIDE
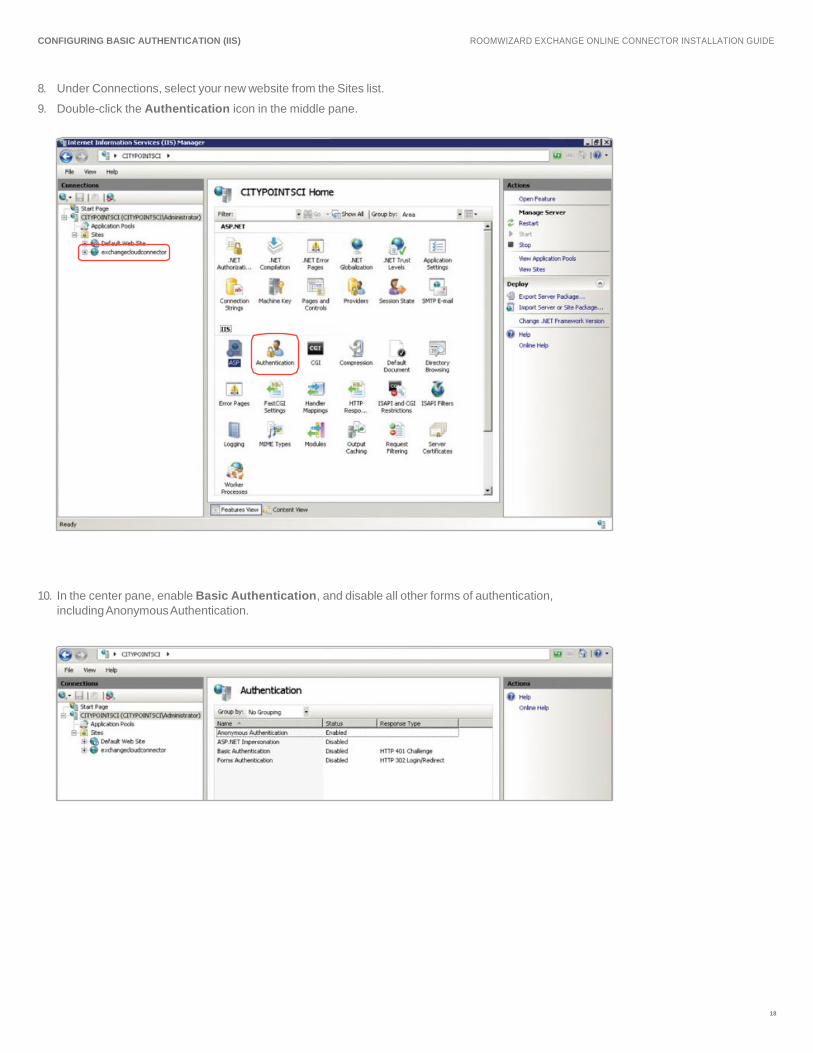
8. Under Connections, select your new website from the Sites list.
9. Double-click the Authentication icon in the middle pane.
10. In the center pane, enable Basic Authentication, and disable all other forms of authentication,
including Anonymous Authentication.
19
ROOMWIZARD EXCHANGE ONLINE CONNECTOR INSTALLATION GUIDE
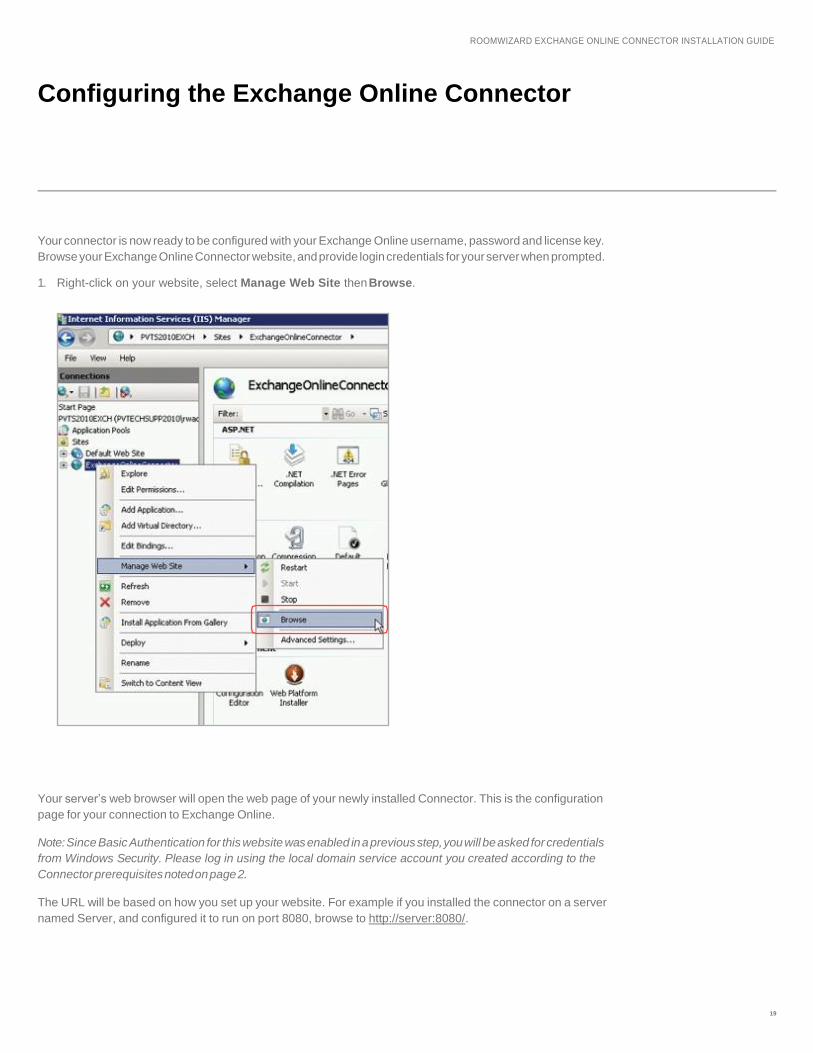
Configuring the Exchange Online Connector
Your connector is now ready to be configured with your Exchange Online username, password and license key.
Browse your Exchange Online Connector website, and provide login credentials for your server when prompted.
1. Right-click on your website, select Manage Web Site then Browse.
Your server’s web browser will open the web page of your newly installed Connector. This is the configuration
page for your connection to Exchange Online.
Note: Since Basic Authentication for this website was enabled in a previous step, you will be asked for credentials
from Windows Security. Please log in using the local domain service account you created according to the
Connector prerequisites noted on page 2.
The URL will be based on how you set up your website. For example if you installed the connector on a server
named Server, and configured it to run on port 8080, browse to http://server:8080/.
CONFIGURING THE EXCHANGE ONLINE CONNECTOR ROOMWIZARD EXCHANGE ONLINE CONNECTOR INSTALLATION GUIDE
20
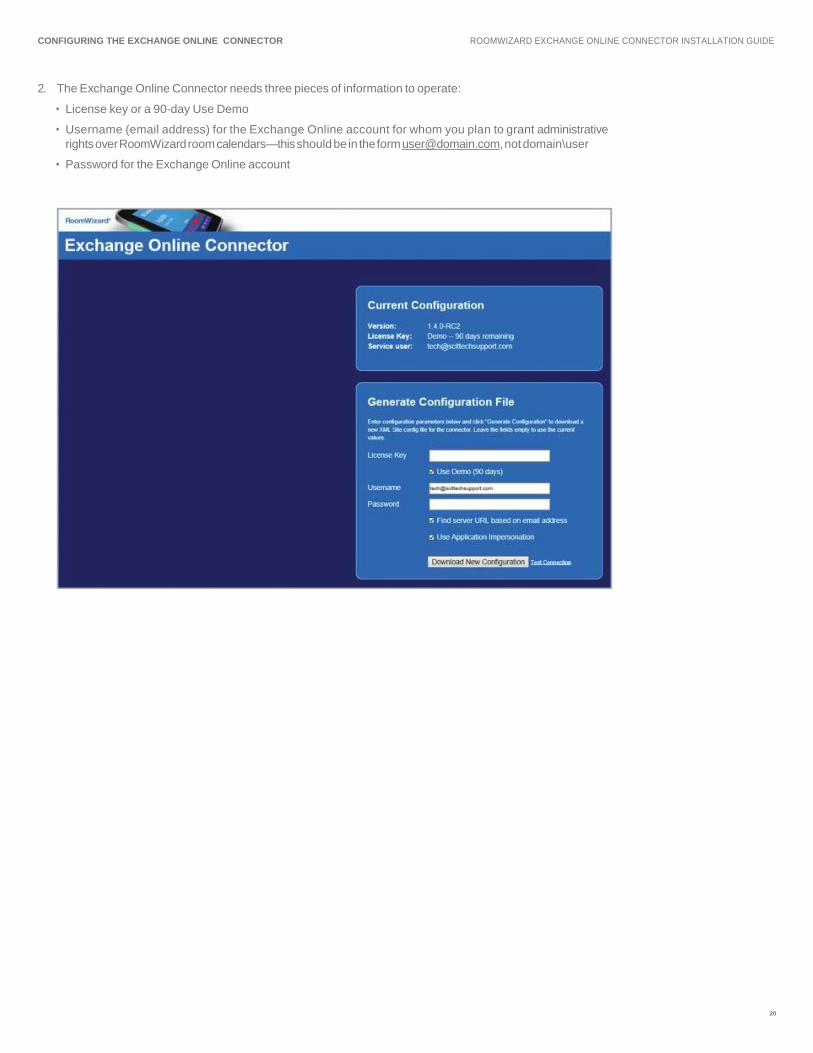
2. The Exchange Online Connector needs three pieces of information to operate:
• License key or a 90-day Use Demo
• Username (email address) for the Exchange Online account for whom you plan to grant administrative
rights over RoomWizard room calendars—this should be in the form [email protected], not domain\user
• Password for the Exchange Online account

ROOMWIZARD EXCHANGE ONLINE CONNECTOR INSTALLATION GUIDE
Generate a New Configuration
21
To generate a new configuration if you have a license:
1. Enter your license key.
2. Enter the username and password for the Exchange Online account.
3. Click Test Connection to test the Exchange connection.
4. If Test Connection is successful, click Download New Configuration and Save As Site.conf file over
the existing Site.conf in the bin folder of your Connector files (e.g., C:\RoomWizard\bin).
• If Test Connection is not successful, make sure you are using an Exchange Online email address
and it passes Microsoft’s test connectivity for Exchange Web Services. (See Appendix B for testing)
testconnectivity.microsoft.com
• If Test Connection continues to fail, make sure you have an E1 or greater Exchange account
(Microsoft link) or contact Microsoft to verify your account.
5. Restart the connector website and reload the connector page in your browser to see that the new
configuration is live.
To use the demo for up to 90 days:
1. Check Use Demo.
2. Follow steps 2-5 from above, as if you have a license.
To update your configuration from a demo to a licensed version:
Open the configuration web page, then:
1. Enter your license key.
2. Uncheck the Use Demo checkbox.
3. Download and install the new configuration as before.
4. Restart the connector’s website.

22
ROOMWIZARD EXCHANGE ONLINE CONNECTOR INSTALLATION GUIDE
Test Connection Using Connector Test Tool
1. Use the URL for the server that the Connector is installed on in Connector URL, including Application name.
2. Choose your Time Zone.
3. Click the About Connector button to test the connection to the Connector.
4. Add a meeting via Outlook and confirm acceptance by the Resource Mailbox. Click the Get Bookings
button. Response should look similar to below with Calendar bookings.
Or you can use the following command: http://Your_WebServer/Application_Name/rwceconnector.
aspx?command=get_bookings&range_start_date=20130707&range_start_time=000000&range_end_
date=20130708&range_end_time=000000&format=xml&source=fp&rnd=1326229104504&devicetype=rw10&
room_id=RoomID&time_zone=US%2FEastern
• Make sure to edit the command to match your settings. The example, above right, shows a result code of
“0” indicating there are no bookings for the room id used; the test is successful.
• Be sure to change the highlighted fields to reflect the correct URL, today’s date and tomorrow’s date, and
the correct Room_ID.

23
ROOMWIZARD EXCHANGE ONLINE CONNECTOR INSTALLATION GUIDE
Configuring the RoomWizard
The RoomWizard is configured for synchronization in the Synchronization web page via the IP address
of the device.
1. Find the IP address of your RoomWizard from the About button on the front panel of the device. Scroll
down to the bottom of the main web page and select RoomWizard setup.
2. Log in. The default password will be either roomwizard or 79201 depending on when the RoomWizard
was purchased. Your organization may have changed the password, so be sure to check with your system
administrator for an updated password.
3. Select Synchronization.
4. The RoomWizard should be set to Synchronized mode by selecting the radio button Use external source.

24
CONFIGURING THE ROOMWIZARD ROOMWIZARD EXCHANGE ONLINE CONNECTOR INSTALLATION GUIDE
The URL for the connector will be something like: http://your web server:8080/api.
1. “Your web server” is the server you installed the connector on and “8080” is the port number you used
for your website. Please use the local domain service account you created according to the Connector
prerequisites on page 2 for username and password.
2. Click the first Save on THIS Wizard button to make the connection to your Connector.
3. In the Room identifier field, enter the name of the mailbox exactly as it is configured in Exchange Online
(e.g., [email protected]). Click the second Save on THIS Wizard button to make the
Connection to your Exchange Online Calendar.

25
ROOMWIZARD EXCHANGE ONLINE CONNECTOR INSTALLATION GUIDE
Appendix A
Capturing Full Requests and Responses From IIS
The easiest way to capture the full request and responses from IIS and the Exchange Cloud Connector is to
use IIS’s Failed Request Tracing: learn.iis.net/page.aspx/266/troubleshooting-failed-requests-using-tracing-in-iis
1. Install IIS: Tracing using the Web Platform Installer.
2. Close the IIS Manager window and open it again.
3. Click Failed Request Tracing in the right-hand pane.
26
APPENDIX A ROOMWIZARD EXCHANGE ONLINE CONNECTOR INSTALLATION GUIDE
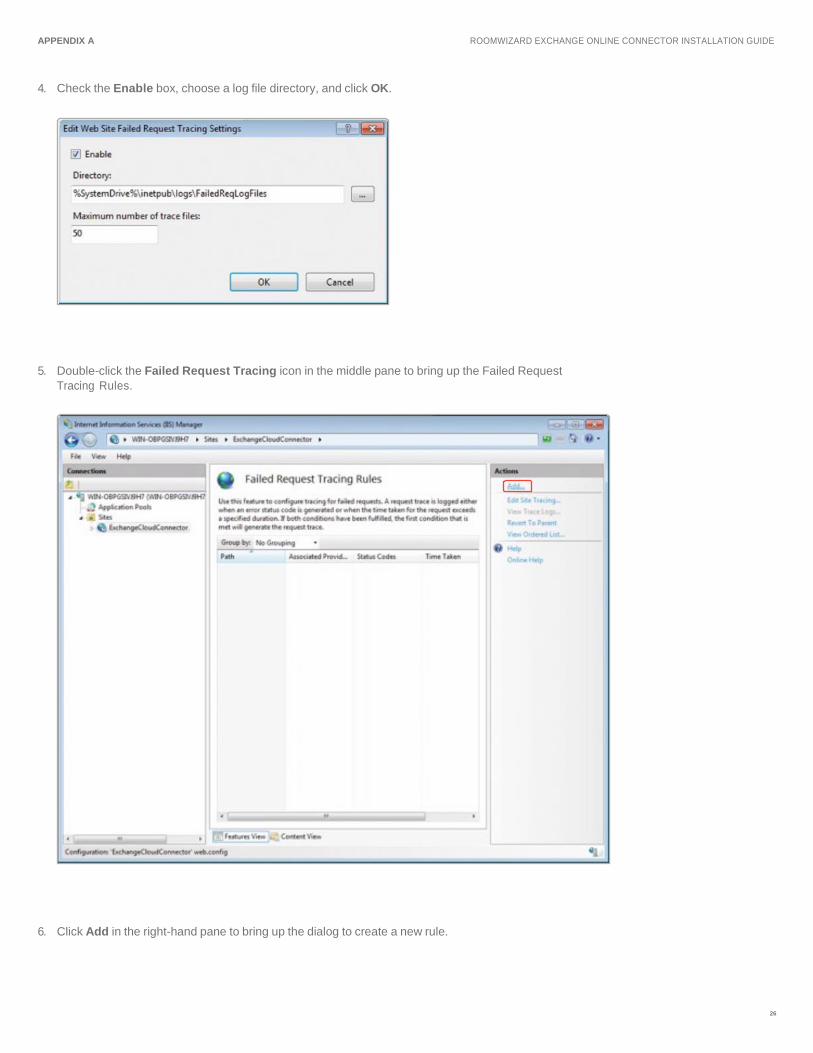
4. Check the Enable box, choose a log file directory, and click OK.
5. Double-click the Failed Request Tracing icon in the middle pane to bring up the Failed Request
Tracing Rules.
6. Click Add in the right-hand pane to bring up the dialog to create a new rule.
27
APPENDIX A ROOMWIZARD EXCHANGE ONLINE CONNECTOR INSTALLATION GUIDE
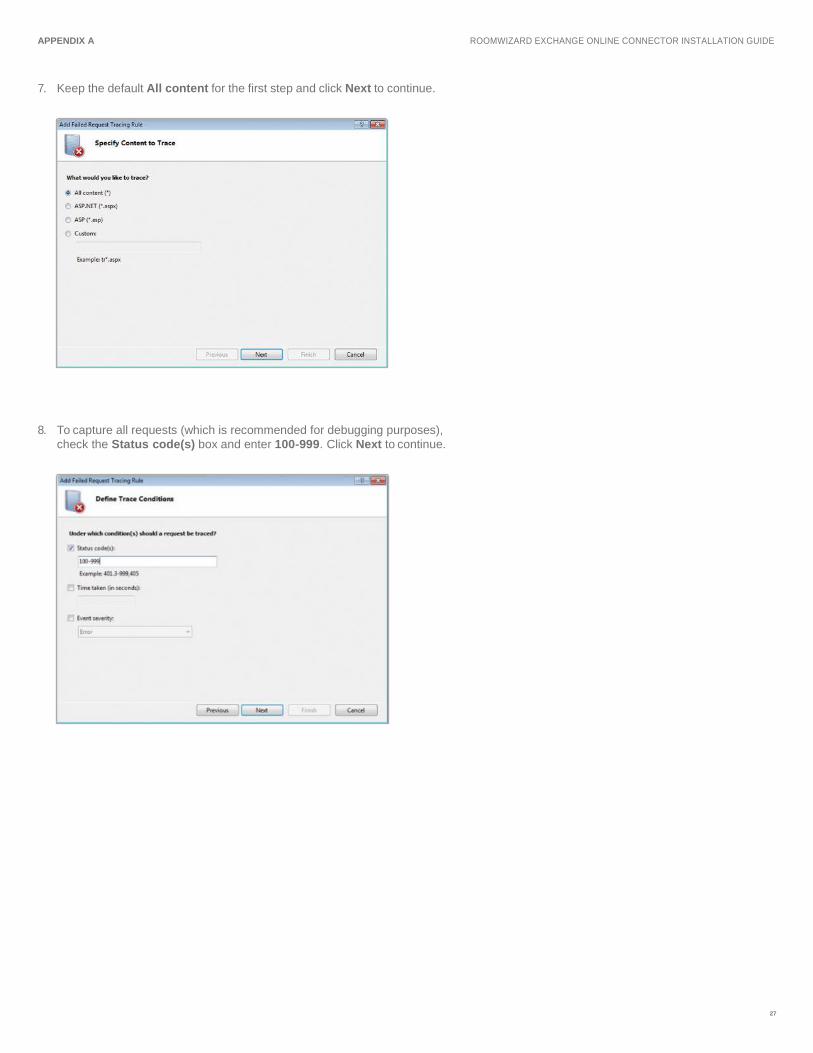
7. Keep the default All content for the first step and click Next to continue.
8. To capture all requests (which is recommended for debugging purposes),
check the Status code(s) box and enter 100-999. Click Next to continue.
28
APPENDIX A ROOMWIZARD EXCHANGE ONLINE CONNECTOR INSTALLATION GUIDE
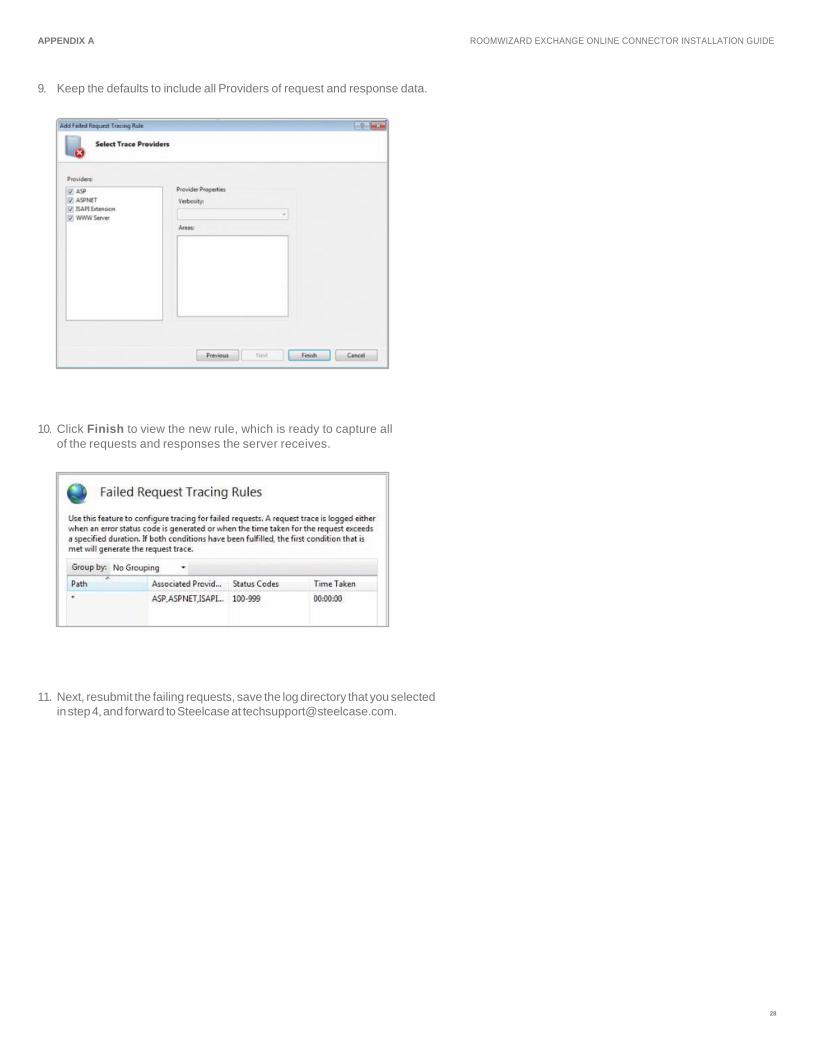
9. Keep the defaults to include all Providers of request and response data.
10. Click Finish to view the new rule, which is ready to capture all
of the requests and responses the server receives.
11. Next, resubmit the failing requests, save the log directory that you selected
in step 4, and forward to Steelcase at [email protected].
29
ROOMWIZARD EXCHANGE ONLINE CONNECTOR INSTALLATION GUIDE
Appendix B
Testing Microsoft Office 365 Auto Discovery
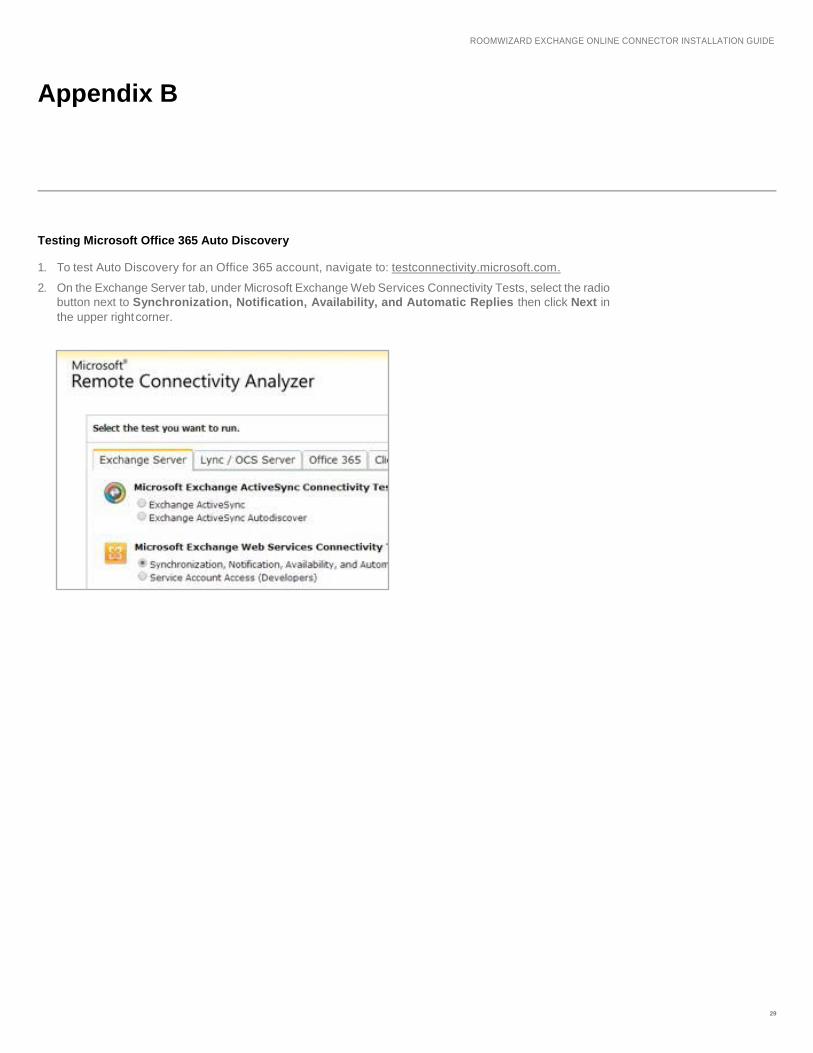
1. To test Auto Discovery for an Office 365 account, navigate to: testconnectivity.microsoft.com.
2. On the Exchange Server tab, under Microsoft Exchange Web Services Connectivity Tests, select the radio
button next to Synchronization, Notification, Availability, and Automatic Replies then click Next in
the upper right corner.

APPENDIX B ROOMWIZARD EXCHANGE ONLINE CONNECTOR INSTALLATION GUIDE
30
3. Enter the e-mail address and password for the account you are attempting to connect to.
4. Select the Use Autodiscover radio button.
5. Check the box next to I understand.
6. Enter the characters for the CAPTCHA and click Verify.
7. After successful Verification, select Perform Test on the right side of the Analyzer page.
8. You will see either success or failure.

ROOMWIZARD EXCHANGE ONLINE CONNECTOR INSTALLATION GUIDE
31
Appendix C
Installing on Server 2012 with IIS 8
1. Launch Server Manager.
2. Click on Manage, then select Add Roles and Features.

32
APPENDIX C ROOMWIZARD EXCHANGE ONLINE CONNECTOR INSTALLATION GUIDE
3. On the Before you Begin screen, click Next.
4. On the Installation Type screen, select Role-based or feature-based installation, then click Next.

33
APPENDIX C ROOMWIZARD EXCHANGE ONLINE CONNECTOR INSTALLATION GUIDE
5. On the Server Selection screen, select the server. (In this example, we are installing on the local server
SP2013.) Click Next.
6. On the Server Roles screen, check the box next to Web Server (IIS). Click Next.

34
APPENDIX C ROOMWIZARD EXCHANGE ONLINE CONNECTOR INSTALLATION GUIDE
7. Click Add Features.
8. Web Server (IIS) box should now be checked. Click Next.
35
APPENDIX C ROOMWIZARD EXCHANGE ONLINE CONNECTOR INSTALLATION GUIDE
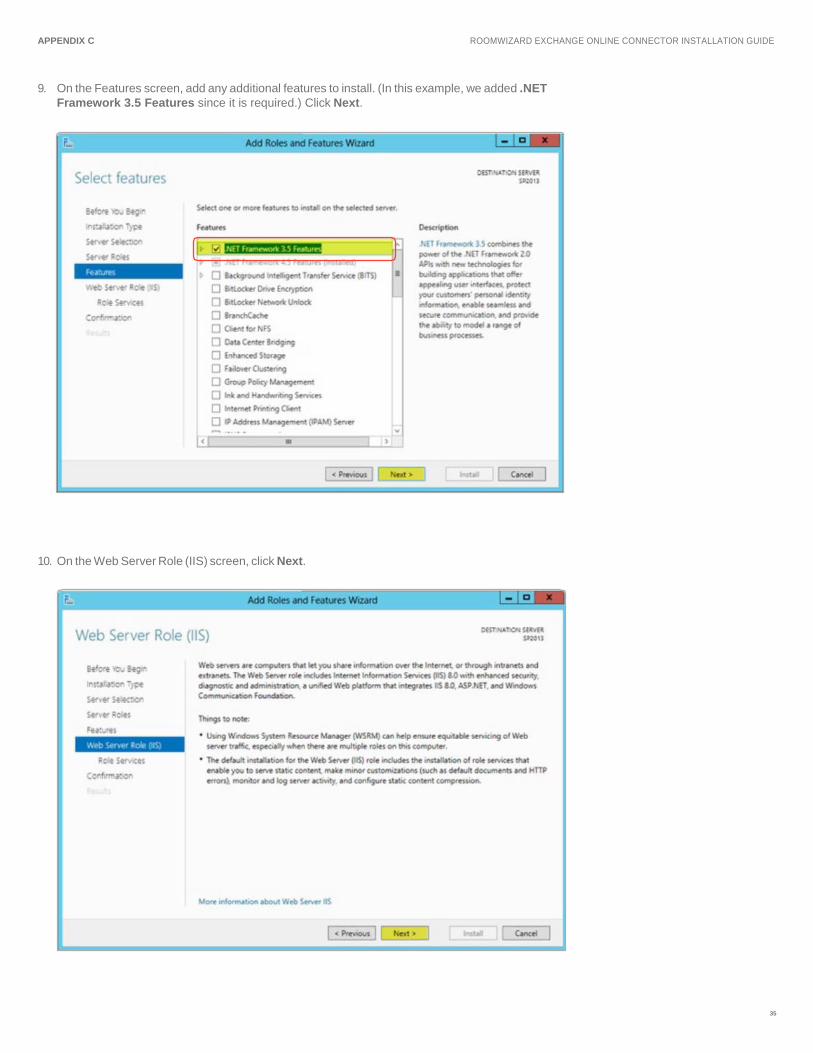
9. On the Features screen, add any additional features to install. (In this example, we added .NET
Framework 3.5 Features since it is required.) Click Next.
10. On the Web Server Role (IIS) screen, click Next.
36
APPENDIX C ROOMWIZARD EXCHANGE ONLINE CONNECTOR INSTALLATION GUIDE
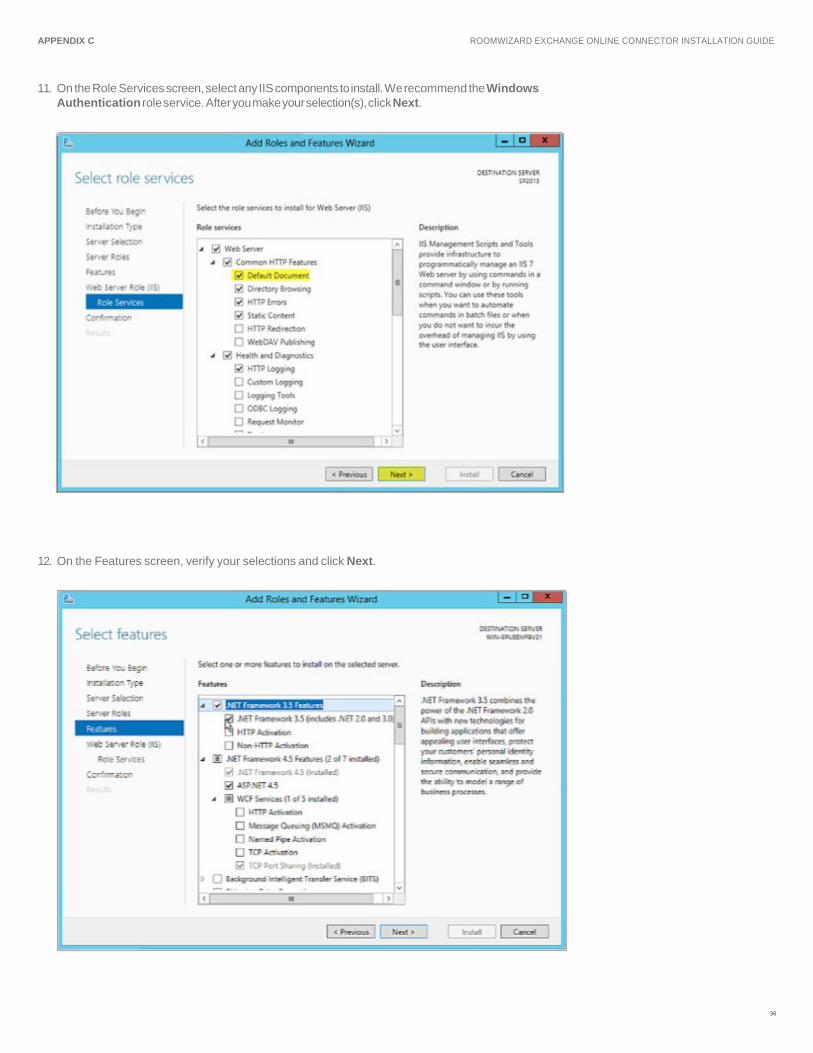
11. On the Role Services screen, select any IIS components to install. We recommend the Windows
Authentication role service. After you make your selection(s), click Next.
12. On the Features screen, verify your selections and click Next.

37
APPENDIX C ROOMWIZARD EXCHANGE ONLINE CONNECTOR INSTALLATION GUIDE
13. Confirm your selections and then click Install.
14. Closing the Server Manager will not affect the installation. If you keep it open, you are able
to monitor the progress of the installation. When it completes, click Close.
Note: Follow the steps on pages 2–19 to complete the Online Connector installation and configuration.
38
ROOMWIZARD EXCHANGE ONLINE CONNECTOR INSTALLATION GUIDE
Appendix D
Establishing Remote Session with Outlook Online
In order to configure mailbox access permissions, you will need to establish a remote PowerShell session
using your Exchange account. This section assumes you have a working knowledge of PowerShell.
Note: You will need to run PowerShell as an Administrator.
The following commands will establish a remote session with Outlook online:
1. Enter your Outlook online credentials: $credentials = Get-Credential.
2. Establish a remote session: $session = New-PSSession -ConfigurationName Microsoft.Exchange
-ConnectionUri https://ps.outlook.com/powershell -Credential $credentials -Authentication Basic
-AllowRedirection.
3. Depending on your security policy, you may need to execute this command in order to import
the session (including the commands): Set-ExecutionPolicy -ExecutionPolicy RemoteSigned.
4. Import session: $sessionimport = Import-PSSession $session.
You should now be able to execute Exchange commands against your remote Outlook online account.
Granting Delegate Access Manually via PowerShell
This section provides the necessary commands to configure a room mailbox that grants the RoomWizard
service user full mailbox access. To proceed, a working knowledge of PowerShell is recommended.
The following command is used to grant a user full access to a mailbox:
Add-MailboxPermission “<Mailbox Identifier>” -User: <Service User> -AccessRights: FullAccess
-InheritanceType: All
For example: Add-MailboxPermission “UpstairsConferenceRoom” -User: room.wizard -AccessRights:
FullAccess -InheritanceType: All
The following command finds all resources and grants full user access:
Get-Mailbox -filter {isResource -eq $True} -Resultsize unlimited | Add-MailboxPermission -User:
<Service User> -AccessRights: FullAccess -InheritanceType: All
Note: You can provide other filtering properties that will reduce the result set. See
technet.microsoft.com/en-us/library/bb738155(EXCHG.80).aspx for more filtering properties.
39
APPENDIX D ROOMWIZARD EXCHANGE ONLINE CONNECTOR INSTALLATION GUIDE
Granting Application Impersonation Role Manually via PowerShell
This section provides the necessary commands to configure a service user that has the Application Impersonation
role. To proceed, a working knowledge of PowerShell is recommended.
The following command is used to grant the Application Impersonation role:
New-ManagementRoleAssignment –Name:impersonationAssignmentName –Role:ApplicationImpersonation
–User: <Service User>
For example: New-ManagementRoleAssignment –Name:impersonationAssignmentName –
Role:ApplicationImpersonation –User: “[email protected]”
The following command checks if a user has the Application Impersonation role:
Get-ManagementRoleAssignment -RoleAssignee <Service User> -Role ApplicationImpersonation
-RoleAssigneeType user
For example: Get-ManagementRoleAssignment -RoleAssignee “[email protected]”
-Role ApplicationImpersonation -RoleAssigneeType user
Configuring Room Mailbox
By default, a room does not auto-accept invitations. In order for the RoomWizard and Exchange Connector
to work properly, the room needs to be configured to auto-accept invitations. The room should also be
configured to reject conflicting meetings.
The following command configures every room’s mailbox to auto-accept invitations:
Get-Mailbox | where{$_.ResourceType -eq “Room”} | Set-CalendarProcessing -AutomateProcessing
AutoAccept -AllowConflicts $false
If you want to maintain the comments and private flag between the resource and the user, add the following
arguments to the command above: -RemovePrivateProperty $false -DeleteComments $false
Reference: http://technet.microsoft.com/en-us/library/dd335046.aspx
The following command configures a specific room’s mailbox to auto-accept invitations:
Get-Mailbox “UpstairsConferenceRoom” | Set-CalendarProcessing -AutomateProcessing AutoAccept
By default, the room does not display the original subject of an invitation. Instead, the room shows the organizer’s
name as the subject. If this format is not desired, the following command will reconfigure the room mailbox to show
the invitation subject:
Set-CalendarProcessing -Identity “$$ResourceName$$” -AddOrganizerToSubject $false -DeleteSubject $false

APPENDIX D ROOMWIZARD EXCHANGE ONLINE CONNECTOR INSTALLATION GUIDE
40
Viewing Attendee Response Status from RoomWizard
In order for the Connector to see how attendees have responded to an invitation, the service user requires
delegate access to all of the user’s mailboxes. The Connector will function without delegate access; however,
the attendees' response status will be unknown.
The following command finds all users and grants a service user full access:
Get-Mailbox -filter {isResource -eq $False} -Resultsize unlimited | Add-MailboxPermission -User: <Service
User> -AccessRights: FullAccess -InheritanceType: All
Visit Steelcase.com
facebook.com/Steelcase twitter.com/Steelcase youtube.com/SteelcaseTV
06/2016 © 2016 Steelcase Inc. All rights reserved. All specifications subject to change without notice.
Trademarks used herein are the property of Steelcase Inc. or of their respective owners.

![Oracle Identity Manager Connector Guide for Microsoft Exchange · [1]Oracle® Identity Manager Connector Guide for Microsoft Exchange Release 11.1.1 E27258-22 November 2017](https://static.fdocuments.in/doc/165x107/5be70f1a09d3f247448e093b/oracle-identity-manager-connector-guide-for-microsoft-exchange-1oracle-identity.jpg)