Rockets Office 365 How To Guide - University of Toledo
33
Office 365 How-To Guide For Students
Transcript of Rockets Office 365 How To Guide - University of Toledo
Office 365 How-To Guide
For Students

2 Need Help? Call the IT Help Desk at 419-530-2400
Table of Contents
First Time Logging into Office365 Webmail ................................................ 3
Change Outlook Web App Theme............................................................... 4
Add/Change your account Picture in Office 365 ........................................ 5
Use Outlook Web App Offline Mode .......................................................... 6
Configuring Student Email - Outlook 2007/2010/2013 .............................. 7
Configuring Student Email - Mac OSX Mail, Calendar, & Address Book ..... 9
Configuring Student Email - Outlook for Mac 2011 .................................. 11
Microsoft Outlook Web App E-Mail Quick Reference Guide .................... 13
Create/Send a New Message .................................................................... 14
Save a Composed Message as a Draft ...................................................... 15
Reply, Reply All, & Forward a Message ..................................................... 16
Insert An Attachment ................................................................................ 17
Request a Delivery and/or Read Receipt .................................................. 18
Send Automatic Replies ............................................................................ 19
Create a Signature ..................................................................................... 20
Create a Inbox Rule ................................................................................... 21
Create an Appointment ............................................................................ 23
Microsoft Outlook Web App Calendar Quick Reference Guide ................ 23
Create a Meeting ...................................................................................... 25
Share Your Calendar with another University of Toledo Student ............ 26
Remove/Change a user’s access to YOUR Calendar ................................. 27
Outlook Web App Contacts (People) Quick Reference Guide .................. 28
Add a New Contact ................................................................................... 29
Add a New Contact Group ........................................................................ 30
Modify a Contact ....................................................................................... 31
Modify a Contact Group ............................................................................ 32
Import Contacts ........................................................................................ 33

3 Need Help? Call the IT Help Desk at 419-530-2400
First Time Logging into Office365 Webmail
1) Log in at rockets.utoledo.edu with your UTAD credentials
2) Choose the language
3) Choose the Time Zone (UT is Eastern Time) and click save

4 Need Help? Call the IT Help Desk at 419-530-2400
Change Outlook Web App Theme
1) Click the Settings icon
2) Select Change theme
3) Select the theme and click OK

5 Need Help? Call the IT Help Desk at 419-530-2400
Add/Change your account Picture in Office 365
Note-By choosing to upload your photo to Office 365, you are agreeing to the terms
and conditions set forth by the University of Toledo’s acceptable computer usage
policy found by logging into myutaccount.utoledo.edu and selecting “View
Computer Usage Policy”. Individuals with offensive and distasteful images will be
referred to the dean of students for disciplinarian action.
1) When logged into Office 365 (Rockets Mail) click on your name in
the upper right hand corner of the screen.
2) Click on the Change link.
3) Click on browse button and browse for the photo you wish to
upload.
4) One the photo is selected, it will appear. Click on the save button.
Browse Button

6 Need Help? Call the IT Help Desk at 419-530-2400
Use Outlook Web App Offline Mode
In Offline Mode, the user can do most of the tasks they can while in online
mode only with a few limitations. You must set Offline Mode with an active
internet connection. Please be advised of the limitations in Offline mode:
All folders may not appear in Offline Mode
Calendar reminders will only go up to 2 months
Can only view the previous month and future year in Calendar mode
Messages sent, changes made in the calendar, edit to contacts list
and other changes will not be saved to the Exchange Server till
Online mode is restored
Information Technology always recommends using Online Mode for full
feature support but in the event that the user will not have an internet
connection, Offline Mode may be handy.
1) Click on the Settings icon and select Offline Settings
2) Once in Offline Settings, select Turn on offline access and click OK
3) Follow the informational steps 1-4. Step 3 will ask the user to add a
bookmark. This can be done by pressing Ctrl + D
4) Once at step 4, click OK

7 Need Help? Call the IT Help Desk at 419-530-2400
Configuring Student Email - Outlook 2007/2010/2013
1) If already in outlook, please exit.
2) Click Start>Control Panel
1. If in Category mode, please select Large Icons or Small Icons (upper
right portion of the window).
2. Click on the Mail Icon.
3. If there is not a default mail profile, the window to create a profile
will appear. Type Office 365 then click OK. If you already have a mail
profile, please skip to step 6.
4. Click E-Mail Accounts.
5. If other accounts are already configured with Outlook, click New

8 Need Help? Call the IT Help Desk at 419-530-2400
6. Ensure the E-mail Account radio button is selected. Enter the
following information in:
Your Name: Your First & Last Name
E-mail Address: [email protected]
Password & Re-Type Password: UTAD Password
7. When the “Allow this Website configure…” appears, check Don’t ask
me about this website again then click Allow.
8. If prompted at the Windows Security login box, please ensure the
username is set to [email protected] and the
password is your UTAD password. This box may appear more than
once. Click OK when finished.
9. Once the account has been successfully configured, the windows
below should be displayed. Please click Finished. Start Outlook and
your email should begin to sync from the Office 365 server.

9 Need Help? Call the IT Help Desk at 419-530-2400
Configuring Student Email - Mac OSX Mail, Calendar, & Address
Book
1) If already in Mail, Calendar & Address book, please exit.
2) Click the Apple Menu>System Preferences.
3) Click Internet Accounts.
4) In Internet Accounts window, select Exchange.
5) In enter the following information:
Name: YOUR First & Last Name
Email Address: [email protected]
Password: UTAD Password
Once information is inputted, click Continue.
6) Once the account finishes auto configuring, click Continue.

10 Need Help? Call the IT Help Desk at 419-530-2400
7) Select the applications (Mail, Contacts, Calendars, Notes, &
Reminders) that are to be utilitized then click Done.

11 Need Help? Call the IT Help Desk at 419-530-2400
Configuring Student Email - Outlook for Mac 2011
1) Open Microsoft Outlook for Mac 2011. If presented at the
“Welcome to Outlook:mac” screen, click Add Account. If not,
proceed to step 1.A.
1.A) In Outlook for Mac, click the Outlook
menu>Preferences.
2) Click Accounts
3) At the lower left hand corner of the Accounts window, click the
plus upside-down triangle>Exchange.
4) Enter the following information:
E-mail address: [email protected]
Method: User Name and Password
User name: [email protected]
Password: UTAD Password
Ensure Configure automatically is checked
12 Need Help? Call the IT Help Desk at 419-530-2400
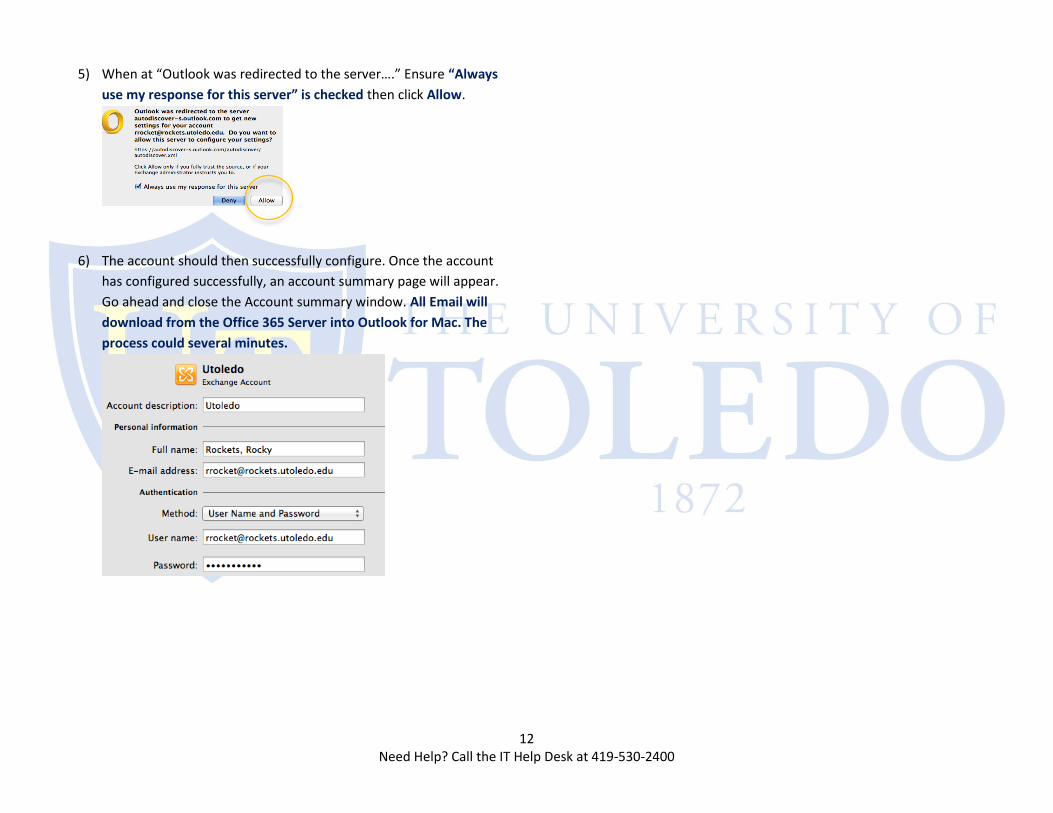
5) When at “Outlook was redirected to the server….” Ensure “Always
use my response for this server” is checked then click Allow.
6) The account should then successfully configure. Once the account
has configured successfully, an account summary page will appear.
Go ahead and close the Account summary window. All Email will
download from the Office 365 Server into Outlook for Mac. The
process could several minutes.

13 Need Help? Call the IT Help Desk at 419-530-2400
Microsoft Outlook Web App E-Mail Quick Reference Guide Compose a new
message
Folder Pane
Tasks List
Search Box Message Pane
Reading Pane Switch between Email, Calendar, and Contacts mode
Reply, Reply All, & Forward Commands
Settings
Delete Individual Email

14 Need Help? Call the IT Help Desk at 419-530-2400
Create/Send a New Message
1) At the Office 365 inbox screen, click new mail
2) On the right side of the screen, the reading pane will turn into the
compose pane.
3) When finished composing the email, click on the send button.

15 Need Help? Call the IT Help Desk at 419-530-2400
Save a Composed Message as a Draft
1) Click on the more options menu
2) Click save
3) The draft email will save to the draft folder

16 Need Help? Call the IT Help Desk at 419-530-2400
Reply, Reply All, & Forward a Message
1) Highlight the message to reply
2) Click either Reply, Reply All, or Forward
3) Compose your message (if applicable) then click Send
Highlighted Message
Compose your message here (if applicable)

17 Need Help? Call the IT Help Desk at 419-530-2400
Insert An Attachment
1) Click the INSERT button in the message that the attachment is to go
into
2) Click either attachment or picture (depending on the document)
3) Browse for the attachment
4) Once the attachment is uploaded, the attachment will
appear below the Subject line.

18 Need Help? Call the IT Help Desk at 419-530-2400
Request a Delivery and/or Read Receipt
1) Display the more options dialogue menu
2) Select Show Message Options…
3) Checkmark the boxes that are applicable then click OK and
send the message when ready.

19 Need Help? Call the IT Help Desk at 419-530-2400
Send Automatic Replies
1) Click the Settings button
2) Click Set automatic replies
3) Select the radio button Send automatic replies
4) Type in the automatic reply message that is to be sent to the
senders of the user’s account. Click save when done
Tip: You may have automatic replies turned on and off automatically.
Check the box Send replies only during this time period: and
customize the time.
Tip

20 Need Help? Call the IT Help Desk at 419-530-2400
Create a Signature
1) Click on the Settings icon & select Options.
2) Click Settings
3) Edit Signature and click Save
Signature Pane
Check “Automatically include my signature on messages I
send” if signatures should be applied to all outgoing
messages.

21 Need Help? Call the IT Help Desk at 419-530-2400
Create a Inbox Rule
Rules are high customizable. An inbox rule can be created to automatically
Move the message to a folder
Mark the message with a category
Redirect the message to a different email address
Delete the message
Send a text message to
1) Click the Settings icon and select options
2) Select organize email (left hand side)
3) Ensure inbox rules in selected and click the plus symbol
4) Select the option that best fits the task that needs completed

22 Need Help? Call the IT Help Desk at 419-530-2400
5) Name the rule
6) Select the next option that is applicable
7) Enter the email address/or specific words then click OK
8) In the Do the following, choose the applicable option then click
save
9) The name and the rule(s) details will appear on the inbox rules
dialogue area

23 Need Help? Call the IT Help Desk at 419-530-2400
Microsoft Outlook Web App Calendar Quick Reference
Guide
Create a new
calendar event Current month displayed Quick month access
toolbar
Switch between e-mail, Calendar, and Contacts
(People) Mode
Highlighted Box indicates day
selected
Search calendaring events
Full month mini calendar
Other calendars that is OWNED by the
user
Other calendars that the user has
access to
Switch calendar mode by day, work week, full week or
month
Share calendar to another UT
Student
Calendar

24 Need Help? Call the IT Help Desk at 419-530-2400
Create an Appointment
1) Click on Calendar (top left)
2) Click on the day of the future appointment then click new event
3) Fill in the required information for your appointment then click
SAVE
Delete/Cancel
25 Need Help? Call the IT Help Desk at 419-530-2400
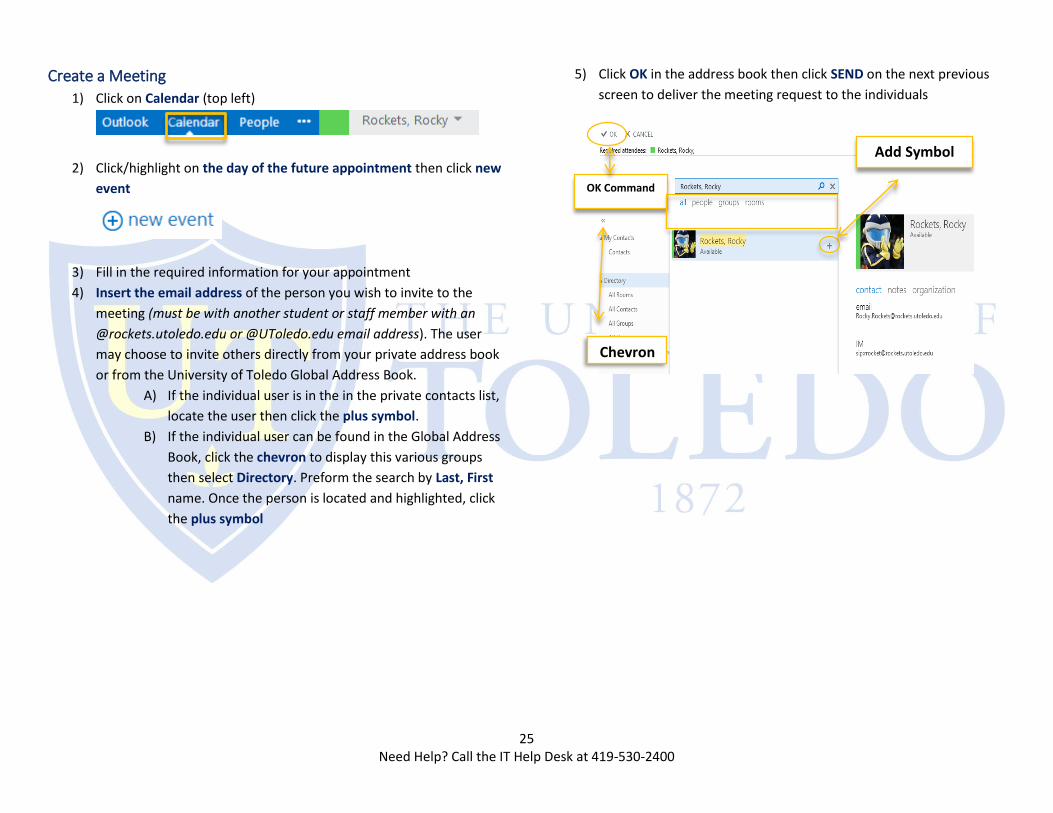
Create a Meeting
1) Click on Calendar (top left)
2) Click/highlight on the day of the future appointment then click new
event
3) Fill in the required information for your appointment
4) Insert the email address of the person you wish to invite to the
meeting (must be with another student or staff member with an
@rockets.utoledo.edu or @UToledo.edu email address). The user
may choose to invite others directly from your private address book
or from the University of Toledo Global Address Book.
A) If the individual user is in the in the private contacts list,
locate the user then click the plus symbol.
B) If the individual user can be found in the Global Address
Book, click the chevron to display this various groups
then select Directory. Preform the search by Last, First
name. Once the person is located and highlighted, click
the plus symbol
5) Click OK in the address book then click SEND on the next previous
screen to deliver the meeting request to the individuals
OK Command
Chevron
Add Symbol

26 Need Help? Call the IT Help Desk at 419-530-2400
Share Your Calendar with another University of Toledo Student
1) Click on the Calendar button (top right)
2) Click the SHARE button (top right)
3 In the Share with field, type the full email address of the student
the user wishes the share their calendar with
4) Select the permissions then click SEND
Permissions Definitions
Availability only-Only shows the times of your availability.
Location, event name, attendees are NOT shared.
Limited details-Only provides the subject and the location.
Full details-Provides all information on your calendar
including the location, event name, attendees, and the time.
Editor- Can create, read, and modify meetings on your
behalf.
Delegate-Can create, read, and modify meetings on your
behalf. Can also respond to meeting requests on your behalf.

27 Need Help? Call the IT Help Desk at 419-530-2400
Remove/Change a user’s access to YOUR Calendar
1) Click Calendar (top right)
2) On the left hand side, right click Calendar (under MY CALENDARS)
then select permissions
3) On permissions, either edit the user’s permission or click the X to
remove access altogether.
4) Click SAVE when done editing or removing permissions
Permissions Definitions
Availability only-Only shows the times of your availability.
Location, event name, attendees are NOT shared.
Limited details-Only provides the subject and the location.
Full details-Provides all information on your calendar including the
location, event name, attendees, and the time.
Editor- Can create, read, and modify meetings on your behalf.
Delegate-Can create, read, and modify meetings on your behalf.
Can also respond to meeting requests on your behalf.

28 Need Help? Call the IT Help Desk at 419-530-2400
+
Outlook Web App Contacts (People) Quick Reference Guide
Create a new contact or
contract group.
Switch between e-mail,
Calendar, and Contacts
(People) Mode
Search for contacts
User’s private
contacts University of Toledo Global Address
Book
Search between individual & group contacts
Individual Contact Group
Contact
Sort contacts by
criteria
Send E-mail to
contact
Schedule appointment with
contact
Send Instant Message to
contact
Edit Contact Details
Delete Contact

29 Need Help? Call the IT Help Desk at 419-530-2400
Add a New Contact
1) Click on People (top right)
2) Click on new (top left)
3) Select create contact
4) Fill out the contact information then click Save

30 Need Help? Call the IT Help Desk at 419-530-2400
Add a New Contact Group
1) Click on People (top right)
2) Click on New (top left)
3) Select create group
4) Type the name of the group that is to be created
5) Add members by typing their email address in the members box
([email protected]) and then pushing the Enter button on the
keyboard to add them to the group. When finished adding members
to the group, click SAVE when finished.
To delete a contact, click … and then click delete

31 Need Help? Call the IT Help Desk at 419-530-2400
Modify a Contact
1) Click on People (top right)
2) Select the contact that needs changed and click EDIT
3) Edit the contact as needed then click SAVE
… will allow the option to delete the contact or contact
group.

32 Need Help? Call the IT Help Desk at 419-530-2400
Modify a Contact Group
1) Click on People (top right)
2) Select on the Group that needs modified and click EDIT
3) Make the necessary changes and click SAVE
.
To remove a contact from a group, click the X next
to the member’s name.

33 Need Help? Call the IT Help Desk at 419-530-2400
Import Contacts
Note-Before importuning contacts into the Outlook Web App, you must
already have your contacts exported from your current email program to
your local PC in a .CSV (comma separated value) format
1) Click on People (top right)
2) Click on the settings gear > Import Contacts
3) Click Choose File and browse for the specific .CSV file
4) Once the file has been located, click next. The contacts should be
imported into Office 365. Depending on the amount of contacts you
have, it may take several minutes.