Rob Miles Windows Phone Blue Book
160
Windows Phone Programming in C# Rob Miles Version 1.0 January 2011
-
Upload
ribariba23 -
Category
Documents
-
view
18 -
download
1
Transcript of Rob Miles Windows Phone Blue Book
Windows Phone Programming
in C#
Rob Miles Version 1.0 January 2011
i
Contents
Introduction 3
Welcome ............................................................................................................................. 3 What you need to have before you start .............................................................................. 3
1 Windows Phone 7 4
1.1 The Windows Phone hardware ............................................................................. 4 1.2 The Windows Phone ecosystem ......................................................................... 11 1.3 Windows Phone program execution ................................................................... 12 1.4 Windows Phone application development .......................................................... 14 What we have learned ....................................................................................................... 16
2 Introduction to Silverlight 18
2.1 Program design with Silverlight ......................................................................... 18 2.2 Understanding XAML ........................................................................................ 28 2.3 Creating an application with Silverlight ............................................................. 31 What we have learned ....................................................................................................... 37
3 Introduction to Visual Studio 2010 38
3.1 Projects and Solutions ........................................................................................ 38 3.2 Debugging Programs .......................................................................................... 52 What we have learned ....................................................................................................... 58
4 User Interface Design with Silverlight 60
4.1 Improving the user experience ........................................................................... 60 4.2 Data manipulation and display ........................................................................... 73 4.3 Pages and Navigation ......................................................................................... 82 What we have learned ....................................................................................................... 87
5 Consuming Data Services 89
5.1 Connecting to a data service ............................................................................... 89 5.2 Using LINQ to read structured data ................................................................... 92 5.3 Using Network Services ................................................................................... 102 What we have learned ..................................................................................................... 108
6 XNA Overview 109
6.1 XNA in context ................................................................................................ 109 6.2 Making an XNA program ................................................................................. 110 6.3 Using the accelerometer in games .................................................................... 121 6.4 Adding sound to a game ................................................................................... 125 6.5 Playing Sound in a Silverlight Program ........................................................... 128 6.6 Managing screen dimensions and orientation ................................................... 130 What we have learned ..................................................................................................... 132
7 Creating Windows Phone Applications 134
7.1 The Windows Phone icons and Splash Screens................................................ 134

ii
7.2 Persisting data in isolated storage ..................................................................... 136 7.3 Persisting application state ............................................................................... 141 7.4 Launchers and Choosers ................................................................................... 147 What we have learned ..................................................................................................... 151
8 Windows Phone Marketplace 153
8.1 How the Marketplace works ............................................................................. 153 8.2 Marketplace membership ................................................................................. 154 8.3 Deploying and testing to hardware ................................................................... 154 8.4 The Submission and approval process .............................................................. 157 What we have learned ..................................................................................................... 157 Program Ideas ................................................................................................................. 158

Welcome
Introduction 3
Introduction
Welcome These notes are an introduction to Windows Phone development for anyone
learning to program. They assume some knowledge of programming
fundamentals, but they will teach you programming concepts in the framework
of Windows Phone development.
These notes do not teach programming from first principles. I am going to
assume that you already know how to write and run simple C# programs on a
Windows PC.
What you need to have before you start All the development tools that you need can be downloaded for free from here:
http://www.microsoft.com/downloads/en/details.aspx?FamilyID=04704acf-
a63a-4f97-952c-8b51b34b00ce
If you have your own Windows Phone device you can use this to run programs if
you become a registered Windows Phone developer. This is free for students,
and also lets you sell programs that you have written in the Windows Phone
Marketplace. However, to get started writing programs you don‟t need to have a
physical device, you can use the emulator that is supplied with the development
tools.
Version 1.0 January 2011 © Rob Miles and Microsoft
The Windows Phone hardware
Windows Phone 7 4
1 Windows Phone 7
In this chapter you are going to find out about the Windows Phone platform as a
device for running programs. You will learn the key features of the platform
itself, how programs are written and also how you can sell your programs via the
Windows Marketplace.
1.1 The Windows Phone hardware In this section we are going to take a look at the actual hardware that makes up a
Windows Phone. This is particularly important as we need to put the abilities of
the phone into context and identify the effect of the physical limitations imposed
by platform that it uses.
A Windows Phone as a computer
Pretty much everything these days is a computer. Mobile phones are no
exception. When you get to the level of the Windows Phone device it is
reasonable to think of it as a computer that can make telephone calls rather than
a phone that can run programs.
The Windows Phone device has many properties in common with a “proper”
computer. It has a powerful processor, local storage, fast 3D graphics and plenty
of memory. It also has its own operating system which looks after the device and
controls the programs that run on it. If you have used a PC you are used to the
Windows 7 operating system which starts running when you turn the computer
and even turns the computer off for you when you have finished.
The Windows Phone 7 series is a complete break with previous versions of
Windows Mobile devices. You could write programs and run them on earlier
versions but you did not use the Silverlight or XNA environments to do this. The
number 7 in the name of the product reflects the fact that this is also the 7th
incarnation of the Windows Mobile platform. It does not mean that the device
shares its underpinnings with desktop PCs running Windows 7. However, as we
shall see, it is perfectly possible to take a program you have created for
Windows Phone and run it on the Windows desktop, and vice versa.
If you are familiar with computer specifications, then the specifications below
are pretty impressive for a portable device. If you are not familiar, then just bear
in mind that nobody in the world had a computer like this a few years ago, and
now you can carry one around in your pocket.
The Windows Phone hardware platform
Before we start programming we can take a look at the hardware we will be
working with. This is not a text about computer hardware, but it is worth putting
some of the phone hardware into context. All Windows Phones must have a
particular minimum specification, so these are the very least you can expect to
find on a device.
It is quite likely that different phone manufacturers will add their particular
“take” on the platform, so you will find devices with more memory, faster
processors, hardware keyboards and larger screens.
Note that a hardware keyboard is not guaranteed to be present on the device (it
might be just a touchscreen based phone) and that if you are an XNA game
developer you will be wondering where the gamepad has gone. There are some

The Windows Phone hardware
Windows Phone 7 5
changes to the hardware that you will have to get used to when writing for this
platform, but there are also some very interesting input options (particular for
game development) where you can use the accelerometer and the touch screen to
good effect. We will look at these later in the text.
The Windows Phone Processor
The Central Processing Unit (CPU) of a computer is the place where all the
work gets done. Whenever a program is running the CPU is in charge of fetching
data from memory, changing the data and then putting it back (which is really all
computers do). The most popular speed measure in a computer is the clock
speed. A CPU has a clock that ticks when it is running. At each clock tick the
processor will do one part of an operation, perhaps fetch an instruction from
memory, perform a calculation and so forth.
The faster the clock speed the faster the computer. Modern desktop computers
have clocks that tick at around 3 GHz (that is around 3 thousand, million times a
second). This is actually incredibly fast. It means that a single clock tick will
last a nanosecond. A nanosecond is the time that light takes to travel around 30
cm. If you were wondering why we don‟t have big computers any more, it is
because the time it takes signals to travel around a circuit is a serious limiting
factor in performance. Making a computer smaller actually makes it go faster.
A Windows Phone has a clock that ticks at around 1GHz. You might think that
this means a Windows Phone will run around a third the speed of a PC, but this
turns out not to be the case. This is because of a number of things:
Firstly, clock speed is not directly comparable between processors. The
processor in the Windows PC might take five clock ticks to do something that
the Windows Phone processor needs ten ticks to perform. The Windows PC
processor might be able to do things in hardware (for example floating point
arithmetic) which the Windows Phone processor might need to call a software
subroutine to perform, which will be much slower. You can regard clock speed
as a bit like engine size in cars. A car with a bigger engine might go faster than
one with a smaller one, but lots of other factors (weight of car, gearbox, tires)
are important too.
Secondly, a Windows PC may well have multiple processors. This doesn‟t mean
a Windows PC can go faster, any more than two motorcycles can go faster than
one, but it does mean they can process more data in a given time (two
motorcycles can carry twice as many people as one). At some point we will get
multiple-processor phones (and the Windows Phone operating system can
support this), but at the moment they all have a single processor unit.
Finally, a Windows PC has unlimited mains power. It can run the CPU at full
speed all the time if it needs to. The only real problem with doing this is that the
processor must be kept cool so that it doesn‟t melt. The faster a processor runs
the more power it consumes. If the phone ran the processor at full speed all the
time the battery life would be very short. The phone operating system will speed
up and slow down the processor depending on what it needs to do at any given
instant. Although the phone has a fast processor this speed is only actually used
when the phone has something to do which requires very fast response.
The result of these considerations is that when you are writing a Windows Phone
program you cannot regard processing power as an unlimited resource. Desktop
PC programmers do not see processor speed as much of an issue but Windows
Phone programmers have to remember that poor design can have consequences,
both in terms of the experience of the user and the battery life of the phone. The
good news for us is that worrying about these things will cause us to turn into
better programmers.
The Windows Phone hardware
Windows Phone 7 6
The Windows Phone operating system
The operating system in a Windows Phone is called Windows CE (CE stands for
“Compact Edition”). It was specially designed to run on portable computer
systems and is very good at getting performance and good battery life out of a
device. As we shall see later this puts some constraints on your programs,
however the good news is that as far as we are concerned the underlying
operating system is pretty much irrelevant. Our program will run on the
Windows Phone in pretty much the same way as they do on the full sized
Windows PC.
Graphical Display
The Windows Phone has a high resolution display made up of a very large
number of pixels. This provides good quality graphics and also allows lots of
text to be displayed on the screen. The more pixels you have on your screen the
higher the quality of image that you can display. However, the more dots you
have the greater the amount of memory that you need to store an image, and the
more work the computer has to do to change the picture on the screen. This is
particularly significant on a mobile device, where more work for the hardware
translates to greater power consumption and lower battery life. The display
resolution is a compromise between battery life, cost to manufacture and
brightness of the display (the smaller the dots the less light each can give out).
The first generation versions of Windows Phone will have a screen resolution of
at least 800x480 pixels. This can be used in both landscape (800 wide and 480
high) and portrait (480 wide by 800 high) modes. The phone contains an
accelerometer that detects how the phone is being held. The Windows Phone
operating system can then adjust the display to match the orientation. Our
programs can decide when they run what orientations they can support. If we
design our programs to work in both landscape and portrait mode they can be
sent messages to allow them to adjust their display when the user changes the
orientation of the device.
One problem faced by phone developers is the multitude of different screen sizes
that are available. A program would have usually have to be customised for each
different sized screen. The Windows Phone screen hardware includes a feature
that allows it to scale the screen of an application to fit whatever screen size the
device supports. A game can specify that it must have a particular sized screen
(say 400x280) and then the display hardware will scale that size to fit whatever
physical size is fitted on the device being used. This is very useful and makes it
possible to create games that will work on any device including ones with screen
sizes that have not been made yet.
The Windows Phone Graphical Processor Unit
In the very first computers all the work was performed by the computer
processor itself. This work included putting images on the display. Computer
hardware engineers soon decided that they could get faster moving images by
creating custom devices to drive the screen. A Graphical Processor Unit (GPU)
is given commands by the main processor and takes away all the work involved
in drawing the screen. More advanced graphical processors have 3D support and
are able to do the floating point and matrix arithmetic needed for three
dimensions. They also contain pixel shaders which can be programmed to
perform image processing on the each dot of the screen at high speed as it is
drawn, adding things such as lighting effects and blur.
Until quite recently only desktop PC systems and video game consoles had
graphical processors, but they are now appearing in mobile phones. The
Windows Phone platform contains a graphics processing chip which is used to
provide 3D animation effects for the phone display and can also be used from
The Windows Phone hardware
Windows Phone 7 7
within the XNA game development environment to create fast moving 3D
games.
Touch input
Older portable devices used resistive touch input screens. When the user touches
a resistive touch screen the plastic surface bends and makes a connection with
the layer below it. A simple circuit then measures the electrical resistance to the
point of contact and uses this to determine where on the screen the touch took
place. Resistive touch screens are cheap to make and work very well with a
stylus. However the way they work makes it very difficult to detect multiple
simultaneous touches on the screen. It is also difficult to make a resistive screen
out of a very hard material, for example glass, as the screen must bend to make
the contact that detects the input point.
A capacitive touch screen works in a different way. An array of conductors
underneath the screen surface detects the change in capacitance caused by the
presence of a finger on the surface. The touch screen hardware then works out
where on the screen that the touch input took place. Capacitive touch screens are
more expensive to make as they require extra hardware to process the input
signals but the sensor circuits can be printed on the back of a glass screen to
make a much tougher display. A capacitive touch screen is not quite as precise
as a resistive screen which uses a stylus, but you can build a capacitive screen
that can detect multiple inputs on different parts of the display.
All Windows Phone devices have touch input which is capable of tracking at
least four input points. This means that if you create a Windows Phone piano
program it will be able to detect at least four notes being pressed at the same
time.
The move to multi-touch input is an important step in the evolution of mobile
devices. The user can control software by using multi-touch gestures such as
“pinch”. The Windows Phone operating system provides built in support for
gesture recognition. Your programs can receive events when the user performs
particular types of gesture. We will be using this feature later.
Location Sensors
The Windows Phone device is location aware. It contains a Global Positioning
System (GPS) device that receives satellite signals to determine the position of
the phone to within a few feet. Since the GPS system only works properly when
the phone has a clear view of the sky the phone will also use other techniques to
determine position, including the location of the nearest cell phone tower and/or
the location of the WIFI connection in use. This is called “assisted” GPS.
The Windows Phone operating system exposes methods our programs can call to
determine the physical position of the device, along with the level of confidence
and resolution of the result supplied. Our programs can also make use of
mapping and search facilities which can be driven by location information. We
will be exploring this later.
The actual phone hardware also contains an electronic compass, although there
is not a software interface to this in the present version of the Windows Phone
operating system.
Accelerometer
The accelerometer is a hardware device that measures acceleration, so no
surprises there. You could use it to compare the performance of sports cars if
you wish. You can also use the accelerometer to detect when the phone is being
shaken or waved around but the thing I like best is that you can also use it to
detect how the phone is being held. This is because the accelerometer detects the
The Windows Phone hardware
Windows Phone 7 8
acceleration due to gravity on the earth. This gives a phone a constant
acceleration value which always points downwards. Programs can get the
orientation of the phone in three axes, X, Y and Z.
This means we can write programs that respond when the user tips the phone in
a particular direction, providing a very useful control mechanism for games. It is
very easy for programs to obtain accelerometer readings, as we shall see later.
Camera
All mobile devices have cameras these days, and the Windows Phone is no
exception. A phone camera will have at least 5 mega pixels or more. This means
that it will take pictures that contain 5 million dots. This equates to a reasonable
resolution digital camera (or the best anyone could get around five years ago). A
5 megapixel picture can be printed on a 7”x5” print with extremely good quality.
We can write Windows Phone applications that use the camera, but there are a
few things that we need to remember.
Firstly, programs can‟t have access to the live video stream from the camera in
the current version of the Windows operating system. This means that we can‟t
make “augmented reality” type applications where the program displays a
camera view and then overlays program output onto it. We also can‟t make
video recorder programs because of this issue (although the Windows Phone
camera application can record video).
Secondly, programs are not allowed to take photographs without the user being
involved in the process. This is a privacy protection measure, in that it stops
programs being distributed that take clandestine pictures without the program
user being aware the software is doing anything. When your program wants the
user to take a picture this task will be performed by the Windows Phone camera
application that will guide the user through framing the picture and taking the
shot.
Pictures that are taken by the user are stored as part of the media content on the
phone. Our programs can open these images and work with them.
Hardware buttons
All Windows Phone systems share a common user interface. As part of this
design there are a number of physical buttons which are fitted to every Windows
Phone that will always perform the same function, irrespective of the make or
model of the phone.
Start: The start button is pressed to start a new activity. Pressing the start
button will always return the user to the program start screen, where
they can select a new program and begin to run it. When the user
presses the Start button this causes the currently running application to
be stopped (we will discuss this more a bit later). However, the
Windows Phone operating system “remembers” which application was
stopped so that the user may return to it later by pressing the Back
button.
Back: The back button is pressed to move back to the previous menu in a
particular application. It is also used to stop one application and return
to the one that was previously running. The back button makes the
phone very easy to work with. A user can start a new application (for
example they could decide to send an email message in the middle of
browsing the web) and then once the message has been sent they can
press Back to return to the browser. Within the mail application the
Back button will move the user in and out of the various input screens
and menus used to create and send the message. Once the message has
been sent the user can press Back at the top menu of the email

The Windows Phone hardware
Windows Phone 7 9
application and return to the start menu and either run another program
or press Back to return to browsing.
Lock: Pressing the lock button will always lock the phone and turn off the
display to save the phone battery. The currently running application
will be stopped. When the user presses the lock or start button again
the phone will display the lock screen. A phone can be configured to
automatically lock after a number of minutes of inactivity.
Search: Pressing the search button will start a new search. Precisely what
happens when search is pressed depends on what the user is doing at
the time. If the user presses search during a browsing session they will
see a web search menu. If they press Search when the “People”
application is active they can search for contacts. A program can get a
“user has pressed search” message which will allow it to respond in a
useful way.
Camera: If the user presses the camera button this will stop the currently
executing program and start the camera application to take a new
picture.
The way these buttons will be used has implications for the programs that we
write. A program must be able to cope with the possibility that it will be
removed from memory at any time, for example if the user decides to take a
photograph while playing our game the game program will be removed from
memory. When they have taken their picture they will expect to be able to
resume their game just as they left it. The user should not notice that the game
was stopped.
Programs that are about to be stopped are given a warning message and the
Windows Phone operating system provides a number of ways that a program can
store state information. We will explore how to do this later in the text.
Not all Windows Phone devices will have a physical keyboard for entering text
but all devices will be able to use the touch screen for text entry.
Memory and Storage
Memory is one of the things that computer owners have been known to brag
about. Apparently the more memory a computer has the “better” it is.. Memory
actually comes in two flavors. There is the space in the computer itself where
programs run and then there is the “mass storage” space that is used to store
programs and data on the device. On a desktop computer these are determined
by the amount of RAM (Random Access Memory) and the amount of hard disk
space. A modern desktop computer will probably have around 2 gigabytes (two
thousand megabytes) of RAM and around 500 gigabytes of hard disk storage. A
megabyte is a million bytes (1,000,000). A gigabyte is a thousand million bytes
(1,000,000,000). As a rough guide, a compressed music track uses around six
megabytes, a high quality picture around three megabytes and an hour of good
quality video will occupy around a gigabyte.
The minimum specification Windows Phone will have at least 256 megabytes of
RAM and 8 gigabytes of storage. This means that a base specification Windows
Phone will have an eighth the amount of memory and around a fiftieth of the
amount of storage of a desktop machine. The Windows Phone operating system
has been optimized to work in slightly smaller amounts of memory (although
you must remember that a few years ago this amount of storage would have been
regarded as extravagantly large but it does make sure that users always get a
responsive device by imposing a few limitations on the way that programs run,
of which more later.

The Windows Phone hardware
Windows Phone 7 10
Network Connectivity
A mobile phone is actually the most connected device you can get. The one
device has a range of networking facilities:
WiFi: All Windows Phones will support wireless networking. WiFi provides a
high speed networking connection, but only works if you are quite near
to a network access point. Fortunately these are appearing all over the
place now, with many fast food outlets and even city centres being WiFi
enabled.
3G: The next thing down from WiFi in performance is the 3G (Third
Generation) mobile phone network. The speed can approach WiFi, but
is much more variable. 3G access may also be restricted in terms of the
amount of data a mobile device is allowed to transfer, and there may be
charges to use this connectivity.
GPRS: In many areas 3G network coverage is not available. The phone will
then fall back to the GPRS mobile network, which is much slower.
The networking abilities are exposed as TCP/IP connections (we will explore
what this means later in the text). Unfortunately, as you will have undoubtedly
experienced, network coverage is not universal, and so software running on the
phone must be able to keep going even when there is no data connection. Ideally
the software should also cope with different connectivity speeds.
The Windows Phone also provides support for Bluetooth networking. This is
used in the context of connecting external devices such as headsets and car audio
systems and is not something our programs are able to access in the present
version of Windows Phone.
Platform Challenges
The Windows Phone hardware is very powerful for a mobile device, but it is still
constrained by the way that it musts be portable and battery power is limited. To
make matters worse, users who are used to working with high speed devices
with rich graphical user interfaces expect their phone to give them the same
experience.
As software developers our job is to provide as much of that experience as
possible, within the constraints of the environment provided by the phone. When
we write programs for this device we need to make sure that they work in an
efficient way that makes the most of the available platform. I actually see this as
a good thing, I am never happy when programmers are allowed to get away with
writing inefficient code just because the underlying hardware is very powerful.
Whenever we do something in this course we will consider the implications on
the phone. I hope you will see that one effect of this is to make us all into much
better programmers.
The Good News
The last few sections read like a list of the bad things, limitations and
compromises that surround mobile development. While you have to remember
all these issues, it is also the case that writing for mobile devices is actually great
fun. The range of features that the device provides and the fact that it is portable
make it possible for you to create genuinely new applications that have never
been done before.
Also, the tools that we will use to write the program and the built in features
provided with the tools make it possible to create really nice looking
applications very easily. So don‟t give up on Windows Phone development just
yet.

The Windows Phone ecosystem
Windows Phone 7 11
1.2 The Windows Phone ecosystem The Windows Phone is not designed as a device that stands by itself. It is
actually part of an ecosystem which contains a number of other software systems
that work around it to provide the user experience.
The Zune media management software
A Windows Phone device is connected to a Windows PC by means of the Zune
software. This provides a way of managing media and transferring it to and from
the phone device. The Zune software is also the means by which the firmware of
the Windows Phone can be updated as new versions come along. The Zune
software also provides the link between the Visual Studio development
environment and the phone itself.
The programs that we write can make use of the media loaded onto the phone
via the Zune software. It is very easy to write programs that load pictures or
playback music and videos stored on the phone.
Windows Live and Xbox Live
The owner of a Windows Phone can register the phone to their Windows Live
account. If their Windows Live account is linked to their Xbox Live gamertag
their gamer profile is imported onto their device and so they can participate in
handheld gaming using the same identity as they use on their console.
A Windows Phone program can use the Windows Live identity of the owner and
XNA gamertag information.
Bing Maps
We know that a phone contains hardware that allows it to be aware of its
location. The Microsoft Bing maps service provides maps which cover most of
the earth. A Windows Phone program can use its network connection to contact
the Bing maps service and download maps and aerial views. There is even a
Silverlight mapping control that makes it very easy for a program to add location
displays. We will do this later in the course.
Windows Notification Server
Although a phone has a wide range of networking technologies available there
will still be occasions when the phone is unable to connect to a network.
Windows Phone provides a notification service which allows programs to get
notifications from the network even when the program is not active. The user is
given a notification on the phone that they can use to start the application.
Notifications are stored and managed by a notification service which will buffer
them if the phone is not connected to the network when the notification is raised.
For example, you might have a sales system that needs to tell a customer when
an item they have reserved is in stock. The ordering application on the phone can
register with the notification service and then your stock management server has
a means of sending a notification to the customer when the item becomes
available. This system can also be used in gaming, where one player wants to
send a challenge to another. Getting this to work involves a very interesting
exploration of some programming issues, and is something we will do later in
the course.

Windows Phone program execution
Windows Phone 7 12
Using the Ecosystem
It is important to remember that a phone is not just a phone these days. The
connected nature of the application means that it will function in conjunction
with remote services which are available over the network connection. Other
parts of the phone make use of this connected ability too. The phone has a
Facebook client built in and the camera application and picture storage elements
can upload your pictures to Windows Live Skydrive or Facebook.
You can also use the network features of the phone to create your own client and
server applications. You will need to write two programs to do this, one will run
on the Windows Phone and the other can run on any computer connected to the
internet, or even on a system in the “cloud”.
1.3 Windows Phone program execution The Windows phone provides a platform to run programs, some of which can be
ones that we have written. It is worth spending some time considering how the
programs are made to run on the phone and some of the implications for the way
that we write them.
Multi-tasking on Windows Phone
One limitation of the present version of the platform is that it can only run a
single program at one time. While the operating system is perfectly capable of
executing multiple programs this ability is not enabled for programs that we
write. There are a number of sound technical reasons for this, only having a
single program active will conserve memory and improve battery life. The
limitation might be removed in a later version of the Windows Phone operating
system.
In my opinion this is not a huge problem for the user in practice, as long as it is
quick and easy to resume an application. Because a phone screen is very small it
is unlikely that you would be able to see two applications running at the same
time anyway.
However, the implication for developers is that they must live with the
possibility that at any point their program might be removed from the system to
make way for another. They must also make sure that if a user comes back to an
application that was previously suspended in this way it looks exactly as it did
when they left.
We will have add behaviours to our programs to give the user the illusion that
our program was never stopped and started when they return to it from working
with another application. A program is given a message when it is about to be
removed and it has access to storage that it can use to retain state information.
We will find out how to do this later on.
Windows Phone and Managed Code
In the early days a computer ran a program just by, well, running a program. The
file containing the program instructions was loaded into memory and then the
computer just obeyed each one in turn. This worked OK, but this simple
approach is not without its problems.
The first problem is that if you have a different kind of computer system you
have to have a different file of instructions. Each computer manufacturer made
hardware that understood a particular set of binary instructions, and it was not
possible to take a program created for one hardware type and then run it on
another.
Windows Phone program execution
Windows Phone 7 13
The second problem is that if the instructions are stupid/dangerous the computer
will obey them anyway. Stupid instructions in the file that is loaded into memory
may cause the actual hardware in the computer to get stuck (a bit like asking me
to do something in Chinese). Dangerous instructions could cause the program to
damage other data in the computer (a bit like asking me to delete all the files on
my computer).
The Microsoft Intermediate Language (MSIL)
Microsoft .NET addresses these problems by using an intermediate language to
describe what a program wants to do. When a C# program is compiled the
compiler will produce a file containing instructions in this intermediate
language. When the program actually runs these instructions are compiled again,
this time into the low level instructions that are understood by the target
hardware in use. During the compilation process the instructions are checked to
make sure they don‟t do anything stupid and when the program runs it is closely
monitored to make sure that it doesn‟t do anything dangerous.
Microsoft .NET programs are made up of individual components called
asssemblies. An assembly contains MSIL code along with any data resources
that the code needs, for example images, sounds and so on. An assembly can
either be an executable (something you can run) or a library (something that
provides resources for an application). A Windows Phone can run C# executable
assemblies and libraries produced from any .NET compatible compiler. This
means that you could write some of the library code in your application in
another language, for example Visual Basic, C++ or F#. It also means that if you
have libraries already written in these languages you can use them in phone
applications.
The idea behind .NET was to provide a single framework for executing code
which was independent of any particular computer hardware or programming
language. The standards for .NET specify what the intermediate language looks
like, the form of the data types stored in the system and also includes the designs
of the languages C# and Visual Basic .NET.
Just in Time Compilation
When a program actually gets to run something has to convert the MSIL (which
is independent of any particular computer hardware) into machine code
instructions that the computer processor can actually execute. This compilation
process is called Just In Time compilation because the actual machine code for
the target device is compiled from the intermediate instructions just before it
gets to run. The way in which the program runs within a monitored environment
is called managed code. The compilation happens in the instant before the
program runs, i.e. the user of the phone selects a program from the start page, the
MSIL is loaded from storage and then compiled at that time.
The downside of this approach is that rather than just run a file of instructions
the computer now has to do more work to get things going. It must load the
intermediate language, compile it into machine code and then keep an eye on
what the program itself does as it runs. Fortunately modern processors
(including the one inside the Windows Phone) can achieve this without slowing
things down.
The upside is that the same intermediate code file can be loaded and executed on
any machine that has the .NET system on it. You can (and I have) run exactly
the same compiled program on a mobile device, Windows PC and Xbox 360,
even though the machines have completely different operating systems and
underlying hardware.
Another advantage is that this loading process can be expanded to ensure that
programs are legitimate. .NET provides mechanisms by which programs can be
“signed” using cryptographic techniques that make it very difficult for naughty

Windows Phone application development
Windows Phone 7 14
people to modify the program or create “fake” versions of your code. If you
become a marketplace developer you will be assigned your own cryptographic
key that will be used to sign any applications that you create.
Finally, the use of an intermediate language means that we can use a wide range
of programming languages. Although the programming tools for Windows
Phone are focused on C# it is possible to use compiled code from any
programming language which has a .NET compiler. If you have existing
programs in Visual Basic, C++ or even F# you can use intermediate code
libraries from these programs in your Windows Phone solutions. Remember
though that you will need to use C# for the Silverlight or XNA “front end” for
these programs.
Managed Code
Programs that you create on Windows Phone run within the “managed”
environment provided by the operating system. You will write your C#
programs and then they will run inside a safe area in the phone provided by the
operating system. Your program will not be allowed direct access to the
hardware. This is good news because it stops people from writing programs that
stop the proper operation of the phone itself. As far as the developer is
concerned this actually makes no difference. When a program calls a method to
put a picture on the screen the underlying systems will cause the picture to
appear.
Developer Implications
As far as a developer is concerned there is an element of good news/bad news
about all this. The good news is that you only need to learn one programming
language (C#) to develop on a range of platforms. Programs that you write will
be isolated from potential damage by other programs on a system and you can be
sure that software you sell can‟t be easily tampered with.
The bad news is that all this comes at the expense of extra work for the system
that runs your application. Starting up a program is not just a case of loading it
into memory and obeying the instructions it contains. The program must be
checked to ensure that it has not been tampered with and then “just in time”
compiled into the instructions that will really do the work. The result of all this
is that the user might have to wait a little while between selecting the application
and getting the first screen displayed.
Fortunately the power of Windows Phone means that these delays are not
usually a problem but it does mean that if we have very large programs we might
want to break them into smaller chunks, so that not everything is loaded at once.
But then again, as sensible developers we would probably want to do this kind of
thing anyway.
1.4 Windows Phone application development You write Windows Phone applications in exactly the same way as you write
other applications for the Windows desktop. You use the Visual Studio IDE
(Integrated Development Environment). You can debug a program running in a
Windows Phone device just as easily as you can debug a program on your PC
desktop. You can also create solutions that share components across the desktop,
Windows Phone and even Xbox platforms.
You can take all your Windows Desktop development skills in Silverlight and
your console skills in XNA and use them on the phone. If you learn how to use
the Windows Phone you are also learning how to write code for the desktop
(Silverlight) or console (XNA). This is great news for you as it means that you
can write (and even sell) programs for Windows Phone without having to learn a
lot of new stuff. If you have previously written programs for desktop computers
Windows Phone application development
Windows Phone 7 15
then the move to Windows Phone development will be a lot less painful than
you might expect.
The Windows Phone Emulator
The Windows Phone development environment is supplied with an emulator
which gives you a Windows Phone you can play with on your PC desktop. If
you have a PC system that supports multi-touch input you can even use this with
the emulator to test the use of multi-touch gestures with your Windows Phone
programs.
While the emulator is feature complete, in that it behaves exactly like a real
phone would in response to the requests from your software, it does not mimic
the performance of the actual phone hardware. Programs running on the
emulator are using the power of your PC, which may well be much greater than
the processor in the phone. This means that although you can test the
functionality of your programs using the emulator you only really get a feel for
how fast the program runs, and what the user experience feels like, when you
run your program on a real device.
Accessing Windows Phone facilities
The Windows Phone platform provides a library of software resources that let
your programs make use of the features provided by the device itself. Your
programs can make use of the camera in the phone, place phone calls and even
send SMS messages. They can also make use of the GPS resources of the phone
to allow you to create location aware applications. The facilities are divided into
Launchers which let your program transfer to another application and Choosers
which use the system to select an item and then return control to your program.
We will see how to use these later in this text.
Windows Phone Connectivity
As you might expect, programs on a Windows Phone are extremely well
connected. Applications on the phone can make use of the TCP/IP protocol to
connect to servers on the internet. Programs can use Web Services and also set
up REST based sessions with hosts. The present version of the operating system
does not support direct socket connections. If you are not sure what any of this
means, don‟t worry. We will be exploring the use of network services later in the
text.
Silverlight and XNA Development
There are essentially two flavours to Windows Phone development. If you are
creating an application (for example a word processor, email client or cheese
calculator) then you can use Silverlight. This provides a whole range of features
just for creating such programs. If you are creating a game then you can use
XNA. XNA provides all the facilities for creating 2D and 3D games with high
performance graphics.
You are not forced to work this way. You could create your cheese calculator in
XNA or (perhaps more sensibly) you can create simple games (for example
word puzzles) very successfully in Silverlight.
You select the type of application you are creating when you make a new project
with Visual Studio. It is not possible to make a single program that combines
both types of application.
What we have learned
Windows Phone 7 16
Development Tools
The tools that you need to get started are free. You can download a copy of
Visual Studio 2010 Express Edition and be started writing Windows Phone
applications literally within minutes. Developers who have more advanced, paid
for, copies of Visual Studio 2010 can use all the extra features of their versions
in mobile device development by adding the Windows Phone plugin to their
systems. We will see in detail how to get started with Visual Studio later in the
text.
Windows Marketplace
Windows Marketplace is where you can sell programs that you have created. It
is moderated and managed by Microsoft to ensure that applications meet certain
minimum standards of behaviour. If you want to sell an application you must be
a registered developer and submit your program to an approvals process.
It costs $99 to register as a developer, but students can register for free via the
Dreamspark programme. Developers can register their Windows Phone devices
as “development” devices. Visual Studio can deploy applications to a developer
device and you can even step through programs running in the device itself.
You can distribute free applications as well as paid ones. A registered developer
can distribute up to five free applications in any year. If you want to distribute
more than five free applications you must pay a $20 fee for each additional free
application. You can also create applications that have a “demo” mode which
can be converted into a “full” version when the user purchases them. Your
program can tell when it runs whether it is operating in full or demo mode.
When you submit an application to be sold in the marketplace it will go through
an approvals process to make sure that it doesn‟t do anything naughty and that it
works in a way that users expect. If the approvals process fails you will be given
a diagnostic report. Before you send an application into the system you should
read the certification guidelines of the marketplace.
What we have learned 1. Windows Phone is a powerful computing platform.
2. All Windows Phone devices have a core specification. This includes a
particular size of display, capacitive touch input that can track at least
four points, Global Positioning System support, 3D graphics
acceleration, high resolution camera and ample memory for program
and data storage.
3. The Windows Phone device is connected to a Windows PC by means
of the Zune PC software, which provides a media management system
for the PC and also allows media to be synchronised to the phone.
4. Windows Phone systems can make use of network based services to
receive notifications, determine their position and perform searches.
5. When developing programs for Windows Phone the Zune software is
used to transfer programs into the phone for testing. The Zune software
is also used to upgrade the firmware in the phone.
6. The Windows Phone operating system supports full multi-tasking, but
to preserve battery life and conserve memory only one user application
can be active at one time.
7. The Windows Phone runs programs that have been compiled into
Microsoft Intermediate Language (MSIL). This MSIL is compiled
inside the phone just before the program runs. The programs

What we have learned
Windows Phone 7 17
themselves run in a “managed” environment which stops them from
interfering with the operating of the phone itself.
8. When developing software for Windows Phone you can create
Silverlight and XNA applications. These are written in C# using Visual
Studio 2010. Programmers can use a Windows Phone emulator that
runs on Windows PC and provides a simulation of the Windows Phone
environment.
9. Programs have access to all the phone facilities and can place calls,
send SMS messages etc.
10. The free, Express, version of Visual Studio can be used to create
Windows Phone applications. However, to deploy applications to a
phone device you must be a registered Windows Phone Developer. This
costs $99 per year but registration is free to students via the Microsoft
Dreamspark initiative. A registered developer can upload their
applications to Windows Phone Marketplace for sale.

Program design with Silverlight
Introduction to Silverlight 18
2 Introduction to Silverlight
A user interface is a posh name for the thing that people actually see when they
use your program. It comprises the buttons, text fields, labels and pictures that
the user actually works with to get their job done. Part of the job of the
programmer is to create this “front end” and then put the appropriate behaviors
behind the screen display to allow the user to drive the program and get what
they want from it. In this section we are going to find out about Silverlight, and
how to use it to create a user interface for our programs.
2.1 Program design with Silverlight It turns out that most programmers are not that good at designing attractive user
interfaces (although I‟m sure that you are). In real life a company will employ
graphic designers who will create artistic looking front ends. The role of the
programmer will then be to put the code behind these displays to get the required
job done. Silverlight recognises this process by enforcing a very strong
separation between the screen display design and the code that is controlled by
it. This makes it easy for a programmer to create an initial user interface which
is subsequently changed by a designer into a much more attractive one. It is also
possible for a programmer to take a complete user interface design and then fit
the behaviours behind each of the display components.
Development Tools
The user interface designer uses the Expression Blend tool and the programmer
uses the Visual Studio tool to create the code. The Silverlight system provides a
really easy way for combining user interface designs with code. A good way to
work is for the programmer to use a “placeholder” design to create the program
behaviours and then incorporate the final designs later in the production process.
The Windows Phone SDK (Software Development Kit) includes versions of
Visual Studio and Expression Blend that can be used in this way.
The Metro Design Style
From a design point of view a nice thing about Windows Phone is that it brings
with it a whole set of design guidelines which are referred to as “Metro”. This
sets out how controls are supposed to look and establishes a set of criteria that
your applications should meet if they are to be “good looking” Windows Phone
applications. This style regime is carried over into the built in components that
are provided for you to use in your programs. The happy consequence of this is
that if you use the Buttons, TextFields and other components that are supplied
with Visual Studio you will be automatically adhering to the style guidelines.
This is a great help those of us who are not very good at design because it means
that we are only ever going to use things that look right. Of course you can
completely override the properties of the supplied components if you really want
purple text on an orange background but I would not really advise this.
There is actually a Metro style document you can read if you really want to
know how to make “proper looking” programs. This is well worth a look if you
want to publish your programs in the Marketplace, where people will have
certain expectations of how things should look and work. You can find the
document here:
Program design with Silverlight
Introduction to Silverlight 19
http://download.microsoft.com/download/D/8/6/D869941E-455D-4882-A6B8-0DBCAA6AF2D4/UI%20Design%20and%20Interaction%20Guide%20for%20Windows%20Phone%207%20Series.pdf
For the purpose of this course we are going to use the Silverlight design tools in
Visual Studio. These do not give all the graphical richness that you can achieve
with Expression Blend, but for programmers they are more than adequate. This
should make sure that our applications adhere to the Metro guidelines and are
clean and simple to use.
Silverlight elements and objects
From a programming point of view each of the elements on the screen of a
display is actually a software object. We have come across these before. An
object is a lump of behaviours and data. If we were creating an application to
look after bank accounts we could create a class to hold account information:
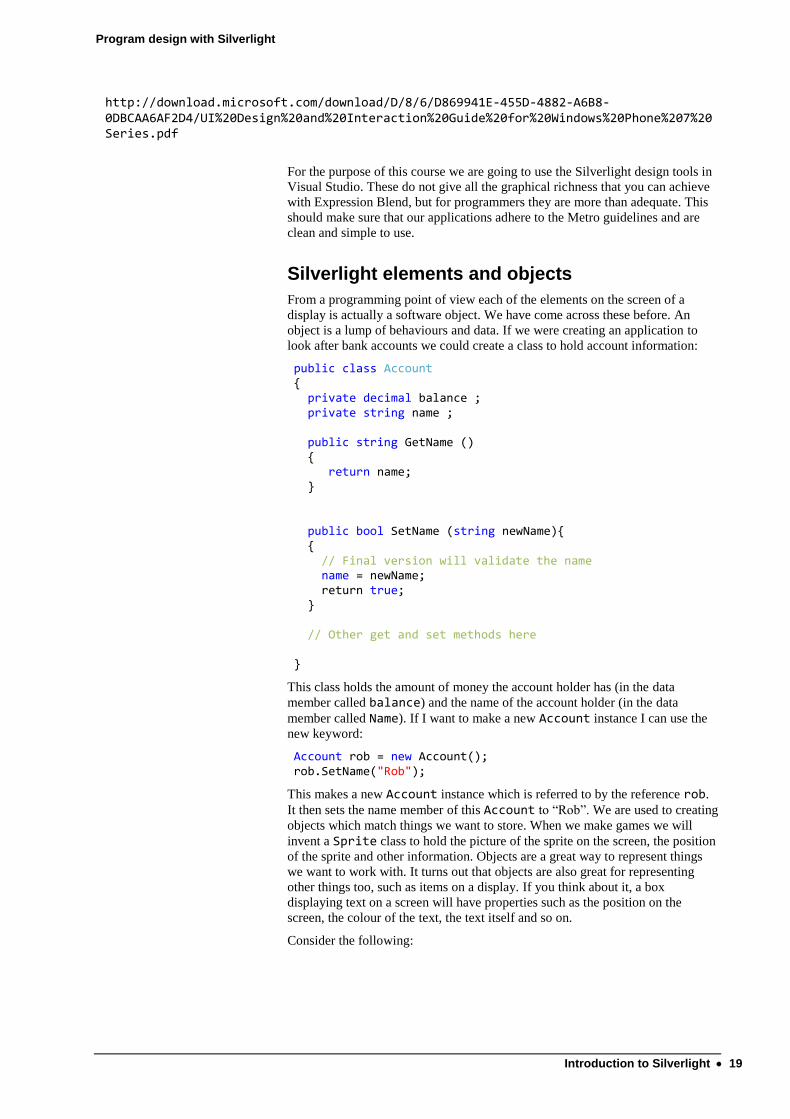
public class Account { private decimal balance ; private string name ; public string GetName () { return name; } public bool SetName (string newName){ { // Final version will validate the name name = newName; return true; } // Other get and set methods here }
This class holds the amount of money the account holder has (in the data
member called balance) and the name of the account holder (in the data
member called Name). If I want to make a new Account instance I can use the
new keyword:
Account rob = new Account(); rob.SetName("Rob");
This makes a new Account instance which is referred to by the reference rob.
It then sets the name member of this Account to “Rob”. We are used to creating
objects which match things we want to store. When we make games we will
invent a Sprite class to hold the picture of the sprite on the screen, the position
of the sprite and other information. Objects are a great way to represent things
we want to work with. It turns out that objects are also great for representing
other things too, such as items on a display. If you think about it, a box
displaying text on a screen will have properties such as the position on the
screen, the colour of the text, the text itself and so on.
Consider the following:

Program design with Silverlight
Introduction to Silverlight 20
This is a very simple Windows Phone program that I‟ve called an “Adding
Machine”. You can use to perform very simple sums. You just enter two
numbers into the two text boxes at the top and then press the equals button. It
then rewards you with the sum of these two numbers. At the moment it is
showing us that 0 plus 0 is 0. Each individual item on the screen is called a
UIElement or User Interface element. I‟m going to call these things elements
from now on.There are seven of them on the screen above:
1. The small title “Adding Machine”. This is known in the Windows
Phone style guidelines as the „Application Title‟.
2. The larger title “Add”. This is known as the „Page Title‟.
3. The top textbox, where I can type a number.
4. A text item holding the character +.
5. The bottom textbox, where I can type another number.
6. A button, which we press to perform the sum.
7. A result textbox, which changes to show the result when the button is
pressed.
Each of these items has a particular position on the screen, particular size of text
and lots of other properties too. We can change the colour of the text in a text
box, whether it is aligned to the left, right or centre of the enclosing box and lots
of other things too.
There are three different types of element on the screen:
1. TextBox – allows the user to enter text into the program.
2. TextBlock – a block of text that just conveys information.
3. Button – something we can press to cause events in our program.
If you think about it, you can break the properties of each of these elements
down into two kinds, those that all the elements need to have, for example
position on the screen, and those that are specific to that type of element. For
example only a TextBox needs to record the position of the cursor where text is
being entered. From a software design point of view this is a really good use for
a class hierarchy.

Program design with Silverlight
Introduction to Silverlight 21
FrameworkElement
TextBlock
TextBox ContentControl
ButtonBase
Button
Control
Above you can see part of the hierarchy that the Silverlight designers built. The
top class is called FrameworkElement. It contains all the information that is
common to all controls on the screen. Each of the other classes is a child of this
class. Children pick up all the behaviours and properties of their parent class and
then add some of their own. Actually the design is a bit more complex than
shown above, the FrameworkElement class is a child of a class called
UIElement, but it shows the principles behind the controls.
Creating a class hierarchy like this has a lot of advantages. If we want a custom
kind of textbox we can extend the TextBox class and add the properties and
behaviours that we need. As far as the Silverlight system is concerned it can treat
all the controls the same and then ask each control to draw itself in a manner
appropriate to that component.
So, remember that when we are adjusting things on a display page and creating
and manipulating controls we are really just changing the properties of objects,
just as we would change the name and balance values of a bank account object.
When we design a Silverlight user interface we set the data inside the display
elements to position them on the display. Next we are going to find out how to
do this.
The toolbox and design surface
We could start by investigating how the Adding Machine above was created. It
turns out to be really easy (we will take a really detailed look at Visual Studio in
the next section). When we create a brand new Silverlight project we get an
empty page and we can open up a ToolBox which contains all the controls that
we might want to add to the page:

Program design with Silverlight
Introduction to Silverlight 22
We can assemble the user interface by simply dragging the controls out of the
toolbox onto the design surface.
Above shows the effect of dragging a TextBox out of the Toolbox area and
dropping it onto the Windows Phone page. If we run the program now we can
see our textbox on the screen:

Program design with Silverlight
Introduction to Silverlight 23
This is the Windows Phone emulator running our program, which is showing the
textbox on the screen.
If you have ever done any Windows Forms development (perhaps using earlier
versions of .NET) then this will all be very familiar to you. If you haven‟t then it
is a quick and easy way to build up a user interface. Because all the controls are
already styled in the Metro style, just like the Windows Phone user interface,
you are automatically building an application that looks like a “real” one. The
designer has lots of nice features that make it very easy to align your controls
too, which is nice.
Managing element names in Visual Studio
Once we have put some elements on the screen we need to set the names of them
to sensible values. The designer will give each element a meaningless name like
“TextBox1”, which I like to change to something which has meaning in the
context of the system being created.
We can change the properties of things on the screen by clicking on the item in
the designer and then seeking out the Properties pane in Visual Studio for that
item.
Program design with Silverlight
Introduction to Silverlight 24
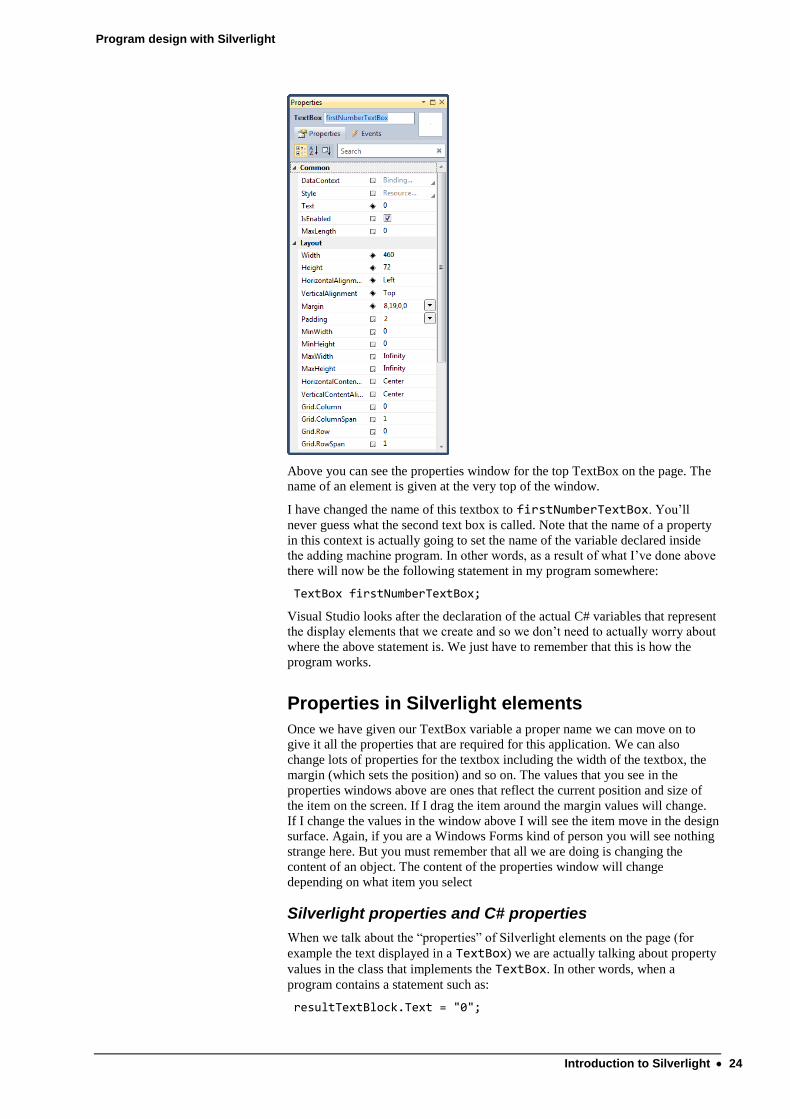
Above you can see the properties window for the top TextBox on the page. The
name of an element is given at the very top of the window.
I have changed the name of this textbox to firstNumberTextBox. You‟ll
never guess what the second text box is called. Note that the name of a property
in this context is actually going to set the name of the variable declared inside
the adding machine program. In other words, as a result of what I‟ve done above
there will now be the following statement in my program somewhere:
TextBox firstNumberTextBox;
Visual Studio looks after the declaration of the actual C# variables that represent
the display elements that we create and so we don‟t need to actually worry about
where the above statement is. We just have to remember that this is how the
program works.
Properties in Silverlight elements
Once we have given our TextBox variable a proper name we can move on to
give it all the properties that are required for this application. We can also
change lots of properties for the textbox including the width of the textbox, the
margin (which sets the position) and so on. The values that you see in the
properties windows above are ones that reflect the current position and size of
the item on the screen. If I drag the item around the margin values will change.
If I change the values in the window above I will see the item move in the design
surface. Again, if you are a Windows Forms kind of person you will see nothing
strange here. But you must remember that all we are doing is changing the
content of an object. The content of the properties window will change
depending on what item you select
Silverlight properties and C# properties
When we talk about the “properties” of Silverlight elements on the page (for
example the text displayed in a TextBox) we are actually talking about property
values in the class that implements the TextBox. In other words, when a
program contains a statement such as:
resultTextBlock.Text = "0";
Program design with Silverlight
Introduction to Silverlight 25
- this will cause a Set method to run inside the resultTextBlock object
which sets the text on the TextBlock to the appropriate value. At this point it is
worth refreshing our understanding of properties in C# so that can get a good
understanding of what is happening here.
C# classes and properties
C# classes can contain member data (the name of the person owning a particular
bank account) and behaviours (methods called GetName and SetName that let a
program find out this name and change it). Properties provide a way of
representing data inside a class that is easier to work with than using Get and
Set methods . They are used extensively in managing Silverlight elements, and
therefore worth a refresher at this point.
A property is a member of a class that holds a value. We have seen that we can
use a member variable to do this kind of thing, but we need to make the member
value public. For example, the bank may ask us to keep track of staff members.
One of the items that they may want to hold is the age of the bank account
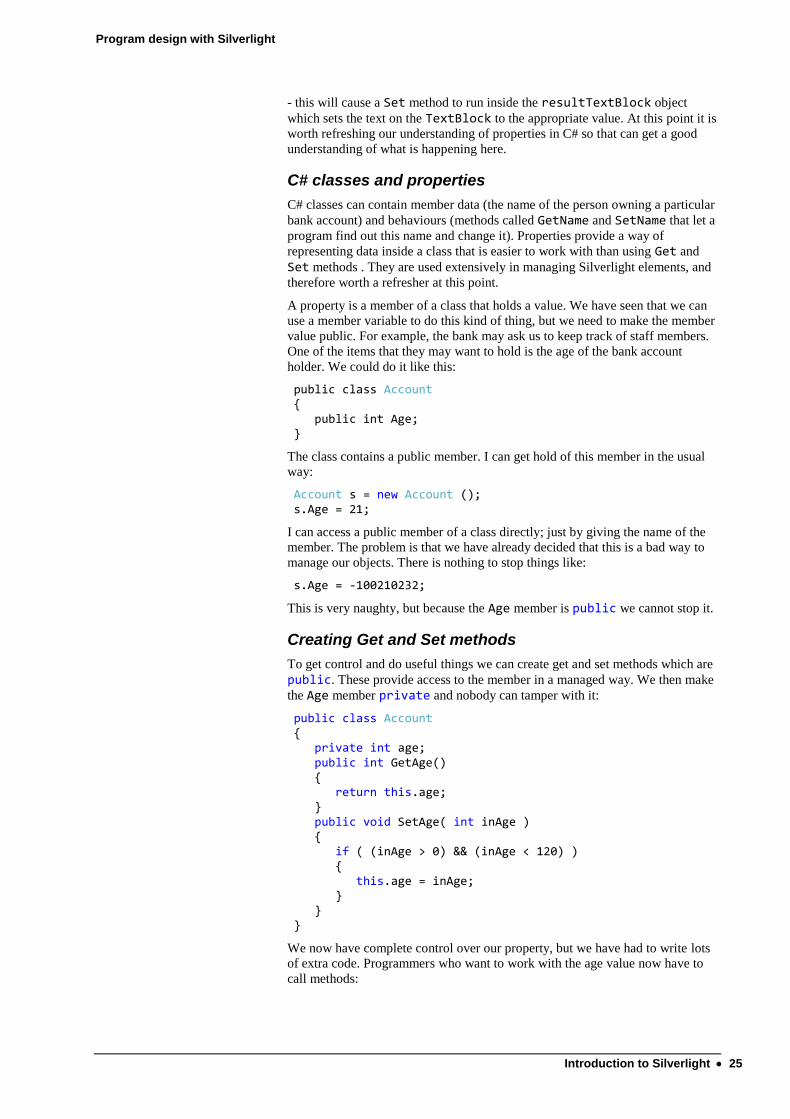
holder. We could do it like this:
public class Account { public int Age; }
The class contains a public member. I can get hold of this member in the usual
way:
Account s = new Account (); s.Age = 21;
I can access a public member of a class directly; just by giving the name of the
member. The problem is that we have already decided that this is a bad way to
manage our objects. There is nothing to stop things like:
s.Age = -100210232;
This is very naughty, but because the Age member is public we cannot stop it.
Creating Get and Set methods
To get control and do useful things we can create get and set methods which are
public. These provide access to the member in a managed way. We then make
the Age member private and nobody can tamper with it:
public class Account { private int age; public int GetAge() { return this.age; } public void SetAge( int inAge ) { if ( (inAge > 0) && (inAge < 120) ) { this.age = inAge; } } }
We now have complete control over our property, but we have had to write lots
of extra code. Programmers who want to work with the age value now have to
call methods:

Program design with Silverlight
Introduction to Silverlight 26
Account s = new Account (); s.SetAge(21); Console.WriteLine ( "Age is : " + s.GetAge() );
Using Properties
Properties are a way of making the management of data like this slightly easier.
An age property for the StaffMember class would be created as follows:
public class Account { private int ageValue; public int Age { set { if ( (value > 0) && (value < 120) ) ageValue = value; } get { return ageValue; } } }
The age value has now been created as a property. Note how there are get and
set parts to the property. These equate directly to the bodies of the get and set
methods that I wrote earlier. The really nice thing about properties is that they
are used just as the class member was:
Account s = new Account (); s.Age = 21; Console.WriteLine ( "Age is : " + s.Age );
When the Age property is given a value the set code is run. The keyword
value means “the thing that is being assigned”. When the Age property is being
read the get code is run. This gives us all the advantages of the methods, but
they are much easier to use and create.
Data validation in properties
If we set an age value to an invalid one (for example we try to set the age to 150)
the set behaviour above will perform validation and reject this value (nobody
over 120 is allowed to have an account with our bank), leaving the age as it was
before. A program that is using our Age property has no way of knowing
whether an assignment to the property has failed unless it actually checks that
the assignment worked.
Account s = new Account (); int newAge = 150; s.Age = newAge; if (s.Age != newAge ) Console.WriteLine ( "Age was not set" );
The code above sets the age to 150, which is not allowed. However, the code
then tests to see if the value has been set. In other words, it is up to the users of
your properties to make sure that values have been set correctly. In the case of a
Set method the method itself could return false to indicate that the set has failed,
here the user of the property has to do a bit more work.
Program design with Silverlight
Introduction to Silverlight 27
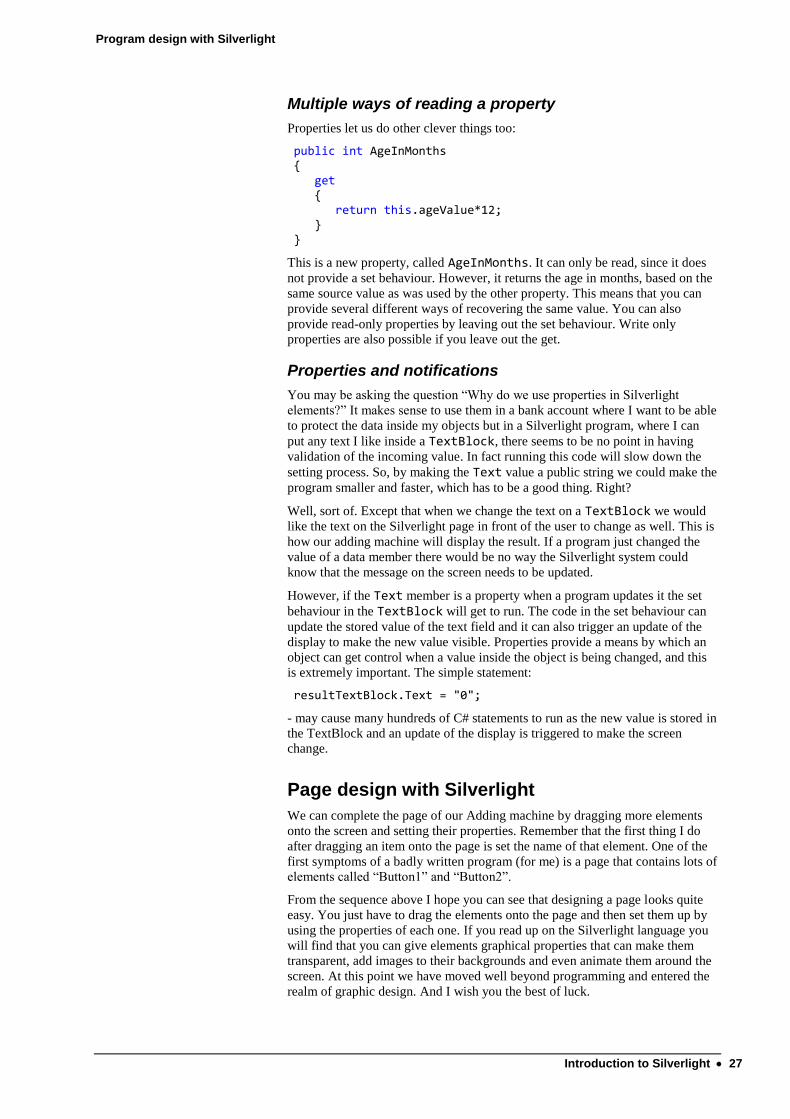
Multiple ways of reading a property
Properties let us do other clever things too:
public int AgeInMonths { get { return this.ageValue*12; } }
This is a new property, called AgeInMonths. It can only be read, since it does
not provide a set behaviour. However, it returns the age in months, based on the
same source value as was used by the other property. This means that you can
provide several different ways of recovering the same value. You can also
provide read-only properties by leaving out the set behaviour. Write only
properties are also possible if you leave out the get.
Properties and notifications
You may be asking the question “Why do we use properties in Silverlight
elements?” It makes sense to use them in a bank account where I want to be able
to protect the data inside my objects but in a Silverlight program, where I can
put any text I like inside a TextBlock, there seems to be no point in having
validation of the incoming value. In fact running this code will slow down the
setting process. So, by making the Text value a public string we could make the
program smaller and faster, which has to be a good thing. Right?
Well, sort of. Except that when we change the text on a TextBlock we would
like the text on the Silverlight page in front of the user to change as well. This is
how our adding machine will display the result. If a program just changed the
value of a data member there would be no way the Silverlight system could
know that the message on the screen needs to be updated.
However, if the Text member is a property when a program updates it the set
behaviour in the TextBlock will get to run. The code in the set behaviour can
update the stored value of the text field and it can also trigger an update of the
display to make the new value visible. Properties provide a means by which an
object can get control when a value inside the object is being changed, and this
is extremely important. The simple statement:
resultTextBlock.Text = "0";
- may cause many hundreds of C# statements to run as the new value is stored in
the TextBlock and an update of the display is triggered to make the screen
change.
Page design with Silverlight
We can complete the page of our Adding machine by dragging more elements
onto the screen and setting their properties. Remember that the first thing I do
after dragging an item onto the page is set the name of that element. One of the
first symptoms of a badly written program (for me) is a page that contains lots of
elements called “Button1” and “Button2”.
From the sequence above I hope you can see that designing a page looks quite
easy. You just have to drag the elements onto the page and then set them up by
using the properties of each one. If you read up on the Silverlight language you
will find that you can give elements graphical properties that can make them
transparent, add images to their backgrounds and even animate them around the
screen. At this point we have moved well beyond programming and entered the
realm of graphic design. And I wish you the best of luck.
Understanding XAML
Introduction to Silverlight 28
2.2 Understanding XAML In the above section we saw that Silverlight design can be broken down into
some element manipulation using the Visual Studio designer and some property
setting on the elements that you create. Once you know how to do these things,
you can create every user interface you need.
It is perfectly true that you can work this way, and you could even think about
making every program you ever need without touching XAML, although I think
you would be missing out on some of the most powerful features of Silverlight.
At the moment everything seems quite sensible and we are all quite happy (at
least I hope so). So this would seem a good point to confuse everybody and start
to talk about XAML. The letters stand for “Extensible Application Markup
Language” which I‟m sure makes everything clear. Or not. XAML is the
language used by Silverlight to describe what a page should look like.
Why have XAML?
You might be wondering why we have XAML. If you have used Windows
Forms before you might think that you managed perfectly well without this new
language getting in the way. XAML provides a well-defined interface between
the look of an application (the properties of the display elements that the user
sees) and the behaviour of the application (what happens behind the display to
make the application work).
The split is a good idea because, as we have mentioned before, there is no
guarantee that a good programmer will be a good graphic designer. If you want
to make good looking applications you really have to have both designers and
programmers working on your solution. This leads to a problem, in that ideally
you want to separate the work of the two, and you don‟t want the programmer
unable to do anything until the graphical designer has finished creating all the
menu screens.
XAML solves both these problems. As soon as the requirements of the user
interface have been set out (how many text boxes, how many buttons, what is
there on each page etc) then the designer can work on how each should look,
while the programmer can focus on what they do. The XAML files contain the
description of the user interface components and the designer can work on the
appearance and position of these elements to their heart‟s content while the
programmer gets one with making the code that goes behind them. There is no
need for the programmer to give the designer their code files since they are
separate from the design, and vice versa.
XAML file content
A XAML file for a given page on the display will contain constructions that
describe all the elements on it. Each description will contain a set of named
properties. The line of XAML that describes our first TextBox is as given
below:
<TextBox Height="72" HorizontalAlignment="Left" Margin="8,19,0,0" Name="firstNumberTextBox" Text="0" VerticalAlignment="Top" Width="460" TextAlignment="Center" />
If you compare the information in the Properties pane with the values in the
XAML above you will find that they all line up exactly. The name of the
TextBox is firstNumberTextBox, the width is 460 and so on.
If you were wondering how the page and the properties pane kept themselves
synchronised it is because they both used the XAML description file for the
page. When I move things around the page the editor updates the XAML with
the new positions. The properties window reads this file and updates its values
accordingly.

Understanding XAML
Introduction to Silverlight 29
XAML is described as a declarative language. This means it just tells us about
stuff. It is designed to be understandable by humans, which is why all the
properties above have sensible names. If you want to, you can edit the text
contents of the XAML files within Visual Studio and change both the
appearance in the designer and also the property values.
XAML turns out to be very useful. Once you get the hang of the information
used to describe components it turns out to be much quicker to add things to a
page and move them about by just editing the text in the XAML file, rather than
dragging things around or moving between property values. I find it particularly
useful when I want a large number of similar elements on the screen. Visual
Studio is aware of the syntax used to describe each type of element and will
provide Intellisense support help as you go along.
When an application is built the XAML file is converted into a file containing
low level instructions that create the actual display components when the
program runs. This means that declaring a control inside the XAML file for a
page will mean that the control will exist as an object our program can use.
XAML looks a lot like XML, an eXtensible MarkUp language you may have
heard of. The way that items and elements are expressed is based on XML
syntax and it is quite easy to understand.
Extensible Markup Languages
At this point you may be wondering what an eXtensible Markup Languge
actually is. Well, it is a markup language that is extensible. I‟m sure that helped.
What we mean by this is that you can use the rules of the language to create
constructions that describe anything. English is a lot like this. We have letters
and punctuation which are the symbols of English text. We also have rules
(called grammar) that set out how to make up words and sentences and we have
different kinds of words. We have nouns that describe things and verbs that
describe actions. When something new comes along we invent a whole new set
of word to describe them. Someone had to come up with the word “computer”
when the computer was invented, along with phrases like “boot up”, “crash” and
“too slow”.
XML based languages are extensible in that we can invent new words and
phrases that fit within the rules of the language and use these new constructions
to describe anything we like. They are called markup languages because they are
often used to describe the arrangement of items on a page. The word markup
was originally used in printing when you wanted to say things like “Print the
name Rob Miles in very large font”. The most famous markup language is
probably HTML, HyperText Markup Language, which is used by the World
Wide Web to describe the format of web pages.
Programmers frequently invent their own data storage formats using XML. As
an example, a snippet of XML that describes a set of high scores might look as
follows:
<?xml version="1.0" encoding="us-ascii" ?> <HighScoreRecords count="2"> <HighScore game="Breakout"> <playername>Rob Miles</playername> <score>1500</score> </HighScore> <HighScore game="Space Invaders"> <playername>Rob Miles</playername> <score>4500</score> </HighScore> </HighScoreRecords>
This is a tiny XML file that describes some high score records for a video game
system. The HighScoreRecords element contains two HighScore items, one

Understanding XAML
Introduction to Silverlight 30
for Breakout and one for Space Invaders. The two high score items are
contained within the HighScoreRecords item. Each of the items has a
property which gives the name of the game and also contains two further
elements, the name of the player and the score that was achieved. This is quite
easy to us to understand. From the text above it is not hard to work out the high
score for the Space Invaders game.
The line at the very top of the file tells whatever wants to read the file the
version of the XML standard it is based on and the encoding of the characters in
the file itself. XAML takes the rules of an extensible markup language and uses
them to create a language that describes components on a page of a display.
<TextBox Height="72" HorizontalAlignment="Left" Margin="8,19,0,0" Name="firstNumberTextBox" Text="0" VerticalAlignment="Top" Width="460" TextAlignment="Center" />
If we now take a look at the description of a TextBox I think we can see that the
designers of XAML have just created field names that match their requirements.
XML Schema
The XML standard also contains descriptions how to create a schema which
describes a particular document format. For example, in the above the schema
for the high score information would say that a HighScore must contain a
PlayerName and a Score property. It might also say things like the
HighScore can contain a Data value (the date when the high score was
achieved) but that this is not required.
This system of standard format and schema means that it is very easy for
developers to create data formats for particular purposes. This is helped by the
fact that there are a lot of design tools to help create documents and schemas.
The .NET framework even provides a way by which a program can save an
object as a formatted XML document. In fact the Visual Studio solution file is
actually stored as an XML document.
As far as we are concerned, it is worth remembering that XML is useful for this
kind of thing, but at the moment I want to keep the focus on XAML itself.
XAML and pages
A file of XAML can describe a complete page of the Windows Phone display.
When you create a brand new Windows Phone project you get a page that just
contains a few elements. As you put more onto the page the file grows as each
description is added. Some elements work as containers which means that they
can hold other components. They are very useful when you want to lay things
out, for example there is a Grid element which can hold a set of other elements
in a grid arrangement. The XAML code can also contain the descriptions of
animations and transitions that can be applied to items on the page to make even
more impressive user interfaces.
One thing you need to bear in mind at this point is that XAML has no concept of
hierarchy. It is not possible to create an XAML element which is derived from
another. We do this in software so that we can create a new object which is
similar to an existing one. We know that Silverlight elements are represented in
software terms by an object which is part of a class hierarchy. However, when
they are written in a XAML file they are all expressed as items which are at the
same level.
We are not going to spend too much time on the layout aspects of XAML;
suffice it to say that you can create incredibly impressive front ends for your
programs using this tool. There is also a special design tool called “Expression
Blend” for use by graphical designer. However, it is important to remember that
at the end of the day the program is working in terms of objects that expose
properties and methods that we can use to work on the data inside them. In the
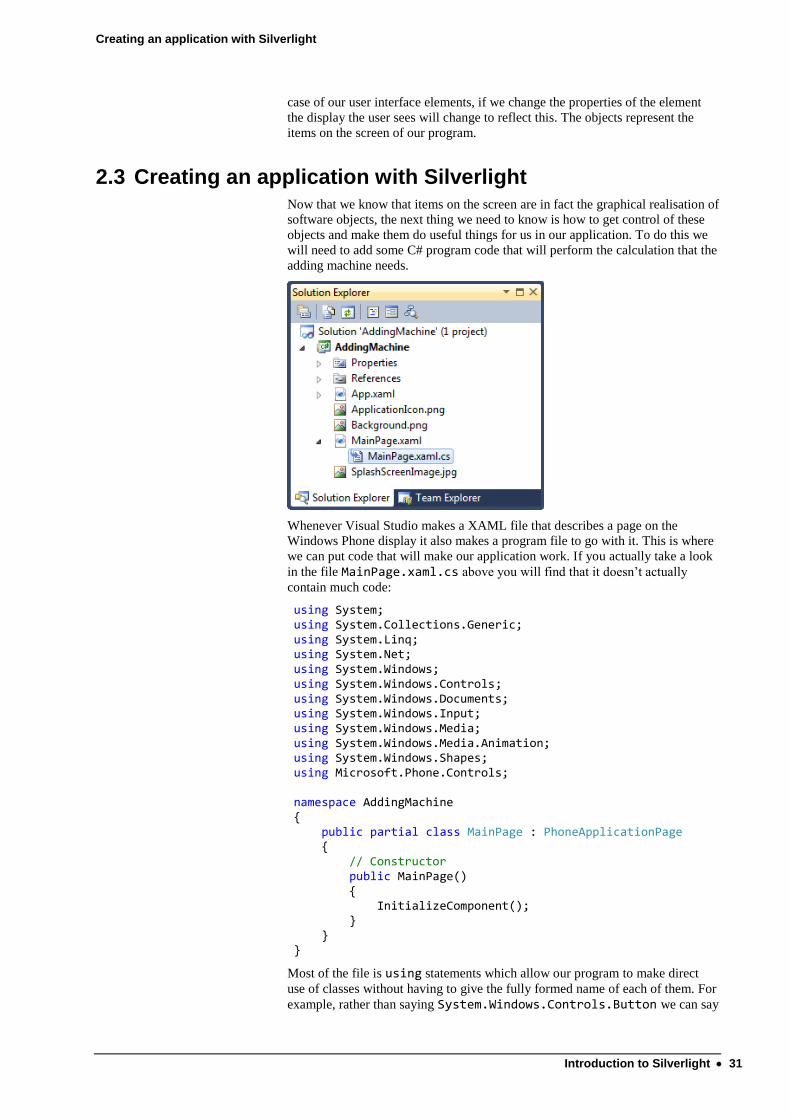
Creating an application with Silverlight
Introduction to Silverlight 31
case of our user interface elements, if we change the properties of the element
the display the user sees will change to reflect this. The objects represent the
items on the screen of our program.
2.3 Creating an application with Silverlight Now that we know that items on the screen are in fact the graphical realisation of
software objects, the next thing we need to know is how to get control of these
objects and make them do useful things for us in our application. To do this we
will need to add some C# program code that will perform the calculation that the
adding machine needs.
Whenever Visual Studio makes a XAML file that describes a page on the
Windows Phone display it also makes a program file to go with it. This is where
we can put code that will make our application work. If you actually take a look
in the file MainPage.xaml.cs above you will find that it doesn‟t actually
contain much code:
using System; using System.Collections.Generic; using System.Linq; using System.Net; using System.Windows; using System.Windows.Controls; using System.Windows.Documents; using System.Windows.Input; using System.Windows.Media; using System.Windows.Media.Animation; using System.Windows.Shapes; using Microsoft.Phone.Controls; namespace AddingMachine { public partial class MainPage : PhoneApplicationPage { // Constructor public MainPage() { InitializeComponent(); } } }
Most of the file is using statements which allow our program to make direct
use of classes without having to give the fully formed name of each of them. For
example, rather than saying System.Windows.Controls.Button we can say

Creating an application with Silverlight
Introduction to Silverlight 32
Button, because the file contains the line using
System.Windows.Controls.
The only method in the program is the constructor of the MainPage class. As
we know, the constructor of a class is called when an instance of the class is
created.
All the constructor does is call the method InitializeComponent. If you go
take a look inside this method you will find the code that actually creates the
instances of the display elements. This code is automatically created for you by
Visual Studio, based on the XAML that describes your page. It is important that
you leave this call as it is and don‟t change the content of the method itself as
this will most likely break your program.
Note that at this point we are deep in the “engine room” of Silverlight. I‟m only
really telling you about this so that you can understand that actually there is no
magic here. If the only C# programs you have seen so far start with a call of the
Main method then it is important that you understand that there is nothing
particularly special about a Silverlight one. There is a Main method at the base
of a Silverlight application; it starts the process of building the components and
putting them on the screen for the user to interact with.
The nice thing as far as we are concerned is that we don‟t need to worry about
how these objects are created and displayed, we can just use the high level tools
or the easy to understand XAML to design and build our display.
Building the application
We can now see how to create the user interface for our number adding program.
If we add all the components and then start the application it even looks as
though it might do something for us. We can type in the numbers that we want to
add, and even press the equals button if we like:
If we touch inside a TextBox item the keyboard appears and we can type
numbers into the box. If we then touch anywhere else on the screen the keyboard
moves out of the way. We seem to have got a lot of behaviour for very little
effort, which is nice. However, we need to add some business logic of our own
now to get the program to work out the answer and display it.
Creating an application with Silverlight
Introduction to Silverlight 33
Calculating the result
At the moment our program looks good, but doesn‟t actually do anything. We
need to create some code which will perform the required calculation and
display the result. Something like this.
private void calculateResult() { float v1 = float.Parse(firstNumberTextBox.Text); float v2 = float.Parse(secondNumberTextBox.Text); float result = v1 + v2; resultTextBlock.Text = result.ToString(); }
The TextBox objects expose a property called Text. This can be read or
written. Setting a value into the Text property will change the text in the
textbox. Reading the Text property allows our program to read what has been
typed into the textbox.
The text is given as a string, which must be converted into a numeric value if our
program is to do any sums. You may have seen the Parse method before. This
takes a string and returns the number that the string describes. Each of the
numeric types (int, float, double etc) has a Parse behaviour which will take a
string and return the numeric value that it describes. The adding machine that we
are creating can work with floating point numbers, so the method parses the text
in each of the input textboxes and then calculates a result by adding them
together.
Finally it takes the number that was calculated, converts it into a string and then
sets the text of the resultTextBlock to this string. ToString is the reverse
of Parse, the “anti-parse” if you like. It provides the text that describes the
contents of an object. In the case of the float type, this is the text that describes
that value.
Now we have our code that works out the answer, we just have to find a way of
getting it to run when the user presses the equals button.
Events and Programs
If you have done any kind of form based programming you will know all about
events. If you haven‟t then don‟t worry, we now have a nice example of a
situation where we need them, and they are not that frightening anyway. In the
olden days, before graphical user interfaces and mice, a program would
generally start at the beginning, run for a while and then finish.
But now we have complicated and rich user interfaces with lots of buttons and
other elements for the user to interact with. The word processor I am using at the
moment exposes hundreds of different features via buttons on the screen and
menu items. In this situation it would be very hard to write a program which
checked every user element in turn to see if the user has attempted to use that.
Instead the system waits for these display elements to raise an event when they
want attention. Teachers do this all the time. They don‟t go round the class
asking each child in turn if they know the answer. Instead they ask the children
to raise their hands. The “hand raising” is treated as an event which the teacher
will respond to.
Using events like this makes software design a lot easier. Our program does not
have to check every item on the screen to see if the user has done anything with
it, instead it just binds to the events that it is interested in.
To make events work a programing language needs a way of expressing a
reference to a method in an object. C# provides the delegate type which does

Creating an application with Silverlight
Introduction to Silverlight 34
exactly that. You can create a delegate type that can refer to a particular kind of
method and then create instances of that delegate which refer to a method in an
object. Delegates are very powerful, but can be a bit tricky to get your head
around. Fortunately we don‟t have to worry about how delegates work just at the
moment, because we can get Silverlight and Visual Studio to do all the hard
work for us.
Events in Silverlight
In C# an event is delivered to an object by means of a call to a method in that
object. In this respect you can regard an event and a message as the same thing.
From the point of view of our adding machine we would like to have a particular
method called when the "equals" button is pressed by the user. This is the only
event that we are interested in. When the event fires we want it to call the
calculateResult method above.
We can use the editor in Visual Studio to bind this event for us. This is actually
so easy as to appear magical. To connect a method to the click event of a
particular button we just have to double click on that button on the editing
surface.
The picture above shows where we should double click in Visual Studio. When
we double click on the button Visual Studio sets the properties of the button in
XAML to connect the button to a method in our page. It also creates an empty
version of that method and takes us straight to this method, so that we can start
adding the code that must run when the button is clicked.
If we just single click on the button this has the effect of selecting it, so that we
can move it around the display and change its size. If you want to connect an
event handler it must be a double click. If we do this we will see a display like
the one shown below.
Now, all we have to do is add the code to make this work.

Creating an application with Silverlight
Introduction to Silverlight 35
private void calculateResult() { float v1 = float.Parse(firstNumberTextBox.Text); float v2 = float.Parse(secondNumberTextBox.Text); float result = v1 + v2; resultTextBlock.Text = result.ToString(); } private void equalsButton_Click(object sender, RoutedEventArgs e) { calculateResult(); }
The event handler that is created is automatically given a sensible name by
Visual Studio. It takes the name of the element and adds the text “_Click” on the
end. This underlines the importance of giving your elements sensible names
when you create them, because this name makes it very easy for anyone to
understand what is happening.
The program works fine, as you can see above. Of course it is not perfect. If a
user types in text rather than a numeric value the program will fail with an
exception, but we will deal with this later.
Managing Event Properties
At the moment the process of connecting event handlers to events looks a bit
magic. And if there is one thing I‟m sure of, it is that computers are not magical.
Ever. So now we should really find out how this event process actually works.
We can start by taking a look at the properties of the equals button in our
application.

Creating an application with Silverlight
Introduction to Silverlight 36
If we single click on the button in the editor and then take a look at the property
information in Visual Studio we see something very like the display above. The
information here sets out the position of the button on the screen and a bunch of
other things too. The property window has two tab panels though. If we look at
the top we will find one with the name Events, and a rather scary looking
lightning bolt icon. If we click on the Events tab the display changes to display
the events that this element can generate, and which are presently connected to
code:
The Properties window is now showing us all the events that a button can
generate. At the moment only one event has a method connected to it, and that is
the Click event. This is linked to the equalsButton_Click method. If we
wanted to disconnect the Click event from the method we could do this by just
deleting the name of the handler from this window. We could cause problems
for ourselves by replacing the content of that part of the form with something
stupid like “ILikeCheese”. If we do this the program will not work (or even
build) any more because the Click event is now connected to something that
does not exist.
Events and XAML
Up until now we have worked on the principle that the properties display in
Visual Studio is driven by the XAML file which describes the components on

What we have learned
Introduction to Silverlight 37
the screen. We can prove that this is the case by taking a look at the Button
description in the XAML file for the MainPage:
Button Content="equals" Height="72" HorizontalAlignment="Left" Margin="158,275,0,0" Name="equalsButton" VerticalAlignment="Top" Width="160" Click="equalsButton_Click" />
As you can see; the description of Button now contains an item that connects the
Click event with the name of a method.
One important point to note here is that if the XAML file says that a button is
connected to a method with a particular name the program will fail to run
correctly if that method is not there.
What we have learned 1. Silverlight provides a way of designing graphical user interfaces.
2. A Silverlight user interface is made up of elements which are things
such as text boxes and buttons.
3. The Visual Studio integrated development environment provides an
editor which can be used to add Silverlight user interface elements onto
the pages of an application.
4. From a software point of view each of the user interface elements is
represented by a particular type of object in a class hierarchy which is
part of Silverlight.
5. Designers can modify the properties of the elements using the design
tools in Visual Studio, either by changing them on the design surface or
by modifying their properties.
6. The actual properties of Silverlight elements in a project are held in text
files in the XAML format. These files are updated by the design tools
and used when the program is built to create the software objects that
are used in the solution.
7. XAML (eXtensible Application Markup Language) is an XML based
language that specifies all the properties of the design elements on a
page. It provides a separation between the appearance and properties of
the display elements and the program code that sits behind them.
8. XML (eXtensible Markup Language) is a way of creating customised
languages that can be used to describe things.
9. Elements can generate events which may be bound to methods inside a
C# program. The method name is given in the XML description for the
element.
10. The methods that are bound to the events can provide the business logic
for a user application.
Projects and Solutions
Introduction to Visual Studio 2010 38
3 Introduction to Visual Studio 2010
When you write programs for Windows Phone you will be using Visual Studio.
In this section we will take a look at the process of creating and managing
Windows Phone projects. We will also find out how to run and debug Windows
Phone programs using the Windows Phone emulator program. This allows you
to test your programs without needing to have a device.
However, this is not just a look at how to use Visual Studio. That would be too
easy. We are also going to take a peek underneath the hood and find out how
Visual Studio manages the content that makes up our solutions. This will stand
us in good stead when we come to create Windows Phone applications.
3.1 Projects and Solutions The first thing we are going to look at is just how Visual Studio manages the
programs that you create.
Creating programs
We know that when we create a program we write a set of instructions in a high
level language (which if we are lucky is C#). The compiler is a program that
takes the high level instructions which the programmer created and converts
them into lower level instructions for execution on the computer. We also know
now that in Microsoft .NET the compiler produces output in an intermediate
language (MSIL) which is then “Just In Time” compiled into hardware
instructions when the program actually runs.
The bare minimum you need to create a working program is therefore a C#
source file (a text file with the language extension .CS) and a compiler. The
compiler takes the source file and converts it into an executable file (a binary file
with the language extension .EXE) which can then be used by the .NET runtime
system for whatever platform you want to execute the program on. The use of
MSIL means that I can take exactly the same .EXE file and run it on completely
different hardware platforms if I wish.
The .NET SDK
If you just want to create programs for the Windows PC and you don‟t want to
download all of Visual Studio you can actually just get the compiler and
runtimes for .NET from here:
http://msdn.microsoft.com/en-us/netframework/aa569263.aspx
When you install the framework you get a command line compiler which can
take C# source files and convert them into executable ones using console
commands such as:
csc MyProg.cs
This command will compile the file MyProg.cs and create a file called
MyProg.exe.
The command prompt compiler is also available if you have installed Visual
Studio.

Projects and Solutions
Introduction to Visual Studio 2010 39
It is possible to use these simple tools to create very large programs, but it is also
rather hard work. You have to create large, complicated commands for the
compiler and you need to make sure that whenever you make a new version of
your system that you compile every source file that you need to. Furthermore
you have manage and incorporate all the media that your system needs and when
it comes to debugging your program all you are going to get is text messages
when the program fails.
Visual Studio
Visual Studio addresses all the problems above. It provides a single environment
in which you can edit, build and run your programs. It also provides projects and
solutions which let you organise your systems and manage what goes into them.
Finally, just to make it even more wonderful, it provides a full debugging
solution that lets you single step through your program and even execute
individual statements and change the values in variables as your program runs.
Skill with Visual Studio and an understanding of how it works is very
marketable.
The first thing that hits you with Visual Studio is the sheer number of buttons
and controls that you have to deal with. If we start opening menus it gets even
worse. However, the good news is that you don‟t have to press all the buttons to
get started. We are just going to take a look at the basics of the program. You
can pick up more advanced features as we go along.
The first aspect of Visual Studio we are going to take a look at is that of projects
and solutions. You will use these to organise any systems that you create. Visual

Projects and Solutions
Introduction to Visual Studio 2010 40
Studio is not able to run any program code which is not in a project or solution.
The good news is that to get started you can use one of the templates that
provide a starting point for particular project types. We will be using the
Windows Phone templates for now. There are many other templates for different
kinds of programs.
Visual Studio makes a distinction between a project and a solution when
organising your work. It is important that you understand the difference between
these two. Let‟s start by looking at a project.
A Simple Visual Studio Project
A project is a container for a set of program files and resources which generate a
particular assembly file. So, what does that mean? Well, the simplest possible
project would be one containing a single program file. You can create one of
these by asking Visual Studio to create a Console Application. We can do this by
using the File>New>Project command to open up the New Project dialogue:
The New Project dialogue shows us all the possible project templates that are
supplied with Visual Studio. A template is a pre-set collection of files, folders
and resources which is used for a particular type of application. We can add to
the template once it has been created, and it is even possible to create customised
templates of our own. The projects that we saw earlier were created using
templates for creating Windows Phone applications.
If we select the template for a Windows Console Application as shown above
Visual Studio will create the simplest possible project for us. This is what it
would look like in Visual Studio Solution explorer.
This project contains a single program file, called Program.cs. The program
source in this file is very simple too:
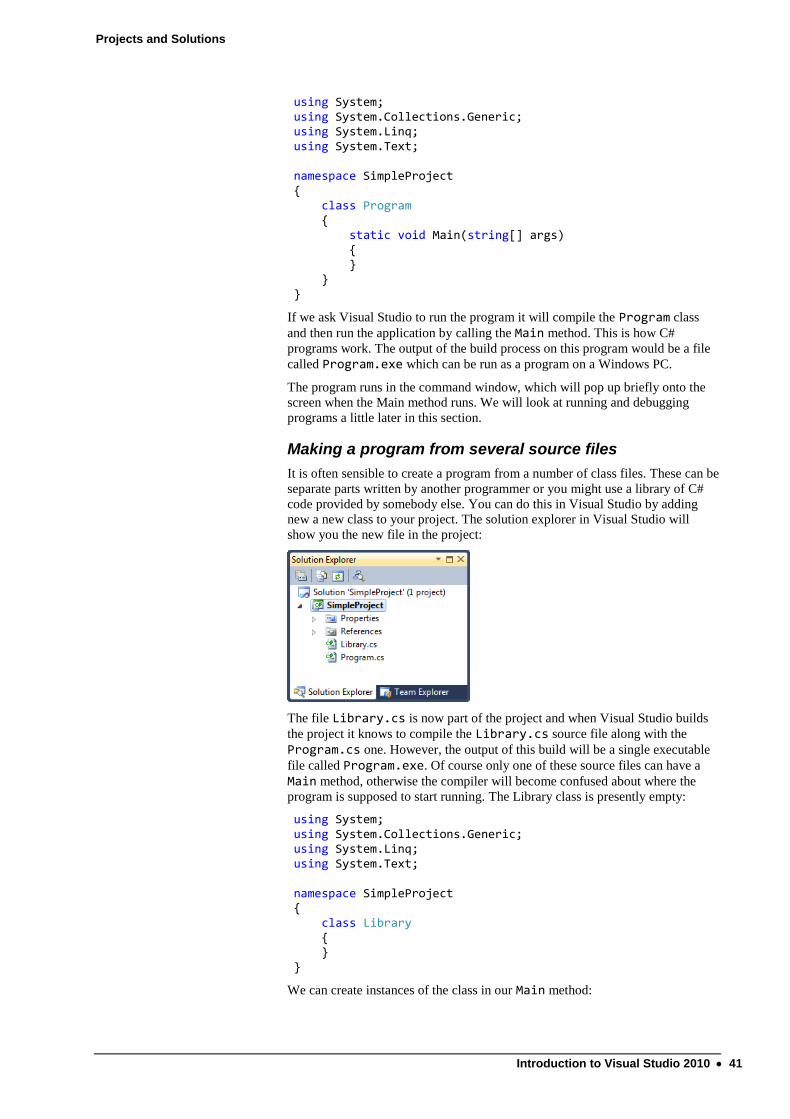
Projects and Solutions
Introduction to Visual Studio 2010 41
using System; using System.Collections.Generic; using System.Linq; using System.Text; namespace SimpleProject { class Program { static void Main(string[] args) { } } }
If we ask Visual Studio to run the program it will compile the Program class
and then run the application by calling the Main method. This is how C#
programs work. The output of the build process on this program would be a file
called Program.exe which can be run as a program on a Windows PC.
The program runs in the command window, which will pop up briefly onto the
screen when the Main method runs. We will look at running and debugging
programs a little later in this section.
Making a program from several source files
It is often sensible to create a program from a number of class files. These can be
separate parts written by another programmer or you might use a library of C#
code provided by somebody else. You can do this in Visual Studio by adding
new a new class to your project. The solution explorer in Visual Studio will
show you the new file in the project:
The file Library.cs is now part of the project and when Visual Studio builds
the project it knows to compile the Library.cs source file along with the
Program.cs one. However, the output of this build will be a single executable
file called Program.exe. Of course only one of these source files can have a
Main method, otherwise the compiler will become confused about where the
program is supposed to start running. The Library class is presently empty:
using System; using System.Collections.Generic; using System.Linq; using System.Text; namespace SimpleProject { class Library { } }
We can create instances of the class in our Main method:
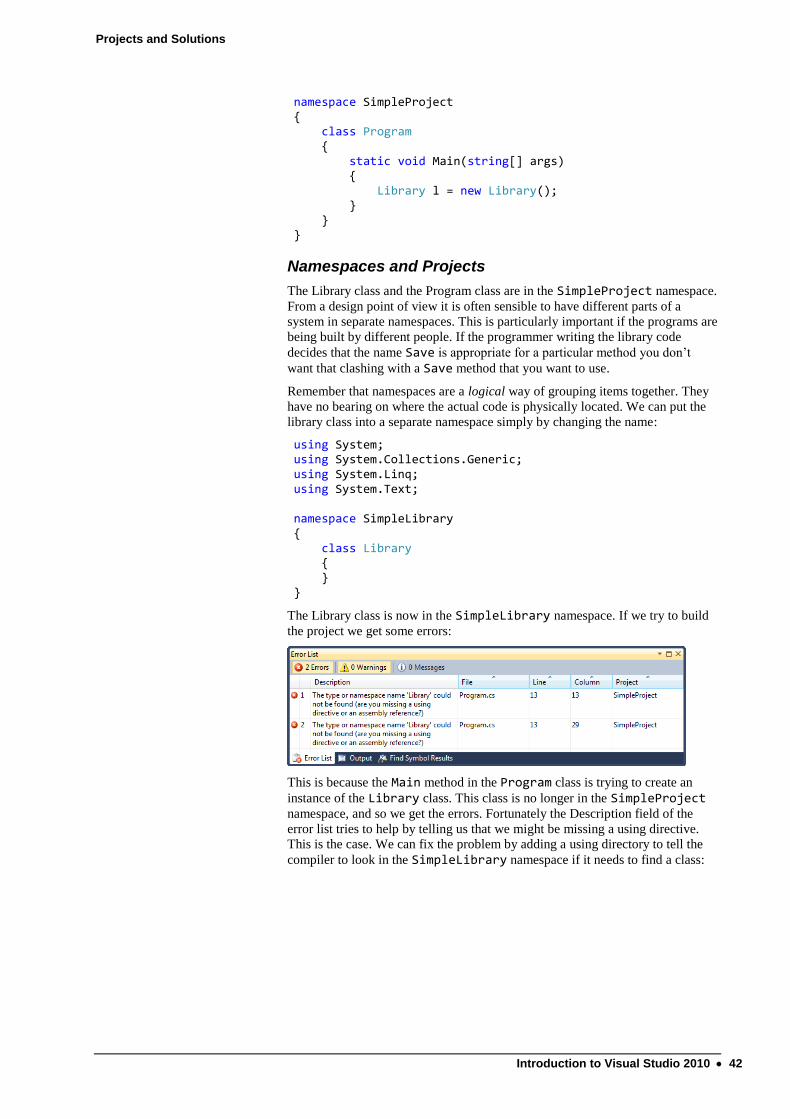
Projects and Solutions
Introduction to Visual Studio 2010 42
namespace SimpleProject { class Program { static void Main(string[] args) { Library l = new Library(); } } }
Namespaces and Projects
The Library class and the Program class are in the SimpleProject namespace.
From a design point of view it is often sensible to have different parts of a
system in separate namespaces. This is particularly important if the programs are
being built by different people. If the programmer writing the library code
decides that the name Save is appropriate for a particular method you don‟t
want that clashing with a Save method that you want to use.
Remember that namespaces are a logical way of grouping items together. They
have no bearing on where the actual code is physically located. We can put the
library class into a separate namespace simply by changing the name:
using System; using System.Collections.Generic; using System.Linq; using System.Text; namespace SimpleLibrary { class Library { } }
The Library class is now in the SimpleLibrary namespace. If we try to build
the project we get some errors:
This is because the Main method in the Program class is trying to create an
instance of the Library class. This class is no longer in the SimpleProject
namespace, and so we get the errors. Fortunately the Description field of the
error list tries to help by telling us that we might be missing a using directive.
This is the case. We can fix the problem by adding a using directory to tell the
compiler to look in the SimpleLibrary namespace if it needs to find a class:
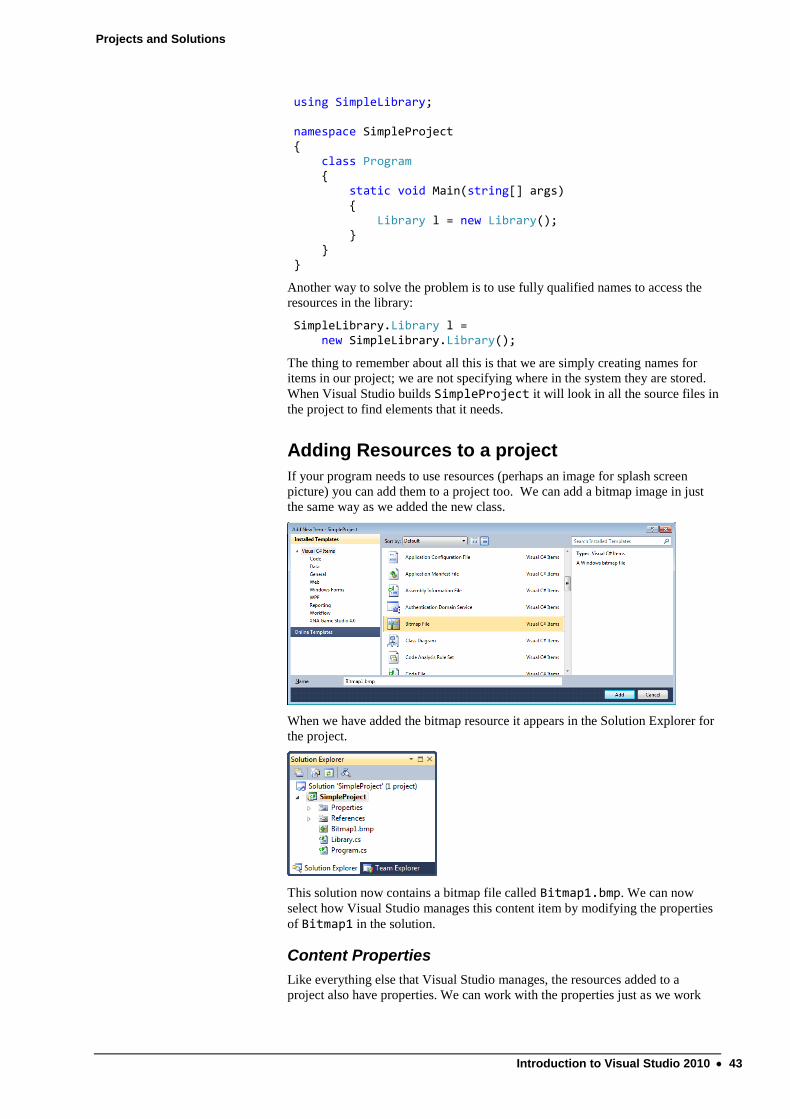
Projects and Solutions
Introduction to Visual Studio 2010 43
using SimpleLibrary; namespace SimpleProject { class Program { static void Main(string[] args) { Library l = new Library(); } } }
Another way to solve the problem is to use fully qualified names to access the
resources in the library:
SimpleLibrary.Library l = new SimpleLibrary.Library();
The thing to remember about all this is that we are simply creating names for
items in our project; we are not specifying where in the system they are stored.
When Visual Studio builds SimpleProject it will look in all the source files in
the project to find elements that it needs.
Adding Resources to a project
If your program needs to use resources (perhaps an image for splash screen
picture) you can add them to a project too. We can add a bitmap image in just
the same way as we added the new class.
When we have added the bitmap resource it appears in the Solution Explorer for
the project.
This solution now contains a bitmap file called Bitmap1.bmp. We can now
select how Visual Studio manages this content item by modifying the properties
of Bitmap1 in the solution.
Content Properties
Like everything else that Visual Studio manages, the resources added to a
project also have properties. We can work with the properties just as we work

Projects and Solutions
Introduction to Visual Studio 2010 44
with the properties of any other item that we add to a project, we use the
properties pane.
The settings above ask Visual Studio to copy the bitmap into the same directory
as the program when it builds the project. The program can then open this file
and use it when it runs:
Bitmap b = new Bitmap("Bitmap1.bmp");
The above code would load the bitmap resource into a bitmap called b.
This is a very good way to add items to a project. Note that the properties above
are not the default ones which are set when a new item of content is added. By
default (i.e. unless you specify otherwise) the content is not copied into the
output directory.
Embedding Content in the Application itself
The above settings ask that the bitmap be stored in the same directory as the
program. This works well, but assumes that when we install the program the
image files are copied as well as the program binary.
If we want tighter coupling between a program and its resources we can request
that this resource be embedded in the program file when the program is built.
When the program is built the output executable program will contain the
bitmap. We do this by changing the properties of the content item.
The Build Action property of the Bitmap2.bmp file is now set to Embedded
Resource. Our image is now stored in the actual program file. Getting hold of
this is slightly more involved, but guaranteed to work wherever our program is
deployed, because there are no extra files:
Assembly assembly; Stream imageStream; assembly = Assembly.GetExecutingAssembly(); imageStream = assembly.GetManifestResourceStream("SimpleProject.Bitmap2.bmp"); Bitmap b = new Bitmap(imageStream);
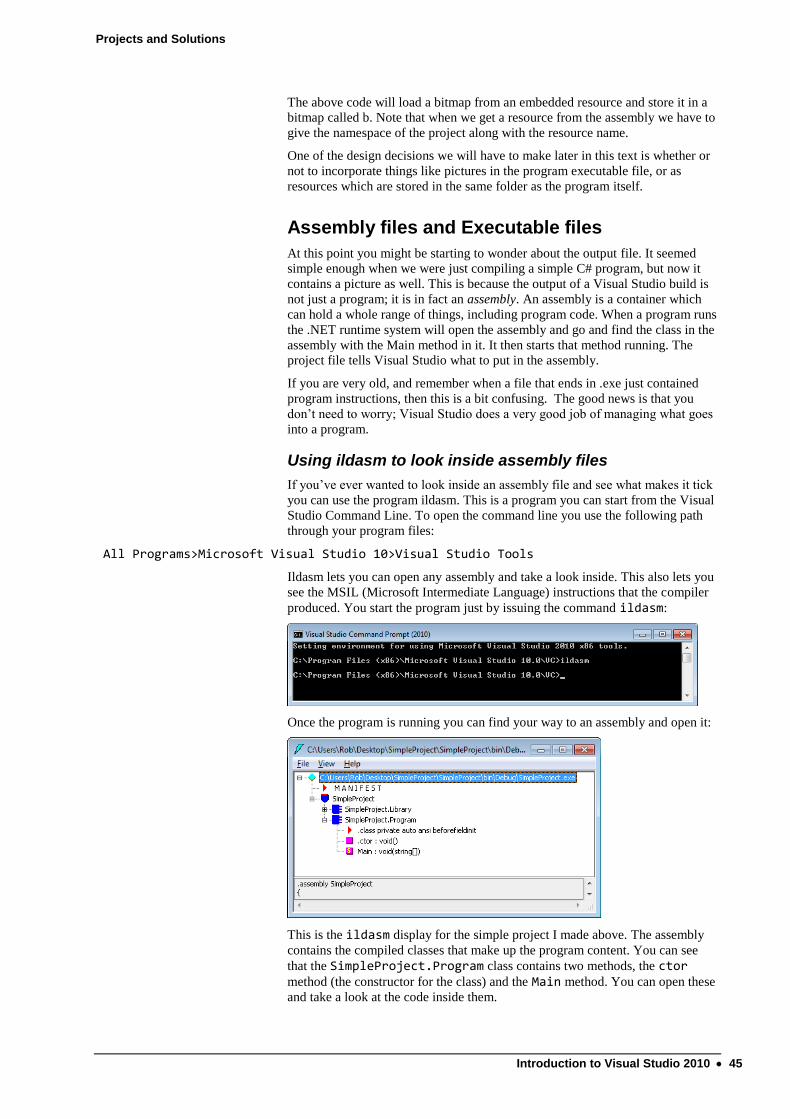
Projects and Solutions
Introduction to Visual Studio 2010 45
The above code will load a bitmap from an embedded resource and store it in a
bitmap called b. Note that when we get a resource from the assembly we have to
give the namespace of the project along with the resource name.
One of the design decisions we will have to make later in this text is whether or
not to incorporate things like pictures in the program executable file, or as
resources which are stored in the same folder as the program itself.
Assembly files and Executable files
At this point you might be starting to wonder about the output file. It seemed
simple enough when we were just compiling a simple C# program, but now it
contains a picture as well. This is because the output of a Visual Studio build is
not just a program; it is in fact an assembly. An assembly is a container which
can hold a whole range of things, including program code. When a program runs
the .NET runtime system will open the assembly and go and find the class in the
assembly with the Main method in it. It then starts that method running. The
project file tells Visual Studio what to put in the assembly.
If you are very old, and remember when a file that ends in .exe just contained
program instructions, then this is a bit confusing. The good news is that you
don‟t need to worry; Visual Studio does a very good job of managing what goes
into a program.
Using ildasm to look inside assembly files
If you‟ve ever wanted to look inside an assembly file and see what makes it tick
you can use the program ildasm. This is a program you can start from the Visual
Studio Command Line. To open the command line you use the following path
through your program files:
All Programs>Microsoft Visual Studio 10>Visual Studio Tools
Ildasm lets you can open any assembly and take a look inside. This also lets you
see the MSIL (Microsoft Intermediate Language) instructions that the compiler
produced. You start the program just by issuing the command ildasm:
Once the program is running you can find your way to an assembly and open it:
This is the ildasm display for the simple project I made above. The assembly
contains the compiled classes that make up the program content. You can see
that the SimpleProject.Program class contains two methods, the ctor
method (the constructor for the class) and the Main method. You can open these
and take a look at the code inside them.

Projects and Solutions
Introduction to Visual Studio 2010 46
The MANIFEST part of the assembly contains a “list of contents” for the
assembly.
This is the manifest for an assembly that contains an embedded resource. You
can see the name of the resource and the size of it.
The ildasm program can show us this information because a compiled class
contains metadata which describes the methods and members and can even
include information for Intellisense to use in Visual Studio. If you have ever
wondered exactly what a program does and how it gets to run you can have a lot
of fun going through the views that ildasm provides. However you might not
have the same idea about what constitutes fun as I do.
Library Assemblies
There are actually two kinds of assembly; ones that contain a Main method
somewhere (the executable ones) and libraries. When you create a new project
you can create a library project if you like:
This will create a brand new project which will only contain library classes, i.e.
none of the classes in the assembly will contain a Main method. If any of them
do you will get an error when you try to compile the project. A library assembly
compiles to a file with the language extension .dll. This stands for Dynamic Link
Library. The library word sounds sensible enough; the dynamic link part means
that the library classes are loaded dynamically when the program runs.
When the program refers to a method in a class in the library that class will be
loaded into memory and the Just In Time compiler will convert the method into
machine code so that it can run. If the class is never used, it is never loaded. This
is a nice way of saving memory, at the expense of a little more effort when the
program runs.
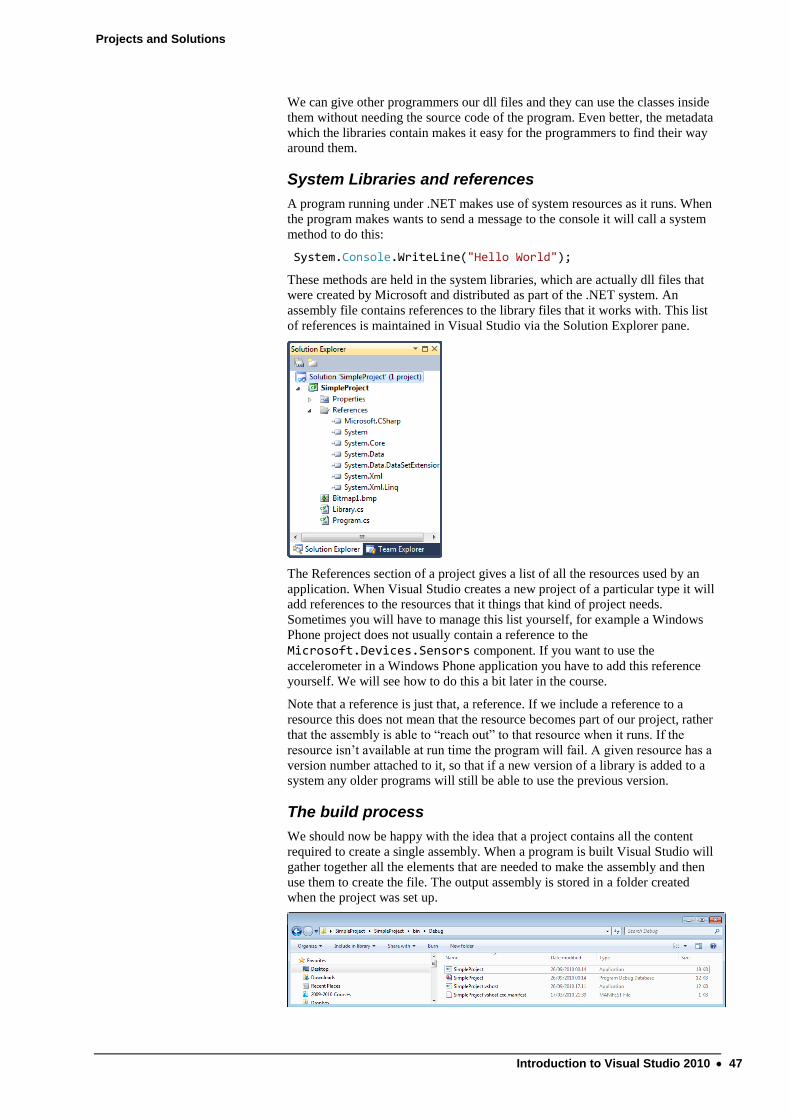
Projects and Solutions
Introduction to Visual Studio 2010 47
We can give other programmers our dll files and they can use the classes inside
them without needing the source code of the program. Even better, the metadata
which the libraries contain makes it easy for the programmers to find their way
around them.
System Libraries and references
A program running under .NET makes use of system resources as it runs. When
the program makes wants to send a message to the console it will call a system
method to do this:
System.Console.WriteLine("Hello World");
These methods are held in the system libraries, which are actually dll files that
were created by Microsoft and distributed as part of the .NET system. An
assembly file contains references to the library files that it works with. This list
of references is maintained in Visual Studio via the Solution Explorer pane.
The References section of a project gives a list of all the resources used by an
application. When Visual Studio creates a new project of a particular type it will
add references to the resources that it things that kind of project needs.
Sometimes you will have to manage this list yourself, for example a Windows
Phone project does not usually contain a reference to the
Microsoft.Devices.Sensors component. If you want to use the
accelerometer in a Windows Phone application you have to add this reference
yourself. We will see how to do this a bit later in the course.
Note that a reference is just that, a reference. If we include a reference to a
resource this does not mean that the resource becomes part of our project, rather
that the assembly is able to “reach out” to that resource when it runs. If the
resource isn‟t available at run time the program will fail. A given resource has a
version number attached to it, so that if a new version of a library is added to a
system any older programs will still be able to use the previous version.
The build process
We should now be happy with the idea that a project contains all the content
required to create a single assembly. When a program is built Visual Studio will
gather together all the elements that are needed to make the assembly and then
use them to create the file. The output assembly is stored in a folder created
when the project was set up.
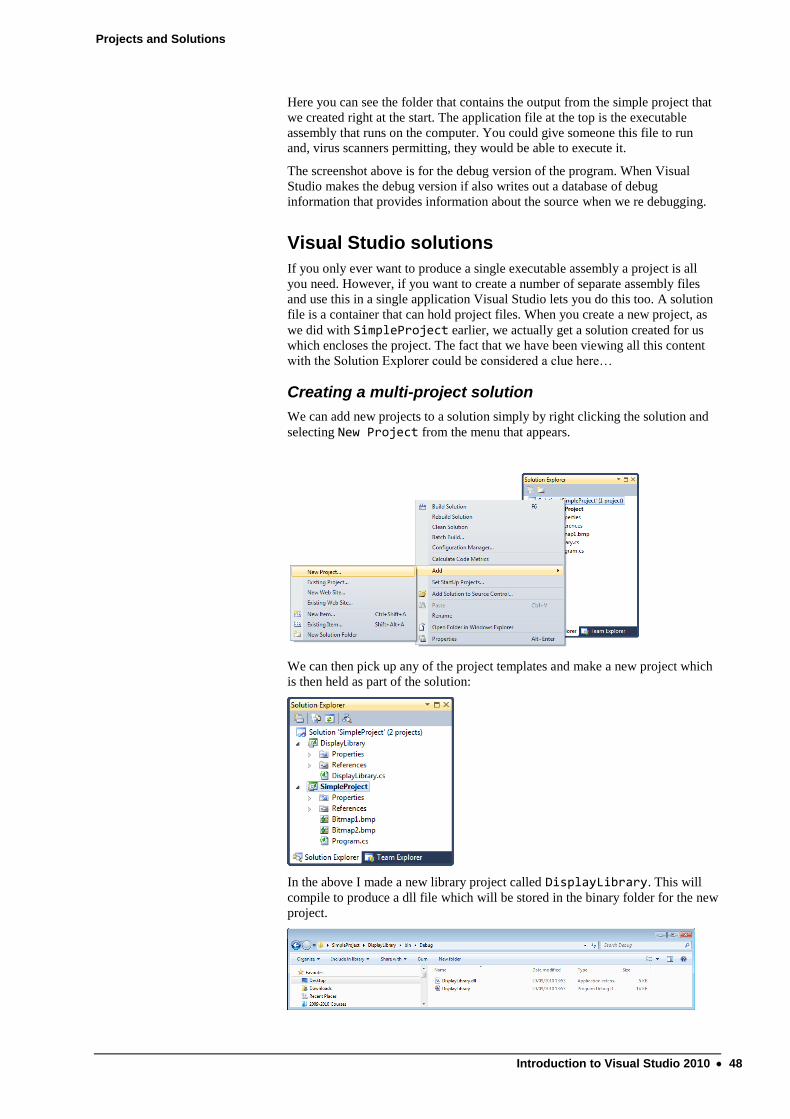
Projects and Solutions
Introduction to Visual Studio 2010 48
Here you can see the folder that contains the output from the simple project that
we created right at the start. The application file at the top is the executable
assembly that runs on the computer. You could give someone this file to run
and, virus scanners permitting, they would be able to execute it.
The screenshot above is for the debug version of the program. When Visual
Studio makes the debug version if also writes out a database of debug
information that provides information about the source when we re debugging.
Visual Studio solutions
If you only ever want to produce a single executable assembly a project is all
you need. However, if you want to create a number of separate assembly files
and use this in a single application Visual Studio lets you do this too. A solution
file is a container that can hold project files. When you create a new project, as
we did with SimpleProject earlier, we actually get a solution created for us
which encloses the project. The fact that we have been viewing all this content
with the Solution Explorer could be considered a clue here…
Creating a multi-project solution
We can add new projects to a solution simply by right clicking the solution and
selecting New Project from the menu that appears.
We can then pick up any of the project templates and make a new project which
is then held as part of the solution:
In the above I made a new library project called DisplayLibrary. This will
compile to produce a dll file which will be stored in the binary folder for the new
project.

Projects and Solutions
Introduction to Visual Studio 2010 49
This library can be used by any projects that add a reference to the dll file.
Linking Projects
At the moment the projects in our solution are not connected in any way. If
programs in SimpleProject want to use resources from ResourceLibrary
they have to add them as a resource reference:
In the dialog above I‟m adding a reference to DisplayLibrary to the project
in SimpleProject. To make my programming easier I can add a using
directive into the program source file.
using DisplayLibrary;
This all helps to remind us that the using directive doesn‟t actually connect our
program to any resources that it wants to use. We only need the using directive
to reduce the amount of typing that we have to do when writing programs. When
we build the SimpleProject we find that the binary directory for this program
now contains copies of the DisplayLibrary dll files:
This is a version of the SimpleProject program that uses the
DisplayLibrary to load and display images. The external resources used by
an assembly are listed in the manifest for that assembly.

Projects and Solutions
Introduction to Visual Studio 2010 50
Here you can see the manifest for a version of the SimpleProject program
that uses a library called DisplayLibrary. Note that the version of the library
is added to the information so that if a new version of the library is released this
assembly will continue to use the old one.
Multi-project solutions
You can put many projects of different types into a single solution. For example
you could create an XNA game for Windows Phone, Xbox 360 and Windows
PC using a single solution file. Each of the devices could have their own project
file, the game engine could be held in a fourth project that was then included by
the others.
If you are writing a Silverlight application that connects to a web site that
provides services you can put both the Silverlight application project and the
web server project inside the same solution.
The projects in your solution and the tasks performed by each of them should be
designed at the start of your development.
If your solution contains several projects that produce executable outputs you
can set one as the “Startup Project” which will be given control when the project
is executed.
Windows Phone Solutions
There are essentially two kinds of Windows Phone solutions that can be created
using Visual Studio. These are Silverlight application and XNA application.
Note that there is no way you can make a single Windows Phone application that
uses both systems. While it would be nice to be able to use Silverlight for all the
game menus and then XNA for the gameplay this is not at the moment possible.
Silverlight Windows Phone Project
The adding machine that we created in the previous chapter was created as a
Silverlight project. If you take a look at Solution for this project you get
something like this:
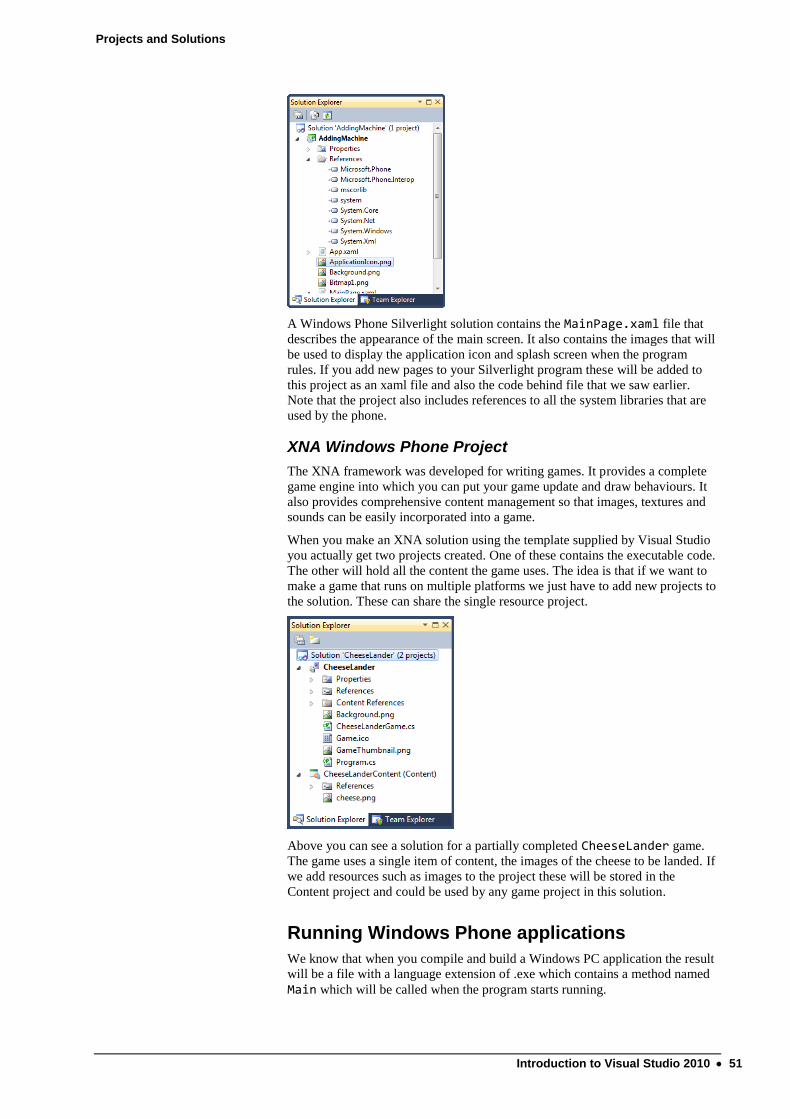
Projects and Solutions
Introduction to Visual Studio 2010 51
A Windows Phone Silverlight solution contains the MainPage.xaml file that
describes the appearance of the main screen. It also contains the images that will
be used to display the application icon and splash screen when the program
rules. If you add new pages to your Silverlight program these will be added to
this project as an xaml file and also the code behind file that we saw earlier.
Note that the project also includes references to all the system libraries that are
used by the phone.
XNA Windows Phone Project
The XNA framework was developed for writing games. It provides a complete
game engine into which you can put your game update and draw behaviours. It
also provides comprehensive content management so that images, textures and
sounds can be easily incorporated into a game.
When you make an XNA solution using the template supplied by Visual Studio
you actually get two projects created. One of these contains the executable code.
The other will hold all the content the game uses. The idea is that if we want to
make a game that runs on multiple platforms we just have to add new projects to
the solution. These can share the single resource project.
Above you can see a solution for a partially completed CheeseLander game.
The game uses a single item of content, the images of the cheese to be landed. If
we add resources such as images to the project these will be stored in the
Content project and could be used by any game project in this solution.
Running Windows Phone applications
We know that when you compile and build a Windows PC application the result
will be a file with a language extension of .exe which contains a method named
Main which will be called when the program starts running.

Debugging Programs
Introduction to Visual Studio 2010 52
If you create a Windows Phone application things are a little more complicated.
The program will not be running inside the PC, instead it must be transferred
into the Windows Phone device, or the emulator, before being started.
Furthermore, any resources that the program needs (for example content that is
not part of the program assembly) must be made available in the target device.
This problem is solved by the use of a container file that holds the entire
application and all required resources. Below you can see the output directory
for the AddingMachine program. It contains all the resources along with the
AddingMachine.dll file that contains the program code.
There is also a file that has the language extension .XAP. This is the XAP file.
This is the container that holds the entire application.
The XAP file
The XAP file is an archive file (stored in the same format as Zip files) which
contains all the files that make up the application. It also contains a manifest file
which describes the contents of the XAP.
Above you can see the contents of the XAP file for the AddingMachine
application. The XAP file is the file that is transferred into the Windows Phone
device and made to run. When you press the run button in Visual Studio this file
is created and then sent into the device or emulator. The target device opens the
file, reads the manifest and then unpacks the content. Finally the application is
executed. If your program is made up of multiple libraries and contains images
and sound files these will all placed in the XAP file to be picked up in the target.
When you submit an application to the Windows Phone Marketplace you
actually send the XAP file, this is the file that is loaded into the customer‟s
phone if they buy your program.
3.2 Debugging Programs One of the great things about the Windows Phone development environment is
the ease with which you can debug programs. We can get a really good idea of
what is going on inside a program by single stepping through the code and

Debugging Programs
Introduction to Visual Studio 2010 53
taking a look at the values in variables. You can debug programs on either the
real device or the emulator.
Using the Windows Phone emulator
The Windows Phone emulator gives you a chance to try your programs and
discover what they look like when they run. The emulator works in just the same
way as a real phone. Effectively it is a Windows PC implementation of the
Windows Phone platform, running exactly the same source code as the actual
phone. You can use the emulator to prove that your program works correctly.
Deploying to the emulator
You can deploy programs to the emulator or a real device. To select the
destination when you run a program you use the combo-box to the right of the
run button as shown below.
It is possible to select a Windows Phone device even when one is not connected.
In this case you will get an error when you try to run the program and Visual
Studio detects that a device is not attached.
When the program starts it runs in exactly the same was as it would on the
Windows Phone device. You can use the Windows PC mouse to click on items.
If you have a multi-touch monitor on your Windows 7 PC you can use multiple
touches on the emulator screen to access the multi-touch features of the user
interface.
To stop the program you can click the back button (the left pointing arrow) at the
base of the emulator or press the stop button in Visual Studio.
Emulator features
Note that the emulator is not provided with all the built in programs provided
with a real device. You can browse the internet using Internet Explorer and you
can change some machine settings but lots of things, for example the Calculator,
the Calendar and Zune behaviour are all absent. There are some emulations
provided to allow you to test your programs however, if you write a program
that works with contacts from the address book (something we will do later) you
will find that some contacts have been set up inside the phone for you to work
with.
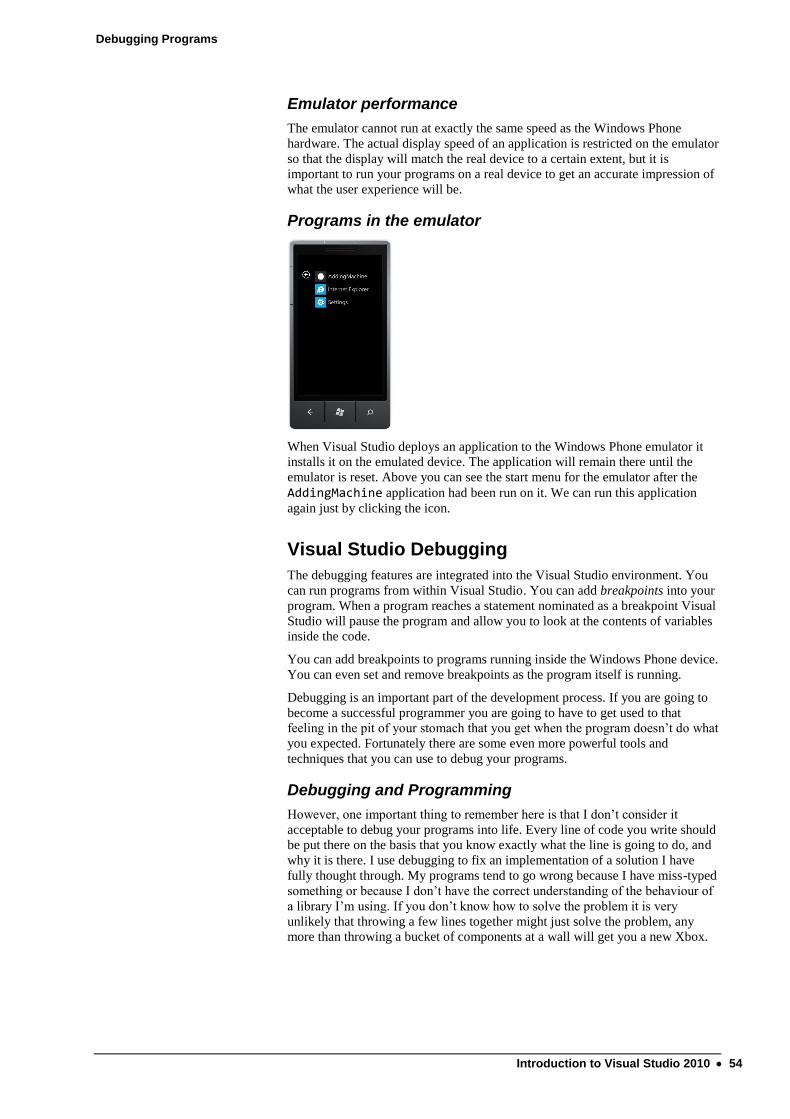
Debugging Programs
Introduction to Visual Studio 2010 54
Emulator performance
The emulator cannot run at exactly the same speed as the Windows Phone
hardware. The actual display speed of an application is restricted on the emulator
so that the display will match the real device to a certain extent, but it is
important to run your programs on a real device to get an accurate impression of
what the user experience will be.
Programs in the emulator
When Visual Studio deploys an application to the Windows Phone emulator it
installs it on the emulated device. The application will remain there until the
emulator is reset. Above you can see the start menu for the emulator after the
AddingMachine application had been run on it. We can run this application
again just by clicking the icon.
Visual Studio Debugging
The debugging features are integrated into the Visual Studio environment. You
can run programs from within Visual Studio. You can add breakpoints into your
program. When a program reaches a statement nominated as a breakpoint Visual
Studio will pause the program and allow you to look at the contents of variables
inside the code.
You can add breakpoints to programs running inside the Windows Phone device.
You can even set and remove breakpoints as the program itself is running.
Debugging is an important part of the development process. If you are going to
become a successful programmer you are going to have to get used to that
feeling in the pit of your stomach that you get when the program doesn‟t do what
you expected. Fortunately there are some even more powerful tools and
techniques that you can use to debug your programs.
Debugging and Programming
However, one important thing to remember here is that I don‟t consider it
acceptable to debug your programs into life. Every line of code you write should
be put there on the basis that you know exactly what the line is going to do, and
why it is there. I use debugging to fix an implementation of a solution I have
fully thought through. My programs tend to go wrong because I have miss-typed
something or because I don‟t have the correct understanding of the behaviour of
a library I‟m using. If you don‟t know how to solve the problem it is very
unlikely that throwing a few lines together might just solve the problem, any
more than throwing a bucket of components at a wall will get you a new Xbox.
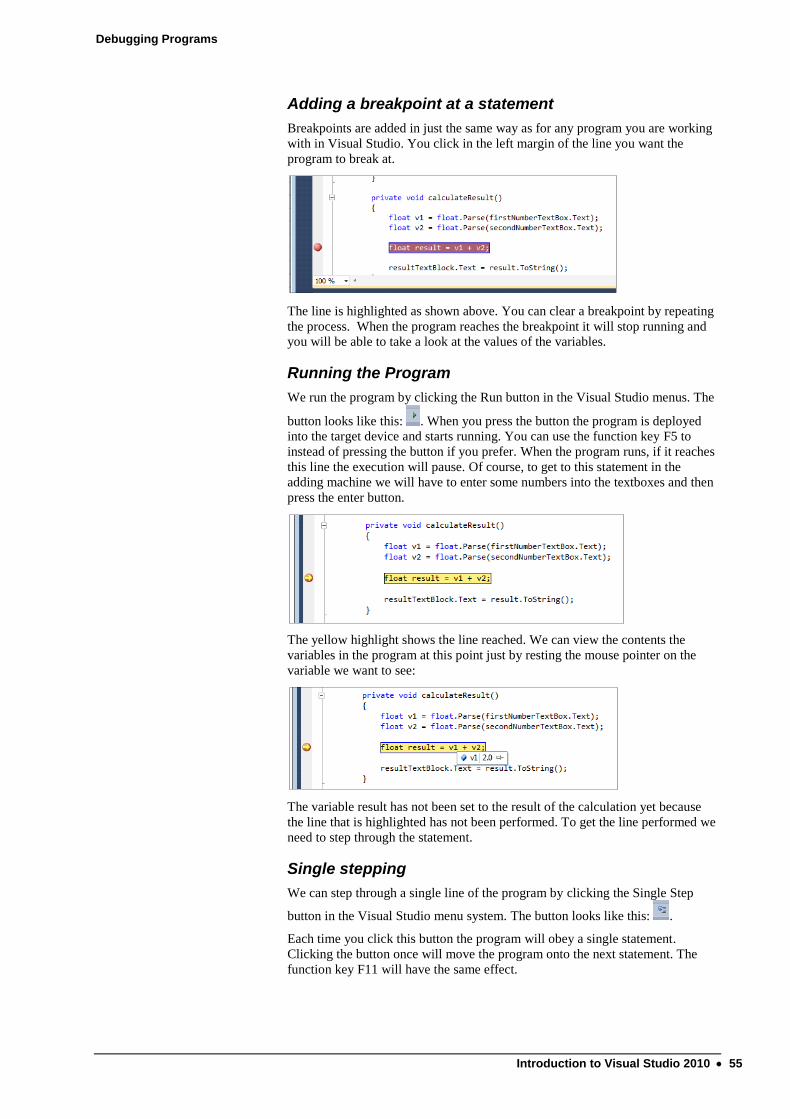
Debugging Programs
Introduction to Visual Studio 2010 55
Adding a breakpoint at a statement
Breakpoints are added in just the same way as for any program you are working
with in Visual Studio. You click in the left margin of the line you want the
program to break at.
The line is highlighted as shown above. You can clear a breakpoint by repeating
the process. When the program reaches the breakpoint it will stop running and
you will be able to take a look at the values of the variables.
Running the Program
We run the program by clicking the Run button in the Visual Studio menus. The
button looks like this: . When you press the button the program is deployed
into the target device and starts running. You can use the function key F5 to
instead of pressing the button if you prefer. When the program runs, if it reaches
this line the execution will pause. Of course, to get to this statement in the
adding machine we will have to enter some numbers into the textboxes and then
press the enter button.
The yellow highlight shows the line reached. We can view the contents the
variables in the program at this point just by resting the mouse pointer on the
variable we want to see:
The variable result has not been set to the result of the calculation yet because
the line that is highlighted has not been performed. To get the line performed we
need to step through the statement.
Single stepping
We can step through a single line of the program by clicking the Single Step
button in the Visual Studio menu system. The button looks like this: .
Each time you click this button the program will obey a single statement.
Clicking the button once will move the program onto the next statement. The
function key F11 will have the same effect.
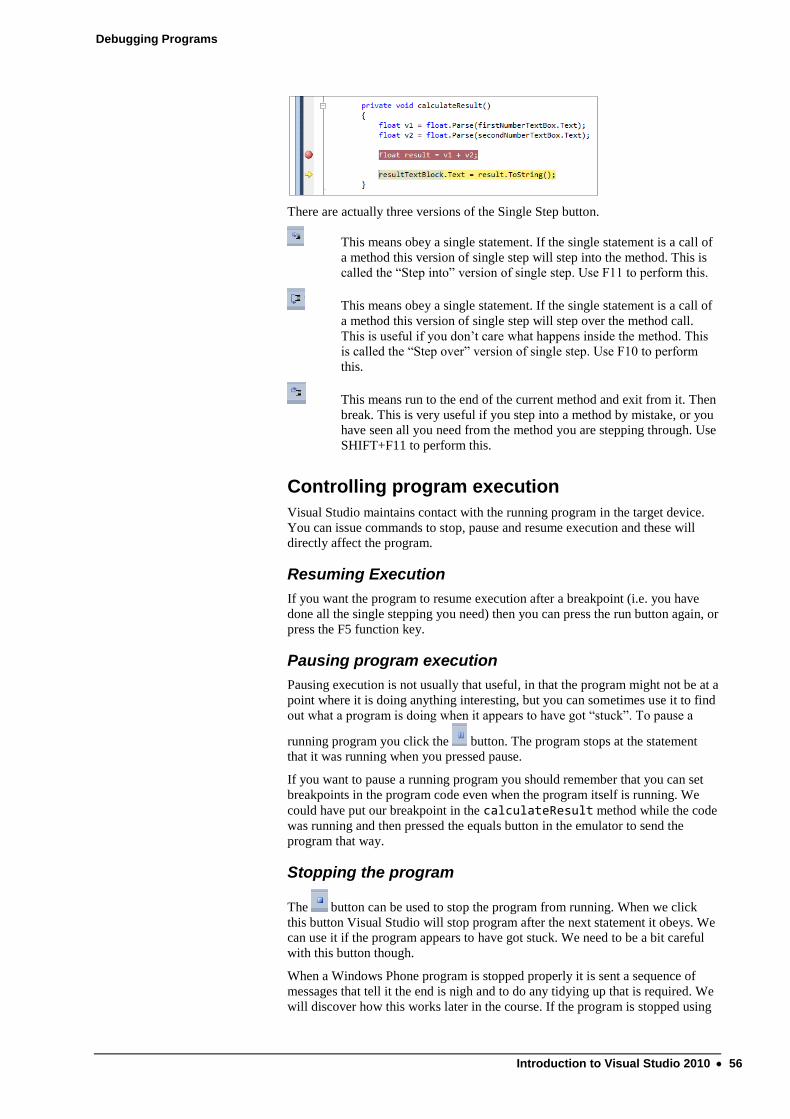
Debugging Programs
Introduction to Visual Studio 2010 56
There are actually three versions of the Single Step button.
This means obey a single statement. If the single statement is a call of
a method this version of single step will step into the method. This is
called the “Step into” version of single step. Use F11 to perform this.
This means obey a single statement. If the single statement is a call of
a method this version of single step will step over the method call.
This is useful if you don‟t care what happens inside the method. This
is called the “Step over” version of single step. Use F10 to perform
this.
This means run to the end of the current method and exit from it. Then
break. This is very useful if you step into a method by mistake, or you
have seen all you need from the method you are stepping through. Use
SHIFT+F11 to perform this.
Controlling program execution
Visual Studio maintains contact with the running program in the target device.
You can issue commands to stop, pause and resume execution and these will
directly affect the program.
Resuming Execution
If you want the program to resume execution after a breakpoint (i.e. you have
done all the single stepping you need) then you can press the run button again, or
press the F5 function key.
Pausing program execution
Pausing execution is not usually that useful, in that the program might not be at a
point where it is doing anything interesting, but you can sometimes use it to find
out what a program is doing when it appears to have got “stuck”. To pause a
running program you click the button. The program stops at the statement
that it was running when you pressed pause.
If you want to pause a running program you should remember that you can set
breakpoints in the program code even when the program itself is running. We
could have put our breakpoint in the calculateResult method while the code
was running and then pressed the equals button in the emulator to send the
program that way.
Stopping the program
The button can be used to stop the program from running. When we click
this button Visual Studio will stop program after the next statement it obeys. We
can use it if the program appears to have got stuck. We need to be a bit careful
with this button though.
When a Windows Phone program is stopped properly it is sent a sequence of
messages that tell it the end is nigh and to do any tidying up that is required. We
will discover how this works later in the course. If the program is stopped using

Debugging Programs
Introduction to Visual Studio 2010 57
the button above these messages are not sent, and so a program interrupted in
this way may lose or corrupt data that it was using when the stop event was
fired.
Managing Breakpoints
Visual Studio also has a breakpoint window that you can use to see the
breakpoints you have created. You can display this window by going to the
Debug>Windows menu in Visual Studio and selecting the Breakpoints option.
You can use this window to set breakpoint properties. You can request that a
breakpoint only fire after a given number of hits, or only fire when a particular
condition fires. This is terribly useful. You might have a program that fails after
the fiftieth time round a loop. It is very nice to be able to add a counter or a test
so that the program skips past the breakpoints you are not interested in.
To open the properties of a breakpoint, either in the code itself or in the
Breakpoints window, right click the breakpoint and then select Breakpoint from
the context menu that appears.
Using the immediate window
The Immediate Window can be displayed by going to the Debug>Windows
menu and selecting it. It is where you can view and change the contents of
variables. You can also use it to evaluate expressions. As an example of the
immediate window in action, we could set a breakpoint just before the
calculateResult method returns:
When I run the program and press the equals button the program will hit the
breakpoint. I can now move to the Immediate Window and play with the
variables in this method.

What we have learned
Introduction to Visual Studio 2010 58
If I just type the name of a variable the window displays the value in that
variable. I can also type in expressions (e.g. v1+v2 as shown above) and these
are evaluated and displayed. I can also assign a value (e.g. result = 100) and call
methods on objects to work out results.
The Immediate pane uses Intellisense to help you write the statements you want
to run. It even works when you are debugging a program stored inside the
Windows Phone device. It is very powerful, but should be used with care.
Design for debug
Single stepping through code is a great way to find out what it is doing. When
you write code it useful to design it so that you can easily step through it and
find out what it is doing. The code in the calculateResult method could
easily be as a single statement.
private void calculateResult() { resultTextBlock.Text = (float.Parse(firstNumberTextBox.Text) + float.Parse(secondNumberTextBox.Text)).ToString(); }
However this version is impossible to step through. I am a great believer in
spreading my code over a number of statements and even using extra temporary
variables when it runs. This makes debugging easier and doesn‟t even cost your
program more memory since in the “smaller” version of the code above Visual
Studio will still have to create some internal temporary variables to perform the
calculation. The only difference with the “more efficient” version above is that
you can‟t take a look at them.
What we have learned 1. Visual Studio is the development environment that is used to create
Windows Phone applications. You can obtain a free version of this
SDK.
2. Microsoft .NET applications are organised into assemblies. An
assembly is either an executable program (.exe) or a library (.dll).
3. Visual Studio organises the elements required to produce an assembly
into a project. A project brings together the source files and other
program resources such as images and sounds required to produce the
assembly. When the assembly is created a manifest is added to the
project which describes the contents.
4. You can use the ildasm program which is supplied with Visual Studio
to view the contents of assemblies.
5. A Visual Studio solution brings together a number of projects which
can describe the creation of different elements of an application. This
can include the production of completely different components, for
example the server and client parts of a large installation.
6. A Windows Phone application can contain a number of assemblies,
including library resources. An assembly will contain versioned
references to all the resources that it uses.
7. When a Windows Phone application is prepared for deployment to the
target device it is packaged into a XAP file which contains a manifest
file, program assemblies and any resources that the program uses.
8. The Windows Phone emulator runs on the Windows PC and provides
an emulation of the functionality of the device, but does not emulate the
performance.

What we have learned
Introduction to Visual Studio 2010 59
9. Visual Studio provides a means by which a programmer can insert
breakpoints into program. These are statements where program
execution will stop and the programmer can view the contents of the
variables in the program. Breakpoints and single stepping of code can
be used on programs executing in the Windows Phone device as well as
the emulator.

Improving the user experience
User Interface Design with Silverlight 60
4 User Interface Design with Silverlight
In section 2 we looked at some of the elements provided with Silverlight. Now
we are going to build on our skills and delve a bit more deeply into what
Silverlight can do for us. By the end of this section you should be able to create
useable, multi-page Silverlight applications that will work on Windows Phone.
4.1 Improving the user experience At the moment we are able to build user interfaces out of three Silverlight
elements:
TextBlock to display messages and labels
TextBox to receive input from the user
Button to receive events
Now we are going to build on these three items to create slightly more
interesting places for the user to work. At the same time we are going to learn a
bit more about how the Silverlight elements work together to build user
interfaces.
Manipulating element properties
We have seen that Silverlight display elements are actually implemented as
classes in the code, and that we can change how they appear by modifying the
properties in instances of these elements. The properties of a Silverlight element
can be set using the Properties pane in Visual Studio or by editing the XAML
that describes each element. However, these settings are made when the program
is built. We can also set the properties of the elements when the program runs.
We have already done this in our AddingMachine application, the result is
displayed by changing the properties of the ResultTextBlock.
resultTextBlock.Text = result.ToString();
Programs can manipulate any of the properties of a display element. This
includes their position on screen, making it possible for us to create moving
sprites in games.
We are going to take a look at some other properties that are available. We are
going to use further property manipulation to improve the user experience of our
AddingMachine program. However, we are just going to scratch the surface of
what is actually possible. I strongly advise to you spend some time looking at
just what you can do with elements. There are some very powerful features
available.
Adding Error Handling
We are going to start by improving the error handing of our AddingMachine.
In my experience I spend at least as much time writing code to deal with invalid
inputs for a system as I do writing programs that deal with the working parts.
At the moment the error handling in our AddingMachine program is non-
existent. If a user enters text into a TextBox the program will try to use the
Parse method to convert this into a number, and this will fail.

Improving the user experience
User Interface Design with Silverlight 61
Above you can see trouble brewing for our adding machine program. The user
will claim that they just wanted to work out the answer to “two plus two” but the
result will not be a successful one:
This is because this version of the program uses a very simple method to convert
the text in the TextBox into a number:
float v1 = float.Parse(firstNumberTextBox.Text);
If firstNumberTextBox contains text that cannot be converted into a number
(for example “two”) it will throw an exception. We can improve on this by using
a different version of the Parse method:
float v1 = 0; if (!int.TryParse(firstNumberTextBox.Text, out v1)) { // Invalid text in textbox }
The code above uses the TryParse method which returns false if the parse
fails. It will obey the statements in the conditional clause if the text in
firstNumberTextBox contains invalid text. It would be nice to turn the text
red in the TextBox to indicate there is a problem.
Changing the colour of text
A good way to show an error status is to change the colour of the text. This is a
very good way to highlight a problem. Silverlight uses a system of brushes to
draw items on the screen. This is a very powerful mechanism. It means that we
can draw text using images or textures and get some very impressive effects. In
the case of our error display we don‟t want to do anything quite so interesting,
we just want to draw the text with a solid red brush. Silverlight has a set of such
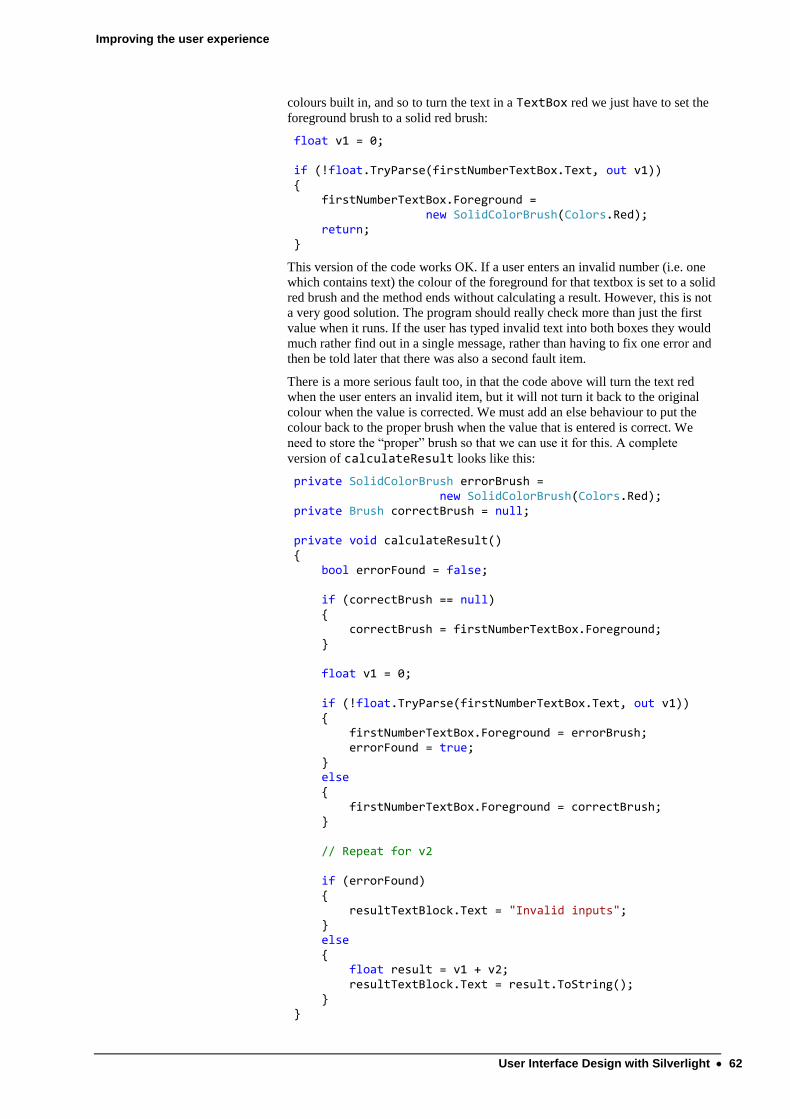
Improving the user experience
User Interface Design with Silverlight 62
colours built in, and so to turn the text in a TextBox red we just have to set the
foreground brush to a solid red brush:
float v1 = 0; if (!float.TryParse(firstNumberTextBox.Text, out v1)) { firstNumberTextBox.Foreground = new SolidColorBrush(Colors.Red); return; }
This version of the code works OK. If a user enters an invalid number (i.e. one
which contains text) the colour of the foreground for that textbox is set to a solid
red brush and the method ends without calculating a result. However, this is not
a very good solution. The program should really check more than just the first
value when it runs. If the user has typed invalid text into both boxes they would
much rather find out in a single message, rather than having to fix one error and
then be told later that there was also a second fault item.
There is a more serious fault too, in that the code above will turn the text red
when the user enters an invalid item, but it will not turn it back to the original
colour when the value is corrected. We must add an else behaviour to put the
colour back to the proper brush when the value that is entered is correct. We
need to store the “proper” brush so that we can use it for this. A complete
version of calculateResult looks like this:
private SolidColorBrush errorBrush = new SolidColorBrush(Colors.Red); private Brush correctBrush = null; private void calculateResult() { bool errorFound = false; if (correctBrush == null) { correctBrush = firstNumberTextBox.Foreground; } float v1 = 0; if (!float.TryParse(firstNumberTextBox.Text, out v1)) { firstNumberTextBox.Foreground = errorBrush; errorFound = true; } else { firstNumberTextBox.Foreground = correctBrush; } // Repeat for v2 if (errorFound) { resultTextBlock.Text = "Invalid inputs"; } else { float result = v1 + v2; resultTextBlock.Text = result.ToString(); } }
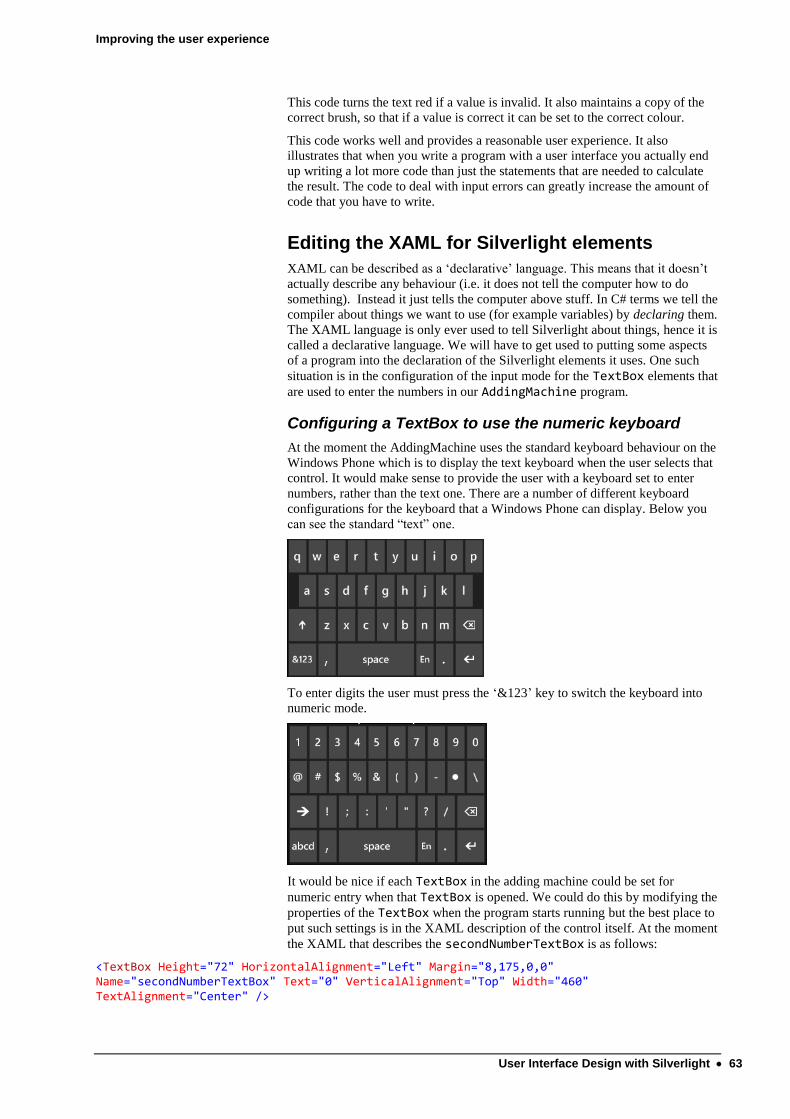
Improving the user experience
User Interface Design with Silverlight 63
This code turns the text red if a value is invalid. It also maintains a copy of the
correct brush, so that if a value is correct it can be set to the correct colour.
This code works well and provides a reasonable user experience. It also
illustrates that when you write a program with a user interface you actually end
up writing a lot more code than just the statements that are needed to calculate
the result. The code to deal with input errors can greatly increase the amount of
code that you have to write.
Editing the XAML for Silverlight elements
XAML can be described as a „declarative‟ language. This means that it doesn‟t
actually describe any behaviour (i.e. it does not tell the computer how to do
something). Instead it just tells the computer above stuff. In C# terms we tell the
compiler about things we want to use (for example variables) by declaring them.
The XAML language is only ever used to tell Silverlight about things, hence it is
called a declarative language. We will have to get used to putting some aspects
of a program into the declaration of the Silverlight elements it uses. One such
situation is in the configuration of the input mode for the TextBox elements that
are used to enter the numbers in our AddingMachine program.
Configuring a TextBox to use the numeric keyboard
At the moment the AddingMachine uses the standard keyboard behaviour on the
Windows Phone which is to display the text keyboard when the user selects that
control. It would make sense to provide the user with a keyboard set to enter
numbers, rather than the text one. There are a number of different keyboard
configurations for the keyboard that a Windows Phone can display. Below you
can see the standard “text” one.
To enter digits the user must press the „&123‟ key to switch the keyboard into
numeric mode.
It would be nice if each TextBox in the adding machine could be set for
numeric entry when that TextBox is opened. We could do this by modifying the
properties of the TextBox when the program starts running but the best place to
put such settings is in the XAML description of the control itself. At the moment
the XAML that describes the secondNumberTextBox is as follows:
<TextBox Height="72" HorizontalAlignment="Left" Margin="8,175,0,0" Name="secondNumberTextBox" Text="0" VerticalAlignment="Top" Width="460" TextAlignment="Center" />
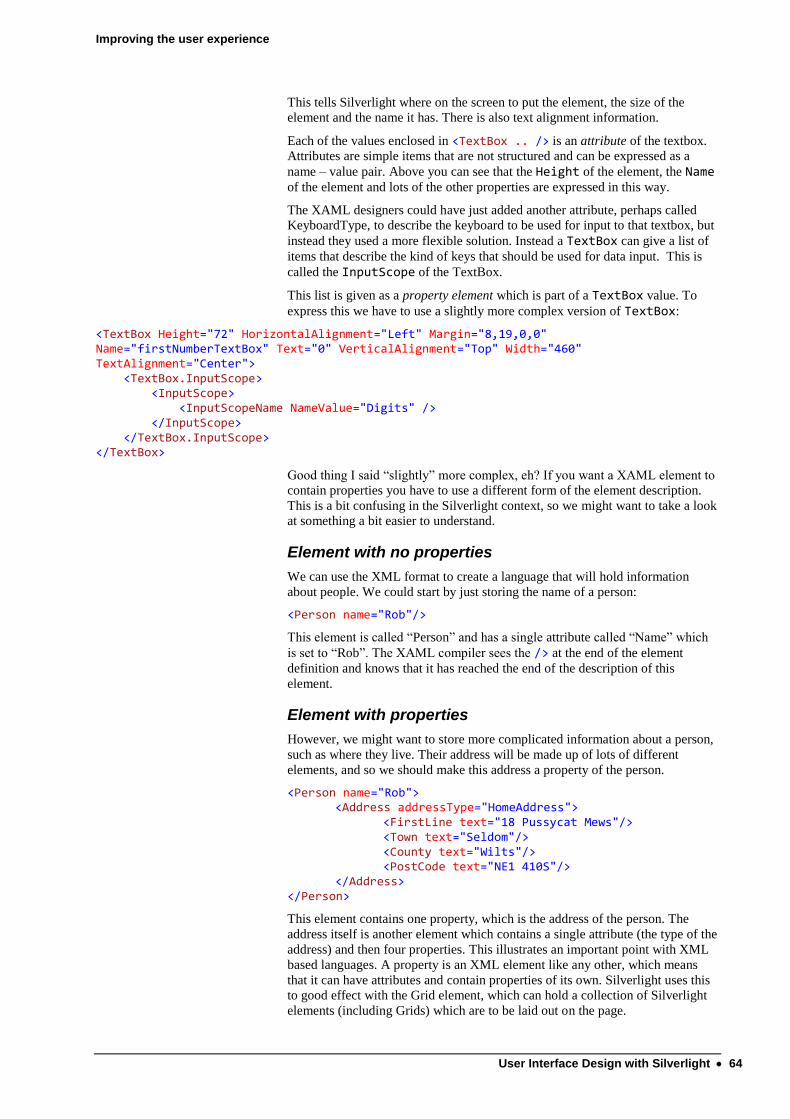
Improving the user experience
User Interface Design with Silverlight 64
This tells Silverlight where on the screen to put the element, the size of the
element and the name it has. There is also text alignment information.
Each of the values enclosed in <TextBox .. /> is an attribute of the textbox.
Attributes are simple items that are not structured and can be expressed as a
name – value pair. Above you can see that the Height of the element, the Name
of the element and lots of the other properties are expressed in this way.
The XAML designers could have just added another attribute, perhaps called
KeyboardType, to describe the keyboard to be used for input to that textbox, but
instead they used a more flexible solution. Instead a TextBox can give a list of
items that describe the kind of keys that should be used for data input. This is
called the InputScope of the TextBox.
This list is given as a property element which is part of a TextBox value. To
express this we have to use a slightly more complex version of TextBox:
<TextBox Height="72" HorizontalAlignment="Left" Margin="8,19,0,0" Name="firstNumberTextBox" Text="0" VerticalAlignment="Top" Width="460" TextAlignment="Center"> <TextBox.InputScope> <InputScope> <InputScopeName NameValue="Digits" /> </InputScope> </TextBox.InputScope> </TextBox>
Good thing I said “slightly” more complex, eh? If you want a XAML element to
contain properties you have to use a different form of the element description.
This is a bit confusing in the Silverlight context, so we might want to take a look
at something a bit easier to understand.
Element with no properties
We can use the XML format to create a language that will hold information
about people. We could start by just storing the name of a person:
<Person name="Rob"/>
This element is called “Person” and has a single attribute called “Name” which
is set to “Rob”. The XAML compiler sees the /> at the end of the element
definition and knows that it has reached the end of the description of this
element.
Element with properties
However, we might want to store more complicated information about a person,
such as where they live. Their address will be made up of lots of different
elements, and so we should make this address a property of the person.
<Person name="Rob"> <Address addressType="HomeAddress"> <FirstLine text="18 Pussycat Mews"/> <Town text="Seldom"/> <County text="Wilts"/> <PostCode text="NE1 410S"/> </Address> </Person>
This element contains one property, which is the address of the person. The
address itself is another element which contains a single attribute (the type of the
address) and then four properties. This illustrates an important point with XML
based languages. A property is an XML element like any other, which means
that it can have attributes and contain properties of its own. Silverlight uses this
to good effect with the Grid element, which can hold a collection of Silverlight
elements (including Grids) which are to be laid out on the page.
Improving the user experience
User Interface Design with Silverlight 65
The XAML compiler can tell that an element contains properties because the
first line of the element description ends with > rather than ending />. The
XAML compiler will regard everything it sees after the first line as a property of
the element, until it sees the </ElementName> which rounds things off.
If you find this confusing at first, welcome to the club. The best way to think
about this is to consider what is being stored. In the case of the Person above the
name is just a single item which can be expressed in a simple attribute. However
the address will contain multiple properties of its own and so is best made into a
property. There is also the possibility that a Person will have several address
values, for example a HomeAddress and a WorkAddress and so the above
design makes it possible to add new address types easily.
The type of the address has been made an attribute of the address, which I think
is the most appropriate.Whether to make a data item an attribute or a property is
something you have to think about when you use XML (eXtensible Markup
Language) to describe things.
If we go back to our TextBox we should find that things make a bit more sense
now.
<TextBox Height="72" HorizontalAlignment="Left" Margin="8,19,0,0" Name="firstNumberTextBox" Text="0" VerticalAlignment="Top" Width="460" TextAlignment="Center"> <TextBox.InputScope> <InputScope> <InputScopeName NameValue="Digits" /> </InputScope> </TextBox.InputScope> </TextBox>
Simple information about the TextBox is given as attributes, whereas the
InputScope value is given as a property. The InputScope itself contains a set
of properties, each of which describes a particular input scope. This means that
we could if we want ask for an input scope that includes Digits and Text, but not
punctuation. However, we don‟t want anything as complex as that. We just want
to ask for Digit input, and so that is the InputScope that we set up. If we use
the above description for the two textboxes in the adding machine we get a
vastly improved user interface where the user is given the numeric keyboard
when they move to those input elements.
This is an example of a situation where just adding text to the XAML is the
quickest and easiest way to configure the input behaviour. We could have used
the Visual Studio property pane, or even written some complex code to build a
collection of InputScopeName values and assign them to the TextBox, but
this solution is much neater, and also allowed us to refine our understanding of
XAML.
Attributes and Properties – the truth
It turns out that from the point of view of XAML attributes and properties are
actually interchangeable
<TextBox HorizontalAlignment="Left" Margin="8,175,0,0" Name="secondNumberTextBox" Text="0" VerticalAlignment="Top" Width="460" TextAlignment="Center"> <TextBox.Height> 72 </TextBox.Height> </TextBox>
In the XAML above the height of the TextBox has been brought out of the
attributes and turned into a property. The property name must contain the name
of the element type that it is part of. We can‟t just say Height, we have to put
TextBox.Height. This is not a restriction of XML (we didn‟t have to put this
in our Person example above) but is a requirement for XAML.
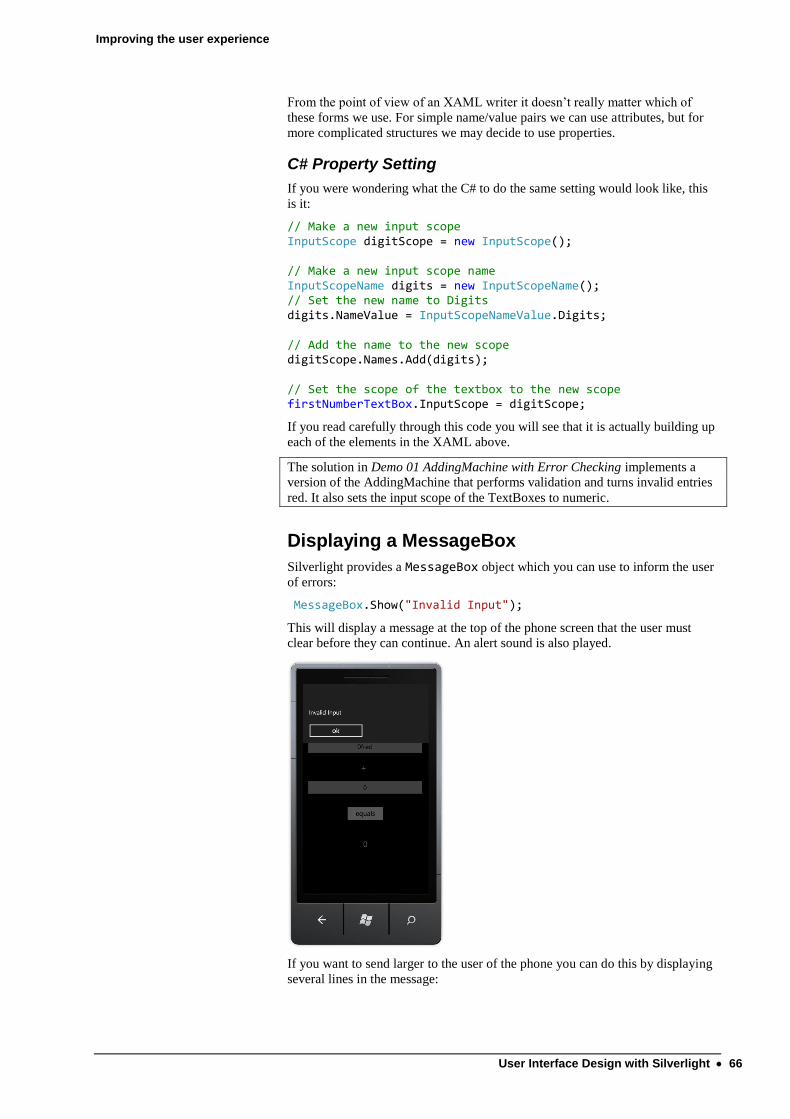
Improving the user experience
User Interface Design with Silverlight 66
From the point of view of an XAML writer it doesn‟t really matter which of
these forms we use. For simple name/value pairs we can use attributes, but for
more complicated structures we may decide to use properties.
C# Property Setting
If you were wondering what the C# to do the same setting would look like, this
is it:
// Make a new input scope InputScope digitScope = new InputScope(); // Make a new input scope name InputScopeName digits = new InputScopeName(); // Set the new name to Digits digits.NameValue = InputScopeNameValue.Digits; // Add the name to the new scope digitScope.Names.Add(digits); // Set the scope of the textbox to the new scope firstNumberTextBox.InputScope = digitScope;
If you read carefully through this code you will see that it is actually building up
each of the elements in the XAML above.
The solution in Demo 01 AddingMachine with Error Checking implements a
version of the AddingMachine that performs validation and turns invalid entries
red. It also sets the input scope of the TextBoxes to numeric.
Displaying a MessageBox
Silverlight provides a MessageBox object which you can use to inform the user
of errors:
MessageBox.Show("Invalid Input");
This will display a message at the top of the phone screen that the user must
clear before they can continue. An alert sound is also played.
If you want to send larger to the user of the phone you can do this by displaying
several lines in the message:
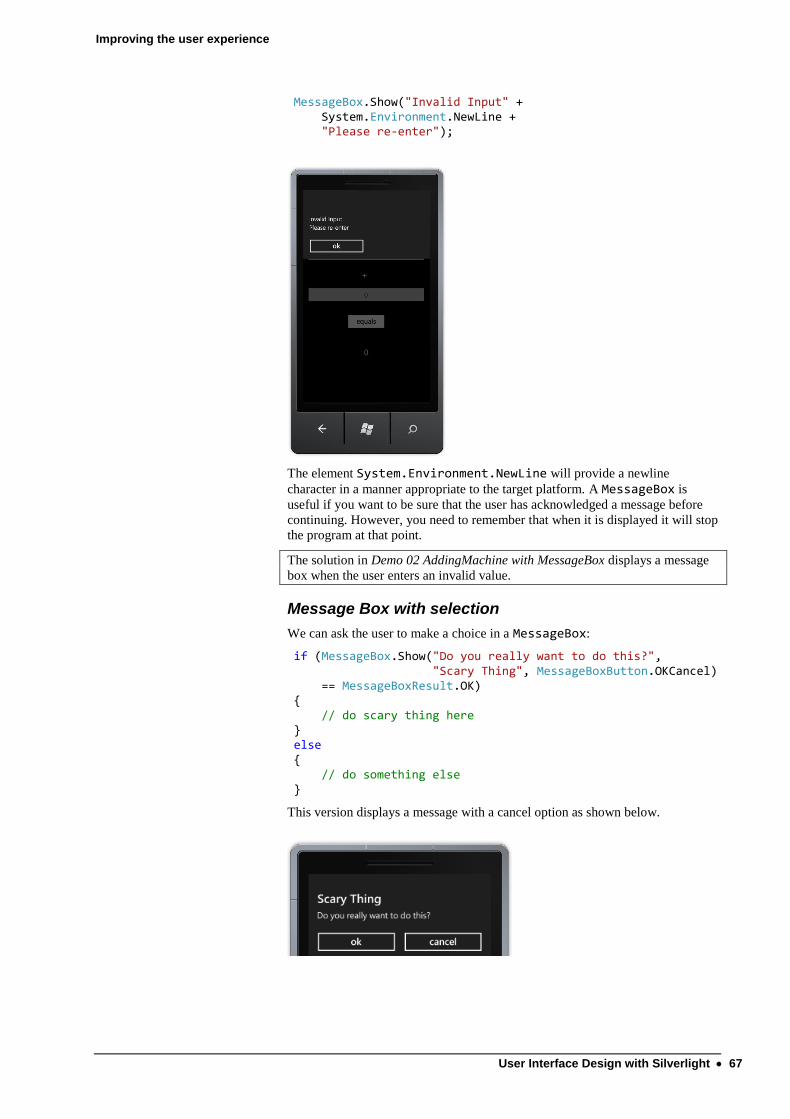
Improving the user experience
User Interface Design with Silverlight 67
MessageBox.Show("Invalid Input" + System.Environment.NewLine + "Please re-enter");
The element System.Environment.NewLine will provide a newline
character in a manner appropriate to the target platform. A MessageBox is
useful if you want to be sure that the user has acknowledged a message before
continuing. However, you need to remember that when it is displayed it will stop
the program at that point.
The solution in Demo 02 AddingMachine with MessageBox displays a message
box when the user enters an invalid value.
Message Box with selection
We can ask the user to make a choice in a MessageBox:
if (MessageBox.Show("Do you really want to do this?", "Scary Thing", MessageBoxButton.OKCancel) == MessageBoxResult.OK) { // do scary thing here } else { // do something else }
This version displays a message with a cancel option as shown below.

Improving the user experience
User Interface Design with Silverlight 68
Adding and using assets
In the previous section we saw how Visual Studio manages assets such as
images and sounds and adds these to the XAP file for transfer into the target
device. Now we are going to see how our applications can add assets of our own
and then use it.
A background screen for the Adding Machine
We have been asked by the son of the boss of our customer (who seems to think
he is a graphic designer) to add the above image as a background to the adding
machine application. This is actually a photograph of some of the gears of
Charles Babbage‟s “Difference Engine” and he thinks that this addition will
make the program much better. We‟re not convinced, but as he is the son of the
boss we have to go along.
Assets for Windows Phone
When you add assets such as this it is important to remember that the target
device does not have a lot of memory or a particularly high resolution screen. If
the above picture was from a high resolution camera it might contain a lot more
detail than would be required for a phone application. Remember that the highest
resolution for a Windows Phone at the moment is 800x480 pixels. There is no
point in using a background image with a higher resolution than this.
Adding Images as Items of Content
We can add an image as an item of content to the AddingMachine project. The
boss‟s son has given us a jpeg image called AddingGears.jpg to use. It turns
out that the quickest way to add a content item to a project in Visual Studio is
just to drag the item out of the folder and drop it onto the project:
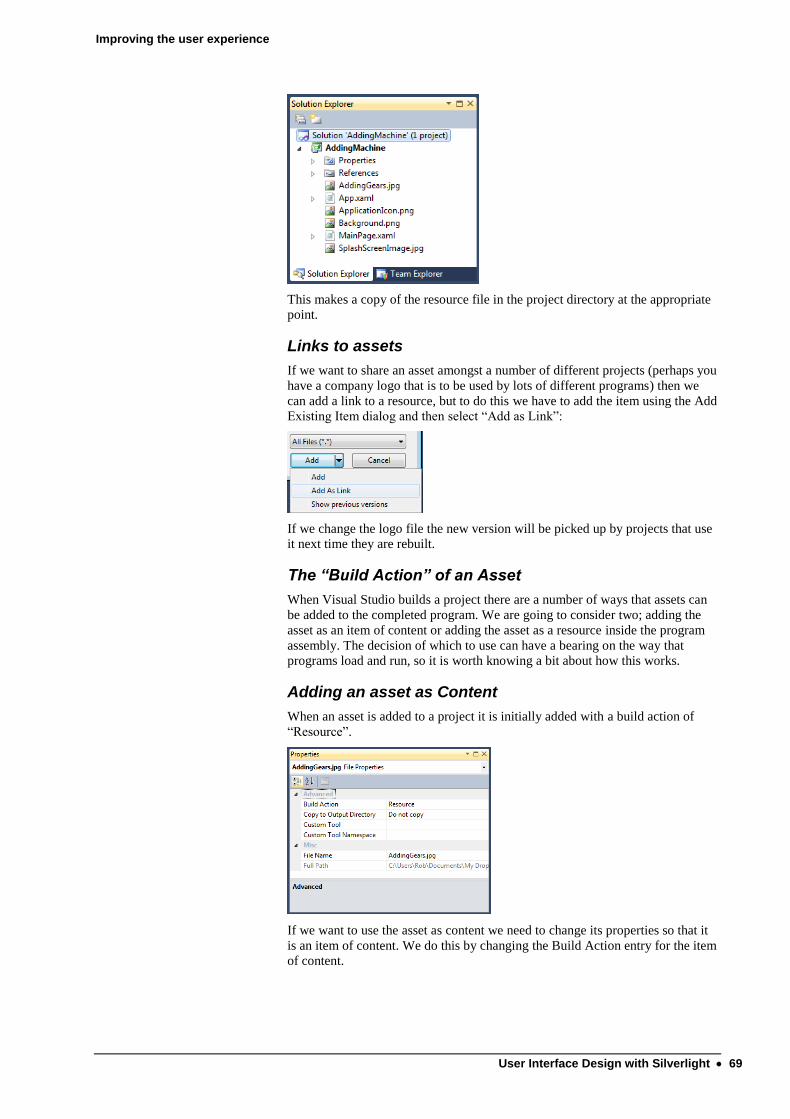
Improving the user experience
User Interface Design with Silverlight 69
This makes a copy of the resource file in the project directory at the appropriate
point.
Links to assets
If we want to share an asset amongst a number of different projects (perhaps you
have a company logo that is to be used by lots of different programs) then we
can add a link to a resource, but to do this we have to add the item using the Add
Existing Item dialog and then select “Add as Link”:
If we change the logo file the new version will be picked up by projects that use
it next time they are rebuilt.
The “Build Action” of an Asset
When Visual Studio builds a project there are a number of ways that assets can
be added to the completed program. We are going to consider two; adding the
asset as an item of content or adding the asset as a resource inside the program
assembly. The decision of which to use can have a bearing on the way that
programs load and run, so it is worth knowing a bit about how this works.
Adding an asset as Content
When an asset is added to a project it is initially added with a build action of
“Resource”.
If we want to use the asset as content we need to change its properties so that it
is an item of content. We do this by changing the Build Action entry for the item
of content.

Improving the user experience
User Interface Design with Silverlight 70
Content assets are copied by Visual Studio into the application directory when
the program is built. The “Copy if newer” setting means that Visual Studio will
copy a new version of the image into the binary folder if the current image in the
project is replaced by a newer file.
Using Image content in a program
An asset of type content is simply made available to the application as a file in
the same folder as the program itself. To display an image held as content in our
program we just need to add the line of XAML that describes the image file that
we want to use:
<Image Height="611" HorizontalAlignment="Left" Margin="8,0,0,0" Name="gearBackgroundImage" Stretch="Fill" VerticalAlignment="Top" Width="472" Source="AddingGears.jpg" />
The Image element displays an image on the page. It has a Source attribute
that identifies the file from which the image is to be loaded. If we enter a
filename as the source the image will be loaded from the file. When the program
runs the file will be loaded from the file and then drawn on the screen.
Silverlight draws the elements on the screen in the order they are defined in the
XAML. If this line is put at the top of the Grid containing the elements the
image will be drawn in the background:
This is the result of the program. From an artistic point of view we are not
convinced, by the choice of picture but the process itself works.
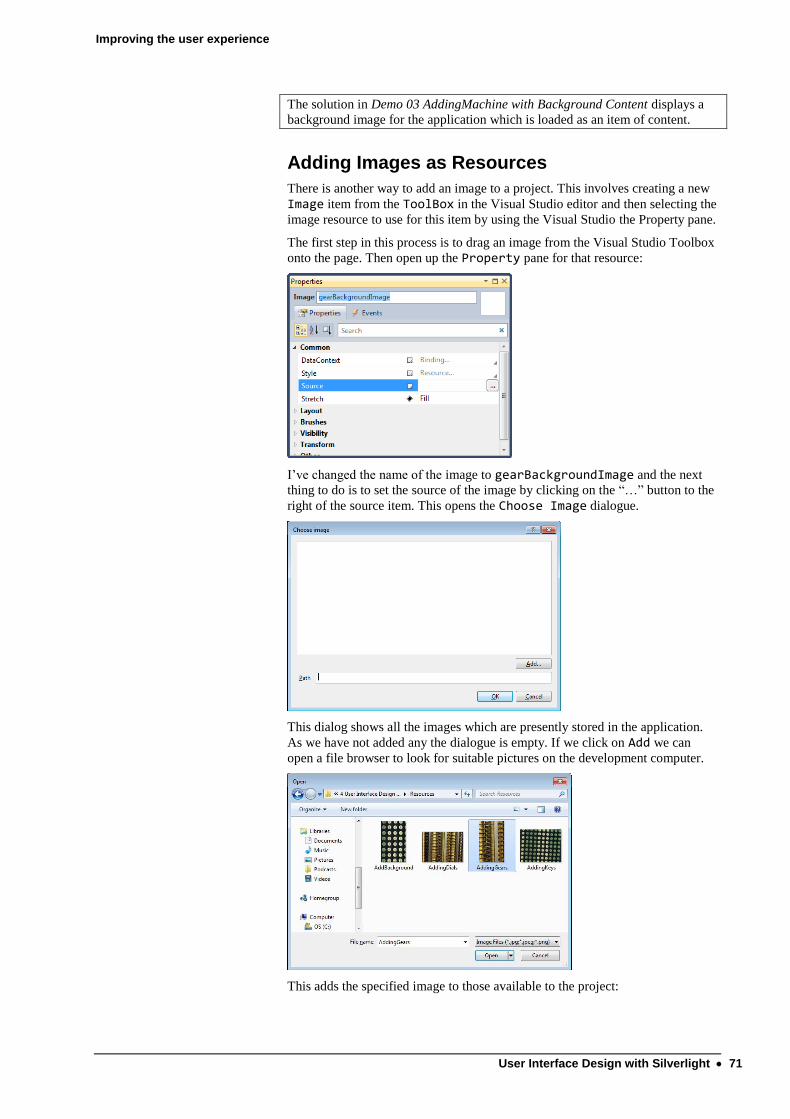
Improving the user experience
User Interface Design with Silverlight 71
The solution in Demo 03 AddingMachine with Background Content displays a
background image for the application which is loaded as an item of content.
Adding Images as Resources
There is another way to add an image to a project. This involves creating a new
Image item from the ToolBox in the Visual Studio editor and then selecting the
image resource to use for this item by using the Visual Studio the Property pane.
The first step in this process is to drag an image from the Visual Studio Toolbox
onto the page. Then open up the Property pane for that resource:
I‟ve changed the name of the image to gearBackgroundImage and the next
thing to do is to set the source of the image by clicking on the “…” button to the
right of the source item. This opens the Choose Image dialogue.
This dialog shows all the images which are presently stored in the application.
As we have not added any the dialogue is empty. If we click on Add we can
open a file browser to look for suitable pictures on the development computer.
This adds the specified image to those available to the project:

Improving the user experience
User Interface Design with Silverlight 72
It also creates the resource item in the project for this item:
Any other images that we add to the project will be added in the folder that
Visual Studio created for us. The properties of these images will be set as
Resources, not content.
The XAML that describes the image contains an image source that refers to the
resource in the application:
<Image Height="611" HorizontalAlignment="Left" Name="gearBackgrounds" Stretch="Fill" VerticalAlignment="Top" Width="472" Source="/AddingMachine;component/Images/AddingGears.jpg" />
When the program runs the display is exactly the same, but there is a crucial
difference in how the resource is located and used.
The solution in Demo 04 AddingMachine with Background Resource displays a
background image for the application which is loaded as a resource.

Data manipulation and display
User Interface Design with Silverlight 73
Content vs Resources
When creating Windows Phone applications it is important that we understand
the difference between content and resources in an application.
An item of content is simply a file that is stored in the application directory. Our
programs can open and use content files when they need them. Adding content
has no effect on the size of the program itself, although of course when a
program is running and loads content it will use more memory.
A resource item is stored in the program assembly. Adding the gears background
image to the assembly above made the program around 317K bytes larger. When
a Windows Phone device loads a program it looks through the entire program
assembly and does some checks to make sure that it is legal code. These checks
take longer if the program is bigger. If your program takes too long to start up
when it is loaded it will be killed by the Windows Phone operating system. This
means that you should be careful about putting too many things in the program
assembly.
Adding our image as an item of content made the program itself smaller,
meaning that it starts running more quickly. However, content items take slightly
longer to load because they have to be fetched from the filestore when they are
used. Adding our image as a resource makes it faster to load when the program
tries to fetch it, but makes the program larger and will make the program itself
slower to start.
If this is confusing, here are some hints:
If you have lots of large resources, and you don‟t need to load all of
them into the program at once, use content. An example would be
where you allow the user to select from a number of different
background images for their screen.
If you have lots of small resources which are used all the time
throughout the program, use resource. An example would be if you had
icons that represent particular program setting or options.
If you find your program is taking too long to get started you should
move some of the resources out of the program assembly and add a
loading screen of your own to show them being brought into memory
when the program starts up. You can also speed up the program startup
process by breaking your program into smaller assemblies which are
linked together.
4.2 Data manipulation and display Our adding machine is now quite useable, but the customer is still not
completely happy. He doesn‟t like the way that users have to press the Calculate
button each time they want a new answer. What he wants is for the program to
detect when the text in the number boxes changes and then update the total
automatically. Fortunately for us this turns out to be quite easy to do. We need to
revisit events to find out more.
The TextChanged event
We first saw events when we considered the Button element. A Button
element generates an event when it is activated. From a program point of view
an event is a call to a method. We can get Visual Studio to “hook up” a button to
an event for us just by double clicking the button in the designer. At the moment
the Calculate button has a click behaviour that calculates and displays the
result. The method to be called is identified in the Button description:
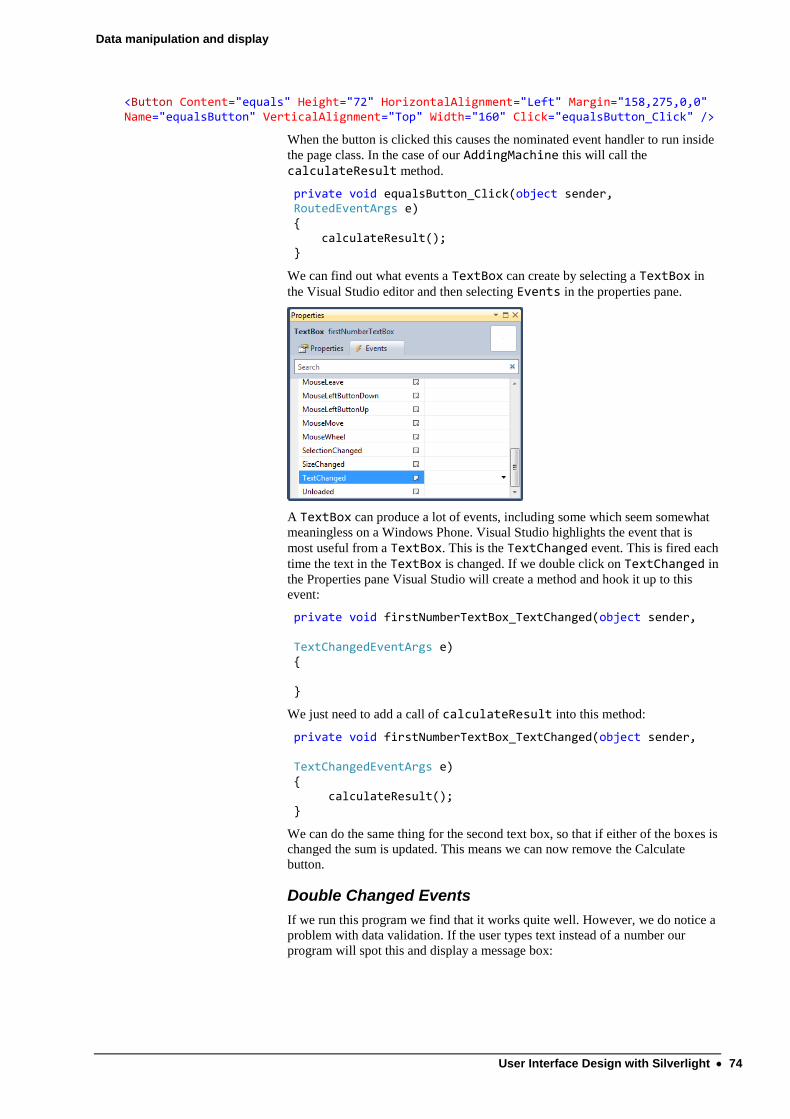
Data manipulation and display
User Interface Design with Silverlight 74
<Button Content="equals" Height="72" HorizontalAlignment="Left" Margin="158,275,0,0" Name="equalsButton" VerticalAlignment="Top" Width="160" Click="equalsButton_Click" />
When the button is clicked this causes the nominated event handler to run inside
the page class. In the case of our AddingMachine this will call the
calculateResult method.
private void equalsButton_Click(object sender, RoutedEventArgs e) { calculateResult(); }
We can find out what events a TextBox can create by selecting a TextBox in
the Visual Studio editor and then selecting Events in the properties pane.
A TextBox can produce a lot of events, including some which seem somewhat
meaningless on a Windows Phone. Visual Studio highlights the event that is
most useful from a TextBox. This is the TextChanged event. This is fired each
time the text in the TextBox is changed. If we double click on TextChanged in
the Properties pane Visual Studio will create a method and hook it up to this
event:
private void firstNumberTextBox_TextChanged(object sender, TextChangedEventArgs e) { }
We just need to add a call of calculateResult into this method:
private void firstNumberTextBox_TextChanged(object sender, TextChangedEventArgs e) { calculateResult(); }
We can do the same thing for the second text box, so that if either of the boxes is
changed the sum is updated. This means we can now remove the Calculate
button.
Double Changed Events
If we run this program we find that it works quite well. However, we do notice a
problem with data validation. If the user types text instead of a number our
program will spot this and display a message box:

Data manipulation and display
User Interface Design with Silverlight 75
However, this message is displayed twice for each invalid character that is
entered. It is as if the TextChanged event is firing twice for each character. It
turns out that this is the case and it is a known issue with Windows Phone
applications. We can get around it by checking for successive changed events
with the same data:
string oldFirstNumber = ""; private void firstNumberTextBox_TextChanged(object sender, TextChangedEventArgs e) { if (firstNumberTextBox.Text == oldFirstNumber) return; oldFirstNumber = firstNumberTextBox.Text; calculateResult(); }
This method only calls calculateResult if the text in the TextBox has really
changed.
The solution in Demo 05 AddingMachine with no button implements an adding
machine which uses TextChanged events and does not have a calculate button.
Data binding
Data binding is wonderful. Perhaps there are even statues out there to it. Perhaps
we should build one, but then again perhaps not. Data binding takes the place of
the “glue” code that we are writing to connect display elements to the methods
that work on them. It allows us to take a property of a display element and
connect it directly to an object. All we have to do is create an object that behaves
in a particular way and we can get values in the object transferred into the
Silverlight element with no effort on our part.
Data binding can work in either direction. We can bind the text a TextBox to
our application so that when a user changes the text in the textbox our
application is informed of this. We can also bind a TextBlock to an object so
that when a property in the object is changed the content of the TextBlock
updates to match. This is “two-way” binding, where a program can both change
an element and respond to changes in it. We can do “one way” binding so that a
program can display output just by changing properties in an object. Finally we
can bind to any of the properties of an object so that a program can move a
Silverlight element around the screen by changing X and Y properties in a game
object.
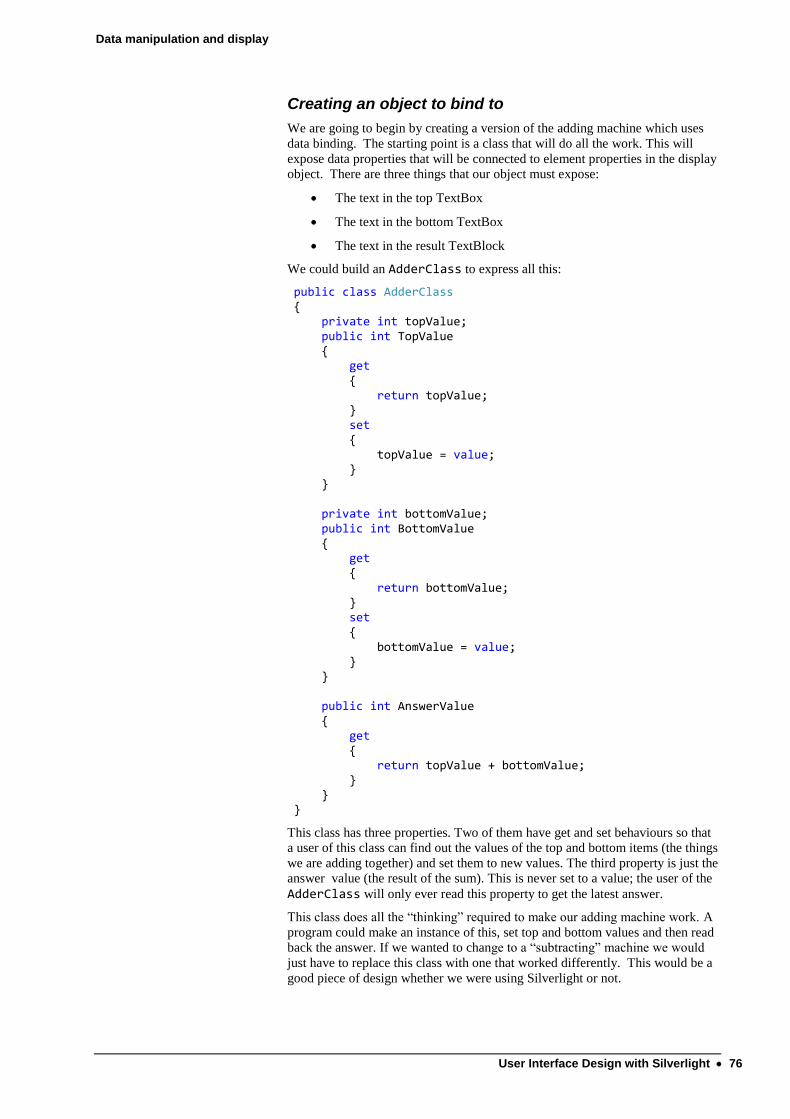
Data manipulation and display
User Interface Design with Silverlight 76
Creating an object to bind to
We are going to begin by creating a version of the adding machine which uses
data binding. The starting point is a class that will do all the work. This will
expose data properties that will be connected to element properties in the display
object. There are three things that our object must expose:
The text in the top TextBox
The text in the bottom TextBox
The text in the result TextBlock
We could build an AdderClass to express all this:
public class AdderClass { private int topValue; public int TopValue { get { return topValue; } set { topValue = value; } } private int bottomValue; public int BottomValue { get { return bottomValue; } set { bottomValue = value; } } public int AnswerValue { get { return topValue + bottomValue; } } }
This class has three properties. Two of them have get and set behaviours so that
a user of this class can find out the values of the top and bottom items (the things
we are adding together) and set them to new values. The third property is just the
answer value (the result of the sum). This is never set to a value; the user of the
AdderClass will only ever read this property to get the latest answer.
This class does all the “thinking” required to make our adding machine work. A
program could make an instance of this, set top and bottom values and then read
back the answer. If we wanted to change to a “subtracting” machine we would
just have to replace this class with one that worked differently. This would be a
good piece of design whether we were using Silverlight or not.

Data manipulation and display
User Interface Design with Silverlight 77
Adding Notification Behaviour
In order for a class to be able to bind to Silverlight objects it must implement the
INotifyPropertyChanged interface:
public interface INotifyPropertyChanged { // Summary: // Occurs when a property value changes. event PropertyChangedEventHandler PropertyChanged; }
For a class to implement this interface it must contain the event delegate which
will be used by AdderClass to tell anything that is interested when a property
has changed.
public event PropertyChangedEventHandler PropertyChanged;
The PropertyChangedEventHandler type is used by Silverlight elements to
manage event messages. It is described in the System.ComponentModel
namespace. If a Silverlight component wants to bind to any of the properties in
the class it can add delegates to this event.
The AdderClass will use this delegate to tell the outside world when one of the
properties in the class has changed. This will trigger a display update. Silverlight
objects that are connected to our properties bind to this delegate so that they can
be notified when required. The final version of the class looks like this:
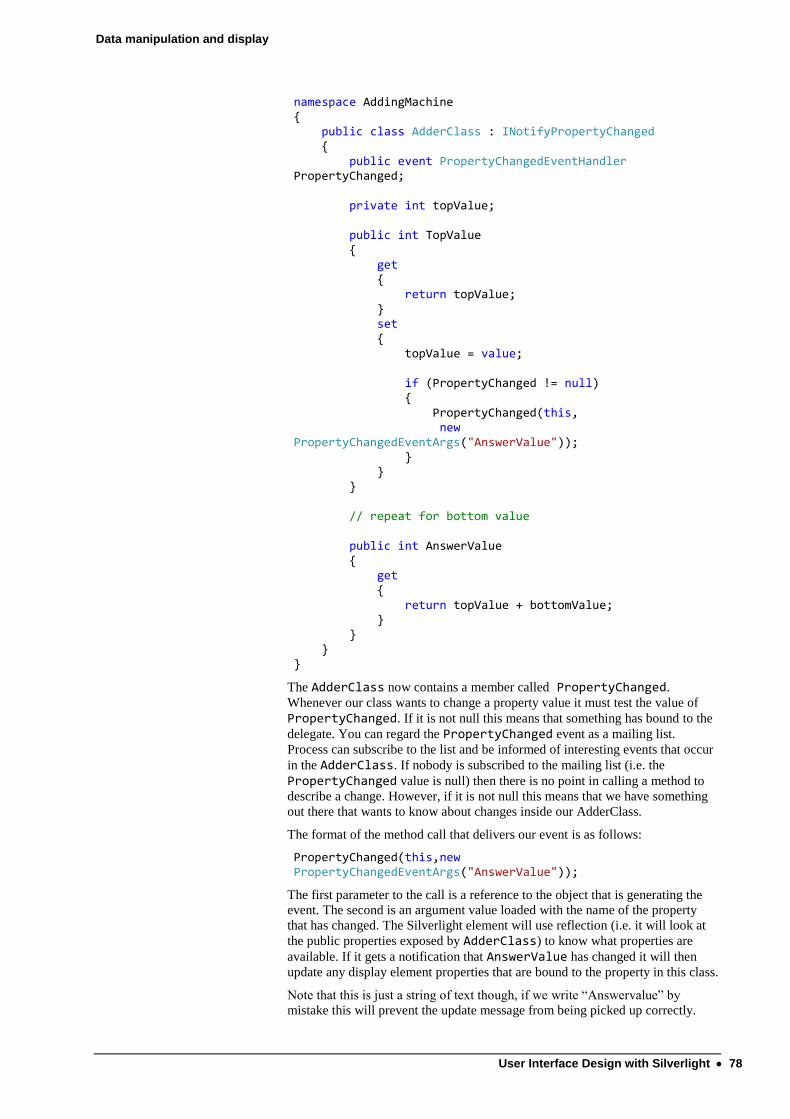
Data manipulation and display
User Interface Design with Silverlight 78
namespace AddingMachine { public class AdderClass : INotifyPropertyChanged { public event PropertyChangedEventHandler PropertyChanged; private int topValue; public int TopValue { get { return topValue; } set { topValue = value; if (PropertyChanged != null) { PropertyChanged(this, new PropertyChangedEventArgs("AnswerValue")); } } } // repeat for bottom value public int AnswerValue { get { return topValue + bottomValue; } } } }
The AdderClass now contains a member called PropertyChanged.
Whenever our class wants to change a property value it must test the value of
PropertyChanged. If it is not null this means that something has bound to the
delegate. You can regard the PropertyChanged event as a mailing list.
Process can subscribe to the list and be informed of interesting events that occur
in the AdderClass. If nobody is subscribed to the mailing list (i.e. the
PropertyChanged value is null) then there is no point in calling a method to
describe a change. However, if it is not null this means that we have something
out there that wants to know about changes inside our AdderClass.
The format of the method call that delivers our event is as follows:
PropertyChanged(this,new PropertyChangedEventArgs("AnswerValue"));
The first parameter to the call is a reference to the object that is generating the
event. The second is an argument value loaded with the name of the property
that has changed. The Silverlight element will use reflection (i.e. it will look at
the public properties exposed by AdderClass) to know what properties are
available. If it gets a notification that AnswerValue has changed it will then
update any display element properties that are bound to the property in this class.
Note that this is just a string of text though, if we write “Answervalue” by
mistake this will prevent the update message from being picked up correctly.
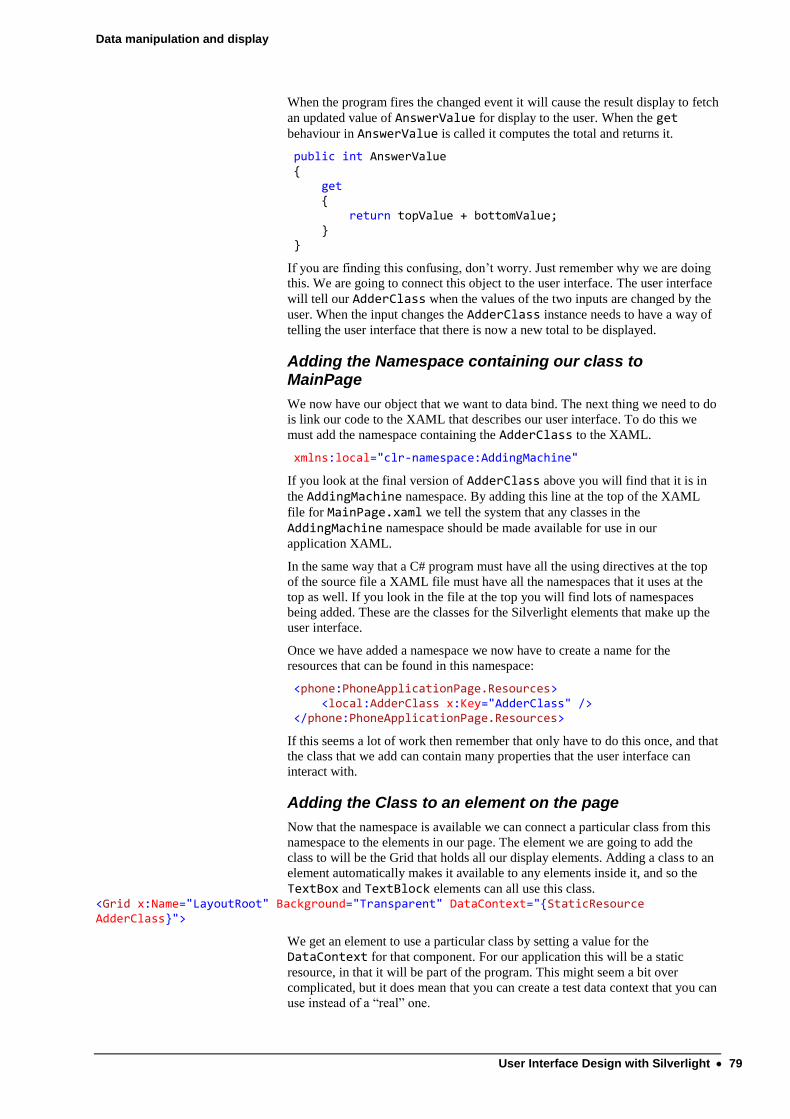
Data manipulation and display
User Interface Design with Silverlight 79
When the program fires the changed event it will cause the result display to fetch
an updated value of AnswerValue for display to the user. When the get
behaviour in AnswerValue is called it computes the total and returns it.
public int AnswerValue { get { return topValue + bottomValue; } }
If you are finding this confusing, don‟t worry. Just remember why we are doing
this. We are going to connect this object to the user interface. The user interface
will tell our AdderClass when the values of the two inputs are changed by the
user. When the input changes the AdderClass instance needs to have a way of
telling the user interface that there is now a new total to be displayed.
Adding the Namespace containing our class to MainPage
We now have our object that we want to data bind. The next thing we need to do
is link our code to the XAML that describes our user interface. To do this we
must add the namespace containing the AdderClass to the XAML.
xmlns:local="clr-namespace:AddingMachine"
If you look at the final version of AdderClass above you will find that it is in
the AddingMachine namespace. By adding this line at the top of the XAML
file for MainPage.xaml we tell the system that any classes in the
AddingMachine namespace should be made available for use in our
application XAML.
In the same way that a C# program must have all the using directives at the top
of the source file a XAML file must have all the namespaces that it uses at the
top as well. If you look in the file at the top you will find lots of namespaces
being added. These are the classes for the Silverlight elements that make up the
user interface.
Once we have added a namespace we now have to create a name for the
resources that can be found in this namespace:
<phone:PhoneApplicationPage.Resources> <local:AdderClass x:Key="AdderClass" /> </phone:PhoneApplicationPage.Resources>
If this seems a lot of work then remember that only have to do this once, and that
the class that we add can contain many properties that the user interface can
interact with.
Adding the Class to an element on the page
Now that the namespace is available we can connect a particular class from this
namespace to the elements in our page. The element we are going to add the
class to will be the Grid that holds all our display elements. Adding a class to an
element automatically makes it available to any elements inside it, and so the
TextBox and TextBlock elements can all use this class. <Grid x:Name="LayoutRoot" Background="Transparent" DataContext="{StaticResource AdderClass}">
We get an element to use a particular class by setting a value for the
DataContext for that component. For our application this will be a static
resource, in that it will be part of the program. This might seem a bit over
complicated, but it does mean that you can create a test data context that you can
use instead of a “real” one.

Data manipulation and display
User Interface Design with Silverlight 80
Connecting the Silverlight element to the property
We now have the Adder class available as a data context for elements on a page.
This sets up a link between the Silverlight page and an object that is going to
provide business behaviours. The next thing we need to do is connect properties
of each element to properties that our business object exposes.
We can do this from the Properties pane for each element. Let‟s start by
connecting the text in the firstNumberTextBox with the TopValue property
in our AdderClass. If we click on the TextBox in the Visual Studio editor we
can then open the Property pane for the item. We can then go and find the Text
property. At the moment it is just set to a string, we want to apply a Data
Binding to our adding machine object:
If we click “Apply Data Binding” the next thing we need to do is find the
property that is going to be bound. Behind the scenes Visual Studio has gone off
and opened the AdderClass and used found out what properties it exposes. It
can then display a menu of those that are available:
This is where the magic starts to happen. Simply by selecting the required item
from the list we can connect the Silverlight element property with my object.
Note that the TwoWay option is selected so that when the user changes the value
in the TextBox my object is informed.
When we bind to the TextBlock we are only given the option of OneWay
binding, as it is not possible to send data from a TextBlock into a program.

Data manipulation and display
User Interface Design with Silverlight 81
Once we have made these bindings our program will just work. The interesting
thing about this is that if you look in the MainPage.xaml.cs file for the
program code that makes the application work you will find that it is completely
empty. All the work is now being done by our tiny little class, which is
connected to the display items.
The solution in Demo 06 AddingMachine with data binding implements an
adding machine which uses data binding to connect the inputs to the AdderClass.
Data Binding using the Data Context
You might be looking at data binding and thinking “This looks OK, and I
understand how it works, but you do seem to have to do a lot of work to add the
resources and everything” The really good news is that there is a way to sort
circuit this process which makes the whole thing really easy. It means adding a
statement to our code (one of the interesting things about the solution above is
that there is no code in our MainPage.xaml.cs file) but I reckon we can live
with this.
Setting the Data Binding in XAML
We have seen how the elements in a control can be bound to object properties.
We can just bind an object property to an element property and Silverlight will
provide the glue to tie these together. <TextBox Height="72" HorizontalAlignment="Left" Margin="8,19,0,0" Name="firstNumberTextBox" Text="{Binding TopValue, Mode=TwoWay}" VerticalAlignment="Top" Width="460" TextAlignment="Center" >
The XAML above shows how this works. I‟ve highlighted the data binding for
the first number textbox in the XAML above. This gives the name of the
property that the text will bind to and the mode of the binding.
Setting the DataContext
Now all we have to do is create an AdderClass instance and set the
DataContext of the element that contains the firstNumberTextbox to this
instance. We can do this in the constructor for the main page.
// Constructor public MainPage() { InitializeComponent(); AdderClass adder = new AdderClass(); ContentGrid.DataContext = adder; }
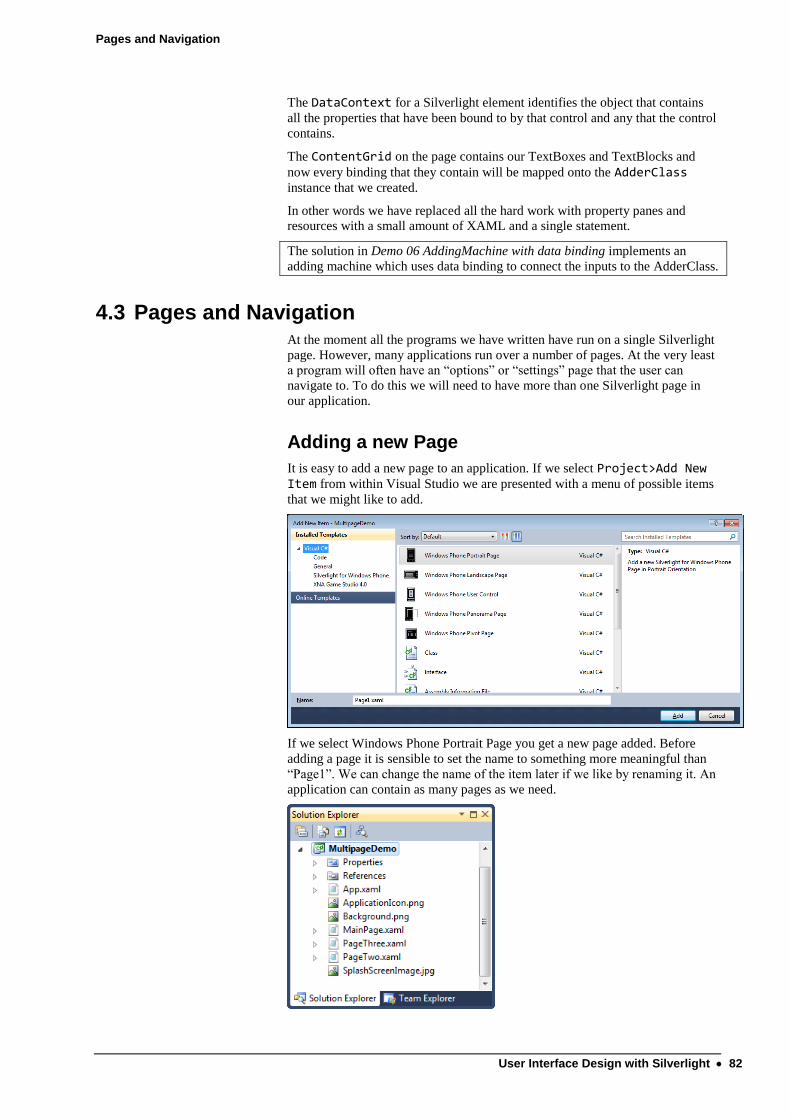
Pages and Navigation
User Interface Design with Silverlight 82
The DataContext for a Silverlight element identifies the object that contains
all the properties that have been bound to by that control and any that the control
contains.
The ContentGrid on the page contains our TextBoxes and TextBlocks and
now every binding that they contain will be mapped onto the AdderClass
instance that we created.
In other words we have replaced all the hard work with property panes and
resources with a small amount of XAML and a single statement.
The solution in Demo 06 AddingMachine with data binding implements an
adding machine which uses data binding to connect the inputs to the AdderClass.
4.3 Pages and Navigation At the moment all the programs we have written have run on a single Silverlight
page. However, many applications run over a number of pages. At the very least
a program will often have an “options” or “settings” page that the user can
navigate to. To do this we will need to have more than one Silverlight page in
our application.
Adding a new Page
It is easy to add a new page to an application. If we select Project>Add New Item from within Visual Studio we are presented with a menu of possible items
that we might like to add.
If we select Windows Phone Portrait Page you get a new page added. Before
adding a page it is sensible to set the name to something more meaningful than
“Page1”. We can change the name of the item later if we like by renaming it. An
application can contain as many pages as we need.

Pages and Navigation
User Interface Design with Silverlight 83
This demo contains two new pages, with the original names of PageTwo and
PageThree. For each new page we get a file of XAML and the code behind page.
The pages themselves are edited in exactly the same way as MainPage. When
the page is open we can drag elements onto it from the Visual Studio ToolBox,
we can manipulate their properties and we can edit the XAML directly if we
wish.
Navigation between pages
The Silverlight model for moving between pages has more in common with the
internet than Windows Forms. If you are used to writing Windows Forms
applications you will be familiar with methods such as “Show” and
“ShowDialog” which are used to allow one form to cause the display of
another.
Silverlight doesn‟t work like that. When you think about moving around a
Silverlight application you should think in terms of navigating from one page to
another. Each page has an address expressed as a uri (Uniform Resource
Indicator). The NavigationService object provides methods that perform the
navigation for us.
private void page2Button_Click(object sender, RoutedEventArgs e) { NavigationService.Navigate(new Uri("/PageTwo.xaml", UriKind.RelativeOrAbsolute)); }
Above you can see an event handler for a button. This will cause the program to
switch to the page PageTwo when the button is pressed. Note that the
Navigate method is given a uri value which contains the name of the page and
also the kind of Uri being used.
When we create the uri we also need to select what kind of uri it is, we are
setting this uri to be RelativeOrAbsolute, even though this particular Uri is
relative to the present one. We do this to ensure maximum flexibility when
loading resources.
When the user clicks on the button the display will switch to the contents of
PageTwo. Note that if there is no PageTwo.xaml the program will throw an
exception if the user tries to navigate there.
Using the Back button
Users will expect the Back button on Windows Phone to return to the previous
page. This is exactly what it does. If the user has navigated to PageTwo as
shown above, and then presses the Back button they will be returned to the page
they came from. If the user presses Back when they are at the MainPage the
application is ended.
Sometimes we want to override this behaviour. We might not want our user to
leave the page if they have not saved the data they have entered. We can do this
by adding an event handler to the BackKeyPress event:
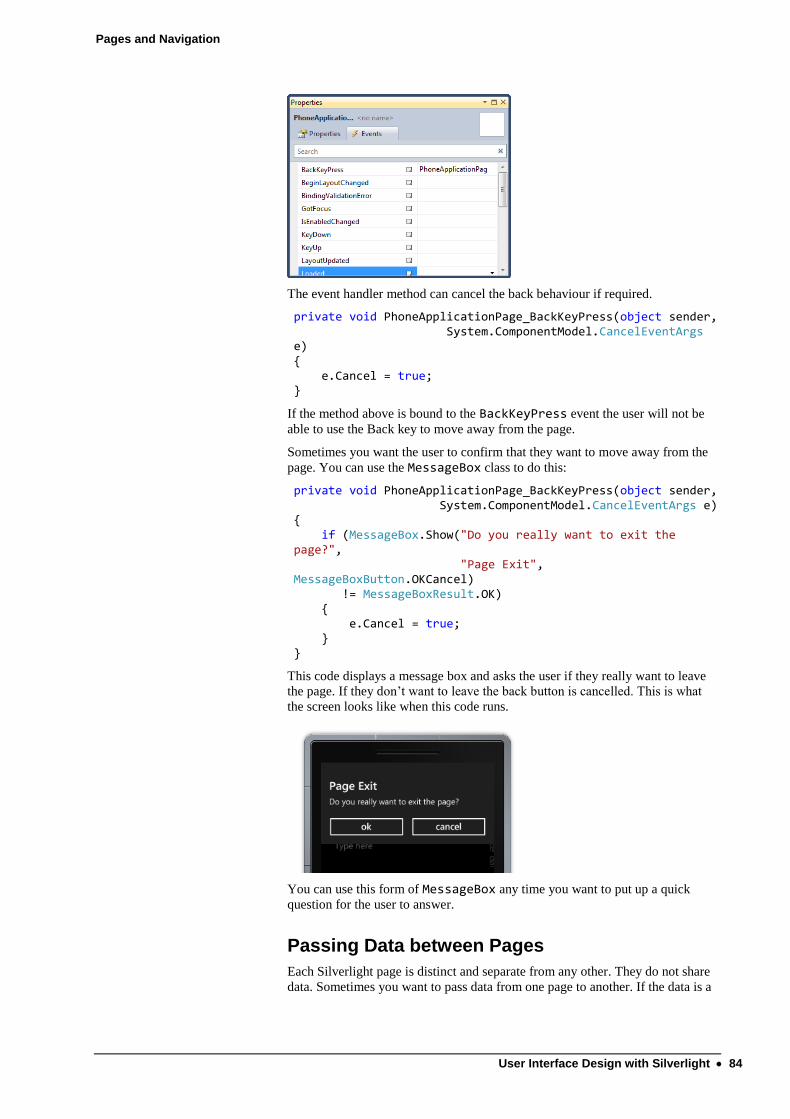
Pages and Navigation
User Interface Design with Silverlight 84
The event handler method can cancel the back behaviour if required.
private void PhoneApplicationPage_BackKeyPress(object sender, System.ComponentModel.CancelEventArgs e) { e.Cancel = true; }
If the method above is bound to the BackKeyPress event the user will not be
able to use the Back key to move away from the page.
Sometimes you want the user to confirm that they want to move away from the
page. You can use the MessageBox class to do this:
private void PhoneApplicationPage_BackKeyPress(object sender, System.ComponentModel.CancelEventArgs e) { if (MessageBox.Show("Do you really want to exit the page?", "Page Exit", MessageBoxButton.OKCancel) != MessageBoxResult.OK) { e.Cancel = true; } }
This code displays a message box and asks the user if they really want to leave
the page. If they don‟t want to leave the back button is cancelled. This is what
the screen looks like when this code runs.
You can use this form of MessageBox any time you want to put up a quick
question for the user to answer.
Passing Data between Pages
Each Silverlight page is distinct and separate from any other. They do not share
data. Sometimes you want to pass data from one page to another. If the data is a
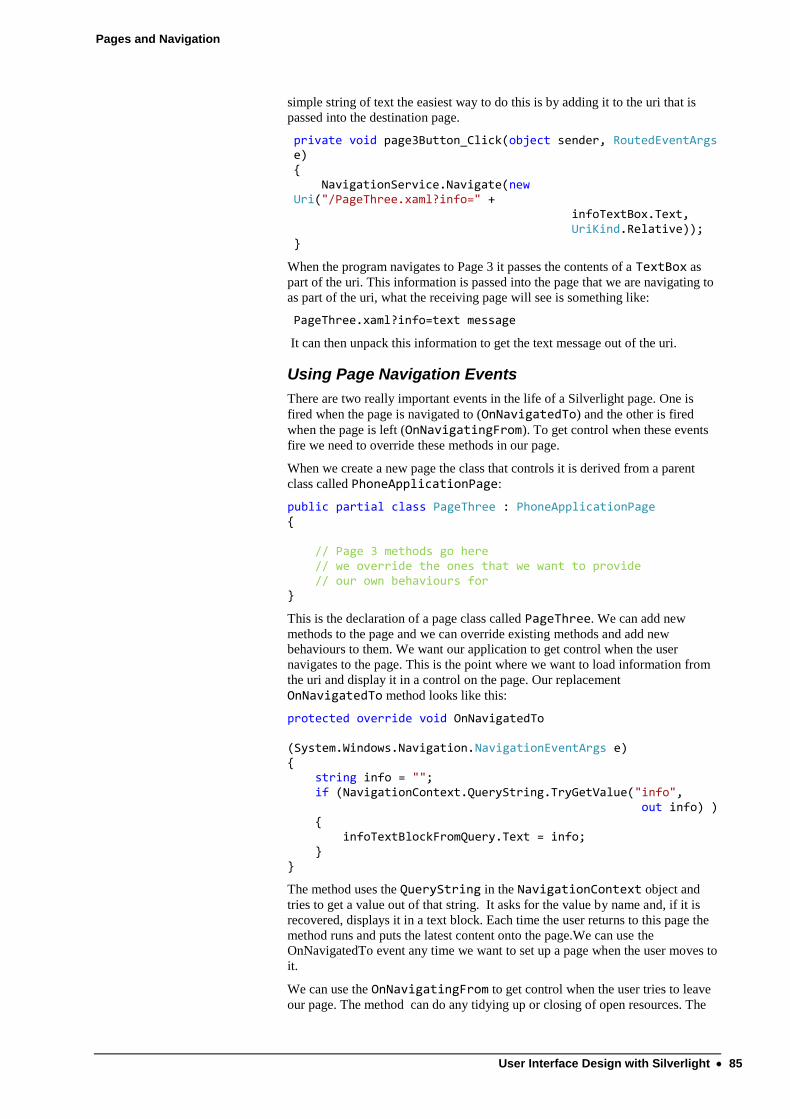
Pages and Navigation
User Interface Design with Silverlight 85
simple string of text the easiest way to do this is by adding it to the uri that is
passed into the destination page.
private void page3Button_Click(object sender, RoutedEventArgs e) { NavigationService.Navigate(new Uri("/PageThree.xaml?info=" + infoTextBox.Text, UriKind.Relative)); }
When the program navigates to Page 3 it passes the contents of a TextBox as
part of the uri. This information is passed into the page that we are navigating to
as part of the uri, what the receiving page will see is something like:
PageThree.xaml?info=text message
It can then unpack this information to get the text message out of the uri.
Using Page Navigation Events
There are two really important events in the life of a Silverlight page. One is
fired when the page is navigated to (OnNavigatedTo) and the other is fired
when the page is left (OnNavigatingFrom). To get control when these events
fire we need to override these methods in our page.
When we create a new page the class that controls it is derived from a parent
class called PhoneApplicationPage:
public partial class PageThree : PhoneApplicationPage { // Page 3 methods go here // we override the ones that we want to provide // our own behaviours for }
This is the declaration of a page class called PageThree. We can add new
methods to the page and we can override existing methods and add new
behaviours to them. We want our application to get control when the user
navigates to the page. This is the point where we want to load information from
the uri and display it in a control on the page. Our replacement
OnNavigatedTo method looks like this:
protected override void OnNavigatedTo (System.Windows.Navigation.NavigationEventArgs e) { string info = ""; if (NavigationContext.QueryString.TryGetValue("info", out info) ) { infoTextBlockFromQuery.Text = info; } }
The method uses the QueryString in the NavigationContext object and
tries to get a value out of that string. It asks for the value by name and, if it is
recovered, displays it in a text block. Each time the user returns to this page the
method runs and puts the latest content onto the page.We can use the
OnNavigatedTo event any time we want to set up a page when the user moves to
it.
We can use the OnNavigatingFrom to get control when the user tries to leave
our page. The method can do any tidying up or closing of open resources. The

Pages and Navigation
User Interface Design with Silverlight 86
page can also use a Cancel flag to stop the user from leaving the page, just as we
did with the Back button earlier.
The OnNavigatedTo method can query the NavigationContext and try to
get data out of it. The above method shows how this is done. The info string is
copied into a TextBlock on Page3.
The solution in Demo 08 Multipage Demo is a three page Silverlight application.
You can move to pages 2 and 3 by pressing buttons on the main page. You can
return from Page 2 by pressing the back button. If you use the back button on
page 3 you need to respond to a confirmation dialog before being moved off the
page. Text entered on the main page is transferred into a TextBlock in page 3 via
the page uri.
Sharing objects between pages
Passing strings of text between pages is useful, but you often need to share larger
items which contain structured data. Often your user will be working with a
“thing” of some kind; perhaps a document or a game, and the different pages
will provide different views of that object.
What you really want is an object which is common to all the pages and can be
accessed by any of them. You could put your shared data into the object and
they could all make use of it. Turns out that this is very easy to do, because all
Windows Phone Silverlight programs have such a thing as part of the way they
work. It is called the App class.
The App.xaml page
When we create a Silverlight application we get a MainPage.xaml and an
App.xaml page.
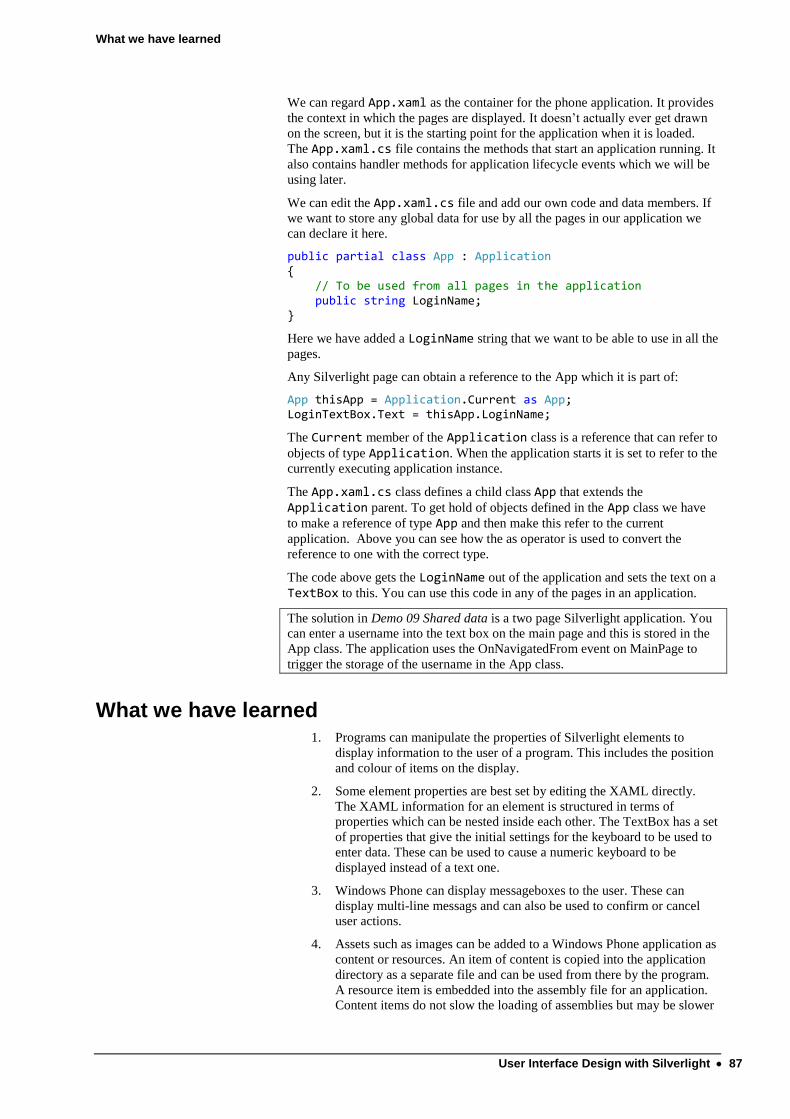
What we have learned
User Interface Design with Silverlight 87
We can regard App.xaml as the container for the phone application. It provides
the context in which the pages are displayed. It doesn‟t actually ever get drawn
on the screen, but it is the starting point for the application when it is loaded.
The App.xaml.cs file contains the methods that start an application running. It
also contains handler methods for application lifecycle events which we will be
using later.
We can edit the App.xaml.cs file and add our own code and data members. If
we want to store any global data for use by all the pages in our application we
can declare it here.
public partial class App : Application { // To be used from all pages in the application public string LoginName; }
Here we have added a LoginName string that we want to be able to use in all the
pages.
Any Silverlight page can obtain a reference to the App which it is part of:
App thisApp = Application.Current as App; LoginTextBox.Text = thisApp.LoginName;
The Current member of the Application class is a reference that can refer to
objects of type Application. When the application starts it is set to refer to the
currently executing application instance.
The App.xaml.cs class defines a child class App that extends the
Application parent. To get hold of objects defined in the App class we have
to make a reference of type App and then make this refer to the current
application. Above you can see how the as operator is used to convert the
reference to one with the correct type.
The code above gets the LoginName out of the application and sets the text on a
TextBox to this. You can use this code in any of the pages in an application.
The solution in Demo 09 Shared data is a two page Silverlight application. You
can enter a username into the text box on the main page and this is stored in the
App class. The application uses the OnNavigatedFrom event on MainPage to
trigger the storage of the username in the App class.
What we have learned 1. Programs can manipulate the properties of Silverlight elements to
display information to the user of a program. This includes the position
and colour of items on the display.
2. Some element properties are best set by editing the XAML directly.
The XAML information for an element is structured in terms of
properties which can be nested inside each other. The TextBox has a set
of properties that give the initial settings for the keyboard to be used to
enter data. These can be used to cause a numeric keyboard to be
displayed instead of a text one.
3. Windows Phone can display messageboxes to the user. These can
display multi-line messags and can also be used to confirm or cancel
user actions.
4. Assets such as images can be added to a Windows Phone application as
content or resources. An item of content is copied into the application
directory as a separate file and can be used from there by the program.
A resource item is embedded into the assembly file for an application.
Content items do not slow the loading of assemblies but may be slower
What we have learned
User Interface Design with Silverlight 88
to load when the program runs. Resource items are more readily
available to a program but they increase the size of the program
assembly.
5. Silverlight elements can generate events in response to user actions.
One such action is the TextChanged event produced by the TextBox.
6. Silverlight provides data binding support where the properties of an
object in the program can be connected to those of a Silverlight display
element. The binding can be “one way”, where the display element is
used to output the value of a program item or “two way” where changes
to the item on the page result in an update of the bound property in the
class.
7. Silverlight applications can be made up of multiple pages. The
navigation between pages is performed by a navigation helper class
which is given the uri of the page to be navigated to. Simple items of
text can be passed between pages by placing them in a query string
attached to the uri.
8. Pages can receive events when they are navigated to and from. The
OnNavigatedFrom event provides cancellation option so that a user can
be asked to confirm the navigation.
9. Larger data objects can be shared between pages in an application by
the use of the App class which is part of a Windows Phone application.
Any Silverlight page in an application can obtain a reference to the
application object that it is part of.

Connecting to a data service
Consuming Data Services 89
5 Consuming Data Services
One of the things that make a Windows Phone very useful is the
“connectedness” that it has. It allows the user to consume network services
wherever they are (as long as they can get a signal). This makes possible some
genuinely new kinds of application, particularly if you add in the way that the
device is also location aware.
In this section we are going to explore the ways in which C# programs on the
device can connect to and use data services provided by the network.
5.1 Connecting to a data service All Windows Phones support network connectivity via the mobile telephone
network and also by means of their built in WIFI. As far as our programs are
concerned the two network technologies are interchangeable. The programs we
are going to write will initiate connections to a data service and the underlying
phone systems will make the connection the best way that they can.
Of course, if there is no mobile signal or WIFI available these connections will
fail. Applications that we write must be able to deal with this situation
gracefully. At the very least this means displaying a “Sorry we can‟t connect you
just now, please try later” message. A more advanced program may store data
locally and then send it later. It is up to you how your program will work in this
respect.
Windows Phone applications on a network
Programs running in a Windows Phone can connect to and access servers on the
network via a variety of connection mechanisms. They can make web requests
and also connect to web services and Windows Communication Foundation
(WCF) hosts. However, the present version of the network library in the
Windows Phone does not support direct sockets for such things as “session-less”
communication.
Networked programs on the Windows Phone Emulator
The Windows phone emulator has the same networking abilities as the real
device. It uses the network connectivity of the host PC it is running on. This
means that you can test any applications that use the network on your desktop
PC. However you should also test your programs on a real device. On a real
Windows Phone you can disable network services and test your application to
ensure that it performs properly over lower speed connections.
Reading text off a Web Page
We can start exploring the networking ability of the Windows Phone by writing
a program that displays the text from a web page. We could use this to “scrape”
data off web pages that we want to present to the user in a different format. We
can also use this mechanism to read structured data from services such as
provided by Twitter, of which more later in this section.
Reading a web page turns out to be very easy indeed. There is only one
complication, and that is caused by the way that all the network activities
performed by Windows Phone are asynchronous.

Connecting to a data service
Consuming Data Services 90
Synchronous vs Asynchronous operations
There are two ways you can do things, synchronous and asynchronous. When
you do something synchronously what we are really saying is “while you wait”.
If I have my car serviced “synchronously” it means that I stand in the garage
waiting for the “service my car” method to complete, at which point I can take
my car and drive home. If I have my car serviced “asynchronously” this means
that I go off and do some shopping while the job is being done. At some point
the garage will ring me up and deliver a “service complete” event. At which
point I go and pick up my car and drive home.
Making asynchronous use of data services is very sensible, particularly on a
device such as a Windows Phone. The limitations of the network connection to
the phone mean that a network connection may take several seconds to deliver
an answer. A program should not be stopped for the time it takes for the server
to respond. Furthermore, the whole way that Silverlight works is event based.
We are used to writing programs that respond to events generated by display
elements. You make a program respond to events from network requests in
exactly the same way.
Using the WebClient class
To read text from the web we can use the WebClient class. This is provided as
part of the Windows .NET networking library, so if you learn how to use it on
the Windows Phone you can also use it in your Windows desktop programs. We
can use the class to perform an HTTP (Hyper Text Transfer Protocol) interaction
with a remote web server. There are a number of different ways we can use a
WebClient, we are going to look at one of the simplest.
We are going to create a WebClient variable in the MainPage.xaml.cs of
our application. When the user presses the loadButton our application will
load the url from a TextBox and then display the text content of that page.
Above you can see the program in action, displaying one of the best pages on the
web. Note that this is exactly what a browser does, except that a browser will
then take the HTML content received from the server and render it along with
any associated graphical content.

Connecting to a data service
Consuming Data Services 91
The first thing we need to do is declare our WebClient as a member of the
MainPage class. This will be used manage the web requests that we are going to
make.
WebClient client;
At the moment we just have the reference to a WebClient object. The next
thing we need to do is create an actual instance of a WebClient. We can do this
in the constructor for the page class:
public MainPage() { InitializeComponent(); client = new WebClient(); client.DownloadStringCompleted += new DownloadStringCompletedEventHandler( client_DownloadStringCompleted); }
The constructor creates a new WebClient and then binds a method to the
DownloadStringCompleted event that the WebClient exposes. The method,
called client_DownloadStringCompleted, will display the web page text
in the in the pageTextBlock:
void client_DownloadStringCompleted(object sender, DownloadStringCompletedEventArgs e) { if (e.Error == null) { pageTextBlock.Text = e.Result; } }
When this method is called it tests to see if any errors were reported. If there are
no errors the method displays the result of the download in the pageTextBlock
element.
The last thing we need to add to our program is the event handler for the button
that will start the download of a page at the url that the user has typed in:
private void loadButton_Click(object sender, RoutedEventArgs e) { client.DownloadStringAsync(new Uri(urlTextBox.Text)); }
When the load button is clicked the following sequence takes place:
1. The text from the urlTextBox is used to create a new Uri which
describes the web site to be loaded.
2. The DownloadStringAsync method is called on the WebClient.
This starts a new web transaction. This method returns immediately, so
the button event handler is now completed.
3. Some-time later the WebClient will have fetched the string of content
at the url. It fires the DownloadStringCompleted event to indicate
that it has finished, and to deliver the result.
4. The client_DownloadStringCompleted method now runs, which
checks for errors and displays the received text in the TextBlock.
The solution in Demo 01 Web Scraper contains this code. You can type in any
url and download the html from that page. The program will work on either the
emulator or a real device.

Using LINQ to read structured data
Consuming Data Services 92
Note that this is a very basic web page reading program (as you might expect for
only fifteen or so lines of code). It does not stop the user from pressing the Load
button repeatedly and interrupting downloads and it does not provide any form
of time out or progress display to the user.
5.2 Using LINQ to read structured data The ability to read from the web can be used for much more than just loading the
text part of a web page. We can also interact with many other data services, for
example Twitter. This uses a REST (Representational State Transfer) protocol to
expose the activities of Twitter users. REST makes use of the structure of the url
being used to denote the required action. As an example, if you point a web
browser at the following url:
http://twitter.com/statuses/user_timeline/robmiles.xml
- you will be rewarded with an XML document that contains my most recent
Twitter posts. By replacing robmiles with the name of another Twitter user you
can read their feed.
This makes it very easy to make a slightly modified version of our WebClient
program that assembles a web request for the Twitter server and uses that to read
feed information from it. The only change we have to make is to the code that
produces the web request:
private void loadButton_Click(object sender, RoutedEventArgs e) { string url = "http://twitter.com/statuses/user_timeline/" + nameTextBox.Text + ".xml"; client.DownloadStringAsync(new Uri(url)); }

Using LINQ to read structured data
Consuming Data Services 93
The solution in Demo 02 Twitter Reader contains this code. You can type in any
twitter username and download the feed from that user. The program will work
on either the emulator or a real device.
Structured Data and LINQ
Twitter returns status reports in the form of an XML formatted document. XML
is something we know and love (a bit). What we want to do now is pull all the
information out of the XML content we get from Twitter and display this
information properly. As great programmers we could of course write some
software to do this. The good news is that we don‟t have to. We can use LINQ to
do this for us. LINQ stands for “Language INtegrated Query”. It is really useful.
It is designed to provide the “glue” between databases and programs. I don‟t
have space to go into all that LINQ can do for you, but we need to take a look at
the problem LINQ was invented to solve before we start using it.
A quick word about databases
To understand what LINQ is used for we have to start by considering how
computers manage large amounts of data. They do this by using databases. A
database is a collection of, well, data, which is organised and managed by a
computer program which is often, and rather confusingly, called a database.
Another computer program can ask a database questions and the database will
come back with the results. You don‟t think of a database as part of your
program as such, it is the component in your solution that deals with data
storage.
We could discover how a database works by taking a quick look at a very simple
example. Consider how we would create a database to hold information for an
internet shop. We have a large number of customers that will place orders for
particular products.
If we hire a database designer they will charge us a huge amount of money and
then they will come up with some designs for database tables that will hold the
information in our system. Each of the tables will have a set of columns that
hold one particular property of an item, and a row across the table will describe a
single item.
Name Address Bank Details Customer ID
Rob 18 Pussycat
Mews
Nut East Bank 123456
Jim 10 Motor Drive Big Fall Bank 654322
Ethel 4 Funny Address Strange bank 111111
This is a Customers table that our sales system will use. Each row of the table
will hold information about one customer. The table could be a lot larger than
this; it might also hold the email address of the customer, their birthday and so
on.
Customer ID Product ID Order Date Status
123456 1001 21/10/2010 Shipped
111111 1002 10/10/2010 Shipped
654322 1003 1/09/2010 On order
This is the Orders table. Each row of the table describes a particular order that
has been placed. It gives the Product ID of the product that was bought, and the
Customer ID of the customer that bought it.
Product ID Product Name Supplier Price
1001 Windows Phone 7 Microsoft 200

Using LINQ to read structured data
Consuming Data Services 94
1002 Cheese grater Cheese Industries 2
1003 Boat hook John‟s Dockyard 20
This is the Products table. Each row of this table describes a single product that
the store has in stock. This idea might be extended so that rather than the name
of the supplier the system uses a Supplier ID which identifies a row in the
Suppliers table.
By combining the tables you can work out that Rob has bought a Windows
phone, Ethel has bought a Cheese grater and the Boat hook for Jim is on order.
This is a bit like detective work or puzzle solving. If you look in the Customer
table you can find that the customer ID for Rob is 123456. You can then look
through the order table and find that customer 123456 ordered something with
an ID of 1001. You can then look through the product table and find that product
1001 is a Windows Phone (which is actually not that surprising).
Databases and Queries
You drive a database by asking it questions, or queries. We could build a query
that would find all the orders that Rob has placed. The database system would
search through the Orders table and return all the rows that have the Customer
ID of 123456. We could then use this table to find out just what products had
been purchased by searching through the Products table for each of the Product
IDs in the orders that have been found. This would return another bunch of
results that identify all the things I have bought. If I want to ask the database to
give me all the orders from Rob I could create a query like this:
SELECT * FROM Orders WHERE CustomerID = "123456"
This would return a “mini-table” that just contained rows with the Customer ID
of Rob. The commands I‟m using above are in a language called SQL or
Structured Query Language. This was specifically invented for asking questions
of databases.
Companies like Amazon do this all the time. It is how they manage their
enormous stocks and huge number of customers. It is also how they create their
“Amazon has recommendations for you” part of the site, but we will let that
slide for now.
Databases and Classes
Unfortunately object oriented programs do not work in terms of tables, rows and
queries. If I was writing a C# program to manage a shop I would create some
classes, perhaps starting with one for a Customer.
public class Customer { public string Name {get; set;} public string Address { get; set; } string BankDetails { get; set; } public int ID { get; set; } }
This contains all the information that you find in a single row of the Customers
table. To hold a large number of customer entries I could create a List collection
that holds them all:
List<Customer> Customers = new List<Customer>();
Whenever I add a new customer I add it to the Customers list and to find
customers I use the foreach loop to work through the customers and locate the
one I want. As an example, to find all the orders made by a customer I could do
something like this:

Using LINQ to read structured data
Consuming Data Services 95
public List<Order> FindCustomerOrders(int CustomerID) { List<Order> result = new List<Order>(); foreach ( Order order in Orders ) { if (order.CustomerID == CustomerID) { result.Add(order); } } return result; }
The method searches through all the orders and builds a new list containing only
ones which have the required customer ID. It is a bit more work than the SQL
query, but it has the same effect.
Linking Databases and Programs
People like using databases because it is easier to create a query than write the
code to perform the work. However, they also like using objects because they
are a great way to structure programs. To use databases and object oriented
programs together the programmer would have to write lots of “glue” code that
transferred data from SQL tables into objects and then back again when they are
stored.
This is a big problem in large developments where they may have many data
tables and classes based information in them.
LINQ
Language Integrated Query, or LINQ, was the result of an effort to remove the
need for all this glue. It is called “Language Integrated” because they actually
had to change the design of the C# language to be able to make the feature work.
What LINQ lets a programmer do is create objects directly from database
queries:
var orderQueryResult = from order in db.Orders where order.CustomerID == "123456" select order;
This LINQ query is actually C# code that returns a collection of Orders that
meet the selection criteria. You can compare it with both the SQL code and the
C# above to see how it borrows from both.
One thing that might confuse you is that the from construction will return a
collection of items, but we don‟t really know what type these objects will have.
This is where the “Language Integrated” bit comes in. The C# language was
extended to include a mechanism where the types that hold the results from
queries like this (which as a programmer you never actually declare) are created
“on the fly” when the query runs. They are given the placeholder type of var,
which means “a type that works here”. The C# compiler and run time system can
track the use of var types so that programs are still type safe.
In the LINQ query above, which returns a collection of Orders, it would be fine
to use the Order Date property on one of the results as this exists in the result.
However, you could not use an Address property as this class doesn‟t hold that
property.
If you do any kind of database programming in C# you should find out more
about LINQ. It makes it really easy to store and retrieve data.

Using LINQ to read structured data
Consuming Data Services 96
LINQ on Windows Phone
One piece of bad news to introduce at this point is the fact that the present
version of Windows Phone does not have a built in database facility that we can
use from C# programs we write. The phone does have database capability, but at
the moment this is not exposed to developers. The good news is that this will
change in the future. However, it is possible to use the features of LINQ to very
good effect when reading other kinds of structured data.
An XML document is very like a database, in that contains a number of elements
each of which has property information attached to it. Along with tools to create
database queries and get structured information from them, LINQ also contains
tools that can create objects from XML data. We are going to use these to read
our Twitter feed.
The Twitter feed as a data source
The feed information that you get from Twitter in response to a status request is
a structured document that contains attributes and properties that describe the
Twitter content. If you have been paying attention during the discussions of
XAML and XML you should find this very familiar.

Using LINQ to read structured data
Consuming Data Services 97
<?xml version="1.0" encoding="UTF-8"?> <statuses type="array"> <status> <created_at>Tue Oct 12 11:57:37 +0000 2010</created_at> <id>27131245083</id> <text>Had 12,000 hits on www.csharpcourse.com for my C# Yellow Book. No idea why.</text> <source>web</source> <truncated>false</truncated> <in_reply_to_status_id></in_reply_to_status_id> <in_reply_to_user_id></in_reply_to_user_id> <favorited>false</favorited> <in_reply_to_screen_name></in_reply_to_screen_name> <retweet_count>0</retweet_count> <retweeted>false</retweeted> <user> <id>2479801</id> <name>Rob Miles</name> <screen_name>robmiles</screen_name> <location>Hull, UK</location> <description>A Computer Science lecturer and Microsoft MVP.</description> <profile_image_url>http://a3.twimg.com/prof_im/157/me2_normal.jpg</profile_image_url> <url>http://www.robmiles.com</url> <protected>false</protected> <friends_count>21</friends_count> <created_at>Tue Mar 27 12:35:28 +0000 2007</created_at> <favourites_count>0</favourites_count> <utc_offset>0</utc_offset> <time_zone>London</time_zone> <profile_background_image_url>http://s.twimg.com/a/1286/images/themes/theme1/bg.png </profile_background_image_url> <notifications>false</notifications> <geo_enabled>true</geo_enabled> <verified>false</verified> <following>true</following> <statuses_count>731</statuses_count> <lang>en</lang> <contributors_enabled>false</contributors_enabled> <follow_request_sent>false</follow_request_sent> <listed_count>61</listed_count> <show_all_inline_media>false</show_all_inline_media> </user> <geo/> <coordinates/> <place/> <contributors/> </status> </statuses>
I‟ve removed some elements to make it fit nicely on the page, but if you look
carefully you can find the text of the tweet itself, along with lots of other stuff.
The real document contains a number of status elements. Above I have only
shown one.
In the same way as we can ask LINQ to query a database and return a collection
of objects it has found we can ask LINQ to create a construction that represents
the contents of an XML document:
XElement TwitterElement = XElement.Parse(twitterText);
The XElement class is the part of LINQ that represents an XML element. The
twitterText string contains the text that we have loaded from the Twitter web
site using our WebClient. Once this statement has completed we now have an
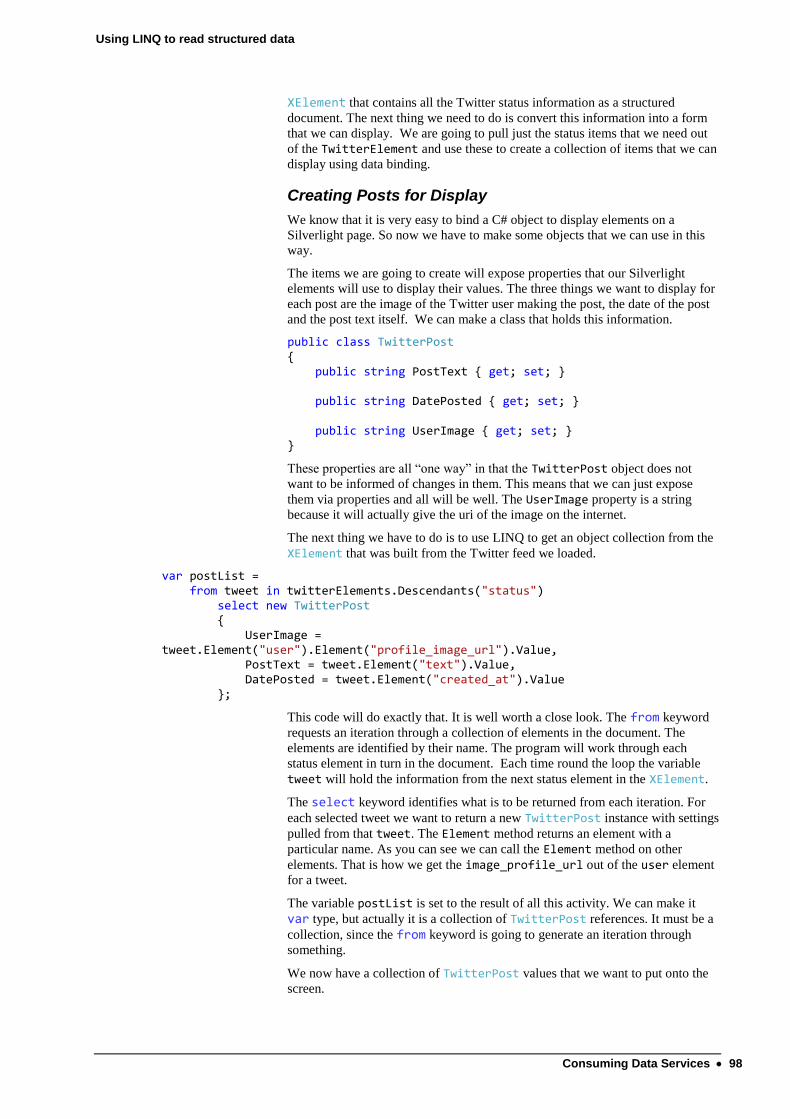
Using LINQ to read structured data
Consuming Data Services 98
XElement that contains all the Twitter status information as a structured
document. The next thing we need to do is convert this information into a form
that we can display. We are going to pull just the status items that we need out
of the TwitterElement and use these to create a collection of items that we can
display using data binding.
Creating Posts for Display
We know that it is very easy to bind a C# object to display elements on a
Silverlight page. So now we have to make some objects that we can use in this
way.
The items we are going to create will expose properties that our Silverlight
elements will use to display their values. The three things we want to display for
each post are the image of the Twitter user making the post, the date of the post
and the post text itself. We can make a class that holds this information.
public class TwitterPost { public string PostText { get; set; } public string DatePosted { get; set; } public string UserImage { get; set; } }
These properties are all “one way” in that the TwitterPost object does not
want to be informed of changes in them. This means that we can just expose
them via properties and all will be well. The UserImage property is a string
because it will actually give the uri of the image on the internet.
The next thing we have to do is to use LINQ to get an object collection from the
XElement that was built from the Twitter feed we loaded.
var postList = from tweet in twitterElements.Descendants("status") select new TwitterPost { UserImage = tweet.Element("user").Element("profile_image_url").Value, PostText = tweet.Element("text").Value, DatePosted = tweet.Element("created_at").Value };
This code will do exactly that. It is well worth a close look. The from keyword
requests an iteration through a collection of elements in the document. The
elements are identified by their name. The program will work through each
status element in turn in the document. Each time round the loop the variable
tweet will hold the information from the next status element in the XElement.
The select keyword identifies what is to be returned from each iteration. For
each selected tweet we want to return a new TwitterPost instance with settings
pulled from that tweet. The Element method returns an element with a
particular name. As you can see we can call the Element method on other
elements. That is how we get the image_profile_url out of the user element
for a tweet.
The variable postList is set to the result of all this activity. We can make it
var type, but actually it is a collection of TwitterPost references. It must be a
collection, since the from keyword is going to generate an iteration through
something.
We now have a collection of TwitterPost values that we want to put onto the
screen.

Using LINQ to read structured data
Consuming Data Services 99
Laying out the post display using XAML
We have seen how easy it is to put a Silverlight element on a page and then bind
object properties to it. However, we have a little extra complication with our
program. We want to display lots of posts, not just one value. Ideally we want to
create something that shows the layout for a single item and use that to create
lots of display elements, each of which is bound to a different TwitterPost
value. This turns out to be quite easy.
Above you can see what I want an individual post to look like. It will have an
image on the side, with the date and post text on the right, one above each other.
From a Silverlight point of view this is three panels, arranged as shown above.
We can get Silverlight to do a lot of the work in laying these out for us by using
the StackPanel container element.
The first StackPanel runs horizontally. This contains the user image and then
another StackPanel that runs vertically and holds the data and time above the
post text.
<StackPanel Orientation="Horizontal" Height="132"> <Image Source="{Binding UserImage}" Height="73" Width="73" VerticalAlignment="Top" Margin="0,10,8,0"/> <StackPanel Width="370"> <TextBlock Text="{Binding DatePosted}" Foreground="#FFC8AB14" FontSize="22" /> <TextBlock Text="{Binding PostText}" TextWrapping="Wrap" FontSize="24" /> </StackPanel> </StackPanel>
Above you can see the XAML that expresses all this. The StackPanel class is a
lovely way of laying out items automatically. We don‟t have to do lots of
calculations about where things should be placed, instead we just give the items
and the StackPanel puts them all in the right place. You can also see the
bindings that link the items to the properties in the TwitterPost class. The
UserImage property in TwitterPost is bound to the Source property of the
image. If we add the complete XAML above to our main page we have an area
that can hold a list of Twitter posts.
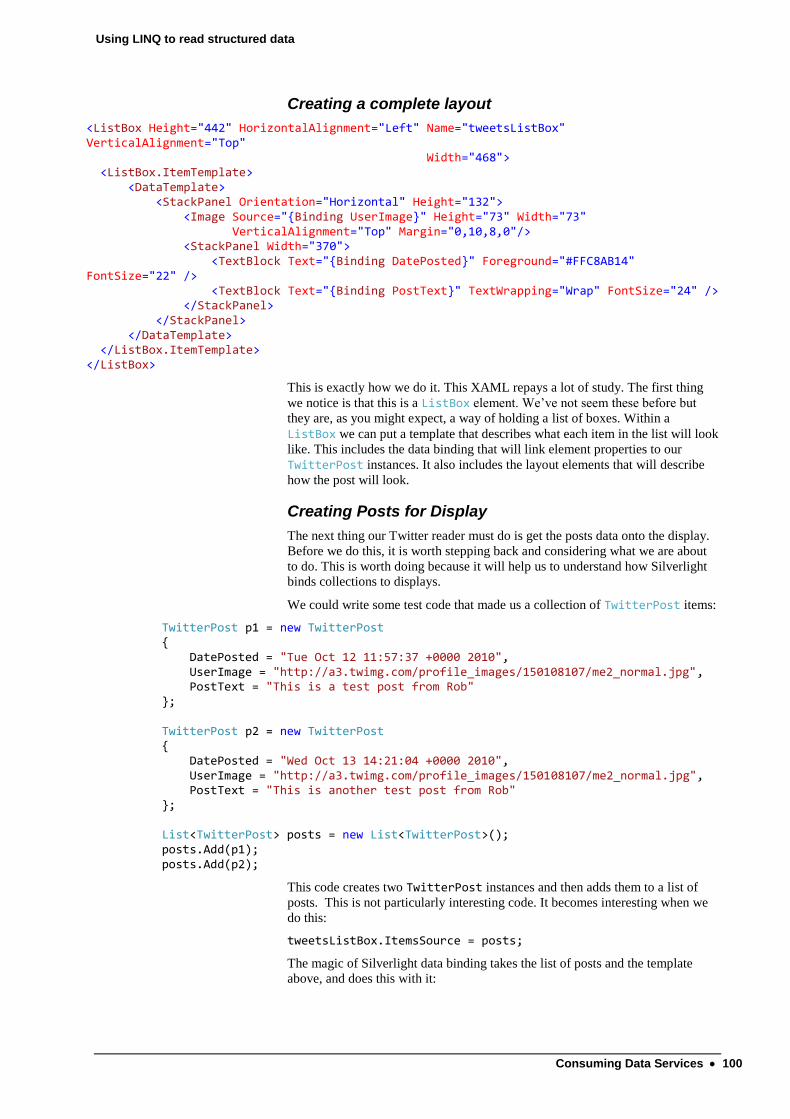
Using LINQ to read structured data
Consuming Data Services 100
Creating a complete layout
<ListBox Height="442" HorizontalAlignment="Left" Name="tweetsListBox" VerticalAlignment="Top" Width="468"> <ListBox.ItemTemplate> <DataTemplate> <StackPanel Orientation="Horizontal" Height="132"> <Image Source="{Binding UserImage}" Height="73" Width="73" VerticalAlignment="Top" Margin="0,10,8,0"/> <StackPanel Width="370"> <TextBlock Text="{Binding DatePosted}" Foreground="#FFC8AB14" FontSize="22" /> <TextBlock Text="{Binding PostText}" TextWrapping="Wrap" FontSize="24" /> </StackPanel> </StackPanel> </DataTemplate> </ListBox.ItemTemplate> </ListBox>
This is exactly how we do it. This XAML repays a lot of study. The first thing
we notice is that this is a ListBox element. We‟ve not seem these before but
they are, as you might expect, a way of holding a list of boxes. Within a
ListBox we can put a template that describes what each item in the list will look
like. This includes the data binding that will link element properties to our
TwitterPost instances. It also includes the layout elements that will describe
how the post will look.
Creating Posts for Display
The next thing our Twitter reader must do is get the posts data onto the display.
Before we do this, it is worth stepping back and considering what we are about
to do. This is worth doing because it will help us to understand how Silverlight
binds collections to displays.
We could write some test code that made us a collection of TwitterPost items:
TwitterPost p1 = new TwitterPost { DatePosted = "Tue Oct 12 11:57:37 +0000 2010", UserImage = "http://a3.twimg.com/profile_images/150108107/me2_normal.jpg", PostText = "This is a test post from Rob" }; TwitterPost p2 = new TwitterPost { DatePosted = "Wed Oct 13 14:21:04 +0000 2010", UserImage = "http://a3.twimg.com/profile_images/150108107/me2_normal.jpg", PostText = "This is another test post from Rob" }; List<TwitterPost> posts = new List<TwitterPost>(); posts.Add(p1); posts.Add(p2);
This code creates two TwitterPost instances and then adds them to a list of
posts. This is not particularly interesting code. It becomes interesting when we
do this:
tweetsListBox.ItemsSource = posts;
The magic of Silverlight data binding takes the list of posts and the template
above, and does this with it:
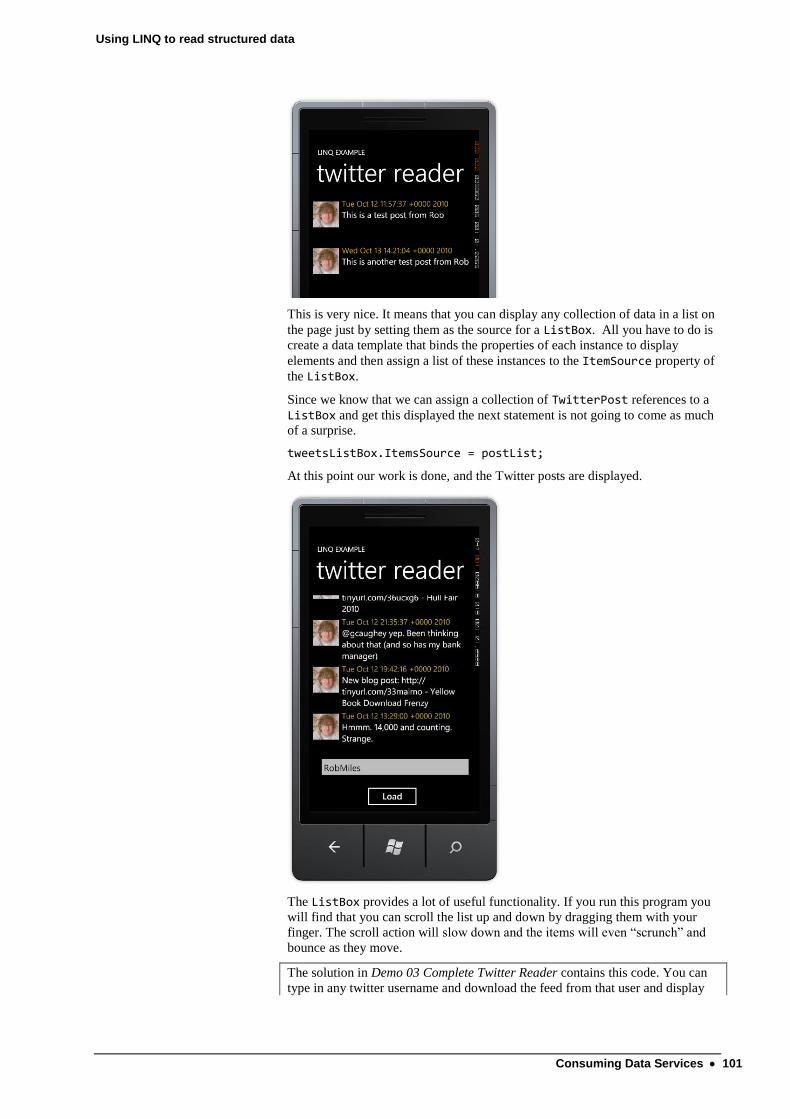
Using LINQ to read structured data
Consuming Data Services 101
This is very nice. It means that you can display any collection of data in a list on
the page just by setting them as the source for a ListBox. All you have to do is
create a data template that binds the properties of each instance to display
elements and then assign a list of these instances to the ItemSource property of
the ListBox.
Since we know that we can assign a collection of TwitterPost references to a
ListBox and get this displayed the next statement is not going to come as much
of a surprise.
tweetsListBox.ItemsSource = postList;
At this point our work is done, and the Twitter posts are displayed.
The ListBox provides a lot of useful functionality. If you run this program you
will find that you can scroll the list up and down by dragging them with your
finger. The scroll action will slow down and the items will even “scrunch” and
bounce as they move.
The solution in Demo 03 Complete Twitter Reader contains this code. You can
type in any twitter username and download the feed from that user and display
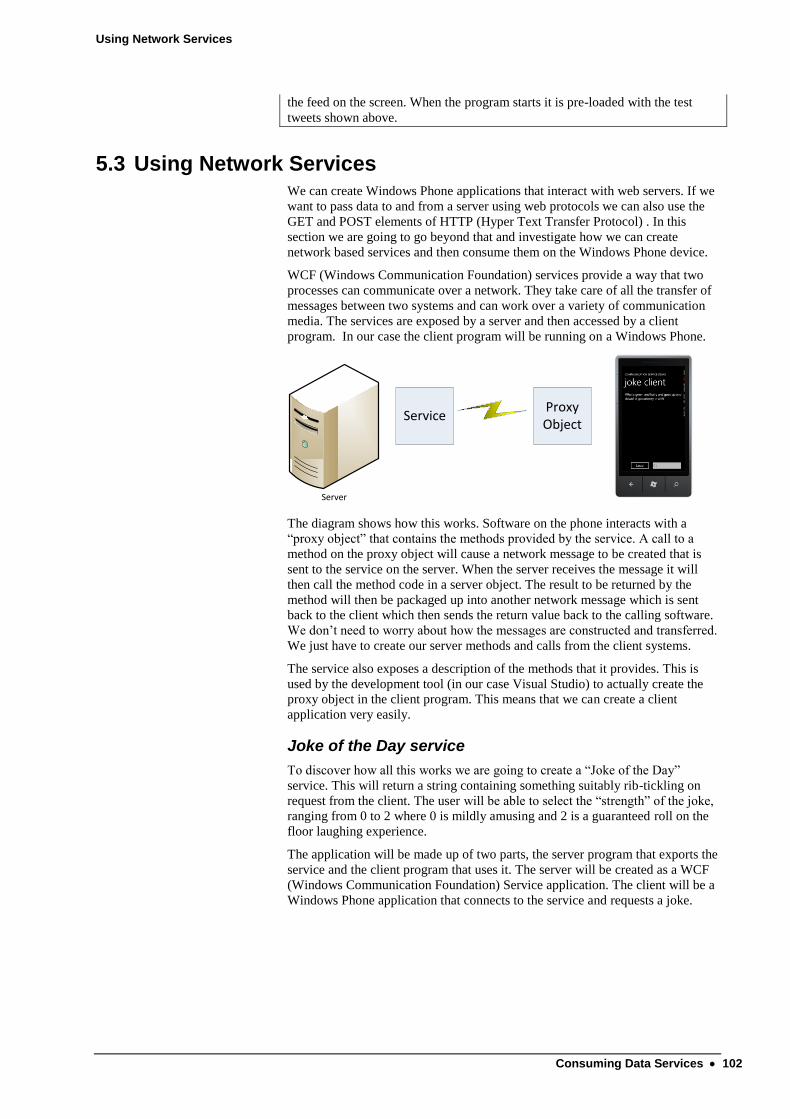
Using Network Services
Consuming Data Services 102
the feed on the screen. When the program starts it is pre-loaded with the test
tweets shown above.
5.3 Using Network Services We can create Windows Phone applications that interact with web servers. If we
want to pass data to and from a server using web protocols we can also use the
GET and POST elements of HTTP (Hyper Text Transfer Protocol) . In this
section we are going to go beyond that and investigate how we can create
network based services and then consume them on the Windows Phone device.
WCF (Windows Communication Foundation) services provide a way that two
processes can communicate over a network. They take care of all the transfer of
messages between two systems and can work over a variety of communication
media. The services are exposed by a server and then accessed by a client
program. In our case the client program will be running on a Windows Phone.
Server
ServiceProxy Object
The diagram shows how this works. Software on the phone interacts with a
“proxy object” that contains the methods provided by the service. A call to a
method on the proxy object will cause a network message to be created that is
sent to the service on the server. When the server receives the message it will
then call the method code in a server object. The result to be returned by the
method will then be packaged up into another network message which is sent
back to the client which then sends the return value back to the calling software.
We don‟t need to worry about how the messages are constructed and transferred.
We just have to create our server methods and calls from the client systems.
The service also exposes a description of the methods that it provides. This is
used by the development tool (in our case Visual Studio) to actually create the
proxy object in the client program. This means that we can create a client
application very easily.
Joke of the Day service
To discover how all this works we are going to create a “Joke of the Day”
service. This will return a string containing something suitably rib-tickling on
request from the client. The user will be able to select the “strength” of the joke,
ranging from 0 to 2 where 0 is mildly amusing and 2 is a guaranteed roll on the
floor laughing experience.
The application will be made up of two parts, the server program that exports the
service and the client program that uses it. The server will be created as a WCF
(Windows Communication Foundation) Service application. The client will be a
Windows Phone application that connects to the service and requests a joke.

Using Network Services
Consuming Data Services 103
Services are created as Visual Studio projects. They can run inside Visual
Studio in a test environment. After testing the project files would be loaded onto
a production server.
Services and Clients
Services and clients look like methods. When we write the server we write a
method that does something and returns a result. When we write the client we
call a method and something comes back. The communication service
underneath the programs takes care of packaging the parameters and the method
return value. When we create the service we create an interface that defines the
method the service will provide.
[ServiceContract] public interface IJokeOfTheDayService { [OperationContract] string GetJoke(int jokeStrength); }
We are only going to create one method in our service, but a service could
provide many methods if required. This method only accepts a single parameter
and returns a result, but we could create more complex methods if we wish.
Once we have the interface we can now create the method to provide the service
that the service describes. The [ServiceContract] and
[OperationContract] attributes on the classes and methods provide the
means by which the build process can generate the service descriptions that will
be used by clients to discover and bind to these services.

Using Network Services
Consuming Data Services 104
public class JokeOfTheDayService : IJokeOfTheDayService { public string GetJoke(int jokeStrength) { string result = "Invalid strength"; switch (jokeStrength) { case 0: result = "Knock Knock. Who's there? Oh, you've heard it"; break; case 1: result = "What's green and hairy and goes up and down? A gooseberry in a lift"; break; case 2: result = "A horse walks into a bar and the barman asks 'Why the long face?"; break; } return result; } }
As you can see from above, the method is quite simple. As are the jokes. The
input parameter is used to select one of three jokes and return them. If there is no
match to the input the message “Invalid strength” is returned.
If we create a service like this we can use the WCF Test Client to invoke the
methods and view the results.
This tool lets us call methods in the service and view the results that they return.
You can see the results of a call to the method with a parameter of 0. We can
also view the service description in a browser:

Using Network Services
Consuming Data Services 105
This gives a link to the service description, as well some sample code that shows
how to use it.
Joke of the Day Client
The client application needs to have a connection to the
JokeOfTheDayService. This is added as a resource like any other, by using the
Solution Explorer pane in Visual Studio:
Rather than being a reference to a library assembly we instead start to create a
Service reference. At this point Visual Studio needs to find the description of the
service that is to be used. The Add Service Reference dialog lets us type in the
network address of a service and it will then read the service description
provided by the service.
It is very easy to create and test WCF services as these can be run on your
Windows PC using a Development Server which is provided as part of Visual
Studio. Once we have the service running and have obtained the url of the
service on from the development server we just have to type this into the “Add
Service Reference” dialog as shown below.
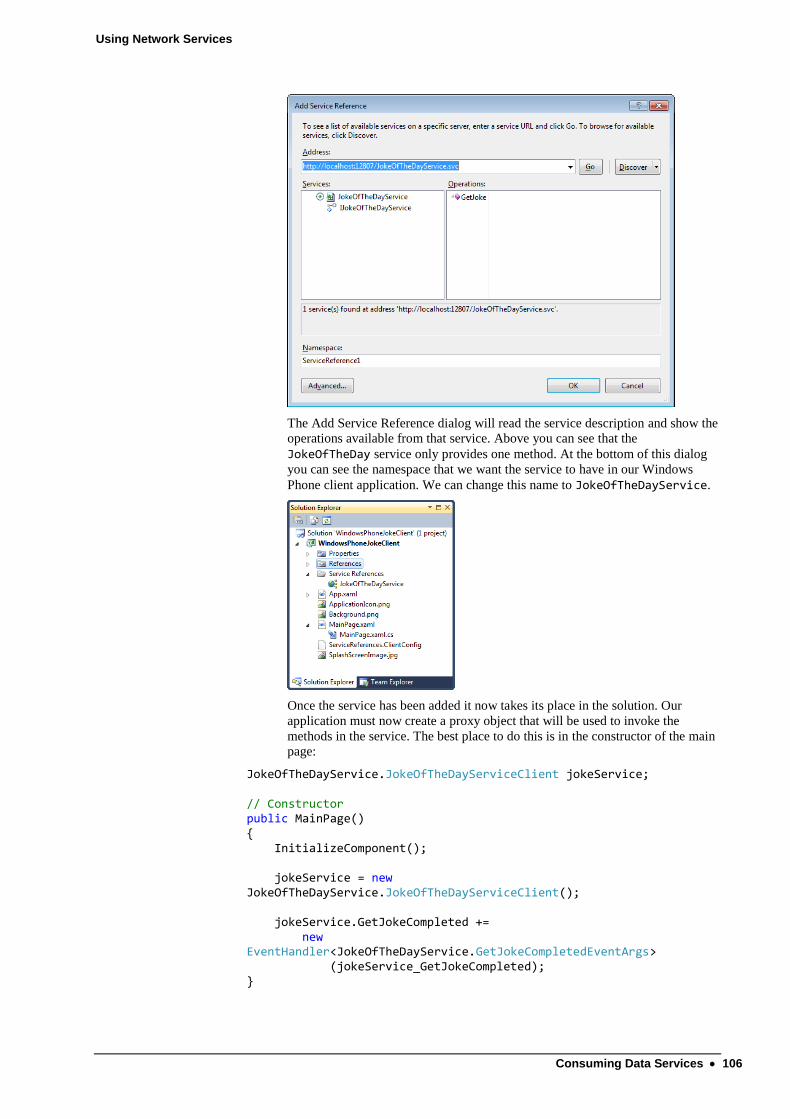
Using Network Services
Consuming Data Services 106
The Add Service Reference dialog will read the service description and show the
operations available from that service. Above you can see that the
JokeOfTheDay service only provides one method. At the bottom of this dialog
you can see the namespace that we want the service to have in our Windows
Phone client application. We can change this name to JokeOfTheDayService.
Once the service has been added it now takes its place in the solution. Our
application must now create a proxy object that will be used to invoke the
methods in the service. The best place to do this is in the constructor of the main
page:
JokeOfTheDayService.JokeOfTheDayServiceClient jokeService; // Constructor public MainPage() { InitializeComponent(); jokeService = new JokeOfTheDayService.JokeOfTheDayServiceClient(); jokeService.GetJokeCompleted += new EventHandler<JokeOfTheDayService.GetJokeCompletedEventArgs> (jokeService_GetJokeCompleted); }

Using Network Services
Consuming Data Services 107
This code creates a service instance and binds a method to the “completed”
event that is fired when a service call returns. You might remember that when
we got content from a web server the action was performed asynchronously, in
that the program sent off a request to read the service and then another method
was called when the data had returned. Calls to WCF methods are exactly the
same. When the program wants a new joke it must call the GetJoke method.
This will not return with the joke, instead it will start off the process of fetching
a joke. At some point in the future, when the joke arrives back from the server, a
method will be called to indicate this. All the method needs to do is display the
joke on the screen:
void jokeService_GetJokeCompleted(object sender, JokeOfTheDayService.GetJokeCompletedEventArgs e) { if (!e.Cancelled) { jokeTextBlock.Text = e.Result; } }
This method just checks to see if the call was successful and if it was the method
takes the result from the call and puts it on the screen.
The final piece of code that we need to add is the button event handler that will
actually call the WCF method to ask the server to do something:
private void getJokeButton_Click(object sender, RoutedEventArgs e) { int strength = 0; if (int.TryParse(strengthTextBox.Text, out strength)) { jokeService.GetJokeAsync(strength); } }
This method gets the strength value and then uses this in a call of the
GetJokeAsync method. Note that TryParse will return false if the text in
strengthTextBox could not be converted into an integer.
Errors and TimeOuts
If the service cannot be accessed the call to GetJokeAsync will throw an
exception:
We know that the connectivity of a Windows Phone is not guaranteed. If they do
not have a network signal when they run this program then it will throw the
above exception. In production code you must make sure that these exceptions
never get passed through to the user. This means that you need to enclose all

What we have learned
Consuming Data Services 108
your attempts to use these facilities in try – catch constructions and provide
appropriate feedback to the user when these events happen.
Using Network Services
For the purpose of the demonstration above I used a network server that runs on
the same machine as the client. In reality you will be connecting to different
systems on the internet which may be a long way away. This is not a problem.
As long as Visual Studio can locate the service and download the service
information it can then build the correct proxy objects to use the service
correctly. If you want to test a service you can connect to a local service initially
and then re-configure the service uri later to connect to the actual service.
The solution in Demo 04a JokeService contains a server which provides the joke
service as described above. You can run this service on your machine and use
the solution in Demo 04b WindowsPhoneJokeClient to connect to this service
and read jokes from it. When you run the program you need to make sure that
the development server url assigned to the service matches that of the service in
the client.
We can now create systems that use Windows Phones as clients to servers. A
given Windows Phone client can connect to multiple remote services at the same
time if required. This is just an introduction to the things you can do with
network services. Later we will look at some of the Windows Phone controls
that build on these abilities.
What we have learned 1. Windows Phone applications can create and use objects that represent a
connection to a network service. The use of these objects is
asynchronous, in that the results of a request are not returned to that
request, but delivered later by a further call made by the network client.
2. Some network calls may return structured data that contains XML
describing the content.
3. The LINQ (Language INtegrated Query) library provided for use on the
phone can create a representation of structured data which can then be
traversed to create structured data for use in a program.
4. LINQ can used be to provide an automatic transfer of data from the
rows and tables in a database into objects that can be used in a program.
5. XAML allows the creation of display templates which can be bound to
data elements. These templates can include lists, so that a collection of
structured data can be bound to a list.
6. Windows Communication Foundation (WCF) provides a means by
which servers can be set up that expose methods for clients to call.
7. A client application can read the service description provided by a
WCF server and use this to create a proxy object that contains the
methods provided by the service. When code in the client calls the
method in the proxy object a network transaction is performed that
transfers the parameters of the call into the server. The server method is
then invoked and a further network transaction delivers the result back
to the caller.

XNA in context
XNA Overview 109
6 XNA Overview
After all the hard work of the previous sections, now would seem a good place
to have some fun and play some games. You can write games in Silverlight, but
that is not really what it was designed for. XNA on the other hand was built from
the ground up to be an efficient and powerful tool for game creation. In this
section we are going to take a look at XNA and how to use it to create games for
the Windows Phone device.
6.1 XNA in context XNA is for creating games. It provides a complete ecosystem for game creation,
including Content Management (how you get your sound effects, maps and
textures into a game) and the game build process (how you combine all the
elements into the single distributable game element). We are not going to delve
too deeply into all these aspects of the system, instead we are going to focus on
the XNA Framework, which is a library of C# objects that is used to create the
games programs themselves. XNA allows game developers to use C# to create
high performance games on a variety of platforms, including Windows PC,
Xbox 360 and Windows Phone. By careful design of your program structure it is
possible to reuse the base majority of your game code across these three
platforms.
2D and 3D games
Games can be “2D” (flat images that are drawn in a single plane) or “3D” (a
visual simulation of a 3D environment). XNA provides support for both kinds of
games and the Windows Phone hardware acceleration makes it capable of
displaying realistic 3D worlds. For the purpose of this section we are going to
focus on 2D, sprite based, games however. We can create a good gameplay
experience this way, particularly on a mobile device.
XNA and Silverlight
When we create a Windows Phone project we can create either a Silverlight
application or an XNA one. Visual Studio uses the appropriate template and
builds the solution with the required elements to make that kind of program. It is
not possible to combine these. It would be lovely to think of a system which
allowed us to use Silverlight to make the game menus and XNA to provide the
gameplay but at the present this is not possible.
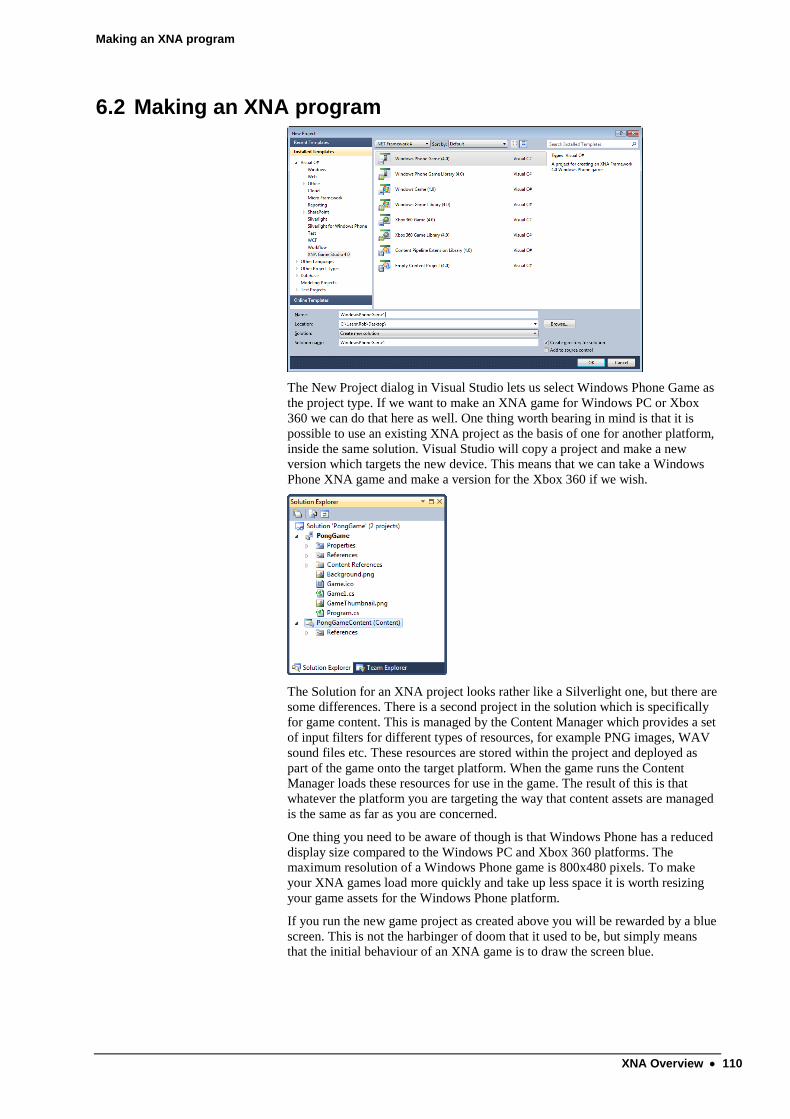
Making an XNA program
XNA Overview 110
6.2 Making an XNA program
The New Project dialog in Visual Studio lets us select Windows Phone Game as
the project type. If we want to make an XNA game for Windows PC or Xbox
360 we can do that here as well. One thing worth bearing in mind is that it is
possible to use an existing XNA project as the basis of one for another platform,
inside the same solution. Visual Studio will copy a project and make a new
version which targets the new device. This means that we can take a Windows
Phone XNA game and make a version for the Xbox 360 if we wish.
The Solution for an XNA project looks rather like a Silverlight one, but there are
some differences. There is a second project in the solution which is specifically
for game content. This is managed by the Content Manager which provides a set
of input filters for different types of resources, for example PNG images, WAV
sound files etc. These resources are stored within the project and deployed as
part of the game onto the target platform. When the game runs the Content
Manager loads these resources for use in the game. The result of this is that
whatever the platform you are targeting the way that content assets are managed
is the same as far as you are concerned.
One thing you need to be aware of though is that Windows Phone has a reduced
display size compared to the Windows PC and Xbox 360 platforms. The
maximum resolution of a Windows Phone game is 800x480 pixels. To make
your XNA games load more quickly and take up less space it is worth resizing
your game assets for the Windows Phone platform.
If you run the new game project as created above you will be rewarded by a blue
screen. This is not the harbinger of doom that it used to be, but simply means
that the initial behaviour of an XNA game is to draw the screen blue.
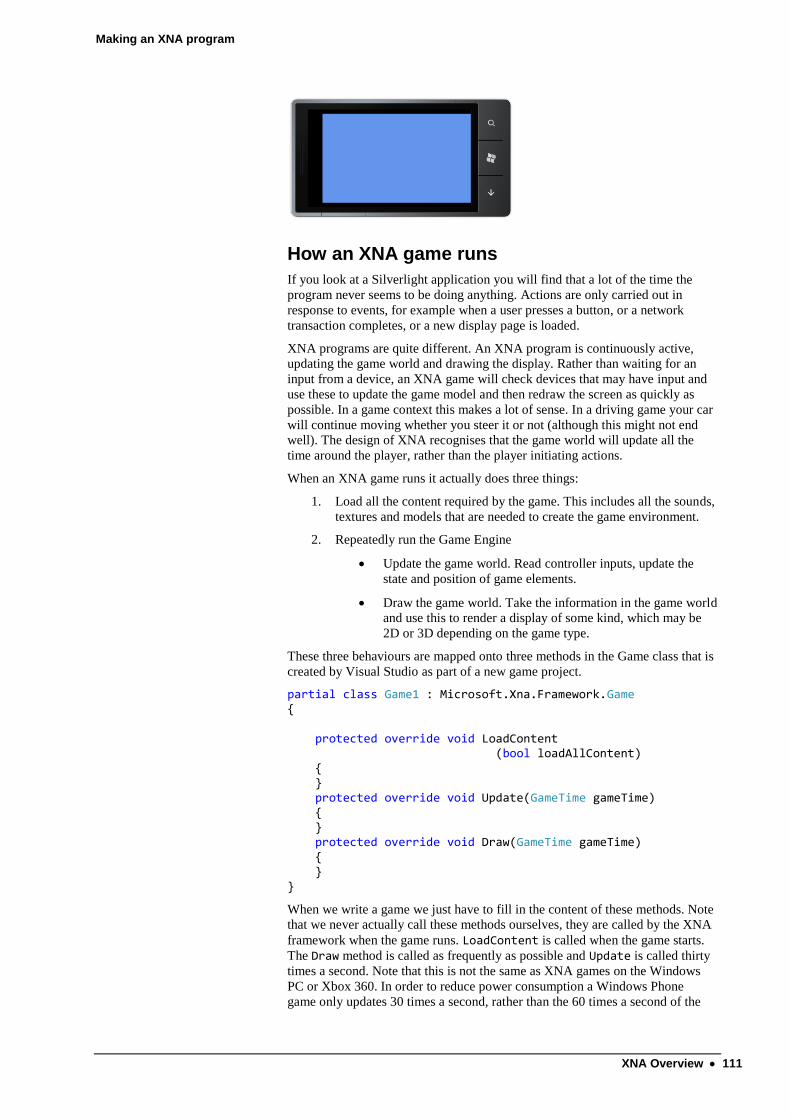
Making an XNA program
XNA Overview 111
How an XNA game runs
If you look at a Silverlight application you will find that a lot of the time the
program never seems to be doing anything. Actions are only carried out in
response to events, for example when a user presses a button, or a network
transaction completes, or a new display page is loaded.
XNA programs are quite different. An XNA program is continuously active,
updating the game world and drawing the display. Rather than waiting for an
input from a device, an XNA game will check devices that may have input and
use these to update the game model and then redraw the screen as quickly as
possible. In a game context this makes a lot of sense. In a driving game your car
will continue moving whether you steer it or not (although this might not end
well). The design of XNA recognises that the game world will update all the
time around the player, rather than the player initiating actions.
When an XNA game runs it actually does three things:
1. Load all the content required by the game. This includes all the sounds,
textures and models that are needed to create the game environment.
2. Repeatedly run the Game Engine
Update the game world. Read controller inputs, update the
state and position of game elements.
Draw the game world. Take the information in the game world
and use this to render a display of some kind, which may be
2D or 3D depending on the game type.
These three behaviours are mapped onto three methods in the Game class that is
created by Visual Studio as part of a new game project.
partial class Game1 : Microsoft.Xna.Framework.Game { protected override void LoadContent (bool loadAllContent) { } protected override void Update(GameTime gameTime) { } protected override void Draw(GameTime gameTime) { } }
When we write a game we just have to fill in the content of these methods. Note
that we never actually call these methods ourselves, they are called by the XNA
framework when the game runs. LoadContent is called when the game starts.
The Draw method is called as frequently as possible and Update is called thirty
times a second. Note that this is not the same as XNA games on the Windows
PC or Xbox 360. In order to reduce power consumption a Windows Phone
game only updates 30 times a second, rather than the 60 times a second of the

Making an XNA program
XNA Overview 112
desktop or console version of the game. If you want to write a game which will
work on all three platforms you will have to bear this in mind.
Before we can start filling in the Update and Draw methods in our game we
need to have something to display on the screen. We are going to start by
drawing a white ball. Later we will start to make it bounce around the screen and
investigate how we can use this to create a simple bat and ball game.
Game Content
We use the word content to refer to all the assets that make a game interesting.
This includes all the images on the textures in a game, the sound effects and 3D
models. The XNA framework Content Management system can take an item of
content from its original source file (perhaps a PNG image) all the way into the
memory of the game running on the target device. This is often called a content
pipeline in that raw resources go into one end and they are then processed
appropriately and finally end up in the game itself.
The content management is integrated into Visual Studio. Items of content are
managed in the same way as files of program code. We can add them to a project
and then browse them and manage their properties.
Above you can see an item of content which has been added to a Content
project. The item is a PNG (Portable Network Graphics) image file that contains
a White Dot which we could use as a ball in our game. This will have the asset
name “WhiteDot” within our XNA game. Once we have our asset as part of the
content of the game we can use it in games.
We have seen something that looks a bit like this in the past when we added
resources to Silverlight games. Those resources have actually been part of
Visual Studio solutions as well. However, it is important that you remember that
the Content Manager is specifically for XNA games and is how you should
manage XNA game content.
Loading Content
The LoadContent method is called to load the content into the game. (the clue
is in the name). It is called once when the game starts running.
protected override void LoadContent() { // Create a new SpriteBatch, which can be used to // draw textures. spriteBatch = new SpriteBatch(GraphicsDevice); }

Making an XNA program
XNA Overview 113
The first thing that LoadContent does is actually nothing to do with content at
all. It creates a new SpriteBatch instance which will be used to draw items on
the screen. We will see what the SpriteBatch is used for later.
We can add a line to this method that loads image into our game:
ballTexture = Content.Load<Texture2D>("WhiteDot");
The Load method provided by the content manager is given the type of resource
to be loaded (in this case Texture2D). The appropriate loader method is called
which loads the texture into the game.
Texture2D ballTexture;
XNA provides a type called Texture2D which can hold a single two-
dimensional texture in a game. Later in the program we will draw this on the
screen. A game may contain many textures. At the moment we are just going to
use one.
Creating XNA sprites
In computer gaming terms a sprite is an image that can be positioned and drawn
on the display. In XNA terms we can make a sprite from a texture (which gives
the picture to be drawn) and a rectangle (which determines the position on the
screen). We already have the texture, now we need to create the position
information.
XNA uses a coordinate system that puts the origin (0,0) of any drawing
operations in the top left hand corner of the screen. This is not same as a
conventional graph, where we would expect the origin to be the bottom left hand
corner of the graph. In other words, in an XNA game if you increase the value of
Y for an object this causes the object to move down the screen.
The units used equate to pixels on the screen itself. Most Windows Phones have
a screen resolution of 800 x 480 pixels. If we try to draw objects outside this
area XNA will not complain, but it won‟t draw anything either.
XNA provides a Rectangle structure to define the position and size of an area
on the screen.
Rectangle ballRectangle = new Rectangle( 0, 0, ballTexture.Width, ballTexture.Height);
The above code creates a rectangle which is positioned at the top left hand
corner of the screen. It is the same width and height as the ball texture.
Drawing objects
Now that we have a sprite the next thing we can do is make the game draw this
on the screen. To do this we have to fill in the Draw method.
protected override void Draw(GameTime gameTime) { GraphicsDevice.Clear(Color.CornflowerBlue); base.Draw(gameTime); }
This is the “empty” Draw method that is provided by Visual Studio when it
creates a new game project. It just clears the screen to blue. We are going to add
some code to the method that will draw our ball on the screen. Before we can do
this we have to understand a little about how graphics hardware works.
Modern devices have specialised graphics hardware that does all the drawing of
the screen. A Windows Phone has a Graphics Processor Unit (GPU) which is

Making an XNA program
XNA Overview 114
given the textures to be drawn, along with their positions, and then renders these
for the game player to see. When a program wants to draw something it must
send a batch of drawing instructions to the GPU. For maximum efficiency it is
best if the draw requests are be batched together so that they can be sent to the
GPU in a single transaction. We do this by using the SpriteBatch class to do
the batching for us.
protected override void Draw(GameTime gameTime) { GraphicsDevice.Clear(Color.CornflowerBlue); spriteBatch.Begin(); // Draw operations go here spriteBatch.End(); base.Draw(gameTime); }
When we come to write our game the only thing we have to remember is that
our code must start and end a batch of drawing operations, otherwise the
drawing will not work.
We now have our texture to draw and we know how the draw process will work,
the next thing to do is position the draw operation on the screen in the correct
place. Once we have done this we will have created a sprite. The SpriteBatch
command that we use to draw on the screen is the Draw method:
spriteBatch.Draw(ballTexture, ballRectangle, Color.White);
The Draw method is given three parameters; the texture to draw, a Rectangle
value that gives the draw position and the color of the “light” to shine on the
texture when it is drawn. The complete Draw method looks like this
protected override void Draw(GameTime gameTime) { GraphicsDevice.Clear(Color.CornflowerBlue); spriteBatch.Begin(); spriteBatch.Draw(ballTexture, ballRectangle, Color.White);
spriteBatch.End(); base.Draw(gameTime); }
When we run this program we find that the ball is drawn in the top left hand
corner of the screen on the phone:
Note that, by default, XNA games expect the player to hold the phone
horizontally, in “landscape” mode, with the screen towards the left. We will see
later that your game can change this arrangement if it needs to.
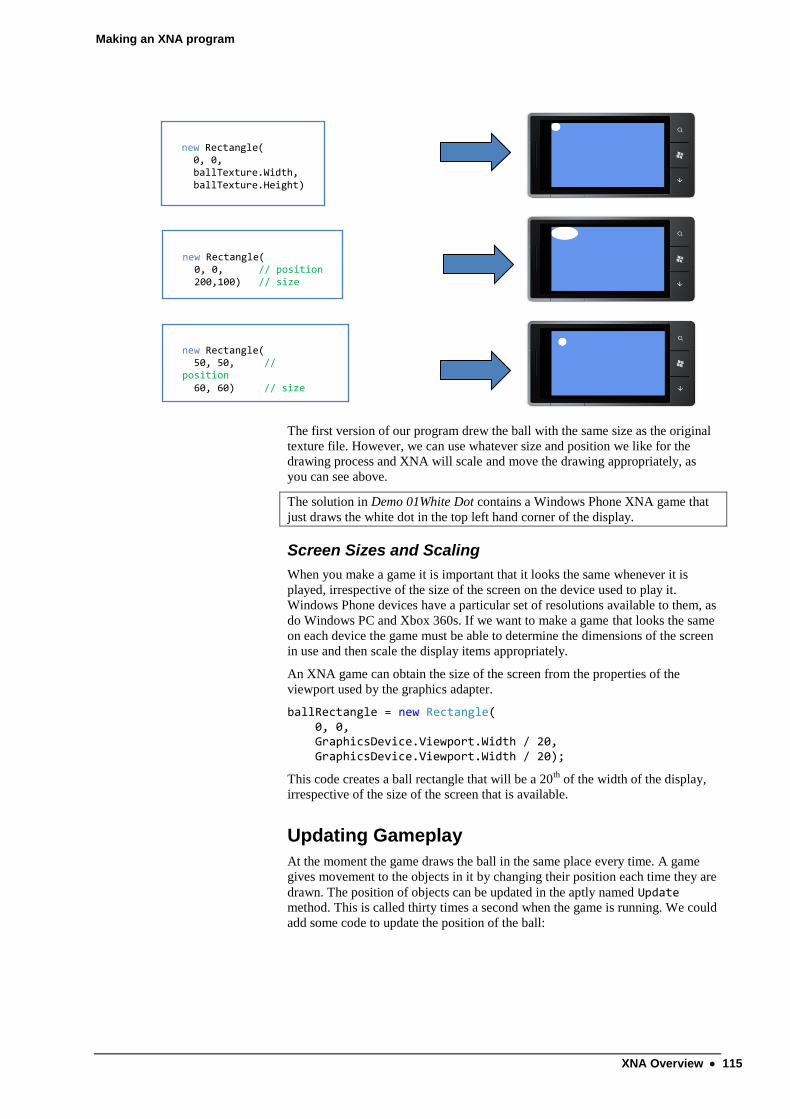
Making an XNA program
XNA Overview 115
The first version of our program drew the ball with the same size as the original
texture file. However, we can use whatever size and position we like for the
drawing process and XNA will scale and move the drawing appropriately, as
you can see above.
The solution in Demo 01White Dot contains a Windows Phone XNA game that
just draws the white dot in the top left hand corner of the display.
Screen Sizes and Scaling
When you make a game it is important that it looks the same whenever it is
played, irrespective of the size of the screen on the device used to play it.
Windows Phone devices have a particular set of resolutions available to them, as
do Windows PC and Xbox 360s. If we want to make a game that looks the same
on each device the game must be able to determine the dimensions of the screen
in use and then scale the display items appropriately.
An XNA game can obtain the size of the screen from the properties of the
viewport used by the graphics adapter.
ballRectangle = new Rectangle( 0, 0, GraphicsDevice.Viewport.Width / 20, GraphicsDevice.Viewport.Width / 20);
This code creates a ball rectangle that will be a 20th
of the width of the display,
irrespective of the size of the screen that is available.
Updating Gameplay
At the moment the game draws the ball in the same place every time. A game
gives movement to the objects in it by changing their position each time they are
drawn. The position of objects can be updated in the aptly named Update
method. This is called thirty times a second when the game is running. We could
add some code to update the position of the ball:
new Rectangle( 0, 0, ballTexture.Width, ballTexture.Height)
new Rectangle( 0, 0, // position 200,100) // size
new Rectangle( 50, 50, // position 60, 60) // size

Making an XNA program
XNA Overview 116
protected override void Update(GameTime gameTime) { ballRectangle.X++; ballRectangle.Y++; base.Update(gameTime); }
This version of Update just makes the X and Y positions of the ball rectangle
one pixel bigger each time it is called. This causes the ball to move down
(remember that the Y origin is the top of the screen) and across the screen at a
rate of one pixel every thirtieth of a second. After fifteen seconds or so the ball
has left the screen and will continue moving (although not visible) until we get
bored and stop the game from running.
Using floating point positions
The code above moves the ball one pixel each time Update is called. This
doesn‟t give a game very precise control over the movement of objects. We
might want a way to move the ball very slowly. We do this by creating floating
point variables that will hold the ball position:
float ballX; float ballY;
We can update these very precisely and then convert them into pixel coordinates
when we position the draw rectangle:
ballRectangle.X = (int)(ballX + 0.5f); ballRectangle.Y = (int)(ballY + 0.5f);
The above statements take the floating point values and convert them into the
nearest integers, rounding up if required. We can also use floating point values
for the speed of the ball:
float ballXSpeed = 3; float ballYSpeed = 3;
Each time the ball position is updated we now apply the speed values to the ball
position:
ballX = ballX + ballXSpeed; ballY = ballY + ballYSpeed;
Now that we can position the ball and control the speed very precisely we can
think about making it bounce off the edge of the screen.
Making the ball bounce
Our first game just made the ball fly off the screen. If we are creating some kind
of bat and ball game we need to make the ball “bounce” when it reaches the
screen edges. To do this the game must detect when the ball reaches the edge of
the display and update the direction of movement appropriately. If the ball is
going off the screen in a horizontal direction the game must reverse the X
component of the ball speed. If the ball is going of the top or the bottom of the
screen the game must reverse the Y component of the ball speed.

Making an XNA program
XNA Overview 117
(0,0)
(0,height) (width, height)
(width, 0)
x +texture width > width
x < 0
y < 0
y + texture height > height
The figure above shows the directions the ball can move off the screen and the
conditions that become true when the ball moves in that direction.
if (ballX < 0 || ballX + ballRectangle.Width > GraphicsDevice.Viewport.Width) { ballXSpeed = -ballXSpeed; }
The code above reverses the direction of the ball in the X axis when the ball
moves off either the left or right hand edge of the display. We can use a similar
arrangement to deal with movement in the Y direction.
The solution in Demo 03 Bouncing Ball contains a Windows Phone XNA game
that just draws a ball that bounces around the display.
Adding paddles to make a bat and ball game
We now have a ball that will happily bounce around the screen. The next thing
that we need is something to hit the ball with.
The paddle is a rectangular texture which is loaded and drawn in exactly the
same way as the ball. The finished game uses two paddles, one for the left hand
player and one for the right. In the first version of the game we are going to
control the left paddle and the computer will control the right hand one. This
means that we have three sprites on the screen. Each will need a texture variable
to hold the image on the sprite and a rectangle value to hold the position of the
sprite on the screen.

Making an XNA program
XNA Overview 118
// Game World Texture2D ballTexture; Rectangle ballRectangle; float ballX; float ballY; float ballXSpeed = 3; float ballYSpeed = 3; Texture2D lPaddleTexture; Rectangle lPaddleRectangle; float lPaddleSpeed = 4; float lPaddleY; Texture2D rPaddleTexture; Rectangle rPaddleRectangle; float rPaddleY; // Distance of paddles from screen edge int margin;
These variables represent our “Game World”. The Update method will update
the variables and the Draw method will use their values to draw the paddles and
ball on the screen in the correct position.
When the game starts running the LoadContent will fetch the images using the
Content Manager and then set up the draw rectangles for the items on the screen.
protected override void LoadContent() { // Create a new SpriteBatch, which is used to draw textures. spriteBatch = new SpriteBatch(GraphicsDevice); ballTexture = Content.Load<Texture2D>("ball"); lPaddleTexture = Content.Load<Texture2D>("lpaddle"); rPaddleTexture = Content.Load<Texture2D>("rpaddle"); ballRectangle = new Rectangle( GraphicsDevice.Viewport.Width/2, GraphicsDevice.Viewport.Height/2, GraphicsDevice.Viewport.Width / 20, GraphicsDevice.Viewport.Width / 20); margin = GraphicsDevice.Viewport.Width / 20; lPaddleRectangle = new Rectangle( margin, 0, GraphicsDevice.Viewport.Width / 20, GraphicsDevice.Viewport.Height / 5); rPaddleRectangle = new Rectangle( GraphicsDevice.Viewport.Width - lPaddleRectangle.Width - margin, 0, GraphicsDevice.Viewport.Width / 20, GraphicsDevice.Viewport.Height / 5); lPaddleY = lPaddleRectangle.Y; rPaddleY = rPaddleRectangle.Y; }
This LoadContent method repays careful study. It loads all the textures and
then positions the paddle draw positions each side of the screen as shown below.
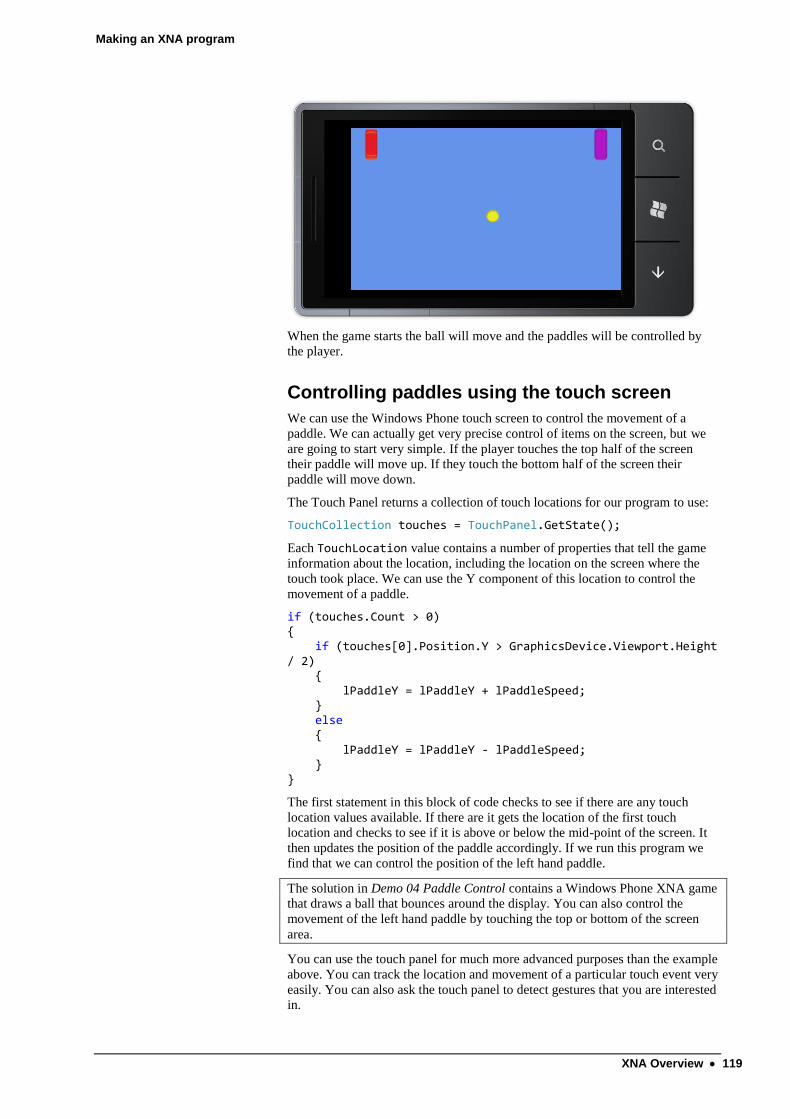
Making an XNA program
XNA Overview 119
When the game starts the ball will move and the paddles will be controlled by
the player.
Controlling paddles using the touch screen
We can use the Windows Phone touch screen to control the movement of a
paddle. We can actually get very precise control of items on the screen, but we
are going to start very simple. If the player touches the top half of the screen
their paddle will move up. If they touch the bottom half of the screen their
paddle will move down.
The Touch Panel returns a collection of touch locations for our program to use:
TouchCollection touches = TouchPanel.GetState();
Each TouchLocation value contains a number of properties that tell the game
information about the location, including the location on the screen where the
touch took place. We can use the Y component of this location to control the
movement of a paddle.
if (touches.Count > 0) { if (touches[0].Position.Y > GraphicsDevice.Viewport.Height / 2) { lPaddleY = lPaddleY + lPaddleSpeed; } else { lPaddleY = lPaddleY - lPaddleSpeed; } }
The first statement in this block of code checks to see if there are any touch
location values available. If there are it gets the location of the first touch
location and checks to see if it is above or below the mid-point of the screen. It
then updates the position of the paddle accordingly. If we run this program we
find that we can control the position of the left hand paddle.
The solution in Demo 04 Paddle Control contains a Windows Phone XNA game
that draws a ball that bounces around the display. You can also control the
movement of the left hand paddle by touching the top or bottom of the screen
area.
You can use the touch panel for much more advanced purposes than the example
above. You can track the location and movement of a particular touch event very
easily. You can also ask the touch panel to detect gestures that you are interested
in.

Making an XNA program
XNA Overview 120
Detecting Collisions
At the moment the bat and the ball are not “aware” of each other. The ball will
pass straight through the bat rather than bounce off it. What we need is a way to
determine when two rectangles intersect.
The Rectangle structure provides a method called Intersects that can do this
for us:
if (ballRectangle.Intersects(lPaddleRectangle)) { ballXSpeed = -ballXSpeed; }
The above code tests to see if the ball has hit the left hand paddle. If it has the
direction of movement of the ball is reversed to make the ball bounce off the
paddle.
Keeping score
For the game to be worth playing it must also keep a score and display this for
the players. Points are scored by hitting the back wall of the opponent player.
We already have the code that does this. At the moment it just reverses the
direction of movement of the ball, it is a simple matter to add a score variable for
each player and increase this each time a “goal” is scored. The final thing we
need to be able to do at this point is display the score for the players to see. To
do this we need to find out how an XNA game draws text for a player.
Displaying Text
The XNA environment does not provide direct access to text drawing. To write
text on the screen a game must load a character font and then use this to draw the
characters. The font to be used is an item of game content which we need to add
to the game. When the font is added the size and the font design is selected.
When the game is built the Content Manager will build a set of character images
and add these to the game. The game can then draw the text on the game screen
along with the other game items.
The font, called a “SpriteFont”, is created as a new item and given a name. The
actual font information is held in an XML file which you can edit with Visual
Studio:

Using the accelerometer in games
XNA Overview 121
This file is where the font size and the name of the font are selected. Above you
can see that the font “Segoe UI Mono” is being used with a font size of 14.
Further down the XML file you will find settings for bold and italic versions of
the font.
Once the SpriteFont has been added to the content in a program it can then be
loaded when the program runs:
SpriteFont font;
font = Content.Load<SpriteFont>("MessageFont");
Note that this is exactly the same format as the Load we used to fetch the
textures in our game only this time it is being used to fetch a SpriteFont rather
than a Texture2D.
Once we have the font we can use it to draw text:
spriteBatch.DrawString( font, "Hello", new Vector2(50,100), Color.White);
The DrawString method is given four parameters. These are the font to use, the
string to display, a vector to position the text on the screen and the colour of text
to draw. A vector is a way that we can specify a position on the screen, in the
example code above the text would be drawn 50 pixels across the screen and 100
pixels down (remember that the origin for Y is at the top of the screen).
The solution in Demo 05 Complete Pong Game contains a Windows Phone
XNA game that implements a working pong game. The left hand paddle is
controlled by the touch panel. The right hand paddle is controlled by an ultra-
intelligent AI system that makes it completely unbeatable. Take a look at the
code to discover how this top secret technology works. This game is not perfect.
Because of the way the ball movement is managed it can sometimes get “stuck”
on a paddle or off the edge of the screen. It is up to you to make a completed
version of this.
6.3 Using the accelerometer in games The touch panel is not the only novel input device provided by the Windows
Phone. Games can also make use of the accelerometer so that we can create
games that are controlled by the tipping of the phone. The accelerometer can
measure acceleration in three axes. While it can be used to measure acceleration
(you could use your Windows Phone to measure the acceleration of your sports
car if you like) it is most often used to measure the orientation of the phone. This
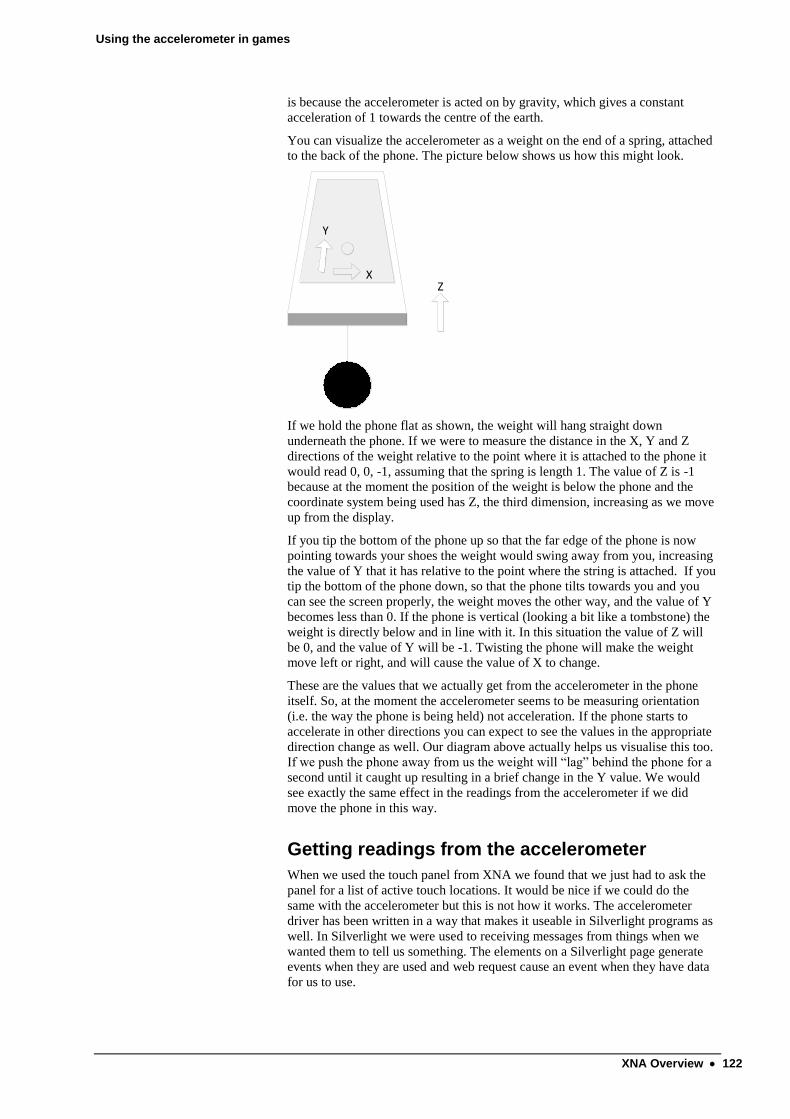
Using the accelerometer in games
XNA Overview 122
is because the accelerometer is acted on by gravity, which gives a constant
acceleration of 1 towards the centre of the earth.
You can visualize the accelerometer as a weight on the end of a spring, attached
to the back of the phone. The picture below shows us how this might look.
ZX
Y
If we hold the phone flat as shown, the weight will hang straight down
underneath the phone. If we were to measure the distance in the X, Y and Z
directions of the weight relative to the point where it is attached to the phone it
would read 0, 0, -1, assuming that the spring is length 1. The value of Z is -1
because at the moment the position of the weight is below the phone and the
coordinate system being used has Z, the third dimension, increasing as we move
up from the display.
If you tip the bottom of the phone up so that the far edge of the phone is now
pointing towards your shoes the weight would swing away from you, increasing
the value of Y that it has relative to the point where the string is attached. If you
tip the bottom of the phone down, so that the phone tilts towards you and you
can see the screen properly, the weight moves the other way, and the value of Y
becomes less than 0. If the phone is vertical (looking a bit like a tombstone) the
weight is directly below and in line with it. In this situation the value of Z will
be 0, and the value of Y will be -1. Twisting the phone will make the weight
move left or right, and will cause the value of X to change.
These are the values that we actually get from the accelerometer in the phone
itself. So, at the moment the accelerometer seems to be measuring orientation
(i.e. the way the phone is being held) not acceleration. If the phone starts to
accelerate in other directions you can expect to see the values in the appropriate
direction change as well. Our diagram above actually helps us visualise this too.
If we push the phone away from us the weight will “lag” behind the phone for a
second until it caught up resulting in a brief change in the Y value. We would
see exactly the same effect in the readings from the accelerometer if we did
move the phone in this way.
Getting readings from the accelerometer
When we used the touch panel from XNA we found that we just had to ask the
panel for a list of active touch locations. It would be nice if we could do the
same with the accelerometer but this is not how it works. The accelerometer
driver has been written in a way that makes it useable in Silverlight programs as
well. In Silverlight we were used to receiving messages from things when we
wanted them to tell us something. The elements on a Silverlight page generate
events when they are used and web request cause an event when they have data
for us to use.
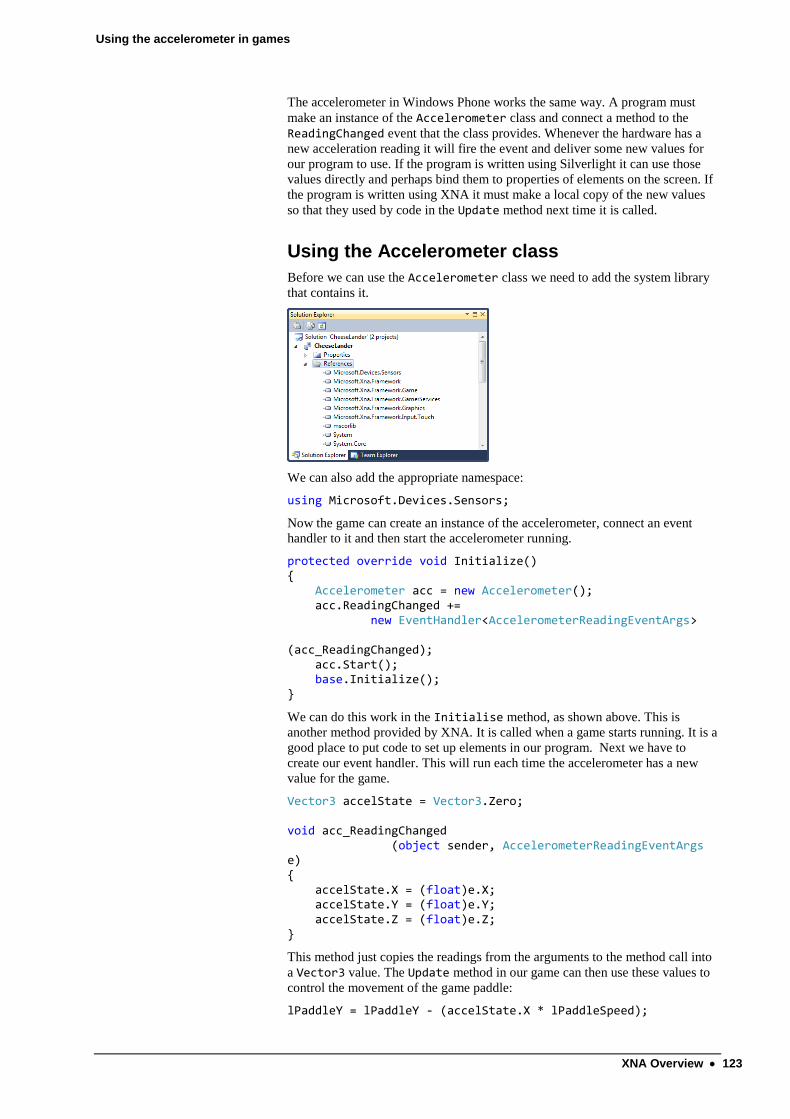
Using the accelerometer in games
XNA Overview 123
The accelerometer in Windows Phone works the same way. A program must
make an instance of the Accelerometer class and connect a method to the
ReadingChanged event that the class provides. Whenever the hardware has a
new acceleration reading it will fire the event and deliver some new values for
our program to use. If the program is written using Silverlight it can use those
values directly and perhaps bind them to properties of elements on the screen. If
the program is written using XNA it must make a local copy of the new values
so that they used by code in the Update method next time it is called.
Using the Accelerometer class
Before we can use the Accelerometer class we need to add the system library
that contains it.
We can also add the appropriate namespace:
using Microsoft.Devices.Sensors;
Now the game can create an instance of the accelerometer, connect an event
handler to it and then start the accelerometer running.
protected override void Initialize() { Accelerometer acc = new Accelerometer(); acc.ReadingChanged += new EventHandler<AccelerometerReadingEventArgs> (acc_ReadingChanged); acc.Start(); base.Initialize(); }
We can do this work in the Initialise method, as shown above. This is
another method provided by XNA. It is called when a game starts running. It is a
good place to put code to set up elements in our program. Next we have to
create our event handler. This will run each time the accelerometer has a new
value for the game.
Vector3 accelState = Vector3.Zero; void acc_ReadingChanged (object sender, AccelerometerReadingEventArgs e) { accelState.X = (float)e.X; accelState.Y = (float)e.Y; accelState.Z = (float)e.Z; }
This method just copies the readings from the arguments to the method call into
a Vector3 value. The Update method in our game can then use these values to
control the movement of the game paddle:
lPaddleY = lPaddleY - (accelState.X * lPaddleSpeed);

Using the accelerometer in games
XNA Overview 124
This code is very simple. It uses the X value of the accelerometer state to control
the movement up and down of the left hand side paddle. You might thing we
should use the Y value from the accelerometer, but remember that our game is
being played in landscape mode (with the phone held on its side) and the
accelerometer values are always given as if the phone is held in portrait mode.
The accelerometer, in association with a very simple physics model, can be used
to create “tipping” games, where the player has to guide a ball around a maze or
past obstacles.
The solution in Demo 06 Tipping Pong contains a Windows Phone XNA game
that implements a working pong game. The left hand paddle is controlled by
tipping the phone to make the paddle move. You will notice that the further you
tip the phone the faster the paddle moves, which is just how it should be.
Threads and Contention
The version of the accelerometer code above will work OK, but code like this
can vulnerable to a problem because of the way the program is written. In the
case of this version of the game it would not drastically affect gameplay, but this
issue is worth exploring because you may fall foul of similar problems when you
start writing programs like these. Mistakes like these can give rise to the worst
kind of programming bug imaginable, which is where the program works fine
99.999 per cent of the time but fails every now and then.
I hate bugs like these. I‟m much happier when a program fails completely every
time I run it because I can easily dive in and start looking for problems. If the
program only fails once in a blue moon I have to wait around until I see the fault
occur.
The problem has to do with the way that accelerometer readings are created and
stored. We have two processes running working at the same time.
The accelerometer is generating readings and storing them
The Update method is using these readings to move the paddle
However, the Windows Phone only has one computer in it, which means that in
reality only one of these processes can ever be active at any given time. The
operating system in Windows Phone gives the illusion of multiple computer
processors by switching rapidly between each active process. This is the cause of
our problem. Consider the following sequence of events:
1. Update runs and reads the X value of the acceleration
2. The Accelerometer event fires and starts running. It generates and
stores new values of X, Y and Z
3. Update reads the Y and Z values from the updated values
4. Update now has “scrambled” data made up of a mix of old and new
readings.
In the case of our game we don‟t have much of a problem here, in that it only
uses the X value of the accelerometer anyway. But if we had a more advanced
game which used all three values the result would be that every now and then the
Update method would be given information that wasn‟t correct. In an even
larger and more complex program that used multiple processes this could cause
huge problems.
Of course the problem will only happen every now and then, when the timing of
the two events was very close together, but the longer the program runs the more
chance there is of the problem arising.
The way to solve the problem is to recognise that there are some operations in a
program that should not be interruptible. We need a way to stop the

Adding sound to a game
XNA Overview 125
accelerometer process from being able to interrupt the Update process, and vice
versa. The C# language provides a way of doing this. It is called a lock.
A given process can grab a particular lock object and start doing things. While
that process has the lock object it is not possible for another process to grab that
object. In the program we create a lock object which can be claimed by either
the event handler or the code in Update that uses the accelerometer value:
object accelLock = new object(); void acc_ReadingChanged (object sender, AccelerometerReadingEventArgs e) { lock (accelLock) { accelState.X = (float)e.X; accelState.Y = (float)e.Y; accelState.Z = (float)e.Z; } }
The variable accelLock is of the simplest possible type, that of object. We are
not actually storing any data in this object at all. Instead we are just using it as a
token which can be held by one process or another. This is the new code in
Update that uses the accelerometer reading and is also controlled by the same
lock object
lock (accelLock) { lPaddleY = lPaddleY - (accelState.X * lPaddleSpeed); }
When a process tries to enter a block of code protected by a lock it will try to
grab hold of the lock object. If the object is not available the process will be
made to wait for the lock to be released. This means that it is now not possible
for one method to interrupt another. What will happen instead is that the first
process to arrive at the block will get the lock object and the second process will
have to wait until the lock is released before it can continue.
Locks provide a way of making sure that processes do not end up fighting over
data. It is important that any code protected by a lock will complete quickly, so
that other processes do not have to spend a lot of time waiting for access to the
lock.
It is also important that we avoid what is called the “Deadly Embrace” problem
where process A has obtained lock X and is waiting for lock Y, and process B
has obtained lock Y and is waiting for lock X. We can help prevent this by
making a process either a “producer” which generates data or a “consumer”
which uses data. If no processes are both consumers and producers it is unlikely
that they will be stuck waiting for each other.
6.4 Adding sound to a game We can make games much more interesting by adding sound effects to them. As
far as XNA is concerned a sound in a game is just another form of game
resource. There are two kinds of sounds in a game. There are sound effects
which will accompany particular game events, for example the sound of a
spaceship exploding when it is hit with a missile, and there is background music
which plays underneath the gameplay.
Sound effects are loaded into the game as content. They start as WAV files and
are stored in memory when the game runs. They are played instantly on request.

Adding sound to a game
XNA Overview 126
Music files can also be supplied as game content but are played by the media
player.
Creating Sounds
There are many programs that can be used to prepare sound files for inclusion in
games. A good one is the program called Audacity. This provides sound capture
and editing facilities. It can also convert sound files between different formats
and re-sample sounds to reduce the size of sound files. Audacity is a free
download from http://audacity.sourceforge.net
This shows a sound sample being edited in Audacity.
Sound samples and content
As far as an XNA game is concerned, a sound is just another item of content. It
can be added alongside other content items and stored and managed by the
content manager.
Within the game the SoundEffect class is used to hold the sound items:
// Sound effects SoundEffect dingSound; SoundEffect explodeSound;
These are loaded in the LoadContent method, as usual:
dingSound = Content.Load<SoundEffect>("ding"); explodeSound = Content.Load<SoundEffect>("explode");
A SoundEffect instance provides a Play method that triggers the playback of
the sound:

Adding sound to a game
XNA Overview 127
if (ballRectangle.Intersects(rPaddleRectangle)) { ballXSpeed = -ballXSpeed; dingSound.Play(); }
This is the code that detects a collision of the bat with the ball. The ding sound
effect is played when this happens. This is the simplest form of sound effect
playback. The sound is made the instant the method is called. The program will
continue running as the sound is played. Windows Phone can play multiple
sound effects at the same time; the hardware supports up to 64 simultaneous
sound channels.
Using the SoundEffectInstance class
The SoundEffect class is very easy to use. It is a great way of playing sounds
quickly. A game does not have to worry about the sound once it has started
playing. However, sometimes a game needs to do more than just play the sound
to completion. Some sound effects have to be made to play repeatedly, change in
pitch or move to the left or the right. To get this extra control over a sound a
game can create a SoundEffectInstance value from a particular sound effect.
We can think of this as a handle onto a playing sound. For example we might
want to create the sound of a continuously running engine. To do this we start
with a SoundEffect which contains the sound sample.
SoundEffect engineSound;
This would be loaded from an item of content which contains the engine sound.
Next we need to declare a SoundEffectInstance variable:
SoundEffectInstance engineInstance;
We can ask a SoundEffect to give us a playable instance of the sound:
engineInstance = engineSound.CreateInstance();
Now we can all methods on this to control the sound playback of the sound
effect instance:
engineInstance.Play(); ... engineInstance.Pause(); ... engineInstance.Stop();
Note that the program can stop and start the playback of the sound effect
instance, which is not something that is possible with a simple sound effect. A
game can also control the volume, pitch and pan of a sound effect instance:
engineInstance.Volume = 1; // volume ranges from 0 to 1
engineInstance.Pitch = 0; // pitch ranges from -1 to +1 // -1 – octave lower // +1 – octave higher
engineInstance.Pan = 0; // pan ranges from -1 to +1 // -1 – hard left // +1 – hard right
The program can also make a sound loop, i.e. play repeatedly:
engineInstance.IsLooped = true;
Finally a program can test the state of the sound playback:
if (engineInstance.State == SoundState.Stopped) { engineInstance.Play(); }
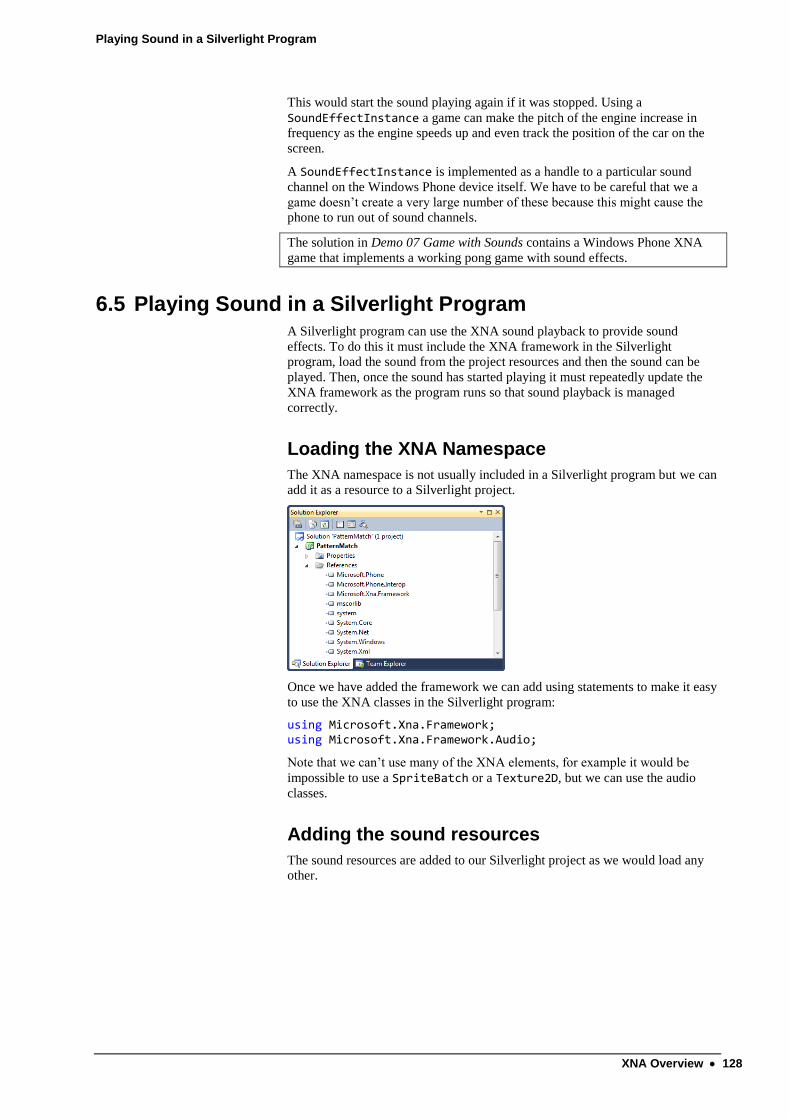
Playing Sound in a Silverlight Program
XNA Overview 128
This would start the sound playing again if it was stopped. Using a
SoundEffectInstance a game can make the pitch of the engine increase in
frequency as the engine speeds up and even track the position of the car on the
screen.
A SoundEffectInstance is implemented as a handle to a particular sound
channel on the Windows Phone device itself. We have to be careful that we a
game doesn‟t create a very large number of these because this might cause the
phone to run out of sound channels.
The solution in Demo 07 Game with Sounds contains a Windows Phone XNA
game that implements a working pong game with sound effects.
6.5 Playing Sound in a Silverlight Program A Silverlight program can use the XNA sound playback to provide sound
effects. To do this it must include the XNA framework in the Silverlight
program, load the sound from the project resources and then the sound can be
played. Then, once the sound has started playing it must repeatedly update the
XNA framework as the program runs so that sound playback is managed
correctly.
Loading the XNA Namespace
The XNA namespace is not usually included in a Silverlight program but we can
add it as a resource to a Silverlight project.
Once we have added the framework we can add using statements to make it easy
to use the XNA classes in the Silverlight program:
using Microsoft.Xna.Framework; using Microsoft.Xna.Framework.Audio;
Note that we can‟t use many of the XNA elements, for example it would be
impossible to use a SpriteBatch or a Texture2D, but we can use the audio
classes.
Adding the sound resources
The sound resources are added to our Silverlight project as we would load any
other.

Playing Sound in a Silverlight Program
XNA Overview 129
Here you can see that I have created a folder called Sounds which is going to
hold all the sound samples in the program. The resources themselves must be
added as Content:
Now that the sound sample is part of the project, the next thing that the
Silverlight program must do is load the sound data when the program starts
running.
Loading a SoundEffect in a Silverlight program
Because there is no content management in a Silverlight program it must use a
different way to load the SoundEffect value. A SoundEffect can be
constructed using a method which loads the sound data from a stream. The
following statement will do this for us:
SoundEffect beep; ... beep = SoundEffect.FromStream( TitleContainer.OpenStream("Sounds/beep.wav"));
The TitleContainer class is part of the Silverlight solution, and can open any
of the content items in the project as a stream. The result of this statement is that
we now have a SoundEffect that we can play in a Silverlight program.
Playing the sound
A Silverlight program plays the sound in exactly the same way as an XNA
program.
beep.Play();
A Silverlight program can also use SoundEffectInstance values to play more
complicated sounds.
However, there is one important thing that a Silverlight system must do to make
sure that sound playback works correctly. You will remember that in an XNA
game the Update method is called 30 times a second. When an XNA game
updates it also updates some of the system elements, including sound playback.
A Silverlight program does not have this regular update behaviour, and so we
need to add an update call to keep the framework running:
FrameworkDispatcher.Update();
Managing screen dimensions and orientation
XNA Overview 130
This must be called around 30 times a second, otherwise sound playback may
fail and the program itself may be stopped.
The best way to get this method called regularly is to create a timer to make the
call for us. A timer is an object that will generate events at regular intervals. We
can bind a method to the timer event and make the method call our despatcher.
Our program can use a DispatcherTimer. This is part of the
System.Threading namespace:
using System.Windows.Threading;
The code to create the timer and start it ticking is as follows:
DispatcherTimer timer = new DispatcherTimer(); timer.Tick += new EventHandler(timer_Tick); timer.Interval = TimeSpan.FromTicks(333333); timer.Start();
This code creates the timer, connects a method to the Tick event, sets the update
rate to 30 Hz and then starts the timer running. The timer_tick method just has
to update the XNA framework.
void timer_Tick(object sender, EventArgs e) { FrameworkDispatcher.Update(); }
Timers are very useful things. A Silverlight program does have the regular
update/draw method calls that an XNA game does, and so you can use a timer to
allow you to create moving backgrounds or ticking clocks and the like.
The solution in Demo 08 Silverlight with Sound contains a Windows Phone
Silverlight adding machine that plays a sound effect each time a new result is
displayed.
6.6 Managing screen dimensions and orientation We have already seen that a Windows Phone program can be used in more than
one orientation. By default (i.e. unless we say otherwise) an XNA game is
created that is played in landscape mode with the display towards the left.
However, sometimes we want to play games in portrait mode. Our games can
tell XNA the forms of orientation they can support and then receive events when
the player tips the phone into a new orientation.
The graphics class in a game provides a number of properties that games can use
to manage orientation and screen size:
graphics.SupportedOrientations = DisplayOrientation.Portrait | DisplayOrientation.LandscapeLeft | DisplayOrientation.LandscapeRight;
To allow a particular orientation we just have to add it to the values that are
combined using the arithmetic OR operator, as shown above.
If we want our game to get control when the orientation of the screen changes
we can bind a method to the event handler as shown below:
Window.OrientationChanged += new EventHandler<EventArgs>(Window_OrientationChanged);
The Window_OrientationChanged method can then resize all the objects on
the screen to reflect the new orientation of the game. We have already seen how
a program can get the width and height of the display screen. The orientation
handler method would use these values to set the new dimensions of the
elements in the game.

Managing screen dimensions and orientation
XNA Overview 131
void Window_OrientationChanged(object sender, EventArgs e) { // resize the objects here }
The required orientation is best set in the constructor for the game class.
Selecting a screen size
Games can also select a specific screen size:
graphics.PreferredBackBufferWidth = 480; graphics.PreferredBackBufferHeight = 800;
If our game does this it forces the display to run at the requested resolution. It
also forces the orientation too. The above width and height values would make
the game work on portrait mode because the height of the game is greater than
the width.
The clever thing about this is that when we set a particular display resolution the
Windows Phone display hardware will make sure that we get that resolution,
irrespective of the dimensions of the actual screen. In other words our game can
operate as if the screen is that size and the hardware will make sure that it looks
correct. This is a way you can make sure that your games will always look
correct on the current version, and any new versions, of the Windows Phone
hardware. No matter what new devices come along and whatever screen sizes
they have the game will always look correct because the display will be scaled to
fit the requested size.
We can use this to our advantage to improve the performance of our games:
graphics.PreferredBackBufferWidth = 240; graphics.PreferredBackBufferHeight = 400;
The above statements ask for a screen which is smaller than the one fitted to
most Windows Phone devices. In fact this screen is a quarter the size of the
previous one. However, the hardware scaling in the Windows Phone will ensure
that the screen looks correct on a larger display by performing scaling of the
image. In a fast moving game this is not usually noticeable and the fact that the
display is only a quarter the size of the previous one will make a huge difference
to the graphical performance.
Using the Full Screen
At the moment every XNA game that we have produced has been scaled slightly
to fit a smaller screen. This is because by default an XNA game does not use the
top bar of the phone display. This display area is set aside for status messages. If
we want our game to use the entire screen we must explicitly request this:
graphics.IsFullScreen = true;
A game can set this property to true or false. If it is set to true this means that the
game can use the whole of the Windows Phone screen. I always set this to true
to give my games the maximum possible amount of display area.
Disabling the screen timeout
The owner of a Windows Phone can set a screen timeout for the device. The idea
is that if the phone is left doing nothing for a while it will shut down the screen
and lock itself to save battery life. The phone monitors the touch screen to detect
user input and if there is no input for the prescribed time it will shut down. The
phone does not check the accelerometer however, so if we make a game that is
entirely controlled by tipping the phone our customers would become very upset
What we have learned
XNA Overview 132
when they played the game. They would just be getting to an interesting part and
then find that their screen went blank.
A game can disable the screen timeout function by turning off the screen saver
in the XNA Guide:
Guide.IsScreenSaverEnabled = false;
The XNA Guide is the part of XNA that has conversations with the player about
their Xbox Live membership and achievements etc. If we tell it to stop the
screen saver from appearing this means that the game can continue until the
phone battery goes flat. You should use this option with care. If a user gets bored
by your game and puts the phone down it will not shut down if the screensaver
has been turned off. This may mean that the phone battery will go flat as the
game has been left running.
If you do have a game that is controlled by the accelerometer I would also add
some gameplay element where a player has to touch the screen every now and
then to keep the phone awake. I would much rather have a game that worked in
this way rather than one that ran the risk of flattening the phone battery.
What we have learned 1. The XNA framework provides an environment for creating 2D and 3D
games. The games can be created for Windows PC, Xbox 360 or
Windows Phone.
2. XNA games operate in a completely different way from Silverlight
applications. An XNA game contains methods to load content, update
the game world and draw the game world which are called by the XNA
framework when a game runs.
3. When Visual Studio creates a new XNA game it makes a class which
contains empty LoadContent, Update and Draw methods that are filled
in as a game is written. The LoadContent method should load all the
required game content. The Update method is called by XNA 30 times
a second to update the game content and the Draw method is called to
render the game on the screen.
4. Any content (for example images or sounds) added to an XNA game is
managed by the Content Management process that provides input filters
for different file types and also output processors that prepare the
content for deployment to the target device. Within an XNA game the
way that content is loaded and used the same irrespective of the target
hardware.
5. A sprite is made up of a texture which gives the image to be drawn and
a position which determines where to draw the item and its size. The
XNA Framework provides objects that can hold this information.
6. When drawing in 2D within the XNA system a given position on the
screen is represented by pixel coordinates with the origin at the top left
hand corner of the display.
7. The SpriteBatch class is able to batch up drawing commands and send
them to the Graphics Processor Unit (GPU).
8. The Windows Phone touch panel can provide a low level array of touch
location information which can contain details of at least 4 touch
events.
9. XNA games can display text by using spritefonts made from fonts on
the host Windows PC

What we have learned
XNA Overview 133
10. XNA and Silverlight programs can play sound effects. For greater
control of sound effect playback a program can create a
SoundEffectInstance value which is a handle to a playing sound.
11. XNA programs on Windows Phone can select a particular display
resolution and orientation. If they select a resolution lower than that
supported by the phone display the GPU will automatically scale the
selected size to fit the screen of the device.
12. XNA programs on Windows Phone can disable the status bar at the top
of the screen so that they can use the entire screen area. They can also
disable the screensaver so that they are not timed out by the phone.

The Windows Phone icons and Splash Screens
Creating Windows Phone Applications 134
7 Creating Windows Phone Applications
We now know enough to make programs that run on the Windows Phone
device. In this section we will to take a look at what takes a program and turns it
into a “proper” application. This includes a variety of topics, from how to give
your program a custom splash screen and icons to how a program can store data
on a phone device.
7.1 The Windows Phone icons and Splash Screens At the moment all the programs that we have written have had the same icon and
“splash screen”. These have been the “empty” ones that Visual Studio created
when it made a new project. There are two images that Windows Phone uses to
identify your program when it is stored on the phone. To understand how these
are used we have to learn a little about how Windows Phone users find and run
programs on the device.
A Windows Phone has a “Start” screen which is displayed whenever the user
presses the “Start” button on the device:
The user can then touch any of the large tiles on the start screen to run the
program behind that tile. Alternatively they can slide the start screen to the left
(or press the little arrow at the top right of the screen) to move to a list of
applications that are installed on the device.
Then the user can scroll up and down the application list and select the program
that they want to run. If the user wants to be able to start one of their
applications from the Start screen they can “pin” it to the start screen.

The Windows Phone icons and Splash Screens
Creating Windows Phone Applications 135
Silverlight icons
If you create a new Silverlight application Visual Studio will create a project that
contains “default” versions of these two icons:
The file ApplicationIcon.png holds the image to be used in the application
list. The file Background.png holds the image to be used when the application
has been “pinned” to the Start menu.
XNA icons
If you create a new XNA application Visual Studio will create a slightly
different arrangement of programs and the icon files are named differently too:
The file GameThumbnail.png holds the image to be used in the application list.
The file Background.png holds the image to be used when the application has
been “pinned” to the Start menu.
Customising Icons
If you want to customise the program icons (and you should) you can open and
edit these files with any paint program that you like. Remember that they are
stored in the project folder along with all the project files. However, you must
make sure that you retain the file type and the image dimensions of the originals.
From my experience it turns out that designing icons like this (particularly small
ones) is something of an art form. For this reason if you can find an artist to do
the design for you this will probably be a good idea. If you have to do the work
yourself I would advise you to make the design as simple as possible and make
sure that it gives the user a good idea of what your program does. Remember
that the icon for your program is also used to promote it in the Marketplace, so
the better and slicker the icon looks the more chance there is of people
downloading and buying your program.
Splash Screens
A “splash screen” is something that a program “splashes” onto the display as it
starts up. These can be used to “brand” your application by showing your
company logo when your program starts. Splash screens are also useful to
improve the experience of program users when your program starts running. At
the very least a splash screen will give them something nice to look at as your
program loads.

Persisting data in isolated storage
Creating Windows Phone Applications 136
Silverlight splash screens
The Silverlight run time system has a splash screen behaviour built in. A new
Silverlight project actually contains an image file which is displayed during the
interval between a program being started and the MainPage being displayed on
the screen. If you have run programs on the emulator you may have seen this for
a brief instant at the very start of a program run.
If your programs become larger, with more elements on the page and more
resources to be loaded, this page may be displayed for more time. You can make
your own version by modifying the SplashScreenImage.jpg file in your
Silverlight project.
XNA splash screens
XNA programs do not have splash screens provided as part of the game project.
We have already seen that the way that the display is produced is quite different.
When an XNA program starts running the LoadContent method is called to
fetch assets from storage and make them available to the game. Once the content
has been loaded the Draw and Update methods begin to be called. This can lead
to problems. The XNA framework insists on a game displaying something on
the screen within five seconds of the program starting. If this does not happen
the framework assumes that the game has got stuck and aborts it. This would
mean that your game never actually gets to run if the content loading takes too
long.
Fortunately an XNA does not have to load all the content at the start. A game
can use the content manager to load items at any time. A program can also fire
off threads to perform background loading of items while the game runs. The
upshot of all this is that for XNA you need to develop a strategy for loading
content. Perhaps the game LoadContent method could just load a splashscreen
texture and this could be displayed while the rest of the content items are
fetched.
It turns out that this is a problem common to games on all platforms. A major
limiting factor in the development of ever larger console games is the limited
access speed and transfer rate of the optical drives used to load information from
the storage media.
7.2 Persisting data in isolated storage A proper application will need to store data which it can use each time it runs. A
Silverlight application will need to hold settings and information the user is
working on and an XNA game will want to store information about the progress
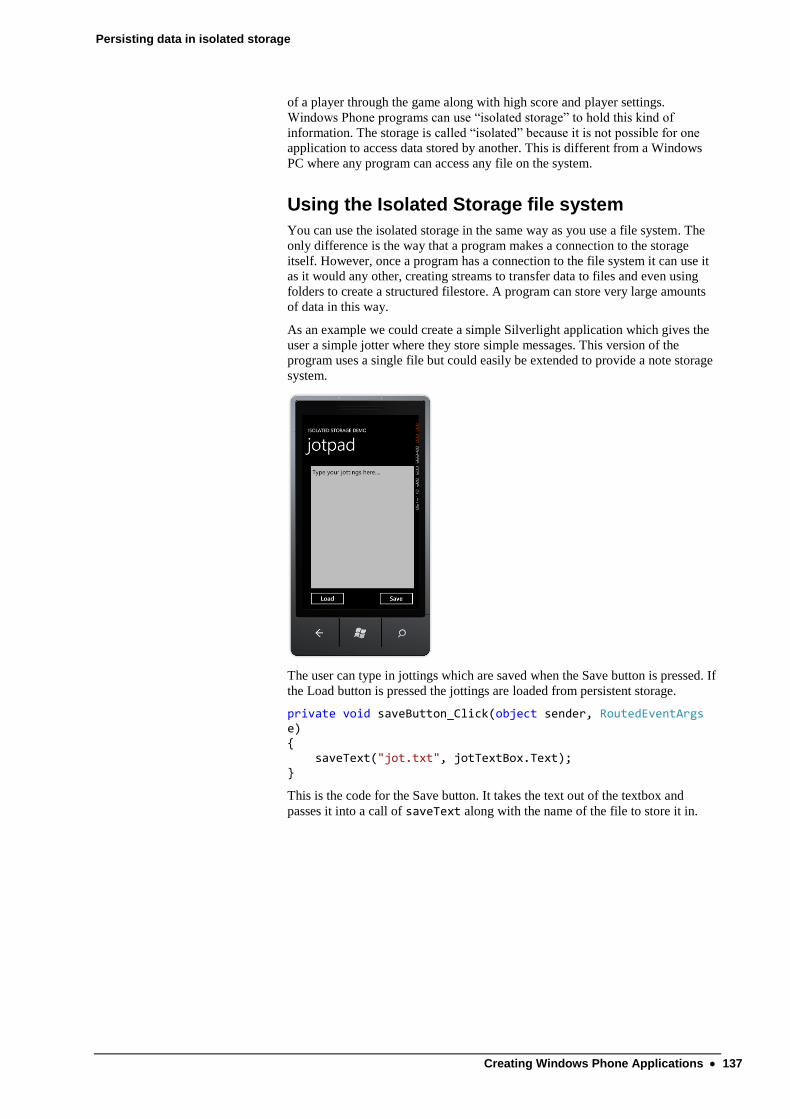
Persisting data in isolated storage
Creating Windows Phone Applications 137
of a player through the game along with high score and player settings.
Windows Phone programs can use “isolated storage” to hold this kind of
information. The storage is called “isolated” because it is not possible for one
application to access data stored by another. This is different from a Windows
PC where any program can access any file on the system.
Using the Isolated Storage file system
You can use the isolated storage in the same way as you use a file system. The
only difference is the way that a program makes a connection to the storage
itself. However, once a program has a connection to the file system it can use it
as it would any other, creating streams to transfer data to files and even using
folders to create a structured filestore. A program can store very large amounts
of data in this way.
As an example we could create a simple Silverlight application which gives the
user a simple jotter where they store simple messages. This version of the
program uses a single file but could easily be extended to provide a note storage
system.
The user can type in jottings which are saved when the Save button is pressed. If
the Load button is pressed the jottings are loaded from persistent storage.
private void saveButton_Click(object sender, RoutedEventArgs e) { saveText("jot.txt", jotTextBox.Text); }
This is the code for the Save button. It takes the text out of the textbox and
passes it into a call of saveText along with the name of the file to store it in.
Persisting data in isolated storage
Creating Windows Phone Applications 138
private void saveText(string filename, string text) { using (IsolatedStorageFile isf = IsolatedStorageFile. GetUserStoreForApplication()) { using (IsolatedStorageFileStream rawStream = isf.CreateFile(filename)) { StreamWriter writer = new StreamWriter(rawStream); writer.Write(text); writer.Close(); } } }
The saveText method creates a stream connected to the specified file and then
writes the text out to it. Note that once we have a stream we can use it like any
other. In this case the method creates a StreamWriter and then just sends the
text out to that stream.
The read button uses a loadText method to do the reverse of this operation.
private void loadButton_Click(object sender, RoutedEventArgs e) { string text; if ( loadText("jot.txt", out text ) ) { jotTextBox.Text = text; } else { jotTextBox.Text = "Type your jottings here...."; } }
The loadText method tries to open a file with the name it has been given. It
then tries to read a string from that file. If any part of the read operation fails the
loadText method returns false and jotTextBox is set to a starting message.
If the file can be read correctly the loadText method returns true and sets the
output parameter to the contents of the file. This is then used to set the text in
jotTextBox.
Note that we are using an out parameter to allow the loadText method to
return the string that was read as well as whether it worked or not.
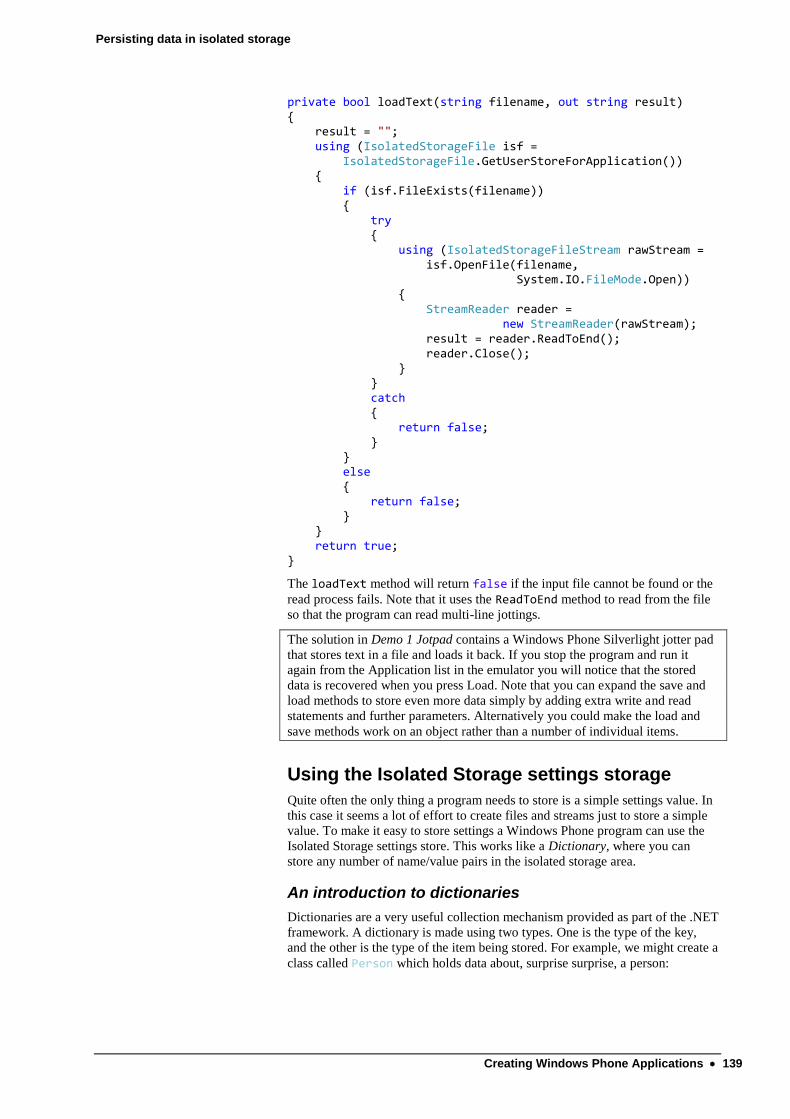
Persisting data in isolated storage
Creating Windows Phone Applications 139
private bool loadText(string filename, out string result) { result = ""; using (IsolatedStorageFile isf = IsolatedStorageFile.GetUserStoreForApplication()) { if (isf.FileExists(filename)) { try { using (IsolatedStorageFileStream rawStream = isf.OpenFile(filename, System.IO.FileMode.Open)) { StreamReader reader = new StreamReader(rawStream); result = reader.ReadToEnd(); reader.Close(); } } catch { return false; } } else { return false; } } return true; }
The loadText method will return false if the input file cannot be found or the
read process fails. Note that it uses the ReadToEnd method to read from the file
so that the program can read multi-line jottings.
The solution in Demo 1 Jotpad contains a Windows Phone Silverlight jotter pad
that stores text in a file and loads it back. If you stop the program and run it
again from the Application list in the emulator you will notice that the stored
data is recovered when you press Load. Note that you can expand the save and
load methods to store even more data simply by adding extra write and read
statements and further parameters. Alternatively you could make the load and
save methods work on an object rather than a number of individual items.
Using the Isolated Storage settings storage
Quite often the only thing a program needs to store is a simple settings value. In
this case it seems a lot of effort to create files and streams just to store a simple
value. To make it easy to store settings a Windows Phone program can use the
Isolated Storage settings store. This works like a Dictionary, where you can
store any number of name/value pairs in the isolated storage area.
An introduction to dictionaries
Dictionaries are a very useful collection mechanism provided as part of the .NET
framework. A dictionary is made using two types. One is the type of the key,
and the other is the type of the item being stored. For example, we might create a
class called Person which holds data about, surprise surprise, a person:
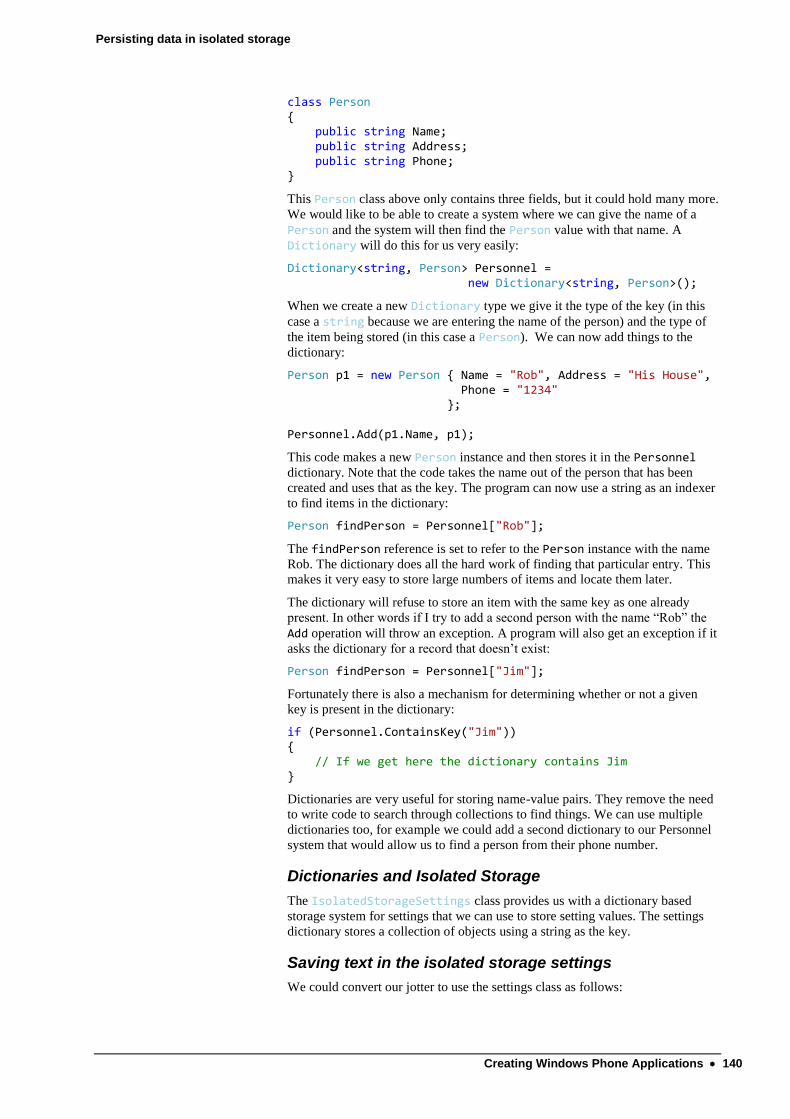
Persisting data in isolated storage
Creating Windows Phone Applications 140
class Person { public string Name; public string Address; public string Phone; }
This Person class above only contains three fields, but it could hold many more.
We would like to be able to create a system where we can give the name of a
Person and the system will then find the Person value with that name. A
Dictionary will do this for us very easily:
Dictionary<string, Person> Personnel = new Dictionary<string, Person>();
When we create a new Dictionary type we give it the type of the key (in this
case a string because we are entering the name of the person) and the type of
the item being stored (in this case a Person). We can now add things to the
dictionary:
Person p1 = new Person { Name = "Rob", Address = "His House", Phone = "1234" }; Personnel.Add(p1.Name, p1);
This code makes a new Person instance and then stores it in the Personnel
dictionary. Note that the code takes the name out of the person that has been
created and uses that as the key. The program can now use a string as an indexer
to find items in the dictionary:
Person findPerson = Personnel["Rob"];
The findPerson reference is set to refer to the Person instance with the name
Rob. The dictionary does all the hard work of finding that particular entry. This
makes it very easy to store large numbers of items and locate them later.
The dictionary will refuse to store an item with the same key as one already
present. In other words if I try to add a second person with the name “Rob” the
Add operation will throw an exception. A program will also get an exception if it
asks the dictionary for a record that doesn‟t exist:
Person findPerson = Personnel["Jim"];
Fortunately there is also a mechanism for determining whether or not a given
key is present in the dictionary:
if (Personnel.ContainsKey("Jim")) { // If we get here the dictionary contains Jim }
Dictionaries are very useful for storing name-value pairs. They remove the need
to write code to search through collections to find things. We can use multiple
dictionaries too, for example we could add a second dictionary to our Personnel
system that would allow us to find a person from their phone number.
Dictionaries and Isolated Storage
The IsolatedStorageSettings class provides us with a dictionary based
storage system for settings that we can use to store setting values. The settings
dictionary stores a collection of objects using a string as the key.
Saving text in the isolated storage settings
We could convert our jotter to use the settings class as follows:
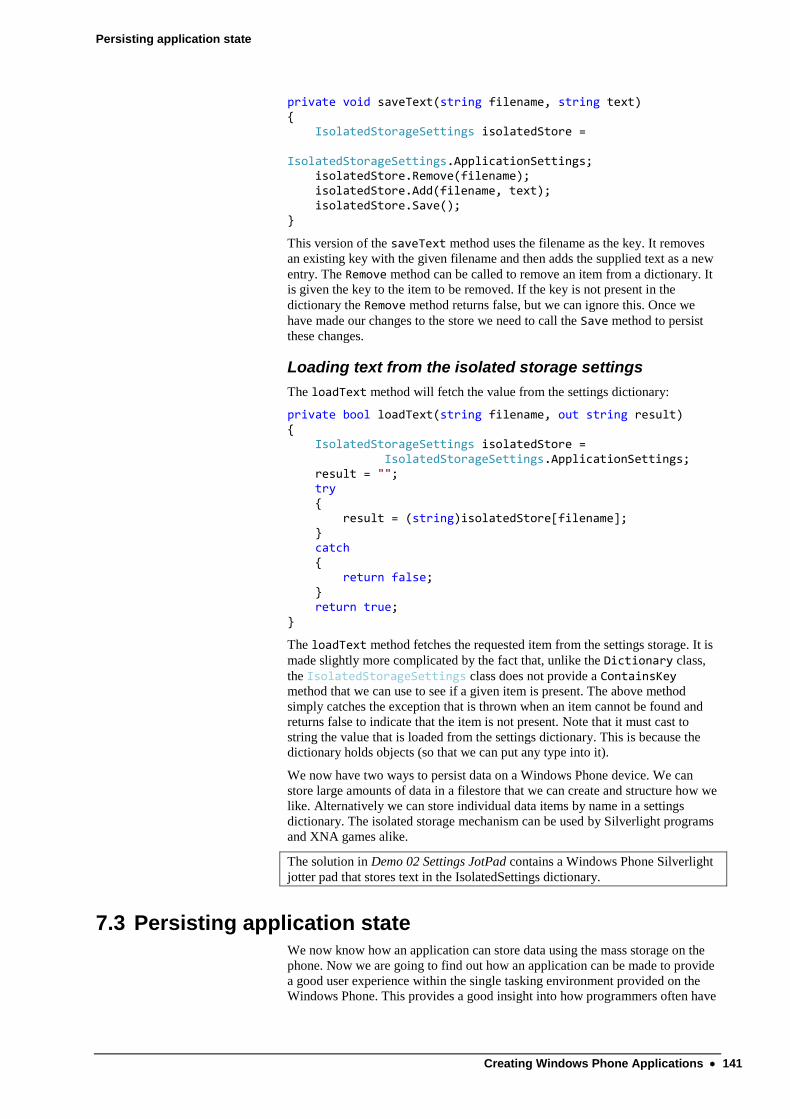
Persisting application state
Creating Windows Phone Applications 141
private void saveText(string filename, string text) { IsolatedStorageSettings isolatedStore = IsolatedStorageSettings.ApplicationSettings; isolatedStore.Remove(filename); isolatedStore.Add(filename, text); isolatedStore.Save(); }
This version of the saveText method uses the filename as the key. It removes
an existing key with the given filename and then adds the supplied text as a new
entry. The Remove method can be called to remove an item from a dictionary. It
is given the key to the item to be removed. If the key is not present in the
dictionary the Remove method returns false, but we can ignore this. Once we
have made our changes to the store we need to call the Save method to persist
these changes.
Loading text from the isolated storage settings
The loadText method will fetch the value from the settings dictionary:
private bool loadText(string filename, out string result) { IsolatedStorageSettings isolatedStore = IsolatedStorageSettings.ApplicationSettings; result = ""; try { result = (string)isolatedStore[filename]; } catch { return false; } return true; }
The loadText method fetches the requested item from the settings storage. It is
made slightly more complicated by the fact that, unlike the Dictionary class,
the IsolatedStorageSettings class does not provide a ContainsKey
method that we can use to see if a given item is present. The above method
simply catches the exception that is thrown when an item cannot be found and
returns false to indicate that the item is not present. Note that it must cast to
string the value that is loaded from the settings dictionary. This is because the
dictionary holds objects (so that we can put any type into it).
We now have two ways to persist data on a Windows Phone device. We can
store large amounts of data in a filestore that we can create and structure how we
like. Alternatively we can store individual data items by name in a settings
dictionary. The isolated storage mechanism can be used by Silverlight programs
and XNA games alike.
The solution in Demo 02 Settings JotPad contains a Windows Phone Silverlight
jotter pad that stores text in the IsolatedSettings dictionary.
7.3 Persisting application state We now know how an application can store data using the mass storage on the
phone. Now we are going to find out how an application can be made to provide
a good user experience within the single tasking environment provided on the
Windows Phone. This provides a good insight into how programmers often have

Persisting application state
Creating Windows Phone Applications 142
to make use of systems that are compromised by underlying limitations of the
platform and operating system.
Single process operation
The Windows Phone operating system is inherently multi-tasking. This means
that it can easily run more than one process at the same time. This is how it can
play music using the Zune program while you use the phone to check your
email. However, for a number of very sound technical reasons this multi-tasking
ability is not extended to applications running on the system. The creators of the
Windows Phone system took a deliberate design decision not to allow more than
one application to be active at any given time.
In some ways this is a good thing. It stops our programs from looking bad just
because another application in the phone is stealing all the memory or processor
time. But it does give us some programming challenges that we must address
when we write Windows Phone applications.
When we write an application the aim should be to make it appear that the
application never stops when a user leaves it and goes off to do something else.
This “leaving and going off to do something else” is a behaviour that is strongly
encouraged by the design of the Windows Phone user interface.
The Start and Back buttons
While Windows Phone does not have multi-tasking it does have features which
have been designed to make it easy for a user to move in and out of programs.
These are based on the hardware Back and Start buttons that are fitted to every
Windows phonee device.
The Back button allows a user to exit a program and return to the one that they
were previously running and the Start button allows a user to leave a program at
any point and go to the Start screen to run another. Used in combination these
buttons greatly enhance the user experience. It is easy to press Start to send a
quick SMS message and then press Back to return to whatever you were doing
before. The Back and Start button allow the user to navigate through a stack of
recently used applications.
Application switching
The result of all this is that an application must be adept at saving its state and
then restoring itself to the same state when the user returns to it. The Windows
Phone system helps us do this by sending an application messages that indicate
when it is about to be removed from memory. In this section we are going to
explore the situations in which the messages are sent and how we can make our
applications and games respond correctly to give the appearance that they are
always active.
Understanding tombstoning
If we are going to understand how to make programs that behave properly we
are going to have to learn some of the terminology used by the Windows Phone
designers to describe what happens when a program runs.
When a program is launched the program files are loaded into memory and
executed by the Windows Phone processor. There are two things that the user
can do next. The user can exit the program by pressing the Back button at the top
level menu of the program or the user can “tombstone” the program by pressing
the Start button. A program can also be “tombstoned” if the phone lock screen
is displayed because the phone has not been used and has timed out.
If the program is being exited it receives a “Closing” message. If the program is
being “tombstoned” it receives a “Deactivated” message. A program is allowed
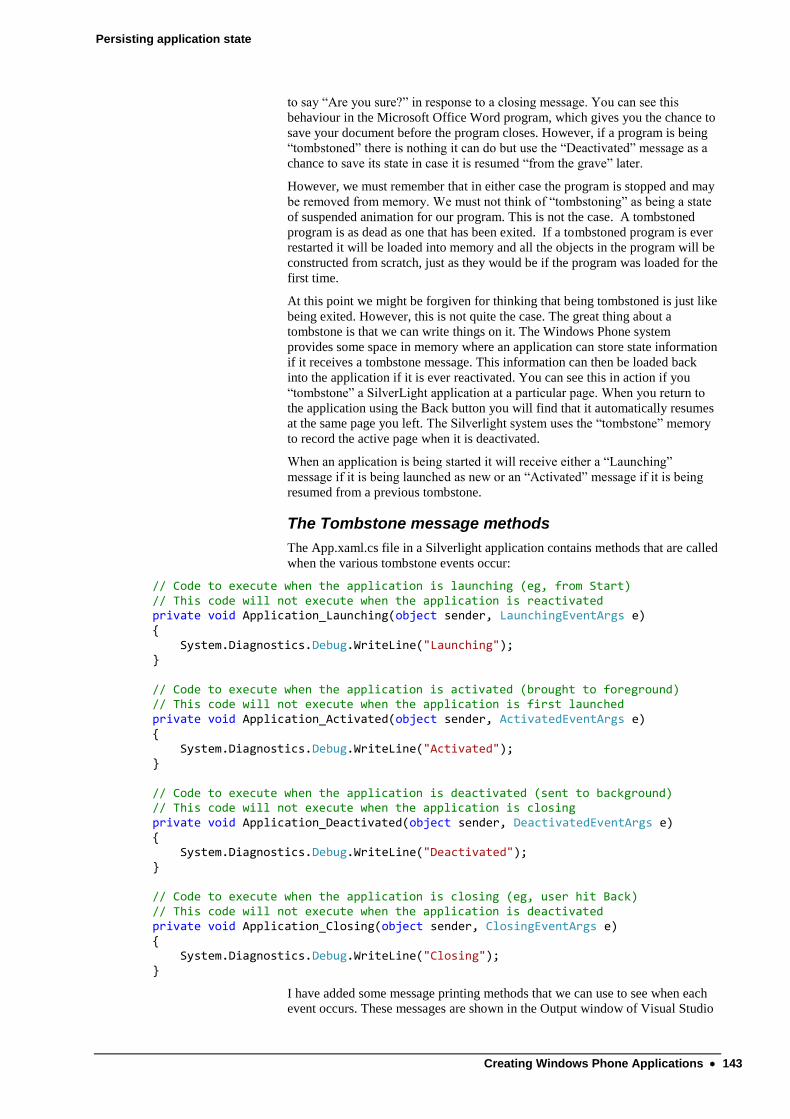
Persisting application state
Creating Windows Phone Applications 143
to say “Are you sure?” in response to a closing message. You can see this
behaviour in the Microsoft Office Word program, which gives you the chance to
save your document before the program closes. However, if a program is being
“tombstoned” there is nothing it can do but use the “Deactivated” message as a
chance to save its state in case it is resumed “from the grave” later.
However, we must remember that in either case the program is stopped and may
be removed from memory. We must not think of “tombstoning” as being a state
of suspended animation for our program. This is not the case. A tombstoned
program is as dead as one that has been exited. If a tombstoned program is ever
restarted it will be loaded into memory and all the objects in the program will be
constructed from scratch, just as they would be if the program was loaded for the
first time.
At this point we might be forgiven for thinking that being tombstoned is just like
being exited. However, this is not quite the case. The great thing about a
tombstone is that we can write things on it. The Windows Phone system
provides some space in memory where an application can store state information
if it receives a tombstone message. This information can then be loaded back
into the application if it is ever reactivated. You can see this in action if you
“tombstone” a SilverLight application at a particular page. When you return to
the application using the Back button you will find that it automatically resumes
at the same page you left. The Silverlight system uses the “tombstone” memory
to record the active page when it is deactivated.
When an application is being started it will receive either a “Launching”
message if it is being launched as new or an “Activated” message if it is being
resumed from a previous tombstone.
The Tombstone message methods
The App.xaml.cs file in a Silverlight application contains methods that are called
when the various tombstone events occur:
// Code to execute when the application is launching (eg, from Start) // This code will not execute when the application is reactivated private void Application_Launching(object sender, LaunchingEventArgs e) { System.Diagnostics.Debug.WriteLine("Launching"); } // Code to execute when the application is activated (brought to foreground) // This code will not execute when the application is first launched private void Application_Activated(object sender, ActivatedEventArgs e) { System.Diagnostics.Debug.WriteLine("Activated"); } // Code to execute when the application is deactivated (sent to background) // This code will not execute when the application is closing private void Application_Deactivated(object sender, DeactivatedEventArgs e) { System.Diagnostics.Debug.WriteLine("Deactivated"); } // Code to execute when the application is closing (eg, user hit Back) // This code will not execute when the application is deactivated private void Application_Closing(object sender, ClosingEventArgs e) { System.Diagnostics.Debug.WriteLine("Closing"); }
I have added some message printing methods that we can use to see when each
event occurs. These messages are shown in the Output window of Visual Studio
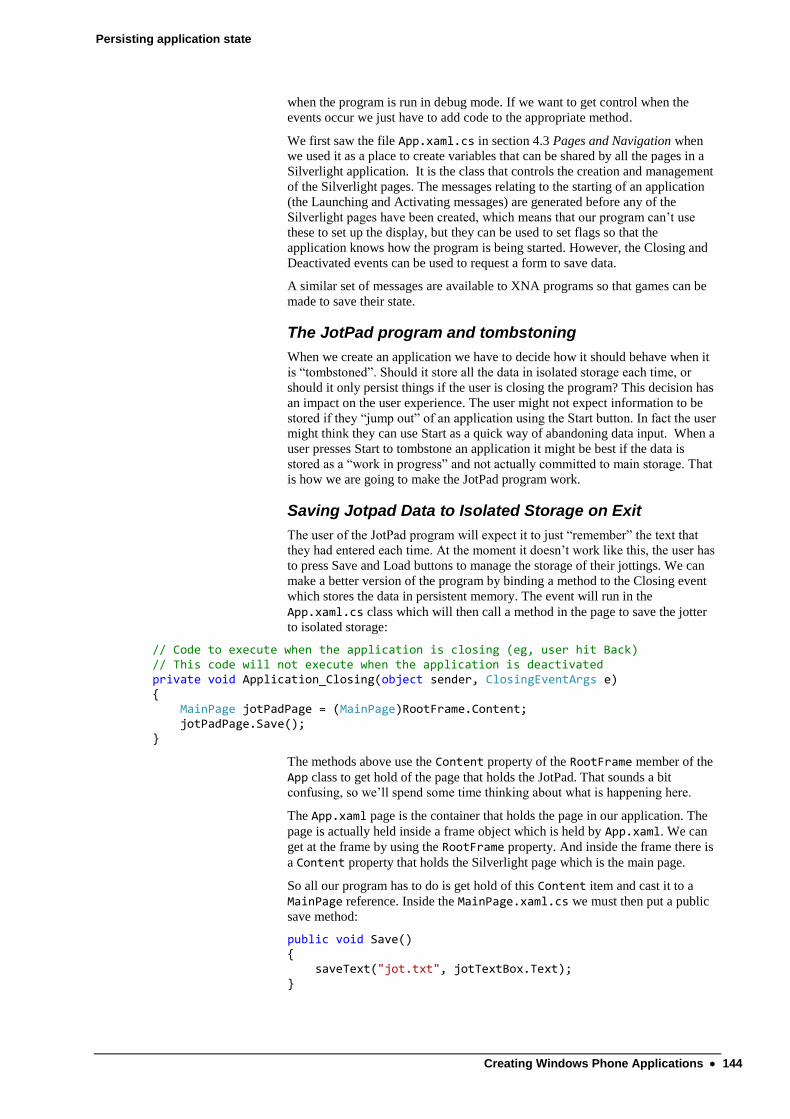
Persisting application state
Creating Windows Phone Applications 144
when the program is run in debug mode. If we want to get control when the
events occur we just have to add code to the appropriate method.
We first saw the file App.xaml.cs in section 4.3 Pages and Navigation when
we used it as a place to create variables that can be shared by all the pages in a
Silverlight application. It is the class that controls the creation and management
of the Silverlight pages. The messages relating to the starting of an application
(the Launching and Activating messages) are generated before any of the
Silverlight pages have been created, which means that our program can‟t use
these to set up the display, but they can be used to set flags so that the
application knows how the program is being started. However, the Closing and
Deactivated events can be used to request a form to save data.
A similar set of messages are available to XNA programs so that games can be
made to save their state.
The JotPad program and tombstoning
When we create an application we have to decide how it should behave when it
is “tombstoned”. Should it store all the data in isolated storage each time, or
should it only persist things if the user is closing the program? This decision has
an impact on the user experience. The user might not expect information to be
stored if they “jump out” of an application using the Start button. In fact the user
might think they can use Start as a quick way of abandoning data input. When a
user presses Start to tombstone an application it might be best if the data is
stored as a “work in progress” and not actually committed to main storage. That
is how we are going to make the JotPad program work.
Saving Jotpad Data to Isolated Storage on Exit
The user of the JotPad program will expect it to just “remember” the text that
they had entered each time. At the moment it doesn‟t work like this, the user has
to press Save and Load buttons to manage the storage of their jottings. We can
make a better version of the program by binding a method to the Closing event
which stores the data in persistent memory. The event will run in the
App.xaml.cs class which will then call a method in the page to save the jotter
to isolated storage:
// Code to execute when the application is closing (eg, user hit Back) // This code will not execute when the application is deactivated private void Application_Closing(object sender, ClosingEventArgs e) { MainPage jotPadPage = (MainPage)RootFrame.Content; jotPadPage.Save(); }
The methods above use the Content property of the RootFrame member of the
App class to get hold of the page that holds the JotPad. That sounds a bit
confusing, so we‟ll spend some time thinking about what is happening here.
The App.xaml page is the container that holds the page in our application. The
page is actually held inside a frame object which is held by App.xaml. We can
get at the frame by using the RootFrame property. And inside the frame there is
a Content property that holds the Silverlight page which is the main page.
So all our program has to do is get hold of this Content item and cast it to a
MainPage reference. Inside the MainPage.xaml.cs we must then put a public
save method:
public void Save() { saveText("jot.txt", jotTextBox.Text); }
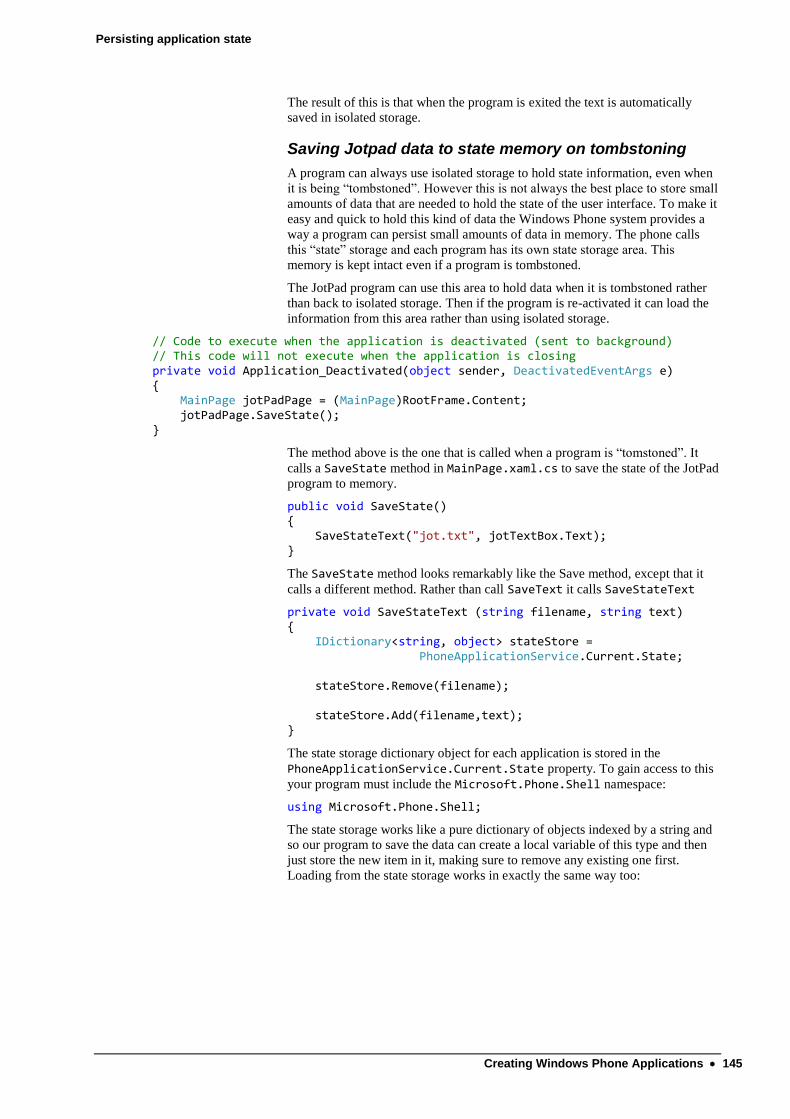
Persisting application state
Creating Windows Phone Applications 145
The result of this is that when the program is exited the text is automatically
saved in isolated storage.
Saving Jotpad data to state memory on tombstoning
A program can always use isolated storage to hold state information, even when
it is being “tombstoned”. However this is not always the best place to store small
amounts of data that are needed to hold the state of the user interface. To make it
easy and quick to hold this kind of data the Windows Phone system provides a
way a program can persist small amounts of data in memory. The phone calls
this “state” storage and each program has its own state storage area. This
memory is kept intact even if a program is tombstoned.
The JotPad program can use this area to hold data when it is tombstoned rather
than back to isolated storage. Then if the program is re-activated it can load the
information from this area rather than using isolated storage.
// Code to execute when the application is deactivated (sent to background) // This code will not execute when the application is closing private void Application_Deactivated(object sender, DeactivatedEventArgs e) { MainPage jotPadPage = (MainPage)RootFrame.Content; jotPadPage.SaveState(); }
The method above is the one that is called when a program is “tomstoned”. It
calls a SaveState method in MainPage.xaml.cs to save the state of the JotPad
program to memory.
public void SaveState() { SaveStateText("jot.txt", jotTextBox.Text); }
The SaveState method looks remarkably like the Save method, except that it
calls a different method. Rather than call SaveText it calls SaveStateText
private void SaveStateText (string filename, string text) { IDictionary<string, object> stateStore = PhoneApplicationService.Current.State; stateStore.Remove(filename); stateStore.Add(filename,text); }
The state storage dictionary object for each application is stored in the
PhoneApplicationService.Current.State property. To gain access to this
your program must include the Microsoft.Phone.Shell namespace:
using Microsoft.Phone.Shell;
The state storage works like a pure dictionary of objects indexed by a string and
so our program to save the data can create a local variable of this type and then
just store the new item in it, making sure to remove any existing one first.
Loading from the state storage works in exactly the same way too:
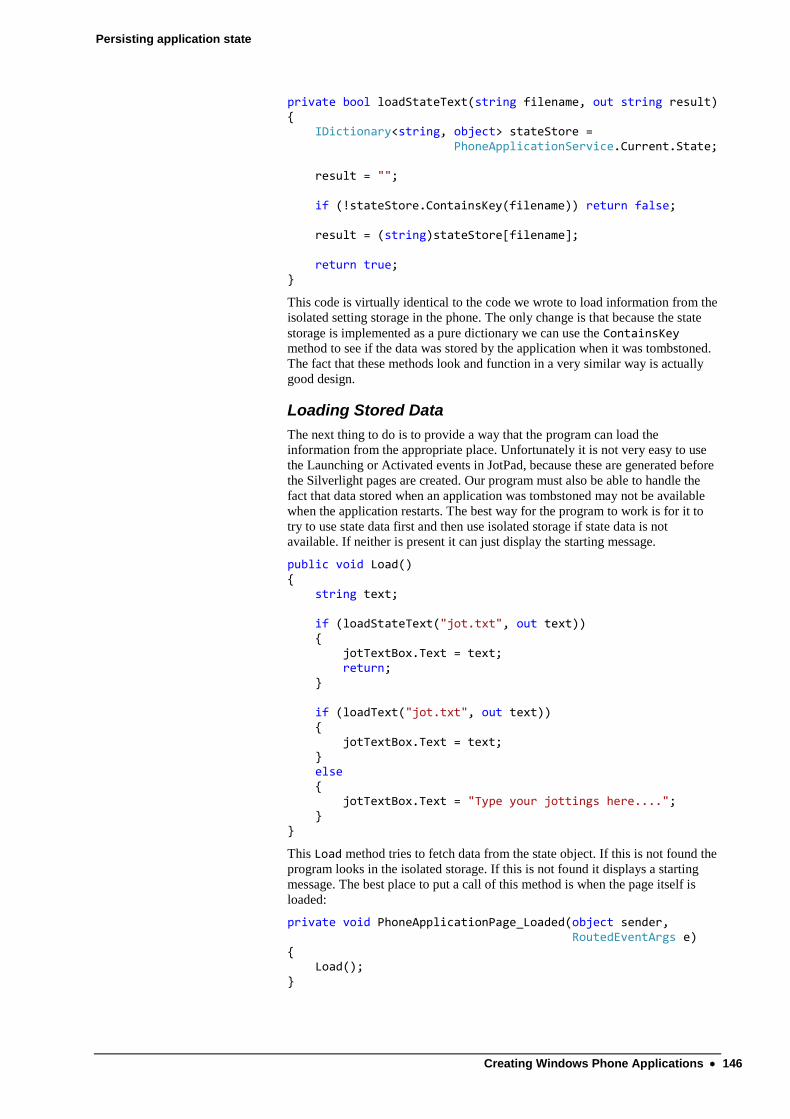
Persisting application state
Creating Windows Phone Applications 146
private bool loadStateText(string filename, out string result) { IDictionary<string, object> stateStore = PhoneApplicationService.Current.State; result = ""; if (!stateStore.ContainsKey(filename)) return false; result = (string)stateStore[filename]; return true; }
This code is virtually identical to the code we wrote to load information from the
isolated setting storage in the phone. The only change is that because the state
storage is implemented as a pure dictionary we can use the ContainsKey
method to see if the data was stored by the application when it was tombstoned.
The fact that these methods look and function in a very similar way is actually
good design.
Loading Stored Data
The next thing to do is to provide a way that the program can load the
information from the appropriate place. Unfortunately it is not very easy to use
the Launching or Activated events in JotPad, because these are generated before
the Silverlight pages are created. Our program must also be able to handle the
fact that data stored when an application was tombstoned may not be available
when the application restarts. The best way for the program to work is for it to
try to use state data first and then use isolated storage if state data is not
available. If neither is present it can just display the starting message.
public void Load() { string text; if (loadStateText("jot.txt", out text)) { jotTextBox.Text = text; return; } if (loadText("jot.txt", out text)) { jotTextBox.Text = text; } else { jotTextBox.Text = "Type your jottings here...."; } }
This Load method tries to fetch data from the state object. If this is not found the
program looks in the isolated storage. If this is not found it displays a starting
message. The best place to put a call of this method is when the page itself is
loaded:
private void PhoneApplicationPage_Loaded(object sender, RoutedEventArgs e) { Load(); }

Launchers and Choosers
Creating Windows Phone Applications 147
If you have a program that needs to behave differently depending on whether it
is newly launched or activated from a tombstone event then you can use the
event handlers above to set flag variables that can be picked up by your code.
Tombstones and development
We can “tombstone” an application even when it is running via Visual Studio. If
the application is restarted any debugging sessions are automatically resumed in
the development environment. This works even if the application is being
debugged within a Windows Phone device.
You can see this at work if you press the Start button in the emulator while one
of your programs is running. Your program is tombstoned but Visual Studio
does not end debugging. If you then press the Back button you will find that the
program will resume execution after being reactivated.
Note that, rather interestingly, a Silverlight application is not “tombstoned”
when a Windows Phone receives a phone call. The application will keep running
unless the user does something which starts another application, for example
looks up a contact during the call.
Tombstones and applications
It is unfortunate that we have to do so many complicated things to give the user
the impression that our application never actually stops. However, it is putting in
the effort to make sure that your applications work correctly in this respect as it
adds a great deal to the user experience. It is worth spending some time working
with this as it is a good way to brush up on your understanding of events and
dictionary storage, amongst other things. It is also an interesting way to discover
that the road to producing a good user experience is not always a smooth one,
particularly if you are writing programs in a constrained environment.
An XNA game can also connect to events that will be generated when it is
stopped or tombstoned and you can make games that store game state and high
scores when the user moves away from them in exactly the same way.
The solution in Demo 03 Tombstone JotPad contains a Windows Phone
Silverlight jotter pad that uses both state and persistent storage. State storage is
used when the application is tombstoned.
7.4 Launchers and Choosers The final part of our application development is concerned with how we use the
Launchers and Choosers in the phone. These are the built in behaviours that are
provided to allow our programs to perform standard actions. A Launcher is
means by which our program can fire off a phone feature which does not return
any data. A Chooser is where a phone feature is used to select something. Your
application can then do something with the item returned.
Launchers and choosers make use of tombstoning in that when a program
activates launcher or chooser it is automatically tombstoned. When the launcher
or chooser finishes the program is reactivated.
Using a Launcher
These are all the launchers, along with a brief explanation of what each does:
PhoneCallTask starts the Phone application with a particular
phone number and display name selected. Note
that the program cannot place the call, the user

Launchers and Choosers
Creating Windows Phone Applications 148
must initiate this
EmailComposeTask your program can set properties on an email and
then launch a task to allow the user to send the
message.
SmsComposeTask starts the Messaging application and display a
new SMS message. Note that the message is not
sent automatically.
SearchTask starts the Search application using a query you
provide
WebBrowserTask starts the Web browser and displays the URL
you provide.
MediaPlayerLauncher starts the Media Player application and play a
given media file
MarketplaceDetailTask your program can show details of a particular
application in the market place
MarketplaceHubTask starts the Windows Phone Marketplace client
MarketplaceSearchTask your program can search the Windows Phone
Marketplace for a particular application and then
show search results
Each of these tasks can be started by your application and when the task is
complete your application will be re-activated. Of course there is no guarantee
that your application will regain control at any point in the future. The user may
instead go off and do lots of other things instead of returning to your program.
Adding an email feature to JotPad
We might decide to add a Mail feature to the Jotpad program. By pressing the
Mail button a user can send the contents of the jotpad as an email. The image
above shows how this might work.
private void mailButton_Click(object sender, RoutedEventArgs e) { sendMail("From JotPad", jotTextBox.Text); }

Launchers and Choosers
Creating Windows Phone Applications 149
When the mail button is clicked the event handler takes the text out of the
textbox and calls the sendMail method to send this. It also adds a From message
as well. The sendMail method is very simple:
private void sendMail(string subject, string body) { EmailComposeTask email = new EmailComposeTask(); email.Body = body; email.Subject = subject; email.Show(); }
This creates an instance of the EmailComposeTask class and then sets the Body
and Subject properties to the parameters that were provided. It then calls the
Show method on the task instance. This is the point at which the JotPad
application is tombstoned to make way for the email application. When the user
has finished sending the email the JotPad program will resume.
To make use of the tasks a program must include the Tasks namespace:
using Microsoft.Phone.Tasks;
The solution in Demo 04 Email JotPad contains a Windows Phone Silverlight
jotter pad that can send the jotting as an email. Note that this will not work
properly in the Windows Phone emulator as this does not have an email client
set up. However, you can see the tombstoning behaviour in action as the
program tries to send an email and displays a warning instead.
Using a Chooser
These are all the choosers that are available:
CameraCaptureTask starts the Camera application for the user to
take a photo
EmailAddressChooserTask starts the Contacts application and allows the
user to select a contact's email address
PhoneNumberChooserTask starts the Contacts application and allows the
user to select a contact's phone number.
PhotoChooserTask starts the Photo Picker application for the user
to choose a photo.
SaveEmailAddressTask saves the provided email address to the
Contacts list
SavePhoneNumberTask saves the provided phone number to the
Contacts list
A chooser works in exactly the same way as a launcher with just one difference.
A chooser can return a result to the application that invoked it. This is done in a
manner we are very used to by now; our application binds a handler method to
the completed event that the chooser provides.

Launchers and Choosers
Creating Windows Phone Applications 150
Picture display
We can explore how this works by creating a simple picture display application
this will allow the user to choose a picture from the media library on the phone
and then display this on the screen. We must create the chooser in the
constructor for the MainPage of our application:
PhotoChooserTask photoChooser; // Constructor public MainPage() { InitializeComponent(); photoChooser = new PhotoChooserTask(); photoChooser.Completed += new EventHandler<PhotoResult>(photoChooser_Completed); }
This constructor creates a new PhotoChooser value and binds a handler to the
completed even that it generates. The completed event handler uses the result
returned by the chooser and displays this in an image.
void photoChooser_Completed(object sender, PhotoResult e) { if (e.TaskResult == TaskResult.OK) { selectedImage.Source = new BitmapImage(new Uri(e.OriginalFileName)); } }
This method sets the source of the image to a new BitMapImage that is created
using the address of the photo result. Note that the TaskResult property of the
result allows our program to determine whether or not the use chose something
to return.
The final link we need to provide is the event handler for the Load button that
starts the process off.
private void loadButton_Click(object sender, RoutedEventArgs e) { photoChooser.Show(); }
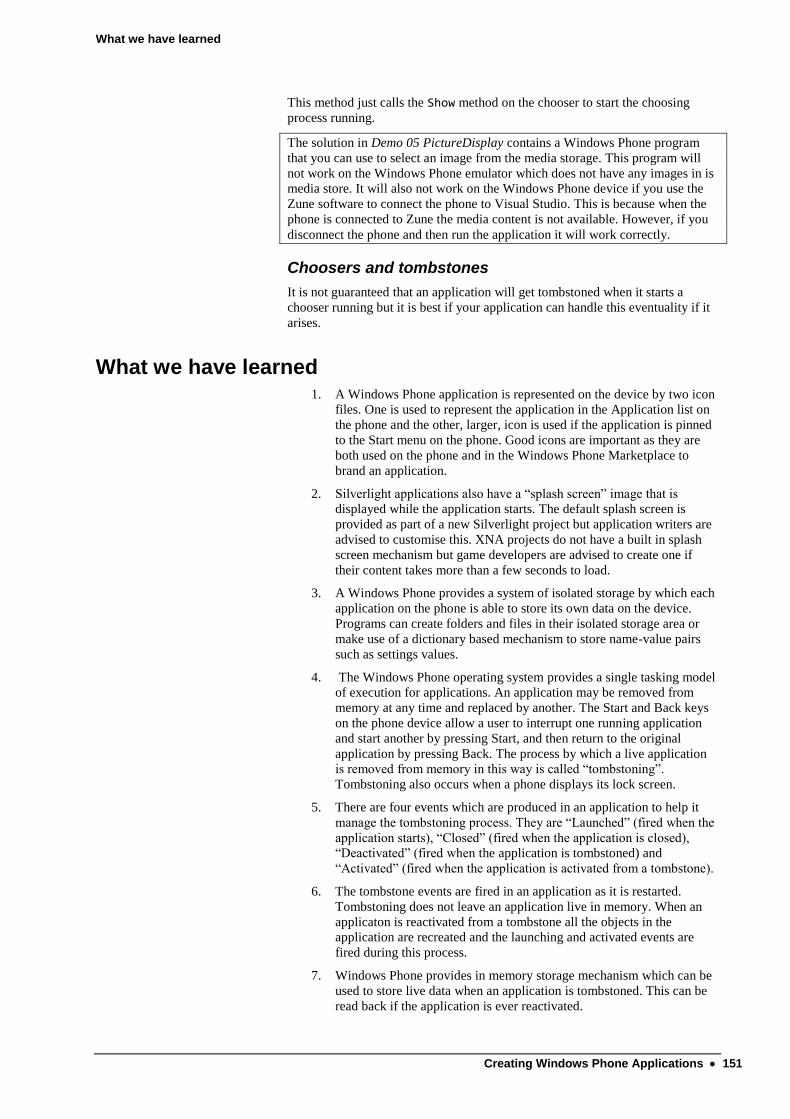
What we have learned
Creating Windows Phone Applications 151
This method just calls the Show method on the chooser to start the choosing
process running.
The solution in Demo 05 PictureDisplay contains a Windows Phone program
that you can use to select an image from the media storage. This program will
not work on the Windows Phone emulator which does not have any images in is
media store. It will also not work on the Windows Phone device if you use the
Zune software to connect the phone to Visual Studio. This is because when the
phone is connected to Zune the media content is not available. However, if you
disconnect the phone and then run the application it will work correctly.
Choosers and tombstones
It is not guaranteed that an application will get tombstoned when it starts a
chooser running but it is best if your application can handle this eventuality if it
arises.
What we have learned 1. A Windows Phone application is represented on the device by two icon
files. One is used to represent the application in the Application list on
the phone and the other, larger, icon is used if the application is pinned
to the Start menu on the phone. Good icons are important as they are
both used on the phone and in the Windows Phone Marketplace to
brand an application.
2. Silverlight applications also have a “splash screen” image that is
displayed while the application starts. The default splash screen is
provided as part of a new Silverlight project but application writers are
advised to customise this. XNA projects do not have a built in splash
screen mechanism but game developers are advised to create one if
their content takes more than a few seconds to load.
3. A Windows Phone provides a system of isolated storage by which each
application on the phone is able to store its own data on the device.
Programs can create folders and files in their isolated storage area or
make use of a dictionary based mechanism to store name-value pairs
such as settings values.
4. The Windows Phone operating system provides a single tasking model
of execution for applications. An application may be removed from
memory at any time and replaced by another. The Start and Back keys
on the phone device allow a user to interrupt one running application
and start another by pressing Start, and then return to the original
application by pressing Back. The process by which a live application
is removed from memory in this way is called “tombstoning”.
Tombstoning also occurs when a phone displays its lock screen.
5. There are four events which are produced in an application to help it
manage the tombstoning process. They are “Launched” (fired when the
application starts), “Closed” (fired when the application is closed),
“Deactivated” (fired when the application is tombstoned) and
“Activated” (fired when the application is activated from a tombstone).
6. The tombstone events are fired in an application as it is restarted.
Tombstoning does not leave an application live in memory. When an
applicaton is reactivated from a tombstone all the objects in the
application are recreated and the launching and activated events are
fired during this process.
7. Windows Phone provides in memory storage mechanism which can be
used to store live data when an application is tombstoned. This can be
read back if the application is ever reactivated.

What we have learned
Creating Windows Phone Applications 152
8. Programs can use Launchers and Choosers to interact with phone
subsystems. A Launcher starts an external application (for example and
email send) and a chooser launches an external application that returns
a result (for example selecting a picture from the media store). A
program may be tombstoned while the external application runs.
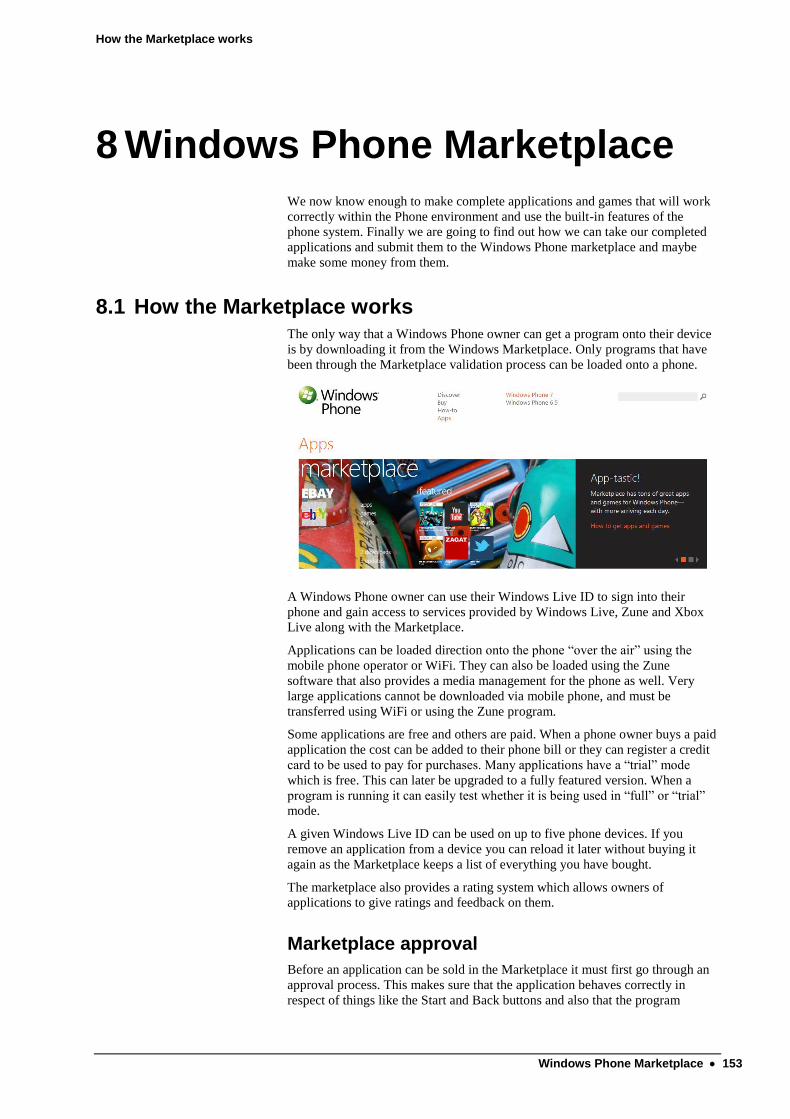
How the Marketplace works
Windows Phone Marketplace 153
8 Windows Phone Marketplace
We now know enough to make complete applications and games that will work
correctly within the Phone environment and use the built-in features of the
phone system. Finally we are going to find out how we can take our completed
applications and submit them to the Windows Phone marketplace and maybe
make some money from them.
8.1 How the Marketplace works The only way that a Windows Phone owner can get a program onto their device
is by downloading it from the Windows Marketplace. Only programs that have
been through the Marketplace validation process can be loaded onto a phone.
A Windows Phone owner can use their Windows Live ID to sign into their
phone and gain access to services provided by Windows Live, Zune and Xbox
Live along with the Marketplace.
Applications can be loaded direction onto the phone “over the air” using the
mobile phone operator or WiFi. They can also be loaded using the Zune
software that also provides a media management for the phone as well. Very
large applications cannot be downloaded via mobile phone, and must be
transferred using WiFi or using the Zune program.
Some applications are free and others are paid. When a phone owner buys a paid
application the cost can be added to their phone bill or they can register a credit
card to be used to pay for purchases. Many applications have a “trial” mode
which is free. This can later be upgraded to a fully featured version. When a
program is running it can easily test whether it is being used in “full” or “trial”
mode.
A given Windows Live ID can be used on up to five phone devices. If you
remove an application from a device you can reload it later without buying it
again as the Marketplace keeps a list of everything you have bought.
The marketplace also provides a rating system which allows owners of
applications to give ratings and feedback on them.
Marketplace approval
Before an application can be sold in the Marketplace it must first go through an
approval process. This makes sure that the application behaves correctly in
respect of things like the Start and Back buttons and also that the program

Marketplace membership
Windows Phone Marketplace 154
doesn‟t do anything silly like grab all the memory or take twenty minutes to start
running. This process also makes sure that programs that are offensive are not
made generally available. Once an application has been approved it is listed in
one of the application categories and is available for download. A developer can
produce an upgraded version of the application which, once it has been through
the approvals process, will be made available as an upgrade to all existing
owners.
8.2 Marketplace membership Before a developer can submit applications to the Marketplace they must first
become a member. Membership is keyed to the Windows Live ID of the
member. It costs $99 per year to be member of the marketplace. If you stop
being a member of the marketplace all your applications are removed. Students
who have access to the DreamSpark programme can get free membership of the
Windows Phone marketplace.
Members of the marketplace have their identity validated when they join and the
Marketplace gives them a unique key which is used to sign their applications.
The Marketplace also retains their bank and tax details so that they can be paid
for application sales.
Submitting applications
A member of the marketplace can submit up to five free applications for
approval and an unlimited number of “paid” ones. If a member wants to submit
further free applications these will cost $20 each to be processed.
Members of the Marketplace can set the selling price of their application and
receive 70% of the cost paid by the customer. This is paid directly into their
bank account once they have reached a threshold of $200 sales.
Trial mode
An application or game can be downloaded as a free demo. A program can
easily determine whether or not it is operating in demo mode:
LicenseInformation info = new LicenseInformation(); if ( info.IsTrial() ) { // running in trial mode }
The LicenseInformation class is in the Windows.Phone.Marketplace
namespace. If the program is running in trial mode it can restrict the user
actions, for example it could disable certain functions or stop the program
running after a time limit. If the user wishes to upgrade the application it can use
the Launcher mechanism to direct the user to the marketplace.
8.3 Deploying and testing to hardware While the emulator provides a faithful representation of the way that Windows
Phone works from a software point of view it does not allow us to get much of
an idea of how the program feels when in use. This is particularly the case in
games where it is very important to be able to test the gameplay on a proper
device.
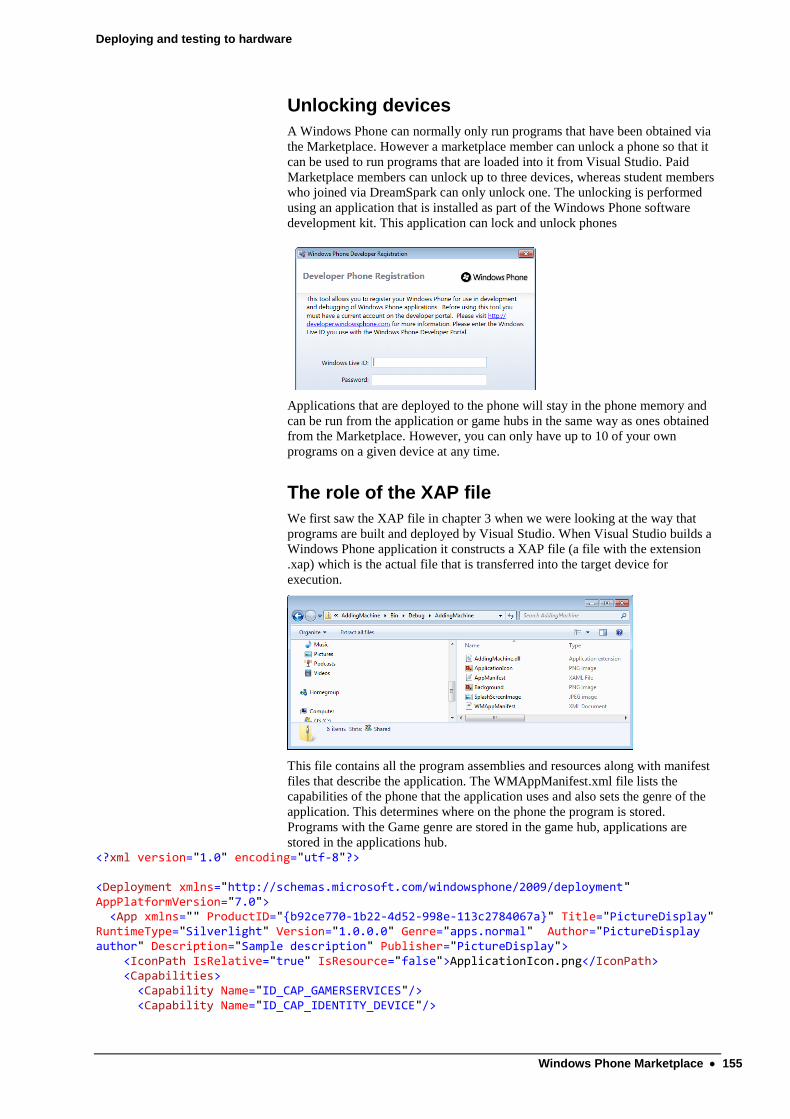
Deploying and testing to hardware
Windows Phone Marketplace 155
Unlocking devices
A Windows Phone can normally only run programs that have been obtained via
the Marketplace. However a marketplace member can unlock a phone so that it
can be used to run programs that are loaded into it from Visual Studio. Paid
Marketplace members can unlock up to three devices, whereas student members
who joined via DreamSpark can only unlock one. The unlocking is performed
using an application that is installed as part of the Windows Phone software
development kit. This application can lock and unlock phones
Applications that are deployed to the phone will stay in the phone memory and
can be run from the application or game hubs in the same way as ones obtained
from the Marketplace. However, you can only have up to 10 of your own
programs on a given device at any time.
The role of the XAP file
We first saw the XAP file in chapter 3 when we were looking at the way that
programs are built and deployed by Visual Studio. When Visual Studio builds a
Windows Phone application it constructs a XAP file (a file with the extension
.xap) which is the actual file that is transferred into the target device for
execution.
This file contains all the program assemblies and resources along with manifest
files that describe the application. The WMAppManifest.xml file lists the
capabilities of the phone that the application uses and also sets the genre of the
application. This determines where on the phone the program is stored.
Programs with the Game genre are stored in the game hub, applications are
stored in the applications hub. <?xml version="1.0" encoding="utf-8"?> <Deployment xmlns="http://schemas.microsoft.com/windowsphone/2009/deployment" AppPlatformVersion="7.0"> <App xmlns="" ProductID="{b92ce770-1b22-4d52-998e-113c2784067a}" Title="PictureDisplay" RuntimeType="Silverlight" Version="1.0.0.0" Genre="apps.normal" Author="PictureDisplay author" Description="Sample description" Publisher="PictureDisplay"> <IconPath IsRelative="true" IsResource="false">ApplicationIcon.png</IconPath> <Capabilities> <Capability Name="ID_CAP_GAMERSERVICES"/> <Capability Name="ID_CAP_IDENTITY_DEVICE"/>
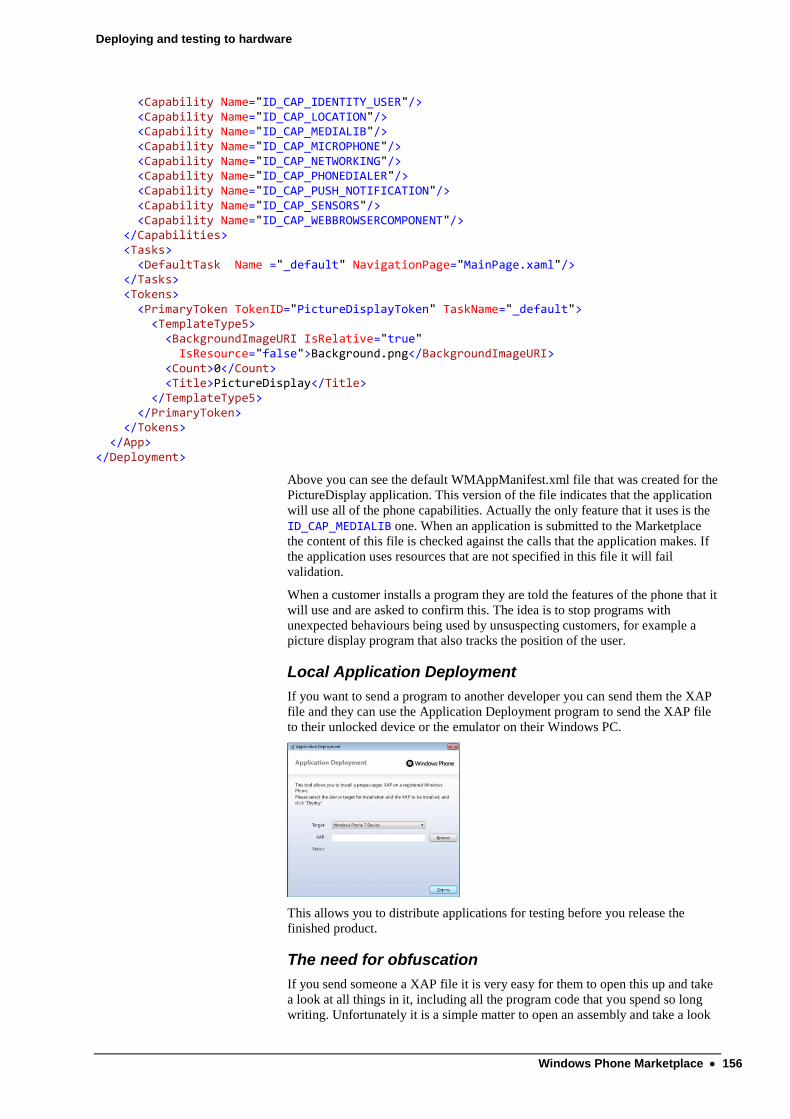
Deploying and testing to hardware
Windows Phone Marketplace 156
<Capability Name="ID_CAP_IDENTITY_USER"/> <Capability Name="ID_CAP_LOCATION"/> <Capability Name="ID_CAP_MEDIALIB"/> <Capability Name="ID_CAP_MICROPHONE"/> <Capability Name="ID_CAP_NETWORKING"/> <Capability Name="ID_CAP_PHONEDIALER"/> <Capability Name="ID_CAP_PUSH_NOTIFICATION"/> <Capability Name="ID_CAP_SENSORS"/> <Capability Name="ID_CAP_WEBBROWSERCOMPONENT"/> </Capabilities> <Tasks> <DefaultTask Name ="_default" NavigationPage="MainPage.xaml"/> </Tasks> <Tokens> <PrimaryToken TokenID="PictureDisplayToken" TaskName="_default"> <TemplateType5> <BackgroundImageURI IsRelative="true" IsResource="false">Background.png</BackgroundImageURI> <Count>0</Count> <Title>PictureDisplay</Title> </TemplateType5> </PrimaryToken> </Tokens> </App> </Deployment>
Above you can see the default WMAppManifest.xml file that was created for the
PictureDisplay application. This version of the file indicates that the application
will use all of the phone capabilities. Actually the only feature that it uses is the
ID_CAP_MEDIALIB one. When an application is submitted to the Marketplace
the content of this file is checked against the calls that the application makes. If
the application uses resources that are not specified in this file it will fail
validation.
When a customer installs a program they are told the features of the phone that it
will use and are asked to confirm this. The idea is to stop programs with
unexpected behaviours being used by unsuspecting customers, for example a
picture display program that also tracks the position of the user.
Local Application Deployment
If you want to send a program to another developer you can send them the XAP
file and they can use the Application Deployment program to send the XAP file
to their unlocked device or the emulator on their Windows PC.
This allows you to distribute applications for testing before you release the
finished product.
The need for obfuscation
If you send someone a XAP file it is very easy for them to open this up and take
a look at all things in it, including all the program code that you spend so long
writing. Unfortunately it is a simple matter to open an assembly and take a look

The Submission and approval process
Windows Phone Marketplace 157
at how it works. We did this in chapter 3 using the ildasm program. This means
that you should be careful when sending out programs that you don‟t give away
all the hard work that you put into making the program. Whenever you send out
a program you should take steps to make it more difficult for someone to unpick
the contents.
In software development this process is called obfuscation. It involves the use of
a special tool that you use in the build process to make it very hard for someone
looking at your program to deduce how it works and what it does. The tool
changes variable names and adds spurious control flow to make a program very
hard to understand.
There are a number of free obfuscation tools that you can use to make your
program harder to understand. You could use these on your program code before
you submit the XAP file. The Windows Phone developer programme also
includes access to obfuscation tools from PreEmptive Solutions. These are being
provided at very low cost (these systems are usually extremely expensive) and
you should consider using them if you are concerned about this issue.
8.4 The Submission and approval process The submission process for programs is not hard to use. It is all managed from
the developer site for Windows Phone and XNA Games:
http://create.msdn.com
Visitors to the site can download documentation and the development tools.
Members of the Marketplace can use the dashboard pages to view the progress
of submissions and submit new programs. There are a number of detailed
walkthroughs that will take you through the membership and submission
process, you should go through these to make sure you understand what is going
on and what is required of you and any programs that you submit.
Windows Phone Application Certification Guidelines
The Windows Phone developer website provides access to a very detailed
document that describes how to create applications. It is very important that you
read the latest version of this document and follow the guidelines set out in it. It
has been through numerous versions as the process has evolved, so you should
make sure that you are using the most up to date version of the text.
What we have learned 1. Windows Phone owners get their applications from the Windows Phone
Marketplace.
2. Registered developers can submit applications for approval and
distribution via the Marketplace.
3. Developers register and track the progress of their applications via the
Windows Phone developer website.
4. Registering as a developer costs $99 a year, students can register for
free via the Dreamspark programme.
5. Developers can produce free or paid applications, but are limited to
submitting only 5 free applications per year. Further submissions of
free applications cost $20 each.
6. A registered developer can unlock phones so that they can run
programs compiled in Visual Studio.

Program Ideas
Windows Phone Marketplace 158
7. Applications are distributed as XAP files which contain all the
resources and content along with a manifest file that describes the
content and gives the phone setting information about the application.
8. XAP files can be loaded directly onto unlocked devices by developers.
9. Programmers should obfuscate their programs so that it is not easy for
anyone obtaining a XAP file to find out how the code works. There is
an obfuscation processor available via the Windows Phone developer
web site.
10. A developer must read the Windows Phone Certification guidelines
before submitting programs to the approval process.
Program Ideas We now know how to make programs for Windows Phone. We can create multi-
page Silverlight interfaces which match those of the phone itself and we have
also had a look at how to create games using XNA. We also know how to create
connected applications that make use of data hosted on the internet. We have
discovered some of the difficulties encountered by programmers when they
write code for small, resource constrained, devices and we now also know how
the Windows Phone operating system allows us to create useable applications in
spite of these issues. Finally we know how to use the underlying Windows
Phone system so that our applications can make use of features in the phone
itself.
At this point we have a superb set of tools, next we have to find a problem to
solve with them.
Application Ideas
Applications ideas do not always appear fully formed. Quite often you will start
with a small idea for a solution and then add features or discover situations
where the solution could be made even more useful. This is not a bad way to
come up with something original, but you must beware of adding too many
feature ideas before you have made something work, otherwise the whole thing
might collapse under its own weight before you have built anything.
You can get good ideas for applications by talking to lots of people and trying to
find out what would be useful to them. Not everyone is aware of just how much
you can do with modern devices and so if you say that you can make something
mobile that can track position, take pictures and make use of internet services
they might have an idea of a situation where some of that power would be useful
to them.
Game Ideas
In some ways game ideas are easier to come by than application ideas. Systems
like XNA let you “doodle” with game code to find out what it does. I‟ve already
mentioned the importance of playtesting. This is where you give your game to
other people to find out if the game is playable. Playtesting can also throw up
ideas for game development. Often a playtester will suggest changes to the
program that will make it more interesting and fun. Don‟t be afraid to do silly
things in a game (add 10 times as many aliens, invert gravity, make everything
bigger/smaller etc etc) and see what happens to the play experience.
The great thing about a game is that rather than hitting a specific problem, as
with an application, a game just has to be fun to play.
Program Ideas
Windows Phone Marketplace 159
Fun with Windows Phone
Windows Phone provides an amount of processing power that was unavailable
in the world a few years ago, let alone in everyone‟s pocket. It also provides an
amazing level of connectivity, high performance graphics and devices such as
cameras and location sensors that make it possible to build truly novel
applications.
Personally I reckon that just being able to program for this device, let along sell
the results, is inspiring enough. I hope you have learned enough from these notes
to get yourself started on the fun you can have with this platform.
Rob Miles
November 2010