Right To Play Middle East to Play... · Federation of International Football Associations (FIFA)...
28
Right To Play – Middle East Coach2Coach Program Football Module
Transcript of Right To Play Middle East to Play... · Federation of International Football Associations (FIFA)...

Right To Play – Middle East
Coach2Coach Program Football Module

INTRODUCTION .............................................................................................................................................................. 3
The History of Football ................................................................................................................................................... 3
How the Game of Football is Played ........................................................................................................................... 3
Field of Play ....................................................................................................................................................................... 4 Minimum and maximum dimensions. ............................................................................................................................................. 4 Pitch layout ............................................................................................................................................................................... 4
The Basic Rules of Football ............................................................................................................................................ 5
Coaching football – some hints and tips ...................................................................................................................... 7
BASIC SKILLS ..................................................................................................................................................................... 8
Ball Control ........................................................................................................................................................................ 8
Dribbling ............................................................................................................................................................................. 8
Passing ................................................................................................................................................................................. 9
Shooting ............................................................................................................................................................................. 10
Kicking for Distance ....................................................................................................................................................... 10
Heading ............................................................................................................................................................................. 10
The Throw In ................................................................................................................................................................... 11
Goalkeeping ...................................................................................................................................................................... 11
Tackling ............................................................................................................................................................................ 12
DRILLS ................................................................................................................................................................................. 13
Warming Up .................................................................................................................................................................... 13
Cooling Down ............................................................................................................. Fout! Bladwijzer niet gedefinieerd.
Ball Control ...................................................................................................................................................................... 15
Dribbling ........................................................................................................................................................................... 16
Passing ............................................................................................................................................................................... 17
Shooting ............................................................................................................................................................................. 19
Heading ............................................................................................................................................................................. 20
Goalkeeping ...................................................................................................................................................................... 21
Small Fun Games .......................................................................................................................................................... 22
Mini Football ................................................................................................................................................................... 23
SAMPLE PRACTICE SESSION PLANS ................................................................................................................. 24
Ball Control and Dribbling .......................................................................................................................................... 24
Passing and Shooting ...................................................................................................................................................... 25
The Header and Throw-In ........................................................................................................................................... 26
Goalkeeping ...................................................................................................................................................................... 27
REFERENCES ................................................................................................... FOUT! BLADWIJZER NIET GEDEFINIEERD.

Introduction
The History of Football
Football was first recorded in Britain, yet it is not known exactly where the sport was invented. There are records of earlier forms in China, at least two thousand years ago, and in ancient Greece and Rome. But it was in England that football began to take the shape we now recognise. Originally frowned upon by authorities and the ‘well bred’, who made constant efforts from the 14th century onwards to suppress it, football was seen as a game of the people: a vulgar and rowdy pastime. Known as “mob football”, matches were little more than violent street battles. The football field was the length of the town, the players might be as many as five hundred, and the ‘match’ continued all day long. Vast numbers of windows and legs were broken, and there were even some deaths! The contemporary history of football, as we know it today, began in Great Britain in 1863 when 12 clubs and schools attended a meeting where they decided to form an association called ‘The Football Association’. This Association drafted the first common set of rules which were accepted on the 8th of December that year. Among others, the original set of rules included ‘restricting’ the field size to 200 by 100 metres, allowing players to catch the ball with their hands and teams changing ends after each goal. Eight years later the first football competition in the world started – the FA Cup – and in 1872 the first international match was contested by England and Scotland. The spread of football outside of Great Britain, mainly due to the British influence abroad, started slowly, but it soon gathered momentum and spread rapidly to all parts of the world. When the Federation of International Football Associations (FIFA) was founded in Paris in May 1904, it had seven founder members: France, Belgium, Denmark, the Netherlands, Spain, Sweden and Switzerland. By 1930, the year of the first World Cup, there were 41 members, 51 in 1938, and in 1950, after the interval caused by the Second World War, the number had reached 73. At present, there are 204 members in every part of the world, and the Football World Cup is the 2nd largest sporting event in the world behind the Olympics.
How the Game of Football is Played
Football is played by two teams, each consisting of not more than 11 players, one of whom is the goalkeeper. Official matches may not start if either team consists of fewer than seven players. The duration of the match lasts two equal periods of 45 minutes, unless otherwise mutually agreed between the referee and the two participating teams. Players are entitled to a half time interval of no more than 15 minutes. Each team consists of a goalkeeper, defenders, midfielders and forwards. The combination of defenders, midfielders and forward is referred to as the team’s system, and there can be many variations. Systems are stated in a three consecutive number combination, with the first number referring to the defenders, the second to the midfielders and the third to the forwards. For example, a ‘5-3-2 combination’ would be a very defensive system, with 5 defenders, 3 midfielders and only 2 forwards, while a ‘4-3-4 combination’ would be an attacking system with 4 defenders, 3 midfielders and 4 forwards. The team scoring the greater number of goals during a match is the winner. If both teams score an equal number of goals, or if no goals are scored, the match is drawn.

Field of Play
It is important that the pitch sizes are set in accordance with the age of the players – generally the younger the children, the smaller the pitch. The tables below show the optimum pitch size for each age group (as recommended by the English Football Association) and the maximum and minimum sizes in both yards and metres.
Age grouping Suggested pitch size in yards
(length x width)
U7-U8 50 yds x 30.yds
U9-U10 60 yds x 40 yds
U11-U12 70 yds x 50 yds
U13-U14 80 yds x 60 yds
U15-U16 90 yds x 60 yds
U17-U18 & adults 110yds x 70 yds
Minimum and maximum dimensions.
Age Grouping
Yards Metres
Length Width Length Width
Max Min Max Min Max Min Max Min
U7-U8 50 yds 30 yds 30 yds 20 yds 45.75m 27.45m 27.45m 18.3m
U9-U10 60 yds 50 yds 40 yds 30 yds 54.9m 45.75m 36.6m 27.45m
U11-U12 80 yds 60 yds 55 yds 45 yds 73.85m 54.9m 50.77m 42m
U13-U14 80 yds 70 yds 60 yds 45 yds 73.85m 64.62m 56m 42m
U15-U16 90 yds 75 yds 60 yds 45 yds 82m 70m 56m 42m
U17-U18 & adults 130 yds 100 yds 100 yds 50 yds 120m 90m 90m 45m
Pitch layout
The pitch should be laid out as in this diagram. The boxes that mark the goalkeepers area are 15m (18yds) wide by 9m (10yds) deep. A 5m diameter centre circle can be added if you wish.

The Basic Rules of Football
Note: For beginner players there is no need to place too high an emphasis on learning the rules - it is far more important to concentrate on teaching them the necessary skills required to play.
1. The start and restart of play – A coin is tossed and the team which wins the toss decides which goal
it will attack in the first half of the match. The other team takes the kick-off to start the match. The team that wins the toss takes the kick-off to start the second half of the match, and the teams change ends.
2. The ball in and out of play – The ball is out of play when it has wholly crossed the goal line or touch
line whether on the ground or in the air, or play has been stopped by the referee. The ball is in play at all other times.
3. The method of scoring – A goal is scored when the whole of the ball passes over the goal line,
between the goal posts and under the crossbar, provided that no infringement of the laws of the game has been committed previously by the team scoring the goal.
4. Offside – A player is in an offside position if she or he is nearer to his opponents’ goal line than
both the ball and the second last opponent, and involved in the play. A player can not be offside from a throw in, corner kick, goal kick or in their own half.
5. Direct free kick – A direct free kick is awarded if a player commits any of the following offences,
and is taken from where the offence occurred: • Kicks or attempts to kick an opponent • Trips or attempts to trip an opponent • Jumps at an opponent • Charges at an opponent • Strikes or attempts to strike an opponent • Pushes an opponent • Tackles an opponent, making contact with the opponent before touching the ball • Holds an opponent • Spits at an opponent • Handles the ball with her or his hands deliberately
6. Indirect free kick – An indirect free kick (a goal cannot be scored from an indirect free kick) is awarded to the opposing team from where the offence took place if: • The Goalkeeper takes more than 6 seconds to release the ball from her or his possession • The Goalkeeper touches the ball again with her or his hands after it has been released from her
or his possession and not touched another player • The Goalkeeper touches the ball with her or his hands after it has been deliberately kicked to her
or him by a team mate • The Goalkeeper touches the ball with her or his hands after he or she has received it directly
from a throw in taken by a team mate. • If any player plays in a dangerous manner • If any player impedes the progress of an opponent • If any player prevents the goalkeeper from releasing the ball from her or his hands

• If any player commits any other offence for which play is stopped to caution or dismiss a player
7. The penalty – the penalty kick is awarded against a team which commits any of the ten offences for which a direct free kick is awarded, inside its own penalty area and while the ball is in play. The penalty kick is taken from the penalty spot, 11 metres from the centre of the goal.
8. The throw in/goal kick/corner kick
• A throw in is awarded when the whole of the ball passes over the touch line, either on the ground or in the air from the point where it crossed the touch line to the opponents of the player who last touched the ball.
• A goal kick is awarded when the whole of the ball, having last touched a player of the attacking team, passes over the goal line, either on the ground or in the air, and a goal is not scored.
• A corner kick is awarded when the whole of the ball, having last touched a player of the defending team, passes over the goal line, either on the ground or in the air, and a goal is not scored.

Coaching football – some hints and tips
• Utilise the K.I.S.S. principle (Keep It Short and Simple) when introducing new skills;
• Give short, effective demonstrations while briefly explaining the new skill or concept;
• Keep coaching sessions short, clear and well-planned;
• Be positive - focus on what the player does correctly ("catch them being good");
• Make the sessions meaningful, fun, challenging and exciting,
• No static line drills! Play fun, soccer-like games instead.
• Don't play "elimination games" – the players most in need of improvement and repetitions are usually the first to be eliminated;
• Don't play large sided games for more than 10 minutes per hour. In 8 v 8 or 10 v 10 etc, players don't get enough touches on the ball, the weaker players tend to get the fewest touches and bad habits can be reinforced because players tend to do the same things they have always done.
DO:
• Find out what the children expect to get out of sport with you.
• Be firm, fair and organised.
• Give credit where it is due and give help where it is needed.
• Be consistent.
• Provide learning experiences: teach.
• Make practice and competition fun; it needn't be silly.
• Recognise the value of friendships between children.
• Show your approval whenever you can.
• Listen to the children
• Relax and enjoy yourself with the kids.
• Emphasise learning skill, not competing.
• Reward children for effort.
• Help children over the realisation that they might not have the ability of others.
• Build confidence by being positive.
• Reduce competitive expectations.
• Help those who do not want to compete.
• Remember that mistakes are part of learning.

Basic Skills
Ball Control
There are three important points for good ball control:
1. The first touch should protect the ball from challenging players and not give them a chance to regain possession.
2. The ball should be played into available space to allow for the next touch. 3. The ball should be played so that the team’s movement or momentum is continued.
A poor first-touch will risk taking the momentum out of play and increase the possibility of losing possession. Some players make the mistake of stopping the movement of the ball and not concentrating on getting it out of their feet. The first touch should ensure that a time wasting second touch is not needed to get the ball ready to pass or shoot.
The different body surfaces often used in controlling the ball are the foot (sole, inside, outside, instep), thigh, chest, stomach and head. Generally, the part of the body used should preferably be large, flat and able to take the weight of the incoming pass.
The key coaching points for general ball control are:
• Keep the head steady and watch the ball carefully to judge its flight and speed.
• Move feet quickly so the body is in front of the ball.
• Choose the right technique and body surface to control the ball (for example, the foot).
• Relax the body part.
• Cushion the force of the ball by pulling back the body part being used to control the ball.
• Pretend the body part is a pillow or something soft. The ball should not go very far after it contacts the body.
• Maintain eye contact with ball until fully controlled.
Dribbling
Another important aspect of ball control is the ability to run with the ball. The key coaching points are:
• Use short steps.
• Push the ball forward gently with the inside or the outside of the foot. Alternate feet.
• Keep the ball close and in front.
• Use peripheral vision (that is, the ‘corner’ of the eye) to look at the ball while watching the direction being travelled. As skill increases, look less at the ball.
• Monitor speed based on ability to keep the ball close.

Passing Successful passing is the key to good teamwork. Teaching the technique of passing is actually quite straightforward but it is not always easy to spot and remedy the mistakes that children make. The key coaching points are:
• Use inside of the foot (the instep).
• The non-striking foot should be pointing in the direction of the intended target.
• The striking leg makes a swinging motion similar to a putter in golf.
• The striking ankle must be locked.
• Stay relaxed. Don’t be like a robot.
• Look up to find your target but remember to look at the ball as you strike it. That is the only way the player can strike the ball correctly.
• Foot follows through in direction of target.
• Move afterwards – don’t stand there admiring your pass! The Push Pass The push pass is used to pass the ball over short distances. The key coaching points are:
• Plant the non-kicking foot beside ball.
• The kicking foot should be pointing sideways with the inside of the foot facing the ball.
• Push the ball towards target. Inside of the Foot Pass This is the method used for passing the ball over longer distances, or in situations where the pass requires some extra power. The key coaching points are:
• Non-kicking foot next to the ball.
• Contact ball in the middle.
• Use the inside of the foot.
• Follow through so your kicking foot goes to your target.
• Use a firm kick so it gets to your target. Common Mistakes These are some common mistakes and how to correct them:
• If the ball is off target, but rolling well - the player has not pointed her non-striking foot at the target.
• If the ball spins off the foot - the ankle was not locked when striking the ball.
• If the ball goes in the air - the player has struck the ball below the centreline of the ball and it will rise. Striking the ball above the centreline will ensure that it rolls on the ground.

• If the pass lacks power or the player falls down after passing – the player tried to swing her or his leg ACROSS the body instead of on a line with the hips and shoulders.
Shooting
To score goals, players need to be able to use both power and placement. The key coaching points are:
• Keep the head down and eyes on the ball – look up to pick out the target, but then look back at the ball to shoot.
• Plant non-striking foot alongside (not in front of) the ball.
• Strike the middle of the ball so it doesn’t rise.
• Keep the knee of the kicking leg over the ball.
• Approach the ball slightly from the side.
• Follow through, don’t jerk back when striking the ball (loses power).
Kicking for Distance
Especially in defence, the long kick is important for clearing the ball. The key coaching points are:
• Non-kicking foot next to the ball.
• Contact ball below the middle of the ball.
• Contact ball with instep of foot.
• Follow through.
• Kick hard!
Heading
Heading is an inevitable part of football, both in attack and defence, but can be dangerous for smaller children (see warning below). If teaching heading, as a general rule, defensive headers should go high, wide and far, while offensive headers should be aimed towards the ground (as ground balls are harder for keepers to handle). Defenders usually will aim for the bottom half of the ball while attackers usually will aim for the top half. Initially, of course, it is most important to teach the correct technique (and the courage to use it), so it is not too important where the ball goes. The key coaching points are:
• Put feet in a balanced, athletic, ready position with knees bent and weight centered evenly.
• Keep the neck stiff and lean back.
• Keep eyes OPEN, and watch the ball until contact!
• Keep mouth CLOSED to avoid injury!
• Move head forward towards the ball and contact the ball with the forehead area between hairline and eyebrows.
• Arms should reach forward as the ball is coming and pull backwards as the head moves forward.
• Follow through to the target area.

• If you hit the ball on its bottom half, the ball will go up.
• If you hit the ball on its upper half, the ball will go down.
Warning - There could be the risk of injury to the spine from the excess compacting effect of heading the ball. Heading skills can be left for intensive development until the early teens(it is recommended for children above 12 years old) - particularly as the skill of heading is something older players can cope with better than a non-discerning youngster. Heading the ball is an inevitable part of any soccer match, so for this reason it is important to show players how to head the ball correctly. Just don't do it too much!
The Throw In
When the ball goes out of play, it must be put back into play by a ‘throw in’. The key coaching points of the ‘throw in’ are:
• Face target, feet shoulder width apart (or one in front of the other as long as they both remain on the ground when the ball is released).
• Grip ball firmly with two hands.
• Lean back and bring the ball over the head.
• Transfer weight forward, quickly bring the arms forward and fully extend them at the point of release.
• Ball is released in front of head.
• Add a short run to generate momentum.
Goalkeeping
Children should not start specialising in any positions until they are a bit older. Therefore, teaching goalkeeping skills to smaller children is a great way to help them understand the game better. The key coaching points are:
• Start with the ready position – balance on the balls (or front) of the feet, bend comfortably at the knees while keeping as tall as possible, and have the hands relaxed through the fingertips.
• Hand positioning for high balls – the hands should form a supple web that surrounds the back side (closest to the goal) of the ball. Fingertips should be pointed up and palms facing forward. The thumbs of both hands are almost touching.
• Hand positioning for low balls – the hands should form a supple web that surrounds the back side (closest to the goal) of the ball. Fingers should be pointed down and palms facing forward. The little fingers of both hands are almost touching.
• Side-step quickly behind the line of the ball and try to get two hands behind the ball.
• Create barriers between the ball and the goal with the body, legs and hands and have as much of body behind the ball as possible.
• Concentrate until the ball is in the hands, relax at the point of contact and cushion the ball towards the body with hands.
• Attack the ball whenever possible.

Tackling
In soccer, the term “tackling” is used to describe any effort to steal the soccer ball or knock it away from an opposing player. There are two types of tackling – block and slide tackling. Slide tackling can be dangerous, and is banned in some children’s leagues. Block tackling is safer, and will be taught in this manual. It is important to point out that the player is tackling the ball itself and not the opponent. The key coaching points of block tackling are:
• Place the non-kicking foot alongside the ball.
• The ankle joint of the tackling foot must be firm and locked.
• The knees should be bent to lower the centre of gravity of the player.
• The head and upper body should be over the ball.
• The hands should be closed (make a fist). This will tighten the upper body.
• Contact is made with the inside of the foot.
• Contact on the ball should be made through the middle of the ball.

Drills
Drills are used to enable players to practice and improve specific aspects of the game and once the drill is set up and running the coach should then advise, correct and encourage the players. The drill is a means to an end and not an end in itself. When using drills remember to:
• Vary the drill to prevent monotony.
• Explain the purpose of the drill.
• Don’t continue the same drill too long.
• Try to make the drill fun.
• Follow difficult drills with easy ones and vice versa.
Warming Up
1. Spiders and bugs - Mark three lines 20 metres long and 15 metres apart as shown in the diagram below:
S B S B S B S B S B S B S B S B S B S B S B
Divide players into two equal teams. Each team should stand along side the centre line about two metres apart and all facing forward. Name one team Spiders (the ‘S’ in the diagram above) and one team Bugs (the 'B's). When you call 'Spiders'! or 'Bugs'! that team has to sprint for the end line nearest them. The other team tries to tag them. Anyone who is tagged joins the other team. Continue only until the players start to breathe heavily (that is, don’t exhaust them or keep going until only one player is left).
2. The Zipper Drill – Make a square about 20m by 20m. Divide team into two groups. Players start on cone A and run down to cone B. When they pass cone B they run diagonally to the opposite corner and across the other group, they now start from cone A again. Different exercises can include: slow jogging, stopping and turning, skipping (forwards, sideways, backwards), faster jogging, striding out, sprinting, three steps to the right then three steps to the left, high knees, heel flicks and ‘jump and head’.
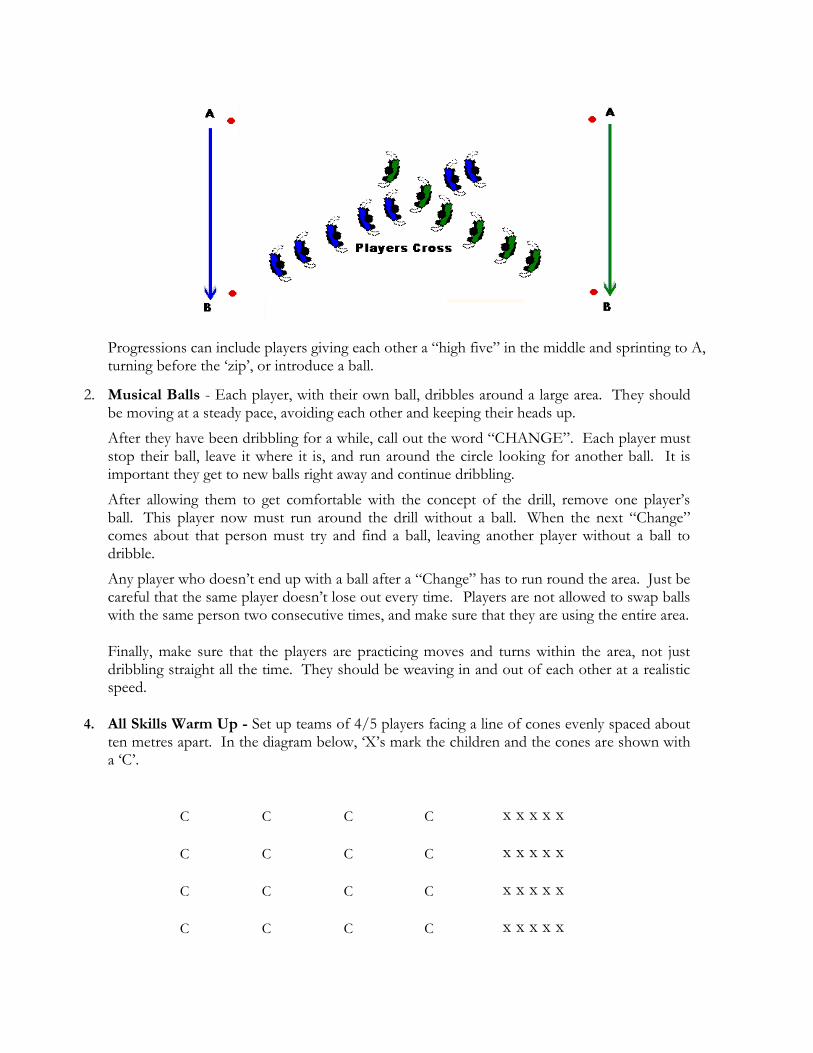
Progressions can include players giving each other a “high five” in the middle and sprinting to A, turning before the ‘zip’, or introduce a ball.
2. Musical Balls - Each player, with their own ball, dribbles around a large area. They should be moving at a steady pace, avoiding each other and keeping their heads up.
After they have been dribbling for a while, call out the word “CHANGE”. Each player must stop their ball, leave it where it is, and run around the circle looking for another ball. It is important they get to new balls right away and continue dribbling.
After allowing them to get comfortable with the concept of the drill, remove one player’s ball. This player now must run around the drill without a ball. When the next “Change” comes about that person must try and find a ball, leaving another player without a ball to dribble.
Any player who doesn’t end up with a ball after a “Change” has to run round the area. Just be careful that the same player doesn’t lose out every time. Players are not allowed to swap balls with the same person two consecutive times, and make sure that they are using the entire area.
Finally, make sure that the players are practicing moves and turns within the area, not just dribbling straight all the time. They should be weaving in and out of each other at a realistic speed.
4. All Skills Warm Up - Set up teams of 4/5 players facing a line of cones evenly spaced about ten metres apart. In the diagram below, ‘X’s mark the children and the cones are shown with a ‘C’.
C C C C x x x x x
C C C C x x x x x
C
C
C
C
x x x x x
C C C C x x x x x

Start with simple shuttle races (players run to and from each of the cones in turn). When they have run to the first cone, back to the beginning, to the second cone, back to the beginning and so on until they have run to all cones, they hand over to the next in line. The first team to finish is the winner. Then tell the players that the handovers require the successful completion of a basic skill.
For example, place a ball between each line and the first cone. After running to all of the cones, the runner must handover to the next in line by passing the ball to her or him, receiving a return pass and then passing it back. This exercise has to performed correctly before the next in line can go. After passing try other skills such as heading or side foot volleys.
5. Three Ball Keep Away - Start with two teams of equal numbers and three soccer balls. On your signal, players try to possess as many balls as possible. In this game, players must be good passers of the ball to keep possession. They must also make decisions on where to run when they don't have the ball, when to pass or dribble, and whom to pass to. On your second signal the play stops and the team in possession of two or more balls wins that round. Repeat several times.
7. Reaction Warm-Up - This is a good warm-up exercise that warms up the brain as well as the feet. It is a good activity to find out who can think quickly - and also who knows their left from their right! Make a circle with cones - one for each player. Players should face the centre of the circle. If there are a large number of players, make two (or three) circles. The size of the circle will depend on the age of the players but even a small circle is good enough if the drill is done at pace. Players stand at each cone and the coach calls out a variety of instructions that players must follow. For example, “2 left” (players all have to run to the cone 2 places to their left) or “3 right, 1 left” (3 cones to the right then back one cone to the left) or “2 right, centre, 1 left” (2 cones to the right, run to the centre and back, then 1 cone to the left). Variations - The drill can be done with or without a ball, specify the type of steps players have to use between each cone (for example, sidesteps, backwards, turn and run), have players sit down after each instruction to get practice getting on their feet quickly.
8. Quick Reactions – Players line up behind each other in a straight line with cones 10m away on their left and right. The coach stands opposite them and shouts instructions (for example, “run left”, “jump right”, “skip left”, “hop right”, “sidestep left”. The players move to the line of cones indicated and back to the centre for the next instruction.
Ball Control
1. Monkey-in-the-Middle - Break the team up into groups of three, with one ball to a group. Volunteer one player to be the monkey-in-the-middle. The two other players try to pass the ball past the ‘monkey’ without letting her or him control it. Once the ‘monkey’ traps the ball, the last player to touch the ball takes her or his place. The two outside players must control the ball, or they will have to switch with the ‘monkey’.
2. Rapid Fire - Have the team form a circle around a single player. If possible, every player except the
middle player should have a ball. Have each team member take turns passing the ball to the player in the centre. This player tries to trap and control the ball, and then passes it back to the original
player. Have each team member take a turn as the middle player. If there is limited equipment the
player in the middle starts with a ball and passes to a player standing in the circle. That player

then passes it back to the middle player who then passes the ball to a different player in the
circle. 3. Continue Down the Line - Divide team members into groups of four players with one ball for
each group. Select one player to be the server. The three remaining players should line up, side by side, facing the server. The server will take turns serving the ball to each player who must trap and control before returning it to the server. Continue in this fashion, alternating the server.
4. Flight ball - Divide team into pairs, giving each pair one ball and a mark an area on the ground.
One player will be the server, who is to serve the ball in the air to any location in the other player’s half of the area. This player must move to the ball, trap it, and return it to the server. Alternate roles after every 10 serves.
5. 4 v 1 keep-away – Divide team members into groups of five. Use a square area about 10m by 10m
for each group with a player at each corner and one in the middle. Players must keep the ball away from defender in middle while keeping ball in the area. For more advanced players use 3 v 1 or 3 v 2 with one open corner (player must move to support).
Tips: Reduce the size of the area as players get better. Keep score by counting passes. Don’t be
too strict in keeping ball in square - let play continue unless blatantly out of square.
6. Protect the Cone - Use a 20m by 30m area. Divide the players into four teams. Each player has a
ball. Each team sets up three or four cones to protect on one side of the space. Teams decide which players will defend and attack. The game begins with players defending their cones or trying to knock down the other teams’ cones, while controlling their own soccer ball. When a team’s cones are knocked down, the team is out. The team with the last standing cone is the winner. Tips: Make sure the turnover time for this game is quick so that the 1st team knocked out is not waiting at the sidelines for a long time.
Dribbling
1. Keep Away - Using cones, mark boundary proportionate to group size. Each player has a ball. On signal, dribble ball within boundary and try to kick other players’ balls out of the area. Players whose ball is kicked out of area must retrieve ball and dribble around area before returning to game.
2. The Stop and Go - This is simply a change of pace. Players jog slowly with the ball, and then on
‘go’ a burst of speed until the coach says ‘stop’. The key is a change of pace with the ball. Players can also put the sole of their foot on top of the ball when stopping the ball and then push it forward with the instep when they break off on the dribble again. Add a defender to simulate a game situation.
3. Beehive – In a 20m x 20m square each player has a ball. Players dribble inside the area avoiding
other players. Players should practice inside and outside foot dribbling, stopping changing direction and pace, and maintaining control while in the beehive.
4. King of the Ring - In a 20m x 20m square each player has a ball except one player who is ‘it’.
Players start to dribble inside the area while trying to avoid having their ball kicked out of the area by the player who is ‘it’. Players may re-enter area after retrieving their ball.

5. Shadow Dribbling - Have players pair up, each with a ball. The first player (leader) dribbles while
the second player follows, also dribbling. The second player must copy what the leader does. Players have to try to keep their heads up. Encourage creative dribbling - changes in direction, pace, and technique. Stress control and change leaders frequently.
6. One on One - Players pair up, each couple with a ball in a square with cones at each corner. The
player with the ball is ‘on the attack’ and the other player is the defender. The attacking player tries to dribble to any of the cones and touch the cone with the ball. The defending player tries to prevent this. Players switch possession of ball when attacker accomplishes his/her goal or when the ball goes out of bounds.
7. Dribble across a square - This is a good way to evaluate dribbling skill. It teaches general ball
control, dribbling, and the importance of looking up while dribbling. Players also develop their peripheral vision, practice shielding the ball and improve their ability to speed up if they get in the clear. Use 4 cones to make a square about 10 or 12 steps wide (smaller or larger depending on age and number of players). Every player has a ball. Spread players around the square, all facing inward (see diagram below):
All players start on “Go” and each player dribbles across and back. They must do a ‘Pullback’ (putting the bottom of the foot on top of ball to stop it and pulling it back in the direction you came from) or a ‘Hook Turn’ (pulling the toes up and turning the foot so the outside of the foot can "hook" the ball, stop it and pull it back) to turn. Tell players to look up while they dribble so they don’t run into each other. The first to 12 is the winner (each turn is 1 point). Tell players to yell ‘Done’ when finished and ask each player her score at the end of the game. Play 2 or 3 games. For the second game, the first to 10 is the winner and for the third game, the first to 8 is the winner. Coaching points: when in “traffic” (surrounded by other players), keep the ball close to the feet to protect it, learn how to look up while dribbling by keeping the ball close to the feet, when in the ‘open’ (out of traffic) kick the ball and run to it to go faster, but still keep it under control to turn.
Passing
1. Basic Passing - Divide the group into partners, giving each pair a ball. Have the players pass and trap the ball, while you evaluate their skill. Later, introduce one touch control passing (or passing the ball without first trapping it).

2. Triangle Pass - Set up a three player triangle. Each group has one ball. Players try to pass around
the triangle shape. Make sure they reverse the direction of the passes from time to time. After a certain level of proficiency is reached, add a defender to try and intercept the passes.
3. Pass and Follow – One player stands in the centre of a circle. One of the players in the circle
passes the ball to the player in the centre, follows the pass and takes the place of player in the middle. Meanwhile, the player in the centre traps the ball and passes to another player on the outside, following the pass and taking the place of the player passed to. The player with the ball traps the ball, passes it to the centre player and follows the pass. Continue around the circle.
As the players improve, put another ball into play and/or impose restrictions (for example, one-touch play or alternate side-of-the-foot).
4. Pressure Passing - Set up a circle of cones about 10m in diameter. One player stands in the
middle, the rest space themselves out equally around the edge of the circle. The player in the middle receives the ball from a player on the edge, controls it, turns and passes to another player. As soon as she or he passes the ball out, a second ball is played in from the edge of the circle. As soon as this ball is passed out to a player on the edge of the circle the first ball is played in again and so on. The middle player has to run quickly backwards and forwards to provide passes to the rest of the circle. Swap the middle player after one minute. Stress the importance of good, crisp and accurate passing. The middle player must keep their head up and look at the target. Vary the game by only allowing two touches, then one touch. Played properly, this is an intensive and fun workout.
5. Keep Away Ring - Players pair up and stand across from each other around a circle of cones. One
player stands inside the circle and tries to intercept passes made between the players. Passes made between the players count as goals. Change the players in the circle after a pass is intercepted or after a short time.
6. Cone Game - Players stand in a circle, facing a partner on the opposite side. Set up 6 or 8 cones in
the middle of the circle as targets. Players try to knock over the cones in the middle with accurate passes.
7. Four Corner Pass - Set up a 10 by 10 metre square with cones at each of the corners. Four players
on each side of the square have one ball between them. They attempt to pass the ball to each other, but may only run between the cones on their side of the area. A fifth player inside the area tries to steal the ball. Change the middle defender frequently.
8. Circle Passing - Many of the basic circle games can be used to practice passing. Try using a circle
with two players in the middle trying to intercept passes made by the players on the outside. The player whose pass is intercepted goes into the middle.
9. Triangles - This is a good way to reinforce basic passing skills with the added bonus of introducing
vision and awareness. Divide into groups of three. Player 1 passes to player 2 then immediately runs between player 2 and 3. Player 2 passes to player 3 and runs through the gap between player 3 and player 1. And so on.

Done properly, this is a fast game that reinforces the pass/move combination, makes players look carefully to find their next target and requires good passing technique. Just be careful the players don’t all disappear out of sight!
10. Relays - You can use a passing and moving relay race with a set up like this:
F
E
D
F
E
D
A
B
C
A
B
C
The basic practice is A passing to D and running to the back of the line, D passing to B and so on. Practice this for a few minutes (watching for and praising correct technique) then add the requirement that players must shout out the name of the person they are passing to. If they don’t, send them back and make them do it again. Adding this rule has the following benefits: it makes the players talk, it makes them look up to see who they are passing to, and if done at the start of a season it helps introduce the new players to each other. This game can be made competitive by making the first team to do 20 passes the winner. Many variations are possible. For example, go from two touches to one touch.
Shooting
1. Marbles - Players are organised into pairs, each with a ball. Standing with her or his back to the field of play, the first player throws the ball over her or his head. The second player then kicks their ball from the starting point and tries to hit the ball that was thrown. Play alternates by kicks until one ball is hit. The players then change over and start again. Coaches should emphasise instep kicks for length and the side of the foot for accuracy. Make it a condition that in every other game only the left foot is allowed to be used.
2. Shoot Between Cones - Set up a row of cones 3 to 5 metres apart. Pair up players and put one
player on each side of the line facing the cones and each other. Players should start close to the row of cones at first, striking the ball between the cones. The partner receives ball and passes it back through the cones. Move players further apart as their technique and accuracy improve.
3. Go For Goal - Players form two lines on either side of the coach who is standing 20 metres from a
goal. The coach serves the ball toward the goal line while one player races to win the ball and shoot. As skills improve, add a goalkeeper. The coach should encourage correct shooting technique and a good first touch on the ball.
4. Quick Shot - Divide players into groups of three, and give each group one ball and two cones. Set the cones up as a goal, and have one player be the goalkeeper. The remaining two players should be

on opposite sides of the goal, facing each other. They take turns shooting on goal. When the goalkeeper makes a save, he should turn and roll the ball to the other player. Switch goalkeepers often.
5. Cone Kick Down - This is played just like a regular small sided game, but instead of having a goal
to shoot at set up five cones along each goal line. The first team to knock down all five cones wins. There are no goalkeepers.
6. Shot Against Goalkeeper - Divide the team into pairs. Give each pair one ball and four cones. Set
the cones up as two separate goals, about 10 metres apart. Every player stands in front of a goal and takes turns shooting and being the goalkeeper. Initially, have the players shoot a stationary ball. Then have them stand behind their goal line and dribble up to it before shooting or have the goalkeeper roll the ball to the shooter for a one-touch shot.
7. Pass and Shoot - Set up two cones as a goal at one end of the square and divide the group in half.
Pick one player to start as goalkeeper. Then line one group up behind the goal, with one ball for each player. Line the other group up fifteen feet in front of the goal, in the centre. The first player in the line behind the goal should pass the ball to the first player in the centre line. This person then traps the ball and takes a shot on goal. After their turns, the players should get in the end of the alternate line (players who took shots need to retrieve the ball if needed). Switch goalkeepers often. For large groups, two games can be set up at opposite ends of the square. Later, have the shooting line take their shots with only one touch.
8. 3 v 3 One Goal - A normal 3-a-side game in an area approximately 30m by 20m, except that it is
played around one goal rather than two (two cones placed in the middle of the area). There is one goalkeeper to defend the goals from both teams. Team A can score only from the left side of the field, and team B only from the right side. Players combine to create goal-scoring opportunity. Emphasise shooting at goal at the earliest opportunity. Re-start game with a throw-in any time the ball goes out of bounds. When goalkeeper makes a save from one team, she or he throws the ball into the opposing half of the field. Change the goalkeeper often.
9. Cone Ball - Can be played 4v4v4. Put a large cone (or similar) in the middle of the field. The three
teams play against each other. To score a team simply has to hit the target (the cone). Add a 5 metre exclusion zone around the cone and introduce a goalkeeper to this area.
Heading
1. Self Heading – Players ‘head’ the ball out of their hands and catch it. The ball should start being held against each player’s forehead. The player then pulls head/upper body back while holding ball still and then strikes the ball. Concentrate on eyes open, mouth closed, hit with proper part of forehead (contact the ball with the forehead area between hairline and eyebrows).
2. Self Heading (in pairs) – Players form pairs, each pair with a ball, and stand about 5 metres apart.
One player heads the ball to their partner using technique described above. Partner catches and heads back.
3. Partner Heading – In pairs, one player tosses the ball gently to the other player who heads it back.
Continue for 10 consecutive headers and change.

4. The Heading Game - In 10 by 5 metre square, players take it in turn to head ball over opponent’s
goal line by pulling ball back and using their own momentum to head the ball. The player who is attempting to stop the ball can use their hands or dive if necessary.
5. Three Person Heading – Have one player stand in the middle of two others, who each have one
ball. The outside players take turns tossing the ball gently for the middle player to head it back. The middle player must head one ball, spin around and head the other ball, then back again. Continue for a given number of headers (10-20), and switch the player in the middle.
6. Target Heading – Players form groups of three (two tossing the ball and one heading it). The first
player gently tosses the ball for the second player to head in the direction of the third player, who is
standing to the side (at a 90° angle). This player catches the ball, and tosses it gently for the second player to head it back to the first. Continue for a given number of headers (10-20) and switch the player heading the ball. Encourage accuracy of the headers.
7. Keep It Up – In pairs, one player tosses the ball gently to the other player who heads it back. The
first player tries to head the ball back and players try to keep the ball from hitting the ground only by using their heads. Encourage players to keep count of how many times they head the ball and try to beat their best effort. Join two pairs together and have them try to make the balls collide mid-air.
8. Volley Football – Two teams stand at either end of a 10m by 5m area with a centre line (similar to
volleyball court). Place benches or cones along the centre of the court to represent a net. Game begins with throw-in to teammate who heads ball over net. The opponent must header the ball back before it bounces twice. Points are scored as in volleyball.
9. Circle Keep It Up – Players form a circle of 4 or 5. The drill begins by one player tossing the ball
gently to another player in the circle. The group must then try to keep the ball up for as long as possible only using their heads. Teams can count the highest number of consecutive headers to determine which group is the winner.
10. The Heading Game 2x2 - Players are paired up to play 2v2 in a 10 by 10 metre square. One pair
has ball and tries to advance down field heading the ball to each other (without it touching the ground). Once they get near the other teams goal line then one of them can attempt to head it past their line to score. The other team stays on their goal line and attempts to save the ball. Once the ball hits the ground or is saved, the two heading retreat to their goal line and the other 2 begin to try to keep the ball in the air and advance up the field to score.
Goalkeeping
1. Soft Catch - Play game in pairs throwing and catching ball. Try to make no sound as the ball hits the hands (this is almost impossible!)
2. Keepers Nest 3v1 - Place three cones in a triangle 10 metres apart. One player is inside the triangle
as the keeper. The other three try to possess the ball and score goals by moving the keeper out of position and playing the ball through two cones on the opposite side of the triangle. If the keeper intercepts the ball, the player who played the ball last becomes the new keeper.
3. American Football – Divide the group into teams and players use their hands to pass. Concentrate
on proper hand position under pressure. If a player has the ball in her or his hands they cannot
move their feet. Players cannot grab the ball if it is in a player’s hands! Instead of making goals for the teams to score in, create an end zone at either end of the small field. A team can score a ‘touch-down’ if they pass the ball to a team-mate standing in the end zone (players can not stand in the end zone for more than 3 seconds).
4. Crocodiles in the River - 20 by 30 metre square. 3 teams of about 4 players and 3 balls. Each
team gets five minutes in the middle as goalkeepers (they are the crocodiles in river trying to intercept the ball!) Count the number of interceptions. The other two teams have to play the balls across the ‘river’ back and forth. Introduce calling for the ball, then passing to a teammate on same side. Goalkeeping techniques being used include – anticipation, setting position for shot, and receiving balls. If ball is intercepted have keeper distribute back to the coach.
5. Triangular Goals - Create triangular goals (3 cones 2 metres apart in a triangle shape) in the middle
of the penalty area. Play 4v4 within penalty box. One team has 4 attackers, the other 3 keepers and 1 defender. If the ball goes out of the box, or the keepers/defender make a save, switch teams. Let each team keep scores. Then go to larger area - 6v6 or 8v8 in between halfway line and edge of 18 yard box. Open goals up to 6 metres wide. Advance the activity appropriately by asking players to play 3 passes before shooting, having to header a goal or chip over goals to teammate to score!
Small Fun Games
9 x 9 Mobile Wingers - 2 teams of 7 playing in an area approximately 60m x 40m. An additional 2 players per team act as “wingers” playing in a channel just outside the main pitch. These wingers cannot enter the playing area, nor can they tackle one another. Their team-mates can, however, pass to and receive the all from them. Key Points: Encourage players to use the full width of the pitch in order to “stretch” the defence. Emphasise the need for wingers to cross the ball well and for attackers to make good runs into the penalty area. Your Number’s Up - 2 teams of 10. Teams are divided into 2 groups and 5 from each team are positioned in each corner. When a player’s number is called, he/she must come onto the pitch as quickly as possible and will play against the opponent who has the same number. By calling more than one number, the leader can vary the amount of people playing. Change when a goal is scored or after 2 minutes. Key Points: Emphasise working as a team in attack and defence. Run for your life – 4 teams of 7. Pitch 60m x 40m, 2 teams play a 7 v 7 match, in which the first team to score are the winners. As soon as a goal is scored, the winning team must retrieve the ball from the goal as quickly as possible and play into the opposite goal. The other team leaves the pitch immediately and join the “queue” to play. The next team must get into the pitch quickly and ensure they are defending the correct goal. Key Points: Speed to thought and movement. Stress importance of organisation in defence. In the Zone – 2 teams of 7 playing in an area approximately 60m x 40m. 2 players from each team must play in each of the 3 zones, i.e. 2 defenders, 2 midfielders and 2 attackers. Players must stay in their zone
- mark the zones with cones. (As a progression the midfielders can be allowed to move into their team’s attacking zone to create a numerical advantage) Key Points: Man-to-man marking, finding space/mobility. Changeover – 2 teams of 7 playing in an area approximately 60m x 40m. An additional 7 players per team stand on the line just outside the pitch and can receive and pass the ball to those actually playing. On a given command (e.g. change), players on the outside swap with those on the pitch.
Mini Football
Mini Football is a game of football devised for children under the age of 12. It was created to improve children’s skill and understanding of the game of football, and can be a great way to end a practice session by allowing players to practice the skills they have just been learning or developing in a simulated game environment. A smaller field with fewer players greatly improves the game of football for younger children, as they get to touch the ball more often, don’t get tired from running around a big field, and therefore can more easily develop their skills. All the rules are generally the same as traditional 11-a-side football except for a few simple variations. The advantage of mini-football is that any rule can be modified to cope with conditions and skill level of the children participating. Field Dimensions – A regular football field is generally cut in half into two equally sized mini-football fields. This makes a smaller more practical field for children. The opposing goals are then placed on the side lines of the new field (new goal line). There are not direct measurements for the goals. They are usually much smaller than the regular nets and should not be more than 4m wide by 2m high. The size of the goal should be set to the age and skill level of the children participating. Penalty Area - One rule change is that there is no penalty area and no penalty shots. Throw-ins - For the younger children (about 5 to 9) who have not learnt to throw the ball in, the ball can be placed on the ground and kicked like a free kick (where a normal throw-in takes place). Older children who can do a proper throw-in can continue with the regular rules. Offside - Generally offside is not called for younger children until a strong understanding and comprehension of the rule is taught. Usually children around the age of 10 can begin to understand the rule and it can slowly begin to be introduced. Players – The number of players is variable, but generally there are 7 players a side (3 forwards, 3 defenders and a goalkeeper).

Sample Practice Session Plans
Ball Control and Dribbling
OBJECTIVE: Players will be able to demonstrate the fundamentals of ball control and dribbling.
AGE GROUP: 10-12 years NO. OF PARTICIPANTS: 20
WARM UP: Three Ball Keep-Away TIME: Equipment Two teams - three soccer balls. On coach’s signal players try to possess as many balls as possible. On second signal, play stops. Team in possession of two or more balls wins that round. Repeat several times. Stretching.
5 mins 5 mins
3 balls
Individual/Pair Skill Activity: Ball Control In pairs, player A rolls or tosses the ball to player B. Player B brings ball under control.
Coaching Points 1. Keep the head steady and
watch the ball carefully to judge its flight and speed.
2. Move feet quickly so the body is in front of the ball.
3. Choose the right body surface to control the ball.
4. Cushion the force of the ball by pulling back the body part being used to control the ball.
5 mins
1 ball per pair
Individual/Pair Skill Activity: Dribbling 1. Dribble ball between feet while in stationary
position 2. Dribble around cone course. 3. On signal, dribble ball as fast as possible from
one sideline to other side and stop on sideline. 4. On signal, count number of dribbles between
feet in stationary position.
1. Use short steps. 2. Push the ball forward gently
with the inside or the outside of the foot. Alternate feet.
3. Keep the ball close and in front.
10 mins
1 ball per player (or one per small group), cones.
Small Group Activity: Monkey-in-the-Middle In groups of three, one player is the monkey-in-the-middle. The two other players pass the ball past the ‘monkey’ without letting her or him control it. Once the ‘monkey’ traps the ball, one of the other players takes her or his place. The two outside players must control the ball, or they will have to switch with the ‘monkey’. Passes must be quick and short. Switch at least every 30 seconds.
5 mins
1 ball per group
Large Group Activity/Modified Game: Keep Away Within set boundary each player has a ball. On signal, dribble ball within boundary and try to kick other players’ balls out of the area. Players whose ball is kicked out of area must retrieve ball and dribble around area before returning to game.
Mini Football
10 mins 10 mins
1 ball per player 1 ball, goals
COOL DOWN: 5 mins
BACK UP ACTIVITIES: King of the Ring, Protect the Cone Balls, cones NOTES/SELF EVALUATION (for example, What worked well? What needs improvement? What do I need to work on in the future?)

Passing and Shooting
OBJECTIVE: Players will be able to demonstrate the fundamentals of passing and shooting.
AGE GROUP: 10-12 NO. OF PARTICIPANTS: 20
WARM UP: Spiders and Bugs Time: Equipment: Divide players into two equal teams. Each team stands alongside the centre line about two metres apart and all facing forward, with two lines about 20m away on each side. Name one team Spiders and one team Bugs. When you call 'Spiders' or 'Bugs' that team has to sprint for the line nearest them. The other team tries to tag them. Anyone who is tagged joins the other team. Stretching
5 mins 5 mins
None
Individual/Pair Skill Activity: Passing 1. Standing 3-4 meters from partner, pass ball back
and forth using the inside of the foot. 2. As in 1, but count number of passes between
partners in 1 minute. 3. Partners pass ball back and forth while jogging
across field.
Coaching Points 1. With non-striking foot, step even
with ball. 2. Strike ball at mid-point with inside
of foot for low controlled pass 3. Face target before passing, look at
ball during the pass 4. Follow through to target
5 mins
1 ball per pair
Individual/Pair Skill Activity: Shooting 1. Set up a line of cones each placed 3 to 5 metres
apart. 2. Pair up players and put one player on each side of
the line facing the cones and each other. 3. Players should start close to the row of cones at
first, striking the ball between the cones. 4. The partner receives ball and passes it back
through the cones. 5. Move players further apart as their technique and
accuracy improve.
1. Keep the head down and eyes on the ball – look up to pick out the target, but then look back at the ball to shoot.
2. Plant non-striking foot alongside (not above) the ball.
3. Strike the middle of the ball so it doesn’t rise.
4. Follow through, don’t jerk back when striking the ball (loses power).
5 mins
1 ball and 2 cones per pair.
Small Group Activity: Four Corner Pass 10m by 10m square with cones at each of the corners. Four players pass the ball, one on each side of the square. A fifth player defends inside the area. Players attempt to pass the ball across the area. Players may only run on their sides of the area between the cones. Change the middle defender frequently.
15 mins
1 ball and 4 cones per group
Large Group Activity/Modified Game: 3 on 3 One Goal A normal 3-a-side game in an area approximately 30m by 20m, except that it is played around one goal rather than two (which is placed in the middle of the area). Emphasize shooting at goal at the earliest opportunity. Players combine to create goal-scoring opportunity. Team A can score only from the left side of the field, and teamB only from the right side. Re-start game with a throw-in any time the ball goes out of bounds. When goalkeeper makes a save from one team, she/he throws the ball into the opposing half of the field.
15 mins
1 ball and 2 cones per group
COOL DOWN: 5 mins
BACK UP ACTIVITIES: Triangles, Quick Shot Balls, cones
NOTES/SELF EVALUATION (for example, What worked well? What needs improvement? What do I need to work on in the future?)

The Header and Throw-In
OBJECTIVE: Players will be able to demonstrate the fundamentals of the header and throw-in.
AGE GROUP: 10-12 NO. OF PARTICIPANTS: 20
WARM UP: Reaction Warm Up TIME: Equipment: Make a circle with cones - one for each player. If there are a large number of players, make two (or three) circles. Players stand at each cone and the coach calls out a variety of instructions that players must follow. For example, “2 left” (players all have to run to the cone 2 places to their left) or “3 right, 1 left” (3 cones to the right then back one cone to the left) or “2 right, centre, 1 left” (2 cones to the right, run to the centre and back, then 1 cone to the left). Stretching
5 mins 5 mins
One cone for each player
Individual/Pair Skill Activity: The Header
1. Players ‘head’ the ball out of their hands and catch it. The ball should start being held against each player’s forehead. The player then pulls head/upper body back while holding ball still and then strikes the ball. Concentrate on eyes open, mouth closed, hit with proper part of forehead.
2. Players form pairs, each with a ball, and stand about 5 metres apart. One player heads the ball to their partner using technique described above. Partner catches and heads back.
Coaching Points
1. Stand in balanced, athletic,
ready position 2. Lean back from waist as ball
approaches 3. Move head forward towards
ball and contact ball with hairline of forehead
4. Keep mouth closed and eyes open
5. Follow through towards target
5 mins
1 ball per player/pair
Individual Skill/Pair Activity: The Throw-in As in Drill 2 for the header, players form pairs and take turns throwing the ball to each other, gradually increasing the distance.
1. Face target, feet shoulder width apart
2. Draw ball back behind head with both hands and lean back
3. Transfer weight forward and throw
5 mins
1 ball per pair.
Small Group Activity: Volley Football Two teams stand at either end of a 10m by 5m area with a centre line (similar to volleyball court). Place benches or cones along the centre of the court to represent a net. Game begins with throw-in to teammate who heads ball over net. The opponent must header the ball back before it bounces twice. Points scored as in volleyball. Divide teams and play a ‘tournament’
15 mins
1 ball per game, cones for boundary lines, cones and/or benches for ‘net’
Large Group Activity/Modified Game: Two 5-a-side games in each 18 yard box. Goals can only be scored by heading the ball.
15mins
1 ball per game, 2 cones for each goal
COOL DOWN: 5 mins
BACK UP ACTIVITIES: The Heading Game, Partner Heading, American Football (passing by throw in)
Balls, cones
NOTES/SELF EVALUATION (for example, What worked well? What needs improvement? What do I need to work on in the future?)
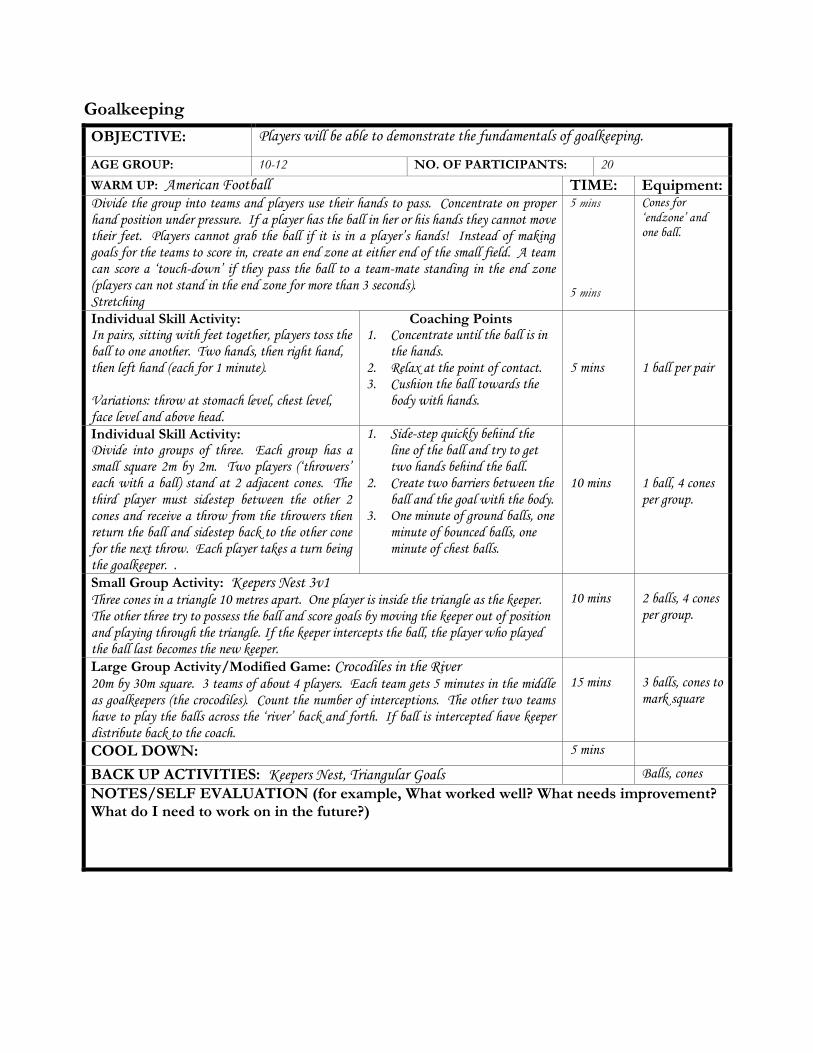
Goalkeeping
OBJECTIVE: Players will be able to demonstrate the fundamentals of goalkeeping.
AGE GROUP: 10-12 NO. OF PARTICIPANTS: 20
WARM UP: American Football TIME: Equipment: Divide the group into teams and players use their hands to pass. Concentrate on proper hand position under pressure. If a player has the ball in her or his hands they cannot move their feet. Players cannot grab the ball if it is in a player’s hands! Instead of making goals for the teams to score in, create an end zone at either end of the small field. A team can score a ‘touch-down’ if they pass the ball to a team-mate standing in the end zone (players can not stand in the end zone for more than 3 seconds). Stretching
5 mins 5 mins
Cones for ‘endzone’ and one ball.
Individual Skill Activity: In pairs, sitting with feet together, players toss the ball to one another. Two hands, then right hand, then left hand (each for 1 minute). Variations: throw at stomach level, chest level, face level and above head.
Coaching Points 1. Concentrate until the ball is in
the hands. 2. Relax at the point of contact. 3. Cushion the ball towards the
body with hands.
5 mins
1 ball per pair
Individual Skill Activity: Divide into groups of three. Each group has a small square 2m by 2m. Two players (‘throwers’ each with a ball) stand at 2 adjacent cones. The third player must sidestep between the other 2 cones and receive a throw from the throwers then return the ball and sidestep back to the other cone for the next throw. Each player takes a turn being the goalkeeper. .
1. Side-step quickly behind the line of the ball and try to get two hands behind the ball.
2. Create two barriers between the ball and the goal with the body.
3. One minute of ground balls, one minute of bounced balls, one minute of chest balls.
10 mins
1 ball, 4 cones per group.
Small Group Activity: Keepers Nest 3v1 Three cones in a triangle 10 metres apart. One player is inside the triangle as the keeper. The other three try to possess the ball and score goals by moving the keeper out of position and playing through the triangle. If the keeper intercepts the ball, the player who played the ball last becomes the new keeper.
10 mins
2 balls, 4 cones per group.
Large Group Activity/Modified Game: Crocodiles in the River 20m by 30m square. 3 teams of about 4 players. Each team gets 5 minutes in the middle as goalkeepers (the crocodiles). Count the number of interceptions. The other two teams have to play the balls across the ‘river’ back and forth. If ball is intercepted have keeper distribute back to the coach.
15 mins
3 balls, cones to mark square
COOL DOWN: 5 mins
BACK UP ACTIVITIES: Keepers Nest, Triangular Goals Balls, cones
NOTES/SELF EVALUATION (for example, What worked well? What needs improvement? What do I need to work on in the future?)