RFTerm Reference Guide - gammasolutions.com · RFTerm™ For: HX2withWindows®CE5.0...
382
RFTerm™ For: HX2 with Windows ® CE 5.0 MX3Plus with Windows ® CE 5.0 MX7 Tecton™ with Windows ® Embedded CE 6.0 or Windows Mobile ® 6.5 MX7 with Windows ® CE 5.0 MX8 with Windows ® CE 5.0 or Windows Mobile ® 6.1 MX9 with Windows ® CE 5.0 or Windows Mobile ® 6.5 Thor™ VM1 with Windows ® Embedded CE 6.0 or Windows ® Embedded Standard 2009 Thor™ VM2 with Windows ® Embedded CE 6.0 or Windows ® Embedded Standard 2009 Thor™ VX8 with Windows ® XP, Windows ® 7 or Windows ® Embedded Standard 2009 Thor™ VX9 with Windows ® XP, Windows ® 7 or Windows ® Embedded Standard 2009 VX3 Plus with Windows ® CE 5.0 VX6 with Windows ® CE 5.0 VX7 with Windows ® CE 5.0 Reference Guide
Transcript of RFTerm Reference Guide - gammasolutions.com · RFTerm™ For: HX2withWindows®CE5.0...
RFTerm™For:HX2withWindows®CE 5.0MX3Plus withWindows®CE 5.0MX7 Tecton™withWindows® Embedded CE 6.0 orWindows Mobile® 6.5MX7withWindows®CE 5.0MX8withWindows®CE 5.0 orWindows Mobile® 6.1MX9withWindows®CE 5.0 orWindows Mobile® 6.5Thor™VM1withWindows® Embedded CE 6.0 orWindows® Embedded Standard 2009Thor™VM2withWindows® Embedded CE 6.0 orWindows® Embedded Standard 2009Thor™VX8withWindows® XP, Windows® 7 orWindows® Embedded Standard 2009Thor™VX9withWindows® XP, Windows® 7 orWindows® Embedded Standard 2009VX3 Plus withWindows®CE 5.0VX6withWindows®CE 5.0VX7withWindows®CE 5.0
Reference Guide

DisclaimerHoneywell International Inc. (“HII”) reserves the right to make changes in specifications and other information contained in thisdocument without prior notice, and the reader should in all cases consult HII to determine whether any such changes havebeenmade. The information in this publication does not represent a commitment on the part of HII.HII shall not be liable for technical or editorial errors or omissions contained herein; nor for incidental or consequential damagesresulting from the furnishing, performance, or use of this material.This document contains proprietary information that is protected by copyright. All rights are reserved. No part of this documentmay be photocopied, reproduced, or translated into another language without the prior written consent of HII.© 2002-2013 Honeywell International Inc. All rights reserved.Web Address: www.honeywellaidc.comRFTerm is a trademark or registered trademark of EMS Technologies, Inc. in the United States and/or other countries.Microsoft®Windows, ActiveSync®, MSN, Outlook®, Windows Mobile®, theWindows logo, andWindows Media areregistered trademarks or trademarks of Microsoft Corporation.Summit Data Communications, the Laird Technologies Logo, the Summit logo, and "Connected. NoMatterWhat" aretrademarks of Laird Technologies, Inc.The Bluetooth®wordmark and logos are owned by the Bluetooth SIG, Inc.Freefloat, Link*One and Freefloat Wlinq are trademarks of Freefloat, Mölndalsvägen 30B, SE-412 63Gothenburg, Sweden.Acrobat®Reader © 2013 with express permission from Adobe Systems Incorporated.Other product names or marks mentioned in this document may be trademarks or registered trademarks of other companiesand are the property of their respective owners.
PatentsFor patent information, please refer to www.honeywellaidc.com/patents.
Limited WarrantyRefer to www.honeywellaidc.com/warranty_information for your product’s warranty information.
License StatementPuTTY is copyright 1997-2007 Simon Tatham.Portions copyright Robert de Bath, Joris van Rantwijk, Delian Delchev, Andreas Schultz, JeroenMassar, Wez Furlong,Nicolas Barry, Justin Bradford, Ben Harris, Malcolm Smith, Ahmad Khalifa, Markus Kuhn, and CORE SDI S.A.Permission is hereby granted, free of charge, to any person obtaining a copy of this software and associated documentationfiles (the “Software”), to deal in the Software without restriction, including without limitation the rights to use, copy, modify,merge, publish, distribute, sublicense, and/or sell copies of the Software, and to permit persons to whom the Software isfurnished to do so, subject to the following conditions:The above copyright notice and this permission notice shall be included in all copies or substantial portions of the Software.THE SOFTWARE IS PROVIDED "AS IS", WITHOUTWARRANTY OF ANY KIND, EXPRESS OR IMPLIED, INCLUDINGBUT NOT LIMITED TO THEWARRANTIES OFMERCHANTABILITY, FITNESS FOR A PARTICULAR PURPOSE ANDNONINFRINGEMENT. IN NOEVENT SHALL SIMON TATHAM BE LIABLE FOR ANY CLAIM, DAMAGES OR OTHERLIABILITY, WHETHER IN AN ACTION OF CONTRACT, TORT OR OTHERWISE, ARISING FROM, OUT OFOR INCONNECTION WITH THE SOFTWARE OR THE USE OR OTHER DEALINGS IN THE SOFTWARE.

Table of Contents
Chapter 1 - Overview 1-1Assumptions 1-1Conventions Used in this Guide 1-1About RFTerm 1-2Feature Highlights 1-3SSH Protocol 1-3Multiple Host Sessions 1-3Swapping Between Sessions 1-3HotSpots 1-4Screen Panning 1-4Configurable KeyBar 1-4SmartPads 1-4Access Control 1-4Device Lockdown 1-4Configurable Fonts 1-4Color Schemes 1-4Automatic Login 1-5Automatic Session Persistence 1-5Dynamic Cursor View Modes 1-5Text InputTool 1-5Device / LU NameSupport 1-5Automatic Re-connection 1-5Full VT220 Support 1-5VT LineMode 1-5VT Answerback String 1-5HotKeys 1-5Block Mode 1-6Programmable Function Keys 1-6Printing 1-6Help 1-6Double Byte Support 1-6
Installation 1-7Installation Note 1-7Initial Installation 1-7Upgrading from an Earlier Version of RFTerm 1-7
Quick Start 1-8RFTerm Screen Sizes 1-9
i

Important Notes 1-10Quick Tips 1-11Screen Panning 1-11HotSpots 1-11Predefined HotKeys (Shortcuts) 1-11Readability 1-11Data Input 1-11Configurable KeyBar 1-11Access Control 1-11Application ToolBar 1-12Miscellaneous 1-12
Chapter 2 - RFTerm Settings 2-1Display 2-1Parameters 2-1Menu 2-1ToolBars, KeyBars, Shortcut Keys andWindows Mobile 2-1Hide All Bars 2-2Disable/HideMenuBar 2-2Hide KeyBar 2-2Hide ToolBar 2-2(Menu) at Bottom 2-2HideOIA (IBM only) 2-2
Scroll Bars 2-3Hide Vertical Scroll Bars 2-3Hide Horizontal Scroll Bars 2-3
Disable Touch Screen 2-3Shortcuts 2-4Parameters 2-4Jump to Inactive Sessions 2-4Disable Shortcut Keys 2-4Buttons 2-4Shortcuts Active Until Disabled 2-5
Options1 2-7Parameters 2-7Access Control 2-7Hide Start Menu 2-7Disable App Exit 2-7Exit Now 2-8Config Password 2-8
ii

Confirm Disconnect 2-8Enable HotSpots 2-8Enlarge HotSpots 2-8Check Network Status 2-9Disable ScanOn Exit Focus 2-9KeyBars 2-10KeyBar Cycle 2-10Custom Bar 2-11
Options2 2-12Parameters 2-12Respond DONT encryption 2-12Focus Control 2-12
Options3 2-13Parameters 2-14Origin X 2-14Origin Y 2-14Width Reduction 2-14Height Reduction 2-14
Sounds 2-15Parameters 2-15Good Sound 2-15Bad Sound 2-16Beep on Error 2-16
Alarm Sound 2-16Match Text / Sound Key 2-16Alarm Position 2-17
Sound Events 2-17Status 2-18Parameters 2-18Status Icons 2-18Orientation 2-18Location 2-19Color 2-19WAN 2-19Con 2-19WiFi 2-20Bat 2-20Key 2-20
SessionMenu 2-21Host Menu 2-21
iii
Session Start Control 2-21Logging 2-21
Serial Data 2-22Parameters 2-22COM Port 2-22Baud Rate 2-23Data Bits 2-23Timeout 2-23Parity 2-23Stop Bits 2-23DTR Control 2-23RTS Control 2-23CTS Out 2-23DSR Out 2-23XonXoff Xmit 2-23XonXoff Recv 2-23
Stored Forms 2-24Creating Stored Forms 2-24
Chapter 3 - Session Configuration 3-1Connection 3-1Prerequisites for Connection 3-2Parameters 3-2Host Type 3-2Host Address 3-2Host Name 3-2Terminal Device 3-3Telnet Port 3-3Reset Defaults 3-33270, 5250, VT Config 3-3KeepAlive 3-3Auto Reconnect 3-3Retry on Signal Loss 3-3
VT Configuration 3-4Keys 3-4Parameters 3-4Backspace 3-4Enter Key 3-4Keyboard 3-4
Screen 3-5
iv

Parameters 3-5Background 3-5Columns 3-5Autowrap 3-5Local Echo 3-5Screen Update 3-6
Options 3-7Parameters 3-7C1Controls 3-7User Preference Supplemental 3-7Auto Transmit 3-7Inclusive End Prot Area 3-7Send/ReceiveMode 3-8
Answerback 3-9Parameters 3-9Use LXE Format 3-9Use Secondary ID 3-9Use IP Address 3-10Zero Pad 3-10Row 3-10Columns 3-10Display 3-10Answerback Message 3-10
Special Formatting for Answerback String 3-11Compatibility 3-13Parameters 3-13SEM (Select Editing Extent Mode for VT220) 3-13Select DEC Special Graphics into G1 3-13Unlock Keyboard Before End of Data Stream 3-13Clear Tabs on Clear Screen 3-14
5250 Configuration 3-15Options 3-15Parameters 3-15Device / LU# 3-15Auto Transmit 3-16Tab = Field Exit 3-16Status Line Visible 3-16Support ANSI Login 3-16Auto Enter 3-16Field Exit on Scan 3-16
v

Special Formatting for Device / LU# String 3-17Compatibility 3-19Parameters 3-19Block PF key Inhibit 3-19Block Negative Response for Message Buffer in Use 3-19Auto Clear Field 3-20Block Send Data Aid Invite 3-20Reject On Restore Screen 3-20Cursor Home 3-20
3270 Configuration 3-21Options 3-21Parameters 3-21Device / LU# 3-21EAB 3-21Auto Transmit 3-22Status Line Visible 3-22Auto Enter 3-22Support TN3270E 3-22
Special Formatting for Device / LU# String 3-23Compatibility 3-25Parameters 3-25Clear to EOL 3-25Auto Clear Field 3-25Order Prog Tab Erase 3-26Null Format Control Order 3-26
Font 3-27Parameters 3-27Font 3-27Style 3-27Pointsize 3-27Specify Rows and Columns 3-27
Colors 3-28Parameters 3-28Scheme 3-28Attribute 3-28Sample Attribute 3-28Intense 3-29Select Color 3-29How To: Custom Color Scheme 3-29
Barcode 3-30
vi

Parameters 3-31Left Justify 3-31Truncate 3-31Clear Data 3-31Auto Advance 3-31Fast Scan 3-31Use Field Exit 3-31Scan Control 3-31Barcode Preamble 3-32Barcode Postamble 3-32Send Key 3-32Character Mapping 3-33Character Stripping 3-34Code ID Stripping 3-34Code ID 3-34Pre-Strip 3-34Post-Strip 3-34
Cursor 3-35Parameters 3-35Cursor Options 3-35Automatic Scrolling 3-36
Print DataMap 3-37Parameters 3-37Pass Thru Exceptions 3-37CR as CR 3-37EOT as NULL 3-38
Start Print 3-38End Print 3-38
Auto Login 3-39Parameters 3-39Auto 3-39Timeout 3-40Prompt 3-40Reply 3-40
Fn Keys (Function Key Programming) 3-41Parameters 3-41Function Key Combo Box 3-41Function Key Edit Box 3-41Add 3-41Clear 3-41
vii

Disable Blank Keys 3-42Keybd 3-43Parameters 3-43Default Key Map 3-43PC Style Keyboard (IBM only) 3-43HX2 Function Key Enable 3-43Two Key Function Keys 3-44
Compatibility 3-45Parameters 3-45Multi beep on good scan 3-45Disable *P 3-45Continuous Retries Without Prompt 3-46Show Input Error Message 3-46
SSH 3-47Parameters 3-47SSH Select 3-47SSH Server Address 3-47SSH Server Port 3-47Authorization 3-48Configure... 3-48User Authorization 3-48User 3-48Password 3-48
Private Key File 3-49User 3-49Passphrase 3-49User Key File 3-49Browse... 3-50OK 3-50
Advanced... 3-50Server Keys 3-50Delete 3-51Allow Connection to Unlisted Host (global) 3-51
Misc 3-51Keep Alive Ping Interval 3-52Rekey After MB of Data 3-52Rekey After Minutes 3-52Compression 3-52
Chapter 4 - Session Interaction 4-1
viii

Multiple Sessions 4-1MenuBar SessionMenu 4-1Session Host Menu 4-2HotKey Session Selection 4-2ToolBar Session Selection 4-3
Password Protection 4-4Connecting / Disconnecting from Host 4-5Device Name In Use 4-5
SmartPads 4-5Configurable KeyBar 4-6Print Setup 4-8Print Method 4-8Installed Printer 4-8Direct Serial 4-9Com Port Error Dialog 4-9Cradle Printing via IR 4-9Media Copy Command 4-9
IP 4-10Using a Bar Code to Input IP Address 4-10
Scanner Applet 4-10Bluetooth 4-10
Buffer Print 4-10Out of Range 4-11Text InputTool 4-12HotSpots 4-14Screen Panning 4-15Access Control / Device Lockdown 4-15HotKey Shortcuts 4-16Automatic Session Startup 4-18
Chapter 5 - ANSI 5-1ANSI Client Overview 5-1Block Mode Communication 5-1Block Mode Setup 5-1
Scroll Mode Communication 5-2Scroll Mode Setup 5-2
Initialization 5-2Sending the Client Screen to the Host 5-3Character Mode 5-3Scroll Mode 5-3
ix

Block Mode 5-3Tabbing 5-5Default Tabs 5-5Area Tabs 5-5Regular Tabs 5-5
ANSI Control Codes 5-6Using the 8-Bit Code Table 5-68-Bit Code Table 5-6C0Codes: 7-Bit Control Codes 5-9BEL - Bell 5-9BS - Backspace 5-10CR - Carriage Return 5-10DC2 - Device Control 2 5-11DC4 - Device Control 4 5-11DEL - Delete 5-12ENQ - Inquiry 5-12ESC - Escape 5-13FF - Form Feed 5-13HT - Horizontal Tab 5-14LF - Line Feed 5-15NUL - Null 5-16VT - Vertical Tab 5-17
C1Codes: 8-Bit Control Codes 5-18CSI - Control Sequence Introducer 5-18EPA - End of Protected Area 5-19ESA - End of Selected Area 5-20HTJ - Horizontal Tab with Justify 5-21HTS - Horizontal Tabulation Set 5-22IND - Index 5-22NEL - Next Line 5-23RI - Reverse Index 5-24SPA - Start of Protected Area 5-25SSA - Start of Selected Area 5-26
ANSI Escape Sequences 5-27CBT - Cursor Backward Tabulation 5-27CHA - Cursor Horizontal Absolute 5-28CHT - Cursor Horizontal Tab 5-29CNL - Cursor Next Line 5-30CPL - Cursor Preceding Line 5-31CPR - Cursor Position Report 5-32
x
CTC - Cursor Tabulation Control 5-33CUB - Cursor Back 5-34CUD - Cursor Down 5-35CUF - Cursor Forward 5-36CUP - Cursor Position Absolute 5-37CUU - Cursor Up 5-38CVT - Cursor Vertical Tab 5-39DAQ - Define AreaQualifications 5-40DCH - Delete Character 5-42DL - Delete Line 5-43DMI - Disable Manual Input 5-44DSR - Device Status Report 5-45EA - Erase in Area 5-47ECH - Erase Character 5-48ED - Erase in Display 5-49EF - Erase in Field 5-50EL - Erase in Line 5-51EMI - EnableManual Input 5-52HVP - Horizontal Vertical Position 5-53ICH - Insert Character 5-54IL - Insert Line 5-55MC -Media Copy 5-56REP - Repeat Character 5-57RM - Reset Mode 5-58SEM - Select Editing Extent Mode 5-59SM - Set Mode 5-60TBC - Tab Clear 5-62
DEC Private Escape Sequences 5-63APM - Auto Print Mode 5-63DECRM - DEC Reset Mode 5-64DECSCA - Select Character Attribute 5-65DECSED - Selective Erase in Display 5-66DECSEL - Selective Erase in Line 5-67DECSM - DEC Set Mode 5-68DECDHL - Double-Height Line 5-69Top Half 5-69Bottom Half 5-69
DECDWL - Double-Width Line 5-70G0/G1/G2/G3 - Designate G0/G1/G2/G3 5-70PL - Print Line 5-71
xi

PS - Print Screen 5-71S7C1T - Select 7-Bit C1 Control Transmission 5-72S8C1T - Select 8-Bit C1 Control Transmission 5-72SI - Shift In (Lock Shift G0) 5-73SO - Shift Out (Lock Shift G1) 5-73
Private Escape Sequences 5-74LXERM - Reset Mode 5-74LXESM - Set Mode 5-75Scanner Enable / Disable 5-76Disable Scanner 5-76Enable Scanner 5-76
Keyboard Enable / Disable 5-77Disable Keyboard 5-77Enable Keyboard 5-77
Enable/Disable Bar Code Symbologies 5-78Specifying Bar Code, Keypad and Control Modes 5-79Command String for Bar Code, Keypad and Control Modes 5-79Left Justify Mode: p2 5-81Left Justify Off 5-81Left Justify On 5-81
Clear Mode: p3 5-82TruncateMode: p4 5-83TruncateModeOff 5-83TruncateModeOn 5-83
AdvanceMode: p5 5-84Specifying Transmit and Screen Function Setup 5-85Command String for Transmit and Screen Function Setup 5-85
Local Edit Commands 5-87Command String for Local Edit Match Field 5-87Command String for Local Edit Wildcard 5-88Using Local Edit 5-89VT Host Key Descriptions 5-91Hold 5-91Enter 5-91Compose Character 5-91Tab 5-91Delete 5-91Break 5-91Cancel 5-91Answerback 5-91
xii

Find 5-91Insert Here 5-92Remove 5-92Select 5-92Previous Screen 5-92Next Screen 5-92Escape 5-92Backspace 5-92Line Feed 5-93PF Keys 5-94Function Keys 5-94
Custom VT220 Host Commands 5-95
Chapter 6 - ANSI Quick Reference Guide 6-1Functionality List 6-1Notes 6-1Cursor Positioning 6-2Forms 6-3Transmission To Host 6-4Editing 6-5Character Rendition 6-5Bar Code 6-6Reports / Status / Test 6-6Printing 6-7Hat Encoding 6-8DEC Special Graphics - Code Table 6-11IS0 8859-1 Character Set 6-12
Chapter 7 - IBM 3270 7-13270 Host Key Descriptions 7-1Attention 7-1System Request 7-1Clear 7-1Reset 7-1Erase Input 7-1Erase to End of Field 7-1Delete 7-1Insert 7-1Home 7-1Tab or Next 7-2Backtab or Previous 7-2
xiii

Enter 7-2New Line 7-2Escape 7-2PA Keys 7-2Function Keys 7-2
3270 Commands 7-2Printing a Field 7-2Beep 7-2
Custom IBM 3270 Host Commands 7-3
Chapter 8 - IBM 5250 8-15250 Host Key Descriptions 8-1Attention 8-1System Request 8-1Clear 8-1Reset 8-1Erase Input 8-1Erase to End of Field 8-1Field Minus 8-1Field Plus 8-1Field Exit 8-1Duplicate 8-2Field Mark 8-2Delete 8-2Insert 8-2Home 8-2Tab or Next 8-2Backtab or Previous 8-2Enter 8-2New Line 8-2Roll Up 8-2Roll Down 8-2Cursor Select 8-3Print 8-3Function Keys 8-3
5250 Commands 8-3Input Device ID (*K) 8-3Description 8-3Input ID Field 8-3Terminal Operation 8-4
xiv

Examples 8-5Example 1 8-5Example 2 8-5
Input Identification Types 8-6Printing a Field 8-6Beep 8-6Terminal Setup 8-7Input Identification Types 8-8
CustomMapping 8-9Custom Character Mapping 8-9Custom KeyboardMapping 8-9
Custom IBM 5250 Host Commands 8-10
Chapter 9 - Key Maps 9-1RFTerm ToolBar 9-1RFTerm Functions 9-7Functions Not Supported 9-8
Virtual Key Maps 9-9RFTerm Functions - Virtual Keys 9-9ANSI Functions - Virtual Keys 9-11IBM 3270 Functions - Virtual Keys 9-12IBM 5250 Functions - Virtual Keys 9-14
Optional F1 - F40 Key Maps 9-16HX2 Key Maps 9-17Important Note for AlphaMode 3 Tap Keypad 9-17RFTerm Functions - HX2 9-18HX2Dual Alpha Keypad 9-18HX2 Triple Tap Keypad 9-19HX2 AlphaMode 3 Tap Keypad 9-20
ANSI Functions - HX2 9-21HX2Dual Alpha Keypad 9-21HX2 Triple Tap Keypad 9-22HX2 AlphaMode 3 Tap Keypad 9-23
IBM 3270 Functions - HX2 9-24HX2Dual Alpha Keypad 9-24HX2 Triple Tap Keypad 9-26HX2 AlphaMode 3 Tap Keypad 9-27
IBM 5250 Functions - HX2 9-29HX2Dual Alpha Keypad 9-29HX2 Triple Tap Keypad 9-31
xv

HX2 AlphaMode 3 Tap Keypad 9-33MX3Plus, MX3X, VX3Plus and VX3X Key Maps 9-35RFTerm Functions - MX3Plus / MX3X / VX3Plus / VX3X 9-36ANSI Functions - MX3Plus / MX3X / VX3Plus / VX3X 9-37IBM 3270 Functions - MX3Plus / MX3X / VX3Plus / VX3X 9-38IBM 5250 Functions - MX3Plus / MX3X / VX3Plus / VX3X 9-40
MX7 andMX7 Tecton Key Maps 9-42RFTerm Functions - MX7 andMX7 Tecton 9-43MX7 andMX7 Tecton 55-Key Keypad 9-43MX7 andMX7 Tecton 32-Key Keypad 9-44
ANSI Functions - MX7 andMX7 Tecton 9-45MX7 andMX7 Tecton 55-Key Primary Delete Keypad 9-45MX7 andMX7 Tecton 55-Key Primary Backspace Keypad 9-46MX7 andMX7 Tecton 32-Key Keypad 9-47
IBM 3270 Functions - MX7 andMX7 Tecton 9-48MX7 andMX7 Tecton 55-Key Primary Delete Keypad 9-48MX7 andMX7 Tecton 55-Key Primary Backspace Keypad 9-50MX7 andMX7 Tecton 32-Key Keypad 9-52
IBM 5250 Functions - MX7 andMX7 Tecton 9-53MX7 andMX7 Tecton 55-Key Primary Delete Keypad 9-53MX7 andMX7 Tecton 55-Key Primary Backspace Keypad 9-55MX7 andMX7 Tecton 32-Key Keypad 9-57
MX8 Key Maps 9-59RFTerm Functions - MX8 9-60MX8 Triple Tap Keypad 9-60MX8 AlphaMode Keypad 9-61
ANSI Functions - MX8 9-62MX8 Triple Tap Keypad 9-62MX8 AlphaMode Keypad 9-63
IBM 3270 Functions - MX8 9-64MX8 Triple Tap Keypad 9-64MX8 AlphaMode Keypad 9-66
IBM 5250 Functions - MX8 9-68MX8 Triple Tap Keypad 9-68MX8 AlphaMode Keypad 9-70
MX9 Key Maps 9-72RFTerm Functions - MX9 9-73MX9 38-Key Keypad 9-73MX9 62-Key Keypad 9-74
ANSI Functions - MX9 9-75
xvi

MX9 38-Key Keypad 9-75MX9 62-Key Keypad 9-76
IBM 3270 Functions - MX9 9-77MX9 38-Key Keypad 9-77MX9 62-Key Keypad 9-79
IBM 5250 Functions - MX9 9-81MX9 38-Key Keypad 9-81MX9 62-Key Keypad 9-83
Thor VM1 Key Maps 9-85RFTerm Functions - Thor VM1 9-87Thor VM1 64-Key Keypad 9-87Thor VM1 12-Key Keypad 9-88
ANSI Functions - Thor VM1 9-89Thor VM1 64-Key Keypad 9-89Thor VM1 12-Key Keypad 9-90
IBM 3270 Functions - Thor VM1 9-91Thor VM1 64-Key Keypad 9-91Thor VM1 12-Key Keypad 9-93
IBM 5250 Functions - Thor VM1 9-94Thor VM1 64-Key Keypad 9-94Thor VM1 12-Key Keypad 9-96
Thor VM2 Key Maps 9-98RFTerm Functions - Thor VM2 9-99Thor VM2 Integrated Keypad 9-99Thor VM2 External 95-Key Keyboard 9-99
ANSI Functions - Thor VM2 9-100Thor VM2 Integrated Keypad 9-100Thor VM2 External 95-Key Keyboard 9-100
IBM 3270 Functions - Thor VM2 9-101Thor VM2 Integrated Keypad 9-101Thor VM2 External 95-Key Keyboard 9-101
IBM 5250 Functions - Thor VM2 9-103Thor VM2 Integrated Keypad 9-103Thor VM2 External 95-Key Keyboard 9-103
VX6 and VX7 Key Maps 9-105RFTerm Functions - VX6 and VX7 9-107VX6 and VX7 60-key Keyboard 9-107VX7 95-key Keyboard 9-108
ANSI Functions - VX6 and VX7 9-109VX6 and VX7 60-key Keyboard 9-109
xvii

VX7 95-key Keyboard 9-110IBM 3270 Functions - VX6 and VX7 9-111VX6 and VX7 60-key Keyboard - 3270 9-111VX7 95-key Keyboard 9-113
IBM 5250 Functions - VX6 and VX7 9-115VX6 and VX7 60-key Keyboard 9-115VX7 95-key Keyboard 9-117
Thor VX8 and Thor VX9 Key Maps 9-119RFTerm Functions - Thor VX8 and Thor VX9 9-121Thor VX8 and Thor VX9 60-key Keyboard 9-121Thor VX8 and Thor VX9 95-key Keyboard 9-122
ANSI Functions - Thor VX8 and Thor VX9 9-123Thor VX8 and Thor VX9 60-key Keyboard 9-123Thor VX8 and Thor VX9 95-key Keyboard 9-124
IBM 3270 Functions - Thor VX8 and Thor VX9 9-125Thor VX8 and Thor VX9 60-key Keyboard 9-125Thor VX8 and Thor VX9 95-key Keyboard 9-127
IBM 5250 Functions - Thor VX8 and Thor VX9 9-129Thor VX8 and Thor VX9 60-key Keyboard 9-129Thor VX8 and Thor VX9 95-key Keyboard 9-131
Chapter 10 - Technical Assistance 10-1
xviii

Chapter 1 - Overview
RFTerm allows users to connect to applications running on IBM® 3270, AS/400 and VT hosts from aMicrosoft®Windows®equippedmobile computer over a wireless TCP/IP data network.RFTerm can be used to directly communicate with host applications. Users can connect and log on to the host applicationswithout the need for an intermediary device.
AssumptionsThis reference guide assumes you have working knowledge of:
l Microsoft Windows user interfacemetaphor and terminology.l Stylus based touch screen navigation terminology.l Basic knowledge of concepts and terms for wireless networking.l Basic operations and requirements of the host applications you want to access with terminal emulation clients.
Conventions Used in this GuideThis guide uses the following typographical conventions:
l All user actions and interactions with the application are in bold, as inSession > Configurel All text associated with sample or configuration files is presented in a special font:
# This is a sample configuration file for…# #################################################[options]recursion=truesilent=truecheckonly=false
1-1

About RFTermInformation about RFTerm can be viewed by selecting File > About.
The About screen contains important information about RFTerm, including:l The platform on which RFTerm is installed (Windows XP, Windows CE, etc)l The revision level of RFTerml Copyrights and licensing information. Click thePuTTY License button, if present, to display the PuTTY License
(PuTTY is used for SSH).Click theOK button to dismiss the About screen.
1-2

Feature Highlights
SSH ProtocolWhen using Secure Shell (SSH), a connection is established to an SSH server and Telnet traffic is tunneled or port forwardedthrough the SSH connection. RFTerm supports SSH version 2.For outgoing traffic from RFTerm:
l SSH client (built into RFTerm) listens on a local IP port for Telnet trafficl SSH client encrypts the Telnet traffic and sends it to the SSH serverl The SSH server decrypts the Telnet traffic and forwards the traffic to the Telnet host.
For incoming traffic to RFTerm:l The SSH server receives Telnet traffic from the host application, encrypts the traffic and sends it to the SSH client (built
into RFTerm)l The SSH client decrypts the traffic and passes it to the RFTerm Telnet session.
Encryptionmethods are auto negotiated between the client software (RFTerm) and the SSH server. Supported encryptionmethods include:
l AES (Rijndael) - 256, 192, or 128-bit SDCTR or CBCl Arcfour (RC4) - 256 or 128-bit stream cipherl Blowfish - 256-bit SDCTR or 128-bit CBCl Triple-DES - 168-bit SDCTR or CBCl Single-DES - 56-bit CBC
Note: Arcfour and Single DES are not very secure. A warning box is displayed if either of these encryptionmethods isselected.
There are twomessage boxes that may be displayed for SSH server host keys:l If the key does not exist in the registry, a message box asks if you want to add the key and connect to the SSH server.l A message box is displayed if the SSH server host key changes.
If SSH is not enabled, transmission is over an unencrypted Telnet connection.
Multiple Host SessionsRFTerm supports up to four simultaneous pre-defined host sessions. All sessions run under a single application process.Interactive, per session configuration settings aremaintained. Users may connect with any permutation of 3270, 5250 or VThost sessions. HotKeys andmenu context are available to jump between these sessions.
Swapping Between SessionsVarious HotKeys are defined to allow the user to swap to a specified session or to jump to the next connected session.A SessionMenu can be enabled to display information on configured sessions.
1-3

HotSpotsA HotSpot is an invisible field on themobile client screen where a user can tap with a stylus to execute a function. A HotSpotallows a user to interact with the host application with minimal need for the special key pads. Instead the user can directly tapon the text in the display to invoke the desired operation.
Screen PanningPanning allows an additional row and column on the display by providing an alternative to horizontal and vertical scroll bars.Imagine the host application screen as a large sheet under the display on the hand-held device. Screen Panning allows users to“tap” and “drag” this sheet in any direction tomove hidden areas of the host display into view on the hand-held device withoutthe use of scroll bars.
Configurable KeyBarThe configurable KeyBar allows users to customize a set of soft buttons to control and invoke any host specific keys oremulator operation. Users can select from a set of pre-defined KeyBar templates. In addition they can also configure up to fourcustom templates of their own. Users can navigate between a selected set of templates.
SmartPadsAll host applications have specific keyboard requirements. The SmartPad is a floating button pad which provides support forspecial emulation host keys. Depending upon the current configured host emulation type, the appropriate SmartPad for thatemulation is displayed. The SmartPad supports all the popular 3270, 5250 and VT host keys.Note: This option is not available devices with aMicrosoft® Windows XP, Windows 7 orWindows Embedded Standard
operating system.
Access ControlAccess Control allows administrators to prevent users from changing the TE configuration for deployed devices.Administrators can require a password to change the session configuration and application settings.
Device LockdownLockdown allows administrators to prevent users from exiting the TE client. Lockdown also prevents users from running anyother application on the device.
Configurable FontsThis option allows users to increase or decrease the font sizes of displayed text.
Color SchemesSupport for color displays. A color scheme is a collection of colors mapped to a set of screen display attributes. Users canselect from pre-defined color schemes or create a custom scheme based upon their preferences. Applications dynamicallydetect LCD displays to self configure for a two color scheme (Black onWhite).
1-4

Automatic LoginUsers can configure one or more host sessions to automatically launch when the TE application is started. Pre-defined loginscripts can be configured to launch automatically and log into the host system.
Automatic Session PersistenceLatest values of session configuration are automatically saved for every session.
Dynamic Cursor View ModesMultiple cursor modes are available to support automatic scrolling, so that the cursor / input field is visible. These view modesare configurable on a per client session basis. The screen display window will “track” and follow the cursor.
Text InputToolThe Text InputTool improves upon the typical Windows CE soft keypad by sending complete text strings to the display windowat the current cursor location. A user can cache often-used text strings in the InputTool.Note: This option is not available devices with aMicrosoft® Windows XP, Windows 7 orWindows Embedded Standard
operating system.
Device / LU Name SupportFor IBM emulations (3270 and 5250), logical unit device name resource configuration is supported. This is used duringconnection negotiations.
Automatic Re-connectionIf for some reason the network connection to the host is lost, the user can configure the session to automatically attempt to re-connect to the host.
Full VT220 SupportThis includes support for multinational character sets and NRC support.
VT Line ModeThis is a special optimization for VT host sessions. Data is buffered locally within the device prior to sending it to the host. Linemode optimizes usage of the network bandwidth and host resources.
VT Answerback StringThis is a configurable text string that certain host applications require to identify themobile client.
HotKeysPredefined HotKeys, shortcuts, are available to interact with and invoke application operations.
1-5

Block ModeBlock mode communication is a communicationmode that enables the device to send an entire block of data to the host at onetime. Block mode greatly reduces RF traffic by sending data in this way. Block modeminimizes RF overhead better than theother modes. Thus, block mode supports more users on an RF channel and allows faster response time.Local echo is a process that allows each character to display locally at the device as the user presses the keys. The host doesnot see these characters until the user presses the [Enter] key.Note: In most cases, operations using programming tools that include screen painters cannot use block mode
communication. Screen painters or designers usually comewith programming tools such as Oracle, Ingress, Informix,and Powerhouse, which normally use character mode communications.
Programmable Function KeysUser can configure all available function keys, and the 4 arrow keys, to perform text and control character inputs. Controlcharacters and characters not accessible from the keyboard can be represented using the hat encoding table.
PrintingUser can print the screen for any session using the shortcut key [Ctrl] [Alt] [P], or by sending print commands to the clientfrom the host in 5250 and ANSI sessions.
HelpUser can display frequently used RFTerm shortcut keys and support contact information by pressing [Ctrl] [H].
Double Byte SupportRFTerm supports Simplified Chinese, Traditional Chinese, Korean and Japanese font sets for VT emulations based uponTELNET data being received in standard DBCS format.
1-6
InstallationTo verify the version of RFTerm currently installed, see the About panelYour devicemay require special installation procedures. Please review the information below for details.
Installation NoteEvaluation copies of RFTerm allow the user to Connect eleven (11) times. The Software License Agreement dialog appearsafter each connect request and before the connection is activated. Select either Accept or Reject to continue. When thecounter reaches 0, you cannot use the RFTerm Connect function until the evaluation version of RFTerm is activated.
Initial InstallationFor devices with aWindows CE orWindows Mobile operating system, use the procedures listed below.
l Launch the RFTerm cab file.l Launch RFTerm to complete the installation.
For devices with aWindows XP, Windows 7 orWindows Embedded Standard operating system, the following steps must betaken to ensure RFTerm can read and write to the registry before initial installation:
l Log on as the Administrator.l Browse to the location of the RFTerm.inf file, click on the file and select File > Install. Follow the on screen prompts.l Launch RFTerm for the initial time as the administrator.l This will create the RFTerm registry with guest privileges.
Upgrading from an Earlier Version of RFTermWhen you upgrade RFTerm to a new release version, youmust begin with a clean registry. Use the procedures listed below fordevices equipped withWindows CE orWindows Mobile.
l Exit RFTerm if it is currently running.l Open the registry editor.l Delete the entire registry key HKEY_LOCAL_MACHINE\SOFTWARE\LXE\RFTerm.l Do not delete the LXE key or any other items under it except RFTerm.l Launch the RFTerm cab file.l Launch RFTerm to complete the installation.
For devices with aWindows XP, Windows 7 orWindows Embedded Standard operating system, the following steps must betaken to ensure RFTerm can read and write to the registry before initial installation or upgrading to a newer revision:
l Log on as the Administrator.l Open the registry editor.l Delete the entire registry key HKEY_LOCAL_MACHINE\SOFTWARE\LXE\RFTerm.l Do not delete the LXE key or any other items under it except RFTerm.l Browse to the location of the RFTerm.inf file, click on the file and select File > Install. Follow the on screen prompts.l Launch RFTerm for the initial time as the administrator.l This will create the RFTerm registry with guest privileges.
1-7

Quick StartThis section is for advanced users who can comfortably navigate withinWindows andWindows CE and are familiar with hostterminal emulation details. Follow these steps to connect to your host application with minimal configuration setup. For detailson various configuration parameters, it is recommended that you read through the following sections.
1. Make sure themobile network settings are configured. If you are connecting over wireless LAN, make sure your deviceis communicating with the Access Point. If you are connecting viaWWAN, make sure your device has an activeconnection. Details on configuring themobile network settings can be found in the reference guide for themobile device.
2. If the RFTerm splash screen does not automatically appear after startup or rebooting, go toStart > Programs, andselect Honeywell RFTerm or double-click the RFTerm icon on theWindows desktop.
3. Select Session > Configure from the applicationmenu and select the Host Type that you require. This will depend onthe type of host system that you are trying to connect to; i.e. 3270mainframe, AS/400 5250 server or VT host.
4. Enter the Host Address of the host system to which you wish to connect. This may either be a DNS name or an IPaddress of the host system.
5. Update the Telnet Port number, if your host application is configured to listen on a specific port. If not, just use thedefault Telnet port.
6. Select OK.7. Select Session > Connect from the applicationmenu or tap the Connect button on the Command Bar. Upon a
successful connection, you should see the host application screen displayed.8. During the connection process, the following popup dialog appears:
1-8

RFTerm Screen SizesThe RFTerm screen displays are designed to function onmost Windows-based computers, regardless of the physical screensize.RFTermmenus and editing parameters, save and exit options are available on-screen, where needed, regardless of the size ofthe screen. On-screen they may look or be named differently from one device to the other yet they will perform the samefunction when activated.
RFTerm uses a one-quarter screen, horizontally oriented on the HX2.
RFTerm uses a one-quarter screen, vertically oriented on theWin-dows CE equippedMX7 Tecton, MX8 andMX9.
RFTerm uses a one-quarter screen, vertically oriented on theWin-dows Mobile equippedMX7 Tecton, MX8 andMX9.
RFTerm uses a one-half screen, horizontally oriented on theMX3Plus,MX3X, VX3Plus, VX3X and VX6.
1-9

RFTerm uses a full screen on the VX7, Thor VM2, Thor VX8 and ThorVX9.
RFTerm uses aWVGA full screen on the Thor VM1.
This guidemakes the assumption that the user or systems administrator is familiar with Microsoft Windows standardnavigation/performance for each of their devices running RFTerm.Therefore, the sections that follow describe only thoseWindows capabilities that are unique to RFTerm.
Important NotesFor Devices with aWindows Mobile Operating System:
l TheMenuBar is displayed at the bottom of theWindows Mobile screen and cannot be toggled to the top of the screen.l By default, the KeyBar is hidden but can be accessed from theMenuBar using the KeyBar icon.l When accessed, the KeyBar is displayed above theMenuBar. Clicking the KeyBar icon again hides the KeyBar.l The ToolBar is not available on devices with aWindows Mobile operating system.
For Devices with aWindows XP, Windows 7 orWindows Embedded Standard Operating System:l SmartPads, Text InputTool, and Hide/Display All Bars are not available on devices with aWindows XP, Windows 7 or
Windows Embedded Standard operating system.l TheMenuBar is displayed at the top of the screen for these devices and cannot be toggled to the bottom of the screen.
1-10
Quick Tips
Screen Panning
l For all connected sessions (3270, 5250 and VT), you can “tap-and-drag” the display screen in any direction with yourstylus. Just make sure that HotSpots are enabled in File > Settings > Options1.
HotSpots
l For all connected sessions (3270, 5250 and VT), you can “double tap” anywhere on the screen to invoke an Enter (orSend) operation.
l To use HotSpots, you can directly tap the function key text string on the display rather than use a SmartPad. Refer toHotSpots for details.
Predefined HotKeys (Shortcuts)
l Almost every application operation has a HotKey associated with it. HotKeys provide an efficient alternative to invokean operation or action. Refer to the HotKey Shortcuts table.
Readability
l Formore screen real estate, you canminimize the applicationmenu. You can alsomove open windows to anywhere onthe screen (unless the windows are locked to prevent edit).
l You can select different background, foreground and attribute colors for enhanced visual readability. For mobile clientswith LCD display screens, the default color scheme is automatically detected and configured to “Bright White” foroptimal readability.
Data Input
l If you have the same data strings that you input all the time, you can cache it in the data input tool. You can then “send”the text string to the emulator with a single stylus tap. Refer to Text InputTool for details.
Note: This option is not available on devices with aWindows XP, Windows 7 orWindows Embedded Standard operatingsystem.
Configurable KeyBar
l The soft KeyBar can be configured to perform most emulator and host operations with a single stylus tap. Refer toConfigurable KeyBar for details.
Access Control
l You can prevent a user from changing the TE configuration by specifying an access password. Refer to Access Controlfor details.
1-11

Application ToolBar
l An integrated ToolBar is provided for touch screen navigation.l Please refer to RFTerm ToolBar to identify the function for the icons that are included in the different application touch
KeyBars.
Miscellaneous
l The RFTerm emulator will automatically save configuration settings for the four most recent sessions, S1 - S4 asdisplayed in themenu. The configuration settings are saved in themobile client registry. Please refer to themobile clientreference guide for instruction.
l To launch RFTerm automatically, please refer to the reference guide for the device.l Support tools and procedures are available to provide deployment configurations to self-install and restore application
andmobile client configurations during a cold boot.
1-12

Chapter 2 - RFTerm Settings
This section describes application wide settings. All these parameters may be set using the application settings dialogsaccessed from the File > Settings applicationmenu. Parameters configured through the File > Settings dialog apply to allterminal emulation sessions.
DisplayThe client screen display may be configured to optimize screen available area and readability. These options may beconfigured for connected or non-connected host sessions. HotKeys are available to toggle the options on and off.
l From the applicationmenu, select File > Settings.l A Settings dialog box is displayed.l Choose theDisplay tab.
Parameters
Menu
ToolBars, KeyBars, Shortcut Keys and Windows Mobile
By default, the ToolBar button function is configured as part of the KeyBar on devices with aWindows Mobile operating systemso the checkbox for the ToolBar does not exist on theSettings > Display tab.ToolBar buttons can be removed from the KeyBar on devices with aWindows Mobile operating system.ToolBar buttons can be hidden by using [Ctrl][Shift][K]whichmakes the entire KeyBar hidden on devices with aWindowsMobile operating system.The Hide ToolBar shortcut key [Ctrl][Shift][T] is not available on devices with aWindows Mobile operating system.
2-1

Hide All Bars
Checking this box will hide the file menu, the KeyBar and the ToolBar. Pressing [Ctrl][Shift][L] alternates between the hiddenand visible states. This will override each individual item listed below.Not available on devices with aWindows Mobile operating system.
Disable/Hide MenuBar
Checking this box will hide theMenuBar on devices with aWindows CE operating system. Pressing [Ctrl][Shift][M] alternatesbetween the hidden and visible states.When theMenuBar is hidden, the KeyBar is displayed on the bottom row, where theMenuBar is normally shown. WhenMenuBar is toggled on, the KeyBar is displayed on the row above theMenuBar.Checking this box disables theMenuBar on devices with aMicrosoft Windows XP, Windows 7 orWindows EmbeddedStandard operating system.Note: This parameter is titled DisableMenuBar on devices with aMicrosoft Windows XP, Windows 7 orWindows
Embedded Standard operating system and HideMenuBar on devices with aWindows CE orWindows Mobileoperating system.
Hide KeyBar
Checking this box will hide the KeyBar. The default is checked (hide KeyBar). Click the K icon on theMenuBar to launch theKeyBar. Pressing [Ctrl][Shift][K]will alternate between the hidden and visible states.When theMenuBar is hidden, the KeyBar is displayed on the bottom row, where theMenuBar is normally shown. WhenMenuBar is toggled on, the KeyBar is displayed on the row above theMenuBar.On devices equipped withWindows Mobile, the ToolBar buttons can be hidden by using [Ctrl][Shift][K] and the entire KeyBaris hidden on these devices.
Hide ToolBar
Checking this box will hide the ToolBar. Pressing [Ctrl][Shift][T] alternates between the hidden and visible states.Not available on devices with aWindows Mobile operating system.
(Menu) at Bottom
Checking this box will move themenu to the bottom of the screen. Pressing [Ctrl][Shift][B] alternates the location between thetop and bottom of the screen.Note: This option is not available on devices with aMicrosoft Windows XP, Windows 7 orWindows Embedded Standard
operating system.
Hide OIA (IBM only)
Checking this box will toggle hiding of the OIA or the Operator Information Area. This option applies only to IBM 3270 and 5250emulations.Pressing [Ctrl][Shift][O] or [Alt] [T] alternates between the hidden and visible states.
2-2

Scroll Bars
Hide Vertical Scroll Bars
Checking this box will hide the vertical scroll bar. Pressing [Ctrl][Shift][V] alternates between the hide and visible states.
Hide Horizontal Scroll Bars
Checking this box will hide the horizontal scroll bar. Pressing [Ctrl][Shift][H] alternates between the hide and visible states.
Disable Touch Screen
When checked, this option prevents the user from inadvertently moving the cursor via the touch screen. The touch screenwithin the RFTerm display portion of the screen is disabled while still allowing RFTerm HotSpots to function using touch. Itemssuch as scroll bars andmenu items still are accessible via the touch screen.The default value for Disable Touch Screen is “Not Disabled” (blank).
2-3

ShortcutsKeypress shortcuts can be enabled or disabled from theShortcuts tab.
l All shortcut keys can be enabled or disabled at once. Shortcut keys can be disabled or enabled individually as well.
l From the applicationmenu, select File > Settings.l A Settings dialog box is displayed.l Choose theShortcuts tab
Parameters
Jump to Inactive Sessions
When the Jump to Inactive Sessions item is selected, the user can use the shortcut key sequence [Ctrl] [Shift] [J] to jump toan inactive session that has a host name specified. The inactive session remains dormant when disconnected, but when itbecomes the active session again, it automatically attempts to reconnect and run the Autologin script.
Disable Shortcut Keys
When the Disable Shortcut Keys item is checked, RFTerm prevents the user from accessing all shortcut keys with theexception of Session, Configure and Application Exit shortcut keys. This also activates the “Allow Session Shortcuts” checkbox. F1, F2, F3, and F4 function keys remain active. See RFTerm ToolBar for a complete list of RFTerm shortcut keys.
Buttons
Select All
Click this button to disable all shortcut keys, in the list, at once. Click a shortcut key checkbox to enable the individual shortcutwhile the rest remain disabled (checked). The Select All button has no effect on the Jump to Inactive Sessions checkbox.
2-4

Clear All
Click this button to enable all shortcut keys, in the list, at once. Click a shortcut key checkbox to disable (check) the individualshortcut while the rest remain enabled. The Clear All button has no effect on the Jump to Inactive Sessions checkbox.
Shortcuts Active Until Disabled
The shortcut is disabled when the checkbox has a check mark. See Also: HotKey Shortcuts for a complete list of defaultHotKeys.Note: Depending onmobile client screen size constraints, the parameter namemay be abbreviated based on the parameter
names shown in the list that follows.
Parameter Shortcut Key Description
Configure [Ctrl][Shift][N] Configure a host connection
Settings [Ctrl][Shift][E] Configure application settings.
Connect [Ctrl][Shift][C] Connect to the host(Manual Reconnect shortcut)
Status [Ctrl][Shift][2] Display or hide Status Window.(Not supported onWindows Mobile)
Decrease Font [Ctrl][Shift][DownArrow] Decrease font size
Disconnect [Ctrl][Shift][D] Disconnect a connected host session(Manual Disconnect shortcut)
Toggle HScroll [Ctrl][Shift][H] Display or hide horizontal scroll bar
Toggle SmartPad [Ctrl][Shift][P] Display or hide SmartPad(Not supported onWindows XP, Windows 7 orWindows Embedded Standard)
Toggle InputPad [Ctrl][Shift][I] Display or hide Text InputTool(Not supported onWindows XP, Windows 7 orWindows Embedded Standard)
ToggleMenuBar [Ctrl][Shift][M] Display or hideMenuBar(Not supported onWindows XP, Windows 7 orWindows Embedded Standard)
Move All Bars [Ctrl][Shift][B] Display all bars at the bottom(Not supported onWindows XP, Windows 7 orWindows Embedded Standard)
Toggle All Bars [Ctrl][Shift][L] Display or Hide all bars (Menu, Tool, Key)
Toggle ToolBar [Ctrl][Shift][T] Display or Hide ToolBar
Toggle KeyBar [Ctrl][Shift][K] Display or Hide KeyBar
Toggle VScroll [Ctrl][Shift][V] Display or Hide vertical scroll bar
Increase Font [Ctrl][Shift][UpArrow] Increase font size
Next Session [Ctrl][Shift][J] Jump to next connected host(Session Control shortcut)
Scroll Down [Shift][Down Arrow] Scroll down one row
Scroll Left [Shift][Left Arrow] Scroll left one column
2-5

Parameter Shortcut Key Description
Scroll Right [Shift][Right Arrow] Scroll right one column
Scroll Up [Shift][Up Arrow] Scroll up one row
Toggle Bold [Ctrl][Shift][1] Toggle between bold and normal font
Print Screen [Ctrl][Alt][P] Print the screen of the active session
Program Help [Ctrl][H] Display frequently used shortcuts
Jump to Session1 [Ctrl][Alt][1] Jump to Session 1
Jump to Session2 [Ctrl][Alt][2] Jump to Session 2
Jump to Session3 [Ctrl][Alt][3] Jump to Session 3
Jump to Session4 [Ctrl][Alt][4] Jump to Session 4
Show SessionMenu [Ctrl][Alt][0] Display Session Host Menu (if enabled) over top of a connected session
Session Save [Ctrl][Shift][S] Invoke the session save dialog
Exit RFTerm [Ctrl][Shift][X] Exit the emulator
Toggle OIA Bar [Ctrl][Shift][O] or[Alt][T] Hide and unhide status bar (OIA)
Advance Down [Ctrl][Down Arrow] Scroll down one row segment (see Note below)
Advance Left [Ctrl][Left Arrow] Scroll left one column segment (see Note below)
Advance Right [Ctrl][Right Arrow] Scroll right one column segment (see Note below)
Advance Up [Ctrl][Up Arrow] Scroll up one row segment (see Note below)
Toggle Status [Ctrl][Shift][2]
Display or hide status icons(must be enabled on theSettings > Status tab first)(Not supported onWindows Mobile, Windows XP, Windows 7 orWindows Embed-ded Standard)
Note: Depending on themobile device screen and font size constraints, the segment area used by an Advance Down,Advance Left, Advance Right or Advance Up key sequence is approximately one-quarter of the total area available.
2-6

Options1General options may be configured and updated from theOptions1 tab.Note: This tab was previously labeledOptions.
l From the applicationmenu, select File > Settings.l A Settings dialog box is displayed.l Choose theOptions1 tab
Parameters
Access Control
Hide Start Menu
When the Hide Start Menu item is selected, RFTerm prevents the user from accessing functionalities within the task bar.
For devices with a Windows XP, Windows 7 or Windows Embedded Standard operating system
This featuremakes the application full-screen and also disables window resizing.
For devices with a Windows Mobile operating system
When the Hide Start Menu / Disable Start Menu item is selected, neither the Start Menu nor the OK button responds to a stylustap. Use an Enter keypress to close the Settings and Configure window.
Disable App Exit
When enabled, this option disables the application exit button and the [Alt][X] shortcut key. This prevents the user from exitingthe application.
2-7

Exit Now
This button is enabled only when the Disable App Exit option is checked. It allows the administrator to save the configurationand exit when Disable App Exit is checked. Typical use would be for an administrator to set all configuration settings includinga config password and exit the application using this button. Subsequently, users will not be able to exit the application and theconfig password will be required to change the configuration.
Config Password
The Config Password button prompts the user for a dialog access password. When a password is set, users must enter thispassword prior to viewing andmodifying the session and settings configuration. This capability enables administrators toprevent users from changing the application configuration settings in controlled environments.
Confirm Disconnect
When enabled, the user is prompted before every attempt to disconnect an active session.
Enable HotSpots
Checking this box will enable HotSpots and Screen Panning onmobile clients with touch screens. A HotSpot is a field on thescreen where a user can tap with a stylus to execute a function. This allows a user to interact with a host application withminimal need for special keys. Checking this box is a requirement for the Enlarge HotSpots parameter.
For example
A simple examplemight be the use of F Keys. An operation associated with an F key might be displayed on the screen as “F1= Help”. RFTerm automatically detects this as a HotSpot and will simulate an F1 key being pressed on the keyboard when youtap on the F1 text on the screen display. Refer to HotSpots for further details.Note: Reprogramming the function keys using the Fn Keys tab under the Configure dialog alters the operation of a function
key HotSpot.
Enlarge HotSpots
Prerequisite:
Enable HotSpots must be enabled (checked).Checking this box increases the size of the HotSpot area, slightly, radiating from the center of the HotSpot. If a screen doesnot have a HotSpot area, this parameter setting is ignored until a screen is presented that has a HotSpot area. For example,enlarging the HotSpot areamay assist clicking the correct HotSpot even if themobile client is being jostled by outsideinfluences.When Enable HotSpots is disabled, the Enlarge HotSpots parameter is dimmed and cannot be activated.
2-8
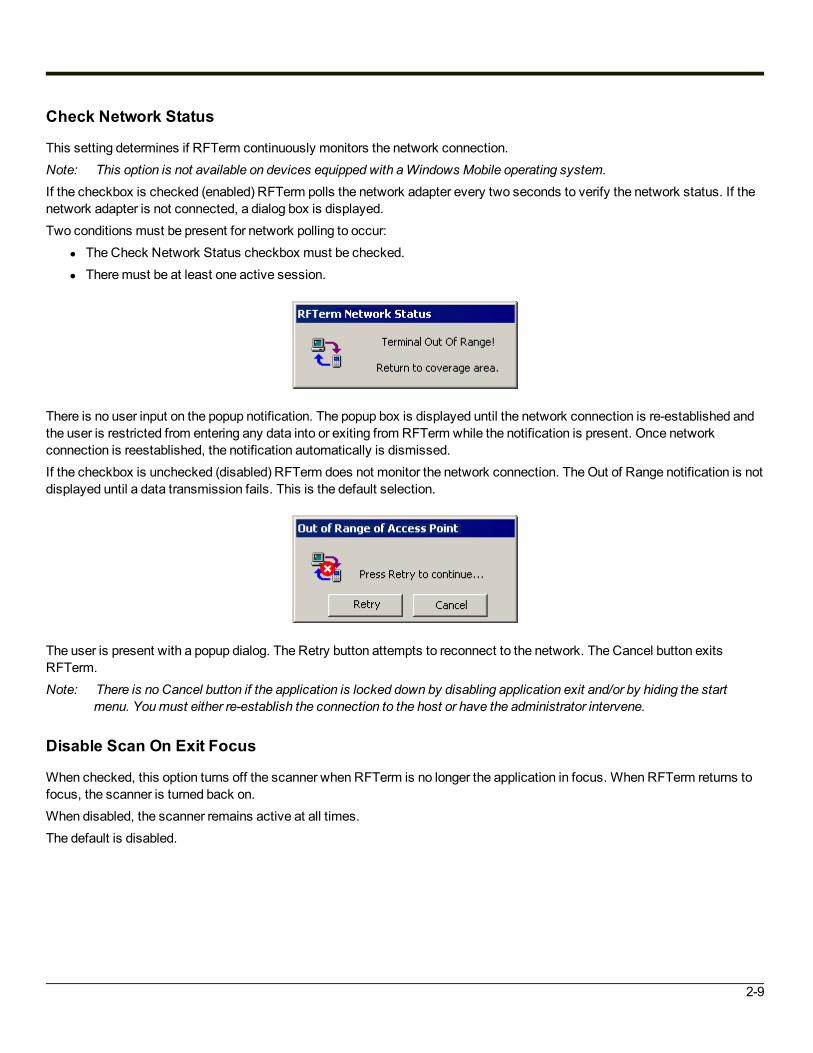
Check Network Status
This setting determines if RFTerm continuously monitors the network connection.Note: This option is not available on devices equipped with aWindows Mobile operating system.If the checkbox is checked (enabled) RFTerm polls the network adapter every two seconds to verify the network status. If thenetwork adapter is not connected, a dialog box is displayed.Two conditions must be present for network polling to occur:
l The Check Network Status checkbox must be checked.l Theremust be at least one active session.
There is no user input on the popup notification. The popup box is displayed until the network connection is re-established andthe user is restricted from entering any data into or exiting from RFTerm while the notification is present. Once networkconnection is reestablished, the notification automatically is dismissed.If the checkbox is unchecked (disabled) RFTerm does not monitor the network connection. TheOut of Range notification is notdisplayed until a data transmission fails. This is the default selection.
The user is present with a popup dialog. The Retry button attempts to reconnect to the network. The Cancel button exitsRFTerm.Note: There is no Cancel button if the application is locked down by disabling application exit and/or by hiding the start
menu. Youmust either re-establish the connection to the host or have the administrator intervene.
Disable Scan On Exit Focus
When checked, this option turns off the scanner when RFTerm is no longer the application in focus. When RFTerm returns tofocus, the scanner is turned back on.When disabled, the scanner remains active at all times.The default is disabled.
2-9
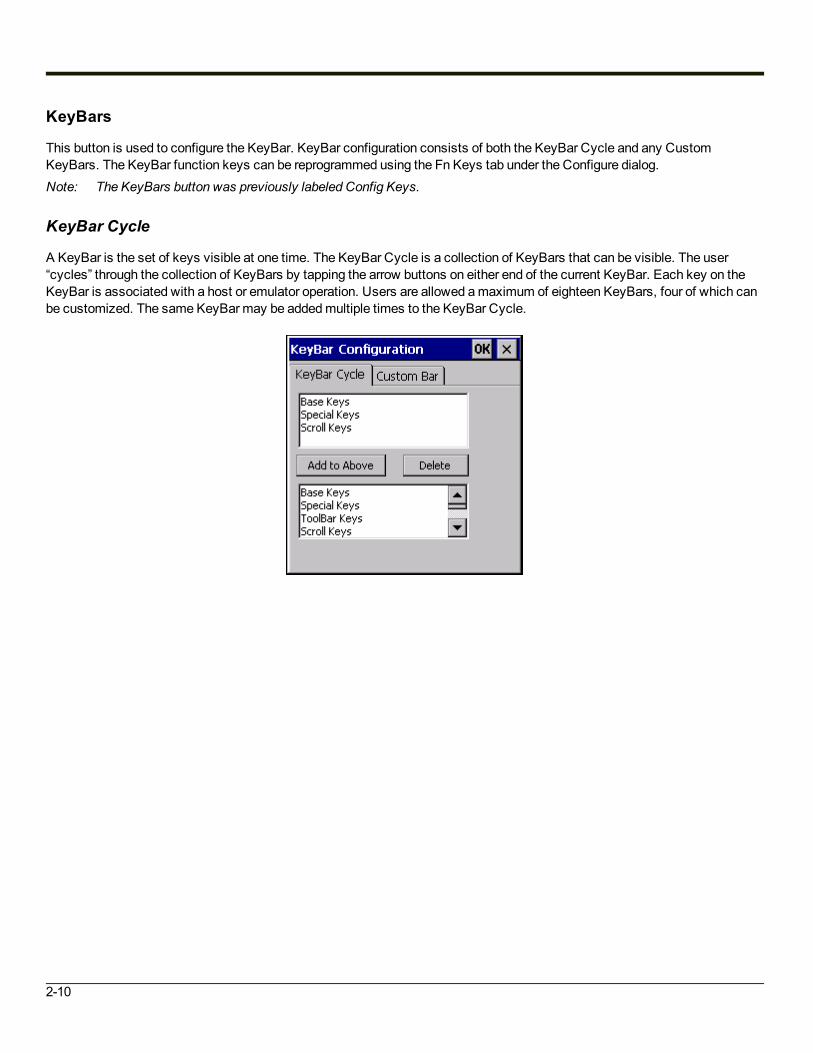
KeyBars
This button is used to configure the KeyBar. KeyBar configuration consists of both the KeyBar Cycle and any CustomKeyBars. The KeyBar function keys can be reprogrammed using the Fn Keys tab under the Configure dialog.Note: The KeyBars button was previously labeled Config Keys.
KeyBar Cycle
A KeyBar is the set of keys visible at one time. The KeyBar Cycle is a collection of KeyBars that can be visible. The user“cycles” through the collection of KeyBars by tapping the arrow buttons on either end of the current KeyBar. Each key on theKeyBar is associated with a host or emulator operation. Users are allowed amaximum of eighteen KeyBars, four of which canbe customized. The same KeyBarmay be addedmultiple times to the KeyBar Cycle.
2-10
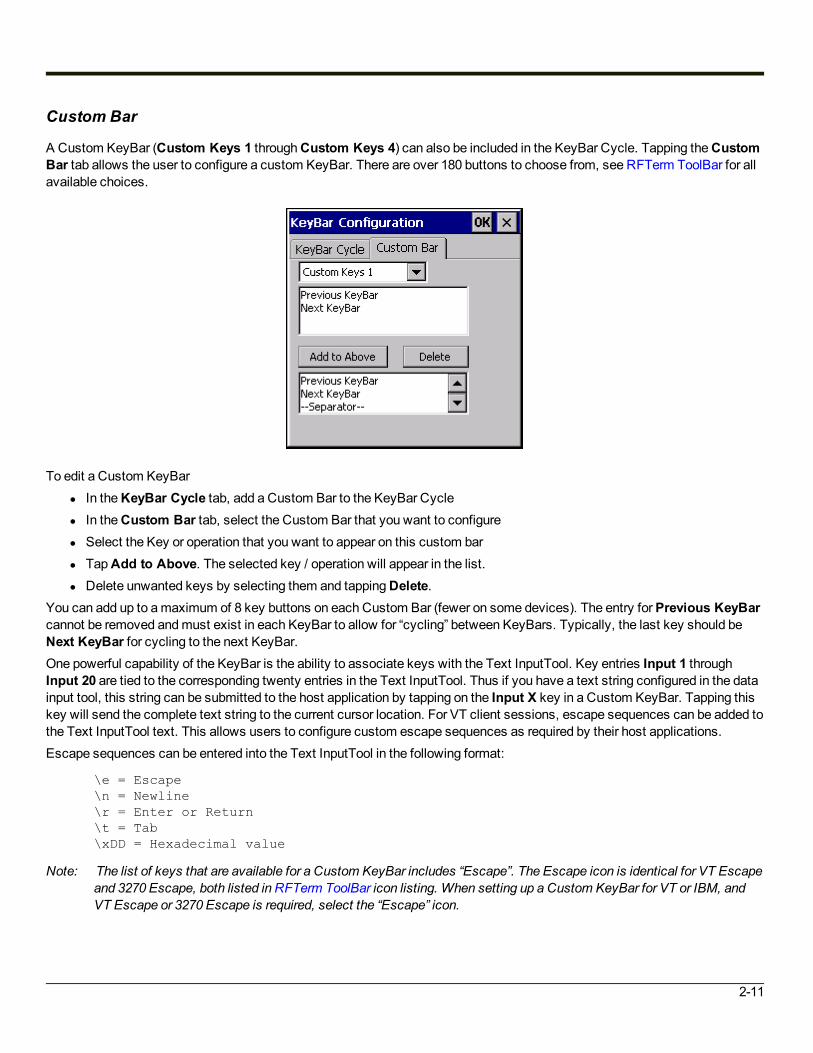
Custom Bar
A Custom KeyBar (Custom Keys 1 throughCustom Keys 4) can also be included in the KeyBar Cycle. Tapping theCustomBar tab allows the user to configure a custom KeyBar. There are over 180 buttons to choose from, see RFTerm ToolBar for allavailable choices.
To edit a Custom KeyBarl In theKeyBar Cycle tab, add a Custom Bar to the KeyBar Cyclel In theCustom Bar tab, select the Custom Bar that you want to configurel Select the Key or operation that you want to appear on this custom barl TapAdd to Above. The selected key / operation will appear in the list.l Delete unwanted keys by selecting them and tappingDelete.
You can add up to amaximum of 8 key buttons on each Custom Bar (fewer on some devices). The entry forPrevious KeyBarcannot be removed andmust exist in each KeyBar to allow for “cycling” between KeyBars. Typically, the last key should beNext KeyBar for cycling to the next KeyBar.One powerful capability of the KeyBar is the ability to associate keys with the Text InputTool. Key entries Input 1 throughInput 20 are tied to the corresponding twenty entries in the Text InputTool. Thus if you have a text string configured in the datainput tool, this string can be submitted to the host application by tapping on the Input X key in a Custom KeyBar. Tapping thiskey will send the complete text string to the current cursor location. For VT client sessions, escape sequences can be added tothe Text InputTool text. This allows users to configure custom escape sequences as required by their host applications.Escape sequences can be entered into the Text InputTool in the following format:
\e = Escape\n = Newline\r = Enter or Return\t = Tab\xDD = Hexadecimal value
Note: The list of keys that are available for a Custom KeyBar includes “Escape”. The Escape icon is identical for VT Escapeand 3270 Escape, both listed in RFTerm ToolBar icon listing. When setting up a Custom KeyBar for VT or IBM, andVT Escape or 3270 Escape is required, select the “Escape” icon.
2-11

Options2Determines the behavior of in certain circumstances.
l From the applicationmenu, select File > Settings.l A Settings dialog box is displayed.l Choose theOptions2 tab
Parameters
Respond DONT encryption
Determines the behavior of RFTerm response toWILL encryption.l When checked, RFTerm responds DONT.l When unchecked, RFTerm responds WONT.
The default is unchecked (WONT).
Focus Control
Determines if RFTerm remains the focus window when another dialog attempts to grab focus.l Normal - RFTerm does not override. (default)l Foreground - RFTerm forces the focus back to RFTerm if a "Backup Battery Low" dialog grabs focus.
2-12

Options3Allows the size and position of the RFTerm window to be specified. By default, RFTerm is displayed in a full window.Note: This tab was previously labeledWin Size.Note: There are no configurable options on this screen for devices equipped with aWindows Mobile, Windows XP,
Windows 7 orWindows Embedded Standard operating system. Window Size cannot be adjusted for these devices.
l From the applicationmenu, select File > Settings.l A Settings dialog box is displayed.l Choose theOptions3 tab
By default, RFTerm is displayed in a full window (all four settings are 0). There is no error checking for the specified rangesexcept:
l Valid entries for each parameter are 0 through 999l The smallest window size is 60x60 pixels regardless of the specified values.
2-13

Parameters
Origin X
Specifies the number of pixels to the right of the left origin point to place the left edge of the RFTerm window. Valid entries are 0through 999. Default is 0.
Origin Y
Specifies the number of pixels below the top origin point to place the top edge of the RFTerm window. Valid entries are 0through 999. Default is 0.
Width Reduction
Specifies the number of pixels to the left of the right side screen limit to place the right edge of the RFTerm window. Validentries are 0 through 999. Default is 0.
Height Reduction
Specifies the number of pixels above the bottom screen limit to place the bottom edge of the RFTerm window. Valid entries are0 through 999. Default is 0.
2-14

SoundsSounds may be configured for various events.The Alarm onMatch Text only sounds when a form is sent to RFTerm from the host. Entering data or moving the cursor aroundon the screen does not cause extra beeps when the alarm text remains unchanged. When the user exits and then returns to theAlarm onMatch Text menu, another beep will occur.Note: Before selecting a user-installed sound orWAV file to be played on amobile client, the appropriateWAV file or sound
file must be available in themobile device operating system persistent folder on the storage card. This will ensure theWAV file is saved instead of discarded when the device is rebooted.
If there is noWAV file in the folder, the text boxes are blank. When there is aWAV file in the folder, the Good Beep/Bad Beepand Alarm Sound drop down boxes are preset with the default value <DEFAULT> until changed.
l From the applicationmenu, select File > Settings.l A Settings dialog box will be displayed.l Choose theSounds tab.
Note: TheGood Sound pulldown list was previously labeled Good Beep. The Bad Sound pulldown list was previouslylabeled Bad Beep. TheMatch Text / Sound Key textbox was previous labeled Alarm onMatch Text. The Alarm onMatch Text textbox only accepts Match Text. It does not accept Sound Keys.
Parameters
Good Sound
Select the sound from the drop-down box to play when an event such as a good scan occurs. Valid entries are determined bythe availableWAV files, plus <NONE> (no sound) and <DEFAULT> (default Windows event sound). The default is<DEFAULT>.Note: Before enabling the Good Sound, verify that “Good Scan” sounds are disabled on themobile client using the device’s
control panel applet (e.g., Volume and Sounds Properties and/or Scanner Properties). WhenGood Scan sounds areenabled in RFTerm and on themobile client, theremay be double sounds emitted by themobile client during a “GoodBeep” function.
2-15

Bad Sound
Select the sound from the drop-down box to play when an error such as a bad scan occurs. Valid entries are determined by theavailableWAV files, plus <NONE> (no sound) and <DEFAULT> (default Windows event sound). The default is <DEFAULT>.Note: Before enabling the Bad Sound verify that “Bad Scan” sounds are disabled on themobile client using the client’s
Control Panel applet (e.g., Volume and Sounds Properties and/or Scanner Properties). When Bad Scan sounds areenabled in RFTerm and on themobile client, theremay be double sounds emitted by themobile client during a “BadBeep” function.
Beep on Error
When theWindows System Sound (Exclamation Point) is desired as the Bad Beep sound, the user must change theWAV fileassociated with the Operating System on themobile client (e.g. “Volume and Sounds”). See themobile client specificReferenceGuide.
Alarm Sound
Select the sound from the drop-down box to play when a when text shown in “Match Text” is displayed. Valid entries aredetermined by the availableWAV files, plus <NONE> (no sound) and <DEFAULT> (default Windows event sound). Thedefault is <DEFAULT>.Note: Before enabling the Alarm SoundWav, verify that all sounds are disabled on themobile client using the client’s
Control Panel applet (e.g., Volume and Sounds Properties). When Alarm Sounds are enabled in RFTerm and on themobile client, theremay be double sounds emitted by themobile client during an RFTerm Alarm function.
Match Text / Sound Key
Specify theMatch Text or Sound Keys. Bothmay be specified in this textbox; however theMatch Text must be specified first.See below for examples.
Match Text
Enter the text to be displayed on the user’s screen (for example, “Login”) when a response from the user is desired. The defaultis blank.After playing the Alarm SoundWAV and displaying theMatch Text, RFTerm then waits for a user response.
Sound Key
Use Sound Key tomap various sound causes to the three available sounds.The Sound Key string is three characters:
The first character is $.
The second character is the cause of the sound:
M for MatchH for HostU for UserS for Good ScanL for Laser Error or Bad Scan.
2-16

The third character is the sound played:
G for Good SoundB for Bad SoundA for Alarm Sound.
Examples
$HA means to assignHost initiated sounds to theAlarm sound$MA means to assign theMatch string sound to theAlarm sound$LB means to assign the Laser error (scan error) to theBad sound$SGmeans to assign the goodScan sound toGood sound$UA means to assignUser initiated sounds to theAlarm sound.$HA$LB$SG - Multiple sounds can be assigned by entering Sound Keys consecutively.Login$HA$MA$UA - Match Text can be used with Sound Keys as long as theMatch Text comes before the Sound Keys inthe string.
Alarm Position
Enter the row and column starting position for the Alarm onMatch Text to be displayed on the user’s screen. The default isRow=0Column=0.The alarm sounds when it discovers the Alarm onMatch Text at the specified row and column. The alarm does not sound whenthe Alarm onMatch Text is located at any other position.
Sound EventsHost initiated sounds can be triggered by:
l a TN5250/TN3270message with the Alarm bit setl a VT220 "bell" commandl a *B string
User initiated sounds are triggered by:l the user moving the cursor outside a field and trying to enter datal the user trying to enter a letter into a numeric only fieldl the user trying to enter data during input inhibit.
2-17

StatusStatus information is split into two categories.Status icons that show connection information, the battery level and the state of the keyboardmodifier keys may be displayed.Status icons are not available on devices equipped with aWindows Mobile operating system.A sessionmenu can be displayed that shows all configured sessions.
Parameters
Status Icons
Orientation
Determines if the status icons are active and, if active, the orientation of the status display.Valid options are:
l None - Do not display the status iconsl Horizontal - Display the status icons with a horizontal orientationl Vertical - Display the status icons with a vertical orientationl Large Horizontal - Display larger status icons with a horizontal orientationl Large Vertical - Display larger status icons with a vertical orientation.
The default is None (status icons not displayed).
2-18

Location
If enabled, determines the location of the status icons on the RFTerm screen. Valid options are:l Top-Left,l Top-Right,l Bottom-Left,l Bottom-Right.
The default is Bottom-Right.
Color
Determines if the status icons are displayed in color (default) or monotone. The examples below are the color icons.
WAN
WWAN signal strength is indicated by a four bar icon with aW.
Excellent signal strength
Good signal strength
Fair signal strength
Poor signal strength
No signal
Con
Displays the status of the connection to the host.
No currently connected session
Session connected
2-19

WiFi
Signal strength for 802.11 radio is indicated by a four bar icon.
Excellent signal strength
Good signal strength
Fair signal strength
Poor signal strength
No signal
Bat
Battery power is indicated by a battery icon or a plug icon.
Excellent battery strength
Good battery strength
Fair battery strength
Poor battery strength
External power source connected
Key
The status of certain keypress states are indicated.
None of the states below are active.
The Alt keypress state is active
The Ctl keypress state is active
The Shift keypress state is active
The CapsLock (or CAPS) keypress state is active
2-20

Session Menu
The SessionMenu parameters provide options for displaying and swapping between sessions.
Host Menu
When enabled, the Host Menu displays information on sessions on the RFTerm “idle” screen. The Host Menu can also bedisplayed in front of an actively connected session by pressing [Ctrl][Alt][0]. When the SessionMenu is displayed, pressingkeys 1 through 4 switches to that session:
l If the selected session is not connected, selecting the session starts that session. If the connection fails, the HostMenu is displayed again.
l If the selected session is already connected, selecting returns the user back to that session.When a session is selected, the Host Menu is dismissed. When a session is ended by a regular sign off, the SessionMenu isautomatically displayed, if enabled.Information displayed, from left to right is:
l Active session indicator:>> for active__ for inactive
l Session ID, i.e. S1l Connection status:
C for connected_ for not connected
l Host Name, as entered onSession > Configure screen (optional)l Host IP Address, as entered onSession > Configure screen
Session Start Control
Session Start Control is provided so the user has control over whether or not an auto login session starts.When enabled, Session Start Control displays a confirmation box before starting the session selected from the Host Menu.When the popup is displayed:
l ClickingOK or pressing Enter starts the session.l Clicking theX or pressing ESC cancels the session start and returns the user to the Host Menu.
Since auto login sessions may start as soon as the session is selected. By providing the option to start or cancel the session,the user is provided a rest-point where it is safe to switch off the device without having any openWhen disabled, the auto login sessions start without the user having any input.
Logging
The logging feature is designed for Honeywell field service use only.
2-21

Serial DataNote: The serial input ports are only configurable on devices equipped with aWindows XP, Windows 7 orWindows
Embedded Standard operating system.
l From the applicationmenu, select File > Settings.l A Settings dialog box will be displayed.l Choose theSerial Data tab.
Should RFTerm be unable to apply any of the COM Port settings, the following popup dialog will appear.
Parameters
COM Port
COM ports available are dependent on the configuration of themobile device. Select the COM port from the drop downmenu.Options may include: COM1, COM2, None, etc.
2-22

Baud Rate
Specifies the baud rate at which the COM port operates.
Data Bits
Specifies the number of data bits to be used. It is one of the following values: 7, or 8.
Timeout
Specifies port timeout in seconds.
Parity
Specifies the parity scheme to be used. It is one of the following values: even, mark, none, odd and space.
Stop Bits
Specifies the number of stop bits to be used. It is one of the following values: 1, or 2.
DTR Control
Specifies the data-terminal-ready flow control. The options are enable, disable and handshake.
RTS Control
Specifies the request-to-send flow control. The options are enable, disable, handshake and toggle.
CTS Out
Specifies if the CTS (clear-to-send) signal is monitored for output flow control.
DSR Out
Specifies if the DSR (data-set-ready) signal is monitored for output flow control.
XonXoff Xmit
Specifies if XON/XOFF flow control is used during transmission.
XonXoff Recv
Specifies if XON/XOFF flow control is used during reception.
2-23

Stored FormsA stored form is a combination of valid ANSI/DEC/LXE commands and text that, when executed by RFTerm and displayed onthe screen, appears as a fill-in form.
For all devices with a Windows CE or Windows Mobile operating system
RFTerm places the commands and text that comprise the form in the System/LXE/RFTerm/Stored Forms folder.
For all devices with a Windows XP, Windows 7 or Windows Embedded Standard operating system
RFTerm places the commands and text that comprise the form in theWindows/LXE/Stored Forms folder.
Creating Stored FormsStored forms are written by the host application programmer and sent from the host to themobile client. You cannot create aform from themobile client.Themaximum number of stored forms supported by RFTerm is 100 and themaximum size of each stored form is 2K. The/Stored Forms folder is not automatically cleared upon amobile client cold boot.See also: Forms for command codes for stored forms.
2-24

Chapter 3 - Session Configuration
This section describes various configuration parameters for setting host connections. All these parameters may be set usingthe application configuration dialogs accessed from theSession > Configure applicationmenu. Except for “Connection”parameters, you can change or update any other parameters at any time, whether the host session is connected ordisconnected.All configuration attributes are associated with the currently active session. Every session can have a different set ofconfiguration attributes.
ConnectionThe following figures show the Connection tab of the host session configuration dialog.
3-1

Note: The dialogs dynamically change depending upon the current selection of “Host Type”.1. From the applicationmenu, Select Session > Configure or tap the Configure button on the ToolBar.2. A Configure dialog box is displayed.3. Choose theConnection tab.
Prerequisites for ConnectionBefore youmake a host connection, you will, at a minimum, need to know:
l the alias name or IP address andl the port number of the host system
to properly set up your host session.Note: There are several new tabs available on theSessions > Configure screen.
Parameters
Host Type
This is the terminal emulation type required by the host. Your choices are 3270, 5250 or VT220. Youmay select only oneemulation type for the session. Other connection options may change depending upon the host emulation type selected.
Host Address
This is the address of a host system or an intermediate gateway managing connections to the host system. Enter either thenumeric IP address or the alias name, using up to 64 characters. This option is case-sensitive.
Host Name
Host name is a field used to identify the session in the SessionMenu. Host name is comprised of alphanumeric characters. Nohost name resolving is performed.
3-2

Terminal Device
This is the client type string that determines the specific client to emulate. For 3270 emulations only model 2 screen geometryis supported. VT220 supports VT52, VT100 and VT220 terminal types. Each host emulation type has its own default terminaltype.
Telnet Port
This is the TCP socket port number to be used to connect to the host system. The default is 23. The range is between 0 and65535.
Reset Defaults
Tap this button to reset all parameters for the selected session to their default values.
3270, 5250, VT Config
This button, which changes with the Host Type selection, opens a configuration dialog for 3270, 5250 or VT emulation settings.
KeepAlive
Checking the KeepAlive box will send amessage to the host every 2 hours (approximately). If the host responds, RFTermknows the host is still present and will keep the socket open. If the host does not respond to repeated KeepAlivemessages,RFTerm will close the connection to the host. The KeepAlive Interval default value is approximately 2 hours.By default, KeepAlive is enabled.
Auto Reconnect
Checking this box will cause RFTerm to automatically attempt to reconnect to the host should the connection be terminated bythe user or the host, other than signal loss.
Retry on Signal Loss
This option enables an automatic reconnection attempt for this session should the signal be lost. This option is valid for bothRF (802.11) andWWAN connections to the host
3-3

VT Configuration
Keys
l From the applicationmenu, select Session > Configure or tap theConfigure button on the ToolBar.l A Configure dialog box will be displayed.l Choose theConnection tab.l Select VT220 as the Host Type, press theVT Config button.l Choose theKeys tab.
Parameters
Backspace
When in character mode, this option configures the backspace key to send either the Delete character or the Backspacecharacter. The default is Send Delete character.
Enter Key
This option configures the Enter key to send either a carriage return or a carriage return and line feed. The default is SendCarriage Return.
Keyboard
Specifies the international ASCII character set for use with the VT220 emulation. The default is North American.
3-4

Screen
l From the applicationmenu, select Session > Configure or tap theConfigure button on the ToolBar.l A Configure dialog box will be displayed.l Choose theConnection tab.l Select VT220 as the Host Type, press theVT Config button.l Choose theScreen tab.
Parameters
Background
This option controls the background shade for VT host sessions. The default is Dark.
Columns
This option specifies the number of columns to be set for the VT host session to be 80 or 132. The default column value is 80columns.See also: VT Configuration > Screen > Columns.
Autowrap
Check this option to enable automatic wrapping of text once it reaches themaximum columnwidth. The default is Enabled(checked).
Local Echo
When in character mode, check this option to echo typed text locally on themobile client.
3-5

Screen Update
Controls the fast screen update enhancement.l Normal - rapid (fast) update enhancements are used. This is the default.l Rapid 1 - Half second timer for last update, packet count of 3 to begin fast updatel Rapid 2 - Half second timer for last update, packet count of 5 to begin fast updatel Rapid 3 - One second timer for last update, packet count of 3 to begin fast updatel Rapid 4 - One second timer for last update, packet count of 5 to begin fast update
3-6

Options
l From the applicationmenu, select Session > Configure or tap theConfigure button on the ToolBar.l A Configure dialog box will be displayed.l Choose theConnection tab.l Select VT220 as the Host Type, press theVT Config button.l Choose theOptions tab.
Parameters
C1 Controls
The C1Controls option allows the user to select 7 bit or 8 bit ASCII control sequences for the host session. The default is Send7-bit.
User Preference Supplemental
This is the user preferred supplemental character set. The default is DEC.
Auto Transmit
Checking this box will cause the entire screen to be sent to the host after the user exits the last field on the screen. Beforesending the data, the Auto Transmit function evaluates the final cursor movement. If the final cursor movement was caused bya backspace or backtab, the screen is not sent to the host. Note that arrow keys have no effect on Auto Transmit. The defaultis blank.
Inclusive End Prot Area
When checked, the EndOf Protected Area command is inclusive when a second field exists on the screen, so that the lastlocation does not become unprotected. The default is unchecked.
3-7
Send/Receive Mode
The default is Character.l Always Block - RFTerm will remain in Block mode during and after logon. The host can override the current mode.l Always Character - RFTerm will remain in Character mode during and after logon. The host can override the current
mode.l Always Line - RFTerm will remain in Linemode during and after logon. The host can override the current mode.l Block - RFTerm starts in Character mode until a logon connection occurs, and then it remains in Block mode. The host
can override the current mode. A function key press performs an Autosend.l Character - RFTerm starts in Character mode until a logon connection occurs, and then it remains in Character mode.
The host can override the current mode.l Key Buf Char - Character mode with a buffer. The buffer captures incomingmessages and forwards them for
processing. If a character fails to be processed, the buffer reattempts processing the buffer contents.l Line - RFTerm starts in Character mode until a logon connection occurs, and then it remains in Linemode. The host can
override the current mode. A function key press performs an Autosend.
3-8

Answerback
l From the applicationmenu, select Session > Configure or tap theConfigure button on the ToolBar.l A Configure dialog box will be displayed.l Choose theConnection tab.l Select VT220 as the Host Type, press theVT Config button.l Choose theAnswerback tab.
Parameters
Use LXE Format
When this parameter is enabled (checked), the following options tomodify the Honeywell formatted string are available and theAnswerback string cannot be directly edited.When this parameter is disabled (blank), the user can edit the Answerback string as described below. Other parameters on thisdialog box cannot be edited (dimmed). Use IP Address and Zero Pad are Enabled by default.
Use Secondary ID
Secondary ID and IP Address aremutually exclusive. Checking one disables the controls for the other. The default SecondaryID is 4 zeros “0000” in alphanumeric format. This is an alternatemethod to identify the client with a 4-digit number. It isautomatically padded with zeros if it contains fewer than 4 characters.
Honeywell Session Management
To use RFTerm with any of the Honeywell SessionManagement products, the Answerback stringmust be formatted toinclude a Secondary ID.
Special Formatting
Special formatting characters are available to insert device specific ID components into the Secondary ID portion of theanswerback string. Please see Special Formatting for Answerback Message for details.
3-9

Use IP Address
Instructs RFTerm to use the IP Address of the device in the Answerback string. This parameter is disabled when UseHoneywell Format and Use Secondary ID are enabled. This is the default.
Zero Pad
When Zero Pad is enabled (checked), any of the four numbers in the IP address less than 100 will be padded with leadingzeros. For example, with Zero Pad disabled (blank), an IP address is generated as 1.16.253.42. With Zero Pad enabled, the IPaddress is generated as 001.016.253.042.
Row
The default is Full Screen.l None - When selected, sends nothing for the row field in the Answerback string.l Full Screen - When selected, sends 24 for rows in the Answerback string.l Specify - Allows the row information to be set according to the customer’s needs. Two characters maximum.
Columns
The default is None.l None - When selected, sends nothing for the column field in the Answerback string.l Full Screen - The setting established in the Columns parameter (80 or 132) on theVT Configuration > Screen tab
sets the column size for the Answerback string.l Specify - Refer to VTConfiguration > Screen > Columns parameter. Allows the column size, based on the setting in
the Columns parameter, to be adjusted according to the customer’s needs. Three characters maximum.See also: VT Configuration > Screen > Columns.
Display
The user may press this button at any time to view the answerback string with the selected options.Note: The string cannot be edited by the user when Use LXE Format is enabled (checked).
Answerback Message
Host applications may query the VT client for a text message answerback response. This responsemay be used to identify theclient. The answerback string is automatically generated when requested by the host using the ENQ command, or by pressingthe Display button. The default format contains the following items after LXE/q/:
l The number of rows currently visible on the screen.l The current release number of RFTerm, same as in the About Box.l The IP address of the device, or an optional secondary ID. The default uses the IP address.l Optionally, the number of columns currently visible on the screen.
If Use LXE Format is unchecked, the Answerback Message is an entry field.Special formatting characters are available to insert device specific ID components into the answerback string. Please seebelow for details.
3-10

Special Formatting for Answerback String
The user can enter the% character in either the Secondary ID textbox (when the LXE format is enabled) or directly in theAnswerback Message textbox (when the LXE formatting is disabled) to indicate how to retrieve and format the portion of thedata source to be included in the Answerback string.The% is followed by a string of special characters in the format%vwwyyzWhere:vmust be one of the following values:
v value Result
0 The string is zero padded.
<space> The string is space padded.
: The next character is not to be formatted and is copied without processing into the string. Special formattingresumes if another% symbol is encountered in the string.
; Formatting is stopped for the remainder of the string. In this case, the initial “%” and the “;” characters are deletedfrom the string and all other characters are shifted to the left.
ww is the two digit minimum display width.yy is the two digit precision, the number of digits to display.
l If theminimum display width (ww) is greater than the precision (yy) then the string is padded with either zeros or spaces(depending on the value for v).
l When counting digits of precision (yy), only the actual hexadecimal digits are counted. Delimiters such as the period (inan IP or MAC address) or the dash (GUID) are not counted as digits of precision and are not displayed in the result.
l If the selected precision (yy) is greater than theminimum display width (ww) and the selected precision is less than theavailable digits in the ID selected, the number of digits returned is the digits of precision.
l If the selected precision (yy) is greater than theminimum display width (ww) and the selected precision is greater thanthe available digits in the ID selected, the number of digits returned is the greater of the available digits or theminimumdisplay width.
l Themaximum value is 31 for display width (ww) and digits of precision (yy).z must be one of the following values:
z value Result
I Indicates the device’s IP address is used to identify the device. If the IP address is not available, astring of padding characters results.
G
Indicates the GUID is used to identify the device. The conversion beings with the rightmost characterof the GUID and counts to the left. If a GUID is not available from the operating system, RFTerm gen-erates and stores the GUID in a non-volatile location eliminating the need to generate the GUID morethan once.
MIndicates theMAC address is used to identify the device. The conversion begins with the rightmostcharacter of theMAC address andmoves to the left. Colons are ignored during the conversion. If theMAC address is not available, a string of padding characters results.
T Indicates theWavelink Avalanche TID is used to identify the device. If the TID is not available, a stringof padding characters results.
Note: If the above rules are broken (ww or yy are not two digits, y is an invalid value, etc.) the special formatting isabandoned and the string is filled with *ERROR*.
3-11

Examples
Refer to the following examples for a device with IP address: 10.10.1.23, GUID: 415B1AF5-561F-373D-A244-80250E3CA123, MAC address: 00:0F:F8:01:23:45 and noWavelink TID assigned to the device:
String Entered Resolves to
ABC%00808I ABC01010123
ABC% 0808I ABC 1010123
ABC%00804I ABC00000123
ABC%00408I ABC1010123
ABC%00301I ABC003
ABC%01012I ABC0001010123
ABC%00404G ABCA123
ABC%00303M ABC345
ABC%00404T ABC0000
ABC%0404T *ERROR*
ABC%;XYZ ABCXYZ
ABC%;%X%Y%Z ABC%X%Y%Z
%:%ABC%00303I %ABC123
ABC%:%% 0303I ABC% 23
3-12
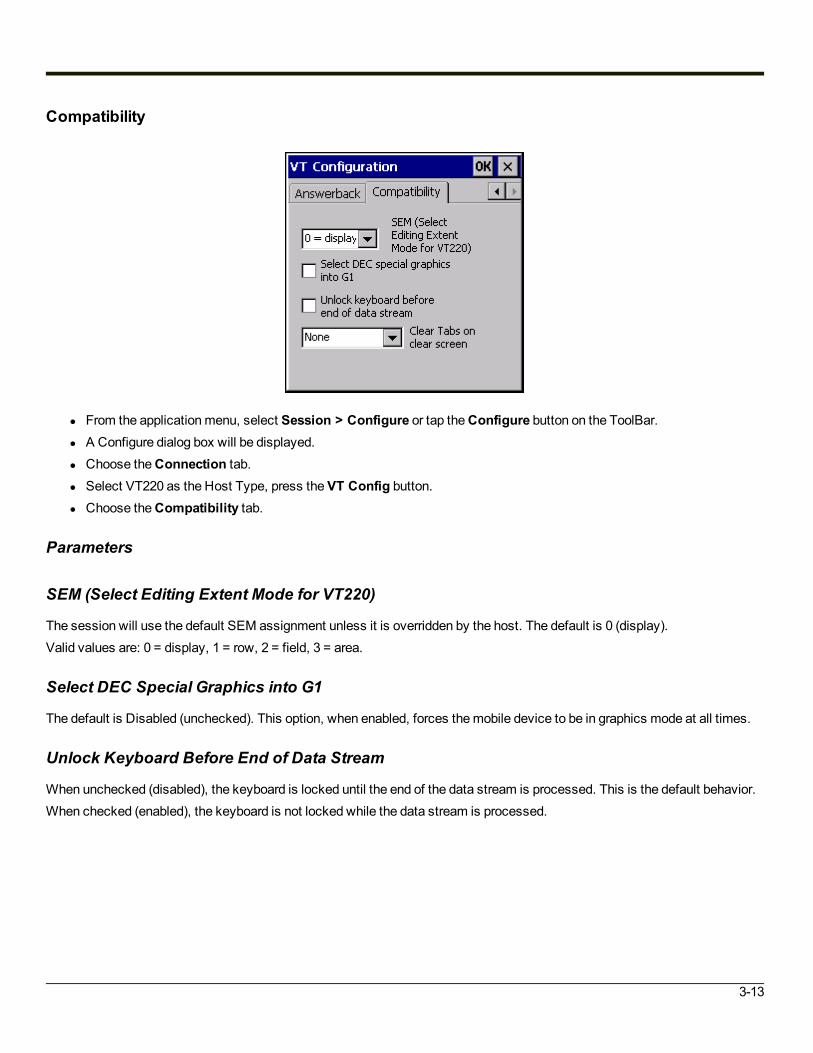
Compatibility
l From the applicationmenu, select Session > Configure or tap theConfigure button on the ToolBar.l A Configure dialog box will be displayed.l Choose theConnection tab.l Select VT220 as the Host Type, press theVT Config button.l Choose theCompatibility tab.
Parameters
SEM (Select Editing Extent Mode for VT220)
The session will use the default SEM assignment unless it is overridden by the host. The default is 0 (display).Valid values are: 0 = display, 1 = row, 2 = field, 3 = area.
Select DEC Special Graphics into G1
The default is Disabled (unchecked). This option, when enabled, forces themobile device to be in graphics mode at all times.
Unlock Keyboard Before End of Data Stream
When unchecked (disabled), the keyboard is locked until the end of the data stream is processed. This is the default behavior.When checked (enabled), the keyboard is not locked while the data stream is processed.
3-13

Clear Tabs on Clear Screen
Determines if tabs will be cleared when the clear screen command “ESC[2J” is used. The default is None.Valid values are:
l None - Does not clear any preset tabs.l Cursor Only - Clears only the preset cursor tabs.l Column Only - Clears only the preset column tabs.l Cursor and Col - Clears both cursor and column preset tabs.
3-14

5250 Configuration
Options
l From the applicationmenu, select Session > Configure or tap theConfigure button on the ToolBar.l A Configure dialog box will be displayed.l Choose theConnection tab.l Select 5250 as the Host Type, press the 5250 Config button.l Choose theOptions tab.
Parameters
Device / LU#
This is an optional IBM parameter. It represents a dedicated LU number or name on the server that youmight want to connectthrough. Default is blank.
Special Formatting
Special formatting characters are available to insert device specific ID components into the Device / LU# string. Please seeSpecial Formatting for Device / LU# String for details.
3-15

Auto Transmit
This selection determines the auto transmit behavior of RFTerm.l Off - Auto transmit is disabled. This is the default.l Last field & pos - This option causes the entire screen to be sent to the host based on data being entered into the last
field and the last position of the field, thereby causing a field exit. The Auto Transmit function evaluates the final cursormovement. If the final cursor movement was caused by a backspace or backtab, the screen is not sent to the host.Note that arrow keys have no effect on Auto Transmit.
l Last field & exit - This option causes the entire screen to be sent to the host based on the occurrence of a field exitdata in the last field.
l Scan last field - This option causes the entire screen to be sent to the host when data is scanned into the last field. Thedata does not have to fill the field to trigger the transmit.
Note: This parameter was previously a check box. Auto transmit was either disabled (unchecked) or enabled for transmit onlast field and position (checked).
Tab = Field Exit
Determines the behavior of the Tab key:l None - Tab does not behave as Field Exit.l Field Exit - Tab behaves has field exit except when in a signed numeric field.l Field Exit Signed Only - Tab behaves has field exit when in a signed numeric fieldl Field Plus Signed Only - Tab behaves has field plus when in a signed numeric field
Status Line Visible
When Status Line Visible is checked, the status line is displayed on the last viewable row of themobile client’s screen. Defaultis blank.
Support ANSI Login
Checking this box will enable the 5250 session to perform as a limited VT emulation until an IBM terminal type is negotiatedwith the host. Default is blank.
Auto Enter
When Auto Enter is checked, an Enter command is sent to the host after a print. Default is blank.
Field Exit on Scan
When Field Exit on Scan is checked, RFTerm performs a Field Exit automatically if a field is being exited due to a bar codescan. Default is blank.
3-16

Special Formatting for Device / LU# String
The user can enter the% character in the Device / LU# textbox to indicate how to retrieve and format the portion of the datasource to be included in the Device / LU# string.The% is followed by a string of special characters in the format%vwwyyzWhere:vmust be one of the following values:
v value Result
0 The string is zero padded.
<space> The string is space padded.
: The next character is not to be formatted and is copied without processing into the string. Special formattingresumes if another% symbol is encountered in the string.
; Formatting is stopped for the remainder of the string. In this case, the initial “%” and the “;” characters are deletedfrom the string and all other characters are shifted to the left.
ww is the two digit minimum display width.yy is the two digit precision, the number of digits to display.
l If theminimum display width (ww) is greater than the precision (yy) then the string is padded with either zeros or spaces(depending on the value for v).
l When counting digits of precision (yy), only the actual hexadecimal digits are counted. Delimiters such as the period (inan IP or MAC address) or the dash (GUID) are not counted as digits of precision and are not displayed in the result.
l If the selected precision (yy) is greater than theminimum display width (ww) and the selected precision is less than theavailable digits in the ID selected, the number of digits returned is the digits of precision.
l If the selected precision (yy) is greater than theminimum display width (ww) and the selected precision is greater thanthe available digits in the ID selected, the number of digits returned is the greater of the available digits or theminimumdisplay width.
l Themaximum value is 31 for display width (ww) and digits of precision (yy).z must be one of the following values:
z value Result
I Indicates the device’s IP address is used to identify the device. If the IP address is not available, astring of padding characters results.
G
Indicates the GUID is used to identify the device. The conversion beings with the rightmost characterof the GUID and counts to the left. If a GUID is not available from the operating system, RFTerm gen-erates and stores the GUID in a non-volatile location eliminating the need to generate the GUID morethan once.
MIndicates theMAC address is used to identify the device. The conversion begins with the rightmostcharacter of theMAC address andmoves to the left. Colons are ignored during the conversion. If theMAC address is not available, a string of padding characters results.
T Indicates theWavelink Avalanche TID is used to identify the device. If the TID is not available, a stringof padding characters results.
Note: If the above rules are broken (ww or yy are not two digits, y is an invalid value, etc.) the special formatting isabandoned and the string is filled with *ERROR*.
3-17

Examples
Refer to the following examples for a device with IP address: 10.10.1.23, GUID: 415B1AF5-561F-373D-A244-80250E3CA123, MAC address: 00:0F:F8:01:23:45 and noWavelink TID assigned to the device:
String Entered Resolves to
ABC%00808I ABC01010123
ABC% 0808I ABC 1010123
ABC%00804I ABC00000123
ABC%00408I ABC1010123
ABC%00301I ABC003
ABC%01012I ABC0001010123
ABC%00404G ABCA123
ABC%00303M ABC345
ABC%00404T ABC0000
ABC%0404T *ERROR*
ABC%;XYZ ABCXYZ
ABC%;%X%Y%Z ABC%X%Y%Z
%:%ABC%00303I %ABC123
ABC%:%% 0303I ABC% 23
3-18
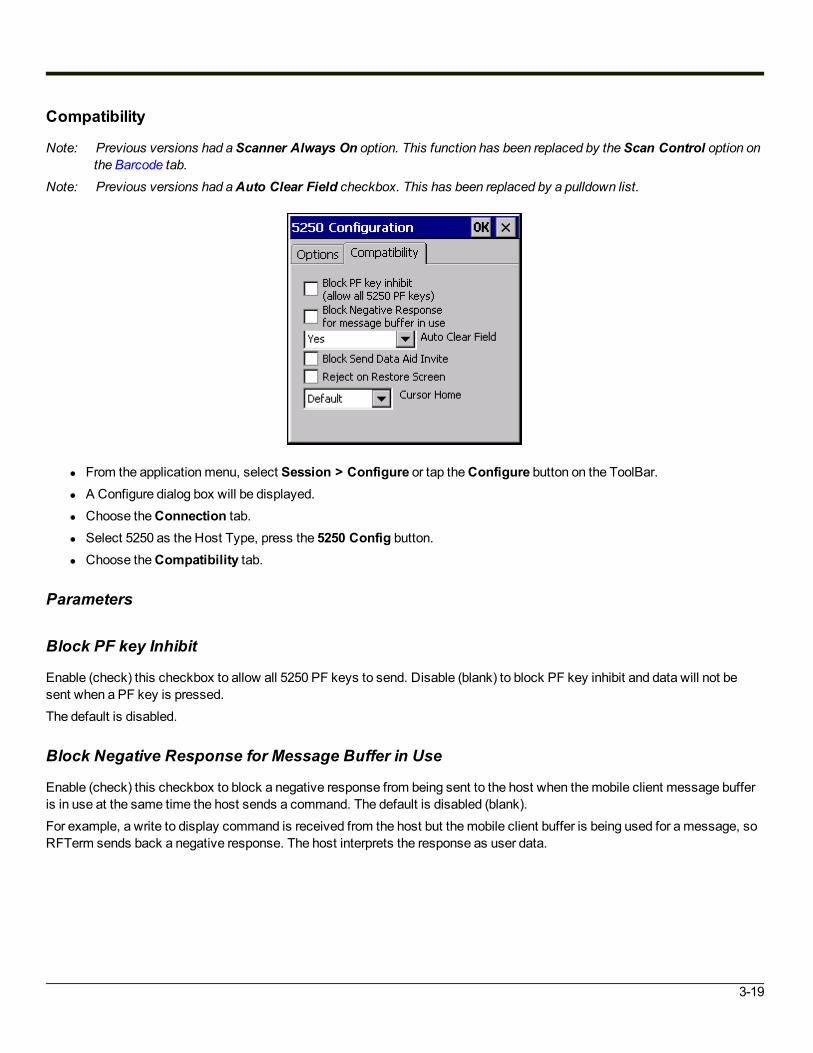
Compatibility
Note: Previous versions had aScanner Always On option. This function has been replaced by theScan Control option onthe Barcode tab.
Note: Previous versions had aAuto Clear Field checkbox. This has been replaced by a pulldown list.
l From the applicationmenu, select Session > Configure or tap theConfigure button on the ToolBar.l A Configure dialog box will be displayed.l Choose theConnection tab.l Select 5250 as the Host Type, press the 5250 Config button.l Choose theCompatibility tab.
Parameters
Block PF key Inhibit
Enable (check) this checkbox to allow all 5250 PF keys to send. Disable (blank) to block PF key inhibit and data will not besent when a PF key is pressed.The default is disabled.
Block Negative Response for Message Buffer in Use
Enable (check) this checkbox to block a negative response from being sent to the host when themobile client message bufferis in use at the same time the host sends a command. The default is disabled (blank).For example, a write to display command is received from the host but themobile client buffer is being used for amessage, soRFTerm sends back a negative response. The host interprets the response as user data.
3-19

Auto Clear Field
Select the desired option for auto clearing of the input field when the user moves the cursor to a field.l No - The field is not cleared.l Yes - The field is cleared when the user enters data (default).l Yes except arrow - The field is cleared when the user enters data, however if the previous keypress was an arrow key,
the field is not cleared.
Block Send Data Aid Invite
If not checked (default), the invite and pending read are set for the Send Data Aid.If checked (blocked) then the invite and pending read are not set for Send Data Aid.The default is disabled (not checked).
Reject On Restore Screen
When checked, RFTerm executes a CmdClearUnit command to clear the screen when a CmdRestoreScreen is received.The default is unchecked, the CmdClearUnit is not executed on CmdRestoreScreen.
Cursor Home
Determines the behavior for cursor home. The default is Default.Valid options are
l Default - Cursor is not repositioned.l Next - Locates the cursor to the next field location.l Current - Locates the cursor at the current field position.l Home - Locates the cursor at the origin position (upper left corner).
3-20

3270 Configuration
Options
l From the applicationmenu, select Session > Configure or tap theConfigure button on the ToolBar.l A Configure dialog box will be displayed.l Choose theConnection tab.l Select 3270 as the Host Type, press the 3270 Config button.l Choose theOptions tab.
Parameters
Device / LU#
This is an optional IBM parameter. It represents a dedicated LU number or name on the server that youmight want to connectthrough. Default is blank.
Special Formatting
Special formatting characters are available to insert device specific ID components into the Device / LU# string. Please seeSpecial Formatting for Device / LU# String for details.
EAB
This is an optional 3270 terminal emulation parameter. If checked, this will allocate an Enhanced Attribute Buffer. EAB supportallows for advanced display features such as color and highlighting. Default is Enabled.
3-21

Auto Transmit
Checking this box will cause the entire screen to be sent to the host after the user exits the last field on the screen. Beforesending the data, the Auto Transmit function evaluates the final cursor movement. If the final cursor movement was caused bya backspace or backtab, the screen is not sent to the host. Note that arrow keys have no effect on Auto Transmit. Default isblank.
Status Line Visible
When Status Line Visible is checked, the status line is displayed on the last viewable row of themobile client’s screen. Defaultis blank.
Auto Enter
When Auto Enter is checked, all data will be sent to the host when all fields are completed. Valid for Block and Linemode.Default is blank.
Support TN3270E
When Support TN3270E is enabled, only Basic TN3270E (as defined in Section 9 of RFC 2355) host requests are supported.The default value is “checked” or enabled. Please note that Full 3270E is not supported by RFTerm. Default is Enabled.
3-22

Special Formatting for Device / LU# String
The user can enter the% character in the Device / LU# textbox to indicate how to retrieve and format the portion of the datasource to be included in the Device / LU# string.The% is followed by a string of special characters in the format%vwwyyzWhere:vmust be one of the following values:
v value Result
0 The string is zero padded.
<space> The string is space padded.
: The next character is not to be formatted and is copied without processing into the string. Special formattingresumes if another% symbol is encountered in the string.
; Formatting is stopped for the remainder of the string. In this case, the initial “%” and the “;” characters are deletedfrom the string and all other characters are shifted to the left.
ww is the two digit minimum display width.yy is the two digit precision, the number of digits to display.
l If theminimum display width (ww) is greater than the precision (yy) then the string is padded with either zeros or spaces(depending on the value for v).
l When counting digits of precision (yy), only the actual hexadecimal digits are counted. Delimiters such as the period (inan IP or MAC address) or the dash (GUID) are not counted as digits of precision and are not displayed in the result.
l If the selected precision (yy) is greater than theminimum display width (ww) and the selected precision is less than theavailable digits in the ID selected, the number of digits returned is the digits of precision.
l If the selected precision (yy) is greater than theminimum display width (ww) and the selected precision is greater thanthe available digits in the ID selected, the number of digits returned is the greater of the available digits or theminimumdisplay width.
l Themaximum value is 31 for display width (ww) and digits of precision (yy).z must be one of the following values:
z value Result
I Indicates the device’s IP address is used to identify the device. If the IP address is not available, astring of padding characters results.
G
Indicates the GUID is used to identify the device. The conversion beings with the rightmost characterof the GUID and counts to the left. If a GUID is not available from the operating system, RFTerm gen-erates and stores the GUID in a non-volatile location eliminating the need to generate the GUID morethan once.
MIndicates theMAC address is used to identify the device. The conversion begins with the rightmostcharacter of theMAC address andmoves to the left. Colons are ignored during the conversion. If theMAC address is not available, a string of padding characters results.
T Indicates theWavelink Avalanche TID is used to identify the device. If the TID is not available, a stringof padding characters results.
Note: If the above rules are broken (ww or yy are not two digits, y is an invalid value, etc.) the special formatting isabandoned and the string is filled with *ERROR*.
3-23

Examples
Refer to the following examples for a device with IP address: 10.10.1.23, GUID: 415B1AF5-561F-373D-A244-80250E3CA123, MAC address: 00:0F:F8:01:23:45 and noWavelink TID assigned to the device:
String Entered Resolves to
ABC%00808I ABC01010123
ABC% 0808I ABC 1010123
ABC%00804I ABC00000123
ABC%00408I ABC1010123
ABC%00301I ABC003
ABC%01012I ABC0001010123
ABC%00404G ABCA123
ABC%00303M ABC345
ABC%00404T ABC0000
ABC%0404T *ERROR*
ABC%;XYZ ABCXYZ
ABC%;%X%Y%Z ABC%X%Y%Z
%:%ABC%00303I %ABC123
ABC%:%% 0303I ABC% 23
3-24

Compatibility
Note: Previous versions had aScanner Always On option. This function has been replaced by theScan Control option onthe Barcode tab.
Note: Previous versions had aAuto Clear Field checkbox. This has been replaced by a pulldown list.
l From the applicationmenu, select Session > Configure or tap theConfigure button on the ToolBar.l A Configure dialog box will be displayed.l Choose theConnection tab.l Select 3270 as the Host Type, press the 3270 Config button.l Choose theCompatibility tab.
Parameters
Clear to EOL
The default value is Disabled (unchecked). Enable (check) this parameter to force the RFTerm 3270 TE to clear displayabletext to the end of line or to the end of field attribute when writing displayable text from the host. Hidden attributes are removed.
Auto Clear Field
Select the desired option for auto clearing of the input field when the user moves the cursor to a field.l No - The field is not cleared.l Yes - The field is cleared when the user enters data (default).l Yes except arrow - The field is cleared when the user enters data, however if the previous keypress was an arrow key,
the field is not cleared.
3-25

Order Prog Tab Erase
Determines if the 3270 screen is erased upon an error notification from the host:l Normal - The erase does not occur for the Order Program Tab command (default).l Erase - The erase does occur for the Order Program Tab command.
Null Format Control Order
This option determines how to handle a Null Format Control Order:l Process - The beginning character in a field is erased after entering data and pressing send (default).l Ignore - Prevents the erasing of the initial character in the field.
3-26

Font
l From the applicationmenu, select Session > Configure or tap theConfigure button on the ToolBar.l A Configure dialog box will be displayed.l Choose the Font tab.
The default font is “Courier New” style “Normal”. The default font may change based on the operating system and installedfonts on themobile client.
Parameters
Font
The drop down box contains the name of a fixed-width True Type font that is used to display the text on the screen. The fontslisted are pre-installed in themobile client or installed by the end-user. RFTerm supports double byte fonts.For more information on installed fonts, please see the equipment specific reference guide.
Style
This is the weight setting of the selected font. Available weights are: Default, Thin, Light, Normal, Medium, Bold, XBold,Heavy. The default is Normal.
Pointsize
Allows the pointsize of the selected font to be specified. The default is 10, valid values are from 6 to 72. If the Specify Rowsand Columns checkbox is checked, Pointsize is calculated by RFTerm and this control is disabled (grayed out).
Specify Rows and Columns
The default is disabled (unchecked). Select this option to specify the rows and columns to fit the display using the Rows: andCols: boxes. Using the specified rows and columns, RFTerm calculates the pointsize for the fonts. When this option isselected, the Pointsize control is disabled.
3-27
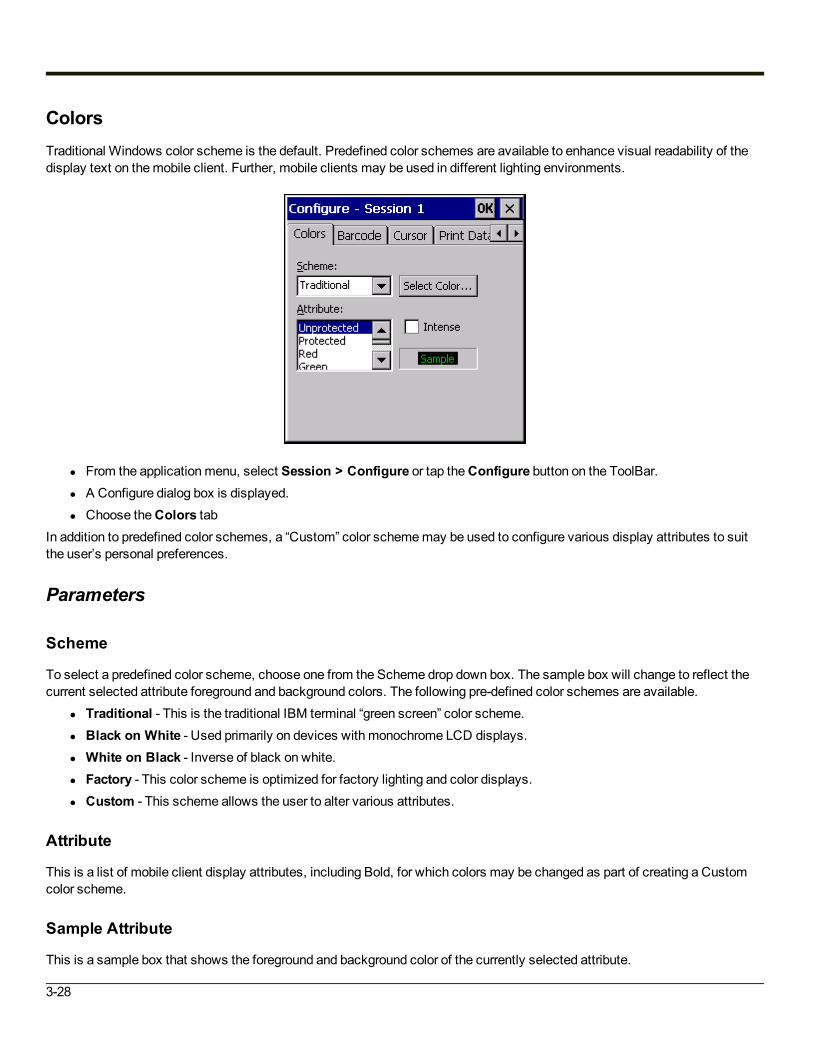
ColorsTraditional Windows color scheme is the default. Predefined color schemes are available to enhance visual readability of thedisplay text on themobile client. Further, mobile clients may be used in different lighting environments.
l From the applicationmenu, select Session > Configure or tap theConfigure button on the ToolBar.l A Configure dialog box is displayed.l Choose theColors tab
In addition to predefined color schemes, a “Custom” color schememay be used to configure various display attributes to suitthe user’s personal preferences.
Parameters
Scheme
To select a predefined color scheme, choose one from the Scheme drop down box. The sample box will change to reflect thecurrent selected attribute foreground and background colors. The following pre-defined color schemes are available.
l Traditional - This is the traditional IBM terminal “green screen” color scheme.l Black on White - Used primarily on devices with monochrome LCD displays.l White on Black - Inverse of black on white.l Factory - This color scheme is optimized for factory lighting and color displays.l Custom - This scheme allows the user to alter various attributes.
Attribute
This is a list of mobile client display attributes, including Bold, for which colors may be changed as part of creating a Customcolor scheme.
Sample Attribute
This is a sample box that shows the foreground and background color of the currently selected attribute.
3-28

Intense
This check box, when selected, applies the custom color to the Intense version of the selected attribute. This option applies to3270 emulations.
Select Color
This button invokes the Color dialog to select a color for an attribute.
How To: Custom Color Scheme
To create a custom color scheme, select the attribute from the attribute list box.l Choose the attribute, whose color is to be changed.l Tap the Select Color... button.l The Color dialog appears.l Select the desired color for the attribute. Click OK.l The Sample box will change to reflect the newly selected color.l For updating colors associated with the Intensemode of an attribute, check the Intense box then select the desired
color.
3-29
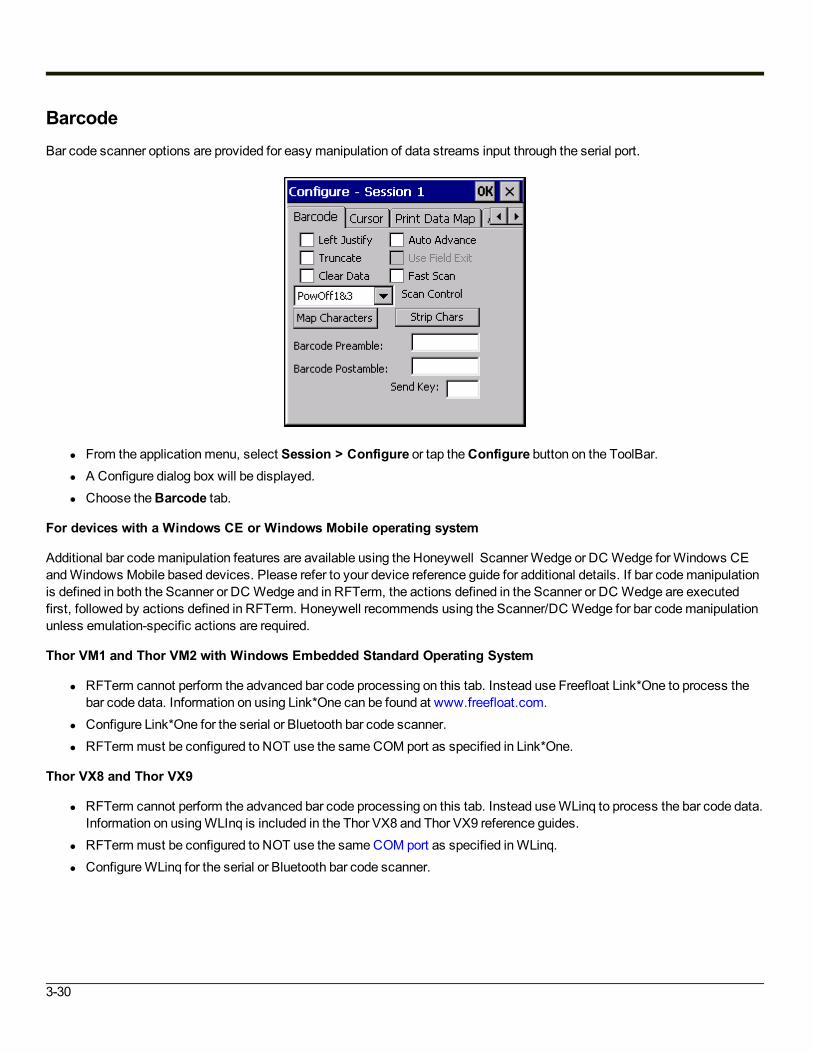
BarcodeBar code scanner options are provided for easy manipulation of data streams input through the serial port.
l From the applicationmenu, select Session > Configure or tap theConfigure button on the ToolBar.l A Configure dialog box will be displayed.l Choose theBarcode tab.
For devices with a Windows CE or Windows Mobile operating system
Additional bar codemanipulation features are available using the Honeywell ScannerWedge or DC Wedge forWindows CEandWindows Mobile based devices. Please refer to your device reference guide for additional details. If bar codemanipulationis defined in both the Scanner or DC Wedge and in RFTerm, the actions defined in the Scanner or DC Wedge are executedfirst, followed by actions defined in RFTerm. Honeywell recommends using the Scanner/DC Wedge for bar codemanipulationunless emulation-specific actions are required.
Thor VM1 and Thor VM2 with Windows Embedded Standard Operating System
l RFTerm cannot perform the advanced bar code processing on this tab. Instead use Freefloat Link*One to process thebar code data. Information on using Link*One can be found at www.freefloat.com.
l Configure Link*One for the serial or Bluetooth bar code scanner.l RFTermmust be configured to NOT use the sameCOM port as specified in Link*One.
Thor VX8 and Thor VX9
l RFTerm cannot perform the advanced bar code processing on this tab. Instead useWLinq to process the bar code data.Information on usingWLInq is included in the Thor VX8 and Thor VX9 reference guides.
l RFTermmust be configured to NOT use the sameCOM port as specified inWLinq.l ConfigureWLinq for the serial or Bluetooth bar code scanner.
3-30
Parameters
Left Justify
When checked, the Left Justify option shifts the cursor to the leftmost position of the current input field before any serial inputdata is displayed on the screen.
Truncate
The Truncate option instructs RFTerm to discard any serial input data that would be beyond the end of the current field.
Clear Data
The Clear Data option automatically erases all data from the current cursor location to the end of the current field before anyserial input data is displayed.
Auto Advance
When checked, the Auto Advance option automatically moves the cursor to the beginning of the next input field after displayingall data input through the serial port.
Fast Scan
When unchecked, there is a 200millisecond delay to allow the scanner to interpret and forward data and for the scanner wedgeto place the data into the buffer and notify RFTerm the data is available. This is the default.If a user performs multiple rapid scans, and subsequent scans are performed before the 200millisecond delay has expired,some scans may be dropped. Check this option to reduce the delay to 10milliseconds.
Use Field Exit
The Use Field Exit feature is only available for 5250 emulations and only when the Auto Advance box is checked. Checkingboth boxes will cause RFTerm to append Field Exit to the scanned bar code.
Scan Control
This option allows the behavior of the scanner to be configured during Input Inhibit or keyboard lock.The valid options are:
l PowOff1&3 - Power is shut off to COM ports 1 and 3 during Input Inhibit or keyboard lock. This option is the default.l PowOn1&3 - Power is not shut off to COM ports 1 and 3 during Input Inhibit or keyboard lock.l Disable1 - Power is shut off to COM ports 1 and 3 during Input Inhibit or keyboard lock and the LS3408 scanner
attached to COM1 is disabled (see note below).l Disable3 - Power is shut off to COM ports 1 and 3 during Input Inhibit or keyboard lock and the LS3408 scanner
attached to COM1 is disabled (see note below.Note: Disable1 and Disable3may require an upgrade to your computer's software load and a firmware update for the LS3408
scanner.
3-31

Barcode Preamble
This option will automatically insert the requested data at the head of the incoming data stream before it is displayed. Controlcharacters and characters not accessible from the keyboard can be represented using the Hat Encoding table.
Barcode Postamble
This option will automatically insert the requested data at the tail of the incoming data stream before it is displayed. Controlcharacters and characters not accessible from the keyboard can be represented using the Hat Encoding table.
Send Key
When checked, the Send Key option allows for a designated character in a bar code scan to automatically send an [Enter]command, provided it is the last printable character in the bar code.
3-32
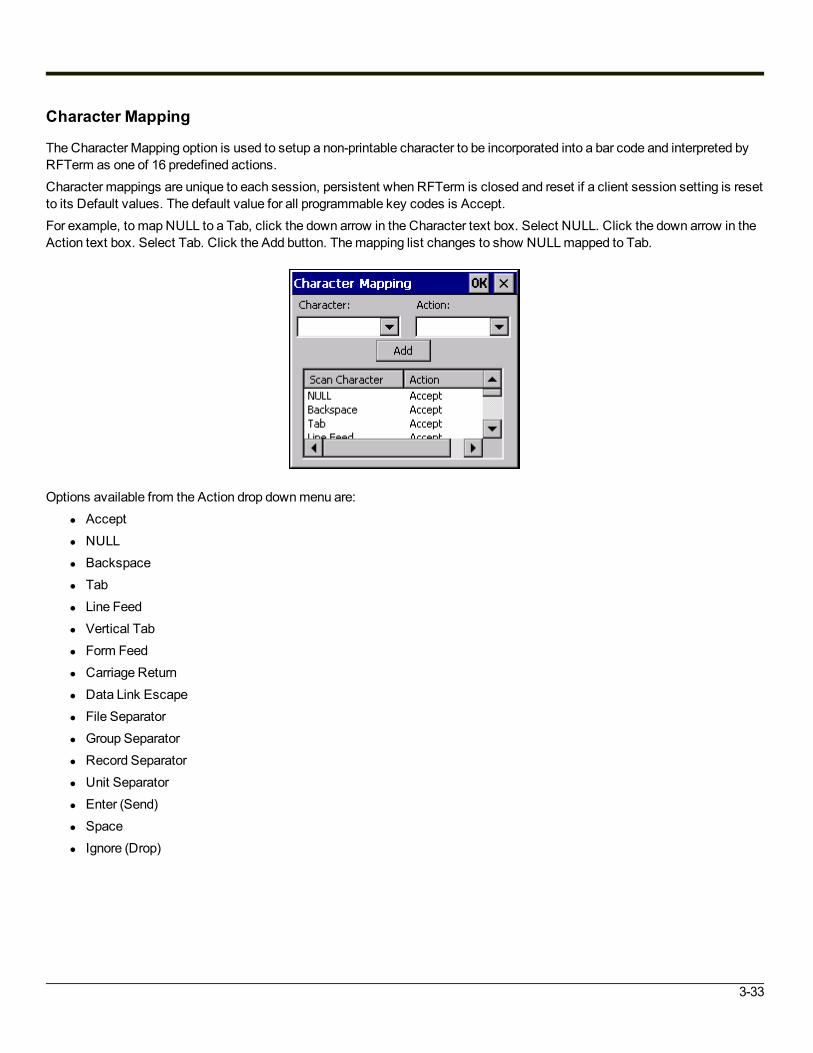
Character Mapping
The Character Mapping option is used to setup a non-printable character to be incorporated into a bar code and interpreted byRFTerm as one of 16 predefined actions.Character mappings are unique to each session, persistent when RFTerm is closed and reset if a client session setting is resetto its Default values. The default value for all programmable key codes is Accept.For example, to mapNULL to a Tab, click the down arrow in the Character text box. Select NULL. Click the down arrow in theAction text box. Select Tab. Click the Add button. Themapping list changes to show NULLmapped to Tab.
Options available from the Action drop downmenu are:l Acceptl NULLl Backspacel Tabl Line Feedl Vertical Tabl Form Feedl Carriage Returnl Data Link Escapel File Separatorl Group Separatorl Record Separatorl Unit Separatorl Enter (Send)l Spacel Ignore (Drop)
3-33

Character Stripping
Default values are Code ID = *, Pre-Strip = 0 and Post-Strip = 0. The asterisk (*) is a wildcard character. Click the OK button tosave any changes/additions. Click the Cancel button or the X button to ignore any changes made.
Code ID Stripping
WhenCode ID Stripping is checked, the first character is stripped. When not checked, character stripping occurs based on thevalues in the Pre-Strip category.
Code ID
Code ID matches are based on this ID. The asterisk (*) is the default - whichmeans match any character.
Pre-Strip
The Pre-Strip option removes the requested number of characters from the head of the incoming data stream before it isdisplayed.
Post-Strip
The Post-Strip option removes the requested number of characters from the tail of the incoming data stream before it isdisplayed.
3-34
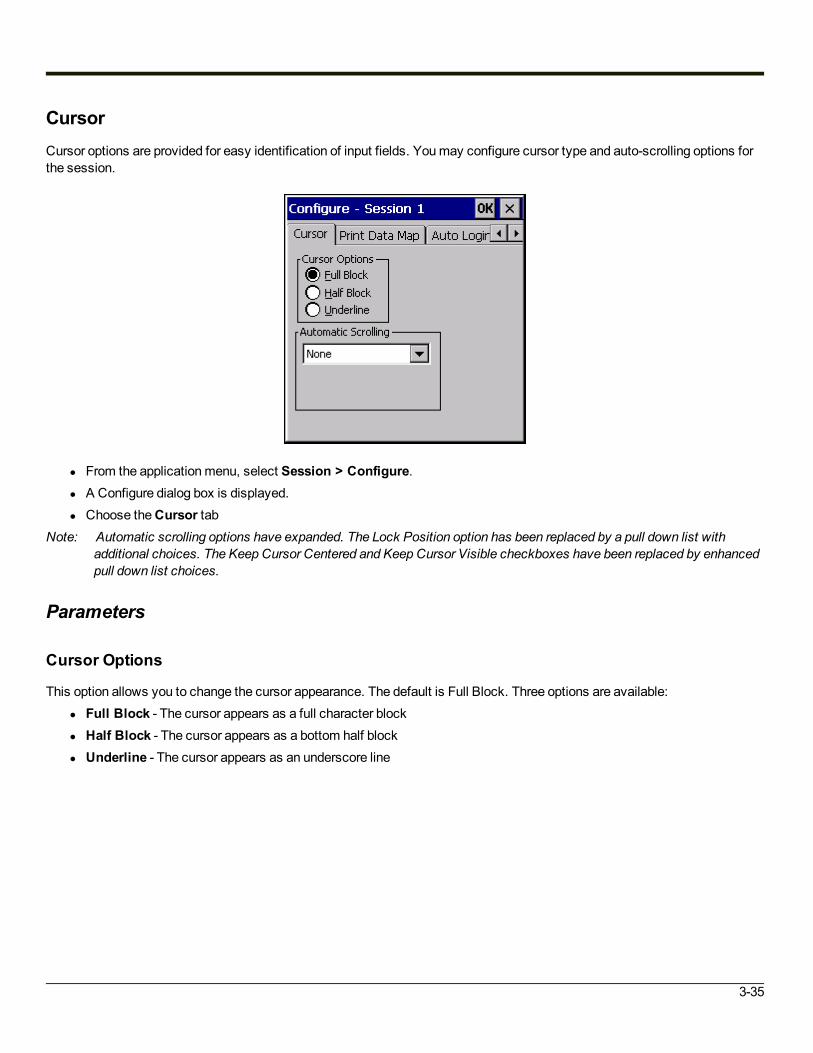
CursorCursor options are provided for easy identification of input fields. Youmay configure cursor type and auto-scrolling options forthe session.
l From the applicationmenu, select Session > Configure.l A Configure dialog box is displayed.l Choose theCursor tab
Note: Automatic scrolling options have expanded. The Lock Position option has been replaced by a pull down list withadditional choices. The Keep Cursor Centered and Keep Cursor Visible checkboxes have been replaced by enhancedpull down list choices.
Parameters
Cursor Options
This option allows you to change the cursor appearance. The default is Full Block. Three options are available:l Full Block - The cursor appears as a full character blockl Half Block - The cursor appears as a bottom half blockl Underline - The cursor appears as an underscore line
3-35

Automatic Scrolling
This option enables automatic scrolling so the current cursor position is always visible. This option is helpful onmobile clientswith small screens. The default is None. The following auto-scrolling options are available:
l None - No automatic scrolling is performed, except those caused by host app (commands) or the device user (viamouse or scroll bar). (default)
l No Lock - The scrolling ability is not locked.l Lock Pos - The scroll bars are locked and the screen position is maintained limiting the viewing area.l Smart Lock - Allows movement and viewing outside the locked region but a Send or Host update shifts the screen back
to the Smart Lock position.l Cursor Centered - The cursor is always as close as possible to the center of the screen. When scrolling limits are
reached, the cursor will move toward the edge of the client display.l Cursor Centered NS - Same as above, except the cursor is “Non Stick” (NS). The NS selection allows the user to
move the screen around, without a put back to cursor centered. Pressing the escape key will cause a cursor centeringscreen adjustment.
l Cursor Visible - The cursor is always visible. The display is scrolled vertically and horizontally to prevent the cursorfrommoving out of view.
l Cursor Visible NS - Same as above, except the cursor is “Non Stick” (NS). The NS selection allows the user to movethe screen around, without a put back to cursor visible. Pressing the escape key will cause a cursor visible screenadjustment.
l Origin - Cursor is forced to the top left corner (origin) in most cases of screen updates and screen shifting.Note: Unless the user is connected and viewing a scrollable area, the Lock Position and Smart Lock selections are
undefined and automatic scrolling is forced back to None.
3-36

Print Data MapSend and receive data on the same serial port on a per session basis, regardless of print setup. See also File > Print > DirectSerial.
l From the applicationmenu, select Session > Configure.l A Configure dialog box is displayed.l Choose the Print Data Map tab.
Note: The serial port configuration parameters are now located at File > Print Setup > Serial Data.Note: Previous versions may have “Pass thru CR” and “EOT as Null” instead of the expanded “Non-display char
conversions” and “Pass thru exception” options.
ParametersNon-Display Char ConversionAllows selected treatment of non-displayable characters (0x0 through 0x1F) when printing:
l Space - Non-display characters are passed through as a space (default).l None - No conversion is performed on the non-display characters.l Null - Non-display characters are passed through as a null.l Deleted - Non-display characters are deleted.
Please see Pass Thru Exceptions (below) for exceptions to the conversion process.
Pass Thru Exceptions
The following exceptions are provided for the Non-Display Character Conversion rule selected above.
CR as CR
Enable (check) for pass through carriage return. This option passes through both CR and LF.Default is disabled (blank).
3-37

EOT as NULL
Enable (check) to replace EOT (End of Text) with a Null character.The default is disabled (blank); EOT is a Space character.
Start Print
Allows a start string to be specified to begin screen printing (output data to the com port). The string can contain amaximum offive characters. When the Start Print field contains data, the emulation searches for the specified Start Print and End Printstrings in the display buffer each time data is received. If the Start Print string is found, the screen data is sent to the com portuntil the end of display buffer or until the End Print string (see below) is reached.This feature is in addition to the *P command, detailed elsewhere in this manual.The default is no entry, so Start Print is disabled.
End Print
Allows an ending string to be specified to terminate screen printing (output data to the com port). When the Start Print option isused (see above) screen printing continues until the end of the display buffer unless the End Print string is specified.The End Print string can contain amaximum of five characters. When the Start Print field contains data, the emulationsearches for the specified Start Print and End Print strings in the display buffer each time data is received. If the End Printstring is found, only the data beginning with the Start Print string and ending with the End Print string is printed. If the End Printstring is not found, all data from the Start Print string until the end of the display buffer is printed.If there is no Start Print string specified, any entry in the End Print field is ignored.The default is no entry, so End Print is disabled.
3-38

Auto LoginUse this option to create automatic login scripts.Note: Previous versions had anAuto Login Enabled checkbox which is replaced by theAuto pulldown list.
l From the applicationmenu, select Session > Configure or tap theConfigure button on the ToolBar.l A Configure dialog box is displayed.l Choose theAuto Login tab.
Parameters
Auto
Determines if the connection to the session and login are done automatically.l None - RFTerm does not connect to the session or login automatically.l Connect Only - RFTerm connects to the session automatically, but does not login automatically. Once connected, the
user must manually login.l Login Only - RFTerm does not connect to the session automatically, but does login automatically once amanual
connection to a session is established. If no prompt or reply is specified, RFTerm waits at the client login screen, andproceeds to connect to the next auto login enabled session. Should a session fail to connect, the client is prompted witha popup dialog requesting a retry or cancel.
l Conn & Log - Both the connection to the session and login are performed automatically by RFTerm. If no prompt orreply is specified, RFTerm waits at the client login screen, and proceeds to connect to the next auto login enabledsession. Should a session fail to connect, the client is prompted with a popup dialog requesting a retry or cancel.
The default is None.
3-39

Autologin Process
When an option with autologin is selected, RFTerm automatically logs in after the session is connected. The connectionmayeither be automatic or manual, depending on the option selected. Once the session is connected, if no prompt or reply isspecified, RFTerm waits at the client login screen, and proceeds to connect to the next auto login enabled session. Should asession fail to connect, the client is prompted with a popup dialog requesting a retry or cancel.
Timeout
Enter how long RFTerm will wait for the session to connect and find the prompt string. The default is the standard RFTerm 30second connection timeout.
Prompt
Enter the string to search for after RFTerm connects to the auto login enabled session. The prompts must be contained onsuccessive screens or the reply will not be sent. The prompts are case sensitive. Leaving the Prompt blank but filling in data forthematching Reply will cause the Reply to be performed regardless of the screen data received from the host.You can enter up to four Prompt/Reply pairs for 3270 and 5250 sessions and six Prompt/Reply pairs for ANSI sessions.
Reply
Enter the string, or action, to place at the current cursor location when RFTerm finds the Prompt string. Control characters andnon-printable characters can be represented using the hat encoding table. The Replies are case sensitive. This data will onlybe sent to the host if the Reply ends in a carriage return. Maximum of 64 characters.Note: For 3270mobile devices, ATTN, CLR, ESC and SYSRQmust be contained within curly brackets { }.
3-40

Fn Keys (Function Key Programming)Allows for programming all available function keys and the 4 arrow keys.
l From the applicationmenu, select Session > Configure or tap theConfigure button on the ToolBar.l A Configure dialog box is displayed.l Choose the Fn Keys tab.
Parameters
Function Key Combo Box
Select the function key you wish to program. There are currently 40 selections for ANSI emulations and 24 each for 3270 and5250 sessions. Most ANSI function keys have default values. The 4 arrow keys are also available for programming for allemulations.
Function Key Edit Box
Enter the keystrokes for that function key to perform. Control characters and characters not accessible from the keyboard canbe represented using the hat encoding table Maximum number of characters is 64.
Add
Adds the entry to the function key table.
Clear
Clears the entry in the function key table for the function key highlighted in the function key combo box.
3-41

Disable Blank Keys
The default value for Disable Blank Keys is Blank or empty. This option is available for ANSI, 3270 and 5250 emulations.When the Disable Blank Keys checkbox is disabled (empty), all blank/unassigned function keys send nothing when pressed.When the Disable Blank Keys checkbox is enabled (checked), then all blank function keys will send the default data for thatfunction key.Enable (check) the Disable Blank Keys checkbox to cause all blank function keys to send the default data for that function key.Explanations:
l An unassigned key, such as F5, can send data assigned to another key, such as F18. Enable this value if you wantunassigned keys to send nothing.
l In ANSI, an F5 keypress (when the F5 key is empty or unprogrammed) will send F18 data (the default value for anempty F5 key). The F18 data will be either the assigned default for an empty F18 or the user entered data for a non-empty F18.
3-42

Keybd
l From the applicationmenu, select Session > Configure or tap theConfigure button on the ToolBar.l A Configure dialog box is displayed..l Choose theKeybd tab.
Parameters
Default Key Map
When selected, the current operating system default keyboard/keypad function key mapping is in effect.
PC Style Keyboard (IBM only)
When selected, function keys [Shift] [F1] through [Shift] [F12]will map to [F13] through [F24].The default function key mapping is [Shift] [F1] through [Shift] [F4]will map to [F21] through [F24].
HX2 Function Key Enable
Note: Applies to HX2with AlphaMode 3 Tap keyboard only.When unchecked, F11 - F19 ([Blue] plus [1 - 9]) are used to implement RFTerm functions such as Connect/Disconnect, HideBars, etc. This behavior means a F11 - F19 keypress is not sent to the application, but instead performs a specified RFTermfunction.When checked, virtual keys F11 - F19 ([Blue] plus [1 - 9]) are no longer mapped to RFTerm functions but aremapped to F11 -F19. Other keypress combinations should be assigned by the user to the RFTerm function.
3-43

Two Key Function Keys
When unchecked, the standard key maps for each device apply for F1 through F40. This is the default.When checked, the following key maps replace the standard key maps for F1 through F40:
F1 and... Produces Ctrl orF2 and... Produces F3 and... Produces F4 and... Produces
1 F1 1 F11 1 F21 1 F31
2 F2 2 F12 2 F22 2 F32
3 F3 3 F13 3 F23 3 F33
4 F4 4 F14 4 F24 4 F34
5 F5 5 F15 5 F25 5 F35
6 F6 6 F16 6 F26 6 F36
7 F7 7 F17 7 F27 7 F37
8 F8 8 F18 8 F28 8 F38
9 F9 9 F19 9 F29 9 F39
10 F10 10 F20 10 F30 10 F40
3-44

Compatibility
l From the applicationmenu, select Session > Configure or tap theConfigure button on the ToolBar.l A Configure dialog box is displayed.l Choose theCompatibility tab.
Parameters
Multi beep on good scan
Enables amultiple beep on a good scan. Default is disabled, a single beep on good scan.
Disable *P
When checked, the *P (IBM print command) is disabled. By default this option is unchecked (*P is treated as the IBM printcommand).
3-45

Continuous Retries Without Prompt
When checked, RFTerm performs continuous retries on the initial auto connect and any auto reconnect after losing aconnection.The default is unchecked, no continuous retries without prompting.A message is displayed on initial connect and on reconnect. No user action is required to begin the connect or reconnectprocess.
If the connection cannot be established, an error message is displayed. Again, no user input is required and RFTerm continuesto retry the connection.
The retry process continues until:l A connection is established.l The user presses [Control] + [D] to end the retry process.
Show Input Error Message
When checked, RFTerm displays amessage if the user attempts to input data, either by keypad or scanner, during Input Inhibitor XCLock.The default is unchecked, nomessage is displayed.
3-46

SSHNote: SSH credentials were previously entered on theSSH Auth tab. They are now accessed from this tab using the
Configure button.
l From the applicationmenu, select Session > Configure or tap theConfigure button on the ToolBar.l A Configure dialog box is displayed..l Choose theSSH tab.
Parameters
SSH Select
Select the type of connection:l None - Telnet is used without SSH.l Shell - A direct connection is made to the SSH server. Not supported with IBM 3270 or IBM 5250 emulations.l Tunnel - A connection is established to an SSH server and Telnet traffic is tunneled or port forwarded through the SSH
connection.
SSH Server Address
Enter the address of the SSH server.
SSH Server Port
Enter the port for the SSH server.
3-47
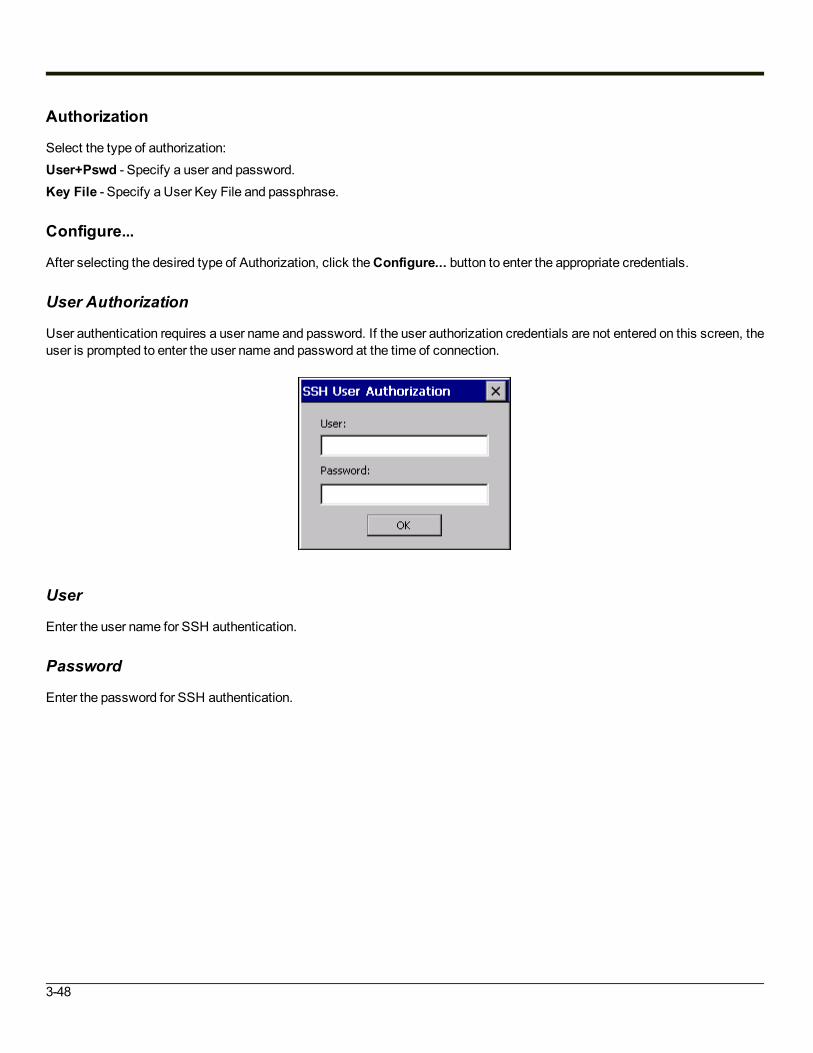
Authorization
Select the type of authorization:User+Pswd - Specify a user and password.Key File - Specify a User Key File and passphrase.
Configure...
After selecting the desired type of Authorization, click theConfigure... button to enter the appropriate credentials.
User Authorization
User authentication requires a user name and password. If the user authorization credentials are not entered on this screen, theuser is prompted to enter the user name and password at the time of connection.
User
Enter the user name for SSH authentication.
Password
Enter the password for SSH authentication.
3-48
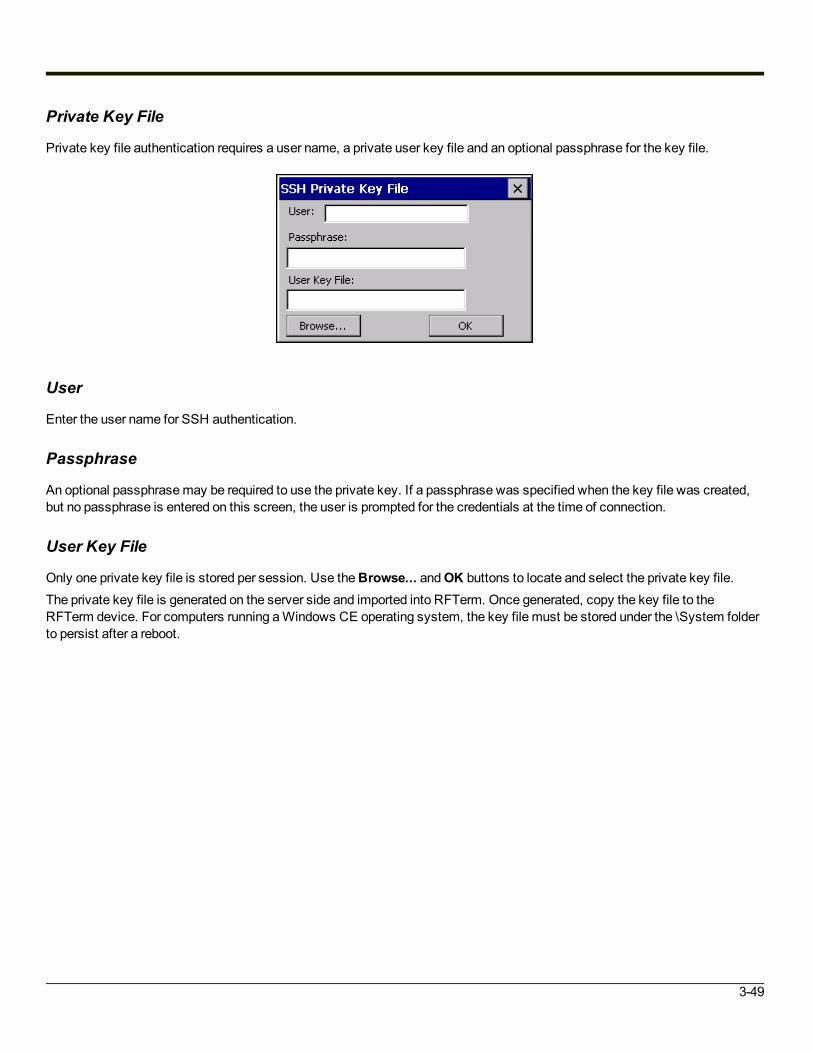
Private Key File
Private key file authentication requires a user name, a private user key file and an optional passphrase for the key file.
User
Enter the user name for SSH authentication.
Passphrase
An optional passphrasemay be required to use the private key. If a passphrase was specified when the key file was created,but no passphrase is entered on this screen, the user is prompted for the credentials at the time of connection.
User Key File
Only one private key file is stored per session. Use theBrowse... andOK buttons to locate and select the private key file.The private key file is generated on the server side and imported into RFTerm. Once generated, copy the key file to theRFTerm device. For computers running aWindows CE operating system, the key file must be stored under the \System folderto persist after a reboot.
3-49

Browse...
Clicking this button opens an explorer window to locate the key file. By default, only PuTTY private key files are displayed inthe explorer window. Putty private key files are generated using the PuTTY Key Generator. The PuTTY Key Generator isinstalled as part of Honeywell's Telnet Manager. Please refer to the Telnet Manager Reference guide for more details.
OK
After using theBrowse... button to locate and select a key file, the file location and name are displayed in the User Key textbox. Click theOK button to save the private key information and exit the private key screen.
Advanced...
Click theAdvanced... button tomanage server keys, keep alives, rekey intervals, etc.
Server Keys
The host key list is global, meaning a Host Key accepted for any session is displayed in all sessions.
When connecting to an SSH session, if the Host is not already in the Global Allowed Host Key list, a warning is displayed.
3-50

The following options are available:Yes - The key is added to the Global Allowed Host Key list and the connection continues. Use this option for a trusted host.No - The key is not added to the Global Allowed Host Key list, however, the connection is allowed just this one time.Cancel - The key is not added to the Global Allowed Host Key list and no connection is allowed.
Delete
Select an entry from theGlobal Allowed Host Key list and tap theDelete button to delete a host key entry.
Allow Connection to Unlisted Host (global)
When selected, only hosts included in the Global Allowed Host Key listing are available for connection.Before removing the checkmark from this option, first connect to any desired hosts so they are in the Allowed list. Once alldesired hosts are included, then uncheck this item to prevent connection to any other hosts.
Misc
3-51

Keep Alive Ping Interval
Use this option tomanage SSH Keep Alivemessages. The default is 0minutes (no SSH Keep Alivemessages). Any valuegreater than 0 (whole numbers only) sends SSH Keep Alivemessages after the specified number of minutes.TCP level Keep Alive is enabled on the Connection tab.
Rekey After MB of Data
The session key is negotiated at session startup. Because the longer a key is used, the greater the chances the connectionmay be successfully attacked, an option is provided to force a new key exchange (from the client side) after the specifiedMBof data is exchanged.The default is 0MB, no rekey is enabled after a certain amount of data is transferred. Any value greater than 0 (whole numbersonly) forces a rekey after that amount of data has been transferred. No data passes through the SSH connection while therekeying takes place.Note: The server may also enable rekeying, so rekeyingmay still happen even if this option and the one below are disabled.
Rekey After Minutes
The session key is negotiated at session startup. Because the longer a key is used, the greater the chances the connectionmay be successfully attacked, an option is provided to force a new key exchange (from the client side) after the specifiednumber of minutes.The default is 0minutes, no rekey is enabled after a certain time period. Any value greater than 0 (whole numbers only) forces arekey after that length of time. No data passes through the SSH connection while the rekeying takes place.Note: The server may also enable rekeying, so rekeyingmay still happen even if this option and the one above are disabled.
Compression
When enabled, data compression is used. By default, compression is disabled.
3-52

Chapter 4 - Session Interaction
Honeywell RFTerm allows up to four simultaneous host client sessions. Although each of these client sessions may bedisconnected or connected, only one session is in the foreground at any time. The session in the foreground is the activesession and receives all user interaction. Connected sessions in the backgroundmaintain their host session connections andupdate their (hidden) screen content.
Multiple SessionsYou can navigate betweenmultiple sessions either from the ToolBar sessionmenu or the session host menu, by usingHotKeys or the ToolBar.
MenuBar Session MenuThe current active session is indicated in the application Sessionmenu as shown below. Host addresses configured for eachof the host sessions are indicated as part of the session names.
l Configured sessions are identified by the Host Address specified on the Connection tab.l >> indicates the current active host session.l A checkmark indicates a connected session.l When this menu is displayed, pressing 1 - 4 selects the corresponding session.
In the example above:l Current Active Host Session is S1 and it is ready to be configured or to connect.l S2 is connected.
4-1
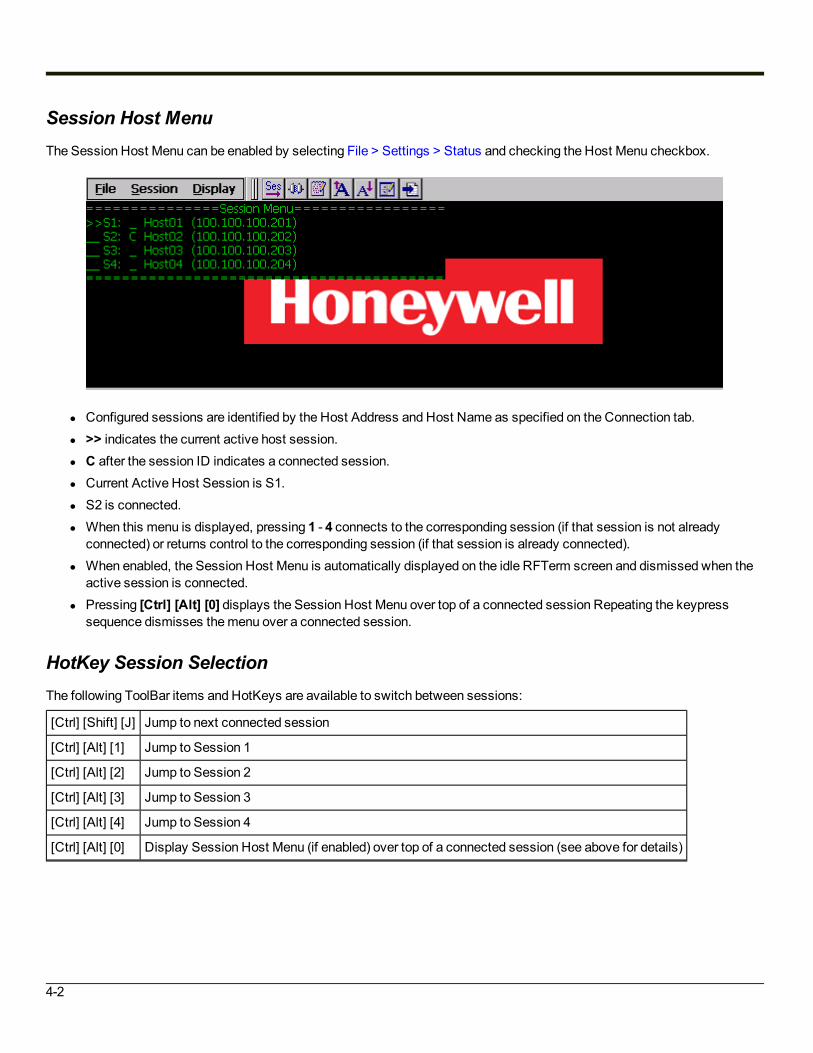
Session Host MenuThe Session Host Menu can be enabled by selecting File > Settings > Status and checking the Host Menu checkbox.
l Configured sessions are identified by the Host Address and Host Name as specified on the Connection tab.l >> indicates the current active host session.l C after the session ID indicates a connected session.l Current Active Host Session is S1.l S2 is connected.l When this menu is displayed, pressing 1 - 4 connects to the corresponding session (if that session is not already
connected) or returns control to the corresponding session (if that session is already connected).l When enabled, the Session Host Menu is automatically displayed on the idle RFTerm screen and dismissed when the
active session is connected.l Pressing [Ctrl] [Alt] [0] displays the Session Host Menu over top of a connected session Repeating the keypress
sequence dismisses themenu over a connected session.
HotKey Session SelectionThe following ToolBar items and HotKeys are available to switch between sessions:
[Ctrl] [Shift] [J] Jump to next connected session
[Ctrl] [Alt] [1] Jump to Session 1
[Ctrl] [Alt] [2] Jump to Session 2
[Ctrl] [Alt] [3] Jump to Session 3
[Ctrl] [Alt] [4] Jump to Session 4
[Ctrl] [Alt] [0] Display Session Host Menu (if enabled) over top of a connected session (see above for details)
4-2

ToolBar Session SelectionThe following ToolBar items can be enabled (see File > Settings > Options1 > KeyBars Custom Bar) and used to switchbetween sessions:
Jump to next connected session
Jump to Session 1
Jump to Session 2
Jump to Session 3
Jump to Session 4
4-3
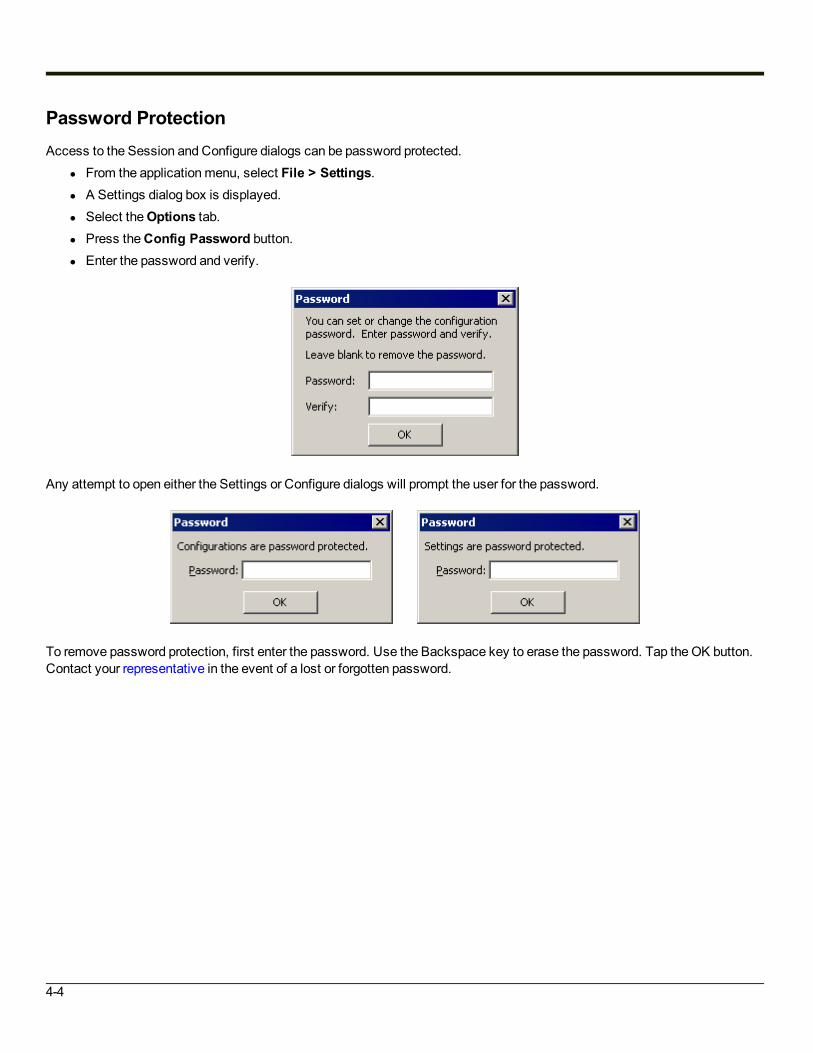
Password ProtectionAccess to the Session and Configure dialogs can be password protected.
l From the applicationmenu, select File > Settings.l A Settings dialog box is displayed.l Select theOptions tab.l Press theConfig Password button.l Enter the password and verify.
Any attempt to open either the Settings or Configure dialogs will prompt the user for the password.
To remove password protection, first enter the password. Use the Backspace key to erase the password. Tap theOK button.Contact your representative in the event of a lost or forgotten password.
4-4
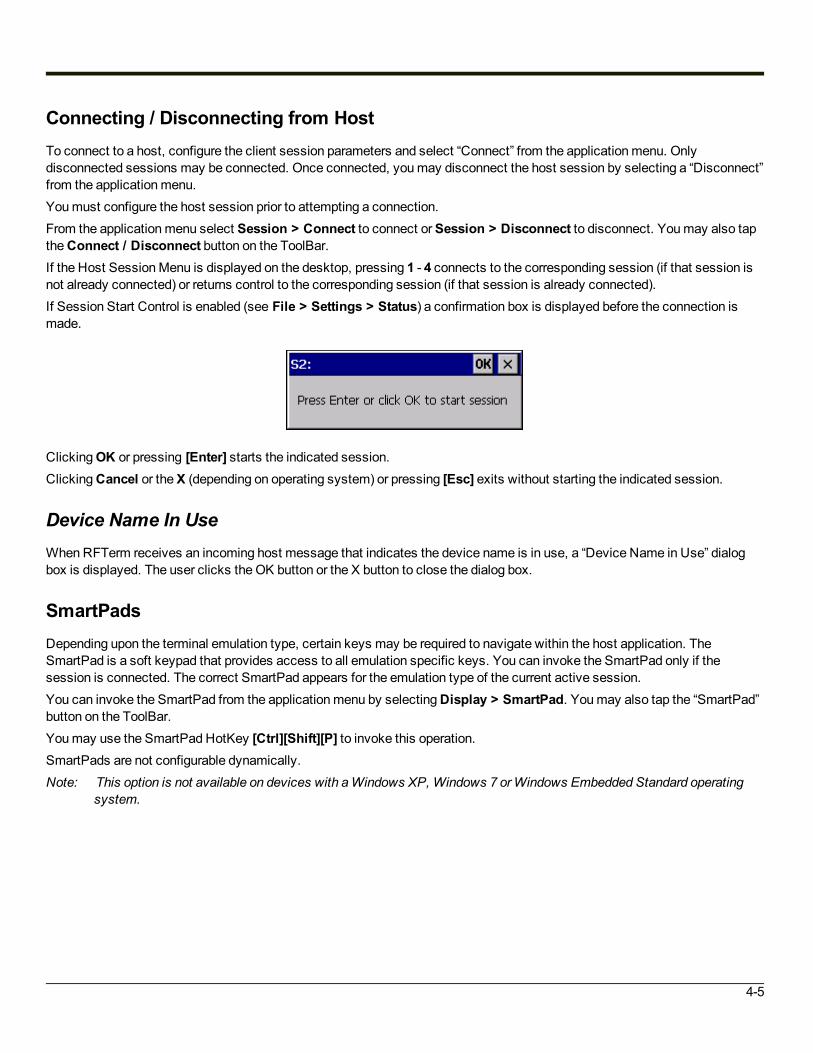
Connecting / Disconnecting from HostTo connect to a host, configure the client session parameters and select “Connect” from the applicationmenu. Onlydisconnected sessions may be connected. Once connected, youmay disconnect the host session by selecting a “Disconnect”from the applicationmenu.Youmust configure the host session prior to attempting a connection.From the applicationmenu select Session > Connect to connect orSession > Disconnect to disconnect. Youmay also taptheConnect / Disconnect button on the ToolBar.If the Host SessionMenu is displayed on the desktop, pressing 1 - 4 connects to the corresponding session (if that session isnot already connected) or returns control to the corresponding session (if that session is already connected).If Session Start Control is enabled (see File > Settings > Status) a confirmation box is displayed before the connection ismade.
ClickingOK or pressing [Enter] starts the indicated session.ClickingCancel or theX (depending on operating system) or pressing [Esc] exits without starting the indicated session.
Device Name In UseWhenRFTerm receives an incoming host message that indicates the device name is in use, a “Device Name in Use” dialogbox is displayed. The user clicks the OK button or the X button to close the dialog box.
SmartPadsDepending upon the terminal emulation type, certain keys may be required to navigate within the host application. TheSmartPad is a soft keypad that provides access to all emulation specific keys. You can invoke the SmartPad only if thesession is connected. The correct SmartPad appears for the emulation type of the current active session.You can invoke the SmartPad from the applicationmenu by selectingDisplay > SmartPad. Youmay also tap the “SmartPad”button on the ToolBar.Youmay use the SmartPad HotKey [Ctrl][Shift][P] to invoke this operation.SmartPads are not configurable dynamically.Note: This option is not available on devices with aWindows XP, Windows 7 orWindows Embedded Standard operating
system.
4-5
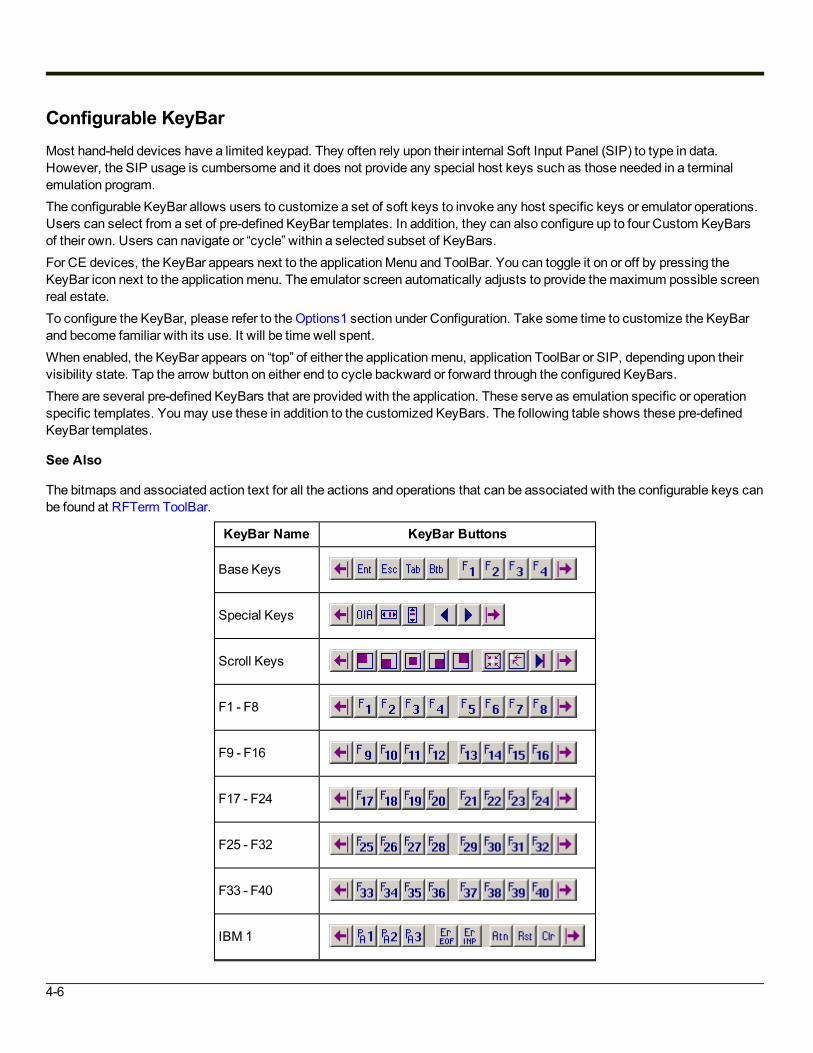
Configurable KeyBarMost hand-held devices have a limited keypad. They often rely upon their internal Soft Input Panel (SIP) to type in data.However, the SIP usage is cumbersome and it does not provide any special host keys such as those needed in a terminalemulation program.The configurable KeyBar allows users to customize a set of soft keys to invoke any host specific keys or emulator operations.Users can select from a set of pre-defined KeyBar templates. In addition, they can also configure up to four Custom KeyBarsof their own. Users can navigate or “cycle” within a selected subset of KeyBars.For CE devices, the KeyBar appears next to the applicationMenu and ToolBar. You can toggle it on or off by pressing theKeyBar icon next to the applicationmenu. The emulator screen automatically adjusts to provide themaximum possible screenreal estate.To configure the KeyBar, please refer to the Options1 section under Configuration. Take some time to customize the KeyBarand become familiar with its use. It will be time well spent.When enabled, the KeyBar appears on “top” of either the applicationmenu, application ToolBar or SIP, depending upon theirvisibility state. Tap the arrow button on either end to cycle backward or forward through the configured KeyBars.There are several pre-defined KeyBars that are provided with the application. These serve as emulation specific or operationspecific templates. Youmay use these in addition to the customized KeyBars. The following table shows these pre-definedKeyBar templates.
See Also
The bitmaps and associated action text for all the actions and operations that can be associated with the configurable keys canbe found at RFTerm ToolBar.
KeyBar Name KeyBar Buttons
Base Keys
Special Keys
Scroll Keys
F1 - F8
F9 - F16
F17 - F24
F25 - F32
F33 - F40
IBM 1
4-6
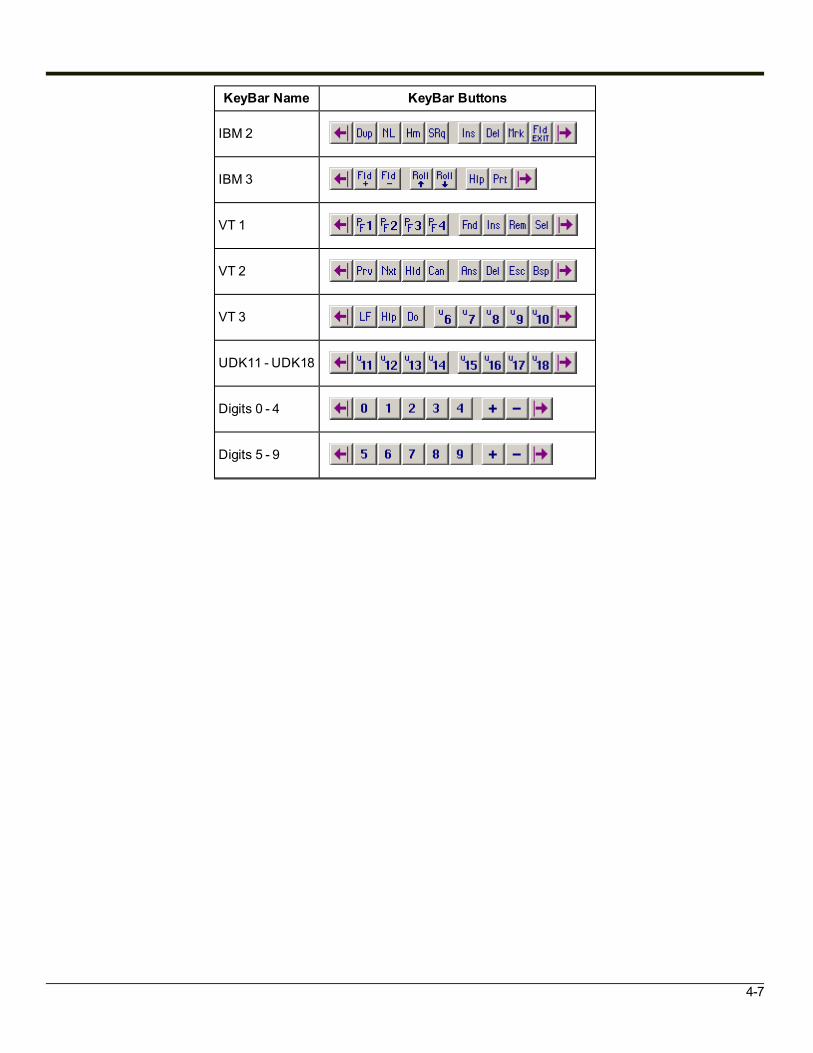
KeyBar Name KeyBar Buttons
IBM 2
IBM 3
VT 1
VT 2
VT 3
UDK11 - UDK18
Digits 0 - 4
Digits 5 - 9
4-7

Print SetupYou can configure a printer for RFTerm.
l From the applicationmenu, select File > Print Setup.This will bring up a popup dialog.
Note: Previous versions may display an alternatemenu. The Serial button is similar in function to the Direct Serial button onthe newer interface. TheWindows button is similar in function to the Installed Printer button on the newer interface.
Print MethodPrint Method is used to specify which print method you wish to use.
Installed Printer
If you select Installed Printer, a standardMicrosoft Windows Print dialog box will appear.
4-8

Direct Serial
If you select Direct Serial, the following dialog is displayed:
This dialog contains parameters that are identical, except for the Pass thru CR checkbox, to the Serial Data dialog. Pleasereview that section for Serial Data parameter details.Select the external COM Port for the device and click OK. The devicemust have a serial printer attached to this COM port.All RFTerm print commands will then send unformatted data to the serial printer. A screen print can be performed by using thekeyboard shortcut [Ctrl] [Alt] [P].
Com Port Error Dialog
Should RFTerm be unable to apply any of the COM Port settings, the following popup dialog will appear:
Cradle Printing via IR
When amobile client with an IR port is docked in a cradle and COM2 is selected as the serial print port on themobile client,RFTerm immediately takes control of the port and continues to listen for print requests from themobile client. RFTerm releasesCOM2when the connection between themobile client’s COM2 port and the cradle is disconnected. While RFTerm is pollingand controlling the cradle connection, the connection cannot be used by another application.
Media Copy Command
The serial port is opened on the initial MC command, all data received is written and the serial port is closed upon receipt of theproper MC command. Before the data is written to the serial port, the data is examined for carriage returns (CR / CR LF) within80 bytes of the previous data stream. If found, the counter is reset and line wrapping/dropping does not occur.
4-9

IP
If you select IP, you can specify the IP address of a printer. The IP address can be specified in the textbox, for example:100.100.100.100The default port value is 515. By following the IP address with a colon ‘:’ and a port number, an alternative port number can bespecified, for example: 100.100.100.100:516
Using a Bar Code to Input IP Address
The IP address of the printer can also be specified by scanning a special bar code. To create the bar code, use anycommercially available bar code software using the format %$.TP followed by the IP address desired.
Example
1. Create a bar code from the string%$.TP100.100.100.100 where 100.100.100.100 is the IP address of the desiredprinter.
2. Print the bar code using a printer with aminimum 600x600 resolution.3. With RFTerm running on the device, scan the bar code with an internal, ring or tethered scanner attached to an
Honeywell computer.4. The IP contents of the string, 100.100.100.100 in this case, are inserted in the IP textbox.
Scanner Applet
If themobile client running RFTerm supports WedgeOutput, the third option, Scanner Applet, can be selected.Not all COM port parameters supported in RFTerm can be supported by themobile client Wedge due to the small form factor ofthe client.Note: This option is only available if themobile client supports ScannerWedge output. For mobile clients that do not support
Wedge output, the Scanner Applet option is not available.
Bluetooth
When themobile device supports Bluetooth, the Print Setup tab contains a selection for a Bluetooth printer.Note: Youmay need to pair with a Bluetooth printer before this option is available.
Buffer PrintWhen checked (enabled) RFTerm can accept scanner or keyboard input while serial printing. This allows RFTerm to buffer theprint data and perform the serial printing in a separate thread.When unchecked (disabled) serial printing is done synchronously, one character at a time. Input is blocked until the print iscompleted.The default is unchecked (disabled).
4-10

Out of RangeThere are configuration options for the behavior of RFTerm in case themobile client loses contact with the host. TheOut ofRange options described in this section are valid for both RF (802.11) andWWAN connections to the host.Should themobile client lose contact with the host, RFTerm can attempt to reconnect the active session. To enable thisfeature, select Session > Configure > Connection and check theRetry on Signal Loss checkbox. For more details,please see Connection.RFTerm can be configuredmonitor the network connection and provide an indication when the network connection is lost. Toenable this feature, select File > Settings > Options and check theCheck Network Status checkbox. If this option isdisabled, RFTerm provides notification of the lost connection only after a data transmission has timed out. The type ofnotification received depends on the option selected. For more details, please seeOptions1.
4-11

Text InputToolNote: This option is not available on devices with aWindows XP, Windows 7 orWindows Embedded Standard operating
system.The Text InputTool sends complete text strings to the display window at the current cursor location. A user can cache a set ofalphanumeric text strings in the input tool.You can invoke the InputTool from the applicationmenu by selectingDisplay > InputTool. Youmay also tap the InputToolbutton on the ToolBar.
You can also invoke the Text InputTool by using the HotKey [Ctrl][Shift][I].You can build your cached list of text strings by pasting text from the clipboard (For example [Edit][Copy] in MicrosoftWordPad) directly into the Text InputTool edit box. You can also directly type a text string into the edit box using the systemsoft keypad. Lastly, you can initialize this list from an ASCII text file.
Command Description
Paste Tapping the Paste button will copy any text from the clipboard into the edit box.
Add Tapping the Add button adds any text in the edit box to the cache list. If the text string is already is in the list, it isnot added again. Blank strings are not added.
Del Tapping the Del button deletes the currently selected text string from the cache list.
Clear Tapping the Clear button clears the edit box.
File
Tapping the File button opens a dialog to select a text file that can be read to initialize the list. Each text string tobe added to the list must be on a separate line delimited by a CRLF. The following shows a sample input text file:
78438-8889-9494Any text string hereUsername
It is recommended that you create a file for initializing the list on the desktop and then ActiveSync it to themobileclient. Each session has its own list.
Send The Send button sends the currently selected text string to the current cursor location on the client display.
Enter Sends a carriage return keystroke to the TE application.
Tab Sends a Tab keystroke to the TE application.
BTab Sends a back tab keystroke to the TE application. This is equivalent to [Shift][Tab].
Esc Sends an Escape keystroke to the TE application.Each entry in the list is preceded by an index value in the form “1”. This index, including the first space after the period, isstripped before sending. You can edit an existing list entry by selecting it, making your changes, then pressing Add. The saved
4-12
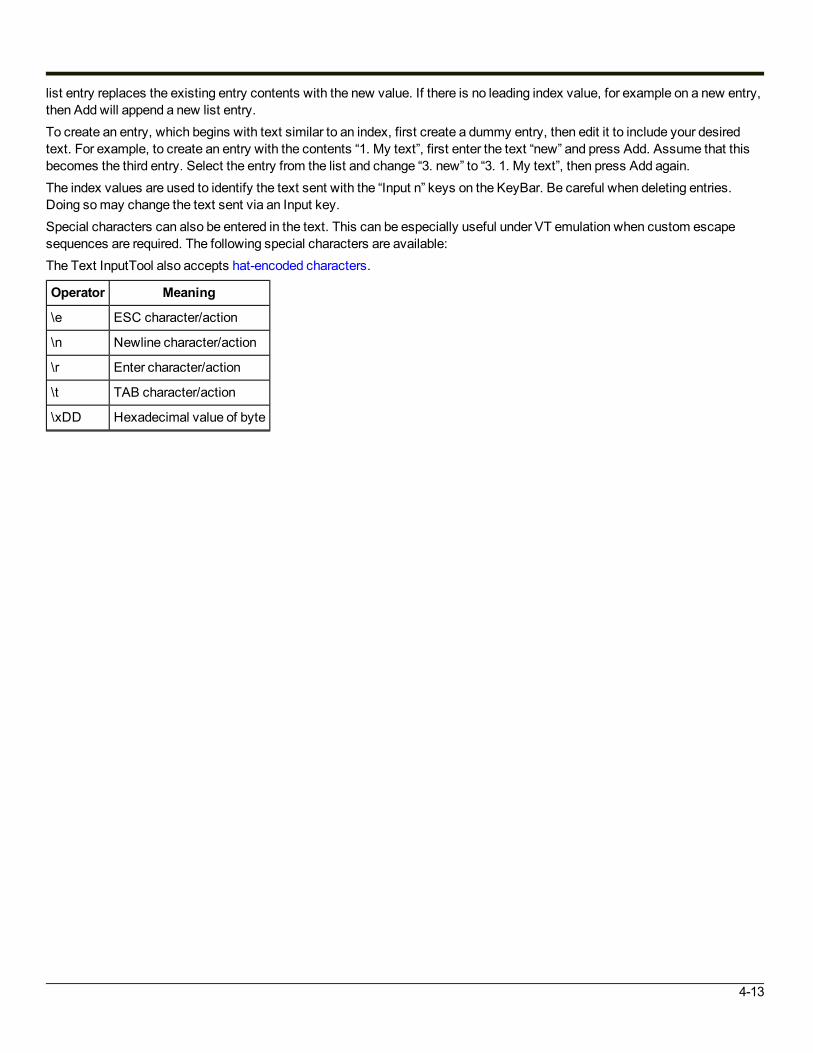
list entry replaces the existing entry contents with the new value. If there is no leading index value, for example on a new entry,then Add will append a new list entry.To create an entry, which begins with text similar to an index, first create a dummy entry, then edit it to include your desiredtext. For example, to create an entry with the contents “1. My text”, first enter the text “new” and press Add. Assume that thisbecomes the third entry. Select the entry from the list and change “3. new” to “3. 1. My text”, then press Add again.The index values are used to identify the text sent with the “Input n” keys on the KeyBar. Be careful when deleting entries.Doing somay change the text sent via an Input key.Special characters can also be entered in the text. This can be especially useful under VT emulation when custom escapesequences are required. The following special characters are available:The Text InputTool also accepts hat-encoded characters.
Operator Meaning
\e ESC character/action
\n Newline character/action
\r Enter character/action
\t TAB character/action
\xDD Hexadecimal value of byte
4-13

HotSpotsA HotSpot is a field on the client screen where a user can tap with a stylus to execute a function. This allows a user to interactwith a host application without using physical keys or the KeyBar. A simple examplemight be the use of PF Keys. Anoperation associated with a PF key might be displayed on the client as “PF1 = Help”. RFTerm emulators automatically detectthis as a HotSpot and will send a PF1 key to the host when you tap on the PF1 text on the client display. To invoke a HotSpot,tap anywhere on the text of that HotSpot. HotSpots are not user configurable.HotSpots are supported for 3270, 5250 and VT emulations. The emulations share some forms of HotSpots, such as functionkeys andmenus, but others depend on the type of emulation.The following table lists some text strings that are recognized as HotSpots.
HotSpot String Sends
PFx= Function key x. where x is between 1..9
PFxx= For 3270, 5250 emulations: Function key x. where x is between 10..24For VT emulations: Function key x. where x is between 10..20
xx. Menu option xx. where xx is any one or two digit number
Fxx= Function key x. where x is between 1..24
<Fxx>= Function key x. where x is between 1..24
Enter Sends Enter key
“X. Menu choice” Selects menu choice X
Double Tap Sends Enter key
+ Roll Up key (5250 only)
- Roll Down Key (5250 only)
More Roll Down AID (5250 only)
Bottom Roll Down AID (5250 only)
Note: Prior to using a “menu choice” HotSpot, the cursor must be in the input field where themenu choice is submitted.(Applies to IBM emulation only.)
Note: Reprogramming the functions keys using the Fn Keys tab under the Configure dialog alters the operation of a functionkey HotSpot.
HotSpots are sensitive to the stylus calibration on the device. To get accurate HotSpot taps, make sure your touch screen iscorrectly calibrated.
4-14
Screen PanningMost host applications have been designed for the desktop screen form factor. When viewing these applications from a hand-held device, only a portion of the host screen is visible because of the smaller display of the hand-held device. Horizontal andvertical scroll bars are typically used to set the virtual screen location. As an alternative to scroll bars, the screen can bepositioned by “dragging” the stylus.Imagine the host application screen as a large sheet under the display on the hand-held device. Screen Panning allows users to“tap” and “drag” this sheet in any direction tomove hidden areas of the host display into view on the hand-held device withoutthe use of scroll bars.Follow these steps to use panning:
l Connect to a host applicationl With the stylus, “tap and hold” anywhere on the client screen. Be careful not to tap on a HotSpot, if you do not also want
a HotSpot actionl Drag the stylus, without lifting, to drag hidden areas of the screen into view
There is no configuration for Screen Panning. It is enabled whenever HotSpots are enabled for touch screen devices.
Access Control / Device LockdownIn some cases, there is a need to prevent users from being able to change the emulator configuration. Further theremay be arequirement to prevent users from exiting the TE application or launching other applications on the device. The Access Controlfeatures address these needs. Refer to the File > Settings > Options1 configuration section for details on configuring thesefeatures.Note: Devices with aWindows XP, Windows 7 orWindows Embedded Standard operating system can additionally be
locked down by configuring the OS.Note: Devices with aWindows CE orWindows Mobile operating system can additionally be locked down using
Honeywell's AppLock. Details on configuring and using AppLock are contained in the equipment specific referenceguide.
Access control functionality allows for the following:l Administrators can password protect access to the RFTerm session configuration settings. This prevents changing the
configuration:l From within the applicationl By loading another sessionl Saving the current session (to then load onto another device)
l Prevent users from invoking another application by disabling the Start menu. This prevents users from invoking anotherapplication while running the Terminal Emulation program.
l Prevent users from exiting the emulator by disabling the application exit feature.
4-15

HotKey ShortcutsRFTerm has several predefined HotKeys. Thesemay normally be used with devices that have a keypad. The following tablelists the default HotKeys.
HotKey Description
[Ctrl][Shift][N] Configure dialog box
[Ctrl][Shift][E] Settings dialog box
[Ctrl][Shift][C] Connect to the host
[Ctrl][Shift][Down Arrow] Decrease font size
[Ctrl][Shift][D] Disconnect a connected host session
[Ctrl][Shift][F] Displays dialog box forWWAN signal strength and connectivity status.
[Ctrl][Shift][H] Display or Hide horizontal scroll bar
[Ctrl][Shift][P] Display or Hide SmartPad(Not supported onWindows XP, Windows 7 orWindows Embedded Standard)
[Ctrl][Shift][I] Display or Hide Text InputTool(Not supported onWindows XP, Windows 7 orWindows Embedded Standard)
[Ctrl][Shift][L] Display or Hide all bars (Menu, Tool, Key)
[Ctrl][Shift][M] Display or HideMenuBar(Not supported onWindows XP, Windows 7 orWindows Embedded Standard)
[Ctrl][Shift][T] Display or Hide ToolBar
[Ctrl][Shift][K] Display or Hide KeyBar
[Ctrl][Shift][V] Display or Hide vertical scroll bar
[Ctrl][Shift][B] Display all bars at the bottom(Not supported onWindows XP, Windows 7 orWindows Embedded Standard)
[Ctrl][Shift][X] Exit the emulator
[Ctrl][Shift][O] or [Alt][T] Hide and unhide status bar (OIA)
[Ctrl][Shift][Up Arrow] Increase font size
[Ctrl][Shift][S] Invoke the session save dialog.
[Ctrl][Shift][J] Jump to next connected host
[Ctrl][Alt][0] Display Host Menu
[Ctrl][Alt][1] Jump to Session 1
[Ctrl][Alt][2] Jump to Session 2
[Ctrl][Alt][3] Jump to Session 3
[Ctrl][Alt][4] Jump to Session 4
[Shift][Down Arrow] Scroll down one row
[Shift][Left Arrow] Scroll left one column
4-16

HotKey Description
[Shift][Right Arrow] Scroll right one column
[Shift][Up Arrow] Scroll up one row
[Ctrl][Down Arrow] Scroll down one row segment (see Note below)
[Ctrl][Left Arrow] Scroll left one column segment (see Note below)
[Ctrl][Right Arrow] Scroll right one column segment (see Note below)
[Ctrl][Up Arrow] Scroll up one row segment (see Note below)
[Ctrl][Shift][1] Toggle between bold and normal font
[Ctrl][Shift][2] Display or Hide status icons(Not supported onWindows Mobile)
[Ctrl][Alt][P] Print the screen of the active session
[Ctrl][H] Display frequently used shortcuts.
Note: Depending onmobile client screen and font size constraints, the segment area used by a [Ctrl]+[Arrow] key sequenceis approximately one-quarter of the total area available.
4-17

Automatic Session StartupYou can automate startup of up to four host sessions when the TE application starts. To do so, enable theAuto LoginEnabled box in theSession > Configure > Auto Login tab, for each of the sessions that you want to automatically start.Each of these sessions will attempt a connection to the configured host when the emulator is started. If a connection cannot beestablished, the following popup dialog will appear, indicating the session number:
4-18

Chapter 5 - ANSI
ANSI Client Overview
Block Mode CommunicationBlock mode communication is a communicationmode that enables the client to send an entire block of data to the host at onetime. (Refer to Sending the Client Screen to the Host for more details.) Block mode greatly reduces RF traffic by sending datain this way. Block modeminimizes RF overhead better than the other modes. Thus, block mode supports more users on an RFchannel and allows faster response time.Local echo is a process that allows each character to display locally at the client as the client user presses the keys. The hostdoes not see these characters until the user presses the [Enter] key.Note: In most cases, operations using programming tools that include screen painters cannot use block mode
communication. Screen painters or designers usually comewith programming tools such as Oracle, Ingress, Informix,and Powerhouse, which normally use character mode communications.
Block Mode Setup
Refer to the following rules for setting up block mode communication:l The programmermust include the following commands in the command string for setting up block mode:
ESC[12l (turn local echo on in SRM)ESC[=1l (turn block mode on in LXELM)
Note: If local echo is off in send-receivemode (SRM), the client operates in character mode while the scroll or block modesetting in LXELM is ignored.
l The programmermust send formatted screens to the client from the host.
5-1

Scroll Mode CommunicationScroll mode communication is a communicationmode where the client allows data entry only on one line. The client user canview the rest of the form, but the cursor returns to the line the host placed the cursor in whenever the user tries to enter data.Scroll mode has the following advantages:
l Provides local protection of unformatted text.l Protects all information on the screen except the command line, which is the line where the host positions the cursor.
Character positions to the left of the cursor’s current position are also protected.l Enables the client user to move the cursor around the screen with the arrow keys. If the user moves the cursor, with the
arrow keys, away from the command line and then tries to enter data, the cursor returns to the command line beforeaccepting the data.
Note: Applications that edit individual characters do not perform well in scroll mode.
Scroll Mode Setup
Refer to the following rules for setting up scroll mode communications:l The programmermust include the following commands in the command string for setting up scroll mode:
ESC[12l (turn on local echo in SRM)ESC[=1h (turn on scroll mode in LXESM)
l The programmermust construct a form consisting of one unprotected field on one line.
InitializationThe ANSI TE powers up in char mode and stays that way until the host changes the TE’s mode. The host must specify thatscroll or block mode is to be used during the current session.
5-2

Sending the Client Screen to the Host
Character Mode
Since each keypress is sent to the host as it is pressed, there is no concept of sending the screen in character mode. Pressingthe [Enter] key in this case will simply send a carriage return and/or line feed to the host. No other sections of the Scroll Modescreen are sent as a result of pressing [Enter].
Scroll Mode
Scroll mode allows user input on only one line of the display at a time until the user presses [Enter]. When this happens, thecursor will jump back to the active position if necessary. The cells between command start and command end will be sent tothe host. TheGATM/SATM/MATMmodes are ignored in scroll mode. See Scroll Mode Communication for more details.
Block Mode
Block mode allows the user to input in any unprotected area on the display until the client user presses [Enter]. When thishappens, the client will look at the current settings of GATM, SATM andMATM to determine exactly which screen cells aretransmitted back to the host. The settings of these threemodes yields 6 different combinations of cells (see the table below,“Sending The Screen In Block Mode”).Protected cells are cells tagged with SPA (Start Protected Area) or DAQ 1 (Define AreaQualification).Unprotected cells are cells that are neither SSA (Start Selected Area) nor SPA nor DAQ 1.Note: DAQ 8 cells are considered unprotected.
Case # Description of Cells Sent Kind of Cells Sent(x = don't care)
GATM SATM MATM
1 Entire screen All set1h
set17h x
2 Current/next selected only 1 SSA set1h
reset17l
reset15l
3 All selected and all unprotected SSA +!(SPA/DAQ1)
reset1l
reset17l
set15h
4 Current/next selected and all unprotected 1 SSA +!(SPA/DAQ1/SSA)
reset1l
reset17l
reset15l
5 All selected SSA set1h
reset17l
set15h
6 All unprotected !SSA +!(SPA/DAQ1)
reset1l
set17h x
To use the table, first decide which of the 6 cases is desired. For example, to use case #6 set SATM and reset GATM. SinceMATM is don’t care in this case, it does not need to be set either way. Set up the screen so that it is marked protected orselected except where the client user will enter data. Now when the user presses [Enter], all cells that are not SSA, not SPAand not DAQ1will be sent back to the host.Sending the screen always operates on the virtual screen so EBM (Editing Boundary Mode) is ignored. Tab fields do not affecthow the screen is sent.
5-3

When sending the screen, the “current/next” selected areameans that if the cursor is currently on a selected area, that area willbe sent. If not, search forward in the screen to find one and use that one. If none are found before the end of the screen, reset tothe screen origin and look from there. If the client returns to the cursor position without finding one, it sends nothing.In all cases the screen is scanned starting from the origin and each cell is transmitted in the order in which it is programmed onthe display. For example, #5means start at the origin and scan forward for all selected cells (type SSA only) sending them inthe order they are found. For case #4, the current/next selected area is found first based on the current cursor position and it isremembered. However, the cells are still transmitted starting from the origin. The selected area is simply transmitted when theclient comes across it in the display.A single area separator (HT 0/9) byte is inserted into the transmit stream for each protected area on the screen (for case #3, 4,5 and 6 only). However, if the first or last area on the screen is protected, no separator byte is inserted.For example, assume case #3 is in effect. If the first few cells of the screen are defined as follows where p is a protected cell, sis an SSA selected cell and u is an unprotected cell:
p1 p1 p1 s1 s1 s1 p2 p2 p2 s2 s2 s2 p3 p3 p3 s3 s3 s3 u1 u1 u1 ...
yields a transmit stream of:
s1 s1 s1 HT s2 s2 s2 HT s3 s3 s3 u1 u1 u1...
Note: No separator is inserted for the first protected area on the screen. No separator appears between s3 and u1 sincethere are no protected cells between them.
If the last few cells on the same display are defined as follows:
...p4 p4 p4 p4 u2 u2 u2 u2 u2 p5 s4 s4 s4 s4 p6 p6
yields a transmit stream of:
...HT u2 u2 u2 u2 u2 HT s4 s4 s4 s4
Note: No separator is inserted for the last protected area on the screen.To reduce traffic between the client and the host when sending the screen, use cases #3, #5 and #6. Tagmost of the screen asprotected by using SPA or DAQ1. Leave only the cells that the user will type/scan into as unprotected/selected. When theclient user presses [Enter] to send the screen, only the unprotected/selected cells will be sent separated by tabs.
5-4

TabbingThree types of tabs are provided in the client:
l defaultl areal regular
Only one type of tab can be active at any time. Previously set tabs may be suppressed by a tab type with a higher priority.However, the suppressed tabs are still defined in the client.Block modemust be active for the [Tab] key to work. If the [Tab] key is pressed in character mode, it will be transmitted backto the host. It is up to the host to echo it back to actually perform the tab. In scroll mode, pressing the [Tab] key is equivalent topressing the [Spacebar] key.The host may perform tabbing by sending the appropriate commands (i.e. HT) to the client regardless of themode it is in.When a tab command is received or the client user presses the [Tab] key, the cursor will move forward until the next tab stop isfound. If none is found before the end of the display, the cursor will move to the origin of the virtual display and continuesearching. The client will not tab to a tab that is in a protected area. Tabs are stationary and do not scroll when the screen does.EBM is ignored when the client tabs.
Default Tabs
These tabs are present when the client is first powered up. They appear on every line starting in column one and are spaced 8columns apart (i.e. 1, 9, 17, etc.). These tabs have the lowest priority and they can be neither set nor erased by the host.
Area Tabs
These tabs can be set by the DAQ, SSA, EPA and ESA commands. They can be set by the host on any screen cell within thevirtual display. These tabs have amedium priority. Setting one or more area tabs suppresses all of the default tabs. They canbe erased only by the ED (Erase in Display) and EL (Erase in Line) commands when ERM (ERasureMode) is set. If all of thearea tabs are erased (and there are no regular tabs) the default tabs are restored.
Regular Tabs
These tabs can be set by the HTS, CTC and DAQ 7 commands. They can be set by the host on any screen cell within thevirtual display. These tabs have high priority. Setting one or more regular tabs suppresses all default and area tabs. Regulartabs can be erased by the CTC, HTS and TBC commands. If all of the regular tabs are erased, any existing area tabs arerestored. If no area tabs exist, the default tabs are restored.
5-5

ANSI Control CodesControl codes enable a programmer to control or modify a client and attached device. ANSI control codes consist of 7-bit and8-bit control codes. This section provides information for the programmer on formatting control codes for Honeywell equipment.All the control codes supported by Honeywell are listed in this section. If a control code is not listed, Honeywell does notsupport it, and it is treated as a no operation (NOP).
Using the 8-Bit Code TableThe 8-bit code table has the same number of rows as the 7-bit code table, but twice as many columns. The codes on the lefthalf of the table (columns 0 - 7) are used in a 7-bit and 8-bit environment. The eighth bit of these codes is 0. The codes on theright half of the table (columns 8 - 15) have an eighth bit of 1. These codes are used in an 8-bit environment and indirectly in a 7-bit environment.Themnemonics in columns 0 and 1 are C0 (control 0) codes, which can be used in 7-bit environments. Themnemonics incolumns 8 and 9 are C1 (control 1) codes, which can be used in 8-bit environments and indirectly in 7-bit environments asescape sequences.A code table is a tool used to group all the characters in a character set with their codes.A mnemonic is an abbreviated name that can be a single control character, escape sequence, or a control sequence.
8-Bit Code TableRefer to the 8-bit code table below that lists all the decimal, hexadecimal, and octal values for each character:
5-6

5-7

5-8
C0 Codes: 7-Bit Control CodesC0 codes are 7-bit control codes that enable the programmer to perform basic functions with Honeywell clients and attacheddevices. This section lists all the C0 codes supported by Honeywell equipment. The examples show applications for eachcontrol code. Not all C0 codes are supported by Honeywell equipment. If a code is not listed, Honeywell does not support it,and it is treated as a no operation (NOP).
BEL - Bell
Function
BEL causes the client to play the Good Sound.
Hexadecimal Value
07
Control Code
^G
Modes that affect this code
None
Example
Refer to the following example on how a programmer can format a BEL command in the C programming language:
printf("Alert the user to this message!");printf("\007\007\007\007"); /*Beep 4 times*/
5-9
BS - Backspace
Function
BS moves the cursor one space to the left. The cursor stops at the left margin of the virtual display.
Hexadecimal Value
08
Control Code
^H
Modes that affect this code
None
Example
Refer to the following example on how a programmer can format a BS command in the C programming language:
printf("The cursor will backspace one space.");printf("\010"); /*(Octal for hex 08)*/
CR - Carriage Return
Function
CR returns the cursor to the left margin (of the virtual screen) of the row that the cursor is currently in.
Hexadecimal Value
0D
Control Code
^M
Modes that affect this code
None
Example
Refer to the following example on how a programmer can format a CR command in the C programming language:
printf("Return cursor to beginning of \n");printf("this second line.");printf("\015"); /*Octal for hex 0D*/
5-10

DC2 - Device Control 2
Function
DC2 is ignored by the client device while media copy is enabled. The DC2 code will not be sent to the printer.
Hexadecimal Value
12
Control Code
^R
Modes that affect this code
None
Example
Refer to the following example on how a programmer can format an DC2 command in the C programming language:
printf("\033[5i"); /*Enables following text to copy to the RS-232 port*/printf("This message will copy to the RS-232 port.");printf("\022"); /*Terminal ignores this code and does not send it to the RS-232 port.*/printf("\033[4i"); /*Disables RS-232 port*/
DC4 - Device Control 4
Function
DC4 is an alternative way to turn off media copy.
Hexadecimal Value
14
Control Code
^T
Modes that affect this code
None
Example
Refer to the following example on how a programmer can format an DC4 command in the C programming language:
printf("\033[5i"); /*Enables following text to copy to the RS-232 port*/printf("This message will copy to the RS-232 port.");printf("\020"); /*Disables RS-232 port*/
5-11

DEL - Delete
Function
DEL erases a character in the data stream. DEL is for client user use only. The host does not send this command.
Hexadecimal Value
7F
Control Code
[Delete]
Modes that affect this code
None
Example
If an user enters a keystroke by mistake, the user can press [Del] causing the client to backspace, which deletes the lastcharacter.
ENQ - Inquiry
Function
ENQ requests a response from the client. The client responds with an answerback message.
Hexadecimal Value
05
Control Code
^E
Modes that affect this code
None
Example
Refer to the following example on how a programmer can format an ENQ command in the C programming language:
printf("Requesting client response now.");printf("\005"); /*Octal for hex 05*/gets(input_str); /*input_str = LXE/q/08/TERMS67001C/0010*/
5-12

ESC - Escape
Function
ESC extends the set of ANSI controls by acting as a code extension.
Hexadecimal Value
1B
Control Code
^[
Modes that affect this code
None
Example
Refer to the following example on how a programmer can format an ESC command in the C programming language:
printf("\033E"); /*Octal for hex 1B. ESC E is a NEL command*/
FF - Form Feed
Function
FF is processed as a line feed (LF) in Honeywell clients and advances the cursor down one line. Refer to the Line Feed controlcode for amore detailed description.
Hexadecimal Value
0C
Control Code
^L
Modes that affect this code
Scroll Region, LNM
Example
Refer to the following example on how a programmer can format an FF command in the C programming language:
printf("This appears on line 1.\n");printf("\014"); /*(Octal for hex 0C)*/printf("\014");printf("This appears on line 4.");
See Also
LF
5-13

HT - Horizontal Tab
Function
HTmoves the cursor to the next predetermined position (tab stop) to the right, within the virtual screen.If there are nomore tab stops after the cursor, it will jump to the origin of the screen and continue looking for the next tab stopfrom there.Note: The cursor will not tab to any protected screen cells.
Hexadecimal Value
09
Control Code
^I
Modes that affect this code
None
Example
Refer to the following example on how a programmer can format the HT command in the C programming language:
printf("\033[1;25H"); /*CUP-place cursor at 1,25*/printf("\033H"); /*HTS-Set Tab*/printf("\033[1;1H"); /*CUP-place cursor at 1,1*/printf("\011"); /*HT-tab to 1,25. Octal for hex 09*/
5-14

LF - Line Feed
Function
LF moves the cursor down one line.If the cursor is outside the scrolling region when the Line Feed is received, it will not move past the bottom of the virtual screen.Scrolling does not occur outside the scrolling region.If the cursor is on the bottom row of the scrolling region when the Line Feed is received and the client is in scroll mode, a blankline is inserted at the cursor and the screen scrolls up one (1) row.
Hexadecimal Value
0A
Control Code
^J
Modes that affect this code
Scroll Region, LNM
Example
Refer to the following example on how a programmer can format an LF command in the C programming language:
print("\033[20h"); /*Set LNM*/printf("This appears on line 1.\n");printf("\012"); /*Octal for hex 0A*/printf("\012");printf("This appears on line 4.");
5-15

NUL - Null
Function
NUL acts as a space-fill or time-fill character.Note: You can insert a NUL anywhere in the data stream without affecting the information content.
Hexadecimal Value
00
Control Code
^@
Modes that affect this code
None
Example
Refer to the following example on how a programmer can format a NUL command in the C programming language:
printf("There will \000not be any\n");printf("extra \000characters here.");
5-16
VT - Vertical Tab
Function
VT is processed as a line feed (LF) in LXE clients and advances the cursor down one line. Refer to the Line Feed control codefor amore detailed description.
Hexadecimal Value
07
Control Code
^G
Modes that affect this code
Scroll Region, LNM
Example
Refer to the following example on how a programmer can format a VT command in the C programming language:
printf("This appears on line 1.\n");printf("\013"); /*(Octal for hex 0B)*/printf("\013");printf("This appears on line 4.");
See Also
LF
5-17

C1 Codes: 8-Bit Control CodesC1 codes are 8-bit control codes that enable the programmer to perform various functions with Honeywell clients and attacheddevices. Some environments operate in 7-bit code; therefore, 8-bit control codes also have 7-bit equivalents. This section listsall the C1 codes supported by Honeywell equipment. The examples show applications for each control code. Honeywellsupports most of the C1 codes but not all of them. If a code is not listed, Honeywell does not support it, and it is treated as a nooperation (NOP).
CSI - Control Sequence Introducer
Function
CSI indicates the start of a control sequence.
Hexadecimal Value
9B
7-Bit Equivalent
ESC[
Modes that affect this code
None
Example
Refer to the following example on how a programmer can format a CSI command in the C programming language:
printf("\033[10C"); /*CUF moves cursor 10 spaces forward. 033[ represents hex 9B*/
5-18

EPA - End of Protected Area
Function
EPA indicates that the cursor’s position is the end of a string of character positions protected from alteration by the client andguarded against transmission back to the host. The area from the cursor position forward is marked to accept all input as if aDAQ 0 commandwas issued from that position.
Hexadecimal Value
97
7-Bit Equivalent
ESC W
Modes that affect this code
None
Example
Refer to the following example on how a programmer can format an EPA command in the C programming language:
printf("\033V"); /*SPA*/printf("This is the start of a protected area\n");printf("This is the end of a protected area");printf("\033W"); /*EPA*/
See Also
SPA (which precedes an EPA command)
5-19

ESA - End of Selected Area
Function
ESA indicates that the cursor position is the end of a string of character positions selected for transmission in a data stream tothe host. The area from the cursor position forward is marked to accept all input as if a DAQ 0 commandwas issued from thatposition.Note: The ESA does not initiate the RF transmission.
Hexadecimal Value
87
7-Bit Equivalent
ESC G
Modes that affect this code
None
Example
Refer to the following example on how a programmer can format an ESA command in the C programming language:
printf("\033F"); /*SSA-start of selected area*/printf("This area is selected for transmission");printf("\033G"); /*ESA-end of selected area*/
See Also
SSA (which precedes an ESA command).
5-20
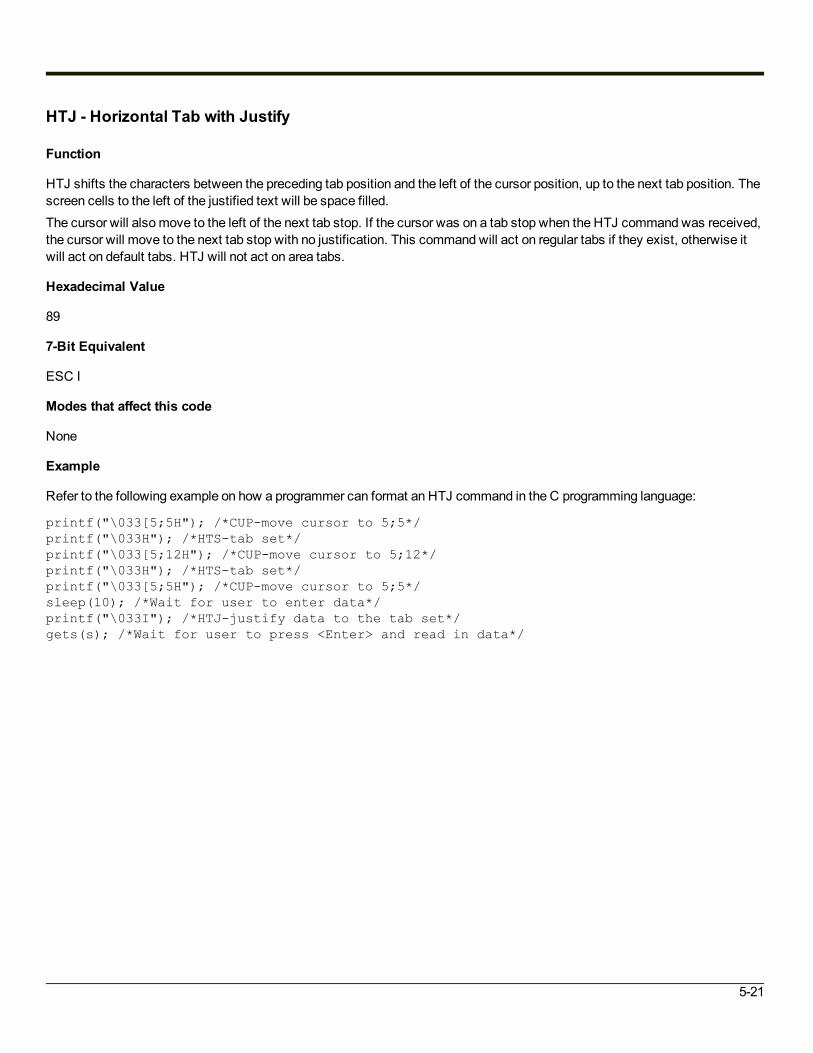
HTJ - Horizontal Tab with Justify
Function
HTJ shifts the characters between the preceding tab position and the left of the cursor position, up to the next tab position. Thescreen cells to the left of the justified text will be space filled.The cursor will alsomove to the left of the next tab stop. If the cursor was on a tab stop when the HTJ commandwas received,the cursor will move to the next tab stop with no justification. This commandwill act on regular tabs if they exist, otherwise itwill act on default tabs. HTJ will not act on area tabs.
Hexadecimal Value
89
7-Bit Equivalent
ESC I
Modes that affect this code
None
Example
Refer to the following example on how a programmer can format an HTJ command in the C programming language:
printf("\033[5;5H"); /*CUP-move cursor to 5;5*/printf("\033H"); /*HTS-tab set*/printf("\033[5;12H"); /*CUP-move cursor to 5;12*/printf("\033H"); /*HTS-tab set*/printf("\033[5;5H"); /*CUP-move cursor to 5;5*/sleep(10); /*Wait for user to enter data*/printf("\033I"); /*HTJ-justify data to the tab set*/gets(s); /*Wait for user to press <Enter> and read in data*/
5-21

HTS - Horizontal Tabulation Set
Function
HTS sets a tab position at the cursor position.
Hexadecimal Value
88
7-Bit Equivalent
ESC H
Modes that affect this code
TSM
Example
Refer to the following example on how a programmer can format an HTS command in the C programming language:
printf("\033[4,20H"); /*CUP-move cursor to 4,20*/printf("\033H"); /*HTS-Set Tab Stop*/
IND - Index
Function
IND moves the cursor down one row without changing column position.If the cursor is on the bottom row of the scrolling region, the display within the region will scroll up by one (1) row.No scrolling occurs if the cursor is outside of the scrolling region.
Hexadecimal Value
84
7-Bit Equivalent
ESC D
Modes that affect this code
Scroll Region
Example
Refer to the following example on how a programmer can format an IND command in the C programming language:
printf("\033D"); /*Index-move down 1 row*/
5-22
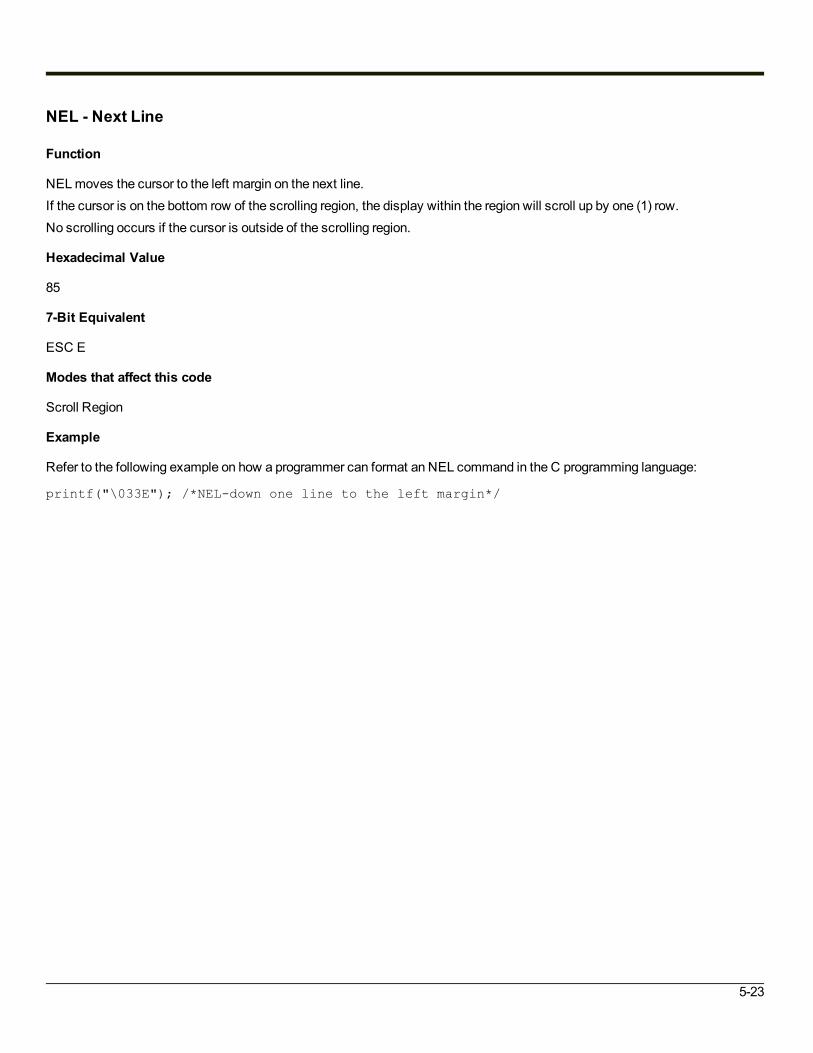
NEL - Next Line
Function
NELmoves the cursor to the left margin on the next line.If the cursor is on the bottom row of the scrolling region, the display within the region will scroll up by one (1) row.No scrolling occurs if the cursor is outside of the scrolling region.
Hexadecimal Value
85
7-Bit Equivalent
ESC E
Modes that affect this code
Scroll Region
Example
Refer to the following example on how a programmer can format an NEL command in the C programming language:
printf("\033E"); /*NEL-down one line to the left margin*/
5-23
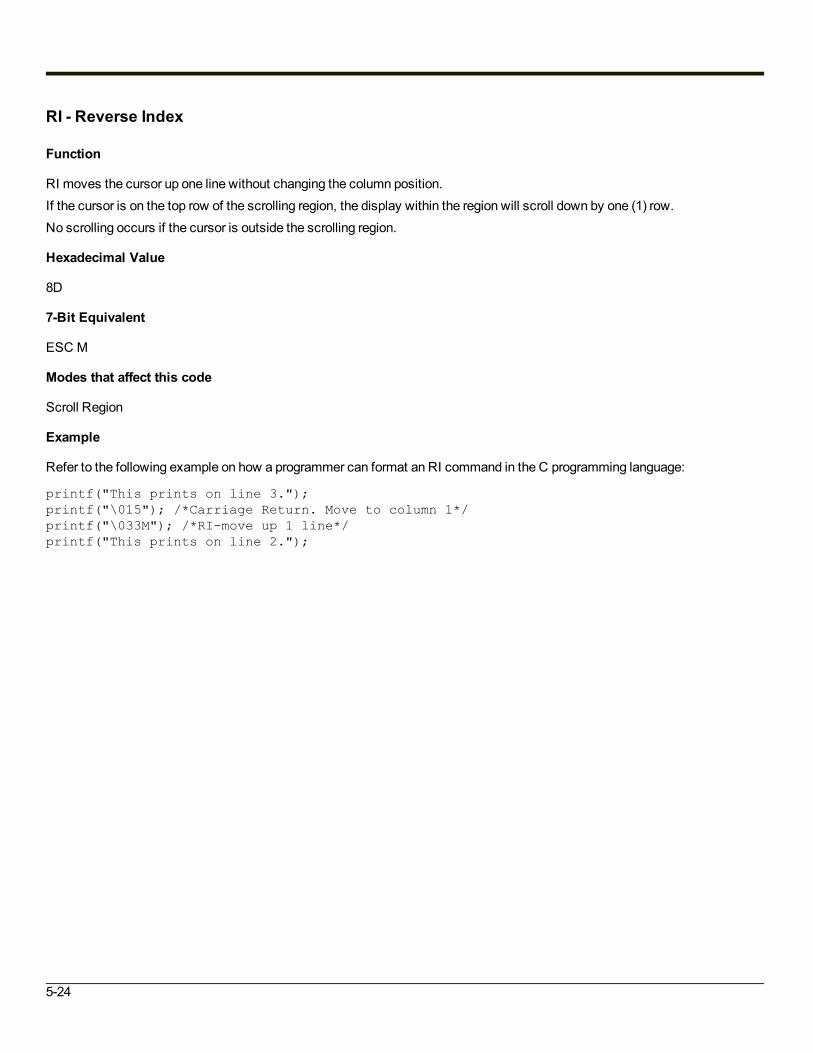
RI - Reverse Index
Function
RI moves the cursor up one line without changing the column position.If the cursor is on the top row of the scrolling region, the display within the region will scroll down by one (1) row.No scrolling occurs if the cursor is outside the scrolling region.
Hexadecimal Value
8D
7-Bit Equivalent
ESC M
Modes that affect this code
Scroll Region
Example
Refer to the following example on how a programmer can format an RI command in the C programming language:
printf("This prints on line 3.");printf("\015"); /*Carriage Return. Move to column 1*/printf("\033M"); /*RI-move up 1 line*/printf("This prints on line 2.");
5-24

SPA - Start of Protected Area
Function
SPA indicates the start of a string of character positions protected from alteration by the client and guarded againsttransmission back to the host. This command is equivalent to DAQ 1.
Hexadecimal Value
96
7-Bit Equivalent
ESC V
Modes that affect this code
None
Example
Refer to the following example on how a programmer can format an SPA command in the C programming language:
printf("\033V"); /*SPA*/printf("This is the start of a protected area\n");printf("This is the end of a protected area");printf("\033W"); /*EPA*/
See Also
EPA (which follows the SPA command)
5-25

SSA - Start of Selected Area
Function
SSA indicates the start of a string of character positions selected for transmission back to the host. This command is similar toDAQ 8, except that SSA allows user input whereas DAQ 8 does not.Note: The SSA does not initiate the RF transmission.
Hexadecimal Value
86
7-Bit Equivalent
ESC F
Modes that affect this code
None
Example
Refer to the following example on how a programmer can format an SSA command in the C programming language:
printf("\033F"); /*SSA-start of selected area*/printf("This area is selected for transmission");printf("\033G"); /*ESA-end of selected area*/
See Also
ESA (which follows the SSA command)
5-26
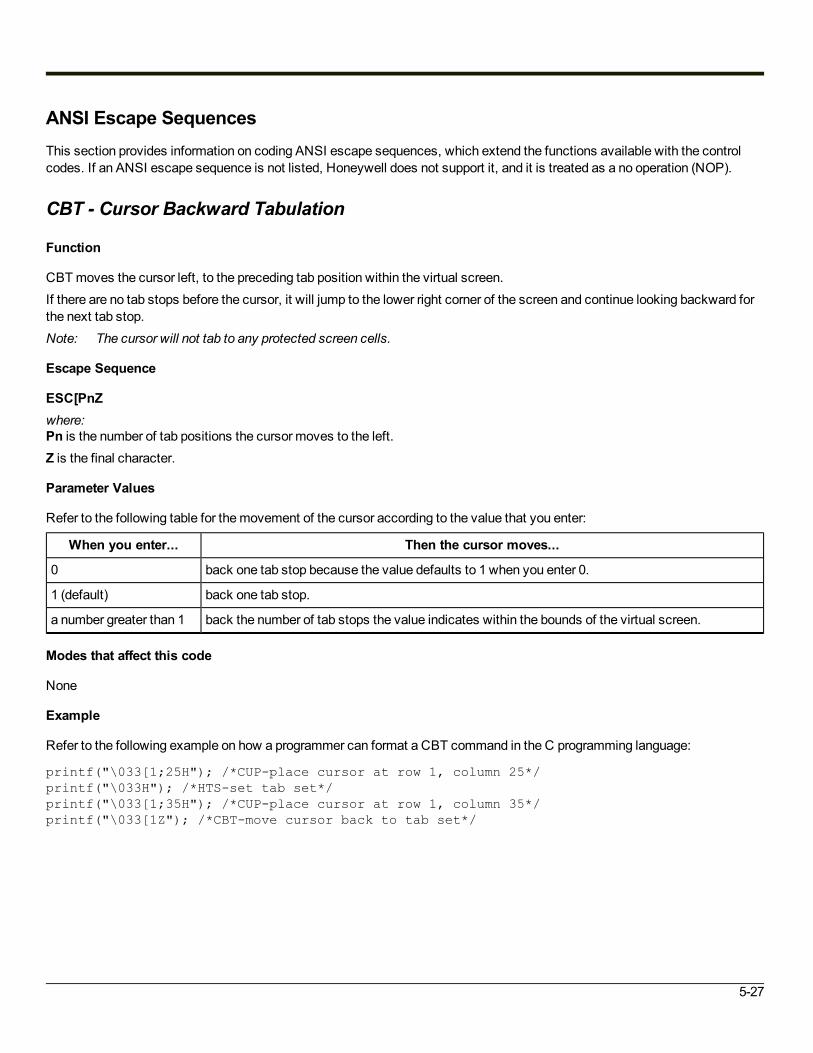
ANSI Escape SequencesThis section provides information on coding ANSI escape sequences, which extend the functions available with the controlcodes. If an ANSI escape sequence is not listed, Honeywell does not support it, and it is treated as a no operation (NOP).
CBT - Cursor Backward Tabulation
Function
CBTmoves the cursor left, to the preceding tab position within the virtual screen.If there are no tab stops before the cursor, it will jump to the lower right corner of the screen and continue looking backward forthe next tab stop.Note: The cursor will not tab to any protected screen cells.
Escape Sequence
ESC[PnZwhere:Pn is the number of tab positions the cursor moves to the left.Z is the final character.
Parameter Values
Refer to the following table for themovement of the cursor according to the value that you enter:
When you enter... Then the cursor moves...
0 back one tab stop because the value defaults to 1 when you enter 0.
1 (default) back one tab stop.
a number greater than 1 back the number of tab stops the value indicates within the bounds of the virtual screen.
Modes that affect this code
None
Example
Refer to the following example on how a programmer can format a CBT command in the C programming language:
printf("\033[1;25H"); /*CUP-place cursor at row 1, column 25*/printf("\033H"); /*HTS-set tab set*/printf("\033[1;35H"); /*CUP-place cursor at row 1, column 35*/printf("\033[1Z"); /*CBT-move cursor back to tab set*/
5-27

CHA - Cursor Horizontal Absolute
Function
CHA moves the cursor to the column (on the current row) that the parameter indicates. If a number greater that 80 is entered,the cursor will move to column 80 by default.Note: Column number depends on the setting in Session Configuration.
Escape Sequence
ESC[PnGwhere:Pn is the column number the cursor moves to.G is the final character.
Parameter Values
Refer to the following table for the effect the value that you enter has on the cursor’s position:
When you enter... Then the cursor moves...
0 to column one because the value defaults to 1 when you enter 0.
1 (default) to column one.
a number greater than 1 to the column the value indicates in the current line.
Modes that affect this code
None
Example
Refer to the following example on how a programmer can format a CHA command in the C programming language:
printf("\033[7G"); /*move cursor to column 7 of the current line*/
5-28

CHT - Cursor Horizontal Tab
Function
CHTmoves the cursor right, to the next tab position within the virtual screen. If there are no tab stops found after the cursor, itwill jump to the origin of the screen and continue looking for the next tab stop.Note: The cursor will not tab to any protected screen cells.
Escape Sequence
ESC[PnIwhere:Pn is the number of tab positions the cursor moves to the right.I is the final character.
Parameter Values
Refer to the following table for the effect the value that you enter has on the cursor’s position:
When you enter... Then the cursor moves...
0 forward one tab position because the value defaults to 1 when you enter 0.
1 (default) forward one tab position.
a number greater than 1 forward the number of tab positions that the value indicates within the bounds of the virtual screen
Modes that affect this code
None
Example
Refer to the following example on how a programmer can format a CHT command in the C programming language:
printf("\033[1;25H"); /*CUP-place the cursor at row 1, column 25*/printf("\033H"); /*HTS-tab stop*/printf("\033[1;1H"); /*CUP-move cursor up to row 1, column 1*/printf("\033[1I"); /*CHT-place cursor horizontal tab*/
5-29

CNL - Cursor Next Line
Function
CNLmoves the cursor down one or more lines to the left margin from the cursor’s current position. The cursor will stick at thebottommargin if a large number is entered.
Escape Sequence
ESC[PnEwhere:Pn is the number of lines the cursor moves down.E is the final character.
Parameter Values
Refer to the following table for the effect the value that you enter has on the cursor’s position:
When you enter... Then the cursor moves...
0 to the left margin on the next line from its current position because the value defaults to 1 whenyou enter 0.
1 (default) to the left margin on the next line from its current position.
a number greater than 1 down, as many lines as the value indicates, to the left margin.
Modes that affect this code
None
Example
Refer to the following example on how a programmer can format a CNL command in the C programming language:
printf("\033[1;20H"); /*CUP-place cursor at row 1, column 20*/printf("\033[1E"); /*CNL-move cursor to next line, column 1*/
5-30

CPL - Cursor Preceding Line
Function
CPLmoves the cursor up one or more lines to the left margin from the cursor’s current position. The cursor will stick at the topmargin if a large number is entered.
Escape Sequence
ESC[PnFwhere:Pn is the number of lines the cursor moves up.F is the final character.
Parameter Values
Refer to the following table for the effect the value that you enter has on the cursor’s position:
When you enter... Then the cursor moves...
0 up one line to the left margin because the value defaults to 1 when you enter 0.
1 (default) up one line to the left margin.
a number greater than 1 up, as many lines as the value indicates, to the left margin.
Modes that affect this code
None
Example
Refer to the following example on how a programmer can format a CPL command in the C programming language:
printf("\033[3;20H"); /*CUP-move the cursor to row 3, column 20*/printf("\033[2F"); /*CPL-move the cursor up 2 lines*/
5-31

CPR - Cursor Position Report
Function
CPR reports the cursor’s position to the host. DECOM is ignored when reporting the cursor position. The position reported isalways relative to the origin of the virtual screen.Note: This report is sent from the client to the host in response to a device status report 6 (DSR 6)
Escape Sequence
ESC[Pr,PcRwhere:Pr is the row position.Pc is the column position.R is the final character.
Example
Refer to the following example of a CPR sent from the client to the host:
printf("\033[2;5H"); /*CUP-Place cursor*/printf("\033[6n"); /*DSR-Request cursor position*/gets(s); /*String returned= "\033[2;5R"*/
Note: This example requires that the [Enter] key is pressed to exit from the gets command.
Modes that affect this code
None
See Also
DSR
5-32

CTC - Cursor Tabulation Control
Function
CTC sets or clears the horizontal tab positions.
Escape Sequence
ESC[PnWwhere:Pn is the tab position you want to set.W is the final character.
Parameter Values
Refer to the following table for the effect the value that you enter has on the cursor’s tab position:
When you enter... Then this parameter value...
0 (default) with TSM set, sets the tab stop at the cursor’s position.with TSM reset, sets the tab stop at the cursor’s column, on all rows in the virtual screen.
1 Honeywell does not support this parameter value.
2 with TSM set, clears the tab stop at the cursor’s position.with TSM reset, clears the tab stop at the cursor’s column, on all rows in the virtual screen.
3 Honeywell does not support this parameter value.
4 with TSM set, clears all of the tab stops on the cursor’s row in the virtual screen.with TSM reset, clears all of the tab stops on the virtual screen.
5 with TSM set or reset, clears all of the tab stops on the virtual screen.
6 Honeywell does not support this parameter value.
Modes that affect this code
None
Example
Refer to the following example on how a programmer can format a CTC command in the C programming language:
printf("\033[5W"); /*clear all horizontal tab positions*/
5-33

CUB - Cursor Back
Function
CUB moves the cursor one or more positions to the left, up to the left margin. The cursor will stick at the left margin if a largenumber is entered.
Escape Sequence
ESC[PnDwhere:Pn is the number of character spaces the cursor moves to the left.D is the final character.
Parameter Values
Refer to the following table for the effect the value that you enter has on the cursor’s position:
When you enter... Then the cursor moves...
0 to the left one space because the value defaults to 1 when you enter 0.
1 (default) to the left one space.
a number greater than 1 to the left the number of spaces the value indicates up to the left margin.Each line contains 80 or 132 character positions depending on configuration.
Modes that affect this code
None
Example
The following example illustrates how a programmer can format a CUB command in the C programming language:
printf("\033[4D"); /*CUB-move cursor back 4 spaces*/
5-34

CUD - Cursor Down
Function
CUD moves the cursor down one or more lines, without changing the cursor’s column position.If the cursor is outside the scrolling region when this command is received, it will not move past the bottom of the virtualscreen.If the cursor is inside the scrolling region, it will not move past the bottom row of the scrolling region.If Editing Boundary Mode (EBM) is set to the physical display, the scrolling region is ignored and the cursor will not move pastthe bottom of the physical display.Note: Scrolling does not occur with this command.
Escape Sequence
ESC[PnBwhere:Pn is the number of lines the cursor moves down.B is the final character.
Parameter Values
Refer to the following table for the effect the value that you enter has on the cursor’s position:
When you enter... Then the cursor moves...
0 down one line in the same column because the value defaults to 1 when you enter 0.
1 (default) down one line in the same column.
a number greater than 1 down the number of lines the value indicates without changing column position.
Modes that affect this code
None
Example
Refer to the following example on how a programmer can format a CUD command in the C programming language:
printf("\033[4B"); /*CUD-move cursor down 4 lines*/
5-35

CUF - Cursor Forward
Function
CUFmoves the cursor forward (to the right) one or more spaces up to the right margin. The cursor will stick at the right margin ifa large number is entered.
Escape Sequence
ESC[PnCwhere:Pn is the number of character positions the cursor moves to the right.C is the final character.
Parameter Values
Refer to the following table for the effect the value that you enter has on the cursor’s position:
When you enter... Then the cursor moves...
0 one position to the right because the value defaults to 1 when you enter 0.
1 (default) one position to the right.
a number greater than 1 to the right the number of times the value indicates up to the right margin.Each line contains 80 or 132 character positions depending on configuration.
Modes that affect this code
None
Example
Refer to the following example on how a programmer can format a CUF command in the C programming language:
printf("\033[4C"); /*CUF-moves cursor forward 4 spaces*/
5-36

CUP - Cursor Position Absolute
Function
CUP moves the cursor to a specified row/column position.If the row or column positions are out of range, the client will adjust them and be within range of the appropriate display.
Escape Sequence
ESC[Pr,PcHwhere:Pr is the row position.Pc is the column position.H is the final character.
Parameter Values
Refer to the following table for the values that you can enter for CUP:
Parameter Value
Pr 1-25 Line 25 is the status line.
Pc 1-80
If you enter 0 for Pr or Pc, the parameter defaults to 1.
Modes that affect this code
None
Example
Refer to the following example on how a programmer can format a CUP command in the C programming language:
printf("\033[3;17H"); /*CUP-move cursor to row 3, column 17*/
5-37

CUU - Cursor Up
Function
CUU moves the cursor up one or more lines, without changing the cursor’s column position.Note: Scrolling does not occur with this command.
Escape Sequence
ESC[PnAwhere:Pn is the number of lines the cursor moves up.A is the final character.
Parameter Values
Refer to the following table for the effect the value that you enter has on the cursor’s position:
When you enter... Then the cursor moves...
0 up one line because the value defaults to 1 when you enter 0.
1 (default) up one line.
a number greater than 1 up the number of lines the value indicates up to the top of the virtual screen.
Modes that affect this code
None
Example
Refer to the following example on how a programmer can format a CUU command in the C programming language:
printf("\033[4A"); /*CUU-move cursor up 4 lines*/
5-38

CVT - Cursor Vertical Tab
Function
CVT is processed the same as the Cursor Next Line command (CNL).
Escape Sequence
ESC[PnYwhere:Pn is the number of lines the cursor moves down.Y is the final character.
Modes that affect this code
None
See
CNL for more details.
5-39

DAQ - Define Area Qualifications
Function
DAQ indicates that the cursor’s position is the start of a string of consecutive character positions that constitute a qualifiedarea. The end of a qualified area is indicated by the beginning of the next qualified area. A qualified area restricts the type ofinput the client user enters.
Escape Sequence
ESC[Pnowhere:Pn indicates the type of data that the client accepts.o is the final character.Multiple parameters may be sent in a single DAQ command if they are separated by semi-colons.
Parameter Values
Refer to the following table for the effect the value that you enter has on the qualified area:
When you enter... Then the qualified area...
0 (default) accepts all data.
1does not accept any input and is not selected to transmit.Entering 1 for this value is equivalent to the 8-bit control code start of protected area (SPA) dis-cussed in C1Codes: 8-Bit Control Codes.
2 accepts only displayable characters, 20-7E hex.
3 accepts only numeric characters.
4 accepts only alphabetic characters.
5 right justifies the data.
6 is filled with zeros.
7 has a horizontal tab stop set at the start of area.
8 does not accept any input, but it is selected to transmit.
9 is filled with spaces.
10 accepts input, but the characters are invisible.
15 accepts only keyboard input.Every new DAQ command that the client receives will always overwrite the existing DAQ attribute type from the cursor to theend of the area.Note: Parameter types 6 and 9 are executed immediately and are not stored in the TE.
5-40
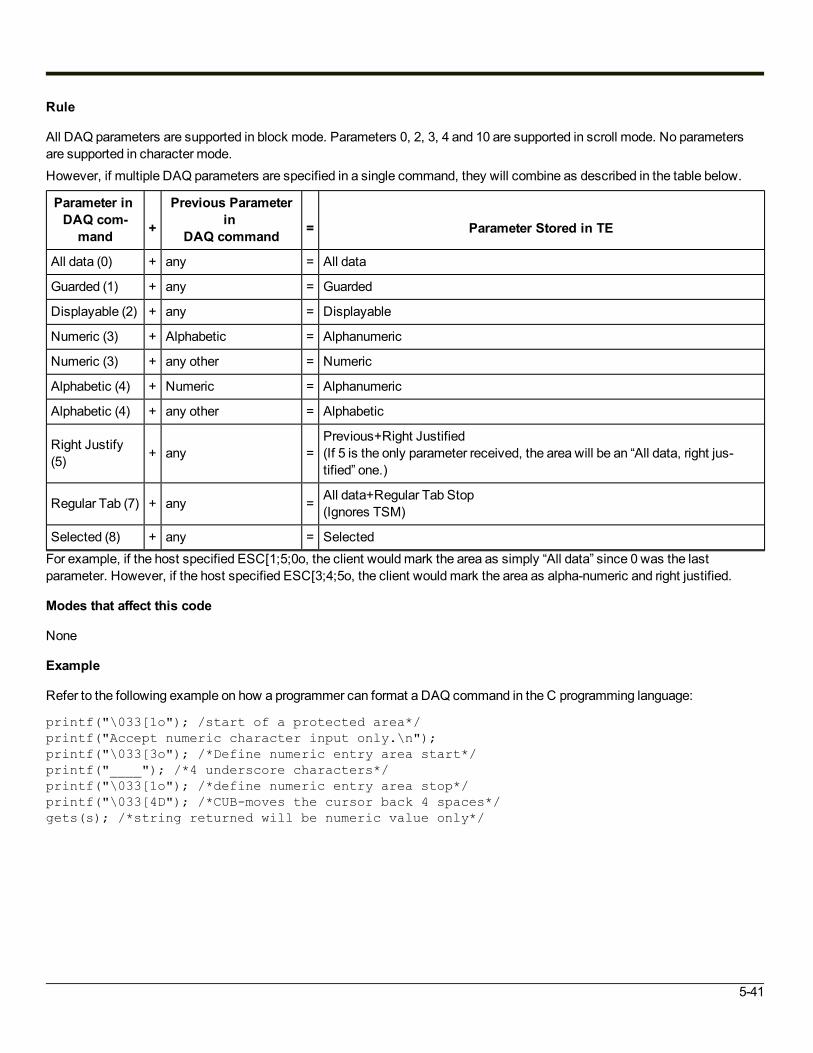
Rule
All DAQ parameters are supported in block mode. Parameters 0, 2, 3, 4 and 10 are supported in scroll mode. No parametersare supported in character mode.However, if multiple DAQ parameters are specified in a single command, they will combine as described in the table below.
Parameter inDAQ com-mand +
Previous Parameterin
DAQ command = Parameter Stored in TE
All data (0) + any = All data
Guarded (1) + any = Guarded
Displayable (2) + any = Displayable
Numeric (3) + Alphabetic = Alphanumeric
Numeric (3) + any other = Numeric
Alphabetic (4) + Numeric = Alphanumeric
Alphabetic (4) + any other = Alphabetic
Right Justify(5) + any =
Previous+Right Justified(If 5 is the only parameter received, the area will be an “All data, right jus-tified” one.)
Regular Tab (7) + any = All data+Regular Tab Stop(Ignores TSM)
Selected (8) + any = SelectedFor example, if the host specified ESC[1;5;0o, the client wouldmark the area as simply “All data” since 0 was the lastparameter. However, if the host specified ESC[3;4;5o, the client wouldmark the area as alpha-numeric and right justified.
Modes that affect this code
None
Example
Refer to the following example on how a programmer can format a DAQ command in the C programming language:
printf("\033[1o"); /start of a protected area*/printf("Accept numeric character input only.\n");printf("\033[3o"); /*Define numeric entry area start*/printf("____"); /*4 underscore characters*/printf("\033[1o"); /*define numeric entry area stop*/printf("\033[4D"); /*CUB-moves the cursor back 4 spaces*/gets(s); /*string returned will be numeric value only*/
5-41

DCH - Delete Character
Function
DCH deletes the character(s) at the cursor position and shifts all the characters right of the cursor to the left (toward thecursor).The client will not delete past the first protected screen cell to the right of the cursor. If the cursor is on a protected cell when theDCH command is received, it will move one position to the right (i.e. CUF 1). No deletion takes place in this case.Note: The vacated character position at the other end is erased.
Rule
Block modemust be enabled to use DCH.
Escape Sequence
ESC[PnPwhere:Pn is the number of characters to delete.P is the final character.
Parameter Values
Refer to the following table for the effect the value that you enter has on the cursor’s position:
When you enter... Then the client...
0 deletes one character because the value defaults to 1 when you enter 0.
1 (default) deletes one character.
a number greater than 1 deletes the number of characters the value indicates.
Modes that affect this code
SEM
Example
Refer to the following example on how a programmer can format a DCH command in the C programming language:
printf("All X's on this XX line will be deleted");printf("\033[23D"); /*CUB-23 spaces back*/printf("\033[2P"); /*DCH-deletes 2 x's*/printf("\033[12D"); /*CUB-12 spaces back*/printf("\033[1P"); /*DCH-deletes x's remaining*/
5-42

DL - Delete Line
Function
DL deletes the line the cursor is in and shifts all following lines up. If the cursor is outside the scrolling region, this command isignored.
Escape Sequence
ESC[PnMwhere:Pn is the number of lines the device deletes.M is the final character.
Parameter Values
Refer to the following table for the number of lines the client deletes according to the value that you enter:
When you enter... Then the client deletes...
0 one character because the value defaults to 1 when you enter 0.
1 (default) one line.
a number greater than 1 the number of lines the value indicates without going beyond the bottom of the virtual screen orthe scrolling region.
Modes that affect this code
None
Example
Refer to the following example on how a programmer can format a DL command in the C programming language:
printf("This line will be deleted.\n");printf("This line will be deleted.\n");printf("This line moves up and is not deleted.\n");printf("\033[3A"); /*CUU-cursor moves up 3 lines*/printf("\033[2M"); /*DL-2 lines are deleted and remaining lines move up*/
5-43

DMI - Disable Manual Input
Function
DMI disables keyboard and RS-232 input. This command is equivalent to SM KAM.
Escape Sequence
ESC` (tilde)
Modes that affect this code
None
Example
Refer to the following example on how a programmer can format a DMI command in the C programming language:
printf("\033`"); /* Keyboard and RS-232 now locked */
5-44

DSR - Device Status Report
Function
DSR requests information or reports information. DSR from the host requests information from the client receiving thesequence (Pn = 5, 6). DSR from the client reports the status of the client (Pn = 0).
Escape Sequence
ESC[Pnnwhere:Pn is either a value that you enter (5 or 6) or it is a value returned from the client (0).n is the final character.
Parameters Indicating a Request
Refer to the following table for the requests the host sends to a client according to the parameter value:Note: Parameter 5 and 6 do not append a CR or LF to the response. Parameters 90, 92 and 93 append CR and LF as if the
[SEND] key was pressed.
Parameter Report that the Host is Requesting
5 Status Report.The client returns a CSI0n indicating ready status.
6 Cursor Position Report (CPR).
90 Sends the TE display, just as if the client user had pressed the [Enter] key.
92 Sends the TE display just as if the client user had pressed [Enter].
93 Same as 90, except the TE does not lock its keyboard.
94Sends the upper left and lower right coordinates of the physical display in the formatCSI?ULRow;UL Col;LR Row,LR Col RThe coordinates are 1-based.
Note: DSR 90 - 94 are useful for debugging host applications.
Response to a CPR Request
The client sends a CPR response when the host requests a CPR (cursor position report).Note: A carriage return (CR) and a line feed (LF) are not returned in the response to a CPR request.
Modes that affect this code
None
5-45

Example
Refer to the following example on how a programmer can format a DSR command that requests a client to send a status reportin C programming language:
printf("\033[5n");gets (s); /*string returned is \033[0n for a ready status*/
Note: The example above requires that the [Enter] key be pressed at the client to exit from the gets command.
5-46

EA - Erase in Area
Function
EA erases characters in the qualified area where the active position (cursor’s position) resides according to the value that youenter. This commandwill not erase the type of qualified area that the cursor is in.
Escape Sequence
ESC[PnOwhere:Pn indicates what portion of the area is erased.O is the final character.
Parameter Value
Refer to the following table on how characters are erased in the qualified area:
When you enter... Then the client ...
0 (default) erases characters from the cursor to the end of the qualified area.
1 erases characters from the start of the qualified area to the cursor.oul
2 erases all characters in the qualified area.
Modes that affect this code
ERM
Example
Refer to the following example on how a programmer can format an EA command in the C programming language:
printf("\033[6l"); /*Reset ERM*/printf("\033[1o") /*DAQ-Start of protected area*/printf("This will not be erased.\n");printf("\033[0o"); /*DAQ-Accepts all input*/printf("_ _ _ _ \033[1o"); /*DAQ-Accept no input*/printf("\033[4D"); /*CUB-4 spaces*/printf("\033[2O"); /*EA-Erase in Area-all*/
5-47

ECH - Erase Character
Function
ECH erases the character at the cursor’s position and possibly other characters to the right of the cursor, depending on thevalue that you enter. If a large number of characters to erase is specified, the erase will continue on succeeding lines.Note: The active (cursor) position is unchanged.
Escape Sequence
ESC[PnXwhere:Pn is the number of characters to erase.X is the final character.
Parameter Values
Refer to the following table on how the client erases characters according to the value that you enter:
When you enter... Then the client ...
0 erases one character because the value defaults to 1 when you enter 0.
1 (default) erases one character.
a number greater than 1 erases the number of characters the value indicates.
Modes that affect this code
ERM
Example
Refer to the following example on how a programmer can format an ECH command in the C programming language:
printf("This Z will be erased.");printf("\015"); /*Carriage return*/printf("\033[5c"); /*Cursor forward 5 spaces*/printf("\033[1X"); /*Erase character Z*/
5-48

ED - Erase in Display
Function
ED erases some or all of the characters in the display according to the value that you enter. This commandwill erase the typeof qualified area that the cursor is in. It will also erase qualified area boundaries.If EBM is set to the virtual screen, every row that is completely erased will have its line attribute reset to single high and singlewide.
Escape Sequence
ESC[PnJwhere:Pn indicates what portion of the display is erased.J is the final character.
Parameter Values
Refer to the following table on how the client erases characters according to the value that you enter:
When you enter... Then the client ...
0 (default) erases characters starting with the cursor position to the end of the display.
1 erases the characters from the start of the display to the cursor.
2 erases all the characters on the display. The cursor is moved to the origin of the physical displayor virtual screen, depending on the EBM setting.
Modes that affect this code
ERM
Example
Refer to the following example on how a programmer can format an ED command in the C programming language:
printf("\033[2J"); /*Erases entire display*/
5-49

EF - Erase in FieldFunctionEF erases characters in the current field depending on the value that you enter. This commandwill not erase the type ofqualified area that the cursor is in.
Escape Sequence
ESC[PnNwhere:Pn indicates what portion of the current field is erased.N is the final character.
Parameter Values
Refer to the following table on how the client erases characters in a field according to the value that you enter:
When you enter... Then the client ...
0 (default) erases characters from the cursor position to the end of the field.
1 erases characters from the beginning of the field to the cursor position.
2 erases the entire field that the cursor is in.
Modes that affect this code
EBM
Example
Refer to the following example on how a programmer can format an EF command in the C programming language:
printf("\033[5W"); /*CTC-Clear all tabs*/printf("\033[0W"); /*CTC-Set a tab*/printf("_ _ _ _ \033[0W"); /*CTC-Set a tab*/printf("\033[3D"); /*CUB-3 spaces*/printf("\033[2N"); /*EF-Erases all of field*/
5-50

EL - Erase in LineFunctionEL erases characters in the line the cursor is in according to the value that you enter. This commandwill erase the type ofqualified area that the cursor is in. It will also erase qualified area boundaries.
Escape Sequence
ESC[PnKwhere:Pn indicates what portion of the current line is erased.K is the final character.
Parameter Values
Refer to the following table on how the client erases characters according to the value that you enter:
When you enter... Then the client ...
0 (default) erases characters from the cursor position to the end of line.
1 erases characters from the beginning of the line to the cursor.
2 erases the entire line that the cursor is in.
Modes that affect this code
ERM
Example
Refer to the following example on how a programmer can format an EL command in the C programming language:
printf("\033[6l"); /*Reset ERM*/printf("\033[1o"); /*DAQ-Start of protected area*/printf("This will not be erased.\n");printf("\033[0o"); /*DAQ-Accepts all input*/printf("_ _ _ _ \033[1o"); /*DAQ-Accepts no input*/printf("\033[4D"); /*CUB-4 spaces*/printf("\033[2K"); /*Erase in Line*/
5-51
EMI - Enable Manual Input
Function
EMI enables keyboard and RS-232 input. This command is equivalent to RM KAM.
Escape Sequence
ESCb
Modes that affect this code
None
Example
Refer to the following example on how a programmer can format an EMI command in the C programming language:
printf("\033b"); /* Keyboard and RS-232 now unlocked */
5-52

HVP - Horizontal Vertical PositionFunctionHVP moves the cursor to the specified row/column position. HVP is the same as the CUP command in Legacy clients. Referto the CUP command for more details.
Escape Sequence
ESC[Pr,Pcfwhere:Pr is the row position.Pc is the column position.f is the final character.
Parameter Values
Refer to the following table for the values that you can enter for HVP:
Parameter Value
Pr 1 - 25(Line 25 is the status line.)
Pc 1 - 80
If you enter 0 for Pr or Pc, the parameter defaults to 1.
Modes that affect this code
None
Example
Refer to the following example on how a programmer can format an HVP command in the C programming language:
printf("\033[3;17f"); /*Move the cursor to row 3, column 17*/
5-53

ICH - Insert Character
Function
ICH shifts all characters from the cursor to the right and inserts a space character at the cursor position.The client will not insert past the first protected screen cell to the right of the cursor. If the cursor is on a protected cell when thiscommand is received, it will move one position to the right (i.e. CUF 1). No insertion takes place in this case.
Escape Sequence
ESC[Pn@where:Pn is the number of character spaces the cursor shifts to the right.@ is the final character.
Rule
Block modemust be enabled for ICH to work.
Parameter Values
Refer to the table below on how the characters move according to the value that you enter:
When you enter... Then the client shifts the characters...
0 one space to the right because the value defaults to 1 when you enter 0.
1 (default) one space to the right.
a number greater than 1 the number of spaces the value indicates to the right.
Modes that affect this code
SEM
Example
Refer to the following example on how a programmer can format an ICH command in the C programming language:
printf("Insert space here");printf("\015"); /*CR-carriage return*/printf("\033[6C"); /*CUF-cursor forward*/printf("\033[1@"); /*ICH-insert space character*/printf("\033[1C"); /*CUF-cursor forward*/printf("\033[1@"); /*ICH-insert space character*/
5-54

IL - Insert Line
Function
IL inserts one or more blank lines at the cursor’s position and shifts all following lines down. If the cursor is outside the scrollingregion, this command is ignored.
Escape Sequence
ESC[PnLwhere:Pn is the number of blank lines inserted at the cursor’s position.L is the final character.
Parameter Values
Refer to the following table on how to insert blank lines at the cursor’s position:
When you enter... Then the client inserts...
0 one blank line because the value defaults to 1 when you enter 0.
1 (default) one blank line.
a number greater than 1 the number of blank lines the value indicates at the cursor’s position. The inserted lines do not gobeyond the bottom of the virtual screen or the scrolling region.
Modes that affect this code
None
Example
Refer to the following example on how a programmer can format an IL command in the C programming language:
printf("This line will move down 2 lines.");printf("\015"); /*CR-carriage return*/printf("\033[2L"); /*Insert 2 lines*/
5-55

MC - Media Copy
Function
MC enables or disables the RS-232 port. When enabled, the client sends received characters to the RS-232 port withoutdisplaying them on the screen. All characters (except: Nul, XON, XOFF, DC4, DC2, CSI5i and CSI4i) are sent to the port.When disabled, the client sends received chars to the display. MC has a higher priority than autoprint mode.Note: An alternative way to disable MC is to send a DC4.
Escape Sequence
ESC[Pniwhere:Pn indicates whether the RS-232 port is off or on.i is the final character.
Parameter Values
Refer to the table below on how to enable or disable the RS-232 port:
When you enter... Then the RS-232 port is ...
4 off.
5 on.
Modes that affect this code
None
Example
Refer to the following example on how a programmer can format anMC command in the C programming language:
printf("\033[5i"); /*Enables following text to copy to the RS-232 port*/printf("This message will copy to the RS-232 port.");printf("\033[4i"); /*Disables RS-232 port*/
5-56

REP - Repeat Character
Function
REP repeats the last character transmitted by the host the number of times indicated by the value. Only characters arerepeated. Escape sequences are not repeated.
Escape Sequence
ESC[Pnbwhere:Pn is the number of times a character is repeated.b is the final character.Parameter ValuesRefer to the table below on how many times the character is repeated according to the value that you enter:
When you enter... Then the client repeats the character ...
0 once because the value defaults to 1 when you enter 0.
1 (default) once.
a number greater than 1 the number of time that the value indicates.
Modes that affect this code
None
Example
Refer to the following example on how a programmer can format an REP command in the C programming language:
printf("The number 3 is repeated:\n);printf("4 times-3");printf("\033[4b"); /*repeat 4 times*/
5-57

RM - Reset Mode
Function
RM resets one or moremodes for the device indicated by the value that you enter. Several modes can be reset with the samecommand if the parameter values are separated by semicolons. They can be sent in any order except #3.
Escape Sequence
ESC[Pn1where:Pn indicates whichmode to reset.l (lower-case L) is the final character.
Parameter Values
Refer to the following table for themodes RM resets:
Parameter Mode to Reset Description
1 Guarded Area Trans-fer Mode (GATM)
Enables the client to transmit only the unguarded areas to the host and auxiliary device.See Sending the Client Screen to the Host for more details.
2 Keyboard ActionMode (KAM) Unlocks the keyboard and RS-232 data entry.
4 Insert-ReplaceMode(IRM)
Enables the client to replace the information during editing by overwriting the content ofthe line.
6 ErasureMode (ERM) Determines that the editing commands such as EA cannot erase protected characters.
12 Send-ReceiveMode(SRM)
Enables local echo in the client so that the client operates in scroll or block mode. Char-acter mode communication is disabled.
15 Multiple Area Trans-mit Mode (MATM)
Enables the client to transmit only the selected area containing the cursor. See Sendingthe Client Screen to the Host for more details.
17 Selected Area Trans-mit Mode (SATM)
Enables the client to transmit only the selected areas. See Sending the Client Screen tothe Host for more details.
18 Tab StopMode (TSM) Determines that the tab stop settings affect the entire virtual display.
20 Line Feed/New LineMode (LNM)
Enables the client to perform only a line feed while the cursor remains in its current col-umn.
Modes that affect this code
None
Example
Refer to the following example on how a programmer can format an RM command in the C programming language:
printf("\033[4l")/*reset IRM*/
See Also
Refer to SM for more information on how to set themodes discussed in the previous table.
5-58

SEM - Select Editing Extent Mode
Function
SEM indicates the extent to which the delete character (DCH) command and the insert character (ICH) command affect thedisplay window.
Escape Sequence
ESC[PnQwhere:Pn indicates how much of the display window is affected by the editing commands.Q is the final character.
Parameter Values
Refer to the following table for the affect that SEM has on the DCH and ICH editing commands:
When you enter... Then DCH and ICH commands affect...
0 (default) the entire display.
1 only the row the cursor is in.
2 only the field containing the cursor (between horizontal tab stops).
3 only the selected area containing the cursor (defined by DAQ, SPA and EPA).
Modes that affect this code
None
Example
Refer to the following example on how a programmer can format an SEM command in the C programming language:
printf("\033[3Q"); /*SEM-3*/
See Also
Refer to DAQ for more information on define area qualification. Refer to EPA and SPA for more information on end of protectedarea and select protected area.
5-59
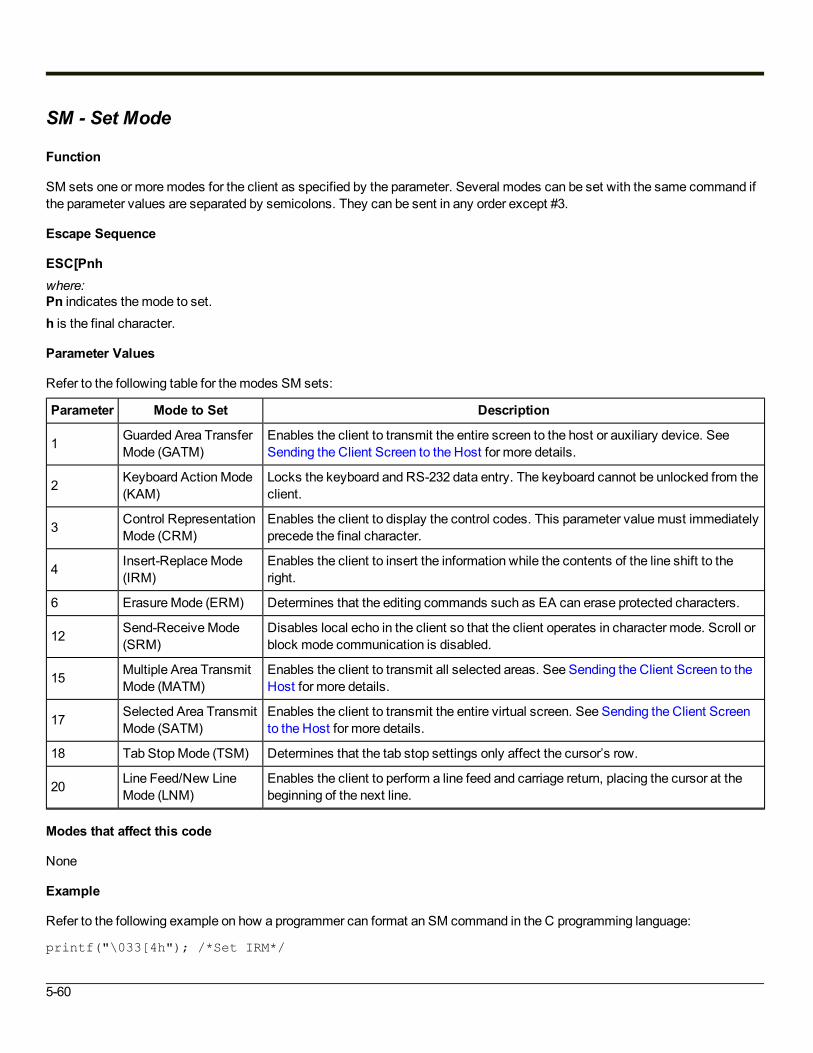
SM - Set Mode
Function
SM sets one or moremodes for the client as specified by the parameter. Several modes can be set with the same command ifthe parameter values are separated by semicolons. They can be sent in any order except #3.
Escape Sequence
ESC[Pnhwhere:Pn indicates themode to set.h is the final character.
Parameter Values
Refer to the following table for themodes SM sets:
Parameter Mode to Set Description
1 Guarded Area TransferMode (GATM)
Enables the client to transmit the entire screen to the host or auxiliary device. SeeSending the Client Screen to the Host for more details.
2 Keyboard ActionMode(KAM)
Locks the keyboard and RS-232 data entry. The keyboard cannot be unlocked from theclient.
3 Control RepresentationMode (CRM)
Enables the client to display the control codes. This parameter valuemust immediatelyprecede the final character.
4 Insert-ReplaceMode(IRM)
Enables the client to insert the information while the contents of the line shift to theright.
6 ErasureMode (ERM) Determines that the editing commands such as EA can erase protected characters.
12 Send-ReceiveMode(SRM)
Disables local echo in the client so that the client operates in character mode. Scroll orblock mode communication is disabled.
15 Multiple Area TransmitMode (MATM)
Enables the client to transmit all selected areas. See Sending the Client Screen to theHost for more details.
17 Selected Area TransmitMode (SATM)
Enables the client to transmit the entire virtual screen. See Sending the Client Screento the Host for more details.
18 Tab StopMode (TSM) Determines that the tab stop settings only affect the cursor’s row.
20 Line Feed/New LineMode (LNM)
Enables the client to perform a line feed and carriage return, placing the cursor at thebeginning of the next line.
Modes that affect this code
None
Example
Refer to the following example on how a programmer can format an SM command in the C programming language:
printf("\033[4h"); /*Set IRM*/
5-60

See Also
RM (for more information on how to reset themodes discussed in the previous table).
5-61

TBC - Tab Clear
Function
TBC clears one or more tab stops according to the value that you enter.
Escape Sequence
ESC[Pngwhere:Pn is the type of tab stops to clear.g is the final character.
Parameter Values
Refer to the following table on how TBC affects the tab stop positions:
When you enter... Then the parameter value ...
0 (default) with TSM set, clears the tab stop at the cursor’s position.with TSM reset, clears the tab stop at the cursor’s column on all rows in the virtual screen.
1 Honeywell does not support this parameter.
2 with TSM set, clears all of the tab stops on the cursor’s row in the virtual screen.
3 with TSM set or reset, clears all of the tab stops on the virtual screen.
4 Honeywell does not support this parameter.
Modes that affect this code
None
Example
Refer to the following example on how a programmer can format a TBC command in the C programming language:
printf("\033[0g"); /*Clear tab stop*/
5-62

DEC Private Escape SequencesThis section provides information for the programmer on how to code DEC private escape sequences for Honeywellequipment. All the private escape sequences supported by Honeywell are listed in this section. If a DEC private escapesequence is not listed, Honeywell does not support it, and it is treated as a no operation (NOP).
APM - Auto Print Mode
Function
APM turns auto print mode on or off. When auto print is on, the virtual screen row that the cursor is presently on prints when thecursor is moved off the line with a line feed, form feed, vertical tab or auto wrap. The printed line ends with a carriage return anda line feed. Trailing spaces on a screen row will not print.
Escape Sequence
ESC[?Pniwhere:Pn is the parameter value that indicates on or off.i is the final character.
Parameter Values
Refer to the following table on the parameter values indicating themode to set:
When you enter... Auto Print mode is turned ...
4 (default) off.
5 on.
Modes that affect this code
None
5-63

DECRM - DEC Reset Mode
Function
DECRM resets themode you choose.
Escape Sequence
ESC[?Pnlwhere:? is a constant.Pn is the value of themode to reset.l (lowercase L) is the final character.
Parameter Values
Refer to the following table for themodes DECRM can reset:
Parameter Mode to Reset Description
18 Print Form FeedMode(DECPFF)
Disables the terminating character (form feed) after print screen operations. (Print fullscreen or scroll region with the PS command.)
19 Print Extent Mode(DECPEX) Selects the scrolling region to print for each Print Screen (PS) command issued.
Modes that affect this code
None
5-64
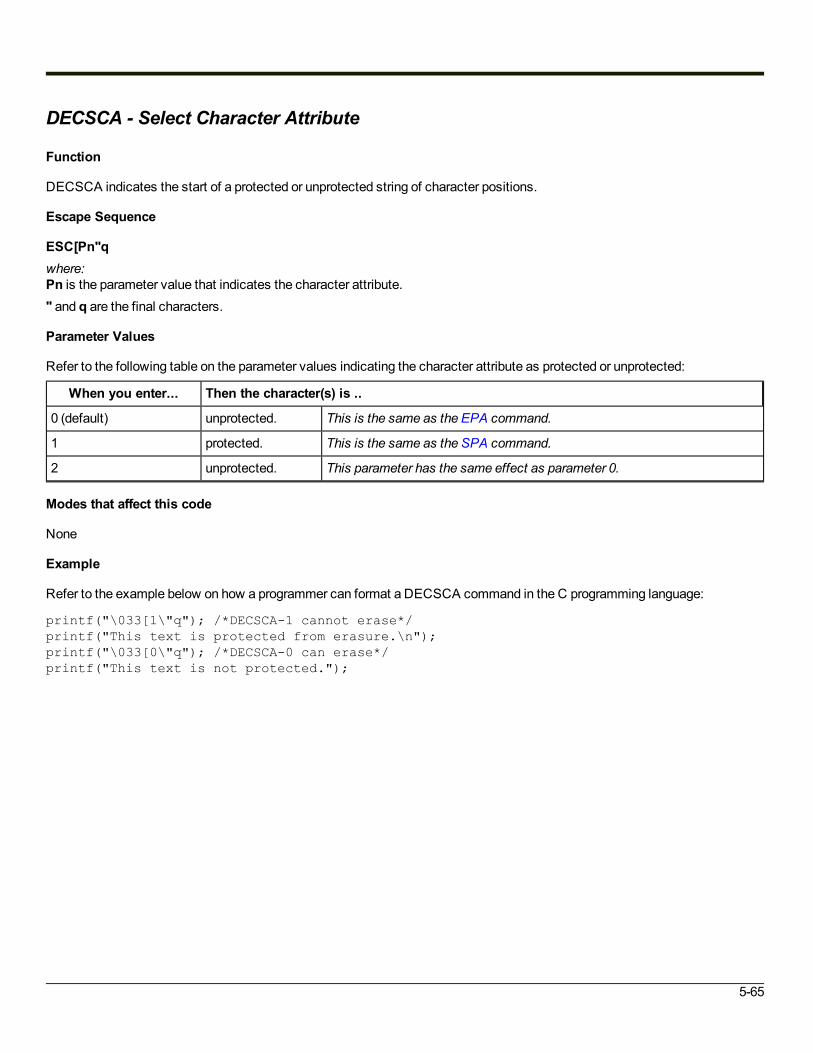
DECSCA - Select Character Attribute
Function
DECSCA indicates the start of a protected or unprotected string of character positions.
Escape Sequence
ESC[Pn"qwhere:Pn is the parameter value that indicates the character attribute." and q are the final characters.
Parameter Values
Refer to the following table on the parameter values indicating the character attribute as protected or unprotected:
When you enter... Then the character(s) is ..
0 (default) unprotected. This is the same as the EPA command.
1 protected. This is the same as the SPA command.
2 unprotected. This parameter has the same effect as parameter 0.
Modes that affect this code
None
Example
Refer to the example below on how a programmer can format a DECSCA command in the C programming language:
printf("\033[1\"q"); /*DECSCA-1 cannot erase*/printf("This text is protected from erasure.\n");printf("\033[0\"q"); /*DECSCA-0 can erase*/printf("This text is not protected.");
5-65

DECSED - Selective Erase in Display
Function
DECSED enables the programmer to erase some or all of the erasable characters in the display. This commandwill not erasequalified area boundaries or the type of qualified area the cursor is in.If EBM is set to the virtual screen, every row that is completely erased will have its line attribute reset to single high and singlewide.
Escape Sequence
ESC[?PnJwhere:? is a constant.Pn is the portion of the display to erase.J is the final character.
Parameter Values
Refer to the following table on how the characters are erased according to the value that you enter:
When you enter... Then the characters are erased from ...
0 (default) the cursor through the end of the display.
1 the beginning of the display through the cursor.
2 the entire display. The cursor is moved to the origin of the physical or virtual display depending onthe EBM setting.
Modes that affect this code
None
Example
Refer to the example below on how a programmer can format a DECSED command in the C programming language:
printf("\033[0\"q"); /*DECSCA = 0*/printf("Text from this letter x to the end of \n");printf("the display should be erased.\n");printf("\033[2A"); /*CUU-Cursor up 2 lines*/printf("\033[22C"); /*CUF-Cursor Forward 22 to the x*/printf("\033[?0J"); /*Erase from x to the end of the display*/
5-66

DECSEL - Selective Erase in Line
Function
DECSEL enables the programmer to erase some or all of the erasable characters in a single line of text. This commandwill noterase qualified area boundaries or the type of qualified area the cursor is in.
Escape Sequence
ESC[?PnKwhere:? is a constant.Pn is the portion of the line to erase.K is the final character.
Parameter Values
Refer to the following table on how the characters are erased in relation to the cursor:
When you enter... Then the characters are erased from ...
0 (default) the cursor through the end of the line.
1 the beginning of the line through the cursor.
2 the entire line.
Modes that affect this code
None
Example
Refer to the example below on how a programmer can format a DECSEL command in the C programming language:
printf("\033[0\"q"); /*DECSCA = 0*/printf("Text from this letter x to the end of \n");printf("the above line should be erased.\n");printf("\033[2A"); /*CUU-Cursor up 2 lines*/printf("\033[22C"); /*CUF-Cursor forward 22*/printf("\033[0K"); /*Erase from x to the end of the line*/
5-67
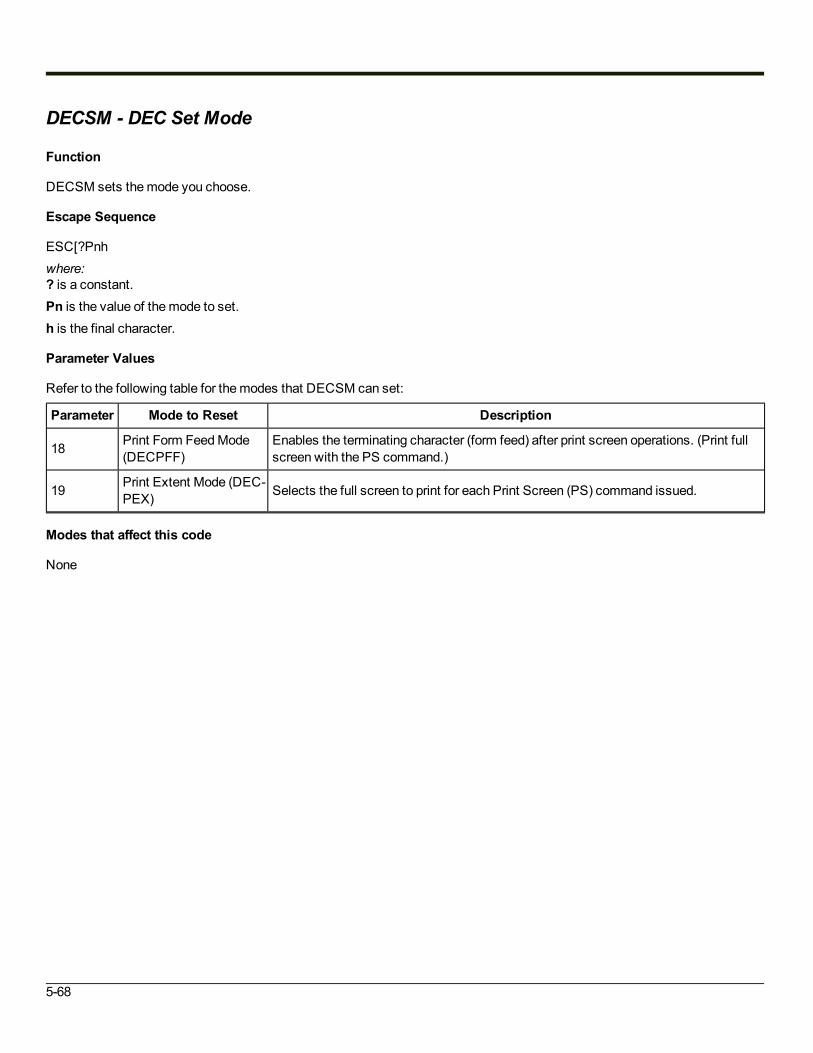
DECSM - DEC Set Mode
Function
DECSM sets themode you choose.
Escape Sequence
ESC[?Pnhwhere:? is a constant.Pn is the value of themode to set.h is the final character.
Parameter Values
Refer to the following table for themodes that DECSM can set:
Parameter Mode to Reset Description
18 Print Form FeedMode(DECPFF)
Enables the terminating character (form feed) after print screen operations. (Print fullscreen with the PS command.)
19 Print Extent Mode (DEC-PEX) Selects the full screen to print for each Print Screen (PS) command issued.
Modes that affect this code
None
5-68

DECDHL - Double-Height Line
Function
Makes the line with the cursor on it the top or bottom half of a double-height, double-width line. Pairs of this commandmust beused on adjacent lines.The same screen character must be used on both the top and bottom lines in that column to form a full character.Note: When this command is received, the device will reset the right half of the virtual screen to spaces and remove any
tabs or areas contained there. If the cursor is in the right half, it will bemoved to the last column in the left half.
Top Half
Escape Sequence
ESC#3
Modes that affect this code
None
Bottom Half
Escape Sequence
ESC#4
Modes that affect this code
None
Example
Refer to the following example on how a programmer can format a DECDHL command in the C programming language:
printf("\033#3 Double High Line\n");printf("\033#4 Double High Line\n");
5-69

DECDWL - Double-Width Line
Function
Makes the line with the cursor on it double-width, single-height.Note: When this command is received, the device will reset the right half of the virtual screen to spaces and remove any
tabs or areas contained there. If the cursor is in the right half, it will bemoved to the last column in the left half.
Escape Sequence
ESC#6
Modes that affect this code
None
Example
Refer to the following example on how a programmer can format a DECDWL command in the C programming language:
printf("\033#6 Double-Width Line\n");
G0/G1/G2/G3 - Designate G0/G1/G2/G3
Function
G0 designates one of the hard character sets (ASCII, DEC Supplemental Graphics, DEC Special Graphics, and NationalReplacement character sets) as G0 throughG3.
Escape Sequence To Designate
ESC(F G0
ESC)F G1
ESC*F G2
ESC+F G3
where:F is the final character from the following table.
Character set to designate... Final character...
ASCII B
DEC Supplemental <
DEC Special Graphics 0
National Replacement CharacterSets
various final characters dependent uponmobile device operating system and device spe-cific settings
For more information, refer to the DEC Special Graphics Code Table.
5-70

PL - Print Line
Function
PL prints the display line containing the cursor. A carriage return and line feed are automatically printed after the line.
Escape Sequence
ESC[?1i
Modes that affect this code
None
Example
Refer to the following example on how a programmer can format a PL command in the C programming language:
printf("\033[?1i"); /*Prints the line the cursor is on*/
PS - Print Screen
Function
PS prints the display to the RS-232 port. A carriage return and line feed is automatically printed after each line.
Escape Sequence
ESC[Pniwhere:Pn is either 0 or omitted.
Modes that affect this code
DECPEX, DECPFF
Example
Refer to the following example on how a programmer can format a PS command in the C programming language:
printf("\033[0i"); /*Causes the display to be printed*/
5-71

S7C1T - Select 7-Bit C1 Control Transmission
Function
S7C1T informs the client to convert all C1 codes to their 7-bit equivalent before sending them back to the host.Note: The client will always accept either 7-bit or 8-bit control codes regardless of the state of this command.
Escape Sequence
ESC sp F
Modes that affect this code
None
Example
Refer to the following example on how a programmer can format a S7C1T command in the C programming language:
printf("\033 F"); /*There is a single space between the 3 and the F*/
S8C1T - Select 8-Bit C1 Control Transmission
Function
S8C1T informs the client to send all C1 codes back to the host without converting them to their 7-bit equivalent.Note: The client will always accept either 7-bit or 8-bit control codes regardless of the state of this command.
Escape Sequence
ESC sp G
Modes that affect this code
None
Example
Refer to the following example on how a programmer can format a S8C1T command in the C programming language:
printf("\033 G"); /*There is a single space between the 3 and the G*/
5-72

SI - Shift In (Lock Shift G0)
Function
Invokes G0 character set into GL.
Hexadecimal Value Control Code
0F ^O
Example
Refer to the following example on how a programmer can format an SI command in the C programming language:printf("\033(0"); /* Designate DEC special graphics into G0. */printf("\017"); /* Shift G0 into GL */printf("lqqk\n"); /* These two lines print a small box on the display. */printf("mqqj");
SO - Shift Out (Lock Shift G1)
Function
Invokes G1 character set into GL.
Hexadecimal Value Control Code
0E ^N
Example
Refer to the following example on how a programmer can format an SO command in the C programming language:
printf("\033)0"); /* Designate DEC special graphics into G1. */printf("\016"); /* Shift G1 into GL */printf("lqqk\n"); /* These two lines print a small box on the display. */printf("mqqj");
5-73

Private Escape SequencesHoneywell offers special escape sequences as well as command strings that modify terminal emulation functions, windowparameters, and wild card local edit characters. Honeywell also provides command strings for stored forms, using abackspace function with the [CLEAR] key, enabling an echo suppress, and a wide range of beep patterns.This section describes the applications for each command string and information on how the programmer can code the escapesequences and command strings.
LXERM - Reset Mode
Function
LXERM resets themode that you choose.
Escape Sequence
ESC[=Pnlwhere:= is a constant.Pn is the value of themode to reset.l (lowercase L) is the final character.
Parameter Values
Refer to the following table for themodes LXERM can reset:
Parameter Mode to Reset Description
1 Scroll/BlockMode (LXELM)
Enables block mode.Rule: Send-receivemode (SRM)must be reset for LXELM to work.
2 New Line EchoMode (LXENE)
Disables new line local echo. If the client is in scroll/block mode, does not execute carriagereturn and line feed to the client display when the [Enter] key is pressed.
3 Autosend(LXEAS)
Disables autosend. In other words, the client transmits only when the [Enter] key is pressed.Rule: Send-receivemode (SRM)must be reset for LXEAS to work.
Modes that affect this code
None
Example
Refer to the following example on how a programmer can format an LXERM command in the C programming language:
printf("\033[=3l"); /*Reset LXEAS- Reset autosend mode*/
5-74

LXESM - Set Mode
Function
LXESM sets themode you choose.
Escape Sequence
ESC=Pnhwhere:= is a constant.Pn is the value of themode to set.h is the final letter.
Parameter Values
Refer to the following table for themodes LXESM can set:
Parameter Mode to Set Description
1 Scroll/BlockMode (LXELM)
Enables scroll mode.Rule: Send-receivemode (SRM)must be reset for LXELM to work.
2 New Line EchoMode (LXENE)
Enables new line local echo. If the client is in scroll/block mode, execute carriage return andline feed to the client display when the [Enter] key is pressed.
3 Autosend(LXEAS)
Enables autosend. In other words, the client transmits the screen when the last field is filledwith a bar code entry, keyboard entry or RS-232 port entry.Rule: Send-receivemode (SRM)must be reset for LXEAS to work.
Modes that affect this code
None
Example
Refer to the following example on how a programmer can format an LXESM command in the C programming language:
printf("\033[=3h"); /*Set LXEAS-Set autosend mode*/
5-75

Scanner Enable / Disable
Function
Enable or disable scanner input.
Disable Scanner
The scanner is disabled when this command is used:l For devices with an internal or tethered scanner, the scan trigger is disabled.l For devices with a tethered scanner, serial input received from the scanner is rejected and an error sound is produced.
Escape Sequence
ESC%0
Modes that affect this code
None
Enable Scanner
This command enables the scanner after it has been disabled with the command above.
Escape Sequence
ESC%1
Modes that affect this code
None
5-76
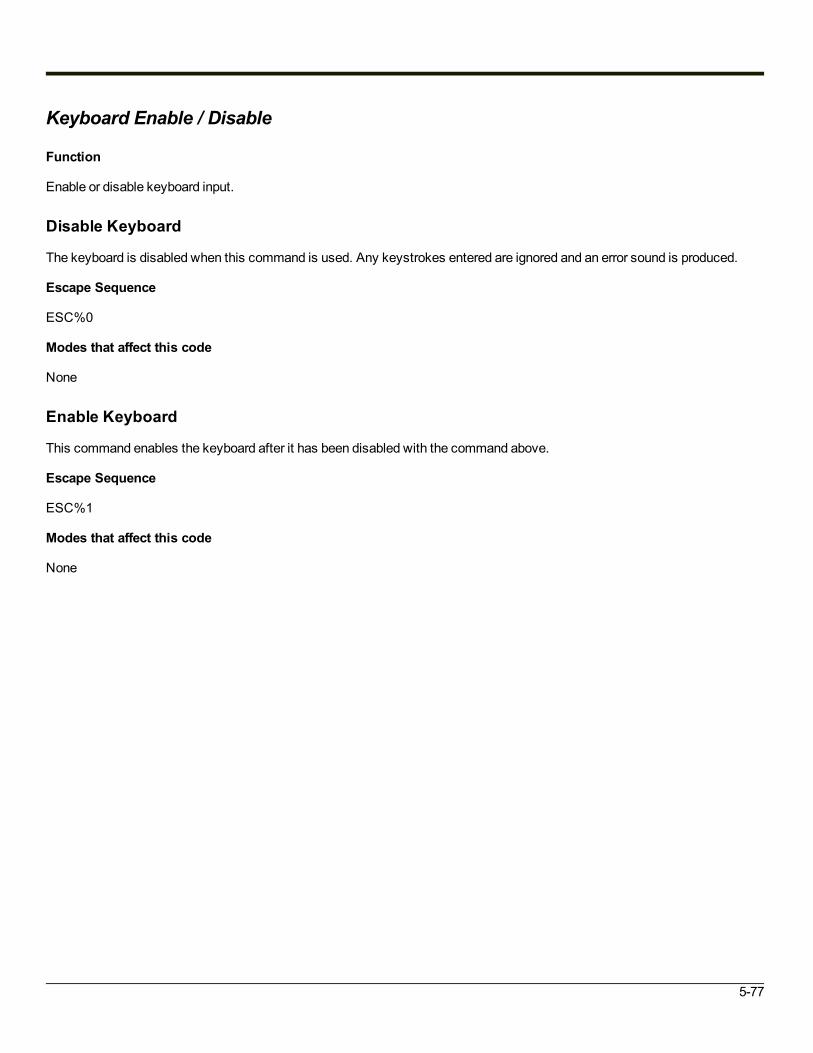
Keyboard Enable / Disable
Function
Enable or disable keyboard input.
Disable Keyboard
The keyboard is disabled when this command is used. Any keystrokes entered are ignored and an error sound is produced.
Escape Sequence
ESC%0
Modes that affect this code
None
Enable Keyboard
This command enables the keyboard after it has been disabled with the command above.
Escape Sequence
ESC%1
Modes that affect this code
None
5-77

Enable/Disable Bar Code SymbologiesThe host computer can be used to enable or disable scanning of specified bar code symbologies. If a bar code symbology isdisabled with this feature, the scanner does not recognize that symbology. The scanner sounds a bad scan beep (double beepsound is the default) when trying to scan the disabled symbologies. Use the following example and table of values to see how aprogrammer can enable or disable symbologies with a command in the C programming language:
printf("\033[xx+A"); /*Substitute the applicable xx value from the chart to enable or dis-able symbology*/
Set xx to: Perform this action
65 (0x41) Enable Code 39
66 (0x42) Disable Code 39
67 (0x43) Enable Interleaved 2of5
68 (0x44) Disable Interleaved 2of5
75 (0x4B) Enable Codabar/Ames
76 (0x4C) Disable Codabar/Ames
77 (0x4D) EnableMSI
78 (0x4E) Disable MSI
79 (0x4F) Enable Code 93
80 (0x50) Disable Code 93
81 (0x51) Enable Code 128
82 (0x52) Disable Code 128
85 (0x55) Enable UPC-A
86 (0x56) Disable UPC-A
87 (0x57) Enable UPC-E
88 (0x58) Disable UPC-E
89 (0x59) Enable EAN/JAN
90 (0x5A) Disable EAN/JAN
5-78

Specifying Bar Code, Keypad and Control ModesThis section discusses the elements of the command string that enable the programmer to set the bar code, keypad andcontrol modes for the client. The different settings for each parameter of the command string are discussed in detail.
Command String for Bar Code, Keypad and Control ModesThe programmer can specify bar code, keypad and control modes with the appropriate command string. This sectiondiscusses elements of the command string and its structure.
Command String
Use the following command string for specifying bar code, keypad, and control modes:
CSIc1;p1;p2;p3;p4;p5;p6;p7;p8;p9;p10+E
Rule
Each parameter must be preceded by a semicolon (;).You can use the semicolon as a placeholder if you want to change only one parameter. For example, you can send thefollowing string to change only p5 of the command string:
CSI1;;;;;1+E
String Elements
The following table describes the different elements of the command string for specifying bar code, keypad, and control modes:
StringElement Description
CSI ANSI control sequence introducer (Hex 9B for 8-bit code or Hex 1B5B for 7-bit code).
c1A compatibility byte that ensures the terminal emulation understands the command string sent to it. The c1 is arevision level character for compatibility purposes, which increments with each revision. The original value for thisparameter is 1.
; A required delimiter that must precede all parameter entries.
p2
Bar Code/RS-232 Input Left Justify Mode 0 = Left Justify ModeOff 1 = Left Justify ModeOnLeft Justify Mode: p2 discusses this parameter in more detail.
p3
Bar Code/RS-232 Input Clear Mode 0 = Clear Off 1 = Clear OnClear Mode: p3 discusses this parameter in more detail.
p4
Bar Code/RS-232 Input TruncateMode 0 = Truncate Off 1 = Truncate OnTruncateMode: p4 discusses this parameter in more detail.
5-79

StringElement Description
p5
Bar Code/RS-232 Input AdvanceMode 0 = AdvanceOff 1 = AdvanceOnAdvanceMode: p5 discusses this parameter in more detail.
+E The final characters of the ANSI command string. This combination indicates the end of the command string andidentifies the command string as a bar code, keypad, and control mode command.
5-80

Left Justify Mode: p2Left justify mode determines where the cursor appears in a field from one bar code entry to the next. The programmermustdecide if the cursor in a field justifies to the left each time a new bar code entry occurs or if the bar code entry appears at theend of the previous entry.
Rule
Youmust enable block mode to use left justify mode.
Parameter Values
Refer to the following table on how to set p2 of the command string to disable or enable left justify mode:
When you enter ... Then left justify is ...
0 off
1 (default) on
Left Justify Off
Left Justify Off enables a bar code read to appear in the next available cursor position of a field directly following a previous barcode entry. For example, the first bar code entry fills the first five positions of the first field available as shown below:
The next bar code read is entered starting at the cursor’s position and proceeding to the next unprotected field.
Left Justify On
Left Justify On enables the cursor to left justify in a field each time a bar code read occurs. For example, the following bar coderead appears in the field and then the cursor left justifies when the next bar code entry occurs. The next bar code read appearsin the field starting at the B position:
5-81

Clear Mode: p3Clear mode determines if a field is automatically cleared when the next bar code entry occurs or if the data in the field isoverwritten by the new entry.Note: If a field is not cleared after the data is transmitted to the host, there is a chance that some of the previous data will not
be completely overwritten by the new entry. If the data is not completely overwritten, it appears at the end of the newentry and is transmitted with the new entry to the host.
Rule
Youmust enable block mode to use clear mode.
Parameter Values
Refer to the following table on how to set p3 of the command string to disable or enable clear mode:
When you enter ... Then clear mode is ...
0 off
1 (default) on
Clear Mode Off
When clear mode is off, the client does not clear the data in a field. The new data entered overwrites portions of the left-overdata. An operation that has bar code entries with equal character lengths might choose clear mode off.
Clear Mode On
When clear mode is on, the client clears the data entered in a field each time a new bar code entry occurs. An operation thathas bar code entries with varying lengths would need to use clear mode on to ensure accurate transmission of each entry.
5-82

Truncate Mode: p4Truncatemode determines whether the character positions of a bar code entry that exceeds the field length are simply droppedoff or if the leftover characters are entered in the next available field.
Rule
Youmust enable block mode to use truncatemode.
Parameter Values
Refer to the following table on how to set p4 of the command string to disable or enable truncatemode:
When you enter ... Then truncate mode is ...
0 off
1 (default) on
Truncate Mode Off
When truncatemode is off, the character positions of a bar code entry exceeding the field length are entered in the nextavailable field. An operation that has two kinds of information in one bar code entry would use truncatemode off so that one barcode read can fill two fields on a form.
Truncate Mode On
When truncatemode is on, the character positions of a bar code entry exceeding the field length are dropped off. If the field has10 available character positions and the bar code entry has 22, the first 10 character positions of the entry are entered in thefield and the remaining 12 character positions are dropped. An operation that wants to ensure that a bar code entry from onefield is not carried over into the next field would want to have truncatemode on.
5-83

Advance Mode: p5Advancemode determines whether the cursor advances to the next field at the end of a bar code entry. If the cursor does notadvance to the next field, the next bar code entry is entered at the end of the previous bar code entry.
Rule
Youmust enable block mode to use advancemode.Parameter ValuesRefer to the following table on how to set p5 of the command string to disable or enable advancemode:
When you enter ... Then advance mode is ...
0 off
1 (default) on
Advance Mode Off
When advancemode is off, the cursor does not advance to the next field at the end of a bar code entry. The next bar code entryis entered directly following the previous bar code entry.
Advance Mode On
When advancemode is on, the cursor advances to the next field at the end of each entry regardless of whether the field iscompletely filled or not. An operation that has bar code entries that do not always fill the field would use advancemode on.If autosend (LXEAS) is also enabled, the client will automatically send the screen even if the last bar code entry did notcompletely fill the last field on the display.
5-84
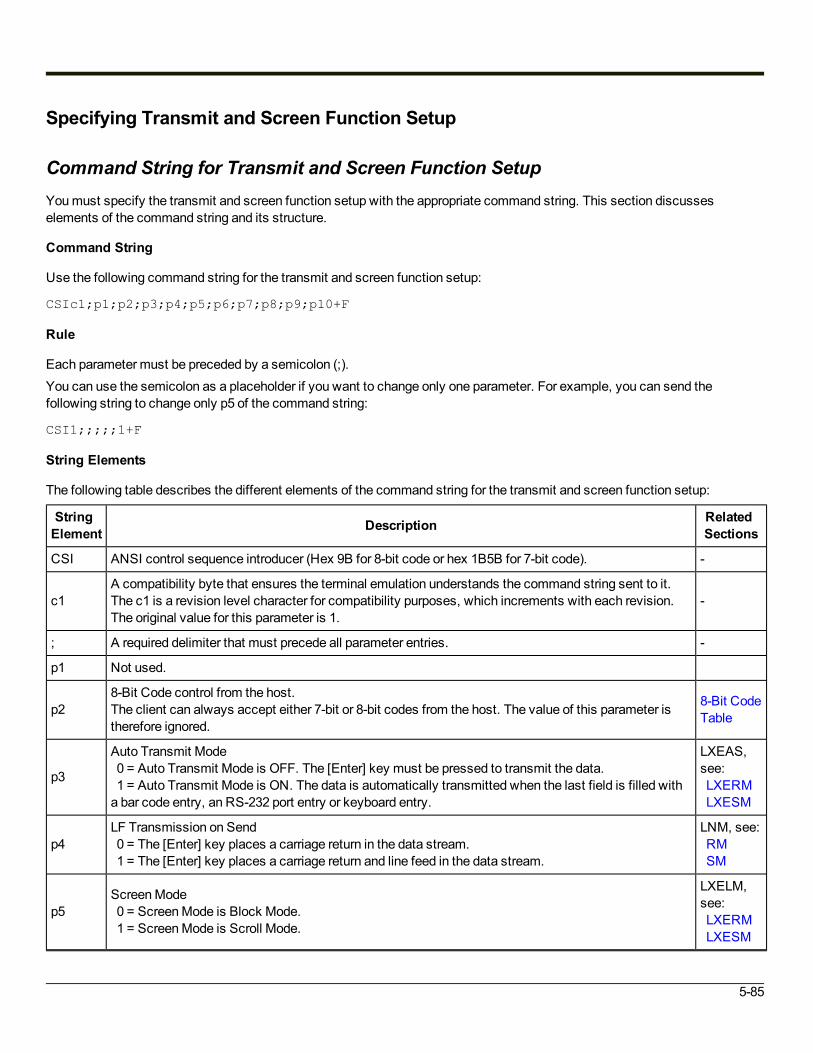
Specifying Transmit and Screen Function Setup
Command String for Transmit and Screen Function SetupYoumust specify the transmit and screen function setup with the appropriate command string. This section discusseselements of the command string and its structure.
Command String
Use the following command string for the transmit and screen function setup:
CSIc1;p1;p2;p3;p4;p5;p6;p7;p8;p9;p10+F
Rule
Each parameter must be preceded by a semicolon (;).You can use the semicolon as a placeholder if you want to change only one parameter. For example, you can send thefollowing string to change only p5 of the command string:
CSI1;;;;;1+F
String Elements
The following table describes the different elements of the command string for the transmit and screen function setup:
StringElement Description Related
Sections
CSI ANSI control sequence introducer (Hex 9B for 8-bit code or hex 1B5B for 7-bit code). -
c1A compatibility byte that ensures the terminal emulation understands the command string sent to it.The c1 is a revision level character for compatibility purposes, which increments with each revision.The original value for this parameter is 1.
-
; A required delimiter that must precede all parameter entries. -
p1 Not used.
p28-Bit Code control from the host.The client can always accept either 7-bit or 8-bit codes from the host. The value of this parameter istherefore ignored.
8-Bit CodeTable
p3
Auto Transmit Mode 0 = Auto Transmit Mode is OFF. The [Enter] key must be pressed to transmit the data. 1 = Auto Transmit Mode is ON. The data is automatically transmitted when the last field is filled witha bar code entry, an RS-232 port entry or keyboard entry.
LXEAS,see:LXERMLXESM
p4LF Transmission on Send 0 = The [Enter] key places a carriage return in the data stream. 1 = The [Enter] key places a carriage return and line feed in the data stream.
LNM, see:RMSM
p5ScreenMode 0 = ScreenMode is Block Mode. 1 = ScreenMode is Scroll Mode.
LXELM,see:LXERMLXESM
5-85

StringElement Description Related
Sections
p6New Line EchoMode 0 = New Line EchoModeOFF. 1 = New Line EchoModeON.
LXENE,see:LXERMLXESM
p7AutoWrapMode 0 = AutoWrapModeOFF.= AutoWrapModeON.
DECAWM
p8
On LineMode 0 = Operate in On LineMode. The [Enter] key is enabled to sendmessages to the host through theRF link. 1 = Operate in Local Mode. The [Enter] key is disabled.
-
p9 Not used.
p10Transmit Mode 0 = Transmit in Block or Scroll Mode. 1 = Transmit in Character Mode.
SRM, see:RMSM
+F The final character of the ANSI command string. This combination indicates the end of the commandstring and identifies the command string as a transmit and screen functionmode. -
5-86

Local Edit CommandsLocal edit commands enable a programmer to control data entry from the client. This section discusses the two types of localedit commands and the command string elements for each.
Command String for Local Edit Match FieldA local edit match field restricts user data entry to exact match values or ranges of accepted values. A programmer can usethis feature to prevent incorrect part number or bin location entries.
Definitions
An exact match field is a field with predetermined values that must bematched exactly by user entry.Local edit match field is a feature provided by Honeywell that enables the client to perform data comparisons between thematch buffer in the client and the data entered by the client user. In other words, the client locally edits information as the clientuser enters data instead of the host performing the edit.A match buffer is an area of memory used by the local edit match field command to restrict data entry by the client user.
Rules
Refer to the following rules for using local edit match field:l Youmust specify a local edit field by placing the cursor at the beginning of the appropriate field and sending the correct
command string.l Youmust placematch data between two identical Honeywell local edit command strings.l Youmust enable Local echo. Refer to RM (parameter value 12) in this manual for more information on local echo.l Youmust enable block mode. If character mode or scroll mode is enabled, local edit match fields are ignored.l Use characters entered into thematch buffer field that do not match the local edit wildcard symbols (defaults: ?, $, #, +,
*) as exact match characters.
Command String
Use the following command string for specifying a local edit match field:
CSId+A
String Elements
The following table describes the different elements of the command string for specifying a local edit match field:
StringElement Description
CSI ANSI control sequence introducer (Hex 9B for 8-bit code or Hex 1B5B for 7-bit code).
d
Keyboard Input 0 (default) = Display the keyboard input if user entry matches the requirements of thematch buffer. 1 = Do not display the keyboard input if user entry matches the requirements of thematch buffer. Host input onthese cells is displayed.
+A The final character of the ANSI command sequence. This combination indicates the end of the command stringand identifies the command string as a local edit match field.
5-87
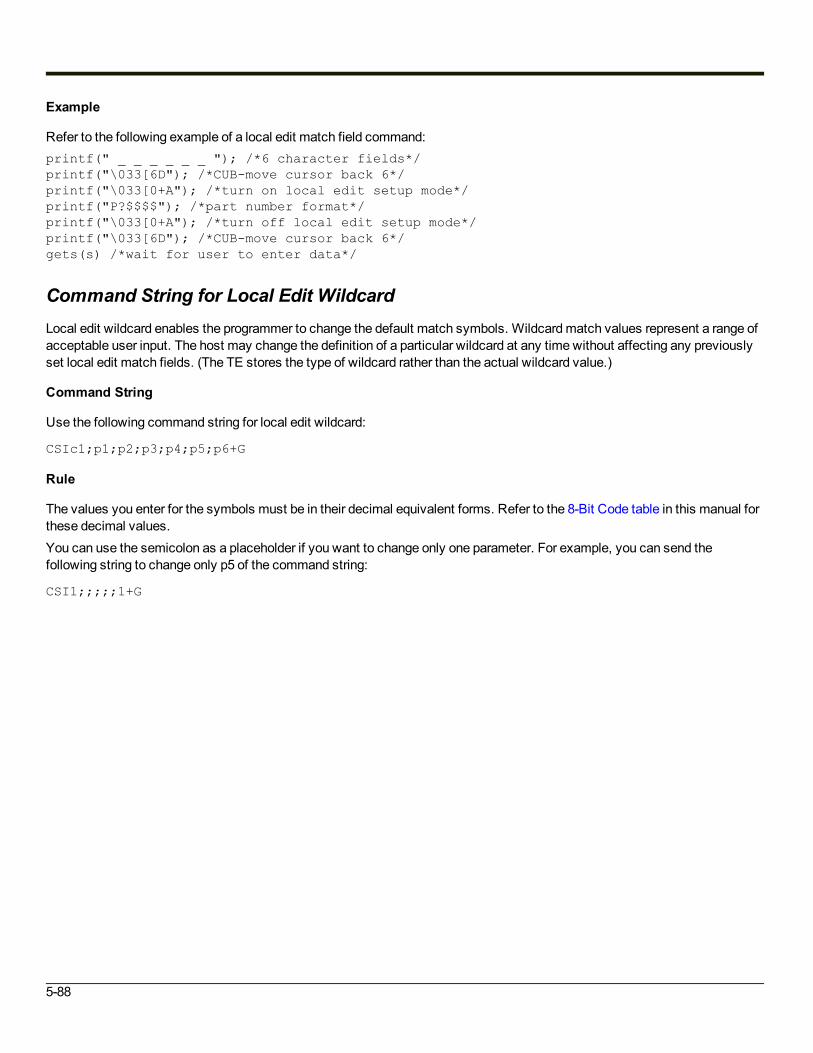
Example
Refer to the following example of a local edit match field command:printf(" _ _ _ _ _ _ "); /*6 character fields*/printf("\033[6D"); /*CUB-move cursor back 6*/printf("\033[0+A"); /*turn on local edit setup mode*/printf("P?$$$$"); /*part number format*/printf("\033[0+A"); /*turn off local edit setup mode*/printf("\033[6D"); /*CUB-move cursor back 6*/gets(s) /*wait for user to enter data*/
Command String for Local Edit WildcardLocal edit wildcard enables the programmer to change the default match symbols. Wildcardmatch values represent a range ofacceptable user input. The host may change the definition of a particular wildcard at any time without affecting any previouslyset local edit match fields. (The TE stores the type of wildcard rather than the actual wildcard value.)
Command String
Use the following command string for local edit wildcard:
CSIc1;p1;p2;p3;p4;p5;p6+G
Rule
The values you enter for the symbols must be in their decimal equivalent forms. Refer to the 8-Bit Code table in this manual forthese decimal values.You can use the semicolon as a placeholder if you want to change only one parameter. For example, you can send thefollowing string to change only p5 of the command string:
CSI1;;;;;1+G
5-88

String Elements
The following table describes the different elements of the command string for specifying a local edit wildcard:
StringElement Description
CSI ANSI control sequence introducer (Hex 9B for 8-bit code or Hex 1B5B for 7-bit code).
c1A compatibility byte that ensures the terminal emulation understands the command string sent to it. The c1 is arevision level character for compatibility purposes, which will increment with each revision. The original value forthis parameter is 1.
; A required delimiter that must precede all parameter entries.
p1 Not used.
p2 ?(AlphaOnly Match)Alpha only match includes the following characters: A-Z, a-z, comma, period, dash, space.
p3 $(Digits Only Match)Digits only match includes the following characters: 0-9.
p4 #(Numeric Only Match)Numeric only match includes the following characters: 0-9, plus, comma, period, dash, space.
p5 +(Alphanumeric Only Match)Alphanumeric only match includes the following characters: A-Z, a-z, 0-9, plus, comma, period, dash, space.
p6 *(Match All)Match all includes any GL or GR characters.
+G The final characters of the ANSI command sequence. This combination indicates the end of the command stringand identifies the command string as a local edit wildcard command.
Using Local EditUsing the local edit command enables the programmer to control data entry at the client. The local edit field length can be aslong as the virtual screen.The client edits the field locally as data is entered and not when the field is exited. During the editing of a field, if the data failsthematch test, the cursor does not move.
Exception
When a bar code entry fails thematch test, the cursor goes to the first position where the character did not match the test. Theremaining characters in the input field are checked against thematch test.
Programming Local Edit Fields
1. Position the cursor to the beginning of the local edit field.2. Send the CSId+A command to put the TE in local edit setupmode.3. Send the local edit match characters which could be either exact match or wildcards. These are sent as regular GL or
GR characters. They will be stored internally in the TE and not displayed on the screen. The cursor position willautomatically be updated after each char is received.
Note: Setting a screen cell as a local edit cell overrides any previous DAQ/SPA/SSA settings for that cell and vice versa.
5-89

4. If desired, position the cursor to a new location and sendmore local edit match characters to definemore fields. Repeatas necessary.
5. Send amatching CSId+A command to put the TE in normal mode.6. If automatic tabbing is desired to the start of each field, the host must send the standard area or tab commands at the
start of each local edit field. This can be accomplished even when the TE is in local edit mode.7. The TE user may now enter data through keyboard or RS-232 inputs.
If the user input passes the local edit checks, the data will be displayed (if the local edit field was set up as CSI0+A). The datawill not be displayed if the local edit field was set up as CSI1+A. In either case, the cursor position will advance by 1.If the data does not pass the local edit checks, the TE will beep to inform the user and the cursor will not advance.
Requirements
The following requirements must bemet for local edit to work properly:l The client must be in block mode (LXELM).l Local echomust be enabled in send-receivemode (SRM).l The client must be an RFTerm client to have local edit capabilities.
5-90

VT Host Key DescriptionsEscape sequence values associated with various keys are noted for 7 bit ASCII mode and 8 bit ASCII mode.
Hold
Hld - This key has no current action.
Enter
Ent - The Enter or Return key transmits either a carriage return (CR) character or a carriage return and line feed (LF) character,depending on the VT configuration.See Also: 8 Bit Code Table
Compose Character
Cmp - The Compose Character key does not transmit a code. Pressing the Compose character key starts a composesequence which is used to generate characters that cannot be typed directly from the keyboard. This key is not implemented.
Tab
Tab - This key transmits a TAB character.
Delete
Del - This key transmits a DEL character.
Break
Brk - This key has no current action.
Cancel
Can - This key transmits a CAN character.
Answerback
Ans - This key sends an ENQ request to the host.
Find
Fnd - This key transmits the escape sequence:ESC [1 ~ (7 bit ASCII mode)orCSI 1 ~ (8 bit ASCII mode)
5-91

Insert Here
Ins - This key transmits the escape sequence:ESC [2 ~ (7 bit ASCII mode)orCSI 2 ~ (8 bit ASCII mode)
Remove
Rem - This key transmits the escape sequence:ESC [3 ~ (7 bit ASCII mode)orCSI 3 ~ (8 bit ASCII mode)
Select
Sel - This key transmits the escape sequence:ESC [4 ~ (7 bit ASCII mode)orCSI 4 ~ (8 bit ASCII mode)
Previous Screen
Prv - This key generates an escape sequence:ESC [5 ~ (7 bit ASCII mode)orCSI 5 ~ (8 bit ASCII mode)
Next Screen
Nxt - This key transmits the escape sequence:ESC [6 ~ (7 bit ASCII mode)orCSI 6 ~ (8 bit ASCII mode)
Escape
Esc - This key sends an ESC character to the host.
Backspace
BS - This key sends a BS character to the host.
5-92

Line Feed
LF - This key sends a LF character to the host
5-93

PF Keys
PF1 -PF4 - The numeric keypad keys PF1 through PF5 keys transmit the following escape sequences. The default action ofFunction Keys 1 through 4 is identical.
PF Key 7 bit ANSI Mode 8 bit ANSI Mode VT 52 Mode
PF1 SS3 P ESC OP ESC P
PF2 SS3Q ESC OQ ESC Q
PF3 SS3R ESC OR ESC R
PF4 SS3 S or ESC OS ESC SThe 5 keys F1-F5 on a VT client are local function keys and do not send codes. When a device has physical keys for F1-F5, wesend PF1-PF4 for the corresponding F1-F4 and send a custom escape sequence for F5, the custom escape sequencedepends on the device.
Function Keys
F1 - F40 - The Function keys F1 - F40 communicate with the host application. They transmit the following default escapesequences or their 7-bit equivalent, unless reprogrammed by the user in the Function Key dialog.
Function Key Default Value
F1 ESC OP
F2 ESC OQ
F3 ESC OR
F4 ESC OS
F5 none
F6 CSI 17~
F7 CSI 18~
F8 CSI 19~
F9 CSI 20~
F10 CSI 21~
F11 (ESC) CSI 23~ (ESC in VT100 and VT 52)
F12 (BS) CSI 24~ (BS in VT 100 and VT 52)
F13 (LF) CSI 25~ (LF in VT 100 and VT 52)
F14 CSI 26~
F15 (HELP) CSI 28~
F16 (DO) CSI 29~
F17 CSI 31~
F18 CSI 32~
F19 CSI 33~
5-94

Function Key Default Value
F20 CSI 34~
F21 CSI 25~
F22 CSI 26~
F23 CSI 28~
F24 CSI 29~
F25 CSI 31~
F26 CSI 32~
F27 CSI 33~
F28 CSI 34~
F29 through F40 none
Custom VT220 Host CommandsThe following host command strings can be sent to RFTerm to provide the designated action.
Command String Action
/cmd!1;3z/cmde RFTerm disabled the scanner
/cmd!1;0z/cmde RFTerm enables the scanner
/cmd!1;2z/cmde RFTerm turns on the display backlight
/cmd!1;1z/cmde RFTerm turns off the display backlight
/cmd!1;4z/cmde RFTerm turns on vibration for 1 second (see note below)
/cmd!1;5z/cmde RFTerm turns on vibration for 2 seconds (see note below)
/cmd!1;6z/cmde RFTerm turns on vibration for 3 seconds (see note below)
/cmd!1;7z/cmde RFTerm turns on vibration for 7 seconds (see note below)
Note: Vibration is only supported onmobile devices containing a vibration unit, such as MX7 Tecton, MX8 andMX9.Vibration has no effect on other devices.
5-95

5-96

Chapter 6 - ANSI Quick Reference Guide
Functionality List
NotesReset mode terminating character is l, set mode is h.
C The configuration utility equivalent of this command.
M Themodes that affect this command.
R The effect generated when this mode is reset.
S The effect generated when this mode is set.
BKC Bar code/Keypad Setup Private Sequence
CCT Character Collection Timer Private Sequence
DECOM DEC Origin Mode
DECPEX DEC Print Extent Mode
DECPFF DEC Print Form FeedMode
DRM/SM DECRM/DECSM
EBM Editing Boundary Mode
ERM ErasureMode
LNM Line Feed/New LineMode
LRM/SM LXERM/LXESM
NRC National Replacement Character Sets
SEM Select Editing Extent Mode
SGR Select Graphic Rendition
SRM Send/ReceiveMode
TSM Tab StopMode
TSS Transmit/Screen Setup Private Sequence
6-1

Cursor Positioning
CursorPos. Description Hex Value / Esc Seq Notes
BS Backspace 0x08 (^H)
CUB Cursor Back ESC[PnD M=None
CUF Cursor Forward ESC[PnC M=None
CUD Cursor Down ESC[PnB M=None
CUU Cursor Up ESC[PnA M=None
CUP Cursor Position ESC[Pr;PcH M=None
HVP Horizontal Vertical Pos ESC[Pr;Pcf M=None
CHA Cursor Horizontal Absolute ESC[PnG
CR Carriage Return 0x0d (^M)
LF Line Feed 0x0a (^J) M=Scroll Region, LNM
FF Form Feed 0x0c (^L) M=Scroll Region, LNM; Same as LF
VT Vertical Tab 0x0b (^K) M=Scroll Region, LNM; Same as LF
IND Index 0x84 (ESC D) M=Scroll Region
RI Reverse Index 0x8d (ESC M) M=Scroll Region
LNM Line Feed/New LineMode ESC[20l (or h) R=LF, S=LF+CR (RM/SM);See Transmission to Host
LXENE New Line EchoMode ESC[=2l (or h) R=neither, S=CR+LF (LRM/SM);Also TSS 6; C=EchoCrLf
CNL Cursor Next Line ESC[PnE
NEL Next Line 0x85 (ESC E) M=Scroll Region
CVT Cursor Vertical Tab ESC[PnY
CPL Cursor Previous Line ESC[PnF
6-2

Forms
Forms Description Hex Value/ESC Seq Notes
HT Horizontal Tab 0x09 (^I) No tab to protected cells
CHT Cursor Horizontal Tab ESC[PnI No tab to protected cells
CBT Cursor Back Tab ESC[PnZ No tab to protected cells
HTJ Horizontal Tab w/Ju-stify 0x89 (ESC I) No tab to protected cells
HTS Horizontal Tab Set 0x88 (ESC H) M=TSM
CTC Cursor Tab Clear ESC[PnW (TSM reset/TSM set); 0,2=column/position,4=all/row, 5=all/all
TBC Tab Clear ESC[Png (TSM reset/TSM set); 0=column/position,2=all/row, 3=all/all
TSM Tab Set Mode ESC[18l (or h) R=virtual, S=curr line (RM/SM)
DAQ Define AreaQual-ification ESC[Pno
0=all data, 1=prot, 2=display,3=num,4=alpha, 5=right just, 6=zero filled, 7=tab, 8=selected, 9=spacefilled,10=hidden,15=keyboard input only
SPA Start Protected Area 0x96 (ESC V) Same as DAQ 1
EPA End Protected Area 0x97 (ESC W) Current area is all input
SSA Start Selected Area 0x86 (ESC F)
ESA End Selected Area 0x87 (ESC G) Current area is all input
EA Erase Area ESC[PnO 0=to end, 1=from start, 2=all; M=ERMDoes not erase area type
EF Erase Field ESC[PnN 0=to end, 1= from start, 2=all; M=EBM; Does not erase areatype
LEM Local Edit Match ESC[Pn+A R=display, S=hide
LEM AlphaWC Alpha only wildcard ESC[c1;;p2+G Matches A-Z, a-z, comma, period, dash, space; C=AlphaOnly
LEM Digits WC Digits only wildcard ESC[c1;;;p3+G Matches 0-9; C=DigitsOnly
LEM NumericWC
Numeric only wild-card ESC[c1;;;;p4+G Matches 0-9, plus, comma, period, dash, space; C=N-
umericOnly
LEM AlphanumWC
Alphanumeric onlywildcard ESC[c1;;;;;p5+G Matches A-Z, a-z, 0-9, plus, comma, period, dash, space; C =
AlphaNumericOnly
LEMMatch AllWC Match all wildcard ESC[c1;;;;;;p6+G All GL andGR; C=MatchAll
6-3

Transmission To Host
TransmissionTo Host Description Hex Value/
Esc Seq Notes
GATM Guarded Area TransmitMode ESC[1l (or h) R=unguarded, S=entire screen (RM/SM)
MATM Multiple Area TransmitMode ESC[15l (or h) R=cursor selected, S=all selected (RM/SM)
SATM Selected Area Trans-mit Mode ESC[17l (or h) R=selected, S=virtual (RM/SM)
LXEAS Auto SendMode ESC[=3l (or h) R=disable, s=enable (LRM/SM); SRMmust be reset; AlsoTSS 3; C=AutoTransmit
SRM Send ReceiveMode ESC[12l (or h) R=local echo, S=char (RM/SM); Also TSS 10; C=Se-ndReceiveMode
LXELM LineMode ESC[=1l (or h) R=block, S=scroll (LRM/SM);Also TSS 5; C=ScrollMode
DECSCL Select Operating Level ESC[62;Pn"p R=8 bit, S=7 bit
S7C1T Select 7 Bit Trans-mission ESC F A space (0x20) precedes F; C=EightBitMode
S8C1T Select 8 Bit Trans-mission ESC G A space (0x20) precedes G; C=EightBitMode
LNM Line Feed/New LineMode ESC[c1;;;;p4+F R=CR, S=CR+LF;
Also TSS 4; See Cursor Positioning; C=TransmitCR/LF
OLM OnlineMode ESC[c1;;;;;;;;p8+F R=online, S=offline; Also TSS 8; C=OnlineMode
6-4

Editing
Editing Description Hex Value/Esc Seq Notes
ECH Erase Character ESC[PnX M=ERM
DCH Delete Character ESC[PnP M=SEMAborts at protected cells
ICH Insert Character ESC[Pn@ M=SEMAborts at protected cells
SEM Select EditingExtent Mode ESC[PnQ 0=display, 1=row, 2=field, 3=area; M=None
DL Delete Line ESC[PnM M=None
IL Insert Line ESC[PnL M=None
ED Erase Display ESC[PnJ 0=to end, 1=from start, 2=all; M=ERMErases area type/boundaries, homes cursor.
EL Erase Line ESC[PnK 0=to end, 1=from start, 2=all; M=ERMErases area type/boundaries
DECSED DEC SelectiveErase In Display ESC[?PnJ 0=to end, 1=from start, 2=all; M=None
Never erases protected cells or area types/boundaries, homes cursor
DECSEL DEC SelectiveErase In Line ESC[?PnK 0=to end, 1=from start, 2=all; M=None
Never erases protected cells or area types/boundaries
ERM ErasureMode ESC[6l (orh)
R=cannot erase prot,S=erase prot (RM/SM)
SD Scroll Down ESC[PnT M=Scroll Region
SU Scroll Up ESC[PnS M=Scroll Region
DECSTBM DEC Set Top/BottomMargins ESC[Pt;Pbr M=DECOM; Must have full screen client to use; Min height of region is 2
rows, Homes cursor according to DECOM
IRM Insert/ReplaceMode ESC[4l (orh)
R=overwrite,S=insert (RM/SM)
Character Rendition
Character Rendition Description Hex Value/Esc Seq Notes
SGR Select Graphics Rendition ESC[Pnm
0=normal1,22=bold4,24=underline5,25=blink7,27=reverseFirst num enables, second disables
6-5

Bar Code
Bar code Description Hex Value/Esc Seq Notes
Left Justify Left Justify ESC[c1;;p2+ER=offS=on (BKC); Requires block modeC=LeftJustify
Clear Clear ESC[c1;;;p3+ER=offS=on (BKC); Requires block modeC=ClearData
Truncate Truncate ESC[c1;;;;p4+ER=offS=on (BKC); Requires block modeC=TruncateData
Auto Advance Auto Advance ESC[c1;;;;;p5+ER=offS=on (BKC); Requires block modeC=AutoAdvance
Reports / Status / Test
Reports /Status/ Test Description Hex Value/Esc Seq Notes
ENQ Enquire 0x05 (^E)
CPR Cursor Position Report ESC[Pr;PcR Only sent from client; Position relative to virtual display
DSR Device Status Report ESC[Pnn5=status6=CPR26=keyboard
6-6

Printing
Printing Description Hex Value/Esc Seq Notes
MC Media Copy ESC[Pni 4=off5=on
DC2 Device Control 2 0x12 (^R) Ignored from host
DC4 Device Control 4 0x14 (^T) Same as MC4
APM Auto Print Mode ESC[?Pni 4=off5=on
PL Print Line ECS[?1i
PS Print Screen ESC[0i
DECPFF DEC Print Form FeedMode ECS[?18l (or h) h=enable terminating characterl=disable terminating character
DECPEX DEC Print Extent Mode ECS[?18l (or h) h=full screenl=scrolling region
6-7

Hat Encoding
DesiredASCII Hex Value Hat
EncodedDesiredASCII Hex Value Hat
Encoded
NUL 00 ^@ × D7 ~W
SOH 01 ^A Ø D8 ~X
STX 02 ^B Ù D9 ~Y
ETX 03 ^C Ú DA ~Z
EOT 04 ^D Û DB ~[
ENQ 05 ^E Ü DC ~\\
ACK 06 ^F Ý DD ~]
BEL 07 ^G Þ DE ~\^
BS 08 ^H ß DF ~_ (Underscore)
HT 09 ^I à E0 ~`
LF 0A ^J á E1 ~a
VT 0B ^K â E2 ~b
FF 0C ^L ã E3 ~c
CR 0D ^M ä E4 ~d
SO 0E ^N å E5 ~e
SI 0F ^O æ E6 ~f
DLE 10 ^P ç E7 ~g
DC1 (XON) 11 ^Q è E8 ~h
DC2 12 ^R é E9 ~i
DC3 (XOFF) 13 ^S ê EA ~j
DC4 14 ^T ë EB ~k
NAK 15 ^U ì EC ~l
SYN 16 ^V í ED ~m
ETB 17 ^W î EE ~n
CAN 18 ^X ï EF ~o
EM 19 ^Y ð F0 ~p
SUB 1A ^Z ñ F1 ~q
ESC 1B ^[ ò F2 ~r
FS 1C ^\\ ó F3 ~s
GS 1D ^] ô F4 ~t
RS 1E ^^ õ F5 ~u
6-8

DesiredASCII Hex Value Hat
EncodedDesiredASCII Hex Value Hat
Encoded
US 1F ^_ (Underscore) ö F6 ~v
80 ~^@ ÷ F7 ~w
81 ~^A ø F8 ~x
82 ~^B ù F9 ~y
83 ~^C ú FA ~z
IND 84 ~^D û FB ~{
NEL 85 ~^E ü FC ~|
SSA 86 ~^F ý FD ~}
® AE ~. (Period) þ FE ~~
¯ AF ~/ ÿ FF ~^?
° B0 ~0 (Zero) ESA 87 ~^G
± B1 ~1 HTS 88 ~^H
² B2 ~2 HTJ 89 ~^I
³ B3 ~3 VTS 8A ~^J
´ B4 ~4 PLD 8B ~^K
µ B5 ~5 PLU 8C ~^L
¶ B6 ~6 RI 8D ~^M
· B7 ~7 SS2 8E ~^N
¸ B8 ~8 SS3 8F ~^O
¹ B9 ~9 DCS 90 ~^P
º BA ~: PU1 91 ~^Q
» BB ~; PU2 92 ~^R
¼ BC ~< STS 93 ~^S
½ D ~= CCH 94 ~^T
¾ BE ~> MW 95 ~^U
¿ BF ~? SPA 96 ~^V
À C0 ~@ EPA 97 ~^W
Á C1 ~A 98 ~^X
 C2 ~B 99 ~^Y
à C3 ~C 9A ~^Z
Ä C4 ~D CSI 9B ~^[
Å C5 ~E ST 9C ~^\\
Æ C6 ~F OSC 9D ~^]
6-9

DesiredASCII Hex Value Hat
EncodedDesiredASCII Hex Value Hat
Encoded
Ç C7 ~G PM 9E ~^^
È C8 ~H APC 9F ~^_ (Underscore)
É C9 ~I (no-break space) A0 ~ (Tilde and Space)
Ê CA ~J ¡ A1 ~!
Ë CB ~K ¢ A2 ~”
Ì CC ~L £ A3 ~#
Í CD ~M ¤ A4 ~$
Î CE ~N ¥ A5 ~%
Ï CF ~O ¦ A6 ~&
Ð D0 ~P § A7 ~’
Ñ D1 ~Q ¨ A8 ~(
Ò D2 ~R © A9 ~)
Ó D3 ~S ª AA ~*
Ô D4 ~T « AB ~+
Õ D5 ~U ¬ AC ~,
Ö D6 ~V (soft hyphen) AD ~- (Dash)
6-10

DEC Special Graphics - Code TableRefer to the 8-bit code table below that lists all the decimal, hexadecimal, and octal values for each character:
6-11

IS0 8859-1 Character Set
6-12

Chapter 7 - IBM 3270
3270 Host Key Descriptions
Attention
Attn - The Attention key interrupts the host application.
System Request
Srq - The System Request key gives context to the System Software such as the SSCP (System Services Control Point).
Clear
Clr - The Clear key causes a CLEAR Attention Identifier key to be sent to the host and the host responds according to the hostapplication.
Reset
Rst - The Reset key resets themobile client. Depending upon the current state, it removes the host application from akeyboard inhibit state, terminates the System Request functions and exits themobile client from insert mode.
Erase Input
EIn - This key clears all unprotected input fields andmoves the cursor to the beginning of the first input field.
Erase to End of Field
Eof - This key erases all data in an input field from the current cursor location to the end of the input field.
Delete
Del - The Delete key deletes data from an input field. When you press this key, the character at the cursor location is deleted,and all characters to the right of the cursor shift one position to the left.
Insert
Ins - This key toggles the insert mode on and off. In insert mode, characters are inserted at the current cursor location if spaceis available. The characters to the right of the cursor are shifted one character position to the right.
Home
Hm - This key repositions the cursor to the first input location of the first input field.
7-1

Tab or Next
Tb - This key moves the cursor forward to the next input field. When the cursor is not on an input field it moves to the next inputfield from the current cursor location.
Backtab or Previous
BTb - This key moves the cursor back to the previous input field. When the cursor is not on an input field, the cursor moves tothe previous input field from the current cursor location. This key is equivalent to [Shift][Tab].
Enter
Ent - The Enter key submits control to the host application.
New Line
NL - This functionmoves the cursor to the first input field on the next line.
Escape
Esc - The function is the same as the Reset command.
PA Keys
Pa1, Pa2, Pa3 - The PA1 through PA3 keys communicate with the host application. Their use is defined by the hostapplication.
Function Keys
F1 - F24 - The Function keys F1 - F24 communicate with the host application. Their use is defined by the host application,unless their action has been programmed using the Function Key dialog.
3270 Commands
Printing a FieldYou can print a field by sending a print command (*P) from the host to the client. It must be preceded by a field attribute (FA)byte. The printing ends when the next FA is encountered. The value of the FA is ignored, but it must be present.
BeepYou can sound a beep by sending the beep command (*B) from the host to the client. It must be preceded by a field attribute(FA) byte. When RFTerm encounters a beep command, by default it activates the Good sound.Host initiated sounds can also be reassigned to produce the Bad or Alarm sounds by using the Sound Key field. For exampleentering $HA in the Sound Key field means to assignHost initiated sounds to theAlarm soundSee File > Settings > Sounds to review Good, Bad and Alarm sounds and for more instructions on using the Sound Key field.
7-2

Custom IBM 3270 Host CommandsThe following host command strings can be sent to RFTerm to provide the designated action.
Command String Action
/cmd!1;3z/cmde RFTerm disabled the scanner
/cmd!1;0z/cmde RFTerm enables the scanner
/cmd!1;2z/cmde RFTerm turns on the display backlight
/cmd!1;1z/cmde RFTerm turns off the display backlight
/cmd!1;4z/cmde RFTerm turns on vibration for 1 second (see note below)
/cmd!1;5z/cmde RFTerm turns on vibration for 2 seconds (see note below)
/cmd!1;6z/cmde RFTerm turns on vibration for 3 seconds (see note below)
/cmd!1;7z/cmde RFTerm turns on vibration for 7 seconds (see note below)
Note: Vibration is only supported onmobile devices containing a vibration unit, such as MX7 Tecton, MX8 andMX9.Vibration has no effect on other devices.
7-3

7-4

Chapter 8 - IBM 5250
5250 Host Key Descriptions
Attention
Attn - The Attention key interrupts the host application.
System Request
Srq - The System Request key gives context to the System Software such as the SSCP (System Services Control Point).
Clear
Clr - The Clear key causes a CLEAR Attention Identifier key to be sent to the host and the host responds according to the hostapplication.
Reset
Rst - The Reset key resets the client. Depending upon the current state, it removes the host application from a keyboard inhibitstate, terminates the System Request functions and exits the client from insert mode.
Erase Input
EIn - This key clears all unprotected input fields andmoves the cursor to the beginning of the first input field.
Erase to End of Field
Eof - This key erases all data in an input field from the current cursor location to the end of the input field.
Field Minus
F- - This key causes the cursor to advance to the next field and aminus sign is inserted in the last position of a signed numeric-only field.
Field Plus
F+ - This key causes the cursor to exit an input field and insert null characters from the current cursor location to the end of thefield.
Field Exit
FEx - This key behaves similar to the Field Plus key. It causes the cursor to exit an input field and insert null characters fromthe current cursor location to the end of the field.
8-1

Duplicate
Dup - This DUP key is used to insert DUP characters in a field for host processing.
Field Mark
Mrk - The Field Mark key is used to insert a Field Mark character in a field for host processing.
Delete
Del - The Delete key deletes data from an input field. When you press this key, the character at the cursor location is deleted,and all characters to the right of the cursor shift one position to the left.
Insert
Ins - This key toggles the insert mode on and off. In insert mode, characters are inserted at the current cursor location if spaceis available. The characters to the right of the cursor are shifted one character position to the right.
Home
Hm - This key moves the cursor to the first input location of the first input field.
Tab or Next
Tb - This key moves the cursor forward to the next input field. When the cursor is not on an input field it moves to the next inputfield from the current cursor location.
Backtab or Previous
BTb - This key moves the cursor back to the previous input field. When the cursor is not on an input field, the cursor moves tothe previous input field from the current cursor location. This key is equivalent to [Shift][Tab].
Enter
Ent - The Enter key submits control to the host application.
New Line
NL - This functionmoves the cursor to the first input field on the next line.
Roll Up
RUp - This function sends a roll up request to the host, similar to a scroll up.
Roll Down
RDn - This function sends a roll down request to the host, similar to a scroll down.
8-2
Cursor Select
Sel - This function allows the user to select an input field using the keyboard.
Prt - This function prints the current screen.
Function Keys
F1 - F24 -The Function keys F1 - F24 communicate with the host application. Their use is defined by the host application,unless their action has been programmed using the Function Key dialog.
5250 Commands
Input Device ID (*K)The input device ID feature provides the host application developer with the ability to determine which Honeywell mobile clientuser input device and which bar code symbology was utilized to enter data in any field on the screen. When the 5250 hostapplication is programmed to request this data from themobile client, and when the input device ID feature is enabled at theclient, the client sends this information to the 5250 host emulation. This feature can be used with thematch field edit and scanand increment features, in addition to normal user input.This feature is useful to monitor the use of automatic input devices to enforce the practice of not using the keyboard or keypadas an input device.
Description
There are twomajor components to this feature:l The input ID field identifies the field that follows as an operator input field.l The operator input field is the area on the screen where information is returned to the host application.
Input ID Field
The input ID field:l must be preceded by a field attribute (FA) that designates the input ID field as unprotected (operator input capable).l is designated with an * (asterisk) as the first character and a K as the second character.l can have any display attribute including non-display.l does not have to be on the same line as the operator input field, but it must be the first input field to precede it.l cannot have any input fields defined on the screenmap between it and its associated operator input field.l must have theModified Data Tag (MDT) set by the host application so it will return to the host when [Enter] is pressed.l behaves exactly the same as any protected field on the Honeywell client device.
8-3

Terminal Operation
When the input ID feature is enabled in client setup, the RFTerm 5250 terminal emulationmodifies the input ID field to behaveas if it has the Bypass (protected) field attribute. The user can place the cursor in the input ID field with the arrow keys, butinput is not allowed. If the user attempts input in this field, an error message will appear indicating that the field is protected. Ifthe input ID feature is not enabled at the client device, RFTerm will treat input ID fields as normal input fields.
8-4
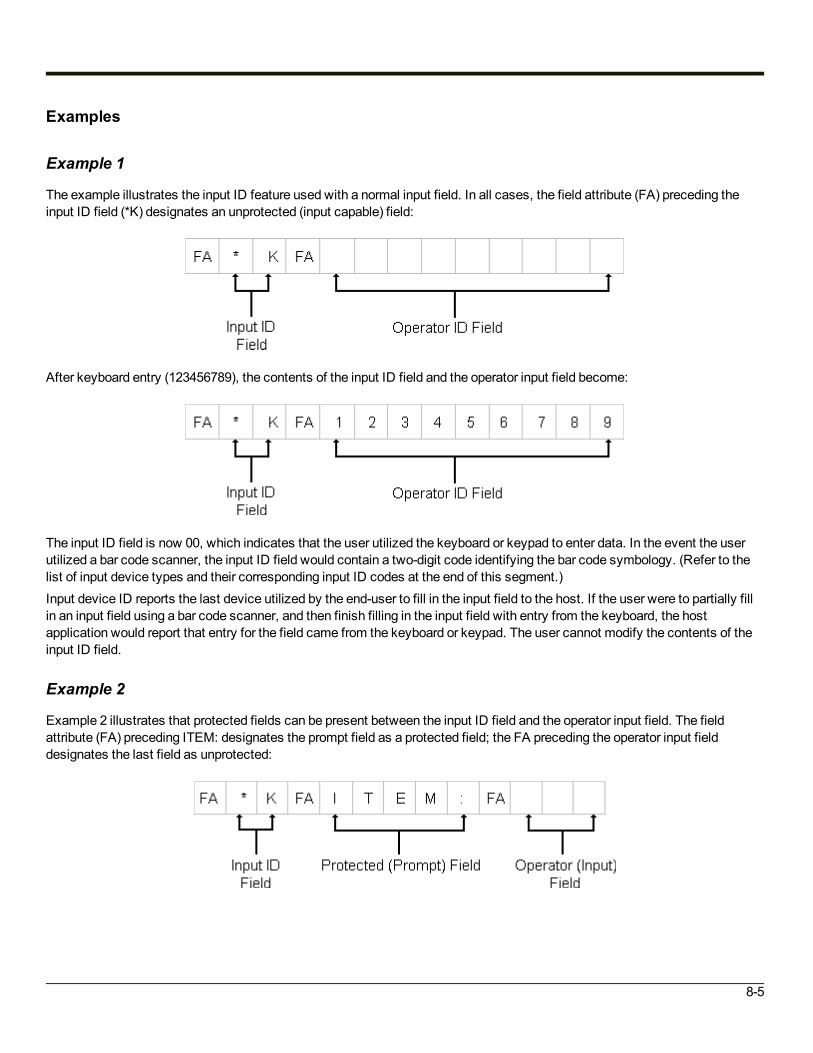
Examples
Example 1
The example illustrates the input ID feature used with a normal input field. In all cases, the field attribute (FA) preceding theinput ID field (*K) designates an unprotected (input capable) field:
After keyboard entry (123456789), the contents of the input ID field and the operator input field become:
The input ID field is now 00, which indicates that the user utilized the keyboard or keypad to enter data. In the event the userutilized a bar code scanner, the input ID field would contain a two-digit code identifying the bar code symbology. (Refer to thelist of input device types and their corresponding input ID codes at the end of this segment.)Input device ID reports the last device utilized by the end-user to fill in the input field to the host. If the user were to partially fillin an input field using a bar code scanner, and then finish filling in the input field with entry from the keyboard, the hostapplication would report that entry for the field came from the keyboard or keypad. The user cannot modify the contents of theinput ID field.
Example 2
Example 2 illustrates that protected fields can be present between the input ID field and the operator input field. The fieldattribute (FA) preceding ITEM: designates the prompt field as a protected field; the FA preceding the operator input fielddesignates the last field as unprotected:
8-5

Input Identification Types
Here is a list of the numerical values that appear in the input ID field returned from themobile client, designating the type ofinput device utilized by the end-user.
Numerical Value Input Device Type
00 Keyboard / Keypad
01 Bar code Code 39
02 Bar code Code 128
03 Bar code Interleaved 2 of 5
04 Bar code UPC
05 Bar code EAN
06 Bar code Code 11
07 Bar code Discrete 2 of 5
08 Bar codeMSI Plessey
50 RS-232
Printing a FieldYou can print a field by sending a print command (*P) from the host to the client. It must be preceded by a field attribute (FA)byte. The printing ends when the next FA is encountered. The value of the FA is ignored, but it must be present.
BeepYou can sound a beep by sending the beep command (*B) from the host to the client. It must be preceded by a field attribute(FA) byte. When RFTerm encounters a beep command, by default it activates the Good sound.Host initiated sounds can also be reassigned to produce the Bad or Alarm sounds by using the Sound Key field. For exampleentering $HA in the Sound Key field means to assignHost initiated sounds to theAlarm soundSee File > Settings > Sounds to review Good, Bad and Alarm sounds and for more instructions on using the Sound Key field.
8-6

Terminal SetupYou can configure printing options by sending the Terminal Setup command (*E) from the host to the client. These optionsapply when either the “Prnt” ToolBar button (IBM 3 or IBM 4 KeyBar) or the “Prt” button on the CE SmartPad is pressed. TheTerminal Setup command has the following format, each parameter must be preceded by a semicolon (;) :
*Ecl;p1;p2;p3;p4;p5;p6;p7;p8;p9;p10;p11;p12
This commandmust be sent to the client in the screen definition of the first field on the screen.
c1 A revision compatibility byte, currently not supported, use 1.
p1 Save to disk, currently not supported, use 0.
p2 Bar code left justify, currently not supported, use a semicolon as a place holder.
p3 Bar code input clear mode, currently not supported, use a semicolon as a place holder.
p4 Bar code input truncatemode, currently not supported, use a semicolon as a place holder.
p5 Bar code input truncatemode, currently not supported, use a semicolon as a place holder.
p6Auto transmit after print. 0 = Do not transmit an Enter command after a print (default) 1 = Automatically transmit an Enter command after a print
p7Print carriage return per line. 0 = No carriage return per line on a screen print 1 = Append a carriage return per line on a screen print (default)
p8Print line feed per line. 0 = No line feed per line on a screen print 1 = Append a line feed per line on a screen print (default)
p9 Status line display mode, currently not supported, use a semicolon as a place holder.
p10 Input device ID, currently not supported, use a semicolon as a place holder.
p11 Swap Tab/Field Exit, currently not supported, use a semicolon as a place holder.
p12 Tab/Field Exit for advancing, currently not supported, use a semicolon as a place holder.
8-7

Input Identification Types
Here is a list of the numerical values that appear in the input ID field returned from themobile client, designating the type ofinput device utilized by the end-user.
Numerical Value Input Device Type
00 Keyboard / Keypad
01 Bar code Code 39
02 Bar code Code 128
03 Bar code Interleaved 2 of 5
04 Bar code UPC
05 Bar code EAN
06 Bar code Code 11
07 Bar code Discrete 2 of 5
08 Bar codeMSI Plessey
50 RS-232
8-8

Custom MappingThemethod for creating EBCDIC character sets for countries other than the U.S. is described below, and is followed by anexample.
Custom Character MappingUpon loading, RFTerm first loads the standard character set ISOCharacter Set 8859-1 (Latin 1). RFTerm then searches for aplain text document file named EBCDIC.TXT in the \os dependent\LXE\RFTerm folder, which is the default install folder for theapplication. If the file is found, RFTerm will read replacement character pairs from the EBCDIC.TXT file and place them in thesubstitution table for IBM emulations.
For example:
0x40 0x52
will replace the default character whose value is 0x40 with the character whose value is 0x52 according to ISOCharacter Set8859-1 (Latin 1). Each occurrence of the character 0x40 will be replaced regardless of whether it originated from the host orfrom the client.Where the <white space> represents any number of spaces and/or tabs, and is used for clarity. The first entry is the EBCDICcharacter position in hexadecimal in the default EBCDIC character table, and the second entry is the hexadecimal or decimalposition in the ISOCharacter Set 8859-1 (Latin 1) table.
Custom Keyboard MappingRFTerm will also search for a KEYS.TXT file in the same folder. It will contain character pairs of the same format as theEBCDIC.TXT file, however these substitutions will bemadeONLY for characters originating from the keyboard.Note: If both files are present, a key press will bemodified by the KEYS.TXT substitution and thenmodified by the
EBCDIC.TXT substitution. Place a copy of the EBCDIC.TXT and KEYS.TXT files in the device operating systempersistent folder. This will ensure the files are saved instead of discarded if the device is rebooted.
8-9
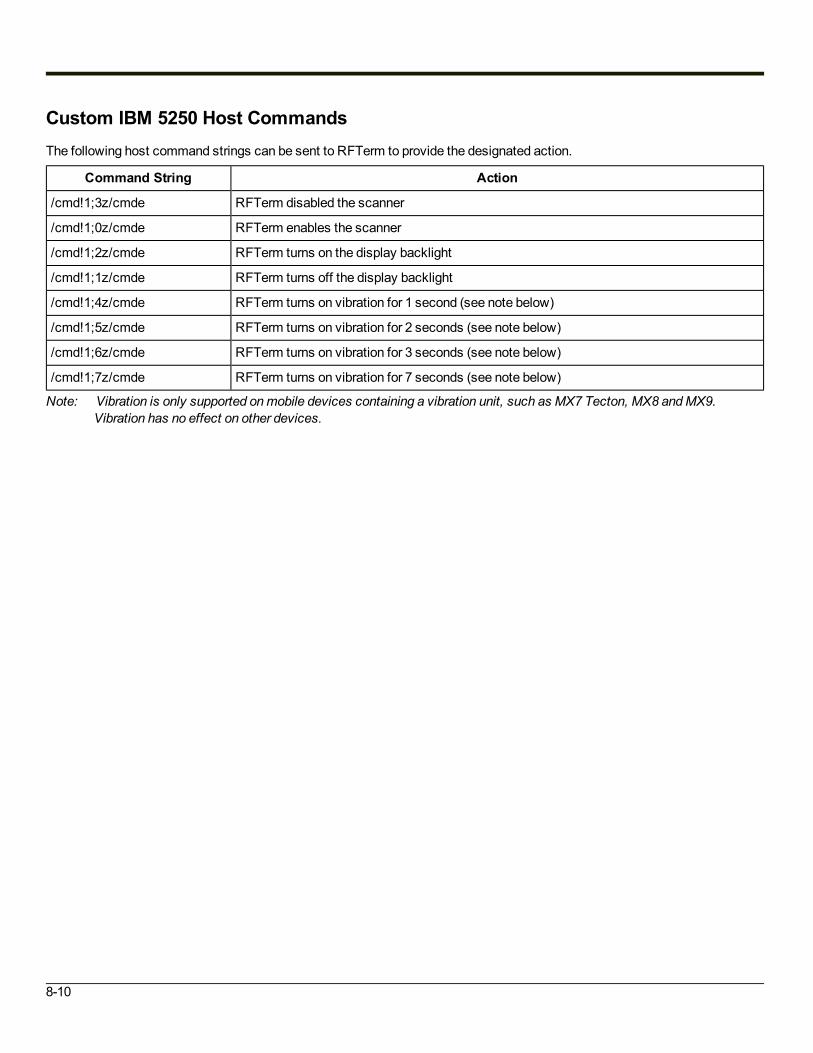
Custom IBM 5250 Host CommandsThe following host command strings can be sent to RFTerm to provide the designated action.
Command String Action
/cmd!1;3z/cmde RFTerm disabled the scanner
/cmd!1;0z/cmde RFTerm enables the scanner
/cmd!1;2z/cmde RFTerm turns on the display backlight
/cmd!1;1z/cmde RFTerm turns off the display backlight
/cmd!1;4z/cmde RFTerm turns on vibration for 1 second (see note below)
/cmd!1;5z/cmde RFTerm turns on vibration for 2 seconds (see note below)
/cmd!1;6z/cmde RFTerm turns on vibration for 3 seconds (see note below)
/cmd!1;7z/cmde RFTerm turns on vibration for 7 seconds (see note below)
Note: Vibration is only supported onmobile devices containing a vibration unit, such as MX7 Tecton, MX8 andMX9.Vibration has no effect on other devices.
8-10
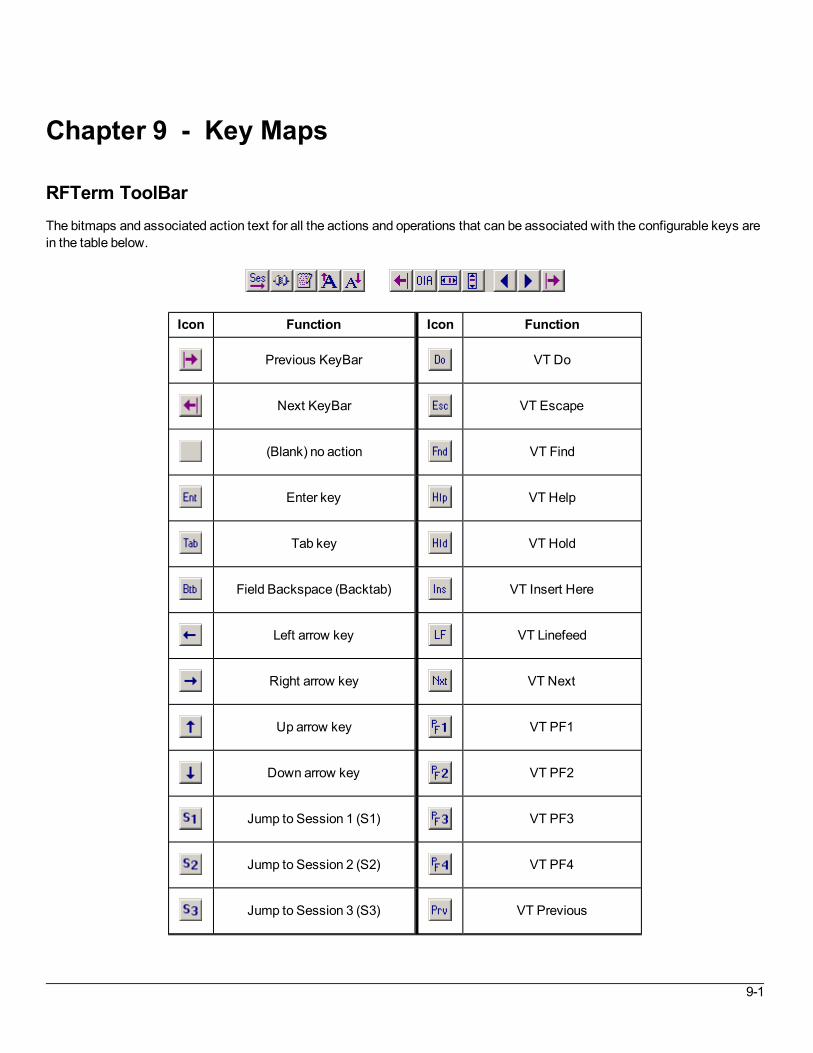
Chapter 9 - Key Maps
RFTerm ToolBarThe bitmaps and associated action text for all the actions and operations that can be associated with the configurable keys arein the table below.
Icon Function Icon Function
Previous KeyBar VT Do
Next KeyBar VT Escape
(Blank) no action VT Find
Enter key VT Help
Tab key VT Hold
Field Backspace (Backtab) VT Insert Here
Left arrow key VT Linefeed
Right arrow key VT Next
Up arrow key VT PF1
Down arrow key VT PF2
Jump to Session 1 (S1) VT PF3
Jump to Session 2 (S2) VT PF4
Jump to Session 3 (S3) VT Previous
9-1

Icon Function Icon Function
Jump to Session 4 (S4) VT Remove
Jump to Next Connected Session VT Select
Connect Session VT Numpad 0
Font Increase VT Numpad 1
Font Decrease VT Numpad 2
Configure Session VT Numpad 3
Print Screen VT Numpad 4
Start Menu Toggle VT Numpad 5
SmartPad Toggle VT Numpad 6
Text InputTool Toggle VT Numpad 7
Program Exit (Emulator) VT Numpad 8
F1 function key VT Numpad 9
F2 function key VT Numpad Comma
F3 function key VT Numpad Enter
F4 function key VT NumpadMinus
F5 function key VT Numpad Period
F6 function key ASCII 0
F7 function key ASCII 1
9-2
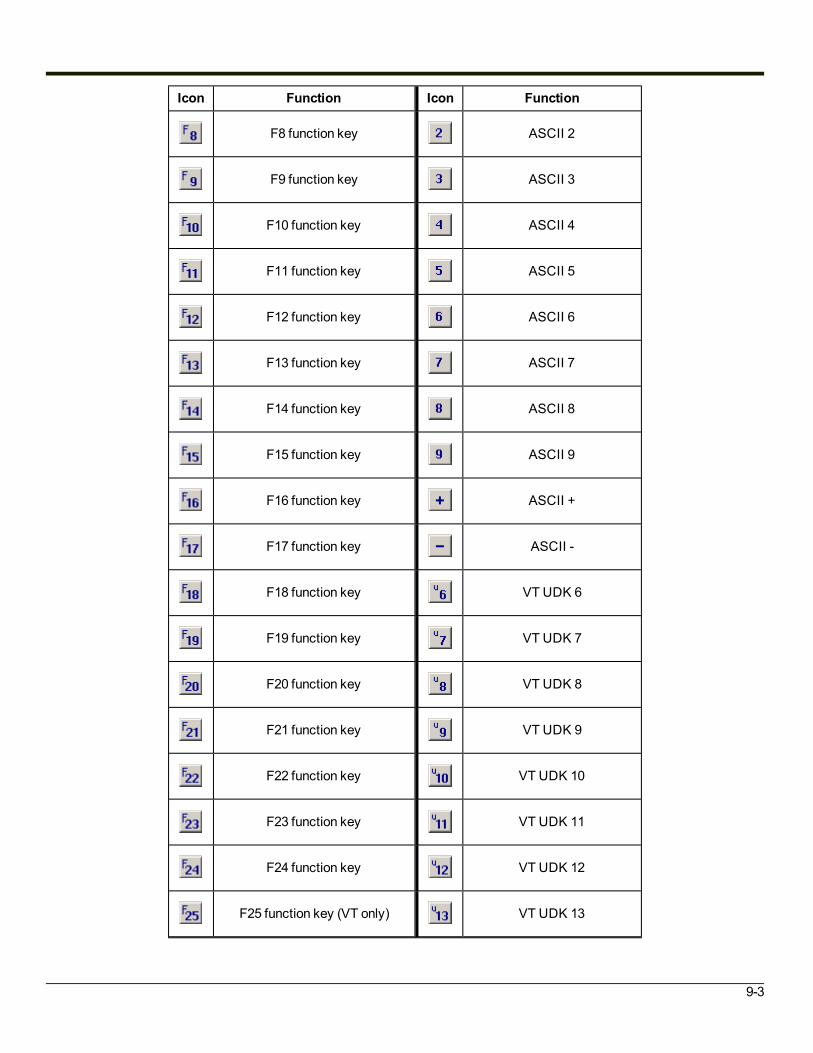
Icon Function Icon Function
F8 function key ASCII 2
F9 function key ASCII 3
F10 function key ASCII 4
F11 function key ASCII 5
F12 function key ASCII 6
F13 function key ASCII 7
F14 function key ASCII 8
F15 function key ASCII 9
F16 function key ASCII +
F17 function key ASCII -
F18 function key VT UDK 6
F19 function key VT UDK 7
F20 function key VT UDK 8
F21 function key VT UDK 9
F22 function key VT UDK 10
F23 function key VT UDK 11
F24 function key VT UDK 12
F25 function key (VT only) VT UDK 13
9-3
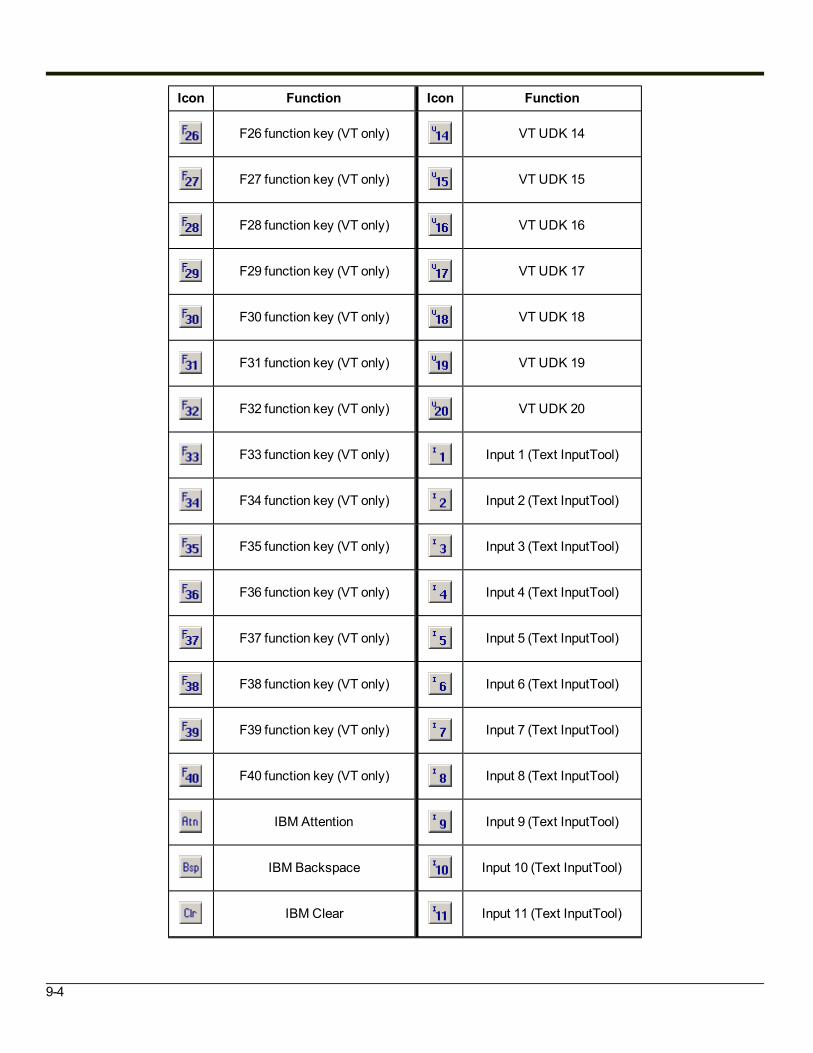
Icon Function Icon Function
F26 function key (VT only) VT UDK 14
F27 function key (VT only) VT UDK 15
F28 function key (VT only) VT UDK 16
F29 function key (VT only) VT UDK 17
F30 function key (VT only) VT UDK 18
F31 function key (VT only) VT UDK 19
F32 function key (VT only) VT UDK 20
F33 function key (VT only) Input 1 (Text InputTool)
F34 function key (VT only) Input 2 (Text InputTool)
F35 function key (VT only) Input 3 (Text InputTool)
F36 function key (VT only) Input 4 (Text InputTool)
F37 function key (VT only) Input 5 (Text InputTool)
F38 function key (VT only) Input 6 (Text InputTool)
F39 function key (VT only) Input 7 (Text InputTool)
F40 function key (VT only) Input 8 (Text InputTool)
IBM Attention Input 9 (Text InputTool)
IBM Backspace Input 10 (Text InputTool)
IBM Clear Input 11 (Text InputTool)
9-4
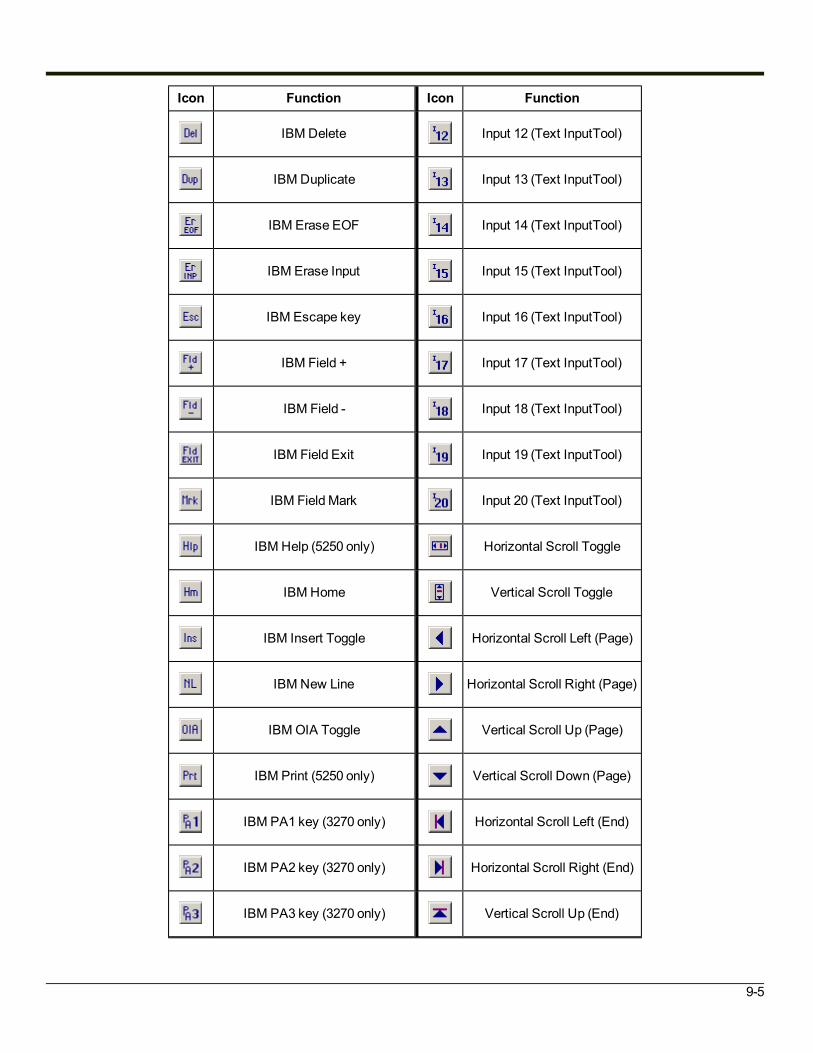
Icon Function Icon Function
IBM Delete Input 12 (Text InputTool)
IBM Duplicate Input 13 (Text InputTool)
IBM Erase EOF Input 14 (Text InputTool)
IBM Erase Input Input 15 (Text InputTool)
IBM Escape key Input 16 (Text InputTool)
IBM Field + Input 17 (Text InputTool)
IBM Field - Input 18 (Text InputTool)
IBM Field Exit Input 19 (Text InputTool)
IBM Field Mark Input 20 (Text InputTool)
IBM Help (5250 only) Horizontal Scroll Toggle
IBM Home Vertical Scroll Toggle
IBM Insert Toggle Horizontal Scroll Left (Page)
IBM New Line Horizontal Scroll Right (Page)
IBM OIA Toggle Vertical Scroll Up (Page)
IBM Print (5250 only) Vertical Scroll Down (Page)
IBM PA1 key (3270 only) Horizontal Scroll Left (End)
IBM PA2 key (3270 only) Horizontal Scroll Right (End)
IBM PA3 key (3270 only) Vertical Scroll Up (End)
9-5

Icon Function Icon Function
IBM Reset Vertical Scroll Down (End)
IBM Roll Up (5250 only) Scroll Upper Left quadrant
IBM Roll Down (5250 only) Scroll Upper Right quadrant
IBM System Request Scroll Lower Left quadrant
VT Answerback Scroll Lower Right quadrant
VT Backspace Scroll Center quadrant
VT Cancel Scroll Cursor Center
VT Delete Scroll Cursor Visible
9-6

RFTerm Functions
Function Path
Connect to Host Session > Connect or ToolBar Button
Disconnect from Host Session > Disconnect or ToolBar Button
Hide / Display MenuBar File > Settings > Display > HideMainMenu
Enable / Disable MenuBar (XP) File > Settings > Display > DisableMenu-Bar
Hide / Display ToolBar File > Settings > Display > Hide ToolBar
Hide / Display KeyBar File > Settings > Display > Hide KeyBar
Hide / Display All Bars(Not supported onWindows Mobile) File > Settings > Display > Hide All Bars
ToggleMenuBar Bottom / Top(Not supported onWindows Mobile, Windows XP, Windows 7 orWindowsEmbedded Standard)
File > Settings > Display > Menu at Bottom
Configure Host Session Session > Configure
Increase Font Size ToolBar Button: Capital A with Up Arrow
Decrease Font Size ToolBar Button: Capital A with Down Arrow
Font Selection Session > Configure > Font > Font Weightcombo box
Display / Hide SmartPad(Not supported onWindows XP, Windows 7 orWindows Embedded Standard) Display > SmartPad
Display / Hide InputTool(Not supported onWindows XP, Windows 7 orWindows Embedded Standard) Display > InputTool
Scroll Up Scroll Bars
Scroll Down Scroll Bars
Scroll Left Scroll Bars
Scroll Right Scroll Bars
Print Setup File > Print Setup
Exit RFTerm File > Exit
9-7
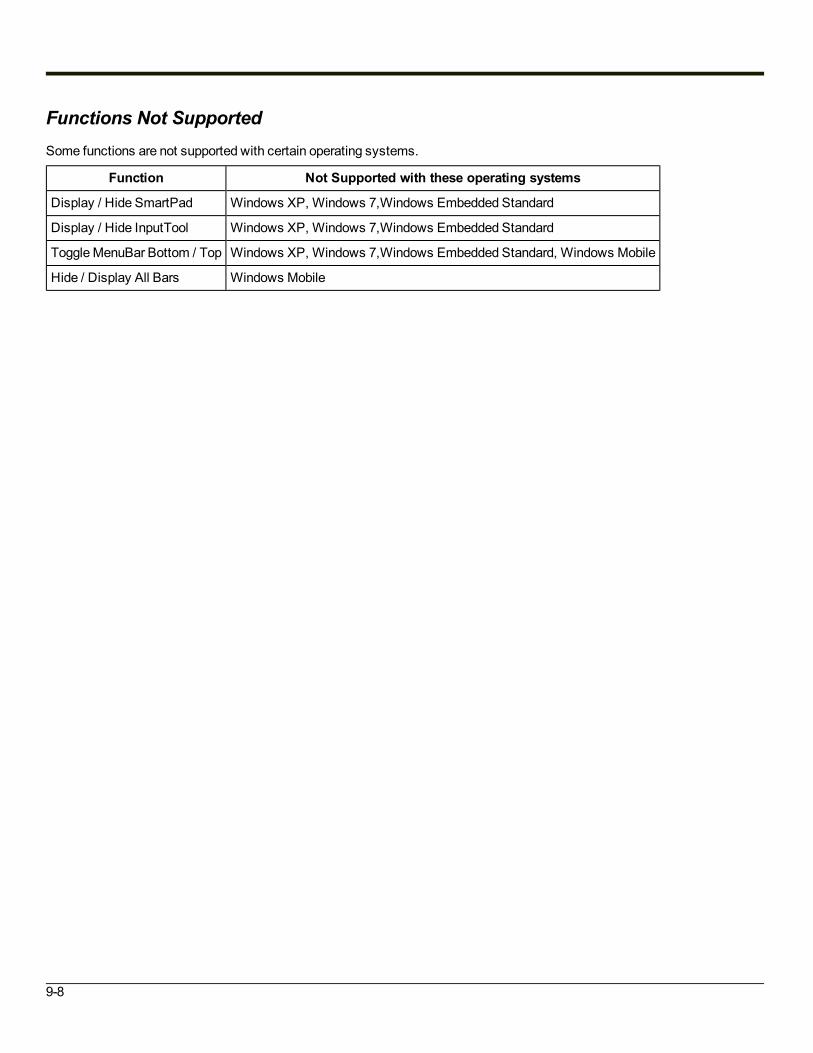
Functions Not SupportedSome functions are not supported with certain operating systems.
Function Not Supported with these operating systems
Display / Hide SmartPad Windows XP, Windows 7,Windows Embedded Standard
Display / Hide InputTool Windows XP, Windows 7,Windows Embedded Standard
ToggleMenuBar Bottom / Top Windows XP, Windows 7,Windows Embedded Standard, Windows Mobile
Hide / Display All Bars Windows Mobile
9-8

Virtual Key MapsThe Virtual Key tables indicate the key combinations that RFTerm looks for to perform each function. These key combinationsare provided for the convenience of users who wish to remapRFTerm functions to physical keys different from those providedby the default key map. In most cases, the key combinations used by RFTerm are the same for each device type. Exceptionsare noted.
RFTerm Functions - Virtual KeysImportant note for HX2 users:When running an HX2with an AlphaMode 3 Tap keypad, RFTerm hijacks virtual function keys F11 through F19 to perform theRFTerm functions indicated in the “HX2” column of this table. This hijacking occurs only if the HX2 Function Key Enable optionis not selected. If HX2 Function Key Enable is selected, the key map reverts to the standard RFTerm virtual key map(indicated in the column labeled “Virtual Key” in the table below).
RFTerm Function Virtual Key HX2 RFTerm GUI Equivalent
Connect to Host Ctrl Shift C F17 Session > Connect
Disconnect from Host Ctrl Shift D F17 Session > Disconnect
Exit the EmulatorAlt X
Escape File > ExitCtrl Shift X
Help Ctrl H Ctrl H N/A
Hide / Display All Bars(See Note 1 below) Ctrl Shift L F16 File > Settings > Display > Hide All Bars
Hide / Display MenuBar Ctrl Shift M F15 File > Settings > Display > HideMenuBar
Hide / Display ToolBar Ctrl Shift T F14 File > Settings > Display > Hide ToolBar
Hide / Display KeyBar Ctrl Shift K F13 File > Settings > Display > Hide KeyBar
ToggleMenuBar Bottom / Top(See Note 2 below) Ctrl Shift B Ctrl Shift B File > Settings > Display > Menu at Bottom
Configure Host Session Ctrl Shift N F18 Session > Configure
Next Session Ctrl Shift J Session > S1/S2/S3/S4
Application Settings Ctrl Shift E F19 File > Settings
Increase Font Size Ctrl Shift Up Arrow F12 Display > Font Up
Decrease Font Size Ctrl Shift Down Arrow F11 Display > Font Down
Toggle Font Bold / Normal Ctrl Shift 1 Ctrl Shift 1 Session > Configure > Font tab
Toggle Status(See Note 3 below) Ctrl Shift 2 Ctrl Shift 2 File > Settings > Status > Orientation
Toggle OIA Bar Ctrl Shift O Ctrl Shift O File > Settings > Display > HideOIA Bar
Display / Hide SmartPad(see Note 1 below) Display > SmartPad
9-9

RFTerm Function Virtual Key HX2 RFTerm GUI Equivalent
Display / Hide InputTool(see Note 1 below) Ctrl Shift I Ctrl Shift I Display > InputTool
Toggle Vertical Scroll Bars Ctrl Shift V Ctrl Shift V File > Settings > Display > Hide Vertical
Toggle Horizontal Scroll Bars Ctrl Shift H Ctrl Shift H File > Settings > Display > Hide Horiz
Print Screen Ctrl Alt P Ctrl Alt P File > Print Screen
Scroll UpOneRow Shift Up Arrow Shift Up Arrow Scroll Bars
Scroll DownOneRow Shift Down Arrow Shift Down Arrow Scroll Bars
Scroll Left One Column Shift Left Arrow Shift Left Arrow Scroll Bars
Scroll Right One Column Shift Right Arrow Shift Right Arrow Scroll Bars
Note 1
These RFTerm functions are not available with the following operating systems:l Windows Embedded Standardl Windows XPl Windows 7
Note 2
These RFTerm functions are not available with the following operating systems:l Windows Mobilel Windows Embedded Standardl Windows XPl Windows 7
Note 3
These RFTerm functions are not available with the following operating systems:l Windows Mobile
9-10
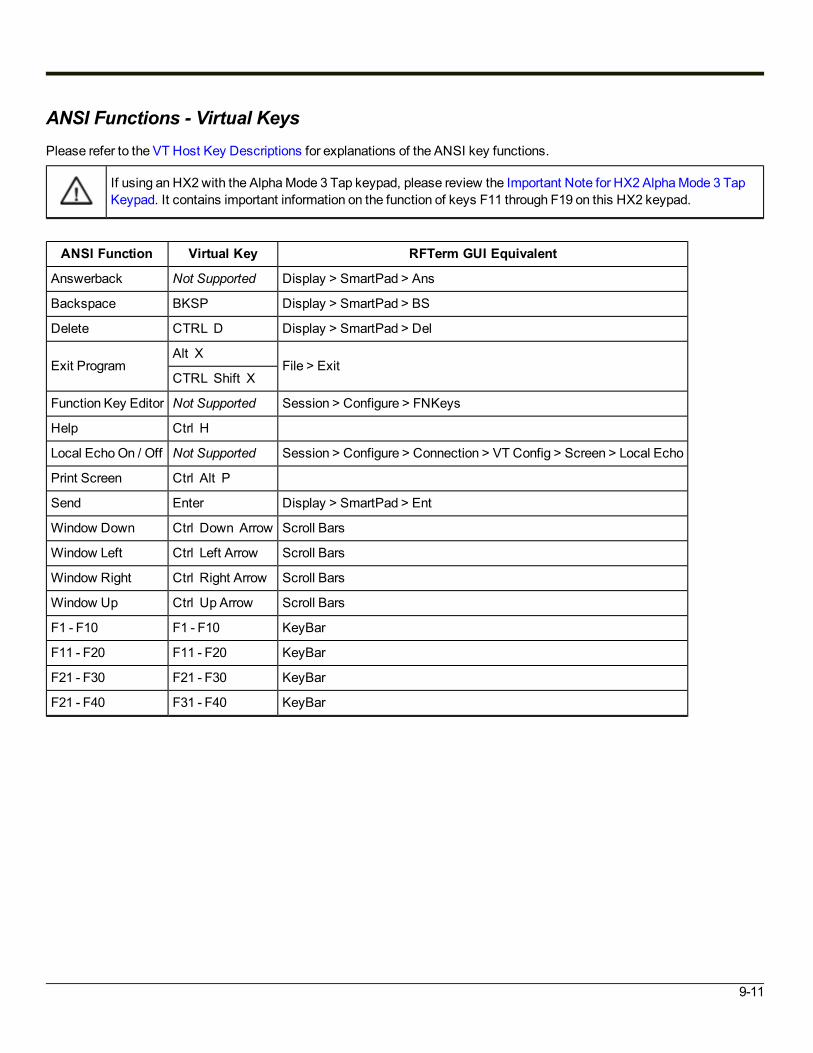
ANSI Functions - Virtual KeysPlease refer to the VT Host Key Descriptions for explanations of the ANSI key functions.
If using an HX2with the AlphaMode 3 Tap keypad, please review the Important Note for HX2 AlphaMode 3 TapKeypad. It contains important information on the function of keys F11 through F19 on this HX2 keypad.
ANSI Function Virtual Key RFTerm GUI Equivalent
Answerback Not Supported Display > SmartPad > Ans
Backspace BKSP Display > SmartPad > BS
Delete CTRL D Display > SmartPad > Del
Exit ProgramAlt X
File > ExitCTRL Shift X
Function Key Editor Not Supported Session > Configure > FNKeys
Help Ctrl H
Local EchoOn / Off Not Supported Session > Configure > Connection > VT Config > Screen > Local Echo
Print Screen Ctrl Alt P
Send Enter Display > SmartPad > Ent
Window Down Ctrl Down Arrow Scroll Bars
Window Left Ctrl Left Arrow Scroll Bars
Window Right Ctrl Right Arrow Scroll Bars
Window Up Ctrl Up Arrow Scroll Bars
F1 - F10 F1 - F10 KeyBar
F11 - F20 F11 - F20 KeyBar
F21 - F30 F21 - F30 KeyBar
F21 - F40 F31 - F40 KeyBar
9-11

IBM 3270 Functions - Virtual KeysWhen running the RFTerm IBM 3270 terminal emulator on the HX2, please refer to the 3270 Host Key Descriptions forexplanations of the IBM 3270 functions.
If using an HX2with the AlphaMode 3 Tap keypad, please review the Important Note for HX2 AlphaMode 3 TapKeypad. It contains important information on the function of keys F11 through F19 on this HX2 keypad.
3270 Function Virtual Key RFTerm GUI Equivalent
Attention Ctrl A Display > SmartPad > Attn
Backtab Shift Tab Display > SmartPad > Btb
Clear Ctrl C Display > SmartPad > Clr
Cursor Block / Underline Not Supported File > Settings > Cursor > Cursor Options
Delete Ctrl D Display > SmartPad > Del
Erase Bksp Display > SmartPad > BSp
Erase Input Ctrl Bksp Display > SmartPad > Ein
Error Reset Ctrl R Display > SmartPad > Rst
Exit ProgramAlt X
File > ExitCtrl Shift X
Function Key Editor Not Supported Session > Configure > FNKeys
Help Ctrl H
HomeKey Not Supported Display > SmartPad > Hm
Insert Ctrl I Display > SmartPad > Ins
New Line Key Ctrl N Display > SmartPad > NL
Next or Tab Tab Display > SmartPad > Tb
Print Screen Ctrl Alt P
Roll Up Not Supported IBM 3 KeyBar: Roll Up
Roll Down Not Supported IBM 3 KeyBar: Roll Dn
SW Rev Not Supported File > About
Send Not Supported Base KeyBar: Ent
Status Line ToggleAlt T
File > Settings > Display > HideOIACtrl Shift O
System Request Ctrl S Display > SmartPad > Srq
Window Down Ctrl Down Arrow Scroll Bars
9-12

3270 Function Virtual Key RFTerm GUI Equivalent
Window Right Ctrl Right Arrow Scroll Bars
Window Left Ctrl Left Arrow Scroll Bars
Window Up Ctrl Up Arrow Scroll Bars
PA1 - PA3 Ctrl 1 - 3 Display > SmartPad > Pa1 - Pa3
F1 - F10 F1 - F10 KeyBar
F11 - F20 F11 - F20 KeyBar
F21 - F24 F21 - F24 KeyBar
9-13

IBM 5250 Functions - Virtual KeysPlease refer to the 5250 Host Key Descriptions for explanations of the IBM 5250 functions.
If using an HX2with the AlphaMode 3 Tap keypad, please review the Important Note for HX2 AlphaMode 3 TapKeypad. It contains important information on the function of keys F11 through F19 on this HX2 keypad.
5250 Function Virtual key RFTerm GUI Equivalent
Attention Ctrl A Display > SmartPad > Attn
Backtab Shift Tab Base KeyBar: Btb
Char Backspace Bksp Display > SmartPad > BSp
Clear Ctrl C Display > SmartPad > Clr
Cursor Block / Underline Not Supported File > Settings > Cursor > Cursor Options
Delete Ctrl D Display > SmartPad > Del
Dup Ctrl U Display > SmartPad > Dup
Erase Input Ctrl Bksp Display > SmartPad > Ein
Error Reset or Reset Esc Display > SmartPad > Rst
Exit ProgramAlt X
File > ExitCtrl Shift X
Field Exit Ctrl Enter Display > SmartPad > Fex
Field Minus Ctrl M Display > SmartPad > F-
Field Plus Ctrl L Display > SmartPad > F+
Function Key Editor Not Supported Session > Configure > FNKeys
HomeKey Not Supported Display > SmartPad > Hm
Help Ctrl H
Insert Ctrl I Display > SmartPad > Ins
New Line Key Ctrl N Display > SmartPad > NL
Next or Field Advance or Tab Tab Base KeyBar: Tb
Print Screen Ctrl Alt P Display > SmartPad > Prt
Send or Enter CATV Enter Base KeyBar: Ent
Status Line ToggleAlt T
Special KeyBar: OIACtrl Shift 0
SW Rev Not Supported File > About
System Request Ctrl S Display > SmartPad > Srq
9-14

5250 Function Virtual key RFTerm GUI Equivalent
Window Down Ctrl Down Arrow Scroll Bars
Window Left Ctrl Left Arrow Scroll Bars
Window Right Ctrl Right Arrow Scroll Bars
Window Up Ctrl Up Arrow Scroll Bars
F1 - F10 F1 - F10 KeyBar
F11 - F20 F11 - F20 KeyBar
F21 - F24 F21 - F24 KeyBar
9-15

Optional F1 - F40 Key MapsThere are optional key maps for the F1 through F40 keys. To access the option, select Session > Configure > Keybd. If theTwo-key Function Keys checkbox is unchecked, the standard function key keypresses listed for each piece of equipmentapply.If this checkbox is checked, the following key maps replace the standard key maps for F1 through F40:
F1 and... Produces Ctrl orF2 and... Produces F3 and... Produces F4 and... Produces
1 F1 1 F11 1 F21 1 F31
2 F2 2 F12 2 F22 2 F32
3 F3 3 F13 3 F23 3 F33
4 F4 4 F14 4 F24 4 F34
5 F5 5 F15 5 F25 5 F35
6 F6 6 F16 6 F26 6 F36
7 F7 7 F17 7 F27 7 F37
8 F8 8 F18 8 F28 8 F38
9 F9 9 F19 9 F29 9 F39
10 F10 10 F20 10 F30 10 F40
If using an HX2with the AlphaMode 3 Tap keypad, please review the Important Note for HX2 AlphaMode 3 TapKeypad. It contains important information on the function of keys F11 through F19 on this HX2 keypad.
9-16

HX2 Key Maps
Dual Alpha Keypads
Triple Tap Keypads
AlphaMode 3 Tap KeypadNote: All RFTerm shortcut keys are directly accessible through the RFTerm user interface.When using a sequence of keys that includes theBlue, Orange, Green or Light Blue key, press the color key first then therest of the key sequence unless otherwise noted in the tables. Ctrl, Shift, Blue, Light Blue andOrange keys (not all keys arepresent on each keyboard) are “sticky keys”. They do not need to be held down before pressing the next (or desired) key.By default, theGreen key (when present) is not sticky. However theGreen key can be configured to be sticky via theStart >Settings > Control Panel > HX2-3 Options > Misc tab.User defined keys can be set using Start > Settings > Control Panel > Keypad and selecting theKey Map tab. Please seethe HX2ReferenceGuide for details.
Important Note for Alpha Mode 3 Tap KeypadWhen running an HX2with an AlphaMode 3 Tap keypad, RFTerm hijacks virtual function keys F11 through F19 to perform theRFTerm functions indicated in the RFTerm Functions - HX2 key map for the AlphaMode 3 Tap keypad. This hijacking occurs
9-17

only if the HX2 Function Key Enable option is not selected. If HX2 Function Key Enable is selected, the key map reverts to thestandard RFTerm virtual key map (indicated in the column labeledVirtual Key in the table here).
RFTerm Functions - HX2
HX2 Dual Alpha Keypad
RFTerm Function Press these keys in this order RFTerm GUI Equivalent
Connect to Host CTRL SHIFT Orange 2 Session > Connect
Disconnect from Host CTRL SHIFT Light Blue 2 Session > Disconnect
Hide / Display All Bars CTRL SHIFT Light Blue 6 File > Settings > Display > Hide All Bars
Hide / Display MenuBar CTRL SHIFT Orange 7 File > Settings > Display > HideMenuBar
Hide / Display ToolBar CTRL SHIFT Light Blue Up Arrow File > Settings > Display > Hide ToolBar
Hide / Display KeyBar CTRL SHIFT Orange 6 File > Settings > Display > Hide KeyBar
ToggleMenuBar Bottom / Top CTRL SHIFT Light Blue 1 File > Settings > Display > At Bottom
Configure Host Session CTRL SHIFT Light Blue 7 Session > Configure
Application Settings CTRL SHIFT Orange 3 File > Settings
Increase Font Size CTRL SHIFT Up Arrow Display > Font Up
Decrease Font Size CTRL SHIFT Down Arrow Display > Font Down
Toggle Font Bold / Normal CTRL SHIFT 1 Session > Configure > Font Tab
Display/Hide SmartPad CTRL SHIFT Light Blue 8 Display > SmartPad
Display / Hide Text Input CTRL SHIFT Orange 5 Display > InputTool
Help CTRL Light Blue 4
Scroll UpOneRow SHIFT Up Arrow Scroll Bars
Scroll DownOneRow SHIFT Down Arrow Scroll Bars
Scroll Left One Row SHIFT Green Up Arrow Scroll Bars
Scroll Right One Row SHIFT Green Down Arrow Scroll Bars
Exit the Emulator Green CTRL Light Blue BKSP File > Exit
9-18

HX2 Triple Tap Keypad
RFTerm Function Press these keys in this order RFTerm GUI Equivalent
Connect to Host CTRL SHIFT Light Blue 2 2 2 Session > Connect
Disconnect from Host CTRL SHIFT Light Blue 3 Session > Disconnect
Hide / Display All Bars CTRL SHIFT Light Blue 5 5 5 File > Settings > Display > Hide All Bars
Hide / Display MenuBar CTRL SHIFT Light Blue 6 File > Settings > Display > HideMenuBar
Hide / Display ToolBar CTRL SHIFT Light Blue 8 File > Settings > Display > Hide ToolBar
Hide / Display KeyBar CTRL SHIFT Light Blue 5 5 File > Settings > Display > Hide KeyBar
ToggleMenuBar Bottom / Top CTRL SHIFT Light Blue 2 2 File > Settings > Display > At Bottom
Configure Host Session CTRL SHIFT Light Blue 6 6 Session > Configure
Application Settings CTRL SHIFT Light Blue 3 3 File > Settings
Increase Font Size CTRL SHIFT Up Arrow Display > Font Up
Decrease Font Size CTRL SHIFT Down Arrow Display > Font Down
Toggle Font Bold / Normal CTRL SHIFT 1 Session > Configure > Font Tab
Display/Hide SmartPad CTRL SHIFT Light Blue 7 Display > SmartPad
Display / Hide Text Input CTRL SHIFT Light Blue 4 4 4 Display > InputTool
Help CTRL Light Blue 4 4
Scroll UpOneRow SHIFT Up Arrow Scroll Bars
Scroll DownOneRow SHIFT Down Arrow Scroll Bars
Scroll Left One Row SHIFT Green Up Arrow Scroll Bars
Scroll Right One Row SHIFT Green Down Arrow Scroll Bars
Exit the Emulator Green CTRL Light Blue 9 9 File > Exit
9-19

HX2 Alpha Mode 3 Tap Keypad
The notationNot Defined in the following table indicates that no key combination provides this function in the default key map.To obtain this function, some key (or combination of keys) must be remapped to provide key combination specified earlier inthe RFTerm Functions - Virtual Keys table.
RFTerm Function Press these keys in this order RFTerm GUI Equivalent
Connect to Host Blue 7 Session > Connect
Disconnect from Host Blue 7 Session > Disconnect
Hide / Display All Bars Blue 6 File > Settings > Display > Hide All Bars
Hide / Display MenuBar Blue 5 File > Settings > Display > HideMenuBar
Hide / Display ToolBar Blue 4 File > Settings > Display > Hide ToolBar
Hide / Display KeyBar Blue 3 File > Settings > Display > Hide KeyBar
ToggleMenuBar Bottom / Top Not Defined File > Settings > Display > At Bottom
Configure Host Session Blue 8 Session > Configure
Application Settings Blue 9 File > Settings
Increase Font Size Blue 2 Display > Font Up
Decrease Font Size Blue 1 Display > Font Down
Toggle Font Bold / Normal Not Defined Session > Configure > Font Tab
Display/Hide SmartPad Not Defined Display > SmartPad
Display / Hide Text Input Not Defined Display > InputTool
Help Not Defined
Scroll UpOneRow Not Defined Scroll Bars
Scroll DownOneRow Not Defined Scroll Bars
Scroll Left One Row Not Defined Scroll Bars
Scroll Right One Row Not Defined Scroll Bars
Exit the Emulator Blue Bksp File > Exit
9-20

ANSI Functions - HX2When running the RFTerm ANSI on the HX2, please refer to the VT Host Key Descriptions for explanations of the ANSI keyfunctions.
HX2 Dual Alpha Keypad
Alternative keypresses may be defined for F1 through F40. Please seeOptional F1 - F40 Key Maps for details.
ANSI Function Press these keys in this order RFTerm GUI Equivalent
Answerback Not Supported Display > SmartPad > Ans
Backspace BKSP Display > SmartPad > BSp
Delete Orange Light Blue 1 Display > SmartPad > DEL
Exit Program Green CTRL Light Blue BKSP File > Exit
Help CTRL Light Blue 4
F1 - F9 Green 1 - 9 KeyBar
F10 Green 0 KeyBar
F11 - F19 SHIFT Green 1 - 9 KeyBar
F20 SHIFT Green 0 KeyBar
F21 - F24 SHIFT Green Light Blue 1 - 4 KeyBar
F25 - F40 Not Supported KeyBar
Function Key Editor Not Supported Session > Configure > FNKeys
Send Enter Display > SmartPad > Ent
Window Down CTRL Down Arrow Scroll Bars
Window Left CTRL Green Up Arrow Scroll Bars
Window Right CTRL Green Down Arrow Scroll Bars
Window Up CTRL Up Arrow Scroll Bars
Print Screen Green CTRL Light Blue 8
9-21

HX2 Triple Tap Keypad
Alternative keypresses may be defined for F1 through F40. Please seeOptional F1 - F40 Key Maps for details.
ANSI Function Press these keys in this order RFTerm GUI Equivalent
Answerback Not Supported Display > SmartPad > Ans
Backspace BKSP Display > SmartPad > BSp
Delete Orange Light Blue 1 Display > SmartPad > DEL
Exit Program Green CTRL Light Blue 9 9 File > Exit
Help CTRL Light Blue 4 4
F1 - F9 Green 1 - 9 KeyBar
F10 Green 0 KeyBar
F11 - F19 SHIFT Green 1 - 9 KeyBar
F20 SHIFT Green 0 KeyBar
F21 - F24 SHIFT Green Light Blue 1 - 4 KeyBar
F25 - F40 Not Supported KeyBar
Function Key Editor Not Supported Session > Configure > FNKeys
Send Enter Display > SmartPad > Ent
Window Down CTRL Down Arrow Scroll Bars
Window Left CTRL Green Up Arrow Scroll Bars
Window Right CTRL Green Down Arrow Scroll Bars
Window Up CTRL Up Arrow Scroll Bars
Print Screen Green CTRL Light Blue 7
9-22
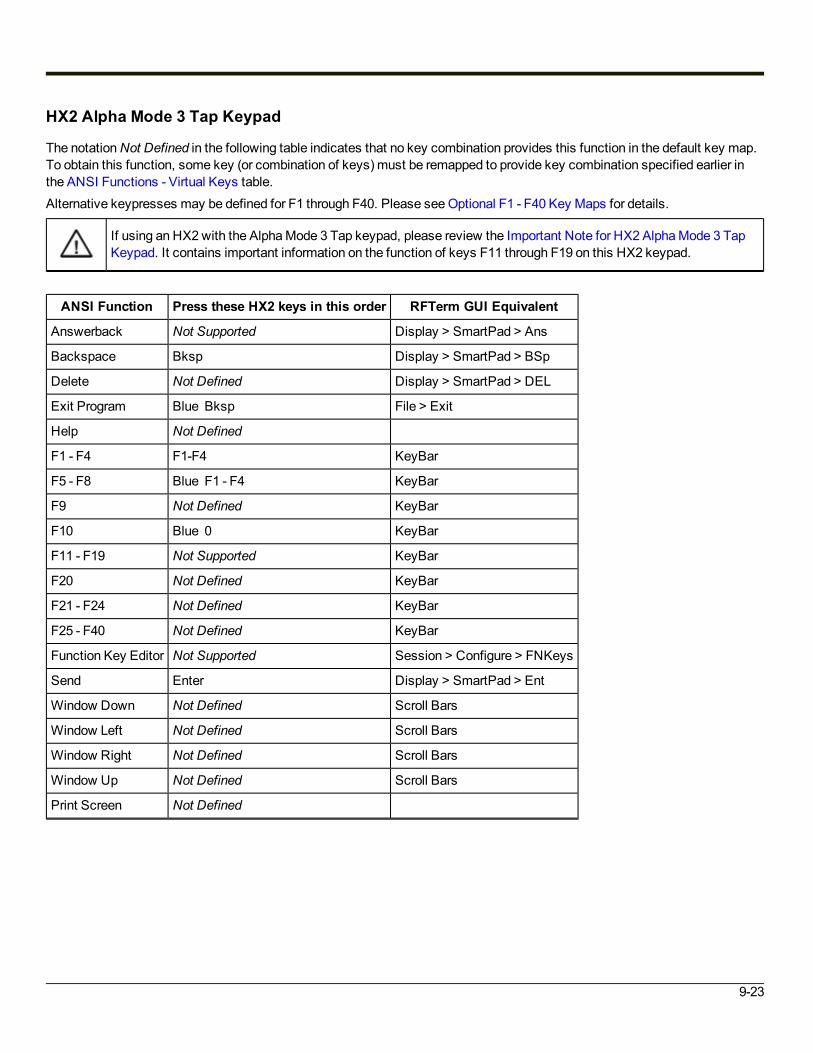
HX2 Alpha Mode 3 Tap Keypad
The notationNot Defined in the following table indicates that no key combination provides this function in the default key map.To obtain this function, some key (or combination of keys) must be remapped to provide key combination specified earlier inthe ANSI Functions - Virtual Keys table.Alternative keypresses may be defined for F1 through F40. Please seeOptional F1 - F40 Key Maps for details.
If using an HX2with the AlphaMode 3 Tap keypad, please review the Important Note for HX2 AlphaMode 3 TapKeypad. It contains important information on the function of keys F11 through F19 on this HX2 keypad.
ANSI Function Press these HX2 keys in this order RFTerm GUI Equivalent
Answerback Not Supported Display > SmartPad > Ans
Backspace Bksp Display > SmartPad > BSp
Delete Not Defined Display > SmartPad > DEL
Exit Program Blue Bksp File > Exit
Help Not Defined
F1 - F4 F1-F4 KeyBar
F5 - F8 Blue F1 - F4 KeyBar
F9 Not Defined KeyBar
F10 Blue 0 KeyBar
F11 - F19 Not Supported KeyBar
F20 Not Defined KeyBar
F21 - F24 Not Defined KeyBar
F25 - F40 Not Defined KeyBar
Function Key Editor Not Supported Session > Configure > FNKeys
Send Enter Display > SmartPad > Ent
Window Down Not Defined Scroll Bars
Window Left Not Defined Scroll Bars
Window Right Not Defined Scroll Bars
Window Up Not Defined Scroll Bars
Print Screen Not Defined
9-23

IBM 3270 Functions - HX2When running the RFTerm IBM 3270 terminal emulator on the HX2, please refer to the 3270 Host Key Descriptions forexplanations of the IBM 3270 functions.
HX2 Dual Alpha Keypad
Alternative keypresses may be defined for F1 through F40. Please seeOptional F1 - F40 Key Maps for details.
3270 Function Press these keys in this order RFTerm GUI Equivalent
Attn CTRL Orange 1 Display > SmartPad > Attn
Backtab Green TAB Display > SmartPad > BTb
Clear CTRL Orange 2 Display > SmartPad > Clr
Delete CTRL Light Blue 2 Display > SmartPad > Del
Erase BKSP Display > SmartPad > Bsp
Erase Input CTRL BKSP Display > SmartPad > EIn
Error Reset or Reset CTRL Light Blue 9 Display > SmartPad > Rst
Exit Program Green CTRL Light Blue BKSP File > Exit
Function Key Editor Not Supported Session > Configure > FNKeys
Help CTRL Light Blue 4
Homekey Not Supported Display > SmartPad > Hm
Insert CTRL Orange 5 Display > SmartPad > Ins
LDUB Not Supported
New Line Key CTRL Light Blue 7 Display > SmartPad > Nl
Next or Tab TAB Display > SmartPad > Tb
Print Screen Green CTRL Light Blue 8
RDUB Not Supported
SW Rev Not Supported File > About
Window Down CTRL Down Arrow Scroll Bars
Window Right CTRL Green Down Arrow Scroll Bars
Window Left CTRL Green Up Arrow Scroll Bars
Window Up CTRL Up Arrow Scroll Bars
Status Line Toggle Green CTRL Light Blue Up Arrow File > Settings > Display > HideOIA
SYS_REQ CTRL Orange Up Arrow Display > SmartPad > Srq
PA1 - PA3 CTRL 1-3 Display > SmartPad > Pa1 - Pa3
F1 - F9 Green 1 - 9 KeyBar
F10 Green 0 KeyBar
9-24

3270 Function Press these keys in this order RFTerm GUI Equivalent
F11 - F29 SHIFT Green 1 - 9 KeyBar
F20 SHIFT Green 0 KeyBar
F21 - F24 SHIFT Green Light Blue 1 - 4 KeyBar
9-25

HX2 Triple Tap Keypad
Alternative keypresses may be defined for F1 through F40. Please seeOptional F1 - F40 Key Maps for details.
3270 Function Press these keys in this order RFTerm GUI Equivalent
Attn CTRL Light Blue 2 Display > SmartPad > Attn
Backtab Green TAB Display > SmartPad > BTb
Clear CTRL Light Blue 2 2 2 Display > SmartPad > Clr
Delete CTRL Light Blue 3 Display > SmartPad > Del
Erase BKSP Display > SmartPad > Bsp
Erase Input CTRL BKSP Display > SmartPad > EIn
Error Reset or Reset CTRL Light Blue 7 7 7 Display > SmartPad > Rst
Exit Program Green CTRL Light Blue 9 9 File > Exit
Function Key Editor Not Supported Session > Configure > FNKeys
Help CTRL Light Blue 4 4
Homekey Not Supported Display > SmartPad > Hm
Insert CTRL Light Blue 4 4 4 Display > SmartPad > Ins
LDUB Not Supported
New Line Key CTRL Light Blue 6 6 Display > SmartPad > Nl
Next or Tab TAB Display > SmartPad > Tb
Print Screen Green CTRL Light Blue 7
RDUB Not Supported
SW Rev Not Supported File > About
Window Down CTRL Down Arrow Scroll Bars
Window Right CTRL Green Down Arrow Scroll Bars
Window Left CTRL Green Up Arrow Scroll Bars
Window Up CTRL Up Arrow Scroll Bars
Status Line Toggle Green CTRL Light Blue 8 File > Settings > Display > HideOIA
SYS_REQ CTRL Light Blue 7 7 7 7 Display > SmartPad > Srq
PA1 - PA3 CTRL 1 - 3 Display > SmartPad > Pa1 - Pa3
F1 - F9 Green 1 - 9 KeyBar
F10 Green 0 KeyBar
F11 - F19 SHIFT Green 1 - 9 KeyBar
F20 SHIFT Green 0 KeyBar
F21 - F24 SHIFT Green Light Blue 1 - 4 KeyBar
9-26

HX2 Alpha Mode 3 Tap Keypad
The notationNot Defined in the following table indicates that no key combination provides this function in the default key map.To obtain this function, some key (or combination of keys) must be remapped to provide key combination specified earlier inthe IBM 3270 Functions - Virtual Keys table.Alternative keypresses may be defined for F1 through F40. Please seeOptional F1 - F40 Key Maps for details.
If using an HX2with the AlphaMode 3 Tap keypad, please review the Important Note for HX2 AlphaMode 3 TapKeypad. It contains important information on the function of keys F11 through F19 on this HX2 keypad.
3270 Function Press these keys in this order RFTerm GUI Equivalent
Attn Not Defined Display > SmartPad > Attn
Backtab Blue Left Arrow Display > SmartPad > BTb
Clear Not Defined Display > SmartPad > Clr
Delete Not Defined Display > SmartPad > Del
Erase Bksp Display > SmartPad > Bsp
Erase Input Not Defined Display > SmartPad > EIn
Error Reset or Reset Not Defined Display > SmartPad > Rst
Exit Program Blue Bksp File > Exit
Function Key Editor Not Supported Session > Configure > FNKeys
Help Not Defined
Homekey Not Defined Display > SmartPad > Hm
Insert Not Defined Display > SmartPad > Ins
LDUB Not Supported
New Line Key Not Defined Display > SmartPad > Nl
Next or Tab Blue Right Arrow Display > SmartPad > Tb
Print Screen Not Defined
RDUB Not Supported
SW Rev Not Defined File > About
Window Down Not Defined Scroll Bars
Window Right Not Defined Scroll Bars
Window Left Not Defined Scroll Bars
Window Up Not Defined Scroll Bars
Status Line Toggle Not Defined File > Settings > Display > HideOIA
SYS_REQ Not Defined Display > SmartPad > Srq
PA1 - PA3 Not Defined Display > SmartPad > Pa1 - Pa3
9-27
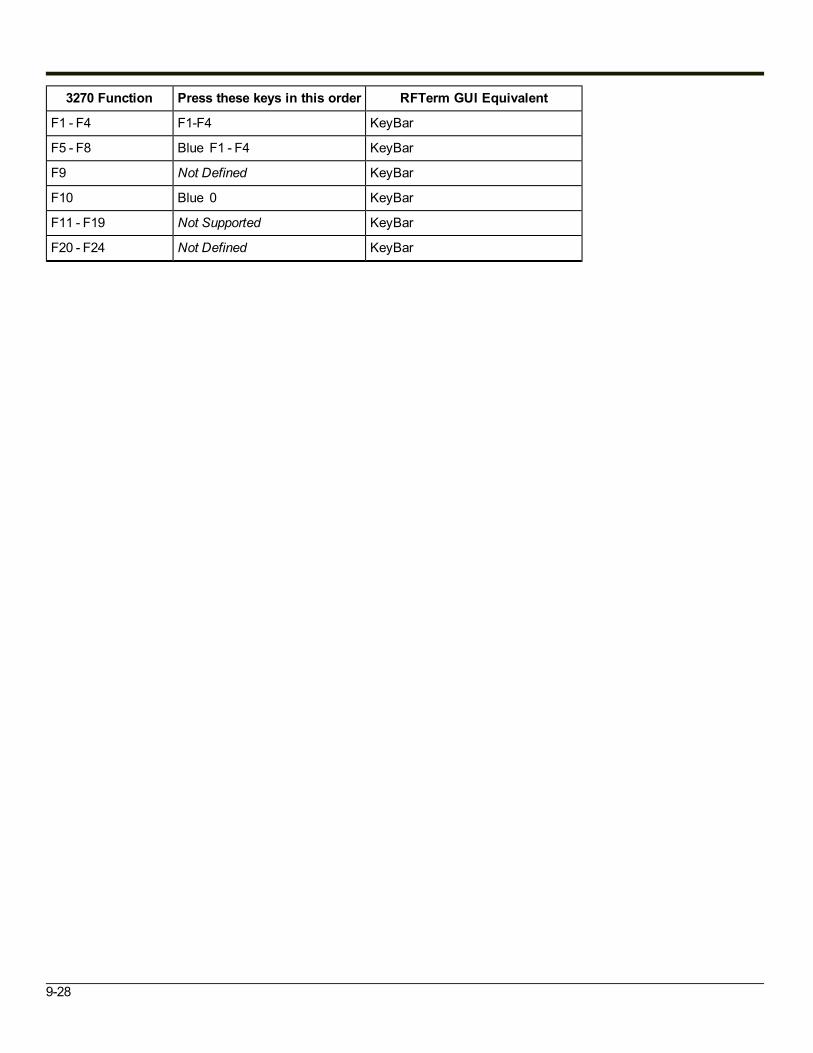
3270 Function Press these keys in this order RFTerm GUI Equivalent
F1 - F4 F1-F4 KeyBar
F5 - F8 Blue F1 - F4 KeyBar
F9 Not Defined KeyBar
F10 Blue 0 KeyBar
F11 - F19 Not Supported KeyBar
F20 - F24 Not Defined KeyBar
9-28

IBM 5250 Functions - HX2When running the RFTerm IBM 5250 terminal emulator on HX2 devices, please refer to the 5250 Host Key Descriptions forexplanations of the IBM 5250 functions.
HX2 Dual Alpha Keypad
Alternative keypresses may be defined for F1 through F40. Please seeOptional F1 - F40 Key Maps for details.
5250 Function Press these keys in this order RFTerm GUI Equivalent
Attn CTRL Orange 1 Display > SmartPad > Attn
Backtab Green TAB Display > SmartPad > BTb
Char Backspace BKSP Display > SmartPad > BSp
Clear CTRL Orange 2 Display > SmartPad > Clr
Delete CTRL Light Blue 2 Display > SmartPad > Del
Dup CTRL Orange 0 Display > SmartPad > Dup
Erase Input CTRL BKSP Display > SmartPad > EIn
Error Reset or Reset ESC Display > SmartPad > Rst
Exit Program Green CTRL Light Blue BKSP File > Exit
Function Key Editor Not Supported Session > Configure > FNKeys
Fastback Not Supported
Fastfwd Not Supported
Field Exit CTRL Enter Display > SmartPad > FEx
Field Minus CTRL Orange 7 Display > SmartPad > F-
Field Plus CTRL Light Blue 6 Display > SmartPad > F+
Help CTRL Light Blue 4
Homekey Not Supported Display > SmartPad > Hm
Insert CTRL Orange 5 Display > SmartPad > Ins
New Line Key CTRL Light Blue 7 Display > SmartPad > Nl
Next or Tab TAB Display > SmartPad > Tb
Print Screen Green CTRL Light Blue 8 Display > SmartPad > Prt
SW REV Not Supported File > About
Window Down CTRL Down Arrow Scroll Bars
Window Right CTRL Green Down Arrow Scroll Bars
Window Left CTRL Green Up Arrow Scroll Bars
Window Up CTRL Up Arrow Scroll Bars
Send or Entercatv Enter Display > SmartPad > Ent
9-29
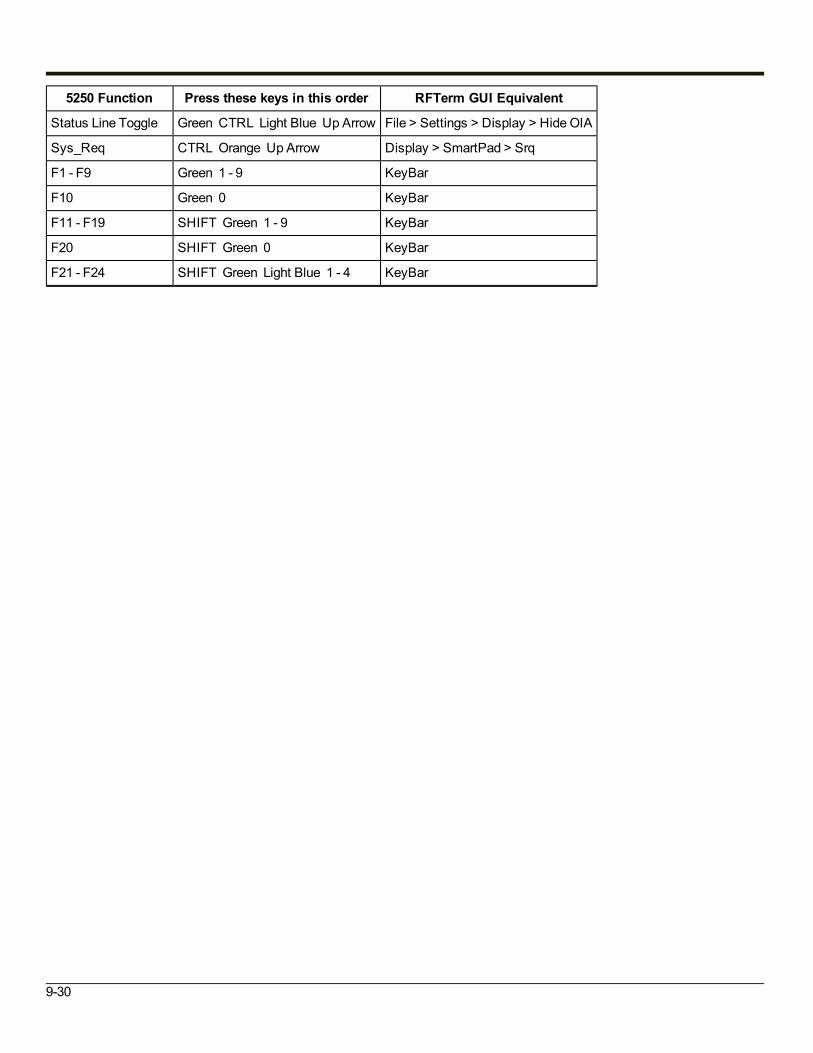
5250 Function Press these keys in this order RFTerm GUI Equivalent
Status Line Toggle Green CTRL Light Blue Up Arrow File > Settings > Display > HideOIA
Sys_Req CTRL Orange Up Arrow Display > SmartPad > Srq
F1 - F9 Green 1 - 9 KeyBar
F10 Green 0 KeyBar
F11 - F19 SHIFT Green 1 - 9 KeyBar
F20 SHIFT Green 0 KeyBar
F21 - F24 SHIFT Green Light Blue 1 - 4 KeyBar
9-30

HX2 Triple Tap Keypad
Alternative keypresses may be defined for F1 through F40. Please seeOptional F1 - F40 Key Maps for details.
5250 Function Press these keys in this order RFTerm GUI Equivalent
Attn CTRL Light Blue 2 Display > SmartPad > Attn
Backtab Green TAB Display > SmartPad > BTb
Char Backspace BKSP Display > SmartPad > BSp
Clear CTRL Light Blue 2 2 2 Display > SmartPad > Clr
Delete CTRL Light Blue 3 Display > SmartPad > Del
Dup CTRL Light Blue 8 8 Display > SmartPad > Dup
Erase Input CTRL BKSP Display > SmartPad > EIn
Error Reset or Reset ESC Display > SmartPad > Rst
Exit Program Green CTRL Light Blue 9 9 File > Exit
Function Key Editor Not Supported Session > Configure > FNKeys
Fastback Not Supported
Fastfwd Not Supported
Field Exit CTRL Enter Display > SmartPad > FEx
Field Minus CTRL Light Blue 6 Display > SmartPad > F-
Field Plus CTRL Light Blue 5 5 5 Display > SmartPad > F+
Help CTRL Light Blue 4 4
Homekey Not Supported Display > SmartPad > Hm
Insert CTRL Light Blue 4 4 4 Display > SmartPad > Ins
New Line Key CTRL Light Blue 6 6 Display > SmartPad > Nl
Next or Tab TAB Display > SmartPad > Tb
Print Screen Green CTRL Light Blue 7 Display > SmartPad > Prt
SW REV Not Supported File > About
Window Down CTRL Down Arrow Scroll Bars
Window Right CTRL Green Down Arrow Scroll Bars
Window Left CTRL Green Up Arrow Scroll Bars
Window Up CTRL Up Arrow Scroll Bars
Send or Entercatv Enter Display > SmartPad > Ent
Status Line Toggle Green CTRL Light Blue 8 File > Settings > Display > HideOIA
Sys_Req CTRL Light Blue 7 7 7 7 Display > SmartPad > Srq
F1 - F9 Green 1 - 9 KeyBar
F10 Green 0 KeyBar
9-31

5250 Function Press these keys in this order RFTerm GUI Equivalent
F11 - F19 SHIFT Green 1 - 9 KeyBar
F20 SHIFT Green 0 KeyBar
F21 - F24 SHIFT Green Light Blue 1-4 KeyBar
9-32

HX2 Alpha Mode 3 Tap Keypad
The notationNot Defined in the following table indicates that no key combination provides this function in the default key map.To obtain this function, some key (or combination of keys) must be remapped to provide key combination specified earlier inthe IBM 5250 Functions - Virtual Keys table.Alternative keypresses may be defined for F1 through F40. Please seeOptional F1 - F40 Key Maps for details.
If using an HX2with the AlphaMode 3 Tap keypad, please review the Important Note for HX2 AlphaMode 3 TapKeypad. It contains important information on the function of keys F11 through F19 on this HX2 keypad.
5250 Function Press these keys in this order RFTerm GUI Equivalent
Attn Not Defined Display > SmartPad > Attn
Backtab Blue Left Arrow Display > SmartPad > BTb
Char Backspace Bksp Display > SmartPad > BSp
Clear Not Defined Display > SmartPad > Clr
Delete Not Defined Display > SmartPad > Del
Dup Not Defined Display > SmartPad > Dup
Erase Input Not Defined Display > SmartPad > EIn
Error Reset or Reset Not Defined Display > SmartPad > Rst
Exit Program Blue Bksp File > Exit
Function Key Editor Not Supported Session > Configure > FNKeys
Fastback Not Supported
Fastfwd Not Supported
Field Exit Blue Enter Display > SmartPad > FEx
Field Minus Not Defined Display > SmartPad > F-
Field Plus Not Defined Display > SmartPad > F+
Help Not Defined
Homekey Not Defined Display > SmartPad > Hm
Insert Not Defined Display > SmartPad > Ins
New Line Key Not Defined Display > SmartPad > Nl
Next or Tab Blue Right Arrow Display > SmartPad > Tb
Print Screen Not Defined Display > SmartPad > Prt
SW REV Not Supported File > About
Window Down Not Defined Scroll Bars
Window Right Not Defined Scroll Bars
Window Left Not Defined Scroll Bars
9-33

5250 Function Press these keys in this order RFTerm GUI Equivalent
Window Up Not Defined Scroll Bars
Send or Entercatv Enter Display > SmartPad > Ent
Status Line Toggle Not Defined File > Settings > Display > HideOIA
Sys_Req Not Defined Display > SmartPad > Srq
F1 - F4 F1 - F4 KeyBar
F5 - F8 Blue F1 - F4 KeyBar
F9 Not Defined KeyBar
F10 Blue 0 KeyBar
F11 - F19 Not Supported KeyBar
F20 - F24 Not Defined KeyBar
9-34
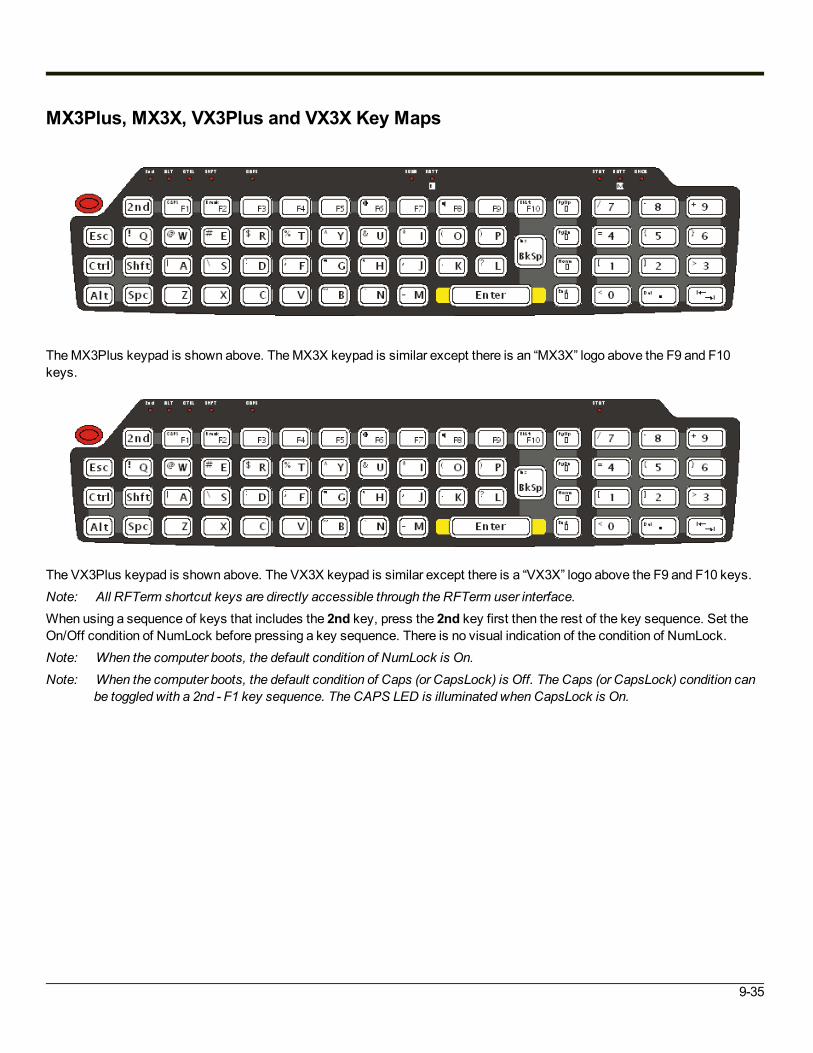
MX3Plus, MX3X, VX3Plus and VX3X Key Maps
TheMX3Plus keypad is shown above. TheMX3X keypad is similar except there is an “MX3X” logo above the F9 and F10keys.
The VX3Plus keypad is shown above. The VX3X keypad is similar except there is a “VX3X” logo above the F9 and F10 keys.Note: All RFTerm shortcut keys are directly accessible through the RFTerm user interface.When using a sequence of keys that includes the 2nd key, press the 2nd key first then the rest of the key sequence. Set theOn/Off condition of NumLock before pressing a key sequence. There is no visual indication of the condition of NumLock.Note: When the computer boots, the default condition of NumLock is On.Note: When the computer boots, the default condition of Caps (or CapsLock) is Off. The Caps (or CapsLock) condition can
be toggled with a 2nd - F1 key sequence. The CAPS LED is illuminated when CapsLock is On.
9-35

RFTerm Functions - MX3Plus / MX3X / VX3Plus / VX3X
RFTerm Function Press these keys in this order RFTerm GUI Equivalent
Connect to Host Ctrl Shft C Session > Connect
Disconnect from Host Ctrl Shft D Session > Disconnect
Hide / Display All Bars Ctrl Shft L File > Settings > Display > Hide All Bars
Hide / Display MenuBar Ctrl Shft M File > Settings > Display > HideMenuBar
Hide / Display ToolBar Ctrl Shft T File > Settings > Display > Hide ToolBar
Hide / Display KeyBar Ctrl Shft K File > Settings > Display > Hide KeyBar
ToggleMenuBar Bottom / Top Ctrl Shft B File > Settings > Display > At Bottom
Configure Host Session Ctrl Shft N Session > Configure
Application Settings Ctrl Shft E File > Settings
Increase Font Size Ctrl Shft Up Arrow Display > Font Up
Decrease Font Size Ctrl Shft Down Arrow Display > Font Down
Toggle Font Bold / Normal Ctrl Shft 1 Session > Configure > Font Tab
Display/Hide SmartPad Ctrl Shft P Display > SmartPad
Display / Hide Text Input Ctrl Shft I Display > InputTool
Help Ctrl H
Scroll UpOneRow Shft Up Arrow Scroll Bars
Scroll DownOneRow Shft Down Arrow Scroll Bars
Scroll Left One Row Shft Left Arrow Scroll Bars
Scroll Right One Row Shft Right Arrow Scroll Bars
Exit the EmulatorCtrl Shft X
File > ExitAlt X
9-36

ANSI Functions - MX3Plus / MX3X / VX3Plus / VX3XWhen running the RFTerm ANSI on these devices, please refer to the VT Host Key Descriptions for explanations of the ANSIkey functions.Alternative keypresses may be defined for F1 through F40. Please seeOptional F1 - F40 Key Maps for details.
ANSI Function Press these keys in this order RFTerm GUI Equivalent
Answerback Not Supported Display > SmartPad > Ans
Backspace BkSp Display > SmartPad > BSp
Delete 2nd . (period) Display > SmartPad > DEL
Exit ProgramAlt X
File > ExitShft Ctrl X
Help Ctrl H
F1 - F10 F1 - F10 KeyBar
F11 - F20 Alt F1 - F10 KeyBar
F21 - F30 Shft F1 - F10 KeyBar
F31 - F40 Ctrl F1 - F10 KeyBar
Function Key Editor Not Supported Session > Configure > FNKeys
Send Enter Display > SmartPad > Ent
Window Down Ctrl Down Arrow Scroll Bars
Window Left Ctrl Left Arrow Scroll Bars
Window Right Ctrl Right Arrow Scroll Bars
Window Up Ctrl Up Arrow Scroll Bars
Print Screen Ctrl Alt P
9-37

IBM 3270 Functions - MX3Plus / MX3X / VX3Plus / VX3XWhen running the RFTerm IBM 3270 terminal emulator on these devices, please refer to the 3270 Host Key Descriptions forexplanations of the IBM 3270 functions.Alternative keypresses may be defined for F1 through F40. Please seeOptional F1 - F40 Key Maps for details.
3270 Function Press these keys in this order RFTerm GUI Equivalent
Attn Ctrl A Display > SmartPad > Attn
Backtab 2nd Tab Display > SmartPad > BTb
Clear Ctrl C Display > SmartPad > Clr
Delete Ctrl D Display > SmartPad > Del
Erase BkSp Display > SmartPad > Bsp
Erase Input Ctrl BkSp Display > SmartPad > EIn
Error Reset or Reset Ctrl R Display > SmartPad > Rst
Exit ProgramAlt X
File > ExitShft Ctrl X
Function Key Editor Not Supported Session > Configure > FNKeys
Help Ctrl H
Homekey Ctrl Left Arrow Display > SmartPad > Hm
Insert Ctrl I Display > SmartPad > Ins
LDUB Not Supported
New Line Key Ctrl N Display > SmartPad > Nl
Next or Tab Tab Display > SmartPad > Tb
Print Screen Ctrl Alt P
RDUB Not Supported
SW Rev Alt F B File > About
Window Down Ctrl Down Arrow Scroll Bars
Window Right Ctrl Right Arrow Scroll Bars
Window Left Ctrl Left Arrow Scroll Bars
Window Up Ctrl Up Arrow Scroll Bars
Status Line ToggleAlt T
File > Settings > Display > HideOIAShft Ctrl O
SYS_REQ Ctrl S Display > SmartPad > Srq
PA1 - PA3 Ctrl F1 - F3 Display > SmartPad > Pa1 - Pa3
9-38

3270 Function Press these keys in this order RFTerm GUI Equivalent
F1 - F10 F1 - F10 KeyBar
F11 - F20 Alt F1 - F10 KeyBar
F21 - F24 Shft F1 - F4 KeyBar
9-39

IBM 5250 Functions - MX3Plus / MX3X / VX3Plus / VX3XWhen running the RFTerm IBM 5250 terminal emulator on these devices, please refer to the 5250 Host Key Descriptions forexplanations of the IBM 5250 functions.Alternative keypresses may be defined for F1 through F40. Please seeOptional F1 - F40 Key Maps for details.
5250 Function Press these keys in this order RFTerm GUI Equivalent
Attn Ctrl A Display > SmartPad > Attn
Backtab 2nd Tab Display > SmartPad > BTb
Char Backspace BkSp Display > SmartPad > BSp
Clear Ctrl C Display > SmartPad > Clr
Delete Ctrl D Display > SmartPad > Del
Dup Ctrl U Display > SmartPad > Dup
Erase Input Ctrl BkSp Display > SmartPad > EIn
Error Reset or Reset Esc Display > SmartPad > Rst
Exit ProgramAlt X
File > ExitCtrl Shft X
Function Key Editor Not Supported Session > Configure > FNKeys
Fastback Not Supported
Fastfwd Not Supported
Field ExitCtrl Enter
Display > SmartPad > FEx2nd Enter
Field Minus Ctrl M Display > SmartPad > F-
Field Plus Ctrl L Display > SmartPad > F+
Help Ctrl H
Homekey 2nd Home Display > SmartPad > Hm
Insert Ctrl I Display > SmartPad > Ins
New Line Key Ctrl N Display > SmartPad > Nl
Next or Tab Tab Display > SmartPad > Tb
Print Screen Ctrl Alt P Display > SmartPad > Prt
SW REV Alt F B File > About
Window Down Ctrl Down Arrow Scroll Bars
Window Right Ctrl Right Arrow Scroll Bars
Window Left Ctrl Left Arrow Scroll Bars
9-40
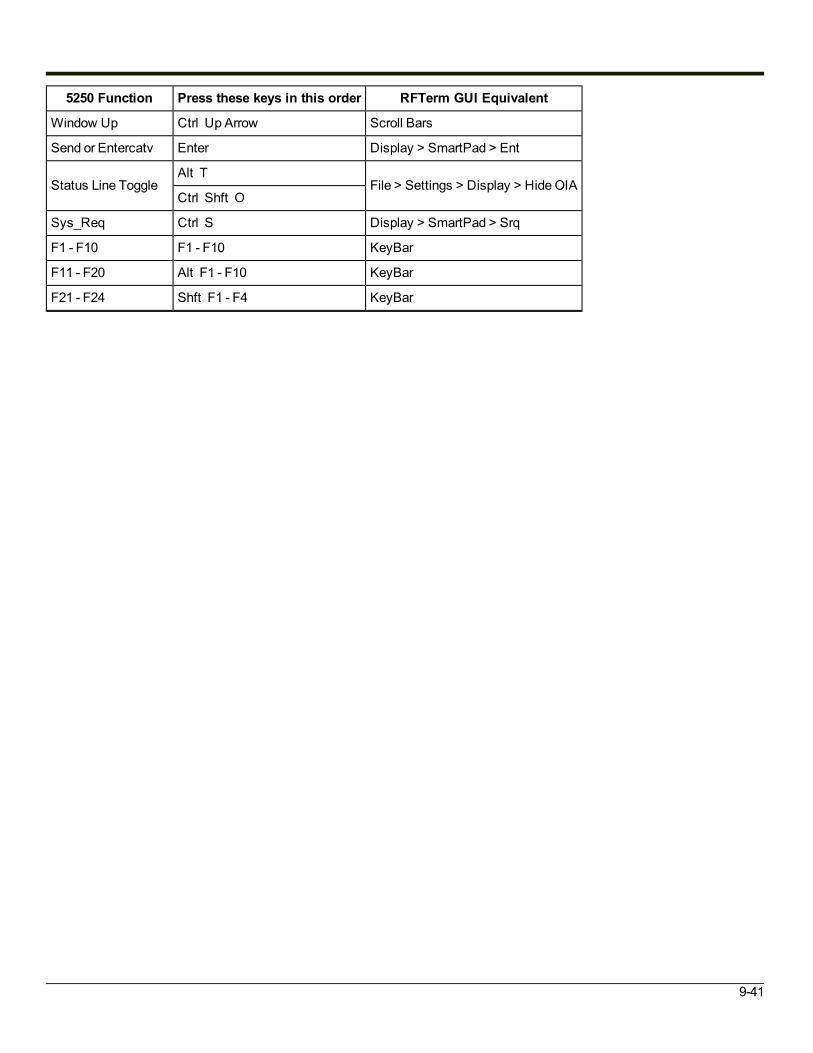
5250 Function Press these keys in this order RFTerm GUI Equivalent
Window Up Ctrl Up Arrow Scroll Bars
Send or Entercatv Enter Display > SmartPad > Ent
Status Line ToggleAlt T
File > Settings > Display > HideOIACtrl Shft O
Sys_Req Ctrl S Display > SmartPad > Srq
F1 - F10 F1 - F10 KeyBar
F11 - F20 Alt F1 - F10 KeyBar
F21 - F24 Shft F1 - F4 KeyBar
9-41

MX7 and MX7 Tecton Key Maps
32-key Keypad 55-key PrimaryDelete Keypad
55-key IBM5250 Keypad
55-key PrimaryBackspace Keypad
TheMX7 Tecton keypads are shown above. TheMX7 keypad is similar except for the "Tecton" logo and the position of the"MX7" logo.Note: The 55-key Primary Delete keypad has a primary delete key. The 55-key Primary Backspace keypad has a primary
backspace key. All other keys are the same.Note: All RFTerm shortcut keys are directly accessible through the RFTerm user interface.Unless otherwise noted, key maps in this section are valid for theMX7 Tecton with either aMicrosoft Windows CE 6.0 orWindows Mobile 6.5 operating system.When using a sequence of keys that includes theOrange orBlue keys, press the color key first then the rest of the keysequence unless otherwise noted in the tables. Ctrl, Alt, Shft, Blue andOrange keys are “sticky keys”. They do not need tobe held down before pressing the next (or desired) key. It is valid to use combinedmodifiers on specific keys.Alphabetic keys default to lower case letters. Press theShft key, then the alphabetic key for an uppercase letter.Note: When the computer boots, the default condition of Caps (or CapsLock) is Off. The Caps (or CapsLock) condition can
be toggled with Blue plus Tab key sequence.
9-42
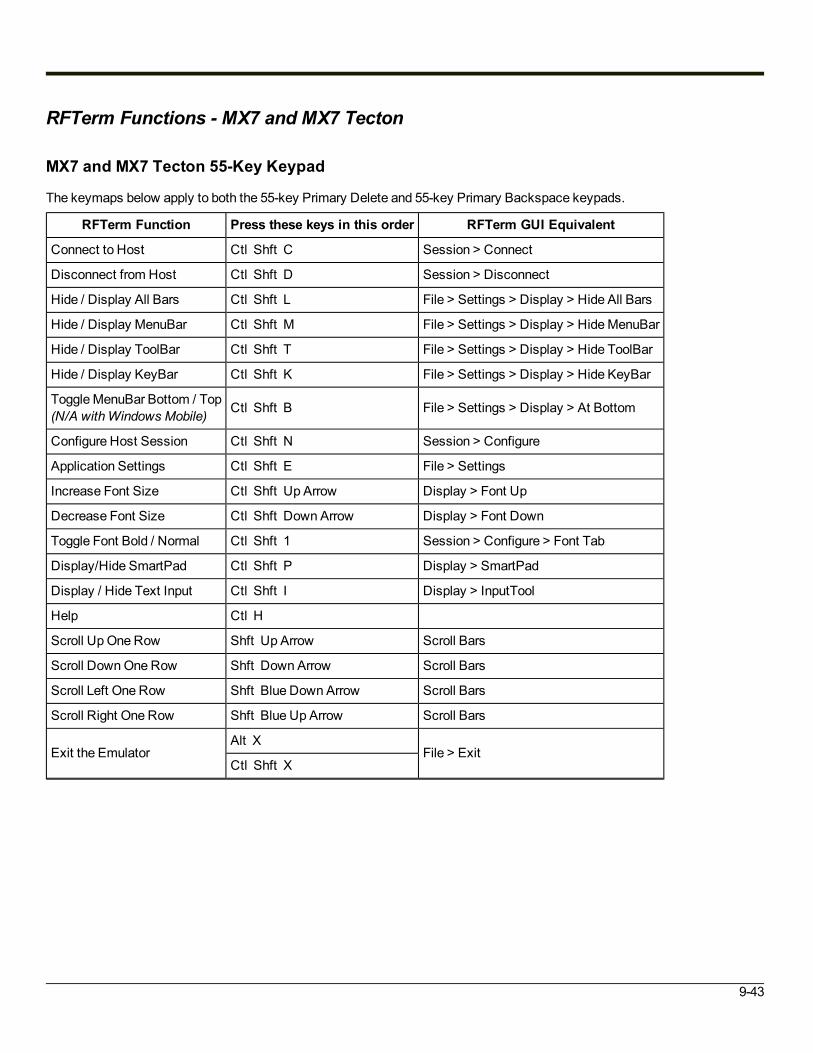
RFTerm Functions - MX7 and MX7 Tecton
MX7 and MX7 Tecton 55-Key Keypad
The keymaps below apply to both the 55-key Primary Delete and 55-key Primary Backspace keypads.
RFTerm Function Press these keys in this order RFTerm GUI Equivalent
Connect to Host Ctl Shft C Session > Connect
Disconnect from Host Ctl Shft D Session > Disconnect
Hide / Display All Bars Ctl Shft L File > Settings > Display > Hide All Bars
Hide / Display MenuBar Ctl Shft M File > Settings > Display > HideMenuBar
Hide / Display ToolBar Ctl Shft T File > Settings > Display > Hide ToolBar
Hide / Display KeyBar Ctl Shft K File > Settings > Display > Hide KeyBar
ToggleMenuBar Bottom / Top(N/A withWindows Mobile) Ctl Shft B File > Settings > Display > At Bottom
Configure Host Session Ctl Shft N Session > Configure
Application Settings Ctl Shft E File > Settings
Increase Font Size Ctl Shft Up Arrow Display > Font Up
Decrease Font Size Ctl Shft Down Arrow Display > Font Down
Toggle Font Bold / Normal Ctl Shft 1 Session > Configure > Font Tab
Display/Hide SmartPad Ctl Shft P Display > SmartPad
Display / Hide Text Input Ctl Shft I Display > InputTool
Help Ctl H
Scroll UpOneRow Shft Up Arrow Scroll Bars
Scroll DownOneRow Shft Down Arrow Scroll Bars
Scroll Left One Row Shft Blue Down Arrow Scroll Bars
Scroll Right One Row Shft Blue Up Arrow Scroll Bars
Exit the EmulatorAlt X
File > ExitCtl Shft X
9-43

MX7 and MX7 Tecton 32-Key Keypad
RFTerm Function Press these keys in this order RFTerm GUI Equivalent
Connect to Host Alph Ctl Shft 2 2 2 Session > Connect
Disconnect from Host Alph Ctl Shft 3 Session > Disconnect
Hide / Display All Bars Alph Ctl Shft 5 5 5 File > Settings > Display > Hide All Bars
Hide / Display MenuBar Alph Ctl Shft 6 File > Settings > Display > HideMenuBar
Hide / Display ToolBar Alph Ctl Shft 8 File > Settings > Display > Hide ToolBar
Hide / Display KeyBar Alph Ctl Shft 5 5 File > Settings > Display > Hide KeyBar
ToggleMenuBar Bottom / Top(N/A withWindows Mobile) Alph Ctl Shft 2 2 File > Settings > Display > At Bottom
Configure Host Session Alph Ctl Shft 6 6 Session > Configure
Application Settings Alph Ctl Shft 3 3 File > Settings
Increase Font Size Ctl Shft Up Arrow Display > Font Up
Decrease Font Size Ctl Shft Down Arrow Display > Font Down
Toggle Font Bold / Normal Ctl Shft 1 Session > Configure > Font Tab
Display/Hide SmartPad Alph Ctl Shft 7 Display > SmartPad
Display / Hide Text Input Alph Ctl Shft 4 4 4 Display > InputTool
Help Alph Ctl 4 4
Scroll UpOneRow Shft Up Arrow Scroll Bars
Scroll DownOneRow Shft Down Arrow Scroll Bars
Scroll Left One Row Shft Blue Down Arrow Scroll Bars
Scroll Right One Row Shft Blue Up Arrow Scroll Bars
Exit the Emulator Alph Alt 9 9 File > Exit
9-44
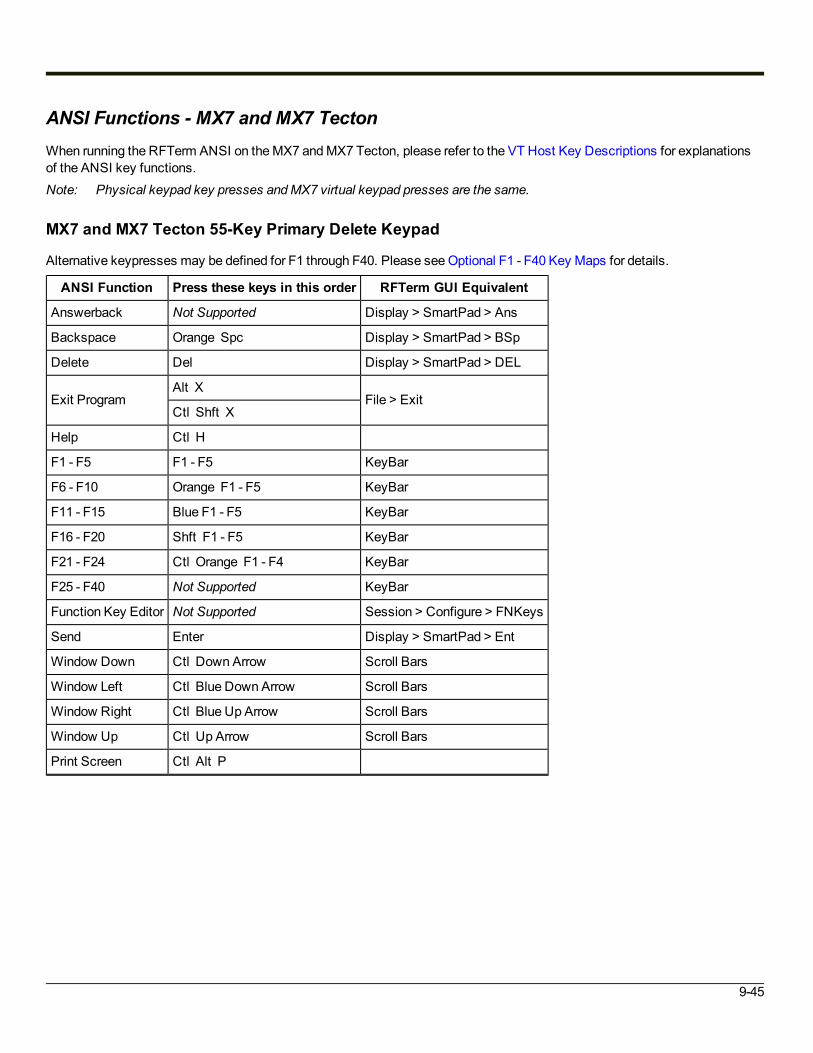
ANSI Functions - MX7 and MX7 TectonWhen running the RFTerm ANSI on theMX7 andMX7 Tecton, please refer to the VT Host Key Descriptions for explanationsof the ANSI key functions.Note: Physical keypad key presses andMX7 virtual keypad presses are the same.
MX7 and MX7 Tecton 55-Key Primary Delete Keypad
Alternative keypresses may be defined for F1 through F40. Please seeOptional F1 - F40 Key Maps for details.
ANSI Function Press these keys in this order RFTerm GUI Equivalent
Answerback Not Supported Display > SmartPad > Ans
Backspace Orange Spc Display > SmartPad > BSp
Delete Del Display > SmartPad > DEL
Exit ProgramAlt X
File > ExitCtl Shft X
Help Ctl H
F1 - F5 F1 - F5 KeyBar
F6 - F10 Orange F1 - F5 KeyBar
F11 - F15 Blue F1 - F5 KeyBar
F16 - F20 Shft F1 - F5 KeyBar
F21 - F24 Ctl Orange F1 - F4 KeyBar
F25 - F40 Not Supported KeyBar
Function Key Editor Not Supported Session > Configure > FNKeys
Send Enter Display > SmartPad > Ent
Window Down Ctl Down Arrow Scroll Bars
Window Left Ctl Blue Down Arrow Scroll Bars
Window Right Ctl Blue Up Arrow Scroll Bars
Window Up Ctl Up Arrow Scroll Bars
Print Screen Ctl Alt P
9-45

MX7 and MX7 Tecton 55-Key Primary Backspace Keypad
Alternative keypresses may be defined for F1 through F40. Please seeOptional F1 - F40 Key Maps for details.
ANSI Function Press these keys in this order RFTerm GUI Equivalent
Answerback Not Supported Display > SmartPad > Ans
Backspace Bksp Display > SmartPad > BSp
Delete Orange Spc Display > SmartPad > DEL
Exit ProgramAlt X
File > ExitCtl Shft X
Help Ctl H
F1 - F5 F1 - F5 KeyBar
F6 - F10 Orange F1 - F5 KeyBar
F11 - F15 Blue F1 - F5 KeyBar
F16 - F20 Shft F1 - F5 KeyBar
F21 - F24 Ctl Orange F1 - F4 KeyBar
F25 - F40 Not Supported KeyBar
Function Key Editor Not Supported Session > Configure > FNKeys
Send Enter Display > SmartPad > Ent
Window Down Ctl Down Arrow Scroll Bars
Window Left Ctl Blue Down Arrow Scroll Bars
Window Right Ctl Blue Up Arrow Scroll Bars
Window Up Ctl Up Arrow Scroll Bars
Print Screen Ctl Alt P
9-46
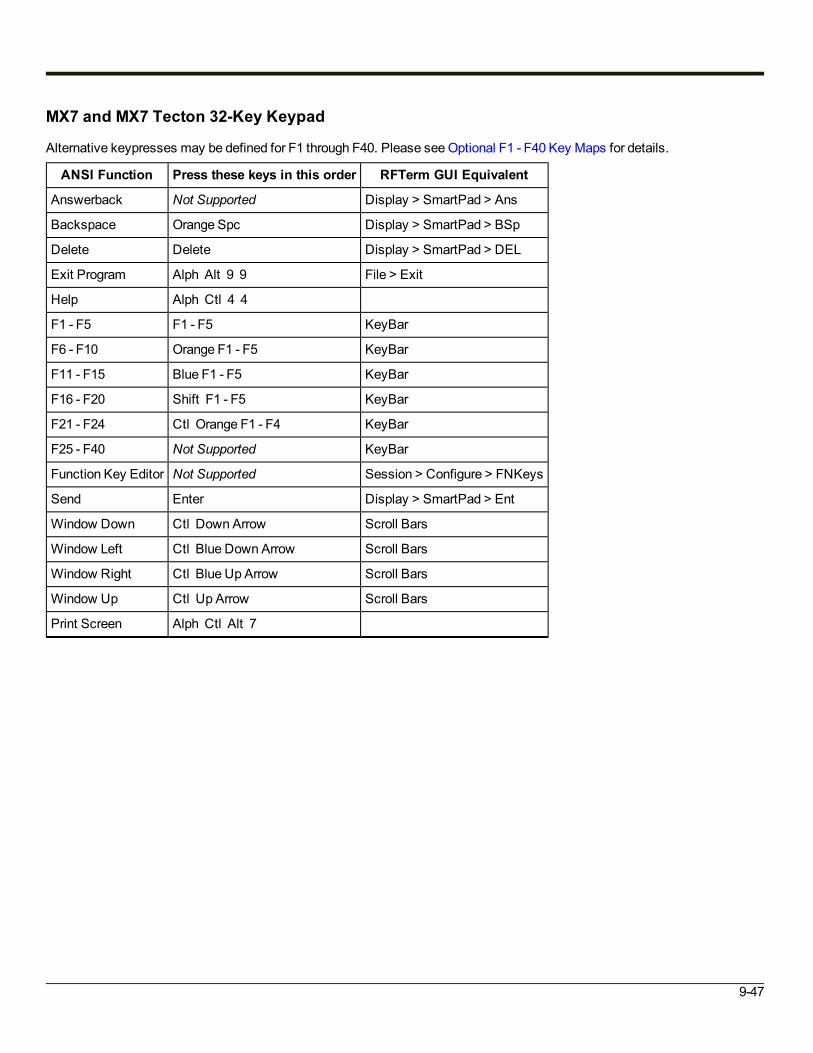
MX7 and MX7 Tecton 32-Key Keypad
Alternative keypresses may be defined for F1 through F40. Please seeOptional F1 - F40 Key Maps for details.
ANSI Function Press these keys in this order RFTerm GUI Equivalent
Answerback Not Supported Display > SmartPad > Ans
Backspace Orange Spc Display > SmartPad > BSp
Delete Delete Display > SmartPad > DEL
Exit Program Alph Alt 9 9 File > Exit
Help Alph Ctl 4 4
F1 - F5 F1 - F5 KeyBar
F6 - F10 Orange F1 - F5 KeyBar
F11 - F15 Blue F1 - F5 KeyBar
F16 - F20 Shift F1 - F5 KeyBar
F21 - F24 Ctl Orange F1 - F4 KeyBar
F25 - F40 Not Supported KeyBar
Function Key Editor Not Supported Session > Configure > FNKeys
Send Enter Display > SmartPad > Ent
Window Down Ctl Down Arrow Scroll Bars
Window Left Ctl Blue Down Arrow Scroll Bars
Window Right Ctl Blue Up Arrow Scroll Bars
Window Up Ctl Up Arrow Scroll Bars
Print Screen Alph Ctl Alt 7
9-47

IBM 3270 Functions - MX7 and MX7 TectonWhen running the RFTerm IBM 3270 terminal emulator on theMX7 andMX7 Tecton, please refer to the 3270 Host KeyDescriptions for explanations of the IBM 3270 functions.
MX7 and MX7 Tecton 55-Key Primary Delete Keypad
Alternative keypresses may be defined for F1 through F40. Please seeOptional F1 - F40 Key Maps for details.
3270 Function Press these keys in this order RFTerm GUI Equivalent
Attn Ctl A Display > SmartPad > Attn
Backtab Orange Tab Display > SmartPad > BTb
Clear Ctl C Display > SmartPad > Clr
Delete Ctl D Display > SmartPad > Del
Erase Orange Spc Display > SmartPad > Bsp
Erase Input Ctl Orange Spc Display > SmartPad > EIn
Error Reset or Reset Ctl R Display > SmartPad > Rst
Exit ProgramAlt X
File > ExitCtl Shft X
Function Key Editor Not Supported Session > Configure > FNKeys
Help Ctl H
Homekey Not Supported Display > SmartPad > Hm
Insert Ctl I Display > SmartPad > Ins
LDUB Not Supported
New Line Key Ctl N Display > SmartPad > Nl
Next or Tab Tab Display > SmartPad > Tb
Print Screen Ctl Alt P
RDUB Not Supported
SW Rev Not Supported File > About
Window Down Ctl Down Arrow Scroll Bars
Window Right Ctl Blue Up Arrow Scroll Bars
Window Left Ctl Blue Down Arrow Scroll Bars
Window Up Ctl Up Arrow Scroll Bars
Status Line ToggleAlt T
File > Settings > Display > HideOIACtl Shft O
9-48

3270 Function Press these keys in this order RFTerm GUI Equivalent
SYS_REQ Ctl S Display > SmartPad > Srq
PA1 - PA3 Ctl 1 - 3 Display > SmartPad > Pa1 - Pa3
F1 - F5 F1 - F5 KeyBar
F6 - F10 Orange F1- F5 KeyBar
F11 - F15 Blue F1 - F5 KeyBar
F16 - F20 Shft F1 - F5 KeyBar
F21 - F24 Ctl Orange F1 - F4 KeyBar
9-49

MX7 and MX7 Tecton 55-Key Primary Backspace Keypad
Alternative keypresses may be defined for F1 through F40. Please seeOptional F1 - F40 Key Maps for details.
3270 Function Press these keys in this order RFTerm GUI Equivalent
Attn Ctl A Display > SmartPad > Attn
Backtab Orange Tab Display > SmartPad > BTb
Clear Ctl C Display > SmartPad > Clr
Delete Ctl D Display > SmartPad > Del
Erase Bksp Display > SmartPad > Bsp
Erase Input Ctl Bksp Display > SmartPad > EIn
Error Reset or Reset Ctl R Display > SmartPad > Rst
Exit ProgramAlt X
File > ExitCtl Shft X
Function Key Editor Not Supported Session > Configure > FNKeys
Help Ctl H
Homekey Not Supported Display > SmartPad > Hm
Insert Ctl I Display > SmartPad > Ins
LDUB Not Supported
New Line Key Ctl N Display > SmartPad > Nl
Next or Tab Tab Display > SmartPad > Tb
Print Screen Ctl Alt P
RDUB Not Supported
SW Rev Not Supported File > About
Window Down Ctl Down Arrow Scroll Bars
Window Right Ctl Blue Up Arrow Scroll Bars
Window Left Ctl Blue Down Arrow Scroll Bars
Window Up Ctl Up Arrow Scroll Bars
Status Line ToggleAlt T
File > Settings > Display > HideOIACtl Shft O
SYS_REQ Ctl S Display > SmartPad > Srq
PA1 - PA3 Ctl 1 - 3 Display > SmartPad > Pa1 - Pa3
F1 - F5 F1 - F5 KeyBar
F6 - F10 Orange F1- F5 KeyBar
9-50

3270 Function Press these keys in this order RFTerm GUI Equivalent
F11 - F15 Blue F1 - F5 KeyBar
F16 - F20 Shft F1 - F5 KeyBar
F21 - F24 Ctl Orange F1 - F4 KeyBar
9-51

MX7 and MX7 Tecton 32-Key Keypad
Alternative keypresses may be defined for F1 through F40. Please seeOptional F1 - F40 Key Maps for details.
3270 Function Press these keys in this order RFTerm GUI Equivalent
Attn Alph Ctl 2 Display > SmartPad > Attn
Backtab Orange Tab Display > SmartPad > BTb
Clear Alph Ctl 2 2 2 Display > SmartPad > Clr
Delete Alph Ctl 3 Display > SmartPad > Del
Erase Orange Space Display > SmartPad > Bsp
Erase Input Ctl Orange Spc Display > SmartPad > EIn
Error Reset or Reset Alph Ctl 7 7 7 Display > SmartPad > Rst
Exit Program Alph Alt 9 9 File > Exit
Function Key Editor Not Supported Session > Configure > FNKeys
Help Alph Ctl 4 4
Homekey Not Supported Display > SmartPad > Hm
Insert Alph Ctl 4 4 4 Display > SmartPad > Ins
LDUB Not Supported
New Line Key Alph Ctl 6 6 Display > SmartPad > Nl
Next or Tab Tab Display > SmartPad > Tb
Print Screen Alph Ctl Alt 7
RDUB Not Supported
SW Rev Not Supported File > About
Window Down Ctl Down Arrow Scroll Bars
Window Right Ctl Blue Up Arrow Scroll Bars
Window Left Ctl Blue Down Arrow Scroll Bars
Window Up Ctl Up Arrow Scroll Bars
Status Line Toggle Alph Alt 8 File > Settings > Display > HideOIA
SYS_REQ Alph Ctl 7 7 7 7 Display > SmartPad > Srq
PA1 - PA3 Ctl 1 - 3 Display > SmartPad > Pa1 - Pa3
F1 - F5 F1 - F5 KeyBar
F6 - F10 Orange F1- F5 KeyBar
F11 - F15 Blue F1 - F5 KeyBar
F16 - F20 Shft F1 - F5 KeyBar
F21 - F24 Ctl Orange F1 - F4 KeyBar
9-52

IBM 5250 Functions - MX7 and MX7 TectonWhen running the RFTerm IBM 5250 terminal emulator onMX7 andMX7 Tecton devices, please refer to the 5250 Host KeyDescriptions for explanations of the IBM 5250 functions.
MX7 and MX7 Tecton 55-Key Primary Delete Keypad
Alternative keypresses may be defined for F1 through F40. Please seeOptional F1 - F40 Key Maps for details.
5250 Function Press these keys in this order RFTerm GUI Equivalent
Attn Ctl A Display > SmartPad > Attn
Backtab Orange Tab Display > SmartPad > BTb
Char Backspace Bksp Display > SmartPad > BSp
Clear Ctl C Display > SmartPad > Clr
Delete Ctl D Display > SmartPad > Del
Dup Ctl U Display > SmartPad > Dup
Erase Input Ctl Orange Spc Display > SmartPad > EIn
Error Reset or Reset Blue Alt Display > SmartPad > Rst
Exit ProgramAlt X
File > ExitCtl Shft X
Function Key Editor Not Supported Session > Configure > FNKeys
Fastback Not Supported
Fastfwd Not Supported
Field ExitCtl Enter
Display > SmartPad > FExDiamond 1
Field Minus Ctl M Display > SmartPad > F-
Field Plus Ctl L Display > SmartPad > F+
Help Ctl H
Homekey Not Supported Display > SmartPad > Hm
Insert Ctl I Display > SmartPad > Ins
New Line Key Ctl N Display > SmartPad > Nl
Next or Tab Tab Display > SmartPad > Tb
Print Screen Ctl Alt P Display > SmartPad > Prt
SW REV Not Supported File > About
Window Down Ctl Down Arrow Scroll Bars
9-53

5250 Function Press these keys in this order RFTerm GUI Equivalent
Window Right Ctl Blue Down Arrow Scroll Bars
Window Left Ctl Blue Up Arrow Scroll Bars
Window Up Ctl Up Arrow Scroll Bars
Send or Entercatv Enter Display > SmartPad > Ent
Status Line ToggleAlt T
File > Settings > Display > HideOIACtl Shft O
Sys_Req Ctl S Display > SmartPad > Srq
F1 - F5 F1 - F5 KeyBar
F6 - F10 Orange F1 - F5 KeyBar
F11 - F15 Blue F1 - F5 KeyBar
F16 - F20 Shft F1 - F5 KeyBar
F21 - F24 Ctl Orange F1 - F4 KeyBar
9-54

MX7 and MX7 Tecton 55-Key Primary Backspace Keypad
Alternative keypresses may be defined for F1 through F40. Please seeOptional F1 - F40 Key Maps for details.
5250 Function Press these keys in this order RFTerm GUI Equivalent
Attn Ctl A Display > SmartPad > Attn
Backtab Orange Tab Display > SmartPad > BTb
Char Backspace Orange Spc Display > SmartPad > BSp
Clear Ctl C Display > SmartPad > Clr
Delete Ctl D Display > SmartPad > Del
Dup Ctl U Display > SmartPad > Dup
Erase Input Ctl Orange Spc Display > SmartPad > EIn
Error Reset or Reset Blue Alt Display > SmartPad > Rst
Exit ProgramAlt X
File > ExitCtl Shft X
Function Key Editor Not Supported Session > Configure > FNKeys
Fastback Not Supported
Fastfwd Not Supported
Field ExitCtl Enter
Display > SmartPad > FExDiamond 1
Field Minus Ctl M Display > SmartPad > F-
Field Plus Ctl L Display > SmartPad > F+
Help Ctl H
Homekey Not Supported Display > SmartPad > Hm
Insert Ctl I Display > SmartPad > Ins
New Line Key Ctl N Display > SmartPad > Nl
Next or Tab Tab Display > SmartPad > Tb
Print Screen Ctl Alt P Display > SmartPad > Prt
SW REV Not Supported File > About
Window Down Ctl Down Arrow Scroll Bars
Window Right Ctl Blue Down Arrow Scroll Bars
Window Left Ctl Blue Up Arrow Scroll Bars
Window Up Ctl Up Arrow Scroll Bars
Send or Entercatv Enter Display > SmartPad > Ent
9-55

5250 Function Press these keys in this order RFTerm GUI Equivalent
Status Line ToggleAlt T
File > Settings > Display > HideOIACtl Shft O
Sys_Req Ctl S Display > SmartPad > Srq
F1 - F5 F1 - F5 KeyBar
F6 - F10 Orange F1 - F5 KeyBar
F11 - F15 Blue F1 - F5 KeyBar
F16 - F20 Shft F1 - F5 KeyBar
F21 - F24 Ctl Orange F1 - F4 KeyBar
9-56
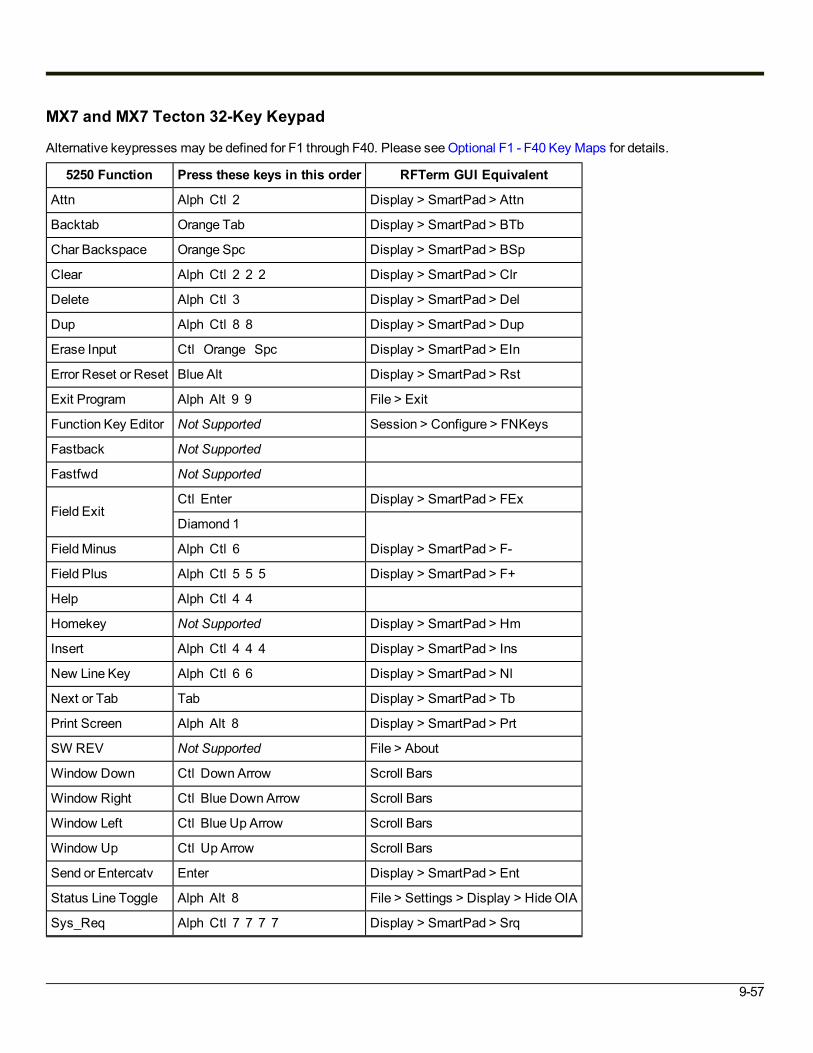
MX7 and MX7 Tecton 32-Key Keypad
Alternative keypresses may be defined for F1 through F40. Please seeOptional F1 - F40 Key Maps for details.
5250 Function Press these keys in this order RFTerm GUI Equivalent
Attn Alph Ctl 2 Display > SmartPad > Attn
Backtab Orange Tab Display > SmartPad > BTb
Char Backspace Orange Spc Display > SmartPad > BSp
Clear Alph Ctl 2 2 2 Display > SmartPad > Clr
Delete Alph Ctl 3 Display > SmartPad > Del
Dup Alph Ctl 8 8 Display > SmartPad > Dup
Erase Input Ctl Orange Spc Display > SmartPad > EIn
Error Reset or Reset Blue Alt Display > SmartPad > Rst
Exit Program Alph Alt 9 9 File > Exit
Function Key Editor Not Supported Session > Configure > FNKeys
Fastback Not Supported
Fastfwd Not Supported
Field ExitCtl Enter Display > SmartPad > FEx
Diamond 1
Field Minus Alph Ctl 6 Display > SmartPad > F-
Field Plus Alph Ctl 5 5 5 Display > SmartPad > F+
Help Alph Ctl 4 4
Homekey Not Supported Display > SmartPad > Hm
Insert Alph Ctl 4 4 4 Display > SmartPad > Ins
New Line Key Alph Ctl 6 6 Display > SmartPad > Nl
Next or Tab Tab Display > SmartPad > Tb
Print Screen Alph Alt 8 Display > SmartPad > Prt
SW REV Not Supported File > About
Window Down Ctl Down Arrow Scroll Bars
Window Right Ctl Blue Down Arrow Scroll Bars
Window Left Ctl Blue Up Arrow Scroll Bars
Window Up Ctl Up Arrow Scroll Bars
Send or Entercatv Enter Display > SmartPad > Ent
Status Line Toggle Alph Alt 8 File > Settings > Display > HideOIA
Sys_Req Alph Ctl 7 7 7 7 Display > SmartPad > Srq
9-57

5250 Function Press these keys in this order RFTerm GUI Equivalent
F1 - F5 F1 - F5 KeyBar
F6 - F10 Orange F1 - F5 KeyBar
F11 - F15 Blue F1 - F5 KeyBar
F16 - F20 Shft F1 - F5 KeyBar
F21 - F24 Orange Ctl F1 - F4 KeyBar
9-58
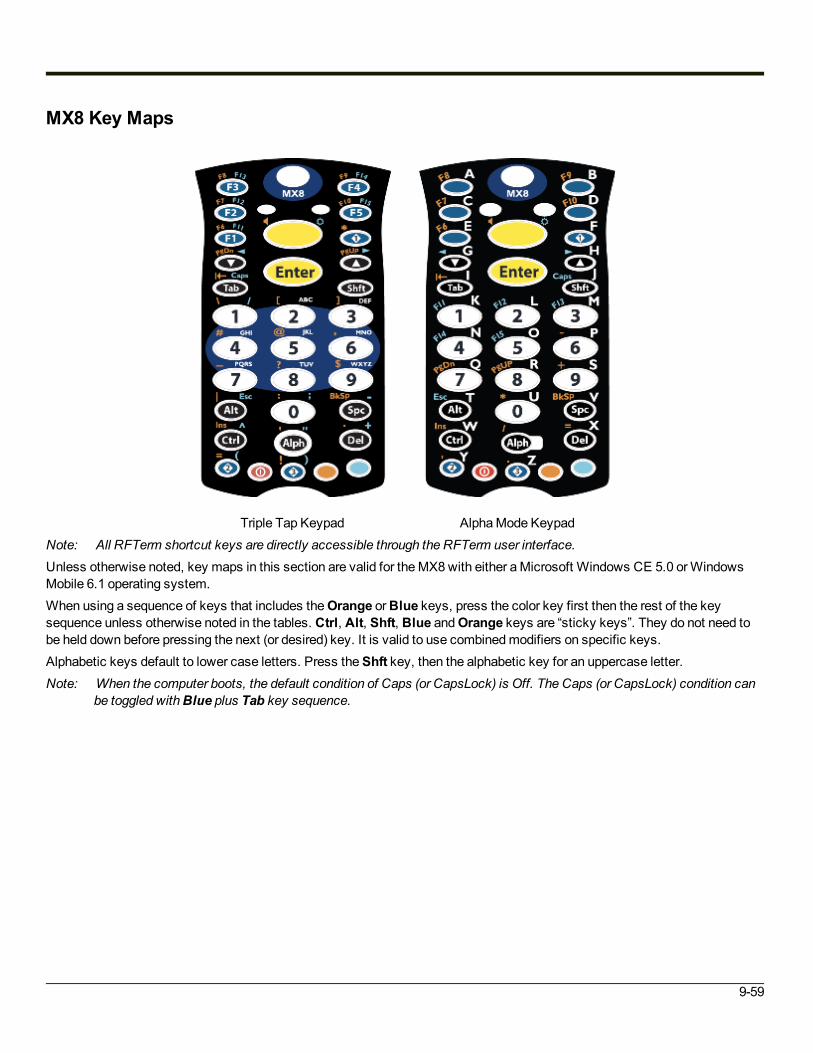
MX8 Key Maps
Triple Tap Keypad AlphaMode KeypadNote: All RFTerm shortcut keys are directly accessible through the RFTerm user interface.Unless otherwise noted, key maps in this section are valid for theMX8with either aMicrosoft Windows CE 5.0 orWindowsMobile 6.1 operating system.When using a sequence of keys that includes theOrange orBlue keys, press the color key first then the rest of the keysequence unless otherwise noted in the tables. Ctrl, Alt, Shft, Blue andOrange keys are “sticky keys”. They do not need tobe held down before pressing the next (or desired) key. It is valid to use combinedmodifiers on specific keys.Alphabetic keys default to lower case letters. Press theShft key, then the alphabetic key for an uppercase letter.Note: When the computer boots, the default condition of Caps (or CapsLock) is Off. The Caps (or CapsLock) condition can
be toggled withBlue plus Tab key sequence.
9-59

RFTerm Functions - MX8
MX8 Triple Tap Keypad
RFTerm Function Press these keys in this order RFTerm GUI Equivalent
Connect to Host Alph Ctrl Shft 2 2 2 Session > Connect
Disconnect from Host Alph Ctrl Shft 3 Session > Disconnect
Hide / Display All Bars Alph Ctrl Shft 5 5 5 File > Settings > Display > Hide All Bars
Hide / Display MenuBar Alph Ctrl Shft 6 File > Settings > Display > HideMenuBar
Hide / Display ToolBar Alph Ctrl Shft 8 File > Settings > Display > Hide ToolBar
Hide / Display KeyBar Alph Ctrl Shft 5 5 File > Settings > Display > Hide KeyBar
ToggleMenuBar Bottom / Top(N/A withWindows Mobile) Alph Ctrl Shft 2 2 File > Settings > Display > At Bottom
Configure Host Session Alph Ctrl Shft 6 6 Session > Configure
Application Settings Alph Ctrl Shft 3 3 File > Settings
Increase Font Size Ctrl Shft Up Arrow Display > Font Up
Decrease Font Size Ctrl Shft Down Arrow Display > Font Down
Toggle Font Bold / Normal Ctrl Shft 1 Session > Configure > Font Tab
Display/Hide SmartPad Alph Ctrl Shft 7 Display > SmartPad
Display / Hide Text Input Alph Ctrl Shft 4 4 4 Display > InputTool
Help Alph Ctrl 4 4
Scroll UpOneRow Shft Up Arrow Scroll Bars
Scroll DownOneRow Shft Down Arrow Scroll Bars
Scroll Left One Row Shft Blue Down Arrow Scroll Bars
Scroll Right One Row Shft Blue Up Arrow Scroll Bars
Exit the Emulator Alph Alt 9 9 File > Exit
9-60

MX8 Alpha Mode Keypad
RFTerm Function Press these keys in this order RFTerm GUI Equivalent
Connect to Host Ctrl Shft Alph F2 Session > Connect
Disconnect from Host Ctrl Shft Alph F5 Session > Disconnect
Hide / Display All Bars Ctrl Shft Alph 2 File > Settings > Display > Hide All Bars
Hide / Display MenuBar Ctrl Shft Alph 3 File > Settings > Display > HideMenuBar
Hide / Display ToolBar Ctrl Shft Alph Alt File > Settings > Display > Hide ToolBar
Hide / Display KeyBar Ctrl Shft Alph 1 File > Settings > Display > Hide KeyBar
ToggleMenuBar Bottom / Top(N/A withWindows Mobile) Ctrl Shft Alph F4 File > Settings > Display > At Bottom
Configure Host Session Ctrl Shft Alph 4 Session > Configure
Application Settings Ctrl Shft Alph F1 File > Settings
Increase Font Size Ctrl Shft Up Arrow Display > Font Up
Decrease Font Size Ctrl Shft Down Arrow Display > Font Down
Toggle Font Bold / Normal Ctrl Shft 1 Session > Configure > Font Tab
Display/Hide SmartPad Ctrl Shft Alph 6 Display > SmartPad
Display / Hide Text Input Ctrl Shft Alph Tab Display > InputTool
Help Ctrl Alph Up Arrow
Scroll UpOneRow Shft Up Arrow Scroll Bars
Scroll DownOneRow Shft Down Arrow Scroll Bars
Scroll Left One Row Shft Blue Down Arrow Scroll Bars
Scroll Right One Row Shft Blue Up Arrow Scroll Bars
Exit the EmulatorAlt Alph Del
File > ExitCtrl Shft Alph Del
9-61
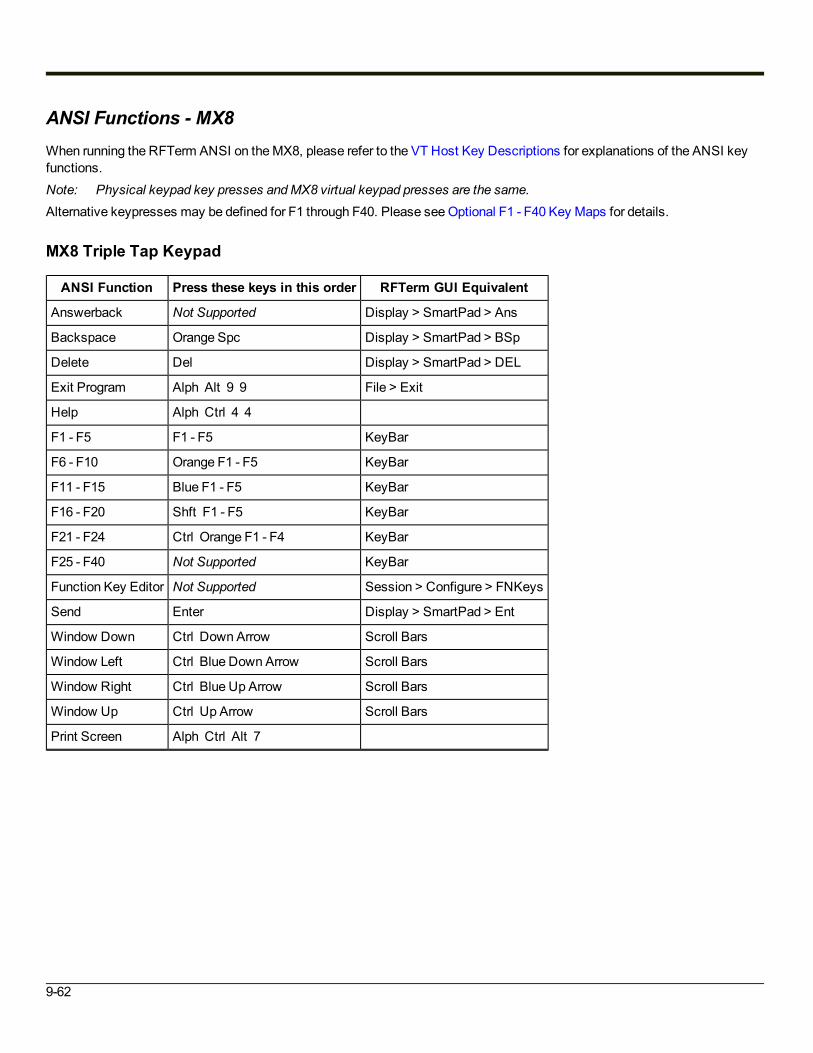
ANSI Functions - MX8When running the RFTerm ANSI on theMX8, please refer to the VT Host Key Descriptions for explanations of the ANSI keyfunctions.Note: Physical keypad key presses andMX8 virtual keypad presses are the same.Alternative keypresses may be defined for F1 through F40. Please seeOptional F1 - F40 Key Maps for details.
MX8 Triple Tap Keypad
ANSI Function Press these keys in this order RFTerm GUI Equivalent
Answerback Not Supported Display > SmartPad > Ans
Backspace Orange Spc Display > SmartPad > BSp
Delete Del Display > SmartPad > DEL
Exit Program Alph Alt 9 9 File > Exit
Help Alph Ctrl 4 4
F1 - F5 F1 - F5 KeyBar
F6 - F10 Orange F1 - F5 KeyBar
F11 - F15 Blue F1 - F5 KeyBar
F16 - F20 Shft F1 - F5 KeyBar
F21 - F24 Ctrl Orange F1 - F4 KeyBar
F25 - F40 Not Supported KeyBar
Function Key Editor Not Supported Session > Configure > FNKeys
Send Enter Display > SmartPad > Ent
Window Down Ctrl Down Arrow Scroll Bars
Window Left Ctrl Blue Down Arrow Scroll Bars
Window Right Ctrl Blue Up Arrow Scroll Bars
Window Up Ctrl Up Arrow Scroll Bars
Print Screen Alph Ctrl Alt 7
9-62

MX8 Alpha Mode Keypad
ANSI Function Press these keys in this order RFTerm GUI Equivalent
Answerback Not Supported Display > SmartPad > Ans
Backspace Orange Spc Display > SmartPad > BSp
Delete Del Display > SmartPad > DEL
Exit ProgramAlt Alph Del
File > ExitCtrl Shft Alph Del
Help Ctrl Alph Up Arrow
F1 - F5 F1 - F5 KeyBar
F6 - F10 Orange F1 - F5 KeyBar
F11 - F15Blue 1 - 5
KeyBarBlue F1 - F5
F16 - F20 Shft F1 - F5 KeyBar
F21 - F24 Ctrl Orange F1 - F4 KeyBar
F25 - F40 Not Supported KeyBar
Function Key Editor Not Supported Session > Configure > FNKeys
Send Enter Display > SmartPad > Ent
Window Down Ctrl Down Arrow Scroll Bars
Window Left Ctrl Blue Down Arrow Scroll Bars
Window Right Ctrl Blue Up Arrow Scroll Bars
Window Up Ctrl Up Arrow Scroll Bars
Print Screen Ctrl Alt Alph 6
9-63

IBM 3270 Functions - MX8When running the RFTerm IBM 3270 terminal emulator on theMX8, please refer to the 3270 Host Key Descriptions forexplanations of the IBM 3270 functions.
MX8 Triple Tap Keypad
Alternative keypresses may be defined for F1 through F40. Please seeOptional F1 - F40 Key Maps for details.
3270 Function Press these keys in this order RFTerm GUI Equivalent
Attn Alph Ctrl 2 Display > SmartPad > Attn
Backtab Orange Tab Display > SmartPad > BTb
Clear Alph Ctrl 2 2 2 Display > SmartPad > Clr
Delete Alph Ctrl 3 Display > SmartPad > Del
Erase Orange Space Display > SmartPad > Bsp
Erase Input Ctrl Orange Spc Display > SmartPad > EIn
Error Reset or Reset Alph Ctrl 7 7 7 Display > SmartPad > Rst
Exit Program Alph Alt 9 9 File > Exit
Function Key Editor Not Supported Session > Configure > FNKeys
Help Alph Ctrl 4 4
Homekey Not Supported Display > SmartPad > Hm
Insert Alph Ctrl 4 4 4 Display > SmartPad > Ins
LDUB Not Supported
New Line Key Alph Ctrl 6 6 Display > SmartPad > Nl
Next or Tab Tab Display > SmartPad > Tb
Print Screen Alph Ctrl Alt 7
RDUB Not Supported
SW Rev Not Supported File > About
Window Down Ctrl Down Arrow Scroll Bars
Window Right Ctrl Blue Up Arrow Scroll Bars
Window Left Ctrl Blue Down Arrow Scroll Bars
Window Up Ctrl Up Arrow Scroll Bars
Status Line Toggle Alph Alt 8 File > Settings > Display > HideOIA
SYS_REQ Alph Ctrl 7 7 7 7 Display > SmartPad > Srq
PA1 - PA3 Ctrl 1 - 3 Display > SmartPad > Pa1 - Pa3
F1 - F5 F1 - F5 KeyBar
F6 - F10 Orange F1- F5 KeyBar
9-64

3270 Function Press these keys in this order RFTerm GUI Equivalent
F11 - F21 Blue F1 - F5 KeyBar
F16 - F20 Shft F1 - F5 KeyBar
F21 - F24 Ctrl Orange F1 - F4 KeyBar
9-65

MX8 Alpha Mode Keypad
Alternative keypresses may be defined for F1 through F40. Please seeOptional F1 - F40 Key Maps for details.
3270 Function Press these keys in this order RFTerm GUI Equivalent
Attn Ctrl Alph F3 Display > SmartPad > Attn
Backtab Orange Tab Display > SmartPad > BTb
Clear Ctrl Alph F2 Display > SmartPad > Clr
Delete Ctrl Alph F5 Display > SmartPad > Del
Erase Orange Spc Display > SmartPad > Bsp
Erase Input Ctrl Orange Spc Display > SmartPad > EIn
Error Reset or Reset Ctrl Alph 8 Display > SmartPad > Rst
Exit ProgramAlt Alph Del
File > ExitCtrl Shft Alph Del
Function Key Editor Not Supported Session > Configure > FNKeys
Help Ctrl Alph Up Arrow
Homekey Not Supported Display > SmartPad > Hm
Insert Ctrl Alph Tab Display > SmartPad > Ins
LDUB Not Supported
New Line Key Ctrl Alph 4 Display > SmartPad > Nl
Next or Tab Tab Display > SmartPad > Tb
Print Screen Ctrl Alt Alph 6
RDUB Not Supported
SW Rev Not Supported File > About
Window Down Ctrl Down Arrow Scroll Bars
Window Right Ctrl Blue Up Arrow Scroll Bars
Window Left Ctrl Blue Down Arrow Scroll Bars
Window Up Ctrl Up Arrow Scroll Bars
Status Line ToggleAlt Alph Alt
File > Settings > Display > HideOIACtrl Shft Alph 5
SYS_REQ Ctrl Alph 9 Display > SmartPad > Srq
PA1 - PA3 Ctrl 1 - 3 Display > SmartPad > Pa1 - Pa3
F1 - F5 F1 - F5 KeyBar
F6 - F10 Orange F1- F5 KeyBar
9-66

3270 Function Press these keys in this order RFTerm GUI Equivalent
F11 - F21Blue 1 - 5
KeyBarBlue F1 - F5
F16 - F20 Shft F1 - F5 KeyBar
F21 - F24 Ctrl Orange F1 - F4 KeyBar
9-67

IBM 5250 Functions - MX8When running the RFTerm IBM 5250 terminal emulator onMX8 devices, please refer to the 5250 Host Key Descriptions forexplanations of the IBM 5250 functions.
MX8 Triple Tap Keypad
Alternative keypresses may be defined for F1 through F40. Please seeOptional F1 - F40 Key Maps for details.
5250 Function Press these keys in this order RFTerm GUI Equivalent
Attn Alph Ctrl 2 Display > SmartPad > Attn
Backtab Orange Tab Display > SmartPad > BTb
Char Backspace Orange Spc Display > SmartPad > BSp
Clear Alph Ctl 2 2 2 Display > SmartPad > Clr
Delete Alph Ctl 3 Display > SmartPad > Del
Dup Alph Ctl 8 8 Display > SmartPad > Dup
Erase Input Orange Ctl Spc Display > SmartPad > EIn
Error Reset or Reset Blue Alt Display > SmartPad > Rst
Exit Program Alph Alt 9 9 File > Exit
Function Key Editor Not Supported Session > Configure > FNKeys
Fastback Not Supported
Fastfwd Not Supported
Field ExitCtl Enter Display > SmartPad > FEx
Diamond 1
Field Minus Alph Ctl 6 Display > SmartPad > F-
Field Plus Alph Ctl 5 5 5 Display > SmartPad > F+
Help Alph Ctl 4 4
Homekey Not Supported Display > SmartPad > Hm
Insert Alph Ctl 4 4 4 Display > SmartPad > Ins
New Line Key Alph Ctl 6 6 Display > SmartPad > Nl
Next or Tab Tab Display > SmartPad > Tb
Print Screen Alph Alt 8 Display > SmartPad > Prt
SW REV Not Supported File > About
Window Down Ctl Down Arrow Scroll Bars
Window Right Ctl Blue Down Arrow Scroll Bars
Window Left Ctl Blue Up Arrow Scroll Bars
9-68
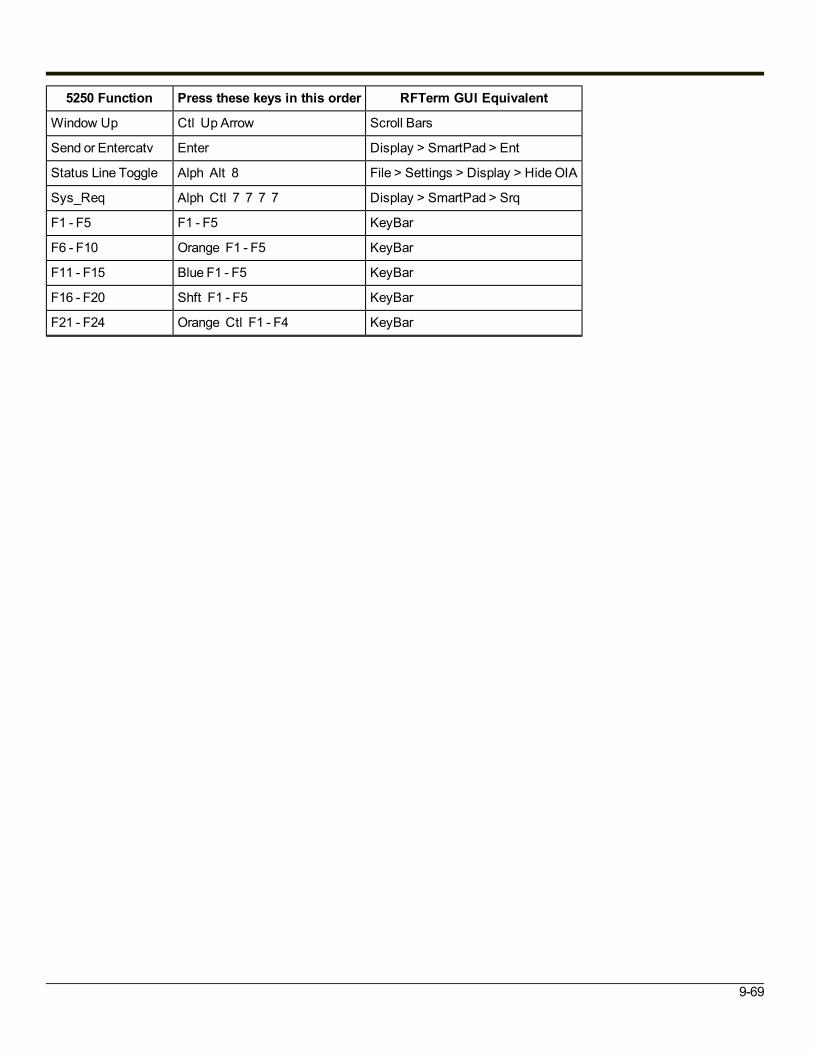
5250 Function Press these keys in this order RFTerm GUI Equivalent
Window Up Ctl Up Arrow Scroll Bars
Send or Entercatv Enter Display > SmartPad > Ent
Status Line Toggle Alph Alt 8 File > Settings > Display > HideOIA
Sys_Req Alph Ctl 7 7 7 7 Display > SmartPad > Srq
F1 - F5 F1 - F5 KeyBar
F6 - F10 Orange F1 - F5 KeyBar
F11 - F15 Blue F1 - F5 KeyBar
F16 - F20 Shft F1 - F5 KeyBar
F21 - F24 Orange Ctl F1 - F4 KeyBar
9-69

MX8 Alpha Mode Keypad
Alternative keypresses may be defined for F1 through F40. Please seeOptional F1 - F40 Key Maps for details.
5250 Function Press these keys in this order RFTerm GUI Equivalent
Attn Ctrl Alph F3 Display > SmartPad > Attn
Backtab Orange Tab Display > SmartPad > BTb
Char Backspace Orange Spc Display > SmartPad > BSp
Clear Ctrl Alph F2 Display > SmartPad > Clr
Delete Ctrl Alph F5 Display > SmartPad > Del
Dup Ctrl Alph 0 Display > SmartPad > Dup
Erase Input Ctrl Orange Spc Display > SmartPad > EIn
Error Reset or Reset Orange Alt Display > SmartPad > Rst
Exit ProgramAlt Alph Del
File > ExitCtrl Shft Alph Del
Function Key Editor Not Supported Session > Configure > FNKeys
Fastback Not Supported
Fastfwd Not Supported
Field Exit Ctrl Enter Display > SmartPad > FEx
Field Minus Ctrl Alph 3 Display > SmartPad > F-
Field Plus Ctrl Alph 2 Display > SmartPad > F+
Help Ctrl Alph Up Arrow
Homekey Not Supported Display > SmartPad > Hm
Insert Ctrl Alph Tab Display > SmartPad > Ins
New Line Key Ctrl Alph 4 Display > SmartPad > Nl
Next or Tab Tab Display > SmartPad > Tb
Print Screen Ctrl Alt Alph 6 Display > SmartPad > Prt
SW REV Not Supported File > About
Window Down Ctrl Down Arrow Scroll Bars
Window Right Ctrl Blue Up Arrow Scroll Bars
Window Left Ctrl Blue Down Arrow Scroll Bars
Window Up Ctrl Up Arrow Scroll Bars
Send or Entercatv Enter Display > SmartPad > Ent
Status Line Toggle Alt Alph Alt File > Settings > Display > HideOIA
9-70

5250 Function Press these keys in this order RFTerm GUI Equivalent
Ctrl Shft Alph 5
Sys_Req Ctrl Alph 9 Display > SmartPad > Srq
F1 - F5 F1 - F5 KeyBar
F6 - F10 Orange F1 - F5 KeyBar
F11 - F15Blue 1 - 5
KeyBarBlue F1 - F5
F16 - F20 Shft F1 - F5 KeyBar
F21 - F24 Orange Ctl F1 - F4 KeyBar
9-71

MX9 Key Maps
38-key Keypad 62-key KeypadNote: All RFTerm shortcut keys are directly accessible through the RFTerm user interface.Unless otherwise noted, key maps in this section are valid for theMX9with either aMicrosoft Windows CE 5.0 orWindowsMobile 6.5 operating system.When using a sequence of keys that includes theOrange orBlue keys, press the color key first then the rest of the keysequence unless otherwise noted in the tables. Ctrl, Alt, Shift, Blue andOrange keys are “sticky keys”. They do not need tobe held down before pressing the next (or desired) key. It is valid to use combinedmodifiers on specific keys.Alphabetic keys default to lower case letters. Press theShift key, then the alphabetic key for an uppercase letter.Note: When the computer boots, the default condition of Caps (or CapsLock) is Off. The Caps (or CapsLock) condition can
be toggled withBlue plus Tab key sequence.
9-72
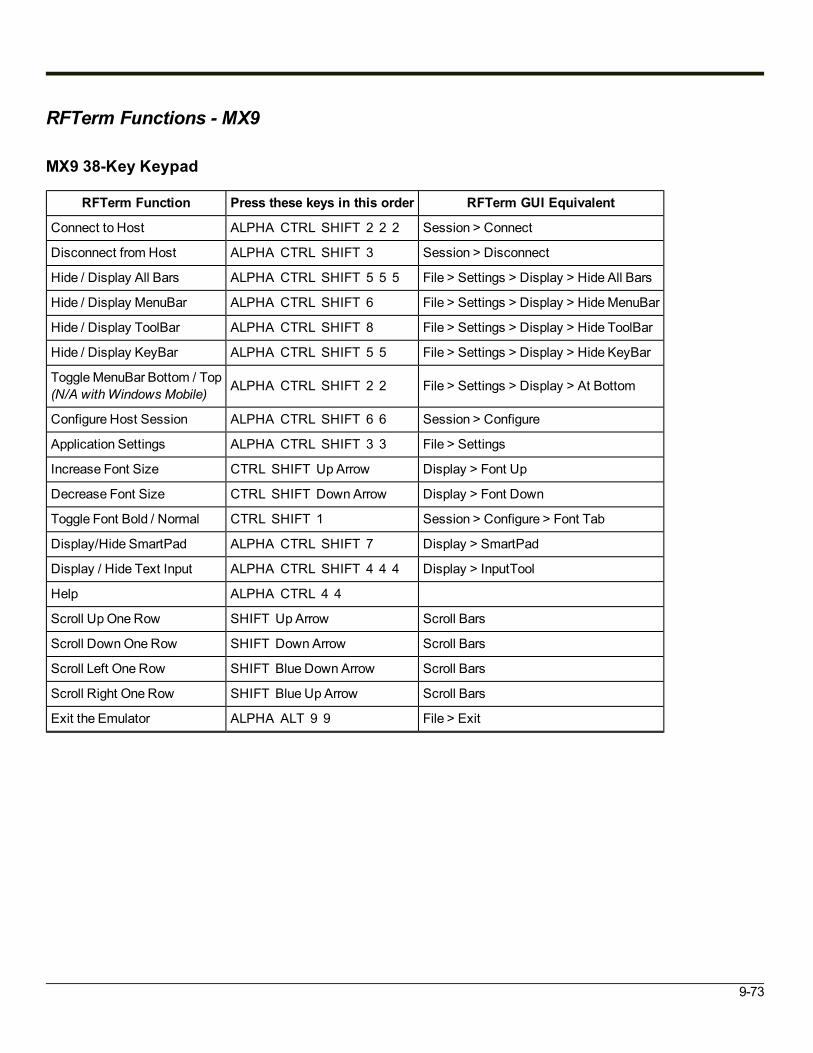
RFTerm Functions - MX9
MX9 38-Key Keypad
RFTerm Function Press these keys in this order RFTerm GUI Equivalent
Connect to Host ALPHA CTRL SHIFT 2 2 2 Session > Connect
Disconnect from Host ALPHA CTRL SHIFT 3 Session > Disconnect
Hide / Display All Bars ALPHA CTRL SHIFT 5 5 5 File > Settings > Display > Hide All Bars
Hide / Display MenuBar ALPHA CTRL SHIFT 6 File > Settings > Display > HideMenuBar
Hide / Display ToolBar ALPHA CTRL SHIFT 8 File > Settings > Display > Hide ToolBar
Hide / Display KeyBar ALPHA CTRL SHIFT 5 5 File > Settings > Display > Hide KeyBar
ToggleMenuBar Bottom / Top(N/A withWindows Mobile) ALPHA CTRL SHIFT 2 2 File > Settings > Display > At Bottom
Configure Host Session ALPHA CTRL SHIFT 6 6 Session > Configure
Application Settings ALPHA CTRL SHIFT 3 3 File > Settings
Increase Font Size CTRL SHIFT Up Arrow Display > Font Up
Decrease Font Size CTRL SHIFT Down Arrow Display > Font Down
Toggle Font Bold / Normal CTRL SHIFT 1 Session > Configure > Font Tab
Display/Hide SmartPad ALPHA CTRL SHIFT 7 Display > SmartPad
Display / Hide Text Input ALPHA CTRL SHIFT 4 4 4 Display > InputTool
Help ALPHA CTRL 4 4
Scroll UpOneRow SHIFT Up Arrow Scroll Bars
Scroll DownOneRow SHIFT Down Arrow Scroll Bars
Scroll Left One Row SHIFT Blue Down Arrow Scroll Bars
Scroll Right One Row SHIFT Blue Up Arrow Scroll Bars
Exit the Emulator ALPHA ALT 9 9 File > Exit
9-73

MX9 62-Key Keypad
RFTerm Function Press these keys in this order RFTerm GUI Equivalent
Connect to Host CTL SHFT C Session > Connect
Disconnect from Host CTL SHFT D Session > Disconnect
Hide / Display All Bars CTL SHFT L File > Settings > Display > Hide All Bars
Hide / Display MenuBar CTL SHFT M File > Settings > Display > HideMenuBar
Hide / Display ToolBar CTL SHFT T File > Settings > Display > Hide ToolBar
Hide / Display KeyBar CTL SHFT K File > Settings > Display > Hide KeyBar
ToggleMenuBar Bottom / Top(N/A withWindows Mobile) CTL SHFT B File > Settings > Display > At Bottom
Configure Host Session CTL SHFT N Session > Configure
Application Settings CTL SHFT E File > Settings
Increase Font Size CTL SHFT Up Arrow Display > Font Up
Decrease Font Size CTL SHFT Down Arrow Display > Font Down
Toggle Font Bold / Normal CTL SHFT 1 Session > Configure > Font Tab
Display/Hide SmartPad CTL SHFT P Display > SmartPad
Display / Hide Text Input CTL SHFT I Display > InputTool
Help CTL H
Scroll UpOneRow SHFT Up Arrow Scroll Bars
Scroll DownOneRow SHFT Down Arrow Scroll Bars
Scroll Left One Row SHFT Blue Down Arrow Scroll Bars
Scroll Right One Row SHFT Blue Up Arrow Scroll Bars
Exit the EmulatorALT X
File > ExitCTL SHFT X
9-74

ANSI Functions - MX9When running the RFTerm ANSI on theMX9, please refer to the VT Host Key Descriptions for explanations of the ANSI keyfunctions.Note: Physical keypad key presses andMX9 virtual keypad presses are the same.
MX9 38-Key Keypad
Alternative keypresses may be defined for F1 through F40. Please seeOptional F1 - F40 Key Maps for details.
ANSI Function Press these keys in this order RFTerm GUI Equivalent
Answerback Not Supported Display > SmartPad > Ans
Backspace BKSP Display > SmartPad > BSp
DeleteOrange BKSP
Display > SmartPad > DELCTRL D
Exit Program ALPHA ALT 9 9 File > Exit
Help ALPHA CTRL 4 4
F1 - F10 F1 - F10 KeyBar
F11 - F20 Blue F1 - F10 KeyBar
F21 - F24 SHIFT F1 - F4 KeyBar
F25 - F40 Not Supported KeyBar
Function Key Editor Not Supported Session > Configure > FNKeys
Send ENTER Display > SmartPad > Ent
Window Down CTRL Down Arrow Scroll Bars
Window Left CTRL Blue Down Arrow Scroll Bars
Window Right CTRL Blue Up Arrow Scroll Bars
Window Up CTRL Up Arrow Scroll Bars
Print Screen ALPHA CTRL Alt 7
9-75

MX9 62-Key Keypad
Alternative keypresses may be defined for F1 through F40. Please seeOptional F1 - F40 Key Maps for details.
ANSI Function Press these keys in this order RFTerm GUI Equivalent
Answerback Not Supported Display > SmartPad > Ans
Backspace BS Display > SmartPad > BSp
DeleteOrange BS
Display > SmartPad > DELCTL D
Exit ProgramALT X
File > ExitCTL SHFT X
Help CTL H
F1 - F10 F1 - F10 KeyBar
F11 - F20 Blue F1 - F10 KeyBar
F21 - F24 SHFT F1 - F4 KeyBar
F25 - F40 Not Supported KeyBar
Function Key Editor Not Supported Session > Configure > FNKeys
Send ENTER Display > SmartPad > Ent
Window Down CTL Down Arrow Scroll Bars
Window Left CTL Blue Down Arrow Scroll Bars
Window Right CTL Blue Up Arrow Scroll Bars
Window Up CTL Up Arrow Scroll Bars
Print Screen CTL ALT P
9-76

IBM 3270 Functions - MX9When running the RFTerm IBM 3270 terminal emulator on theMX9, please refer to the 3270 Host Key Descriptions forexplanations of the IBM 3270 functions.
MX9 38-Key Keypad
Alternative keypresses may be defined for F1 through F40. Please seeOptional F1 - F40 Key Maps for details.
3270 Function Press these keys in this order RFTerm GUI Equivalent
Attn ALPHA CTRL 2 Display > SmartPad > Attn
BacktabOrange TAB
Display > SmartPad > BTbSHIFT TAB
Clear ALPHA CTRL 2 2 2 Display > SmartPad > Clr
DeleteALPHA CTRL 3
Display > SmartPad > DelOrange BKSP
Erase BKSP Display > SmartPad > Bsp
Erase Input CTRL BKSP Display > SmartPad > EIn
Error Reset or Reset ALPHA CTRL 7 7 7 Display > SmartPad > Rst
Exit Program ALPHA ALT 9 9 File > Exit
Function Key Editor Not Supported Session > Configure > FNKeys
Help ALPHA CTRL 4 4
Homekey Orange SHIFT Down Arrow Display > SmartPad > Hm
Insert ALPHA CTRL 4 4 4 Display > SmartPad > Ins
LDUB Not Supported
New Line Key ALPHA CTRL 6 6 Display > SmartPad > Nl
Next or Tab TAB Display > SmartPad > Tb
Print Screen ALPHA CTRL ALT 7
RDUB Not Supported
SW Rev Not Supported File > About
Window Down CTRL Down Arrow Scroll Bars
Window Right CTRL Blue Up Arrow Scroll Bars
Window Left CTRL Blue Down Arrow Scroll Bars
Window Up CTRL Up Arrow Scroll Bars
Status Line Toggle ALPHA ALT 8 File > Settings > Display > HideOIA
9-77

3270 Function Press these keys in this order RFTerm GUI Equivalent
SYS_REQ ALPHA CTRL 7 7 7 7 Display > SmartPad > Srq
PA1 - PA3 CTRL 1 - 3 Display > SmartPad > Pa1 - Pa3
F1 - F10 F1 - F10 KeyBar
F11 - F20 Blue F1 - F5 KeyBar
F21 - F24 SHIFT F1 - F4 KeyBar
9-78
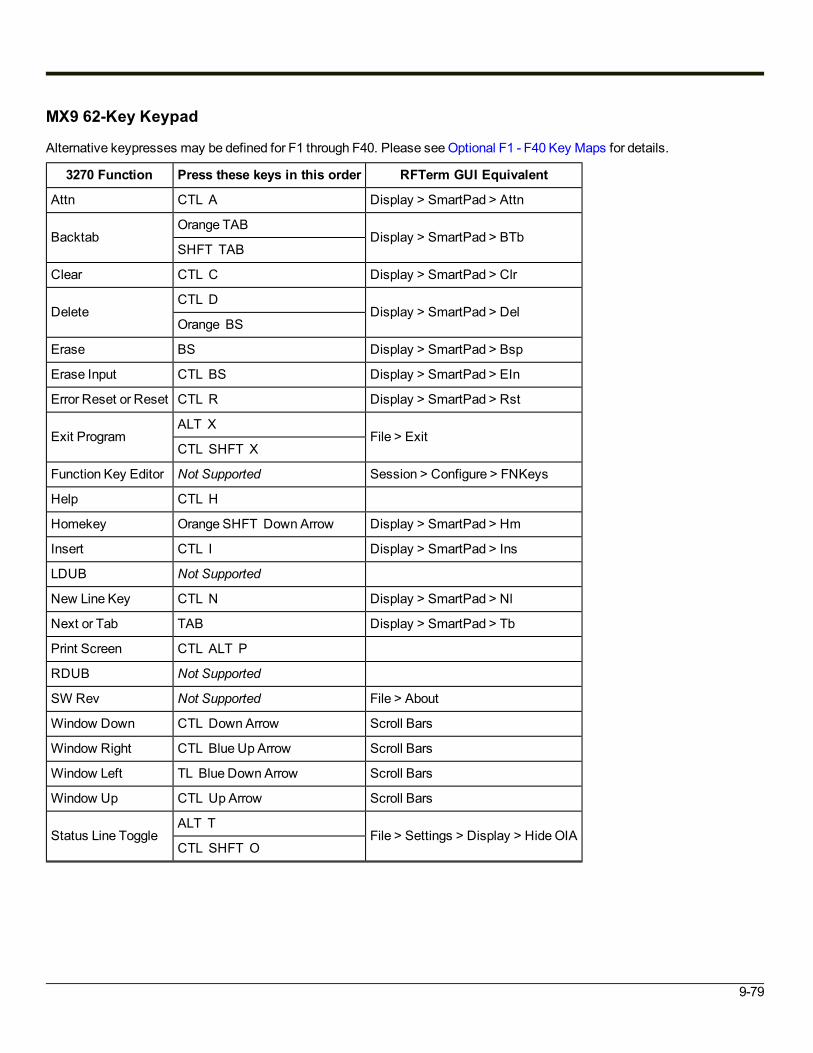
MX9 62-Key Keypad
Alternative keypresses may be defined for F1 through F40. Please seeOptional F1 - F40 Key Maps for details.
3270 Function Press these keys in this order RFTerm GUI Equivalent
Attn CTL A Display > SmartPad > Attn
BacktabOrange TAB
Display > SmartPad > BTbSHFT TAB
Clear CTL C Display > SmartPad > Clr
DeleteCTL D
Display > SmartPad > DelOrange BS
Erase BS Display > SmartPad > Bsp
Erase Input CTL BS Display > SmartPad > EIn
Error Reset or Reset CTL R Display > SmartPad > Rst
Exit ProgramALT X
File > ExitCTL SHFT X
Function Key Editor Not Supported Session > Configure > FNKeys
Help CTL H
Homekey Orange SHFT Down Arrow Display > SmartPad > Hm
Insert CTL I Display > SmartPad > Ins
LDUB Not Supported
New Line Key CTL N Display > SmartPad > Nl
Next or Tab TAB Display > SmartPad > Tb
Print Screen CTL ALT P
RDUB Not Supported
SW Rev Not Supported File > About
Window Down CTL Down Arrow Scroll Bars
Window Right CTL Blue Up Arrow Scroll Bars
Window Left TL Blue Down Arrow Scroll Bars
Window Up CTL Up Arrow Scroll Bars
Status Line ToggleALT T
File > Settings > Display > HideOIACTL SHFT O
9-79

3270 Function Press these keys in this order RFTerm GUI Equivalent
SYS_REQ CTL S Display > SmartPad > Srq
PA1 - PA3 CTL 1 - 3 Display > SmartPad > Pa1 - Pa3
F1 - F10 F1 - F10 KeyBar
F11 - F20 Blue F1 - F10 KeyBar
F21 - F24 SHFT F1 - F4 KeyBar
9-80
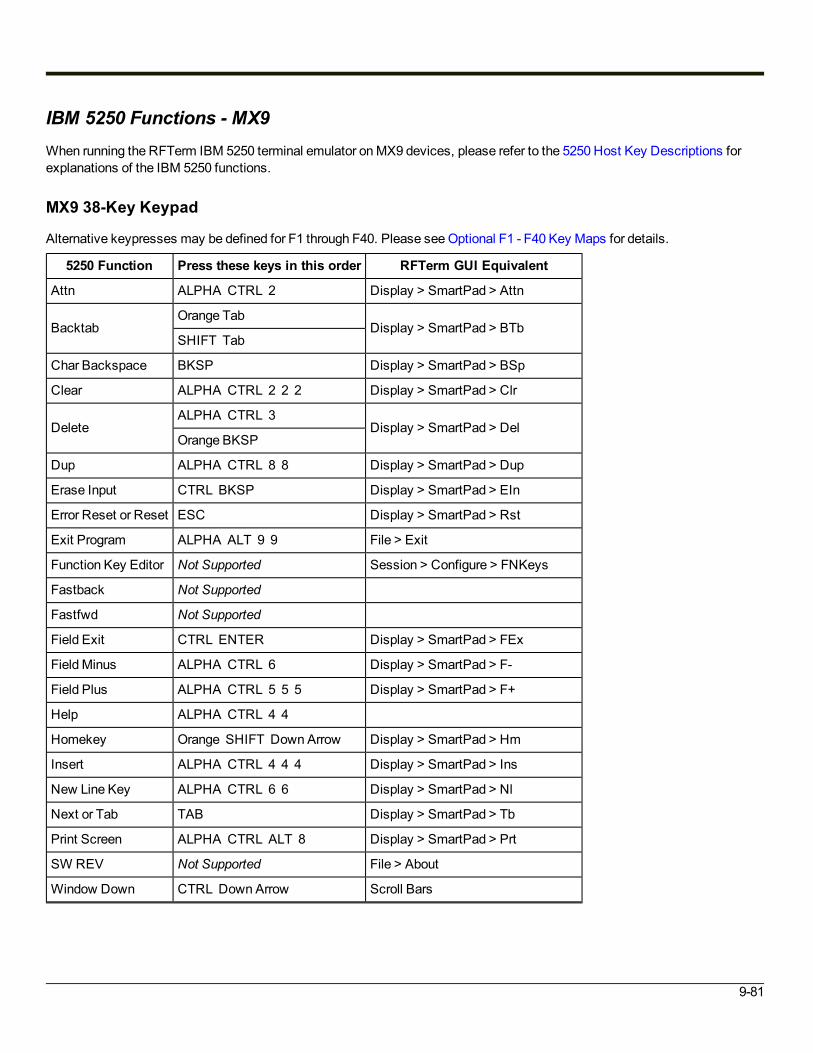
IBM 5250 Functions - MX9When running the RFTerm IBM 5250 terminal emulator onMX9 devices, please refer to the 5250 Host Key Descriptions forexplanations of the IBM 5250 functions.
MX9 38-Key Keypad
Alternative keypresses may be defined for F1 through F40. Please seeOptional F1 - F40 Key Maps for details.
5250 Function Press these keys in this order RFTerm GUI Equivalent
Attn ALPHA CTRL 2 Display > SmartPad > Attn
BacktabOrange Tab
Display > SmartPad > BTbSHIFT Tab
Char Backspace BKSP Display > SmartPad > BSp
Clear ALPHA CTRL 2 2 2 Display > SmartPad > Clr
DeleteALPHA CTRL 3
Display > SmartPad > DelOrange BKSP
Dup ALPHA CTRL 8 8 Display > SmartPad > Dup
Erase Input CTRL BKSP Display > SmartPad > EIn
Error Reset or Reset ESC Display > SmartPad > Rst
Exit Program ALPHA ALT 9 9 File > Exit
Function Key Editor Not Supported Session > Configure > FNKeys
Fastback Not Supported
Fastfwd Not Supported
Field Exit CTRL ENTER Display > SmartPad > FEx
Field Minus ALPHA CTRL 6 Display > SmartPad > F-
Field Plus ALPHA CTRL 5 5 5 Display > SmartPad > F+
Help ALPHA CTRL 4 4
Homekey Orange SHIFT Down Arrow Display > SmartPad > Hm
Insert ALPHA CTRL 4 4 4 Display > SmartPad > Ins
New Line Key ALPHA CTRL 6 6 Display > SmartPad > Nl
Next or Tab TAB Display > SmartPad > Tb
Print Screen ALPHA CTRL ALT 8 Display > SmartPad > Prt
SW REV Not Supported File > About
Window Down CTRL Down Arrow Scroll Bars
9-81

5250 Function Press these keys in this order RFTerm GUI Equivalent
Window Right CTRL Blue Down Arrow Scroll Bars
Window Left CTRL Blue Up Arrow Scroll Bars
Window Up CTRL Up Arrow Scroll Bars
Send or Entercatv ENTER Display > SmartPad > Ent
Status Line Toggle ALPHA ALT 8 File > Settings > Display > HideOIA
Sys_Req ALPHA CTRL 7 7 7 7 Display > SmartPad > Srq
F1 - F10 F1 - F10 KeyBar
F11 - F20 Blue F1 - F10 KeyBar
F21 - F24 SHIFT F1 - F4 KeyBar
9-82

MX9 62-Key Keypad
Alternative keypresses may be defined for F1 through F40. Please seeOptional F1 - F40 Key Maps for details.
5250 Function Press these keys in this order RFTerm GUI Equivalent
Attn CTL A Display > SmartPad > Attn
BacktabSHFT Tab
Display > SmartPad > BTbOrange Tab
Char Backspace BS Display > SmartPad > BSp
Clear CTL C Display > SmartPad > Clr
DeleteCTL D
Display > SmartPad > DelOrange BS
Dup CTL U Display > SmartPad > Dup
Erase Input CTL BS Display > SmartPad > EIn
Error Reset or Reset ESC Display > SmartPad > Rst
Exit ProgramALT X
File > ExitCTL SHFT X
Function Key Editor Not Supported Session > Configure > FNKeys
Fastback Not Supported
Fastfwd Not Supported
Field Exit CTL ENTER Display > SmartPad > FEx
Field Minus CTL M Display > SmartPad > F-
Field Plus CTL L Display > SmartPad > F+
Help CTL H
Homekey Orange SHFT X Display > SmartPad > Hm
Insert CTL I Display > SmartPad > Ins
New Line Key CTL N Display > SmartPad > Nl
Next or Tab TAB Display > SmartPad > Tb
Print Screen CTL ALT P Display > SmartPad > Prt
SW REV Not Supported File > About
Window Down CTL Down Arrow Scroll Bars
Window Right CTL Blue Down Arrow Scroll Bars
Window Left CTL Blue Up Arrow Scroll Bars
9-83
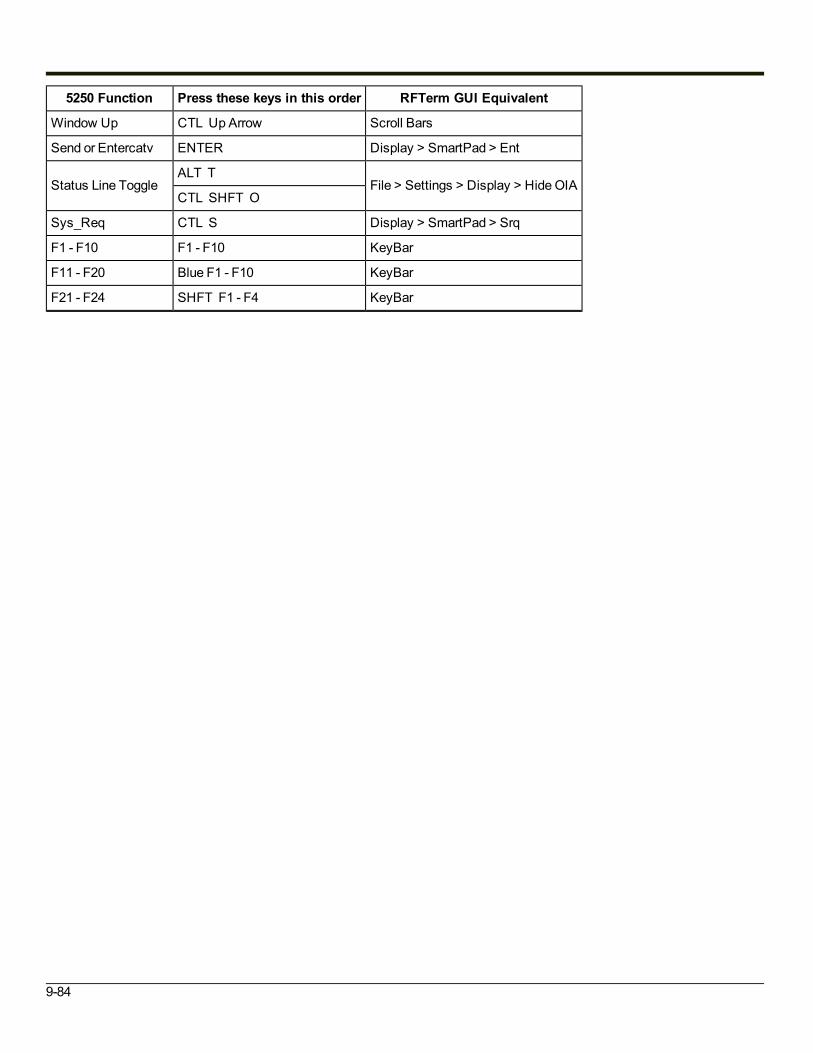
5250 Function Press these keys in this order RFTerm GUI Equivalent
Window Up CTL Up Arrow Scroll Bars
Send or Entercatv ENTER Display > SmartPad > Ent
Status Line ToggleALT T
File > Settings > Display > HideOIACTL SHFT O
Sys_Req CTL S Display > SmartPad > Srq
F1 - F10 F1 - F10 KeyBar
F11 - F20 Blue F1 - F10 KeyBar
F21 - F24 SHFT F1 - F4 KeyBar
9-84

Thor VM1 Key Maps
12-key KeypadNote: The 12-key keypad is available on a Thor VM1 runningWindows CE 6.0.
64-key ANSI Keypad
9-85

64-key IBM 5250 Keypad
64-key IBM 3270 KeypadNote: All RFTerm shortcut keys are directly accessible through the RFTerm user interface.Alphabetic keys default to lower case letters. Press theShift key, then the alphabetic key for an uppercase letter.Note: When the computer boots, the default condition of CapsLock is Off. CapsLock can be toggled with 2nd plus Shift key
sequence.
9-86

RFTerm Functions - Thor VM1
Thor VM1 64-Key Keypad
RFTerm Function Press these keys in this order RFTerm GUI Equivalent
Connect to Host Ctrl Shift C Session > Connect
Disconnect from Host Ctrl Shift D Session > Disconnect
Hide / Display All Bars Ctrl Shift L File > Settings > Display > Hide All Bars
Hide / Display MenuBar Ctrl Shift M File > Settings > Display > HideMenuBar
Hide / Display ToolBar Ctrl Shift T File > Settings > Display > Hide ToolBar
Hide / Display KeyBar Ctrl Shift K File > Settings > Display > Hide KeyBar
ToggleMenuBar Bottom / TopN/A withWindows Embedded Standard Ctrl Shift B File > Settings > Display > At Bottom
Configure Host Session Ctrl Shift N Session > Configure
Application Settings Ctrl Shift E File > Settings
Increase Font Size Ctrl Shift Up Arrow Display > Font Up
Decrease Font Size Ctrl Shift Down Arrow Display > Font Down
Toggle Font Bold / Normal Ctrl Shift 1 Session > Configure > Font Tab
Display/Hide SmartPadN/A withWindows Embedded Standard Ctrl Shift P Display > SmartPad
Display / Hide Text InputN/A withWindows Embedded Standard Ctrl Shift I Display > InputTool
Help Ctrl H
Scroll UpOneRow Shift Up Arrow Scroll Bars
Scroll DownOneRow Shift Down Arrow Scroll Bars
Scroll Left One Row Shift Left Arrow Scroll Bars
Scroll Right One Row Shift Right Arrow Scroll Bars
Exit the EmulatorCtrl Shift X
File > ExitAlt X
9-87

Thor VM1 12-Key Keypad
The notationNot Defined in the following table indicates that no key combination provides this function in the default key map.To obtain this function, some key (or combination of keys) must be remapped to provide key combination specified earlier inthe “RFTerm Functions - Virtual Keys” table.Note: This keyboard is not available with theMicrosoft Windows Embedded Standard operating system.
RFTerm Function Press these keys in this order RFTerm GUI Equivalent
Connect to Host Not Defined Session > Connect
Disconnect from Host Not Defined Session > Disconnect
Hide / Display All Bars Not Defined File > Settings > Display > Hide All Bars
Hide / Display MenuBar Not Defined File > Settings > Display > HideMenuBar
Hide / Display ToolBar Not Defined File > Settings > Display > Hide ToolBar
Hide / Display KeyBar Not Defined File > Settings > Display > Hide KeyBar
ToggleMenuBar Bottom / Top Not Defined File > Settings > Display > At Bottom
Configure Host Session Not Defined Session > Configure
Application Settings Not Defined File > Settings
Increase Font Size Not Defined Display > Font Up
Decrease Font Size Not Defined Display > Font Down
Toggle Font Bold / Normal Not Defined Session > Configure > Font Tab
Display/Hide SmartPad Not Defined Display > SmartPad
Display / Hide Text Input Not Defined Display > InputTool
Help Not Defined
Scroll UpOneRow Not Defined Scroll Bars
Scroll DownOneRow Not Defined Scroll Bars
Scroll Left One Row Not Defined Scroll Bars
Scroll Right One Row Not Defined Scroll Bars
Exit the Emulator Not Defined File > Exit
9-88

ANSI Functions - Thor VM1When running the RFTerm ANSI on the Thor VM1, please refer to the VT Host Key Descriptions for explanations of the ANSIkey functions.Note: Physical keypad key presses and Thor VM1 virtual keypad presses are the same.
Thor VM1 64-Key Keypad
Alternative keypresses may be defined for F1 through F40. Please seeOptional F1 - F40 Key Maps for details.
ANSI Function Press these keys in this order RFTerm GUI Equivalent
Answerback Not Supported Display > SmartPad > Ans
Backspace BkSp Display > SmartPad > BSp
Delete 2nd . (period) Display > SmartPad > DEL
Exit ProgramAlt X
File > ExitShift Ctrl X
Help Ctrl H
F1 - F10 F1 - F10 KeyBar
F11 - F20 Shift F1 - F10 KeyBar
F21 - F30 Alt F1 - F10 KeyBar
F31 - F40 Ctrl F1 - F10 KeyBar
Function Key Editor Not Supported Session > Configure > FNKeys
Send Enter Display > SmartPad > Ent
Window Down Ctrl Down Arrow Scroll Bars
Window Left Ctrl Left Arrow Scroll Bars
Window Right Ctrl Right Arrow Scroll Bars
Window Up Ctrl Up Arrow Scroll Bars
Print Screen Ctrl Alt P
9-89

Thor VM1 12-Key Keypad
The notationNot Defined in the following table indicates that no key combination provides this function in the default key map.To obtain this function, some key (or combination of keys) must be remapped to provide key combination specified earlier inthe ANSI Functions - Virtual Keys table.Note: This keyboard is not available with theMicrosoft Windows Embedded Standard operating system.
ANSI Function Press these keys in this order RFTerm GUI Equivalent
Answerback Not Supported Display > SmartPad > Ans
Backspace Not Defined Display > SmartPad > BSp
Delete Not Defined Display > SmartPad > DEL
Exit Program Not Defined File > Exit
Help Not Defined
F1 - F10 F1 - F10 KeyBar
F11 - F20 Shift F1 - F10 KeyBar
F21 - F30 Not Defined KeyBar
F31 - F40 Not Defined KeyBar
Function Key Editor Not Supported Session > Configure > FNKeys
Send Not Defined Display > SmartPad > Ent
Window Down Not Defined Scroll Bars
Window Left Not Defined Scroll Bars
Window Right Not Defined Scroll Bars
Window Up Not Defined Scroll Bars
Print Screen Not Defined
9-90

IBM 3270 Functions - Thor VM1When running the RFTerm IBM 3270 terminal emulator on the Thor VM1, please refer to the 3270 Host Key Descriptions forexplanations of the IBM 3270 functions.
Thor VM1 64-Key Keypad
Alternative keypresses may be defined for F1 through F40. Please seeOptional F1 - F40 Key Maps for details.
3270 Function Press these keys in this order RFTerm GUI Equivalent
Attn Ctrl A Display > SmartPad > Attn
Backtab 2nd Tab Display > SmartPad > BTb
ClearCtrl C
Display > SmartPad > ClrESC
Delete Ctrl D Display > SmartPad > Del
Erase BkSp Display > SmartPad > Bsp
Erase Input Ctrl BkSp Display > SmartPad > EIn
Error Reset or Reset Ctrl R Display > SmartPad > Rst
Exit ProgramAlt X
File > ExitShift Ctrl X
Function Key Editor Not Supported Session > Configure > FNKeys
Help Ctrl H
HomekeyCtrl Left Arrow
Display > SmartPad > Hm2nd Home
Insert Ctrl I Display > SmartPad > Ins
LDUB Not Supported
New Line Key Ctrl N Display > SmartPad > Nl
Next or Tab Tab Display > SmartPad > Tb
Print Screen Ctrl Alt P
RDUB Not Supported
SW Rev Alt F B File > About
Window Down Ctrl Down Arrow Scroll Bars
Window Right Ctrl Right Arrow Scroll Bars
Window Left Ctrl Left Arrow Scroll Bars
9-91

3270 Function Press these keys in this order RFTerm GUI Equivalent
Window Up Ctrl Up Arrow Scroll Bars
Status Line ToggleAlt T
File > Settings > Display > HideOIACtrl Shift O
SYS_REQ Ctrl S Display > SmartPad > Srq
PA1 - PA3 Ctrl F1 - F3 Display > SmartPad > Pa1 - Pa3
F1 - F10 F1 - F10 KeyBar
F11 - F20 Shift F1 - F10 KeyBar
F21 - F24 Alt F1 - F4 KeyBar
9-92

Thor VM1 12-Key Keypad
The notationNot Defined in the following table indicates that no key combination provides this function in the default key map.To obtain this function, some key (or combination of keys) must be remapped to provide key combination specified earlier inthe IBM 3270 Functions - Virtual Keys table.Note: This keyboard is not available with theMicrosoft Windows Embedded Standard operating system.
3270 Function Press these keys in this order RFTerm GUI Equivalent
Attn Not Defined Display > SmartPad > Attn
Backtab Not Defined Display > SmartPad > BTb
Clear Not Defined Display > SmartPad > Clr
Delete Not Defined Display > SmartPad > Del
Erase Not Defined Display > SmartPad > Bsp
Erase Input Not Defined Display > SmartPad > EIn
Error Reset or Reset Not Defined Display > SmartPad > Rst
Exit Program Not Defined File > Exit
Function Key Editor Not Defined Session > Configure > FNKeys
Help Not Defined
Homekey Not Defined Display > SmartPad > Hm
Insert Not Defined Display > SmartPad > Ins
LDUB Not Defined
New Line Key Not Defined Display > SmartPad > Nl
Next or Tab Not Defined Display > SmartPad > Tb
Print Screen Not Defined
RDUB Not Defined
SW Rev Not Defined File > About
Window Down Not Defined Scroll Bars
Window Right Not Defined Scroll Bars
Window Left Not Defined Scroll Bars
Window Up Not Defined Scroll Bars
Status Line Toggle Not Defined File > Settings > Display > HideOIA
SYS_REQ Not Defined Display > SmartPad > Srq
PA1 - PA3 Not Defined Display > SmartPad > Pa1 - Pa3
F1 - F10 F1 - F10 KeyBar
F11 - F20 Shift F1 - F10 KeyBar
F21 - F24 Not Defined KeyBar
9-93

IBM 5250 Functions - Thor VM1When running the RFTerm IBM 5250 terminal emulator on Thor VM1 devices, please refer to the 5250 Host Key Descriptionsfor explanations of the IBM 5250 functions.
Thor VM1 64-Key Keypad
Alternative keypresses may be defined for F1 through F40. Please seeOptional F1 - F40 Key Maps for details.
5250 Function Press these keys in this order RFTerm GUI Equivalent
Attn Ctrl A Display > SmartPad > Attn
Backtab 2nd Tab Display > SmartPad > BTb
Char Backspace BkSp Display > SmartPad > BSp
Clear Ctrl C Display > SmartPad > Clr
Delete Ctrl D Display > SmartPad > Del
Dup Ctrl U Display > SmartPad > Dup
Erase Input Ctrl BkSp Display > SmartPad > EIn
Error Reset or Reset ESC Display > SmartPad > Rst
Exit ProgramAlt X
File > ExitCtrl Shift X
Function Key Editor Not Supported Session > Configure > FNKeys
Fastback Not Supported
Fastfwd Not Supported
Field ExitCtrl Enter
Display > SmartPad > FEx2nd Enter
Field Minus Ctrl M Display > SmartPad > F-
Field Plus Ctrl L Display > SmartPad > F+
Help Ctrl H
Homekey 2nd Home Display > SmartPad > Hm
Insert Ctrl I Display > SmartPad > Ins
New Line Key Ctrl N Display > SmartPad > Nl
Next or Tab TAB Display > SmartPad > Tb
Print Screen Ctrl Alt P Display > SmartPad > Prt
SW REV Alt F B File > About
Window Down Ctrl Down Arrow Scroll Bars
9-94

5250 Function Press these keys in this order RFTerm GUI Equivalent
Window Right Ctrl Right Arrow Scroll Bars
Window Left Ctrl Left Arrow Scroll Bars
Window Up Ctrl Up Arrow Scroll Bars
Send or Entercatv Enter Display > SmartPad > Ent
Status Line ToggleAlt T
File > Settings > Display > HideOIACtrl Shift O
Sys_Req Ctrl S Display > SmartPad > Srq
F1 - F10 F1 - F10 KeyBar
F11 - F20 Shift F1 - F10 KeyBar
F21 - F24 Alt F1 - F4 KeyBar
9-95

Thor VM1 12-Key Keypad
The notationNot Defined in the following table indicates that no key combination provides this function in the default key map.To obtain this function, some key (or combination of keys) must be remapped to provide key combination specified earlier inthe IBM 5250 Functions - Virtual Keys table.Note: This keyboard is not available with theMicrosoft Windows Embedded Standard operating system.
5250 Function Press these keys in this order RFTerm GUI Equivalent
Attn Not Defined Display > SmartPad > Attn
Backtab Not Defined Display > SmartPad > BTb
Char Backspace Not Defined Display > SmartPad > BSp
Clear Not Defined Display > SmartPad > Clr
Delete Not Defined Display > SmartPad > Del
Dup Not Defined Display > SmartPad > Dup
Erase Input Not Defined Display > SmartPad > EIn
Error Reset or Reset Not Defined Display > SmartPad > Rst
Exit Program Not Defined File > Exit
Function Key Editor Not Defined Session > Configure > FNKeys
Fastback Not Defined
Fastfwd Not Defined
Field Exit Not Defined Display > SmartPad > FEx
Field Minus Not Defined Display > SmartPad > F-
Field Plus Not Defined Display > SmartPad > F+
Help Not Defined
Homekey Not Defined Display > SmartPad > Hm
Insert Not Defined Display > SmartPad > Ins
New Line Key Not Defined Display > SmartPad > Nl
Next or Tab Not Defined Display > SmartPad > Tb
Print Screen Not Defined Display > SmartPad > Prt
SW REV Not Defined File > About
Window Down Not Defined Scroll Bars
Window Right Not Defined Scroll Bars
Window Left Not Defined Scroll Bars
Window Up Not Defined Scroll Bars
Send or Entercatv Not Defined Display > SmartPad > Ent
Status Line Toggle Not Defined File > Settings > Display > HideOIA
9-96

5250 Function Press these keys in this order RFTerm GUI Equivalent
Sys_Req Not Defined Display > SmartPad > Srq
F1 - F10 F1 - F10 KeyBar
F11 - F20 Shift F1 - F10 KeyBar
F21 - F24 Not Defined KeyBar
9-97
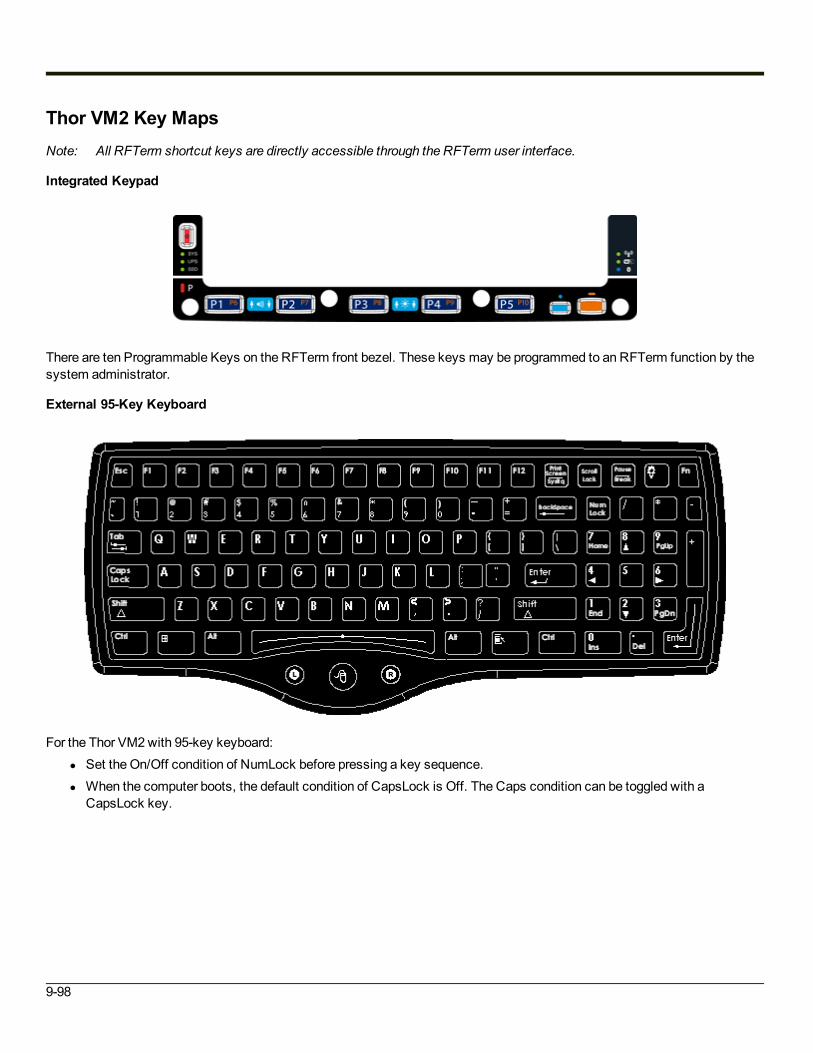
Thor VM2 Key MapsNote: All RFTerm shortcut keys are directly accessible through the RFTerm user interface.
Integrated Keypad
There are ten Programmable Keys on the RFTerm front bezel. These keys may be programmed to an RFTerm function by thesystem administrator.
External 95-Key Keyboard
For the Thor VM2with 95-key keyboard:l Set the On/Off condition of NumLock before pressing a key sequence.l When the computer boots, the default condition of CapsLock is Off. The Caps condition can be toggled with a
CapsLock key.
9-98

RFTerm Functions - Thor VM2
Thor VM2 Integrated Keypad
By default, no RFTerm functions are assigned to the integrated keypad.
Thor VM2 External 95-Key Keyboard
RFTerm Function Press these keys in this order RFTerm GUI Equivalent
Connect to Host Ctrl Shift C Session > Connect
Disconnect from Host Ctrl Shift D Session > Disconnect
Hide / Display All Bars Ctrl Shift L File > Settings > Display > Hide All Bars
Hide / Display MenuBar Ctrl Shift M File > Settings > Display > HideMenuBar
Hide / Display ToolBar Ctrl Shift T File > Settings > Display > Hide ToolBar
Hide / Display KeyBar Ctrl Shift K File > Settings > Display > Hide KeyBar
ToggleMenuBar Bottom / Top(N/A withWindows Embedded Standard) Ctrl Shift B File > Settings > Display > At Bottom
Configure Host Session Ctrl Shift N Session > Configure
Application Settings Ctrl Shift E File > Settings
Increase Font Size Ctrl Shift Up Arrow Display > Font Up
Decrease Font Size Ctrl Shift Down Arrow Display > Font Down
Toggle Font Bold / Normal Ctrl Shift 1 Session > Configure > Font Tab
Display/Hide SmartPad(N/A withWindows Embedded Standard) Ctrl Shift P Display > SmartPad
Display / Hide Text Input(N/A withWindows Embedded Standard) Ctrl Shift I Display > InputTool
Help Ctrl H
Scroll UpOneRow Shift Up Arrow Scroll Bars
Scroll DownOneRow Shift Down Arrow Scroll Bars
Scroll Left One Row Shift Left Arrow Scroll Bars
Scroll Right One Row Shift Right Arrow Scroll Bars
Exit the EmulatorCtrl Shift X
File > ExitAlt X
9-99

ANSI Functions - Thor VM2When running RFTerm ANSI on these devices, please refer to the VT Host Key Descriptions for explanations of the ANSI keyfunctions.
Thor VM2 Integrated Keypad
By default, no ANSI functions are assigned to the integrated keypad keys except as noted below:
VM2 Key Default Programmable Key Value
P1 F1
P2 F2
P3 F3
P4 F4
P5 F5
Thor VM2 External 95-Key Keyboard
Alternative keypresses may be defined for F1 through F40. Please seeOptional F1 - F40 Key Maps for details.
ANSI Function Press these keys in this order RFTerm GUI Equivalent
Answerback Not Supported Display > SmartPad > Ans
Backspace BackSpace Display > SmartPad > BSp
Delete Del Display > SmartPad > DEL
Exit ProgramAlt X
File > ExitShift Ctrl X
Help Ctrl H
F1 - F10 F1 - F10 KeyBar
F11 - F20 Alt F1 - F10 KeyBar
F21 - F30 Shift F1 - F10 KeyBar
F31 - F40 Ctrl F1 - F10 KeyBar
Function Key Editor Not Supported Session > Configure > FNKeys
Send Enter Display > SmartPad > Ent
Window Down Ctrl Down Arrow Scroll Bars
Window Left Ctrl Left Arrow Scroll Bars
Window Right Ctrl Right Arrow Scroll Bars
Window Up Ctrl Up Arrow Scroll Bars
Print Screen Ctrl Alt P
9-100

IBM 3270 Functions - Thor VM2When running RFTerm IBM 3270 on these devices, please refer to the 3270 Host Key Descriptions for explanations of the IBM3270 functions.
Thor VM2 Integrated Keypad
By default, no IBM 3270 functions are assigned to the integrated keypad keys except as noted below:
VM2 Key Default Programmable Key Value
P1 F1
P2 F2
P3 F3
P4 F4
P5 F5
Thor VM2 External 95-Key Keyboard
Alternative keypresses may be defined for F1 through F40. Please seeOptional F1 - F40 Key Maps for details.
3270 Function Press these keys in this order RFTerm GUI Equivalent
Attn Ctrl A Display > SmartPad > Attn
Backtab Shift Tab Display > SmartPad > BTb
ClearCtrl C
Display > SmartPad > ClrEsc
Delete Ctrl D Display > SmartPad > Del
Erase BackSpace Display > SmartPad > Bsp
Erase Input Ctrl BackSpace Display > SmartPad > EIn
Error Reset or Reset Ctrl R Display > SmartPad > Rst
Exit ProgramAlt X
File > ExitShift Ctrl X
Function Key Editor Not Supported Session > Configure > FNKeys
Help Ctrl H
HomekeyCtrl Left Arrow
Display > SmartPad > HmCtrl Home
Insert Ctrl I Display > SmartPad > Ins
9-101

3270 Function Press these keys in this order RFTerm GUI Equivalent
LDUB Not Supported
New Line Key Ctrl N Display > SmartPad > Nl
Next or Tab Tab Display > SmartPad > Tb
Print Screen Ctrl Alt P
RDUB Not Supported
SW Rev Alt F B File > About
Window Down Ctrl Down Arrow Scroll Bars
Window Right Ctrl Right Arrow Scroll Bars
Window Left Ctrl Left Arrow Scroll Bars
Window Up Ctrl Up Arrow Scroll Bars
Status Line ToggleAlt T
File > Settings > Display > HideOIAShift Ctrl O
SYS_REQ Ctrl S Display > SmartPad > Srq
PA1 - PA3 Ctrl F1 - F3 Display > SmartPad > Pa1 - Pa3
F1 - F10 F1 - F10 KeyBar
F11 - F20 Alt F1 - F10 KeyBar
F21 - F24 Shift F1 - F4 KeyBar
9-102

IBM 5250 Functions - Thor VM2When running RFTerm IBM 5250 on these devices, please refer to the 5250 Host Key Descriptions for explanations of the IBM5250 functions.
Thor VM2 Integrated Keypad
By default, no IBM 5250 functions are assigned to the integrated keypad keys except as noted below:
VM2 Key Default Programmable Key Value
P1 F1
P2 F2
P3 F3
P4 F4
P5 F5
Thor VM2 External 95-Key Keyboard
Alternative keypresses may be defined for F1 through F40. Please seeOptional F1 - F40 Key Maps for details.
5250 Function Press these keys in this order RFTerm GUI Equivalent
Attn Ctrl A Display > SmartPad > Attn
Backtab Shift Tab Display > SmartPad > BTb
Char Backspace BackSpace Display > SmartPad > BSp
Clear Ctrl C Display > SmartPad > Clr
Delete Ctrl D Display > SmartPad > Del
Dup Ctrl U Display > SmartPad > Dup
Erase Input Ctrl BackSpace Display > SmartPad > EIn
Error Reset or Reset Esc Display > SmartPad > Rst
Exit ProgramAlt X
File > ExitCtrl Shift X
Function Key Editor Not Supported Session > Configure > FNKeys
Fastback Not Supported
Fastfwd Not Supported
Field ExitCtrl Enter
Display > SmartPad > FExEnd
9-103

5250 Function Press these keys in this order RFTerm GUI Equivalent
Pause
Field Minus Ctrl M Display > SmartPad > F-
Field Plus Ctrl L Display > SmartPad > F+
Help Ctrl H
Homekey Home Display > SmartPad > Hm
Insert Ctrl I Display > SmartPad > Ins
New Line Key Ctrl N Display > SmartPad > Nl
Next or Tab Tab Display > SmartPad > Tb
Print Screen Ctrl Alt P Display > SmartPad > Prt
SW REV Alt F B File > About
Window Down Ctrl Down Arrow Scroll Bars
Window Right Ctrl Right Arrow Scroll Bars
Window Left Ctrl Left Arrow Scroll Bars
Window Up Ctrl Up Arrow Scroll Bars
Send or Entercatv Enter Display > SmartPad > Ent
Status Line ToggleAlt T
File > Settings > Display > HideOIACtrl Shift O
Sys_Req Ctrl S Display > SmartPad > Srq
F1 - F10 F1 - F10 KeyBar
F11 - F20 Alt F1 - F10 KeyBar
F21 - F24 Shift F1 - F4 KeyBar
9-104

VX6 and VX7 Key MapsNote: All RFTerm shortcut keys are directly accessible through the RFTerm user interface.
VX6 or VX7with 60-key KeyboardFor the VX6 and the VX7with 60-key keyboard:
l When using a sequence of keys that includes the 2ND key, press the 2ND key first then the rest of the key sequence.l Set the On/Off condition of NumLock before pressing a key sequence. There is no visual indication of the condition of
NumLock.l When the computer boots, the default condition of Caps (or CapsLock) is Off. The Caps (or CapsLock) condition can be
toggled with a 2ND-F1 key sequence. The CAPS LED is illuminated when CapsLock is On.l When the computer boots, the default condition of NumLock is On. The warmboot behavior of NumLock can be
configured, as detailed in the VX6ReferenceGuide or the VX7ReferenceGuide.
9-105

VX7with 90-key KeyboardFor the VX7with 95-key keyboard:
l There is no 2ND key on this keyboard.l Set the On/Off condition of NumLock before pressing a key sequence. When NumLock is On, the NumLock key and
the numeric keys are backlit amber. When NumLock is Off, these keys are backlit green.l When the computer boots, the default condition of CapsLock is Off. The Caps condition can be toggled with a
CapsLock key. The CapsLock key is backlit amber when CapsLock is On and backlit green when CapsLock is Off.l When the computer boots, the default condition of NumLock is On. The warmboot behavior of NumLock can be
configured, as detailed in the VX7ReferenceGuide.
9-106

RFTerm Functions - VX6 and VX7
VX6 and VX7 60-key Keyboard
RFTerm Function Press these keys in this order RFTerm GUI Equivalent
Connect to Host CTRL SHIFT C Session > Connect
Disconnect from Host CTRL SHIFT D Session > Disconnect
Hide / Display All Bars CTRL SHIFT L File > Settings > Display > Hide All Bars
Hide / Display MenuBar CTRL SHIFT M File > Settings > Display > HideMenuBar
Hide / Display ToolBar CTRL SHIFT T File > Settings > Display > Hide ToolBar
Hide / Display KeyBar CTRL SHIFT K File > Settings > Display > Hide KeyBar
ToggleMenuBar Bottom / Top CTRL SHIFT B File > Settings > Display > At Bottom
Configure Host Session CTRL SHIFT N Session > Configure
Application Settings CTRL SHIFT E File > Settings
Increase Font Size CTRL SHIFT Up Arrow Display > Font Up
Decrease Font Size CTRL SHIFT Down Arrow Display > Font Down
Toggle Font Bold / Normal CTRL SHIFT 1 Session > Configure > Font Tab
Display/Hide SmartPad CTRL SHIFT P Display > SmartPad
Display / Hide Text Input CTRL SHIFT I Display > InputTool
Help CTRL H
Scroll UpOneRow SHIFT Up Arrow Scroll Bars
Scroll DownOneRow SHIFT Down Arrow Scroll Bars
Scroll Left One Row SHIFT Left Arrow Scroll Bars
Scroll Right One Row SHIFT Right Arrow Scroll Bars
Exit the EmulatorCTRL SHIFT X
File > ExitALT X
9-107

VX7 95-key Keyboard
RFTerm Function Press these keys in this order RFTerm GUI Equivalent
Connect to Host Ctrl Shift C Session > Connect
Disconnect from Host Ctrl Shift D Session > Disconnect
Hide / Display All Bars Ctrl Shift L File > Settings > Display > Hide All Bars
Hide / Display MenuBar Ctrl Shift M File > Settings > Display > HideMenuBar
Hide / Display ToolBar Ctrl Shift T File > Settings > Display > Hide ToolBar
Hide / Display KeyBar Ctrl Shift K File > Settings > Display > Hide KeyBar
ToggleMenuBar Bottom / Top Ctrl Shift B File > Settings > Display > At Bottom
Configure Host Session Ctrl Shift N Session > Configure
Application Settings Ctrl Shift E File > Settings
Increase Font Size Ctrl Shift Up Arrow Display > Font Up
Decrease Font Size Ctrl Shift Down Arrow Display > Font Down
Toggle Font Bold / Normal Ctrl Shift 1 Session > Configure > Font Tab
Display/Hide SmartPad Ctrl Shift P Display > SmartPad
Display / Hide Text Input Ctrl Shift I Display > InputTool
Help Ctrl H
Scroll UpOneRow Shift Up Arrow Scroll Bars
Scroll DownOneRow Shift Down Arrow Scroll Bars
Scroll Left One Row Shift Left Arrow Scroll Bars
Scroll Right One Row Shift Right Arrow Scroll Bars
Exit the EmulatorCtrl Shift X
File > ExitAlt X
9-108

ANSI Functions - VX6 and VX7When running RFTerm ANSI on these devices, please refer to the VT Host Key Descriptions for explanations of the ANSI keyfunctions.
VX6 and VX7 60-key Keyboard
Alternative keypresses may be defined for F1 through F40. Please seeOptional F1 - F40 Key Maps for details.
ANSI Function Press these keys in this order RFTerm GUI Equivalent
Answerback Not Supported Display > SmartPad > Ans
Backspace BKSP Display > SmartPad > BSp
Delete 2ND . (period) Display > SmartPad > DEL
Exit ProgramALT X
File > ExitSHIFT CTRL X
Help CTRL H
F1 - F10 F1 - F10 KeyBar
F11 - F20 ALT F1 - F10 KeyBar
F21 - F30 SHIFT F1 - F10 KeyBar
F31 - F40 CTRL F1 - F10 KeyBar
Function Key Editor Not Supported Session > Configure > FNKeys
Send ENTER Display > SmartPad > Ent
Window Down CTRL Down Arrow Scroll Bars
Window Left CTRL Left Arrow Scroll Bars
Window Right CTRL Right Arrow Scroll Bars
Window Up CTRL Up Arrow Scroll Bars
Print Screen CTRL ALT P
9-109

VX7 95-key Keyboard
Alternative keypresses may be defined for F1 through F40. Please seeOptional F1 - F40 Key Maps for details.
ANSI Function Press these keys in this order RFTerm GUI Equivalent
Answerback Not Supported Display > SmartPad > Ans
Backspace BackSpace Display > SmartPad > BSp
Delete Del Display > SmartPad > DEL
Exit ProgramAlt X
File > ExitShift Ctrl X
Help Ctrl H
F1 - F10 F1 - F10 KeyBar
F11 - F20 Alt F1 - F10 KeyBar
F21 - F30 Shift F1 - F10 KeyBar
F31 - F40 Ctrl F1 - F10 KeyBar
Function Key Editor Not Supported Session > Configure > FNKeys
Send Enter Display > SmartPad > Ent
Window Down Ctrl Down Arrow Scroll Bars
Window Left Ctrl Left Arrow Scroll Bars
Window Right Ctrl Right Arrow Scroll Bars
Window Up Ctrl Up Arrow Scroll Bars
Print Screen Ctrl Alt P
9-110

IBM 3270 Functions - VX6 and VX7When running RFTerm IBM 3270 on these devices, please refer to the 3270 Host Key Descriptions for explanations of the IBM3270 functions.
VX6 and VX7 60-key Keyboard - 3270
Alternative keypresses may be defined for F1 through F40. Please seeOptional F1 - F40 Key Maps for details.
3270 Function Press these keys in this order RFTerm GUI Equivalent
Attn CTRL A Display > SmartPad > Attn
Backtab 2ND Tab Display > SmartPad > BTb
ClearCtrl C
Display > SmartPad > ClrESC
Delete CTRL D Display > SmartPad > Del
Erase BKSP Display > SmartPad > Bsp
Erase Input CTRL BKSP Display > SmartPad > EIn
Error Reset or Reset CTRL R Display > SmartPad > Rst
Exit ProgramALT X
File > ExitSHIFT CTRL X
Function Key Editor Not Supported Session > Configure > FNKeys
Help CTRL H
HomekeyCTRL Left Arrow
Display > SmartPad > Hm2ND Home
Insert CTRL I Display > SmartPad > Ins
LDUB Not Supported
New Line Key CTRL N Display > SmartPad > Nl
Next or Tab Tab Display > SmartPad > Tb
Print Screen CTRL ALT P
RDUB Not Supported
SW Rev ALT F B File > About
Window Down CTRL Down Arrow Scroll Bars
Window Right CTRL Right Arrow Scroll Bars
Window Left CTRL Left Arrow Scroll Bars
9-111

3270 Function Press these keys in this order RFTerm GUI Equivalent
Window Up CTRL Up Arrow Scroll Bars
Status Line ToggleALT T
File > Settings > Display > HideOIACTRL SHIFT O
SYS_REQ CTRL S Display > SmartPad > Srq
PA1 - PA3 CTRL F1 - F3 Display > SmartPad > Pa1 - Pa3
F1 - F10 F1 - F10 KeyBar
F11 - F20 ALT F1 - F10 KeyBar
F21 - F24 SHIFT F1 - F4 KeyBar
9-112
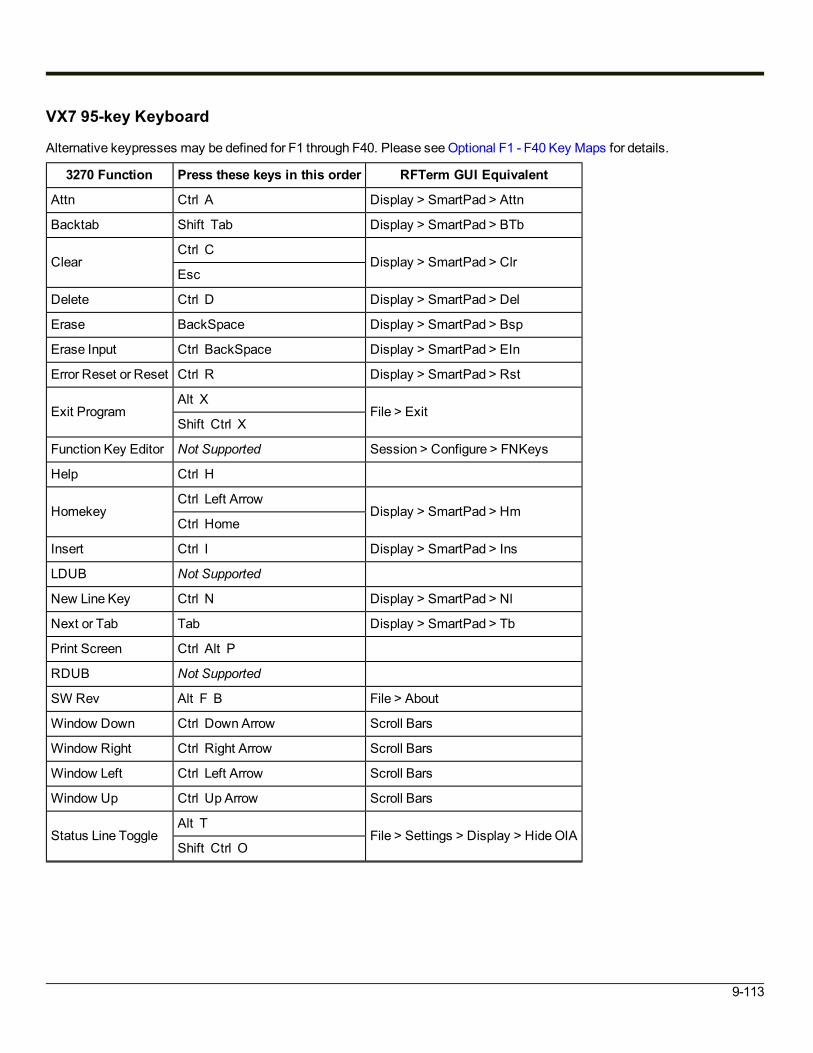
VX7 95-key Keyboard
Alternative keypresses may be defined for F1 through F40. Please seeOptional F1 - F40 Key Maps for details.
3270 Function Press these keys in this order RFTerm GUI Equivalent
Attn Ctrl A Display > SmartPad > Attn
Backtab Shift Tab Display > SmartPad > BTb
ClearCtrl C
Display > SmartPad > ClrEsc
Delete Ctrl D Display > SmartPad > Del
Erase BackSpace Display > SmartPad > Bsp
Erase Input Ctrl BackSpace Display > SmartPad > EIn
Error Reset or Reset Ctrl R Display > SmartPad > Rst
Exit ProgramAlt X
File > ExitShift Ctrl X
Function Key Editor Not Supported Session > Configure > FNKeys
Help Ctrl H
HomekeyCtrl Left Arrow
Display > SmartPad > HmCtrl Home
Insert Ctrl I Display > SmartPad > Ins
LDUB Not Supported
New Line Key Ctrl N Display > SmartPad > Nl
Next or Tab Tab Display > SmartPad > Tb
Print Screen Ctrl Alt P
RDUB Not Supported
SW Rev Alt F B File > About
Window Down Ctrl Down Arrow Scroll Bars
Window Right Ctrl Right Arrow Scroll Bars
Window Left Ctrl Left Arrow Scroll Bars
Window Up Ctrl Up Arrow Scroll Bars
Status Line ToggleAlt T
File > Settings > Display > HideOIAShift Ctrl O
9-113

3270 Function Press these keys in this order RFTerm GUI Equivalent
SYS_REQ Ctrl S Display > SmartPad > Srq
PA1 - PA3 Ctrl F1 - F3 Display > SmartPad > Pa1 - Pa3
F1 - F10 F1 - F10 KeyBar
F11 - F20 Alt F1 - F10 KeyBar
F21 - F24 Shift F1 - F4 KeyBar
9-114

IBM 5250 Functions - VX6 and VX7When running RFTerm IBM 5250 on these devices, please refer to the 5250 Host Key Descriptions for explanations of the IBM5250 functions.
VX6 and VX7 60-key Keyboard
Alternative keypresses may be defined for F1 through F40. Please seeOptional F1 - F40 Key Maps for details.
5250 Function Press these keys in this order RFTerm GUI Equivalent
Attn CTRL A Display > SmartPad > Attn
Backtab 2ND Tab Display > SmartPad > BTb
Char Backspace BKSP Display > SmartPad > BSp
Clear CTRL C Display > SmartPad > Clr
Delete CTRL D Display > SmartPad > Del
Dup CTRL U Display > SmartPad > Dup
Erase Input CTRL BKSP Display > SmartPad > EIn
Error Reset or Reset ESC Display > SmartPad > Rst
Exit ProgramALT X
File > ExitCTRL SHIFT X
Function Key Editor Not Supported Session > Configure > FNKeys
Fastback Not Supported
Fastfwd Not Supported
Field ExitCTRL ENTER
Display > SmartPad > FEx2ND ENTER
Field Minus CTRL M Display > SmartPad > F-
Field Plus CTRL L Display > SmartPad > F+
Help CTRL H
Homekey 2ND Home Display > SmartPad > Hm
Insert CTRL I Display > SmartPad > Ins
New Line Key CTRL N Display > SmartPad > Nl
Next or Tab TAB Display > SmartPad > Tb
Print Screen CTRL ALT P Display > SmartPad > Prt
SW REV ALT F B File > About
Window Down CTRL Down Arrow Scroll Bars
9-115

5250 Function Press these keys in this order RFTerm GUI Equivalent
Window Right CTRL Right Arrow Scroll Bars
Window Left CTRL Left Arrow Scroll Bars
Window Up CTRL Up Arrow Scroll Bars
Send or Entercatv ENTER Display > SmartPad > Ent
Status Line ToggleALT T
File > Settings > Display > HideOIACTRL SHIFT O
Sys_Req CTRL S Display > SmartPad > Srq
F1 - F10 F1 - F10 KeyBar
F11 - F20 ALT F1 - F10 KeyBar
F21 - F24 SHIFT F1 - F4 KeyBar
9-116
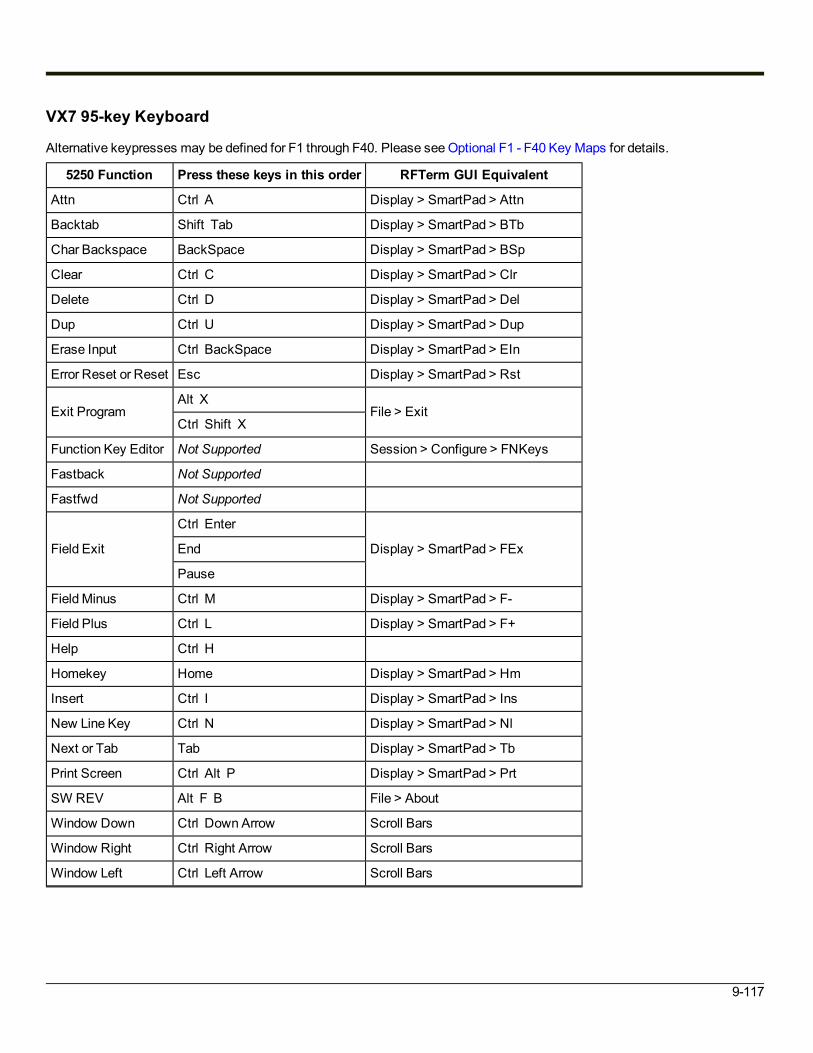
VX7 95-key Keyboard
Alternative keypresses may be defined for F1 through F40. Please seeOptional F1 - F40 Key Maps for details.
5250 Function Press these keys in this order RFTerm GUI Equivalent
Attn Ctrl A Display > SmartPad > Attn
Backtab Shift Tab Display > SmartPad > BTb
Char Backspace BackSpace Display > SmartPad > BSp
Clear Ctrl C Display > SmartPad > Clr
Delete Ctrl D Display > SmartPad > Del
Dup Ctrl U Display > SmartPad > Dup
Erase Input Ctrl BackSpace Display > SmartPad > EIn
Error Reset or Reset Esc Display > SmartPad > Rst
Exit ProgramAlt X
File > ExitCtrl Shift X
Function Key Editor Not Supported Session > Configure > FNKeys
Fastback Not Supported
Fastfwd Not Supported
Field Exit
Ctrl Enter
Display > SmartPad > FExEnd
Pause
Field Minus Ctrl M Display > SmartPad > F-
Field Plus Ctrl L Display > SmartPad > F+
Help Ctrl H
Homekey Home Display > SmartPad > Hm
Insert Ctrl I Display > SmartPad > Ins
New Line Key Ctrl N Display > SmartPad > Nl
Next or Tab Tab Display > SmartPad > Tb
Print Screen Ctrl Alt P Display > SmartPad > Prt
SW REV Alt F B File > About
Window Down Ctrl Down Arrow Scroll Bars
Window Right Ctrl Right Arrow Scroll Bars
Window Left Ctrl Left Arrow Scroll Bars
9-117

5250 Function Press these keys in this order RFTerm GUI Equivalent
Window Up Ctrl Up Arrow Scroll Bars
Send or Entercatv Enter Display > SmartPad > Ent
Status Line ToggleAlt T
File > Settings > Display > HideOIACtrl Shift O
Sys_Req Ctrl S Display > SmartPad > Srq
F1 - F10 F1 - F10 KeyBar
F11 - F20 Alt F1 - F10 KeyBar
F21 - F24 Shift F1 - F4 KeyBar
9-118
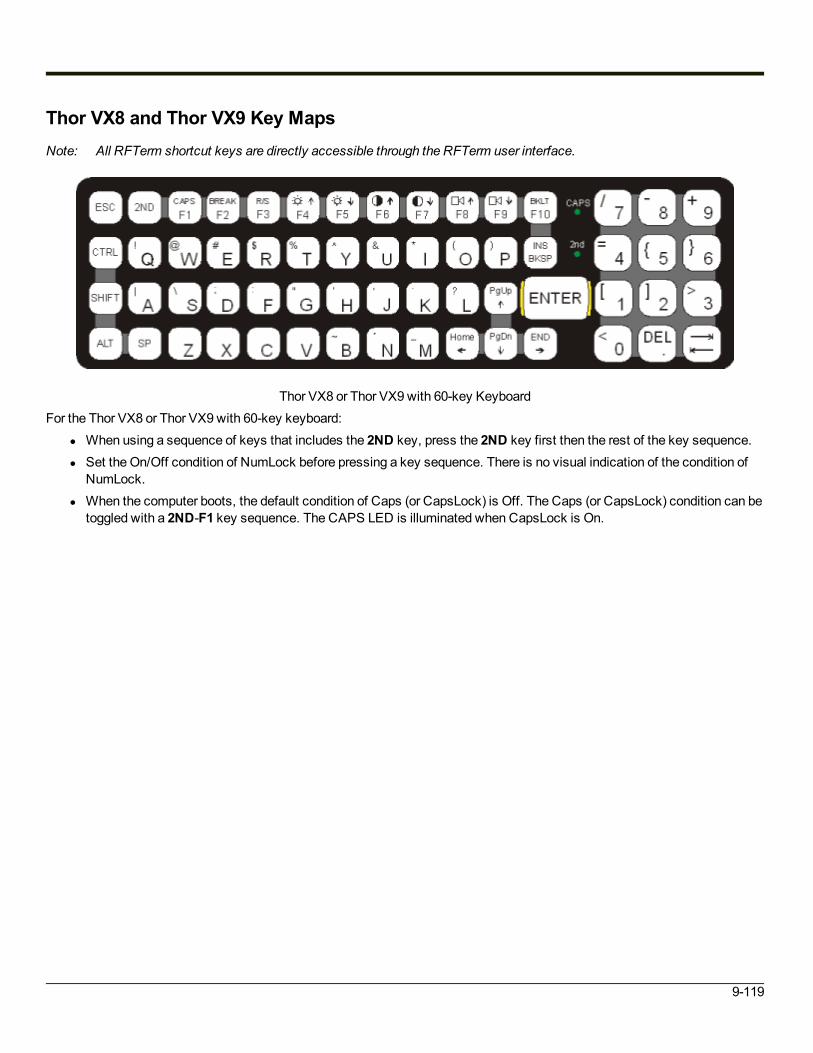
Thor VX8 and Thor VX9 Key MapsNote: All RFTerm shortcut keys are directly accessible through the RFTerm user interface.
Thor VX8 or Thor VX9with 60-key KeyboardFor the Thor VX8 or Thor VX9with 60-key keyboard:
l When using a sequence of keys that includes the 2ND key, press the 2ND key first then the rest of the key sequence.l Set the On/Off condition of NumLock before pressing a key sequence. There is no visual indication of the condition of
NumLock.l When the computer boots, the default condition of Caps (or CapsLock) is Off. The Caps (or CapsLock) condition can be
toggled with a 2ND-F1 key sequence. The CAPS LED is illuminated when CapsLock is On.
9-119

Thor VX8 or Thor VX9with 95-key keyboardFor the Thor VX8 or Thor VX9with 95-key keyboard:
l There is no 2ND key on this keyboard.l Set the On/Off condition of NumLock before pressing a key sequence. When NumLock is On, the NumLock key and
the numeric keys are backlit amber. When NumLock is Off, these keys are backlit green.l When the computer boots, the default condition of CapsLock is Off. The Caps condition can be toggled with a
CapsLock key. The CapsLock key is backlit amber when CapsLock is On and backlit green when CapsLock is Off.
9-120

RFTerm Functions - Thor VX8 and Thor VX9
Thor VX8 and Thor VX9 60-key Keyboard
RFTerm Function Press these keys in this order RFTerm GUI Equivalent
Connect to Host CTRL SHIFT C Session > Connect
Disconnect from Host CTRL SHIFT D Session > Disconnect
Hide / Display All Bars CTRL SHIFT L File > Settings > Display > Hide All Bars
Hide / Display ToolBar CTRL SHIFT T File > Settings > Display > Hide ToolBar
Hide / Display KeyBar CTRL SHIFT K File > Settings > Display > Hide KeyBar
Configure Host Session CTRL SHIFT N Session > Configure
Application Settings CTRL SHIFT E File > Settings
Increase Font Size CTRL SHIFT Up Arrow Display > Font Up
Decrease Font Size CTRL SHIFT Down Arrow Display > Font Down
Toggle Font Bold / Normal CTRL SHIFT 1 Session > Configure > Font Tab
Help CTRL H
Scroll UpOneRow SHIFT Up Arrow Scroll Bars
Scroll DownOneRow SHIFT Down Arrow Scroll Bars
Scroll Left One Row SHIFT Left Arrow Scroll Bars
Scroll Right One Row SHIFT Right Arrow Scroll Bars
Exit the EmulatorCTRL SHIFT X
File > ExitALT X
9-121

Thor VX8 and Thor VX9 95-key Keyboard
RFTerm Function Press these keys in this order RFTerm GUI Equivalent
Connect to Host Ctrl Shift C Session > Connect
Disconnect from Host Ctrl Shift D Session > Disconnect
Hide / Display All Bars Ctrl Shift L File > Settings > Display > Hide All Bars
Hide / Display MenuBar Ctrl Shift M File > Settings > Display > HideMenuBar
Hide / Display ToolBar Ctrl Shift T File > Settings > Display > Hide ToolBar
Hide / Display KeyBar Ctrl Shift K File > Settings > Display > Hide KeyBar
Configure Host Session Ctrl Shift N Session > Configure
Application Settings Ctrl Shift E File > Settings
Increase Font Size Ctrl Shift Up Arrow Display > Font Up
Decrease Font Size Ctrl Shift Down Arrow Display > Font Down
Toggle Font Bold / Normal Ctrl Shift 1 Session > Configure > Font Tab
Help Ctrl H
Scroll UpOneRow Shift Up Arrow Scroll Bars
Scroll DownOneRow Shift Down Arrow Scroll Bars
Scroll Left One Row Shift Left Arrow Scroll Bars
Scroll Right One Row Shift Right Arrow Scroll Bars
Exit the EmulatorCtrl Shift X
File > ExitAlt X
9-122

ANSI Functions - Thor VX8 and Thor VX9When running RFTerm ANSI on these devices, please refer to the VT Host Key Descriptions for explanations of the ANSI keyfunctions.
Thor VX8 and Thor VX9 60-key Keyboard
Alternative keypresses may be defined for F1 through F40. Please seeOptional F1 - F40 Key Maps for details.
ANSI Function Press these keys in this order RFTerm GUI Equivalent
Answerback Not Supported
Backspace BKSP
Delete 2ND . (period)
Exit ProgramALT X
File > ExitSHIFT CTRL X
Help CTRL H
F1 - F10 F1 - F10 KeyBar
F11 - F20 ALT F1 - F10 KeyBar
F21 - F30 SHIFT F1 - F10 KeyBar
F31 - F40 CTRL F1 - F10 KeyBar
Function Key Editor Not Supported Session > Configure > FNKeys
Send ENTER
Window Down CTRL Down Arrow Scroll Bars
Window Left CTRL Left Arrow Scroll Bars
Window Right CTRL Right Arrow Scroll Bars
Window Up CTRL Up Arrow Scroll Bars
Print Screen CTRL ALT P
9-123

Thor VX8 and Thor VX9 95-key Keyboard
Alternative keypresses may be defined for F1 through F40. Please seeOptional F1 - F40 Key Maps for details.
ANSI Function Press these keys in this order RFTerm GUI Equivalent
Answerback Not Supported Display > SmartPad > Ans
Backspace BackSpace Display > SmartPad > BSp
Delete Del Display > SmartPad > DEL
Exit ProgramAlt X
File > ExitShift Ctrl X
Help Ctrl H
F1 - F10 F1 - F10 KeyBar
F11 - F20 Alt F1 - F10 KeyBar
F21 - F30 Shift F1 - F10 KeyBar
F31 - F40 Ctrl F1 - F10 KeyBar
Function Key Editor Not Supported Session > Configure > FNKeys
Send Enter Display > SmartPad > Ent
Window Down Ctrl Down Arrow Scroll Bars
Window Left Ctrl Left Arrow Scroll Bars
Window Right Ctrl Right Arrow Scroll Bars
Window Up Ctrl Up Arrow Scroll Bars
Print Screen Ctrl Alt P
9-124

IBM 3270 Functions - Thor VX8 and Thor VX9When running RFTerm IBM 3270 on these devices, please refer to the 3270 Host Key Descriptions for explanations of the IBM3270 functions.
Thor VX8 and Thor VX9 60-key Keyboard
Alternative keypresses may be defined for F1 through F40. Please seeOptional F1 - F40 Key Maps for details.
3270 Function Press these keys in this order RFTerm GUI Equivalent
Attn CTRL A
Backtab 2ND Tab
ClearCtrl C
ESC
Delete CTRL D
Erase BKSP
Erase Input CTRL BKSP
Error Reset or Reset CTRL R
Exit ProgramALT X
File > ExitSHIFT CTRL X
Function Key Editor Not Supported Session > Configure > FNKeys
Help CTRL H
HomekeyCTRL Left Arrow
2ND Home
Insert CTRL I
LDUB Not Supported
New Line Key CTRL N
Next or Tab Tab
Print Screen CTRL ALT P
RDUB Not Supported
SW Rev ALT F B File > About
Window Down CTRL Down Arrow Scroll Bars
Window Right CTRL Right Arrow Scroll Bars
Window Left CTRL Left Arrow Scroll Bars
9-125
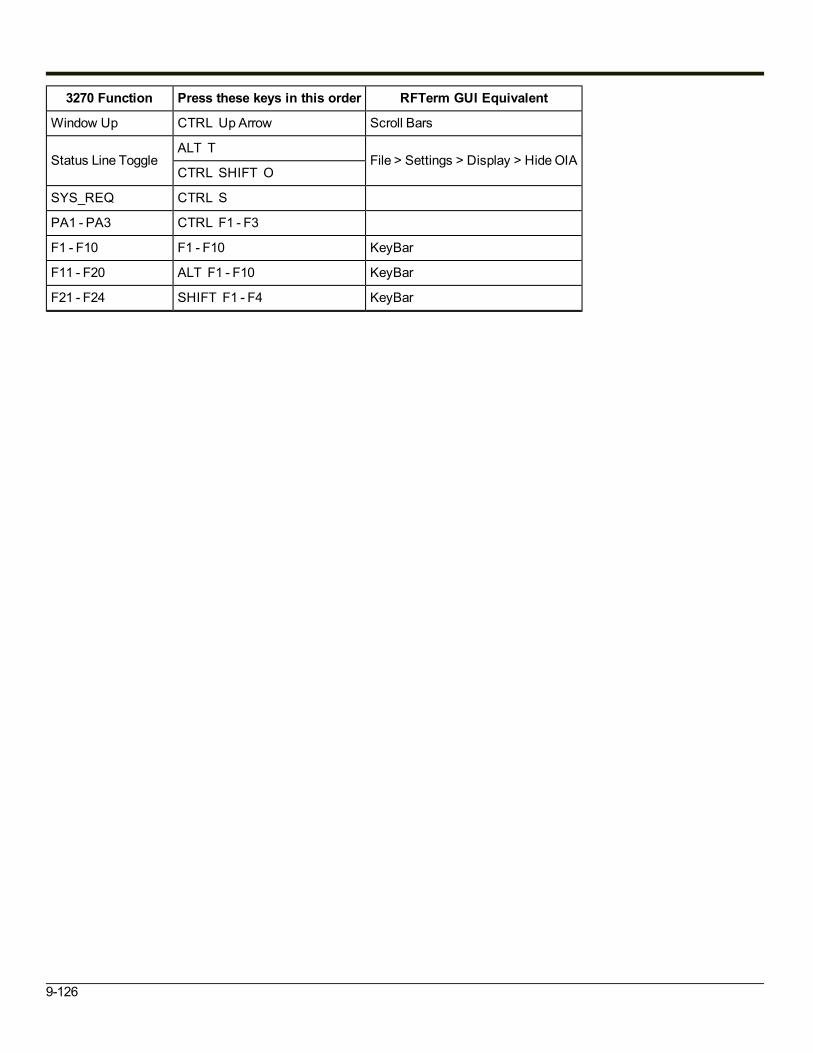
3270 Function Press these keys in this order RFTerm GUI Equivalent
Window Up CTRL Up Arrow Scroll Bars
Status Line ToggleALT T
File > Settings > Display > HideOIACTRL SHIFT O
SYS_REQ CTRL S
PA1 - PA3 CTRL F1 - F3
F1 - F10 F1 - F10 KeyBar
F11 - F20 ALT F1 - F10 KeyBar
F21 - F24 SHIFT F1 - F4 KeyBar
9-126

Thor VX8 and Thor VX9 95-key Keyboard
Alternative keypresses may be defined for F1 through F40. Please seeOptional F1 - F40 Key Maps for details.
3270 Function Press these keys in this order RFTerm GUI Equivalent
Attn Ctrl A Display > SmartPad > Attn
Backtab Shift Tab Display > SmartPad > BTb
ClearCtrl C
Display > SmartPad > ClrEsc
Delete Ctrl D Display > SmartPad > Del
Erase BackSpace Display > SmartPad > Bsp
Erase Input Ctrl BackSpace Display > SmartPad > EIn
Error Reset or Reset Ctrl R Display > SmartPad > Rst
Exit ProgramAlt X
File > ExitShift Ctrl X
Function Key Editor Not Supported Session > Configure > FNKeys
Help Ctrl H
HomekeyCtrl Left Arrow
Display > SmartPad > HmCtrl Home
Insert Ctrl I Display > SmartPad > Ins
LDUB Not Supported
New Line Key Ctrl N Display > SmartPad > Nl
Next or Tab Tab Display > SmartPad > Tb
Print Screen Ctrl Alt P
RDUB Not Supported
SW Rev Alt F B File > About
Window Down Ctrl Down Arrow Scroll Bars
Window Right Ctrl Right Arrow Scroll Bars
Window Left Ctrl Left Arrow Scroll Bars
Window Up Ctrl Up Arrow Scroll Bars
Status Line ToggleAlt T
File > Settings > Display > HideOIAShift Ctrl O
9-127

3270 Function Press these keys in this order RFTerm GUI Equivalent
SYS_REQ Ctrl S Display > SmartPad > Srq
PA1 - PA3 Ctrl F1 - F3 Display > SmartPad > Pa1 - Pa3
F1 - F10 F1 - F10 KeyBar
F11 - F20 Alt F1 - F10 KeyBar
F21 - F24 Shift F1 - F4 KeyBar
9-128

IBM 5250 Functions - Thor VX8 and Thor VX9When running RFTerm IBM 5250 on these devices, please refer to the 5250 Host Key Descriptions for explanations of the IBM5250 functions.
Thor VX8 and Thor VX9 60-key Keyboard
Alternative keypresses may be defined for F1 through F40. Please seeOptional F1 - F40 Key Maps for details.
5250 Function Press these keys in this order RFTerm GUI Equivalent
Attn CTRL A
Backtab 2ND Tab
Char Backspace BKSP
Clear CTRL C
Delete CTRL D
Dup CTRL U
Erase Input CTRL BKSP
Error Reset or Reset ESC
Exit ProgramALT X
File > ExitCTRL SHIFT X
Function Key Editor Not Supported Session > Configure > FNKeys
Fastback Not Supported
Fastfwd Not Supported
Field ExitCTRL ENTER
2ND ENTER
Field Minus CTRL M
Field Plus CTRL L
Help CTRL H
Homekey 2ND Home
Insert CTRL I
New Line Key CTRL N
Next or Tab TAB
Print Screen CTRL ALT P
SW REV ALT F B File > About
Window Down CTRL Down Arrow Scroll Bars
9-129

5250 Function Press these keys in this order RFTerm GUI Equivalent
Window Right CTRL Right Arrow Scroll Bars
Window Left CTRL Left Arrow Scroll Bars
Window Up CTRL Up Arrow Scroll Bars
Send or Entercatv ENTER
Status Line ToggleALT T
File > Settings > Display > HideOIACTRL SHIFT O
Sys_Req CTRL S
F1 - F10 F1 - F10 KeyBar
F11 - F20 ALT F1 - F10 KeyBar
F21 - F24 SHIFT F1 - F4 KeyBar
9-130

Thor VX8 and Thor VX9 95-key Keyboard
Alternative keypresses may be defined for F1 through F40. Please seeOptional F1 - F40 Key Maps for details.
5250 Function Press these keys in this order RFTerm GUI Equivalent
Attn Ctrl A Display > SmartPad > Attn
Backtab Shift Tab Display > SmartPad > BTb
Char Backspace BackSpace Display > SmartPad > BSp
Clear Ctrl C Display > SmartPad > Clr
Delete Ctrl D Display > SmartPad > Del
Dup Ctrl U Display > SmartPad > Dup
Erase Input Ctrl BackSpace Display > SmartPad > EIn
Error Reset or Reset Esc Display > SmartPad > Rst
Exit ProgramAlt X
File > ExitCtrl Shift X
Function Key Editor Not Supported Session > Configure > FNKeys
Fastback Not Supported
Fastfwd Not Supported
Field Exit
Ctrl Enter
Display > SmartPad > FExEnd
Pause
Field Minus Ctrl M Display > SmartPad > F-
Field Plus Ctrl L Display > SmartPad > F+
Help Ctrl H
Homekey Home Display > SmartPad > Hm
Insert Ctrl I Display > SmartPad > Ins
New Line Key Ctrl N Display > SmartPad > Nl
Next or Tab Tab Display > SmartPad > Tb
Print Screen Ctrl Alt P Display > SmartPad > Prt
SW REV Alt F B File > About
Window Down Ctrl Down Arrow Scroll Bars
Window Right Ctrl Right Arrow Scroll Bars
Window Left Ctrl Left Arrow Scroll Bars
9-131

5250 Function Press these keys in this order RFTerm GUI Equivalent
Window Up Ctrl Up Arrow Scroll Bars
Send or Entercatv Enter Display > SmartPad > Ent
Status Line ToggleAlt T
File > Settings > Display > HideOIACtrl Shift O
Sys_Req Ctrl S Display > SmartPad > Srq
F1 - F10 F1 - F10 KeyBar
F11 - F20 Alt F1 - F10 KeyBar
F21 - F24 Shift F1 - F4 KeyBar
9-132

Chapter 10 - Technical Assistance
If you need assistance installing or troubleshooting your device, please contact us by using one of themethods below:Knowledge Base:www.hsmknowledgebase.comOur Knowledge Base provides thousands of immediate solutions. If the Knowledge Base cannot help, our Technical SupportPortal (see below) provides an easy way to report your problem or ask your question.Technical Support Portal:www.hsmsupportportal.comThe Technical Support Portal not only allows you to report your problem, but it also provides immediate solutions to yourtechnical issues by searching our Knowledge Base. With the Portal, you can submit and track your questions online and sendand receive attachments.Web form:www.hsmcontactsupport.comYou can contact our technical support team directly by filling out our online support form. Enter your contact details and thedescription of the question/problem.Telephone:www.honeywellaidc.com/locationsFor our latest contact information, please check our website at the link above.
Product Service and RepairHoneywell International Inc. provides service for all of its products through service centers throughout the world. To obtainwarranty or non-warranty service, please visit www.honeywellaidc.com and select Support > Contact Service and Repairto see your region’s instructions on how to obtain a ReturnMaterial Authorization number (RMA #). You should do this prior toreturning the product.
10-1

Honeywell Scanning & Mobility9680Old Bailes RoadFort Mill, SC 29707www.honeywellaidc.com
E-SW-RFTERMRGRev AG
1/13