Restore Web Customer Portal User Guide
20
Restore Web Customer Portal User Guide January 2019
Transcript of Restore Web Customer Portal User Guide

Restore Web Customer Portal
User Guide January 2019

1
Contents 1. Logging in to Restore Web
2. Forgotten password
4. Home Page
5. View & Order
5.1 Search
5.2 Matching Items
5.3 Filtering and Sorting
5.4 Paging
5.5 Items per page
5.6 Show Box / Files
5.6.1 Un-catalogued files
5.7 Other Options
5.8 Item history
5.9 Item selection
5.10 ‘Requested for’ field
6. Basket
6.1 Basket ownership
7. Checkout
8. Product sales
9. Order History
10. Adding New Items into Storage
10.1 Add box
10.2 Catalogue files
10.3 Add box range
12. Scanned documents
13. Settings
13.1 User details
13.2 Permitted functions
13.3 My Profile
13.4 Change Password
14. Reports

2
1. Logging in to Restore Web
Restore Web can be accessed using the URL https://online5.restore.co.uk/RestoreWeb
The user will be prompted to enter a Username (Email Address) and Password.
2. Forgotten password
If a user has forgotten the password, then clicking the <Forgotten password> link will present
the following page:
The user will be sent a link to change the password.
Below the <Forgotten password> link are also links to email or telephone Business Support.
3
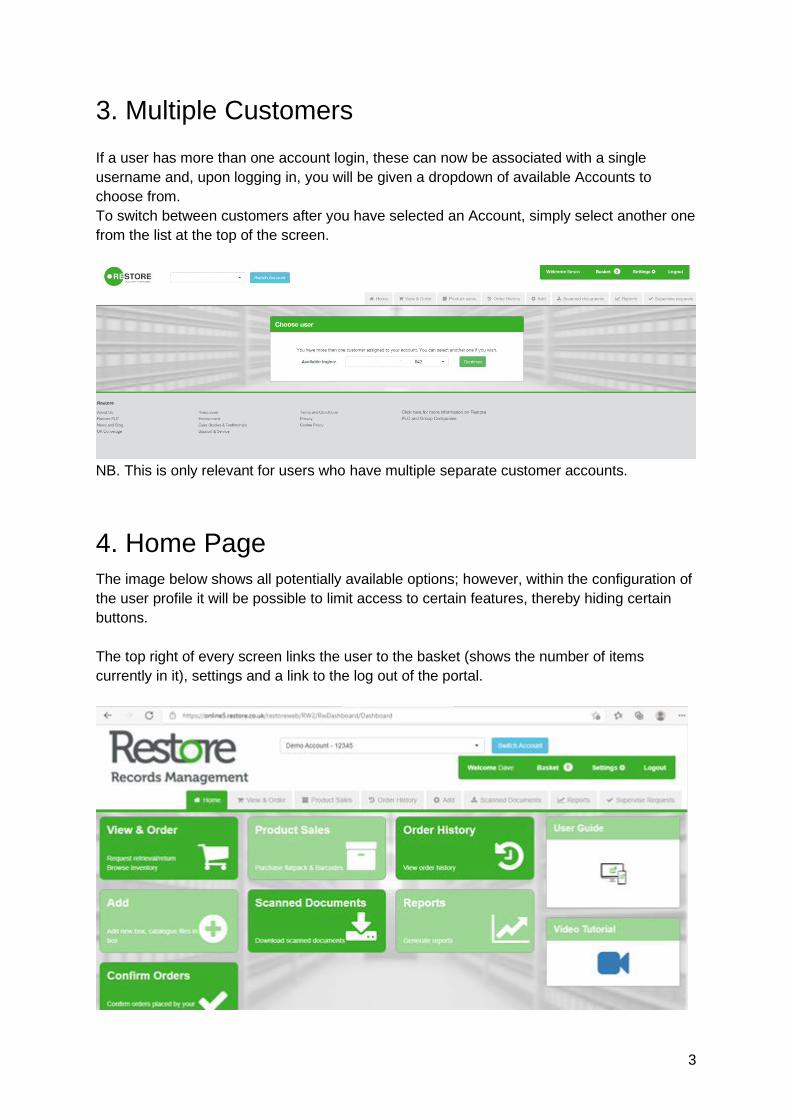
3. Multiple Customers
If a user has more than one account login, these can now be associated with a single
username and, upon logging in, you will be given a dropdown of available Accounts to
choose from.
To switch between customers after you have selected an Account, simply select another one
from the list at the top of the screen.
NB. This is only relevant for users who have multiple separate customer accounts.
4. Home Page
The image below shows all potentially available options; however, within the configuration of
the user profile it will be possible to limit access to certain features, thereby hiding certain
buttons.
The top right of every screen links the user to the basket (shows the number of items
currently in it), settings and a link to the log out of the portal.

4
5. View & Order
Clicking the ‘View & Order’ button on the Homepage will begin the process of finding items
to add to the basket. The following page will be shown (though possibly with fewer buttons,
depending upon permissions):
5.1 Search
Section 1- There are 7 possible search options, each of the options searched by will specify
the action to perform on the search results:
● Retrieve from storage - This option will show you all matching items but with any
items not in storage greyed out (as these cannot be retrieved). Hitting add to basket
will add the item for retrieval.
● Retrieve from storage permanently - This option will show you all matching items
but with any items not in storage greyed out (as these cannot be retrieved). Hitting
add to basket will add the item for retrieval and perm them out.
● Scan file - This option will show you all matching items but only those files that are
IN (and thus eligible for scanning) or “In Pending box” (not yet – but perhaps nearly –
eligible). Hitting add to basket will add the item for scanning.
● Return to storage - The results will only include those items that are currently at the
customer premises in the ‘OUT’ state. Hitting add to basket will add the item for
collection.
● Deposit new items to storage - The results will only include those items that are
currently in the ‘pending’ state. Hitting add to basket will add the item for collection.
● Keep retrieved items - The results will only include those items that are currently
temporarily retrieved at the customer premises in the ‘OUT’ state. This functionality is
for files only, not boxes (you are requested to contact Customer Services to request
perm out of boxes). You do not add to basket with this functionality: you click on the
<Keep file> link on the results row
● View all - The results are not filtered at all. It is not designed to be run with a search
term but is designed to show an “overview” of your archive. There will not be an add
to basket (shopping trolley icon) option but you can use the menu icon ( ) on
individual items to perform actions.

5
5.2 Matching Items
Section 2 - Shows the results of a search (for “smith”) divided up into items
(boxes/files/tapes). Search on key words e.g. “smith”, “joan smith”, strings of numbers or
references e.g. 12345, ABC012. Search strings with odd configurations or use of symbols
are often worth “wrapping” in asterisks e.g. *ABC.$$1234*
Each tile represents a combination of sub-account (if applicable) and storage type
(boxes/files/tapes); hence, in the example above, Dept 1 has 1 box and also 4 files where a
search on “smith” got a match, Dept 2 got a match with 2 files, and Leeds Finance got a
match with 1 box. The tile that is dark blue represents the items that are displayed in section
3 (thus clicking on another tile will change that tile’s colour to dark blue instead of orange).
5.3 Filtering and Sorting
Filter results using the fields found at the top of each column. Select or enter the filter and
then use the green button on either side of the filtering row to apply
the filter.
You can also sort results on each column by clicking the title of any
column. The results will be sorted by this column. A small blue arrow
will be revealed to show whether the column is displaying in
ascending or descending order. To change the order, click the
column title once more.
5.4 Paging
The user can page through the results using page numbers to the left of the results table
(top and bottom).
5.5 Items per page
The rows per page can be set at the bottom right of the results table (limited to 250).

6
5.6 Show Box / Files
To look inside a box and see the items inside and the details of the item, you
can use the “open box” icon towards the left-hand side of the results table.
5.6.1 Un-catalogued files
Where a user wishes to add or request the retrieval of a file that has not yet been catalogued
into a box, use the ‘Add or retrieve uncatalogued file’ button (shown below).
5.7 Other Options
Other actions can be carried out using the menu icon to the left of each row.

7
5.8 Item history
Clicking ‘Show item history’ in the item menu will pop up a simple chronological list of the
history of state changes for the relevant item.
5.9 Item selection
To add items to the basket simply click on the basket icon to the right of the results table.
To remove click the same icon which will now say .
Select all items on the page using the button.
5.10 ‘Requested for’ field
When adding an item to the basket there will be an option to change the “Requested for”
name. It will default to your own name but you can amend this and Restore Web will
remember the last entry. The association of this person to the items will be displayed in the
basket. Alternatively, you can change it later, directly in your basket, if you prefer.
6. Basket
Once all items have been selected the user will be able to review the full contents of their
basket in the format shown below:

8
It will be possible to remove an item from the basket by clicking the relevant button.
Or removing the whole contents of the basket by clicking on the button.
The contents of any basket will remain intact unless explicitly emptied by the user or the
when the order is submitted. This will be the case even if the user logs out of the Portal, is
timed out, loses connection, closes the browser, etc.
6.1 Basket ownership
Where the user is in the ‘Administrator’ role then the main basket page will provide a ‘List all
baskets’ button at the bottom and top as seen in the previous image.
Clicking this button will present a list of all baskets for the customer containing one or more
items.

9
At this stage it will not be possible to modify anything about the basket / order. However,
clicking the button will take over that user’s basket allowing the
administrator to remove items, add items and even submit the order at the checkout.
The administrator will be able to relinquish control of a basket at any time back to the original
owner, returning that administrator back to their own basket. However, whilst a basket has
been taken over, the original owner will not be able to make any changes to it.
7. Checkout
The final step in the standard ordering process will be to submit the order. This will be done
through the ‘Checkout’ page as shown below:
Where the order has services that require a visit (delivery/collection) then the ‘Address’
section will be made visible and require selection of an address from the drop-down list of
available addresses for that customer. In this case the user must select from the list and will
not be able to enter an ad-hoc address. The address will default to the one configured for the
user entering the order.
Clicking the ‘Submit order’ button will submit all the associated service requests for
processing by Restore staff under the banner of a single order. A confirmation window will
be shown re-displaying the visit address and stating that the user is confirming this order for
delivery/collection at the address shown.

10
8. Product sales
Clicking the ‘Product sales’ button on the ‘Home’ page will present a page in the following
format:
The plus/minus control to the right of each product will permit the entry of a multiple of 10
items. Clicking the plus sign will increase the quantity by 10 and clicking the minus sign will
reduce the quantity by 10. Note that “10 barcodes” equals 10 individual barcodes and not 10
sheets of barcodes.
Once the required quantities have been selected (and if applicable, a sub-account that will
be responsible for this purchase), clicking ‘Add to basket’ will commit the required products
to the basket. It will be possible to re-visit the page and alter the quantities at any time.

11
9. Order History
This will provide a means of searching back through the history of orders (created by the
user). By default it returns the last thirty days’ worth of workorders though these search
variables may then be employed:
Clicking on <View details> reveals the details of the specific workorder, with item details in
the upper section and any fixed charges or products shown in the lower section:
10. Adding New Items into Storage
Clicking the ‘Add’ button of the ‘Home’ page will display a sub-menu with the following
options:

12
10.1 Add box
Clicking the ‘Add box’ button of the ‘Add’ page will display a page permitting the entry of full
box details as formatted below:
The Barcode is the number on the box label that has been provided for you. This is the label
that should be affixed to the front of the box.
The Account will define the account to be charged for storage as well as the account the
item will be recorded against. The account is pre-allocated to the barcode so the correct
account must be specified otherwise the system will reject the action when attempting to
save.

13
The Description section of the page will permit entry of standard and custom fields as
defined in the relevant account field template.
The Retention section will permit entry of details relating to the retention period of an item
for subsequent review and destruction purposes.
The ‘Destroy date’ may be optional or mandatory depending upon your company’s
preference. Ticking the ‘Never destroy’ checkbox will give the item a destruction date of
31/12/9998.
Clicking the ‘Save as Pending item’ button will create the single box or range of boxes in
the ‘pending’ state. This will permit self-management of the boxes (using the Catalogue Files
button) and their contents pending a potential subsequent request to deposit the items to
storage. Where the user wishes to add the new box to the basket immediately then clicking
the ‘Save and add to collections’ button will put the box straight into the basket. In either
case, you will be asked if you wish to add files to the box, in which case (upon clicking Yes)
an <Add File> form appears, perhaps including other fields of information to be captured
10.2 Catalogue files
Clicking the ‘Catalogue files’ button of the ‘Add’ page will display a page permitting Pending
boxes (that is, boxes previously added to the system, not new boxes…see <Add box> for
new boxes) to be found by using the Search button in conjunction with the box number.
Open the box via the icon,
Any files previously added to the box will show here (although in usual circumstances you
will be starting with an empty box)

14
Use the <Add or retrieve uncatalogued file> button to add files
10.3 Add box range
Clicking the ‘Add box range’’ button of the ‘Add’ page will display a page to select an account
to add the range of boxes to:
Once the range is created, users will be diverted to the list of items.
From here users can edit and catalogue files before adding one or all items to the basket.

15
12. Scanned documents
Clicking the ‘Scanned documents’ button of the ‘Home’ page will show the following page:
Where a previous ‘Scan file’ service request has been ordered then once the requested file
has been picked and scanned, a PDF document containing image scans of each page in the
document will be made available for download from this Portal page.
Documents will remain available for download for a period of 30 days from first publishing,
after which it will be removed from the list of downloadable links and the actual PDF
document will be removed from the relevant server file system.
The user only sees scanned documents requested by him or her, unless the user has a
supervisory capacity and has a permission called “View all scans” ticked in his or her profile

16
13. Settings
Clicking the <Settings> button at the top of the screen will display a sub-menu with the
following options:
The functions in this area of the application will all relate to the configuration of various
system settings.
Clicking the ‘Users’ button (if you have the relevant permission) will display a list of the
current users:

17
13.1 User details
Clicking the ‘edit’ link of an individual in the list will display the following page to
view and edit the details of an existing user:
13.2 Permitted functions
The ‘Account Settings’ section header will show a list of all page access and some primary
function buttons as follows:

18
Against each button is a Tick Box. A tick in the box will mean that the user will have access
to that page or function.
13.3 My Profile
<My Profile> is used to manage a user’s name, phone number, and default delivery address.
If applicable, this also shows the user which sub-accounts they have access to (My
Departments):
13.4 Change Password
A user can use this at any time to amend their password:

19
14. Reports
Reports is available to those users with the relevant permission in Users. The standard suite
of reports includes:
• Inventory
• Destruction (or Review Date) Due Report
• OUT Report
• Transactions Report
• Items Count
For further information or help, please contact [email protected]


![P I CUSTOMER PORTAL - extranet.fusionconnect.com · February 10, 2009 [CUSTOMER PORTAL] MegaPath Customer Portal Authored By Page 1 MEGAPATH Confidential and Proprietary Pamela Fiorentino](https://static.fdocuments.in/doc/165x107/5e6b5c5bd0591c22e053095b/p-i-customer-portal-february-10-2009-customer-portal-megapath-customer-portal.jpg)