
RESPONDENT PARENT PAYMENT SYSTEM USER … Requests ... ICWA EPP P-Home Concurrent Check those that...
39
RESPONDENT PARENT PAYMENT SYSTEM USER MANUAL Updated 08/01/2016
Transcript of RESPONDENT PARENT PAYMENT SYSTEM USER … Requests ... ICWA EPP P-Home Concurrent Check those that...

RESPONDENT PARENT PAYMENT SYSTEM USER MANUAL
Updated 08/01/2016

1
TableofContents
GettingStarted................................................................................................................................................................................................................3
Pop‐ups .................................................................................................................................................................................... 3
FirstLogin ................................................................................................................................................................................ 3
AccountLocking ...................................................................................................................................................................... 6
DashboardTab...............................................................................................................................................................................................................6
NeedsAttentionCategories ................................................................................................................................................ 7
DateRange ........................................................................................................................................................................... 7
Appointments ...................................................................................................................................................................... 8
ReopenRequests ................................................................................................................................................................. 9
Payments ............................................................................................................................................................................. 9
ExcessFeesRequests .......................................................................................................................................................... 9
ExpertWitnessRequests .................................................................................................................................................... 9
OverHoursRequests .......................................................................................................................................................... 9
ContractToHourly ............................................................................................................................................................. 9
TranscriptRequests ............................................................................................................................................................ 9
DiscoveryRequests ............................................................................................................................................................. 9
OvernightTravelRequests ................................................................................................................................................. 9
AppointmentsTab.......................................................................................................................................................................................................10
NewCase ............................................................................................................................................................................ 10
Documents ............................................................................................................................................................................. 13
Billing–ContractAppointment ........................................................................................................................................... 19
Billing–HourlyAppointment .............................................................................................................................................. 21
Billing–SubstitutionofCounsel .......................................................................................................................................... 24
ChanginganAppointmentfromContracttoHourly .......................................................................................................... 26
ReopenRequests ................................................................................................................................................................... 27
ExpertRequests .................................................................................................................................................................... 29
RequestforExpenses ............................................................................................................................................................ 31
Preferences....................................................................................................................................................................................................................32
DefaultDisplayList ............................................................................................................................................................... 32
DefaultDateRange ................................................................................................................................................................ 32
GridOptions .......................................................................................................................................................................... 32
ScreenLayout ........................................................................................................................................................................ 32

2
Help...................................................................................................................................................................................................................................36
Contact.............................................................................................................................................................................................................................37
Index.....................................................................................................................................................................................................................................i

3
GettingStartedThe Respondent Parents Payment System (RPPS) provides relevant functionality and has easy accessible information. This design minimizes the number of screen changes and mouse clicks and as a result greatly increases productivity and ease of use. RPC Attorneys will be able to request payments, request various approvals, and check the status of both on the dashboard.
The pairing of information and the ability to make choices is designed for each RPPS screen. To provide the user with the best possible experience, RPPS allows the user to customize some of the display settings of major screens.
Pop‐upsYou must enable pop-ups for www.rpps.coloradoorpc.org in your browser. On you first login you will need to set up your pop-up blocker to always allow pop-ups for the RPPS site.
FirstLoginTo keep the system secure, no one (not even ORPC Staff) can retrieve your password. However, you can easily reset your own password, which is what you need to do the first time you login to the system.
If you are a new user, you will receive your username from ORPC.

4
To login:
1. Enter https://www.rpps.coloradoorpc.org into your browser’s address bar. 2. Click on the RPPS login section. 3. Enter your username and click “I Forgot My Password”.
4. Click on the “Request Password Reset Code” button. Click OK. Message will be sent to your email on record containing the code you need to enter into the “Reset Code” box. Enter your new password in both the “New Password” boxes. Click “Change Password” button.

5

6
5. You will automatically return to the login screen. Login using your username and new password.
AccountLockingFor security, your account will lock for 30 minutes after 5 failed login attempts.
After 30 minutes, your account will automatically unlock and you may try to login again.
If you have forgotten your password, you can reset it by following the steps noted above.
DashboardTabThe “Dashboard” screen summarizes the status of all cases the user has in the system. The screen name is at the top of the screen under the user name.
7
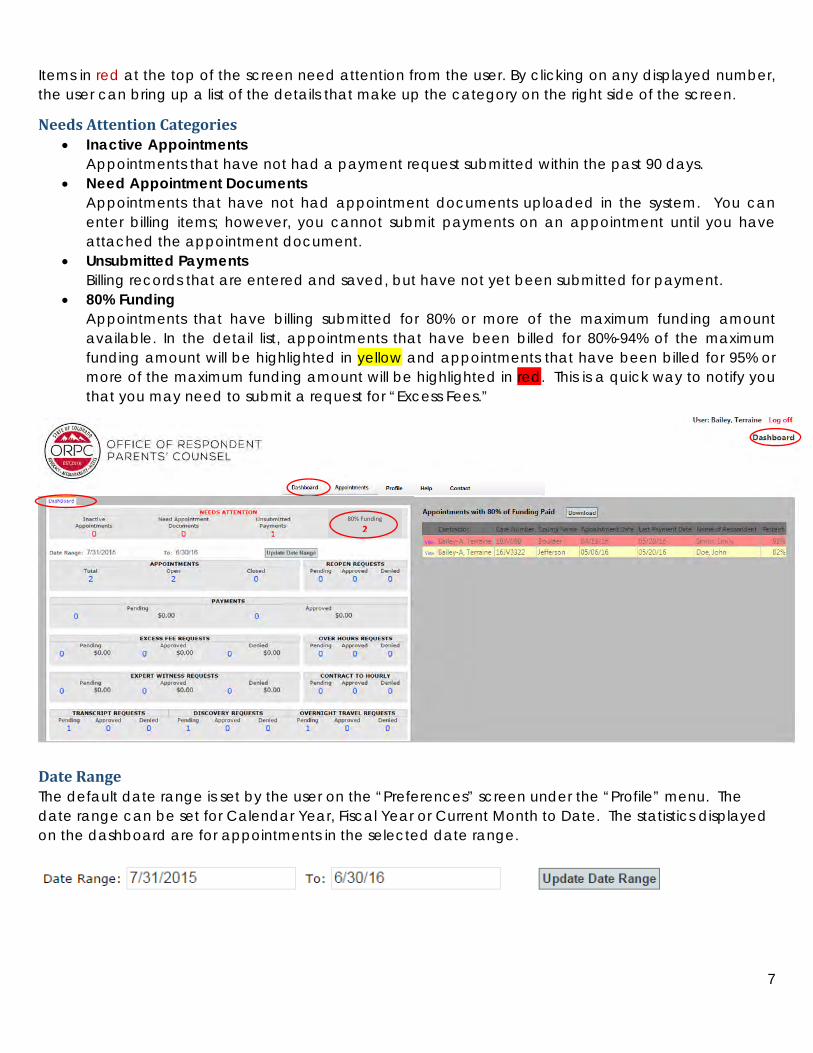
Items in red at the top of the screen need attention from the user. By clicking on any displayed number, the user can bring up a list of the details that make up the category on the right side of the screen.
NeedsAttentionCategories Inactive Appointments
Appointments that have not had a payment request submitted within the past 90 days. Need Appointment Documents
Appointments that have not had appointment documents uploaded in the system. You can enter billing items; however, you cannot submit payments on an appointment until you have attached the appointment document.
Unsubmitted Payments Billing records that are entered and saved, but have not yet been submitted for payment.
80% Funding Appointments that have billing submitted for 80% or more of the maximum funding amount available. In the detail list, appointments that have been billed for 80%-94% of the maximum funding amount will be highlighted in yellow and appointments that have been billed for 95% or more of the maximum funding amount will be highlighted in red. This is a quick way to notify you that you may need to submit a request for “Excess Fees.”
DateRangeThe default date range is set by the user on the “Preferences” screen under the “Profile” menu. The date range can be set for Calendar Year, Fiscal Year or Current Month to Date. The statistics displayed on the dashboard are for appointments in the selected date range.
80% Funding
2

8
Appointments Total
The number of appointments within the selected date range. Open
The number of appointments in the selected date range that have not been closed or had a final payment submitted.
Closed The number of appointments in the selected date range that have been closed or had a final payment submitted.

9
ReopenRequests Pending Approved Denied
Payments Approved
ThenumberofpaymentswithinthespecifieddaterangeapprovedbyORPC. Pending
ThenumberofpaymentswithinthespecifieddaterangesubmittedtoORPCandwaitingapproval.
ExcessFeesRequests Pending Approved Denied
ExpertWitnessRequests Pending Approved Denied
OverHoursRequests Pending Approved Denied
ContractToHourly Pending Approved Denied
TranscriptRequests Pending Approved Denied
DiscoveryRequests Pending Approved Denied
OvernightTravelRequests Pending Approved Denied
10
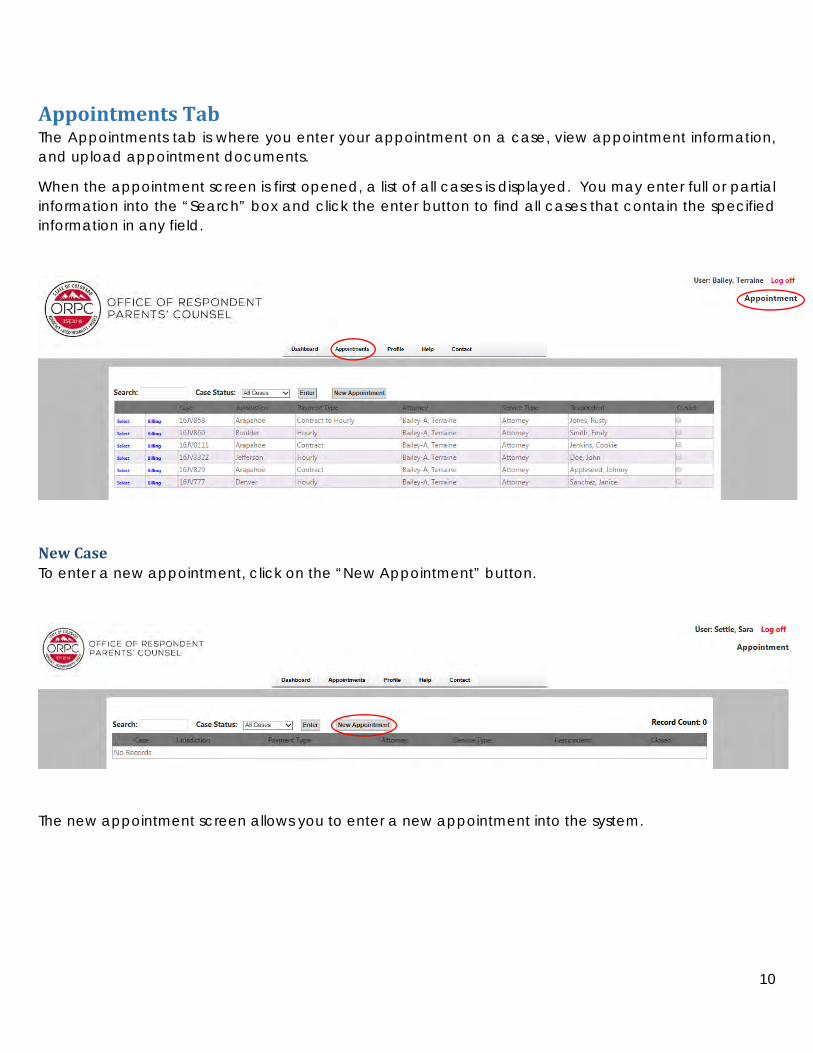
AppointmentsTabThe Appointments tab is where you enter your appointment on a case, view appointment information, and upload appointment documents.
When the appointment screen is first opened, a list of all cases is displayed. You may enter full or partial information into the “Search” box and click the enter button to find all cases that contain the specified information in any field.
NewCase To enter a new appointment, click on the “New Appointment” button.
The new appointment screen allows you to enter a new appointment into the system.

11
Appointment Information
o Enter the case number, e.g., 16JV12345 Year: (YY) = 16 Class: Use the drop down to select = JV, CA, SC Sequence: Case number from your appointment email = 12345 County: Use the drop down to select Judicial Officer: Use the drop down to select Appointment Date: Date the appointment was made (MM/DD/YYYY) Reason for filing: Use the drop down to select ICWA EPP P-Home Concurrent Check those that apply Respondent First Name Respondent Middle Name Respondent Last Name DOB: Date of Birth (MM/DD/YYYY) Party Status: Use the drop down to select Race/Ethnicity: Use the drop down to select Number of respondent’s children on case: Use the drop down to select Complete information for each of the children on the case Child’s First and Last Name Original Placement Original Custody Next, upload your Appointment email
See below for steps to “Upload Document” If you have not uploaded a document you can still create your appointment
and upload your document at a later time Click the “Create Appointment Record” button
A message box will pop up asking “Do you want to enter and/or submit billing?”
o If Yes, you will be forwarded to the billing screen o If No, you will return to the appointment screen

12
OR

13
Documents You must upload your appointment document before you can save a new appointment. Click on the “Upload Document” button. This button can be found on the appointment screen. This will take you to the “Drop files here” box.

14
Save your email as a document prior to uploading
If you are uploading an email, please be sure to save your email to a local drive on your computer that you can upload to RPPS. o To save an email to your local drive, please open the email you wish to save. Go to file > Save As > select the location on your computer you wish to save the email. If you prefer you can name your email on the file name box > click “Save”. The email is
ready to upload to RPPS as a document. Return to the RPPS system.

15
16
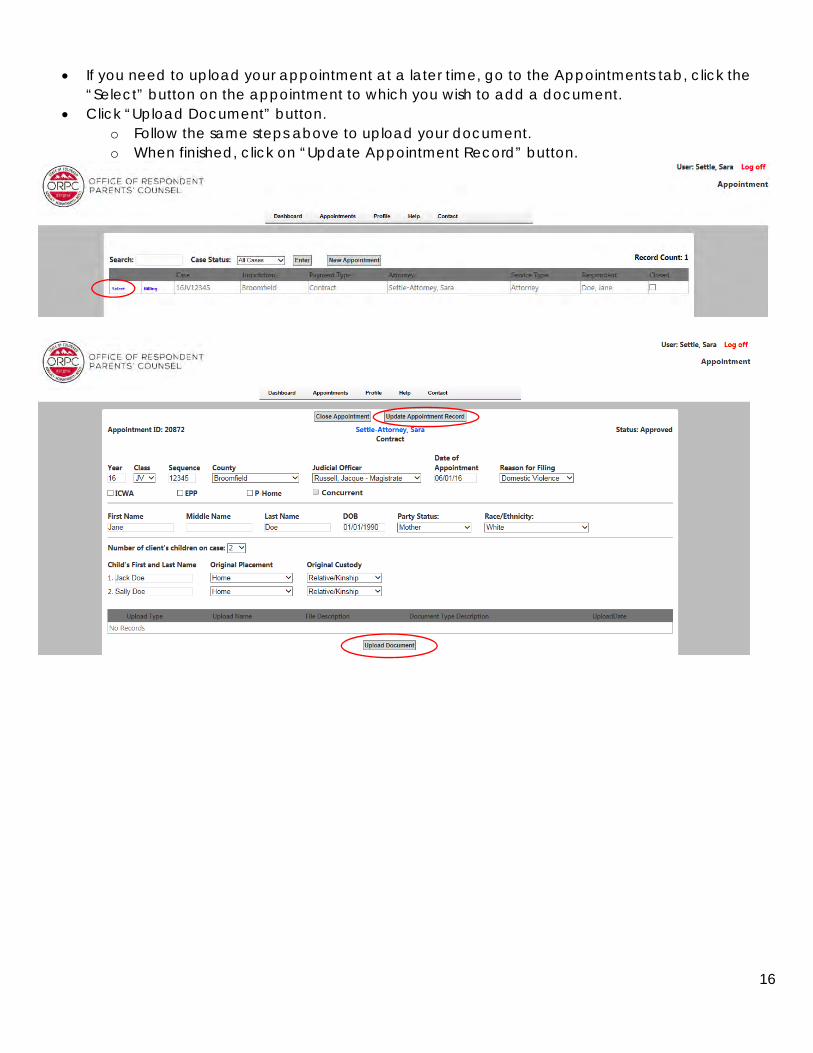
If you need to upload your appointment at a later time, go to the Appointments tab, click the “Select” button on the appointment to which you wish to add a document.
Click “Upload Document” button. o Follow the same steps above to upload your document. o When finished, click on “Update Appointment Record” button.

17
Next click “Select File” and find your saved document for your appointment Click on your saved document and then click “Open” button Click “Upload” then click “Close” button You should now be able to see the uploaded document in the document list
18
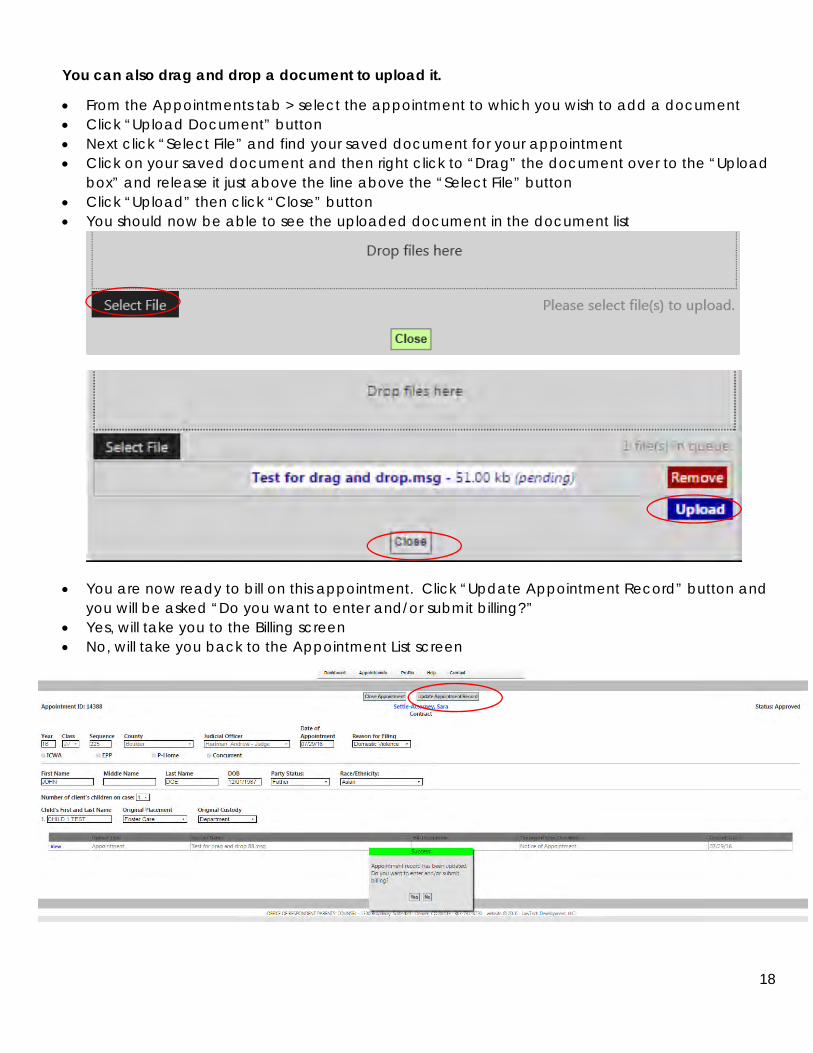
You can also drag and drop a document to upload it.
From the Appointments tab > select the appointment to which you wish to add a document Click “Upload Document” button Next click “Select File” and find your saved document for your appointment Click on your saved document and then right click to “Drag” the document over to the “Upload
box” and release it just above the line above the “Select File” button Click “Upload” then click “Close” button You should now be able to see the uploaded document in the document list
You are now ready to bill on this appointment. Click “Update Appointment Record” button and you will be asked “Do you want to enter and/or submit billing?”
Yes, will take you to the Billing screen No, will take you back to the Appointment List screen

19
Billing–ContractAppointmentGo to the appointment tab > select the appointment you need to enter your billable items and click on “Billing.”
If this is a contract “flat-fee” appointment, enter the date of service and the description from the drop down list. Click “Submit for Payment.”
You will be prompted with a pop-up message asking if you have met with your client.
If you click “Yes,” you will need to enter the date you met with the client and then click “Submit.”
You will then be returned to the Appointment screen.
20
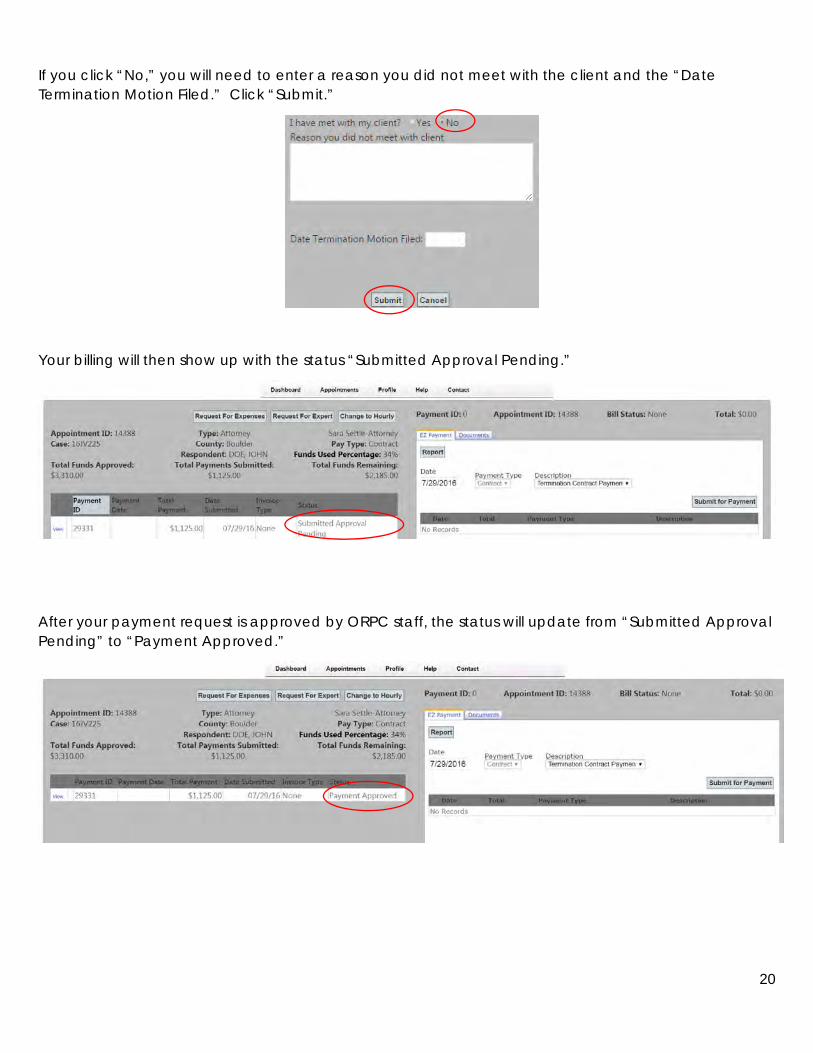
If you click “No,” you will need to enter a reason you did not meet with the client and the “Date Termination Motion Filed.” Click “Submit.”
Your billing will then show up with the status “Submitted Approval Pending.”
After your payment request is approved by ORPC staff, the status will update from “Submitted Approval Pending” to “Payment Approved.”

21
Billing–HourlyAppointmentGo to the appointment tab > select the appointment for which you need to enter billable items and click on “Billing.”
The Billing tab allows you to enter in your hourly billable items.
If this is an hourly appointment, you need to enter the “Date” of service, the “Type,” the “Description,” and the “Hours”. Click the “Add” button.
You can add one hourly line item or several over a few days. Once you have all the entries that you want on the billing request, click the “Submit for Payment” button.
You will need to answer the question, “Is this the final invoice for the appointment?
If No, the screen will return to the Appointment list and your billing request will now show up as “Submitted Approval Pending” on the billing screen.

22
If this is the final invoice for this appointment, click “Yes” and then click the “Submit” button.
You will need to answer each of the questions. You will receive a warning message about closing the appointment. If you are sure this will be your last bill for this appointment, click the “Submit” button. The Payment will now show up as “Submitted Approval Pending” on the billing screen.
You are not allowed to add any additional billing on a closed appointment.

23
The Payment will now show up as “Submitted Approval Pending” on the billing screen.
Once your payment request is approved by ORPC staff, the status will update from “Submitted Approval Pending” to “Payment Approved.”

24
Billing–SubstitutionofCounselGo to the appointment tab > Click on the “New Appointment” button.
Start to build your appointment record as you would a new record. If you enter in a case number that has already been used in the same jurisdiction, then you will see a pop-up message asking “Is this a substitution of counsel appointment?” Please select the “Yes” or “No” button.
If No, then the message goes away and you can complete your appointment record as usual.

25
If Yes, then another pop-up box will appear showing any other appointments in the same jurisdiction with the same case number. You will need to select the appointment for substitution.
The First and Last name of the Respondent Parent will populate for you. You will need to complete the rest of the appointment record and upload your substitution appointment email. You are now ready to bill against this appointment.
Select 16JV6 Alamosa Hourly BAILEY, TERRAINE DOE, JEFFERY
JEFFERY DOE

26
ChanginganAppointmentfromContracttoHourlyGo to the Appointment screen > Click on the “Billing” button for the appointment you wish to Change to Hourly.
Click the “Change to Hourly” button.
Select a reason from the drop down list and add a comment in the box. Click “Submit” and “OK”.

27
ReopenRequests Reopen Requests are the appointments in the selected date range that have been closed, but
are waiting for ORPC approval to be reopened. To submit a Reopen Request
o Click on the number under the Closed Appointments. This will show you the closed appointments on the right side of the dashboard
screen. o Click on View on the appointment you wish to re-open.
o Click on Request Appointment be reopened.

28
o Click on the drop down box “Select Reason Category” add a brief comment and then
click “Submit”. o You will then see a pop-up box showing “Success” Request has been saved” click “OK”

29
ExpertRequests Go to the Appointment screen > Click on the “Billing” button for the appointment you wish to
request an Expert.
Click the “Request for Expert” button.
Click the drop down for “Type of Request” and select “Expert” Click the drop down for “Expert Category” and select a category Click the drop down for the “Requested Individual” and select an expert from the approved list Enter the requested amount in the “Requested Amount” box Enter a “Reason” for the Expert in the box Click “Submit” then click “OK”. Please note, if no expert is available for the category, the attorney should contact ORPC staff.

30
Your request will show as pending until reviewed by ORPC staff.
Once the Expert Request is approved, the expert can begin work. o The expert should submit their billing directly to the ORPC for payment processing. Please
have the expert reference the appointment number, the respondent name, and the attorney name on their billing request.

31
RequestforExpenses Go to the Appointment screen > Click on the “Billing” button for the appointment you wish to
request expenses.
Discovery over $30 Instate Travel Transcripts
Select your request type in the drop down Add Request Amount, if necessary Add Reason for Request Click “Submit Request” Once your Request has been reviewed by ORPC staff, you will receive an email.

32
PreferencesClick on the Profile tab > select “Preferences.”
This screen allows the user to set options for most screens. DefaultDisplayList The user may select what information to display in the data grid when the Dashboard screen is displayed.
DefaultDateRangeThis is the date range that displays after the initial login on the Dashboard screen. If the user changes the dates, the system remembers the dates until the next user login.
GridOptionsThe user may set two options for a given grid on a screen.
Max Lines per Grid This is the maximum number of lines that will be displayed in a grid before it shows page numbers at the bottom. The maximum number of lines is 1,000 before the grid will automatically create a new page.
Scrollable Instead of paging, the user may scroll through the records. The maximum number of lines is 1,000 before the grid will automatically create a new page.
When you finish modifying your preferences for all tabs, Click “Save”.
ScreenLayoutThe “Screen Layout” section allows the user to adjust how the screen is displayed in order to obtain the best format for individual display types (tablet, small or large monitors). Three options are available, with examples of each. The side by side layout is the default selection.

33
Side By Side
Below

34
As a Tab
When you finish modifying your preferences for all tabs, click “Save”.
35
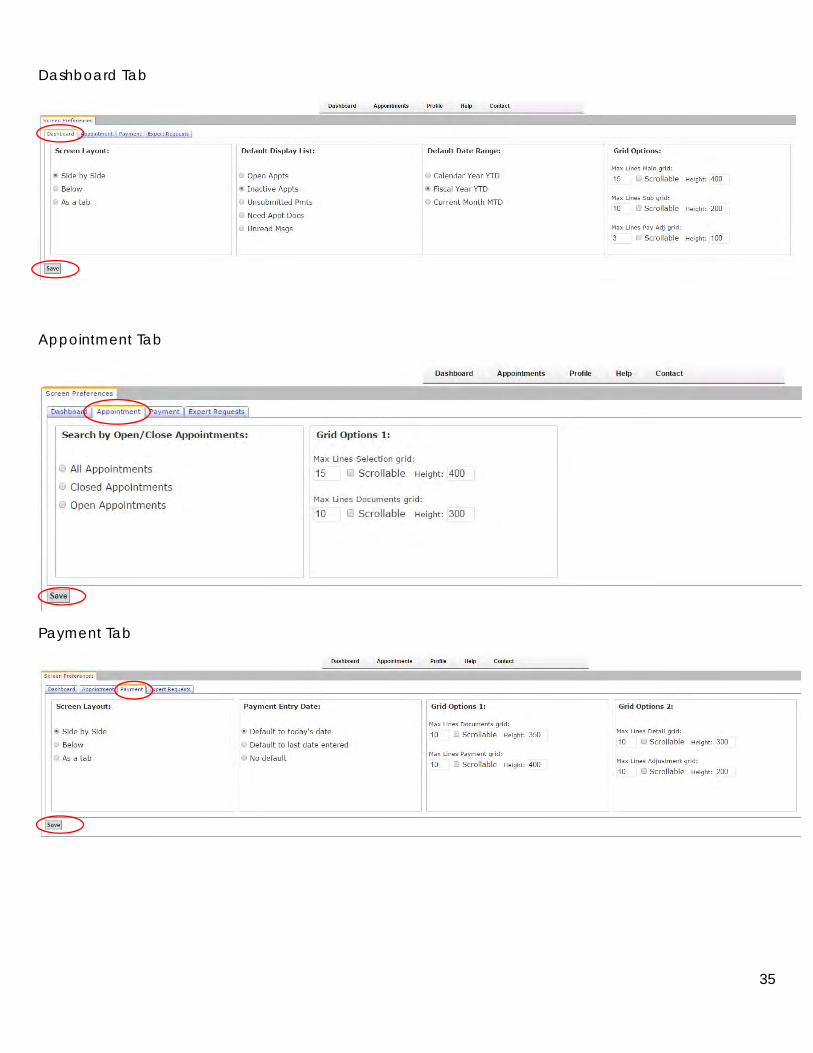
Dashboard Tab
Appointment Tab
Payment Tab

36
Help The Help tab contains the following options:
Forms o Payment Authorization o W9
Manual: Online copy of the Respondent Parent Payment System User Manual Screen Help
Click the Help button on the main menu bar and then select the Help option to display a pop-up containing specific help for the screen you are on in RPPS. This is an example of the Help screen for the Dashboard screen.

37
Contact

Page i of i
IndexAccount Locking, 6 Appointments, 8, 9, 10 Contacts, 37 Dashboard, 7 Date Range, 7, 32 Default Display List, 32 Documents, 13 Funding Requests, 9 Grid Options, 32 Help, 36 Login, 3, 4, 6 Messages, 7 Need Appt. Docs, 7
Needs Attention, 7 New appointment, 10 Over Hours Requests, 9 OverMax Requests, 9 Password, 3, 5, 6 Password Reset Code, 5 Payments, 7, 19, 21 Preferences, 32 Screen Layout, 32 Stats, 9, 10 Un-submitted Pmts, 7 Username, 3, 4, 6