![RemoteCall, Increase your · RemoteCall’smarket share: ... 79% Email 13% Messenger 4.5% Other 3.5% [Source: RSUPPORT customer service center 2016] 5 [Overcome Limitations With Remote](https://static.fdocuments.in/doc/165x107/5f0750377e708231d41c5e0b/remotecall-increase-your-remotecallasmarket-share-79-email-13-messenger.jpg)
RemoteCall 6.0 User Admin Guide
95
© 2016 Rsupport Co., Ltd. ALL RIGHTS RESERVED. [www.rsupport.com] RemoteCall User Admin Center User Admin Center User Guide Last Updated: November 2016
Transcript of RemoteCall 6.0 User Admin Guide

© 2016 Rsupport Co., Ltd. ALL RIGHTS RESERVED. [www.rsupport.com]
RemoteCall User Admin Center
User Admin Center User Guide
Last Updated: November 2016

© 2016 Rsupport Co., Ltd. ALL RIGHTS RESERVED. [www.rsupport.com]
Copyright
RemoteCall User Admin Center User Guide
Version 2.4.1
Ⓒ 2001 - 2016 Rsupport Co., Ltd.
The information contained in this manual and future improvements are subject to change without notice.
Rsupport Co., Ltd. hereafter referred to as “Rsupport”, does not take any responsibility for any marketability nor compatibility apart from the usage described in the manual.
Under no circumstances will Rsupport be liable to direct, indirect, incidental nor accidental damages due to errors in the manual.
This manual is the intellectual property of Rsupport and is protected under international copyright laws. Reproducing or copying all or part of this document without the prior written consent of Rsupport is a violation of international copyright law.
Windows 95 / 98 / ME / NT / 2000 / 2000 Server / XP / Server 2003 / Vista / Server 2008 / 7 / 8 / 8.1 are registered trademarks of Microsoft Corporation in the U.S. and other countries. Mac, MacBook, iOS, Macintosh, Safari, OS X, iPhone, iPad are registered trademarks of Apple Inc., registered in the U.S. and other countries. Android and Google Play are registered trademarks of Google Inc. Any additional third party registered trademarks mentioned in this manual are used for reference and descriptive purposes only and are still the intellectual property of the third party in question.
Ⓒ 2001-2016 RSUPPORT Co., Ltd. Address: 560 Sylvan Ave. Suite 1000, Englewood Cliffs, NJ 07632 Official Website: http://www.rsupport.com Phone: (888) 348-6330 Fax: (888) 348-6340
© 2016 Rsupport Co., Ltd. ALL RIGHTS RESERVED. [www.rsupport.com]
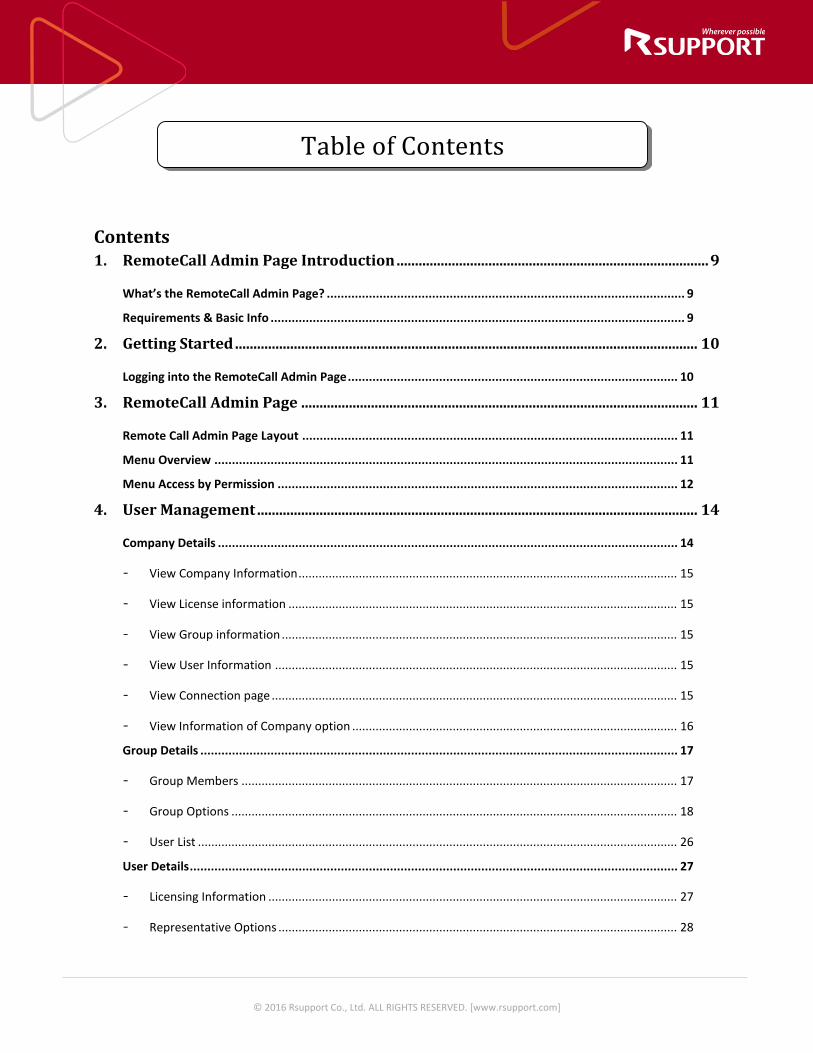
Table of Contents
Contents 1. RemoteCall Admin Page Introduction ..................................................................................... 9
What’s the RemoteCall Admin Page? ...................................................................................................... 9
Requirements & Basic Info ...................................................................................................................... 9
2. Getting Started .............................................................................................................................. 10
Logging into the RemoteCall Admin Page .............................................................................................. 10
3. RemoteCall Admin Page ............................................................................................................ 11
Remote Call Admin Page Layout ........................................................................................................... 11
Menu Overview .................................................................................................................................... 11
Menu Access by Permission .................................................................................................................. 12
4. User Management ........................................................................................................................ 14
Company Details ................................................................................................................................... 14
- View Company Information ................................................................................................................. 15
- View License information .................................................................................................................... 15
- View Group information ...................................................................................................................... 15
- View User Information ........................................................................................................................ 15
- View Connection page ......................................................................................................................... 15
- View Information of Company option ................................................................................................. 16
Group Details ........................................................................................................................................ 17
- Group Members .................................................................................................................................. 17
- Group Options ..................................................................................................................................... 18
- User List ............................................................................................................................................... 26
User Details ........................................................................................................................................... 27
- Licensing Information .......................................................................................................................... 27
- Representative Options ....................................................................................................................... 28
© 2016 Rsupport Co., Ltd. ALL RIGHTS RESERVED. [www.rsupport.com]
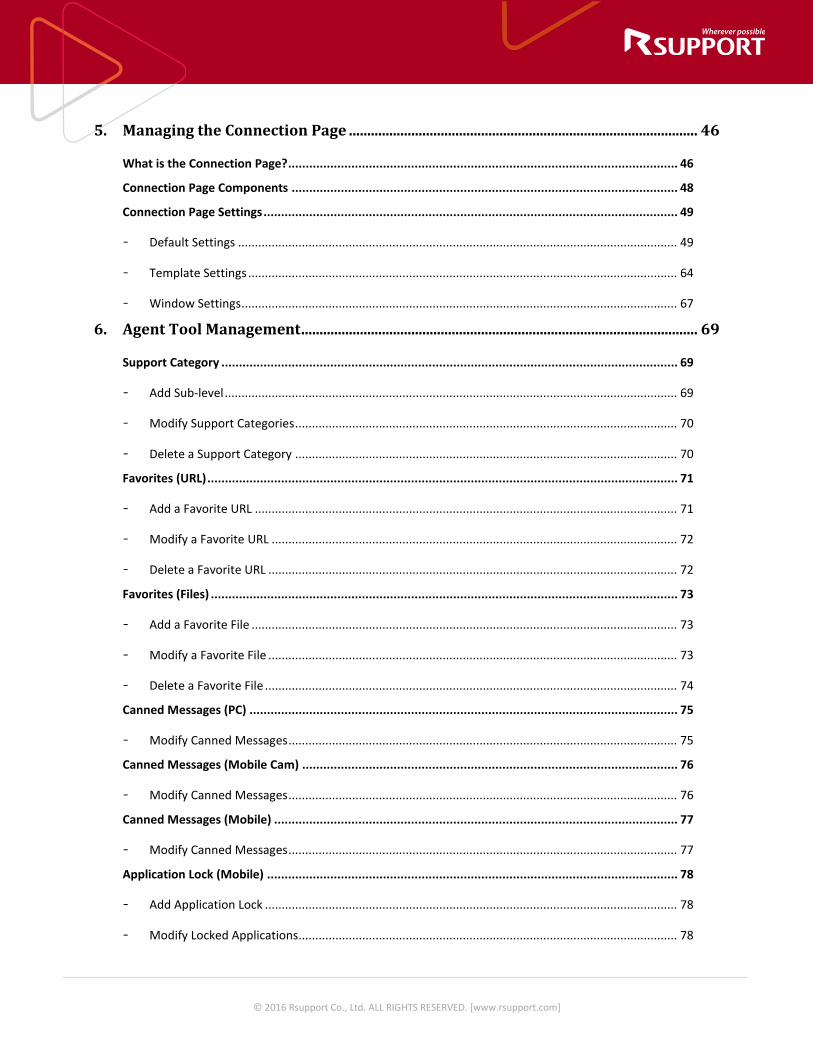
5. Managing the Connection Page ............................................................................................... 46
What is the Connection Page? ............................................................................................................... 46
Connection Page Components .............................................................................................................. 48
Connection Page Settings ...................................................................................................................... 49
- Default Settings ................................................................................................................................... 49
- Template Settings ................................................................................................................................ 64
- Window Settings .................................................................................................................................. 67
6. Agent Tool Management ............................................................................................................ 69
Support Category .................................................................................................................................. 69
- Add Sub-level ....................................................................................................................................... 69
- Modify Support Categories .................................................................................................................. 70
- Delete a Support Category .................................................................................................................. 70
Favorites (URL) ...................................................................................................................................... 71
- Add a Favorite URL .............................................................................................................................. 71
- Modify a Favorite URL ......................................................................................................................... 72
- Delete a Favorite URL .......................................................................................................................... 72
Favorites (Files) ..................................................................................................................................... 73
- Add a Favorite File ............................................................................................................................... 73
- Modify a Favorite File .......................................................................................................................... 73
- Delete a Favorite File ........................................................................................................................... 74
Canned Messages (PC) .......................................................................................................................... 75
- Modify Canned Messages .................................................................................................................... 75
Canned Messages (Mobile Cam) ........................................................................................................... 76
- Modify Canned Messages .................................................................................................................... 76
Canned Messages (Mobile) ................................................................................................................... 77
- Modify Canned Messages .................................................................................................................... 77
Application Lock (Mobile) ..................................................................................................................... 78
- Add Application Lock ........................................................................................................................... 78
- Modify Locked Applications................................................................................................................. 78

© 2016 Rsupport Co., Ltd. ALL RIGHTS RESERVED. [www.rsupport.com]
- Delete .................................................................................................................................................. 79
Command of Mobile System Log ........................................................................................................... 80
- Add a Log Command ............................................................................................................................ 80
- Modify a Log Command ....................................................................................................................... 80
- Delete a Log Command........................................................................................................................ 81
iPhone Guided Image ............................................................................................................................ 82
- Add Guided Image(s) ........................................................................................................................... 83
- Modify Guided Image(s) ...................................................................................................................... 83
- Delete Guided Image(s) ....................................................................................................................... 83
7. Product Usage Management .................................................................................................... 84
Currently Logged in Users ..................................................................................................................... 84
- Search .................................................................................................................................................. 84
- Export to Excel ..................................................................................................................................... 84
- View ..................................................................................................................................................... 84
- Close .................................................................................................................................................... 85
Currently Active Sessions ...................................................................................................................... 86
- Search .................................................................................................................................................. 86
- Export to Excel ..................................................................................................................................... 86
- View ..................................................................................................................................................... 86
User Login History ................................................................................................................................. 88
- Search .................................................................................................................................................. 88
- Export to Excel ..................................................................................................................................... 88
- View ..................................................................................................................................................... 88
Session History per User ....................................................................................................................... 90
- Search .................................................................................................................................................. 90
- Export to Excel ..................................................................................................................................... 90
- View Support History ........................................................................................................................... 90
Support History ..................................................................................................................................... 91

© 2016 Rsupport Co., Ltd. ALL RIGHTS RESERVED. [www.rsupport.com]
- Search .................................................................................................................................................. 91
- Export to Excel ..................................................................................................................................... 91
- View ..................................................................................................................................................... 91
Reservation Support History ................................................................................................................. 93
- Search .................................................................................................................................................. 93
- Export to Excel ..................................................................................................................................... 93
- View ..................................................................................................................................................... 93
8. Statistics .......................................................................................................................................... 94
Support Statistics .................................................................................................................................. 94
- Search .................................................................................................................................................. 94
- Export to Excel ..................................................................................................................................... 94

© 2016 Rsupport Co., Ltd. ALL RIGHTS RESERVED. [www.rsupport.com]
Disclaimer
This document was created to help even first-time users understand how to use the RemoteCall User Admin Center. If you have a question that is not addressed within this user guide, please contact us. Our contact information can be found at the end of this document.

© 2016 Rsupport Co., Ltd. ALL RIGHTS RESERVED. [www.rsupport.com]
Glossary
Term Definition
Remote Support The act of remotely diagnosing and resolving customer support issues.
Remote Control Controlling a remote system locally.
Administrator The individual who handles user permissions and manages overall remote support environments.
Support Rep / User The individual who provides remote support. The end user.
Customer The individual who receives or requests remote support.
RemoteCall Agent / Agent The support console application used to provide remote support.
Viewer The window used to view and control the remote system.
Chat Standby Window The window which waits for chat session to be established.
Session Standby Window The window which waits for the remote connection to be established.
Connection Page / Relay Page The webpage which connects the customer and the representative.
Remote Session An active remote support session.
Connection Window Displays the remote connection options on the customer’s computer.
Connection Code The six digit number the customer must enter to establish the connection.
Mouse / Keyboard Control The supporting representative will be able to use his/her local keyboard and mouse to control the remote system after receiving customer consent.
Authentication Server The server which authenticates the user’s login credentials.
Agent in Standby Logged in and in standby to start a session. Reservation Support a customer in specific time slot.
Support Window Assign a representative to a window and receive support request through it.
Note: this User Guide includes mobile support / support window / visual support. Sections marked as “Mobile” or “Mobile Only”, “Mobilecam” requires separate licensing.
© 2016 Rsupport Co., Ltd. ALL RIGHTS RESERVED. [www.rsupport.com]
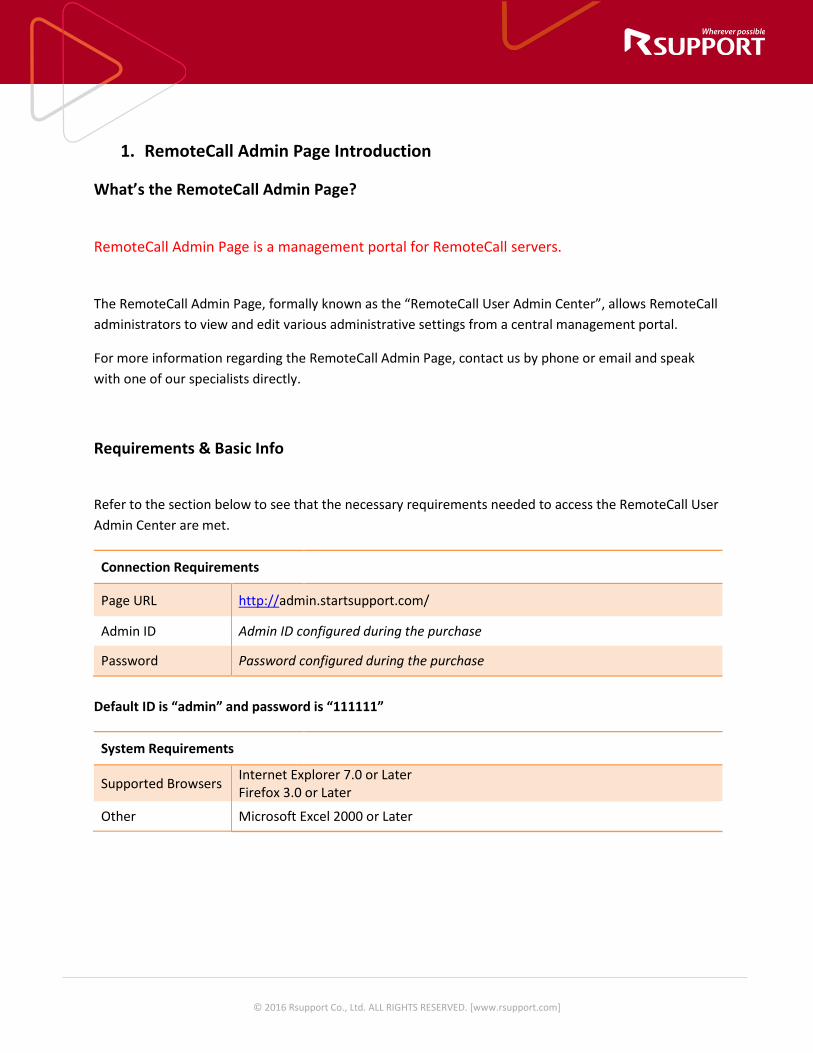
1. RemoteCall Admin Page Introduction
What’s the RemoteCall Admin Page?
RemoteCall Admin Page is a management portal for RemoteCall servers.
The RemoteCall Admin Page, formally known as the “RemoteCall User Admin Center”, allows RemoteCall administrators to view and edit various administrative settings from a central management portal.
For more information regarding the RemoteCall Admin Page, contact us by phone or email and speak with one of our specialists directly.
Requirements & Basic Info
Refer to the section below to see that the necessary requirements needed to access the RemoteCall User Admin Center are met.
Connection Requirements
Page URL http://admin.startsupport.com/
Admin ID Admin ID configured during the purchase
Password Password configured during the purchase
Default ID is “admin” and password is “111111”
System Requirements
Supported Browsers Internet Explorer 7.0 or Later Firefox 3.0 or Later
Other Microsoft Excel 2000 or Later

© 2016 Rsupport Co., Ltd. ALL RIGHTS RESERVED. [www.rsupport.com]
2. Getting Started
Logging into the RemoteCall Admin Page
To start, open a web browser and navigate to the RemoteCall Admin Page (http://”server address”/). Enter your admin ID and password then click “Login”.
Remember ID: Check “Remember ID” if you want the web browser to store your admin ID for future use.
Stay signed in:
Check “Stay signed in” if you would like the web browser to store your login credentials for future use.

© 2016 Rsupport Co., Ltd. ALL RIGHTS RESERVED. [www.rsupport.com]
3. RemoteCall Admin Page
Remote Call Admin Page Layout
Menu Overview
Note: Certain menu options may not be available depending on the permissions of the logged in user.
User Management
Company View and edit company information
Group View and edit group information.
Agent View and edit agent information.
Agent Tool Management
Support Category View and edit support categories.

© 2016 Rsupport Co., Ltd. ALL RIGHTS RESERVED. [www.rsupport.com]
Favorites (URL) Modify and delete Favorite URLs.
Favorites (Files) Modify and delete Favorite Files.
Canned Messages (PC) View and edit canned messages used in remote computer support.
Canner Messages (Mobile Cam) View and edit canned messages used in remote visual support.
Canner Messages (Mobile) View and edit canned messages used in remote mobile device support.
Application Lock (Mobile) View and edit restricted packages.
Command of Mobile System Log Manage the Mobile System log.
iPhone Guided Image Manage iPhone Guided Images.
Product Usage Management
Currently Logged in Users View a list of all currently logged in users.
Currently Active Sessions View a list of all current sessions and sessions in standby.
Login History of User (Agent) View a user’s or user’s login history.
Session History per User View an overview of a user’s or company’s session history.
Support History View a list of all of a user’s or company’s support history.
Reservation Support History View a list of all of a user’s or company’s reserved support history.
Menu Access by Permission
User Management
Company manager Do not provide support. Manage the entire account.
Group manager Can provide support. Manage group options.
Agent user Provide support. Manage own privilege only.

© 2016 Rsupport Co., Ltd. ALL RIGHTS RESERVED. [www.rsupport.com]
[Company Manager] [Group Manager] [Basic User]

© 2016 Rsupport Co., Ltd. ALL RIGHTS RESERVED. [www.rsupport.com]
4. User Management
Company Details Company manager is able to edit company information.

© 2016 Rsupport Co., Ltd. ALL RIGHTS RESERVED. [www.rsupport.com]
View Company Information 1. Click on User Management > Company. 2. View and edit Company information and Contact information.
View License information 1. Click on User Management > Company. 2. Select license number or product name to view license details. 3. Assign or Cancel license user in License Details
View Group information 1. Click on User Management > Company. 2. Click on Add Group to add a new group. 3. Select group number or group name to view group details. 4. Select Support Page to view and edit Connection page.
View User Information 1. Click on User Management > Company. 2. Search for any specific user ID. 3. Click on Add User to add a new user from the pop-up window. 4. Click on Upload to batch add multiple users using Excel file.
Adding user using Excel file a. Download the template and follow the same format. b. Empty group name will NOT add the user (※ new group name can be added) c. ID is required and it will be ignored if same ID already exists. d. Only the number of users permitted by the license will be added. e. ID must be between 4 to 50 characters. f. ID can be made using a~z, A~Z, 0~9, +, @, ., _, -. g. Email can be made using (a~z, A~Z, 0~9, +, @, ., _, -)@( a~z, A~Z, 0~9).( a~z, A~Z, 0~9). h. Group name must be less than 400 characters. i. Last name, first name, email must be less than 100 characters. j. Phonetic name must be less than 200 characters.
View Connection page 1. Click on User Management > Company. 2. Click on Add connection page to add a new connection page.
© 2016 Rsupport Co., Ltd. ALL RIGHTS RESERVED. [www.rsupport.com]
3. Select page number or Relay page to view and edit the details. 4. Click on Delete to remove the connection page (associated group must be removed first).
View Information of Company option 1. Click on User Management > Company. 2. Configure the option for each company.
a. Security level: select from Weak, medium and Strong. It will be applied to the password creation process. - Weak: 6~24 characters / alphabets and numbers. - Medium: 8~24 characters / combination of alphabets and numbers / 3 consecutive numbers are not permitted (ex. 111, 123) - Strong: 8~24 characters / combination of uppercase and lowercase alphabets, numbers and symbols / 3 consecutive numbers are not permitted (ex. 111, 123)
b. Password term: set the password reset interval (30, 60, 90 days). Once expired, users must reset their password following the security level.
c. Account lock when login has failed: limit the login after 5th failed intent to login. Admin must change/reset the password to unlock.
d. Account hold when login has failed: block the login for the set time after 5th failed intent to login.
e. Dormant account expiration: enable the option to expire the accounts that are dormant for the set time (30, 60, 90 days). User must reset their password to use the service.
f. Permitted IP access: enable this and add IP address from which the access to the admin page will be permitted (※ caution required when using this option).

© 2016 Rsupport Co., Ltd. ALL RIGHTS RESERVED. [www.rsupport.com]
Group Details Group administrators are able to edit group information.
x Basic Information: Enter all the necessary fields, marked with an asterisk, then click “Save” to apply any and all changes. o Group Name: View and edit the group name. o Product: View the product associated with the group. o Support Page: View the support page associated with the group. o External link group ID: identifier used when integrating with external CRMs.
Group Members A full list of users belonging to your group will be displayed here.

© 2016 Rsupport Co., Ltd. ALL RIGHTS RESERVED. [www.rsupport.com]
Group Options Group administrators will be able to manage a wide variety of group settings. Refer to the icon set below to determine which remote solutions the settings will apply to.
Most Group Options can be managing by choosing either “Disabled”, “Optional”, or “Use All”.
x Disabled: Disables the selected feature entirely. x Optional: Allows support representatives to individual manage the selected feature. x Use All: Enables the selected feature for all support representatives.
Icon Product
Support for PC
Support by Reservation
Android Support
iOS Support
Visual Support
Android SDK
iOS SDK

© 2016 Rsupport Co., Ltd. ALL RIGHTS RESERVED. [www.rsupport.com]
Starting & Ending Sessions
Products Features Description
Display Expiration Date Displays the license expiration date in the Viewer
Email Invitations Send remote session invites via email.
Copy App Installation Info to Clipboard
Provide the option to copy the app installation file onto a clipboard.
Use Reporting after Session End Create a service report at the end of a remote session.
Use Send SMS with App Installation Guide
Allows sending the app installation link via SMS
Phone Number for SMS Allows connecting with the customer’s phone number.
SMS Contents Enter the text to be included in the SMS.
SMS Server ID Select the SMS service.
Disconnection Popup Allows setting the page to be opened after session has ended.
Pop-up window size and location Set the size of the popup window and the starting location.
Disconnect Message Allows the session disconnect message.
Send System and Screen Info Select simultaneous data transfer or prioritized data transfer between system info and screen sharing data.
© 2016 Rsupport Co., Ltd. ALL RIGHTS RESERVED. [www.rsupport.com]
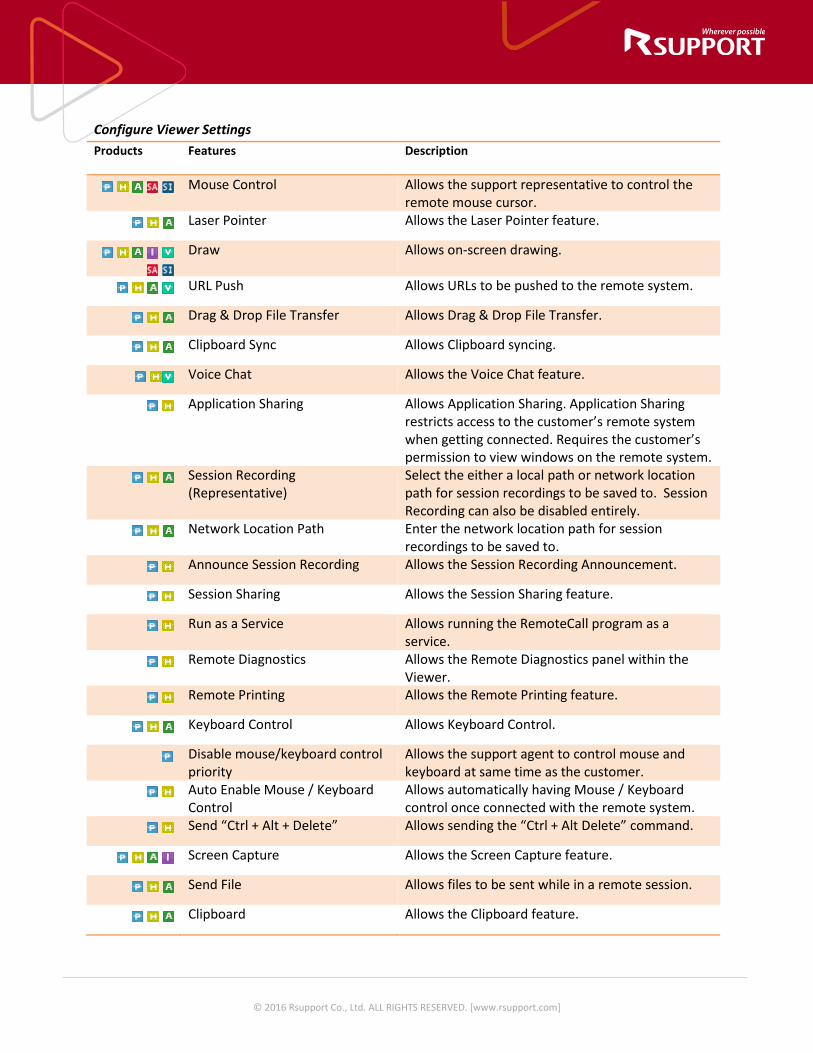
Configure Viewer Settings
Products Features Description
Mouse Control Allows the support representative to control the remote mouse cursor.
Laser Pointer Allows the Laser Pointer feature.
Draw Allows on-screen drawing.
URL Push Allows URLs to be pushed to the remote system.
Drag & Drop File Transfer Allows Drag & Drop File Transfer.
Clipboard Sync Allows Clipboard syncing.
Voice Chat Allows the Voice Chat feature.
Application Sharing Allows Application Sharing. Application Sharing restricts access to the customer’s remote system when getting connected. Requires the customer’s permission to view windows on the remote system.
Session Recording (Representative)
Select the either a local path or network location path for session recordings to be saved to. Session Recording can also be disabled entirely.
Network Location Path Enter the network location path for session recordings to be saved to.
Announce Session Recording Allows the Session Recording Announcement.
Session Sharing Allows the Session Sharing feature.
Run as a Service Allows running the RemoteCall program as a service.
Remote Diagnostics Allows the Remote Diagnostics panel within the Viewer.
Remote Printing Allows the Remote Printing feature.
Keyboard Control Allows Keyboard Control.
Disable mouse/keyboard control priority
Allows the support agent to control mouse and keyboard at same time as the customer.
Auto Enable Mouse / Keyboard Control
Allows automatically having Mouse / Keyboard control once connected with the remote system.
Send “Ctrl + Alt + Delete” Allows sending the “Ctrl + Alt Delete” command.
Screen Capture Allows the Screen Capture feature.
Send File Allows files to be sent while in a remote session.
Clipboard Allows the Clipboard feature.

© 2016 Rsupport Co., Ltd. ALL RIGHTS RESERVED. [www.rsupport.com]
Screen Sharing (Representative) Allows Screen Sharing. Screen sharing mode shares the local computer screen with the customer.
Text Chat (Application Chat) Allows Text Chat within the Viewer.
Remote Sound Allows Remote Sound. Remote Sounds are sounds which are being emitted from the remote system.
Session Recording (Customer) Allows customers to record the remote session.
Session Transfer Allows the Session Transfer feature.
Reboot & Reconnect Allows the Reboot & Reconnect feature. Reboot & Reconnect will reboot the remote system and reconnect to the remote session automatically.
Favorite Allows the Favorites feature.
Process Info Allows all currently running processes on the remote system to be managed by the support representative.
Preview Allows the Preview feature.
Routing Information Allows routing information to be viewed by the support representative.
Mobile Chatting Allows the Mobile Chatting feature.
Information of Mobile System Log Allows the support representative to view the mobile system log information.
Command of Mobile System Log Allows the support representative to view the mobile system log commands.
Support History Allows Support History to be viewed by the support representative.
Additional Information Allows the support representative to view additional device information.
Open Chat Window upon Connection
Allows opening the Chat Window upon Connection.
Image Transfer (Server) Allows images stored on the server to be transferred.
Support Android USB Connection Allows remote Android devices to connect via USB.
Mobile App -
Auto-reconnect Set to auto-reconnect the session.
Image Transfer (PC) Allows images stored on the local computer to be transferred.
Zoom In / Out Allows the zooming in and out of the Viewer screen.
Flash Allows the Flash feature.

© 2016 Rsupport Co., Ltd. ALL RIGHTS RESERVED. [www.rsupport.com]
Guide Allows the Guide Panel within the Viewer.
Speakerphone Allows the Speakerphone feature.
Photo / Video Mode Switch Allows switching between Photo Mode and Video Mode.
Screen Transfer Mode Set either Photo Mode or Video Mode as the default screen transfer method.
Session Recording (Representative)
Allows the support representative to record the video session.
Send Support Data Allows sending the support data to a third party solution.
URL to Send Support Data Enter the URL address to send the support data to.
Detailed Support Data Enter additional support data.
Rotate Allows the Rotate feature which turns the Viewer screen 90, 180, 270, and 360 degrees.
Quality Allows the Quality feature which controls the bitrate of the video stream. (Low, Medium, High)
Set Focus Allows the Set Focus feature which automatically focuses the remote device’s camera.
Switch Front and Rear Camera Allows the support representative to switch between front-facing and rear-facing cameras.
Location Information Allows the support representative to request the customer’s location.
Screen Capture Allows the Screen Capture feature.
Picture mode resolution Set the resolution of the image captured during the session. Set to 640 x 480 by default.

© 2016 Rsupport Co., Ltd. ALL RIGHTS RESERVED. [www.rsupport.com]
Configure Chat Features
Request Remote Control Allows a message to be sent requesting remote control.
Send File Allows the customer to send files during chat.
Save Chat History Allows customers to save chat history.
Chat Session Sharing Allows previous chat dialog to be shared with the session.
Send File (Representative) Allows the representative to send files during chat.
Save Chat History (Representative) Allows support representatives to save chat history.
Configure Agent
Agent Favorite (URL) Allows support representatives to manage Favorite URLs from within the RemoteCall Agent.
Canned Messages (PC) Allows support representative to use canned messages in computer-to-computer support sessions.
Canned Messages (Visual)) Allows support representative to use canned messages in video support sessions.
Agent Favorites (Files) Allows support representatives to manage Favorite files from within the RemoteCall Agent.
Canned Messages (Mobile) Allows support representative to use canned messages in mobile support sessions.
Use P2P mode Allows support representative to connect directly in P2P mode.
Force Disconnect Agent Allows support representatives to forcefully logout of the RemoteCall Agent if their user ID is already logged in elsewhere.
© 2016 Rsupport Co., Ltd. ALL RIGHTS RESERVED. [www.rsupport.com]
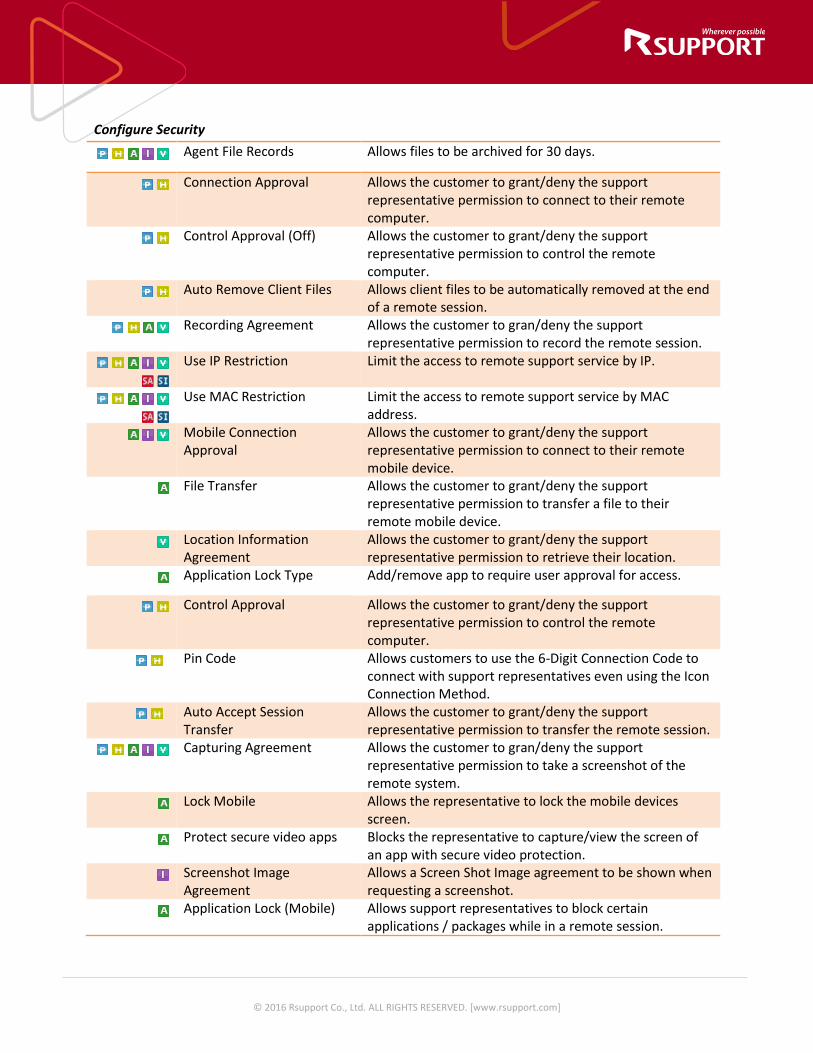
Configure Security
Agent File Records Allows files to be archived for 30 days.
Connection Approval Allows the customer to grant/deny the support representative permission to connect to their remote computer.
Control Approval (Off) Allows the customer to grant/deny the support representative permission to control the remote computer.
Auto Remove Client Files Allows client files to be automatically removed at the end of a remote session.
Recording Agreement Allows the customer to gran/deny the support representative permission to record the remote session.
Use IP Restriction Limit the access to remote support service by IP.
Use MAC Restriction Limit the access to remote support service by MAC address.
Mobile Connection Approval
Allows the customer to grant/deny the support representative permission to connect to their remote mobile device.
File Transfer Allows the customer to grant/deny the support representative permission to transfer a file to their remote mobile device.
Location Information Agreement
Allows the customer to grant/deny the support representative permission to retrieve their location.
Application Lock Type Add/remove app to require user approval for access.
Control Approval Allows the customer to grant/deny the support representative permission to control the remote computer.
Pin Code Allows customers to use the 6-Digit Connection Code to connect with support representatives even using the Icon Connection Method.
Auto Accept Session Transfer
Allows the customer to grant/deny the support representative permission to transfer the remote session.
Capturing Agreement Allows the customer to gran/deny the support representative permission to take a screenshot of the remote system.
Lock Mobile Allows the representative to lock the mobile devices screen.
Protect secure video apps Blocks the representative to capture/view the screen of an app with secure video protection.
Screenshot Image Agreement
Allows a Screen Shot Image agreement to be shown when requesting a screenshot.
Application Lock (Mobile) Allows support representatives to block certain applications / packages while in a remote session.

© 2016 Rsupport Co., Ltd. ALL RIGHTS RESERVED. [www.rsupport.com]

© 2016 Rsupport Co., Ltd. ALL RIGHTS RESERVED. [www.rsupport.com]
User List View a list of all registered users within your group.
Export to Excel:
A list of all registered users can be exported as a Microsoft Excel spreadsheet file (.XLSX)
1
© 2016 Rsupport Co., Ltd. ALL RIGHTS RESERVED. [www.rsupport.com]
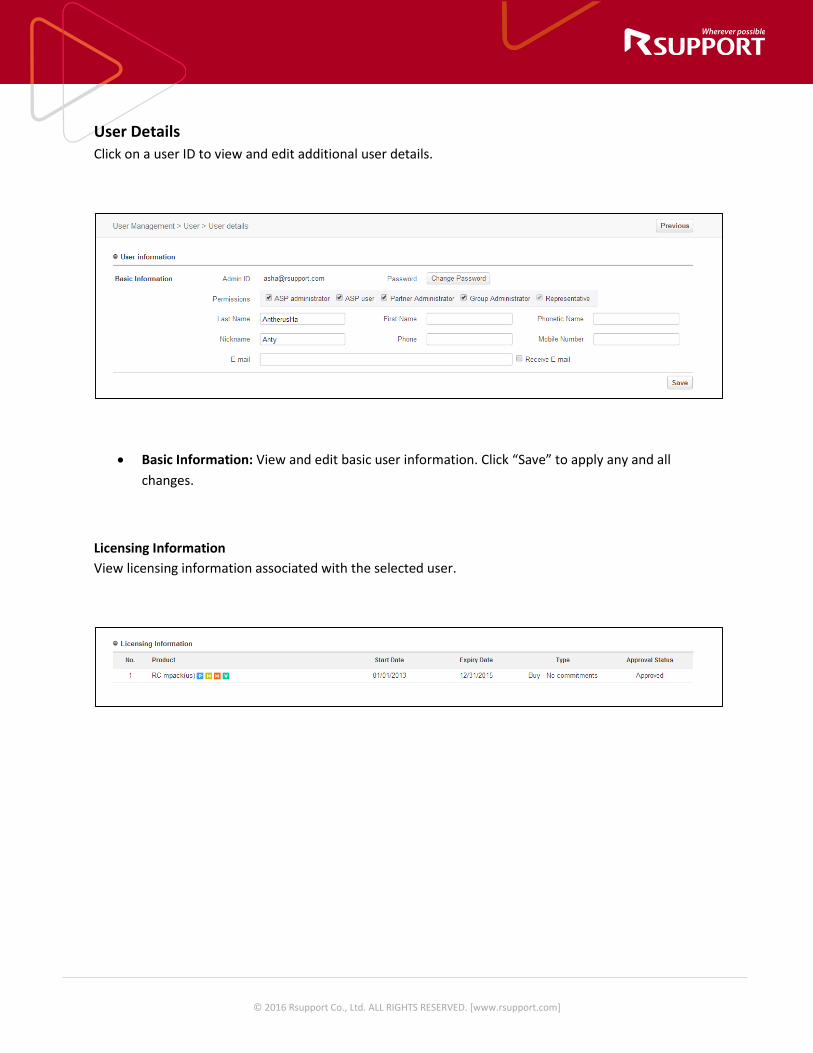
User Details Click on a user ID to view and edit additional user details.
x Basic Information: View and edit basic user information. Click “Save” to apply any and all changes.
Licensing Information View licensing information associated with the selected user.

© 2016 Rsupport Co., Ltd. ALL RIGHTS RESERVED. [www.rsupport.com]
Representative Options Support representatives will be able to manage a wide variety of settings. Refer to the icon set below to determine which remote solutions the settings will apply to.
Most Representative Options can be managing by checking or unchecking the associated boxes.
Note: If a certain option can’t be checked or unchecked, please refer to the group options page and verify that the associated feature is set to “Optional”.
Icon Product
Computer Support
Reserved Support
Android Support
iOS Support
Visual Support
© 2016 Rsupport Co., Ltd. ALL RIGHTS RESERVED. [www.rsupport.com]
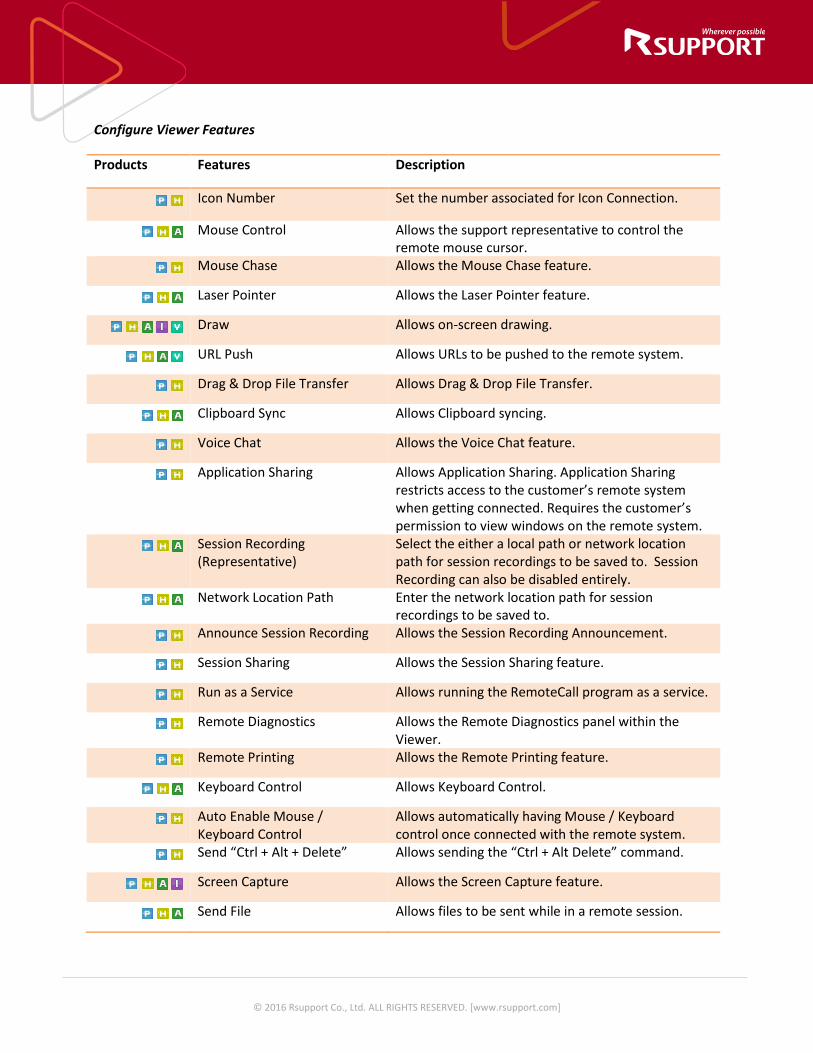
Configure Viewer Features
Products Features Description
Icon Number Set the number associated for Icon Connection.
Mouse Control Allows the support representative to control the remote mouse cursor.
Mouse Chase Allows the Mouse Chase feature.
Laser Pointer Allows the Laser Pointer feature.
Draw Allows on-screen drawing.
URL Push Allows URLs to be pushed to the remote system.
Drag & Drop File Transfer Allows Drag & Drop File Transfer.
Clipboard Sync Allows Clipboard syncing.
Voice Chat Allows the Voice Chat feature.
Application Sharing Allows Application Sharing. Application Sharing restricts access to the customer’s remote system when getting connected. Requires the customer’s permission to view windows on the remote system.
Session Recording (Representative)
Select the either a local path or network location path for session recordings to be saved to. Session Recording can also be disabled entirely.
Network Location Path Enter the network location path for session recordings to be saved to.
Announce Session Recording Allows the Session Recording Announcement.
Session Sharing Allows the Session Sharing feature.
Run as a Service Allows running the RemoteCall program as a service.
Remote Diagnostics Allows the Remote Diagnostics panel within the Viewer.
Remote Printing Allows the Remote Printing feature.
Keyboard Control Allows Keyboard Control.
Auto Enable Mouse / Keyboard Control
Allows automatically having Mouse / Keyboard control once connected with the remote system.
Send “Ctrl + Alt + Delete” Allows sending the “Ctrl + Alt Delete” command.
Screen Capture Allows the Screen Capture feature.
Send File Allows files to be sent while in a remote session.
© 2016 Rsupport Co., Ltd. ALL RIGHTS RESERVED. [www.rsupport.com]
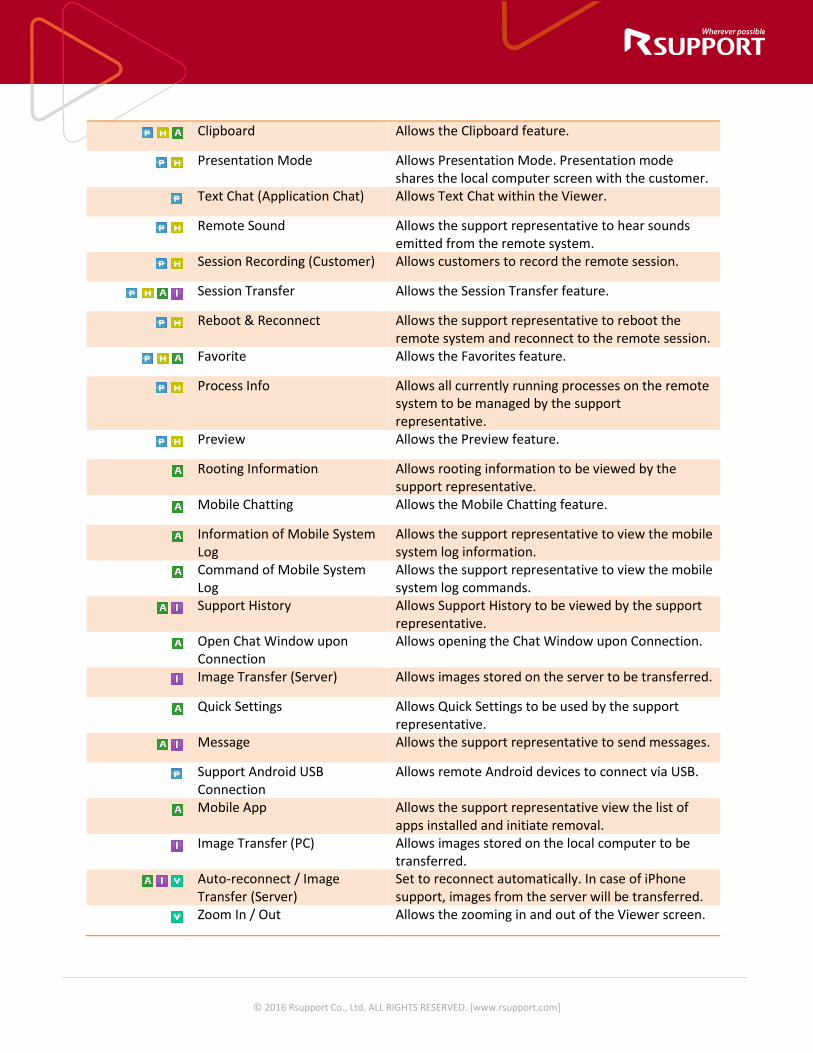
Clipboard Allows the Clipboard feature.
Presentation Mode Allows Presentation Mode. Presentation mode shares the local computer screen with the customer.
Text Chat (Application Chat) Allows Text Chat within the Viewer.
Remote Sound Allows the support representative to hear sounds emitted from the remote system.
Session Recording (Customer) Allows customers to record the remote session.
Session Transfer Allows the Session Transfer feature.
Reboot & Reconnect Allows the support representative to reboot the remote system and reconnect to the remote session.
Favorite Allows the Favorites feature.
Process Info Allows all currently running processes on the remote system to be managed by the support representative.
Preview Allows the Preview feature.
Rooting Information Allows rooting information to be viewed by the support representative.
Mobile Chatting Allows the Mobile Chatting feature.
Information of Mobile System Log
Allows the support representative to view the mobile system log information.
Command of Mobile System Log
Allows the support representative to view the mobile system log commands.
Support History Allows Support History to be viewed by the support representative.
Open Chat Window upon Connection
Allows opening the Chat Window upon Connection.
Image Transfer (Server) Allows images stored on the server to be transferred.
Quick Settings Allows Quick Settings to be used by the support representative.
Message Allows the support representative to send messages.
Support Android USB Connection
Allows remote Android devices to connect via USB.
Mobile App Allows the support representative view the list of apps installed and initiate removal.
Image Transfer (PC) Allows images stored on the local computer to be transferred.
Auto-reconnect / Image Transfer (Server)
Set to reconnect automatically. In case of iPhone support, images from the server will be transferred.
Zoom In / Out Allows the zooming in and out of the Viewer screen.
© 2016 Rsupport Co., Ltd. ALL RIGHTS RESERVED. [www.rsupport.com]
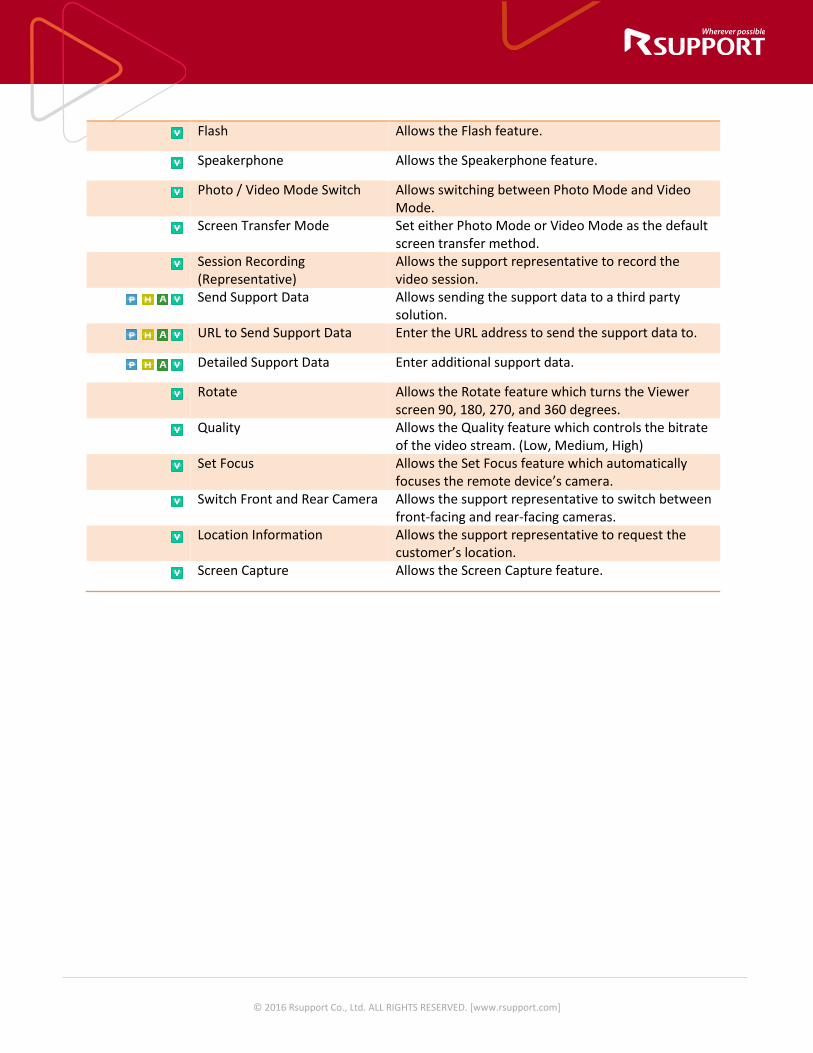
Flash Allows the Flash feature.
Speakerphone Allows the Speakerphone feature.
Photo / Video Mode Switch Allows switching between Photo Mode and Video Mode.
Screen Transfer Mode Set either Photo Mode or Video Mode as the default screen transfer method.
Session Recording (Representative)
Allows the support representative to record the video session.
Send Support Data Allows sending the support data to a third party solution.
URL to Send Support Data Enter the URL address to send the support data to.
Detailed Support Data Enter additional support data.
Rotate Allows the Rotate feature which turns the Viewer screen 90, 180, 270, and 360 degrees.
Quality Allows the Quality feature which controls the bitrate of the video stream. (Low, Medium, High)
Set Focus Allows the Set Focus feature which automatically focuses the remote device’s camera.
Switch Front and Rear Camera Allows the support representative to switch between front-facing and rear-facing cameras.
Location Information Allows the support representative to request the customer’s location.
Screen Capture Allows the Screen Capture feature.

© 2016 Rsupport Co., Ltd. ALL RIGHTS RESERVED. [www.rsupport.com]
Configure Chat Features
Request Remote Control Allows a message to be sent requesting remote control.
Send File Allows the customer to send files during chat.
Save Chat History Allows customers to save chat history.
Chat Session Sharing Allows previous chat dialog to be shared with the session.
Send File (Representative) Allows the representative to send files during chat.
Save Chat History (Representative) Allows support representatives to save chat history.
Configure Agent
Agent Favorite (URL) Allows support representatives to manage Favorite URLs from within the RemoteCall Agent.
Agent Program Allows support representatives to register a executable path to the RemoteCall Agent for quick access on the remote computer.
Canned Messages (PC) Allows support representative to use canned messages in computer-to-computer support sessions.
Canned Messages (Mobile Cam) Allows support representative to use canned messages in video support sessions.
Agent Folder Allows support representatives to register a folder path to the RemoteCall Agent for quick access on the remote computer.
Agent Favorites (Files) Allows support representatives to manage Favorite files from within the RemoteCall Agent.
Canned Messages (Mobile) Allows support representative to use canned messages in mobile support sessions.
Force Disconnect Agent Allows support representatives to forcefully logout of the RemoteCall Agent if their user ID is already logged in elsewhere.
© 2016 Rsupport Co., Ltd. ALL RIGHTS RESERVED. [www.rsupport.com]
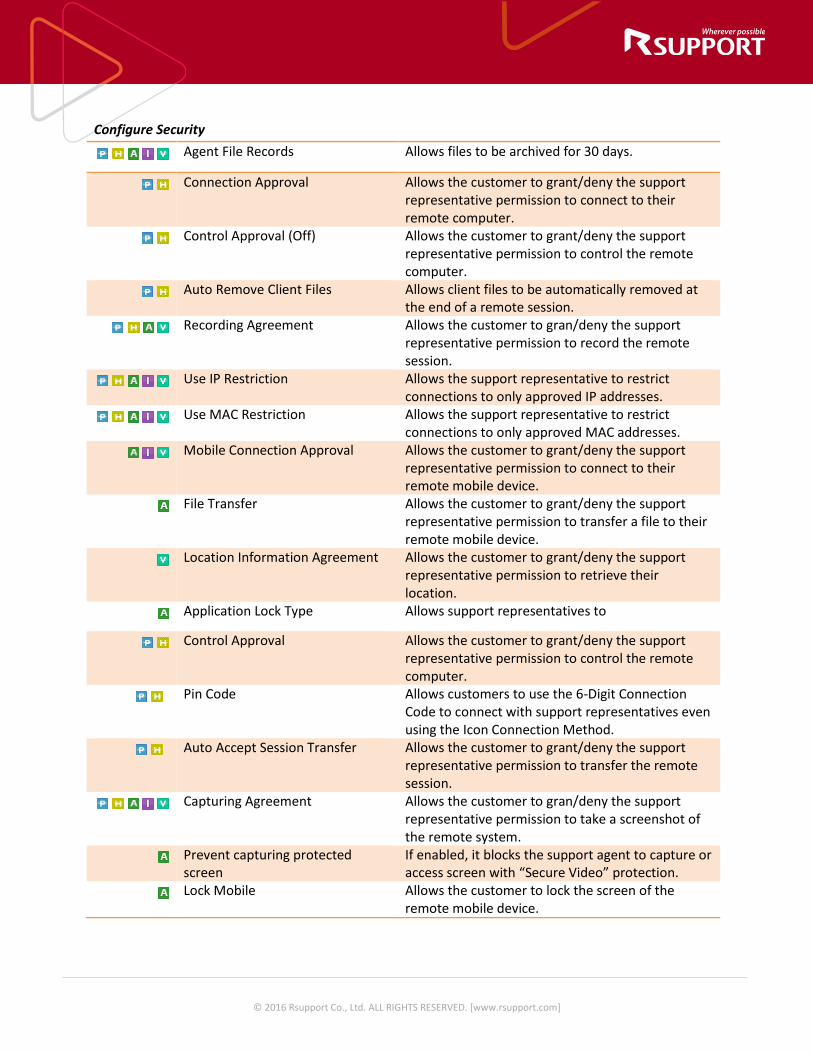
Configure Security
Agent File Records Allows files to be archived for 30 days.
Connection Approval Allows the customer to grant/deny the support representative permission to connect to their remote computer.
Control Approval (Off) Allows the customer to grant/deny the support representative permission to control the remote computer.
Auto Remove Client Files Allows client files to be automatically removed at the end of a remote session.
Recording Agreement Allows the customer to gran/deny the support representative permission to record the remote session.
Use IP Restriction Allows the support representative to restrict connections to only approved IP addresses.
Use MAC Restriction Allows the support representative to restrict connections to only approved MAC addresses.
Mobile Connection Approval Allows the customer to grant/deny the support representative permission to connect to their remote mobile device.
File Transfer Allows the customer to grant/deny the support representative permission to transfer a file to their remote mobile device.
Location Information Agreement Allows the customer to grant/deny the support representative permission to retrieve their location.
Application Lock Type Allows support representatives to
Control Approval Allows the customer to grant/deny the support representative permission to control the remote computer.
Pin Code Allows customers to use the 6-Digit Connection Code to connect with support representatives even using the Icon Connection Method.
Auto Accept Session Transfer Allows the customer to grant/deny the support representative permission to transfer the remote session.
Capturing Agreement Allows the customer to gran/deny the support representative permission to take a screenshot of the remote system.
Prevent capturing protected screen
If enabled, it blocks the support agent to capture or access screen with “Secure Video” protection.
Lock Mobile Allows the customer to lock the screen of the remote mobile device.

© 2016 Rsupport Co., Ltd. ALL RIGHTS RESERVED. [www.rsupport.com]
Screenshot Image Agreement Allows a Screen Shot Image agreement to be shown when requesting a screenshot.
Application Lock (Mobile) Allows support representatives to block certain applications / packages while in a remote session.
Preventing random connection on icon based
Icon base connection is a convenient way of getting connected with a customer. But, there is a possibility of getting connected with an unwanted customer.
Use the “Enforce PIN code Connection” option to add extra level of security by entering 4 digits passcode.
[Process before using PIN code]
[Process after using PIN code]
1. Click on User Management - Group.
2. In Configure Security – Pin Code, set to “Use All”.
3. Click on User Management – Agent.
4. Select the User ID to update.
5. In Configure Security – Pin Code, check the option and select “Automatic” or “Fixed”.
Standby Connection page
Click icon
Connected
Standby Connection page
Click icon
Enter PIN code
Connected
© 2016 Rsupport Co., Ltd. ALL RIGHTS RESERVED. [www.rsupport.com]
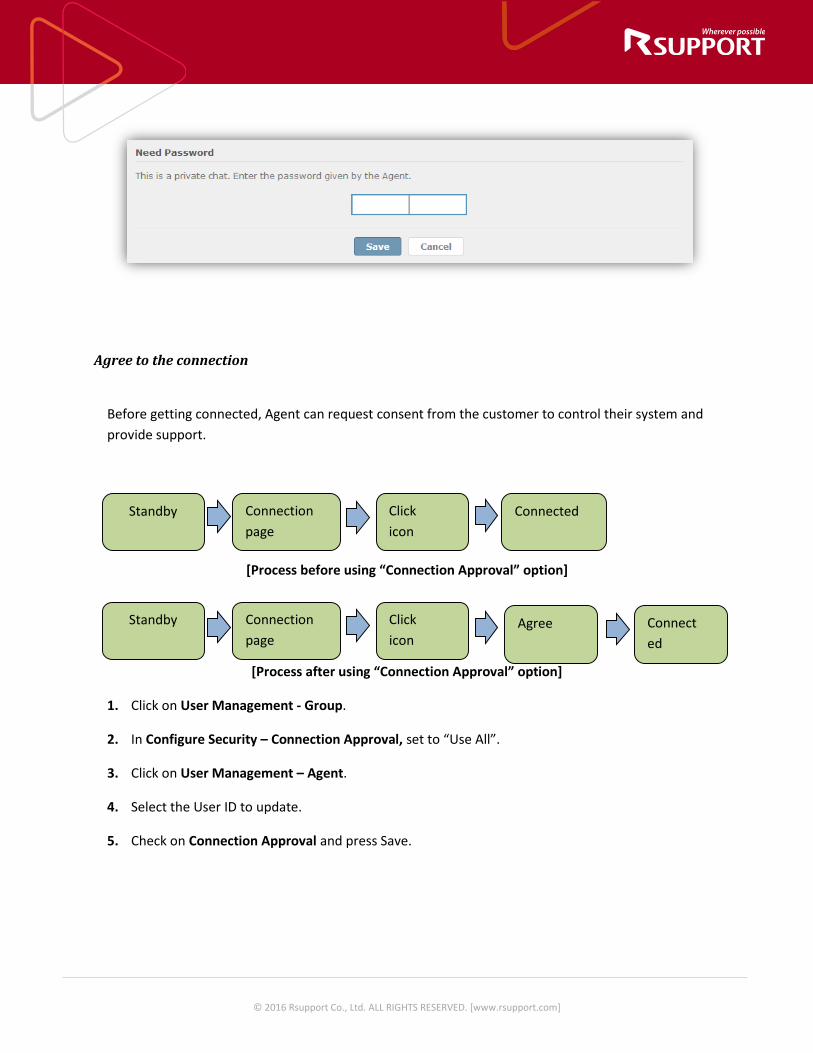
Agree to the connection
Before getting connected, Agent can request consent from the customer to control their system and provide support.
[Process before using “Connection Approval” option]
[Process after using “Connection Approval” option]
1. Click on User Management - Group.
2. In Configure Security – Connection Approval, set to “Use All”.
3. Click on User Management – Agent.
4. Select the User ID to update.
5. Check on Connection Approval and press Save.
Standby Connection page
Click icon
Connected
Standby Connection page
Click icon
Agree Connected

© 2016 Rsupport Co., Ltd. ALL RIGHTS RESERVED. [www.rsupport.com]
[PC agreement]
[Mobile agreement] [Photo agreement]
Block by IP, MAC address
By default, RemoteCall can be used anywhere internet is available. Agent can log in and provide support anytime, anywhere. But, it is possible to limit the agents to use the service in a limited environment, by IP or MAC address.

© 2016 Rsupport Co., Ltd. ALL RIGHTS RESERVED. [www.rsupport.com]
Office FL 2 (192.168.100.100)
Office FL 5 (192.168.100.200)
Home (10.10.10.100)
Default Accessible Accessible Accessible Only allow IP on FL 2
Accessible Inaccessible Inaccessible
[Example of Block by IP]
To apply same permission zone to all Agents,
1. Click on User Management - Group.
2. Scroll down to Configure Security – Use IP Restriction / Use MAC Restriction.
3. Change to Use All to “Use IP Restriction” to block by IP and/or “Use MAC Restriction” to lock by MAC address.
4. Enter the necessary information in the provided boxes such as IP range and/or MAC addresses.
5. Press Save to store the information.

© 2016 Rsupport Co., Ltd. ALL RIGHTS RESERVED. [www.rsupport.com]
To apply separate permission zone the each Agent,
1. Click on User Management - Group.
2. Scroll down to Configure Security – Use IP Restriction / Use MAC Restriction.
Change to Optional to “Use IP Restriction” to block by IP and/or “Use MAC Restriction” to lock by MAC address and press Save.
3. Click on User Management – Agent.
4. Select the User ID to update.
5. Scroll down to Configure Security.
6. Check on “Use IP Restriction” to block by IP and/or “Use MAC Restriction” to block by MAC address.
7. Enter the necessary information in the provided boxes such as IP range and/or MAC addresses. In case of MAC address, do not include the separator.
8. Press Save to store the information.

© 2016 Rsupport Co., Ltd. ALL RIGHTS RESERVED. [www.rsupport.com]
Send connection info via email
To establish the connection, customer will be directed to the connection page spoken by the agent. But, if the customer’s email is known, the connection URL and code can be sent via default email client.
[Before using “Send E-mail”] [After using “Send E-mail”]
Reference: “Send E-mail” cannot be used if there is no email client available.
© 2016 Rsupport Co., Ltd. ALL RIGHTS RESERVED. [www.rsupport.com]
[Connection E-mail]
1. Click on User Management - Group.
2. Scroll down to Group Options – Starting, ending the session.
3. Change “E-mail Invitations” to Use All and press Save.
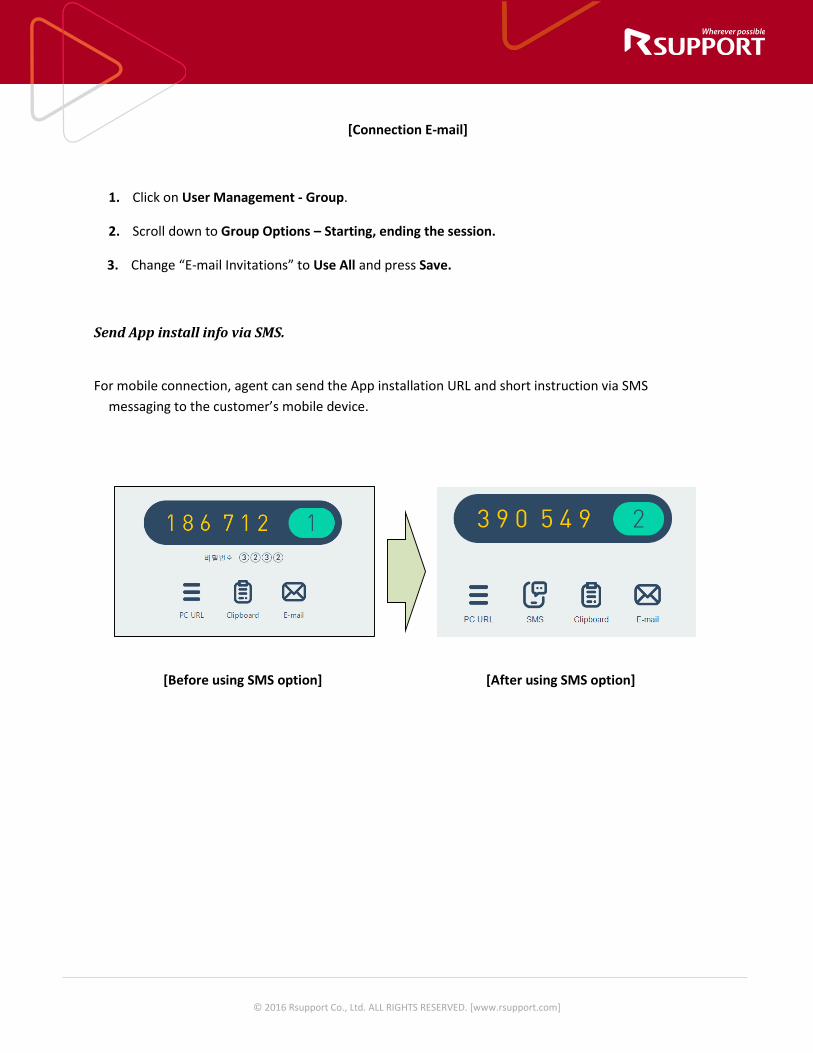
Send App install info via SMS.
For mobile connection, agent can send the App installation URL and short instruction via SMS
messaging to the customer’s mobile device.
[Before using SMS option] [After using SMS option]
© 2016 Rsupport Co., Ltd. ALL RIGHTS RESERVED. [www.rsupport.com]
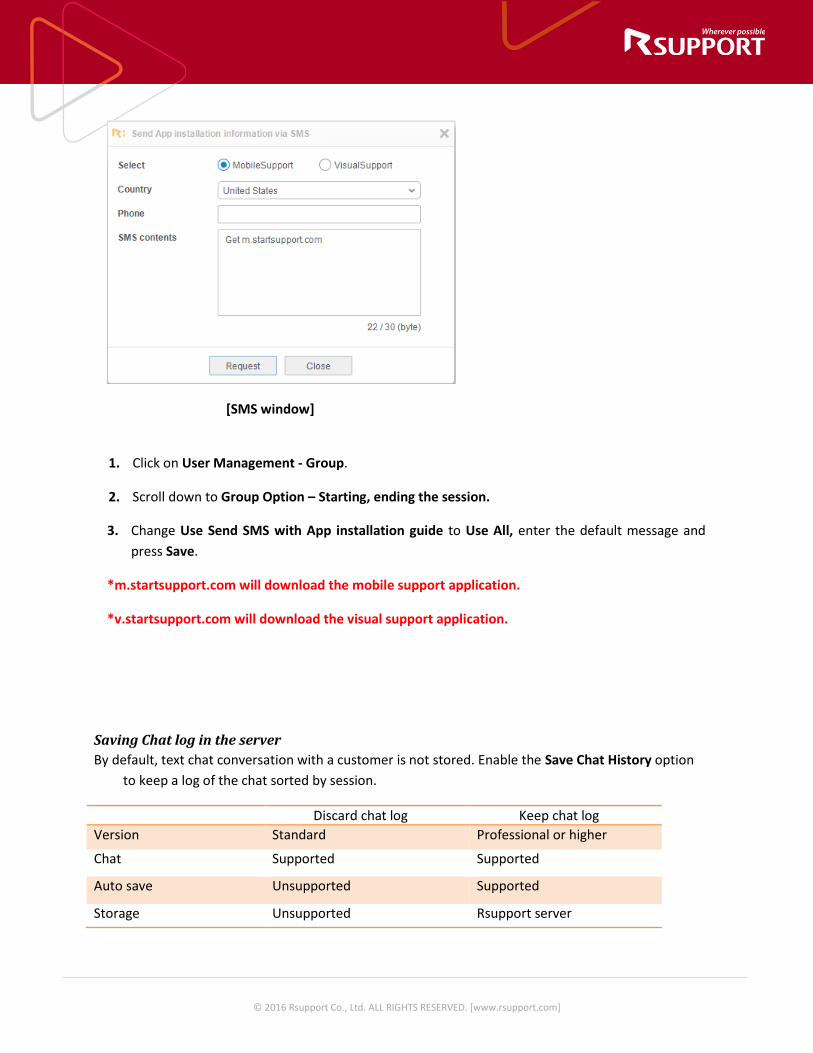
[SMS window]
1. Click on User Management - Group.
2. Scroll down to Group Option – Starting, ending the session.
3. Change Use Send SMS with App installation guide to Use All, enter the default message and press Save.
*m.startsupport.com will download the mobile support application.
*v.startsupport.com will download the visual support application.
Saving Chat log in the server By default, text chat conversation with a customer is not stored. Enable the Save Chat History option
to keep a log of the chat sorted by session.
Discard chat log Keep chat log Version Standard Professional or higher
Chat Supported Supported
Auto save Unsupported Supported
Storage Unsupported Rsupport server

© 2016 Rsupport Co., Ltd. ALL RIGHTS RESERVED. [www.rsupport.com]
Data loss Possible Impossible Sync with session Unsupported Supported
View in Admin Console Unsupported Supported
[Advantage of keeping the chat log]
1. Click on User Management - Group.
2. Scroll down to Configure Chat features.
3. Change Save Chat History (Representative) to Use All and press Save.
Display page after disconnection
After the session is ended, together with the session information page, a pop-up URL can be set to be automatically launched on the default browser.
Disconnection Message
Use Use Not use Not use
Disconnection Popup
Use Not use Use Not use
Screen after session ended
Message and assigned
custom page displayed
Only message is displayed.
Only assigned custom page
displayed.
Empty
[Screen status after session ended]
1. Click on User Management - Group.
2. Scroll down to Group Option – Starting, ending the session.
3. Change Disconnection Popup to Use All, and enter the URL of the page to be display and the size of the window.
4. Press Save.

© 2016 Rsupport Co., Ltd. ALL RIGHTS RESERVED. [www.rsupport.com]
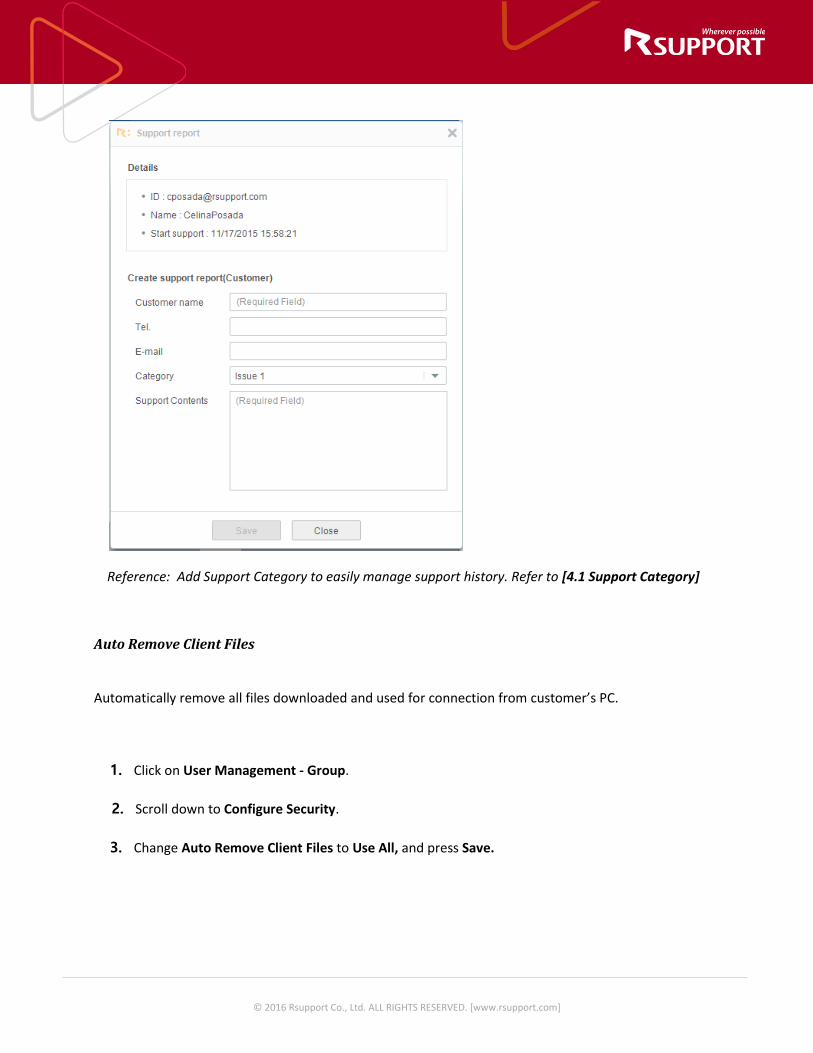
Submit report after the session
After the session has ended, agent can complete a service report to manage the support sessions.
1. Click on User Management - Group.
2. Scroll down to Group Option – Starting, ending the session.
3. Change Use reporting after session ends to Optional or Use All, and press Save.
4. Optional will not enforce the agent to complete the report; Use All will enforce the agent to complete all fields in the report window to close it.
© 2016 Rsupport Co., Ltd. ALL RIGHTS RESERVED. [www.rsupport.com]
Reference: Add Support Category to easily manage support history. Refer to [4.1 Support Category]
Auto Remove Client Files
Automatically remove all files downloaded and used for connection from customer’s PC.
1. Click on User Management - Group.
2. Scroll down to Configure Security.
3. Change Auto Remove Client Files to Use All, and press Save.
© 2016 Rsupport Co., Ltd. ALL RIGHTS RESERVED. [www.rsupport.com]
Restrict Access to Pop-up Windows
During a support session, various pop up window will appear requesting user consent. This is only clickable by the customer as it is requiring their permission. But, if the customer finds it annoying or difficult to follow, enabling Control Approval (Off) option allows the agent to click on the messages directly for faster support.
1. Click on User Management - Group.
2. Scroll down to Configure Security.
3. Change Control Approval (Off) to Use All, and press Save.
© 2016 Rsupport Co., Ltd. ALL RIGHTS RESERVED. [www.rsupport.com]
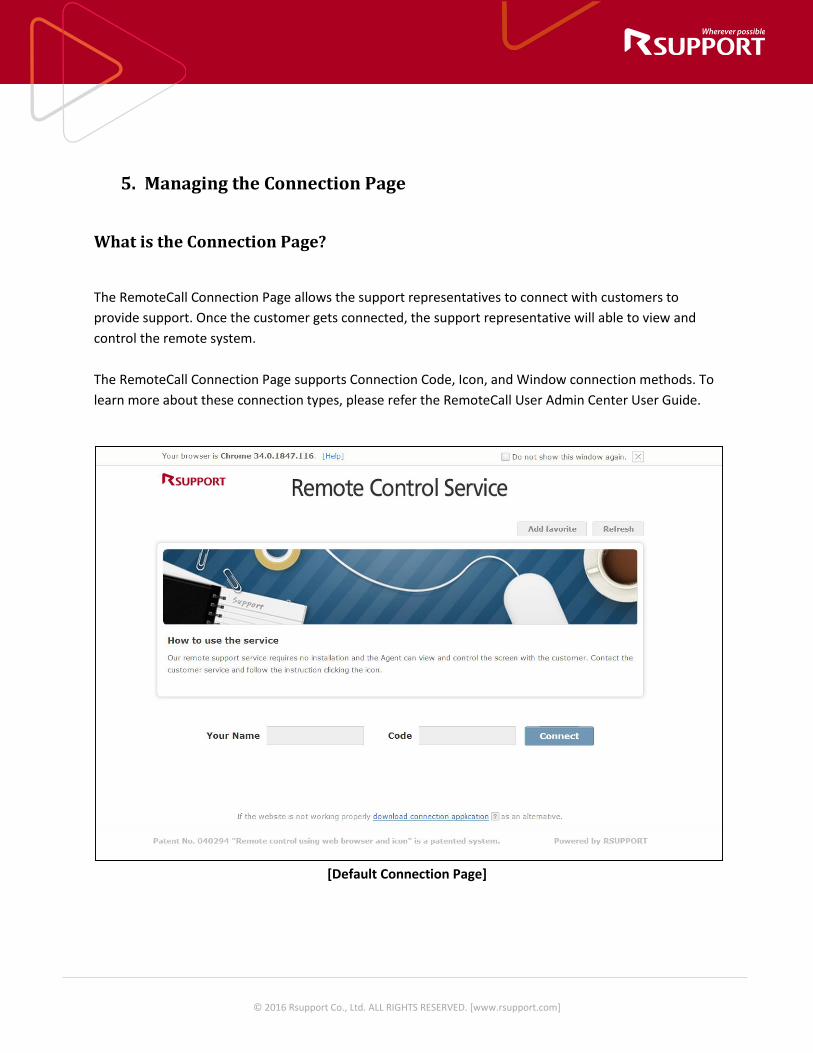
5. Managing the Connection Page
What is the Connection Page?
The RemoteCall Connection Page allows the support representatives to connect with customers to provide support. Once the customer gets connected, the support representative will able to view and control the remote system. The RemoteCall Connection Page supports Connection Code, Icon, and Window connection methods. To learn more about these connection types, please refer the RemoteCall User Admin Center User Guide.
[Default Connection Page]

© 2016 Rsupport Co., Ltd. ALL RIGHTS RESERVED. [www.rsupport.com]
© 2016 Rsupport Co., Ltd. ALL RIGHTS RESERVED. [www.rsupport.com]
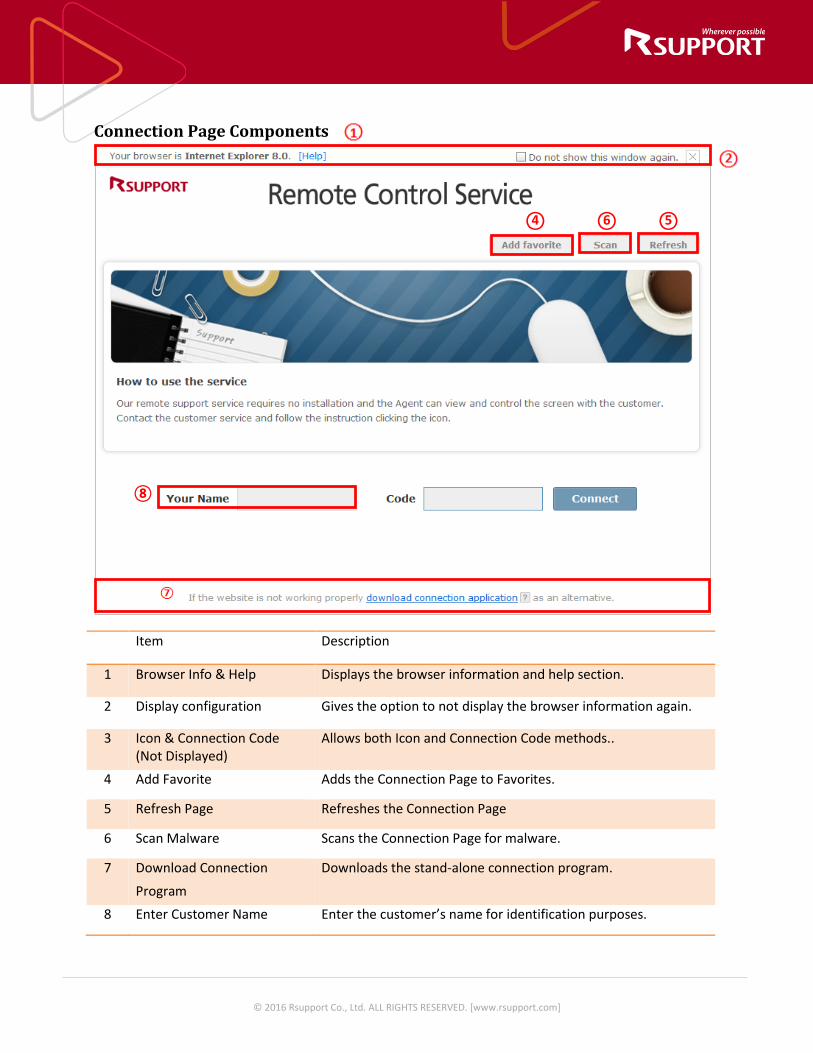
Connection Page Components
Item Description
1 Browser Info & Help Displays the browser information and help section.
2 Display configuration Gives the option to not display the browser information again.
3 Icon & Connection Code (Not Displayed)
Allows both Icon and Connection Code methods..
4 Add Favorite Adds the Connection Page to Favorites.
5 Refresh Page Refreshes the Connection Page
6 Scan Malware Scans the Connection Page for malware.
7 Download Connection Program
Downloads the stand-alone connection program.
8 Enter Customer Name Enter the customer’s name for identification purposes.
○4 ○6 ○5
⑧

© 2016 Rsupport Co., Ltd. ALL RIGHTS RESERVED. [www.rsupport.com]
Connection Page Settings
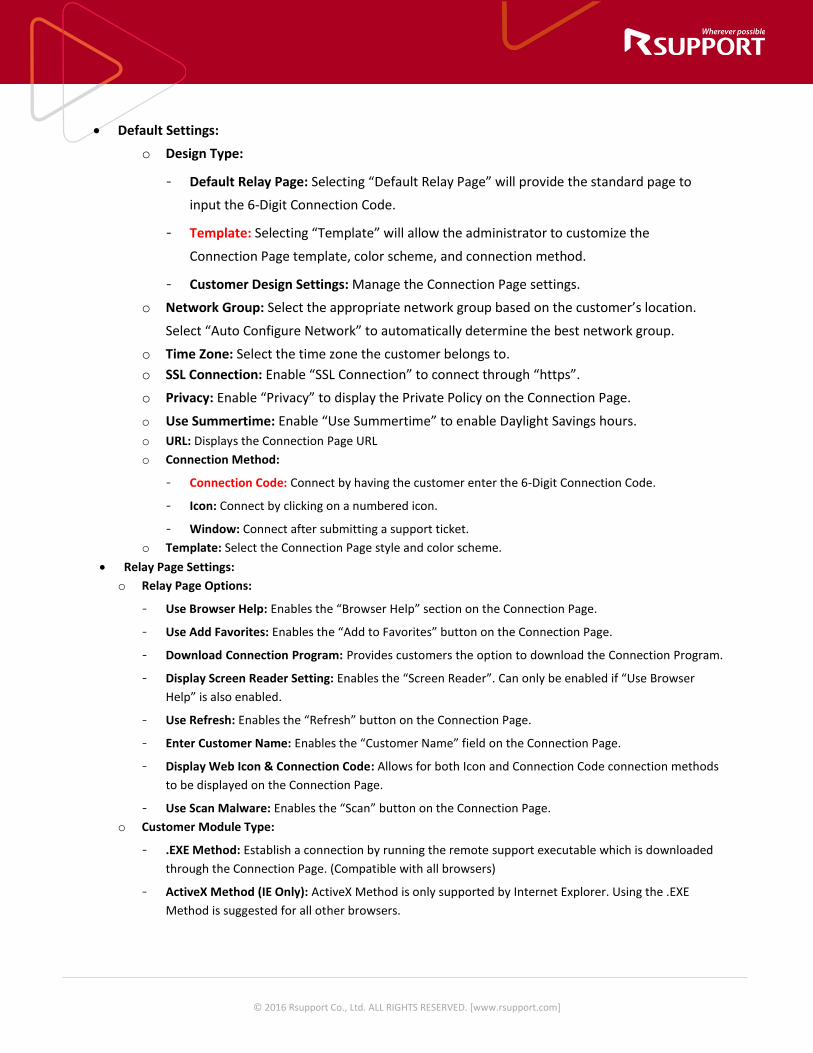
Default Settings
Default Relay Page
x Default Settings: o Design Type:
- Default Relay Page: Selecting “Default Relay Page” will provide the standard page to input the 6-Digit Connection Code.
- Template: Selecting “Template” will allow the administrator to customize the Connection Page template, color scheme, and connection method.
- Customer Design Settings: Manage the Connection Page settings. o Network Group: Select the appropriate network group based on the customer’s location.

© 2016 Rsupport Co., Ltd. ALL RIGHTS RESERVED. [www.rsupport.com]
Select “Auto Configure Network” to automatically determine the best network group. o Time Zone: Select the time zone the customer belongs to. o SSL Connection: Enable “SSL Connection” to connect through “https”. o Privacy: Enable “Privacy” to display the Private Policy on the Connection Page. o Use Summertime: Enable “Use Summertime” to enable Daylight Savings hours.
x Relay Page Settings: o Banner Tag: Displays the HTML code to provide an image link to the connection page. The
image link is shown below:
o Connection Tag: Displays the HTML code to embed the Connection Code input box directly
into the customer’s website. The Connection Code input box is shown below:
x Use Groups: Click “Assign Group” to assign a specific group for this Connection Page.
© 2016 Rsupport Co., Ltd. ALL RIGHTS RESERVED. [www.rsupport.com]
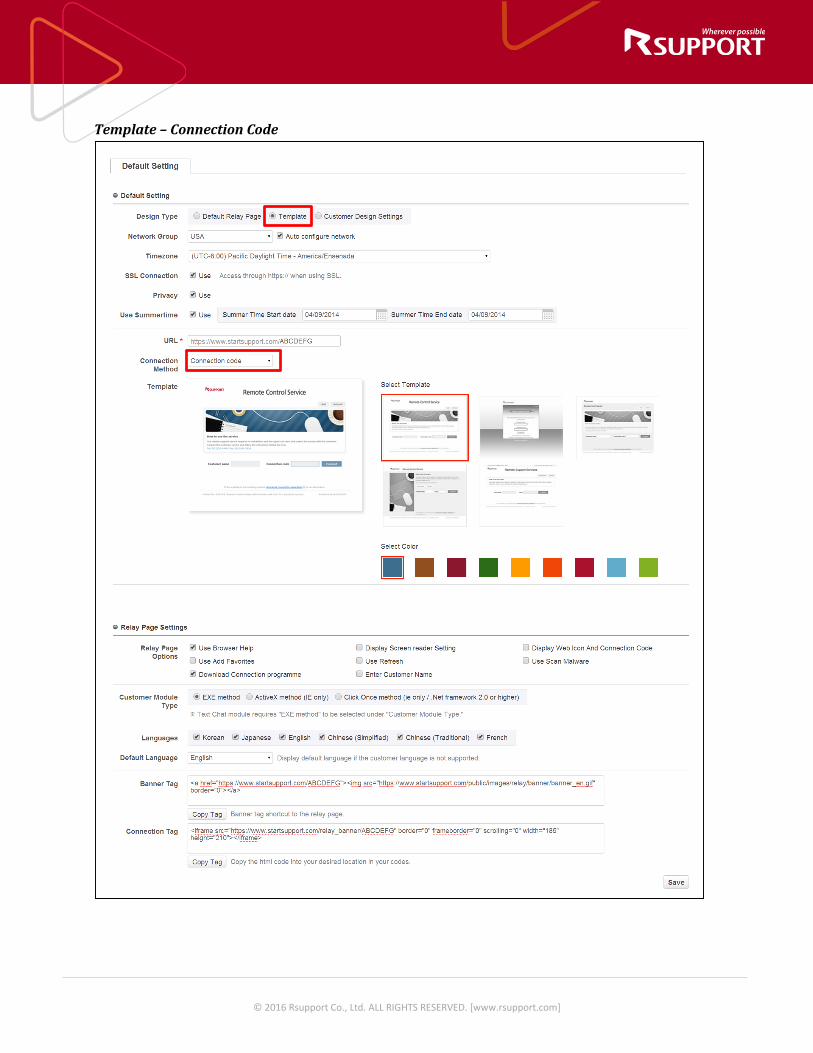
Template – Connection Code
© 2016 Rsupport Co., Ltd. ALL RIGHTS RESERVED. [www.rsupport.com]
x Default Settings: o Design Type:
- Default Relay Page: Selecting “Default Relay Page” will provide the standard page to input the 6-Digit Connection Code.
- Template: Selecting “Template” will allow the administrator to customize the Connection Page template, color scheme, and connection method.
- Customer Design Settings: Manage the Connection Page settings. o Network Group: Select the appropriate network group based on the customer’s location.
Select “Auto Configure Network” to automatically determine the best network group. o Time Zone: Select the time zone the customer belongs to. o SSL Connection: Enable “SSL Connection” to connect through “https”. o Privacy: Enable “Privacy” to display the Private Policy on the Connection Page. o Use Summertime: Enable “Use Summertime” to enable Daylight Savings hours. o URL: Displays the Connection Page URL o Connection Method:
- Connection Code: Connect by having the customer enter the 6-Digit Connection Code.
- Icon: Connect by clicking on a numbered icon.
- Window: Connect after submitting a support ticket. o Template: Select the Connection Page style and color scheme.
x Relay Page Settings: o Relay Page Options:
- Use Browser Help: Enables the “Browser Help” section on the Connection Page.
- Use Add Favorites: Enables the “Add to Favorites” button on the Connection Page.
- Download Connection Program: Provides customers the option to download the Connection Program.
- Display Screen Reader Setting: Enables the “Screen Reader”. Can only be enabled if “Use Browser Help” is also enabled.
- Use Refresh: Enables the “Refresh” button on the Connection Page.
- Enter Customer Name: Enables the “Customer Name” field on the Connection Page.
- Display Web Icon & Connection Code: Allows for both Icon and Connection Code connection methods to be displayed on the Connection Page.
- Use Scan Malware: Enables the “Scan” button on the Connection Page. o Customer Module Type:
- .EXE Method: Establish a connection by running the remote support executable which is downloaded through the Connection Page. (Compatible with all browsers)
- ActiveX Method (IE Only): ActiveX Method is only supported by Internet Explorer. Using the .EXE Method is suggested for all other browsers.
© 2016 Rsupport Co., Ltd. ALL RIGHTS RESERVED. [www.rsupport.com]
- Click Once / .NET Framework 2.0 or Higher (IE Only): Compatible only with PCs with .NET 2.0 installed and running Internet Explorer. Using the .EXE Method is suggested for all other browsers.
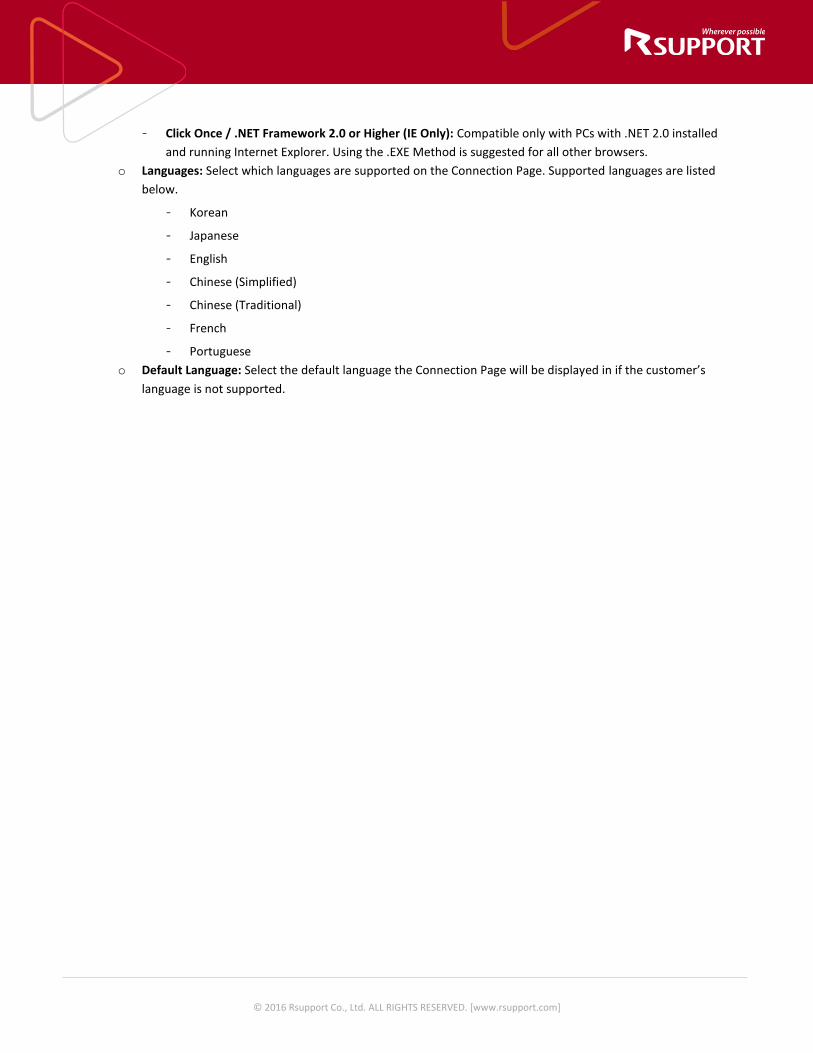
o Languages: Select which languages are supported on the Connection Page. Supported languages are listed below.
- Korean
- Japanese
- English
- Chinese (Simplified)
- Chinese (Traditional)
- French
- Portuguese o Default Language: Select the default language the Connection Page will be displayed in if the customer’s
language is not supported.

© 2016 Rsupport Co., Ltd. ALL RIGHTS RESERVED. [www.rsupport.com]
Template - Icon
© 2016 Rsupport Co., Ltd. ALL RIGHTS RESERVED. [www.rsupport.com]
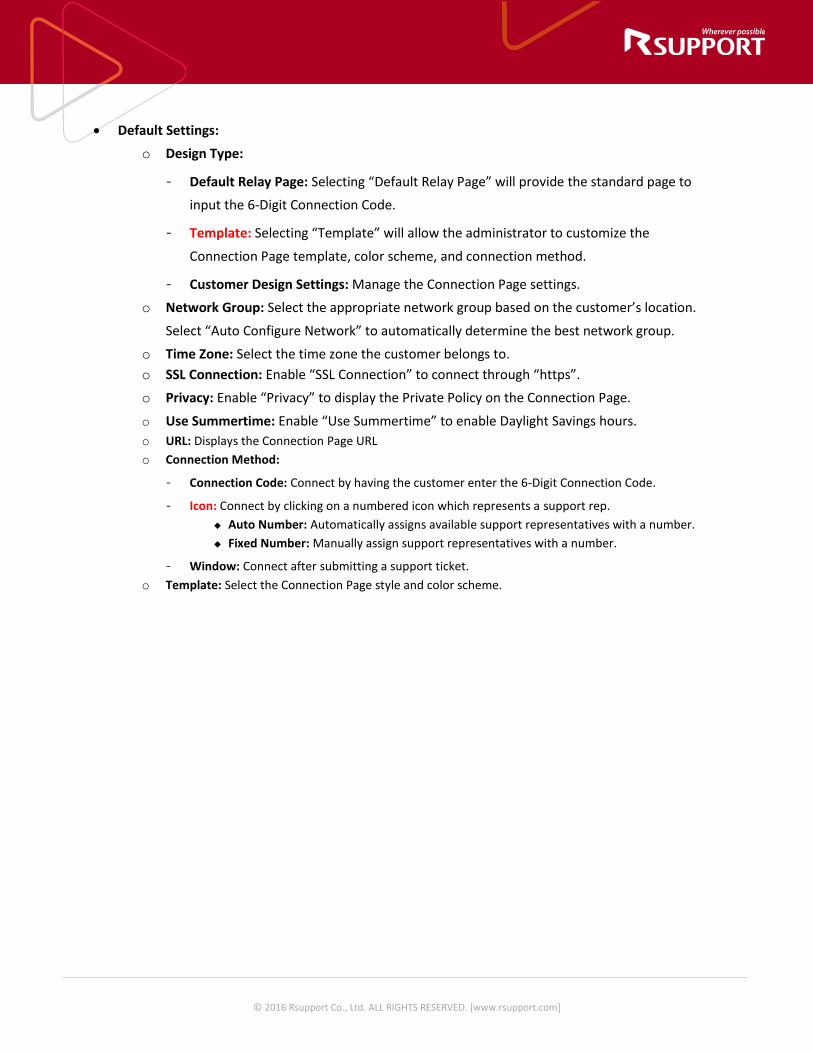
x Default Settings: o Design Type:
- Default Relay Page: Selecting “Default Relay Page” will provide the standard page to input the 6-Digit Connection Code.
- Template: Selecting “Template” will allow the administrator to customize the Connection Page template, color scheme, and connection method.
- Customer Design Settings: Manage the Connection Page settings. o Network Group: Select the appropriate network group based on the customer’s location.
Select “Auto Configure Network” to automatically determine the best network group. o Time Zone: Select the time zone the customer belongs to. o SSL Connection: Enable “SSL Connection” to connect through “https”. o Privacy: Enable “Privacy” to display the Private Policy on the Connection Page. o Use Summertime: Enable “Use Summertime” to enable Daylight Savings hours. o URL: Displays the Connection Page URL o Connection Method:
- Connection Code: Connect by having the customer enter the 6-Digit Connection Code.
- Icon: Connect by clicking on a numbered icon which represents a support rep. � Auto Number: Automatically assigns available support representatives with a number. � Fixed Number: Manually assign support representatives with a number.
- Window: Connect after submitting a support ticket. o Template: Select the Connection Page style and color scheme.
© 2016 Rsupport Co., Ltd. ALL RIGHTS RESERVED. [www.rsupport.com]
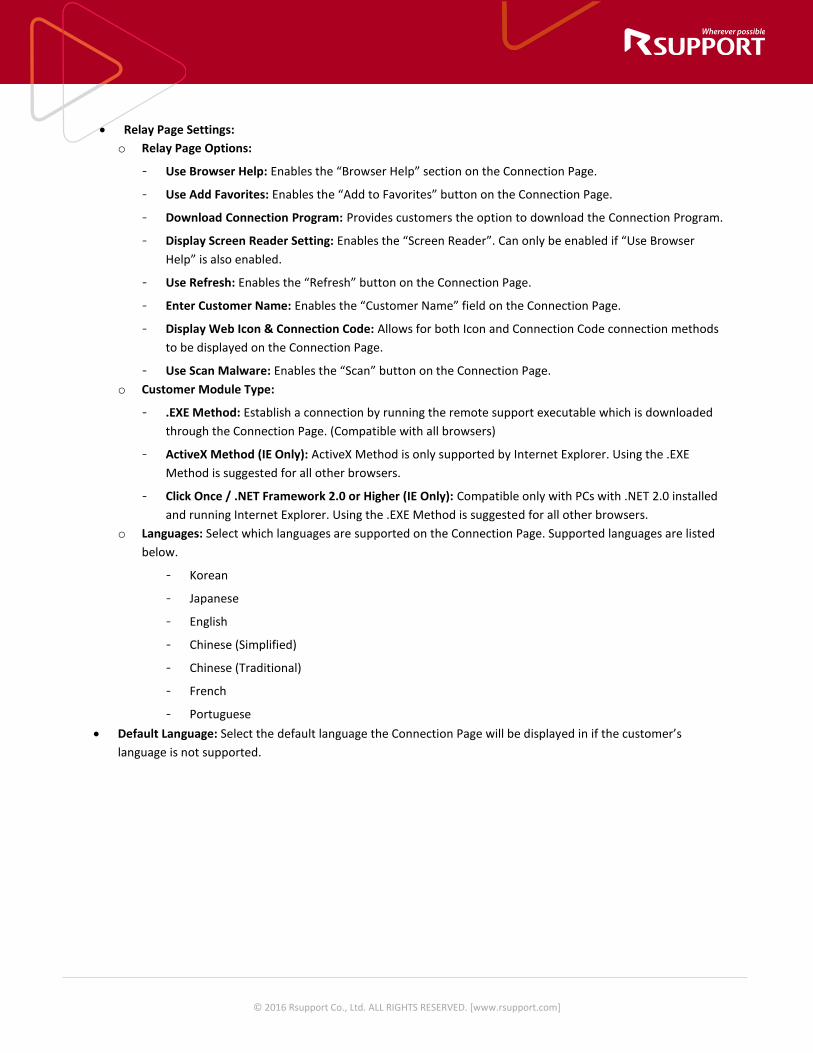
x Relay Page Settings: o Relay Page Options:
- Use Browser Help: Enables the “Browser Help” section on the Connection Page.
- Use Add Favorites: Enables the “Add to Favorites” button on the Connection Page.
- Download Connection Program: Provides customers the option to download the Connection Program.
- Display Screen Reader Setting: Enables the “Screen Reader”. Can only be enabled if “Use Browser Help” is also enabled.
- Use Refresh: Enables the “Refresh” button on the Connection Page.
- Enter Customer Name: Enables the “Customer Name” field on the Connection Page.
- Display Web Icon & Connection Code: Allows for both Icon and Connection Code connection methods to be displayed on the Connection Page.
- Use Scan Malware: Enables the “Scan” button on the Connection Page. o Customer Module Type:
- .EXE Method: Establish a connection by running the remote support executable which is downloaded through the Connection Page. (Compatible with all browsers)
- ActiveX Method (IE Only): ActiveX Method is only supported by Internet Explorer. Using the .EXE Method is suggested for all other browsers.
- Click Once / .NET Framework 2.0 or Higher (IE Only): Compatible only with PCs with .NET 2.0 installed and running Internet Explorer. Using the .EXE Method is suggested for all other browsers.
o Languages: Select which languages are supported on the Connection Page. Supported languages are listed below.
- Korean
- Japanese
- English
- Chinese (Simplified)
- Chinese (Traditional)
- French
- Portuguese x Default Language: Select the default language the Connection Page will be displayed in if the customer’s
language is not supported.

© 2016 Rsupport Co., Ltd. ALL RIGHTS RESERVED. [www.rsupport.com]
Template - Window

© 2016 Rsupport Co., Ltd. ALL RIGHTS RESERVED. [www.rsupport.com]
x Default Settings: o Design Type:
- Default Relay Page: Selecting “Default Relay Page” will provide the standard page to input the 6-Digit Connection Code.
- Template: Selecting “Template” will allow the administrator to customize the Connection Page template, color scheme, and connection method.
- Customer Design Settings: Manage the Connection Page settings. o Network Group: Select the appropriate network group based on the customer’s location.
Select “Auto Configure Network” to automatically determine the best network group. o Time Zone: Select the time zone the customer belongs to. o SSL Connection: Enable “SSL Connection” to connect through “https”. o Privacy: Enable “Privacy” to display the Private Policy on the Connection Page. o Use Summertime: Enable “Use Summertime” to enable Daylight Savings hours. o URL: Displays the Connection Page URL o Connection Method:
- Connection Code: Connect by having the customer enter the 6-Digit Connection Code.
- Icon: Connect by clicking on a numbered icon which represents a support rep.
- Window: Connect after submitting a support ticket. � All: � Window: � Sequence:
x Template: Select the Connection Page style and color scheme. x Relay Page Settings:
o Relay Page Options:
- Use Browser Help: Enables the “Browser Help” section on the Connection Page.
- Use Add Favorites: Enables the “Add to Favorites” button on the Connection Page.
- Download Connection Program: Provides customers the option to download the Connection Program.
- Display Screen Reader Setting: Enables the “Screen Reader”. Can only be enabled if “Use Browser Help” is also enabled.
- Use Refresh: Enables the “Refresh” button on the Connection Page.
- Enter Customer Name: Enables the “Customer Name” field on the Connection Page.
- Display Web Icon & Connection Code: Allows for both Icon and Connection Code connection methods to be displayed on the Connection Page.
- Use Scan Malware: Enables the “Scan” button on the Connection Page. o Window Option:
© 2016 Rsupport Co., Ltd. ALL RIGHTS RESERVED. [www.rsupport.com]
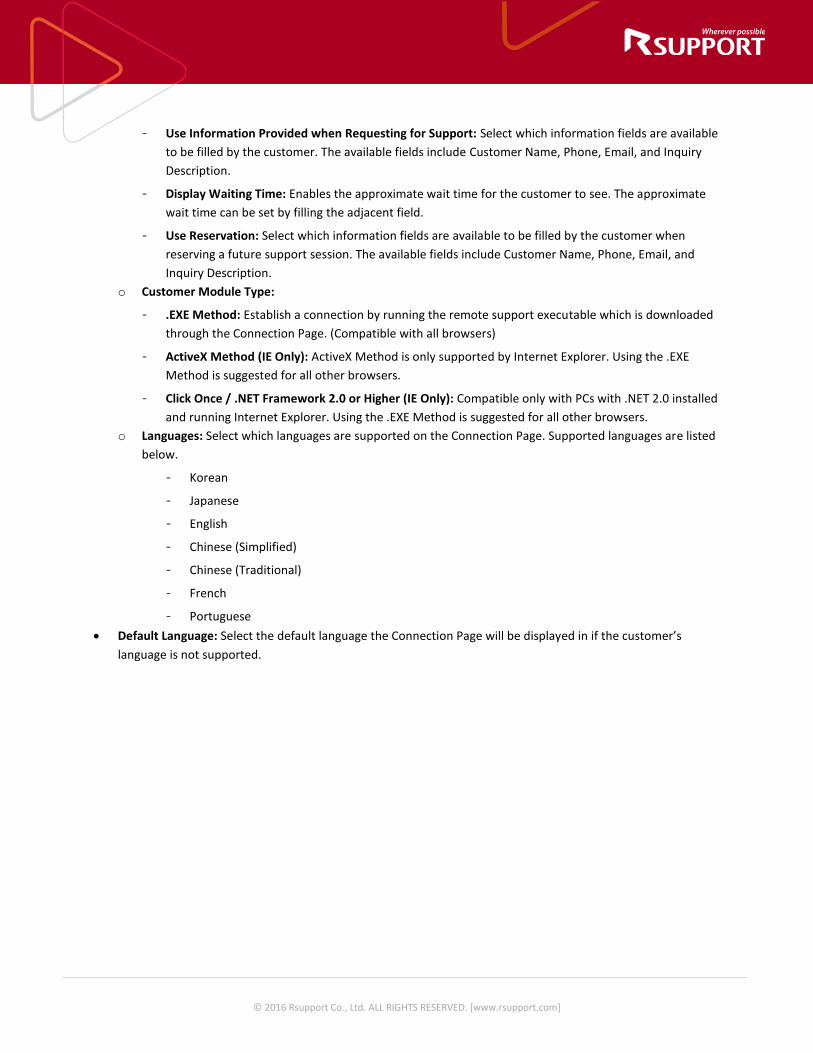
- Use Information Provided when Requesting for Support: Select which information fields are available to be filled by the customer. The available fields include Customer Name, Phone, Email, and Inquiry Description.
- Display Waiting Time: Enables the approximate wait time for the customer to see. The approximate wait time can be set by filling the adjacent field.
- Use Reservation: Select which information fields are available to be filled by the customer when reserving a future support session. The available fields include Customer Name, Phone, Email, and Inquiry Description.
o Customer Module Type:
- .EXE Method: Establish a connection by running the remote support executable which is downloaded through the Connection Page. (Compatible with all browsers)
- ActiveX Method (IE Only): ActiveX Method is only supported by Internet Explorer. Using the .EXE Method is suggested for all other browsers.
- Click Once / .NET Framework 2.0 or Higher (IE Only): Compatible only with PCs with .NET 2.0 installed and running Internet Explorer. Using the .EXE Method is suggested for all other browsers.
o Languages: Select which languages are supported on the Connection Page. Supported languages are listed below.
- Korean
- Japanese
- English
- Chinese (Simplified)
- Chinese (Traditional)
- French
- Portuguese x Default Language: Select the default language the Connection Page will be displayed in if the customer’s
language is not supported.
© 2016 Rsupport Co., Ltd. ALL RIGHTS RESERVED. [www.rsupport.com]
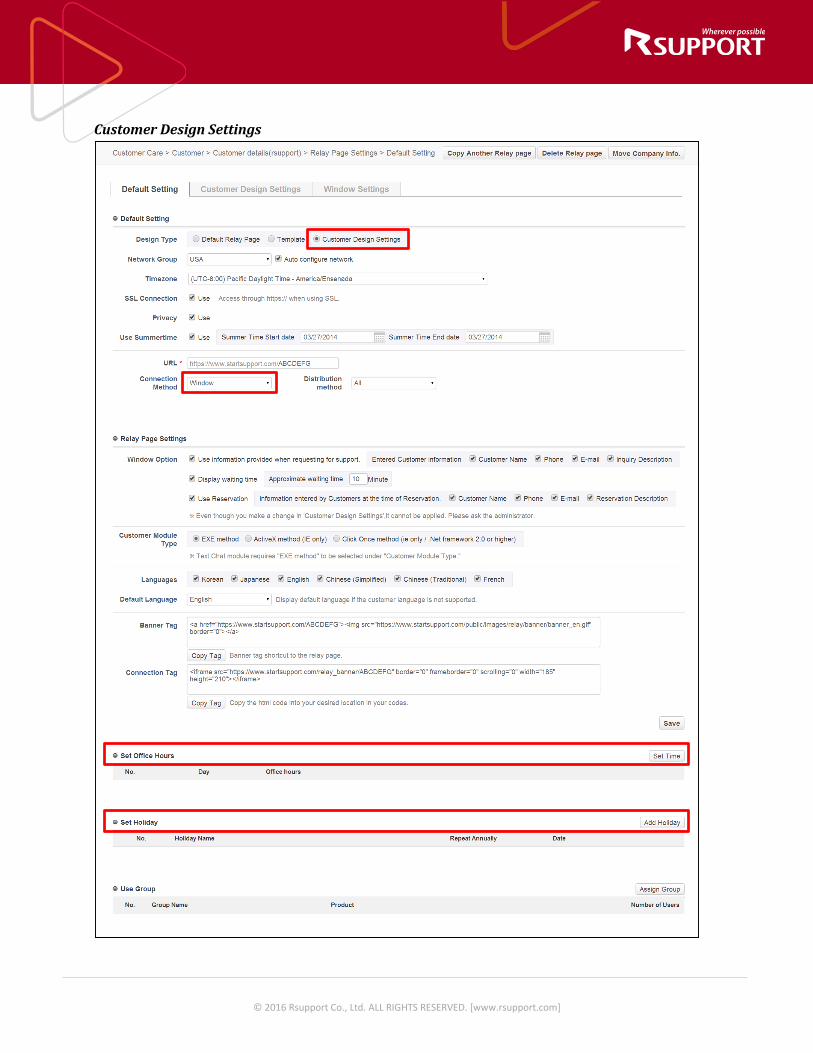
Customer Design Settings

© 2016 Rsupport Co., Ltd. ALL RIGHTS RESERVED. [www.rsupport.com]
x Default Settings: o Design Type:
- Default Relay Page: Selecting “Default Relay Page” will provide the standard page to input the 6-Digit Connection Code.
- Template: Selecting “Template” will allow the administrator to customize the Connection Page template, color scheme, and connection method.
- Customer Design Settings: Manage the custom Connection Page settings. o Network Group: Select the appropriate network group based on the customer’s location.
Select “Auto Configure Network” to automatically determine the best network group. o Time Zone: Select the time zone the customer belongs to. o SSL Connection: Enable “SSL Connection” to connect through “https”. o Privacy: Enable “Privacy” to display the Private Policy on the Connection Page. o Use Summertime: Enable “Use Summertime” to enable Daylight Savings hours. o URL: Displays the Connection Page URL o Connection Method:
- Connection Code: Connect by having the customer enter the 6-Digit Connection Code.
- Icon: Connect by clicking on a numbered icon which represents a support rep.
- Window: Connect after submitting a support ticket. x Relay Page Settings:
o Relay Page Options:
- Use Browser Help: Enables the “Browser Help” section on the Connection Page.
- Use Add Favorites: Enables the “Add to Favorites” button on the Connection Page.
- Download Connection Program: Provides customers the option to download the Connection Program.
- Display Screen Reader Setting: Enables the “Screen Reader”. Can only be enabled if “Use Browser Help” is also enabled.
- Use Refresh: Enables the “Refresh” button on the Connection Page.
- Enter Customer Name: Enables the “Customer Name” field on the Connection Page.
- Display Web Icon & Connection Code: Allows for both Icon and Connection Code connection methods to be displayed on the Connection Page.
- Use Scan Malware: Enables the “Scan” button on the Connection Page. o Window Option:
- Use Information Provided when Requesting for Support: Select which information fields are available to be filled by the customer. The available fields include Customer Name, Phone, Email, and Inquiry Description.
- Display Waiting Time: Enables the approximate wait time for the customer to see. The approximate wait time can be set by filling the adjacent field.

© 2016 Rsupport Co., Ltd. ALL RIGHTS RESERVED. [www.rsupport.com]
- Use Reservation: Select which information fields are available to be filled by the customer when reserving a future support session. The available fields include Customer Name, Phone, Email, and Inquiry Description.
o Customer Module Type:
- .EXE Method: Establish a connection by running the remote support executable which is downloaded through the Connection Page. (Compatible with all browsers)
- ActiveX Method (IE Only): ActiveX Method is only supported by Internet Explorer. Using the .EXE Method is suggested for all other browsers.
- Click Once / .NET Framework 2.0 or Higher (IE Only): Compatible only with PCs with .NET 2.0 installed and running Internet Explorer. Using the .EXE Method is suggested for all other browsers.
o Languages: Select which languages are supported on the Connection Page. Supported languages are listed below.
- Korean
- Japanese
- English
- Chinese (Simplified)
- Chinese (Traditional)
- French
- Portuguese
Default Language: Select the default language the Connection Page will be displayed in if the customer’s language is not supported.
© 2016 Rsupport Co., Ltd. ALL RIGHTS RESERVED. [www.rsupport.com]
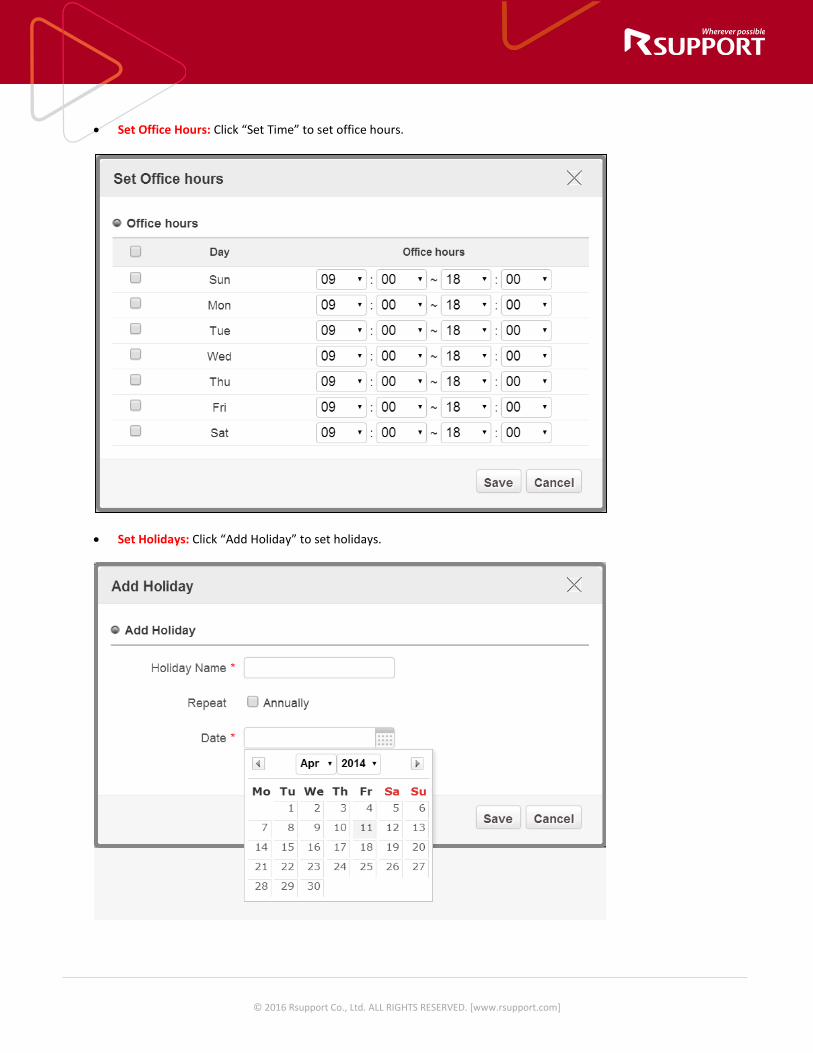
x Set Office Hours: Click “Set Time” to set office hours.
x Set Holidays: Click “Add Holiday” to set holidays.

© 2016 Rsupport Co., Ltd. ALL RIGHTS RESERVED. [www.rsupport.com]
Template Settings
Template – Connection Code
The images shown below show which sections of the Connection Code template can be changed or customized.
x Use Custom Design: Clicking “Use Custom Design” will allow the administrator to customize the section.
x Apply all Languages: Clicking “Apply all Languages” will apply the changes to all language pages.
Common Image: Session in Progress Screen:
Relay Initial Page: Disconnect Page:

© 2016 Rsupport Co., Ltd. ALL RIGHTS RESERVED. [www.rsupport.com]
Template – Icon
The images shown below show which sections of the Icon template can be changed or customized.
x Use Custom Design: Clicking “Use Custom Design” will allow the administrator to customize the section.
x Apply all Languages: Clicking “Apply all Languages” will apply the changes to all language pages.
Common Image: Session in Progress Screen:
Relay Initial Page: Disconnect Page:

© 2016 Rsupport Co., Ltd. ALL RIGHTS RESERVED. [www.rsupport.com]
Template – Window
The images shown below show which sections of the Icon template can be changed or customized.
x Use Custom Design: Clicking “Use Custom Design” will allow the admin to customize the section.
x Apply all Languages: Clicking “Apply all Languages” will apply the changes to all language pages.
Common Image: Request Support Screen:
Relay Initial Page: Reservation Screen:
Session in Progress Screen: Disconnect Page:

© 2016 Rsupport Co., Ltd. ALL RIGHTS RESERVED. [www.rsupport.com]
Window Settings
Manage Window settings from the “Window Settings” tab. Sections of the Window template can be changed or customized.
x Use Custom Design: Clicking “Use Custom Design” will allow the administrator to customize the section.
x Apply all Languages: Clicking “Apply all Languages” will apply the changes to all language pages.
x Add Window: Clicking “Add Window” will add another window that can be changed or customized.
x Window Name: Enter the title will be displayed for the selected “Window”. The “Window Name” will be displayed below the Window Image.
x Can be set for only mobile and not shown for PC.
x Window Description: Enter the description for the selected “Window”. The “Window Description”

© 2016 Rsupport Co., Ltd. ALL RIGHTS RESERVED. [www.rsupport.com]
will appear below the “Window Name”.
x Window Image: Select a 240 x 107 pixel image to be displayed towards the top of the “Window”.
x Maximum Possible Reservations: Enter the maximum number of reservations.
x Banner Tag: Displays the HTML code to provide an image link to the connection page.
x Window Banner Tag: Displays the HTML code to embed the “Window” input box directly into the customer’s website.
x User Settings: Assign users to the selected “Window”.
x Window ID: The Window ID is displayed here. Click “Modify” to edit the Window ID.
© 2016 Rsupport Co., Ltd. ALL RIGHTS RESERVED. [www.rsupport.com]
6. Agent Tool Management
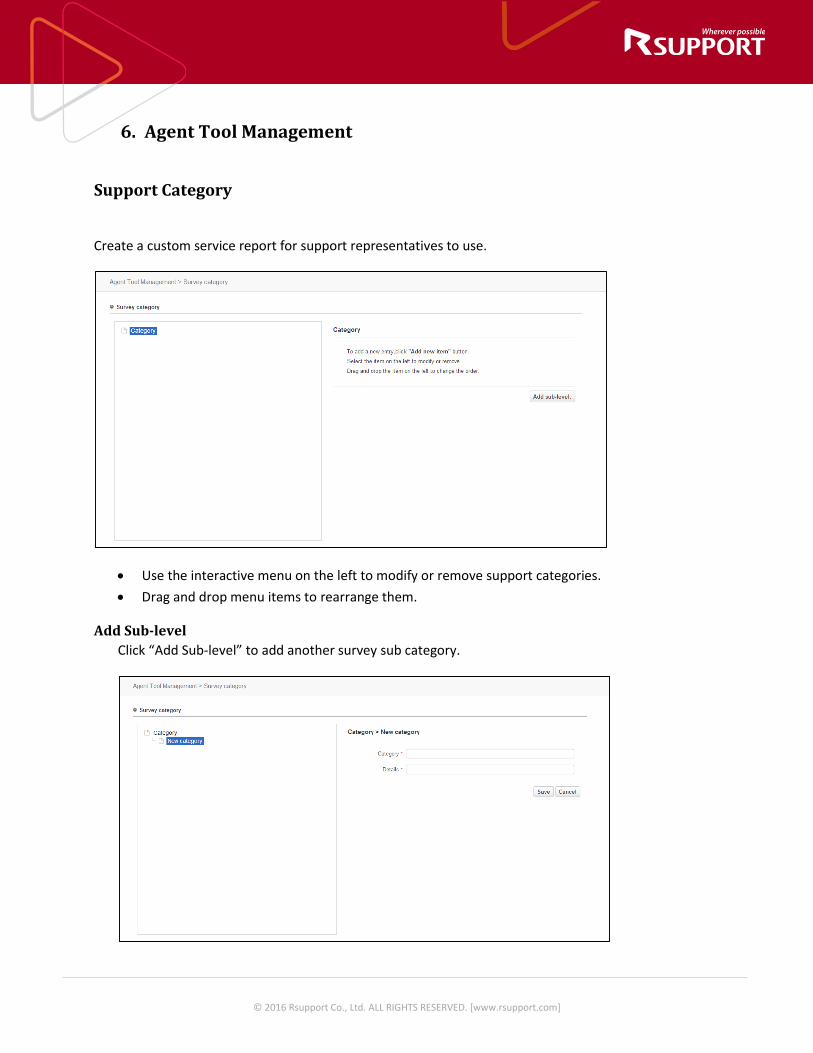
Support Category
Create a custom service report for support representatives to use.
x Use the interactive menu on the left to modify or remove support categories. x Drag and drop menu items to rearrange them.
Add Sub-level Click “Add Sub-level” to add another survey sub category.
© 2016 Rsupport Co., Ltd. ALL RIGHTS RESERVED. [www.rsupport.com]
x Category: Enter the category name. x Details: Enter additional details.
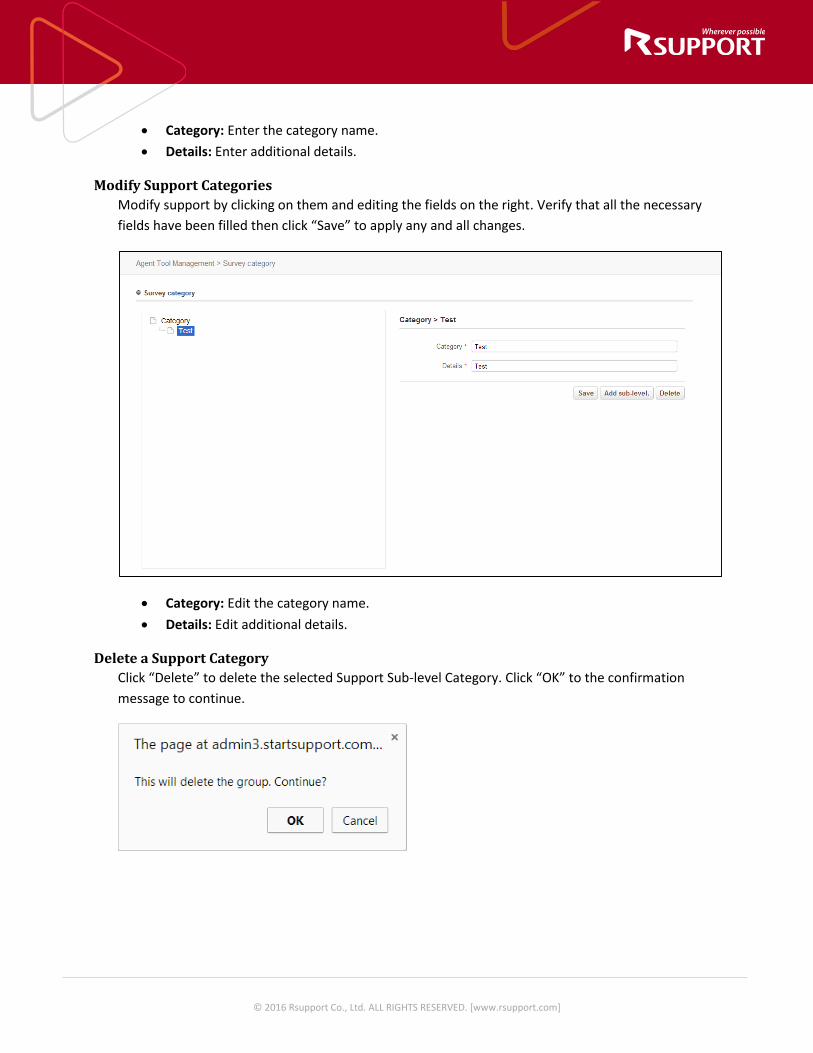
Modify Support Categories Modify support by clicking on them and editing the fields on the right. Verify that all the necessary fields have been filled then click “Save” to apply any and all changes.
x Category: Edit the category name. x Details: Edit additional details.
Delete a Support Category Click “Delete” to delete the selected Support Sub-level Category. Click “OK” to the confirmation message to continue.
© 2016 Rsupport Co., Ltd. ALL RIGHTS RESERVED. [www.rsupport.com]
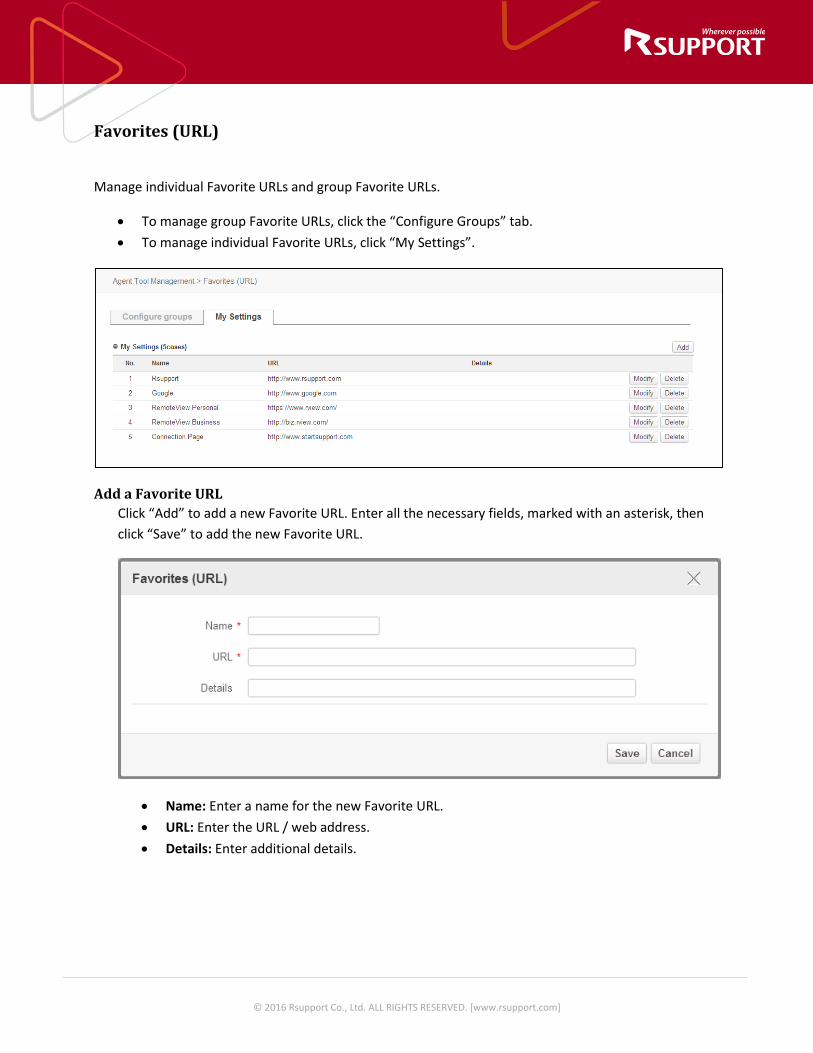
Favorites (URL)
Manage individual Favorite URLs and group Favorite URLs.
x To manage group Favorite URLs, click the “Configure Groups” tab. x To manage individual Favorite URLs, click “My Settings”.
Add a Favorite URL Click “Add” to add a new Favorite URL. Enter all the necessary fields, marked with an asterisk, then click “Save” to add the new Favorite URL.
x Name: Enter a name for the new Favorite URL. x URL: Enter the URL / web address. x Details: Enter additional details.

© 2016 Rsupport Co., Ltd. ALL RIGHTS RESERVED. [www.rsupport.com]
Modify a Favorite URL Click “Modify” to edit the selected Favorite URL. Verify that all the necessary fields have been filled then click “Save” to apply any and all changes.
Delete a Favorite URL Click “Delete” to delete the selected Favorite URL. Click “OK” to the confirmation message to continue.

© 2016 Rsupport Co., Ltd. ALL RIGHTS RESERVED. [www.rsupport.com]
Favorites (Files)
Manage individual Favorite Files and group Favorite Files.
x To manage group Favorite Files, click the “Configure Groups” tab. x To manage individual Favorite Files, click “My Settings”.
Add a Favorite File Click “Add” to add a new Favorite File.
x File Name: Click “Search” to browse through your local directory and select a JPG, GIF, PNG, or ZIP file to upload.
x Details: Enter additional details.
Modify a Favorite File Click “Modify” to edit the selected Favorite File. Verify that all the necessary fields have been filled then click “Save” to apply any and all changes.

© 2016 Rsupport Co., Ltd. ALL RIGHTS RESERVED. [www.rsupport.com]
x File Name: Click “Change File” to browse through your local directory and select either a JPG, GIF, PNG, or ZIP file to change.
x Details: Enter additional details.
Delete a Favorite File Click “Delete” to delete the selected Favorite File. Click “OK” to the confirmation message to continue.

© 2016 Rsupport Co., Ltd. ALL RIGHTS RESERVED. [www.rsupport.com]
Canned Messages (PC)
Manage individual Canned Messages and group Canned Messages. These Canned Messages will be available for use when supporting a remote computer.
x To manage group Canned Messages, click the “Configure Groups” tab. x To manage individual Canned Messages, click “My Settings”.
Modify Canned Messages Click “Modify” to edit the selected Canned Message. Click “Save” once the selected Canned Message has been successfully modified.
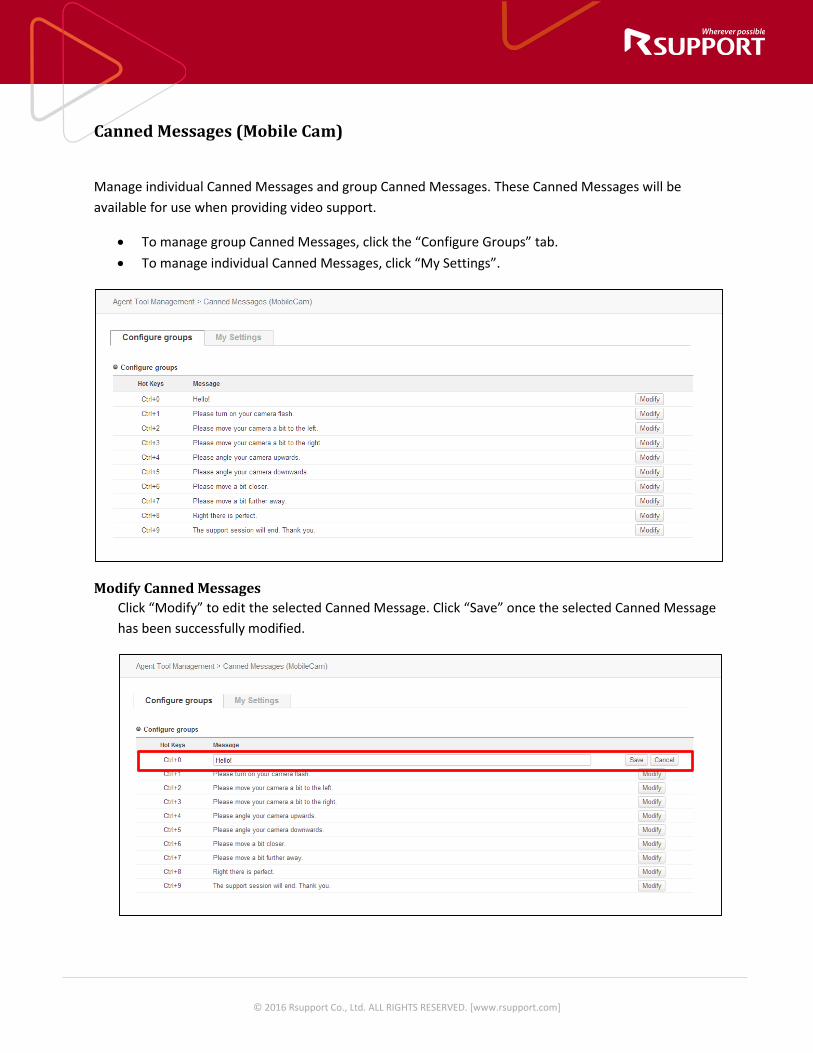
© 2016 Rsupport Co., Ltd. ALL RIGHTS RESERVED. [www.rsupport.com]
Canned Messages (Mobile Cam)
Manage individual Canned Messages and group Canned Messages. These Canned Messages will be available for use when providing video support.
x To manage group Canned Messages, click the “Configure Groups” tab. x To manage individual Canned Messages, click “My Settings”.
Modify Canned Messages Click “Modify” to edit the selected Canned Message. Click “Save” once the selected Canned Message has been successfully modified.

© 2016 Rsupport Co., Ltd. ALL RIGHTS RESERVED. [www.rsupport.com]
Canned Messages (Mobile)
Manage individual Canned Messages and group Canned Messages. These Canned Messages will be available for use when supporting a remote mobile device.
x To manage group Canned Messages, click the “Configure Groups” tab. x To manage individual Canned Messages, click “My Settings”.
Modify Canned Messages Click “Modify” to edit the selected Canned Message. Click “Save” once the selected Canned Message has been successfully modified.
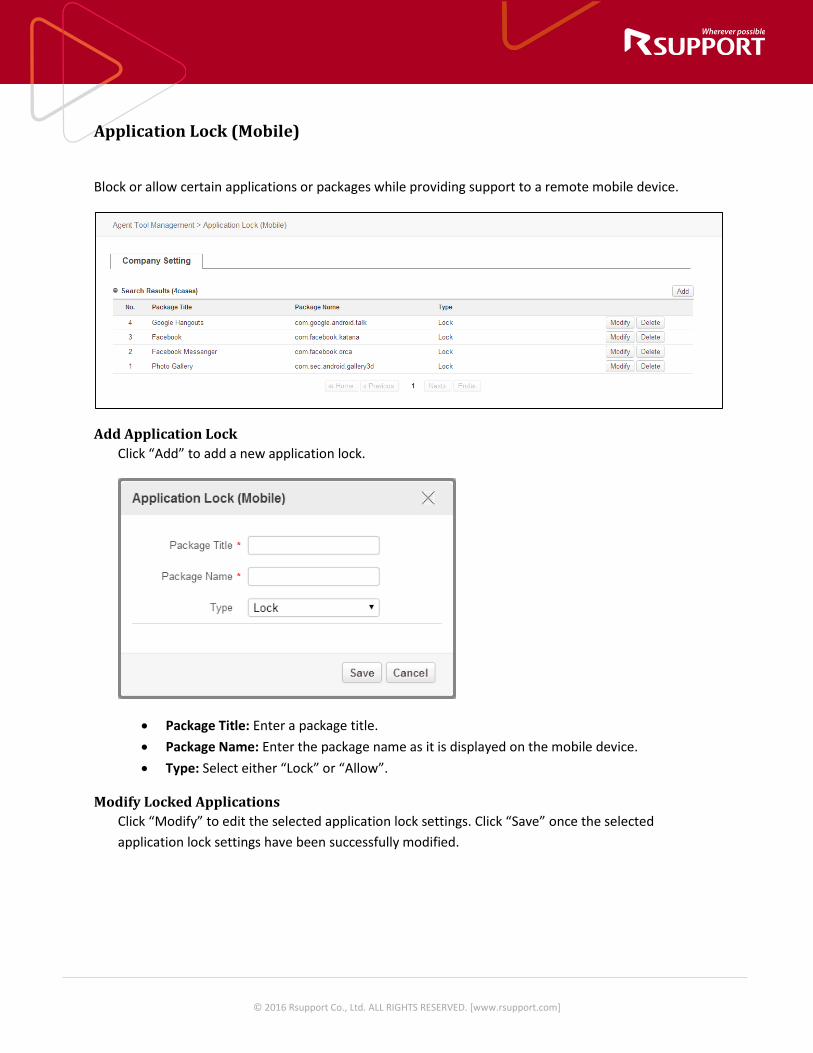
© 2016 Rsupport Co., Ltd. ALL RIGHTS RESERVED. [www.rsupport.com]
Application Lock (Mobile)
Block or allow certain applications or packages while providing support to a remote mobile device.
Add Application Lock Click “Add” to add a new application lock.
x Package Title: Enter a package title. x Package Name: Enter the package name as it is displayed on the mobile device. x Type: Select either “Lock” or “Allow”.
Modify Locked Applications Click “Modify” to edit the selected application lock settings. Click “Save” once the selected application lock settings have been successfully modified.

© 2016 Rsupport Co., Ltd. ALL RIGHTS RESERVED. [www.rsupport.com]
Delete Click “Delete” to delete the selected Application Lock. Click “OK” to the confirmation message to continue.
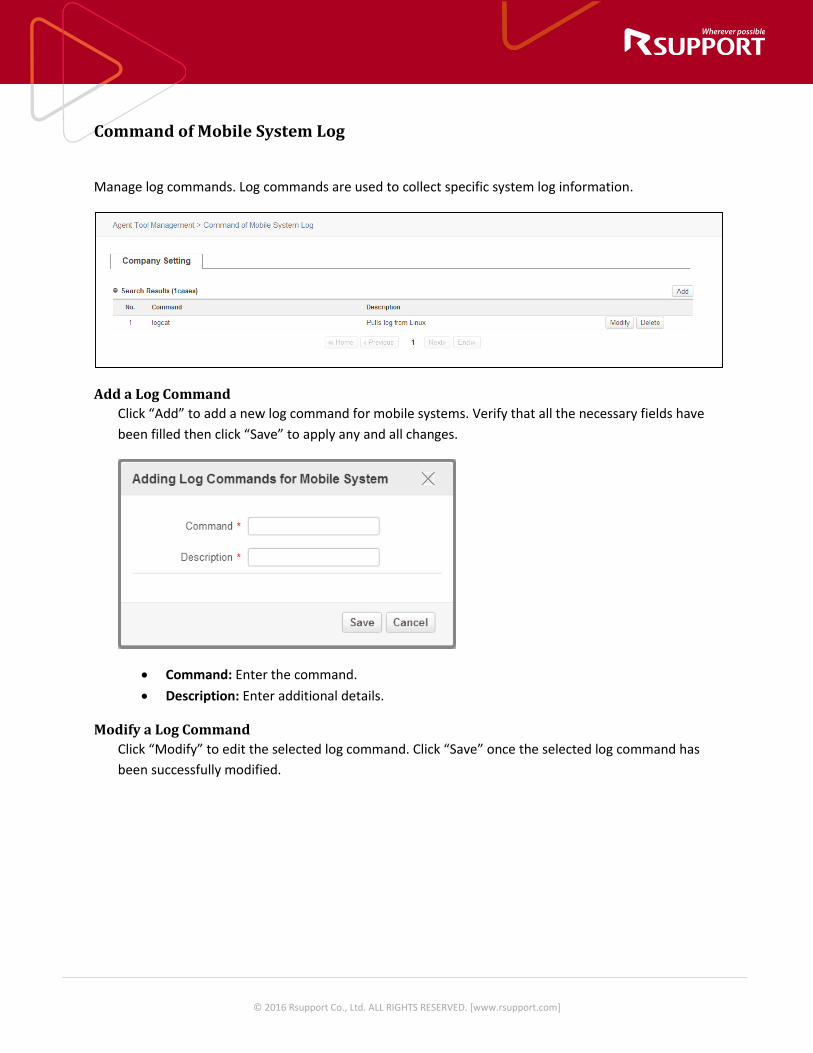
© 2016 Rsupport Co., Ltd. ALL RIGHTS RESERVED. [www.rsupport.com]
Command of Mobile System Log
Manage log commands. Log commands are used to collect specific system log information.
Add a Log Command Click “Add” to add a new log command for mobile systems. Verify that all the necessary fields have been filled then click “Save” to apply any and all changes.
x Command: Enter the command. x Description: Enter additional details.
Modify a Log Command Click “Modify” to edit the selected log command. Click “Save” once the selected log command has been successfully modified.

© 2016 Rsupport Co., Ltd. ALL RIGHTS RESERVED. [www.rsupport.com]
Delete a Log Command Click “Delete” to delete the selected command. Click “OK” to the confirmation message to continue.
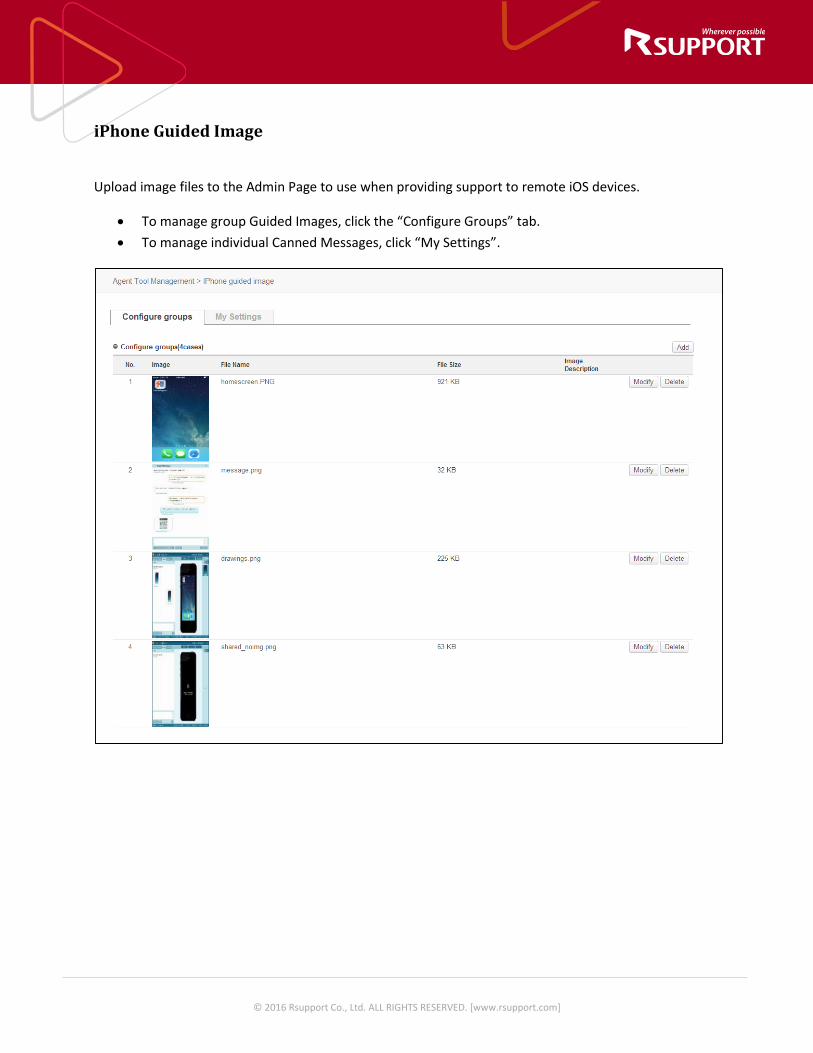
© 2016 Rsupport Co., Ltd. ALL RIGHTS RESERVED. [www.rsupport.com]
iPhone Guided Image
Upload image files to the Admin Page to use when providing support to remote iOS devices.
x To manage group Guided Images, click the “Configure Groups” tab. x To manage individual Canned Messages, click “My Settings”.

© 2016 Rsupport Co., Ltd. ALL RIGHTS RESERVED. [www.rsupport.com]
Add Guided Image(s) Click “Add” to upload a new Guided Image to the RemoteCall Admin Center.
x Image: Click “Search” to browse through your local directory and select a JPG, GIF, PNG, or BMP file to upload.
x Image Description: Enter additional details.
Modify Guided Image(s) Click “Modify” to change a new Guided Image to the RemoteCall Admin Center.
x Image: Click “Change File” to browse through your local directory and select a JPG, GIF, PNG, or BMP file to change to.
x Image Description: Enter additional details.
Delete Guided Image(s) Click “Delete” to delete the selected command. Click “OK” to the confirmation message to continue.

© 2016 Rsupport Co., Ltd. ALL RIGHTS RESERVED. [www.rsupport.com]
7. Product Usage Management
Currently Logged in Users View a list of all currently logged in users.
Search Search logged in users by company ID, or user ID. Clicking “Advanced Search” will allow the administrator to further refine their search terms through with the following filters:
x Purchase Category x Source
Export to Excel A list of all logged in users can be exported as a Microsoft Excel spreadsheet file (.XLSX)
View Click “View” for additional session information.

© 2016 Rsupport Co., Ltd. ALL RIGHTS RESERVED. [www.rsupport.com]
Close Click “Close” to forcefully terminate the current remote session.
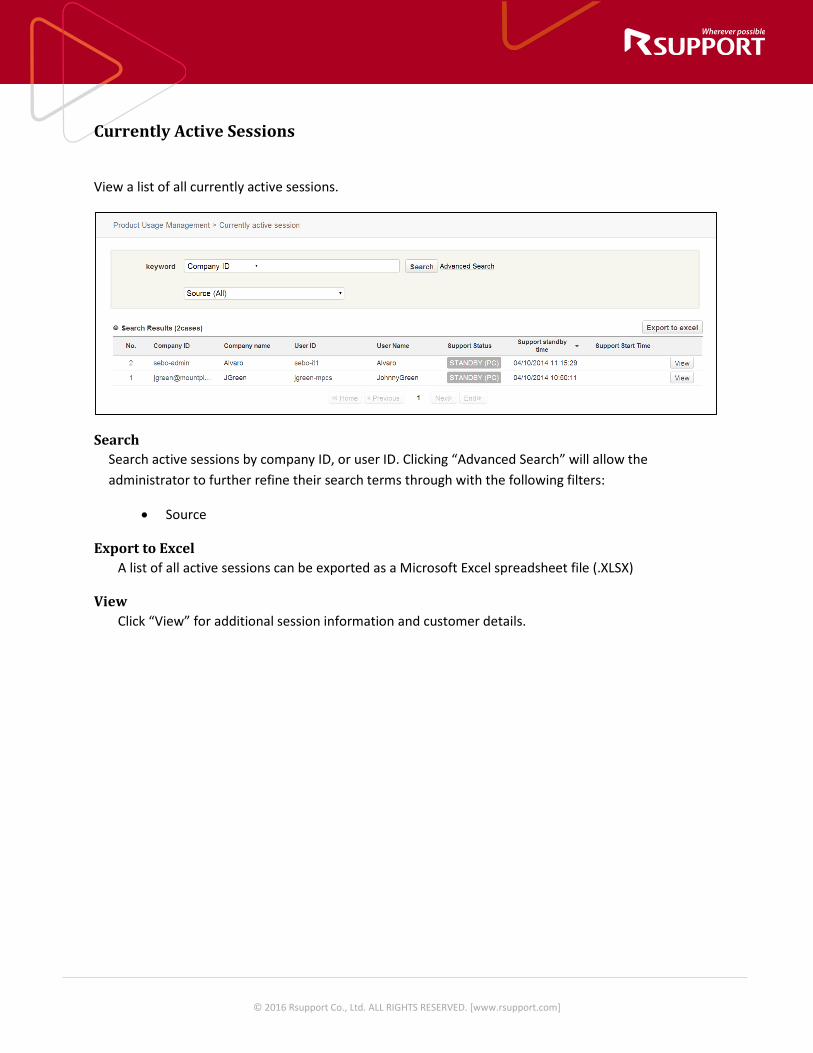
© 2016 Rsupport Co., Ltd. ALL RIGHTS RESERVED. [www.rsupport.com]
Currently Active Sessions
View a list of all currently active sessions.
Search Search active sessions by company ID, or user ID. Clicking “Advanced Search” will allow the administrator to further refine their search terms through with the following filters:
x Source
Export to Excel A list of all active sessions can be exported as a Microsoft Excel spreadsheet file (.XLSX)
View Click “View” for additional session information and customer details.
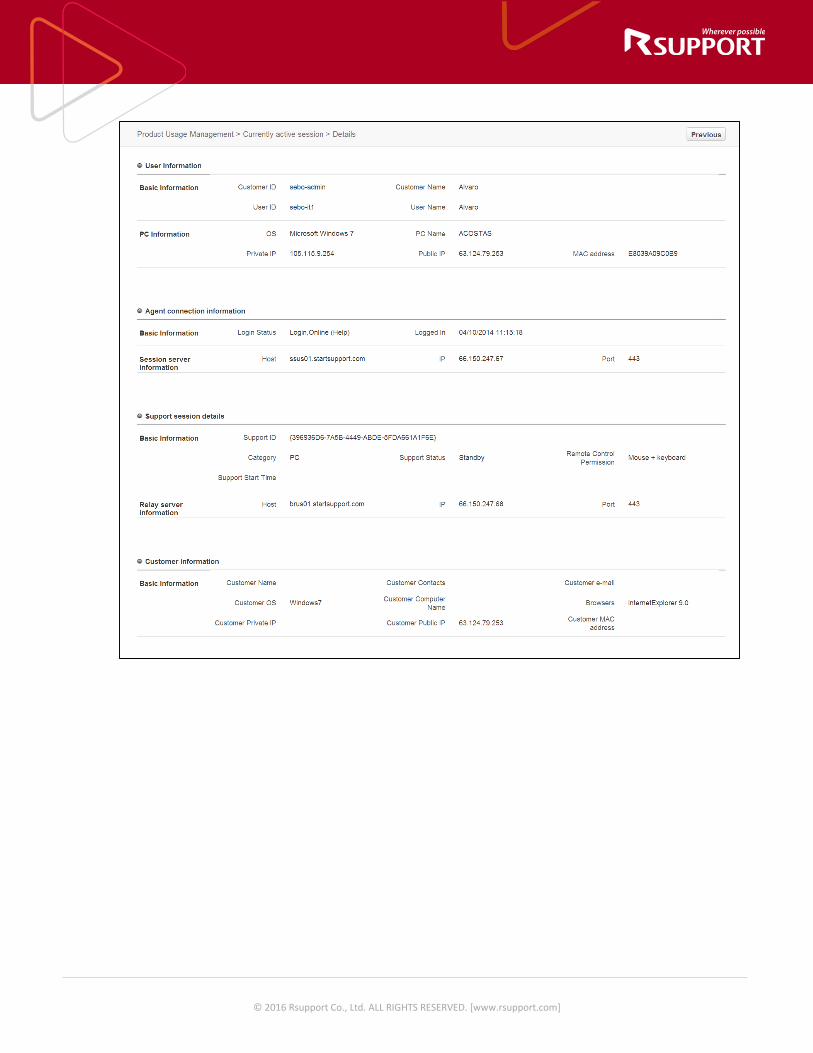
© 2016 Rsupport Co., Ltd. ALL RIGHTS RESERVED. [www.rsupport.com]
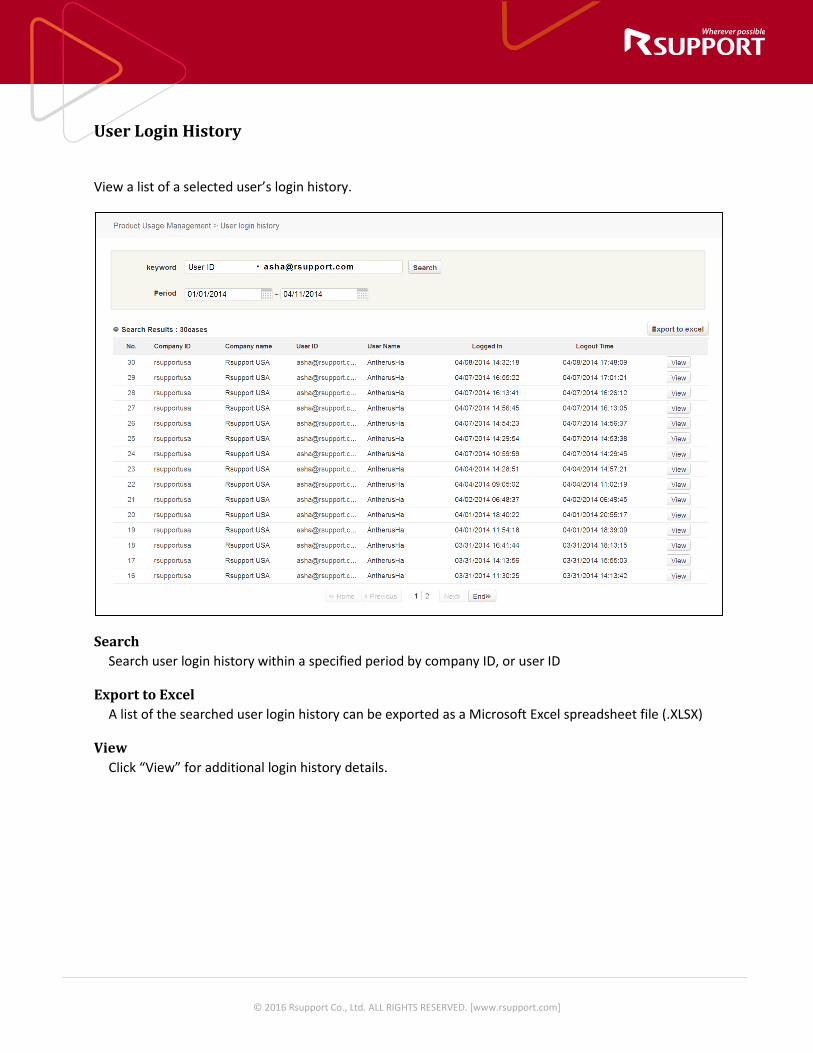
© 2016 Rsupport Co., Ltd. ALL RIGHTS RESERVED. [www.rsupport.com]
User Login History
View a list of a selected user’s login history.
Search Search user login history within a specified period by company ID, or user ID
Export to Excel A list of the searched user login history can be exported as a Microsoft Excel spreadsheet file (.XLSX)
View Click “View” for additional login history details.

© 2016 Rsupport Co., Ltd. ALL RIGHTS RESERVED. [www.rsupport.com]
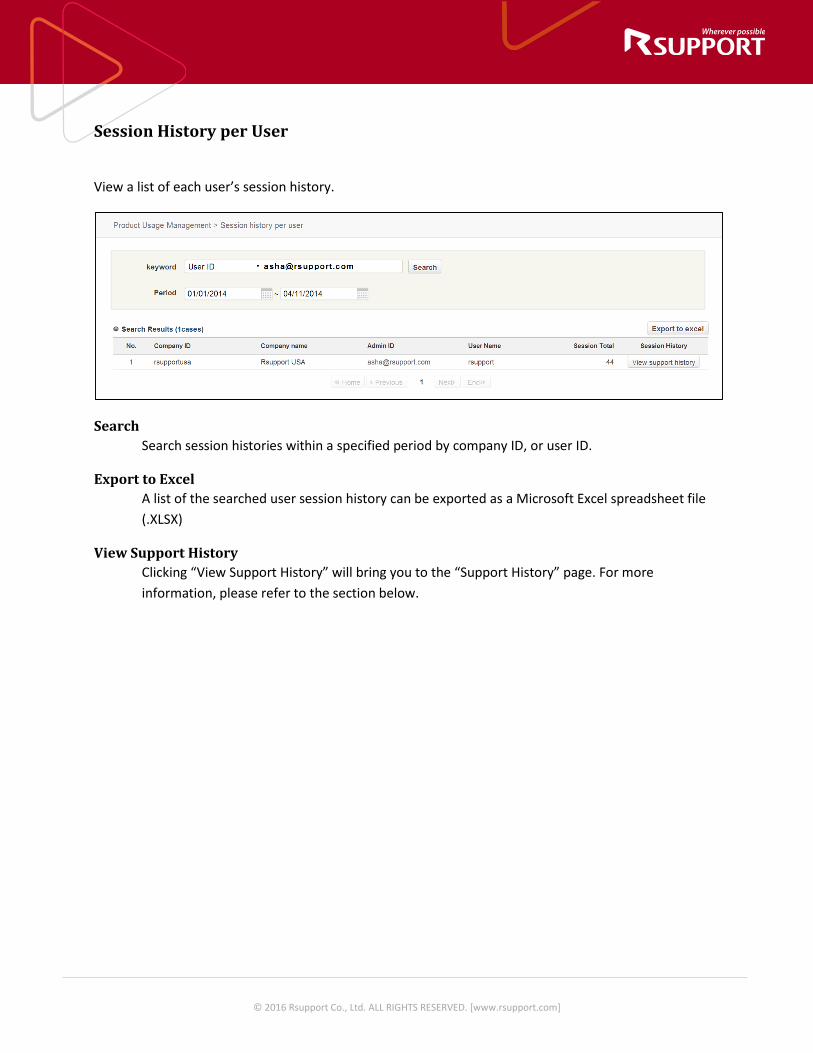
© 2016 Rsupport Co., Ltd. ALL RIGHTS RESERVED. [www.rsupport.com]
Session History per User
View a list of each user’s session history.
Search Search session histories within a specified period by company ID, or user ID.
Export to Excel A list of the searched user session history can be exported as a Microsoft Excel spreadsheet file (.XLSX)
View Support History Clicking “View Support History” will bring you to the “Support History” page. For more information, please refer to the section below.

© 2016 Rsupport Co., Ltd. ALL RIGHTS RESERVED. [www.rsupport.com]
Support History
View a list of each user’s support history.
Search Search support histories within a specified period by company ID, or user ID.
Export to Excel A list of the searched support history can be exported as a Microsoft Excel spreadsheet file (.XLSX)
View Click “View” to view additional support history details and customer information.

© 2016 Rsupport Co., Ltd. ALL RIGHTS RESERVED. [www.rsupport.com]
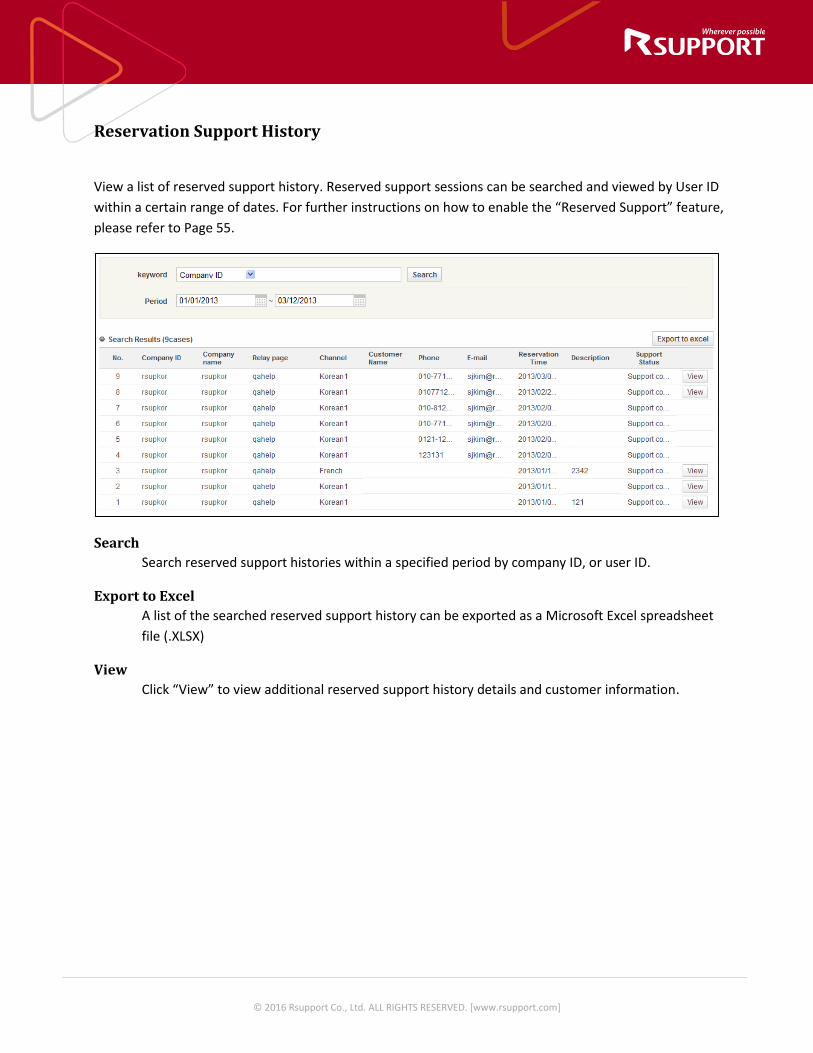
© 2016 Rsupport Co., Ltd. ALL RIGHTS RESERVED. [www.rsupport.com]
Reservation Support History
View a list of reserved support history. Reserved support sessions can be searched and viewed by User ID within a certain range of dates. For further instructions on how to enable the “Reserved Support” feature, please refer to Page 55.
Search Search reserved support histories within a specified period by company ID, or user ID.
Export to Excel A list of the searched reserved support history can be exported as a Microsoft Excel spreadsheet file (.XLSX)
View Click “View” to view additional reserved support history details and customer information.

© 2016 Rsupport Co., Ltd. ALL RIGHTS RESERVED. [www.rsupport.com]
8. Statistics
Support Statistics View the statistics of the connections and support sessions.
Search Search by day, week day, month, user, category, support time, OS and browser. Default is per session, but use the option “Search Group” to search within the group.
Export to Excel A list of the searched statistics can be exported as a Microsoft Excel spreadsheet file (.XLSX).
Export to Excel allows up to 3 month old data only.
This feature is available for admin only.

© 2016 Rsupport Co., Ltd. ALL RIGHTS RESERVED. [www.rsupport.com]
For more information about RSUPPORT, please visit http://www.rsupport.com
Korea : (138-724) 서울특별시 송파구 위례성대로 14(방이동 45) 한미타워 15층, 16층 전화 : +82-70-7011-3900 팩스 : +82-2-479-4429 기술문의 : [email protected] 구매문의 : [email protected] 기타문의 : [email protected]
USA : 560 Sylvan Avenue Suite 1000, Englewood Cliffs, NJ 07632, USA Phone : +1 (888) 348-6330 Fax : +1 (888) 348-6340 Tech : [email protected] Sales : [email protected] Info : [email protected]
Japan : 〒105-0001 東京都港区虎ノ門 1-2-20 第 3虎の門ビル TEL : +81-3-3539-5761 FAX : +81-3-3539-5762 お問い合わせ : [email protected] Sales : [email protected] Info : [email protected]
China : 北京市朝阳区霄云路 38号现代汽车大厦 2203室 I-101 电话 +86-10-8256-1810 传真 +86-10-8256-2978 支持咨询 [email protected] 业务咨询 [email protected] 销售咨询 [email protected]