Releasing Time to Care - NHS England
57
Toolkit Version 1 The Productive Community Hospital TM Releasing Time to Care
Transcript of Releasing Time to Care - NHS England

ToolkitVersion 1
The Productive Community HospitalTM
Releasing Time to Care
CH_TKT_PDF:53226 INNERS 12/9/08 12:42 Page 1
© Copyright NHS Institute for Innovationand Improvement 2008
Releasing Time to Care: The ProductiveCommunity HospitalTM – Toolkit is publishedby the NHS Institute for Innovation andImprovement, Coventry House, Universityof Warwick Campus, Coventry, CV4 7AL
This publication may be reproduced andcirculated by and between NHS Englandstaff, related networks and officiallycontracted third parties only, this includestransmission in any form or by any means,including photocopying, microfilming, andrecording.
This publication is copyright under theCopyright, Designs and Patents Act 1988.All rights reserved. Outside of NHS Englandstaff, related networks and officiallycontracted third parties, no part of thispublication may be reproduced ortransmitted in any form or by any means,including photocopying, microfilming, andrecording, without the written permissionof the copyright holder, application forwhich should be in writing and addressedto the Marketing Department (and marked‘re: permissions’). Such written permissionmust always be obtained before any partof this publication is stored in a retrievalsystem of any nature, or electronically.
ISBN: 978-1-906535-49-0
CH_TKT_PDF:53226 INNERS 12/9/08 12:42 Page 2
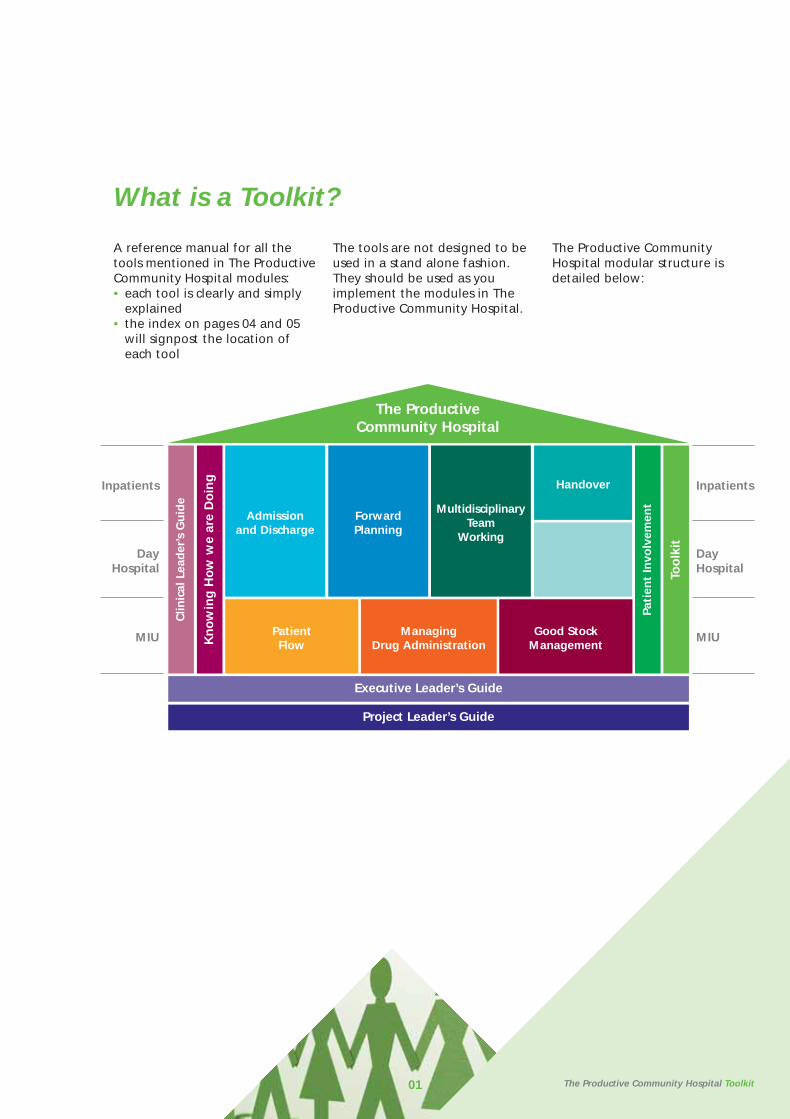
What is a Toolkit?
A reference manual for all thetools mentioned in The ProductiveCommunity Hospital modules:• each tool is clearly and simply
explained• the index on pages 04 and 05
will signpost the location of each tool
The tools are not designed to beused in a stand alone fashion.They should be used as youimplement the modules in TheProductive Community Hospital.
The Productive CommunityHospital modular structure isdetailed below:
01 The Productive Community Hospital Toolkit
PatientFlow
ManagingDrug Administration
Good StockManagement
Admissionand Discharge
ForwardPlanning
MultidisciplinaryTeam
Working
HandoverInpatients
DayHospital
MIU
Inpatients
DayHospital
MIU
Too
lkit
Pati
ent
Invo
lvem
ent
Project Leader’s Guide
Executive Leader’s Guide
Kn
ow
ing
Ho
w w
e ar
e D
oin
g
Clin
ical
Lea
der
’s G
uid
e
The Productive Community Hospital
CH_TKT_PDF:53226 INNERS 12/9/08 12:42 Page 3

02
CH_TKT_PDF:53226 INNERS 12/9/08 12:42 Page 4
The Productive Community Hospital Toolkit
Tools are the easy and fun bit butthese alone will rarely get youresults. They will help you getresults only as part of a radicalchange in your clinical area. Thereal challenge will be leadingyour team towards your definedvision of a safer, more timely andmore dignified experience foryour patients.
It is very tempting to jumpstraight for the Toolkit whenstarting The ProductiveCommunity Hospital. You need toremember that tools are just ameans to an end. In the sameway as having a set of wrenchesand spanners does not necessarilymean you can fix a car, justpossessing The ProductiveCommunity Hospital Toolkit is notenough for successfulimplementation.
Start to use these tools only afteryou are confident you haveprepared to the level the ClinicalLeader’s Guide modulerecommends.
It will help you implement TheProductive Community Hospital inyour clinical area and overcomespecific problems.
03 The Productive Community Hospital Toolkit
CH_TKT_PDF:53226 INNERS 12/9/08 12:42 Page 5
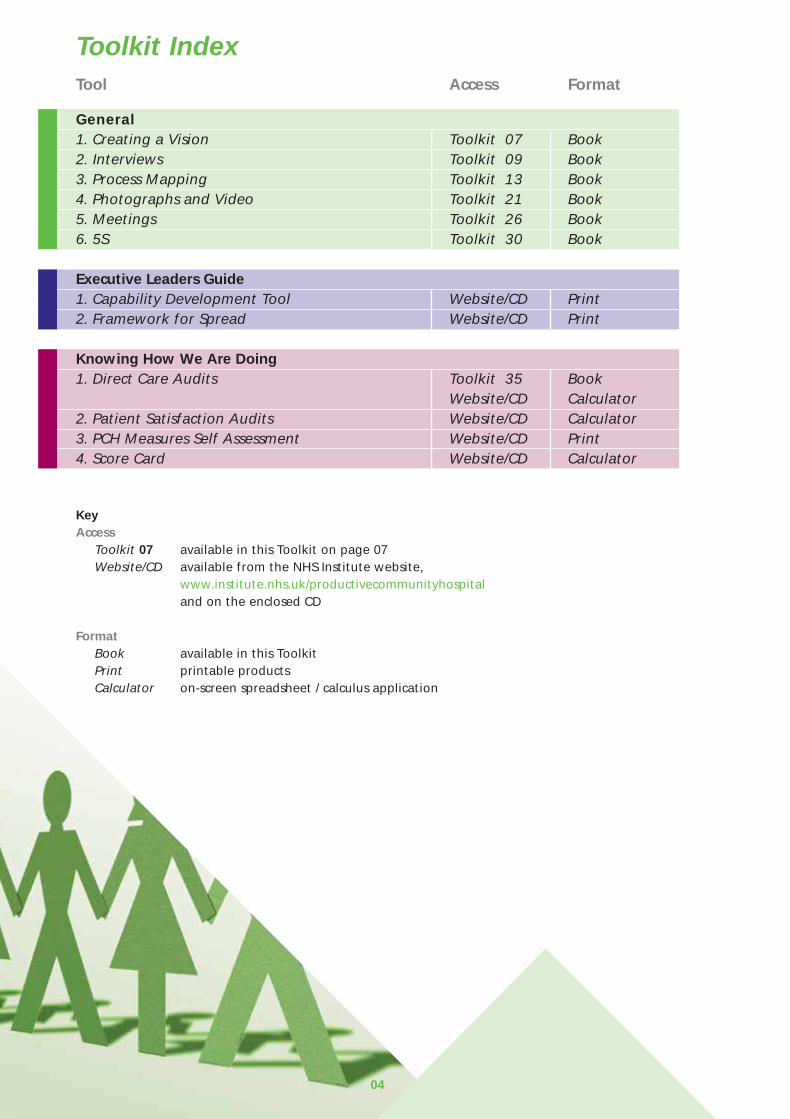
Toolkit IndexTool Access Format
General1. Creating a Vision Toolkit 07 Book2. Interviews Toolkit 09 Book3. Process Mapping Toolkit 13 Book4. Photographs and Video Toolkit 21 Book5. Meetings Toolkit 26 Book6. 5S Toolkit 30 Book
Executive Leaders Guide1. Capability Development Tool Website/CD Print2. Framework for Spread Website/CD Print
Knowing How We Are Doing1. Direct Care Audits Toolkit 35 Book
Website/CD Calculator2. Patient Satisfaction Audits Website/CD Calculator3. PCH Measures Self Assessment Website/CD Print4. Score Card Website/CD Calculator
KeyAccess
Toolkit 07 available in this Toolkit on page 07Website/CD available from the NHS Institute website,
www.institute.nhs.uk/productivecommunityhospitaland on the enclosed CD
FormatBook available in this ToolkitPrint printable products Calculator on-screen spreadsheet / calculus application
04
CH_TKT_PDF:53226 INNERS 12/9/08 12:42 Page 6
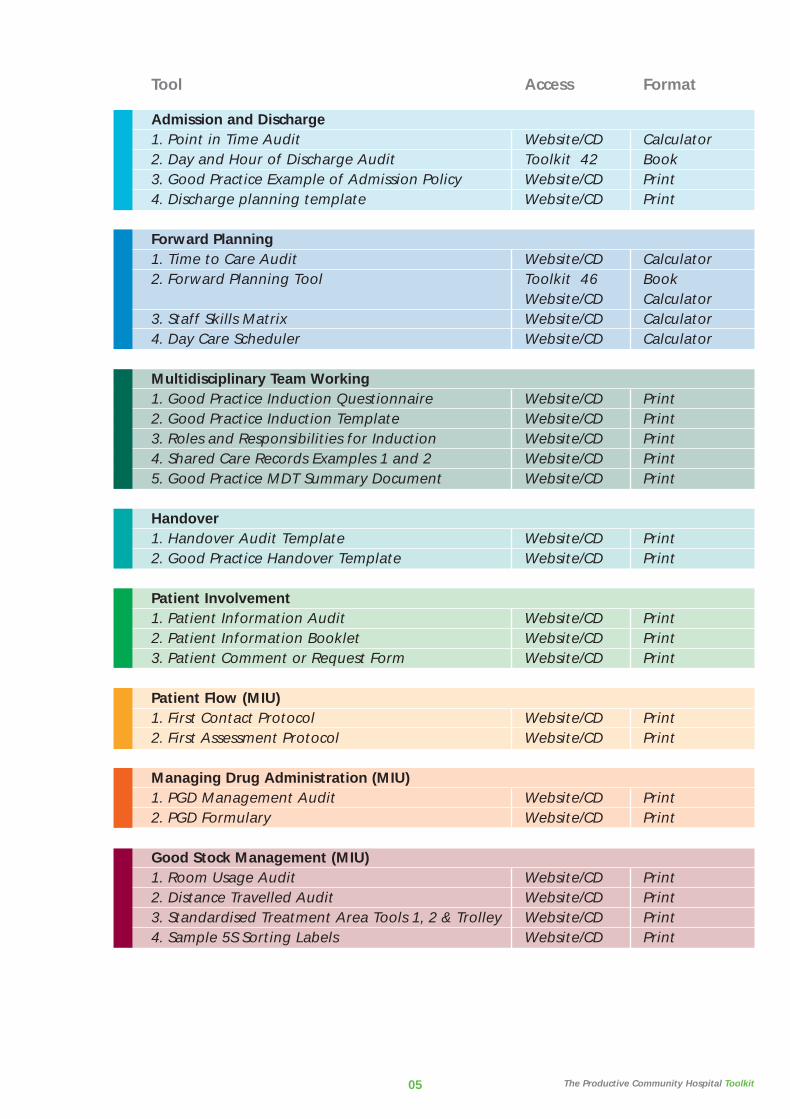
TTool Access Format
Admission and Discharge1. Point in Time Audit Website/CD Calculator2. Day and Hour of Discharge Audit Toolkit 42 Book3. Good Practice Example of Admission Policy Website/CD Print4. Discharge planning template Website/CD Print
Forward Planning1. Time to Care Audit Website/CD Calculator2. Forward Planning Tool Toolkit 46 Book
Website/CD Calculator3. Staff Skills Matrix Website/CD Calculator4. Day Care Scheduler Website/CD Calculator
Multidisciplinary Team Working1. Good Practice Induction Questionnaire Website/CD Print2. Good Practice Induction Template Website/CD Print3. Roles and Responsibilities for Induction Website/CD Print4. Shared Care Records Examples 1 and 2 Website/CD Print5. Good Practice MDT Summary Document Website/CD Print
Handover1. Handover Audit Template Website/CD Print2. Good Practice Handover Template Website/CD Print
Patient Involvement1. Patient Information Audit Website/CD Print2. Patient Information Booklet Website/CD Print3. Patient Comment or Request Form Website/CD Print
Patient Flow (MIU)1. First Contact Protocol Website/CD Print2. First Assessment Protocol Website/CD Print
Managing Drug Administration (MIU)1. PGD Management Audit Website/CD Print2. PGD Formulary Website/CD Print
Good Stock Management (MIU)1. Room Usage Audit Website/CD Print2. Distance Travelled Audit Website/CD Print3. Standardised Treatment Area Tools 1, 2 & Trolley Website/CD Print4. Sample 5S Sorting Labels Website/CD Print
The Productive Community Hospital Toolkit05
CH_TKT_PDF:53226 INNERS 12/9/08 12:42 Page 7

06
CH_TKT_PDF:53226 INNERS 12/9/08 12:43 Page 8
07
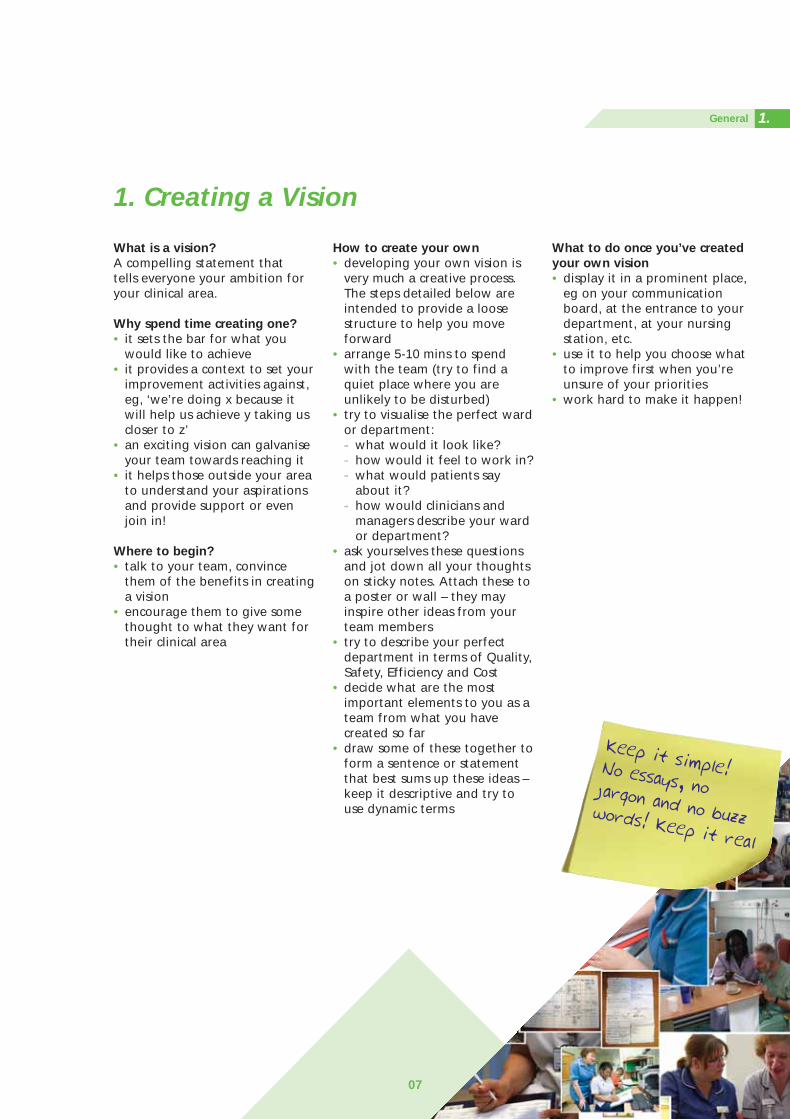
1. Creating a Vision
What is a vision?A compelling statement that tells everyone your ambition foryour clinical area.
Why spend time creating one?• it sets the bar for what you
would like to achieve• it provides a context to set your
improvement activities against, eg, ‘we’re doing x because it will help us achieve y taking us closer to z’
• an exciting vision can galvanise your team towards reaching it
• it helps those outside your area to understand your aspirations and provide support or even join in!
Where to begin?• talk to your team, convince
them of the benefits in creating a vision
• encourage them to give some thought to what they want for their clinical area
How to create your own• developing your own vision is
very much a creative process. The steps detailed below are intended to provide a loose structure to help you move forward
• arrange 5-10 mins to spend with the team (try to find a quiet place where you are unlikely to be disturbed)
• try to visualise the perfect ward or department:- what would it look like?- how would it feel to work in?- what would patients say
about it?- how would clinicians and
managers describe your ward or department?
• ask yourselves these questions and jot down all your thoughts on sticky notes. Attach these to a poster or wall – they may inspire other ideas from your team members
• try to describe your perfect department in terms of Quality, Safety, Efficiency and Cost
• decide what are the most important elements to you as a team from what you have created so far
• draw some of these together to form a sentence or statement that best sums up these ideas – keep it descriptive and try to use dynamic terms
What to do once you’ve createdyour own vision• display it in a prominent place,
eg on your communication board, at the entrance to your department, at your nursing station, etc.
• use it to help you choose what to improve first when you’re unsure of your priorities
• work hard to make it happen!
Keep it simple! No essays, nojargon and no buzzwords! Keep it real
1.General
CH_TKT_PDF:53226 INNERS 12/9/08 12:43 Page 9

0808
CH_TKT_PDF:53226 INNERS 12/9/08 12:43 Page 10

09
2. Interviews
What is it? Talking to colleagues, staff orpatients to get information –either opinions, facts or both!
Why do it? Knowing what people ‘think’ and‘feel’ before looking at facts puts adifferent spin on the facts
Sometimes that is all you have togo on!
When to use? Before starting a module, tounderstand how staff or patientsfeel about:
• the way the process runscurrently
• what needs to change
• the possibilities of change
After running a module tounderstand how they feel aboutthe new ‘way’:
• is it an improvement?
• are they excited and willing toparticipate?
• are there any issues?
Materialrequired
• notepad
• pen
• some people prefer to use adictaphone but it is not essential
Always carry anotebook. When youhear a useful comment,write it down!
2.General
Remember, when planning tointerview patients seek guidancefrom nursing director/public andpatient involvement lead.
CH_TKT_PDF:53226 INNERS 12/9/08 12:43 Page 11

10
Interviewing – top tips
1. Make sure the interviewee hassufficient time for theinterview.
2. Always have an ‘interviewguide’ prepared before youstart talking – this is simply alist of questions to ask, andinformation you require.
3. When coming up with thequestions, keep theinterviewees’ perspective inmind – how will they feelabout being interviewed, whatare their priorities, are they ina position to answer yourquestions honestly.
4. Start the interview byexplaining the purpose for theinterview, and what you willdo with the information yougather.
5. Make it explicit whether whatyou ask will be attributed backto the interviewee or not.
6. Before starting, ask if theinterviewee has any questionsfor you.
7. Run through your questions list– but listen to the answers –sometimes they may take youdown another path. Feel freeto abandon your scriptedquestions if more valuableinformation is forthcoming.
8. Take notes or use a dictaphone– if using a dictaphone, makesure the interviewee iscomfortable with it.
9. Convert the notes to a formalrecord as soon as possible – thisis essential to capture thedetail, if the written noteshave missed it.
10. Ideally, share the interviewnotes with the interviewee tomake sure you have capturedit right.
11. Use ‘open’ questions ie,questions that don’tinadvertently lead to predefined answers (see nextpage).
2.
CH_TKT_PDF:53226 INNERS 12/9/08 12:43 Page 12

11
Interviewing – using ‘open’ questions
Informal conversations with staff,patients and stakeholders can bea valuable and efficient researchmethod.
When you are working on aparticular project you may belooking for a particular type ofanswer or seeking a particularresult. Usually this will influencethe way that you ask yourquestions.
The fundamental thing about‘open’ language is being awareof where you are leading peoplewith your questions.
Being aware of, and using, ‘open’questions will help you tominimise your influence on yourinterviewee.
‘Open’ questioning can help youfind out what your intervieweereally thinks.
‘Open’ questions are questionsthat do not direct people to giveparticular answers and they donot have any major pre-suppositions.
For example, after running aproject, you might ask:‘What do you think of theimprovements on this ward?’
This question is problematic innumerous ways:1. It presumes that the person has
noticed that some changeshave been made.
2. It presumes that a project hasproduced improvements.
3. The framing of the questionforces the person to answer inthe positive. They could beseen as rude if they answernegatively.
An ‘open’ version of the samequestion might be:‘What is your experience of thisproject?’
No question is entirely ‘open’ andyou will always inject your owninterests and motivations into aconversation. However if you canbecome aware of how you aredirecting the conversation youcan begin to gather much moredetailed and honest information.
Try to think about the categoryof information that you want tocollect information under. Forexample, staff satisfaction. Youmay want to think of a few‘open’ questions under thiscategory such as:• how long have you worked
here?• has it changed?• what is it like to work here?• how do you feel about your
work?
You may find it useful to rephrasea question and ask it again if youthink an interviewee has more tosay on this subject.
If you are getting useful resultsand you want the interviewee tocontinue speaking in the samevein, you may find it useful torepeat back to people what theyhave just said to you. This canencourage them to keepspeaking and often they will godeeper into their thoughts on aparticular issue.
Interviewee example:• ‘I feel we could have gone
much further with theimprovements if we hadinvolved more people’
• ‘if you had involved morepeople…’
• ‘if we had involved morepeople the project would havehappened much more quickly, itseemed… it seemed thatpeople who weren’t told aboutit at the beginning started toslow the whole thing down’
Practising these techniques canhelp you become more aware ofthe way that you are askingquestions and to get more usefulresults. You can also practise bylistening to the way that otherpeople ask questions.
2.General
CH_TKT_PDF:53226 INNERS 12/9/08 12:43 Page 13

12
CH_TKT_PDF:53226 INNERS 12/9/08 12:43 Page 14
13
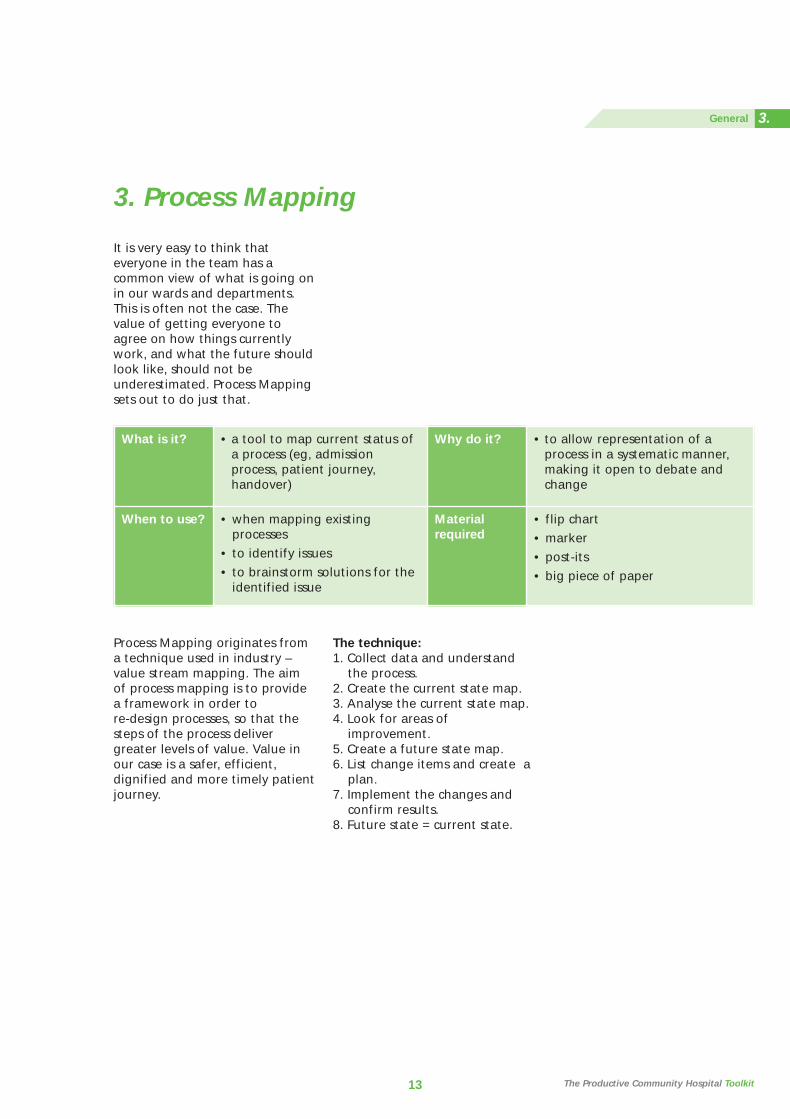
3. Process Mapping
It is very easy to think thateveryone in the team has acommon view of what is going onin our wards and departments.This is often not the case. Thevalue of getting everyone toagree on how things currentlywork, and what the future shouldlook like, should not beunderestimated. Process Mappingsets out to do just that.
What is it? • a tool to map current status ofa process (eg, admissionprocess, patient journey,handover)
Why do it? • to allow representation of aprocess in a systematic manner,making it open to debate andchange
When to use? • when mapping existingprocesses
• to identify issues
• to brainstorm solutions for theidentified issue
Materialrequired
• flip chart
• marker
• post-its
• big piece of paper
Process Mapping originates froma technique used in industry –value stream mapping. The aimof process mapping is to providea framework in order to re-design processes, so that thesteps of the process delivergreater levels of value. Value inour case is a safer, efficient,dignified and more timely patientjourney.
The technique:1. Collect data and understand
the process.2. Create the current state map.3. Analyse the current state map.4. Look for areas of
improvement.5. Create a future state map.6. List change items and create a
plan.7. Implement the changes and
confirm results.8. Future state = current state.
The Productive Community Hospital Toolkit
3.General
CH_TKT_PDF:53226 INNERS 12/9/08 12:43 Page 15

14
Example: Map how we currently do our handover
1. Collect data and understand theprocessIf possible video your processfrom start to finish. If this is notpossible then it is important thatyou ‘go and see’ to observe andmake notes of what actuallyhappens. Try to gather any datathat can be used to show the truepicture.
3 metres
1 m
etre
2. Create the current state mapUse a large piece of paper roll toallow you to attach sticky notesrepresenting each step of yourprocess. It is important to involveall of the relevant staff at thisstage. So if your process involvesexternal resources then theseshould be included now.
3.
CH_TKT_PDF:53226 INNERS 12/9/08 12:43 Page 16

15
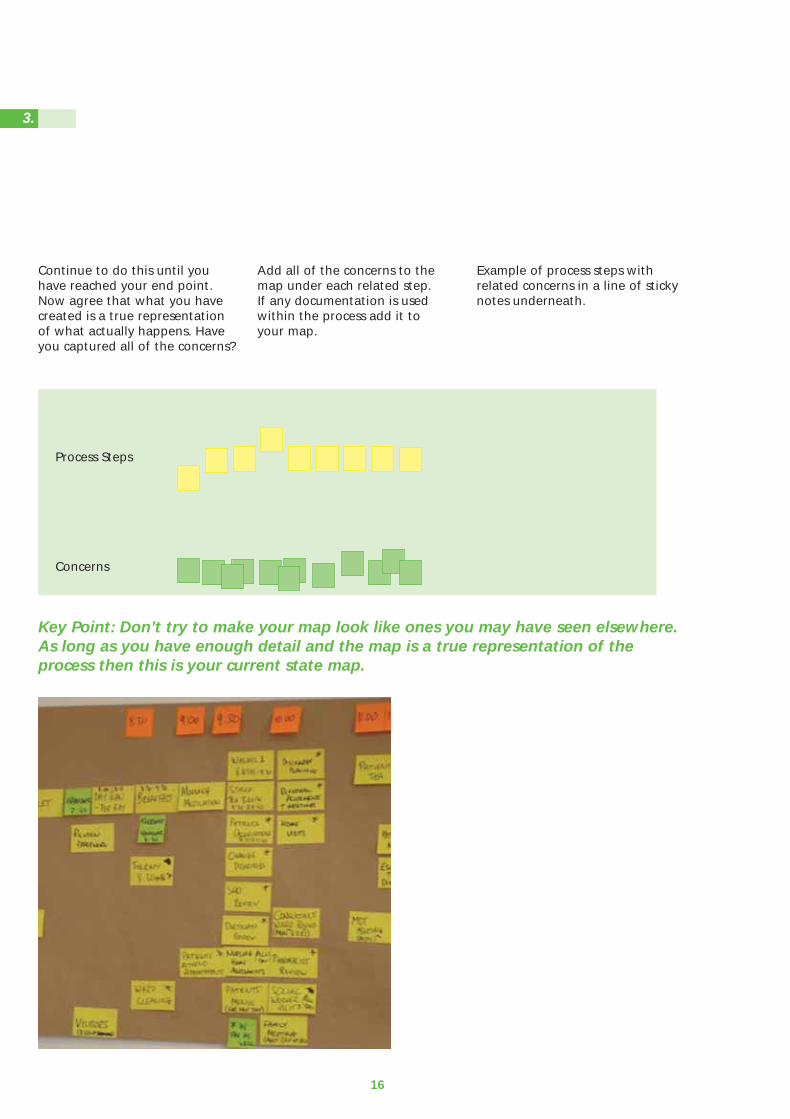
If you do not have enough roomon one wall, you can bend thepaper round a corner asillustrated in this picture.
Start to map out your processusing one sticky note for eachstep. If watching the video,start/stop the video at each step,note the time elapsed and place
onto the paper roll sequentially.Actively involve all present toidentify concerns or activities thatshould not be happening usingdifferent coloured sticky notes.
Remember this is not aboutblame, more about highlightingareas that can be improved.
3.General
CH_TKT_PDF:53226 INNERS 12/9/08 12:43 Page 17
16
Continue to do this until youhave reached your end point.Now agree that what you havecreated is a true representationof what actually happens. Haveyou captured all of the concerns?
Add all of the concerns to themap under each related step. If any documentation is usedwithin the process add it to your map.
Example of process steps withrelated concerns in a line of stickynotes underneath.
Key Point: Don’t try to make your map look like ones you may have seen elsewhere.As long as you have enough detail and the map is a true representation of theprocess then this is your current state map.
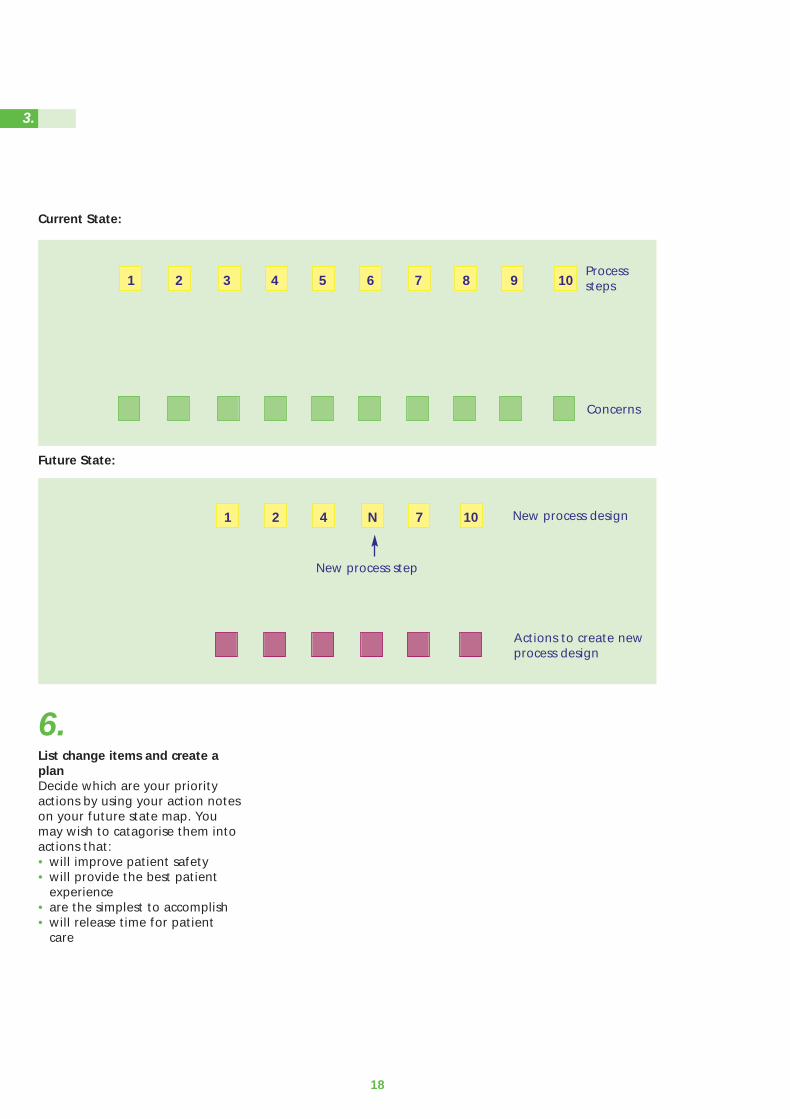
Process Steps
Concerns
3.
CH_TKT_PDF:53226 INNERS 12/9/08 12:43 Page 18
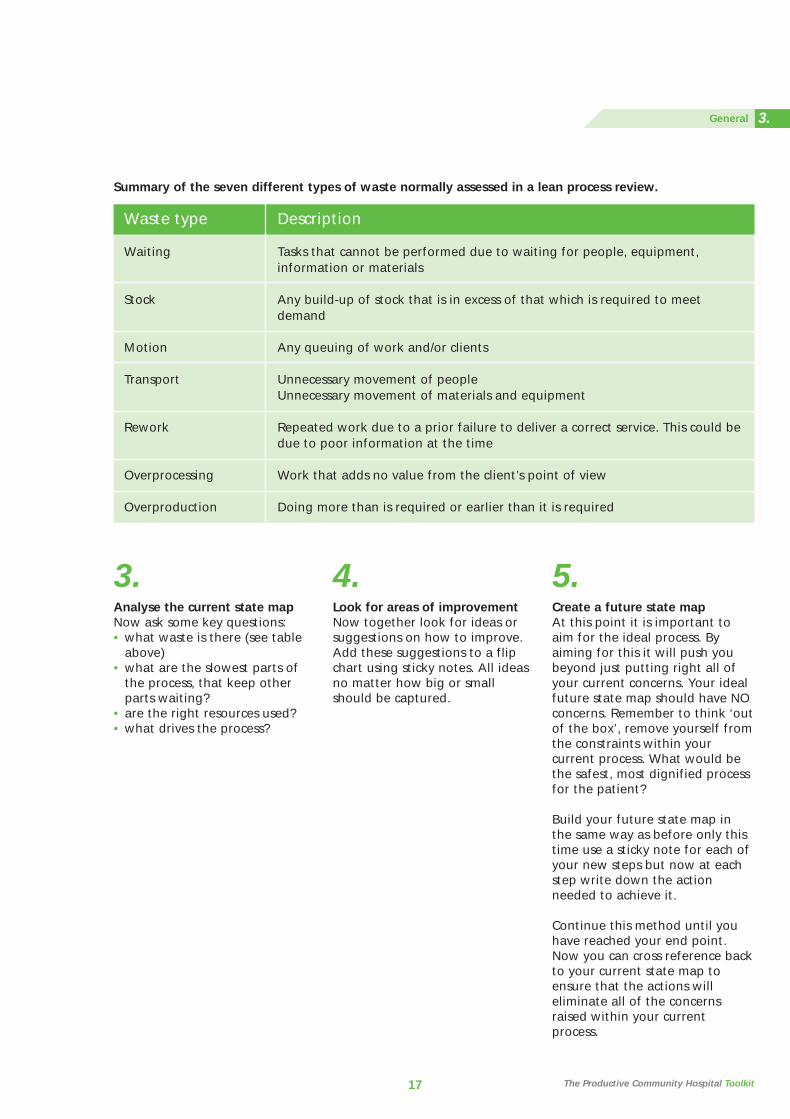
3. Analyse the current state mapNow ask some key questions:• what waste is there (see table
above)• what are the slowest parts of
the process, that keep other parts waiting?
• are the right resources used?• what drives the process?
4. Look for areas of improvementNow together look for ideas orsuggestions on how to improve.Add these suggestions to a flipchart using sticky notes. All ideasno matter how big or smallshould be captured.
5. Create a future state mapAt this point it is important toaim for the ideal process. Byaiming for this it will push youbeyond just putting right all ofyour current concerns. Your idealfuture state map should have NOconcerns. Remember to think ‘outof the box’, remove yourself fromthe constraints within yourcurrent process. What would bethe safest, most dignified processfor the patient?
Build your future state map inthe same way as before only thistime use a sticky note for each ofyour new steps but now at eachstep write down the actionneeded to achieve it.
Continue this method until youhave reached your end point.Now you can cross reference backto your current state map toensure that the actions willeliminate all of the concernsraised within your currentprocess.
17
Summary of the seven different types of waste normally assessed in a lean process review.
Waste type
Waiting
Stock
Motion
Transport
Rework
Overprocessing
Overproduction
Description
Tasks that cannot be performed due to waiting for people, equipment,information or materials
Any build-up of stock that is in excess of that which is required to meet demand
Any queuing of work and/or clients
Unnecessary movement of peopleUnnecessary movement of materials and equipment
Repeated work due to a prior failure to deliver a correct service. This could bedue to poor information at the time
Work that adds no value from the client’s point of view
Doing more than is required or earlier than it is required
The Productive Community Hospital Toolkit
3.General
CH_TKT_PDF:53226 INNERS 12/9/08 12:43 Page 19
18
6. List change items and create aplanDecide which are your priorityactions by using your action noteson your future state map. Youmay wish to catagorise them intoactions that:• will improve patient safety• will provide the best patient
experience• are the simplest to accomplish• will release time for patient
care
Current State:
Future State:
1 2 3 4 5 6 7 8 9 10
1 2 4 N 7 10
Actions to create newprocess design
New process design
Processsteps
Concerns
New process step
3.
CH_TKT_PDF:53226 INNERS 12/9/08 12:43 Page 20

19
Summary Process maps allow processes tobe broken down into smallmanageable chunks which can beanalysed and understood at aglance by everybody.
Process maps help engage theattention of all participants,whereby their contribution andknowledge is fundamental inmaking the process maps whatthey are.
Process maps help identify thecurrent state of a process andwhen changes and modifications are made they can also illustratethe future state process with allthe waste and inefficientprocesses removed.
7.Implement the changes andconfirm resultsMonitor your KPIs to understandimpact of changes made. Try toquantify improvements madewhere possible or collect quotesfrom staff / patients to help raiseawareness and enthusiasm as youprogress. Confirm your resultsand feed back to all involved.
8.Future state = current stateOnce we have created andimplemented our future statemap, we have effectively set anew standard and so the futurestate map now becomes thecurrent state from which we cancontinually improve.
3.General
CH_TKT_PDF:53226 INNERS 12/9/08 12:43 Page 21
6820
CH_TKT_PDF:53226 INNERS 12/9/08 12:43 Page 22

4. Photographs and Video
What is it? Taking photographs is a goodtool to collect data that alsodoubles as a presentation tool
Why do it? Captures ‘perishable evidence’ suchas meetings and unfilled charts etc.
Avoids ‘hearsay’
Is a very good communications tool
When to use? Photographs should be used tocapture:
• events (meetings andworkshops)
• displays (boards, signs)
• situations that change (eg,unattended drug trolley,unmade beds etc)
Especially useful to demonstratethe difference ‘before’ and‘after’ a change
Materialrequired
• a camera (digital preferred,ideally >2 mega pixels)
• camcorder (digital or mini DVrecommended)
• communications, A&E andimaging departments often havethese cameras
Capture your story! Youcan easily forget how faryou have come – usepictures to tell yourstory to others
21 The Productive Community Hospital Toolkit
4.General
CH_TKT_PDF:53226 INNERS 12/9/08 12:43 Page 23
Photographs – top tips
1. Use a digital camera – photoscan then be transferred to acomputer, mailed, printed, andincluded in presentations.
2. Ask staff and patients forpermission to photograph: getwritten consent (see below) - Ifpatients are in a confused statethen assume you do not havetheir permission and do notphotograph them.
3. Ensure the area beingphotographed is well lit.
4. Always keep your back to thelight source.
5. Determine exactly what isneeded in the photo – try andinclude that, but nothing else.
6. Steady yourself, and thecamera.
7. Allow a few seconds for thecamera to focus.
8. If photographing text, ensureyou take photographs withand without the flash –different surfaces reactdifferently.
9. If using a digital camera(usually with a large memory),click 2 photographs every time– one as back-up.
10. If people are photographed,show the photograph to thembefore using it in apresentation/meeting.
Photographs – written consent
Under no circumstances shouldyou take photographs, or videos,without the consent of thoseinvolved.
Ask your communicationsdepartment for your trust’sphotograph / consent form. Have one filled out by everyoneinvolved in your photographs.
Be extra careful whenphotographing patients. If apatient is in a confused statethen make the presumption thatconsent has not been given.
22
4.
CH_TKT_PDF:53226 INNERS 12/9/08 12:43 Page 24
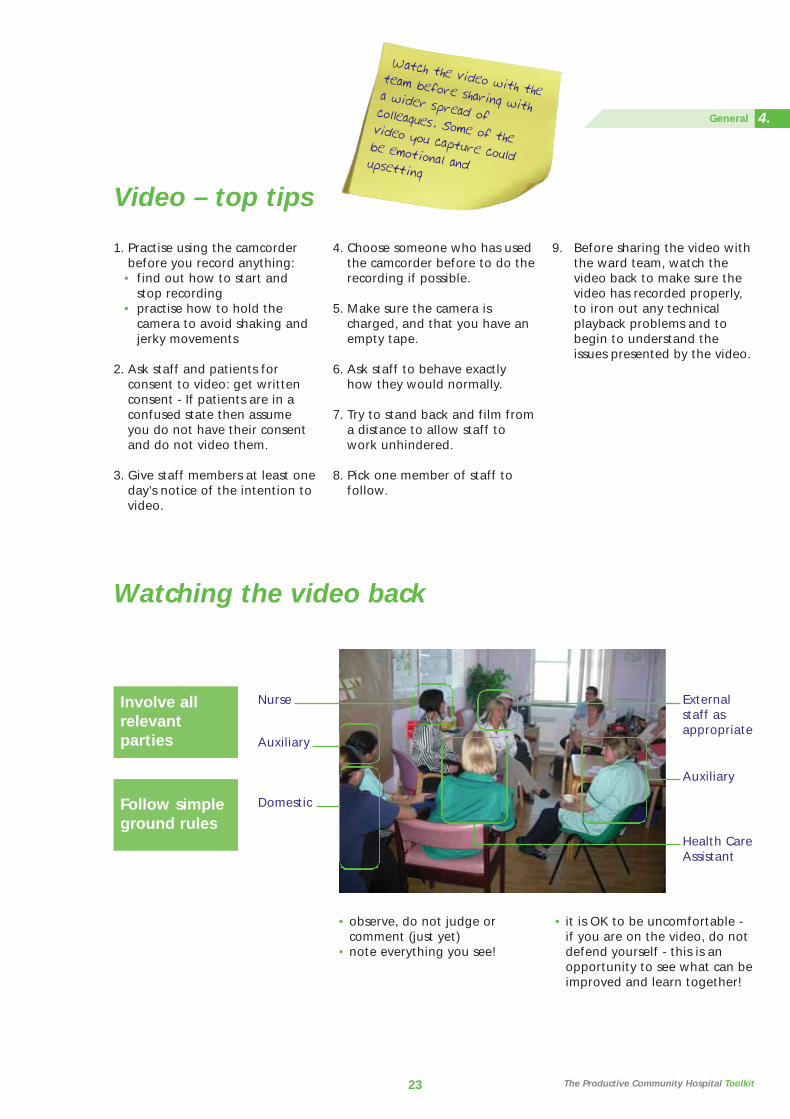
Watch the video with theteam before sharing witha wider spread ofcolleagues. Some of thevideo you capture couldbe emotional andupsetting
23
Video – top tips
1. Practise using the camcorderbefore you record anything:
• find out how to start and stop recording
• practise how to hold the camera to avoid shaking and jerky movements
2. Ask staff and patients forconsent to video: get writtenconsent - If patients are in aconfused state then assumeyou do not have their consentand do not video them.
3. Give staff members at least oneday’s notice of the intention tovideo.
4. Choose someone who has usedthe camcorder before to do therecording if possible.
5. Make sure the camera ischarged, and that you have anempty tape.
6. Ask staff to behave exactlyhow they would normally.
7. Try to stand back and film froma distance to allow staff towork unhindered.
8. Pick one member of staff tofollow.
9. Before sharing the video withthe ward team, watch thevideo back to make sure thevideo has recorded properly,to iron out any technicalplayback problems and tobegin to understand theissues presented by the video.
Watching the video back
Involve allrelevantparties
Follow simpleground rules
Nurse
Auxiliary
Domestic
Externalstaff asappropriate
Auxiliary
Health CareAssistant
• observe, do not judge orcomment (just yet)
• note everything you see!
• it is OK to be uncomfortable -if you are on the video, do notdefend yourself - this is anopportunity to see what can beimproved and learn together!
The Productive Community Hospital Toolkit
4.General
CH_TKT_PDF:53226 INNERS 12/9/08 12:43 Page 25
Advanced tips for shooting video
After you have done a fewvideos, you should consider someof the advanced tips below. Theywill help you produce betterquality videos that are easier forthe team to use.
Use the widest lens settingpossibleA ‘wide lens’ means the camera isfully ‘zoomed out’. If you arehand holding the camera alwaysuse the widest lens setting thatyou can. This will minimise anyshaking and make it much lessapparent to the viewer. You willget a cleaner and sharper imagetoo. Set the lens to the widest orsomething close to the widestsetting and leave it there.
Avoid zoomsZooming in and out can be verydistracting for the viewer. If youare hand holding the camera it isoften better to physically moverather than zoom. In general youshould find your shot and stick toit. If you do zoom (for instance,to show some detail or toemphasise something or to gentlychange the frame because thereis something you want to includeor exclude) do it deliberately andsmoothly, but in most cases it isbest avoided.
Keep steady / hold the frameAvoid unnecessary movement -let the subject move rather thanthe camera. Be confident - keepthe frame steady and allowaction to come in and out of itrather than trying to followeverything. Don’t cut or move toanother shot too quickly - allowthe action to unfold.
Don’t make your shots too shortSome video cameras take a littletime to come to ‘speed’ so nevershoot less than five seconds andpreferably at least ten. Thosefew seconds extra will also makeediting much, much easier.
Try to avoid filming peopleagainst the lightOften the most dramatic shotsare filmed against the light, butfilm someone against a windowand they will be a silhouette.Most video cameras don’t copevery well with contrast and if youare doing an interview try tomake sure that they are litbrighter than the backgroundbehind them.
Look at the overall frame, notjust through the viewfinderBe aware of what is in thebackground of the shot. Goodmaterial can be renderedunusable if the activity or imagesin the background are distractingor inappropriate. Compose theshot - mentally step back andlook at it as a frame with objectspositioned in it. Most people canrecognise what a good shot iswhen they see it on a monitor orlook at a photograph but theuntrained eye can forget thiswhen looking at the worldthrough the camera viewfinder.
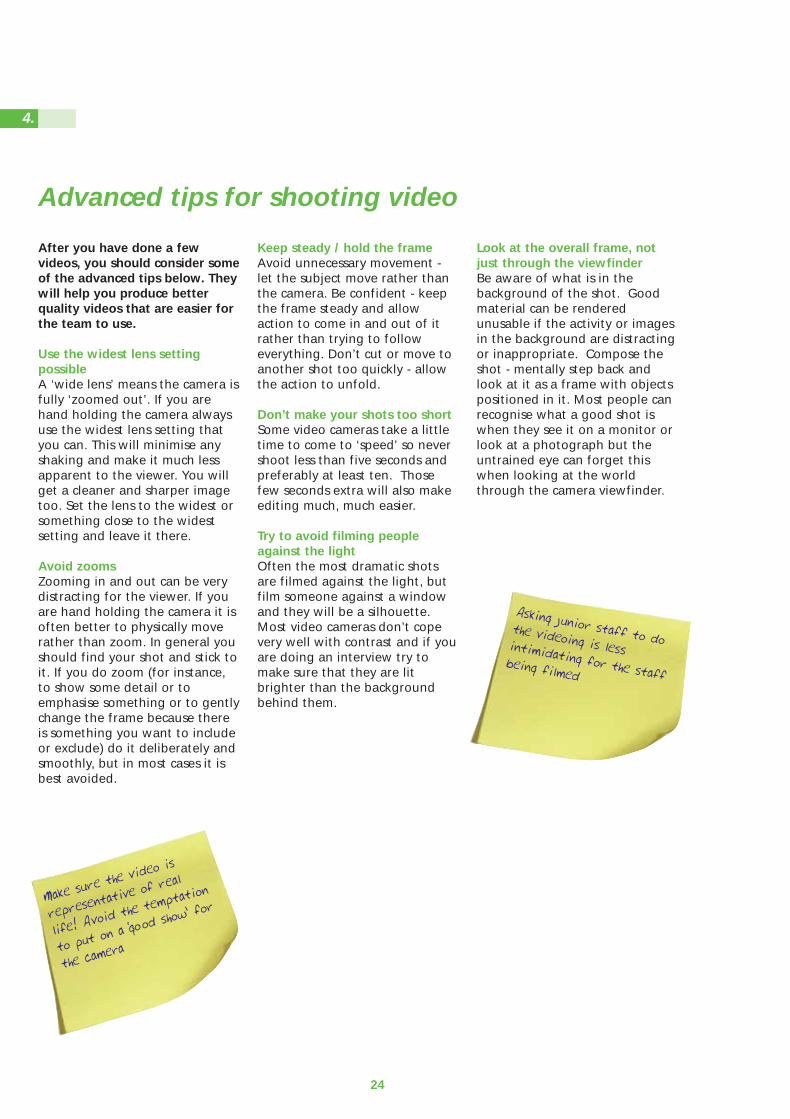
Make sure the
video is
representati
ve of real
life! Avoid t
he temptatio
n
to put on a
‘good show’ fo
r
the camera
Asking junior staff to dothe videoing is lessintimidating for the staff
being filmed
24
4.
CH_TKT_PDF:53226 INNERS 12/9/08 12:43 Page 26

25
CH_TKT_PDF:53226 INNERS 12/9/08 12:44 Page 27
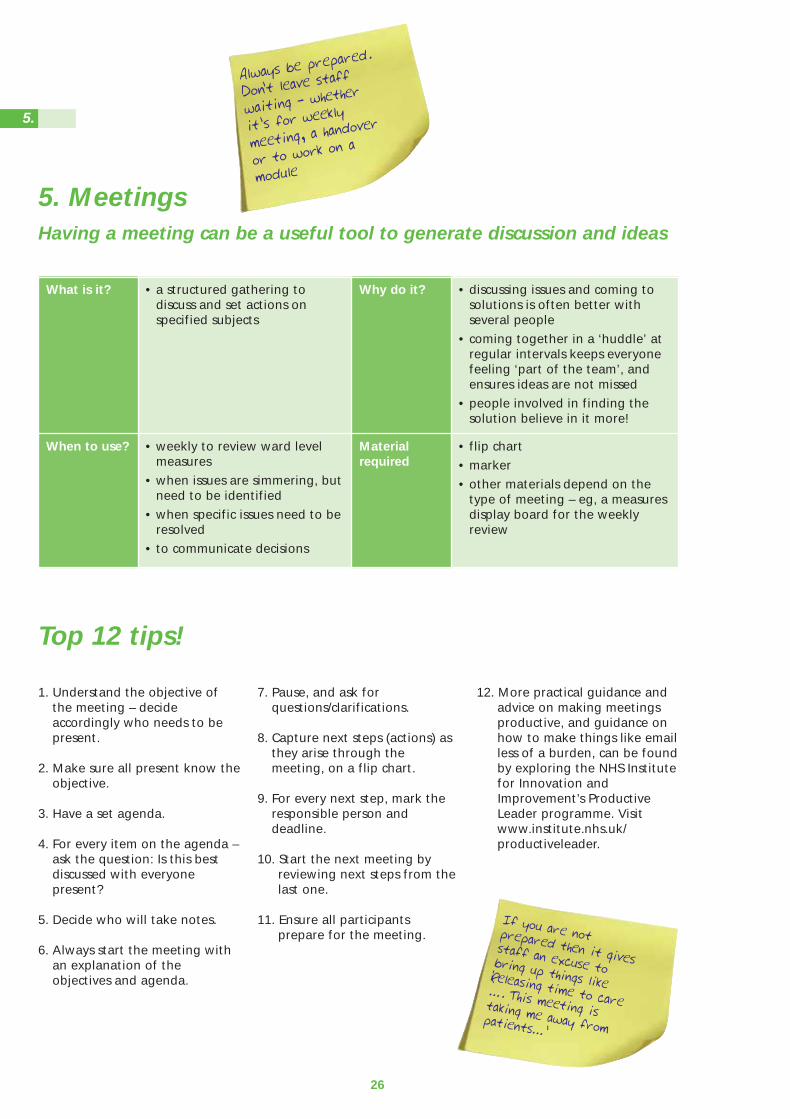
Always be prepared.
Don’t leave staff
waiting - whether
it’s for weekly
meeting, a handover
or to work on a
module
26
5. MeetingsHaving a meeting can be a useful tool to generate discussion and ideas
What is it? • a structured gathering todiscuss and set actions onspecified subjects
Why do it? • discussing issues and coming tosolutions is often better withseveral people
• coming together in a ‘huddle’ atregular intervals keeps everyonefeeling ‘part of the team’, andensures ideas are not missed
• people involved in finding thesolution believe in it more!
When to use? • weekly to review ward levelmeasures
• when issues are simmering, butneed to be identified
• when specific issues need to beresolved
• to communicate decisions
Materialrequired
• flip chart
• marker
• other materials depend on thetype of meeting – eg, a measuresdisplay board for the weeklyreview
Top 12 tips!
1. Understand the objective ofthe meeting – decideaccordingly who needs to bepresent.
2. Make sure all present know theobjective.
3. Have a set agenda.
4. For every item on the agenda –ask the question: Is this bestdiscussed with everyonepresent?
5. Decide who will take notes.
6. Always start the meeting withan explanation of theobjectives and agenda.
7. Pause, and ask forquestions/clarifications.
8. Capture next steps (actions) asthey arise through themeeting, on a flip chart.
9. For every next step, mark theresponsible person anddeadline.
10. Start the next meeting byreviewing next steps from thelast one.
11. Ensure all participantsprepare for the meeting.
12. More practical guidance andadvice on making meetingsproductive, and guidance onhow to make things like emailless of a burden, can be foundby exploring the NHS Institutefor Innovation andImprovement’s ProductiveLeader programme. Visitwww.institute.nhs.uk/productiveleader.
If you are notprepared then it givesstaff an excuse tobring up things like‘Releasing time to care
…. This meeting istaking me away frompatients…’
5.
CH_TKT_PDF:53226 INNERS 12/9/08 12:44 Page 28
27
The 4 Ps of productive meetings
Plan Top TipsThink about the following:• do you need a meeting?• what do you want to achieve?• who needs to be there?• is this a formal or informal meeting? • where should you hold the meeting?
AgendaAn effective agenda is vital:• don’t leave important items until the end• assign people to items• assign timings to items• schedule breaks if meeting is over an hour
Prepare Top TipsYou need to have given thought to:• why you are attending the meeting?• what your contribution will be• do you need to do pre-reading?• have you done actions from previous
meetings?
VenueChoosing the right venue for your meeting isreally important. Make sure everybody can:• see• hear
It is also important that you limit distractions
Participate Top Tips for Participants:• know why you are there• be there on time• stay on subject• don’t cause problems for the Chair• be open to the ideas of others• help the Chair control the meeting• share your thoughts and ideas
The Role of the Chair:• agree note/actions taker who uses the
actions/decision sheet• start and finish on time even if people are late• be clear about the purpose of the meeting• keep the meeting to time• keep track of agreed actions• review actions with agreed timescales• confirm date and time of next meeting
Pusue • ensure that any lessons learned are communicated to all the team• make sure that the actions and decisions sheet is circulated to everybody within 48 hours• read the actions and decisions sheet and allocate time to follow-through on your actions• prepare for next meeting
The four Ps of productive meetings are underpinned by golden rules for each stage of the meetings process.
You have a responsibility to yourself and others to run productivemeetings, maximising your own and their time.
Plan Prepare Participate Pursue
The Productive Community Hospital Toolkit
5.General
CH_TKT_PDF:53226 INNERS 12/9/08 12:44 Page 29
28
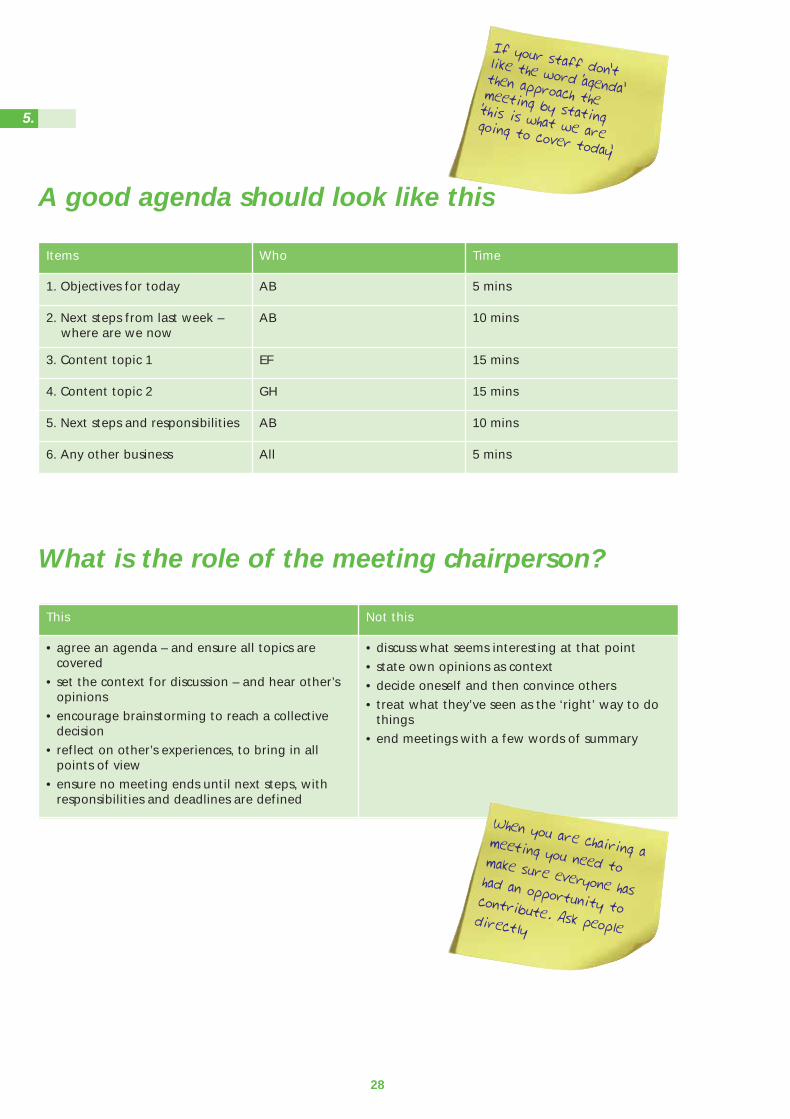
Items Who Time
1. Objectives for today AB 5 mins
2. Next steps from last week –where are we now
AB 10 mins
3. Content topic 1 EF 15 mins
4. Content topic 2 GH 15 mins
5. Next steps and responsibilities AB 10 mins
6. Any other business All 5 mins
What is the role of the meeting chairperson?
This Not this
• agree an agenda – and ensure all topics arecovered
• set the context for discussion – and hear other’sopinions
• encourage brainstorming to reach a collectivedecision
• reflect on other’s experiences, to bring in allpoints of view
• ensure no meeting ends until next steps, withresponsibilities and deadlines are defined
• discuss what seems interesting at that point
• state own opinions as context
• decide oneself and then convince others
• treat what they’ve seen as the ‘right’ way to dothings
• end meetings with a few words of summary
When you are chairing ameeting you need tomake sure everyone hashad an opportunity tocontribute. Ask peopledirectly
If your staff don’tlike the word ‘agenda’then approach themeeting by stating‘this is what we aregoing to cover today’
A good agenda should look like this
5.
CH_TKT_PDF:53226 INNERS 12/9/08 12:44 Page 30

29
CH_TKT_PDF:53226 INNERS 12/9/08 12:44 Page 31

6. 5S
Simply put, 5S stands for: • Sort: identify items that are
needed.• Set in Order: create a place for
all of these items• Shine: create a clean and safe
working environment.• Standardise: put standards in
place and monitor.• Sustain: continually review the
working practices to ensure that the working environment supports the process.
5S is a Lean Thinking techniquethat can be used alongside andindependent of other techniquesand will rapidly affect theworkplace with little or noinvestment.
For more information about LeanThinking and its application inthe NHS Institute for Innovationand Improvement’s ‘Going Leanin the NHS’, www.institute.nhs.uk
30
What is it?
When to use?
A simple technique used tocreate and maintain anorganised, clean, safe, and highperforming workplace
• To improve ward/department layout
• To improve cluttered or busy work areas
• To systematise stock and equipment flow
What is it?
When to use?
• to standardise processes which should always be the same
• to reduce unnecessary variation in layout, stock or equipment
• to quickly identify a shortage of tools or materials
• sticky labels• tie tags• sorting boxes• marker• colour coding mechanisms
(labels, tags)
6.
CH_TKT_PDF:53226 INNERS 12/9/08 12:44 Page 32

5S – things to consider
• untidy, cluttered work areas are not productive, but merelytidying up will only make amarginal improvement to theproductivity of the operation
• when performing 5S, the focus is not about being more tidyand more organised. The focusis on understanding what toolsand materials support theprocesses being delivered andhow they can be stored,cleaned and maintained inorder to best support thatprocess For every next step,mark the responsible personand deadline
• take photos of the work area before you start, of the itemsthat are removed from theprocess and of the work area atthe end of the process. Thesewill act as good documentationof the ‘before’, ‘during’ and‘after’ and may help prioritisewhich areas to work on duringthe process
• the 5S process is sometimes referred to as the ‘6S’processwith a sixth overarching focuson Safety. It is important thatthroughout a 5S initiative focusis always placed on the safetyof the workplace, or clinicalenvironment
• estimate the value of out-of-date and surplus stock
31 The Productive Community Hospital Toolkit
6.General
CH_TKT_PDF:53226 INNERS 12/9/08 12:44 Page 33
32
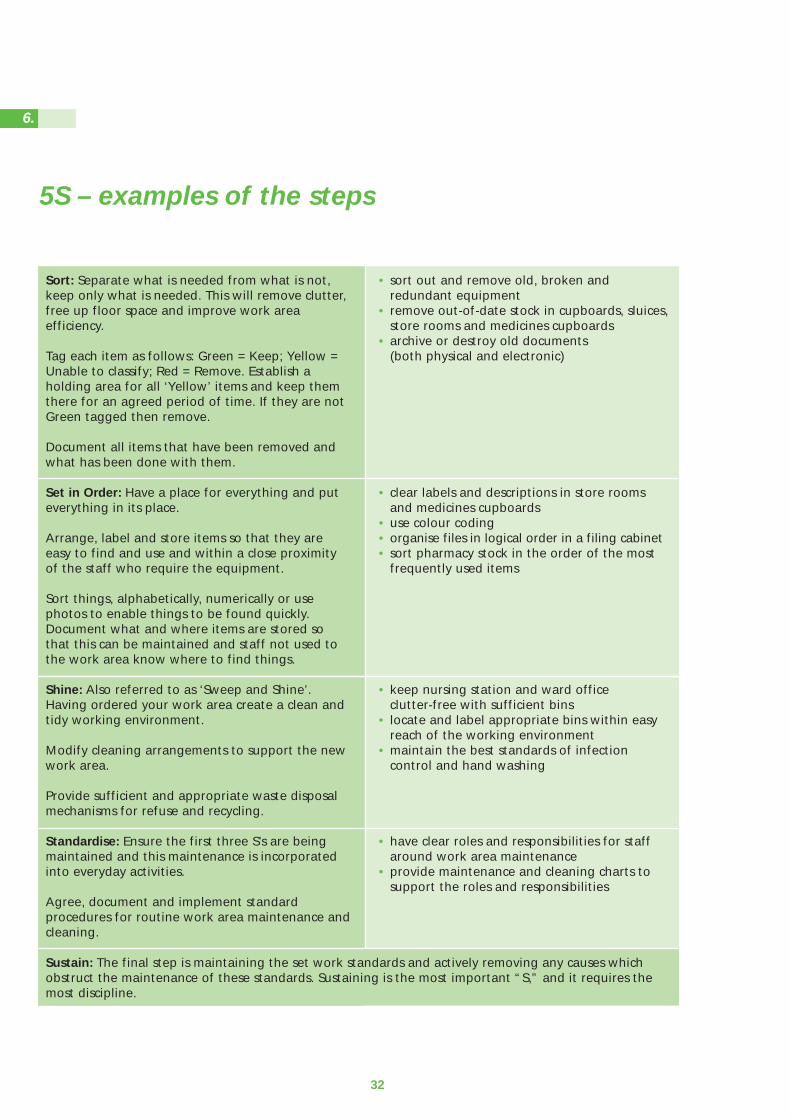
Sort: Separate what is needed from what is not,keep only what is needed. This will remove clutter,free up floor space and improve work areaefficiency.
Tag each item as follows: Green = Keep; Yellow =Unable to classify; Red = Remove. Establish aholding area for all ‘Yellow’ items and keep themthere for an agreed period of time. If they are notGreen tagged then remove.
Document all items that have been removed andwhat has been done with them.
Set in Order: Have a place for everything and puteverything in its place.
Arrange, label and store items so that they areeasy to find and use and within a close proximityof the staff who require the equipment.
Sort things, alphabetically, numerically or usephotos to enable things to be found quickly.Document what and where items are stored sothat this can be maintained and staff not used tothe work area know where to find things.
Shine: Also referred to as ‘Sweep and Shine’.Having ordered your work area create a clean andtidy working environment.
Modify cleaning arrangements to support the newwork area.
Provide sufficient and appropriate waste disposalmechanisms for refuse and recycling.
Standardise: Ensure the first three S’s are beingmaintained and this maintenance is incorporatedinto everyday activities.
Agree, document and implement standardprocedures for routine work area maintenance andcleaning.
Sustain: The final step is maintaining the set work standards and actively removing any causes whichobstruct the maintenance of these standards. Sustaining is the most important “S,” and it requires themost discipline.
• sort out and remove old, broken and redundant equipment
• remove out-of-date stock in cupboards, sluices, store rooms and medicines cupboards
• archive or destroy old documents (both physical and electronic)
• clear labels and descriptions in store rooms and medicines cupboards
• use colour coding• organise files in logical order in a filing cabinet• sort pharmacy stock in the order of the most
frequently used items
• keep nursing station and ward office clutter-free with sufficient bins
• locate and label appropriate bins within easy reach of the working environment
• maintain the best standards of infection control and hand washing
• have clear roles and responsibilities for staff around work area maintenance
• provide maintenance and cleaning charts to support the roles and responsibilities
5S – examples of the steps
6.
CH_TKT_PDF:53226 INNERS 12/9/08 12:44 Page 34
5S Drawer GameA quick simple game to illustrate the concept and principles of 5S
Preparation
Find a box / container and fillwith items that could be found ina typical ward clerk’s drawer in award environment.
For example:pens, blue tack, highlighter pens,rubber bands, correction fluid,and ruler, hole punch, stapler andstaples etc. Vary the amount anddon’t forget the paper clips allloose in the drawer.
Then add the other items thatyou know you would also find:Old Christmas cards, sugar, teabags, loose change, glovessyringes, odd tube of KY jelly,tissues, packets of sugar, post itnotes, scissors, calculator, screws,tube of hand cream etc.
Don’t forget the one item that isalways found in the drawer...something that no one knowswhat it is... a piece of brokenequipment or broken bit ofplastic. Add a teaspoon or two…
Prepare areas / boxes to replicatewhere items should be stored ie,kitchen, store room, bin. Alsoinclude an area / box for itemswhere the team are un-decided.
Collect your staff (do not use award clerk). The minimumnumber of staff required for thisgame is 2 but it is better if playedwith more.
A 5S numbers game is availableon the NHS Institute’s ProductiveWard web pages atwww.institute.nhs.uk/productiveward
Playing the game
Stage 1• run through a short
introduction on the principlesof 5S
Stage 2• ask your staff to use the 5S
process and sort, set, shine,standardise and use the generalrule of audit to sustain theimprovement
• staff should ask for aninventory sheet. If notrequested then suggest thatthey may need one and handout
• explain they can write on thebox and mark the box in anyway
• when using the inventorysheet, ask the team to estimatethe cost of each item.
• the group will need between10 and 15 minutes to completethis
Stage 3 • if more than one team is
playing, ask the teams to auditeach other’s work and feedbackcomments. If just one team isplaying, the facilitator shouldaudit the drawer
• encourage the team to talkthrough the exercise
• ask them to highlight anysavings made
• ask the staff what theirrationale was for setting thestock levels?
• what items did they return andbin?
• what visual management didthey use?
• ask the teams who they feltshould be involved in theprocess?
• ask the team what they wouldneed to do in order to sustainthe changes?
• explore with them how theywould do that
Stage 4 • ask the team how the ward
clerk felt about his/her newwell organised drawer?
• did any one in the group pickup that the exercise wascompleted withoutengagement from the wardclerk?
• how did you decide the stocklevels of her equipment?
33 The Productive Community Hospital Toolkit
6.General
CH_TKT_PDF:53226 INNERS 12/9/08 12:44 Page 35

11034
CH_TKT_PDF:53226 INNERS 12/9/08 12:44 Page 36

3. How to carry out a direct and indirect care audit
Management preparation for the audit
35
Identify which clinical areas will undertake the audit
Inform all staff participating and any others that might need to know (managers, patients)Consider putting up a poster
Ensure you have demonstrated how to complete the audit to those participating. Gothrough the descriptions of the activities to ensure they are consistently understood
Print out the audit sheets in A3 and provide clip boards or identify a flat surface for theduration of the audit. Display the activity descriptions clearly.
Identify who will be the observers (non participant)
Arrange to count and record:occupied beds at 12MD or 12MN for inpatients, or total attendances during the time periodfor MIU, or total patients for day hospital
Establish a safe collection point for completed forms and how you will return them to yoursupport team member
Who should take part
Staff included: medical, allied health, nursing,and health care assistant staff.Administration and clericalsupport staff directly supportingclinical activities. Pharmacistwhen providing intervention topatient ie, advise.
Not included: House-keeping/cleaning staff,maintenance andkitchen/catering staff. Volunteers.Hairdresser. Pharmacist whendispensing.
The Productive Community Hospital Toolkit
3.Knowing How we are Doing
CH_TKT_PDF:53226 INNERS 12/9/08 12:44 Page 37

Example of audit sheet
36
3.
CH_TKT_PDF:53226 INNERS 12/9/08 12:44 Page 38
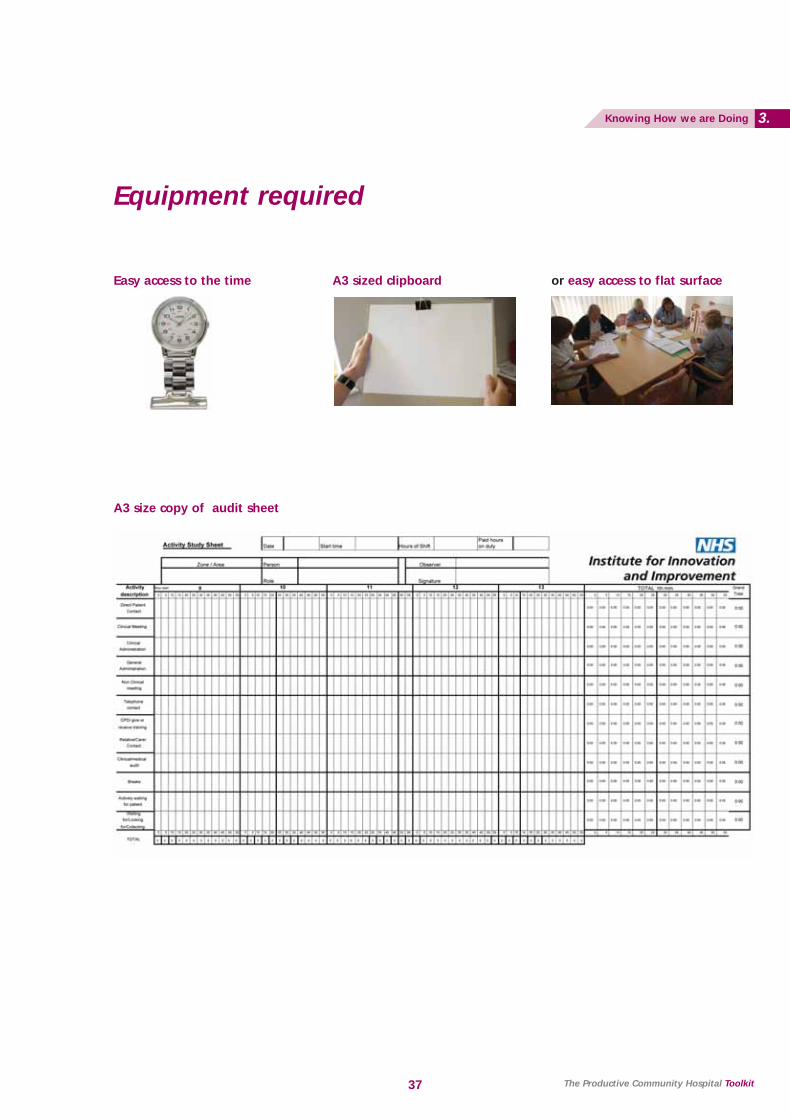
Equipment required
37
Easy access to the time
A3 size copy of audit sheet
A3 sized clipboard or easy access to flat surface
The Productive Community Hospital Toolkit
3.Knowing How we are Doing
CH_TKT_PDF:53226 INNERS 12/9/08 12:44 Page 39
Basic methodology for staff completing sheet
The audit sheet is designed toallow a staff member toaccurately capture the activityundertaken in the timeframe set.
The audit sheet works in fiveminute intervals it captures thespecific piece of data about whatthe staff member is doing.
Place the audit sheet where youhave easy access to it. You do notneed to return to it every fiveminutes but at the end of atask/activity, return to it andrecord how many five minuteintervals it took.
Use the nearest five minutesinterval. ie, an activity takes 12minutes record 2 five minutes.An activity takes 18 minutes,record 4 five minutes.
To record, you need to put amark in the appropriate box. Do not go outside the line.
If the activity does not exactlymatch, use the closest to it: themain analysis will be total directcare and total indirect care.
38
3.
CH_TKT_PDF:53226 INNERS 12/9/08 12:44 Page 40

Elements of the audit
39 The Productive Community Hospital Toolkit
3.Knowing How we are Doing
CH_TKT_PDF:53226 INNERS 12/9/08 12:44 Page 41

Example completion of electronic tool
40
This person started at 09.00 and:• undertook 20 minutes of direct patient care from 09.00 to 09.20• followed by a 30 minute clinical meeting• followed by a 10 minute phone call
You do not need to add anything into any of the totals, this will be collated for you when the informationis entered into the tool.
3.
CH_TKT_PDF:53226 INNERS 12/9/08 12:44 Page 42
The observer
Activity descriptions
The observer should be impartialand not one of the staff takingpart.
They should be available toanswer queries, and to checkperiodically that the audit isbeing completed accurately.
The role is likely to beundertaken by more than oneperson, so they need to bebriefed in detail about the auditand handover progress andconcerns when they swap.
Your Site Lead could undertakethis, or Unit Manager, colleaguefrom another dept/ward etc orthe Site Support if you have theaudit when they are present.
41 The Productive Community Hospital Toolkit
3.Knowing How we are Doing
CH_TKT_PDF:53226 INNERS 12/9/08 12:44 Page 43

Variation in discharge.... tool instructions
Day of week and hour by hour analysis of discharge
Why do it?
This tool will be useful to helpyou to understand the variationthat currently exists in yourdischarge process and where youmight need to work to assist withstreamlining the flow ofdischarge for your patients.
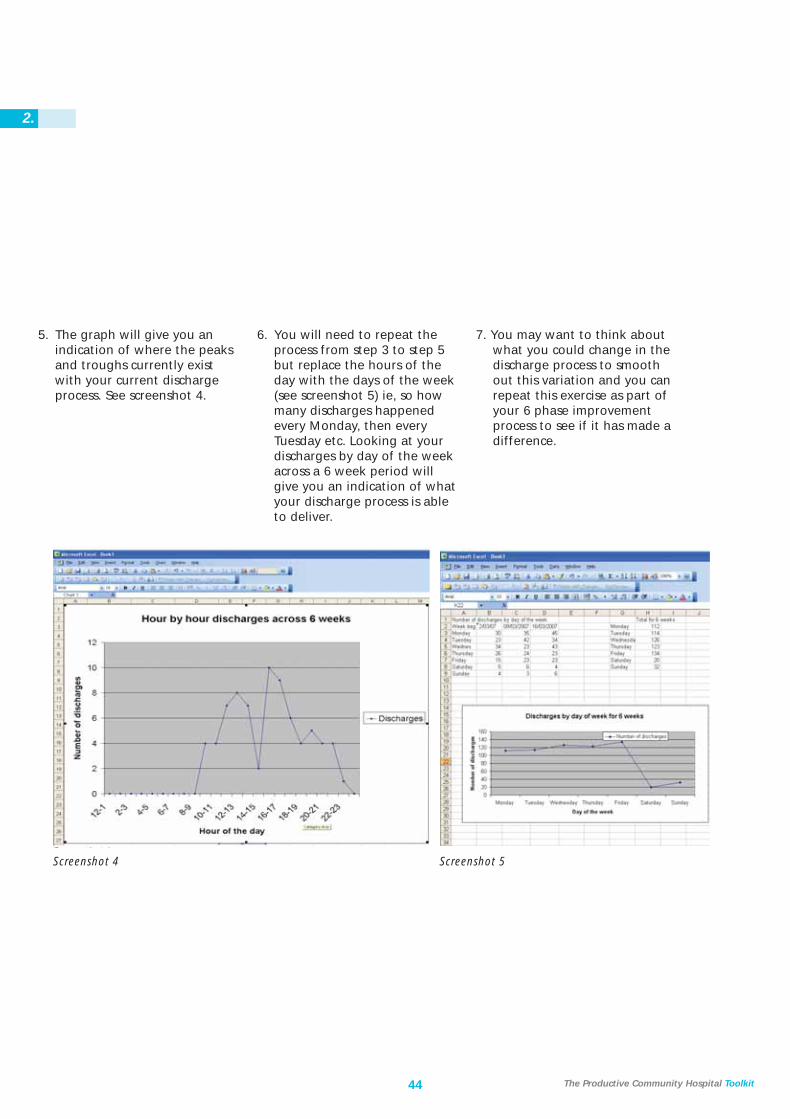
1. Devise a mechanism to collectthe number of discharges byday of the week and hour ofthe day such as the spreadsheetin screenshot 1. This could be asimple table that is printed outand stuck on the wall on theward to record daily dischargeinformation.
2. Complete this spreadsheeteveryday across a 6 weekperiod. This will give youenough data for it not to bejust a ‘one off’ occurrence.
3. Once you have all the datayou will need to add up thetotal across the 6 weeks foreach hour. As in the screenshotbelow so that you have acumulative total of each houracross the 6 week period.
Screenshot 1
42
2.
CH_TKT_PDF:53226 INNERS 12/9/08 12:44 Page 44

4. Once you have the total thenhighlight the data in the totalcolumn and the time columnas shown in screenshot 2. Clickon the chart wizard andchoose a line graph from thechart type. Click next andname the chart and the axisappropriately as shown inscreenshot 3.
Screenshot 2
Screenshot 3
43
2.Admission and Discharge
CH_TKT_PDF:53226 INNERS 12/9/08 12:44 Page 45
44 The Productive Community Hospital Toolkit
Screenshot 4 Screenshot 5
5. The graph will give you anindication of where the peaksand troughs currently existwith your current dischargeprocess. See screenshot 4.
6. You will need to repeat theprocess from step 3 to step 5but replace the hours of theday with the days of the week(see screenshot 5) ie, so howmany discharges happenedevery Monday, then everyTuesday etc. Looking at yourdischarges by day of the weekacross a 6 week period willgive you an indication of whatyour discharge process is ableto deliver.
7. You may want to think aboutwhat you could change in thedischarge process to smoothout this variation and you canrepeat this exercise as part ofyour 6 phase improvementprocess to see if it has made adifference.
2.
CH_TKT_PDF:53226 INNERS 12/9/08 12:44 Page 46

45
CH_TKT_PDF:53226 INNERS 12/9/08 12:44 Page 47
46
2.
Foward planning tool instructions
This tool enables the day hospitalto monitor which patients areattending on each day andcalculate the amount of staffinput required.
This will be compared to the staffcapacity for that day to identifywhen the day hospital hasexceeded or is close to exceedingcapacity.
The tool has been developed sothat most data entry is quick andeasy and it is possible to navigatebetween each day easily.
The tool contains informationabout the staff working in theunit, what staff type they are (ie,nurse, physio etc.) and a defaultamount of time they each haveto see patients.
The tool also contains informationabout the patients currentlyattending the unit and a numberof default ‘Patient Types’.
For each patient type there isassigned a default amount oftime that is required of each stafftype in a single attendance.
Examples of Patient Types mayinclude ‘New Admission’, ‘StandardFollow Up’, and ‘Follow-up – NoPhysio’. The default time is derivedfrom the Time to Care Audit whichyou have already carried out.
For each day that the unit is openthere will be a page in the toolwhere the patients attending areadded and assigned a patienttype for that day. A patient canbe assigned any ‘Patient Type’,this may vary for each of theirvisits.
The staffs on shift for that day isadded and the tool compares thetotal amount of predicted timerequired for all of the patientsattending that day against theavailable staff time and anyshortfalls in staff time versuspredicted demand arehighlighted.
The tool is designed to be quickand simple to use and allows theusers to manually override any ofthe default data that is enteredin the tool.
CH_TKT_PDF:53226 INNERS 12/9/08 12:44 Page 48

Guidance material
The following is a brief systemuser guide on how the tool isoperated.
1. Enter the following passwordin lowercase to open the tool:• productive
2. When the tool is first openedit will open onto a sheet called‘Front Page’. This sheet is usedto maintain the defaultinformation in the tool.Screenshot 1 shows the ‘FrontPage’ sheet.
3. The tool will eventuallycontain a separate sheet foreach day loaded into the tool
4. The tool can only hold 12months worth of days at atime. Eventually it is necessaryto maintain the tool by addingmonths to be used in thefuture and by archivingmonths that have beencompleted.
Screenshot 1
47 The Productive Community Hospital Toolkit
2.Forward Planning
CH_TKT_PDF:53226 INNERS 12/9/08 12:44 Page 49
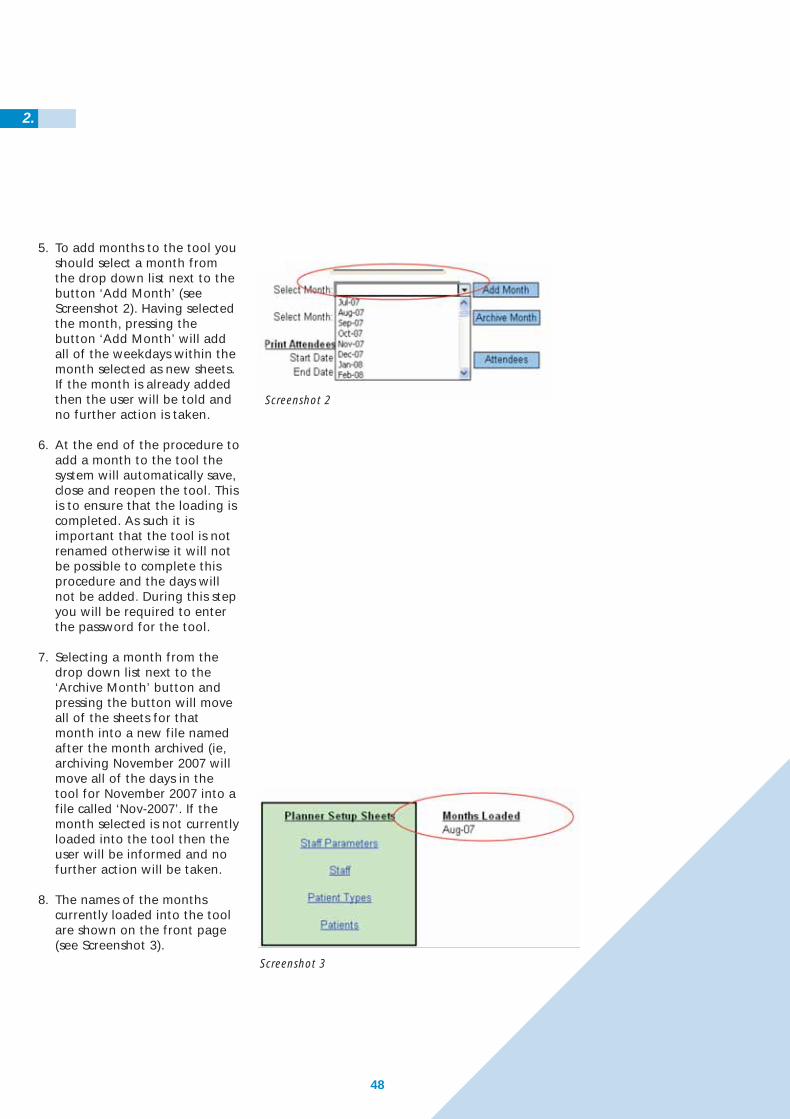
5. To add months to the tool youshould select a month fromthe drop down list next to thebutton ‘Add Month’ (seeScreenshot 2). Having selectedthe month, pressing thebutton ‘Add Month’ will addall of the weekdays within themonth selected as new sheets.If the month is already addedthen the user will be told andno further action is taken.
6. At the end of the procedure toadd a month to the tool thesystem will automatically save,close and reopen the tool. Thisis to ensure that the loading iscompleted. As such it isimportant that the tool is notrenamed otherwise it will notbe possible to complete thisprocedure and the days willnot be added. During this stepyou will be required to enterthe password for the tool.
7. Selecting a month from thedrop down list next to the‘Archive Month’ button andpressing the button will moveall of the sheets for thatmonth into a new file namedafter the month archived (ie,archiving November 2007 willmove all of the days in thetool for November 2007 into afile called ‘Nov-2007’. If themonth selected is not currentlyloaded into the tool then theuser will be informed and nofurther action will be taken.
8. The names of the monthscurrently loaded into the toolare shown on the front page(see Screenshot 3).
Screenshot 3
Screenshot 2
2.
48
CH_TKT_PDF:53226 INNERS 12/9/08 12:44 Page 50
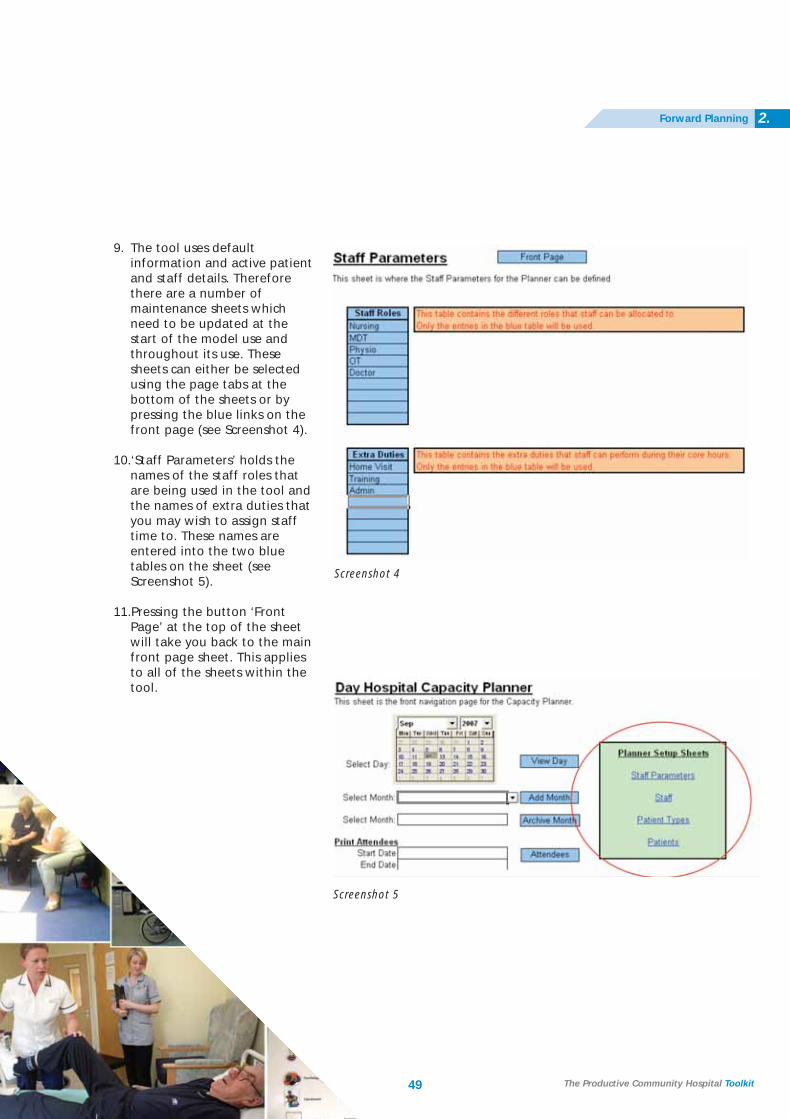
9. The tool uses defaultinformation and active patientand staff details. Thereforethere are a number ofmaintenance sheets whichneed to be updated at thestart of the model use andthroughout its use. Thesesheets can either be selectedusing the page tabs at thebottom of the sheets or bypressing the blue links on thefront page (see Screenshot 4).
10.‘Staff Parameters’ holds thenames of the staff roles thatare being used in the tool andthe names of extra duties thatyou may wish to assign stafftime to. These names areentered into the two bluetables on the sheet (seeScreenshot 5).
11.Pressing the button ‘FrontPage’ at the top of the sheetwill take you back to the mainfront page sheet. This appliesto all of the sheets within thetool.
Screenshot 4
Screenshot 5
2.Forward Planning
49 The Productive Community Hospital Toolkit
CH_TKT_PDF:53226 INNERS 12/9/08 12:44 Page 51

50
2.
12.The ‘Staff’ sheet holds thenames; role and effectiveworking hours for each staffmember (see Screenshot 6).Effective working hours shouldbe the amount of time thatthis member of staff hasavailable to see patientswhenthey are on shift.
13.The ‘Patient Types’ sheet holdsthe different patient types anddefault timings that will beused in the tool (seeScreenshot 7).
If ‘Yes’ is selected in the ‘UseDefault’ column then thesedefault times will be assignedto a patient when theassociated patient type isselected for that patient. If‘No’ is selected then the nameof the patient type will beavailable to be assigned to thepatient but no default timeswill be assigned to the patient. The roles at the top of thetable reflect the staff rolesentered into the ‘StaffParameters’ sheet.
Setting up ‘Patient Types’ isthe key to the model. Eachpatient type can have adifferent amount of time foreach member of the MDTassigned to them.
Screenshot 6
Screenshot 7
CH_TKT_PDF:53226 INNERS 12/9/08 12:44 Page 52
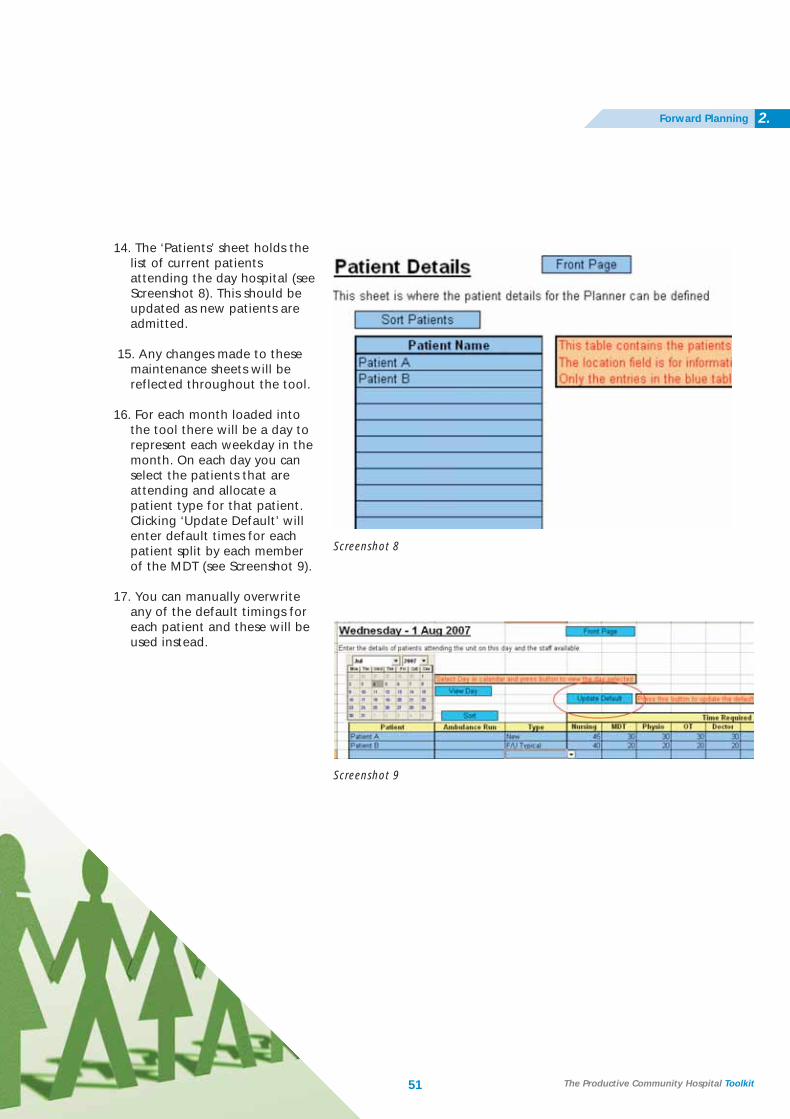
14. The ‘Patients’ sheet holds thelist of current patientsattending the day hospital (seeScreenshot 8). This should beupdated as new patients areadmitted.
15. Any changes made to thesemaintenance sheets will bereflected throughout the tool.
16. For each month loaded intothe tool there will be a day torepresent each weekday in themonth. On each day you canselect the patients that areattending and allocate apatient type for that patient.Clicking ‘Update Default’ willenter default times for eachpatient split by each memberof the MDT (see Screenshot 9).
17. You can manually overwriteany of the default timings foreach patient and these will beused instead.
Screenshot 8
Screenshot 9
2.Forward Planning
51 The Productive Community Hospital Toolkit
CH_TKT_PDF:53226 INNERS 12/9/08 12:44 Page 53
52
2.
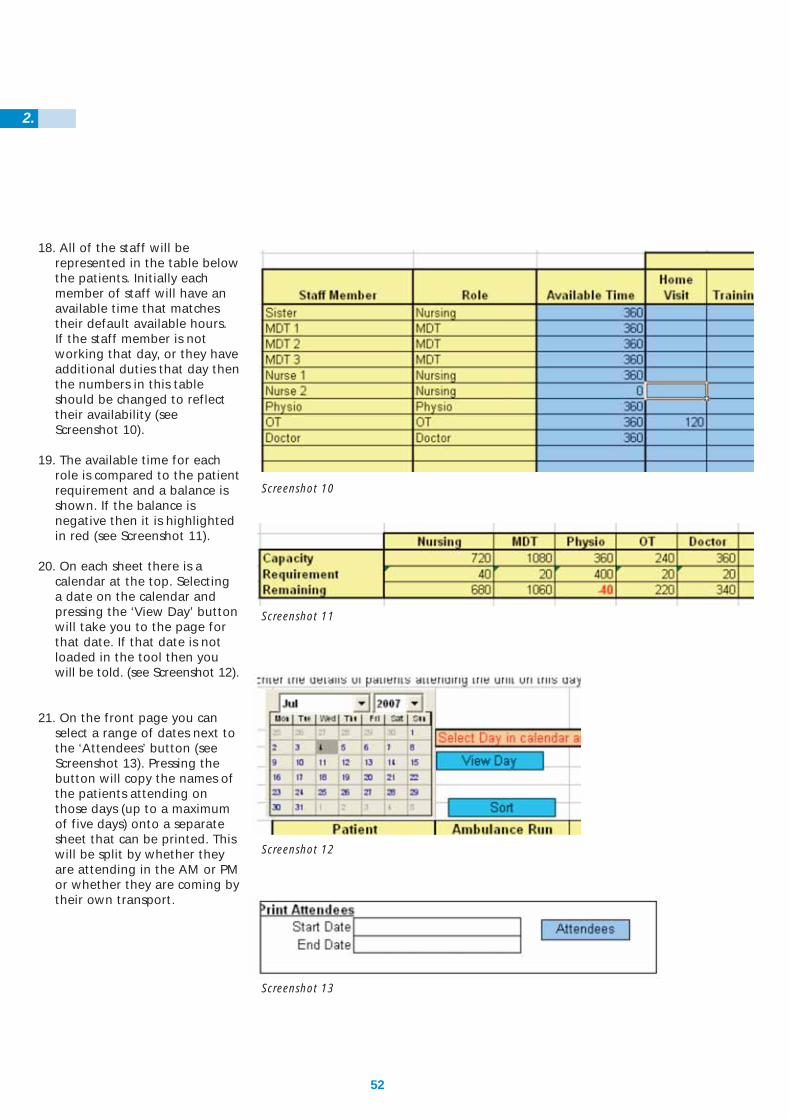
18. All of the staff will berepresented in the table belowthe patients. Initially eachmember of staff will have anavailable time that matchestheir default available hours. If the staff member is notworking that day, or they haveadditional duties that day thenthe numbers in this tableshould be changed to reflecttheir availability (seeScreenshot 10).
19. The available time for eachrole is compared to the patientrequirement and a balance isshown. If the balance isnegative then it is highlightedin red (see Screenshot 11).
20. On each sheet there is acalendar at the top. Selectinga date on the calendar andpressing the ‘View Day’ buttonwill take you to the page forthat date. If that date is notloaded in the tool then youwill be told. (see Screenshot 12).
21. On the front page you canselect a range of dates next tothe ‘Attendees’ button (seeScreenshot 13). Pressing thebutton will copy the names ofthe patients attending onthose days (up to a maximumof five days) onto a separatesheet that can be printed. Thiswill be split by whether theyare attending in the AM or PMor whether they are coming bytheir own transport.
Screenshot 10
Screenshot 11
Screenshot 12
Screenshot 13
CH_TKT_PDF:53226 INNERS 12/9/08 12:44 Page 54

CH_TKT_PDF:53226 INNERS 12/9/08 12:44 Page 55

Acknowledgements
Thank you to all staff at:
Chippenham Community Hospital, Wiltshire PCT
Farnham Hospital and Centre for Health, Surrey PCT
Grindon Lane Primary Care Centre, Sunderland TPCT
Queen Mary’s Hospital, Roehampton, Wandsworth PCT
St Benedicts Day Hospital, Sunderland TPCT
NHS Institute for Innovation and Improvement
Staff from our improvement partners
Members of the Expert Panel
Thanks also go to:
Liz Thiebe, Head of Productive Series, NHS Institute for Innovation and Improvement
Julie Clatworthy, Clinical Lead, NHS Institute for Innovation and Improvement
Helen Bevan, Director of Service Transformation, NHS Institute for Innovation and Improvement
Maggie Morgan-Cooke, Head of Productive Ward/Productive Community Hospital, NHS Institute for Innovation and Improvement
Sue Deane, Clinical Facilitator, NHS Institute for Innovation and Improvement
Kim Parish, Clinical Facilitator, NHS Institute for Innovation and Improvement
Clare Neill, Communications Associate, NHS Institute for Innovation and Improvement
Ray Foley, Associate, NHS Institute for Innovation and Improvement
CH_TKT_PDF:53226 INNERS 12/9/08 12:44 Page 56
Website: For more information please visit www.institute.nhs.uk/productivecommunityhospital
Contact the Productive Community Hospital team:[email protected]
ISBN: 978-1-906535-49-0Copyright © NHS Institute for Innovation andImprovement 2008 all rights reserved
CH_TKT_PDF:53226 INNERS 12/9/08 12:44 Page 57