RedHawk Linux Frequently Asked Questions - Concurrent Software
22
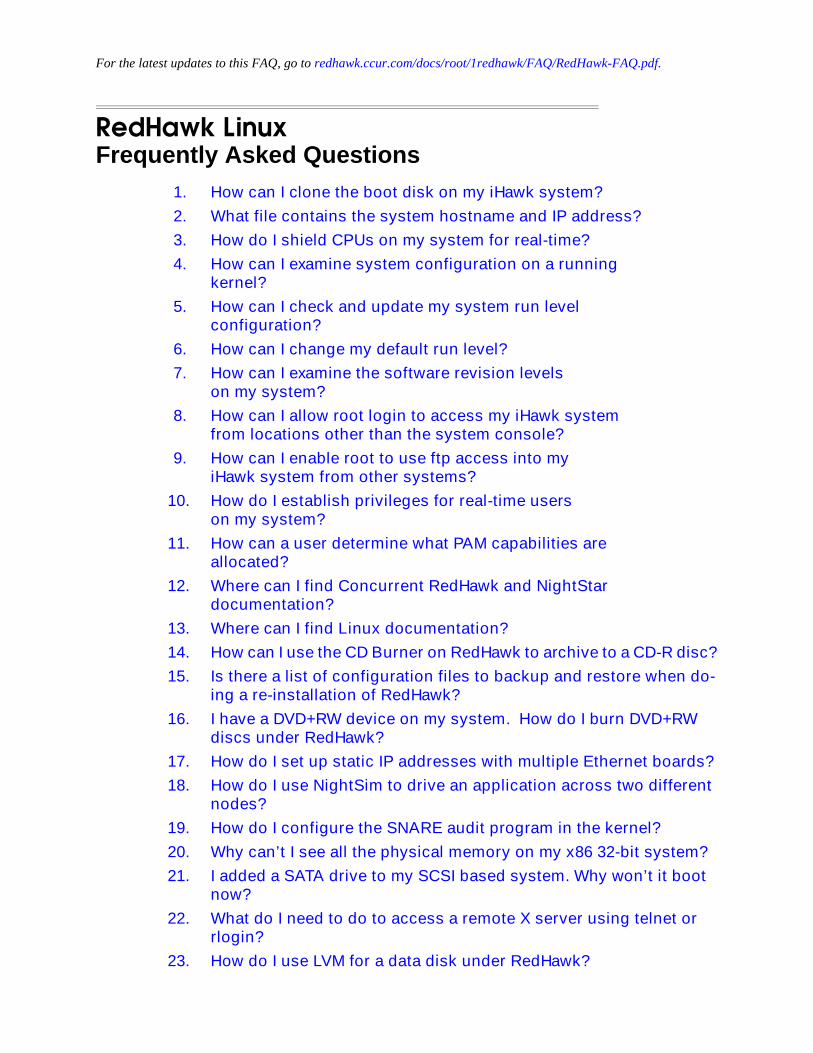
For the latest updates to this FAQ, go to redhawk.ccur.com/docs/root/1redhawk/FAQ/RedHawk-FAQ.pdf. RedHawk Linux Frequently Asked Questions 1. How can I clone the boot disk on my iHawk system? 2. What file contains the system hostname and IP address? 3. How do I shield CPUs on my system for real-time? 4. How can I examine system configuration on a running kernel? 5. How can I check and update my system run level configuration? 6. How can I change my default run level? 7. How can I examine the software revision levels on my system? 8. How can I allow root login to access my iHawk system from locations other than the system console? 9. How can I enable root to use ftp access into my iHawk system from other systems? 10. How do I establish privileges for real-time users on my system? 11. How can a user determine what PAM capabilities are allocated? 12. Where can I find Concurrent RedHawk and NightStar documentation? 13. Where can I find Linux documentation? 14. How can I use the CD Burner on RedHawk to archive to a CD-R disc? 15. Is there a list of configuration files to backup and restore when do- ing a re-installation of RedHawk? 16. I have a DVD+RW device on my system. How do I burn DVD+RW discs under RedHawk? 17. How do I set up static IP addresses with multiple Ethernet boards? 18. How do I use NightSim to drive an application across two different nodes? 19. How do I configure the SNARE audit program in the kernel? 20. Why can’t I see all the physical memory on my x86 32-bit system? 21. I added a SATA drive to my SCSI based system. Why won’t it boot now? 22. What do I need to do to access a remote X server using telnet or rlogin? 23. How do I use LVM for a data disk under RedHawk?
Transcript of RedHawk Linux Frequently Asked Questions - Concurrent Software
For the latest updates to this FAQ, go to redhawk.ccur.com/docs/root/1redhawk/FAQ/RedHawk-FAQ.pdf.
RedHawk Linux Frequently Asked Questions
1. How can I clone the boot disk on my iHawk system?
2. What file contains the system hostname and IP address?
3. How do I shield CPUs on my system for real-time?
4. How can I examine system configuration on a runningkernel?
5. How can I check and update my system run level configuration?
6. How can I change my default run level?
7. How can I examine the software revision levels on my system?
8. How can I allow root login to access my iHawk system from locations other than the system console?
9. How can I enable root to use ftp access into my iHawk system from other systems?
10. How do I establish privileges for real-time users on my system?
11. How can a user determine what PAM capabilities are allocated?
12. Where can I find Concurrent RedHawk and NightStar documentation?
13. Where can I find Linux documentation?
14. How can I use the CD Burner on RedHawk to archive to a CD-R disc?
15. Is there a list of configuration files to backup and restore when do-ing a re-installation of RedHawk?
16. I have a DVD+RW device on my system. How do I burn DVD+RW discs under RedHawk?
17. How do I set up static IP addresses with multiple Ethernet boards?
18. How do I use NightSim to drive an application across two different nodes?
19. How do I configure the SNARE audit program in the kernel?
20. Why can’t I see all the physical memory on my x86 32-bit system?
21. I added a SATA drive to my SCSI based system. Why won’t it boot now?
22. What do I need to do to access a remote X server using telnet or rlogin?
23. How do I use LVM for a data disk under RedHawk?

RedHawk Linux Frequently Asked Questions
RedHawk Linux FAQs08980011-140
September 2013
24. How do I reinstall the Gnome power manager and screen saver packages
25. How can I change the NIC device enumeration and make it persis-tent across reboots?
26. How do I get my system using EFI BIOS to boot again after a system configuration change?
27. Why does sendmail stall during boot?
1
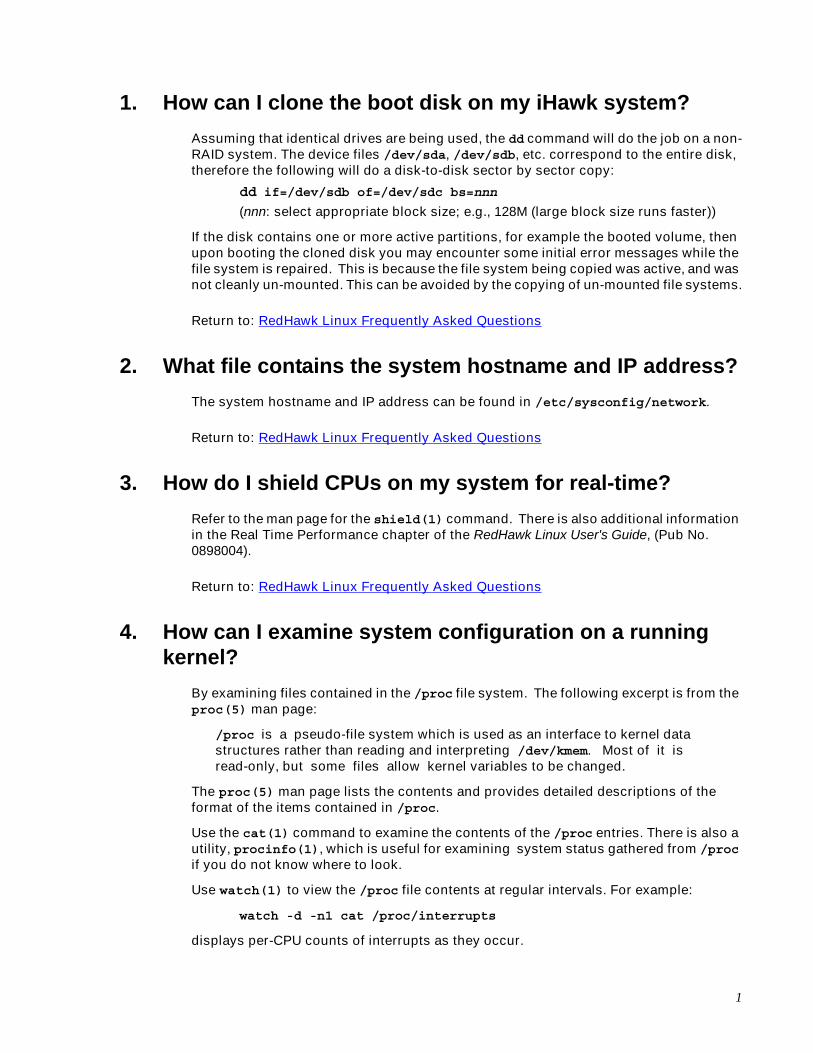
1. How can I clone the boot disk on my iHawk system?
Assuming that identical drives are being used, the dd command will do the job on a non-RAID system. The device files /dev/sda, /dev/sdb, etc. correspond to the entire disk, therefore the following will do a disk-to-disk sector by sector copy:
dd if=/dev/sdb of=/dev/sdc bs=nnn
(nnn: select appropriate block size; e.g., 128M (large block size runs faster))
If the disk contains one or more active partitions, for example the booted volume, then upon booting the cloned disk you may encounter some initial error messages while the file system is repaired. This is because the file system being copied was active, and was not cleanly un-mounted. This can be avoided by the copying of un-mounted file systems.
Return to: RedHawk Linux Frequently Asked Questions
2. What file contains the system hostname and IP address?
The system hostname and IP address can be found in /etc/sysconfig/network.
Return to: RedHawk Linux Frequently Asked Questions
3. How do I shield CPUs on my system for real-time?
Refer to the man page for the shield(1) command. There is also additional information in the Real Time Performance chapter of the RedHawk Linux User's Guide, (Pub No. 0898004).
Return to: RedHawk Linux Frequently Asked Questions
4. How can I examine system configuration on a runningkernel?
By examining files contained in the /proc file system. The following excerpt is from the proc(5) man page:
/proc is a pseudo-file system which is used as an interface to kernel data structures rather than reading and interpreting /dev/kmem. Most of it is read-only, but some files allow kernel variables to be changed.
The proc(5) man page lists the contents and provides detailed descriptions of the format of the items contained in /proc.
Use the cat(1) command to examine the contents of the /proc entries. There is also a utility, procinfo(1), which is useful for examining system status gathered from /proc if you do not know where to look.
Use watch(1) to view the /proc file contents at regular intervals. For example:
watch -d -n1 cat /proc/interrupts
displays per-CPU counts of interrupts as they occur.
2
Return to: RedHawk Linux Frequently Asked Questions
5. How can I check and update my system run level configuration?
Use /sbin/chkconfig to manage the various run level scripts. This relieves the system administrator of the tedious task of manually maintaining all of the symbolic links in the /etc/rc[0-6].d hierarchy. See the chkconfig(8) man page for more information.
For example, to enable the lpd service use the following command:
chkconfig lpd on
To disable the lpd service:
chkconfig lpd off
Newly added services (installed manually or via rpm) may need to be registered with the chkconfig system before they can be controlled. In this case you will need to invoke chkconfig as follows:
chkconfig -add mynewservice
before you can enable and disable the service. See the chkconfig(8) man page for more information.
Return to: RedHawk Linux Frequently Asked Questions
6. How can I change my default run level?
Change the default run level by editing the following line in the file /etc/inittab:
id:5:initdefault:
This entry shows run level 5 (Full X Window System level) as the default.
Switch to run level 3 for text-only mode.
Return to: RedHawk Linux Frequently Asked Questions
7. How can I examine the software revision levels on my system?
Use the rpm command (RPM Package Manager). Executing the command
rpm -qa
will show you the list of currently installed rpm's. There are additional options available to rpm which are detailed in the rpm(8) man page. The contents of the rpm(8) man page should be thoroughly understood by the System Administrator.
Return to: RedHawk Linux Frequently Asked Questions
3
8. How can I allow root login to access my iHawk system from locations other than the system console?
Edit the file /etc/pam.d/remote if it exists or /etc/pam.d/login. Change the entry:
auth required /lib/security/pam_securetty.so (i386 systems)
auth required /lib64/security/pam_securetty.so (x86_64 systems)
to:
auth optional /lib/security/pam_securetty.so (i386 systems)
auth optional /lib64/security/pam_securetty.so (x86_64 systems)
NOTE: This change removes the “secure tty” concept and is NOT recommended for any system that is not protected within a secure area.
Return to: RedHawk Linux Frequently Asked Questions
9. How can I enable root to use ftp access into my iHawk system from other systems?
Root login access must be established. (See FAQ entry 8 above if necessary).
Follow procedures for RedHawk Release 1.x or RedHawk Release 2.x/4.x/5.x as appropriate.
RedHawk Release 1.x 9
1. Edit the file /etc/ftpusers and comment out the entry for root.
2. Edit the file /etc/ftpaccess and follow the listed instructions:
At the line containing:
# Don't allow system accounts to log in over ftpdeny-uid %-99 %65534-deny-gid %-99 %65534-
Add:
allow-uid rootallow-gid root
At the line containing:
# If you wish to allow user1 and user2 to access other# directories, use the line below:
Add:
realuser root
4
RedHawk Release 2.x/4.x/5.x 9
1. Verify that vsftpd is on in the desired run state:
# chkconfig --list vsftpd
2. Comment out the ‘root’ entries in the following two files:
RedHawk 2.x:
/etc/vsftpd.ftpusers/etc/vsftpd.user_list
RedHawk 4.x/5.x:
/etc/vsftpd/ftpusers/etc/vsftpd/user_list
3. Then run:
# service vsftpd restart
Return to: RedHawk Linux Frequently Asked Questions
10. How do I establish privileges for real-time users on my system?
In RedHawk this is known as "capabilities" and is controlled by PAM (Pluggable Authentication Modules). The procedure for using PAM in general is found in man pages and Linux Documentation. RedHawk Linux specific information (with examples) can be found in the PAM chapter of the RedHawk Linux User's Guide (Pub No. 0898004).
The procedure is described below:
• Enable the use of PAM capabilities for login by editing the file /etc/pam.d/remote if it exists or /etc/pam.d/login and add the following line to the end of the file:
session required /lib/security/pam_capability.so (i386 systems)session required /lib64/security/pam_capability.so (x86_64 systems)
• Add the same line to other /etc/pam.d files for services that users would use to log into the system; for example, Gnome Desktop Manager (/etc/pam.d/gdm), KDE (/etc/pam.d/kde), rsh (/etc/pam.d/rsh), ssh (/etc/pam.d/sshd), etc. Other services may apply at your site.
Note: In order to use PAM with ssh, the /etc/ssh/sshd_config file must have the following option set:
UsePrivilegeSeparation no
• Add the appropriate "role" and "user" entries to the file /etc/security/capability.conf.
A role defines specific capabilities (privileges). Roles are assigned to users, granting them the capabilities defined in those roles. See the comments in the capability.conf file. For a more complete discussion and examples, see the PAM chapter of the RedHawk Linux User's Guide.
5
After making the appropriate entries, the user then obtains allowed capabilities at subsequent logins.
Return to: RedHawk Linux Frequently Asked Questions
11. How can a user determine what PAM capabilities are allocated?
The capabilities present for a particular pid (process id) may be examined in the /proc file system, or by using the utility /usr/sbin/getpcaps, which will display capabilities in ASCII format.
A list of capabilities is found in /usr/include/sys/capability.h. The RedHawk Linux User’s Guide (Pub No. 0898004-410 and later) contains an appendix that describes the permissions provided by each capability at length.
Return to: RedHawk Linux Frequently Asked Questions
12. Where can I find Concurrent RedHawk and NightStar documentation?
There are a number of ways to access this documentation.
• RedHawk documentation in PDF format is located at /usr/share/doc/ccur. It
can be viewed by clicking on the Documents desktop icon on your
RedHawk system.
• NightStar RT documentation is provided with the product in three electronic forms:
• By selecting the Help menu from any tool.
• In PDF format under /usr/share/doc/NightStar/pdf.
• In HTML format under /usr/share/doc/NightStar/html.
• Documentation in PDF format is also available from Concurrent’s web site at redhawk.ccur.com/docs.
Return to: RedHawk Linux Frequently Asked Questions
13. Where can I find Linux documentation?
On your RedHawk installation, documentation on kernel internals can be found under /usr/src/linux*RedHawk*/Documentation. All Linux related documentation is located under /usr/share/docs.
There are numerous resources available in the public domain. Of interest to RedHawk users as a starting point is the CentOS website at www.centos.org/docs.
6
Another resource is The Linux Documentation Project (TLDP) at www.tldp.org which is also a link from the CentOS docs page. Other sources include Google searches and newsgroups.
Return to: RedHawk Linux Frequently Asked Questions
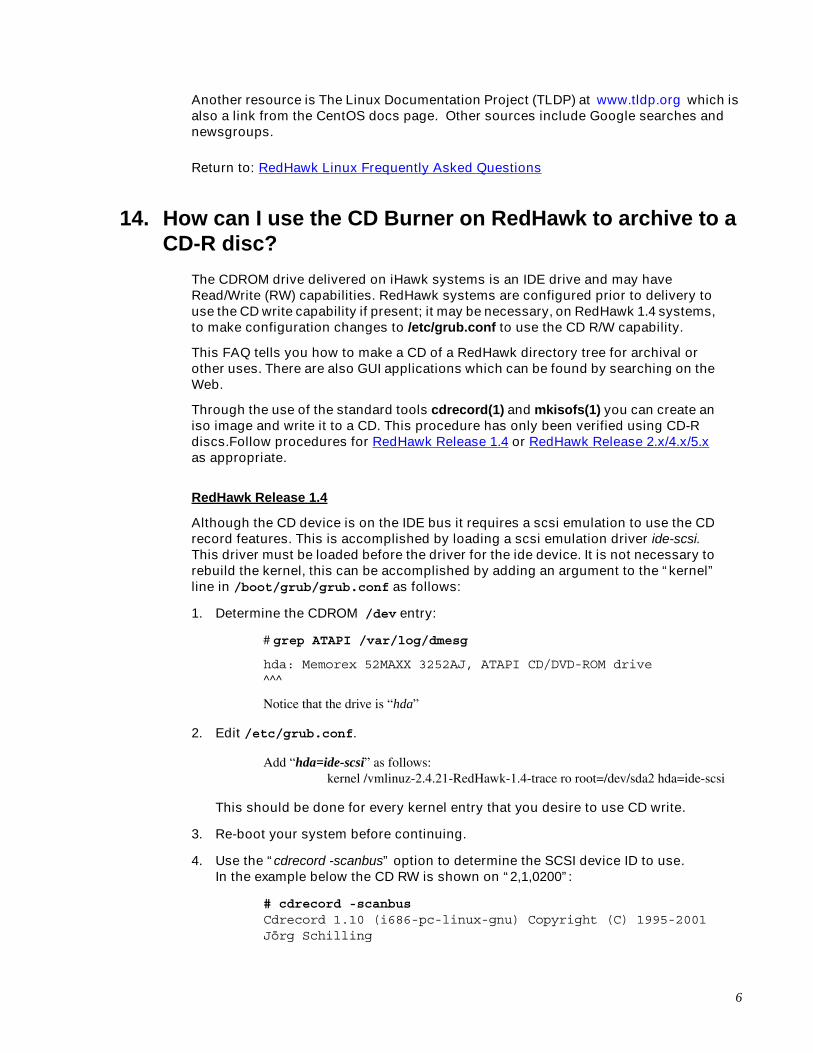
14. How can I use the CD Burner on RedHawk to archive to a CD-R disc?
The CDROM drive delivered on iHawk systems is an IDE drive and may have Read/Write (RW) capabilities. RedHawk systems are configured prior to delivery to use the CD write capability if present; it may be necessary, on RedHawk 1.4 systems, to make configuration changes to /etc/grub.conf to use the CD R/W capability.
This FAQ tells you how to make a CD of a RedHawk directory tree for archival or other uses. There are also GUI applications which can be found by searching on the Web.
Through the use of the standard tools cdrecord(1) and mkisofs(1) you can create an iso image and write it to a CD. This procedure has only been verified using CD-R discs.Follow procedures for RedHawk Release 1.4 or RedHawk Release 2.x/4.x/5.x as appropriate.
RedHawk Release 1.4 14
Although the CD device is on the IDE bus it requires a scsi emulation to use the CD record features. This is accomplished by loading a scsi emulation driver ide-scsi. This driver must be loaded before the driver for the ide device. It is not necessary to rebuild the kernel, this can be accomplished by adding an argument to the “kernel” line in /boot/grub/grub.conf as follows:
1. Determine the CDROM /dev entry:
# grep ATAPI /var/log/dmesg
hda: Memorex 52MAXX 3252AJ, ATAPI CD/DVD-ROM drive^^^
Notice that the drive is “hda”
2. Edit /etc/grub.conf.
Add “hda=ide-scsi” as follows:kernel /vmlinuz-2.4.21-RedHawk-1.4-trace ro root=/dev/sda2 hda=ide-scsi
This should be done for every kernel entry that you desire to use CD write.
3. Re-boot your system before continuing.
4. Use the “cdrecord -scanbus” option to determine the SCSI device ID to use. In the example below the CD RW is shown on “2,1,0200”:
# cdrecord -scanbusCdrecord 1.10 (i686-pc-linux-gnu) Copyright (C) 1995-2001 Jörg Schilling

7
Linux sg driver version: 3.1.25Using libscg version 'schily-0.5'scsibus0:
0,0,0 0) 'MAXTOR ' 'ATLAS10K4_36SCA ' 'DFM0' Disk0,1,0 1) *0,2,0 2) *0,3,0 3) *0,4,0 4) *0,5,0 5) *0,6,0 6) 'PE/PV ' '1x5 SCSI BP ' '1.1 ' Processor0,7,0 7) *
scsibus2:2,0,0200) 'HL-DT-ST' 'RW/DVD GCC-4240N' 'E112' Removable
CD-ROM2,1,0201) *2,2,0202) *2,3,0203) *2,4,0204) *2,5,0205) *2,6,0206) *2,7,0207) *
5. To test the CD RW installation, use the mkisofs command to create an ISO9660 image.
# mkisofs -R -o cdimage.iso ./mytree
Where mytree is the directory tree to use.
To check the iso image before writing to CD:
# mount -t iso9660 -o loop ./cdimage.iso ./mnt# ls -lR ./mnt #to verify the contents# umount ./mnt
Write the iso image to CD.
# cdrecord dev=2,0,0200 ./cdimage.iso
This writes the iso image to the CD. Test the result by ejecting, inserting, and examining the CD contents.
RedHawk Release 2.x/4.x/5.x
1. To test the CD RW installation, use the mkisofs command to create an ISO9660 image.
# mkisofs -R -o cdimage.iso ./mytree
Where mytree is the directory tree to use.
To check the iso image before writing to CD:
# mkdir ./mnt# mount -t iso9660 -o loop ./cdimage.iso ./mnt# ls -lR ./mnt #to verify the contents# umount ./mnt# rmdir ./mnt
Write the iso image to CD.
8
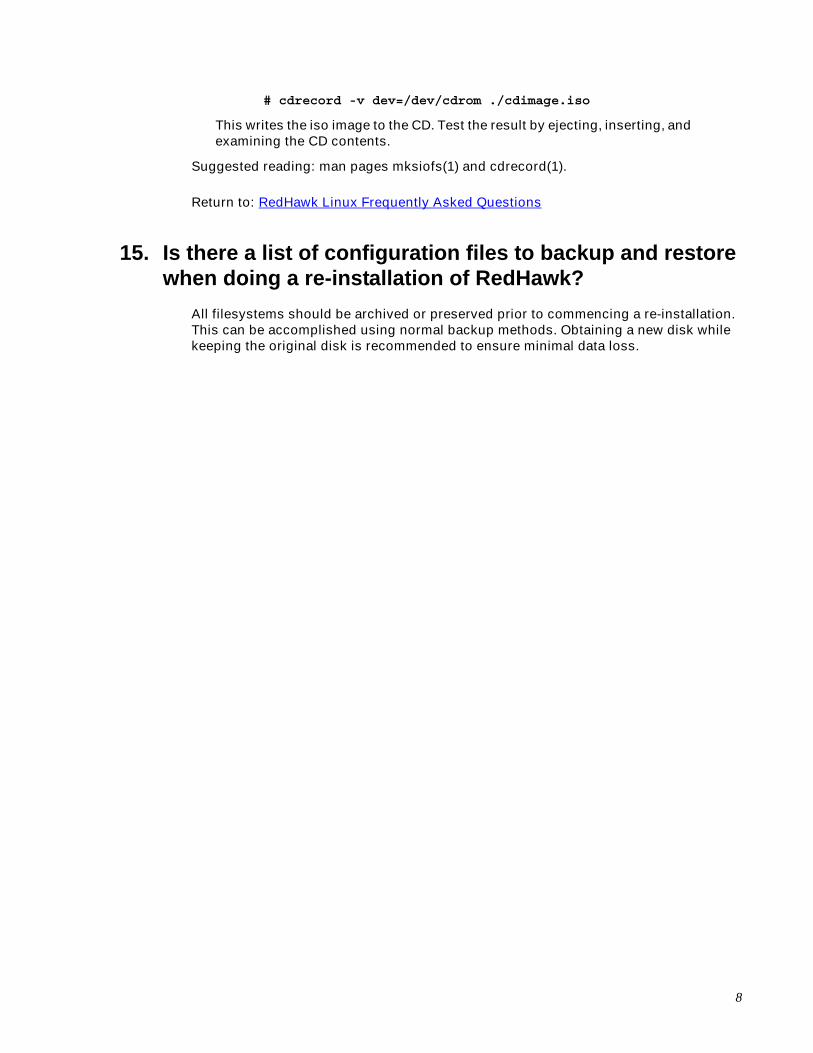
# cdrecord -v dev=/dev/cdrom ./cdimage.iso
This writes the iso image to the CD. Test the result by ejecting, inserting, and examining the CD contents.
Suggested reading: man pages mksiofs(1) and cdrecord(1).
Return to: RedHawk Linux Frequently Asked Questions
15. Is there a list of configuration files to backup and restore when doing a re-installation of RedHawk?
All filesystems should be archived or preserved prior to commencing a re-installation. This can be accomplished using normal backup methods. Obtaining a new disk while keeping the original disk is recommended to ensure minimal data loss.
9
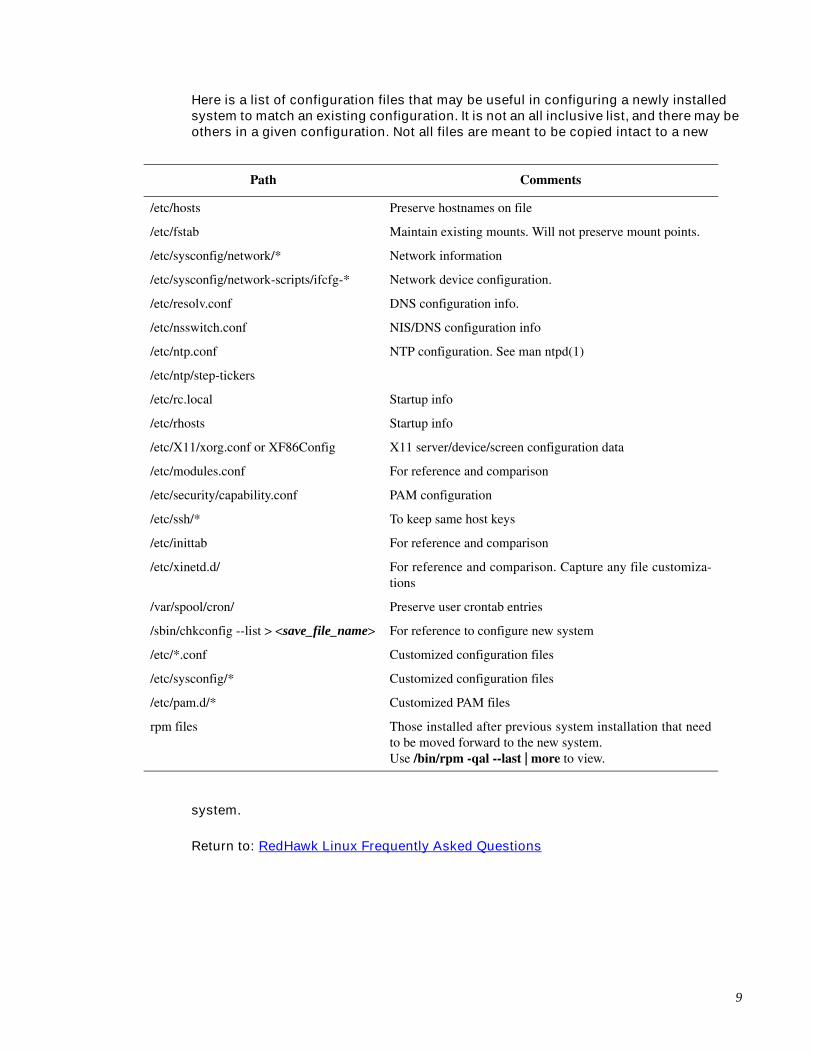
Here is a list of configuration files that may be useful in configuring a newly installed system to match an existing configuration. It is not an all inclusive list, and there may be others in a given configuration. Not all files are meant to be copied intact to a new
system.
Return to: RedHawk Linux Frequently Asked Questions
Path Comments
/etc/hosts Preserve hostnames on file
/etc/fstab Maintain existing mounts. Will not preserve mount points.
/etc/sysconfig/network/* Network information
/etc/sysconfig/network-scripts/ifcfg-* Network device configuration.
/etc/resolv.conf DNS configuration info.
/etc/nsswitch.conf NIS/DNS configuration info
/etc/ntp.conf NTP configuration. See man ntpd(1)
/etc/ntp/step-tickers
/etc/rc.local Startup info
/etc/rhosts Startup info
/etc/X11/xorg.conf or XF86Config X11 server/device/screen configuration data
/etc/modules.conf For reference and comparison
/etc/security/capability.conf PAM configuration
/etc/ssh/* To keep same host keys
/etc/inittab For reference and comparison
/etc/xinetd.d/ For reference and comparison. Capture any file customiza-tions
/var/spool/cron/ Preserve user crontab entries
/sbin/chkconfig --list > <save_file_name> For reference to configure new system
/etc/*.conf Customized configuration files
/etc/sysconfig/* Customized configuration files
/etc/pam.d/* Customized PAM files
rpm files Those installed after previous system installation that needto be moved forward to the new system. Use /bin/rpm -qal --last | more to view.
10
16. I have a DVD+RW device on my system. How do I burn DVD+RW discs under RedHawk?
Create an ISO image of the files to be placed on the DVD+RW disc.
$ mkisofs -r -J -o ./bkup.iso ./source_directory
This will copy all files in the source_directory into the ‘bkup.iso’ file.
Format a DVD+RW disc.
$ dvd+rw-format -f /dev/cdrom1
To OVERWRITE previous data on the DVD with the contents of the files contained in the bkup.iso image.
$ growisofs -Z /dev/cdrom1=./bkup.iso
To APPEND the contents of the ISO image to a DVD+RW disc:
$ growisofs -M /dev/cdrom1 -R -J ./bkup.iso
Test that the data was written to the disc by mounting the DVD+RW disc in read only mode.
$ mount -o ro -t iso9660 /dev/cdrom1 /mnt/cdrom1
Additional information about DVD+RW for Linux can be found at
http://fy.chalmers.se/~appro/linux/DVD+RW
Return to: RedHawk Linux Frequently Asked Questions
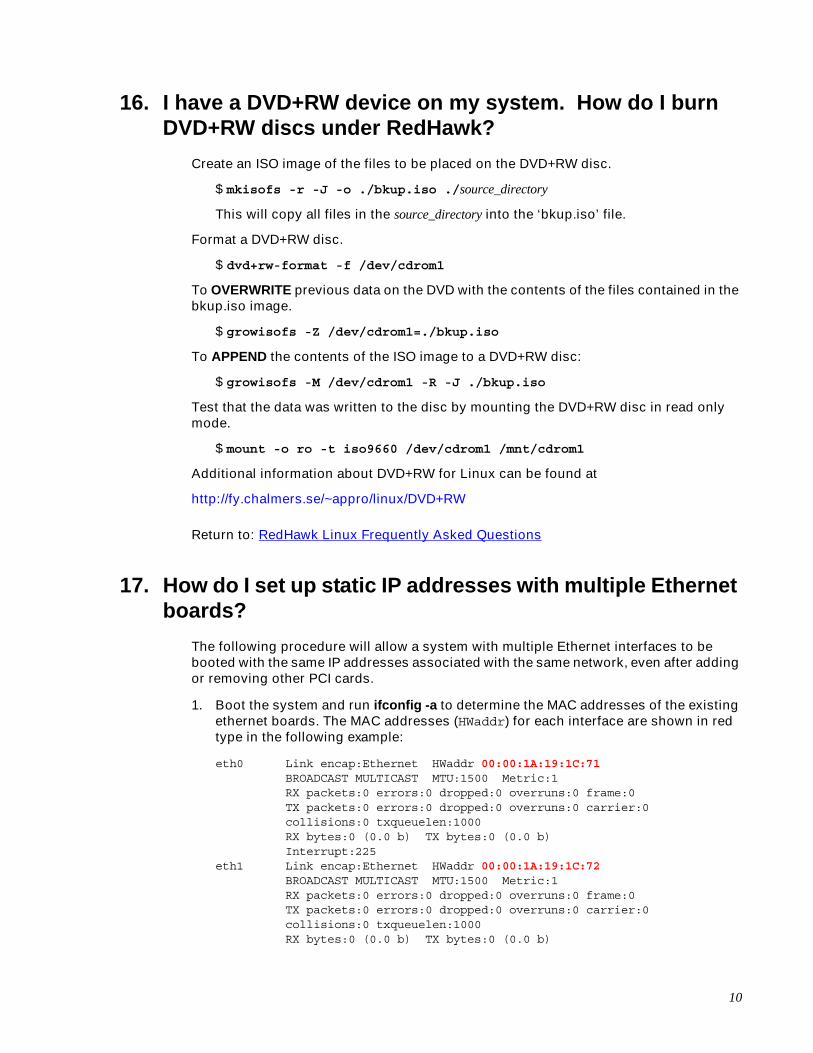
17. How do I set up static IP addresses with multiple Ethernet boards?
The following procedure will allow a system with multiple Ethernet interfaces to be booted with the same IP addresses associated with the same network, even after adding or removing other PCI cards.
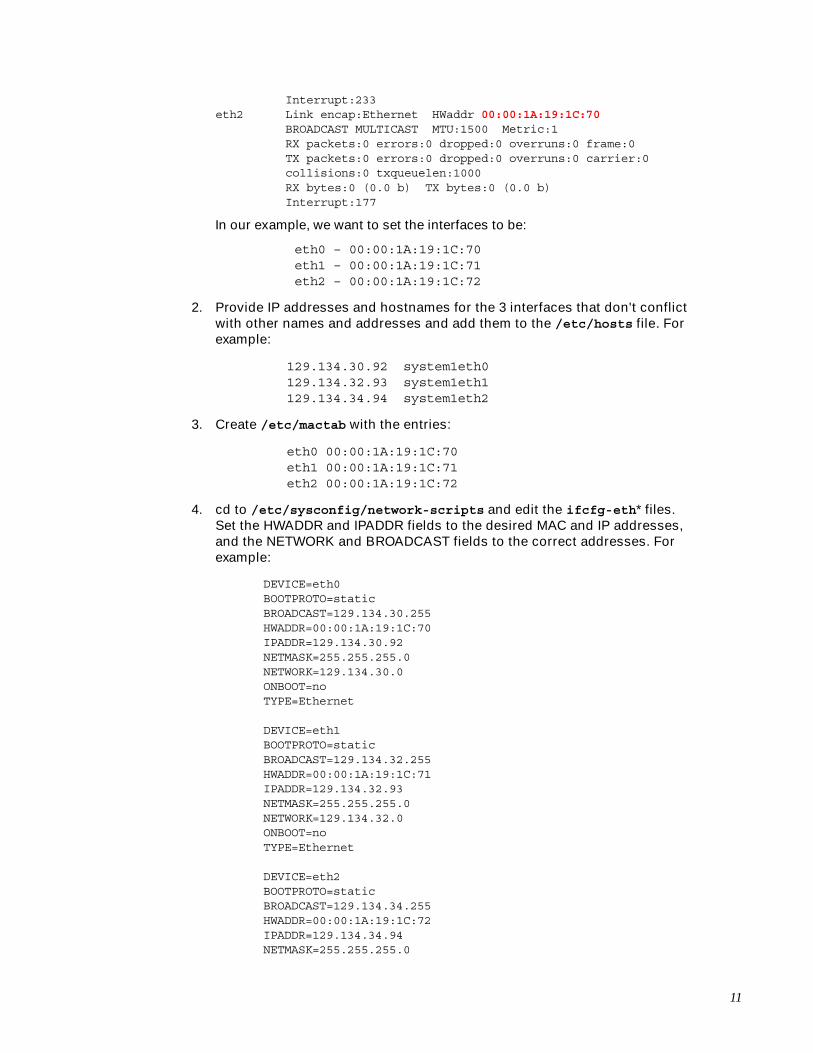
1. Boot the system and run ifconfig -a to determine the MAC addresses of the existing ethernet boards. The MAC addresses (HWaddr) for each interface are shown in red type in the following example:
eth0 Link encap:Ethernet HWaddr 00:00:1A:19:1C:71 BROADCAST MULTICAST MTU:1500 Metric:1 RX packets:0 errors:0 dropped:0 overruns:0 frame:0 TX packets:0 errors:0 dropped:0 overruns:0 carrier:0 collisions:0 txqueuelen:1000 RX bytes:0 (0.0 b) TX bytes:0 (0.0 b) Interrupt:225 eth1 Link encap:Ethernet HWaddr 00:00:1A:19:1C:72 BROADCAST MULTICAST MTU:1500 Metric:1 RX packets:0 errors:0 dropped:0 overruns:0 frame:0 TX packets:0 errors:0 dropped:0 overruns:0 carrier:0 collisions:0 txqueuelen:1000 RX bytes:0 (0.0 b) TX bytes:0 (0.0 b)
11
Interrupt:233 eth2 Link encap:Ethernet HWaddr 00:00:1A:19:1C:70 BROADCAST MULTICAST MTU:1500 Metric:1 RX packets:0 errors:0 dropped:0 overruns:0 frame:0 TX packets:0 errors:0 dropped:0 overruns:0 carrier:0 collisions:0 txqueuelen:1000 RX bytes:0 (0.0 b) TX bytes:0 (0.0 b) Interrupt:177
In our example, we want to set the interfaces to be:
eth0 – 00:00:1A:19:1C:70 eth1 – 00:00:1A:19:1C:71 eth2 – 00:00:1A:19:1C:72
2. Provide IP addresses and hostnames for the 3 interfaces that don't conflict with other names and addresses and add them to the /etc/hosts file. For example:
129.134.30.92 system1eth0 129.134.32.93 system1eth1 129.134.34.94 system1eth2
3. Create /etc/mactab with the entries:
eth0 00:00:1A:19:1C:70 eth1 00:00:1A:19:1C:71 eth2 00:00:1A:19:1C:72
4. cd to /etc/sysconfig/network-scripts and edit the ifcfg-eth* files. Set the HWADDR and IPADDR fields to the desired MAC and IP addresses, and the NETWORK and BROADCAST fields to the correct addresses. For example:
DEVICE=eth0BOOTPROTO=staticBROADCAST=129.134.30.255HWADDR=00:00:1A:19:1C:70IPADDR=129.134.30.92NETMASK=255.255.255.0NETWORK=129.134.30.0ONBOOT=noTYPE=Ethernet
DEVICE=eth1BOOTPROTO=staticBROADCAST=129.134.32.255HWADDR=00:00:1A:19:1C:71IPADDR=129.134.32.93NETMASK=255.255.255.0NETWORK=129.134.32.0ONBOOT=noTYPE=Ethernet
DEVICE=eth2BOOTPROTO=staticBROADCAST=129.134.34.255HWADDR=00:00:1A:19:1C:72IPADDR=129.134.34.94NETMASK=255.255.255.0
12
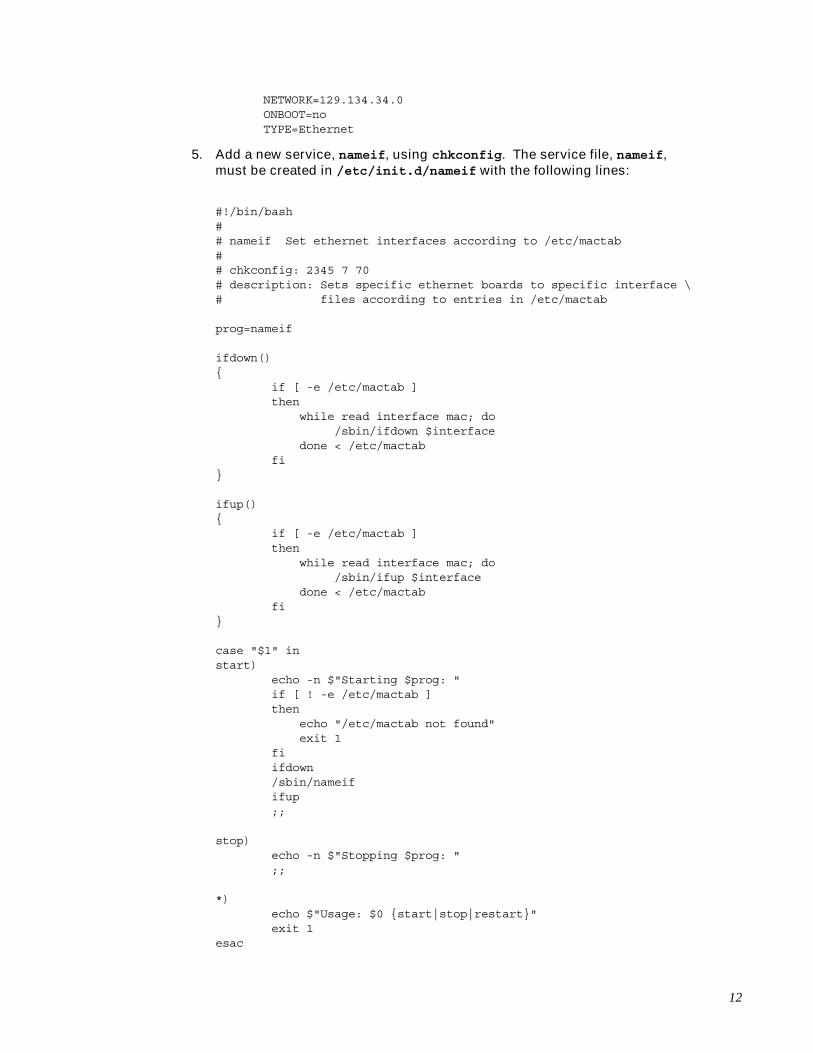
NETWORK=129.134.34.0ONBOOT=noTYPE=Ethernet
5. Add a new service, nameif, using chkconfig. The service file, nameif, must be created in /etc/init.d/nameif with the following lines:
#!/bin/bash## nameif Set ethernet interfaces according to /etc/mactab## chkconfig: 2345 7 70# description: Sets specific ethernet boards to specific interface \# files according to entries in /etc/mactab
prog=nameif ifdown(){ if [ -e /etc/mactab ] then while read interface mac; do /sbin/ifdown $interface done < /etc/mactab fi}
ifup(){ if [ -e /etc/mactab ] then while read interface mac; do /sbin/ifup $interface done < /etc/mactab fi}
case "$1" instart) echo -n $"Starting $prog: " if [ ! -e /etc/mactab ] then echo "/etc/mactab not found" exit 1 fi ifdown /sbin/nameif ifup ;; stop) echo -n $"Stopping $prog: " ;; *) echo $"Usage: $0 {start|stop|restart}" exit 1esac
13
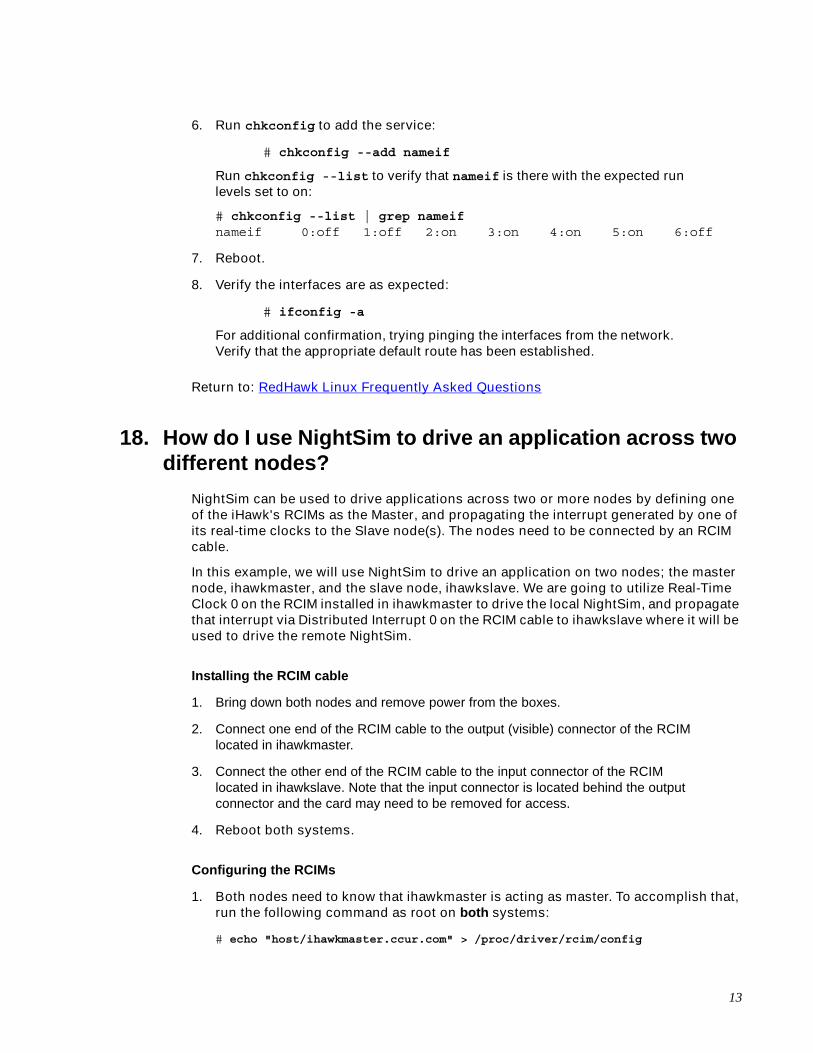
6. Run chkconfig to add the service:
# chkconfig --add nameif
Run chkconfig --list to verify that nameif is there with the expected run levels set to on:
# chkconfig --list | grep nameifnameif 0:off 1:off 2:on 3:on 4:on 5:on 6:off
7. Reboot.
8. Verify the interfaces are as expected:
# ifconfig -a
For additional confirmation, trying pinging the interfaces from the network. Verify that the appropriate default route has been established.
Return to: RedHawk Linux Frequently Asked Questions
18. How do I use NightSim to drive an application across two different nodes?
NightSim can be used to drive applications across two or more nodes by defining one of the iHawk's RCIMs as the Master, and propagating the interrupt generated by one of its real-time clocks to the Slave node(s). The nodes need to be connected by an RCIM cable.
In this example, we will use NightSim to drive an application on two nodes; the master node, ihawkmaster, and the slave node, ihawkslave. We are going to utilize Real-Time Clock 0 on the RCIM installed in ihawkmaster to drive the local NightSim, and propagate that interrupt via Distributed Interrupt 0 on the RCIM cable to ihawkslave where it will be used to drive the remote NightSim.
Installing the RCIM cable 18
1. Bring down both nodes and remove power from the boxes.
2. Connect one end of the RCIM cable to the output (visible) connector of the RCIM located in ihawkmaster.
3. Connect the other end of the RCIM cable to the input connector of the RCIM located in ihawkslave. Note that the input connector is located behind the output connector and the card may need to be removed for access.
4. Reboot both systems.
Configuring the RCIMs 18
1. Both nodes need to know that ihawkmaster is acting as master. To accomplish that, run the following command as root on both systems:
# echo "host/ihawkmaster.ccur.com" > /proc/driver/rcim/config
14
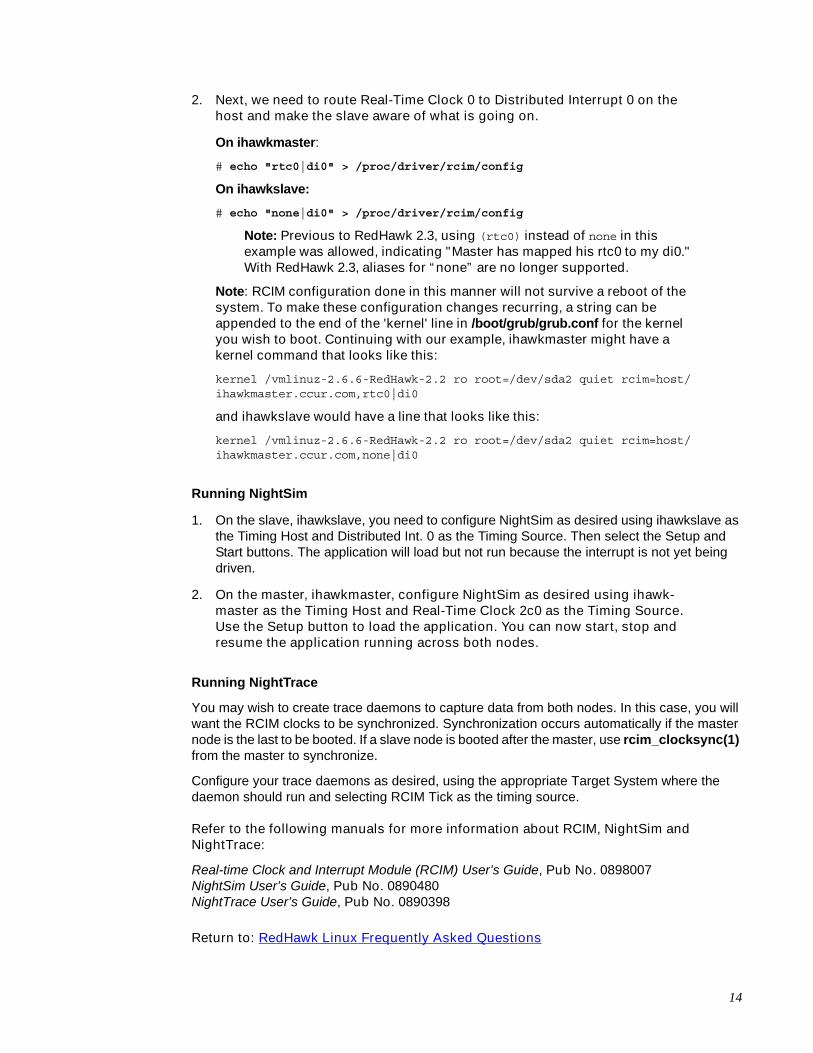
2. Next, we need to route Real-Time Clock 0 to Distributed Interrupt 0 on the host and make the slave aware of what is going on.
On ihawkmaster:
# echo "rtc0|di0" > /proc/driver/rcim/config
On ihawkslave:
# echo "none|di0" > /proc/driver/rcim/config
Note: Previous to RedHawk 2.3, using (rtc0) instead of none in this example was allowed, indicating "Master has mapped his rtc0 to my di0." With RedHawk 2.3, aliases for “none” are no longer supported.
Note: RCIM configuration done in this manner will not survive a reboot of the system. To make these configuration changes recurring, a string can be appended to the end of the 'kernel' line in /boot/grub/grub.conf for the kernel you wish to boot. Continuing with our example, ihawkmaster might have a kernel command that looks like this:
kernel /vmlinuz-2.6.6-RedHawk-2.2 ro root=/dev/sda2 quiet rcim=host/ ihawkmaster.ccur.com,rtc0|di0
and ihawkslave would have a line that looks like this:
kernel /vmlinuz-2.6.6-RedHawk-2.2 ro root=/dev/sda2 quiet rcim=host/ ihawkmaster.ccur.com,none|di0
Running NightSim 18
1. On the slave, ihawkslave, you need to configure NightSim as desired using ihawkslave as the Timing Host and Distributed Int. 0 as the Timing Source. Then select the Setup and Start buttons. The application will load but not run because the interrupt is not yet being driven.
2. On the master, ihawkmaster, configure NightSim as desired using ihawk-master as the Timing Host and Real-Time Clock 2c0 as the Timing Source. Use the Setup button to load the application. You can now start, stop and resume the application running across both nodes.
Running NightTrace 18
You may wish to create trace daemons to capture data from both nodes. In this case, you will want the RCIM clocks to be synchronized. Synchronization occurs automatically if the master node is the last to be booted. If a slave node is booted after the master, use rcim_clocksync(1) from the master to synchronize.
Configure your trace daemons as desired, using the appropriate Target System where the daemon should run and selecting RCIM Tick as the timing source.
Refer to the following manuals for more information about RCIM, NightSim and NightTrace:
Real-time Clock and Interrupt Module (RCIM) User’s Guide, Pub No. 0898007NightSim User’s Guide, Pub No. 0890480NightTrace User’s Guide, Pub No. 0890398
Return to: RedHawk Linux Frequently Asked Questions
15
19. How do I configure the SNARE audit program in the kernel?
SNARE (System iNtrusion Analysis Reporting Environment) is an open source system auditing and event logging facility.
RedHawk Release 5.x
1. Make a new kernel to enable SNARE in RedHawk.
Follow the procedure in the RedHawk Linux User’s Guide, Chapter 11 to make a new kernel with the AUDIT tunable set to “yes”.
Note that the kernel configuration parameter supporting the previous version of SNARE, SNARE_AUDIT, should not be enabled; it is not needed for the latest version of SNARE and adds unneeded overhead to the kernel.
2. Boot the new kernel and log in as root.
3. Download and install the userland component, SNARE Agent for Linux, from Intersect Alliance (http://www.intersectalliance.com) in order to activate SNARE. Documentation for SNARE is also available from this web site.
RedHawk Release 2.3 through 4.x
1. Make a new kernel to enable SNARE in RedHawk.
Follow the procedure in the RedHawk Linux User’s Guide, Chapter 11 to make a new kernel with the SNARE_AUDIT tunable set to YES.
2. Execute the following commands:
# /sbin/chkconfig ––add snare This adds the snare script in /etc/init.d to the appropriate rc directories.
# /sbin/service snare start This runs the init script to start SNARE running.
3. From the toolbar, select System Tools > More System Tools > SNARE. If you are not root, you will be prompted for the root password.
4. In the SNARE GUI window, select Reload and verify that event records are being displayed.
For additional configuration information see the Guide to SNARE for Linux included with the RedHawk online documentation. Another source of information is the Help > Documentation selection on the SNARE GUI window.
Return to: RedHawk Linux Frequently Asked Questions

16
20. Why can’t I see all the physical memory on my x86 32-bit system?
There are two possible reasons why /proc/meminfo may show less physical memory than what is actually installed:
1. RedHawk is not seeing the physical memory which appears above the 4 GB boundary.
2. RedHawk is not seeing memory which is overlaid (suppressed) by the ‘PCI hole’ or other device holes.
For reason 1, the solution is to compile a custom RedHawk kernel with the kernel configuration parameter HIGHMEM64G=y. This turns on the x86 PAE (Physical Address Extensions) mode, which in turn enables the virtual address system to map a 32-bit virtual address to any desired physical address in a 40-bit address range. The price for this extension is a small but measurable loss in system performance.
Reason 2 is generally a problem of older systems with no real solution. It is the result of the need for the hardware to map the registers of various I/O devices into the same physical address space where memory also resides. When the two map to the same address, access to the memory is suppressed in favor of accesses to the I/O device. This appears as a loss of physical memory.
There may be several such device holes in the physical address space. These vary from system to system: some have legacy holes (e.g., the famous 640KB-1MB hole), which may no longer be in use for some motherboards. The PCI bus has its own hole, and the 'AGP aperture' (for the graphics card) may be another hole. The existence and size of some of these I/O holes is configurable from the BIOS on some motherboards. If that is the case, you can gain back some of your memory by, for example, making the AGP aperture hole exactly the size of the memory on your graphics card.
Please note that modern motherboards tend not to overlap memory where the PCI device hole is anymore. Instead they will map the memory that would otherwise be hidden by the hole higher up in the physical address space. So, if one has a 4 GB system with a 128 MB PCI hole, one would see a memory range of 0 .. 4Gb+128M, with a hole somewhere in that range 128 MB deep. In addition, these modern systems tend not to create the legacy holes. So for these systems, all one needs to do is turn on HIGHMEM64G in order to see most or all installed memory be utilized.
Return to: RedHawk Linux Frequently Asked Questions
17
21. I added a SATA drive to my SCSI based system. Why won’t it boot now?
The drive assignment letter, i.e. /dev/sda, /dev/sdb, etc., is determined when the driver initializes. The first drive discovered becomes /dev/sda, the second is /dev/sdb and so on.
A SCSI based system (before adding a SATA drive) configures the first drive (the boot drive) at /dev/sda. The /etc/grub.conf file and the /etc/fstab file both contain references to /dev/sda.
When the SATA drive is added to the system, the SATA drive is discovered first and is assigned /dev/sda, the SCSI drive is assigned /dev/sdb. Since the entry in /etc/grub.conf points to /dev/sda2 (which is now the SATA drive) the system won't boot.
If a kernel panic occurs on boot after adding the SATA drive, make these changes:
1. Change all command line entries for RedHawk in /etc/grub.conf to /dev/sdb if a SATA drive is present. For example:
title RedHawk Linux 2.3.7 (Trace=Yes, Debug=No) root (hd0,0) kernel /vmlinuz-2.6.9-RedHawk-2.3.7-trace ro root=/dev/sdb2
2. Comment out the swap entry in /etc/fstab:
#/dev/sda3 swap swap defaults 0 0
3. Insert the following in /etc/rc.local:
#needed if SATA drive and SCSI drive are presentif [ -d /proc/ccur ]; then
/sbin/swapon /dev/sdb3else
/sbin/swapon /dev/sda3fi
Return to: RedHawk Linux Frequently Asked Questions
22. What do I need to do to access a remote X server using telnet or rlogin?
There are differences between RedHawk 2.3 and 4.1 when using the RedHawk system as a remote X server.
In RedHawk 2.3, the telnet, rexec, rsh and rlogin services are all disabled by default and must be enabled using /sbin/chkconfig on the client system in order to be used.
In RedHawk 4.1, these services are enabled by default, however, the X server has the default “nolisten tcp” option set. With this option set, a service that uses TCP such as telnet and rlogin to access a target X server will fail with the message “Cannot open display”.

18
To eliminate this problem, use “/usr/bin/ssh -X target” to access other systems supporting ssh.
If targeting PowerMAX or other systems that don’t use ssh, change the following to enable the system to run without the “nolisten tcp” option:
1. Edit /etc/X11/gd/gdm.conf on the 4.1 system being used as the remote X server.
2. Search for the line #DisallowTCP=true and change it to Disal-lowTCP=false or add it as a new line.
3. Restart the X server (init 3 or init 5).
Return to: RedHawk Linux Frequently Asked Questions
23. How do I use LVM for a data disk under RedHawk?
While it is not possible to boot RedHawk 5.X or earlier from an LVM partition, LVM can be enabled on non-boot devices. To enable LVM under RedHawk, you will need to make the following changes to /etc/rc.d/rc.sysinit. Change this block of code from:
if [ -x /sbin/lvm.static ] && [ ! -e /proc/ccur ]; then action $”Setting up Logical Volume Management:” /sbin/lvm.static vgchange -a y --ignorelockingfailurefi
to this code:
if [ -x /sbin/lvm.static ]; then#if [ -x /sbin/lvm.static ] && [ ! -e /proc/ccur ]; then action $”Setting up Logical Volume Management:” /sbin/lvm.static vgchange -a y --ignorelockingfailurefi
This will ensure that LVM is configured properly after boot so that any LVM partitions mounted will operate successfully.
Note that LVM is fully supported in RedHawk version 6.0 and later.
Return to: RedHawk Linux Frequently Asked Questions
24. How do I reinstall the Gnome power manager and screen saver packages
iHawk systems configured and shipped by Concurrent may have had the Gnome power saver and screen saver packages removed during ship acceptance testing. If you wish to reinstall these package follow these instructions:
This text assumes the optical media mount point is /media/cdrecorder.
1. Insert the CentOS or equivalent Install DVD appropriate for your system.
2. Once the DVD has mounted, execute the following commands:
19
# mount /dev/cdrom /media/cdrecorder# rpm -ivh /media/cdrecorder/client/gnome-power-manager-*.rpm# rpm -ivh /media/cdrecorder/client/gnome-screensaver-*.rpm# eject# init 3 ; init 5
Note that these packages are no longer removed in RedHawk version 6.0 and later.
Return to: RedHawk Linux Frequently Asked Questions
25. How can I change the NIC device enumeration and make it persistent across reboots?
After RedHawk installation is complete a default NIC device enumeration (i.e. mapping of network interfaces to eth# identifiers) has been chosen. If the default enumeration is not the mapping that is desired, it can be changed by following these steps:
1. Edit the /etc/sysconfig/network-scripts/ifcfg-eth# files to map each NIC MAC address to the desired eth# device.
For example, edit the HWADDR= line in the ifcfg-eth0 file (which should have a DEVICE="eth0" line at the top) to contain the MAC address of the NIC you wish to be mapped to eth0. Do the same for ifcfg-eth1, ifcfg-eth2, etc. until the desired mapping of all device names to MAC addresses is correctly described in these files.
Note that you should also remove the UUID= lines in these files as well because it is not necessary to preserve UUID assignments when remapping network interfaces.
2. Remove the /etc/udev/rules.d/70-persistent-net.rules file. This file will automatically be re-created upon the next boot of the system.
3. Reboot the system.
After following these steps the ifconfig -a command should show the desired mapping of network interfaces to eth# identifiers.
Return to: RedHawk Linux Frequently Asked Questions
26. How do I get my system using EFI BIOS to boot again after a system configuration change?
Systems using an EFI BIOS may lose their ability to boot from the installed hard drive upon certain system configuration changes (e.g. updated BIOS, replaced motherboard). This happens because the EFI boot link in the system BIOS has been lost, which makes the system unable to boot from the installed hard drive.
Follow these procedures to restore the EFI boot link:
1. Enter the system BIOS, boot the built-in EFI Shell and enter these commands:
20
# fs0: Mount the boot hard drive.# cd EFI\REDHAT Change to the EFI boot partition.# GRUB.EFI Start up the grub menu to boot a kernel.
2. Once the kernel boots, log in as root and issue these commands:
# modprobe efivars Probe for EFI devices.# efibootmgr -v Display currently configured EFI boot devices.# efibootmgr -c -l \\EFI\\redhat\\grub.efi -L "CentOS"
Add a new EFI boot link for the booted hard drive.Note: if using RHEL use -L “Red Hat Enterprise Linux”
# efibootmgr -v Display currently configured EFI boot devices again.
3. Reboot the system, enter the BIOS again and update the default device boot priority to use the new CentOS boot device.
Return to: RedHawk Linux Frequently Asked Questions
27. Why does sendmail stall during boot?
Sendmail stalls during boot up are almost always due to a network problem. The most common problem is that the startup code cannot determine the hostname of the machine and so it pauses waiting for the results of a DNS lookup. Eventually the DNS lookup will timeout and the boot will continue.
To resolve this, ensure that the /etc/resolv.conf file has the correct addresses for your machine's DNS server. Check with your system administrator to ensure that the addresses are correct.
If the machine is not using DNS, then ensure that the /etc/hosts file is configured correctly. The start of the /etc/hosts file should be similar to the following example:
127.0.0.1 localhost localhost.localdomain::1 localhost localhost.localdomain192.168.1.100 mymachine mymachine.mynetwork.com
Return to: RedHawk Linux Frequently Asked Questions