Recovering from an IP Address Change - Snap AV Technical Bulletin Version Recovering from an IP...
4
1 Technical Bulletin Version 170928-1356 Recovering from an IP Address Change If you do not secure your Luma by using best password practices, you open up your customers (and therefore yourself) to malicious attacks. One such attack uses weak admin passwords to change the IP address of recorders, knocking them offline. What Happens When the IP Address Changes? If the recorder’s IP address changes to something outside the range used by your LAN’s subnet, the recorder is no longer accessible through the network, because the network cannot find it. It’s not visible on OvrC, it cannot be accessed on the Luma app, and it cannot be logged into through a browser. Thankfully, the recorder is not bricked; it can be accessed with a local monitor. What Is Luma Doing About It? Luma is continuously enhancing our safeguards against port sniffers and other malicious third parties, but it is still crucial that you use strong passwords and take other common security precautions. We have implemented a major change starting with } DVR firmware V3.0.4 build 170324 } NVR firmware V3.1.2 build 170612 } IP camera firmware V5.4.1 build 170821 With this firmware, we have removed the default password. With new systems, you must enter a new password during the install. With existing systems, your recorder prompts you for a non-default password for your own protection. See below for best password practices. Recovery Using a Local Monitor To recover the recorder, you’ll need to roll a truck. Bring a monitor (if one is not available at the job site). Connect the monitor to the recorder via eitrher VGA or HDMI. You should see the main page, and everything should look normal. Click the Settings icon. Select the Configuration icon.
Transcript of Recovering from an IP Address Change - Snap AV Technical Bulletin Version Recovering from an IP...
1
Technical Bulletin
Version 170928-1356
Recovering from an IP Address Change
If you do not secure your Luma by using best password practices, you open up your customers (and therefore yourself) to malicious attacks. One such attack uses weak admin passwords to change the IP address of recorders, knocking them offline.
What Happens When the IP Address Changes? If the recorder’s IP address changes to something outside the range used by your LAN’s subnet, the recorder is no longer accessible through the network, because the network cannot find it. It’s not visible on OvrC, it cannot be accessed on the Luma app, and it cannot be logged into through a browser.
Thankfully, the recorder is not bricked; it can be accessed with a local monitor.
What Is Luma Doing About It?
Luma is continuously enhancing our safeguards against port sniffers and other malicious third parties, but it is still crucial that you use strong passwords and take other common security precautions.
We have implemented a major change starting with
} DVR firmware V3.0.4 build 170324
} NVR firmware V3.1.2 build 170612
} IP camera firmware V5.4.1 build 170821
With this firmware, we have removed the default password. With new systems, you must enter a new password during the install. With existing systems, your recorder prompts you for a non-default password for your own protection. See below for best password practices.
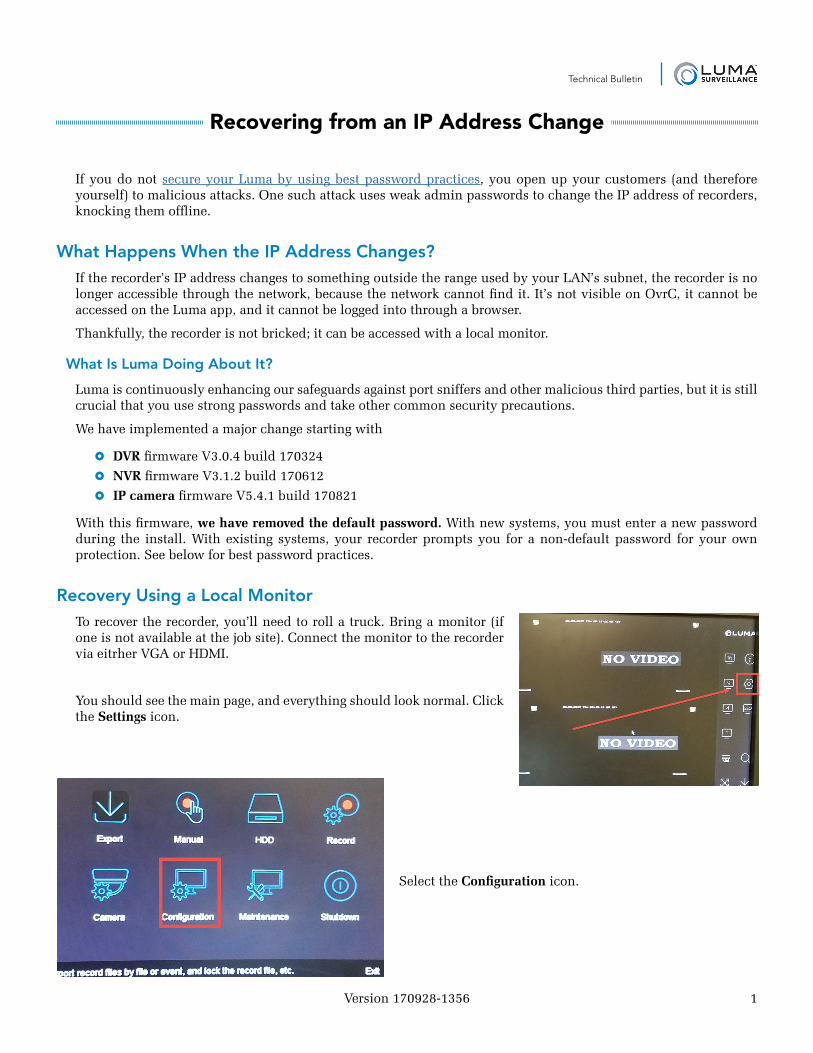
Recovery Using a Local MonitorTo recover the recorder, you’ll need to roll a truck. Bring a monitor (if one is not available at the job site). Connect the monitor to the recorder via eitrher VGA or HDMI.
You should see the main page, and everything should look normal. Click the Settings icon.
Select the Configuration icon.
2
Technical Bulletin
Version 170928-1356
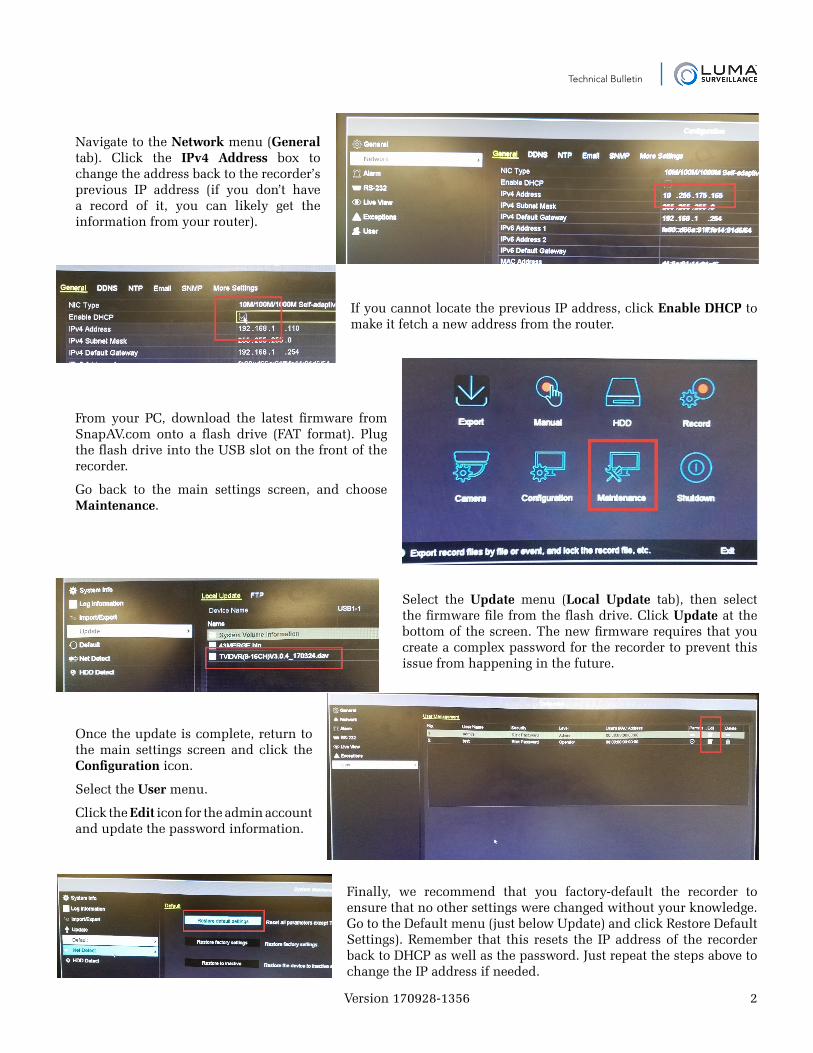
Navigate to the Network menu (General tab). Click the IPv4 Address box to change the address back to the recorder’s previous IP address (if you don’t have a record of it, you can likely get the information from your router).
If you cannot locate the previous IP address, click Enable DHCP to make it fetch a new address from the router.
From your PC, download the latest firmware from SnapAV.com onto a flash drive (FAT format). Plug the flash drive into the USB slot on the front of the recorder.
Go back to the main settings screen, and choose Maintenance.
Select the Update menu (Local Update tab), then select the firmware file from the flash drive. Click Update at the bottom of the screen. The new firmware requires that you create a complex password for the recorder to prevent this issue from happening in the future.
Once the update is complete, return to the main settings screen and click the Configuration icon.
Select the User menu.
Click the Edit icon for the admin account and update the password information.
Finally, we recommend that you factory-default the recorder to ensure that no other settings were changed without your knowledge. Go to the Default menu (just below Update) and click Restore Default Settings). Remember that this resets the IP address of the recorder back to DHCP as well as the password. Just repeat the steps above to change the IP address if needed.
3
Technical Bulletin
Version 170928-1356
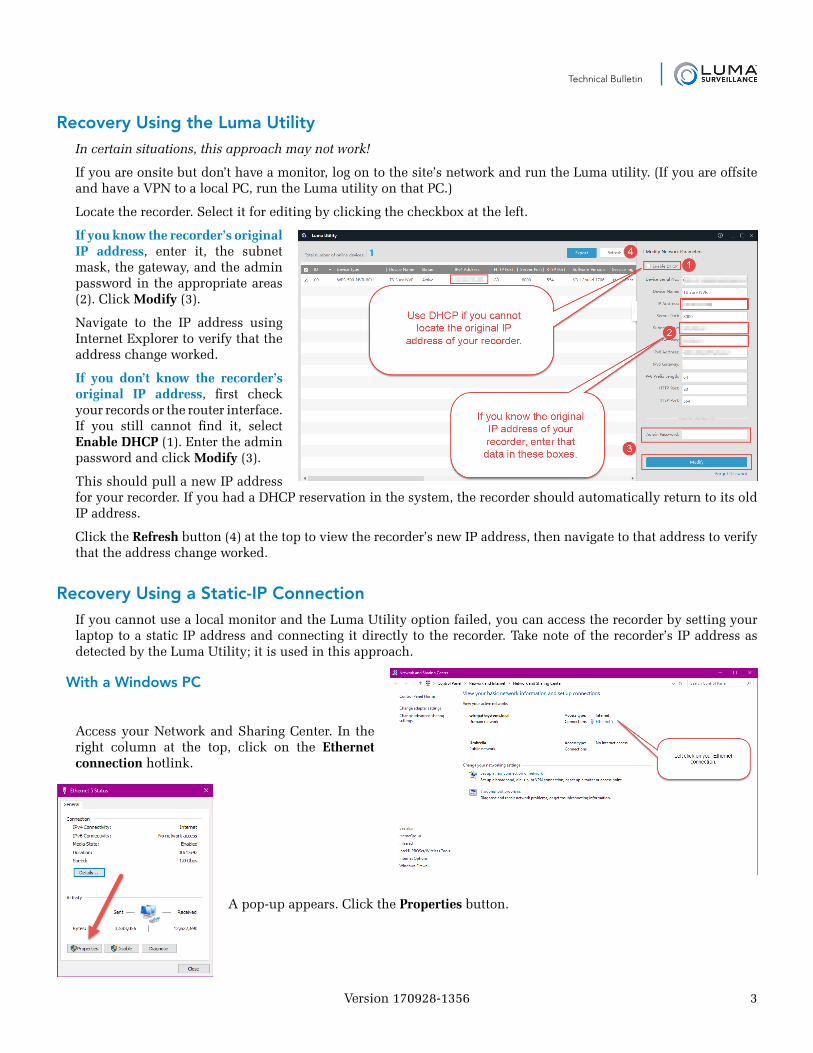
Recovery Using the Luma UtilityIn certain situations, this approach may not work!
If you are onsite but don’t have a monitor, log on to the site’s network and run the Luma utility. (If you are offsite and have a VPN to a local PC, run the Luma utility on that PC.)
Locate the recorder. Select it for editing by clicking the checkbox at the left.
If you know the recorder’s original IP address, enter it, the subnet mask, the gateway, and the admin password in the appropriate areas (2). Click Modify (3).
Navigate to the IP address using Internet Explorer to verify that the address change worked.
If you don’t know the recorder’s original IP address, first check your records or the router interface. If you still cannot find it, select Enable DHCP (1). Enter the admin password and click Modify (3).
This should pull a new IP address for your recorder. If you had a DHCP reservation in the system, the recorder should automatically return to its old IP address.
Click the Refresh button (4) at the top to view the recorder’s new IP address, then navigate to that address to verify that the address change worked.
Recovery Using a Static-IP ConnectionIf you cannot use a local monitor and the Luma Utility option failed, you can access the recorder by setting your laptop to a static IP address and connecting it directly to the recorder. Take note of the recorder’s IP address as detected by the Luma Utility; it is used in this approach.
With a Windows PC
Access your Network and Sharing Center. In the right column at the top, click on the Ethernet connection hotlink.
A pop-up appears. Click the Properties button.
4
Technical Bulletin
Version 170928-1356
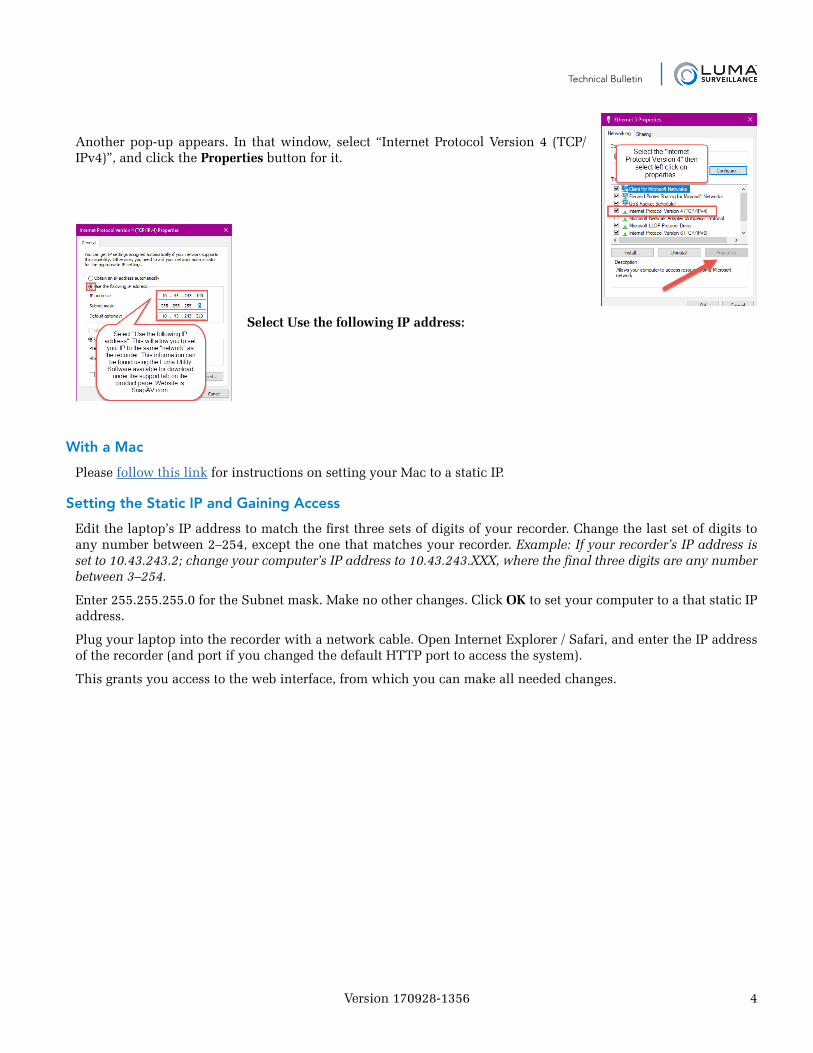
Another pop-up appears. In that window, select “Internet Protocol Version 4 (TCP/IPv4)”, and click the Properties button for it.
Select Use the following IP address:
With a Mac
Please follow this link for instructions on setting your Mac to a static IP.
Setting the Static IP and Gaining Access
Edit the laptop’s IP address to match the first three sets of digits of your recorder. Change the last set of digits to any number between 2–254, except the one that matches your recorder. Example: If your recorder’s IP address is set to 10.43.243.2; change your computer’s IP address to 10.43.243.XXX, where the final three digits are any number between 3–254.
Enter 255.255.255.0 for the Subnet mask. Make no other changes. Click OK to set your computer to a that static IP address.
Plug your laptop into the recorder with a network cable. Open Internet Explorer / Safari, and enter the IP address of the recorder (and port if you changed the default HTTP port to access the system).
This grants you access to the web interface, from which you can make all needed changes.