RECEPTOR CON CD RECEPTEUR CD KD...
23
GET0064-001A [J] For customer Use: Enter below the Model No. and Serial No. which are located on the top or bottom of the cabinet. Retain this information for future reference. Model No. Serial No. For installation and connections, refer to the separate manual. Para la instalación y las conexiones, refiérase al manual separado. Pour l’installation et les raccordements, se référer au manuel séparé. KD-S6250 ENGLISH ESPAÑOL FRANÇAIS KD-S580 KD-S6250/S580 CD RECEIVER RECEPTOR CON CD RECEPTEUR CD MO RPT RND MODE SCM CD AM FM KD-S580 SSM DIRECT TRACK ACCESS 31 COMPACT DIGITAL AUDIO MO RPT RND MODE SCM CD AM FM KD-S6250 SSM DIRECT TRACK ACCESS INSTRUCTIONS MANUAL DE INSTRUCCIONES MANUEL D’INSTRUCTIONS
Transcript of RECEPTOR CON CD RECEPTEUR CD KD...

KD-S6250/S580 [EN] GET0064-001A [J]
GET0064-001A[J]
For customer Use:
Enter below the Model No. andSerial No. which are located onthe top or bottom of the cabinet.Retain this information for futurereference.
Model No.
Serial No.
For installation and connections, refer to the separate manual.Para la instalación y las conexiones, refiérase al manual separado.Pour l’installation et les raccordements, se référer au manuel séparé.
KD-S6250
EN
GL
ISH
ES
PA
ÑO
LF
RA
NÇ
AIS
KD-S580
KD-S6250/S580
CD RECEIVERRECEPTOR CON CDRECEPTEUR CD
MO RPT RNDMODE SCM
CD
AM
FM
KD-S580
SSM
DIRECT TRACK ACCESS
31
COMPACT
DIGITAL AUDIO
MO RPT RNDMODE SCM
CD
AM
FMKD-S6250
SSM
DIRECT TRACK ACCESS
INSTRUCTIONSMANUAL DE INSTRUCCIONES
MANUEL D’INSTRUCTIONS
Cover-KD-S6250/S580(J)-1 11/7/01, 7:48 PM3
2
EN
GL
ISH
KD-S6250/S580 [EN] GET0064-001A [J]
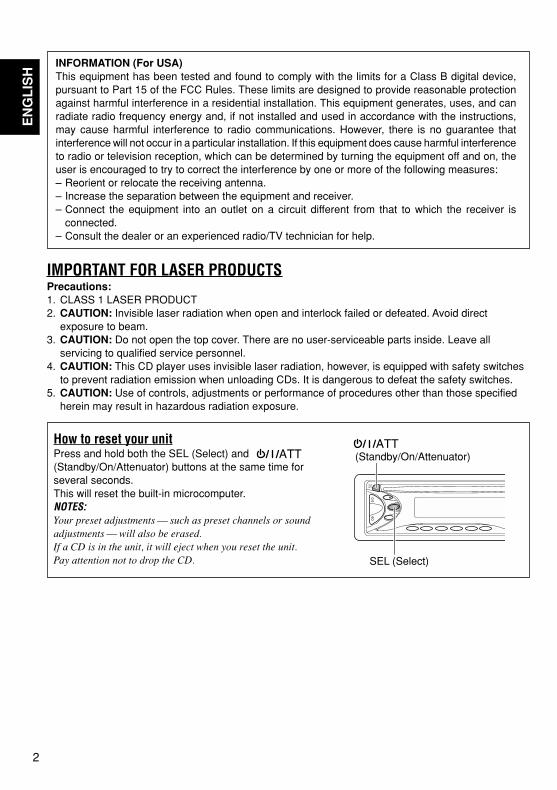
INFORMATION (For USA)This equipment has been tested and found to comply with the limits for a Class B digital device,pursuant to Part 15 of the FCC Rules. These limits are designed to provide reasonable protectionagainst harmful interference in a residential installation. This equipment generates, uses, and canradiate radio frequency energy and, if not installed and used in accordance with the instructions,may cause harmful interference to radio communications. However, there is no guarantee thatinterference will not occur in a particular installation. If this equipment does cause harmful interferenceto radio or television reception, which can be determined by turning the equipment off and on, theuser is encouraged to try to correct the interference by one or more of the following measures:– Reorient or relocate the receiving antenna.– Increase the separation between the equipment and receiver.– Connect the equipment into an outlet on a circuit different from that to which the receiver is
connected.– Consult the dealer or an experienced radio/TV technician for help.
IMPORTANT FOR LASER PRODUCTSPrecautions:1. CLASS 1 LASER PRODUCT2. CAUTION: Invisible laser radiation when open and interlock failed or defeated. Avoid direct
exposure to beam.3. CAUTION: Do not open the top cover. There are no user-serviceable parts inside. Leave all
servicing to qualified service personnel.4. CAUTION: This CD player uses invisible laser radiation, however, is equipped with safety switches
to prevent radiation emission when unloading CDs. It is dangerous to defeat the safety switches.5. CAUTION: Use of controls, adjustments or performance of procedures other than those specified
herein may result in hazardous radiation exposure.
(Standby/On/Attenuator)
How to reset your unitPress and hold both the SEL (Select) and (Standby/On/Attenuator) buttons at the same time forseveral seconds.This will reset the built-in microcomputer.NOTES:Your preset adjustments — such as preset channels or soundadjustments — will also be erased.If a CD is in the unit, it will eject when you reset the unit.Pay attention not to drop the CD. SEL (Select)
EN02-03-KD-S6250/S580[J]-7 11/7/01, 7:48 PM2

3
EN
GL
ISH
KD-S6250/S580 [EN] GET0064-001A [J]
CONTENTS
Thank you for purchasing a JVC product. Please read all instructions carefully before operation,to ensure your complete understanding and to obtain the best possible performance from the unit.
How to reset your unit .................................. 2How to use the number buttons ................... 3
LOCATION OF THE BUTTONS ...............4Control panel ............................................... 4Remote controller (only for KD-S6250) ....... 5Preparing the remote controller
(only for KD-S6250) ................................. 6
BASIC OPERATIONS ..........................7Turning on the power ................................... 7
RADIO BASIC OPERATIONS .................8Listening to the radio ................................... 8Storing stations in memory .......................... 9Tuning into a preset station ....................... 10
CD OPERATIONS ............................ 11Playing a CD .............................................. 11Locating a track or a particular portion
on a CD .................................................. 12
Selecting CD playback modes ................... 12Prohibiting CD ejection .............................. 13
SOUND ADJUSTMENTS .................... 14Adjusting the sound ................................... 14Turning on/off the loudness function ............. 14Using the Sound Control Memory (SCM) .. 15Storing your own sound adjustments ......... 16
OTHER MAIN FUNCTIONS ................. 17Setting the clock ........................................ 17To cancel advanced SCM .......................... 17Selecting the level display .......................... 18Detaching the control panel ....................... 19
MAINTENANCE .............................. 20Handling CDs ............................................ 20
TROUBLESHOOTING ....................... 21
SPECIFICATIONS ............................ 22
BEFORE USE* For safety....• Do not raise the volume level too much, as this
will block outside sounds, making drivingdangerous.
• Stop the car before performing any complicatedoperations.
* Temperature inside the car....If you have parked the car for a long time in hotor cold weather, wait until the temperature in thecar becomes normal before operating the unit.
How to use the number buttons:If you press MODE, the unit goes into functions mode and the number buttons work as differentfunction buttons.
To use these buttons as number buttons again after pressing MODE, wait for 5 seconds withoutpressing any number button until the functions mode is cleared.• Pressing MODE again also clears the functions mode.
Time countdown indicator
MODE
MO RPT RND7 8 9 10 11 12
EN02-03-KD-S6250/S580[J]-7 11/7/01, 7:48 PM3

EN
GL
ISH
4
KD-S6250/S580 [EN] GET0064-001A [J]
MO RPT RNDMODE SCM
CD
AM
FM
SSM
DIRECT TRACK ACCESS
12 34 9876
yeq
; a s d fg h j
lk
p
5
w r t oiu
LOCATION OF THE BUTTONS
1 (Standby/On/Attenuator) button2 +/– button3 LOUD (Loudness) button4 SEL (Select) button5 Loading slot6 AM button7 0 (Eject) button8 CD button9 FM buttonp Remote sensor (only for KD-S6250)q DISP (Display) buttonw MO (Monaural) buttone RPT (Repeat) buttonr RND (Random) buttont Number buttonsy MODE buttonu SCM (Sound control memory) buttoni (Control panel release) buttono 4 / ¢ buttons
• Also functions as SSM buttons whenpressed together.
Display window; "SCM" indicatora CD indicators Band indicators
FM1, FM2, FM3AM
d Tuner reception indicatorsMO (Monaural), ST (Stereo)
f RND (Random) indicatorg RPT (Repeat) indicatorh LOUD indicatorj CD-in indicatork Main displayl Volume level indicator
Display window
Control panel
EN04-06-KD-S6250/S580[J]-7 11/7/01, 7:48 PM4

EN
GL
ISH
5
KD-S6250/S580 [EN] GET0064-001A [J]
1
2
3
4
6
7
5
RM-RK31
Remote controller(only for KD-S6250)
This section is only for KD-S6250.
1 • Turns on the unit if pressed when the unit isturned off.
• Turns off the unit if pressed and held until“SEE YOU” appears on the display.
• Drops the volume level in a moment ifpressed briefly.Press again to resume the volume.
2 • Functions as the BAND button while listeningto the FM broadcast.Each time you press the button, the bandchanges.
• Does not function as the PROG/DISC +button.
3 • Functions as the PRESET button whilelistening to the radio.Each time you press the button, the presetstation number increases, and the selectedstation is tuned into.
• Does not function as the DISC – button.
4 Functions the same as the + and – buttons onthe main unit.Note: These buttons cannot be used for the clock
(CLOCK H, CLOCK M), SCM LINK andLEVEL (see pages 17 and 18).
5 Selects the sound mode.Each time you press the button, the modechanges.
6 Selects the source.Each time you press the button, the sourcechanges.
7 • Searches stations while listening to the radio.• Fast -forwards or reverses the track if pressed
and held while listening to a CD.• Skips to the beginning of the next tracks or
goes back to the beginning of the current (orprevious tracks) if pressed briefly whilelistening to a CD.
EN04-06-KD-S6250/S580[J]-7 11/7/01, 7:48 PM5

EN
GL
ISH
6
KD-S6250/S580 [EN] GET0064-001A [J]
Remote sensor
(back side)
WARNING:• Store the batteries in a place which children
cannot reach.If a child accidentally swallows the battery,consult a doctor immediately.
• Do not recharge, short, disassemble or heat thebatteries or dispose it in a fire.Doing any of these things may cause thebatteries to give off heat, crack or start a fire.
• Do not leave the batteries with other metallicmaterials.Doing this may cause the batteries to give offheat, crack or start a fire.
• When throwing away or saving the batteries,wrap it in tape and insulate; otherwise, thebatteries may start to give off heat, crack or starta fire.
• Do not poke the batteries with tweezers orsimilar tools.Doing this may cause the batteries to give offheat, crack or start a fire.
3 Return the battery holder.Insert again the battery holder pushing it untilyou hear a clicking sound.
Preparing the remote controllerThis section is ONLY FOR KD-S6250.
Before using the remote controller:• Aim the remote controller directly at the remote
sensor on the main unit. Make sure there is noobstacle in between.
• Do not expose the remote sensor to strong light(direct sunlight or artificial lighting).
(back side)
1)2)
Installing the battery
When the controllable range or effectiveness ofthe remote controller decreases, replace thebattery.
1 Remove the battery holder.1) Push out the battery holder in the direction
indicated by the arrow using a ball pointpen or a similar tool.
2) Remove the battery holder.
2 Place the battery.Slide the battery into the holder with the +side facing upwards so that the battery is fixedin the holder.
Lithium coin battery(product number:CR2025)
EN04-06-KD-S6250/S580[J]-7 11/7/01, 7:48 PM6

7
EN
GL
ISH
KD-S6250/S580 [EN] GET0064-001A [J]
4 Adjust the sound as you want (seepages 14 – 16).
To drop the volume in a momentPress briefly while listening to anysource. “ATT” starts flashing on the display, andthe volume level will drop in a moment.To resume the previous volume level, press thebutton briefly again.
To turn off the powerPress and hold until "SEE YOU"appears on the display.
Note:When you use this unit for the first time, set the built-in clock correctly, see page 17.
Turning on the power
1 Turn on the power.
Note on One-Touch Operation:When you select a source in step 2 below, thepower automatically comes on. You do not haveto press this button to turn on the power.
2 Select the source.
3 Adjust the volume.
BASIC OPERATIONS
Volume level indicator(see page 18)
Volume level appears
To increase the volume.
To decrease the volume.
To operate the tuner (FM or AM),see pages 8 – 10.
To operate the CD,see pages 11 – 13.
CAUTION on volume settingCDs produce very little noise compared with othersources. If the volume level is adjusted for the tuner,for example, the speakers may be damaged by thesudden increase in the output level. Therefore, lowerthe volume before playing a disc and adjust it asrequired during playback.
SCMMO RPT RND
MODE
SSM
DIRECT TRACK ACCESS
1
3
2CD
AM
FM
CD
AM
FM
EN07-07-KD-S6250/S580[J]-3 11/7/01, 7:49 PM7

8
EN
GL
ISH
KD-S6250/S580 [EN] GET0064-001A [J]
RADIO BASIC OPERATIONS
Listening to the radio
You can use either automatic searching or manualsearching to tune into a particular station.
Searching a station automatically:Auto search
1 Select the band (FM 1 – 3, AM).
Note:This receiver has three FM bands (FM1, FM2,FM3). You can use any one of them to listen to anFM broadcast.
2 Start searching a station.
When a station is received, searching stops.
Selected band appears
Press ¢ to searchstations of higherfrequencies.
Press 4 to searchstations of lowerfrequencies.
To stop searching before a station is received,press the same button you have pressed forsearching.
Searching a station manually:Manual search
1 Select the band (FM 1 – 3, AM).
Note:This receiver has three FM bands (FM1, FM2,FM3). You can use any one of them to listen to anFM broadcast.
2 Press and hold ¢ or 4 until“M” starts flashing on the display.
MO RPT RNDMODE SCM
DIRECT TRACK ACCESS
SSM
CD
AM
FM
Selected band appears
AM
FMFM1 FM2
FM3
AM
AM
FMFM1 FM2
FM3
AM
SSM
SSM
EN08-10-KD-S6250/S580[J]-7 11/8/01, 8:54 AM8

9
EN
GL
ISH
KD-S6250/S580 [EN] GET0064-001A [J]
SSM
3 Tune into a station you want while “M”is flashing.
• If you release your finger from the button, themanual mode will automatically turn off after 5seconds.
• If you hold down the button, the frequency keepschanging until you release the button.
When an FM stereo broadcast is hardto receive:1 Press MODE to enter the functions mode while
listening to an FM stereo broadcast.2 Press MO (monaural), while still in the functions
mode, so that the MO indicator lights up onthe display.Each time you press the button, the MO indicatorlights up and goes off alternately.
When the MO indicator is lit on the display, thesound you hear becomes monaural but thereception will be improved (the ST indicatorgoes off).
Storing stations in memory
You can use one of the following two methods tostore broadcasting stations in memory.• Automatic preset of FM stations: SSM (Strong-
station Sequential Memory)• Manual preset of both FM and AM stations
FM station automatic preset: SSMYou can preset 6 local FM stations in each FM band(FM1, FM2 and FM3).
1 Select the band (FM1 – 3) you wantto store FM stations into.• Each time you press the button, the FM
band changes as follows:
2 Press and hold both buttons formore than 2 seconds.
Local FM stations with the strongest signals aresearched and stored automatically in the bandnumber you have selected (FM1, FM2 or FM3.)These stations are preset in the number buttons –No.1 (lowest frequency) to No.6 (highest frequency).When automatic preset is over, the station storedin number button 1 will be automatically tuned in.
Press ¢ to searchstations of higherfrequencies.
Press 4 to searchstations of lowerfrequencies.
“SSM” appears, then disappears when automaticpreset is over.
MODE MO
SSM
FMFM1 FM2
FM3
EN08-10-KD-S6250/S580[J]-7 11/8/01, 8:54 AM9

10
EN
GL
ISH
KD-S6250/S580 [EN] GET0064-001A [J]
MO RPT RND7 8 9 10 11 12
SSM
Manual presetYou can preset up to 6 stations in each band (FM1,FM2, FM3 and AM) manually.
Ex: Storing an FM station of 88.3 MHz into thepreset number 1 of the FM1 band.
1 Select the band (FM1 – 3, AM) youwant to store FM stations into (inthis example, FM1).• Each time you press the button, the FM
band changes as follows:
2 Tune into a station of 88.3 MHz.
3 Press and hold the number button (inthis example, 1) for more than 2seconds.
4 Repeat the above procedure to storeother stations into other presetnumbers.
Press ¢ to tunestations of higherfrequencies.
Press 4 to tunestations of lowerfrequencies.
“P1” flashes for a few seconds.
Notes:• A previously preset station is erased when a new station
is stored in the same preset number.• Preset stations are erased whent the power supply to
the memory circuit is interrupted (for example, duringbattery replacement). If this occurs, preset the stationsagain.
Tuning into a preset stationYou can easily tune into a preset station.Remember that you must store stations first. If youhave not stored them yet, see “Storing stations inmemory” on page 9 and 10.
1 Select the band (FM1 – 3, AM).
2 Select the number (1 – 6) for the presetstation you want.
AM
FMFM1 FM2
FM3
AM
AM
FMFM1 FM2
FM3
AM
EN08-10-KD-S6250/S580[J]-7 11/8/01, 8:54 AM10

11
EN
GL
ISH
Playing a CD
1 Insert a disc into the loading slot.The unit turns on,draws a CD and startsplayback automatically.
Note:When a CD is insertedupside down, the CDautomatically ejects.
Note on One-Touch Operation:When a CD is already in the loading slot, pressing CDturns on the unit and starts playback automatically.
CD OPERATIONS
To stop play and eject the CDPress 0.CD play stops and the CD automatically ejectsfrom the loading slot.If you change the source, the CD play also stops(without ejecting the CD this time).
Notes:• If the ejected disc is not removed for about 15 seconds,
the disc is automatically inserted again into theloading slot to protect it from dust. (CD play will notstart this time.)
• You can eject the CD even when the unit is turned off.
Elapsed playing time
Total playing time ofthe inserted disc
Total track number ofthe inserted disc
Current track
The CD-in indicator lights up
MO RPT RNDMODE SCM
AM
FM
SSM
DIRECT TRACK ACCESS
CD
EN11-13-KD-S6250/S580[J]-3 11/8/01, 8:56 AM11

12
EN
GL
ISH
SSM
Locating a track or a particularportion on a CD
To fast-forward or reverse the track
To go to the next tracks or the previoustracks
To go to a particular track directly
Press the number button corresponding to thetrack number to start its playback.• To select a track number from 1 – 6:
Press 1 (7) – 6 (12) briefly.• To select a track number from 7 – 12:
Press and hold 1 (7) – 6 (12) for more than1 second.
Press and hold ¢,while playing a CD, to fastforward the track.
Press and hold 4 ,while playing a CD, toreverse the track.
Press ¢ briefly, whileplaying a CD, to go aheadto the beginning of the nexttrack. Each time you pressthe button consecutively,the beginning of the nexttracks is located and playedback.
Press 4 briefly, whileplaying a CD, to go back tothe beginning of the currenttrack. Each time you pressthe button consecutively,the beginning of theprevious tracks is locatedand played back.
Selecting CD playback modes
To play back tracks at random (Random Play)1 Press MODE to enter the functions mode
while playing a CD. This unit enters thefunctions mode.
2 Press RND (Random), while still in the functionsmode, so that the RND indicator lights up onthe display.Then, each time you press the button, CDrandom play mode turns on and off alternately.
When the random mode is turned on, the RNDindicator lights up on the display and a trackrandomly selected starts playing.
To play back tracks repeatedly (Repeat Play)1 Press MODE to enter the functions mode
while playing a CD. This unit enters thefunctions mode.
2 Press RPT (Repeat), while still in the functionsmode, so that the RPT indicator lights up onthe display.Then, each time you press the button, CDrepeat play mode turns on and off alternately.
When the repeat mode is turned on, the RPTindicator lights up on the display.
Track numberof the currentlyplaying trackThe RPT indicator
The RND indicator
SSM
MO RPT RND7 8 9 10 11 12
RNDMODE
RPTMODE
EN11-13-KD-S6250/S580[J]-3 11/8/01, 8:56 AM12

13
EN
GL
ISH
Prohibiting CD ejection
You can prohibit the CD ejection and can lock aCD in the loading slot.
Press and hold CD and 0 for more than 2seconds.
“EJECT” flashes on the display for about 5seconds, and the CD is locked and cannot beejected.
To cancel the prohibition and “unlock” the CD,press and hold CD and 0 again for more than2 seconds. “EJECT” appears on the display, andthe CD ejects from the loading slot.
CD
EN11-13-KD-S6250/S580[J]-3 11/8/01, 8:56 AM13

14
EN
GL
ISH
SOUND ADJUSTMENTSAdjusting the sound
You can adjust the sound characteristics to yourpreference.
1 Select the item you want to adjust.
Each time you press thebutton, the adjustableitems change as follows:
Indication To do: Range
BAS Adjust the bass. –06 (min.)(Bass) |
+06 (max.)
TRE Adjust the treble. –06 (min.)(Treble) |
+06 (max.)
FAD Adjust the front R06 (Rear only)(Fader)* and rear speaker |
balance. F06 (Front only)
BAL Adjust the left L06 (Left only)(Balance) and right speaker |
balance. R06 (Right only)
VOL Adjust the volume. 00 (min.)(Volume) |
50 (max.)
* If you are using a two-speaker system, set the faderlevel to “00.”
2 Adjust the level
Note:Normally the + and – buttons work as the volumecontrol. So you do not have to select “VOL” to adjustthe volume level.
Turning on/off the loudnessfunction
The human ear is less sensitive to low and highfrequencies at low volumes.The loudness function can boost these frequenciesto produce well-balanced sound at low volume level.Each time you press LOUD, the loudness functionturns on and off alternatively.
@A
To increase the level.
To decrease the level.
Bass level indicator Treble level indicator
EN14-16-KD-S6250/S580[J]-6 11/7/01, 7:50 PM14

15
EN
GL
ISH
Recalling the sound modesWhen “SCM LINK” is set to “LINK ON,”select the source.
Each time you change the playback source, theSCM indicator flashes on the display.
The sound mode stored in memory for theselected source is recalled.
Notes:• You can adjust each sound mode to your preference,
and store it in memory.If you want to adjust and store your original soundmode, see “Storing your own sound adjustment” onpage 16.
• To adjust the bass and treble reinforcement levels orto turn on/off the loudness function temporarily, seepage 14. (Your adjustments will be cancelled if anothersource is selected.)
Using the Sound ControlMemory (SCM)
You can select and store a preset sound adjustmentsuitable to each playback source. (Advanced SCM)
Selecting and storing the sound modesOnce you select a sound mode, it is stored inmemory. It will be recalled every time you selectthe same source and will be shown on the display.A sound mode can be stored for each of thefollowing sources — FM1, FM2, FM3, AM, CD.• If you do not want to store the sound mode
separately for each playback source, but wantto use the same sound mode for all the sources,see “To cancel Advanced SCM” on page 17.
Select the sound mode you want.• Each time you press the button, the sound mode
changes as follows.
• When “SCM LINK” is set to “LINK ON”, theselected sound mode can be stored in memoryfor the current source and the effect applies onlyto the current source.
• When “SCM LINK” is set to “LINK OFF”, theselected sound mode effect applies to any source.
Indication For: Preset valuesBas TRE LOUD
SCM OFF (Flat sound) 00 00 On
BEAT Rock or disco +02 00 Onmusic
SOFT Quiet +01 –03 Offbackgroundmusic
POP Light music +04 +01 Off
SCM
CD
AM
FM
EN14-16-KD-S6250/S580[J]-6 11/7/01, 7:50 PM15

16
EN
GL
ISH
Storing your own soundadjustment
You can adjust the sound modes (BEAT, SOFT,POP: see page 15) to your preference and storeyour own adjustments in memory.• There is a time limit in doing the following
procedure. If the setting is cancelled before youfinish, start from step 1 again.
1 Call up the sound mode you want toadjust.See page 15 for details.
2 Select “BAS” (bass) or “TRE” (treble).
3 Adjust the bass or treble level.See page 14 for details.
4 Repeat steps 2 and 3 to adjust theother items.
5 To turn ON/OFF the loudness function.See page 14 for details.
6 Press and hold SCM until the soundmode you have selected in step 1flashes on the display.Your adjustment made for the selected soundmode is stored in memory.
7 Repeat the same procedure to storeother sound modes.
To reset to the factory settingsRepeat the same procedure and reassign the presetvalues listed in the table on page 15.
SCMSCM
EN14-16-KD-S6250/S580[J]-6 11/7/01, 7:50 PM16

17
EN
GL
ISH
KD-S6250/S580 [EN] GET0064-001A [J]
OTHER MAIN FUNCTIONSSetting the clock
1 Press and hold SEL (Select) for morethan 2 seconds.“CLOCK H”, “CLOCK M”, “SCM LINK” or“LEVEL” appears on the display.
2 Set the hour.1 Select “CLOCK H” if not shown on the
display.2 Adjust the hour.
3 Set the minute.1 Select “CLOCK M.”2 Adjust the minute.
4 Press SEL (select) to finish the setting.
21
During tuner operation:
During CD operation:
ClockFrequency
ClockElapsedplaying time
To check the current clock time (changingthe display mode)Press DISP repeatedly. Each time you press thebutton, the display mode changes as follows.
To Cancel Advanced SCM
You can cancel the Advanced SCM (Sound ControlMemory), and unlink the sound modes and theplayback sources.When shipped from the factory, a different soundmode can be stored in memory for each source sothat you can change the sound modes simply bychanging the sources.LINK ON: Advanced SCM (different SCM for
different sources)LINK OFF: Conventional SCM (one SCM for all
sources)
1 Press and hold SEL for more than 2seconds.“CLOCK H”, “CLOCK M”, “SCM LINK” or“LEVEL” appears on the display.
2 Select "SCM LINK" if not shown on thedisplay.
3 Select the desire mode — "LINK ON"or "LINK OFF".
4 Press SEL (select) to finish the setting.
• If the unit is not in use when you press DISP, thepower turns on, the clock time is shown for5 seconds, then the power turns off.
21
SSM
SSM
SSM
EN17-19-KD-S6250/S580[J]-4 11/7/01, 7:50 PM17

18
EN
GL
ISH
KD-S6250/S580 [EN] GET0064-001A [J]
3 Select the desired mode — “VOL 1”,“VOL 2” or “OFF”.
4 Press SEL (select) to finish the setting.
Selecting the level display
You can select the level display according to yourpreference.When shipped from the factory, “VOL 2” is selected.VOL 1 : Shows the volume level indicator.VOL 2 : Alternates “VOL 1” setting and
illumination display.OFF : Erase the volume level indicator.
1 Press and hold SEL for more than 2seconds.“CLOCK H”, “CLOCK M”, “SCM LINK” or“LEVEL” appears on the display.
2 Select “LEVEL” if not shown on thedisplay.“CLOCK H”, “CLOCK M”, “SCM LINK” or“LEVEL” appears on the display.
SSM
EN17-19-KD-S6250/S580[J]-4 11/7/01, 7:50 PM18

19
EN
GL
ISH
KD-S6250/S580 [EN] GET0064-001A [J]
Note on cleaning the connectors:If you frequently detach the control panel, theconnectors will deteriorate.To minimize this possibility, periodically wipe theconnectors with a cotton swab or cloth moistenedwith alcohol, being careful not to damage theconnectors.
Connectors
Detaching the control panel
You can detach the control panel when leaving thecar.When detaching or attaching the control panel, becareful not to damage the connectors on the backof the control panel and on the panel holder.
How to detach the control panelBefore detaching the control panel, be sure toturn off the power.
1 Unlock the control panel.
2 Lift and pull the control panel out ofthe unit.
3 Put the detached control panel intothe case provided.
How to attach the control panel
1 Insert the left side of the control panelinto the groove on the panel holder.
2 Press the right side of the controlpanel to fix it to the panel holder.
EN17-19-KD-S6250/S580[J]-4 11/7/01, 7:50 PM19

20
EN
GL
ISH
KD-S6250/S580 [EN] GET0064-001A [J]
MAINTENANCEHandling CDs
This unit has been designed only to reproduce the
CDs bearing the mark.
• Other discs cannot be played back.
How to handle CDsWhen removing a CD from itscase, press down the centerholder of the case and lift theCD out, holding it by the edges.• Always hold the CD by the edges. Do not touch
its recording surface.
When storing a CD into its case, gentlyinsert the CD around the center holder (with theprinted surface facing up).• Make sure to store CDs into the cases after
use.
To keep CDs cleanA dirty CD may not playcorrectly. If a CD doesbecomes dirty, wipe it with asoft cloth in a straight linefrom center to edge.
To play new CDsNew CDs may have somerough spots around theinner and outer edges. Ifsuch a CD is used, this unitmay reject the CD.To remove these rough spots, rub the edges witha pencil or ball-point pen, etc.
COMPACT
DIGITAL AUDIO
Center holder
Moisture condensationMoisture may condense on the lens inside theCD player in the following cases:• After starting the heater in the car.• If it becomes very humid inside the car.Should this occur, the CD player maymalfunction. In this case, eject the CD and leavethe unit turned on for a few hours until themoisture evaporates.
When playing a CD-R (Recordable)You can playback your original CD-Rs on thisreceiver.• Before playing back CD-Rs, read their
instructions or cautions carefully.• Some CD-Rs recorded on CD recorders may not
be played back on this receiver because of theirdisc characteristics, and of the following reasons:– Discs are dirty or scratched.– Moisture condensation occurs on the lens
inside the unit.– The pickup lens inside the CD player is dirty.
• Use only “finalized” CD-Rs.• CD-RWs (Rewritable) cannot be played back on
this receiver.• Do not use CD-Rs with stickers or sticking labels
on the surface. They may cause malfunctions.
CAUTIONS:• Do not insert 8cm (3 3/16") CDs (single CDs)
into the loading slot. (Such CDs cannot beejected.)
• Do not insert any CD of unusual shape – like aheart or flower; otherwise, it will cause amalfunction.
• Do not expose CDs to direct sunlight or anyheat source or place them in a place subject tohigh temperature and humidity. Do not leavethem in a car.
• Do not use any solvent (for example,conventional record cleaner, spray, thinner,benzine, etc.) to clean CDs.
About mistracking:Mistracking may result from driving on extremelyrough roads. This does not damage the unit and theCD, but will be annoying.We recommend that you stop CD play while drivingon such rough roads.
EN20-22-KD-S6250/S580[J]-4 11/7/01, 7:50 PM20

21
EN
GL
ISH
KD-S6250/S580 [EN] GET0064-001A [J]
TROUBLESHOOTINGWhat appears to be trouble is not always serious. Check the following points before calling a servicecenter.
Symptoms
• CD cannot be played back.
• CD sound is sometimesinterrupted.
• “NO DISC” appears on thedisplay.
• Sound cannot be heard fromthe speakers.
• SSM (Strong-stationSequential Memory) automaticpreset does not work.
• Static noise while listening tothe radio.
• CD can be neither played backnor ejected.
• The unit does not work at all.
Remedies
Insert the CD correctly.
Stop CD play while drivingrough roads.
Change the CD.
Check the cords andconnections.
Insert a CD into the loading slot.
Insert it correctly.
Adjust it to the optimum level.
Check the cords andconnections.
Store stations manually.
Connect the antenna firmly.
Press and 0 at thesame time for more than 2seconds. Be careful not to dropCD when it is ejected.
Press and SEL at thesame time for more than 2seconds to reset the unit. (Theclock setting and preset stationsstored in memory are erased.)(See page 2.)
Causes
CD is inserted upside down.
You are driving on rough roads.
CD is scratched.
Connections are incorrect.
No CD is in the loading slot.
CD is inserted incorrectly.
The volume control is turned tothe minimum level.
Connections are incorrect.
Signals are too weak.
The antenna is not connectedfirmly.
The CD player may functionincorrectly.
The built-in microcomputer mayfunction incorrectly due to noise,etc.
EN20-22-KD-S6250/S580[J]-4 11/7/01, 7:50 PM21

22
EN
GL
ISH
KD-S6250/S580 [EN] GET0064-001A [J]
SPECIFICATIONSAUDIO AMPLIFIER SECTIONMaximum Power Output:
Front: 45 watts per channelRear: 45 watts per channel
Continuous Power Output (RMS):Front: 17 watts per channel into 4 Ω,
40 Hz to 20 000 Hz at no more than0.8% total harmonic distortion.
Rear: 17 watts per channel into 4 Ω,40 Hz to 20 000 Hz at no more than0.8% total harmonic distortion.
Load Impedance: 4 Ω (4 Ω to 8 Ω allowance)Tone Control Range
Bass: ±10 dB at 100 HzTreble: ±10 dB at 10 kHz
Frequency Response: 40 Hz to 20 000 HzSignal-to-Noise Ratio: 70 dBLine-Out Level/Impedance: 2.0 V/20 kΩ load
(full scale)Output Impedance: 1 kΩ
TUNER SECTIONFrequency RangeFM: 87.5 MHz to 107.9 MHzAM: 530 kHz to 1 710 kHz
[FM Tuner]Usable Sensitivity: 11.3 dBf (1.0 µV/75 Ω)50 dB Quieting Sensitivity:
16.3 dBf (1.8 µV/75 Ω)Alternate Channel Selectivity (400 kHz):
65 dBFrequency Response: 40 Hz to 15 000 HzStereo Separation: 35 dBCapture Ratio: 1.5 dB
[AM Tuner]Sensitivity: 20 µVSelectivity: 35 dB
CD PLAYER SECTIONType: Compact disc playerSignal Detection System: Non-contact optical
pickup (semiconductor laser)Number of channels: 2 channels (stereo)Frequency Response: 5 Hz to 20 000 HzDynamic Range: 90 dBSignal-to-Noise Ratio: 95 dBWow and Flutter: Less than measurable limit
GENERALPower RequirementOperating Voltage: DC 14.4 volts (11 volts to 16
volts allowance)Allowable Working Temperature:
0°C to +40°C (32°F to 104°F)Grounding System: Negative groundDimensions (W x H x D)
Installation Size:182 mm x 52 mm x 150 mm(7-3/16" x 2-1/16" x 5-15/16")
Panel Size: 188 mm x 58 mm x 14 mm(7-7/16" x 2-5/16" x 5/8")
Mass: 1.3 kg (2.9 lbs) (excluding accessories)
Design and specifications subject to changewithout notice.
If a kit is necessary for your car, consult yourtelephone directory for the nearest car audiospeciality shop.
EN20-22-KD-S6250/S580[J]-4 11/7/01, 7:50 PM22

KD-S6250/S580 [EN] GET0064-001A [J]
1001KKSFLEJEINEN, SP, FRJVC
VICTOR COMPANY OF JAPAN, LIMITED
Having TROUBLE with operation?Please reset your unit
Refer to page of How to Reset
Still having trouble?? USA ONLY
Call 1-800-252-5722http://www.jvc.com
We can help you!
http://www.jvcmobile.comVisit us on-line for
Technical Support & Customer Satisfaction Survey.US RESIDENTS ONLY
Cover-KD-S6250/S580(J)-1 11/7/01, 7:48 PM2


![[TIPE] KD-R526/KD-R525/ KD-R426/KD-R425 Having TROUBLE ... · CD RECEIVER / ALAT PENERIMA CD For canceling the display demonstration, see page 4. ... BUKU PETUNJUK For installation](https://static.fdocuments.in/doc/165x107/5cec5ada88c993f4158d4541/tipe-kd-r526kd-r525-kd-r426kd-r425-having-trouble-cd-receiver-alat.jpg)