

RAMMER - The Home Depot · PDF filesomeone familiar with the equipment before being allowed to...
22
Tomahawk TAMPING RAMMER Power PMR68 Operation and Instruction Manual
Transcript of RAMMER - The Home Depot · PDF filesomeone familiar with the equipment before being allowed to...

Tomahawk
TA M P I N GR A M M E R
PowerPMR68
Operation and Instruction Manual

2
Table of Contents1. Safety Information
1.1 Safety Precautions1.2 Operating Safety1.3 Operator Safety while using Internal Combustion Engines1.4 Service Safety
3. Maintenance3.1 Periodic Maintenance Schedule3.2 Transporting3.3 Spark Plug3.4 Air Cleaner
4. Technical Data
2. Operation2.1 Application2.2 Structure
33456
1414151516
19
111111
------------------------------------------------------------------------------------------------------------------------------------------------------
------------------------------------------------------------------------------------------
-------------------------------------------------------------------------------------------------------------
-------------------------------------------------------------------------------------1.5 Label Locations 7------------------------------------------------------------------------------------1.6 Safety Labels 8---------------------------------------------------------------------------------------1.5 Operating Labels 10----------------------------------------------------------------------------------
------------------------------------------------------------------------------------------
------------------------------------------------------------------------------------
----------------------------------------------------------------------------------
Warranty 20----------------------------------------------------------------------------------------------
Maintenance Record 21----------------------------------------------------------------------------
------------------------------------------------------------------------------------------
--------------------------------------------------------------------------------------------2.3 Before Starting2.4 To Start
1112
1213
---------------------------------------------------------------------------------------------------------------------------------------------------------------------------------
2.5 Operation2.6 To Stop
-------------------------------------------------------------------------------------------------------------------------------------------------------------------------------------------
----------------------------------------------------------------------------------------------------------------------------------------------------------------------------------
3.5 Storage3.6 Troubleshooting
1617----------------------------------------------------------------------------------
----------------------------------------------------------------------------------------------
--------------------------------------------------------------

3
This manual provides information and procedures to safely operate and maintain this model. For your own safety and protection from injury, carefully read, understand and observe the safety instructions described in this manual.
Keep this manual or a copy of it with the machine. If you lose this manual or need an additional copy, please contact Tomahawk Power LLC or visit www.tomahawk-power.com This machine is built with user safety in mind; however, it can present hazards if improp-erly operated and serviced. Follow operating instructions carefully. If you have questions about operating or servicing this equipment, please contact Tomahawk Power.
The information contained in this manual is based on machines in production at the time of publication. Tomahawk Power reserves the right to change any portion of this information without notice. No part of this publication may be reproduced in any form or by any means, electronic or mechanical, including photocopying, without express writ-ten permission from Tomahawk Power.
Any type of reproduction or distribution not authorized by Tomahawk Power rep-resents an infringement of valid copyrights and will be prosecuted. We expressly reserve the right to make technical modifications, even without due notice, which aim at improving our machines or their safety standards.
1. SAFETY INFORMATION
1.1 Safety Precautions This manual contains DANGER, WARNING, CAUTION, and NOTE callouts which must be followed to reduce the possibility of personal injury, damage to the equipment, or improper service.
This is the safety alert symbol. It is used to alert you to potential personal injury hazards. Obey all safety messages that follow this symbol to avoid possible injury or death. DANGER indicates an imminently hazardous situation which, if not avoided, will result in death or serious injury. WARNING indicates a potentially hazardous situation which, if not avoided, could result in death or serious injury.
CAUTION indicates a potentially hazardous situation which, if not avoided, may result in minor or moderate injury.
DANGER
WARNING
CAUTION

CAUTION: Used without the safety alert symbol, CAUTION indicates a potentially hazard-ous situation which, if not avoided, may result in property damage.
1.2 Operating Safety
Familiarity and proper training are required for the safe operation of this equipment. Equipment operated improperly or by untrained personnel can be dangerous! Read the operating instructions and familiarize yourself with the location and proper use of all instruments and controls. Inexperienced operators should receive instruction from someone familiar with the equipment before being allowed to operate the rammer.
-NEVER operate rammer in applications for which it is not intended.-NEVER allow improperly trained personnel to operate rammer.-NEVER touch hot mu�ler, engine cylinders, or cooling fins.-NEVER use accessories or attachments for the rammer, which are not recommended by TOMAHAWK POWER. Damage to the rammer and/or injury to user may occur.-NEVER leave a running machine unattended.-NEVER run machine indoors or in an enclosed area such as a deep trench unless ade-quate ventilation is provided. Exhaust gas from the engine contains poisonous carbon monoxide gas; exposure to carbon monoxide can cause loss of consciousness and may lead to death.-NEVER tamper with or disable the function of operating controls.-NEVER use choke to stop the engine.-NEVER operate the machine in areas where explosions may occur.-ALWAYS remove or disconnect engine spark plug before servicing rammer, to avoid accidental start-up.-ALWAYS read, understand, and follow procedures in the Operation Manual before attempting to operate equipment.-ALWAYS be sure that all other persons are at a safe distance away from the rammer. Stop the machine if people step into the working area of the machine.-ALWAYS be sure the operator is familiar with proper safety precautions and operation techniques before using rammer.-ALWAYS wear protective clothing when operating rammer. Wear goggles or safety glass-es, hearing protection, and safety shoes.-ALWAYS keep hands, feet, and loose clothing away from the moving parts of rammer.
4
5
-ALWAYS use common sense and caution when operating rammer.-ALWAYS be sure rammer will not tip over, roll slide, or fall when not being operated.-ALWAYS turn engine OFF when rammer is not being operated.-ALWAYS guide the rammer in such a way that the operator is not squeezed between the rammer and solid objects. Special care is required when working on uneven ground or when compacting coarse material. Make sure to stand firmly when operating the ma-chine under such conditions.-ALWAYS operate the rammer in such a way that there is no danger of it turning over or falling in, when working near the edges of breaks, pits, slopes, trenches and platforms.
1.3 Operator Safety while using Internal Combustion Engines
-DO NOT smoke when refueling the engine or operating the machine.-DO NOT refuel a hot or running engine.-DO NOT refuel the engine near an open flame.-DO NOT smoke while operating the rammer.-DO NOT operate the rammer near open flames.-ALWAYS refill fuel tank in a well-ventilated area.-ALWAYS replace fuel tank cap a�er refueling.-ALWAYS check fuel lines, fuel cap, and fuel tank for leaks and cracks before starting engine. Do not run machine if fuel leaks are present, or fuel cap or fuel lines are loose.-If fuel is spilled during refueling, wipe it o� from the engine immediately and discard the rag in a safe place. Do not operate the unit if fuel or oil leaks remain.-NEVER operate any gas powered equipment in a poorly ventilated or enclosed area.-NEVER perform any work on the unit while it is running. Before working on it, stop the engine and disconnect the spark plug wire to prevent accidental starting.-Avoid prolonged breathing of exhaust gases.-Avoid contact with hot exhaust systems and engine parts.-Allow engine to cool before performing any repairs or service.-ALWAYS transport and handle fuel only when contained in approved safety containers.-ALWAYS keep the area around the mu�ler free of debris such as leaves, paper, cartons, etc. A hot mu�ler could ignite the debris and start a fire.

6
1.4 Service Safety
Poorly maintained equipment can become a safety hazard! In order for the equipment to operate safely and properly over a long period of time, periodic maintenance and occa-sional repairs are necessary.
-DO NOT attempt to clean or service rammer while it is running.-DO NOT operate rammer with safety devices or guards removed or that are not in work-ing order.-DO NOT operate rammer without air cleaner.-DO NOT remove air cleaner paper component, precleaner, or air cleaner cover while operating rammer.-DO NOT alter engine speeds. Run engine only at speeds specified in Technical Data Section.-ALWAYS replace safety devices and guards a�er repairs and maintenance.-ALWAYS keep area around mu�ler free of debris in order to reduce to chance of an acci-dental fire.-ALWAYS do Periodic Maintenance as recommended in Operation Manual.-ALWAYS clean debris from engine cooling fins.-ALWAYS replace worn or damaged components with spare parts designed and recom-mended by TOMAHAWK POWER for servicing this rammer.

7
1.5 Label Locations
8
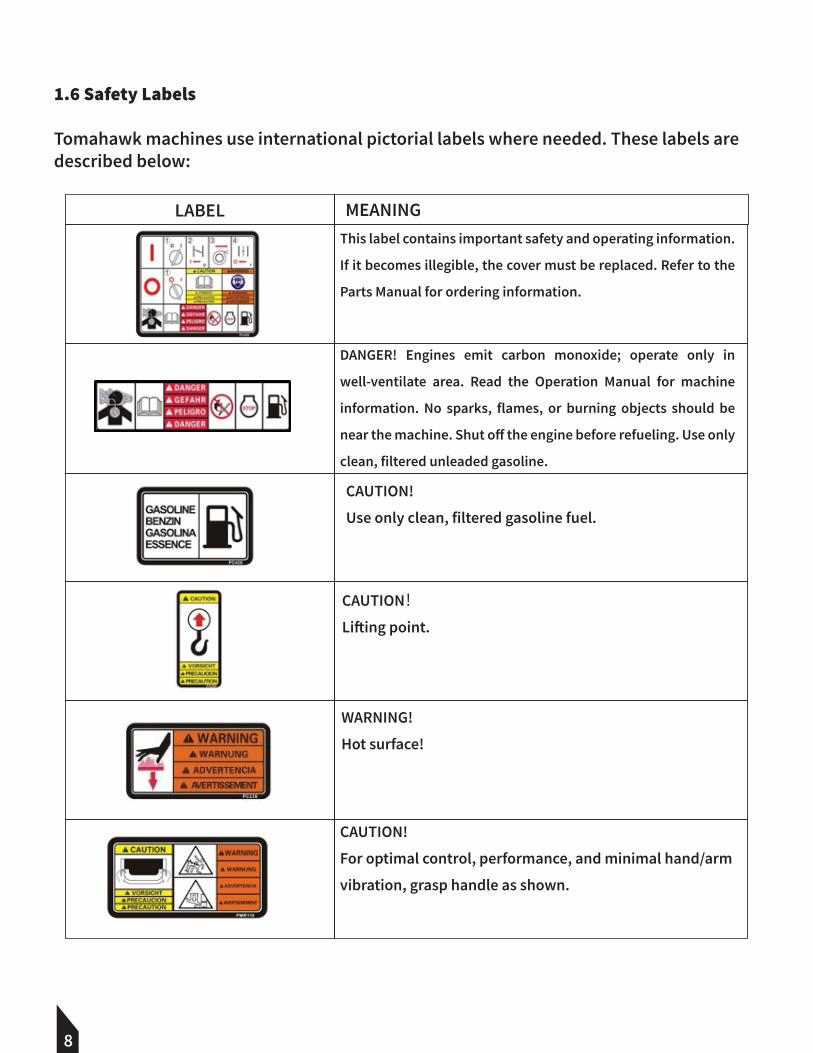
LABEL MEANINGThis label contains important safety and operating information.
If it becomes illegible, the cover must be replaced. Refer to the
Parts Manual for ordering information.
DANGER! Engines emit carbon monoxide; operate only in
well-ventilate area. Read the Operation Manual for machine
information. No sparks, flames, or burning objects should be
near the machine. Shut o� the engine before refueling. Use only
clean, filtered unleaded gasoline.
CAUTION!
Use only clean, filtered gasoline fuel.
CAUTION!Li�ing point.
CAUTION!
For optimal control, performance, and minimal hand/arm
vibration, grasp handle as shown.
WARNING!
Hot surface!
1.6 Safety Labels
Tomahawk machines use international pictorial labels where needed. These labels are described below:
9
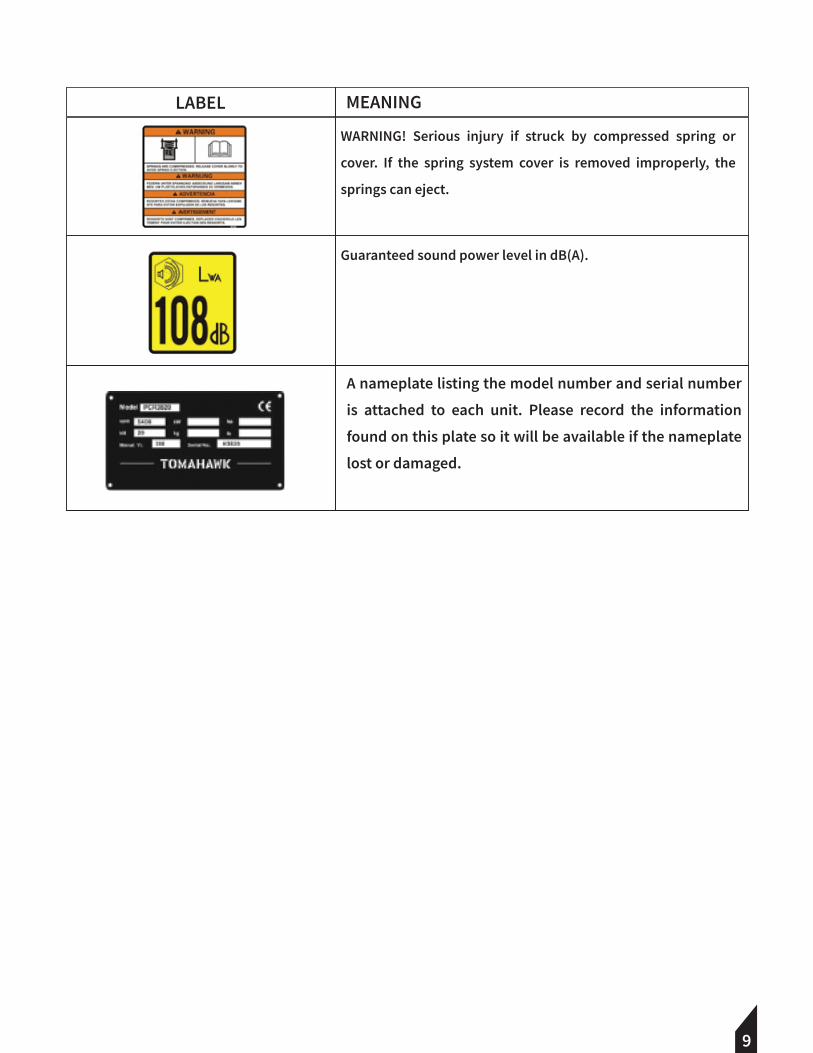
LABEL MEANING
WARNING! Serious injury if struck by compressed spring or
cover. If the spring system cover is removed improperly, the
springs can eject.
Guaranteed sound power level in dB(A).
A nameplate listing the model number and serial number
is attached to each unit. Please record the information
found on this plate so it will be available if the nameplate
lost or damaged.

10
1.7 Operating Labels
Tomahawk Power’s machines use international pictorial labels where needed. These labels are described below:
LABEL MEANINGStart the engine:
① Turn the engine switch to the ON position
② Close the choke.
③ Pull the rewind starter.
④ Open the choke.
Stop the engine:
Turn the engine switch to OFF position.
Fuel valve:
Closed
Open
Engine stop button:
Press to stop engine.
Choke:
O: Open
I: Closed
NOTICE!
Throttle control lever:
Turtle = Idle or Slow
Rabbit = Full or Fast

11
2. Operation
2.1 Application
Rammers are designed to compact loose soils and gravel to prevent settling and to pro-vide a firm, solid base for the placement of footings, concrete slabs, foundations, gas piping works, water pipe works, and cable backfill works, etc.
Please do not use in the following cases as it may cause damage because machine being unbalanced.
-Pile foundation -Hard soil excessively compacted over normal condition -Steep bank slope
The Tamping Rammer is to be used for compacting cohesive clay, gravels, and patching work on asphalt, etc.
2.2 Structure
The top end is made up of the engine, Clutch, Connecting Rod, Operating Handle, and Fuel Tank that connects via Shock Absorbing Rubber to the body. The bottom end is made up of Spring Cylinder (Sliding part), Foot Plate that ramps body, Foot and Bellows.
2.3 Before Starting
-This machine is of oil bath lubrication system.-Check the oil level through a window at rear end of the foot. Replenish oil if oil is not visible at the window. For lubrication, use automobile engine oil of 10W-30 SE, SF or better grade. Capacity is 830cc.-Fill the fuel tank with regular gasoline (unleaded). Simultaneously, check engine oil and make it a habit to replenish on the earlier side. Low lubrication oil level may result in engine seizure due to consumption during operation. Nevertheless, oil level should be checked prior to start up without fail. For lubrication, use automobile engine oil of 10W-30 SE, SF or better grade. See Engine Operating Manual for further detail.-Check every bolt, nut or screwed area for tightness. These may have become loosened due to vibrations from previous use. -Remove dirt and dust. Particularly clean the vicinity of recoil starter and foot.
WARNING
12
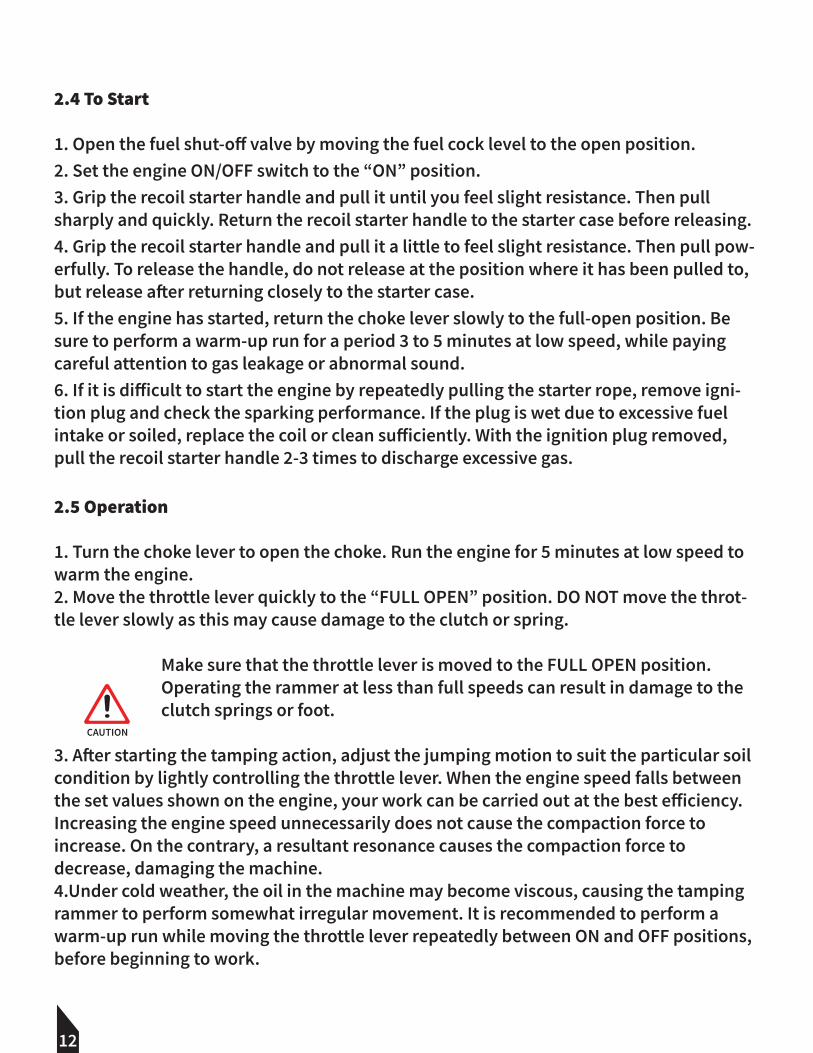
2.4 To Start 1. Open the fuel shut-o� valve by moving the fuel cock level to the open position.2. Set the engine ON/OFF switch to the “ON” position.3. Grip the recoil starter handle and pull it until you feel slight resistance. Then pull sharply and quickly. Return the recoil starter handle to the starter case before releasing.4. Grip the recoil starter handle and pull it a little to feel slight resistance. Then pull pow-erfully. To release the handle, do not release at the position where it has been pulled to, but release a�er returning closely to the starter case.5. If the engine has started, return the choke lever slowly to the full-open position. Be sure to perform a warm-up run for a period 3 to 5 minutes at low speed, while paying careful attention to gas leakage or abnormal sound.6. If it is di�icult to start the engine by repeatedly pulling the starter rope, remove igni-tion plug and check the sparking performance. If the plug is wet due to excessive fuel intake or soiled, replace the coil or clean su�iciently. With the ignition plug removed, pull the recoil starter handle 2-3 times to discharge excessive gas.
2.5 Operation
1. Turn the choke lever to open the choke. Run the engine for 5 minutes at low speed to warm the engine.2. Move the throttle lever quickly to the “FULL OPEN” position. DO NOT move the throt-tle lever slowly as this may cause damage to the clutch or spring.
Make sure that the throttle lever is moved to the FULL OPEN position. Operating the rammer at less than full speeds can result in damage to the clutch springs or foot. 3. A�er starting the tamping action, adjust the jumping motion to suit the particular soil condition by lightly controlling the throttle lever. When the engine speed falls between the set values shown on the engine, your work can be carried out at the best e�iciency. Increasing the engine speed unnecessarily does not cause the compaction force to increase. On the contrary, a resultant resonance causes the compaction force to decrease, damaging the machine.4.Under cold weather, the oil in the machine may become viscous, causing the tamping rammer to perform somewhat irregular movement. It is recommended to perform a warm-up run while moving the throttle lever repeatedly between ON and OFF positions, before beginning to work.
CAUTION

13
5. Soil contacting surface of the foot is lined with heat-treated metal sheet for extra strength. However, for compacting cobblestone, use the filling-up soil for example so that the foot hits the soil uniformly.6. The tamping rammer has been designed to advance while jumping. For quicker advance, erect the machine by pushing its handle down slightly so that flat surface of the foot at its rear-end contacts the ground.7. To stop the tamping action, move throttle lever quickly from the FULL OPEN to IDLE position.
2.6 To Stop
2.6.1 Normal Shutdown1. With the throttle lever closed from ON to OFF, run the engine for 3-5 minutes at low speed, and a�er the temperature is lowered, turn the switch to the “OFF” position.2. Close the fuel shut-o� valve by moving the fuel cock lever to the CLOSED position.
2.6.2 Emergency ShutdownMove the throttle lever quickly to the IDLE position, and turn the engine’s ON/OFF switch to the OFF position.
14
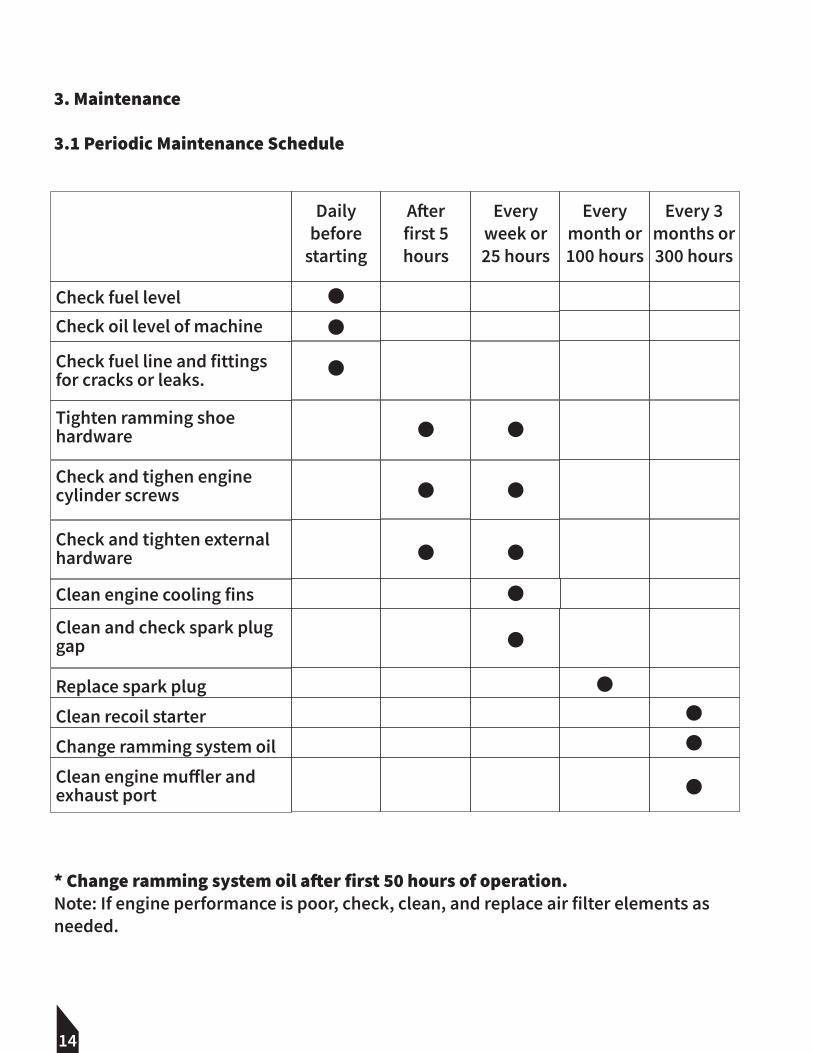
3. Maintenance
3.1 Periodic Maintenance Schedule
* Change ramming system oil a�er first 50 hours of operation.Note: If engine performance is poor, check, clean, and replace air filter elements as needed.
Dailybefore
starting
Check fuel levelCheck oil level of machine
Check fuel line and fittingsfor cracks or leaks.
Check and tighen enginecylinder screws
Check and tighten externalhardware
Clean and check spark pluggap
Replace spark plugClean recoil starterChange ramming system oilClean engine mu�ler andexhaust port
Tighten ramming shoe hardware
A�erfirst 5hours
Everyweek or25 hours
Every 3months or300 hours
Everymonth or100 hours
Clean engine cooling fins
15
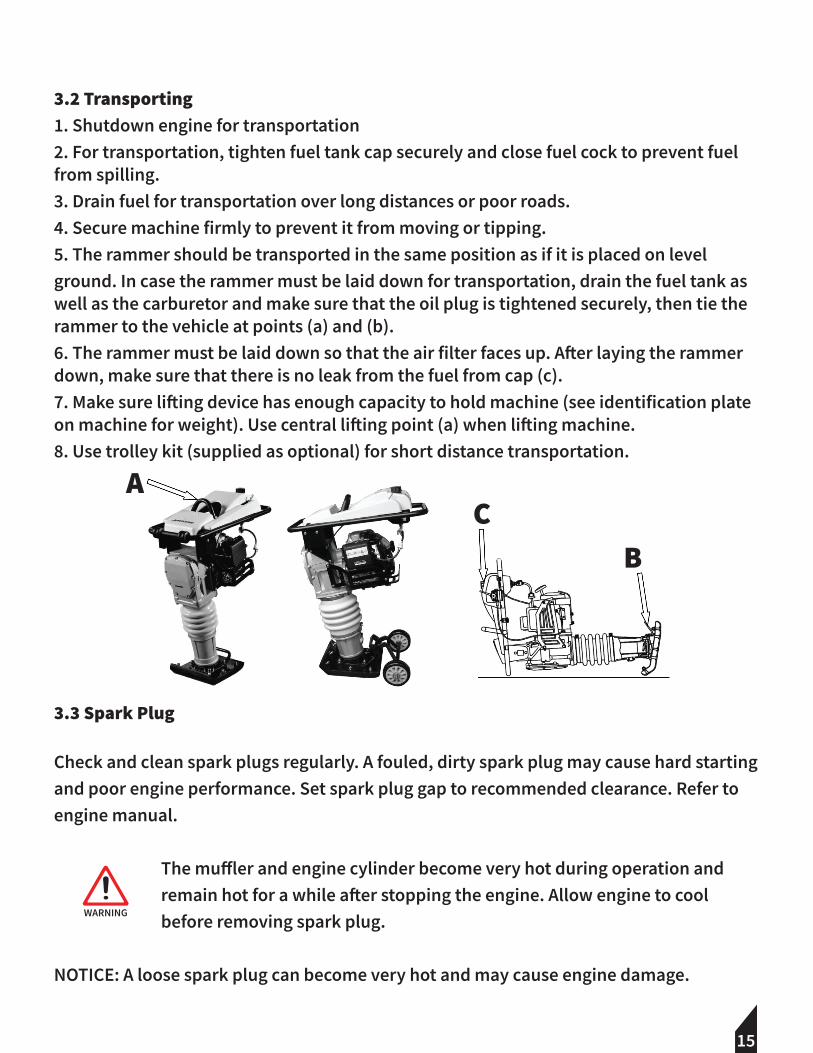
3.2 Transporting1. Shutdown engine for transportation2. For transportation, tighten fuel tank cap securely and close fuel cock to prevent fuel from spilling.3. Drain fuel for transportation over long distances or poor roads.4. Secure machine firmly to prevent it from moving or tipping.5. The rammer should be transported in the same position as if it is placed on level ground. In case the rammer must be laid down for transportation, drain the fuel tank as well as the carburetor and make sure that the oil plug is tightened securely, then tie the rammer to the vehicle at points (a) and (b).6. The rammer must be laid down so that the air filter faces up. A�er laying the rammer down, make sure that there is no leak from the fuel from cap (c).7. Make sure li�ing device has enough capacity to hold machine (see identification plate on machine for weight). Use central li�ing point (a) when li�ing machine.8. Use trolley kit (supplied as optional) for short distance transportation.
3.3 Spark Plug
Check and clean spark plugs regularly. A fouled, dirty spark plug may cause hard starting and poor engine performance. Set spark plug gap to recommended clearance. Refer to engine manual.
The mu�ler and engine cylinder become very hot during operation and remain hot for a while a�er stopping the engine. Allow engine to cool before removing spark plug.
NOTICE: A loose spark plug can become very hot and may cause engine damage.
WARNING

16
3.4 Air CleanerA clean engine will extend engine life. Keep the air filter clean at all times. Clean the rammer’s air filter using the recommended solvent daily. See engine manual for proper cleaning procedure. Let the filter dry before reinstalling.
NEVER use gasoline or other types of low flash point solvents for cleaning the air cleaner. A fire or explosion could result.
3.5 Storage
The rammer should be stored on level ground, a�er the engine and machine have cooled down. Be sure to secure the rammer as necessary to avoid it from falling down. If the rammer has to be laid down, tighten fuel tank cap and engine oil plug securely and wait until the engine and machine are cooled down. A�er laying it down, make sure that there is no fuel or oil leak (if fuel leaks, drain the tank).
3.5.1 Long-Term Storage- Drain fuel from fuel tank, fuel line and carburetor.-Remove spark plug and pour a few drops of motor oil into cylinder. Crank engine 3 to 4 times so that oil reaches all internal parts.-Clean exterior with a cloth soaked in clean oil.-Store unit covered with plastic sheet in moisture free and dust free location out of direct sunlight.
WARNING

17
Engine rotates butamplitude not uniform or does not strike
3.6 Troubleshooting
3.6.1 Rammer Troubleshooting
Improper engine speed? Adjust engine speed to correctoperating RPM setting.
Clutch slips? Replace or adjust clutch.
Spring failure? Replace spiral spring.
SYMPTOM POSSIBLE PROBLEM SOLUTION
Operating speed of throttlelever is incorrectly set?
Set throttle lever to correct position.
Oil in excess? Drain excess oil. Bring to correct level.
18
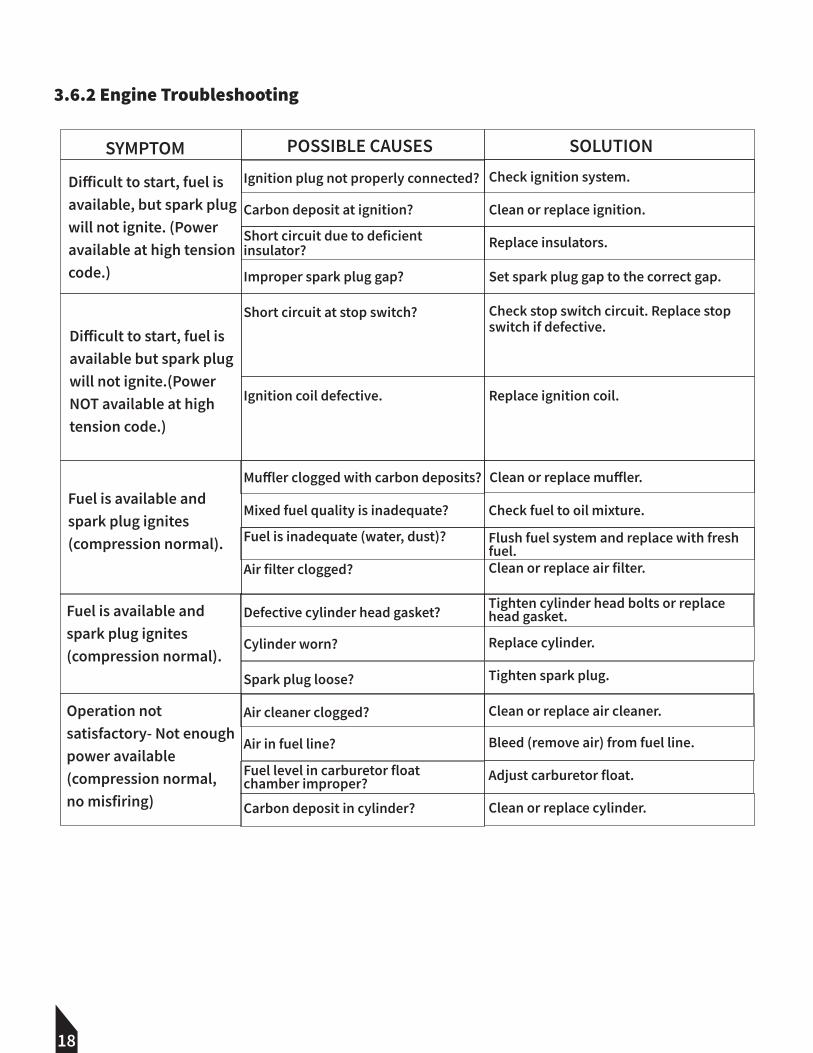
3.6.2 Engine Troubleshooting
SYMPTOM POSSIBLE CAUSES SOLUTION
Di�icult to start, fuel isavailable, but spark plugwill not ignite. (Poweravailable at high tensioncode.)
Ignition plug not properly connected?
Carbon deposit at ignition?
Check ignition system.
Clean or replace ignition.
Short circuit due to deficientinsulator?
Improper spark plug gap?
Replace insulators.
Set spark plug gap to the correct gap.
Di�icult to start, fuel is available but spark plugwill not ignite.(Power NOT available at high tension code.)
Short circuit at stop switch?
Ignition coil defective.
Check stop switch circuit. Replace stop switch if defective.
Replace ignition coil.
Fuel is available and spark plug ignites (compression normal).
Mu�ler clogged with carbon deposits?
Mixed fuel quality is inadequate? Check fuel to oil mixture.
Fuel is inadequate (water, dust)?
Air filter clogged?
Flush fuel system and replace with freshfuel.Clean or replace air filter.
Fuel is available and spark plug ignites (compression normal).
Defective cylinder head gasket?
Cylinder worn?
Tighten cylinder head bolts or replacehead gasket.
Replace cylinder.
Spark plug loose? Tighten spark plug.
Clean or replace mu�ler.
Operation not satisfactory- Not enough power available (compression normal, no misfiring)
Air cleaner clogged?
Air in fuel line?
Clean or replace air cleaner.
Bleed (remove air) from fuel line.
Fuel level in carburetor float chamber improper? Adjust carburetor float.
Carbon deposit in cylinder? Clean or replace cylinder.
19
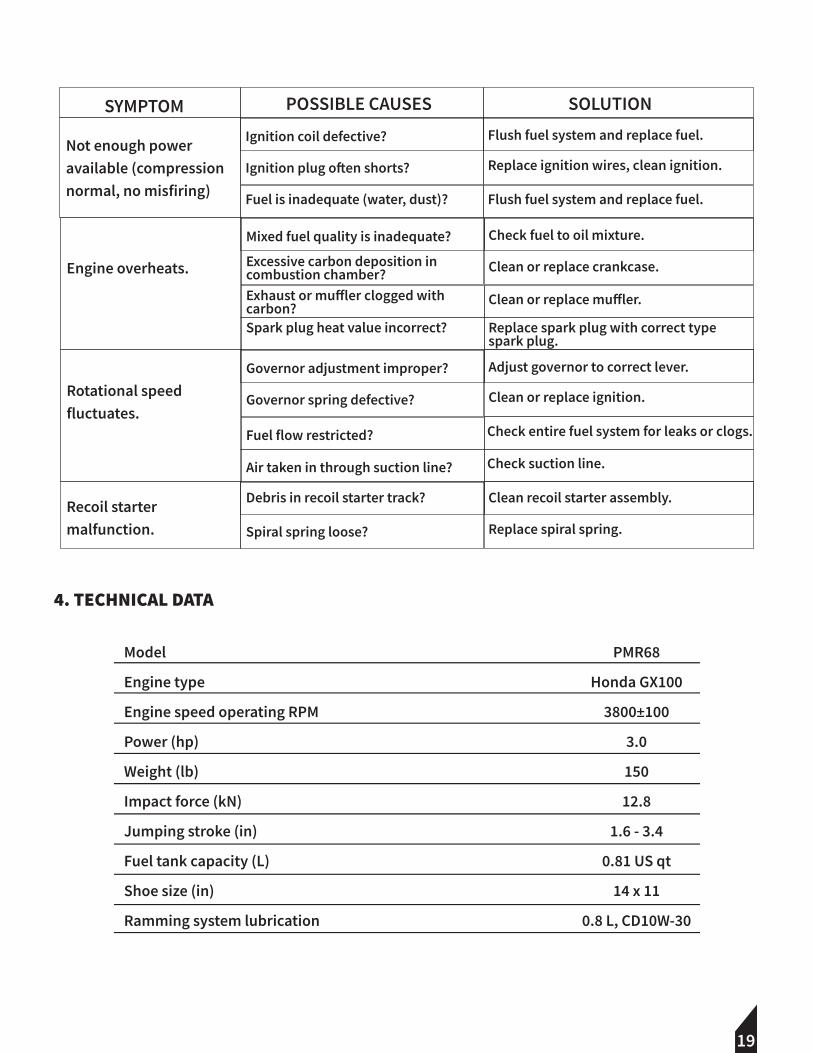
SYMPTOM POSSIBLE CAUSES SOLUTION
Not enough poweravailable (compressionnormal, no misfiring)
Ignition coil defective?
Ignition plug o�en shorts?
Flush fuel system and replace fuel.
Replace ignition wires, clean ignition.
Fuel is inadequate (water, dust)? Flush fuel system and replace fuel.
Engine overheats.
Mixed fuel quality is inadequate?
Excessive carbon deposition incombustion chamber?
Check fuel to oil mixture.
Clean or replace crankcase.
Exhaust or mu�ler clogged withcarbon? Clean or replace mu�ler.
Spark plug heat value incorrect? Replace spark plug with correct typespark plug.
Rotational speedfluctuates.
Governor adjustment improper?
Governor spring defective?
Adjust governor to correct lever.
Clean or replace ignition.
Fuel flow restricted? Check entire fuel system for leaks or clogs.
Air taken in through suction line? Check suction line.
Recoil startermalfunction.
Debris in recoil starter track?
Spiral spring loose?
Clean recoil starter assembly.
Replace spiral spring.
4. TECHNICAL DATA
Model
Engine type
Engine speed operating RPM
Power (hp)
Weight (lb)
Impact force (kN)
Jumping stroke (in)
Fuel tank capacity (L)
Shoe size (in)
Ramming system lubrication
PMR68
Honda GX100
3800±100
3.0
150
12.8
1.6 - 3.4
0.81 US qt
14 x 11
0.8 L, CD10W-30
20
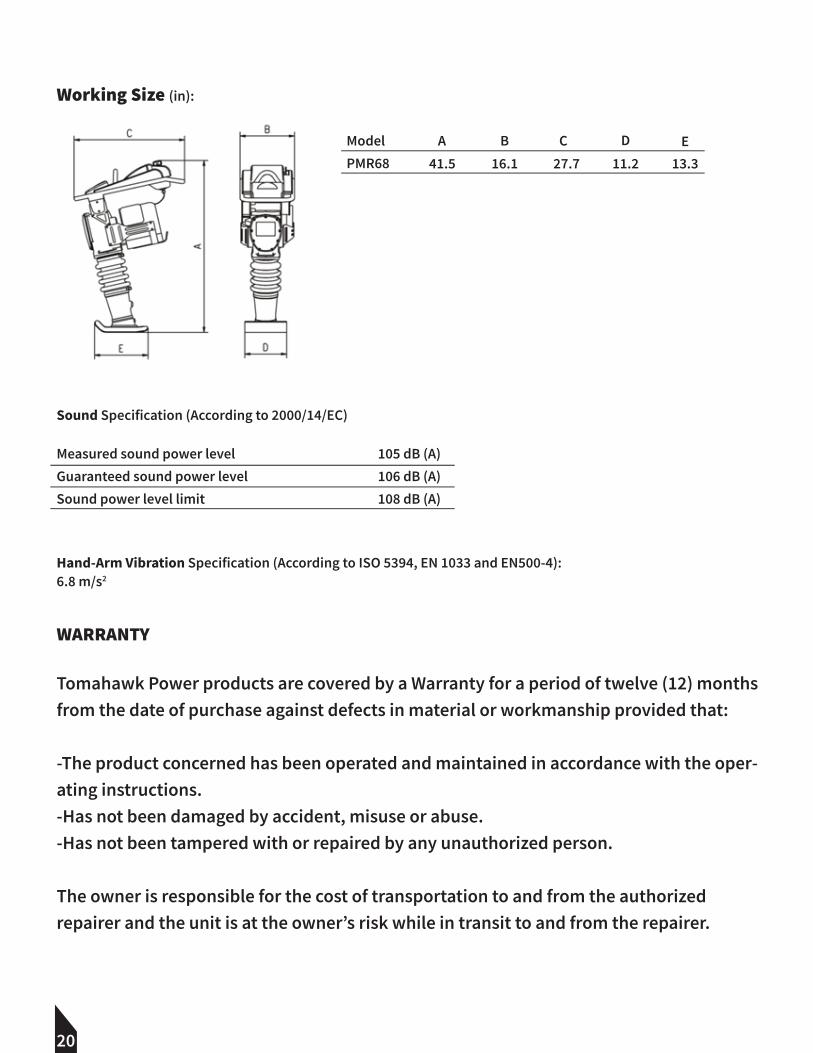
Working Size (in):
Sound Specification (According to 2000/14/EC)
Measured sound power level 105 dB (A)Guaranteed sound power level 106 dB (A)Sound power level limit 108 dB (A)
Hand-Arm Vibration Specification (According to ISO 5394, EN 1033 and EN500-4):6.8 m/s2
WARRANTY
Tomahawk Power products are covered by a Warranty for a period of twelve (12) months from the date of purchase against defects in material or workmanship provided that:
-The product concerned has been operated and maintained in accordance with the oper-ating instructions.-Has not been damaged by accident, misuse or abuse.-Has not been tampered with or repaired by any unauthorized person.
The owner is responsible for the cost of transportation to and from the authorized repairer and the unit is at the owner’s risk while in transit to and from the repairer.

21
Impact damage is not covered under warranty. Clutches are not covered under any warranty.
Engines are o�icially guaranteed by Honda.
MAINTENANCE RECORD PREVENTATIVE MAINTENANCE AND ROUTINE SERVICE PLAN
Tomahawk Power’s PMR68 Tamping Rammer has been assembled with care and will provide years of service. Preventative maintenance and routine service are essential to the long life of your tamping rammer. A�er reading through this manual thoroughly, you will find that you can do some of the regular maintenance yourself. However, when in need of parts or major service, be sure to see your dealer. For your convenience we have provided this space to record relevant data about your tamping rammer.
Invoice Number:Date Purchased:Serial Number:
Type of Machine:Dealer Name:Dealer Phone:
REPLACEMENT PARTS USED MAINTENANCE LOGPART NO. QTY COST DATE DATE OPERATIONDESCRIPTION