QuickStart UCS
18
. Quick Start Guide © 2013-2014 Cisco and/or its affiliates. All rights reserved. This document is Cisco Public. Page 1 of 18 Smart Call Home Quick Start Configuration Guide Cisco Unified Computing System Cisco ® Smart Call Home is an automated support capability that provides continuous monitoring, proactive diagnostics, alerts, and remediation recommendations on select Cisco devices. Smart Call Home can help identify and resolve issues more quickly to achieve higher network availability and increased operational efficiency. This capability is available with an active support contract for the Cisco Unified Computing System™ (UCS). This document describes how to configure and register a Cisco UCS ® to use Smart Call Home using two transport options and using either the Cisco UCS Manager or command line interface (CLI) to configure. ● Email direct to Cisco using Cisco UCS Manager GUI ● Email direct to Cisco using UCS Manager CLI ● HTTPS to Cisco via a Transport Gateway (TG) using Cisco UCS Manager GUI ● HTTPS to Cisco via a Transport Gateway (TG) using UCS Manager CLI Requirements for Smart Call Home ● A Cisco.com ID associated with an active support contract for your company. ● An active support contract that includes the device(s) to be registered. Resources for Smart Call Home Information and resources for Smart Call Home are available on the Cisco Support Community for Smart Call Home. Detailed Call Home configuration information for Cisco UCS is available in the document Configuring Call Home for Cisco Unified Computing System. Call Home Configuration Using Cisco UCS Manager GUI: Email to Smart Call Home The following is a sample configuration showing the minimum steps required to configure Call Home on a Cisco Unified Computing System using the Cisco UCS Manager GUI. This enables the Cisco UCS to communicate with the Smart Call Home system. 1. Launch Cisco UCS Manager GUI. Using any web browser, go to http://<ip address of UCS> and click Launch UCS Manager. When the login window appears, enter your credentials and click Login.
description
UCS
Transcript of QuickStart UCS
.
Quick Start Guide
© 2013-2014 Cisco and/or its affiliates. All rights reserved. This document is Cisco Public. Page 1 of 18
Smart Call Home Quick Start Configuration Guide
Cisco Unified Computing System
Cisco® Smart Call Home is an automated support capability that provides continuous monitoring, proactive diagnostics, alerts, and remediation recommendations on select Cisco devices. Smart Call Home can help identify and resolve issues more quickly to achieve higher network availability and increased operational efficiency. This capability is available with an active support contract for the Cisco Unified Computing System™ (UCS).
This document describes how to configure and register a Cisco UCS® to use Smart Call Home using two transport options and using either the Cisco UCS Manager or command line interface (CLI) to configure.
● Email direct to Cisco using Cisco UCS Manager GUI
● Email direct to Cisco using UCS Manager CLI
● HTTPS to Cisco via a Transport Gateway (TG) using Cisco UCS Manager GUI
● HTTPS to Cisco via a Transport Gateway (TG) using UCS Manager CLI
Requirements for Smart Call Home ● A Cisco.com ID associated with an active support contract for your company.
● An active support contract that includes the device(s) to be registered.
Resources for Smart Call Home Information and resources for Smart Call Home are available on the Cisco Support Community for Smart Call Home. Detailed Call Home configuration information for Cisco UCS is available in the document Configuring Call Home for Cisco Unified Computing System.
Call Home Configuration Using Cisco UCS Manager GUI: Email to Smart Call Home
The following is a sample configuration showing the minimum steps required to configure Call Home on a Cisco Unified Computing System using the Cisco UCS Manager GUI. This enables the Cisco UCS to communicate with the Smart Call Home system.
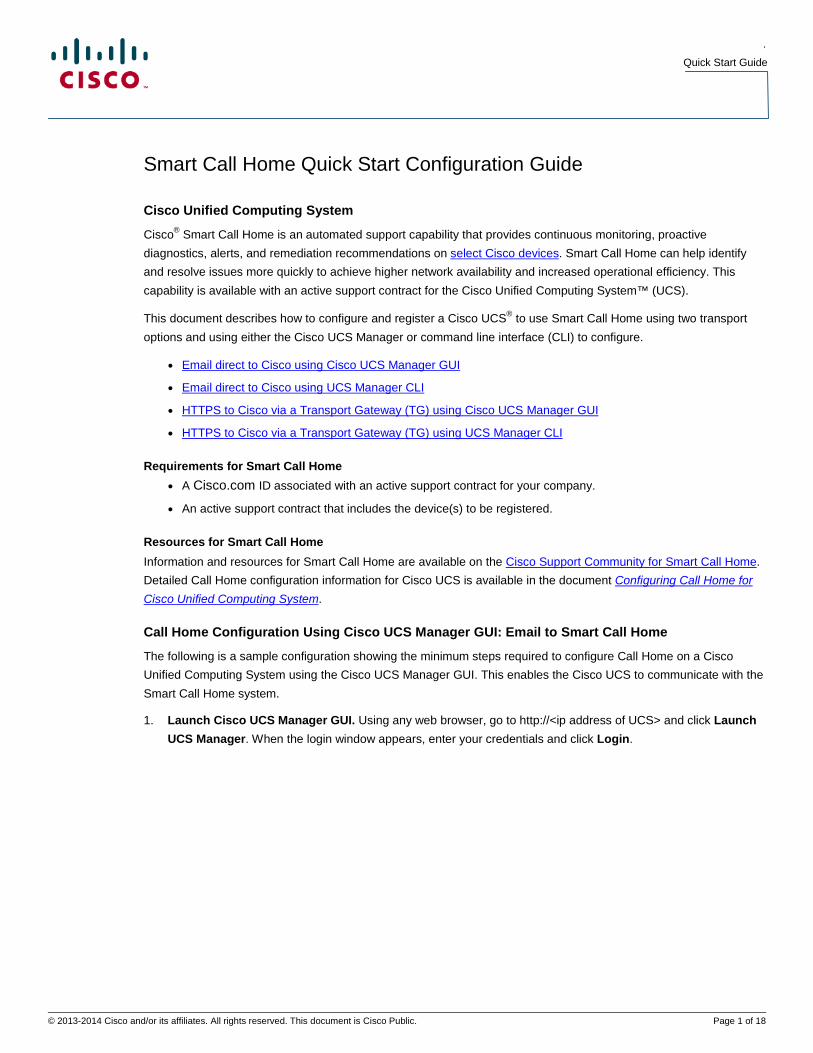
1. Launch Cisco UCS Manager GUI. Using any web browser, go to http://<ip address of UCS> and click Launch UCS Manager. When the login window appears, enter your credentials and click Login.
Quick Start Guide
© 2013-2014 Cisco and/or its affiliates. All rights reserved. This document is Cisco Public. Page 2 of 18
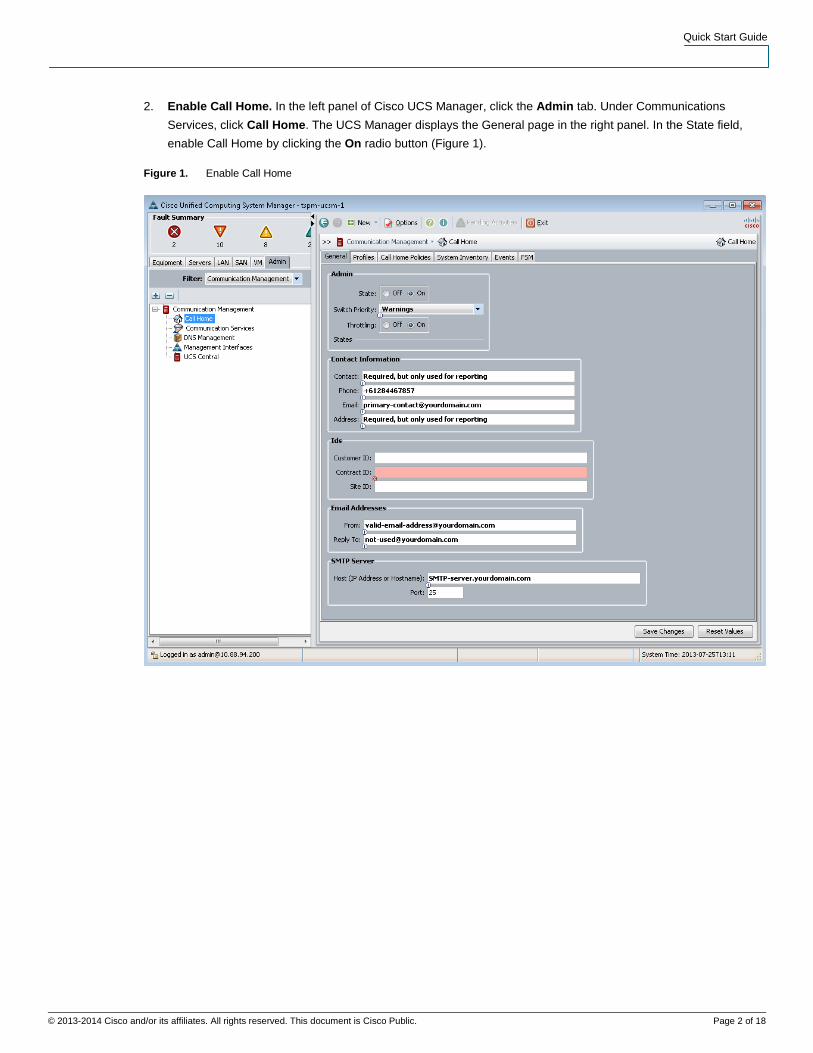
2. Enable Call Home. In the left panel of Cisco UCS Manager, click the Admin tab. Under Communications Services, click Call Home. The UCS Manager displays the General page in the right panel. In the State field, enable Call Home by clicking the On radio button (Figure 1).
Figure 1. Enable Call Home
Quick Start Guide
© 2013-2014 Cisco and/or its affiliates. All rights reserved. This document is Cisco Public. Page 3 of 18
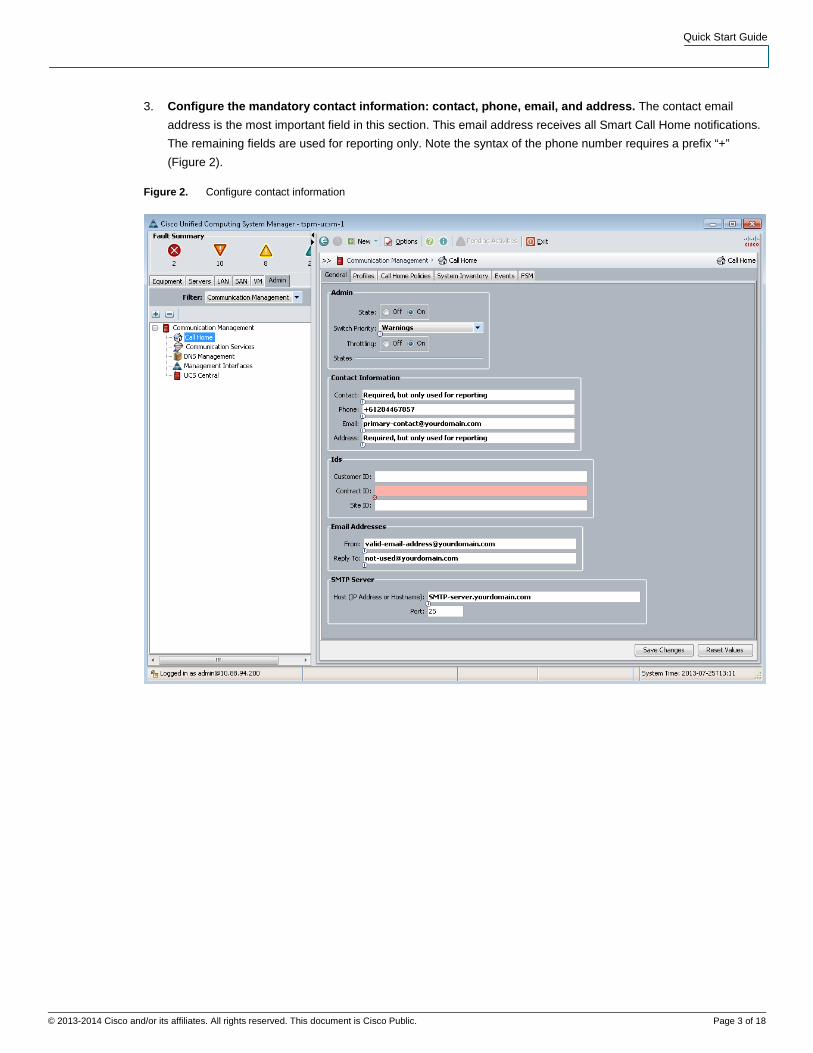
3. Configure the mandatory contact information: contact, phone, email, and address. The contact email address is the most important field in this section. This email address receives all Smart Call Home notifications. The remaining fields are used for reporting only. Note the syntax of the phone number requires a prefix “+” (Figure 2).
Figure 2. Configure contact information
Quick Start Guide
© 2013-2014 Cisco and/or its affiliates. All rights reserved. This document is Cisco Public. Page 4 of 18
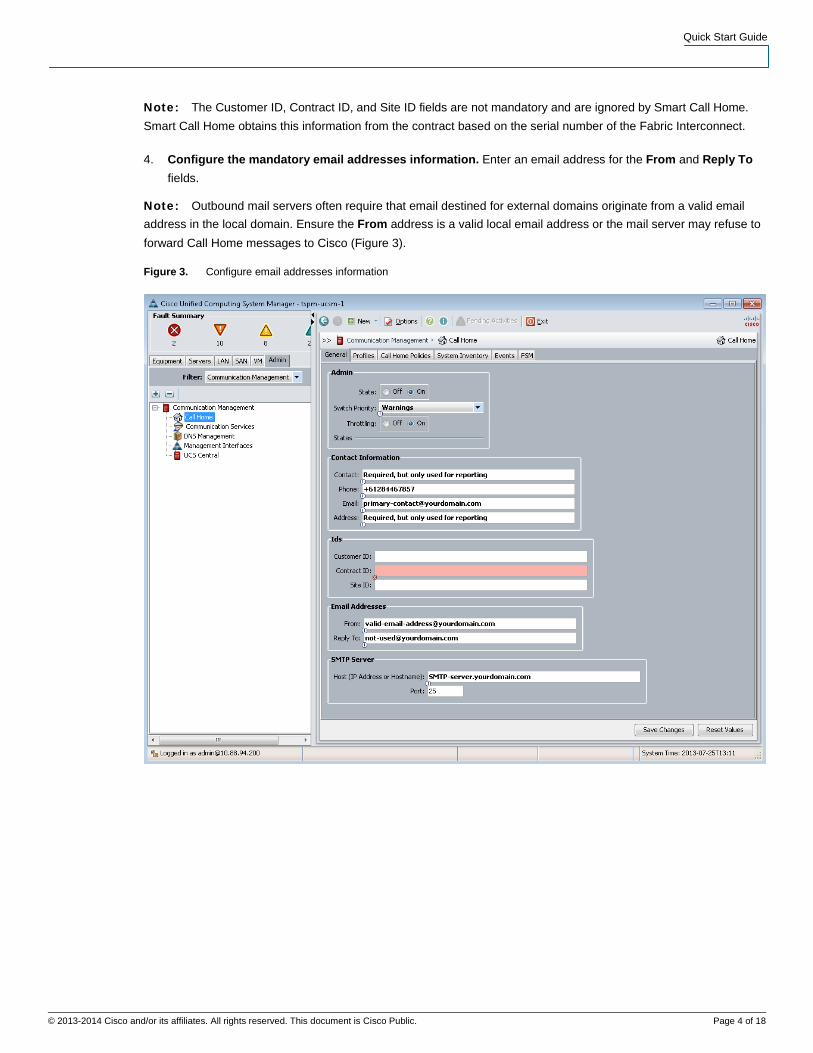
Note: The Customer ID, Contract ID, and Site ID fields are not mandatory and are ignored by Smart Call Home. Smart Call Home obtains this information from the contract based on the serial number of the Fabric Interconnect.
4. Configure the mandatory email addresses information. Enter an email address for the From and Reply To fields.
Note: Outbound mail servers often require that email destined for external domains originate from a valid email address in the local domain. Ensure the From address is a valid local email address or the mail server may refuse to forward Call Home messages to Cisco (Figure 3).
Figure 3. Configure email addresses information

Quick Start Guide
© 2013-2014 Cisco and/or its affiliates. All rights reserved. This document is Cisco Public. Page 5 of 18
5. Configure mandatory SMTP server information. The SMTP server address is either the IP address or the hostname (domain name) of the SMTP server. Call Home sends email messages to either the IP address or hostname and associated port number. Click Save Changes (Figure 4).
Figure 4. Configure SMTP server information
6. Activate the default CiscoTAC-1 profile and add email recipients. Click the Profiles tab on the right panel. The profile Cisco TAC-1 appears.
Quick Start Guide
© 2013-2014 Cisco and/or its affiliates. All rights reserved. This document is Cisco Public. Page 6 of 18
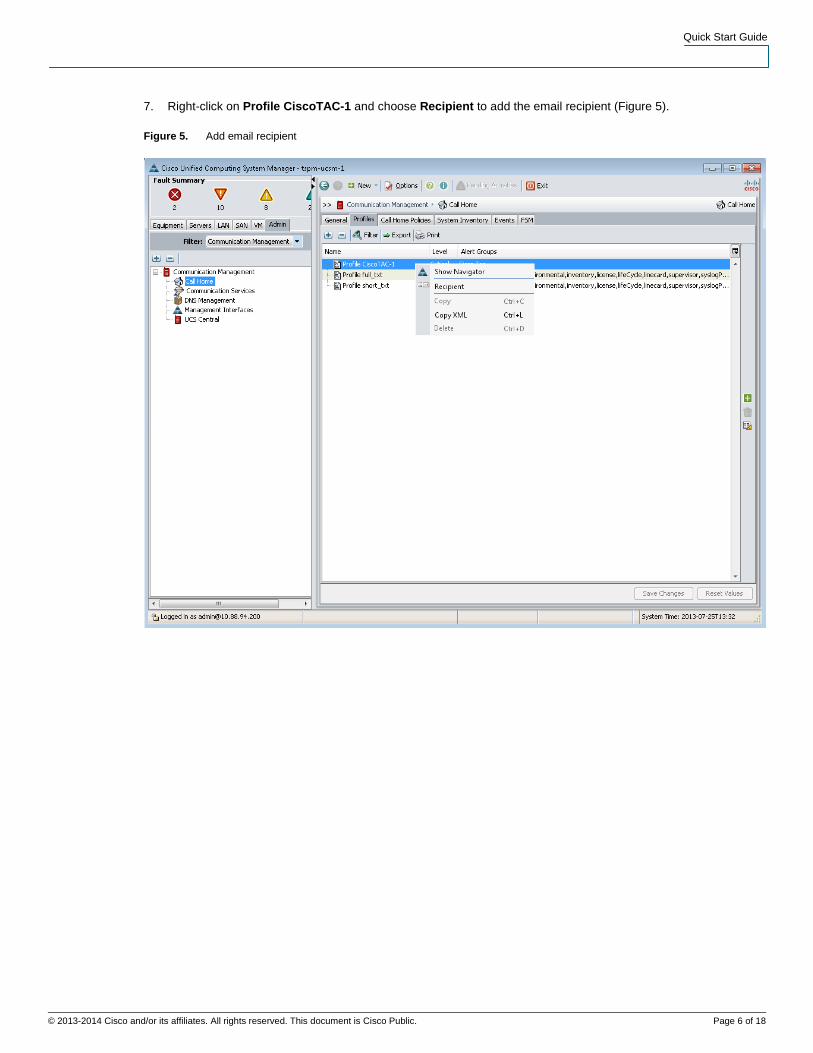
7. Right-click on Profile CiscoTAC-1 and choose Recipient to add the email recipient (Figure 5).
Figure 5. Add email recipient
Quick Start Guide
© 2013-2014 Cisco and/or its affiliates. All rights reserved. This document is Cisco Public. Page 7 of 18
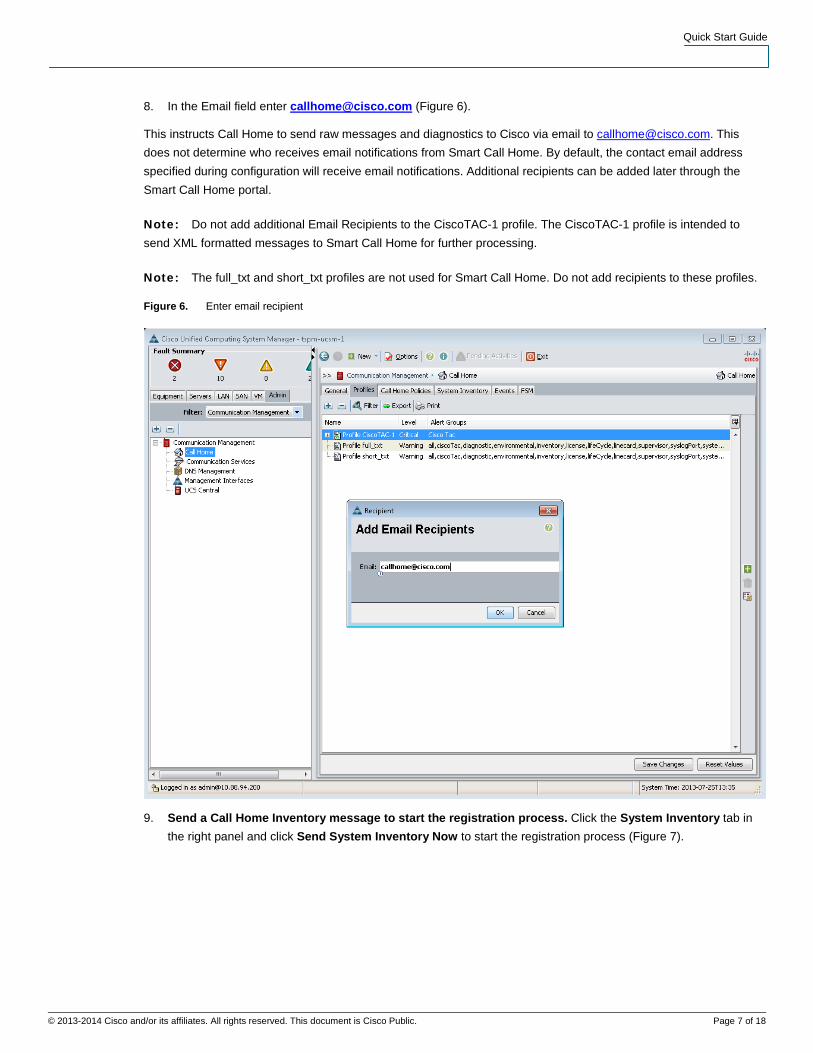
8. In the Email field enter [email protected] (Figure 6).
This instructs Call Home to send raw messages and diagnostics to Cisco via email to [email protected]. This does not determine who receives email notifications from Smart Call Home. By default, the contact email address specified during configuration will receive email notifications. Additional recipients can be added later through the Smart Call Home portal.
Note: Do not add additional Email Recipients to the CiscoTAC-1 profile. The CiscoTAC-1 profile is intended to send XML formatted messages to Smart Call Home for further processing.
Note: The full_txt and short_txt profiles are not used for Smart Call Home. Do not add recipients to these profiles.
Figure 6. Enter email recipient
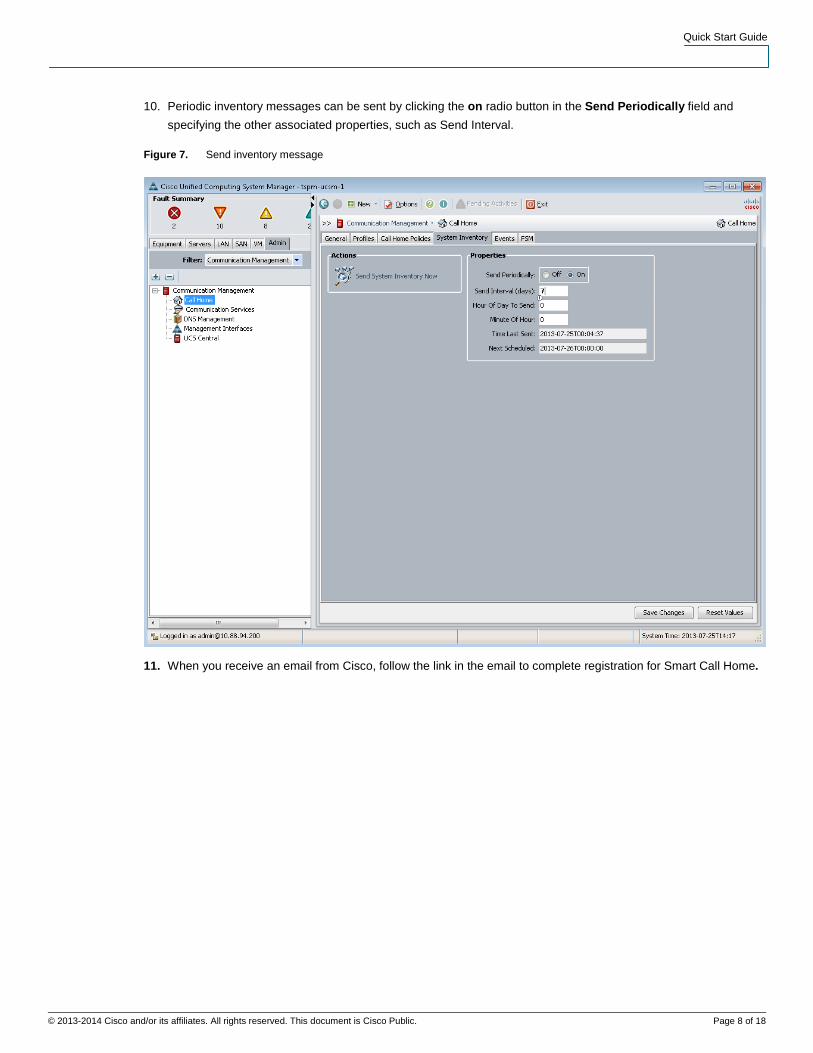
9. Send a Call Home Inventory message to start the registration process. Click the System Inventory tab in the right panel and click Send System Inventory Now to start the registration process (Figure 7).
Quick Start Guide
© 2013-2014 Cisco and/or its affiliates. All rights reserved. This document is Cisco Public. Page 8 of 18
10. Periodic inventory messages can be sent by clicking the on radio button in the Send Periodically field and specifying the other associated properties, such as Send Interval.
Figure 7. Send inventory message
11. When you receive an email from Cisco, follow the link in the email to complete registration for Smart Call Home.
Quick Start Guide
© 2013-2014 Cisco and/or its affiliates. All rights reserved. This document is Cisco Public. Page 9 of 18
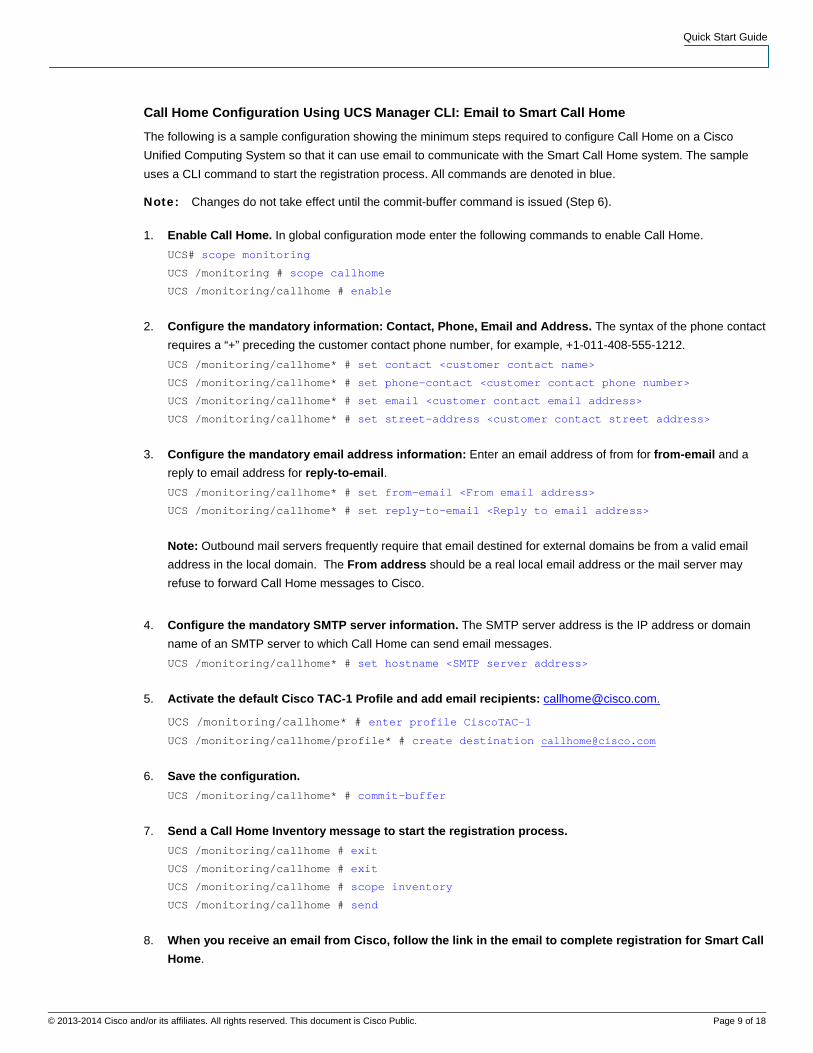
Call Home Configuration Using UCS Manager CLI: Email to Smart Call Home
The following is a sample configuration showing the minimum steps required to configure Call Home on a Cisco Unified Computing System so that it can use email to communicate with the Smart Call Home system. The sample uses a CLI command to start the registration process. All commands are denoted in blue.
Note: Changes do not take effect until the commit-buffer command is issued (Step 6).
1. Enable Call Home. In global configuration mode enter the following commands to enable Call Home. UCS# scope monitoring
UCS /monitoring # scope callhome
UCS /monitoring/callhome # enable
2. Configure the mandatory information: Contact, Phone, Email and Address. The syntax of the phone contact requires a “+” preceding the customer contact phone number, for example, +1-011-408-555-1212. UCS /monitoring/callhome* # set contact <customer contact name>
UCS /monitoring/callhome* # set phone-contact <customer contact phone number>
UCS /monitoring/callhome* # set email <customer contact email address>
UCS /monitoring/callhome* # set street-address <customer contact street address>
3. Configure the mandatory email address information: Enter an email address of from for from-email and a reply to email address for reply-to-email. UCS /monitoring/callhome* # set from-email <From email address>
UCS /monitoring/callhome* # set reply-to-email <Reply to email address>
Note: Outbound mail servers frequently require that email destined for external domains be from a valid email address in the local domain. The From address should be a real local email address or the mail server may refuse to forward Call Home messages to Cisco.
4. Configure the mandatory SMTP server information. The SMTP server address is the IP address or domain name of an SMTP server to which Call Home can send email messages. UCS /monitoring/callhome* # set hostname <SMTP server address>
5. Activate the default Cisco TAC-1 Profile and add email recipients: [email protected].
UCS /monitoring/callhome* # enter profile CiscoTAC-1
UCS /monitoring/callhome/profile* # create destination [email protected]
6. Save the configuration. UCS /monitoring/callhome* # commit-buffer
7. Send a Call Home Inventory message to start the registration process. UCS /monitoring/callhome # exit
UCS /monitoring/callhome # exit
UCS /monitoring/callhome # scope inventory
UCS /monitoring/callhome # send
8. When you receive an email from Cisco, follow the link in the email to complete registration for Smart Call Home.

Quick Start Guide
© 2013-2014 Cisco and/or its affiliates. All rights reserved. This document is Cisco Public. Page 10 of 18
Call Home Configuration Using Cisco UCS Manager GUI: Email to Transport Gateway and HTTPS to Cisco
The following is a sample configuration showing the minimum steps required to configure Call Home on a Cisco Unified Computing System by using the Cisco UCS Manager GUI to send email to a transport gateway, which will use HTTPS to securely communicate with the Smart Call Home system. The last step shows how to trigger an inventory message, which starts the registration process.
The sample assumes that the Transport Gateway software been installed, configured, and registered with Smart Call Home.
1. Launch the Cisco UCS Manager GUI. Use any web browser and go to http://<ip address of UCS> and click Launch UCS Manager. When the login window appears, enter your credentials and click Login.
2. Enable Call Home. In the left panel of Cisco UCS Manager, click the Admin tab. Under Communications Services, click Call Home. The UCS Manager displays the General page in the right panel. In the State field, enable Call Home by clicking the on radio button (Figure 8).
Figure 8. Enable Call Home

Quick Start Guide
© 2013-2014 Cisco and/or its affiliates. All rights reserved. This document is Cisco Public. Page 11 of 18
3. Configure the mandatory contact information: contact, phone, email, and address. The contact email address is the most important field in this section. This email address receives all Smart Call Home notifications. The remaining fields are used for reporting only. Note the syntax of the phone number requires a prefix “+” (Figure 9).
Figure 9. Configure contact information
Quick Start Guide
© 2013-2014 Cisco and/or its affiliates. All rights reserved. This document is Cisco Public. Page 12 of 18
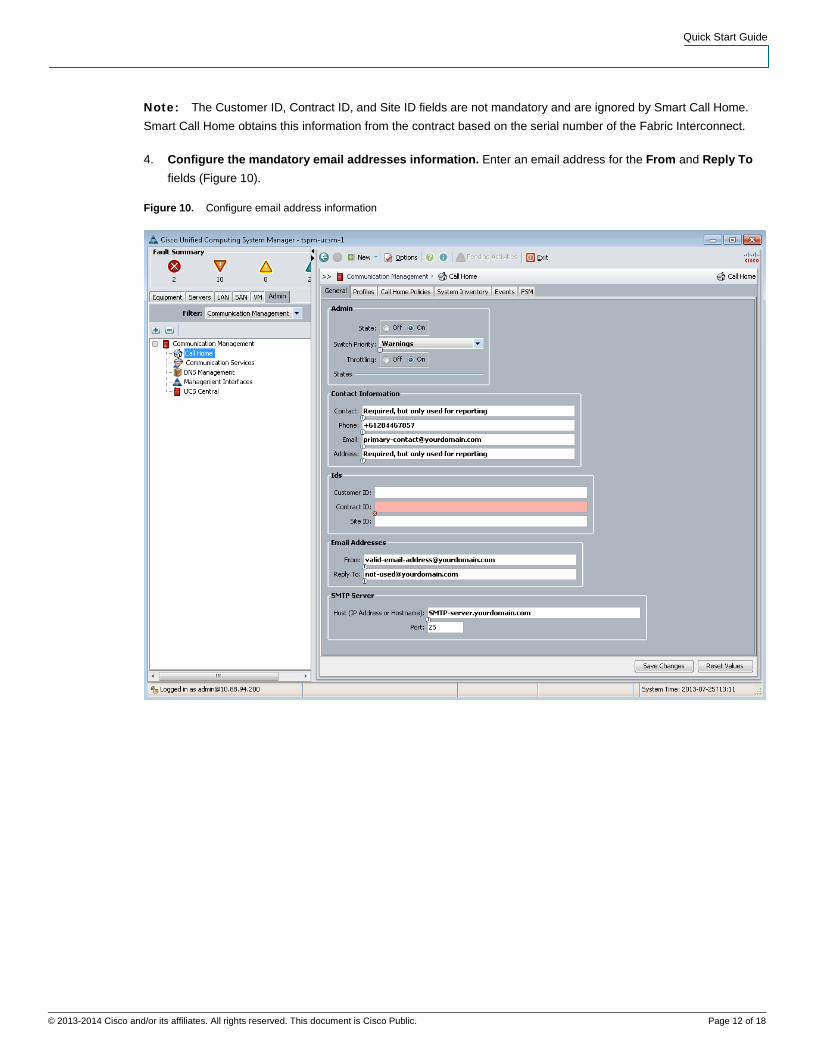
Note: The Customer ID, Contract ID, and Site ID fields are not mandatory and are ignored by Smart Call Home. Smart Call Home obtains this information from the contract based on the serial number of the Fabric Interconnect.
4. Configure the mandatory email addresses information. Enter an email address for the From and Reply To fields (Figure 10).
Figure 10. Configure email address information

Quick Start Guide
© 2013-2014 Cisco and/or its affiliates. All rights reserved. This document is Cisco Public. Page 13 of 18
5. Configure mandatory SMTP server information. The SMTP server address is either the IP address or the hostname (domain name) of the SMTP server. Call Home sends email messages to either the IP address or hostname and associated port number. Click Save Changes (Figure 11).
Figure 11. Configure SMTP server information
6. Activate the default Cisco TAC-1 profile and add email recipients. Click the Profiles tab in the right panel. The profile CiscoTAC-1 appears.
Quick Start Guide
© 2013-2014 Cisco and/or its affiliates. All rights reserved. This document is Cisco Public. Page 14 of 18
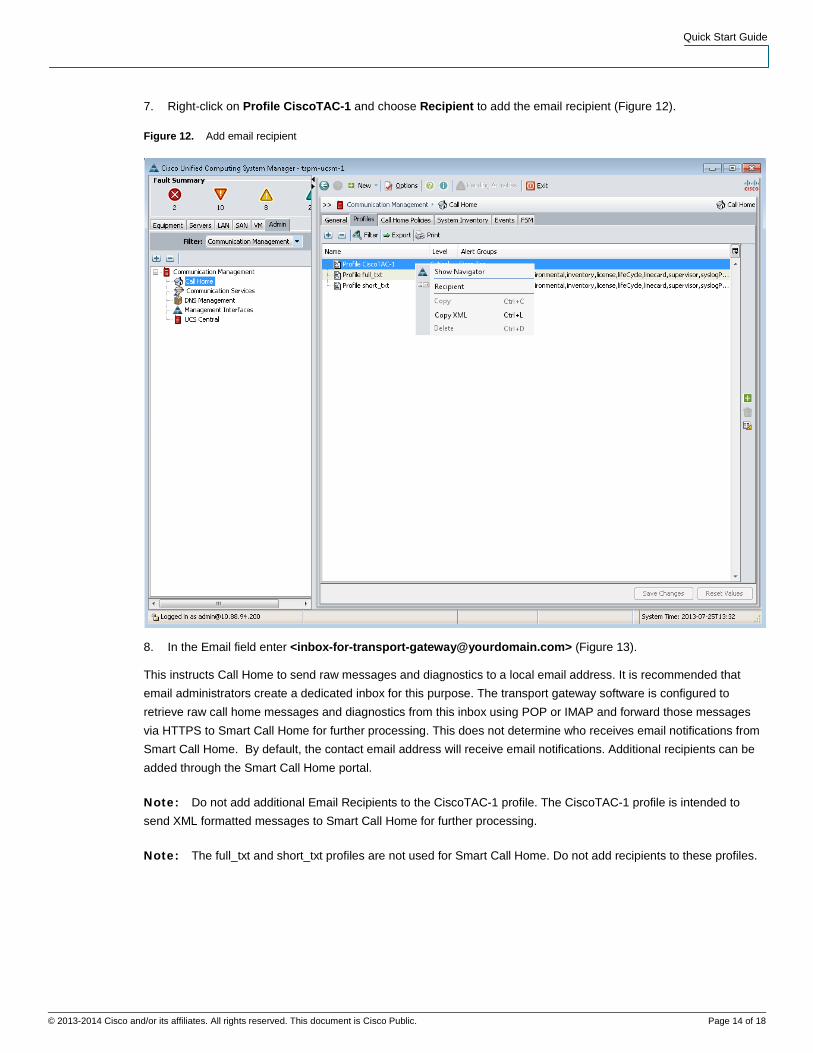
7. Right-click on Profile CiscoTAC-1 and choose Recipient to add the email recipient (Figure 12).
Figure 12. Add email recipient
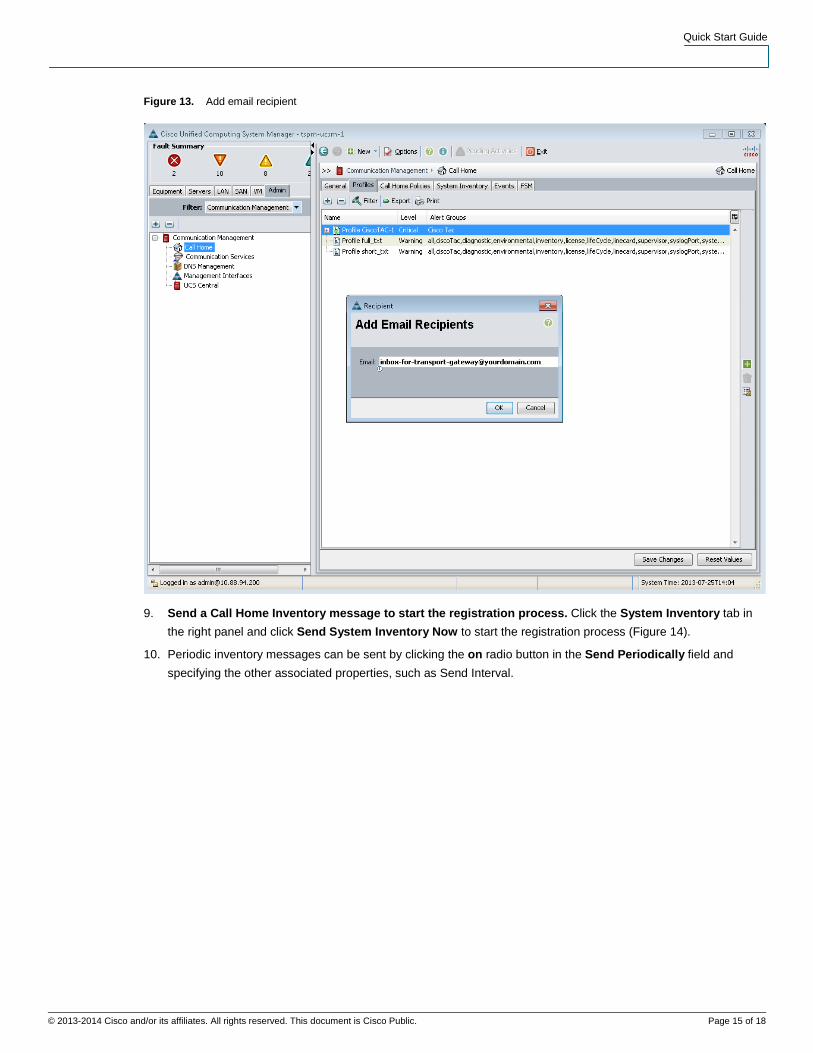
8. In the Email field enter <[email protected]> (Figure 13).
This instructs Call Home to send raw messages and diagnostics to a local email address. It is recommended that email administrators create a dedicated inbox for this purpose. The transport gateway software is configured to retrieve raw call home messages and diagnostics from this inbox using POP or IMAP and forward those messages via HTTPS to Smart Call Home for further processing. This does not determine who receives email notifications from Smart Call Home. By default, the contact email address will receive email notifications. Additional recipients can be added through the Smart Call Home portal.
Note: Do not add additional Email Recipients to the CiscoTAC-1 profile. The CiscoTAC-1 profile is intended to send XML formatted messages to Smart Call Home for further processing.
Note: The full_txt and short_txt profiles are not used for Smart Call Home. Do not add recipients to these profiles.
Quick Start Guide
© 2013-2014 Cisco and/or its affiliates. All rights reserved. This document is Cisco Public. Page 15 of 18
Figure 13. Add email recipient
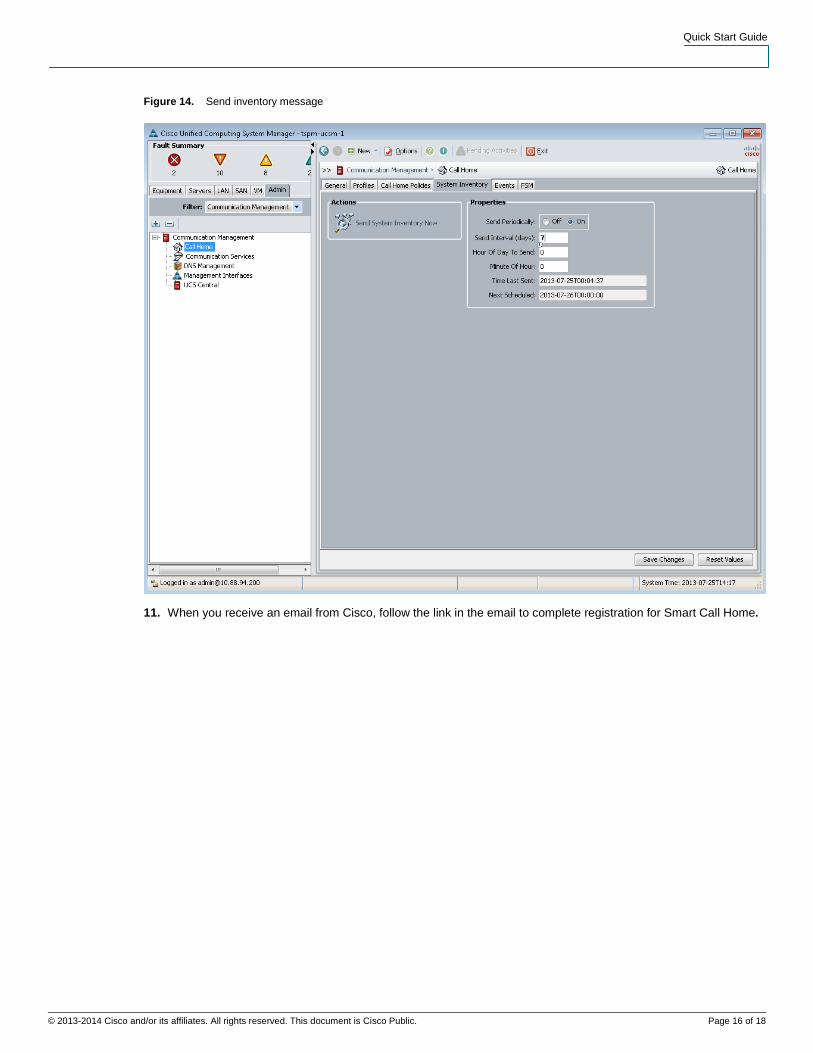
9. Send a Call Home Inventory message to start the registration process. Click the System Inventory tab in the right panel and click Send System Inventory Now to start the registration process (Figure 14).
10. Periodic inventory messages can be sent by clicking the on radio button in the Send Periodically field and specifying the other associated properties, such as Send Interval.
Quick Start Guide
© 2013-2014 Cisco and/or its affiliates. All rights reserved. This document is Cisco Public. Page 16 of 18
Figure 14. Send inventory message
11. When you receive an email from Cisco, follow the link in the email to complete registration for Smart Call Home.
Quick Start Guide
© 2013-2014 Cisco and/or its affiliates. All rights reserved. This document is Cisco Public. Page 17 of 18
Call Home Configuration Using UCS Manager CLI: SMTP to Transport Gateway and HTTPS to Cisco
The following is a sample configuration showing the minimum steps required to configure Call Home on a Cisco Unified Computing System so that it can use SMTP to communicate with the transport gateway, which will use HTTPS to communicate with the Smart Call Home system.
This sample uses a command to start the registration process, and assumes that the Transport gateway software has been installed, configured, and registered with Smart Call Home. All commands are denoted in blue.
Note: Changes do not take effect until the commit-buffer command is issued (Step 6).
1. Enable Call Home. In global configuration mode enter the following commands to enable Call Home. UCS# scope monitoring
UCS /monitoring # scope callhome
UCS /monitoring/callhome # enable
2. Configure the mandatory information: Contact, Phone, Email and Address. The syntax of the phone contact requires a “+” preceding the customer contact phone number. For example, +1-011-408-555-1212. UCS /monitoring/callhome* # set contact <customer contact name>
UCS /monitoring/callhome* # set phone-contact <customer contact phone number>
UCS /monitoring/callhome* # set email <customer contact email address>
UCS /monitoring/callhome* # set street-address <customer contact street address>
3. Configure the mandatory email address information: Enter a from email address for from-email and a reply to email address for reply-to-email. UCS /monitoring/callhome* # set from-email <From email address>
UCS /monitoring/callhome* # set reply-to-email <Reply to email address>
Note: Outbound mail servers frequently require that email destined for external domains be from a valid email address in the local domain. The From address below should be a real local email address or the mail server may refuse to forward Call Home messages to Cisco.
4. Configure the mandatory SMTP server information. The SMTP Server address is the IP address or domain name of an SMTP server to which Call Home can send email messages. UCS /monitoring/callhome* # set hostname <SMTP server address>
5. Activate the default Cisco TAC-1 Profile and add email recipient:
UCS /monitoring/callhome* # enter profile CiscoTAC-1
UCS /monitoring/callhome/profile* # create destination <Dedicated local email address>
6. Save the configuration. UCS /monitoring/callhome* # commit-buffer
7. Send a Call Home Inventory message to start the registration process. UCS /monitoring/callhome # exit
UCS /monitoring/callhome # exit
UCS /monitoring/callhome # scope inventory
UCS /monitoring/callhome # send

Quick Start Guide
© 2013-2014 Cisco and/or its affiliates. All rights reserved. This document is Cisco Public. Page 18 of 18
8. When you receive an email from Cisco, follow the link in the email to complete registration for Smart Call Home.
Downloading Cisco Transport Gateway Software To download the Cisco transport gateway software, go to the download software web page. In the left pane, click the version link of the latest release. Listed in the right pane are the transport gateway software options for Linus, Solaris, and Windows. Click Download next to the desired version.
After you have downloaded the transport gateway software, refer to the guide Deploying the Transport Gateway for information about how to install, configure, and register the transport gateway.
Printed in USA 07/14