QuickStart Guide for tudents - Pearson ELT · PDF fileSpeaking and Writing activities...
16
QuickStart Guide for Students
-
Upload
duongkhuong -
Category
Documents
-
view
232 -
download
1
Transcript of QuickStart Guide for tudents - Pearson ELT · PDF fileSpeaking and Writing activities...

QuickStart Guide for Students

Table of Contents
1. Before You Begin
2. Registration
3. Joining a Teacher’s Course
4. Completing Assignments
5. Checking Your Grades
6. Take a Tour
1

1. Before You Begin
Welcome to the Student Getting Started Guide for MyEnglishLab. This guide will walk you through the steps required to
successfully use MyEnglishLab.
Before you begin, run the Browser Tuneup Check Tool to ensure your computer is ready to use MyEnglishLab.
To run the browser tuneup check, go to https://www.PearsonELTSupport.com/CheckMyComputer
Note: Mozilla Firefox or Google Chrome are the preferred Internet browsers for MyEnglishLab.
Things You'll Need:
1. A Student Access Code: You will need a student access code to register and create an account. If you do not have a
student access code, please contact your local bookstore, buy online, or contact your local Pearson Sales
Representative.
2. An Email Address: This email address will be used to receive registration confirmation and system update notifications.
3. Your Instructor Course ID: The Course ID is provided by your instructor. If you are a selfstudy student (working on
your own), you will not need this information.
Ready? Let’s Get Started!
2

2. Registration
To gain student access to MyEnglishLab, you must first create an account. To register, you will need a student access code. In
this section, we will walk you through the registration process.
Note: You will need a student access code. If you do not have a student access code, please contact your local bookstore, buy online, or contact your local Pearson Sales Representative.
To register your access code:
1. Go to www.MyEnglishLabHelp.com/Register
2. Click on Change Language to select your
preferred language.
3. Enter your Access Code and then click on
Next.
4. Confirm you are registering for the correct
product and then click on Next.
3

5. You can either create a new account or signin
if you already have a Pearson account.
A. First time registering?
Click on Create to set up a new Pearson
account.
OR
B. Already have a Pearson Account?
Enter your existing Username and
Password, and then click on Sign In. [Go to Step 10]
6. Read the License Agreement. Click "I agree to
the license agreement" and then click on
Next.
4

7. Enter your Personal Information (Email
Address, Full Name, and Institution). Note: You can still proceed with the registration if
your Institution is not listed.
8. Enter your Account Information.
A. Username must be at least six
characters long. We recommend that
you use your email address as an easy
way to remember your username.
B. Password must be between 8 and 32
characters long and have at least one
number.
Note: Do not include blank spaces, your
name, all numbers, or your username.
9. Click on Next.
10.Review your information and then click on
Finish.
11.Click on Go to your product. You will be
automatically logged into the MyEnglishLab
platform. Otherwise, enter your username and
password.
5
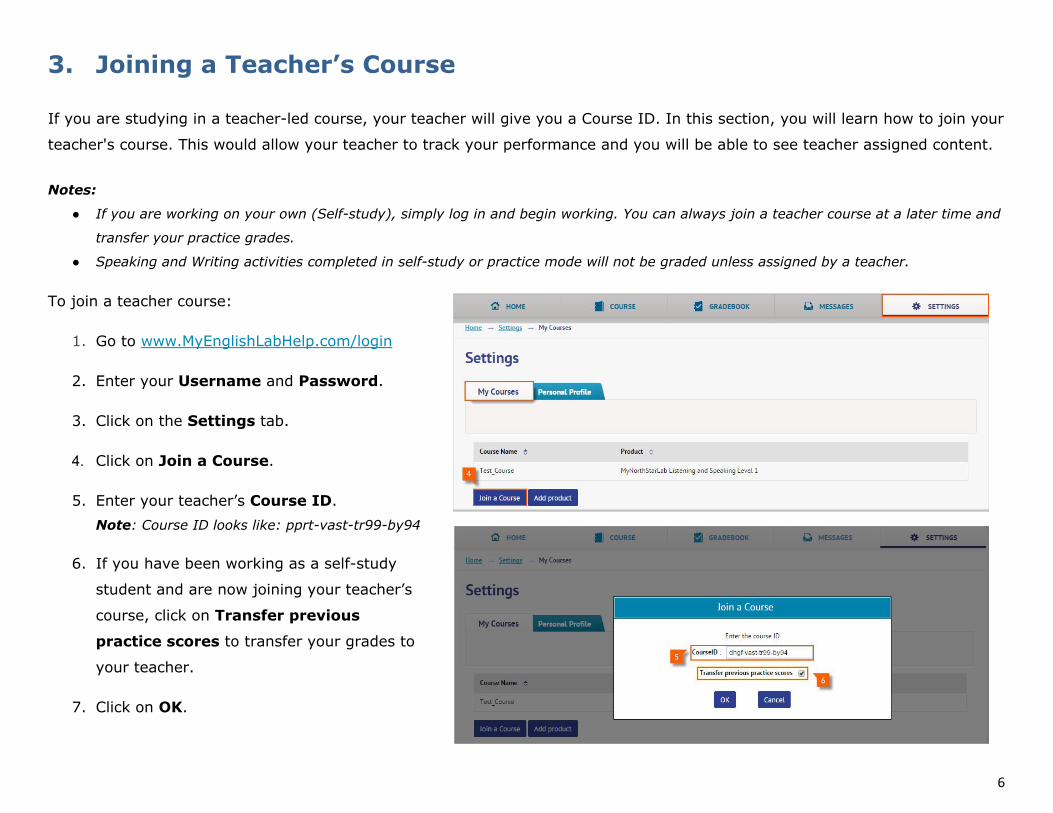
3. Joining a Teacher’s Course
If you are studying in a teacherled course, your teacher will give you a Course ID. In this section, you will learn how to join your
teacher's course. This would allow your teacher to track your performance and you will be able to see teacher assigned content.
Notes:
● If you are working on your own (Selfstudy), simply log in and begin working. You can always join a teacher course at a later time and
transfer your practice grades.
● Speaking and Writing activities completed in selfstudy or practice mode will not be graded unless assigned by a teacher.
To join a teacher course:
1. Go to www.MyEnglishLabHelp.com/login
2. Enter your Username and Password.
3. Click on the Settings tab.
4. Click on Join a Course.
5. Enter your teacher’s Course ID. Note: Course ID looks like: pprtvasttr99by94
6. If you have been working as a selfstudy
student and are now joining your teacher’s
course, click on Transfer previous
practice scores to transfer your grades to
your teacher.
7. Click on OK.
6
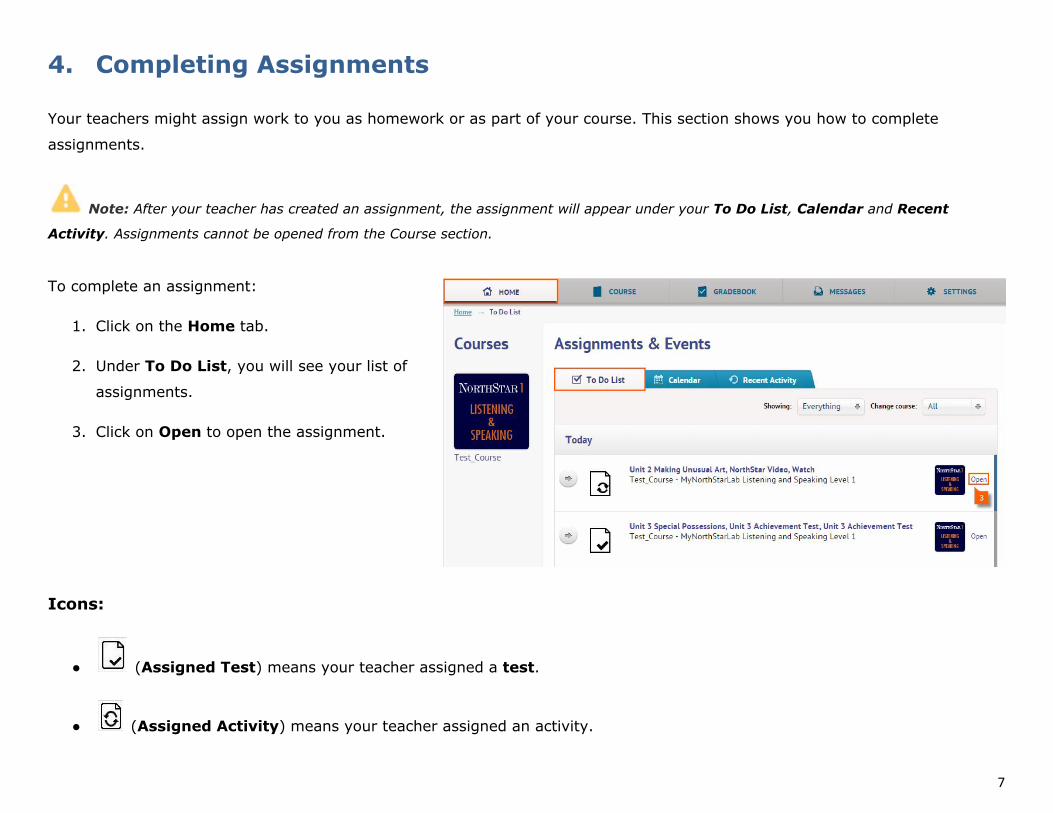
4. Completing Assignments
Your teachers might assign work to you as homework or as part of your course. This section shows you how to complete
assignments.
Note: After your teacher has created an assignment, the assignment will appear under your To Do List, Calendar and Recent
Activity. Assignments cannot be opened from the Course section.
To complete an assignment:
1. Click on the Home tab.
2. Under To Do List, you will see your list of
assignments.
3. Click on Open to open the assignment.
Icons:
● (Assigned Test) means your teacher assigned a test.
● (Assigned Activity) means your teacher assigned an activity.
7

5. Checking Your Grades
Most practice activities and assignments are autograded, so you will have immediate access to your grades in the Gradebook.
However, some activities have to be graded by a teacher, like Speaking and Writing activities.
Notes:
● Teachergraded assignments will not appear in the Gradebook until the assignment has been marked by a teacher.
● Speaking and Writing activities completed in selfstudy or practice mode will not be graded unless assigned by a teacher.
To check your grades:
1. Click on the Gradebook tab.
2. Select your course from the Change
course dropdown list.
3. Grades will appear under the Data tab.
4. The default view of the Gradebook is
Assignment and Tests. To view grades
for practice activities, select an option
from Change view.
8

6. Take a Tour
HOME
The Home tab has three main subtabs under Assignments & Events: To Do List, Calendar, and Recent Activity. You can
switch between these tabs at any time.
9

1. Courses: This section lists the top products or courses you can access.
2. View all course: You can view all courses or products here. You can also drag and drop courses to change the order they
appear on the home page.
3. To Do List: The list shows upcoming assigned activities and calendar events. You can click on View more (A) to expand
the list.
4. Calendar: The Calendar tab features a familiar way of seeing events and activities associated with all your courses.
5. Recent Activity: The Recent Activity screen is similar to the To Do List, but gives a view of events that have already
happened and assignments that have been submitted or marked. It also records actions such as changes in due dates or
assignments.
6. Filters (Showing/Change course): Allows you to filter the To Do List.
7. Assignment and Events List: You can click on View more (A) to expand the list. You can also see more details by
clicking on the Expand details arrow.
8. Open: Click on Open to open an assignment.
9. See report: Click on See report to go to the Assignment report screen page and get information about the submitted
assignment, including date submitted and score.
10. Expand details arrow: Click on the arrow to expand the display and view assignment details.
10

COURSE
The Course tab allows you to view the course content and access practice activities. If your product has eText available, you
access additional resources from here as well.
1. Change course: Allows you to
switch to another course.
2. Product Title: Displays the name
and level of the product you are
using.
3. Units: Displays the available units.
4. eText: An icon appears if your
product is bundled with eText. Click
on the icon to open the eText.
5. Open: Allows you to open activities.
6. Contents: Allows you to view
subsection and activities available
in the unit.
`
11

GRADEBOOK
The Gradebook tab allows you to access your grades and keep records of your performance.
1. Change course: Allows you to switch to
another course.
2. Expand details: Allows you to view
additional information, such as the number
of attempts, number of completed activities,
and time spent on activities.
3. Data: Provides your course scores and
grades.
4. Diagnostics: Gives you an instant view of
how you are progressing, both in average
scores and time on task.
5. Change view: Allows you to easily see the
available views: Practice only,
Assignments only, Tests only, Practice
& tests, and Assignments & tests.
6. Markers: Allows you to see which activities
have been completed.
7. Filtering/Sorting: Allows you to filter
activities by Last attempt, First attempt,
Average score or Highest score.
8. Export: Allows you to export your course
Gradebook to Microsoft Excel.
12

MESSAGES
The Messages tab allows you to communicate with both your teacher and other students in the course.
1. New message: Used to initiate email
communication with teachers and other
students in the course.
2. Inbox: Keeps email you have received
from your teacher and other students.
3. Sent messages: Keeps your previously
sent emails.
4. Contact List: Provides information of
all the students and teachers you can
communication with, if allowed by your
teacher.
13

SETTINGS
The Settings tab allows you to manage your account and make changes to personal information.
1. My Courses: Lists all of the courses
you have joined.
2. Personal Profile: Allows you to
change your account profile
information, including Password,
Country of Residence, Time Zone,
Native language, Date Format,
Email, etc.
3. Join a Course: Allows you to enroll
into a teacher’s course.
4. Add product: Allows you to quickly
add another product level to the
account using an access code.
14

7. Need Help?
Visit https://support.pearsonelt.com for help, training, howdo videos, and support.
15