Quick Start: µC/OS-III on the Actel SmartFusion Evaluation Kit (with
16
Quick Start: μC/OS‐III on the Actel SmartFusion Evaluation Kit (with SoftConsole) This document describes how to build and run μC/OS‐III example projects for Actel’s SmartFusion Evaluation Kit. The projects covered in the document were developed with Actel’s free Eclipse‐based IDE, SoftConsole. The projects are intended to provide developers who are interested in using μC/OS‐III with a convenient means of evaluating the software. Required Hardware Actel’s SmartFusion Evaluation Kit is needed in order to run each of the projects described herein. The board included in this kit is shown below. With its Ethernet connector, OLED display, and Flash memory, the small, USB‐powered board is ideal for developers who are looking to become acquainted with Actel’s highly capable SmartFusion FPGAs.
Transcript of Quick Start: µC/OS-III on the Actel SmartFusion Evaluation Kit (with

Quick Start: µC/OS‐III on the Actel SmartFusion Evaluation Kit (with SoftConsole)
This document describes how to build and run µC/OS‐III example projects for Actel’s SmartFusion Evaluation Kit. The projects covered in the document were developed with Actel’s free Eclipse‐based IDE, SoftConsole. The projects are intended to provide developers who are interested in using µC/OS‐III with a convenient means of evaluating the software.
Required Hardware
Actel’s SmartFusion Evaluation Kit is needed in order to run each of the projects described herein. The board included in this kit is shown below. With its Ethernet connector, OLED display, and Flash memory, the small, USB‐powered board is ideal for developers who are looking to become acquainted with Actel’s highly capable SmartFusion FPGAs.

Required Software and Tools
The SoftConsole IDE from Actel is needed to build and run the example projects that this document covers. Another tool from Actel, FlashPro, is required to download the bitstream associated with the projects. Both SoftConsole and FlashPro can be downloaded as part of Actel’s Libero IDE by anyone who has registered on the Actel Web site. Libero is available from the following page on this site: http://www.actel.com/download/software/libero/default.aspx
Developers seeking to use Libero must have a license for the software. Free Gold 1‐year licenses can be requested on the Actel Web site. These licenses provide access to all of the features that are needed to run Micriµm’s µC/OS‐III example projects.
Micriµm’s Web site provides access to the µC/OS‐III example projects and to µC/Probe, a unique visualization tool that one of the projects is intended to demonstrate. Visitors to the site must complete a registration form in order to download any of this software. (Unfortunately, developers who have registered on Actel’s site must re‐register on Micriµm’s.) The URL for the example projects is http://micrium.com/page/downloads/ports/actel

There are actually two different versions of µC/Probe available from the URL listed on the previous page. One of the versions is full‐featured but limits developers to a 30‐day evaluation period. The other version has no time limit but does not facilitate monitoring more than 5 symbols. Either version is appropriate for the µC/OS‐III example projects. (Developers should not download both.)
Software Versions
The example projects currently available on the Micriµm Web site were tested using Libero v9.0 and Service Pack C. Micriµm’s engineers will attempt to keep the projects up‐to‐date, so that the software is always compatible with the newest version of Libero. It is possible, though, that the engineers may not be able to provide updated code for every tool release. Vistors to the Web site who are unable to build and run the projects using the latest version of Libero should contact Micriµm; relevant phone numbers and e‐mail addresses are provided at the close of this document.
Downloading the Bitstream for the Examples
1. Before attempting to take any of the steps outlined below, you will need to install the software and tools described in the previous sections. In the case of uCOS-III-Actel-SmartFusionEvalKit.zip (the zip file containing the µC/OS‐III example projects), “installing” simply means extracting the contents of the zip file. You can place the contents of the zip file practically anywhere on your PC.
2. Your board will need to be linked to your PC in order for you to be able to download the bitstream. After making sure that the JP7 jumper is in the USB PROG position and that the JP10 jumper is in the FPGA position, you should connect both of the board’s USB connectors (labeled J13 and J14) to unused ports on your PC. You’ll likely receive multiple prompts to install drivers for the board. Assuming that you’ve installed the aforementioned software, Windows should be able to automatically locate the drivers.
3. You’ll use FlashPro to download the bitstream. You should start this tool now, by selecting All Programs>Actel Libero IDE v9.0>FlashPro v9.0>FlashPro v9.0 from your PC’s Start menu.
4. After FlashPro has finished checking for updates, you should click the New Project button, which is shown in the screenshot on the next page. In the dialog box that subsequently appears on your screen, you should select Single device. You must then name your project and give it a location. You can use practically any combination of name and location.

5. You should now click the large Configure Device button at the top of the screen. In the Single Device Configuration Window that next appears on your screen, you should click the Browse button, as indicated in the screenshot on the following page. You should then browse to the location of the example project’s PDB file. The path of this file is given below. (<Install folder> is the folder to which you extracted the contents of uCOS-III-Actel-SmartFusionEvalKit.zip.)
<Install folder>\MICRIUM\Software\EvalBoards\Actel\SmartFusionEvalKit\Hardware\SmartFusion.pdb
New Project button

6. FlashPro should now warn you that “One or more programming or configuration files have changed since generation.” You can ignore this warning.
7. To actually download the bitstream, you must click the large PROGRAM button located at the top of your screen. FlashPro will once again warn you about the modified programming file, this time via the dialog box shown below. You can click this box’s Yes button.
Browse button

8. When the downloading process has completed, you should see RUN PASSED in the Programmer Status field of the Programmer List Window, as shown below. After receiving this indication of successful completion, you can close FlashPro. You won’t need to use this tool anymore in order to run the µC/OS‐III example projects. Nonetheless, you should probably save your project when FlashPro prompts you to do so.
Building and Running Example 1
1. In order to run the µC/OS‐III example projects, you’ll need to change the position of the board’s JP10 jumper. You should now move this jumper to the M3 position.
2. With your board connected to your PC via both USB connectors (J13 and J14) you should now start SoftConsole by selecting All Programs>Actel SoftConsole v3.1>Actel SoftConsole IDE from your PC’s Start menu.
Programmer Status
3. If you have not previously used SoftConsole, you’ll be prompted to select a workspace location. The ideal workspace location is the folder containing the example projects: <Install folder>\MICRIUM\Software\EvalBoards\Actel\SmartFusionEvalKit\Software\SoftConsole, where <Install folder> is the folder to which you extracted the contents of uCOS-III-Actel-SmartFusionEvalKit.zip. However, if you would prefer to use another folder (perhaps because you’ve already established a workspace in SoftConsole), you’ll still be able to run the examples.
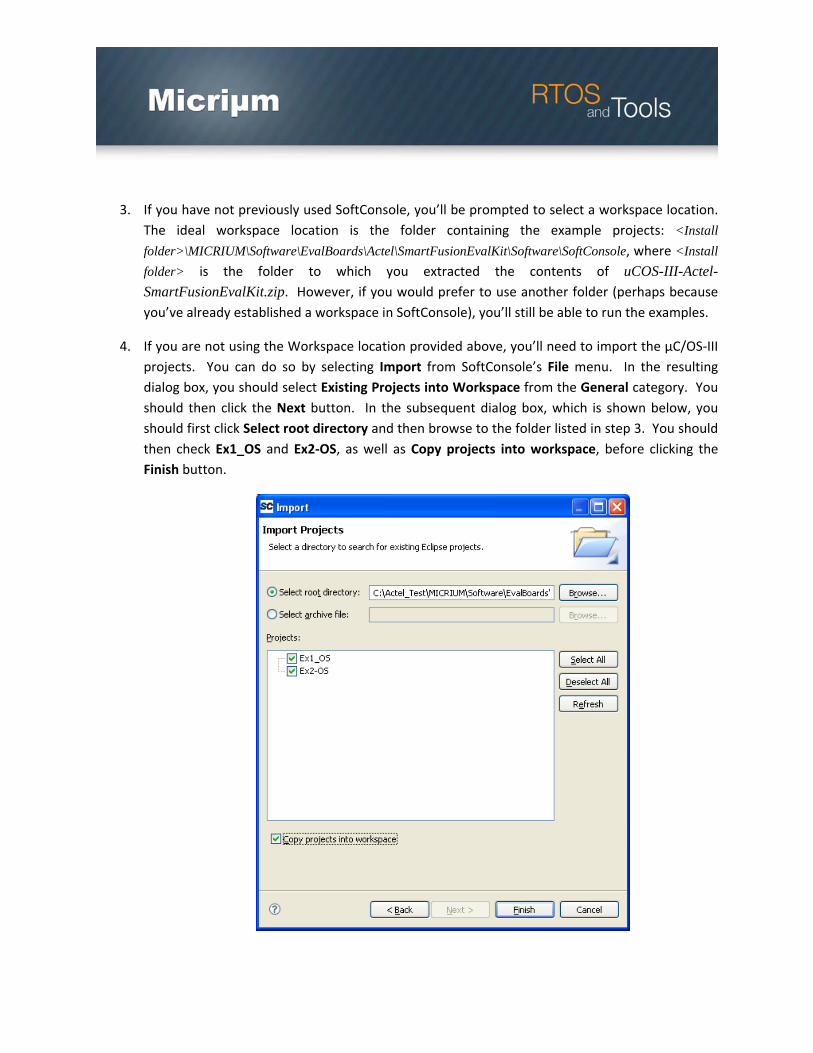
4. If you are not using the Workspace location provided above, you’ll need to import the µC/OS‐III projects. You can do so by selecting Import from SoftConsole’s File menu. In the resulting dialog box, you should select Existing Projects into Workspace from the General category. You should then click the Next button. In the subsequent dialog box, which is shown below, you should first click Select root directory and then browse to the folder listed in step 3. You should then check Ex1_OS and Ex2‐OS, as well as Copy projects into workspace, before clicking the Finish button.

5. Regardless of your workspace location, you should now see Ex1_OS and Ex2‐OS listed in SoftConsole’s Project Explorer. You may also see several warnings listed in the Problems tab, as indicated below. These warnings indicate that SoftConsole was unable to locate the files comprising the two examples. You’ll need to set a couple of variables in order to eliminate the warnings.
6. To set the first of the two aforementioned variables, you’ll need to open the SoftConsole Window menu and select Preferences. In the ensuing dialog box, you should expand the General category, followed by the Workspace category. You should then select Linked Resources, as shown in the screenshot on the next page.
Warnings

7. You should now click the New button on the Linked Resources page. You should name your new variable MICRIUM_ROOT, and you should assign it a value indicating the location of the MICRIUM folder that should have been created when you extracted the contents of uCOS-III-Actel-SmartFusionEvalKit.zip. For example, if your MICRIUM folder is located at C:\Actel_Test\MICRIUM, you should define MICRIUM_ROOT as shown in the screenshot on the next page.

8. After defining MICRIUM_ROOT as a path variable, you’ll need to define an environment
variable, also named MICRIUM_ROOT. To do so, you must right click on Ex1_OS in the Project Explorer and select Properties from the resulting menu. In the dialog box that then appears, you should expand C/C++ Build (which you’ll find in the menu on the left‐hand side of the box) and then select Environment. Next, you should click the New button and define MICRIUM_ROOT. You must assign this environment variable the same value that you used to define the identically named path variable. An example is provided below.
9. Before attempting to build the first project, you should repeat the above procedure for the second project. In other words, you should right‐click Ex2‐OS and then use the Properties dialog box to define MICRIUM_ROOT.

10. There should now be zero warnings in the Problems tab. Thus, you will be able to easily see any errors or warnings that appear during the build process. Before attempting to initiate this process, you should make sure that the first example’s Debug configuration is active. You can determine which configuration is active by right‐clicking Ex1_OS in the Project Explorer and selecting Build Configurations, followed by Set Active. You should make sure that a check mark appears beside Debug.
11. To build the example, you should right‐click on Ex1_OS in the Project Explorer and select Build Project from the resulting menu. A Build Project dialog box will appear to indicate the status of the build operations. After SoftConsole has finished building the project, you should still have an empty Problems tab.
12. If you were able to build the project without any warnings or errors, you should now attempt to run the code. With Ex1_OS selected in the Project Explorer, you should select Open Debug Dialog from SoftConsole’s Run menu. On the left‐hand side of the Debug Dialog box that then appears, you’ll find a list of multiple different targets. You should right‐click Actel Cortex‐M3 eNVM Target and select New. A configuration named Ex1_OS Debug should then appear under Actel Cortex‐M3 eNVM Target. You should click on Ex1_OS Debug and make sure that this configuration’s Main and Commands tabs look similar to those shown in the following screenshots. To start the debugger, you must click the Apply button and then the Debug button.


13. Via a dialog box entitled Confirm Perspective Switch, SoftConsole will inform you that “This kind of launch is associated with the Debug perspective.” You should click the Yes button. You will then enter the Debug perspective and SoftConsole will begin downloading code to your FPGA’s non‐volatile memory. When all of the code has downloaded, the source file app.c should appear in the Debugger’s editor window. The function BSP_PreInit() should be highlighted in this file.
14. To begin running code, you should click the Launch button, as shown in the below screenshot. Your board’s D1 LED should begin blinking.
Using µC/Probe with Example 2
1. You can build and run the second example using practically the same procedure that you followed for the first. After completing the procedure for Example 2 by clicking the Launch button in the debugger, your board’s D1 and D3 LEDs should begin blinking.
2. To start µC/Probe, you should now select All Programs>Micriµm>uC‐Probe from your PC’s Start menu. If you are using the 30‐day evaluation version of the software, you will see a screen similar to the one shown below. You should click the Evaluate button.
Launch button
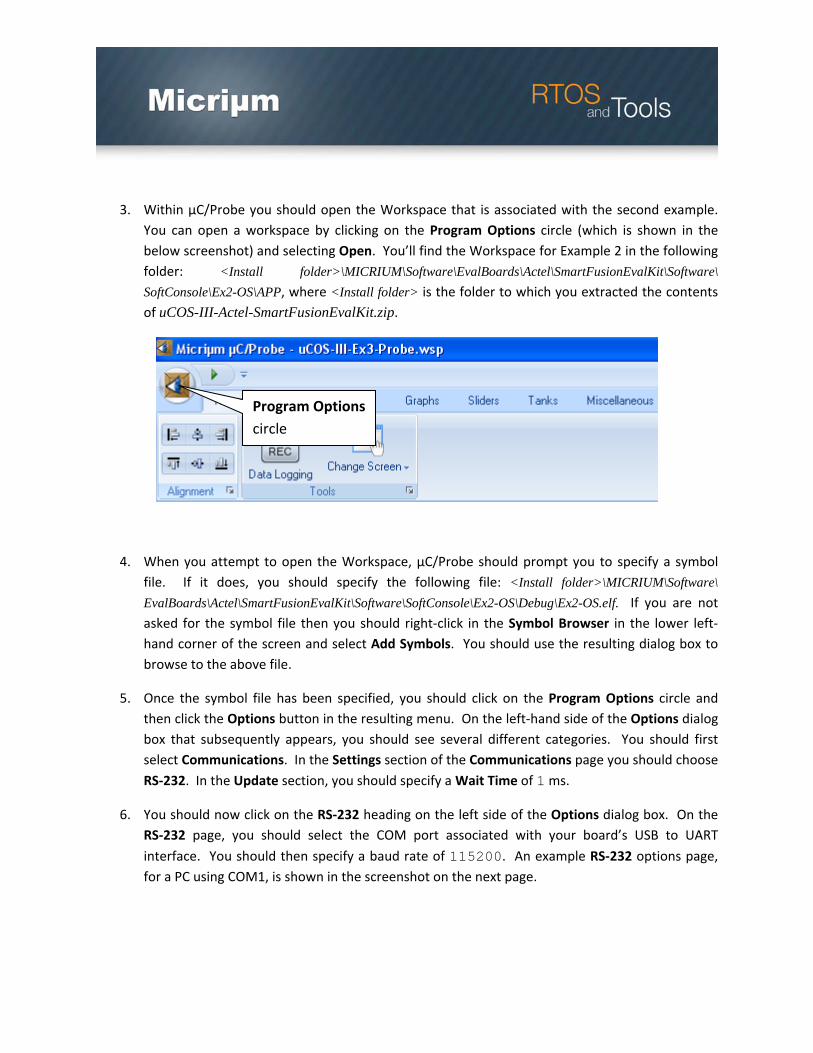
3. Within µC/Probe you should open the Workspace that is associated with the second example. You can open a workspace by clicking on the Program Options circle (which is shown in the below screenshot) and selecting Open. You’ll find the Workspace for Example 2 in the following folder: <Install folder>\MICRIUM\Software\EvalBoards\Actel\SmartFusionEvalKit\Software\ SoftConsole\Ex2-OS\APP, where <Install folder> is the folder to which you extracted the contents of uCOS-III-Actel-SmartFusionEvalKit.zip.
4. When you attempt to open the Workspace, µC/Probe should prompt you to specify a symbol file. If it does, you should specify the following file: <Install folder>\MICRIUM\Software\ EvalBoards\Actel\SmartFusionEvalKit\Software\SoftConsole\Ex2-OS\Debug\Ex2-OS.elf. If you are not asked for the symbol file then you should right‐click in the Symbol Browser in the lower left‐hand corner of the screen and select Add Symbols. You should use the resulting dialog box to browse to the above file.
5. Once the symbol file has been specified, you should click on the Program Options circle and then click the Options button in the resulting menu. On the left‐hand side of the Options dialog box that subsequently appears, you should see several different categories. You should first select Communications. In the Settings section of the Communications page you should choose RS‐232. In the Update section, you should specify a Wait Time of 1 ms.
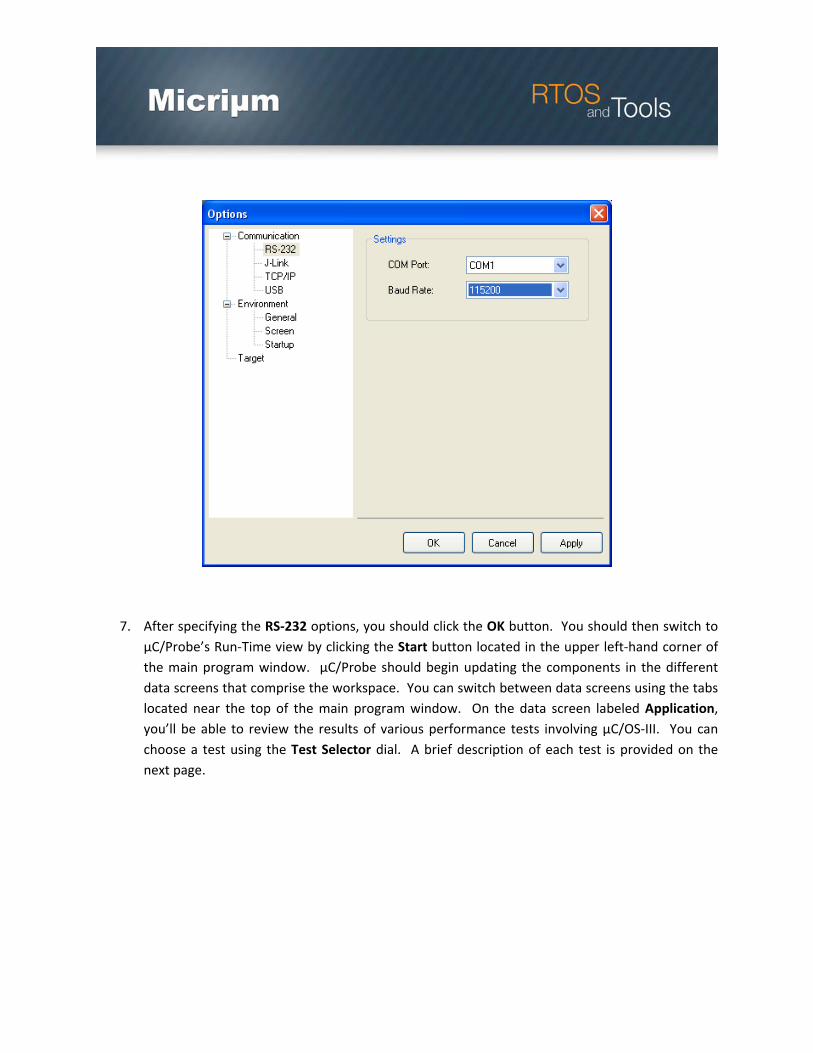
6. You should now click on the RS‐232 heading on the left side of the Options dialog box. On the RS‐232 page, you should select the COM port associated with your board’s USB to UART
interface. You should then specify a baud rate of 115200. An example RS‐232 options page, for a PC using COM1, is shown in the screenshot on the next page.
Program Optionscircle
7. After specifying the RS‐232 options, you should click the OK button. You should then switch to µC/Probe’s Run‐Time view by clicking the Start button located in the upper left‐hand corner of the main program window. µC/Probe should begin updating the components in the different data screens that comprise the workspace. You can switch between data screens using the tabs located near the top of the main program window. On the data screen labeled Application, you’ll be able to review the results of various performance tests involving µC/OS‐III. You can choose a test using the Test Selector dial. A brief description of each test is provided on the next page.

Test # Description
0 Semaphore – one task signaling another task
1 Semaphore – one task signaling itself
2 Task semaphore – one task signaling another task
3 Task semaphore – one task signaling itself
4 Message queue – One task sending a message to another task
5 Message queue – One task sending a message to itself
6 Task message queue – One task sending a message to another task
7 Task message queue – One task sending a message to itself
8 Mutex – One task acquiring and releasing a mutex
9 Event flags – One task signaling another
10 Event flags – One task signaling itself
Micriµm Contact Information
Phone: +1 954 217 2036 Fax: +1 954 217 2037 E‐Mail: [email protected] URL: http://www.micrium.com