Quick Reference Guide -...
14
Model No. KX-AT7730 Proprietary Telephone Quick Reference Guide Thank you for purchasing this Panasonic product. Please read this manual carefully before using this product and save this manual for future use. IMPORTANT NOTICE: Note • In this manual, the suffix of each model number is omitted. • Under power failure conditions, this telephone may not operate. Please ensure that a separate telephone, not dependent on local power, is available for use in an emergency. The illustrations may differ from the appearance of the actual product. • For details, refer to the instructions for analogue proprietary telephones (such as the KX-T7700 series) in the Main Unit/PBX Manuals.
Transcript of Quick Reference Guide -...

Model No. KX-AT7730Proprietary Telephone
Quick Reference Guide
Thank you for purchasing this Panasonic product.Please read this manual carefully before using this product and save this manual for future use.
IMPORTANT NOTICE:
Note• In this manual, the suffix of each model number is omitted.•
Under power failure conditions, this telephone may not operate. Please ensure that a separate telephone, not dependent on local power, is available for use in an emergency.
The illustrations may differ from the appearance of the actual product.• For details, refer to the instructions for analogue proprietary telephones (such as the
KX-T7700 series) in the Main Unit/PBX Manuals.

For Users in the European CountriesThis product is intended to be connected to Panasonic KX series PBX only.For information of Compliance with EU relevant Regulatory Directives, Contact to Authorized Representative:Panasonic Testing CentrePanasonic Marketing Europe GmbHWinsbergring 15, 22525 Hamburg, Germany
For Users in the United KingdomThis unit is capable of being used in conjunction with hearing aids fitted with inductive coil pick-ups. The handset should be held as for normal conversation. For operation, the hearing aid should be set to its "T" position or as directed in the operating instructions for the hearing aid.
This unit is designed to aid the visually handicapped to locate dial keys and buttons.This unit is designed to be installed under controlled conditions of ambient temperature and a relative humidity.Avoid installing the unit in damp or humid environments, such as bathrooms orswimming pools.999 and 112 can be dialed on the product after accessing the outside line for thepurpose of making outgoing calls to the BT emergency (999) and (112) services.
•
•
•
•
•
– 2 –
Important Information

KX-AT7730
PROGRAM MESSAGE
INTERCOM
FLASH/RECALL
FWD/DNDCONF PAUSE
AUTO ANS AUTO DIAL TRANSFER
MUTE STORE
ABC DEF
JKLGHI MNO
TUVPQRS WXYZ
REDIAL HOLD SP-PHONE
1
2
34
6
7
8
9
5
Headset Jack
LCD (Liquid Crystal Display)
RINGER Volume Selector
12
13
16
14
15
10 11
Microphone
* The headsets can be used with this unit. (Not all operations with the headsets can be guaranteed.)For up-to-date information about headsets that have been tested with this unit, refer to the following web sites:https://panasonic.net/cns/pcc/support/pbx/
RINGER
– 3 –
Location of Controls

7 AUTO DIAL/STORE: Used for speed dialing or storing program changes.
8 TRANSFER: Used to transfer a call to another party.
9 REDIAL (ordinarily): Used to redial.
10 HOLD: Used to place a call on hold.
11 SP-PHONE (Speaker Phone):Used for the hands-free operation.
12 Navigator Key: Used to adjust the volume and the display contrast or select desired items for each function.
14 PAUSE: Used to insert a pause during dialing.
15 MESSAGE: Used to leave a message waiting indication or call back the party who left the message waiting indication.
16 Message/Ringer Lamp: The Message/ Ringer lamp informs you visually that you have a message or a call.• When you receive a call, the lamp flashes
depending on the ringing pattern. When someone has left you a message, the lamp is lit continuously.
• When the ringing pattern is set to Single (Slow flash), Double (Moderate flash), or Triple (Rapid flash) in your PBX, the lamp flashes. When the other ringing patterns are set in your PBX, the lamp may not flash. (e.g., S-Double, Call Waiting Tone1).
13 Flexible Outside (CO) Line Button: Used to make or receive an outside call. Pressing this button seizes an idle outside line automatically. (Button assignment is required.) Also used as the desired function buttons. (Button assignment is required.)
6 AUTO ANS (Auto Answer): Used to receive an incoming call inthe hands-free mode.
MUTE: Used to mute themicrophone during a conversation.
1 PROGRAM: Used to enter and exit the programming mode.
4 FWD/DND (Call Forwarding/Do Not Disturb): Used to perform Call Forwarding or Do Not Disturb.
5 FLASH/RECALL: Used to disconnect the current call and make another call withouthanging up.
2 CONF (Conference): Used to establish amultiple party conversation.
3 INTERCOM: Used to make or receive intercom calls.
– 4 –
Location of Controls
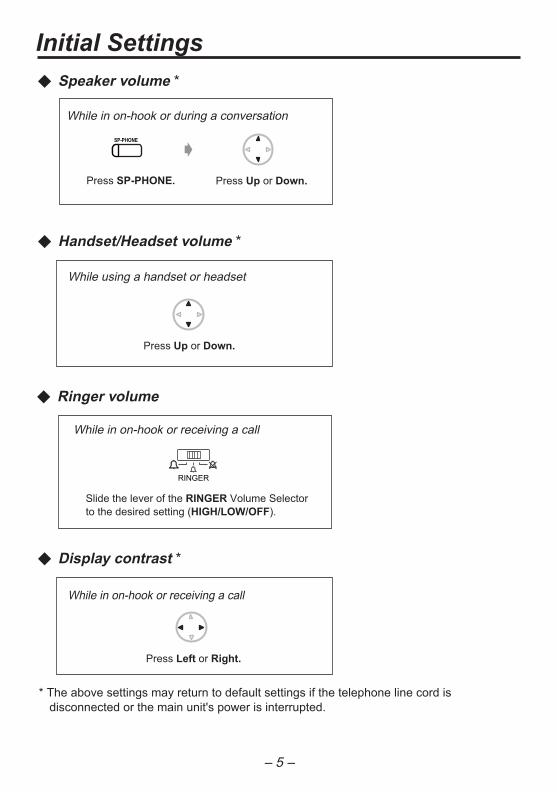
Speaker volume *
Press SP-PHONE. Press Up or Down.
While in on-hook or during a conversation
Handset/Headset volume *
Press Up or Down.
While using a handset or headset
Ringer volume
Display contrast *
Press Left or Right.
While in on-hook or receiving a call
While in on-hook or receiving a call
Slide the lever of the RINGER Volume Selector to the desired setting (HIGH/LOW/OFF).
* The above settings may return to default settings if the telephone line cord is disconnected or the main unit's power is interrupted.
SP-PHONE
RINGER
– 5 –
Initial Settings

Off-hookOutside (CO) Line button On-hook Feature number Talk
Desired Function Operation
Calling
To set
To dial
Redial
One-touch Dialing
Calling an operator
Personal Speed Dialing
To an extension To an external partyextension no.
To program
To dial
– assigned as a One-touch dialing button
phone no.
(Check the type of your Main Unit.)
desired no.
(Check the type of your Main Unit.)
System SpeedDialing
To dial
Making Calls
KX-TE Series
phone no.
Personal speed dial no.
System speed dial no.
Personal speed dial no. KX-TDA (excl. KX-TDA100D)/
KX-TDE/KX-NS/KX-NCP/KX-NSX Series
REDIAL
PROGRAMPROGRAM AUTO DIAL
STORE
AUTO DIAL
STORE
AUTO DIAL
STORE
KX-TE Series
KX-TDA (excl. KX-TDA100D)/KX-TDE/KX-NS/KX-NCP/KX-NSX Series
– 6 –
Features List

Desired Function Operation
Picking up a call Group
Directed
extension no.
(Check the type of your Main Unit.)
extension no.
group no.
To setWhile hearing a busy tone
To answerIf you hear callback ringingAutomatic
Callback Busy
When the Dialed Extension is Busy/No Answer
Sender
To leave a notification
To cancel a notification
extension no.
extension no.
(Check the type of your Main Unit.)MessageWaiting
Receiver
To call back
To clear all notifications
receiver's extension no.
(Check the type of your Main Unit.)
Receiving CallsWhile on-hook
Hands-freeanswerback
KX-TE Series
KX-TDA (excl. KX-TDA100D)/KX-TDE/KX-NS/KX-NCP/KX-NSX Series
KX-TE Series
KX-TE Series
KX-TDA (excl. KX-TDA100D)/KX-TDE/KX-NS/KX-NCP/KX-NSX Series
KX-TE Series
KX-TDA (excl. KX-TDA100D)/KX-TDE/KX-NS/KX-NCP/KX-NSX Series
KX-TDA (excl. KX-TDA100D)/KX-TDE/KX-NS/KX-NCP/KX-NSX Series
MESSAGE
MESSAGE MESSAGE
MESSAGE
AUTO ANS
MUTE
– 7 –
Features List

Desired Function Operation
When the Dialed Extension is Busy/No Answer
Call Waiting
Set
Cancel
For outside calls
Set
Cancel
For intercom calls/doorphone calls
Receiver
Sender
While hearing a busy tone
Wait for an answer.
(Check the type of your Main Unit.)
(Check the type of your Main Unit.)
For outside callsSet
For intercom callsSet
To talk to the new party (While hearing the Call Waiting tone)Terminating a current status Holding a current status (outside call)
Holding a current status (extension)
KX-TE Series
KX-TE Series
Cancel
Cancel
KX-TDA (excl. KX-TDA100D)/KX-TDE/KX-NS/KX-NCP/KX-NSX Series
KX-TDA (excl. KX-TDA100D)/KX-TDE/KX-NS/KX-NCP/KX-NSX Series
HOLD
HOLD INTERCOM
– 8 –
Features List

Desired Function Operation
Holding To retrieve a call at the holding extension
To retrieve an outside call from another extension
To retrieve a call on exclusive holdHolding
extension no. to an extension
Announce.phone no. to an external party
Holding a call
Holding a call exclusively
Transferring a call
Paging
Announce.
All extensions
Group
All external speakers
All extensions & external speakers
group no.
To answer an announced page
Through a telephone speaker
To page
group no.
During a Conversation
Useful Features
third party's no.Three-partyconference
(Check the type of your Main Unit.)
KX-TE Series
Announce.
You can make a voice announcement to extensions or external speakers or both in the preset group simultaneously.
KX-TDA (excl. KX-TDA100D)/KX-TDE/KX-NS/KX-NCP/KX-NSX Series
KX-TE Series
KX-TDA (excl. KX-TDA100D)/KX-TDE/KX-NS/KX-NCP/KX-NSX Series
HOLD HOLD
HOLD
INTERCOM
CONFCONF
INTERCOM
TRANSFER
– 9 –
Features List

Desired Function Operation
Useful Features
Setting Absent Message
message no.
parameter (if required)
message no.
(Check the type of your Main Unit.)
To an outside line
Cancel
Busy/No answer
All callsextension no.
extension no.
Follow Meyour extension no.
Follow Me Cancel your extension no.
phone no.line accesscode
Clearing thesetting 7 9 0
(Check the type of your Main Unit.)
7 9 #
(Check the type of your Main Unit.)
Busy
CancelNo answer
Busy/No answer
extension no.
All callsextension no.
extension no.
extension no.
your extension no.
your extension no.
Follow Me
Follow Me Cancel
Forwarding a call
Both callsOutside calls
Intercom calls
#
#
#
#
KX-TE Series
KX-TDA (excl. KX-TDA100D)/KX-TDE/KX-NS/KX-NCP/KX-NSX Series
KX-TE SeriesKX-TDA (excl. KX-TDA100D)/KX-TDE/KX-NS/KX-NCP/KX-NSX Series
KX-TE SeriesKX-TDA (excl. KX-TDA100D)KX-TDE/KX-NS/KX-NCP/KX-NSX Series
FWD/DND
– 10 –
Features List
Desired Function Operation
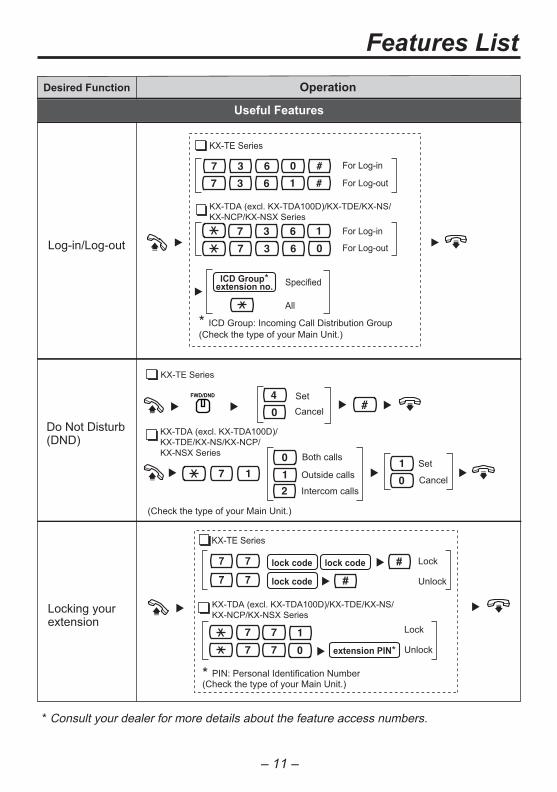
Do Not Disturb(DND)
SetCancel
Both calls
Outside calls Cancel
Set
Intercom calls
lock code lock code
lock code
Lock
Unlock
Locking your extension
extension PIN*
Lock
Unlock0
7 7
7 7 #
#
* Consult your dealer for more details about the feature access numbers.
Useful Features
ICD Group*extension no.
Log-in/Log-out
For Log-in
For Log-out
For Log-in
For Log-out
Specified
All
(Check the type of your Main Unit.)* ICD Group: Incoming Call Distribution Group
(Check the type of your Main Unit.)
KX-TE Series
KX-TE Series
KX-TE Series
* PIN: Personal Identification Number(Check the type of your Main Unit.)
KX-TDA (excl. KX-TDA100D)/KX-TDE/KX-NS/KX-NCP/KX-NSX Series
KX-TDA (excl. KX-TDA100D)/KX-TDE/KX-NS/KX-NCP/KX-NSX Series
KX-TDA (excl. KX-TDA100D)/KX-TDE/KX-NS/KX-NCP/KX-NSX Series
FWD/DND
– 11 –
Features List
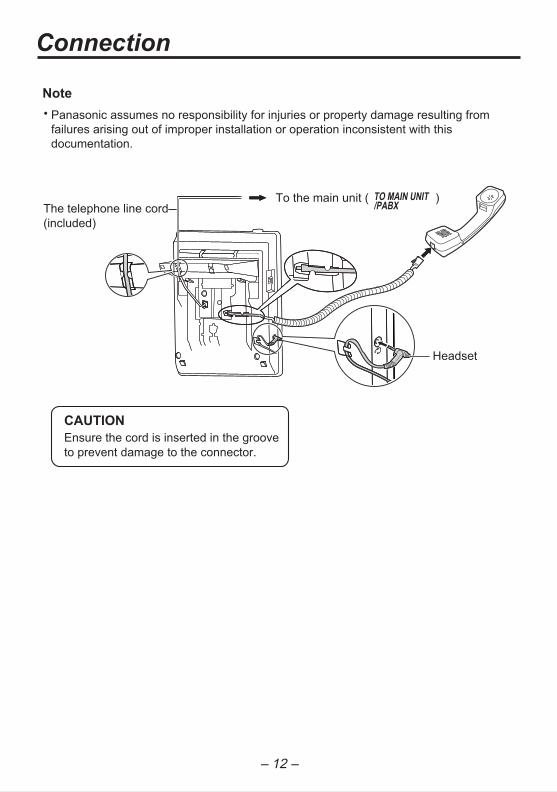
CAUTIONEnsure the cord is inserted in the groove to prevent damage to the connector.
To the main unit ( )TO MAIN UNIT /PABXThe telephone line cord
(included)
Headset
Note• Panasonic assumes no responsibility for injuries or property damage resulting from
failures arising out of improper installation or operation inconsistent with this documentation.
– 12 –
Connection

Wall Mounting
– 13 –
To temporarily place the handset down during a conversation, hook it over the top edge of the phone as shown.
1 Pull down the handset hook until it locks, so the tab holds the handset.
2 Remove the attached stand.
3 Mount the unit on the wall.
83 mm
2
1
• Recommended screw size isM4 x 20.
20 mm (3/4 in)or longer
Space2 mm
(1/16 in)
PNQX8734ZA PP0618MK0
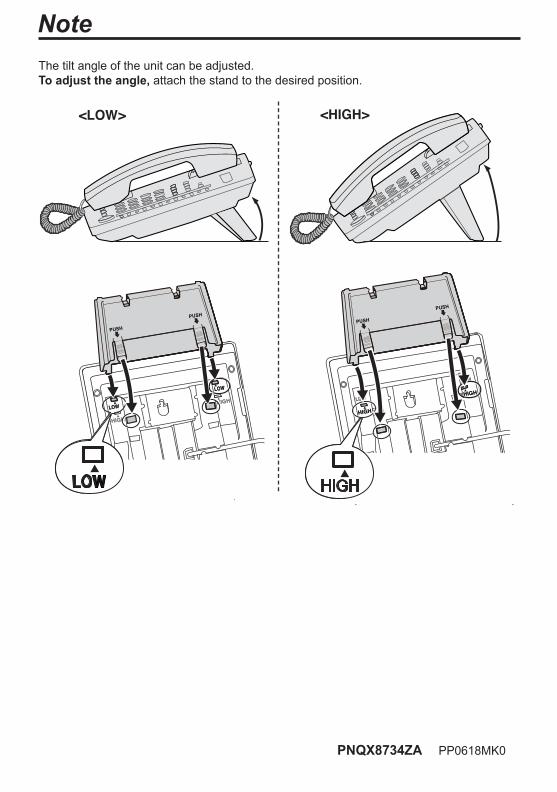
The tilt angle of the unit can be adjusted.To adjust the angle, attach the stand to the desired position.
Note
PUSH
PUSHPUSH
PUSH